2500 point cross table deployment with the Emperor's Will mission type.
My army:
Big Mek: Da Finkin' Kap; kustom force field; grot oiler 100
30 Boyz: shootas; 3 - big shoota; Boss Nob (shoota; power klaw; bosspole) 129
10 gretchin
Bully Boy formation
5 Meganobz: 2 killsaws; bosspole 215
• Battlewagon: killkannon; big shoota; reinforced ram 150
5 Meganobz: 2 killsaws; bosspole 215
• Trukk 30
5 Meganobz: 2 killsaws; bosspole 215
• Battlewagon: big shoota; reinforced ram 120
5 Burna Boyz: Mek; Mek; Mek 80
9 Lootas
9 Lootas
10 Flash Gitz: 8× ammo runt 250
• Battlewagon: killkannon; 2× big shoota; reinforced ram 155
Kill Bursta 365 - Belly Gun
2,498 points
Realized afterwards that the boss poles weren't needed since this is a Bully Boy formation. Never took them off when I put in the formation.
His army:
Khorne Terminator Lord - axe of blinding fury
10 khorne terminators - 5 combi melta, 2 reapers, several
CC upgrades.
10 Khorne possessed marines in a land raider
2x10 marines with the marks of khorne, bolters and pistols, power axe on the sgt., 2 melta guns - in rhinos.
5 chaos spawn of nurgle
2 maulerfiend
2x3 obliterators - mark of nurgle
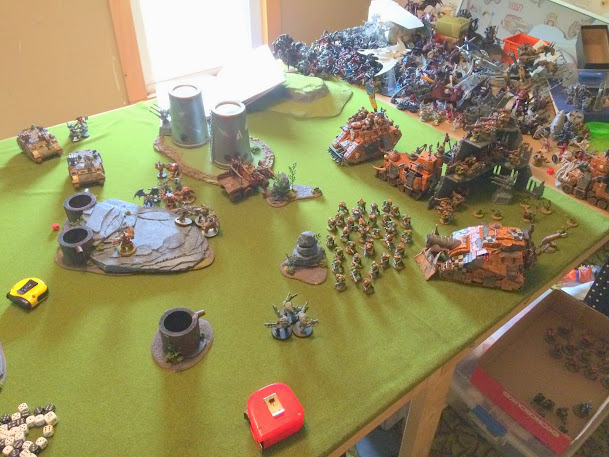
My Deployment:
[img width=609 height=457]https://lh6.googleusercontent.com/-Iu5e9936WDc/VB35tMfKPgI/AAAAAAAAAmM/-pD_7h8yV-0/w609-h457-no/IMG_1534.JPG[/img]
As you can see, clear firebase in the corner with the gretchin actually on the objective, the two loota units arrayed from ground to third floor side by side, and the Kill Bursta parked in the back. The 30 make ork unit was to the left of the tank to prevent deep strike melta attacks if need be. In front of them, right to left, was the wagons holding the flash gitz and then two meganobz. On the left flank, deployed behind the wagon, was the trukk with the third meganob unit.
My goal was to engage him as close to his lines as I could with the nobz, do whatever damage I could in
CC with them and delay his line, and pick him to pieces using lootas and the belly gun at range. The flash gitz and ork squad would move about close or mid field picking at the enemy with shooting and the kill kannons would support. End game would be placing the trukk on the enemy objective if need be.
His Deployment:
[img width=609 height=457]https://lh3.googleusercontent.com/-RrcktESmCL0/VB35uTrWhbI/AAAAAAAAAmU/oWYVluH30MI/w609-h457-no/IMG_1535.JPG[/img]
He chose a tight parking lot as he put it, using the invulnerable save mauler fiends and the super tough landraider to cover the rhinos. The chaos spawn set up behind a hill across from the fire base. He placed his objective behind the silo.
Turn 1:
My movement phase:
[img width=609 height=457]https://lh3.googleusercontent.com/-PxOz9mg7hao/VB35v9V0_NI/AAAAAAAAAmc/svi2LFtOa-c/w609-h457-no/IMG_1536.JPG[/img]
Mega nobz moved forward. Flash Gitz moved to block the firebase from the chaos spawn.
Shooting:
The lootas were terrible. Two units shot, ended up stunning a rhino and getting a single glance on a mauler fiend. That was it!
After flat out moves:

With the terribleshooting, I ended up backing off the wagons a little to
raw his maulers out in the open when they inevitably charged them. The trukk remained to the left in support.
Turn 1.2
His Movement Phase:

Sure enough, he moved into position to charge the wagons. The spawn raced ahead to charge the flash gitz wagon. The stunned rhino remained a stunned rhino and his brother rhino stayed behind to protect him or give him comfort!
Shooting:
Laser cannons fired from the landraider into the front of the battlewagon which took it like a champion and shrugged it off without trouble.
Combat:
The first mauler fiend killed the wagon he charged, but humorously, the second got only a single glancing hit! I disembarked the exploded unit and took a single wound in the blast. The chaos spawn managed to charge, hit the wagon and wreck it... I really made a poor play putting it out there. Somehow I keep underestimating spawn charge potential. The Flash gitz disembarked to the right of the wreck.
Turn 2:
My movement phase:

The remaining wagon moved to the right of the mauler who killed it and disembarked its meganobz who moved up to the flank of the land raider to kill it. The trukk disembarked its meganobz. The ork horde moved to shoot and charge the spawn at the firebase.
Shooting:
Shooting did a little better. The flash gitz killed a spawn and wounded another twice. The ork boyz put 7 wounds down, killing two more and wounding the fifth. The lootas fired and broke open both rhinos to force the marines to disembark. The kill bursta then fired and killed 6 in each unit!
Combat:
The meganobz charged both mauler fiends and the land raider. The raider exploded and killed 4 possessed. The mauler fiends both died, but one managed to kill three meganobz and the other took a single mega down. Really not a bad round of combat.
Turn 2.2
His Movement Phase:

The two obliterator squads arrived while the terminators were delayed. One landed to the left of my line beside the trukk after a scatter. The other landed mid board. The remains of the marines moved forward to engage the meganobz.
Shooting:
The obliterators did there thing. One fired on and killed a meganob while the other opened fire on the ork horde but failed to do any wounds. Just terrible luck. The marines fired on and killed a couple meganobz as they moved in to assault them.
Combat:
The possessed assaulted the a mega nob unit while a marine squad assaulted the other. In the case of the possessed and their thirty attacks, they tore down two meganobz for their trouble. The other meganob unit suffered a death from power axe blows before it brought the unit down to a single remaining marine.
Turn 3:
My movement phase:
I drove the last wagon over and picked up the flash gitz. The ork horde moved to engage the obliterators.
Shooting:
The flashgitz smoked two obliterators. The ork horde and lootas killed two obliterators in the other unit. The kill bursta fired and killed three out of four marines in the second marine unit.
Combat:
A solo meganob charged and killed one of the remaining obliterator units while being killed in turn. The ork horde charged and killed the obliterator unit. The possessed and meganob combat continued, with casualties in both. The marine and mega combat resulted in no casualties.
At this point, he had 2 possessed marines and and two single marines. He did have a large terminator unit and his general which arrived on this turn. I won't break things down much since they arrived north of the ork horde and killed 4 orks with their shooting.
The final phases:

The meganob in combat with the marine killed him. The possessed squad was finished by the mega they were fighting. Meanwhile, everything that could shot the terminators. All told, 9 terminators died and the general took 2 wounds.
The death of the chaos lord:

The general and his terminator friend charged the ork unit. The terminator was cut down by overwatch. The general raised his demon weapon and... buried it in his own head. And died.
The Firebase:

This did its job!
Game MVP:

The Flash Gitz killed:
6 terminators
1 chaos spawn
2 obliterators
The kill bursta was neat but not that killy. My opponent, knowing I was using it, did field a list that minimized the effectiveness. Tyranid or guard would have suffered greatly! Instead it killed:
1 possessed marine
12 marines
1 rhino
HP
All told a fun enough game with plenty of things dying! The game hinged on the chaos army getting to my firebase. My tactic was successful. I had hoped to engage him on his battleline or at board center, keep him busy fighting meganobz, and blast him to bitz before grabbing the objectives.
In the end, I had first Kill The Warlord and both objectives for 7 points. He had First Blood and Linebreaker for 2. Fun, but surprising. I had figured the game would be closer but in the end it was around 900 points in dead models to 2500.


 "Sons of the Last Breath"
 "Host of Shattered Purity"
 "Kabal of the Dying Sun, Cult of Marrow Excised, Coven of Lambent Hunger"