Chaos Mortals Display Board I thought some might be interested in a step by step for a display board that I created for my Warhammer Fantasy army. I made a step by step with about fifty pictures. Below is a more lengthy explanation.
http://www.bluetablepainting.com/vie...galleryID=1242 {Use these tips at your own risk! Use your common sense!}
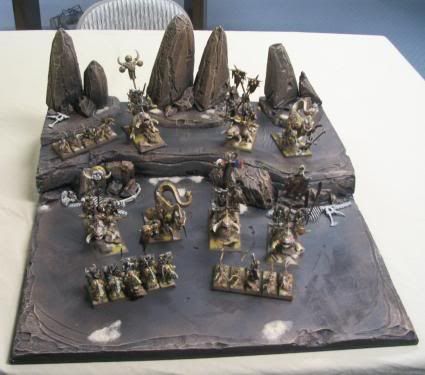
In the fall of 2006 I started on a Chaos Mortals army. One idea led to another and this is what I ended up with:
 http://www.bluetablepainting.com/vie...?galleryID=977
 A painting needs a good and suitable frame, and an army needs a display board. When making the army, I was tempted to do the bases in a black/grey slate but decided to go with an earthy brown color, just for a change of pace. Naturally, the display board would need to be this color as well to match.
Materials needed:
· 2” thick Extruded Styrofoam (hard construction grade blue or pink) four square feet
· 1” thick Extruded Styrofoam (hard construction grade blue or pink) four square feet
· 2” thick Extruded Styrofoam (hard construction grade blue or pink) 24” square (or 1” thick if you’re mounting it on plywood)
· 24” square piece of plywood
· 1 soldering iron (screw out tip removed)
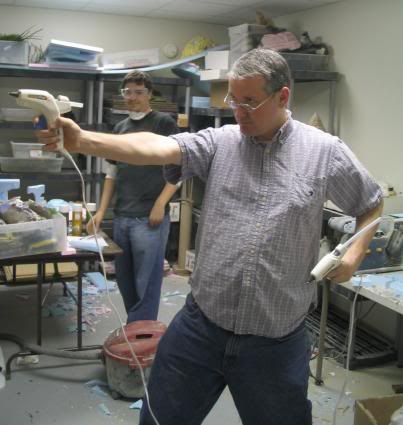
· 1 low heat glue gun (larger kind is better)
· 1 belt sander (just regular sandpaper and elbow grease will work)
· 2 sheets of medium grit sandpaper
· 1 steak knife
Any good display board starts with a solid base. I prefer a solid base of 2” hard styro since it is light and durable. However, for this board I had on hand a pre-fabricated board of 1” hard styro glued with wood glue onto a 1” plywood base (or is it half inch?).
Two feet square is a good size for a display board, but I make them 23.5” so they will fit into a two foot square box.
To create a wood backed base, just cut each piece (hard styro and plywood) to the same dimensions then glue them together with wood glue. Put something heavy on top (clamps will dig into the styro) and let it cure overnight. Then sand the edges thoroughly.
A display board is for displaying an army, so it should have a backdrop piece, and where possible a higher elevation on the farther end. Additionally, I like to create a few taller backdrop pieces along the back edge. Be sure to keep the bulk of the board flat and uncluttered so that they army will fit on it. I like to make a dry run to see where everything will fit.
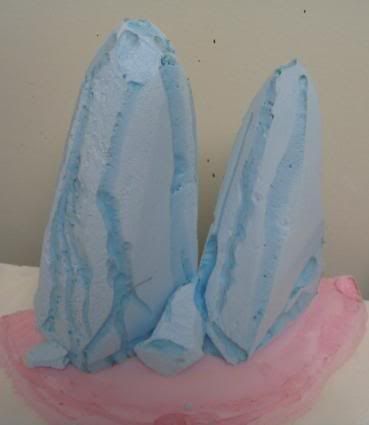
Then, I cut a backdrop plateau out of 2” hard styro using the steak knife. Presently, I sanded down the edges in more natural shapes, taking off burrs, flat spots, and irregularities. For this project, the only 2” styro I had already had spackle buttered on, so that explains the white edge, but it doesn’t really make a difference.

After sanding I took a soldering iron and with roughly parallel strokes burned in some natural formations. The heat makes shapes like stone that has been worn away by erosion or the action of water or acid.
A soldering iron comes with a screw off tip, and many have multiple tips. It goes without saying to be super-careful with the soldering iron. I’ve burned myself once, but never again, that was enough for me to remember for the rest of my life.
Ventilation is the key here, the soldering iron on the styro will put off some serious fumes. I like to have a strong fan inches away, to whisk away the vapors.
Now on to the crags. I roughly cut steep trapezoidal shapes from the 2” styro, as well as some rough boulder shapes. I fired up the belt sander and ground off the rough edges, now one step closer to a natural shape. When using a belt sander watch your fingers—I’ve sanded off my fingertips a few times and few things hurt more.
For both crags and boulders I repeated the process of rough sanding and soldering.
Once the various pieces are done, it’s time to glue it all together. I like to use a large glue gun with half inch glue sticks. If you use too high a temperature it will melt the styro and the parts will not stick. So, low temp is the order of the day.
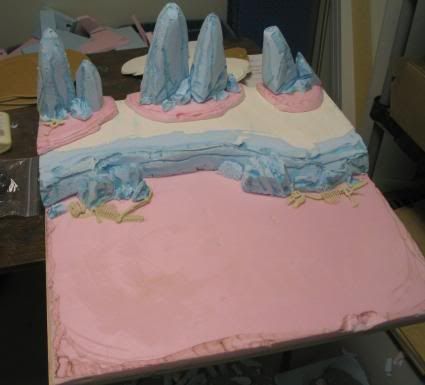
Smaller pieces, like boulders and rocks, should be used to cover gaps and unnatural joins.
Once the terrain is constructed, it has to be thoroughly brushed off. This gets rid of dust, particles and irregularities and it is now ready for blackening. A hand whisk works nicely here, or just a large brush (like a three incher).
Almost all terrain starts with a coat of black paint. I like to use black acrylic house paint. Buy it by the gallon and you’ll cover a lot of terrain. Water it down ever so slightly after thoroughly stirring and all will go on smoothly.
Typically, I’ll construct and blacken the terrain one day, allowing it to dry overnight. A pair of box fans can help speed the process. I like to make my terrain out in the open on a mild summer day.
The painting of the terrain is generously covered in this album:
http://www.bluetablepainting.com/vie...galleryID=1244 The only tip I’d give is the
de-glopping of brushes. As you know, after dipping a brush (turning it around in the paint for thorough saturation) it is drawn across a cloth or paper towel to get ready for drybrushing. Well, with a large brush big glops of paint tend to hide in there and these come out in hideous brush streaks when painting terrain, which detracts from the realism of the piece. Soooo, I keep a slab of cardboard nearby and lightly smack or swoosh the brush on it to flush out the glops.
I like to pull off like four paper towels and make a thick pad.
I hope this has been useful in some way. If you’d like to contact me with questions I can be reached at
jazzmouth@yahoo.com Shawn Gately
Blue Table Painting