Switch Theme:

Making a Two-Piece Mold to Cast with Resin (and doing a test cast)  [RSS] Share on facebook Share on Twitter Submit to Reddit
»
Author Message
Advert


Forum adverts like this one are shown to any user who is not logged in. Join us by filling out a tiny 3 field form and you will get your own, free, dakka user account which gives a good range of benefits to you:
  • No adverts like this in the forums anymore.
  • Times and dates in your local timezone.
  • Full tracking of what you have read so you can skip to your first unread post, easily see what has changed since you last logged in, and easily see what is new at a glance.
  • Email notifications for threads you want to watch closely.
  • Being a part of the oldest wargaming community on the net.
If you are already a member then feel free to login now.


Made in us
Fixture of Dakka


Columbia, SC (USA)

This tutorial shows a step-by-step process for making a two-piece mold using Alumilite Amazing Mold Putty and Amazing Casting Resin.

The finished mold will produce resin replicas of a Imperial Guard Griffon Mortar shell that I made out of bits and styrene. Unfortunately, Forge World doesn't make these shells and I want about 18 of them.

The first few pictures illustrate the materials used to make the two-piece mold:
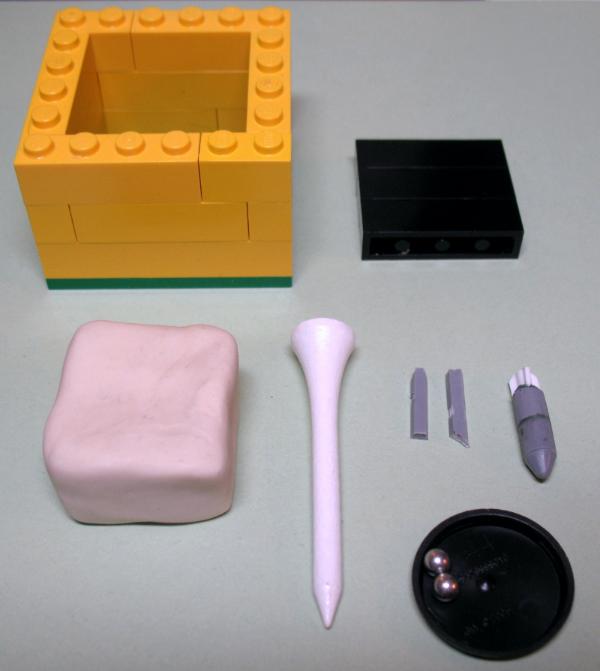


In the picture above, you can see the Lego mold frame, a Lego tamping block, a block of non-drying modelling clay, a wooden golf tee, bits of trimmed sprue, my original Griffon shell, and two small ball bearings AKA Daisy BBs (in an upside down 25mm round base to stop them from rolling off of my table).
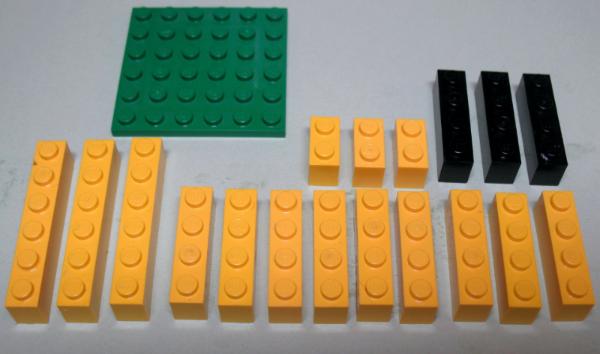


This second shot of materials better illustrates the type and quantity of Lego pieces, that I used to build my mold frame and tamping block.
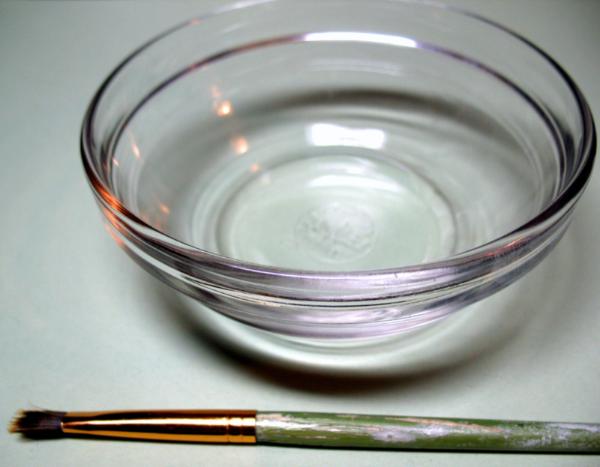


The picture above shows the bowl of light virgin olive oil and brush that I use to keep my mold putty from sticking together when I create mold side 2. You can use a mold release agent like Alumilite Universal Mold Release (UMR) if you wish.
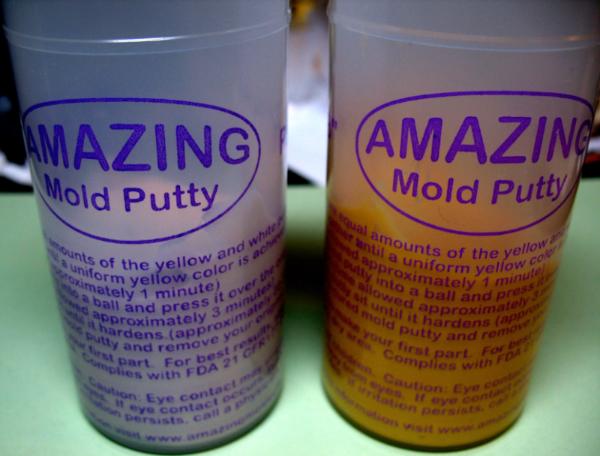


This final picture of materials for mold making shows the two components - A and B - of Alumilite's Amazing Mold Putty.

You will also need tools that will show up in later pictures: A craft knife or X-Acto blade that can cut through the golf tee, a pair of sprue cutters, a round file (optional), and a pen that can write on the tee. You will also need something like a stopwatch or clock to measure curing time (or demold time when we get around to casting).

When we do a test cast, you will need a mixing cup (paper or plastic) for the resin, a rubber band to hold the mold together, Alumilite's Amazing Casting Resin kit (which inludes the measuring cups and stirring sticks, and a nice surface to work on that will allow you to spill some resin.


Automatically Appended Next Post:
Now that we've covered materials, it's time to begin making the mold.

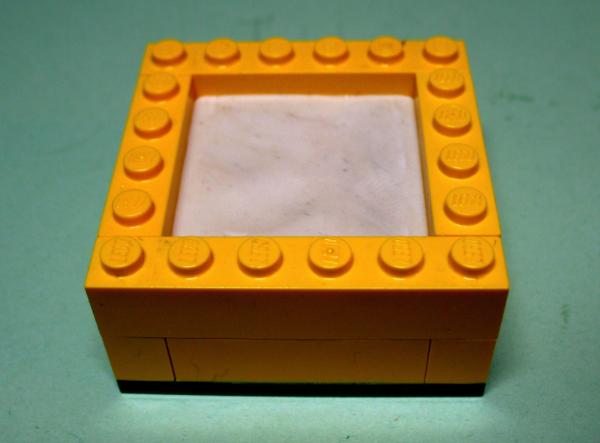
First, we will build a nice clay base to set our originals in.
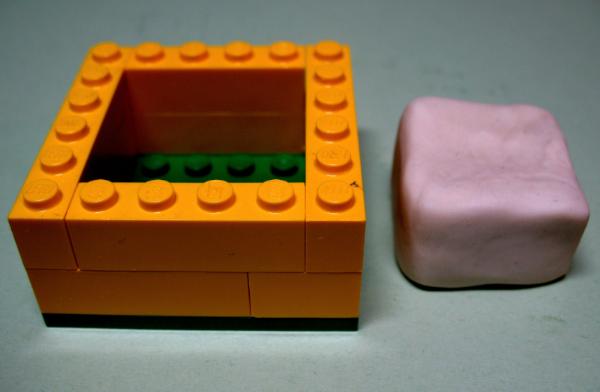


Build the Lego frame up to two levels and make a nice square piece of non-drying modelling clay that will fill about one and a half levels of the frame.

Next place the clay into the frame and use your fingers to push the clay around so that it firmly joins the sides of the frame and has a fairly level surface.
Now use the Lego tamping block (my black Lego pieces) to compact the clay even more and to make the clay nice and level.
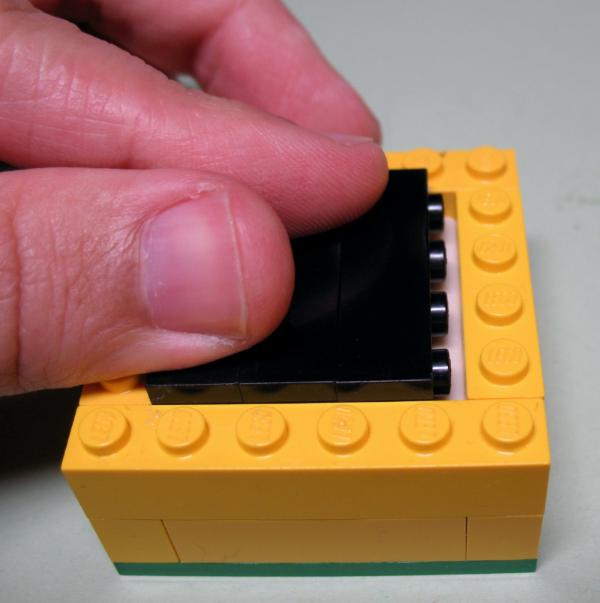


This leaves you with a nice clay base to set pieces in.


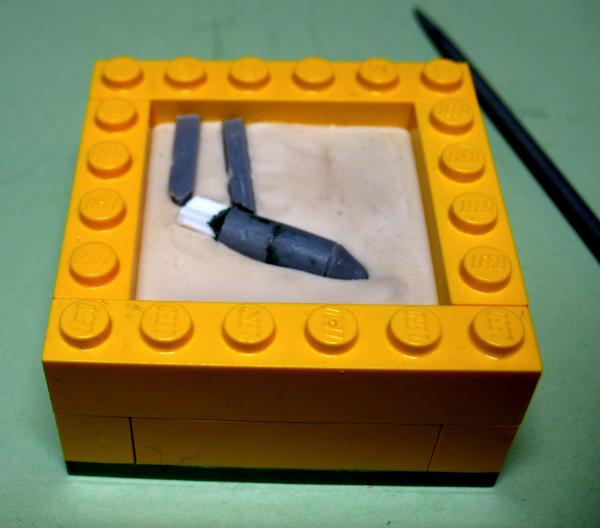
Now insert your sprue pieces to make air vent channels. I use two vents in this example. Note that they are placed at the highest points on the cast because these points are where air bubbles will become trapped in your mold. The vents open to the side that will become the top of the mold. You can lay out the pieces on top of the clay to figure out the right locations before pushing them about halfway into the clay. In this example, I pushed the shell deeper than halfway so that the tail fins would not have any gaps open underneath.


Next we need a nice large pour channel. I like to use a golf tee for this purpose as it has a nice funnel shape. It's also cheap. You can get broken tees at golf courses for free.
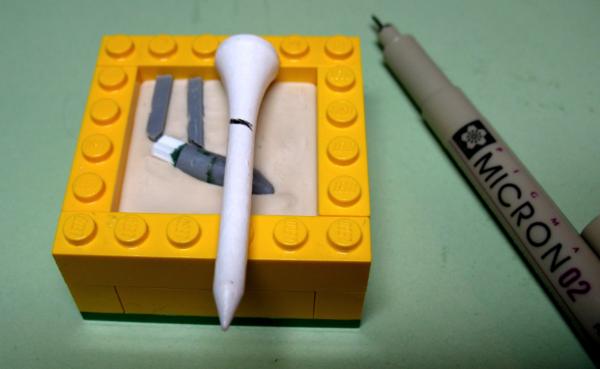


In this example I need a 45 degree slant on my tee so I laid it on top of the clay to measure and mark where I want to make my cut.
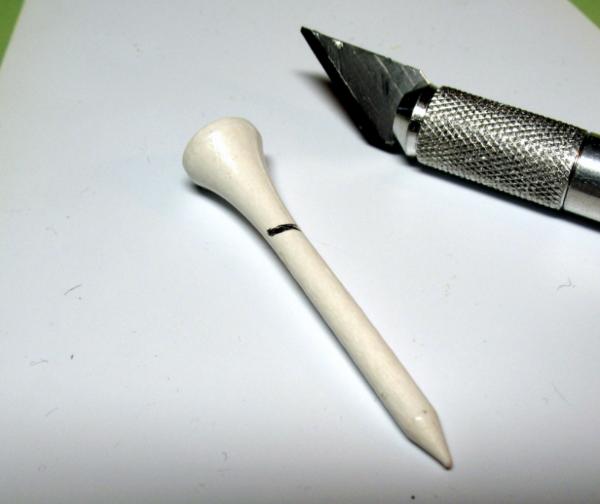


I used a heavier craft knife to make my cut. You could try to vise the tee in a miter box if you want an even more precise angle cut. I find that I need the fit close but not perfect.

Then we place the tee where we want the pour channel.
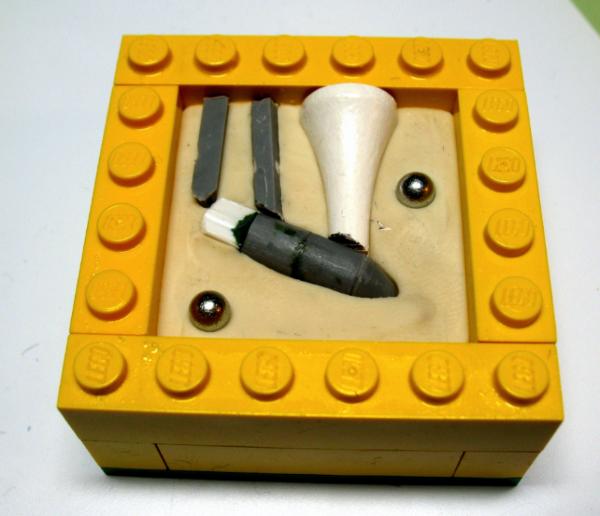


I've also added some small ball-bearings (Daisy BBs) to serve as register marks. These will help later in proper joining of the two halves of the mold for casting.

Now we are ready to make the first half of our mold. For this, we need mold putty. So we get an equal amount of component A and component B. I judge the amount visually. I suppose you could try to use a scale to measure by weight. I don't normally use a ruler. It's included to show you the approximate diameter of the balls of putty.
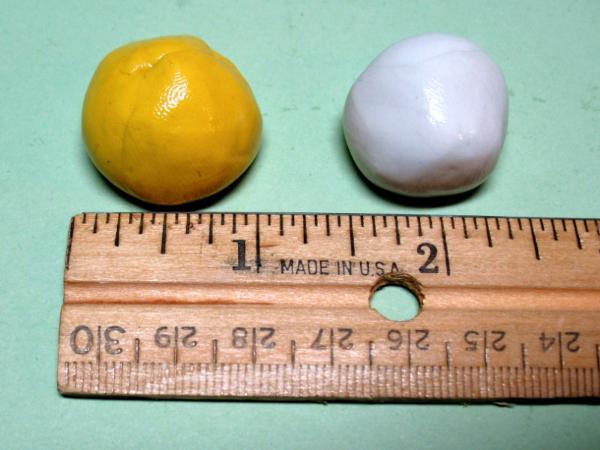


Now we build up the Lego frame to the third level and mix our putty. You need to mix it thoroughly by hand in less than a minute. Don't worry, it's easy. I shape the mixed putty into a small square that will fit into the frame.
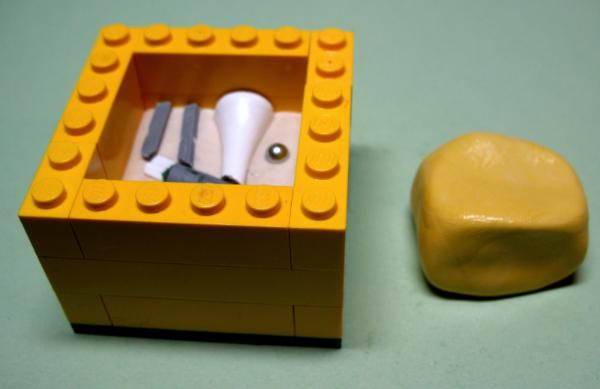


Now use your hands to push the putty down into the frame. Make sure you don't disturb your pieces set in the clay. Use your fingers to make the putty join the sides of the frame and get the putty fairly level. Then bring out the Lego tamping block and push the putty down firmly and neatly.
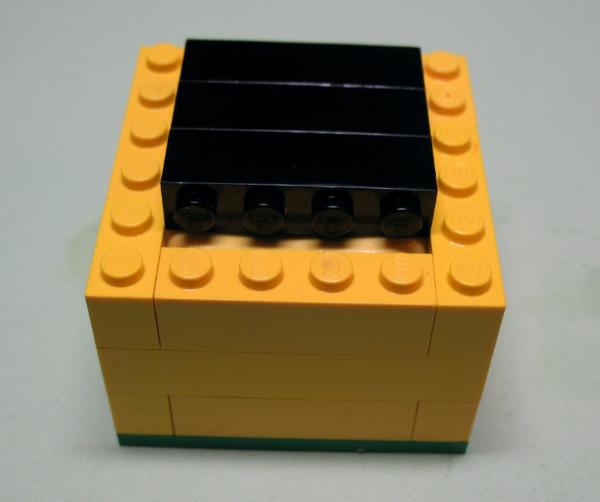


Now let the mold putty cure for a minimum of 20 minutes. Go get on Dakka and read blogs for a while. I usually let my putty cure for 30 minutes just to be sure.


Once your putty is dry, take the Lego frame apart and separate your new mold side 1 from the modelling clay. Huzzah!

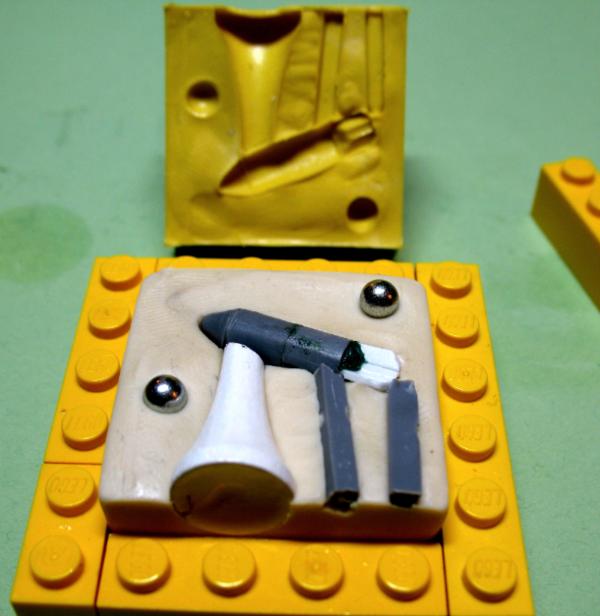


Automatically Appended Next Post:
Now it's time to build the other side of the mold.

We no longer need the modelling clay so carefully remove your vent and pour channel pieces, your original model, and your register pieces (ball-bearings). Take the clay off of your Lego frame base and put your newly created mold on the base. Build the Lego mold frame one level high. Insert the vent and pour channel pieces and your original model that were in the clay into your mold. Make sure the side of the pieces fit snugly into the mold (this usually means that they face the mold just as they did when it was created). You no longer need the register pieces (ball-bearings). The new mold side will fill in the register holes and thereby make the other half of the register marks.
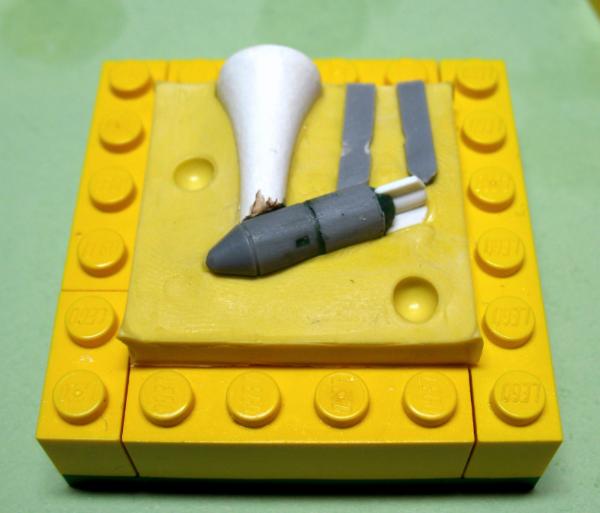


Now we completely cover the mold face with light virgin olive oil or an appropriate mold release. If you don't do this step, you will find that your mold sides will join together permanently. This will trap your original model in a solid block of putty. It's a bit like being swallowed by a gelatinous cube. You'll have to cut your model free. You'll gain experience points but I don't think you'll appreciate them.
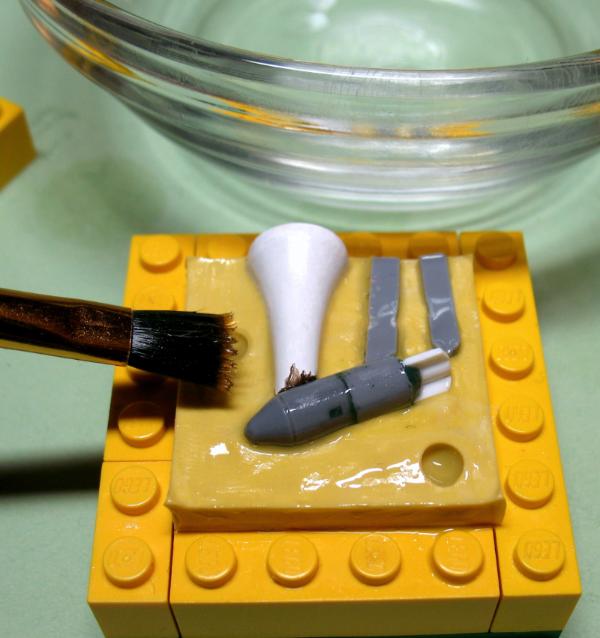


Next we build our Lego mold frame up to three levels high again. Make sure your bricks are staggered so that one side doesn't just fall off.
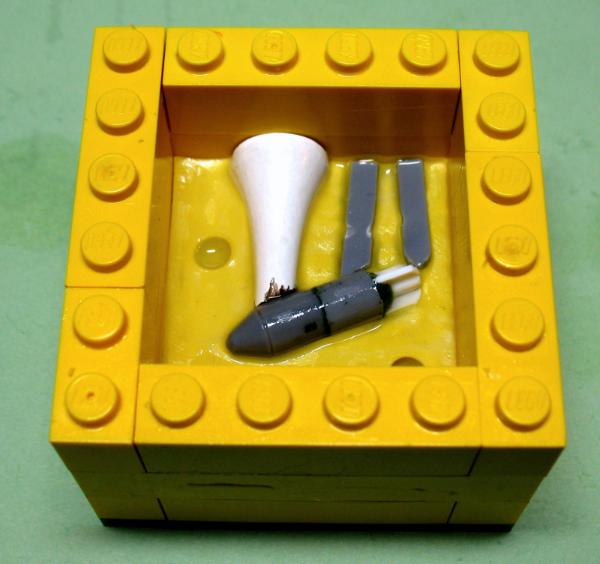


Now we repeat the process with mold putty that we used to build the first side of our mold. First, we create the equal sized putty balls of component A and B.
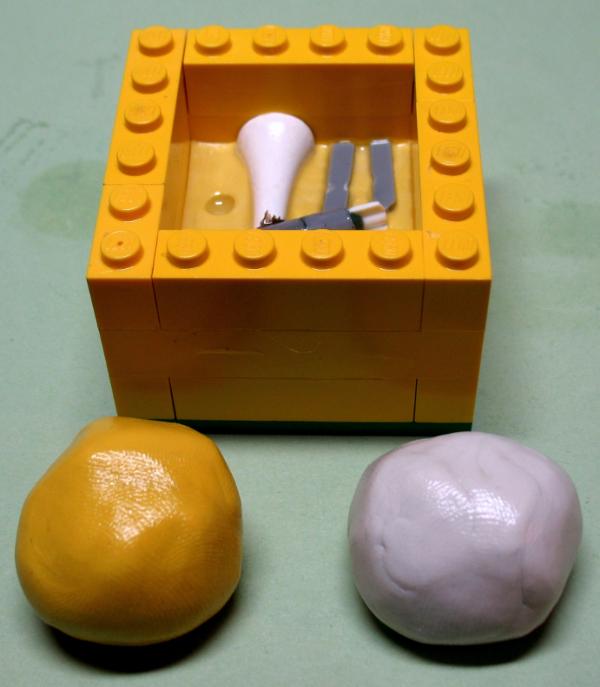


We thoroughly mix the putty and make a square block that will fit inside the mold frame. The block in my example is a little too large so I removed a bit of it.
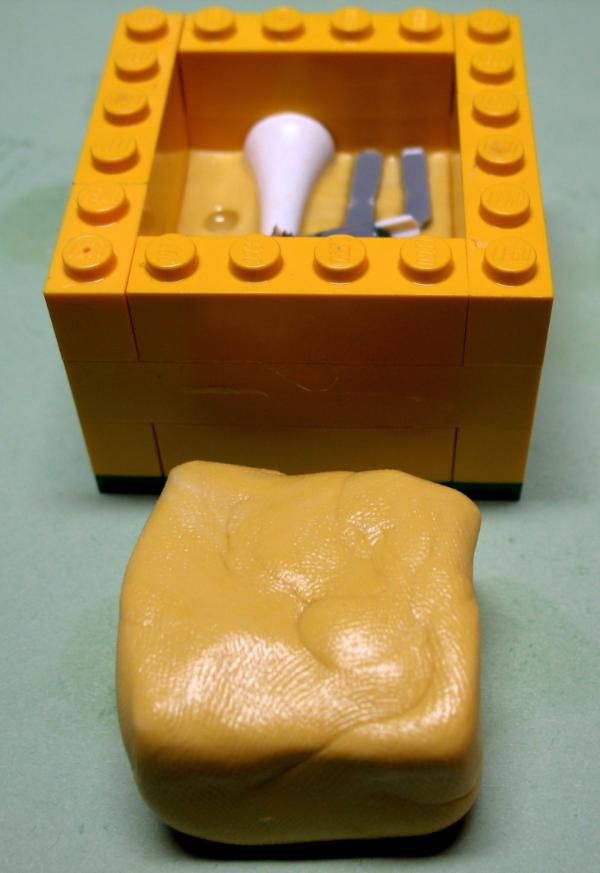


Use your fingers to get the putty to join the sides of the frame and to make the putty fairly level.
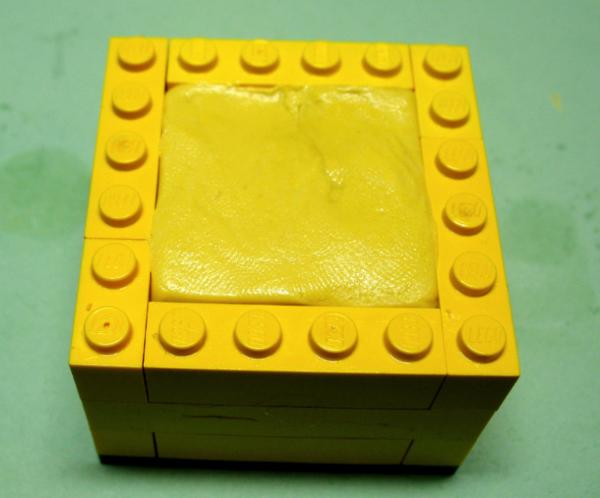


Now I use my Lego tamping block again to push the putty down firmly and neatly. You don't have to push too hard. If the sides of your Lego frame start buckling outward, you are pushing way too hard.


Now we wait again for a minimum of 20 minutes. I like to wait 30 minutes.


After the mold putty has cured, remove your Lego frame and separate the two halves of the mold. This is the first moment of Truth!

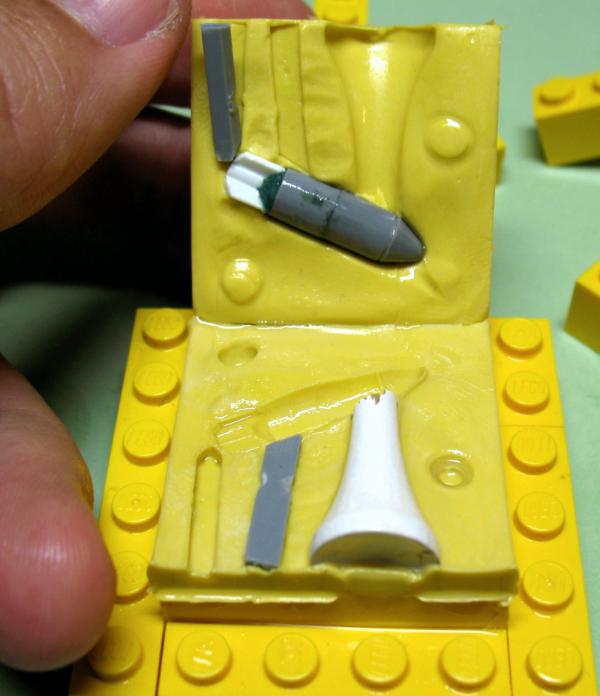

Ahhh...sweet success! And now remove the vent and pour channel pieces as well as your original model.

You can now observe your completed mold and see all the places where a little putty is partially blocking your vent and pour channels. Look inside...
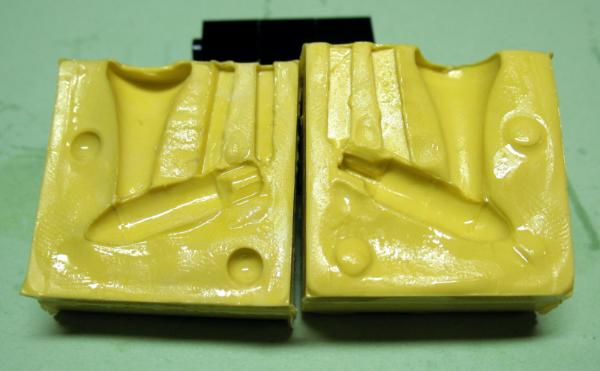


...and look at the top of your mold with both halves joined to see if the vent and pour channel openings are clear.
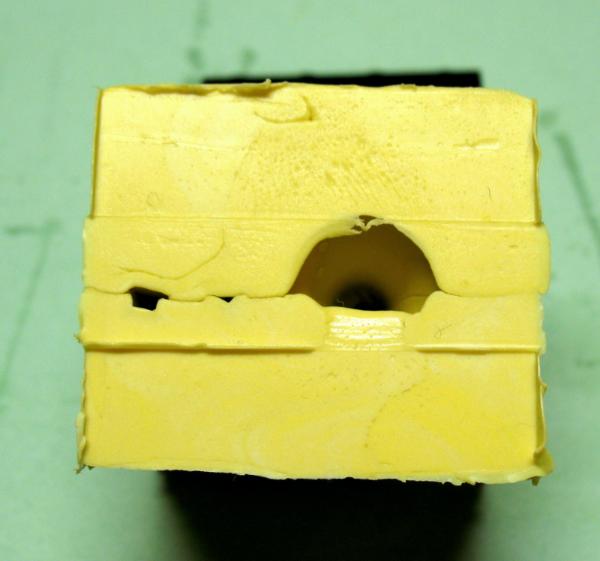


In this example, I'm not happy with the channels so I get a round file and my sprue snippers. I occasionally use the pointy tip of the round file as a scribing device to clear a small blockage. Most of the time, I use the snips to clip the blockage out. The file is more likely to tear the mold's surface. The snips do a much cleaner job as long as you are careful. Don't clip parts of your mold that aren't part of the blockages.

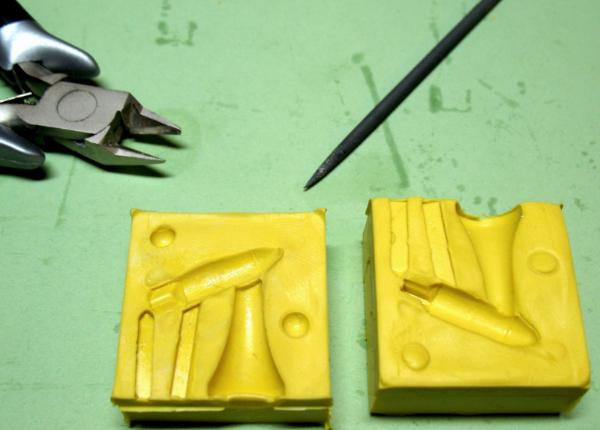

Below we see the mold after clipping. Note how much cleaner the channels are now.


Now you can wipe off the olive oil so we can do a test cast.


Automatically Appended Next Post:
In order to do a test cast of the new mold, you'll need a good surface to work on that can handle drippy resin. I like hard plastic (free comic book dividers from a friend work nicely) or a cutting mat. You will also need casting resin. I use the Amazing Alumilite Casting Resin that is made to work with the Amazing Mold Putty. You do not need mold release if you use this type of resin with this mold putty! Get one paper or plastic cup to mix resin in. Measuring cups and stirring sticks come in the kit with the resin. Also obtain one fat rubber band (thin ones tend to bite into the sides of the mold).
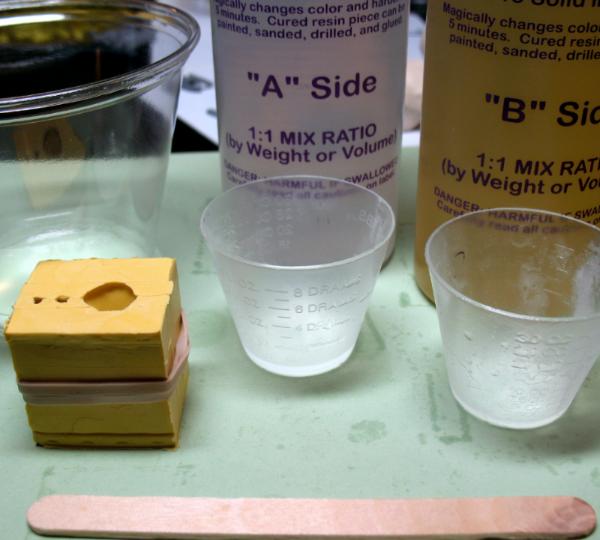


Put the mold together and wrap the rubber band around the two halves of the mold. It doesn't need to be super tight. It just has to keep the mold halves firmly in contact with each other.

Now we get equal amounts of resin component A and resin component B. I labelled my mixing cups A and B respectively so that I never get the wrong component into my reusable cups. The amount I used for this example is 1 Dram of each component. The measuring cups are marked for Drams, tablespoons, CCs, MLs, and fluid ounces. One Dram of each component works for me and always leaves me with a bit extra to pour into some one-piece molds I have lying around.
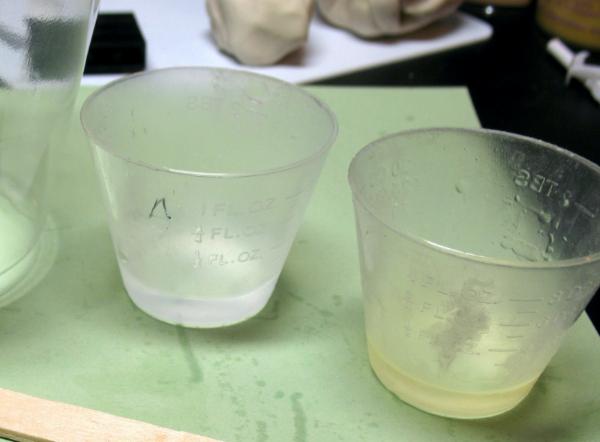


Pour each component into your clean mixing cup one after the other. Don't waste time waiting for every last drop to pour out. You don't have time to waste. The Alumilite instructions tell you give your 40 seconds for mixing and 1 minute to pour. I go faster when I have multiple molds to fill.
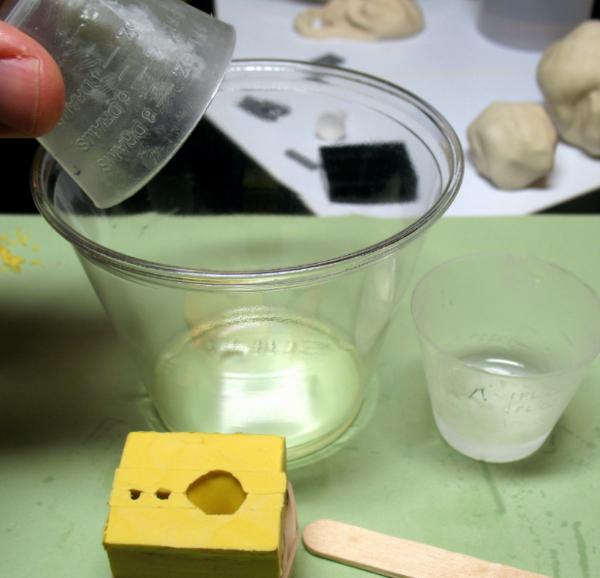


Use the stirring stick to mix your resin. Mix it thoroughly. It normally takes me 20 seconds. I can smell the chemical reaction (the resin components usually don't smell too strong), and I can see the mixed liquid get a little grey so that you can see the swirls. The grey swirls go away as the resin becomes well mixed and your cup looks clear again. Now you're ready to pour the resin into the mold.
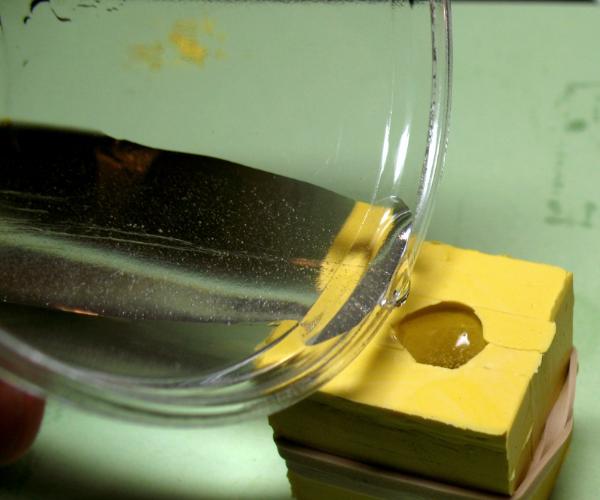


The nice round pour channel makes it easy to get the resin into the mold. Pour until you fill the pour channel. The level of fluid will drop as the resin flows into the mold. Add more resin until you see the liquid coming up the air vents in the mold. You do not need the liquid to rise to the top of the air vents! If you can see the liquid rising in the vents, you can stop adding resin to the mold. Now you should gently tap the mold to make the resin settle and get air bubbles to move out.
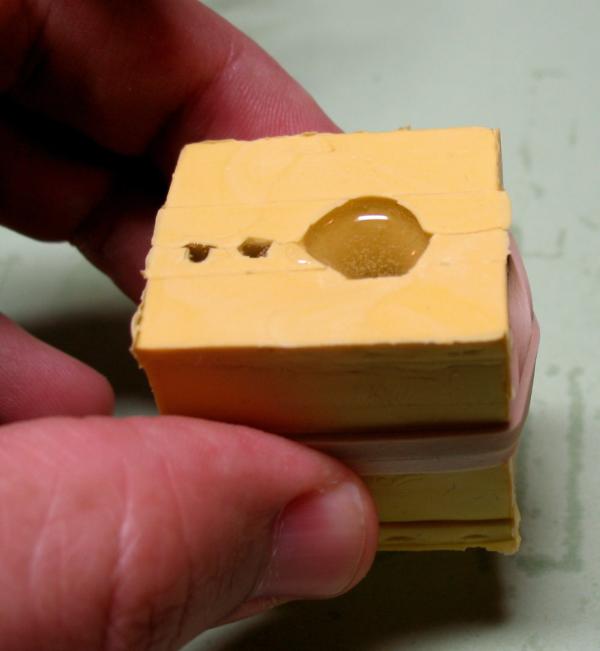


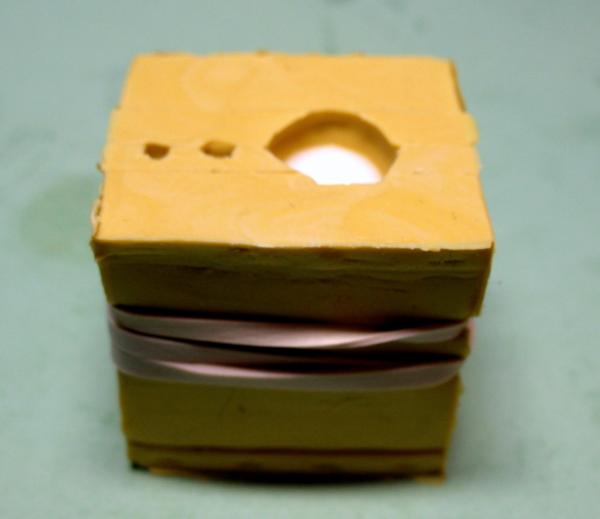
Now let the resin cure for about 10 minutes. If the air is very cold or humid in your work area you may wish to wait longer to allow the resin to fully cure. The instructions say that the demold time (time before you can open the mold) is 5-10 minutes. With the small pieces that I make, I find that less than 10 minutes is too soon. The pieces will be soft and will bend when you open the mold. If they continue to cure with those bends in them, you will have to live with mutated models.

Another sign of a mistake is shown in the picture below. See the resin bubbling out of the mold. This means that the resin was poorly mixed or had an improper ratio of components. It will cure into resin that has lots of large air bubbles and which is very weak.
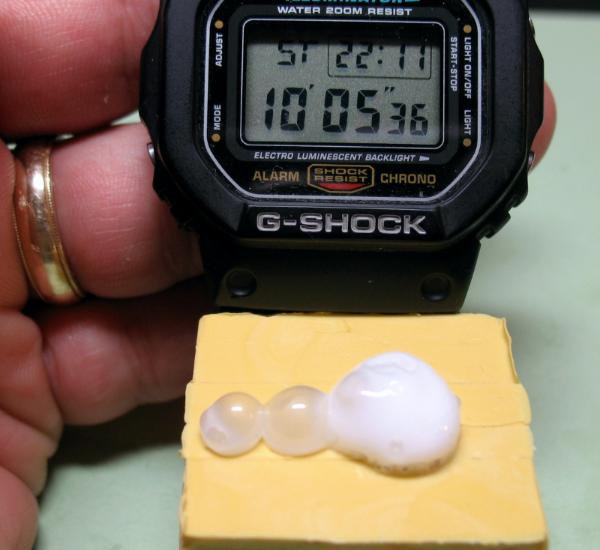


Good resin rises a bit and turns an appropriate color (white in this case) without the massive number of air bubbles. You can see this in the picture below.


After curing, we can open the mold and see if the casting is fully formed. Sometimes a mold will have recurring air bubbles which will require you to improve your vent channels. Let's look at this one.
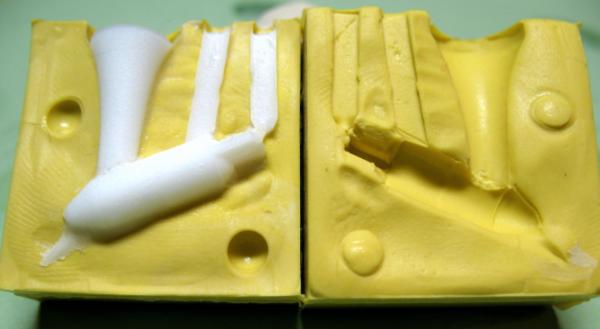


Our test cast is successful. It turns out to be a good mold with no nasty air pockets. Now we pull on the resin in the vent and pour channels to see how firm the resin is now. If it is still soft, we let the casting cure longer. Once the resin is hard, we pull the new casting out of the mold.
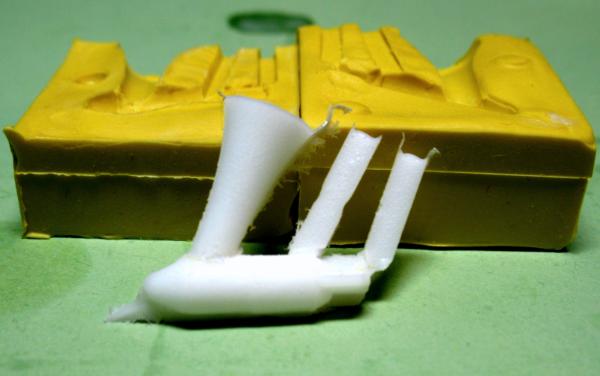


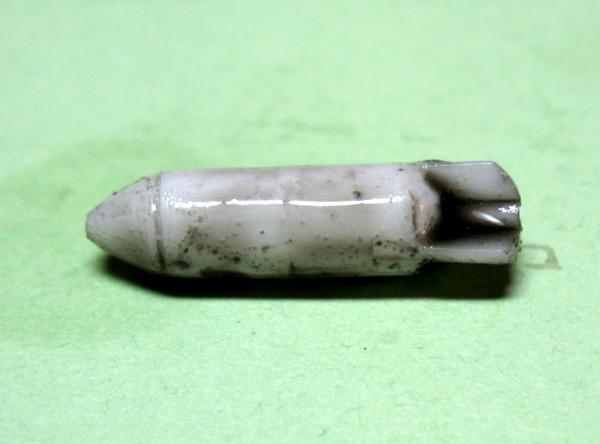
Since the white resin makes it difficult to see any detail. I trimmed the casting and washed it with Badab Black to make the shell more visible.


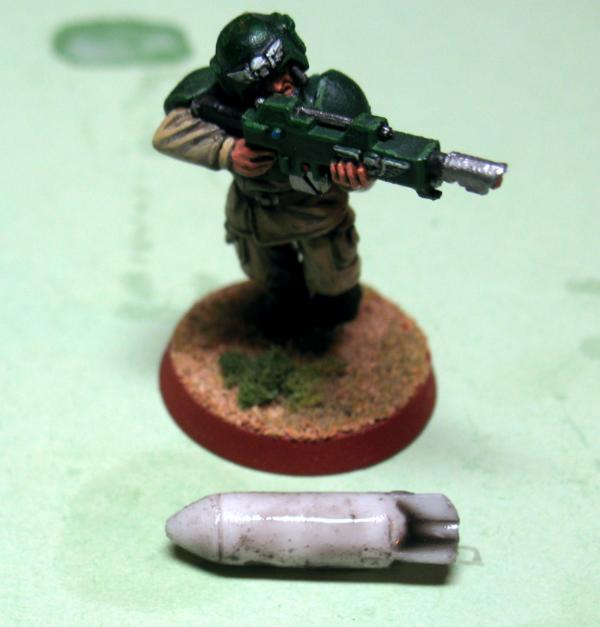
Finally, I'll show you the size of the shell in relation to one of my Cadian soldiers.


Thanks for reading. I hope this tutorial helps you to successfully experiment with making two-piece molds for casting with resin.

This message was edited 3 times. Last update was at 2009/05/29 01:19:29


The secret to painting a really big army is to keep at it. You can't reach your destination if you never take any steps.

I build IG...lots and lots of IG.  
   
Made in us
Disciplined Sea Guard


Way out West

That's a pretty cool,simple explanation for casting. Thanks.

Wyoming, yeah, the big square state out west. No, that one's Colorado... just above... yeah right there, the one with Yellowstone. No, we're not Montana. 
   
Made in au
Navigator


Omg you are a saint, very comprehensive. I have no excuses now. Thanyou thankyou thankyou.

She thirsts, We dance, They die, He laughs.  
   
Made in us
Wraith


O H I am in the Webway...

Would this kinda thing work well molding something like an assault cannon arm from the terminator sprue? And how easily are these things to paint? Is there anything "to detailed" that this kinda process won't really produce well?

This message was edited 1 time. Last update was at 2009/05/31 23:18:20


He who fights with monsters might take care lest he thereby become a monster and if you gaze for long into an abyss, the abyss gazes also into you  
   
Made in us
Fixture of Dakka


Columbia, SC (USA)

A two-piece mold can produce a lot of detail but I would try it with different materials like silicone rubber molds and high quality casting resin. You would have to position your original in the mold so that your most desired details are not located where the mold lines will fall, since those areas lose some detail during the casting process. They also lose more detail after casting when you trim the mold line.

The Alumilite Amazing Casting Resin and Amazing Mold Putty used in this tutorial are best suited for beginners or for experimentation.

The cast pieces take paint very well. I was worried about this due to the shine on the castings but have had no problem with GW paints.

The secret to painting a really big army is to keep at it. You can't reach your destination if you never take any steps.

I build IG...lots and lots of IG.  
   
Made in us
Grovelin' Grot


Texas

Wow. Thanks a lot for posting this. I've been thinking about getting into casting, but was afraid it would be too complicated. Would the quality be the same if you tried to cast an entire GW sprue?

“The end may justify the means as long as there is something that justifies the end.” 
   
Made in us
Fixture of Dakka


Columbia, SC (USA)

Phonate,

I haven't tried to cast something that large and complicated. I see at least two potential problems. The first one is techical: GW's models are injected plastic so I doubt a two-piece mold would capture every detail well. The second problem is legality: you might run afoul of GW's intellectual property rights though they might not care if you were only making a few models for yourself.

I have seen some successful sprues made of heavily converted or newly sculpted figures. DarkSoul (Thomas Sexton) casts sprues of female IG-style torsos, heads, and legs. You can see some of these sprues on Spack's site, Age of Strife.

One of Dakka's P&M blogs, produced by BrotherArgos, shows two-part silicone rubber molds for sprues of Steel Legion style infantry models.

Both of these castings are not sprues as large as GW's. Instead they tackle a section with only three to eight pieces on a single sprue.

Whatever you do, I recommend starting small and developing experience before trying complicated molds.

This message was edited 1 time. Last update was at 2009/06/01 05:17:01


The secret to painting a really big army is to keep at it. You can't reach your destination if you never take any steps.

I build IG...lots and lots of IG.  
   
Made in us
Gargantuan Gargant


New Bedford, MA USA

GW uses plastic injection molding, where the molten plastic is forced into the sprue under pressue.

Gravity casting with resin is limited by how far gravity will pull the resin along.

If you tried to cast a GW spue in resin, via gravity casting, it most likely would fail as there would be air pockets.

Gravity casting is better suited to simpler molds.

   
Made in au
Morphing Obliterator


rAdelaide

This is genius. great work, and nice tip on the ball bearings.
   
Made in us
Fixture of Dakka


Columbia, SC (USA)

AdamSouza, thanks for the helpful explanation to answer Phonate's question!

Darkkt, thanks! There are lots of ways to make the register marks but I like round stuff.

The secret to painting a really big army is to keep at it. You can't reach your destination if you never take any steps.

I build IG...lots and lots of IG.  
   
Made in de
Plastictrees


Bonn

This is great.
Thanks a lot for this!!
   
Made in us
Trigger-Happy Baal Predator Pilot


Awesome I was looking for something like this.

2000 points
http://www.dakkadakka.com/dakkaforum/posts/downloadAttach/19113.page
500 points
1500 points "You don’t want to play Blood Angels to be different you play them because you finally realized that they go crazy and drink blood yet haven’t been killed off by the Inquisition. Proving that they are just bada**”  
   
Made in us
Hardened Veteran Guardsman


Gainesville, Florida

Couldn't you just use a large syringe to force the resin into the mold?
adamsouza wrote:GW uses plastic injection molding, where the molten plastic is forced into the sprue under pressure.

Gravity casting with resin is limited by how far gravity will pull the resin along.

If you tried to cast a GW spue in resin, via gravity casting, it most likely would fail as there would be air pockets.

Gravity casting is better suited to simpler molds.

Jtw1n
Vostroyan XCIX "The Heirs Apparent" 
   
Made in us
Fixture of Dakka


Columbia, SC (USA)

Flachzange and Emrab,

Thanks! I hope the tutorial helps you to experiment with casting. The more I practice, the loftier my future plans become.

Jtw1n,

I don't know if a large syringe will work. The resin is quite thin when it is first mixed so it will travel quite well with just the force of gravity and the weight of the liquid in the pour channel (a large mouth pour channel that narrows from top to bottom increases this force). The big question is whether your air vents are correctly placed to allow the resin to fully fill the areas you need to cast the model, if you attempt a large one.


This message was edited 1 time. Last update was at 2009/06/06 03:20:39


The secret to painting a really big army is to keep at it. You can't reach your destination if you never take any steps.

I build IG...lots and lots of IG.  
   
Made in ca
Stealthy Dark Angels Scout with Shotgun


Zerg Spawning Pool

Pretty amazing. I like your use of lego.

"Turn the tables and sometimes your pieces are the only ones that fall off the board."

Wah! I like dis beef too much!
__________________________________________

And nothing else...  
   
Made in us
Fixture of Dakka


Columbia, SC (USA)

V0ldem0r7,

Thanks! I can't take credit for coming up with the idea to use Legos. Many folks that do their own small castings use Legos as the mold frame. They're easy to use, durable, can handle many different frame sizes, and they are readily available. It's difficult to think of an alternative to them.

The secret to painting a really big army is to keep at it. You can't reach your destination if you never take any steps.

I build IG...lots and lots of IG.  
   
Made in us
Gargantuan Gargant


New Bedford, MA USA

jtw1n wrote:Couldn't you just use a large syringe to force the resin into the mold?

adamsouza wrote:GW uses plastic injection molding, where the molten plastic is forced into the sprue under pressure.

Gravity casting with resin is limited by how far gravity will pull the resin along.

If you tried to cast a GW spue in resin, via gravity casting, it most likely would fail as there would be air pockets.

Gravity casting is better suited to simpler molds.


Then you would be doing plastic injection molding

For a hobbyist, probably not. It's just not practical for a multitude of reasons.

You can't really regulate the pressure with a syringe. You'd underfill sometimes, and shoot resin out of the resevior other times, both leaving air pockets and ruining the model. (Believe me, I tried)

You could duplicate everything on a Plastic sprue with multiple rubber/silicone gravity molds. Just don't try to duplicate the sprue as a single piece. It's layed out to take advantage of plastic injection molding techniques, and gravity casting has it's own different quirks and techniques to deal with.


Made in au
Trustworthy Shas'vre


I'm trying to cast a piece for use in my tau army but having difficulty working out which way up to put the model, where the vents should be, etc etc. Could you help?

I'm using silicone rubber molds and resin casts.
I'll post a little pic of the thing i'm casting:


It has quite massive overhang.. imagine its like a lego brick with one end removed.

This message was edited 2 times. Last update was at 2009/06/06 05:56:30


Made in us
Fixture of Dakka


Columbia, SC (USA)

Trasvi,

That's a tricky piece! I would probably have the tricky edges facing sideways (perpendicular to the top of the mold that you will use for pouring and vent channels). I would sink those edges into my modelling clay at a 45 degree angle (a line from the top right corner of the front edge shown in your picture on the right side to the bottom left corner of that same edge in the same picture). This means that your pour channel and pour vents will touch the opposite edge (the one that you can't see in either of your images, i.e. not the side facing the viewer in the left side picture).

For a smooth object like this with hard edges I would ensure that my pour and vent channels touch squarely on the large flat surface. AVOID having the channels touch the hard 90 degree edges because you'll have a difficult time sanding the flash to regain your 90 degree edge. Since the pour channel is largest, I would position it to touch the larger end (the "pistol grip" looking end) and have one or two vent channels touching the smooth flat surface of the "pistol barrel" end.

I have not tried a piece like yours before so my advice is just based on my observations and assumptions. Good luck and don't forget to use mold release!

The secret to painting a really big army is to keep at it. You can't reach your destination if you never take any steps.

I build IG...lots and lots of IG.  
   
Made in us
Pragmatic Collabirator


Dark Side of the Mood

adamsouza wrote:GW uses plastic injection molding, where the molten plastic is forced into the sprue under pressue.

Gravity casting with resin is limited by how far gravity will pull the resin along.

If you tried to cast a GW spue in resin, via gravity casting, it most likely would fail as there would be air pockets.

Gravity casting is better suited to simpler molds.


The trick is to get the air bubble of before the resin sets. I have seem some tutorials where they use a vacuum "bell?" to remove all of the air. There is one here on Dakka Dakka. The guy built four Titans. Check it out.

   
Made in us
Fixture of Dakka


Columbia, SC (USA)

Evil Eli wrote:The trick is to get the air bubble of before the resin sets. I have seem some tutorials where they use a vacuum "bell?" to remove all of the air. There is one here on Dakka Dakka. The guy built four Titans. Check it out.

On small molds, the bubbles are not a problem as long as your vent channels are in the right place and you gently tap the mold a bit to make the air bubbles move. It may also help if you avoid getting air in the resin during mixing and pouring (pour close to the edge of the mold and make the liquid hit the side of the pour channel rather than letting it drop all the way into the mold).

I've noticed that when I fill multiple molds the resin begins thickening. It's noticeable because the resin will pour more slowly out of my mixing cup. When that happens, I stop pouring. The thicker resin will flow too slowly into a mold and will not get into all of the corners and crevices. So far, with the Amazing Casting resin, this tends to happen after I've poured my three main two-piece molds and about three one-piece molds. Of course, the longer you spend mixing the less time you have to pour. The instructions state that you have about a minute for each task. I take about 20 seconds to mix and spend the remainder of my time pouring.

If anyone else has tried this recently, I'd like to hear how well it went for you.

The secret to painting a really big army is to keep at it. You can't reach your destination if you never take any steps.

I build IG...lots and lots of IG.  
   
Made in us
Regular Dakkanaut


JB: great tutorial

@ Trasvi: from the views you have shown there, it looks to me like you could make it in a one piece mold with the U-shaped end pointing down. If the opposite surface is important from appearance or fit perspective you would then have to sand it.
   
Made in us
Fixture of Dakka


Columbia, SC (USA)

asmith wrote:JB: great tutorial

@ Trasvi: from the views you have shown there, it looks to me like you could make it in a one piece mold with the U-shaped end pointing down. If the opposite surface is important from appearance or fit perspective you would then have to sand it.

Thanks Asmith!

The only reason I didn't advise Trasvi to go with a simple one-piece mold is the bevelled 45 degree edges. Those are not easy to file to a uniform shape.


The secret to painting a really big army is to keep at it. You can't reach your destination if you never take any steps.

I build IG...lots and lots of IG.  
   
Made in us
Regular Dakkanaut


I was suggesting that the U shaped face be pointing down, so the bevels would be part of the mold. The back face (which he does not show in any of his views) would be the side at the top.
   
Made in us
Hooded Inquisitorial Interrogator


jtw1n wrote:Couldn't you just use a large syringe to force the resin into the mold?
adamsouza wrote:GW uses plastic injection molding, where the molten plastic is forced into the sprue under pressure.

Gravity casting with resin is limited by how far gravity will pull the resin along.

If you tried to cast a GW spue in resin, via gravity casting, it most likely would fail as there would be air pockets.

Gravity casting is better suited to simpler molds.


A vacuum chamber is usually utilized to mimic the process of injection molding. The vacuum chamber sucks all the air out instead of pushing the air out as with injection molding. The force you could apply with your syringe is negligible to that used in injection molding. Injection molding doesn't necessarily push out all the air in a mold but compresses any trace existent air into solution with the plastic. Some mold making hobbyists use a pressure pot and compressor to mimic this effect instead of the vacuum chamber. (A vacuum chamber is required, regardless, in both processes. If you expect to subject your mold to pressure, negative or otherwise, it has to be free of bubbles.)

A vacuum chamber and pump will run you about $350, probably. I haven't priced one in a while.

This message was edited 1 time. Last update was at 2009/06/08 21:04:08


Redstripe Envy: My thoughts as a freelance writer and wargamer. 
   
Made in us
Fixture of Dakka


Columbia, SC (USA)

asmith wrote:I was suggesting that the U shaped face be pointing down, so the bevels would be part of the mold. The back face (which he does not show in any of his views) would be the side at the top.

I agree with you as long as that face is flat. I have two one-piece molds that are long pieces with the flat end at the top of the mold. He could try it. The only drawback to a one-piece mold with a long piece is that they don't last as long as the two-piece molds. It will be alright as long as he only wants a half dozen or so castings, and he is careful getting each one out of the mold.


Automatically Appended Next Post:
redstripe wrote:
jtw1n wrote:Couldn't you just use a large syringe to force the resin into the mold?
adamsouza wrote:GW uses plastic injection molding, where the molten plastic is forced into the sprue under pressure.

Gravity casting with resin is limited by how far gravity will pull the resin along.

If you tried to cast a GW spue in resin, via gravity casting, it most likely would fail as there would be air pockets.

Gravity casting is better suited to simpler molds.

A vacuum chamber is usually utilized to mimic the process of injection molding. The vacuum chamber sucks all the air out instead of pushing the air out as with injection molding. The force you could apply with your syringe is negligible to that used in injection molding. Injection molding doesn't necessarily push out all the air in a mold but compresses any trace existent air into solution with the plastic. Some mold making hobbyists use a pressure pot and compressor to mimic this effect instead of the vacuum chamber. (A vacuum chamber is required, regardless, in both processes. If you expect to subject your mold to pressure, negative or otherwise, it has to be free of bubbles.)

A vacuum chamber and pump will run you about $350, probably. I haven't priced one in a while.

Thanks Redstripe,

For those that are interested, check out Sersi's P&M Tutorial on casting. This is advanced level methodology with somewhat expensive equipment. You kind of get what you pay for though as the casting quality is consistently very good. The Alumilite Amazing products used in my P&M Tutorial are for beginners or those that wish to experiment a bit. Once you get a firm idea of where you want to go with casting, I recommend the use of better mold material and resins.

This message was edited 2 times. Last update was at 2009/06/08 23:26:02


The secret to painting a really big army is to keep at it. You can't reach your destination if you never take any steps.

I build IG...lots and lots of IG.  
   
Made in us
Sneaky Chameleon Skink


Needles, CA

nice work! got 2 questions for ya!
1- after you mix the casting resin, what is the initial viscosity?(is it like water, thicker like PVA glue?)
2- do you have links for the Casting resin and the mold putty? i need to make some custom lightning claws for my Deathwing Commander

"I stand for the Emperor. In all things, I am loyal to Him, and I cannot break that bond. He has many great ambitions, and the noblest of intentions, but I know that above all else, He is determined to stand firm against the rise of Chaos. He has always known the truth of it. The overthrow of the Primordial Annihilator is His greatest wish. So what I do, autarch, from this moment on, I will do for the Emperor." -Alpharius, Primarch of the Alpha Legion.

current armies-
4500 pts Tyranids
1500 pts blood ravens
3250 pts HH Alpha legion 
   
Made in us
Fixture of Dakka


Columbia, SC (USA)

AlphariusOmegon wrote:nice work! got 2 questions for ya!
1- after you mix the casting resin, what is the initial viscosity?(is it like water, thicker like PVA glue?)
2- do you have links for the Casting resin and the mold putty? i need to make some custom lightning claws for my Deathwing Commander

Thanks!

1. The initial viscosity is like water. After 60-90 seconds the resin thickens until you cannot pour it.

2. Alumilite's web site is www.Alumilite.com. Another good company is Smooth-On but I prefer Alumilite's starter kits for experimentation. I buy the Amazing Mold Putty and Amazing Casting Resin at my local Hobby Lobby. They keep it in the jewelry making section. Unfortunately, they are sometimes out of stock so it may be an advantage to order directly from Alumilite. Be warned that their postage fees are high. On the plus side you can get larger quantities as well as packets of measuring cups and sticks. The cups are reusable but tend to get difficult to read after 10-12 uses.

You can just buy craft sticks or popsicle sticks instead of Alumilite's mixing sticks. You can use almost any paper or plastic cup as your mixing cup. A pour spout on the mixing cup is handy. I considered shot glasses and lab beakers as well. A metal or glass beaker is reusable as long as you scour the resin out after each cast.

I plan to try silicone rubber molds, different resins, and dental plaster (for terrain pieces) over the next three-four months. I'll post WIPs and results in my Cadian 11th Mech blog here on Dakka.

The secret to painting a really big army is to keep at it. You can't reach your destination if you never take any steps.

I build IG...lots and lots of IG.  
   
Made in us
Rampaging Carnifex


Los Angeles, CA

SWEETNESS!

Armies I play:
-5000 pts
-2500 pts
Mechanicus -1850 pts 
   
Made in us
Longtime Dakkanaut


Scyzantine Empire

Wanted to let you know that I built a mold using your tutorial this week and it's turned out great. I hope to be casting with resin by the weekend. Without this tutorial, I'd still be dithering over what casting material to use, how to build a form from wood (Legos... ingenius!) and probably spend a fortune in GS. Thanks bunches!

What harm can it do to find out? It's a question that left bruises down the centuries, even more than "It can't hurt if I only take one" and "It's all right if you only do it standing up." Terry Pratchett, Making Money

"Can a magician kill a man by magic?" Lord Wellington asked Strange. Strange frowned. He seemed to dislike the question. "I suppose a magician might," he admitted, "but a gentleman never could." Susanna Clarke Jonathan Strange & Mr. Norrell

DA:70+S+G+M++B++I++Pw40k94-D+++A+++/mWD160R++T(m)DM+


Forum Index » Painting & Modeling Tutorials
Go to: