| Author |
Message |
 |
|
|
 |
|
Advert
|
Forum adverts like this one are shown to any user who is not logged in. Join us by filling out a tiny 3 field form and you will get your own, free, dakka user account which gives a good range of benefits to you:
- No adverts like this in the forums anymore.
- Times and dates in your local timezone.
- Full tracking of what you have read so you can skip to your first unread post, easily see what has changed since you last logged in, and easily see what is new at a glance.
- Email notifications for threads you want to watch closely.
- Being a part of the oldest wargaming community on the net.
If you are already a member then feel free to login now. |
|
 |
![[Post New]](/s/i/i.gif) 2009/05/30 08:51:11
Subject: Sculpting the Insaniak Way: Chains
|
 |

[MOD]
Making Stuff
|
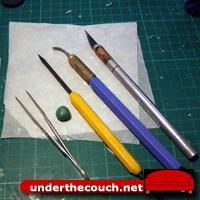 Next tutorial: Chains
Handy for draping over models, or for securing stowage onto vehicles, chains can take a little practice to turn out neatly, but the basic technique is really very simple.
First off, tools... You'll need some putty, a hobby knife, a sculpting tool, a pair of tweezers, and a spike of some kind (the one I have pictured here with the yellow handle is from a cheap set of soldering tools). You will also want some water for dipping your tools as you work. A little water on the tool helps to stop it from sticking to the putty.
You will also obviously need something to sculpt the chain onto. You can sculpt it directly onto your miniature, or do it on a flat surface like a tile or spare base and glue it onto the miniature when it is set.
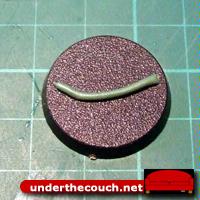 Step 1:
Roll out a thin sausage of putty between your fingers. Try to get the sausage a fairly even thickness, although it's not a big deal if you don't, as it can be trimmed down as you go. Press this sausage into place on your miniature or work surface.
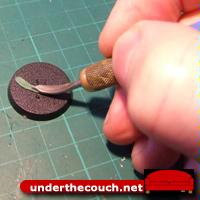 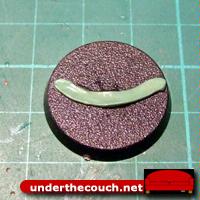 Step 2:
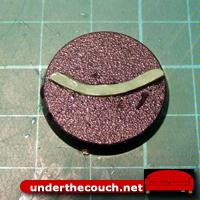
Flatten the sausage of putty down using your sculpting tool, to the thickness that you want the chain.
 Step 3:
If your flattened sausage is a little too wide, you can trim it down to size with a knife. The width is really up to you... it all just comes down to how you want the chain to look. I would recommend trying a few different thicknesses and widths for practice, just to see how they turn out.
  Step 4:
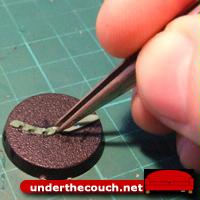
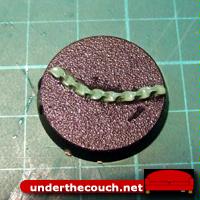
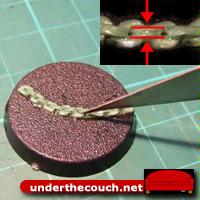
Take the tweezers and pinch the putty in regular intervals along the length of the sausage. This forms the upright links of the chain.
 Step 5:
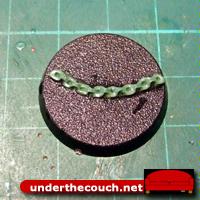
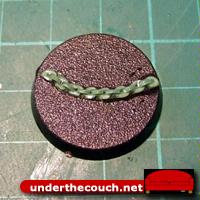
Using your spike, press a hole into the putty in between each of the raised links you have just created.
  Step 6:
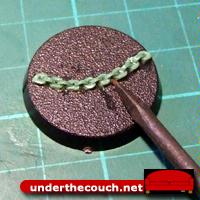
Now you need to define the links a little better. Take your knife and cut a small line into the putty along the edge of each of the raised links. This line should run from the centre of the indent in the side of the chain to the side of the hole you made with the spike, on each side and both ends of the raised link.
 Step 7:
Now, take your spike and press an indent into each side of the raised links. You can push the spike right through if you like, although that can be tricky to do without seriously warping your links, and is generally not necessary on smaller chains. Shading in the indents when you paint it will be sufficient to look the part.
If any of your links are a little deformed, you can touch them up with the sculpting tool at this point. If the raised links are sitting a little too flat, you can lift them up a little with the spike when you make the indents by just pulling gently upwards.
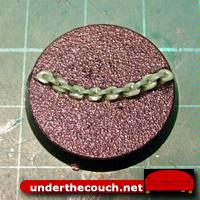 And there you have it: one chain.
There's a pretty much infinite amount of variety you can give to the look of it by just changing the thickness and width of the initial putty sausage, altering the length of the links, and tinkering with the final shape of the links, making them square or more rounded.
Edit: a couple of minor tweaks for clarity
|
|
This message was edited 1 time. Last update was at 2009/05/30 11:14:58
|
|
|
 |
 |
![[Post New]](/s/i/i.gif) 2009/05/30 09:02:26
Subject: Sculpting the Insaniak Way: Chains
|
 |

Junior Officer with Laspistol
|
As always a very nice tutorial.
|
"I refuse to join any club that would have me as a member."-Groucho Marx
|
|
|
 |
 |
![[Post New]](/s/i/i.gif) 2009/05/30 09:05:40
Subject: Re:Sculpting the Insaniak Way: Chains
|
 |

Deadshot Weapon Moderati
|
Agreed very nice. Always makes we wonder why there are not more chains and skulls in the 40k universe.  JK Nice work. Thanks for posting.
|
|
|
|
 |
 |
![[Post New]](/s/i/i.gif) 2009/05/30 09:23:38
Subject: Re:Sculpting the Insaniak Way: Chains
|
 |

Bounding Assault Marine
In the deepest reaches of Valhalla
|
Insaniak... I have no words. You manage to make all sculpting look so easy!
One of thees days I will try it, definitel!
Please keep posting more!
//Edge
|
|
|
 |
 |
![[Post New]](/s/i/i.gif) 2009/06/02 02:20:00
Subject: Sculpting the Insaniak Way: Chains
|
 |

Frothing Warhound of Chaos
|
this is perfect for my CSM, great as always!
|
You're not a geek if you can beat the  out of people who call you a geek, as such, i am not a geek. out of people who call you a geek, as such, i am not a geek. 
I play 2000 point  (homebrew warband) L:2 D:1 W:2 (homebrew warband) L:2 D:1 W:2
DS:90-S+GMB-IPw40K08#++D+A+/SWD-R+T(OT)DM+
Purgo vestri vesica per vestri hostilis cruor.
Purgo vestri animus per cruor of reproba unus |
|
|
 |
 |
![[Post New]](/s/i/i.gif) 2009/06/02 10:13:34
Subject: Sculpting the Insaniak Way: Chains
|
 |

Battlefortress Driver with Krusha Wheel
|
More more more. Insaniak = sculpting tutor of pure awesome sauce.
|
|
|
|
 |
 |
![[Post New]](/s/i/i.gif) 2009/06/03 23:39:29
Subject: Sculpting the Insaniak Way: Chains
|
 |

Morally-Flexible Malleus Hearing Whispers
Well I kind of moved near Toronto, actually.
|
dude, that is insanely awesome.
Automatically Appended Next Post:
(no pun intended)

|
|
This message was edited 2 times. Last update was at 2009/06/04 02:11:54
|
|
|
 |
 |
![[Post New]](/s/i/i.gif) 2009/06/04 16:14:14
Subject: Re:Sculpting the Insaniak Way: Chains
|
 |

Bounding Assault Marine
In the deepest reaches of Valhalla
|
Of course the pun was intended   , no?'
//Edge
|
|
|
 |
 |
![[Post New]](/s/i/i.gif) 2009/06/04 16:41:19
Subject: Re:Sculpting the Insaniak Way: Chains
|
 |

Chosen Baal Sec Youngblood
|
Cheers have been looking for a way to make chains for a while.
|
 2500pt 2500pt
 2500pt 2500pt
 2000-3000pt 2000-3000pt
 2000pt 2000pt
 new amy new amy
|
|
|
 |
 |
![[Post New]](/s/i/i.gif) 2009/06/05 17:07:49
Subject: Re:Sculpting the Insaniak Way: Chains
|
 |

Hardened Veteran Guardsman
|
legionier alpha IV wrote:Cheers have been looking for a way to make chains for a while.
So have i 
|
|
|
|
 |
 |
![[Post New]](/s/i/i.gif) 2009/06/07 18:21:18
Subject: Sculpting the Insaniak Way: Chains
|
 |

Regular Dakkanaut
|
I so love this tutorial i have made some chains and leaves and rope myself and im very pleased with the result. thanks.
@insaniak
p.s. do you mind me posting some of these tuts on another forum???.
cheers.
|
|
|
|
 |
 |
![[Post New]](/s/i/i.gif) 2010/02/25 20:33:37
Subject: Sculpting the Insaniak Way: Chains
|
 |

Nervous Accuser
|
The amount of new, good tuts here never cease to amaze. Thanks for another great one.
|
Sons of the Phoenix  HUGE Project Coming Soon! HUGE Project Coming Soon!
"In a period of darkness a blind man is the best guide. In a time of insanity look to the mad man to lead the way." |
|
|
 |
 |
![[Post New]](/s/i/i.gif) 2010/03/15 03:11:55
Subject: Sculpting the Insaniak Way: Chains
|
 |

Monstrous Master Moulder
Secret lab at the bottom of Lake Superior
|
I must say, nice job, but what brand putty were you using? It looks very nice, and I am somewhat frustrated with the price of Green Stuff.
|
Commissar NIkev wrote:
This guy......is smart 
|
|
|
 |
 |
![[Post New]](/s/i/i.gif) 2010/03/15 04:48:22
Subject: Sculpting the Insaniak Way: Chains
|
 |

Satyxis Raider
In your head, screwing with your thoughts...
|
Sure looks like greenstuff to me... Anyway this is a nice tutorial. The only issue I can see is that only 1 side of the chain will be sculpted, which might be a problem for a hanging chain where you can see both sides...
|
|
|
|
 |
 |
![[Post New]](/s/i/i.gif) 2010/03/15 06:35:57
Subject: Sculpting the Insaniak Way: Chains
|
 |

Road-Raging Blood Angel Biker
|
Nice tutorial. should try it out, thanks. 
|
 Beyond state of being mortal Beyond state of being mortal 
The Dreadnote wrote:...Ultra mortalitas wins the thread.
Cheif Librarian Vaako wrote:...Terminator:I'm goin' in............. Whoa! man down!
Terminator 2:What happened?
Terminator:I tripped over a piece of string concealed in the bushes.
Emperor: 
|
|
|
 |
 |
![[Post New]](/s/i/i.gif) 2010/03/16 17:34:07
Subject: Sculpting the Insaniak Way: Chains
|
 |

Blood-Raging Khorne Berserker
|
nice tut
|

DA:90-SG-M+B++I+Pw40k00-ID+++++A+/wWD149R---T(S)DM++
 |
|
|
 |
 |
![[Post New]](/s/i/i.gif) 2010/03/16 21:01:19
Subject: Re:Sculpting the Insaniak Way: Chains
|
 |

Veteran ORC
|
thanks, I was planning on making some chains and this just saved me some trial and error
|
I've never feared Death or Dying. I've only feared never Trying. |
|
|
 |
 |
![[Post New]](/s/i/i.gif) 2010/03/19 20:05:34
Subject: Sculpting the Insaniak Way: Chains
|
 |

Blood-Raging Khorne Berserker
|
Nice
|

DA:90-SG-M+B++I+Pw40k00-ID+++++A+/wWD149R---T(S)DM++
 |
|
|
 |
 |
![[Post New]](/s/i/i.gif) 2010/03/19 20:23:51
Subject: Sculpting the Insaniak Way: Chains
|
 |

Thunderhawk Pilot Dropping From Orbit
|
Would a toothpick be enough for the spike you speak of ?
Great tutorial 
|
|
|
|
 |
 |
![[Post New]](/s/i/i.gif) 2010/03/20 20:35:49
Subject: Sculpting the Insaniak Way: Chains
|
 |

Stalwart Space Marine
|
You know what else could work. Buy real chains (small doh) but instead put them in salt water. Leave them for a month and they will rust.Then again this could work too.
|
    
Dreadnoughts: Dying is a thing of the past....... |
|
|
 |
 |
![[Post New]](/s/i/i.gif) 2010/03/21 20:54:30
Subject: Sculpting the Insaniak Way: Chains
|
 |

[MOD]
Making Stuff
|
micahaphone wrote:I must say, nice job, but what brand putty were you using? It looks very nice, and I am somewhat frustrated with the price of Green Stuff.
It's Green Stuff in the tute. You can get it much cheaper (and in bigger packages) than GW sells it if you shop around. Automatically Appended Next Post: gretar wrote:Would a toothpick be enough for the spike you speak of ?
A toothpick would probably work just fine. Automatically Appended Next Post: Dreadnought96 wrote:You know what else could work. Buy real chains (small doh) but instead put them in salt water. Leave them for a month and they will rust.Then again this could work too.
Once you start them rusting, they will continue to do so. So ultimately not the best solution.
The main reason to sculpt chains instead of using real chain is that it can be a paint to get real chain to hang right and stay where you want it.
|
|
This message was edited 2 times. Last update was at 2010/03/21 20:56:17
|
|
|
 |
 |
![[Post New]](/s/i/i.gif) 2010/03/22 07:06:19
Subject: Sculpting the Insaniak Way: Chains
|
 |

Fresh-Faced New User
|
Nicee
|
|
|
|
 |
 |
![[Post New]](/s/i/i.gif) 2010/04/04 21:58:15
Subject: Re:Sculpting the Insaniak Way: Chains
|
 |

Giggling Nurgling
California
|
I just made one and it looks awesome, Thanks for the tutorial.
|
 "In the embrace of great Nurgle, I am no longer afraid, for with his pestilential favour I have become that which I once most feared: Death." "In the embrace of great Nurgle, I am no longer afraid, for with his pestilential favour I have become that which I once most feared: Death." 
 around 2000pts around 2000pts 
 around 1300pts around 1300pts  |
|
|
 |
 |
![[Post New]](/s/i/i.gif) 2010/04/05 09:46:08
Subject: Re:Sculpting the Insaniak Way: Chains
|
 |

Spawn of Chaos
|
 Holy Crap Green Stuff Awesomeness!
|
     Black Legion:12,000 points Black Legion:12,000 points     
Unleash the forces of Chaos! FOR THE WARMASTER! |
|
|
 |
 |
![[Post New]](/s/i/i.gif) 2010/08/09 22:57:07
Subject: Sculpting the Insaniak Way: Chains
|
 |

Cultist of Nurgle with Open Sores
|
wow you make it look so easy and i have all of these tools so ill be trying this for sure
|
a cow and a calf are cut in half, and put into some cases, to call it art, however smart, casts doubt on arts hole basis. |
|
|
 |
 |
![[Post New]](/s/i/i.gif) 2010/08/09 22:58:50
Subject: Sculpting the Insaniak Way: Chains
|
 |

Napoleonics Obsesser
|
Looks great! It gets really tedious to put them on Chaos Tanks though. UGH.
|

If only ZUN!bar were here... |
|
|
 |
 |
![[Post New]](/s/i/i.gif) 2010/08/21 11:59:08
Subject: Sculpting the Insaniak Way: Chains
|
 |

Fleshound of Khorne
|
Cool Tutorial, and now i know how to sculpt a chain, thanks!
|
|
|
 |
 |
![[Post New]](/s/i/i.gif) 2010/08/21 19:52:23
Subject: Sculpting the Insaniak Way: Chains
|
 |

Hungry Little Ripper
The Restaurant at the end of the Warp
|
Chain Bases. Aces! IMO Chains are like skulls: You can never have enough.
|
|
This message was edited 1 time. Last update was at 2010/08/22 12:56:21
|
|
|
 |
 |
![[Post New]](/s/i/i.gif) 2010/08/21 21:18:39
Subject: Sculpting the Insaniak Way: Chains
|
 |

Preacher of the Emperor
|
Thats a nice tutorial. I'm definetly going to give this a try.
sillyboy
|
|
|
|
 |
 |
![[Post New]](/s/i/i.gif) 2011/06/16 11:19:39
Subject: Sculpting the Insaniak Way: Chains
|
 |

Esteemed Veteran Space Marine
|
this is an amazing tutorial, it will help tying a lot of stuff together.. and its easier then the skulls from the skull tut, which is a good tut but i just cant pull it off
|
|
|
|
 |
 |
|
|