| Author |
Message |
 |
|
|
|
|
Advert
|
Forum adverts like this one are shown to any user who is not logged in. Join us by filling out a tiny 3 field form and you will get your own, free, dakka user account which gives a good range of benefits to you:
- No adverts like this in the forums anymore.
- Times and dates in your local timezone.
- Full tracking of what you have read so you can skip to your first unread post, easily see what has changed since you last logged in, and easily see what is new at a glance.
- Email notifications for threads you want to watch closely.
- Being a part of the oldest wargaming community on the net.
If you are already a member then feel free to login now. |
|
 |
2009/05/31 07:22:01
Subject: Gavin Thorne Gets His Teach On or How to Convert Necrons on the Cheap, Part 2.2: Immortals
|
|

Longtime Dakkanaut
|
Continuing from Part 2.1. Again, I'm asking the Powers That Be to please consider part one and two of this tutorial a single entry for the contest! There's so many pics that I want to have a little consideration for anyone that has a slow connection.
Cut Off the Shoulder Blade
Not the whole thing, just the bits that stick up. You want it to be as level as possible since this is where the armor plates are going.
Cut OFF the Spine Bits
Just as pictured. You'll want to leave the little plates under the spikes so the Greenstuff will have something to stick to.
Score the Shoulder Blades
Using your hobby knife, crosshatch the shoulder blades so the armor plates will have some extra surface area.
Add Greenstuff to the Spine
Mix up a small amount of greenstuff to make a "sausage" just big enough to cover the spine. Try to keep it off the shoulder blades.
Mold the Greenstuff and Add the Head

Using a sculpting tool or your hobby knife, mold the greenstuff to make a peak as shown. This will be the base of our new spine. Next, glue the head on. I like them facing forwards or slightly bent to one side, but not too far.
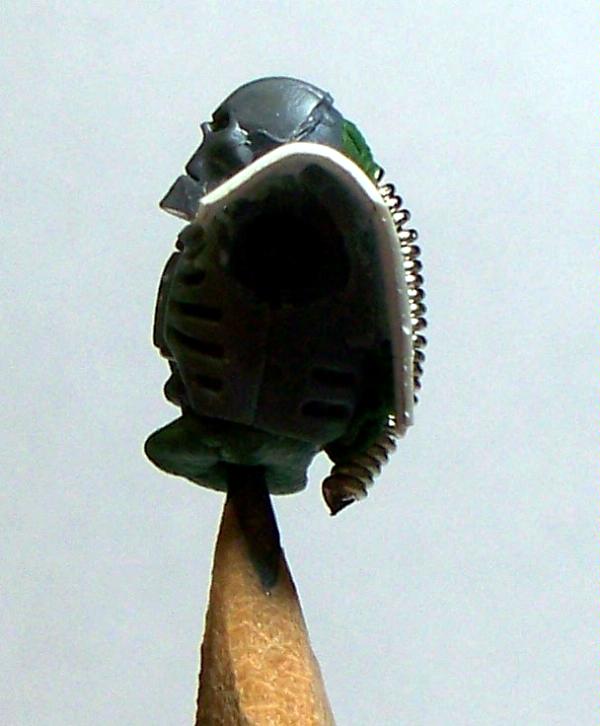
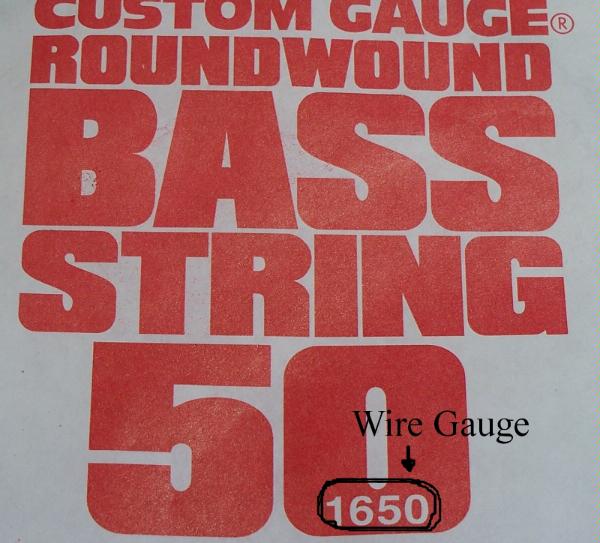
Bass Guitar Wire
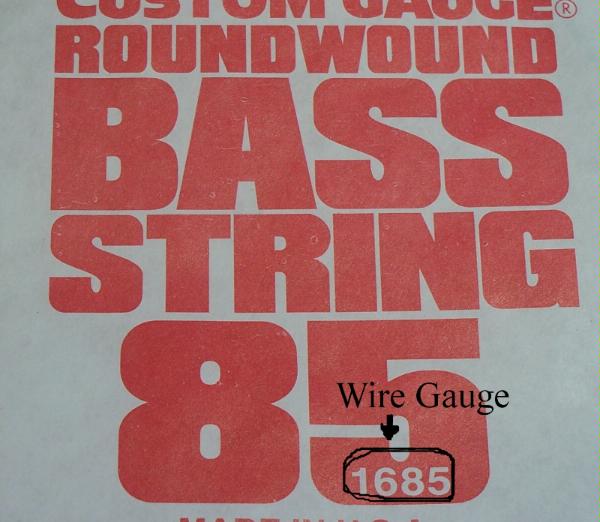
You'll need 1685 gauge round-wound bass string for the spine, although you could use flatwound if necessary. I'm a bass player so I have yards of this stuff, but you can get yours at the local guitar shop or even big box stores - my wally*world keeps them near the toys along with all the musical instrument paraphenalia. Most guitar/music shops sell individual strings for a few bucks each or as a set for anywhere from $15-40 USD. If you're an avid converter, buy a set on the cheap. You'll use them for all kinds of things.
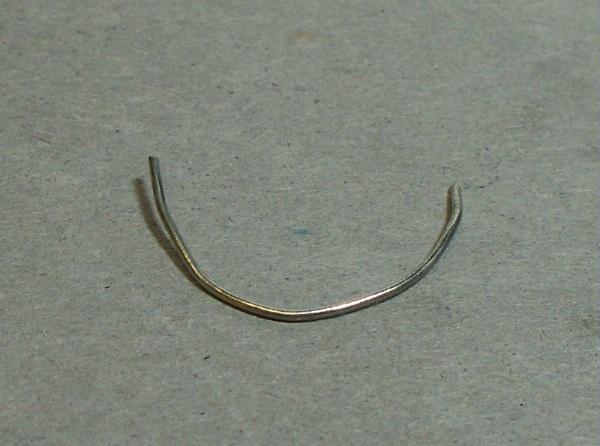
Cut the Wire
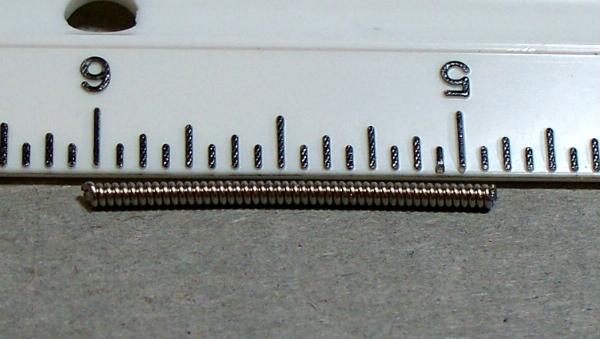
Using wire cutters or the snip bit at the base of a pair of needle-nose pliers, CAREFULLY cut about an inch of wire off your strand. [Begin Rant  ]Wear eye protection and gloves! Anchor the wire in a vise! Take it to a licensed machinist and have them do it! Kids, have your parental units or equivalents cut the wire for you. Seriously folks, this stuff can fly off when cut so take precautions to prevent this. I'm not going to be waylaid by jackassery if you put out your own eye. [/End Rant ]

Then, trim the wire down to little more than half an inch, 9/16th in this case. Do it a little at a time since you can always cut again if it's too long but have to start over if it's too short.
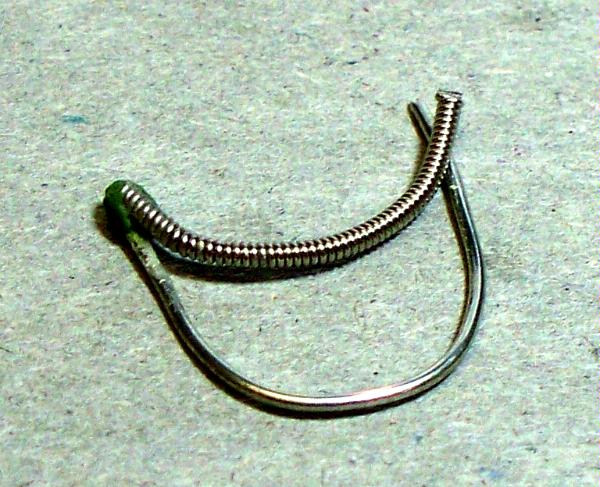
Bend the Wire
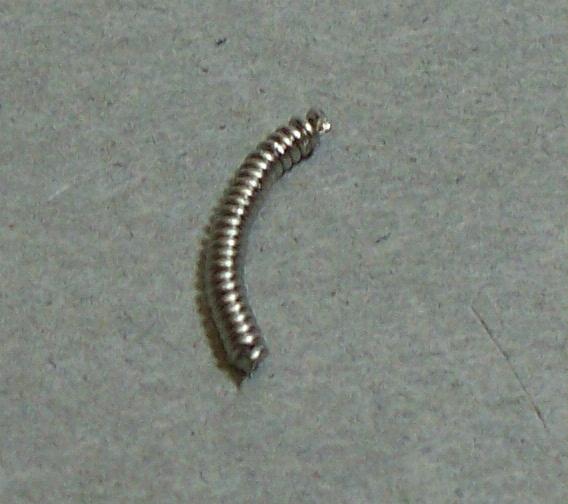
Using two pair of pliers, carefully bend the wire into the shape shown. Curve the wire a little at a time, starting at one end and working to the other. It's not quite a half circle, more of a sloping hump than anything. It will follow the curvature of the Warrior's back and be long enough to touch his skull and extend almost to his hips.
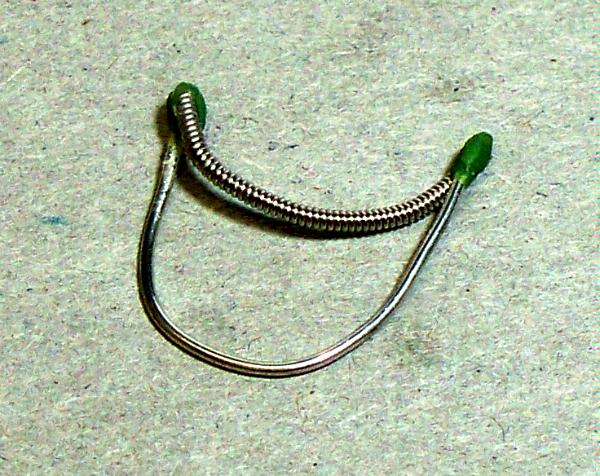
Add Greenstuff to the Wire
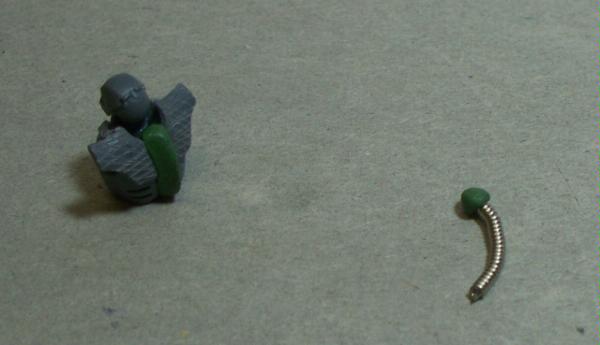
Mix a small blob of greenstuff and add it to the end that curves more sharply.
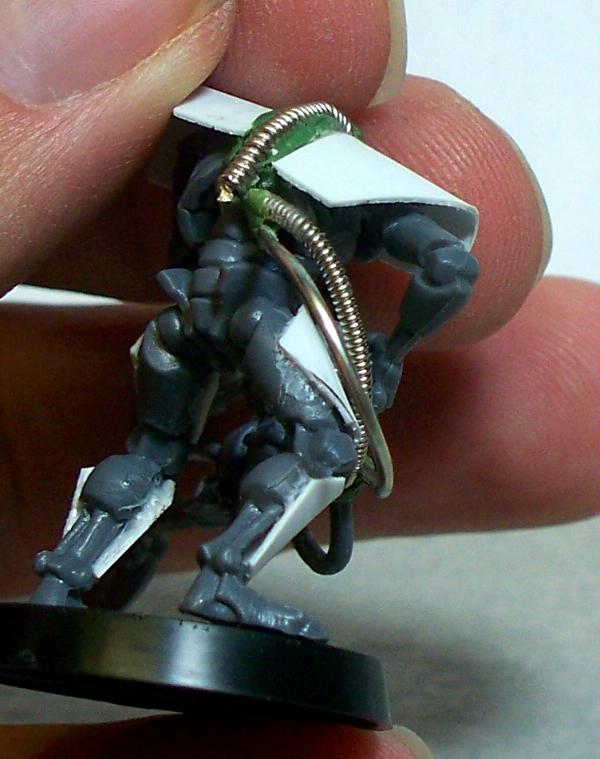
Attach Wire to Greenstuff
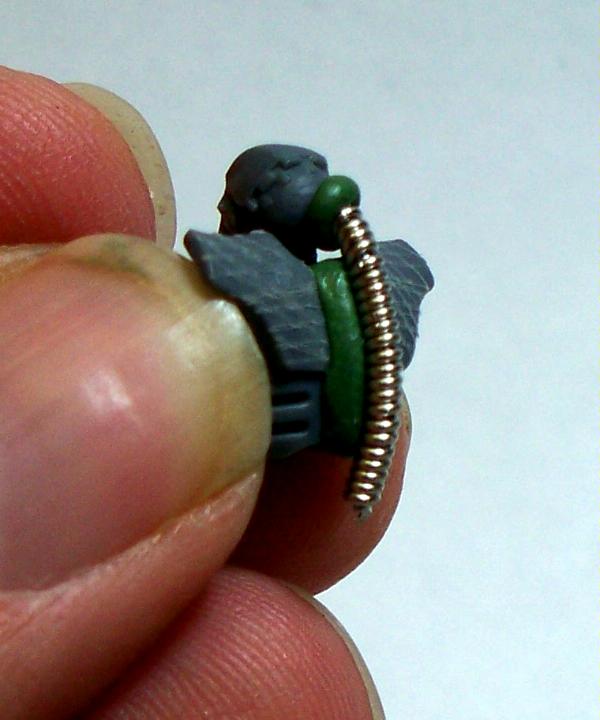
Press the wire into the greenstuff on the back and press the ball of greenstuff on the end of the wire onto the back of the skull. If necessary, use your hobby knife or sculpting tool to mold the greenstuff back into shape. Make sure that the wire is straight on the back and arches away from the body.
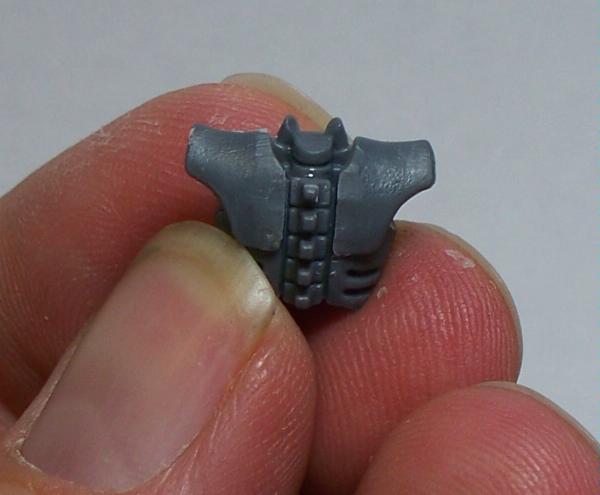
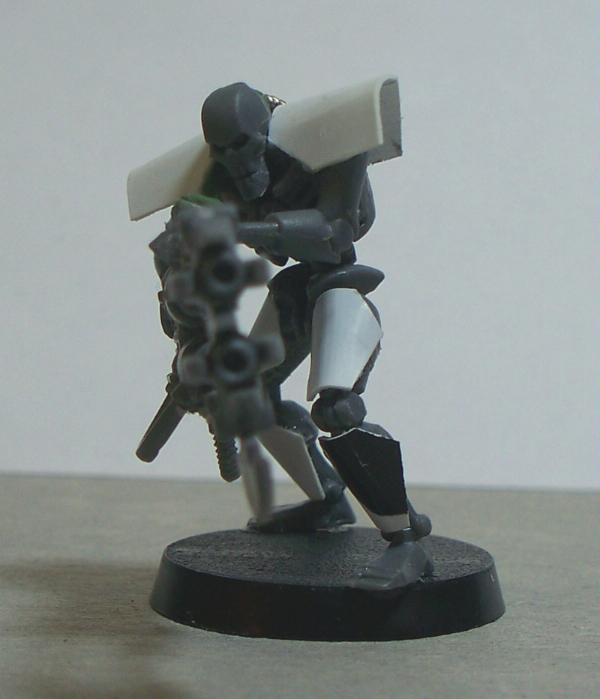
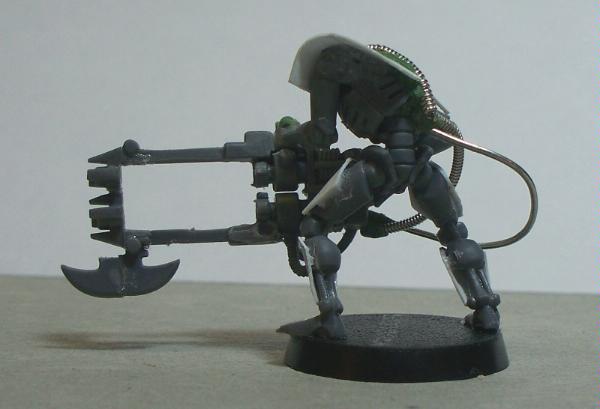
Making Shoulder Armor Plates
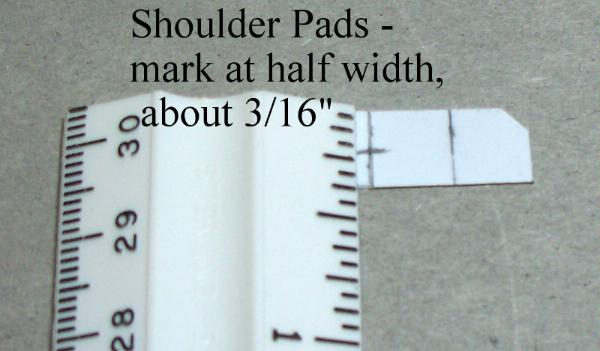
First, trim one of the corners of each shoulder pad at one end. Then, make a mark at about half the width of the pad at the opposing end. They should look like this:
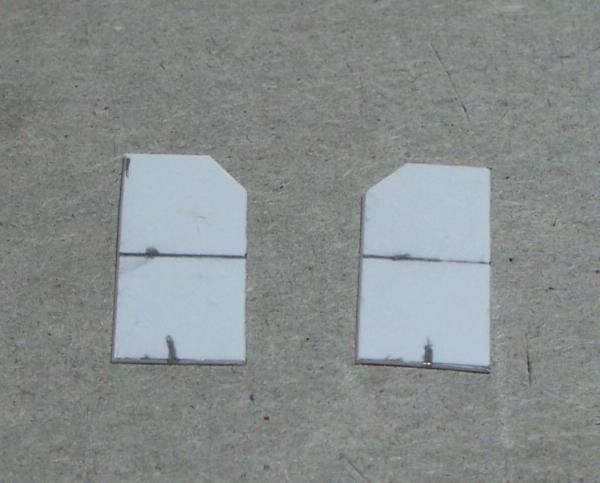 Shape the Shoulder Plates

You then cut along the red lines. Like this:
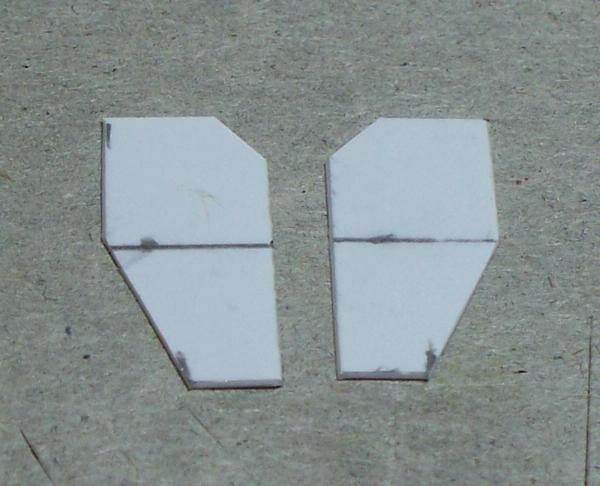 Score the Shoulder Plates

Instead of crosshatches, score the shoulder plates in checkers. Bend them length-wise to help them hold their shape when glued on.
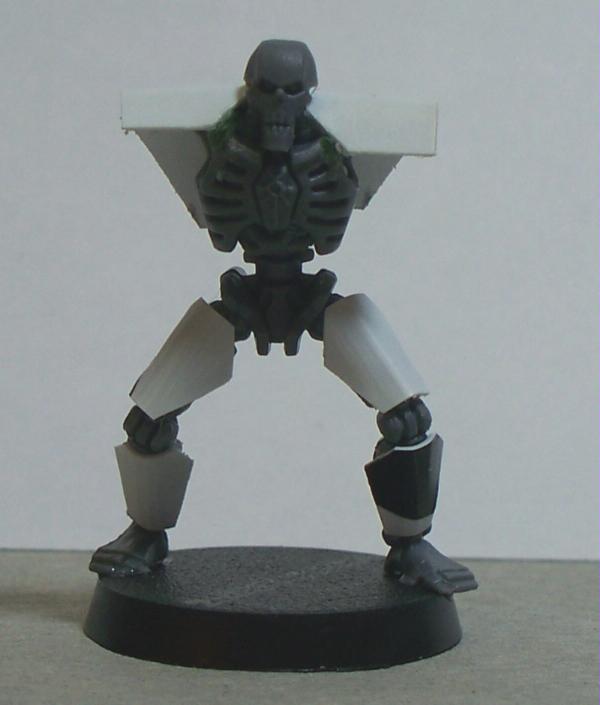
Glue the Plates On
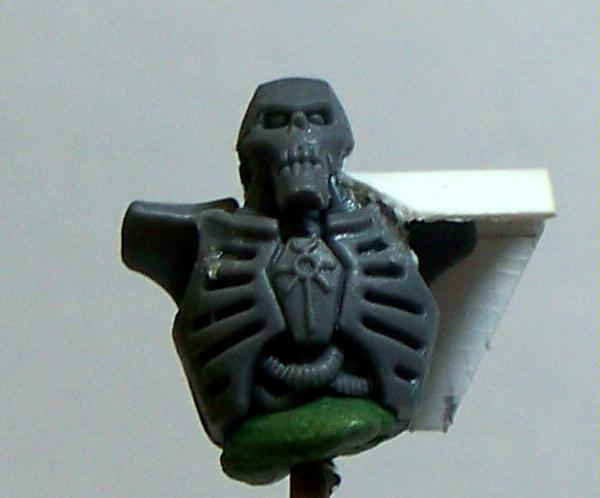
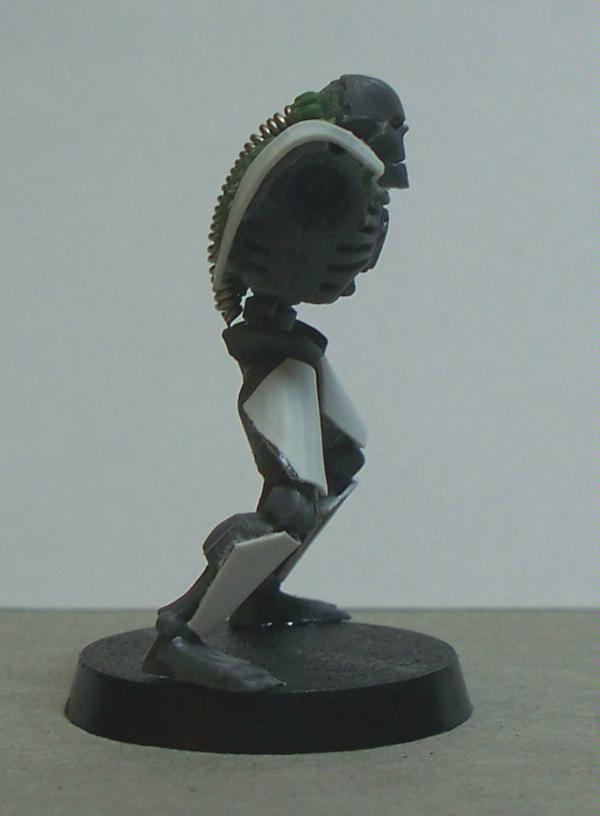
Like so... The trimmed corner touches the collarbone, which should also be lightly scored to help hold. The plates in the back follow the shoulder blades and end around the bottom of the ribcage, well past the shoulder blades.
Here's the side view so you can see the angle of the bend and how far the plate goes down in the back.
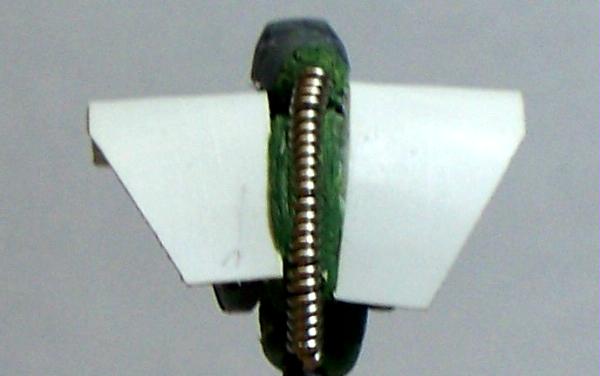
Both plates are now on. One's a little longer than the other, more from wonky placement than anything. Once the glue dries solid, I trim them up so they're mostly even.
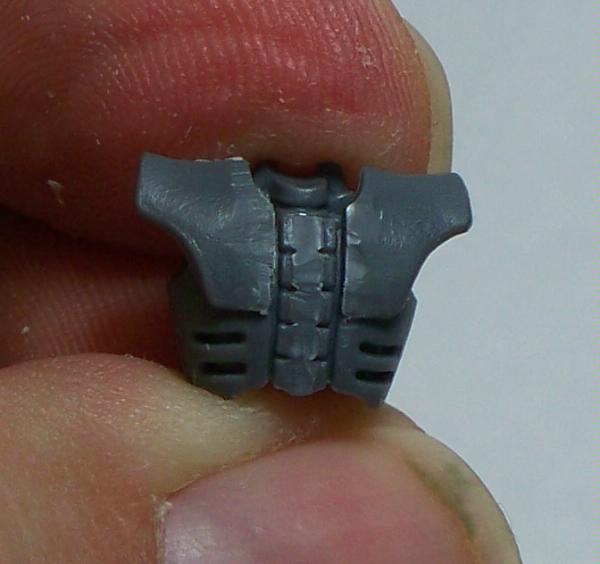
Detail to Headsocket
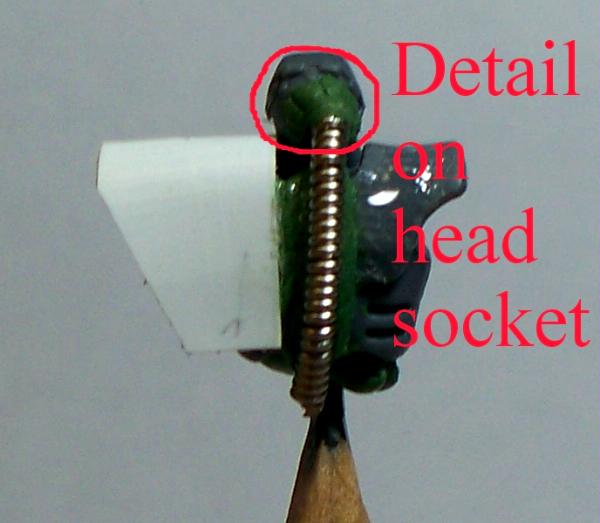
I added a few lines of detail to the greenstuff headsocket using my hobby knife before adding the second shoulderplate. This was a mistake since I didn't let the GS cure completely before adding the plates. The detail got mushed and I had to redo it once I got the plates on. The things you don't think of when you're rushing through a job!  Shoulder Plates Clean Up
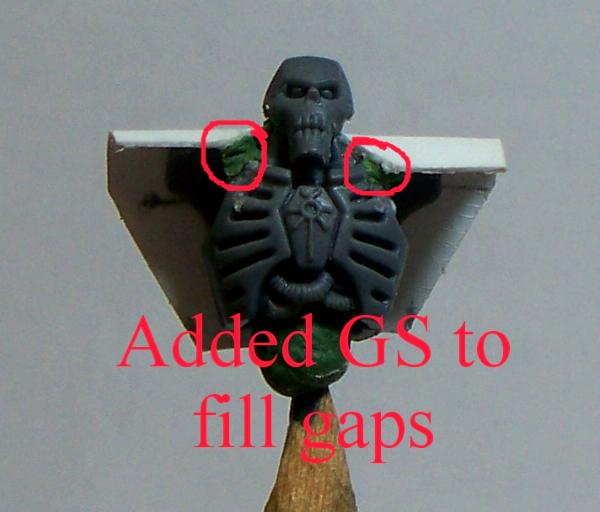
While the glue works pretty well to hold the plates down, sometimes it just doesn't want to stay stuck all the way. It was bonded, but pulled away from the chest a bit, leaving a gap. I added a bit of greenstuff to fill the gaps and clean it up some.
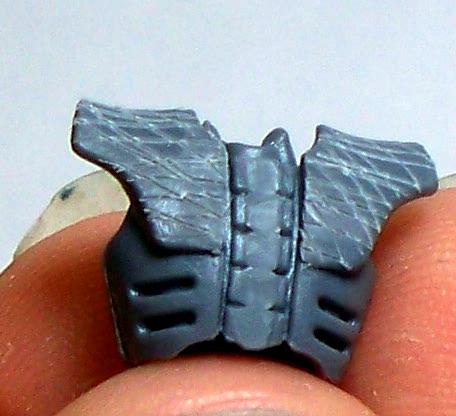
Glue the Body and Legs Together
Just like it says. I now try to make the Immortals a tad hunchy, since they're carrying all that weight, but my other converted models stood a little taller or faced left or right.
Making a Left Hand
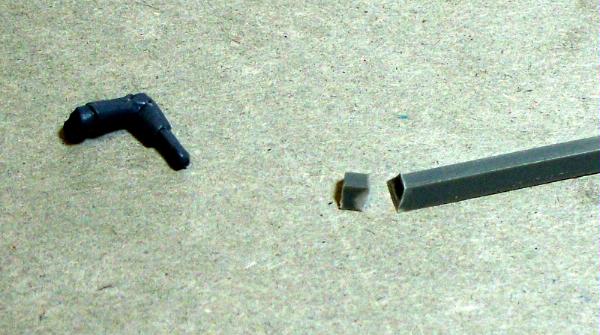
The left arm needs a hand to hold the gun. You could do the same thing for the Flayed Ones, but I've found the GS to work pretty well just on it's own for them. First, cut a hand-sized bit off a trapezoidal plastic sprue. This sprue came from the warriors box.
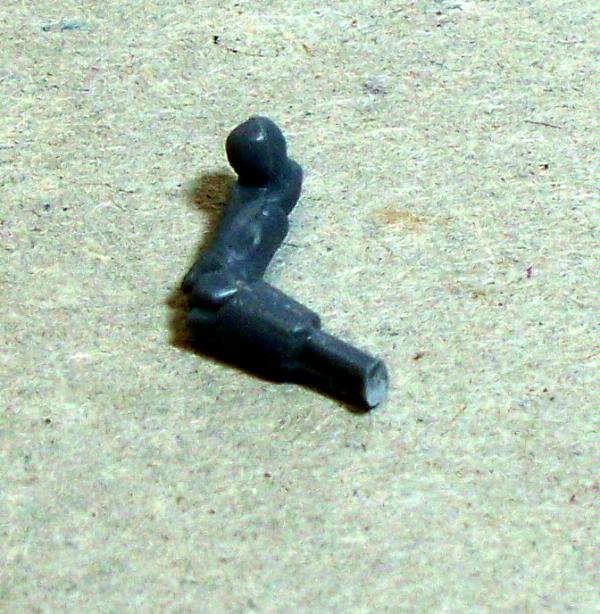
Then cut the forearm of the arm bit. Make sure it's a flat cut.
Glue the short side of the sprue bit to the wrist of the arm. You *could* stop here, but I like to make the hand look like a hand - fingers and thumb included. Feel free to skip this step if you like since it's completely cosmetic.
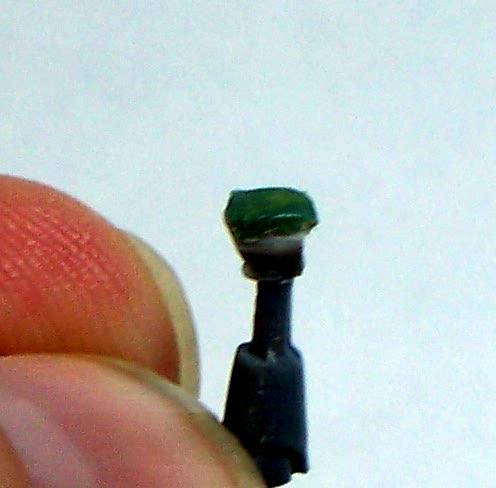
Put a tiny amount of greenstuff on the tip of the hand and smooth it on. Make sure the sides are trimmed and as square as possible.
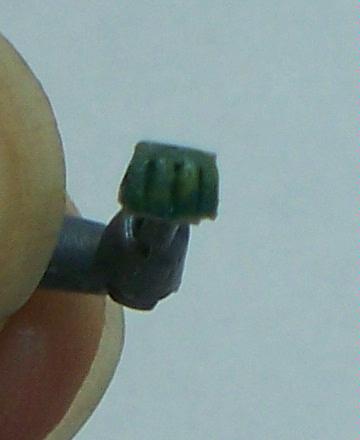
Use your hobby knife to make three small cuts, not quite to the back edge of the hand.
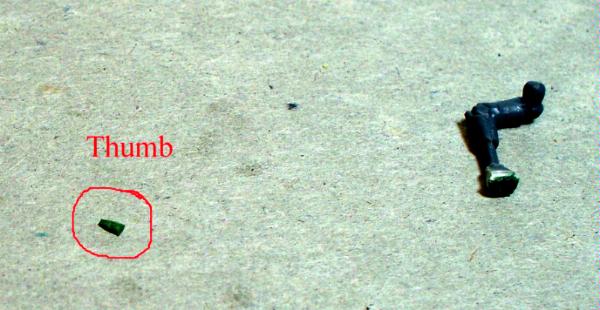
Flatten out a tiny amount of greenstuff and cut it into a trapezoid shape. then score it across the middle to create a joint for the thumb.
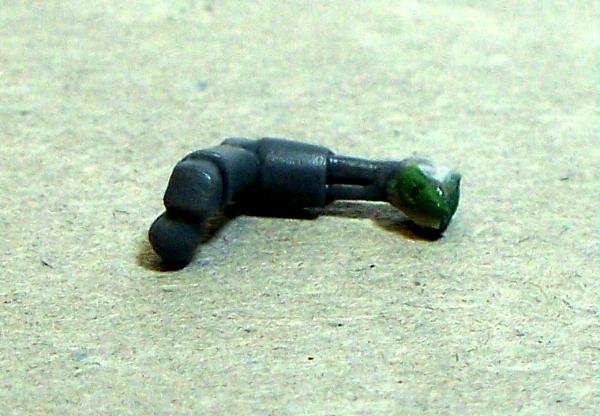
Glue this to the top of the hand. I forgot to allow the "fingers" to fold around the inside of the hand this time, but again that's a detail you can skip unless it shows and doesn't look good. Now, the most important step: let everything cure completely before moving on. You'll destroy the hard work you've invested if you don't.
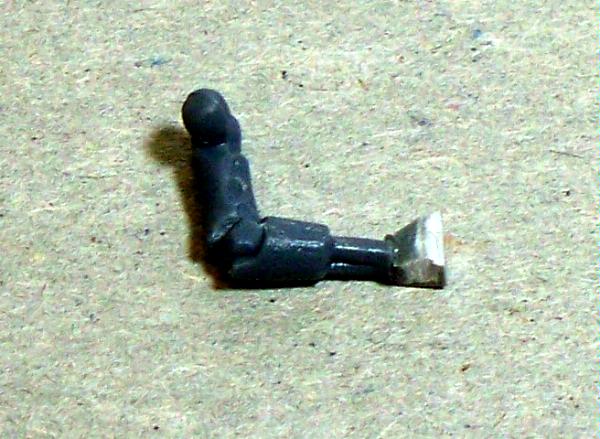
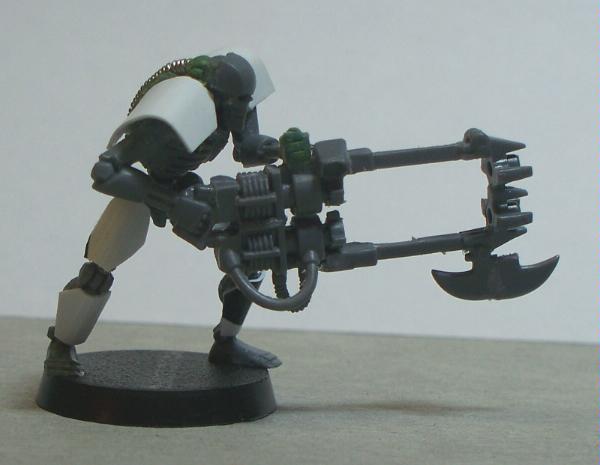
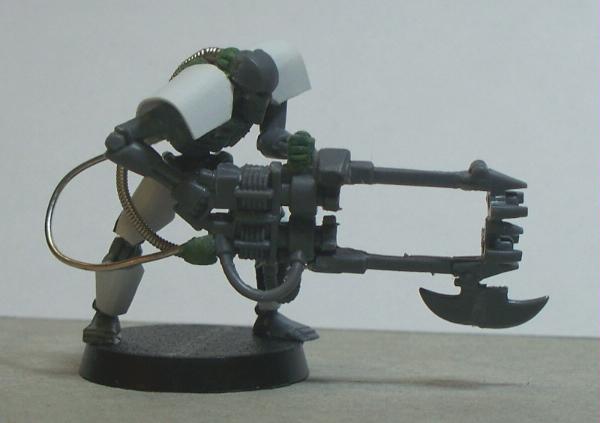
Putting the Gun, Arm, and Body Together
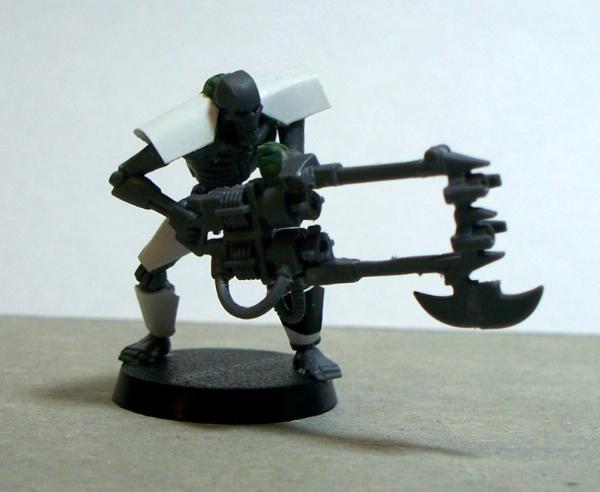
This can be a pain and I encourage getting out of earshot of anyone that might be offended by your cursing. I generally keep them to myself, but surprised my wife a few times when the arms just didn't want to cooperate with me. Put a dab of glue on the shoulder ball of each arm and on the bottom of the fist.
Gingerly, insert each arm into the shoulder sockets and the fist to the top of the gun. Once the glue has partially set, you can gently angle the arms into a position you like and pray it holds.
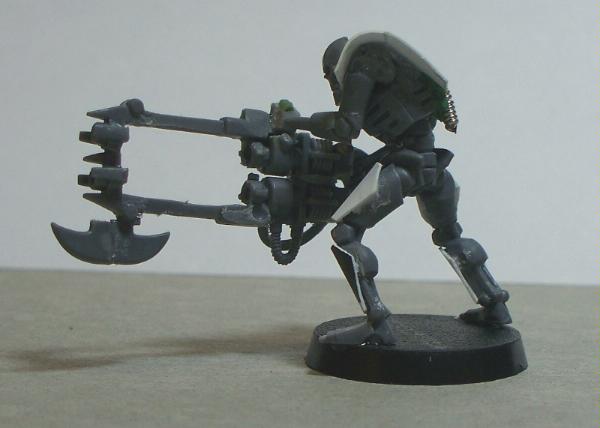
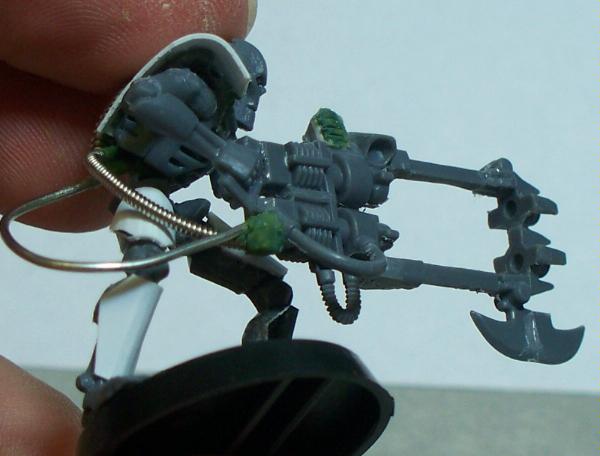
 Preparing the Gun Wires
You'll need about an inch of this gauge bass guitar wire.
As well as an inch and a half of 16 gauge or 18 gauge craft wire. I'm pretty sure this stuff is 18g.
Bend the wires as shown - the guitar wire may need pliers to bend properly - and use a tad of greenstuff to stick them together at one end. I molded the GS over both wires slightly to look like a socket and added a drop of super glue to make sure they really didn't go anywhere.
After dry-fitting the wires to make sure they were the proper length and trimming the longer ends, I did the GS/Superglue to the other end as well.
Glue the Wires to the Back
Glue the wires in the back using superglue. I get them under the armor plate up next to the spine, near the base.
Glue the Wires to the Gun
Then, glue the wires to the gun under the hand. At this point you're done.
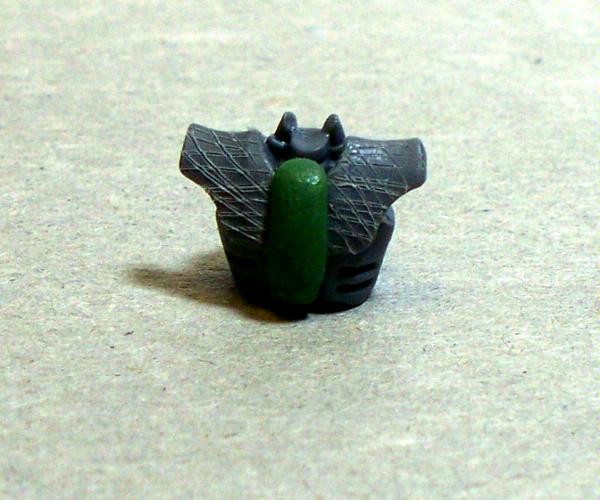
Finished!
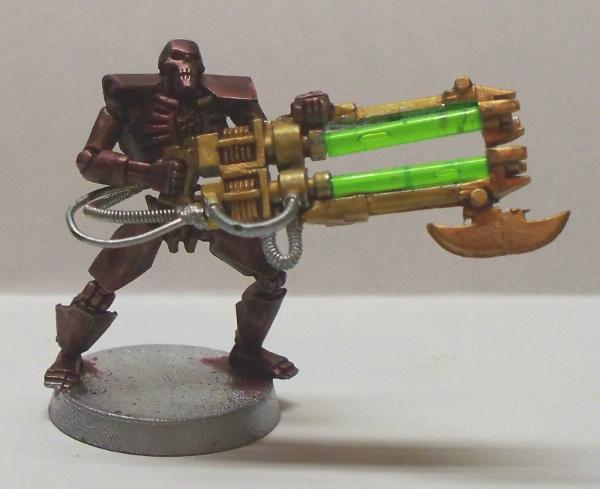
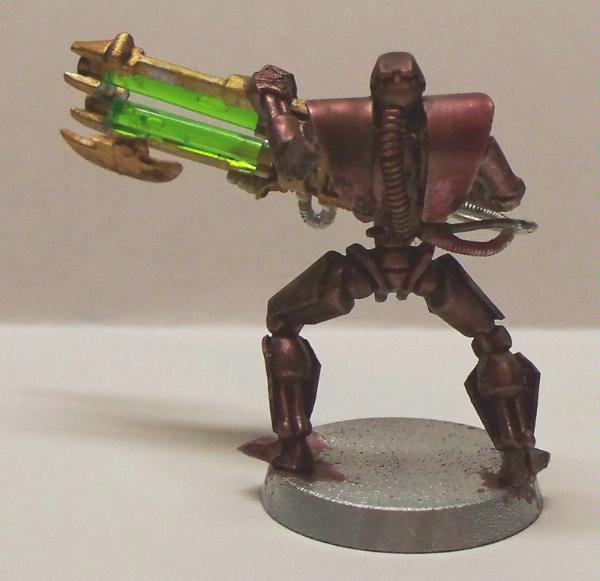
 Painted
Here's a pre-based, painted Immortal. He's an early one so some things may not match exactly with the version I've provided in the tutorial, but it was a learning process filled with trial and error. Spraypainted with a Krylon Nickel metallic shade, then two coats of Baal Red Wash and one coat of Devlan Mud. The gun is Burnished Gold with two coats of Ogryn Flesh Wash. No detail painting yet.
 End
End
Hope you enjoy it and get plenty of use!
|
|
This message was edited 1 time. Last update was at 2009/05/31 07:23:39
What harm can it do to find out? It's a question that left bruises down the centuries, even more than "It can't hurt if I only take one" and "It's all right if you only do it standing up." Terry Pratchett, Making Money
"Can a magician kill a man by magic?" Lord Wellington asked Strange. Strange frowned. He seemed to dislike the question. "I suppose a magician might," he admitted, "but a gentleman never could." Susanna Clarke Jonathan Strange & Mr. Norrell
DA:70+S+G+M++B++I++Pw40k94-D+++A+++/mWD160R++T(m)DM+
 |
|
|
 |
|
2009/06/03 04:10:14
Subject: Re:Gavin Thorne Gets His Teach On or How to Convert Necrons on the Cheap, Part 2.2: Immortals
|
|

Freaky Flayed One
|
Thank you so much for this tutorial, a great idea, great instructions, very achievable and stunning results. I love the guitar string too!
Great work and thank you again!
|
|
|
|
|
2009/06/03 18:01:26
Subject: Gavin Thorne Gets His Teach On or How to Convert Necrons on the Cheap, Part 2.2: Immortals
|
|
Sybarite Swinging an Agonizer
|
Cool stuff.
|
Own and play
+/- 3,500 Dark Eldar  (8% painted) (8% painted)
+/- 4,500 Tyranids  (99% painted) (99% painted)
+/- 4,500 Necrons  (82% painted) (82% painted)
Proxy and play
Chaos Space Marines
Demons
Orks
Space Marines
|
|
|
|
|
2009/06/06 14:17:15
Subject: Re:Gavin Thorne Gets His Teach On or How to Convert Necrons on the Cheap, Part 2.2: Immortals
|
|

Spawn of Chaos
België
|
Most impressive!
|
|
|
|
|
2009/06/08 18:32:30
Subject: Gavin Thorne Gets His Teach On or How to Convert Necrons on the Cheap, Part 2.2: Immortals
|
|
Longtime Dakkanaut
|
Thanks! I hope someone besides me gets use out of this conversion tutorial. If you give it a try I invite you to post picks here in the thread!
|
What harm can it do to find out? It's a question that left bruises down the centuries, even more than "It can't hurt if I only take one" and "It's all right if you only do it standing up." Terry Pratchett, Making Money
"Can a magician kill a man by magic?" Lord Wellington asked Strange. Strange frowned. He seemed to dislike the question. "I suppose a magician might," he admitted, "but a gentleman never could." Susanna Clarke Jonathan Strange & Mr. Norrell
DA:70+S+G+M++B++I++Pw40k94-D+++A+++/mWD160R++T(m)DM+
|
|
|
|
|
2009/06/22 15:51:09
Subject: Gavin Thorne Gets His Teach On or How to Convert Necrons on the Cheap, Part 2.2: Immortals
|
|

Huge Hierodule
|
Not sure I like the size of the Shoulder Pads, but the rest looks awesome!
|
Q: What do you call a Dinosaur Handpuppet?
A: A Maniraptor |
|
|
|
|
2009/06/22 19:25:00
Subject: Re:Gavin Thorne Gets His Teach On or How to Convert Necrons on the Cheap, Part 2.2: Immortals
|
|
Longtime Dakkanaut
|
Yeah, they scream 80's metal band, but Necrons do that in general 
I tried to make it easy to measure everything, but you could make them say 1/4" or 3/16" wide. I did trim up the length a bit, to help even them - one was a tad longer due to positioning. My Immortals are a bit mismatched, some with longer plates than others and most of the guns are a bit different due to the trial and error of getting it right.
The great thing about the conversion is that you can change anything to match your own tastes and your personal army. Hope you get some use out of it! 
|
What harm can it do to find out? It's a question that left bruises down the centuries, even more than "It can't hurt if I only take one" and "It's all right if you only do it standing up." Terry Pratchett, Making Money
"Can a magician kill a man by magic?" Lord Wellington asked Strange. Strange frowned. He seemed to dislike the question. "I suppose a magician might," he admitted, "but a gentleman never could." Susanna Clarke Jonathan Strange & Mr. Norrell
DA:70+S+G+M++B++I++Pw40k94-D+++A+++/mWD160R++T(m)DM+
|
|
|
|
|
2009/06/23 10:43:43
Subject: Gavin Thorne Gets His Teach On or How to Convert Necrons on the Cheap, Part 2.2: Immortals
|
|

Highlord with a Blackstone Fortress
Adrift within the vortex of my imagination.
|
Aa a fellow modelling cheapskate I can appreciate the budget quality of this work. Are you going to do cheap wraiths?
|
n'oublie jamais - It appears I now have to highlight this again.
It is by tea alone I set my mind in motion. By the juice of the brew my thoughts aquire speed, my mind becomes strained, the strain becomes a warning. It is by tea alone I set my mind in motion. |
|
|
|
|
2009/06/23 13:37:05
Subject: Gavin Thorne Gets His Teach On or How to Convert Necrons on the Cheap, Part 2.2: Immortals
|
|
Longtime Dakkanaut
|
Orlanth, I hadn't even thought of making wraiths - Pariahs have been the next project on my mind since my son asked me if I could make them a week or so ago.
The warrior head and bodies *should* match the wraith's pretty close in terms of size... the wraith torso may be closer to the destroyer's - I'll have to check when I get home.
That being said, now you've got me thinking about it and I don't think it's a difficult conversion. I've already made something like a wraith's tail for the one-armed tomb spyder that I got from ebay, and that is probably the most difficult bit.
::thoughtful:: I'll put something together and post it in the P & M forum for feedback... Thanks for the inspiration!
edited for spelling
|
|
This message was edited 1 time. Last update was at 2009/06/23 13:56:18
What harm can it do to find out? It's a question that left bruises down the centuries, even more than "It can't hurt if I only take one" and "It's all right if you only do it standing up." Terry Pratchett, Making Money
"Can a magician kill a man by magic?" Lord Wellington asked Strange. Strange frowned. He seemed to dislike the question. "I suppose a magician might," he admitted, "but a gentleman never could." Susanna Clarke Jonathan Strange & Mr. Norrell
DA:70+S+G+M++B++I++Pw40k94-D+++A+++/mWD160R++T(m)DM+
|
|
|
|
|
2009/06/23 13:40:06
Subject: Gavin Thorne Gets His Teach On or How to Convert Necrons on the Cheap, Part 2.2: Immortals
|
|

Blackclad Wayfarer
From England. Living in Shanghai
|
Now this is a tutorial I'm going to have to bookmark or something.
|
Looking for games in Shanghai? Send a PM |
|
|
|
|
2009/06/23 16:36:08
Subject: Gavin Thorne Gets His Teach On or How to Convert Necrons on the Cheap, Part 2.2: Immortals
|
|
Huge Hierodule
|
Waaaaaaaa! Now I want to start Necrons!
|
Q: What do you call a Dinosaur Handpuppet?
A: A Maniraptor |
|
|
|
|
2009/06/25 17:17:50
Subject: Gavin Thorne Gets His Teach On or How to Convert Necrons on the Cheap, Part 2.2: Immortals
|
|
Longtime Dakkanaut
|
Orlanth wrote:Aa a fellow modelling cheapskate I can appreciate the budget quality of this work. Are you going to do cheap wraiths?
I took a look at the Wraiths and definitely think I can do something with warriors - they're almost exactly the same head and torso size. The main problem is going to be the tail and the spines on it... I'll see if I can't figure something out and scrounge up a spare warrior to work on.
|
What harm can it do to find out? It's a question that left bruises down the centuries, even more than "It can't hurt if I only take one" and "It's all right if you only do it standing up." Terry Pratchett, Making Money
"Can a magician kill a man by magic?" Lord Wellington asked Strange. Strange frowned. He seemed to dislike the question. "I suppose a magician might," he admitted, "but a gentleman never could." Susanna Clarke Jonathan Strange & Mr. Norrell
DA:70+S+G+M++B++I++Pw40k94-D+++A+++/mWD160R++T(m)DM+
|
|
|
|
|
2009/06/26 18:32:59
Subject: Gavin Thorne Gets His Teach On or How to Convert Necrons on the Cheap, Part 2.2: Immortals
|
|
Huge Hierodule
|
Gavin Thorne wrote:Orlanth, I hadn't even thought of making wraiths - Pariahs have been the next project on my mind since my son asked me if I could make them a week or so ago.
The warrior head and bodies *should* match the wraith's pretty close in terms of size... the wraith torso may be closer to the destroyer's - I'll have to check when I get home.
That being said, now you've got me thinking about it and I don't think it's a difficult conversion. I've already made something like a wraith's tail for the one-armed tomb spyder that I got from ebay, and that is probably the most difficult bit.
::thoughtful:: I'll put something together and post it in the P & M forum for feedback... Thanks for the inspiration!
edited for spelling
You know... if you used the Destroyer torso, the skimmer body would probably work well as the Basis for a tomb Spider. Hmmm...
|
Q: What do you call a Dinosaur Handpuppet?
A: A Maniraptor |
|
|
|
|
2009/06/26 20:16:16
Subject: Gavin Thorne Gets His Teach On or How to Convert Necrons on the Cheap, Part 2.2: Immortals
|
|
[DCM]
Dankhold Troggoth
|
Wow  Very impressive. I love the use of the guitar strings!! You have some great skills and imagination!!
|
|
|
|
|
2009/06/26 21:50:27
Subject: Gavin Thorne Gets His Teach On or How to Convert Necrons on the Cheap, Part 2.2: Immortals
|
|
Longtime Dakkanaut
|
Now we're thinking cheap C_C, two models for the price of one.
Use the Destroyer torso for a wraith and the skimmer for a Tomb Spyder... that's a good idea. The wraith's torso is actually a little closer to the warriors in size and the Destroyer's torso might be better for a Wraith Lord. I've got a destroyer and a bunch of warriors coming and I'll see what I can do with them!
RTides, Thank you very much!
|
|
This message was edited 1 time. Last update was at 2009/06/26 21:58:09
What harm can it do to find out? It's a question that left bruises down the centuries, even more than "It can't hurt if I only take one" and "It's all right if you only do it standing up." Terry Pratchett, Making Money
"Can a magician kill a man by magic?" Lord Wellington asked Strange. Strange frowned. He seemed to dislike the question. "I suppose a magician might," he admitted, "but a gentleman never could." Susanna Clarke Jonathan Strange & Mr. Norrell
DA:70+S+G+M++B++I++Pw40k94-D+++A+++/mWD160R++T(m)DM+
|
|
|
|
|
2009/07/24 01:01:51
Subject: Gavin Thorne Gets His Teach On or How to Convert Necrons on the Cheap, Part 2.2: Immortals
|
|
Tinkering Tech-Priest
|
Awesome as Ever!
|
This is Daemonic Cheese: 
3000 Pts
2500 Pts
 1000 Pts (And growing) 1000 Pts (And growing)
I'd put a quote here, but XKCD would have a better one. |
|
|
|
|
2009/07/24 02:15:19
Subject: Gavin Thorne Gets His Teach On or How to Convert Necrons on the Cheap, Part 2.2: Immortals
|
|
Longtime Dakkanaut
|
Nice idea!
|
|
|
|
|
|
2009/07/26 07:57:43
Subject: Gavin Thorne Gets His Teach On or How to Convert Necrons on the Cheap, Part 2.2: Immortals
|
|
Rough Rider with Boomstick
New York city
|
nioce !
|
 The Warmonger Club The Warmonger Club
http://warmongers.ziggyqubert.com/wmbb/index.php |
|
|
|
|
2009/07/27 14:05:28
Subject: Gavin Thorne Gets His Teach On or How to Convert Necrons on the Cheap, Part 2.2: Immortals
|
|
Longtime Dakkanaut
|
I started converting the Destroyer-to-Wraith-and-Tomb Spyder this weekend. The model was damaged from excessive gluing, particularly on the torso, head, and arms.
The conversion's been pretty simple - plates on the back, thick wire for the tail. Because of the damages, I've had to remodel the head and arms. I'm making the model a counts-as destroyer lord so he also has vestments (possibly a shroud or veil), a rez orb, and I'm working on a warscythe now.
While I haven't started on the spyder, I did compare the destroyer body to the spyder's and it is different... not so much that the conversion will be difficult, but it will be visibly different from my current spyders.
Pics to follow!
|
What harm can it do to find out? It's a question that left bruises down the centuries, even more than "It can't hurt if I only take one" and "It's all right if you only do it standing up." Terry Pratchett, Making Money
"Can a magician kill a man by magic?" Lord Wellington asked Strange. Strange frowned. He seemed to dislike the question. "I suppose a magician might," he admitted, "but a gentleman never could." Susanna Clarke Jonathan Strange & Mr. Norrell
DA:70+S+G+M++B++I++Pw40k94-D+++A+++/mWD160R++T(m)DM+
|
|
|
|
|
2009/07/29 10:26:16
Subject: Gavin Thorne Gets His Teach On or How to Convert Necrons on the Cheap, Part 2.2: Immortals
|
|
Power-Hungry Cultist of Tzeentch
|
Firstly a superbly executed and well written tutorial, very helpful.
I will more than likely never do anything with Necron's but I do have to thank you for putting the guitar string gauges in as I have been wondering for a while what size would fit in with 28mm models.
Off to find me a website to order some from...
|
|
|
|
|
|
2009/08/01 16:02:35
Subject: Gavin Thorne Gets His Teach On or How to Convert Necrons on the Cheap, Part 2.2: Immortals
|
|

Twisted Trueborn with Blaster
|
This is pure madness.
No man/woman should be able to do so cool Necron figus.
But this time I allow it, just because it's so cool.
|
Win/Draw/Lost statics
Space Orks: 11/1/1
Space Marines: 10/2/5
Lizardmen: 8/2/3
High Elves: 13/2/2 and one tournament victory!
Dark Eldar: 1/0/0 |
|
|
|
|
2009/08/01 17:49:20
Subject: Gavin Thorne Gets His Teach On or How to Convert Necrons on the Cheap, Part 2.2: Immortals
|
|
Huge Hierodule
|
Madness? THIS IS DAKKA-DAKKA!
|
Q: What do you call a Dinosaur Handpuppet?
A: A Maniraptor |
|
|
|
|
2009/08/04 00:51:53
Subject: Re:Gavin Thorne Gets His Teach On or How to Convert Necrons on the Cheap, Part 2.2: Immortals
|
|
Longtime Dakkanaut
|
Check out the Wraith Lord conversion!
I'm working on the Spyder now - much harder than I thought it would be!
|
What harm can it do to find out? It's a question that left bruises down the centuries, even more than "It can't hurt if I only take one" and "It's all right if you only do it standing up." Terry Pratchett, Making Money
"Can a magician kill a man by magic?" Lord Wellington asked Strange. Strange frowned. He seemed to dislike the question. "I suppose a magician might," he admitted, "but a gentleman never could." Susanna Clarke Jonathan Strange & Mr. Norrell
DA:70+S+G+M++B++I++Pw40k94-D+++A+++/mWD160R++T(m)DM+
|
|
|
|
|
2010/02/14 21:32:19
Subject: Gavin Thorne Gets His Teach On or How to Convert Necrons on the Cheap, Part 2.2: Immortals
|
|
Satyxis Raider
In your head, screwing with your thoughts...
|
Not trying to threadomance, but I just wanted to say that I'd already known about the 'box of warriors makes flayed ones and immortals' idea, but this tutorial really goes into detail about how to fully 'immortalize' the warrior model. (I notice you skipped over what size to cut the legplates though, if you decided to maybe add that bit on it would make this 100% complete...)
Your Flayed Ones tutorial is great too, although I prefer a more 'codex', uniform look regarding the flesh and claws, so in that regard I plan on using Jerseydevil's template for claws. Your flesh-making tutorial is great as well, I just intend to make more than you did.
Anyway great tutorial, 10/10, 5 stars, 2 thumbs up and suchlike.
|
|
|
|
|
|
2010/02/14 23:05:56
Subject: Gavin Thorne Gets His Teach On or How to Convert Necrons on the Cheap, Part 2.2: Immortals
|
|
Screaming Banshee
|
Best conversion tutorial ever.
|
|
|
|
|
|
2010/02/14 23:58:27
Subject: Gavin Thorne Gets His Teach On or How to Convert Necrons on the Cheap, Part 2.2: Immortals
|
|
Focused Dark Angels Land Raider Pilot
|
Very, very, cool. That works incredibly well, so thank you for this.
|
|
|
|
|
2010/02/15 07:25:45
Subject: Gavin Thorne Gets His Teach On or How to Convert Necrons on the Cheap, Part 2.2: Immortals
|
|
Courageous Questing Knight
|
hey, that's excelent.
|
DR:90S+++G++MB+I+Pw40k096D++A+/areWD360R+++T(P)DM+
3000 pt space marine 72% painted! 
W/L/D 24/6/22
2500 pt Bretons 10% painted
W/L/D 1/0/0
http://www.dakkadakka.com/dakkaforum/posts/list/337109.page lekkar diorama, aye? |
|
|
|
|
2010/02/15 07:25:57
Subject: Gavin Thorne Gets His Teach On or How to Convert Necrons on the Cheap, Part 2.2: Immortals
|
|
Courageous Questing Knight
|
hey, that's excelent.
|
DR:90S+++G++MB+I+Pw40k096D++A+/areWD360R+++T(P)DM+
3000 pt space marine 72% painted!
W/L/D 24/6/22
2500 pt Bretons 10% painted
W/L/D 1/0/0
http://www.dakkadakka.com/dakkaforum/posts/list/337109.page lekkar diorama, aye? |
|
|
|
|
2010/02/15 09:59:18
Subject: Gavin Thorne Gets His Teach On or How to Convert Necrons on the Cheap, Part 2.2: Immortals
|
|

Focused Fire Warrior
|
Gavin Thorne wrote:Pariahs have been the next project on my mind since my son asked me if I could make them a week or so ago.
That sounds amazing! Have been scouring google for the past cquple of months trying to find a half decent guide, but nothing came up... But given the standard of your conversion I would have NO fear starting a Necron army from battle forces only (something of a dream of mine for many years )
REALLY looking forward to it!
Cheers
- Gorlak
|
Saddened on behalf of all the Ultramarines, Salamanders and White Scars players who got their Codex rolled into Codex: Black Templars. |
|
|
|
|
2010/02/16 17:53:53
Subject: Gavin Thorne Gets His Teach On or How to Convert Necrons on the Cheap, Part 2.2: Immortals
|
|
Blood Angel Neophyte Undergoing Surgeries
|
brill tutorial... may have to try this on a rainy day
|
109. Though shalt not use Lasguns as laser sights for thy Bolters.
456. Thou shalt not assume that because you can take a Bolter hit in the head, the
Guardsman over there can too.
592. Remember a 2+ armour save does not make you a Primarch.
644.Thou shalt not chant "Thirteen - nill, Thirteen - nill" at Abbadon the Despoiler.
645.Thou shalt not ask Kharn how his mates are.
If my calculations are correct SLINKY + ESCELATOR = EVERLASTING FUN
#1 pickup line of all time: "Hey, does this rag smell like chloroform to you?
They say if you play a Microsoft CD backwards, you hear satanic messages. Thats nothing, cause if you play it forwards, it installs Windows.
 3000 pts 3000 pts
 1000 pts 1000 pts
 2000pts 2000pts
|
|
|
|
|
|
|


 <-- Finally, level 666!