I've had a lot of people asking me how I made my Hot Wire Cutter that I use for making terrain, so I thought I'd post a little article on it.
A hot wire cutter is a device used for cutting polystyrene foam. Polystyrene foam can come in 2 forms - expanded (the white beady stuff) and extruded (the denser pink or blue stuff, often called by its brand name Styrofoam or Foamular). These are perfect materials for making terrain out of - its light, cheap and strong. However, cutting your terrain out of it with a knife can be an absolute nightmare. Blades quickly dull, and the mess it makes is terrible.
Thankfully, someone came up with a brilliant idea to cut foam: a Hot Wire Cutter. Basically, you heat up a tightly stretched piece of wire and it cuts through the foam faster than Assault Terminators through Grotz. It simply melts the foam on its way through. For this reason you should do this in a well ventilated area, or wear a respirator. Trust me, I've had NASTY headaches from the fumes; you've been warned. In the end you get very clean cuts, with no mess. The perfect solution.
This will show you how you can make a hot wire cutter (or a set of cutters) on the cheap. Overall, my first cutter cost me about $5 AU to make with parts I had at home... compared to $40 or more that it would cost to buy a 'real' one.
Disclaimers: 1) certain store bought hot wire cutters are very good and will be better quality, though vastly more expensive.
2) This is a guide for making a ROUGH cutter - it is not designed for detail work. Model Airplane enthusiasts will cry when they see this. Their hot wire cutters are much more precision oriented with controlled wire tension or heat. Not mine.
3) My measurements and prices are in Metric and Australian Dollars.
4) Be sensible! You are working with electricity. Make sure that you are being safe. I don't accept any responsibility for anything that goes wrong.
Materials:
1 12V 1A Regulated
DC Power Pack. Possibly free, otherwise $25-30 AUD
This is a transformer to heat the wire. You may be able to acquire one of these for free. Look around any spare power packs you have for electronics. Mobile Phone chargers tend to not be powerful enough, but power supplies for Modem/Router, Clock-radio, computer speakers, or iPod chargers tend to be in the correct voltage range. Try to be OVER 12V 1A rather than under, but something 8V 750mA would probably still work.
If you decide to buy one, a small power pack can be found for around $30 with a multitude of connector plugs. You can get ones with adjustable Voltage, but I find myself only using the highest setting. You can get REALLY fancy ones for up to $200 that have adjustable voltage and current but that is way beyond what we really need for this rough cutter.
Dick Smith Australia
RadioShack

1 Connector Socket. $2 AUD
To plug your power supply into. If you buy a power supply they tend to come with 5-6 different types of plugs, so just pick one that fits. It can be a little harder finding a correct socket for a scrounged power supply, but DSE/RadioShack will generally have whatever type of socket you need. I have been using 2.5mm sockets.
Dick Smith
RadioShack

1 Momentary Switch. $2 AUD
This is for safety. You need to hold down the button for the wire to heat.
Dick Smith Australia
RadioShack

2 Bolt + Wingnuts. $5 AUD
To connect your wires to. You may opt to buy
proper connector terminals, but to keep it simple I just used these wing nuts.
Can be bought in a small pack at your local hardware store (Bunnings in Australia)

Nichrome Resistance Wire - $4 AUD
This is the cutting wire. Nichrome is high resistance electronics wire, and is commonly regarded as the best wire for hit wire cutters. Some people use thin guitar wire, or cheap steel wire.
The wire I use is 0.32
mm diameter (Gauge 28), 13.4 ohm/meter resistance.
Dick Smith
US supplier with free shipping

Insulated Copper Wire - about 50cm.
MDF Board. I use 6mm thickness
MDF, the piece being approximately 50cm x 25cm (20"x10") Depending on what shape cutter you decide to make, you may need more.
Seeing as I use this to make terrain anyway, it wasn't a special purchase. a 2'x2' piece should only cost you around $3 AU anyway.
Electrical Tape.
Tools
Wire Cutters/Strippers.
Soldering Iron - Can be purchased for as little as $15 AUD. Not 100% necessary, but HIGHLY recommended. You don't need anything fancy- just something that will melt some solder over your wire connections.
Jigsaw - to cut the
MDF. Most highly recommended tool. I think
MDF basing terrain is the best solution, and thus can't fathom making terrain without a Jigsaw. You don't need a laser-guided tool, but you can get very decent saws for as little as $30 AUD.
Drill - to make holes for your Socket, Terminals and Switch. Will need quite a big drillbit - (i used a 12mm bit for the socket and a 4mm bit for my bolts)
Sticking it all together
Unfortunately my digital camera isn't working at the moment, so you'll need to put up with my sketches in paint. Will be updated with better pics.
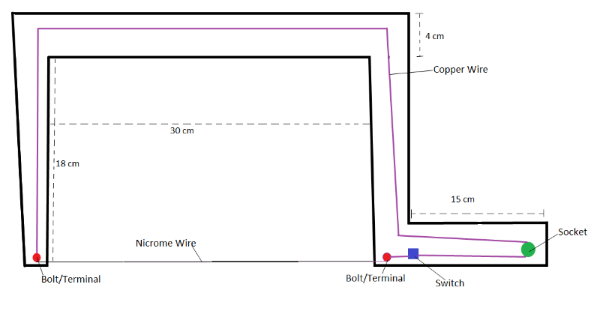
1) Trace the design of the cutter onto your
MDF and cut it out with the jigsaw. This one is my favourite shape, as the wide mouth allows to cut very shallow hills.
A smaller mouth will only be able to cut steep hills. However, a cutter with a small mouth but a deep throat (a U shape) will be better for cutting the initial shape out of the sheet of styrene. I have three different cutters for different purposes, all of which will accept the plug from my power supply.
2) Drill holes for the Switch and Socket in approximately the noted places. You'll need a big drillbit (12mm worked for me) or to widen the hole with a file once drilled.
3) Drill the holes for the two bolts in the noted places. Use a smaller drillbit - you should be able to find one exactly the diameter of your bolts.
4) Cut a ~15cm section of your insulated wire and strip the insulator 2.5cm off each end. Connect this between your Switch and Socket and solder together.
5) Cut a 7cm section of wire and strip as above. Wrap the wire tightly around the base of the bolt, and then push/screw through the hole on the handle. Connect the other end to the switch, and solder.
6) Cut a ~80cm
cm section of wire, strip as above. Wind one end tightly around the base of the second bolt, then push/screw through the hold on the far side of the cutter. Use tape to hold the wire in place and tape it around the long section back to the socket. Connect and solder.
7) Cut a 40cm section of nichrome wire. Wrap one end tightly around the bolt on the upper side of the cutter (the part sticking up). Screw the wingnut down until it tightens. Make sure that when you tighten the nut, the wire tightens as well. Pull the wire as tight as you can and coil around the other bolt - it might help to actually squeeze the frame closer so that when released the wire tightens. Tighten the wing nut down so that the cutting wire becomes taut.
8) Cover the connectors of the socket and switch with electrical tape so that you can't touch them.
9) Plug in your power supply.
10) Cut some polystyrene. Hold down the switch and don't touch the wire. It should heat very rapidly, but shouldn't become 'red-hot' unless you hold down the trigger for ~60 seconds. The wire will cool rapidly and should be safe to touch 30 seconds after releasing the trigger, but this will all depend on your power supply. Test the heat on pieces of spare polystyrene, and NEVER touch the wire whilst the trigger is depressed. It should be hot enough to cut foam within 10 seconds. There should be SOME resistance, but you should be able to cut through a foot of foam in 30 seconds or less.
Always use with a respirator or in a well ventilated area. it is MELTING the plastic and as such gives off fairly toxic fumes.
Stay safe, and have fun!
I hope this helps anyone who has had questions regarding hot wire cutters! Next week I will update with actual pictures of me making a cutter to make this more useful.


 Laugh, and the worlds laugh with you. Cry, and someone cuts off your head for the glory of Khorne!
  ' ~9000pts
 ' ~1500
 " ~3000
 " ~2500