| Author |
Message |
 |
|
|
|
|
Advert
|
Forum adverts like this one are shown to any user who is not logged in. Join us by filling out a tiny 3 field form and you will get your own, free, dakka user account which gives a good range of benefits to you:
- No adverts like this in the forums anymore.
- Times and dates in your local timezone.
- Full tracking of what you have read so you can skip to your first unread post, easily see what has changed since you last logged in, and easily see what is new at a glance.
- Email notifications for threads you want to watch closely.
- Being a part of the oldest wargaming community on the net.
If you are already a member then feel free to login now. |
|
 |
2010/06/03 23:16:11
Subject: Making my board. Low tech, high quality - now with added section
|
|

Longtime Dakkanaut
|
So, first step was to get a bunch of 2'x2' squares. This was done by the nice man at B&Q.
Second step was to mark out some cracked hardpan in pencil.
Third, use my router to cut out the lines to a depth ofabout 2-3mm.
Next, I stuck sand over the unrouted bits using PVA glue.
Then I painted it using a medium-dark brown emulsion.
Next, I highlighted with two lighter shades of emulsion.
Then I painted some GW craters to match.
Make a board, get a friend round, chuck some of his scenery on it, and play a game!
I am really pleased with how this looks. From start to finish, it took a long time, but actual hours of work were quite low. I've also used a router for the first time.
The longest part of the work was putting plug holes in the side of each board section so they are held together with short bits of dowelling rod, but that gave me the chance to use a power drill for the first time for anything other than drilling a hole for a screw to go in.
Overall, it was fun to build, and I am very pleased with the results. Now I need to get cracking with some Eldar Bastions to go on it. I may post a photo in a minute of my first WIP, prior to it getting basecoated, so you can see how I have done it.
|
|
This message was edited 2 times. Last update was at 2015/08/05 21:58:45
|
|
|
 |
|
2010/06/03 23:33:17
Subject: Making my board. Low tech, high quality.
|
|

Roarin' Runtherd
An old crypt
|
This is simple buy yet still awesome!
|
An open mind is like a fortress with its gates unbarred and unguarded. |
|
|
|
|
2010/06/04 00:11:06
Subject: Making my board. Low tech, high quality.
|
|
Longtime Dakkanaut
|
First Bet-Rep on this board here
|
|
This message was edited 2 times. Last update was at 2010/06/04 00:11:32
|
|
|
|
|
2010/06/04 18:23:12
Subject: Re:Making my board. Low tech, high quality.
|
|

Bounding Assault Marine
|
Awesome job, I am working on something very similar. I have a few questions,
First. what is the overall size of the board.
second. can you give some more details about how you painted it I just would like to know what kind of paint you recommend.
|
|
|
|
|
2010/06/04 20:04:23
Subject: Making my board. Low tech, high quality.
|
|
Longtime Dakkanaut
|
So far, I have done six 2'x2' pieces, so I have a 6'x4' board. I have a lot more 2'x2' pieces, but don't need them yet, so I will do them in a few months and get on with other projects for now.
As for the painting, it is just emulsion from my local B&Q DIY store. To get the right colours of emulsion, I painted some bestial brown onto a sheet of paper, some vomit brown, and a mixture of 50/50 vomit brown and skull white. At B&Q, and probably at your local DIY store too, they have a machine that can match the colour you have painted, and mix up emulsion to match it fairly closely. If they do not have such a machine, you want a medium-dark brown, followed by a lighter brown, followed by a creamy-ish colour.
I just painted the darkest brown directly onto the sand as a full base coat using a regular wall-painting paint brush (make sure you let the PVA holding the sand dry first, or you'll have a terrible mess). After that, using the same brush, I did quite a heavy highlight. You have to be careful about how much paint you use at this stage. Finally, a very light drybrush with your lightest colour.
|
|
|
|
|
|
2010/06/04 20:30:43
Subject: Re:Making my board. Low tech, high quality.
|
|
Bounding Assault Marine
|
Very cool, thanks a ton!
|
|
|
|
|
2010/06/05 00:22:05
Subject: Re:Making my board. Low tech, high quality.
|
|
Sneaky Kommando
|
That thing is pretty sweet
|
|
|
|
|
|
2010/06/05 00:52:14
Subject: Making my board. Low tech, high quality.
|
|
Brainy Zoanthrope
|
Pretty nice man. I'd like to make an ice-world themed board. The router would be awesome for making "splits in ice" or glacier pieces...nice idea.
|
|
|
|
|
2015/08/05 21:52:40
Subject: Re:Making my board. Low tech, high quality.
|
|
Longtime Dakkanaut
|
Right then, sorry for the threadnomancy. If it is a problem, perhaps this could be moved to the blogs section where I believe such things are less frowned upon? I plan more updates for his going forwards.
By the way, I seem to have forgotten to say in the orignal post that the original board is all based on This Thread and some of the later stuff too.
I just got back from a holiday in Morocco, where I was inspired by the Medinas of Fez;
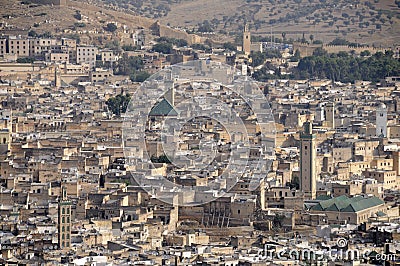
plus the town of Ait Ben Haddou, as seen in Gladiator, Game of Thrones and others;

and Aroumd

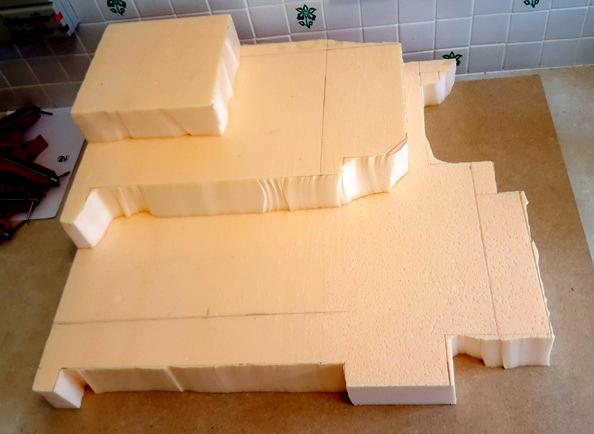
I love multi-level games of Necromunda, and am often sad that 40k is so 2-dimensional, and I also like areas where only the infantry can really go. I decided to create something to reflect this. I did not want something that would always be the same though, so I have created 6x6" "docks" on which to place terrain. Another advantage of this is that I can smooth the terrain up to the base of the structure rather than having the very stark And used a hot angles you get when you simply place building on the table.
Not finished yet, but here is progress so far:
First of all, I carved out the basic shape from some insulation foam using a hit wire cutter:
Then I made the square docks using foamcore card:
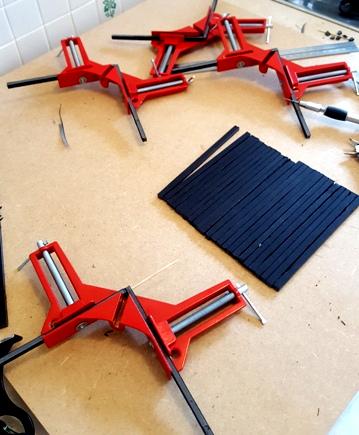
And used a hot glue gun to stick the bases down.

Before I glue down the foam blocks I need to cut out some more ramps and detail the steeper sections. Once they are glued down, I need to add rockfalls from the leftover bits of foamcore, PVA glue lots of sand to everything and then paint.
Each dock then needs some ruins and/or buildings.
If this works out as well as I am hoping, I plan to ultimately make four corner sections like the first one here, four straight sections and one central tower. That way I have either go without the central bit and play 8x4' very very hilly, or a ridiculous 6x6' board that is very very tall in the middle!
|
|
This message was edited 1 time. Last update was at 2015/10/27 11:11:33
|
|
|
|
|
2015/08/05 22:24:43
Subject: Making my board. Low tech, high quality - now with added section
|
|
Longtime Dakkanaut
|
Good stuff, I think it will make a great P&M.
|
|
|
|
|
|
2015/08/05 23:02:54
Subject: Making my board. Low tech, high quality - now with added section
|
|
Human Auxiliary to the Empire
Charlottetown, PEI
|
Man, this is really awesome; looks great, seems cheap, and would totally be flocked as well. Is the material solid wood, plywood, or pressboard/mdf?
Automatically Appended Next Post:
nevermind, stupid question. Still looks awesome tho
|
|
This message was edited 1 time. Last update was at 2015/08/05 23:06:30
|
|
|
|
|
2015/10/27 17:14:41
Subject: Re:Making my board. Low tech, high quality - now with added section
|
|
Longtime Dakkanaut
|
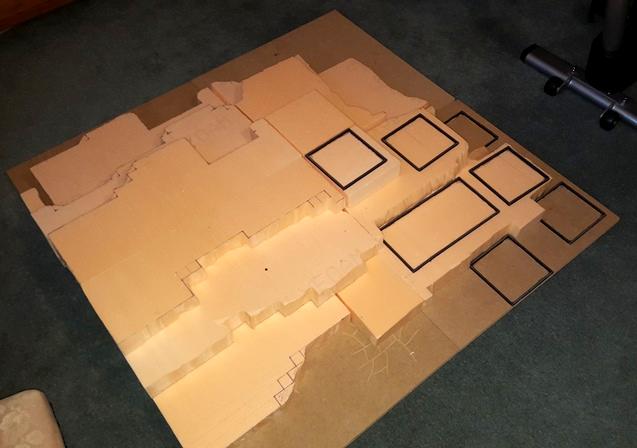
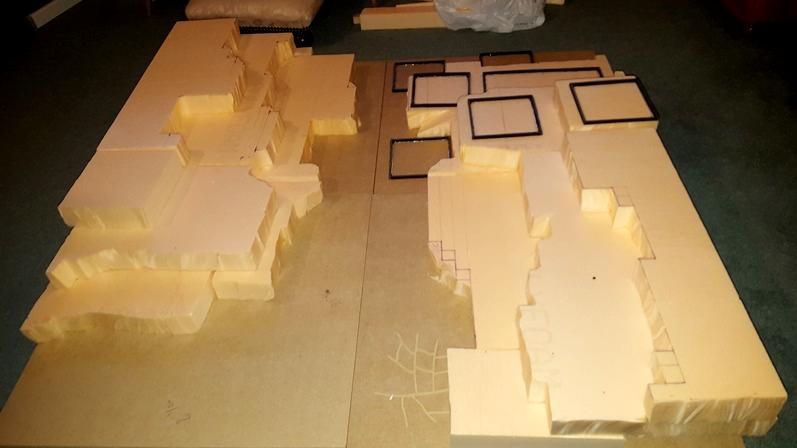
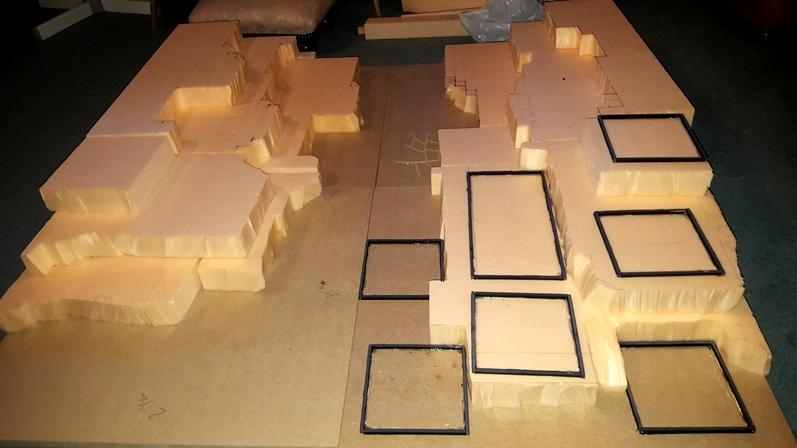
I got the basic layout done for three more board sections today as the weather is unseasonably good in Kent, where I am visiting my parents and it might be the last chance I have to get outside work done this holiday.
Next job is to build a bunch more docking points, carve out all of the necessary ramps, and get everything fixed in place. Then, I'll need to add any bits of broken rock I want before PVAing sand over most of it, then painting. I doubt I'll have chance to do any more before Late December though, if I even get a chance then. :(
Here are my possible layouts with the four sections I am working on.
|
|
|
|
|
|
2015/10/27 19:56:00
Subject: Re:Making my board. Low tech, high quality - now with added section
|
|
Utilizing Careful Highlighting
|
I'm not sure I can wait til December  It's gonna look really sweet! nice ideas!
|
|
|
|
|
|
2015/10/28 11:47:15
Subject: Making my board. Low tech, high quality - now with added section
|
|

Jovial Plaguebearer of Nurgle
|
This is really inspiring
|
Facts are chains that bind perception and fetter truth. For a man can remake the world if he has a dream and no facts to cloud his mind. |
|
|
|
|
2015/10/28 11:56:08
Subject: Re:Making my board. Low tech, high quality - now with added section
|
|
Longtime Dakkanaut
|
Guildenstern wrote:I'm not sure I can wait til December It's gonna look really sweet! nice ideas!
Well, I'm going back to London today, where I have no space to store it, sadly. That means you'll have to!!!
In fact, I'm building it on the assumption that when I buy my new place in a few months, I might have some storage space. Even so, there is no guarantee I'll be able to store in London then! My girlfriend is prioritising a garden over a decent-sized second bedroom, unfortunately, and whilst I'm going to make sure I have a spare room for my toys, I doubt it will be very big.
Ubl1k wrote:This is really inspiring
Thanks - it is quite ambitious. Hopefully I can actually finish it in a reasonable time frame. Or at least get the first four bits into a use-able state.
I am REALLY looking forward to getting nine sectons done in total and fighting over the whole town, or setting up a valley with eight sections as an 8x4 board and setting up an ambush scenario.
Like I say, hopefully it won't be too long...
|
|
This message was edited 1 time. Last update was at 2015/10/28 11:57:54
|
|
|
|
|
|
|


