| Author |
Message |
 |
|
|
|
|
Advert
|
Forum adverts like this one are shown to any user who is not logged in. Join us by filling out a tiny 3 field form and you will get your own, free, dakka user account which gives a good range of benefits to you:
- No adverts like this in the forums anymore.
- Times and dates in your local timezone.
- Full tracking of what you have read so you can skip to your first unread post, easily see what has changed since you last logged in, and easily see what is new at a glance.
- Email notifications for threads you want to watch closely.
- Being a part of the oldest wargaming community on the net.
If you are already a member then feel free to login now. |
|
 |
2010/09/13 07:29:22
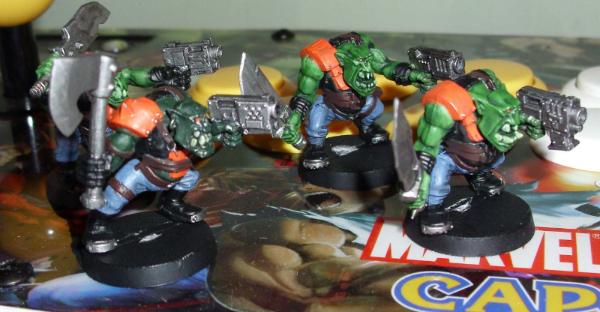
Subject: Ork Tips for a Newb (AKA What Did I Do Wrong?)
|
|

Screamin' Stormboy
|
|
|
|
|
 |
|
2010/09/13 07:31:15
Subject: Re:Ork Tips for a Newb (AKA What Did I Do Wrong?)
|
|
Storm Trooper with Maglight
|
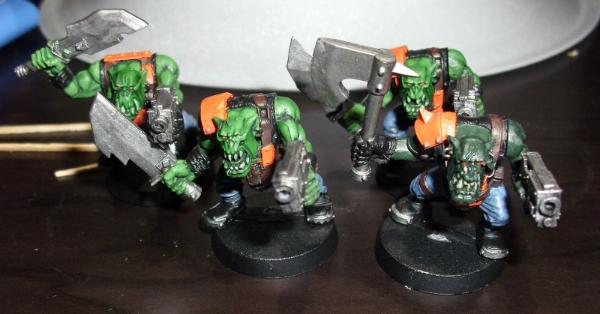
I think they look okay. you could highlight some of the flesh areas. The highest points with a little more green but overall I think they look pretty good. A wash over metallics wouldnt hurt as well.
|
___________________________________
Andy |
|
|
|
|
2010/09/13 07:40:15
Subject: Re:Ork Tips for a Newb (AKA What Did I Do Wrong?)
|
|
Painting Within the Lines
|
brush_slip wrote:I think they look okay. you could highlight some of the flesh areas. The highest points with a little more green but overall I think they look pretty good. A wash over metallics wouldnt hurt as well.
^this, I think a thin brown wash over the metallics would add to the orkiness^
Additionally, if you're looking to add more detail, putting a dot of metallic on some of the rivets on their armor might work nicely, when I was doing metalwork the paint over rivets would always be the first to go, I think the "wear" would add a nice touch. Oh, and I'd personally paint their bracers a different color than black, but that's a stylistic choice too. Overall, good job, especially if you're new to painting!
|
Casual wargamer, casual painter, casual grad student. I can do formal though, I do own a tuxedo T-shirt.
My wargaming blog: http://headspigot.blogspot.com |
|
|
|
|
2010/09/13 07:47:20
Subject: Ork Tips for a Newb (AKA What Did I Do Wrong?)
|
|
Fresh-Faced New User
|
I think that they have potential to look really good with a few highlights. I agree with the previous suggestions.
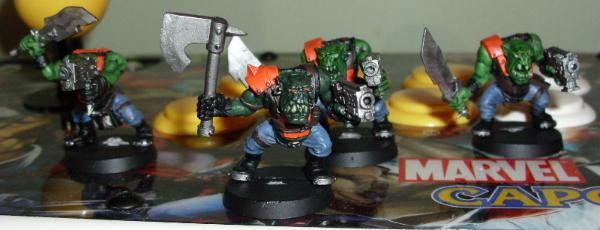
Over all I'd suggest using a much thinner paint and layering it a few times just to get a clean look an the armor.
This is just a matter of preference, but for orky, or leathery clothing I'd suggest using a really really watered down ratio of the color you want to use, almost like a wash, and do a few coats of it on the pants. It helps to create a more textured feel to clothing.
Also, a really light drybrush of a lighter brown on the leather parts (belt, armband, etc) would really bring it together in my opinion.
Great job overall though. They're looking pretty good.
|
|
|
|
|
2010/09/13 07:49:21
Subject: Re:Ork Tips for a Newb (AKA What Did I Do Wrong?)
|
|
Last Remaining Whole C'Tan
|
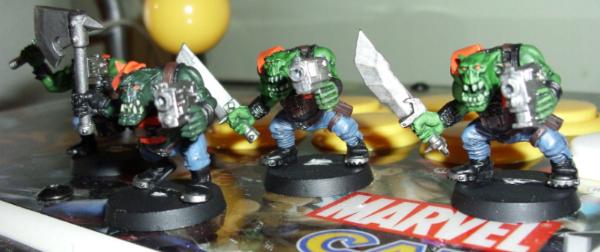
If you're going to be doing a boatload of these, and are planning to dip them, you've done nothing wrong, and they are ready to be dipped.
Otherwise, pick out some rivets/buckles/etc to paint in a different shade of metallic, wash them, and maybe highlight the faces a little, and you're golden.
|
|
This message was edited 1 time. Last update was at 2010/09/13 07:52:36
 lord_blackfang wrote: lord_blackfang wrote:Respect to the guy who subscribed just to post a massive ASCII dong in the chat and immediately get banned.
 Flinty wrote: Flinty wrote:The benefit of slate is that its.actually a.rock with rock like properties. The downside is that it's a rock
|
|
|
|
|
2010/09/13 08:42:45
Subject: Ork Tips for a Newb (AKA What Did I Do Wrong?)
|
|

Dakka Veteran
Brisbane, OZ
|
They're pretty damn good. A little bit of a darker shade to start with or a flesh wash over it will add dept and make them look more realistic.
|
Son can you play me a memory? I'm not really sure how it goes... |
|
|
|
|
2010/09/13 08:57:33
Subject: Ork Tips for a Newb (AKA What Did I Do Wrong?)
|
|
Big Fat Gospel of Menoth
The other side of the internet
|
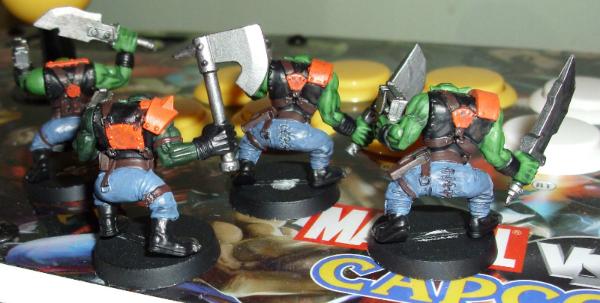
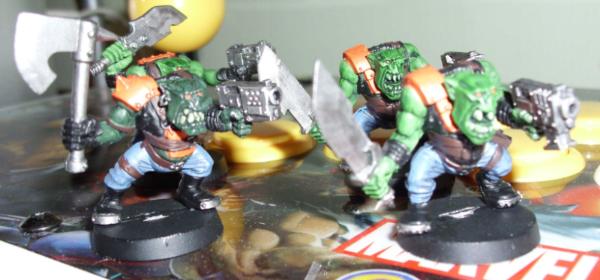
Mold lines, didn't base sand before priming, and weapons and leather straps are plain.
I actually think the faces are good from what I can tell.
|
(╯°□°)╯︵ ┻━┻
RAGE
Be sure to use logic! Avoid fallacies whenever possible.
http://en.wikipedia.org/wiki/List_of_fallacies |
|
|
|
|
2010/09/13 09:37:27
Subject: Ork Tips for a Newb (AKA What Did I Do Wrong?)
|
|
Screamin' Stormboy
|
Should I have sanded the base?
I actually did dab the rivets in Boltgun Metal, as well as the buckles [few were done in Tin Bitz] but it didn't show so well on the picture. I like the idea of highlighting the raised areas of flesh, what's the recommended way of doing that without making splotches of hard color? I'd dilute a lighter green but I'd be worried about it running into the dark bits like a wash.
As for a brown wash for the weapons, perhaps Devlan Mud? It seems about right, and popular.
Further, how do I know I'm drybrushing correctly? The end result [as hard to see in the pics] tends to be paint that mostly collects on the edges of things, slightly upraised bits, and if I pushed a little harder, scratchy lines on flat surfaces.
And lastly, how do you do small details accurately? You as in, you personally, I'm curious how other people do it, it's something I have a bit of trouble with. A bit of hand shaking makes me swear at least once a figure where I'm painting a strap and smear it outside the edge -just- far enough that I have to go through the rigmarole of a touchup.
Oh! And for the record, I am gonna turf and rock in the bases, I just figure I'll do that when I have them all done.
Thank you kindly for all the help!
|
|
This message was edited 1 time. Last update was at 2010/09/13 09:43:36
|
|
|
|
|
2010/09/13 23:16:21
Subject: Ork Tips for a Newb (AKA What Did I Do Wrong?)
|
|

Squishy Oil Squig
UK
|
I'd like to start this reply by saying I clearly don't consider myself an expert in these matters and in all honesty have only recently gotten into painting quite recently, but my comments are based on a "crash course and learn by your mistakes" approach not so long ago, coupled with much, much trawling of Dakka and other sources. I hope you find some of it as useful as I (eventually) did 
Agrinja wrote:I like the idea of highlighting the raised areas of flesh, what's the recommended way of doing that without making splotches of hard color? I'd dilute a lighter green but I'd be worried about it running into the dark bits like a wash.
Personally for this I find if you start with a black priming, your choice of green base coat followed by a dark wash, your first highlight can be the same green. Then wash this with a heavy wash of thrakka green and you can do the 2nd highlight with the same green yet again. At this point you can opt to move to other greens if you have them, but if they are really a stark brightness in comparisson, go with another light wash with thrakka. It amazes me sometimes the magic washes can achieve not just for filling in the recesses but in how they affect the colours of the paints you have used.
Agrinja wrote:As for a brown wash for the weapons, perhaps Devlan Mud? It seems about right, and popular.
A nice uneven coat of baddab black works wonders on metallics.
Agrinja wrote:Further, how do I know I'm drybrushing correctly? The end result [as hard to see in the pics] tends to be paint that mostly collects on the edges of things, slightly upraised bits, and if I pushed a little harder, scratchy lines on flat surfaces.
Sounds like you are drybrushing correctly, but it isn't a 100% replacement for highlighting, more of a shortcut to a desired effect. To really push the boat out go back over some selected edges of things by hand to indicate a light source or whatever. When you look at the best looking models in the gallery they have all used a huge combination of the different techniques, quite probably in many, many different layers / stages to pull of that "truly awesome" look or effect.
Agrinja wrote:And lastly, how do you do small details accurately? You as in, you personally, I'm curious how other people do it, it's something I have a bit of trouble with. A bit of hand shaking makes me swear at least once a figure where I'm painting a strap and smear it outside the edge -just- far enough that I have to go through the rigmarole of a touchup.
After trying various suggestions gleamed from trawling the net the one I've had the most success with is keeping your hands firmly together at the wrist. If you're painting by holding the mini by the base, or on a coke bottle lid / paint pot you should find the ball part on the inner / bottom of your wrists can touch each other and still leave room to move the painting hand. If you use something larger to stick your mini on, say 2 GW pots together or and old glass herb bottle, you can put the ball of your painting hand up against that to steady it up nicely too.
|
|
|
|
|
2010/09/13 23:37:07
Subject: Re:Ork Tips for a Newb (AKA What Did I Do Wrong?)
|
|

Fresh-Faced New User
|
I have to say I like your painted models - they are much better than mine, althought I am more of a 'Big Mek' convertor than a painter and I haven't got much mobility in my right hand (bit of a downer since I'm right handed).
Well done.
|
|
|
|
|
|
2010/09/14 00:57:06
Subject: Ork Tips for a Newb (AKA What Did I Do Wrong?)
|
|
Last Remaining Whole C'Tan
|
Agrinja wrote:Should I have sanded the base
No. I don't do anything with my bases, prior to basin them, other then cut off the sprue bit.
To finish the base, you have two or 3 basic options that require little skill but look good:
1.) Flocking
Make a mixture of 50/50 elmers glue and water. Paint the base with this mixture, being careful to not paint the mini. Sprinkle the base with green flocking until covered. Turn upside down, tap a little, and allow to dry.
2.) Sand
Make a mixture of 50/50 elmers glue and water. Paint the base with this mixture, being careful to not paint the mini. Sprinkle the base with sand until covered. Allow to dry. Turn upside down, tap off excess. Make a mixture of 75/25 a shade of brown and water (like snakebite leather). Wash the base with this. Allow to dry. Now brush the top carefully, with a nearly dry brush, a brown that is lighter (like bleached bone). Do it very lightly so it blends well, but even if you screw it up it will look pretty good. I prefer this method, I think it gives a more natural look then flock, but many people like flock.
3.) Bonus points: Flock & Sand
If you're really feeling sassy, base as in #2. When dry, paint a few little patches with glue, and then apply flock. Tap upside down. You will now have a more realistic base with little patches of grass.
|
lord_blackfang wrote:Respect to the guy who subscribed just to post a massive ASCII dong in the chat and immediately get banned.
Flinty wrote:The benefit of slate is that its.actually a.rock with rock like properties. The downside is that it's a rock
|
|
|
|
|
2010/09/14 06:51:46
Subject: Ork Tips for a Newb (AKA What Did I Do Wrong?)
|
|
Screamin' Stormboy
|
Awesome! Thank you all very very much.
As for basing, I was thinking of doing the second option with a sort of gritty fill I found that looks like hard, gravely, bombed out soil. Figured I'd combine it with a bit of yellowed grass flocking here and there to give the impression of a wartorn field.
Again, thank you all!
|
|
|
|
|
|
|
|