| Author |
Message |
 |
|
|
|
|
Advert
|
Forum adverts like this one are shown to any user who is not logged in. Join us by filling out a tiny 3 field form and you will get your own, free, dakka user account which gives a good range of benefits to you:
- No adverts like this in the forums anymore.
- Times and dates in your local timezone.
- Full tracking of what you have read so you can skip to your first unread post, easily see what has changed since you last logged in, and easily see what is new at a glance.
- Email notifications for threads you want to watch closely.
- Being a part of the oldest wargaming community on the net.
If you are already a member then feel free to login now. |
|
 |
2011/01/18 08:52:16
Subject: Necron Temple Project - A Tale of LEDs and Blood (Finished, new LED pics page 2!)
|
|

Regular Dakkanaut
|
Hello again ladies and gents of DakkaDakka! We haven't posted any new projects in a while, but that doesn't mean we haven't been working on some really awesome stuff!
I'm going to be posting my project log of my solo venture deep into the heart of Necron country. I've never done any Necron pieces before and had really been looking forward to the chance to try my hand at this style of architecture. The first thing I wanted to do was establish a plan with my client, and a direction for myself.
Here are a few 3D plans I threw together on Sketchup. At this point we’re still at the planning stage, and the final version will probably look way different, but it helps to have a 3 dimensional model to play around with before committing to a design, especially on a complicated or unique project.
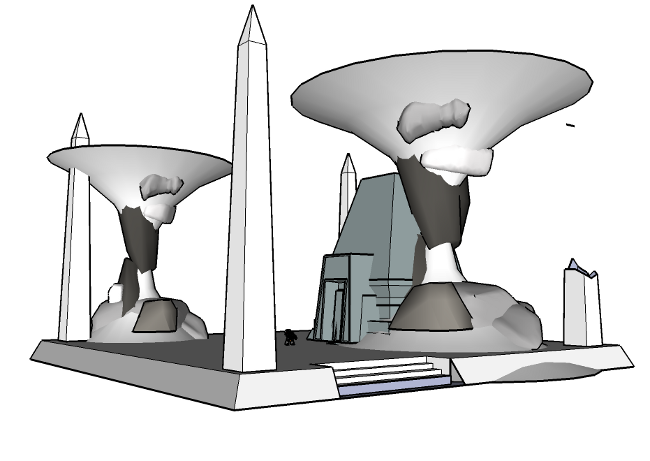

In the top picture you see the first wacky idea we had, which was to build the temple between these large, natural rock columns that were shaped like apple-cores. The idea was that the Necrons had carved away the crust of the world, leaving mushroom-like features still standing in places. I liked the idea but I had a lot of doubts about how it would look in application, and more importantly, how to construct the apple cores without them overshadowing the temple. After some consideration and rummaging through our materials I eventually scrapped this design. (For this project at least.)
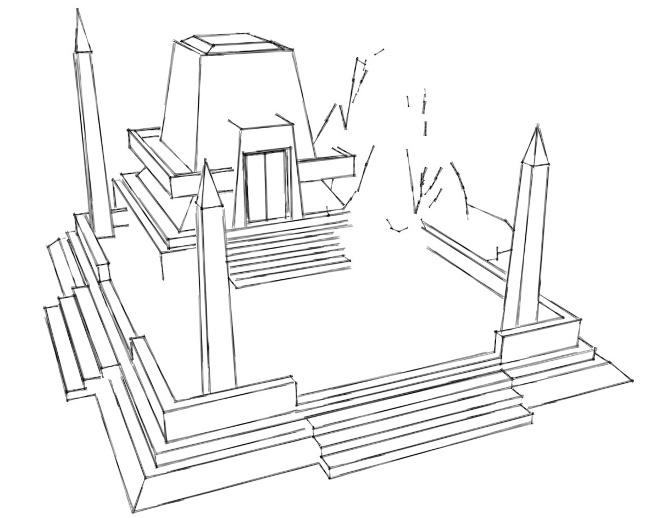
After a bit of fresh planning, revising and communicating with our client, I had a new general direction. Gone were the carved away apple-core like columns, to be replaced by something a little more playable and easier to represent as a battle-damaged Necron ruin. Again, the sketchup plan is very rough and missing a lot of detail, I use it more like a 3D scratch pad to get some form to my ideas.
With this new direction and plan in hand, I was finally ready to start carving and sculpting. But first I had to do some preparation.
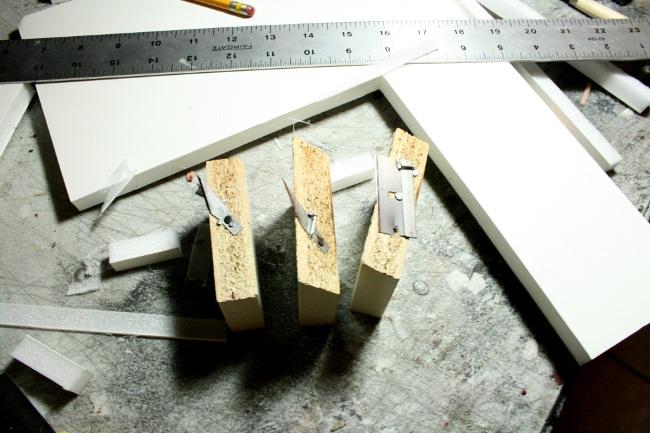
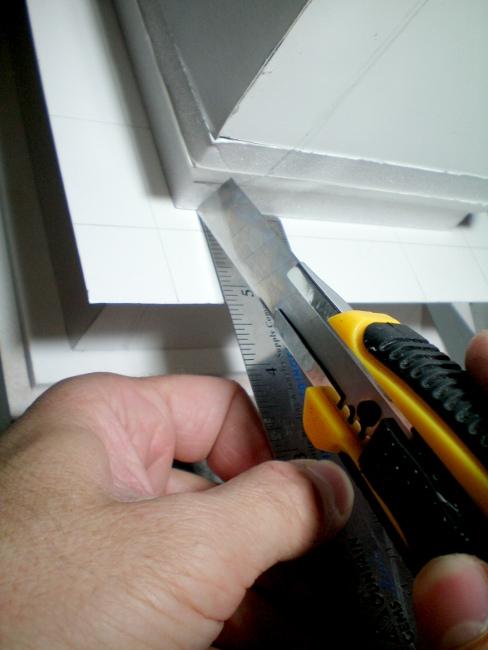
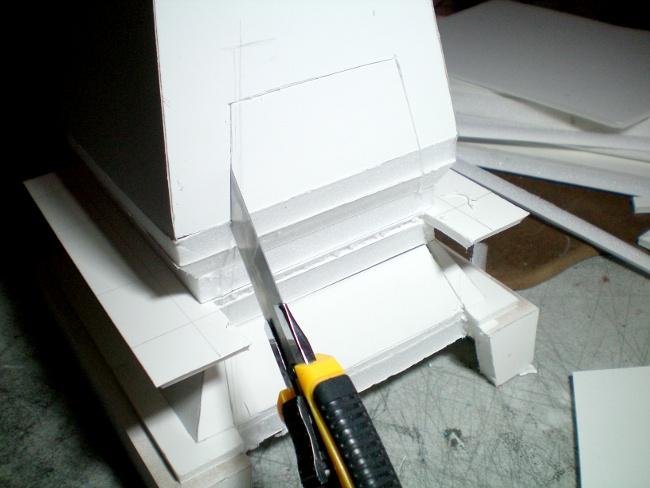
The main structure of this project will be made of foamcore with plasticard plating and details, and because it’s Necron, I really need to make sure the corners and edges of the foamcore are sharp and lined up as perfectly as possible. To aid in this, I assembled a few cutting tools, both for cutting angles and to work as rabbets. Rabbets are types of joins made between two flat pieces to minimize seams. Foamcore rabbet cutters can be purchased in framing shops, but they can also be made relatively easily and in greater variety. (And much, much cheaper.) The basic principle is to make a razor blade that doesn’t cut all the way through the foamcore, leaving the thin strip of paper on the other side so two pieces can fit like this:

I also needed just simple angled cutters to make angled surfaces. I used a miter saw to cut a few blocks of laminated wood at straight angles, 45 degree angles, and 22.5 degree angles, then used tacks and staples to carefully mount blades on the sides at my desired cutting depth.
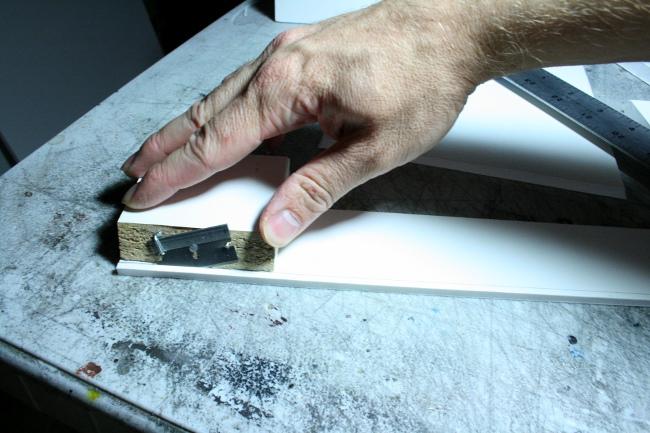
The rabbets worked great, and miter cutting blocks also made nice smooth cuts. A straight-edge ruler should be used against the back-side of the block to keep lines straight, but after a while I was able to eyeball it with just a pencil line as a visual guide.
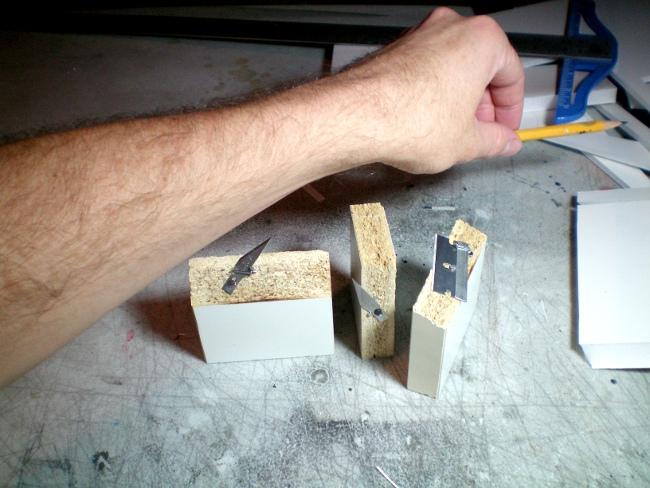
Although it should be noted, that once made, these cutting tools are essentially flesh-slashing booby traps. Freed from their confines within exacto blade handles, these monsters will do anything in their power to taste human blood. “ Yeeeesssss, reach over us...” they whisper anxiously, as they lay in hiding within a pile of foam scraps. “ Rummage for that missing pencil with your soft fleshmeat…. yessss…”
Respect the rabbet.
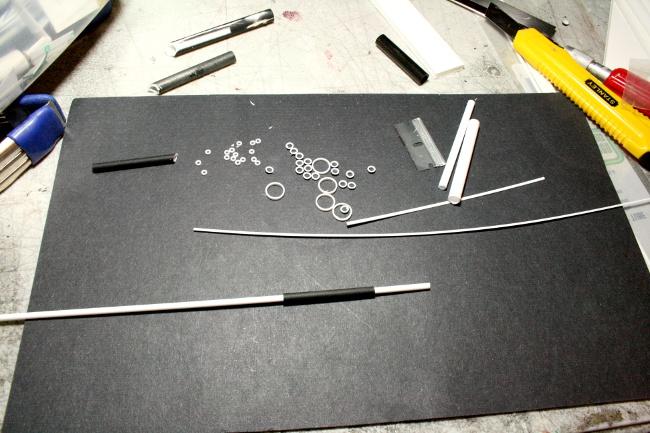
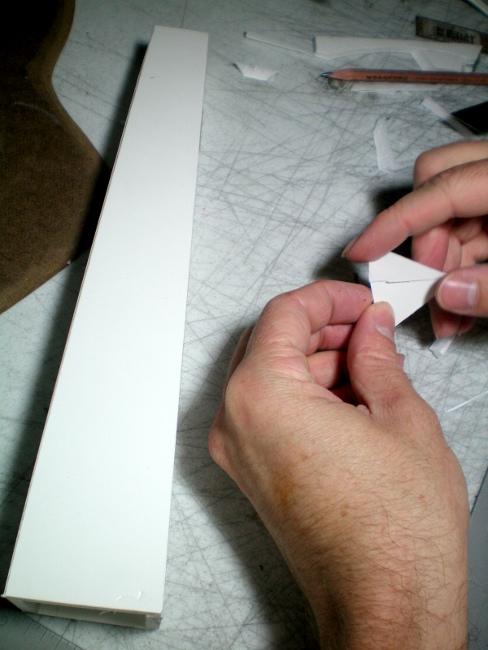
Next item I needed to prepare beforehand was the Necron iconography. I could free-hand small areas of writing and symbols, but for larger pieces I would need something a little more more grand. I was going to make a large central plate with the familiar Necron symbol, and two smaller plates covered with glyphs. These pieces may be used in other areas on the finished temple, so I decided to make the plates something I could make molds of and cast over and over.

I chopped thin rings from some different sized evergreen plastic tubes (using a slightly larger tube as a cutting guide) and used plasticard strips and plates for the background and connecting pieces.
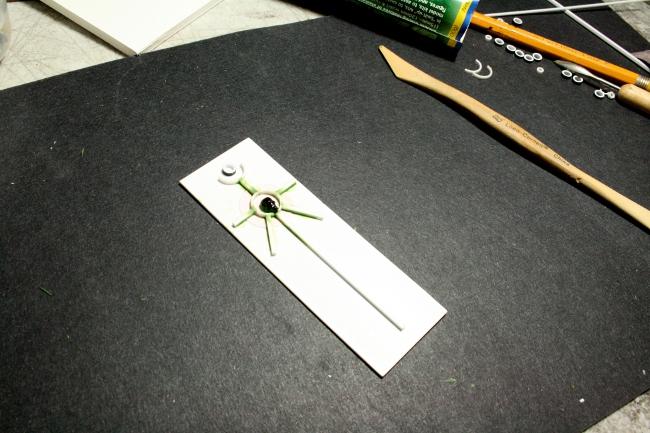
I chopped the back of a Necron head off and placed it in the center of the icon, then used Greenstuff to fill and smooth out gaps. All the edges received a light sanding.
The side pieces were made the same way. After being assembled, the rings were all sanded down, and Greenstuff and/or squadron green putty was used to fill tiny gaps. The background was sanded with a tiny piece of fine-grit sandpaper on a toothpick to smooth out tiny glue spills and scratches made during assembly.
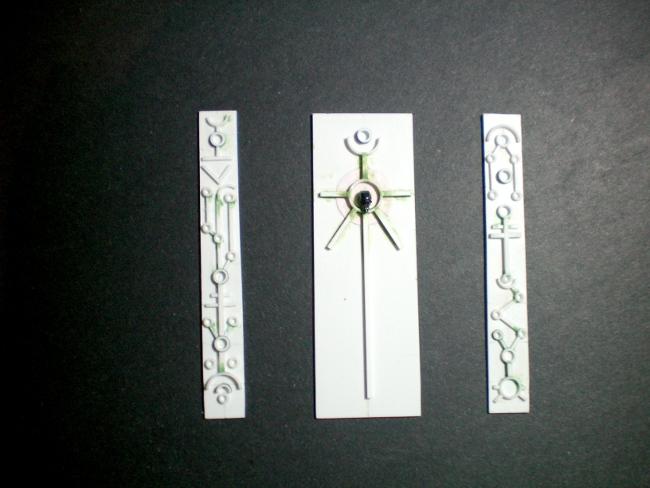
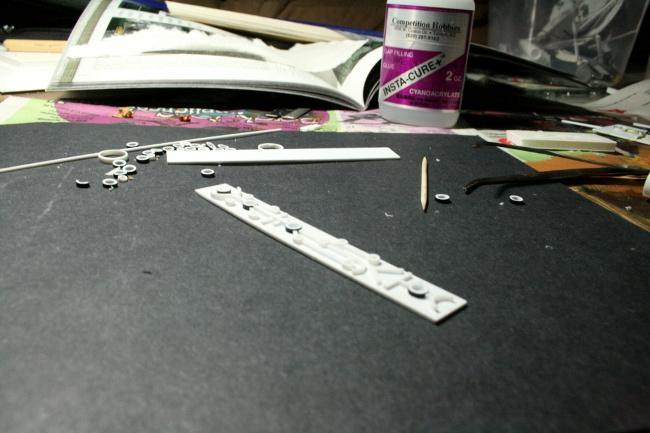
Finished! I then set these pieces aside, to be cast later. I have no idea what it says in Necron machine language, probably something ominous and nasty about the pointlessness of even trying to fight. Might also say “No parking.” or “Restrooms for C’tans only.”
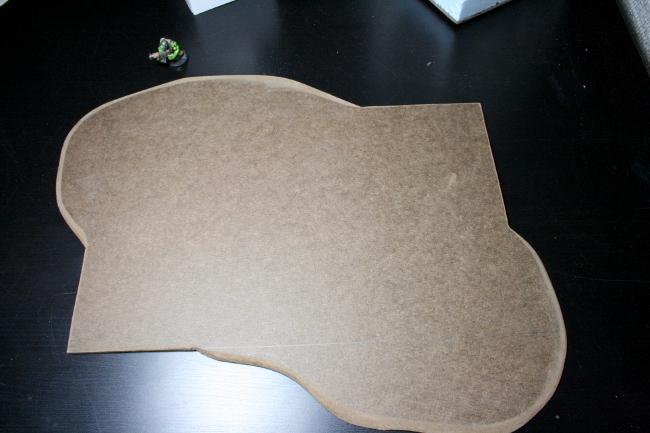
With some of the preliminary work done, it was time to start building! I cut a piece of MDF at the measurements I was planning for the structure, leaving a rounded bit on the corners to model rocky landscape and battle damage. The rounded areas were sanded down on the edges so it wouldn't look like some kind of out-of-place earthen ledge sitting on the table.
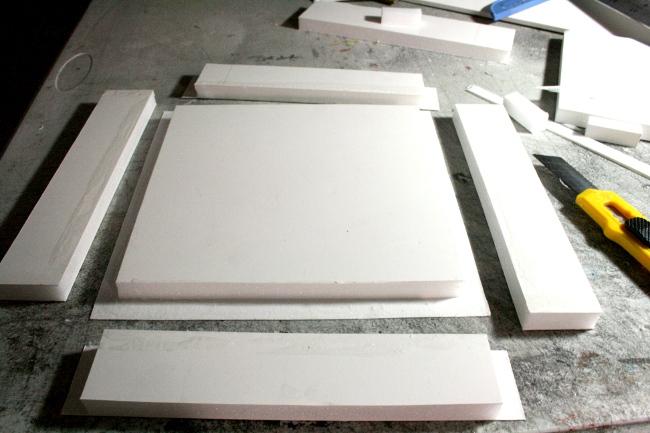
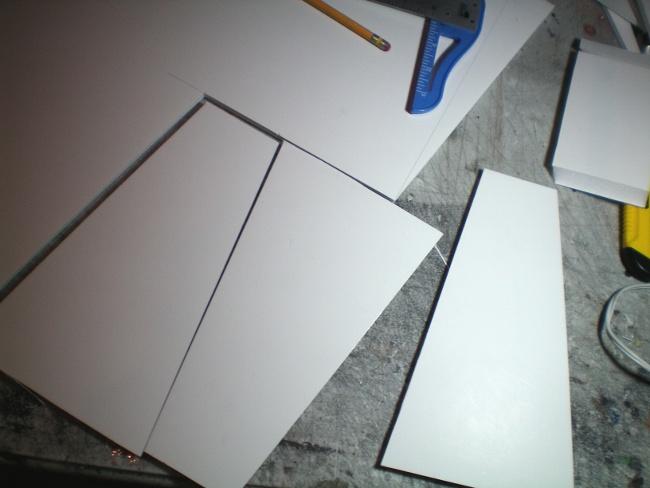
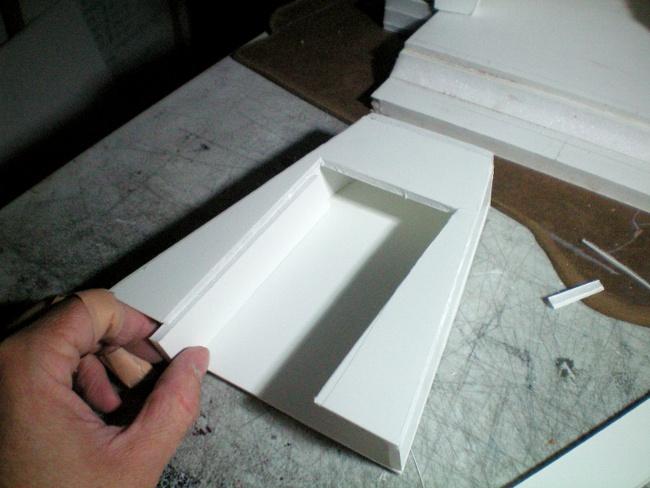
I cut pieces of 1/4″ and 1/2″ foamcore using my angle cutters, these would be the foundations and courtyard area for the main temple. I would construct everything whole and intact, and then later I would carve in areas that I wanted to make damaged to achieve the look my client was asking for.
Here you can see the rabbet cuts in action. After making the first rabbet cuts, I used a retractable hobby knife and just carefully cut along the underside of the paper backing to finish the rabbet cut-out. I made this piece by eyeball and heart instead of following measurements I had written down. I tend to do that at times.
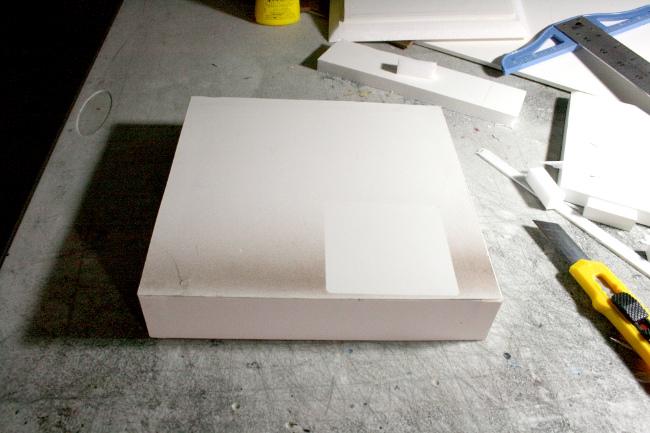
I used PVA glue to assemble the pieces after a few test fits and careful trimming. Now, the rabbet cuts are not perfect, there is rarely such thing when building three dimensional models. But it helps a whole lot to have seams only on the edges. Later this whole model will be covered in plates and edges will be filled and sanded to achieve that seamless Necron look. (That strange coloration on the foamcore is overspray from previous airbrushwork, making the label into a stencil.)
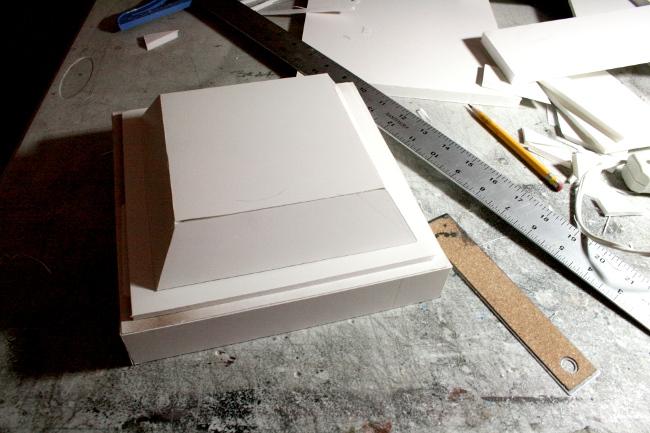
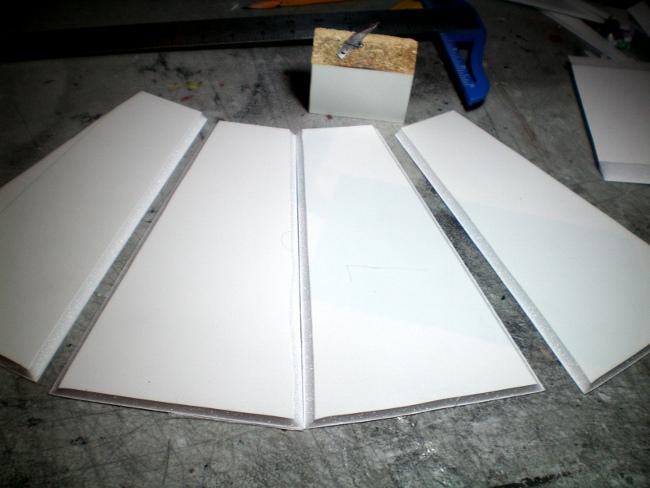
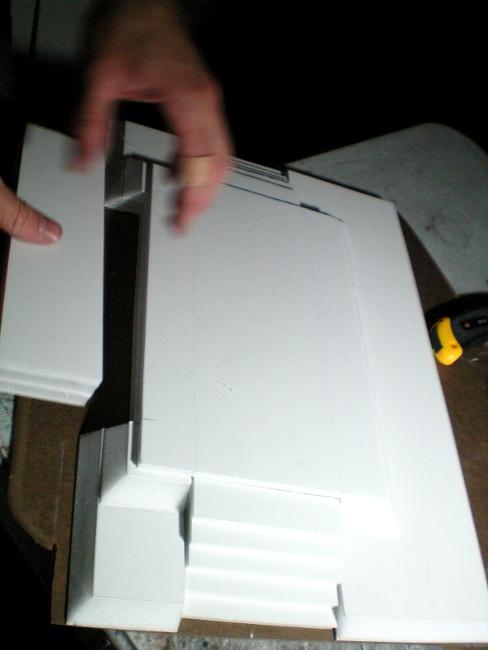
Next, the first tapered tier, built much like the base piece. The bottom and top edges were cut with a 22.5 degree cutter, and the sides with a 45 degree cutter.
A few more assemblies later, and I had the first “balcony” section, which would be a defensible firing position. I continued angled structures up from the balcony.
The pieces were stacked, but not glued yet. At this point I was still working out a number of things in my head, such as the balcony edges, the “ribs” on the side of the tower and other details. I wanted to be sure I had a plan for those steps before gluing it all together.
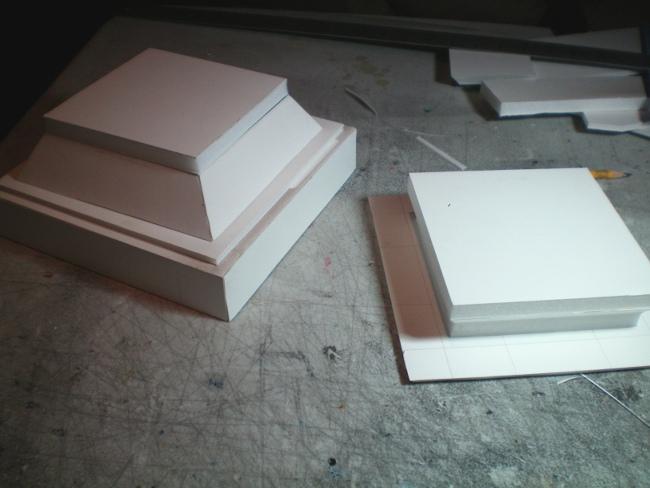
Now I cut the walls of the main temple spire. Again, my carefully planned measurements were discarded in favor of proportions of awesomeness. I wanted this thing to be feared from a distance, and tower over soft, puny meat men.
Once trimmed to equal sizes, the edges were carefully mitered the same way as the other pieces. So far I was lucky in this project as the rabbets and angle cutters only feasted on my flesh once, and I didn’t even know it until I felt something wet run down my hand.
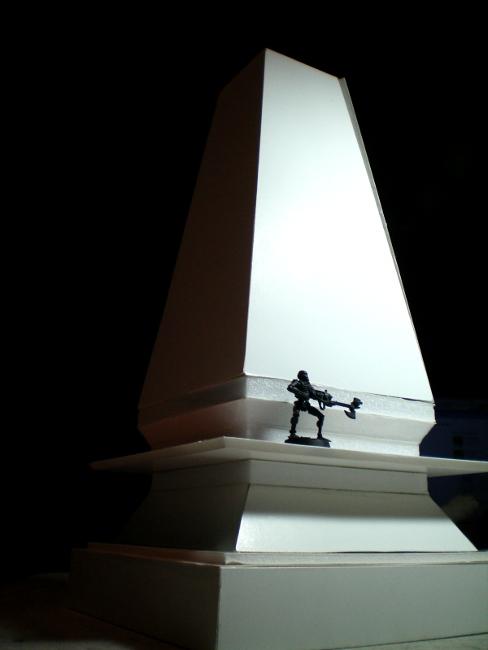
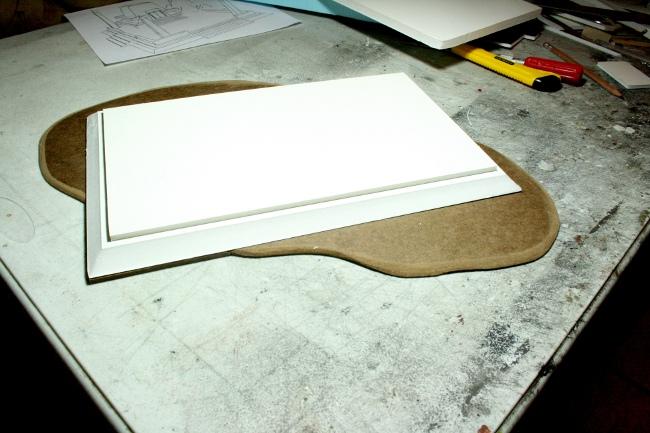
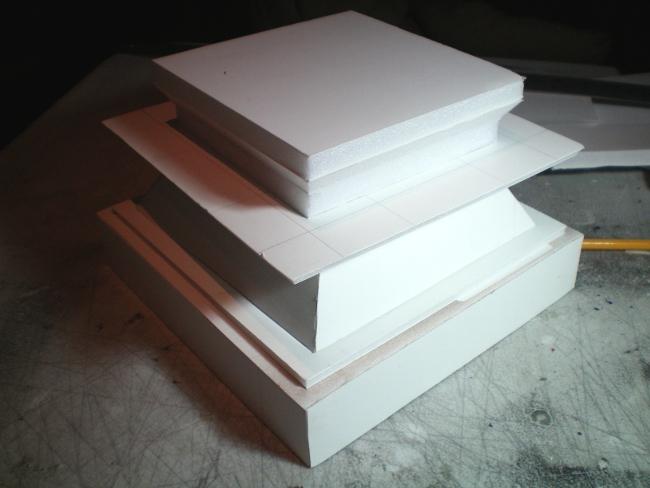
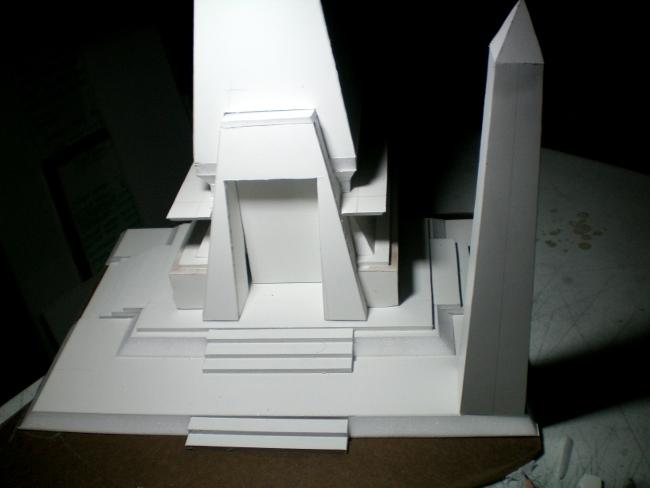
Now at last we begin to see the structure take shape. I put an unfinished Necron of mine up for scale reference. So far this was basically just the skeleton of the temple still, and once clad and smoothed out, it would appear even larger, since I would be adding a lot of Necronish details, curved ribs and layered panels, a grand entryway and some other crazy plans that I’ll save for the next update. There was just one last thing to check before moving on, which was to see how well this piece would fit into its base and foundations I made earlier.

Oops. My free-spirited, loose-cannon modeling ways have gone and done it again. The temple completely dwarfs the base I made! The base blocks of the temple alone are wider than the MDF board they're supposed to sit on even. Now I had two choices, the first choice would be to rebuild the temple smaller and less dramatic, making it fit neatly in the base I prepared, or I could scrap the base and make a new, huge and amazing base and foundation structure that would accommodate this mighty Necron fortress. Can you guess which choice I went for?
To be continued very soon.
|
|
This message was edited 10 times. Last update was at 2011/01/23 02:43:36
|
|
|
 |
|
2011/01/18 11:06:16
Subject: Re:Necron Temple Project - A Tale of LEDs and Blood
|
|
Last Remaining Whole C'Tan
|
I love where this is headed!
|
 lord_blackfang wrote: lord_blackfang wrote:Respect to the guy who subscribed just to post a massive ASCII dong in the chat and immediately get banned.
 Flinty wrote: Flinty wrote:The benefit of slate is that its.actually a.rock with rock like properties. The downside is that it's a rock
|
|
|
|
|
2011/01/18 11:46:19
Subject: Necron Temple Project - A Tale of LEDs and Blood
|
|

Esteemed Veteran Space Marine
Sheppey, England
|
Great step-by-step! I'm sure the final product will be fantastic - can't wait to see it.
|
|
|
|
|
|
2011/01/18 12:21:17
Subject: Necron Temple Project - A Tale of LEDs and Blood
|
|

Stabbin' Skarboy
|
Yey a new project blogg from Terraformer!
|
monkeytroll wrote:
In the grim darkness of the future there is only boar.
 Waagh Nazdreg! Waagh Nazdreg!
|
|
|
|
|
2011/01/18 13:14:25
Subject: Necron Temple Project - A Tale of LEDs and Blood
|
|
Rampaging Reaver Titan Princeps
|
My thoughts entirely Rose!
Love it so far, you are one crazy dude Terraformer, please dont ever stop! 
|
|
|
|
|
2011/01/18 15:59:24
Subject: Necron Temple Project - A Tale of LEDs and Blood
|
|
Regular Dakkanaut
|
Vitruvian XVII wrote:My thoughts entirely Rose!
Love it so far, you are one crazy dude Terraformer, please dont ever stop!
Can't stop, voices won't let me.
|
|
|
|
|
|
2011/01/18 16:14:36
Subject: Necron Temple Project - A Tale of LEDs and Blood
|
|

Mekboy Hammerin' Somethin'
|
Terraformer wrote:
Can't stop, voices won't let me.
 Love seeing your work! Tis a fine line between genius and madness.
|
|
|
|
|
|
2011/01/18 16:21:04
Subject: Necron Temple Project - A Tale of LEDs and Blood
|
|

Shroomin Brain Boy
|
screw that line go full monty and blast us away mate^^
vik
|
|
|
|
|
|
2011/01/19 03:28:16
Subject: Re:Necron Temple Project - A Tale of LEDs and Blood
|
|
Regular Dakkanaut
|
This project has taken on a life of its own. In the last chapter, we were building the main structure of the temple, and ran into an issue with the base being too wimpy.
I also decided the foundations were too wimpy as well, so my new plan consisted of building the Necron temple area as wild and awesome as I thought it should be, and then later carve the MDF to suite. I sandwiched new layers of foamcore together, this time over 16″ wide to accommodate the space I would need for the obelisks later.
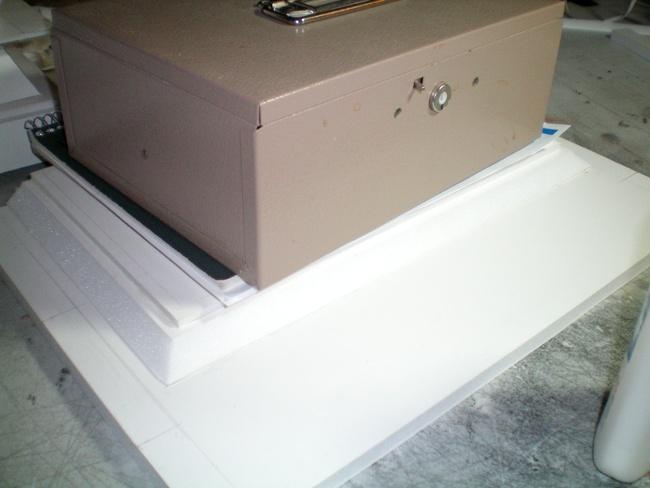
After spreading a thin layer of PVA glue, I usually weigh the layers of foamcore down to insure they set and dry even without gaps. For this I used the 3T-Studios cashbox since it was the only heavy object in reach at the time. Some of you may be looking at this locked case and imagining what riches lay within, so I’ll grant an exclusive peak inside this valuable repository.
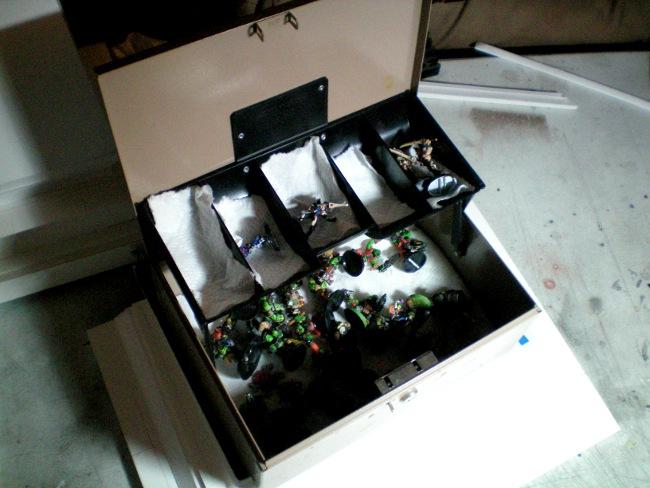
That’s right, at some point or another, our Orks and Eldar required safer keeping than our pocket change. Tomorrow we may change our portfolio to Chaos Deamons, depending on which direction the market goes.

While the base dried I assembled the steps. I would be cutting out places to put the steps after the base was finalized, that would allow me flexibility of design.
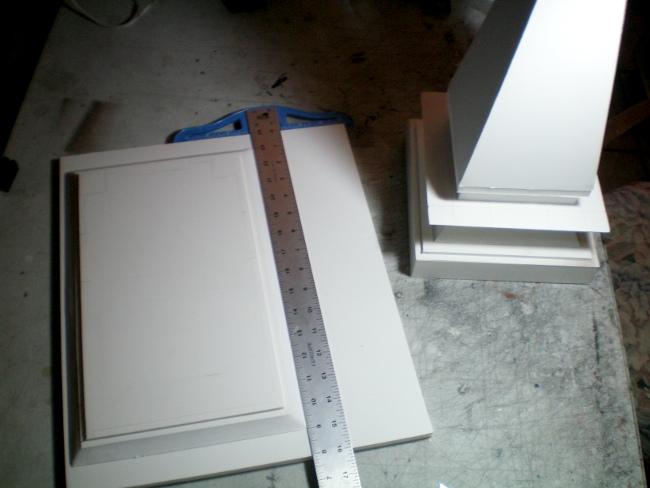
I cut a new MDF base and started working on some test fits. This new base was huge, but would allow me to to add the details like fallen pillars, rocks and defensible positions. Next I would be cutting out the space for the grand temple doorway. I traced the outline very, very slowly by transferring measurements and angles with a ruler. This is the kind of project that makes you glad you paid attention in Geometry.
Some angles were really hard to cut with a straight edge, and forced me to adopt some funny hand positions while cutting. At this point I realized the danger my left knuckle was in as I made this cut and shouted out “ Hey, see this? Nobody ever cut like this!”
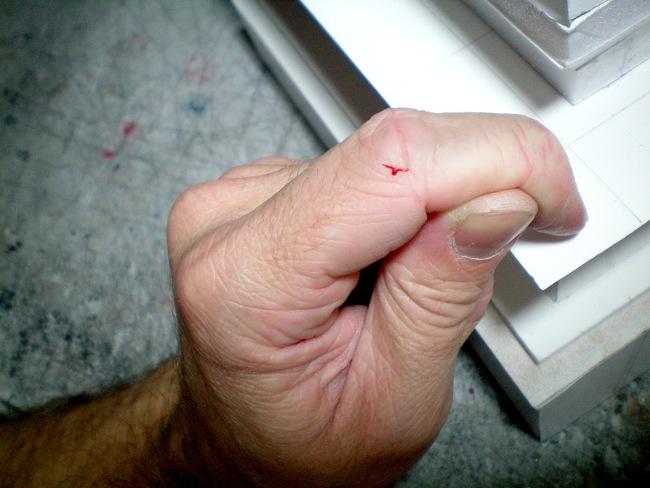
Of course, as I said that, the blade slipped. At least I made my point.
I’ve never cut myself so many times on a project. I think it’s part of the evil of Necrons, designing buildings with so many odd angles and difficult shapes.

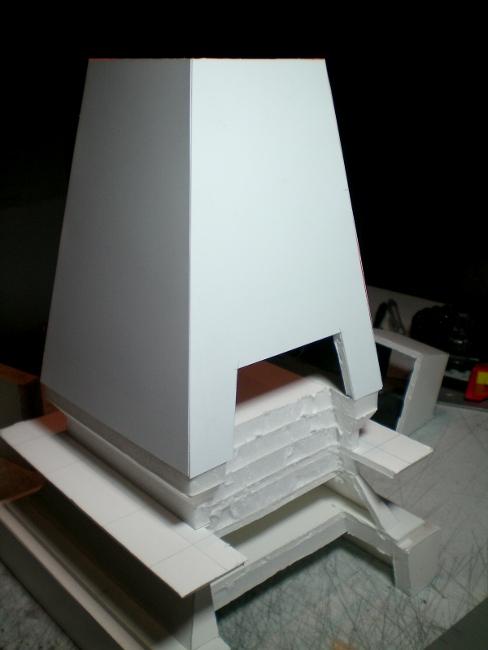
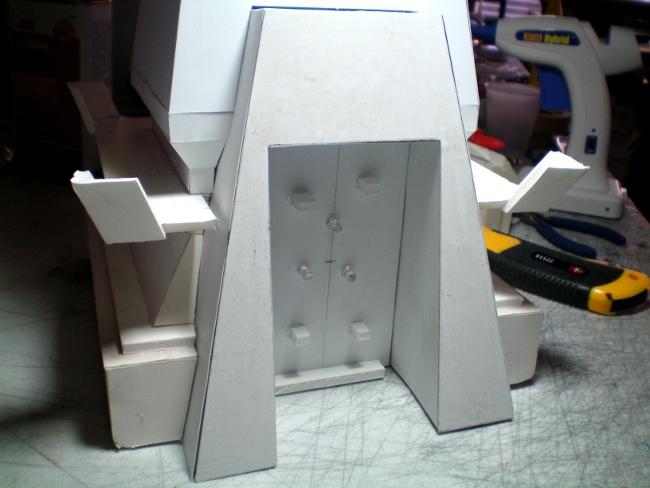
Alcove cut, now time to make the doorway.
This picture shows my second of three versions of the doorway area that I built, the last one I set to angle back instead of being vertical, which was the most difficult to construct, but looked the best in the end.
I made one last change to the base as well, cutting yet another foundation/courtyard area with better angles and more room for figures. I also made a block to set the temple further back on the upper tier of the foundations.
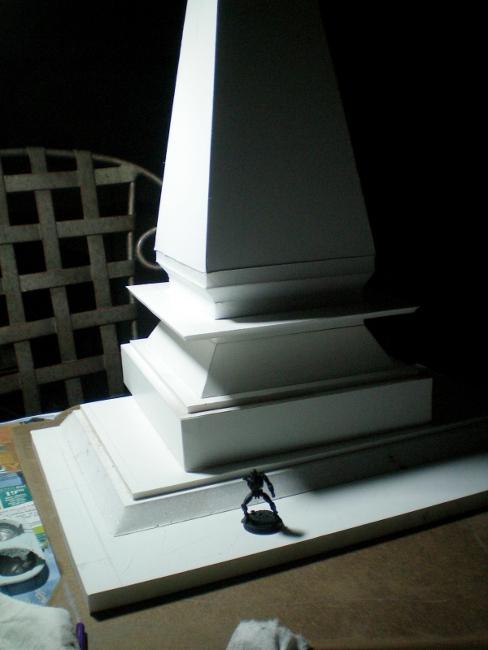
Now it was time to start making Obelisks! I would leave it up to future historians and/or comedians to try to actually figure out why Necrons decorate their worlds with large phallic monuments.
And now at last we see something just a little closer to the actual final shape of the structure start to appear. Of course I had a long way to go still, but once the Obelisks were done, I could actually start working on the details.
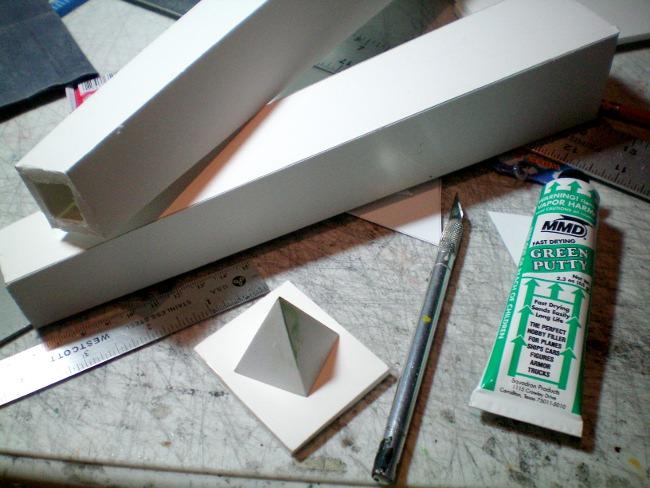
I wanted to make sure the obelisks were as uniform as possible, so instead of scratch-building each pyramid shaped point, I put all my effort into building just one good one, then I would cast it and make resin caps for each obelisk.
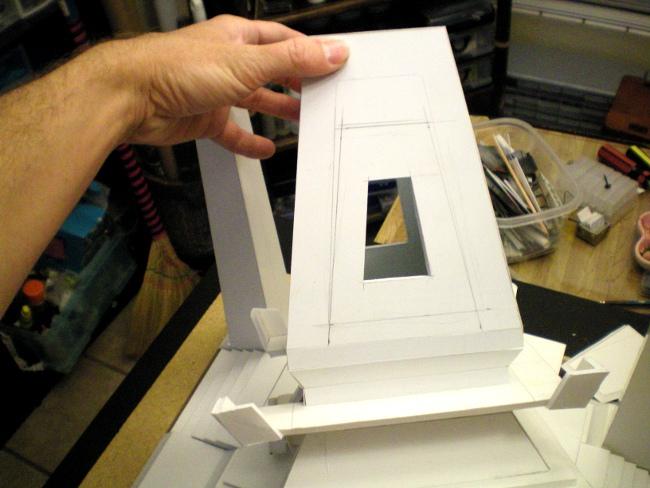
I had not yet glued the temple to the base, or even glued the doorway assembly into the temple. I had a plan that required access into the temple still. At this point I started cutting the plasticard pieces that would cover the entire structure. I would be able to make much nicer edges this way. I also made the decision to cut off the top two inches of the temple, because I didn’t like how tall it was in comparison to the obelisks and how pointed it was.
What did I do with the remaining piece I cut off?

Sometimes long, lonely hours and lack of sleep forces one to improvise for companionship. Meet Wilson. Moving along now…
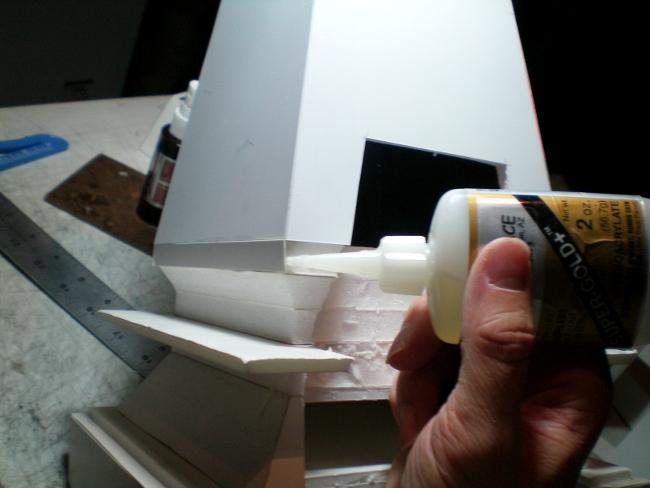
To attach the plasticard to the bare styrofoam edges I used “Super Gold +” named so because it costs as much as a 3 oz bottle of pure gold. Also it doesn’t dissolve styrofoam but takes a long time to bond well, even using cyno glue accelerator. (The bottle in the background is glued to the MDF board because we all keep spilling the stuff over and over.)
Now for a surprise plot twist. I scrawled some more arcane, necronish symbols, but these had a real meaning, which many of you can probably already figure out.
Yes, I cannot in good conscience allow a piece of Necron scenery out of our studio without a healthy dose of green LED love strewn throughout.
One area I knew should have ominous light coming out, would be the main entry to the tomb/temple. I wanted the light to spill from the edges and through the “seams” so I would call in another nifty tool from Terraformer’s Big Bag O’ Tricks.
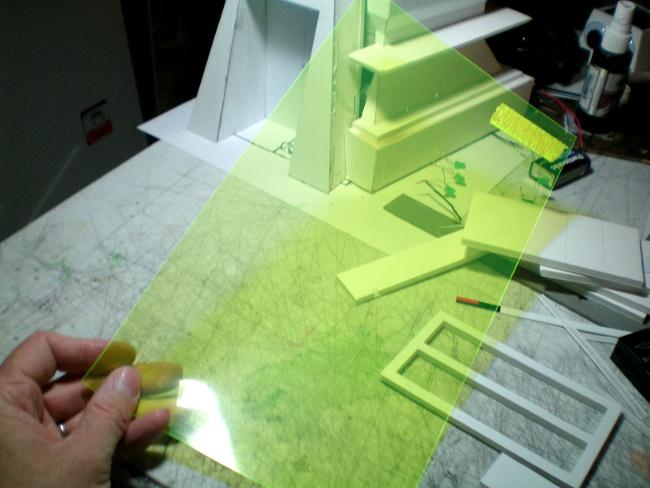
You know that glowing green plastic that comes with Necrons? I got sheets of the stuff. Now many an excited gamer would look at this stuff and start hacking pieces off to make green windows or some such nonsense, however that would be ignoring the most important property of this material…
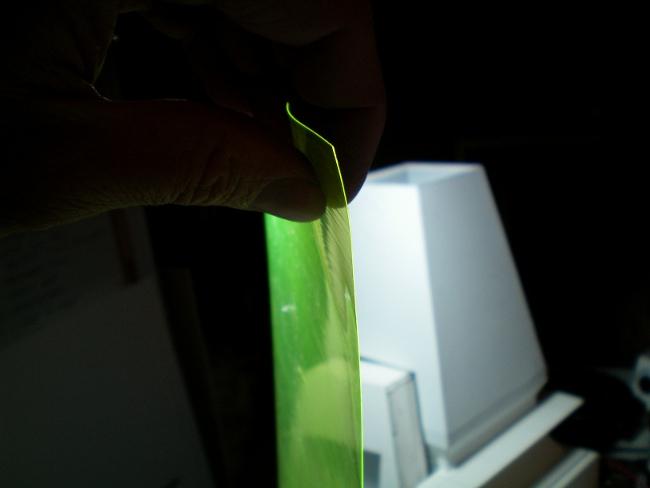
My plan was to use this nifty stuff to accent the seams and edges of my doorway, and perhaps other areas as well.
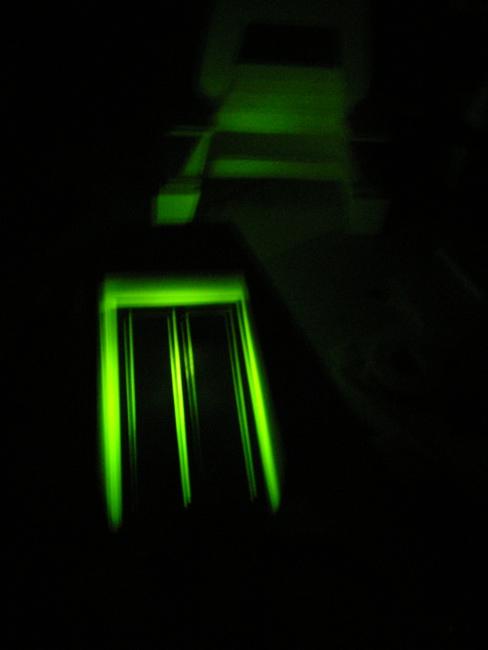
This is a test I did with just the LEDs behind the doorway, with all the lights in the studio turned off. Looks very Necron, but I learned quickly that green LED light doesn’t transmit through the green plastic material. I needed to work on a wiring scheme to include some hidden bright white LEDs in my circuit as well.
To be continued.
|
|
|
|
|
|
2011/01/19 04:10:38
Subject: Necron Temple Project - A Tale of LEDs and Blood (updated 01/18/11)
|
|
Wolf Guard Bodyguard in Terminator Armor
|
Looks awesome can't wait to see it all done
|
DR:90+S++G++M+B++I+Pw40kPwmhd+ID+++A++/wWD359R+++++T(M)DM+
 Deff Gearz 2,000+pts. (50% painted), Deff Gearz 2,000+pts. (50% painted),  Retribution 57pt.(70% painted), Retribution 57pt.(70% painted),  FOW British Armoured Squadron 1660pts. (15% painted) FOW British Armoured Squadron 1660pts. (15% painted)
|
|
|
|
|
2011/01/19 04:20:46
Subject: Necron Temple Project - A Tale of LEDs and Blood (updated 01/18/11)
|
|
[SWAP SHOP MOD]
Decrepit Dakkanaut
OH-I Wanna get out of here
|
Ohh a new T-former blog, exciting! Where'd ya get the cool sheet-o-color, and are there other flavors?
|
|
|
|
|
2011/01/19 04:35:18
Subject: Necron Temple Project - A Tale of LEDs and Blood (updated 01/18/11)
|
|
Boom! Leman Russ Commander
|
I'm excited about this, when I saw your first concepts I thought you where making the terrain piece as if it was underground like a Dwarf Hold or something. I'll be watching this 
|
|
|
|
|
|
2011/01/19 04:46:26
Subject: Necron Temple Project - A Tale of LEDs and Blood (updated 01/18/11)
|
|

Combat Jumping Garuda
Down Under
|
Awesome stuff so far can't wait to see what it looks like.
|
|
|
|
|
|
2011/01/19 07:09:54
Subject: Necron Temple Project - A Tale of LEDs and Blood (updated 01/18/11)
|
|
Fighter Pilot
|
Absolutely beautiful, inspiring to say the least.
|
PAINTED:
 ~4200pts ~4200pts  ~2800pts - DIY chapter ~2800pts - DIY chapter  ~900pts ~900pts
 ~ 365pts Deathwing ~ 365pts Deathwing  ~ 900pts Themed penal legion ~ 900pts Themed penal legion |
|
|
|
|
2011/01/19 22:21:32
Subject: Necron Temple Project - A Tale of LEDs and Blood (updated 01/18/11)
|
|
Nasty Nob on Warbike with Klaw
|
This is simply amazing.
I can't wait to see it through to completion.
Eric
|
Black Fiend wrote: Okay all the ChapterHouse Nazis to the right!! All the GW apologists to the far left. LETS GET READY TO RUMBLE !!!
The Green Git wrote: I'd like to cross section them and see if they have TFG rings, but that's probably illegal.
Polonius wrote: You have to love when the most clearly biased person in the room is claiming to be objective.
Greebynog wrote:Us brits have a sense of fair play and propriety that you colonial savages can only dream of.
Stelek wrote: I know you're afraid. I want you to be. Because you should be. I've got the humiliation wagon all set up for you to take a ride back to suck city.
Quote: LunaHound--- Why do people hate unpainted models? I mean is it lacking the realism to what we fantasize the plastic soldier men to be?
I just can't stand it when people have fun the wrong way. - Chongara
I do believe that the GW "moneysheep" is a dying breed, despite their bleats to the contrary. - AesSedai
You are a thief and a predator of the wargaming community, and i'll be damned if anyone says differently ever again on my watch in these forums. -MajorTom11 |
|
|
|
|
2011/01/20 13:29:07
Subject: Re:Necron Temple Project - A Tale of LEDs and Blood (updated 01/18/11)
|
|
Regular Dakkanaut
|
Alright, we’re back to my journal of this fun project. Most of the lacerations have healed and important lessons have been learned along the way. (Never hold a miter box while you use a razor-saw on something in it.)
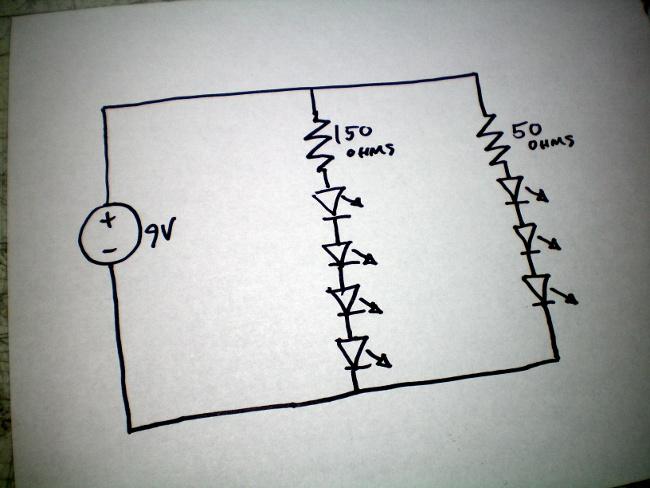
I had to change out the wiring and lighting plan I had, and for the sake of simplicity, I chose to make two circuits, one for white lights and one for the green lights.
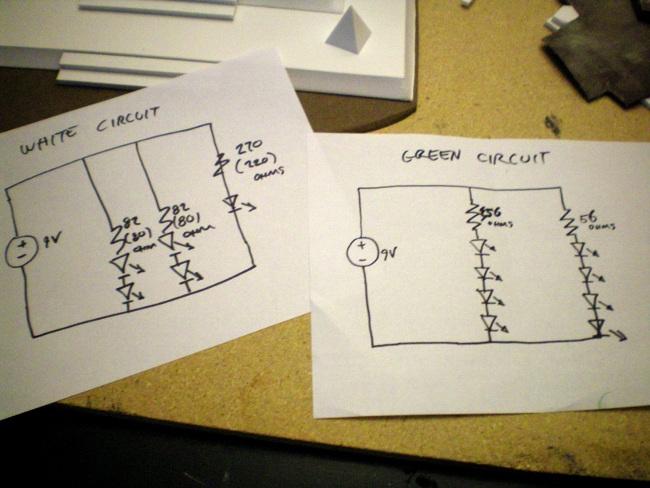
This would mean two batteries, so at least these lights would last for a long time when turned on.
The green LEDs have been replaced with ultra bright white LEDs, and here you can see some foamcore place-holders for the balcony guards I would be working on later. I often will stick rough pieces and shapes on with a tiny bit of hot glue just to make sure the concept will work.
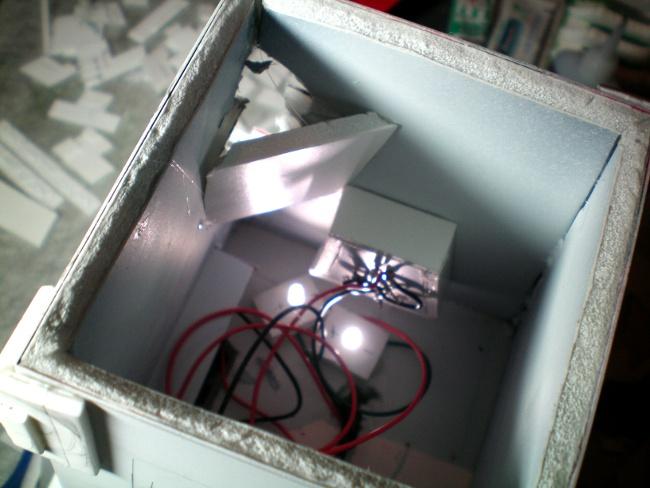
For the second circuit of green lights, I needed to modify the temple a little. A lot of careful measurements and some careful cutting supplied me with the holes for the recessed panels I had planned for this monster.
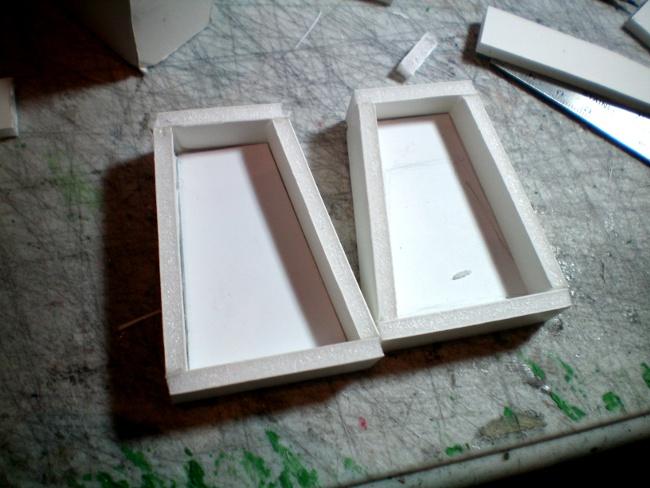
Then, using the pieces I cut out, I made the little recessed alcoves themselves, which the green LEDs would be attached to. These were hot-glued to the interior, then it was time to make some spaghetti!
 Oork de bork bork, djerp do gork!
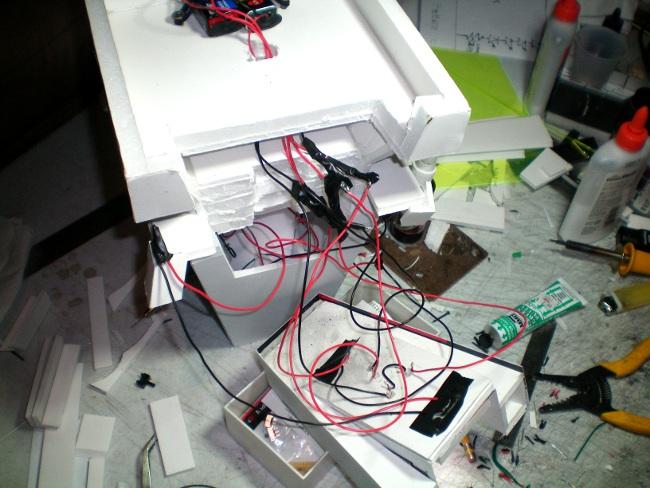
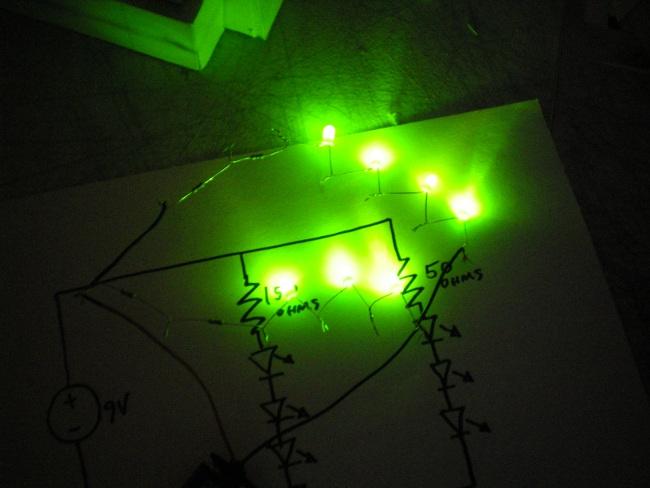
Okay it looks like a disaster, and took a lot longer than expected, but it worked. At least I prayed that it worked at this point, I realized that I forgot to test each LED individually before soldering them in place, and some of the color codes on the assorted capacitors were a little tough to make out when I ID’ed them. The batteries are held in by elastic bands tied to a pair of long screws screwed up into the body of the temple, with the switches sticking out the back side of the temple. Next was the moment of truth.
Wow, they weren’t kidding around about those white LEDs being “utlra” bright. At least nothing was smoking.
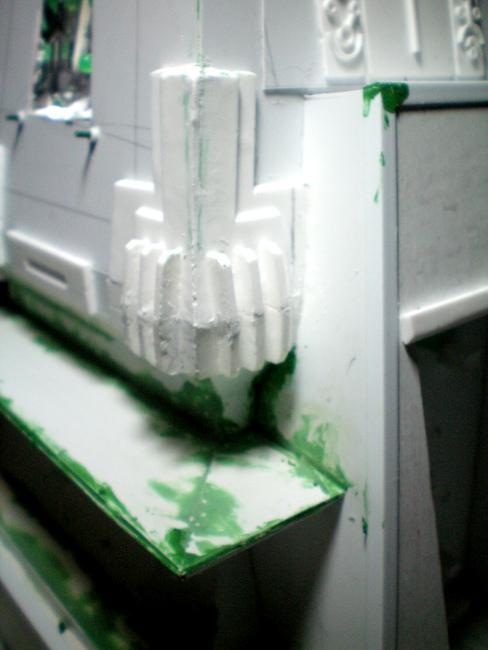
In order to give the green LEDs a boost, I glued and lined the recessed chamber with actual silver foil. Why not aluminum foil you ask? because that’s just the way I roll.
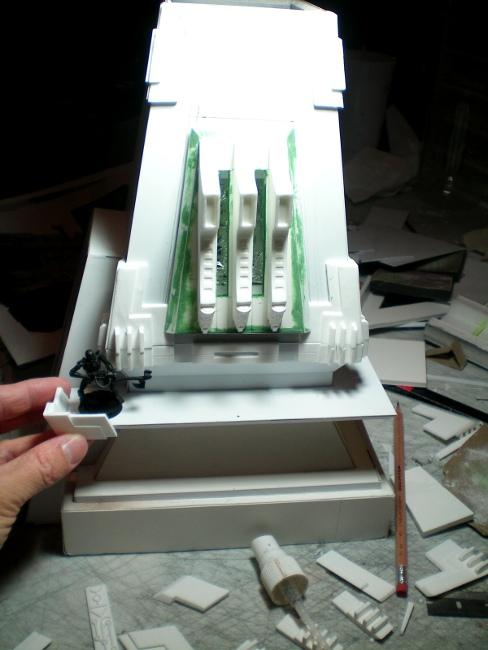
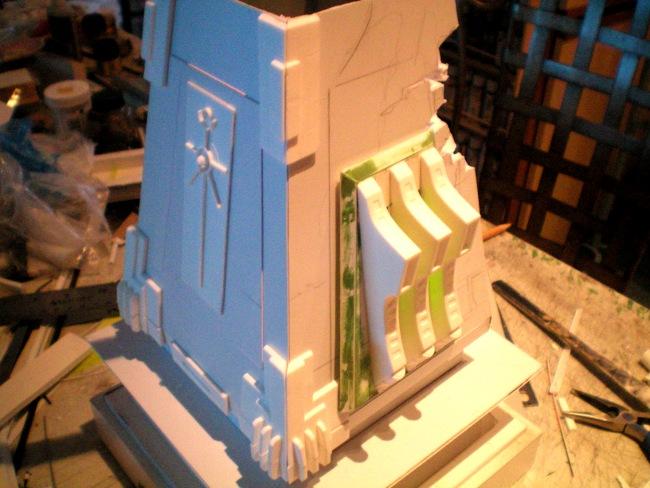
These lights were not going to be exposed of course, I had the idea that the temple should have some kind of system of mechanical vertical vanes on each side, with the green light spilling out from between the vanes. Vertical vanes of some kind seem to be a reoccurring theme in the very few samples of Necron art that exist out there.
I made mine from plasticard and puttied seams, but instead of using the putty to simulate weld lines and crusty metal, this time the idea was to sand everything as smooth as possible for nice, clean edges.
I cast 6 copies of the vane in resin after making a mold, then cut a rough shape out of foamcore and test-fit the pieces with a couple dabs of hot glue to see the effect over the green lights.
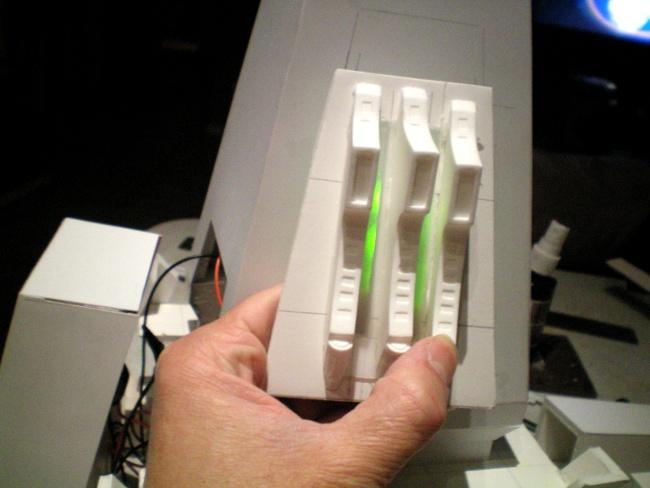
This was the idea, but hard to capture under bright light.

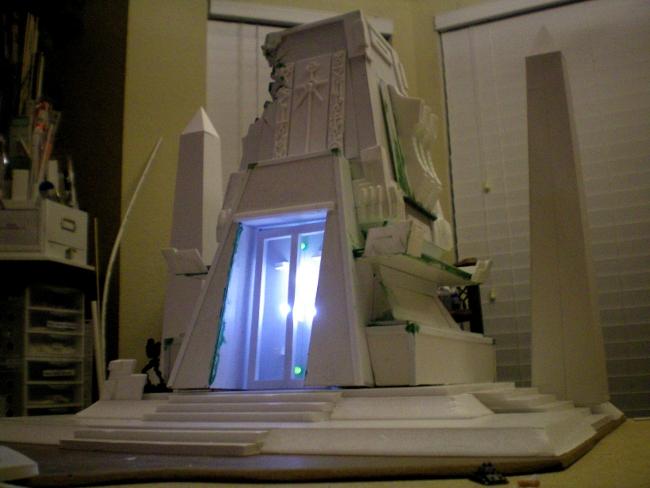
You can see the intended effect much better in lower light. With that success now it was time for the next phase.
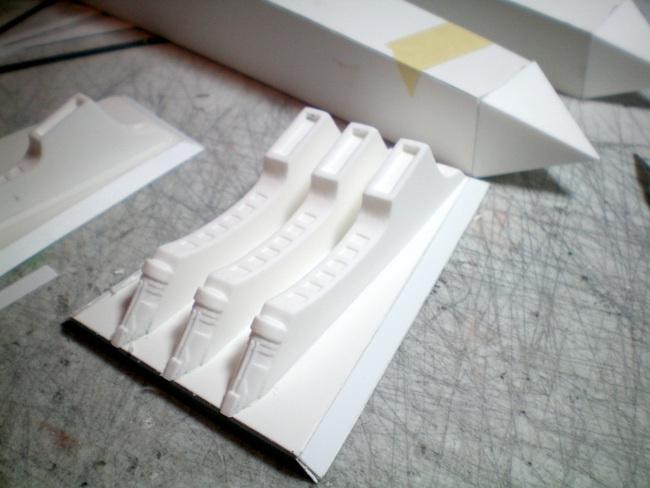
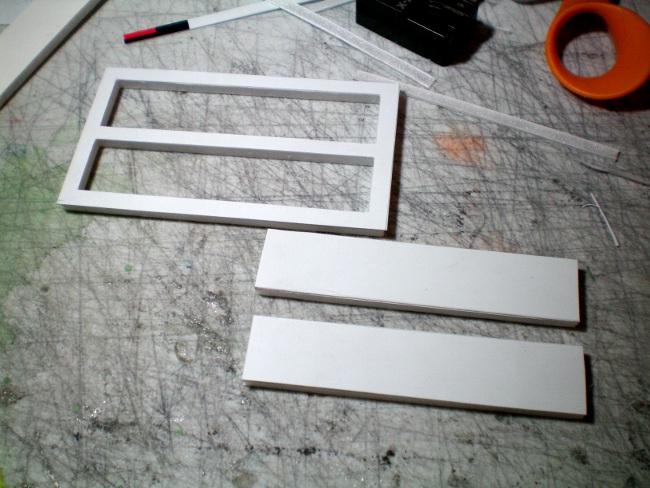
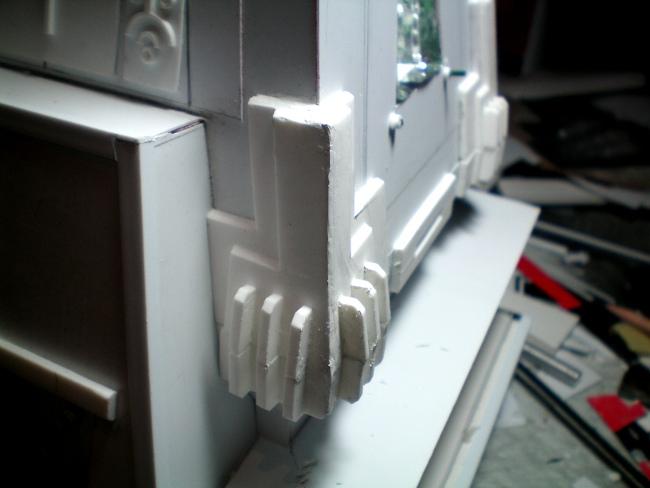
The plates that would sit over the lights were made with mitered edges, and the vanes lined up with holes in between. In the background you can see the obelisks also setting up.
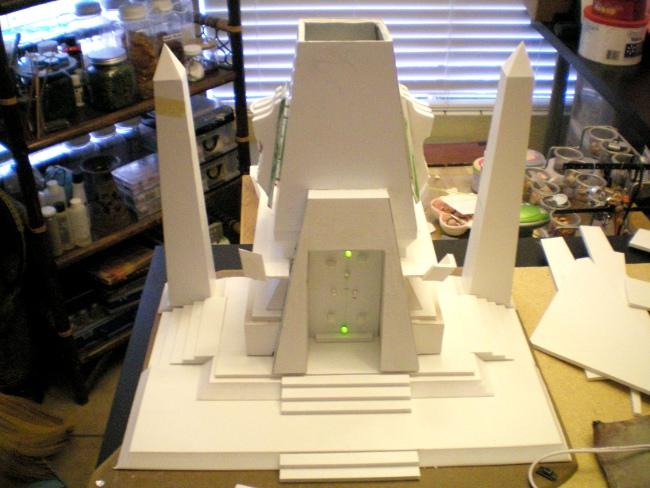
Now things are getting real. At this point, with two obelisks up and the temple taking shape, I realized that 4 Obelisks would look too busy, and tossed a couple off the design. But right now this was all still just smooth foamcore and plasticard, which would not do. These guys are supposed to complicated, twisted technological marvels, their architecture should be equally complex.
I’ll give the viewer the luxury I didn’t get, and skip to the end of the endless time I spent preparing and building these plates which would make up components of the shell of the Temple. I’m going to start capitalizing “Temple” now because I was beginning to realize what this would look like at the end.
I could go on a long tangent here about how sometimes I don’t know what a project will look like until it’s done, or the Michelangelo philosophy of releasing a sculpture from the raw material that confines it… but that would be kind of long. You probably want to see this thing finished. So do I.
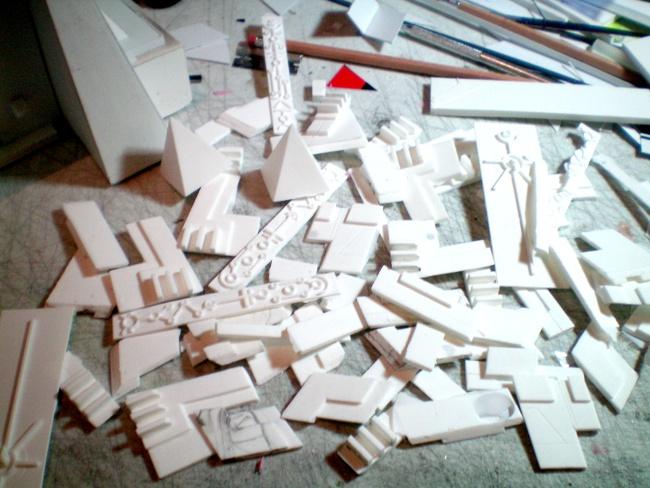
Castings began to accumulate into small mountains of angular shapes. The next run would be the final long, hard push to the finish line. This project was already taking weeks longer than I estimated, teaching me a valuable lesson about my ability to finish a project like this by myself. Did I mention I was the only one left here? With all my help sick, injured or at school, my only choices were to finish this or go mad trying. I chose both.
To be continued.
|
|
This message was edited 1 time. Last update was at 2011/01/20 13:33:55
|
|
|
|
|
2011/01/20 13:34:19
Subject: Necron Temple Project - A Tale of LEDs and Blood (updated 01/18/11)
|
|
Courageous Silver Helm
|
This is looking amazing! I am envious of both your skills and your patience.
|
I have recently been diagnosed with swelling in the brain, so please excuse spelling mistakes and faulty sentences. I am losing my ability to type and talk effectively, but dammit, that is not going to stop me from trying. |
|
|
|
|
2011/01/20 13:36:30
Subject: Re:Necron Temple Project - A Tale of LEDs and Blood (updated 01/20/11)
|
|
Rough Rider with Boomstick
|
I got a 6000 point cron army I would love to use on a board with that kind of scenery. Love it
|
|
This message was edited 1 time. Last update was at 2011/01/20 13:36:46
|
|
|
|
|
2011/01/20 15:34:27
Subject: Necron Temple Project - A Tale of LEDs and Blood (updated 01/20/11)
|
|
Powerful Spawning Champion
|
Looking quite interesting.
|
|
|
|
|
|
2011/01/20 15:52:54
Subject: Necron Temple Project - A Tale of LEDs and Blood (updated 01/20/11)
|
|
Using Inks and Washes
|
Your blogs are always mindblowing.
|
|
|
|
|
2011/01/20 17:06:06
Subject: Necron Temple Project - A Tale of LEDs and Blood (updated 01/20/11)
|
|
Paladin of the Wall
|
one word WOW
okay... maybe a few more
This looks really awesome! can't wait to see it finished!!!!
|
thornfall alliance: 30pts bringing home the bacon
menoth: 134pts "burn heretics, BURN!" |
|
|
|
|
2011/01/20 17:22:47
Subject: Necron Temple Project - A Tale of LEDs and Blood (updated 01/20/11)
|
|
Longtime Dakkanaut
|
This looks briiliant
and don't worry you're not the only person to acidently cut yourself whilst doing the hobby, I had to spend a few hours in the hospital, getting half my index fingure put back together
|
|
This message was edited 2 times. Last update was at 2011/01/20 17:23:43
|
|
|
|
|
2011/01/20 19:21:12
Subject: Re:Necron Temple Project - A Tale of LEDs and Blood (updated 01/20/11)
|
|
Fixture of Dakka
drinking ale on the ground like russ intended
|
To fix the foam cutters you make a cutter with a base then a riser the thickness of the foam core and then the knife block so an offset U with the blade not out in the open.
|
|
This message was edited 1 time. Last update was at 2011/01/20 19:21:55
 Logan's Great Company Oh yeah kickin' Logan's Great Company Oh yeah kickin'  and not even bothering to take names. and not even bothering to take names.  2nd company 2nd company  3rd company ravenguard 3rd company ravenguard  House Navaros Forge world Lucious & Titan legion void runners House Navaros Forge world Lucious & Titan legion void runners   314th pie guard warboss 'ed krunchas waaaaaargh This thred needs more cow bell. Raised to acolyte of the children of the church of turtle pie by chaplain shrike 3/06/09 Help stop thread necro do not post in a thread more than a month old. "Dakkanaut" not 314th pie guard warboss 'ed krunchas waaaaaargh This thred needs more cow bell. Raised to acolyte of the children of the church of turtle pie by chaplain shrike 3/06/09 Help stop thread necro do not post in a thread more than a month old. "Dakkanaut" not "Dakkaite"
 Join the Church of the Children of Turtle Pie To become a member pm me or another member of the Church Join the Church of the Children of Turtle Pie To become a member pm me or another member of the Church  |
|
|
|
|
2011/01/21 02:06:36
Subject: Necron Temple Project - A Tale of LEDs and Blood (updated 01/20/11)
|
|

Strategizing Grey Knight Chapter Master
|
Your ability with terrain leaves me both envious and worried at the same time.
Envious at the pure ability and craftsmanship, combined with your patience and skill.
Worried because I laughed for at least 2 minutes at the nom nom nom top of your obelisk with the googly eyes.
I really like your great sense of humour please don’t ever stop.
|
IceAngel wrote:I must say Knightley, I am very envious of your squiggle ability. I mean, if squiggles were a tactical squad, you'd be the sergeant. If squiggles were an HQ, you'd be the special character. If squiggles were a way of life, you'd be Doctor Phil...
The Cleanest Painting blog ever!
Gitsplitta wrote:I am but a pretender... you are... the father of all squiggles. .
|
|
|
|
|
2011/01/21 02:36:54
Subject: Necron Temple Project - A Tale of LEDs and Blood (updated 01/18/11)
|
|
Regular Dakkanaut
|
whalemusic360 wrote:Ohh a new T-former blog, exciting! Where'd ya get the cool sheet-o-color, and are there other flavors?
Plastruct makes some, but there are a handful of plastic companies out there with different colored plexiglass as well.
moonshine wrote:This looks briiliant
and don't worry you're not the only person to acidently cut yourself whilst doing the hobby, I had to spend a few hours in the hospital, getting half my index fingure put back together
Yikes! I've been lucky enough to not have anything this bad happen so far, but what I lack in severity of wounds, I make up for in quantity and frequency. Whenever I hear stories of bodily harm from this hobby I have to ask how it happened though, so that the rest of us might avoid the same fate.
sonofruss wrote:To fix the foam cutters you make a cutter with a base then a riser the thickness of the foam core and then the knife block so an offset U with the blade not out in the open.
I'm having a hard time visualizing this, but if my blade isn't exposed, how will I be able to quickly grab it to use as a hastily improvised ninja-defense weapon or stabbing implement? 
Knightley wrote: please don’t ever stop.
See previous post about the voices.
Next update is coming later, hang tight guys n' gals, the finale is around the corner.
|
|
|
|
|
|
2011/01/21 05:01:53
Subject: Re:Necron Temple Project - A Tale of LEDs and Blood (updated 01/20/11)
|
|

Longtime Dakkanaut
|
Very inspiring work sir! So clean, well planned and professional. And we never have enough terrain blogs here.
|

“Of the fabulous hydra it is said, cut off one head and two will grow in its place”
- antique proverb
LEGION of PLASTIC blog |
|
|
|
|
2011/01/21 05:33:05
Subject: Re:Necron Temple Project - A Tale of LEDs and Blood (updated 01/20/11)
|
|
Regular Dakkanaut
|
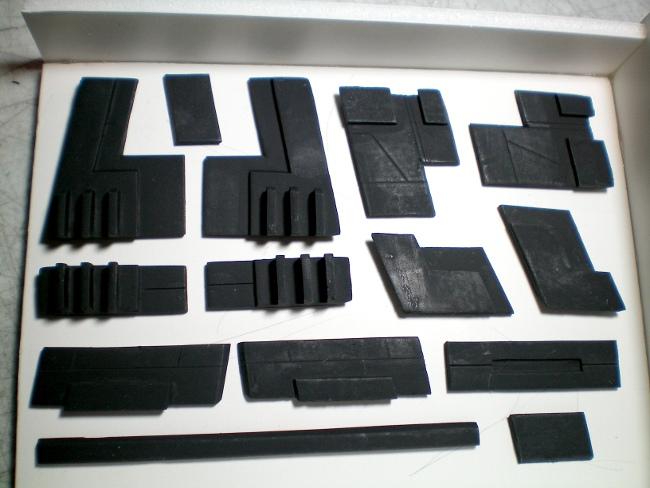
Previously I cast piles of Necronish parts in white resin. Next phase will consist of attaching those parts, finishing up the miscellaneous areas of plating and gap filling, then working on the base.
I designed these pieces to attach at the same angles of the Temple, so for the most part all I had to do was stick them in place where needed. This was a fun phase because in a short time I could clearly see how well my plan would work. I use super glue/cyano glue with all my resin parts, and a bottle of accelerator to speed up the process of hopelessly bonding tiny pieces to my fingers.

Now it was also time to start planning my damaged areas. I gave some thought to what kind of damage this magical Necron metal would sustain from heavy firepower. My interpretation of their technology told me that that they probably had a seamless, heavy duty structure, so there would be no bent and twisted layers of metal and girders like a human building, and since I would be making this structure in metal rather than the often imagined “black marble,” I wouldn’t be making it shattered like stone either. I tried to strike a balance between the two, cutting jagged edges to be filled and smoothed later, similar to what you might see in relatively brittle metal fatigue.
Next I glued the two loose LEDs to the bottom of the inside of the Temple, then constructed a backing for the damaged hole in the side.
The sets of iconography was attached to the front and back, over extra plasticard plating.
After all the trim pieces were in place, I rolled very thin strips of milliput to fill any remaining gaps between the resin parts, smoothing it out with a damp razor blade. After the milliput, I started laying down green squadron putty into the rest of the structure’s seams and gaps.
It looks rough, but would be further trimmed and sanded after hardening.
Another “turn it on and step back” test. It’s too bad Necrons prefer green, the blue light looks pretty nice also.
Next the roof of the Temple, which I wanted to give a dynamic and exotic touch, so I decided on a dilating iris diaphragm hatch.
 Figure 3-4. Circular Dilating “Iris” Diaphragm Mechanism for Dynamic Nanopore Sizing. Courtesy of the Foresight Institute – Nanomedicine Journal.
“Circular dilating iris diaphragm” is a mouthful to say, and a genius design, but in the real world it would appear they are currently used only in nano-scale medicine unless someone can point me to a real-world example that people really walk through.
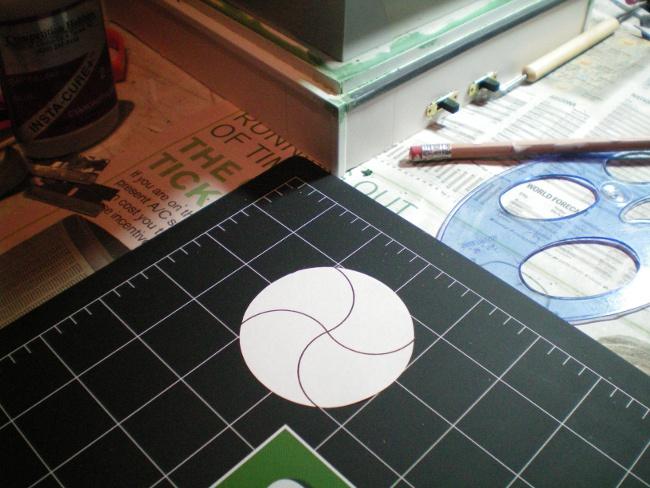
Too bad I didn’t have the time to make mine functional. Just the look was all I needed. I drew quick template on my computer and printed it out to use as a guide.
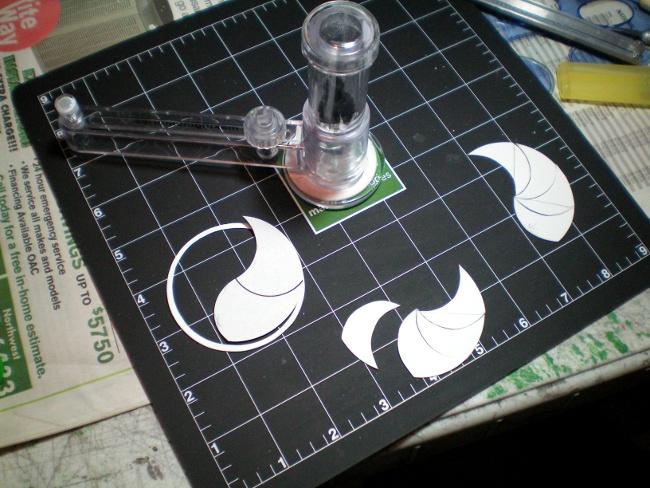
I used a circular cutter to make the round back piece and trim ring, then carefulyl cut out the “petals” of the iris with an exacto.
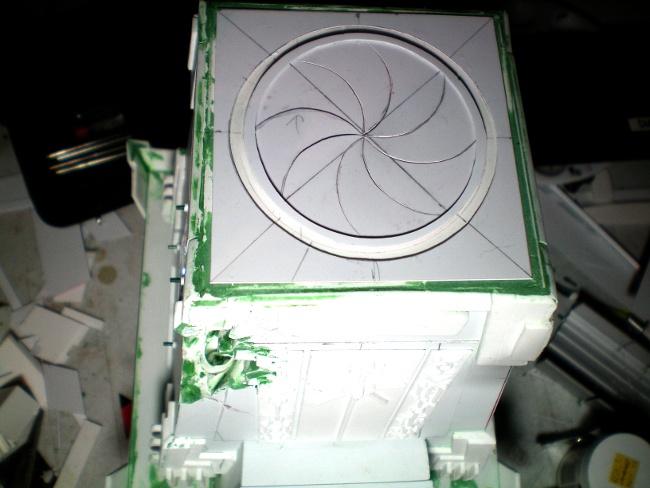
The finished hatch looks a little confusing because I have so many guide-lines drawn across everything. Once primed, my mad scrawlings and marks would disappear under the paint.
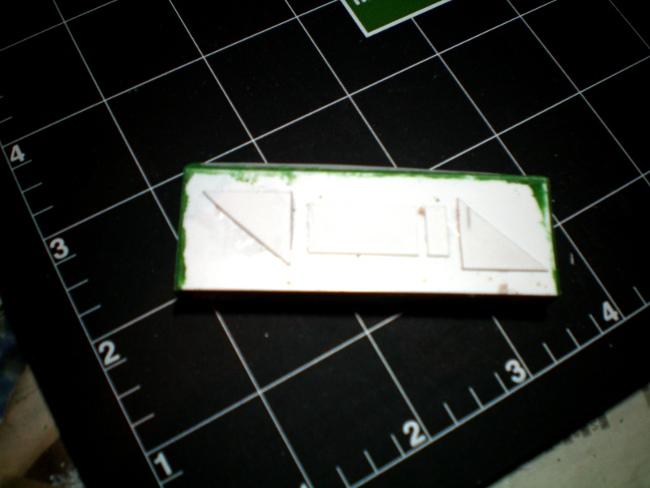
This is the switch cover to hide the ugly metal and plastic switches on the back of the Temple. Included is the universal symbol for “slide it this way or that way.”
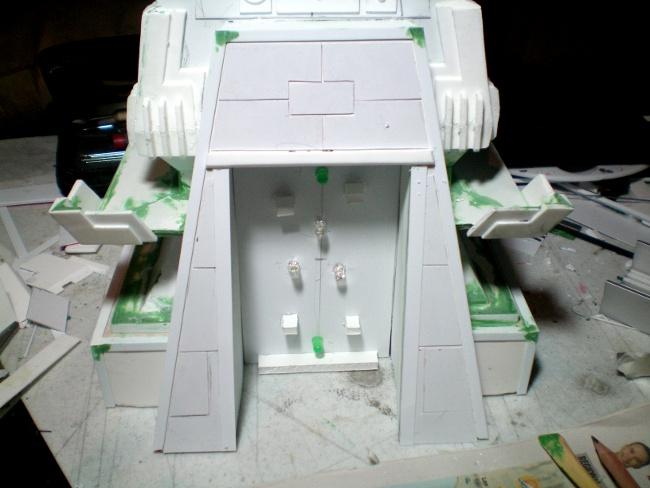
I finished adding plates to the front entry, final trim pieces and filled out the damaged hole in the corner with putty and extra plastic parts, then set the whole Temple aside to set and be sanded smooth later, then it would finally be time to prime this thing.
But I had another huge piece to work on next, the base and obelisks were still bare and unfinished.
Next: The Finale!
|
|
|
|
|
|
2011/01/21 06:33:19
Subject: Necron Temple Project - A Tale of LEDs and Blood (Updated again 01/20/11, pic heavy)
|
|
Morphing Obliterator
|
So awesome.
Love checking these scenery blogs!
|
|
|
|
|
2011/01/21 07:19:13
Subject: Re:Necron Temple Project - A Tale of LEDs and Blood (Updated again 01/20/11, pic heavy)
|
|
Liche Priest Hierophant
|
Great Necron terrain!
Subscribed!
|
|
|
|
|
2011/01/21 08:42:02
Subject: Necron Temple Project - A Tale of LEDs and Blood (Updated again 01/20/11, pic heavy)
|
|
Cackling Chaos Conscript
|
wow, that is really spot on necron architecture. and thanks for the angle cutter idea, that's pure gold!
|
Wie ein Sturm so wüten wir in die Schlacht hinein,
Das Heer es singt, der Kampf beginnt, der Sieg wird unser sein! |
|
|
|
|
|
|