Switch Theme:

Feathering/blending questions  [RSS] Share on facebook Share on Twitter Submit to Reddit
»
Author Message
Advert


Forum adverts like this one are shown to any user who is not logged in. Join us by filling out a tiny 3 field form and you will get your own, free, dakka user account which gives a good range of benefits to you:
  • No adverts like this in the forums anymore.
  • Times and dates in your local timezone.
  • Full tracking of what you have read so you can skip to your first unread post, easily see what has changed since you last logged in, and easily see what is new at a glance.
  • Email notifications for threads you want to watch closely.
  • Being a part of the oldest wargaming community on the net.
If you are already a member then feel free to login now.


Made in sg
Fresh-Faced New User


ive just been to coolmini and was reading the tutorial about feathering, it says going from a lighter tone to a darker tone of color or vice versa, is it possible to apply the technique to blend different colors together? im building an army for deathguard and im trying to do feathering for the first time to from the green of the armor to the sick yellow pus of the green stuff i have on it.

i wont say im the best at painting, so some answers to my doubts will be greatly appreciated.

Only But The Laughter Of Thirsting Gods 
   
Made in gb
Regular Dakkanaut


Yes.

Got your pallette and lay out your graduations.

From green to yellow

Base Green Colour

2:1 Green to Yellow

1:2 Green to Yellow

Yellow.

Base with the pure green. Now start to graduate. Cover maybe 70% of the blend area with the 2:1 - thin coats. 1:2 is next at say 40-50%, thin coat, and then maybe pure yellow at 20% or so. If it looks a little stark you can oull it back with a wash of your original green with a touch of yellow and 2:1 water to paint.

That's a quick and dirty method.

   
Made in sg
Fresh-Faced New User


Phayse wrote:Yes.

Got your pallette and lay out your graduations.

From green to yellow

Base Green Colour

2:1 Green to Yellow

1:2 Green to Yellow

Yellow.

Base with the pure green. Now start to graduate. Cover maybe 70% of the blend area with the 2:1 - thin coats. 1:2 is next at say 40-50%, thin coat, and then maybe pure yellow at 20% or so. If it looks a little stark you can oull it back with a wash of your original green with a touch of yellow and 2:1 water to paint.

That's a quick and dirty method.


haha what if i want it the pain staking way? and i heard that you gotta do it while the paint is still wet or somethin is it?

Only But The Laughter Of Thirsting Gods 
   
Made in gb
Screamin' Stormboy


London UK

Thats called wet blending when the paint is still wet.
   
Made in au
Chaplain with Hate to Spare


Many layers and much patience grasshopper, don't rush and you can always keep adding color as long as you are thinning it properly until you get the right shdes you're after, also using a glaze wouldn't hurt either to tie the colors in.

Flesh Eaters 4,500 points


" I will constantly have those in my head telling me how lazy and ugly and whorish I am. You sir, are a true friend " - KingCracker

"Nah, I'm just way too lazy to stand up so I keep sitting and paint" - Sigur

"I think the NMM technique with metals is just MNMM. Same sound I make while eating a good pizza" - Whalemusic360 
   
Made in gb
Regular Dakkanaut


ionsel wrote:
Phayse wrote:Yes.

Got your pallette and lay out your graduations.

From green to yellow

Base Green Colour

2:1 Green to Yellow

1:2 Green to Yellow

Yellow.

Base with the pure green. Now start to graduate. Cover maybe 70% of the blend area with the 2:1 - thin coats. 1:2 is next at say 40-50%, thin coat, and then maybe pure yellow at 20% or so. If it looks a little stark you can oull it back with a wash of your original green with a touch of yellow and 2:1 water to paint.

That's a quick and dirty method.


haha what if i want it the pain staking way? and i heard that you gotta do it while the paint is still wet or somethin is it?


That's wet blending. It's a skill that can take months, years to get down to a T. The above method is often called "glazing" Successive layers of colour to create a gradient.


I think for nurgle though, you can't beat a nice vallejo plague brown instead of your yellow. It's kind of dysentry beige.

Awesome.

Anyhow - wet blending.

You need a lot of patience, and correct materials are a must. You absolutely MUST have the following

Drying retarder. Made by liquitex, vallejo and a few other paint suppliers. It stops the paint drying as fast, allowing more time to blend. If you try to get a blend on paint without it, chances are the paint will start to dry, forming a skin. As you blend, you end up with this skin getting formed into lumps, so even if the blend is good, the surface looks like crap. You may think "nice look for nurgle" - don't. There is no word for how awful the finish is.

Your transition will be different here. With acrylic, the best bet is to lay down the midtone first. We're only using 3 mixes this time.

Dark: Your green
Midtone: Your 1:1 Yellow/Green
Light: Your yellow.

Cover the blend area with the midtone. With the paint wet, add a touch of your dark to the area you need it. Try not to overload the area as thick/too much paint dries lumpy. Gently mix the two together, pulling first the green into the midtone, and then carefully pulling the midtone back to the green. This will take a bit of time, as you may overrun into the green area, which means you'll need to apply more green and repeat the process. Do the same for wherever you want the yellow.

Here's an example of a quick and dirty blend.


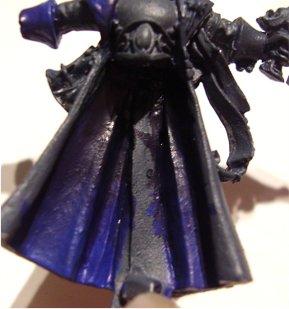
A quick blend from dark purple to blue. Very rough, as I'd run out of drying retarder.

It's not for the faint hearted. The first few attempts will likely destroy the will to paint. Especially if you plan to repeat it across an army.

Stick with glazes!


Forum Index » Painting & Modeling
Go to: