| Author |
Message |
 |
|
|
|
|
Advert
|
Forum adverts like this one are shown to any user who is not logged in. Join us by filling out a tiny 3 field form and you will get your own, free, dakka user account which gives a good range of benefits to you:
- No adverts like this in the forums anymore.
- Times and dates in your local timezone.
- Full tracking of what you have read so you can skip to your first unread post, easily see what has changed since you last logged in, and easily see what is new at a glance.
- Email notifications for threads you want to watch closely.
- Being a part of the oldest wargaming community on the net.
If you are already a member then feel free to login now. |
|
 |
2012/01/02 20:15:48
Subject: Mutley's minis
|
|

Widowmaker
|
Hullo. Since I was a tiny Mutley, I have been building Games Workshop kits. 40k has been my sole wargaming experience. Time to change that. Warmachine has always tickled my fancy, so I am giving it a go.
So, the starter set contains two small forces. The frostbitten Khador and the rather zealous forces from The Protectorate of Menoth. White and Red. The Russians and the devout of fiery faith. You get a whole bunch of plastic miniatures in the box. Both sides get a Warcaster, some heavy infantry and a few hulking, steam powered, arcane controlled robots called Warjacks. Yes I know. What an awesome concept.
So, opening the box, I was impressed at what came tumbling out. Individually packaged and de-sprued models. A rule book. Stat cards. Dice. A few quick start guides and a mini version of a Hordes/Warmachine magazine. Pretty nifty. Time to get building.
I opted to get started with the Khador forces first, as I want to get gaming as soon as possible. So, opening up the Khador Man-O-War shocktroopers I got to work.
Now, the plastic used by Privateer Press does not seem to be polystyrene based and is more of an ultra hard and heavy duty resin. As such, polystyrene cement (the usual plastic glue) will not work at all. Cleaning up the flash and where the pieces had been affixed to the sprues showed just how tough this material is.

The Men-O-War come as an 8 piece kit (11 piece for the leader) with plenty of ball joints. Usually this makes for fairly simple construction of using poly cement, as it creates a very strong bond. Privateer Press themselves recommend superglue (cyanoacrylate). I find that superglue to form a brittle, easy to break bond when used on both metal and resin. I much prefer to use a mix of two part epoxy resin, and pinning. So I did the same here.


I also discovered that a few of the axes for the Men-O-War has become warped. When working with resin, a quick blast of heat from a hair dryer or brief immersion in very hot water softens the component, allowing it to be repositioned or straightened. The same is true for this plastic.


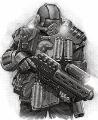
So here have one assembled Man-O-War shock trooper. Quite an impressive fellow really.

And the completed unit. I watered down PVA glue and painted it onto the bases, then dipped them in sand. After it had dried, a second quick coat of PVA seals it in place (stops errant granules ending up stuck all over your model when the time comes to undercoat/paint).

This is Kommander Sorscha. The Khador Warcaster who casts spells at the enemy and controls the Warjacks. I am glad the material she is built from is so strong and sturdy. Some of her components are very thin and fiddly indeed.


I think it is time to take a break there while things dry. I am really rather pleased with the look of these models, as well as how they have turned out. I think building the rest of them is going to be a real blast.
|
|
This message was edited 2 times. Last update was at 2013/01/29 21:34:19
|
|
|
 |
|
2012/01/03 09:20:07
Subject: Warmachine: A foray into the world of Privateer Press
|
|

Paingiver
|
Welcome to the Warmachine side of things. The two player starter is really great value for money with lot of nice figs.
Have you decided on the colors for your Khador yet?
|
|
|
|
|
|
2012/01/03 12:09:36
Subject: Warmachine: A foray into the world of Privateer Press
|
|
Widowmaker
|
Metsuri wrote:Welcome to the Warmachine side of things. The two player starter is really great value for money with lot of nice figs.
Have you decided on the colors for your Khador yet?
I am currently pondering that very subject. So far I am thinking of weathered winter grey with a dash of red here and there. Automatically Appended Next Post: This is the Destroyer. Or rather it will be when I finish cleaning up the parts and assemble him. For whatever, there are more mould lines, flash and injection points on the Warjack kits than on the Man-O-War shocktroopers. As such, it too rather a long time to get them ready for assembly.

And here it is, all built and ready for painting. I went for a bit of a dynamic pose with him. Or tried to at least. For all those ball joints in the arms, the legs are depressingly static.

Here is the second completed warjack, the Juggernaut.

So there you have it. The full, assembled might of Khador, as contained within the Warmachine starter box.

|
|
This message was edited 1 time. Last update was at 2012/01/03 22:10:05
|
|
|
|
|
2012/01/04 07:40:30
Subject: Warmachine: A foray into the world of Privateer Press
|
|
Paingiver
|
Mutley wrote:Metsuri wrote:Have you decided on the colors for your Khador yet?
I am currently pondering that very subject. So far I am thinking of weathered winter grey with a dash of red here and there.
That sounds good, realistic military modelling influenced schemes work well with Khador. The weathering will be important to get some life to the large plain armor plates of the jacks.
Mutley wrote:This is the Destroyer. Or rather it will be when I finish cleaning up the parts and assemble him. For whatever, there are more mould lines, flash and injection points on the Warjack kits than on the Man-O-War shocktroopers. As such, it too rather a long time to get them ready for assembly.
The multijack kits were among the first plastic kits from PP, the shocktroopers are the latest. I imagine that they have learned a lot of how the material behaves in the time between and have adjusted the process accordingly.
|
|
|
|
|
|
2012/01/04 08:05:53
Subject: Warmachine: A foray into the world of Privateer Press
|
|
Widowmaker
|
Metsuri wrote:Mutley wrote:Metsuri wrote:Have you decided on the colors for your Khador yet?
I am currently pondering that very subject. So far I am thinking of weathered winter grey with a dash of red here and there.
That sounds good, realistic military modelling influenced schemes work well with Khador. The weathering will be important to get some life to the large plain armor plates of the jacks.
Mutley wrote:This is the Destroyer. Or rather it will be when I finish cleaning up the parts and assemble him. For whatever, there are more mould lines, flash and injection points on the Warjack kits than on the Man-O-War shocktroopers. As such, it too rather a long time to get them ready for assembly.
The multijack kits were among the first plastic kits from PP, the shocktroopers are the latest. I imagine that they have learned a lot of how the material behaves in the time between and have adjusted the process accordingly.
I had assumed as much, that makes a great deal of sense! I was de-bagging the Menoth force last night and noticed a few pieces missing. Two heads and a shield. The perils of not coming on sprues I suppose, and little plastic bags (so many sharp pieces to tear holes). Privateer Press have a dedicated service for this sort of thing, so I shall have to wait and see if replacements can be sent out.
|
|
|
|
|
2012/01/04 23:00:16
Subject: Re:Warmachine: A foray into the world of Privateer Press
|
|
Widowmaker
|
Getting on with getting on. Undercoated the whole bunch of models. So, to begin with my rusted, worn warriors of Khador.

The next step was to give a quick coat of Tin Bitz, and followed that up with a wash of Badab Black.

|
|
|
|
|
2012/01/05 18:57:46
Subject: Re:Warmachine: A foray into the world of Privateer Press
|
|
Widowmaker
|
Next step in the rust effect was to create a wash of my own. I mixed Blazing Orange with Bestial Brown, then topped up with water. A heavy wash was then applied to the whole model.

And here it is dry.

Next up, a quick and light drybrush of Boltgun Metal.

Then a wash of Devlan Mud to finish. Hey presto. A rusted suit of armour ready for painting.
 Automatically Appended Next Post: Automatically Appended Next Post:
Starting to get there methinks.


 Automatically Appended Next Post: Automatically Appended Next Post:
The wife noticed that the red looked far too dull. And looked a bit pink. She was quite right. It looks much better now.

|
|
This message was edited 2 times. Last update was at 2012/01/05 23:33:00
|
|
|
|
|
2012/01/09 07:37:59
Subject: Warmachine: A foray into the world of Privateer Press
|
|
Paingiver
|
I agree with your wife, the red needs to be warm and strong to make the needed contrast to the rest of the suit.
Nice progress, cannot wait for the next pics.
|
|
|
|
|
|
2012/01/09 13:25:55
Subject: Warmachine: A foray into the world of Privateer Press
|
|
Widowmaker
|
Metsuri wrote:I agree with your wife, the red needs to be warm and strong to make the needed contrast to the rest of the suit.
Nice progress, cannot wait for the next pics.
Thanks! I have begun work on the Warcaster...but I am not happy with the paintjob I have done on her flesh. I need to work on my skin painting technique it seems. Ah well, back to painting school for me.
|
|
|
|
|
2012/01/10 21:12:37
Subject: Re:Warmachine: A foray into the world of Privateer Press
|
|
Widowmaker
|
|
|
|
|
|
2012/01/11 07:51:51
Subject: Warmachine: A foray into the world of Privateer Press
|
|
Paingiver
|
She looks good, are you going to keep the grey long coats for your other light infantry?
The snow on the base looks a bit too fluffy, but the worn metal is nice and muted.
|
|
|
|
|
|
2012/01/11 08:13:59
Subject: Warmachine: A foray into the world of Privateer Press
|
|
Widowmaker
|
Metsuri wrote:She looks good, are you going to keep the grey long coats for your other light infantry?
The snow on the base looks a bit too fluffy, but the worn metal is nice and muted.
I do indeed! The bases are not finished yet, they are to get a watered down coat of PVA to seal it and reduced that fluffy look.
|
|
|
|
|
2012/01/11 09:20:00
Subject: Warmachine: A foray into the world of Privateer Press
|
|

Doc Brown
|
Mutley wrote:
I had assumed as much, that makes a great deal of sense! I was de-bagging the Menoth force last night and noticed a few pieces missing. Two heads and a shield. The perils of not coming on sprues I suppose, and little plastic bags (so many sharp pieces to tear holes). Privateer Press have a dedicated service for this sort of thing, so I shall have to wait and see if replacements can be sent out.
Welcome to Warmachine! I like your rust technique. Privateer Press replacement/fulfillment service is top notch. I'll eagerly await further updates!
|
Mordian Iron Guard, Red Ork Waaagh, Space Wolves, Dark Angels, Praetorians IG & Fenris IG, Saxons/Vikings Warhammer Ancients as well as some Warmachine/Hordes Cygnar, Khador, Mercenary, Menoth models and a Giant Cardstock Pirate Ship P&M Blog
Mordian Iron Guard IG Army Progress Image Gallery
Space Wolves Image Gallery
Warmachine / Hordes Houston, Texas
Warhammer 40k Houston, Texas
Warhammer Fantasy Facebook Houston, Texas
Warhammer Fantasy Yahoo Group Houston, Texas
|
|
|
|
|
2012/01/20 12:42:17
Subject: Re:Warmachine: A foray into the world of Privateer Press
|
|
Widowmaker
|
And here we go. On to the main reason I took up this game to begin with. Warjacks. I just love the look of these things. I am resisting the urge to go over the top for the two Khador Warjacks in the starter set, so I will keep them simple and in keeping with the Man-O-War shocktroopers. When I turn my hand to some of the character jacks and specials I may experiment a little more.
For a start, both of these hulking brutes were given a spray of black undercoat.


Next up, a quick, light and thinned coat of Games Workshop Tin Bitz

 Automatically Appended Next Post:
 Next up, a heavy application of my ‘Rust Wash’ on both Warjacks.

Once the wash has dried, next comes a light drybrush of Boltgun Metal.


|
|
This message was edited 1 time. Last update was at 2012/01/20 12:51:04
|
|
|
|
|
2012/01/26 22:40:02
Subject: Re:Warmachine: A foray into the world of Privateer Press
|
|
Widowmaker
|
Work continues. A few light, watered down coats of Codex Grey.

I made sure to leave areas of bare metal around the edges and rivets. Places where chips, scratches and rust are likely to be in evidence.
|
|
This message was edited 1 time. Last update was at 2012/01/26 22:46:29
|
|
|
|
|
2012/01/27 08:48:08
Subject: Warmachine: A foray into the world of Privateer Press
|
|
Paingiver
|
Looks good, I like how the dirty metals bring some warmth to the jack.
|
|
|
|
|
|
2012/01/27 14:07:54
Subject: Re:Warmachine: A foray into the world of Privateer Press
|
|
Widowmaker
|
Looks good, I like how the dirty metals bring some warmth to the jack.
Thanks! More work to come on the rust effects, so stay tuned!
Automatically Appended Next Post: 
A touch more of my rust wash on the rivets and recesses.
|
|
This message was edited 1 time. Last update was at 2012/01/27 21:31:54
|
|
|
|
|
2012/01/29 00:23:39
Subject: Re:Warmachine: A foray into the world of Privateer Press
|
|
Widowmaker
|
Next up, a few light coats of Blood Red on the shoulder plates. After that, a drybrush of Boltgun Metal on the axe blade. The cartridges in the gun magazine are Dwarf Bronze, washed with Devlan Mud. On goes the flock and hey presto...

So that concludes the Khador build! These chaps will be expanded upon in the future, but for now at least, I am moving on to another faction!

-----------------------------------------------------
And without further ado...a pile of parts that will shortly become Commander Coleman Stryker. Cleaning up the model was easy enough. There is no flash and very little in the way of mould lines, as they are for the most part cunningly hidden amdist the detail of the model itself. What little did need doing was awkward as sin!

But well worth the effort I feel.

And another pile of bits! This one will be the Charger light Warjack. Again, a little work needed to clean up the pieces. The hammer and pins where the legs fit onto the body needed a quick soak in very hot water as they had become warped in transit. Then it was a case of drilling and pinning...then a dob of epoxy here, and another there and...

One finished Charger!

|
|
|
|
|
2012/01/29 00:29:23
Subject: Warmachine: A foray into the world of Privateer Press
|
|
Fixture of Dakka
|
I'm a little confused here, Muttley - I thought you were going to go onto the Protectorate once you finished the Khadoran half of the 2 player box.
|
2021-4 Plog - Here we go again... - my fifth attempt at a Dakka PLOG
My Pile of Potential - updates ongoing...
Gamgee on Tau Players wrote:we all kill cats and sell our own families to the devil and eat live puppies.
 Kanluwen wrote: Kanluwen wrote:This is, emphatically, why I will continue suggesting nuking Guard and starting over again. It's a legacy army that needs to be rebooted with a new focal point.
Confirmation of why no-one should listen to Kanluwen when it comes to the IG - he doesn't want the IG, he want's Kan's New Model Army...
tneva82 wrote:You aren't even trying ty pretend for honest arqument. Open bad faith trolling.
- No reason to keep this here, unless people want to use it for something... |
|
|
|
|
2012/01/29 00:38:29
Subject: Warmachine: A foray into the world of Privateer Press
|
|
Widowmaker
|
Dysartes wrote:I'm a little confused here, Muttley - I thought you were going to go onto the Protectorate once you finished the Khadoran half of the 2 player box.
Ahh, that was the plan, but unfortunately a few of the Menoth models are missing parts. I am still waiting for the replacement bits to arrive...and until they do, I am putting the Menoth force on hold and getting on with my Cygnar contingent.
|
|
|
|
|
2012/01/29 07:24:15
Subject: Warmachine: A foray into the world of Privateer Press
|
|
Fixture of Dakka
|
Well, that makes sense - I take it you have the Cygnar starter, then?
|
2021-4 Plog - Here we go again... - my fifth attempt at a Dakka PLOG
My Pile of Potential - updates ongoing...
Gamgee on Tau Players wrote:we all kill cats and sell our own families to the devil and eat live puppies.
Kanluwen wrote:This is, emphatically, why I will continue suggesting nuking Guard and starting over again. It's a legacy army that needs to be rebooted with a new focal point.
Confirmation of why no-one should listen to Kanluwen when it comes to the IG - he doesn't want the IG, he want's Kan's New Model Army...
tneva82 wrote:You aren't even trying ty pretend for honest arqument. Open bad faith trolling.
- No reason to keep this here, unless people want to use it for something... |
|
|
|
|
2012/01/29 10:01:24
Subject: Warmachine: A foray into the world of Privateer Press
|
|
Widowmaker
|
Dysartes wrote:Well, that makes sense - I take it you have the Cygnar starter, then?
I do indeed. And a box of trenchers. I just love the look of those guys!
|
|
|
|
|
2012/01/30 08:07:38
Subject: Warmachine: A foray into the world of Privateer Press
|
|
Paingiver
|
Mutley wrote:I do indeed. And a box of trenchers. I just love the look of those guys!
Trenchers are nice, but so full of kit that I loath painting them. I still have 3 more to go for the full unit, they have been waiting for several years and are not getting any closer on the paint queue's top.
Nice work on the red panels of the jacks, they made the jacks really come to life. You have a nice and coherent Khador force.
|
|
|
|
|
|
2012/02/05 11:00:57
Subject: Re:Warmachine: A foray into the world of Privateer Press
|
|
Widowmaker
|
Another pile of bits, another Warjack to be. Woohoo! I just love these kits!

Only took a little cleaning up to get the parts prepped for assembly. The thing that needed seeing to the most was the spear. A serious case of brewers droop. I gave super-glue a go on my last Warjack and was not happy with the bond. After stripping off the glue, I tried again with pins and quick drying epoxy. Same problem. So it is back to my favoured method of pins and slow drying epoxy. Time consuming but nigh on indestructible.

And there you have it.

----------------------------------------------------
STOP! I like the look of this kit, but the pose is a bit...pedestrian. Time for a quick conversion! From what I have seen, this is quite a common one, but the result is cracking.
Step one: Get the spear. Nice and straight after a quick soak in near boiling water.

Step two: Cut the business end and counterweight end off the grip. Very carefully drill the grip and the poles and add pins. Then swap them over.

And there you go. The Warjack now looks like he is either about to lob that thing through some poor sod's chest, or a downward, overarm stab. Either way...nasty.


|
|
|
|
|
2012/02/05 12:58:24
Subject: Warmachine: A foray into the world of Privateer Press
|
|
Land Raider Pilot on Cruise Control
|
Whenever I see Warmachine like this I want to get into it. Some lovely models there and paintjobs to match
|
"If you don't have Funzo, you're nothin'!"
"I'm cancelling you out of shame, like my subscription to white dwarf"
Never use a long word where a short one will do. |
|
|
|
|
2012/02/05 13:53:55
Subject: Warmachine: A foray into the world of Privateer Press
|
|
Widowmaker
|
Davylove21 wrote:Whenever I see Warmachine like this I want to get into it. Some lovely models there and paintjobs to match
Thanks! Oh, and... join usssssssss 
|
|
|
|
|
2012/02/06 08:40:59
Subject: Warmachine: A foray into the world of Privateer Press
|
|
Doc Brown
|
Mutley wrote:Dysartes wrote:Well, that makes sense - I take it you have the Cygnar starter, then?
I do indeed. And a box of trenchers. I just love the look of those guys!
I dig that simple, but sweet conversion on the lancer model, keep the great work coming!
I love me some Trenchers! I recommend fielding them at any size with the Officer & Sniper, that 'Cautious Advance' Order is amazing and highly effective in any game, with the addition of other models like the trencher grenadier, they have the potential for the highest CRA in the game. I field them with a full unit + O&S + 2x Trencher Grenadier in a staggered pattern:
x x x s x x x
g x x o x x g
They begin the game Advance deployed & dug in, Base Def 13 & Base Arm 13, then receive the 'cautious advance' order move 6" and pop smoke with both lines, this creates an approx 5" wall of smoke from the front of the line, the unit then gets Cover from being dug in (+4 Def ) and concealment (+2 Def ), this makes them Def 19 from ranged attacks, add Rhupert Carvolio behind them and you can give them another +1 Def or tough. And anyone behind that wall of smoke can't be targeted as they're behind more than 3" of concealment. Give them +3 Arm from a Journeyman or Snipe from another warcaster and they just get even more brutal.
The big thing you'll have to deal with is they don't block line of sight when they're dug in and that works for both sides of the table.
They're also pretty sweet looking models and you're going to have fun making some smoke templates.
Davylove21 wrote:Whenever I see Warmachine like this I want to get into it. Some lovely models there and paintjobs to match
I like Warmachine and Hordes, they're two great games that can be played together or separately and its affordable to get into. I also like a lot of other wargames. I say find a local store and try out a game with some friends.
|
Mordian Iron Guard, Red Ork Waaagh, Space Wolves, Dark Angels, Praetorians IG & Fenris IG, Saxons/Vikings Warhammer Ancients as well as some Warmachine/Hordes Cygnar, Khador, Mercenary, Menoth models and a Giant Cardstock Pirate Ship P&M Blog
Mordian Iron Guard IG Army Progress Image Gallery
Space Wolves Image Gallery
Warmachine / Hordes Houston, Texas
Warhammer 40k Houston, Texas
Warhammer Fantasy Facebook Houston, Texas
Warhammer Fantasy Yahoo Group Houston, Texas
|
|
|
|
|
2012/02/07 11:32:06
Subject: Re:Warmachine: A foray into the world of Privateer Press
|
|
Widowmaker
|
And without any further ado...on to the Ironclad. Love this model. Love it, love it, love it! And here it is, in all its multipart glory.

Unfortunately, the hammer for the Ironclad was suffering a bit from brewers droop, and seems to have warped in transit.

This is an easy enough fix, just pop the part in near boiling water for about 30 seconds or so, then simply bend the piece back into the correct shape. When the part cools, it will be good as new.
So, with the warped part fixed, time to clean up and prep for assembly. Mould lines, injection points and flash...all removed with files and scalpels. Now, the pose for the Ironclad is nice enough but a bit mundane for me. I do not want it to be stood static as if about to attack, or on the defence, I want it charging and about to turn someone into jam with that hammer. Firstly, I clipped the pegs off the legs at the hip joint and glued them into place on the pelvis. Drilling the pegs and fitting pins to the hip joints on the legs allows me to repose them. I should then be able to create a lumbering/running pose and tilt the whole thing forward. I also chopped the hammer head off the shaft and pinned it. This is to allow me to repose the angle of the hammer for the swinging effect I want. So it could be an over the top pound, or a sideways swing. I also pinned the waist and wrists.

With all that done, I drilled the leg that will be the sole support of the model once I am finished, and fitted it to the base via pin and epoxy for an ultra strong hold that should hold up to the rough and tumble of tabletop life. I then added some blutak to the components and had a quick fiddle around for a pose I like the look of.

|
|
This message was edited 1 time. Last update was at 2012/02/07 12:22:00
|
|
|
|
|
2012/02/07 11:45:20
Subject: Warmachine: A foray into the world of Privateer Press
|
|

Screaming Shining Spear
|
Looking good. I'll get the 2-player starter set someday, if only for the Menoth. Will probably keep the Khador though, to strongarm my brother into trying it out.
|
|
|
|
|
|
2012/02/10 11:26:09
Subject: Warmachine: A foray into the world of Privateer Press
|
|
Doc Brown
|
Great work, I would recommend taking a look at the heavy and light warjack kits. Especially the heavy kits and consider magnetizing the arm sockets so you can swap out the arms.
|
Mordian Iron Guard, Red Ork Waaagh, Space Wolves, Dark Angels, Praetorians IG & Fenris IG, Saxons/Vikings Warhammer Ancients as well as some Warmachine/Hordes Cygnar, Khador, Mercenary, Menoth models and a Giant Cardstock Pirate Ship P&M Blog
Mordian Iron Guard IG Army Progress Image Gallery
Space Wolves Image Gallery
Warmachine / Hordes Houston, Texas
Warhammer 40k Houston, Texas
Warhammer Fantasy Facebook Houston, Texas
Warhammer Fantasy Yahoo Group Houston, Texas
|
|
|
|
|
|
|


