The Kabal of the Drowned Gardens VS The Hawk Lords Battle Report: "Death Came Swirling Down"
The best games of
40k are the ones where victory is decided after seven hard fought turns by the tattered remnants of both armies and the final few critical dice rolls. I just played one of those ideal games a couple of days ago, which motivated me to finally try my hand at writing up a battle report.
I’ve been running an active P&M blog in that section of the Dakka Forums, chronicling the growth of The Kabal of the Drowned Gardens:
http://www.dakkadakka.com/dakkaforum/posts/list/378881.page
But, now that the army has reached a respectable size, it’s time for the Kabal to extend its influence into a whole new section of DakkaDakka!
I’m using Microsoft Word (yes, I should get Vassal) for the diagrams, distances, sizes and model placements only generally indicative. On the other hand, I did my best to get the major events and decisions right. So while units may look like they are way out of range or out of line of sight in the diagrams, it was a legal move in the actual game. In the same vein, while I remember my decisions very well, I’m fuzzier on my friend’s. So if you’re thinking, “why would the Marine player shoot that?” it’s probably me remembering wrong. My choices, however, are entirely open to criticism.

Well, with the disclaimers out of the way, let’s begin!
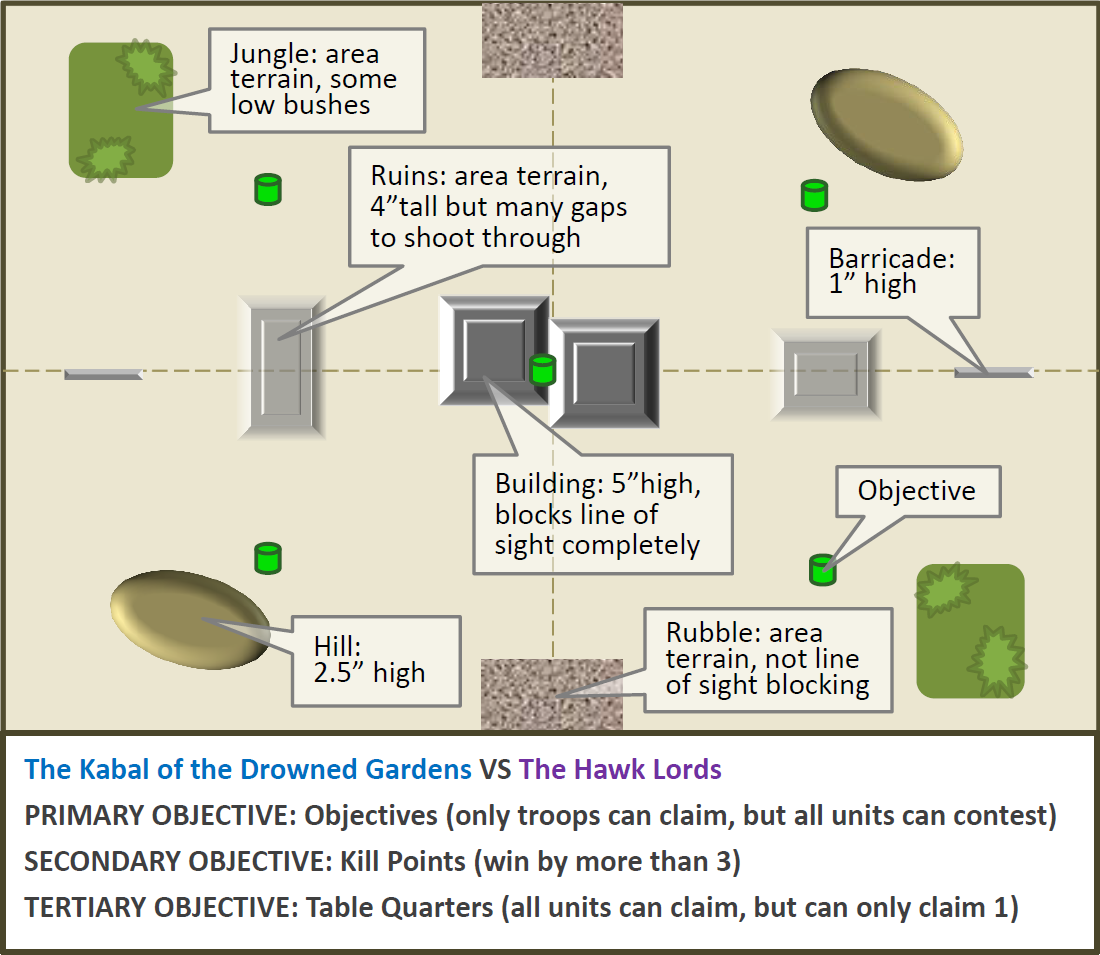
THE MISSION & TERRAIN
We decided on a Nova Open style mission (but simplified) and rolled to randomly determine the ranking of the objectives.
Primary: Objectives
As rulebook mission except placement is set.
Secondary: Kill Points
As rulebook mission but must win by more than 3 Kill Points.
Tertiary: Table Quarters
All units may claim/contest quarters, but only one quarter each (the quarter the majority of the unit is in). If a unit straddles multiple quarters equally then randomly select the quarter it’s in.
The Primary is the Win Condition; the Secondary is the 1st tiebreaker and the Tertiary the 2nd tiebreaker.
The “mirror match” terrain was a trial of the tournament setup recommended on yesthetruthhurts.com.
 THE LISTS
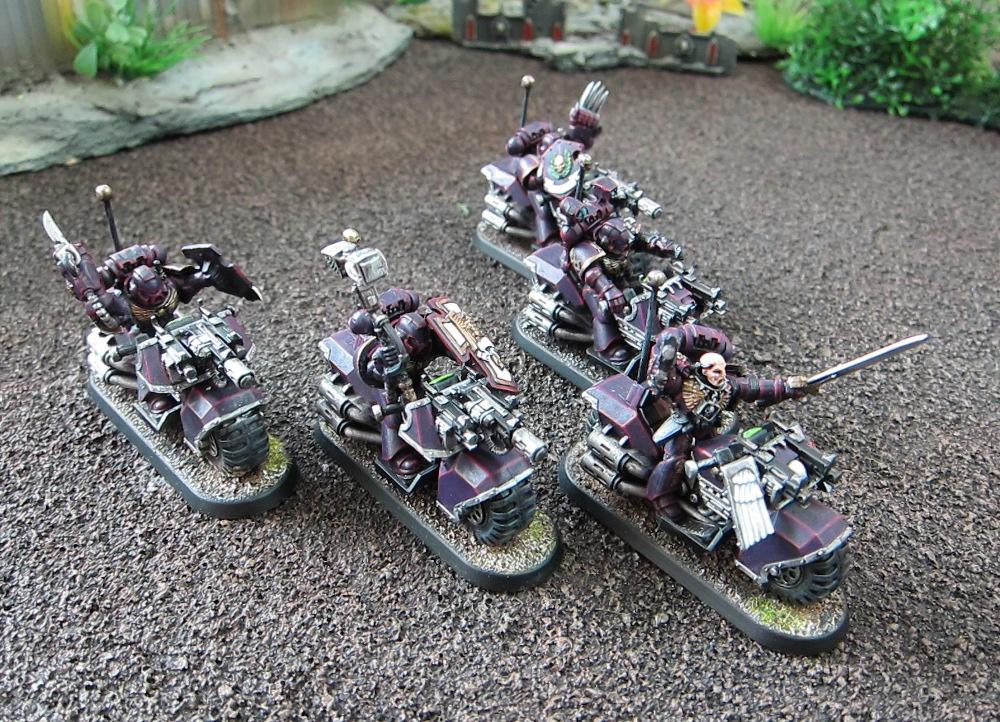
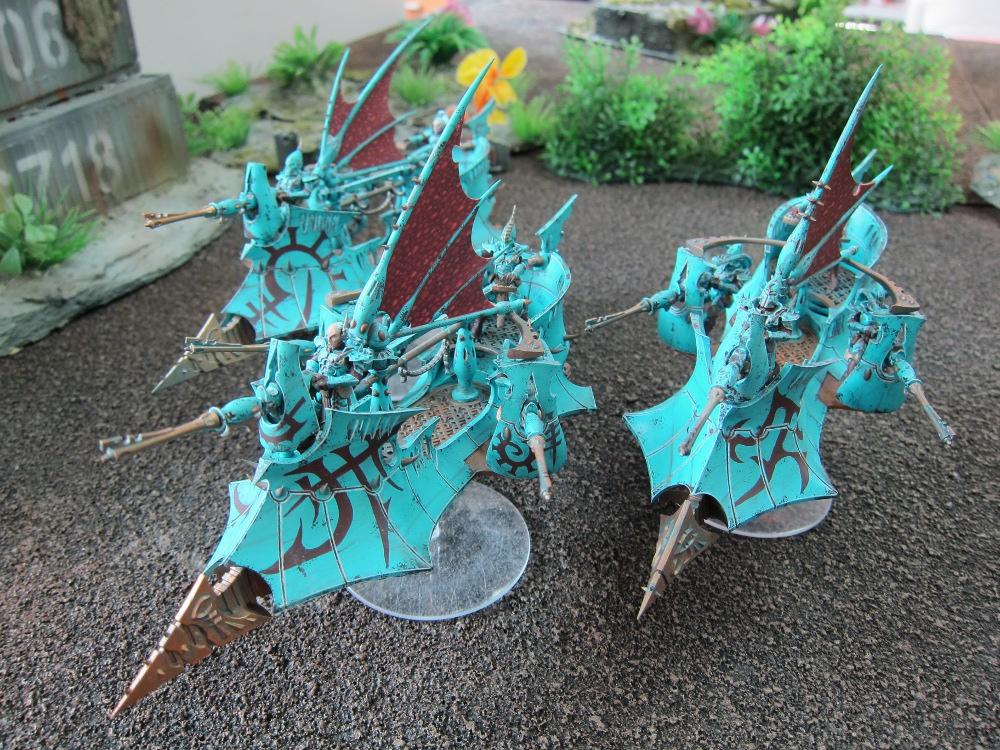
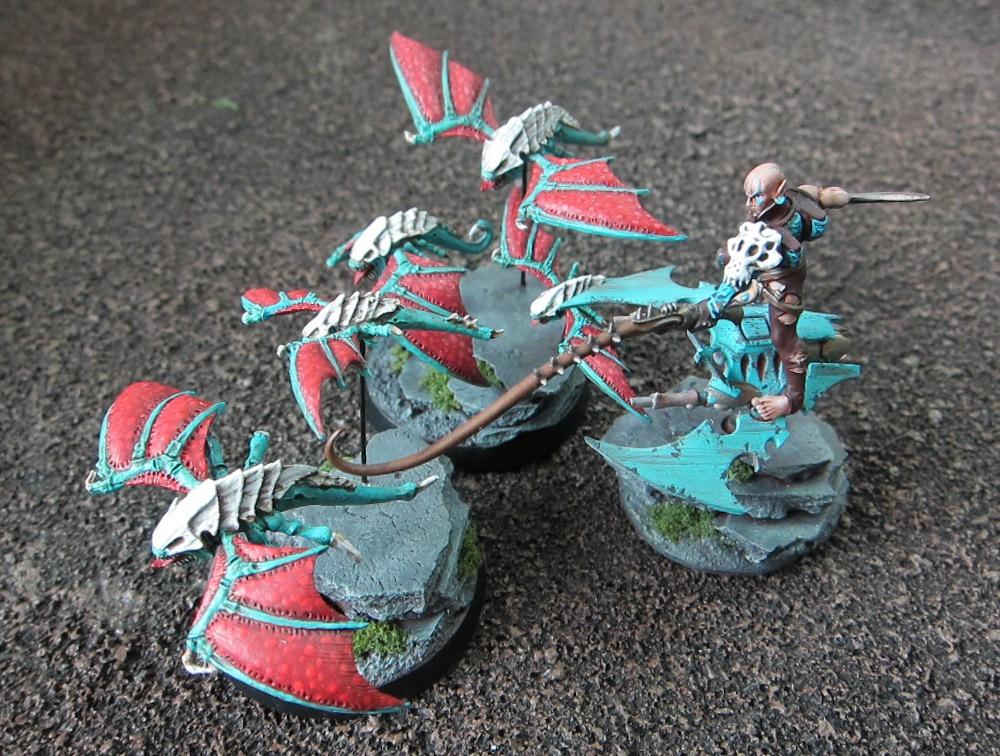
I didn't take pictures during the game but I did take some pictures of the models afterwards to add interest to the battle report. Here I've included pictures of each army's respective commanders to help set the scene.
The Hawk Lords
Captain (Bike, Relic Blade)
Command Squad (Bikes)
1 Apothecary (Storm Shield, Meltagun)
1 Veteran (Thunder Hammer, Storm Shield, Meltagun)
2 Veterans (Lightning Claw, Storm Shield, Meltagun)
Dreadnought (2 Twin-linked Autocannons)
Dreadnought (2 Twin-linked Autocannons)
Dreadnought (2 Twin-linked Autocannons)
Space Marine Bike Squad
1 Sargent
2 Bikers (Meltagun)
2 Bikers
1 Attack Bike (Multi-Melta)
Space Marine Bike Squad
1 Sargent
2 Bikers (Meltagun)
2 Bikers
1 Attack Bike (Multi-Melta)
Space Marine Bike Squad
1 Sargent
2 Bikers (Meltagun)
2 Bikers
1 Attack Bike (Multi-Melta)
Land Speeder Typhoon (Heavy Bolter, Typhoon Missile Launcher)
Land Speeder Typhoon (Heavy Bolter, Typhoon Missile Launcher)
Land Speeder Typhoon (Heavy Bolter, Typhoon Missile Launcher)
 The Kabal of the Drowned Gardens
Haemonculus (Webway Portal, Venom Blade) – a.k.a. Sara
Trueborn
3 Trueborn (Blaster)
1 Raider (Dark Lance, Flickerfield)
Trueborn
3 Trueborn (Blaster)
1 Raider (Dark Lance, Flickerfield)
Kabalite Warriors
1 Warrior (Blaster)
4 Warriors (Splinter Rifle)
1 Raider (Dark Lance, Flickerfield, Shock Prow)
Kabalite Warriors
1 Warrior (Blaster)
4 Warriors (Splinter Rifle)
1 Raider (Dark Lance, Flickerfield, Shock Prow)
Kabalite Warriors
1 Warrior (Blaster)
4 Warriors (Splinter Rifle)
1 Raider (Dark Lance, Flickerfield)
Kabalite Warriors
1 Warrior (Blaster)
4 Warriors (Splinter Rifle)
1 Raider (Dark Lance, Flickerfield)
Wracks
3 Wracks
1 Venom (2 Splinter Cannons, Flickerfield)
Wracks
3 Wracks
1 Venom (2 Splinter Cannons, Flickerfield)
Beastmasters
4 Beastmasters
8 Razorwing Flocks
Beastmasters
4 Beastmasters
7 Razorwing Flocks
Ravager (3 Dark Lances)
Ravager (3 Dark Lances)
Ravager (3 Dark Lances)
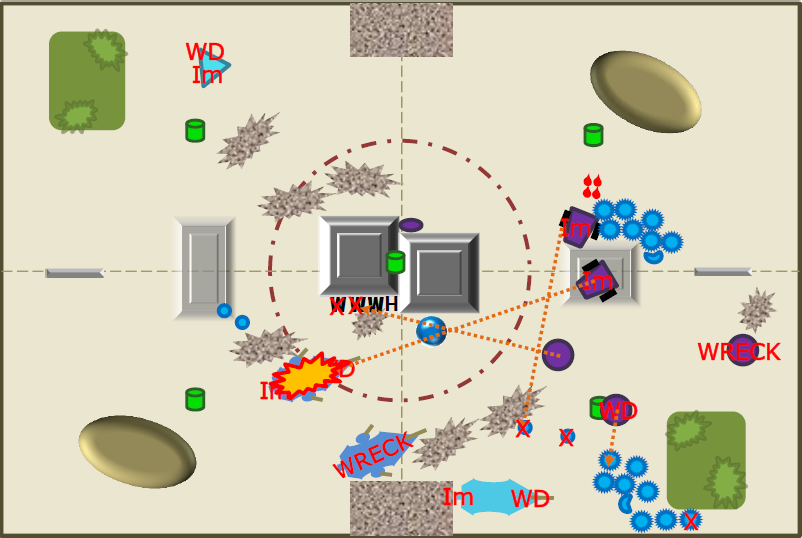
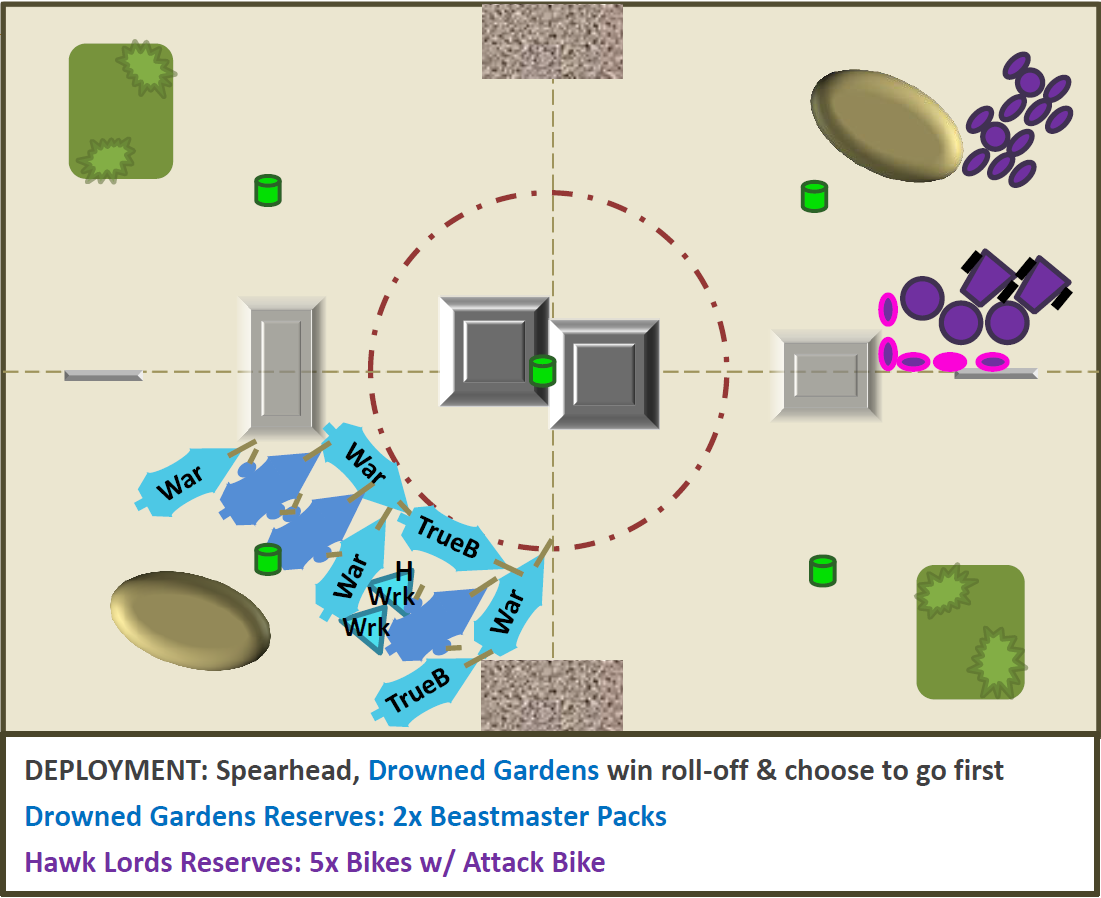
 DEPLOYMENT
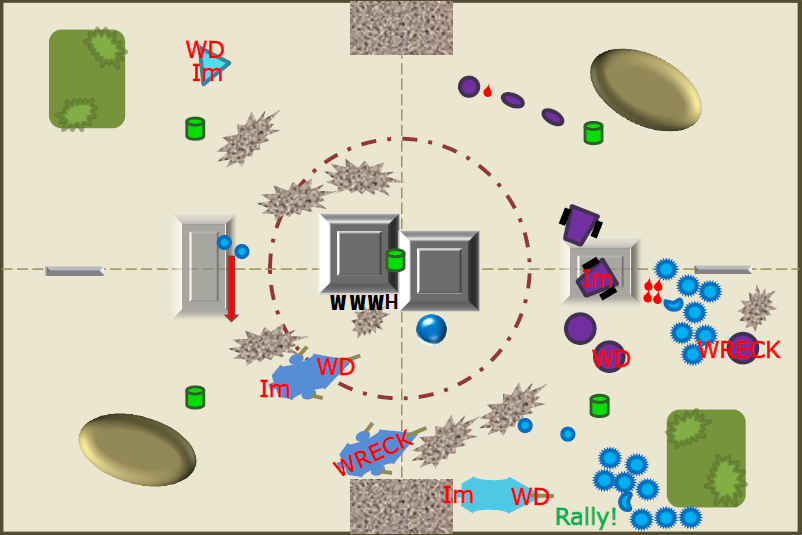
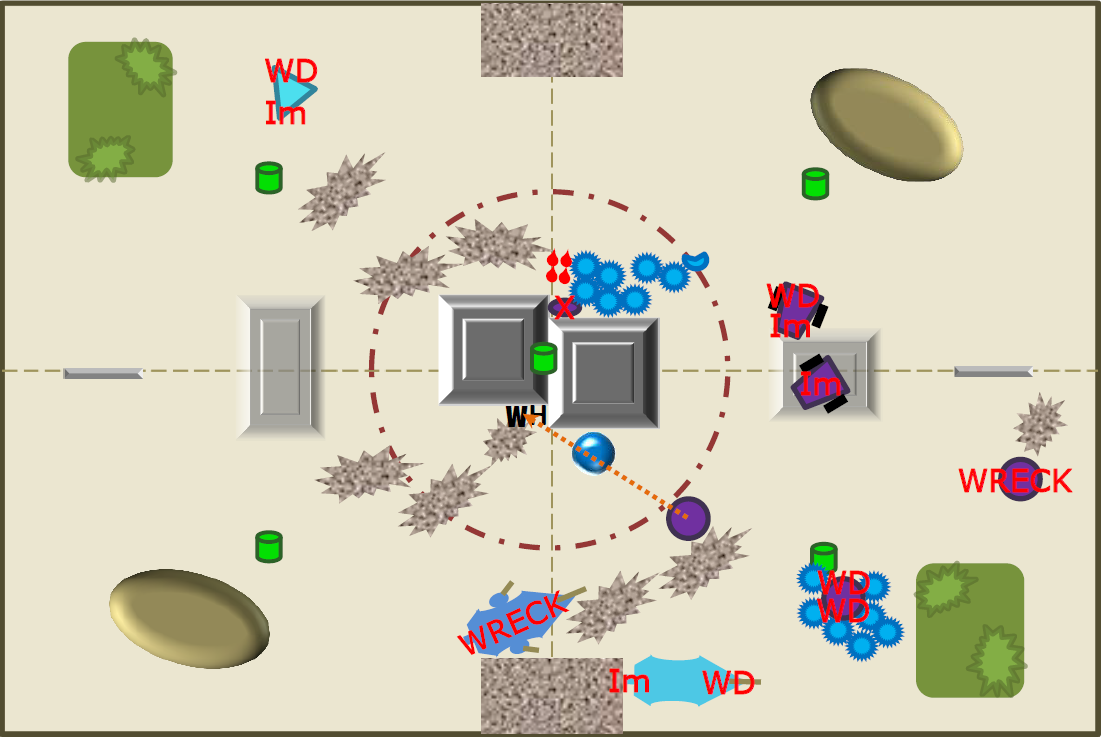
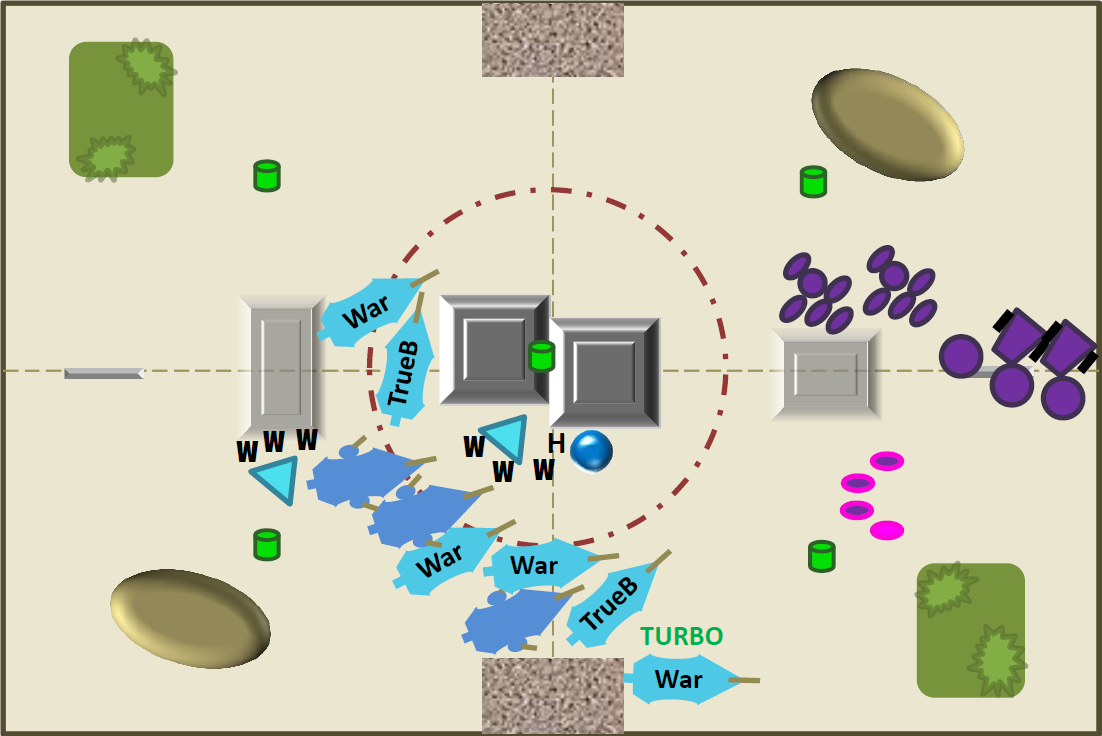
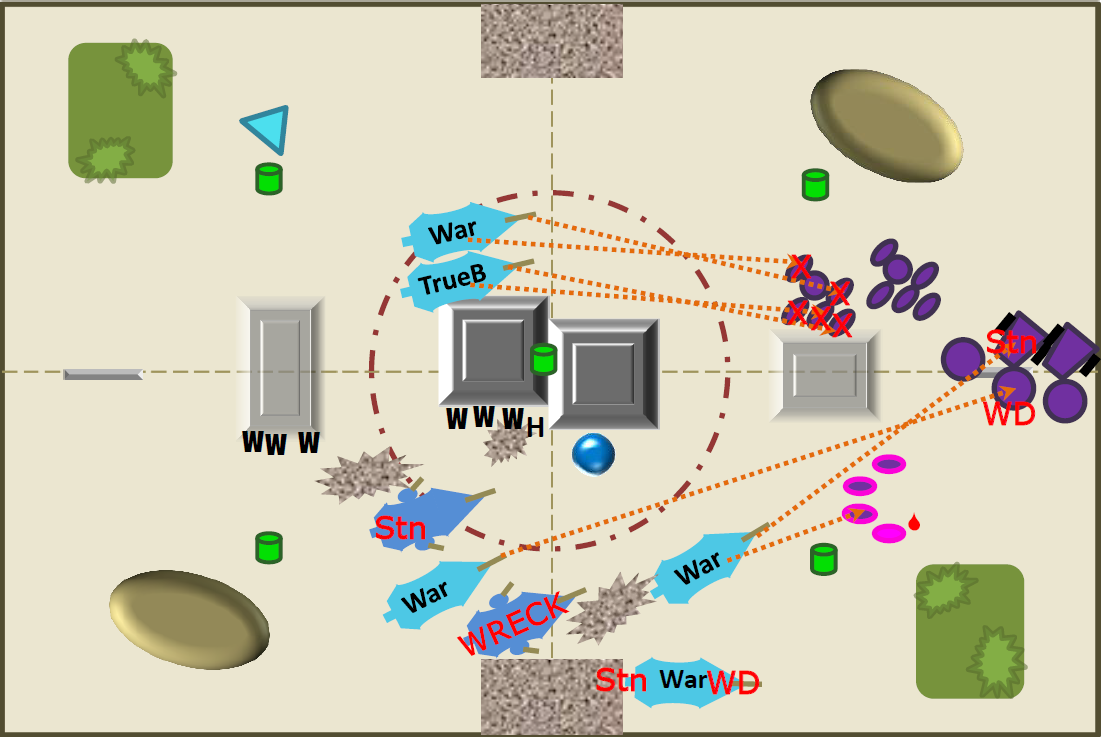
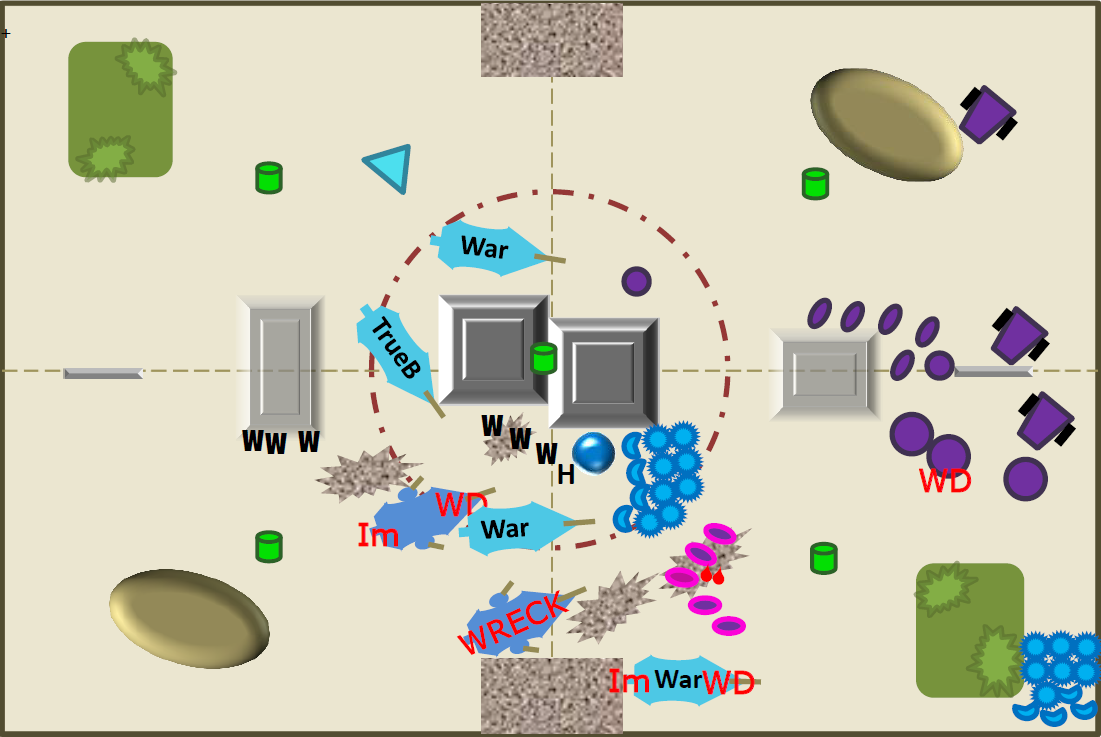
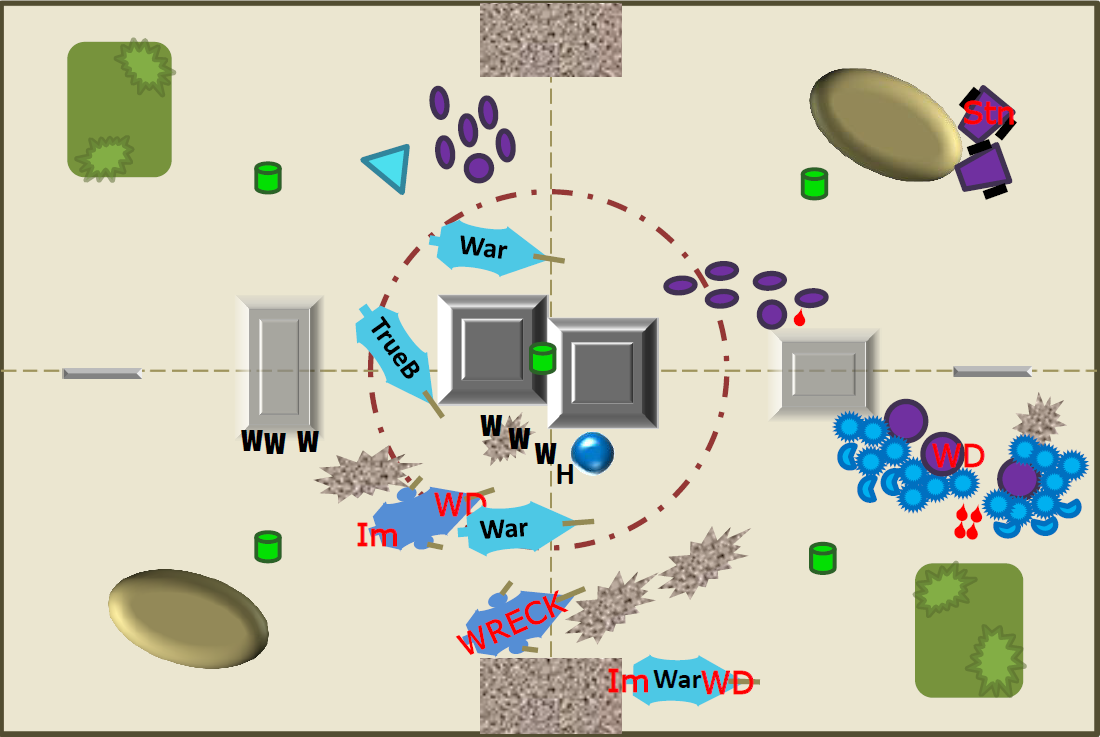
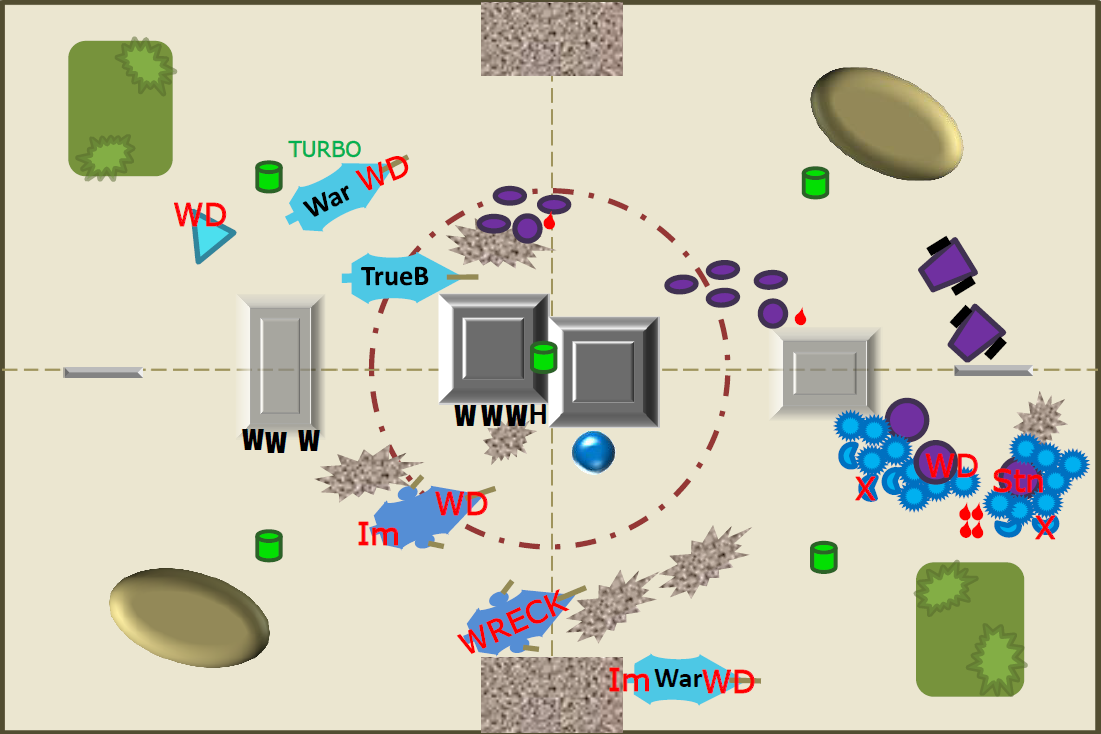
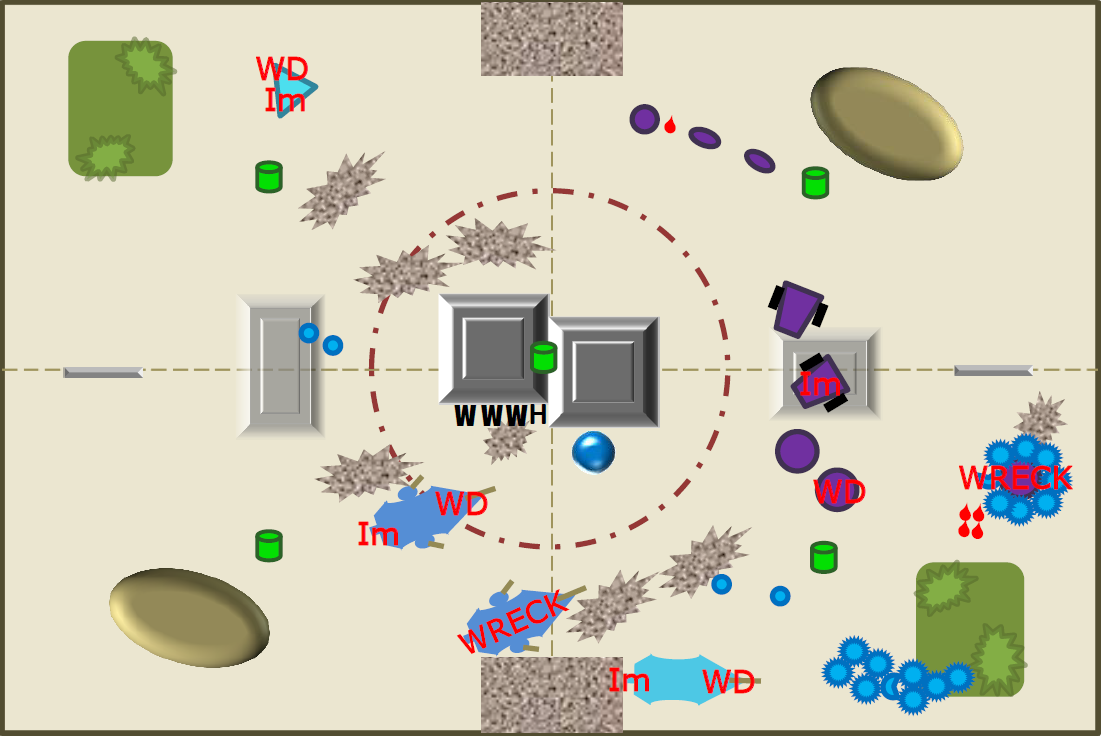
We roll Spearhead for deployment type. I win the roll-off and decide to go first. I deploy in a standard Dark Eldar vehicle wall, protecting the Ravagers and Sara’s Venom (the blue triangles are Venoms!) in case the Hawk Lords seize the initiative. The two Beastmaster units are put in reserve.
The Hawk Lords deploy with everything in cover. The Command Squad giving cover to the Dreads (large purple circles) and the Dreads giving cover to the Land Speeders. The pink oval is the Captain. A Land Speeder and Bike Squad are put in reserve.
The Hawk Lords fail to seize.
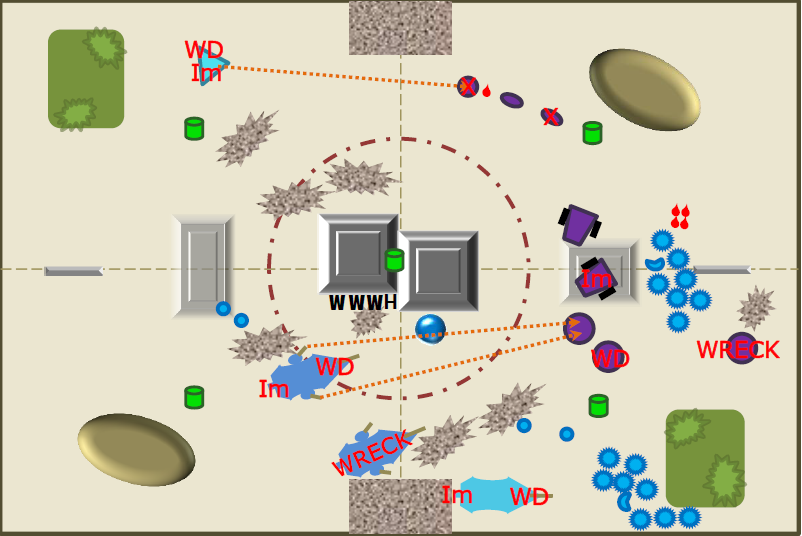
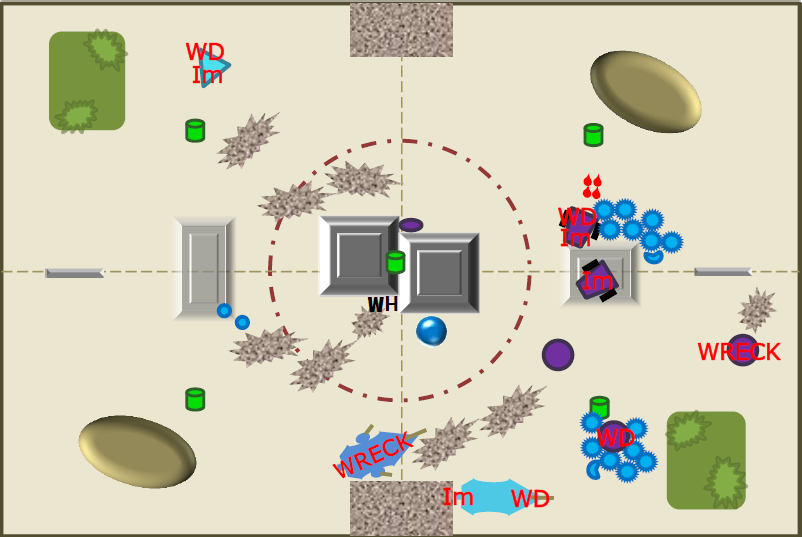
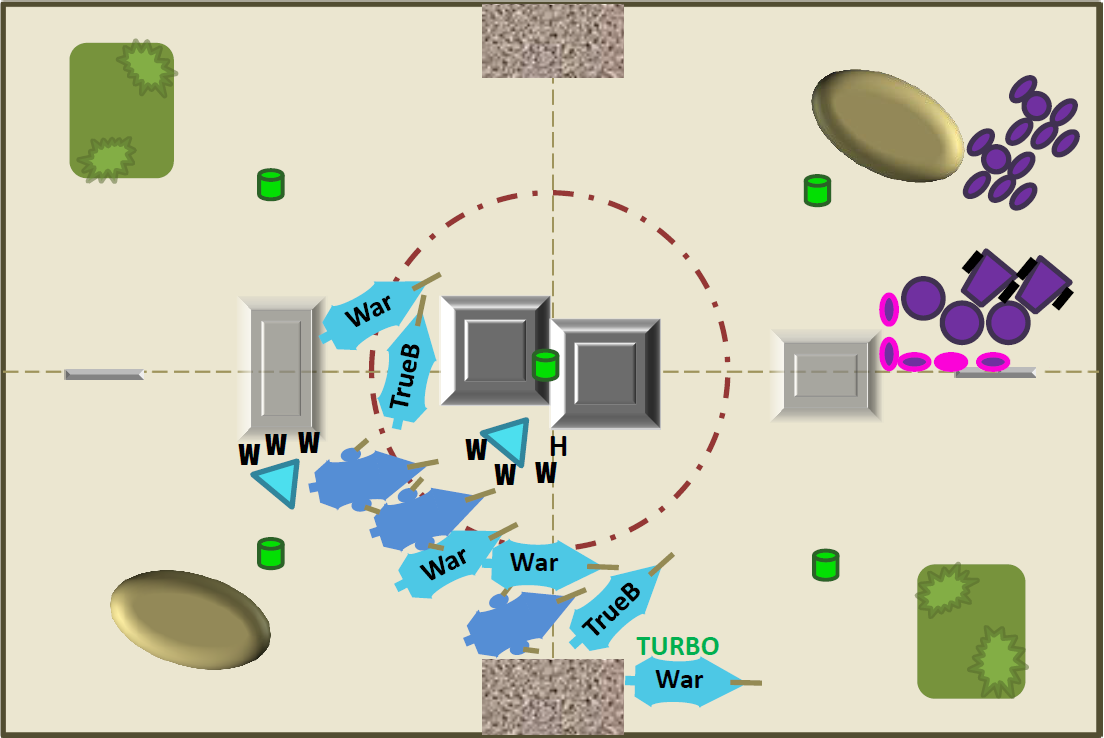
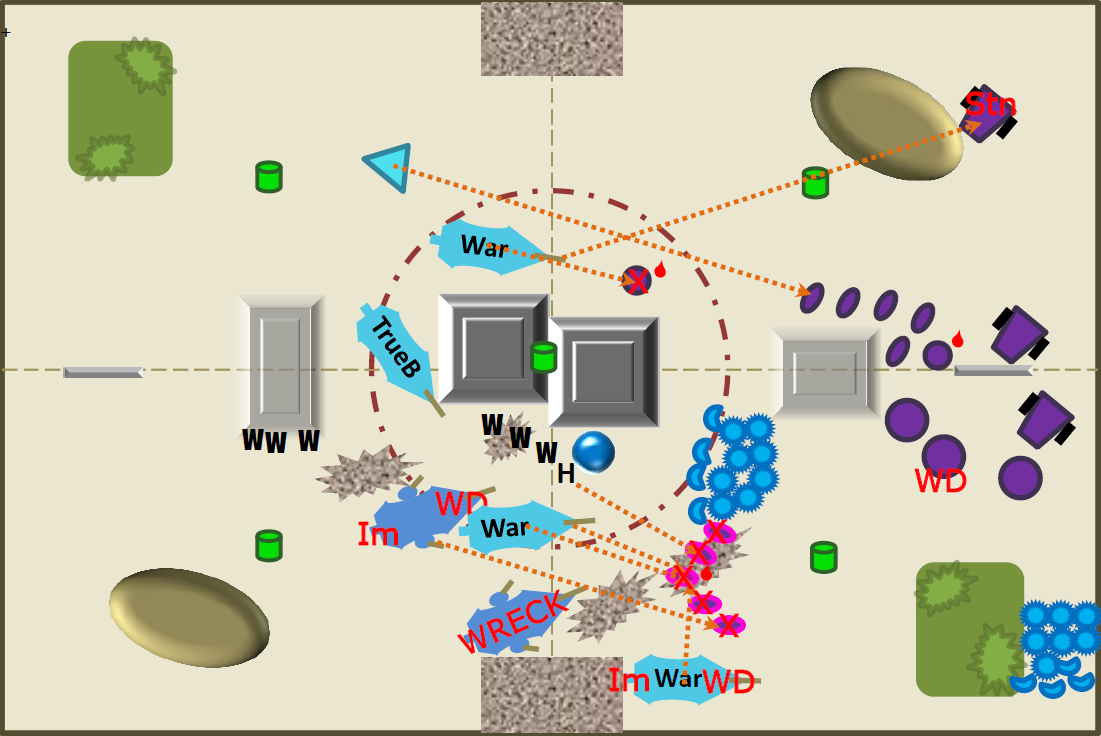
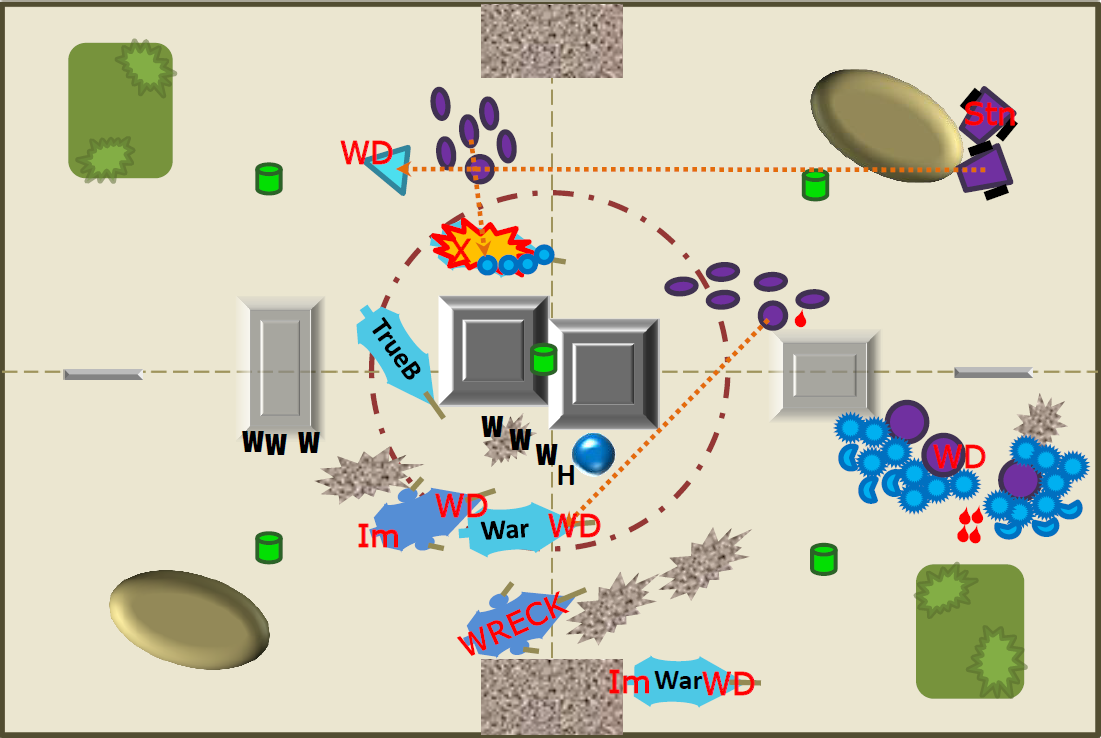
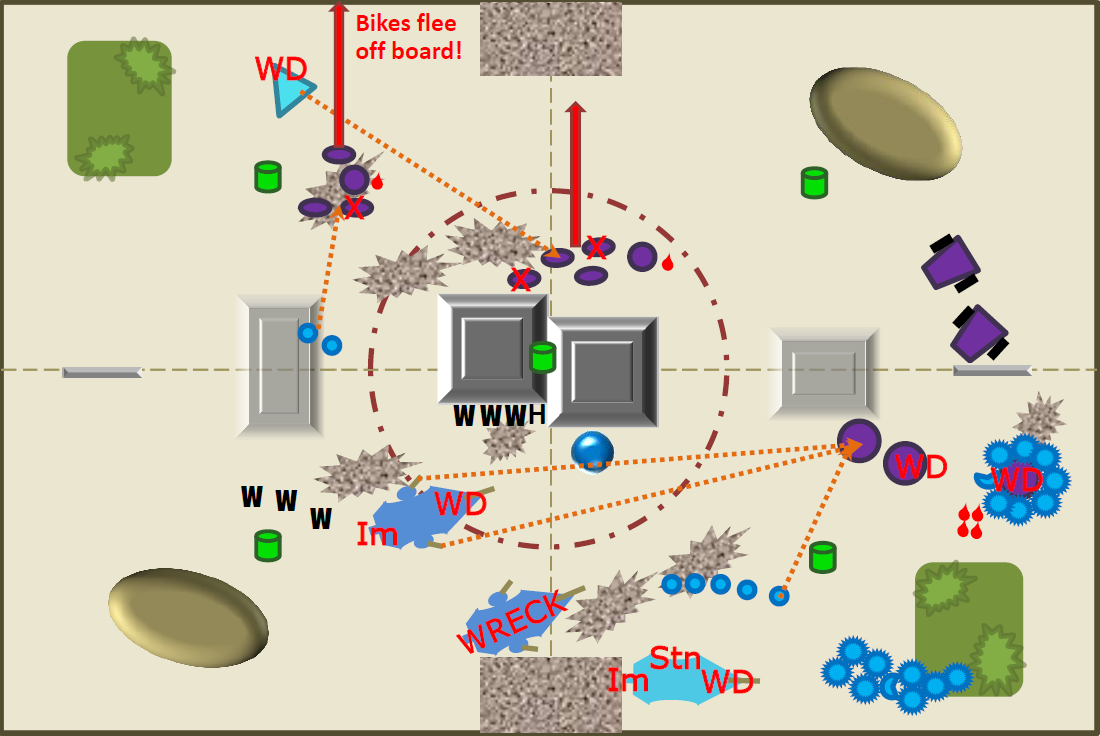
 DROWNED GARDENS TURN 1
Movement
DROWNED GARDENS TURN 1
Movement
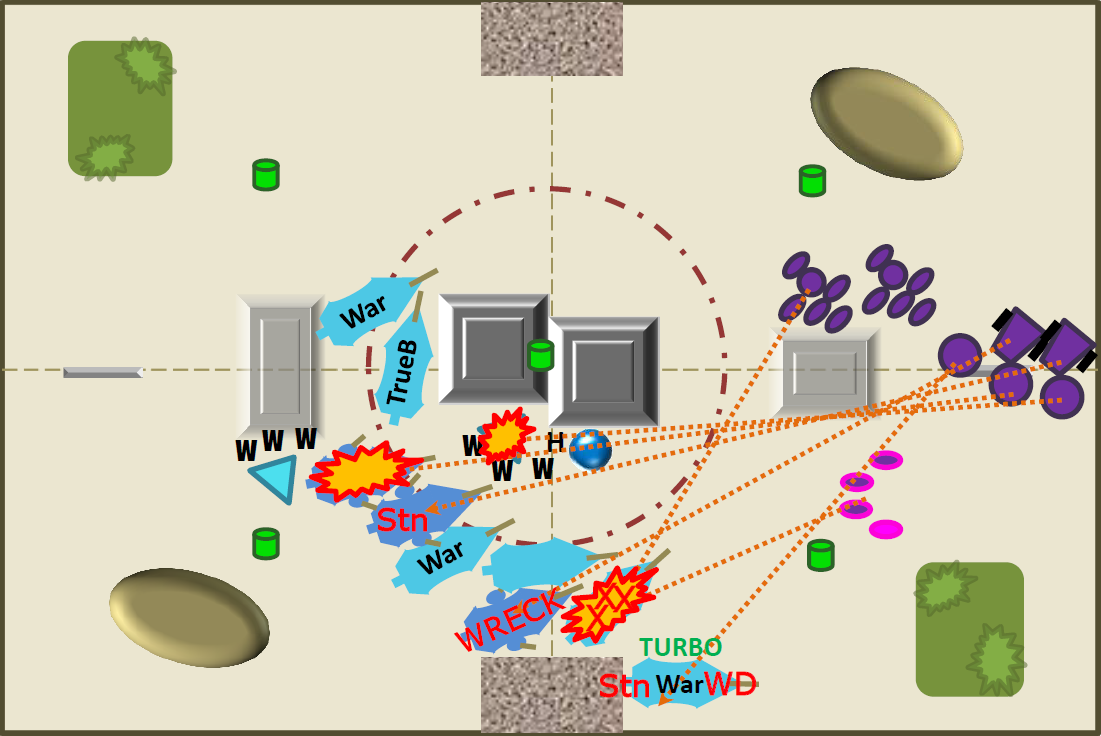
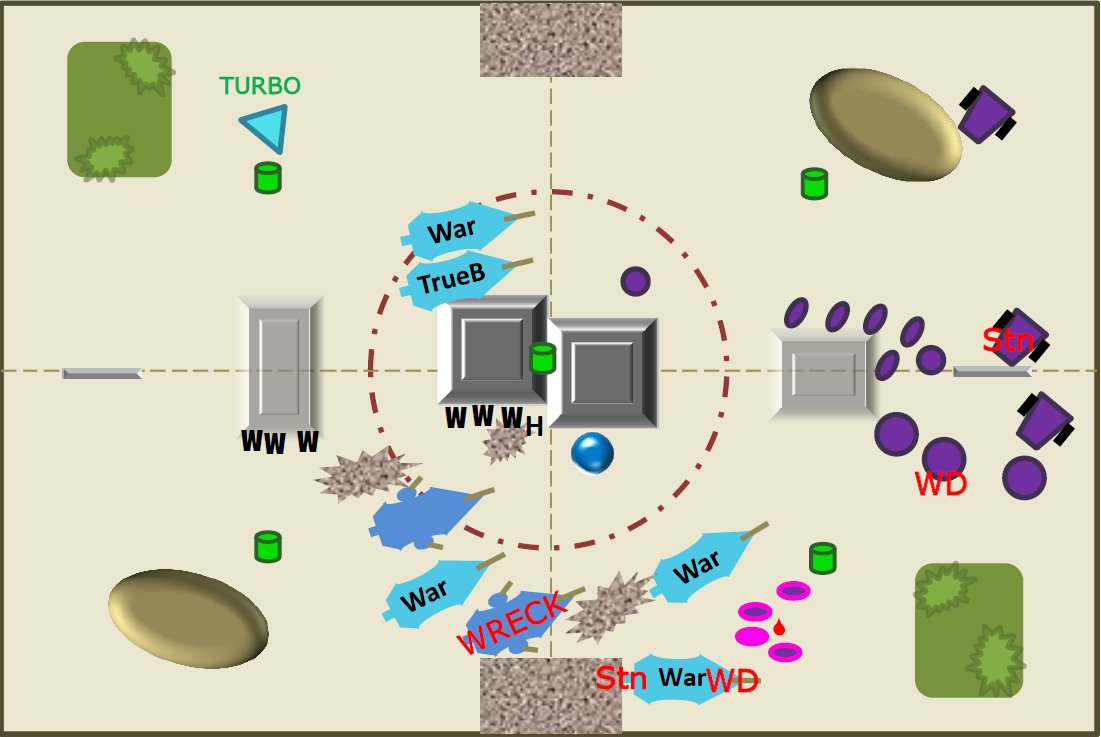
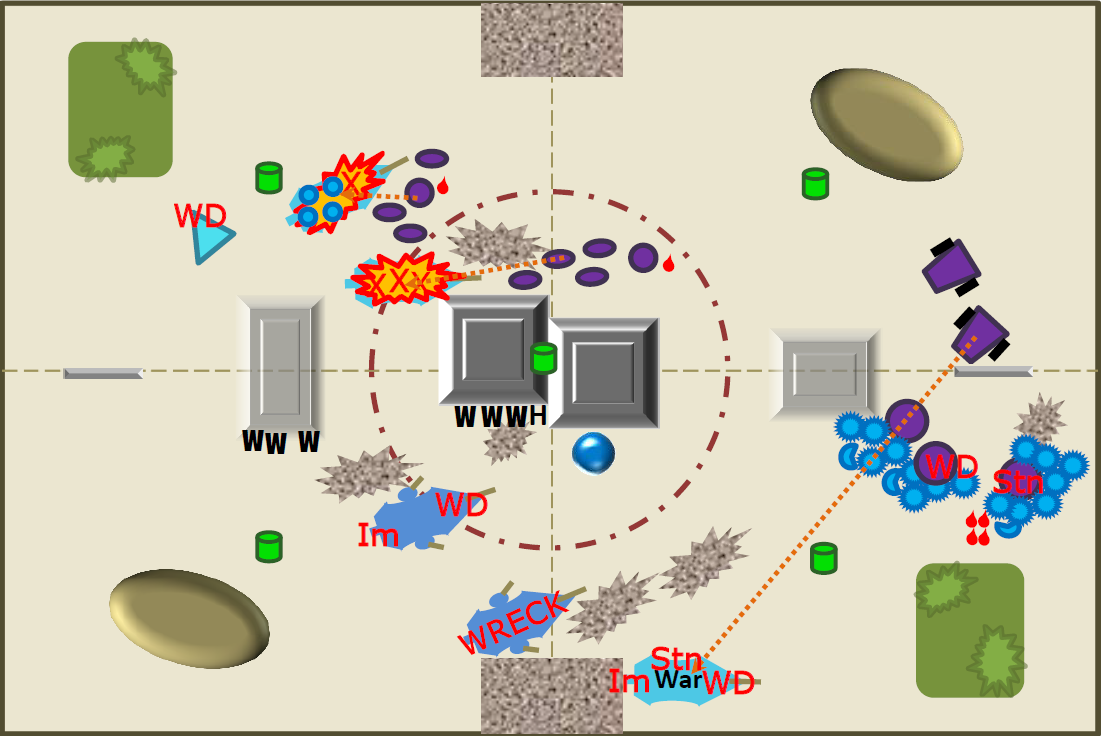
Since this was the first time in a while I had played with a large
LOS blocker in the middle, I underestimate how well it restricts firing lanes. So I move everything to get
LOS on targets. I move Sara’s Venom into the middle of the table and she and the Wracks get out, intending to drop the portal. The other Venom moves back to drop off the Wracks because there is no room in the scrum in front for it to get
LOS on the Command Squad.
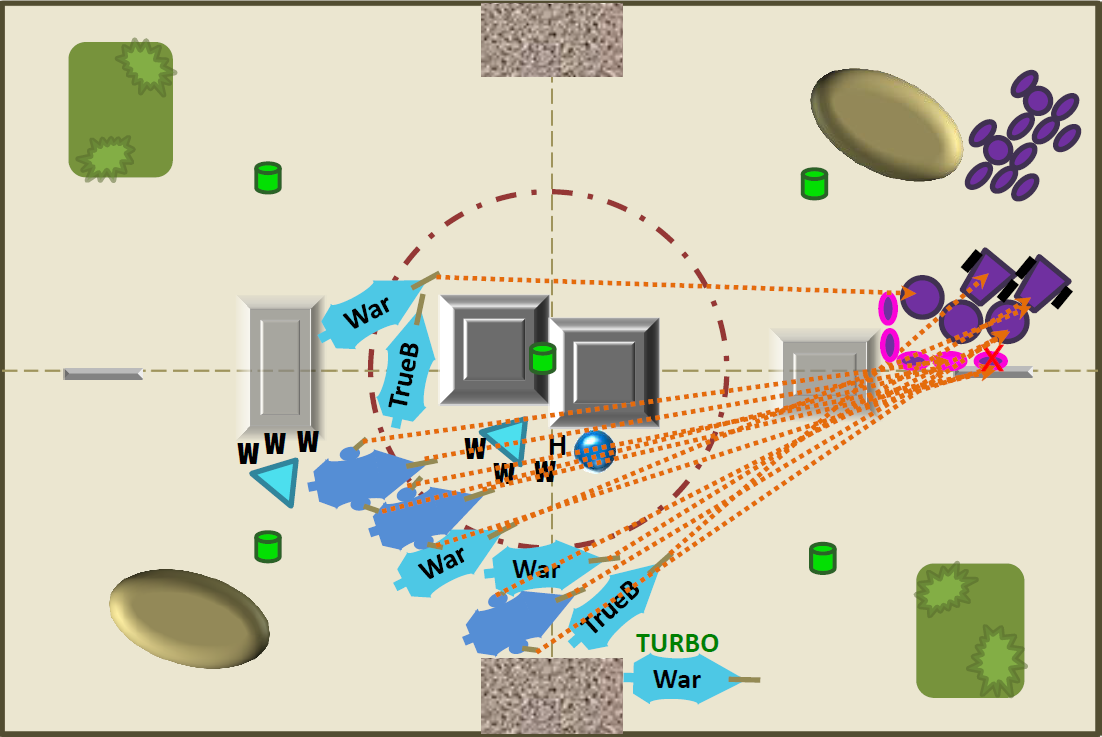
 Shooting
My key aim during the shooting phase is to at least shake or stun a couple vehicles to reduce the amount of incoming fire next turn. Everything else that is out of
LOS or range will shoot at the Command Squad.
The left-most Ravager opens the phase up well by killing a Lightning Claw Biker who fails his 3+ Storm Shield save. Sara puts down the portal. The rest of the phase goes terribly for me, since my friend makes all of his subsequent cover and invulnerable saves!
It was at this point that I realize that I have committed one of the cardinal sins of playing with Dark Eldar because I was a bit flustered by the terrain:
Thou Shalt Not Move Everything Out Of Cover To Shoot At Things In Cover! 
Yes, by the odds I should have shaken or stunned a couple units but I have almost entirely opened up my formation to do so. It would have been much smarter to not worry about the Dark Lance shots from the Raiders and boost them into better positions, while keeping the formation intact.
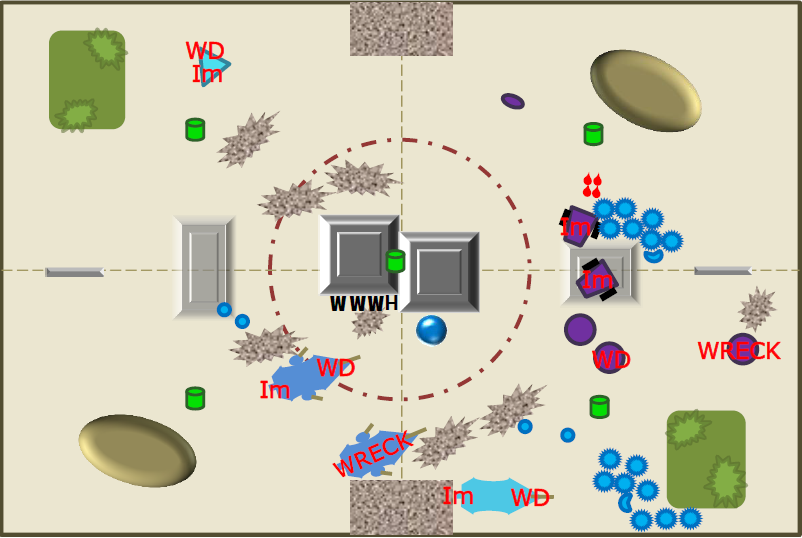
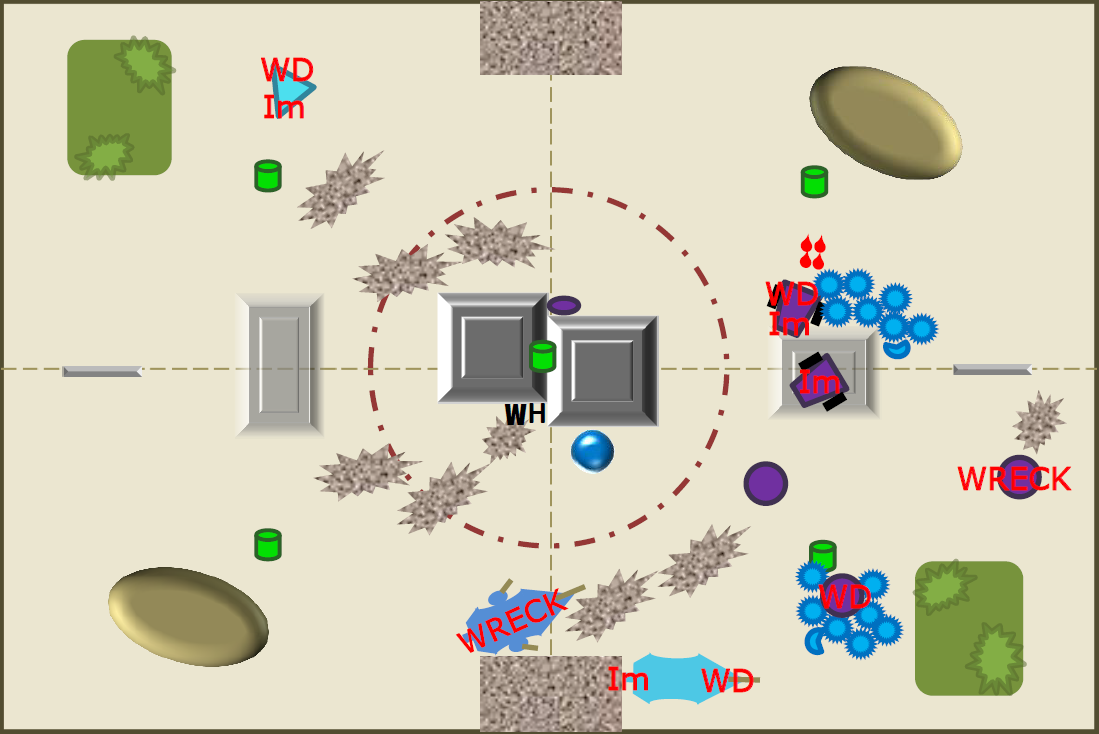
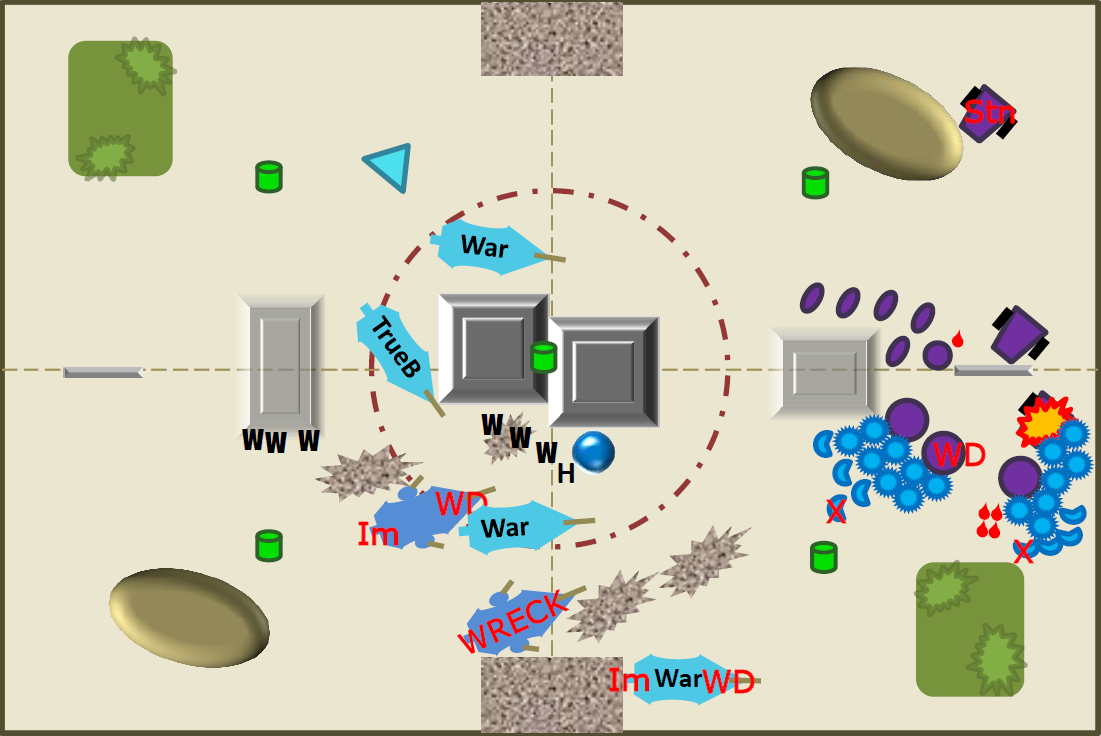
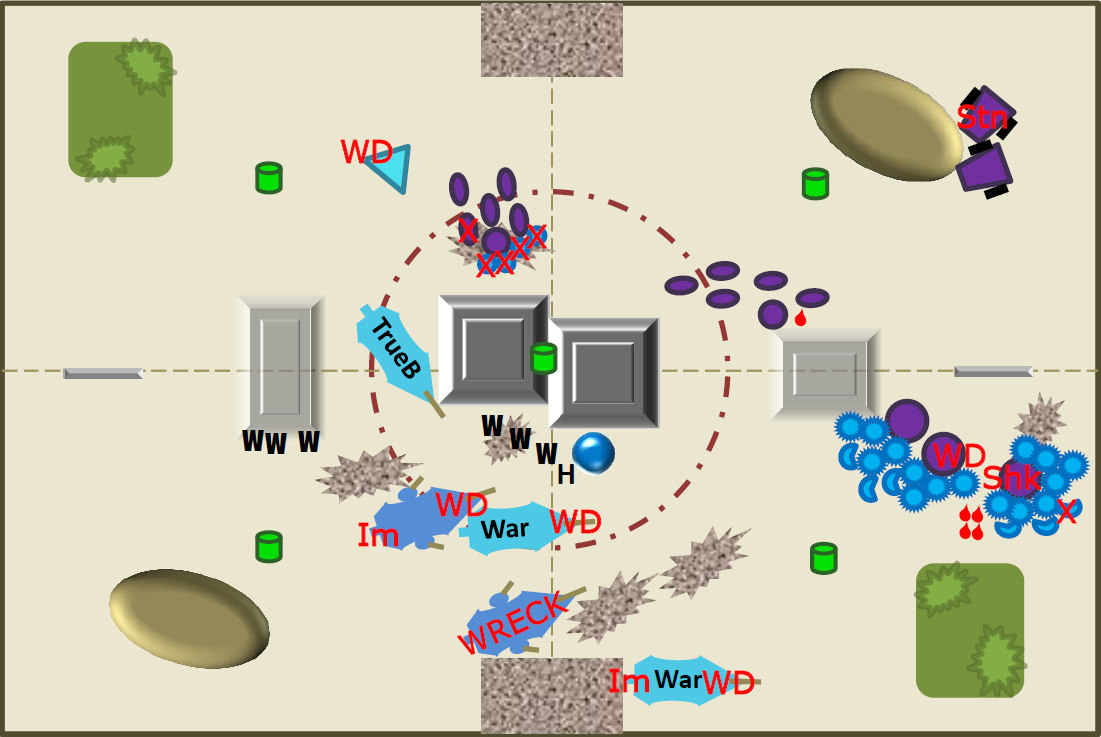
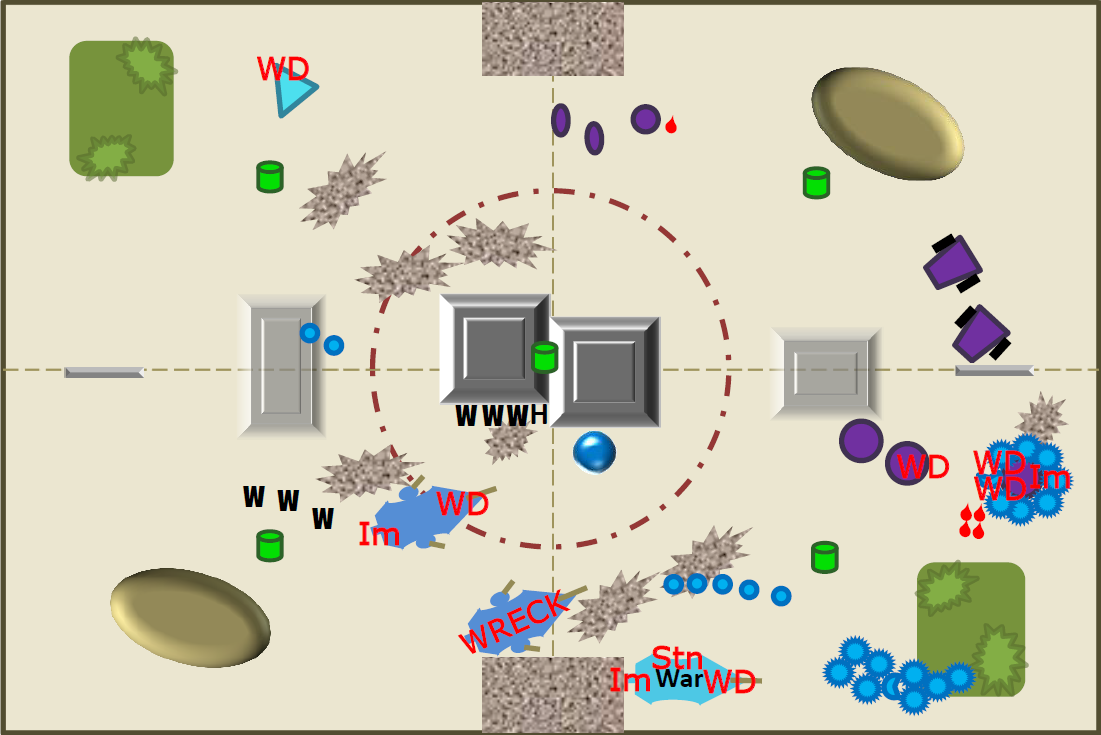
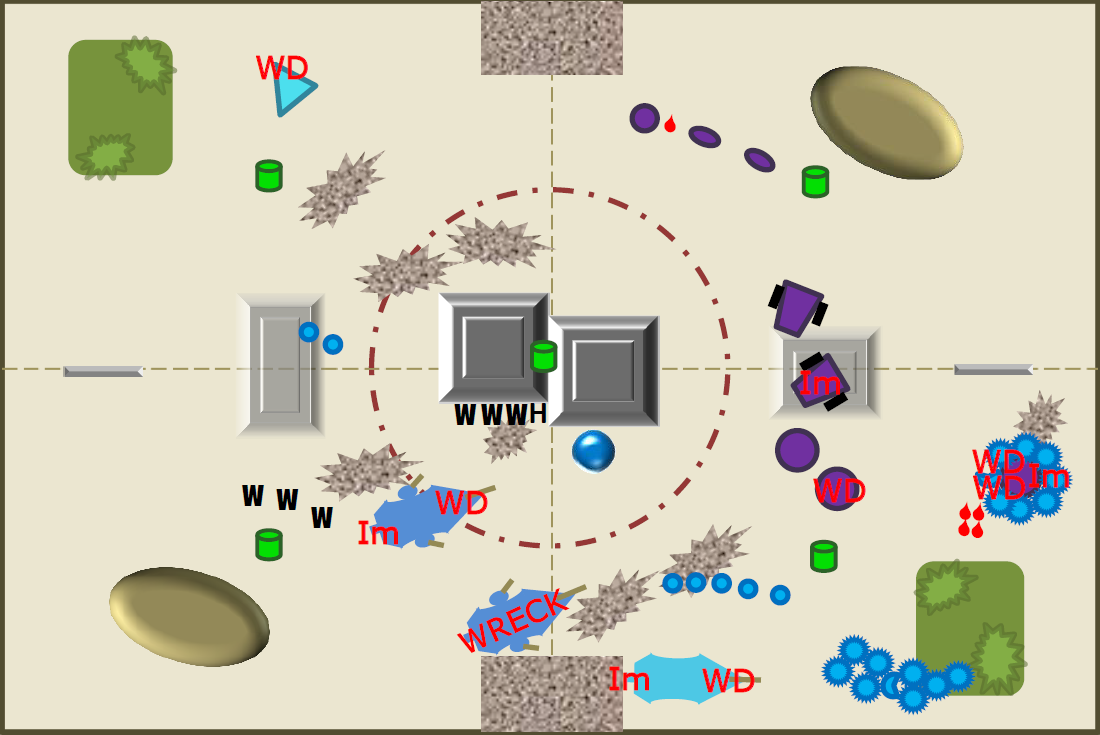
 HAWK LORDS TURN 1
Movement
HAWK LORDS TURN 1
Movement
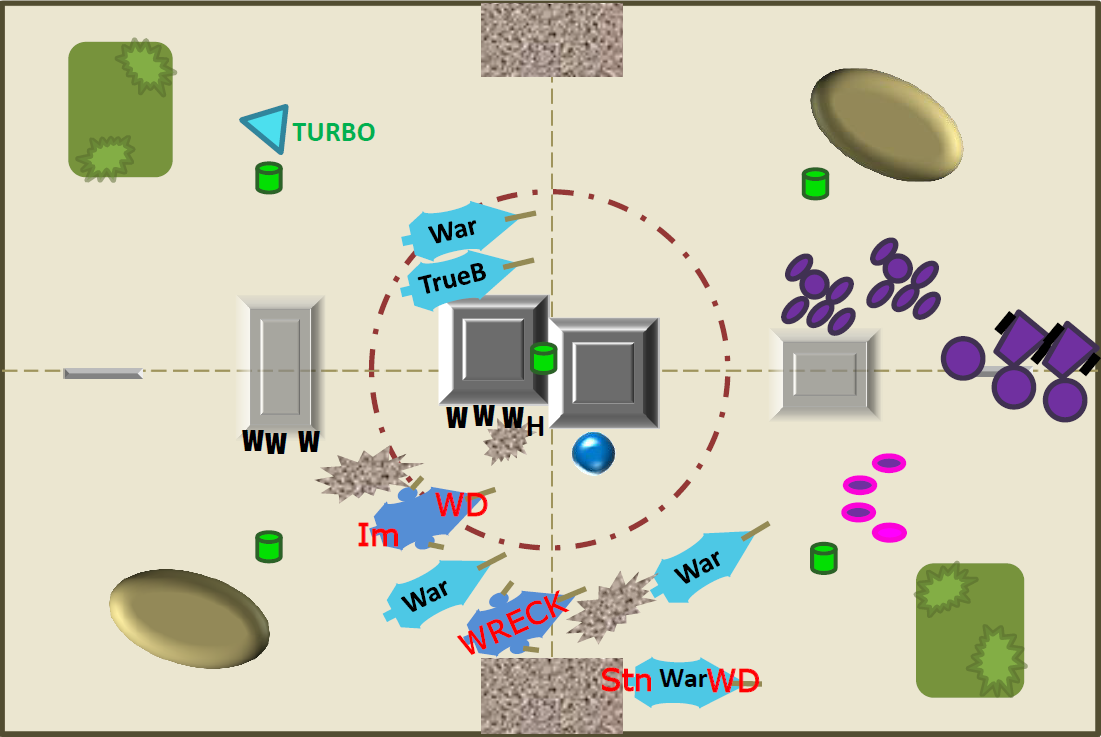
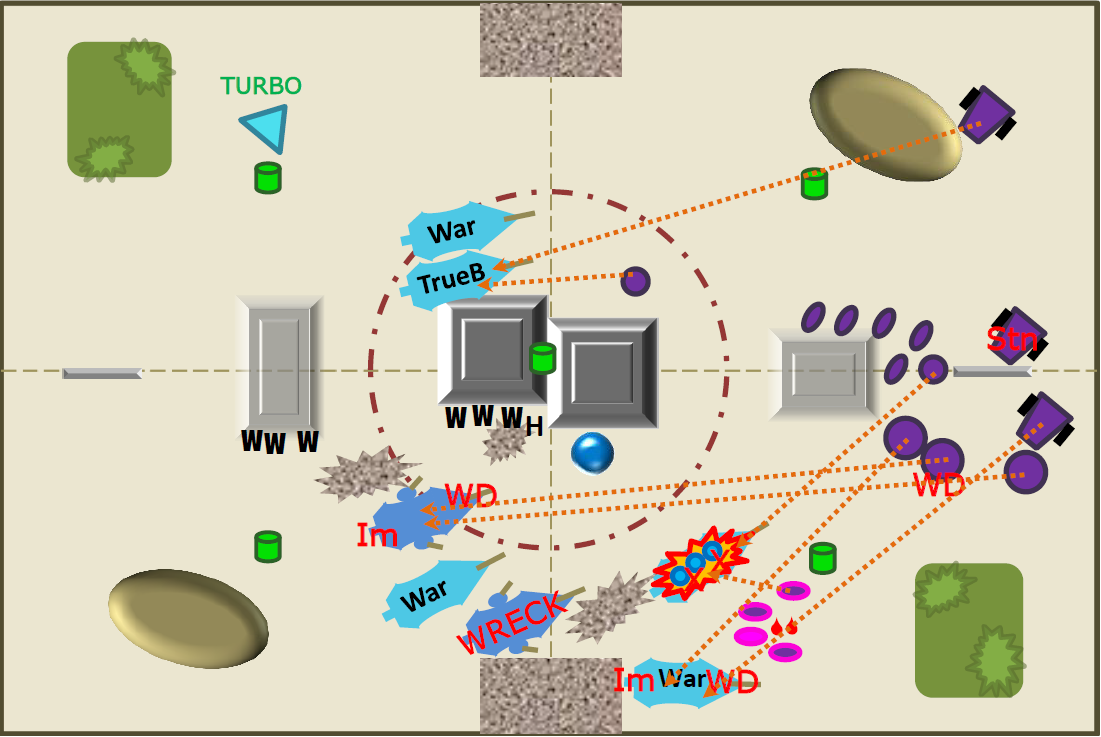
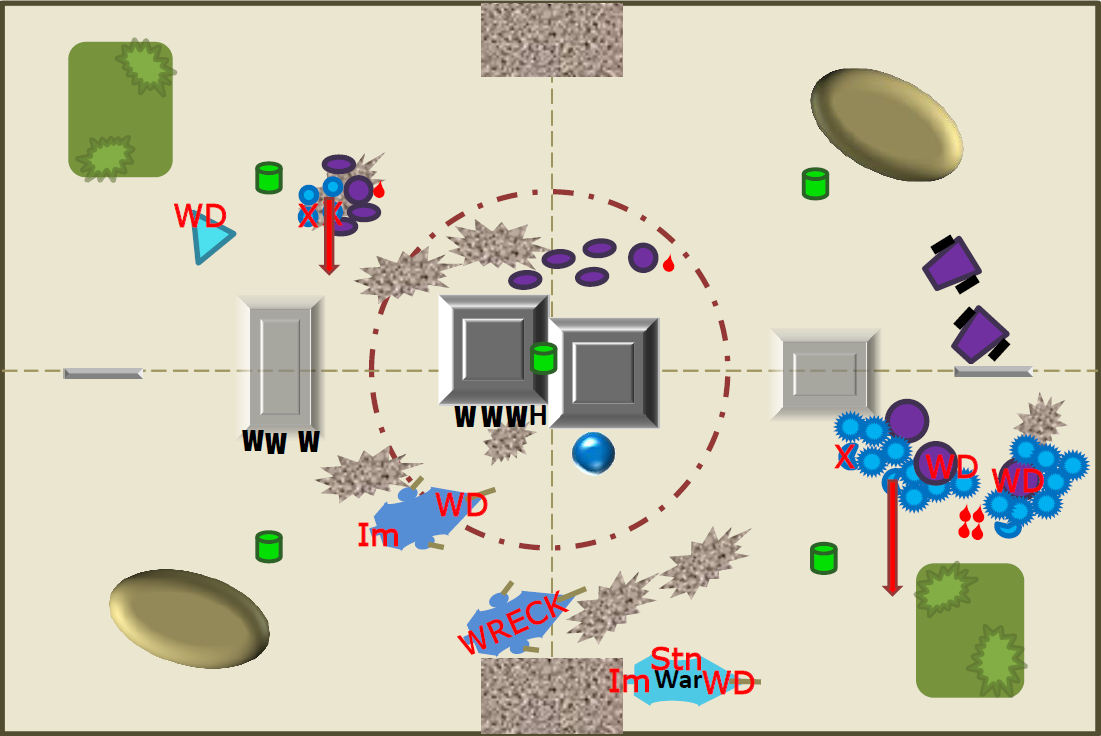
My friend moves everything to take up firing positions. The Dreads roll well on their difficult terrain checks to get over the barricade. The Land Speeders stay behind the Dread wall to get cover.
Hawk Lords Bike Squad, you called for an express shipment of hot melta?
My friend thinks about whether he should move a bike squad up to take a pot shot with the Attack Bike. The Beasts could come out of the portal next turn and eat them. He decides to take the risk and positions the rest of the squad so that it is unlikely I will get all the Razorwings into combat unless I get a good run roll. Note that the diagram does not show the formation of the bikes at all accurately.
 Shooting
The rightmost Dread opens up the Hawk Lords shooting phase by targeting the left-most Ravager in the open, exploding it. The middle Ravager is stunned by the Landspeeder on the right.
A Trueborn Raider is exploded by the Attack Bike and one Trueborn dies. The remaining two pass their pinning check but are gunned down by the Command Squad’s bolters.
Now that the Trueborn Raider is gone the other Landspeeder has a clear shot at the third Ravager and wrecks it.
The leftmost Dread shoots at the turbo-boosting Raider, stuns it, and blows off its Dark Lance.
Finally the remaining Dread explodes Sara’s Venom. The only upside being that Sara and her Wracks come through all the explosions this phase unharmed.
Wow, those were some spectacular fireworks!
My anti-tank firepower has just been cut down by more than 50%! I’ve dropped from a potential 15 Dark Lances and 10 Blasters, to 4 Dark Lances and 7 Blasters that can potentially fire during Turn 2.
I think I'm going to name these Ravagers "Snap", "Crackle" and "Pop" because of what happens to them every game!

At this point I toy with the idea of conceding, but then decide not to be such a scrub since I’ve only actually lost about a quarter of my army. I’m a firm believer that the benefit of playing above 1500 points is the fact that you can take it on the chin with one really bad turn and still keep on going. It’s time to put that theory into practice! After all, there are some tasty Bikes out there and the Beasts are ready for lunch!
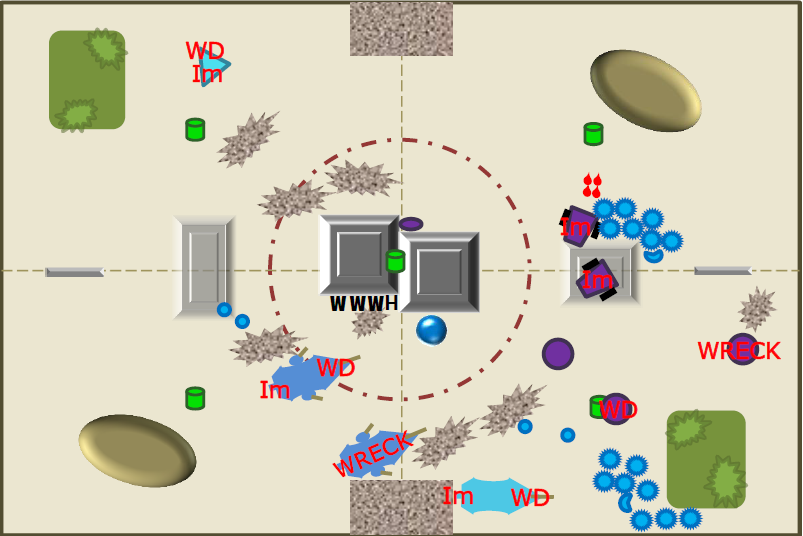
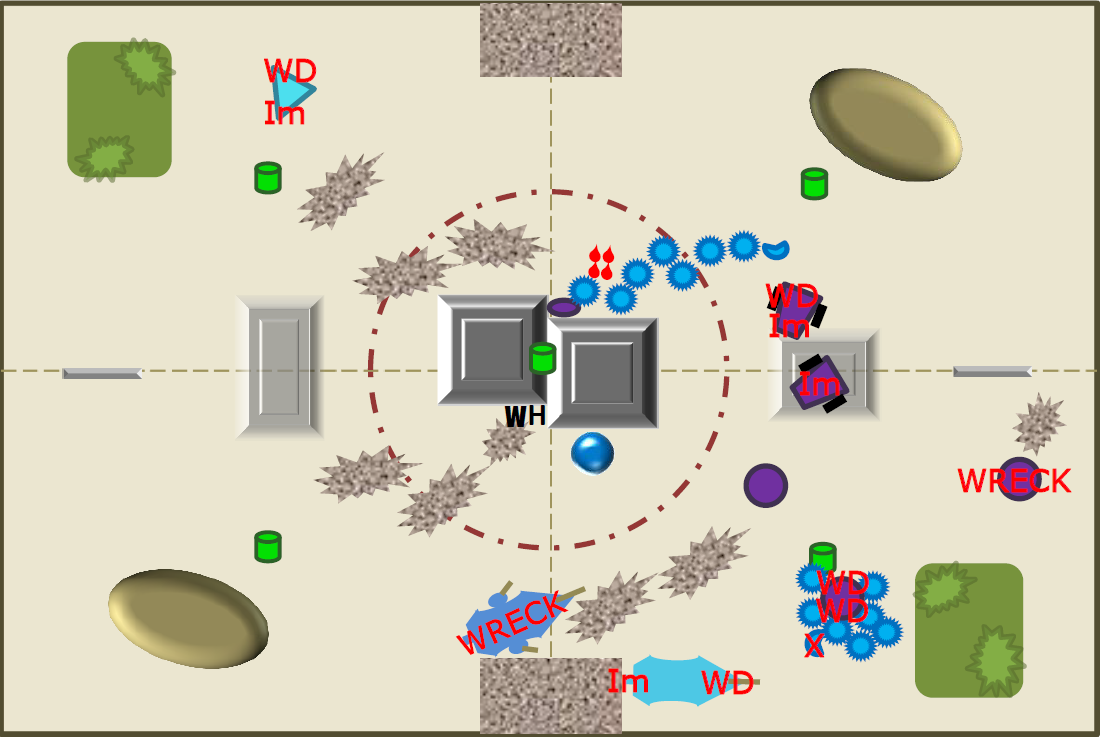
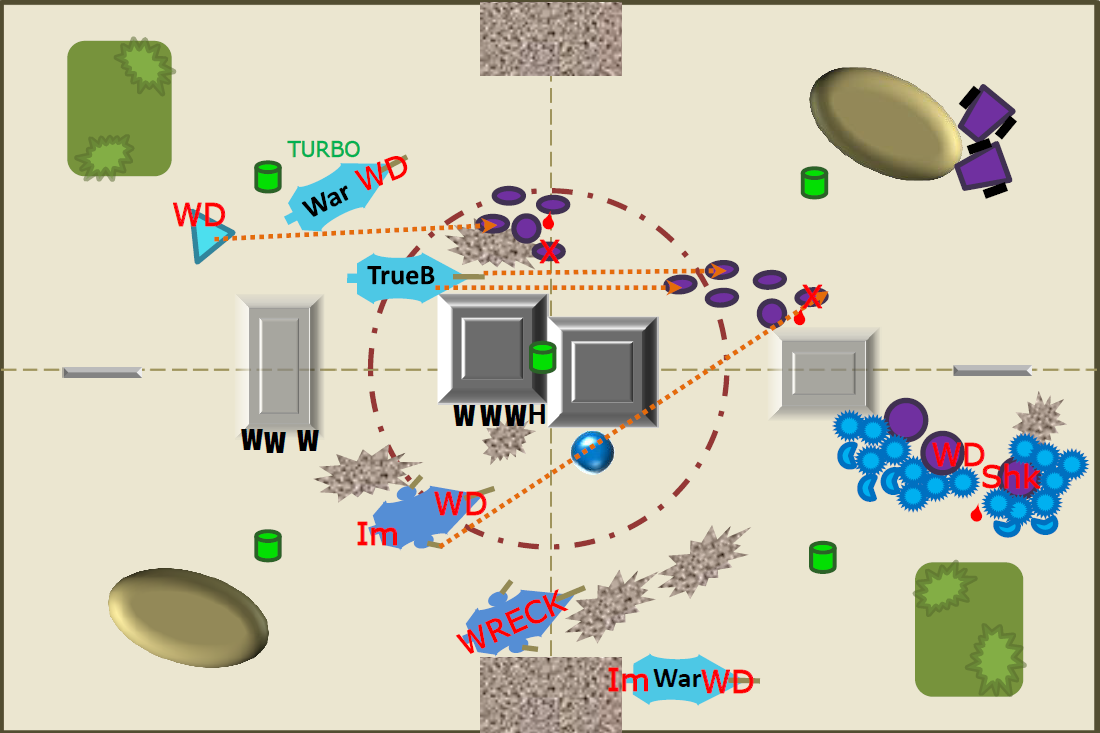
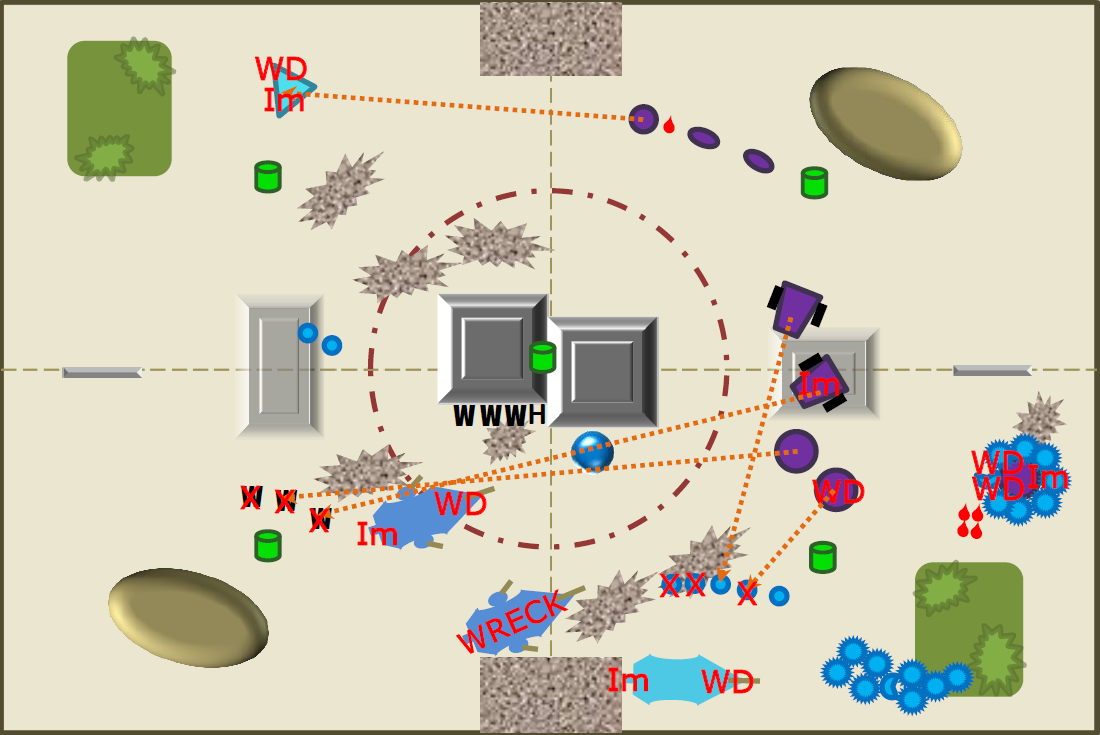
 DROWNED GARDENS TURN 2
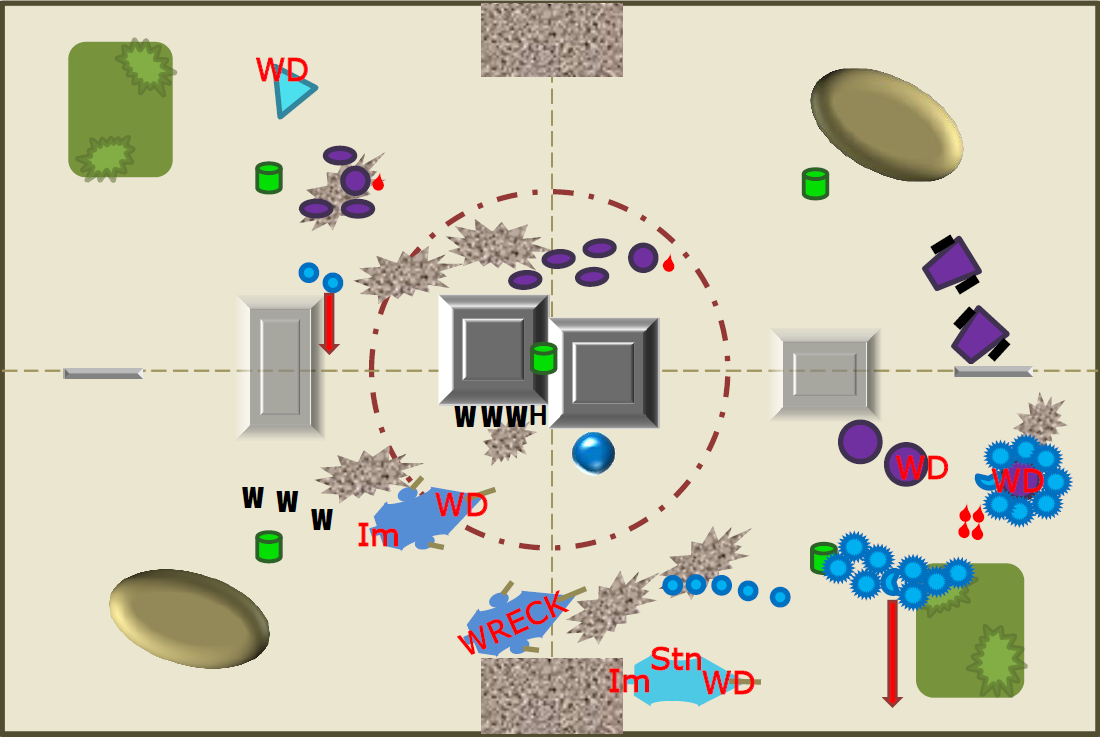
Reserves
DROWNED GARDENS TURN 2
Reserves
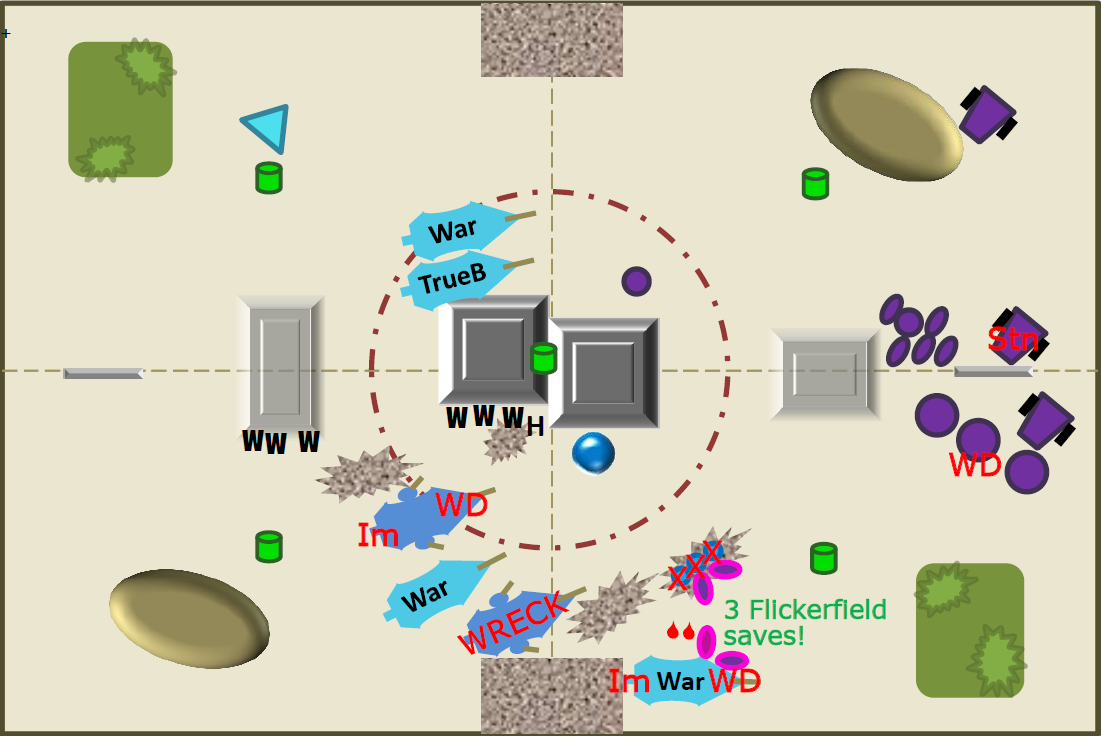
Neither Beast unit comes on.
I see, so we’re going to have to do this the hard way…
To be continued…
Thanks for reading! Since this is the first time I've tried to put together a battle report, I'd really appreciate any tips, comments and criticism you can provide. Or just let me know if it's worth me putting my time into this since I'm doing it in lieu of my usual painting and modeling routine!


 3000 Points
 500 Points


 Renegade Guardsmen