You will need the following (mostly available at any major hobby shop):
Graphics editing program (like photoshop though other programs will also work)
A color inkjet printer
Decal paper:
http://www.testors.com/product/136937/9201/_/Decal_Paper_-_Clear
Decal Bonder:
http://www.testors.com/product/136937/9200/_/Decal_Bonder
Decal Solvent:
http://www.microscale.com/Merchant2/merchant.mvc?Screen=PROD&Product_Code=MI-2 (Testors also makes some, but I haven't used it so I can't vouch for it's effectiveness)
Use your favorite graphics package to make the symbol, make it several sizes appropriate for shoulder pads, banners, vehicles, ect. (if you need help with this just
PM me)
Print them out on the decal paper ( the paper's instruction recommend normal print settings, I suggest high print settings).
Give the ink plenty of time to dry on the paper.
Spray on the bonder to create a nice seal over ink. I suggest you do this in several very light layers. Start with just a quick dusting, give it 20-30 minutes to dry a bit, repeat with a little thicker, let that dry, then a good final coat. If you try and just do a heavy coat from the get go you'll risk the ink bleeding.
Once it's sealed give it plenty of time to dry. At least over night.
Now for the real technique: To apply I've gotten best results by....
Cut out he decal.
Soak in water for exactly 5 seconds. This is holy hand grenade territory, 5 is the magic number, more and you ruin the decal, less and it's hard to slide off the backing.
Remove from water, just hold it for a good 20-30 seconds. This allows the water to really activate the glue properly so it'll slide off nice and easy.
Carefully slide the decal off the backing and onto the model.
Place it best you can, some irregular surfaces (like shoulderpads) will be hard to get a good proper fit. Just do the best you can, well come back to it in a sec.
If it's good, apply some dulcote to help seal the decal to the model, and proceed with finishing the details. Enjoy.
If it's an irregular surface, you'll probably have some parts sticking up. One the decal is otherwise dry, use the solvent and carefully daub a small amount onto the decal. You won't need much. In no time at all the decal will soften and with a little gentle prodding will easily conform to the models surface. Be careful about applying this as the decals will soften quite a bit and if you handle it too rough it'll tear.
Once it's dry, seal it on with dolcote and proceed with any finishing details.
Sometimes even if the surface isn't irregular I'll still do a little of the solvent as the decals seem to just look a little smoother with the help.
The process may be a little time consuming, but it's the kind of thing you can do a little of at a time while you're doing your initial model prep and painting, and the decals will be ready to go when it comes time to apply final details.
Yes, freehanding will make you a better painter, but it's also got a nasty learning curve and can be frustrating for a beginner. Decals require more physical resources, but the technique isn't as rough to learn (especially if you follow my instructions), and you can print off a whole sheet of the dang things, so if you mess a few up it's no big deal, you just wipe it off, cut out a new one, and try again until it's right. Plus you know going in that every one will be nice, clean, and uniform.
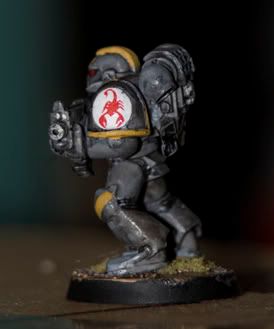
Example of end results:


 Templars - 4500pts
 Excoriators - 1500pts
 Catachan 1074th- 2000
 Zeal is its own excuse