| Author |
Message |
 |
|
|
|
|
Advert
|
Forum adverts like this one are shown to any user who is not logged in. Join us by filling out a tiny 3 field form and you will get your own, free, dakka user account which gives a good range of benefits to you:
- No adverts like this in the forums anymore.
- Times and dates in your local timezone.
- Full tracking of what you have read so you can skip to your first unread post, easily see what has changed since you last logged in, and easily see what is new at a glance.
- Email notifications for threads you want to watch closely.
- Being a part of the oldest wargaming community on the net.
If you are already a member then feel free to login now. |
|
 |
2012/09/09 09:30:44
Subject: Mars Pattern WARHOUND TITAN Construction
|
|

Raging Ravener
|
Hi guys and gals, I started building my warhound this weekend so here I am attempting my very first blog documenting it's construction.
Modelling is a hobby for me, I have a reasonable amount of experience but I do not profess that the way I do is the way it should be done.
I will try my best to show and describe how I go about putting together my very FIRST titan but if you follow in my foot steps please do not blame me if it all goes tits ups.
After cutting away most of the flash and dribbling over the detail of my long awaited titan, the first thing I had to do was to lie all the components out on the table and make sure every little bit was present and correct.
|
|
This message was edited 4 times. Last update was at 2012/09/10 17:02:48
|
|
|
 |
|
2012/09/09 09:35:38
Subject: Mars Pattern WARHOUND TITAN Construction
|
|
Blood Angel Terminator with Lightning Claws
|
Subbed.
|
|
|
|
|
|
2012/09/09 09:36:07
Subject: Re:Mars Pattern WARHOUND TITAN Construction
|
|
Raging Ravener
|
I am missing one part, the inner door that is situated between the two servitors. I also noticed that the front of my vulcan mega bolter looked like it had been drop when taken out of the cast or even dropped on a hot surface.
I got straight on the phone to forgeworld and they said they would have to recast the missing door which could take up to 14 days but they insisted that they send me an entirely new mega bolter arm as well as it should not have been sent out that way.
I'm happy with that.
|
|
This message was edited 1 time. Last update was at 2012/09/10 17:03:04
|
|
|
|
|
2012/09/09 09:38:35
Subject: Re:Mars Pattern WARHOUND TITAN Construction
|
|
Raging Ravener
|
Here are some of the tools I have to hand when attempting a model of this size.
JB Weld is the latest addition, ordinary super glue doesn't cut it when dealing with large heavy chunks of resin like this, not if you what it to stay together in one piece.
Any questions about materials I might mention or that appear in any pics feel free to ask away.
|
|
This message was edited 4 times. Last update was at 2012/09/10 17:03:18
|
|
|
|
|
2012/09/09 10:35:57
Subject: Re:Mars Pattern WARHOUND TITAN Construction
|
|
Raging Ravener
|
The feet were the logical place to start and by the looks of it the trickiest and most crucial component to get right.
To make the model as stable as possible it makes sense to lie all the toes and sole of the feet flat on the ground but when I dry fitted them to do so it didn't look good enough so a more dynamic composition had to be used.
I didn't want to complicate the stance of the titan too much as I have heard many horror stories of the end product toppling over without the aid of an attached base, my aim is to have a freestanding model.
After playing around I came to the conclusion that simply elevating the sole of the foot by about 8mm with plasticard looked good enough, this however means that the weight of the entire Titan will be supported by the toes alone.
Some careful pinning with brass rod will be needed.
|
|
This message was edited 2 times. Last update was at 2012/09/10 17:03:32
|
|
|
|
|
2012/09/09 10:46:06
Subject: Re:Mars Pattern WARHOUND TITAN Construction
|
|
Raging Ravener
|
I wanted to test the strength of the first foot so I dry fitted the toes with a little super glue and started pinning them with 2mm brass rod.
This is only temporary and will all be broken down again so I can pin into where the foot meets the shin.
I will also use a cold weld instead of superglue for added strength.
|
|
This message was edited 2 times. Last update was at 2012/09/10 17:03:41
|
|
|
|
|
2012/09/09 10:52:59
Subject: Re:Mars Pattern WARHOUND TITAN Construction
|
|
Raging Ravener
|
I had real difficulty here pinning into the tips of the toes and getting them all to lie flat on the table,
but with a bit of trial and error I got there in the end. Make sure you have a perfectly flat surface if any of you try to do the same.
|
|
This message was edited 1 time. Last update was at 2012/09/10 17:03:55
|
|
|
|
|
2012/09/09 10:58:32
Subject: Re:Mars Pattern WARHOUND TITAN Construction
|
|
Raging Ravener
|
While I'm still on the subject of feet I just wanted to show off the detail that has been put into the sculpting of the feet.
This is one of the reasons that I don't want my titan permanently attached to a base. I paid for this detail and I want to be able to look at it if I want to.
|
|
This message was edited 1 time. Last update was at 2012/09/10 17:04:10
|
|
|
|
|
2012/09/09 11:01:31
Subject: Re:Mars Pattern WARHOUND TITAN Construction
|
|
Longtime Dakkanaut
|
 Reeno wrote: Reeno wrote:I am missing one part, the inner door that is situated between the two servitors. I also noticed that the front of my vulcan mega bolter looked like it had been drop when taken out of the cast or even dropped on a hot surface.
I got straight on the phone to forgeworld and they said they would have to recast the missing door which could take up to 14 days but they insisted that they send me an entirely new mega bolter arm as well as it should not have been sent out that way.
I'm happy with that.
I had issues with that door section; it is likely to have miscast detail around the inset skull and the control panel. I had several replacements of that sent out; it's likely that the master is worn. You'll need to sharpen it up with paintwork. Other places to look for extra work are the back and underside of the bolter, and the pipes under the plasma gun.
The toes are actually pretty easy to join strongly, I doubt they need more than cursory pinning; there's a very large contact area for each joint so the strength is good. I strongly advise checking the stance you choose by making some rough assembly (tape it together) so you can work out exactly how far the hips need to be rotated; the pistons there have a minimum range of movement that raises its head late in construction if you don't plan for it. You've only got about +/- 20 degrees of motion in the hip to play with IIRC.
Another thing to watch for is the weight of the torso assembly; it's VERY front heavy, especially if you have the weapons pointing in the 'forward' driection. This makes the whole model top-heavy and easy to knock over. For the best chance of survival, a fixed base is a good idea. I know you wanted to avoid it, so one thing you might want to look at is having the base removable for playing games with clumsier folks, or not. You could use terrain under the raised sole to anchor a rod to stop the titan toppling.
|
|
|
|
|
|
2012/09/09 11:10:31
Subject: Re:Mars Pattern WARHOUND TITAN Construction
|
|
Raging Ravener
|
Thanks for the advice winterdyne. Nothing will be permanent until I can have it all roughly dry fixed. It's my first time with this expensive kit and wont be rushing into anything.
All helpful hints and tips like this are much appreciated.
|
|
|
|
|
|
2012/09/09 11:28:34
Subject: Re:Mars Pattern WARHOUND TITAN Construction
|
|
Raging Ravener
|
Started magnetising the leg so the shin guards can be swapped.
2mm x 5mm Neodymium magnets seem to do the trick.
I used JB Weld to glue them in place, first time using the stuff but it worked great.
Application was a little messy and takes quite a while to cure but definitely does the job.
|
|
This message was edited 1 time. Last update was at 2012/09/10 17:04:21
|
|
|
|
|
2012/09/10 16:25:08
Subject: Re:Mars Pattern WARHOUND TITAN Construction
|
|
Raging Ravener
|
Just thought I'd add that if anyone wants to see any component of this model up close, I do have a macro lens for my SLR and would be more than willing to take a snap and post it up here if it would be of interest.
|
|
|
|
|
|
2012/09/10 16:44:02
Subject: Mars Pattern WARHOUND TITAN Construction
|
|
Longtime Dakkanaut
|
Oh yeah, when you come to those cables, expect trouble. BOILING water is needed to soften them enough to flex. Use a piece of wire bent to shape between where you want the cable to hang to judge length correctly.
|
|
|
|
|
|
2012/09/10 16:57:12
Subject: Re:Mars Pattern WARHOUND TITAN Construction
|
|
Raging Ravener
|
That's a cracking idea, cheers! I did have reservations when I spotted them in the kit.
I believe a lot of people don't bother using them when building a magnetised Titan to enable them to reposition the arms, I'm still in two minds whether or not to do this.
I probably will attach them to the arms thinking about it and will definitely utilise the two cables for the head. It's not a teddy bear after all!
|
|
|
|
|
|
2012/09/10 17:06:04
Subject: Mars Pattern WARHOUND TITAN Construction
|
|
Longtime Dakkanaut
|
If you want magnetisable arms, best trick would be to make new cables out of thin rubber string / insulation sleeve. Little greenstuff circle clips and they'd look pretty similar. Advantage of being flexible too.
|
|
|
|
|
|
2012/09/10 17:10:52
Subject: Re:Mars Pattern WARHOUND TITAN Construction
|
|
Raging Ravener
|
I'll keep my eyes open for thin rubber string and insulation sleeve, then i'll see what i can come up with.
|
|
|
|
|
|
2012/09/16 08:40:11
Subject: Re:Mars Pattern WARHOUND TITAN Construction
|
|
Raging Ravener
|
Forgeworld said that my missing piece would be recast and sent to me in about 2 weeks and that is exactly what happened.
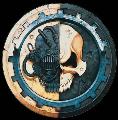
My inner door arrived this Friday, and as I was inspecting it and sizing it up with the rest of the interior I thought it might look good to remodel it as being an open door.
I think it looks a little bit cramped in there and with the use of a knife and some plasticard could let a bit of light into the rear compartment.
|
|
|
|
|
|
2012/09/16 08:58:21
Subject: Re:Mars Pattern WARHOUND TITAN Construction
|
|
Raging Ravener
|
Oh and I gots me two dry fitted chicken feet now, just cleaning up the leg components so I can dry fit them too.
I'm taking winterdyne's advice and checking out how front heavy this Pup is before I start JB welding it together.
|
|
|
|
|
|
2012/09/16 09:03:41
Subject: Mars Pattern WARHOUND TITAN Construction
|
|

Battleship Captain
|
This seems like a long hual, will watch along here.
|
|
|
|
|
2012/09/16 09:25:31
Subject: Mars Pattern WARHOUND TITAN Construction
|
|
Blood Angel Terminator with Lightning Claws
|
Looking good so far mate,i'd say you have the tools and the talent.
|
|
|
|
|
|
2012/09/16 09:34:59
Subject: Mars Pattern WARHOUND TITAN Construction
|
|
Raging Ravener
|
Cheers mate. Yes I definitely have the tools, we will have to see about the talent part though.
|
|
|
|
|
|
2012/09/16 16:19:50
Subject: Re:Mars Pattern WARHOUND TITAN Construction
|
|
Raging Ravener
|
I started dry fitting the legs so I could get a rough idea of how my titan is going to stand, as you can see I inserted pins into each joint so i could pose the legs like some sort of badly made transformer.
This was a very fiddly process that has left the air here very blue.
|
|
|
|
|
|
2012/09/16 16:36:03
Subject: Mars Pattern WARHOUND TITAN Construction
|
|
Huge Hierodule
The centre of a massive brood chamber, heaving and pulsating.
|
I've always wanted to see someone assemble this beauty. Subbed!
|
Squigsquasher, resident ban magnet, White Knight, and general fethwit.
 buddha wrote: buddha wrote:I've decided that these GW is dead/dying threads that pop up every-week must be followers and cultists of nurgle perpetuating the need for decay. I therefore declare that that such threads are heresy and subject to exterminatus. So says the Inquisition!
|
|
|
|
|
2012/09/16 18:17:19
Subject: Re:Mars Pattern WARHOUND TITAN Construction
|
|
Raging Ravener
|
With my legs roughly in place I needed to check that they would take the weight of the main body.
I grabbed all of the large components and strapped them together with sticky tape, this was not a very easy job but I got there in the end.
Thankfully the legs took the weight and the whole thing was surprisingly stable, my cat tried to prove me wrong but was defeated!!
|
|
|
|
|
|
2012/09/16 18:26:03
Subject: Re:Mars Pattern WARHOUND TITAN Construction
|
|
Decrepit Dakkanaut
|
Titans make me smile. 
|
|
|
|
|
2012/09/16 19:59:45
Subject: Re:Mars Pattern WARHOUND TITAN Construction
|
|
Raging Ravener
|
To finish off for the weekend I stripped a lot of the pup back down and began the cold welding on the feet, only the ankles and one of the toes to start off with.
The JB Weld is meant to cure rock hard so should do a better job than super glue. Tomorrow I should find out if this is true or not and how well it works on resin.
I've found a quiet spot between some blurays and set up some AI ork bommers to fend off the cats for the night.
|
|
|
|
|
|
2012/09/16 20:06:30
Subject: Mars Pattern WARHOUND TITAN Construction
|
|
Huge Hierodule
United States
|
In my experience, JB Weld works quite well with resin. It's good stuff. What Legion colors are you planning to give this bad boy?
|
|
|
|
|
|
2012/09/16 20:31:05
Subject: Mars Pattern WARHOUND TITAN Construction
|
|
Raging Ravener
|
That's a very good question, haven't really got that for yet.
I started a dark angels army a while back so the obvious choice would be green. Do you or anyone else know which loyalist Titan legions sport British racing green. If memory serves there are the morning stars but not too keen on their icon.
Any other takers?
|
|
|
|
|
|
2013/02/13 15:51:08
Subject: Re:Mars Pattern WARHOUND TITAN Construction
|
|
Raging Ravener
|
Sorry for my lack of progress on my Titan guys.
Contruction will continue, i just have to finish my tyranid hive fleet first so i can actually take part in a game of 40k.
If your interested you can check on my progress here...
http://www.dakkadakka.com/dakkaforum/posts/list/507422.page
|
|
|
|
|
|
|
|


