| Author |
Message |
 |
|
|
|
|
Advert
|
Forum adverts like this one are shown to any user who is not logged in. Join us by filling out a tiny 3 field form and you will get your own, free, dakka user account which gives a good range of benefits to you:
- No adverts like this in the forums anymore.
- Times and dates in your local timezone.
- Full tracking of what you have read so you can skip to your first unread post, easily see what has changed since you last logged in, and easily see what is new at a glance.
- Email notifications for threads you want to watch closely.
- Being a part of the oldest wargaming community on the net.
If you are already a member then feel free to login now. |
|
 |
2012/11/28 09:41:10
Subject: Fangos Fantasmagorical Figurines and Fortifications - Shelf of Opportunity (Update 1/20: New Years pledge and goals)
|
|

Battle Tested Karist Trooper
Central Coast, California
|
Completed Projects
Stuffed Fables
Incomplete Projects
Board Games (GW)
Deathwatch: Overkill
Dreadfleet
Gorechosen
Hero Quest (I Know, Milton Bradley, but GW did the minis)
Lost Patrol
Necromunda: Underhive
Shadespire (Base game and Sepulchral Guard)
Space Hulk
Warhammer Quest (1995)
Warhammer Quest: Silver Tower
Warhammer Quest: Hamerhal
Warhammer Quest: Blackstone Fortress
Speed Freeksl
Board Games (FFG)
Cadwallon: City of Thieves
Fallout
Mansions of Madness 2nd Edition
New Angeles
Star Wars: Imperial Assault
Talisman: Revised 4th Edition
Board Games (Other)
Big Trouble in Little China
Hellboy
Hybrid + Nemesis
Kingdom Death: Monster
Mice & Mystics
Super Dungeon Explore
Zombicide: Seasons 1-3
Zombicide: Black Plague
Zombicide: Invader (yeah...I know...)
Miniature Games (GW)
Adeptus Titanicus / Epic 40K (Dark Angels, Chaos, Tyranid, Orks, Forgeworld Tau, Imperil Titans, Terrain)
Battlefleet Gothic (Imperial, Chaos, Orks, Forgeworld Tau, Terrain)
Blood Bowl (Human, Orcs, Skaven)
Hobbit / Lord of the Rings (Gondor, Uruk Hai, Goblins, Fellowship, Harad)
Man O War (Empire, Skaven, Dwarf, Bretonnian, Dark Elf, Chaos)
Necromunda (Goliath, Escher, Cawdor, Genesteler Cult, Chaos Cult, Delaque, Palanite Enforcers, Corpse Grinder Cult, Terrain...lots of terrain!)
Warhammer: Age of Sigmar (Disciples of Tzeentch, Skaven, Blades of Khorne, Maggotkin of Nurgle, Undead, Orcs & Goblins, Terrain)
Warhammer 40K / Kill Team (Dark Angels, Drukhari, Tau, Genesteler Cults, Tyranids, Orks, Terrain)
Warcry (Corvus Cabal, Untamed Beasts, Iron Golems, Terrain)
Kill Team (Genestealer Cults, Fronteris Terrain)
Miniature Games (Other)
Confrontation 3.5 (Kelt Sessairs, Dirz, Griffin, Acheron, Ophidian)
Dark Age (Forsaken, Skaard, Nomads)
Flames of War (101st Airborne, 2nd Armored Division, Terrain)
Gaslands
Infinity (Nomads)
Last Days: Zombie Apocalypse
Maelstrom's Edge (Epirian, Karist, Broken, Artarian Remnant, Terrain)
Malifaux (Ressers, Neverborn)
Warmachine/Hordes (Cryx, Cephalyx)
Rangers of Shadowdeep
Dracula's America
Fallout: Wasteland Warfare (Robots, Survivors, Super Mutants, Ghouls, Wasteland Creatures, Scatter Terrain, Raiders)
Frostgrave
Relicblade (everything)
Star Wars: Legion (Empire, Separatists,Terrain)
Marvel: Crisis Protocol (Minis and Terrain)
First Post
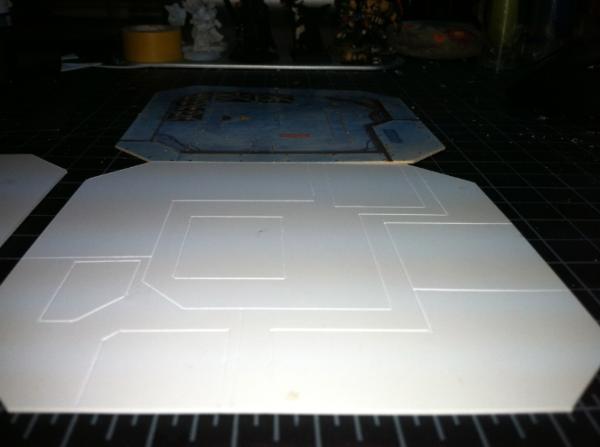
So without wasting any time on explanations, here are two WIP terrain projects I've had kicking around for a few years...trying to get the motivation to finish them up.
Questions, comments and critiques are strongly encouraged 

|
|
This message was edited 49 times. Last update was at 2020/01/04 19:29:32
|
|
|
|
2012/11/28 17:48:54
Subject: Fango's Fantasmagorical Futuristic Figurines and Fortifications - Imperial Firebase and Pump Station
|
|
Battle Tested Karist Trooper
Central Coast, California
|
@Zwan1One - That's one thing I haven't decided yet. My buddy Tyson embellished his Firebase and went with gray and rusty orange...I like the original scheme better, but I have a feeling I will go with something else. I am totally open to suggestions here!
@SilverMK2 - Thanks man, I have a feeling that posting my progress here on Dakka will get me motivated to see these to completion.
@Ruglud - Its all plastic card (some of it textured of course), styrene tubing/rod, and Necro bulkheads. Sadly, I cut up the original card to trace the patterns and panels, etc. There is a bit of wire on that control box, and the vent on top of the maintenance tower is wire mesh.
@Valhalla130 - I indeed cut up the solid Necro bulkheads to assemble the crossbeam textured walls. I've never been any good with a Dremel tool, so I used clippers and hobby knife to cut and shape everything.
@Vitruvian XVII - Thanks!
@Bruticus - Yes, sacrificed those bulkheads....Thanks, I got my bachelors degree in architecture at Cal Poly, SLO. 5 years of constant model building tends to help hone those skills!
@Galorn - Thanks, I need some help deciding how to paint these... 
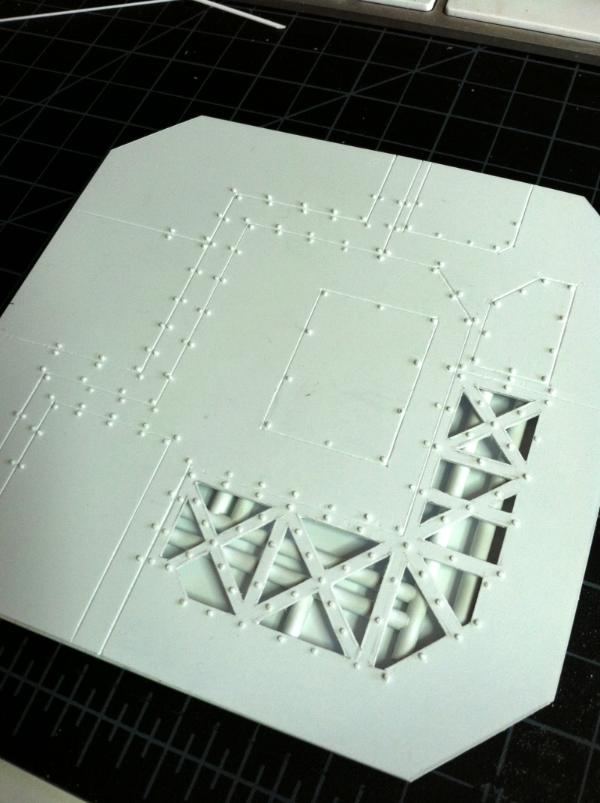
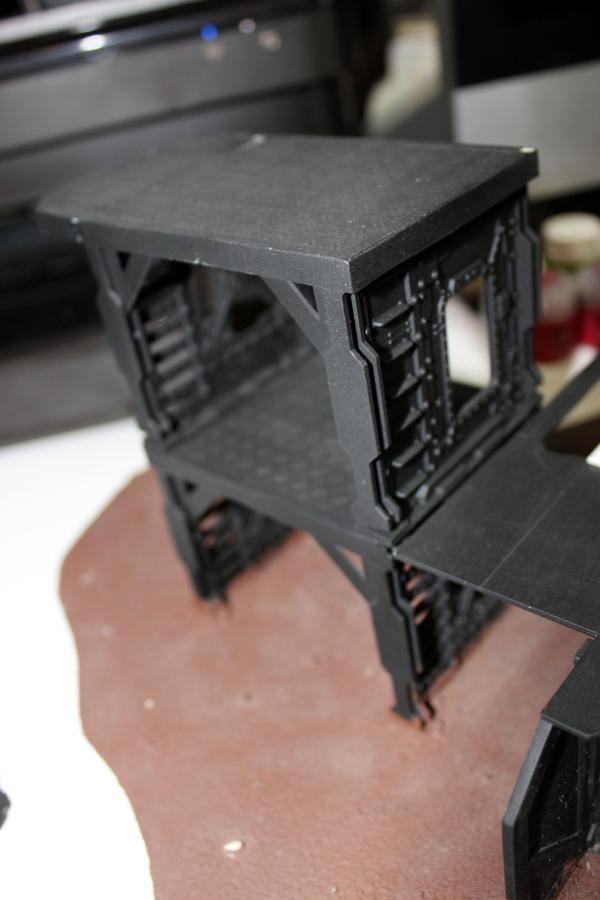
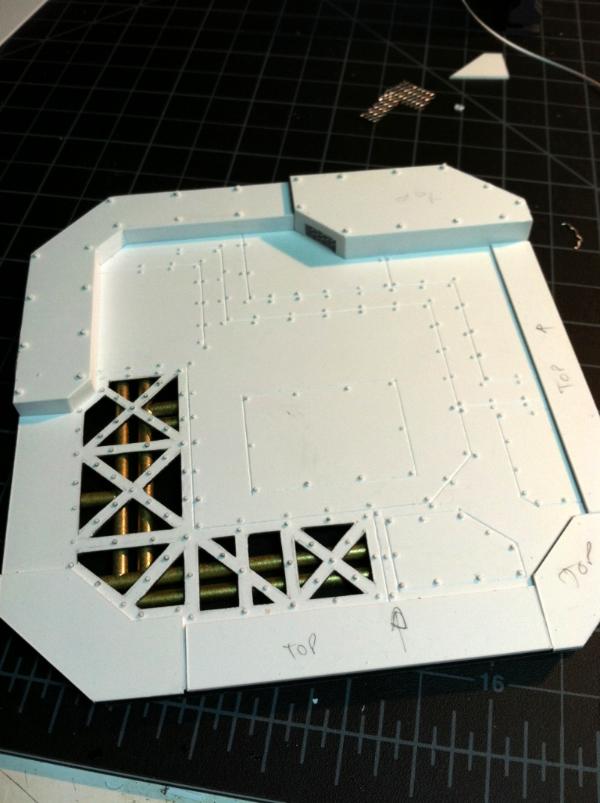
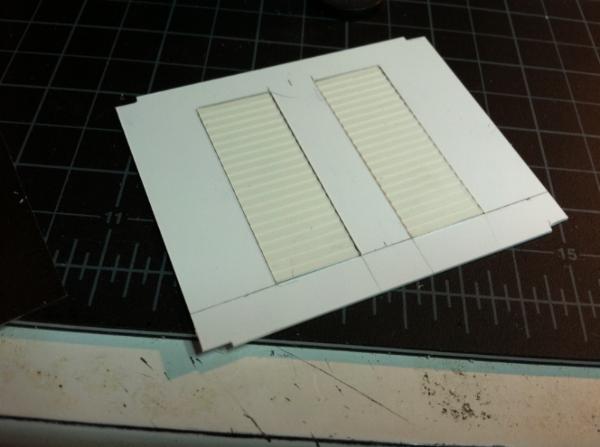
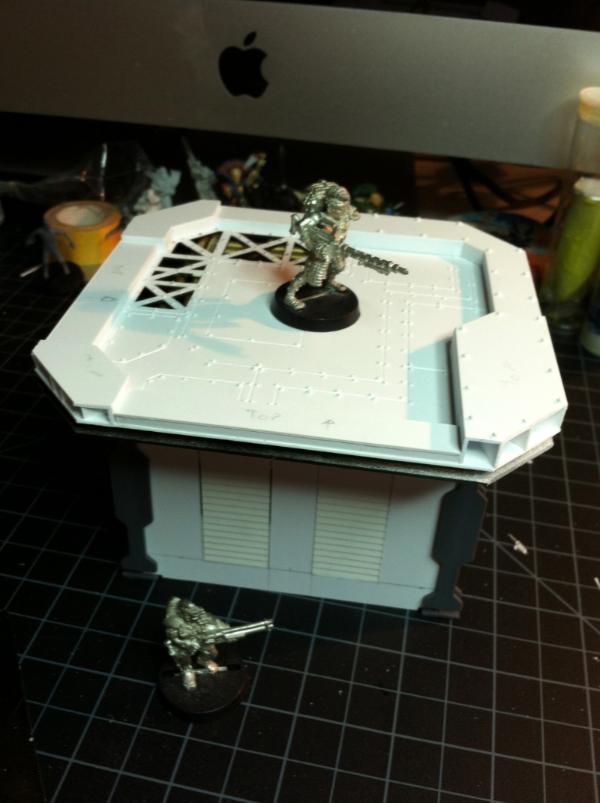
@dsteingass - You were right to recognize those crossbeams from the bulkheads. The floor panel surfaces are individually cut, puzzeled together, and glued down to a solid styrene sheet base. The edges have a slight bevel on them to accentuate the pattern. The base was cut into as well, and I have yet to build the housings for the hydraulic pistons that raise and lower the (eventually hazard striped) blast panels. Most of the wall panels are 2 to 3 layers of styrene, with the outer layer cut to the original pattern printed on the card walls, etc. I hand beveled the edges with an Xacto knife, so they aren't all perfectly straight on close inspection. The rivets are sliced from styrene rod...in hindsight, I think I should have used a smaller diameter...they are pretty beefy rivets!
Thanks everybody, I will post more pics as I make more forward progress. It has always been my dream to wire this thing up and put LED lights on the landing pad, and maybe a flashing red one up on an aerial on the tower. We'll see how ambitious I get...maybe I can be coerced into finally going through with it. As of yet, I don't have any electrical experience!
|
|
|
|
2012/11/28 19:07:26
Subject: Re:Fango's Fantasmagorical Futuristic Figurines and Fortifications - Imperial Firebase and Pump Station
|
|
Battle Tested Karist Trooper
Central Coast, California
|
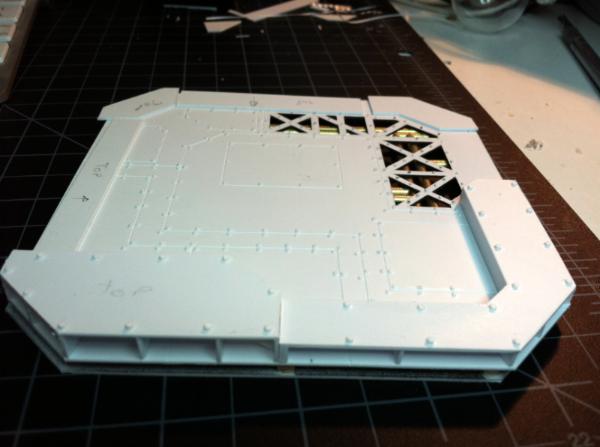
I'll have to mull over the paint scheme for a while. In the mean time...I have to add the structure pattern to the slanted side bunker face, diagonal supports on several places where walls meet supported floors, the access 'boxes' under the blast panels on the landing pad along with pipes, hoses, wires, and the hydraulic pistons, and countless more rivets!
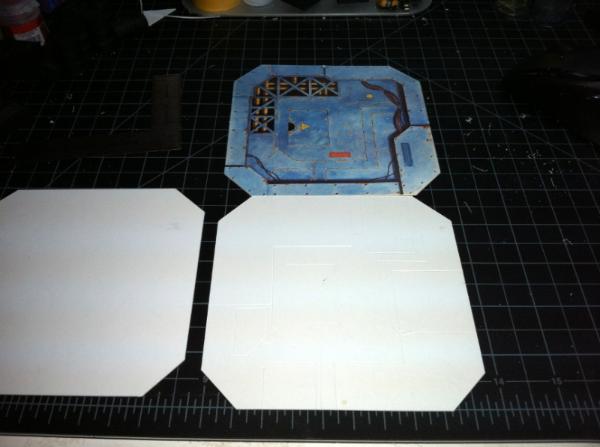
That Imperial Bastion terrain kit was one I started to scratchbuild, in fact the door on the slanted face of the bunker on my Firebase was salvaged from that attempt. I think I abandoned it because I decided, in the end, that it really should be scaled up a bit. I almost wanted to give it a big gate that allowed for maybe a predator or chimera to drive through...like it was an armored checkpoint leading into an demilitarized zone. I will eventually revisit that project. But first, I am inspired to get my Necromunda terrain 3Dified for our upcoming campaign...
|
|
This message was edited 1 time. Last update was at 2012/11/28 19:19:00
|
|
|
|
2012/11/28 20:17:18
Subject: Re:Fango's Fantasmagorical Futuristic Figurines and Fortifications - Imperial Firebase and Pump Station
|
|
Battle Tested Karist Trooper
Central Coast, California
|
Why thank you! Now if you could just cut about 150 rivets for me, I'd be much obliged
|
|
|
|
2012/11/28 21:58:30
Subject: Fango's Fantasmagorical Futuristic Figurines and Fortifications - Imperial Firebase and Pump Station
|
|
Battle Tested Karist Trooper
Central Coast, California
|
 Bruticus wrote: Bruticus wrote:my only criticism is that some of the walls or floors are a bit flat, some additional support struts around the walls or railings/sandbags around the top would make them look more substantial, as would supporting beams underneath the flooring.
I agree Bruticus, especially the walls on the walkway and the floor that juts out to the tower from the main base. I will indeed add some thickness to them.
|
|
|
|
2012/12/09 23:34:26
Subject: Re:Fango's Fantasmagorical Futuristic Figurines and Fortifications - now with 100% more Necromunda!!
|
|
Battle Tested Karist Trooper
Central Coast, California
|
|
|
This message was edited 4 times. Last update was at 2012/12/09 23:59:03
|
|
|
|
2012/12/10 21:58:41
Subject: Fango's Fantasmagorical Futuristic Figurines and Fortifications - Now with 100% more Necromunda!!
|
|
Battle Tested Karist Trooper
Central Coast, California
|
Bruticus wrote:As an architect aren't you more tempted to design your own buildings? I've never really understood the desire to replicate exisiting designs, even if you can make them look a whole lot better by making them 3d. I suppose one big benefit is it will be compatible with the card stuff, but then if that is the goal you may as well just buy more of the card stuff. Why not make new buildings but using the same design elements? Your model building skills are ridiculously good, was just hoping to see some new designs on the way.
E: as you posted the same time as me, that new pic is just amazingly well done. Very precise work. I wish I could buy ready made sheets with that sort of scribing and riviting already done, that's exactly the sort of detail work I don't have the patience for.
Thanks for the praise Bruticus, I've taken a look at your Plog and gallery and I must say that what you have is most impressive! I did get my degree in architecture, but alas, I am not an architect. I work at a software company designing GUIs and button icons. I graduated about a year after the economic, and subsequent real estate market crash here in the States...Sadly, its a mostly thankless and underpaid profession (compared to Doctors and Lawyers who also need to be licensed to practice and can be sued for making mistakes) unless you are someone like Frank Ghery or Norman Foster (whom also took a lifetime to get where they are). I picked architecture to study because I've always loved to draw and build models, and had a knack for spacial awareness...but really my dream job would be working for, say, WETA workshop making hyper realistic 'bigatures' for science fiction and fantasy films. To answer your question though, I couldn't have said it better than Dave did below. It IS mostly for nostalgia and to bring to realization the full potential of what the original designs were...sacrificing some modularity, storability (is that a word?), and game-play functionality (ie, no more all-flat surfaces), in exchange for texture, hyper detail, and sheer coolness factor ( IMHO). Also, my card stock is showing its age from wear and tear...several card panels now have creases, and or have the back edge of the paper peeling off. I would like to know what your painting techniques are for your entropic, rusty, paint peeled look...and where you get your (closely) scaled vehicles from. Ozymandias wrote:Looking good! Keep at it! It'll make my victory over your Escher that much more pretty!
Thanks Chris, I look forward to our game this Thursday...hopefully we can play on this piece! Valhalla130 wrote:That's great. How do you get the straight lines on there? I'm pretty sure I know how to do the rivets now, but those look like they were machined that way.
Thanks Valhalla, the straight lines just require patience is all...the trick is to make several controlled slices (like scoring) but cut all the way through...also, realize that when you are cutting you are basically displacing that plastic by driving a sharp wedge into it. So if your knife is straight up and down, you will get edges that look like this: \ / But if you hold the knife at a slight angle away from the edge you want straight, you can get an edge profile more like this: | / In addition, I use a handy tool called an L-square (and also a triangle square) to keep my cuts straight. If you have a bunch of cuts that you want to line up, make sure you do them all before moving your straight-edge tool. dsteingass wrote:That is awesome excellent stuff Fango! Much more detailed than mine! The riveting is fantastic! I hadn't yet discovered the beauty of my Chop-it tool for slicing mass-quantities of rivets yet when I did mine.
I think you are on a fantastic path here! Please keep up the excellent work!
Thanks Dave, I am just slicing it off the end of a rod by rocking my Xacto up and down. The cut bits are rarely precisely the same size, or at the same angle...but being so small, its hard to tell the difference. dsteingass wrote:I'm guessing he just used a straightedge and a scribing tool. If you can draw a straight line with a pencil, it's pretty easy to scribe it too. When I built mine, I didn't yet have my proper scribing tool, and when you just use a dental pick, it creates a piling on the edge of the groove. A proper scribing tool actually peels that ribbon of plastic out rather than just push it to the side (like a plowed field). Fango's scribes are very clean and they all seem to have the right concave shape.
Actually, I used the back edge of my Xacto, it does leave that little ribbon edge, which I carefully run the tip of my blade down nearly perpendicular to the scribe line. I'm sure there is a better way, or a better tool, that's just how I improvised...The landing pad near the top of this thread I actually cut out all the panels and sanded the edges...but that was way too much work. Bruticus wrote:I understand that it teaches skills, although I think Fango here has the skills pretty much mastered and I think you would learn skills and patience whatever you made. And I get that it lasts longer in plastic. I guess I just don't understand the nostalgia side of things then. I've got nothing against people recreating original scenery - it looks amazing and they were always quite functional designs - I would just also like to see that architecture degree put to use designing something new!
Anyway, people should make whatever they like so just ignore me!
Actually, it hadn't even occurred to me to make anything completely original before completing all of the card terrain pieces. Tell you what, my very next piece will be an original one done in the same design language as the rest of the Studio Necromunda terrain. Can you help me with an idea? I've only just started playing Necromunda for the first time in about 17 years...With your experience, what kind of a structure do you think would compliment the rest of the terrain set in a way that offers unique line of sight and cover situations, would be fun to play on and looks super cool? dsteingass wrote:Your own work is amazing Bruticus! That gives you credibility and makes whatever you say impossible to ignore There is just something exploratory and satisfying about taking the original flat 2D graphic designs that we have all loved for 20+ years and layering them in plastic. Nothing is as cool for me as when someone thinks it is the card stuff at first glance, then they look closer and realize it's all built up and 3D. We're not just recreating, we're fully realizing what it was always supposed to look like. if anything, I'm just trying to pry open your mind a bit my friend
I wholeheartedly agree with Dave here Bruticus, your input is extremely valuable! whill4 wrote:NIce work Fango. If you get the chance I have a couple of questions. What thickness plastic sheet are you using? How do you cut such clean lines on the plastic?
Thanks Whill, I'm using what I had on hand which happens to be .03" high impact styrene. When I buy in bulk, I think I will go for .04" for just a little more rigidity. Scribe and snap will give you the straightest lines on an actual cut. See my comments above for some tips and tricks! Also, check out dsteingass' project blog here on Dakka for some really good modeling tips. Automatically Appended Next Post:
Made a little more progress on this piece tonight. I need to finish up the raised areas around the perimeter, then add a few more rivets. Then its on to the bulkheads that this thing sits on top of. I hope to have the construction done by Wednesday night.
|
|
This message was edited 3 times. Last update was at 2012/12/11 08:35:53
|
|
|
|
2012/12/12 05:13:06
Subject: Re:Fango's Fantasmagorical Futuristic Figurines and Fortifications - Necromunda terrain update (Dec 11)
|
|
Battle Tested Karist Trooper
Central Coast, California
|
@ Bruticus - Thanks for the responses, I will definitely be trying some of your tips out. And thanks for the links, I knew about Antenocitis Workshop, but hadn't heard of Ramshackle, now I recognize some of their models.
bruticus wrote:These new bits are really great, if you could figure out a way to sell similar things to them that would be amazing.
Thanks, I have plans to eventually get some resin casting equipment (vacuum pump, pressure pot, etc), and would like to start selling custom made terrain bits and models (obviously not ones based on GWs designs)
dsteingass wrote:What are your feelings on walkways...I have some great ideas for functional-looking walkways from RL industrial buildings, but to make them look right, they almost need to be permanently attached to the building. I know separate walkways give you more flexibility, but what about a mix of the two types?
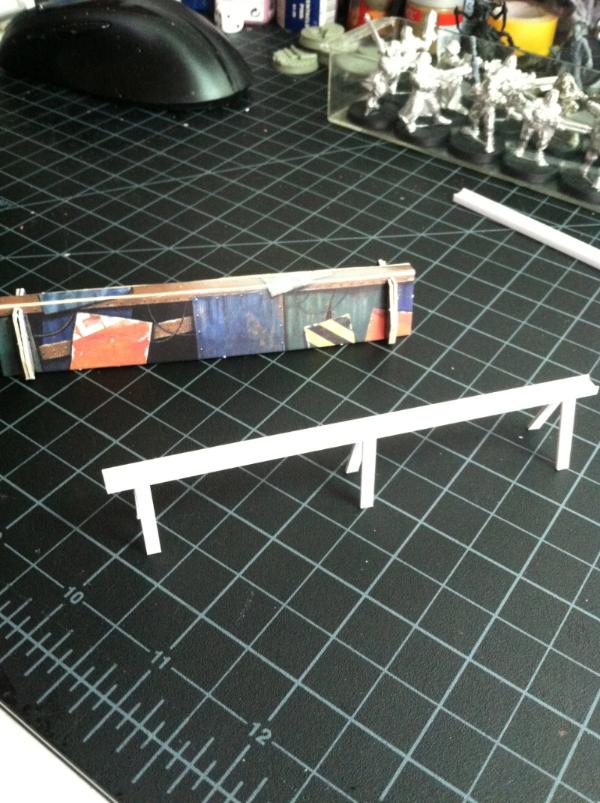
I havent yet decided how to tackle walkways, they need to look substantial enough in structure to hold up the people and gear...but that structure raises it off the buildings platforms, and then there is the connection problem....I have considered using magnets to make them flush AND modular, but then they are restricted to being perpendicular to the edge...I'd love to hear some of your great ideas on this.
dsteingass wrote:
This is why I love Dakka..When I built mine, I was one of the first that I know of, then you come along, get inspired by my attempt, and then go and raise the bar! That little extra vent is so small, yet so completely perfect for that piece! You work with angles and bevels on Plasticard in ways I have never even imagined possible. Is the raised L-shaped lip on the left solid or hollow? I can't tell.
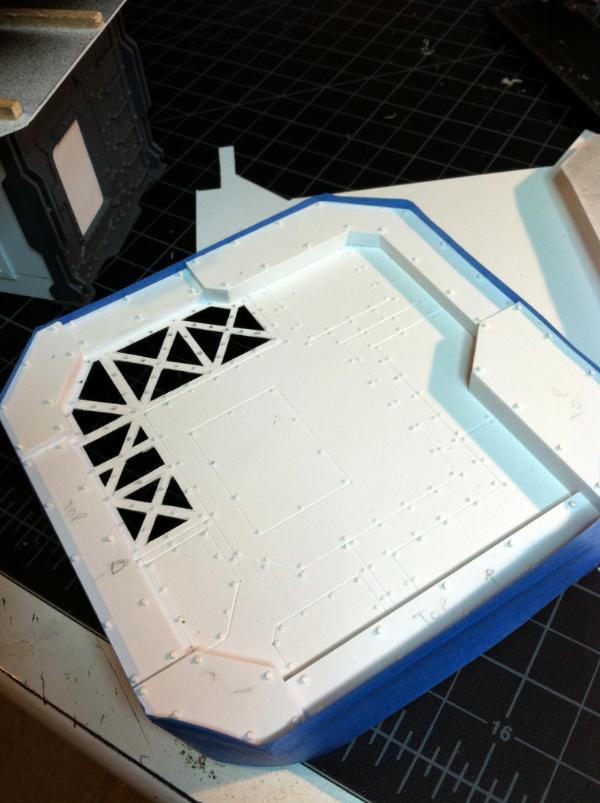
Thanks for the kind words, yes, your project blog (and many others here on Dakka) have very much inspired me! The raised bits on the edge are indeed hollow, as can be seen here...
dsteingass wrote:@Bruticus- You'd be surprised how enjoyable it can be to duplicate something from a photograph or drawing, or video game in detail. A year ago this time, I'd never heard of the Fallout game series, today I am the only producer of 28mm Nuka Cola machines in the world
Indeed! I am seriously considering making some terrain based on Borderlands 2...including the guns/ammo/med vending machines.
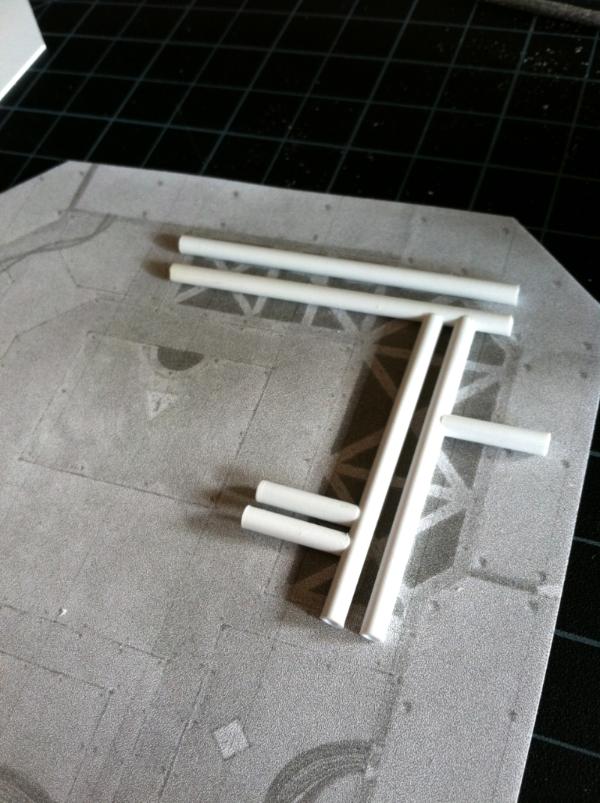
Valhalla130 wrote:Dsteingass, I demand you recreate a walkway out of those pipes.
Well, not so much demand as think it would be really neat. 
I can just imagine a ganger sneaking along those precarious pipes, water condensation making them slippery, as he angles for a better vantage point to fire into the opposing gang.
Wait a minute... I got lost in the threads! You're all posting in each others blogs!!! Whoever!, I demand/request/think it's really cool, to have a walkway made out of those pipes.
My next project will be a custom piece, and it shall include pipes not unlike the ones in that photo.
sennacherib wrote:Dude.
Looking great. I know that with your attention to detail this project is going to be awesome when you are finished with it dude.
Thanks for stopping by man! Your Death Guard are looking wicked disgusting (In a really good way)!
|
|
This message was edited 1 time. Last update was at 2012/12/12 05:29:45
|
|
|
|
2012/12/12 16:25:53
Subject: Fango's Fantasmagorical Futuristic Figurines and Fortifications - Necromunda terrain update (Dec 11)
|
|
Battle Tested Karist Trooper
Central Coast, California
|
Vitruvian XVII wrote:What about putting a semi circle on the end of the walkways? You could mount a magnet in the middle, and that would enable almost 180 degree rotation of the walkway (assuming you dont mind having the walkway jutting out onto the building a bit)
I think you might be on to something with the semi-circular walkway ends...might try this out.
Sheep wrote:This is some truly bespoke terrain. The old designs are classics and bring a nostalgic tear to the eye of all veterans.
I can't wait to see them with paint.
Thanks Sheep! I'm afraid I will ruin it when I go to paint it! Still haven't decided on the original colors or something more natural.
Vitruvian XVII wrote:I drew a quick shcematic up on paint so my idea was easier to understand:
Cool idea! I may have to try something like this...maybe not on a pivot point as Bruticus points out the how limiting it would be, but perhaps without the magnet, or just have the magnet on the walkway and a metal strip on the underside of the floor.
Valhalla130 wrote:Did they forget how to make railings in the 40th millenium? I mean seriously, you can't go to an industrial site nowadays without seeing railings around everything. I guess OSHA didn't make it into the Imperium's beauracracy.

Bruticus wrote:I would say you don't need to bother with magnets for walkways, it limits where you can attach them too much - even just looking at the firebase there are dozens of places where you might want to place a walkway.
Railings are a really good idea in Necromunda, falling from a walkway is far too dangerous. We house rule that a solid barrier prevents needed to check for falling on walkways, otherwise it is simply too risky to ever go above ground level!
Valhalla130 wrote:Still, how many movie villains fall over railings into vats of chemicals to their DOOOOOOOOOOM?
Say... an industrial space with catwalks and vats of bubbling, frothing, multi-colored chemicals in them would look awesome.
Vitruvian XVII wrote:I dont know, i reckon it could be really cool.
If you put magnetic or metal strips around all the platforms on buildings, and just had magnets on the walkways that would give you a lot of interchangeability. Would be a lot of effort though.
dsteingass wrote:In the grim darkness of the 41st Millenium, there are no safety railings, there are only hazard stripes
Valhalla130 wrote:In the grim darkness of the 41st Millenium, there is falling to your DOOOOOOOOOOOM!!!!
Valhalla130 wrote:Those are holy rivets. Blessed by the Emperor and the Machine God.
You guys are awesome  I do like the idea for house rule for railings/barriers. I will have to run that by Ozymandias. So far, I've had several members of my gang suffer heinous wounds from falling off terrain. They are pretty much guaranteed to go out of action if they fall more than like 2 inches.
Some chemical vats or waste sumps to fall into are definitely on my to do list!
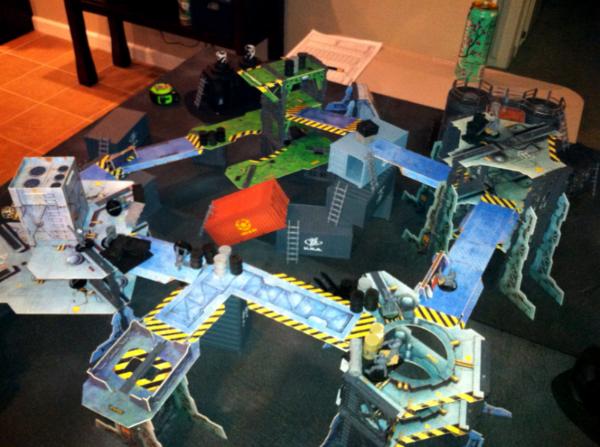
Here are some more progress pics...
|
|
|
|
2012/12/12 17:29:29
Subject: Fango's Fantasmagorical Futuristic Figurines and Fortifications - Necromunda terrain update (Dec 11)
|
|
Battle Tested Karist Trooper
Central Coast, California
|
Valhalla130 wrote:The problem of course, with chemical vats, is that the one guy falls in there and becomes the Joker and has to be repainted.
Holy Repetitive Rivets Batman!
"64 - HORRIBLE SCARS
The fighter recovers from his injuries but is left horribly disfigured. His scarred and distorted features inspire fear as described in the Advanced Rules section of the rulebook."
If I roll this as a serious injury, I am totally painting a joker face on that ganger!
dsteingass wrote:I had a fluffy idea awhile back. One forgotten Servitor, a Hazard stripe-painting servitor.. still functioning after Millennia down in a sealed off dome, every day he goes on his rounds, repainting all the stripes
Couldn't have said it better than Valhalla did Valhalla130 wrote:That's. The. Most. Awesome. Idea. Ever.
|
|
|
|
2012/12/12 18:36:54
Subject: Re:Fango's Fantasmagorical Futuristic Figurines and Fortifications - Necromunda terrain update (Dec 11)
|
|
Battle Tested Karist Trooper
Central Coast, California
|
Bruticus wrote:
There was an official rule for a bit of terrain called an Armoured Bridge that said 'In addition, a fighter never needs to test for falling no matter where they are on the armoured bridge as there is always a railing, armour, cover, etc. for him to hold onto or dive behind.' - it seemed to me that this would really apply to any walkway with sufficient barriers to prevent falling. A simple railing might just let you re-roll your initiative test as you try to grab it, but a full wall or barrier should prevent falling. Necromunda already heavily favours shooting and walkways will just not be used when all it takes is a sniper forcing falling tests on everyone. Without a lot of scenery there are already very few reasons to use walkways - you are generally better off going along the ground, and then racing up a ladder to trap anyone on higher ground where they can't run away. Making walkways useful was pretty much my number one priority when making scenery. I mainly played close combat gangs!
I like the re-roll idea for railings too, I love the look of them on the terrain. I think I remember the armored bridge rule from Outlanders...the rust brown walkway with the fold up edges. That expansion had all the barriers too, I think they realized how dangerous those walkways were without cover, etc. after publishing the main game...
There is a territory called Chemical Pit, if you roll snake eyes while working it, you fall in and get disfigured and then cause fear from then on. In my goliath gang I had several people fall in, at first I tried to model them but by the end of the campaign I had like 5 so gave up. Dunno if you can see in my gallery but one Goliath has a burned face while another wears a mask to hide his scars.
I didnt roll that one up this time, but I do have a settlement which has given me a free Juve 3 game turns in a row! On top of that, my Ratling scout has found me a new territory 3 turns in a row as well! I think my luck will likely run out this next round and he'll run off, never to be heard from again!
I'm sure there is a WALL-E pun here somewhere.
Classic! I might just have to do that as an easter egg to one of my pieces...
oh by the way, that building looks great. That sort of thing but stackable would work well, with enough of a lip around the edge to connect walkways and the versatility to be placed anywhere, like on the firebase platform.
Thanks! I think I will make a few more like this then, with slight variation in structure and detail.
Valhalla130 wrote:He must have had a huge stockpile of paint. But then again, what with typical Imperial beauracratic efficiency, they probably diverted a whole shipload of paint to that planet. That's why everyone died out but the servitor. They were meant to get food. Other colonists die out, servitor is left with a virtually unlimited supply of paint.
And I way overthought that.
Nah, excellent imagination! (And totally something the bloated bureaucracy of the Imperium would end up doing!)
|
|
|
|
2012/12/12 18:46:06
Subject: Fango's Fantasmagorical Futuristic Figurines and Fortifications - Necromunda terrain update (Dec 11)
|
|
Battle Tested Karist Trooper
Central Coast, California
|
Interesting, the 3 territories my Ratskin discovered were a drinking hole and two slag heaps! 
|
|
This message was edited 1 time. Last update was at 2012/12/12 18:46:33
|
|
|
|
2012/12/13 18:50:34
Subject: Fango's Fantasmagorical Futuristic Figurines and Fortifications - Necromunda terrain update (Dec 11)
|
|
Battle Tested Karist Trooper
Central Coast, California
|
dsteingass wrote:I'm pretty sure, from my opponents, that Redemptionists, with flamers, rolling up vents and tunnels is nigh unstoppable
sounds nasty, I rolled up Vents...might have to get myself a heavy with a flamer...
YELLOWBLADES wrote:Very cool!
Thanks Blades!
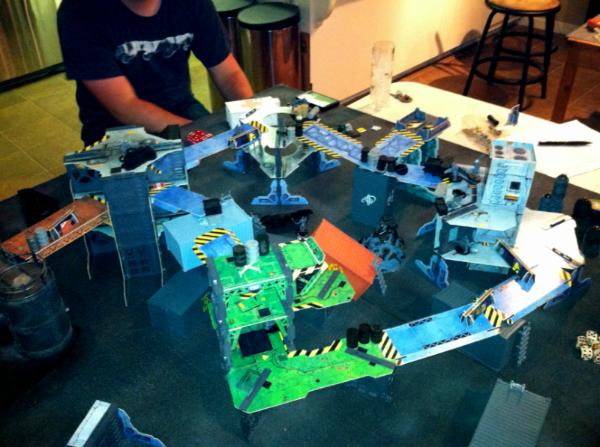
Here are a few more progress pics...
I think the drybrushing looks horrible. I really need to get the airbrush out and lay down a base coat other than black, then dry brush and rust/weather from there....any advice would be MOST welcome!
I have to paint the top before sandwiching it and bottom together and skinning the sides with plastic card...otherwise I'll get paint all over the pipes...so I'm sorta stuck until I figure out a finish for this thing!
|
|
|
|
2012/12/13 19:19:44
Subject: Re:Fango's Fantasmagorical Futuristic Figurines and Fortifications - Necromunda terrain update (Dec 13)
|
|
Battle Tested Karist Trooper
Central Coast, California
|
Thanks for the advice Bruticus. I have an 18 month old girl that has free reign of the kitchen where my desk is (so all hobby related stuff gets put up and away between sessions) and she loves to get into everything! If she can reach it, its getting played with and likely taken somewhere else. Her new favorite thing to do is climb up on my chair when I get up (even just to clean my water cup)...and then she can reach twice as much! AND our garage has no sink for cleaning my airbrush....so it doesn't get used very often (Or at all yet, got it for my birthday in October). It just becomes a hassle, I've been thinking about bringing it up and using it out on the balcony/patio outside out kitchen sliding glass door...but this would have to be done when the little rascal is napping or its just not practical. One day we'll have a house where I can set up my work station in a garage with a sink, etc. Maybe I can work something out with my wife this weekend to get some time alone to bust out the airbrush!
|
|
|
|
2012/12/13 19:24:04
Subject: Fango's Fantasmagorical Futuristic Figurines and Fortifications - Necromunda terrain update (Dec 13)
|
|
Battle Tested Karist Trooper
Central Coast, California
|
 Valhalla130 wrote: Valhalla130 wrote:Maybe it's the pics, but I think it looks pretty good. It looks like it may have been blue at one point, but has gotten very grimy since.
Thanks for the kind words Val, I think I'm going to try the salt weathering thing...for this type of terrain, it seems apropos.
good question 
|
|
|
|
2012/12/14 17:51:26
Subject: Fango's Fantasmagorical Futuristic Figurines and Fortifications - Necromunda terrain update (Dec 13)
|
|
Battle Tested Karist Trooper
Central Coast, California
|
Didn't work on the piece last night as Thursday is our game night. I ended up facing Ozymandias again and ended up overwhelming him with numbers...He had only 9 guys (even with the hired ratskin) to my 13. So that, coupled with his inability to roll a wound on just about any one he hit pretty much sealed the deal. One of the ladies he did take out ended up getting captured, so on top of the 6 bonus points all his guys got simply for stepping on the battlefield with me, he made out with a nice chunk of cash in exchange for the prisoner.
Depending on whether or not its raining this weekend, I'm going to try to break out the airbrush and see if I cant get this thing finished. I still have a little more riveting to do yet. and a few details to add to one of the walls. Hopefully I will be on to my next project by Sunday.
|
|
|
|
2012/12/14 19:04:35
Subject: Fango's Fantasmagorical Futuristic Figurines and Fortifications - Necromunda terrain update (Dec 13)
|
|
Battle Tested Karist Trooper
Central Coast, California
|
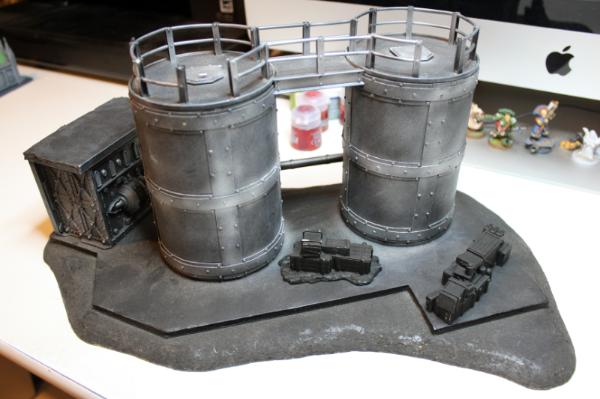
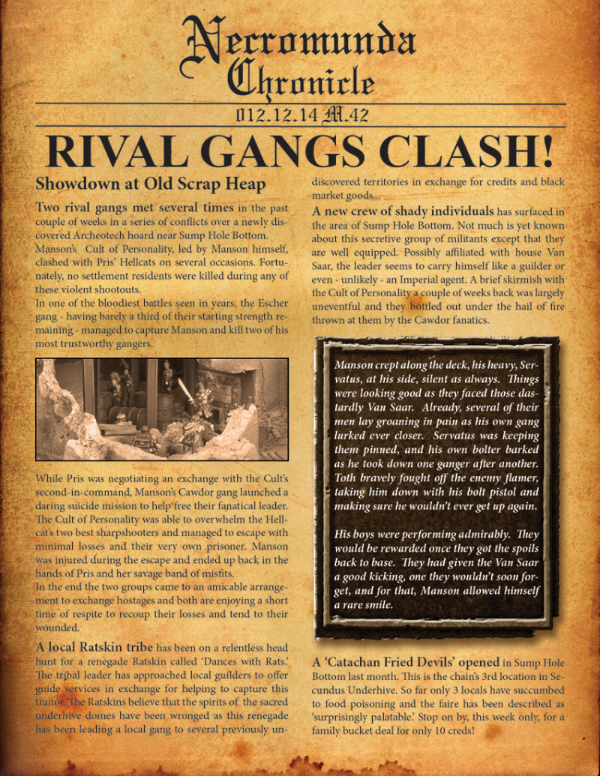
Here is a newsletter I made for our Necromunda campaign, inspired by the article in White Dwarf #193 by Gav Thorpe...
 Automatically Appended Next Post: Automatically Appended Next Post:
Thanks Crypto!
|
|
This message was edited 1 time. Last update was at 2012/12/14 19:08:40
|
|
|
|
2012/12/14 19:33:12
Subject: Fango's Fantasmagorical Futuristic Figurines and Fortifications - Necromunda terrain update (Dec 13)
|
|
Battle Tested Karist Trooper
Central Coast, California
|
Yeah, I wanted something suitably gross. Plus, I plan to make a nasty sewage sump terrain piece to throw in the middle of our board for most games.
Automatically Appended Next Post:
The GW studio campaign in the 90s called their main settlement area 'Glory Hole'...I don't think that name is suitable any longer... 
|
|
This message was edited 2 times. Last update was at 2012/12/14 19:37:47
|
|
|
|
2012/12/14 23:13:05
Subject: Re:Fango's Fantasmagorical Futuristic Figurines and Fortifications - Necromunda terrain update (Dec 13)
|
|
Battle Tested Karist Trooper
Central Coast, California
|
Yeah, I forgot mention you wrote that excellent fluff piece I put in the newsletter
Since there isnt enought room for all that great descriptive writing in every newsletter, we should compile it all somewhere...maybe post it in its entirety up in this blog. Can't wait to see some of Manson's Raiders...er, Cult of Personality all painted up!
|
|
|
|
2012/12/14 23:32:50
Subject: Fango's Fantasmagorical Futuristic Figurines and Fortifications - Necromunda terrain update (Dec 13)
|
|
Battle Tested Karist Trooper
Central Coast, California
|
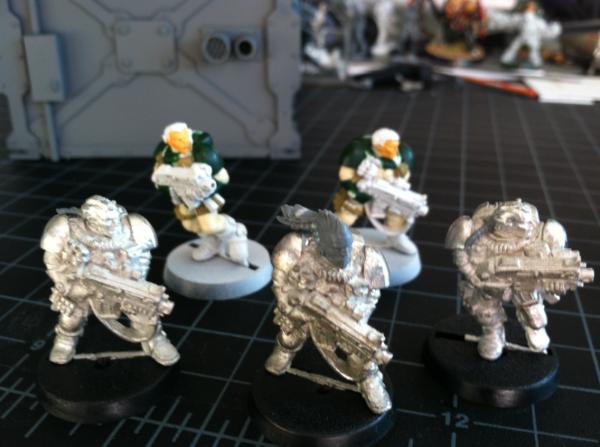
To be completely honest, the only substantial investment in Necromunda is time and materials for terrain (Which can be used in 40k games as well!), and allot of guys on here just recycle old children's toys, cereal box card, and other forms of consumer goods packaging. For a gang you need like 8 models...and a few more to add on as you gang grows. Mine is at 13 now (including a hired Ratskin Scout), and I feel like thats as large as it needs to get before becoming too unwieldy and expensive (in game credits-wise) to run.
If you have a guard army, then you likely already have a few models you can use/convert to gangers. If I hadnt bought these Escher models 18 some odd years ago, I likely would have converted models myself...in fact I have 3 or 4 reaper models on their way from TheWarstore as I type this (meaning, you dont need the official models).
Ozymandias converted all of his Cawdor gangers out of Chaos Cultists from the Dark Vengeance box set.
Edit: Oh, and the rules are a free download on the GW website.
|
|
This message was edited 2 times. Last update was at 2012/12/14 23:35:30
|
|
|
|
2012/12/16 04:45:33
Subject: Re:Fango's Fantasmagorical Futuristic Figurines and Fortifications - Necromunda terrain update (Dec 13)
|
|
Battle Tested Karist Trooper
Central Coast, California
|
Thanks Silver!
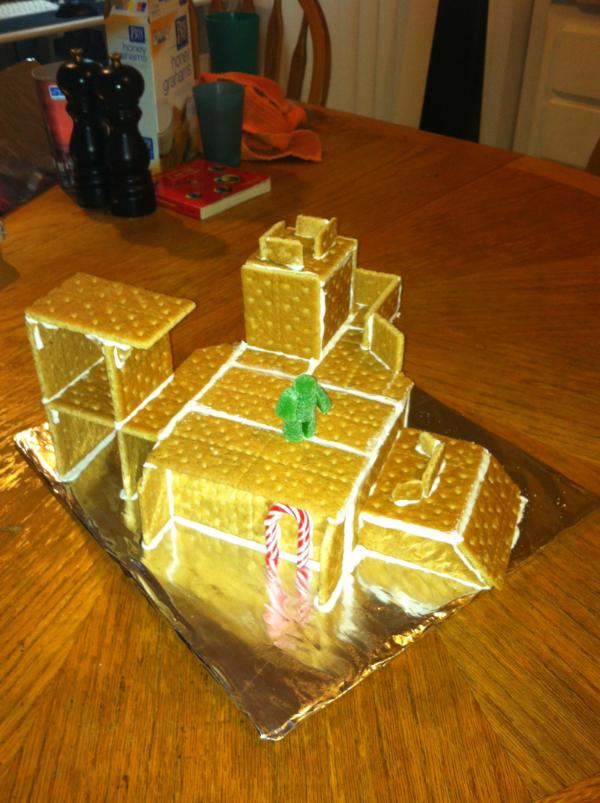
Did 'Gingerbread' houses with the wife and kids tonight, here's mine...
|
|
|
|
2012/12/18 08:50:18
Subject: Re:Fango's Fantasmagorical Futuristic Figurines and Fortifications - 'Gingerbread' Firebase! (Dec 15)
|
|
Battle Tested Karist Trooper
Central Coast, California
|
Thanks for all the comments guys, hope you enjoyed my 'gingerbread' firebase interlude...
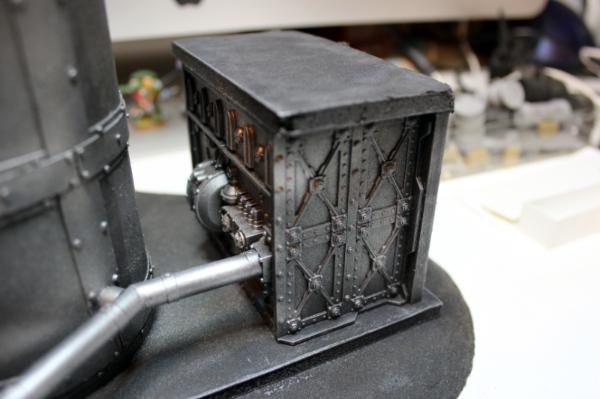
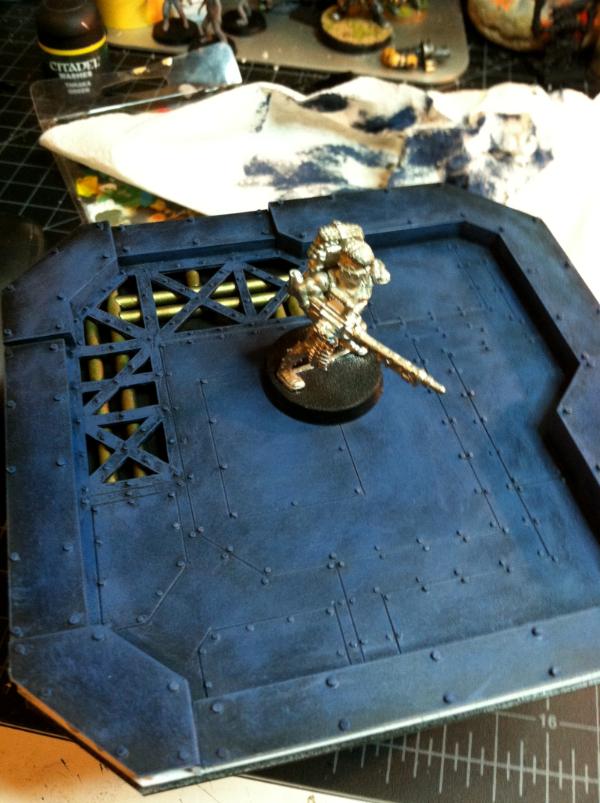
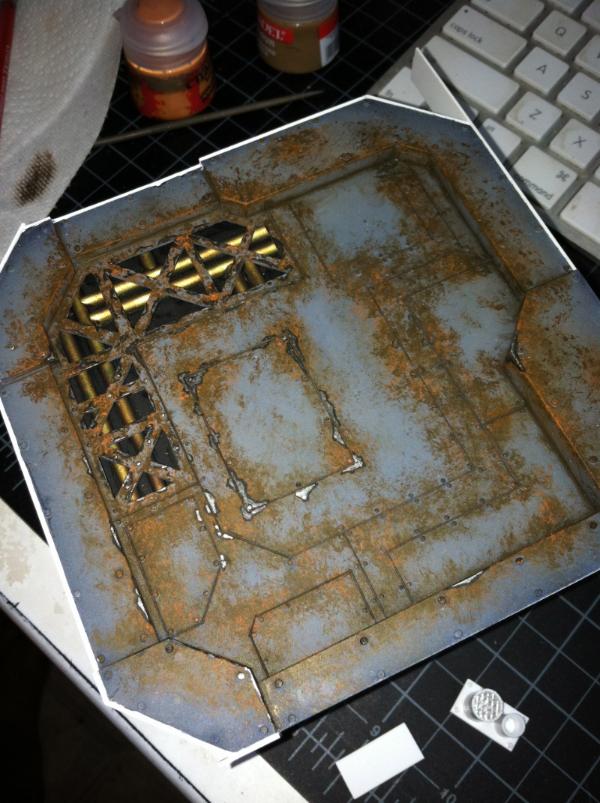
Here is another progress update on my Necromunda terrain scratch build...
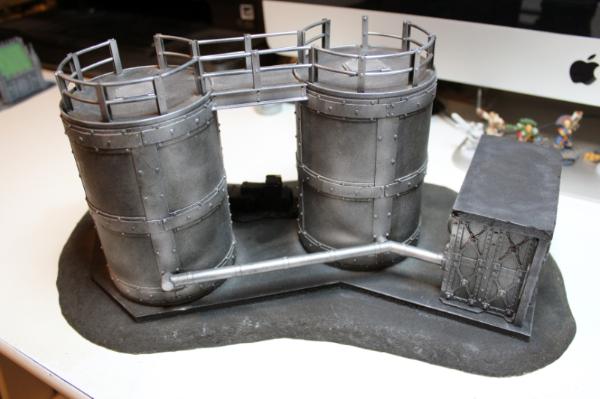
On Sunday I airbrushed the gray over the bad drybrush i did a few days ago. Then I took Bruticus' advice and looked up a rust painting tutorial here on Dakka...and just sorta went at it. I still have more details to do, but mainly I wanted to get the bit around the pipes done so that I could sandwich the top and base together and start skinning the sides with plastic card.
Let me know what you all think so far...
|
|
|
|
2012/12/18 19:19:45
Subject: Fango's Fantasmagorical Futuristic Figurines and Fortifications - Necromunda terrain update (Dec 18)
|
|
Battle Tested Karist Trooper
Central Coast, California
|
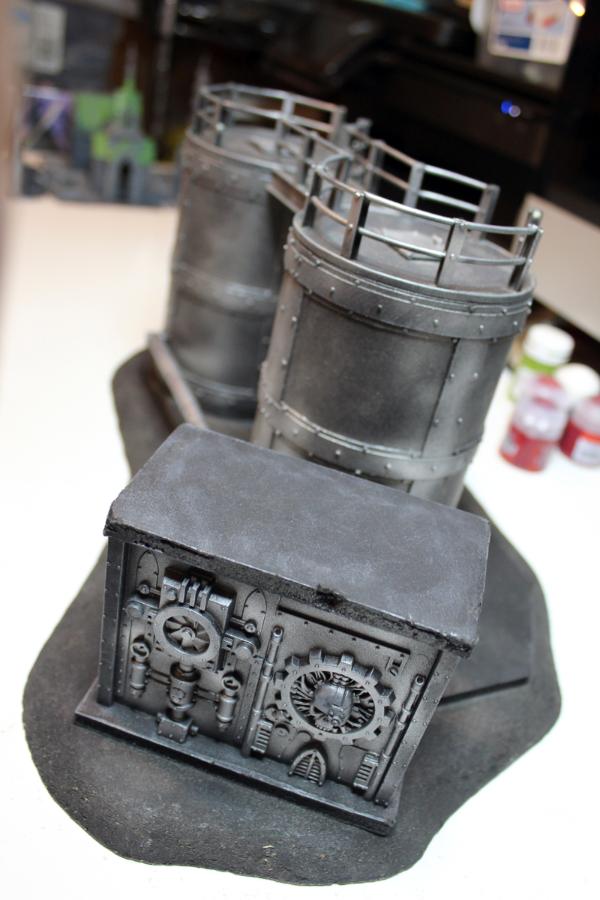
@Ruglud - Thanks man, I just cut a piece of a dish sponge and followed the tutorial in my link above.
@Mephistoles - Thanks, I do want it to look good. I'm hoping to eventually have a whole set of terrain built and painted to this standard.
@Valhalla - Yeah, I might have gone too far in the rust and decay! Still, I'm surprised at how easy it was to make it look decent just by following that 'tute.'
@dsteingass - Thanks Dave! Although I'm not sure what you mean by fill in around the rust... I read somewhere that windex can do bad things to the finish on some of the interior parts to an airbrush...maybe I'm just being paranoid. I have an old Iwata HP-B (not the 'Plus') and I think it needs a new needle/fluid nozzle...but I think they changed the thread on the fluid nozzle for the HP-B plus...and no longer carry parts for the older model. Anyone in the know have any info on this?
@Bruticus - thanks for the comments and crits. I'll try to tone down the exposed metal bits, or go back over them with some pigment powders...and we will definitely be seeing some hazard stripes soon. And thanks for the link to Yakromunda, no affiliation with Yakface at all?
|
|
This message was edited 1 time. Last update was at 2012/12/18 19:21:09
|
|
|
|
2012/12/20 20:23:53
Subject: Fango's Fantasmagorical Futuristic Figurines and Fortifications - Necromunda terrain update (Dec 18)
|
|
Battle Tested Karist Trooper
Central Coast, California
|
Ozymandias wrote:Looking great! Any more detail work on the sides?
Yes, made some progress this morning actually, pic coming shortly...progress overall has been slow this week, just haven't had the 'me' time that I would have liked.
TaWaaagh wrote:This is great stuff Reminding me of our great Necromunda campaign back in school. Necromunda is still one of my favorite settings, but I doubt I can find someone to play with atm.
That's the tough part...though, because of the low model count, and the fast game times its easier to convince someone to try it out with you...vs starting another army-sized miniatures game. Sometimes all it takes is people watching other people playing a game to get them interested...
Ozymandias wrote:Yeah, right now our campaign is just three people, but we are slowly growing interest and hope to have 2-3 more players in the net few weeks.
Talked to Matt today, he said he's totally down, maybe next week Thursday?
dsteingass wrote:You're reading posts by lunatics afraid of their tool. It's designed to handle enamels and stinky petroleum-based solvents, there is no scientific chemical reason why ammonia would harm chrome-plated nickel. It's hokum. seals and O-rings wear out on all airbrushes. I use Badger because they always stand by their products, and are close to me in Chicago, ILL. I'm familiar with Badger, and one model of Paasche, the ancient VL. I'm afraid I've only ever touched an Iwata in the store. I'll find a picture of what I mean by filling in, stand by
I will definitely be running some Windex through it then...Standing by...
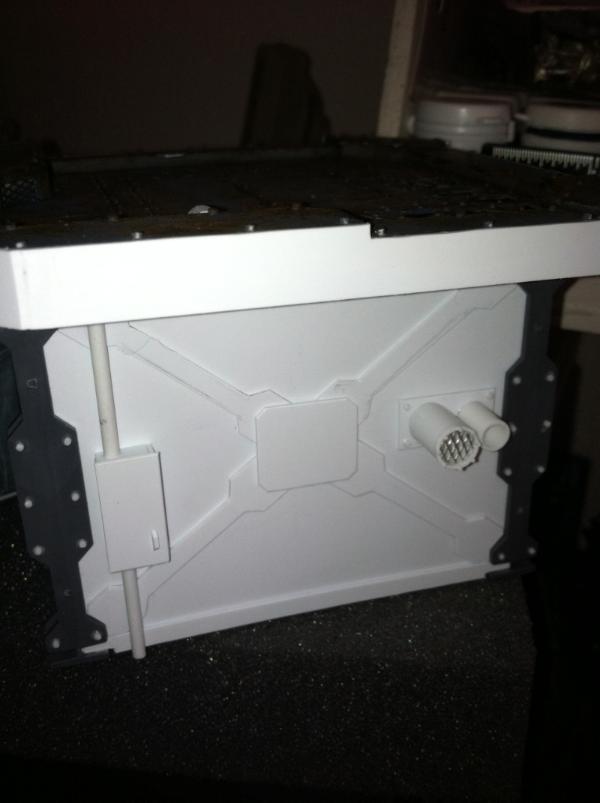
Automatically Appended Next Post: Here's a quick update pic...added some more details to one of the sides...just need some more rivets, and I can get this thing finished and painted.
|
|
This message was edited 1 time. Last update was at 2012/12/20 21:09:32
|
|
|
|
2012/12/20 22:49:22
Subject: Re:Fango's Fantasmagorical Futuristic Figurines and Fortifications - Necromunda terrain update (Dec 20)
|
|
Battle Tested Karist Trooper
Central Coast, California
|
@ Bruticus - Yakface is the owner of Dakka Dakka, he and a couple other guys run these forums.
I'll have to go and check out this Yakromunda...
|
|
This message was edited 1 time. Last update was at 2012/12/20 22:57:49
|
|
|
|
2012/12/22 09:30:24
Subject: Fango's Fantasmagorical Futuristic Figurines and Fortifications - Necromunda terrain update (Dec 20)
|
|
Battle Tested Karist Trooper
Central Coast, California
|
kencotter wrote:@fango - what the hell man your terrain making skills are off the chart, i have never played necromunda before but i used to play dark heresy with models n it seem kinda the same might have to start playing it.
and make me some skaven terrain lol
Thanks for the kudos Ken, definitely try it out if you get the chance!
I will likely get to some Skaven terrain eventually, that is my main Warhammer Fantasy army.
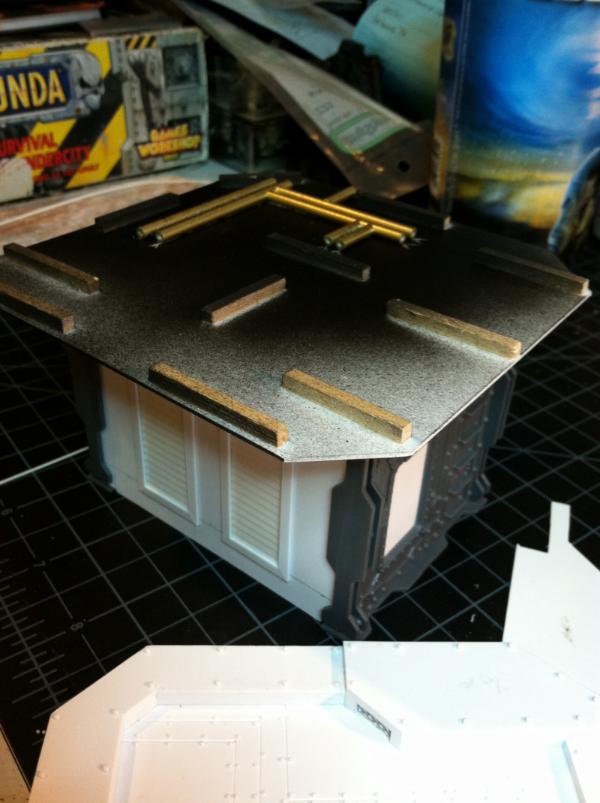
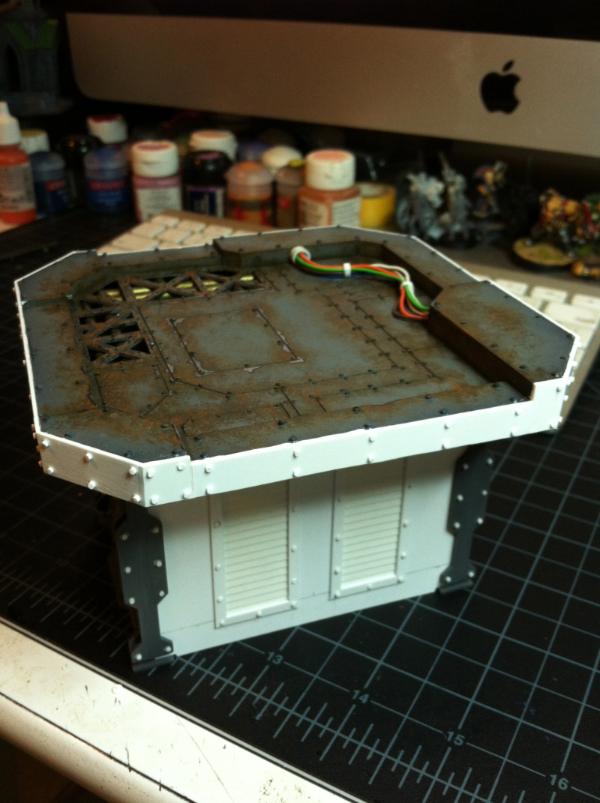
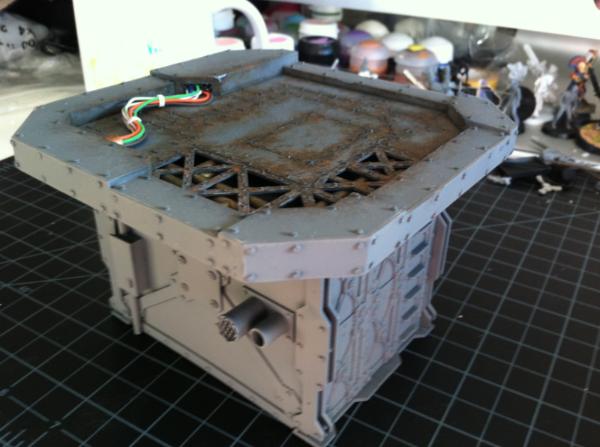
Automatically Appended Next Post: Here are a couple more progress pics of my current piece...I am officially way past due on this one...fortunately, just paint left....Rivets are done! Oh, and I put the wire harness up top too. Wires are from a Cat 5 cable...
|
|
This message was edited 1 time. Last update was at 2012/12/22 09:33:37
|
|
|
|
2013/01/08 18:06:00
Subject: Fangos Fantasmagorical Futuristic Figurines and Fortifications- 'Munda piece #1 Almost done! (12/22)
|
|
Battle Tested Karist Trooper
Central Coast, California
|
SilverMK2 wrote:The rust effect really makes that pop. I love all the little details you have as well in the 3D design of the structures.
Thanks Silver, now I just need to weather the rest of the base (and the wires)
Mephistoles1 wrote:Sweetness in a box! That looks great! The wires, the plasticared in multi levels and the recessed pipes, this thing really has depth to it that so much terrain lacks.
Thanks for the kudos Mephistoles!
Valhalla130 wrote:That looks excellent. Really, really good.
I'm glad you like it, I've got some more projects in the works...
MauS wrote:I think with all that rust the wires would be weathered too. Looking good so far.
Definitely. Haven't got as far as that yet. I hit the top with some testors dullcoat, so weathering washes, etc will stick to the wires etc.
Galorn wrote:That looks awesome dude! Makes me want to try and start up a necro league now...
You totally should. It's a blast and a half. Check out Yakromunda.com for a thriving Necromunda community and a great web-based gang management system.
I've even a way for a couple of weeks, but I haven't been completely idle. We saw the Hobbit, and my 8 yr old son got the Escape From Goblin Town box for Xmas. He and i have been prepping the goblins and terrain (pics below). Automatically Appended Next Post: 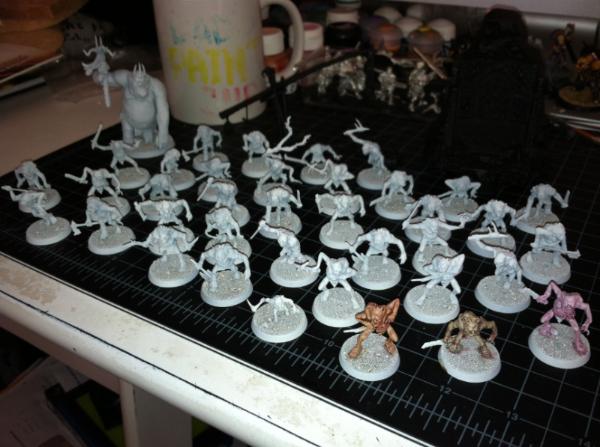
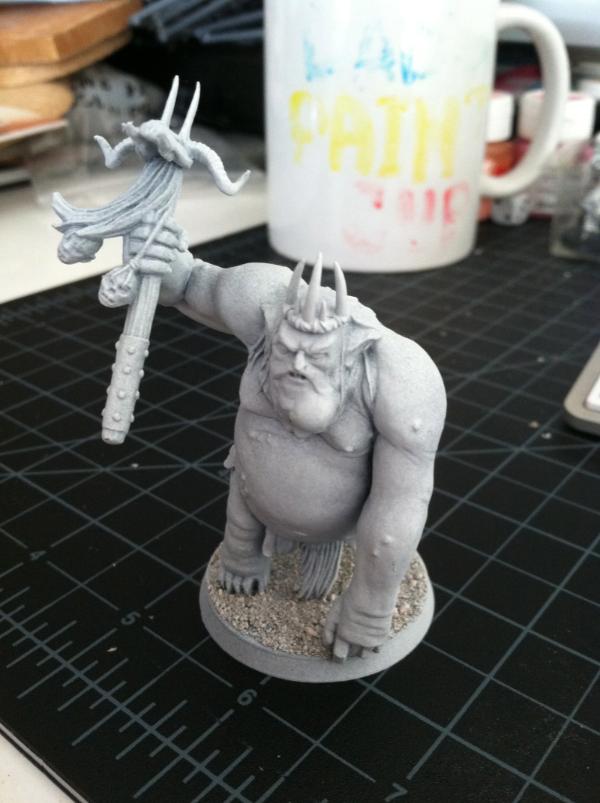
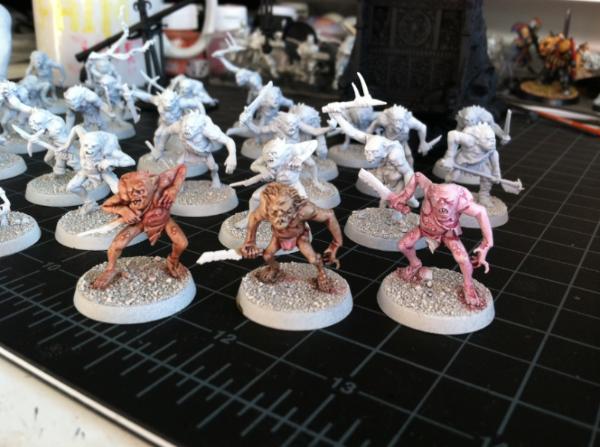 Automatically Appended Next Post: Automatically Appended Next Post: The last pic shows 3 different test washes, left one is Gryphone Sepia, middle one is Devlin Mud and Baal Red, fought one is Baal Red on its own. What does everyone think? We also went and grabbed all the paints used to paint the goblins in the GW iPad painting guide for Escape from Goblin Town...we are going to try painting one up using the guide next to see if it's worth the time VS a wash and highlight.
|
|
This message was edited 2 times. Last update was at 2013/01/08 18:34:30
|
|
|
|
2013/01/08 19:56:21
Subject: Fangos Fantasmagorical Futuristic Figurines and Fortifications - Escape from Goblin Town! (1/8/2013)
|
|
Battle Tested Karist Trooper
Central Coast, California
|
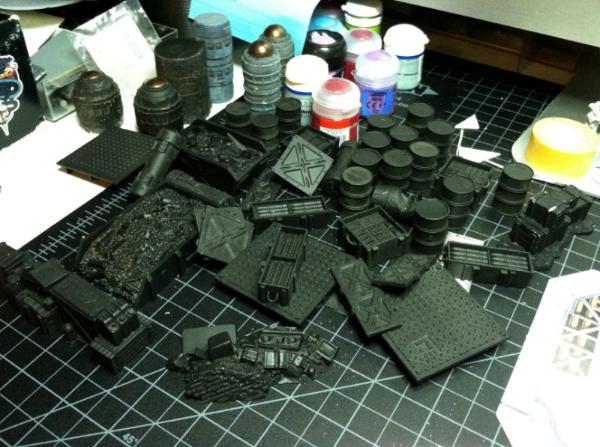
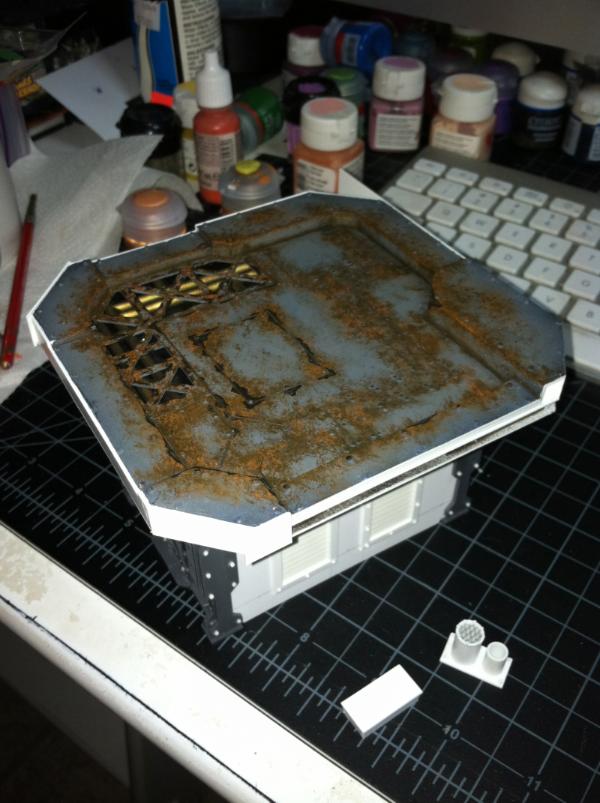
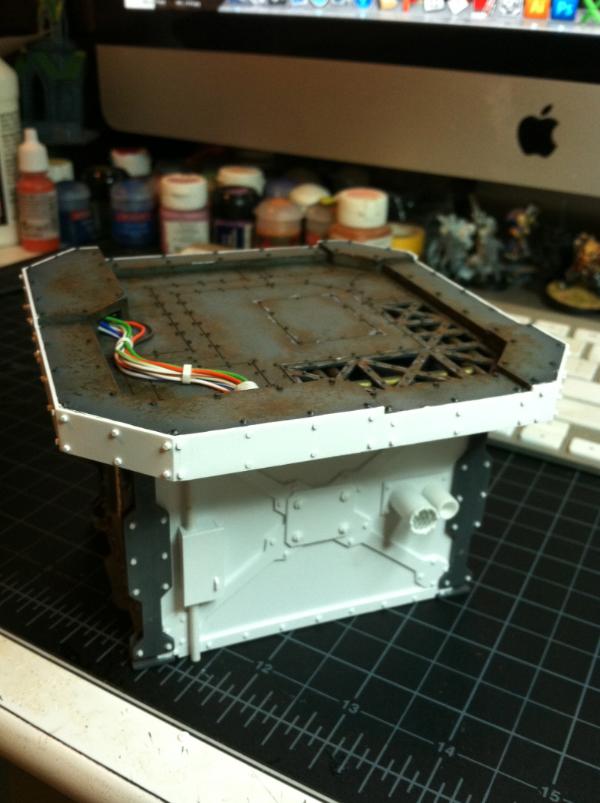
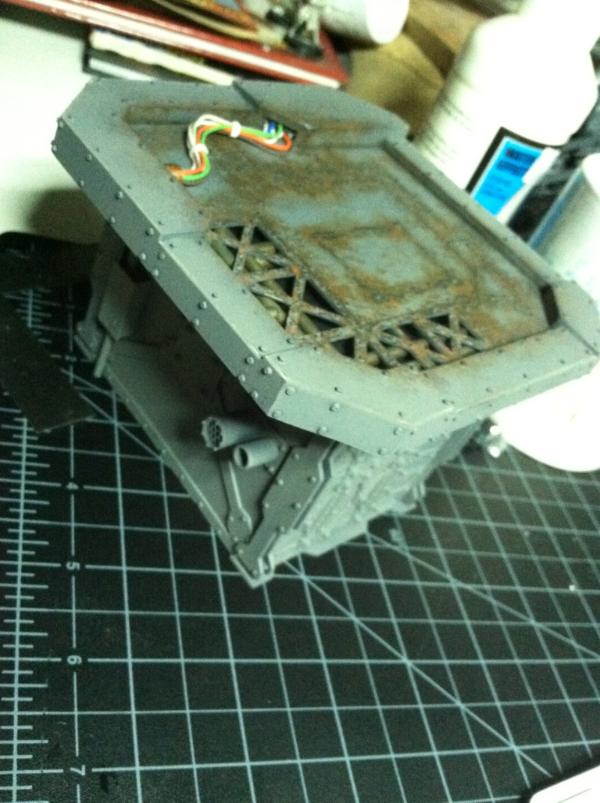
I will make sure to post a progress pic when We get to the poo bucket(s) Automatically Appended Next Post: It's not much, but here's an update to my Necromunda terrain piece after a black primer coat and airbrushing the base gray.
|
|
This message was edited 2 times. Last update was at 2013/01/08 20:25:30
|
|
|
|
2013/01/08 23:00:58
Subject: Re:Fangos Fantasmagorical Futuristic Figurines and Fortifications - Escape from Goblin Town! (1/8/2013)
|
|
Battle Tested Karist Trooper
Central Coast, California
|
|
|
|
|
2013/01/10 00:00:07
Subject: Re:Fangos Fantasmagorical Futuristic Figurines and Fortifications - Escape from Goblin Town! (1/8/2013)
|
|
Battle Tested Karist Trooper
Central Coast, California
|
@Bruticus - Thanks for the hint, I looked it up and commented in his thread....oh, and I'm entering the new Scenery Contest
@Dave - I did notice that...not overly impressed with it considering the $25 price tag! Also, thats an impressive array of colors you have, as I have a hunch they managed to sneak just about every color pot in their paint range into that painting guide...had to buy 7 colors for the goblins alone!
Do I rate a membership in the League yet? or do I need a few thousand more rivets logged in my p&m blog first
On another note, with the impending release of the Dark Angels this weekend...my nostalgic sensibilities got me to dig out my Dark Angels collection and rummage through it (and also pre-order the codex along with a few of the new plastic kits). Now, before you cry "Booo! stick to one project already you nincompoop!" please remember that I have 1. Severe gamer ADD (actually have taken medication for Adult Attention Deficit Disorder) and 2. Started my Warhammer 40k obsession way back in 1990 with the purchase of 'Deathwing' (The first expansion to the first edition of Space Hulk)...the fluff and artwork in those rulebooks got me hooked and I started collecting my first 40K army then and there. (Dark Angels for those who cant see where I am going with this).
Do I have to justify my scattered and non-committal behavior here in my project blog?....no. Do I feel the need to anyway?...sadly, yes :(
Aaaaand on to a progress pic of some scouts I started messing with. I'm going for the original 'Native American' theme for my army and have been giving these metal guys haircuts (and ponytails in some cases) and oh, look, a head swap too. I'm relieved to find out that Dark Angels Scouts are no longer contending with Deathwing Terminators and Dreadnoughts as elites choices in the new Force Org chart (where they annoyingly sat for the past 8 years or so...grumble..) and thus will make a regular appearance in any future army lists I build.
|
|
This message was edited 4 times. Last update was at 2013/01/10 01:00:50
|
|
|
|
|
|
|