Forum adverts like this one are shown to any user who is not logged in. Join us by filling out a tiny 3 field form and you will get your own, free, dakka user account which gives a good range of benefits to you:
No adverts like this in the forums anymore.
Times and dates in your local timezone.
Full tracking of what you have read so you can skip to your first unread post, easily see what has changed since you last logged in, and easily see what is new at a glance.
Email notifications for threads you want to watch closely.
Being a part of the oldest wargaming community on the net.
If you are already a member then feel free to login now.
2013/02/08 17:40:57
Subject: How to - LED lighting in a Chaos Lord (and any other infantry unit)
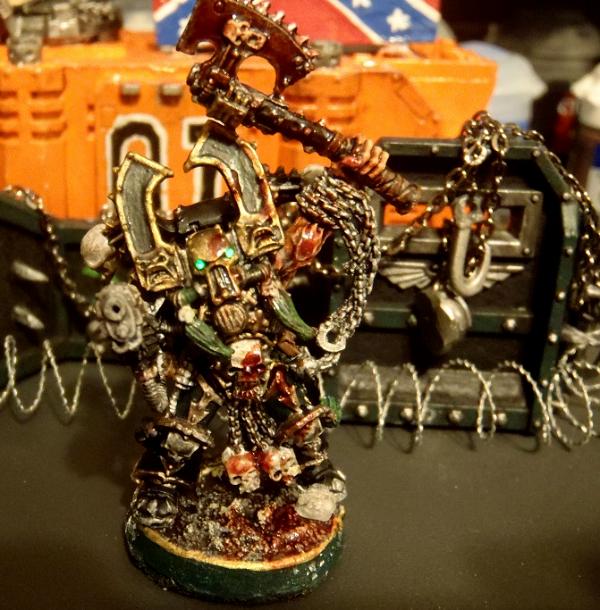
I have seen a few ideas on putting LED lights into smaller models (specficically infantry), but frankly because of the smaller nature it is fairly uncommon if not down right rare. I would not let that stop me though. As of now, most of my chaos army has lighting in it. Everything from possesed to beserkers to my chaos lord is lit up. Vehicles are nothing new, and if you do a search here, you can find plenty of pretty lit up vehicles, however, you will be hard pressed to see something as neat as a chaos lord with glowing red eyes. This is a tutorial on exactly how I did that, with some bonus on magnetizing and custom weapon work. Lastly, you will notice this is also a good way to learn about usint magnetic switches. These are used because most of the light up infantry I have seen has a base that resembles a coke bottle top. My bases are barely larger then a 'normal' base with just a slight bit of felt raising them up.
Follow the links below to the various videos where I walk you through the whole process start to finish. Its around an hour worth of video in 7 parts, so settle in.
Part 1 - Drilling the Legs
Part 2 - Basic soldering of the LEDs
Part 3 - I got a little head.
Part 4 Custom Weapons and Magnets
Part 5 - Finshing the Body
Part 6 Electronics in the basing
Part 7 - The finished product
2013/02/08 18:49:03
Subject: How to - LED lighting in a Chaos Lord (and any other infantry unit)
Great tutorial. I've been planning to light some of my minis, but haven't been 100% sure how to go about it; now, problem solved. I particularly liked your switch solution, with the reed switch and rare earth magnet arrangement. Exalted, and I'll be referring to it closely when I get around to doing my own lighting.
One question - have you ever had to replace a battery? Just I didn't think those little disc batteries held a massive amount of charge, and I can't imagine it'd be easy to replace, being glued in place with felt glued on top.
First, the 'stupidly big sword' was made from a combination of a few different things. The main blade (which is probably what you were asking about) is from the plastic demon prince kit. That kit has a ton of good extra chaos-y bits for stuff like this. Ive used them for converted bikes, hellbrutes, terminators, etc. There are other parts to it that I didnt really go into because they are a bit more boring, like the hand is a normal terminator arm cut from a chaos terminator bolter arm and the bottom of the sword is from the chaos lord's staff that came with the chaos lord kit.
Next on the batteries... Yes, this is a pain in the butt when one runs out, however, I have yet to find a real solution around it. The LEDs really do hold a charge for a long time, but honestly I only really turn them on for display or show purposes, and even then sparingly. It simply takes too long to turn on 50 or more models before playing a game just to have their eyes light up, however, I'll usually do it for kicks the first time I play someone just to mess with their head. That being said, i've had to replace the batteries more for things like shorts then for actual dead batteries. the only one I can remember specifically is one of my beserkers and my demon prince. Both died due to me leaving them on for a week or so accidentally. Replacement isnt really a big deal, but does require removing the felting from the bottom (done with an exacto) and redoing it. The battery usually just pops right out and is put back in the way it went in the first place. It sounds like a lot, but really its about a 10 minute procedure and if you have successfully lit up a squad of 10 guys, replacing a battery is pretty well cake.
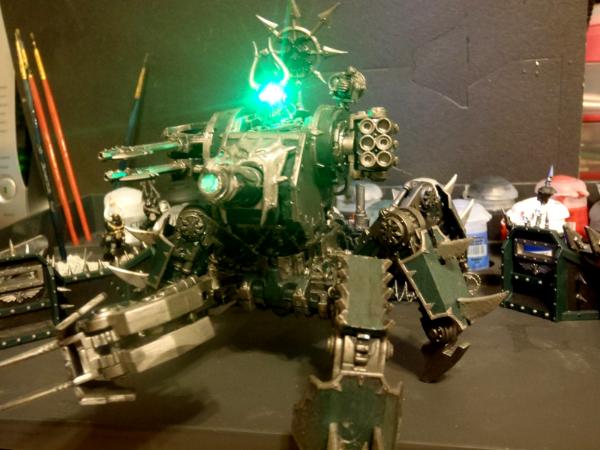
Side note though, on my bigger models I typically opt for a more traditional switch and battery due to having the space to work with. For example, my defiler and the helldrake I'm currently working on both have 'real' switches and use a size 23A battery (one that looks like a really small AAA and is usually used for things like garage door remotes and the like).
The magnetic switches work out very well because they do not require a ton of space, and to me, keeping it looking like a 'normal' model is very important. Nothing against some of the work I've seen, but if it looks like it's base is a recycled coke bottle cap, its not for me.
2013/02/12 19:44:15
Subject: How to - LED lighting in a Chaos Lord (and any other infantry unit)
Blaggard wrote: I enjoyed most of it until you started hot-glueing batteries in there.
I fail to think of a better way atm though.
I agree, but with the little space to work in... I'm up for any suggestions as to a better way to do it. One of these days I will break down and simply invest in some casting equipment and simply cast my own bases with built in battery holders, but until then the hot glue method works pretty well. I have read other places where people will take a dead battery coated in a light layer of vegetable oil and use the hot glue to make a holder, then remove the battery with a nice little compartment left over. Personally, I tried that a few times and eventually said to hell with it. Its way easier just to glue em in there and let it be then to mess with all that. Plus, as I said before, it really isnt all that hard to replace them, glued or not. If you can put them in there in the first place, pulling one out and replacing it is cake.
2013/02/17 17:31:49
Subject: Re:How to - LED lighting in a Chaos Lord (and any other infantry unit)
Very Kewl I watched this to get some hints at doing the very same thing ..... I was thinking of the LED in the base with the fiber optic taking light from the base to the eyes of my Terminator. I have purchased some battery holders for the reason that, I wouldn't have to hot glue the batts in place .... but as I see that's not a problem with a sharp X-acto ....
.....The Coward Dies Many Deaths, But The Valiant Tastes Death But Once .......
2013/06/21 02:00:02
Subject: Re:How to - LED lighting in a Chaos Lord (and any other infantry unit)
Been a while since I visited this thread. I posted these in another thread, but thought it would be fitting here as well:
Warp Talon Squad with LEDs
Close up of a warp talon with LED eyes
Warp talon disco!
Captain Fred of the Chaos Nightmare Squad Warp Talons
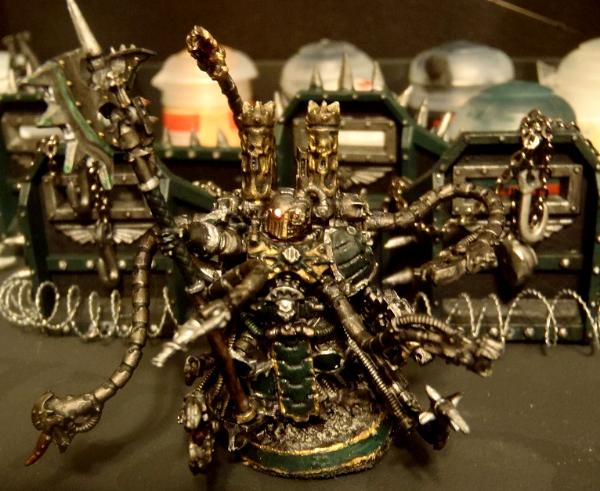
LED lit up Warpsmith
LED lit up defiler
Led Kharn the betrayer
Videos -
These show all of the features of the models, Originally this is all I posted, but on the request of several viewers, I added still pictures in as well. I would encourage anyone that is able to watch the videos (no need for sound, I just have background music playing) because it does show the various features of the models that pictures fail to show.
Heldrake:
Warp Talons
Kharn and Warpsmith
Defiler
2013/06/25 01:18:29
Subject: How to - LED lighting in a Chaos Lord (and any other infantry unit)
sickening wrote: I would love to see how you did your daemon prince!!!
he is cool but not one of my favorites. He was one of the first models I lit up so the technique was far from perfected. I need to replace the batteries in him before I can post. Maybe in a few weeks to shamelessly bump this thread.
2013/07/18 16:47:06
Subject: Re:How to - LED lighting in a Chaos Lord (and any other infantry unit)
Could something be substituted for fiber optics or is there a way around using them, I can't find any near me and am dying to try this, Could fishing line work?
Haerp_a_derp wrote: Could something be substituted for fiber optics or is there a way around using them, I can't find any near me and am dying to try this, Could fishing line work?
Ebay is your friend. This is where i get most of my odd bits (LEDs, Batteries, and fiber optics) Also, you can sometimes go to big box stores like walmart or best buy and buy fiber optic cable for audio equipment and cut it up. Also, near holidays (like 4th of july or christmas) you can often find little kids toys with cheaper grade fiber optic line in them. I've yet to pay more then 5$ on ebay for a small length of a bundled fiber line. (its usually sold by the foot and has like 5~10 strands per foot) All totaled, I think i've done over 50 models with about 3 feet of fiber optic line.
HOWEVER... ifyou are still at a loss, you can use fishing line. Matter of fact, this is what I used for my first few models when I realized direct placement of the LED wouldnt work. The results DO work, but not nearly as well as the true fiber optic line. Also, well place hot glue can have a similar effect. I am NOT recommending either, but in a pinch, they will work with semi-ok results.
Point is, you can use whatever you want, but nothing will compare to the quality and look of using true fiber optics. This was a hard lesson learned on my part.


 nice work


 Night Lords (40k): 3500pts
 Klan Zaw Klan: 4000pts


 .....The Coward Dies Many Deaths, But The Valiant Tastes Death But Once .......
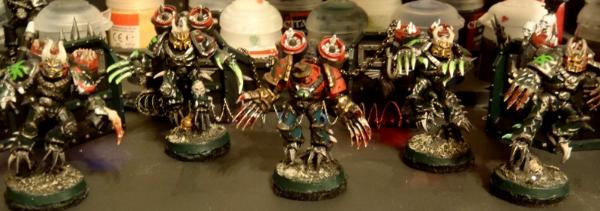


 4000
4000
 2500
2500
 2000
2000
 1850
1850


