Forum adverts like this one are shown to any user who is not logged in. Join us by filling out a tiny 3 field form and you will get your own, free, dakka user account which gives a good range of benefits to you:
No adverts like this in the forums anymore.
Times and dates in your local timezone.
Full tracking of what you have read so you can skip to your first unread post, easily see what has changed since you last logged in, and easily see what is new at a glance.
Email notifications for threads you want to watch closely.
Being a part of the oldest wargaming community on the net.
If you are already a member then feel free to login now.
2013/08/07 14:44:31
Subject: airbrush spray issues UPDATE: first model airbrushed
ive recently started into the wonderful world of spray painting. My primer went easy enough after playing around with the brush for a bit...but when i tried to put the basecoat on i went through a lot more paint than i think i should have and it was making huge 'dust' clouds that didnt happen when i primed. I used the same air setting (18-20ish) on the reg. Did i thin the paint to much or should i use a lowrr air setting for paintvs. primer? my airbrush is the krome.
I Also have just been the needle that came in the brush but it camr with 2 other needles. how do i tell what size they are? i cant find any markings on them except the rings at the base of each needle are different. It didnt come with instructions either to interpret what rings mesn what...if thats even how you tell.
thanks for any insight!
This message was edited 1 time. Last update was at 2013/08/14 20:31:06
Can you please add the exact model of AB you have?
When you say 'dust' clouds do you mean splatter? Can you elaborate or post a pic?
Depending on the AB, the needle, and the consistency of the paint, I'll sometimes use lower air settings. For example when using my H&S with the smallest needle; I will thin paints much more than usual but also keep the pressure around 12-14psi...
When I am basecoating however I usually use my Iwata, with a larger needle, and slightly thicker paint, and a higher psi 18-20...
This message was edited 1 time. Last update was at 2013/08/07 16:29:36
sorry about that. Ill try to be more specific. The airbrush is the badger renegade krome. pretty sure thats the entire name. its not splatter ( i do get a little splatter but i recently noticed it was from a the forked guards on either side of the spray tip...paint would build up while spraying until it got in the way of the stream and would cause droplets) but thats another issue entirely.
by dust cloud i meant overspray. I know there will always be some when spraying...but when i was priming it seemed like a normal amount of "dust" overspray in the air while working. when i switched to paint for my base coat (vallejo game color thinned with vallejo airbrush thinner) it seemed to kick up as much if not more overspray than paint i was actually putting on the model.
Im not sure how much paint is normal to go through but it seemed to me like i was going through an obscene amount as it seemed to floating away more than going on the model.
My distance was the same as with priming and as previously stated, the priming went just fine. The paint that DID go on the model settled down perfectly. It had a bit of shine but didnt look "wet" like i soaked the model or anything. I'm happy with the result as far as the model goes, just not so much with the cloud and paint consumption.
nanaki658 wrote: sorry about that. Ill try to be more specific. The airbrush is the badger renegade krome. pretty sure thats the entire name. its not splatter ( i do get a little splatter but i recently noticed it was from a the forked guards on either side of the spray tip...paint would build up while spraying until it got in the way of the stream and would cause droplets) but thats another issue entirely.
I don't know about the latter issue with the cloud, but what you describe above is a bent needle tip. There are videos on youtube for how to straighten a bent needle, but I never had too much luck with that and I just replace the needle.
lord_blackfang wrote: Respect to the guy who subscribed just to post a massive ASCII dong in the chat and immediately get banned.
Flinty wrote: The benefit of slate is that its.actually a.rock with rock like properties. The downside is that it's a rock
oh my...do you mean the long needle that runs through the whole airbrush? Or do you mean that teeny tiny little tip needle piece. Im not sure what the terms are for these parts, sorry : /
those needles are the 3 it came with. left side came IN the airbrush. middle 2 were spares/different sizes. the one the right seems to have a "hook" on the end. im guessing thats not good.
This message was edited 2 times. Last update was at 2013/08/07 20:20:59
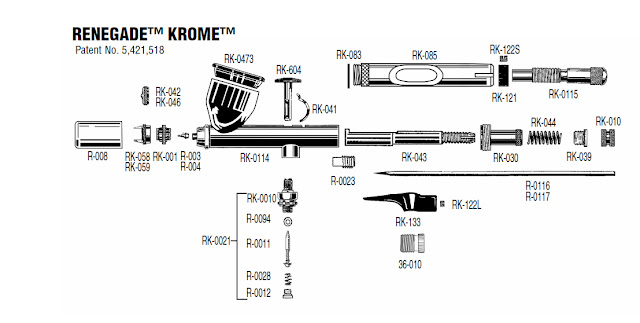
You are correct when you call the pieces pictured "needles". The other tiny piece you mentioned is called either the nozzle or sometimes the tip.
Also, you can (and should!) try fixing that burr.
I've never had any luck with this, but maybe you're luckier than I.
When replacing the needle, the way I like to do it is:
Disassemble the back end (RK-085 handle assembly, don't take it apart just remove the whole handle), remove the needle retaining nut (RK010). Next sisassemble the head (RK-058, RK-001, R-003). Remove the needle.
Now put the new needle in backwards, tail end into the nozzle area and slide it back. The carefully re-assemble being careful not to either bend it or stick yourself with it. If you have problems, this is a very common airbrush so when it doubt, post here and ask.
going back to the cloud issue, I have no answer for that, but that bend as pictured is pretty extreme and I wonder if it's not causing it as well.
This message was edited 1 time. Last update was at 2013/08/07 23:17:33
lord_blackfang wrote: Respect to the guy who subscribed just to post a massive ASCII dong in the chat and immediately get banned.
Flinty wrote: The benefit of slate is that its.actually a.rock with rock like properties. The downside is that it's a rock
The one on the left is the one i was using all along. When you say that bend is extreme are you referring to the left needle? the right needle is the one with the burr or hook...w/e. the middle one seems to be ok but its a different size. It wont fit in the nozzle/tip but i do have a second nozzle that came with it as well and it seems to fit in that. it just doenst have the 2 prong guard thing on the end. on your image there....RK-058/9 is the piece i have 2 of. one like that and one with no guards. also R-003 i have 2 of. one for the middle needle in the image as far as i can tell...and one for the other 2.
Any insight as to what those sizes might be and when i should be using what?
I was referring to the right needles, yes, with the visible bend. The left one looks OK to me but if it's pointing down I wouldn't see anything wrong.
I don't have the Krome, so I'm not sure what the package comes with. I have a Renegade Spirit, which is a very similar predecessor. I'm guessing from the Amazon description it comes with an ultra fine needle and head pre-installed, and an additional fine needle and head (with a more abrupt, less pointy taper). Not sure where the third needle came from.
The one with no guards is, I believe, for doing really fine, super close work. I do not use it because I feel the exposed needle is too likely to get bent by my clumsy ham hands, and I'm not so great an artist that that level of precision would matter anyway.
If you use the fine (medium) needle and the matching head, do you still have the drops building up on the prongs and than flying off into the airstream? What about the extreme overspray?
This message was edited 1 time. Last update was at 2013/08/08 04:59:02
lord_blackfang wrote: Respect to the guy who subscribed just to post a massive ASCII dong in the chat and immediately get banned.
Flinty wrote: The benefit of slate is that its.actually a.rock with rock like properties. The downside is that it's a rock
The other thing that can cause overspray is if the needle isn't seated all the way forward. When you put it in, make sure it goes in all the way before tightening it in place. Don't like super push on it or something, but just be firm.
And yet another issue would be a mismatch between needle size and nozzle size. I don't know enough about the particular brush to know whether or not it comes with different needles and different tips, or if the needles are different sizes and they just put the wrong on in at the factory.
Balance in pick up games? Two people, each with their own goals for the game, design half a board game on their own without knowing the layout of the board and hope it all works out. Good luck with that. The faster you can find like minded individuals who want the same things from the game as you, the better.
So after testing some things out and changing around needles (which took forever seeing as how i was terrified i was gonna break something) I finally think i figured it all out.
The one that came in the airbrush is i believe an ultra fine. The one with the "hook" on the end is also an ultra fine, a spare i guess. The 3rd one is a fine needle or so i assume seeing as how when i tried it put out a lot more primer than the previous one. The second nozzle and tip screw...thingy...were for the fine needle and was the one without the guard.
So in case anyone else who is as clueless as me gets the badger renegade krome 2 in 1 set..thats what you get.
As for my original problem, the original needle has gotten less cloudy and more...splattery...is that even a word? Anyway, that leads me to assume that Ouze was quite right and i have a bent needle. The fine needle sprayed beautifully but i wouldnt want to have to use it on small parts.
So for my question: since my original ultra fine AND the replacement ultra fine that came with it are both buggered....how good is badger with replacements? easy to deal with? should i even bother for 2 needles?
Thanks as always for the insight! couldnt have figured this out without dakka
Badger is all about having the best customer service in the airbrush biz. Get in contact with them for sure.
Balance in pick up games? Two people, each with their own goals for the game, design half a board game on their own without knowing the layout of the board and hope it all works out. Good luck with that. The faster you can find like minded individuals who want the same things from the game as you, the better.
I haven't been airbrushing long and ruined my first needle very quickly by being not careful enough when cleaning it.
The good news is that if you have a non-junk airbrush, and got yourself a proper one instead like you did, that you can get replacement needles and nozzles easily. For my H&S brush, the costs are somewhere around 30 Euros for a nozzle/needle pair, with the needle being cheaper. Note that it is not a good idea to use a needle with a bent tip, since that tip will break the nozzle and make you throw good money after bad. Don't use bent needles, replace them.
What you have to keep in mind is that spay problems can have different causes. Splatter could be due to something being clogged, drops forming in the needle guard at the tip and being blown off, as you suspect the wrong combination of pressure, paint consistency and needle size or a lot of other actual issues. What helped me big time are two things:
1) getting into a routine both about checking the airbrush for proper function and about cleaning it efficiently.
2) using a secondary paint container to first examine the consistency, thin it there, and only then pour some into the brush's paint cup.
It's a good idea to watch a video or two showing how your brush - or one similar to it - is disassembled and reassembled. Better still is having a knowledgable sales person show you directly so you can ask questions. But hey, YouTube should work. For cleaning, you should have a squezze bottle of distillied water, a squeeze bottle of airbrush cleaner, a waste container as well as Q-tips, tissues and maybe some toothpicks. As soon after the paint cup is empty as possible, I like to spray quite a bit of distilled water through it into a container that catches all the spray and follow that up with some airbrush cleaner. I might even do that before cleaning the inside of the paint cup. Taking out the needle and nozzle is not something that needs to be done very often - if the paint consistency was right. If the paint was too thick, it will clog up and more cleaning is needed. I do it before putting my tools away or whenever there is a problem.
The biggest difference was properly preparing the paint in a way that I can see what is going on with it. I use plastic one-way shot glasses (@ 99 cents for 20 or so) and plastic sticks meant for cheese or something. I pour the paint, regardless of it being meant for Airbrush Vallejo Model Air or meant for brush Citadel paints into the shot glass. Then I stir it with the plastic stick. This lets me see how thick the paint is and homogenize it. I add airbrush paint thinner as needed to get a very fluid consistency. Milk is mentioned as example often. You don't want it to leave opaque splotches on the side of the glass. As long as the paint is thinned properly, even paint with compartatively big metallic pigments goes through without a problem (using a 0.4mm needle/nozzle set).
Also, always have a sacrificial surface ready to cough off some paint drops and to check your brush's spray pattern.
This message was edited 1 time. Last update was at 2013/08/10 13:13:54
Thanks for all the advice!
I did do pretty much all of the above. The airbrush was cleaned to within an inch of its life before each test. I have a sheet that i spray on before i spray the models to make sure everything is acceptable and ive watched countless youtube vids.
The biggest thing i noticed was the need for cleaning. As you said you shouldnt have to do it everytime...removing the needle type cleaning i mean. With the needle im now assuming is bent though...I cleaned it every time. When i took apart the needle area it NEEDED to be cleaned every time. Since this was my first experience with an airbursh i assumed that was normal. After using the fine tip and going through my cleaning routine afterwards i was quite suprised to see that there really wasnt anything to clean.
So basically...it splatters badly even when 100% clean, dirtys itself up inside horribly after 5 min of spraying and builds up paint on the side of one of the "prongs" on the nozzle guard....which honestly should have been a big tip off for me right away that it was bent. Now that i think about it...itd had to be spraying somewhat sideways to even hit that guard. : /
Balance in pick up games? Two people, each with their own goals for the game, design half a board game on their own without knowing the layout of the board and hope it all works out. Good luck with that. The faster you can find like minded individuals who want the same things from the game as you, the better.
So basically...it splatters badly even when 100% clean, dirtys itself up inside horribly after 5 min of spraying and builds up paint on the side of one of the "prongs" on the nozzle guard....which honestly should have been a big tip off for me right away that it was bent. Now that i think about it...itd had to be spraying somewhat sideways to even hit that guard. : /
Depending on air pressure and paint viscosity it can happen that the spray hits the guard even if the brush is clean and the needle isn't bent.
When paint collects in the guard, dump the paint from the paint cup in the secondary container, clean the brush to be sure that isn't the problem. Then I load it again and spray. If any paint still collects, I remove the needle guard or change it for a smaller one. If you rememer that you don't want to hit anything with your precious needle, that's fine. The guard is only a bumper.
I got in contact with badger and they were as great to deal with as I was led to believe. They seem to agree that it's a bent needle, so far as they are sending me replacements for the ultra fine. I think im also getting another ultra fine nozzle as a bonus. Definitely a company I dont mind giving my dime to.
As for the airbrushing I just tried using the fine needle for everything instead. It needs a wash and I would like to try an oil wash so Im going to have to seal it first. With a varnish is it usually just 1 coat?
So heres my first airbrushed model (not counting goofing around on practice pieces) and advice is welcome! I was going for a simple snow camo design.
2013/08/14 20:46:26
Subject: airbrush spray issues UPDATE: first model airbrushed
If your going to oil wash, use a Gloss varnish as it will let the wash go into the crevices better. an even coat will do (so probably 2+ coats if needed)
You should mask the windows though. if you hit it with a varnish later on it can fog.
Definitley airbrush on the varnish coat if you can. If not, go very, very light as spraybombs can put out varnish very heavily and fill the recesses and panel lines you want the wash to flow into.
Balance in pick up games? Two people, each with their own goals for the game, design half a board game on their own without knowing the layout of the board and hope it all works out. Good luck with that. The faster you can find like minded individuals who want the same things from the game as you, the better.
2013/08/16 12:42:32
Subject: Re:airbrush spray issues UPDATE: first model airbrushed
I've used Vallejo Airbrush Varnish without problems in my airbrush. Results are good. =]
Also, for washes, I've used Vallejo Dipping Shade unthinned in my airbrush and the results are just as good as when brushing it on or dipping and shaking off the excess - but much quicker than a brush and with more control and less mess than the dipping method.