| Author |
Message |
 |
|
|
|
|
Advert
|
Forum adverts like this one are shown to any user who is not logged in. Join us by filling out a tiny 3 field form and you will get your own, free, dakka user account which gives a good range of benefits to you:
- No adverts like this in the forums anymore.
- Times and dates in your local timezone.
- Full tracking of what you have read so you can skip to your first unread post, easily see what has changed since you last logged in, and easily see what is new at a glance.
- Email notifications for threads you want to watch closely.
- Being a part of the oldest wargaming community on the net.
If you are already a member then feel free to login now. |
|
 |
2013/12/20 15:24:03
Subject: Adventures in 3D Sculpting
|
|

The Last Chancer Who Survived
|
So, I'm developing a new game. It's a mech combat skirmish game called Mechadrome. I have a WIP post in my forums here if you're interested in checking it out  I'm going to use this post to blog about my progress as I learn how to make miniatures in 3D and show some shots of my progress as I go. Maybe it will inspire you to learn 3D sculpting too
I'm on a really tight budget with my new game. I can barely afford the concept art and initial sculpts I'm having done, so I thought to myself, "Self, if you can't afford a lot of sculpts, you may as well sculpt them yourself for free" .. and here I am now. I have some experience with 3D stuff, but going back over 15 years ago when I was messing with 3D Studio Max to do 3D logos for websites, and that's about it. Things are a lot more differenter now.
It seems a lot of 3D sculptors are using a program called Zbrush, which I can't afford but hope to move on to some day. I dug around the web and found a great program called Blender. It's totally free, and you can do everything from making a little teacup to hollywood blockbusters. So I obviously won't be using all of the features it has, but it's great for modeling in general.
But, it's not the kind of program that you can just fire up and play with and figure out on your own. So I found this website, Blender Cookie, that's got tons of really great tutorials and online courses. The basic ones are free too, which was nice. I went through the intro stuff to learn the program in general and I decided to sign up for a monthly membership for $18, a heck of a lot cheaper and faster than taking a course at a college or something. So now I'm just starting the "intro to character modeling" course. They also have others about sculpting for 3D prints, so I'll be doing those as well.
I can already see that my concept art probably isn't quite up to par. It's just 1 shot of a mech, but to really assist with sculpting I could use a front, side and back view all in scale, the same way the concept art for the character modeling course is done. I should be able to handle it, but in the future I'm going to get the artists to do multi-view art going forward.
Lucky for me, I'm going to be off all next week so I'll have plenty of time to go through the course and hopefully start sculpting my first mech in the next week or 2. I think it will be quite a while till I get good enough to sculpt people, but since a mech is mostly all smooth surfaces and flat, inanimate shapes, they should be a great way to learn how to sculpt. In a while I hope to be able to do my own minis for Blackwater Gulch too, but, baby steps...
So, I'm gonna go through the character modeling course now.. I'll show pics of the results when I get to the end
|
|
|
|
 |
|
2014/01/01 20:23:09
Subject: Adventures in 3D Sculpting
|
|
The Last Chancer Who Survived
|
Now that the holidays are over and I had some time to sit down with it, I'm starting to sculpt! For Mechadrome, I'm going to go with the Redsand Raiders / Martian mechs, since I have sculptors working on 2 other teams, I thought this would be a fun team to start with. So, here's the concept art I'm working with...

It took me most of the day, but I got the lower leg finished more or less. There's still some more detail to add, but this is the basic shape. I made some changes for the sculpt, losing the pointy feets that won't stick to a base very well, instead just having the whole piece being the upper part, and I added some "armor plate" details so it wouldn't be so plain looking. I added a 3d sculpt from Blackwater Gulch to show the scale.. this leg will be pretty tall. In the end the mini should be about 30-35mm tall.
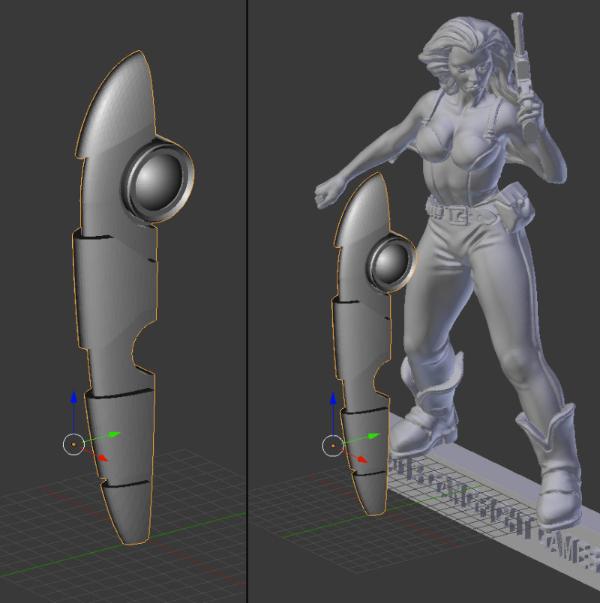
Next I'll start adding the upper leg portion. Trying to come up with a good way to have 3 legs snap together in the middle forming the lower body portion, so it will be easy to glue together.
|
|
|
|
|
|
2014/01/01 20:49:05
Subject: Adventures in 3D Sculpting
|
|

Did Fulgrim Just Behead Ferrus?
|
Kick ass! Keep it up, I'm very curious to see where you're gonna be taking this.
Are you going to print the miniatures? One thing to keep in mind is that this is the part where it can get expensive. Services like Shapeways offer some possibilities, but they aren't fully suitable to make smooth detailed stuff. Meaning you'd have to go to other companies for that, who will charge a lot more. But I guess once you go down that route you will have to start thinking about financing, be it crowdfunding (Kickstarter, etc) or get some sort of deal with a producer.
However, in the meantime it might not be such a bad idea to make test prints, just to see how the miniatures feel in your hand. Making a model on the computer is one thing, having the thing physically in your hands is a world of its own. I already mentioned Shapeways, they can do some easy stuff like that, but I'd imagine there might be some cheaper companies out there that can do a similar service, 3D Print UK for example is already a relatively cheaper service (if you do it right) for test models. However, since you're in the US, shipping costs tend to become rather high, so perhaps find a similar service in the US.
By the way, I'm curious to see what your thoughts are on my own 3d sculpting projects (see sig).
|
|
|
|
|
|
2014/01/01 21:58:15
Subject: Adventures in 3D Sculpting
|
|
The Last Chancer Who Survived
|
So you're using Sketchup? I tried it, but had some issues with it.. I tried another freebie CAD program and then I found Blender. I like Blender so far, and I like that it has sculpting features for if I want to move on to organic things.
I was going to use Shapeways, mostly for test prints. Once I get the first mini done I'll print it just to see how it feels. I'll probably end up getting a couple of prints done as I refine things. I do have a good high quality 3D printer that I use for Blackwater Gulch. It's a lot pricier than Shapeways, but it's not too bad. I think it was like $75 per batch, as many as he could fit in the printable area. And then those get turned into the metal figures the old fashioned way just like it would have been a greenstuff sculpt.
Looking at this leg some more, I think I gotta shrink it a tad and I'll add some more little details, but I want to get the overall shape of the mini done first, and then refine it. I also wanted to do some crop circle glyphs etched in, but I kind of think they will be too small on the final mini to really come out right. Then the other part of the leg that attaches to the body I think I'll have that arched up more instead of straight across, so he'll be taller.
|
|
|
|
|
|
2014/01/02 08:17:13
Subject: Adventures in 3D Sculpting
|
|
Did Fulgrim Just Behead Ferrus?
|
SketchUp works easiest for me, then use CADspan and netfabb to prepare the figure for printing. I am however quite limited in the shapes I can draw. I've tried Blender, but I'm having a hard time using it, guess I need to practise more I guess.
As for the test prints, Shapeways is an option, but they can get quite pricy if you don't hollow out your models. Which company/service is that better printer for $75 a batch?
|
|
|
|
|
|
2014/01/02 13:00:48
Subject: Adventures in 3D Sculpting
|
|
The Last Chancer Who Survived
|
Some more progress, added the upper leg pieces and merched them in the middle with hex hips.. need to do a lot more detail there. I think the ball joint will be part of the hex with a hole and peg for the legs.. or would it be easier to glue with just a half circle in the hex to stick the ball? I dunno if the legs will all line up right if it's more organic like that. I'll need to do 2 different hips, one plain and one with little jets between each leg that will be for the mechs with jump jets.
|
|
This message was edited 1 time. Last update was at 2014/01/02 14:01:41
|
|
|
|
|
2014/01/02 18:29:17
Subject: Adventures in 3D Sculpting
|
|
Longtime Dakkanaut
|
Looking good so far!
|
|
|
|
|
2014/01/03 21:58:59
Subject: Adventures in 3D Sculpting
|
|
The Last Chancer Who Survived
|
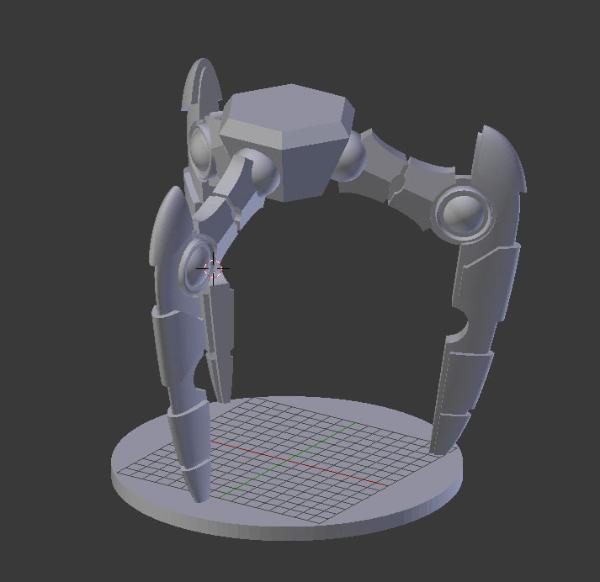
Made some updates .. decided since we need 3 legs for the tripod, maybe it would work better if each leg was one big piece that meets in the middle to form the "hips", so we would just need 3 copies of the same piece and won't need an extra separate hip piece. I still need to do detail work on the middle section though. It will also get a peg on top where the body will plug into, and probably a hole on the bottom to mount a weapon or downward firing jetpack
|
|
|
|
|
|
2014/01/05 02:24:30
Subject: Re:Adventures in 3D Sculpting
|
|

Regular Dakkanaut
|
Well this answers some of my questions about getting into 3D sculpting!, funny enough I found that program as well yesterday whyll looking into it. I have tried my hand in physically sculpting a miniature and for my first sculpt it wasn't too bad at all, I am very interested in 3D sculpting as well however  !.
I am interested it took you a whole day too sculpt just one of those legs eh? I will defiantly be keeping an eye on this and very well looking at giving this a go myself !.
best of luck and look forward too the updates on this blog - Shawn.
|
|
|
|
|
|
2014/01/05 23:13:25
Subject: Adventures in 3D Sculpting
|
|
The Last Chancer Who Survived
|
Yep I figured if I really want to get the models done for my game I'm going to have to learn to do them myself. I just can't afford the sculpting fees for everything and I'd like to introduce it as a "complete" game rather than "hi, here's a couple of minis". So that will be 4 teams at least, with a few different mechs per team.. enough for a starter set plus a few extras. So I have 2 sculptors working on 1 team each and I'll try to do the rest
|
|
|
|
|
|
2014/01/06 21:14:04
Subject: Adventures in 3D Sculpting
|
|
[DCM]
Dankhold Troggoth
|
You're a fast learner, Necros! Good progress so far.
|
|
|
|
|
2014/01/07 14:30:40
Subject: Adventures in 3D Sculpting
|
|
The Last Chancer Who Survived
|
Thanks I've done some 3D work before, but mostly just logos for websites and stuff like that. It's not too tough though once you figure out how the software works
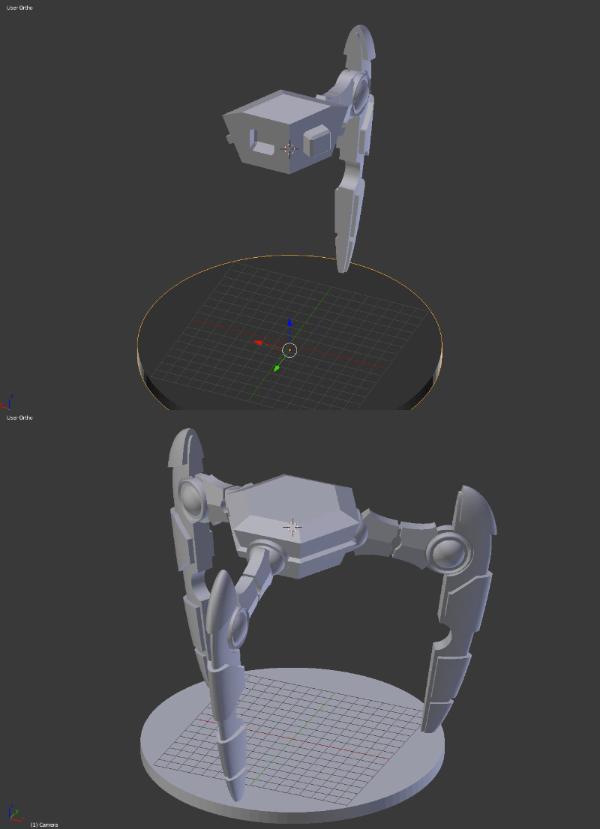
I was sculpting the cockpit area last night, using the sculpting tools instead of modeling.. and I think I'm going to scrap it. it was too organic looking, which is what sculpting does so I should have known. Gonna redo it just using more geometric shapes. I think I'm going to do the lower cockpit area and side armor panels as one piece, probably hollow in the middle to save on metal. And then the pointy leaf shaped top piece will be separate. Since there will be 5 light mechs in the starter set, I think I'll make a few different top pieces so you can tell the models apart. The really tall one will be the team captain, and the others won't be as tall and pointy.
|
|
|
|
|
|
2014/01/08 14:47:46
Subject: Adventures in 3D Sculpting
|
|
The Last Chancer Who Survived
|
So, I scrapped the cockpit I did with the 3D sculpting tools, and then made a new one... and started sculpting again. Now that I'm getting more used to the technique I think it's going to be a better way to go. The new cockpit is coming along much better and with the sculpting tools I can just sculpt the armor plates right onto the body, instead of having to use separate shapes and merging them together. So I'll finish up the bottom half of the cockpit tonight, at least the general look and the fine details won't be till the very end.
The pointy leaf shaped part that sticks way up will probably have to be a separate piece, and both will be hollowed out a little. I think I'll make a few different versions of the top piece, so the really tall pointy one will be for the team captain, and the other mechs on the team will have different ones.. maybe just not as tall. I'd like to have some crop circle designs etched in, but I'm afraid the mini will be too small to really see what it is.
The only thing with the sculpting tools vs geometric shapes is the sculpted pieces have a more rounded look, and it doesn't really seem to fit well with the hard edges I have for the legs.. so I think I may redo the legs and do the hip area more like the concept art where it's much smaller. Right now the hips are in the way and I'd like to try and make enough room for missile pods right under the cockpit window. I think I'll change the legs around a bit too and have them have 3 joints instead of 2, in a Z shape... kind of like robot versions of tyranid scything talons.
I'll get some new pics tonight if I remember
|
|
|
|
|
|
2014/01/20 04:47:48
Subject: Adventures in 3D Sculpting
|
|
The Last Chancer Who Survived
|
And now for something completely different.
I decided to shelf my mech sculpt for now. For the game, I have 2 sculptors working on the first 2 teams and it's becoming apparent that I need a lot more practice before I start doing highly detailed miniatures. So, I decided to work on some terrain.
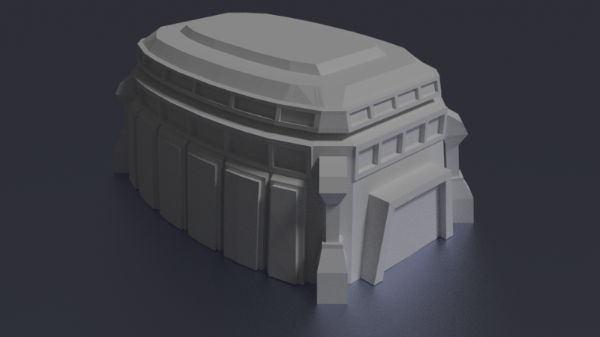
This is a bunker I just started, it's lacking a lot of detail, it's just the basic shape.
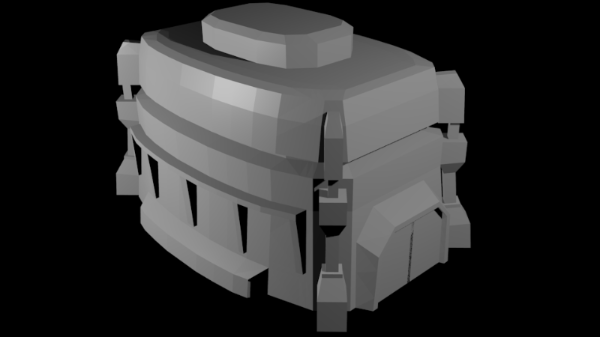
I imagine it will be hollow so it will be the walls and a separate roof, and the pillar thingies on the corners will probably have to be separate pieces too. The final building should be around 3x5" x3" high.
I'm also thinking of slicing it in half across the middle, so it would be sold in 2 halves, or it could be modular and 1 half could attach to a larger building. Or you could have 4 halves with a central hub. I'd like to do skyscraper type buildings for a real sci fi city look, but I think those would be a real pain to play with and would get knocked over easily.
Anyway.. wadaya think so far?
|
|
|
|
|
|
2014/01/21 04:20:55
Subject: Adventures in 3D Sculpting
|
|
The Last Chancer Who Survived
|
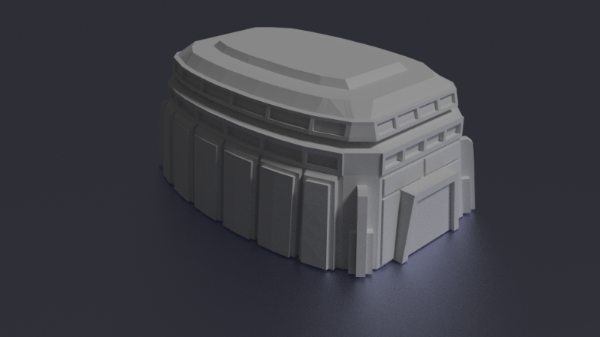
Did a bunch of changes, here's an update
I thought the windows along the top would work better, the sides should be more armored since it's a bunker and all. I had the door attached to the main model before, but now it's going to be a separate piece so I can easily reuse it in on other buildings.
I still haven't started on the real detail sculpting, still trying to get all the main shapes blocked out. I may drop the little pillar thingies on the corners, so it will be easier to cast, but I was also thinking that might come in handy to help hide the seams.
|
|
|
|
|
|
2014/01/22 14:25:03
Subject: Adventures in 3D Sculpting
|
|
The Last Chancer Who Survived
|
A few tweaks
I'm going to add some lights on the upper corner. I think I'm going to have the top roof part be separate, like a lid, and the inside would be hollowed out to not waste resin, then I could make different roof pieces.. maybe a landing pad.
Then I just gotta finish the door and roof detail and then add a bajillion rivets and I should be done
|
|
|
|
|
|
|
|