Forum adverts like this one are shown to any user who is not logged in. Join us by filling out a tiny 3 field form and you will get your own, free, dakka user account which gives a good range of benefits to you:
No adverts like this in the forums anymore.
Times and dates in your local timezone.
Full tracking of what you have read so you can skip to your first unread post, easily see what has changed since you last logged in, and easily see what is new at a glance.
Email notifications for threads you want to watch closely.
Being a part of the oldest wargaming community on the net.
If you are already a member then feel free to login now.
2013/03/24 07:16:38
Subject: Re:1750pts SabrX's Tau-Orks at Bay Area Open GT 2013 (Game 4 Complete)
Introduction (skip if you are only interested in the battle report)
Spoiler:
Shas'el Tealk received a Warrant of Trade issued by Canoness Dianus. Many sacrifices were made by the Shadow Cadre and its Orks ally at the hands of renegade Battle Sisters and Chaos Daemons to secure this document. With this document, Tealk now possess the same authority as a Space Marine Chapter Master, Inquisitor, and Planetary Governor.
While the Warrant did grant him enormous amounts of freedom, there were many strings attached. Under no circumstances may he threaten the Adepta Sororitas. He was not permitted travel into the Segmentum Solar. His military entourage was capped to a single Cadre with small ally detachment. Lastly, his purpose within the Imperium was restricted to trade.
Tealk didn't mind the restrictions. While conquest and colonization had been the Tau Empire's primary goal all along, trade was equally important. Over the course of five months, Tealk establish trading outposts within the Ultima Segmentum. Imperium high society's fascination for exotic xeno goods made Tau wares highly popular. Tealk accepted Imperium currency, which he used to open businesses on Imperial planets. Open trade bolstered unprecedented friendly relations between the Tau and Imperium worlds.
Of course, not all Imperium worlds welcomed Tau commerce. The vast majority of the Imperium were xeno-phobic and view the Tau's commercial activities as a threat to their way of life. Many planetary governors oppose Shas'el Tealk's business proposals. While the govenors they did possess the same authority as Tealk, they were outmatched in military might. Any who resisted Tealk and his Orks ally met swift repercussions. Under the Tealk's Warrant of Trade, anything was fair game just as long his intent was for business and nothing else. He was within his rights to use military force to open closed markets.
This did not bode well with Imperial Army. However, there was little that Imperial Guard Company Commanders could do to Tealk, who had equal status to that of an Inquisitor. For an Astartes Chapter Master, it was a different matter.
Azrael, Supreme Grand Master of the Dark Angels Chapter, had enough with the xeno contamination. Taking charge of Ravenwing, Dark Angel's Second Company, Azrael leads a strike force to the planet Lados where Tealk is conducting business.
.....
Warboss Badgaz inhale his cigar, sucking the smoke deep. For a few seconds he held it in, and then let it out. Off in the distance, he could hear the loud clatter coming from his Shoota Boyz.
It was easy to keep the rowdy bunch entertained. The Warboss however grew bored fighting poorly trained and under-equipped "umies". The last real challenged he faced had was against the daemons. Ever since, it's been down hill with his match ups getting weaker and weaker. There's no fun to be had.
The screams of engines interrupts Badgaz smoke break. He cranes his neck and look towards where the sound was coming from. An ominous black aircraft flew low to the ground toward a group of Fire Warriors. Gun nozzles lining its wings flares to life, spitting hundreds of bolter rounds in seconds. The Tau troops were decimated in its wake.
Warboss Badgaz lets out a low whistles. "Ha ha, got to get me one those," he said. The Warboss turns the ignition on. His Warbike roars to life. He gases while while remaining in park. The Warbike's engine deafens nearby Tau and Orks, catching everyone's attention. "Let's give our guest a proper orky welcome," he shouts.
Badgaz inhales deeply, cocks his head up and bellows, "WAAAAAAGH!!!!"
.....
At last, I reached game 4! Two day tournaments can be extremely grueling. It really tests players' stamina and concentration. By now, my legs were killing me and I could think of nothing, but sleep. It's reassuring to know this is the last game of day 1.
Here's a pic of the table.
My opponent for Game 4 brought a Ravenwing list. Unfortunately, I didn't take a picture of it.
Army List Ravenwing
Azrael
Techmarine, Power Field Generator
Command Squad, Standard of Devastation
6x Ravenwing Bikes, 1x Attack Bike w/ Multi-melta
6x Ravenwing Bikes, 1x Attack Bike w/ Multi-melta
5x Ravenwing Bikes, 1x Attack Bike w/ Multi-melta
6x Ravenwing Black Knights, 2 Grenade Launchers
Ravenwing Darktalon
6x Nobz, warbikes, 2x big choppa, 2x power klaw, 1x bosspole, 1x Waaagh! Banner, Painboy, 6x cybork body
30x Ork Boyz, Shootas
30x Ork Boyz, Shootas
Fortification: Imperial Bastion, Quad-gun
Scenario 4
Mission: Crusade (4pts)
Emperor’s Will (3pts)
First Blood (1pt)
Linebreaker (1pt)
Slay the Warlord (1pt)
There are always 3 Crusade Objectives placed outside of either player’s deployment zone. Emperor’s Will objectives are placed in each player’s own deployment zone.
Deployment: Dawn of War
Warlord Traits, Psychic Powers, Objectives
Spoiler:
We roll for Warlord traits. My Shas'el gets intimidating presence. Azrael picks Brilliant Planning from the Dark Angels codex allowing him to increase or decrease his reserve rolls by 1.
My opponent wins the roll off for deployment. He chooses his deployment zone.
He and I take turns placing objectives. He places his Emperor's will objective in the back right, within his deployment zone.
I place mine in the right corner, which I later place my Bastion.
Pre-game Thoughts: This is going to be a tough match up. My army is primarily foot-slogging with a single mobile element. The majority of my opponent's army is mobile. On top of that, he has more Crusade objectives placed closer to his deployment zone than I do. He has a huge advantage over me.
The Ravenwing Darktalon and Land Raider Crusader aren't a threat. My list has quite a lot of anti-air and my 6 Railsguns eats AV14 for breakfast. However, the Power Field Generator will be a nuisance. I'm more worried about the Banner of Devastation combined with Ravenwing Bikes and Hurricane Bolters. His Bikes have a lot more mobility and packs a lot of fire power. They are a huge threat to my Shoota Boyz and Fire Warriors.
The Attack Bikes will be quite a nuisance. Their Multi-meltas can take out my Bastion. On top of that, they can combat squad and outflank. They are also scoring, so I can't ignore them. The Black Knights is also a threat. Their grenade lauchers can reduce my Nobz Biker's toughness, making it easier to wound with bolters.
My plan is to focus on my opponent's scoring elements. Just like in my second game, my Nobz Bikers will distract enemy units while my Boyz focus on the objectives.
Deployment
Spoiler:
I win the roll of for deployment. For some reason I wasn't thinking straight and opted my opponent to deploy first. In my mind, this is an objective based mission and whoever goes second gets the final say in objectives.
Sorry for the terrible picture. By now it was getting dark and my camera is terrible without ambient lighting. My camera also has auto-focus issues. I really need to buy a new camera.
Azrael and Techpriest deploys with the Command Squad inside the Crusader. Three Ravenwing Bike troop choices and the Black Knights deploy around the Crusader's hull.
Attack Bikes and Darktalon remain in reserves.
I deploy the bulk of my forces deploys in the middle of my deployment zone.
Warboss and Nobz Bikers screen my troops from the front.
My Broadsides deploy in two separate location. One sets-up camp inside a tall multi-story Ruin. The other deploys with the Shas'el on top of the Bastion.
6 man Fire Warriors deploy inside the Bastion.
Before turn 1, Ravenwing Bikes and Black Knights scout moves forward.
I fail to seize the initiative and away we go!
Turn 1:Ravenwing
Spoiler:
Crusader and Bikes do their normal movement.
Ravenwing ground forces fires everything they got into my Ork Deathstar.
They gun down 5 Nobz, leaving the Warboss and Painboy left standing!
Turn 1:Tau-Orks
Spoiler:
Tau and Orks infantry advances forward.
Not to be outmatched, combined shooting from Tau and Orks kills 2 Ravenwing Bike squads and 4 Black Knights!
Warboss and Painboy charges the Black Knights and wipes them out in assault.
Turn 2:Ravenwing
Spoiler:
Only 1 Attack Bike becomes available from reserves. It parks outside the Bastion entrance.
Darktalon also becomes available from reserves. Quad-gun intercepts, but fails to glance or penetrate.
Azrael and Command Squad disembark from the Crusader and gets ready to intercept the Nobz Bikers. Crusader and Ravenwing Bikes retreat.
Attack Bike blows the Bastion sky high. 2 Broadsides receives a wound from leaping off the Battlement. 4 Fire Warriors perish in the explosion.
Combined shooting from Darktalon, Crusader, and Ravenwing Bikes kills 12 Shoota Boyz
Azrael and Command squad assaults Nobz Bikers. My Warboss issues a challenge, which Azrael accepts.
Azrael fumbles his attacks on my Warboss inflicts 3 wounds, but Azrael makes all three 4++ saves!
Painboy also fumble his attacks and Command Squad inflicts 1 wound on him.
Attack Bike assaults Fire Warriors. Neither side wounds, resulting in draw combat.
Turn 2:Tau-Orks
Spoiler:
Black Shoota Boyz pushes forward. Blue Shoota Boyz pulls back.
Shas'el splits off from the Broadsides.
Shoota Boyz only manages to kill 1 Bike.
Broadsides divide their shooting between the Crusaders and Darktalon. 4 Railguns shoots with 2 glances and 1 Penetrating the Crusader. Thanks to the Tech Priest's Power Field Generator, Crusader makes all its 4++ saves. Darktalon also saves 2 penetrating hits.
Curse you Power Field Generator!!!
Azrael inflicts 2 wounds on the Warboss, which I fail both 5++ and FNP. Warboss inflicts 1 wound, but Azrael once again makes his 4++ save. Combat draws between Painboy and Command Squad.
Fortunately, Warboss passes his moral test and stays in the fight.
Shas'el assault the Attack Bike and inflicts 1 wound. Attack Bike finish off Fire Warriors.
Turn 3:Ravenwing
Spoiler:
Last 2 Attack Bikes becomes available from reserves. The outflank from the left board edge.
Combined shooting from one of the Attack Bikes and Crusader kills 1 Broadside and inflicts a wound on a second one. Both Boradsides have 1 wound remaining.
Darktalon uses its rift cannon to blind both Blue Shoota Boyz and Fire Warriors. It also kills 1 Blue Shoota Boyz and 9 Fire Warriors!
Ravenwing Bikes guns down 7 Black Shoota Boyz.
Azrael kills Warboss!
Painboy survives and ties up Command Squad in assault.
Shas'el defeats Attack Bike in assault.
Turn 3:Tau-Orks
Spoiler:
Fire Warriors and Blue Shoota Boyz goes after Attack Bikes. Black Shoota Boyz pushes forward.
Shas'el and Broadsides kills one of the Attack Bikes.
Blue Shoota Boyz and Fire Warriors shoots everything at the single Attack Bike, but it makes all its armor saves!
1 Broadside shoota the Darktalon, but only manages to glance it. 3 Railguns shoots at Ravenwing Bikes, but they make all their 4++ saves!
Black Shoota Boyz attempts to assault the Command Squad, but fails to roll high enough for their charge distance.
Azrael finish off Painboy and consolidates.
Turn 4:Ravenwing
Spoiler:
Lone Attack Bike goes after Fire Warriors.
Azrael goes after Black Shoota Boyz
Ravenwing Bikes and Crusader kills 9 Black Shoota Boyz.
Darktalon strafe 11 Shoota Boyz.
Blue Shoota Boyz fails moral test and runs off the table!
Command Squad assaults and wipes out Black Shoota Boyz while taking no wounds in return.
Attack Bike assaults Fire Warriors. Niether side inflicts any wounds.
Turn 4:Tau-Orks
Spoiler:
Left Broadsides kills 3 Ravenwing Bikes.
Other Broadsides shoots at the Dark Talon and Crusader, but both make their 4++
Attack Bike slays 2 Fire Warriors in combat while taking no wounds in return.
Lone Fire Warrior passes moral test.
Turn 5:Ravenwing
Spoiler:
Crusader and Command Squad goes after Broadside
Lone Ravenwing Bike takes control of Crusader objective.
Combined shooting from Crusader and Dark Talon wipes out Broadsides and kills my Shas'el, giving my opponent Slay the Warlord!
Attack Bike kills last Fire Warriors and takes control of an objective.
Turn 5:Tau-Orks
Spoiler:
Remaining Broadside splits fire between lone Ravenwing Bike and Attack Bike.
2 Railguns hit and wounds the lone Ravenwing Bike. He makes 1 cover save, but fails the other. He dies.
Single Railgun takes out the Attack Bike out in the open.
Game ends.
Niether side has any scoring units left. I score 1 battle point with First Blood. My opponent scored 2 battle points from Slay the Warlord and Line Breaker.
Overview of the board.
Ravenwing wins 2 - 1!
Post-game Thoughts:
Spoiler:
This was a crazy match. In the end, my opponent and I killed off each others' scoring units. This was also the first game in this tournament where my Warlord was killed and my Bastion destroyed.
A lot happening on turn 1. My opponent started the game off decimating my Deathstar. In return, I kill off 2 Ravenwing Bike units and Black Knights. Despite heavy losses, my opponent proved how formidable the Banner of Devastation is with his single Ravenwing bikes and 2 sets of Hurricane Bolters from the Crusader and Darktalon. The Darktalon really surprised me. I didn't realize it could go into Hover Strike mode and stay on the table.
Luck certainly played a huge role in this game's outcome. Had Azrael failed a single save, he would have been instant killed by my Warboss' Str10 Power Klaw, giving me Slay the Warlord and tying the game. Even though I had 6 Railguns, both the Crusader and Darktalon repeatedly made their 4++ saves. That Power Field Generator earned its points back big time!
In hindsight, I made a couple mistakes. I didn't realize Ravenwing Bikes had scout and could outflank. I should have setup my Emperor's Will objective and Bastion in the middle of my deployment zone, away from those nasty outflanking Attack Bikes. I should have not given my opponent first turn. Had I gone first, I would have inflicted tremendous damage to my opponent's bikes and reduce the losses to my Nobz Bikers. Oh well, lessons learned.
So I end day 1 of BAO with 2 wins and 2 losses. Not terrible, but not great either. At least day 2 will have 3 games instead of 4.
Because of the the upcoming 6th ed Tau release, expect faster releases of my BAO battle reports. Hopefully I'll finish the next three games before the new 6th ed Tau is release!
Epilogue (skip if you don't care for narrative)
Spoiler:
..........
Shas'el Tealk winces in pain as he pulls himself out of the wreckage of his Crisis Suits. He had received a deep cut on his side from a grazing bolter round. In the distance, he could hear the sounds of battle slowly dying out with the enemy emerging victorious. Tealk sadly smiles and pulls out a folded parchment containing his Warrant of Trade. "It was a good run while it lasted," he thought. He reflects on all his achievements knowing his end was near.
Through the whirling dust emerge a hooded figure. Wrapped in dusty white robes with fresh blood stains and protected in decorated green armor, the Dark Angels Company Master appeared as an angel of death. He advances toward the wounded Shas'el with his gleaming sword drawn. Tealk closes his eyes braces himself for a coup de gras.
He waits for a few seconds. Nothing happens. Tealk slowly open his eyes and peaks. Azrael towers over him with his left hand outstretched. "Warrant," demands Azrael in deep baritone voice. Tealk's shakily hands over the folded parchment. Azrael snatches it, turns around, and walks back.
Tealk stares dumbstruck for a few minutes. Hundreds of questions flies through his head. He finally collapse on the ground and laughs with tears of joy streaming from his eye. In the end, he didn't care why the Dark Angels Chapter Master left him alive or what he wanted with the Warrant of Trade. The only thing that mattered to Tealk was that he was still alive.
This message was edited 4 times. Last update was at 2013/03/30 06:38:42
Tanakosyke22 wrote:I was thinking of doing a back story with my Techno-Barbaric Tau and Ork Allies with that, and this inspired me to do so even more! ^_^
I'm glad you enjoy reading my stories. Feel free to use them for inspiration.
Charles Rampant wrote:Nice reports. Though the Daemon player had a vicious list, his army is beautifully painted.
Yeah, the Daemon player had a beautifully painted army.
haizelhoff wrote:Thx for the reports. Partly inspired by these i played torks at a tourney last weekend finishing 3/28. They are a very fun army to play
Congratulations placing third in a tournament using Tau-Orks! It is indeed a very fun army to play with.
This message was edited 1 time. Last update was at 2013/03/25 20:46:07
That first attack bike that outflanked and blew up the bastion... it then assaulted the tau who fell out on that same turn? I thought you couldn't assault the turn you arrive from reserve?
Exhumed wrote: That first attack bike that outflanked and blew up the bastion... it then assaulted the tau who fell out on that same turn? I thought you couldn't assault the turn you arrive from reserve?
That's correct. You need a special rule to be able to assault out of reserve. Genestealers who come out of terrain are the only ones who can as far as I know.
2013/03/26 01:25:49
Subject: 1750pts SabrX's Tau-Orks at Bay Area Open GT 2013 (Game 4 Complete)
Thanks. I doubt it would have made a major difference, but it did mean the tau commander had to spend a couple of turns in assault with that attack bike, whereas if it didn't assault.... poof
Good catch! By then, I was either too tired or too exhausted to notice. In the grand scheme, another Attack Bike would have come in the next turn and finish off the 2 Fire Warriors.
Exhumed wrote: That first attack bike that outflanked and blew up the bastion... it then assaulted the tau who fell out on that same turn? I thought you couldn't assault the turn you arrive from reserve?
That's correct. You need a special rule to be able to assault out of reserve. Genestealers who come out of terrain are the only ones who can as far as I know.
Vanguard vets or the lucsis pattern drop pod
40kGlobal AOA member, regular of Overlords podcast club and 4tk gaming store. Blogger @ http://sanguinesons.blogspot.co.uk/ 06/2013: 1st at War of the Roses ETC warm up.
08/213: 3rd place double teams at 4tk
09/2013: 7th place, best daemon and non eldar/tau army at Northern Warlords GT
10/2013: 3rd/4th at Battlefield Birmingham
11/2013: 5th at GT heat 3
11/2013: 5th COG 2k at 4tk
01/2014: 34th at Caledonian
03/2014: 3rd GT Final
2013/03/26 22:41:12
Subject: Re:1750pts SabrX's Tau-Orks at Bay Area Open GT 2013 (Game 5 Complete)
Introduction (skip if you are only interested in the battle report)
Spoiler:
Both Shas'el Tealk and Warboss Badgaz miraculously survived the battle against Azrael and the Dark Angels 2nd Company. However, their defeat against the Astartes left a bitter aftertaste. They both decided to wash it away by drinking at their favorite pub at Russ' Bar Tab, located in spaceport Eldarado XIII.
Shas'el Tealk and Warboss Badgaz sits at a bar. Badgaz greedily chugs down his eleventh tankard of fungus beer while Tealk nurse his fourth cup of Amasec.
Badgaz belches, causing Tealk to cringe his nose. "Like I was sayin," said the Warboss, "Me and you should go back dere and give dos big umies a good stompin. Letz show dem who iz da real boss."
Unlike the warboss, Tealk had low tolerance for alcohol. Once buzzed, he loses composure and speaks his thoughts. "Are you out of your frakkin mind?" Shouts Tealk. "We got our butts kicked faster than you can say, 'Aun'o'T'au'Acaya'Va'Denta.' We are both lucky to be still alive."
The Warboss snaps his fingers, summoning a Kroot bartender to refill his tankard. "Me and ma boyz are itchin for a fight. Idle boyz ain't good for uz both," grunts Badgaz.
"Aun'Va is pissed at me for botching up trade agreements with Imperials," moans Tealk. "My Shadow Cadre is on standby until the next apocalyptic Tyranid or Orks invasion."
After thinking it over a few minutes, an idea pops into Badgaz head. "Does ur space pope still allow ya to fight?" He ask.
Tealk scowls. "My cadre has been downgraded to patrolling the Damocles Gulf. There's little fighting unless the Imperium wills it," he reply.
Badgaz chuckles and raises his tankard. "How bout you join me on a lil blitz to the planet Vodarac? Couple me cousins looted me fortress couple weeks ago. Got to return da favor if ya know wot I mean," he said with a wink.
Tealk shrugs and raises his half glass of Amasec. "As long as I get a cut of the profits, I'm game."
.....
After a good night rest and a hearty complimentary continental breakfast from the motel I was staying at, I head off to day 2 of BAO.
My first match up is against pure Orks.
Army List Orks Warboss, Warbike, Powerklaw, Cybork Body, Attack Squig
Warboss, Warbike, Powerklaw, Cybork Body, Attack Squig
12x Lootas
12x Lootas
11x Lootas
1 Nob and 11 Slugga/Choppa Ork Boyz, Power Klaw, 'eavy armour
-Trukk, Red Paint
1 Nob and 11 Slugga/Choppa Ork Boyz, Power Klaw, 'eavy armour
-Trukk, Red Paint
1 Nob and 11 Slugga/Choppa Ork Boyz, Power Klaw, 'eavy armour
-Trukk, Red Paint
20x Gretchins, 2x Runtherd
1 Nob and 19 Storm Boyz, Power Klaw, 'eavy armour, bosspole
6x Nobz, warbikes, 2x big choppa, 2x power klaw, 1x bosspole, 1x Waaagh! Banner, Painboy, 6x cybork body
30x Ork Boyz, Shootas
30x Ork Boyz, Shootas
Fortification: Imperial Bastion, Quad-gun
Scenario 5
Mission: Purge the Alien (4pts)
The Scouring (3pts)
First Blood (1pt)
Linebreaker (1pt)
Slay the Warlord (1pt)
In the Scouring, each player places 2 objectives in their opponent’s deployment zone and 1 outside of either player’s deployment zone following normal objective placement rules (6 total on the board for the Scouring). Each player has a 1, 2, and 3 point objective, which are revealed just before the roll to seize the initiative as normal. You will end up with 2 objectives in no man’s land, and 2 in each deployment zone. Destroying fast attack choices counts for points to this mission.
Deployment: Vanguard Strike Deployment.
There are always 6 objectives for The Scouring, 2 of which must always go outside either player’s deployment zone.
Warlord Traits, Psychic Powers, Objectives
Spoiler:
My opponent and I roll off for warlord traits. My Shas'el gets Conqueror of Cities, granting all my units move through cover special rule in ruins and Stealth in ruins. Enemy Biker Warboss gets Legendary Fighter.
I win the roll off for picking deployment zone and placing objectives.
I choose the board half with the only ruin. I place my Bastion. My opponent places his Aegis Defense Line.
We take turns placing objectives without revealing their value. Like a true Ork player, my opponent place his objectives not too far from where I placed mine.
Pre-game Thoughts: For a pure Ork army, my opponent's list packs a lot of dakka! Unfortunately, my opponent's list is mechanized Orks with multiple small units of Lootas, Ork Boyz, and Trukks. I have the advantage in primary mission. My Broadsides is well equipped to deal with multiple mechanized light AV armies. My opponent on the other hand has the upper-hand in secondary Scourging. He has his Storm Boyz, which is fast attack. My list has no fast attack.
Thanks to objective placement, my Shoota Boyz don't have to travel too far. I'm worried about the Storm Boyz. They have high mobility and have a high model count. I'll also have to be wary of the two Warbosses. They can go head to head against my Warboss and can decimate my Nobz Bikers.
My strategy is to first disable my opponent's transports. My Shoota Boyz have the advantage against opposing Slugga/Choppa Boyz. I'll also focus on the Lootas, which poses a threat to my Nobz Bikers.
Deployment
Spoiler:
I win the roll off to deploy first.
Broadsides deploy on high ground. Ground forces spread out along the edge of my deployment. 6 Fire Warriors takes their position inside the Bastion.
Orks deploy on the opposite end. Two squads of Lootas deploy in top turquoise area terrain. Third units of Lootas and Grots deploy behind Aegis Defense Line. Both biker Warboss join Storm Boyz.
Before the Ork player attempts to seize the initiative, we reveal the value of each objective. The objectives in the middle are only 1's and 2's. As it turns out, the objective in my opponent's Aegis Defense Line turns out to be worth 3 points.
My opponent fails to seize the initiative and away we go!
Turn 1:Tau-Orks
Spoiler:
Ground forces advances forward, using the large middle terrain to their advantage. 12-man Fire Warriors climb up the ruins.
Fire Warriors whittles down 5 Lootas on the right.
Broadsides blows up both Trukks in the middle. One kareens backwards and blows up, killing 2 passenger Orks. Front one blows up, killing 4 Ork Boyz inside. Blast radius tears 3 Lootas inside the Aegis Defense to shreds.
Left Trukks weathers shooting from second Broadside unit. Shas'el's Quad-gun succeeds in immobilizing it.
Turn 1:Orks
Spoiler:
The immobile Trukk and the impassible terrain causes the two biker Warbosses to take a detour. Ork Boyz advances forward.
Lootas and Quad-gun focus fire on the Nobz Bikers. They manage to pick off two Nobz and scores a wound on a third.
Ork Boyz run, screening the Lootas.
Storm Boyz and Ork Boyz runs as well.
Turn 2:Tau-Orks
Spoiler:
Both Shoota Boyz squads prepares to intercept the enemy Storm Boyz.
Nobz continue driving towards enemy's right flank.
Black Shoota Boyz run.
Combined shooting from Fire Warriors inside Bastion and Black Shoota Boyz kills off 5 Storm Boyz.
Broadsides on the right guns down 4 Slugga/Choppa Boys, opening a path for the Nobz Bikers.
Fire Warriors shoots their Pulse Rifles and finish off a unit of Lootas.
Shas'el manages to score a wound on the enemy Warboss.
Nobz Bikers assault and wipes out a squad of Lootas.
Turn 2:Orks
Spoiler:
Warlord breaks away from the Storm Boyz and goes after my Black Shoota Boyz.
Wounded Warboss and Storm Boyz surrounds Blue Shoota Boyz.
My opponent declares WAAAGH and runs his Slugga/Choppa Boyz.
Combined shooting from Lootas and enemy Ork Boyz kills 2 Nobz, including the Painboy.
Combined shooting from wounded Warboss and Storm Boyz whittles away 5 Blue Shoota Boyz.
At this point my opponent attempts to charge his Slugga/Choppa Boyz into my Shoota Boyz. I inform him the changes to fleet in 6th ed, making his charge move illegal after running in the shooting phase. My opponent is disappointed.
His Warboss declares his charge. Black Shoota Boyz overwatch and nicks a wound off of him.
Ork Slugga/Choppa Boyz charges into the Nobz Bikers. Overwatch kills an Ork Boy.
Warboss and Nobz wipes out the Slugga/Choppa Boyz.
Storm Boyz and Warboss assaults Blue Shoota Boyz. 8 Storm Boyz and 15 Blue Shoota Boyz dies in meelee.
Blue Shoota Boyz loses combat, fails their moral test, and flees off the table.
Shoota Boyz pummels enemy Warlord to death in assault.
At this point there's only 15 minutes left of the game. My opponent concedes.
Tau-Orks wins 10 - 0!
Post-game Thoughts:
Spoiler:
This game took painstakingly long. Despite the allocated 2 hours and 15 minutes time limit, we only completed 2 game turns. My opponent arrived 20 minutes late and it took a while for us to setup. My opponent took a long time during his movement, shooting, and assault phases. I got the feeling he's still new to 6th edition. He didn't know fleet universal special rule had changed. No more running in shooting phase followed by charging in the assault phase. Fleet in 6th ed allows re-rolls for run or charge distance.
Losing all three Trukks on turn 1 was a crushing blow to my opponent. Not only did I score first blood, but I shutdown the bulk of his scoring units' mobility. I'm not sure what he was thinking when he charge his lone Warlord biker Warboss into my Black Shoota Boyz. Despite being T6, the Warboss only has a 4+ save. Shoota Boyz have high volume of attacks and will strike first.
At the end of the game, my opponent reveal that he had originally planned to bring his Chaos Space Marines to the tournament, but he couldn't find them. He ended up dusting off his Orks and bringing them instead. He also told me hasn't played many games in 6th edition. Even though he was losing badly throughout game, he took it like a champ. Not once did he curse, throw a tantrum, or acted poorly. Despite showing up late and taking a long time during his phases, he was a good sport.
Epilogue (skip if you don't care for narrative)
Spoiler:
.....
The battle finished a lot sooner than Shas'el Tealk expected. Like most Orks versus Orks match ups, it came down to which Warboss dies first. After an Orks army loses its Warboss in heat of battle, it typically succumbs to anarchy. Orks will fight amongst themselves until a new Warboss is elected, after proving his strength and toughness. In the case of this battle, the losing Orks army surrendered and joined Warboss Badgaz's army. Much to Tealk's pleasure, his ally detachment had just gotten a lot more formidable.
.....
Shas'el Tealk rummages through discarded loot left behind by Warboss Badgaz and his Boyz. Tealk shook his head in disbelief. Like typical Orks, Badgaz and his Boyz had picked out the biggest and shiniest objects, leaving Tealk with small and dull looking scraps. The Tau commander however, found the left overs to be more valuable containing hidden gems of advance xeno components collected over decades or piracy.
While sifting through a large pile of xeno tech, Tealk spots an Imperium dataslate. He switches it on. An inquisitorial 'I' appear on the screen followed by a prompt asking for password. Tealk summons a DX-4 Technical Drone. After hooking the dataslate to the drone, the Tau's advance AI cracks the Inquisitorial's cryptography in a matter of seconds. Under the secured layer reveals maps and database of xeno activity.
Tealk grins. He just found a treasure trove of top secret Imperial information.
This message was edited 5 times. Last update was at 2013/03/30 06:37:30
As a player who uses mech Orks, I think that you're gonna gub this guy. The trukk mobz (and even the stormboyz) just don't have the numbers to get across the table and charge your shootaboy mobz without perishing to overwatch. Of course, his Lootas might even the scales...
2013/03/27 15:34:31
Subject: 1750pts SabrX's Tau-Orks at Bay Area Open GT 2013 (Game 5 Pre-game thoughts)
Toban wrote:Hey SabrX, another thing.
Does the techmarine sitted in the crusader ALL the time?
In this case, looking at pictures, I may guess your bikerz where into his PFG 3" range and so they had to benefit from his 4++ too.
This could had changed the result of the melee.
The Dark Angels player's Techmarine stayed in the Crusader throughout the entire game.
Unfortunately, my Nobz Bikers weren't in the 3" range of the Crusaders hull.
Charles Rampant wrote:As a player who uses mech Orks, I think that you're gonna gub this guy. The trukk mobz (and even the stormboyz) just don't have the numbers to get across the table and charge your shootaboy mobz without perishing to overwatch. Of course, his Lootas might even the scales...
His Lootas did a number on my Nobz Bikers. He probably could have wipe them out had the game continued.
cormadepanda wrote:well, the meh ork game will be in interesting match up. The lootas can even the boy fight for the storm boyz to pitch in.
IMO, 20 Storm Boyz with kitted Nob is far too expensive. For almost the same points, he could have bought 5 Mega Nobz with a Battle Wagon dedicated transport.
Game #4 was a tough one. Who knew DA could be so competitive. May have to get a game in against John's DA bikers or Trent's triple-LRC banner/powerfield list.
Game #5 was a mismatch for your opponent. Your army just over-powered his.
Looking forwards to the rest of your report and then to some games with the new Tau when they come out.
Introduction (skip if you are only interested in the battle report)
Spoiler:
Nemesor Imotekh awoke from his deep slumber. Someone had set off an alarm. Could it be Helbrecht? Did the the Black Templar Marshal finally discover his hideout? A brief flashback of his beloved flag ship, the 'Inevitable Conqueror', colliding into a star reminds Imotekh the wound Helbrecht dealt to his pride.
He slowly rises from his throne. Two Crypteks kneel before him. "Who dares intrude upon my domain?" He demands. His metallic voice resonates in cavern, turning his words into a thousand echoes.
"N-nothing t-to worry ma-master," stammers one the Crypteks.
"J-just a couple of Tau and Orks raiders" replies the other Cryptek in a shaky voice, "Destroyer Lord Wroth is taking care of them as we speak."
Imotekh eye's flashes with intrigue. "Interesting," booms Imotekh, "Order and disorder joining forces and fighting as one? Inform Wroth we'll be joining him shortly."
.....
Warboss Badgaz lazily looks up into the sky. It was noon with sun at its highest peak. Warboss frowns, thinking back to what brought him to this backwater planet. Shas'el Tealk had come across a dataslate containing Imperium database of Imperial artifacts scattered across the galaxy. Most of them were marked as being too dangerous too retrieve. Tealk seize the opportunity by assembling an expedition to retrieve the unclaimed relics.
Much to Badgaz dismay, the expedition had so far met little distance. Other than cultists and a nest of genestealers, Warboss Badgaz have yet to face an opponent worth his mettle in combat.
Out of the blue, thick dark clouds appear in the sky. A breeze picks up and soon turns into a gale. The ominous clouds blankets the sky, turning night into day. Emerald lightning bolts dances across the landscape, instantly igniting whatever it touches.
Off in the distance, the sounds of clanking metal reaches Badgaz's ears. A phalanx of emotionless and terrifying metallic skeletons marches in perfect synchronization. Each one wields elongated guns with barrels glowing neon green. At the head of the column stood a tall formidable figure wearing a billowing cape and carrying an ornamental staff of light.
Warboss Badgaz grins. At last, something to relieve his boredom.
.....
My three victories and two defeats lands me on table 28. Huzzah! I'm making progress!
Army List
Necrons
Imotekh the Stormlord
Destroyer Lord, Sempiternal Weave (2+), Mindshackle Scarabs, warscythe
-Cryptek, Harbringer of Despair, Viel of Darkness
-Cryptek, Harbringer of Eternity, Chronometron
6x Nobz, warbikes, 2x big choppa, 2x power klaw, 1x bosspole, 1x Waaagh! Banner, Painboy, 6x cybork body
30x Ork Boyz, Shootas
30x Ork Boyz, Shootas
Fortification: Imperial Bastion, Quad-gun
Scenario 6
Mission: Big Guns Never Tire(4pts)
The Relic (3pts)
First Blood (1pt)
Linebreaker (1pt)
Slay the Warlord (1pt)
There are always 6 objectives for The Scouring, 2 of which must always go outside either player’s deployment zone.
In Big Guns Never Tire, each player places 2 objectives, one in their own deployment zone, the other in their opponent’s following normal objective placement rules (4 total for this objective on the table). You will end up with 2 in each deployment zone. Destroying Heavy Support choices counts for points to this mission.
Deployment: Hammer and Anvil Deployment
Warlord Traits, Psychic Powers, Objectives
Spoiler:
My opponent and I roll off for Warlord Traits. My Shas'el rolls a 2. For kicks and giggles, I choose Night Attacker even though I know it will have no effect against Imotekh.
My opponent wins the roll off for picking deployment zone. He chooses a side and setup his Aegis Defence Line. I place my Bastion on the opposite end.
We then take turns placing objectives. Necron player place one of his objective in his deployment zone behind the Aegis Wall. He places his second 12" away in no mans land.
The Relic automatically goes into the middle.
I do the same placing one objective near my Bastion and the other 12" in no mans land.
Pre-game Thoughts:
Wow, this is the first Necron list I've seen in 6th ed without any flyers.
This will be a tough match up for my Orks. Gunline Necron Warriors could potentially wipe out Shoota Boyz advancing out in the open. Destroyer Lord + Wraiths matches well against Nobz Bikers. Imotekh's night fighting special rule weakens my Fire Warriors. I'm not too worried about the Annihilation Barges. My Broadsides will have no problem popping them down range. They also ignore night-fighting thanks to Blacksun Filter. On top of that, primary is Big Guns Never Tire, which means each dead Heavy Support counts as points.
I have the advantage in primary. The only thing I have to worry about is secondary. My strategy is to grab hold of the Relic early on and keep my Shoota Boyz 24" away from the Necron Warriors. Nobz Bikers will go after my opponent's warlord and hopefully tie up Wraiths for a couple of turns in assault.
Deployment
Spoiler:
I win the roll off to deploy first.
I deploy the bulk of my forces on the right side of my deployment zone. Broadsides take high ground, Shas'el mans Quad-gun, 6 man Fire Warriors sits inside the Bastion.
Necrons deploy on the opposite end of the table. Destroyer Lord, Wraiths, and Annihlation Barges takes cover behind tall pieces of terrain. Imotekh and Cryptek with Chronometron joins a squad of 13 Necron Warriors. They take their positions around the Quad-gun. Second squad of 13 Necron Warriors setup on the opposite side. Second Cryptek with Veil of Darkness joins a squd of 20 Necron Warriors and deploy in the back. Scarabs hides behind Aegis Wall.
Mysterious objective near Imotekh's unit turns out to be Grav Wave Generator, which halves assault distance.
Mysterious objective near Blue Shoota Boyz appears to be Targeting Relay, allowing re-rolls for 1's in shooting.
One of Imotekh's special rules is Hyperlogical Strategy. It allows him to seize the initiative on a 4+. However due to fluff reasons, he can never attempt to seize the initiative against any army that includes Orks. My opponent however pointed out this is the case if Orks is the primary and not an allied detachment. Upon writing this battle report, I couldn't find anything in the BAOFAQ or Necron FAQ to support his claim. Nevertheless, time is of the essence and let it slide.
Thanks to the Cryptek with Chronometron, Imotekh gets a re-rollable 4+ to seize the initiative. However, terrible luck foils both attempts. My opponent fails to seize the initiative an away we go!
Turn 1:Tau-Orks
Spoiler:
Thanks to Imotekh, Night Fighting is in effect on turn 1.
Fine with me. My Shoota Boyz could use the extra cover save.
Orks and Fire Warriors advance. To save time, I run both Shoota Boyz squads in the movement phase. Both squads roll low with a 2 and a 1.
Due to Night Fighting, the bulk of the Necron forces receives a 2+ cover save. Fire Warriors only manage to pick off a single Necron Warrior in Imotekh's unit.
Shas'el and Broadsides have Blacksun filters and ignores Night Fighting. Shas'el guns down 2 Necron Warriors on the left side of the Aegis Wall. Broadsides blows up an Annihilation Barge near the Wraiths, giving me First Blood!
None of the Necron Warrior casualties reanimate.
Turn 1:Necrons
Spoiler:
Necrons shuffle around. Scarabs dashes out into the open.
My Nobz Bikers receives a 3+ cover save thanks to stealth + Exhaust Cloud. Necrons rolls poorly during their shooting phase and only manages to inflict a single wound.
Turn 2:Tau-Orks
Spoiler:
Nobz Bikers bears down on Imotekh's unit.
Moving Shoota Boyz straight into a Necron gunline isn't the smartest srategy. I keep my Blue Shoota Boyz back.
Black Shoota Boyz makes a play for the Relic.
Black Shoota Boyz run 4" and sits on top of the Relic.
Fire Warriors and Nobz Bikers whittles down 3 Necron Warriors in the shooting phase.
Shas'el and Fire Warriors inside the Bastion insta-gib 4 Scarab bases and inflicts a wound on a 5th scarab.
Broadsides can only make out a single Annihilation Barge. They shoot, but the Necron heavy support make its 4+ cover saves from hiding behind Ruins.
None of the fallen Necron Warriors stand back up.
Nobz Bikers declares assault. Imotekh and Necron Warriors overwatch. They manage to inflict one more wound, killing the lead Nobz.
Nobz Bikers rolls a 7 for their charge distance. Grav Wave Generator halves it to 3.5" which is rounded up 4". Nobz Bikers just barely makes it in.
Warboss issues a challenge, which Imotekh accepts. Imotekh strikes first and deals 2 wounds to my Warboss. Ork Warboss strikes back, dealing 3 wounds, killing Imotekh.
Nobz decimates Necron Warriors and Cryptek in assault.
My opponent rolls for ever-living, but the wrong model stands back up. Imotekh fails and is removed as casualty, giving me Slay the Warlord. Cryptek passes his ever-living roll and rises from the dead.
Turn 2:Necrons
Spoiler:
Necrons swarm around the Nobz Bikers.
Scarabs scuttle toward my Bastion.
Combined shooting from Necrons kills my Warboss and 2 Nobz Bikers. A third Nobz wielding a Power Klaw receives a wound.
Scarabs charges the Bastion. Thanks to Entropic Strike, they manage reduce its armor value, penetrate, and cause Total Collapse.
Shas'el and Broadside receives a wound from impact hits. 2 Fire Warriors perish.
Wraiths charges the Nobz Bikers. One of the Wraiths dies to overwatch.
Wraith mops up the Nobz in assault while taking no wounds in return.
Turn 3:Tau-Orks
Spoiler:
Black Shoota Boyz pull back after retrieving the Relic.
They hand it over to the Fire Warriors.
Shoota Boyz also run, back 5".
Blue Shoota Boyz shoots and kills a Scarab base.
They attempt to assault, but rolls short for their charge distance.
Turn 3:Necrons
Spoiler:
Necrons kick into action. Both Barges finally comes out from hiding.
Combined shooting from Necron Warriors and Cryptek manning the Quad-gun kills 5 Black Shoota Boyz and 3 Fire Warriors. One of the Fire Warriors holding the Relic is among the dead.
Wraiths run 4".
Scarab assaults and manages to inflict a wound on a Broadside. Entropic Strike strips its armor away. Broadsides and Shas'el strikes back, killing the Scarab.
Turn 4:Tau-Orks
Spoiler:
Shoota Boyz and Fire Warriors goes on the offense.
Fire Warriors reclaims the Relic.
Broadside blows up one of the Annihlation Barges and picks off a Necron Warrior.
Combined shooting from Fire Warriors and Shoota Boyz wipes out the Wraiths and wounds the Destroyer Lord.
Fallen Necron Warrior doesn't stand back up.
Turn 4:Necrons
Spoiler:
Second Cryptek uses Veil of Darkness and teleports near Blue Shoota Boyz.
Destroyer Lord goes after my Fire Warriors controlling the Relic.
Annihilation Barge takes out the wounded Broadside without any armor.
Necron Warriors rapid fire and kills 9 Blue Shoota Boyz.
Quad-gun picks off 3 Black Shoota Boyz.
Destroyer Lord assaults and wipes out the Fire Warriors.
The Relic drops on the ground.
Turn 5:Tau-Orks
Spoiler:
Black Shoota Boyz secures the Relic.
Blue Shoota Boyz advances toward the Necron Warriors.
Broadsides blows up the last Annihilation Barge.
Blue Shoota Boyz rolls poorly and only manages to kill a single Necron Warrior.
Black Shoota Boyz guns down the Destroyer Lord. He doesn't get back up.
Blue Shoota Boyz declares their assault on the Necron Warriors. Necron Warriors overwatch and kills 3 Boyz.
At this point we run out of time. We count up our points.
I score 9 Battle Points after winning primary, secondary, First Blood, and Slay the Warlord. My opponent scores 0 Battle Points.
Tau-Orks win 9 - 0!
Turn 5:Necrons
Spoiler:
Game ended top of turn 5.
Post-game Thoughts:
Spoiler:
Solid victory on my part. I did the right thing not committing my my Shoota Boyz and sending my Nobz Bikers forward. Had it not been for night-fighting, my Nobz might have not made it into assault.
My opponent fail all but one of his reanimation protocol rolls. It seemed like Imotekh did more harm than good. Had my opponent fielded a regular supped up Necron Overlord with MSS, 3++, and Res-Orb, the results in melee may have been different.
As expected, my Broadsides shut down my opponent's heavy support and help me win primary.
The Scarabs surprised me. They manage to bring down my AV14 Bastion!
After thinking it over, it's hard to say what my opponent could have done differently. He played very conservative until the last couple of turns. I thought he would have played more aggressive using reanimation protocol. In hindsight, it wouldn't do him much good considering his terrible WBB rolls. Perhaps he would have been in a better position to claim the Relic and hold objectives.
Epilogue (skip if you don't care for narrative)
Spoiler:
.....
Warboss Badgaz releases the clutch and accelerates forward, driving his Warbike straight into enemy fire. Deadly green beams of light streams all around him like a laser light show. Everytime one of the beams touches the Warboss, it disassembles a thing layer of flesh and armor. Badgaz grunts, feeling his nerve endings go numb. Pain wracks his brain, but it only serves to fuels his adrenaline.
With the few hundreds metre stretch between him and his foe, Badgaz opens in jaws and shouts at the top of his lung, "WAAAAGGGHHH!!!!" Soon after, the beams of light joined into one, blinding the Warboss and his Nobz. Three of his Nobz Bikers in the lead absorbs the death rays and immediately vaporizes into particles.
Badgaz and his crew push forward, closing the distance. A makeshift barricade appears in front with metallic skeletons shooting their gauss blasters from behind. Badgaz shifts his weight to the rear, lifting his Warbike's front into the air. The other Nobz Bikers copies their leader. Together, they slam their Warbikes on top of the Barricade. Upon impact, each biker accelerates, causing their rear-tire to catapult himself over the wall.
Upon landing, the Warboss and his Nobz unsheathes their weapons and guns their bikes charges into the Necron Warriors. Crude steel clangs against living metal in the loud exchange of melee. Through the thick of the fighting, Badgaz recognizes the tall formidable figure, who lead the Necrons.
Sensing someone was watching, Storm Lord Imotekh looks up. Warboss Badgaz locks eyes with Imotekh, issuing a challenge. As per codes of battle, the Storm Lord accepts.
A million scenarios plays out in Imotek's mind. Had his skull still be covered in flesh and muscle, we would be grinning right about now. 98% chance of success, he liked those odds.
The Warboss accelerates, charging straight at Imotekh. Imotekh follows the simulated branch of predicted patterns. Raising his staff, he steps to the side and swings his staff into the oncoming Ork.
The blow connects with Badgaz' upper abdomen, sending the Warboss flying off his bike. The Warboss grunts and stands back up. A sharp needle of pain erupts where we was hit. He looks down and notice he had a deep cut seeping with blood and exposing broken ribs.
"Foolish Ork," goads Imotekh, "I've predicted a million outcomes of this fight. Your chances is close to none."
Badgaz frowns. He reaches inside his side pouch for a stikkbomb, jerks the ring, and flings it at Imotekh. The Storm Lord dodges away from the incoming projectile. Both combatants brace themselves for an explosion.
No explosion came, however. Instead the stikkbomb screeches in pain. Badgaz looks over and discovers he had accidentally thrown Gribbly, his pet attack squig and what he thought was a grenade pin turned out to be the poor squig's nose ring.
Gribbly goes on a rampage and pounces on the closest being, Imotkeh. The Stormlord wildly swings his staff, trying fend off the attack squig.
Meanwhile, Badgaz pulls out a real stikkbomb, releases the pin, and hurls it at the distracted Necron. It detonates, sending out a concussive wave, which knocks Imotekh and Gribbly to the ground.
Badgaz shrugs. Not what he had in mind, but it worked out in the end. He lumbers over and wraps his Power Klaw around Imotekh's neck. "Bet ya didn't see that coming," laughs Badgaz. Before Imotekh can reply, Badgaz slams his Power Klaw shut and yanks Imotekh's head clean off his skeletal body.
"Got me a new trophy," said Badgaz with a grin.
This message was edited 3 times. Last update was at 2013/03/30 05:06:54
At first I was thinking the annihilation barges would give you problems - I forgot about your Broadsides.
Game 4 was a tough match. Land raiders are a tough nut to crack now and Dark Angels can really tweak them with the PFG, Techmarines and the Deathwing upgrade. Techmarines being an IC for Dark Angels is just another bonus since they can attach to another unit embarked inside the land raider. His dice were smoking hot for his saves... Not really anything you can do about that and your army has lots of fire power to spare. If his dice had been more normal I think you would have probably won.
This message was edited 1 time. Last update was at 2013/03/29 00:23:18
jy2 wrote:Game #4 was a tough one. Who knew DA could be so competitive. May have to get a game in against John's DA bikers or Trent's triple-LRC banner/powerfield list.
Game #5 was a mismatch for your opponent. Your army just over-powered his.
Looking forwards to the rest of your report and then to some games with the new Tau when they come out.
The DA player's list is deceptively well crafted. I was taken back by the Darktalon. It's rift cannon is extremely annoying and being able to hover strike near the Banner of Devastation adds to its effectiveness.
It was definitely a bad match up for the Ork player. Had he fielded horde Shoota Boyz, the outcome might have been different.
Dozer Blades wrote:At first I was thinking the annihilation barges would give you problems - I forgot about your Broadsides.
Game 4 was a tough match. Land raiders are a tough nut to crack now and Dark Angels can really tweak them with the PFG, Techmarines and the Deathwing upgrade. Techmarines being an IC for Dark Angels is just another bonus since they can attach to another unit embarked inside the land raider. His dice were smoking hot for his saves... Not really anything you can do about that and your army has lots of fire power to spare. If his dice had been more normal I think you would have probably won.
Yeah, not much I can do against hot invulnerable saves. He was rolling pretty well for his Darktalon.
If only Azrael failed a single 4++ against my Warboss, this game would resulted in a draw.
This message was edited 1 time. Last update was at 2013/03/29 21:33:26
Introduction (skip if you are only interested in the battle report)
Spoiler:
News of Shas'el Tealk's exploits from his expeditions in Ultima Sementum and the Damocles Gulf became popular in Tau media. Much of it was notoriety for the Tau commander's alliance with Warboss Badgaz and his Orks Freebooterz. Despite the Tau's philosophy of welcoming foreign races into the Tau empire, its native population and other minority races loathe the green skins.
Along the eastern fringe, the Tau Empire is currently embattled in a war of attrition against Ork Warlord Grog Ironteef, who had so far outmaneuvered ex-Commander Farsight and conquered three sept world. The Orks terrorize Tau colonies and constantly disrupt trade and transportation.
Beyond the Tau populace, many within the Tau high command view Shas'el Tealk as a valuable asset. His successful expeditions had brought back a treasure trove of advance Imperial relics and technologies. Even now, the Earth Caste engineers busy themselves with unlocking captured relic secrets. However, a small faction in the high command view Tealk as a threat to the Greater Good. For a Shas'el to work alongside with Orks is utter blasphemy. In secret, they plot Shas'el Tealk and his ally demise.
.....
Shas'el Tealk beams with delight. He felt he had redeemed himself. Under the veil of secrecy, the famed Shas'O Or'es'Ka had given Tealk an important mission. Tealk was ordered to seek out and destroy Warboss Goldenteef, second Ork commander within Ork Empire of Alsanta and Grog Ironteef's right hand Ork. "At last," thought, Shas'el Tealk, "High command have overlooked my previous mistakes and recognize my true achievements."
On his way to the bridge, he passes Shas'vre Cruz. The seasoned Fire Warrior is veteran among the Shadow Cadre. Recognizing his achievements, Shas'el Tealk bestowed him the honorific "Vre" title meaning hero and promoted Cruz to be his personal body guard.
Cruz respectfully bows before the Tealk.
"At ease," instructs the Shas'el, "No need to be formal around me."
Cruz relaxes a bit. "Sorry sir," he reply, "first day on the job."
Tealk laughs. "You'll get used it," he said.
He beckons Cruz to follow him as he enters the Manta's bridge. Kor'el Sora looks up from his command HUD and nods his head, greeting Tealk.
"Status report," order Tealk.
Sora tap and swipe his screen, bringing up two images. One displays two Lar'shi'vre Class Cruisers and the other displays a dry planet. "Your mysterious benefactor has dispatched two Protectors to aid in our mission. You must have friends in high places," Sora remark in a sarcastic tone.
Tealk gaze in awe at the two massive Protectors. Each possessed a formidable array of weapons and contained hangers big enough to fit two squadrons of Mantas. He turns his attention to the image of the planet. "What you tell me about our target," he asks Sora.
In response, the image zooms in on the planet revealing its topography. A flag marking the target's location and two arrows appears over the planet's image.
"The other cadre commanders aboard the two Protectors wants the Shadow Cadre and Warboss Badgaz's forces to lands here and bait Goldenteef into this ridge," said Sora, highlighting the lower arrow near the target's location. He then highlights the other arrow above the target. "Once you've confirm our Warboss Goldenteef is present, the other two cadres will deploy their forces behind the enemy Orks and together we'll decimate them in pincer move."
Tealk nods his head in approval. "It's bold and risky, just the way I like it. Tell the two other commander that I approve of their plan."
Sora shook his head in disbelief. "Shas'el, have a bad feeling about this plan. It's too risky and there's no margin for error," he said with a worried look on his face.
Tealk laugh out loud. "Kor'el, you are over thinking it. I full confidence that the two cadre commanders won't let me down. What's the worst that can happen?"
..........
Here's what you've all been waiting for folks, Game 7! This will be my last match of Bay Area Open GT 2013.
My last match will be against mechanized Orks.
Army List
Orks Warboss, Mega Armour (comes with TL-shoota and Power Klaw), Attack Squig, Bosspole, Cybork Body
6x Nobz, warbikes, 2x big choppa, 2x power klaw, 1x bosspole, 1x Waaagh! Banner, Painboy, 6x cybork body
30x Ork Boyz, Shootas
30x Ork Boyz, Shootas
Fortification: Imperial Bastion, Quad-gun
Scenario 7
Mission: Emperor’s Will (4pts)
Crusade (3pts)
First Blood (1pt)
Linebreaker (1pt)
Slay the Warlord (1pt)
There are always 3 Crusade Objectives placed outside of either player’s deployment zone. Emperor’s Will objectives are placed in each player’s own deployment zone.
Deployment: Dawn of War Deployment
Warlord Traits, Psychic Powers, Objectives
Spoiler:
My opponent and I roll for Warlord Traits. My Shas'el gets Master of the Vanguard, allowing him and friendly units within 12" roll 2D6 and pick the highest die for their run move.
My opponent's Warboss gets Conqueror of Cities, giving his units move through cover and +1 cover save inside ruins.
Next we roll off for deployment zones and objectives. I win the roll off and place my Bastion in the far left corner. I place my Emperor's Will objective near my Bastion and the 2 Crusade objectives 12", forming a triangle.
My opponent places his Emperor's Will objective in the top left corner inside ruins. He places his Crusade objective to the right, far away from my Crusade objectives.
Pre-game Thoughts:
Yikes! Have you seen the table? Of all the 40k games I've played to date, that's the largest TLOS blocking terrain I've ever seen! Absolutely terrible for shooty armies.
Having won the roll off for deployment zone and placing more Crusade objectives, I've decided to place everything on the far left side of the board. There's plenty of terrain to give my Tau units cover and there's a large crater, which will give my Shoota Boyz cover.
My opponent brought a strong mechanized Ork army. It contains a whopping 5 scoring units, one of which is Meganobz! It also contains a ridiculous amounts of dakka. For those who don't know, a Boomgun is a 25" Str8 AP3 Ordnance Large Blast and a Killakannon is a 24" Str7 AP3 Ordnance 1, Large Blast. My opponent has two heavy support Battle Wagons both equipped with Killakannons and two squads of Lootas. All of which is great against Nobz Bikers and horde.
Fortunately my army possess 6 Broadsides with multiplet Target Locks. I could have my Broadsides shoot at 6 different targets. Unfortunately with 6th ed rules, it's easy for vehicles to get cover saves. There's also a lot of ruins on this table and on top of that, my opponent's Warlord trait grants his units move through cover and stealth in ruins. AV14 with a 3+ cover saves anyone?
This is going to be a tough match.
Deployment
Spoiler:
I win the roll off to deploy first.
I place my Shoota Boyz at ground level behind two ruins. Fire Warriors sits on the second floor. Nobz Bikers screen from the front.
Broadsides and Shas'el setup camp on top of the Bastion. 6-man Fire Warriors sits inside and mans the Heavy Bolters.
Second Broadside units positions themselves inside Ruins on the opposite table corner. With this setup, my Railguns have good board coverage.
My opponent deploys his forces on the opposite side of the table.
Two Trukks on the far right both contains Shoota Boyz. One of them has a Nob with a Power Klaw.
Warboss joins Meganobs inside the Battle Wagon with the Deffrolla.
Both squads of Lootas goes inside the two heavy support Battle Wagons.
The left most Trukk inside the ruins contains Shoota Boyz.
Over in the middle, the Trukk on right contains Slugga + Choppa Boyz.
It's hard to see, there's a Looted Wagon hiding inside the ruin.
My opponent fails to seize the initiative and away we go!
Turn 1:Tau-Orks
Spoiler:
It's time to go aggressive!
Orks advance. Tau stays put.
To save time, I run both Shoota Boyz. Blue Shoota Boyz runs a mere 2" and Black Shoota Boyz takes a single step 1" forward.
Broadsides splits fire. One Railgun glances the Meganobz's Battle Wagon while the other two penetrate the Loota Battle Wagon and Trukk.
My opponent proceeds to fail all his 3+ cover saves. Penetrated Battle Wagon becomes immobilize, but grot riggers save the day!
Ork Trukk goes boom, giving me First Blood. 5 Ork Boyz perish in the explosion. Adding insult to injury, they fail their pinning test and go to ground. Fire Warriors pick off a single pinned Ork.
My right Broadsides fires 2 Railguns into the middle Trukk and 1 Railgun into the rear of Battle Wagon. 2 Railguns fail to hit. 1 Railgun penetrate. Ork players rolls on the Ramshackle table and gets "Kerrunch!" Slugga + Choppa Boyz bails out.
Here my opponent and I got into a little argument. I had to reference the rule book that Orks who've gone to ground can still take a pinning test.
Pinned Shoota Boyz fail their moral test and runs off the table.
Victory Points (Tau-Orks vs Orks): 1 - 0
Turn 1:Orks
Spoiler:
By now my opponent is demoralize. Two of his Trukks are gone and one of his Ork Boyz unit ran off the table.
He decides to tank shock my Nobz with its Deffrolla. We didn't discuss what this particular terrain piece is, so I let him do it. My opponent ask if I want to stand and shoot. Pfft, against front AV14 and taking 2D6 Str10 instead of 1D6? Heck no! My Warboss passes his moral test. On a D6, the Battlewagon roll a 1 and wounds. My lead Nob makes his armor save.
Both Trukks on the right speed over to a single Crusade objective.
Looted Wagon and Warbuggies goes out into the open. Battle Wagons shuffles around.
Both Trukks on the right move flat out.
During the shooting phase, my opponent's Deffrolla Battle Wagon moves flat out.
Upon writing this battle report and checking the rules, I've discovered a Tank cannot move Flat Out in the same turn it Tank Shock.
I didn't know this at the time and let him do it.
Looted Wagon lands a large Str8 AP3 large blast on my Shas'el and Broadsides.
1 Broadsides fails his armor save and goes splat.
Combined shooting from Lootas and Killakannon kills 3 Nobz including the Painboy. Big Choppa Nob carrying the bosspole receives a wound.
Victory Points (Tau-Orks vs Orks): 1 - 0
Turn 2:Tau-Orks
Spoiler:
My Nobz Bikers have suffered casualties, but that's to be expected. My opponent is pushing on both flanks. I plan to deliver a one-two punch with my Broadsides blowing up the Battlewagon followed by my Nobz Bikers assaulting its bailed out passengers.
Black Shoota Boyz huddle around the Ruin.
Blue Shoota Boyz and Nobz Bikers prepare to engage the Battlewagon.
My Broadsides utterly fails to hit or penetrate the Battlewagon's front armor.
12-man Fire Warriors pick off 4 Ork Boyz.
Fire Warriors inside Bastion wrecks the Warbuggies.
Shas'el's Quad-gun blows up the Looted Wagon.
Second Broadsides split fire on the closest vehicles. Despite the Trukks being right in front of them, second Broadside unit fails to hit the first Trukk. The Trukk behind makes all its cover saves.
Black Shoota Boyz shoota the second Trukk and wrecks it.
Drats, the Battlewagon is still standing. Time to do it the hard way. Blue Shoota Boyz declares a charge on the Battlewagon. Warboss and Meganobz inside overwatch and kills 2 Blue Boyz.
Blue Shoota Boyz fails to make it in assault.
Nobz Bikers makes it and blows up the Battle Wagon.
Victory Points (Tau-Orks vs Orks): 4 - 0
Turn 2:Orks
Spoiler:
Mega Warboss splits away from the Meganobz and goes after my Bastion.
Ork Trukk drives forward and disembarks a squad of Shoota Boyz.
Lootas and one of the Killakannons continues wreaking havoc on my Nobz Bikers. 2 more Nobz perish under a hail of deffguns.
Second Killakannon and Meganobz guns down 8 Blue Shoota Boyz.
Combined shooting from 2 enemy Shoota Boyz units kill 12 Black Shoota Boyz.
Top Shoota Boyz attempts to charge my Black Shoota Boyz. Black Shoota Boyz overwatch and kills 2 enemy Shoota Boyz. Top Shoota Boyz rolls and 8 for their change distance.
I measure and discover they are 8.5 inches away and do not make it in. My opponent argues that I'm looking at the wrong angle, but I tell him I'm looking top down. My opponent measures the distance himself not looking top down and insist from his perspective they make it. We argue for 5 minutes. I notice fellow Dakkalite Janthkin wasn't busy and ask him to judge as a third neutral party. He verifies that my opponent's Shoota Boyz is indeed 8.5 inches away and do not make the charge.
Mega Warboss assaults my Bastion.
Meganobz assault my Blue Shoota Boyz.
Meganobz hacks and slashes 8 Blue Shoota Boyz to pieces while taking no wounds in return.
Fortunately there's 12 Blue Boyz left meaning they are still fearless.
Mega Warboss succeeds in destroys the Bastion. He causes total collapse. 5 Fire Warriors perish and 1 Broadside receives a wound from and impact hit.
End of assault phase, lone Fire Warrior has had enough of the grim dark universe and flees off the table.
Victory Points (Tau-Orks vs Orks): 1 - 3
Turn 3:Tau-Orks
Spoiler:
Yikes! Those Meganobz are vicious. If something isn't done, they'll decimate my Shoota Boyz and potentially wipe out my stronghold.
Fire Warriors secures my Emperor's Will objective.
Shas'el hides behind the Bastion.
My Warboss splits away from Nobz biker and gets ready to lend his support to the Blue Shoota Boyz.
Lone Nob Biker chases after the Slugga + Choppa Boyz.
Black Shoota Boyz shuffles around inside their ruin.
Lone Nob picks off a Slugga + Choppa boy.
Black Shoota Boyz guns down 5 enemy Shoota Boyz from the lower squad.
Broadsides on the right fires their Smart Missile System and kills 2 Shoota Boyz from the top squad.
Left Broadsides shoots point blank the enemy Mega Warboss and instantly kills him. I get Slay the Warlord!
Shoota Boyz fails their moral test and falls back.
Lone Nob declare a charge and makes it into assault. Slugga + Choppa Boyz strikes first and kills the Biker Nob. They consolidate towards their Emperor's Will objective.
Warboss assault the Mega Nobz.
My Warboss slays 3 Nobz while the Blue Shoota Boyz manages to kill a 4th. Meganobz beats down the Warboss and clobbers 4 Blue Shoota Boyz to death.
Tallying up the wounds, Blue Shoota Boyz + Warboss dealt a total of 8 wounds while the Meganobz dealt a total of 7 wounds. Blue Shoota Boyz wins combat and wipes out the remaining 2 Meganobz in seeping advance!
Blue Boyz consolidates and secures left Crusade objective.
Victory Points (Tau-Orks vs Orks): 5 - 0
Turn 3:Orks
Spoiler:
Last remaining Trukk parks on top middle Crusade objective.
Shoota Boyz regroup. Both units secures the Crusade objective.
Slugga + Choppa Boyz secures the other Emperor's Will objective.
Combined shooting from Killakannon and Lootas whittles away 3 Blue Shoota Boyz.
Oh no! Blue Shoota Boyz fails their moral test and falls back.
Victory Points (Tau-Orks vs Orks): 2 - 7
Turn 4:Tau-Orks
Spoiler:
By now I have First Blood and Slay the Warlord while my opponent has Primary and Secondary. I'm down by 5 points. If my Shoota Boyz rally, I'll need to roll a high run move to have them secure my objective. Wining secondary is going to be tough. There's two enemy scoring units guarding the far right Crusade objective.
This turn, I declare Waaagh!
Blue Shoota Boyz regroup and consolidates 3".
Fire Warriors hustle towards the left Crusade objective.
Black Shoota Boyz prepares to assault the Trukk guarding the middle Crusade Objective.
Both my Fire Warriors and Blue Shoota Boyz manages to roll high for their run move. and secures left Crusade Objective and Emperor's Will Objective.
By now, there's 20 minutes left and plenty of time to squeeze in another turn. I'm currently winning 2 - 0 thanks to Slay the Warlord and First Blood. Both sides control an Emperor's Will objective, so primary is a draw. My Fire Warriors and my opponent's Shoota Boyz each control a Crusade objective, so secondary is a draw. My Black Shoota Boyz is about to assault the Trukk and should easily wreck it, claiming middle Crusade objective. Even if they don't wreck the Trukk, vehicles can't contest and they'll be within 3" of the objective. My Fire Warriors might take casualties bottom for turn 4, but they should be able to capture and hold the left Crusade objective top and bottom of turn 5. There's also a a good chance my Broadsides can finally silence those pesky Battlewagons and inflict casualties on the Lootas inside. Overall, I envision winning 5 - 0 after the bottom of turn 5.
Right before I shoot my Broadsides and next declare my assault, my opponent request we end the game. He realize either way I'll win this game and didn't want to end up with 0 Battle Points. He wanted to make a deal. I take Primary, First Blood, and Slay the Warlord while he takes Secondary. By now I was really tired. Playing against my opponent drained all the energy out of me. From the top of turn 1, my opponent had been pessimistic. Throughout the game, we got into a few arguments regarding rules. There were a lot of look ups in the BRB. I welcomed the thought of ending this tiresome match, so I accepted the deal.
Tau-Orks win 6 - 3!
Turn 4:Orks
Spoiler:
Game ended on top of turn 4.
Post-game Thoughts:
Spoiler:
Game wise, it was a well fought match. Turn 1, I'm on top with first blood with one of my opponent's scoring units having fled off the table. Bottom of turn 2, my opponent makes a comeback. His Lootas and Killakannon decimates my Nobz Bikers, leaving only the Warboss and single Nob still standing. Only 12 Blue Shoota Boyz live after taking a beating from the Mega Nobz and my opponent's 2 Shoota Boyz units on the far right could potentially wipe out my Black Shoota Boyz. Top of 3, I strike back by killing the Warboss and the Meganobz, saving my Blue Shoota Boyz from annihilation. Black Shoota Boyz also do well damaging an enemy Shoota Boyz squad, who fail their moral test and fall back. Bottom of turn 3, my opponent secures both his Emperor's Will objective, far right Crusade objective, and force my Blue Shoota Boyz to flee from left Crusade objective. My opponent is winning 2 - 7. Top of turn 4, I rally my falling back Boyz. Thanks to some "Waaagh!", I roll high for my moves and secure my own Emperor's Will objective, secure left Crusade objective using Fire Warrior. I'm in good position to capture middle Crusade objective by assaulting my Black Shoota Boyz against the last Ork Trukk. In the end, it really came down to the wire.
While it was a good match, the game itself was less enjoyable. My opponent got really irritated top of turn 1 after losing 2 Trukks and a unit of Boyz. From there on he was pessimistic and very expressive when I rolls well or he rolls poorly. I got bothered by his negative attitude and the easy going gamer inside of me switch to serious mode. My opponent and I got into a few argument. The biggest one was when his Shoota Boyz failed to charge my Black Shoota Boyz by half an inch. Thankfully Janthkin was around to settle that argument. There were a lot of look ups in the BRB. Playing against my opponent drained all the energy out of me. When he offered the deal to end the game sooner, I accepted.
In summary, this was a good match, but my least enjoyable game. All things considered, I came out top winning game 7, which puts me at a total for 5 wins and 2 losses.
Stay tune for Bay Area Open 2013 summary and final results!
Epilogue (skip if you don't care for narrative)
Spoiler:
.....
The mission went like clockwork. Shas'el Tealk and Warboss Badgaz makes planetfall under the cover of darkness. At the crack of dawn, the Shadow Cadre and Orks ally launch an all out attack on Warboss Goldenteef's forces.
Sounds of battle rings across the battlefield as Orks fought against Orks. All the while Tau Broadsides and Fire Warriors exchange gun fire with Goldenteef's cannons.
Perch on top of a Bastion, Shas'el Tealk spots Warboss Goldenteef through his Crisis Suit's viewfinder. He open communication to Kor'el Sora, who was in orbit and overseeing the battle aboard the Manta.
"Target confirmed, send word two the other two cadre commanders for rapid insertion," commands Tealk.
"Affirmative," replies Sora.
Through live video feed, Tealk hears shouting. Suddenly the screen shakes followed by flashes and sounds of explosions. Sora reappears on Tealk's screen. He appears both confused and angry.
"Shas'el," shouts Sora, "There's been a mutiny. The two Protectors have turned their guns on our Manta and Warboss Badgaz's Kroozer. They've also dispatch drop ships to your current location. If my instinct is correct, their real target is you and Warboss Badgaz!"
Shas'el Tealk curses in frustration. His mind flashes back to when Shas'O Or'es'Ka secretly issued this mission and later when Sora voice his concerns about the two cadre commanders aboard the Protectors using the Shadow Cadre as bait. Tealk had been too absorbed in his fame to realize he was falling into a trap, and now it was too late.
A loud "WAAAGH!" brings Tealk back to reality. Tealk hesitates. That Orks battle cry didn't sound like it came from Warboss Badgaz. Tealk pilots his Crisis Suits and looks over the battlement's edge. He spots spots Warboss Goldenteef, wearing massive armour, closing in on the base of Tealk's Bastion.
"Aww frakk," thoughts Tealk. He orders his gunners to engage, but it was too late.
Goldenteef swings his enormous Power Klaw like a wrecking ball, blowing away concrete and support from the Bastion. The structure collapse, sending Tealk and his Broadside bodyguards tumbling to the ground.
Tealk activate his Crisis Suit's thrusters and safely touches down. His two Broadside bodyguard lands in a tangled mess, but otherwise both still alive. The Shas'el focus his attention on the enemy Warboss. To his surprise, Warboss Goldenteef was oblivious to Tealk's presence and continues pounding away into the collapse Bastion.
Tealk quietly brings up his command HUD and instructs his two Broadside bodyguards to attack the distracted Warboss.
One of the Broadsides piloted by Shas'vre Cruz turns and target locks Goldenteef. A soft hum fills the air as the Broadside's long conductive barrels increases polarity. The humming noise grows louder and louder, and finally catches the Ork's attention. Goldenteef looks back in bewilderment. At that same moment, Cruz presses the trigger.
A loud crack snaps the air as a hypersonic projectile flies out faster than the speed of sound. It blows clean through the Warboss' Mega Armour. Goldenteef's head explodes, sending blood and gore flying everywhere.
This message was edited 4 times. Last update was at 2013/03/31 09:58:21
Seeing the amount of trucks your opponent was bringing I expected to see a lot of burning hunks of metal by the second turn until I saw just how much cover he might be getting. Can’t wait to see how this one plays out.
BAO 2015 : Best Space Wolves.
The best battle plans are the simplest. Just run forward and punch your enemy in the face.
2013/03/30 07:40:48
Subject: 1750pts SabrX's Tau-Orks at Bay Area Open GT 2013 (Game 7 Pre-game Thoughts)
tbh, your necron opponent was a cheat, Immothek can't seize when orks are there, as it is an old book primary or not doesnt matter, secondly he can't reroll the seize, as the chronometron only allows rerolls in every phase of a turn, seizing is preturn.
You have ruled this galaxy for ten thousand years
Yet have little of account to show for your efforts
Order. Unity. Obedience.
We taught the galaxy these things
And we shall do so again.
4500 pts
2013/03/30 08:57:12
Subject: Re:1750pts SabrX's Tau-Orks at Bay Area Open GT 2013 (Game 7 Pre-game Thoughts)
Dozer Blades wrote:I think you have proved the viability of Torks. Exalt bro. : )
Thanks bro.
Forterix wrote:Love your battle reports and thoroughly enjoyed reading about your tournament games.
Thanks!
Game 7 will be completed soon.
Panzer1944 wrote:Seeing the amount of trucks your opponent was bringing I expected to see a lot of burning hunks of metal by the second turn until I saw just how much cover he might be getting. Can’t wait to see how this one plays out.
Aside from Game 3, game 7 will be one of my toughest match ups. I may have more Boyz than him, but he has plenty of anti-horde shooting.
Overall, my opponent for game 7 has solid list. I can see why it went 4 - 2 in the previous 6 games.
Valek wrote:tbh, your necron opponent was a cheat, Immothek can't seize when orks are there, as it is an old book primary or not doesnt matter, secondly he can't reroll the seize, as the chronometron only allows rerolls in every phase of a turn, seizing is preturn.
My memory regarding that is fuzzy, but I know he had Chronometron for reason. Perhaps re-rolls for night fighting?
Either way, it doesn't matter because he fails to seize.
idd, reroll nightfight and if you don't need it a reroll on the lightning or the number of hits etc...
You have ruled this galaxy for ten thousand years
Yet have little of account to show for your efforts
Order. Unity. Obedience.
We taught the galaxy these things
And we shall do so again.
4500 pts
2013/03/30 13:18:35
Subject: 1750pts SabrX's Tau-Orks at Bay Area Open GT 2013 (Game 7 Pre-game Thoughts)
Your game #6 highlights the advantages of a more aggressive army as opposed to a gunline one. You had a slight advantage in objectives-based scenarios, especially with the Relic, because you were pressing forwards and your opponent was just sitting there waiting. That is one of the reasons why I prefer to play more aggressive armies nowadays. Although 6E is primarily a shooty codex, GW has managed to somewhat balance it out with more objectives-based missions that favor the more aggressive.
BTW, your broadsides did a nice job shutting down his AB's and those scarabs really performed admirably. Lol.
jy2 wrote:Your game #6 highlights the advantages of a more aggressive army as opposed to a gunline one. You had a slight advantage in objectives-based scenarios, especially with the Relic, because you were pressing forwards and your opponent was just sitting there waiting. That is one of the reasons why I prefer to play more aggressive armies nowadays. Although 6E is primarily a shooty codex, GW has managed to somewhat balance it out with more objectives-based missions that favor the more aggressive.
An aggressive moving gunline army is also strong. I really like BAO missions. Having objectives placed in no man's land forces static gunline armies to play aggressive.
BTW, your broadsides did a nice job shutting down his AB's and those scarabs really performed admirably. Lol.
It's like a nasty termite infestation. Those pesky Scarabs destroyed my Bastion!
Charles Rampant wrote:I'm really enjoying your battle reports here. Thanks for the writeups!
Thanks!
Stay tuned for Tournament Summary, List Assessment, and Final Results!
This message was edited 1 time. Last update was at 2013/03/31 09:18:39
I've really enjoyed your BAO coverage (and jy2's). I've thought of adding some Tau allies into my Orks and you've given me some food for thought. I like your use of the bastion with the Broadsides.
I'm looking forward to checking out the new Tau codex, see how they might aid my Waaagh!
Did the BAO have an FAQ change to regrouping? Because in game 7 you rallied your blue shoota boyz onto an objective. After regrouping you can only move 3" and can't move again, including running or assaulting. (p31 BRB) Had the game continued to turn 5 it wouldn't have mattered, as you'd have moved onto it that turn.
Congratulations on your 5-2 record
2013/03/31 14:44:12
Subject: Re:1750pts SabrX's Tau-Orks at Bay Area Open GT 2013 (Game 7 Complete, will post final result later)
Tau brings an element to the Ork army that they are really lacking....and that is some very good AT firepower. This was another bad matchup for your opponent, especially with you going first. Crushing his transports early really set the tone for the game. It would have been much worse if you guys were playing VP's.
Congrats on your excellent finish. I won't spoil it for the readers, but let's just say it was a photo-finish for the Best Tau player with only a separation of 1 measley Battle Point! Very well done, Tim.
This message was edited 1 time. Last update was at 2013/03/31 14:44:45
Tournament Summary, List Assessment, and Final Results
Before I start, I would like to thank all of you who've been keeping track of my stories and battle reports. I would also like to thank fellow Dakkalites Jy2 and Ministry for accompanying me along this trip. It's great to attend a tournament with a group of friends. Thanks a lot guys!
Jy2 won 9th place with his Tyranids. You can read his battle report here:
This was the first major tournament in the U.S. to allow Forge World models. I had originally built my list to counter flyers such as Blood Angel/Grey Knights Storm Ravens, Imperial Guard Vendettas, Necron Night Scythes, and Chaos Space Marine Helldrake. There were quite of few of those at this tournament and a surprising number of IG mechanized armies. My Broadsides and Quad-gun would have been perfect in those match ups. Unfortunately, I didn't face a single Forge World model and the only flyers I came across in my games was the a single Dark Eldar Voidraven Bomber in game 1 and a single Darktalon in game 4. I did face 5th ed Fateweaver in game 3, but it's a lot harder for a Railgun to get through re-rollable 3++ compared to a vehicle flyer.
Game 1
I play against Eldar with Dark Elder detachment. My opponent deployed first. I stole the initiative, catching his army out in the open. Top of turn 1, I disabled most of his transports and took out a good chunk of his Guardian Jetbikes. Top of turn 2, I take out his Vypers and a unit of Kabalite warriors. Bottom of turn 2, my Quad-gun intercepts and shoots down his Voidraven Bomber. At that point, my opponent conceded, giving me 10 - 0 in record time.
Game 2
My army is pitted against Slaaneshi themed Chaos Space Marine list, which uses Sisters of Battle models as proxies. Despite my opponent's army having a small model count, it was well equipped to handle my Shoota Boyz. Early on, I took out enemy Chaos Lord and Raptors. My opponent strikes back by almost killing a whole squad of Shoota Boyz, who turn tail and eventually fled off the table. My Nobz Bikers proceeded to wipe out 2 Noise Marine squads and finally met their end against the third. My opponent's reserve came in. Despite taking heavy losses, a single Chaos Sorcerer and Chaos Spawn single handily killed a unit of 12 Fire Warriors and wipes out a whole squad of Shoota Boyz. At the end of the game, my opponent only had 3 Noise Marines still alive winning primary. I scored secondary, Slay the Warlord, and First Blood. I win second game 5 - 4.
Game 3
I go up against a really strong Chaos Daemons list using 5th ed codex. It featured Fateweaver with 27 Flamers, 14 Screamers, and 28 Plague Bearers. My Broadsides are utterly useless against 5th ed Daemons, who all possess Eternal Warrior. Flamers and Screamers decimated my ground forces and my Nobz Bikers were tied in assault the entire game by a unit of Flamers. At the end of the game, only my Shas'el, 6 Fire Warriors, and Bastion remains out of my entire army. Despite losing 2 - 8, I scored a moral victory with my Fire Warriors killing Fate Weaver in assault.
Game 4
I face off against the new 6th ed Dark Angels. My opponent fielded Ravenwing army that centers around Banner of Devastation and Power Field Generator. I make terrible mistake in this game by letting my opponent go first. Turn 1, inflicts heavy casualties on my Nobz Biker unit. Only the Warboss and Painboy survives. I strike back taking out 2 Ravenwing units and Black Knights. Despite my list containing a whopping 6 Railguns, my opponent somehow keeps making every single 4++ save for his single Crusader. That Power Field Generator paid back big time! Azrael also somehow keeps making his 4++ saves and kills my Warboss. In the end, my opponent and I end up killing each others' scoring units. Also for the very first time, my Shas'el dies, giving my opponent Slay the Warlord. Thanks to that plus Linebreaker, My opponent narrowly wins and beats me 1 - 2.
Game 5
I get matched up against hybrid Orks. My opponent's list contains mechanized Trukk Boyz, but only a single horde element. I start off well, blowing up or immobilize all my opponent's Trukks top of turn 1. My opponent is extremely inexperienced with 6th edition and takes a long time during his movement, shooting, and assault phases. Despite each game being allocated 2 hours and 15 minutes, we only reach turn 2. I end up winning 10 - 0.
Game 6
I face off against gunline Necrons. Early on, I play aggressive by charging my Nobz Bikers into the Necron Warrior squad containing Imotekh. My Warboss issues a challenge and kills Imotekh in close combat, giving me Slay the Warlord. Bottom of turn 2, they die after getting assaulted by a unit of Wraiths lead by a Destroyer Lord. By then, my Shoota Boyz were in prime position to secure the Relic. In the last couple of turns, my opponent finally goes on the offense, but it's too late. Shoota Boyz shoots Wraiths to death and later kills the Destoyer Lord. My Broadsides kill off all the Annihilation Barges, giving me primary for Big Guns Never Tire. In the end, I win 9 - 0.
Game 7
I go up against mechanized Orks. My opponent's army is completely mechanized and packs a lot of fire power. It features 3 Battle Wagons, Meganobz, and multiple squads of Trukk Boyz. There's also a plethora of ruins on the table. To top it all, my opponent's Warlord Trait is Conquerer of Cities, granting all his units stealth in ruins. He has terrain advantage and possess the right tools to take out my Shoota Boyz and Nobz Bikers. I on the other hand possess 6 Railguns, which is perfect against multiple vehicles. Top of turn 1, my Broadsides blows up 2 Trukks and sends one of my opponent's Shoota Boyz squad running off the table. My opponent makes a comeback by decimating my Nobz Bikers in the shooting phase, leaving only a Warboss and single Nob still standing. He's also assaults his Meganobz into my Shoota Boyz and almost reduces them below mob rule. Two of his Shoota Boyz adds pressure to my right flank by inflicting heavy casualties on my Black Shoota Boyz. Top of turn 3, I strike back after a successful made by my Warboss. My Warboss dies, but he helps my Blue Shoota Boyz win combat and wipe out the Meganobz in assault. My Black Shoota Boyz also does a splendid job shooting one of my opponent's Shoota Boyz and forcing them to fall back from failed moral test. However, I grow weary of my opponent's negative attitude. My opponent realize there's nothing he can stop me from winning the game. He doesn't want to walk away from this game empty handed and decides to offers me a deal. I'm tired of playing this opponent, so I accept. I win 6 - 4.
Army List Assessment
Overall, I'm pleased with our my Tau-Orks army list performed. I find the two codices compliments each other well. Tau possess a lot of fire power and is strong in the shooting phase. Orks on the other hand is mediocre when it comes to shooting. They provide strong assault element through hordes of Shoota Boyz and mobile Power Klaws. Very few armies can inflict Str10 hits in shooting and assault phase, but my Tau-Orks can.
Shas'el: A
Tau being the primary detachment makes the Shas'el by default my army's Warlord. His primary job is to survive and prevent my opponent from getting Slay the Warlord. My Shas'el did just that. He outlasted my opponents' Warlords in 6 out of 7 games. He also did a superb job providing long range fire support thanks to manning the Quad-gun combined with his Missile Pod. For that, he deserves a solid A in my book.
Fire Warriors: A
My Fire Warriors serve two roles. They are to provide anti-infantry fire support and act as cheap scoring units to hold home objectives. In majority of my games, they fulfill their role well. Their Pulse Rifles out-ranges most other scoring units, allowing them to hold objective while softening targets. They even gave me a moral victory by defeating Fate Weaver in assault. Fire Warriors also get a solid A in my book.
Broadsides: A+
My Broadsides played a critical role in all but game 3. In 6 out of 7 games, they helped me score First Blood. They also did a splendid job taking out vehicles (excluding that pesky Crusader) and they protected my Shas'el. They also have a psychological effect on my opponents. My opponent in game 1 conceded after losing too many vehicles. My opponents in game 5 and game 7 became demoralize after losing Trukks top of turn 1. My opponent in game 4 held back his Annihilation Barges for bulk of the game.
Warboss + Nobz Bikers: A+
The Warboss + Nobz Bikers. Normally, I would separate 2 units and grade them separately. However, the Warboss and Nobz Bikers goes hand in hand. Throughout the tournament, they acted like a single unit. They serve several roles including Assassin, fire magnets, disrupt enemy units through assault, psychological, and line breaker. The Warboss' main job is to assassinate enemy Warlords through challenges. He did just that by killing Chaos Lord in game 2 and Imotekh in game 6. Warboss + Nobz Bikers second role is to serve as firing magnets. In every single match, they were the first target my opponents shot at. They suffered heavy casualties and were completely wiped out in 5 out of 7 game. In that regard, they served that role admirably. Their third role is to disrupt enemy units through assault. In game 2, they went on a killing spree and took out 2 Noise Marine squads, Chaos Lord, and Raptors. In game 5, they took out a squad of Lootas and a unit of Ork Boyz. In game 6, they disrupted my opponent's gunline and took out Imotekh and a squad of Necron Warriors. In game 7, they took out a Battlewagon. I owe it to the Warboss for killing half the Meganobz squad, which ended in the Blue Shoota Boyz winning combat. Had it not been for that, I might have lost the game. The Warboss + Nobz Bikers also have a psychological effect on my opponents. It is a Deathstar after all, albeit a small one. A lot of times, my opponents had to react to their suicidal charges. The last role the Warobss + Nobz Bikers serve is . They are highly mobile and should help me secure line breaker. However, they were too busy fulfilling their first few roles and often didn't survive long enough to get me line breaker. In the 2 games that they didn't die, they did survive and got me Line Breaker. Overall, Warboss + Nobz Bikes earns exemplary A+.
Shoota Boyz: A-
Shoota Boyz serves many roles including scoring, horde, and taking out enemy units through volume of fire. In game 1, they help secure objectives and took out a unit of Kabalite Warriors. In game 2, they practically did nothing. One unit ran off the board. The other got massacred by a Chaos Sorcerer and single Chaos Swan. In game 3, they took out a unit of Flamers and give me First Blood. In game 4, they didn't do much except taking out a single unit of Bikes. In game 5, they killed an enemy Warboss and secured objectives. In game 6, they help bring me the Relic, gun down enemy Wraiths. In game 7, they performed admirably by surviving enemy shooting and assault and helping me secure objectives. Overall, I give my Shoota Boyz a A-. They didn't play a major role in a lot of my games, but they were necessary for helping me win games.
Bastion: B+
The Bastion serves 3 roles, which is protect friendly units inside or on top, help shoot down enemy flyers using the Quad-gun, and provide high elevation to Broadsides and Shas'el. My opponents rarely shot at my Shas'el and Broadside. In 3 out of 7 games, my opponents succeeded in destroying my Bastion. Each time, my 6-man Fire Warriors suffers heavy losses. In game 7, they ran off the table. In truth, a quarter of the time, the Bastion did its job protecting whatever was on top and inside of it. As for the second role, The Bastion's Quad-gun did shoot down a Dark Eldar Voidraven Bomber in game 1, but failed to do anything against the Darktalon. The Bastion did serve its last role well. It gave my Broadsides good field vision and TLOS. Bastion gets a B+.
MVP: Broadsides
This was a tough call to make. Both the Broadsides and the Warboss + Nobz Bikers tie for MVP. Both played key rolls in many of my games. They both inflicted heavy damage and did an excellent job helping me claim victory. However, the Broadsides helped me score Fire Blood in 6 out of 7 of my games and they had a much more psychical effect on opponent than the Warboss + Nobz Bikers. For that, they earn MVP.
Final Result
I won 5 games, lose 2, and draws 0. The scoring formula per a game is battle points + 1000 for wins, battle points + 500 for losses, and battle points + 0 for losses.
Game 1: 1010
Game 2: 1005
Game 3: 0
Game 4: 1
Game 5: 1010
Game 6: 1009
Game 7: 1006
In then end, I score a total of 5041 Battle Points. Out of 144 players that attended, I officially place 23rd in Battle Points.
Unfortunately, I didn't win best Tau player. That award goes to George Martinez who scored 5042 Battle Points and placed 20th. Drats, I'm 2 points short.
However, I made a startling discovery when I was writing Game 3 battle report. I discovered my 2 battle points weren't recorded in the 40k results posted by Reecius. I guess Frankie was too busy and forgot to enter in my score into the excel spread sheet. It was only after the tournament when Reecius posted the 40k results on his website that I discovered their mistake. That means technically I would have had 5043 points, placing me 20th in Battle Points and just above the current best Tau Player.
So technically, I'm the the best Tau player!
I messaged Reecius about my findings. Unfortunately, he won't change the scores or give me official "Best Tau Player" title. Making changes after the fact is unfair to everyone else. In the end, my predicament serves as feedback to help them improve their system for future major tournaments.
I do however have the right to claim the title "Unofficial Best Tau Player" of Bay Area Open GT 2013 and unofficially 20th place in Battle Points.
For the final 40k results of Bay Area Open GT 2013, check this link posted on FrontlineGaming's website:
With the death of Warboss Goldenteef, the opposing Ork forces looks for the next toughest and strongest bad-ass Ork to lead them. They didn't have to look far. Warboss Badgaz smashes Goldenteef's personal elite Meganobz and secures his seat as Warlord.
The two cadre commanders dispatched to assassinate Shas'el Tealk and Warboss Badgaz was shock to find a unified Tau-Orks force waiting for them. Shas'el Tealk and Warboss Badgaz routed the treasonous cadre commanders and sends Goldenteef's fleet of Kroozers to smash the two Protectors.
After a complete victory, Shas'el Tealk returns to Tau sept world. Tau High Command is impressed by Tealk's achievements and promoted him to Shas'O, giving him a full contingent of multiple cadres to command. Shas'O Tealk conducts a secret witch hunt, eradicating the secret faction that plotted his demise. Tau High Command found Tealk's actions disturbing, doing more harm than good. They demote him back to Shas'el with a single cadre under his command. Before he was demoted, Tealk had his Shadow Cadre looted experimental weaponry from a top secret lab named, "6thEdCodex".
Shas'vre Cruz and Kor'el Sora still follow Tealk to this day. Warboss Badga still joins Shas'el Tealk on expeditions from time to time. After completing successful expeditions, the two will often drink themselves under the table at their favorite pub, the Russ' Bar Tab.
And so our story ends with Shas'el Tealk and Warboss Badgaz living a merry life of drinking, fighting, drinking some more, and more fighting.
The End.
Or is it?
This message was edited 1 time. Last update was at 2013/03/31 16:39:58
Nice reports. Great hybrid army. A question if you dont mind, which is of course, do you think the army will change with the coming of the new tau book, being that rumors have broadsides at S8 AP1 instead of S10?
Hope more old fools come to their senses and start giving you their money instead of those Union Jack Blood suckers...


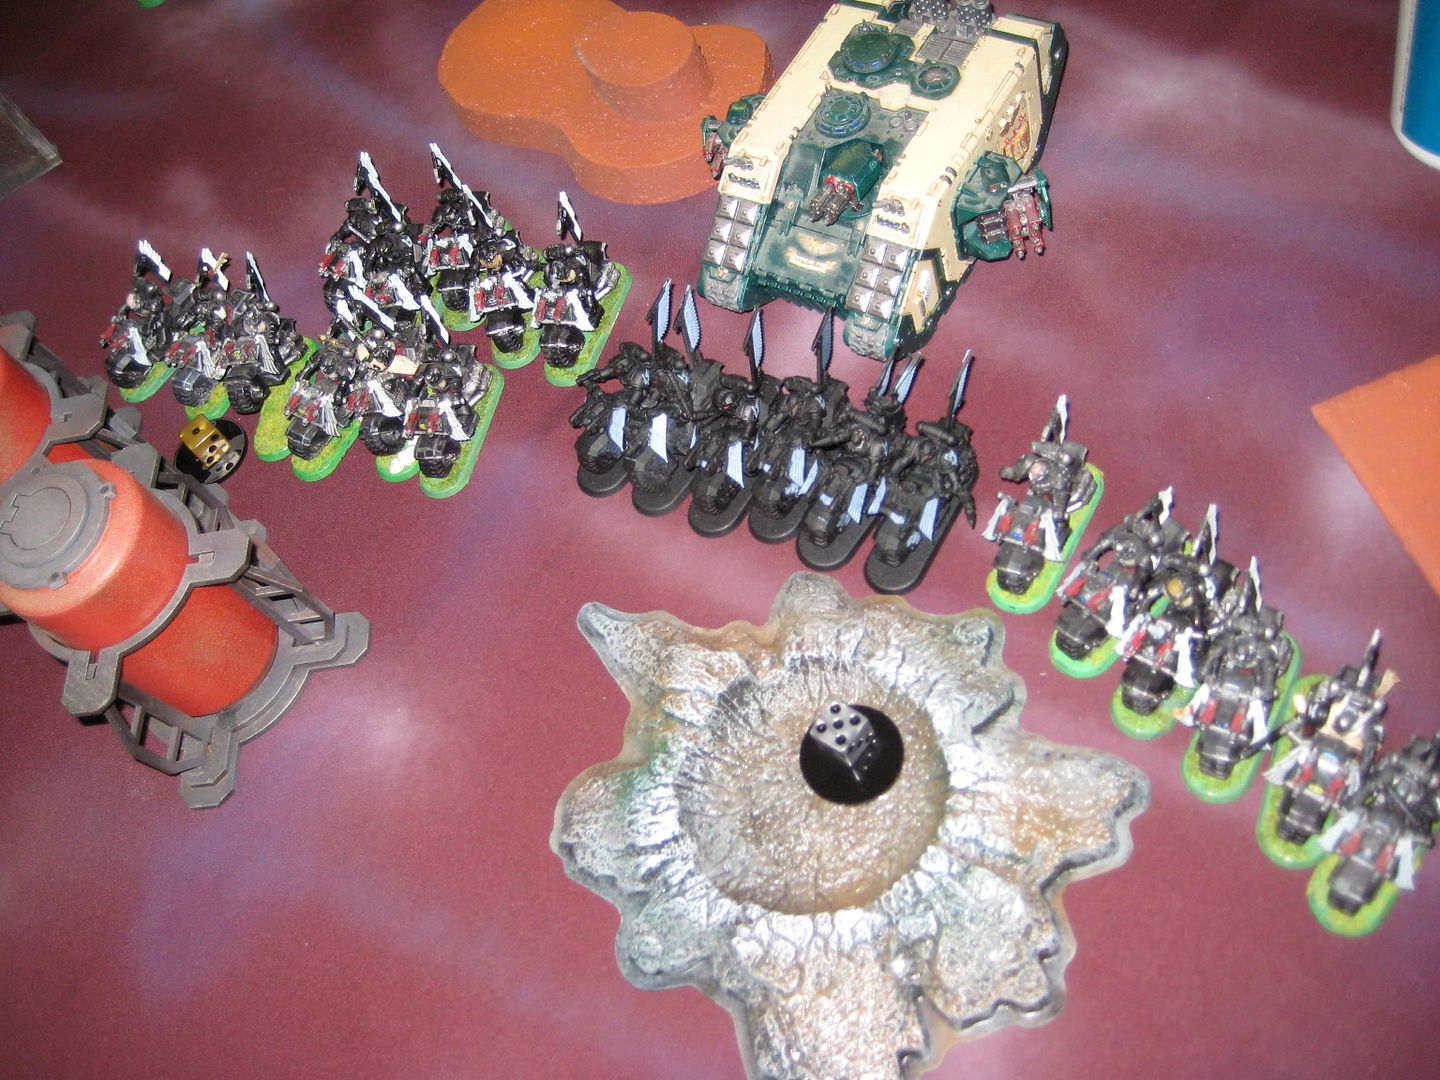


 6000+ pts NIDS
 (
( ) 2000 pts growing to 4000...
  or the lucsis pattern drop pod


 .....Bay Area Open GT 2013 - Best Tyranids
  .....LVO GT 2014 Team Tournament - Best Generals


 1300pts


 I end up winning 10 - 0.