Switch Theme:

Scratchbuilding Plasticard Quest(ions)!  [RSS] Share on facebook Share on Twitter Submit to Reddit
»
Author Message
Advert


Forum adverts like this one are shown to any user who is not logged in. Join us by filling out a tiny 3 field form and you will get your own, free, dakka user account which gives a good range of benefits to you:
  • No adverts like this in the forums anymore.
  • Times and dates in your local timezone.
  • Full tracking of what you have read so you can skip to your first unread post, easily see what has changed since you last logged in, and easily see what is new at a glance.
  • Email notifications for threads you want to watch closely.
  • Being a part of the oldest wargaming community on the net.
If you are already a member then feel free to login now.


Made in us
Fresh-Faced New User


Hi people! New to DakkaDakka, been in the hobby since 2000. I am just now getting into scratchbuildng tanks for my Imperial Guard Army, saw some of the projects on the forum and was floored by how precise the fitting on the pieces appeared. I am trying to scratch build some Leman Russ tanks and had some questions regarding plasticard thickness and technique.

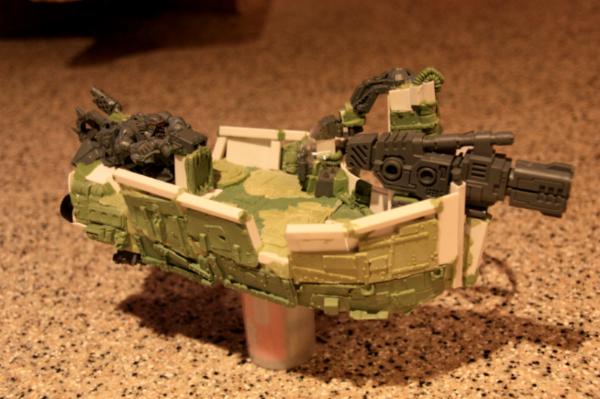
My first build was a looted drop pod for some orks with scratchbuilt trakks and a KillKannon turret.


The trakks were based off a chimera template I have and built up from there.


I would like to know what standard thickness is best for building a vehicle, specifically a Leman Russ, entirely out of plasticard. I have been using .08” card for the trakks above and much thinner card built up for the details. I have no idea how to go about constructing angled sections of the Russ turret or any angles at all. Curved bits are a mystery and fitting the hull together in a solid build seems problematic.
I’d appreciate any and all help on the subject. Thanks.
   
Made in au
[MOD]
Making Stuff


Under the couch

The thickness you've used there looks good for bodywork... It wants to be sturdy.

For curved sections, build a boxwork frame and use a thinner, more flexible sheet for the outer paneling.

Similar process for the angled pieces - build a boxwork frame for the turret, and then add the outer plates with the edges beveled to fit together at the right angle.

See the feet on this guy, just waiting on their outer paneling:


And with panels on:


Made in us
Fresh-Faced New User


What about the main hull? Should I use a bracing system to help support the body?
   
Made in us
Gargantuan Gargant


Binghamton, NY

I'd recommend internal bracing for vehicle hulls, unless using extremely thick styrene. It doesn't need to be terribly complicated or precise - a few lengths of sprue will suffice, for most jobs, and can easily be attached with plastic glue (solvent cement) to make the basic shape quite rigid. For my Malcador build, I popped two chunks of a chopstick from Chinese takeout in with superglue. The hull will be rigid once attached to the sides, but would bow like crazy while working on it beforehand.

Even without bracing, the shapes aren't likely to collapse in on themselves. It's mostly a matter of providing resistance to flex, which helps keep your flats flat, aids in sanding, etc. It takes a pretty crazy build (or the expectation of serious abuse) to require much bracing in the finished product, but I'd consider it a necessity during the build.

The Dreadnote wrote:But the Emperor already has a shrine, in the form of your local Games Workshop. You honour him by sacrificing your money to the plastic effigies of his warriors. In time, your devotion will be rewarded with the gift of having even more effigies to worship.
 
   
Made in gb
Long-Range Land Speeder Pilot


UK

Glad I saw this I,ve been looking to start a little plasticard wrok myself.

My own chapoter, The Broken Swords. Almost a full company.

1500

Check out my painting page on Facebook. Wartable Painting. 
   
Made in gb
Stealthy Grot Snipa


Hey there,

I also tend to agree with the other comments. An internal structure is not required, but i'd recommend it.

It helps give you not only something to connect your actual plates to, it provides some strength when your shell is still incomplete, preventing you crushing it accidentally

This is something i scratch built and I used a very basic internal structure of the lower hull. I simply had a main beam down the centre with a couple cross bars at 1/3 intervals. I then simply used smaller bars to build the outer rim ofthe structure.


I use plasticard I get from china. Its pretty damn cheap tbh. I buy it in sheets and in a pack thats an assortment of rods and square bar.


Favourite Game: When your Warboss on bike wrecks 3 vehicles simply by HoW - especially when his bike is a custom monowheel.


Forum Index » Painting & Modeling
Go to: