| Author |
Message |
 |
|
|
|
|
Advert
|
Forum adverts like this one are shown to any user who is not logged in. Join us by filling out a tiny 3 field form and you will get your own, free, dakka user account which gives a good range of benefits to you:
- No adverts like this in the forums anymore.
- Times and dates in your local timezone.
- Full tracking of what you have read so you can skip to your first unread post, easily see what has changed since you last logged in, and easily see what is new at a glance.
- Email notifications for threads you want to watch closely.
- Being a part of the oldest wargaming community on the net.
If you are already a member then feel free to login now. |
|
 |
2014/10/29 15:21:41
Subject: New To Painting, New To Forums, Much Help Needed...
|
|

Squishy Squig
|
Right, first of all, this is my first time ever posting in a forum, (however, I have been a member of Dakka for a month or so now syping on incredible peices of art by many of yourselves) so forgive me if I don't manage to add on any images correctly or whatever else, so here goes... 
I'm rather new to painting, as in, I've owned Warhammer since I was about 10 or so because the boxes and 'toys' (at the time, silly child  ) looked cool, so I'd buy bits and bobs and glue them together, but never anything else. So, over the years I kept coming accross my old Warhammer, getting excited, impulse buying on eBay and then leaving it to sit for another year or two.
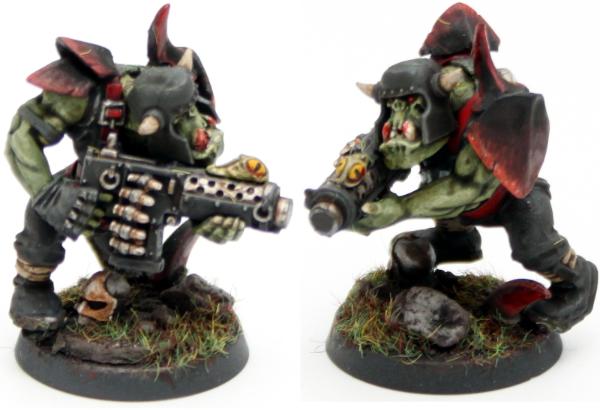
A few years back I attempted some Space Marines that turned out very amateur and I kind of gave up again. However, I've now kinda fallen for Orks and have begun painting my first one, but I thought I'd get ask for some feedback on my WIP.
I've still to paint his grenade backpackey thing and add some yellow armour and yellow slugga for starting a Bad Moons army, but here he is so far. Any advice or tips, or any good or bad points about him so far will be greatly appreciated and taken on board and a thank you for listening to my ramblings... 
Also, appologies for the shoddy camera work, bahaha 
![[Thumb - 1.jpeg]](/s/i/at/2014/10/29/03be066a27bdcc9acac817b226986695_89691.jpeg__thumb)
|
![[Thumb - 2.jpeg]](/s/i/at/2014/10/29/558fdf971bbc6525ae83c921e697fff9_89691.jpeg__thumb)
|
|
My first thread: all advice and criticisms are welcome
http://www.dakkadakka.com/dakkaforum/posts/list/621097.page |
|
|
 |
|
2014/10/29 15:42:09
Subject: New To Painting, New To Forums, Much Help Needed...
|
|
Secret Inquisitorial Eldar Xenexecutor
|
Its hared to tell because either your flash/lamp are really causing some glare but you're off to a solid start, I'll begin with some standard bits of painting advice before moving onto anything specific:
Thin paints, its hard to tell in the picture but I'd say on the teeth its possible that your paints are distording the features. Its best to do many thing layers than to hit it all in one pass, this also helps with bulding up blending of tones from dark to light.
Highlight - the skin especially could benefit from being highlighted in areas to a lighter green as the light catches ridges, the peaks of the skin etc, similarly highlighting other areas like the creases in the trousers give it a more natural and less blocky appearance.
Washes - Add depth, a wash can turn an OK paintjob into something striking but adding a good amount of depth for a small amount of effort, its a tool to use but dont overdo it otherwise you'll be stunting your own painting ability.
Gore, less is more - You seem to have done a relatively good amount of gore, and its understandably tempting to go over the top (waaaaagh and so on), just remember the amount of effort put into painting and what a shame it'd be to hide it all under a dozen coats of blood.
But its a great start!
To give an example of the various techniques:
The skin has been highlighted between 3 greens and washed with a light athonian,
The metallics are 3 metallic shaes with an agrax wash
And there is just a hint of gore on the teeth
|
|
|
|
|
|
2014/10/29 16:20:06
Subject: New To Painting, New To Forums, Much Help Needed...
|
|

Xenohunter with First Contact
Indianapolis, IN
|
Melcavuk hit the nail on the head here. Learning the basics and refining your painting process is the best piece of advice! Your paint job is looking pretty good so far, but it doesn't have a lot of depth yet. But it's also hard to tell due to the light source in your images. It looks like you have a a good hand for painting and it looks nice and clean. If you add a few washes, layer your colors up, and do a bit of weathering you will have some nasty-awesome Orks!
|
What is best in life? To crush your enemies, to see them driven before you, and to hear the lamentations of their women. Grrr. |
|
|
|
|
2014/10/29 16:41:16
Subject: New To Painting, New To Forums, Much Help Needed...
|
|

Fixture of Dakka
|
It looks like a good start
Just remember that the key to miniatures looking great is lots of contrast, neat painting, and thinned paints (no brushstrokes).
The most common way of painting with acrylics now is to layer -- that means, putting down a base coat and wash, and then adding layers of semi-translucent paint to either darken or highlight areas. It's worth mentioning that in the Citadel system, you start with the darkest colors and progressively work your way to the brightest, which will usually also be the most raised edges of models; in contrast, P3 starts with a base color at the midtone, and gives a shade down and a shade up. Not that you have to paint that way with either paint system, but with Citadel, the base paint is thicker than the layer paints.
Pick color schemes with complementary colors (like red/green), and don't be afraid to use the really bright tints of colors as highlights on edges. When you start, look at the manufacturer's guidance as to which colors belong to the same group for progressive highlights.
When you do washes, try washing just the recesses. This saves you some work in layering up the raised areas (to brighten them back up). Then progressively add layers of brighter tints of paint to exaggerate muscles and facial features, and to make definitions of armor visible from further away.
Other than that, just keep painting, and they'll get better and better!
|
|
|
|
|
2014/10/29 17:55:47
Subject: New To Painting, New To Forums, Much Help Needed...
|
|

Speedy Swiftclaw Biker
|
First off I also think you have a natural talented for painting.
Also agree with the gents above.
Three things to add to that:
1) Find refferences in either photo's or (concept) art for all kinds of effects, color schemes you like, or work from peeps that you want to strive to peer with.
2) Always do your bases. It not only compliments your painting it also gives the model so much more detail and depth.
3) most important one of my tips; share your work here on dakka to get comments and compliments. One to improve and the other to motivate.
Good luck and and looking forward to reviewing your work!
|
|
|
|
|
|
2014/10/30 09:32:18
Subject: New To Painting, New To Forums, Much Help Needed...
|
|
Squishy Squig
|
Thank you all very much, I really appreciate all the advice! I have actually used 2/3 colours of green on the skin and the Thraka green wash, however, I attepmted to highlight with Scorpion green and messed it up, I believe orks should have a darker shade of green for the skin to look more natural and the Scorpion green made it look cartooney and didn't flow very well, so had to go over him again with Catachan Green (I think). I attempted to highlight with Goblin green after. I'll try to get better pictures with more natural lighting after work, if I can and post some more pictures. A question I'd love to know the answer to is how to successfully thin paints? I have one of the GW white pallets and I usually try to put paint on to the pallet, the dip my brush in water and mix it in, but it still always covers the model in one cover, so I don't think I'm thinning it enough, but any time I try to add more water, the paint becomes too thin and runs!  @Remco_Tuerlings, I've painted the base white (which took forever and about a million coats) and put modeling snow on it with a gloss varnish on top to make it glisten, but when I've finished the model, I'm going to put down more snow as I watched a tutorial with mixing PVA and modelling snow to give a slushy look I like, which I'll also try to update with pictures when complete. That was also, a plastic rock, bought in a pack that's been painted that the Nob is stepping over. Thank you all for the compliments too, that was a little boost to my day, that I needed. Brought a smile to my face
|
|
This message was edited 1 time. Last update was at 2014/10/30 09:33:58
My first thread: all advice and criticisms are welcome
http://www.dakkadakka.com/dakkaforum/posts/list/621097.page |
|
|
|
|
2014/10/31 01:58:52
Subject: New To Painting, New To Forums, Much Help Needed...
|
|
Thane of Dol Guldur
|
Not a bad effort man. First off one of my main pieces of advice is not to go too crazy with lots of colours. Try to choose colours that work with each other on certain areas. For example the blue pants.. Now maybe you want the ork to look like hes wearing blue jeans, but it clashes horribly with the green skin. Take a little time to Google the colour wheel and study when certain colours can work well in contrast or compliment each other. Other than that, just study tutorials online. Once you get inks and highlights down you'll be fine. Then you can move onto other things like blends/fades, and weathering. Take it slow, one technique at a time
Automatically Appended Next Post:
Also, i'd avoid large areas of white as that is a terrible colour to try and do well. Go for off whites or bone layers.
|
|
This message was edited 1 time. Last update was at 2014/10/31 02:03:38
  Heresy World Eaters/Emperors Children Heresy World Eaters/Emperors Children 
Instagram: nagrakali_love_songs |
|
|
|
|
2014/10/31 09:22:58
Subject: New To Painting, New To Forums, Much Help Needed...
|
|
Speedy Swiftclaw Biker
|
 Gregga wrote: Gregga wrote:Thank you all very much, I really appreciate all the advice!
A question I'd love to know the answer to is how to successfully thin paints? I have one of the GW white pallets and I usually try to put paint on to the pallet, the dip my brush in water and mix it in, but it still always covers the model in one cover, so I don't think I'm thinning it enough, but any time I try to add more water, the paint becomes too thin and runs!
I don't use pallets anymore. I found out that using a sheet of printing paper works way better for me. As the paper absorbs some of the extend moist and works way better to balance the amount of paint on my brushes by smearing the paint out on the paper.
So when I do washes or layers I get a blob of paint from my jar and smutch it on to my paper pallet. Then I dip my brush in to the water and dump some drops of water next to the blob (not on it. I only do that if I want to keep a paint from drying out on me). Next I drag some paint into the water drop and mix them to get the right water paint ratio (it takes some practices to know how much paint to drag in or when to add some more water but I rarely have to add more paint to decrease the watery consistency). But here is the advantage compared to plastic pallets; the paper extracts excess water so If I've made the paint to thin I wait a minute and then the paint gets dryer or I just smear the watery paint some what over the paper and then the paper absorbs the water leaving most of the pigment on my brush. If I made a good wash I mostly first clean my brush by stirring it through the water and drying it by wipping it over a tissue. Then I can take a bit of watered down paint to go paint. I mostly smear/wipe my brush over the paper to make sure there's not to much on my brush. Key here is to always moderate the paint on your brush.. you can always add more paint on you model later on but having to strip down the paint from you model is not a funny or easy thing to do and redoing your paints over badly old paints usually clogs details... So you could try this instead of your pallet... and I'd like to know what you think of it.
@Remco_Tuerlings, I've painted the base white (which took forever and about a million coats) and put modeling snow on it with a gloss varnish on top to make it glisten, but when I've finished the model, I'm going to put down more snow as I watched a tutorial with mixing PVA and modeling snow to give a slushy look I like, which I'll also try to update with pictures when complete. That was also, a plastic rock, bought in a pack that's been painted that the Nob is stepping over.
Yeah definitely try the pva glue stuff (and don't use the gloss finish if you want a fresh-snow look because fresh-snow doesn't shine as much as molten and refrozen snow.) I usually make the base as real dirty ground, grass lands or such would be (much easier to paint than plain white unless you use a spray-paint or airbrush to paint that white... ) and then use the pva glue and snow mixture to paint or smear the snow on to the base... Also again I use reference photo's to guide me on how real snow falls; where to put accumulations or where to put just a transparent layer of fresh snow and mostly I also do some bits of snow specs on the model to blend them in. Also I imagine how the wind affect the snow fall etc and try to implement that when applying the snow to the base. Also I think a totally snow covered base is not much of a interesting thing to watch unless you add something to it, so I usually try to leave some parts of the terrain underneath shimmering through to give an impression on what kind of terrain the figure is walking on. This is what makes basing fun for me.
Looking forward to reviewing your next project!
|
|
|
|
|
|
2014/10/31 10:26:23
Subject: New To Painting, New To Forums, Much Help Needed...
|
|

Swift Swooping Hawk
|
Really good for a beginner. When I started and for a long time I painted worse than you do now already.
My best hint is: don't be afraid of using strong contrasts in brightness of one color. You can see it in Melcavuc's example above, a dark green for the recesses, a medium one for the regular areas and a bright one for the elevated areas and the edges.
Something that helped me getting into this was using a medium brightness colour then use a shade to darken the recesses and use the light colour for highlighting. I did my Blood Bowl Orc team this way and it looked good.
|
My armies:
Eldar  
Necron 
Chaos Space Marines
Grey Knights 
Imperial Knights 
Death Guard 
|
|
|
|
|
2014/11/03 08:31:48
Subject: New To Painting, New To Forums, Much Help Needed...
|
|
Squishy Squig
|
@queen_annes_revenge, I think you're right with the jeans, going to go for the yellow paint scheme trousers for a Bad Moons army, so will again update pictures if I ever get the chance to paint soon in this hectic world haha. Also, the shirt was a light brown at first, but I didn't like it so covered with Bleached Bone (I think) with White highlights, but leaving a little of the underbrown at the edges of his shirt that look like armpit stains. The photo doesn't really do the shirt justice as I quite like the effect I got on it, but I guess that's phone cameras for you...
@Remco, Ooh! I'll be sure to give the paper techniqe a shot while I'm doing all of the above ^
What's the best way to keep the powdered snow on the base? I thought the varnish was a good choice because it held everything together, but you're right, I'd like it to look fresher.
@Murenius, Thank you! 
Have you got any pictures of your Blood Bowl team?
|
My first thread: all advice and criticisms are welcome
http://www.dakkadakka.com/dakkaforum/posts/list/621097.page |
|
|
|
|
2014/11/03 10:59:06
Subject: New To Painting, New To Forums, Much Help Needed...
|
|
Swift Swooping Hawk
|
I will try to take some pictures these days and post them. I don't use them much in the last time.
|
My armies:
Eldar
Necron
Chaos Space Marines
Grey Knights
Imperial Knights
Death Guard
|
|
|
|
|
2014/11/14 09:22:13
Subject: Re:New To Painting, New To Forums, Much Help Needed...
|
|
Squishy Squig
|
 So... Not had much time to paint recently, however not been too busy at work the past week, so been messing around with tools in the workshop to give my orks a unique look.
Let me know what you think, guys and gals. 
I've also bought GS for the first time, so will be trying out some modelling soon. 
Without further adieu, this is the kustom mace/trophy my Nob will carry. I have also magnetised it so it can be removed as the chains are very delicate at the moment.
Also, don't know if this thread has died because I've not posted for a bit, not really sure how this works yet... Here's hoping someone will see this, bahaha.
|
My first thread: all advice and criticisms are welcome
http://www.dakkadakka.com/dakkaforum/posts/list/621097.page |
|
|
|
|
2014/11/14 12:17:52
Subject: New To Painting, New To Forums, Much Help Needed...
|
|
Tough-as-Nails Ork Boy
|
Looks great!
Putting the rod in a vice will help a lot, it will give you some texture to drybrush some detail onto.
|
|
|
|
|
2014/11/14 12:18:25
Subject: New To Painting, New To Forums, Much Help Needed...
|
|
Secret Inquisitorial Eldar Xenexecutor
|
That is an awesomely orky flail, nothing better than beating someone to death with their own friends heads.
|
|
|
|
|
|
2014/11/14 12:29:06
Subject: New To Painting, New To Forums, Much Help Needed...
|
|
Squishy Squig
|
Thanks a lot, chaps, yeah, I thought the chipped look would look much better than some polished rod.
Aw da otha orks mak fun of me fo ma shiny rod... :(
Bahaha, I have pictures on my better half's phone of the complete ork, but she's not been able to send me them yet. Will update ASAP though.
Halfway through making a punk-ork atm too, so be sure to check in soon to see him, just need to practice using GS.
Also, would anyone have any advice how to better hold that chain in it's position, it's just super glued that way just now, but I was thinking about using 'Ardcoat varnish to strenghten it, but then I'm not sure if that would obscure detail and look crappy painted...
|
|
This message was edited 1 time. Last update was at 2014/11/14 12:31:58
My first thread: all advice and criticisms are welcome
http://www.dakkadakka.com/dakkaforum/posts/list/621097.page |
|
|
|
|
2014/11/14 13:03:03
Subject: Re:New To Painting, New To Forums, Much Help Needed...
|
|
Squishy Squig
|
Here we go, this is how the trophy flail will look on the ork.
|
|
This message was edited 1 time. Last update was at 2014/11/14 13:03:34
My first thread: all advice and criticisms are welcome
http://www.dakkadakka.com/dakkaforum/posts/list/621097.page |
|
|
|
|
|
|