So I have a friend that plays Dark Angels and he likes the not too common
HQ options, but hes not great with conversions. I had built a Belial with magnetized arms so I got tapped for his next custom
HQ, Sammael in SableClaw.
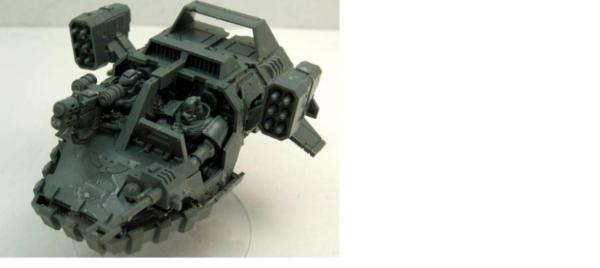
So looking at the stats its an AV14 landspeeder with
TL heavy bolter and
TL Autocannon. Its also the sweet ride of an iconic
HQ, and if I have learned anything about
40k Marine
HQs should have absurd amounts of bling. Looking for source material this is the only thing I really came across:
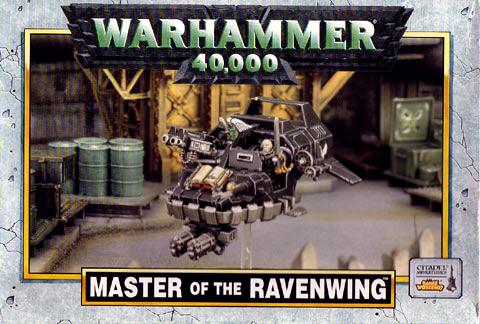
Not nearly as much of an eyesore as a Space marine relic vehicle should be. I did some sketches but was essentially given free artistic license. The base of the project was 2 ravenwing upgrade sprues (that contain the bling and weapons shown in the old kit above), 2 sheets of styrene (1mm thick and 2mm thick) and this landspeeder that my friend got off ebay for 9US dollars:
The large shiny spots are globs of glue. it was a mess, the kit was poorly assembled and warped (Im told this is an issue with landspeeder kits).
Inspiration for this conversion came from the original kit, the forge world Tempest speeder and Import Tuner Magazine (yes I'm serious and you will see why).
Automatically Appended Next Post:
PART 2: how to UNF**K this model.
Here is the best tip i can ever give you. if you suspect that someone has assembled a model with
GW thick super glue (or cheap superglue) soak the model in 99% isypropyl rubbing alcohol. After 24hs most if not all of the glue will have dissolved. it also removes any hobby paint. I got a junk lot of 15 dire avengers and 2 wraithlords that were horribly assembled and painted. after a soak they fell apart to components, it even took off some of the primer.
****WARNING**** DO NOT PUT RESIN IN RUBBING ALCOHOL.
IT WILL TURN
TO JELLY INSIDE AN HOUR.
So after the dunk almost all the glue was gone and the model popped apart to this:
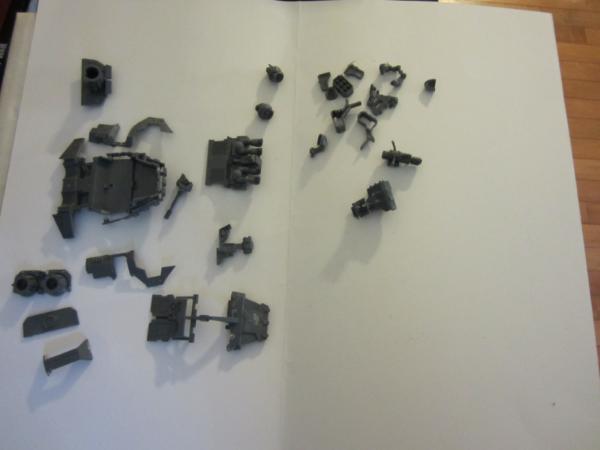
visibly damaged bits were clipped, the model was sanded and reassembly began.
Automatically Appended Next Post:
PART 3: Up armoring
Going from an
AV 10 to
AV 14 the vehicle in my mind needs to look the part. Landspeeders dont seem to have the open top rule so I could go nuts here and still be ok for
WYSIWYG hardliners.
Forgot to take a few pics. Basically built up a speeder with no drivers, then made paper templates for armor to enclose the cockpit.
FRONT:

SIDE:
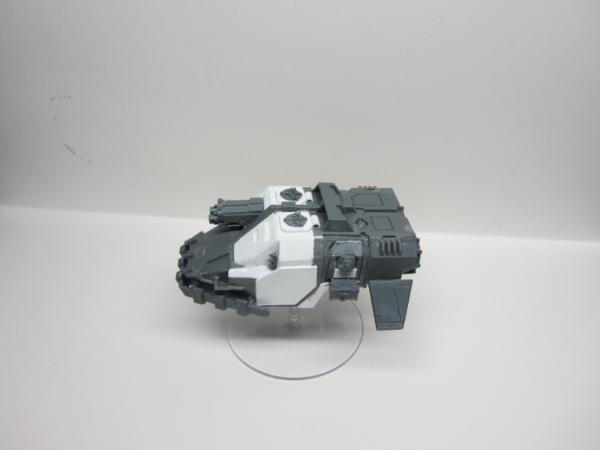
All the white is 1mm thick styrene, the hatches on the top of the cockpit have drop pod icons, the side "doors" where the missiles were mounted were filled in with the assault terminator hip armor, the boxes are from the ravenwing sprue, the bedroll was trimmed off to make them look like exterior gear/toolboxes. the missiles in the front nook are from a Centurion kit.
Automatically Appended Next Post:
PART 4: DID YOU ORDER THAT BODY KIT FROM JAPAN?
Using a razor saw, I cut the wings off the body of the model, then again made templates and cut the wing extensions. on the body of the speeder small 2mmx2mm square rod was added to bulk it up to reattach the wings.
The spoiler, well the wing is 3 parts, center and 2 angled parts. the angled parts were cut and simply sanded at angle then joined to the center. the fronts of all the spoiler parts were sanded round to give then a more wing like appearance. All of the wings are cut from 2mm thick styrene.
FRONT:
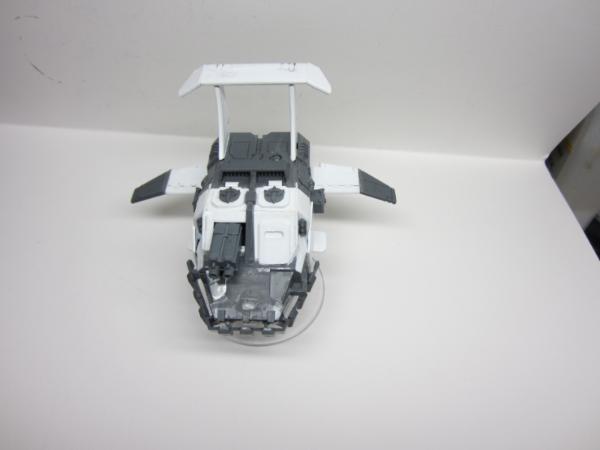
SIDE:
 Automatically Appended Next Post:
PART 5: THE BLING LAYER
To break up large flat areas I clipped parts from the ravenwing upgrade sprue. A Space Marine Relic vehicle should assault your eyes with gaudyness.
 Automatically Appended Next Post:
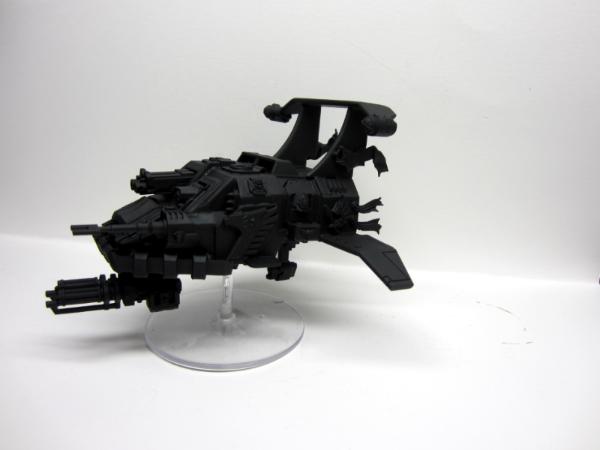
PART 6: LAST BITS AND PRIME
Added the Autocannon, underslung on a 3mm magnet, more for easier transport than anything. Also added the antenna and primmed the entire thing black.
 Automatically Appended Next Post:
PART 7: WHERE IS THE
HQ?
So this is Sammaels sweet ride, surely he is inside, safe right? Again, I feel like being a fearless indoctrinated killing machine alters your sense of reality, and
40K is all about "Drive me closer so I can use my sword!"
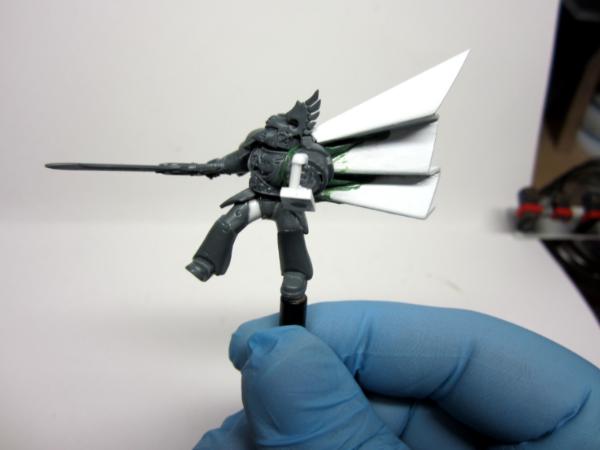
I began working on Sammael, who will be magnetized to the outside of the speeder looking as metal as possible. To do this I needed to have his robes make it look like yes, we are flying at 500mph.
I made a pattern out of paper, then using 1mm thick styrene cut the accordion folded cape. Sanding the joining edges to meet at angles. Why did I use styrene instead of greenstuff? 2 reasons, the styrene would be very ridged, thus making it look like it was pulled tight in the wind, second I am not a great sculptor and didnt think i could pull off a convincing cape in green stuff. I did use greenstuff to add some folds and join the chest robes to the cape.
Parts used for Sammael: head, arms and torso are from the plasma talons box, shoulder pads are from a company champion, legs are from an assault marine, reposed. the hip armor is from a wraithguard kit. magnets are located in the back foot and non sword hand. 3mm magnets in both. 1 magnet may have held him on, but 2 pounts of contact puts him on solidly.
 Automatically Appended Next Post:
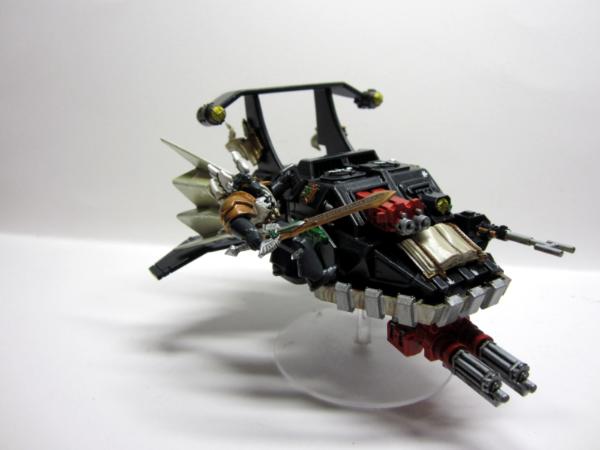
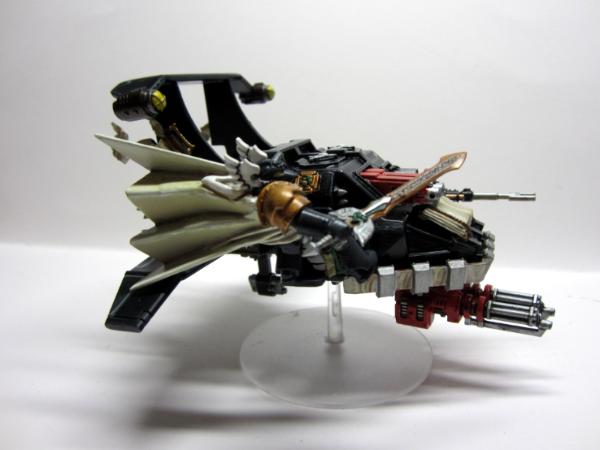
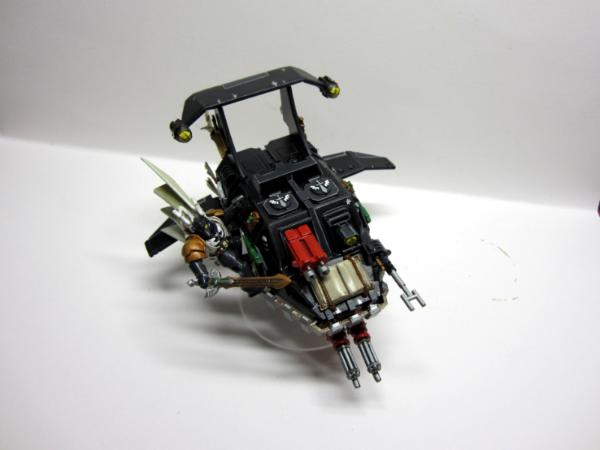
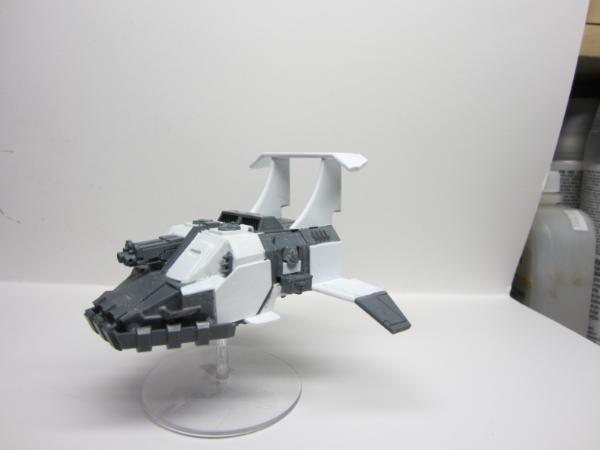
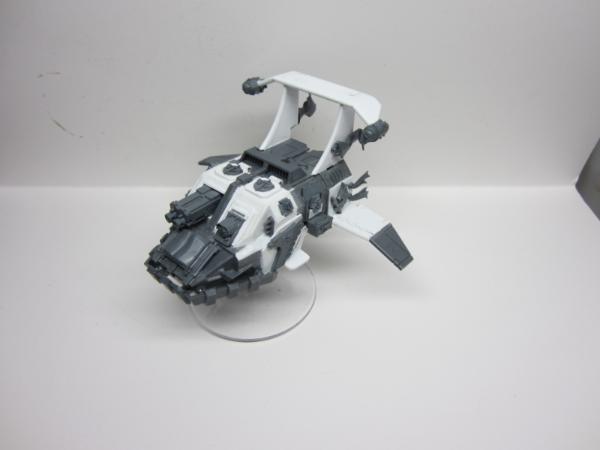
PART 8: THE FINISHED PRODUCT
I dont claim to be a great painter, so I would consider this a little above table top quality. the speeder was painted black, some areas were vallejo heavy charcoal. hard edge in heavy charcoal (on black) and codex grey (on heavy charcoal).
The vehicle was sealed Matte, but Sammael was sealed with Satin to give him ceramite shine, this is also how my friend sealed all of his terminators.