| Author |
Message |
 |
|
|
|
|
Advert
|
Forum adverts like this one are shown to any user who is not logged in. Join us by filling out a tiny 3 field form and you will get your own, free, dakka user account which gives a good range of benefits to you:
- No adverts like this in the forums anymore.
- Times and dates in your local timezone.
- Full tracking of what you have read so you can skip to your first unread post, easily see what has changed since you last logged in, and easily see what is new at a glance.
- Email notifications for threads you want to watch closely.
- Being a part of the oldest wargaming community on the net.
If you are already a member then feel free to login now. |
|
 |
2015/07/13 19:31:04
Subject: Warhound Titan Converted to Ordo Reductor
|
|

Regular Dakkanaut
|
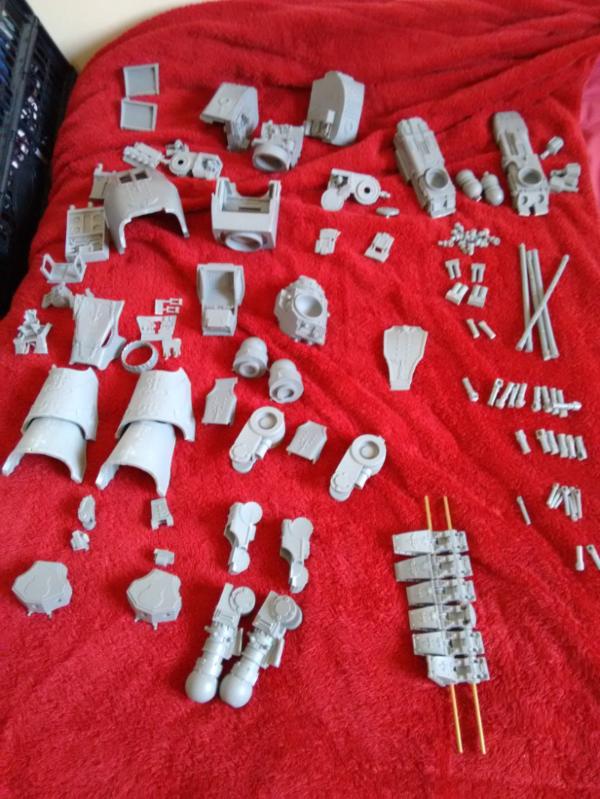
Hi everybody,
Some of you might know me from my scratchbuilt Warlord Titan thread. Given the release of an official one I've put that on hiatus officially, and decided to change tactic. Instead of scratch building like I usually did, I finally got around to buying a Warhound titan. But I couldnt just leave it at that so have decided to make some superficial modifications to give the model a different aesthetic to the common mars style. The main things I want to address are the large number of eagles over the model, which I believe should be replaced with some nice cogs, skulls and ornate 'T's.
When looking for something to replace the symbols with I came across a forum user by the name of SirDonald, who uses the icon of the Ordo Reductor for their picture, I really liked the look of it despite not knowing what it was, so it's lucky for me that they're mechanicum and close enough to justify a titan legion. If anybody has some concrete information on them I'd love to hear it, for now I'm going on what's given in the couple of warhammer wiki pages on the them.
So far I have washed the model, and begun to strip off some of the armour detail (shin and crotch so far) and also started to assemble the body, and articulated the toes for easy posing. I intend to paint the interior. To do this I've glued the back half of the torso, and the front will be attached after painting, so that I have access to paint.
For the new styling I am intending to go with a cog border, and then I will make a large Ordo Reductor symbol in plasticard, and mold it, so that I can create a symbol in resin that can be conformed onto the plates. It shouldnt be to technically challenging as I've cast things before now, but we'll see how it goes. Perhaps in the next update I'll have assembled more and will make a decision on the pose.
Thanks,
Rory
|
|
|
|
 |
|
2015/07/13 20:33:42
Subject: Warhound Titan Converted to Ordo Reductor
|
|

[MOD]
Making Stuff
|
Ah, that new project smell.
Good luck with it 
|
|
|
|
|
|
2015/07/13 21:24:43
Subject: Warhound Titan Converted to Ordo Reductor
|
|

Did Fulgrim Just Behead Ferrus?
|
That's just the resin dust you're inhaling! 
Very curious to see how this project will go!
|
|
|
|
|
|
2015/07/14 00:23:54
Subject: Re:Warhound Titan Converted to Ordo Reductor
|
|
Regular Dakkanaut
|
|
|
|
|
|
|
2015/07/14 00:25:08
Subject: Warhound Titan Converted to Ordo Reductor
|
|

Longtime Dakkanaut
|
Yes! A great new plog.
Keep us posted!
|
|
|
|
|
|
2015/07/21 00:15:32
Subject: Re:Warhound Titan Converted to Ordo Reductor
|
|
Regular Dakkanaut
|
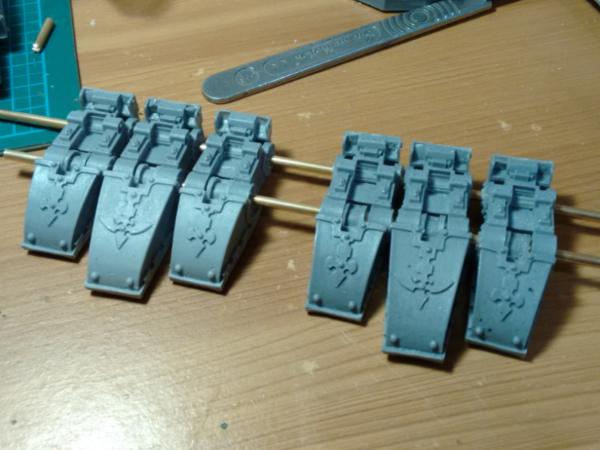
Can't believe it's been a week, not too much for updates, but I have proceeded with a bit more of the destruction, before I get into the main bit of detailing. I''ve now removed the detail from the mid leg, and top leg parts. Remaining for detail scraping is the main carapace, which will be fun and I plan to do interesting things with, and the head.


In addition to removing the detail and the rivets, I have taken off the riges on the joints, they were uneven so I'm just going to redo them with some preformed plasticard sheet detail, or go with the smooth look, which I quite like.
|
|
|
|
|
|
2015/07/21 03:02:19
Subject: Re:Warhound Titan Converted to Ordo Reductor
|
|
Mysterious Techpriest
|
The reductors are basically more crazy mechanicum mofos with blitzkroeg esque tactics. Also AUTOMOTAAAAAA (that look cool unlike kastelans) and THALAAAAAX
|
|
|
|
|
2015/09/26 16:18:25
Subject: Re:Warhound Titan Converted to Ordo Reductor
|
|
Regular Dakkanaut
|
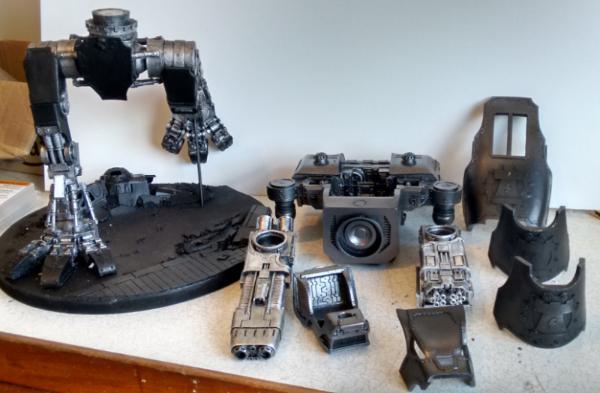
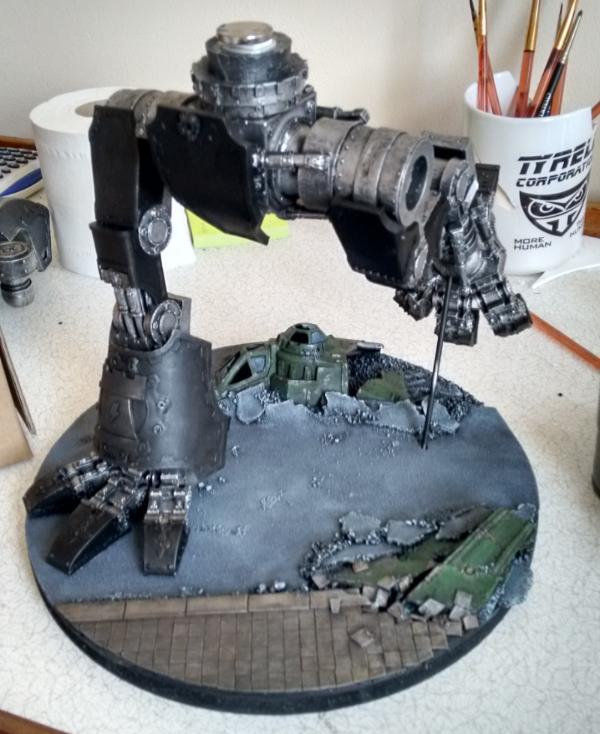
Hi everybody, I'd left this here without doing much, as I've been busy the past few weeks (as always it seems) but I finally caught some time for an update on my progress. Here's the titan as it is now. In a much much more advanced state than before.
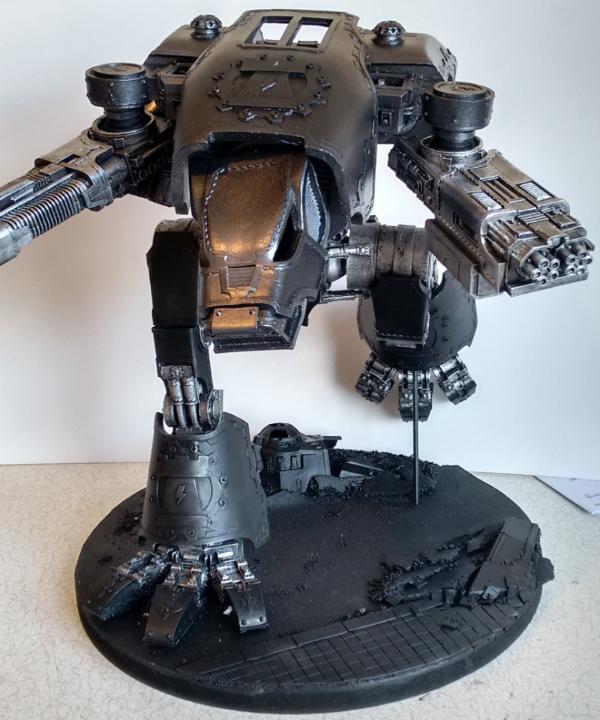
I have managed to assemble all the titan and have begun to paint it. For assembly I have been pinning with some copper rod, and glueing with some 2 part epoxy by
araldite (couldnt find JB weld in a store). It seems fairly stong so let's hope it holds. I have also been putting magnets into a few points. Currently I have magnetised the body to waist, the head to the body and the head cover. The guns are both magnetised and so are the shin plates. For most I used some 10mmx3mm neodymium magnets which have a decent bit of pull to them. I used some 20mmx3mm version in the body to waist join because of the amount of forward leaning torque.
For the pose i decided I wanted a really dynamic looking titan. The static standing pose has always bored me a little. I decided to imitate the pose given here: http://thepaintingbunker.com/2012/06/12/my-4th-wargamer-au-diary-deus-ex-machina-titan/ I also advise you all to check out the rest of that site, the trio of reaver and two warhound they have is really impressive, and I want to get the same formation myself someday.
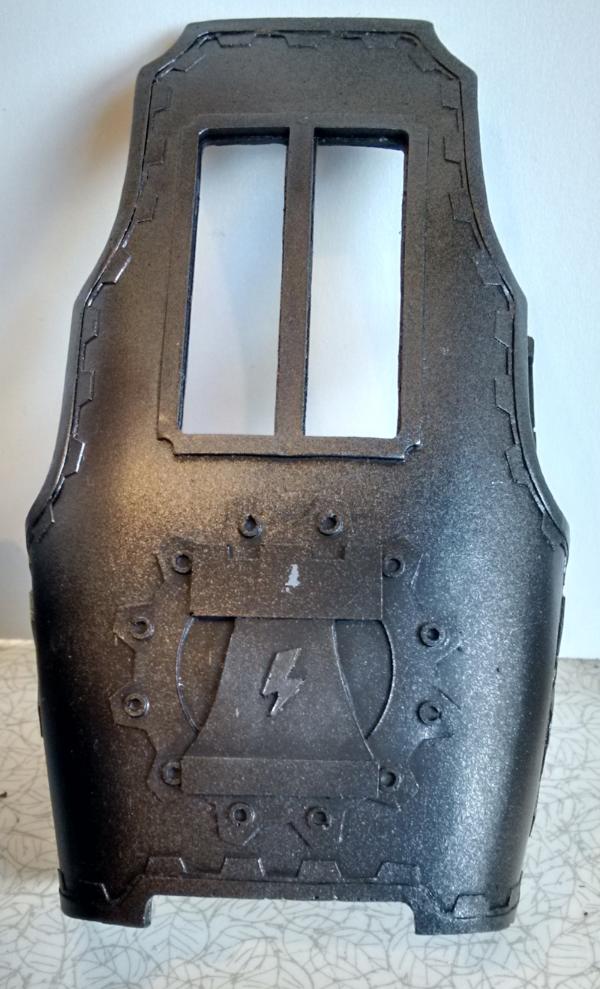
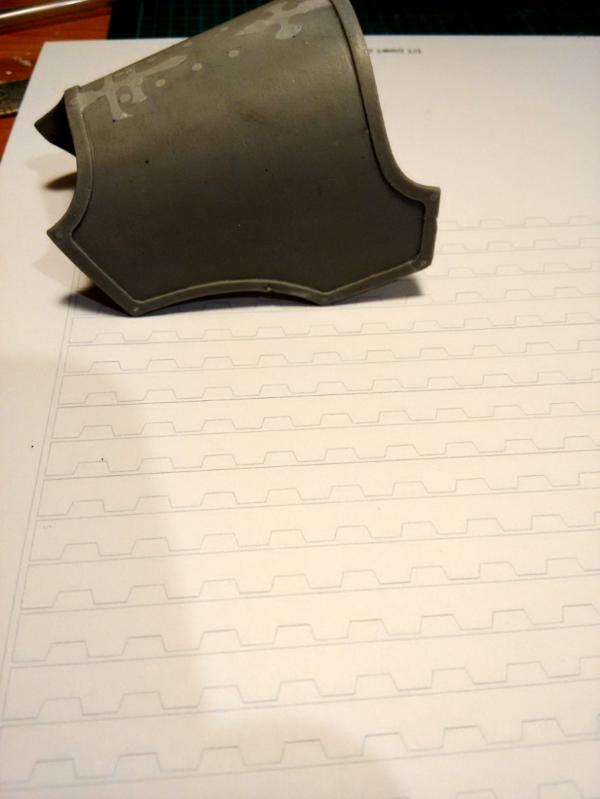
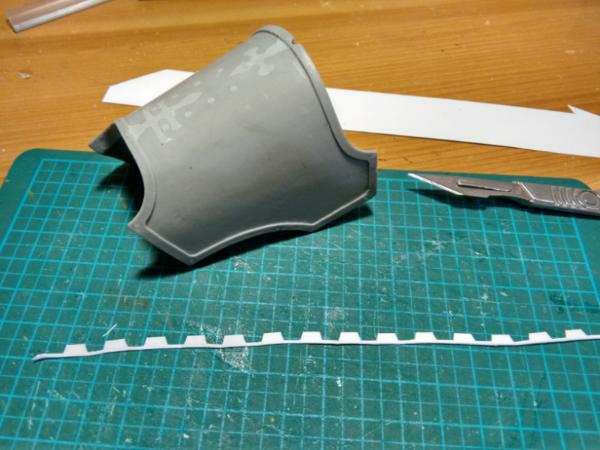
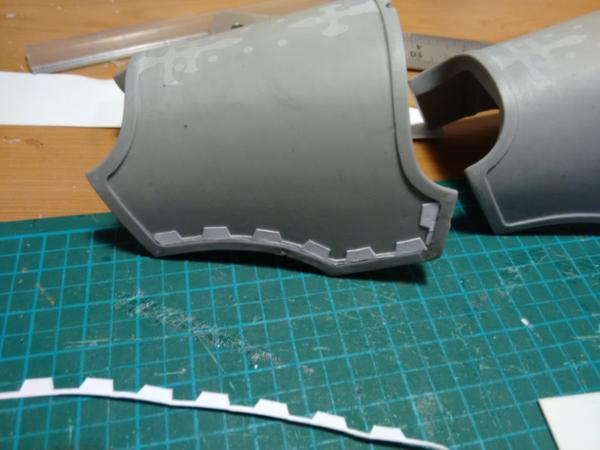
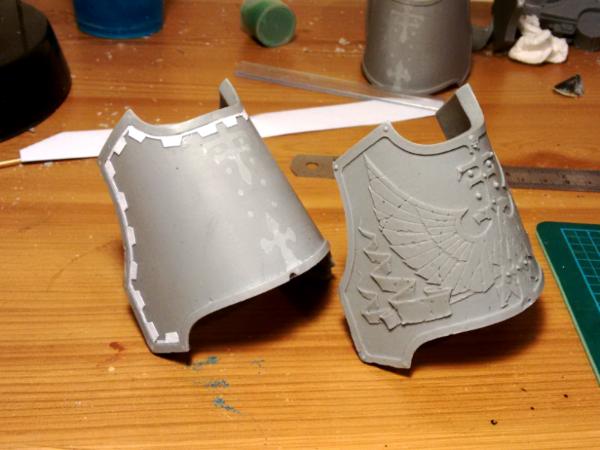
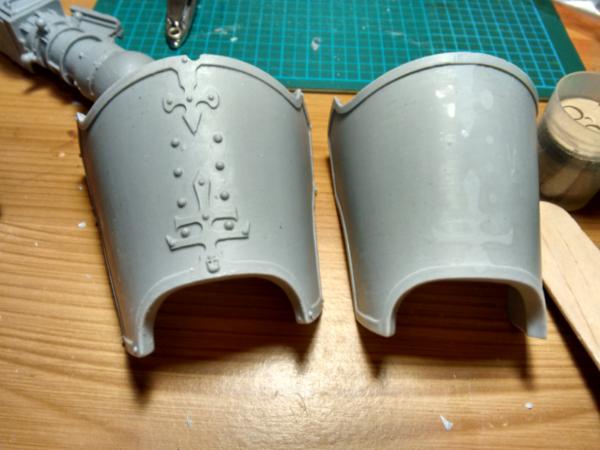
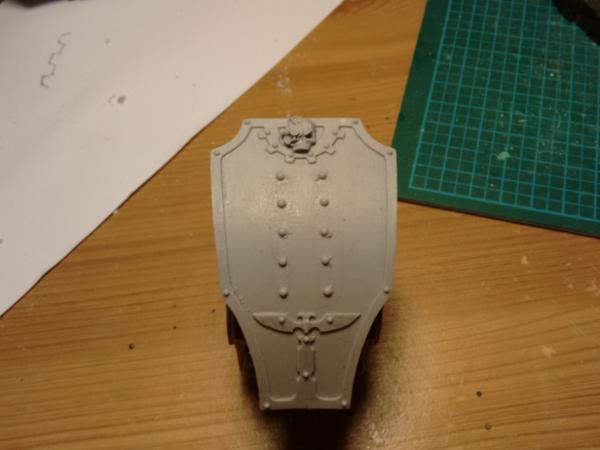
This shows the upper carapace with the conversions which I've intended to do so that the titan is an ordo reductor machine. The symbol is the same as is on the two shin plates and comes from a mold of a flat plasticard version. By casting it in resin I get the advantage of the half cured resin's maleability meaning it can be truly conformed to the surfaces. The trim around the plate is made from card. I printed a gear template and cut out the full trim which is then flexible enough to contort from straight to the edging. On some other parts like the guns and the head there is trim which has been made by cutting a slice from textured sheet plasticard. The corrugated plastic when sliced has a cog-like cross section. I should remember to post a picture to be clear about this.
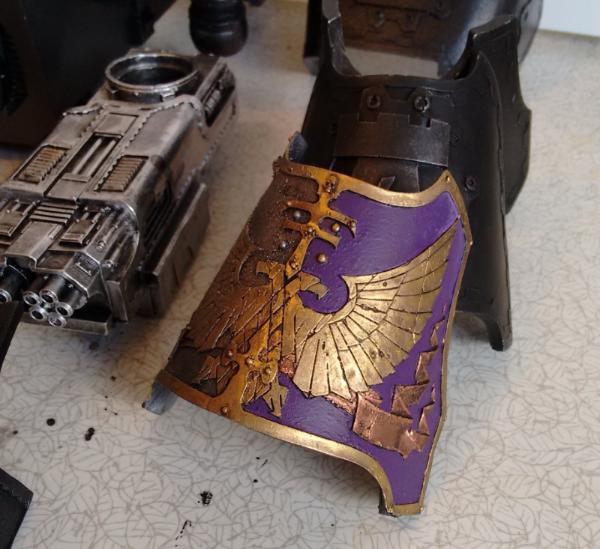
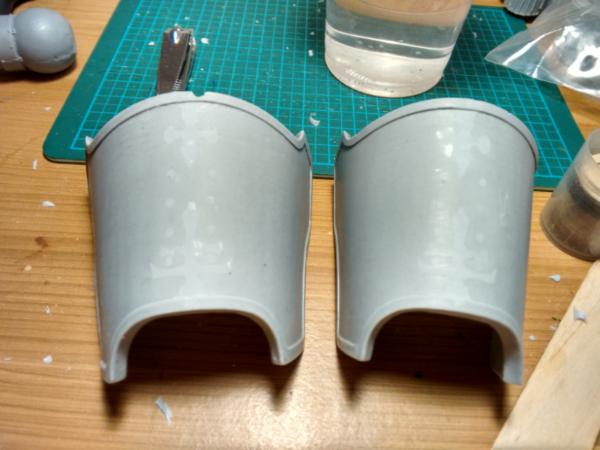
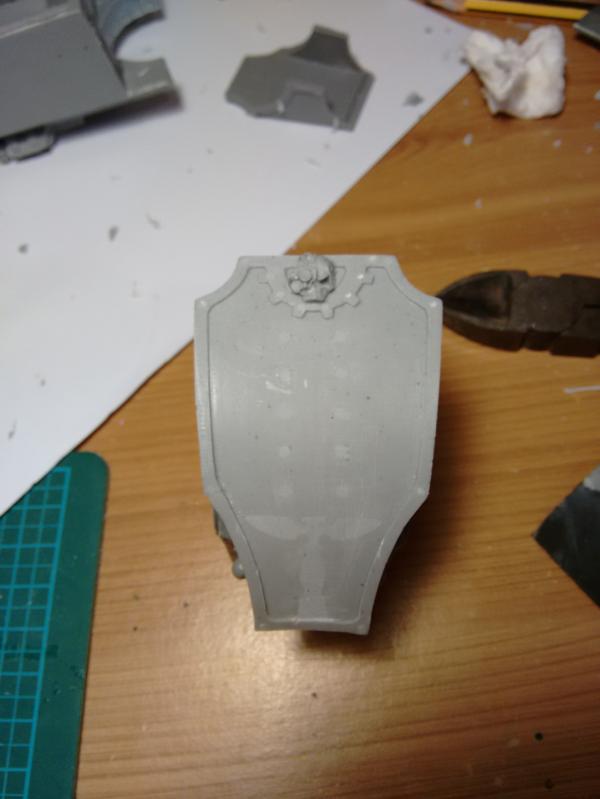
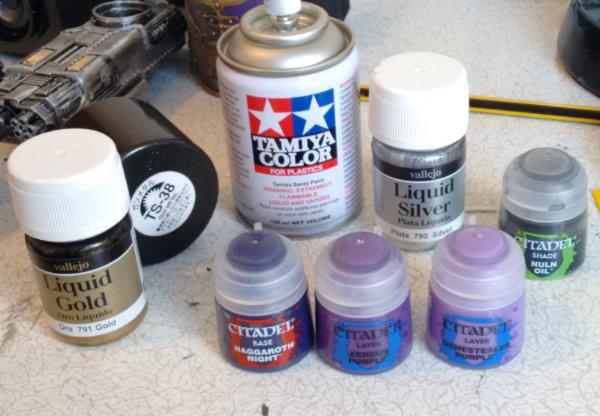
This is one of the unused plates which I used as a paint test, to look at the colours I want to use. The copper doesnt look good so isn't going to be used, but I am happy with the purple shade and the gold trim. The gold is from vallejo's liquid metals range, and is 'liquid gold'. The purple is games workshops xereus purple. I will be drybrushing some highlights in shades between that and genestealer purple for the full armour. The silvers where done by using a tamiya gunmetal spray paint with a liquid silver drybrush. Currently the lower half and guns have been done, but not the rest.
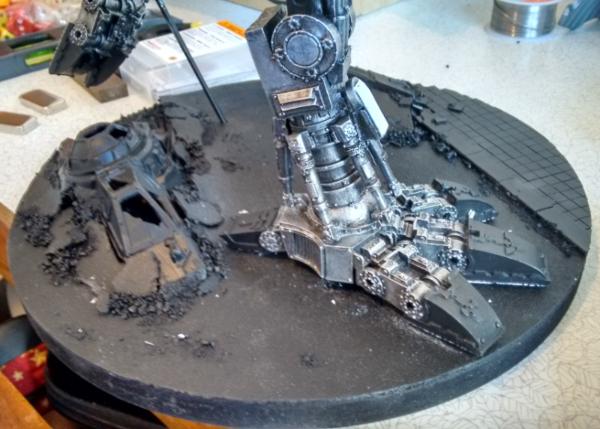
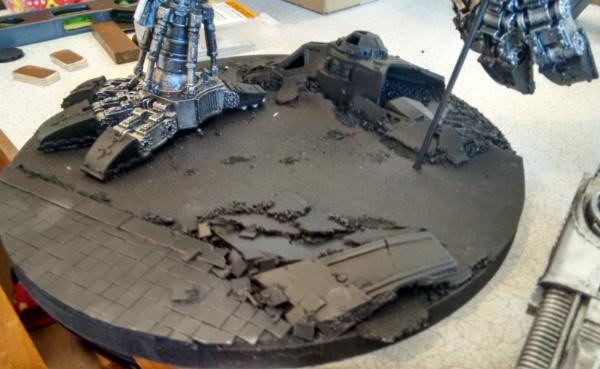
I also did work on the base, which I'm rather proud of. I took a crashed aquilla set which I've been hoarding since the set was replaced, and cut away the non ship parts. I then built a road surface by sticking some 120 grit sandpaper to a cork sheet. This could then be ripped to look like sheets of road material. The idea is that the lander will look like it crashed into the road and slid, digging up the surface about it. I also did a pavement from some textured plasticard with .25" squared. I actually snapped every individual square off and placed them by hand so that they appeared less perfect and fake looking, that's for both the tiles flung around and main surface. The edge is just some other plasticard cut as kerb stone. To add to the base further I used some coard sand affixed with PVA glue and some fine sand that was fixed with super glue. On the road surface I used a fingertip to streak the sand in a more natural pattern than spots. When I paint the base I think I'll go for dark grey, and put some road markings on to make it clearer. I think I might also keep the crashed ship dark. But am not currently sure if I want it as an old wreck, or new.
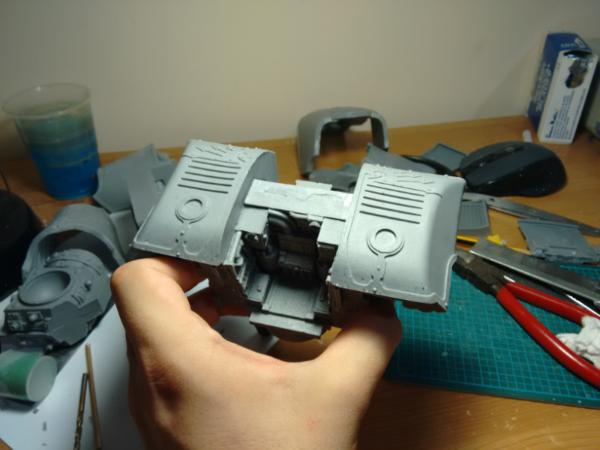
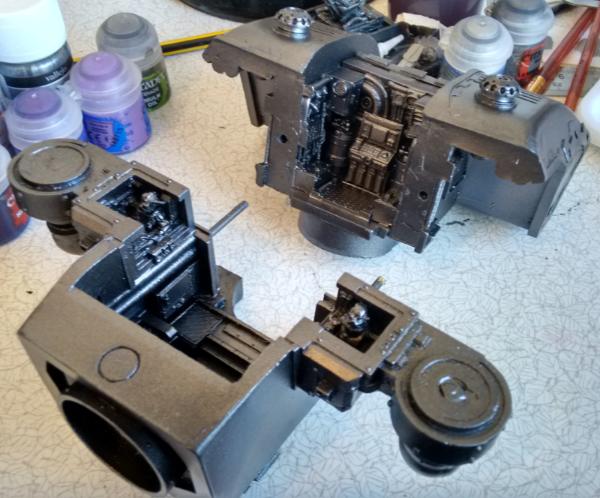
Next up is finishing painting, which I hope to go fairly quickly. I'm not a brilliant painted, but I want a passable job then I'll be happy. To help me out the crew are not put in yet, and the body is held secure by tension on pins for the two halves. This also gives a good view of the gunmetal grey colour. It's very dark, just a shade below whatever the new boltgun stuff is called, and has a nice dull shine to it. I am aiming to be done within the next couple of weeks, but we'll see if that actually happens.
|
|
|
|
|
|
2015/09/26 22:48:54
Subject: Warhound Titan Converted to Ordo Reductor
|
|

Arch Magos w/ 4 Meg of RAM
|
Looking reallyl awesome fella!!!
|
|
|
|
|
|
2015/09/26 23:04:36
Subject: Warhound Titan Converted to Ordo Reductor
|
|
Unstoppable Bloodthirster of Khorne
|
Nice work so far, mate. Very impressive!
|
|
|
|
|
|
2015/09/27 02:59:43
Subject: Warhound Titan Converted to Ordo Reductor
|
|
Ragin' Ork Dreadnought
|
Excellent beginnings!
|
|
|
|
|
|
2015/10/01 13:32:33
Subject: Re:Warhound Titan Converted to Ordo Reductor
|
|
Regular Dakkanaut
|
Thanks for the comments. Much appreciated.
Yesterday I did some work on the base of the titan. I wanted the whole thing to be fairly muted in colours so that it didn't detract from the Titan itself. A colour chart says that green purple and orange are a trio of colours that go, so I decided to do a dark green crashed lander. The pavement I made a pale browny stone, not really orange, but it doesn't look weird either.
My steps were:
On the road
- Paint the road with some very watery mechanicus standard grey
- Drybrush celestria grey to even the colours and highlight all the surface detail
- Drybrush the pavement edges with a mix of celestria and white to really push the broken surface look.
The ship
- Paint waagh flesh all over
- Drybrush with Warboss green
- Very light drybrush of Warboss with a little white
- Paint black for the chipped areas
- Paint over black with leadbelcher leaving a slight edge of black
- Realise the ship is too light, and do an all over wash of watered down black
- Apply some liquid silver (vallejo) to the chiping
The tiles
- 50/50 mech standard grey and mournfang brown
- drybrush 50/50 celestria and xv-88
- drybrush very lightly celestria to mute colours
[url=http://www.dakkadakka.com/gallery/747883-.html] 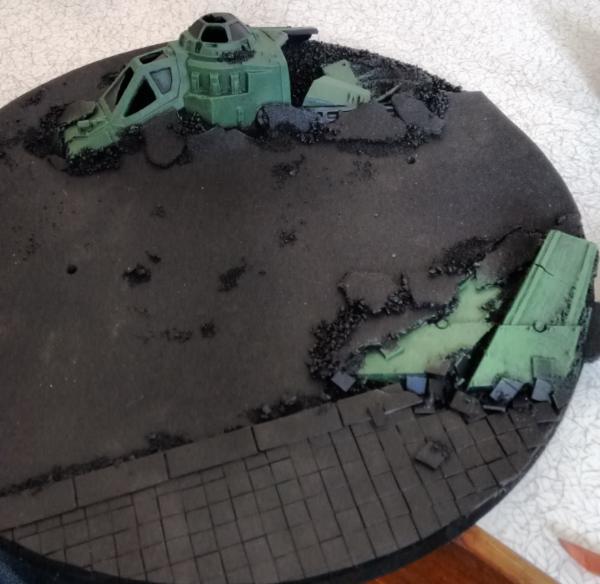
[/url][url=http://www.dakkadakka.com/gallery/747884-.html] 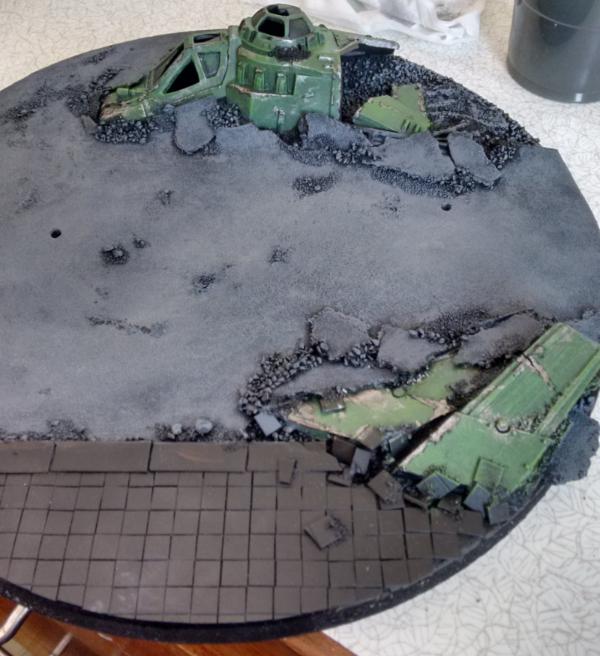
[/url] 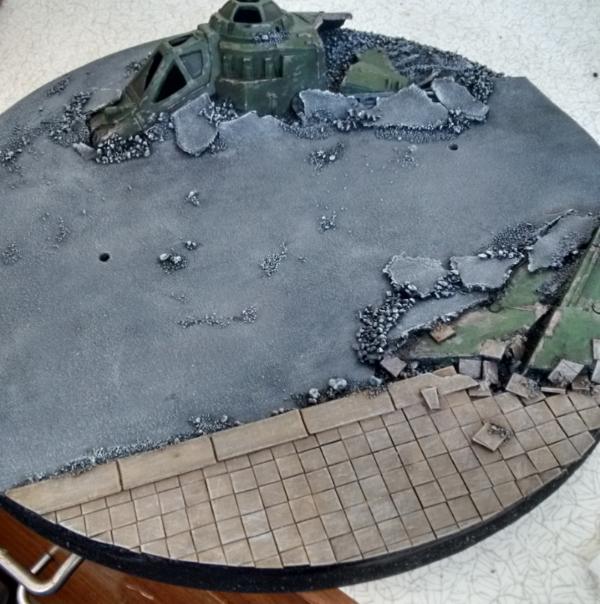
I also had a problem with the gold. My pot of liquid gold went clumpy. I believe that I was careless and let some water get into it, which causes corrosion and bricks the whole pot. I have since ordered and received a new pot of the gold, plus a pot of red gold, which I will be trying out. I did try using the 'old gold' which I had, but it appears to pale for my liking. I have a comparison with the test plate and the proper one but with the wrong gold. For all the wrong colour though, I am happy with the look of the cogged edging.
good gold on the left, bad on the right

For the time however, I think that I will hold off painting the armour because I want to get an airbrush to get good shading on the plates, and a brush less surface. My brithday's in a month, so I think I will get one for then. In the meantime I will be moving onto the second bigger toy that I bought, a Reaver Titan. I intend to do similar modifications of the appearance by adding the edging in card, and doing removal of eagles and replacement with my ordo reductor seal.
|
|
This message was edited 1 time. Last update was at 2015/10/01 13:34:24
|
|
|
|
|
2015/10/01 20:13:19
Subject: Re:Warhound Titan Converted to Ordo Reductor
|
|
Mysterious Techpriest
|
Very nice base!
|
|
|
|
|
2015/10/01 23:38:48
Subject: Re:Warhound Titan Converted to Ordo Reductor
|
|

Strategizing Grey Knight Chapter Master
|
Gah, this makes me want to get a titan now
|
IceAngel wrote:I must say Knightley, I am very envious of your squiggle ability. I mean, if squiggles were a tactical squad, you'd be the sergeant. If squiggles were an HQ, you'd be the special character. If squiggles were a way of life, you'd be Doctor Phil...
The Cleanest Painting blog ever!
Gitsplitta wrote:I am but a pretender... you are... the father of all squiggles. .
|
|
|
|
|
2015/10/02 00:08:04
Subject: Re:Warhound Titan Converted to Ordo Reductor
|
|
Mysterious Techpriest
|
Do eet!
|
|
|
|
|
2015/10/02 09:29:33
Subject: Warhound Titan Converted to Ordo Reductor
|
|
Pious Palatine
|
Very nice. Rare to see conversion work to such a large model. So thanks for sharing.
Looking forward to seeing the final piece.
D
|
|
|
|
|
2015/10/02 10:19:30
Subject: Warhound Titan Converted to Ordo Reductor
|
|
Decrepit Dakkanaut
|
Looking fantastic, and I love your solution for the cogs teeth on the panelling, and the running position. Have you had to counter-weight the base at all?
How positionable is the head on the Warhound?Can it look up, so to speak? I've been lusting after a Chaos one for a while, but I'd want to do it roaring at the sky sort of thing.
|
|
|
|
|
|
2015/10/02 19:29:12
Subject: Warhound Titan Converted to Ordo Reductor
|
|
Implacable Skitarii
|
Amazing job here mate. Subbed!
The trimming and scratch building resulted in a great piece, and the base also looks top job. I might have to borrow the sandpaper idea, if you don't mind!
That said, do you plan on keeping the rof that supports the leg, or remove it once you are sure the epoxy is dried and you won't handle it anymore?
|
|
|
|
|
|
2015/10/04 14:46:09
Subject: Re:Warhound Titan Converted to Ordo Reductor
|
|
Regular Dakkanaut
|
Thanks again for the compliments. Knightly, you should do it. Well worth it if you're up for putting the time in to make it personal and really impressive.
Buttery Commissar; I have not had to counterweight the base so far, I tried fairly hard to center the body on the base. The one I copied the pose from had a larger base and is a little more dynamic as a result, but I'm very happy with the result. My biggest concern is the amount that the body is weighted forward of the waist. I may have to upgrade the magnets because it can wobble a bit if the table moves too much. It's not yet fallen off though.
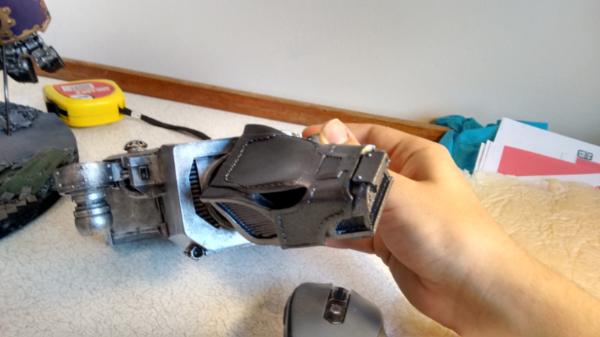
Unmodified, the range of the head is quite limited. The most upward allowed range of motion puts the head surface slope in line with the body, but not looking upwards. This is because the part on the body and the neck are each sloped downwards. I think you could improve it by removing the top part of the 'cable collar' piece, and also by removing some of the upper carapace, which acts to limit the motion further. Posing would be key to make it work. I would think that crouched low, with the body angled sideways so that the head is looking up to the side, rather than straight up would be best. I had a quick pose with mine to try and show the head angle I mean. to make it work it would need well posed legs, and carefully placed guns, to not look gangly. You would also have to redo the neck joints cables, but if it's chaos that should be easy to make look mutated.
ciuncky; Thanks, I stole the idea from somewhere else. Really the sandpaper worked much better than I expected. I would just recommend that you have a very firm base coat to cement the grit into place. And paint it with a very large brush. The very even surface makes brush strokes stick out a bit. The ripped asphalt also worked better than I thought, the cork is a fantastic material for a road subsurface. Currently it is held in place by that rod through the lifted leg, and a short rod coming from the standing leg. I am unsure on whether to permanently affix it to the base. If I did then I could probably remove the support rod. As it is, for the sake of transporting it, I think I will keep the rod in use. If I later decide to remove it, the place which I drilled into is fairly well hidden in the gap between the bottom of the shin plates and foot, so it will be easily doable.
No real update today, but I have been thinking about the reaver some more. I plan to have a base which ties into that of the warhound, so I will be using the larger part of the crashed aquilla, and will try to include some pics of that base during assembly. First though I have to figure out the pose. Much like the warhound I don't want it to look static. Only thing is that I have never seen a truly dynamic looking reaver. The best I have seen is actually the one built by the same person as the running warhound that I copied.
To be specific, the splayed leg stance means that it's super hard to do much with it. I plan to widen the hips by extending the connection to the crotch and bring the legs more vertical. I know it doesn't match the epic titan, but it's sort of stupid. I also want to try and extend the legs themselves. I would like to add a couple of inches to give it the height I think it should have. I believe there is room for this modification in the thighs. For the body I'm pretty happy with it as it is. The connections are all nice and secure so it will be easy to have the legs and body separate for transport. The trick will be getting the arms swappable, I've not figured that out yet. And of course I'm going to be destroying the original detail in favour of my own cog border and seal.
|
|
|
|
|
|
|
|