| Author |
Message |
 |
|
|
|
|
Advert
|
Forum adverts like this one are shown to any user who is not logged in. Join us by filling out a tiny 3 field form and you will get your own, free, dakka user account which gives a good range of benefits to you:
- No adverts like this in the forums anymore.
- Times and dates in your local timezone.
- Full tracking of what you have read so you can skip to your first unread post, easily see what has changed since you last logged in, and easily see what is new at a glance.
- Email notifications for threads you want to watch closely.
- Being a part of the oldest wargaming community on the net.
If you are already a member then feel free to login now. |
|
 |
2015/10/27 22:53:33
Subject: My first titan (or "Probably not how to build and paint a £350 Warhound"!)
|
|

Guard Heavy Weapon Crewman
|
Hey all,
So yeah...I had no intention of ever making a blog up of this because frankly I expect to do a really bad job and that's if I even get to the end of this build! But, you never know, perhaps working on this blog will help keep my motivation!
Anyway, moving swiftly on...I bought a warhound. Standard Mars pattern and for armaments I went for the inferno cannon and the plasma blastgun. My intention is to make a purely scenic model, I have some really cool (I think) ideas for this and I really hope I can pull it off!
The scene, as I hope to portray it, is that this warhound is fighting underground, in a tunnel. There are a few rag-tag but grizzled veteran guardsmen (well, technically they're meant to be PDF) that will be using the titans legs and feet as cover, down the other end of the base will be a load of necrons slowly but surely stalking towards them in a nice neat (robotic, I'm hoping) line and column setup. I have a large wooden chopping board as the base which I will cover completely in modelling clay so I can get a real good varied and textured ground, I also intend to build up one side wall to give the impression of the tunnel. I will embed some bits in the clay to make it look more real (some small coloured glass for example which can be used to show crystal deposits and I have some green basing material which I will use to show some mineral deposits) and I will also build in a mining cart track (thanks to some model railway line) and of course things like stalagmites, cobwebs, barrels, boxes and I was even thinking whether I could produce some kind of structure that is supposedly holding up the roof.
But anyway, the base is a ways off yet as I don't even really know how to start this at all - which order to do things in or anything like that!
Some pics!
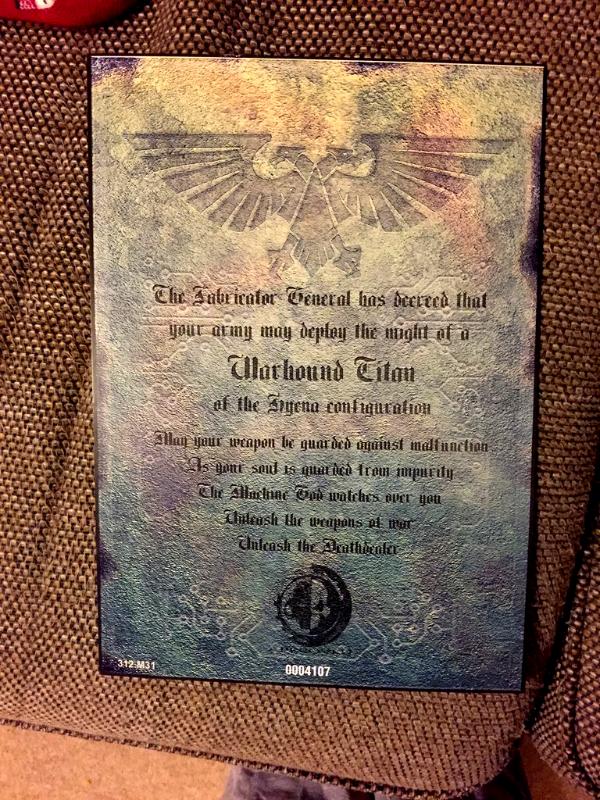
This is my certificate...just so no one thinks I'm lying!
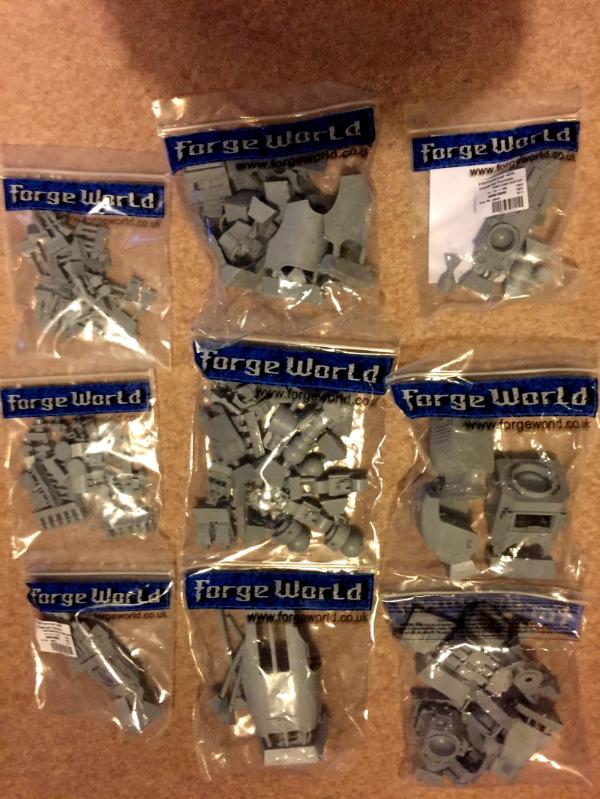
I then unboxed it all and nearly had a heart attack
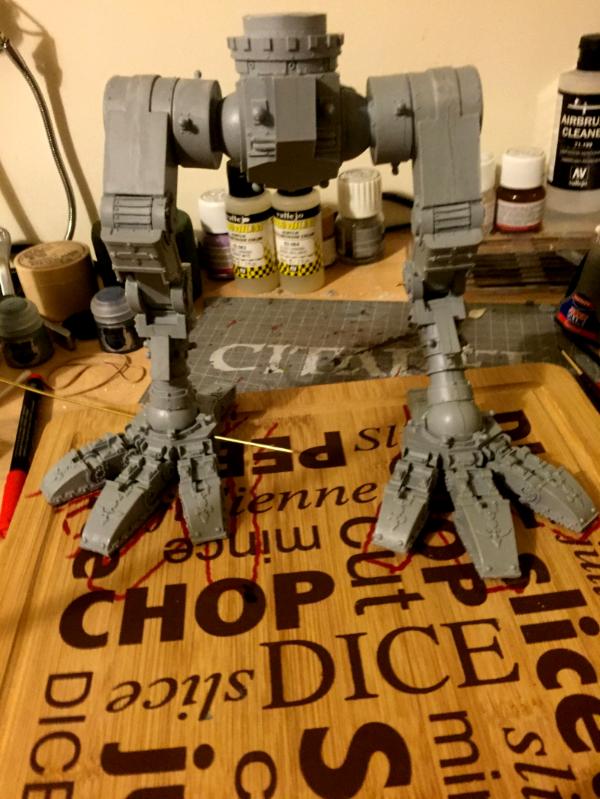
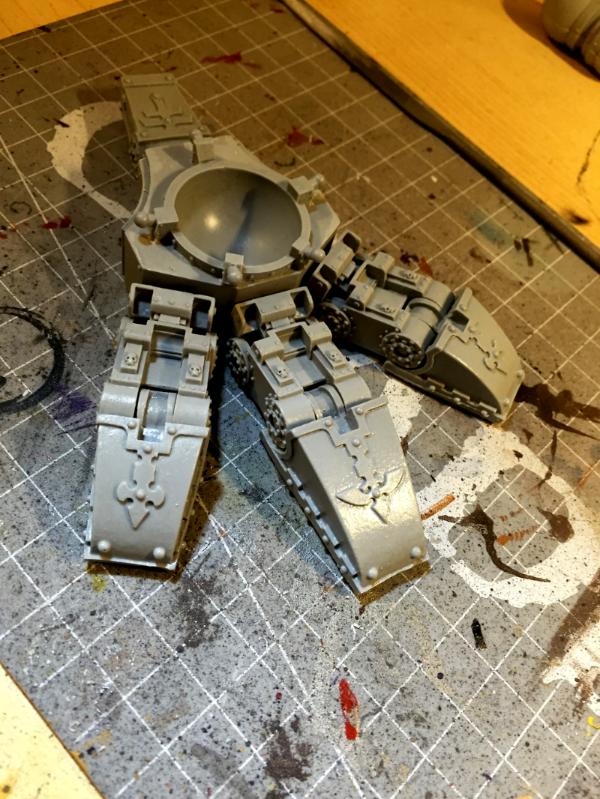
I didn't really know where to start, so I glued the foot all together. No I didn't pin any of the toe joints....yes that will probably suck at some point but I'm hoping that because both feet will be flat to the ground AND wont be moved about at all, that I wont need to worry about snapping joints!
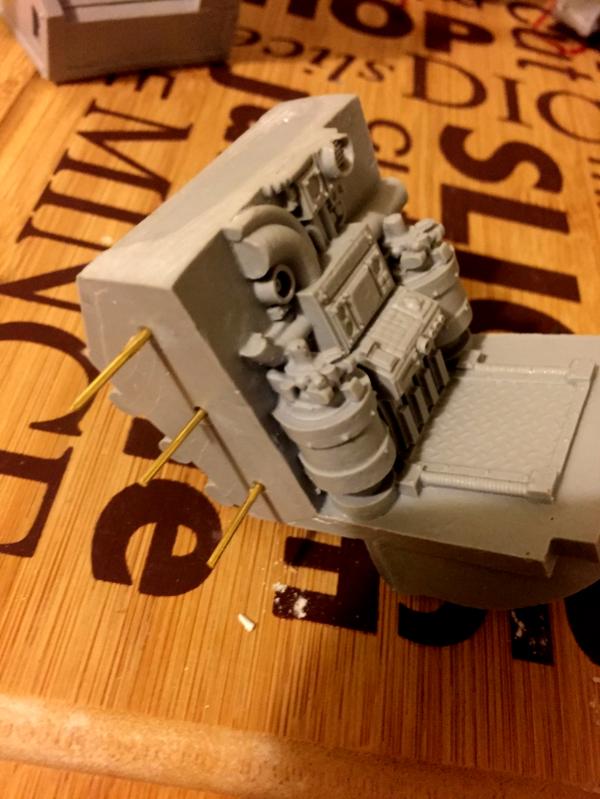
I then drilled one hole straight down the centre of the ball socket in the foot, this was because I intended to screw the foot straight to the base. Course after drilling it and thinking about how to progress I realised that it wasn't going to be that simple, as I would need to base around the foot, but I didn't want to base round a non-undercoated, non-primed, non-painted foot because when it came to doing all that it would be hard to not ruin the base. I also then realised that I couldn't glue the foot to the leg BEFORE screwing it to the base as then I couldn't get to the screw hole as the ball socket would be covered! Thankfully I think I came up with an alternative that works - I drilled three more holes through the bottom of the foot which I would use to insert brass rods from underneath the foot and into the ball socket....three rods going at different angles should hold the ball joint in place and if I didn't glue it then I can use them to hold the joint in place while I build the rest of the leg and get it mostly painted. Once that's done I would be able to remove the rods which would separate the foot and leg again...then screw the foot into the board and base around it (not as important to be careful basing round the foot as to me its just natural weathering  )
I placed the ball socket of the lower leg into the foot and "eyeballed" the angle and direction (totally not what you should do to a model of this cost!) and I drilled up gently through the holes in the bottom of the foot to make marks on the ball. then taking the ball back out the foot, I drilled the holes in it (excuse my messiness with the drill!)
So in this piccy you can see the three brass rods poking out of the bottom of the foot and the main screw hole...
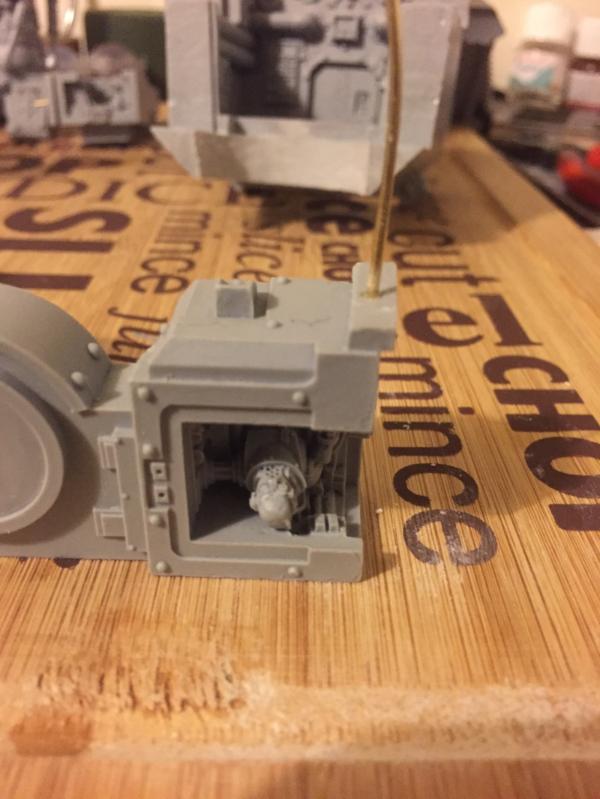
Final pic in this post...As you can see the 3 rods hold the foot up perfectly fine and some blu-tack is holding the rest of the leg in a vague position. Its certainly not perfect and the fact I "eyeballed" it hasn't entirely paid off. I think the angle of the lower leg is far too sharp and as you can see in the pic the position of the hip joint is waaaaay over the back of the foot. Overall it shouldn't matter too much as I'll be screwing the feet to the base so it cant fall over, but if I hadn't been doing that then I think the centre of gravity would have been all wrong and it would have been always toppling over. Perhaps looking like its crouched back on its haunches will add to the realism of being in a confined space...who knows!
I suppose I also have no idea if the pistons will line up well...which again I wont be able to attack till I'm nearly finished with the model as they'd stop me from taking the foot away from the leg.
Next task I guess is to look at the other foot/ leg now. I have somewhat forced myself to have one leg in a certain position - yeah I have the play with the other leg joints but its at least half decided for me now - so I will need to pray that I can do something with the other leg to make it fit so that the hips are flat and square to take on the torso.
Thanks for reading...please feel free to make any comments or suggestions! Hopefully I will be updating this blog every few days and at least once a week!
|
|
|
|
 |
|
2015/10/27 22:55:30
Subject: My first titan (or "Probably not how to build and paint a £350 Warhound"!)
|
|
Lord of the Fleet
|
Looks like a great start, as a fellow Titan owner I can't wait to see the end result 
|
|
|
|
|
2015/10/28 05:00:25
Subject: My first titan (or "Probably not how to build and paint a £350 Warhound"!)
|
|

Douglas Bader
|
SGTSwampy wrote:No I didn't pin any of the toe joints....yes that will probably suck at some point but I'm hoping that because both feet will be flat to the ground AND wont be moved about at all, that I wont need to worry about snapping joints!
You need to pin the feet, trust me. The Warhound is supposed to stand on its toes with the "body" of the foot slightly off the ground and that puts the entire weight of the kit on the toe joints. You'll need to pin them, and you'll probably want to put some hidden support under the foot to hold it up.
(Of course this is a good general rule for titans and similar heavy resin kits: when in doubt, pin it. If you ever find yourself thinking "this probably won't need to be pinned" you're almost certainly wrong.)
|
There is no such thing as a hobby without politics. "Leave politics at the door" is itself a political statement, an endorsement of the status quo and an attempt to silence dissenting voices. |
|
|
|
|
2015/10/28 05:37:32
Subject: Re:My first titan (or "Probably not how to build and paint a £350 Warhound"!)
|
|
Grim Dark Angels Interrogator-Chaplain
|
That thing looks REALLY hard to build, but it'll be awesome once it's done! Good luck!
|
|
|
|
|
|
2015/10/28 06:52:43
Subject: My first titan (or "Probably not how to build and paint a £350 Warhound"!)
|
|
Pious Palatine
|
Stupid question, but you didn't mention it so I'LL ask anyway:
Did you give it a bath? As in did you wash all in resin in war soapy water to remove as residual release agent from the mould? It just helps keep the primer/paint on.
Looking good so far. I can only dream of the days when I'll reach such hope feats as a Titan. Looking forward to see how you progress, especially with the tunnel setting you've described.
D
|
|
|
|
|
2015/10/28 06:58:07
Subject: Re:My first titan (or "Probably not how to build and paint a £350 Warhound"!)
|
|
Douglas Bader
|
To clarify what I mean, here's an example picture. See how the model is walking on its toes and the center of each foot is lifted off the ground? It doesn't look right if you put the feet on the ground, and you can imagine how much weight those toe joints are carrying if you do it the right way.

|
There is no such thing as a hobby without politics. "Leave politics at the door" is itself a political statement, an endorsement of the status quo and an attempt to silence dissenting voices. |
|
|
|
|
2015/10/28 07:56:47
Subject: My first titan (or "Probably not how to build and paint a £350 Warhound"!)
|
|
Guard Heavy Weapon Crewman
|
I did indeed give it a wash. I probably will go over the more detailed pieces again as some of them still felt a little slick once they'd dried. I guess the detail gives a lot of nooks and crannies that I really need to attend to.
As for the feet, I have raised the sole of the foot off the ground, but nowhere near as much as that example. I went for the look of the model standing more flat footed. at work ATM but happy to take a picture later to show what I've done
I will have to think about how I can pin now I've already glued.
|
|
|
|
|
|
2015/10/28 20:23:11
Subject: Re:My first titan (or "Probably not how to build and paint a £350 Warhound"!)
|
|
Guard Heavy Weapon Crewman
|
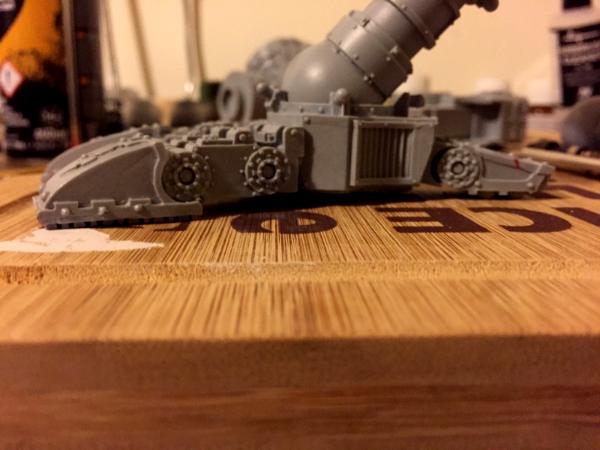
OK so here is the best I could do t show what I've done. As I say, although the toes are holding the sole off the ground its really quite a flat foot
|
|
|
|
|
|
2015/10/28 21:11:43
Subject: My first titan (or "Probably not how to build and paint a £350 Warhound"!)
|
|
[DCM]
Dankhold Troggoth
|
I think one foot being flat will be fine - just don't build them both that way  (as the back foot will need to be tilted, so maybe save it's final gluing until later on in the build)
|
|
|
|
|
2015/11/05 08:40:55
Subject: My first titan (or "Probably not how to build and paint a £350 Warhound"!)
|
|
Guard Heavy Weapon Crewman
|
Sorry for the silence. I just spend time staring at my model and wondering wtf to do!
I really don't like the idea of trying to pin the foot that is already put together, so I have a new plan. I am going to pin the ankle into the foot using some angled rods and then I shall drill a wood screw straight up through the bottom of the chopping board, through the foot, through the ankle ball and a short way up the shin.
Assuming the resin doesn't split this should not only help hold it all together but also then the weight on that leg should really be, at least partly, taken up by the screw and the unpinned toe joints should be ok.
I was worried before about then getting under the foot to do the base but I think that it will be sitting to low to the base that I can get round it.
I'm gunna be looking into this tonight so I may have some pictures for tomorrow...
|
|
|
|
|
|
2015/11/05 08:48:52
Subject: My first titan (or "Probably not how to build and paint a £350 Warhound"!)
|
|
Douglas Bader
|
SGTSwampy wrote:I really don't like the idea of trying to pin the foot that is already put together, so I have a new plan.
Just take it apart and start over. It's usually possible to break glue joints without damaging the parts (look up advice on glue removal if you want) and with such an expensive model you're better off doing it right than trying to improvise a solution.
|
There is no such thing as a hobby without politics. "Leave politics at the door" is itself a political statement, an endorsement of the status quo and an attempt to silence dissenting voices. |
|
|
|
|
2015/11/10 06:23:46
Subject: My first titan (or "Probably not how to build and paint a £350 Warhound"!)
|
|
Guard Heavy Weapon Crewman
|
So...
No I didn't de-glue and re-glue the foot. frankly I couldn't be bothered....
I did however predrill a hole up through the ankle as I said and screwed up through the base into the foot. I then have pinned all joints up to the hip.
I then think boredom started kicking in so I began to cut corners! I vaguely "eyeballed" how the second leg should go, marked the knee and thigh joints and superglued and pinned those. I then drilled through the foot from left to right and though the ball so I could pin straight through and hold it in place. Finally I predrilled a hole up through the foot and ball again so I could also screw this foot into place on the base.
Next task is to pin the hip joints to the legs and finally put the waist piece in place and I can then start the tedium that will be all the pistons!
|
|
|
|
|
|
2015/11/10 06:35:25
Subject: My first titan (or "Probably not how to build and paint a £350 Warhound"!)
|
|
Pious Palatine
|
Sounds like you've made some progress, any pics?
How many pistons?
EDC
|
|
|
|
|
2015/11/10 09:07:18
Subject: My first titan (or "Probably not how to build and paint a £350 Warhound"!)
|
|
Guard Heavy Weapon Crewman
|
I have taken them, I just keep forgetting to upload them! I shall get some on tonight!
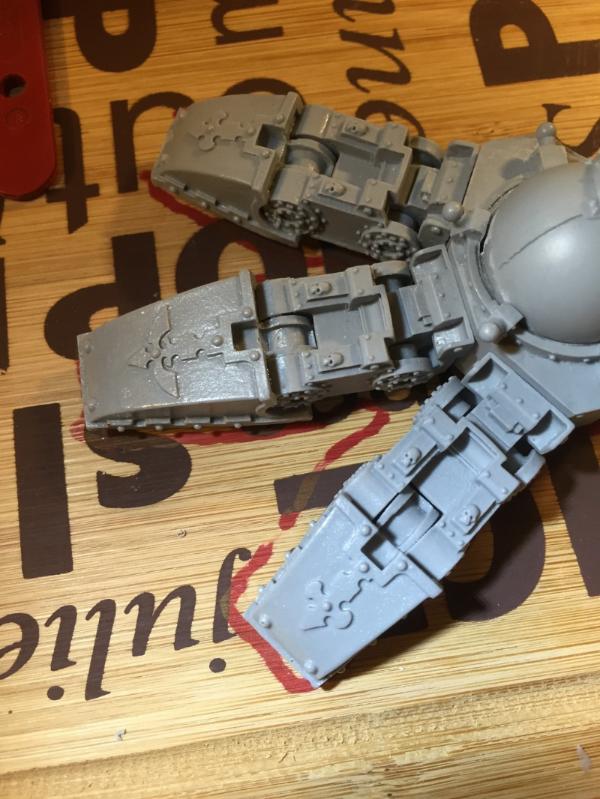
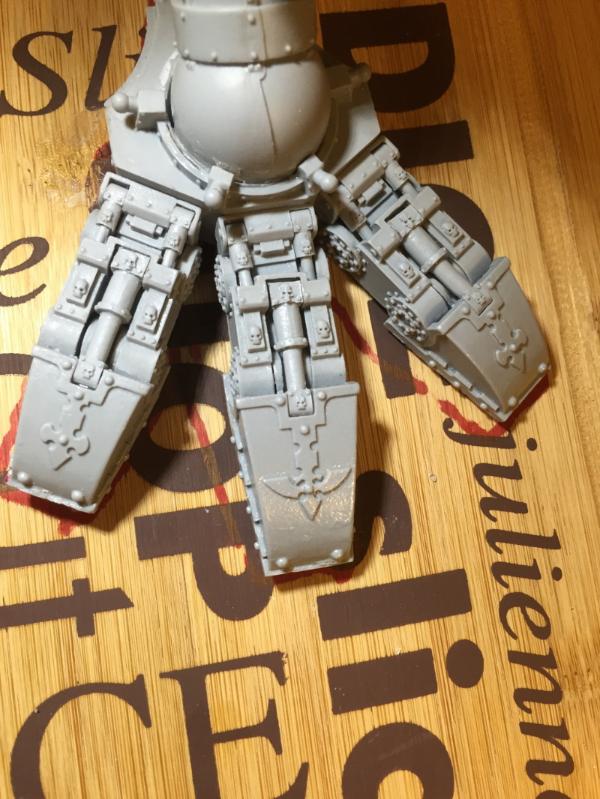
A lot of pistons....there's what 8 per foot, 4 on each ankle, one for each knee, one for each thigh and then 3 for each hip joint. Something like that anyway, each one has to be cut to fit! Automatically Appended Next Post: So...a few pictures.
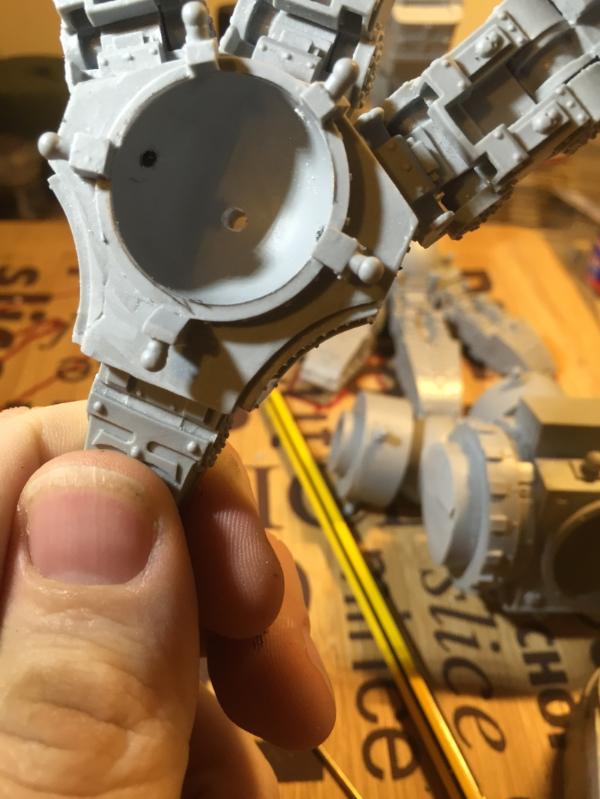
The hole running across the middle of the other foot to help pin the ankle
The foot on the left is already fixed in place, the foot on the right is only held at the ankle by the rod and the rest is glued and pinned in place.
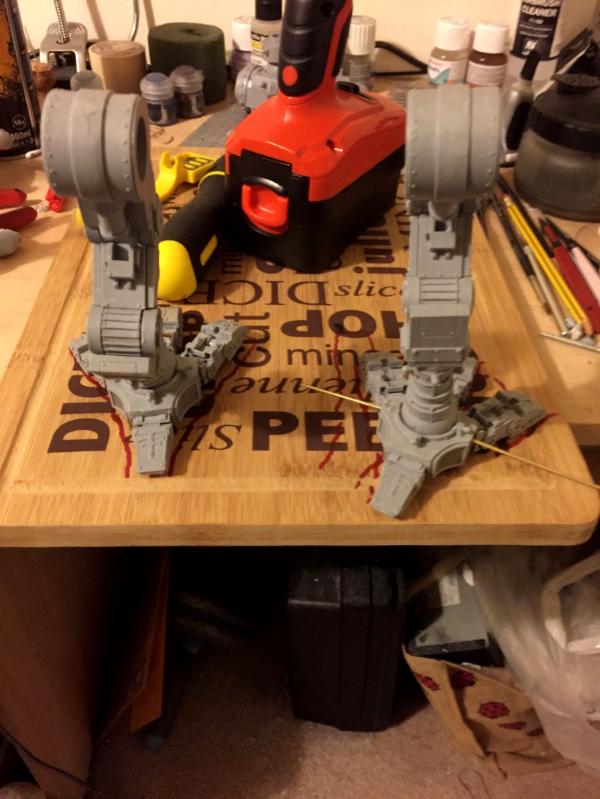
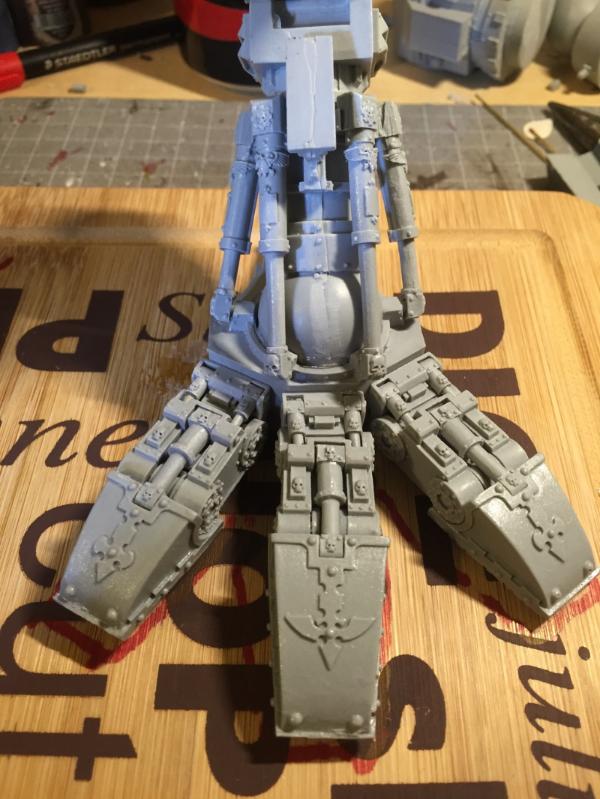
Long-distance shot of the warhound legs with waist in place
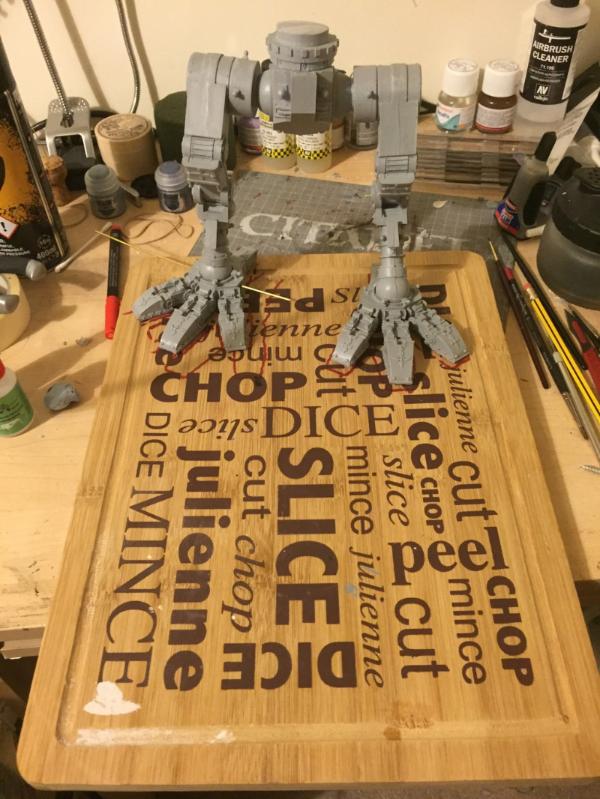
Close-up of the legs with waist in place
I should have done more with the pose....I just, well frankly I just want to get on with it
|
|
This message was edited 1 time. Last update was at 2015/11/10 17:57:14
|
|
|
|
|
2015/11/11 15:56:26
Subject: My first titan (or "Probably not how to build and paint a £350 Warhound"!)
|
|
Pious Palatine
|
Cool. Even just having it standing and starting to take form must be pretty satisfying!
At least you're making good progress.
EDC
|
|
|
|
|
2015/11/11 20:02:28
Subject: Re:My first titan (or "Probably not how to build and paint a £350 Warhound"!)
|
|

Strategizing Grey Knight Chapter Master
|
From what I read on peoples build blogs the feet and legs are the hardest things to build so you've breached that bit, technically it should easy from here right?
|
IceAngel wrote:I must say Knightley, I am very envious of your squiggle ability. I mean, if squiggles were a tactical squad, you'd be the sergeant. If squiggles were an HQ, you'd be the special character. If squiggles were a way of life, you'd be Doctor Phil...
The Cleanest Painting blog ever!
Gitsplitta wrote:I am but a pretender... you are... the father of all squiggles. .
|
|
|
|
|
2015/11/13 23:40:42
Subject: Re:My first titan (or "Probably not how to build and paint a £350 Warhound"!)
|
|
Guard Heavy Weapon Crewman
|
Updates! I felt like I'd had a good day...so I thought I'd tackle the thousands of pistons!
ok, I started off actually by putting some brass rods in a hip joint and gluing that in place
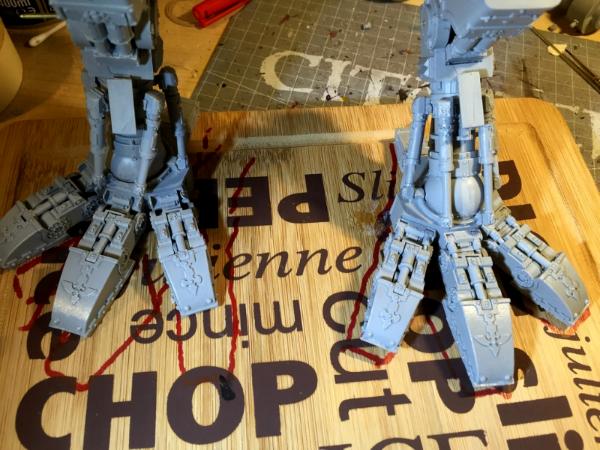
I then moved onto the pistons...so the foot with no pistons
then all the toes in place
Then the ankles
Finally did the other foot, plus the knee and thigh ones (which isn't visible) and I feel that's enough for one night!
|
|
|
|
|
|
2015/12/01 21:56:40
Subject: Re:My first titan (or "Probably not how to build and paint a £350 Warhound"!)
|
|
Guard Heavy Weapon Crewman
|
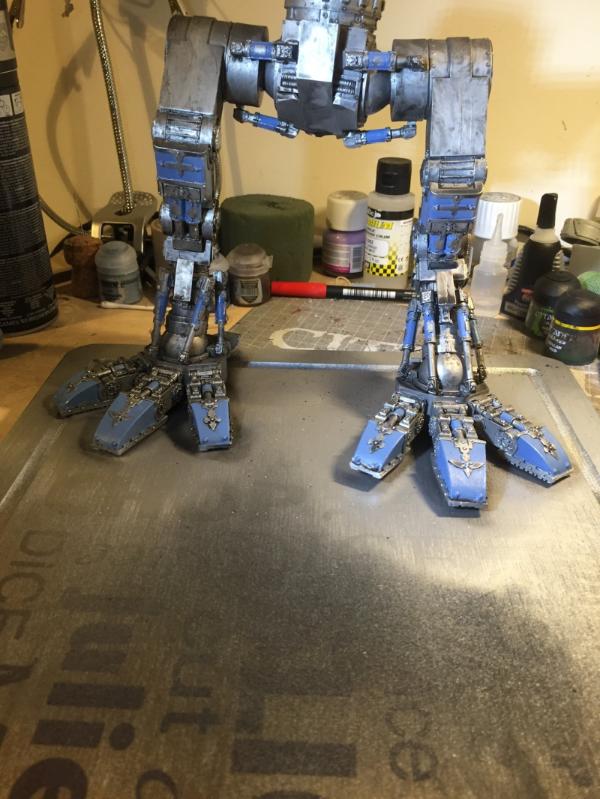
Done some more work finally!
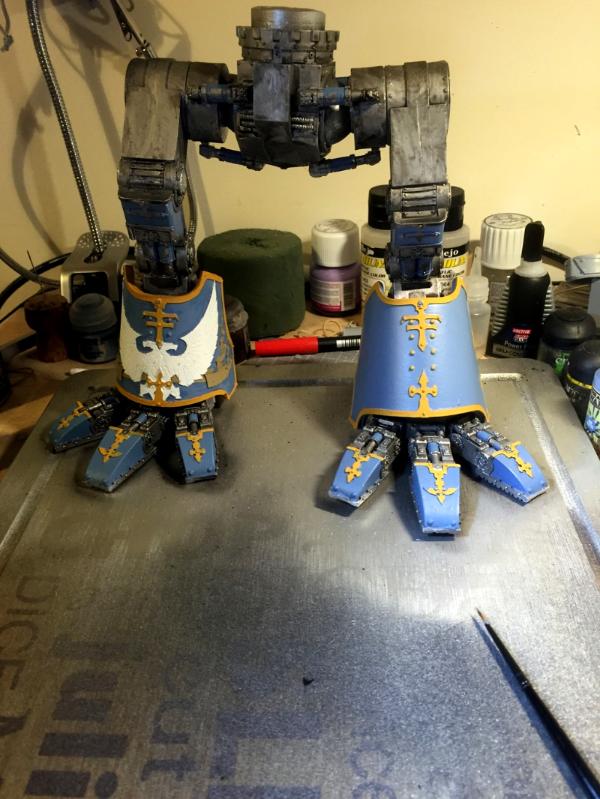
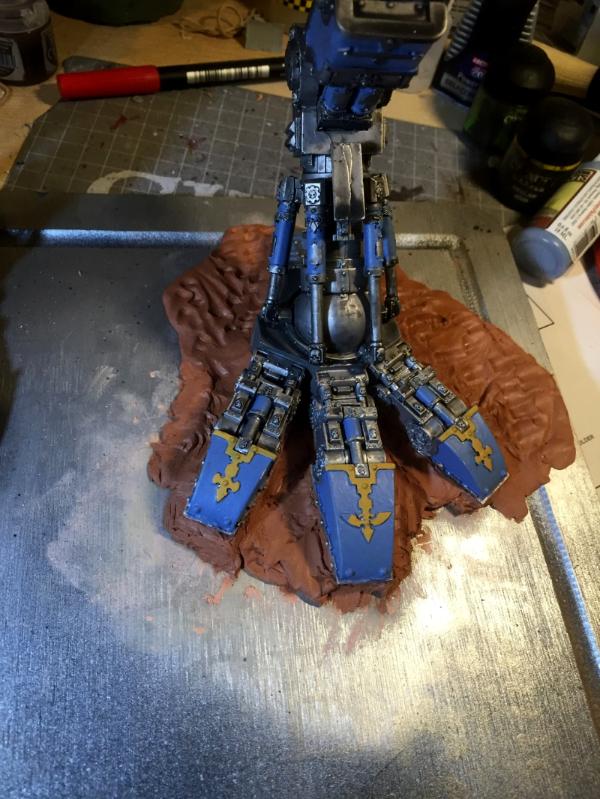
With the feet and legs put together, I have now undercoated black, sprayed silver, airbrushed with Nuln Oil (to dirty it up a bit) and then started roughly painting the primary colour on the feet armour and the piston housings.
I've also now started to prepare the body to go together, so I have placed brass rods in the body and the servitor shoulders
|
|
|
|
|
|
2015/12/02 03:50:00
Subject: Re:My first titan (or "Probably not how to build and paint a £350 Warhound"!)
|
|
Grim Dark Angels Interrogator-Chaplain
|
Looks like that Titan is coming along nicely! I'm already looking forward to the finished product!
|
|
|
|
|
|
2015/12/02 04:31:16
Subject: My first titan (or "Probably not how to build and paint a £350 Warhound"!)
|
|
Decrepit Dakkanaut
|
Impressive work so far! Learning a lot by seeing you do this.
Friend dumped his dogbot on me to build, I'm not even starting it due to sheer bewilderment.
|
|
|
|
|
|
2015/12/02 07:13:18
Subject: My first titan (or "Probably not how to build and paint a £350 Warhound"!)
|
|

Jovial Plaguebearer of Nurgle
|
Looks really cool cant wait to see the end product
|
Facts are chains that bind perception and fetter truth. For a man can remake the world if he has a dream and no facts to cloud his mind. |
|
|
|
|
2015/12/02 09:44:00
Subject: My first titan (or "Probably not how to build and paint a £350 Warhound"!)
|
|
Pious Palatine
|
Awesome progress. You've really broken the back of the project and hopefully you've got all the hard bits out the way.
Keep the momentum and you'll have it done it no time.
EDC
|
|
|
|
|
2015/12/05 21:52:07
Subject: Re:My first titan (or "Probably not how to build and paint a £350 Warhound"!)
|
|
Guard Heavy Weapon Crewman
|
hokay so, had a productive day....again I am probably rushing this AND I probably should have looked into how to use clay before doing this but...ahh what the hell!!
So firstly, I started painting up the feet and also the shin guards, I have rested them in place to give an idea although I have only really got base colours on so far.
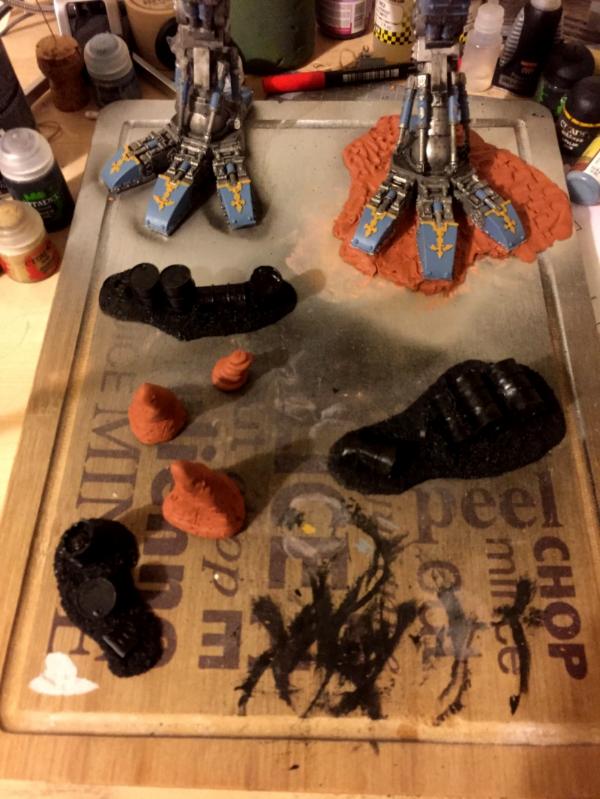
You probably haven't been able to see in any of the other pics but I had one foot raised off the ground slightly, this was always the intention as I wanted to build up some mud beneath it. So I have packed in some clay under and around the foot. It will be more than this but I don't know what the clay will do so I'm holding off doing it all in one go.
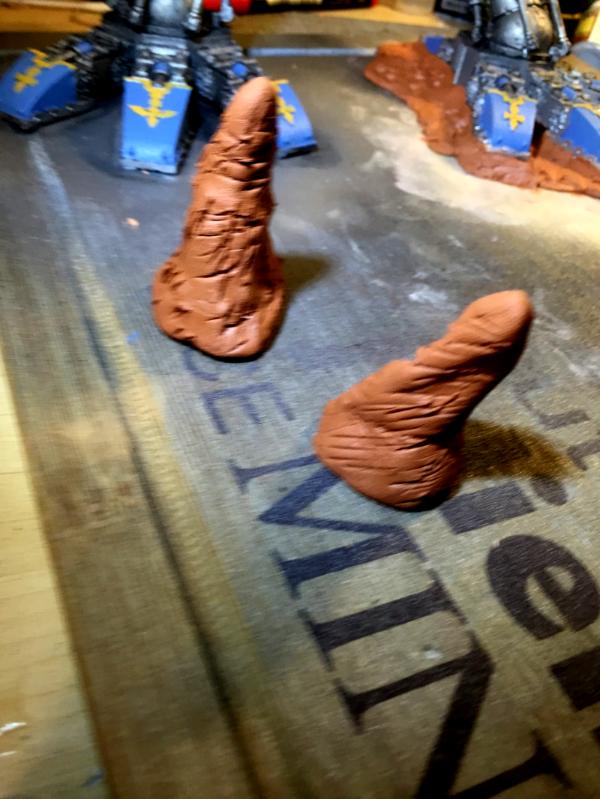
OK so while I had some clay out I thought I would try and be creative and make some stalactites...I'm not sure they really came out that well (a little too phallic for my liking), hopefully they will look better when they've dried and I've painted them.
To go with my base I had bought some resin barrel sets. I have undercoated these and superglued them in place. So if you ignore the stalac-willies that are just there drying, the base is actually starting to come together as well.
Next job. I might actually take a break from the titan itself and have a go at making some cool-looking PDF veterans. a combination of Catachans and Cadians
|
|
|
|
|
|
2015/12/06 04:12:50
Subject: My first titan (or "Probably not how to build and paint a £350 Warhound"!)
|
|
Ultramarine Master with Gauntlets of Macragge
What's left of Cadia
|
Seems like the Titan is coming along nicely. Keep up the great work!
|
TheEyeOfNight- I swear, this thread is 70% smack talk, 20% RP organization, and 10% butt jokes
TheEyeOfNight- "Ordo Xenos reports that the Necrons have attained democracy, kamikaze tendencies, and nuclear fission. It's all tits up, sir."
Space Marine flyers are shaped for the greatest possible air resistance so that the air may never defeat the SPACE MARINES!
Sternguard though, those guys are all about kicking ass. They'd chew bubble gum as well, but bubble gum is heretical. Only tau chew gum
|
|
|
|
|
2015/12/09 22:58:51
Subject: Re:My first titan (or "Probably not how to build and paint a £350 Warhound"!)
|
|
Guard Heavy Weapon Crewman
|
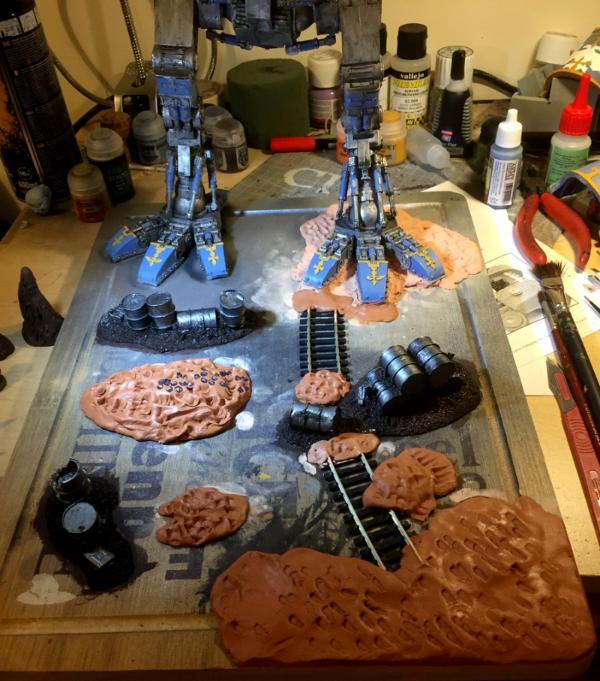
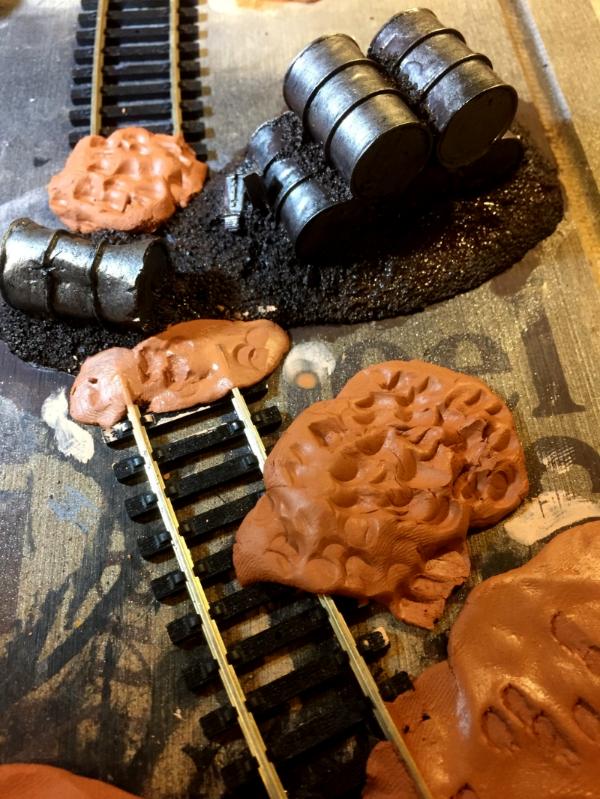
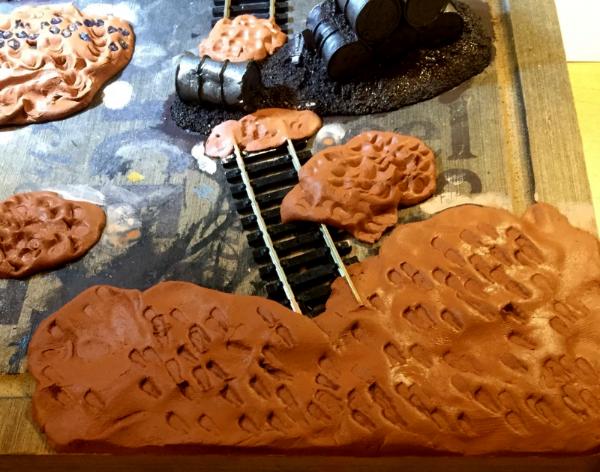
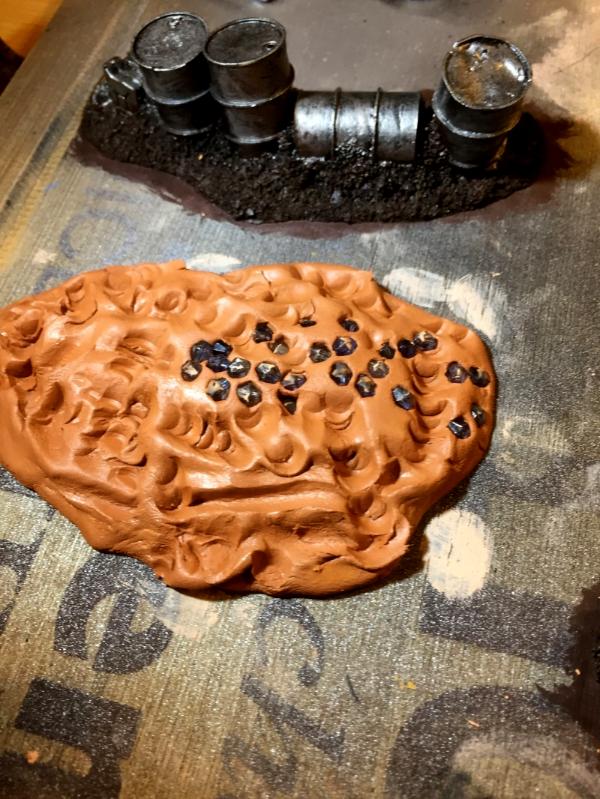
Hokay...more work done on the base to get more of the ground built up using clay and also put the track down, started painting the barrels and also tried an idea I had to buy some jewellery beads and use them to represent a stream of gems in the ground.
So firstly here is an overall shot.
Close-up of the track
Bit more of the tracks and also I used one of the necron models to make a load of footprints, some overlapping each other to try and show a lot of movement across that area
Close-up of the stream of gems. Once the clay has dried I will be painting and texturing and hopefully the beads will sort of be visible...
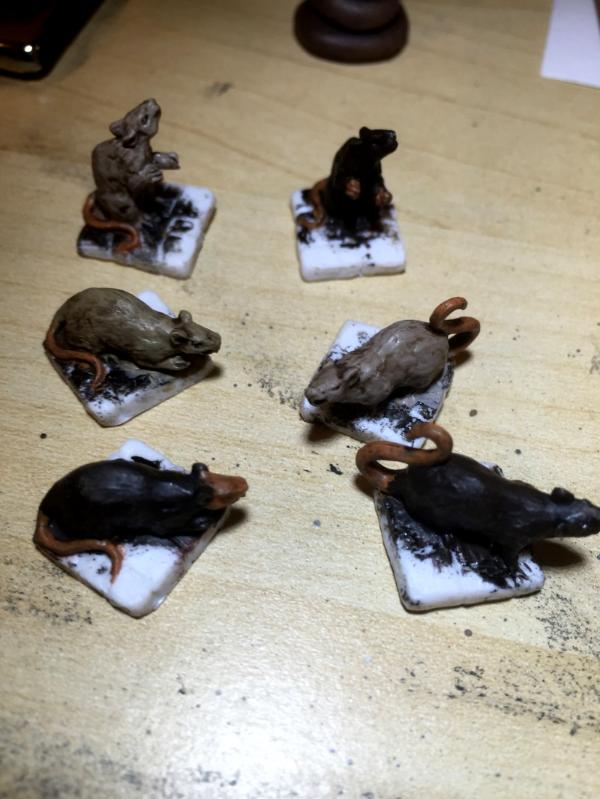
Been painting up my rats as well
Just to say that the Warhound isn't forgotten, I'm just busy gluing it together!
|
|
This message was edited 1 time. Last update was at 2015/12/09 23:01:09
|
|
|
|
|
2016/01/24 19:59:30
Subject: Re:My first titan (or "Probably not how to build and paint a £350 Warhound"!)
|
|
Guard Heavy Weapon Crewman
|
I haven't forgotten or given up...just took a hiatus trying to work out what to do with the body as its pretty badly cast it seems and doesn't fit together well at all!!!
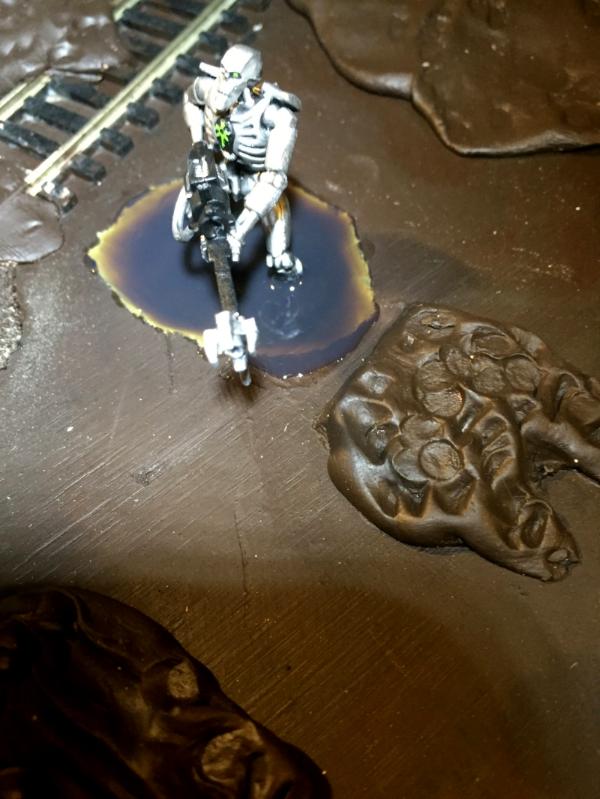
I did take a stab at having one of my necrons standing in a pool of muddy/oily water (and also tried to give the effect of llichen growing as well. Wont know how well that went until the water effect stuff dries.
Also I haven't done a picture of it yet but the base has also been base coated in brown, the clay has also been based, the rats have been cut out and glued down and I'm now gluing sand and rocks around them. I will do a bigger update once I see how the necron taking a paddle comes out!
|
|
|
|
|
|
2016/04/24 19:09:10
Subject: Re:My first titan (or "Probably not how to build and paint a £350 Warhound"!)
|
|
Guard Heavy Weapon Crewman
|
OK so took another hiatus to deal with a new job this time! Still, getting back into it now and quite a bit has happened.
I have been painting up the base, the oil cans are done, the rats are in and the track is done - pics to follow in a few days
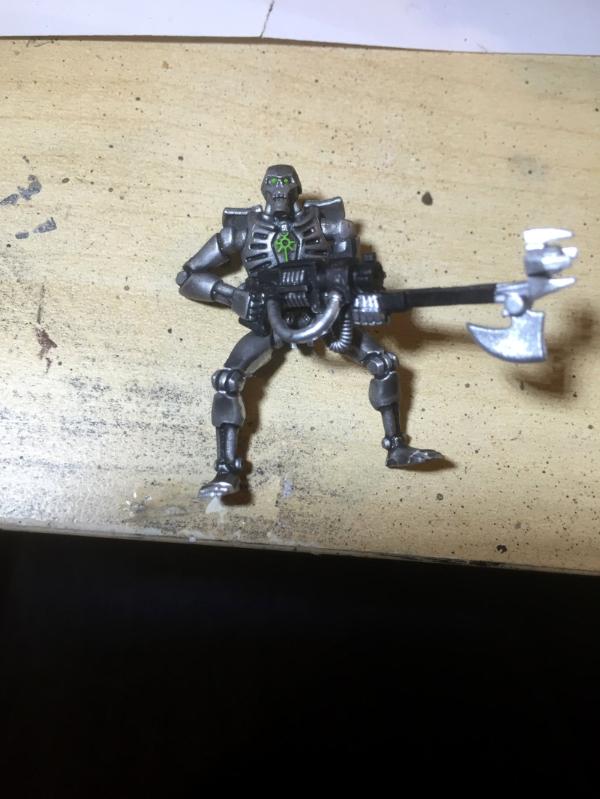
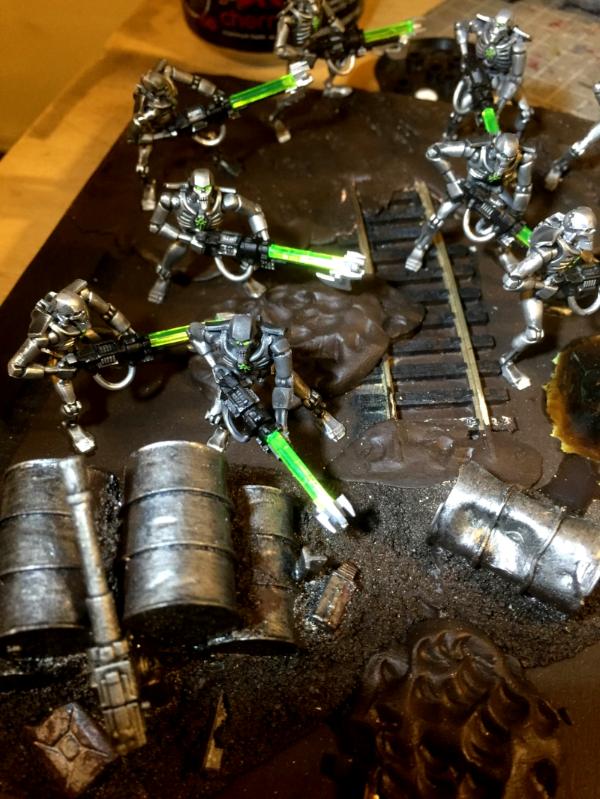
the necrons are near enough all done now, I've not gone for being overly detailed for various reasons but all that is left now is to stick the green gauss bars into the guns. They all basically look like this though.
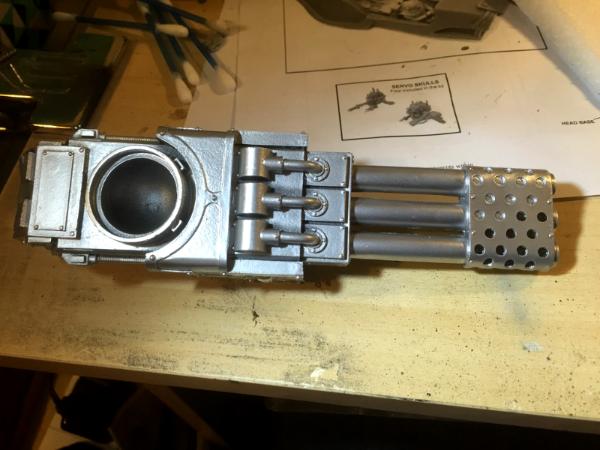
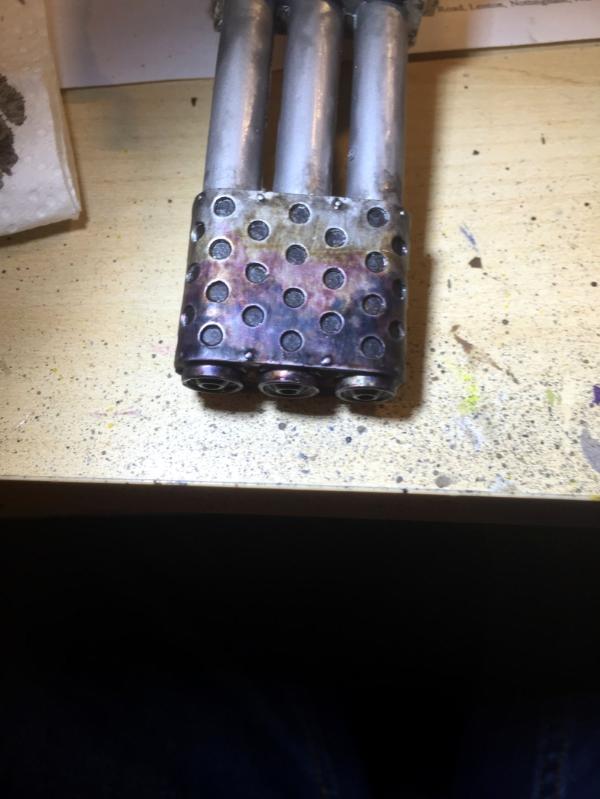
I've mostly concentrated on the inferno cannon today and I spent a bit of effort on trying to give a burned, coloured effect for the business end! So here are some pics of the process...I apologise in advance for the lighting quality and picture taking!
Firstly I undercoated and primed it a bright silver...I then started off by filling in the barrel holes in black.
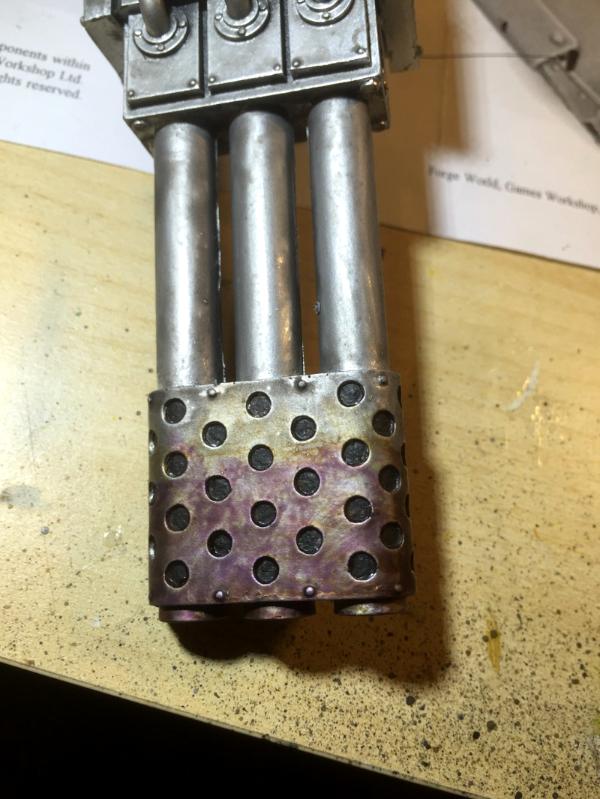
I then moved onto putting a large but light covering of Gryphonne sepia over most of the barrel (quite hard to see in the pic!)
I then went for a stronger coat of Druchii Violet leaving some of the Gryphonne Sepia showing
This was followed by a layer of Asurman Blue which again was covering less of the barrel than before to leave the Gryphonne Sepia and the Druchii Violet showing.
I then went in with Nuln Oil to blacken the end and also did a very fine layer across the whole barrel to tie all the colours in together.
Finally I did another heavy coat of Nuln Oil on the very end of the barrel to darken it a bit more.
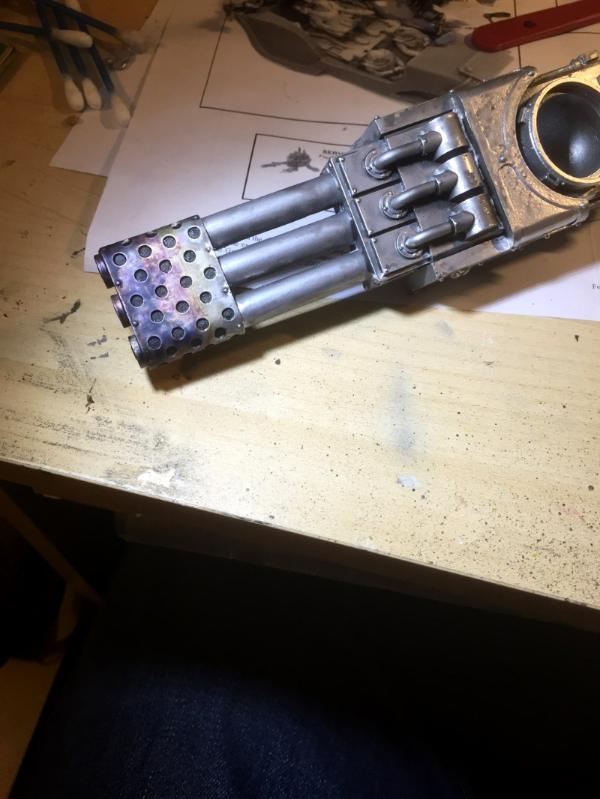
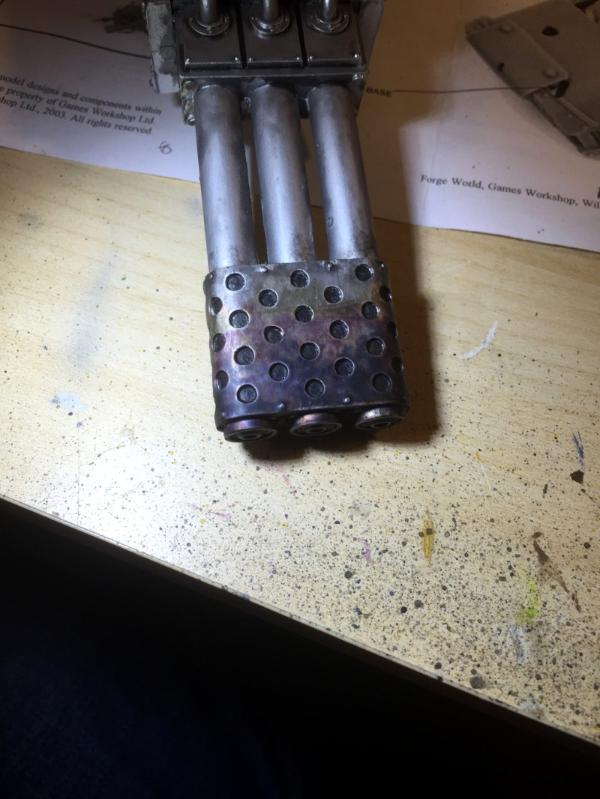
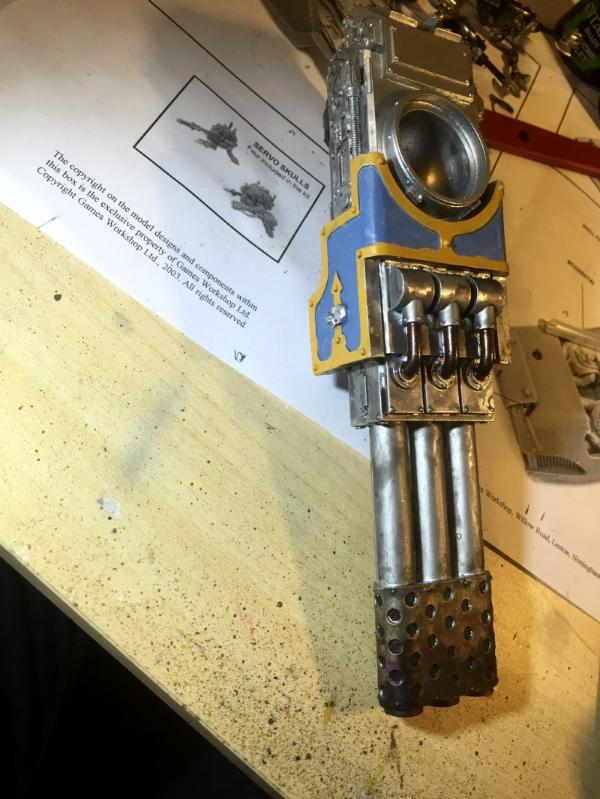
Then finally here is a wide shot including the beginnings of the standard armour colour (blue/mustard)
Its not come out perfect, but it looks a lot better than if I'd just done the usual paint it silver and wash it black!! I do have some weathering powders somewhere so when the gun is closer to completed then I will "soot it up" somewhat.
|
|
|
|
|
|
2016/04/30 21:35:42
Subject: Re:My first titan (or "Probably not how to build and paint a £350 Warhound"!)
|
|
Guard Heavy Weapon Crewman
|
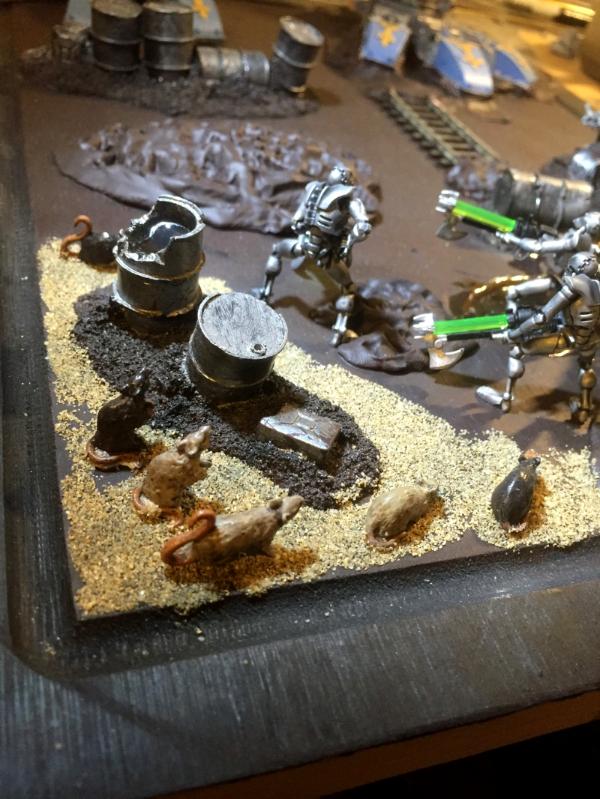
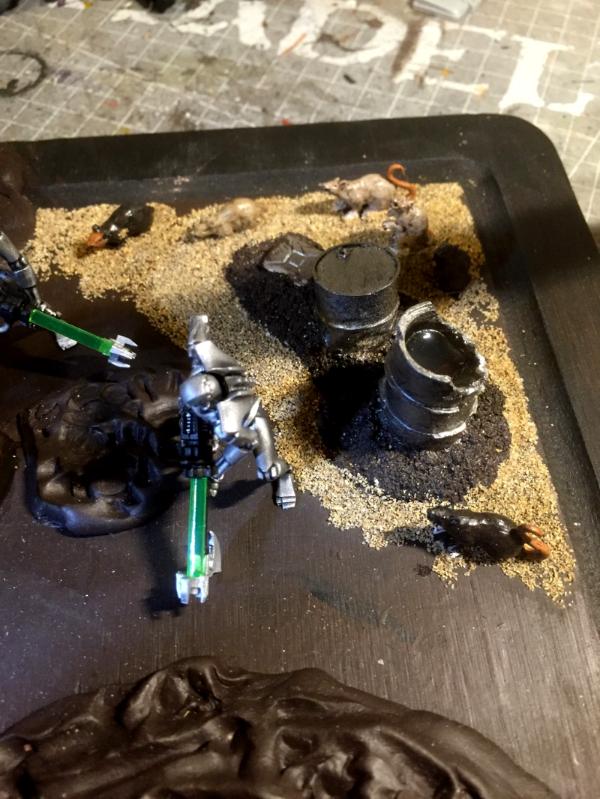
new update. Done some work to finish off the Necrons, put them in place and also started on the IG squad that will be defending the position....oh and I've thrown in some shots of how the base is coming along as well!!
So, firstly, in a corner I have some rats sitting behind some oil barrels watching the battle!
Shot of "rat corner" from the other side. You can see where I have built up some oil sitting in the open barrel.
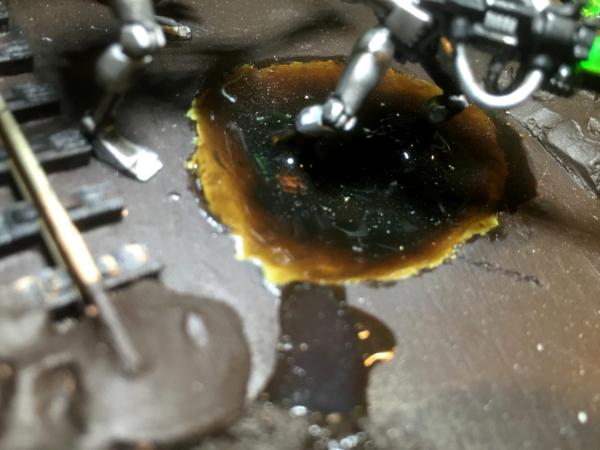
I also did a leaking barrel which has caused a puddle of oil (made a dip in the base, painted that with green and then made up a mix of water effect stuff and brown) that the Necrons are fearlessly stepping through on their way to goose all the naughty guardsmen.
In this shot you can see the Necrons have already caused the guardsmen to fall back from this position so quickly that they left an autocannon (I think) behind!
Shot from between the warhound's legs...showing the silver tide coming.
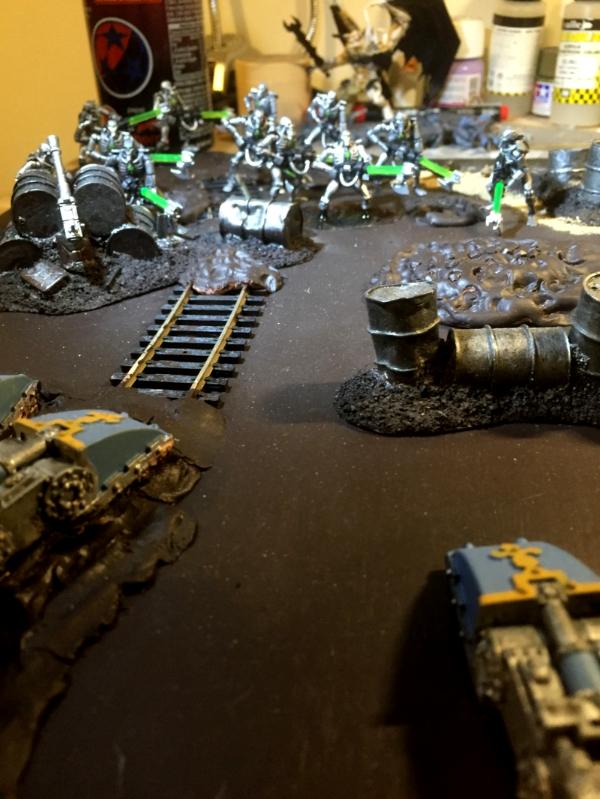
Finally I have a full-board shot. I still have more to do with the base, some more sand, some other basing materials I haven't got hold of yet and some more painting and work all round.. Coming together though.
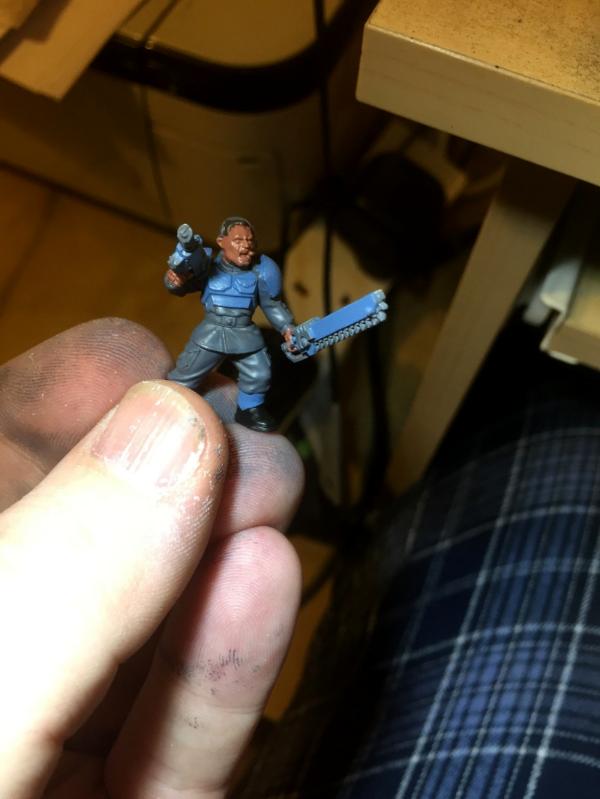
Actually, as you've all been so good here is a sneak peak at my rough working out of the guardsmen colouring. I don't know why but I though that Mechanicus Standard Grey as as the fatigues of my army was a good idea, I also wanted to include the blue that is the main colour of the Warhound. Its not an awful colour scheme but its just not quite there I don't think - both are very flat colours. I could try adding the secondary colour from the Warhound perhaps...I shall see next time I get a chance to paint.
|
|
|
|
|
|
|
|
 ~16000 Astra Militarum:
  ~1200 | Imperial Knights:
  ~2300 | Leagues of Votann:
  ~1300 | Tyranids:
  ~3400 | Stormcast Eternals:
  ~5000 | Kruleboyz:
  ~3500 | Lumineth Realm-Lords:
  ~700
~700