| Author |
Message |
 |
|
|
|
|
Advert
|
Forum adverts like this one are shown to any user who is not logged in. Join us by filling out a tiny 3 field form and you will get your own, free, dakka user account which gives a good range of benefits to you:
- No adverts like this in the forums anymore.
- Times and dates in your local timezone.
- Full tracking of what you have read so you can skip to your first unread post, easily see what has changed since you last logged in, and easily see what is new at a glance.
- Email notifications for threads you want to watch closely.
- Being a part of the oldest wargaming community on the net.
If you are already a member then feel free to login now. |
|
 |
2010/05/15 07:05:16
Subject: Modelling the Insaniak Way: Space Marine Jetbike Conversion
|
|

[MOD]
Making Stuff
|
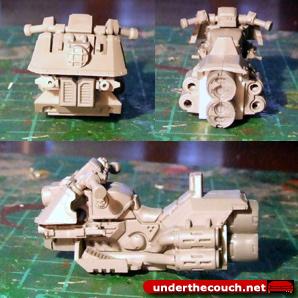
I've been looking at alternatives for making cheap and relatively easy Space Marine Jetbikes. After a bit of tinkering, this is what I came up with.
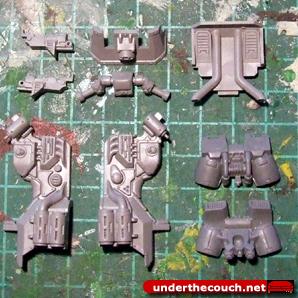
You’ll need a Space Marine bike (I’m working here with a bike that I had previously cut the front mudguard off for a Quad conversion) and a Space Marine jetpack.
You will also need some 1mm thick plasticard, a steel ruler and pencil for marking the plasticard, a hobby knife, a panel scriber (used to score lines in plasticard. A hobby knife will do the job if you don’t have one), and plastic cement.
Step 1:
Cut the front forks and mudguard off the bike chassis, and assemble the two chassis halves and the handlebars as normal.
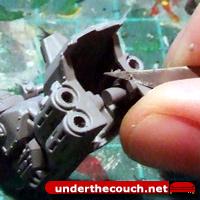
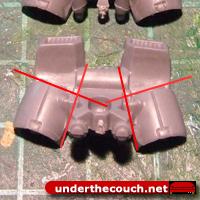
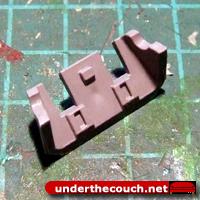
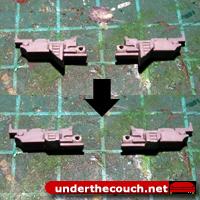
Step 2:
At the back of the bike, you will find two small, kidney-shaped pieces behind the rear axles, that protrude slightly to the back of the rear mudguard (shown in red in the pic to the left). Slice these down flush with the back of the mudguard.
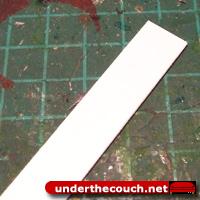
Step 3:
Mark out and cut a strip of plasticard that is 12mm wide. The easiest way to do this is to mark out the width with the ruler and pencil, and then scribe down your pencil line with the panel scriber or knife down the length of the plasticard. Then just snap the strip of plasticard off.
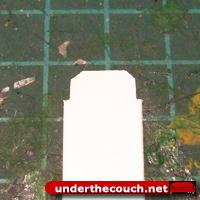
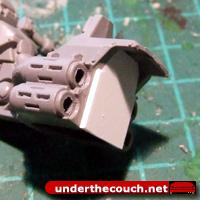
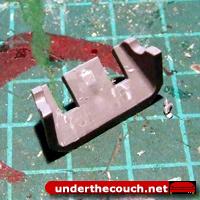
Step 4:
Trim the corners off one end of the plasticard strip at a 45 degree angle. Then cut 1mm indents running along the sides of the strip. You will need to check the length of these against the rear mudguard… The wider part of the strip should sit flush on the back of the mudguard, while the narrower section at the end fits up inside the top of the mudguard, as shown to the right.
 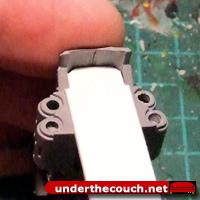
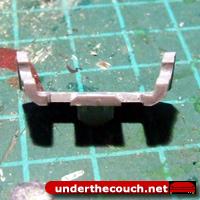
Step 5:
Cut the strip off flush with the bottom of the mudguard, and glue it in place.
Step 6:
Cut a second piece to run along the bottom of the mudguard. This should also have trimmed-off corners on the front end (to match the shape of the front panel of the mudguard), and should sit flush with the strip at the back, and far enough back from the front edge of the mudguard for the bike’s foot-panel to sit in place.
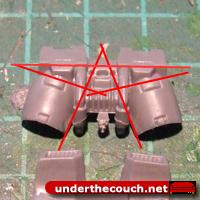
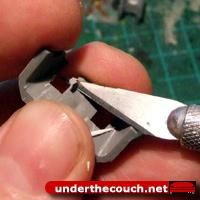
Step 7:
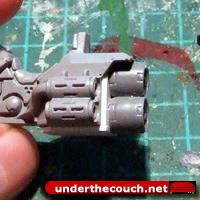
Take the jump pack and cut away the jets and the intakes along the red lines as shown below.
  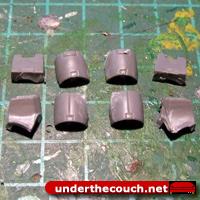
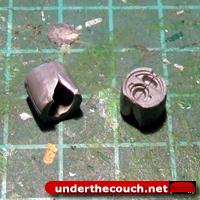
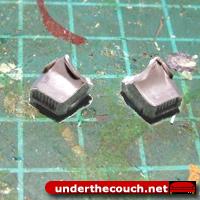
Step 8:
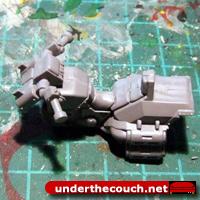
Glue the jet halves together. There will be a damaged piece, where the jet was cut away from the backpack. Once the glue has set, cut a slice away from this damaged side of the jet, to give a flat surface for the two jets to be glued together. If you’re a little unsure about cutting it straight and flat, lay a piece of fine sandpaper on a flat surface and just sand the jet sides down instead.
Step 9
Glue the two joined jets vertically to the plate on the back of the bike’s rear mudguard.
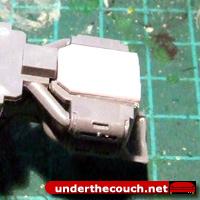
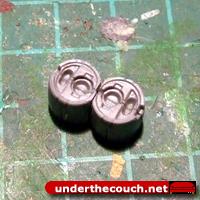
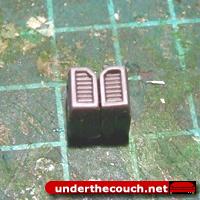
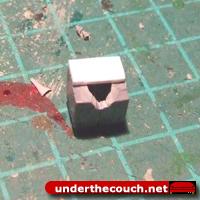
Step 10
Glue the jump pack intakes together. You will see that one side has a partial curved piece from the packpack remaining. Once the glue is set, cut (or sand) this side of each intake down flat, and then glue the intakes together as pictured to the right.
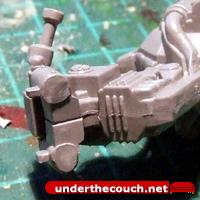
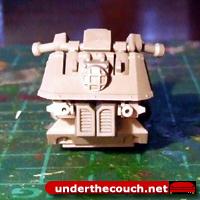
Step 11
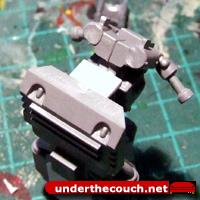
On the front of the bike’s engine are three raised ridges. Slice these off so that the front of the engine is flat.
Step 12
Glue the footplate in place, and then cut a piece of plasticard to fit the part of the engine front that is still showing (coloured red in the picture on the left).
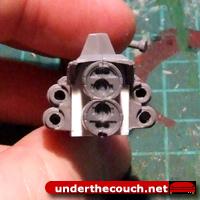
Step 13
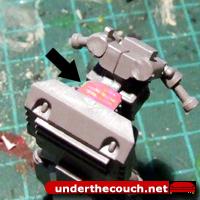
Holding the intakes so that the V-shaped indent is upwards, glue the piece of plasticard to the rear of the intakes, flush with the top surface.
Step 14:
Glue the intakes to the front of the engine and footplate.
Step 15
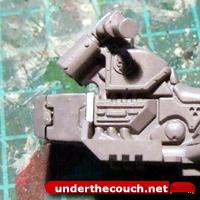
On the back of the bike’s front cowling are several protrusions with normally help to locate the cowling correctly on the handlebars. Slice these protrusions off.
Step 16
The cowling has two cutaways where the bolters normally poke through. On the inside edges of these cutaways that run beside the headlight, slice a 45 degree angle. This will allow the headlight to sit in between the tops of the front forks
Step 17:
Take the bolters and slice the ammunition feed away flush with the bottom of the bolter.
Step 18:
Glue the cowling in place so that the top of the cowling is level with the top of the forks, and the bottom edge is just above the intakes. Then glue the bolters sideways to the sides of the intakes, right at the top just under the cowling.
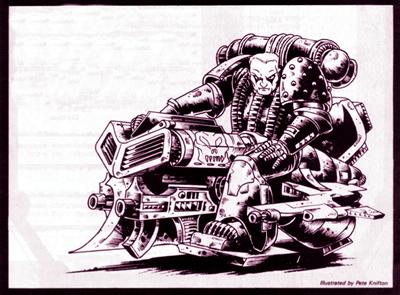
And that’s a basic jetbike. Just add a rider and paint.
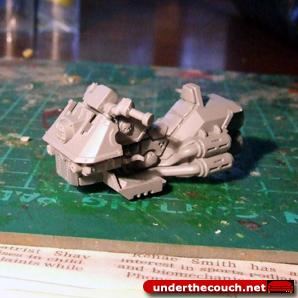 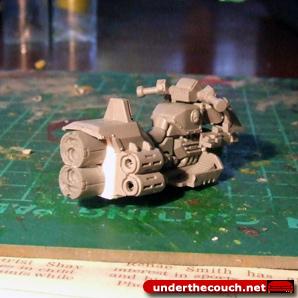
It’s a little clunky (although that’s fitting for Imperial technology) and there’s room for a few prettying-up tweaks here and there, or for extra detailing, but has the benefit of not needing any putty work, and is relatively quick and easy to build… handy for putting together large units.
|
|
This message was edited 2 times. Last update was at 2014/08/11 11:29:07
|
|
|
 |
|
2010/05/15 07:21:07
Subject: Modelling the Insaniak Way: Space Marine Jetbike Conversion
|
|

Long-Range Land Speeder Pilot
|
I thought the dark angels had like the last space marine jetbike? Either way fluffy or not its still really cool
|
You love it you slags!
Blood Ravens  1500 pts 1500 pts |
|
|
|
|
2010/05/15 09:49:42
Subject: Modelling the Insaniak Way: Space Marine Jetbike Conversion
|
|
Snord
|
/+ Flying base from tyranid flying things and = perfectional!
|
 
 Kreig - 2850 pts Kreig - 2850 pts
 Skaven - 3450 pts Skaven - 3450 pts
 Orks - 1950 (pro painted) Orks - 1950 (pro painted)
|
|
|
|
|
2010/05/15 10:45:05
Subject: Modelling the Insaniak Way: Space Marine Jetbike Conversion
|
|

Boosting Space Marine Biker
Netherlands
|
Really nice. I'd thought of something similar but went with an elongated nose cause I thought this would look too stubby. It doesn't, looks great  I'll post mine after painting.
|
|
|
|
|
2010/05/15 11:05:30
Subject: Re:Modelling the Insaniak Way: Space Marine Jetbike Conversion
|
|
Regular Dakkanaut
|
this one looks a bit unstreamlined
|
|
|
|
|
|
2010/05/15 12:01:18
Subject: Re:Modelling the Insaniak Way: Space Marine Jetbike Conversion
|
|
[MOD]
Making Stuff
|
Paintbrushturkey wrote:this one looks a bit unstreamlined
That was deliberate. Above all else, it had to look like something that belonged in a Space Marine army. Automatically Appended Next Post: Joetaco wrote:I thought the dark angels had like the last space marine jetbike?
The DA codex actually says that other jetbikes are thought to have been lost. There's no telling whether other Chapters have them, but just don't get them out much, or are using them in campaigns too remote or isolated for the rest of the Imperium to know about them.
There's also the option for 'rediscovered' technology, Pre-Heresy armies, and the fact that the 40K timeline is a fluid thing. Not every game is supposed to be taking place in the 'current' time as listed in the codexes (as evidenced by the number of special characters over the years whose fluff has said they were already dead...) so a unit of Jetbikes in an army could simply mean that the army hails from a time when they were still in use.
|
|
This message was edited 1 time. Last update was at 2010/05/15 22:30:27
|
|
|
|
|
2010/05/15 22:31:40
Subject: Modelling the Insaniak Way: Space Marine Jetbike Conversion
|
|
Regular Dakkanaut
192.168.4.20
|
those look very nice & building one seems like the kind of conversion I could actually do...
I might have to try this, with a few modifications, for my Master of Ravenwing.
|
''if you try the best you can, the best you can is good enough''
-
''People will call me a failure. Others, however, will call me the world's sexiest killing machine, who's fun at parties.''
|
|
|
|
|
2010/05/15 22:50:20
Subject: Re:Modelling the Insaniak Way: Space Marine Jetbike Conversion
|
|

Mounted Kroot Tracker
|
insaniak wrote:Paintbrushturkey wrote:this one looks a bit unstreamlined
That was deliberate. Above all else, it had to look like something that belonged in a Space Marine army.

So true...
The Emperor's flying boxes of doom will now drop their square missiles on your xeno face, because you don't fit into a square container as easily.
|
Night Watch SM
Kroot Mercenaries  W 2 - D 3 - L 1 W 2 - D 3 - L 1
Manchu wrote: This is simply a self-fulfilling prophecy. Everyone says, "it won't change so why should I bother to try?" and then it doesn't change so people feel validated in their bad behavior.
Nightwatch's Kroot Blog
DQ:90-S++G++M-B++I+Pw40k08#+D+A--/cWD-R+T(S)DM+
|
|
|
|
|
2010/05/17 05:24:11
Subject: Re:Modelling the Insaniak Way: Space Marine Jetbike Conversion
|
|

Perfect Shot Ultramarine Predator Pilot
|
Nicely done, insaniak  . A well executed update to the original RT era concept. Hat's off to you, sir
|
|
|
|
|
|
2010/05/17 11:11:45
Subject: Re:Modelling the Insaniak Way: Space Marine Jetbike Conversion
|
|
Boosting Black Templar Biker
Australia, NSW, Blue Mountains
|
Nightwatch wrote:insaniak wrote:Paintbrushturkey wrote:this one looks a bit unstreamlined
That was deliberate. Above all else, it had to look like something that belonged in a Space Marine army.
So true...
The Emperor's flying boxes of doom will now drop their square missiles on your xeno face, because you don't fit into a square container as easily.
Extremely true! Are there any rules for jet bikes?
|
DOUBLE RAINBOW ALL THE WAY ACROSS THE SKY!! WHAT DOES IT MEAN?!  |
|
|
|
|
2010/05/17 12:16:57
Subject: Modelling the Insaniak Way: Space Marine Jetbike Conversion
|
|
[MOD]
Making Stuff
|
Not for Marines. Most people just use them as regular bikes.
|
|
|
|
|
|
2010/05/20 12:57:42
Subject: Modelling the Insaniak Way: Space Marine Jetbike Conversion
|
|

Irked Necron Immortal
|
That' really cool.
|
|
|
|
|
2010/05/20 13:09:02
Subject: Modelling the Insaniak Way: Space Marine Jetbike Conversion
|
|
Thunderhawk Pilot Dropping From Orbit
|
Dear lord, finally an easy jetbike conversion that I can try. Hats off to you insaniak another great contribution.
|

No trees were hurt in the making of this sig, however many electrons were disturbed.
|
|
|
|
|
2010/05/20 22:28:54
Subject: Re:Modelling the Insaniak Way: Space Marine Jetbike Conversion
|
|
Fresh-Faced New User
Yorkshire, UK
|
That is the most fantasticly easy (I hope) jetbike conversion I've ever seen. I NEED a squad of them! lol 
|
No Grimey, you can't take the titan for a spin so stop humping it's toe!  |
|
|
|
|
2010/05/21 00:33:41
Subject: Re:Modelling the Insaniak Way: Space Marine Jetbike Conversion
|
|
Regular Dakkanaut
The Great White North (Canada)
|
These are pretty ace. I want to see them painted boss-man!
|
 "Behold my Messy Hair of Determination!" "Behold my Messy Hair of Determination!"
 |
|
|
|
|
2010/05/26 14:44:14
Subject: Re:Modelling the Insaniak Way: Space Marine Jetbike Conversion
|
|
Annoyed Blood Angel Devastator
|
Thats really cool, it looks a lot like the bikes from Judge Dread (Lawbringer?).
I've got loads of bikes unmade so I think I might make some into jetbikes, my own chapter is called the "Hammer Hawks" so as much flying stuff as possible is always good.
-Jaxn
|
 2000+ pts 2000+ pts
 2000+ pts 2000+ pts |
|
|
|
|
2010/05/27 03:52:32
Subject: Modelling the Insaniak Way: Space Marine Jetbike Conversion
|
|
Brainy Zoanthrope
|
Great tutorial!
|
NEED COMMISSION ARTWORK FOR MY MINIATURE GAME! PM ME FOR DETAILS. That is all. 
|
|
|
|
|
2010/07/27 03:19:04
Subject: Re:Modelling the Insaniak Way: Space Marine Jetbike Conversion
|
|
Chosen Baal Sec Youngblood
|
this is one of the coolest looking, easiest conversions i have seen in a long time. keep up the good work!  PS
PS srry about the threadomancy. didnt read guidlines first.
|
|
This message was edited 1 time. Last update was at 2010/07/30 01:35:15
|
|
|
|
|
2010/07/27 03:22:36
Subject: Re:Modelling the Insaniak Way: Space Marine Jetbike Conversion
|
|
Nasty Nob on Warbike with Klaw
|
Very nice work, and it does indeed look like a space marine jetbike. It should be pretty easy to house-rule it, just agree with your opponent on how many extra points it should cost. (I would say 10)
|
WAAAAAAAAAAAAAAAAAAAAAAAGGGGGHHHHH!!!!!!!!!! |
|
|
|
|
2010/07/27 15:52:47
Subject: Modelling the Insaniak Way: Space Marine Jetbike Conversion
|
|
Long-Range Black Templar Land Speeder Pilot
|
Hey, the link to the how to bit does not go to the how to bit. nice bikes btw.
|
|
|
|
|
2010/07/27 21:21:17
Subject: Modelling the Insaniak Way: Space Marine Jetbike Conversion
|
|
[MOD]
Making Stuff
|
I've rebuilt the website since this tutorial was originally done... Link should be fixed now.
|
|
|
|
|
|
2014/08/11 11:29:49
Subject: Modelling the Insaniak Way: Space Marine Jetbike Conversion
|
|
[MOD]
Making Stuff
|
Updated - since my website is down for the immediate future, I have removed the link and added the tutorial itself to the first post...
|
|
|
|
|
|
2014/08/13 03:06:41
Subject: Modelling the Insaniak Way: Space Marine Jetbike Conversion
|
|
Gargantuan Gargant
|
It looks great and not that difficult to do.
I'm definitely going to give it a try.
Thanks for posting and updating it
|
|
|
|
|
|
|
|