| Author |
Message |
 |
|
|
|
|
Advert
|
Forum adverts like this one are shown to any user who is not logged in. Join us by filling out a tiny 3 field form and you will get your own, free, dakka user account which gives a good range of benefits to you:
- No adverts like this in the forums anymore.
- Times and dates in your local timezone.
- Full tracking of what you have read so you can skip to your first unread post, easily see what has changed since you last logged in, and easily see what is new at a glance.
- Email notifications for threads you want to watch closely.
- Being a part of the oldest wargaming community on the net.
If you are already a member then feel free to login now. |
|
 |
2015/12/21 15:59:52
Subject: How to Make a Cable or Hose out of Floral Wire
|
|

Focused Dark Angels Land Raider Pilot
|
How to Make a Cable or Hose
One effective way to customize a model is to add a cable or hose. These are easy to make and easy to install on any model. Moreover, these cables are flexible and can be maneuvered in three dimensions so that they can add a special interest to the model itself. Consider this Master of the Forge with a Conversion Beamer.
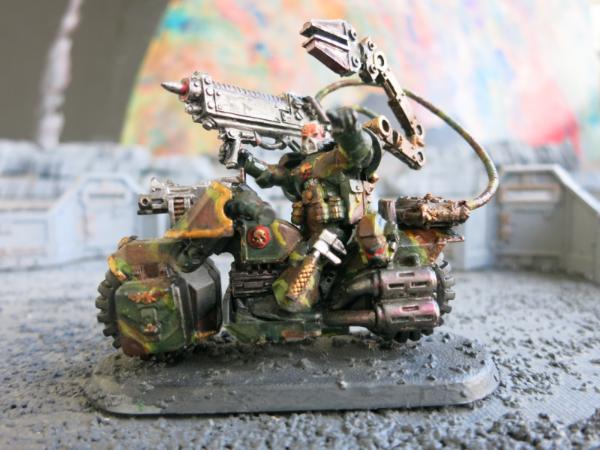
Master of the Forge with Conversion Beamer
This model could have been an exhibit in recent Games Workshop vs ChapterHouse Studio lawsuit. The bike and the Master of the Forge was kit bashed from Warhammer 40K. The conversion beamer and the servo arm are from ChapterHouse Studio. We will focus, however, on the long cable from the back of the bike to the Conversion Beamer. Actually, there are two cables as seen in the next picture.
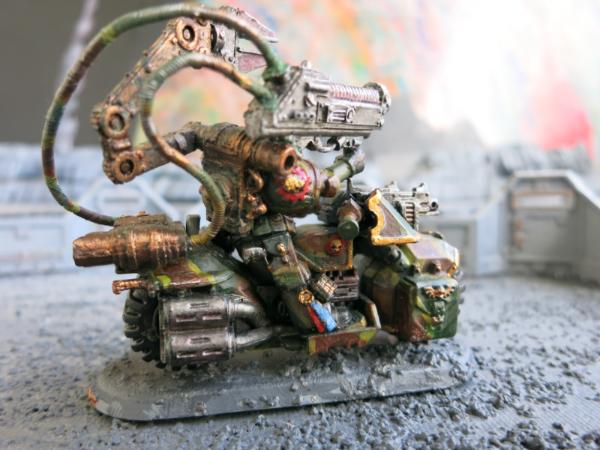
Rear View of Master of the Forge with Two Cables
This picture shows two cables linking a power source on the back of the bike to the conversion beamer. The cable itself is fairly easy to make. You will need two types of wire. The first is a short length of wire to form the core of the cable. It needs to be a length that will reach from your source to the outlet. Thus, on the Master of the Forge above, the longest wire is about 3 inches (8cm), the shortest is about 2 inches (5cm), although I actually eyeball the length rather than measure it. Moreover, I will start with a long length of wire, place one end into the source and cut to fit the gap I need. I usually make the second cut at the end after I have made and fitted the cable. I find copper wire is the best for the core wire since it is reasonably stiff while being reasonably flexible but I have used a straightened out paper clip to form the core wire.
The second wire is floral wire which is readily available in crafts stores, especially crafts stores like Michaels that cater to arts and crafts people. It is also available on the internet. Floral wire is extremely flexible. I use 30 gauge floral wire. Remember, the higher the gauge the thinner the wire.
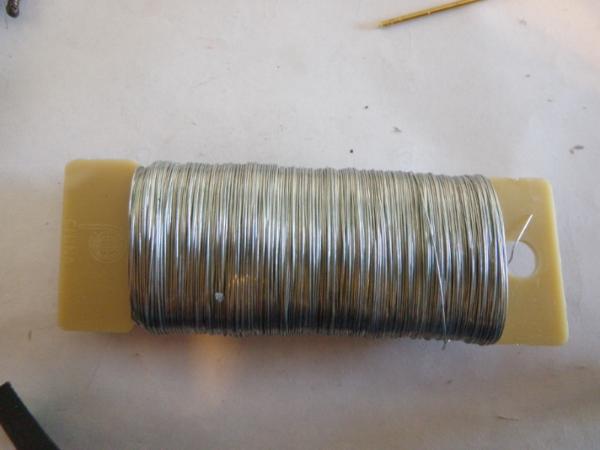
30 Gauge Floral Wire (Picture Suitable for framing)
Wrap the floral wire around the core as shown in the picture below; the tighter the wrapping, the better. Leave about an eighth to quarter inch (0.5cm) of the core wire exposed. This extra wire will be useful for attaching the cable to the model. Keep wrapping until the cable is the desired length. From time to time, push the curves of the floral wire tight to fill the gaps.
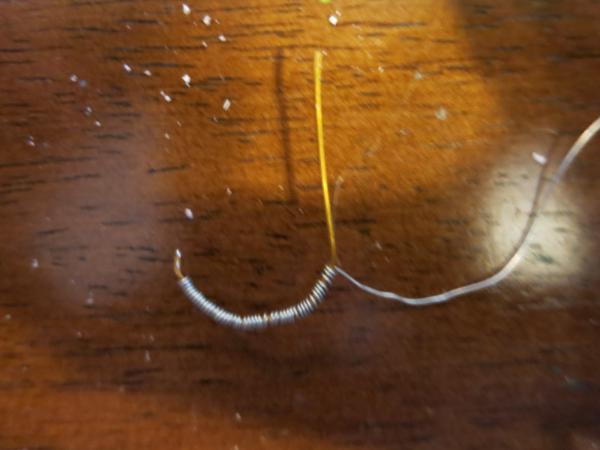
Floral Wire Wrapped Around a Copper Wire Core
Note in the picture I have a few gaps but the fewer the gaps the better. Pull the floral wire tight to avoid gaps. When finished, leave about an eighth to a quarter of an inch (0.5 cm) of the core wire exposed on both ends. These ends will be used to attach the cable to the model.
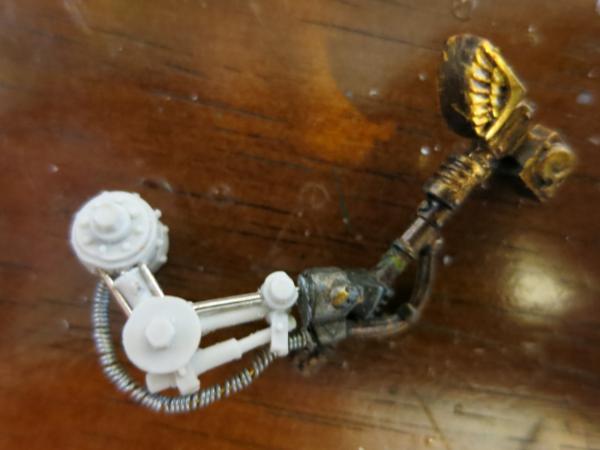
Servo Arm with Thunderhammer
Drill a hole in the parts that you want to attach the cable to. Insert each end of the cable into one of the holes. Remember that I told you to leave a little of the core wire exposed at each end. They should fit right into the hole. Attach with super glue. The floral wire will not unravel so don’t worry about it. Once it is painted, small gaps and imperfections should disappear.
Remember, if your army looks just like everyone else’s, you might as well play checkers.
|
|
This message was edited 2 times. Last update was at 2015/12/22 12:58:41
|
|
|
 |
|
2015/12/26 17:06:24
Subject: Re:How to Make a Cable or Hose out of Floral Wire
|
|

Hacking Interventor
|
Nice tutorial!
I'd assume that Cable with the brass wire as a core is easier to bend than guitar / bass strings?!
|
|
|
|
|
|
2015/12/27 21:07:16
Subject: Re:How to Make a Cable or Hose out of Floral Wire
|
|
Focused Dark Angels Land Raider Pilot
|
 Tristan228 wrote: Tristan228 wrote:Nice tutorial!
I'd assume that Cable with the brass wire as a core is easier to bend than guitar / bass strings?!
Thank you for your kind remarks.
I use brass wire as the core because it is more flexible. A stiffer wire could be used if you wanted to create a straight or stiff hose or cable. Although I have not made a hose or cable with a stiff wire such as a guitar string, it may make sense for certain applications. I actually use piano wire regularly in my models for its stiffness. I particularly use them in my bases to support my models although so far I have not created a hose with it.
|
|
|
|
|
2016/01/05 17:56:21
Subject: How to Make a Cable or Hose out of Floral Wire
|
|
Fresh-Faced New User
|
I love this idea. And will be using it shortly.
I'm going to experiment with an improvement I've heard of from making chain mail links.
I'm going to put the core wire in my dremel and spin it to see about wrapping the floral wire more easily.
I'll let you know how it turns out.
|
|
|
|
|
2016/01/07 13:55:42
Subject: How to Make a Cable or Hose out of Floral Wire
|
|
Focused Dark Angels Land Raider Pilot
|
Eisenfresser wrote:I love this idea. And will be using it shortly.
I'm going to experiment with an improvement I've heard of from making chain mail links.
I'm going to put the core wire in my dremel and spin it to see about wrapping the floral wire more easily.
I'll let you know how it turns out.
Let me know how using the Dremel works out. Thanks.
|
|
|
|
|
|
|
 (expanding to
  )
) 
