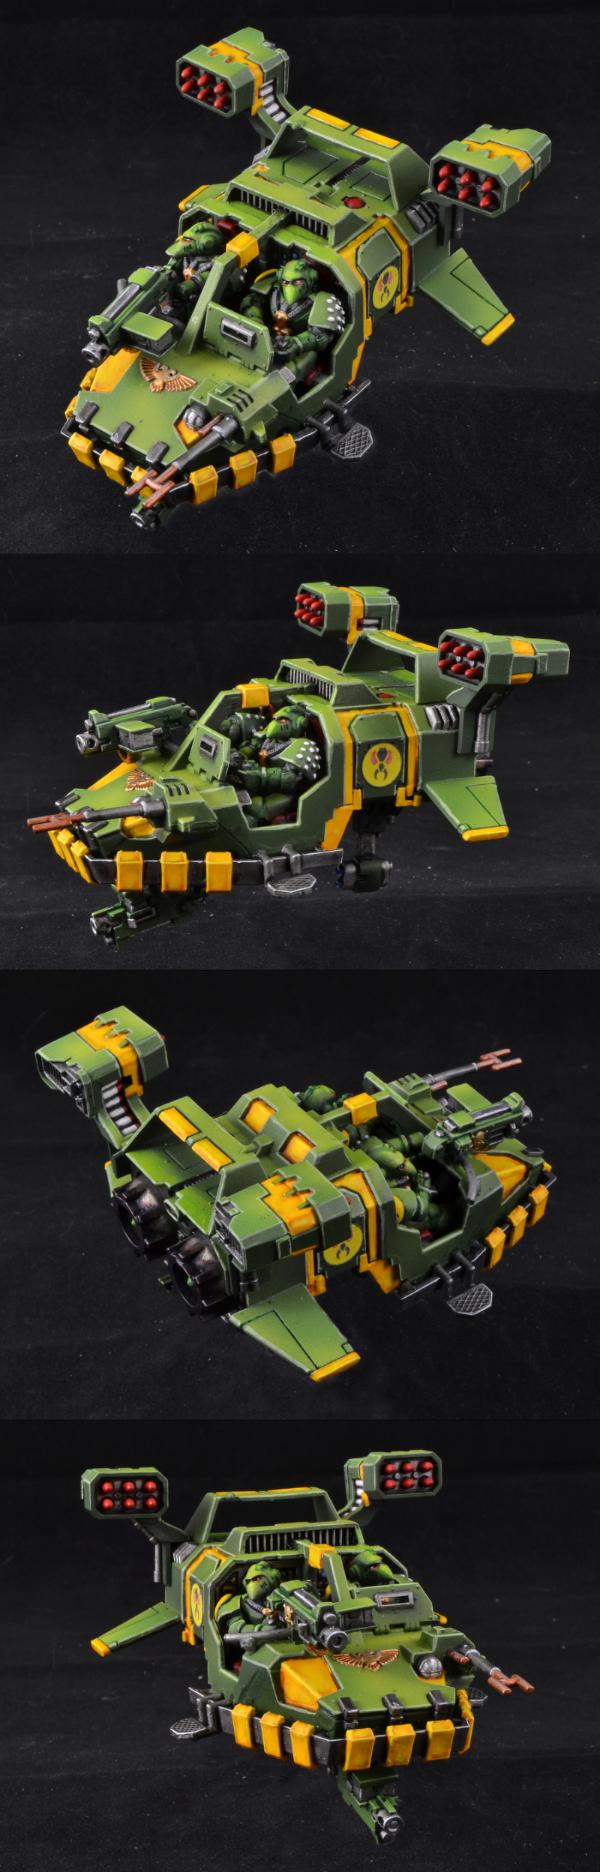
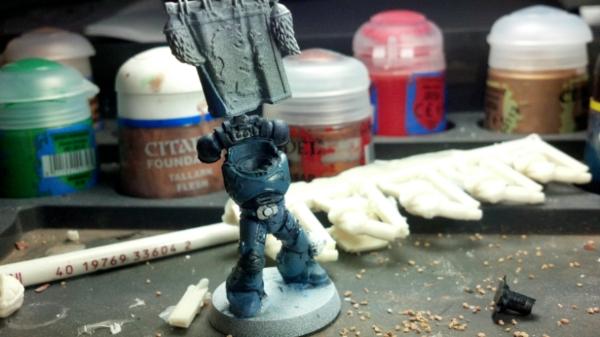
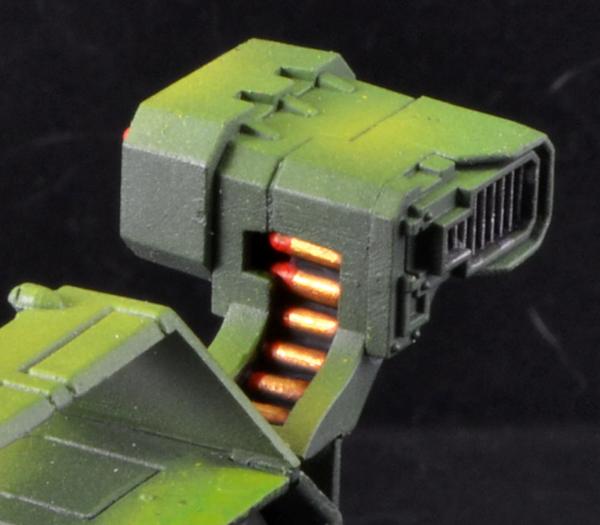
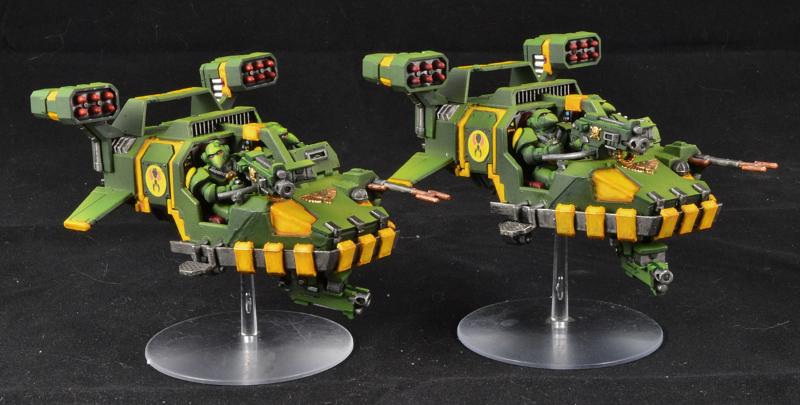
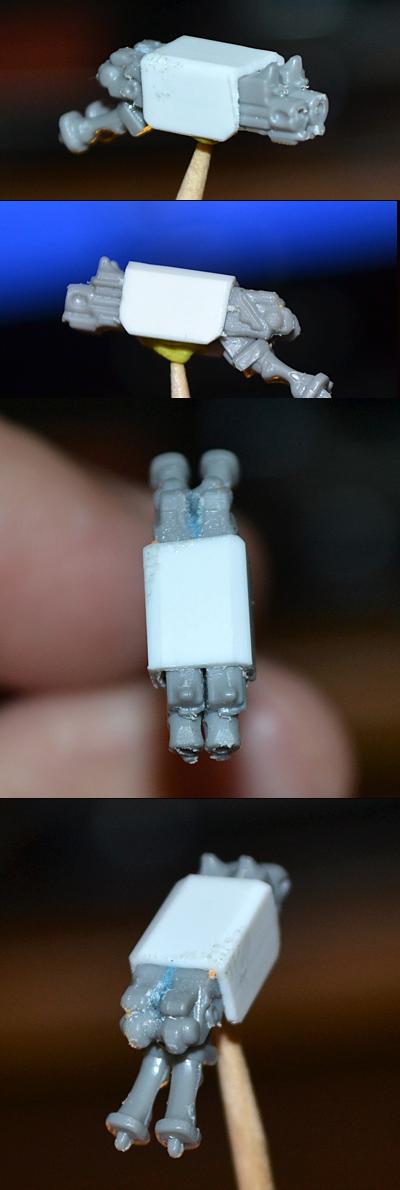
I couldn't figure out where the missile launchers were supposed to be. They didn't seem to fit anywhere... but that's where I put them. Good enough for government work.
Dont shoot me, Gits, but this is GWs build of it for comparison.
Though it seems they have different launchers... hmm... Wait yours are aligned differently- thats it. No clue how the kits supposed to work. Never built one myself.
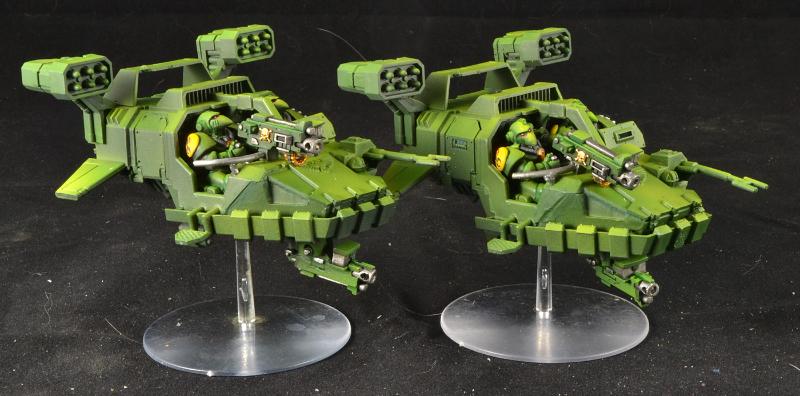
Eh. I think they look good as is. They have sort of a spoiler look to em that gives the LS something of a racer feel
I actually refer your setup mate. I've always thought the side ears looked daft. Nice smooth cover on first coat of paint, too, considering it's a repaint.
Up the back is a better spot for them anyway. I couldn't imagine how distracting having a missile shoot right past your head would be during the heat of battle.
Git I like your design better. From now on, any improperly built vehicle that looks cooler then the original will be known as a mantis patterned vehicle.
DId you ever think about painting any of those speeders in the tranquility pattern?
IceAngel wrote: Git I like your design better. From now on, any improperly built vehicle that looks cooler then the original will be known as a mantis patterned vehicle.
DId you ever think about painting any of those speeders in the tranquility pattern?
I agree with Ice.. They do look more useable towards the back.. Praise Huron!
I agree, i think they look better this way (And have the added benefit that the missiles wont hit one of the drivers if one of them leans over slightly....)
No, no tranquility pattern vehicles at this point. I'm not sure I can rationalize them as I think combat vehicles would need to pulled out of a motor pool to be effective as they'd be constantly in and out of service while being repaired, overhauled, etc. If you had "dedicated" transports (not in the 40k sense), you'd need an entire secondary motor pool to supply the extras you'd need... and that's just not how the Mantis Warriors do things. They're out on their own (even before the Badab War), very efficient and self-sufficient. The extravagance of an "elite" motor pool to babysit vesicles with a different paint job than standard just doesn't wash in my mind. Tranquility camo is reserved for human veterans of the Home Guard. Vehicles are cherished... but they aren't marines.
GMS marines... and some fun stuff. Projects long neglected but well loved. Right now I'm mainly waiting for the the SM 6th edition dex to see what options I have for different units. Other than that I'm ready to do some pretty cool things.
I WOULD have been painting today... but I'd promised thing 1 we'd go skiing... and we skied for 4 hours or so until my legs gave out. Then he skied for another hour and a half with a buddy while I sat in the bar at the chalet. Well... you guys can fill in the rest.
Hey Gits! Looking good, iv been gazing through your gallery and the mantis army is coming along really well. It must be quite a size by now. The speeders are looking fantastic, i think the rocket pods look better up on the back to be honest and the zenithal airbrushing is looking pretty great too. Keep up the great work!
Hey Hits! Glad to see you! Thanks. Funny that the configuration came purely by accident (and not knowing how they were supposed to go together). I have something for you. Expect an e-mail, perhaps as soon as tonight.
Well, spent a fair amount of time painting. Finished of the 4 heavy bolters. Good Lord this is going to be a looooong project at this rate... I do like the look of them though.
Marines next, then the cockpit. I have a feeling that this'll be one of those projects that has a *lot* of WIP steps (unfortunately).
Holy hell Gits! they look superb and I know 'cos I love my speeders and I love my green speeders even more! so i believe i'm qualified to say, THESE LOOK FREAKIN' AWESOME!!!!
Thanks Nerdy. There are some pretty big gaps that should have been filled before I started painting. Think I can still fix most of those. You can see how much the lining changes the character of the green (see the passenger's HB), pretty amazing actually.
I'm debating how to handle the color scheme on the speeders. Have some ideas but I'm not sure. In any case, lots to paint before I get to the point where I have to make decisions on the hull paint job.
Today's work... green stuffing! Not exciting or sexy... but I added the roundels to the shoulder pads (I always forget to do this before painting) and filled the worst of the gaps in the front hulls. Luckily GS is close enough to my base color that I think a light coat of base will effectively hide them with no problems.
I decided not to add the extra little mantis warrior spiky bits to the arms as they'd just be impractical when trying to maneuver in the cabin of the land speeder. I figure they're either retractable or removable so they don't hamper the marine's ability to fight effectively.
So, nothing photo worthy... but definitely a step forward.
I've got a WIP shot for you gits, wanted to get your opinion on it. My paint is a wee thick (I can't get the consistency down in this weather, it's either too thick or too thin... Do you think hitting it with a paint on gloss varnish would smooth it out?
Perhaps... but I'd be careful not to hit it with too much. Give it a nice, light to medium spray... let it dry thoroughly and see where you are. I like the color though.
Gitsplitta wrote: Perhaps... but I'd be careful not to hit it with too much. Give it a nice, light to medium spray... let it dry thoroughly and see where you are. I like the color though.
Whoops, forgot to mention it would be paint on gloss varnish... I've got a bottle of Vallejo Gloss for gems and the like. Glad you liked the color, it's nothing but GW "The Fang" Base, a separate Asurmen Blue Wash, "Russ Gray" and "Fenrisian Wolf" (whichever is the lightest colored layer paint).
I'll take a look at it tonight and see if the gloss can help me even it out, as I'd like to get the armor down before I move on to details.
Slowly reading through this blog/plog, it's so intimidating! I can tell that a lot of thought has gone into this project.
When I have read it more I will have more to say apart from great work and very inspirational
Gits, I'd greatly appreciate it if you'd set up a webcam when you are airbrushing and just put it online, add music..sound is not important..I'd study every second of the footage!
@chrisyella: Thanks so much for taking the time. Going through this blog is a massive undertaking and my hat's off to anyone brave enough to give it a go. I hope you'll hang around and contribute after your caught up. Never too many voices for my liking. Your very kind and I very much appreciate your encouraging words. Thanks.
@dstein: Two problems... 1) I don't have a webcam. 2) I have no idea how to edit or post footage.
Really, it's not all that complicated. You do need a dual-action brush though.
This guy (Scale Model Medic) does the best airbrushing videos... this is just one. He's got one of painting a (real, non-40k tank) that just really nailed it for me. I highly recommend anything he bothers to produce though, he's a very good teacher .
Hope that helps.
Ah, found the original videos I was inspired by... Here's the first in the series.
Watch each of those series a couple of times and you'll be painting like a pro. Seriously... these are the two series I used to learn how to use my air brush.
More progress (still no pics though, sorry). Made good progress on all crewmen and re-GS'd the worst of the gaps in the hull. They should be all set after this go-round. I expect to have the crewmen completed tomorrow and perhaps even make some progress on the cockpits.
Well, life stays interesting... I accidentally (obviously) drove a nail into the center of my wrist yesterday. In spite of what you may think, I wasn't actually doing anything careless or stupid. It was just dumb luck in the bad way. Luckily, it was a finishing nail inside the house that was stuck in a beam for hanging decorations on and not a rusty outdoor kind of nail. It's clear I missed the veins or anything vital, but it hurts like nobody's business and I can't carry any weight in my right hand. I still have full mobility so it doesn't look like it did any damage to the bones. Will double-check with my doc to see if my tetanus shot is up-to-date (just in case).
Before damaging myself, I did get some good work done on the LS crew. Just detail on the pads and their eyes to do & I'll post a pic. I also did some finishing work on some of my GMS marines that needed Inquisition shoulder pads (or had plain pads on and needed an "I"). Got the brass inquisition set from FW(?) and added the necessary detail. Funny how little projects like this can escape attention for so long.
Going to be a very busy day but I'm really going to try to finish up those LS crew... need to keep making progress if things are going to get done in a timely fashion.
On a side note... went to a jazz concert as the kid's school last night. It's an artsy-fartsy school so all the kids have to take music theory and play an instrument (they all start with piano but can eventually migrate to other instruments or sing in one of the choirs). Thing 1 wasn't great at piano, nor was he good with the cello... but he's old enough now that he was able to choose from a wider variety of instruments and landed on drums. So, each of the various aged jazz bands for the school does a number or two & they have the gym decorated like a night club (tables, candles, non-alcoholic drinks, etc.). He was good on the drum set last night... I was impressed. Gene Krupa he aint... but not bad for a 12-year-old starting his first year on the drums. He might have earned himself his own set! I suppose I shouldn't be surprised... other than singing the only musical aptitude I ever showed was for percussion. The highlight of the night... is that they bring in a professional jazz band & a dance instruction company and the adults (and kids) tear it up for the rest of the night. Last night they brought in the best Salsa band in the Madison area. Very fun!
So there you go... all caught up on activities in Git's world. Hope your days are good ones. Don't maim yourselves!
Gitsplitta wrote: Well, life stays interesting... I accidentally (obviously) drove a nail into the center of my wrist yesterday. In spite of what you may think, I wasn't actually doing anything careless or stupid. It was just dumb luck in the bad way. Luckily, it was a finishing nail inside the house that was stuck in a beam for hanging decorations on and not a rusty outdoor kind of nail. It's clear I missed the veins or anything vital, but it hurts like nobody's business and I can't carry any weight in my right hand. I still have full mobility so it doesn't look like it did any damage to the bones. Will double-check with my doc to see if my tetanus shot is up-to-date (just in case).
First off let me just say...
Hope the wrist is ok though with no lasting damage.
It's an artsy-fartsy school so all the kids have to take music theory
Ugh... Music theory *Shudders in horrific rememberence.*
Drums are a good choice though. I was a drummer in highschool and i can say its quite the confidence booster. Its also hugely fun. Sounds like a good night was had by all though.
Hope you get better soon Gits. Snrub, great choice of Gif
Good on Thing 1 for picking drums (of course, drums arent a real musicians instrument.... says a brass player ) they are a lot of fun, and the marching band i am part of is probably the most social thing i have ever done (just entered my 15th/16th year with them) and is where i have met my closest friends...playing an instrument opens a lot of doors as well (working as a team, socialising, extra curricular activities etc.) so its a good thing to do....did i mention its fun as well?
Wow! Sorry to hear about your wrist, Gits. Hope it heals quickly.
Very cool news about the jazz concert, though. Not much of a musician myself, but I love jazz. In fact, I'm team-teaching a course on the jazz age this semester. Krupa's pretty cool, but make sure you introduce him to Art Blakey, too!
Thanks guys. Just back from the doc with an antibiotic prescription (looks like it's getting infected). Apparently my tetanus shots are up-to-date so I didn't have to worry about that. No x-rays or anything so it seems they weren't concerned that I'd done any joint damage.
He really likes the drums... more power to him. Wish I played an instrument (OK, I fool around with bodhran & bones... but even at my best not really good enough to actually do anything official.) I did tell him that if he was going to learn drums, he'd have to suffer through my teaching him what I know about the bodhran & doumbek. Maybe I'll inflict the bones on him eventually but it's torture to listen to someone first starting out.
@Ramos: I saw what you did there...
My schedule might have cleared up enough tonight that I'll be able to get those crewmen done. Sure hope that's the case... the fact that I'm not making more progress on these speeders is wearing on me (and they're taking so long to paint even the simplest things... just one of "those models" I guess).
Automatically Appended Next Post: Man I'm having a bad day. Back at the hospital, nicked a finger with my table saw. Just a nick but will undoubtedly need stitches. Can I just go to bed now?? Somewhere safe?
Excellent work, bud. As for your wrist, astonishing good fortune not to have done any lasting damage! Drums, well, hitting things repeatedly with force? Clearly takes after his dad...
*chuckle* Well, it wasn't really wine mode... just had the camera set half way between taking batrep and lightbox shots, but it was a neat effect.
More entertaining news... we ran out of propane last night so no heat! It's 9 F outside, 60 F inside and dropping. Time to fire up the electric heaters and get the fireplace rolling!
A similar thing happend to my mate, except it was a drill press. His jumper got caught in a spinning drill press. It went straight through his wrist, somehow not causing permanent damage.
Sorry about your wrist Gits, but thanks for the airbrush vid links! After I was in Band for a year, my Dad surprised me with my first ever Drum Kit, a Tama Rockstar 5-piece set in the most beautiful golden yellow woodgrain finish. It will always be the greatest gift I have ever received.
Finally some progress to show. Painting time has been hard to come by.
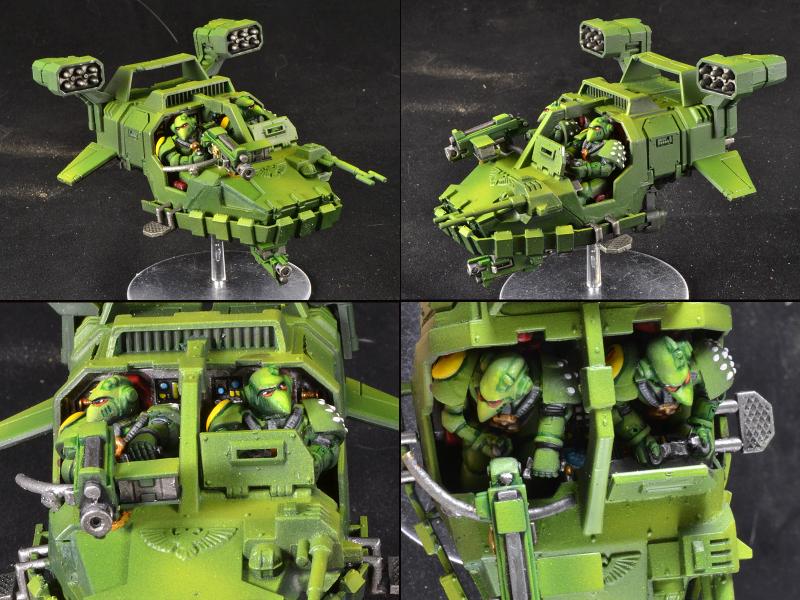
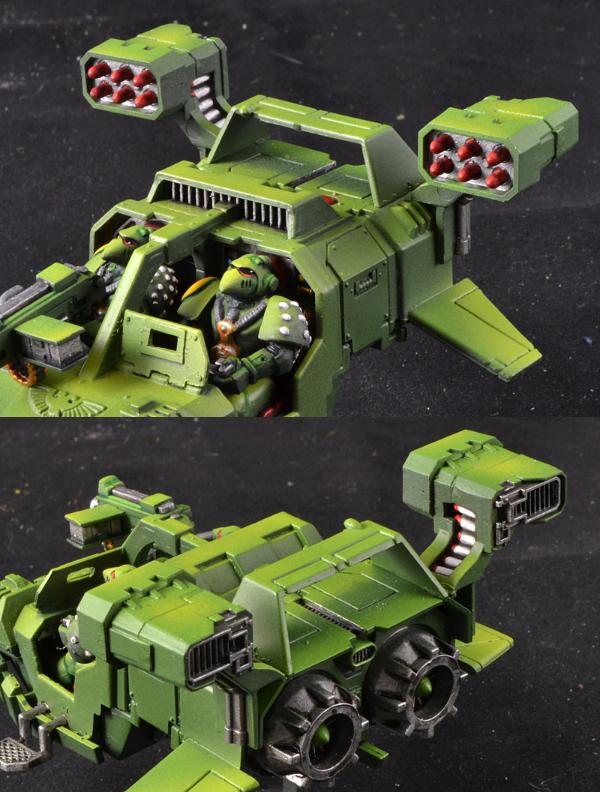
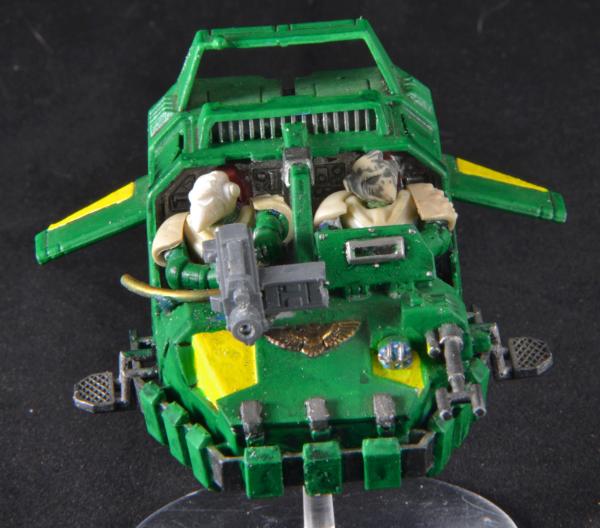
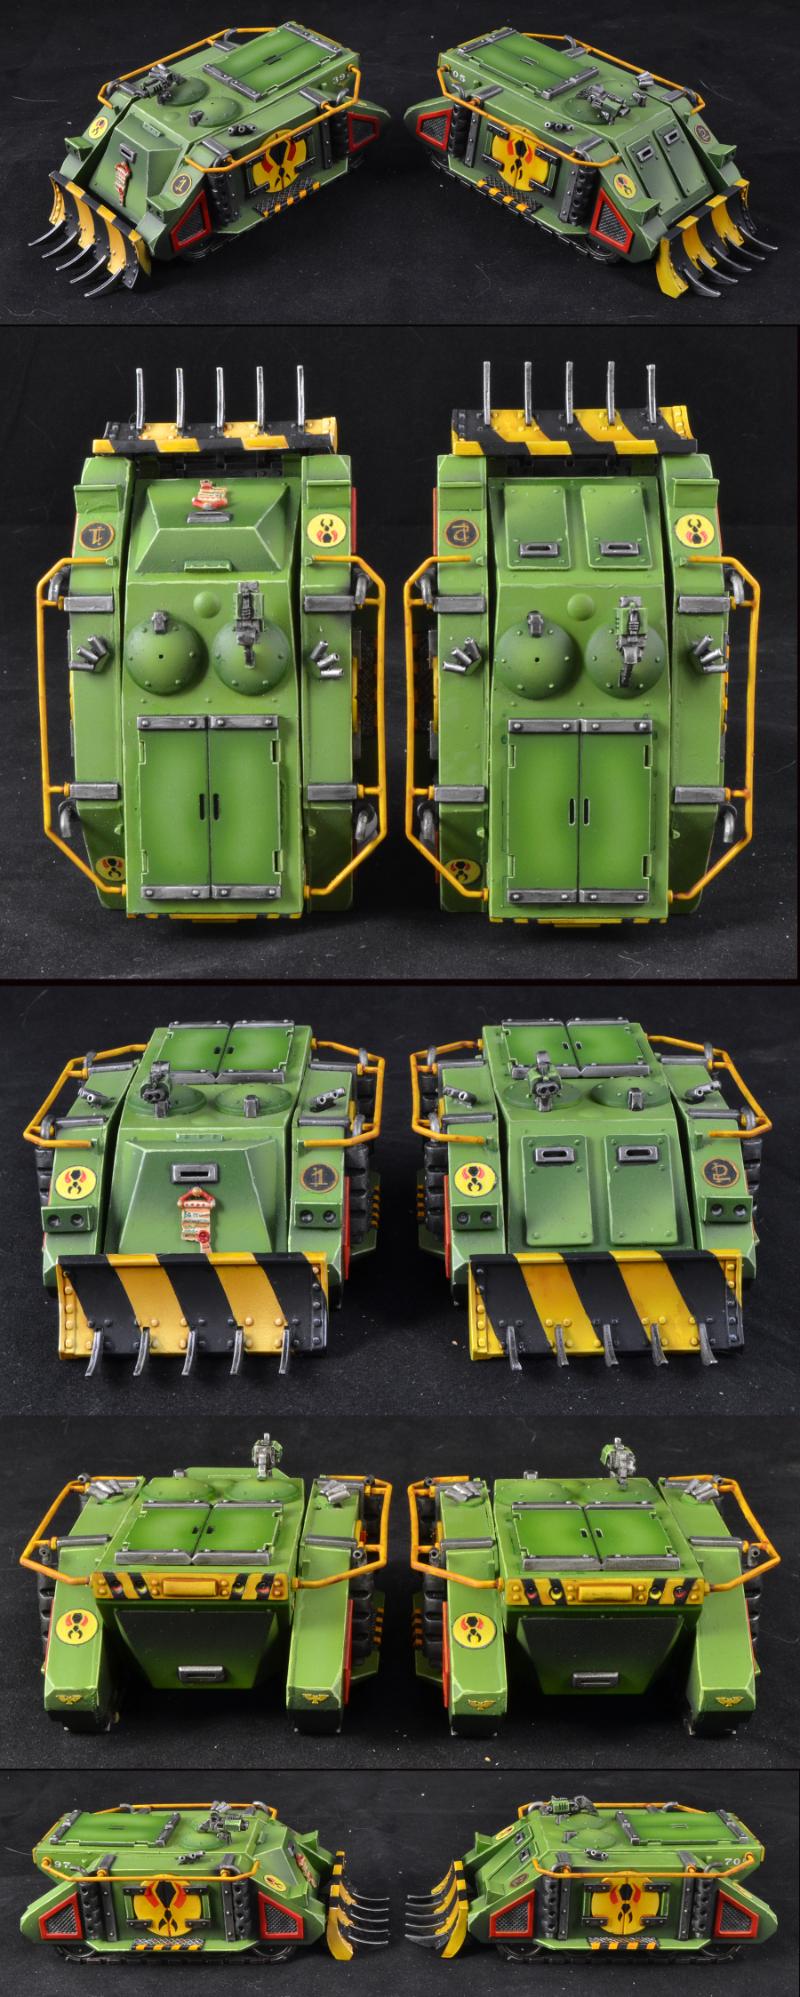
Cockpit is done and the crew is glued in on one speeder. Not that you can tell... looks pretty much the same as in the last shot. BUT... there are some new flashes of color here and there. I tried shooting all these angles to show off the paint job but you still can't see much. Sorry. Also added some metallics to the underside, the engines, missile launchers and the steps.
The bottom left pic shows off the details instrament buttons and other colors (seats). It's the details that that take the longest..Are you going to partition the body or at least the front bumper?
Everything is still in play. I think a very realistic approach would be to keep things as monochrome as possible. However, the rest of the army is rather cartoony so getting creative with the paint job would be consistent with the rest. I do have ideas for both the bumper and body... at least for the more cartoony style.
Anyone have any preference?? (I.e. realistic vs. cartoony)
Or more black/silver...something to balance it a bit...maybe even some hazard stripes like the Razorbacks? (or was that a Rhino or a Vindi....i forget )
Otherwise its great to see progress Gits! (hows the hand(s)?)
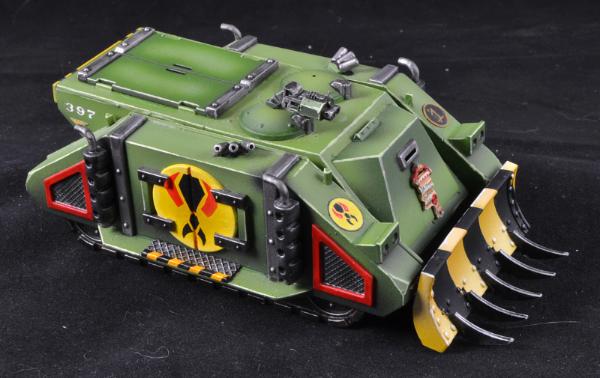
Well, for the cartoony version there will be both yellow to break up the green and a sneaky way of getting the hazard stripe effect without actually painting hazard stripes. (they were on the dozer blades BTW) My scheme is a bit unorthodox & there could be a fair amount of yellow... will have to see once I get rolling on it.
Hands still hurt. Left middle finger really hurts when typing, right wrist just hurts in general... but no signs of infection or limited mobility so I can live with the pain.
I did make some progress, though nothing worthy of a photo. Got the external base metallics laid down on undercarriage, engines and steps on LS #2 in the wee hours this morning before I had to get ready for work. Wish I had more time to make progress but this week (and this weekend) are really booked solid. Gets frustrating when I see everyone else making hay on their projects while mine are languishing.
Still, progress is progress... no matter how small.
Speeders are nice, and the "upside down" typhoon missiles look good too !!!
On a side note, are you supposed to play with them ? If so, you're not allowed to take an additional pintle weapon AND a Typhoon launcher on Speeders... That would make them "LAND SPEEDER TORNADO TYPHOON" lol
Having promised to reply I figure I will do it now before I try to start reading this blog from the start again and loose my mind That land speeder is looking phenomenally good, you have perfected the art of painting garish green! I am so gratefully for putting up that video about the pinnacle highlighting, it gives a really nice effect, will have to try it out.
@Yggs: Thank you. See SL for answer to your question.
@SL: Thanks for having my back!
@J-p: Yes, I am the crown prince of cartoony colors. But thanks!
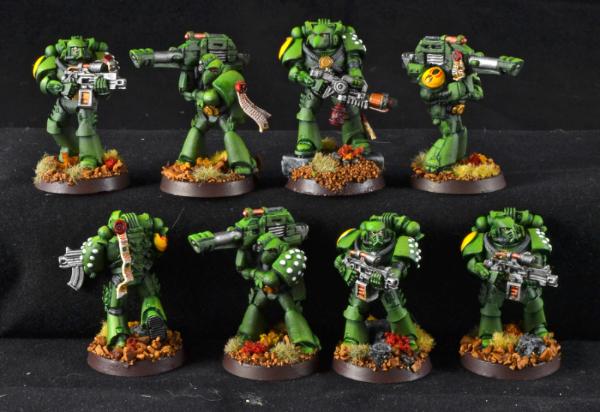
Stopped by my FLGS to try and pick up a game today. No luck, but got a cool pic of one of my tac squads. Had a great game with Thing 1 this evening though. Bat rep is sure to follow shortly.
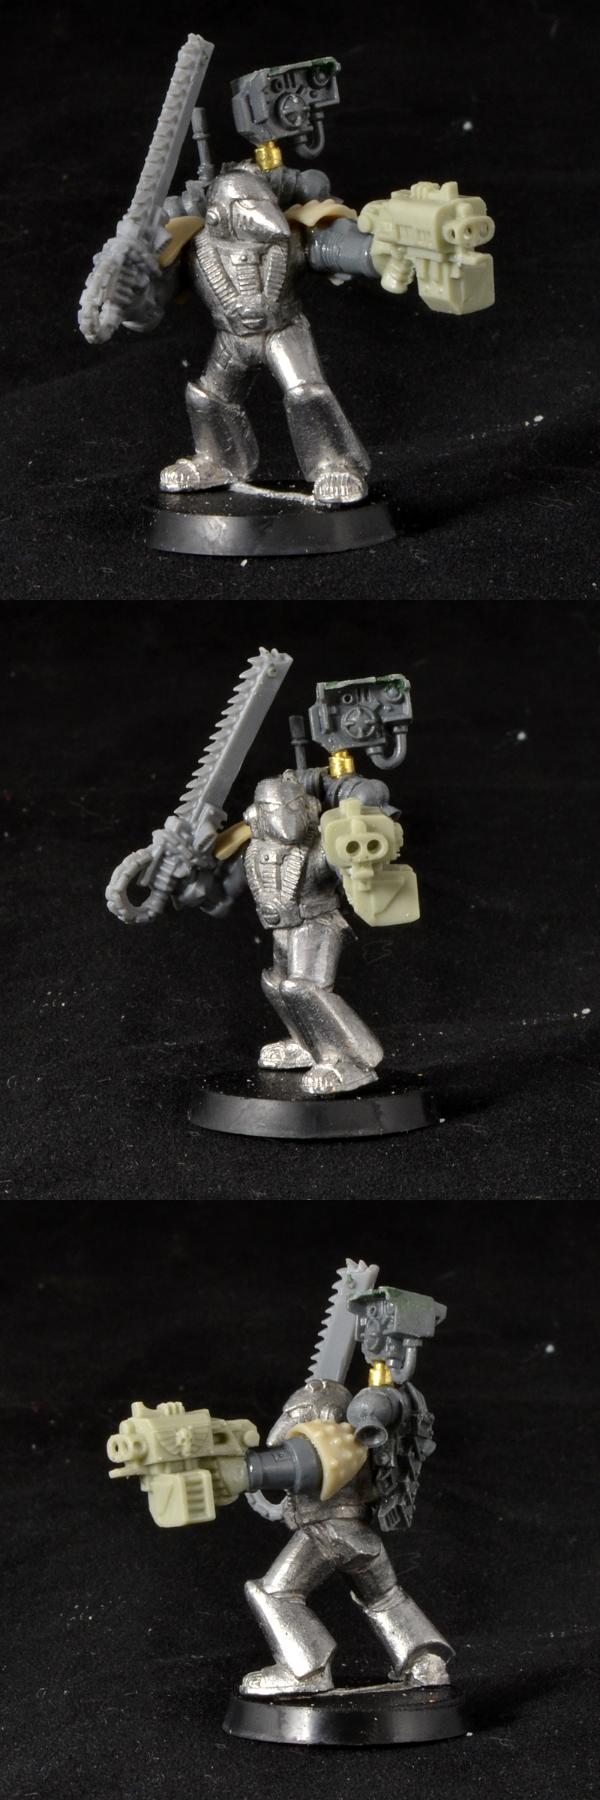
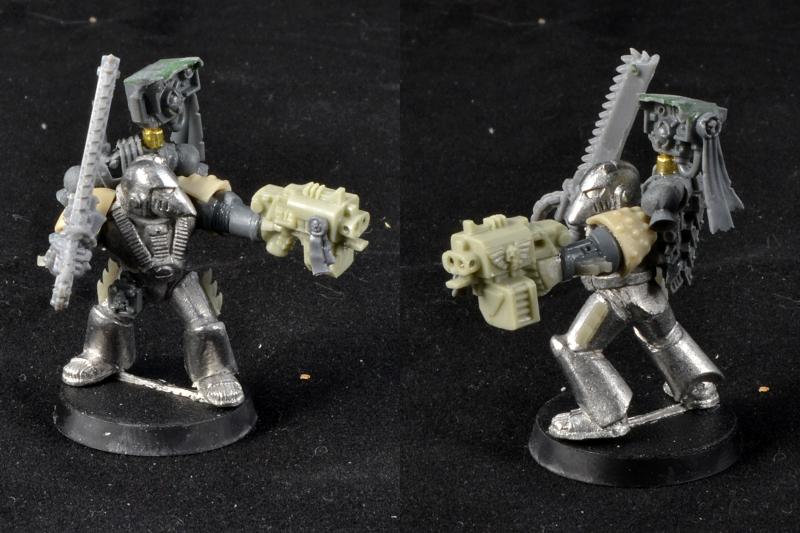
I've got the body of your marine just about done... Still need to do arms and head. I know you said no basing, do you at least want me to paint it black?
Object Source Lighting...Hmm, thinking about it now it doesent really make sense..Its for plasma guns or fire when you paint the light reflecting ie green or bule for a plasma gun or reds and oranges for fire...No what i meant was zenthal...
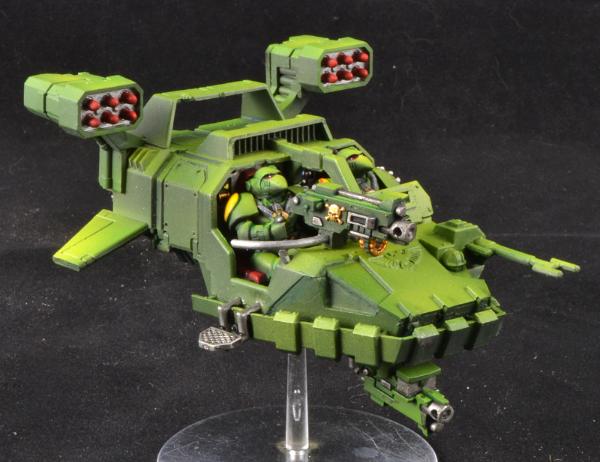
Howdy folks! Been a long time since I posted any painting progress... but I finally made some. This is the OTHER LS Typhoon (i.e. not the one from the last update). The cockpit is now done, the crew are glued in place and I've begun the work on the missile pods. Not to catch the other one up...
Gorgeous as always. I am constantly drawing on your blog for inspiration! The contrast you're able to put into your vehicles is really visually striking. How do you decide where your highlights go? They don't seem to reflect any sort of lighting source, but they always look right nonetheless.
(I may be stealing the veterans-with-a-different-paint-scheme idea. )
Nice job though was looking forward to hazard teeth when I saw you'd updated! One thing I really like on this is how well the metals contrast against the painted weapons. It's not something I'm usually a fan of but I think it works a treat here, and actually it's something I'm going to play with a bit myself I think.
Raatcharch wrote:Gorgeous as always. I am constantly drawing on your blog for inspiration! The contrast you're able to put into your vehicles is really visually striking. How do you decide where your highlights go? They don't seem to reflect any sort of lighting source, but they always look right nonetheless.
(I may be stealing the veterans-with-a-different-paint-scheme idea. )
Thanks Raatcharch, glad you can find some good ideas here. My approach to vehicles has morphed quite a bit... and to a degree depends on the vehicle. My Rhinos and vindi are done using a technique called zenithal lighting. It's based on a real optical effect but I'm not sure that I'd call it a realistic technique. It is striking though & best done on a disassembled model (just to make the painting easier).
My LS Storms (which still aren't done by-the-way) have a Major_Tom inspired paint scheme. Basically I shaded up the model like you would any model, then I ran a dark line along the seams and joins.
Lastly, my newest speeders are shaded up about 3/4ths of the way... but then I save the last highlights for specific areas. Larger plates, areas I want accentuated, highest areas, etc. But they aren't highlighted with this last step all over... just in spots.
All 3 are viable techniques & amazingly enough... go together reasonably well.
inmygravenimage wrote:Nice job though was looking forward to hazard teeth when I saw you'd updated! One thing I really like on this is how well the metals contrast against the painted weapons. It's not something I'm usually a fan of but I think it works a treat here, and actually it's something I'm going to play with a bit myself I think.
Inspiration borne out of laziness. I almost painted the whole weapon metal, but since the airbrushing was turning out so nicely I decided to go with the green/metal scheme. I'll get to the teeth... but it'll be one of the last things I do.
HAZZER wrote:looking good, i think all that is needed is to paint the egeal on the front and it is done!!!
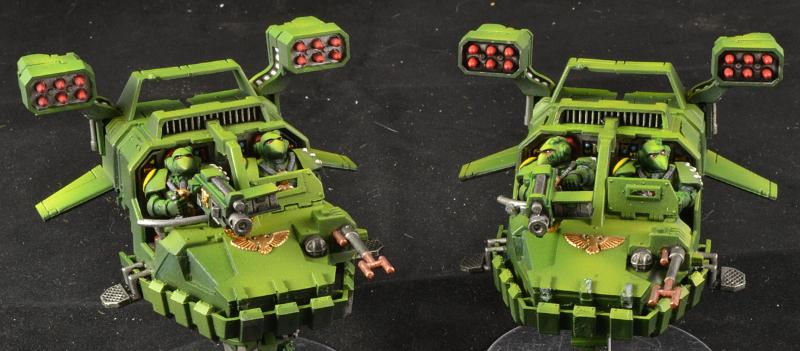
I like the way in the last speeder pic. the gunner is looking over the gun rather than just facing forward. I assume it was intentional as to believe otherwise would render you mortal! And such blasphemy will not be tolerated by Huron!
Well, I could always mount this the same way (on wire), but making the project more complicated is not really what I'm looking for. Though I must admit that I can't stand the GW flying bases... I think they're crap.
I bought some magnetised flight stands from a user on Dakka ages ago - still haven't attached them to my Deffkoptas, but that's another matter. Just can't find/remember who it was. I have it in my mind it was empchild/Battleroad Games and Hobbies - but if it was, they don't appear to sell them anymore... which is a pity, and of no use to you at all... right, I'll stop "contributing" now...
It's hard not have want Kate Beckinsale right up your alley. She's quite the hotty.
Hey Gits, how are you gonna know when this army is done? Do you have a set goal for it or is it just gonna be one of those things that you collect for ever until make a whole chapter?
It's gonna be one of those things I collect forever until I paint all the crap I have lying around. I really haven't bought anything new for it in a long, long time. I just have so much stuff and paint so slowly that it seems like forever. I've got some termies to do yet... I'd like two full squads of assault marines (so... another 10) and I have a bunch of vehicles (rhinos/razorbacks, predators, vindicators, land raiders) that I'd love to get painted up. Even another squad of scout bikes and 3 attack bikes. In general... when I paint what I've got, I'm done. But I'm afraid that will be years down the road yet.
That's kind of the point Alf. For my later period army, the Inquisitional squads are supposed to make up the tactical element... which is why so many of my trades have been for normal, bolter guys. So while it may not look like I've been working on my post-crusade army... actually, I've accomplished quite a bit (over 2 tac squads and several characters).
Gitsplitta wrote: That's kind of the point Alf. For my later period army, the Inquisitional squads are supposed to make up the tactical element... which is why so many of my trades have been for normal, bolter guys. So while it may not look like I've been working on my post-crusade army... actually, I've accomplished quite a bit (over 2 tac squads and several characters).
I knew you've had at least 1 squad, lol and I figured that my Marine was going to be a part of a second or third squad.
As someone whom has seen the entire collection it is truely an awesome sight. There is also a large collection of Orks, Necrons and Nids that he can trace his hand in..
Sorry guys, no updates. Between work and home responsibilities I've been completely swamped. Pinewood Derby time again so I've been helping out with that. At least that'll be over tomorrow evening. Thing 1 and I have a game in limbo, no progress on the speeders, you know the drill. Keep your fingers crossed... still hoping for making some progress some time this weekend.
Evening/mornin' gents! Finished the detail on the missile pods tonight as well as finally finishing my game with Thing 1. Hopefully... bat rep in the not too distant future. Great game, very exciting and bloody.
I have finally made it through this blog resorting to looking at the pictures and gainging the genral idea of what was happening. My favourite models have to be the Tranquility Dreads, the Jump-Pack Chaplain and the corrupted Tranquility Vanguard. Keep up the awesome work
I was hoping to really have shown you guys some progress tonight, but I couldn't because CORMANDEPANDA made me go back and re-paint my missiles from their brass casings to shiny new white casings... So if you're unhappy (graven) that your "pet" part of the project hasn't been addressed yet.... you know EXACTLY who to complain to (it ain't me).
@Nashbashem: I'm so pleased you took the time to work through this monstrosity! Thank you! The jump pack chaplain isn't my work I'm afraid... that was a protege' of pyriel-'s (with a bit'o touching up by him I suspect). I hope you found it worth your time. Please come back frequently and contribute. Make it even better by adding your voice and opinions, I welcome them!
So... here's the "progress"... more vents done, gas cap painted, "new" rockets of course. I'm slowly getting there. Forgot to highlight the rockets... will do that after I post.
OH... played a new game with the kids today. Three words...
"Wings of Glory"
... and another three words...
"Best... Game... Ever!"
Why?? - beautiful models - cheap - stupid simple to learn - challenging - fun - fantastic game to play with young kids through adults - no real limit to how many can play - no dice rolling
Looking good Gits! I do love the Landspeeder models even though they are dog awful to assemble! I really like the colour fading and the lenses on the marines are excellent, and there's nothing wrong with brass cased rockets! you boyz just like style that's all :-)
Hahaha your welcome Gits. It was a pleasure to go through I love your missile racks and the way you've built them does make more sense, unlike GWs version with the whole poke your head out of the side and have it explode thing
@CL: I did too. Could have come up with some plausible excuse but decided not to fight it.
@Dr. H: Funny, I react to them differently. I think they're far more interesting than the other pair looking straight forward. These guys look like they're actually interacting with the environment.
Well, I've put off doing the next major phase about as long as I can. We'll see how it works out. It'll make a pretty significant change in how they look. Keep your fingers crossed because there's no going back... Might be a day or two before the next update as I won't want to post until the next step is done. We'll see how much time I have for painting.
@CL: I did too. Could have come up with some plausible excuse but decided not to fight it. @Dr. H: Funny, I react to them differently. I think they're far more interesting than the other pair looking straight forward. These guys look like they're actually interacting with the environment.
Well, I've put off doing the next major phase about as long as I can. We'll see how it works out. It'll make a pretty significant change in how they look. Keep your fingers crossed because there's no going back... Might be a day or two before the next update as I won't want to post until the next step is done. We'll see how much time I have for painting.
Variety is the key. You have to have some looking forward or the one's that are looking about are not different (you just have a bunch of blokes that aren't paying attention).
They both tell different stories individually, e.g. the left pair are both focussed on a target and are racing to close the distance and attack. The right pair are moving slower and searching for something.
It was only the positioning in that picture that made me think that earlier, change the angle and the story changes.
Gitsplitta wrote: @CL: I did too. Could have come up with some plausible excuse but decided not to fight it.
I was just winding you up, sorry. I think the white looks good, possibly the better looking if the two, but it doesn't make a huge difference, just go with what feels right.
Yeah.... I'm kind of scratching my head over it. I had an idea to alter the second color pattern in order to change the visual profile a bit. I tried it... it looks good but didn't do what I wanted it to do & is suggesting a more radical change which I'm unsure of. I think I'll do the bumper first... see if that changes my opinion. If not, I'll be jumping in with both feet!
Have 4 days off starting tomorrow and I'm really hoping to wrap both of the Typhoons up in that time.
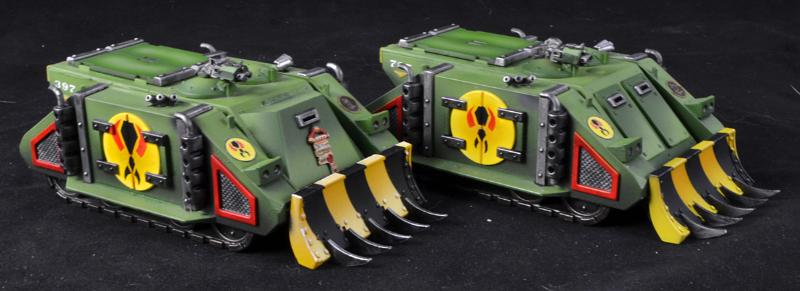
OK guys... here's where the typhoons stand. I've got the yellow blocked out and washed. It's not finished yet... but this gives you the general idea of placement and tone. I'm thinking of adding yellow in two more places but I'm not sure and would like everyone's opinion. The areas I'm thinking of adding more yellow are the little raised area in the support bar between (above) the two crewmen... and the front collar of the missile launchers (that raised area in the front). It's not that hard to do so it's not a work issue... but I don't want to drown them in yellow either. That being said... I WOULD like to give them a rather distinct visual profile, so I'm not at all opposed to a fair amount of yellow on the speeders. Another option I considered is painting the doors yellow. This would definitely change the visual profile of the speeder and is something I'm not entirely talked out of (Thing 1 said "no").
Please let me know your opinion on if I should add any extra yellow and where and give me your reasoning if you can. Opinions backed by rationale are always more useful when making a decision than just a poll.
I really like it. My first thought was "Woah! The door trim is intense! I'm not sure at all!" But then I took in the whole image. Looked it really close, and I really see the logic. It works as a whole, and it makes absolute aesthetic sense.
Right I'll try that again after bloody firefox crashing for like the fifth time today.
I like the placement of the yellow.
The yellow/black will look better once highlighted etc... you said you're not finished so so far.
I think the doors should stay green as it would make a large area of yellow if you painted them and the yellow works better as an accent colour, as it is on the actual marines.
The piece between the marines could go either way. I can't think of a good reason not to paint it yellow.
I do think that the front of the missile pods would be good yellow. It would tie them to the MW vehicles and not to any green landspeeder. As an alternative, if the whole front would look too yellow then maybe just a yellow stripe around the front edge...
I think that's all I was going to say, so good job.
Liking the yellow so far...think the doors would be too much.
Missile pods...not sure about the front collar, was thinking the middle section might look better, the rest of the yellow bar the bumper is in recessed panels rather than outer panels, so think it would work better doing the same for the pods...
Whichever you prefer I'd do the pods first and then make a decision on the cockpit bar.
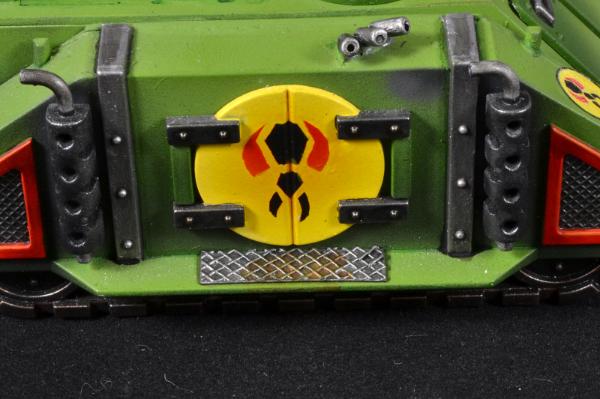
I'm thinking that it would've been more consistent to paint the bar yellow and the pads on the bumper black... (noting mt's observation), unfortunately that ship has sailed unless I want to add another coat of white on the bumper and then re-paint the whole thing. That's a lot of coats of paint...
Gits it looks wicked! :-) I think the yellow makes it look brilliant, it's a prime example of pushing a bit from your comfort zone and getting an outstanding result, the door trim in yellow is a really good touch to the scheme, I think you did the right thing for sure! are you doing any more to them? weathering etc?
There will be highlighting... then chipping and some weathering... this is just defining where the yellow will go.
Man... the more I look at it, the more I want to make the beam of the bumper yellow and the pads either black or perhaps boltgun metal so they match the projections on the front of the hood. The original idea was to make a "hazard stripe like appearance" while using only the molded on detail. It works... but it might not be the best option. It does look just fine on the tabletop though... so while we can merrily nitpick away from the giant blow-up photo... no one will know one way or the other when I"m playing.
I also want to make secondary foot plates to cover where the rods bend for the existing foot plates, but I don't have any plastic sheet in anything close to the right size or pattern. Will have to head down to my FLGS and see if I can order some.
Okay, well, just to awkward, I say repaint the bumper - because you're never going to be happy otherwise. Alternatively, do the reverse on the other Typhoon, and then you can distinguish between them readily.
Wow! The yellow really pops. I like it a lot. As to other places to put it, I agree with Blackhand that the MLs could use a bit. Maybe also on the driver's blast shield, the little rectangle around the eye slit?
I think I nailed it... my own little space marine X-wing.
Thanks everyone for your thoughtful comments... they played a very big role in my final decisions (even if it doesn't look like it). I still may do the yellow bit on the roll-bar because it'll echo the pads on the bumper... But other than that, the placement of the yellow is done. My short term fix for the bumper was to eliminate the black. There wasn't any other black on the model and it seemed very out of place, so I went with the more neutral boltgun metal which seems to tie things together better and is already well represented on the model. I added some detail here and there including the underneath section which I hadn't really done anything with. The yellow of my insignia "decals" was too light, so I had to go over part of it with golden yellow to make it blend in better. Worked fine, just nothing I've ever had to do before.
I'm glad you guys like it! I'm also glad I'm getting into the home stretch. I'm finding my enthusiasm waning for these two. Just been looking at them for too long. I'll soldier on though. I did fiddle around with a devastator sergeant build for a bit of a break today. I think it's going to be a winner.
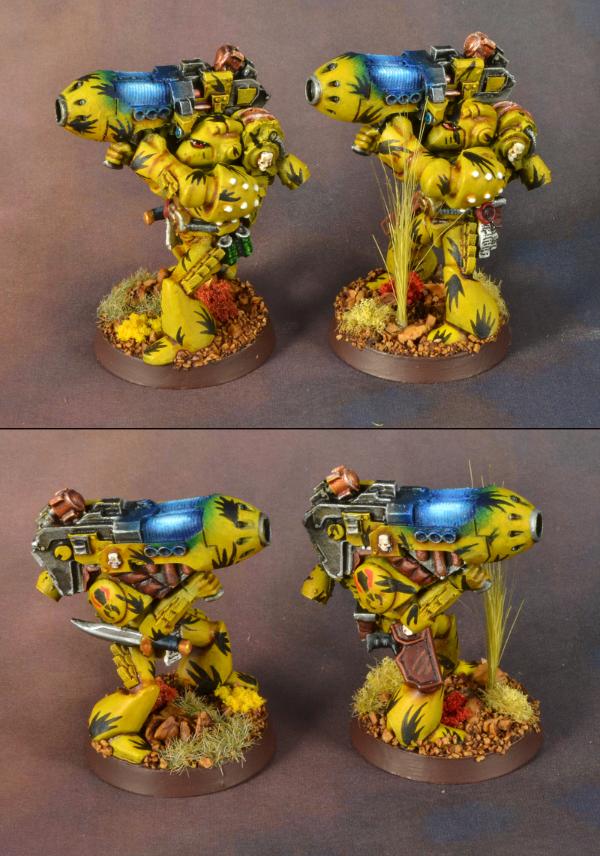
Sometimes... a build just works. This is my devastator sergeant and the last figure I'll do for my Adepticon army. I needed a bit of recreation before the final push on the land speeders and this fit the bill nicely.
Why a storm bolter? Well, I had a few extra points and it's a lot sexier than a melta bomb. Besides... no one gives there characters storm bolters any more... I figure a Dev sergeant would be happier with the best, longest range, shootiest weapon he could get than a grenade he'd have to go charging things to use. He still needs the little mantis bits and it wasn't possible to put my usual badge roundel on his right should pad... so will have to paint that on (oh joy). I like him though. Just what I'd envisioned.
One more day off work. Hope to get the second speeder all yellowed up before I go back to work tomorrow.
Looking good gits! Really like the RTBo1 shoulder pads! The guy reminds me of my dev sarge. THB I prefer not to give any sarges upgrades as the heavy weapons are often expensive enough!
I'd add the yellow on the trim of the missile pods, since they are the only large areas of green that don't have yellow on them. I think if you pick them out it'll stop them being drowned out and balance the model. Go with what feels right though, I'm sure you'll get it right.
Dev Sgt is looking cool I always gave my Dev Sgts Storm Bolters as whats the point in being in a unit of reanged specialists if you have to moved forward to use your weapon Can't wait to see him painted
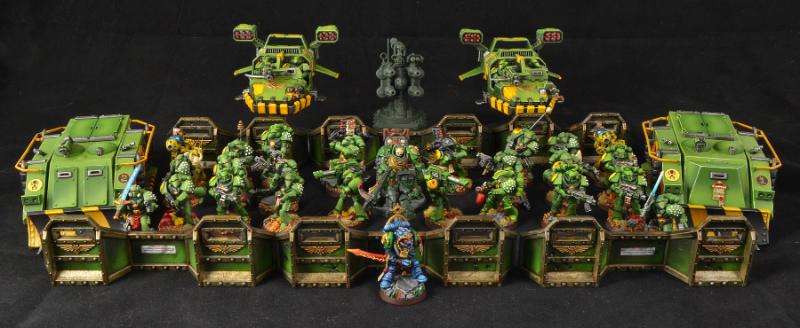
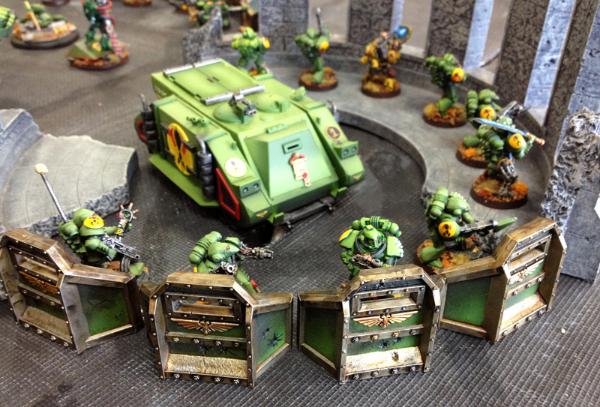
Here's my kind of next Typhoon update... the entire Adepticon force as it stands. Only the quad gun and dev sergeant left with no paint on them. I'm getting there!
@ monkeytroll: Yeah. Like all my Adepticon lists, they never survive play-testing as originally planned. (Sort of like the old adage... "No battle plan survives first contact with the enemy.")
This, however... has proven to be a very resilient force. The whole thing is intended to be combat squadded with the plasma cannon parts of the tac squads in the rear sitting on objectives and giving anti-termie/heavy personnel supporting fire. The other half of the squads with the flamers and power sword sergeants hop in the rhinos to "go get it" (whatever "it" happens to be).The dev's sit back and shoot whatever with MLs & LCs and the sergeant likely mans the quad gun (though any of the rearward squads can do this). Typhoons are also designed for long range fire support and can hit both vehicles and infantry & can make last minute shots at linebreaker or contesting an objective (if they live that long). Whether they start on the table or come on in reserves depends on my opponent, the terrain and the scenario. Ezekiel (Clothis) can do whatever but right now I've got him hanging back & providing psychic support to the rearward squads, as well as a little punch should an assault become necessary.
I had variations of this army with my sternguard as well as other units I've used in the past... but I wanted to try something different. This is basically a standard SM army with the exception of Ezekiel... It was also a good excuse to paint up enough marines for two tactical squads which is something I've wanted to do for a long time but probably wouldn't have done without the tournament as incentive. The real reason the two plasma cannoneers are in tranquility camo is that an early variation of this list had a sternguard squad with two PCs in it. Now however, they're doing what the sternguard in my army do when the "unit" isn't called up... they matriculate with the regular infantry and lend support as they can.
I really only have one quandry remaining with this list. I pay 10 points to make the two tac squad sergeants "veterans", which gives them +1 attack and an LD of 9. I could instead... use that 10 points to give each of the sergeants a melta bomb and the rhinos dozer blades, which would increase the overall flexibility of those squads at the cost of 1 point in LD and the third attack with the 15 point power swords. TBH I'm not sure which is the right way to go. I've been play testing it with the vet sergeants, but so far neither has gotten into cc (which is more typical than not). But since I've already paid 15 pts for the swords... seems a waste not to give them the extra attack. The rhinos would look better with the dozer blades though.
*shrug*
Just not sure which way I should go.
@Snrub: Sorry mate... I respect your opinion but I think they're going to stay the way they are. I need to move on if I'm going to get everything done (including the quad gun).
The speeders are really looking good Git's your so close now.
In regards to the spare points its a hard one, to me its either LD 9 or Melta Bombs, I'd cross my fingers and go for melta bombs to take out dreads and LR's if they get too close.
Yeah... the MBs are handy... and those squads with the sergeants are likely to be in harms way... I'll try some play testing with the MBs and lower LD and we'll see if it bites me in the butt.
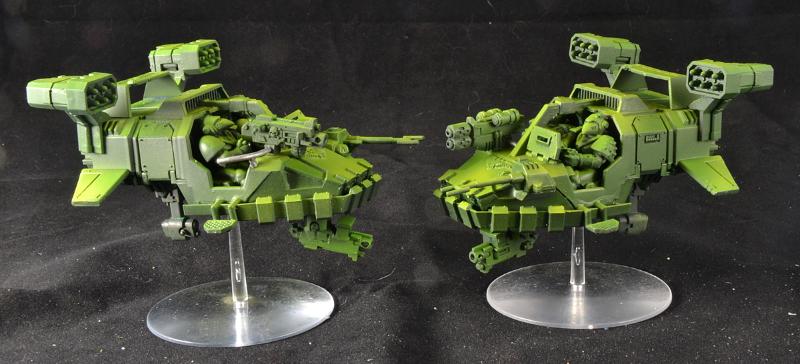
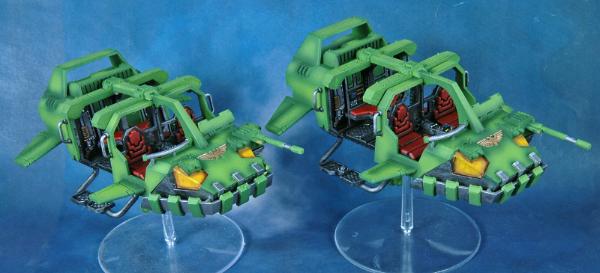
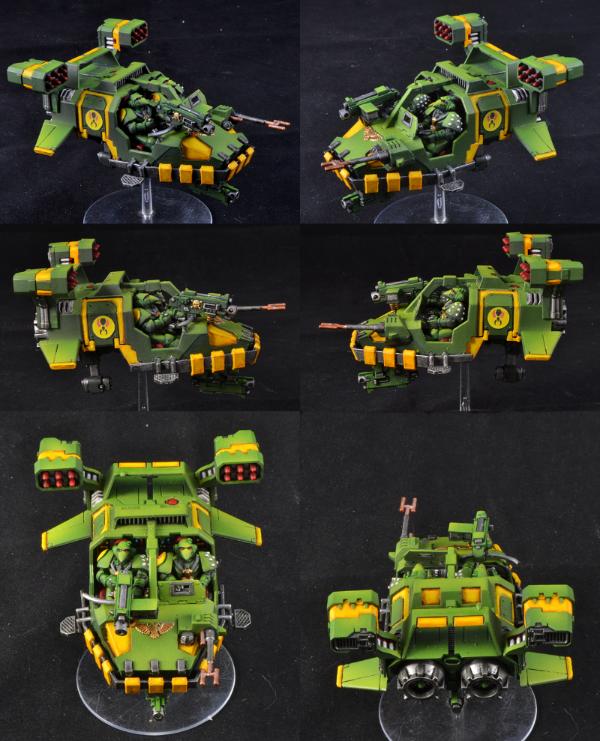
Here are both speeders, now painted up to the same place.
Hey Gits, i wasn't having a go at you in that last post. There was supposed to be another sentance afterwards saying "not my minis so it doesn't matter i like them or not." but i'm guessing i just thought it rather then writing it down.
I didn't think you were Snrub... there was no vitriol in my comment at all. Just meant that I wasn't in a position to re-paint them with a deadline looming. No worries man, we're good.
Just caught up on two and half pages, whereby advice was asked for, I dutifully collected my thoughts, only to find that everything is already done! Slow down man - you are making the rest of us look bad
Right - so you are going to get my opinion anyway, and I give it fully knowing that it won't change anything - this time...
Initial thoughts on the first pic were that you need to decide *how much* yellow you want, and consequently, where it should go. While both are a matter of preference, I think the former is more so - the latter can be improved by consistency of choice. There is too much yellow for it to be a spot colour, it's most definitely a secondary colour (to the primary green) - but the consistency of choice is all over the place - internal placement on the front and rear fin, external placement around the hatch and on the wing tips and raised placement on the bumper. It's obviously missing from other places at this stage, but if you were to fill in everything that matched what you started, yellow would be the primary colour I also didn't think the black worked on the bumper, and was going to ask if that was intended to be metal, as I suspected that would look better (or make the recessed black yellow, and the raised yellow green or metal...) - but you already did that so you'll have to take my word on it that I actually thought it beforehand
Looking a lot better now because you are finished (or close to) and the yellow is better balanced across the model. The boltgun on the bumper looks a lot better and the hatches look a lot better green with the yellow Mantis Warrior emblem. I still think more consistency of placement of the yellow - just recessed areas or just raised areas - may have worked better. If going for recessed, move the yellow on the wings from the tips to flaps, remove the yellow around the hatches, possibly put yellow in the back top defined plates, drop the yellow from the bumper and make it green with metal raised bits - or possibly make it yellow with green or metal raised bits. Paint the centre bar yellow with a green or metal raised bit, or if that is too much, leave green with a metal raised bit. Alternatively, working with the raised areas, reverse the centre and front missile launcher colours, possibly doing the back in yellow as well, reverse the fin and/or intake colours or leave green, potentially lose the yellow on the hood. This also gives rise to some additional possibilities - raised parts of the heavy bolters and the raised "dimple" on the proby thing mounting.
But hey, they look great. Not all (or even any) of my suggestions/thoughts may have improved the end result - I just wanted to share my thought process in respect to your original request for advice, which may or may not be helpful in the future and inevitably never survives actual painting anyway. Someone should do those images up for the DakkaDakka colour chooser thingy.
Now it appears I have two battle reports to catch up with...
Personally I liked the black bumper. Very cautionary. If anything I think if you distressed the bumper a bit it you would have a similar effect ( dry brushing the edges and a bit of wear )
Still a very amazing look and uniquely standout for your army. Good show!
Just caught up on two and half pages, whereby advice was asked for, I dutifully collected my thoughts, only to find that everything is already done! Slow down man - you are making the rest of us look bad
Right - so you are going to get my opinion anyway, and I give it fully knowing that it won't change anything - this time...
Your advice is always sought and welcome my friend. Thank you for taking the time.
Initial thoughts on the first pic were that you need to decide *how much* yellow you want, and consequently, where it should go. While both are a matter of preference, I think the former is more so - the latter can be improved by consistency of choice. There is too much yellow for it to be a spot colour, it's most definitely a secondary colour (to the primary green) - but the consistency of choice is all over the place - internal placement on the front and rear fin, external placement around the hatch and on the wing tips and raised placement on the bumper. It's obviously missing from other places at this stage, but if you were to fill in everything that matched what you started, yellow would be the primary colour
Your comments actually point out a common problem I have, not just with minis but with life. I'm a terrible planner... but I've very good at making it up as I go along. The color choice on the LS is a perfect example. It's kind of a mess and doesn't follow any logical pattern... but in the end it works pretty well. That pretty much sums me up. I'm not saying that's good or bad, it's just how my brain is wired. Your comments are spot on though... consistency of design would have improved the model.
I also didn't think the black worked on the bumper, and was going to ask if that was intended to be metal, as I suspected that would look better (or make the recessed black yellow, and the raised yellow green or metal...) - but you already did that so you'll have to take my word on it that I actually thought it beforehand
Yeah... I was kind of torn on the whole bumper thing. I think the very best option would have been to leave the bumper green and paint the pads metal... but then the front of the LS would be short on yellow when compared to the rest of the vehicle. Second best option would have been to do the bumper yellow and pads either green or steel. That would *really* push yellow towards the primary. I picked the third best option... or maybe the 4th... metal bumper with yellow pads. It was a vast improvement over the black and yellow though. I must have been pickin' up your positive waves.
Looking a lot better now because you are finished (or close to) and the yellow is better balanced across the model. The boltgun on the bumper looks a lot better and the hatches look a lot better green with the yellow Mantis Warrior emblem. I still think more consistency of placement of the yellow - just recessed areas or just raised areas - may have worked better. If going for recessed, move the yellow on the wings from the tips to flaps, remove the yellow around the hatches, possibly put yellow in the back top defined plates, drop the yellow from the bumper and make it green with metal raised bits - or possibly make it yellow with green or metal raised bits. Paint the centre bar yellow with a green or metal raised bit, or if that is too much, leave green with a metal raised bit. Alternatively, working with the raised areas, reverse the centre and front missile launcher colours, possibly doing the back in yellow as well, reverse the fin and/or intake colours or leave green, potentially lose the yellow on the hood. This also gives rise to some additional possibilities - raised parts of the heavy bolters and the raised "dimple" on the proby thing mounting.
My one point of disagreement is that the area around the hatches IS a recessed area. If I was going to really do the recessed area thing, I should have painted not only the rim of the hatches but the hatches themselves yellow (which I did consider). Painting the recess around the hatches was a major element that I set out to do from the beginning, so I wouldn't have changed it anyway. I wanted to make a painting design that gave a different visual image than a normal LS. As I went along, I kept doing things that I thought would make the visual impact I wanted... but thing after thing just didn't really do the trick. What you see is still not what I wanted... but it's as close as I was able to get given my piece-meal approach. Luckily, I have one more to do... and I think I'll push things a little harder with the third one and see where it gets me. You will see the evidence of your advice in the last one.
But hey, they look great. Not all (or even any) of my suggestions/thoughts may have improved the end result - I just wanted to share my thought process in respect to your original request for advice, which may or may not be helpful in the future and inevitably never survives actual painting anyway. Someone should do those images up for the DakkaDakka colour chooser thingy.
I greatly appreciate your help Arakasi and will take it to heart. Your comments are very perceptive and as I mentioned... accentuate a known quirk in my psyche. Something I'll remember to keep in mind as I go forward.
While I agree with most points, in my opinion yellow and dark metal bumper was the best option possible.
At least from what I see on the pictures.
Green bumper would have been kinda boring, while green jellow base would have looked very off.
All in all the end result is really good.
My only critism would be that the edges of yellow in the lower parts are a bit unclean.
At least it looks like this in some pictures.
Also at that painting standart it would have been nice to smooth some of those gaps between the platic parts with greenstuff
Actually I did that... or at least tried to do that. That one seam in the front is just terrible. I tried using the "liquid green stuff" that GW came out with once but it shrinks so much that it never did fill the gaps.
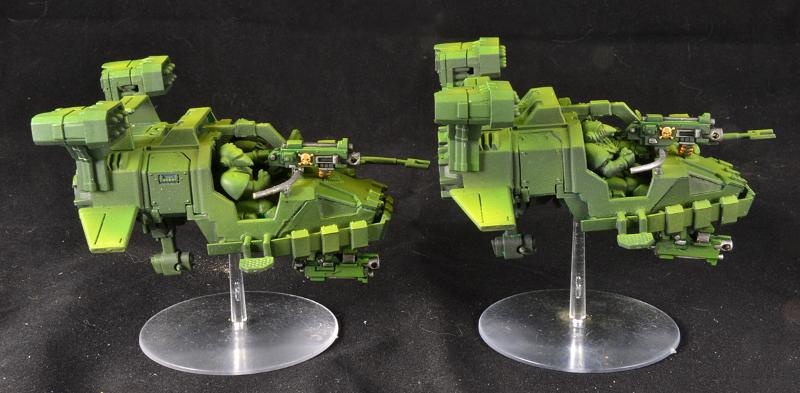
Keep in mind these were rescue projects... here's what they looked like at the beginning... (minus the gunners which we're the first part of the rescue/conversion).
Personally, I really like the execution on yellow/metal bumpers. Having seen the green and metal bumpers I can say that that does not look very appealing.
Added the final touches to the Dev sergeant. Added extras like chainsword teeth (THANK YOU ZINGE!), purity seals and terminator honors.
And re-visited the rhinos. My eldest said the new speeders looked great but odd when next to the rhinos & that I should look at adding some yellow to them. I just couldn't find any good spots to add the yellow, but I did find a lot of areas that could be picked out in metal to add detail and complexity to the figures. So while these may not look like much, they're actually quite different than they used to be.
The other reason I worked on the rhinos a bit is that I know everyone wants me to go further with the land speeders... edge highlighting... weathering & damage and the lot. But I'm not going to do that unless I can be sure that I have enough time to do the same thing to the rhinos. So I'm trying to put myself into a position to be able to add those things once the quad gun and dev sergeant are all painted up. So for now the Speeders will be marked as "finished" with the caveat that they aren't actually done, just consistent with the rest of the army I'll be fielding them with. If I don't get back to them before Adepticon, it'll have to wait until afterwards.
Very very nice number on those tankies! I'm not sold on the purity deal on the dev serg's wall-e though I'm afraid. It looks a bit odd to me. Love the before and after of the speeders!
Tread plates are made by cutting a sheet of thin plasticard, then using a toothpick to spread a thin layer of superglue on it. The take a bit of this flexible mesh I got at the hardware store (you buy it 36" across by the foot... cost me like... $1.25 for a lifetime worth of tread plates). Anyway, you lay that across the plastic, let it dry & cut to size. Simple, effective, cheap.
Oooohhh.... those are old-school looking! Me likey! Are they limited to any specific dex?
... man... now I'm really considering popping those side doors off to see if I can re-do them. Problem is, if I screw it up I've really got a mess to deal with.
I couldn't figure it out either Dr H. If I do tear apart the doors, they'll be repainted green but then have large MW badge decals put on them, which will make them look mostly yellow. There are a few fine details, one of which I have yet to add... that I can do in yellow, but they'll never look like the speeders. They were just made with a different design ethic.
@Snrub: I seem to recall that it's called "hardware cloth"... but I might be mistake about that.
Gitsplitta wrote: I couldn't figure it out either Dr H. If I do tear apart the doors, they'll be repainted green but then have large MW badge decals put on them, which will make them look mostly yellow. There are a few fine details, one of which I have yet to add... that I can do in yellow, but they'll never look like the speeders. They were just made with a different design ethic.
Well it does fit the fluff of the army, if I remember right. Being rebuilt with new or spare equipment, some will be older styles then others, the speeders are new additions and have come with a new chap in the paint shop who has different ideas to the old man who's been there from the start...
If you have large decals, you could add one to the top hatch as I've seen many armies do (or a squad marking etc...) that would break up the large green expanse on top. But I would be very cautious of doing that though, it might be too much. Maybe only a little yellow edging to the hatch doors... I'd probably leave it green if it was mine, it's a very nice green with a very nice shading effect.
Excellent idea Dr H, I'll take a look at that. I actually need to redo my transfer sheet as my yellow shade has changed somewhat over the years. More gold than pure yellow now.
I just asked the guys to show me fine mesh, I didn't care what it was made from. This was the second thing we looked at. I'm not sure that hardware cloth is the correct term... so take it with a grain of salt.
Deimos Preds in any flavour are available to all the 'dexes - only one that isnt is the Infernus and that is only not available to BA as its meant to be a non-BA variant of the Baal.
Well done indeed! A great way to celebrate 350. It's so great to see stuff that hasn't popped up in a while; I'd forgotten for instance, just how good the finished plamas were. Keep on truckin'!
I love this hobby! and how the addition of a simple tread plate can make such an amazing difference to a model, gits it looks awesome and it's such a little thing! lol :-)
*chuckle* Sorry weety... that's an old pic. He's un-fluffed now.
Thanks guys. Not my most prolific run, but what doesn't show here are all the orks, nids and crons I did during the same period.
@graven: took me a while to figure out what a "plamas" was... p-llamas?? Anyway, finally sorted it.
@Ross: Ah yes, you're fairly new to the blog & probably missed that one. It was a trade for Yggs that I'd owed him for a long time. Those get special attention. inmygravenimage has one coming & partially done. Probably be the first thing I address when I know my Adepticon army is sorted.
@nerdfest: Did some more work on the tread plates last night. They do make a difference.
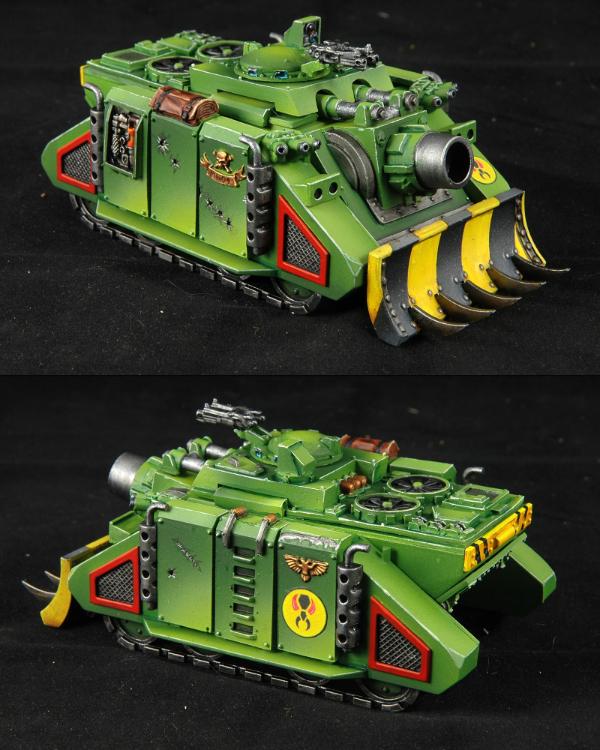
Automatically Appended Next Post: Made significant progress on one of the rhinos in the wee hours this morning. Tread plates, edge highlighting, new metal parts, etc. Unfortunately the yellows are all over the board... that will get addressed eventually but who can say when. The tread plate yellow is where I want these to lean towards. Have one more major element to add, then we'll see. At some point I'll have to set these down and finish the rest of my list... but I'm not quite there yet.
No moss growing under my feet. Have continued to work on the rhinos. Only one more thing to add on them and they'll be "done" until I can make the time to weather all the vehicles. I go from here to the edge highlighting and final details on the land speeders.
I'll be sending Yellowbeard a couple of Mk-1 Razorbacks for his Adepticon army & he was needing some extras for them that it turns out I can't provide... namely storm bolters and dozer blades. I didn't have any ideas on the dozer blades (so if any of you out there have any of the old Mk-1 blades like the ones on my rhino... you might drop Yellowbeard a PM), however... I thought I might be able to mock-up at least one storm bolter out of the bits available. Below is the result. Two of the bolters that come with the Mk-1 kit, some plasticard and a stormbolter handle from the upgrade sprue that I somehow had kept tossing around in a box for years and years. I've cut an extra cowl & tossed it so he can make a second one if he's of a mind or doesn't find a better option.
Expect the final rhino update some time later today.
I post these pics knowing most, if not all of you won't like the result. Keep in mind that spirit that this army is intended to recapture... a throw-back to an earlier time in 40k. I've added the grab rails on sides of the rhino and it's amazing how completely they change the feel of the thing. I'm ambivalent about it... my wife hates it. But... I think I'm going to leave them there, at least through Adepticon. They are very lightly glued on from the two middle struts only, so they can be removed with a minimum of damage to the vehicle.
So... sans chipping and weathering, these are definitely done. I softened the yellows so they're more along the golden color I really want, added lots of details that weren't there before, and the grab bar of course. The grab bars were notorious for breaking in the middle. I'm sure these will too eventually, but my hope is that they'll last through the event.
Ooooooooooh wow. Well call me peculiar then, Coz I like them.
So much so, that I have immediately added it to my list of things to do to future models.
and a nice way to add that little bit extra yellow.
Leave those rails alone right now young man! they look excellent! so different but they capture the style and era you are aiming for! I really like them and in yellow they are just the perfect addition, and tell your wife she's wrong for once!!!
Thanks guys, I appreciate the support. They really change the feel of the model. I'm sure making them yellow accentuates the difference & if I'd made them a more neutral color it wouldn't have been as obvious. But... if I'm going to add them, I might as well go "all in" and have them jump out at you! The choice of yellow was also inspired by modern railroad equipment. Rails on locomotives and such are usually painted in bright colors for safety's sake. White, yellow or red are common. I figured the same reasoning would hold true for these... you wouldn't want a marine forgetting they were there and knocking himself cold while entering or exiting the vehicle!
I dunno; I feel your pain. Ultimately they are "right" even if they feel a bit goofy. Maybe - and not to make life more awkward for you - hazard stripe 'em?
Hi, Gits. Your army is getting bigger and bigger, and your thread hasn't slowed down a bit. The new recruits are looking brilliant. Glad to see you are keeping up the good work.
Those Rhinos are looking awesome, I think the railing is a tad goofy, but it does certainly bring the color forth without ruining previous paint (or at least getting it back to what it was without having to repaint the entire thing).
Just make sure to tell your opponents that the rails aren't a part of the hull
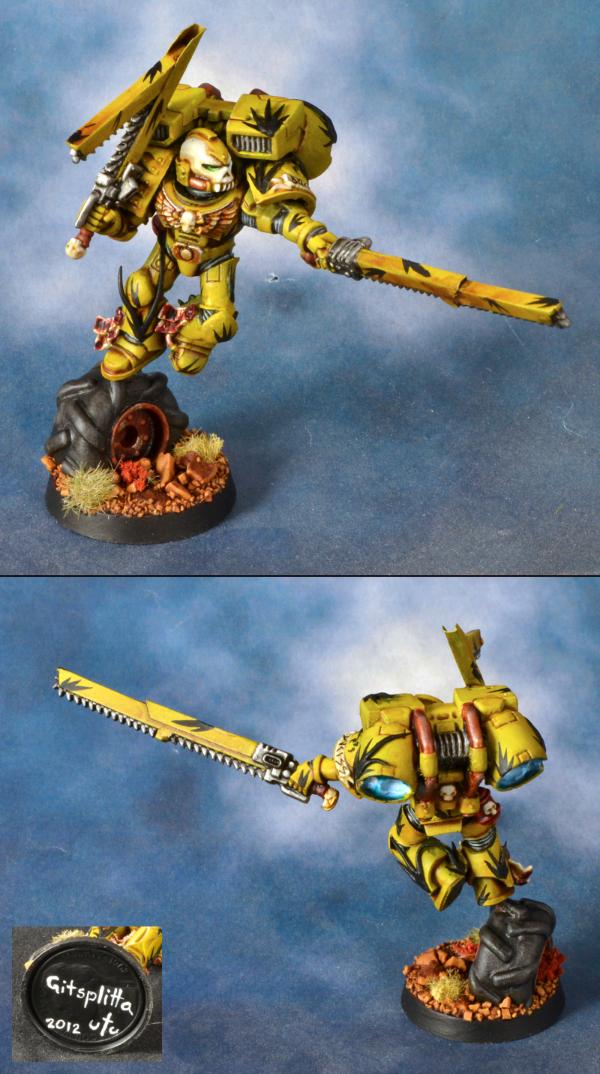
Finished the first of the LS Typhoons. I don't know if you can see the difference but there's a lot more work on this one from the last photo. About the best edge highlighting I've ever done, more details painted, some lining, lenses, etc. This is "finished" save for any damage/weathering I want to do later.
I snapped these shots as the speeder was making a patrol run. Hope you like them!
Second LS Typhoon is done. I don't know that it merits a photo... looks pretty much like the first one. Kind of anti-climactic actually. Ah well, on to airbrushing the last two bits... the quad gun & the dev sergeant. Have a practice team tournament coming up in a couple weekends... be nice to have them done by then.
See post above Dee. Dev sergeant & quad gun next. Both primed and ready to go.
Here's the army as it stands. You can see the two things I have left to do in dark green (primer). Picture was taken before I put the final touches on the left LS Typhoon.
These'll stand pat as they are for now. I will eventually re-visit all my vehicles and weather & chip them, but for now... it makes sense to keep everything painted to a consistent final standard.


 )
)


 ! That's awesome, Gits. Thanks, man.
 Ooooooooooh wow. Well call me peculiar then, Coz I like them.