12188
Post by: Coldsnap
Hi,
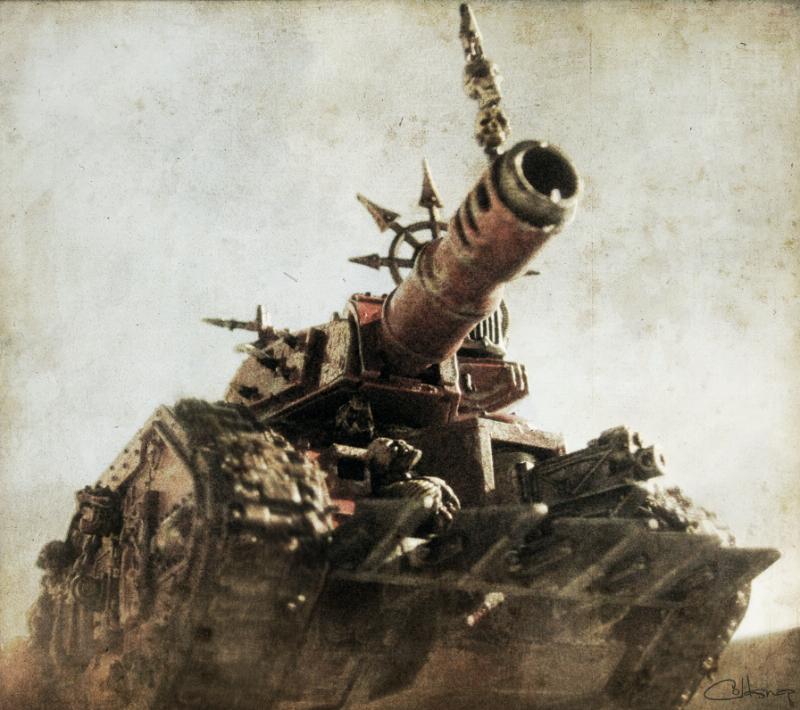
because of my mediocre painting skills and my interest in photo enhancing, I've recently been working on some forgeworld-style artistic photography, and I thought I'd share some of my finished images with you. (Please note that not all of these models have been painted by me, I've been borrowing from friends and the local GW store).
Am I going in the right direction? Any comments or feedback would be most welcome.
3468
Post by: Xanthos
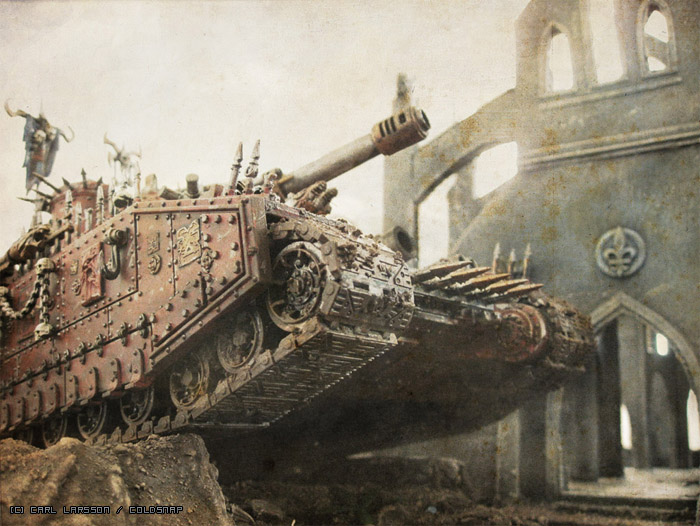
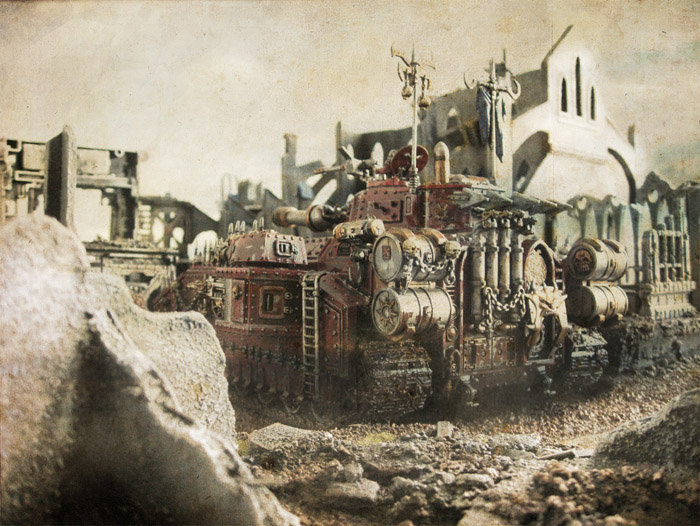
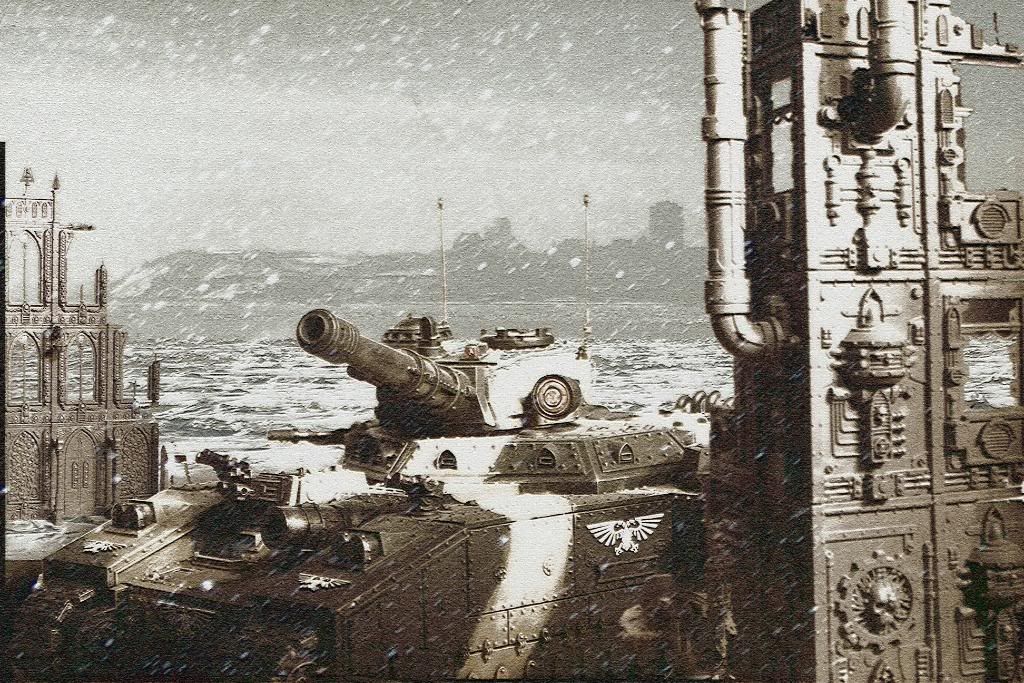
The shots of the chaos Baneblade look really good, nice level of grittyness on those.
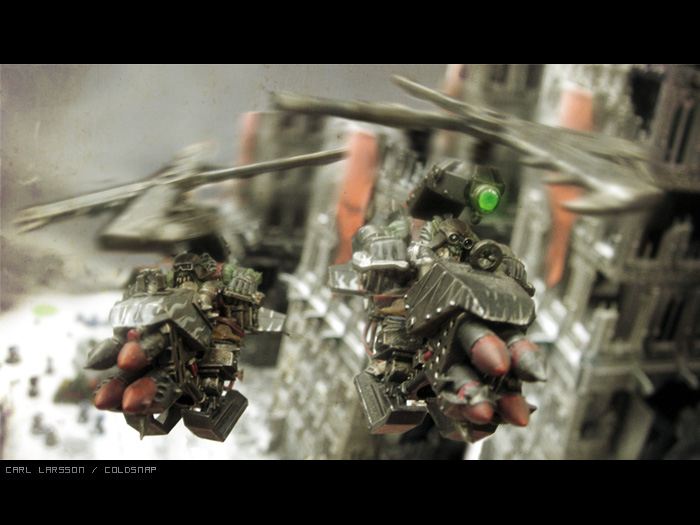
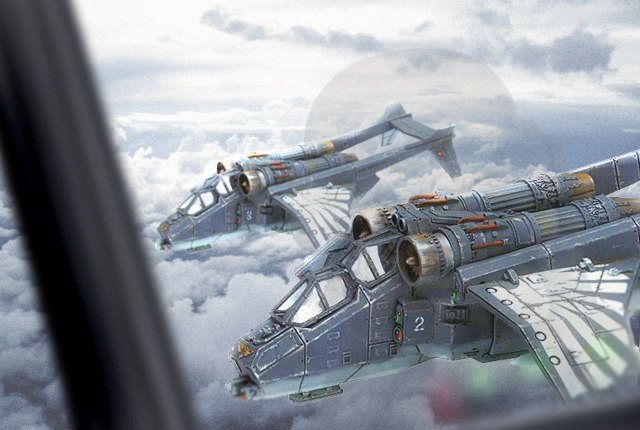
The Deffkoptas are good too, got a sense of movement to them, but the propellers leave me wanting more, somehow.
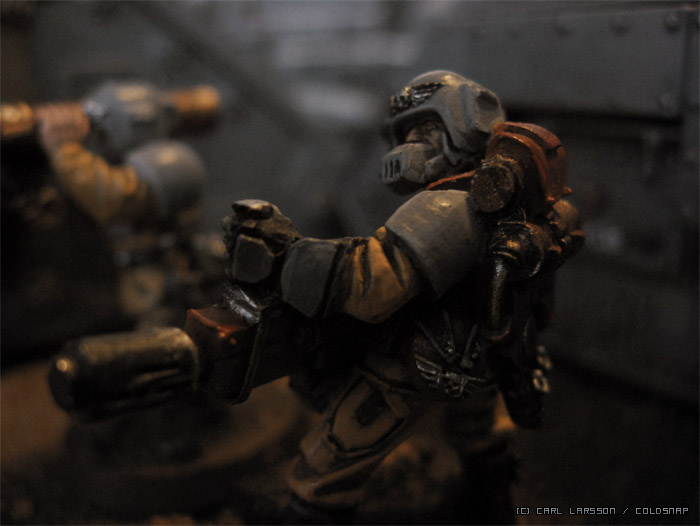
The one with the guardsmen is my least favourite one. Not because the painting is bad, it´s actually very good. However, because he´s so close to the camera, it becomes quite obvious that he´s painted, and the realism suffers for it.
Hope you can use this for something, I really think these are good, do more!
8324
Post by: Dhugs
That is some very good photographic work indeed. Feed us some more!
4786
Post by: legoburner
Looks really good, I'll hope you'll continue to share it with us and maybe upload some to the dakka gallery? My only comments might be that the images are a bit bright maybe? I think it is because the colours are like a washed out blanche style painting so my mind wants to see more blanche style colours? Keep up the good work and cant wait to see more 
4746
Post by: Flachzange
Xanthos hit it dead on. The guardsman looks awkward. Hoewever, the new batch of pics works fine. The marine one for example doesnt look anywhere as static as the guardsman pic.
My fav are the baneblade ones as well though. Those look totally rad
735
Post by: JOHIRA
Xanthos wrote:The Deffkoptas are good too, got a sense of movement to them, but the propellers leave me wanting more, somehow.
The propellers appear to have the same amount of blur as the background, and no motion blurring around their axis of rotation. I imagine getting it right would take quite a bit of playing around in photoshop, but the current effect almost suggests they are part of the background.
I like the rest of the pictures though. Pure win.
12188
Post by: Coldsnap
Thanks for all the praise!
I think the main reason the colors look a bit washed out is that several of the pics were taken at the local GW store (which has really strong fluorescent lights), and the camera I'm using is just a cheap compact one. I'll try to put some effort in getting the lighting right next time. 
9788
Post by: goffnob deffsmakka
I MUST KNOW HOW YOU DO THAT!!!
7654
Post by: JoeyFox
goffnob deffsmakka wrote:I MUST KNOW HOW YOU DO THAT!!!
Photoshop & a good 35 Mil, likely
I'd like to know your exact gear and set up though, along with exposure times and the likes. If your doing it professionally, that is.
Your darn good, and that's coming from someone trained to do this kind of stuff (among a lot of things)
5904
Post by: FearPeteySodes
Those are fething awesome man! Seriously make an article or a how to sort of thing. Having photoshop and a camera alone sweet pics do not make...
But really i want to start doing this too for a side project working alongside/for my army.
7632
Post by: Ghost in the Darkness
Those are amazing, please your really do need to create a article tutorial for the rest of us.
12264
Post by: rhiesa
Absolutely beautiful, definitely have to try doing that ^^
12188
Post by: Coldsnap
JoeyFox wrote:
I'd like to know your exact gear and set up though, along with exposure times and the likes. If your doing it professionally, that is.
Your darn good, and that's coming from someone trained to do this kind of stuff (among a lot of things)
Just using a cheap compact camera (Ixus 950IS) at the moment, so my control over exposure time and such is quite limited.
In retrospect, I should have set exposure times much, much lower for a lot of these images, but done is done
Thanks a lot for all the nice feedback everyone, I'll try to write up some kind of tutorial for my next image!
7116
Post by: Belphegor
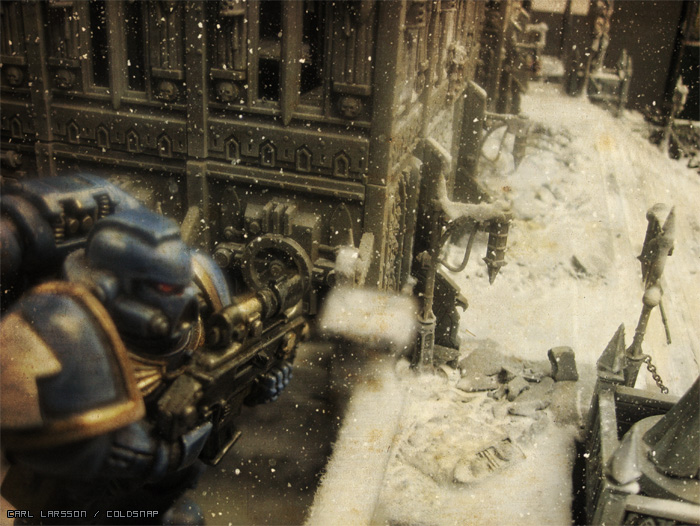
I a big fan of the marine in the snow.
7054
Post by: JediRaptor
I would DEFINATELY keep tabs were you do article or blog how you've done that, I have a camera that could do it, but I am very very lacking in the computer skillz department, so would love some step by steps...
Keep it up!!
1748
Post by: Grandmaster
As a pro photographer, I must say your work is top notch. Well done.
Ive been planning to do a few of these my self. You have inspired me to get my finger out and do it!
Well done!
9956
Post by: gamefreak
awsome!!
Next try some Necrons

12188
Post by: Coldsnap
Sorry for the delay, I've been busy with other things (*cough* Dawn of War II *cough*) but I finally managed to finish a few more pics from my shooting session at the GW store. I'll try doing this as a tutorial, hopefully someone will find it useful.
Note: I'm using Photoshop, but there are other editors out there that can do most of the things Photoshop can (Gimp and PaintShopPro springs to mind). I will not go into details about the specific tools, since these are already covered in the help files or in other tutorials that can easily be found on the web.
Please don't repeat my mistake and start shooting without proper lighting. If you really want to show off your painting skills, it might be a good idea to build a cardboard studio box to get more diffuse lighting, but for this you should be fine with just a desk lamp. There are a few excellent guides covering miniature photography out there already, including these:
http://www.dakkadakka.com/wiki/en/Dakka_Modeling_FAQ:_Photographing_Models
http://www.hodgenet.co.uk/minpics/index.htm
http://www.librarium-online.com/photography/miniature-photography-2-987.html
http://www.cheddarmongers.org/prod/blog/uncle_phil/uncle_phils_miniature_photography_guide
Before you start, turn off the flash. If your camera has a macro setting, turn it on (assuming you are taking a close-up image). Never hold the camera without support if you can avoid it! If you don't have a tripod, put your camera on a box, a piece of terrain, anything. If you just hold it, the image will get more or less shaky. The best option is to use the timer, and not touch the camera at all. However, it's usually very hard to do that AND get a good shot. 
Take a lot of pictures while you're at it, try different angles etc. An image that looks good on the camera display may turn out to be nearly impossible to work with later, so you can never have too many. Well, almost never.
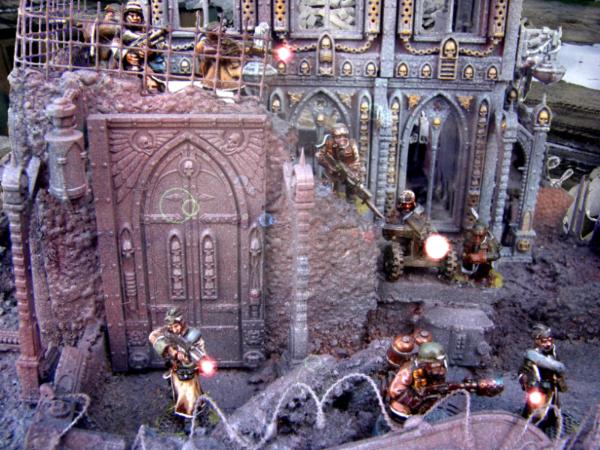
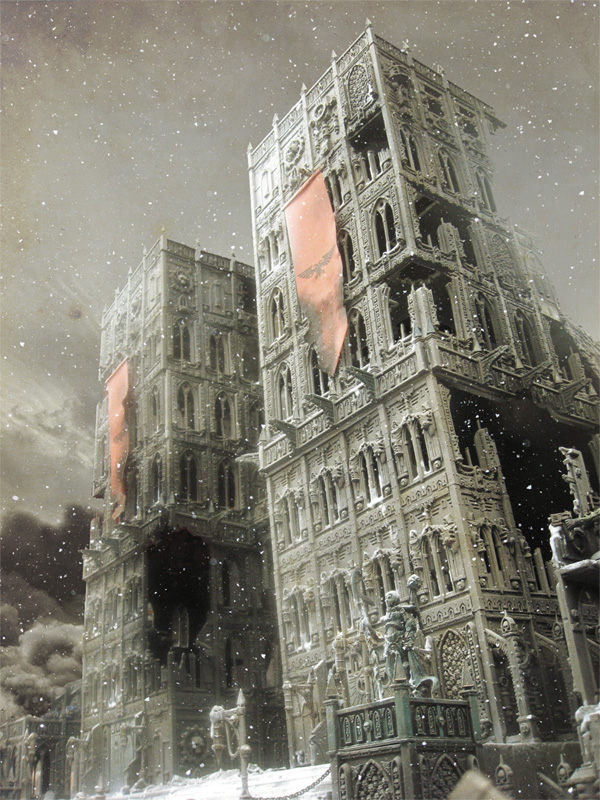
This it the image I'm going to use for this tutorial:
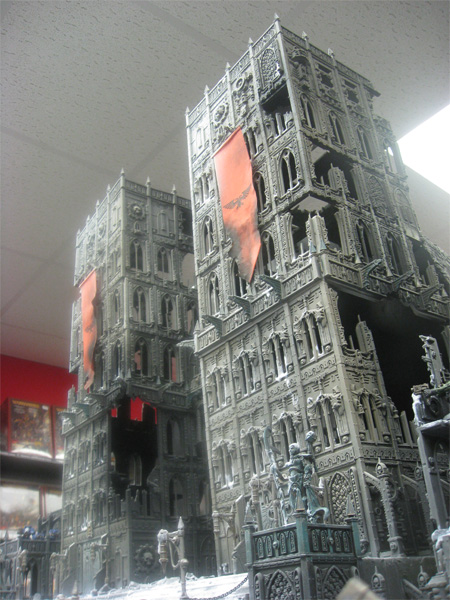
Kudos to the guys at GW Gothenburg for creating this awesome building!
For almost every image, you'll probably need one or more of these things:
Skies
Using a different sky can really change your image, and sometimes you may even want to combine several skies. Just make it a habit to snap a shot or two whenever there are cool clouds in the sky and you'll end up with more sky images than you'll ever need.
Aged Paper
Overlaying an image of old, yellowed paper onto your photo will give it a worn, weathered look. A good way to get this is to scan a page from a really old book. The title pages usually don't have that much text on them, and by using the Clone Stamp tool in Photoshop you can get rid of what text there is.
Smoke
You're not very likely to have direct access to that black, billowing bomb smoke we want (at least I hope you don't), so search the web and the local library for old war images, burning oil fields and the like.
Snow
For this image I'll also need some snow. Taking a good photo of falling snow can be tricky, I've found it's easiest to do it at night, with the flash enabled. Should you get good conditions, be sure to take several photos so you have some to choose from.
The first and most tedious thing we need to do is cut out the image from the background. In Photoshop, the background layer is usually locked for editing, so you may have to make a new copy of it. Just drag the layer to the small "Create a new layer" icon, then hide the original background layer (having the original image around is very useful if you make a mistake). Then carefully erase everything that you don't want in your image (in this case the roof and walls of the store). If you're lucky you can use the Magic Wand tool to quickly select large areas. For more detailed parts I suggest zooming in and using the eraser with a small brush.
This part can be painstaking, but it will pay off in the end. This is what I ended up with:

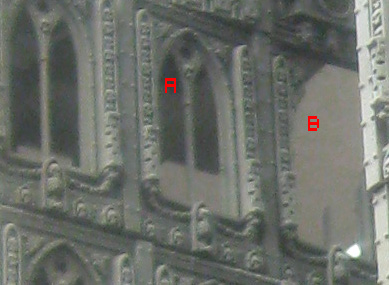
As you can see, the background still shows in some of the windows. We can't just fill these in with black, since it wouldn't look the same as the other windows. If you look closely, you'll see that the windows aren't really black, but a dark-grey noisy mess. To make it look good, we need to duplicate this for the other windows using the Clone Stamp tool. Using the texture from window A as a source (alt-click here to set the clone source), carefully draw into window B until it looks more or less the same. Repeat this for all the other windows.
Now it's time to get that sky in there. For this, I used two images, one for the sky itself and one for the smoke. Just put them underneath your main layer.
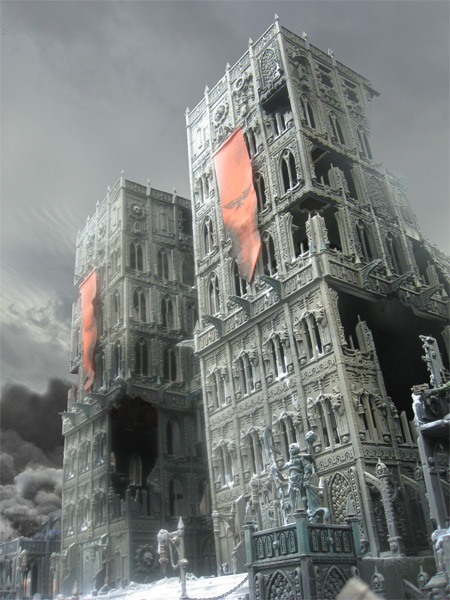
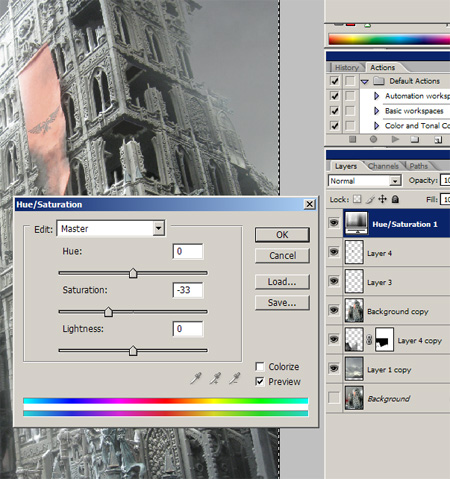
Miniatures, even the dark and gritty ones of 40k, are often painted in bright colors that stand out on the battlefield. In order to make the image look more aged and war-torn, we need to dull the colors down a bit. (This also helps hiding the Ultramarines standing at the bottom-left roof, that I forgot to remove after taking the picture posted earlier in this thread )
Instead of editing the color saturation of every one of your layers, go to Layer->New Adjustment Layer->Hue/Saturation. This will give you a layer that you can use to tweak the color settings for the entire image until you get it right.
Now, drag that old paper texture I mentioned earlier on top of your image, and resize it ( CTRL-T) until it fits your image. Change the layer mode (the roll-down menu in the layers section) from Normal to Overlay, and set the opacity to about 15%. Now make a copy of this layer, and set it to Color Burn mode. You may need to fiddle around with the opacity numbers to make it look just right for your image. 15% worked good for this one.

Finally I'll add some falling snow to the image. If you have white snowflakes on a black background, you can just set the layer to Screen, and only the snow will show. You'll probably have to resize the snow layer until the size of the flakes fit your image.
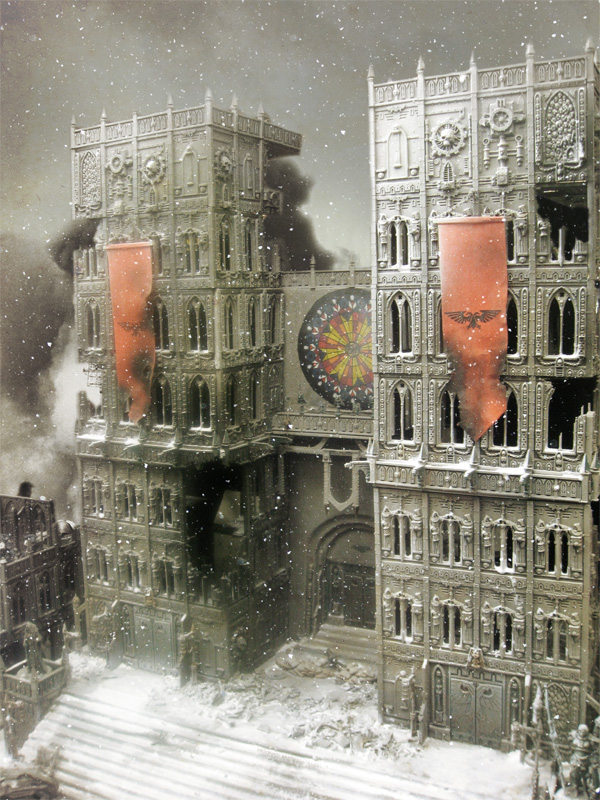
Done!! 
And another using the same materials:
10345
Post by: LunaHound
Amazing, i love how the angle made the building look so tall .
6292
Post by: Valhallan42nd
Most excellent!
474
Post by: AJCarrington
Awesome stuff - would make for an excellent article/tutorial...hint...hint...
AJC
9538
Post by: The Thousandth Son
This is really damn cool.
4634
Post by: Datadep5
Very impressive.
11584
Post by: Roze
thats fantastic!
6292
Post by: Valhallan42nd
Seriously, this needs to be up on the main page or something.
12188
Post by: Coldsnap
Grandmaster wrote:As a pro photographer, I must say your work is top notch. Well done.
Ive been planning to do a few of these my self. You have inspired me to get my finger out and do it!
Happy to hear that, looking forward to seeing them
131
Post by: malfred
Nice work.
You can "enhance" my photos anytime. Rawr!
4461
Post by: Hordicant
Excellent work, nice tutorial also.
I played with photoshop a while back doing EQ signatures, got some good ones, but never did anything this good with real pictures. Excellent work and I have to say I think for overall feel the marine by himself is spot on.
9505
Post by: CaptainRavenclaw
Totally awesome. All information noted and stored! Thanks for sharing your skills. Now I have cake baking skills and warhammer photoshop skills.
7899
Post by: The Dreadnote
Excellent work. Hope to see more!
5642
Post by: covenant84
Great! now, to make work re-install photoshop for free!
More please 
10598
Post by: aunshova
Excellent work. I hope you plan on making further tutorials in the future.
6292
Post by: Valhallan42nd
covenant84 wrote:Great! now, to make work re-install photoshop for free!
More please
Just download GIMP.
11310
Post by: Shortbus
Beautiful work, and thank you for sharing the tutorial.
3197
Post by: MagickalMemories
So, about how long did it take you to do that with the image?
Eric
2050
Post by: Anung Un Rama
Wow, that's some awesome stuff there. My brother started photoshoping some of the pics he took while gaming, but they mostly consist of different kinds of gun fire.
I also like the Baneblade pics the most.
As soon as I have some more time to spare I'm going to read that whole tutorial.
12188
Post by: Coldsnap
MagickalMemories wrote:So, about how long did it take you to do that with the image?
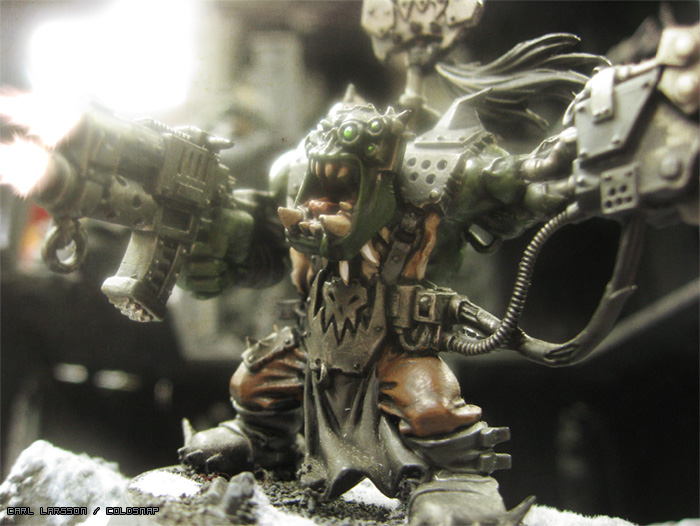
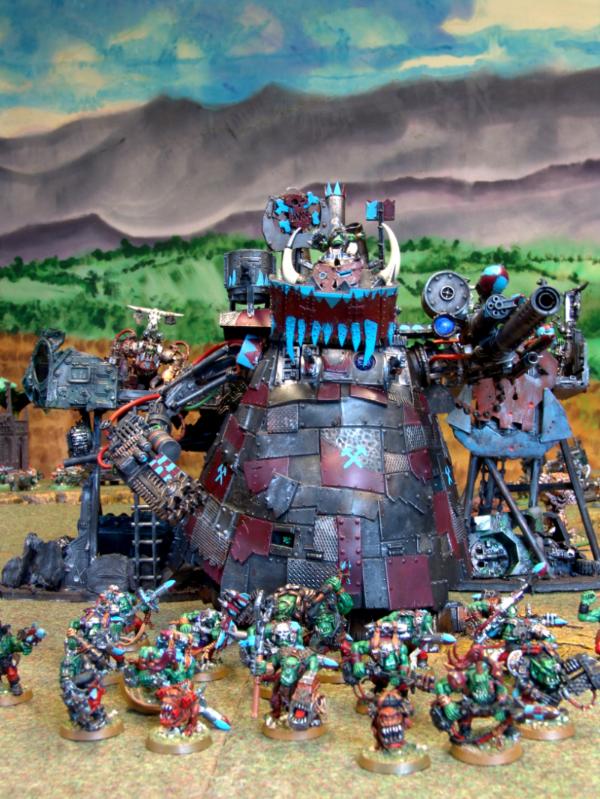
The fortress and the coptas needed a lot of cutout work to get rid of the background, so maybe 4 or 5 hours each on those... others went much faster, the guardsman and the ork warboss took less than one hour.
10773
Post by: mussie76
The baneblade (thought the 1st one was a painting) and building are great but
IMO This wins hands down almost perfect
13085
Post by: jackinthetank
Those are as fantastic as Willy Wonka's 3 course meal bubble gum!
13452
Post by: Million
The orky choppers one is awesome.
The only things I'd say to criticize are that the muzzle flash isn't quite right for me, and they all look quite washed out (may just be my laptop, or the feel you were going for)
Great work though, did you post a tutorial at all? EDIT (note to self, read whole thread first...)
6356
Post by: Ghidorah
Grandmaster wrote:You have inspired me to get my finger out and do it!
Out of where?!?! Eww... nvermind. I don't wanna know.
AJCarrington wrote:Awesome stuff - would make for an excellent article/tutorial...hint...hint...
AJC
Are you serious? Did you happen to read the thread prior to posting? More specifically, three posts up from yours? 
Very nice tute. Also very nice photos. I've been playing with photoshop for several years now. Been awhile since I edited pics. I may have to dabble in it again.
Ghidorah
5478
Post by: Panic
yeah,
I can't believe I almost missed these!
I second the call for front page publicity! and the tutorial is very good it should be converted to the articles system.
Amazing stuff!
Panic...
12290
Post by: gennadius
amazing love the pics i saw most of them already in the gallery
4786
Post by: legoburner
I'll add a note about this to the front page tomorrow.
4786
Post by: legoburner
Finally pushed to front page.
4869
Post by: ShumaGorath
I really need to take some photo classes and get my hands on a respectable camera. I've been doing the photoshop thing for 7 years and I do it professionally now, but thats mostly working with other peoples photos and doing wholecloth composites in 3d and using cs4 materials to shoop it all up good.
I can't really handle a camera myself well at all, it's a skill that increasingly I'm becoming jealous of.
8745
Post by: Llamahead
Wow I did some of these years back your going to force me to try again mine were nowhere near as good as these however. I've also got to second that bit about getting rid of the background being the worst part of these.
7107
Post by: Tek
Coldsnap wrote:
Just drag the layer to the small Create a new layer icon, then hide the original background layer
Double-click the background layer. This converts the background to a functional layer.
Personally I would also not use the delete function here. Use a layer mask (layers>layer mask>reveal all). This way you can paint back in any possible mistakes you make in the deletion process.
This is lovely work though. Keep it up.
10683
Post by: bottbott
this is a great tutorial but it does not really work with the close- ups. its too obvious that there painted
9736
Post by: Sha1emade
I am a photographer as well and must applaud your work! I do mostly natural and glamor photoshoots. I have been playing with making the models look real. This will be a great place to start. I lack the great terrain so I will have to see what I can come up with. Nice work!!!
13443
Post by: Shas'El Tael
I second the above comment, being a professional in media and visuals, this is some clever work and you have explained the core principles well. A well put together guide indeed.
~ Tael.
5344
Post by: Shep
This is a fantastic guide... I think i know what my new hobby is going to be
6806
Post by: Gavin Thorne
I've played around with my painted miniatures using the light effects in GIMP with some success (like my avatar), but I've been intimidated by layering effects. This gives me a good base to work from to try new shots. Thanks!
9736
Post by: Sha1emade
After seeing the above shots, I just had to try it for myself. I followed the great tutorial and spent only about 30min on the whole thing,including taking the pictures, so I did not put the love and effort that coldsnap did, and that is reflected in the quality. As I was doing this very very fast there are many errors. I gritted up the pics quite a bit more so cover them up. You can see that it is effective and simple to do. Coldsnap really made an effective tutorial and easy to follow. I used 8 pictures to make this shot, 2 buildings, 1 snow, 1 parchment shot, 1 baneblade, 1 snow ground, 1 horizon and 1 sky.. I just wanted to see how it would work. I have limited terrain and none is painted so that causes problems.
Mine does not look the quality of the originals but I wanted to see if it could be done quickly and effectively using the above techniques. I play dark heresy from time to time and wanted to see if I could use this to use as supplements for the game. I would say not bad for a practice shot with little to no thought put into it. I hope to be able to spend the time and make a few great shots that would be in the same league with the originals from cold snap. I will attempt a good one later when time permits. Thanks Coldsnap.
I also encourage others to try this and to post what you have come up with.
257
Post by: Harkainos
LOL - I've seen all that scenery Sha1emade. Very cool pic for it.
7199
Post by: spacemarinejunkie
I don't know why you would have to use model scenery for this type of work. I would think you could use real pictures for background.
7267
Post by: Somnicide
Wow very nice - just posting for the subscribe :-p
13549
Post by: Schanknation
You have some real talent there. Thanks for sharing it with us.
7680
Post by: oni
Excellent job Coldsnap and a very nice tutorial. I do have one question tho. Why not use the extraction tool to remove the unwanted background? It's 1000x less hassle.
[edit]
@ Sha1emade - Here's one that I did quickly.

9736
Post by: Sha1emade
Looks good! What is this extraction tool you speak of? I might know it by another name but it is drawing a blank at the moment.
I would also like to suggest using the motion blur at an angle for better looking snow. It makes static snow look like it is moving.
10773
Post by: mussie76
Sha1emade wrote:
Very Very nice mate
10397
Post by: poptarticus
Thanks for sharing and adding to the Dakka!
Very helpful tutorial.
2764
Post by: AgeOfEgos
oni wrote:Excellent job Coldsnap and a very nice tutorial. I do have one question tho. Why not use the extraction tool to remove the unwanted background? It's 1000x less hassle.
[edit]
@ Sha1emade - Here's one that I did quickly.
Would you mind explaining the extraction tool? I've always found erasing the background the most tedious/painful part of shopping mini photos...would love to hear some tips.
Ryan
12188
Post by: Coldsnap
legoburner wrote:Finally pushed to front page.
Woot!
12188
Post by: Coldsnap
Tek wrote:
Double-click the background layer. This converts the background to a functional layer.
Duh! Didn't think of that
Personally I would also not use the delete function here. Use a layer mask (layers>layer mask>reveal all). This way you can paint back in any possible mistakes you make in the deletion process.
So true, not using masks is just a bad habit from back when I used a low-end system, they were a bit harsh on memory back then
Quite frankly I'm overwhelmed by the amount of positive feedback I've gotten after posting these images, and it's awesome to see that the short tutorial I wrote has been an inspiration to others!
I want to (again) point out that without the great paintjobs made by my friends and the local gw staff, none of those photos would have been taken. A photo is never better than the mini in it
7680
Post by: oni
@ Sha1emade and AgeOfEgos
I just made a post on using the Extraction Tool...
http://www.dakkadakka.com/dakkaforum/posts/list/235866.page
5644
Post by: P4NC4K3
jackinthetank wrote:Those are as fantastic as Willy Wonka's 3 course meal bubble gum!
Does that include the part at the end where you blow up and turn blue?
13214
Post by: General Mayhem
9463
Post by: PanzerSmurf
Will we be expecting more of these in the nigh future?
9736
Post by: Sha1emade
General Mayhem- Looks good for a first effort. The general idea is not very hard. The tweaking takes some time. I ended up adding 8 pics to the one I made. I like your use of smoke. I would probally make it a bit more transparent so we cad see the guys a bit better. I shot a pic with that very piece of terrain. I have yet to edit it but it makes for a cool piece.
Panzer Smurf- I was hoping people would just post them here. I think we will see more from cold snap as well.
7199
Post by: spacemarinejunkie
Does photoshop 7 have the tools to make these kinds of pictures happen?
9736
Post by: Sha1emade
Yup. Most are pretty basic photoshop tools. Other tools can be faked with other tools if you dont have the most up to date software.
13214
Post by: General Mayhem
Thanks for the feedback Sha1emade, I will have another go as you suggest. The "smoke" is actually a wispy cloud used as an overlay, hides the obvious fact that they are models! I had a thought about backdrops, what about some painted backdrops specific to the 40K universe photographed and saved as high resolution TIFFS for people to use? My biggest problem is finding the right image for the baxckground so maybe I will have a go at painting some. My Gaming table at home has quite a large painted backdrop:


9736
Post by: Sha1emade
You might try smoke against a black background. Then use screen instead of overlay for the smoke layer. You can adjust the levels, brightness and contrast of the layer and you should get it to look better and still more visible. After that you can make a duplicate layer and try some of the blending options. For the duplicate layer try soft light. It makes a cool effect for smoke when over the first smoke layer. You can also invert the second selection as well. If your smoke is getting to dark. That will lighten it up. Possibly too much but it depends on the picture. Have fun and post the results. Also you might need to erase around the smoke when done if using screen or any inverted pictures. I make a duplicate layer and the use guazzian blur at about 9.0. To soften the edges of the edit. This works best when using an inverted layer above a normal layer. Hope that helps...I'm almost confused reading it so.....good luck...Sorry its late. I also really liked your pic. I just wanted to see more and the smoke was in the way. 
Also for back ground pics. I like long expanses of broken up snow. google iceberg, tundra, glacier and devastated buildings. There are some great backgound pics there. Plus many more that I can't think of.
13214
Post by: General Mayhem
Cheers for all that, will have a go today. Just been down to my "shed" for another photoshoot using the whole 6 x 4 gamingboard and my existing backdrop. I need to do some others butthe one I have is ok for fantasuy as well as 40K. Good tips for googling backdrops, somtimes it's difficult to think what to put in for your search. Do you look for images same pixel size as your originals?
9736
Post by: Sha1emade
I tend to only search for Extra large images. They tend to look better. Large images are ok but you usually still need to resize your photo so they are a bit closer. The camera I use shoots in pixel sizes generally larger then what appears on the net so I just try to find larger pics to play with.
7267
Post by: Somnicide
editted out
4786
Post by: legoburner
Hi Somnicide, I am afraid those images are too unrelated to gaming to be kept in the gallery so I have to remove them. You can upload them as attachments to this thread if you want (and please do as the jet contrails would work very nicely), but in the gallery - a place for wargaming related images, the link is too tentative.
7267
Post by: Somnicide
Meh. I can't upload directly and I am not going to start a photo hosting thing somewhere else just for that.
8303
Post by: sexiest_hero
I tried this, with no snow and no scenery. I tried to match the lighting on the Plague tower to the lighing in the background. I hope you like it! extra hard work was needed to get the background to show through the hose and bell tower. I Hope it produces the moody mood i was going for.
I'll be doing a silver tower next.

| Filename |
Plague.bmp |
![[Disk]](/dakkaforum/templates/default/images/icon_disk.gif) Download
Download
|
| Description |
Plague tower |
| File size |
3072 Kbytes
|
9455
Post by: sodcactus
A nice site with lots of high res textures that are for free is http://zentextures.com/
They also have skies etc in case your lacking in your photo collection. No billowing smoke clouds though as far as I have seen
13975
Post by: Müller
Always nice to see another photographer here
I wish I would get to do that as well with miniatures but at my local store they don't have that extravagant scenery ( GW Stockholm), at least not what I've seen in a long time, they used to have a nice city when cityfight was released though) and I don't have any scenery at all pretty much, nor does any of my friends play any WH games so Im stuck :(
You ever tried to make HDR and Bloom out of these kind of pics? could get pretty amazing I guess...
If you don't know how to in photoshop I'd be glad to tell you ;P
12188
Post by: Coldsnap
You ever tried to make HDR and Bloom out of these kind of pics? could get pretty amazing I guess...
Gave it a first try and ended up with these...

8303
Post by: sexiest_hero
It's something about that flamer I love.
13975
Post by: Müller
I'm glad you did do some HDR, mind if I borrow that flamer and toy with the pic? (I dont have any minis that vivid :( )
3197
Post by: MagickalMemories
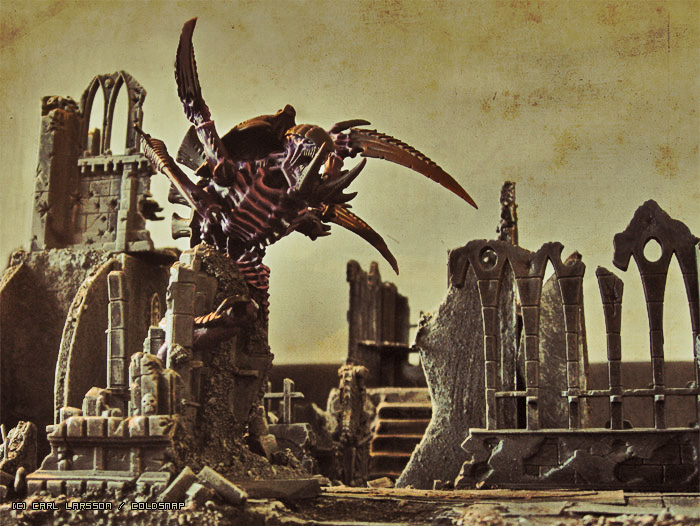
Trygon pic looks cool, but I think it'd look better with a "real" background instead of one that looks like a piece of linen.
Still looks cool, though.
Eric
9639
Post by: rowan341
Holy.... that is amazing. Realy well done and it looks professional. I especialy like the superheavies and that fex
12188
Post by: Coldsnap
MagickalMemories wrote:Trygon pic looks cool, but I think it'd look better with a "real" background instead of one that looks like a piece of linen.
It's actually my Carnifex, still saving up for a Trygon... I've built a ripper-style army, removing the legs on all the models
And yes, I think I went a little overboard with aging the photo
Müller wrote:
I'm glad you did do some HDR, mind if I borrow that flamer and toy with the pic? (I dont have any minis that vivid :( )
Go ahead... I borrowed it from a friend for the shoot
13975
Post by: Müller
Thanks
EDIT: I felt that it needed to be a little brighter seeing as it looks like the sun shines right at the model in focus if you look at the background..
so: 
3197
Post by: MagickalMemories
Coldsnap wrote:MagickalMemories wrote:Trygon pic looks cool, but I think it'd look better with a "real" background instead of one that looks like a piece of linen.
It's actually my Carnifex, still saving up for a Trygon... I've built a ripper-style army, removing the legs on all the models
And yes, I think I went a little overboard with aging the photo
Ah.
My bad.
Judging from the height, I presumed it was a Fex conversion to Trygon. Must just be the camera angle.
Still looks good, though.
Eric
14422
Post by: Hans_posthumus
Wow I just had to try this out, this is what i came up with. not as good as the other examples here but i like it.
I found it difficult to find an good background.
Hans
1
7267
Post by: Somnicide
That battlesuit is pretty cool, actually.
13975
Post by: Müller
The only problem (photoshopwise) that I see is two things...
a) the edges around the battlesuit needs fixing
and
b) you need shadows to be cast from the battlesuit...
14422
Post by: Hans_posthumus
Yeah I saw the edges to, going to fix this. Also thinking about the shadows. Thanks for C&C.
12188
Post by: Coldsnap
@Müller: Definitely looks more like sunlight there, nice work.
@Hans_posthumus: Nice one, I loved what the noise did for the image. Looks a bit like a surveillance camera shot it. One thing you could try (assuming you use photoshop) is dulling the blue and yellow colors down a bit to match the background more, and as others pointed out fixing the edges will do wonders. Selection feathering ( CTRL-ALT-D) can be very helpful in softening up your edges, especially if you work at high resolutions. Painting shadows can be tricky, the cheapest way is probably to make a copy of the battlesuit layer, paint the entire selection black, line it up on the ground using Edit->Transform->Distort and then apply a gaussian blur to it.
Couldn't resist making another one using the technique I posted earlier in the thread...
15101
Post by: DMG
Time for me to stop lurking after all these years & finally post something...

Cheers,
Jim.
8551
Post by: captain.gordino
That's really nice, coldsnap and DMG! Keep making these things, they inspire me!
15101
Post by: DMG
Here's another quick pic.

It's not perfect & the perspective / colouring is out on the cathedral to the left as I just threw it in to fill up that side.
I need to set the board up again & take some good shots.
9736
Post by: Sha1emade
Love that building and the pics!!!! I had to post another one. I really need to spend more time on these but I just haven't had the time. I make this one entirely from images taken from the internet. Added my own smoke, shadows, sign and just manipulated the thing till I liked it. I need to bust out my camera and really plan out a shot. Hope you like it. Keep the pics coming guys they look great!!!!

14571
Post by: gretar
posted too subscribe !
Also , so very talended people out there !
8119
Post by: Trekari
tag for subscription
3197
Post by: MagickalMemories
Trekari wrote:tag for subscription
There's also a "subscribe" button in the bottom left corner of the page.
[/ OT post]
Eric
9736
Post by: Sha1emade
Here is another one. All from internet. Had to stop as I am leaving but I like it. Its about 9 pictures and heavily modified.  Automatically Appended Next Post: Automatically Appended Next Post: Here is another one. Gotta say these are fun to make. 
13214
Post by: General Mayhem
Dah dah da da dah da...

4786
Post by: legoburner
Some great work here but I just wanted to comment on one thing that stands out in some pictures, especially Sha1emade's work...
Play special attention to the lighting and shadows on models and backgrounds that you use in these sorts of pictures. If one model has lighting from the top and another has lighting from the side, it makes the picture look unnatural and less realistic than it would otherwise be. The space marine picture shows this the most, the shadow is coming out the same side as the reflection of light on the armour. Fixing these sorts of issues would significantly increase the quality of the images. As shown in the OP's work, using mist and fog is a good way to get around issues with lighting angles, and avoiding harsh flash in a photo is essential.
9736
Post by: Sha1emade
Legoburner - Given these were done very quickly, about 2 hrs, things are going to drop by the wayside. A simple flip of the marine would fix the lighting in that photo, but i never went back to fix it. Matching the lighting, contrast, saturation, image quality and hue of 7 to 13 pictures (all pulled from the internet) while blending backgrounds from various pictures, creating foreground/background elements, clipping, simulating aperture and creating mostly seamless shadows and lighting from scratch is not easy. Sometimes you just have to force it to work. Ya just have to do the best you can do and go from there with the time you have. In the marine pic I had to make the sunlight come threw in small pieces. This gives the effect of the patchy sky. Hoped no one would notice the problem with the marine but as far as I can tell, it is the most glaring light issue from the latest pictures and they are not THAT bad or obvious, not enough to be singled out by name and deserving of a paragraph. Just so you know, most people get bent out of shape when someone starts with its good but....then proceed to a paragraph about how bad you do it. It is quite rude actually, especially in an art thread where people are trying out new things, to point one person out amongst all the rest and basically lecture as opposed to being specific on your points and general on who they apply to. I understand you were suggesting to be helpful but it just came of as condescending. What a person says and how they say it are two very different things. Just saying...manners 101. Given the time frame put into them, not going for perfect, going for interesting. It is easy to be an arm chair quarterback. If you had made a picture of you own and posted saying what you said I would be more apt to take your advise. And you would probably have suggested something that I could have used. Jump in and make one and lets see. Suggestions like add more smoke or mist as a suggestion does not work in most cases and is just a rehash of what was said earlier. In referencing that, those rules apply to pics with one light source, not multiple. Ever tried adding smoke to a picture? Do you know what it really does? If using light smoke or mist it will help dull your subject and give the appearance of a foreground element and cover your tracks if and when using a clipped image by dulling the edges. It is however mostly to entirely useless for covering flaws in lighting. It cannot change the source of the light or the direction. It cannot cover more intense lighting up, unless it is so thick that you cannot see the model beneath which is often not desired. It can however simulate lower contrast and lower brightness but that can be done in far better and more exacting ways than just tossing smoke over all mistakes. As brighter luminosity shows first when using any type of mask or lower opacity layer. Followed by lights, darks and shadows in most cases depending on your method. Basically does not work like you are suggesting and when it does there are far better ways of achieving the effect, especially on the flawed marine pic. Smoke is a style choice and should not bee seen as a photoshop fix all. Coldsnap uses primarily one shot for his pics. He uses background smoke and sky to great effect. The end result is amazing photos. He started this all with some great creativity and thought. He would have no lighting issues as they all come from one source, generally. When one picture is 75% to 95% of your photo these issues should not arise. So referring to his work really does not apply as they are basically 2 very different styles of photos. A photo montage is very different then doctoring up a photo, even though they both use smiler techniques. Sorry for the rant and rudeness but things like that really bothers me. Rudeness begets rudeness. ADMIN or not. General Mayhem- I was going to do a pic just like that! Yours looks great. Now i don't have to. My Valkyrie is not very convincing, that i stuck in my pic. Was that your valkarie? Did you paint it? If so hats off.
4786
Post by: legoburner
Apologies for causing offense, I was merely trying to offer some constructive criticism, which I assumed was part of the reason why you posted them, and like I said there are some great pictures here. I've done more photo retouching work than I care to remember so am well aware of the efforts required, especially with multisource montage work. The only reason I mentioned you by name was because your images are good but the poor lighting angles was the one exception that would make them great.
9736
Post by: Sha1emade
Thanks for responding like you did. I probably should have been more clear that these are just me messing around and not trying to make a flawless piece. I guess I never really expected them to be good enough for people to get picky about them. Thanks for saying so. It seemed to me that you were just pointing out flaws and dismissing the pics because of that, now I know that you were not, stupid internet and its ability to remove inflection and mood. . So my bad for getting a bit huffy about it. It just didn't seem to come across that way in your original post. I know that to make them really good will take more time then I am willing to spend. I make my living this way and only put that kind of time and effort in when I am getting paid for it.
12188
Post by: Coldsnap
Awesome stuff guys
13214
Post by: General Mayhem
Thats my baby and yes I painted it, thanks Sha1emade. Got some more shots to play with, I want to try getting a guy rapelling out the back! If I get it sorted I will post it.
9736
Post by: Sha1emade
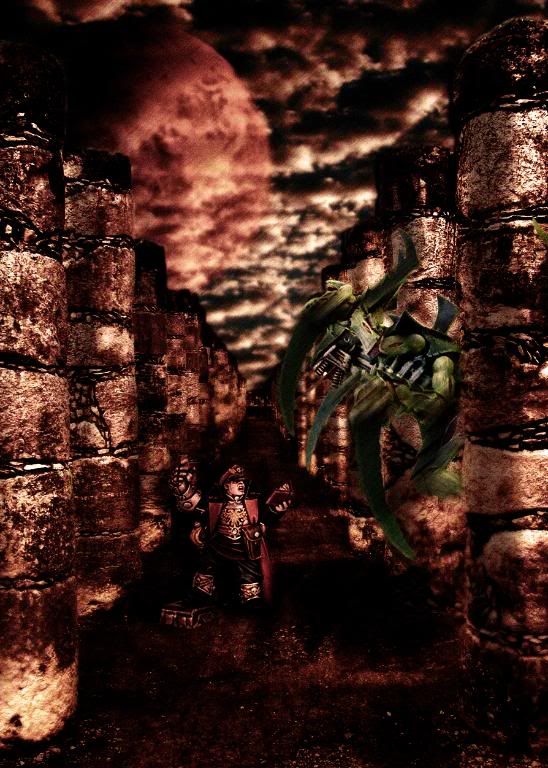
This was pretty much the story last time I actually used a commissar in 40k. I paid a little more attention to the shadows this time but all I really was going for is the overall visual. The shadows played a funky trick on me when I applied the last filter so I just let them go.
13214
Post by: General Mayhem
I love the model of the commisar reading from his "littanies of hate" or "bedtime stories for up too late canifexes". As we have both these models maybe I will try to set it up as a "live" photo shoot tomorrow. Automatically Appended Next Post: This dude, some columns, a carnifex or hive tyrant, and some time. Tomorrow, definately tomorrow.

9736
Post by: Sha1emade
I would love to see that!!! I am thinking trying one with some Tau next.
13214
Post by: General Mayhem
Ok got this shot done today, unedited so far, but based on Sha1emades photo shop image.
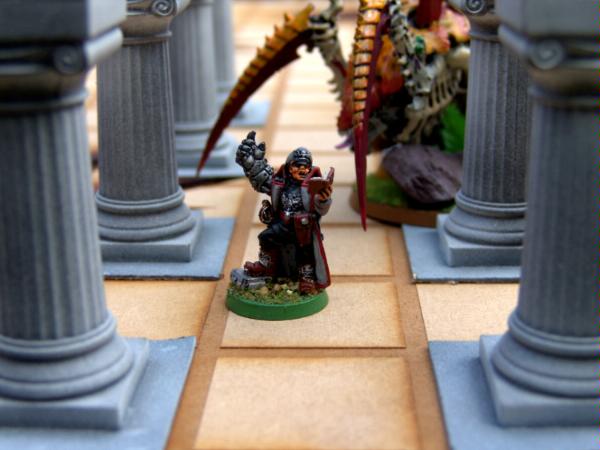
I need to "airbrush" out the bases and try to darken the whole image (Shot taken outside for good lighting)
14571
Post by: gretar
VERY nice pictures all of you ....
9736
Post by: Sha1emade
General Mayhem- Looks like it will be a cool picture! All of my shots were separate elements. This made it easier to move and arrange the models in a pleasing manner. I did not pay much attention to the horizon but it seems to work regardless. You might have trouble editing the photo because of this. I was able to remove bases and add motion effects with little trouble. What you are doing is quite a bit harder than what I had to deal with. My hats off to you for doing it that way. My brain would explode. However if you can pull it off, It will be very cool. Can't wait to see!!
12188
Post by: Coldsnap
@General Mayhem: You're looking forward to quite a bit of work if you're getting rid of those bases (Very nice scene though ). I don't know what I would have done about the carnifex base since it's a large scenic one... the rock will not ruin your scene, but the grass and base edge might. If you really want to get rid of it you could try to mirror parts of the floor from the other side of the pathway, and blend these in on top of the base edge. For the little guy I suggest the same thing, copy the top-right corner of the floor tile, mirror it and use a layer mask to hide the green parts of the base. Of course you could also draw freehand on top of the photo using airbrush and/or clonestamp, but that's going to take some time. You'll probably want to keep the thing he's standing on, and maybe some of the rubble also. If you remove all of it, you'll have to make a fake shadow on the floor or he'll look like he's hovering above it.
One of my own tricks for editing out bases is to have the camera fixed in place (on a tripod, on the ground or whatever), and take 2 photos, one with the mini and one without it. Then you can just put them on top of each other and use layer masking to remove the base (Though you may have issues with shadows here as well).
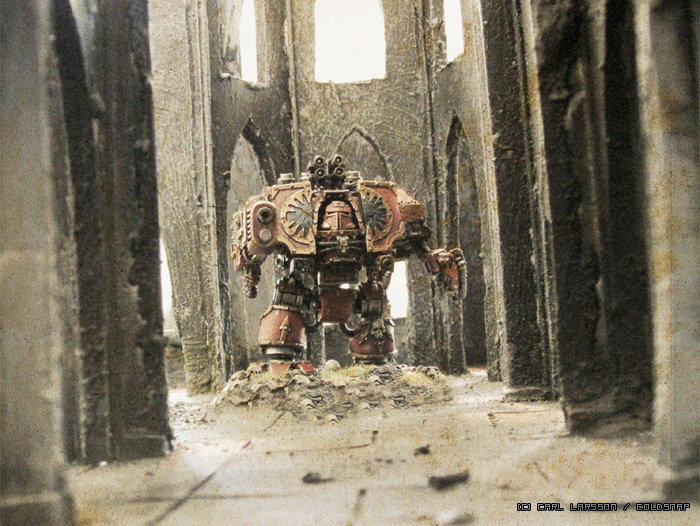
If you have a rubble base, you can also just clonestamp rubble from the base right on top of the base edge, it works surprisingly well sometimes (see the Chaos Dreadnought photo I posted way back in this thread).
14422
Post by: Hans_posthumus
Hi there!
When I was painting my tau fire-warriors I couldn't resist taking a quick pic of my battlesuit and one of the warriors in the grass. Here is the original pics + edited pic's
C&C are more then welcome everyone!
5
9736
Post by: Sha1emade
I really like the codex one. It has a good feel to it and captures what you are going for. The grass is kind of a nice touch, as it is so large it feels kind of alien. Post more when you finish them.
12188
Post by: Coldsnap
Grass Fresco(codex-like)
That one is pure awesomeness.
11210
Post by: blacktemplars1st
wow this is amazing i like everything but the close ups on the models are different the models are painted wonderfully i just think that maybe further away would be beteer idk its your call but everything looks great
14869
Post by: Wrexasaur
Coldsnap wrote:Grass Fresco(codex-like)
That one is pure awesomeness.
Ditto.
You have some talent there mate, keep up the good work
This whole thread is pretty inspiring, I will have to make something special for it.
Ok, took some time to make this contraption. Enjoy!
2
9764
Post by: Septic
This is what I have managed so far
17189
Post by: black-rabbit
Good to see lots of other people getting in on the photoshop thang.
These are some that I did to inspire me to finish my guard army.

.
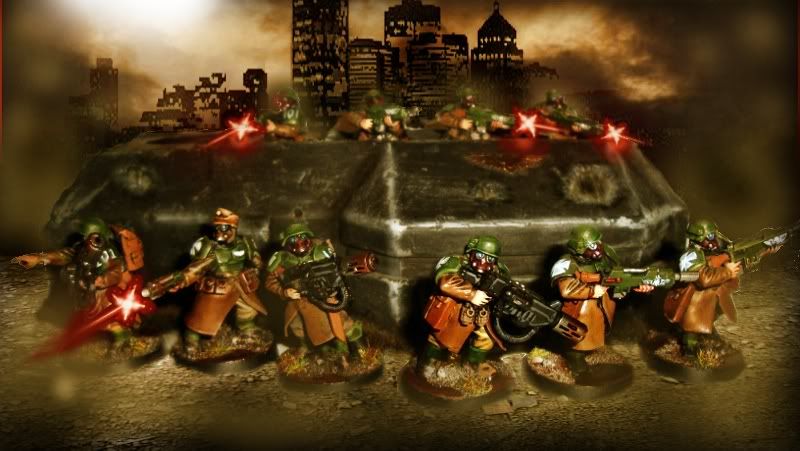
Once you get the hang of it and start to learn the tricks, it's really quite a lot of fun.
As others have said before, the main thing is to get the lighting right. And things such as depth of field are important too in maiking your image look realistic
8551
Post by: captain.gordino
I really like those two!
12188
Post by: Coldsnap
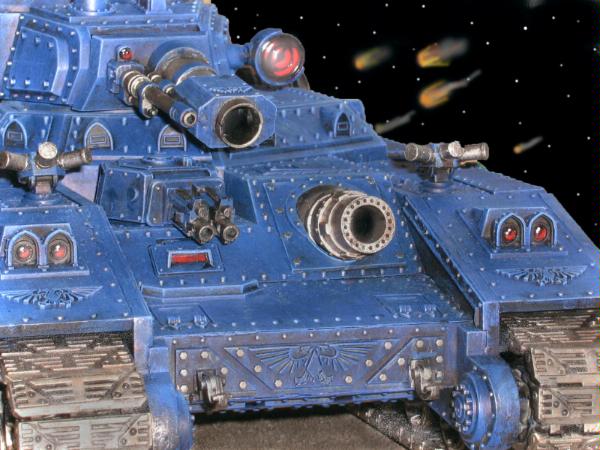
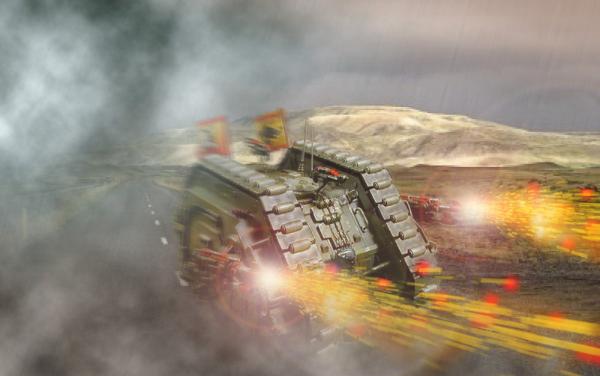
@black-rabbit: Nice work, I'm absolutely in love with the muzzle flash from the tank cannon!
This thread is getting a bit old, but I can't resist posting some more pics!
Went down to the local GW store the other day and borrowed one of their dreads for shooting. I'll try to come up with some useful comments, please correct me if I'm saying anything that's completely wrong (I know there are people reading this thread that have a lot more knowledge about photography than I do )
For this shot I had to put my small compact camera in a very awkward position, but I managed to get a reasonably sharp image by using the 10 second timer and a few other models holding the camera in place (instead of trying to hold the camera in my hand while leaning across the table). As you can see, the depth of field is a bit shallow (both the claw/leg and the cannon are out of focus), this is an effect that occurs on close-up "macro" photos, and it's one of the hardest obstacles to overcome when you're trying to get the model to look "full-scale". A lifesized model would have a much deeper DoF, with almost the entire model being completely in focus. The problem is that to get some action into your picture you'll probably want to put your model VERY close to the camera, almost touching the lens, and with a compact camera this means a shallow DoF (at least in my experience so far). One way of getting away with it is to put the model in such a pose that the blur that occurs can be mistaken for motion blur. For example, the dreadnought's claw is horribly out of focus, but since you might expect a charging dreadnought to have its close combat weapons moving (and becoming blurred), it doesn't really ruin the image. (I know, the leg is also horribly out of focus, but it's so in-your-face I'm hoping no one will notice it).
Ironically, it's very easy to fake this shallow DoF effect in Photoshop or a similar program, using a blur and a gradient mask, thus making a life-sized image look like a miniature. I wish it was just as easy the other way around. ><
There's very little post-processing on the first image, I didn't bother to remove the red store shelf on the left, it looks a bit like a piece of terrain anyway. In the top-right corner, I hid a roof lamp beneath a piece of cloned building which I then blurred until it blended in with the rest. I've added some additional glow on the gold details, making them a little more shiny, and a very light grain texture overlay to hide all the noise my camera produces.
On the grayscale one, my original intention was to do something similar to the pic Hans_posthumus did a few posts back (it's still awesome btw), but it didn't turn out the way I wanted, so instead I went for a very slight codex/comic book effect, blending several layers together using different cutout/drybrush filter settings on each one.
Comments are welcome
9736
Post by: Sha1emade
The thread is old, but the content never gets old. Glad to see some more posters. Love the new IG pics and that dread is very cool. Hope I can shoot some more here soon.
14264
Post by: kravus master of Horus
Really nice photos
24465
Post by: LEEQAEX
wow amazing .I am just getting into photography this would be something really cool to try out .
23976
Post by: Inanimate
Some poor shooping - courtesy of me.

I've been wanting to do this kind of thing with my own models and real scenery, but a phone camera just won't cut it. =/
Epic work by TS, btw. That stuff could possibly be box art.
19787
Post by: Newt-Of-Death
Thats fecking class!
6292
Post by: Valhallan42nd
My attempt from long ago:  It has a video camera filter on it, making it look like it's cheap video.
12188
Post by: Coldsnap
Nice to see some new posts in this old thread... good work everyone!
That one is pure awesomeness, RibonFox
Nothing new from me, I'm afraid... I've been busy trying to get my old ork army in playable shape again.
Most recent image is http://www.dakkadakka.com/gallery/65771-Dark%20Angels%20session%20%231.html
27711
Post by: cormz
Awesome man, they look great.
28082
Post by: Da dakka boy
I love those photos but the one with the space marine standing on lookout doesn't look quite right because of the angle. That's just my opinion so you don't have to listen to it. But I'd love to be able to paint like that.
27565
Post by: alexgm101

My attempt at one, looks a little unreal tho.
brilliant work,
Alexgm101.
10345
Post by: LunaHound
Wood Elves :3

23897
Post by: Scarper
Thank you so much for sharing your technique - I'll have to try this out myself once I get my hands on a copy of photoshop
7506
Post by: Okidan_Champion
these are fantastic.
28422
Post by: Citizensmith
Some really great work here. I'm a photographer, although for architectural stuff not miniatures. Don't actually own a macro lens. I'm going to have to try my hand at this though. I'd like to hope I can get results as good as some of the ones here.
28422
Post by: Citizensmith
OK, had to contribute something. Not as good as some of the excellent, more arty work here. Spent my lunch hour coming up with this one - Looking for a cover save.
1
27772
Post by: Boogie
Couldn't help to try myself - one small SM on watch
1
23115
Post by: OoieGoie
and why isnt GW paying Coldsnap to work for them? Hmmmm????!!!
TELL ME GW!!!
Seriously wow. Love this thread.
24082
Post by: Flying Pooo
Wow great thread!
14152
Post by: CT GAMER
Immolators on patrol:

27273
Post by: Grumpy
Wow these are all awsome
12188
Post by: Coldsnap
@Citizensmith: Love your image, especially the colors are spot on! I like it so much I'm going to shamelessly use it to show a little trick for making fast shadows. (no offense of course)
Look at where the light is coming from, at the direction of the shadows of the trees, and compare with where the sentinel's right foot is.
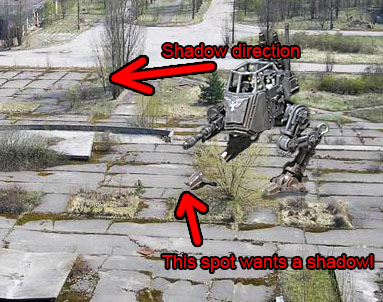
A very fast way to make a shadow is to make a selection containing your model (or if you've already cut it out in a separate layer, you can just CTRL-click this layer), then make a new layer and fill the selection with black, like this.
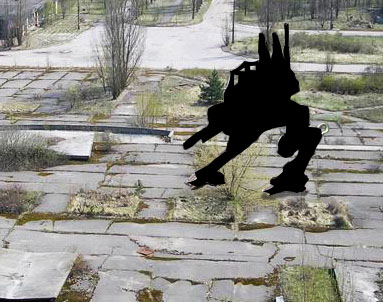
Then select Edit->Transform->Distort and pull at the corners of your selection until the shape aligns (more or less) with the shadows of the background image.

Remove any parts of the shadow that should be "behind the background image", and apply a very light gaussian blur to soften the shadow up.
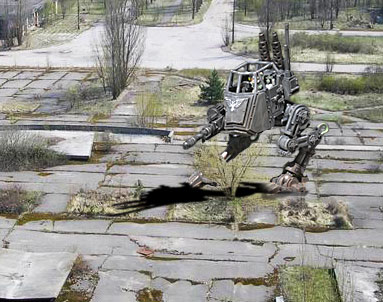
Bring the opacity down until the shadow color matches the shadows in the background image (I used about 20%). If the shadows are colored (here they are slightly tinted in blue) you can double click the layer to bring up the Layer Styles menu, then add a Color Overlay and play around with the color and opacity until you get it right.
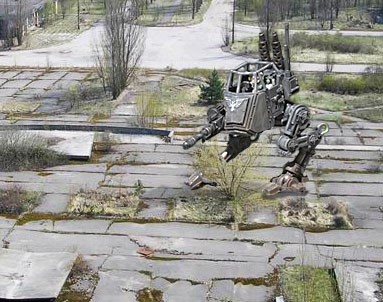
There, I hope this was useful for someone, and again, sorry for hijacking your awesome image
21353
Post by: aromasin
Love the immolators, the sentinel... all the pictures on this thread.
How much does photoshop cost?
27772
Post by: Boogie
A bit. But you can download GIMP - I've used it to create my photo. PS is better but GIMP is free
6210
Post by: Le Grognard
Boogie wrote:A bit. But you can download GIMP - I've used it to create my photo. PS is better but GIMP is free
Seconded on GIMP; and the price is right.
25290
Post by: DISCIPLE_SoC
If you like GIMP, get GIMPSHOP. It changes the UI a bit to make it a bit more like Photoshop. Works great!
Jim
14152
Post by: CT GAMER
Coldsnap wrote:
There, I hope this was useful for someone, and again, sorry for hijacking your awesome image
Thanks for the info on doing shadows.
24060
Post by: PukeNut
Those are some damn good pics. Keep it up.
And subscribed.
6210
Post by: Le Grognard
DISCIPLE_SoC wrote:If you like GIMP, get GIMPSHOP. It changes the UI a bit to make it a bit more like Photoshop. Works great!
Jim
Thanks for the heads-up Jim! I love the GIMP but that makes it 100x better.
28422
Post by: Citizensmith
Coldsnap wrote:@Citizensmith: Love your image, especially the colors are spot on! I like it so much I'm going to shamelessly use it to show a little trick for making fast shadows. (no offense of course)
Look at where the light is coming from, at the direction of the shadows of the trees, and compare with where the sentinel's right foot is.
A very fast way to make a shadow is to make a selection containing your model (or if you've already cut it out in a separate layer, you can just CTRL-click this layer), then make a new layer and fill the selection with black, like this.
Then select Edit->Transform->Distort and pull at the corners of your selection until the shape aligns (more or less) with the shadows of the background image.
Remove any parts of the shadow that should be "behind the background image", and apply a very light gaussian blur to soften the shadow up.
Bring the opacity down until the shadow color matches the shadows in the background image (I used about 20%). If the shadows are colored (here they are slightly tinted in blue) you can double click the layer to bring up the Layer Styles menu, then add a Color Overlay and play around with the color and opacity until you get it right.
There, I hope this was useful for someone, and again, sorry for hijacking your awesome image
Hey, no problem at all. I'd completely missed correcting for the shadows, and great tip on how to do it for this type of photo. It took a long time to get the lighting even half right. The model photo was taken outside in bright sun. The city photo is of Pripyat (seemed suitable) so the weather probably isn't as nice. Lots of playing with levels and saturation to try and blend it in. Scale still bugs me a bit, the Sentinel feels too big.
Next time I'll be finding a photo I really like and then taking a model shot at an angle suitable for it. Rather than the other way round that this one was, basically thrown together in a lunch hour in reaction to this thread.
12188
Post by: Coldsnap
Nice
Fought the Traitors again the other day, lost miserably but managed to get a few good photos!
14422
Post by: Hans_posthumus
Wuwz! great to see this topic is still up and running!
Just had to contribute some more work here.
Also, just have to say thanks to Coldsnap for the shadow tutorial! Gave me some great help!
Anyhow, please share more!
3
29289
Post by: Stu Phoenix
Hey guys new here, I saw your first images coldsnap and loved them , although I thought the world eaters dreadnought image needed to be a bit more dramatic
so I played around with it, hope you like.

19452
Post by: Linked
Absolutely awesome work you've got there!
27599
Post by: Peatreed
Awsome
28422
Post by: Citizensmith
Stu Phoenix wrote:Hey guys new here, I saw your first images coldsnap and loved them , although I thought the world eaters dreadnought image needed to be a bit more dramatic so I played around with it, hope you like.
If only everyone's first posts were as good as yours. Nice shot.
12188
Post by: Coldsnap
Stu Phoenix wrote:Hey guys new here, I saw your first images coldsnap and loved them , although I thought the world eaters dreadnought image needed to be a bit more dramatic
so I played around with it, hope you like.
I like it, makes the image pop a bit more
29289
Post by: Stu Phoenix
Ok I just couldnt leave it alone, it's just to cool a pic so heres another of it at midnight!

12188
Post by: Coldsnap
God rays ftw!
29289
Post by: Stu Phoenix
Another wee one as seen from cockpit of Valkyrie 1
P.S sorry for hijacking your thread coldsnap .
12188
Post by: Coldsnap
Stu Phoenix wrote:P.S sorry for hijacking your thread coldsnap .
NP at all, it's great to see so many people posting stuff here! Keep'em coming!
Awesome pic btw, the foreground metal bar really helped sell the sense of realism there!
28294
Post by: nirvana69
My friend, one day forge world will hire you. EXCELLENT work.
29227
Post by: shakey787
love this thread the smurf dreadnought is my fave by far might have to steall it for my wallpaper if you dont mind?
29820
Post by: nordic marine
those deffkoptas are my favorite
it looks like they are actually flying
19982
Post by: jetjetex
LunaHound wrote:
Wood Elves :3
Lookes like something out of Robin Hood.
29115
Post by: Farseer of the Quiran-Vae
Amazing work. Keep it up!
47255
Post by: Nijal
My try at it:
The image consists of :
2 layers for the Land Raider (one blurred and partially masked to create the illusion of movement
1 sky layer
1 background layer
2 weapon fire layers
3 smoke layers
38486
Post by: Far Seer
Wow! This thread is just amazing! I must get to work on by blood angels now!
5394
Post by: reds8n
A most worthy effort indeed, it is perhaps, alas, a wee bit late with regards to this thread.
Feel free to start a new one to carry it on and display what you've done though
Thread is being locked due to thread necromancy.
|
|