75552
Post by: MagosBiff90
 Dr H wrote: Dr H wrote:It's looking good. 
The one bit I see needs some work is the roof plate with the holes in it.
The holes themselves are nice and rusty and that makes sense (broken surface = rust), but the rest of that plate still looks a little too clean. If it's been there long enough for the holes to get rusty, then the edges (especially the lowest point) would also have a little rust on them, and with all the acid rain, there would be rust streaks from the rusty patches towards the lowest edge.
The rest is perfect though. 
Cheers mate! thanks for the input! i agree with you..... will have a think about the application of the acid rain streaks etc......
Thanks buddy!
75552
Post by: MagosBiff90
Hey All,
Always good to share new tips and ideas so i thought i would share this one........
I was looking for a nice reliable and easy way for my riveting.... i know it has been the subject of a few threads here on the page...
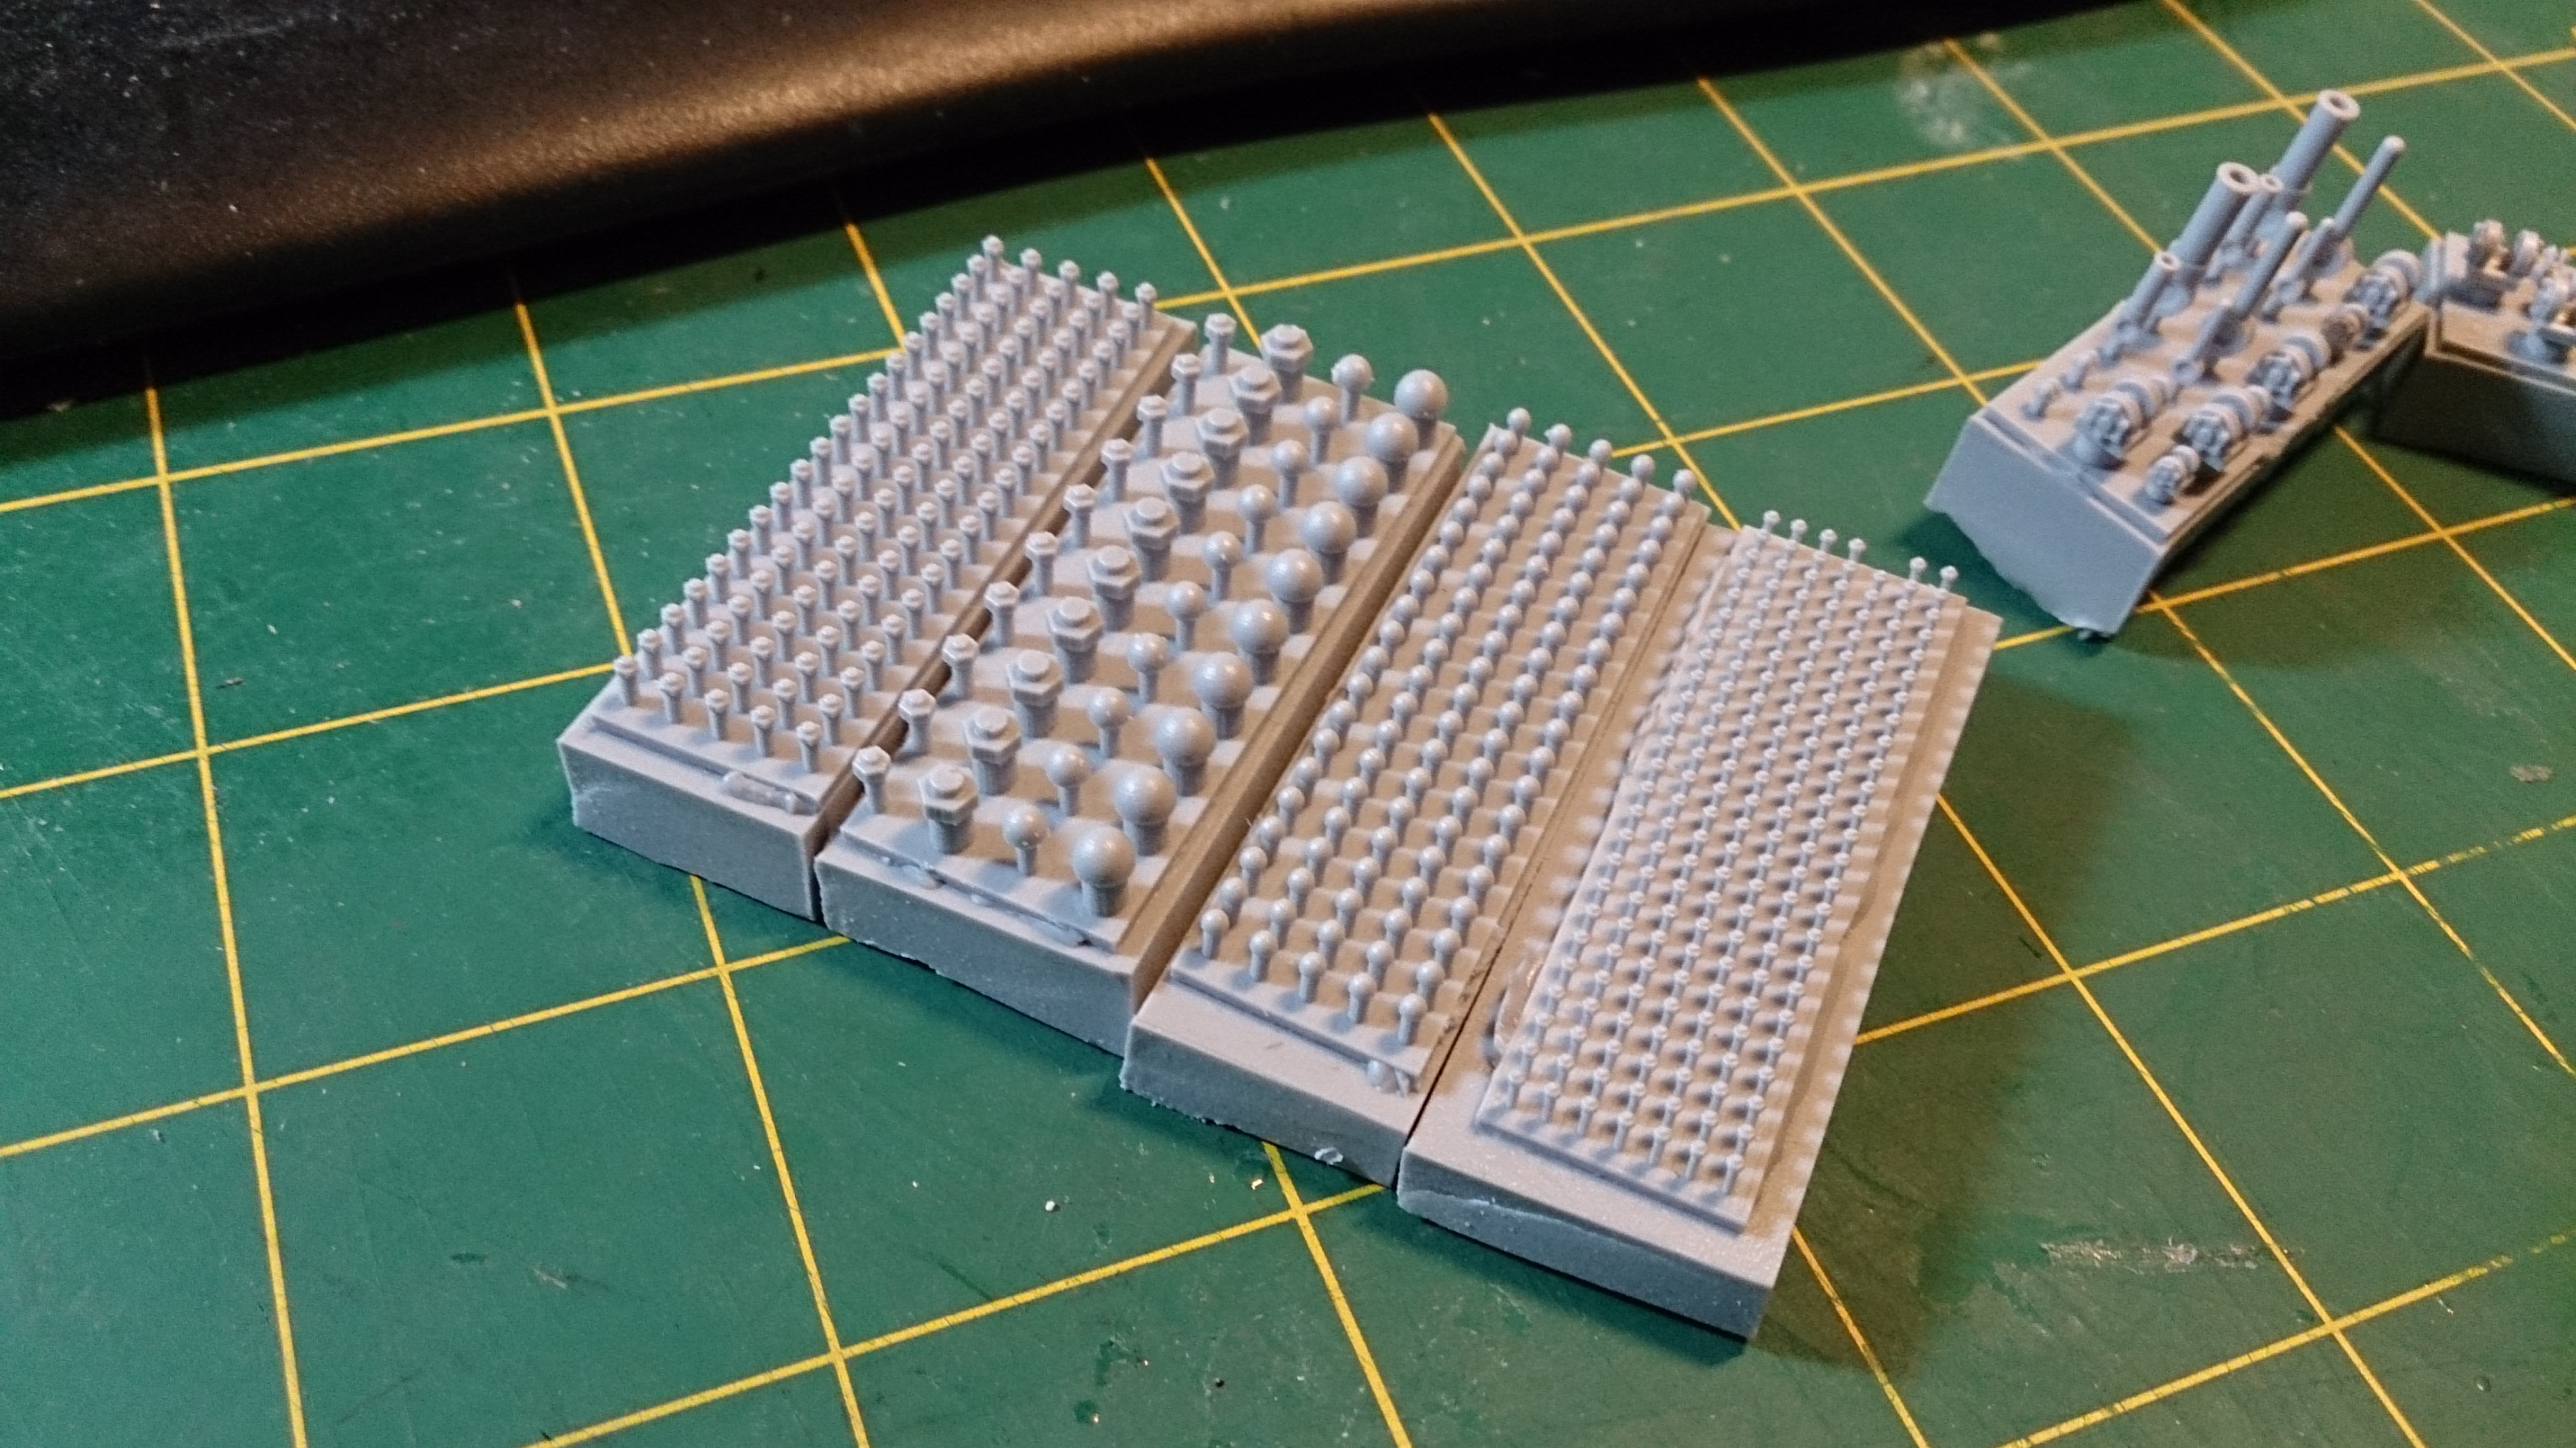
I was having a think and then thought........ The small beads that beautitians use for nail art are very small.... cheap..... and come in the domed form i was after.........
So i had a look online and managed to pick up 1000 beads for£1.99!!!! 
They arived this morning and i have to say i am excited.... they are 2mm diameter and i hope will be pretty simple to use..... the plastic should be resilient enough to superglue as they have to be glued and applied to nails......
So needless to say...... (After i finish my entry for Camkierhi comp)....... something is going to get rivetted the hell out of! 
Maybe someone has used these before.. and if so then sorry for repeating it..... just thought it might help some people out!
Cheers guys,
34329
Post by: dantay_xv
They do look good, I got a bag of them off ebay, but the 0.7mm ones... They are fiddly buggers!
I am hoping they will make good studs/ rivets on marine armour.
I willbe watching to see how you get on with them. Are they for scenery or for model/marines?
75552
Post by: MagosBiff90
Hi mate... yeh they are just what i have been looking for...... going to be using them for armour mostly.... might use some for the terrain competition to give them a test but ..... these ones like i say are 2m...... 0.7mm would just be too small for me! haha!
I have a half built Crassus Armoured Assault carrier i am determined to finish after the terrain project and my Estoc Assault Carrier so i think i will use them fully on that!
Cheers,
34329
Post by: dantay_xv
Cool, I look forward to seeing how you go with thse little beads, will you be sticking them on as-is? Or drill small holes so only the top half visible?
CAnt wait to see the Estoc done, the autogun turret looks great!
I also think Zinge do rivets on sprues too, but more the hex bolt shapes... Cold be worth a look for future projects Automatically Appended Next Post: Here they are 
69676
Post by: Big H
I had exactly the same problem with my Zone Mortalis boards I'm making now ( in my Camo WIP blog) after I used salt.
Acrylic paint , being water based, seems to dissolve the salt crystals and lets them thru the paint. I had to seal my stuff with Enamel varnish before I could paint it !
I won't be using salt again ! 
The rest looks sweet !
76303
Post by: Warboss_Waaazag
Nice rivets! I wish I had more to say...um, oh yeah. That turret at the top of the previous page looks great, too. Keep it up.
75552
Post by: MagosBiff90
 Warboss_Waaazag wrote: Warboss_Waaazag wrote:Nice rivets! I wish I had more to say...um, oh yeah. That turret at the top of the previous page looks great, too. Keep it up.
Haha.... cheers mate! Thanks for looking in!
75552
Post by: MagosBiff90
Ahoy all.......
After getting stuck into the terrain comp.... i have gone back and finished the Estoc Assault Carrier..... Had a tough time trying to come up with a foward compartment for the driver .. where the weapons unit was originally sitting..... i added a simple view unit and armour with some rivets......... IMHO i am thinking it is looking decent!
Next up is going to be the tracks......... i have intentionally kept the hull and track units simple as i want to do a nice design for the tracks.... and thanks to info from [user]Klaus, not Santa
[/user] i am going to have a go at resin casting.......
Anyways.... apart from that... i am going to add decals and then weathering....
Any C&C would be cool!
Cheers,
63129
Post by: Littletower
I'd say it definitely looks the part now!
Like the massive stub gun better, too, it gives (me) a more assault-oriented feel than the turret.
Just don't rust the heck out of this one too, you'll need a couple working ones too! Or do, they look great anyway!
75552
Post by: MagosBiff90
 Littletower wrote: Littletower wrote:I'd say it definitely looks the part now!
Like the massive stub gun better, too, it gives (me) a more assault-oriented feel than the turret.
Just don't rust the heck out of this one too, you'll need a couple working ones too! Or do, they look great anyway!
Thanks mate! Yeh i am happy with where it is going.... and no...... the motto for this one is "DUST NOT RUST" ...... this one is going to be fully operational!
I agree with you that the Autogun is the way forward..... i like the turret but going to keep it for another project......
Thanks for looking in!
32373
Post by: Klaus, not Santa
This is looking nice.
I too prefer the more modern Stubber, vision devices and shield combo to the turret.
I look forward to your weatehring and dusting on this one.
And GOOD LUCK with the casting - let me know if you need anything.
Cheers
Klaus
75552
Post by: MagosBiff90
Thanks Klaus, not Santa
I have found a good sourse of silicone and resin onlne.... so just counting down the days until payday....
But i will take your advise and mock up 4 sections of track and make sure i am happy with them..... I will share the end results when i have them done!
Cheers & Thanks again for looking in!
22619
Post by: inmygravenimage
Looking great mate. Crust away, I say!
75552
Post by: MagosBiff90
haha cheers mate.... i supose a little bt of crust wouldnt do any harm right.... 
72556
Post by: Red Harvest
Really cool thread. Scratchbuilding tanks... takes me back.
Good luck with the resin casting. Just have a care with that stuff, eh.
62749
Post by: Dr H
Good job on the driver's compartment, looks like part of the kit.
75552
Post by: MagosBiff90
Hey all, Hope all is good!
Got a first run of paint on the Estoc! IMHO its looking good.... little bit of crust on there but not much! And first time i had a little go at a "Light Earth" Pigment i bought.... for the dusting around the track units. Have not had a go at the "Spartan" Auto gun unit.... as i want to get a metalic look on the gun....and dont have anything yet......
Pay day at the end of the week so i will be looking to get the resin casting on the go soon!
And beleive it or not..... after the Estoc is completed.... i am going back to finish the MACHARIUS!!!!! About time!
Cheers All,
54500
Post by: hk1x1
The weathering effects on that look perfect, it's just the right balance,
not too little and not too much.
And good luck with the casting, look forward to seeing the results .
32373
Post by: Klaus, not Santa
Looks ACE!
The proper amount of weathering and dusting, color balance is also top!
Cheers
klaus
22619
Post by: inmygravenimage
Agreed, fantastic work. The death guard salute you! Now, they need a Scythe flyer (or possibly a Sickle )
75552
Post by: MagosBiff90
Hey All! Thanks for the feedback! The only thing i am geting annoyed with is the decals...... for some reason i cannot get them to adhere properly to the model.... if you see them close up they look like they might flake off at any point?!?! Realyl annoying... I aplied them after priming and sealed them in with matt varnish before i added any of the effects..... Any one help?!
Also........ I will be making th emockups for the tracks tonight.... might do a couple of varients to see what you think! Am thinkinf of a system like the British WW1 tank tracks where they had the addition of the "grouser" units..... for added track length and ability to operate in very muddy terrain....... ambitious... but hey..... aim high!!!
75552
Post by: MagosBiff90
Hey All....
Had a little go at my idea for the tracks for the Estoc!
Trying to keep it quite basic with no undercuts etc..... i think the dimensions should be good... i want them to be quite chunky looking.... as it needs a lot of grip to cope with the high powered engines.... The rivets are going to be the 2mm nail beads i bought recently..... just need to make my mock ups now and try an get them in as good condition as i can..... After keeping the hull nice and simple i wanted the tracks to really stand out.
Anyone spot any potential issues with casting etc?? Or any changes i might make....... please let me know!
Cheers All,
1
62749
Post by: Dr H
Good job on the weathering.
Assuming the direction of travel for those tracks are right to left (so the small outer protrusions are on the trailing edge), then I see no obvious problems with the design. Worth a mock-up to see what they look like.
As for casting. A single side cast (will give them a flat underside) should be fine.
72556
Post by: Red Harvest
Lose the decals, compadre. In the end they are nothing but trouble. But do use them as a guide for some freehand or stencilling. You will not regret it.
Disclaimer: I'm very anti-decal. Nothing personal. I just do not like them. On anything. Ever.
75552
Post by: MagosBiff90
Hey again all!
Thanks for the comments Dr HRed Harvest
I had a very quick go at making some mock up at a couple of track units for the Estoc.... and first thing i noticed.. is that i am going to need a new material to really get some sharp edges if i am going to cast them!. Secondly... i am really happy with my new 2mm Rivets...... and thirdly...... the track units i have i think look pretty good... but are probarbly a bit to wide!
As you will see... the grey card didnt give me neat edges... but at the momment i just dont have anything thick enough.....
Any comments would be great guys!
Thanks,
69494
Post by: OneManNoodles
The Estoc looks really cool, the tracks are an interesting design are the rivets 2mm diameter?
I'd remove the single rivet(?) on the big flat part of the treads it would be like stilettos on something designed to spread weight. Oh and any bubble on it would be more noticeable.
They Look really good, Its a nice design.
Why the decal hate Red?
72556
Post by: Red Harvest
Well Noodles, many a bad experience as a kid when I built Revell models. Some scars never fade. No matter what, the things always 'silvered' on me. Or wrinkled.
The tracks are indeed too wide relative to the width of the hull and track guide. I agree with Noodles, the center rivet is unneeded. Perhaps the side treads could be combined to one angled tread, so they look like '/ \' or doubled and look like '><'. it would be easier than what you have, when you do a reduced size version.
62749
Post by: Dr H
Yeah, perhaps a little too wide. Agreed with OMN about the rivet. As for material, what are you limiting yourself to? Plasticard would be easy to get sharp edges with, but involves buying plasticard. Milliput (or other similar putty) is good to get sharp edges and is nice to work with after it's set (sanding, sawing, drilling...). I've used it for casting masters. Again, involves buying. If you want to stick with card, have you tried laminating it to get it thicker. This will also make it stronger and you should be able to get a hard edge to it. Will also bulk up the track links, as they look a little thin as they are there.
72556
Post by: Red Harvest
Actually in lieu of buying plasticard if you have any of those plastic bread bag clips...
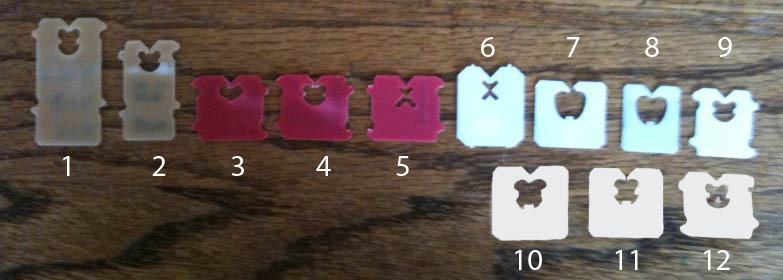
You could use them. They are the right thickness, and essentially plasticard.
Easiest way to 'harden' paper card edges is with watered down PVA or Aliphatic Resiin (wood) glue. I cannot say it would be good enough to for molds though.
75552
Post by: MagosBiff90
Hi All,
Thanks so much for the comments!
Red Harvest I am with you mate! decals good bye!! Will have a crack at some stencils etc.... concider me converted!!
OneManNoodles Thanks for the C&C..... when you look at it... yeh the centre rivet could certainly be lost...
Dr H I have just had very limited finds recently for materials etc..... but yeh i will certainly look at a thicker plasticard... or try and find something around the house i can use..... my worst issue right now is that i am working with a slightly chipped Stanley Knife blade.... not the best.... I will look to invest in a new scalpol and blades.. and actually a little model saw to help.....
One a final note.... I put the track units beside my WIP pile.... and noticed theylooked like they would actually fit the Macharius pretty well...... Think i will keep a hold of them and attempt a cast when i get myself organised!
Thanks again all... really appreciate all the comments and input!
22619
Post by: inmygravenimage
Another good source is free SIM cards - not the cards but the packs they come in.
69494
Post by: OneManNoodles
Try getting a pack of Evergreen mixed plasticard (its a pack of 3 sheets, one each of; 0.25, 0.5 and 1 mm thickness). You can get them for £4-5
A good modeling/craft knife, like an xacto or scalpel, with spare blades should cost you less than that again.
I was the same with decals for a while, then I discovered varnish and decal softeners.
Edit: I didn't notice your tracks last time, they don't look bad, maybe a little on the large size for that tank.
72556
Post by: Red Harvest
 OneManNoodles wrote: OneManNoodles wrote:
I was the same with decals for a while, then I discovered varnish and decal softeners.
Noodles, What is this dark magic you speak of? And would it work with home brew decals?
Cheapest plasticard sources are any food containers labelled with the number 6 (here in the US) which means they are polystyrene. And of course the ubiquitous 'For Sale' signs etc at your DIY store. Those are generally 0.5mm or 1mm thick.
69494
Post by: OneManNoodles
 Red Harvest wrote: Red Harvest wrote:
Noodles, What is this dark magic you speak of? And would it work with home brew decals?
Cheapest plasticard sources are any food containers labelled with the number 6 (here in the US) which means they are polystyrene. And of course the ubiquitous 'For Sale' signs etc at your DIY store. Those are generally 0.5mm or 1mm thick.
Gloss varnish, micro sol & micro set, gloss varnish. Basically its a light acid solution that softens the decal allowing it to conform to contours etc. Instructions on the bottles or there are tutorials around. It's how I did my marines and tanks.
It should work, provided they are thin enough which shouldn't be a problem if they are laser printed and suitably sealed. The ones I've made seemed a little on the thick side, probably too much varnish.
And look for plastic with "6" and PS on it in the UK
75552
Post by: MagosBiff90
OneManNoodlesRed Harvest Hey guys!! Thanks for all the info... Will definetly get on the hunt nerxt time i am out shopping!
In the mean time while i am waiting for the funds for my moulding kit and resin etc...... I found an empty little bottle of vitamins..... some plasti card scraps...... and a small "Glyph" in my bits box......
As someone once said...... Can you guess what it is yet?? My first attempt at something non-imperial.........
75552
Post by: MagosBiff90
Hi All,
Sorry to start off this week on a massive downer..... Has a disaster at home lastnight / this morning. My own fault.... a bit of DIY at the weekend went a bit wrong and ended up dropping a paint pot over some of my models....... (They are sitting in our front bedroom used as a store room while we decorate the rest of the upstairs)
The lid popped off spilling thick emulsion and it is a complete loss on my Macharius Turrets (Both of them) Macharius Track units (Both of them) and my Crassus internal section....... also lost a load of card and couple of sheets of thin plasticard........  all completely covers in thick white paint.
Luckily my terrain piece, Macharius & Crassus Hulls and my bitz box were stored on a higher shelf.
As you can imagine this is totally dissheartening as it was the Macharius scratch that got me back into this whole thing & it was the model i was most proud of so far.......... unfortunately it means i will have to pull out of the next LoER comp while i attempt a salvage mission.
Cheers guys, Will try and keep posted...
72556
Post by: Red Harvest
I am really sorry to hear about that. Is is an acrylic paint? If it is thick enough, consider peeling it off after soaking in water a while, before you go to the hard stuff.
I also hear people have good luck with something called Dawn Power Dissolver for removing paint. But try it on a test piece first.
Patience and persistence, but mostly patience, and you can possibly recover almost everything.
Good luck
75552
Post by: MagosBiff90
Thanks mate! I willd efinetly have a try at it..... unfortunately both Macharius Turrets ar beyond saving (as the pot fell on them first before the lid came off)
So they are smashed and covered.... but yeh.... i will try and claw back as much as i can!
I will look up those products... cheers,
69494
Post by: OneManNoodles
Ouch! Thats really bad, one of the reasons I like plasticard is it's easier to strip paint and clean ... doubt even that would survive having a paint pot land on them!
I think emulsion is a water based acrylic (? ... yea I've got no idea). If it is you might be able to save the plastic bits.
Sorry to hear about that, you put a lot of effort into them.
65595
Post by: Camkierhi
WOW sorry dude.
Yup emulsion paint is water based, if it is still caked on, try peeling, as the innermost layer will not be dry yet. You had primed the bits if memory serves, so that may just save them.
Also I do not know how your models will react, but old fashioned dettol is an amazing paint stripper, but it eats glue too so you would have to be careful. Just maybe as a last resort.
Worst case scenario use the bits as burned out scenery.
I am truly sorry dude, they where spectacular pieces, and having it blown away like that is not cool. But you will rebuild, you must, you are too good and it is in your blood. YOU ARE A RIVETTER.
Good luck.
10972
Post by: Ruglud
Tough luck dude. On the plus side you hours more fun rebuilding
75552
Post by: MagosBiff90
Camkierhi wrote:WOW sorry dude.
Yup emulsion paint is water based, if it is still caked on, try peeling, as the innermost layer will not be dry yet. You had primed the bits if memory serves, so that may just save them.
Also I do not know how your models will react, but old fashioned dettol is an amazing paint stripper, but it eats glue too so you would have to be careful. Just maybe as a last resort.
Worst case scenario use the bits as burned out scenery.
I am truly sorry dude, they where spectacular pieces, and having it blown away like that is not cool. But you will rebuild, you must, you are too good and it is in your blood. YOU ARE A RIVETTER.
Good luck.
Haha... thanks mate.... care to make that official?! ... just kidding.... althoug even before this happened i have a couple of ideas that are going to be "rivitier" than ever! Tonight when i get home wil tell how much i am able to salvage..... not sure i have the heart to rebuild the turrets... but as you say I might make advantage of them to evolve into something else!
Ruglud wrote:Tough luck dude. On the plus side you hours more fun rebuilding
haha... not sure to laugh or cry at that thought so i will do both!!
62749
Post by: Dr H
That sucks dude. We all know your pain, but do not be disheartened. These things happen and can't be helped, Make use of the remains, keep modelling on other projects and come back and perfect the lost projects at a later date.
74682
Post by: MWHistorian
Wow! These are all amazing! Love the Macharius.
22619
Post by: inmygravenimage
Nightmare, we've all been there. Hope you get your groove back!
75552
Post by: MagosBiff90
Hey guys! Hope all s good!
From the ashes.....
As first expected both Macharius turrets were doomed..... the Vulkan varient gone and the Battle Canon version all busted up...... Managed to salvage a few parts from them and also using the second varient in a little terrain peice i am making! Will get some pics up once i get it together...
The internal piece for the Crassus was also a write off... so i am going to just ad the hatch and track units and have it as an enclosed piece.... using parts from the salvaged macharius track units... looks quite promising... so i am happy....
The Estoc was undamaged and i managed to get hold of some modeling clay so i am going to use it to try and get some proper track mock ups before i get the moulding kit which should be here next week....
Also putting together a little "walker" that i have been itching to do for a while see pic below..... so alls good!
Thanks guys!
63129
Post by: Littletower
Glad to hear the good news, sorry not all was salvageable.
And even better yet to see you back in the saddle
Keep it going!
65595
Post by: Camkierhi
That's the spirit, great. Silver linings and all that.
Promising walker.
76303
Post by: Warboss_Waaazag
These are your first scratch building attempts? These are amazing! Really impressive stuff. Totally subbed.
75552
Post by: MagosBiff90
Cheers Guys,
Warboss_Waaazag Yes indeed.... the start of this blog was my first steps into scratchbuilding and infact WH40K! Well... since beeing a wee lad!
Thanks for looking in & glad you like what i am trying to do!
Tonight i am going to try and get the legs done for the Kan.... Am thinking of one wheel and one leg...... give it a bit of character....
Pics to follow!
Oh... one more thing...... HORUS IS AVAILABLE FROM FORGEWORLD!!!!!!!
Incredible looking model! ht elooks magnificant.... and i REALLY like the Pre Heresy Horus!!
72556
Post by: Red Harvest
Back in the saddle so soon? awetastic. Only death can stop the true scratch builder...and even then, I have my doubts about the veracity of that statement...
The little walker, so kawaii.
22619
Post by: inmygravenimage
Good to see you back in your groove chief!
65595
Post by: Camkierhi
Well, what's the news from camp Biff?
75552
Post by: MagosBiff90
Ahoy All!
Thanks for all the comments and posts! Sorry for the lack of contact.. but a nice weekend with the family and a local brewery "sampling" afternoon have kept me away!
Ok.... i have done a full rundown of where i currently sit.... after all the breakages and accidents i have the following WIP>
ESTOC ASSAULT CARRIER> Track units and Spartan Autogun to be finished.
CRASSUS ARMOURED ASSAULT> Rear Ramp and track units to be complete. Rivets to be added & Painted
TERRAIN PIECE 1> Salvaged Macharius Turret (Burnt Out)
TERRAIN PIECE 2> Forgeworld Trench gun emplacement (Somme Style)
ORK KILLA KAN> Arms and legs to be built and painted.
SO thats where i currently stand...... i REALLY need to finish things before i start on new ones.......
The aim tonight is to get the most of the CRASSUS body and rear section finished and rivets added. This will then just leave the track units.....
TALLY HO!!!
cheers,
32373
Post by: Klaus, not Santa
Tally Ho!
I'm glad you recovered form the paint incident and are able to maintain your hobby mojo!
I look forward to see some updates.
Cheers
Klaus
65595
Post by: Camkierhi
Good to hear, and well done.
22619
Post by: inmygravenimage
I likewise did beer sampling at the weekend - where were you A-drinking? Good to hear you are back in your groove, look forward to seeing the results!
75552
Post by: MagosBiff90
Hey all!
inmygravenimage it was at a tiny brewery in Bridge of Allan not far from Stirling! really small and personal bar/sampling room... only one brewmaster/owner.... and some really lovely live ales and beers to try... and to top it all off... a big plate of home made stovies to stabalise the feet for the walk home! recommend it if your ever in the area......
But back to 40K........ i finished my second terrain piece........ back on Vraks and the remnants of one of the emperor's mightiest war machines lies smashed on the battlefield. Only the skeletal remains of the turret from the once mighty Macharius Vanquisher show testament to the once great warbringer.
Without sounding like a one trick pony.... (which i understand could be the feeling) ... i have gone for a complete wreck here again..... salvaged from the parts of the turret under the paint pot....... thrown some pigments at it also and my usual mix of damage and weathering..........
Doff of the cap to Camkierhi as i had a try of his "ripped wallpaper" effect for the tarpaulin. I think to really finish it off i am going to add some regiment details on the tarp and then soe final dust to finish it off... but ...... as far as painting and modeling go... its done......
Would love some feedback guys... and any hints or tips......
Cheers & Thanks all again!
65595
Post by: Camkierhi
Now that is a classy piece of terrain, great work.
II have seen Ruglud use this technique for tarps, and you seem to have pulled it off well.
22619
Post by: inmygravenimage
Great save mate! Love it. I was at WEST - my feet were steadied by schnitzel
75552
Post by: MagosBiff90
inmygravenimage haha... sounds good mate! i think it should be a once monthly occurance! atleast.....
Thanks again for the comments guys....... really happy with how this has turned out..... and gave me a chance to have a crack at using the weathering pigments properly.... and the technique for the tarps..... Next up is going to be the Crassus...... NEED to get it finished.... and also get some more mould mockups for the Estoc done also!
Cheers,
63129
Post by: Littletower
Amazing rescue job, great classic terrain piece
Like how the green tarp gives contrast to the extremely decayed turret.
69494
Post by: OneManNoodles
Really well done on the salvage work! Makes for a really good and cool piece of terrain for part of an old battlefield.
75552
Post by: MagosBiff90
Hey All!
Sorry for the long quiet time.... RL been taking its toll!
Managed to get some time back on the table and had a crack at the Crassus..... Finished the forward section and added a whole load of rivets..... got some paint work done and then a minumal amount of damage...... then added some dirt and dust........
I know the back half of the model isnt finished yet but i really wanted just to get some painting done and some detailing.
Got to admit IMHO these little 2mm 1/2spherical beads are great..... £1.99 for 1000!
Anyways.... thanks all for the comments! And ahain...... all C&C would be great!
62749
Post by: Dr H
Nice work. Looking good.
65595
Post by: Camkierhi
Looking brilliant. Just keep it on the top shelf eh!
Joking aside, looks brilliant, nice colouring, excellent details.
75552
Post by: MagosBiff90
Dr H wrote:Nice work. Looking good.
Camkierhi wrote:Looking brilliant. Just keep it on the top shelf eh!
Joking aside, looks brilliant, nice colouring, excellent details.
Hey guys! Thanks for the comments! AM definetly getting hasppier with my painting and managed with this one to keep the damage to a real mimimum! Will get on with the rear half of the hull and rear access ramp!
Haha... and Camkierhi yes indeed.... being kept safe!!
72556
Post by: Red Harvest
I like using those small sterilite containers, like the shoe boxes, for stuff like this. All the materials I'm using go into it-- so I won't lose any pieces-- and the lid goes on. A nice way to protect things.
Those beads make nice rivets.
Given the shape and size of that thing as it is, it would make a nice start on a drop ship too.
54500
Post by: hk1x1
It's amazing the difference those rivets make, as this is really starting to come to life now, great work. .
75552
Post by: MagosBiff90
Hey All!
Thanks again for all the comments.... really appreciate them all!
Got the hull finished for the CRASSUS.... got it bas coated and added the red regimental stripes..... Happy with the back end.... was going to have the original large ramp but decided against it for a more pronounced troop entrance....... its not going to allow for very fast deployment..... but i dont think thats a huge issue....... going to get the weathering done tonight so alls thats left is the track units that i am looking to salvage from the partf os the Macharius.....
Cheers all..... again all C&C is welcomed!
2
75552
Post by: MagosBiff90
Ahoy!
CRASSUS Hull is now finished.... Added a couple of old bullet holes at the front end of the carrier..... and then added some more dirt and dust..... A rolled up camo net to the side.... and like i said earlier... all thats left is putting together some tack units.....
Cheers All!
4
62749
Post by: Dr H
Nice work Magos. Good weathering.
69494
Post by: OneManNoodles
Thats looking very nice, love the rust and dust !
65595
Post by: Camkierhi
Awesome work, loking brilliant.
63129
Post by: Littletower
Looking great, weathering is spot on!
75552
Post by: MagosBiff90
Hey guys,
Cheers again for the comments...... No work done tonight but thought i would put up a pic showing the scales of the armour i have.... starting with the Rhino up to Estoc and then Crassus.....
3 diferent weathering techniques on each one........  i swear i will find my final technique in there somewhere!!
Cheers Guys,
75552
Post by: MagosBiff90
Hi guys,
Hope all is well,
Not had a lot of time to get anything done this weekend, but i did get a real quick start on a terrain peice i have been wanting to do for ages....
Real basic start but got some cool plans for this!!
Updates soon... cheers guys!
1
65595
Post by: Camkierhi
Sorry for not popping by sooner and commenting.
Those 3 look brilliant, and who's to say they should all be identically weathered! They look awesome together to me.
Interesting start on the terrain project. looking forward to this.
75552
Post by: MagosBiff90
Ahoy everyone!
Hope all is good with you all and you enjoyed Easter.... no rest for the wicked i am affraid..... 0 days off as of yet...
But hey..... managed to get some work done on my next little terrain/objective marker piece..... (Basically my wife has said that my hobby budget is only as much as i can raise from selling some pieces... so along with "Ancient Glory" this next piece is going to be up on Ebay at some point to get me some pennies to finish some other bits and bobs... llol....
Well hey... here it is..... An Imperial flyer has taken a renegade missile strike to its engines and been downed behind enemy lines.... that was 10 years ago and during the constant fighting between loyalist and renegade forces.. the ruined hull of the forgotten bird has been left to rust and rot under the constant hail of fire from both sides.. unable to be recovered or revived.
A muddy base with a sparce covering of grass and mud will be placed under the flyer and it will be semi-buried... hense the incomplete hull...
Hope you guys like it,.
Cheers & Thanks,
62749
Post by: Dr H
Looking good. Nice weathering.
Good luck with the fund-raising.
22619
Post by: inmygravenimage
Well that looks like crap in a really, really, good way!
65595
Post by: Camkierhi
Looking brilliant. You certainly got weathering sorted.
WWhat kinda supplies are you needing?
75552
Post by: MagosBiff90
Thanks for the comments guys! Really appreciate them all! Got a polyfiller/gravel & sand base planned for this one... with pieces or wreckage strewn around... and might well add some bullet marks and lasgun streaks accross the hull. then its business as usual with a heavy mud effect and dust etc.
Camkierhi.... to be honest i am needing to get myself some new paints.. and varied colours.... the majority of the materials from my builds are coming from salvage i can pick up here or there... or scavenged old bits and hand me downs from people who have them as surplus.......
It is my goal to start to work on a couple of legion pieces... either World Eaters or Luna Wolves...... so am looking to get some whites and blues etc..... andget my painting skils built up with those colours... instead of my usual grey...
76303
Post by: Warboss_Waaazag
Looks great! Looking forward to more pictures of your progress.
75552
Post by: MagosBiff90
Hey all! I hope all is well!!
In my quest to raise some funds for my modeling i trawled the lengths and depths of E-Bay and came up with a little beauty i thought i could get my teeth into. I think it is a modern American APC of some type... but for my purposes i am seeing it as a Chimera stand in or something......
When it arrived it had very minor damage and had been given a quick grey coat of paint so i tiried it up hit it with some primer and got to work..... If i am honest i am UBER HAPPY with the results and IMHO i think its probarbly the best model i have done yet!
Still need to finish the tracks and then i am looking to add an auto gun system like the one i added to the Estoc assault Carrier.... they are WIP and i will share them once i have them in one piece!
OH.... i am thinking of naming it the "Claymore" troop transport with automated anti personel weapon system.
Should be sometime next week i can get it finished....... but am actually thinking of keeping this one...... DOH!!!!!! fundraising FAIL!
62749
Post by: Dr H
Good work. Looks nice a grubby. Spot on weathering.
65595
Post by: Camkierhi
Excellent work. No idea what the model is, but could easily count as rhino.
24297
Post by: Viktor von Domm
that looks like a M113 with skirts...
and pretty nifty looking it does too
31424
Post by: Invicta
Great work, I need to sift through your blog and see how you do your weathering and get some pointers.
54500
Post by: hk1x1
The paint work on the land speeder looks fantastic, very realistic .
75552
Post by: MagosBiff90
 Invicta wrote: Invicta wrote:Great work, I need to sift through your blog and see how you do your weathering and get some pointers.
Hiya mate! Thanks for looking in! Yeh there are a couple of descriptions back in the earlier pages for my weathering..... but if you need any explanations or a new description just let me know!
Well, I have put together an autogun system for the Claymore. Double weapon varient with a stubby autogun and a heavy bolter. Added some cabling down into the hull and some front armour...
Think its looking pretty good in place.. just need to get a coat of paint onto it and then get the tracks & wheels weathered and its ready to go!
Would love to hear your thoughts, Cheers all!
4
31424
Post by: Invicta
Looking great as usual. Do you plan on having crewmen on any of your vehicles in the future?
75552
Post by: MagosBiff90
Invicta wrote:Looking great as usual. Do you plan on having crewmen on any of your vehicles in the future?
Hey mate, thanks for looking in & thanks for the comments!
Yeh for sure i definetly want to get the human factor into maybe my next project..... main reason why i have not yet is that my budget for these things is very tight and i have been trying to get my armour painting skills up first..... but LOVE the look of the DKOK / Steel Legion so looking to do an arillery piece with crew in the future for sure! ..... once i get through the heap of unfinished peices i have on my desk........
Thanks again mate, i appreciate it...
38411
Post by: Ragsta
Fantastic scratchbuilding skills here, and I love the mucky weathering you have achieved (hacking apart kits for terrain is also very fun).
Thank you for posting your links to the rivets too! Just got a bag 
I have scratchbuilt 2 Ragnarok tankies my humble self but I really must salute your skill, well done, mate
75552
Post by: MagosBiff90
 Jihad_Ragsta wrote: Jihad_Ragsta wrote:
Fantastic scratchbuilding skills here, and I love the mucky weathering you have achieved (hacking apart kits for terrain is also very fun).
Thank you for posting your links to the rivets too! Just got a bag
I have scratchbuilt 2 Ragnarok tankies my humble self but I really must salute your skill, well done, mate
Heya mate.... thanks so much for looking in and i really appreciate the message! Thats no worries about the rivet link...... Glad it was of use to you!
And just had a look at those Ragnarok in your gallery.... looks awesome mate! really cool! I love that tank design actually..... if i get my current project list done i would love to have a crack at one!
Speaking of which..... the Claymore is now finished! Got the tracks done and weathered and IMHO its cool! Tomorrow night i will get the Broadsword weathered up and then its off to the Maelstrom that is E-Bay.... lol......
ps.... you cant really see it but i went over the pads of the tracks and some of the edges with some graphite to get a nice worn metal look.... lol...
Cheers & Thanks all!
2
63129
Post by: Littletower
Looks great!
The punched skirts look ace, and the weathering is spot on
32373
Post by: Klaus, not Santa
Really nice - realistic and good looking weathering.
Nice travel dust on the wheels and tracks.
And those track skirts.....just ACE
75552
Post by: MagosBiff90
Littletower wrote:Looks great!
The punched skirts look ace, and the weathering is spot on
Klaus, not Santa wrote:Really nice - realistic and good looking weathering.
Nice travel dust on the wheels and tracks.
And those track skirts.....just ACE
Hey guys,
Thanks so much for the comments! Really appreciate them...
Not at work today so i have managed to get the BroadSword autogun system painted and added... and a couple of ariels too.... so....
the Claymore Transport is FINISHED!!
Thanks again all for looking in!
1
62749
Post by: Dr H
Great job Magos.
75552
Post by: MagosBiff90
Hey all... one final update on the Claymore...... had a couple of comments over on the "Finished Model" Thread... about the second gun barrel needing to be drilled out like the first.... so i made a little ammendment and here is the result...
Cheers & Thanks all,
1
65595
Post by: Camkierhi
Looks brilliant, we are going to have to push you on lenses and such, but the beast it self looks fantastic.
24297
Post by: Viktor von Domm
yes... way better to have both barrels drilled out...was not able to tell you about that earlier on...
75552
Post by: MagosBiff90
Camkierhi wrote:Looks brilliant, we are going to have to push you on lenses and such, but the beast it self looks fantastic.
Viktor von Domm wrote:yes... way better to have both barrels drilled out...was not able to tell you about that earlier on...
Thanks guys! Vik... No worries! I appreciate all the comments! Definetly adds just that edge of realism and steps up the detail to have the barrels looking like they have some depth!
And i totally agree with you Cam...... lenses,lights and decals will be my next stage..... really happy now with the technique for the weathering i have going on..... just got to look out for a new base coat colour..... really want to try a more pastely shade of blue maybe.... something with a matt finish.... the Halfords light grey primer i am using as a base coat just now is ideal....... if only it came in sky blue! lol... might have to take a wee trip there tomorrow!
However first thing is first..... i need to get this sucker up on E-Bay to raise some funds to help complete and start some other bits and bobs! lol..
Thanks again guys!
40213
Post by: DiDDe
Yeah.. that one looks epic.
24297
Post by: Viktor von Domm
well...good luck with the sale!!!
75552
Post by: MagosBiff90
Hey guys..... so its onwards and downwards for my next little project...... a while ago i purchased a Forge World Trench piece.... the end one with the machine gun emplacement..... and have been wanting to do a proper terrain piece.....
Had a go a few weeks ago but have restarted it now... and looking better IMHO..... WIP pics to come later.......
I have been having a go at some exploded / damaged reinforced concrete.... using simple grey modeling card and some 1mm grid plastic i found (usually used to stop sofa's sliding around..... from IKEA)
Anyway...... this pic shows my first attempt.... i think it has merit and potential.... !? Because as always.... this is certainly NOT going to be a freshly dug and reinforced trench!
Until later..... thanks all!
22619
Post by: inmygravenimage
Very nice! More please, hurry up now...
69494
Post by: OneManNoodles
Looking really effective, more please!
Best of luck selling the claymore looks really cool.
24297
Post by: Viktor von Domm
would like to see that grid stuff all natural please... and I currently cant tell what´s what...
62749
Post by: Dr H
Looks like that'll work.
Make sure to keep the edges in line on your final pieces. e.g. that one on the right, the broken corner looks like it's been pulled out and pulled the metal with it.
It should look like the concrete (or futuristic version thereof) has fallen away from the metal and the corner of the wall stays where it was, although can bend over.
2326
Post by: shasolenzabi
The APC's are looking really great! I need to look at all of the thread to see what else you got!
65595
Post by: Camkierhi
Great work on the concrete. Like the wire work. I am with Dr. it is either the concrete has broken away and exposed the wire, or if pulled away the wire should be more tisted and deformed. I hope you realise, we only point this out because your paint work and weathered effect is so perfect, the modelling demands to be perfect.Fantastic work matey, at this rate you will be winning awards gallore.
And I echo, good luck with the sale, shame you have to sell it.
75552
Post by: MagosBiff90
Dr H wrote:Looks like that'll work.
Make sure to keep the edges in line on your final pieces. e.g. that one on the right, the broken corner looks like it's been pulled out and pulled the metal with it.
It should look like the concrete (or futuristic version thereof) has fallen away from the metal and the corner of the wall stays where it was, although can bend over.
Camkierhi wrote:Great work on the concrete. Like the wire work. I am with Dr. it is either the concrete has broken away and exposed the wire, or if pulled away the wire should be more tisted and deformed. I hope you realise, we only point this out because your paint work and weathered effect is so perfect, the modelling demands to be perfect.Fantastic work matey, at this rate you will be winning awards gallore.
And I echo, good luck with the sale, shame you have to sell it.
Hey all! Thanks again everyone for the comments and critique! Appreciate them all!
I totally understand what you mean regarding the re-bar in the concrete. I am going to look at making a bunker roof / side walls with this technique tonight for my trench diorama so will definetly work on these things! The peice on the left is actually a lot more realistic IMHO (just a crap photo) its a circular shell hole with the re-bar all warped and twisted and stretched out of place.... i will get a better pic tonight!
And Vik.... i will get a pic of the grid material for you.... comes in huge rolls from Ikea to stop furniture slipping around.
Thanks again all! Cheers,
24297
Post by: Viktor von Domm
thanks mate! I need to visit that store soon too... I recently got me some retail trays from their picture frame range... just black plastic they use to transport the many frames from one point to the other and I got them for free and plan to build a gothic cathedral with these... I probably will show some of these later on in my thread...
75552
Post by: MagosBiff90
 Viktor von Domm wrote: Viktor von Domm wrote:thanks mate! I need to visit that store soon too... I recently got me some retail trays from their picture frame range... just black plastic they use to transport the many frames from one point to the other and I got them for free and plan to build a gothic cathedral with these... I probably will show some of these later on in my thread...
Hey mate! That sounds awesome... big fan of the 40K Architecture and would be sweet to see your take on it!
I got a better pic of the reinforced concrete "shell" damage..... shows a bit better the warped metal re-bars etc..... definetly going to be a pretty effective technique i recon.....
Also... i have added a pic of the grid material itself.... as i said its Ikea's regular "floor gripper" for furniature etc... is really stretchy and maleable... so lots of potential uses.....
Cheers guys!
2
24297
Post by: Viktor von Domm
I see.... yes that is a nice material, I gather you did it in a sandwich method? ...tho I wonder if the alumesh stuff would be the better choice as you can bend it and it will stay in the shape you want it to be...
54500
Post by: hk1x1
Those first wall pieces look good, just maybe add some cracks on the concrete where the exposed re-bar is,
and more rust, depending on what caused the damage, either weather erosion or battle damage.
If you want it very realistic you could add small bits of broken concrete still attached to the re-bar.
75552
Post by: MagosBiff90
Viktor von Domm wrote:I see.... yes that is a nice material, I gather you did it in a sandwich method? ...tho I wonder if the alumesh stuff would be the better choice as you can bend it and it will stay in the shape you want it to be...
You are probarbly right there... the alumesh would certainly hold a shape better...... but....... i have loads of this material around the house and am a "thrifty" Scotsman..... so will keep my wallet safe for now!
hk1x1 wrote:Those first wall pieces look good, just maybe add some cracks on the concrete where the exposed re-bar is,
and more rust, depending on what caused the damage, either weather erosion or battle damage.
If you want it very realistic you could add small bits of broken concrete still attached to the re-bar.
Yeh i totally agree and thanks for commenting...... i am looking to use this technique as a bunker roof / side walls...... with the damaged sections being covered by extra bars and sandbags etc.....
Will add up some pics tonight as i am expecting to get some time looking at this tonight!
Thanks again,
75552
Post by: MagosBiff90
Hey All,
Couple of very much WIP pics of my trench diorama...... very early stages but trying to get the main elements together.......
Got the basic structure sorted for the gun emplacement and added some of the rebar / damage to the roof......
PS..... i know those sand bags look like huge blobs....... they will be shrunk!!
The "mud" effect is just some of the really dark rust pigment mixed with general wall filler...... i am going to add soem pebbpes and rough sand to add soem texture to it for the final piece....
All C&C would be great cheers guys!
24297
Post by: Viktor von Domm
you´re heading in a direction I wanted to go for quite a long time, I envy you^^...
the way you are setting this trench up is a nice idea, I think the main part with all trench ideas is to get that different height issue solved...which I think you got down to a t already!
the sandbags do indeed look a bit akward... I think when working with procreate or other such sculting stuff I would do just sausages and then cut then deliberately smaller than you would originally think they need to be... I made some on my own some years ago and it helped me to have some kind of device to get the right thickness ... I used fitting wooden sticks left and right from the "sausage" and then rolled over the material and the wood and thus shaped the flat under and upper side... the flanks still stayed a bit rounded...but in essence after each cut you need to resculpt the sandbag still... it is an adventure^^
the repair works on the emplacement is something I really like
62749
Post by: Dr H
Nice work.
Something else for when you're making sandbags; pressing some cloth onto the putty before it sets will give it that sandbag texture.
2326
Post by: shasolenzabi
This trench is interesting! can't wait to see how it will be supported, and how extensive it will be
75552
Post by: MagosBiff90
Hey guys.....
Thanks so much for the comments! I will definetly take them onboard and have a go at the sand bags again tonight.....
Shasolenzabi..... i am going to add some horizontal support beams between the "black" concrete pillars to give it some strength and also have some concrete floor beams...... with wiring and drainage underneath a slightly raised walkway..... thinking of adding some wall damage and patch work to it also.....
On a totally diferent note...... I have had an idea as to the model i want to build to "celebrate" my induction into the LoER.......
Now it is VERY early WIP..... and this is the only image i am going to put up until the 3d model is completed....... It is taken from a partial and ancient STC that was found in the oldest and darkest vaults of my forge!
Anyone crack a guess!? 
Cheers & Thanks all,
24297
Post by: Viktor von Domm
looks like some heavy artillery...
on that subject... would you like to get a take on designing a standard leman russ like tank chassis?...I never was the man to use 3D software to an extent that I can benefit from it...
75552
Post by: MagosBiff90
Ahoy!
Vik.... I can certainly have a look at it buddy!
Managed a second shot at the sandbags again..... made them 50% smaller and rolled them out betwen 2 pieces of thick card to get the thickness..... IMHO they are a lot better! Thanks for the tips!!
Added the base floor panels that the drainage and actual floor panels will sit on..... and some mesh to the sides of the emplacement.... and then added a horizontal reinforcement to the trench wall.
Still a lot to do......
Cheers Guys,
2
24297
Post by: Viktor von Domm
that is definitely a huge improvement... specially the lil creases I see is a very convincing detail! those boards look very good too....but what is that black piece in the trench? is that a supportive structure?...
2326
Post by: shasolenzabi
Looks like a Minotaur artillery piece
62749
Post by: Dr H
Yeah, that's looking nice.
What are you going to sit this in/on when it's done? You need a table with a hole in it...
32373
Post by: Klaus, not Santa
This is an excellent piece already - I love the damaged concrete - this will put your weathering and damaging skills to new heights
Thanks for the tip with the grid material - I will see if I can find some too.
Have you tried to make the sandbags between some cloth? It will give them some structure, makes them look less blank.
Cheers
Klaus
75552
Post by: MagosBiff90
Hey All!!
Thanks again for all the comments! Plenty of food for thought.... i will definetly press some sort of fabric into the sandbags and see if i can get some texture there...... also thinking of how to make some bullet holes in the sandbags.... maybe just simply with a pin?!?
Also Vik..... the horizontal peice is meant to be a "spacer" to stop the walls falling in... but it doesnt look great in its current spot..... i am thinking of inverting it and having it at the base... and constructing something a bit nicer for the upper spacer..
Dr H.... haha.... I am going to look to add a base and block in the sides.... so it is like it is like it is a box.... with the trench inside.... lol
Also thinking of adding a firing step along the side of the trench.. or maybe not.... as i want this to be about the gun epmplacement primarily..... might keep the trench detailed.... but simple.......
Oh... and last thought....... i am conciderin trying to work the Wrecked Land Speeder into this peice but i am not sure i have the space and it might make it feel way to cramped...... 
Klaus: Heres the link for the IKEA STOPP product.... UK website... but i am sure it is the same in Germany....
http://www.ikea.com/gb/en/catalog/products/80227877/
Thanks again guys!
62749
Post by: Dr H
Fair enough. I didn't know if you were going for something that could be used on a gaming table.
If you're going more for a diorama, maybe have a cutaway in the bottom of the box and have either an underground bunker/HQ or some enemies tunnelling in underneath...
69494
Post by: OneManNoodles
Good stuff, looks really cool, as soon as I'll try and remember that next time I go there. Some Czech hedgehog tank traps would fit pretty well with that I think.
I wouldn't worry about adding a texture to the sandbags, at 28mm scale its pretty pointless. fingerprints and dry-brushing are good enough.
Mind sharing your source of thick card? I'm always on the lookout for it, my last batch came from a pharmacology lab.
75552
Post by: MagosBiff90
Hey guys,
Mad weekend so not a whole lot of progress.... working on the mesh/metal tread panels for the floor of the trench..... tonight my aim is to add some drainage..... wiring... and tread supports and then get the tread plates down........ also looking at how to add some bullet holes to the sand bags.... i think just a needle should do it... have had a go but it just doesnt look right.....
OneManNoodles i use simple grey modeling card that i pick up from an art stoer in Glasgow..... its about 3mm thick and really resiliant...... can take a lot of cutting and scratching too......
Updates later... cheers guys,
24297
Post by: Viktor von Domm
I would use a pencil rather for those bulletholes. Stick it in the soft foamcore and wriggle it about a bit...to leave a small "craterlike" indent...
75552
Post by: MagosBiff90
Thanks for the tip Vik.... i will give it a try this evening.....
Also... just a small note.... I have had a change of heart for the Minotaur....... i am now looking at an option to fit 2 earth shakers to a Crassus/Praetor Hull........ and add the additional armour like the Minotaur......... Oh..... and i have my idea set for the LoER competition! VERY simple design but i am hoping to push for effect and atmosphere for this one......
Updates tonight!
75552
Post by: MagosBiff90
Evening All,
Hope all is well!
Managed to get some more details done on the trench diorama tonight..... primed the roof and structure and managed to add a couple of the tread plates also..... put together a little barbed wire (there will be lots more) and added a small antena to the roof! added some more detail to the "ad hoc" defenses too...
Cheers everyone!
3
62749
Post by: Dr H
Nice progress, liking it.
Don't forget a cable for the satellite/radar dish.
65595
Post by: Camkierhi
Excellent work.
86460
Post by: Cap'n Facebeard
Holy crap that looks amazing. The completed project is going to be incredible.
75552
Post by: MagosBiff90
Cheers guys! And Dr H never fear..... have got quite a lot of cabling planned for this peice.... for the dish... and want to add a small vox unit within the emplacement..... Also need to add a small drain under the walkway.... and think i am going to add a lot more sandbags to the sides and then some mesh on the back side...!
Then it is time to get the earth and dirt sorted...... so plenty to do!
And thanks for looking in Cap'n Facebeard appreciate it
52425
Post by: Elnibbus
Holy Emprah MB, this stuff is uh-maze-ing!
24297
Post by: Viktor von Domm
I think your new additions look pretty darn cool...
how did you make that barbed wire? looks plastic to me???
75552
Post by: MagosBiff90
Elnibbus wrote:Holy Emprah MB, this stuff is uh-maze-ing!
Cheers buddy! Appreciate it!
Viktor von Domm wrote:I think your new additions look pretty darn cool...
how did you make that barbed wire? looks plastic to me???
Hey mate.... it is the same material as the mesh.... STOPP from IKEA..... only this time i cut it really thinly... (one grid width). I then wrapped it round a pencil.... glued the ends and gently warmed it over a candle.... then let it cool and snipped the ends so it came loose from the pencil..... and that was the end result.....
24297
Post by: Viktor von Domm
Lol...that is great,multiple uses for one material is always something not to he sneezed at
75552
Post by: MagosBiff90
Ahoy!
Just a quick message.... I am looking for a couple of DKoK troopers to add to my trench dio....
It is a cheeky thing to ask but does anyone out there have a couple of spare ones? Really like the troopers "at ease" .... but any of them would be awesome...... willing to swap or pay.... pretty much all of my bits and bobs are available to swap..... any help would be cool!
Cheers All,
65595
Post by: Camkierhi
PM me your address, should be able to sort you out, just bought a couple hundred of these bloody things from Graven. No worries.
24297
Post by: Viktor von Domm
75552
Post by: MagosBiff90
Hey guys!
Awesome! Cheers Cam..... PM sent!
52425
Post by: Elnibbus
I've got a bag of Korpsmen on the desk to assemble so if I have any left over and you still need some, let me know and I'll if I have any suitable ones.
75552
Post by: MagosBiff90
My good sir.... i would be in your debt!
even some parts would be great...... i have a rather dark thought of having perhaps an odd arm or leg sticking our from a shell crater or mud pile.... kind of thing you see from the Somme or something..... but not 100% sure i want to go down that route....... meh........ i will wait and see!
PM sent,
Cheers mate, Automatically Appended Next Post: Oh.... I meant to add......
Just thought i would share a little tip for ariels and communication masts etc...... those really annoying plactis hoops you get attatched to clothes and tshirts etc......... thats what i used on the "Claymore" Assault Carrier....... Simple but pretty Effective IMHO.
i will be using these on the trench dio also.... just thought i would share!
52425
Post by: Elnibbus
Pretty sure I've got a load of broken weapon arms that would fit the bill there.
75552
Post by: MagosBiff90
Ahoy me hearty's,
Hope all is well! Finally managed to get some time on the trench dio...... added more sandbags and razor wire..... a bit of extra padding to the back of the emplacement..... floor panels added and a little comms unit with some wiring..... Thats all the details and construction done.... i just need to pick up some extra polyfilla and then get to work on the mud and terrain..
Also had a care package arrived from Cam so i now have an officer in the dugout keeping watch!
Any C&C guys let me know cheers & Thanks!
Looking forward to taking this on for paint now!
3
65595
Post by: Camkierhi
Looking good.
Glad it's arrived OK. Hope it helps.
75552
Post by: MagosBiff90
Morning!
After a particularly disturbed sleep... i was up early doors and cracked on with a start on the terrain for the trench dio..... I ran out of filler pretty early so had a go at adding a crater and the remainder of an old barbed wire fence...... The picture doesnt really capture it... but once primed and painted / rusterd it should really stand out....
Actualy... looking at the pic again i am going to try and wind it round the poles and wire a bit more......
Right..... time for a lot of coffee.... and then the daily grind!
Cheers guys!
1
32373
Post by: Klaus, not Santa
Thi slooks already great - and if you wrap the wire some more around the poles, as you sugested, I'm sure it will look even better.
A nice piece coming together!
62749
Post by: Dr H
Good progress Magos.
69494
Post by: OneManNoodles
Excellent stuff, I'm looking forward to seeing the whole board like that
75552
Post by: MagosBiff90
Yo Ho Ho!!
Hope all is well guys!
Managed to get a fair bit done tonight.... managed to finish the trench dio....... added the rest of the earthworks and details..... so IMHO its done...
Would love some C&C!......... anything i need to add.....
Next is the paint job.....
ps...... last thing... i am going to add a couple more sandbags to the front of the emplacement and some speant shells on the floor beside the heavy bolter!
And a massive thanks to Cam & Graven for the supply drops! Helped add some real detail and finish this off!
62749
Post by: Dr H
.... anything i need to add.....
Some colour...
Looks great Magos. Good job on the mud.
75552
Post by: MagosBiff90
Dr H wrote:.... anything i need to add.....
Some colour...
Looks great Magos. Good job on the mud.
Haha.... thanks mate! Yeh i do intend on adding colour in the paint job....... mostly greys and browns to really emphasise the down and dreary feel... but picking out some brighter colours and details to add a bit of intrest too!
The mud itself is just regular B&Q wall filler.... with some dried out sand balast.....
Thanks again for lookin in mate!
75552
Post by: MagosBiff90
Ahoy... also meant to add that i will be trying out a wet mud and puddle effect using some PVA glue tonight..... so i will put up some pics and let you see how i get on! lol....
And.... thats just a single coat of halfords primer on the base so far...
cheers All.
38150
Post by: Dark Apostle 666
It's really atmospheric, and I actually think it looks pretty good all in grey - certainly a muted paintjob would look great!
65595
Post by: Camkierhi
Kind of reminds me of pictures you see of WWI Just add some sepia wash and your done.
The model looks brilliant. Keep it coming dude.
75552
Post by: MagosBiff90
Hey yall!
Hope alls good,
So i sidetracked "again" ....... I thought i would give a try at painting something smaller than the trench dio because i didnt want to ruin it and wanted to try out a couple of mud effects...... anyway.....
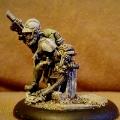
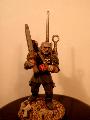
Set on the same battlefield as the trench dio...... a detatchment of Krieg's finest are taking cover while advancing towards their objective .... LT 14-102993 and trooper 14-996024456 take a minute to survey the field and assess their next move.....
I have tried to add a wet mud effect in the track marks and then used some of my own dark rust pigments on the mud..... but i think it is still a little thin...... once it has dried properly i will add some dust pigments to see if it adds more texture......
Oh... i should mention.. obviously the troopers are not painted yet.... just the black undercoat ....
Any C&C would be great guys as always!
6
22619
Post by: inmygravenimage
Your mud is looking great, nice contrasts. Is that another IKEA wall?
62749
Post by: Dr H
Good work Magos.
Keep at it.
75552
Post by: MagosBiff90
inmygravenimage wrote:Your mud is looking great, nice contrasts. Is that another IKEA wall?
Thanks mate! I think i will add another light coat of watered down PVA to the tracks to give a bit more of a wet look.... but apart from that yeh i am really happy with it!
The wall is actually just some regular wall filler..... i made a simple box formwork and filled it then left it to dry..... broke off some chunks and what was left was really usable..... and really easy to add the bullet holes and weather.....
Dr H wrote:Good work Magos.
Keep at it.
Thanks mate! Appreciate it...... next up is going to finish and then paint the actual trench dio!
75552
Post by: MagosBiff90
Hey all,
I hope all is well!
First update in a wee while but literally being run ragged by work and other bits and bobs going on!
Funds right now are exactly 0 so the trench dio is being set aside until i can get some more paints and colours etc......
WIP of the competition entry will be up soon.... its coming along nicely IMHO......
But for now.... i have a couple of pics of what really got me into this whole thing in the first place! The Macharius Tank! This model was the real starter for me and to be honest i have just been waiting until i felt like it could face it again to give it another go! lol!
I decided it was time to get back and make another after what happened to my previous attempt!
Only got the turret done so far..... going to get it painted and add the guns tonight along with some stowage and decals etc! You cant pick up on it in the pics (bad lighting) but there is a grey / dark grey stripe camo scheme going on......
Really pushing the rivits on this one and so far... am happy with where ti is going!
Cheers guys!
62749
Post by: Dr H
Looking good there. Nice riveting.
69494
Post by: OneManNoodles
good start, what armament are you going for this time? nice rounded rivets!
72556
Post by: Red Harvest
Straight out of WWI. Very nice stuff.
75552
Post by: MagosBiff90
Hey guys,
Thanks again for the comments! Yeh really going for a WW1 heavy rivet job on this one... swiped an idea i saw for turrect casting numbers too.. on the front right panel...... i know the turret hers is riveted together.... so it is more of a production number.. rather than a cast number.
OneManNoodles i still have the double Widow Maker Canons i got from @BLood and Skulls@ Machinator .... so they will be added back to where they belong...... but going to make the Vulkan option also......
Cheers Guys,
PS.... the rivets are the 2mm Nail Art rivets i got previously and mentioned in another thread here..... very consistant size and shape and IMHO for 99p /1000rivets... theres nothing better or cheaper!
65595
Post by: Camkierhi
Fantastic work, good to see you back on this beast.
86640
Post by: BloodFather
Rosie the Riveter got ahold of that one, eh?
I am active duty US Army infantry platoon sergeant. I have used Strykers my whole career. It's an 8 wheeled vehicle that comes in several variants. I have personally been in all 8 variants but mostly Ive used the Infantry Fighting Vehicle and Mortar Carrier Vehicle. I would LOVE to see someone scratch build one of these. I've also rolled in a Bradley, a MAT-V, an RG-33, and a bunch more, but I love the Stryker.
72556
Post by: Red Harvest
Well BloodFather, given your intimate knowledge of the details of the vehicle, it sounds to me that you yourself are very well qualified to scratchbuild a stryker. Let me be the first to encourage you to do so.
Since you mentioned her, the Rosie the Riveter image would look pretty cool in place of the skull in the LoER banner, IMHO.
About the turret. I do like the detail of the cargo cage on the back. Good stuff.
75552
Post by: MagosBiff90
Ahoy all!
Hope alls good!
Thanks for all the comments folks! Really appreciate them.
Moving forward slowly.... got the lower hull completed and then started the upper hull..... rivets galore! Decided to throw out a WW1 style Macharius!
RL taking its toll again just now.... looking for a new job and plenty else going on.... but.... getting through....
Cheers all!
65595
Post by: Camkierhi
Best of luck with RL.
Build is looking great.
22619
Post by: inmygravenimage
2014 a good year for such a creation
75552
Post by: MagosBiff90
Ahoy All!
I hope all is well and can safely say it is nice to be back here again!
Although i am quickly realising this ia now becoming a blog of complete inablity to finish anything!!
And this time is no exception..... (although i am serious about seeing this one through to the end!!)
I have actually thought up a little back story for this piece.... actually it was the back story i randomly thought up that inspired me for the build......
........"Ol' Toothless" as she has come to be known is ancient even by the standards of the Imperial Guard. Retro-fitted and re-built countless times over countless centuries, the only thing still intact from the day she rolled off the production line on a long forgotten forgeworld is her machine spirit!
Rumour has it amongst the regiment, that infact her superstructure and engines designations can be traced back to the times of the Great Crusade itself and one of its many Expaditionary fleets..... however this is up for speculation. It does however still invoke a sense of pride in the regiment that such a relic of the Imperium is within their ranks.
Time has not however been kind to Ol Toothless.... retired from front line service 2 centuries ago, it is her lot now to serve the Emperor by acting as a pack horse for the regiment.... gun ports welded up and ammunition racking replaced with storage. Her once imperious outline blurred with racking and carrier spaces, she now feeds the mighty war machine she once upon a time speadheaded.
To think such a mighty weapon layed low is a travesty however would be a mistake. Numerous platoons of troopers and stranded armour units owe their lives to the venerable machine. On more occasions that can be easily counted, these trapped or cut off units have offered up prayers to the Emperor himself as they have heard the din and racket of ancient engines as Ol Toothless emerges through the heavies of gunfire and weather to re-supply them. Never becoming stuck in trecherous terrain and having an uncanny knack of absorbing shell hits that would destroy equivalent vehicles, she has endured and continues to serve, even after all trace of her beginnings have beeb lost in time.......
So yes.. a Malcador Transport / Supply Tractor...... atleast thats the plan....
Still very much a WIP but i have the track units completed and the upper hull.. with its welded up gun ports.....the main hull still needs a lot of work and then i am going to think of how to cram as much stowage onto it as i can......
I hope you guys like it and would love to hear some C&C!
Thanks again guys!
62749
Post by: Dr H
Nice work Magos. Looking good.
65595
Post by: Camkierhi
Love the look and feel of it, could slip straight into a DKoK army no bother. Keep it coming.
Like the fluff too.
24297
Post by: Viktor von Domm
funny that you tackle the malcador now... I recently have started with a scratchbuild for an IG tank as well and used the malcador tracks too... but I am still way too early for any presentable pics^^...
yours however looks very good... where are the treads coming from? that looks like premade? and having had a closer look on the pics... you actually used foamcore for the main structure...aha... never would have thought that as a possible way to do... I either go fully wood and cardboard or fully plastic in my builds... and I also see that you used the micro beads....good work mate...!
and I liked the lil story about ol´ toothless...
75552
Post by: MagosBiff90
Hey guys,
Thanks again for the comments!
VIK: thanks mate! The tracks are actually timing belts used on some of the machinery at work.... was speaking with our engineers and they have hundreds of them.... and IMHO they look pretty sweet!
Foamboard only for the track units.... as the extra thickness has given them a lot of rigidity and had to press pretty hard to get the tracks to stick to them.... but i think it will look good finished!
Going totally OTT on the rivets for this build..... really want ti to convey a kind of WW1 'esque feel!
Going to add some storage space in the sponsons and a large cargo deck ontop and o the side of the engine bay!
Managed to pick up a 1/35 scale AFV accessory kit from E-Bay so going to get all the cans and crates made up and filled!
Cheers guys,
24297
Post by: Viktor von Domm
had to do a google picture research to understand what a timing belt means... here we call them "Zahnriemen" and I quite often have speculated the use for track sections...looks very good... how big was the belt then? did you have to cut it down to size?... and if so... how did you glue it together? I expect it is rubber ? or not?...
and WWI look for the win!!! (they knew back then how to make something look classy while killing you
75552
Post by: MagosBiff90
Hey Vik..... my bad... i should have looked at a translation!
The belt is 15mm accross and was 400mm diameter..... it has very thin metal wires witnin it but was pretty simple to cut with scissors...... and super glue was all that was needed to attach it to the track units! really simple and pretty effective i think! Will look good when it is all painted up!
I am thinking of putting together a little crane to help load and unload the cargo from the racking... what do you think? and like i said... going to replace the sponsons with some racking and storage space...
22619
Post by: inmygravenimage
Looking great. Definitely a crane, Atlas style. Don't fret about hobby adhd!
75552
Post by: MagosBiff90
Ahoy me hearty's!
Hope all is well!
Managed to get some on Ol'e Toothless this afternoon.
Got the storage units finished and built up a little crane. Finished apart from the storage units in the old sponson spaces...
Got it primed and base coated.....and for once..... its not Grey! Really wanted to pull through a WW1 feel... so upped the number of rivets and added a nice matt green.... Just got a few of the parts still to base coat and then its weathering time....
Cheers all,
65595
Post by: Camkierhi
Great work, love the feel of it.
Green is always best!
62749
Post by: Dr H
Nice detail work and a good overall look
75552
Post by: MagosBiff90
Cheers guys!
Picked up one of those Tamiya Weathering masters with Rust Soot and Snow.... (not sure i will use the snow)..... but going to givr it a go on this one! Got the house to myself tonight so will have some time again to get some weathering and details done!
Updates soon....
22619
Post by: inmygravenimage
Very cool, remember to seal those Tamiya powders with varnish.
63129
Post by: Littletower
Looking good! And it will look even better once weathered, for sure.
Will be awaiting that!
52425
Post by: Elnibbus
"Mon' the Biff!" Very nice work dude. I've stagnated somewhat so this has been a bit of a kick up the bum! Cheers!
75552
Post by: MagosBiff90
inmygravenimage wrote:Very cool, remember to seal those Tamiya powders with varnish.
Littletower wrote:Looking good! And it will look even better once weathered, for sure.
Will be awaiting that!
Elnibbus wrote:"Mon' the Biff!" Very nice work dude. I've stagnated somewhat so this has been a bit of a kick up the bum! Cheers!
Cheers guys!! going to get stuck into some painting tonight! have a little formula for the tracks from my very limited paint range but i think it will work out alright!
Haha.. Elnibbus i am glad i could be the boot to get you back on track!
52425
Post by: Elnibbus
We shall see if I actually get anything done this evening mate- MkIV Recon Marines and on the desk waiting for assembly and a new way of painting Marines *gulp*
75552
Post by: MagosBiff90
 Elnibbus wrote: Elnibbus wrote:We shall see if I actually get anything done this evening mate- MkIV Recon Marines and on the desk waiting for assembly and a new way of painting Marines *gulp*
Sounds good mate! And although i have never tried it myself.... the new painting method will be great to see! Always love watching as a new technique or paint scheme evolves.....
Speaking of which.... i have now finished the last parts of Ole Toothless..... sponsons completed and added a spare fuel tank at the rear.... its not so much one step forward and two steps back.... more a step to the side.....
Also.. while the new coat of primer was drying... i had a go at my new weathered green paint job...... basically its the same as the grey ... but with a base coat of green! lol.... still needs the weathering powders... but am happy with the paint effect and the coffee wash is looking the business IMHO!
Hope you guys like it!
Cheers,
3
65595
Post by: Camkierhi
Weathering looks superb. Sponsons etc looking great too.
69676
Post by: Big H
Thats a beautiful scratch build and a great back story !
Nice one !
2326
Post by: shasolenzabi
Cool! a Malc-Wrecker! nice to see a different concept like a Engineer tank
75552
Post by: MagosBiff90
Camkierhi wrote:Weathering looks superb. Sponsons etc looking great too.
Cheers buddy! going to get stuck into the hull tonight i recon! More updates soon!
Big H wrote:Thats a beautiful scratch build and a great back story !
Thanks Big H .... i appreciate it! Yeh i have to agree... even though i wrote it.... i kinda like the idea of the story too.. think i will fluff it up a bit more once i have finished!
Nice one !
shasolenzabi wrote:Cool! a Malc-Wrecker! nice to see a different concept like a Engineer tank
Thanks mate!
22619
Post by: inmygravenimage
Looks fab. If Atlas is the normal recover tank, how about his titanic brother Menoetius (lit 'Doomed Might') for this bad boy?
54500
Post by: hk1x1
The tank looks fantastic, cant wait to see that weathering effect applied to whole thing .
10972
Post by: Ruglud
Always impressed and ever eager to see your progress
75552
Post by: MagosBiff90
Hey all!
Got the base colour on Ol'e Toothless... and started adding some weathering to the paint...... Added the first pin wash (of coffee) and then a general wash after... Still got a lot to do.... add a lot of rust and then pigments to the tracks etc.... and then get to work on the storage racking and crane..... But its heading in the way i waa hoping.....
Love to hear your comments...
Cheers all!
62749
Post by: Dr H
Good work. Looking the part.
65595
Post by: Camkierhi
The green looks fantastic.
75552
Post by: MagosBiff90
Ahoy!
Finished the hull this evening.... got the rust added and then hit it with some pigment and dirt...... really happy with how it is looking.... the ancient old girl is showing her age....
Getting the stowage basecoated later and then getting onto the crane etc.....
Cheers All!
72556
Post by: Red Harvest
Cool stuff. It has turned out very nicely. I've always liked the Malcador. It has the right 'look'.
Now build one in fresh from the factory floor condition...
No, I'm not kidding. Well, not much.
Interesting to me that it looks like it could be run in reverse ( ie the barrel is at the front) and would still look right.
75552
Post by: MagosBiff90
Red Harvest wrote:Cool stuff. It has turned out very nicely. I've always liked the Malcador. It has the right 'look'.
Now build one in fresh from the factory floor condition...
No, I'm not kidding. Well, not much.
Interesting to me that it looks like it could be run in reverse ( ie the barrel is at the front) and would still look right.
Hi mate! Cheers for the comments! Yeh I agree the Malc has a good look and feel to it! Just right for 40k or 30k aswell!
Haha.... believe it or not I am going for a 'new from the forge' look for my Malcarius so you will see it then!
Yeh you might be right... I supose theres no reason why the vehicle cluld not run in both directions..... nice idea!
Cheers again mate!
Automatically Appended Next Post: I meant to add.... sorry for the terrible lighting in the last pics..... had to have them outdoors as we are doing a lot of work in the house and my work area... which was actually our bedroom...... is being totally transformed... and aparently there is no place for my modelling in our bedroom?!?! 
WIll try and get some better ones this evening... and after the crane and stowage area's are done i will get some more pics done!
Cheers All......
63129
Post by: Littletower
Nice, properly weathered look
It really sells the idea of having been around for a long, hard time.
(And good luck with the renovation, sorry to hear about loosing your work space!)
75552
Post by: MagosBiff90
Ahoy All!
Long time away that has included a weekend in Amsterdam for my best friends stag doo.... and a week off from work out and about with my wife.
But i got my head down tonight and set up a temp work space while the rest of the house is being sorted out!
Finished Ol'Toothless! Really happy with how she has finished up..... Got the stowage sorted and the storage rack...... slightly dubious about the crane.... but if i need to i can get back and sort that later.....
Hope you guys like it!
Cheers All.
65595
Post by: Camkierhi
Fantastic result. Looks amazing. Weathered to perfection, love the "grey" planking, perfectly fitting.
I like the crane, "but"....you have no ratio on the lifting. A couple cogs of different sizes or a motor, or different size pulleys. I know it is being stupidly finicky. I love it as is and it looks very fitting in with the model, it just does not quite look perfect, and then I think about it, and thats why! Anything you lift as is will be at dead lift, or worse. Knock a cog in there and you are golden.
Sorry.
62749
Post by: Dr H
Great job. Tanks look great.
Agreed with Cam on the crane. But as you said, it's something you can come back to at a later date.
75552
Post by: MagosBiff90
Camkierhi wrote:Fantastic result. Looks amazing. Weathered to perfection, love the "grey" planking, perfectly fitting.
I like the crane, "but"....you have no ratio on the lifting. A couple cogs of different sizes or a motor, or different size pulleys. I know it is being stupidly finicky. I love it as is and it looks very fitting in with the model, it just does not quite look perfect, and then I think about it, and thats why! Anything you lift as is will be at dead lift, or worse. Knock a cog in there and you are golden.
Sorry.
Dr H wrote:Great job. Tanks look great.
Agreed with Cam on the crane. But as you said, it's something you can come back to at a later date.
Hey guys! Thanks for the comments and you are both right! The crane needs a rethink.... so am going to hammer out a new idea for this tonight...... got some more stowage painted also so an update to come, cheers guys!
72556
Post by: Red Harvest
Would some hydraulics be out of place on the crane? The base where it attaches to the hull, is there more work to be done there?
2326
Post by: shasolenzabi
'Ole Toothless" is looking great!
75552
Post by: MagosBiff90
Hey all! Got a second take on the crane built.... added a platform for the operator.... a thicker support frame and a little control panel as I was going to spin the idea of a motor inside or beneath the structure.....
IMHO its a lot bulkier looking.....
1
22619
Post by: inmygravenimage
Much improved
75552
Post by: MagosBiff90
Ahoy all!
Fimal couple of images of Ol' Toothless..... updated crane and platform.
thanks guys!
65595
Post by: Camkierhi
Perfect.
Looks brilliant, excellent job all round.
75552
Post by: MagosBiff90
Hey mate! Thanks very much, appreciate it!
Yeh i have to admit i am well chuffed with this one..... Thinking about putting a little display base together for her.........
But next up is to finish my LoER Comp piece!!! Going to crack the whip at it tonight!
Cheers again!
72556
Post by: Red Harvest
That is a much better crane. Nicely done.
Chuffed? What does that mean?
65595
Post by: Camkierhi
Very happy, kinda. You are happy with your work, you are chuffed with your work.
75552
Post by: MagosBiff90
Thanks mate!
Ah.... yes... chuffed... happy with my work as Cam says!
Cheers,
72556
Post by: Red Harvest
Chuffed. Got it Never heard/seen it before, so I had to ask. I know what chafed means, but that's generally not a good thing.
75552
Post by: MagosBiff90
hahaha... indeed......thankfully no chafing was involved!!
75552
Post by: MagosBiff90
Howdy, Howdy!
Just looking to bounce some ideas around for my next piece i am concidering doing...... A Double Earthshaker Self Propelled Gun with Crassus forward compartment..... either tracked or a lot of wheels... not decided yet.... and with an enclosed gun turret like an Armageddon Pattern Basilisk.......
I have an image here i found online "all writes to the original image taker etc"............
Any thoughts?
22619
Post by: inmygravenimage
Very nice idea!
63129
Post by: Littletower
That would certainly look good. And shooty...
Either all-wheeled or half-track for me, if you are taking requests.
75552
Post by: MagosBiff90
inmygravenimage wrote:Very nice idea!
Littletower wrote:That would certainly look good. And shooty...
Either all-wheeled or half-track for me, if you are taking requests.
Hey guys! Thanks for the feedback! And Littletower yes indeed taking requests... and i agree with you.... all wheeled its going to be!
Only had an hour tonight and really wanted to finish my trench piece .... kept it very neutral and quite sombre i think.... left a lot of the grey.... as the lore states the "Grey mud of Vraks" .... so i left a lot showing.... i wanted to make it feel and almost be like one of the old grey / sepia pics you see from the trenches of WW1..... fitting as there was obviously all of the centenery commemorations etc...
It is done now so would love some C&C.......
Cheers guys & should add... i am relly dissapointed in myself for not getting my LOeR comp piece finished..... :( no excuses... just RL and a combination of things...... but NEXT TIME!!!!!!
4
40213
Post by: DiDDe
It looks great. i really like the grey finish. though i think you could muddy up the sandbags abit.. but that's just imo. other then that it looks really nice! great work!
also, i think you should go for that basilisk idea you have there
65595
Post by: Camkierhi
Your disappointed?
Anyways, post some piucs of what you did do for the comp on the comp thread please, would help me out.
As to that amazing trench, looks fantastic. I agree with DiDDe, a bit of drt here and there on things like the sandbags and you are golden.
75552
Post by: MagosBiff90
Howdy all!
Working away from home for a few days and so not been able to do much in the way of modeling.... but.... i was looking through some old imperial archives today and i came accross this image....
The caption reads......
"Ole Toothless advancing accross the Arteross River, Planet Heidrum, 738 - 454.M37
Pictographer Jurten Maur
What do you think? Shows the old girl in her role as a service and supply vehicle..... Photoshop is the only thing to keep me sane these few days .... haha.... Rusty skills... but i like the feel of it.
Cheers guys, Automatically Appended Next Post: WOOWW... just realised that is an enormous jpeg file.....
Oh.... and obviously all credits to the original source of the background image which obviously is a WW1 scene.
Cheers all,
22619
Post by: inmygravenimage
Now recreate this for the next League contest
72556
Post by: Red Harvest
^^^What he said
75552
Post by: MagosBiff90
inmygravenimage wrote:Now recreate this for the next League contest
Red Harvest wrote:^^^What he said
Hmmmmm.. that is being seriously concidered ......
going to rack my brain this evening and see if i can come up with a couple of options...... but yeh... this would certainly lend itself to a really cool piece!
Cheers,
75552
Post by: MagosBiff90
Ahoy everyone!
Well... i made a start and got a sketch plan done for the next LoER competition! Gong to get the massing of it done tomorrow so will post pics then......
In the meantime i have had a go at a new "recipie" for a muddy ground cover....
Did 2 little test pieces..... One with a fresh track cutting through it and small patches of grass.... and a second one.. more like a battlefield with some small craters.....
Very simple..... equal measures of "baked" dirt..... wall filler and cheap hot chocolate...... with a little bit of PVA glue mixed in......then once the base is sorted... a little layer of the dried dirt over the top......
Then it was a small amount of hot chocolate and PVA to give the wet look...... (got to wait and see how it is in the morning... as freshly done.. it looks great IMHO)
Going to use this as the ground cover and "path" on my comp piece....
Would love some C&C or comments... and if anyone wants to know anything else... just let me know....
Cheers,
65595
Post by: Camkierhi
Does look amazing, bet it smells nice too. My only concern would be a long term issue. Although sealed in PVA should be fine.
62749
Post by: Dr H
Both look very convincing. Good to see you pushing the boundaries of modelling... into confectionery...
22619
Post by: inmygravenimage
Delicious! There's a lot of overlap between sugarcraft and modelling, so this is a logical step
75552
Post by: MagosBiff90
Camkierhi wrote:Does look amazing, bet it smells nice too. My only concern would be a long term issue. Although sealed in PVA should be fine.
Dr H wrote:Both look very convincing. Good to see you pushing the boundaries of modelling... into confectionery...
inmygravenimage wrote:Delicious! There's a lot of overlap between sugarcraft and modelling, so this is a logical step
Haha.. thanks guys... and yes Cam they actually smell amazing! I had to restrain my dogs from getting their paws on them last night! But they will have ot get used to it... as there is a whole jar of hot chocolate left and its my new "ground / mud" pigment source!
Next thing will be a chocolate brownie Aegis defence line! haha!
Back to planning my comp piece this evening....
cheers all,
72556
Post by: Red Harvest
Once it is sealed from moisture I imagine it would be fine. Now, was this the sort of mix with those little marshmellows,and if so, what plans for those?
75552
Post by: MagosBiff90
This has given me ideas now for " Baking 40k" Sponge layers for plasticard and "millions" as rivets....... ..... Liquerice tank tracks....... stick rock gun barrels.......
Oh..... forgot to add.... the name if my comp piece..... "Not Welcome" ....... more to come tonight!
52425
Post by: Elnibbus
Awesome stuff Magos! I've actually done a bit of sugar-craft- mostly flowers but also bits for a Ferrari cake...
Like the red-blooded, bearded, Whisky sluggin', bear-fightin' Scotsman that I am, I present to you:
A pwetty pink wose!
24297
Post by: Viktor von Domm
that small pathway looks very good... and how crazy to use chocolate... I wouldn´t get away with that in our house...my wife would soon be too interested in the hobby then....
as for old toothless.... I always liked these photoshop pics that look like old newspapers...planned that for years... only I am such a snail when it comes to mini painting...
75552
Post by: MagosBiff90
Elnibbus wrote:Awesome stuff Magos! I've actually done a bit of sugar-craft- mostly flowers but also bits for a Ferrari cake...
Like the red-blooded, bearded, Whisky sluggin', bear-fightin' Scotsman that I am, I present to you:
A pwetty pink wose!
Haha.... indeed mate very pwetty indeed! Impressive! haha.... as for the bear fighting... i find it best to go a few rounds with a grizzly before my breakfast to really set the day up properly!
Viktor von Domm wrote:that small pathway looks very good... and how crazy to use chocolate... I wouldn´t get away with that in our house...my wife would soon be too interested in the hobby then....
as for old toothless.... I always liked these photoshop pics that look like old newspapers...planned that for years... only I am such a snail when it comes to mini painting...
Haha... thanks Vik.... and dont worry.... it was only a small amount of the powdered chocolate drink.... so i didnt really waste too much!
Well.... after my start on the comp piece.... i got stuck back into the old warhorse..... got the hull finished on the Macharius and got a basecoat on it.... Going for almost a Macharius "MkI" look..... heavy on the rivets and thin on the excess details.... chunky and rugged...
Any comments would be great....
cheers all!
2
52425
Post by: Elnibbus
Ah Magos, you never fail to disappoint or shame me! Loving the Macharius: it gives me the urge to build the next Praetorians I've been threatening but after attempting to build a vanquisher style turret I "hulked" it and haven't gone back to it since...
24297
Post by: Viktor von Domm
any comments?...well...blimey...looks brilliant and inspiring... so much that I have to take care it doesn't motivate me too much to not make yet again another super heavy tank when I should be building a bridge instead^^
75552
Post by: MagosBiff90
Elnibbus wrote:Ah Magos, you never fail to disappoint or shame me! Loving the Macharius: it gives me the urge to build the next Praetorians I've been threatening but after attempting to build a vanquisher style turret I "hulked" it and haven't gone back to it since...
Glad to know you are finding some inspiration from these pages! Actually speaking of your Praetorian... i am concidering going for the same searchlight/sensor array and main gun loadout on my Macharius...... one main battlecanon and either a co-axial or searchlight........ i will mock a couple up tonight and put it to a vote!
Viktor von Domm wrote:any comments?...well...blimey...looks brilliant and inspiring... so much that I have to take care it doesn't motivate me too much to not make yet again another super heavy tank when I should be building a bridge instead^^
Thanks again for the kind workd Vik...... haha... your quote about bridge building...... i was watching "ZULU" last night.... very good film and incredible true story....
But yes..... bridge build first..... lol
2326
Post by: shasolenzabi
Tank is looking big and rivetty!
75552
Post by: MagosBiff90
Thanks mate i am glad you like it.... yes indeed .. the Mk1 is a heavily rivetted beast like i mentioned.... the only thing bugging me is the main gun ..... really not sure to go with 2 widowmakers or just have one with a co-axial autocanon or machinegun......... decisions decisions....
Oh... and i forgot to mention...... Red Harvest... this is going to be a fresh from the factory floor tank.... brand spanking new! just for a wee change!
2326
Post by: shasolenzabi
Decisions, decsions
both are tempting, the twinlinked widow makers, or the big gun with a machine gun alongside it.
52425
Post by: Elnibbus
ALL OF THE WIDOW MAKERS AND MASHEEEEEN GUNNNZZ
72556
Post by: Red Harvest
 MagosBiff90 wrote: MagosBiff90 wrote:... this is going to be a fresh from the factory floor tank.... brand spanking new! just for a wee change!
It's about time You won't regret it.
75552
Post by: MagosBiff90
Hey all! Thanks for the comments.... had a go at a couple of options for the armament of the beast and settled on a single widowmaker with a seperate scavenged panzer gun. IMHO it looks the part. Sorry Elnibbus going to have to keep the second widowmaker for another project.
Would love to hear what you all think.
Cheers guys & gals
24297
Post by: Viktor von Domm
I am waiting with bated breat for the addition of the tracks...
looks massive and deadly!!!
75552
Post by: MagosBiff90
Thanks Vik! Yeh i am really pleased with how this is going... really getting the MK1 feel i was wanting.... Going to finalise and finish the guns and turret tonight..... and then onto the track units.... not sure about side sponsons.... i know the Macharius has them technically... but i am going to have a look and see either with or without.......... and with regards to the tracks themselves..... its my birthday soon.... so i am pressing the hints to my wife for a home casting kit.....
62749
Post by: Dr H
Good work Magos.
I feel the Panzer gun could do with something in that gap next to it (where it's off centre in the hole), like a little lens of some kind.
And maybe a rivet or two where the Panzer piece joins the turret. Or some other kind of surface detail, just to tie it in to the design.
75552
Post by: MagosBiff90
Dr H wrote:Good work Magos.
I feel the Panzer gun could do with something in that gap next to it (where it's off centre in the hole), like a little lens of some kind.
And maybe a rivet or two where the Panzer piece joins the turret. Or some other kind of surface detail, just to tie it in to the design.
Hey mate... thanks for looking in!
I totally agree with you.... was just a mock up really go get an idea for the best gun layout...... i will definetly add more details to it and rivet it to match the rest of the model! i was thinking about a little canvas section between the panzer barrel and the gun base..... but maybe a little lense or sensor would be better..... hmmm.... will sort it tonight and get it finished!
Cheers,
62749
Post by: Dr H
Ooo, a canvas cover would also work well.
76303
Post by: Warboss_Waaazag
I like it. Also the whip aerial looks awesome. I think those two guns side by side look awesome.
75552
Post by: MagosBiff90
Hi all....
Had a go at creating a canvas mantlet for the second turret gun..... tissue paper and super glue... and a huge amount of stress...  but..... its done! Before the final paint I might add a little more paper.... but track units next!
Cheers all,
65595
Post by: Camkierhi
Certainly looks the part.
75552
Post by: MagosBiff90
Cheers mate.....yeh concidering how tricky it was to get in place i am pretty happy with it.....
Managed to wrangle a wee half day at work today so going to get some more details done and speand some time "baking my dirt" for the comp this afternoon!
64018
Post by: Freytag93
Love this thread! I missed the past couple months and had to catch up today. Keep up the great work Magos. And maybe add a little paint once in a while
75552
Post by: MagosBiff90
 Freytag93 wrote: Freytag93 wrote:Love this thread! I missed the past couple months and had to catch up today. Keep up the great work Magos. And maybe add a little paint once in a while
thanks mate... and thanks again for coming back to look in!
Complete lack of any kind of development of either my LoER Competition piece... or indeed the Macharius MKI over the last week or 2 because aswell as being away visiting family in the Big Smoke (London) for a few days..... i have also managed to secure myself a new job!!
It means a move back (full time) to an architects office and back on track with the old career path! And also a move away from working in the city of Glasgow for the more rural and visually inspiring landscape of Perthshire!!
Over the moon and cant wait.... but have a couple of weeks before the job move etc so i am determined to get both pieces finished before the 22nd! (My start date and coincidentally.... my Birthday! )
Updates when i get back tonight!
Cheers all!
62749
Post by: Dr H
Congratulations on the new job.
Birthdays in the 20's in September are the bestest.
75552
Post by: MagosBiff90
Dr H wrote:Congratulations on the new job.
Birthdays in the 20's in September are the bestest.
Totally agree with you there mate! And thanks! Yeh am over the moon with it! Cant wait to get stuck in.
Back to modelling matters....... a snails pace was achieved last night.... but thats the hull and turret of the Mach MKI done.
Going to get the track units atleast cut tonight... One thing i am noticing about this version compared to the ill fated previous one is that it is a lot shorter in height so far.... the turret looks low and slender...... i might have to add a rising turret plate just to give it some height and to clear the exhausts as you will see in this pic....
So i got the rear section done.... added some panels and fuel cans.....
Cheers All!
1
22619
Post by: inmygravenimage
Congrats, and serious talent as ever!
75552
Post by: MagosBiff90
Yo ho ho.... Hope all is well with everyone!
Got a little supply drop from the lads in the engineering department at work before i leave at the end of the week and in amongst the goodies was a nice pair of machine timing belts.... 12mm width and a nice rubber material.....
I have fitted them to the Estoc Fast assault Carrier that has been sitting gathering dust waiting for me to finish.. and IMHO i think they look good!
Would love ot hear your thoughts.... oh.... and i will leave it for now... but i am really tempted to go back in and give her another paint job...... kind of feel i would do a better job now than when i did it originally... but i guess that just shows some kind of progression and thats the way we all learn right!
Cheers All,
4
65595
Post by: Camkierhi
Does look great, but tracks look a little "clean" compared to the rest of her.
69676
Post by: Big H
 Camkierhi wrote: Camkierhi wrote:Does look great, but tracks look a little "clean" compared to the rest of her.
Yeah. i agree, you need to apply some of your crazy culinary weathering powders !
75552
Post by: MagosBiff90
Camkierhi wrote:Does look great, but tracks look a little "clean" compared to the rest of her.
Big H wrote: Camkierhi wrote:Does look great, but tracks look a little "clean" compared to the rest of her.
Yeah. i agree, you need to apply some of your crazy culinary weathering powders !
Haha.. point taken gents.... i will "cook up" a batch this evening!
75552
Post by: MagosBiff90
Ahoy all......
Added these pics to the LoER comp page also....
So... Another chance to try out my "baking" terrain technique...... Mixed up a couple of different batched of (Hot Chocolate / Wall Filler / Baked Balast Sand & PVA glue) in differing percentages to get slightly diferent colours and textures......
On the hillside and the riverside i added more of the larger balast stones and on the Road and riverbed... more PVA and finer sand......
To finish off... i sprincled some of the dry sand and balast stones over the hillside and riverbank to show the rougher surface compared to the more well trodden road and riverbed.....
Fairly Simple & cheap... but VERY messy!
Cheers All!
65595
Post by: Camkierhi
Looking very effective though, great stuff.
75552
Post by: MagosBiff90
Hey all!
Hope all is well with everyone. Apologies for the complete lack of any content and contact but as it regularly does, RL has had all of my attentions over the last couple of months.
All good though as the new job is awesome amd things are really backon track.
Had my first spare couple of hours for hobbies tonight and really wanted to get something good together....
Anyway, without any more bable......
I wanted to go back and revisit the ESTOC fast assault carrier so I took an hour and started..... as usual a dirty and scratched paint job .... more dirt and a lot more rust to add to the engine / exhaust system but happy with where it's heading. Also want to use the terrain I started forthe comp a while back... I think ot deserves to be finished!
This is going to be my one piece to work on as I still wont get as much time as I want to spend on the hobby..... but its better than no time at all and it feels great to be back!
Cheers all and please as always, C&C is welcome!
65595
Post by: Camkierhi
Looks brilliant, nice to see you back, even if a little limited edition style.
75552
Post by: MagosBiff90
Cheers Cam, Thanks!
Going to aim to get some veg added to the terrain tonight and also add some water and puddles to the riverbed.... anyone used watered down PVA for this before? I am thinking of trying out some layers...... fingers crossed...
22619
Post by: inmygravenimage
It's alive! Pva works well, get some dark green into the recess beforehand.
8745
Post by: Llamahead
I do regularly it works well indeed just remember thin layers and time to dry between them.
69494
Post by: OneManNoodles
Welcome back
looking good so far.
I'd imagine if you used layers of pva each using slightly different shades you could build up depth whilst maintaining a bit of transparency, I've not tried it before myself, so I'm interested to see what you do.
62749
Post by: Dr H
Welcome back. Tank is looking good.
75552
Post by: MagosBiff90
Hey all, thanks for all the comments folks.
Got a couple of layers of PVA on. The pics are after the second coat is on..... not watered down as much as I found the first coat just got sucked into the mud! Getting some nice contrast in the track marks inthe mud also... and added some grass to the higher ground to give more variety..... I will get a pic once it has dried...
Oh... and got a coat of primer on the rickity bridge too...
Cheers all..
3
10972
Post by: Ruglud
Nice and mucky - rickety bridge looking suitably rickety
65595
Post by: Camkierhi
That water is looking good so far, layering up nicely. Bridge looking great.
75552
Post by: MagosBiff90
Hey all,
Got another layer of PVA onto the river and think it is layering up prety well.... added a little amount of dirt into the pva and is giving it a pretty muddy & murky effect.... will update again once the second layer is dried.....
While it is drying... and I had my dirt and mud out..... I thought I wouldhave a go at updating my trench dio that I didnt ever really finish...... so I gave it a covering of dirt but wanted to keep some of the grey layer showing through.... going to finish it withmore of the sand bags and a few rolls of barbed wire.....
Cheers All...
4
75552
Post by: MagosBiff90
Hey all.... I hope all is well....
Got a third layer of PVA on tje riverside... and its not looking much different yet..... think I am going too thin on the layers.... willpost pics once Iit has dried out..... so in the meantime I have totally finished my trench piece..... added some dirt and grime to the sandbags and more barbed wire.... Its now looking as I had invisaged it and is another one I can finally mark as complete!
Love some C&C.... Cheers all!
2326
Post by: shasolenzabi
That is a great battle zone for the assault carrier, which is also awesome looking!
75552
Post by: MagosBiff90
 shasolenzabi wrote: shasolenzabi wrote:That is a great battle zone for the assault carrier, which is also awesome looking!
Thanks buddy! Really appreciate the comments! Yeh, I Am really happy with the ESTOC.... got a nice feel to it IMHO.
Feels good to nearly get another piece finished......
thanks again for looking in
62749
Post by: Dr H
Job's a good 'un on the trench. Looks brilliant.
64018
Post by: Freytag93
Now that's what I'm talking about!
Love what you've done with the trench. That added brown really helped bring it to life, and it allows the grey to stand out and draw the eyes. It looks like the real deal.
I can't wait to see what it looks like with the water effects.
69494
Post by: OneManNoodles
Very nicely done, very reminiscent of some of the machine-gun positions from the first world war.
75552
Post by: MagosBiff90
Freytag93 wrote:Now that's what I'm talking about!
Love what you've done with the trench. That added brown really helped bring it to life, and it allows the grey to stand out and draw the eyes. It looks like the real deal.
I can't wait to see what it looks like with the water effects.
OneManNoodles wrote:Very nicely done, very reminiscent of some of the machine-gun positions from the first world war.
Thanks for looking in guys & thanks for your comments! Am really pleased with the way it has come out!
Had a little time tonight to have a look at my "Wall" for the LoER comp..... decided to have a go at making some 'real' corrugated steel.... I saw an awesome tutorial by RustyRobot on his blog and gave it a go..... IMHO the results are ok... but I think I kinda rushed it.... but it will do for my piece.... I will put more details of the tutorial in the morning if anyone is interested. ?..
Cheers all!
2
63129
Post by: Littletower
Looks properly made, in a strange sort of way.
For the corrugated sheets, a couple passes over a coarse grit sandpaper before shaping them goes a long way towards a heavy rusted look, if that is what you aim for.
52425
Post by: Elnibbus
Good grief...
75552
Post by: MagosBiff90
Littletower wrote:Looks properly made, in a strange sort of way.
For the corrugated sheets, a couple passes over a coarse grit sandpaper before shaping them goes a long way towards a heavy rusted look, if that is what you aim for.
Hi mate! Thanks for looking in and thanks for the tip!! I am going to add another sheet or 2 of corrugate so I will definetely try it out!
Thanks!
Elnibbus wrote:Good grief...
Uh oh..... was that good.... or bad!?? haha!
Cheers for looking in buddy!
So.. I have a small update on the PVA river... 5 layers now of PVA.... with the first 2 layers being slightly mixed with dirt and IMHO its now looking pretty good! There are a few small bubbles appearing in the surface but I can live with those.... and also got a base coat of paint on the "wall" ..... few more detail to make and then paint up....
Cheers all!
2
62749
Post by: Dr H
Barricade looks good.
PVA seems to be doing the job for the water. May need a good gloss varnish to finish it off.
75552
Post by: MagosBiff90
Good evening gents, heretics, greenskins and adepts...
More work on my barricade for the competition... added a second section of wall with more stonework and a steel wire style fence.... got to get it painted now and then just the dirt ground, sandbags and barbed wire to add....
As is requested by the rules.... the 2 pieces could be used independantly or come together to create the corner piece shown.... could potentially create another 2 sides to give it the look of a barricaded old ruined building or something..... hhmmm......
Love to hear your thoughts....
Cheers all...
65595
Post by: Camkierhi
Sorry been a while, everything is looking brilliant.
Your barracade is looking excellent. Nice mix of stuff.
I say finish these then if you have time do some more. But at least when you have these done you have something in the comp. With your standard of painting lately this has an excellent chance.
|
|
