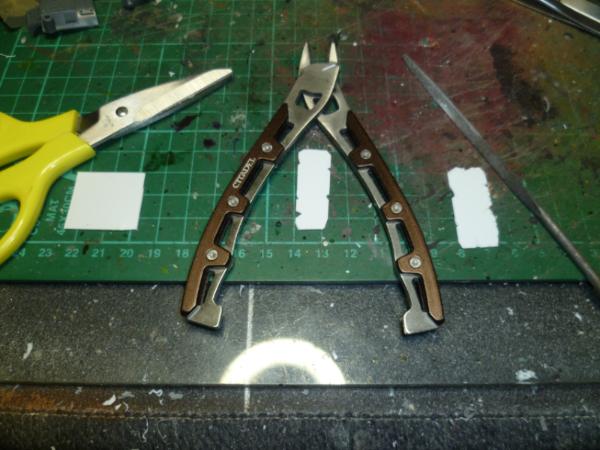
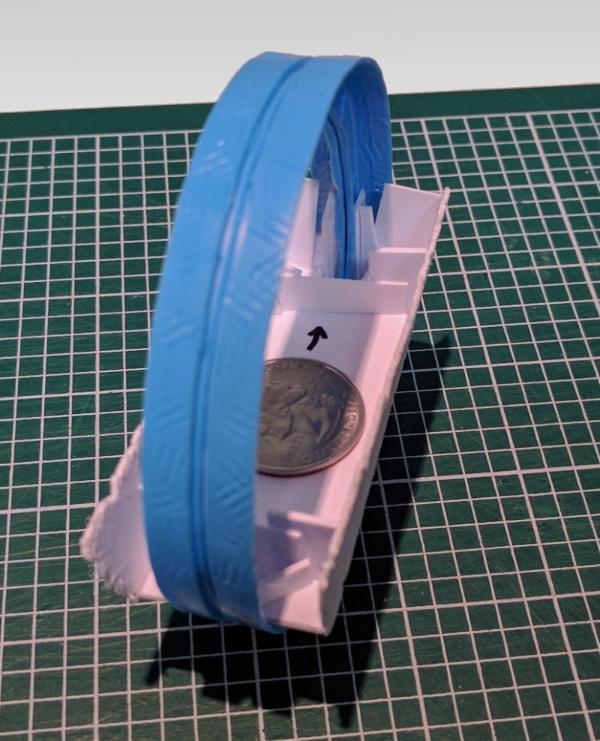
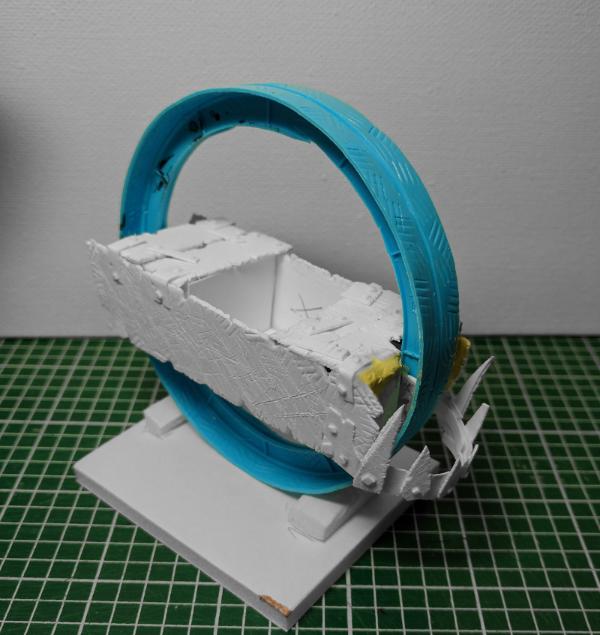
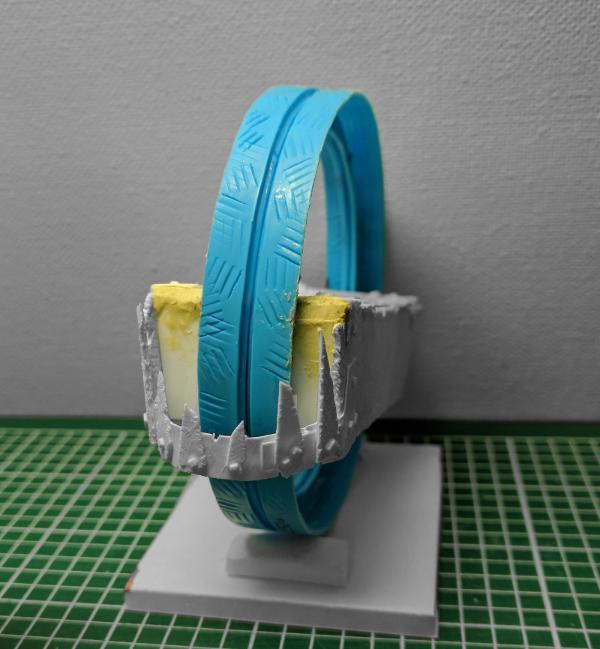
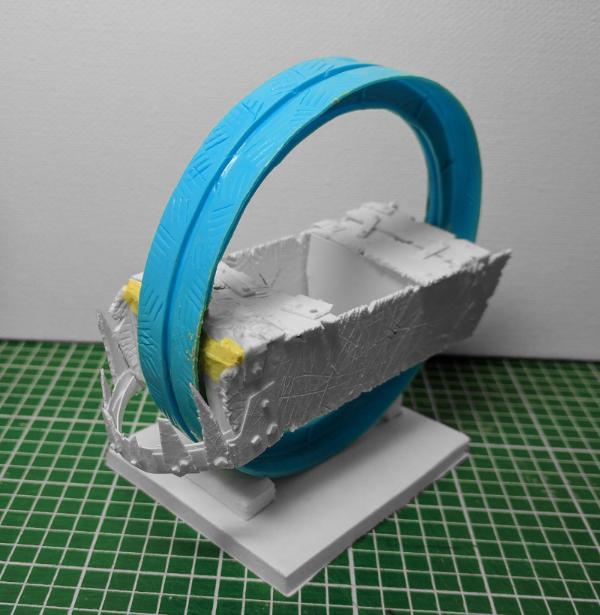
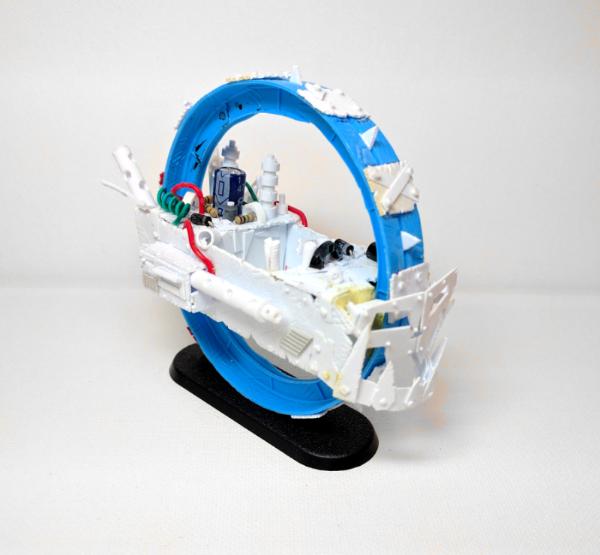
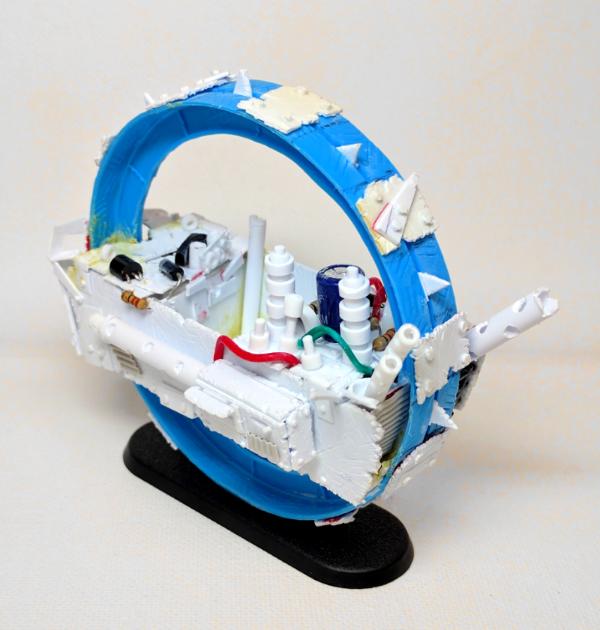
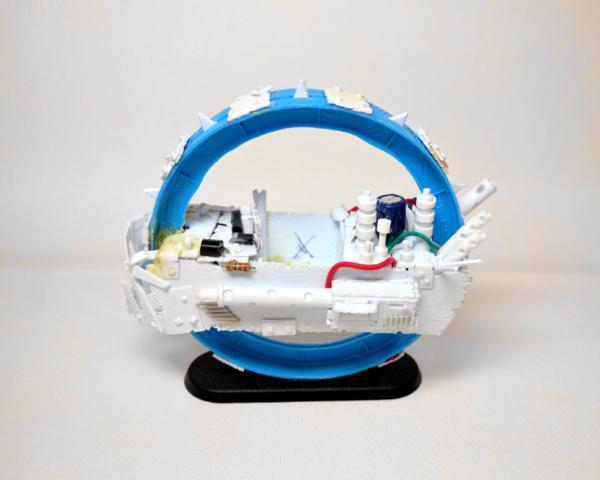
My inner Mek has been hollering and banging his spanna on the workshop walls. Let's get cracking on another scratch build! Am I project hopping? ... yes. Am I having fun? YES! So here we go. I've been thinking that I would like some more Ork Warbikers. I made a few some time ago and they weren't bad for a first attempt. (Holy cow, I just realized that was 2 years ago!) I know I'm not the first person who ever made monowheels, but I'm proud of the way they came out. Apparently I inspiredadamsousa to make some as well. I think they're really fun, and have a distinct look that is quite different than the official GW models, while still being quite Orky. I went back to my original design and revised it a little bit. I wanted to make the main body a touch bigger, and improve the way that it attaches to the wheel. Here's what I've got so far, WIP, obviously:
During this build I'm taking some inspiration from Camkierhi with the way he makes Orky panels.
A quick note on Orky panels...
Cut out an uneven piece, can be card or anything. Nibble at the edges with clippers, then file vigerously with a triangular file, clean up with a quick sand, it does not take long and is so worth it. There are a lot of orks out there who cut very straight and clean lines!
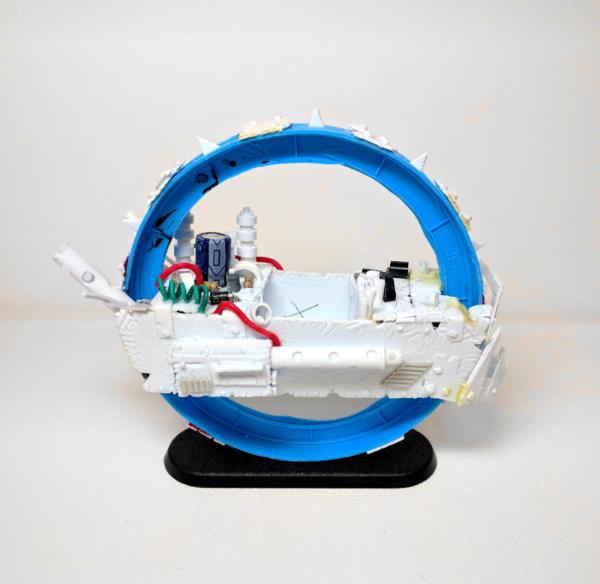
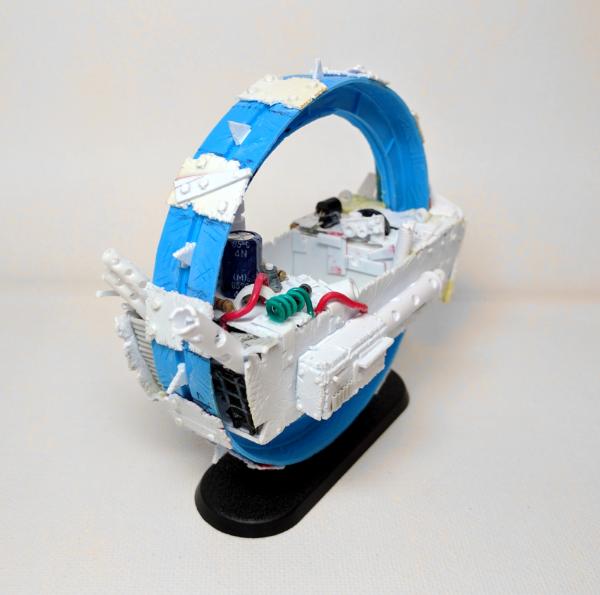
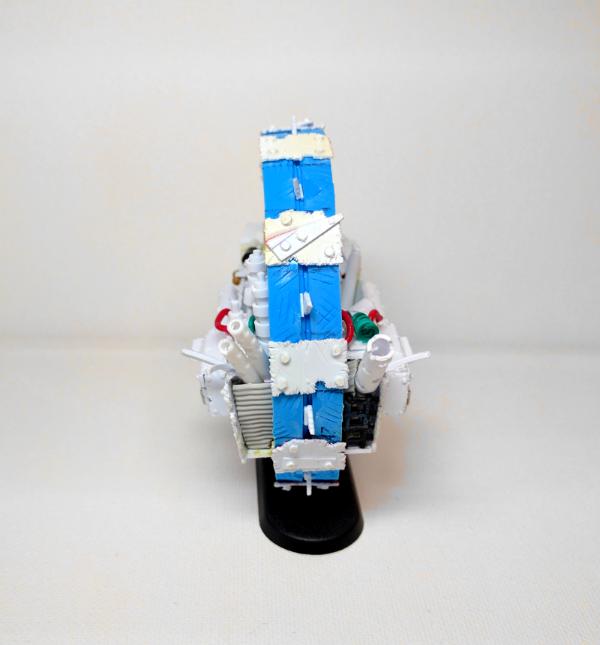
I took some bites out of the edges, scuffed up the panels quiet a bit with a screwdriver, hobby knife, and sandpapger, and even used my vise grips to add some texture both to the panels and the wheel. I think they look pretty good.
The hull is big enough to comfortably seat an Ork Boy, including base. That way I could literally take my already painted Ork Boyz and "upgrade" them to Warbikers. Drop them in and you're good to go.
I had some fun in GIMP and did a mockup the colors. Artist's conception, final product may differ from that pictured.
Games Workshop is happy to announce a new service: Models as a Service ("MaaS").
We've recently been informed that some of our customers have been stripping the paint off of their models and repainting them instead of buying new ones. Some of these individuals just really like the old metal models and take great joy from repainting them. We can respect that, (even though in our humble opinion the newer plastic sculpts are better). There is also a small but vocal minority of gamers who complain that Citadel models are just too darn expensive, and resort to buying dirty models second-hand from strangers on "the internet" instead of at their friendly neighborhood Warhammer store. Regardless of their motivations, these individuals then spend time and effort removing paint from their models, sometimes with disastrous results! That sounds like a lot of work, and wouldn't you rather spend your time painting and playing with your Citadel models? Always on the lookout for a chance to improve our customer's experience, we have decided to offer paint stripping as part of our new "Models as a Service" program!. Simply send us your painted miniatures, and we'll remove the paint for you. Customer pays shipping and handling -- both ways. If you are not completely satisfied, just send your miniatures back and our MaaS will strip them again until they are bare.
In addition to this ground breaking and generous service, we are also piloting a subscription program as part of our new MaaS initiative. Now you can have the highest quality miniatures in the world delivered to your door each month automatically. And don't worry, you won't need to agonize over what models to buy each month. We'll pick something out of the warehouse, and ship it directly to you. In January we might send you a box of Nobz, in February perhaps a box of Space Marine Scouts, or Chaos Chosen, or some Tyranids. Each month is a surprise! Subscription plans start at $19.99 per month, plus the cost of miniatures (MSRP).
We hope you are as excited about our MaaS as we are. If you'd like to some example pictures of our MaaS stripping service, or details about subscription plans to our MaaS, click the link below. And don't forget to like our MaaS on Facebook.
Also, I found a leaked image that shows some new prototype models. Not sure what faction they are, but I think it's some sort of partnership with gossip columns to make miniatures of celebrities. I dunno, it's hard to tell. As you can see, the basic troops don't have much in the way of armor, or even weaponry, whereas the HQ is fully decked out. Perhaps this is for a horde army?
Pictured: 28mm Jessie, Ginsberg, Justina, Kelly, Liz, and Cannoness Rachel.
Yeah, ok, I was just messing around in GIMP. Whatever. I'm amused.
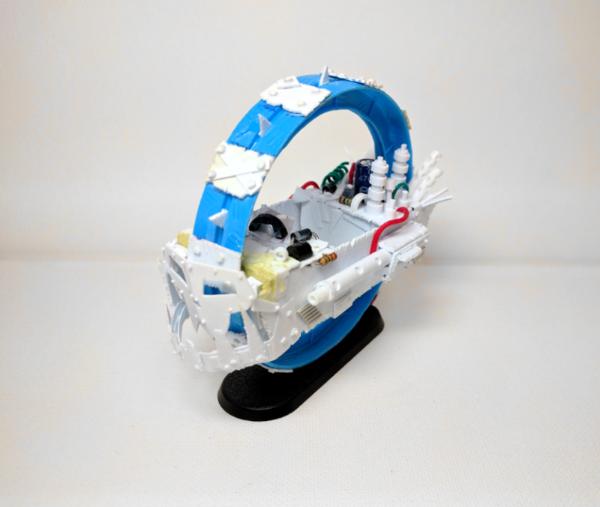
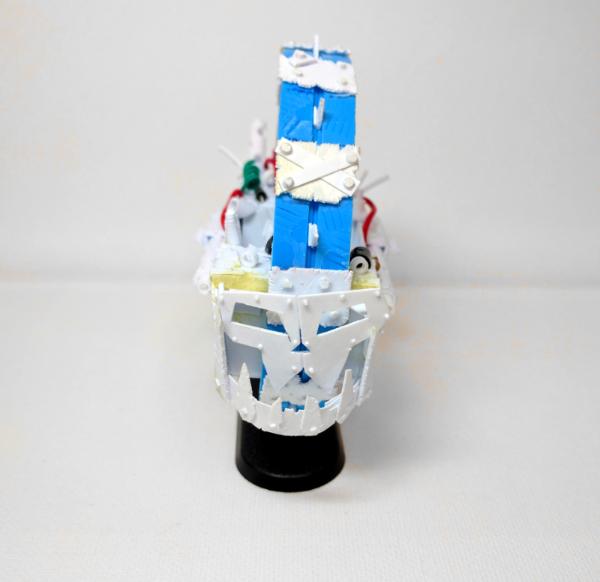
I've made significant progress on the monowheel, but haven't had time to post pictures. Life has really kicked me in the ribs lately. So it goes. I should be able to resume hobby activities this weekend.
Question: Who should get this sweet ride?
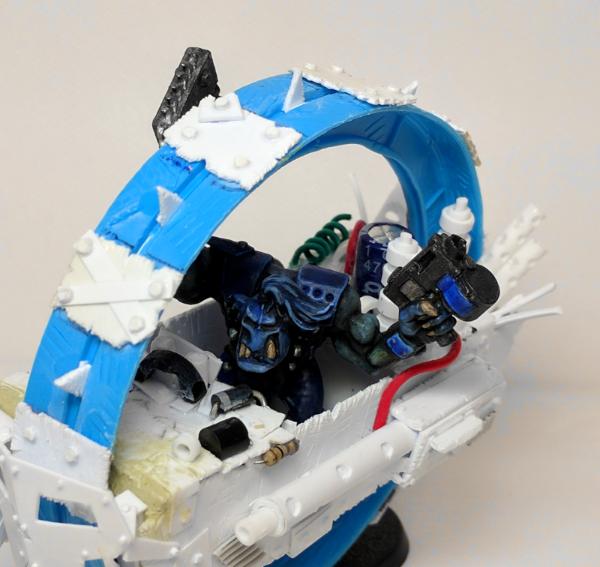
Originally this was just going to be another warbike for an Ork Boy. But the ladz down at the Mek shop spent so much time on this, I think it needs to go to a Nob.
"Oi, you gits! Dis 'ere is my ride now, see?"
Although, I noticed a Painboy eyeing it as well.
"Accidents happen, hehehe!"
I'm thinking the Nob. The Painboy should have his own custom ride. Maybe with saws, jars, phials, etc. hanging off of it.
Lessons learned:
I should have made the "face mask" all one piece. It was difficult to attach after I had glued the jaw/gob in place.
The sides of the bike hull ended up being slightly bowed out/flared. This required me to re-cut the top pieces a little wider to fit.
I'm happy with the way the battle damage turned out. It's time consuming, but the effect looks great. (Thanks, Cam!)
Could add more spikes to the wheel. Their size was limited by the desire for them to "fit" underneath the mask and gob. Realism isn't a huge worry with Orks, but still I wanted everything to make sense.
I spent a long time adding detail to the rear engine area. Probably too long. But hey it turned out pretty cool.
The dakkaguns turned out OK. Lacking a little detail, but I think they look pretty good.
Well folks, that's all I've got for today!
Next decision: paint this right away, or tackle another project?
That's a lovely design. Consider it looted . I can see what you meant with the smaller spikes, and I like the overall effect. With all the gubbins in the back, I thought it was a KKF bike for a mek, but if you're not going that route, I'd go for the nob. I agree the painboy needs a more specialized vehicle for his needs. Amazing design, and love the execution!
CommissarKhaine wrote:That's a lovely design. Consider it looted . I can see what you meant with the smaller spikes, and I like the overall effect. With all the gubbins in the back, I thought it was a KKF bike for a mek, but if you're not going that route, I'd go for the nob. I agree the painboy needs a more specialized vehicle for his needs. Amazing design, and love the execution!
Awww, ty!
You know, it almost does look like a Big Mek KFF bike, doesn't it? A little bit at least. But that would need to be a little bigger. Same for a Warboss.
Slinky wrote:Stunning work, Cleatus!
Thank you!
ZoBo wrote:that looks great man, real nice work on all the mechanical details, rough edges, and rivets
that nob looks about the right size for it, definitely too flash for a regular bikerboy!
...possible idea for a painboy's bike...what about an orky version of a WWI motorcycle ambulance? ...with a sidecar stretcher thingy or something?
Spoiler:
I like that idea.
Skinflint Games wrote:Love it. Love it so much I'm going to nick the idea :-D Brilliant work, Cleatus, if I can get mine even close to that I'll be VERY happy
Thank you. If you make one let me know, I'd love to take a look.
stonned_astartes wrote:Looking wicked mate, real improvement on the last ones.
Thanks!
Well clearly now I need to make one for a Big Mek, and another one for a Painboy! My pile of shame already has an unfinished Warboss biker conversion I need to finish. I think if I build these for HQ's the bases would need to be bigger. I'm really pushing it as it is with a normal biker base.
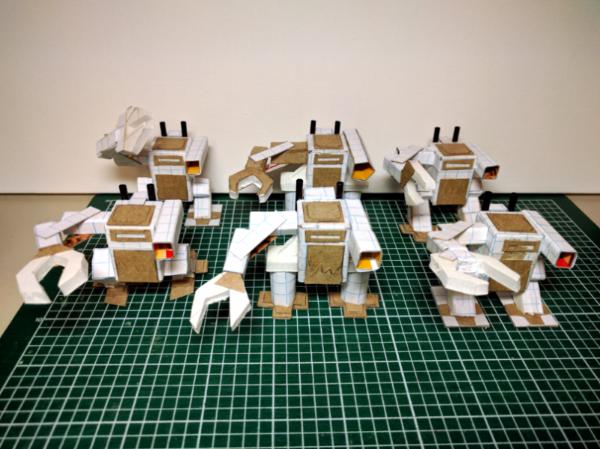
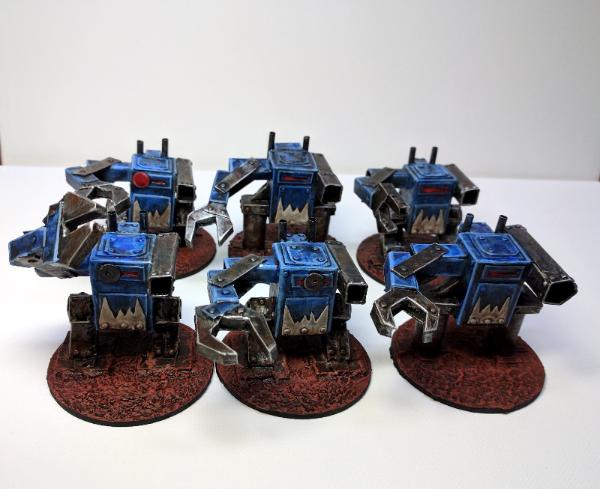
I've been stupidly busy at work lately. Not much time for modelling or painting. However the news of 8th edition 40K has me excited. I think, maybe, possibly, walkers will be playable in this edition. Possibly even awesome. So I decided to make some. Now understand, I'm leaving for work when the sun is coming up, and sometimes coming home as the sun is setting... so my brain and hands aren't really up for any serious modelling. However, scratch building some Killa Kanz while watching Netflix -- that, I can do. Especially if it doesn't involve a hobby knife and the chance of accidentally drawing blood. The wife frowns on that.
So here we go: scissors, card stock, foam board, graph paper, and glue. I give you a gang of Killa Kanz:
I was inspired by the Killa Kanz I spotted over at the Grim Cheapness of the Future blog, which are based on a design that was created by our adamsouza (I think?). I modified the design some. The first two I build have tube legs, but the next four have bent legs. This proved to be a little tricky in getting the balance right, but I figured it out. I also gave them very simple arms for the klaws, and simple rokkit launcher tubes. Could be modified to be grotzookas without too much trouble.
No, they're not the most detailed models. A few rivets would help. But quantity has a quality all it's own, and I was going for quantity over quality here. Also, I can make these little guys while decompressing from the day on the sofa. Each one took me maybe an hour. Not too shabby.
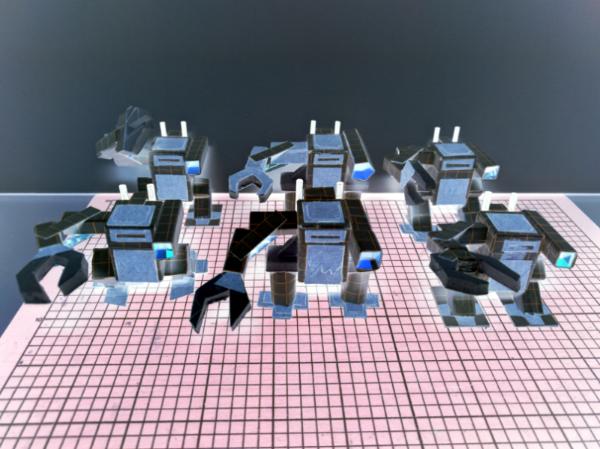
Here's a bonus color-inverted picture, just for fun. I think this makes them look much more menacing, and is very sci-fi.
We haven't seen all the rules for 8th edition yet. Certainly not the faction-specific rules. But I have a vision of dozens of Killa Kanz marching across the battle field, shrugging off enemy fire, and cackling with glee. I own 4 "official" Killa Kanz; perhaps one day I'll own 18+ of these things. In the mean time, these little guys will help to beef up my ranks, and serve well enough for a play test when the new rules drop.
Very cool. Always very appreciative of your style, Cleatus. Pretty sure my orks are coming out of storage... lots of walkers and transport vehicles there that need some TLC. Very excited about 8th.
Fantastic work bud, would like to see you take the extra minute to stick some rivets about, but they are perfectly passable as is. Certainly a mob of them painted up will be impressive on the battle field.
Your brilliant style reminds me to KISS (keep it simple stupid) Often we over complicate things, These are a perfect example of great looking models don't have to be heaving in silly detail.
Anpu-adom wrote:Very cool. Always very appreciative of your style, Cleatus. Pretty sure my orks are coming out of storage... lots of walkers and transport vehicles there that need some TLC. Very excited about 8th.
Thanks!
Camkierhi wrote:Fantastic work bud, would like to see you take the extra minute to stick some rivets about, but they are perfectly passable as is. Certainly a mob of them painted up will be impressive on the battle field.
Your brilliant style reminds me to KISS (keep it simple stupid) Often we over complicate things, These are a perfect example of great looking models don't have to be heaving in silly detail.
Rivets are in the pipe, Cam. Hoping to slap some paint on them this weekend.
Dr H wrote:Good job on the card-kans. Look the part at this stage already.
Thank you!
CommissarKhaine wrote:Kan wall ftw! Looking good, let's hope they're worth it in 8th
Me too. Everything I've seen so far has me excited.
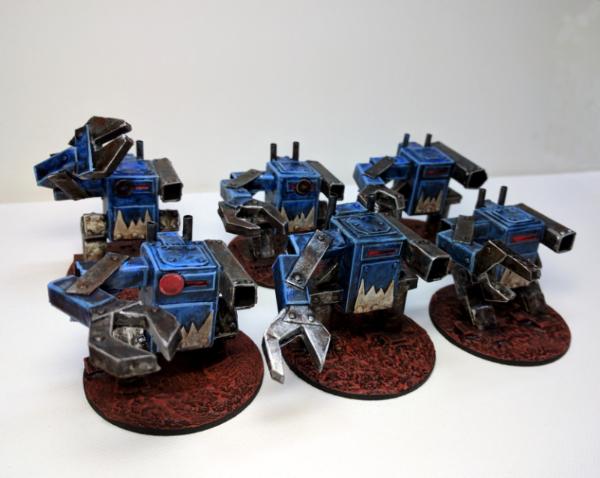
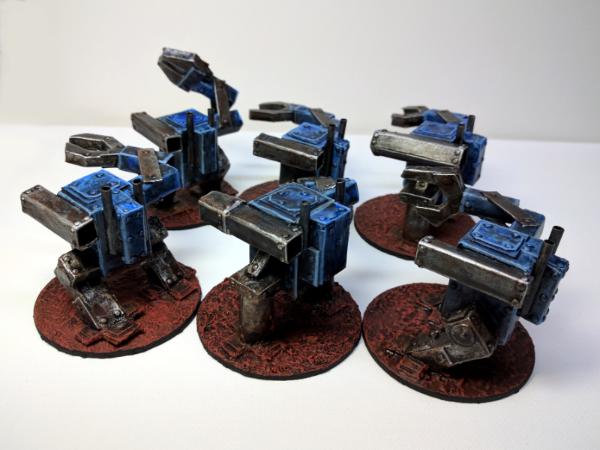
I managed to find several hours of painting time over the last month and committed to painting up the Killa Kanz. I think they turned out really well. Especially considering their humble beginnings. Here you go, ladies and gentlemen:
So there you have it!
Kan wall, coming to a WAAAGH! near you.
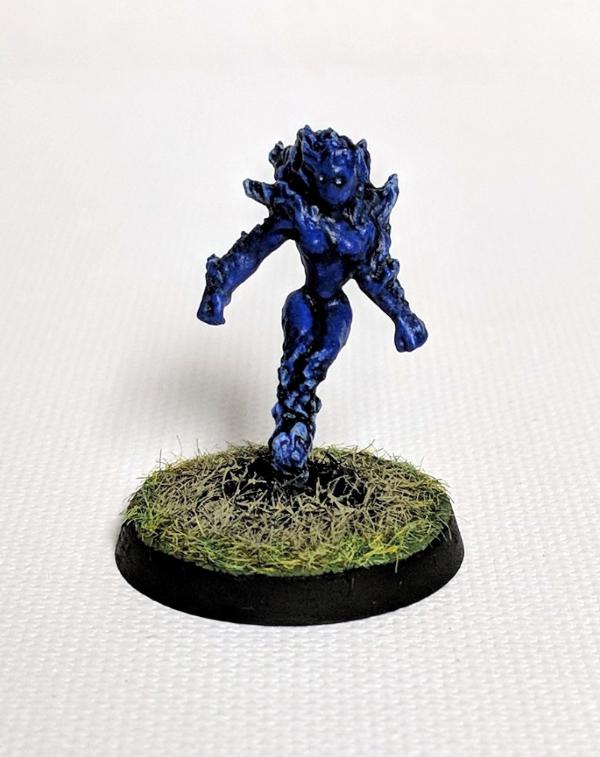
(Oh yeah, and new avatar pic. I got bored with cybork Cleatus. This blue Nob I painted seems like a good fit.)
Very Nice Cleatus! I think Orks would need some sort of mass conveyance to get those little stubby legs up to the frontline with the Waaagh of Boyz though
Whew, long time no post. It's been a busy few months for me, but I've managed to squeeze in a little time for hobbies. I did a little gaming, and a little painting too. Here's what I've been working on:
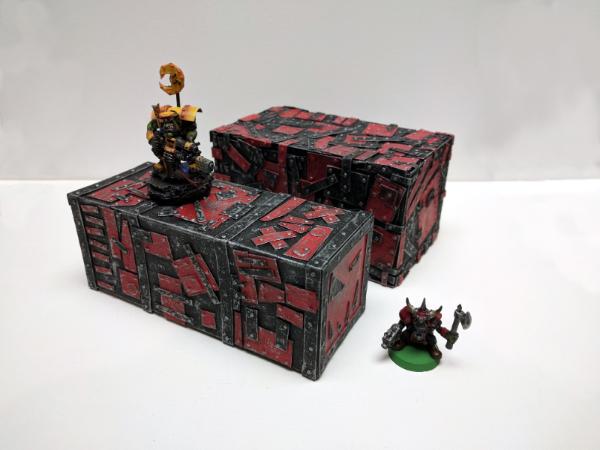
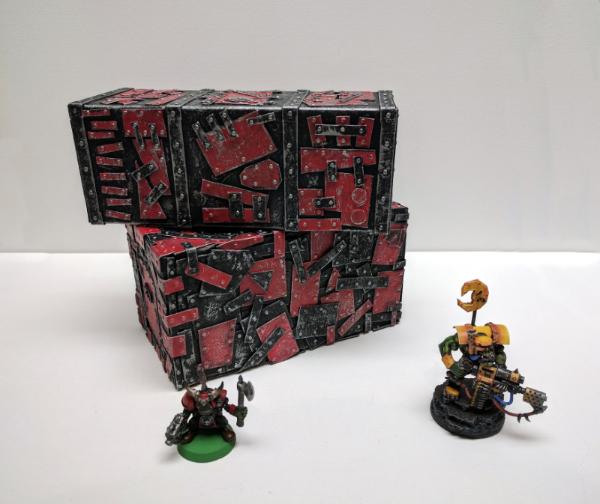
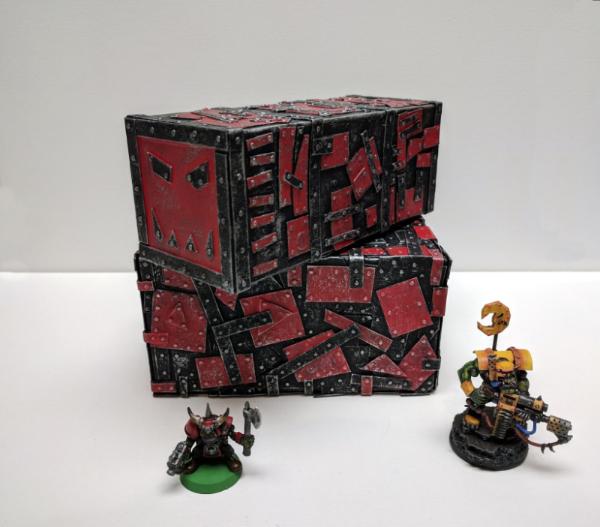
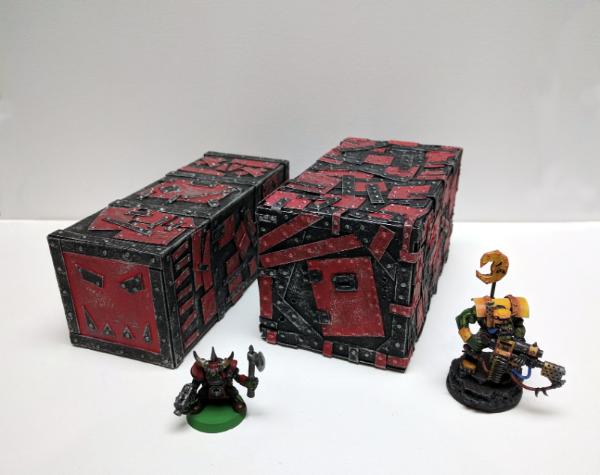
Cargo Containers:
I finally painted my Ork cargo container (aka 'Metal Bawks' ). I actually made a second one at some point in the last... 12 months. Since I had my supplies out, I quickly painted them both. Not super fancy, but I think they turned out pretty good.
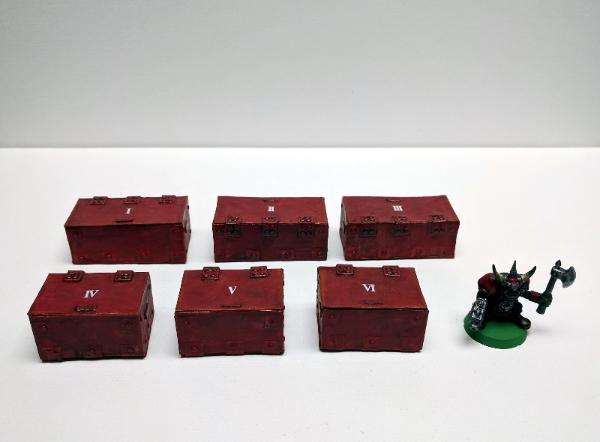
Objective Markers: I made up some objective markers for my games of 40K.
These are made from cardboard, with some Imperial transfers. They also work pretty well as scatter terrain.
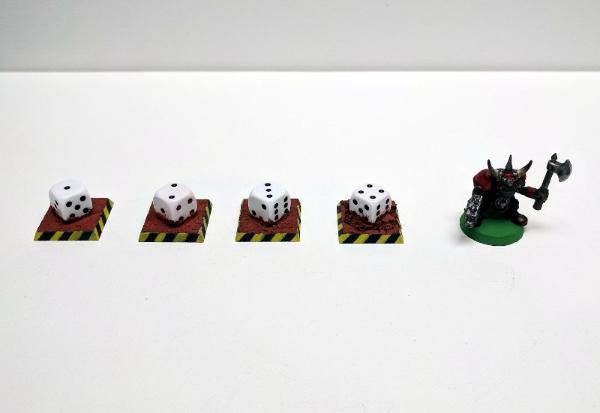
These are old Warhammer Fantasy square bases with dice from the Dark Vengeance box. A little bit of Martian earth texture paint. The hazard stripes too me a while, but I think they came out pretty well and really help the base stand out on the tabletop.
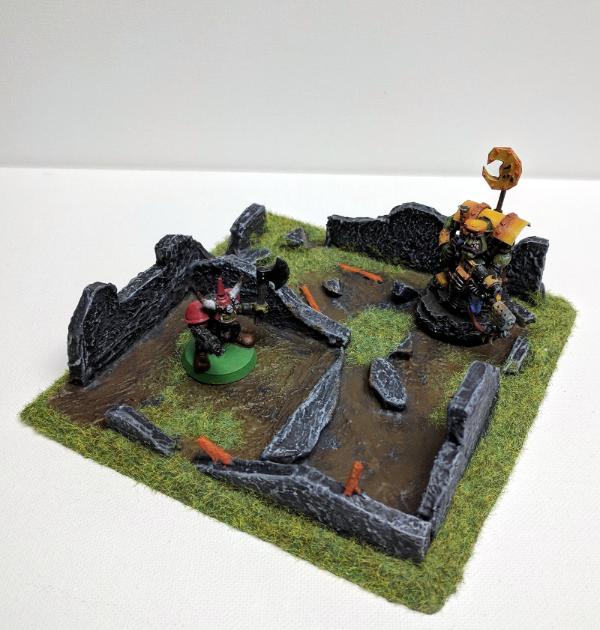
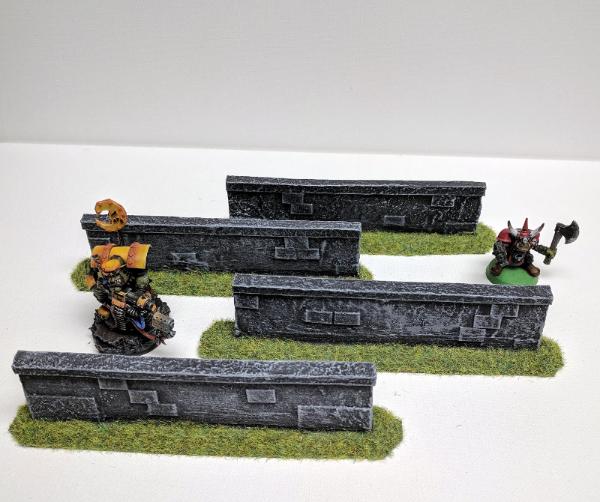
Ruins and Barricades: I made these pieces of ruined wall from cardboard and masking tape, covered in wall spackle. To be honest, I never really liked green static turf before, but I think it's growing on me (ha!).
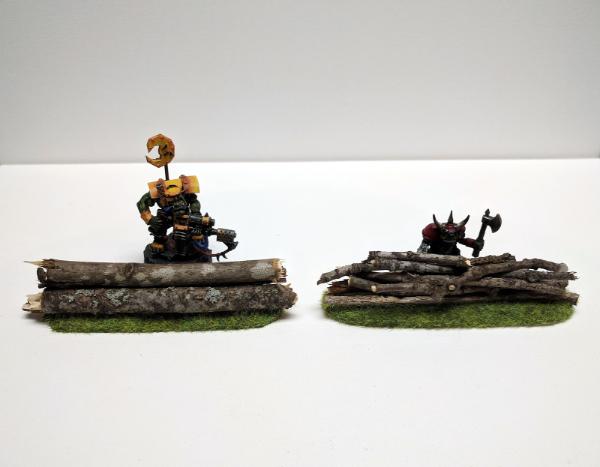
Some log piles / barricades. Made from fallen sticks in my yard and foam board for a base. More static grass.
Work in Progress: I have a few other things brewing, or in various stages of completion on my workbench. Here's a sample:
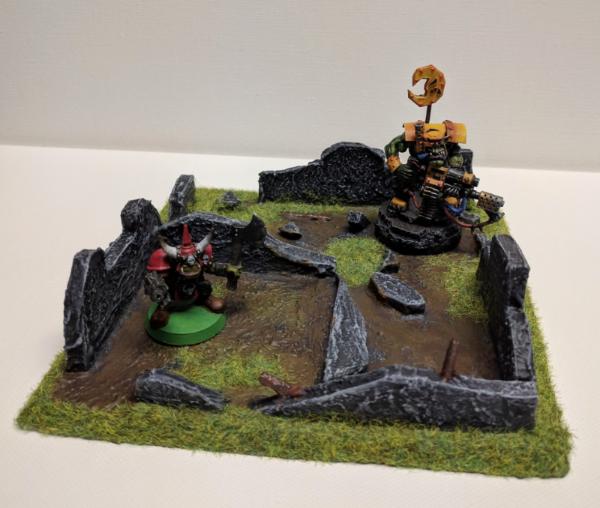
More ruins. Made from foam board and spackle, primed.
Miscellaneous models on my workbench / painting queue. An Ork Nob with Kombi-Weapon, another 2nd Ed Ork Boy, some 2nd Ed Gretchin, and my Ork monowheel.
Also a Reaper mini "Cassie". She/it did not turn out well, and needs to be redone. Painting human skin is hard when you've been doing Orks for a while.
Last one, which is really more of a functional storage solution than a "project":
A container for my T-pins. I use these for holding pieces of foam board together while the glue dries, if you were curious. They came in a small package from the $1 store, but once opened I kept spilling them all over the floor. Which is dangerous, and makes the spouse think I'm a clumsy oaf. (More than usual.) So I recycled / re-purposed a prescription bottle as a container for my T-pins. A quickie bit of freehand paint on the lid made it look more "official". Clever? Not really. Original? No. Functional? Yes!
So that's what I've got going on. Trying to make progress and not start too many projects before completing others. Project hopping is dangerous, especially when hobby time is limited.
Thanks for the comments and praise, I really appreciate it.
As I mentioned in the LOER terrain comp thread, work has been kicking my astra militarum. I've been seriously busy. I had a slight reprieve there for a while, but sadly it was just announced that a guy on my team is moving on, and we were already short staffed. No plans to hire more people, sigh. Also classes just started up again. Working full time, going to school at night, plus study time, plus spending time with my family, and various household projects... these really put a lot of strain on hobby time. A common problem I know.
I'll see if I can sneak in some hobby time this weekend, and take some pictures too.
I second slinky... they are too orange.
Very great scenery, especially considering how quickly you put it together.
How did you do the misaligned bricks in the wall?
Hello folks. Thanks for the feedback. Yes, agreed, the rebar was too orange. I toned it down a little, check out the results:
Still a hint of rusty orange there, but not so overwhelming now.
Anpu-adom, I forgot to take any WIP shots of the walls, so I made another one quickly. Each wall section is 5"x1" of foam board. The misaligned bricks are actually just 1/4"x1/2" card stock glued to the foam board.
Then I coated the walls with spackle for some texture, primed and painted.
In another thread someone was asking me about how I made the ammo crates. Again in my haste to build I forgot to take photos, so I went back and recreated my process. I hope someone finds this helpful.
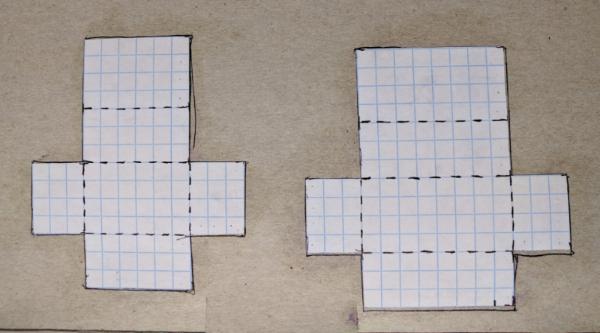
How to Build Ammo Crates from Scratch Start with a template. I like to use graph paper, because it makes measuring easy. I made two different size ammo crates. The small one measures 1.5"x0.75"x0.75", and the large one measures 2"x0.75"x0.75". I based these dimensions on what looked right to me in relation to a 25mm-28mm miniature. I glued my templates to cereal box card stock. You can use whatever materials you wish, or even trace the templates on to styrene. It's up to you.
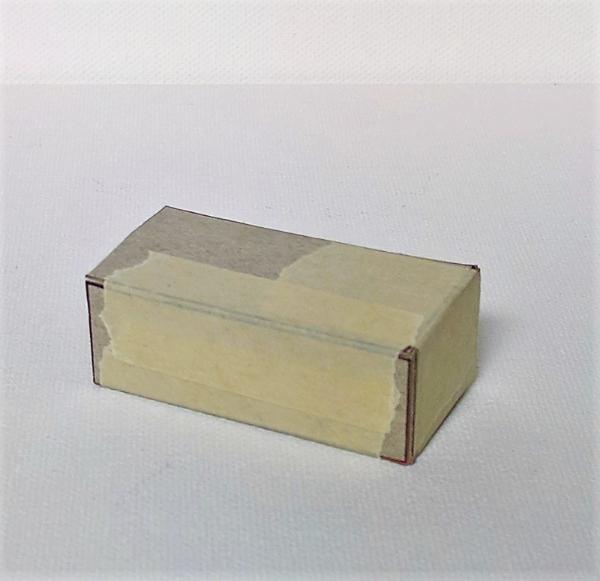
You could just glue the pieces together, and maybe even reinforce from the inside (bracing with supports at 45 and 90 degree angles, etc.), but that takes a long time for such a little box. A faster way is to tape the pieces together with masking tape:
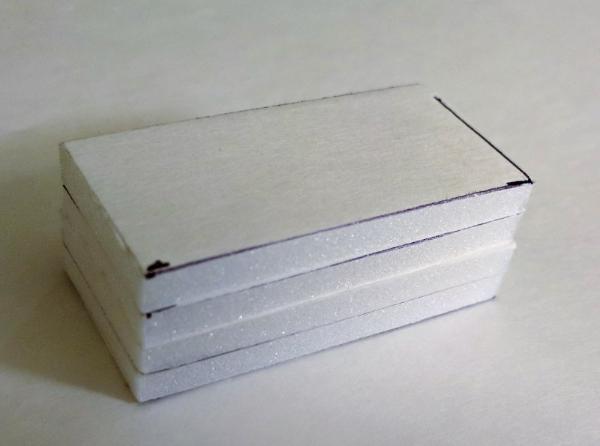
However with no internal reinforcement, the boxes are a bit flimsy and "squish" if you aren't gentle with them. Terrain usually needs to be able to withstand a little punishment, so another way to go is to fill the inside of the box with something sturdy. You could use crumpled up news paper, or if you're willing to spend a little cash, try foam board. I get sheets of this from the $1 store, which is pretty darn cheap. Here I have traced my template and created a stack of four pieces of foam board:
Then glue the pieces of the box to the stack. I use PVA glue. For a more finished edge, you can even use the graph paper to cover the gap where two pieces meet:
Next, add some details to the crates. I added some small pieces of card stock to mine to give the impression of handles and hinges. The handles are 1/8"x1/4", and the hinges are simply made up of two small 1/4"x1/4" pieces of card stock joined at a 90 degree angle. Smooth over the gap with more paper, or PVA glue.
At this point they're looking halfway decent, but you know what would really bring them to the next level?
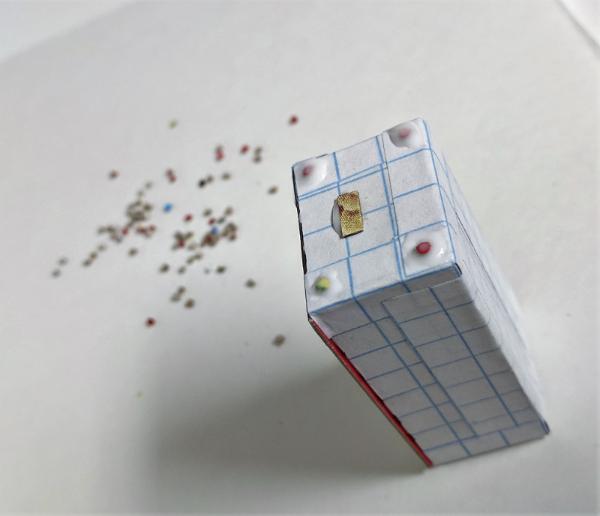
RIVETS!
A 1/16" hole punch is perfect for creating rivets at this scale. Again, I'm using card stock from cereal boxes here (cheap and plentiful). I make these in batches. Fire up Netflix and watch something dumb for a while that doesn't require much attention, and crank out a few (hundred) of these. You will want to make more than you need for this project because some will flake and not be usable.
Use PVA glue to stick the rivets to the box. When I say "use", I mean drown. Use twice as much PVA glue as the diameter of the rivet. Cover them in glue. It will soak in to the cardboard, and since PVA both shrinks and dries clear you won't even notice it when they are dry. Give it a few hours. Go watch Netflix. Or go outside.
Once you have applied all of your rivets, you are ready to prime and paint. I use gesso to prime most stuff (personal preference). My crates were painted with craft paints; DecoArt Americana Tomato Red for the base coat, and then some edge highlights with Georgia Clay. I gave them an Agrax Earthshade wash. This helps add some shadows to the rivets and handles. Here is my finished result:
You'll note on my first batch I glued down some extra strips of 1/4"x1/2" graph paper before applying the rivets. This both added structural integrity, and ended up adding a little more detail to the finished product.
I think it took me about an hour to cut out and glue all of these together. Adding the rivets takes a while, but it's absentminded busy work that you can do while watching TV. If you were to use styrene they would cost a little more, but you could use plastic glue to get to an end result faster.
Let me know if you have any questions.
Happy riveting!
Cleatus wrote: Hello folks. Thanks for the feedback. Yes, agreed, the rebar was too orange. I toned it down a little, check out the results:
Still a hint of rusty orange there, but not so overwhelming now.
Anpu-adom, I forgot to take any WIP shots of the walls, so I made another one quickly. Each wall section is 5"x1" of foam board. The misaligned bricks are actually just 1/4"x1/2" card stock glued to the foam board.
Then I coated the walls with spackle for some texture, primed and painted.
In another thread someone was asking me about how I made the ammo crates. Again in my haste to build I forgot to take photos, so I went back and recreated my process. I hope someone finds this helpful.
How to Build Ammo Crates from Scratch Start with a template. I like to use graph paper, because it makes measuring easy. I made two different size ammo crates. The small one measures 1.5"x0.75"x0.75", and the large one measures 2"x0.75"x0.75". I based these dimensions on what looked right to me in relation to a 25mm-28mm miniature. I glued my templates to cereal box card stock. You can use whatever materials you wish, or even trace the templates on to styrene. It's up to you.
You could just glue the pieces together, and maybe even reinforce from the inside (bracing with supports at 45 and 90 degree angles, etc.), but that takes a long time for such a little box. A faster way is to tape the pieces together with masking tape:
However with no internal reinforcement, the boxes are a bit flimsy and "squish" if you aren't gentle with them. Terrain usually needs to be able to withstand a little punishment, so another way to go is to fill the inside of the box with something sturdy. You could use crumpled up news paper, or if you're willing to spend a little cash, try foam board. I get sheets of this from the $1 store, which is pretty darn cheap. Here I have traced my template and created a stack of four pieces of foam board:
Then glue the pieces of the box to the stack. I use PVA glue. For a more finished edge, you can even use the graph paper to cover the gap where two pieces meet:
Next, add some details to the crates. I added some small pieces of card stock to mine to give the impression of handles and hinges. The handles are 1/8"x1/4", and the hinges are simply made up of two small 1/4"x1/4" pieces of card stock joined at a 90 degree angle. Smooth over the gap with more paper, or PVA glue.
At this point they're looking halfway decent, but you know what would really bring them to the next level?
RIVETS!
A 1/16" hole punch is perfect for creating rivets at this scale. Again, I'm using card stock from cereal boxes here (cheap and plentiful). I make these in batches. Fire up Netflix and watch something dumb for a while that doesn't require much attention, and crank out a few (hundred) of these. You will want to make more than you need for this project because some will flake and not be usable.
Use PVA glue to stick the rivets to the box. When I say "use", I mean drown. Use twice as much PVA glue as the diameter of the rivet. Cover them in glue. It will soak in to the cardboard, and since PVA both shrinks and dries clear you won't even notice it when they are dry. Give it a few hours. Go watch Netflix. Or go outside.
Once you have applied all of your rivets, you are ready to prime and paint. I use gesso to prime most stuff (personal preference). My crates were painted with craft paints; DecoArt Americana Tomato Red for the base coat, and then some edge highlights with Georgia Clay. I gave them an Agrax Earthshade wash. This helps add some shadows to the rivets and handles. Here is my finished result:
You'll note on my first batch I glued down some extra strips of 1/4"x1/2" graph paper before applying the rivets. This both added structural integrity, and ended up adding a little more detail to the finished product.
I think it took me about an hour to cut out and glue all of these together. Adding the rivets takes a while, but it's absentminded busy work that you can do while watching TV. If you were to use styrene they would cost a little more, but you could use plastic glue to get to an end result faster.
Let me know if you have any questions.
Happy riveting!
Great tutorial- thanks for posting again. I especially like the tip about cardboard rivets and PVA glue. Currently, I use cheap (plastic) yard sale signs or something equally cheap, so long as the plastic isn't too thick. I get frustrated gluing a billion rivets on with plastic glue- I think I might do better with the slop and run method with cardboard and PVA!
Nice. I haven't really found a riviting system I like, so I might try your cardboard and PVA system. How do you find the durability on your spackle pieces?
Automatically Appended Next Post: Also, that monowheeel is awesome. Always loved that style for orks. Good job mass producing the cans though too!
Whew, long time, no post. Funny how one's hobby time dries up when you're insanely busy at work. Thank you to the folks who left comments on my last update. I really do appreciate them.
kestral wrote: How do you find the durability on your spackle pieces?
The spackle pieces hold up pretty well. I haven't done any stress tests, or subjected them to serious use, but I would say they are sturdy enough for casual gaming for sure. And they are very cheap to produce, so if they get a little dinged up you're not going to cry over it.
Here is my latest project. Tutorial below
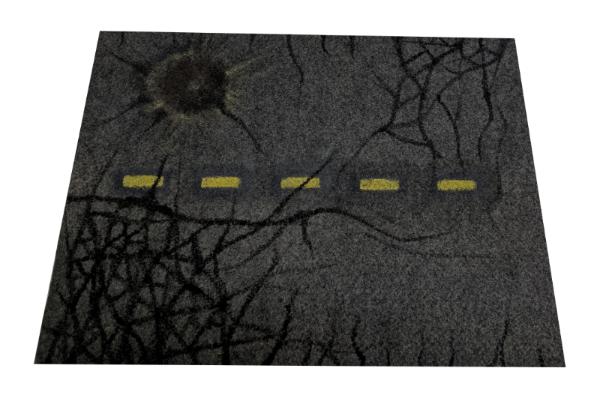
Roads I have only played maybe one or two games of Warhammer 40K this year. Hence, my motivation to build and paint has been a little low. However I do enjoy my hobby time and as I was thinking about what I could add to my game table, it occurred to me that I would like some roads. Being a frugal sort, I looked at options to build/make versus buy. To start with, I did some back of the envelope calculations. I figured that a road wide enough for 40K vehicles (Rhinos, Trukks, etc) should be roughly 4 inches per lane, or 8+ inches wide for a two lane road. My first attempt was to use foamcore board, but that warped badly. Then I had an idea. While browsing the aisles at Michael's I happened to see that pieces of 9"x12" felt were $0.39 each. Perfect! There are many different colors available; I bought several pieces of gray felt and headed home.
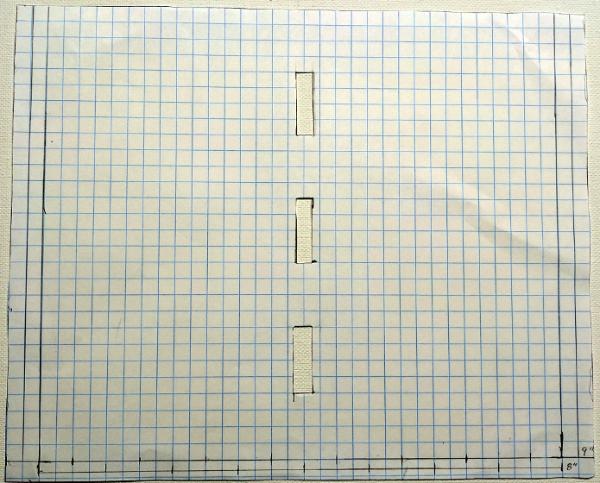
The next thing I did was create a template for road lines. Adding yellow dashes seemed like an easy way to make the sections look like they were actually part of a road. Here's my template, with measurements if anyone is interested:
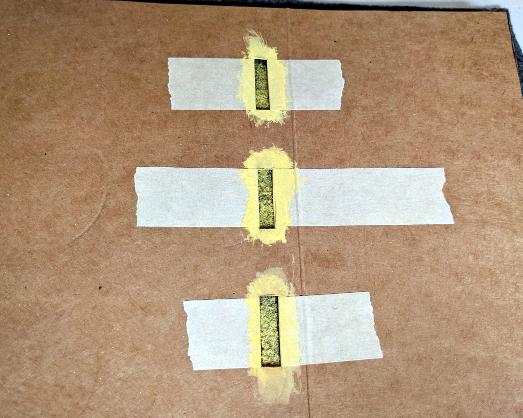
I added masking tape to help prevent warping:
Yellow offered a nice contrast to the gray felt. Here I mixed DecoArt Americana Snow (Titanium) White and Cadmium Yellow:
One coat of the mixed paint, and then a follow-up coat of just yellow for brightness:
I found that the edges stayed crisp if I simply dabbed the paint on to the felt, rather than trying to brush it on.
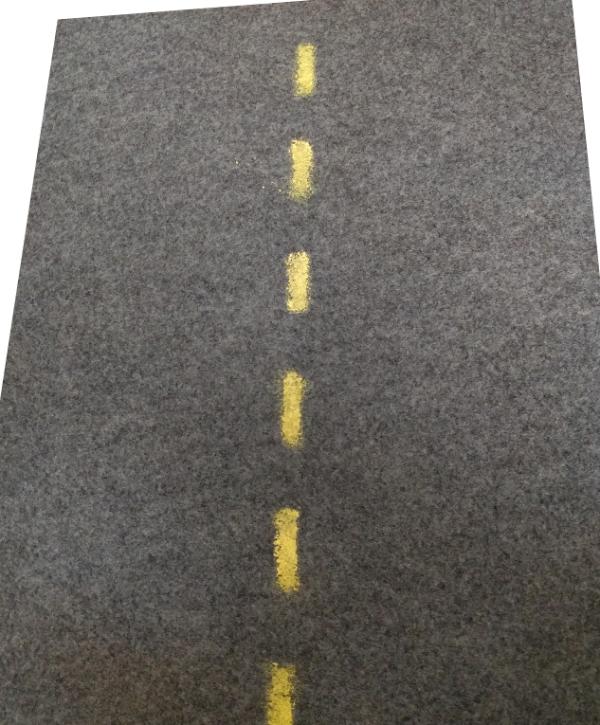
End result:
I went back and cleaned up mistakes with some gray paint to help sharpen up the lines.
In an afternoon of watching Netflix I made 8 sections of road, for a total of 96 inches of roadway. More than enough to span a standard 4'x6' table.
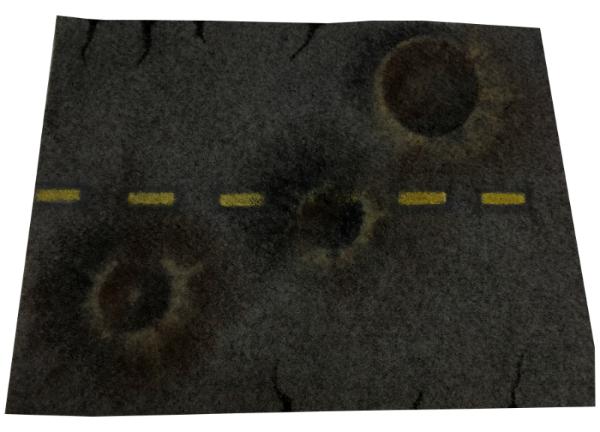
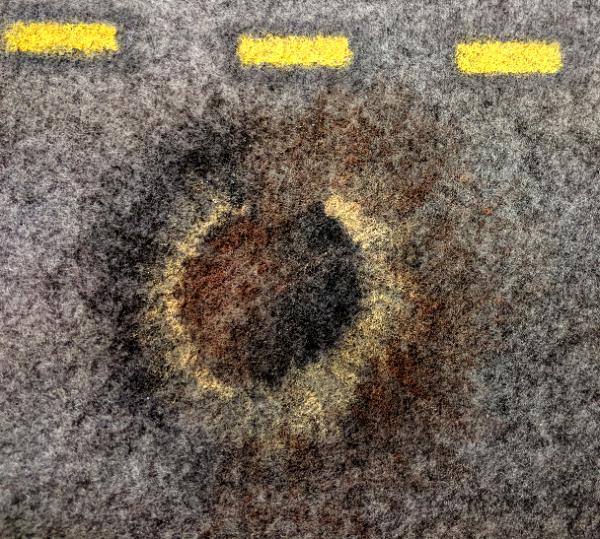
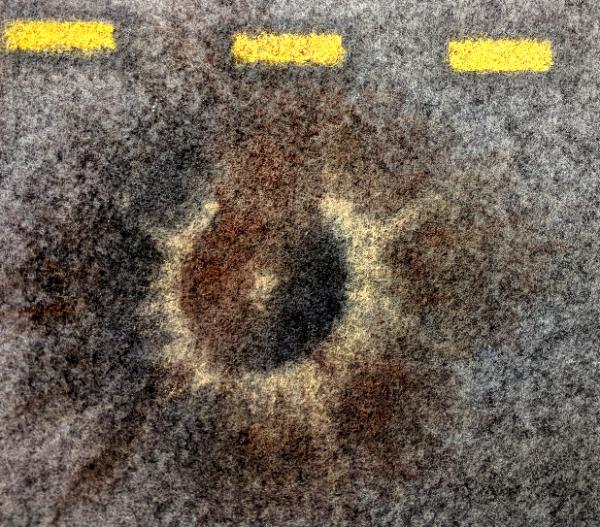
Roads v2.0 But you know, I just wasn't completely satisfied. These were decent, good enough to represent a road on a tabletop surface, but a little simple. I decided to push myself, and see what else I could do here. 40K is a violent, war-torn setting. It seemed unlikely that perfectly paved roads would stay that way for very long. So I thought, hey, let's paint some cracks... and craters. Yes, craters!
How the heck do you paint a crater onto a flat surface?
Google image search was helpful in providing example images of craters, but I was hoping to find a tutorial on painting cracked roads and craters.
search: "cracked paved roads" > "6 Insane Roads You Won't Believe People Actually Drive On" > "5 Famous Movie Lessons (That Didn’t Make A Lick Of Sense)" > Wikipedia article on "Avengers: Age of Ultron" > Wikipedia: "Marvel Cinematic Universe" > OMG comic book enthusiasts have written a lot of articles on Wikipedia... > hey look, it's dawn.
After taking in all this information, digesting it, and thinking about how to represent a crater on my felt surface, I came up with the following formula for creating exaggerated but semi-realistic craters on a flat surface:
Pick a spot where you want a crater:
Outline the crater edge with a color that contrasts with your surface. In this case, I used Apple Barrel Khaki:
Select a third color somewhere in between the two. Fill in the center of the crater, and ring one half of the crater with this color. In this example, I used Delta Ceramcoat Burnt Umber. On the inner lip of the crater, create a shadow with black paint:
Next, add a shadow on the opposite side of the crater. Note that the shadows are going the same direction, as if the light source were on the right:
You can create the impression of a "raised" bit in the middle of the crater by adding another dab of Khaki paint. I also created some ridges stemming out from the rim of the crater, to give the impression of height:
Finally, I softened up some of the edges with more Burnt Umber paint around the edges, both inside and out of the crater. I was trying to create a sense of dirt having been thrown out of the crater when the impact occurred:
And there you have it! Each crater takes maybe 10-20 minutes, depending on how much detail and effort you want to put into it. But again, do this while watching something mindless on TV or Netflix and you'll be done before you know it.
These craters are just meant to convey the impression of impact damage. There's no actual raised ridges or depth to them. At arms length they look pretty darn good. It's a bit of an optical illusion I suppose. The road damage is very exaggerated, which is both necessary for this medium, and intentional. 40K is an exaggerated setting (just look at the proportions on some of the models!).
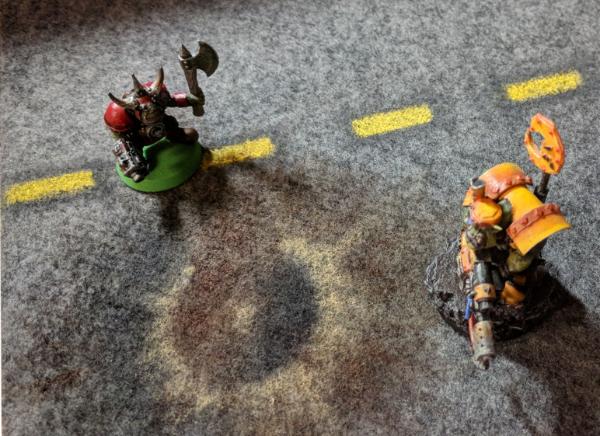
Here is a shot with two minis for scale:
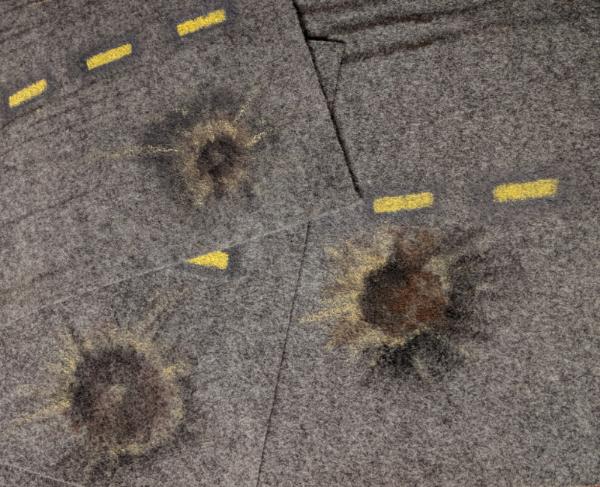
And here are my final results, complete with cracks that I added too. I kind of went wild with the cracks:
This one is supposed to give the sense that there was some vehicle burning rubber, and possibly ran over something (or some one). It didn't turn out as well as I would have liked:
Some sections are more cracked than others. I just had fun with it.
Not bad, eh?
Let me know if you have questions. I'll be happy to answer (in a hopefully timely fashion).
nice...what a truly lovely way to make roads...other surfaces are possible too...the bleed through effect that occurs by using stencils is avoidable when you are willing to paint the whole felt piece with one colour...first the ground colour then stencil application then ground colour in the stencil and THEN the stencil colour...
but that aside...it looks real terrific...and i now regret a bit how went with my own modular table...
I really like how you've achieved the illusion of three-dimensionality with the craters without also inflicting wobbly model syndrome. Awesome work, Cleatus. Well done.
Interesting. A few tips: For the yellow stripes or dashes, paint them on the felt in white first, then paint the yellow over the white -- after it has dried of course. It'll look better. Also, the dashes are too close together, at least by modern standards. For a more 'realistic' look, use the following dimensions: Dashes are 1 3/16" long and 3/16" wide and spaced 2 3/8" apart. (Some time ago, I actually looked up the regulation dim.s from the USDOT and did the math to scale them. Hmmm, not sure what that says about me.)
Now those things get repainted all the time, and if you were to make the adjustments to what you did, and 'blacking out' the parts which don't belong, you would get a interesting, and commonly seen effect-- at least commonly seen on roads around here. Perhaps add white shoulder stripes at some point?
Use of the gray felt is a brilliant idea. The cratering effect reminds me of what I've seen on some of these game mats made from mousepad materials. Very cool. And excellent work.
Thanks for the praise and feedback, folks. Much appreciated.
And now for something completely different...
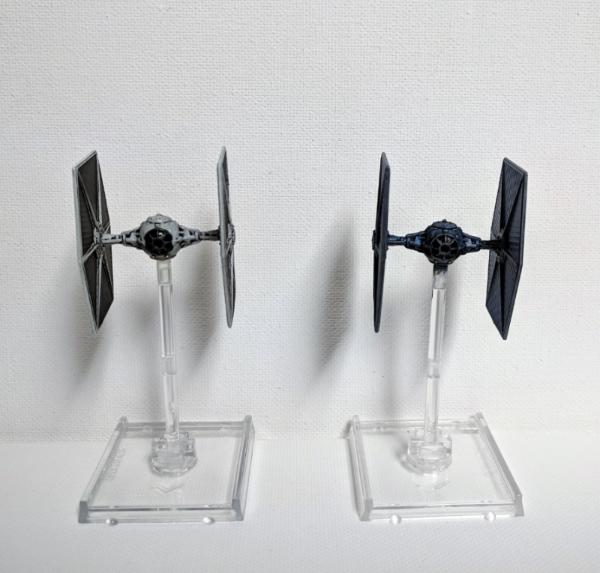
Tie Fighter Repaint I've been casually playing the X-Wing Miniatures game with a friend for some time. When Christmas rolled around I decided to try my hand at a repaint of the classic Tie Fighter. I think it came out pretty good for a first attempt. Here it is, next to one with an original paint job on the left, and my repaint on the right:
Bonus pic, just for fun:
I found these "Squigz" at Target. The name is amusingly similar to the GW squiggly beasts. No relation. Doesn't look anything like them obviously, just an odd coincidence.
Thanks for the feedback, gentlemen. I have some new stuff for you.
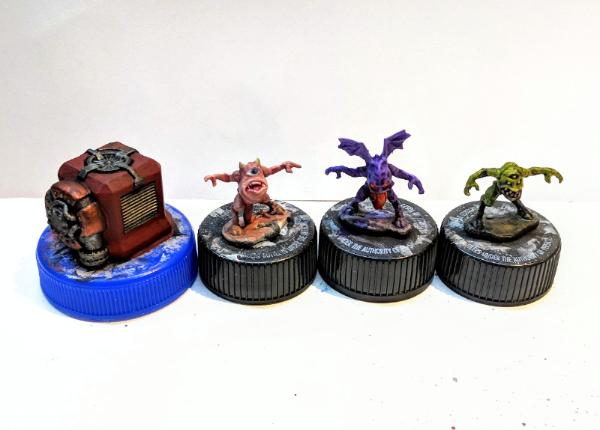
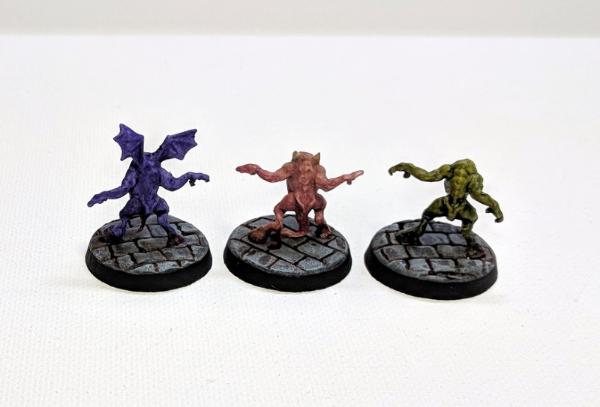
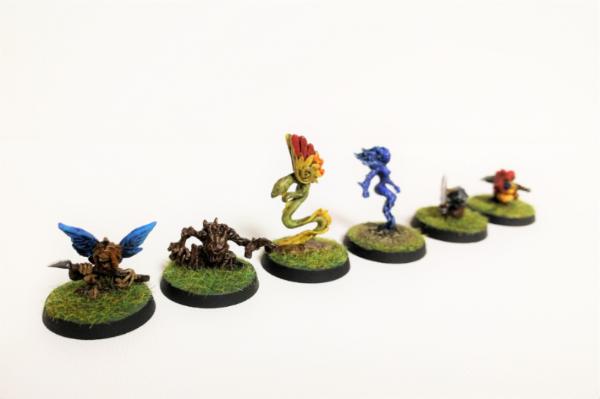
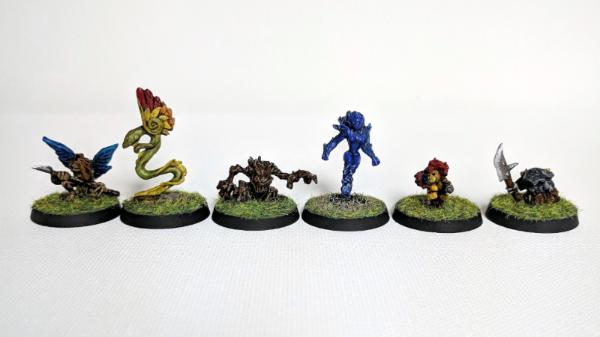
Reaper Bones Familiars 2: Getting back into the swing of painting miniatures I thought I would tackle some Reaper minis. This was a fun group to paint, each one was different. But so tiny! See what you think.
The little dolly with a knife is one of my favorites:
The little death, begrudgingly hauling around scrolls for its master:
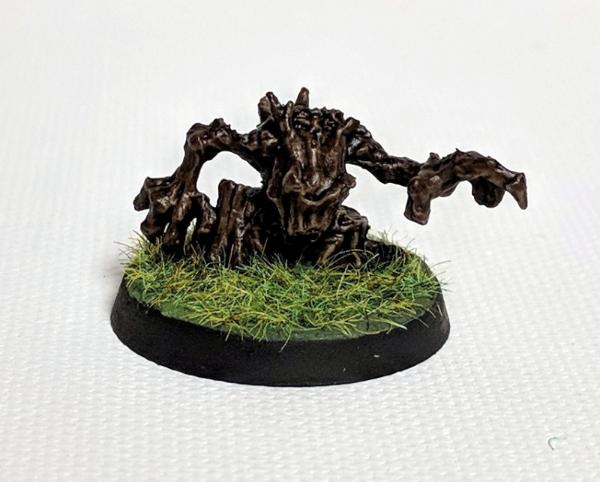
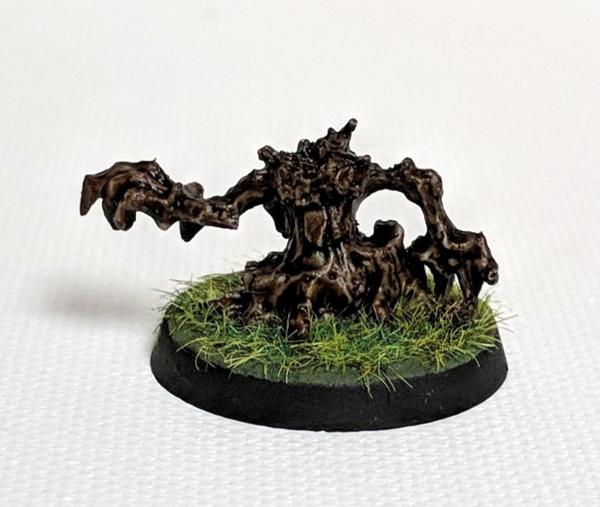
Entling:
Fairy Dragon / winged serpent (quetzalcoatl?):
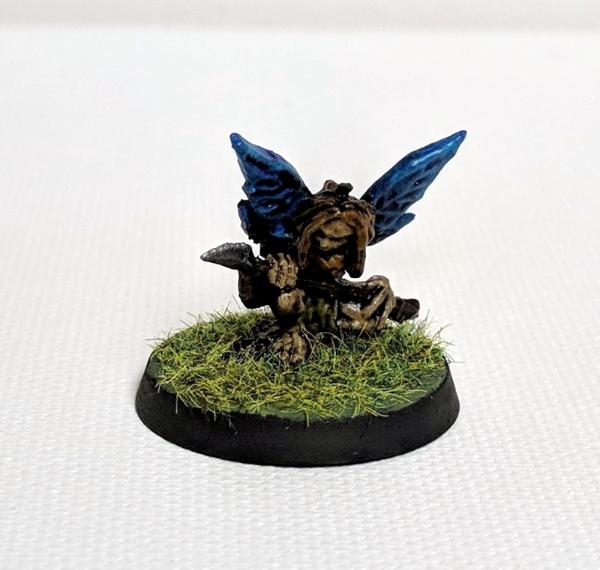
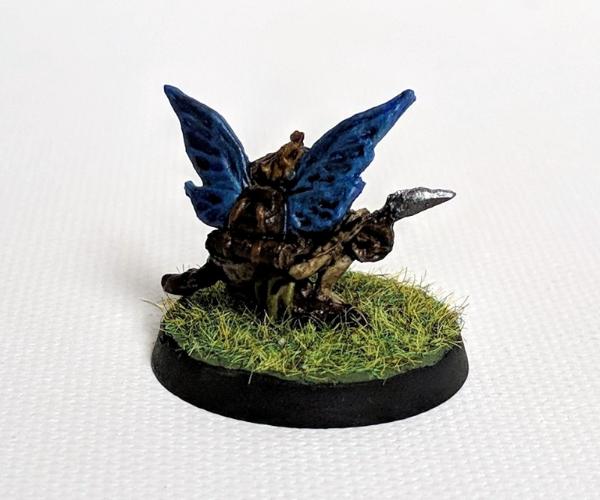
Fairy Hunter / Angry Fairy:
Blue Fire Elemental (or maybe a Water Elemental):
Most other people I have seen paint this one use a traditional fire scheme (red/orange/yellow, or black with fire at the edges like lava). I decided to go another way.
They look fantastic bud, love the Entling the best, really great work all round, though the length of the grass is bothering me, need to get the mower out. The base on the blue girly is superb mind, the way you have it looking scorched almost.
@ Cam: Yes, I kind of agree. This static grass is a little too long. Not sure what I could do about it now, short of scraping it all off, or getting out a tiny pair of scissors and trimming it. But it could also be a trick of perspective due to the relative size of the miniatures. They are rather tiny after all.
On to new stuff!
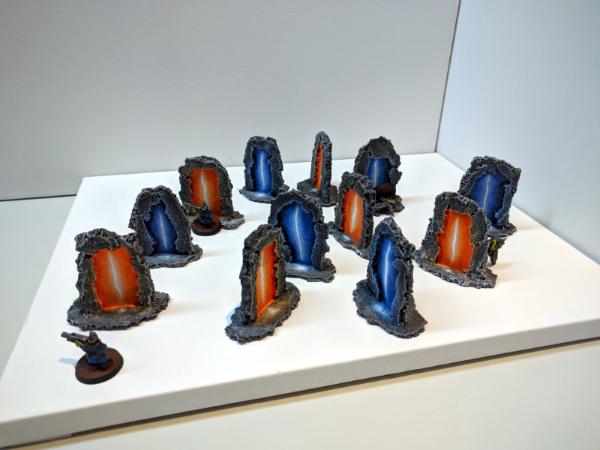
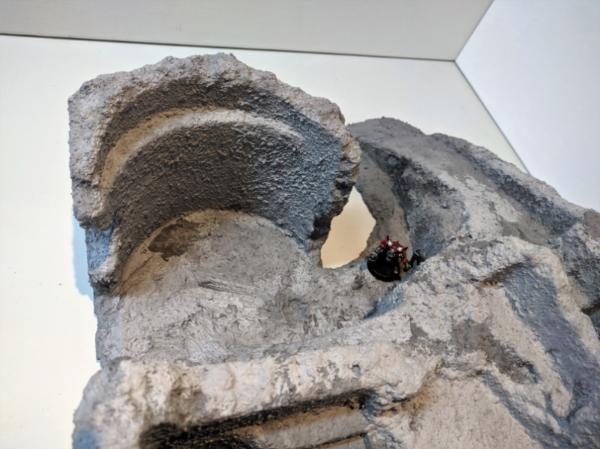
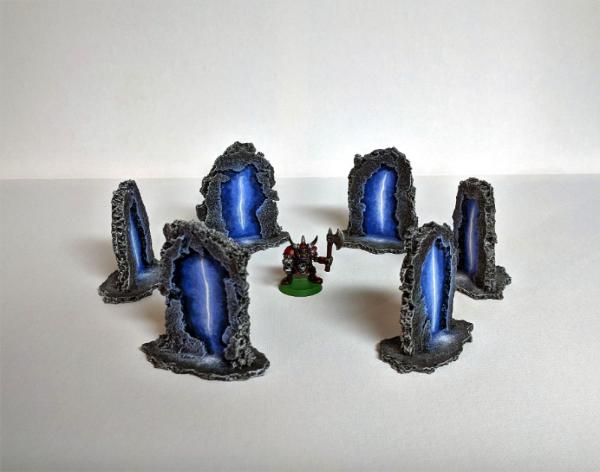
Portals / Objective Markers: I saw a nice little tutorial here by Wyloch on making Necron objective markers / portals, and I was inspired to make some of my own. I also checked out the BoLS Hobby YouTube video featuring the blue portals. So here is my attempt at making a set of these portals for myself:
And here's a scale shot with an Ork Boy on a 25mm base:
I debated gluing these to bases. I might still do that, just to give them a little more stability and longevity. But I think they look pretty good on their own.
In other news, I started painting a unit of Ork Kommandoes. Here's a WIP test paint scheme with camouflage:
I'm really trying to paint more this year, and FINISH things. Starting new projects is fun, but I have an awful lot of unpainted plastic and metal begging for attention. But hey it's a hobby, not a job. This is what I do for fun. No need to stress over it. Hopefully I'll have another update soon.
Those portals are brilliant, really impressive paint job on the blue.
Speaking of which, that kerchief on the ork is blooming fantastic bud.
As to the static grass issue, don't worry at it. However if you really want to, you could flash over it with a flame, be very careful. But it withers it back nicely if you are careful.
Back after posting hiatus. But not hobby hiatus! (I'm just not good at posting. haha...) Some updates to share:
Portals:
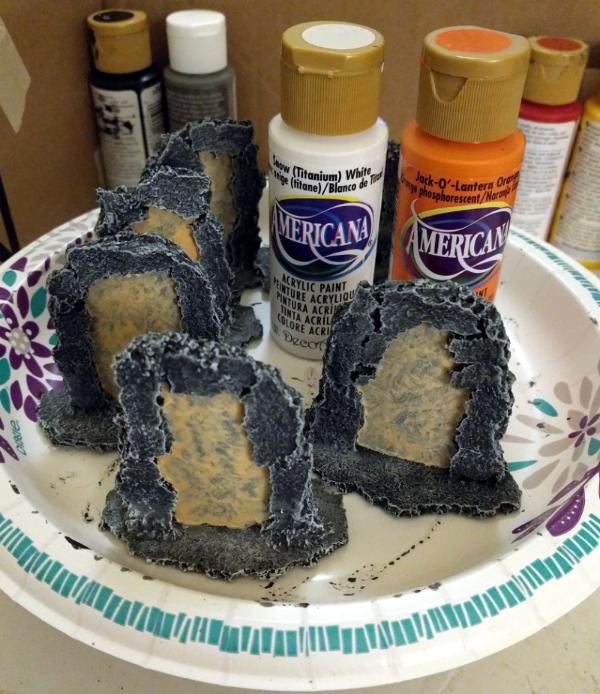
I made another bunch from cork board and card stock.
Here are all six, soon to be all orange and glowy:
WIP shots:
Spoiler:
Filled in the gaps with spackle and sand.
Basecoat:
Drybrush gray:
Drybrush white:
Other WIP:
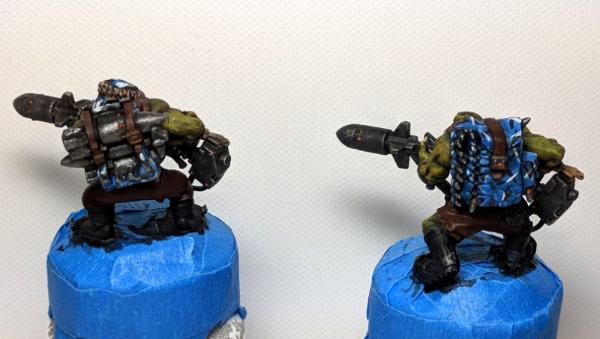
A couple more Ork Kommandoes I painted up, totin' rokkits:
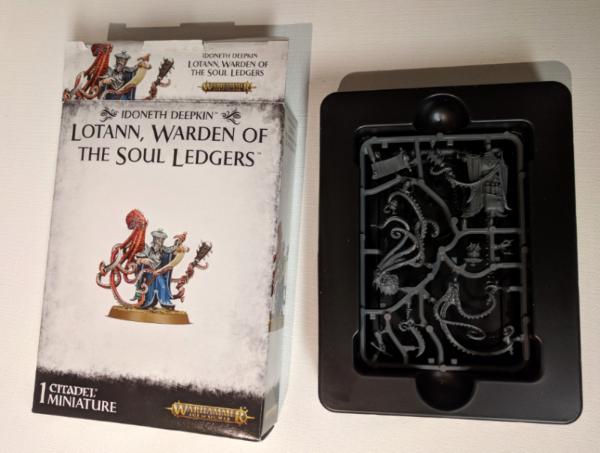
My wife expressed interest in Lotann, the AoS model. So I bought it and will try to do a credible paint job for her. Behold his many appendages!
I posted a tongue-in-cheek thread in the P&M forum about the mixed emotions I have regarding buying and painting yet another chunk of gray plastic, which I thought was funny, but sometimes humor is lost on the internet. Eh!
LOER:
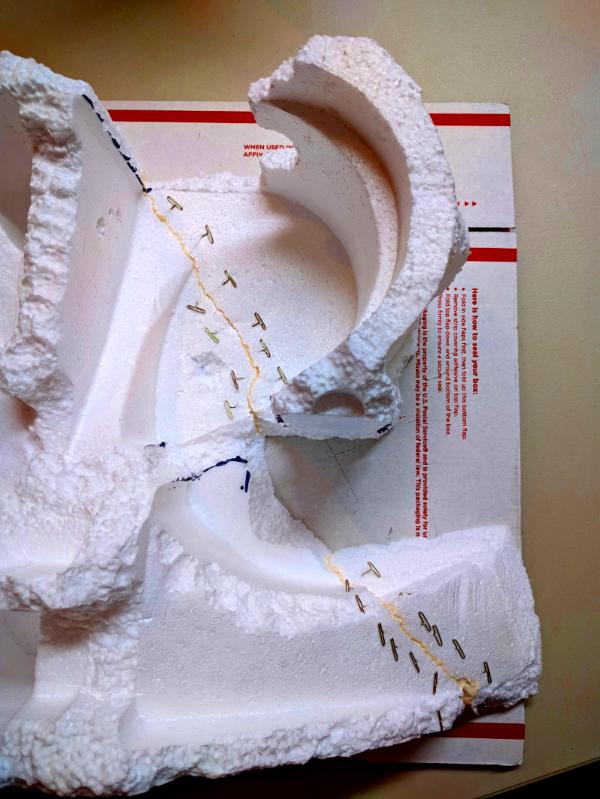
This was the styrafoam that came with a ceiling fan I recently replaced. It just screams TERRAIN to me. I'm going to try using this as a starting point for my LOER entry this round.
That's all for now. I'm going to try and post another update soon. So much to do, so little time!
The wet-elves have an octopus? Scurries off to check it out..... Scurries back in sheepishly to comment on actual content... Those portals are cool. Those familiar are also cool, and I might go look them up too. Rokkit boyz look good. Definitely some promising terrain hidden in that styro.
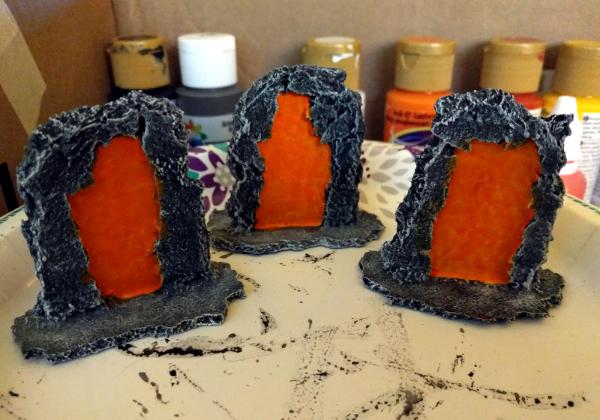
Portals The blue portals now have companions. No, not companion cubes. Orange portals!
It took me a while to finish these. In no small part because I'm a messy painter and kept making mistakes, then correcting them. e.g., getting orange on the gray stone, then touching up the stone and getting gray paint on the orange portal surface...
I'm pleased with the effect and how they turned out.
Here's a shot of one orange and one blue portal together:
And just for fun, a scene of some Grots cavorting through a series of portals:
Oh yeah, I painted a few Grots too. I honestly forget when I finished these... I know it was in 2018!
Here are a couple WIP shots from the portals. I had intended to post these at some point in the last... 6 weeks... but it just didn't happen. Oops.
Spoiler:
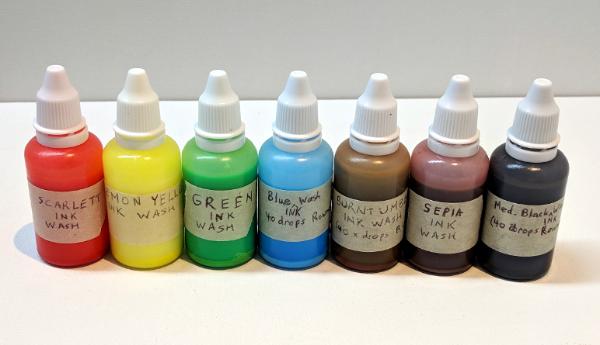
If anyone is curious, I shaded the inside edges of the portals with ink washes. (Recipe courtesy of Les Bursley: https://www.dakkadakka.com/dakkaforum/posts/list/261541.page) I bought several inks at Michael's and have had a fun time mixing up ink washes, and combining them as needed. Here's a pic of what I've mixed up so far:
I have a good sense of how to use them after some experimentation. The blue portals were shaded with a mixture of black and blue ink washes; the orange portals were shaded with a mixture of red (scarlet) and yellow. The effect is almost "blood orange".
In other news...
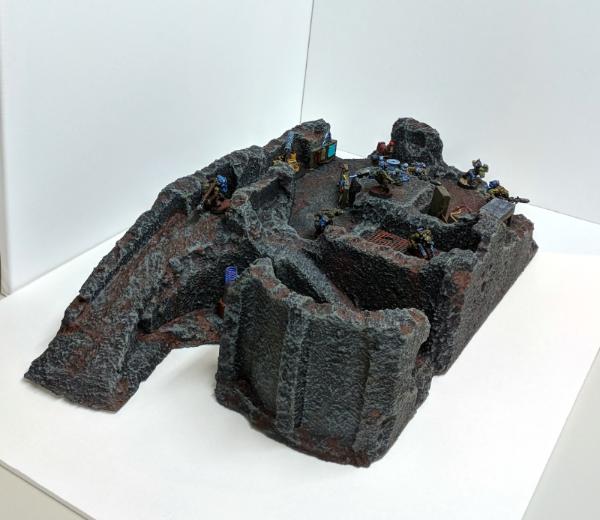
LoER Terrain Comp I've made some progress on my LoER terrain competition entry.
Because there's no paint yet and it's kind of hard to see pure white styrafoam, here's a color-inverted image to show detail and texture:
As I was cutting away at the styrafoam I accidentally broke off a couple of pieces that I thought were interesting and wanted to keep. Go go glue and pins!
The pins will be removed once the glue has dried. I'm thinking that I might want to insert some tooth picks or bamboo skewers into the foam to help give it some structural integrity. Might want to give the thing a base too?
Well that's all I've got to show for now. I have an embarrassing number of WIP projects. I'll try to post a few photos of those. I know folks like to see WIP almost as much as finished projects.
Progress update:
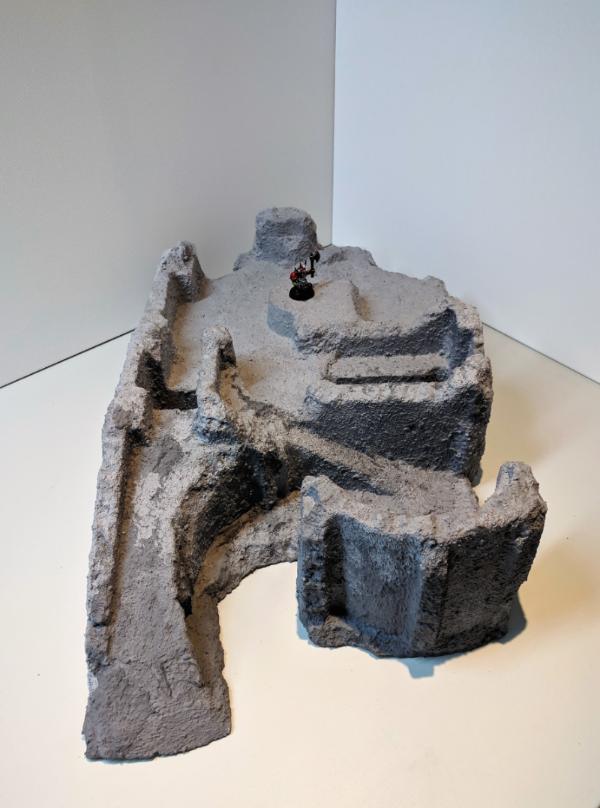
Shaping and texturing is done. The stone texture is a mix of drywall compound (spackle), plaster of paris, sand, and wood glue. I added a few drops of black paint for contrast with the white styrafoam.
I'm satisfied with how the texturing turned out. The overall piece is a little bare on details. If I have time I'll add some accessories for the interior. Wires, pipes, a few doodads, etc.
Slinky wrote:It's looking great, really doesn't look like a piece of packaging, will be even better with some doodads
Thanks! Yes, it's a bit sparse right now. I was thinking of making some computer banks, terminals, maybe some sort of vat with a Grot in it or something...
Viktor von Domm wrote:honestly....it looks like a piece of "schleich" toys...if you know what i mean...
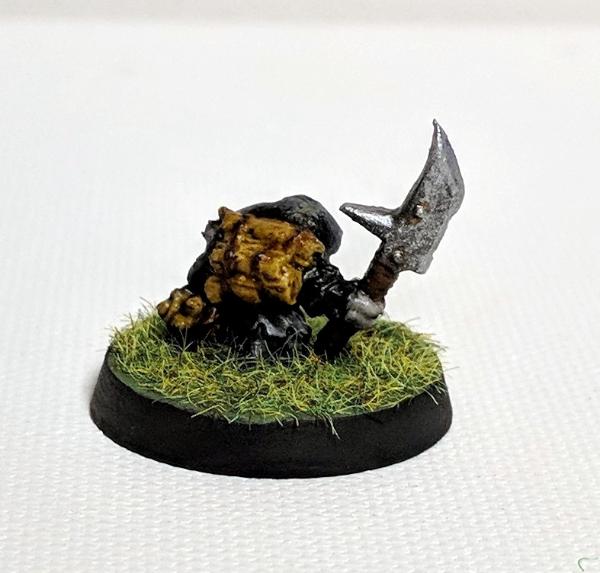
I've been working on these Ork Kommandoes on and off for several months. They've finally reached the point where I would call them "done". So, it's picture time!
I had to get a little creative in finding places to put the camo. It's tempting to just paint the Ork skin blue, or give them tiger stripes, or camo pants, but I think this is more fun. Besides the blue and green which dominate the attention, the rest of the colors are fairly muted. I'm very pleased with how these turned out. I wouldn't mind at all painting up a bunch more with this paint scheme. The camouflage is a little time consuming, but it's really not that hard.
Not sure if these are Deathskulls or Blood Axes... Let's call them Death Axes. Or Looted Skulls. Or just Kommandoes.
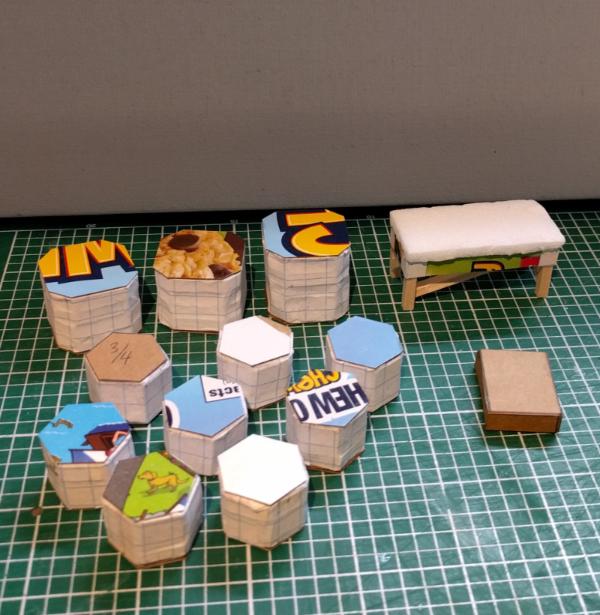
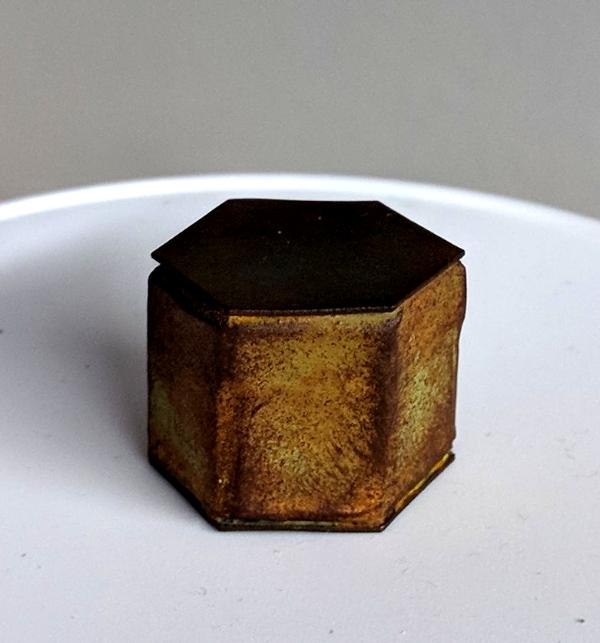
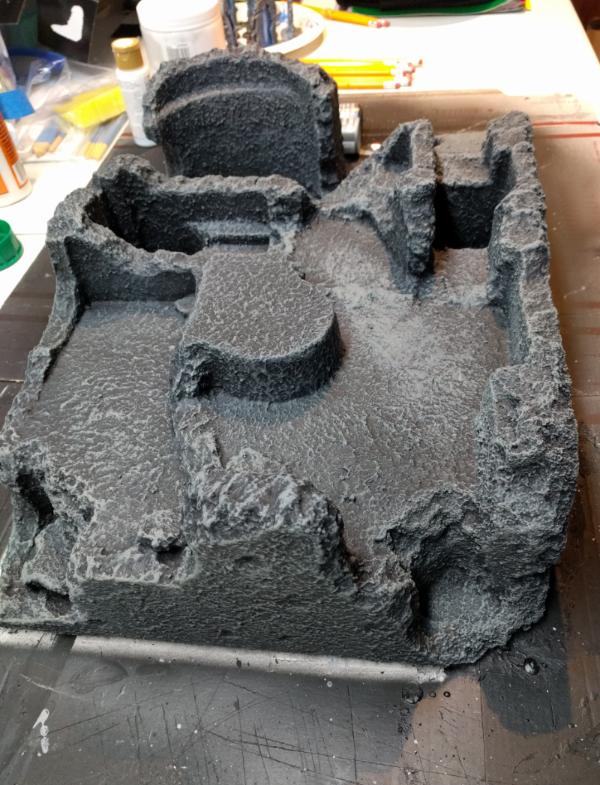
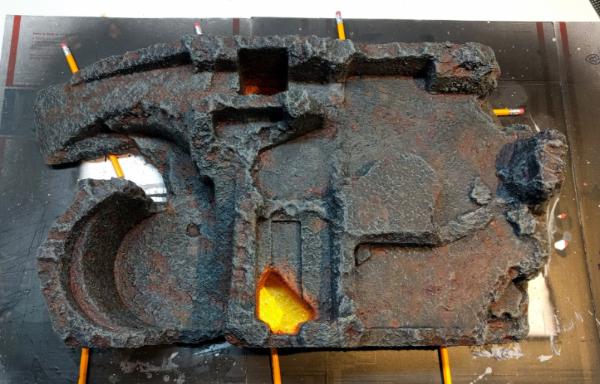
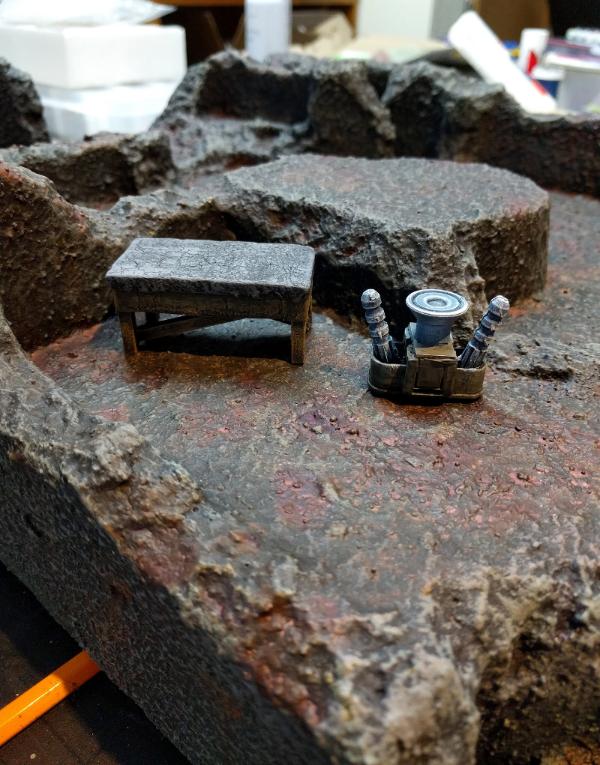
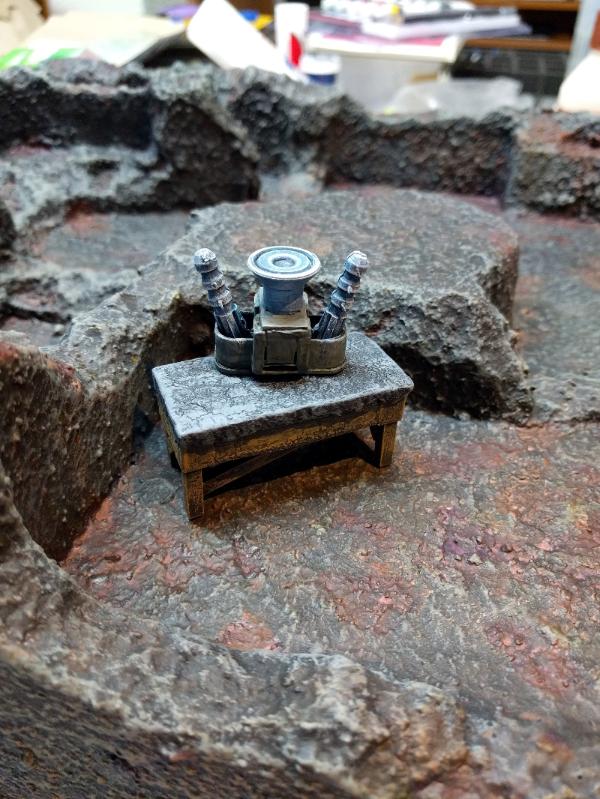
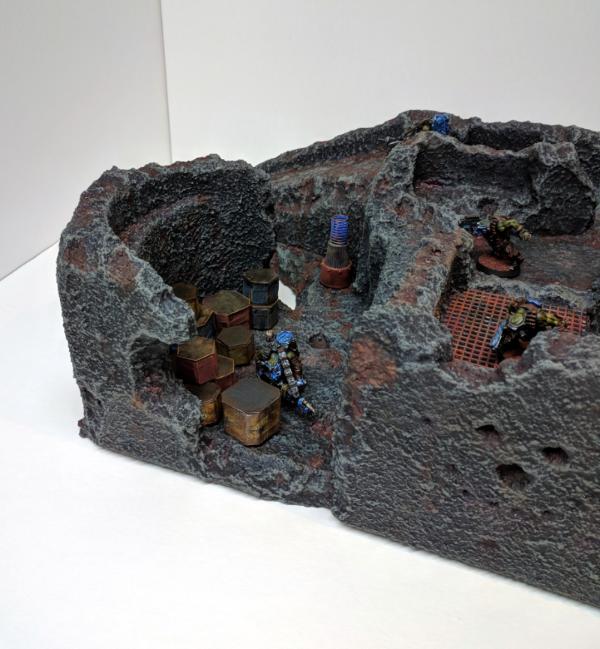
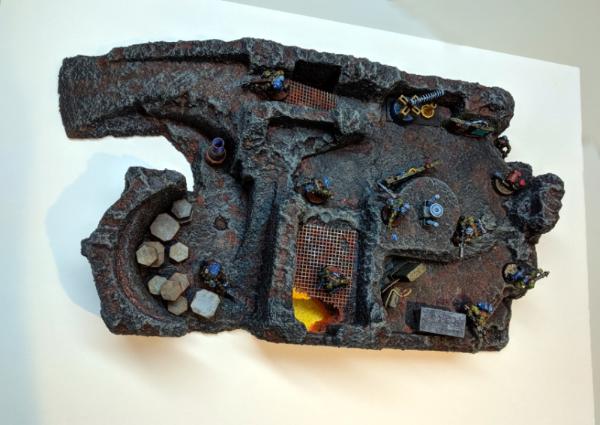
I made some scatter terrain for my LoER terrain comp entry. Misc containers, a work bench, and a box that will probably be some sort of instrument panel.
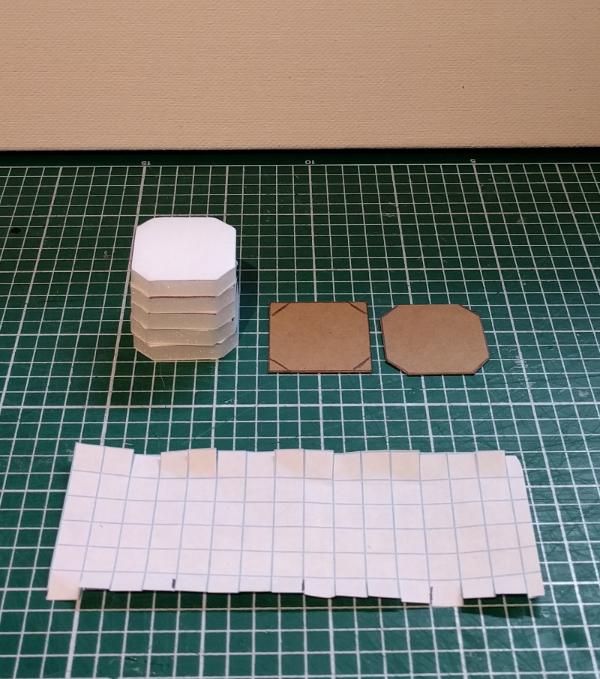
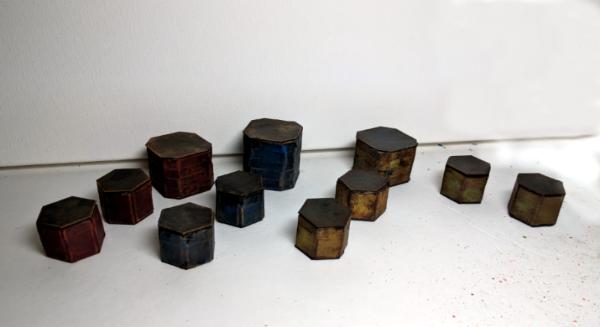
I decided that square or round containers were boring, so I crafted some hexagon and octagon containers. Seems more sci-fi.
Here's a quick WIP assembly photo that shows how I made them:
Spoiler:
And here's one of the small containers painted up with some rust effects:
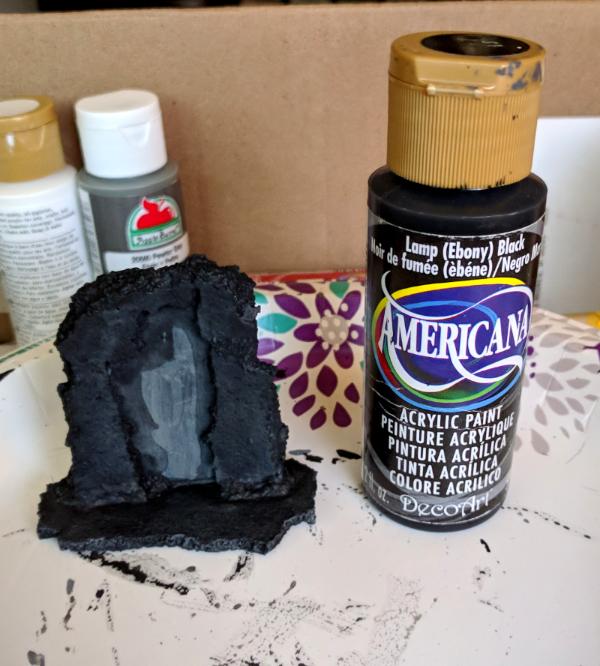
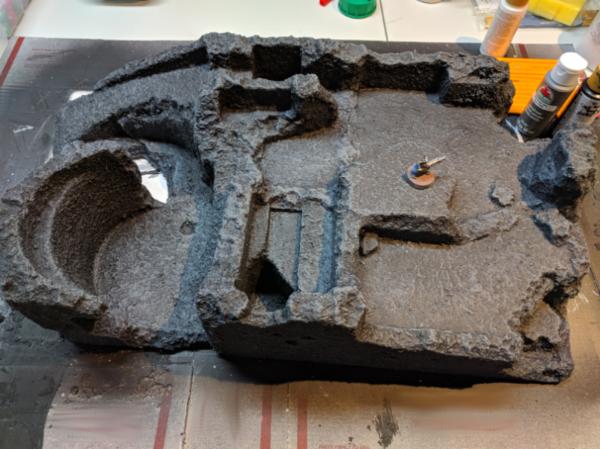
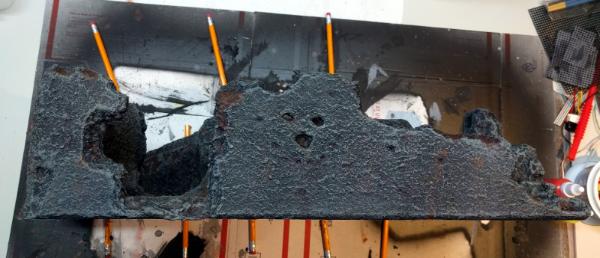
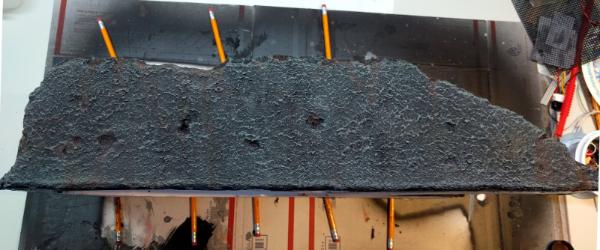
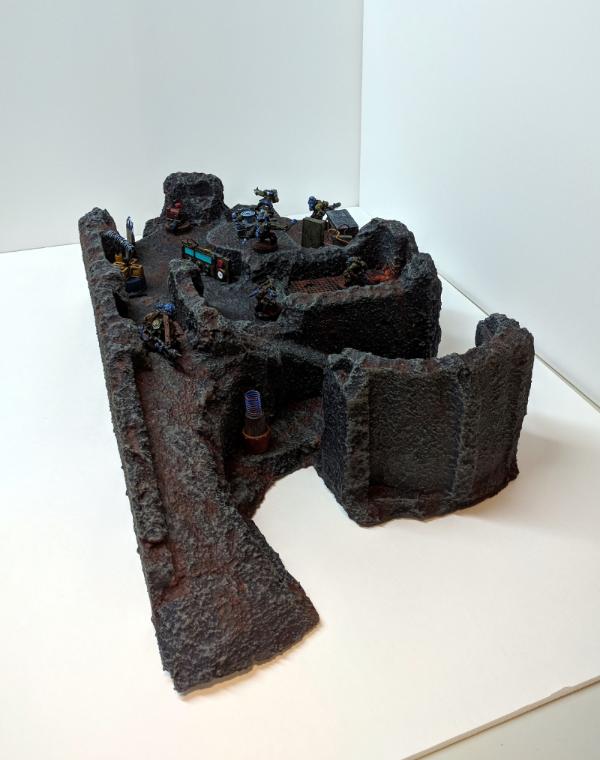
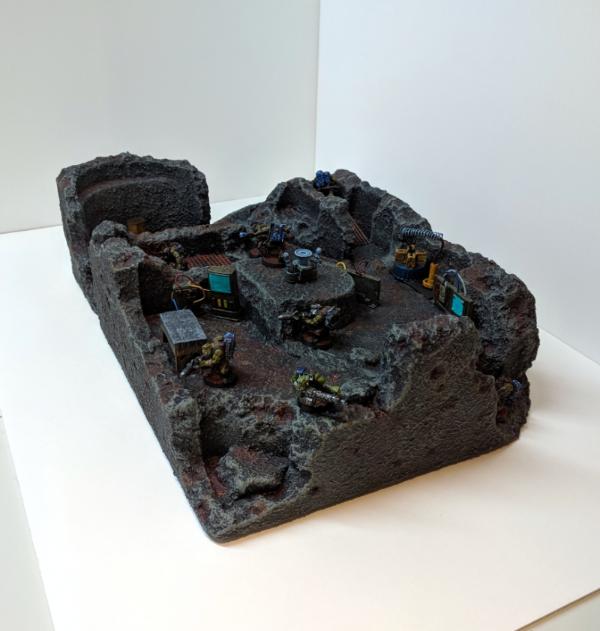
As for the actual terrain, it's taking a long time to get this thing painted. I primed and base-coated the whole thing in black. Just finished touch-ups on the crevices this morning. The dry brushing should go pretty quickly. I might add in some other tones (browns, reds, etc.) to give the stone more variation. Keep it interesting. Depends on time of course. August is starting to run out quick!
Made some more progress on my LoER terrain comp entry:
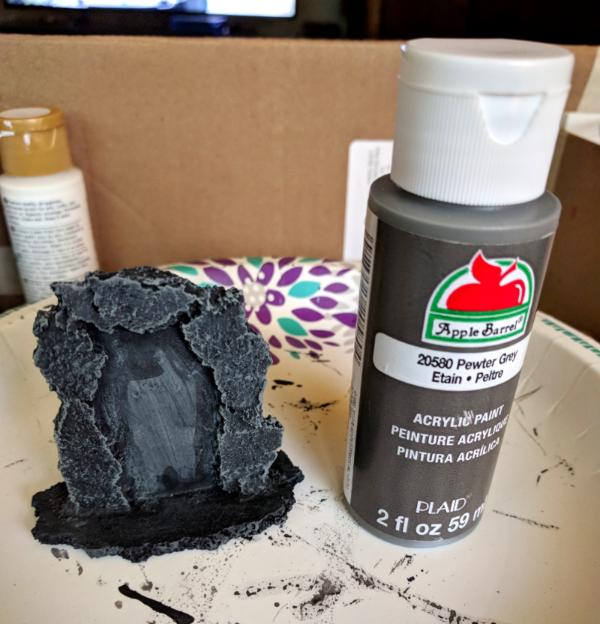
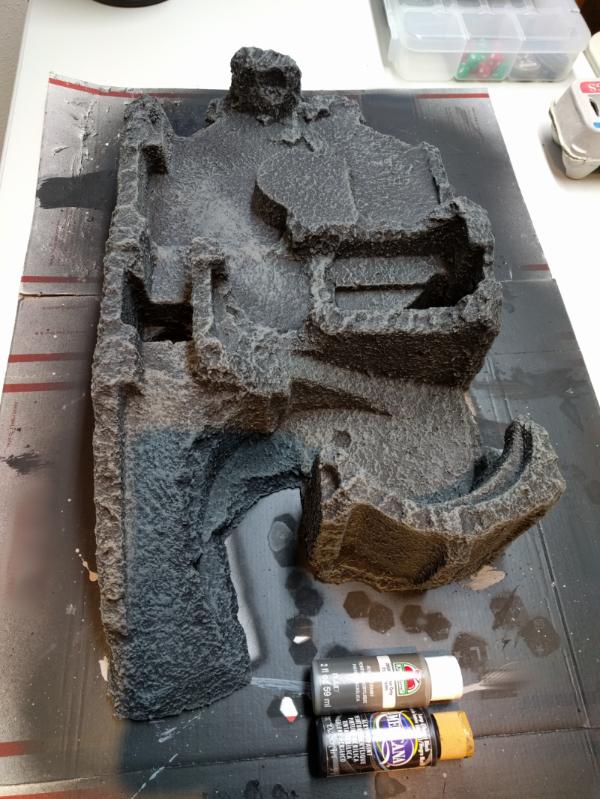
1st highlight. Drybrush with a 2:1 mix of gray and black.
2nd highlight. This time, just a drybrushing of gray.
I went a little too heavy on the gray in that middle section, will need to clean that up later. Probably stipple in some black or something.
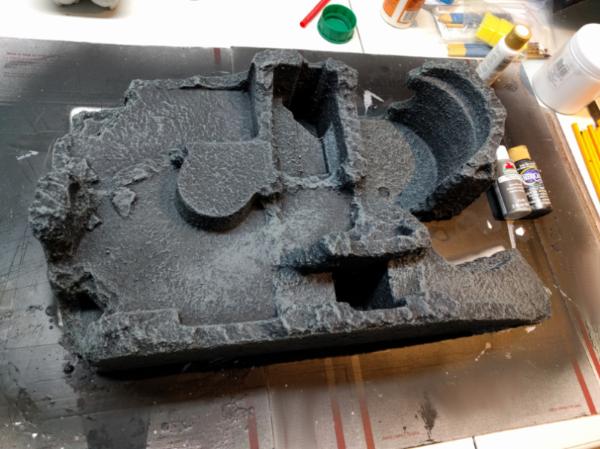
Oh yeah, and I finished the scatter terrain containers:
For the yellow and green containers on the right I applied burnt umber with a sponge to get the rust effect. I tried the same thing for the red and blue containers on the left but it came out too dark. So I decided to drybrush them orange to highlight the edges. I also tried applying some Vallejo rust effects wash, but honestly it just came out a little orange. You can kind of see it on the larger yellow container in the back. It's OK, serves as a nice compliment to the sponge effect, but not really what I was expecting. I added a dark black ink wash to the gaps between the body of the containers and the lids. It ran in a few places, but eh... we'll call that oil or something.
Also cranked out a few more pieces of scatter terrain while watching TV. I really need to stop. But it feels so good!
I'm cooking now. One more pass of drybrushing on the terrain, add some color and shading, maybe a few wires and tubes. Then I'll paint up the rest of the scatter terrain. Promise. No more building. For now.
Thanks gentlemen. I appreciate the comments and feedback.
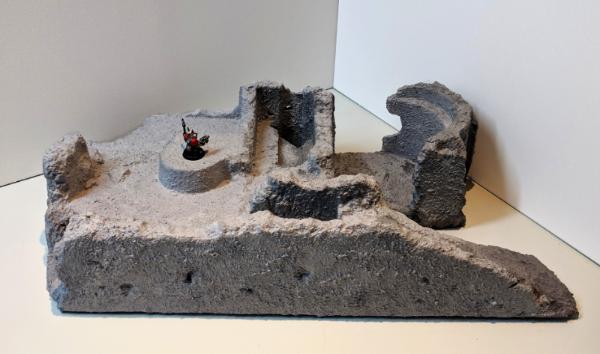
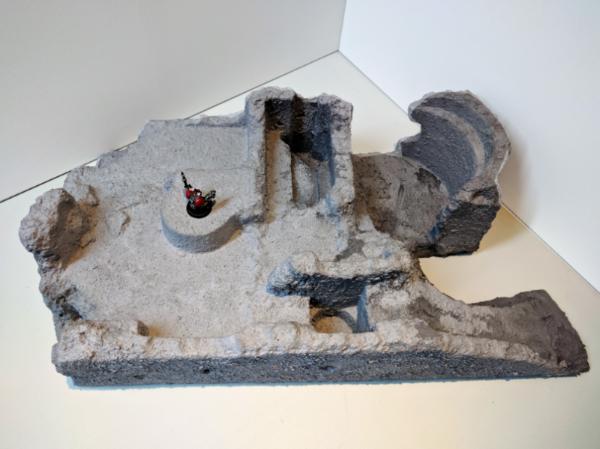
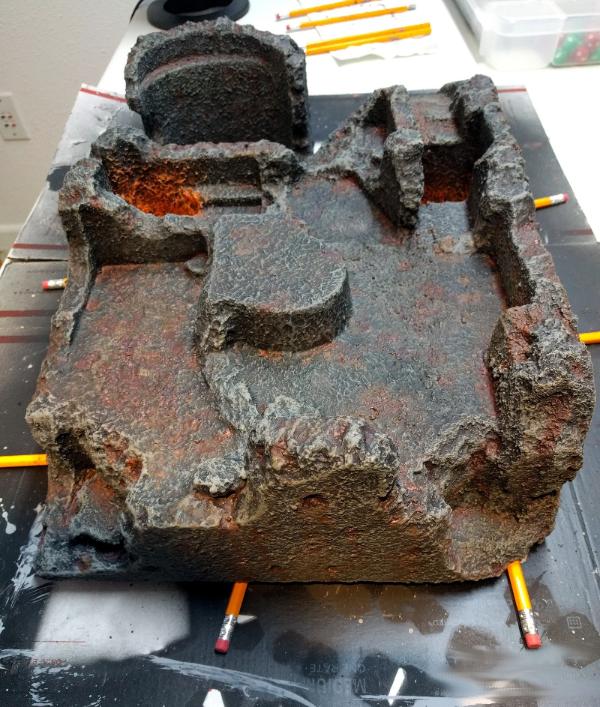
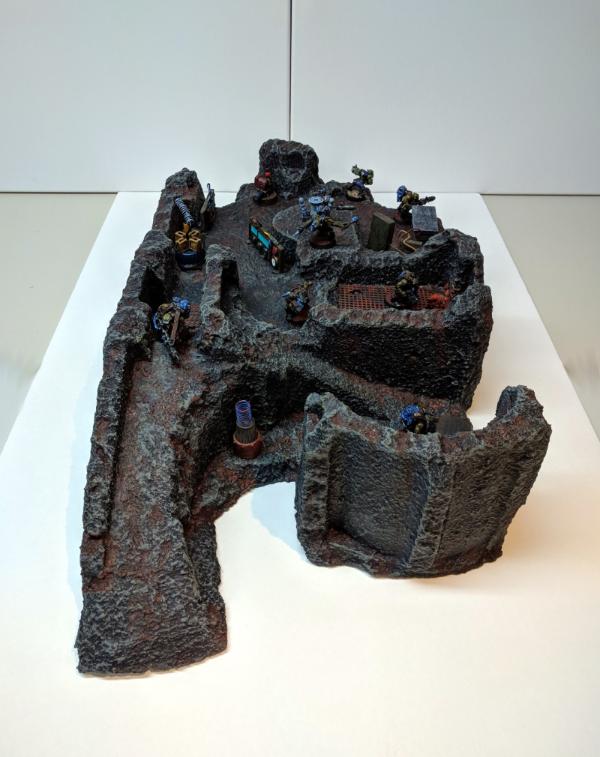
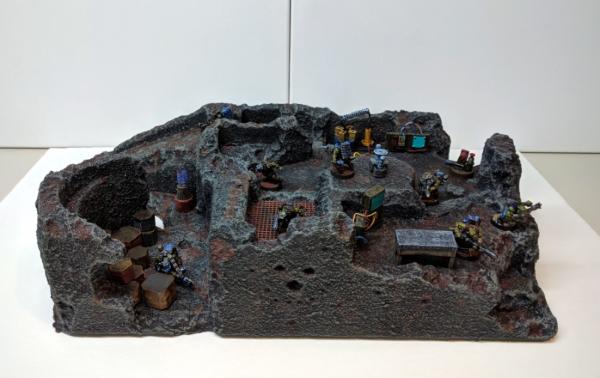
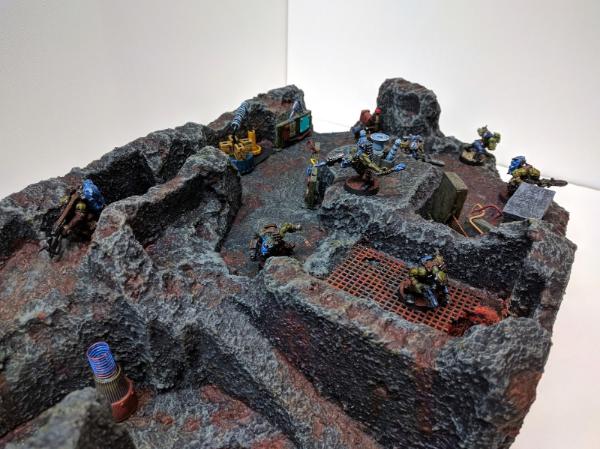
Here's my final set of WIP photos for the LoER terrain competition before turn-in later today. I just need a little more time to finish painting the scatter, and maybe a few touch ups and highlights on the body of the terrain.
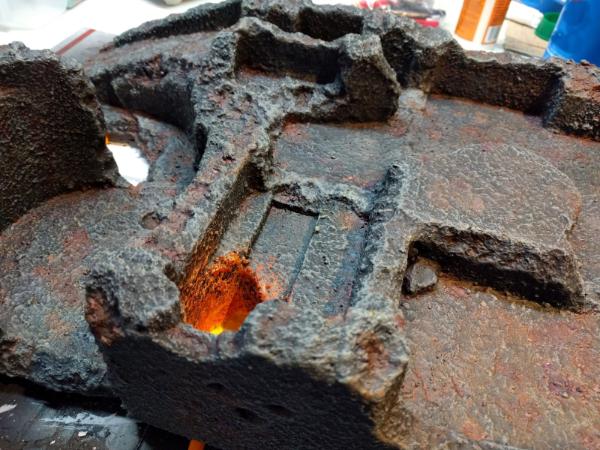
What's that glow? Oh yeah, it's lava. Because... why not?
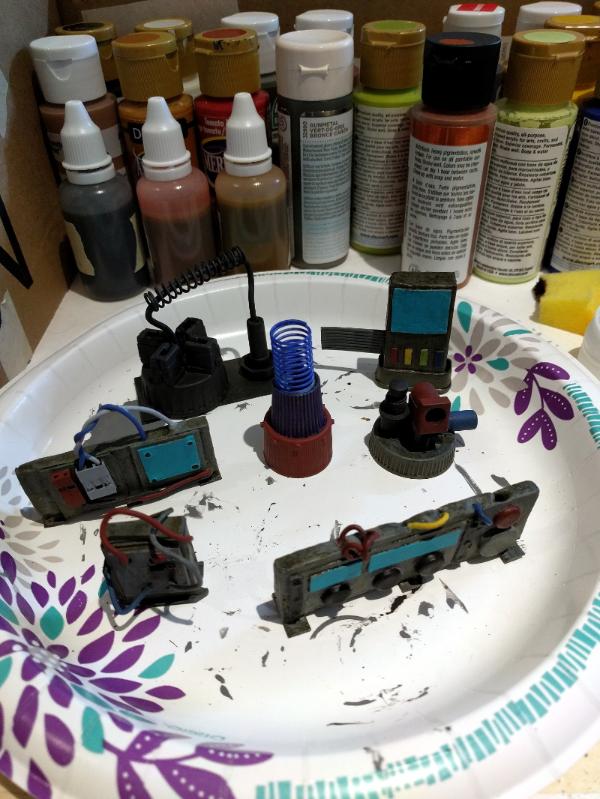
Mad scientist consoles and widgets are base coated, just need some highlights.
I'll also need to decide where to actually put the scatter in the terrain piece too for the final photos.
Like this?
Or like this?
Enough procrastinating. Need to get back to painting.
Scatter bits all look good, and the lava was a nice touch. I'm particularly impressed with the colouring though, with the added brown it's really come into it's own, works perfectly with the texture.
Good job on the LoER piece. Nice, natural look to the rock/stone surfaces.
One thing I will say for the future, Think about ways of breaking up the main colour a bit more: As nice as the rock is, it's difficult at a glance to tell what's a wall, floor, path, room... Some things you can do are to colour the floors differently than the walls; lighter, darker, browner, etc. Even if made from the same stuff, the floor gathers dirt differently than the walls (note that the top of the walls would also gather similar dirt to the floor). Also consider a worn path where there is the heaviest foot traffic (gives it some history).
Or, consider occasional floor coverings, like you have in a couple of places. You don't have to carpet the whole thing, but a rug (for certain circumstances, not all) or rubber mats, diamond-plate patches, tiles. In good contrasting colours/shades to break it up.
Or, buildings often have painted walls. Paint the inside surfaces of the walls and weather them (or even wallpaper them ). Just a remnant of colour can be enough to distinguish walls from floor and to give each room a separation from corridors and the outside.
Also, posters, signs, graffiti all help in breaking up the bulk colour.
Dr H, thanks for the comments on my terrain. I might go back and make improvements to the piece at some point. Feedback appreciated.
I've had some hobby time over the last couple of weeks so I've been puttering around and trying to decide what to do. Half-starting projects, getting ideas, etc.
Couple of things to show:
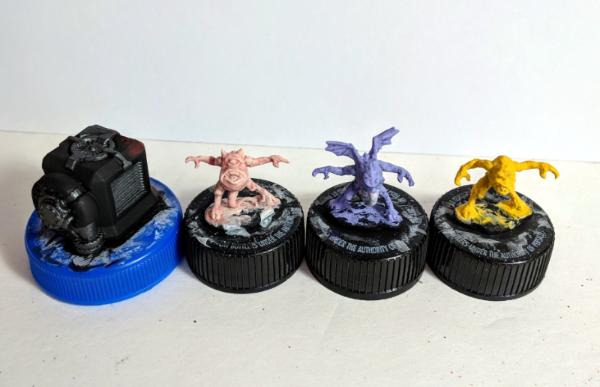
Here are a few Reaper minis I base coated. On the left is a Starship Generator. The three little guys on the right are from the Hordlings Sprue (3 little guys in one pack). I'll give them a wash and some highlights next.
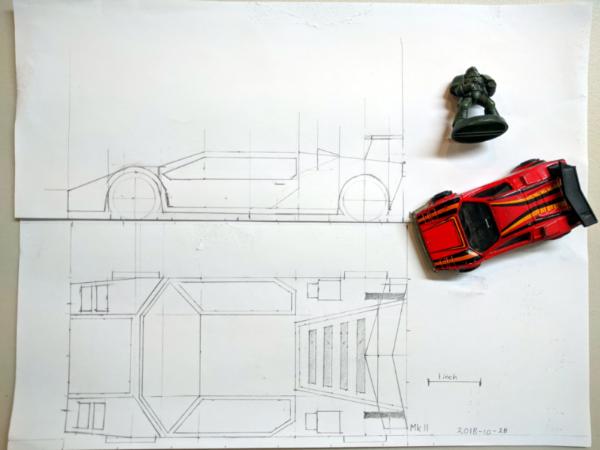
I was digging around in an old tub of toys from my childhood and found a little die-cast Lamborghini car. As I stared at it, I thought: what if an Ork built a car like this on some remote world? A "Lamborkghini" if you will. I'll admit I was inspired a little by the new Ork model releases for the Speed Freaks game, but equally by the idea of designing and building a scale model of this little toy from scratch. I am not a professional artist, and I know next to nothing about Lamborghini's, but hey it's my hobby time so why not? So I set about sketching it out, taking measurements off the die-cast model and trying to keep the scale right. Here's what I came up with after a few hours of effort:
Bear in mind these are just concept drawings. It's big... long and lean, roughly the same footprint of an Ork Battlewagon! I feel it needs rivets. The angle of the windows is going to be tricky. I'm not sure if anyone has done anything like this before, but regardless I think it's a fun concept and I'm excited by the idea of bringing it to life. I've already started cutting styrene... hopefully I can get some good WIP shots of this project. Wish me luck haha!
Skinflint Games wrote:I did the same thing with my Ferrarii F1 themed Evil Suns warband, Da Skooderia Ferrorki! Go for it, love to see the results
Sweet, I'd love to see some pictures. Link?
Dr H wrote:That's a Countach, should you want to look up reference pictures.
I have this kind of project on my to-do list, won't be happening for a long time yet though. I do like Lamborghinis.
Good start to the plan.
Interesting. Yes, I think you're right. Certainly the same wedge design. Like I said, I really know nothing about these cars so don't judge me too harshly haha. The die-cast model only says "LAMBORGHINI" on the bottom. I do think they look really cool. Thanks for the feedback.
Camkierhi wrote:Interesting. Seen it done before, always good to see others have a go. At the end of the day, you will have a unique but very cool army.
I looked around and couldn't find others who had done a similar project but maybe my keyword searches were off. Please do share links if you have them handy.
OK, so more WIP pictures, yes?
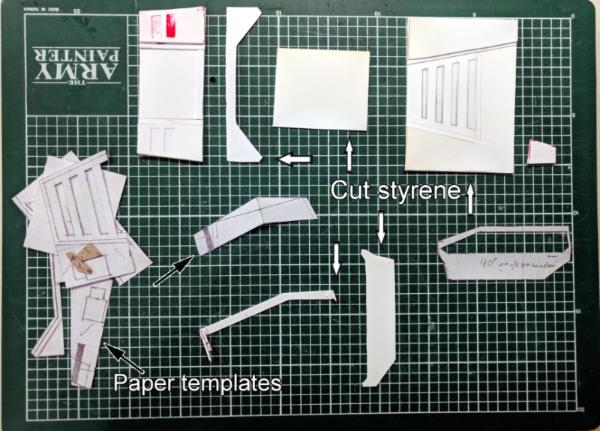
I photocopied my design and began cutting out pieces of styrene. I apologize for the slightly confusing WIP picture here, but I added some arrows to clarify what's plastic and what are the paper templates. I'm building up the front and rear with multiple layers of styrene. This is a very flat, angular car so I think this method will work well to achieve the effect. The hood has 3 layers, and the rear currently has 4. I used a some different thicknesses, between .01" (0.254mm) to 0.05" (1.27mm). I used what I had laying around, including some Evergreen styrene, and some yard sale signs. Hence the red color you see peeking out here and there. The edges are a little rough and uneven but I figure I can clean that up with some Milliput and sanding. Bottom-center you can see what I've been working on for the doors. I'm going to try a two-piece design, and what I've done here is added some supports off the upper window frame part of the door at angles. My rough measurements say that the window portion of the door is at a 40 degree angle to the side of the car (Lamborghini enthusiasts, don't hang me if this is incorrect or blasphemy!). So I've fashioned two supports at 40 degree angles on either side. Then I'll attach the window frame to the door. I'm not too worried about windows per-se... my intention here is that this will be an Ork vehicle. How can you tell how fast you're going if you can't feel the wind in your teef?!
I'm considering casting these pieces once I get them trued up. I have very little casting experience, only press-molds really. I picked up an Amazing Casting Resin kit and Amazing Mold Rubber kit and have read some great tutorials on the subject. I'll do some test casts first to build up my confidence and better understand the process.
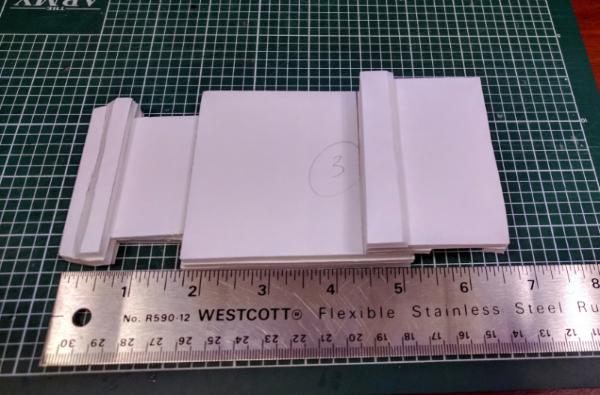
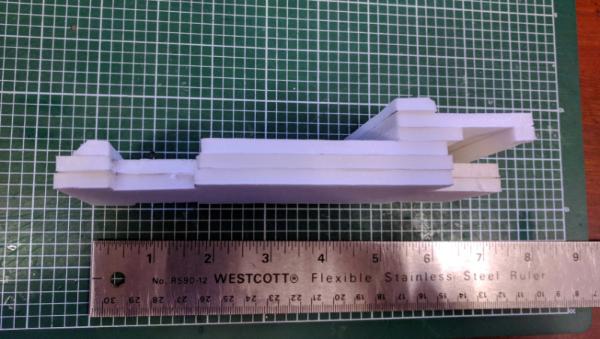
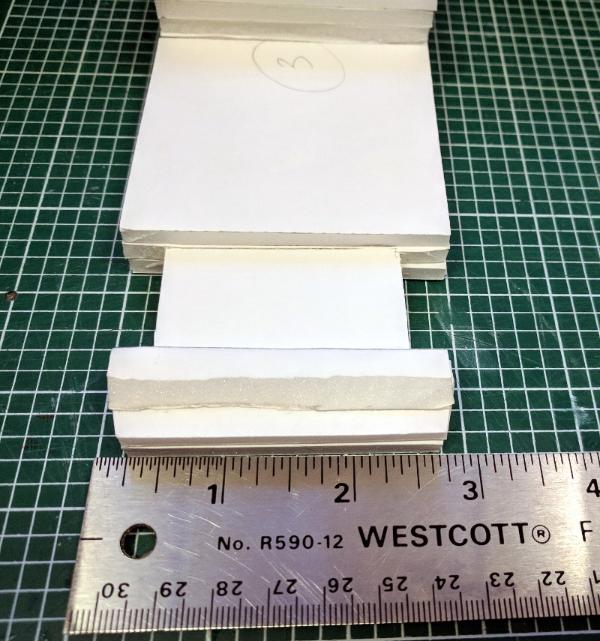
I've also cut out and glued together a rough shape for the body to support the pieces as I'm gluing them together. Spoilered here for size.
Spoiler:
I think the project is coming along nicely. Suggestions appreciated.
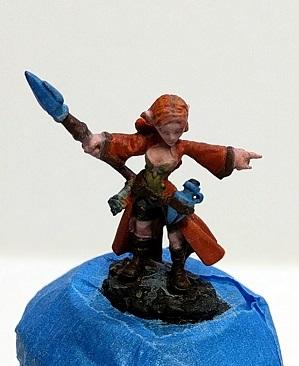
In other news, I'm nearly finished with these Reaper minis:
Just needs basing and varnish. I love that little cyclops guy. He looks like John Candy trying to tiptoe around quietly in an 80's movie. Or maybe like he's about to start singing and dancing around rather than being a menacing demon thing from the abyss. Makes me think of this scene from The Hobbit movie:
Hi Cleatus, I remember checking your blog several times over the last few years.
As a fellow Ork converter its always interesting to see what you are up to, some very fun and inspiring conversions on here
The Lamborkghini is a brilliant idea and will fit in wonderfully with the current focus on speedfreaks, looks like you have made a good start, I'm looking forward to see how it develops.
Actually, I finished these at the beginning of January. The miniature painting was done in November/December, but I got stuck on basing. I wanted to try something a little different than sand grass flock. After giving it some thought and looking for ideas online I decided to try making my own custom bases. So what you see here are simple green stuff bases with a stone pattern. These were really simple to make; I just put a blob of GS on the base, flattened it out, then dragged the back of my hobby knife over them to create the pattern. I think they turned out pretty nice all things considered.
I held off on posting because... guilt? One factor was that my focus shifted to other non-hobby activities (work, holidays, family time, shoveling snow!). But even when I had some hobby time to myself I found myself drawn to other projects. I'm glad that I finished these little minis, but for some reason I felt that I shouldn't post anything if I wasn't working on my ambitious Lamborkghini scratch build. Which is dumb. I've been puttering away on some other painting. I chipped away at some Orks, Skitarii, did some other GS sculpting (no photos yet). I guess the thought of taking the time to take photos, crop, adjust colors, and post them was daunting for some reason? Also silly. But hey, the brain isn't always logical. So here I am posting a picture of something to share.
One more. Here's an updated WIP shot of Cassie, Gnome Wizard:
This is nearly done really. A few more highlights and washes to give depth, then base it. I started on this model months ago, but again got distracted or lost interest. It's a common problem I know. But hey, it's a hobby.
Thank you to the handful of people who visit and post. I'm lurking on my phone and rumor has it I even comment on some posts here occasionally. Thanks for looking.
You do whatever you want with your hobby, and post whatever you want in your blog.
Ambitious projects take exponentially more time than the usual model building and painting. They come and go with the waves of inspiration. It's good to occasionally do other things to keep it interesting.
Thanks for the comments folks. I'm back! Been a while since I've posted anything, but I've been lurking and working on stuff in my nerd cave. Felt like time to share.
So having read and observed some of the hype around the new Contrast paints, I was... I guess you could say inspired to start painting again? I had not actually painted anything for months. (Primarily due to work, and other commitments.) But seeing the fantastic results some people were able to achieve in a short amount of time using only the new Contrast paints, I thought that I might pick up the brush again. However I wasn't keen on spending a lot on new paints just to try things out. Then I remembered I have a decent number of artists inks that I bought to make ink washes. And I thought to myself... I wonder what results I could achieve using inks? So I decided to give it a try. (Note that I am *not* trying to say that Contrast paints are inks, or washes, or even necessarily trying to prove that inks are just as good or anything like that. Just thought I'd put that out there, because I read enough drama about people arguing over this stuff. I just wanted to see what I could do with inks. ).
Let's start in medias res:
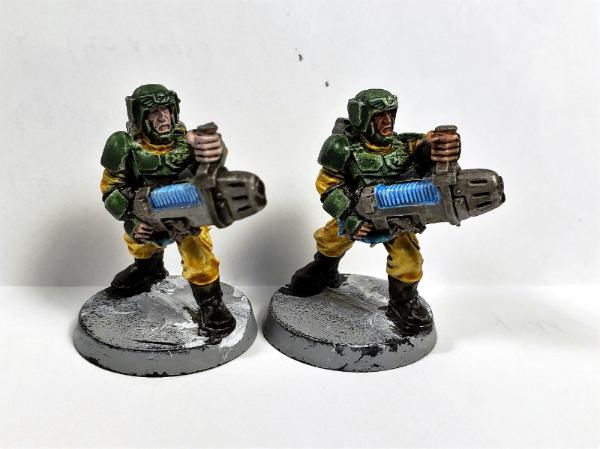
15 minute Imperial Guardsmen with plasma guns. These gents were painted primarily with inks. When I say primarily, I mean almost entirely, with no base coat. Just primer, then ink. Mostly. But I'll get to that.
Here's where I started:
Left-to-Right: First test Ork Boy with normal ink washes (painting time: 7 minutes); second model test with "stronger" ink wash for skin and clothes (painting time: 10 minutes). Model on the right is a control that has only been primed with gesso. Using Daler Rowney FW acrylic artists inks to paint these models.
The model on the left was washed with "normal" strength ink wash, which is basically 40 drops of ink, matte medium, and a solution of flow-aid and water. For my second attempt I increased the amount of ink. A lot. The skin is roughly 3x as much ink as a normal ink wash. The clothes also have an increased strength ink wash applied (roughly double strength). But it looks pretty good considering that's just ink, no base coat!
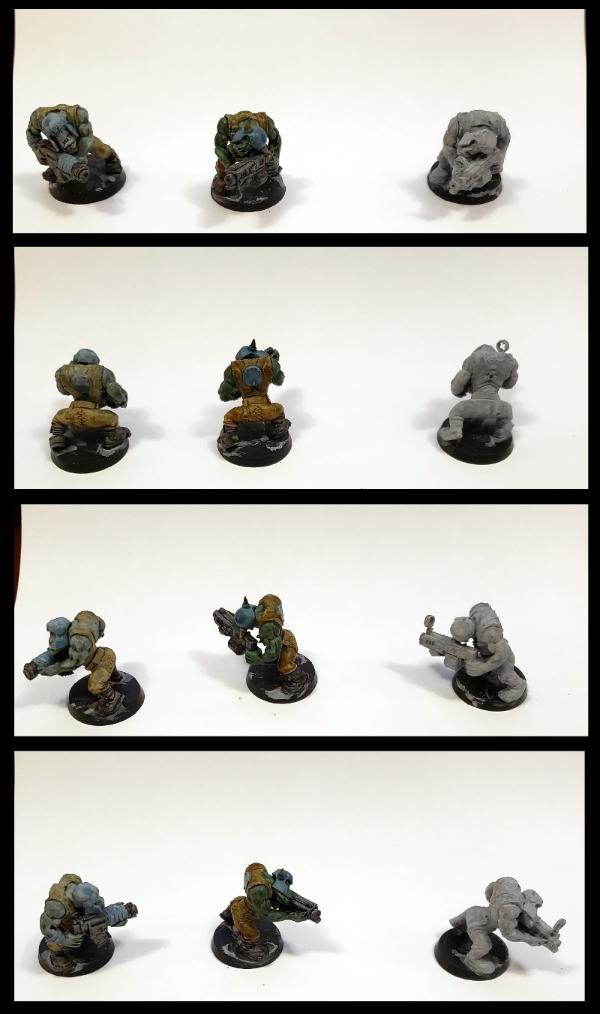
Round 2:
Left-to-Right: First test with normal ink washes (painting time: 7 minutes); second model test with "stronger" ink wash for skin and clothes (painting time: 10 minutes); the 3 models on the right were painted with "extra strength" ink washes (painting time: 15 minutes each). Also applied Leadbelcher to the metallic bits, and a wash with Nuln oil for contrast.
Round 3:
Finally, I went back and repainted the first two Ork Boy models with the 3rd iteration of the "extra strength" ink washes for consistency. Here they are all together.
I also spent just a few minutes on details, like teeth and eyes. This added a few minutes to each model, maybe 5, for a total of 20 minutes each. Still not bad.
Ok, let's move on...
Further tests:
Testing ink washes on an Imperial Guard model. Forgive me if the paint scheme looks weird, I don't play Guard! This guy took maybe 10 minutes from primed to good-enough-for-the-tabletop (not including drying time). Using Daler Rowney FW acrylic artists inks, and P3 flesh wash for the skin. Note that for this model I did not use metallics at all; the weapon and other bits were just washed with a thin black ink for contrast. It looks OK I guess.
IG Test 2:
Comparing the first IG test model I did with inks with my second attempt on an Imperial Guard model that a buddy gave me. I went for a darker ink wash on this one's armor, but kept a lighter olive color on the weapon body. Using Daler Rowney FW acrylic artists inks, and P3 flesh wash for the skin. Oh, and I applied some Leadbelcher to the metallic bits, then gave those a wash with Nuln oil. This one took maybe 15 minutes, not including drying time.
IG Test 3 (with Plasma!):
Another attempt painting some old IG models. Again using ink washes, and P3 flesh wash for the skin. I received some feedback that the model on the left with only the flesh wash was very pale, so for the model on the right I applied a layer of Reikland Fleshshade to the skin as well. I think the contrast is better. The plasma effect is just 1 coat of Cyan ink if you can believe it! Painting time: 15 mins each.
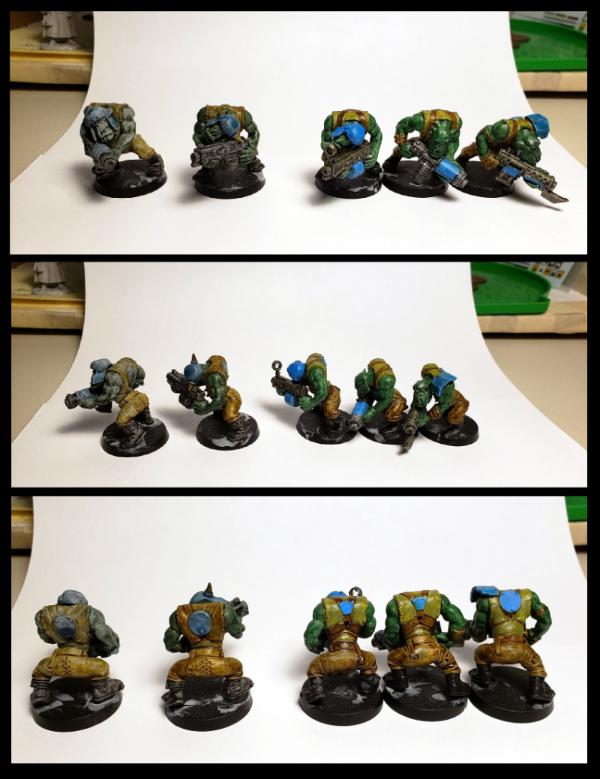
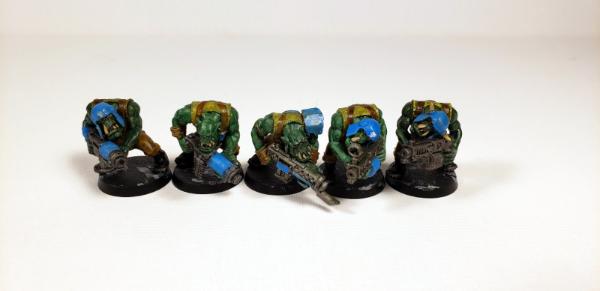
IG Group Shot, Tests 1, 2, & 3:
Group shot of the IG models that I painted up with inks. Left-to-right: 1st attempt, 2nd, attempt, the 3 models on the right were painted with "extra strength" ink washes. You might notice some variation in the color of the armor. I chalk that up to mixing the inks individually for each model. If painting a whole army I would mix up a big batch and then paint them all the same. The models on the right were painted with a solution of green and black ink (roughly 3:1 mix). Using Daler Rowney FW acrylic artists inks, and P3 flesh wash for the skin, Leadbelcher for the metallic bits, and a wash with Nuln oil for contrast.
Not bad, right? I mean, it's not award winning, but considering that it's almost entirely inks with no base coat, and super fast, I'm very pleased! Certainly good enough for the table top. Moreover, I painted up some models that had been sitting there on the shelf, bare plastic (or metal), for a long time. Possibly years. This technique is fast, and produces decent enough results that I'd be satisfied to call these "done" once they are based. As I mentioned, I went back and picked out a few details after the fact, but considering I went from raw models to "good enough" in minutes, I'm satisfied. My usual painting style takes an hour or more on even basic troops. Details? forget it, I might spend 5 hours on a model. Maybe it's because I'm sloppy, or slow, or whatever. But with this technique it's hard to argue with the results considering the time spent.
Ugh, so many salty people going on and on about the contrast paints here and in the FB groups. This is some really interesting reading though - thanks for taking the time to do the tests!
Skinflint Games wrote:Nice to see you back Cleatus, and great results with the washes!
Thanks!
TerrainWalker wrote:Ugh, so many salty people going on and on about the contrast paints here and in the FB groups. This is some really interesting reading though - thanks for taking the time to do the tests!
Yeah, I considered sharing this in the News and Rumors thread about Contrast paints, but I just don't want to deal with the potential drama. Besides I'm not trying to replicate Contrast paints. I have nothing to prove. I'm just seeing what results I can achieve with heavy ink washes. At the end of the day I just want to get some models painted. If people find this information helpful, great!
For those who are curious, I've spent less than $30 (USD) on supplies... I might share details if I get around to typing it all out rather than painting.
I was clearing through some old stuff the other day, and discovered some Cadians that I had done just the same thing to - primed white with a helping of Daler Rowney inks. I obviously had the same concerns back then: how do I paint all of these buggers!
They looked alright, actually, as do your tests. Does Contrast take your fancy at all? I’m really looking forward to giving them a good go.
Cosmic wrote:I was clearing through some old stuff the other day, and discovered some Cadians that I had done just the same thing to - primed white with a helping of Daler Rowney inks. I obviously had the same concerns back then: how do I paint all of these buggers!
They looked alright, actually, as do your tests. Does Contrast take your fancy at all? I’m really looking forward to giving them a good go.
Keep up the good painting fight!
Great minds think alike. I'm interested in Contrast, but not interested in the price tag... if I can find some at a discount I might pick up a jar or two.
Thanks for the feedback gents!
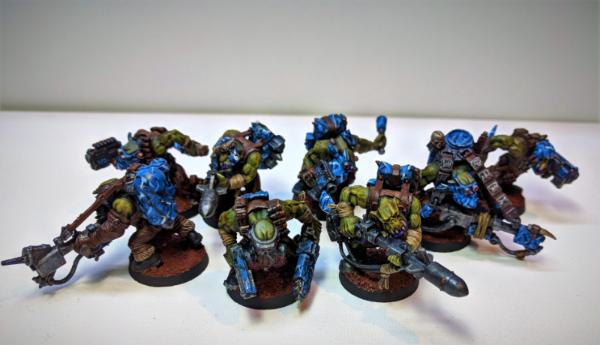
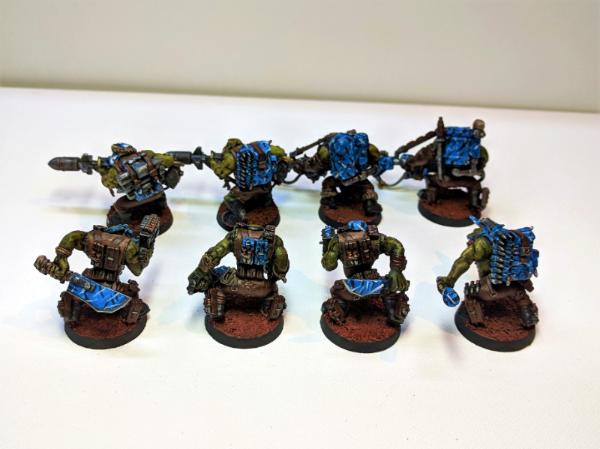
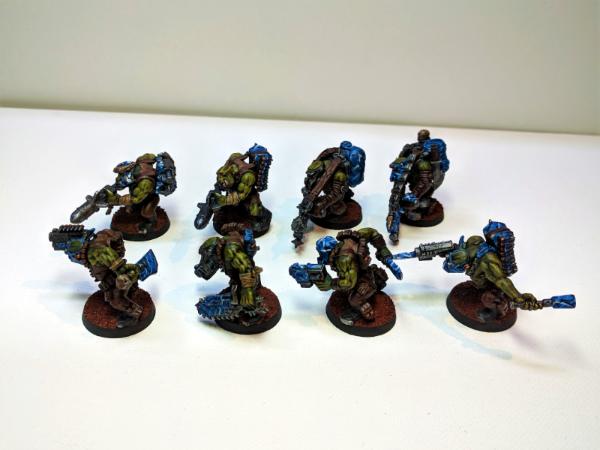
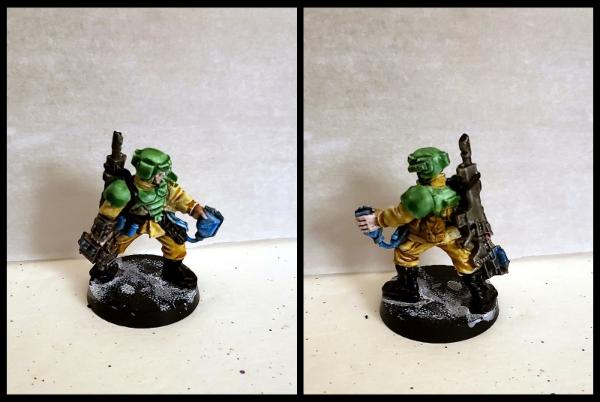
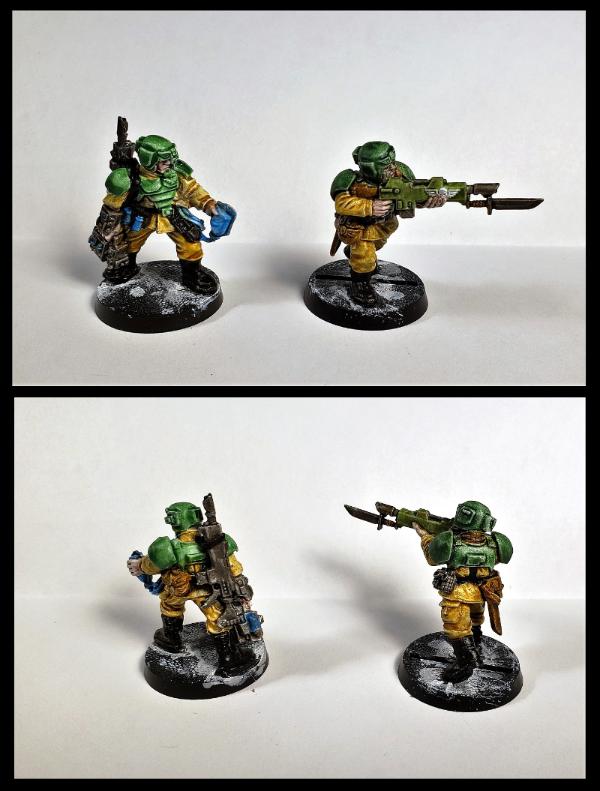
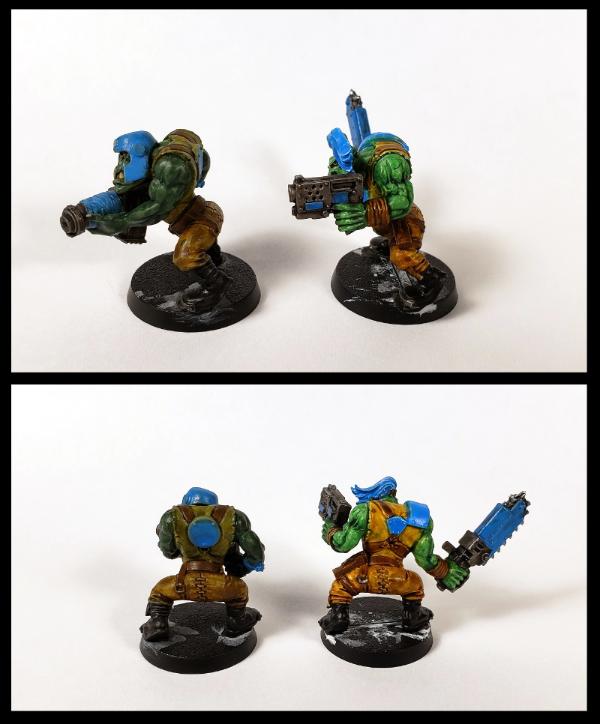
Working on some more Ork Boyz. Here's a comparison shot of my 3rd attempt (left) which looks pretty darn good, and my 4th attempt with brighter colors.
The most obvious difference is the skin. On left I only painted the skin with dark green ink (1:3 mix of black and green inks). On the right I painted the skin first with just green ink, then gave the recesses a wash of the dark green ink mixture. The shirt is also much brighter. On the left the shirt was painted with a sort of olive green ink wash (I think this was burnt umber and green mixed?), whereas on the right I went for straight yellow ("Brilliant Yellow"). The colors are almost too bright for me, but they are very striking and eye catching from further away. I like the dark Ork skin, but from 3+ feet away they look like dark blobs haha.
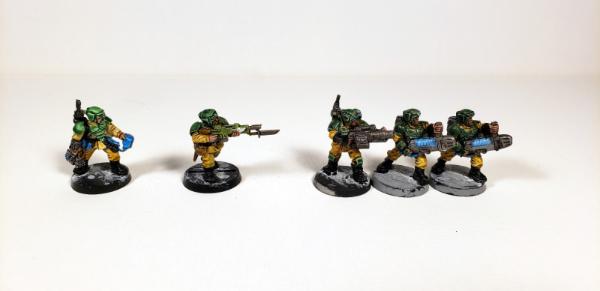
Here's a group of 3 that I painted up with this newer color scheme.
I took a little time to add some details, namely teeth, horns, eyes, and edge highlights on the choppas. I've got several more Choppa Boyz in the queue so I'll end up with at least a squad of 10 with this color scheme.
In other news, I was motivated to finish off some other models I've had 95% complete for a long time. All that needed done was varnish and basing. I had a good day for spraying so I varnished a whole bunch of models. Most of these have not been painted with inks, but rather with "normal" acrylic paints. Just posting to share.
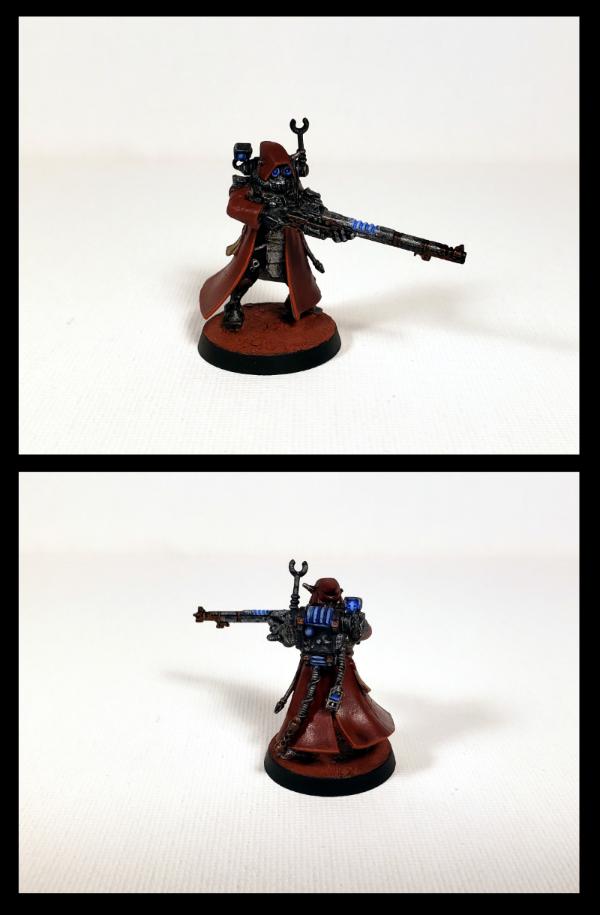
Here's a lone Skitarii model (Skitarius?) that I painted some time ago. Now based with Martian Ironearth.
Here are some old school 2nd ed Ork Boyz that I painted up over a year ago.
They've just been sitting around waiting for varnish. I think these are considered "based" per the usual standards of 2nd ed (green!), but I could throw some sand or grass at them if I felt like it I suppose.
Couple of Big Shoota boyz. These were done years apart and it shows, haha. At least they're based now.
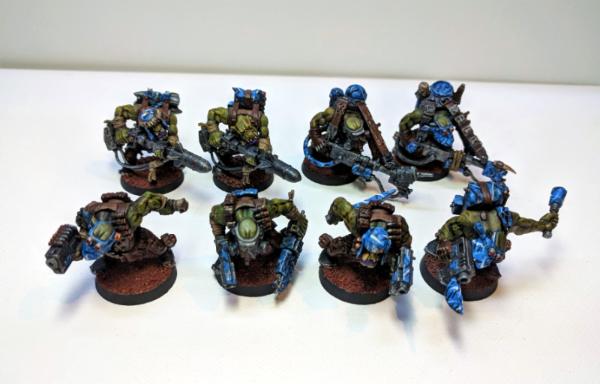
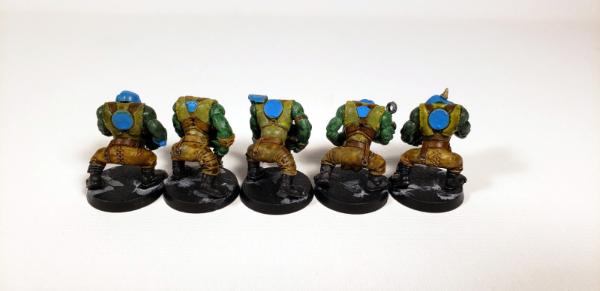
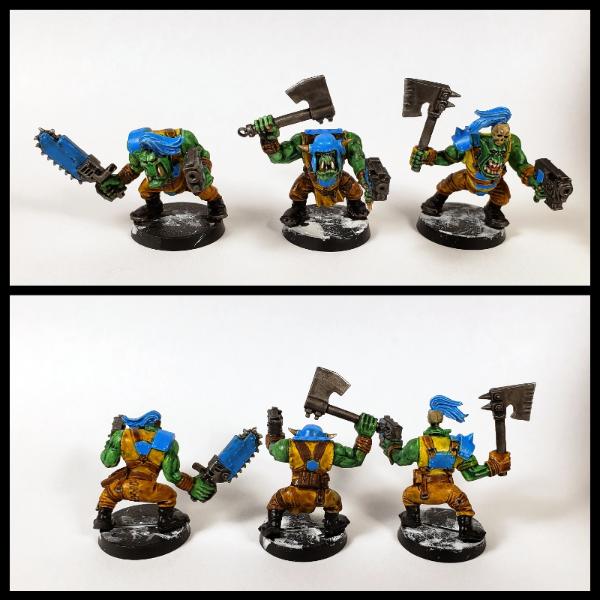
Some more recent Deathskulls Ork Boyz with sluggas and choppas.
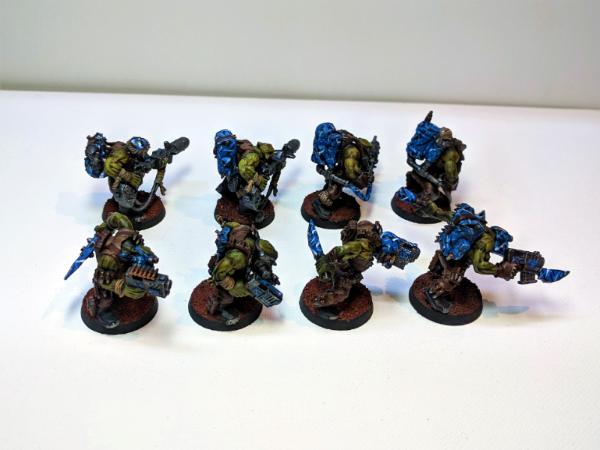
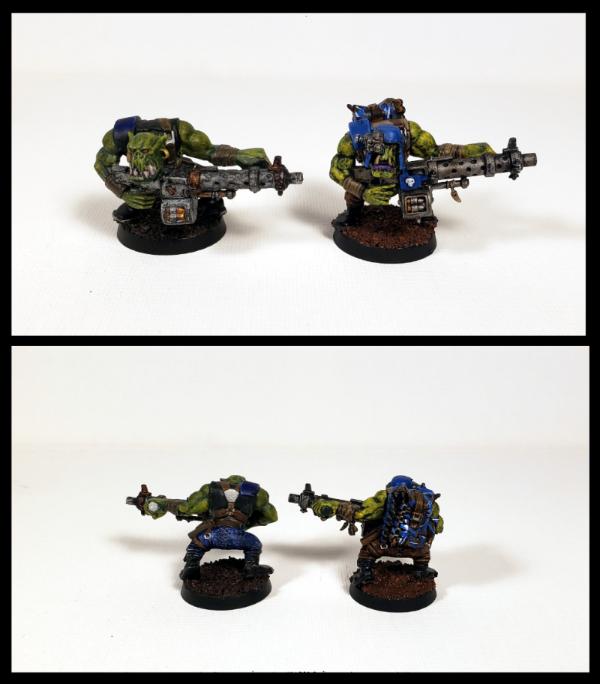
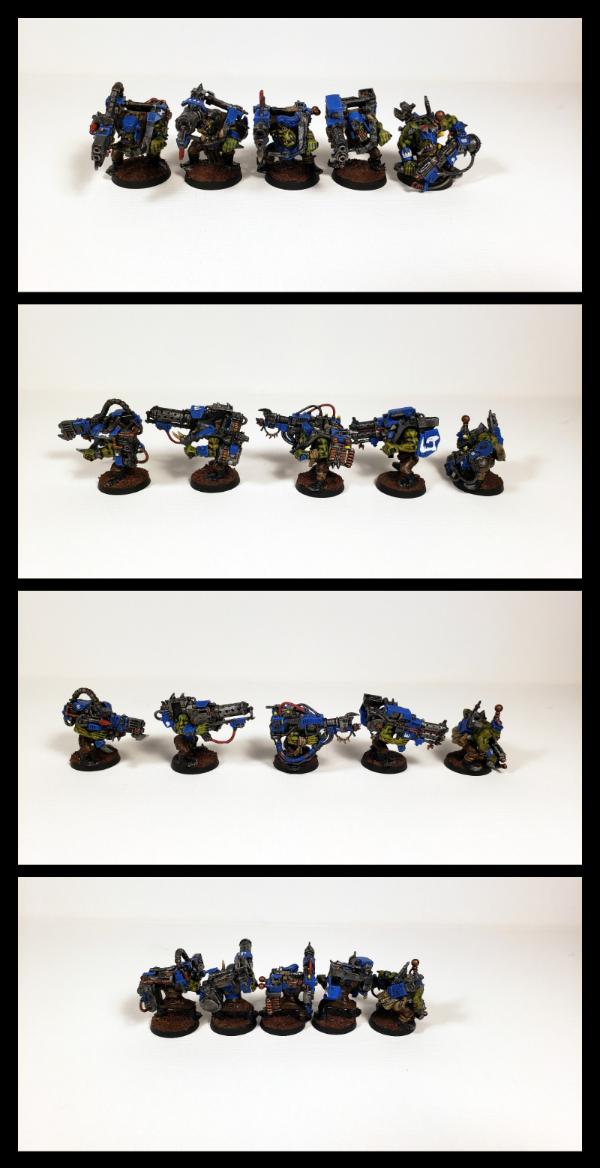
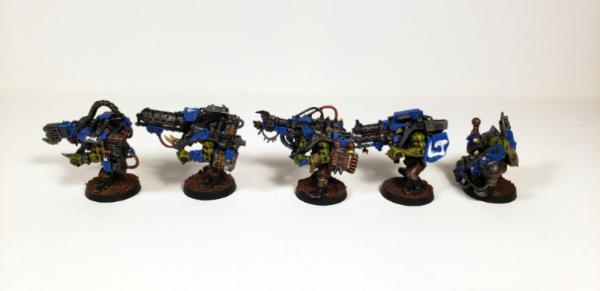
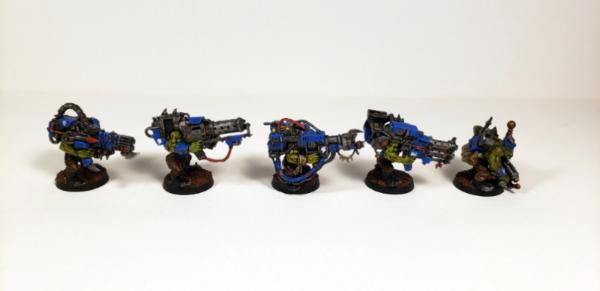
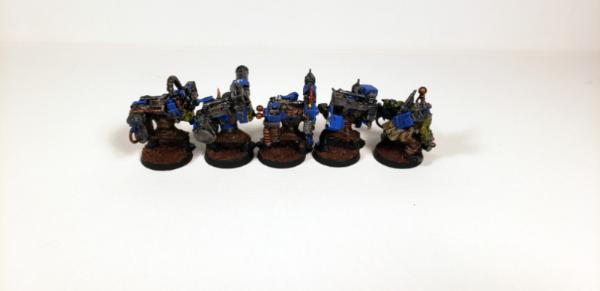
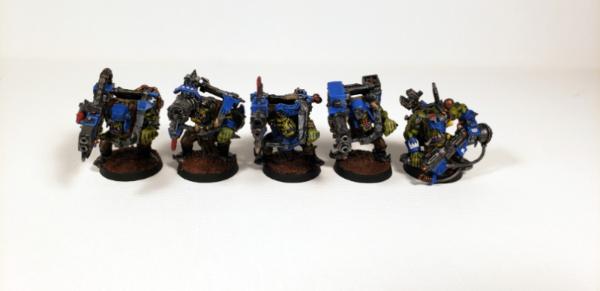
These Lootas were a rescue.
Some of the joins are not joined at all, and I tried fixing them a bit, but the bits were fused together due the type of glue used, and it seemed like a lot of hassle to cut them all up and reposition, rebuild and fill gaps, etc. So I ended up leaving them. Honestly because they're Orks, the aesthetic kind of works haha! These were originally painted back in 2013/2014, and I revisted them at some point in the last 6 months. I spent a fair amount of time on them picking out details. Lootas are fun models to paint. These were probably the last models I painted before taking a hiatus. Just never based them. Now they're done and I can move on.
Gratuitus high-rez shots if you like that sort of thing:
Spoiler:
I've got another half dozen Ork Boyz in the queue that I'm working on with the new ink technique and latest color scheme. I'm excited to be painting again. So I've got that going for me, which is nice.

 I think they're really fun, and have a distinct look that is quite different than the official


 ...with a sidecar stretcher thingy or something?


 RIVETS!


 You need some orange ones to go with them though