EyeamRai, Yeah, if it's getting frustrating then it's time to take a step back, work on something else. Maybe you will get a second wind in a week or so, something may still inspire you. The shows not over until the fat Ork cheerleader sings...(you know the one)
May inspiration creep up on you when you least expect it.
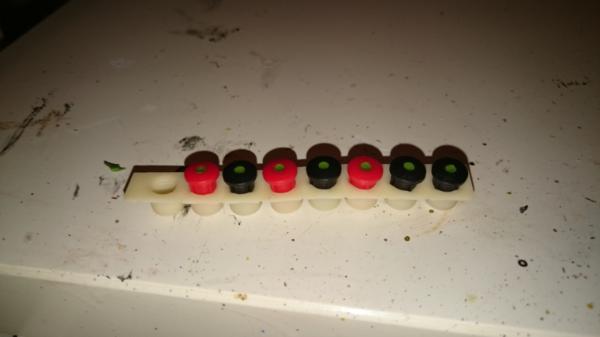
So as you may have gathered I've really struggled to find the right fit for the flight stand for the asteroid; until I find the right one, can't progress... There have been some further attempts that I won't bore you with pics of (cocktail stick holder, ice cream sprinkle tub, etc etc). However... Success!
It's too high at present, but plastic wine glass is perfect. Distribution of weight is perfect, but even better...
So it's modular! Well ish. You can take it off, add a fire arc token - just like a real mini.
Sorry to cross link, but I've got to dash out and wanted to see what people thought
TP^DC Deputy Manager wrote: [color=orange]
WIP from last night.
So we have sprue and lollipop sticks added on one side of the ramp and I am very chuffed. I need to green stuff in around the edges and have bought new which will hopefully work much better.
This is the current state of play:
The black makes it look brilliant in person and with the pad being able to sit raised and lowered, that element has succeeded. The rule that can be seen in the photos was found in the bottom of a drawer and I'm thinking sand off the markings, pint with Tamiya's clearish red paints and then a blue wash, with maybe a white highlight to create a beam of forcefield walkway across to the sensor tower island (I'll make a start and end of beam transmitter array of some description, I'm thinking Plasticard and sprue).
did manage to get a little painting done, and a bit of detail work, but i didn't get nearly as far as i had hoped i would with the project this weekend--had a few things on the honey-do list that needed attention. hopefully will be photobombing the gallery with a bunch of WIP pics later tonight.
Escape pods! They are on flexy rubber so I can wrap to the surface more easily.
I was reading this excellent article of close ups of the original wars models
http://slightlywarped.com/?p=52 And I realised what was wrong: there's not enough detail on my towers. Squares, patterns, etc. And to amuse myself, and in homage to the original models, I'm going to use parts from models kits - though in our case, gw
So cyclone front, backwards and some fw brass sprue. I need to do not too much, obviously, to preserve the inherent cartridge shape. However, much happier
Hey guys. Everyone's pieces are coming along nicely.
Quick WIP:
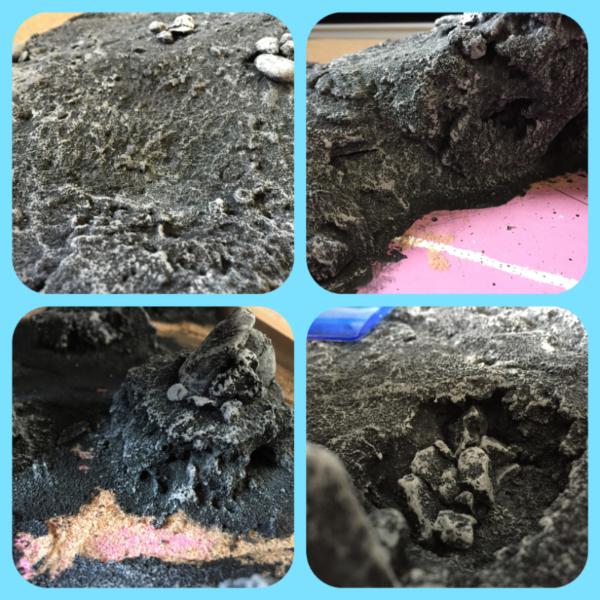
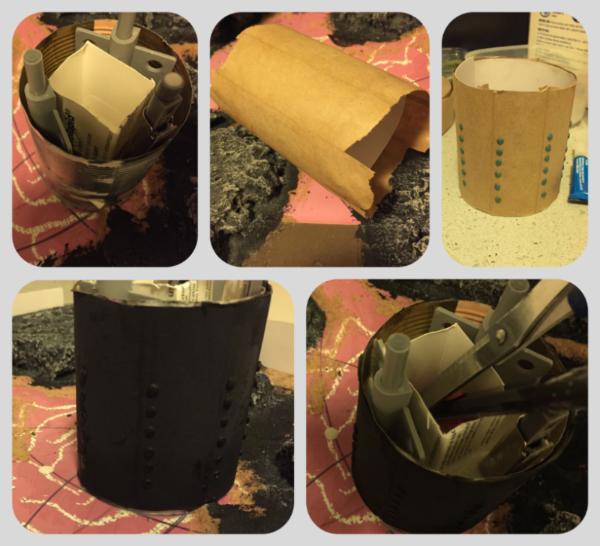
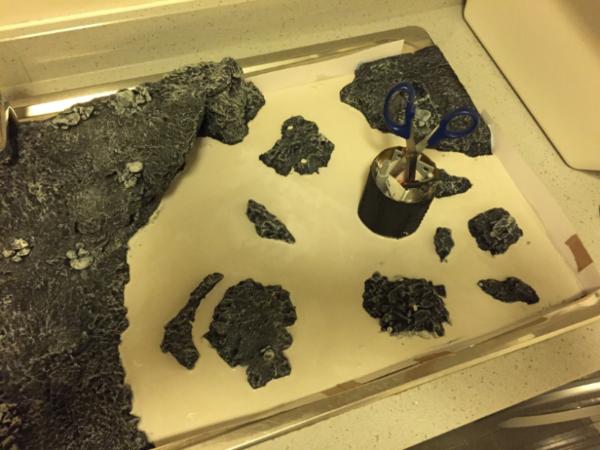
Painted and drybrushed the rocks. Sadly the photo doesn't do it justice . I admit that sounds quite pretentious, but up close I am absolutely blown away by the fact that I managed to make this - I thought I'd mess the whole thing up! Must keep up the pace. I hadn't planned on doing any more for the rocks because it's meant to be a lava planet ie no moss/trees/streams/puddles/hedges etc, if anyway has conflicting thoughts, I'd be grateful to hear them. Next up will be lining the beans tin (the ridges just don't look Tau enough) then pour in some lava.
TP - gnarly drybrushing...you should be proud. and re: using the ruler as a walkway - great idea, but sanding the numbers off will turn the edges opaque...although maybe that's a good thing.
i'm looking for some feedback on my project from anyone/everyone.
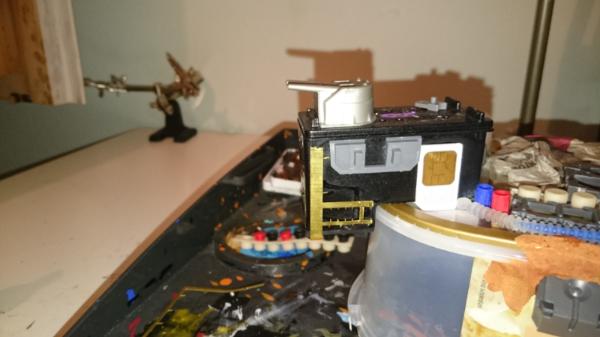
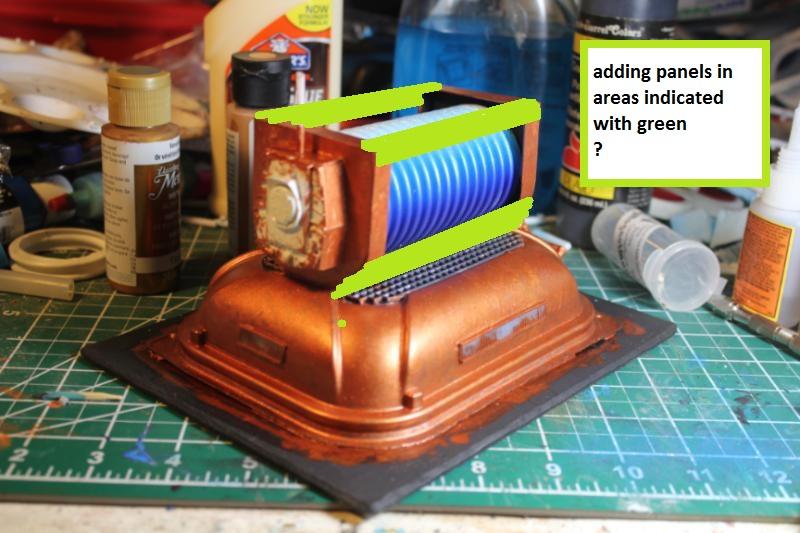
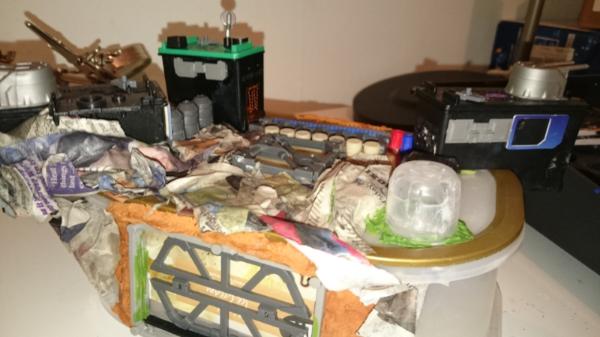
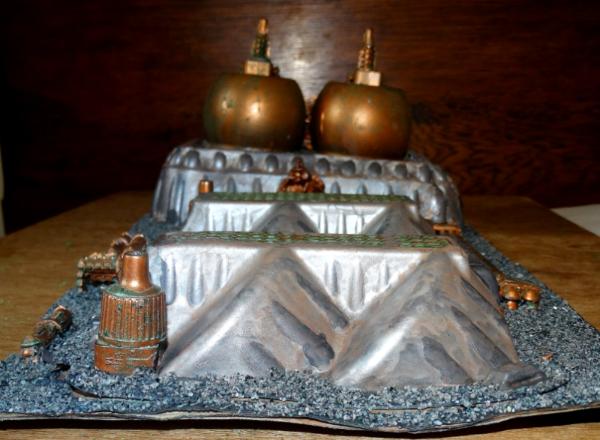
been thinking about adding some plating/panelling/braces to the generator (see pic spoilered below):
I can see why you were thinking of adding panels, because it will frame the generator well, but you do risk making it look cramped. Would you use cocktail sticks (or transparent equivalent) as poles, or more like coffee stirrers as planks?
Without seeing test shots, I'm leaning towards leaving it as it is
Oh, and thank you very much! I'd had a day yesterday and really needed an "achievement" and this seemed to fall in to place perfectly.
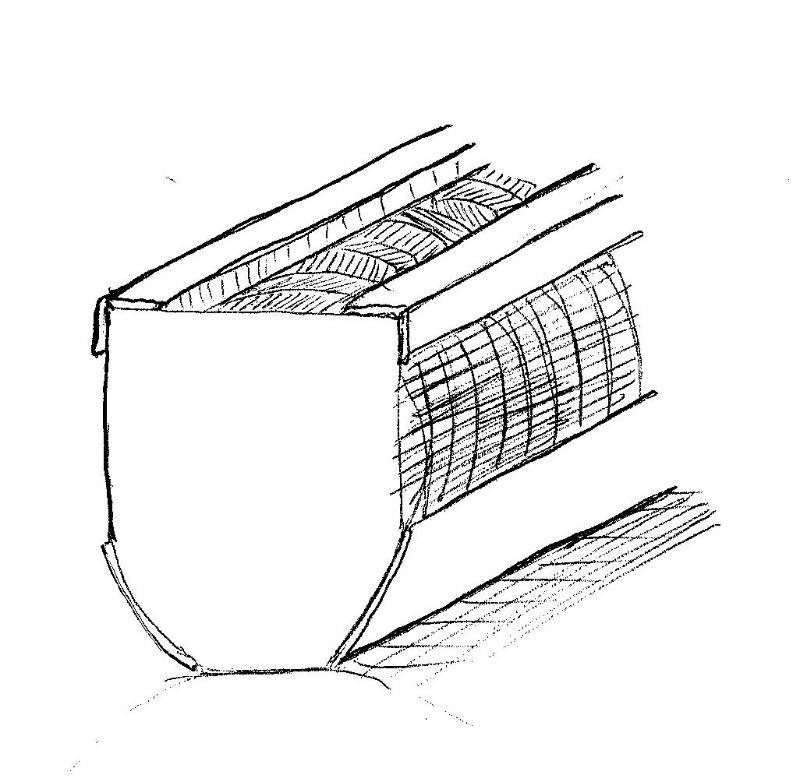
i was thinking more of a sheet metal look (with rivets!); covering the bottom part of the stands that hold the coil up, and then maybe a beam at the corners of the supports holding the coil. Using plastic strip/angle/ibeams...this line drawing might make it clearer:
@Camkierhi - I am not one to dive in to something without prior research and planning, but in this I did the planning without the research! I will probably finish off the structure and lava field and then if there's time add in some appropriate colour splashes based on Google results. Thanks so much for the tip
I'm out guys - university commitments + family visiting from overseas + huge terrain piece. Ugh. I'll still get it done, just not before the deadline crunches closed. Good luck, chaps!
@ Cam - thanks, man. my primary concern was that you can look straight into the support, which has no details and is painted flat black...thought i could kill two birds (block that view, add some detail) ith one stone.
@TP - foliage (weeds) are pretty common around walkways and bases of buildings...may want to concentrate on those areas if you decide to add some color. by the by, what are you going to use for lava? if you have access to a store that sells cheap goods cheaply (a dollar store here in the states), you might get some red and yellow LEDs and use some clear acrylic...
@Chris White - sorry to see you drop out...any way to scaled down your project to get *something* done?
Still get the feeling this is going to be an awesome turn out!
Yeah... I just looked at this and went WTF.
Not to stress you out any further, but you now have just over 4 weeks left.
Good progress people. Nice to see things coming together.
Sorry to see life has got in your way, Chris. Get it done when you can.
Everyone:
Even though we are a month away, from the deadline. Don't look at it as a fixed date. If a number of people are struggling to make it, and everyone else is fine with it, we can sort out an extension so that we get a good selection of completed pieces. We will worry about it when we're nearer the time though.
A few hours over, if you're just finishing off and taking NICE pictures, is not a problem either.
@chriswhite - gutted to hear you can't continue. What if you just did the cylinder with the steps around it. That in itself would be cool to finish.
@Gawdam - I was torn about weeds etc until seeing Cam's photo because I had thought no vegetation would survive on a lava planet. Learnt me a lesson tonight I'm going simple for my first lava outing - want to get practice for my Farsight army resin bases. I'm going to pour plaster in to the bed area between rocks and then hairdry/drag some texture to the surface. There may well be LEDs in my landing pad though as landing lights. That's my penultimate job, so I can abandon if time gets away from me.
Quick WIP (Spoilered due to pictures - don't want to overload this thread)
Spoiler:
Central column (with rivets on!!):
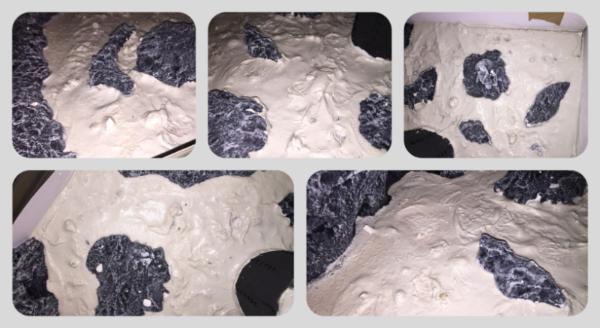
A smooth layer of white plaster between the rocks (which looks very non-lava-like):
I opted for the hairdryer option to dry lava:
Bit disappointed to have some cracking of plaster this morning because of the thin layer, but that was always something I would have to deal with. I'll try to incorporate into the paint job. There a couple of plaster splatters on the rocks which are going to be painted up as lava splatters - seems appropriate.
There's more detailed explanation on my terrain blog if anyone's interested.
As always, comments gratefully received. Also, let me know if I should be posting less on here.
Bit disappointed to have some cracking of plaster this morning because of the thin layer, but that was always something I would have to deal with
i bet it will look spectacular if you paint said cracks bright yellow...i see possibilities in natural cracks...(at all the others...mind out of the gutter please...)
i have been rather unproductive all the past weeks... but i plan to redeem myself..^^
thanks mate...and i m loking forward to more updates from you... and mind you... there is no need to spoiler anything here... cluttering this thread with your pics saves it from getting cluttered with unneded comments... besides... of coure every comment here keeps us in the "recent" threads page!^^
@Vik - really hoping to see you scrape something together for this contest (thought you had exams or something?)
@TP - cracks in the lava could be painted to look like chunks of rock are floating in 'liquid hot mag-ma' with a little bit of work...although it seems a little elaborate for a pen/knick-knacks holder. although a guy who seems to buy a pair of scissors every other week because he keeps losing them probably shouldn't poke fun at someone who made a magnificent display case/holder for *their* scissors...
@Gawdam - har-dee-har-har! To be fair, I did neglect to say that they were in there to weigh down the little box in the plaster that is a space for a battery to go if I add LEDs, time-permitting. Anyway, isn't your pen holder that big?
@Inmygravenimage - I love the details you are putting in to your asteroid, but I'm starting to find it difficult to make out all of the elements due to distracting colours of the newspaper. I'm sure it will be clearer when primed though.
Are you planning on putting more papiér-mâché on or were you going to leave it as a solid structure with rock coming out of it, rather than the other way round?
Thanks mate, yeah I'm finding that distracting myself it will be largely encased in papier-mache, I hope. Monday is looking like go-day. I may add more by then. There may be a couple of rivets also, in unconnected news, it is younger son's birthday Friday, and for one cake (minion) I've convinced the wife to cover the board in rivets! I even gave her a tutorial (sugarpaste + straw!) my work here is done
this is the way to go...er...bake...cake... also...where else are you allowed to add rivets as you please in context of modern cinema culture than with minions?...i rest my case^^
GawdamSumbish wrote: as participants in a League of Extraordinary Riveters contest, we are all entitled to a piece of the Minions riveted cake, are we not?
at the very least, we should get to see a picture of it...
I agree on both counts. In particular (paraphrasing a certain blue furry Sesame Street character) - me want cake!!!!
graven usually at least provides us with pics of cakes... his wife is an extra ordinary cake maker...
i fear tho a cake of these proportion wont travel that good^^
to call these bitz... bitz ... is an understatement... some cool ones there for sure ...would also make a very interesting looking titan or other project...
@Tek - awesome job! As has already been said - you nailed this one.
My WIP after last night:
Hope the lava effect comes through. Not disappointed for my first attempt, but couldn't seem to reduce the quantity of yellow without making it look like a block of red in places. I'll gloss over the lava when I get turps out of the garage (my gloss varnish is not water-based).
There's a couple of photos of layering stages in my terrain blog if anyone interested although I'm not convinced that they will fulfil anyone's lives that much
I don't know what I'm doing. I have a billionty different little projects going at the moment, and I'm not sure what I will get completed before the deadline (for example, I wont be able to do anything for all of next week).
trollmeat wrote: I don't know what I'm doing. I have a billionty different little projects going at the moment, and I'm not sure what I will get completed before the deadline (for example, I wont be able to do anything for all of next week).
Well that still gives you a week and a bit of working. Keep at it, don't give up. If you don't finish, you don't finish, but you didn't quit. How's that for motivation.
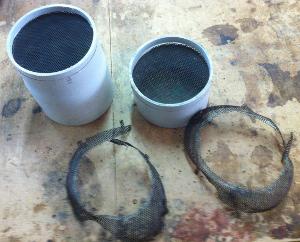
Would PVC pipe and the mesh from the dead stereo count as the 2 items?
The pipes would need to stay intact as the mesh (not to mention the rest of the stereo) is not.
You could nominate any part of the stereo for the second item really. Remember you are getting judged on how well you use both items, not just on the outcome (but both are important).
Just under 3 weeks left. Go to it chaps, you can do this.
Dr H - As I was reading that I imagined you with sports coach posture, knee raised on a bleacher inspiring your team to dig in and win the game. I'm all motivated now!
So I did say I would try to get something in. Here are the two pieces I will use:
A meat package and some object from an old analog timer. No promises that I will finish. More photos on the blog.
Timer piece is 40mm long... and 21-22 mm diameter I could have sworn it was an inch. Ah well, I'll find something else, and update the photo probably Sunday.
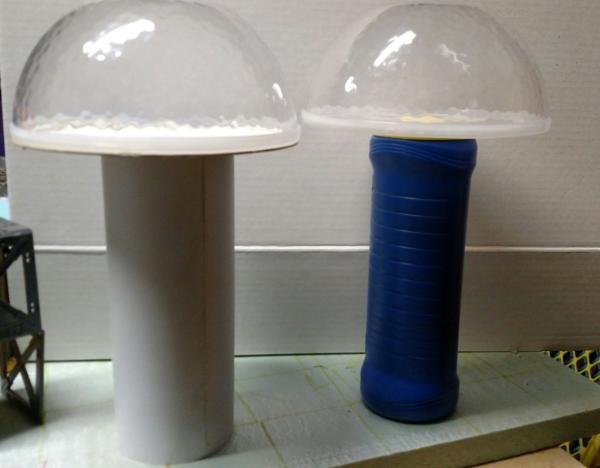
I still plan to enter something, probably just one finished dome.
Need to sort out gubbins and prime before I can paint it and glue in all the flora though. Which base for the support pillar?
Plasticard tube set around the cardboard tubes, allows for the easy removal of the dome leaving a pillar that I could use for a landing pad or just add a damaged portion to the top, should I desire to change things up...
Or, I could go with the Lays Stax can (or wtf ever they call them) can which has some interesting contours built in. By gluing the platform to the can lid, I could easily remove it and sub in another lid with a different top glued to it.
Either piece would get proper gubbins to go with it, probably some straw-pipes to suggest irrigation and some other techy bits.
The plastic+cardboard tube setup is probably gonna be the sturdier rig, but if I adequately glue the stax can to the board section, either should be fine.
Red Harvest wrote: Timer piece is 40mm long... and 21-22 mm diameter I could have sworn it was an inch. Ah well, I'll find something else, and update the photo probably Sunday.
For the sake of a few mm, I'll let you have it. It looked much smaller than that on my little screen.
Alright two votes for plasticard, I'll stick with it. Stax tube is indeed more of an oval with narrow sides.
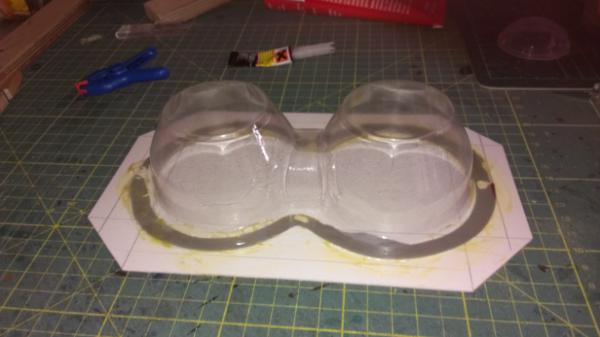
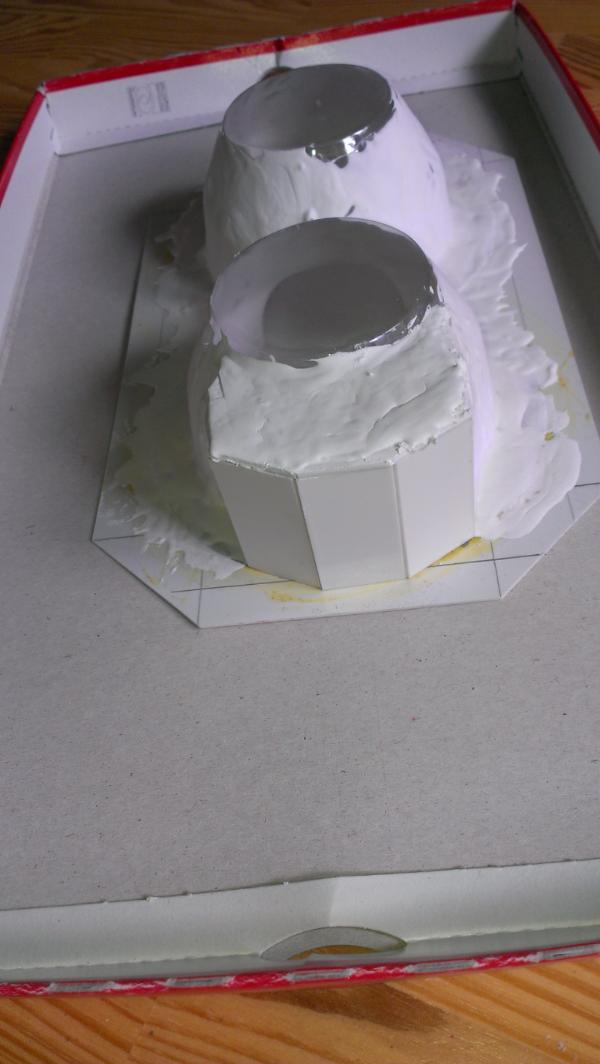
The domes are clear plastic serving/storage bowls from Walmart. I got a nested set of 3 for just under 6 bucks. I'm still trying to source an affordable 24" dome for another section of the board... but the smaller domes are working out pretty well.
I'll have to work out the gubbins and get everything primed soon.
Before you do that, I'd suggest thickening up the platforms. They might be sturdy now, but they seem like they'll end up being a little flimsy in the long-run, especially after you're adding glue and more weight to them.
Even something as 'simple' as some girders or braces underneath would help significantly with both how they look and how they'll perform.
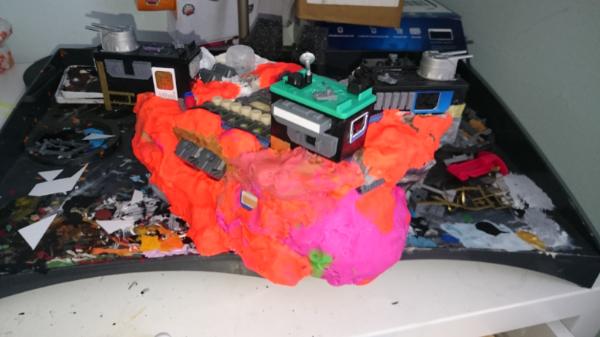
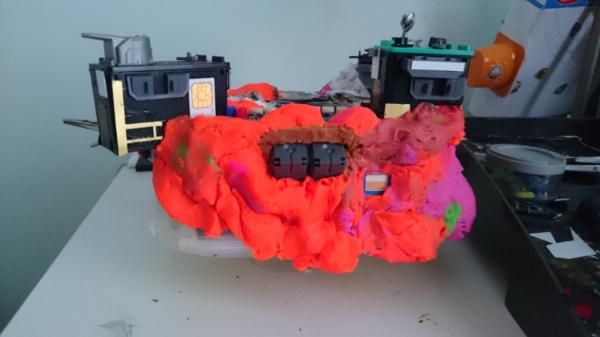
We have bucket loads of playdoh in the house, much of it unrecognisably bilious, like some awful nurgle/slaanesh mash-up (Fabulous Bile, anyone?). And of course, when it dries hard, and cracks...
Well it seems solid enough and has stuck well enough that I can prod it without fear. It is cracking (don't know how well you can see this): Thanks chaps! Am a bit concerned about the weight of the thing. We shall see.
i think you discovered a gold mine with that material... something that could be a true blessing for modelling...damn... now i need to surpress the urge to try that too
Red Harvest wrote: Timer piece is 40mm long... and 21-22 mm diameter I could have sworn it was an inch. Ah well, I'll find something else, and update the photo probably Sunday.
For the sake of a few mm, I'll let you have it. It looked much smaller than that on my little screen.
Good to hear you are still going for it, Grim'.
No worries, I just use another cryovac container instead, but in a different manner. No need for an exception here.
And with primer on the first one
Still much work to do on the details.
Truly epic work going on here gang!
And on with the base.
Just a couple so you can see how I'm getting on. It will need another coat if only to deal with the cracking; however, it's stable, solid and not flaking off, all of which are good. The next step will be gs/Milliput to add some definition to the smooth bits, hide corners of newspaper, and remodel the surface of the kitchen roll. But, generally, I think this has been largely a success!
after an incredibly slow start, decent progress in the middle, and now having procrastinated heading towards the end, i realize i probably will not have time to finish my piece. RL issues, including applying for and getting a new job, got in the way....not to mention the Rangers having 2 7 game stanley cup playoff series, and my discovery of the video games "the interesting adventures of van helsing" 1,2 and 3)
i will keep at it, but i'm not at all confident of finishing at the level i had hoped. would have to radically scale back on the rivets and basically just tidy up the painting of what i have done already.
A lot of truly awesome scratchbuilding work going on here - great work folks! I'm a bit late on this thread (only just registered for Dakka Dakka), so probably won't be entering something. However, I have some mould making to do in the next week, so would you like some pictures of that to add to all the terrain making goodness?
Myself and a mate make resin cast terrain, which we paint up and sell online - have a look at our website (www.reddragongaming.co.uk to see some of our stuff. We're not so much into making stuff from household objects, although our originals are usually polyfilla, sand, bits of stone, stick and bark, matchsticks, card, etc. We then seal them with PVA glue, making silicone moulds out of the and then make batches cast in resin. The advantage of resin is that it's really tough stuff - useful for me because I often drop things!
I've put a few pics below. We also make the boards in these pics - MDF, sand for texture, lots of drybrushing, etc.
Cheers,
Nic
Red Dragon Gaming
Some LotR figures - hedges in the background, one of our forest bases with some Javis trees in it, and dudes using our trenches for cover in the foreground.
Some of our desert stuff for Flames of War. The rocks were cast from pieces of bark mounted on filler and sand! In the foreground you can just see our barbed wire and tank traps. And the guys in the middle are using dug-in markers (more realistic than just putting a token by them).
And finishing off with some good old Warhammer Dwarves. The dry stone walls were made from tiny stones found on a beach all glued together before being moulded. The artillery are being protected by trench end sections. We do our trenches in sections so they can be configured in many, many different ways. As a Warhammer Dwarf player and a Flames of War British Infantryman I like to have bits that give my artillery some protection. The hedges in the background have spongey flock on top which we have soaked in PVA glue to make it rigid once it dries. This makes it really durable but still looks like soft spongey hedge!
Welcome to DDakka, Red Dragon. Many good ideas you have there; I like the idea of the stone walls, I'll remember that one.
There's a great deal of great terrain building that goes on around DD, be sure to have a look around, and look back through the previous rounds of this contest (links in the OP), there's a lot of inspiration there.
Also , Yes there are less than 2 weeks remaining.
However, if there are a lot of you that are going to struggle to reach the deadline, we can consider an extension; so long as it's a matter of days, not weeks... and that everyone agrees to it.
So, keep working on your pieces, and when we get close to the end we can talk about who needs how much more time to finish... if necessary / desired.
Right, better get some paint on then, hadn't I?! These are the last WIP shots I'm going to post, as now I'm going to try crack on to the end (although I'll still WIP in my blog, I guess).
So, here we go, first paint - there will be red in the mix for the asteroid too, but this is just for starters:
The astute amongst you may notice that it's had even more lumps of stuff added. Some bits needed evening out, some needed to be craggier. I do feel like it's starting to really come together now - phew!
C&C me, as always,
graven
Incredible what a base coat and then a dry brush can do.... it was looking good before but now it loo, s outstanding! Can really appreciate those details!
I hope an extension happens but, I will drive ahead and go on. I will at least finish the piece up to the initial prime. That is my goal. I got a ton of 6mm troops, mechs and armor for it yesterday. I'm so stoked.
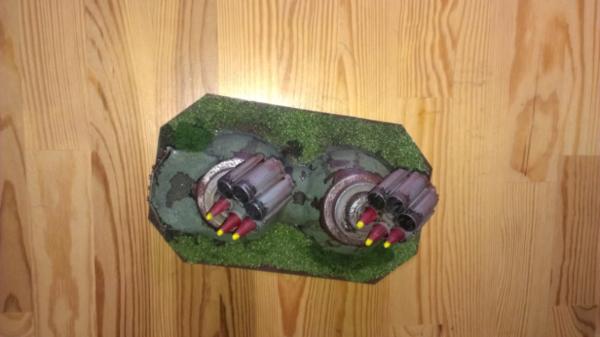
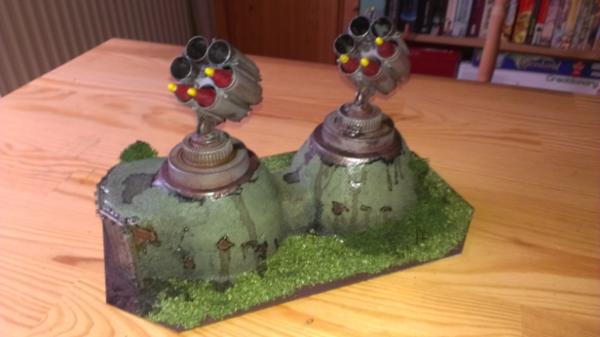
so.....as advertised...here is my entry...
working title is muffin´s tough love...
dunno if i tweak it till the end a bit so this might be the next to finished pics....for now... IF you seem to think i should add something here or there... let me know^^
pics:
Spoiler:
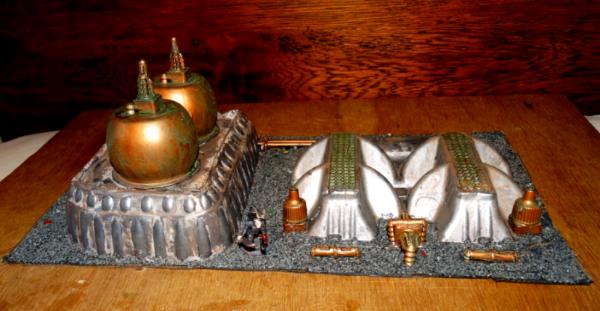
kept the two rocket launchers seperate, for storage reasons...
work in progress pics...
Spoiler:
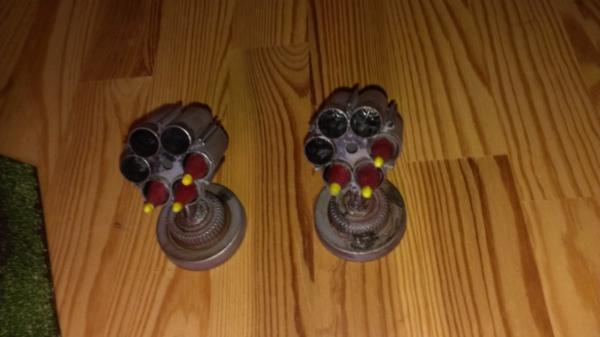
the rockets you see here were made from wooden dowles, sharpened by a pencil sharpener
the rocket launcher is built from confetti launcher bits you might know from new years eve etc...
then some lids of juice packagings...and plastic rhinestones as angles...
the basic structure of the bunker is made from the empty packaging of papery muffin holders....
base got a treatment of PVA and all purpose glue... then sanded...
Keep up the good work chaps. Look, we even brought Comrade Panda out of hibernation!
Vik, remember to send me a PM with your final entry photos in (as noted in the OP), and not to post them in this thread (you can post them in your own blog, which has been too quiet of late ).
Go to it people. There's still plenty of time left to knock out a masterpiece.
2 WEEKS TO GO?!?!?!?!! ..... I am determined to get finished this week.... I don't have much left... but if I don't keep going it will be end time before I know it!
Well there's a bit less than 2 weeks to go now, Magos. The deadline (currently) is midnight of the 17th of June... That's Wednesday, next week.
However, I will give you all until I'm back on DDakka on Thursday (about midday...).
We will talk extensions later; Sunday later, that is.
Anyway, as we approach the final week, I want to canvas opinions on the public vote method.
Last round OMN introduced a voting thread for everyone to vote on their favourite piece in the competition. This allows everyone to see how their piece is measuring up against the rest, good or bad, in the build-up to the results being released.
This differed to the previous rounds in that the voting for those was via PM to the contest organiser. This meant that the results were secret up until they are released by the organiser, and only the winner is declared.
I want to know which of these methods you prefer, and specifically if anyone doesn't like the public vote method?
You can post in here, or PM me with your opinion, and I'll make my decision based on that feedback. If you don't tell me, I won't know.
Bare in mind that this is only for the People's choice award, not the overall winner of the competition. Those are entirely independent of each other.
I am in the same boat as inmygravenimage but...... I am a bit of a glutton for punishment.... GO PUBLIC!! ...... however I feel I may soon regret that statement!!
I am done..... PM sent...... PHEW!!!! ! and to the judges...... good luck.... some awesome entries nailing the brief! top jobs all! time to relax and watch the other entries come in!
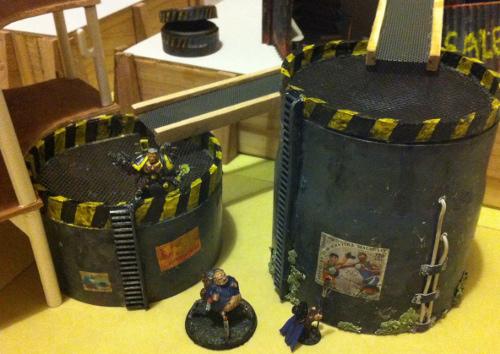
I have two large and two small "risers" (unpainted - picture frame offcuts/etc), a few walkways (mesh from pc-speakers and offcuts), one 3-4 storey building (that can be dismantled - floors are random thin wood stuff that I can't think of the name of right now, and the struts to hold them up are plastic coathanger bits and more offcuts), as well as two vent towers (pvc pipe, stereo mesh and ladders made from the inside of old plastic paint tins)... and a billionty other things that are either yet to be assembled/glued or are far from completion in some other way (such as me not being entirely happy with how large the stereo+fan thing was and putting it aside to be cut smaller later)...
...the Vent Towers are the closest to completion, with only a few more pipes/rivets needing to be added/painted and a more gunk to be thrown on, but they are quite boring/uninteresting pieces, so I think I may be out.
Prespero tries to explain to Pepito that he wouldn't be able to compete in the Necromundan Olympics.
I'll have to hang my head in shame this time around (seems familiar...), I just don't see myself knocking out some terrain in the next week. With the higher temperatures hereabouts my work has been destroying me and I'm really pushing to knock out Imperial Assault in the next week or so.. so yeah.
Maybe next time, but I'll be sure to have a strong start on something before I bother tossing my hat in!
I hear you Grim. I have had no time for it. This is what I have now...
And a lot of work ahead of me. But I'm going to keep plugging away. I may finish in time. Or not. I will finish though. There is no more room on the Table of Shame.
These are all quality entries I see. Congratulations of the excellent work gentlemen.
I say a public vote like what Noodles did. Get our little contest some PR I think Legoburner mentioned something in the Nuts and Bolts thread that he could get us front page coverage again.
Good to see entries coming in, and still a week left.
Keep at it the rest of you. It may seem like you have too much to do, but keep doing what you are doing and you may be surprised as it comes together. You may be closer than you think.
I've not had any entirely negative responses to the public voting yet, so that may be the way it goes. There is still time to send me your opinions on the matter.
I'll be sure to let Lego' know if/when that happens.
In related news, I'll be "out of the office" for the coming weekend.
If you have questions, ask them now (before Friday), or you may have to wait (I might have a chance to check in on occasion) until Sunday (or Monday depending on the hangover).
We can now start talking about the possibility of an extension.
What I want to know is;
Who is in doubt that they may be able to finish by the deadline, and do you think you may have a better chance if you had until Sunday (21st) rather than Wednesday (17th)?
I appreciate that many of you have jobs to go to and this cuts down on mid-week modelling. Would an extra weekend help?
Also, does anyone have any objections to an extension?
I am on leave this week, but life has stopped me repeatedly from getting my entry done. I would be grateful for the extension (although Friday would be my only extra modelling day ). I'll keep slogging away today and tomorrow to try and get my entry completed by Wednesday though
But if you cant.... I have no objections for a wee extension if needed.... emperor knows I will more than definitely need one at some point in the future!
No objections yet to the extension. I'll wait a few more hours and if there are still no objections, the deadline will move to Sunday.
The public voting is also likely to happen as well, but there is still time to voice your opinions on that. I especially want to know if there is anyone who really doesn't want it public.
Ah, so sorry. Even with an extension I know that I won't finish in time, so I'm going to have to withdraw. I started way too late this time.
On the bright side, because of the theme, I did come up with an interesting idea and I will see it through. So thank you for that, Doc. I probably never would have done anything with those containers except use them as temporary storage bins.
But it's good to hear that both you and Anvil' will continue the builds. That is one of the main aims of these contests (to get you to make "better" terrain).
I'm off to bed soon. You have until I'm up and about in the "morning" tomorrow to get your entries in (this is likely to be about mid-day, so final 12 hours give or take a bit...).
I look forward to dissecting the entries from tomorrow. Did I say "dissecting", I meant picking apart... no, judging, that's the word.
That's it. Time is up. The fat lady is singing. Step away from the bench.
First of all, thank you to all the entrants. Even those of you that did not finish in time, your ideas and input have helped make this a successful contest and I'm sure many people (including those just following along) have learnt much from what has been discussed and shown throughout the last 10 (and a bit) weeks.
And another thank you to those that did finish. You have again made a tough decision, tougher. Cam' and myself will be pouring over all the details that you have worked on and we will endeavour to return with a decision as soon as possible.
As I promised in the OP, I will produce a full critique for each of the finishing entries and I can (if you want) post it in this thread or PM it to you once judging has finished. Just let me know (I won't post anything if you don't say).
To those that have not finished their pieces, I hope that you will continue to work on them and will show us all what your vision entailed.
I will be making a public voting thread soon, but here are your champions, doing battle for your pleasure and to claim the prize that they long for.
Show your appreciation for:
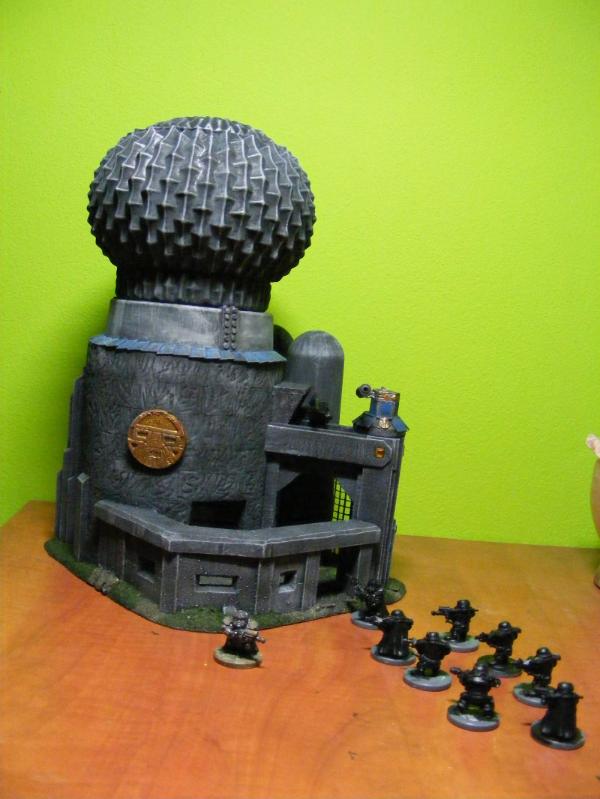
Llamahead.
6mm Industrial works, from a Doughnut box and Yoghurt pots.
Spoiler:
6mm infantry for scale
28mm figure for scale
Entrance showing use of sprue as a lettered sign using the letters moulded into the sprue
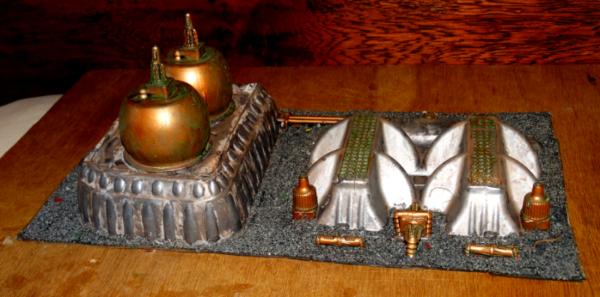
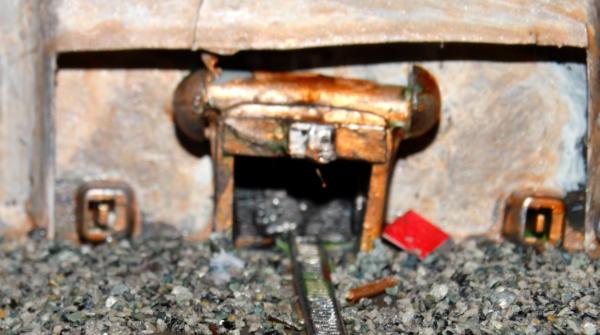
Magosbiff90 Damaged processing equipment from Printer cartridge packaging and a Pill bottle.
Spoiler:
inmygravenimage Asteroid base from a pair of Printer cartridges
Spoiler:
Kalend Thora eased back on the jump engines and pulled the Starknife out of hyperdrive. She looked down, as if her red eyes could see through the deck plates into the tiny packets of glitterstim that were stowed beneath. She couldn’t help but smile. Why risk bulk cargo when something so tiny had such a huge payoff? Even after her Vigo had taken his cut, she’d have more than enough to keep her old D-9 running like a rabid wamp-rat in heat and more to spare.
As the Folly lazed into view, she couldn’t help but marvel at the brutal elegance of the facility. You can keep your gas mines, your spacer stations and dust ports – give me solid rock any day. And this was exactly the kind of… independent operation that kept her pockets fat and her record clean.
2 hours. 2 hours at station keeping. I have a bad feeling about this. “Central, what’s your status?” she broadcast for what must have been at least the twelfth time. R3-2A chirruped at least as impatiently. “Yeah, I know Arty, let’s take a look around.”
The station’s turrets lazily tracked her. Well, at least we know something’s working in there. No escape pods launched, no sign of damage. A beep, a whistle. “Yeah, the lights are on, just not sure who’s home little fella.” She was starting to get twitchy.
Landing lights were on from the cargo bay on the surface – drop ship maybe? That’s not the Empire’s style.
Hutts, perhaps, wanting a piece of the action? That’d be a bloody mess - the Black Sun was happy for Erith to run his place his way, but they wouldn’t want another operation muscling in on the action. Mind you, a mess this far out on the Rim might bring them to Tarkin’s attention, and no-one wanted that. Clean and quiet – a coup then? An inside job. She grimaced, a sour expression on her lipless green countenance.
The ship lazed its way round the station; her R3 unit let out what could only have been a chuckle. “I know, I don’t know why the insist on making exhaust ports so accessible either. Serve them right if someone stuck a proton bomb up it.”
Generators are still running fine. Feels like a trap. “Arty, little buddy, I think we’re just gonna have to chalk this one up to bad timing. Looks like they don’t want us to come a-knocking. We can make Seler in 18 hours.” She moved to bank the ship away, getting an angry series of clicks for her trouble. “Yes, I know you were looking forward to that oil bath. Wouldn’t mind a bath myself, still trying to get half of Kessel out from my fingernails, never mind that the scrubbers are so shot the whole ship tastes of spice.” Silence. “Fine, be like that you big baby.” She punch the co-ordinates into the drive computer, almost too annoyed to ignore the nagging in the back of her head. Almost.
The comms burst into life, startling Kalend and making her reach instinctively to eject her precious load. “Thora you old lizard – that you out there circling my station like a hungry gundark?” Erith’s tones. Jokey, but forced. She could hear – not wariness, exactly, but something different. Still, keep smiling, keep talking – and keep running those numbers. “It’s me you two-cred son of a Jawa. Why the hold up? Been scrimping on the power convertors again?” A low hum from R3 let her know that one flick and they would be the other side of the light barrier. “Let’s just say I’ve decided to put this place to good use. Seems to be there’s a lot to be said for getting shot of the Empire and its cronies – better for business, y’know?”So he’s gone over to the Rebellion, has he? This time, the smile in her voice was genuine, “Well then, if it’s good for business, you’d better let me in then, hadn’t you?” And in response, the bay doors opened, welcomingly. Now that’s information that will fetch a hefty price. R3 peeped a question, and she flicked off her open comms to reply. “You bet we’re going in there, Arty. Things just got interesting.”
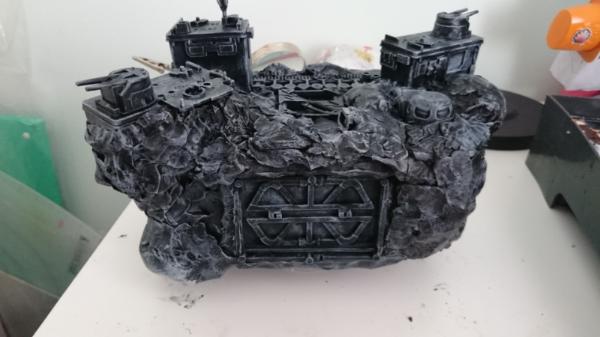
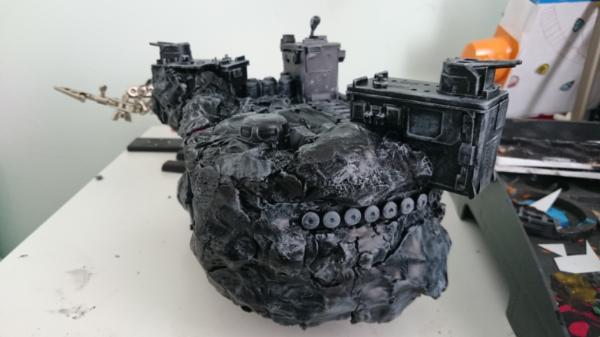
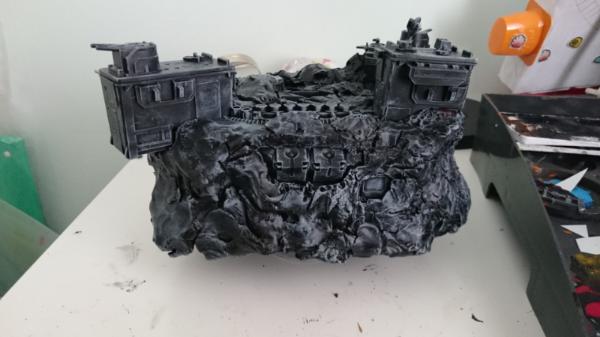
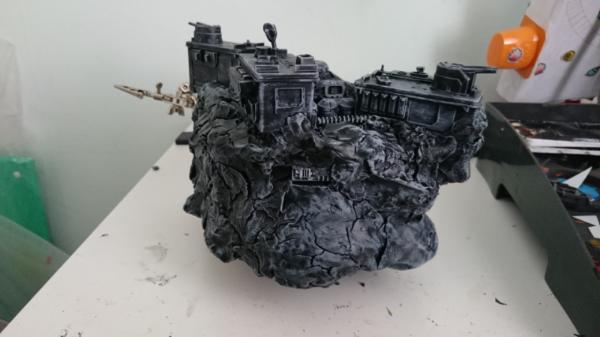
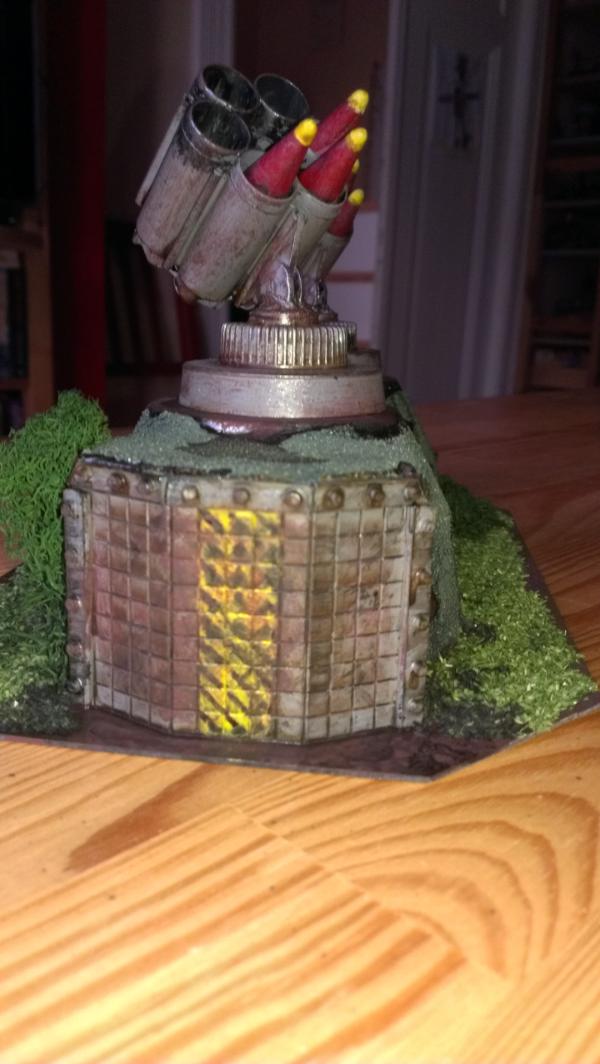
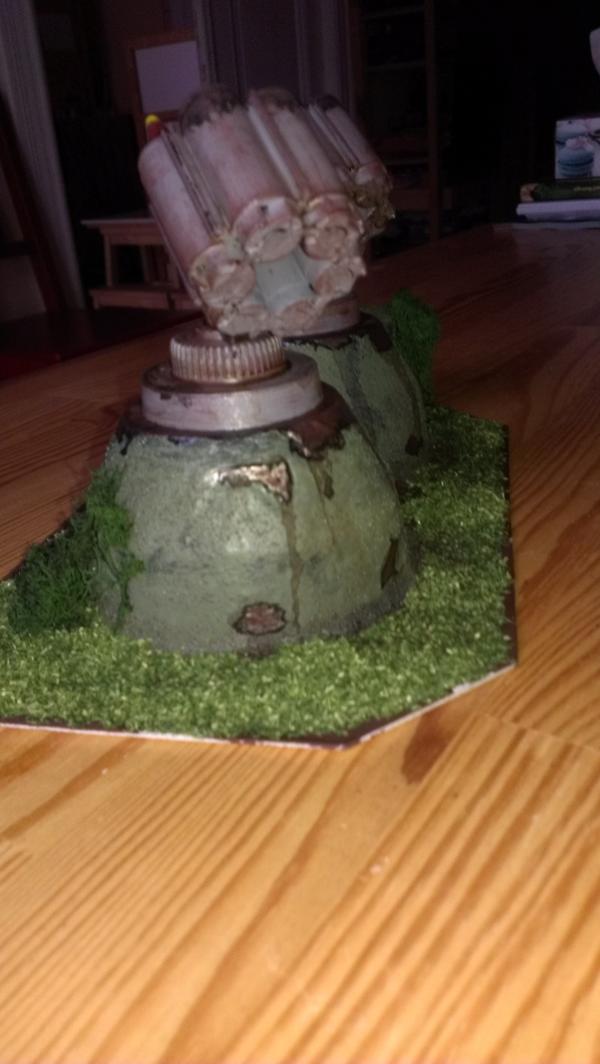
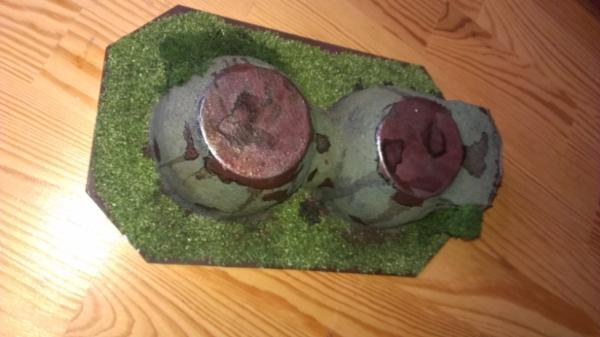
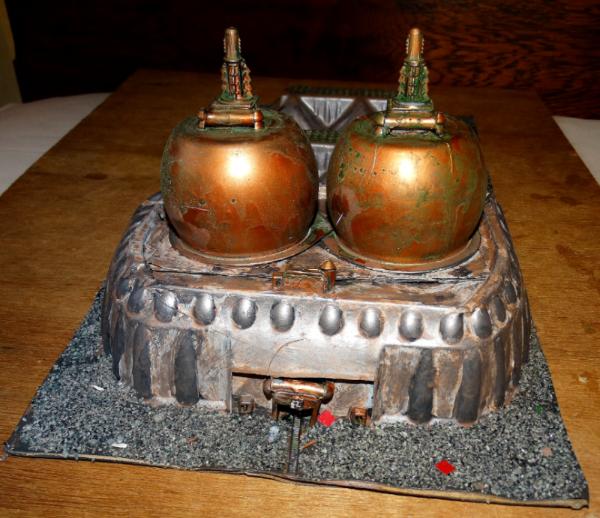
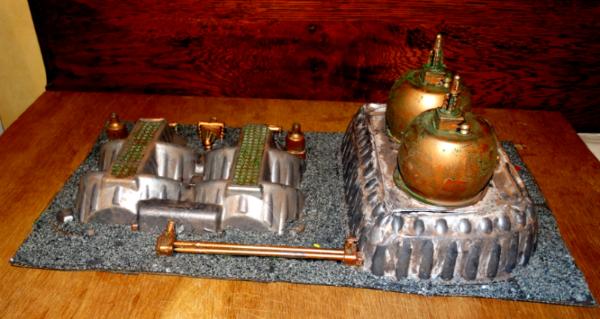
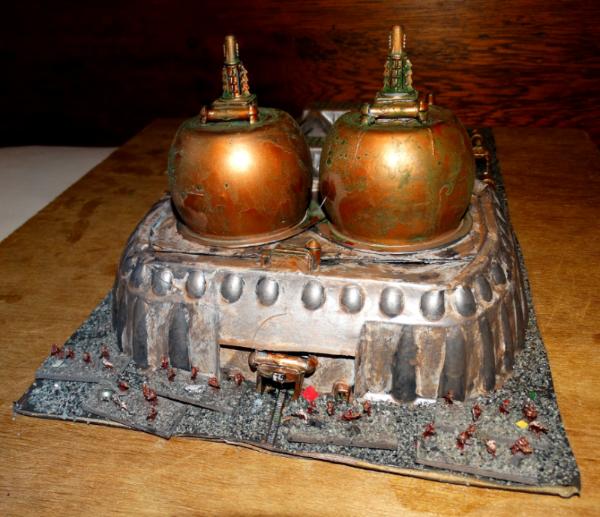
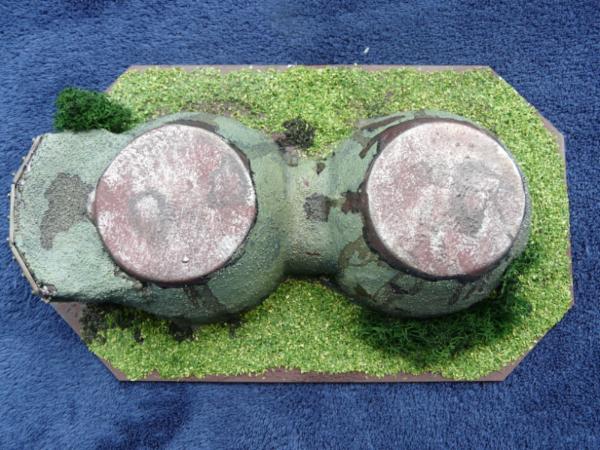
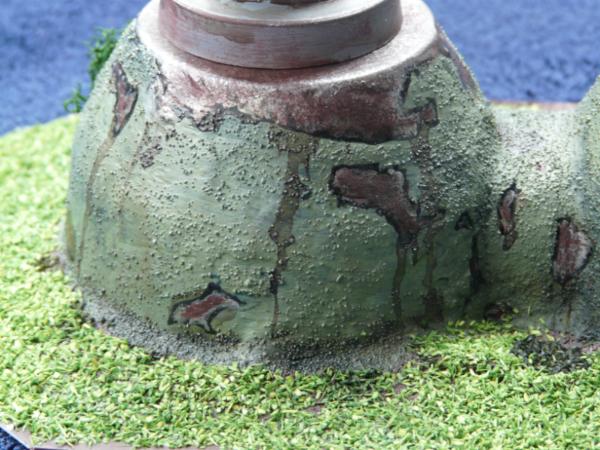
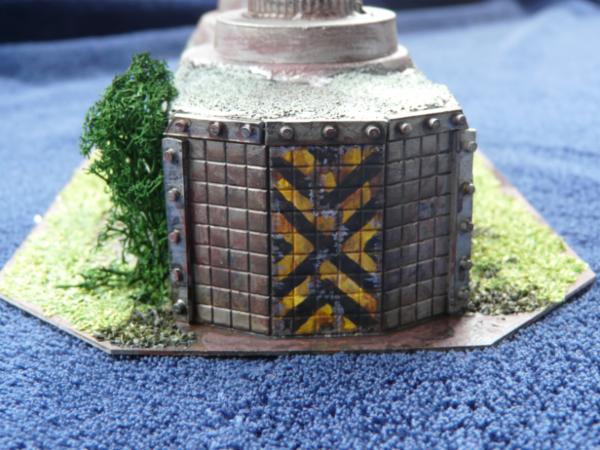
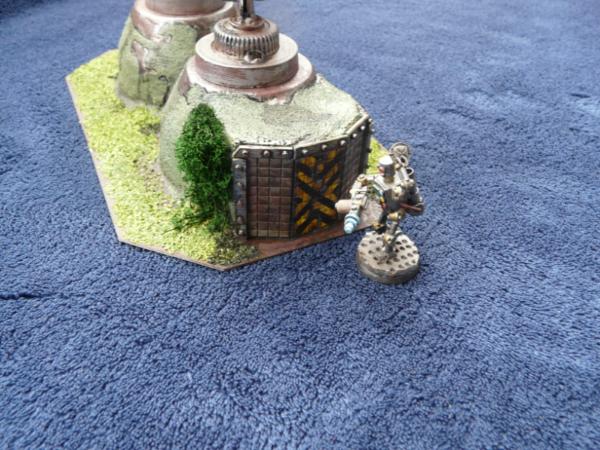
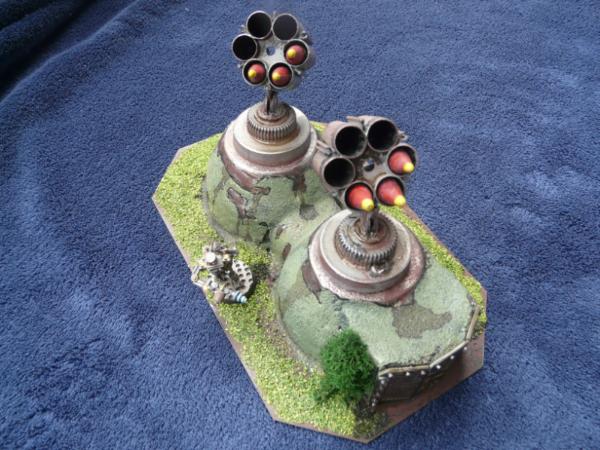
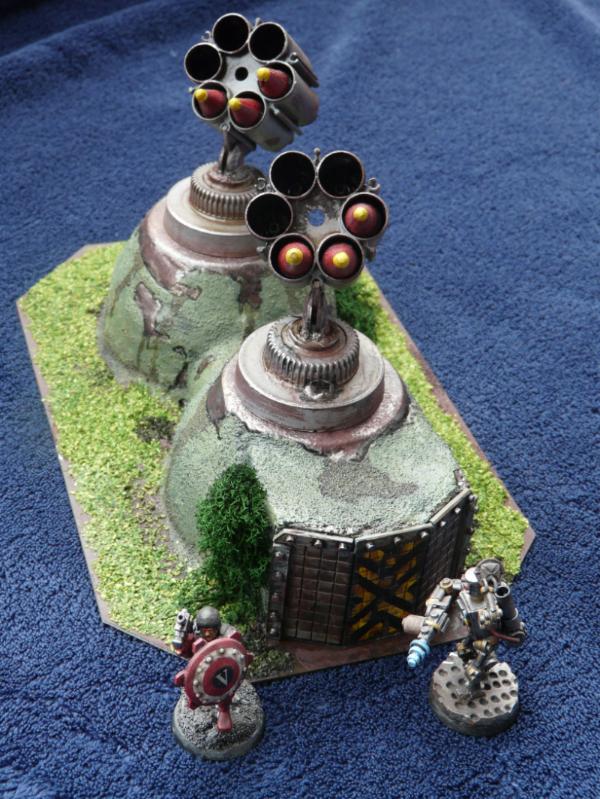
Viktor von Domm Missile defence silo from Muffin paper packaging and confetti launchers.
Spoiler:
without the turrets
turrets cose up
turrets without base
rusty and oily points...
entrence
scaleshots
Remember folks - vote early, vote often! Great stuff all round, a rough, tough field to be in, and thanks to DrH (and Cam) in advance because judging is a hellish business! Good luck y'all!
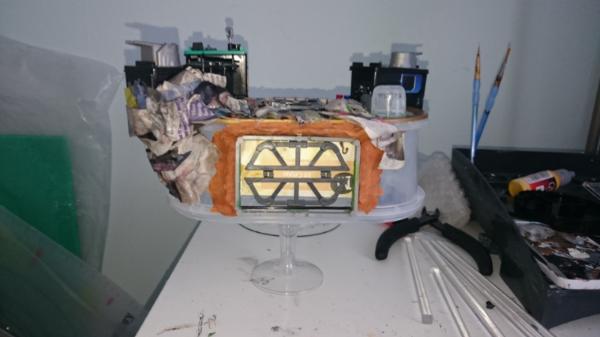
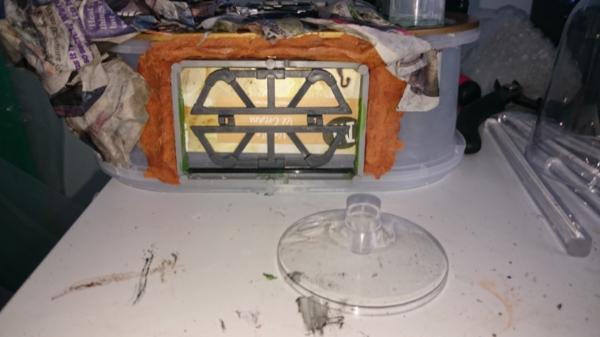
Hey everyone. Just wanted to say a big congratulations to the guys who completed their entries. That's an achievement in itself. My landing pad sits so close to finished, but just not quite there. Life sadly got in my way and I couldn't get it done in time. My last day to push to the end was taken up writing two scientific posters, two abstracts and a 20minute PowerPoint presentation about what I've been up to for 5 years in work ......
.....you can guess which I really wanted to do
If no one objects I would be very grateful if I could try and finish over the next week and post it here for comments. I'd be very keen to hear suggestions. You all have been very welcoming for my first effort and thank you all for your support. Sorry I didn't cross the finish line with you all, but I'll try again next time and fingers crossed I'll get it done in time.
TP^DC Deputy Manager wrote: ... writing two scientific posters, two abstracts and a 20minute PowerPoint presentation about what I've been up to for 5 years in work ......
I know exactly how much time and effort is required for those things. I feel your pain.
If no one objects I would be very grateful if I could try and finish over the next week and post it here for comments. I'd be very keen to hear suggestions. You all have been very welcoming for my first effort and thank you all for your support. Sorry I didn't cross the finish line with you all, but I'll try again next time and fingers crossed I'll get it done in time.
no need to feel bad about it deputy... been there the last two or three competitions too... life always gets in the way...
and i chime in with my predecessors...your terrain piece is a very cool one and a project that is quite an education...so it needs to be shown and viewed when it is finished!!!
Thanks everyone. I really loved being involved and I learnt lessons about what's involved in producing a piece like this and how to keep the momentum up. I'll finish the beasty soon and thanks again for your support. Good to know I'm not alone.
Viktor von Domm wrote: no need to feel bad about it deputy... been there the last two or three competitions too... life always gets in the way...
and i chime in with my predecessors...your terrain piece is a very cool one and a project that is quite an education...so it needs to be shown and viewed when it is finished!!!
Definetly agree with this! I think currently I have about a 40%-50% completion rate for these comps..... but the benefits of even being part of it & the experience and tips that are given from the other lads in the comp is priceless... even in not finishing you will gain a heck of a lot of knowledge that you didn't have at the beginning.
You definetly need to finish your piece and put it on here.... it is really cool and I look forward to seeing it done!
Congratulations to all of you who finished, judging is underway and bloody hard going.
We are a very proud little group and very happy to see so many different games systems represented, and again to echo others thoughts, it is not the winning, or the finishing, it's the sharing, the taking part and joining in. I have been with this crowd a while and I have to say I have enjoyed every last second, and watching new people join in is exciting and wonderful. Thank you all.
And of course we need to see your works when you finish them, we need to see the amazing techniques people have come up with, one of the main reasons we are here.
Now back to ripping your work to little tiny pieces!!!
Congrats to all. And the judges are apparently stymied... understandable. Y'know, perhaps hold off on announcing the decision until the popular vote is completed, then announce everything at once?
Red Harvest wrote: Congrats to all. And the judges are apparently stymied... understandable. Y'know, perhaps hold off on announcing the decision until the popular vote is completed, then announce everything at once?
Many thanks to all those that took part, I have had a great time following along all the various builds and think that everyone (including those that didn't quite make it to the line) have produced some fantastic bits of terrain.
I have placed my vote, and I am now eagerly awaiting the next contest.
Super excited for the next round. This contest reminded me of the ye'olde' days when they made a custom Land Speeder (using the Chapter Approved Vehicle Design Rules) out of bottles, bottlecaps, tubes, and bits!
Enigwolf, These contests usually run for quite a long time, so as long as you don't bite off more than you can chew (and real life doesn't get in the way) there's plenty of time to get involved. You can join in at any time.
TP^DC Deputy Manager wrote:I'm also eager to hear who won, but also to take part in the next. Roll on Monday
Dr H wrote: Enigwolf, These contests usually run for quite a long time, so as long as you don't bite off more than you can chew (and real life doesn't get in the way) there's plenty of time to get involved. You can join in at any time.
TP^DC Deputy Manager wrote:I'm also eager to hear who won, but also to take part in the next. Roll on Monday
Good luck next time. Maybe not go quite so big.
Yeah.
Ahem!
Well.
I have no defence At least it'll take all my Farsight army to display them when it's done (I hope!!)
I'm thinking matchbox sized next time ............
We've all done it;
"I'll just add a bit here"
"That means this bit should be bigger"
"and that bit looks too small now"
"and it needs one of these"
"and..."
...
"Now I need a bigger base"
Dr H wrote: Enigwolf, These contests usually run for quite a long time, so as long as you don't bite off more than you can chew (and real life doesn't get in the way) there's plenty of time to get involved. You can join in at any time.
My issue is that I typically start expanding my armies before I finish them, so I have a never-ending pile of models to assemble or paint.. And then get by things like building servo skull bases or themed fortifications...
The judgement is complete.
The day has come.
The chosen one has been...erm... chosen.
Ladies and Gentle-beings. Your champions have been battling it out to win the favour of the judges.
Many came forward from their own times, dimensions, and positions in space.
They brought with them ideas of grandeur and items of humble origin.
They attempted to create extraordinary things, and all for the possibility of attaining something that the masses cannot comprehend.
Not just a simple material gain, but a thing of intangible wealth.
Many have fallen, and we thank them for their efforts. They came close to greatness and maybe next time they will achieve it. Go now, lick your wounds, learn your lessons, and return when you next hear the calling in the depths of your souls. Once you have entered these halls, you never truly leave.
To the few that remain, you have achieved many great things. You can stand proud of your peers. Assured in yourselves that you completed what was asked of you, and triumphed.
But only one of you can remain, to take control of the mantle, to raise your flag to the skies and cry a challenge to all those that can hear.
You few; Llamahead, Tek Thornison, Magosbiff90, inmygravenimage, and Viktor von Domm (aka. Nursey). You have been placed under judgement, and your creations have been assessed and tested. The trials have been tough, and they needed to be; for they were designed to separate you and find the one.
One that... yadda yadda, etc. etc... I'll stop stalling now.
Well done everyone. Thank you all for taking part, even if you didn't finish.
There were many good ideas and much that we all learnt.
It seems that what I envisioned as a "simple" theme, challenged everyone in ways I had not thought about. It has been a pleasure to see what plans you all came up with as you tested the limits of my rules. I would still love to see those that didn't finish, finished, and I hope that you do continue with them.
I hope that everyone that took part (and those who watched) have learnt to look at the shape of the items around you, and imagine something beautiful (figuratively speaking) sprouting fourth from that. Creating doesn't always have to start from a flat, blank, emptiness. Get inspired by the unique shapes that life provides you with, and work with them to produce fantastic models as shown in this thread.
Thank you for your input and for making this a successful contest.
And that brings us to the moment you've all been waiting for.
The winner is:
Spoiler:
Made you look!
The judging was tough, but we (the judges) are happy with the result.
There were many details to pour over and subtleties to asses in the ideas and execution. All entrants produced great terrain pieces and excelled in areas that others did not. But we can't all be winners (we're not at school here).
A big thank you to Camkierhi as my fellow judge. You were a great help.
And now...
I give you... 1st place:
Spoiler:
inmygravenimage Asteroid base from a pair of Printer cartridges
Congratulations, Graven. We liked the concept and the overall look and feel of the piece. A great many good ideas. Good job.
As you are already a member of the League, I can only re-affirm your place.
And for icing, I will make you a commission piece of terrain, as mentioned in the OP. I'll be in touch for details.
In 2nd place:
Spoiler:
Magosbiff90 Damaged processing equipment from Printer cartridge packaging and a Pill bottle.
So close, really really close. As the scoring was added up, you and graven were neck and neck. Where one of you pulled ahead, the other pulled it back somewhere else.
Well done. We liked the execution of both the painting and modelling, especially the weathering and little details.
For this, you also get a commission piece of terrain (albeit slightly smaller) as a prize. I'll be in touch with you too.
Well done, Tek. We both enjoy the aesthetic of your terrain.
Enjoy the warm glow of kudos, and good luck stepping up next time.
In addition to the judging results above, the good people of DakkaDakka have been voting for their favourite model.
Congratulations to the People's choice, inmygravenimage. Again, pipping Magos' to the win.
Enjoy your warm glow from the whole of DakkaDakka.
When I added the "Honorary mention" category, I envisioned more finalists. As there are only 2 of you outside the top 3, it doesn't seem fair to single out one of you and leave the other as the only person to not get a mention. So instead, it's my contest and I can do whatever I like, I'm going to give the honorary mention to a pair of the contestants that didn't quite finish: TP^DC Deputy Manager and GawdamSumbish.
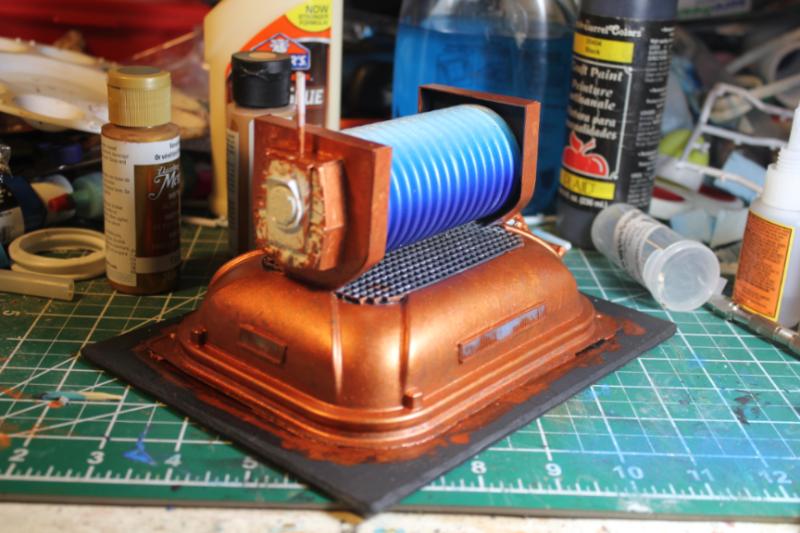
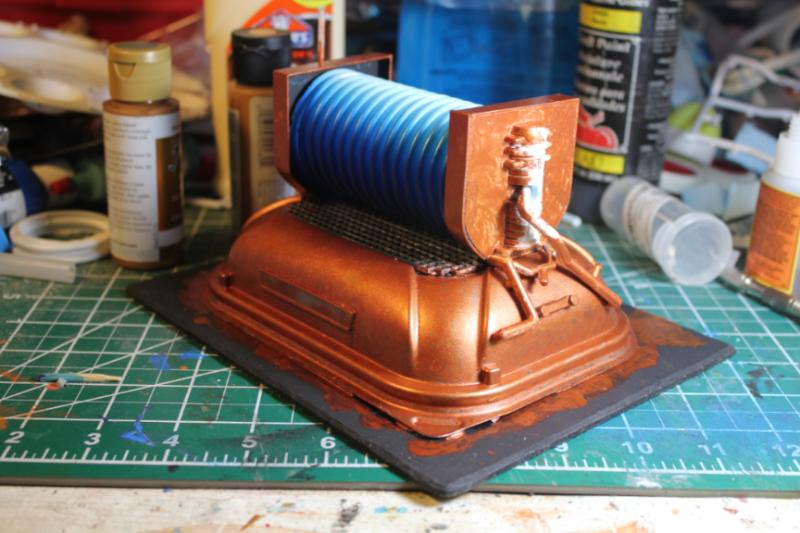
With one of you creating a (moving) landing pad above a volcanic landscape and the other a light-up, shiny (iridescent) generator, I feel that had you finished, you both would have stood up well next to those that did finish.
Good work and better luck next time. I hope to see both finished in the fullness of time.
As I've said, if the 5 finalists want to see my full critique of your piece, let me know (Vik already has) and I'll post it in this thread or send it via PM if you prefer.
And that's it, all done. Congratulations to the winners. I'll be PMing Graven and Magos soon-ish.
Oh Well I'm absolutely thrilled! Thanks to the judges and especially to DrH for the organisation of a tremendous, inspiring contest (c&c please!), fellow competitors both who finished and did not, and all of you lovely dakkanauts out there when I decide on the next round - only a couple of days, I have a beginning of an idea - I'll post here. Onwards dakkasaurs!
Indeed congratulations to the winner's. Fantastic job well done. Again it as close and all are brilliant pieces. We all learned a few new tricks. Been a pleasure.
Big congratulations to inmygravenimage and also to each of those who finished. I am very much looking forward to the next competition. I'm overwhelmed to have received honourable mention despite not completing, genuinely made my day. I will ensure I finished next time with something MUCH MUCH smaller
Ah well, that's everybody. So critique time.
I'm sure you've all seen (and even been on the receiving end of) my critiques before, but for anyone that hasn't;
I write these as part of my judging process. This means that I will call out every little error and anything that I feel could be improved. This may make it appear harsh in places. There is no offence meant and I post these up so that you can become a better modeller (and do better in these types of contest).
I will also praise things that I like and give advice (where I can) to how it could have been improved.
Depending on what I see and what I know (I'm far from the best modeller), the amount of feedback will vary and is independent from the quality of work. Sometimes I may need to write more just to get my idea across.
On that note, I am dyslexic and may not always word something in the best possible way. Please ask if anything is unclear.
And lastly, these are my opinions. Feel free to disagree with something or to clarify your reasonings for doing something the way you have.
Hopefully these will help you (and everyone else) in future models.
In no particular order:
Tek Thornison;
Spoiler:
Nice work, Tek. I do always like the aesthetic of your terrain. Good job.
Your selected items are a mixed bag of opposites. The light cover is a fantastic piece; very unique shape and works well as the top of a shield generator. The pen covers, on the other hand, are very plain and simple. This is not a problem by itself, they are still an interesting shape. However, I'd have added some surface details to them to make them a little more interesting and to tie them in to the scale of the model; a line of rivets around them, a console at ground level or some cables/pipes up one side, doesn't have to be much. Possibly something to disguise the moulding marks on their ends also; either cover them or add something to give them a purpose. On that note, the base of the light cover might have been better to have had the moulded lettering removed (or highlighted in a different colour to make them intentionally a feature); they are a little large for the scale and I'm sure a shield generator uses more power than 60 Watts.
The overall model is nice. The wall, courtyard, fence and walkway give a purposely-built look to the building. All pretty much seamlessly added. The added details to the tower are nicely done, from the vents and the buttress to the tiles and rivets at the top. The addition of the gems to the walkway, the electrical signs to the fence and the dwarven head logo/icon are nice touches. Nice build of the turret, flamethrower(?) thing (like the little head on it too).
Nice to see some variation on the base, with patches of grass, mud and concrete flagstones.
While your painting style works well on the concrete the smooth surface of the pen holders shows up the dry-brushing quite a bit; a lighter touch or different technique would have reduced this. Something else that I feel is missing is weathering. Maybe your dwarves are very clean people, but while the turret appears to have quite worn paintwork, the rest of the building is very clean in contrast. Maybe think about adding some water damage with streaks of washes, and/or chips in the concrete (the occasional bullet hole, although yes it is a shield generator...), a worn/dirty patch by the doorway where a stray hand always rests as the dwarves come and go, or maybe even some bird droppings, and patches of fresh (orange) rust or verdigris on their respective metals. etc.
You don't have to do all of these suggestions on any one model, but a few here and there can help elevate a model to another level of realism.
This (along with the rest of your terrain) would really make a fantastic gaming table with this as a focal point for attack/defend scenarios. Good job again, Tek.
Llamahead;
Spoiler:
Good job, Llamahead. Showing the rest how to do it, in half the time.
Packaging is often a good choice for this kind of thing due to the shapes involved. You also made good use of those shapes and your additions help sell them as buildings... even if there is a slight "Madonna" resemblance to certain parts of it. It looks like your main building part could have done with some internal structure as the top appears to have been pushed in a little. There are also parts where the doughnut package has pulled away from the base and left gaps. This could have either been covered over again with more gravel or been used to add some plants growing out of (to make it seem on purpose).
On this scale it's difficult to say that it could do with some more small details, because the "usual" small details on larger scales would be so small to not actually be visible, but I feel like it could do with something more, just can't put my finger on it.
Painting-wise I like the choice of colours for the various parts and the verdigris on the brassy bits works well. However, it does look rushed. Especially the "grey" metals of the main building. There's a chip in the paint on the top of the doorway; this is a problem with painting certain plastics. It can be helped by a light sanding of the surface, before priming, to give a rougher surface for the paint to stick to. Also, I can see what appears to be a few hairs here and there, stuck in the paint. It's worth taking the time to check a model over for these things. If they can't be removed seamlessly, you could turn them into features (a loose cable or piece of rope, battle-damage if the shape is right, etc.).
It's good that you have added some scattered rubble/rubbish about the base, but I think the gravel could do with a bit more breaking up. A crop of plants probably doesn't fit with an industrial space, but some painted lines (or even modelled fences) to denote hazard areas and safe walkways would have been good. Also, worn pathways would be a nice way to make the area look used and can be achieved with just a different shade of paint if not a different, finer, basing material. These sorts of things, I feel, would show up more on this scale than on larger scales; like the way crops grow over a medieval settlement, that can be seen from a helicopter but not from the top of a farmhouse. A subtle effect, but would add to the realism.
Good idea to use the lettered piece of sprue and I like the use of the zip-ties in particular.
Nice playable piece of terrain.
Graven;
Spoiler:
Good job, Graven. Really shows that you enjoyed yourself with this one. The added fluff is a nice way to give us an idea of the background of the model, and presentation is half the battle.
The use of the printer cartridges was a good idea, and they work well as scale buildings. Making use of the shape of the underside of those cartridges to overhang the edge of the asteroid was a good idea. However, using a pair of near-identical items, I would have hoped for them to be treated differently; for example, one becomes a building (as you have done) and the other becomes something different (a docked spaceship, or a damaged building, etc) or finding and nominating a second, different item. It's more of a repeat of the same shape use and I wanted 2 shapes ideally. I do appreciate that you have done some different touches to them though and that is in your favour.
The other things you have used are all nice touches. The sim-cards and holders working as windows, and while you have used kit parts, they have added nicely to the overall feel of the model as they should do. The silos, air-lock and escape pods are great additions and show that you have given thought to how it all works. Then using the ice-cream tub as the base for the asteroid's shape and experimenting with papier-mâché and play-doh worked out well.
And then using a whole piece of sprue for the main doors was inspired. I was sceptical at first as I did not see what you intended to do with the nodules on it. With the pieces inside that and the paint job, it works perfectly.
On the painting side, you've done a nice job. Good effort adding the OSL, it works well in many places. The asteroid looks like rock and it's good you went with something other than grey to make the buildings etc. stand out. The little touches of colour help to give the whole a life.
Some places though, the dry-brushing is a little obvious and could have done with a smoother application or technique. Only other thing I can think to add is maybe some signs etc. (numbers on the pods or silos, warning lines...). For the scale you can't do many signs though.
Great model, well presented, and good to see you have given it full thought to playability with the cards and base.
Magos;
Spoiler:
Good job, Magos. Nice grubby, banged-up, well-used creation as I've come to expect from you.
Good choice of item in the printer cartridge package. It has a nice shape that works well as a piece of machinery. The pill bottle is a bit "common" in comparison, but for a storage tank there's no finer choice.
Both items have been transformed perfectly into scale. The added gubbins (and plentiful riviting) give a sense of purpose and scale. I like that you added bits inside the damaged part, although I may have removed one of those "cubes" as a source of the apparent explosion. The control console / electrical box thing (near the damage) could have had dials and buttons painted on instead of being just metal, and the wires coming out the bottom of that could have been given some colour.
Lovely muddy/rocky ground, made in your own unique way. Nice variety in tones and texture.
The fence is a bit simple in comparison to the ground it stands on and the equipment it surrounds. The mesh of the fence doesn't appear to be attached to the fence posts: Not just because I'm taking my usual attention to detail to the extreme and expecting little loops to attach them, but the two don't seem to be interacting much. Maybe it's the mesh that doesn't appear to have any "weight" to it, it looks too stiff (as if it would stand up by itself without the posts). Maybe the top of the mesh looks too neat where it's been cut. It needs to be either cut straight along it's lines, or you need to disguise the uneven cuts by nicking bits out to make a rough edge.
I like the addition of all the signs and posters and I like the goo. However, the goo could do with a little variation in it's tone, more so in the pool under the tank (I like that you have made two leaks though), a bit of "marbling" to make it look less like spilt paint. The bubbles are a good idea, but I may have painted those blobs as white first (maybe a blend to dark grey at the base) to make the bubbles look more translucent once covered in the green.
While I'm in that area, the black base of the machinery (nice selection of material) looks too "clean" even though it has some dust and rocks and a goo spill on it. It could have done with some scratches and worn edges to bring it in line with the rusty metal that's standing on top of it.
The fence could also have had a little more rust on it too.
And lastly, colour: The whole model is a little grey and brown, in spite of all the signs and the vivid green goo. it just seems to lack this "pop" that people like to talk about. I love your mud and weathering, but the model needs something to give it some life. I know you've been lacking in supplies recently, so you may not have had the paints to add the colour that I'm on about, and it might have handicapped you.
Possibly, plant-life. I mention this often when I'm judging, and I know that not everywhere has plants, but you will notice that they do get into many places that they shouldn't, and large areas of mud in a long forgotten corner of an industrial area are going to get their fair share of plants. For models like this, I think that some fresh healthy plants can work as a contrast (or counterpoint, I believe artistic people would say) to the decrepit and decaying machinery. Also it would give you a chance to have dying plants next to the leaking goo to show that it is nasty stuff and not just a pretty green.
Really good job and it would be great to see some associated terrain to add to it (like a pool or river of green goo). Would be a credit to any gaming table.
Nursey;
Spoiler:
Good work, Vik'. Nice missile launchers, really like them. It's good that you took advantage of the extra time to make yourself happier with your model.
The confetti launchers are a fantastic piece and they do scream "missile launcher". The packaging is a good overall shape for a small bunker-like building. I'm in two minds about covering them in plaster. On the one hand, you have created a nice concrete texture. But on the other hand, you have covered (and softened) the shape of one of your "items". A couple of alternatives would have been to not add the plaster, but still use the sand (I'm assuming sand was used to make the texture) on the bare plastic. This would have maintained the sharper shape of the item but still added the texture for concrete. Or, added strips of plastic (or card) onto the bare plastic shape and made it a "ribbed" metal bunker with lots of rivets.
However, with the plaster coating you could have actually chipped pieces off to create the damage that you painted on. This would have given you very realistic damage. You do appear to have avoided getting sand into the damaged areas though, which is good.
Either way, I personally would have left the joining "tunnel" between the domes as plain and painted it up in metal, just to vary the texture (as you have for the tops).
As I said, I like the missile launchers. The bottle tops for their bases are a nice way to add some texture. They could have done with some wires/cables leading from their bases to the rear of the missile tubes (even though it would be silly to have external wires for saboteurs to cut), and the plain disks below the bottle caps are unusually devoid of rivets?
I like the door end with the tile texture. That looks nice with it's riveted surround. Unless it's hidden by the bush, the door is lacking in some way to open it from the outside (again, silly to have an obvious way for intruders to get in, but...). It could be hidden behind one of the tiles, and (brainwave) it would have been nice to have one of the tiles cut out and a key pad added there.
I can see that you have listened to my previous comments, in particular the (oft-mentioned) plant-life. We have grass and bushes. A couple of notes to take these further. Vary the colour tones of them: washes in patches of the grass to give lighter and darker patches, and some dry-brushing of a bone (or bone and green mix) on the bushes to highlight the tips (can also be done on the grass). You can also do patches with brown / light brown / bone to show dead parts/tips. Also, you can use tiny pieces of that bush to show fresh sprouts at other parts of the model, so it's not just growing in two distinct parts.
The painting has it's highs and lows. The metals look pretty good. The hazard stripes on the door are very good. Some of the oil streaks (or water damage) are pretty good; some nice shapes to them. But they could be improved by running more of the same paint over the thicker streaks to darken the middles of them to show that they are the result of many years of build up.
Also, another method (that I used on my concrete wall) was to add the streak in a slightly darker paint mix than you want for about half the length that you want, and then allow clean water (in your case, I was using white spirit over my enamels) to flow over the streak, directing the streak to where you want it to go. I made many passes of this and the result is a softer edge to the streaks and a darker middle (that you build up again like above).
The chips you have in the concrete are a little off too. As I said above, chipping the plaster off would have been a nice way to make these look more realistic (although run the risk of completely cracking the whole cover). You have the right idea for making these kinds of chips though. They look painted on unfortunately. What you need is rougher, more irregular, edges to the chips. The best way to achieve this is with a sponge. Dabbing it on the surface with the chosen "undercoat" colour (black in your case) will give you better irregular shapes than anyone can do freehand. Then use an older paintbrush (e,g, not your best pointiest brush) to dab on the clean metal paint inside the undercoat. On average (not everywhere) you want to leave a little less of the black showing than you have, it's very stark in contrast to your green and therefore stands out. Then you want to dab on some darker metal inside the "clean" metal (this gives the chip some depth), this might be the metal with a little black in, or just some dilute black if you're brave. Then you can add the rust. Try not to be so uniform in colour and tone in your rust and try not to have to much of a contrast between your metal and the rust (build up the colour in successive passes with washes or dry-brushing or gentle dabbing, make it darker towards the middle).
Really nice design and great focal point for a gaming table.
thanks for the C&C.. appreciated as always and have to agree with a lot of the points in there! Will certainly take them all onboard moving into round 15!!!


 and some
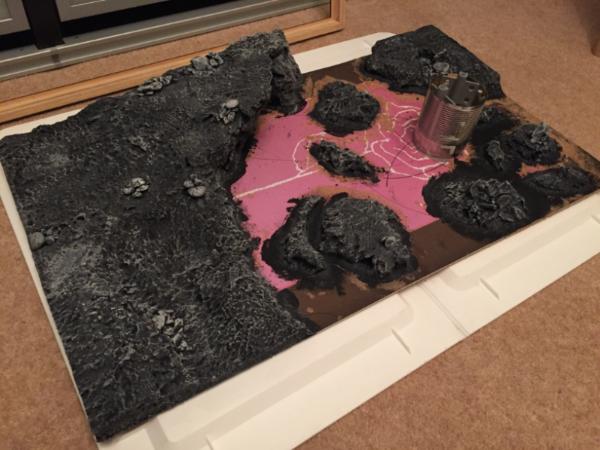
 . I admit that sounds quite pretentious, but up close I am absolutely blown away by the fact that I managed to make this - I thought I'd mess the whole thing up! Must keep up the pace. I hadn't planned on doing any more for the rocks because it's meant to be a lava planet ie no moss/trees/streams/puddles/hedges etc, if anyway has conflicting thoughts, I'd be grateful to hear them. Next up will be lining the beans tin (the ridges just don't look Tau enough) then pour in some lava.
 day yesterday and really needed an "achievement" and this seemed to fall in to place perfectly.

 I'm going simple for my first lava outing - want to get practice for my Farsight army resin bases. I'm going to pour plaster in to the bed area between rocks and then hairdry/drag some texture to the surface. There may well be LEDs in my landing pad though as landing lights. That's my penultimate job, so I can abandon if time gets away from me.


 Well I'm absolutely thrilled! Thanks to the judges and especially to DrH for the organisation of a tremendous, inspiring contest (c&c please!), fellow competitors both who finished and did not, and all of you lovely dakkanauts out there