Welcome to the 14th round of the League of Extraordinary Riveters Terrain Competition. "Making the extraordinary from the ordinary"
Welcome, one and all, to the 14th round of the League of Extraordinary Riveters, Terrain contest.
For those who have not taken part before, this is a competition about terrain building (as you may have gathered from the title), but it is not strictly limited to pure terrain, dioramas that can be used as table top terrain are allowed (see rules below). To get a feel for how these competitions run and what to expect you may wish look at the 13 previous rounds, linked below.
Each round has a “theme” or other defining attribute(s) that must in some way be applied to the your terrain project, to compete with other modellers for that most prestigious of prizes, membership into The League of Extraordinary Riveters [LoER].
The competition is open to everyone registered on Dakka Dakka, all are welcome to enter regardless of ability, etc.
The main aim of these competitions is to encourage gamers and model-makers alike to go that extra mile when building terrain that can be used for playing your preferred tabletop war-game (or similar pastime). Those taking part can expect to receive ideas, inspiration, encouragement and feedback from each other, and at the end each of the participants is "rewarded" with a new piece of terrain for their own use (that's the thing you just built).
The winner of each round hosts the next round, and the cycle continues.
The theme, limitations, rules, judging and prizes are all the responsibility of the host. Although he or she can get help from others for some of those things...
For those who are returning once again to compete a most sincere and heartfelt welcome back!
This round's theme is "Making something extraordinary from the ordinary".
That is, I want you to take something ordinary and make a piece of terrain out of it.
Sounds simple? Well it's not that simple. Specifically:
Take two (that's more than 1 and less than 3) everyday items (this can be household rubbish or recycling; bottles, bottle tops, cans, etc.), something that you find in real life (so not part of a model kit, basically) and turn them into terrain.
The "Ordinary" pieces must be larger than a normal 28mm infantry figure each. That is roughly a cylinder of 30mm in length and 25mm in diameter.
Your first WIP photo should show both of the Ordinary items in the natural state (at least before they become unrecognisable) so that we can see what you are starting with.
Other suitable items include: Cans of beans (probably best without the beans in), boxes of any kind, kinder eggs, liquid soap dispensers, pill bottles and boxes. Anything that didn't come in a model kit.
Viktor von Domm wrote:...by the way... i think i have some pieces found already... say Dr. H... or Cam... the second piece...necessarily a different item altogether or could be twins?
That's an interesting question, Vik.
I will say that twins are allowed, but remember that originality is a key feature in this (as others) competition. It would be advisable to treat the two items differently (and making two identical things into two different things would be good).
A good way of working this would be to have the second of the pair as a broken/destroyed version of the intact one.
Still sounds simple? Well there's one more thing:
One item must remain largely in one piece (you can add greebles to it, but the basic shape must remain intact), the other item can be chopped up or used in any way you want (except as the base).
However, I will allow you to cut holes for pipes etc. and flatten areas to allow it to sit/stand straight on the ground or next to other parts of the model.
But be aware that points may be available for how little abuse (cutting) you can get away with on that item.
I want you to work around the item, not bend it to your will. That is the challenge.
The truly tricky part I see for this competition is using something in such a way that it remains recognisable as what it was, but also is perfectly recognisable as what is represents on the model. Find that balance, and the prize could be yours.
Just to emphasise a point:
The Ordinary items are to be used as part of the model, but not as the base; the thing the whole model sits on.
Also, you can use as many other items (real life or model kit) as you like, for any other part of the model (including the base), but these are not counted as the Two for the theme and can be treated however you like (e.g. cut up, etc...)
For it to qualify as "intact" you cannot remove from it's shape/surface (unless you need to drill a hole for something to be firmly attached with a pin, for example).
You can, however, add as much as you like to it. Use the items as a scaffold to build upon.
But think, that if you completely obliterate the shape of the original item, what was the point of using it in the first place?
This is why I want to know what the two ordinary items are, before you start. So that I can judge how well you have used it's shape.
Work with the shape to create something different and interesting.
I like to see how people build their models, and I'm sure I'm not alone in this. So please post as many WIP shots as you can. This can achieve more than just keeping me happy (and you want to do that anyway ): Regular posts in this thread will keep it in the public eye and will allow more people to find this contest. Also, if you post WIP shots, others can give you feedback and ideas before it's too late to change it (this will only help you as a participant and we all learn something new).
However, FINAL pictures should not be shown here. This is important for motivation, we are all our own worst critics, and seeing someone's brilliant work should not put us off but it can. I can't stop you posting in your own threads, but please not in here. PM me with the pictures / links instead when they are ready.
One last note on photographs. Please put as much effort into taking photos of your finished model as you have building it. Poorly lit, out-of-focus, blurred, and low resolution photos can harm your chances in any competition. Remember, If I can't see it in the photo, I can't judge it. Only you can hold the model in your hands and turn it around to see everything. Make sure everything you want me to see is in the photos. Thank you.
Rules:. 1: Talk about fight club the Competition. Tell everyone. Post it in your blogs. Add the banner to your signature.
HTML code for the banner.....
{url=http://www.dakkadakka.com/dakkaforum/posts/list/643658.page#7734224]{img]http://images.dakkadakka.com/gallery/2012/11/8/429237_md-.jpg{/img]{/url]
change all the "{" to "["
It should look and work like this one:
2: Must be completed by the deadline. And when I say "must", I mean "about". There is a fair amount of leeway given in these contests but assume there will be no extensions and we'll cross any problems when it arises.
The Deadline is 10 weeks which makes it midnight BST 17th June Which I believe is 19:00 EST or 16:00 PST
But anything on that night though to midday will be accepted so that those of you living in the past can keep going until bed time.
Deadline extended to midnight (BST) 21st June (Sunday)
3: Your piece should be scratch-built or heavily converted. Model kit parts can be used, but you will get more points for something you sculpt yourself, so keep that in mind. Unconventional parts are highly recommended in addition to those you will be using as part of this competition.
4: Your model should be a piece of terrain or a diorama that can be used for gaming purposes. It cannot be a playable model in itself (a crashed tank must stay crashed), but removable models (people) are fine.
5: Any scale, any setting and any gaming system are welcome. A nice mixture of fantasy, sci-fi, historical, or modern will make this contest all the more interesting. If you don't play a game, that's fine too; just make a display piece, but keep rule 4 in mind.
6: The women are right, size doesn't matter. You can make as small or as large a model as you want. Bare in mind the time-scale and don't bite off more than you can chew.
However, the two pieces of "Ordinary matter" that you choose to use as the contest pieces must be larger than a normal 28mm infantry figure. That is roughly a cylinder of 30mm in length and 25mm in diameter.
Your first WIP photo should show both of the Ordinary items in the natural state (or as near to it as possible) so that we can see what you are starting with.
7: Final Entry: Six or more photos of your final entry, showing top, front, both sides, back and all the important parts - not to be posted in this thread. PM me with links to your galleries, albums, etc. As I said above, please take the time to take the best photos that you can.
Together with your photos, I would like a statement of the Two ordinary items (a photo would be ideal) that you used. Feel free to include some fluff or an explanation of the model/setting to allow the rest of us to fully appreciate your work.
8: THE RULE OF COOL, trumps all.
9: Not so much a rule, but it wouldn't be the League of Extraordinary Riveters if there are no rivets. This also means similar small details are highly valued (rivets are the best example of this level of detailing).
10: And on a personal note, Sprue. Find a use for the often discarded wonder material and bonus points will be yours.
If you are unsure of anything just ask away.
Judging:. Modelling: 50 points total. (10 points) Skill and Techniques - No mould lines, gaps or rough edges (that are not meant to be rough). Show that you know the difference between a hobby knife and a spatula.
(10 points) Design - How well was the idea translated to the model. Layout of the piece; artistically and for playability. Well thought out design for the setting.
(5 points) Originality - You could have built anything, what did you choose?
(10 points) Materials - Choice of Ordinary items (ease of use / ambition / originality). Scratch-building Vs. recycled materials Vs. kit parts.
(15 points) Final product - How well were the Ordinary items used. Clever incorporation of the shapes into the model. Was the intact piece left intact (no chopping needed).
Painting: 50 points total.
(10 points) Between the lines - Crisp and clean paintwork. No slips or brushstrokes. Good coverage of both the basecoat and final layers.
(10 points) Skill and Techniques - Use of advanced painting techniques such as blending, shading, OSL, weathering, edge highlighting, freehand, etc... And their execution.
(10 points) Simple but effective - Use of basic techniques (washes, dry-brushing, layering etc.) to a high level.
(5 points) Thinking outside the box - Use of unusual methods to produce good results. Including the use of printed materials, or unusual media (iridescent paint, etc.).
(15 points) Final product - How does the piece look overall in all it's glory.
Bonuses: 25 points total.
(5 points) Little details - Rivets and other small details that add realism to the piece.
(3 points) The wonder material - Use of Sprue in it's own right not just as a hidden support structure. Good, new and original use of sprue.
(5 points) The second piece - Was the second piece left intact?
(1 point) On time - A little bonus for those that completed on time (Midnight 17th June) regardless of extensions.
(2 points) Early - Something for those that work really quick. Completed in 5 weeks (by 13th May). Not cumulative with "On Time".
(10 points) Coolness - At the judges discretion. Rule of Cool is always in effect.
Yeah, that's a possible total of 125 points... nobody said it had to be 100.
Prizes:. 1st Prize.
Membership to the League of Extraordinary Riveters as top prize. You will be allowed to fly the League's banner and be recognised as a modeller devoted to Rivets.
Also a commission piece of terrain to your specification, made by me, of a medium size (CD sized base, see my sprue hut for an example). And some of my casts, that I sell, for you to play with.
2nd Prize.
A small commission piece of terrain (see my junk pile for an example), and a smaller collection of my casts.
3rd Prize
Just a warm glow inside to encourage you to come back next time.
People's choice: As voted for by your fellow Dakkanaughts.
More warm feelings inside and the bragging rights that your peers love your work.
Honorary mention: The person that didn't get into the top 3 but received the most votes. Assuming this is different from the People's choice.
And...
Anyone who completes a model for this competition will receive a full, detailed critique of your piece, written by me. This will highlight the good points and the parts I feel need work. I will give advice as to how I would improve the model and suggestions for alternatives. This is purely my opinions and is part of how I judge the pieces. It can be posted in this thread for all to see and learn from, or by PM if you want to see it first.
Judges:
Me (Dr H)
Camkierhi
Volunteers welcome to help in the process.
So, go to it people. Get building.
Current Contestants:
Gawdam Sumbish
Snrub
Trollmeat
EyeamRai
Vik
MagosBiff90
Monkeytroll
Stormwall
Solar Shock
Mars2024
Anvildude
Lone Dirty Dog
OneManNoodles
Red Harvest
GrimDork
Ruglud?
Ignatius-Grulgor
Januine
Tek Thornison
Inmygravenimage
ChrisWhite
Endtransmission
Keltikhoa
Llamahead
Fango
I didn't end up finishing last time I entered. But I already have an idea for this comp, and it's an idea I'm confident I can execute with (hopefully) great results.
I am never going to win one of these, but that isn't why I enter competitions. :-D
These competitions are a great encouragement to Complete pieces, rather than getting half-way through and being entirely distracted, and I like the challenge of finding a way to incorporate the competition's theme into my own Hive World (which is filled with mutants, carnival freaks and other oddities), but above all it is to have some fun (like my entry to the previous competition where I had an ancient titan swan-dive into the dirt) :-)
ah.....a classic theme...difficult...er...read that as challenging...i´m in... for goood or bad.......time hopefully comes to me again...i am itching all over to get my hands into some junk for a long time too....
count me in...
Dr H really cool theme!!! so glad I can use a current idea I have (but not started) for this!!
Making a pledge to the riveting gods that I will finish this one!!!
just on a little extra note..... these competitions are truly awesome! There is always a real buzz around and its great to be a part of it! Best of luck everyone! Lets really push to make this one the best yet!
Snrub: Good to hear you have an idea lined up. Good luck.
Trollmeat: You never can tell how these competitions will turn out. Never say never.
Fun is the aim of the game though. That's what's important. Good luck.
EyeamRai: Good good.
Vik: Hope you find the time, but I am also looking forward to calling you "Nursie"
Magos: Yeah, I had noticed a few people saying that they had ideas for terrain pieces and so to avoid disappointing someone with a theme that didn't fit, I went for a material restriction.
Everyone can build whatever they want. And if your stuck for ideas of what to build, look for the Ordinary items first and then work from what they look like.
Just to emphasise a point:
The Ordinary items are to be used as part of the model, but not as the base.
Also, you can use as many other items (real life or model kit) as you like, for any other part of the model (including the base), but these are not counted as the Two for the theme and can be treated however you like (e.g. cut up, etc...)
Snrub wrote:So, say for example, if I wanted to use a baked bean can and a tissue box then I'm good to go? I can start immediately?
Indeed.
trollmeat wrote:...but!
The frame is... the ... base... the... ground floor .... argh!
*wanders off to take pics of the sketches* ..........................
Unless your picture frame is going to form the walls of the ground floor? Then it would be ok. Maybe I misunderstood your intentions. I'll await your sketches to clarify.
If the frame is only going to form the base of the model, like a plinth, or the sides of a thick base (as seen on my UFO crash piece). Then it won't count as one of the two ordinary items.
If the frame is going to form the walls of the ground floor/basement/subterranean structure, and just happens to be the lowest part of the model (and therefore the base), then I'll allow it.
It can't just be the base, and must form part of the in-universe terrain.
Trollmeat, So in your side on sketch, where is the picture frame? In the lower part of the buildings?
If so, that's fine.
The idea is that the shape of the items you are choosing, affect the shape of the model as they are part of the structure of the model.
A base is just something that the model sits on and does not affect the shape of the model. For example the little black disks that a space marine stands on.
Vik: Hope you find the time, but I am also looking forward to calling you "Nursie"
LOL....the resident doc wants me to call Nursie.......well...what a coincidence....
am i understanding this right... we have to use at least two every day pieces...and make a terrain piece from it...
is a kinder egg an every day piece...or more soap dispenser muzzle like?... pill box...or a cardboard mug from starbucks?... need to clarify what every day bits could be...
the theme is open to everything....it is a strictly material themed comp...?...sorry if i sound a bit dense... but one needs to have a clear road to travel in the train of creativity upon....
Vik: Hope you find the time, but I am also looking forward to calling you "Nursie"
LOL....the resident doc wants me to call Nursie.......well...what a coincidence....
Then we just have to find you a cow costume. (you have seen Blackadder, haven't you).
am i understanding this right... we have to use at least two every day pieces...and make a terrain piece from it...
is a kinder egg an every day piece...or more soap dispenser muzzle like?... pill box...or a cardboard mug from starbucks?... need to clarify what every day bits could be...
Those are all fine. An everyday thing is just to differentiate them from model kit parts. So basically use anything that hasn't come in a model kit.
Keep in mind though, that there may be points on offer for the more adventurous/unexpected the items are (as in the perceived difficulty in using them as a model). I'm going to work on getting the judging criteria done today, and things like this will (hopefully) become clearer.
And remember; one of those two items has to remain intact. However, I will allow you to cut holes for pipes etc. and flatten areas to allow it to sit/stand straight on the ground or next to other parts of the model. Again, points may be available for how little abuse (cutting) you can get away with on that item.
the theme is open to everything....it is a strictly material themed comp...?...sorry if i sound a bit dense... but one needs to have a clear road to travel in the train of creativity upon....
Yes, you can make whatever your little heart desires. I am only limiting what materials you can use, or more precisely; that you must use a certain material (2 items), but you are free in every other respect (within the rules).
The truly tricky part I see for this competition is using something in such a way that it remains recognisable as what it was, but also is perfectly recognisable as what is represents on the model. Find that balance, and the prize could be yours.
Good. Because that's what I'm using and I've already started.
Snrub takes an early lead... Don't forget photographic evidence to show the items before they become unrecognisable. Although a picture of a tissue box and a can o' beans is not necessary by itself, I know what those look like.
Right, figured I'd break this conversation out from being half-way between on the thread and half via PM.
Dr H wrote: Trollmeat, So in your side on sketch, where is the picture frame? In the lower part of the buildings?
If so, that's fine.
The idea is that the shape of the items you are choosing, affect the shape of the model as they are part of the structure of the model.
A base is just something that the model sits on and does not affect the shape of the model. For example the little black disks that a space marine stands on.
On the side-on pic on the bottom. The frames are on the three buildings on the right (smoke stacks, radar, and crane). The frames are half of the first storey (the ones with the buttresses against them).
I have enough off-cuts for the towers, walkways, bulkheads, buttresses, and the base pieces that are attached to the frames to raise them up to bulkhead height, I just have to figure out how to attach them all together, make ladders, and paint it. Oh, and find a readily available material that can be used for the floors! D-:
So, my object is Picture Frames, but I am yet to figure out the 2nd (come on garbage heap that we call the world, give me something to use as the floors!) :-D
ps: This is the sketch:
I see for this competition is using something in such a way that it remains recognisable as what it was, but also is perfectly recognisable as what is represents on the model. Find that balance, and the prize could be yours.
Oh, well. If it is flipped upside down you can see the bevelled edge of the frame? Argh. Perhaps I will have to come back with a different idea! :-P
Trollmeat, the picture frames are fine as you are using them there.
If the outside of the frames are fairly plain then finding a way to show the inside bevel would gain you a few points (bare in mind the scoring system is not all ironed out yet, but don't expect these little bonuses I keep mentioning to be huge hauls of points).
You could break the frames and turn them inside out to use the bevel on the outside of the building, But you would need to find another intact item.
Or you could have subterranean areas below your ground level flooring that are visible from above and show the bevel that way.
Which of those would be better, I can't say (and not just because I'm the judge).
But don't rush to change your plans because I've teased a little bonus. It may cause you more trouble than it's worth.
Well, I still have to find a 2nd every day item to be able to use this concept, but I do have enough busted up bits to make a few U and L shape pieces to go with it and show off the bevel, but *shrugs*, chances are I'll get distracted or inspired to work on something entirely different :-)
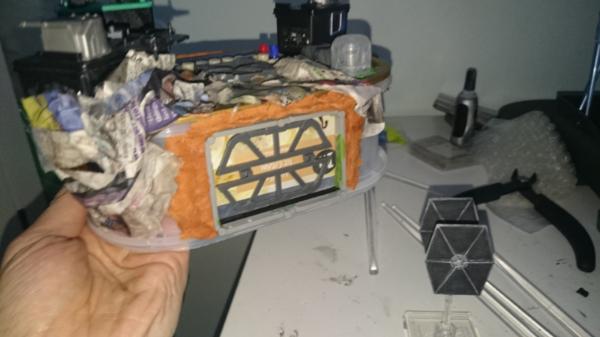
Dr H wrote: Don't forget photographic evidence to show the items before they become unrecognisable. Although a picture of a tissue box and a can o' beans is not necessary by itself, I know what those look like.
*sigh* Looks like I have to do everything for you people.
Here we go.
If all goes to plan (it wont) I should have it done in about 4 days.
Can I cheat and use a pringles can, a wooden house trim corner piece and a giant post office box to make an Athena sized cruiser? (Klaus continues to inspire.)
Nooo?
Ok.
I am worried I can't get into this one, I just can't think of an idea aside from maybe that or a little missile tower. I had originally wanted to finally get off my butt and build that tower from skyrim out of sprue but, you know. Two objects.
Snrub wrote:If all goes to plan (it wont) I should have it done in about 4 days.
Thank you Snrub. 4 days! DAYS! I'm always amazed at how quick some people can work. What's the white round thing? That looks interesting.
Solar Shock: Yeah, that's telling you something. Welcome.
Stormwall: Well an Athena-alike would not be a piece of terrain. A crashed one would be. Try having a look around for items with interesting shapes. Something might spark some inspiration, and it's probably easier than having an idea and then trying to find something to fit...
Scoring criteria are now up in the OP Check them over and let me know if there is an issue.
I think I got just the thing, too- Now, a question for clarification- how much can end up covered? Because I'm planning on using something for a Tyrannid/underground structure (depending on how it comes out), and covering up some of the joints will end up being somewhat critical...
Anvildude: Covered? Of the ordinary items? All of it, if you like. The items are there as a scaffold to build upon, or an obstacle to model about.
I'm not expecting giant coke cans. Do what needs to be done to make the shape fit the scale you are working at.
Here's some examples from the world of the DDakka:
Bottle of Whiskey;
Left pretty much as it is, but with things added. Makes a thing of it being an alcohol bottle to make a bar. Good use of the embossed lettering of the bottle. Doorway is only as deep as the surface of the bottle (the bottle is left intact, I believe).
PVC pipes;
Would need to be part of a terrain piece. But all that is added is the tap (and rivets).
Tin can;
Working with the shape of the item, but mostly hiding it's origins.
Pill boxes (although individually they may be under my size limit);
Again, simple additions to turn something of a near perfect shape into a scale piece. But check the size limit.
Those are by no means the perfect entry, but should give you an idea of what you can do with yours.
The item doesn't have to be the sole focus of the terrain (as with the Kraken bar above), it can be part of a larger piece, or just supplementary to a building.
Although, bare in mind that a fair amount of points are aimed at the Ordinary items and their uses.
Be clever, be inventive, have fun.
LDD: I'll put you down and then you can have 10 weeks to come up with an excuse.
Or, give it a go. It doesn't have to be a huge piece of terrain. The only limit on size is for the Ordinary items, it's a reasonably small limit, and only one of them needs to stay in one piece.
Good to have you on board OMN, one way or another.
So how about something like the picture below? Obviously, I'd need a second base item, but is that the relative level of 'almost just right' you are after?
Dr H wrote: LDD: I'll put you down and then you can have 10 weeks to come up with an excuse.
Or, give it a go. It doesn't have to be a huge piece of terrain. The only limit on size is for the Ordinary items, it's a reasonably small limit, and only one of them needs to stay in one piece.
Good to have you on board OMN, one way or another.
I was a scout = Be prepared.
10 weeks for an excuse thats going to be tough but I might just be able to come up with one by then
I knew you'd come up with a cracking theme Dr H - but I'm still in the same place I was for the last round, that is called - Lack of Inspiration... hmmmmmmmmm.............
Size doesn't matter. I voted yours best on last round G'S. And I am assistant judge.
I think Grimsby is a perfect example. All he needs is a drinking straw for a bit of pipework.
I was thinking last night about a toilet roll insert and a car cleaning sponge making a tree. 10 weeks to make it look good and as much of any other material as you like.! I would give you a run for your money.
Remember one object can be cut to bits. Get hold of a cassette and a disused printer cartridge and the sky is the limit.
One of the big points on these competitions is to gain inspiration so never be afraid to steal ideas. Use the pipe idea, but twist it make it your own. Blow us all away.
Good luck everyone looking forward to this.
@LDD personally I want at least a "the dragon ate my homework. " level from you.
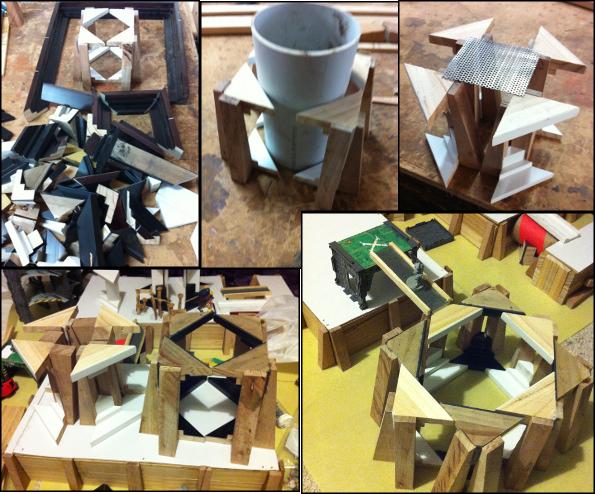
Attempt #1.(not nailed together)
1) I have no more of the "floor" that I used in this mock up, so still have to find something else suitable for it (if I am going to be making more than one piece, which is kinda the point).
2) I need to use 2 different household items, so far I am using a frame and offcuts/scrap, so will have to find something to use as adornments to meet the critera.
(the rectangle piece in the middle of the left picture is the same height as a bulkhead)
(?) Every buttress is to have a ladder. If I was to build them using Staples, would this count as the 2nd everyday item?
They are the lil bits that get cut off when tipping a 2*4 stake (so they are hard wood, where the picture frame and offcuts which make the rest of the base are pine).
The buttresses were inspired by Shadowbadger post, and I've shamelessly stolen the idea as they are exactly what I was looking for to solve my raising the floor level issues.
ah i see... for the hobby it is essential not to overlook the small items that litter our way...i´ve collceted nice transport aids at ikea... plastic stuff even that you would find exactly where you might have found your picture frames......coincidences, coincidences
OOOOooo potential to use a treasure trove of wee scraps and unusual pieces... I like this very much! some awesome ideas coming along already.... I am going to get my idea out of my head tonight and make a start on putting something together!
Ok this is where I am at I am thinking alien invasion or a more elaborate idea a worm hole appeared in my man cave and it now dwells in an alternative dimension.
Although the dragon idea ain't bad have not used a fantasy twist in my project excuses yet, so many decisions and so little time.
Any excuses come to mind please jot them down and send them to " to lazy to think of something and see it through ", although I probably won't read them as I can't be bothered
Woot, I see my bottle bar got a mention, however it's a rum bottle not whisky! Also yes the bottle is most certainly left intact, didn't want to mess about cutting through very thick glass for the sake of my fingers.
Oh how I wish this theme had happened before I built the second one, I feel a little crazy doing a third...
That one is a gin bottle again making a feature of the fact that it's a bar made from an alcohol bottle, and the inherent qualities such as the raised lettering and using the lid for the sign.
Might see if I can come up with another piece, seeing as I've got a decent length of deadline!
Viktor von Domm wrote: er...well you could save the time for an excuse and slap and glue stuff to stuff...
Now what would be the fun in that plus I would have nothing to do for the other 6 and half weeks
Automatically Appended Next Post:
Ignatius-Grulgor wrote: Woot, I see my bottle bar got a mention, however it's a rum bottle not whisky! Also yes the bottle is most certainly left intact, didn't want to mess about cutting through very thick glass for the sake of my fingers.
Oh how I wish this theme had happened before I built the second one, I feel a little crazy doing a third...
That one is a gin bottle again making a feature of the fact that it's a bar made from an alcohol bottle, and the inherent qualities such as the raised lettering and using the lid for the sign.
Might see if I can come up with another piece, seeing as I've got a decent length of deadline!
Now this is genius " I need to drink honey its a necessity for my hobby now past me the other bottle " I like this mans style
Ooohhh - this sounds cracking. Reading the Necromunda novels at the mo and really fancy doing some Downtown n the Sump themed scenary. Count me in!! Off to rumage through my recycling bins.... lol
Viktor von Domm wrote: er...well you could save the time for an excuse and slap and glue stuff to stuff...
Now what would be the fun in that plus I would have nothing to do for the other 6 and half weeks
er....painting....naaawwww...that´d be too easy an answer...
ß
by the way... i think i have some pieces found already... say Dr. H... or Cam... the second piece...necessarily a different item altogether or could be twins?
Hey I might actually enter this after all found something that has kind of inspired me, once I work out what else I need to go with it I will post some pics of the parts ......... thats probably as far as it will get though
Ruglud: Hope you find some inspiration. Have a look around and see what you can find.
Gawdam: Those pics are for inspiration, don't feel bad about using them. Those pipes in particular I stated that they would need to be built into some kind of terrain. Plenty of scope to make it your own there.
It's not so much about what you choose (although still important), but what you do with them. This competition is about taking something ordinary and making it extraordinary. Taking something very simple and ordinary and turning it into an amazing piece of terrain. Just as good is taking something unusual (but still found in the real world) and working that shape into the model in a way that fits.
That's Roy Batty (the replicant), shortly after being whacked by Deckard (the bladerunner).
As for size, Cam' is right. Keep in mind, the larger you go, the more detail and things going on, you can fit in. But it requires a lot more work just to fill that space and then paint the whole thing.
A smaller piece is quicker (by just having less mass), and this allows you to take more time over the details to make them better. It's also a challenge to make something tell a story (either what has happened there, or just why does it look the way it does) in less space. I do take this into account when judging.
Size doesn't impress me as much as little details do. (Just make sure those details have a reason to be there, I'm not a fan of Space Marine HQ bling)
Cam': Yep, we appear to be on the same page.
Trollmeat: Good start. Remember; the Ordinary items need to be bigger than a cylinder of ~30x25mm (give or take, I'm not going to be insisting on exact measurements). So staples are not going to be large enough. You can still use them though, they make good ladders. But you still need a second item, but don't get so stressed out about finding something so early. You could come across a nice bottle tomorrow that would make a nice tower for one of your buildings.
Ignatius': Yes, I believe that seeing your bar was one of the seeds (the other being the amount of stuff I have tucked away for modelling) that led to the idea for this competition.
Rum, Whiskey, whatever, I've only seen it on a shelf and recognised the bottle shape (and having "Kraken" written on it helped). Yeah, didn't expect anyone wanting to cut though glass if they didn't need to.
Lid for a sign is another good idea.
welcome and good luck.
Januine: Welcome and good luck.
Viktor von Domm wrote:...by the way... i think i have some pieces found already... say Dr. H... or Cam... the second piece...necessarily a different item altogether or could be twins?
That's an interesting question, Vik. I will say that twins are allowed, but remember that originality is a key feature in this (as others) competition. It would be advisable to treat the two items differently (and making two identical things into two different things would be good). A good way of working this would be to have the second of the pair as a broken/destroyed version of the intact one.
Tek: Welcome back. Good start. Nice find. Look forward to how that works out.
Snrub: You have sprue... now use it. Good progress.
However, the left intact one; Can I use multiple? As I have these little cereal box toys that I want to use, but I want to use 4-5 of them, they are extremely similar and are basically ever so slight aesthetic variations. Is that ok?
Also, the left intact, does that mean I simply can't cut away from it? or does it also include I can't add over it? An example would be; say I use something as a statue, does having tree branches/moss growing over it mean that its no longer intact? Im pretty sure the answer is that its fine to do that, but I wanted to check I wasn't going to balls it up before i'd even started
You just have to have 2 items, where one must stay intact.. that's the only limitation (other than the basic size of those items).
For it to qualify as "intact" you cannot remove from it's shape/surface (unless you need to drill a hole for something to be firmly attached with a pin, for example).
You can, however, add as much as you like to it. Use the items as a scaffold to build upon.
But think, that if you completely obliterate the shape of the original item, what was the point of using it in the first place?
This is why I want to know what the two ordinary items are, before you start. So that I can judge how well you have used it's shape.
Work with the shape to create something different and interesting.
May I add a suggestion? These items that we choose to use...nothing should be bought specifically for this comps entry ...I think collected stuff or findings are what characterises the materials we use the best...?!?
Just a thought I had...because I also traveled evilbay for plastic stuff...and boy I could buy me poor there just looking at food and diner stuff...
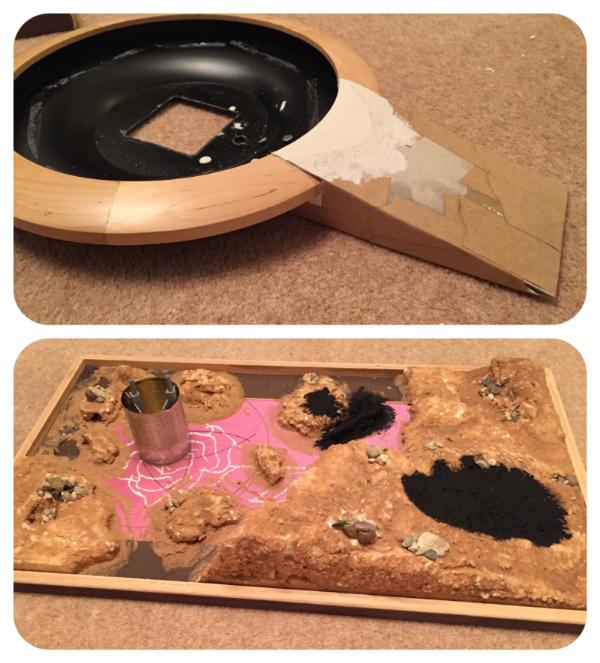
Hi there everyone. I am hoping that there are no objections to me throwing my hat in the ring. I had hoped to make a diorama, but couldn't make it fit in to the theme. Instead I hope to do justice to an idea that has been forming every time I walked past my daughter's old dinner plates. I'll do some more concept moulding, but the raw materials will be the following regardless of what I make - they are begging to be covered in paint and modelling materials:
Dr H wrote: Vik and Magos: Ta. We'll see how it goes. Points are available for recycling things anyway.
TP^DC Deputy Manager: All are welcome. Good luck.
Out of curiosity, what was it about your diorama that wouldn't fit the theme?
I am (trying to) paint up figures for Paradigm's painting competition which is a Veteran theme this month and I've elected to enter a Chapter command squad for the Dark Angels complete with Brother Bethor modded with a storm shield and power fist. The diorama was going to be the squad and Azrael holding ground in front of some ruins with Bethor slightly raised from ground level with the banner pole being removable from his fist so it could be planted behind him in the diorama and the magnetised right power fist replaced with a duplicate that has no hole drilled in for the pole. It would allow Bethor to be fielded on table for a game (if that ever happens) with banner and standard base, but to also be able to display the squad in a more dynamic setting.
It was going to be sparse of terrain features and I was going to finally use up some of the GW moulded cathedral parts that are sat in my cupboard. Anything the size of a standard figure would have just stood out too much.
Aren't you glad you asked? Sorry for droning moment.
Instead, I get to make a Tau landing pad set on a lava world. It might start me painting up my Tau . The bit I'm moulding with my concept is having the pad (plate) capable of being lowered by 1.75" (ahem) so that not only could this be terrain, but may be acceptable as being fielded as a fortification. . . with LEDs . . . and a nervous breakdown.
So I've had something I've wanted to do *forever* but I'm not sure if it would fit here... How well would a gutted desktop tower fit the criteria?
I was thinking of putting it on it's side so it's not too tall and using it as a warehouse or similar, with gantries and maybe a small office elevated off the floor level, and the whole thing would have a clear plexiglass(or whatever it is) almost building-wide skylight, maybe a force field roof or something...
The more I think about it though, I'd probably want to cut some doors into at least one or two of the sides that wouldn't already have them... I dunno.. its possible I could make due with the holes left by the missing cards and power supply, and the disk drives from the front on the opposite end...
I'm thinking it would make a swell terrain piece but at the same time I'm not sure if it would be the truest-to-the-theme base material I could use...
Maybe for the comp I could start smaller and use the power supply housing, it's pretty obvious what it used to be but its also almost the perfect size for a small utility building.
I don't know about anyone else, but I have a spare PC tower laying about (all right, two. But the second one is a functioning PC not an empty box ).
If you can turn a PC tower into a piece of terrain, I would be pretty impressed.
If you have to cut holes in it then find something else to keep intact. The largest of your items doesn't have to be the one to stay intact, you can just stick on a small bottle or can (covered in stuff) and call that intact. This is the tactical side of the competition; which two items to choose (from all the things that you will end up using) and which of them to keep intact... Let me see the cogs turning in those heads of yours'.
True, the PSU would also make a good (if somewhat smaller AND lighter) building. I also have a stripped one of those laying about...
I have enough bits to make a small junk town, I know I've seen a really nice collection/board made of computer/electronic scraps though I don't have that level of junk-to-awesome talent.
If I can find enough time to work on it... Would make for a small skirmish board unto itself or at least a large centerpiece. Guess I could put a pill sorter dumpster out back or something similar up top.
Trollmeat: Good start.
Remember; the Ordinary items need to be bigger than a cylinder of ~30x25mm (give or take, I'm not going to be insisting on exact measurements). So staples are not going to be large enough. You can still use them though, they make good ladders. But you still need a second item, but don't get so stressed out about finding something so early. You could come across a nice bottle tomorrow that would make a nice tower for one of your buildings.
I figured Staples would just be a component piece and not count as the 2nd item. Guess I'll keep an eye out for something suitable. :-)
As for finding the things early, I am prone to distraction and sporadic in my efforts. The last couple of days I had Time+Effort, and I can't be sure when I will next be able to properly work on the project.
I love this... so many cool ideas and inspiration.... my first ideas have been blown out of the water unfortunately as they didn't fit the criteria... but there may be the seed of something that might develop into a thought that might manifest itself as an idea in the depths of my brain at the mo...... so will be sure to update soon! ......
the ideas regarding the PC tower and other parts is a really interesting (& large) one! looking forward to seeing where it might go!
Nothing stuck together yet, but I've temporarily used scraps of cardboard as floors so I could plonk some Necromunda buildings on top to show what I intend.
I am thinking that I will not put ladders on the corners buttresses of the Frameworks(ground/floor/sewer level structures) - where a side has 5 buttresses, only 2 will have ladders, and where an edge has 3 buttresses it will only be the middle one that has a ladder.
With fewer ladders, movement options between the sewer/ground floor and the levels/buildings above it will be roughly the same as the gaps between the bulkheads of the original buildings (and significantly reduce the number of ladders I have to make). :-D
Spoiler:
In the sketch above, I have roughed out some buildings/structures to sit on top of the Frameworks. I plan on having these buildings being similar in style to the Necromunda ones (in that they do not have enclosing walls), but I also want them to appear functional, or at least look as if they once had a purpose.
This is my list of ideas for Building Adornments(top of the building) so far:
-Cranes/Hive Constructors,
-Radar (dish/ball),
-Smoke/smog/steam Stack,
-Giant Cog (I should probably take a photo of the sketch to explain this one) :p,
-Coils / Conduit (Electricity),
...and my list of Building Gubbins:
-Ladders (of course),
-Pipes (thin vertical ones running up side, as well as lager/man-sized effluent exits),
-Vents/Fans,
-Cannisters,
Q: Anyone have any suggestions for additional Adornments or Gubbins for buildings?
After this post, I will update with progress/pics/etc in my plog
Cool! Kids' balloon sticks come in interesting cross sections and make great beams (amongst other things)
Anyway, cautiously, I'm in. I'm going to use 2 printer cartridges plus other guff to make 2 hidden asteroid bases for trek/wars etc - one intact, one bombed out. The stands will be from the ends of balloon sticks probably (as I say, versatile ), not yet quite sure about the asteroids themselves.
as for my own entry... well my paper is forming...sliver linings and al that so i am hoping for the best that i will be back on dakka full steam again...(here´s hoping^^)
Well, my first thought was to go back to my orky terrain - cardboard tubes aplenty in my collection, and I'm relatively sure I can make one that's not too complex to take me forever
However, I'm probably going to let ideas float for a while, have a sift through the junk box sections of my bits, see what else comes up. It's almost as though my first thought is too easy....although I did also contemplate making a space station out of coke cans...scenery for some kind of game set in space (I'm thinking ISS or Mir type of thing, so not the right scale for Trek or SW).
Already well into it, Riveters, and they look great already. Shouldn't be too much of a challenge, as most of the terrain I've got is like this - silos made from Red Bull cans, storage tanks made from pill bottles (see last LoER challenge), or from baked beans tins...
Although I do have this giant formula tin my sister left here. And I'm sure I can push myself to eat another tin of beans - giant silo incoming! I'll have to up my game, now that I've seen what the competition is like ;P.
I love those little dumpsters, /user/Dr H[/user], and Snrub, yours look cool already. Better get on it, and not tell my wife I'm avoiding uni work by building more terrain...
Oooh making stuff for the x/attack wing scale sounds pretty neat...
Gonna see if I can figure something out with my tower first though. Still need to remove the motherboard but, really, I think there's plenty of access on two sides. Just gotta figure out what building would benefit from the shape so I can decide which bits to add. Initial thoughts are maybe factory or warehouse but I dunno.
I've been thinking of having it lay flat but I suppose I really shouldn't automatically dismiss leaving it upright as a proper tower... Upright it could become an office or apartment building... If I flip it to rest on the top instead of its feet, the openings should be close to or at ground level. The clear side panel would act as a cut-away or perhaps a chic modern megawindow, could give individual rooms privacy screens, oooh in the form of advertising holos .
Might be getting ahead of myself here lol... There would be enough rooms that I'd be better off casting furniture/office equipment...
Automatically Appended Next Post: Looking at it again... It really wants to be industrial or maybe military... Or down right necromunda salvage city.
Huh... Maybe a hive/nest for space ratmen.. Gonna have some of those from Mantic eventually... Would let me work from the scrap/necromunda angle... Now I can see sections for salvage work.. Tables and big bins of parts, maybe even part of a tank... Could be a command room up top for the head rats and a lookout post, maybe some gun stations... Hrmrmrmrmmm.
Oh go on then, I'll throw my hat in the ring too, thanks to Monkeytroll's poking. I need to wait until monday before I can get the parts... I have a couple of old mac mini sized harddrive cases at work that might make for an interesting landing pad or bunker. I can't remember how thick they are though...
Anvildude wrote: Heh- you know what would be neat? A big 'ol Grimdark clock-faced landing pad. Pity there aren't any Time or Clock themed Imperium factions.
Actually... there is. There's the Ordo Chronos in Codex: Inquisition. This branch of the Inquisition monitors time anomalies that occur as part of warptravel. For example when a ship vanishes for years and then reappears, believing they have only been gone a day. That sort of thing
June huh? Surely I can come up with something this time
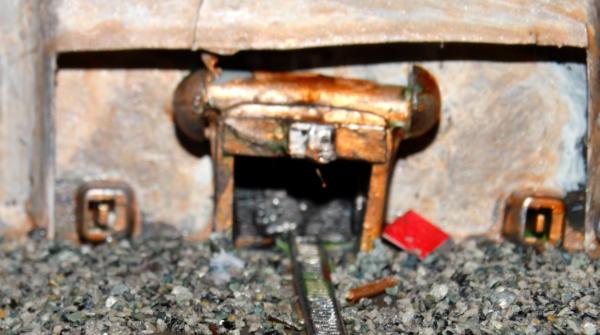
Getting a bit more excited about the scrap/space-rat-men junk/salvage tower thing. I can see a little mine cart type track running through the middle of the ground level, with a bunch of bins (hello pill sorters) filled with scrap for refurbishing and processing. And some work tables to make new stuff. The tracks will proceed out the far side on the ground level.
The thing is nearly two feet tall so I'm gonna have to have several 'floors', I just don't know if I want to make floors or have a 'high ceiling' and make use of the vertical space with gantries and platforms rather than proper floor/ceilings. Almost seems like I should leave the ceiling high unless I'm willing to introduce ducts on the ground floor, they'd all die from smoke inhalation from their processing...
Those little pill-box dumpsters look really good, I've now added them to the thing to keep an eye out for. :-)
GrimDork: Would it be possible for you to build it so the tower can be layed on its side(flat), or standing upright like a highrise (so it can be able to be used either way)?
TP^DC Deputy Manager: Are you going to keep the clock hands on your landing pad as some sort of turn timer?
Make the tower able to be a squat lower building AND be tall? Probably not without a crapload of magnets or screws... Its an interesting idea but I dunno that I could pull it off. The lynchpin for the project's success is going to be an overwhelming amount of small bits and details, since nothing small at my skill level would ever win the comp, I have to go with the quality OF quantity
AHHH all ma stuff has arrived! (ordered some water effects stuff, as i've been meaning to get some, but never got round to it - using you guys as an excuse!)
Have got my parts ready..... going to be using the 2 printer cartridge packets as the main parts... but as you can see... there are a load of other bits amd bobs going to be added.
Not giving away too much but its going to be a power / fuel relay station....
Going to start to bring it together this afternoon! Good luck everyone!
That's right, a Mk IV Warhamster Tank with Goliath Sonic Projector.....
Or maybe it's just my pile of starting bits. I think I'll go with the cardboard tube and a CD as my two items. My original plan for these bits included several pieces of textured plasticard, but I'm now thinking that I'm going full green on this one, and only plan to use recycled bits. We'll see if that works........
I have a couple of potential pieces just need to work out what to do with one of them though I have 2 pieces the same but they are counting as one piece for reasons that will make sense later.
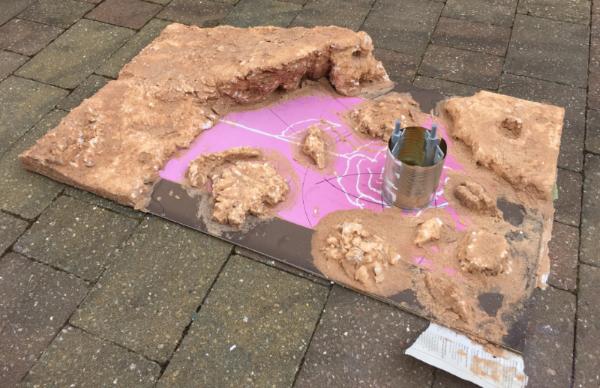
Hi all... wip of the power relay.... got the first take om the base put together. Made from polystyrene pizza bases (unused) and then a first coat of wall filler to make the first idea of terrain and levels. One of the power relays is going to be destroyed and the other still imtact. Got a lot of piping and other little detaisl to add.
IMHO its goimg to be a nice one to do and hopefully fits the bill!
Cheers all!
& MonkeyTroll..... I like the look of that so far!
trollmeat wrote: TP^DC Deputy Manager: Are you going to keep the clock hands on your landing pad as some sort of turn timer?
The plan had been to remove the clock face and use the plate as a pad that could be moved up and down so it could double as terrain and a fortification. I can't figure out an easy way to make that happen though. I may resort to leaving the clear glass face and remove the mechanism and face behind so the landing pad is clear and almost a force-shield pad (or something )
Not a dumb idea at all Stormwall - that was what those bits were earmarked for The very fact of that being the plan for them is why I changed the plan for this comp
So, in lieu of plasticard I wrapped a sheet of paper round the tube using evostik, to help hide the give-away twirly seam that comes with cardboard tubes. And to try and texture the cd I covered it in bostik, then placed some wet kitchen towel on it, liberally applied pva glue and added another sheet of kitchen towel.
After that I tried to add further texture by applying a mix of black ink and pva to the surface (once it had dried) then pressing it against some aluminium mesh. Wasn't the greatest result, and was further compounded by a 'little' spillage when adding some metallic paint......guess I'll just have to corrode the feth out of it
Added a further sheet of paper to the main tube, as the first hadn't hidden the seam that well. Chopped the end of the brush holder at an angle and stuck it to the dessert cup. Sanded a flatish area and stuck the j-bend pipe to that, then filled the space at the top (once the bottom) of the cup with a screw cap from some small container and the blue bit of plastic - think that was once used as part of an DIY eyehole for putting in plastic sheeting.
Solar Shock - let me know how those water effects turn out - I'm always looking at products like that, and disappointed in my 'layer-upon-layer of PVA' turns out!
Automatically Appended Next Post: Here are a couple of things I've been working between last round and this one:
Spoiler:
Big silo with pipe - there is another stand-alone pipe section and an elbow bend bit that I've yet to finish building/put any paint on
Imperial Processing Plant - just got some pipes to add to this one, and some more paint.
Sorry about the phone-quality photos!
Automatically Appended Next Post: And here's the rough form of what I'm working on this time - an even larger silo, with a couple of smaller tanks and what-not.
It'll need some pipes and doohickeys, and I'm planning a stairwell made of granny grating, with handrails and supports made of sprue, and I've got a Rhino top hatch that I'm planning on making into the doorway on the ground floor. And rivets, of course!
Spoiler:
The three main ingredients - a baby formula tin, a normal size baked beans tin, and a snack-sized baked beans tin
And, just for scale, the Predator lurking next to the formula tin
Spoiler:
Automatically Appended Next Post: Gah! One more "Automatically Appended to Last Post" !
I also made some shipping containers:
Spoiler:
Genestealer Cult poster, in anticipation of a rumoured Codex, and because my wife plays 'nids
Different angle, pretty purple that I mixed up
The back
There, I'm done, I'll leave you alone for a while!
Corrugated cardboard as corrugated iron? Nice use.
Also- watch your pipe joints there- that first pic has a pretty obvious gap between the straight side of the horizontal pipe and the curve of the vertical tank- fill that in with GS, put a hole in the vertical pipe, or just stuff it with glue and sawdust or paper-maché- something to cover or fill the gap, to allow it to join properly. Rougher textures can be passed off as corrosion, but smooth edges on gaps like that...
Anvildude I wondered how the hell I was going to fix that without resorting to mathematics! I've got some greenstuff in the freezer I was going to turn into some sandbags - I'll definitely try to fill that gap.
Hi guys, I need some advice regarding size of final piece. If I use the clock it's going to be at least 12 inches to start with. By the time you add in a ramp to get up to the landing pad it's going to end up being about 2 foot by 15 inches. I don't play games of 40K due to a lack of time and nervousness about starting at a late age, I'm therefore a painter/modeller. This means I don't factor size into my plans. Is this too big if I ever take the plunge and play a game, or is that ok?
Here's my plan:
The clock will be on a central column and there'll be a ramp connecting to lava rocks the pedestal will be in a lava field. There will be a sensor drone tower on a nearby rock.
TP^DC Deputy Manager I am in the same boat as you my friend.... painter modeller. So I am probarbly not the best to comment... but I cant see why it would really be an issue. From what I can tell... some of the GW landing pads and terrain pieces are this size if not bigger.
The real challenge IMHO will be to really work into the details of the piece and make sure it is packed with nice little bits and bobs.... aswell as making the landing pad and sensor tower really stand out and be convincing!
Cant wait to see how you tackle it! Sketch looks pretty good!
@ChrisWhite - for me is it Squat. Original is Forge Fathers miniature from Mantic games. No, i don't have army. I have small (10 pieces) unit and one walker, but only this unit is to now painted. Need it for scale, when i build 40K terrain.
Is nicer photos, if painted mini is on it.
@TP^DC Deputy Manager - use your miniature for scale. If it looks good / is terrain good.
About landing pad - Skyshield have 12 inch diameter and 5 inch height If you use google, you will see.
Don't worry mate about painter/modeller. I think that it's a half of us.
Looking good, Snrub. Kinda wishing I had a sprue or ten ;-)
TP^DC Deputy Manager, as others have said, just do what looks right to you. From the sound of it, the piece would be a dominant and if used encourage varied play and the creation of scenarios to include it.
Tek Thornison, your images in this post appear to have vanished (was looking good though) :-)
EyeamRai, those cardboard packaging pieces work really well, they already have textures and interesting shapes. Others might slam me for saying this, but if you don't base any of the pieces they can be modular and put together on the table in any formation (ruined gobbo temple sounds good) ;-)
ChrisWhite, you could make it so that the smaller silo can fit in the larger one for storage. :-D
monkeytroll, I'll have to remember that trick of wrapping paper around the tubes to hide the seams. Cheers for that. :-)
MagosBiff90, wall filler for the base textures? Nice. I have a lot to learn... and my printer needs to have the ink replaced soon, so I know what to do with the packaging :-)
...
Should I use one, or two staples per rung on my ladders? :-D
Those ladders look great! Pinching that for sure, trollmeat! I was just wondering how I was going to fix this mess that I've stumbled across while building. Oh, and apparently my huge tin had a layer of paper or something on it, that my wife sprayed black for me. I've peeled that off now.
Anyway, without further ado...
Spoiler:
Here you can see my problem - you have to travel too far horizontally to get anywhere vertically
As I can't give direct advice to some of your problems/questions, I will say; try searching for pictures of a real life example and see how it would look from the same perspective as your model.
Oh, I know you can't help, Dr H, I just needed to sound off about it, mostly. I've come up with a solution that is, in hindsight, the obvious and real-world one. Just needed a bit of rijiggering the plan and I'm back on track!
Automatically Appended Next Post: Ok, solved my problem and found some imitation Granny Grating.
Here's where we're at after an hour's work or so:
Spoiler:
Spiral staircase! Just need to put in supports, and the two bridges, and rivets and and and...
And here's how the rest of the complex is looking. Need to build a road, some pipes, make that power generator up the back look more 40k...
Now here's a question. I was sorting through the old bits box and found two spare clear square bases. Can I legitimately use these within the context of the contest, given that I'm making pieces for space battle games? I'll be making the stands from salvaged junk (as well as the pieces themselves) but this would also keep it fully playable/legal. Is that ok?
inmygravenimage wrote: Now here's a question. I was sorting through the old bits box and found two spare clear square bases. Can I legitimately use these within the context of the contest, given that I'm making pieces for space battle games? I'll be making the stands from salvaged junk (as well as the pieces themselves) but this would also keep it fully playable/legal. Is that ok?
I think due to his upfront honesty that should be OK, but I am not a judge so this means nothing
inmygravenimage wrote: Now here's a question. I was sorting through the old bits box and found two spare clear square bases. Can I legitimately use these within the context of the contest, given that I'm making pieces for space battle games? I'll be making the stands from salvaged junk (as well as the pieces themselves) but this would also keep it fully playable/legal. Is that ok?
Graven, you can use whatever you like in your models. Keep them legal by all means.
However, if it comes in a model kit, you can't use it as one of the two ordinary items.
Also, you can't use those two ordinary items as the base of the model (the thing it stands on), but I will let you use the ordinary items as the flight stand; so long as it's made as part of the model and not just as a stand (e.g. a tree or rock or church spire or piece of space junk, etc... not left clear or painted black).
Well I don't have many rules for the concept of this contest (two ordinary items, one must stay intact, not used as a base, make terrain...and the various others in the OP), so I have to stick to them.
Everything else is fair game. You can't get freer than that and still be a contest.
You need to choose 2 items that you use as part of the model. Of those 2, one must remain intact, the other can be cut up. However, you can use as many other items as you like and can do whatever you like with them to create the model.
Duplicates of the 2 ordinary items can be used and will be judged accordingly depending on how they are presented or used.
For example; someone has 2 unique items, but a duplicate of one of them. 3 items, but the pair of duplicates can be judged as one item (or one of them can be "ignored" to pass the intact rule).
Or; someone has 2 items that are identical. 2 items, but in order the gain more points they should be used differently (either as completely different things, or one intact building and one broken = keeps to the contest rules of one intact).
My fellow judge(s) and I need to know, when it comes to judging, which two items that you have used are the two ordinary items. Your model will be judged specifically taking this information in mind, about how well you used those items (as well as judging the whole model as usual).
However, I would advise against building the model and then declaring which of the two things you've used are the 2 ordinary items. I think it would be best for you to have in mind which are the items, so that you can focus on them and use them to the maximum effect in your model.
But your final declaration (photos of their natural state would be good) of the 2 ordinary items only needs to be made when you present your final photos. So you can change your mind if your initial plan does not work out.
Yes, that's fine. They both look larger than the modest size limit I set. Add what you like to them and don't cut into one of them. Everything else is up to you.
Stormwall - of course you could just flip it, and no-one would be any the wiser, but this is a challenge, after all
But hey, do what you like! We're just waiting to see the end result, not only how you got there. We do have heaps of time, but do whatever you need to to get it done!
Looking forward to seeing what you do with that little box!
Cut open my thumb with hobby knife. I swear every model/unit/project I have has a good ounce or two in blood. I cut towards myself unconsciously after a good hour of work due to the fact I used to whittle. I guess I am going to get kevlar gloves.
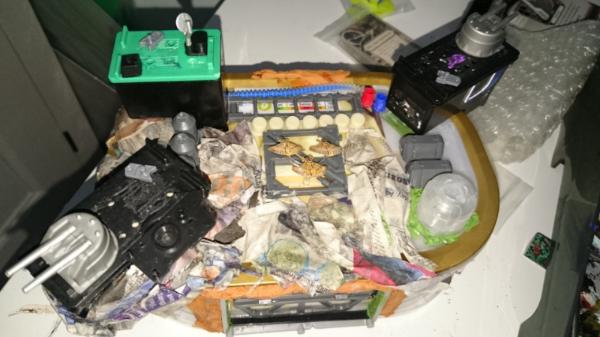
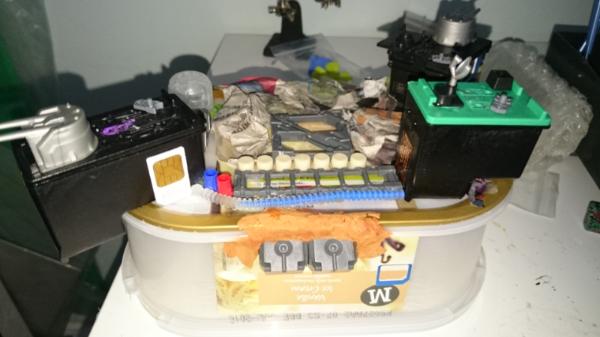
Began on the Mining outpost. This little project is awesome, and every item on the map has sprue involved. Pictures below. Would put in the gallery but I'm sleepy. Superglue container is holding up the pad until my sprue frame is done.
Made a mining vehicle and a WIP of the mining outpost layout:
That mining vehicle is awesome, and the base looks like it's coming along too, Stormwall!
Blood for the modelling god!
Automatically Appended Next Post: Didn't get much done today, other than slapping some paint on the ol' plasma generators - got to get to the shop for paints. My nine year old has taken up wargaming now (she's building Space Wolves), so with three of us building and painting, the paint supplies are running low.
All looking really cool! I need to get my finger out this evening and get some work done!
Not sure how many currently.... but I think this must be the most attended comp yet!? Really awesome to see and great to get ideas and tips from all over the planet!
Stormwall wrote:As you know with an Altoids tin, there is an engraving that is etched out on the top. Would I get points off for making a flat roof out of plasticard?
The reason I ask is, the bottom is flat. So if I flip it over, problem averted but, then it's upside down, which ruins my planned surprise.
So... I'm left here going "Is it legal?"
Things with lids can have their lids removed without (much) damage and can therefore still count as intact (the definition being "no cutting, etc.").
However, making use of engravings or embossed lettering (and an item with the lid still attached) can lead to more points for good/clever use of your item.
Good progress people.
I think each round gets more traffic as the word spreads. Keep spreading the word.
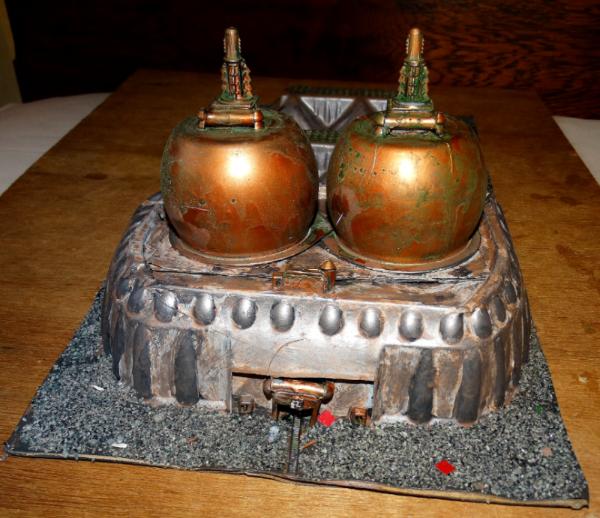
This is sweet.
I just wonder whether it looked better prior to the second level being added. Having the sphere and black pillars close aesthetically seems to work better for me. Either version is awesome though.
@Dr H - thx
a) High density polystyrene (mostly another color than white - yellow,pink, blue, green...)
Is used for insulation buildings, concrete building foundations.
b)sandpaper what i found in desk. This was 180grain/ dry sanding. It make nice relief on wall.
If you need make it in room, is better use wet sanding. (no dust from it and smoothest surface)
@Viktor von Domm
oriental look. no,no is only skelet for wall. I glue another layers of HD styrene on it.
I want make it something between fantasy and futuristic.
Want use all technic what i need when build fantasy building,but with 40K look.
Don't know how it end...
I hope all is well! Got a wee bit done tonight and am just womdering if this amount of "damage" constitutes enough of a difference from the whole piece..... going to add a lot mpre details but as a basis.... do you think this is enough difference?!
Hi guys. Progress slow due to a bunch of 12 hour days recently in work. I have however made a little progress on my Tau Sensor Tower:
Spoiler:
I've modelled it relatively closely on the Forge World Sensor tower, but with obvious proportional differences. After all this is a Farsight Enclaves Landing Pad, their tech is not fully up to date - this is model blah, blah, blahdedy blah. That's a lot older and less streamlined than the standard sensor tower, don't you know. Ahem. Carrying on.
So here are my two Kinder eggs glued together with an air freshener cap stuck on top with air drying modelling clay inside. The drone component at the top was going to just be a second-hand tau drone I had bought with a snapped aerial but it was too small. So instead I glued the clear flying base to the top of an old Bionicle Power Disc and then used air drying clay inside the disc and stuck the tau drone (with the top shaved off) inside. That way I got to keep the Gubbins underneath for effect, but the disc was bigger. If my modelling skills were better I may have tried to sculpt something to span the whole disc, but I'm mediocre at sculpting so left it. I'll possibly do some green stuff detailing in the top after, but at the moment I like the way it looks so may just leave it.
Detail photo of how I incorporated the drone into the base of the Bionicle disc:
Now I need to four "legs" to stabilise the tower and create a Tau disc icon for the side of the tower
Need to find somewhere where I can get free polystyrene from in the Cardiff area to try and make the rock sections of the overall terrain piece, so I can get started on that.
Would be really grateful for comments.
Automatically Appended Next Post: Magos- looks like enough damage to me, but I'm not the boss
@MagosBiff90 - for basis is enough. i'm inquisitive about details for it.
@TP^DC Deputy manager - great tower from scratch.
what type of glue you use on tower?
free polystyrene you can find:
- as garbage near construction yard
near trash can (covers from electronics thing - TV,...)
- someone have it old polystyrene covers in cellar, mansard...
Tek Thornison wrote: @TP^DC Deputy manager - great tower from scratch.
what type of glue you use on tower?
Wood glue (PVA) was enough so far (I hope)
free polystyrene you can find:
- as garbage near construction yard
near trash can (covers from electronics thing - TV,...)
- someone have it old polystyrene covers in cellar, mansard...
I know, I just need to find some. Will go scrounging
Some other places to find polystyrene is at green grocers and cafes/restaurants - things like fish and broccoli are delivered in huge polystyrene boxes, TP^DC Deputy Manager - loving that sensor tower, too btw. I was thinking about building my brother-in-law one for his nascent Tau force, so thanks for showing me how it's done
Magos: "Enough" is a tricky thing to define. It's a personal thing; with one man's enough being another's too much or too little. "Enough" is also a range that may span many individual's taste for the thing in question; the more possible permutations available for a value the more possibilities can potentially be encompassed in the term "Enough". One must consider what the extremes may be to determine where the median average is, and then assess if that median is what may be considered "Enough", Or whether the mean (or mode) average would present a better alternative. Also, consider who it is that you are presenting your value to and whether they represent the total population to which you want a general consensus that what you have presented to be "Enough"...
So long as there is more than a superficial difference (which you appear to have), then seeing as everyone appears to be in agreement, I'd say it'll do.
Good progress Dep'ty Manager. How about buying a new TV, you get free polystyrene with one of those.
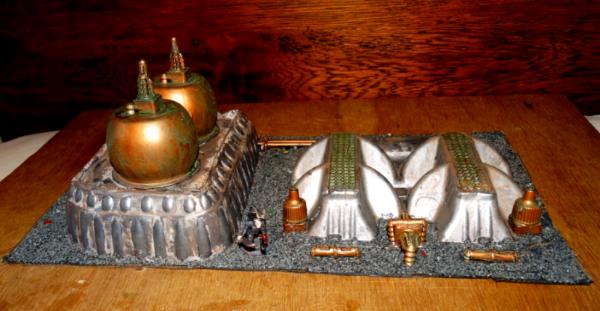
And here you go.
Aimed for a 6mm scale Industrial Plant possibly for the manufacture of dohickeys or hoojamaflips. Due to the choice of material the name is obvious welcome to 7G
Realised one cunning final detail to add
@ Tek
i see now.. wow....that layered look is very nice already! and the cobblestone on the lil balcony looks really nice!
my question is however... how did you achieve the strength in the main tower to support the weight of the top ?... that alone is a master class success!
the two black cylinders currently look a tad unwanted, uncared for... i am eager to see how you tackle these two^^
@ Viktor von Domm
Thank to selected material for construction.
This styrodur(High density polystyrene) need 150 kPa for pressing 10% of bulk. Is it 1,5 kg/cm2
Walls have 35cm2 surfrace. So "colapse" limit is 52,5kg. Up to 40kg on roof, tower will don't have any problem with weight.
I think weight reserve is more than sufficient I see in shop styrodur with max 700 Kpa.( used for insulation floor)
True dwarf style bulky and durable match made in heaven me thinks mind you I can't but think how soul destroying it would have been if it had collapsed underneath the weight
40kg you say. I've never tested my stuff past 32kg. Now I will have to do so.
I need to post a photo of my bits soon. I have a few ideas, and still deciding which will be the most fun. And which I may actually be able to finish :(
Llamahead using rawl plugs? What is the world coming to?
Looking great Tek, and not what I was expecting, although I guess I should have been. From your very first shot I thought you were going to leave the blocks square, and paint them like a hi-tec force shield or similar
So, night shifts, 23-hour days and the like have cramped my hobby time a little recently....more inclined to just sit in the chair and watch Bond movies at the moment However, I may play around a bit now as I start in on the Moore years....
Ahoy all.... just a wee update to inform the crew that I am slightly amending my 2 base parts. I am still using 1 of the printer cartridge packets.... but am now usimg an old multivitamin bottle. "It is the white bottle beside the 2 cartridge packets in the picture..... still an everyday item and imho still fits the brief.... cheers all!
You people and testing their models with heavy weights... *faints*
Good progress Magos. No problems with the change of item at this stage.
This thread has made it on to the front page of DDakka. So be on your best behaviour and welcome anyone that stumbles in.
To those of you that have stumbled upon this series of contests; welcome, come and join in. It's just for fun and may help improve your modelling and terrain selection for the future. We're all nice and friendly in here, we don't bite (too hard).
The terrain is looking great, everyone! I've been delayed by my education (We don't need no, etc) - but will be getting on it once I get through this essay.
Can't wait to see some more of your work, gang, and to get chopping, gluing and painting!
I suppose it would help if I explained what I'm actually up to here; omething along these lines:
A hutt asteroid base from one of the SW games iirc.
First attempt at adding some surface detail, thanks to the mechanism of a broken kitchen clock
To really limit myself, the only plasticard I'm going to allow myself is salvaged from sim card holders. As for the bases, I'm going to use chopsticks for the rods and possibly the ends of balloon holders for the stands.
Oooh tiny cannons. You should make your idea work, and take lots of notes . I, for one, could use more asteroid smuggler bases in my life!
In the interest of finishing this round, I'm gonna put a stall on the tower idea, I don't think I'll get it in time. Instead, I think I'll base the following junction box(modified) and computer power supply case(unaltered) on the shown 1x1' board with a desert/wasteland kind of look. Really torn between a jungle board and a desert board so this will hopefully help me decide.
Tiny bit of progress.....bac to proper shifts now I hope so should give it a bit more love...
Cut up the card from a blu-ray cover (Battle of the Damned if you were wondering Dolph Lundgren leading robots against zombies....if you need more info then it's probably not going to be your thing ) to make a roof for the tube, then attached the other parts to it. The white ring is a disc divider from a pack of dvds.
After my attempt at texturing the tissue on the disc didn't turn out as hoped I reverted to plan B. Slapped some browns, reds and oranges on, then slathered some crackle paint on top. Once it had cracked up I hit it with some sepia/flesh washes then a drybrush of yellow.
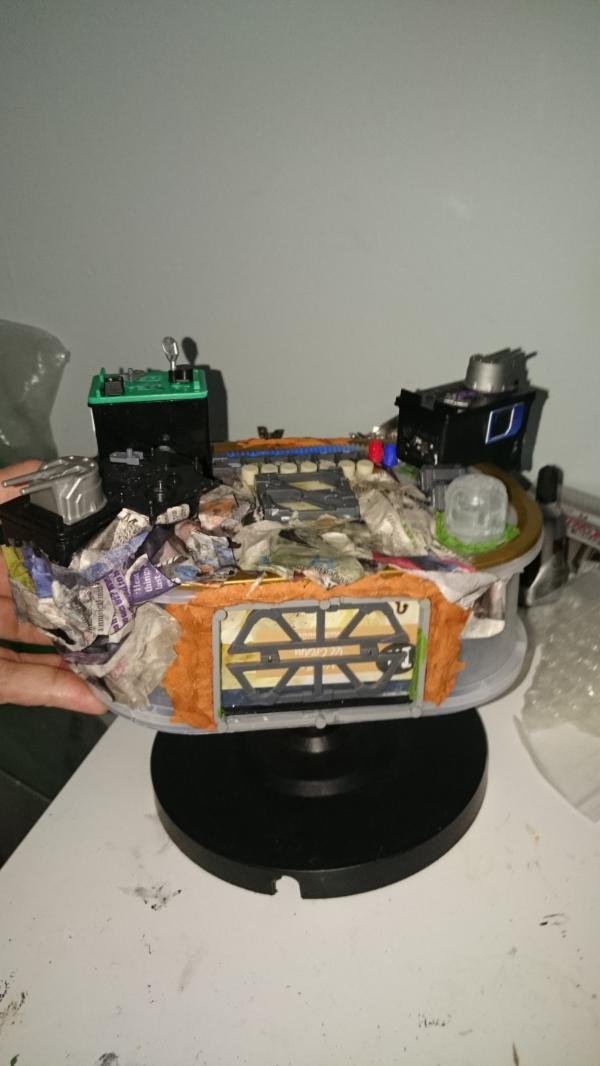
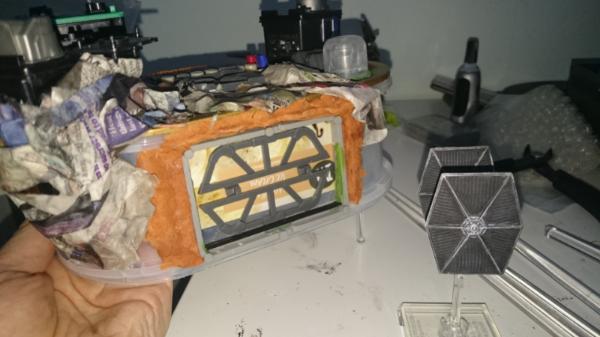
Finally making some progress on my overall terrain (not just the extra bits):
Spoiler:
Thanks to these drawer openers (with spring cut shorter) from ikea and an empty tin of ravioli, we went from them to this:
Which allowed this:
Therefore this landing pad can also be a fortification (I think - I'm not really one who plays the games, but from what I've read this seems to be true). You'll note only two drawer openers are in the tin, the third has a weird mechanism, so I'm going to need to find a way to make the third work, at the moment it won't reset back to the base level without being fully extended to twice the depth I want it to
Overall progress:
Next phase is to shape the slope and make the remaining rocky area away from the landing pad. After this I wI'll paint the rocks with a PVA/water/sand mix to give it some texture.
There's a few more photos on my terrain blog (see my signature). More soon I hope.
Looking good gang! Looking at various methods of papier-mâché making, has anyone tried shredded eggboxes? One modelling site suggests it as suitable as a sculptable version. I'm planning to use watered-down PVA rather than flour and water (my preference, supported by the mighty Viktor). Other alternatives include toilet roll tube...
Haven't done any papier-mâchéing for a good many years now but I remember we always used newspaper and watered down PVA glue. Never tried egg cartons but it's the kind of material that might work well.
Hmm... I'm in the mood to start a 2x2' board project. It would likely involve deadzone terrain tiles and other stuff probably outside/beyond the scope of the project but... I guess I'll just be making something that will fit onto such a thing... May still use the same two pieces I showed earlier, that they'll eventually be part of something larger doesn't exactly matter does it
If all else fails he can always smash up everyone else's entries. Can't lose if you don't have any competition!
Things like pieces of wood or cardboard boxes are why I allowed one item to be broken up. Some things are just more useful that way...
I think when it comes to papier-mâché, if the material is hard when dry and soft when wet, it's a good choice. Anything paper-based is a good bet.
It is perfectly fine to use model kit parts in your model. Yes, you may get more points for scratch-building the same thing, but sometimes that's not possible/worthwhile. It's not going to prevent you from doing well in this contest.
A mistake may be about to be made. Found this when clearing out broken toys :
Note scale - it's perfect if I were to, say, build this thing at 1/270.
Oh dear...
So I'll be using the cartridges as parts of the superstructure. Thinking tupperware as the body. It'll be roughly to scale with Ds9, so will be fully playable.
What am doing?!
I finally got around to gathering together the initial parts to my building... now to see how they all go together! At this point I'm not sure it is going to be a landing pad after all. Probably more a comms bunker or generator...
Everyone is doing such amazing work, kinda feel like I've been a bit slack lately/always :-)
I might have to withdraw from the competition as my project will probably exceed the deadline and be ongoing - I'm building a Hive from Scrap.
Spoiler:
Progress is slow, mostly 'cos I'm just trying to get everything just right and I'm barely past getting the idea for the framework bases sorted. Still scribbling notes on the buildings that are to go on top, and still have a distinct lack of "floor". I might go visit a kitchen shop place and see what off-cuts they have.
Pipes/Sewers are from an industrial sized cling-wrap (the stuff is ~1 meter wide), and are held in place by some corner bits of photo frame off-cuts.
Not entirely satisfied with only using completely solid walkways (top image on the left, there is a car on a piece that hasn't been cut down into smaller walkways yet), I cut up an old PC-Speaker, straightened the bit out and stuck it between two bits of wood. The picture below shows a completed walkway (sans paint), and the other half of the first speaker. I only have two of these old speakers (4 walkways), but will see about acquiring some more.
I've used the needle covers (both the little ones and the big ones) in the construction of a few things, they make pretty decent blight drone lenses properly trimmed. Also with the pens you can continue to twist the top once they're empty to get rather nifty little ridged tubes (check the pipes on the back of my hendricks bar and the chimneys in the gallery). As for the pen lids I've yet to find a use, but I do have getting on for over a hundred sitting in a box
Good shout on the homehub, I may just have to 'borrow' that idea as we've still got the four in a cupboard or draw somewhere. Made precisely no progress on anything so far on account of going through the process of landing a new job, contracts are being sent back tomorrow though so hopefully I'll be able to get cracking soon.
You guys are troublemakers Oh. The madness. A night of hunting through the Internet for asteroid bases leaves me with a couple more questions:
Do I embed the whole thing in the asteroid, with only a couple of bits showing (turrets, a command tower) and a hanger bay in one side of the asteroid? Or do I go with the "landing strip" style above?
And, do I do it flush to table rather than elevated? Whilst I got some fantastic clear rods from Viktor, at that scale it might intrude too much on a game board. Thoughts?
inmygravenimage wrote: Do I embed the whole thing in the asteroid, with only a couple of bits showing (turrets, a command tower) and a hanger bay in one side of the asteroid?
Ignatius-Grulgor wrote: I've used the needle covers (both the little ones and the big ones) in the construction of a few things, they make pretty decent blight drone lenses properly trimmed. Also with the pens you can continue to twist the top once they're empty to get rather nifty little ridged tubes (check the pipes on the back of my hendricks bar and the chimneys in the gallery). As for the pen lids I've yet to find a use, but I do have getting on for over a hundred sitting in a box
You appear to have different pens to me as mine are refillable, so I get transparent plastic tubes with a rubber cork in rather than the twisty numbered bit you've got. I shall have to see if I can fit some of the tops into the design somewhere
Of course if you're on a pump you get a whole stash of these:
Six together to me looks like a future energy facility turbine type thing. It's amazing what wonders healthcare brings you . . . oh and not being ill. That's apparently important too
A question for my learned riveting betters. A threefold question in fact.
Fold 1. Can you have too many rivets? If so, how do you know you have reached that point?
Fold 2. Does realism play a part in the application of rivets? If I start sticking rivets on any given area just for the hell of it am I doing myself a disservice or is that not a problem?
Fold 3. I've forgotten what I was going to ask here. I'll come back when I remember.
Good progress everyone (even if that is only collecting the parts together).
Trollmeat: it's far too early to consider withdrawing. See how it goes, there's still 7 weeks to go.
No problem, GrimDork. No need to have things set in stone yet.
Snrub:
1; Not until you run out of space to add rivets (and that includes on other rivets).
2; I do like realism in my models, but the rule of cool is also important.
3; That would be tricky to answer.
Have a look at the real world for examples of rivet use:
Right. So, a test:
Ice cream tub for structure. Sprue will be mouth of hangar. Papier-mache to follow! Thoughts?
Automatically Appended Next Post: I found a deadzone sprue that would add some great architecture ; however, despite being used at a radically different scale I'm not sure how that squares with league rules. Dr?
GawdamSumbish wrote:FINALLY got my two items. may even get to work on the entry this weekend (DAMN YOU, STANLEY CUP PLAYOFFS!) pics later.
keep up the good work, everyone!
Go Flames! ...er, good to see you have your things.
inmygravenimage wrote:I found a deadzone sprue that would add some great architecture ; however, despite being used at a radically different scale I'm not sure how that squares with league rules. Dr?
It's not against the rules, as far as I see. Unless I don't see what you mean... Use whatever material you like, as per the OP.
When it comes to using the sprues, inmygravenimage, I think that using them for structural details or as part of your construction then that's fine. If you're talking about using nubbins or bits and pieces from the sprue (like a skull, or computer console) I asked that last round and that was also fine. Hope I helped.
Also, my own project: almost done writing my uni essay, so I'll be able to get back to putting this terrain together, but as it stands it looks alright. Power generators painted up, granny grating for walkways and steps cut, major buildings assembled, roads trimmed to size, working on pipes and a factory-sized fan, safety rails, doors when my wife's not looking. I may have bitten off more than I can chew, but I'll keep going until the deadline!
Dr H wrote:Snrub:
1; Not until you run out of space to add rivets (and that includes on other rivets).
2; I do like realism in my models, but the rule of cool is also important.
3; That would be tricky to answer.
Have a look at the real world for examples of rivet use:
Spoiler:
Thanks. I also like a touch of realism. But I probably would have defaulted to "feth it, lets bang rivets on everywhere" had worst come to worst.
Seems like the people who applied the rivets in those pictures also had the same thought.
Graven, that's a promising start to the asteroid base. I'm really digging the nifty little defence cannons on top.
inmygravenimage wrote: I found a deadzone sprue that would add some great architecture ; however, despite being used at a radically different scale I'm not sure how that squares with league rules. Dr?
The original post does say you can use bits form other kits, so I am using a couple of detail bits form the deadzone sprue (A ladder) and the Sedition Wars scenery box (a door and a console)... unless someone objects
I am a little late to the party (been busy with loads of other things, like RL) But I will have time towards the end of the contest to get something made. Hopefully it is not too late to enter....
Snrub wrote:...Seems like the people who applied the rivets in those pictures also had the same thought.
I thought those examples would be good to ally fears of using too many rivets. If it happens in real life then it's fine in a model.
Fango wrote:I am a little late to the party (been busy with loads of other things, like RL) But I will have time towards the end of the contest to get something made. Hopefully it is not too late to enter....
Never too late (unless the competition has already finished ). Welcome and good luck.
Thanks for all the input chaps! Apologies for cross posting with my blog, BTW.
So, with deadzone bits and additional oddments
l
The crates and barrels at this scale feel like believable storage units of some kind (which you'd want surface access for) and the unbuilt box crate makes a pretty good torpedo (or possibly escape pod) launcher. Might make them face the other way though. Some panneling needs added to the cartridge towers and I think I might try cable ties for connecting strips (access tunnels etc) but nearly ready for papier-mache!
I have the hangar bay doors to show you with a HWK-290 for scale:
They are handrails, and they vaguely echo the imperial logo but not too much, which I like, and scale well with the mini (for reference, the falcon/slave 1 could just fit. The sprue gives me a nice "frame" for the whole thing, too. Aside from some paneling, possibly, on the towers, it's nearly papier-mache time!
Edit: Now, following a conversation with Viktor - I feel it should be getting rivets cos this is the =L_=! But he observes that at this scale they woudl be crazy. The hangar doors felt like a logical place for such things. But to be fair, not at all in keeping with the SW or ST aesthetic. Thoughts?
inmygravenimage wrote: I have the hangar bay doors to show you with a HWK-290 for scale:
They are handrails, and they vaguely echo the imperial logo but not too much, which I like, and scale well with the mini (for reference, the falcon/slave 1 could just fit. The sprue gives me a nice "frame" for the whole thing, too. Aside from some paneling, possibly, on the towers, it's nearly papier-mache time!
Edit: Now, following a conversation with Viktor - I feel it should be getting rivets cos this is the =L_=! But he observes that at this scale they woudl be crazy. The hangar doors felt like a logical place for such things. But to be fair, not at all in keeping with the SW or ST aesthetic. Thoughts?
Looking good mate! Really nice little gun turrets and the hanger door looks sweet! How is the rest of the asteroid going to take shape? Chunks of insulation stuck to the sides of the tub?
As far as the rivets go... I agree that the scale would me pretty impossible to show rivets at any reasonable scale.... but maybe something could be done along the edges of a potential "runway" .... landing lights strips along wach side?! Would look rivited but represent landing lights?! Maybe not... just a thoughr!
@TP^DC Deputy Manager - globe of doom? Nice name @Viktor von Domm - @inmygravenimage - nice hangar. Can you make photo with mini next to hangar? For scale.... thx.
Looking good Tek! There's a ship right in front of the hangar doors.
@ Magos not sure mate. Maybe. I had thought about a landing platform with rivet studs around the edge. But I think that it's well balanced just now. The plan is paper mache for the asteroid surface.
Found the other sim card holder, so that will also get used for a window, probably on the bottom half.
Speaking of which, I've been getting the hanger framed:
I dislike milliput, but for this, it's well-suited.
Also, Vik, you and Red Harvest have a lot to answer for:
Kinder egg... things that I was going to use for orky propellors at some point. About 40mm. However, if I cut all the blades off one and overlapped them, I would have, in effect, a large iris shutter I reckon this would then go on the "roof" (i.e. roughly the middle) as some kind of reinforced silo or access? Or possibly the side? Also: it has rivets
Waiting for actual progress and pictures to say anything this time... but I think I've got things moving forward again.
Automatically Appended Next Post:
It's a frontier world still in the process of terraforming. At this point the place is vaguely habitable but they're still working on bulking up the atmosphere to desirable levels. To aid in that they've got super trees, bioengineered to produce crazy amounts of oxygen or what have you. The energy shields that form the domes allow for regulated release of the oxygen and select additional atmospheric components. Though largely automated, each Oxyplant will have an entry point on the support shaft, with diagnostic equipment contained within the shaft. A ladder leads up to the growing surface to which access may be gained by a sealable hatch. The super-plants are inedible and the conditions within the domes are relatively unpleasant (atmospheric mix not fun to breath, I reckon), so even though man-sized creatures can pass through the energy membranes fairly easily, few bother for any length of time.
Even though the Oxyplants are virtually uninhabitable themselves, the air around them tends to be a bit easier to breath and the power lines running to the plants are often easily tapped to provide at least minimal juice. For these reasons, small shanty towns often spring up around new Oxyplants and the Controlling Interest rarely ever finds destroying the places worth the effort and manpower. Under the domes you can expect to see a number of shops, selling anything from scrap to dinner, and a number of small habitations. Occasionally inhabitants of these areas will 'customize' their local Oxyplants with additional gantries and catwalks, allowing them to more readily traverse their domain. Such installations are typically left alone as they tend to ease the difficulty of maintaining the energy field projectors. Kind of a weird symbiosis if you will.
I plan to make 4 boards eventually, but the image above is a rough 'sketch' for the first attempt. If I get it done in time, I'll just enter the whole board and choose strategic intact and modified pieces for the comp. If I don't make the whole thing in time, I'll try to have at least one Oxyplant completed by the deadline.
The little not-cactus things are just from the floral arrangement area in Hobby Lobby. For a few bucks you get a artificial branch maybe 6 inches long with about 3 of those on it.
Thanks for the kind words! Now a question:
Does the added height make the idea better? Certainly gives more playable space beneath.
I was also thinking for added stability, the dome could be glued to the top tube and the bottom tube could be set into the table and secured. I could make a kind of cuff glued to the bottom piece that the top could socket into, kind of like a PVC pipe fitting but probably cardboard and hotglue.
I'm not sure I'm a guru, but in my opinion, the added height helps greatly:
- Your support structure is more pronounced and not just thrown in.
- The construction to the right looks very purposeful.
- It seems to look less busy as well for some reason.
- From a fluff point of view, you can imaging that they would want the plants closer to the sun to maximise UV exposure.
- From a gaming perspective there is more playable area.
They are more thoughts anyway. I'm having similar thoughts about my central tower. I'm going to hot glue it to the structure it's supporting, but will probably have it slot into the base by a small amount so I can out a base of glue in to hold it firm. With your idea of a cuff, would that make it more feasible to have them removable so it could be transported to a gaming club/venue?
I think you should go for the higher setup. And the 'slotting' thing would definitely make it easier to take apart if you need to do fancy stuff underneath.
Yeah the cuff was about removing the tops for ease of storage/transport. Plus could allow for games that didn't benefit from the height by removing them.
Thanks I got the domes glued together. I need to make the cuffs or whatever I find to work and sink the bottom supports. I'll be able to start on the interiors soon as well as the various underlying buildings.
Finally managed to get some terrain building done. Here's the progress so far:
The ramp up to the pad is in progress too and here the top component is placed in it's position to give a idea of the overall look:
Automatically Appended Next Post: @Gawdam - ooh! Lights. Great job
Looking good there mate! Really like the use of LED's in these pieces... gives some amazing effects that I would think would be incredibly difficult to represent with paintwork!
Looking forward to seeing how the details are all added to make it really pop!
Damn there is some very impressive work going on here all very inventive, all kinds of scenic layout and scales.
Pretty intimated now if I can get my man cave tidied in time I might have a go at this, I have the pieces to do it now I found some stuff hidden in my household crap box
@Magos - thanks man, it's going to be a lava field. Iffed and ahhed about whether a lake of lava would make sense, but thought it would look good (I hope)
Looking good gang. Tek, the paint is really bringing that beast together
In honour of the day, began papier-mache
Starting to get more of a sense of how it's going to look (phew!)
Worked out how to do my recesses windows in the bottle cap tower by inserting another, smaller, kids bottle cap within. Also found some nifty lego bits (mechanism for new blasters) that would make handy escape pods. Advice from Viktor is to shred the paper more. Useful for getting a sense of shapes, though.
Automatically Appended Next Post: Oh, and got me an A wing
TP^DC Deputy Manager wrote: Had a horrible shift in working yesterday so to help me forget some of the stuff I took the unprecedented decision to stay up and start on my pad ramp to help me wipe some memories away.
Here's the ramp attached to the pad - I used polystyrene to add some substance to the inside of the ramp, with air drying modelling clay to ensure the top ramp surface was sat on a predominantly flat surface:
Here's how I attached the ramp to the pad so it was stronger than just using glue which may have sheared away at some point. The screws have been driven into the polystyrene and have created a firm fit:
I need to use some plaster now to smooth over the ramp edges so it looks a bit more ma made and smooth. The ramp top will have sprue nieces glued along the edge to create a curb type effect to stop those tanks veering over the edge.
That's all for today.
Thanks for looking.
@Gawdamsumbish - really well thought through, looking good
@inmygravenimage - that's really coming together
@tek - leading the way, looks really good there
Everyone is posting wips. I wanted to finish the craggy cliffs before posting but, here is my wip.
Forgive the blutac on my sprue supports for my landing pad in advance.
So this is a mars like world set in battletech. Backwater mining outpost. The mining vehicle/drill crew has discover ed a very rare downed mech, suddenly placing importqnce on their operation again. Oh and my generator is in pieces under the landing pad.
The clear mech and half of the generator I cast myself. They weren't entirely planned but, life gives you lemons... etc. I added them in. The altoid building will have people, furniture, storage etc. The mech and ammo tin are all that are meant for it atm. Rest is storage for this project so I don't lose little parts.
The water/chemical container has been cut slightly. (Clear tube W/black lid.) Just a shelf hanging thing for retailers but, it still counts as a cut. The tin is my intact piece.
Super late and since this is a phone bump, I will let pics do the talking.
This is my favourite thread to follow at the moment. I'm really loving seeing the progress on all of these designs, there's some really great work being done. Can't wait to see the finished products.
Outstanding all of you, brilliant pieces coming together, and nice to see good WIP pics sharing ideas.
@ trollmeat, You do seem to have a lot going on there. Just something to keep in mind though, you do not have to give us that whole thing complete, just a usable complete part of it! If you look back over the comps, most of us have made smaller pieces that once put with the next compettions piece become tthe whole. You could do the platform with a little adjustment, once thats done maybe start on one of the next bits, but if you don't have time do that bit, just use it for the next competition. Will just have to work it into the theme for that one is all. Just some food for thought.
Now that is more than I have said in a while so I will go shut up again.
Great work all of you, wonderful imagination and some great ideas to be shared. Kepp at it.
Hey all, just a quick WIP:
Made some more progress today - applied PVA glue to the polystyrene and covered with sand:
Need to decide now between brush painting it black or spray
inmygravenimage wrote: ...DrH, a question: would you like a parts list when we are built?
I only need to know what the two ordinary items are, by name or ideally a picture of the items before they were worked on (this is more important for unusual items, a tin o' beans is a tin o' beans everywhere... unless you've found one that doesn't look like the majority).
This is so that I and my fellow judge(s) can assess how well you made use of the items in question.
I have also let you all leave it until you submit your final photos (to me, via PM. Not in this thread) to declare which of the things you have used are your ordinary items. I know that plans can change as you work on something, I don't want to restrict you to your first choices if something is calling out for a hole in it, for example.
Obviously, if you've found a nice item / material for a specific application, then I'm sure everyone would like to know about it. Sharing information is one of the main aims of these competitions.
Forgot to say earlier:
@trollmeat - Your structures are brilliant, the shapes are eye-catching due to their angular nature and I love the idea of a city with that aesthetic.
Completely understand where you are coming from with the size issue. I can imagine it would be tough to choose one section to build above all the others. Is it feasible to build a base that would cover the whole planned structure but with regular anchor points (a bit like Lego etc) to allow you to create a modular terrain collection that can be warped to your will? Then your entry for the contest would just be module 1 or even the central core module etc etc (I hope that makes sense).
@inmygravenimage - I've been following with interest. I don't play X-Wing so can't comment on scale etc, but I really like the way you have a planned structure to the asteroid base.
I wasn't sold on the idea of using papier-mâché having had so many childhood memories of stuff never looking quite as it was meant to. That said, progress so far would suggest you have a great effect.
Are you planning on making the ice cream tub a core structural element, encased in papier-mâché or have you finished with the mâché now? I think encasing it and making the asteroid would work well, but you'd need to bulk out the papier-mâché to create a convincing asteroid appearance to cover it. I remember using large wads of cotton wool or big scrunched balls of newspaper glued to the central starting point to add volume and irregularity of surface which was then covered over with a standard layer of newspaper and glue. That might come off well for an asteroid surface.
Hope that helps a little guys. I'm in awe of your work so far
Got some progress going on with my (rather large) piece:
Spoiler:
The chemical processing tanks, with bridge and banana
The roadway
I'm not so sure about the roadmarkings, but what do you guys reckon? Gotta put some safety rails around the largest tank's gantry, finish weathering the bridge, put on a half-tonne of rivets...
Currently I have two large "risers" (which is what others seem to be calling the framework platform things, as they rise the floor/ground level) and two small/narrow ones. I'm looking at putting together at least one more tomorrow/this week, but only one of them has actually used a photo frame Intact - the other three are just using random off-cuts.
I'm still looking at how to connect the buildings that go on top. Was originally planning on using Magnets, but I only have a hand-full of Magnetix™, and it seems like a waste + I want to do this using discarded/free/cheap materials. Thinking of possibly cutting up some ~3mm BBQ Skewers and using them as Pins (dowel pieces would be too thick for the width of the bulkheads)...............
Risers Pine Photo Frames+Offcuts,
Offcuts from tipping wooden Stakes,
Miscellaneous flooring,
Staples for ladders.
...and the other things are made using larger stake-tip-off-cuts+different-photo-frame-off-cuts. So, nothing really fits the criteria for the competition and I'm no-longer watching the dead-line, but I do think I will try to finish at least one piece, possibly using a computer fan as the intact bit as I've just finished disinfecting/cleaning some up. Perhaps I'll chuck a fan in the side of the next riser as my "intact" bit?
Entry finished early. 6mm Industrial Works, nice simple paint scheme.
6mm infantry for scale
28mm figure for scale
Entrance showing use of sprue as a lettered sign using the letters moulded into the sprue
3 days left for the 2 "Early" bonus points Remember that by just finishing on time (before the deadline on the 17th June) you get 1 bonus point.
However, Llamahead, we will pretend that you didn't post your final photos in this thread and have PM'd them to me.
Rule 7: Final Entry: Six or more photos of your final entry, showing top, front, both sides, back and all the important parts - not to be posted in this thread. PM me with links to your galleries, albums, etc. As I said above, please take the time to take the best photos that you can.
Together with your photos, I would like a statement of the Two ordinary items (a photo would be ideal) that you used.
Feel free to include some fluff or an explanation of the model/setting to allow the rest of us to fully appreciate your work.
Just confirm what your items are, Llamahead. A Doughnut box and 2 yoghurt pots? And both of those have remained intact?
@Chris White - wondering how that tiara fits in to the piece, or if you just wear it while working on hobby stuff.... as for markings, i would suggest you get some kind of base underneath (posterboard? MDF?) and then maybe do some black and yellow diagonal stripes to mark boundaries around the tanks.
I'm so not getting in early. Llama, you are a tiny inspiration dude. @ChrisWhite you could use actual LX / hazard tape or similar, in true LOER upcycling style.
Right, so, my kettle blew up. And naturally, I thought, What can I salvage?
I quite like the idea of a base, I could mark a fire arc on etc.
Hmm.
Of course, if I were to elevate it then the bottom needn't be flat either. Certainly a possibility, although making more work for myself...
I say elevate it, and do more work to make it rounder. Right now it still has a significant 'tub' shape to it. You should build out the bits that don't have bays built into them- maybe make little rocky ledges as 'patios' for the doors and bay openings, then curve it down from there.
Yeah, I'm gonna have to go with raise it, the kettle base was a good move. I think a great big ball of asteroid is what that needs to look like at the end IMO
'tower', but even better would be 'flight stand'. You want a round bottom, and having a single stand going into the, uh, un-pinnacle of it would work best.
I'm really appreciative of all the feedback chaps. My plan is, I think, a cd as a base (cos it really needs one) and the plastic tubs because the wider column gives it much needed stability.
Automatically Appended Next Post: ^which would make it game height!
well, the NY Rangers are still in the playoffs, which has eaten into my hobby time recently, but they play early this Saturday, which leaves 8 or so hours saturday and all of sunday for working on my entry...hope to be most of the way finished by the end of this weekend.
i don;t know about any of you all, but i need to stay the off of kickstarter....
I think I'm bowing out of this round of competition. I just cant seem to pull my head around what I'm thinking I want to do. It's become a source of frustration for me rather that inspiration or fun. I'm going to take that as my cue to step back.
Very slow progress on my end, lot of extra stuff lately beyond work so I kind of doubt I'll be getting the whole 2x2' section done. Surely I can get at least one of those domes completed though.


 THINGS ONE OF THESE DAYS...i'm in.


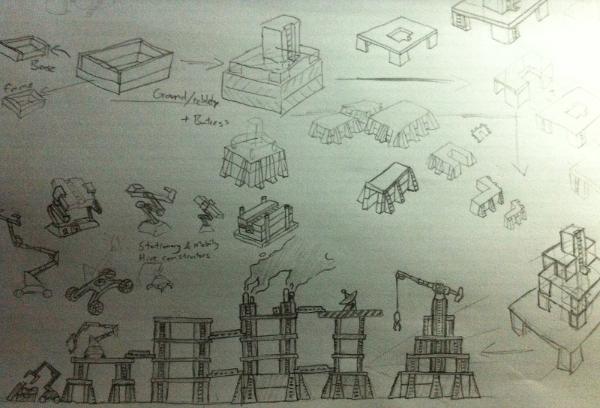


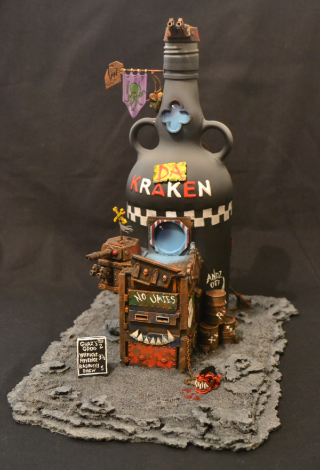
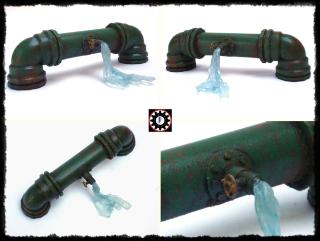

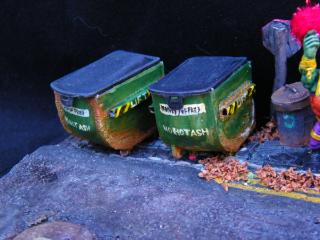
 thats going to be tough but I might just be able to come up with one by then
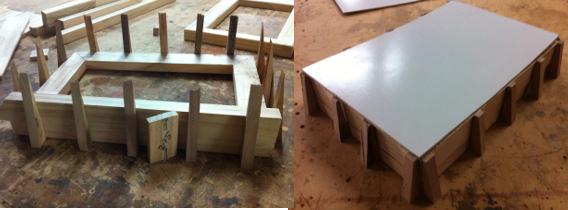
 I am thinking alien invasion or a more elaborate idea a worm hole appeared in my man cave and it now dwells in an alternative dimension.
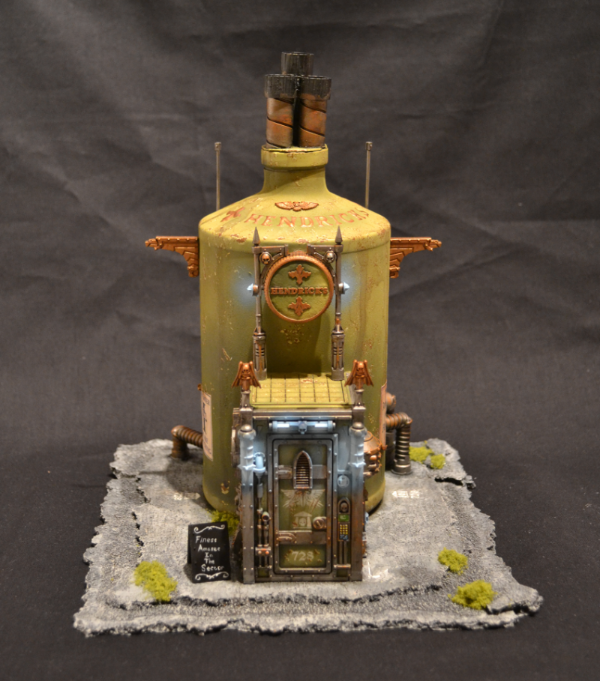


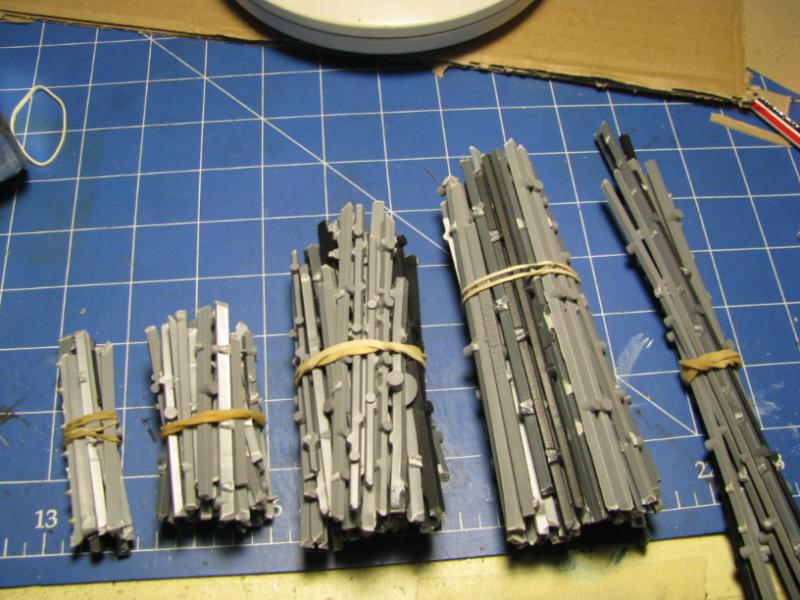
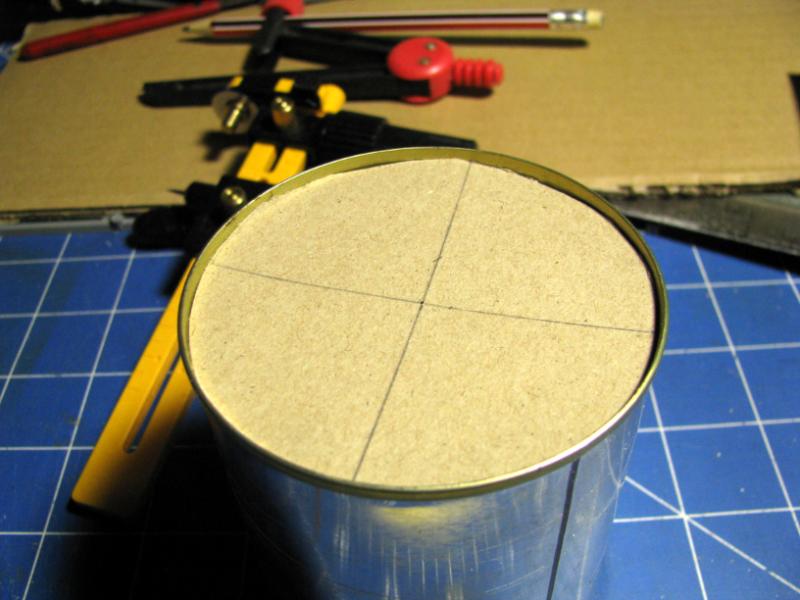
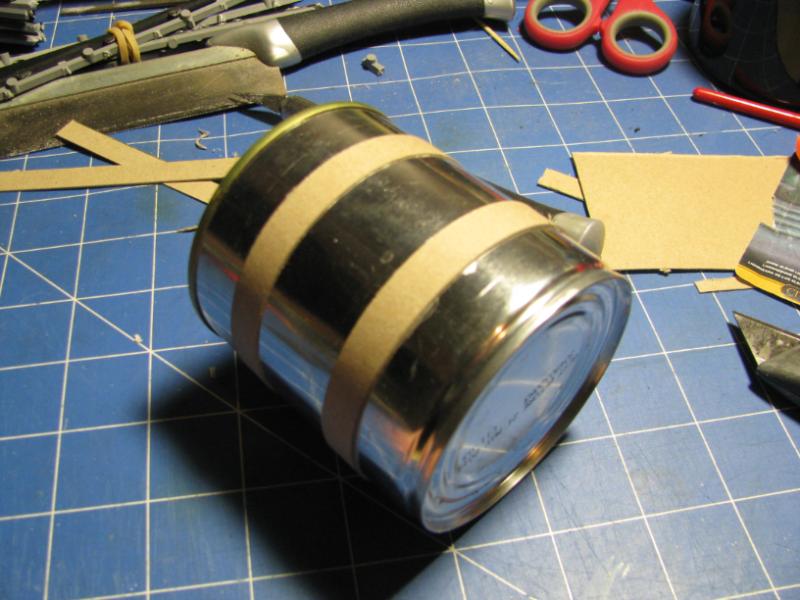
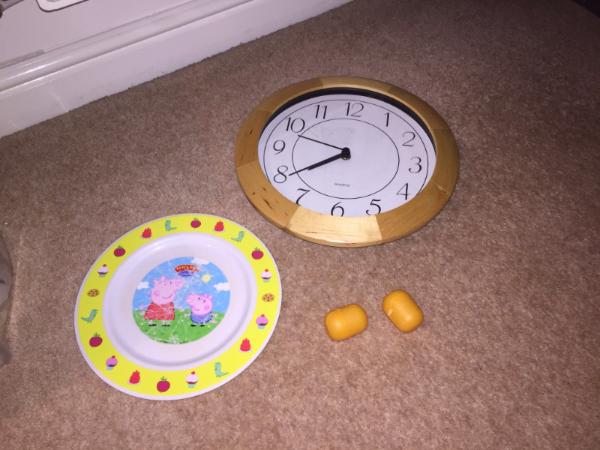
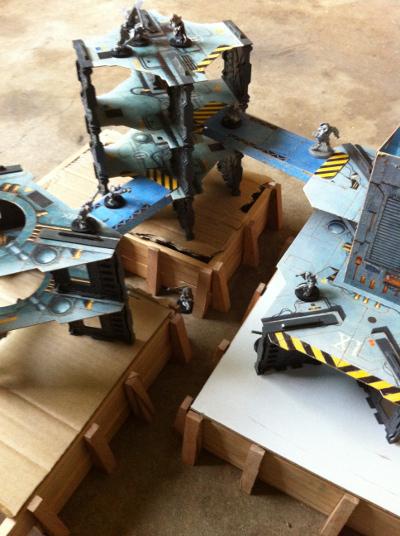
 ), not yet quite sure about the asteroids themselves.
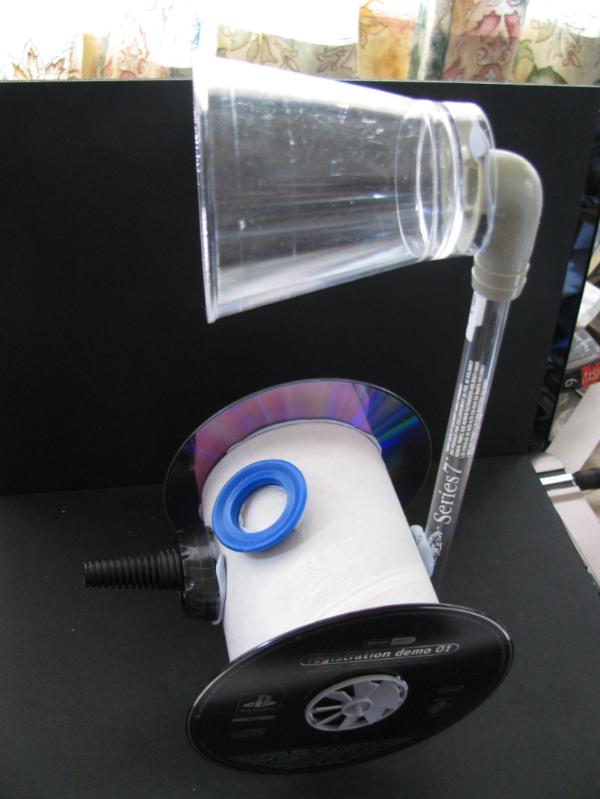
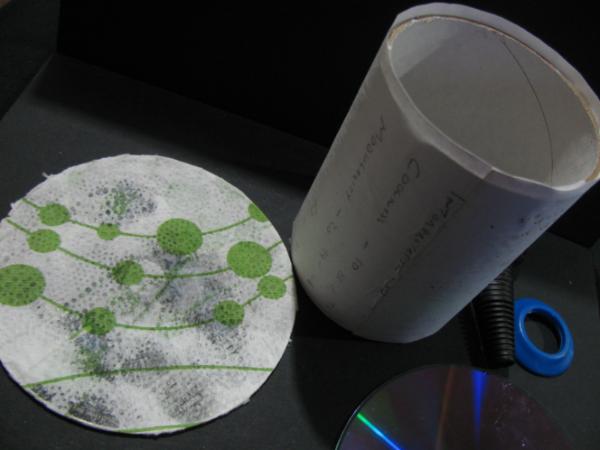
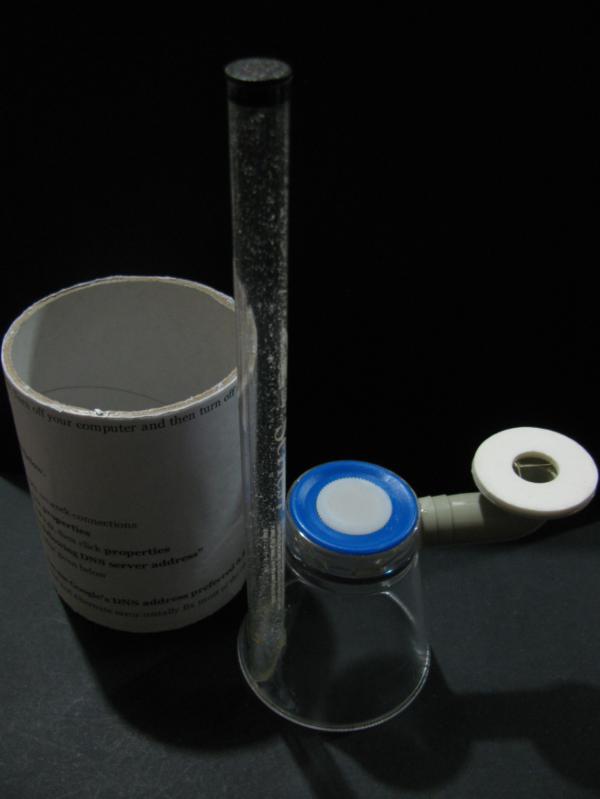
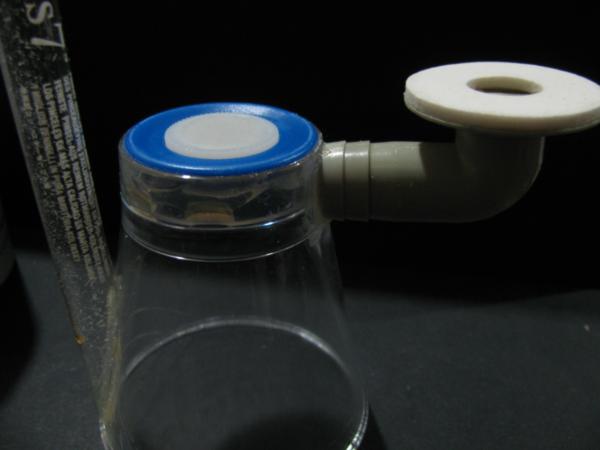


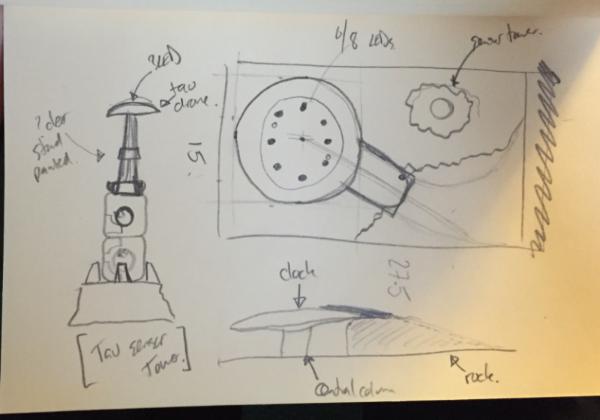
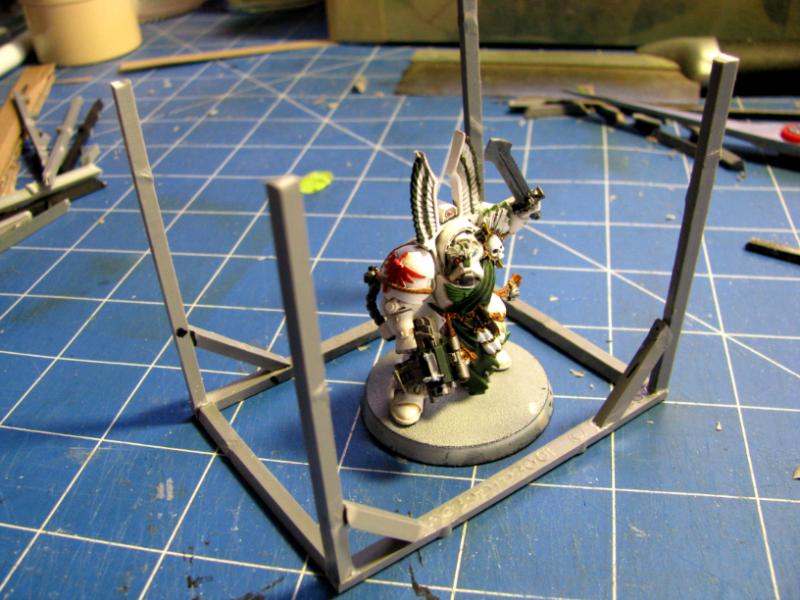
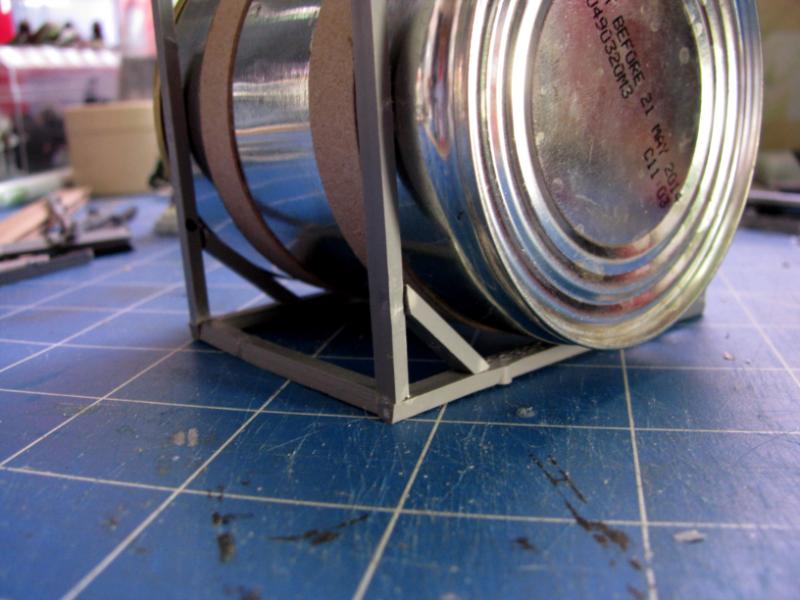


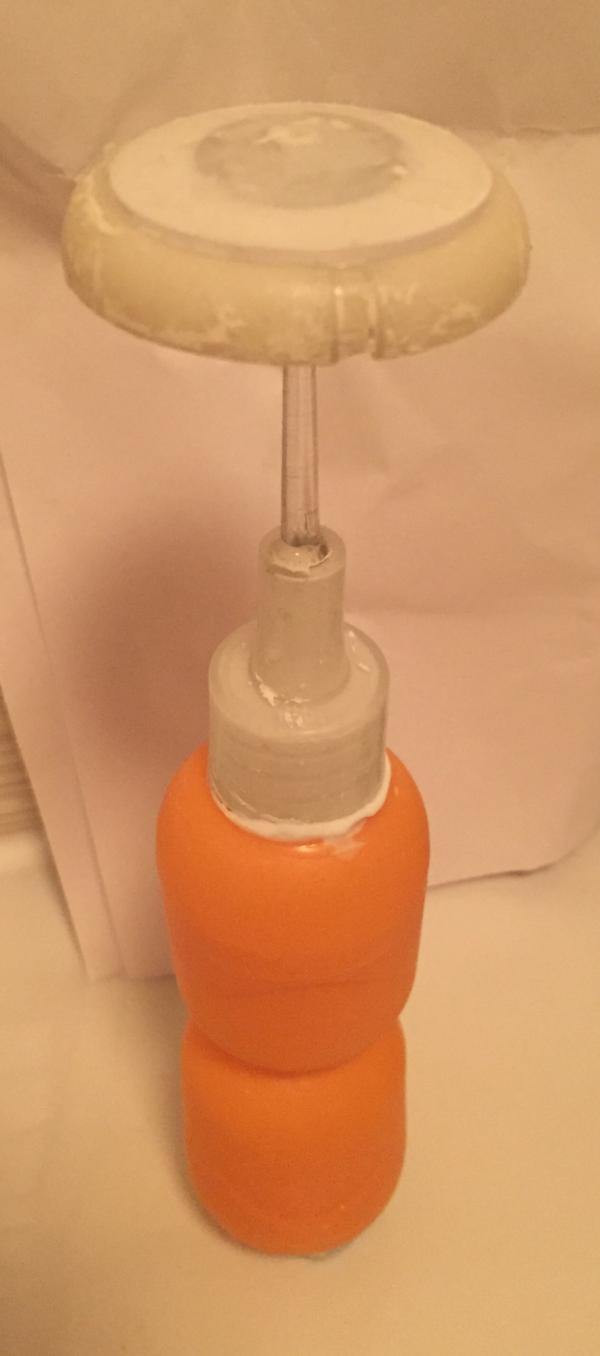


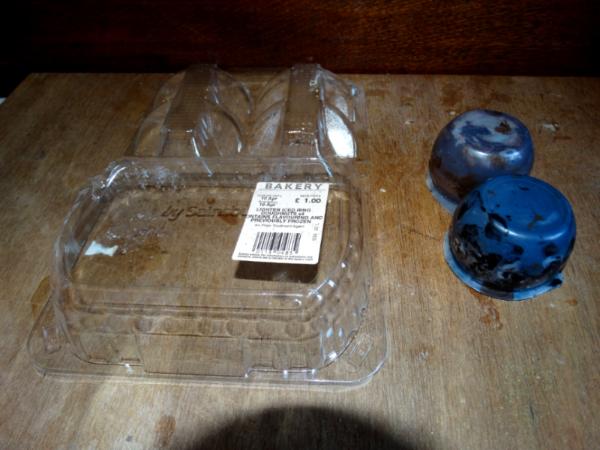
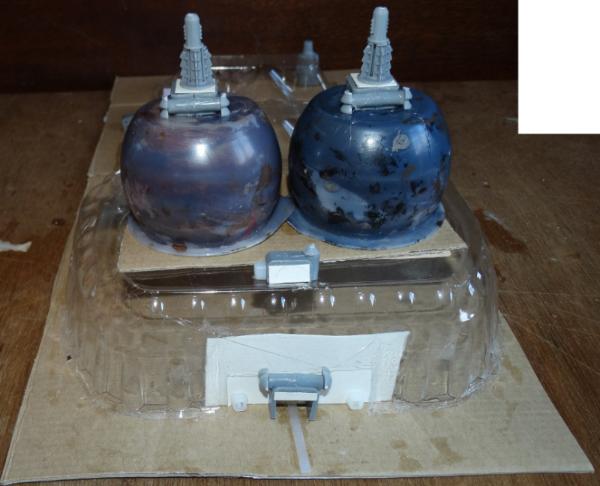
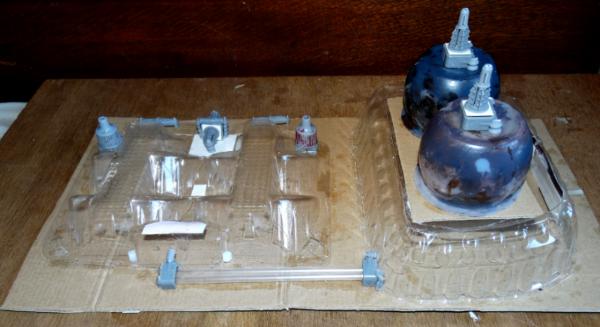
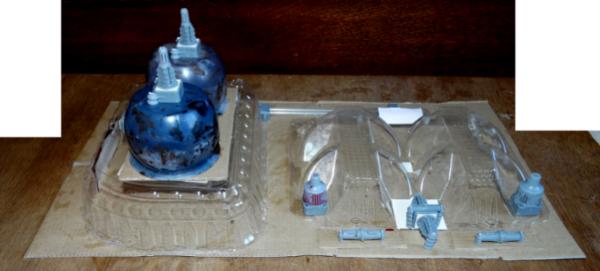


 . This is gonna be a tough comp for sure.
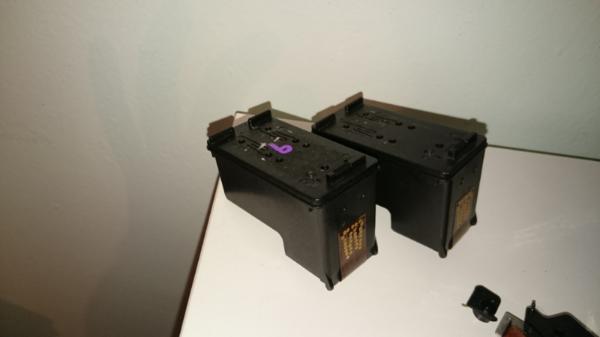
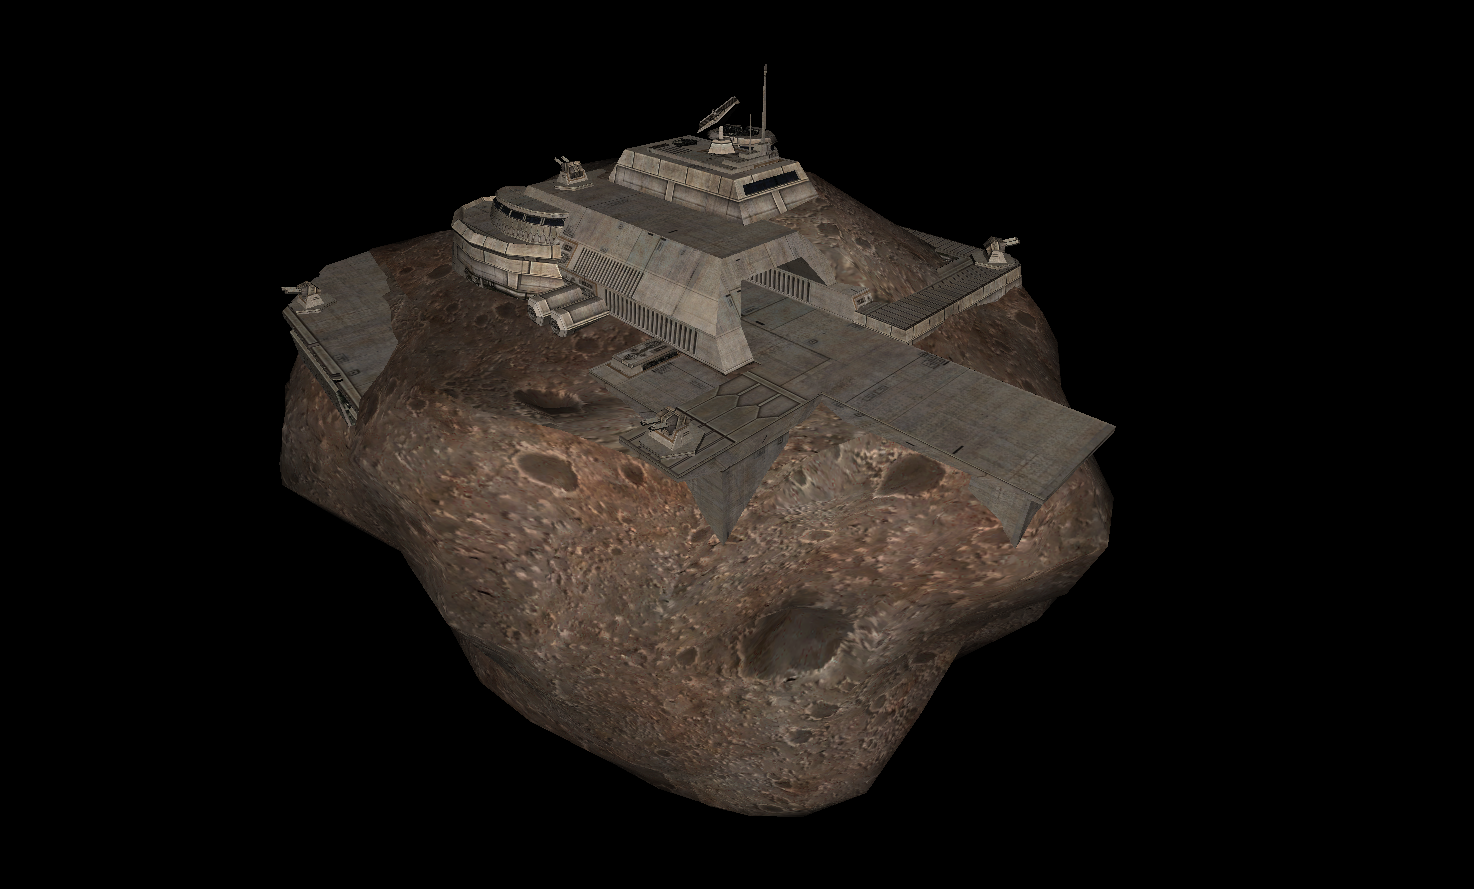
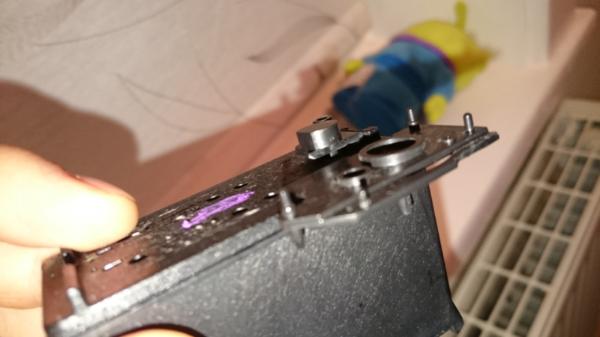
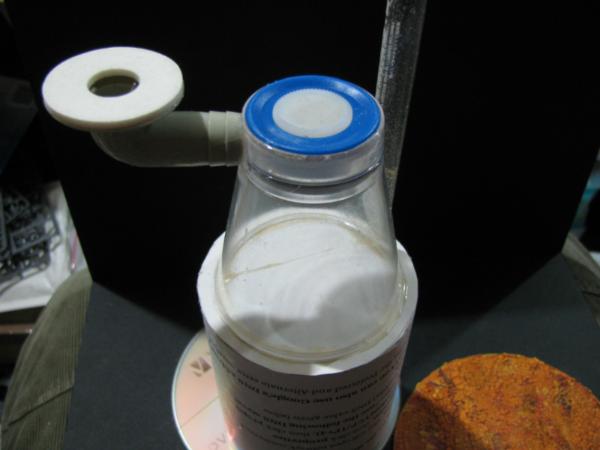
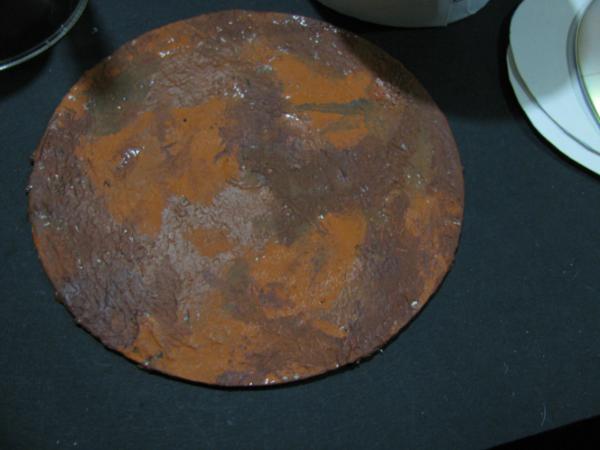
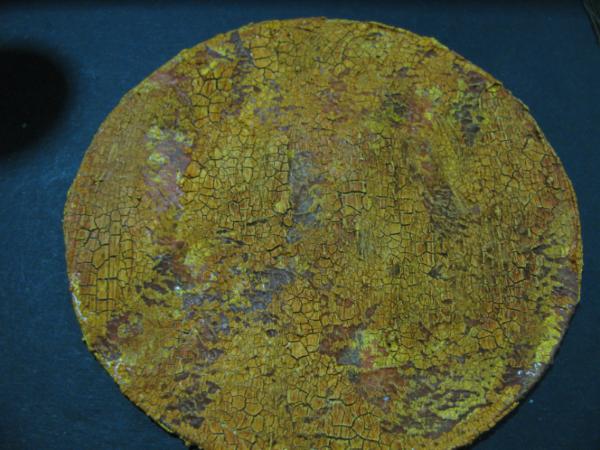
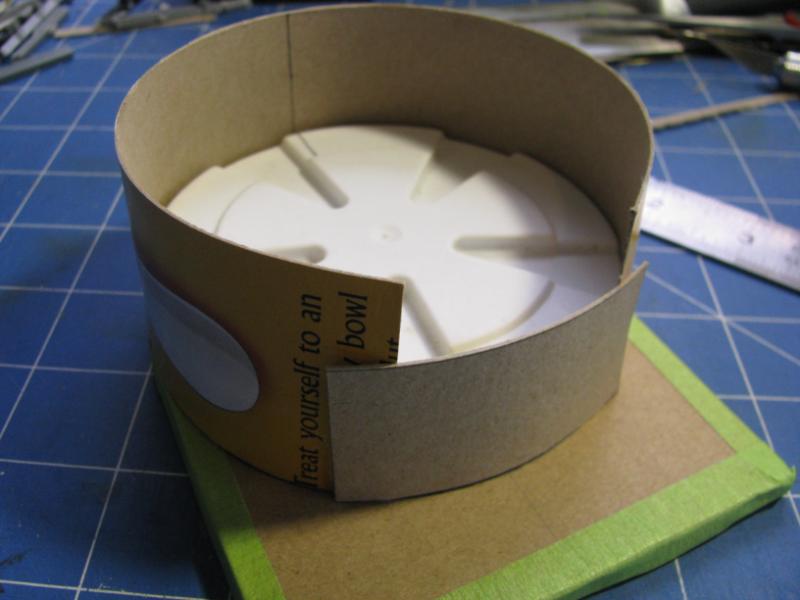
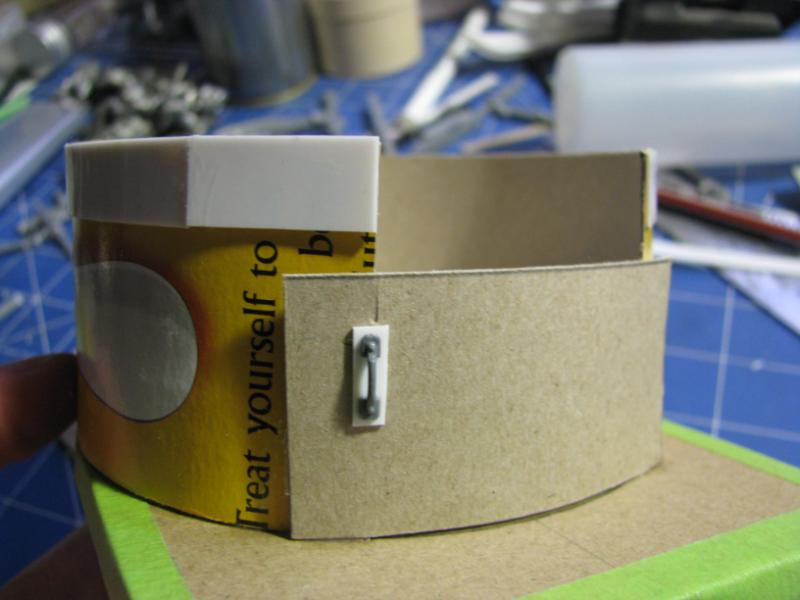
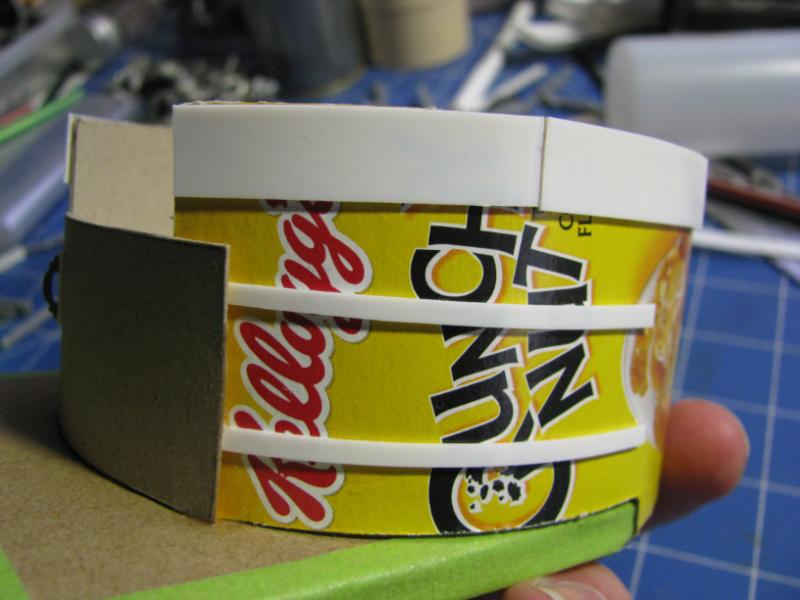
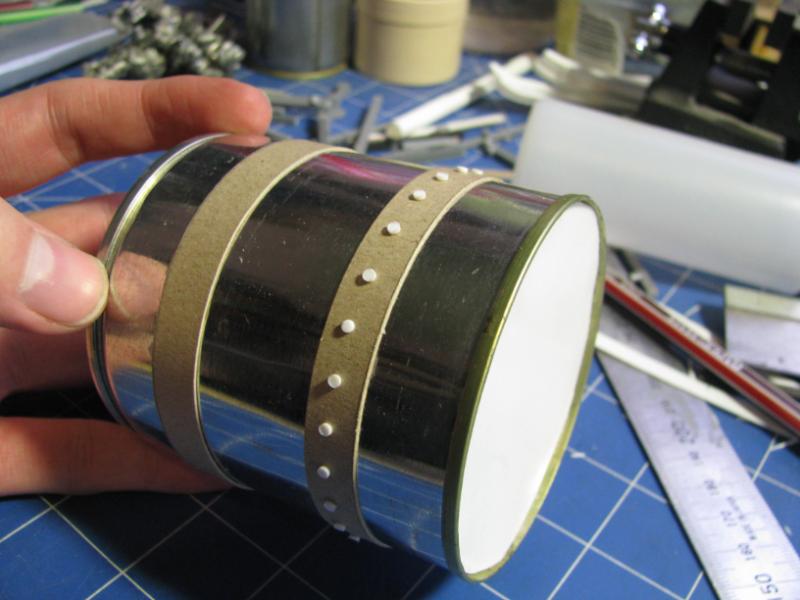
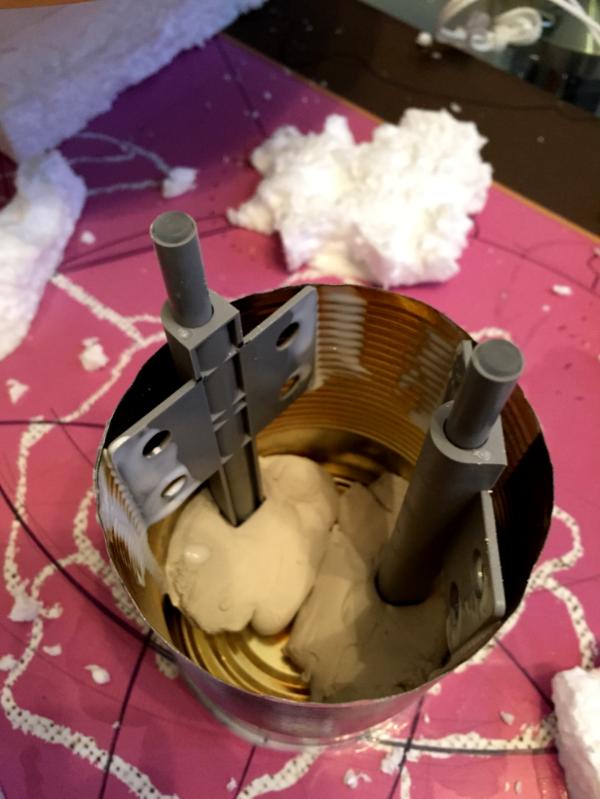
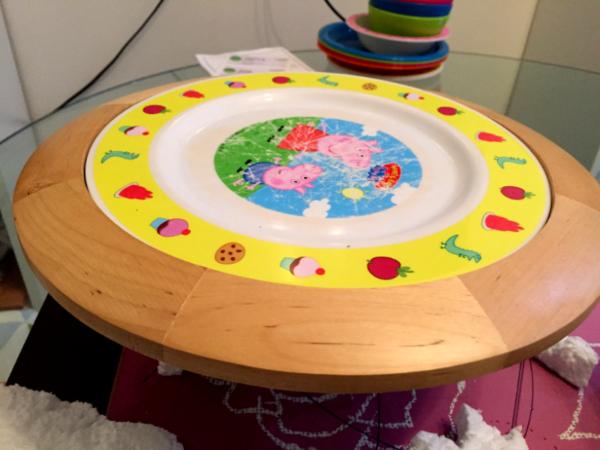
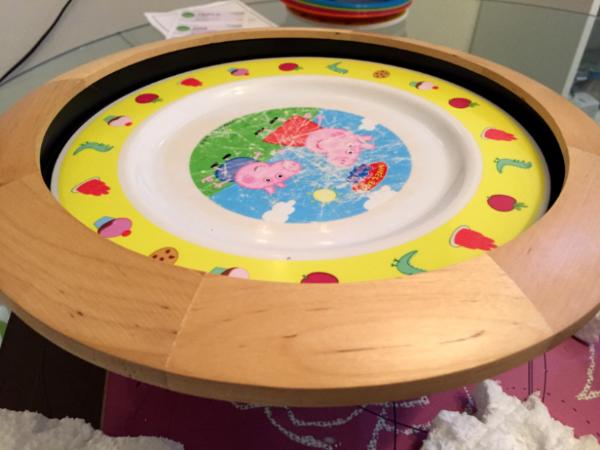

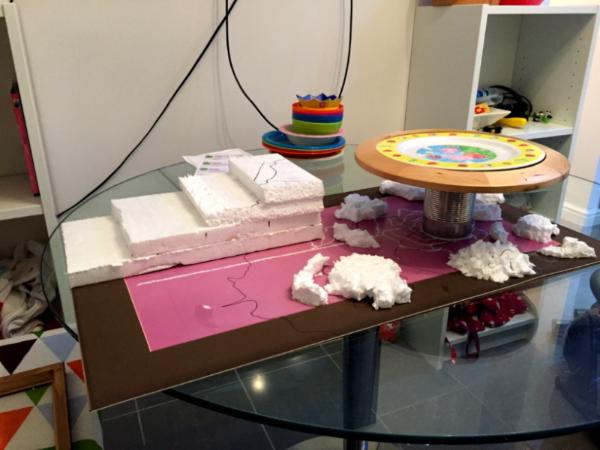
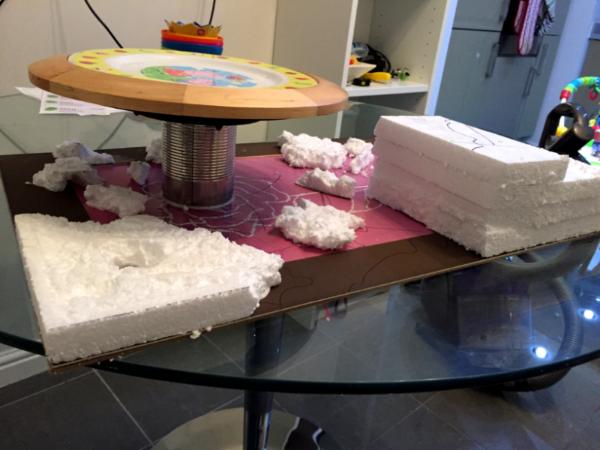

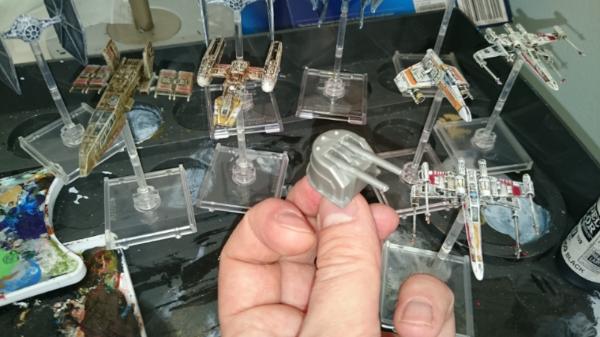
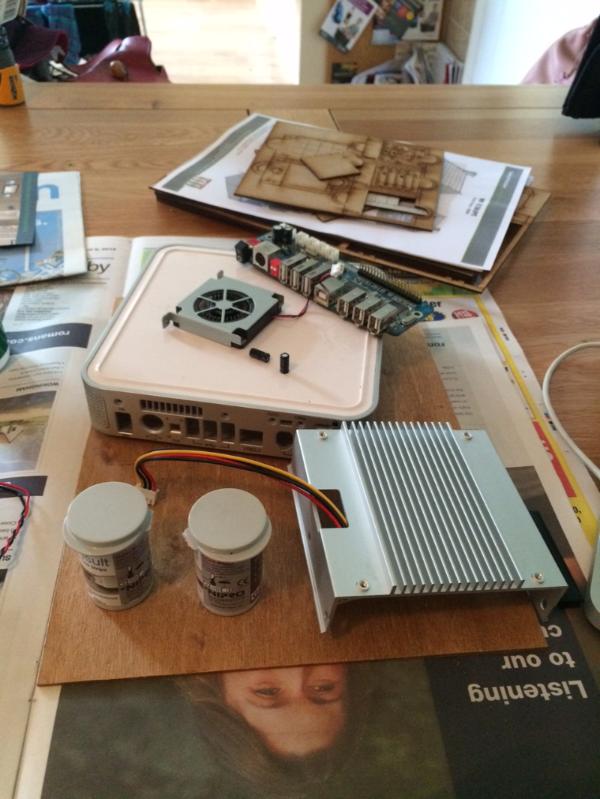
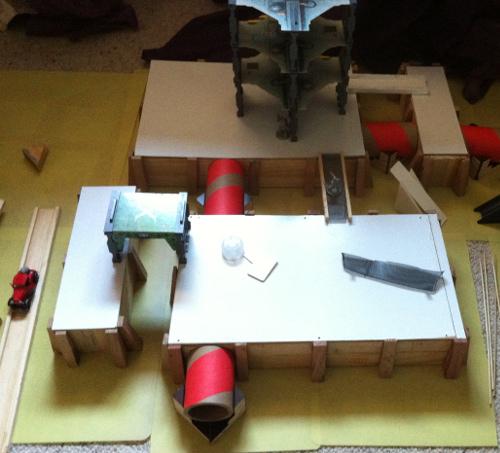
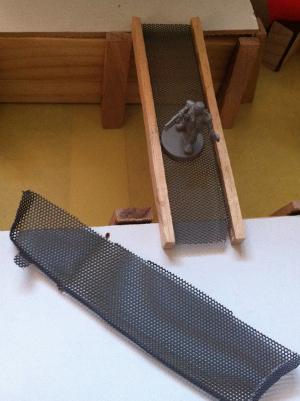

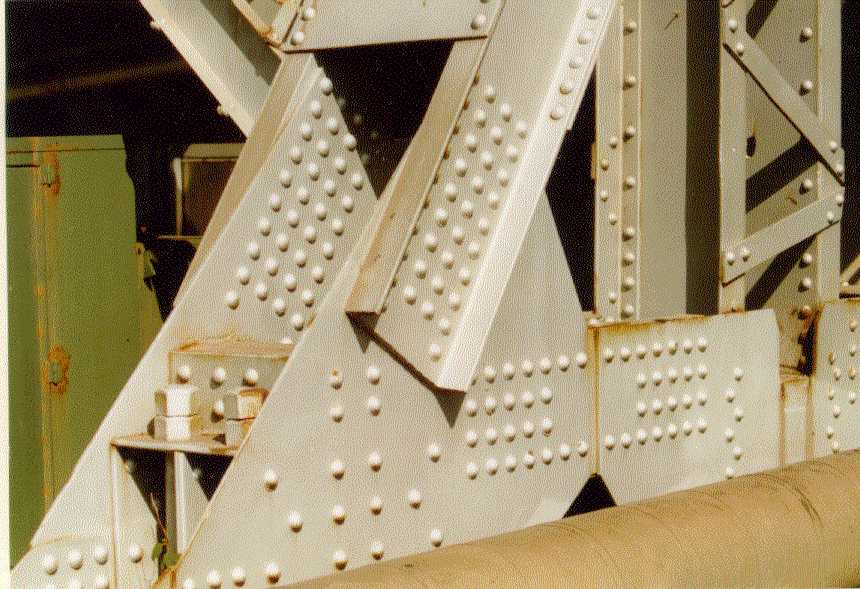


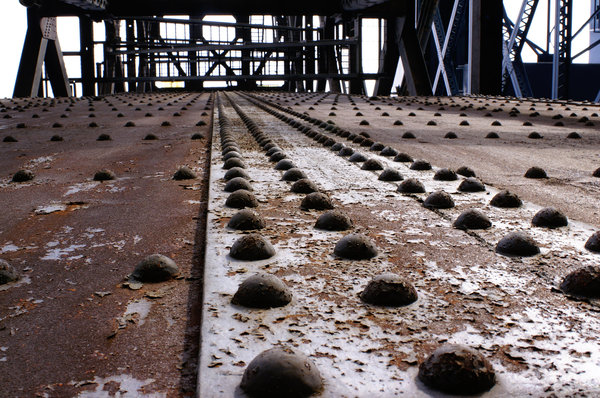
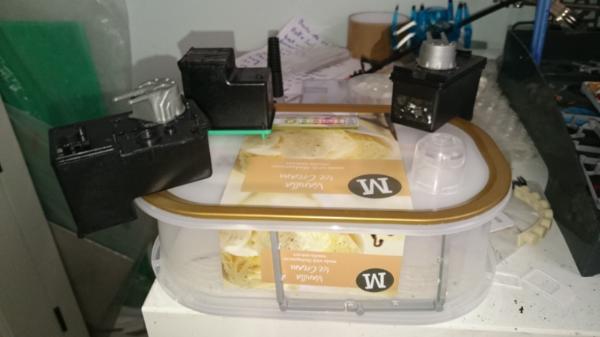
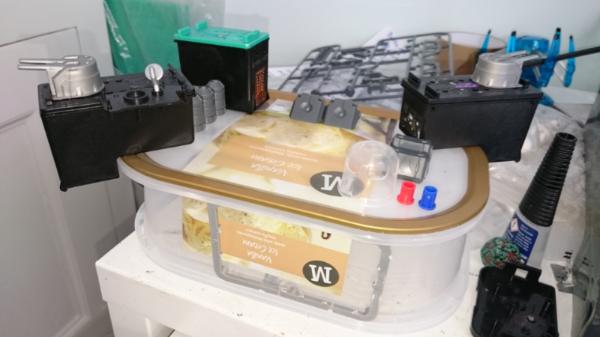


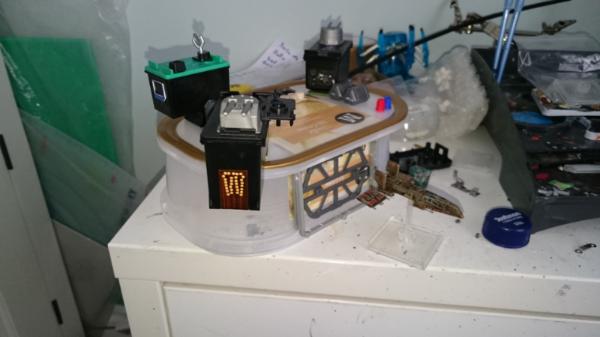


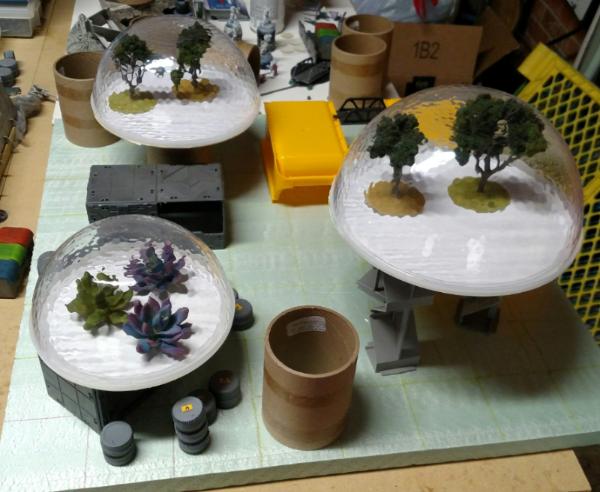
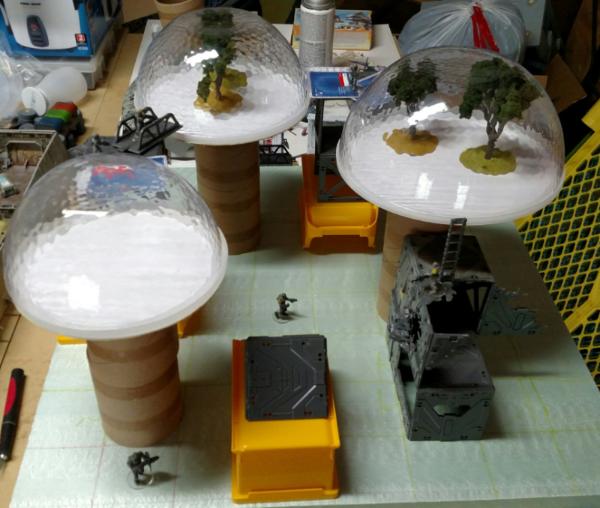
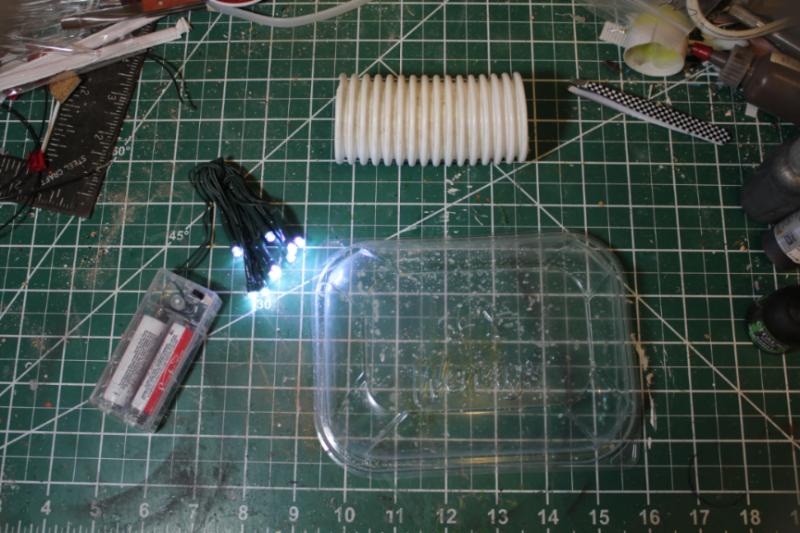
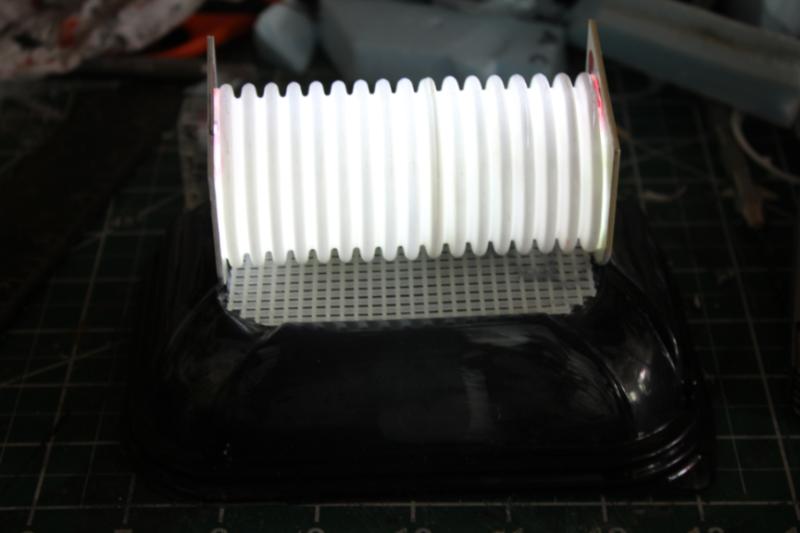
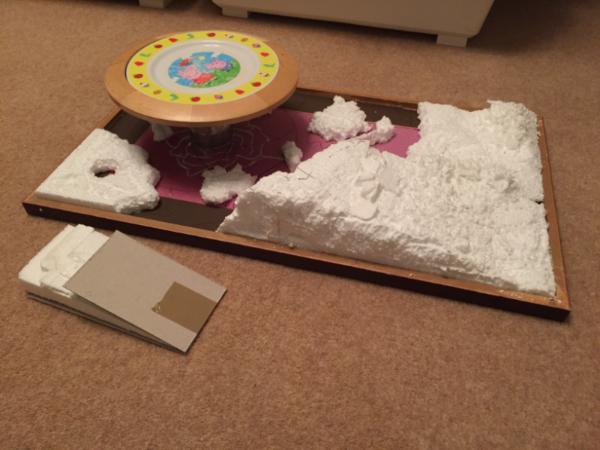
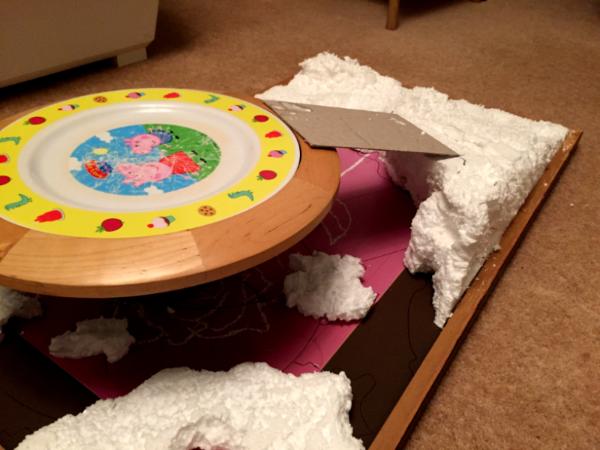


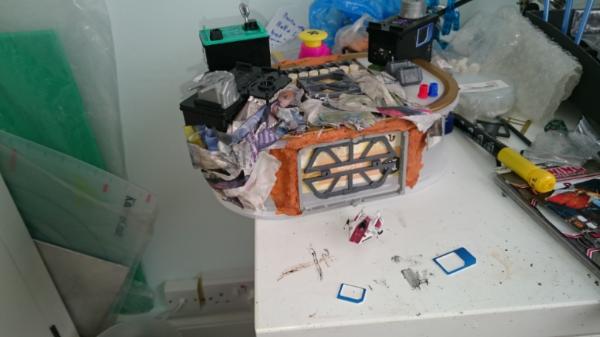
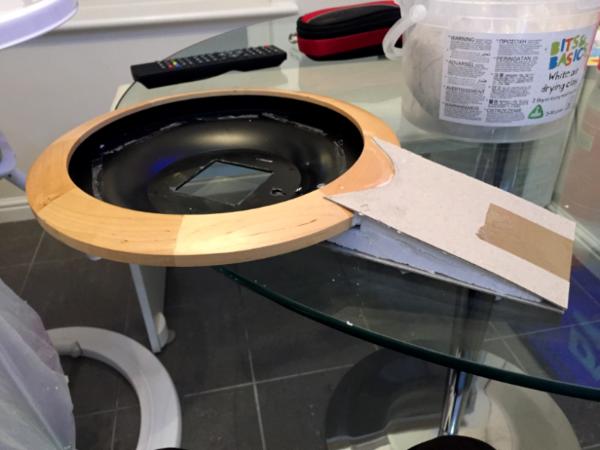
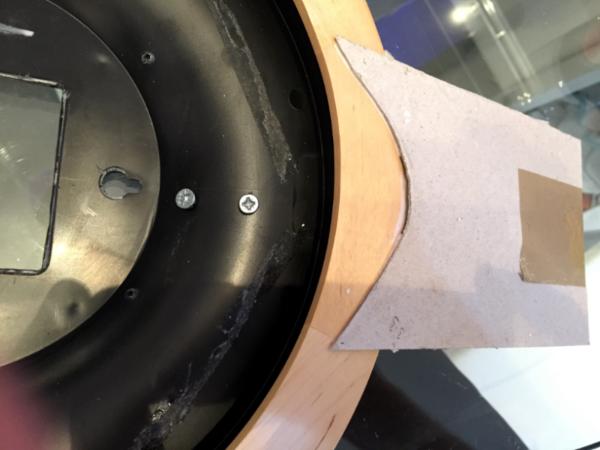
 Time to get stuck in...... DAMN..... only 7 hours of work left to go......