OK guys, here's the final version of the dread w/ hvy flamer and HK missiles installed + the extra work on the impact craters. I decided not to put any discoloration around the scratches as the piece is busy enough as it is.
@Matrim: Thanks! Think I can comfortably put this one down now...
@MissDee: Shrunk the size of the photos, will that suffice?
@Hits: Thanks you! I kind of feel bad reposting shots of the same figure, but there are significant enough changed between this iteration and the last that I figured it was OK.
I made little magnetic "launch ramps" out of strips of flexible magnet, then stuck a little 1/16" magnet in each missile. So the missiles can be added or removed as wargear is fielded or fired.
On th the sternguard & beginning the early work with the drop pods... (no rest for the wicked).
Ninja's by Moltar!....
Thanks Moltar. It's an awfully nice model. The challenge for me is to try and envision the project all the way through to it's completion so I don't overdo it on any particular step and muck the whole thing up to the point that it's unrecognizable. I have one of the FW Mega Dreads for my orks that I've been sitting on for a year because if this issue. Built and primed (for example) the overall shape is clean and clear (for an orky thing), but by the time it gets painted (at least in nearly every case I've seen) it's such a jumbled up looking thing that it's hard to sort out what's what and you lose the overall impact of the figure. There must be a happy medium in there somewhere (i.e. orky without being a jumbled mess) but I'm not confident that I know for certain where it is... so I've put off painting the mini.
Gitsplitta wrote: The challenge for me is to try and envision the project all the way through to it's completion so I don't overdo it on any particular step and muck the whole thing up to the point that it's unrecognizable.
QFT, man that's the story of my life... well, my painting life, I guess. The worst is when you think you're almost done and this crazy idea pops in your head and you realize that your not close to being done at all, because this new idea is so awesome.
As for the orky stuff ... When dealing with a large scale Ork vehicle, having too much detail on the plates can quickly become too distracting or end up looking just jumbled together. I feel like the best looking ork vehicles contain one or two main colors and one spot color. (Not counting white, black, or metallics) Awhile ago, long before his awesome Iron Warriors army, Lemmingspawn had some really cool orky vehicles:
http://www.dakkadakka.com/dakkaforum/posts/list/208455.page - His ork army, which is a treat in itself
Man, you crank out too cool of stuff to just let that Mega Dred sit on a shelf primed and taunting you on a regular basis. What's the worst case scenario? You totally blow it? Paints removable...to a degree. And if it totally blows just don't post it on Dakka so your shame stays with you and you alone...forever...
Gits! Your dirty dirty melta hole is epic! (space-based geek flavoured dirty innuendo intended!).
Seriously though, I had my apprehensions about that melta burn/hole but the slightly sideways shot REALLY makes the effect pop for me. Becomes much more obvious and impressive. Nice work
Dread over all looks great! Nice work on the weathering, I think being subtle and knowing what not to paint/add is just as much an art form as weathering/blending etc. It really helps the model pop effectively.
On the scratch/colour (that IS how it's spelt!) thing, in either scenario there should be extra colour in your scratches. The primer should be showing through in a very thin layer between the yellow and black, it adds much more depth and realism to the damage. If we follow on with the 'pre primed' colour base metal then the scratch itself would be that colour only a lighter shade rather than silver as it is.
Taking the above into account though, ignore it entirely because your dread looks badass just the way it is and you shouldnt go back and play with it becuase you'll never be happy with it again.
Nice work man, please keep it up! This thread and your project is a major tie for the community
Edit: PS - Did you realise you're actually being revolutionary? Yours is the first 40k vehicle that has erm.. 'active weathering' with that melta hole.. usually it's age and damage but that melta hole is real time weathering. Really adds a new dimension to the dynamic of the pose and model itself.. at least for me!
Moltar wrote:Man, you crank out too cool of stuff to just let that Mega Dred sit on a shelf primed and taunting you on a regular basis. What's the worst case scenario? You totally blow it? Paints removable...to a degree. And if it totally blows just don't post it on Dakka so your shame stays with you and you alone...forever...
Man, that boy does some serious converting work... wow. Never fear, it's near the top of the "after Adepticon" painting list. My wife got it for me two Christmases ago and she's on me like white on rice to paint it.
perplexiti wrote:It really looks like it's just jumped out of a drop pod and charged through the enemy's fire.
That's the effect I was going for... thanks! I wanted him to look heavily battle damaged, not neglected (i.e. rusty or dirty). I wanted him to look as if his life consisted of drop podding directly into hand-to-hand with the biggest, nastiest thing the enemy has to offer, while using it's higher AV to ignore gunfire along the way.
CommissarKhaine wrote:Great model, love the weathering like this, especially the melta damage!
Thanks CK, I wasn't sure about it at first myself but it's growing on me...
Miss Dee wrote:Fantastic thanks mate. Looks cool now he's not in your face.
No problem Miss Dee, wouldn't want to be in anyones face...
vent wrote:That is one awesome Dreadnought!
Thanks my friend! Probably the last dread for a while... lots of other things to do.
Monkeh wrote:Gits! Your dirty dirty melta hole is epic! (space-based geek flavoured dirty innuendo intended!).
Thanks! .... I think...
Seriously though, I had my apprehensions about that melta burn/hole but the slightly sideways shot REALLY makes the effect pop for me. Becomes much more obvious and impressive. Nice work
You and both! I still can't do OSL worth beans... and I think it would stand out more if the dread wasn't yellow... but it's O.K.
On the scratch/colour (that IS how it's spelt!) thing, in either scenario there should be extra colour in your scratches. The primer should be showing through in a very thin layer between the yellow and black, it adds much more depth and realism to the damage. If we follow on with the 'pre primed' colour base metal then the scratch itself would be that colour only a lighter shade rather than silver as it is.
Taking the above into account though, ignore it entirely because your dread looks badass just the way it is and you shouldnt go back and play with it becuase you'll never be happy with it again.
You're probably right on the first part... and definitely right on the second... but I will take that into consideration on future projects.
Nice work man, please keep it up! This thread and your project is a major tie for the community
It's a major something... "tie" might not be the word I'd choose.
Edit: PS - Did you realise you're actually being revolutionary? Yours is the first 40k vehicle that has erm.. 'active weathering' with that melta hole.. usually it's age and damage but that melta hole is real time weathering. Really adds a new dimension to the dynamic of the pose and model itself.. at least for me!
Never looked at it from that perspective... but I guess you're right. Now if I could only model the spall from the shell impacts we'd really have something.
monkeytroll wrote:Very nice Gits. The extra work on the weathering makes a big difference, that is one awesome dread
Took a short mental break from my Mantis Warriors (as I have to do when I finish a big project) and finished painting the last of Thing 2's Tyranid Warriors. I'll put a pic up of the squad on the appropriate blog later this evening. I always find it useful to work on something else in-between major marine projects as it clears my head and gives me fresh eyes.
Be nice to get the last two sternguard done as I can then call that entire unit complete.
perplexiti wrote:It really looks like it's just jumped out of a drop pod and charged through the enemy's fire.
That's the effect I was going for... thanks! I wanted him to look heavily battle damaged, not neglected (i.e. rusty or dirty). I wanted him to look as if his life consisted of drop podding directly into hand-to-hand with the biggest, nastiest thing the enemy has to offer, while using it's higher AV to ignore gunfire along the way.
Well sir, you've more than achieved what you set out to do then!...
I know it's a bit late, but I saw a tutorial recently that I really liked for making bullet holes. What you do is use your small drill bit to drill out a hole as normal, then using a larger bit lightly enlarge the top. It gives more of a depressed look to the hole, like what you would expect.
I think the dread is incredible. Now if I only had the time to work on my Kans.
@fatty: No idea how you do that and keep motivated on all 4...
@Joske: Thanks... no magic to it.. just a bit 'o hard work and a little imagination.
@perplexiti: Cool. Always nice to hit something right...
@tipios: Thank you sir! It was a risk to be sure, but as they say... "with great risk comes great rewards". Now if I can only get the "rewards" to come in unmarked 10's and 20's...
@Heff: Thanks for the tip, if you can post a link to that tut I'd be most appreciative.
@IHEART: I appreciate your comments IHEART. The model I can't take credit for... but the pose and basing I'll cop to. Unfortunately with everything magnetized on him, moving him can be tricky as he has a tendency to fall apart if handled roughly... but then I can outfit him however I'd like... so there is that.
Well, spent tonight at one of my favorite brew pubs with a friend talking though current events and personal decisions... so no painting. Did update Thing 2's blog with a pic of the complete Tyranid warrior squad if your interested though. Came home to my lovely wife making me a toasted cheese sandwich on the skillet. 15 minutes later the cold cheese sandwich was still sitting on the luke-warm skillet. It was at this point I noticed the open bottle of wine on the kitchen table. *sigh* You'd never know which one of us spent the evening at the pub.
Well I am easely distracted and don't have the motivation too finish my army. but with 4 armies too paint if I dont feel like Painting my Dark Elves I will just paint my Orks or my Renegade guard or my friends Empire or my Rebel grot army (following Dark Eldar rules) or my Dark Eldar wych army (there yellow too) or my small small gondor lord of the rings army. wait thats more than 4 thats 7
Yes i have way too much stuff.and now I am not even looking at my other i dont feel like painting armies.
but anyway the pub you say eh? I hope you had some good times and I look forward too your next update
Gitsplitta wrote:Unfortunately with everything magnetized on him, moving him can be tricky as he has a tendency to fall apart if handled roughly... but then I can outfit him however I'd like... so there is that.
I too have discovered the joys of magnetising meets table-top - I think it is just an experience thing. Just like our painting gets better with practise, we'll learn to magnetise more table-top friendly in the future
Yeah... it's just that all the bits are *so small* that I couldn't really use larger magnets that would hold securely. The magnets on the rifleman dread for example are sizable and very strong... so the need to be pulled off. The magnets I chose for the assault launchers and HK missiles are tiny and while they hold those bits on the dread just fine, they're easily knocked off by incidental contact, so I have to be careful about how I handle the model. Unfortunately the war gear in both cases is expensive enough that I can't assume I'll always take it (and indeed, the Adepticon build has neither) so either pinning or magnets were necessary... and I wanted to play around with the magnets some to see how good of a job I could do.
Time for me to check in again, lol. Great progress on the army Gits, the dread is absolutely immense. Personally I think the base and the dread clash an little in the photo and I'm still making my mind up on the melta hit but other than that its another first rate win from 'Gits Art Studio' - GAS for short
Well, the basing is what it is. It's the same kind of base that the rest of the army is on so I can't change it for one figure.
As to the rest... I like to keep experimenting as that's the only way I get better. Some things work better than others and a lot is in they eye of the beholder of course... but I'm satisfied with it. Time to move on.
Another splendid and creative paint job by Gits! I can imagine that when your army is deployed on the battlefield it must have a stunning look to it! Lots of quality work in your Dread. I love the fact that you made the effort to break up the colors a little with the white helmet (unless thats the original color of the Mantis elite). Great job on staying consistent throughout your army with the serrated areas of the color scheme. Your right, he does look quite busy, but if he is a centerpiece to your army then I dont see anything wrong with that. Again, fantastic work!
Are you using neo dymium (sp?) magnets Gits? If not, get them. Good times. Hold strong regardless of size. If you are then the fragility can be solved by greenstuffng holding blocks or being creative with the magnets
On my converted magnetised dread I've actually recessed the magnets on the arms and protruded the magnets on the chassis itself, this just adds another layer of strength to the magnets.
Green stuff holding blocks (particularly for annoying things like the HK missles) are another good option, thin 'block' of greenstuff that you work into the model that forms an almost 'lock piece' for the join. I'm likely not explaining it well. If you're interested let me know and I'll explain/document it a little better. I'm fail at englandish right now.
@Element: Thanks my friend. I really hope the army is going to be very impressive when done. That's kind of what I bring to my team I guess... I'm hardly a table-top Romel.
@Monkeh: Yes, and by-and-large they work great... just due to the size of some of these pieces the magnets I'm using are either really small, or don't make direct contact so things are little hinkey. But... they'll work fine over all. I think a did a good job putting them in though, even the magnets on his "shoulders" where the assault launchers go are invisible if you remove the launchers.
fatty wrote:there awesome blackhand put wont gw bug you about the fact you casted one of there parts?
unless he sells them, probably not.
the dread looks awesome, gits, but I have one nitpick- I think the base has too much going on- too busy. Not saying that I wouldn't love to have one or anything... ^^
@shrike: might be the angle of the photos too... but then again, basing is a matter of personal taste. Basing won't change though for this model as it is consistent with the rest of the army.
@Vit: I wish... still so much to do. 10 troopers, 2 sternguard, 3 drop pods and my MoTF. No idea how on earth I'm going to get it all done. Sternguard and MoTF will get the "full treatment" but I'm going to have to make accommodations on the drop pods and troopers. Not that I won't try to make them look good... but for example the pods will get minimal detail on the interior so I can focus my time on the exterior & I'll be airbrushing 90% of the paint job on the tactical squads so to leave as little time-consuming brush painting as possible.
@fatty: As Blackhand does not sell any of his castings there is no IP infringement issue on which to base legal action.
They're already primed black on the inside & I'll be giving them a quick drybrush of boltgun metal tomorrow in-between working on the last two sternguard. I'll hit a few details on the interiors but very few... just enough to make them look fully painted.... then it's off to the outsides which get white primer and a yellow base (they're all for tranquility units unfortunately). I can probably do most of them with airbrushing but then there's the murderous job of putting the camo pattern on 3 pods. Uugh.
I have considered painting the pods green rather than yellow, figuring that if (as in my fluff) the tranquility units are essentially home-defense units they would not need pods of their own & would have been assigned to standard MW drop pods. But I'm not sure.
In either case it's all-or-nothing... either I do all three in tranquility pattern or as normal Mantis pods.
I'd go with green. I dont see drop pods being individualized for units like other transports. They get used, there done (afaik), so spending extra time on something would be odd fluff wise for pretty much any chapter.
I appreciate the offer Brian, but I need to see this project through myself. Just something I have to do.
Would appreciate your opinion of the pods though... not just on the aesthetics but what type would make sense given the units / fluff.
@Vit: Well, I do have enough of the Chapterhouse pre-herasy drop pod armor panels to cover all three pods and those fit neatly over the doors pretty much exactly where you indicated. I could do those in tranquility pattern and just pop them on. Still a lot of work though... have to think about it.
I'd stick with your original thought that the tranquility vets wouldn't really get camo drop pods. It's not as if the pod will be sneaking around anywhere once it hits the ground to need camo anyway...
I vote for a MW paint job on the pods, not only because they wouldn't necessarily get a pod in their own colours but because then you can use them in your army later on without a repaint.
@Fatty - Sorry I didn't reply to your question, I read it but there was like a page and a half of other replies before I got the chance to post anything and I thought it may be redundant
The other guys were pretty much spot on, as long as I'm not selling the things I cast I should be under the radar of the GW attack drones. I like to believe that they can appreciate the amount of work and creativity I put into what I do (despite them never replying when I send pics of my work to the GW website!) and reserve their lawsuits to people who are actively selling.
okay. well they wont except your stuff for the whats new today topic? thats blasfemy. well to make it up too you the guys in the GW Amsterdam they found both of your works git and black brilliant.
My compliments to them then: "Thanks guys!! Loved Amsterdam... unfortunately I only got to see the airport and train station. Next time eh?"
O.K.... green it is. Next BIG question is how to actually go about painting the models (not physically but color scheme wise).
I'm currently thinking of doing the body green with the panels on the wings and the base below the doors a kind of grey... with scorch marks coming up for the bottom as reentry burns.
Any thoughts? Feel free to point out examples of any pods where the painting scheme is particularly effective.
I will chime in with the "Go Green" feelings, especially given the two schemes of your army.
As for the paint scheme for the pods themselves, I would use the color scheme of your standard MW, so...green main body, and the 'wings' painted the color of the border of your shoulder pads. Then, if you have a tertiary color, use that for details and paneling.
Nice idea Brian but at the time period this army is based on there were no borders to the shoulder pads. But yes, the green will be consistent with the rest of the army.
If it's for your tranquility vets, yellow with black camo and maybe red details. For your regular guys, green with yellow panelling and/or doors. It depends how much yellow you want on it.
shrike wrote:If it's for your tranquility vets, yellow with black camo and maybe red details. For your regular guys, green with yellow panelling and/or doors. It depends how much yellow you want on it.
I did find a decent example of the re-entry burns on a drop pod by petergollum.
It would seem that using an airbrush to paint a metal underskin coating, then doing almost like a directional highlight with a dark grey, or a black wash might give you a similar effect.
Thanks btemple0, that's helpful. I did finally figure out how to apply my weathering powders when I was tweaking the damage on that last dreadnought & I'm sure I can use the same techniques to get the proper streaking. Looks like any leading or projecting edges or edges after a gap that would produce friction would be recipients of the scorch marks...
If there is no intention of using them for the vets then go for green. I don't actually see the need for any colour other than green. I think that (time allowing) a combination of battle damage, the proposed hazard stripes (sparingly) and the scorch marks may actually be enough in this case.
I've still not managed to master the airbrush myself but my guess is the majority of the green will go on first and then any secondary colour. I think it's that point you have to make the decision really.
Taff, you must have missed the earlier discussion. The pods in this case will be used for the tranquility units (exclusively), but an earlier discussion decided that given the position of the tranquility vets in my fluff and the fire-and-forget nature of the pods, it is highly unlikely that the pods would be given the same treatment as the veterans themselves. Thus green pods even for the tranquility veterans.
I'm confident I can do a decent job on the airbrushing... perhaps even some zenithal effects while I'm at it.
A full mantis army shot would be nice, but maybe when more stuff is done?
Also are you rising this army past Adepticon, and if so what is the 1850-2000pt list, or the 3000pt (etc. depending on how addicted you gotten to the army) planned, or is it not and just what ever units strike your fancy.
Have you seen the hairspray style of weathering Gits? Basically base layer, erratic hairspray then top coats. Then you can wipe and get more of a gradual 'fade' effect for continual wear and tear. It's used pretty heavily for WWII tank weathering. Will look up a linky so you can have a look at it.. it'd look awesome for entry burn and paint stripping.
@Sage: I have the army I'm shooting for somewhere... it's big with multiple elements to be explored so I have options... though it will follow a general theme and there will be several specific builds within it. Actually, it's a bit more complicated than that... there's two armies separated in time by 100 years. One, a mechanized Badab War army, the second a post-crusade, non-mechanized force with all modern equipment, the chapterhouse pads and BLACKHAND's custom pieces.
As I said before... do you want a shot of the progress on just the Adepticon (1000 pt) build or do you want a shot of everything that I've painted?
@Monkeh: I've heard of that but have never tried it.. would be interested in seeing what you can find.
Gitsplitta wrote:
As I said before... do you want a shot of the progress on just the Adepticon (1000 pt) build or do you want a shot of everything that I've painted?
Maybe a shot of each army, it could get confusing to have them together, or maybe a shot of them together, then one of post-crusade, and one of the badab war?
so if i get this right, the entire 1000pt army now is for the post-crusade army, and the badab war army will be other units?
Sageheart wrote:Maybe a shot of each army, it could get confusing to have them together, or maybe a shot of them together, then one of post-crusade, and one of the badab war?
so if i get this right, the entire 1000pt army now is for the post-crusade army, and the badab war army will be other units?
Thats flipped Sage, the 1000 point army he is building is pre-crusade. Everything else will be post Badab War.
Oo do you guess remember that one opst on page 3 good times good times. a 113 poages allready wow
back on topic Git why dont you paint them like your razorbacks? it seems logical too me that all the vehicles in the army look the same. but thats just my 2 cents
@fatty: Yeah, that's kind of what I was planning on, though I'm not sure that yellow doors will really work, but that style of green is what I was planning on.
I think I can finish, or nearly finish the last two sternguard today... The yellow and lining are done and I'm working on the detail painting, to be followed by the camo & basing. When they're complete I will take the army shots as I will have reached a major milestone at that point.
Let me summarize: I'm rebuilding my 20-year-old Mantis Warrior army. My original idea was to do an army after the return of the chapter from it's 100 year crusade, and to this end things were moving apace. However, I then had the foolish idea to go to Adepticon with a team called "The Wardens of the Maelstrom" based on the 4 rebelling chapters of the Badab War and based at the time of the Badab War. This completely de-railed my post crusade army and has instead involved 4 solid months of completely obsessive painting of RT era figures (wherever possible). I am coming down to the wire and still have a ton of things to build and paint. But all hope is not yet lost...
Oh I guess I completely missed that part . I thought you were still doing a post crusade army. I kept waiting for you to add new stuff to army. The "Rebuilding" stuff .
Actually one interesting little tip from the FW tank masterclass that I forgot to pass on is the use of one of their newer weathering powders (effectively ground up pencil lead).
Gently rubbing this over any colour will make it look like you've got a coloured metal with some tiny tiny chips showing through. He'd used it on some plates of ork battlewagons to make the blue plates look like they had metal showing through patchy paintwork, but it might be useful to create an interesting look to parts of the pods
Automatically Appended Next Post:
Gitsplitta wrote:Not bad Brian, I'll kick it around.
That is looking good, Gits, have a cookie!
Anyways, That is a small force, but I was wondering for a bit of advice on Forgeworld things. Is it strait conversion, or do we pay a little more or less, money scale wise. It would suck having to pay $60+ for a single squad of DKoK.
It was worse when I first found the Manta, instant mini love, then I looked at the pricetag.
I smashed my mom's china cabinet, but I managed to put the blame on my sister. No regrets there.
Hey guys, sorry I've been so quiet but my Ethernet card died at home & my only Internet access is on my phone.
Sorry about the misspelling, fixing it will have to wait. These figures are all made with RT beakies of various types which can still be had at a reasonable price.
Yes the stencils are different, as they would have been painted by each squad you'd expect variation.
First drop pod is green... at least that's a start.
Automatically Appended Next Post:
OK, have some limited access back... still not at home though. First, thanks everyone for you kind comments!
I think the only unanswered question is the bit about did I airbrush them. Yes, I airbrushed the yellow. I started to paint them the old fashioned way, got two plates done and realized the time for that luxury was long gone. So, they got a base coat, wash, airbrushed highlights & then a lining of wash in the gaps. Did brush paint on the final bad moon yellow layer on the center of each plate (it's what makes the pop). When they're mixed in with the unit I don't think you can see the difference in technique... the camo pattern takes care of that (visually brakes up the model so the difference in painting style is not as apparent).
I love the little FW Mk-VI armor minis but who can afford them? These are all original beakies, mostly plastics with a few early metals mixed in. You can still find them from time-to-time though many are used & need to be cleaned up. As you can tell by my build shots most of these are cobbled together from bits as the original plastics offered very few opportunities for posing without major re-construction (which is what I did in most cases).
As I mentioned above I got the first green coat on the pods. Painting them is going to bee a chore... gotta make it happen fast though.
Hey Gits,
after a solid 2 weeks of reading (while trying to get my dissertation finished) ive finally read through all 114 pages and can i just say, Holy feth its amazing!! seriously, this one thread alone has convinced me to join Dakka just so i can post to say well done and please keep up the good work. i absolutely love all the new (technically old) models, the paint jobs, the conversions...the list is endless.
I'm also now thinking of actually doing some work on my old BA army and getting back into the hobby (a disinct lack of funds and time at uni pretty much scuppered me doing anything for the last 4 years) so many thanks for the inspiration.
and a slight aside to BLACKHAND, dude how have you not been employed by GW yet?! ur sculpts are incredible!
anyway, apologies for the wall of text and hope you get your internet back soon so we can see some more progress!
LOL! Hardly a "wall of text" Reiko... if you've read through the whole blog then you KNOW what my wall-of-text posts look like.
Anyway, welcome! I'm glad to joined up and took the time to post. It's probably one of the things I've found most enjoyable about maintaining the blog, when people feel inspired enough to finally get involved. Just gives me a warm and fuzzy feeling all over (usually that takes several fingers of scotch).
Hopefully you'll continue to like what you see, though I caution that what's coming down the pike in the next month will be driven by expediency as much as anything.
Feel free to chime in at anytime. There is no litmus test for contributing to this blog... so just jump in if the spirit moves you!
Gitsplitta wrote:LOL! Hardly a "wall of text" Reiko... if you've read through the whole blog then you KNOW what my wall-of-text posts look like.
lol yeah thats true!!
to tell you the truth, it was the fact that you get inspired by other people being inspired by you that finally made me pull the finger out, sign up and post. and i love that you take the time to reply to everyone personally, really shows the best of the Dakka community spirit, and the spiit of this blog in particular, so thank you.
i cant wait to see what other wonders you produce for your MW, and i cant believe it will be of anything other than the highest standard expediency or no.
might take me a while to build up the courage to make any expansive comments but ill try.
Automatically Appended Next Post: @BLACKHAND very true, its awesome to see someone creating such quality pieces, really glad you enjoy it too, and this project is definitely worth it!
You're doing great already! All you need to do to be part of this crowd of ne'er-do-wells is stop assuming I'll do something good and start brow-beating me into doing something good!
to tell you the truth, it was the fact that you get inspired by other people being inspired by you that finally made me pull the finger out, sign up and post. and i love that you take the time to reply to everyone personally, really shows the best of the Dakka community spirit, and the spiit of this blog in particular, so thank you.
I agree with you 100%. I used to be a forum whore, I'd post pretty much the same thing on all the forums I could find. But members like Gits converted me to a one forum man Now I only post on Dakka. The other forums never felt like a community unless you are a part of their circle. But Dakka welcomes everyone. That being said, Welcome to Dakka!
Gitsplitta wrote:You're doing great already! All you need to do to be part of this crowd of ne'er-do-wells is stop assuming I'll do something good and start brow-beating me into doing something good!
*grins at everyone*
Aww thanks Gits! can do..... Get on with finishing those Drop-pods! lol
Styrofoam wrote: agree with you 100%. I used to be a forum whore, I'd post pretty much the same thing on all the forums I could find. But members like Gits' converted me to a one forum man
Now I only post on Dakka. The other forums never felt like a community unless you are a part of their circle. But Dakka welcomes everyone. That being said, Welcome to Dakka!
thanks, its good to be here! and you are right, there isnt another forum that has the same feeling as Dakka. i lurked on a couple of other forums but it was Dakka (and this blog in particular) that convinced me to be Dakka-exclusive
Automatically Appended Next Post: Damn, i havent worked out the quoting thing yet, sorry
Naaaah... I'll be fine. Have to b**ch a little... it's my nature.
I am kind of scratching my head a bit on exactly how to approach it... would have been a heck of a lot easier to paint before it was assembled... but then again these pods were inexpensive and already assembled which saved time... so... guess I shouldn't complain. Though it would also be a lot easier to paint if I'd just glued the darn doors shut!
I may do some general shading tonight with the airbrush (dark from below, light from above), then I'll have to look hard at the design and see if I want to try some gradients on the doors.
Wow, I'm loving the pose on that melta guy, it really makes him stand out. The airbrushing on them looks great too; much smoother than trying to do yellow by hand.
Yeah endtrans... I hate to just abandon the painting method I've been using for probably 40 years (long before 40k)... but the results speak for themselves and the time savings is really astounding. I wouldn't buy an airbrush for just base coating as there are colored spray primers on the market now that work fine for that.. but you add in the options for highlighting and blending and the balance just tips for me. Perhaps if I only had 1 army to work with it would be more of a luxury than a necessity... but with two gaming kids and a total of about 5 active armies to try to keep up with, there's just no arguing with it.
Well i know i'm an airbrush convert, they are just so great at saving time. I was like you Gits, wanting to 'hang on' to the old style of doing things, but now i don't think ill every brush coat base colours again.
Automatically Appended Next Post: Congrats on the title page special Gits, well deserved.
You are now front page news, Gits. Congratulations to you and all of your achievements. And, of course, a shout out to all the people who have help Gits realize his 20 year dream. THIS is Dakka at its finest.
No congratulations needed (really) as I wrote that piece myself! LOL!
One of the DCM perks is the opportunity to write and submit a news piece to Admin for consideration. I was the first one to try is all & took the opportunity to pimp my own blog! I'll do the same for some of your blogs in the upcoming months.
Green is complete on pod. I'm not entirely happy with it as I've been having issues with my air brush but it will have to work. Took a pic, will try to upload tomorrow.
Gitsplitta wrote:No congratulations needed (really) as I wrote that piece myself! LOL!
One of the DCM perks is the opportunity to write and submit a news piece to Admin for consideration. I was the first one to try is all & took the opportunity to pimp my own blog! I'll do the same for some of your blogs in the upcoming months.
Green is complete on pod. I'm not entirely happy with it as I've been having issues with my air brush but it will have to work. Took a pic, will try to upload tomorrow.
I was going to say something, but thought I'd let you bask for a bit
I could use a bit of input on the one I posted for the GMS. Seems like it needs....more.
Congrats on getting published, definitely one to push the Badab War fascination which is appearing currently in the wake of the Forgeworld books. Long may it continue!
You shall have to keep an eye out for some of your handiwork appearing in my blog in the next few days
OK, here's a pic of the pod, then of it in comparison with the rest of the army. Again this is WIP... only the green and *some* of the metal parts are done.
Assuming someone follows up these posts with a comment, I'll do another work summary. I think it's too early but with the news article on the front page I want to make sure any new readers get fully up to speed.
That's actually what I'm kicking around in my head. How hazard striping on the wings makes no sense what-so-ever... inside of the door edges I can see... wings?? No.
However... I could do yellow on those panels as yellow figures prominently in the chapter badge. The other option would be a light grey, seen that used with a variety of chapters and it always looks good.
There is just so much masking involved in painting these... sucks up a lot of time. I don't want to spend more than one more evening on it... 3 nights each is about all I can afford at this point. If I end up with time on the back side, I can always add more detail then.
I think the mantis heraldic device on the doors should do the job of breaking up the mass of colour. If you add colouration to the wings as well it could detract form the main device and make the pod look a little too busy.
Also if you are still intending to do scorch marks they will also help to break up the mass of green.
Time for another P&M update... #3 if you're keeping track.
Let's start with Ramos Asura's power katana...
Ramos Asura wrote:Popped my PK on a test marine today, and took some pics. The sword is rather big, however only a few fractions of an inch longer than a vanilla power sword. I did a simple oval tsuba, wiith a sunflower one currently in progress. The sword still needs a bit of cosmetic work, mostly on the tsuba and handle, however here are a few comparison/progress shots: (a note: the tsuba might need to be sanded down some more... i dont know, but it might be a bit too big around in relation to the sword)
Then my first complete Great Marine Swap Unit: And a special treat tonight: Inquisitional Supplement Squad Alpha (which I mis-spelled on the photo) In my army these marines will be used as tacticals rather than full Deathwatch, reflecting my chapters loss of it's "center" during the crusade & the need for the Inquisition to "keep a vigilant eye" on the chapter as it seeks to reestablish itself in the ranks of the Adeptis Astartes.
And I even have two marines towards the second squad...
Roll Call: (L to R, back row) Brother Tanaerum of the Achylsian Reavers by Yggsdrasil Brother Fwuapuu of the Ice Angels by Ice Angel Brother Solomon of the Sons of Talidha by Sageheart Brother Felix of the Sons of the Ouroboros by battle Brother Lucifer Brother Cestus of the Doom Eagles, by Thing 1
(L-R, front row) Sergeant Crixis of the Lamenters by Solar_lion Brother Pendrake of the Sinners by an00bis Honoured Brother Thanatos of the Sons of Hades - Evocati Echelon by Lennysmash Brother Navarro of the Omega Raptors by FITZZ Brother Gretar of the Salamanders by Gretar
These are my three objective markers for the Mantis Warriors: Left: The infamous "chaos idol". Been fighting over this little dragon statue for as long as I've been playing 40k... 20 years or so, hundreds of games if not over a thousand. Center: Beautiful dead termie made for me by Solar_lion, the guy who got me started in 40k all those years ago. Right: Wonderful little wounded marine diorama made by inmygravenimage, though I ended up re-doing the flocking so it matched the rest of my army. (hope you don't mind graven)
My first attempt at a decent white (helmet for my Iron Clad dread).
Terminator helmet by BLACKHAND:
And the new heads cast (termie, bug and tech heads).
My Iron Clad:
Two newest Tranquility Snipers (sternguard):
And the group that's going to Adepticon together as a unit for the first time (note that I've misspelled Mantis in the pic... that's two-out-of-two times I've done this).
That, plus the work on the pod above should catch you up!
Small mantis badges (size that the other chapter badges that come with the pods are) on the doors and yellow wing recesses would look best imo [matches best with the amount of yellow on the RBs]
Vitruvian XVII wrote:Small mantis badges (size that the other chapter badges that come with the pods are) on the doors and yellow wing recesses would look best imo [matches best with the amount of yellow on the RBs]
That's 15 custom made badges for 3 pods... not going to happen. However... IF I can find all of my WST making stuff I can try producing a design, scanning it and making transfers out of it... that might happen. I like your idea Vit... just running out of time.
Solar_lion wrote:what a great sheathed knife/sword on your tranquality marine ( on the hip.. serious 2chuck use blade) where is that from?
That's from the marine scout set. I've been collecting scouts bits off the internet for my bikes and some other long-term projects... I just snagged this out of the pile as the design of his combimelta did not allow for the standard bayonet (though I did put one on his bolt pistol... just for fun).
@Joske: Thanks! Man I'm going to need a painting vacation when this is over...
@Alfndrate: I'll definitely add the scorch marks... will add the symbols if I can figure out an expedient way to do it.
I missed the Inquisitorial Squad somewhere in the maze of your posts, they are some very beautiful marines. If I could paint that well I'd send you one to join your squads!
The pod looks amazing, I would be worried to do anything else to it myself if I had one that looked that good. A bit of yellow will make it perfect I reckon, but on the wings rather than the doors, as once the doors go down, you can't see them any more.
Sorry Yggs, there was just no time. I have one month... hell, it used to take me a month to do a single tranquility vet... I did the last two in three days! (three very long days) My back is up against the wall so I've got to go with what I know I can accomplish to a decent standard in short order. Besides, the logic for using only green pods is sound.
As a caveat... I have 3 other pods (1 built, two unbuilt), so in the future... when there's time. I can do tranquility pods if I want.
As to the front page... there's nothing wrong with a little self-promoting as long as the product is good. What makes this thread so good (in my opinion) isn't my work per se, it's the fact that everybody is pitching in ideas and figures and doing their own Mantis Warriors, etc... so I don't feel so much like I'm saying "Hey everybody, look what I did!"... it's more like "Hey everybody, look what WE did!" And I'm not being modest... that' really the way I see it.
Some of it of course is self-serving in that the more eyes I have on the blog, the more good ideas I'm going to hear & the better my army will be in the end! In future, there are other people's blogs that I'd like to pitch, but since I know my own best and could whip out the blurb in what... 3 minutes??... it was kind of a natural fit.
Neat thing is that some of the obvious blogs that I *would* have written blurbs for are run by DCMs... so youz guyz can do your own self-promoting! That leaves me free to concentrate on folks who haven't made the "leap of cash" yet & get them some front-page action.
My advice for writing your news article? Think of a "hook" to capture the imagination of the casual reader as that front page gets hit-on by a much broader variety of search engines than an blog buried in the bowels of Dakka does. Assume you're talking to someone who may not even have any forum experience & draw them in by catching them with the unique or unusual qualities of the blog you want to highlight.
BishopGore wrote:I missed the Inquisitorial Squad somewhere in the maze of your posts, they are some very beautiful marines. If I could paint that well I'd send you one to join your squads!
The pod looks amazing, I would be worried to do anything else to it myself if I had one that looked that good. A bit of yellow will make it perfect I reckon, but on the wings rather than the doors, as once the doors go down, you can't see them any more.
You paint well enough. Just post your interest on the GMS blog along with a couple of pics of the things you've done already and see what happens! I think I'm behind in about 3 trades, but when I get caught up I'd be delighted to trade with you.
I like the look of the pod as well, and think, like others, when you get the Mantis sign on the doors it should break up the green nicely. Also while I like yellow, having it in the wing things might be a bit much maybe? But I think once you've done the signs and beaten up/scorched the pod a bit it'll look great.
Another congrats on the front page! This blog is a real testament to the community on Dakka, long may it continue!
I saw the pod and thought that the Mantis heraldry would hit the spot perfectly, chevrons may make it too cluttered or messy. You could give it a go with one of the other pods at some point.
What ever you end up doing, if the rest of the army is anything to go by, I'm sure it'll be awesome!
Great work Git. The two newest snipers look full of action. Way to go on the front page. I have been going numb looking at how many pages you've got on this blog.
maybe yellow panels on the DP? I know it's WIP, but I'm imagining it with metal and decals, but it still seems too...one-coloured to fit in with your other vehicles.
just my two pence/cents/euros/yen/whatever the heck you lot use.
Having decided to add custom chapter symbols to my Drop Pod I agree with Gits, its a lot more work than you first think of! After casting five resin badges I was pretty sure I won't be doing it again...decals would be a much better option if possible
Symbols on doors will happen eventually, when is a matter of some debate. If I can make decals they'll happen before Adepticon, if not, it'll be after.
@sennacherib: little of both
@BLACKHAND: thanks for the back-up bud... appreciate it
@Vit: Even with painting... too time consuming (and irregular), keep your fingers crossed for decals.
@fatty & stompydakka: Thanks! check back tomorrow, I should have a final or at least near final pic (though any decals will take longer to produce)
Question:
Should the bottom of the pod be something like a grey, washed with badab black... or black with a boltgun dry brush? I'm referring to the section on the outside below the base of the doors. Keep in mind I'm on a tight schedule so it's got to be simple for time's sake. I want a contrast with the green, but am open to ideas. In either case I will add scorching... it's just the base color that I'm concerned with.
I certainly could, but the greater issue is if I want it to look noticeably metallic or non-metallic. The top of the pod is done black with a boltgun dry brush. Here's a re-post of the pic for reference...
I could re-paint the top to match if necessary. That's why I'm doing this one before doing the other two... want to nail down the prototype design before I crank out the other two (which will hopefully go faster).
Cjsuner wrote:hehe, it is kinda funny to me, how you have over a 100 pages in the blog, for only 12 and a half compleated models xD
lookin good so far!
Now, now... there are more than that...
Lessee...
10 sternguard (2 have been given away)
20 repainted scouts
2 repainted dreadnoughts
1 venerable dread
1 iron clad dread
2 razorbacks
1 Pedro Kantor counts-as
1 Telion counts-as
1 trooper (Brother Six)
1 chaos mantis warrior, Brother Benedictus (part of GMS)
1 modern mantis warrior, Brother Inushi (part of GMS)
Things that add to the blog but I did not paint myself:
10 GMS marines for my Inquisitional Squad
3 objective markers (one made by me)
3 reader created mantis warriors
So that's 42 models that I've painted myself and 15 models painted by others towards the cause or in emulation of it...
OH, and well over a dozen unique sculpts done by readers specifically for the Mantis Warriors & a custom shoulder pad commissioned from a merchant.
Not bad for less than a year. Averages less than 2 pages per model.
...
OH, and one ork nob pretending to be a Mantis Warrior!!
Been a while since last post and you blooming well front page the thread.
Well... where to begin... Ah yes, the sternguard look sweet. Lovely smooth paintwork with perfectly executed camo once again. The drop pod looks great, the gradient painting is really effective on the model.
Also, I made some progress on the Chaos Marine I promised you. Gone for the MW colour scheme and I'll be turning it into an objective. And, do you want me to leave it unbased for you?
The salt technique not so much but it could help with gradient weathering as the burnt metal meets the coloured metals.. tallmantims effect is much more striking for a realistic high activity metal like a dozer blade/burn up from pods.
I am a grammar nazi (blame my computing teacher from last year). This one was just bugging me; It is Misspelt, not mis-spelled. Otherwise its all great.
I have to say that I LOVE the deathwatch squad, they look brilliant altogether.
Gitsplitta wrote:Well... I think you could call tonight an unmitigated disaster.
Yep, that about sums it up.
Did a mini black hole appear in your games room and suck several of your best loved models into it's super dense mass before popping back out of existence just as quickly as it appeared? I hate it when that happens.
Gitsplitta wrote:You paint well enough. Just post your interest on the GMS blog along with a couple of pics of the things you've done already and see what happens! I think I'm behind in about 3 trades, but when I get caught up I'd be delighted to trade with you.
Cheers Gits, might well do that. Need to concentrate on getting my own force done for now and then choose one of my chapters to supply someone from.
@Monkeh: Thanks for those. Unfortunately I don't believe I'll have the time for those techniques, especially since in order to be consistent I'd have to do them to all the models in the army. But I will keep them for later on.
@ImpMonkey: I appreciate that... but in the US we say mis-spelled. I'm not arguing that it is the correct way to say it, but it is the accepted standard over here.
BishopGore wrote:Did a mini black hole appear in your games room and suck several of your best loved models into it's super dense mass before popping back out of existence just as quickly as it appeared?
No, I pretty much just screwed the pooch on every single thing I tried on the model last night... not only didn't they work but they essentially damaged the existing paint job, some of which were in ways that are not fixable without a complete re-paint (which isn't going to happen).
Got up early this morning and spent an hour working on repairing what I could. Wont get to work on it again until very late tonight.
Gitsplitta wrote:Put that in your pipe and smoke it!
well i am from Holland and we smoke a lot of stuff but models??? a heck worth the try let me clean out my bong (note i dont own a bong and not everybody in holland is a stoner. we need some dudes who grow it )
on to the pod ( i am on a roll here ) why dont you do the underside silver and dirty it up with some cole's? you know the stuff that you use to bbq. just grind some of it and powder it on the metal areas. that should give a nice effect.
Cjsuner wrote:hehe, it is kinda funny to me, how you have over a 100 pages in the blog, for only 12 and a half compleated models xD
lookin good so far!
Now, now... there are more than that...
Lessee...
10 sternguard (2 have been given away)
20 repainted scouts
2 repainted dreadnoughts
1 venerable dread
1 iron clad dread
2 razorbacks
1 Pedro Kantor counts-as
1 Telion counts-as
1 trooper (Brother Six)
1 chaos mantis warrior, Brother Benedictus (part of GMS)
1 modern mantis warrior, Brother Inushi (part of GMS)
Things that add to the blog but I did not paint myself:
10 GMS marines for my Inquisitional Squad
3 objective markers (one made by me)
3 reader created mantis warriors
So that's 42 models that I've painted myself and 15 models painted by others towards the cause or in emulation of it...
OH, and well over a dozen unique sculpts done by readers specifically for the Mantis Warriors & a custom shoulder pad commissioned from a merchant.
Not bad for less than a year. Averages less than 2 pages per model.
...
OH, and one ork nob pretending to be a Mantis Warrior!!
Put that in your pipe and smoke it!
Oh, sorry, i did not releize that, i just saw the picture on the last page (i have not been foloowing this all the way)
My bad
Well, I'd say last night was a success except for one thing. The masking tape (Tamaya) that was supposed to protect the paint job ended up severely damaging it in certain areas. The spots (look at the two right wings, just above the yellow) were right at an intermediate point in a gradient... God only knows how I'm going to fix that.
So here's the next WIP... other than the decals and some edge highlighting (which may not happen for a few weeks) these are basically done. Bare bones but they match the rest of the army. If I can come back to them later and give them more detail I will, but if not at least they are consistent with the rest of the force. I opted for a shot in the context of the rest of the army so you could see how well it fits in, which given my time constraints is the primary measure by which I will judge these models.
I did learn some valuable lessons though and expect the other two pods to paint up much easier. Yellow panels first (no masking), then varnish the yellow, then mask off the yellow, paint the whole thing green and do the gradients, finally hand paint the metal bits. This should minimize my need for masking off areas which is very time consuming and give much more reliable results.
Gitsplitta wrote:Well, I'd say last night was a success except for one thing. The masking tape (Tamaya) that was supposed to protect the paint job ended up severely damaging it in certain areas. The spots (look at the two right wings, just above the yellow) were right at an intermediate point in a gradient... God only knows how I'm going to fix that.
Easy fix Git! Battle Damage! Lots of battle damage.
Yeah... actually I think the scorch marks would take care of it pretty well, it's just a matter of time. Looking at the photo above, I think I'm going to paint the rims around the projecting bits around the lower wing vents red, like the edging around the grills on the razorbacks. It would be a nice touch of color and would tie the pods to the other vehicles nicely.
That's actually why I wanted to post this "in context" picture... lets me look at things more objectively so I can make better decisions about my time.
@Vit: I agree, the edge highlighting should take care of that... though I may do a whiter blend on the leading edges with my smallest needle. Will probably do something similar on the top of the wings as well.
Aw heck.... so this isn't done! But, I think I made some good progress & should be able to get a decent result. How long it will take is the question.
Do a melta burn on one wing and scarring on the other. Your dreadnoughts are battered and display their wounds with pride, why shouldn't your pods be? And you can have a lot of fun working out where the melta burned through, calculating the angle and having just a little residual heat each side. Maybe make it a defence laser, just clipped the pod and they were remarkably lucky to land safely after that!
The yellow looks great and the pod, though slightly marred, is not a write off or anything
BG: good idea, but not until later These will not be up to the same standard as the rest of the army... just trying to make them done enough to fit in well.
WM: I'm hoping that lining the gaps with sepia wash, a lighter yellow general highlight and and edge highlight will help. We shall see.
I also hope to get my home computer back up and running again, which will allow for better pictoral updates. I may stop trying to paint fast and just drop my final standard and paint well up to it... that may help this whole process flow more smoothly and give a better final result.
It seems odd that your vehicles have that distinctly airbrushed look that your dudes and dreads do not share. This gives it a bit of a disjointed feeling. I suspect that this will resolve it self when you add a bit more detail on them.
crimsonmicc wrote:It seems odd that your vehicles have that distinctly airbrushed look that your dudes and dreads do not share. This gives it a bit of a disjointed feeling. I suspect that this will resolve it self when you add a bit more detail on them.
Cogent observation. Actually two of the sternguard have been airbrushed, you just cant see it as the models are so busy. You are essentially correct however in that it's the relative lack of detail on some of the airbrushed pieces that makes them stand out stylistically. I will eventually correct that, but I doubt I'll have the opportunity to do so before April 1st. Once that deadline passes, I can revisit all of these if I want and bring the up to specs.
The other thing to keep in mind is that the sternguard and associated dreads are hyper-detailed because of the camo pattern... so I'm sure that adds to the disparity. Which is fine to a degree as there is supposed to be a significant difference in appearance between the standard pattern and tranquility pattern paint schemes. I think some simple edge chipping and ground weathering would go a long way in bringing the vehicles into focus as a better match for the tranquility detachment. If I can do it in time, I will certainly attempt it, but they will never be as busy looking as their yellow brethren.
I think Perplexiti is referring to the gradient paintwork on your tanks and pod compared to the subtle shading/highlights that we're used to on figures. The two different painting styles do stand apart from each other when placed together like that.
Understood, but their are gradients on some of the sternguard and one of the dreadnoughts as well, you just can see it as such because of the other detail... which is the point I was trying to make. It's the big bare areas on the other vehicles that makes the disparity in painting techniques so glaring.
Really, the only figure that could show a gradient that doesn't already have one is the venerable dread... but it's so busy you'd probably never notice it even if I did it that way.
That's true enough but I don't think it overly detracts from anything.
I also think that the key thing to remember here is that, personal preferences aside, you have a complete pod within the theme. Is it completed? Even if everyone had said "it's done, move on" I suspect you would have gone back to it! Maybe the lesson is that if you are going to do the yellow first you may do the highlighting at that point, before the green. Having said that I don't know how long high lighting the yellow will take so your the best judge given your time restraints.
Speaking of time restraints - you feeling the pressure yet? Is the shopping list starting to include energy bars and drinks yet, lol. Seriously though I hope you finish with enough time for you to sit back and enjoy what you've accomplished.
I'm sure that my problems in finishing this model are directly related to the fact that I see time slipping away and I have so much to paint... much less all the other things associated with the event. I will do one or two minor things to this pod... paint the others to match & then move on. No time for anything else. What kills me is that I started this project months ago, and it still came down to this. I'm just hoping I have enough time to get the MoTF built and painted to the same standard as the other infantry... especially since he's still kind of a nebulous concept rather than just assembling and painting a standard figure.
I will enjoy myself once I'm there and can no longer do anything except ride it out... till then... don't ask.
relax take it easy. maybe its best to give the brush the night off? sometimes a break is the best way too get something done faster. if the presure is to big than take of some presure off. if painting becomes a burden lift it and re-read your 117 page tread to find some strenght and get back at it tommorow.
Well, finally got the internet up and running at home again thanks to my buddy the computer god.
I've decided I'm just going to paint the pods till I'm satisfied with them... screw it. They won't be pushed as far as the other figures but I'll paint them 'till their done. Time or no time.
Update: Have decided to work on multiple things at once in order to keep myself entertained and hopefully move the process along more quickly.
Tonight: 1. Applying a careful sepia wash to yellow panels on pod. This is a slow process as, in order to get it to pool correctly I have to do 1 panel at a time. 2. Cleaned up and primed other two pods, will get base yellow sprayed on the appropriate places tonight. 3. Tidy'd up the first batch of marines that WM360 built for me so they're ready for priming.
Well Gits...I've spent the last few days going over your entire blog and I really want to say what an incredibly fantastic job you've done.
One can honestly see that yours is a labor of love and it truly a treat to see each new entry into your army.
Keep up the amazing work Gits.
Gitsplitta wrote:1. Applying a careful sepia wash to yellow panels on pod. This is a slow process as, in order to get it to pool correctly I have to do 1 panel at a time.
Add Gloss Varnish - at least 1:1 - it should take care of your pooling problem (and if not - give you time to fix it!) thereby speeding up this "slow process". This hint was brought to you by the FW Tank Masterclass...
Thanks Arakasi, I'll give that a shot. Up-side is this has made a BIG difference in the look of the yellow. Much more in-line with the sternguard yellow now though not so much with the yellow on the razorbacks (as that was never washed).
I'll get another step along in the process and provide pics of each some time today. Taking the boys to the kid's game at our FLGS this evening so with a little luck I'll get a game or two in myself while I'm there.
Gitsplitta wrote:Understood, but their are gradients on some of the sternguard and one of the dreadnoughts as well, you just can see it as such because of the other detail... which is the point I was trying to make. It's the big bare areas on the other vehicles that makes the disparity in painting techniques so glaring
Ah, sorry. My brain wasn't in gear properly last night... :/
Good luck with the looming deadline. I think you've made the right call moving on with the other pods. The one you have looks great as it is and if you have the time after everything else, you can come back and do more later (either before or after the deadline).
Actually, since I decided to just say the heck with it and proceed at my own pace... things are going much better. Washing the yellow panels on the pods made a HUGE difference, and I washed the yellow on the turrets of the razorbacks so they'd match. I'm juggling a variety of projects today, they're all the kinds of things that need a lot of drying time in-between stages, so I just move from project to project. Hope to have something substantial to show tonight on all three projects.
Hey Gits, I finally started painting the Dark Mechanicus Marine for you. Can you please check out my blog (it's in my sig). I've got a bit of a conundrum: use two more chainswords two make Mantis like chainsword arms or keep the two of them for the trade to you. It's your call.
I like the yellow in the drop pod but I think it'll lookbetter when I see pics of it washed.
He's perfect the way he is GS... looks more primal as is.
Well, I can finally say that I am really and truly done with the first pod, minus decals and markings... but while this is technically a WIP shot, the basic paint job shown here will not be amended further, at least not until after Adepticon.
It really blends in perfectly with the other units now.
And a shot for context so you can see how it fits in with the other units.
Got one of the last troopers built yesterday. Communications specialist to go along with the one Whalemusic360 made... I'll count that as good progress.
Haha! I was going to say that I didn't like the red on the vents, but then when you had it next to the Razorback, it tied it together nicely. Certainly not up to the normal Gitsplitta standard, but I think you will be still ahead of the curve in most cases. Can always play with it when you aren't 11th hour painting.
whalemusic360 wrote:Haha! I was going to say that I didn't like the red on the vents, but then when you had it next to the Razorback, it tied it together nicely.
+1. It really needed the group shot to make it work. And very important: it loosk like you can come ack to it if you want to, to upgrade from 'nice paintjob! to regular Gitsplitta standards
That's the plan. Still a fair amount of detailing that these will get too. Chapter insignia, imperial insignia and numbering. The weathering/scorch marks will have to wait for later though.
I can see in the photographs the red looks a bit odd, but in RL it just works... You'll have to trust me on this one.
Thanks guys. I hope to be able to do the Mantis Warrior badge decals today... then it's just painting up some of FW brass insignia (imperial eagles) and pod numbers. With luck... might have a finished product to show you by today's end. I'm also going to re-take that group shot as the photo there is really lousy. Look for a much better group shot a bit later this morning.
looking great Gits,
cant wait to see the finished product (and the group pic) , and very glad that you've overcome ur problems to get it finished. Hope the other two pods come out as good as this one has. btw really like how the red vents tie it in to your razorbacks, looks awesome.
O and a belated well done on the front page!
I like the red. Even by itself. The details Help break up the large blocks of color. With green and yellow, red is a much better choice than most colors, even white or black and definitly better than Browns or blues.
Glad you got your look down onthe pods...tiime to whip out the other two and move on to more troops.
At this point I realize that I have once again forgotten to put the "I" in Mantis... I glance askew at the bottle of Glen Morangie that sits empty on the table and suspect that it's not really the alcohol that has made me screw up my spelling for the 3rd time (especially since I formatted the picture hours ago).
We rolled for spearhead deployment & capture & control, 5 objectives. Mantis Warriors go first. I pick my side and deploy both dreads on the table with sternguard & MoTF in pod to come down in reserve. Thing 2 deploys in opposite quarter, Trygon to deep strike, everything else on the table.
Turn 1: First two empty pods scatter max distance to the *exact same spot* (no lie). Since I was still painting them and they were effectively out of the game I just removed them, but you can see where they landed by the two orange arrows in the upper left. Las cannons on razorbacks account for two warriors, Iron clad moves in front of rifleman to provide cover. Meanwhile, Thing 2 moves to envelop, moving must in a circular pattern around central building while stealers take the fall line across the field.
Turn 2: I roll for reserves and my sternguard pod comes down EXACTLY where the other two were supposed to come down... firing from the squad and MoTF nearly eliminates the stealers... leaving one. (I forget to have it make a morale test). One more warrior is lost to lascannon fire from the lower razorback. Thing 2's Warrior squad dives for cover of building. and his deep striking Trygon mishaps onto the lone gene stealer and dies. I suggested that he auto fail the stealer's morale roll (since we forgot it before) which would have cleared the way for the trygon, but he stubbornly refuses and rolls a 2 on the mishap table. He melts down. Takes me 10 minutes or so to get him talked back into playing but he eventually bucks up and gives me one hell of a game. Two sternguard meet their end through a combination of firing and the gene stealer's last charge. Warrior squad shakes "southern" razorback.
Turn 3: Sternguard press the attack on the left, wounding a zoey with special bolter fire. Iron Clad steps up to confront warriors who are now threatening rifleman dread, deals 3 wounds with his heavy flamer & charges. Stunned razorback backs up out of harms way. In his turn his Prime kills the dread with one mighty swing and the squad moves forward towards the other dread. He charges the autocannon dread but it holds.
Turn 4: The sternguard move in on the zoeys and shoot, but to no avail. Returning fire kills 2 and they fail their morale roll. I decide to make a play for two objectives NOT in warrior charge range and spring my razorbacks left. Battle with rifleman goes on... I do one wound.
Turn 5: Dash for objectives continues and I pop smoke. Sternguard continue to fall back as I have forgotten about "and they shall know no fear). Zoey's shooting is ineffective, assault continues.
Turn 6: Pretty much a stale mate here... but last minute shooting fro pod kills 1 warrior.
Turn 7: Sternguard and MoTF start moving in the right direction again. Killed a second zoay. Thing 2 finally blows an army off my dread.
Game ends: Mantis Warriors 2, Nids 0 Once he got over the shock of losing his Trygon to the mishap... he played a great game. The fact that the warriors took out the Iron Clad in 1 combat and were then totally tarpitted by the rifleman (who by the end had done 2 wounds to each attacking Nid) was just too funny! He had terrible luck with dice near the end, and the poor zoeys were just having the worst shooting luck imaginable (making their psychic tests, then rolling 1's and 2's to hit).
It was also a game of guest objectives...
Gretars... which has already traveled the Atlantic twice & will do so again shortly...
There are flangers in the inner-top of the fins that look to me to be the same as those on the outside of the lower fins, so I'm doing them in yellow as well.
I got the brass FW bits painted and put on last night, but the decal project ran into a snag. I used clear decal film but the yellow comes out translucent that way rather than solid. So I have to go back and buy some solid white decal paper and redo the decals on that so the yellow will cover the green. At least I have my template now so one of the hardest aspects is done. The little brass bits look really good. There are little imperial eagles on the top of each door and one door gets a roman numeral insignia which effectively "names" the pod.
You guys want a pic now or wait until I have the decals on?
Why do you have the pods come down without the dreads? It just seems a waste of points, If you skipped those two pods then you could get a land speeder or something more useful... Or is this some sneaky tactic that would have worked if they hadn't scattered?
It is so gutting when a deep strike mishap destroys a unit like that. Good on your son for deciding not to take the easy route and let you move the genestealer away. He's going to be a great player if he continues in that vein.
Good luck with the pods, I would take photos when you feel you are ready to post them up, better to spend that 20mins painting and modelling than taking photos, because you'll just have to take more photos when you're done anyway!
Having the flexibility to bring the pods down empty is part of the strategy. I essentially don't have to decide what I'm going to do until deployment, which gives me a lot of leeway when it comes to strategy depending on the army I'm facing and the objectives presented.
Sorry to butt in here but I've finally read all 118 pages of the thread. It's really good and I've really enjoyed reading it.
Stupid deep strike mishaps.
You're a brave person DTH... hope it was worth your time. Actually I just found out the Trygon can't mishap like that... it's like a drop pod in that respect. Ah well, he's happy with the battle in spite of the mess ups with the rules. Next time we'll get it right!
Yeah, I'm currently scouting for my canoness so I can get her painted up!
Yep... but in that case it's not that I cant spell "mantis"... I think sometimes my keyboard doesn't register keystrokes and if I'm not really paying attention to the word I don't see the missing letter.
I hve nevr ha tat problm....
oke maybe i have it can be really annoying if your key board doesnt register the keys. and a great way too down grade your grades in school.
and besides Mants warriors are way more awesome than Mantis warriors
Good point. Standard practice in editing is to set the work down for a day or two, then go back to it when your have "fresh eyes" and your mind isn't reading what you wanted to say rather than what you actually wrote. OR simply get someone else to give it a read through... Not practical in an internet sense however.
I'm about 20 pages in and all I can say is wow. I really like how you've built this whole project. I really like the thought process and questioning of what makes the MW the MW. I really like that attention to detail. Looking forward to finishing this and more updates.
Well, last night's decal experiment failed miserably. The decal won't release from the backing making the whole thing rather pointless. I'm going to try and get some thinner plasticard and either just print the design directly on that, or print it on paper then cut out and glue it to plasticard disks.
I did however get the yellow completely masked off on one of the pods so it's ready for the green. I hope to get the other one masked off tonight.
Gitsplitta wrote:You're a brave person DTH... hope it was worth your time. Actually I just found out the Trygon can't mishap like that... it's like a drop pod in that respect. Ah well, he's happy with the battle in spite of the mess ups with the rules. Next time we'll get it right!
Yeah, I'm currently scouting for my canoness so I can get her painted up!
Next time for those rules!
This thread was definitely worth the three days on, off reading!
If you want to try printing and transfering to your models, you could print to rice paper (which is super thin), then apply with gloss varnish. Add a coat or two of varnish over it and it will smooth out the seams so it looks painted.
There's some youtube videos about airbrushing and rice paper that are worth looking at.
Thanks Heff, I'll give that some serious thought. I have several weeks to work this out so there's no rush, just frustrating that I can't call these models "done" until I sort out this last step. Any suggestions as to where rice paper might be found?
I would think asian food stores or hobby stores such as Hobby Lobby or Michaels. If looking at HL or Michaels, check around the inks area, as rice paper would be used by people wanting to write in Kanji.
I would offer to find the youtube video for you, but I picked up Dragon Age 2 at lunch, so I don't expect to get anything done for the next week (including painting).
Well, checked two Asian food stores. They have rice paper, it's round and has a waffle pattern pressed into it. So no go.
Checked FLGS & large copy/office supply store... nothing there.
Finally went to university art store, no rice paper but found something called "marker paper". It's very smooth on the drawing surface (fine grained) and the lightest paper I could find (even lighter weight than tracing paper) but it is not translucent, which is good. It may work. I will also keep trying to make the decal paper work. The owner of our FLGS said they sell a ton of it and have never had anyone report a complete failure of the system like I have before.
Just like the polar bear Garry Larson strip (crunchy on the outside chewy in the middle ref..)
Good god Git these guys are really coming together well you must be happy with how things are turning out the dread look excellent as I've said before
and your ability with that air gun is gaining in spades the drop pod look great!
Really wish I could see these guys in person, oh and a question do you have aguide for taking better pics of your mini's / whats the background in your shots
from and what camera settigns do you use. Everytime I take a shot it seems to depend ont he phases of the moon the tide what solar cycle we ahve entered
and if martians have landed.
@Santobell: Thanks! Yeah, I am generally quite satisfied with how they're turning out. Just worried about getting everything painted by the deadline.
vent actually made a great tutorial/article on photographing minis, and he gives the we addy of where to get the backgrounds in the discussion afterwards... look through his topics, is should be easy to find.
Well, I got the decals to work... more or less. Here is my first successfull test on the bottom of a Mk-1 razorback that I have yet to really paint (it's just green). The real decals have finer printing on them and the yellow is more golden brown than screaming yellow... but I think I can make this work. These decals were way too big... so the new sheet I made has about 4 sizes starting with this (3/4") and going down by 1/8" each. I'm sure I can find something that'll work. To bad I didn't have these for the razorback doors...
Well, I don't think the decal thing is going to work. The decals are supposed to be on a white background, but they aren't... it's transparent which means the yellow will not cover the green enough to get good coverage. I've ordered some stuff that is supposed to allow you to make dry, rub-on decals. Should be here by the weekend. If that fails we go to plan 3.
I did tack these in place so you could see how they were supposed to look though.
Each pod will also have an inspirational saying or litany, written in latin, one word per door (where the number is). I found about 30 or so saying that fit, many from classic literature (homer, etc.).
I could just glue these in place, don't think I'd need the plasticard to back them, the decal material is pretty heavy. I'll also try printing on the marker paper I picked up yesterday and see how that looks. But I'll wait until the rub-on material comes to make my final decision. If I can get that to work, it would by far be my best option.
Question: should I ring each roundel in black, or leave the yellow as it is?
@samwel: Thanks, I'll check that out. The company that I ordered the rub-on kit from makes kits for that as well, but having some professionally made would be very nice... and probably more reliable.
Well, option C didn't pan out. Before I left for work this morning I quickly printed out my decal sheet on a piece of the marker paper... which apparently is very absorbent as it drew the ink all over the page.
So it's down to either D) the dry, rub-on decals or E) just gluing on these printed designs. I have some magazine paper that will probably work well and be easier to handle than the decal sheet. Luckily I know option E will work, just don't know how good it's going to look.
I will approach Zinge about their vinyl transfers, but they need to be put on before priming and I suspect he will not be able to turn them out fast enough for my needs in any case. However, I think they would work quite well with the MW symbol, so I will pursue it.
Both of the other pods are now completely masked off and I'll begin the airbrushing tonight.
LOL Vit... I think you're the only one reading my blog any more.... think I burned people out! :-)
One way or the other I'll get it done. I really hope the dry transfer thing works as I much prefer them to waterslide transfers. They just look better, they have depth and they're one heck-of-a-lot easier to work with.
I am excited about the prospect of beginning the airbrushing of the other two pods. They'll really get done in a hurry now that the worst of the taping is complete. I'm confident I can finish them by this weekend (sans the decals) so I can then throw myself into my infantry squads.
God no... that's a ridiculous Mantis Warrior logo. Besides, it's not making the logo that I'm having issues with, it's finding a way to physically transfer it to the model that is the problem.
Just been rather quiet lately xD Contracted a bit of Nurgle's Rot, so that laid me out for the past 2 weeks and naturally the joys of finals followed ><
Still loving the work Gits, though Im rather surprised that the Decal system totally failed on you like that. Ive had limited experience with mine, but never have i seen that happen :/
Though I gotta say, Im rather interested in how the Dry-rub transfer kit will work out. Ive always had a fondness for them, but they seem to be something of a dying item. everything i find these days is a sticker or a waterslide!
So with that, I retreat to the shadows! Definitely gonna keep eyes on this developing.
Well, I eventually figured out why the decals failed completely and fixed that. Problem now is that they were supposed to have a white background (so I could print yellow over the white and I'd have a "solid" yellow that I could put over the green). Unfortunately they're not white as advertised but still translucent, so the yellow doesn't cover the green (i.e. the green shows through).
I have experimented with painting a white disk on the model, then putting the transfer over that, but it's really hard to get the transfer to sit right... think I destroyed 5 decals last night trying that technique to work before I finally gave up. Nothing I want to try on a real model that's already painted... that's for certain.
Sorry to hear that you've been under the weather Ramos... hope you bounce back quickly!
No Dee, the issue in manipulating the decal into position without destroying it. The DIY decals aren't as robust as commercially made ones and it doesn't take too much rough handling before the ink starts to show wear. Perhaps someone more deft could do it... but I've got to work with the hand's I've got.
Meh, I still have options... the last of which is rather inelegant but I know positively will work. I'm just looking at this as kind of drawn-out, elaborate, tedious, somewhat frustrating experiment in modeling.
still here too,
shame about the decal problems, tbh i always thought they were a pain in the hope you get the problems worked out.
Great job again on the pods, really liking all the subtle additions keep at it and don't get dis-heartened, i know you'll get there eventually (hopefully sooner rather than later of cors lol)
Not sure, won't be able to look at it until tonight. Though I am disinclined to paint the white background unless that is the last possible option as it just gives an additional step for things to go horribly wrong. But I'll eyeball that post, there might well be something in there that will help out. Thanks Dee.
@Reiko: Thanks! It'll all sort out. Panicked there a week ago or so, but I'm good now. I just want to have an army that looks good and have fun at the con with my friends. I think I can handle that. I like the subtle touches as well. Not everything in the grim future is displayed in letters 6 feet high, and often it's the little things that make a model look "real".
Always the way isn't it. The smallest things are those that are the hardest to pull together. I wish I had some advice to give but I struggle at the best of times with those things. I would have said to put them on to plasticard to get the white background but you've already covered that! Loads of effort clearly going in to sorting this though so I hope you reap what you sow and a simple olution presents itself!
I really like the look of the pod. The thought of three of them landing on a table in any battle outs a smile on my face. I can't wait to see the latin on them too.
Well, our FLGS is having the second of it's Adepticon practice tournaments on the 19th. Solar_lion and I are teamed up for the day and I should have the pods finished and the tac squads well on their way by then. I'll do pics from the day... hopefully it won't be as frustrating a day as the last.
Gits have you tried spraying the printed decal with matt varnish after you print it but before you wet it to apply them onto the model? I always thought that you needed to spray several coats of varnish on them to "fix" the ink to the decal itself and to add strength...not sure if I am thinking of the same product though.
If I had known you were going to need 3D MW logos I would have cast some up for you, as it is I don't know if I would get them to you in time.....
Maybe provide some good ideas, maybe not. Lots of good tutorial on there for other things too, most of which work in 40k modeling just as well as TF customizing.
Briancj wrote:Hey, Git, do you have an image of your logo in the correct size of the circles you want on your drop pods?
Yes.
BLACKHAND wrote:Gits have you tried spraying the printed decal with matt varnish after you print it but before you wet it to apply them onto the model? I always thought that you needed to spray several coats of varnish on them to "fix" the ink to the decal itself and to add strength...not sure if I am thinking of the same product though.
Yes, you have to spray the decal or there's no chance of it working as the actual film is super thin and totally flimsy. i.e., if you didn't spray it, there would be no chance of it working.
If I had known you were going to need 3D MW logos I would have cast some up for you, as it is I don't know if I would get them to you in time.....
Naah, it's OK Blackhand, I'll get this sorted out. Been a while since I had a good modeling challenge anyway... and besides, you've done so much for me already... you just won't get to see it until after Adepticon when I can relax and model free-style again. Not that I wouldn't love to have some 3-d badges... but for the nonce they can wait (and I might try modeling them myself & then casting them).
Maybe provide some good ideas, maybe not. Lots of good tutorial on there for other things too, most of which work in 40k modeling just as well as TF customizing.
I'll be sure to check those out WM, thanks. I've actually had very good luck with waterslides in the past when I was doing model railroading... things you'd swear came on the model rather than were added afterwards... but none of the DIY transfers work nearly as good as the real, commercially available ones. Guess that's just common sense.
Keep in mind that if my transfer color was darker than my background, I wouldn't be having any of these problems... it's the light transfer on the dark background that's really kicking the *ss of this little venture.
I'm just about to start my airbrushing of the other two pods... look for an update (probably an append) later this evening (or morning depending on your part of the world).
There is a place in the city (I'll be there next week) who sell a quality printable transfers I'll get the info off them when I'm there, they have shown me some examples in the past (I
was thinking about doing flame transfers for the Legion of the Damned vehicles) it was only the price that stopped me.
Otherwise you can always look at normal clear printer stickers you buy them in A4 sheets and are used to lable products like coke bottles etc only on a home/diy platform.
The quality is good, though they are glossy so you would need to matt spray or coat them after applying to remove the shine.
I hope you do nut out a solution I would love to do some custom transfers for my units.
Well, 2 beers, 1 coheba, several episodes of Family Guy and American Dad, and 1.5 bottles of zinc chromate later.... I have two green pods! (Thank God for "Adult Swim".)
Not much to look at yet so I'll postpone a pic until I get the gradients done... but the worst is over. Brush is stripped and cleaned and ready for the next step!
@Santobell: Thanks, I'd be interested in checking them out. Issue right now is time, but long term I'd like to find a reliable source for professional quality transfers.
This might be a bit simplistic or too in elegant, but this is what I do. Feel free to try it or not
What i did for my Land Raider is to measure up the area i want to put a design on, or if its a small area skip this stage.
Draw out my designs on paper, the paint it, cut it out & stick it on.
If its quite elaborate then draw a larger image, the use a photocopier to scale it down.
If you scale it down i do not recommend painting first as scanner/photocopiers tend to dull the colours down.
If you can get the glue to the edges without going on the paint the seam is almost un-noticeable.
I have been reading and keeping tabs but a total lack of internet has turned me into a lictor style lurker
Hey Gits, still following your every post like a crazy little Mantis lurker
I have to say I really dislike transfers. I physically can't keep either of my hands still, so even using commercially available transfers, 90% of them rip or they end up stuck on at an odd angle. That's why I hand paint every single thing on my models. It's not as nice as being able to have the same image on every warrior, but in my mind each of the Marines maintain their own armour, rather than having the servitors do it. Thus each warrior's chapter symbol will vary according to taste and skill with whatever they apply paint with.
Have you considered just making the emblem out of thin plasticard or carstock? You could make a template for one, then use it to cut others out and then place them on the model. I would be pretty easy to paint it in then.
Alternatively, you could make a pair of cardstock templates. One for the yellow circle, and one with only the non-yellow bits cut out. If you start with two cards (I'm thinking 3x5 index cards), you could cut the circle in one, lay it over the second and cut out your Mantis Warriors logo.
Make sure you cut the initial circle out so that you could line up the edge of the card with a specific edge of the drop pod, then just press it down and/or tape that end while you airbrush in the circle. This would let you line up the 2nd car to go over the yellow circle just how you've cut it out.
Alternatively, do you think you could hit the decals with a varnish before applying? That would prevent them from tearing, but could also prevent them from sticking.
At the moment I appear to be having printer problems as well... which I don't understand at all & pretty much precludes the decal issues. I've thought about making 3-d badges but I suspect lack of time will prevent that (remember I need 10 of them. I might be able to make one & then press-mold copies, but whooosh... that's a tall order for something so small.
For the nonce getting the pods painted will be my major focus, I'll noodle around with the badges on the side.

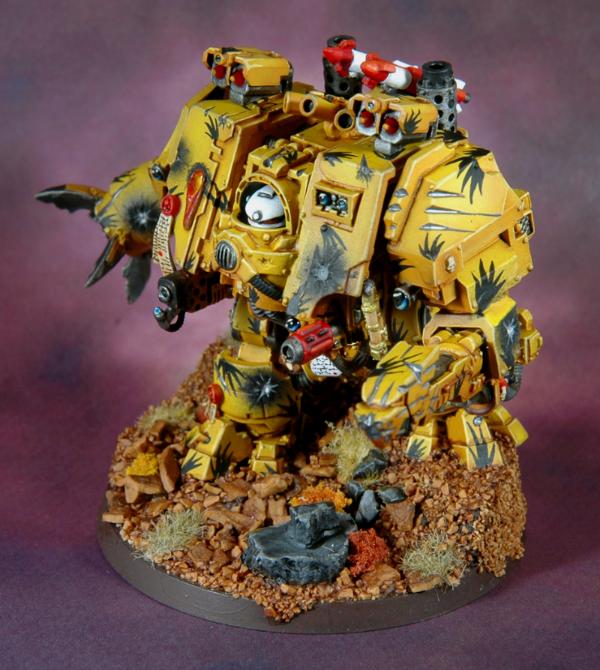
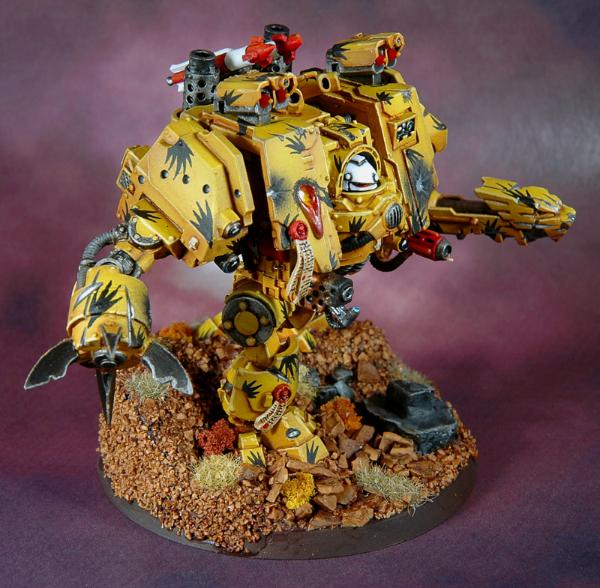
 ... When dealing with a large scale Ork vehicle, having too much detail on the plates can quickly become too distracting or end up looking just jumbled together. I feel like the best looking ork vehicles contain one or two main colors and one spot color. (Not counting white, black, or metallics) Awhile ago, long before his awesome Iron Warriors army, Lemmingspawn had some really cool orky vehicles:


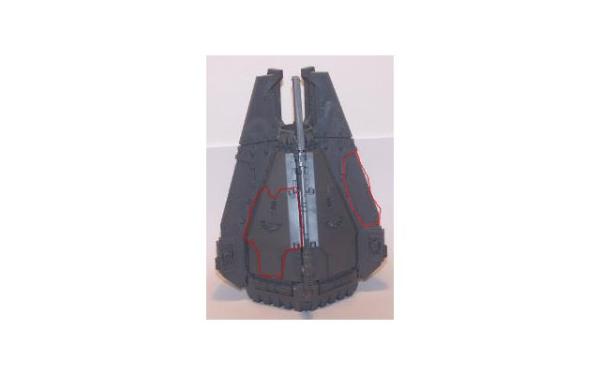
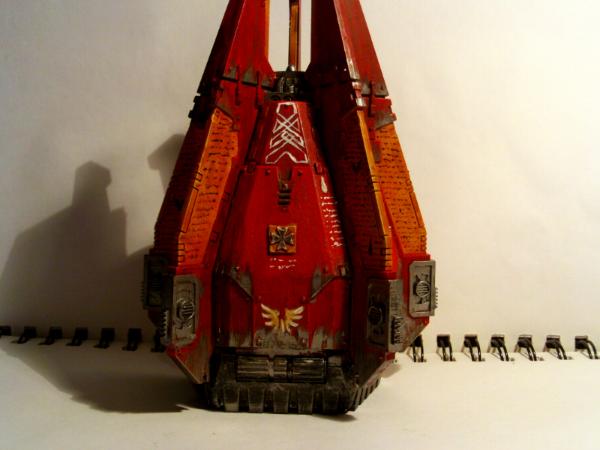

 . I thought you were still doing a post crusade army. I kept waiting for you to add new stuff to army. The "Rebuilding" stuff
  .
.
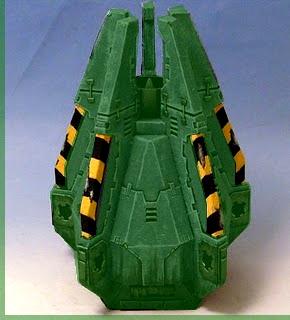

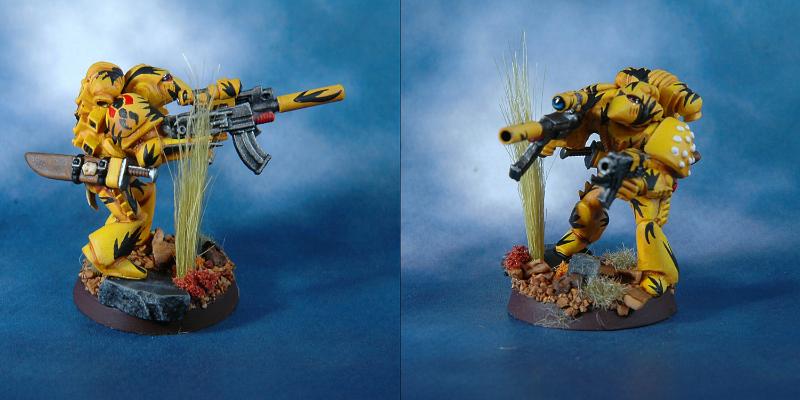
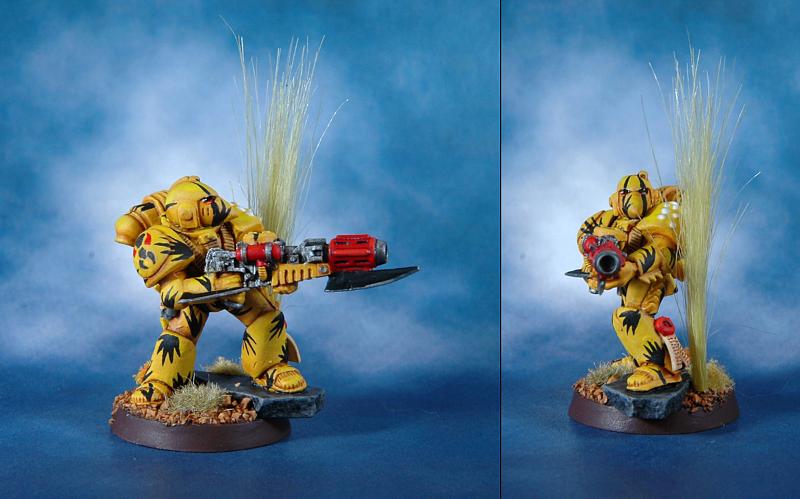
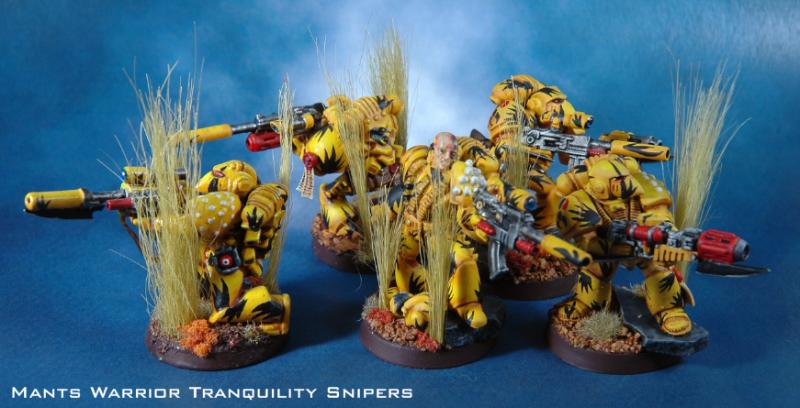
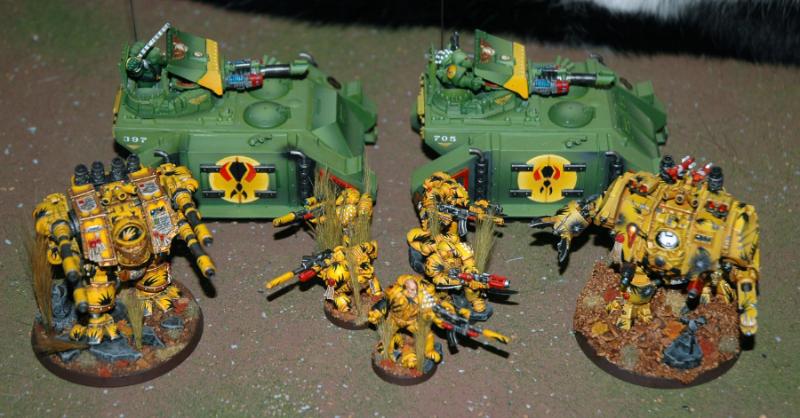

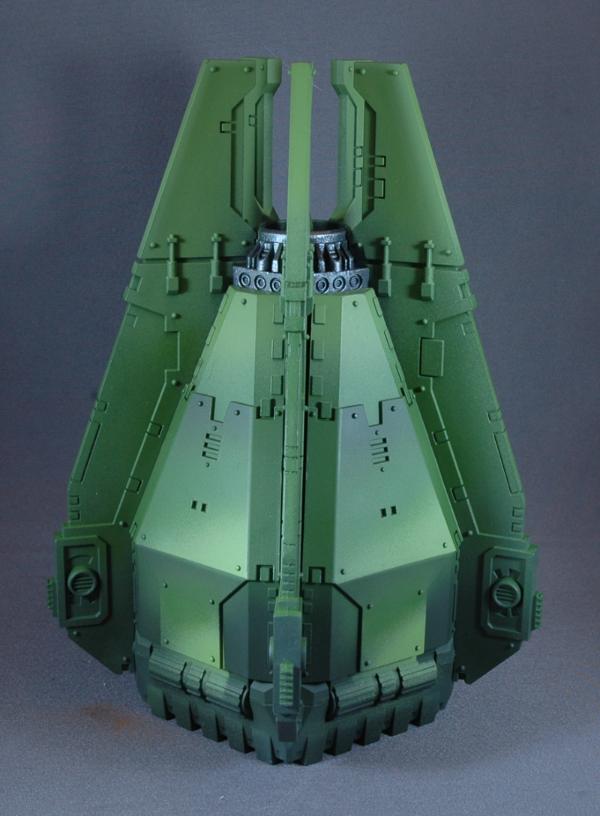
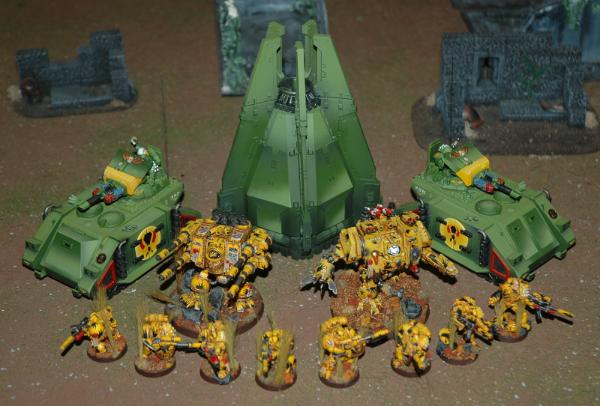
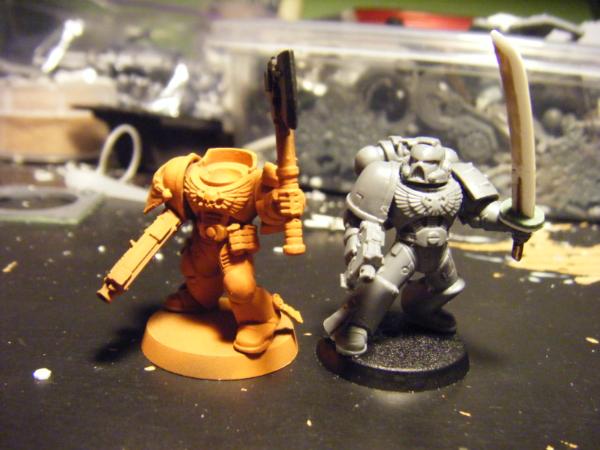
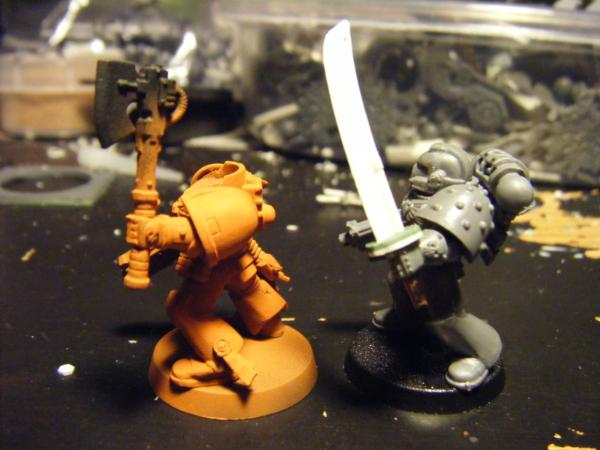
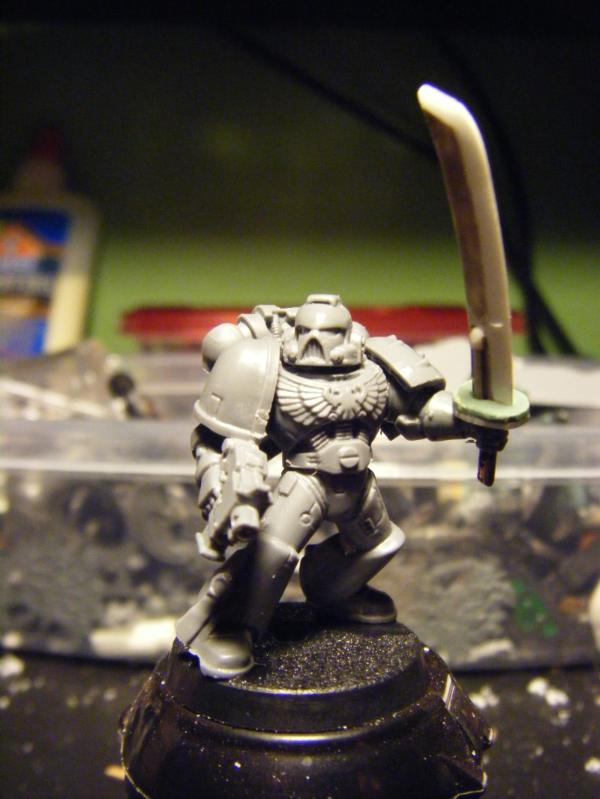
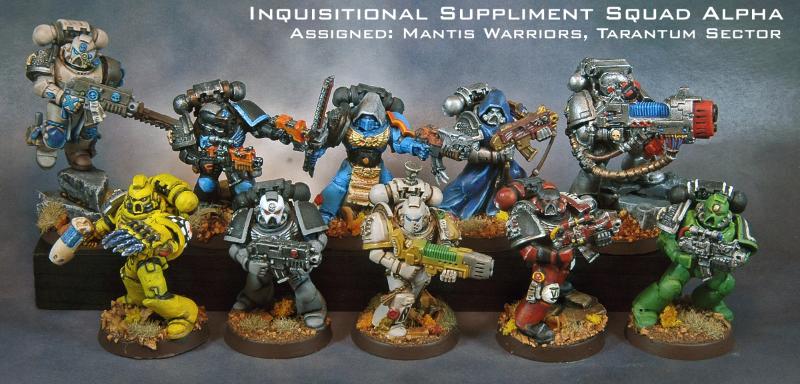
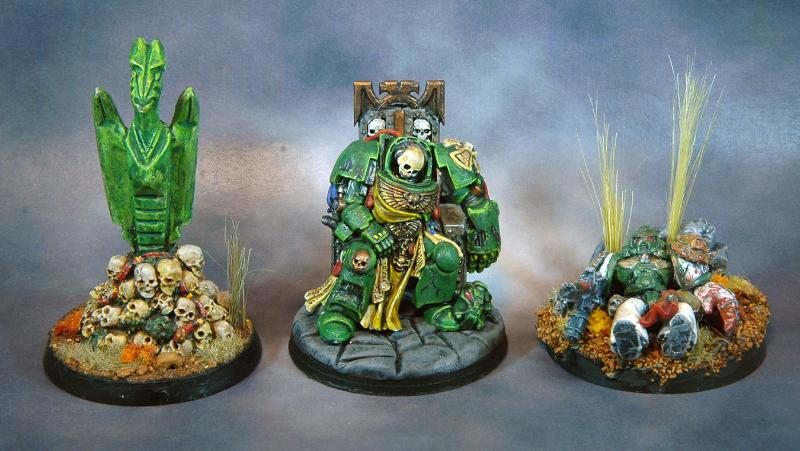
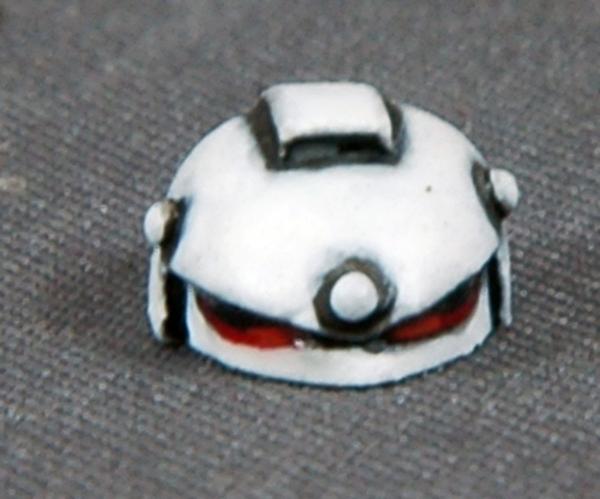
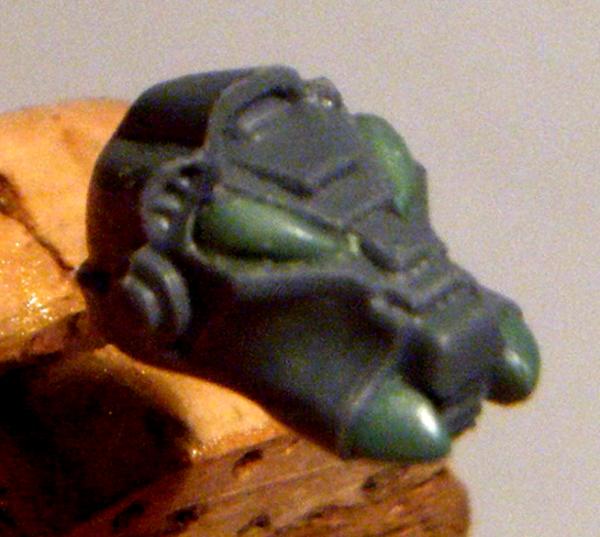
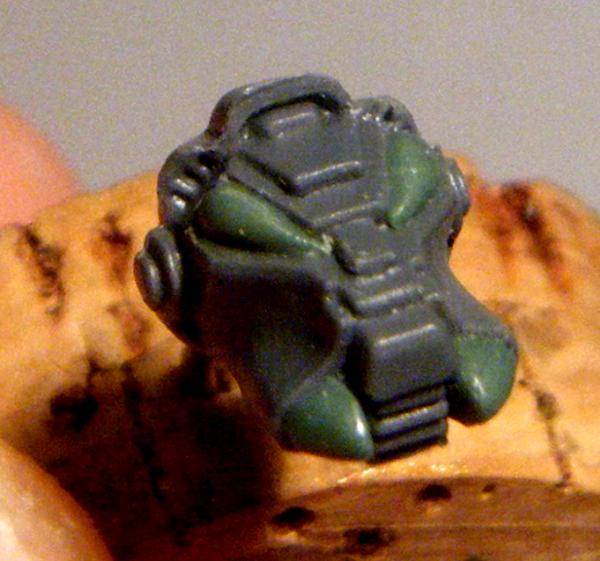
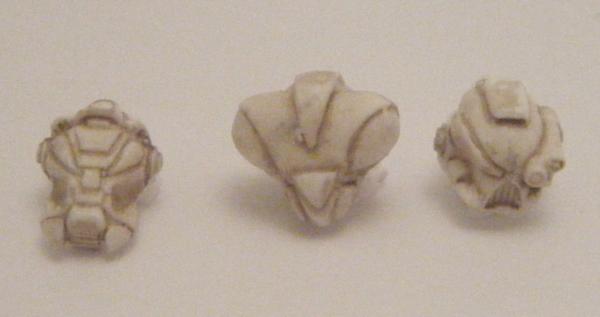

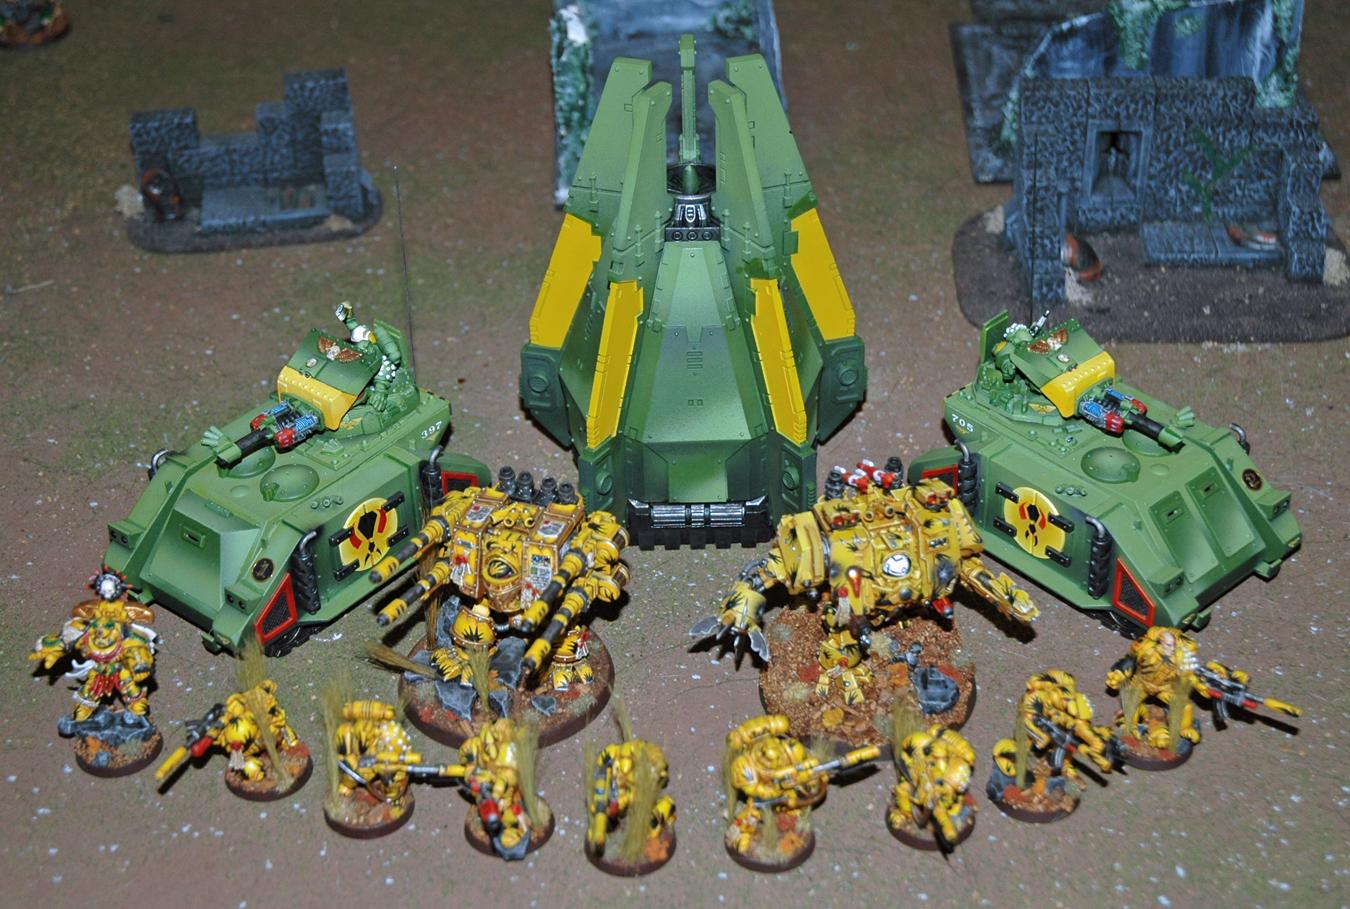
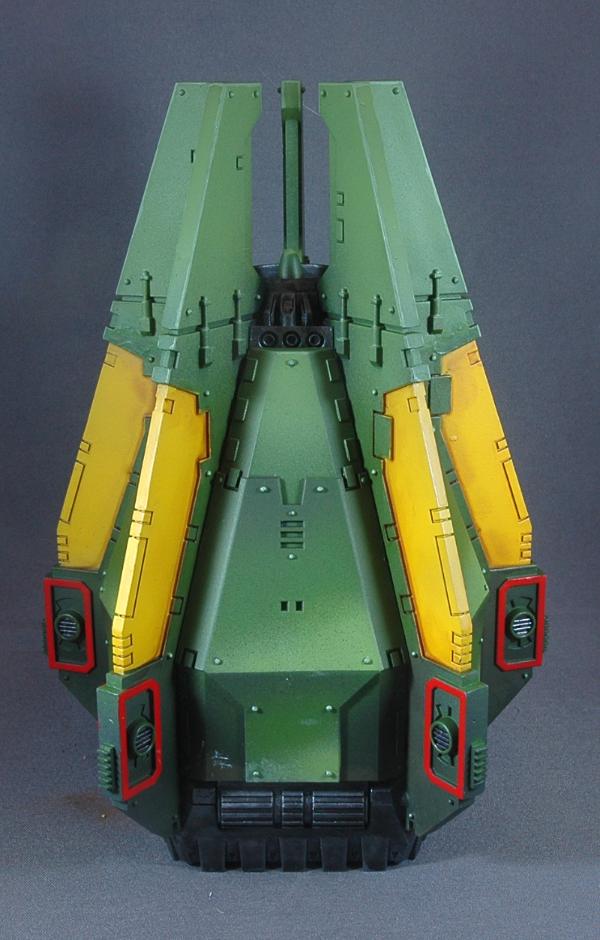
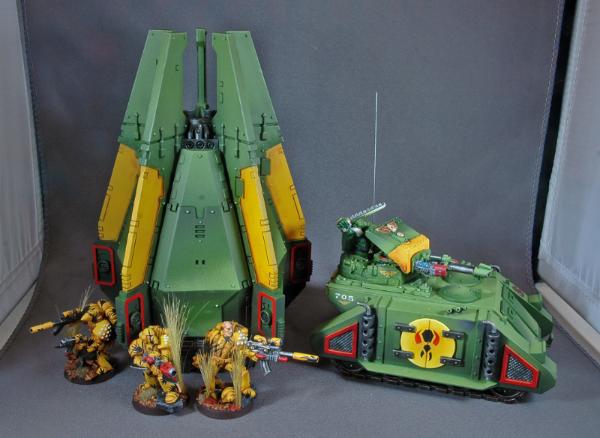
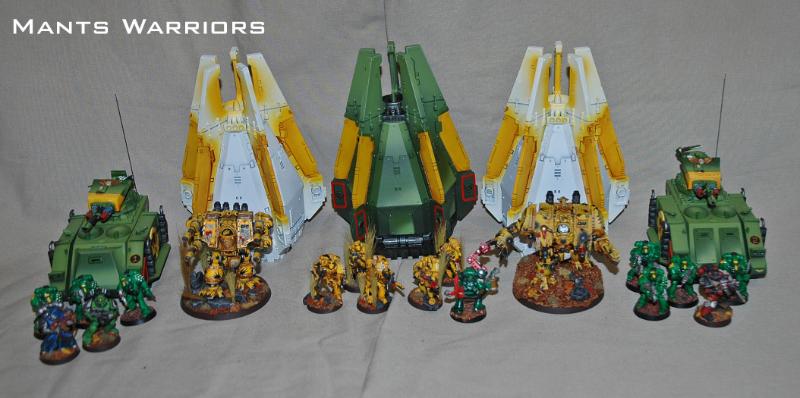
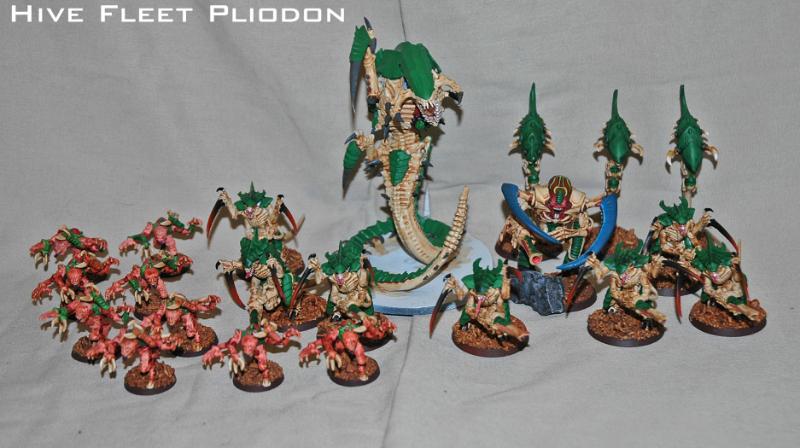
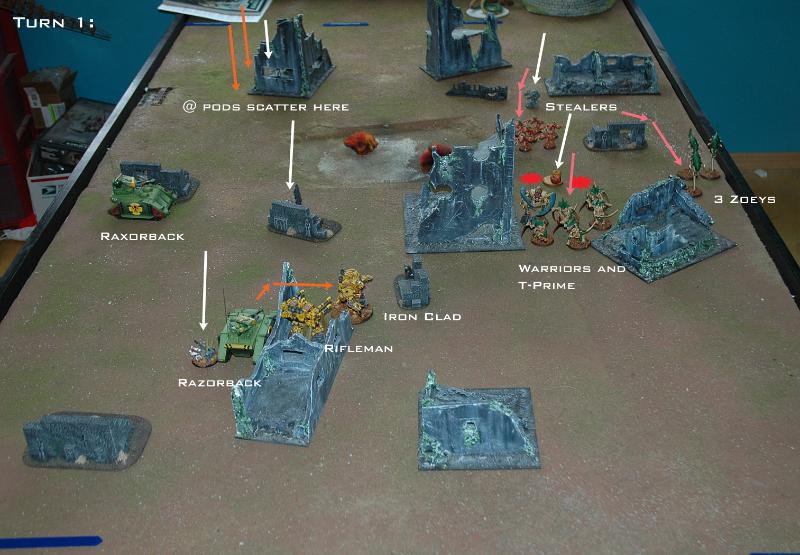
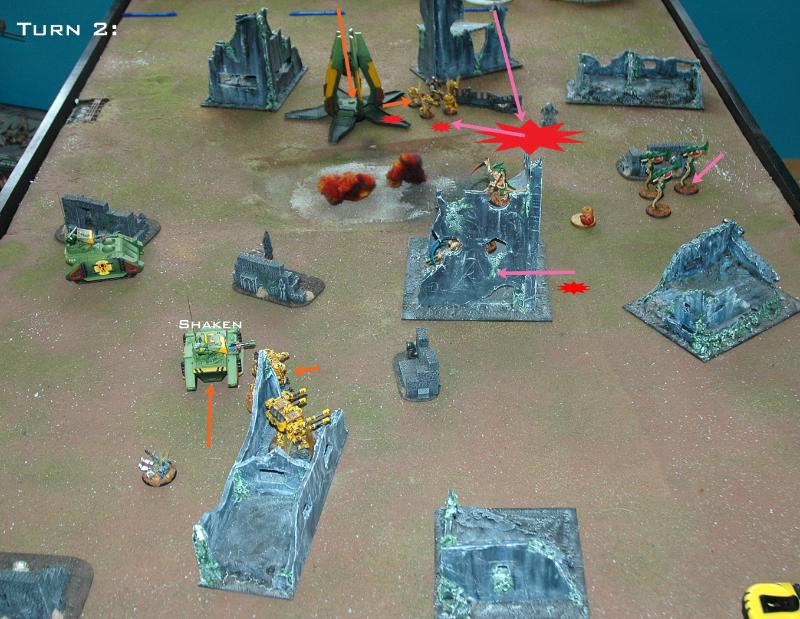
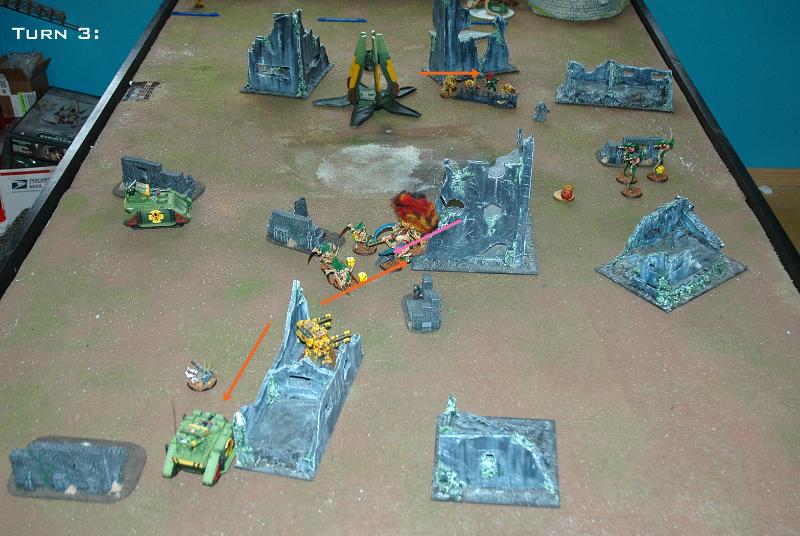
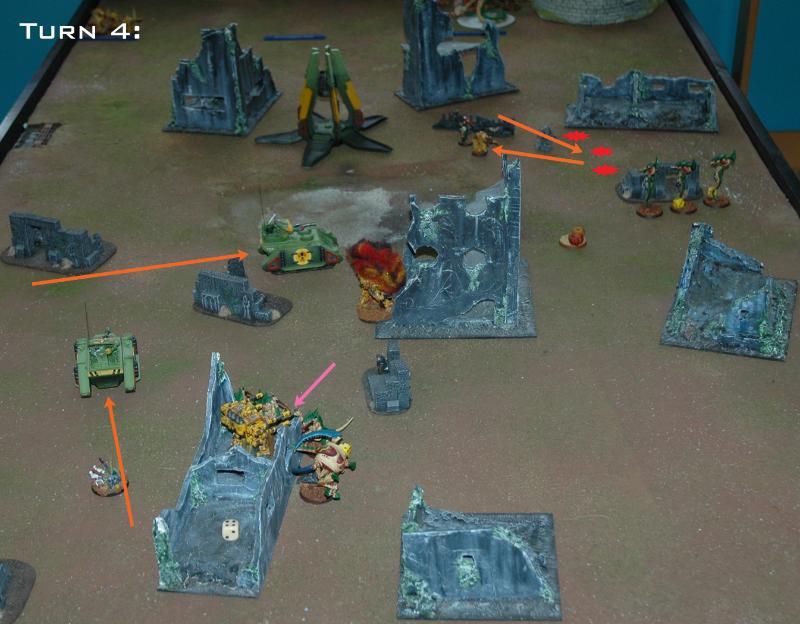
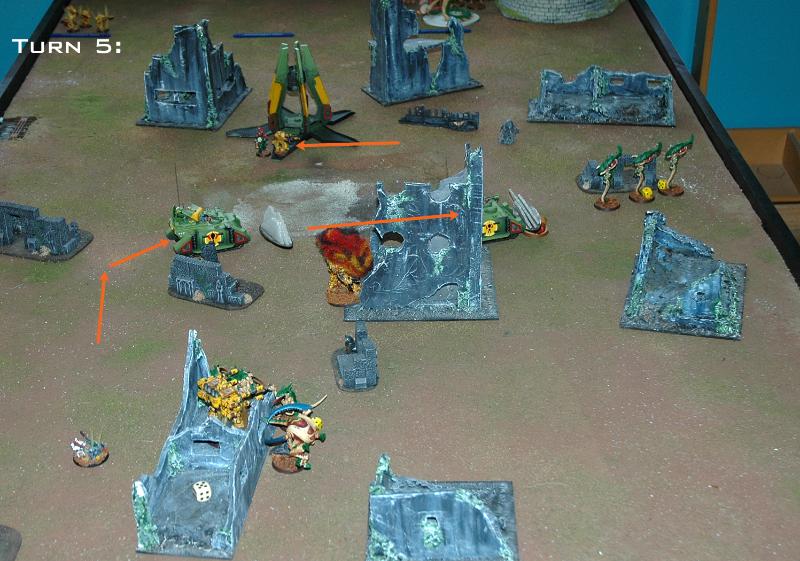
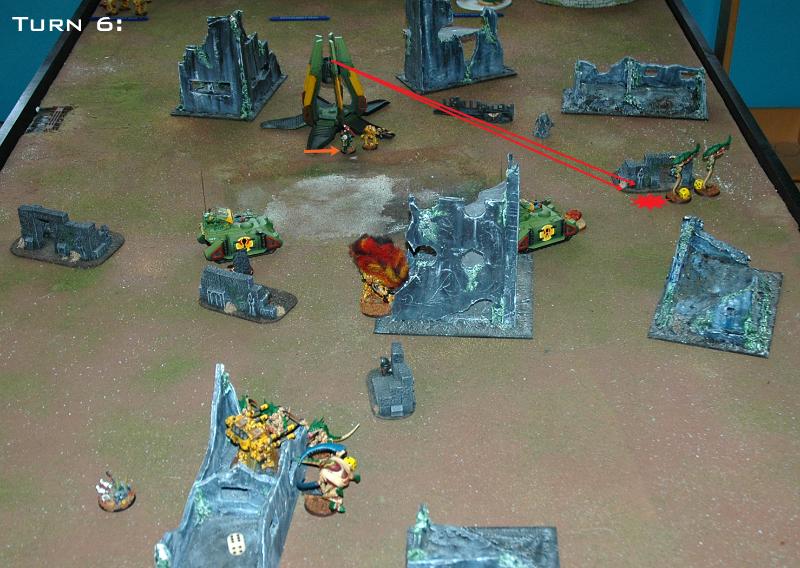
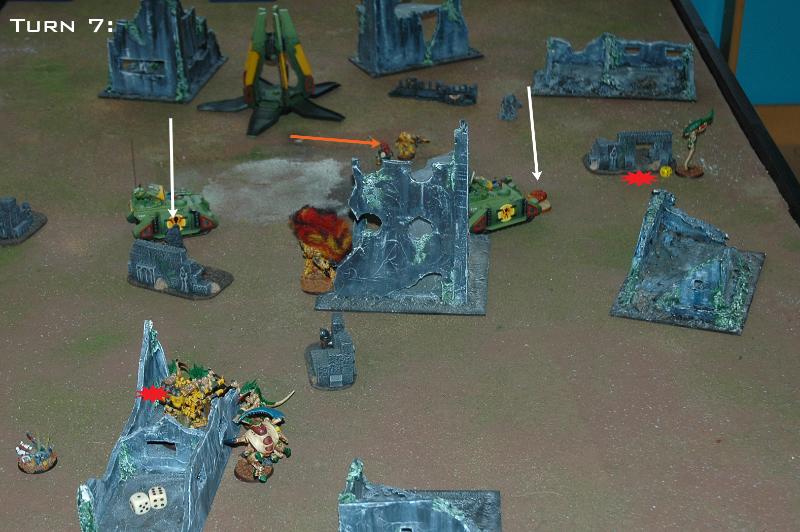
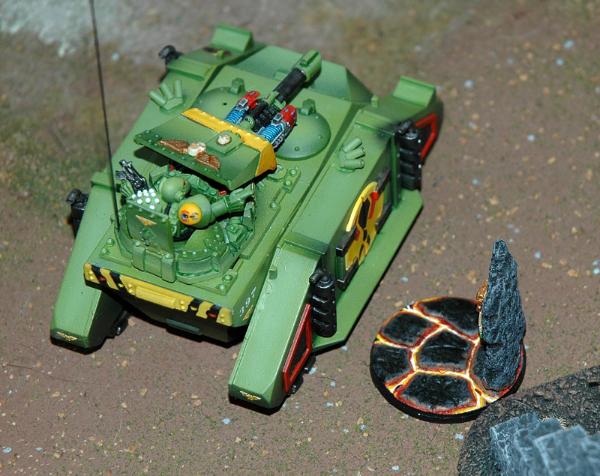

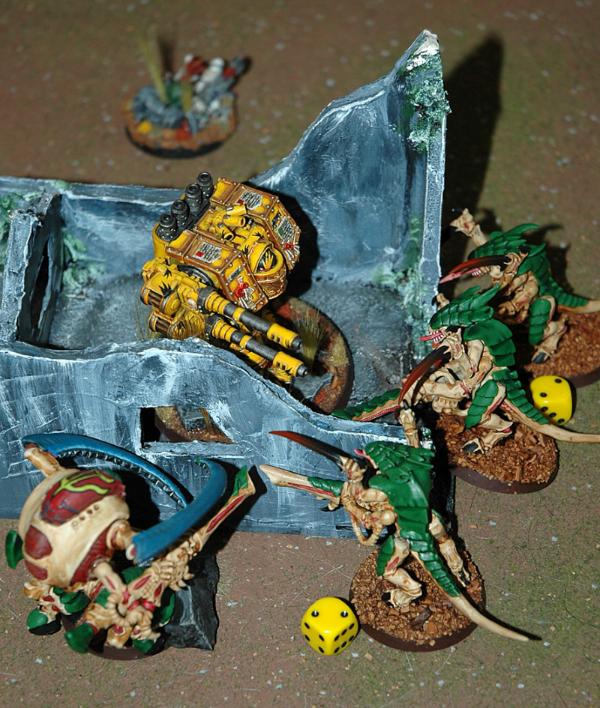
 Stupid deep strike mishaps.
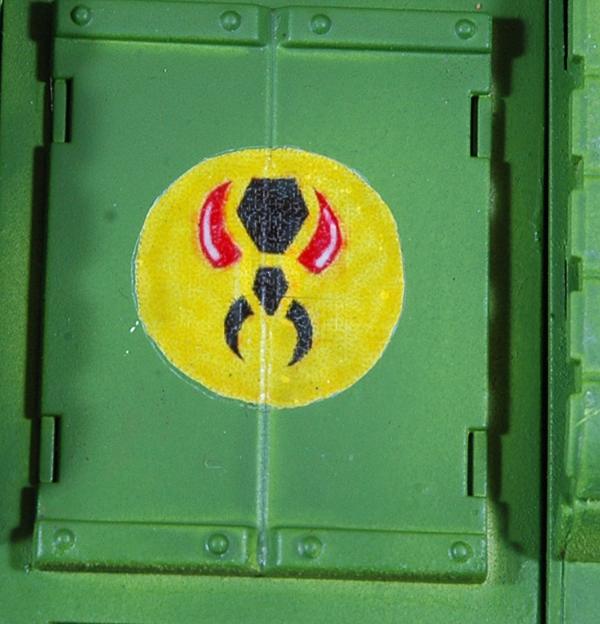
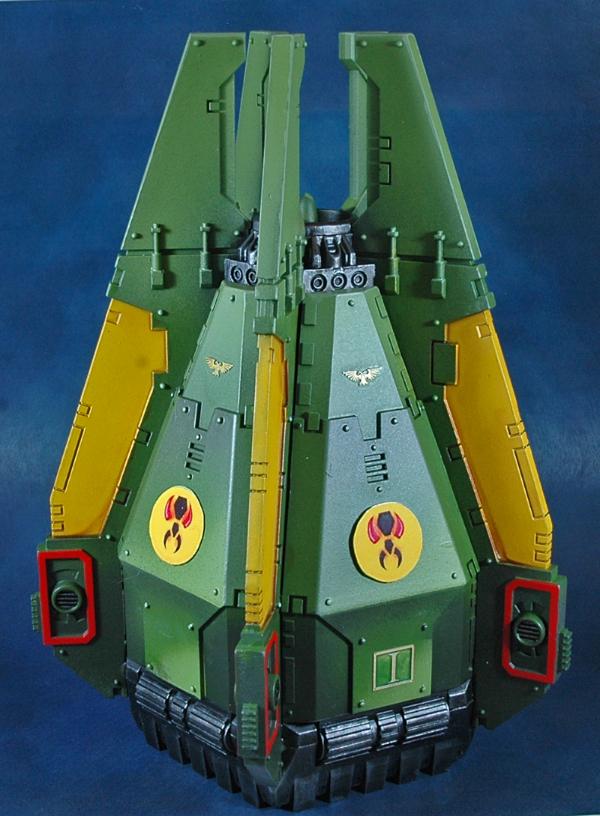
 hope you get the problems worked out.