22687
Post by: MajorTom11
Alright boys, I have been receiving PMs asking if I was actually going to do this:
The answer is: YES
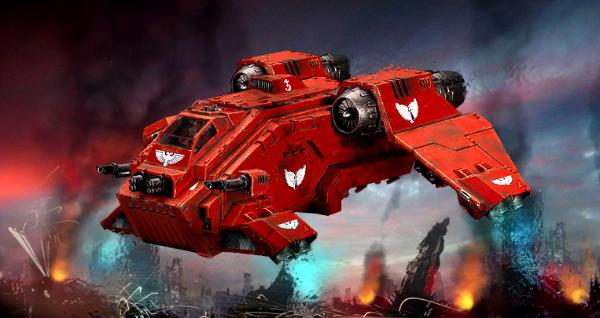
Now, here is the thing. I would really like to do it and document it so that when I am done, I can upload a pdf whomever wants to can use as a template to mod their own in the same way. I am sure many people will do many different things with it, but the one thing I think we can all agree on, this chick is all boob and no butt, and adding an extended fuselage and something resembling an actual dread bay would go a long way on this wonky but still from some angles enticing bird.
BUT
I will be learning the intricacies of Plasticard-Fu as I go, this will be ambitious for me. I hope to channel a tiny portion of some of the great Plasticard-Sensei's of Dakka:
Machinator. Commisar Khaine. Inquisitor Earl. Proiteus. Hits_the_spot. Hyena Joe. elotsip. Skrall. a94marbo. Klaus, not Santa. Foda_Bett. silveroxide.
So many others too, each of them a huge inspiration in their own way. If you haven't seen their work before, do a search on them. Incredible stuff, all of them do insane conversions/scratchbuilds.
The place I started is here in order to brush up on things I knew would be a concern, angled cuts to avoid gaps in non-90 degree edges, rivets, thickness etc.
Foda_Bett was generous enough to provide an awesome post with some handy, little known tools of the trade -
http://www.dakkadakka.com/dakkaforum/posts/list/510/205219.page#top
Now is the time for me to research and learn the pitfalls and tricks of vehicle modeling, so if you have any, please share! Thing will begin in earnest when I receive the model in the next few weeks from Empchild over at Battleroad games (he gives a great price on his stuff peeps!)
Cheers to all! Will post anything interesting I come across in the meantime -
17710
Post by: Yggdrasil
Good luck Tom, though I won't be of any help to you... My plasticard-fu is reduced to a few tiles for basing individual minis...
22687
Post by: MajorTom11
Still more than most bud  . Mine isnt much more than that at the moment either, but design school involved a lot of precision cutting and measuring, so I hope that will serve me well!
578
Post by: BobboDaGreen
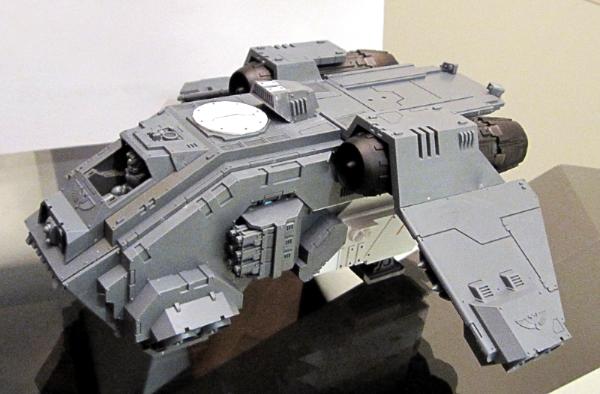
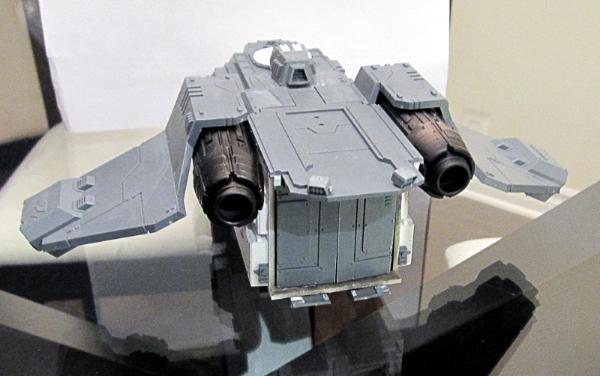
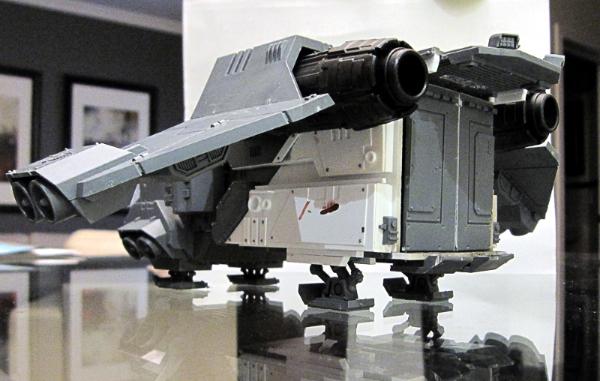
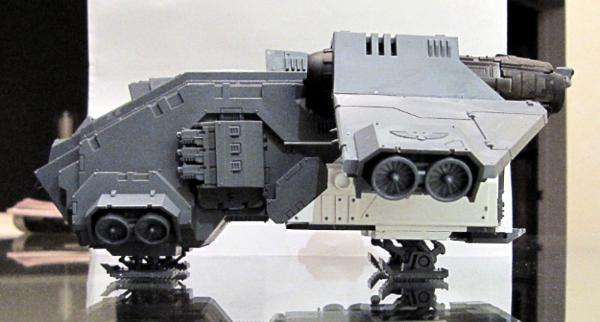
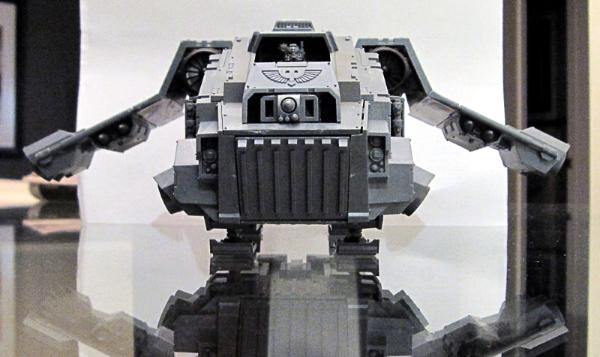
GW sent their "Black Box" to my FLGS. Inside was the Storm Raven and the new Blood Angel Dread. The Storm Raven is easily converted into this by not attaching the turret and bit behind it. The turret fits into the top like the Predator or Leman Russ. The Awkward tail is also easy enough to not attach, however the dread is "held" by what looks to be a winch that ends in some magnetic grappler. (I want to loot one of these for my orks and have a destroyed dread as my wrecking ball!)
The only area that really needs to be built up is the extended passenger cab.
10345
Post by: LunaHound
I want to call it Blood Orca :<
30875
Post by: Popsicle
Glad to see this is going through!
If it goes successfully... will you be accepting Commissions on building them? 
494
Post by: H.B.M.C.
Good luck Tom!
*flight of Chibi-Hawks zooms overhead in salute of your efforts*
15358
Post by: Vitruvian XVII
Will you put links when you start the project? Either here or on your SH blog please! On the various scratch builds i've done i just tend to wing it with the plasticard, cutting by eye, so im not going to be much help!! Sorry. I do intend to do a MajorTom pattern Stormraven though, but i have a whole valkyrie to loot!
22687
Post by: MajorTom11
It will be on here, I am hoping one of the plasti-greats will be kind enough to come on and share some wisdom!
Right now, I am going to need a mat cutter, this is a cutting board with an x-acto on rails essentially, that can do 90 and 45 degree cuts. This is helpful as it lets you make angled corners with no or greatly reduced gaps.
I also would love to the a precision punch and die set, but damn those thing are expensive!! Boda Fett recommends the waldron precision set, so far I have found it for 60 bucks at the absolute cheapest!
Next thing for me to look up will be best thicknesses of plasticard to use, how best to re-enforce them to maintain good solid structural integrity.
I can't start planning too indepth until I have the thing in hand to take really precise measurements, but I might post up some sketches of how I see the back end. I definitely want servo arms and more obvious dread holding bits, it will be a matter of figuring out what to do about the back door... maybe the door on the bottom, so marines could just drop through the opening while the raven hovers? mmmm....
273
Post by: Foda_Bett
I'll be keeping an eye on this.
Your photo shop is actually first in my "How to fix the storm raven" folder. I can't decide if I want to go for a total overhaul or try to keep it minimal so I can keep it inside of Romeo's new trays.
I think I'll keep an eye on this to decide my course of action.
22687
Post by: MajorTom11
Hmm... a little foam cutting to accomodate the bum should do it, otherwise, should be an identical sillhouette... I will probably leave the front thrusters as is, since this mock-up was done while that part was not visible... then again, if the are nice and seperate and easy to extend, could be interesting to mount the 'turret' stand ins there, possibly with some means to traverse them lower too!
Btw, thanks for your advice, I have ordered all the gadgets you suggested, although I had to go larger on the mat cutter, friskars paper cutters do not have any functionality to make bevel cuts!
494
Post by: H.B.M.C.
Well if anyone can do it Tom, it's you.
And if there's anyone who could make a second one and send it to me for free, it's you as well!
22687
Post by: MajorTom11
Will a template with instructions do? 
32193
Post by: PDH
Hi Tom,
I've never built a vehicle using plasticard, I've only ever used it for basing and backpacks etc. But since you were asking for advice I'd throw my limited experience in...
Make sure the plasticard you've buy is square. I bought a piece once and assumed it was square...cut it to find the two edges I was working from were fine, the other long edge had been cut at an angle  .
Anyway good luck with the project, I look forward to seeing more of the dread area. I saw the model in the flesh the other day and the tiny mag grapple for the dread looks laughable.
Peter
4566
Post by: catharsix
i like your version better, and your desecription is apt. i'll be checking this out to see how you pull it off, since, if i decide to break down and play Marines again, it will almost certainly be BA, and i'll probably want a Stormraven...
-C6
37345
Post by: Boyz "R" Us
Great project MajorTom11, I've recently started using plastikard myself (even made my avatar out of the stuff!), and so will be watching your progress very closely. (subscribed). And thanks for the very useful links too, lots of great information there for me to digest!  !
123
Post by: Alpharius
As noted, the biggest challenge is going to be in extending the passanger section - other than that, you're golden by just leaving off the offending parts!
You can do it!
And, you can help the rest of us do it too!
26800
Post by: Commander Cain
Major Tom, you are a lifesaver! I knew that someone was going to make a 'how to make a decent SR' and you have my best wishes in this project.
'salutes'
35712
Post by: Machinator
Sir, yes sir! Reporting for duty.
I'd be happy to pass on some of my knowledge if it will help you out. Where do you want to start?
22687
Post by: MajorTom11
Machinator wrote:Sir, yes sir! Reporting for duty.
I'd be happy to pass on some of my knowledge if it will help you out. Where do you want to start?
Awesome! Machinator is here boys!
My first question to you in particular Mach would be what advice you would give in terms of joining and reinforcing odd angle edges.
For example, if you have a mat cutter, you can cut 45 degree bevels into your edges, so you have the means to create both 90 degree seamless joins with two beveled pieces, or, make a solid 45 degree join by joining a bevel and regular cut piece.
Since you seem to be able to pull of joins other than 45 and 90, what is your suggestion/technique when approaching shape building and planning? Or, am I mistaken and you plan carefully around using a majority of 45 and 90's?
I was really hoping to see you here, this will be awesome! My biggest hope for starting this thread early was to build up a base of knowledge not only for myself, but for others interested in pulling off this type of conversion as well. Hopefully, we will have some truly awesome info from Plasti-Sensei's before I even get the model in my hands!
PDH wrote:Hi Tom,
I've never built a vehicle using plasticard, I've only ever used it for basing and backpacks etc. But since you were asking for advice I'd throw my limited experience in...
Make sure the plasticard you've buy is square. I bought a piece once and assumed it was square...cut it to find the two edges I was working from were fine, the other long edge had been cut at an angle .
Anyway good luck with the project, I look forward to seeing more of the dread area. I saw the model in the flesh the other day and the tiny mag grapple for the dread looks laughable.
Peter
Sound advice my friend... Sometimes, especially before painting it is damned hard to see the stuff in certain lights. In the case of most projects, precision is everything when it comes to having something that will fit together right!
catharsix wrote:i like your version better, and your desecription is apt. i'll be checking this out to see how you pull it off, since, if i decide to break down and play Marines again, it will almost certainly be BA, and i'll probably want a Stormraven...
-C6
Well even if you don't, hopefully this will be a good place to learn a few tricks anyhow!
Boyz "R" Us wrote:Great project MajorTom11, I've recently started using plastikard myself (even made my avatar out of the stuff!), and so will be watching your progress very closely. (subscribed). And thanks for the very useful links too, lots of great information there for me to digest! !
So far, I haven't contribute much, Foda Bett is the one to thank, and hopefully, shortly Machinator too!
Alpharius wrote:As noted, the biggest challenge is going to be in extending the passenger section - other than that, you're golden by just leaving off the offending parts!
You can do it!
And, you can help the rest of us do it too!
Yup, that will be the only tricky part. I know I can do it, but I want to pull it off really well and seamlessly. It needs to look like it 'works' if you know what I mean. No afterthough winch and circle for the Dread!
Commander Cain wrote:Major Tom, you are a lifesaver! I knew that someone was going to make a 'how to make a decent SR' and you have my best wishes in this project.
'salutes'
Thanks bud, hopefully I won't embarass myself here lol!
35712
Post by: Machinator
MajorTom11 wrote:Machinator wrote:Sir, yes sir! Reporting for duty.
I'd be happy to pass on some of my knowledge if it will help you out. Where do you want to start?
Awesome! Machinator is here boys!
My first question to you in particular Mach would be what advice you would give in terms of joining and reinforcing odd angle edges.
For example, if you have a mat cutter, you can cut 45 degree bevels into your edges, so you have the means to create both 90 degree seamless joins with two beveled pieces, or, make a solid 45 degree join by joining a bevel and regular cut piece.
Since you seem to be able to pull of joins other than 45 and 90, what is your suggestion/technique when approaching shape building and planning? Or, am I mistaken and you plan carefully around using a majority of 45 and 90's?
I was really hoping to see you here, this will be awesome! My biggest hope for starting this thread early was to build up a base of knowledge not only for myself, but for others interested in pulling off this type of conversion as well. Hopefully, we will have some truly awesome info from Plasti-Sensei's before I even get the model in my hands!
Hey Tom, I'm glad to be of help. So let's get started tackling the first question.
For more complex cuts between 0 and 90 degrees this is a must:
http://www.amazon.com/General-Tools-Square-Head-Protractor/dp/B00004T7TB/ref=sr_1_11?s=power-hand-tools&ie=UTF8&qid=1296185870&sr=1-11
As I am an engineer by trade my knowledge of trigonometry is of great help but with the right tools you will do just fine. It's best to draw out what you're planning as you can actually use the drawing to determine your angles. Just adjust the protractor above to the lines drawn and you can use it as a straight edge to cut your piece. Also you can get a mirror image by adjusting the protractor to the same angle on the other side. If you're unsure if the piece will fit you can always cut it out of paper first before using the plastic. Don't worry about getting the cuts perfect, you can always go back and trim things later.
The best way to reinforce the joint is to have a piece of plastic cut to the correct angle that's glued perpendicular to both of the pieces on the inside of the joint (Don’t worry about beveling the two edges, as long as they overlap or butt up to each other you can get a clean joint). This not only helps reinforce the joint but will make sure the piece stays at the right angle as the glue dries. I also reinforce the joint with some super glue along the inside seam. This not only helps hold it together but it can also act as filler for any small gaps. Next I smear on some Squadron Green putty to fill in any remaining gaps along the outside seam. Once everything dries trim off any high edges with a knife, give it a light sanding (Emory boards for fingernails work great), and it's good to go.
Hope this help!
22687
Post by: MajorTom11
It does indeed! Another question though if you don't mind -
Squadron green, I am reading up on it and it mentions that white has a finer texture, and sands a bit better. Several reviews mention it shrinks a bit too, both of them.
(Note, I just spent 3 minutes figuring out how to word the next question correctly LOL, it was at first simply after 'shrinks a bit too,' and there was no specific remention of squadron putties LOL)
Do you run into shrinkage issues with squadron putties?
Also curious why you use green instead of white?
Thanks! p.s, check news and rumors for a new press molding product that looks pretty crazy! or just go to coolminiornot.com it is at the top... very promising product if it works as advertised!
35712
Post by: Machinator
MajorTom11 wrote:It does indeed! Another question though if you don't mind -
Squadron green, I am reading up on it and it mentions that white has a finer texture, and sands a bit better. Several reviews mention it shrinks a bit too, both of them.
(Note, I just spent 3 minutes figuring out how to word the next question correctly LOL, it was at first simply after 'shrinks a bit too,' and there was no specific remention of squadron putties LOL)
Do you run into shrinkage issues with squadron putties?
Also curious why you use green instead of white?
Thanks! p.s, check news and rumors for a new press molding product that looks pretty crazy! or just go to coolminiornot.com it is at the top... very promising product if it works as advertised!
Yes, it does shrink but only if you use a lot of it. For the stuff you're doing all you need is a skim coat to fill in the gaps so the shrinkage should be minimal. If the gap is more than a 1/16 of an inch best to use some green stuff or a sliver of plastic to fill the gap before putting on the Squadron Green.
As for why I use green? It's because I can see it against the white of the plastic and when I'm sanding I know that when the green color gets feathered out that the area is smooth. Plus I've always used it so I know what to expect
Thanks for the heads up on the press mold. That is a cool new product!
9910
Post by: CommissarKhaine
Sounds interesting, and your stormraven looks nice . Reporting for duty, sir! Just let us know what you need - though I feel humbled by the company I'm in... It seems Machinator is the pro here though, I just use a gradient, a steel ruler and a good modelling knife  .
Just a simple trick to get things going: if you're using plastic glue, cut a tiny bit 'outside' the template (0.5 mm or so); the plastic glue will melt this, allowing for a strong, gapless bond. I suggest you check out The blackadder's work as well, since he built a brilliant warhound out of plasticard and added lots of tips in his posts. Also, Teek is the ork convertin' master, so he's worth checkin'out as well.
The best way to reinforce the joint is to have a piece of plastic cut to the correct angle that's glued perpendicular to both of the pieces on the inside of the joint (Don’t worry about beveling the two edges, as long as they overlap or butt up to each other you can get a clean joint). This not only helps reinforce the joint but will make sure the piece stays at the right angle as the glue dries. I also reinforce the joint with some super glue along the inside seam. This not only helps hold it together but it can also act as filler for any small gaps.
+1; I do the the same thing.
I'll add in a tip for linked rotating bits, which might come in handy for the lascannons: if you measure correctly, you can drill a hole on each side of the hull. You then fit in a tube of the exact same diameter. Afterwards, you pass a second tube through to which you attach the lascannons. If you want to magnetize, just add magnets tot he end of the tube and presto, two lascannons moving in sync .
You can also make additional reinforcements this way for bits that can come apart: you glue a tube of the appropriate size to one part of the bit, and a rod that fits inside to the other one
If you want working pistons to hold the dread, just let me know and I'll try to explain how I do it.
22687
Post by: MajorTom11
Awesome guys thanks! Is there any chance of a quick set of pics showing the proper way to make a non 45/90 corner? I am a little confused by how the corners would contact each other enough to get a firm hold?
I know that is a request for work, I totally understand if you guys don't feel like it! Just want to make sure I am clear on the terminology of the instructions.
Mach, just ordered Squadron green!
CK, I have a vague sketch of an idea of attaching a set of rails to the top of the underside (make sense??) of the tail, after suitably building it up of course. I would then attach a rolling gantry of some kind to those rails but not glue it, along with clasps/ servo arms that would appear to drip the dread, when in reality a small R.E magnet would be used to hold it up, located in the central sliding gantry/dolly? I like the idea of tucking the dread back a bit, and then having him launched off the back by a pneumatic launch, assumedly to arrest the momentum the SR has while fling, allowing the dread to fall more or less straight down at any speed. This area would be encased by the hull extensions, but also open-air at the very back and halfway through the bottom section. Once the dread deploys, then the back is open and the marines can pop the hatch and also drop out the back.
The trick here will be to design it in a way that enough of the details are visible that they are worth doing, but also not compromising the solidity the build is meant to impart to the model...
#1 issue of course, is whether a dread would fit under there at all without having to widen the entire central hull...
18746
Post by: Heliodore
Cool Stormraven mod, can't wait to see what you do with the physical kit! You're well ahead of me when I was at this stage!
20018
Post by: Hyenajoe
Ground Control to MajorTom...
I'm in! Your Stormraven is far more interesting than the GW version, and I'd be proud to help you!
Have you already started to gather plasticard materials ?
224
Post by: migsula
I also intend to kitbash one - I think getting rid of the top junk and the chicken leg landing gear will make a huge head start!
Looking forward to what you come up with.
15358
Post by: Vitruvian XVII
Wow, already this blog is turning out some wicked tips of the trade! Thans Tom for starting it and for the others who are contributing
MajorTom11 wrote:I like the idea of tucking the dread back a bit
 I read that 't' wrong for a minute there, quite funny 
21364
Post by: FM Ninja 048
this thread already sounds promising.
may I suggest it be called the "Magos Tom-XI" pattern stormraven
15358
Post by: Vitruvian XVII
Best name ever!
26521
Post by: goldlinkdawg
cant wiat to see how this turns out
273
Post by: Foda_Bett
I personally hate the squadron green putty. I've found the stuff never sands well and if I've got big gaps I use either the white or Vallejo's putty. If i have small gaps I use Mr Surfacer or Mr Dissolved Putty
http://www.swannysmodels.com/Surfacer.html
33759
Post by: The only jp
Good luck Tom! I will be attempting to make a warhound during the summer so I will watch for tips, unfortunately I have exams atm and I'm in the middle of my RC baneblade.
May the sauce be with you!
33955
Post by: crimsonfist832
Where can you buy plasticard from???
28997
Post by: Alastergrimm
looking forward to seeing how this plays out.
35712
Post by: Machinator
crimsonfist832 wrote:Where can you buy plasticard from???
Most of your hobby stores should carry plasticard and other supplies. Woodland Scenic and Plastruct are the two big brands.
However, if you want to buy in bulk this is a good place to use if you're in the States:
http://www.usplastic.com/catalog/item.aspx?itemid=22883&catid=715
22687
Post by: MajorTom11
Foda_Bett wrote:I personally hate the squadron green putty. I've found the stuff never sands well and if I've got big gaps I use either the white or Vallejo's putty. If i have small gaps I use Mr Surfacer or Mr Dissolved Putty
http://www.swannysmodels.com/Surfacer.html
I am hoping the gaps I leave will be thin enough that I can use the green, if not, I'll look into Vallejo! Love their paints afterall!
crimsonfist832 wrote:Where can you buy plasticard from???
http://www.dakkadakka.com/dakkaforum/posts/list/283826.page
I usually get it from www.towerhobbies.com, ebay, or the local hobby store which is quite far but I am occasionally near. Any train model store worth it's salt will have a ton of this stuff.
FM Ninja 048 wrote:this thread already sounds promising.
may I suggest it be called the "Magos Tom-XI" pattern stormraven
Lol I only named it the MajorTom11 pattern SR because most people knew what it was from the News and Rumors thread lol. Otherwise, at the end of this, with everyones help and advice, I think it should simply be called the Dakka Pattern SR, it's going to be a group effort!
Hyenajoe wrote:Ground Control to MajorTom...
I'm in! Your Stormraven is far more interesting than the GW version, and I'd be proud to help you!
Have you already started to gather plasticard materials?
Yessir, i have quite an array available to me already. All kinds! Also picked up a new compressor, another airbrush, weathering fixer, punch and die for rivets, mat cutter, protractor ruler, and all kinds of new gubbins to make sure this goes right!
Thanks a lot boys, Mach or CK, any chance of those demo shots of a properly done corner ?
19585
Post by: McNutty
I will keeping an eye on this blog.
One stop shopping for an improved Storm Raven and plasticard tips from the pros.
30532
Post by: Zefig
I'm very much liking the collaborative feel of this already, and have already learned a good amount. Hopefully we'll all be able to learn a lot more! I'll certainly be following this with great interest.
8745
Post by: Llamahead
A decent triangular steel ruler is a basic must for this type of work, the one I've got's also a scale one and has a scale of 1;50 which is about right for 40k stuff. They hold better and help your knife cut neater on the surface.
9910
Post by: CommissarKhaine
Mach or CK, any chance of those demo shots of a properly done corner ?
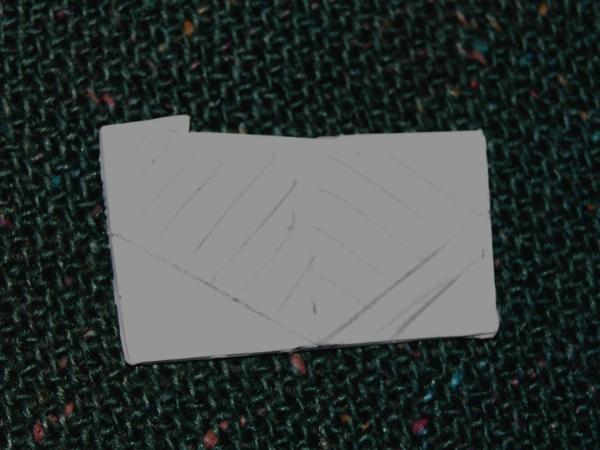
Someone's anxious to get started . Good nthing I suffer the occasional bout of insomnia, so here's how I do it, Mach's way may be better/more accurate/easier.
Step 1:Choose the two panels that will fit and clean them up (which I didn't in this pic). Then, decide which two edges will go together, and file them down, so they'll fit together nicely in the end.
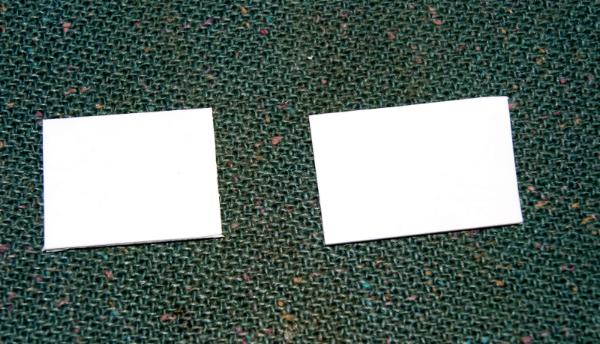

 Step 2:
 Decide your angle and make the supports. I normally use a gradient to measure out the angle (plasticard takes pencil pretty well), draw it out, the cut it. Here, I just randomly decided on an angle by making two identical trapezia . Trigonometry 101: for an 'outward' angle: 90° + the angle you want!
Here's how it looks, the arced-in bits will be the supports.
Cut loose, and one trimmed down so it takes less place:
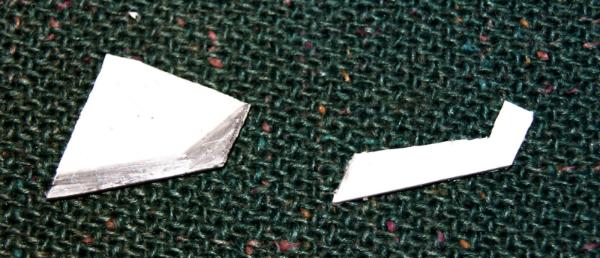
I penciled in the bit you really need. The rest of the card is gravy and can be left on for additional structural integrity if it's not in the way of construction.
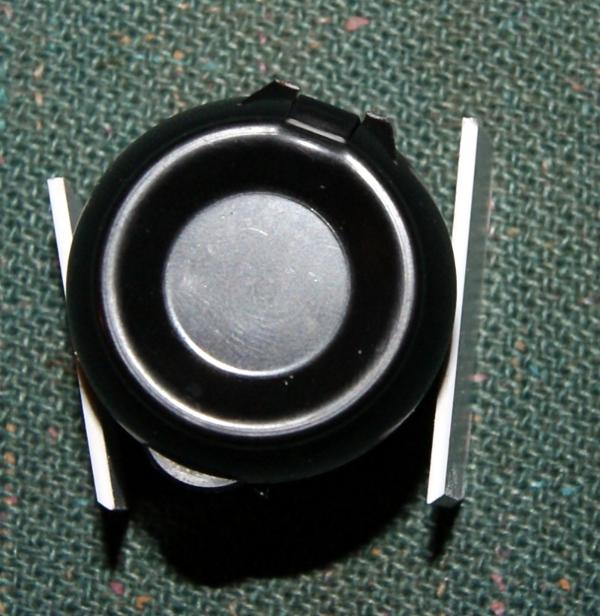
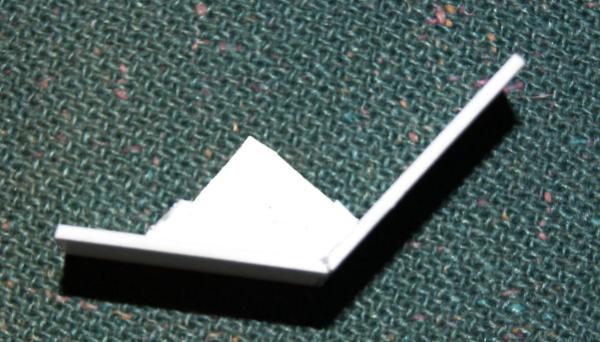
Step3: Add the support to the first panel. Make sure the angled side is properly placed, or your second panel won't fit.
 Step 4
: Add in the second panel:
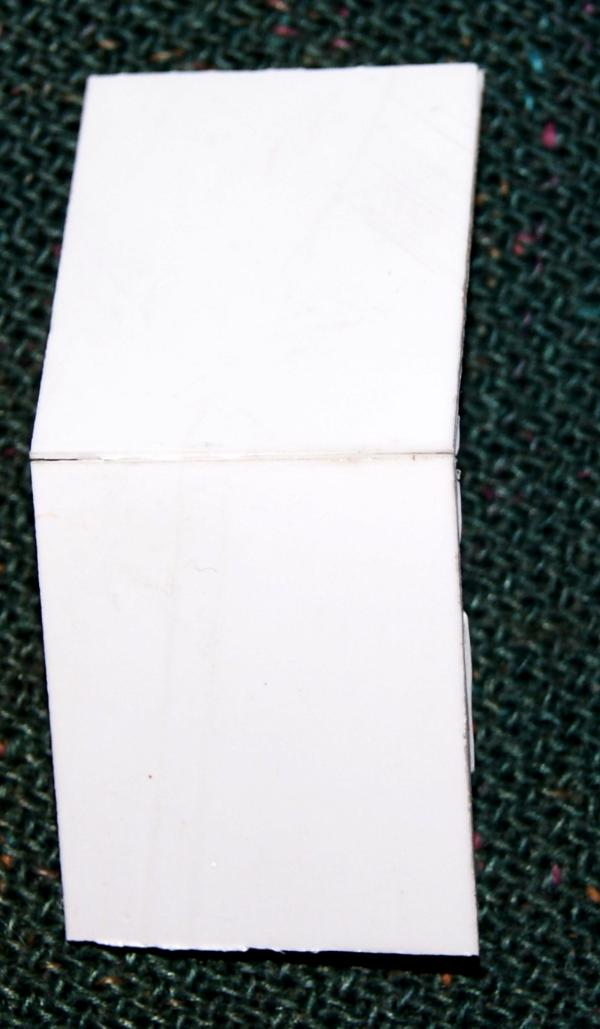 Step 5:
 Touch up with a file or gs depending on taste. No piccies here since I'm lazy and din't feel like gsing
Hope this helps you out!
33575
Post by: Bossasaurus
Its a really cool kit, i held it like 2 days back and its alot nicer irl. Your conversion idea looks great, but i'm not sure if its totally necessary.
20018
Post by: Hyenajoe
A small detail came to my mind: what measurement system are you using guys? It might be a usefull thing to know in a group project.
I use the metric system (and don't know any others... )
I suggest to add an equivalence board of the measurements to this thread.
Now back to MajorTom's material: what's your thickest plasticard sheet? I sometimes use 2mm thick sheet (it would be fine to build the main structure), but it's quite a pain to cut with manual tools. If you want to use this kind of material, I recommend a Dremmel-like tool ( or enough spare blades ).
Otherwise I think you've got the right tools
Do you alaready have front and profile drawings?
1464
Post by: Breotan
A quick suggestion. Leave the front of the model for last. You may not need to change the... thrusters? if that's what they are. The challenging part will be extending the back of the model and supporting it structurally.
9910
Post by: CommissarKhaine
Hyenajoe wrote:A small detail came to my mind: what measurement system are you using guys? It might be a usefull thing to know in a group project.
I use the metric system (and don't know any others... )
I suggest to add an equivalence board of the measurements to this thread.
Now back to MajorTom's material: what's your thickest plasticard sheet? I sometimes use 2mm thick sheet (it would be fine to build the main structure), but it's quite a pain to cut with manual tools. If you want to use this kind of material, I recommend a Dremmel-like tool ( or enough spare blades ).
Otherwise I think you've got the right tools
Do you alaready have front and profile drawings?
1" = 2.5 cm; 2.54 if you want to be really precise
2 mm is very thick and I rarely use it. 1mm with added support for really big structures (10+ cm ) usually suffices.
22687
Post by: MajorTom11
Thanks ck! Awesome, and muck appreciated!
Bossasaurus wrote:Its a really cool kit, i held it like 2 days back and its alot nicer irl. Your conversion idea looks great, but i'm not sure if its totally necessary.
It is absolutely not 'neccesary', if you like it as is that is perfectly cool with me! Besides my own personal issues with the design, this is just as much about the challenge of the conversion!
Hyenajoe wrote:A small detail came to my mind: what measurement system are you using guys? It might be a usefull thing to know in a group project.
I use the metric system (and don't know any others... )
I suggest to add an equivalence board of the measurements to this thread.
Now back to MajorTom's material: what's your thickest plasticard sheet? I sometimes use 2mm thick sheet (it would be fine to build the main structure), but it's quite a pain to cut with manual tools. If you want to use this kind of material, I recommend a Dremmel-like tool ( or enough spare blades ).
Otherwise I think you've got the right tools
Do you alaready have front and profile drawings?
Have dremel, and mat cutter, which should suffice, and both 1 an 2mm plasticard. For my own measurements, will probably go metric due to tighter packing of measuring increments on your average ruler. Conversion is easy enough though, will mark everything down and make 2versions maybe?
Breotan wrote:A quick suggestion. Leave the front of the model for last. You may not need to change the... thrusters? if that's what they are. The challenging part will be extending the back of the model and supporting it structurally.
Yup, thrusters will be as is for now unless there is a good reason to fiddle with them, my design was done on the first leaked shot before they could be seen, so I was actually pretty happy they were there!
35712
Post by: Machinator
CommissarKhaine is right on with the method of how to do the joint. I couldn't have done it better
17738
Post by: Briancj
This is already a fascinating thread, a work-in-progress supported by the masters of plasticard and converting, with illustrated instructions and tool suggestions?
Someone's gonna need to sticky this one.
--B.
273
Post by: Foda_Bett
Here's some cool WIP pictures of one I found on the internet. It definitely gets the juices flowing.
http://captureandcontrol.blogspot.com/2011/01/stormraven-built-and-reviewed.html
22687
Post by: MajorTom11
Indeed, I think it will be easiest to build the main body and take measurements with calipers and protractors first, find out exactly what the 'connection areas' are going to be, then measure up a dread to see if it is even feasible to get one hanging back there enclosed. Just missing a square-head protractor and I can safely and officially say, I have everything I need to do this!
After seeing your pressure cooked resin molds Foda, I would ask how feasible you think it would be to cast whatever I make on these? I have zero experience in terms of mold making or pouring resin, without the extra equipment would you even recommend trying? My desire to do this will be entirely dependent on how long it takes to build these parts new, and then trying again based on known templates and measurements. If it still takes 20 hrs even when you know exactly what to cut, how to assemble etc, then mold-making will seem like an interesting idea lol!
Thanks again everyone, Foda, CK and Mach you guys are really providing fantastic, useful and inspiring information here, cheers!
17923
Post by: Asherian Command
Cool. I wish i could make one but I stink at plasticard.
35712
Post by: Machinator
Here's an idea I'm thinking of doing: A Stormraven that carries a Baal Predator instead of troops and a Dreadnought. Just beef up and extend the rear a bit while adding a clamping system that holds the Predator via magnets.
What do you think?
22687
Post by: MajorTom11
Chibi Transport T-hawk? Win!
Only thing is unless it's a stand in the rules won't be there... I am thinking of installing 'rails' to slide the hull extension onto... partly so I can take it off to cast it if I ever want to, and partly to be able to put on alternates like this kinda thing down the line
35712
Post by: Machinator
If it's cool enough, someone will make the rules
33727
Post by: NamTaey
Guess what I found when I typed custom Storm Raven?  WIN
22687
Post by: MajorTom11
LOL
22687
Post by: MajorTom11
Alright boys, heard from Empchild over at Battleroad games that the SR and Furiosos should be en-route in a few days! Give a week or 2 delivery to Canada and we can pretty much be assured that this project starts officially at the latest by Valentines.
If some of you get the kits early, feel free to do me a solid and take a few measurements!
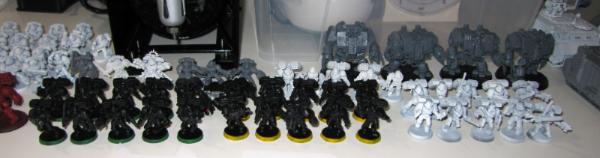
I am 85% finished with the last 4 SH Termies, which will tie up that project til Summer when I will finish the hybrids. It will be a BA-a-thon til then! Have to sketch out SR back end ideas and practice with my new compressor as soon as the termies are done...
18509
Post by: endtransmission
I've started making some plasticard tanks of my own, so it's interesting to see that I've been doing exactly what the masters suggest. Huzzah! I shall be watching with interest to see what other tips and tricks come up.
One thing I've found useful is to mock up what you're making in cardboard or paper first as it's much cheaper to scrap a design in paper than in plasticard. You can then also unfold it and use it as a template for your actual model.
15358
Post by: Vitruvian XVII
I got my SR in today, very nice. All sorts of lovely bits that i can leave off for other projects. I may even startbuilding it now! Edit: Okay, i started! Almost done fleshing out the shape, then its final detailing. Do you want me to put up some pics Tom??
22687
Post by: MajorTom11
Sure!
15358
Post by: Vitruvian XVII
Okey doke! Here you go, got the sides to plasticard and a little gap-filling then it should be done. Still havent decided if im going to put a stripped down turret or put the weapons somewhere else. 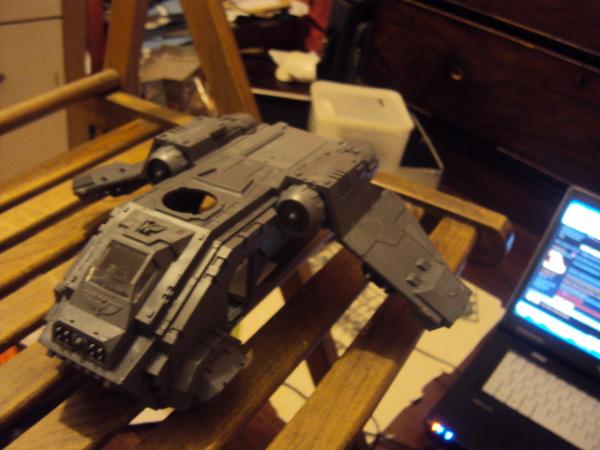 Decided to keep the interior closed (ie glued shut) so i get some cool bits, so i put some plasticard to allow the thrusters to move but not fall out. 
22687
Post by: MajorTom11
Dude that looks awesome! Lol I may not need to do this afterall, probably won't get my Raven til next week at least, so you may be done by then lol!
MORE PICS! I would love to see the sides, the back if you have done anything yet, just go pic crazy!
And Thanks!
10470
Post by: shrike
Post this link in the "stormraven conversions" thread which will be made soon.
I'm gonna be making an appearance, though with little in the way o plasticard- just a classic arcade grabber claw made out of one to hold the dread, and maybe a plasticarded turret to allow razorback turrets to go on.
15358
Post by: Vitruvian XVII
Okay, okay, did more work so here you go! I present the Dakka pattern StormRaven, STC created by MagosTom XI (Kitbashed with a valk + plasticard)
Do i keep the turret or not, cant decide?
Bottom:
Top:
Plasticard detailing, just need gap-filling and rivets now:
Rear door:
If youve got any questions fell free to ask
Vitruvian
9910
Post by: CommissarKhaine
I like the look, seems a lot sturdier the the standard version. For the turret, have you considered putting it more towards the back, mimicking the T-hawk setup? I feel that the visual 'balance' of the model is disturbed by the huge amount of detail in front, whiile the backpiece is relatively flat and featureless - or will it get the tail end?
10470
Post by: shrike
where is that door from?
37798
Post by: alphaomega
shrike wrote:where is that door from?
If you are talking rear door, that is from the Valk kit 
22687
Post by: MajorTom11
Looks pretty sweet dude seriously!
14765
Post by: paulson games
Tom if you are looking for punch and die sets check out www.micromark.com they have several differant ones, also a great range of tools in general.
If you need any casting advice check out the resinaddict forum.
19650
Post by: shingouki
looking very interesting.im subscribed.
6005
Post by: Death By Monkeys
@Commissar Khaine and Machinator - How viable is it do bend plasticard and get good corners? Or should bending be left for curved surfaces and corners really need to be cut?
22687
Post by: MajorTom11
Not qualified to answer at all, but it seems to me logically speaking that you should do that with thinner card or tubes, I have never seen an instance where thick plasticard was bent reliably?
Again, not qualified to answer at all, could be completely wrong!
15358
Post by: Vitruvian XVII
Thanks for the comments guys, sti;; a bit to go, but i'm gettng there
@Khaine: I'll try a mock-up with it further back, does the slimmed down turret look alright?? Thought i'd leave the tail off, to give it more of an orbital lander look.
The rear door is indeed from the Valkyrie, as are the bottom and top pieces.
I do plasticard corners by scoring the card, then bending it but making sure it doesnt come off. Then i run glue into the seam to fix the corner in place.
6005
Post by: Death By Monkeys
@Vitruvian - Which side do you score? The inside of the corner or the outside?
22687
Post by: MajorTom11
Hmm valkyrie bits eh, they seem to fit perfectly... mmmm....
35712
Post by: Machinator
Death By Monkeys wrote:@Commissar Khaine and Machinator - How viable is it do bend plasticard and get good corners? Or should bending be left for curved surfaces and corners really need to be cut?
Nah, you can never get a good sharp corner that way. Even with thin card stock it's going to be rounded and the thicker stuff will likely crack. To get a good corner it really needs to be cut and joined.
5539
Post by: Madness!
I think the tl lascannons should be moved to the back like an ww2 bomber.
9910
Post by: CommissarKhaine
@Khaine: I'll try a mock-up with it further back, does the slimmed down turret look alright?? Thought i'd leave the tail off, to give it more of an orbital lander look.
Slimmed down turret looks great, like the design! If you're leaving the tail off, I feel the rear could with some additiona (eye-catchong- detail.
Not qualified to answer at all, but it seems to me logically speaking that you should do that with thinner card or tubes, I have never seen an instance where thick plasticard was bent reliably?
You can heat plasticard and then bend it, but that's good for bending whole surfaces, not for corners. I use either a candle or a hairdryer for heating, but I've heard about people sumbersing the card in hot water then bending it as well - juist never tried that last technique. Word of warning: don't heat it for too long or the plasticard will start melting and start to sag.
Machinator wrote:Death By Monkeys wrote:@Commissar Khaine and Machinator - How viable is it do bend plasticard and get good corners? Or should bending be left for curved surfaces and corners really need to be cut?
Nah, you can never get a good sharp corner that way. Even with thin card stock it's going to be rounded and the thicker stuff will likely crack. To get a good corner it really needs to be cut and joined.
+1.You can get a halfway decent corner with cardboard this way, buit it'll always remain visible.
23944
Post by: Hits_the_spot
Loving this, looks 100x better than the standard, i'm planning something very similar, plus a tank carrying version. cant wait to see more.
22687
Post by: MajorTom11
Still not sure about the turret on top Vitruvian, purely from a function point of view, but, it is a definite improvement, and, as far as putting the turret on top goes, I would say that is perfect!
In other news.... My SR arrived lightning fast from Empchild and Battleroad today, so, looks like this weekend the fun starts! (I ordered valk bits a la vitruvian, so hopefully those will arrive soon too to experiment with). Only thing left to pick up will be a square head protractor from home depot and I should be ready to rock!
23400
Post by: Ma55ter_fett
@Vitruvian XVII
I'm going to have the hate on the rear door.
I think it would look better if it was slightly smaller so you could have it set in a frame.

Like this but instead of two doors have one, and have them flush with the sides when closed like all other SM transports.
You need at have the illusion of thickness; if you look at a rhino they have (preposterous dimensions) very thick hulls on the sides, where as the rear of your chib hawk looks a little like a the door of a metal shipping container.

273
Post by: Foda_Bett
A question for anyone that has the SR. Does the door for the front hatch match the back door on a rhino?
I'm probably going to be adding some Grey Knight/Inquisitorial details to mine and if I can just use the forgeworld rhino hatch it will make my life easier.
22687
Post by: MajorTom11
Will check that for you tonight Foda!
15358
Post by: Vitruvian XVII
Cheers for the comments guys!
Still not sure about the turret, but the SR is on hold now until I can get some of Hits_the Spot's new true-scale marines to go with it. So,
Over to you Tom!!
@Ma55ter_fett: Yeah, you're totally right but im a lazy guy and it looks as though a dread could fit atm so i think ill leave it as is
@Foda_Bett: Had a look, they should be compatible but mines glued so i cant tell for sure.
30532
Post by: Zefig
Foda_Bett- I'm assembling my stormraven right now, and had a spare razorback kit on hand for the turret. Held up the raven's front door to the razorback's back door, and lo and behold, they've got the exact same profile, same axles, everything. The only thing the raven's front door appears to add are the ribs. Presumably for her pleasure.
22687
Post by: MajorTom11
Confirmed, looks like the right size to me too!
So, update, as mentioned my SR kit is in hand, and using Foda's guidance, I have gotten my dirty mits on a mat cutter, square head protractor, squadron green filler putty, a precision hammer (light tac hammer) and the plasticard I will need.
Based on Vitruvian's work, I have also ordered Valkyrie bits. I am waiting on those and a precision punch/die set for rivets, however, that is not neccesary to start, but the Valk bits are. They seem like an ideal solution for the top and bottom of the fuselage extension, and I think that door has possibilities too!
So, with the imminent completion of my 1.5 year long space hulk project (tonight, the last Termies will be done) I will be ready to get started this weekend. If the Valk stuff arrives tomorrow (with any luck) full on build, if not, I will begin partial assembly on the front bits including the thrusters and guns, and begin designing/constructing the dread deployment bits.
It's almost time boys!
15358
Post by: Vitruvian XVII
Im flattered you think my kitbash is worth using!
Cant wait to see what you do!
22687
Post by: MajorTom11
Dude of course, a good idea is a good idea is a good idea, Valk bits were a great solution!
Can you tell us how well they fit initially? I.e was the width and height spot on the same?
17349
Post by: SilverMK2
That looks so much better than the actual kit.
273
Post by: Foda_Bett
Zefig wrote:Foda_Bett- I'm assembling my stormraven right now, and had a spare razorback kit on hand for the turret. Held up the raven's front door to the razorback's back door, and lo and behold, they've got the exact same profile, same axles, everything. The only thing the raven's front door appears to add are the ribs. Presumably for her pleasure.
Thanks! Now I've got a forgeworld order to make.
30532
Post by: Zefig
Noooo problem. I'm thinking I might switch mine out with a regular rhino door and add some teeth. Give it a good ol' shark mouth on the front.
Crap. I just remembered I already glued it in. Noooooo!
15358
Post by: Vitruvian XVII
@ Tom: Yeah sure, ummmm
Not sure how they come on sprue as i cut the pieces up a bit prior when i kitbashed a lightning. The door is pretty much the same height and a few saw cuts made the other bits fit lenghtways. Width is almost spot on to the most sunken armour plate on the SR (if that makes sense! ) I did have to put a long cross-piece to make the bottom bit fit though, possibly was due to shoddy cutting on my part
15358
Post by: Vitruvian XVII
Btw, Hits_the_Spot just posted another SR variant on his TS marine blog, think i still prefer it without the tail tbh.
22687
Post by: MajorTom11
Saw it, and I agree, the tail just doesn't work for me either... I am thinking about possibly putting a landspeeder style tail on her, something low key. Really depends on how it looks to me when the rest is otherwise done.
BTW, box is out, tools are out, it has begun!
15358
Post by: Vitruvian XVII
Mmmm, might have to look into a small tail too....
Eagerly waiting
22687
Post by: MajorTom11
For the record, just calipered a rhino door and the SR door, identical!
21364
Post by: FM Ninja 048
Hello FW, I've got a set of FW doors just waiting for something worth putting them on...
22687
Post by: MajorTom11
Build begun, side templates started... jeeze lots of angles if you want to have the plates flush!
Proceeding apace....
Automatically Appended Next Post:
p.s, have a set of FW doors ordered too... but for me, they will be instamold victims, the big BA symbol and chalices anyways, not the whole doors...
Automatically Appended Next Post:
Interesting fact #2
Razorback/LR turret does NOT fit into the slot... would need to shave 2mm off all around or so...
9910
Post by: CommissarKhaine
Piccies! We demand piccies!
jeeze lots of angles if you want to have the plates flush!
The most time-consuming part of any plasticard build - but it's very rewarding to have those white bits of plastic fit nicely together and turn into an engine of destruction.
Interesting fact #2
Razorback/LR turret does NOT fit into the slot... would need to shave 2mm off all around or so...
Check out your wife/gf's deodorant bottles, and check out the medicine cabinet for aspirine tubes etc. You can probablyt find something that fits the slot in the SR. Glue it underneath the razorback turret, add tabs so it can't fall out, and then buy your wife a new whatever you wrecked - the last bit is the most important!
22687
Post by: MajorTom11
Lol this is HARD
I have a pile of discarded cuts already lol. Front of the SR is built, wings build, and I wanted to get the side panels for the extension cut tonight but I got derailed building a dread to check it vs the SR size -
Interesting Fact #3
A dread will not fit inside, even with the hull extension. It is wider than the SR hull... it might work sideways, but any visions of popping the back doors to reveal a mighty war refrigerator doesn't look like it will happen...
Automatically Appended Next Post:
p.s @ CK, not going to use a turret on top, but if I was going to, a RB or LR turret looks much, much better!
10470
Post by: shrike
MajorTom11 wrote:Lol this is HARD
I have a pile of discarded cuts already lol. Front of the SR is built, wings build, and I wanted to get the side panels for the extension cut tonight but I got derailed building a dread to check it vs the SR size -
Interesting Fact #3
A dread will not fit inside, even with the hull extension. It is wider than the SR hull... it might work sideways, but any visions of popping the back doors to reveal a mighty war refrigerator doesn't look like it will happen...
Automatically Appended Next Post:
p.s @ CK, not going to use a turret on top, but if I was going to, a RB or LR turret looks much, much better!
have you tried w/o the base?
22687
Post by: MajorTom11
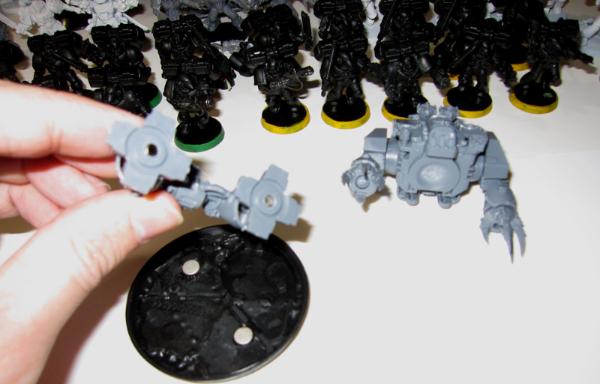
Oh, suppose it was worth mentioning the dreads are magnetized, specifically so their bases can come off... Would find it extremely silly looking otherwise!
25141
Post by: Chibi Bodge-Battle

You could always claim the Dreads don't like flying and have gripped Terra Firma in abject terror and ripped the ground with their feet?
okay
maybe not...
21364
Post by: FM Ninja 048
dreads surfing on the top, or paragliding, or hanging from the bottom by there DCCW
22687
Post by: MajorTom11
There will be no CS Goto style rhino surfing antics here! lol
20956
Post by: Empchild
Hrmmm Tom... you are actually making me want to pick up one of these for myself .
22687
Post by: MajorTom11
I'm sure you have one or 2 close at hand should you want one no
In all honesty though, thus far I haven't accomplished much besides the concept art itself, we all have to thank Vitruvian, Machinator, Foda and CK for their contributions making this thread worth looking at thus far!
That being said, I finished assembling 4 magnetized dreads, so it will be back to figuring out the SR after a jaunt to the gym! should be back at it in a couple of hours, wish me luck people lol, this is going to be frustrating!
9910
Post by: CommissarKhaine
p.s @ CK, not going to use a turret on top, but if I was going to, a RB or LR turret looks much, much better!
Yep, I feel they would fit the silhouette a lot better. I'd even consider making them underlsung, though that would involve changing the landing gear. Makes more sense IMO to have guns underneath when you're flying over your enemy...
That being said, I finished assembling 4 magnetized dreads, so it will be back to figuring out the SR after a jaunt to the gym! should be back at it in a couple of hours, wish me luck people lol, this is going to be frustrating!
Your condition is that bad? On a serious note: measure carefully, and use paper templates when in doubt. Pencil can easily be removed from plasticard, so don't be afraid to doodle a bit on them; it can help you out with deciding on a final shape.
7013
Post by: Ifurita
I am thinking of plating over the front ramp and moving the turret down there, to replicate the gunner-pilot arrangement on Hinds or Apache helicopters. I can use the turret base as the start of a chin turret. Now I just have to figure out how I'm going to attach it.
Just saw that observation re: rhino back doors. Woot! going to switch out a set from an unbuilt rhino I have.
26800
Post by: Commander Cain
Looking forward to some progress! I have a feeling that I may be stealing a few of your ideas when this is all done
Once you are all done of this project I say you make a big old thunderhawk using a SR
22687
Post by: MajorTom11
CommissarKhaine wrote:p.s @ CK, not going to use a turret on top, but if I was going to, a RB or LR turret looks much, much better!
Yep, I feel they would fit the silhouette a lot better. I'd even consider making them underlsung, though that would involve changing the landing gear. Makes more sense IMO to have guns underneath when you're flying over your enemy...
That being said, I finished assembling 4 magnetized dreads, so it will be back to figuring out the SR after a jaunt to the gym! should be back at it in a couple of hours, wish me luck people lol, this is going to be frustrating!
Your condition is that bad? On a serious note: measure carefully, and use paper templates when in doubt. Pencil can easily be removed from plasticard, so don't be afraid to doodle a bit on them; it can help you out with deciding on a final shape.
Underslung would have been awesome, I just can't bring myself to lower that front end even a mm more. And I don't see a way to pull off both the turret and the ramp at the same time... Apache style wouldl have made a lot more sense overall though!
LOL yes I didn't quite word the gym vs plasticard thing well did I lol... No worries, gym was fine , now back to the plasticard, I will def be making paper templates first before continuing again.
Thanks everyone, wish me luck!! Automatically Appended Next Post: Progress made, side panel templates are set and fitting flush. Still need to figure detailing specifics, but at least I know I have a proper base to build on.
Valkyrie bits will hopefully arrive shortly, in which case I will check what will be a worthy/useful addition to the build. I am taking steps to ensure that the fuselage will wide as far as possible as it moves back, hopefully allowing a sideways dread accommodation at the least.
I would also like to figure out some way to avoid goofy landing gearage out back, whether that would be by simply not having them deployed, or simply lowering the gear bay... progress is slower than I wanted, but it's coming!
24567
Post by: Kroothawk
I have seen a nice conversion of a looted Storm Raven mixing it with parts of the Ork Battlewaggon (including the front shovel and the open body, the wings put underneath).
15358
Post by: Vitruvian XVII
I used the landing pistons from the front on the back instead (and left the front undeployed), depends what look you're going for i guess
9910
Post by: CommissarKhaine
I would also like to figure out some way to avoid goofy landing gearage out back, whether that would be by simply not having them deployed, or simply lowering the gear bay... progress is slower than I wanted, but it's coming!
Change it to bigger skids, or change their positioning to the side maybe? If they came down from the side, it would also change the profile of the SR.
22687
Post by: MajorTom11
Ok so it's been too long -
I managed to cut the side panels, but a bit order for valkyrie plating took a bloody month to get here, so that stalled me out...
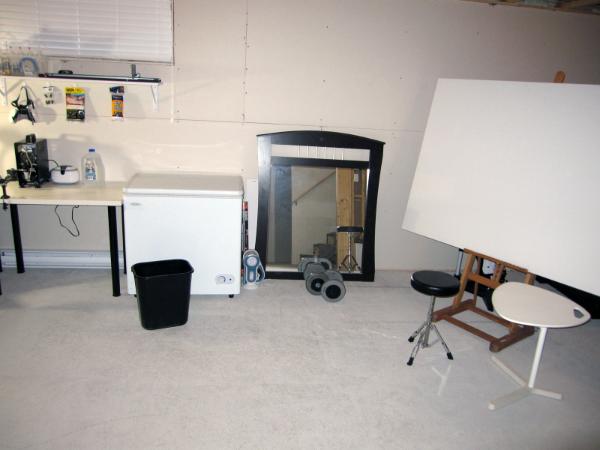
In the meantime, I took the oppurtunity to set up something a bit better than the breakfast table as a workspace
when I got back in the hobby, I have accumulated such a ridiculous amount of crap and equipment that I decided to finally make a move and build myself a hobby cave in the unfinished basement. I could have went with one of the spare bedrooms upstairs, but I like the idea of not worrying about making a mess with the airbrush etc...
So, 1 trip to Ikea and 500 bucks later... I present the hobby cave
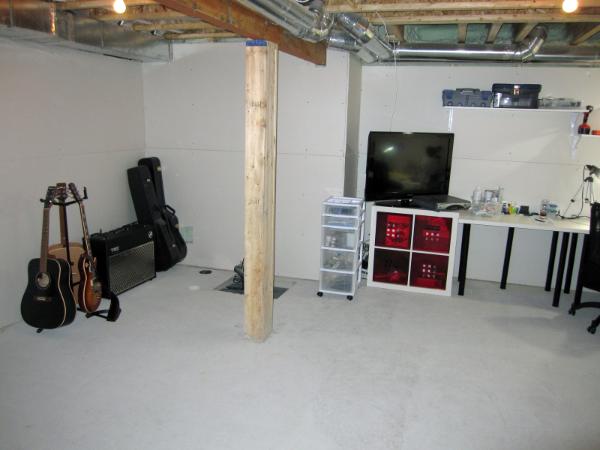
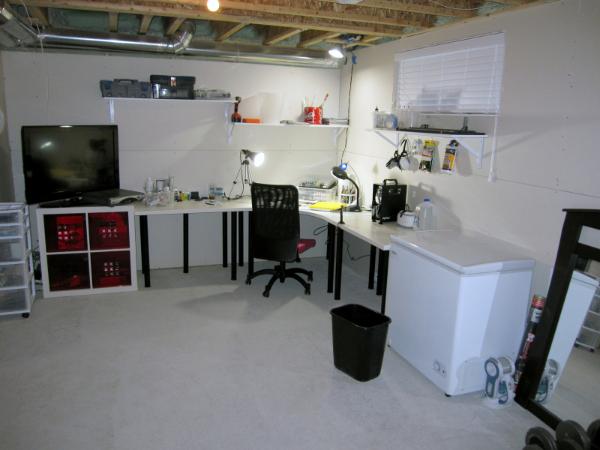
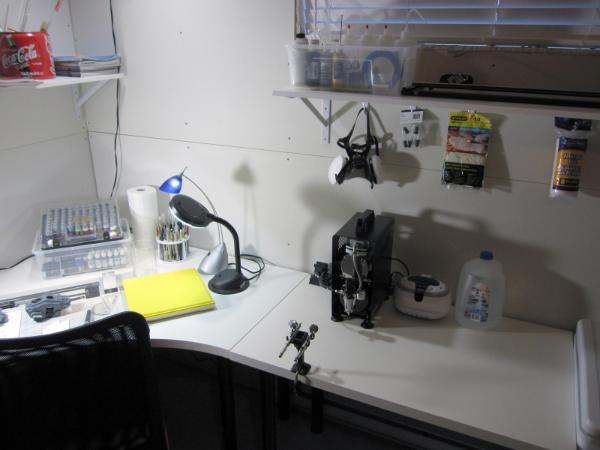
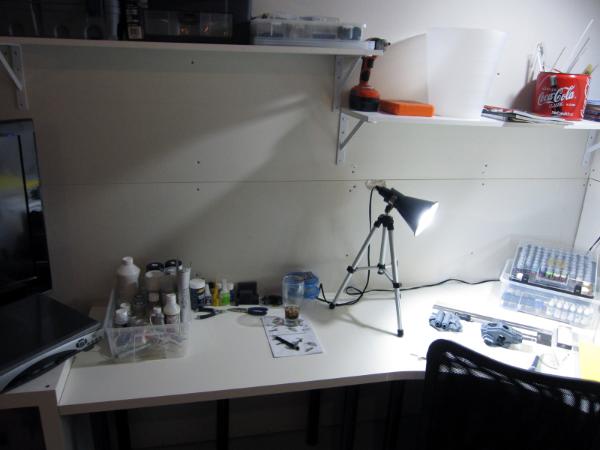
Of particular note -
Paint shelves... love it!
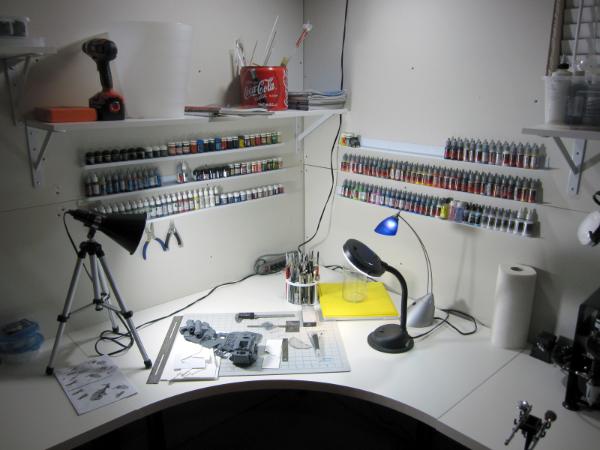
Made from vinyl garage door sweeps, nice and cheap-
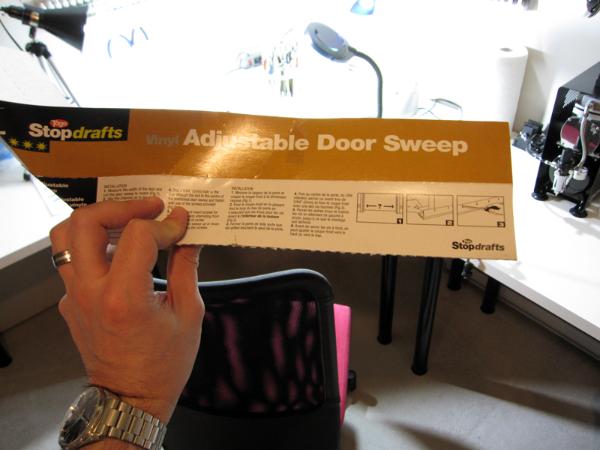
They come in 2 parts, one of which has predrilled holes, and one that needs them drilled in but no big deal. They both have slightly upturned angles to the paints are actually leaning back just a bit. Nice and steady, it would be extremely tough to knock them down.
No more fishing around in drawers, cases or whatnot, and takes up much less space than a carousel!
****
Good timing setting it up, because the parts finally arrived today, which means it's go-time! I really want to get this done so I can start airbrushing, so hopefully this next week should see some major progress!
Stay tuned...
18474
Post by: Darth Bob
That's quite the man cave, though a bit bright for my taste. I prefer mine dark and unsettling to keep would-be anti-man-cavers away. Then again, I am dark and unsettling and tend to shun anti-man-cavers.
22687
Post by: MajorTom11
Lol maybe could turn out the non-table lights and wear a phantom of the opera mask while watching dawson's creek re-runs?
I believe that would be super creepy enough to keep the non-devoted away lol
25141
Post by: Chibi Bodge-Battle
Insert swear word of choice!
I hate you Major Tom that is bigger than my enire house!
no fair! 
Done a grand job of the workspace.
No excuses now mate, get cracking on the modelling!
18474
Post by: Darth Bob
MajorTom11 wrote:Lol maybe could turn out the non-table lights and wear a phantom of the opera mask while watching dawson's creek re-runs?
I believe that would be super creepy enough to keep the non-devoted away lol
And wearing floral-pattern hawaiian shirts. It's the only way to be sure.
22687
Post by: MajorTom11
Dust off, Hawaiian shirts from orbit, got it!
Chibi lol, it's not the size it's how you use it, so all that time and work better pay off with the SR I have been trying to achieve!
Thanks boys -
33018
Post by: medabee
Awesome Hobby (why not man cave???) Cave. Expecting great things in the future from this one.
22687
Post by: MajorTom11
Man cave requires a bit more in the way of leather furniture, bar, bigger bigscreen and xbox in my book . This spot is more a studio than a hangout area I guess... for now!
25141
Post by: Chibi Bodge-Battle
Reassured that size doesn't matter
now just have to convince the ladies
22687
Post by: MajorTom11
Lol y'know and I was trying to avoid the whole thing... size doesn't matter is what guys with small hobby-caves say
9910
Post by: CommissarKhaine
*Stares jealously at workspace* Looks great! And the hawaiian short won't cut it, it should be a Justin Bieber t-shirt
17349
Post by: SilverMK2
Great idea using the "door sweeps" as shelves.
15358
Post by: Vitruvian XVII
Hope you don't mind me hijacking your thread Tom! Have you made any more progress?
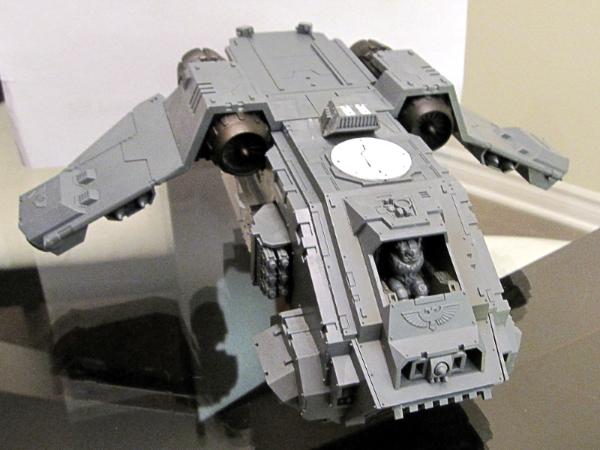
Anyway,I present to you, Dakkanauts, my realisation of the MajorTom/Dakka pattern Storm Raven. Its all painted now (oops, bar the cockpit canopy ) but still WIP as i need to do lights, weathering and chapter markings (its an RG vehicle)
Its my first attempt at gradients with an airbrush, i tried to do a subtle highlight as opposed to zenithal.
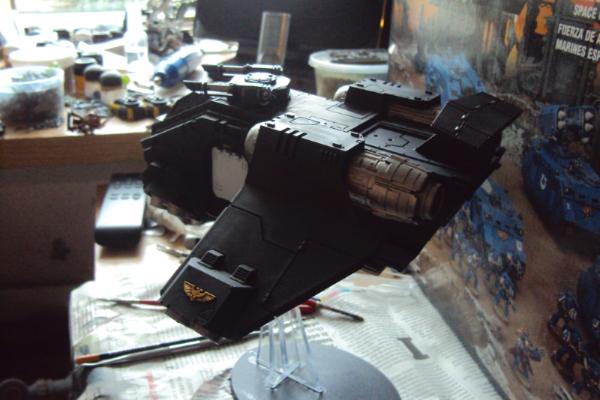
( Btw, the pics are a bit washed out, the grey highlights arent actually that stark)
What do we think?
Cheers,
Vitruvian
10470
Post by: shrike
Nice!
I might be inclined to paint my stormraven in that scheme...maybe a tad more white...
22687
Post by: MajorTom11
Looking pretty ace dude! And don't worry about hijacking the thread, I am getting nowhere fast with mine lol, plasticard is an unforgiving master in my case :(
Would love some better lit shots though, especially from the back and bottom -
15358
Post by: Vitruvian XVII
Sure, i'll do some proper pics ( ) once ive finished it, should be soon
22687
Post by: MajorTom11
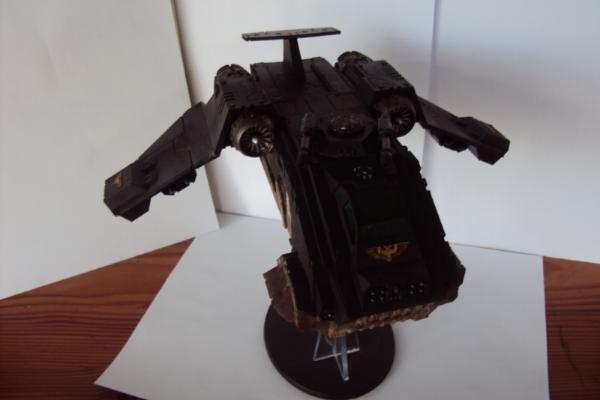
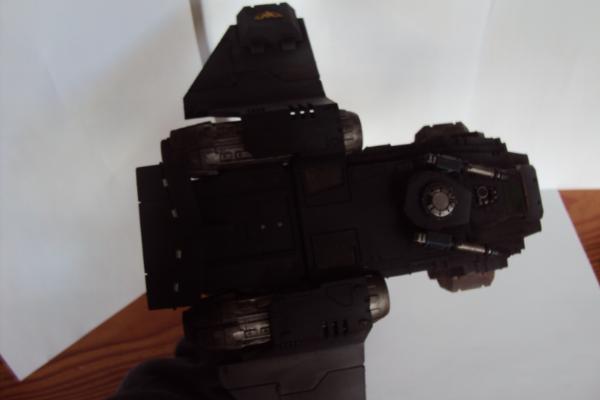
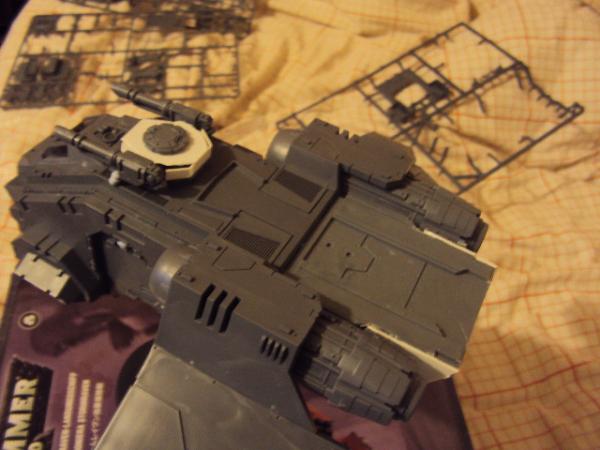
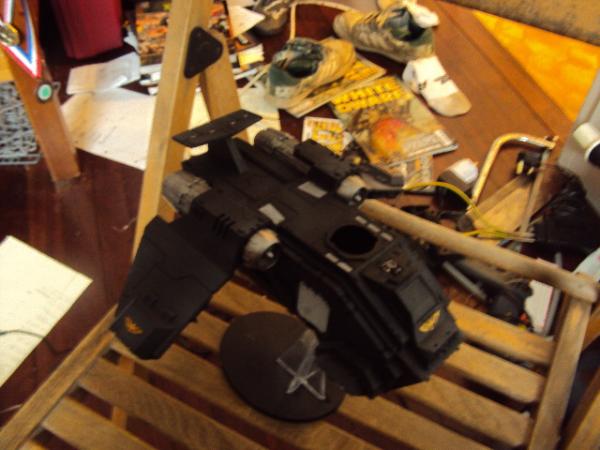
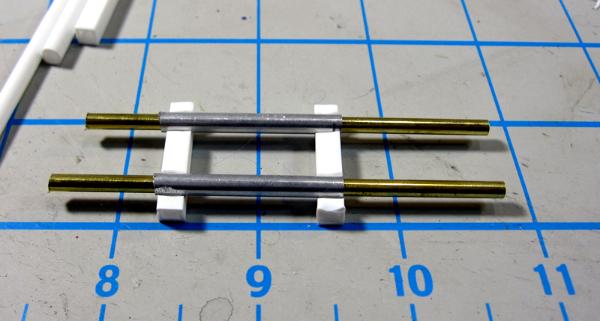
I passed some major hurtles tonight, the back end is getting pretty far along except for (alot) cosmetic additions and cleanup. Even set up the beginnings of the piston deployment system for the dread!
Thanks to Vitruvian, AlexNeufeld and Eggroll for the kick in the butt -

beginnings of Dread deployment piston system -
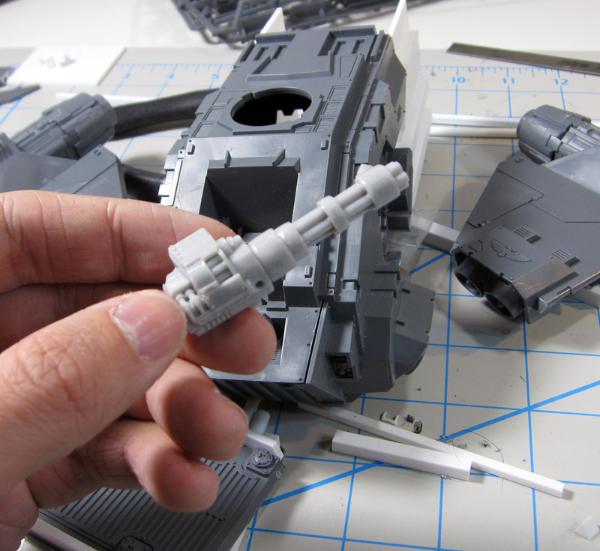
and, upgraded boomsticks, because normal one's are too dinky for a gunship
As stated, things got so delayed
A - Waiting over a month for certain needed parts to arrive
B - Getting the hybrids sorted out for shipping
C - Ordering many, many parts getting all THIS sorted out and starting set-up
And of course, need magnetic dreads, would look pretty goofy flying around the back of the Stormraven riding a big disk of dirty lol -
updates should ramp up now, I'm looking to git er done!
9910
Post by: CommissarKhaine
Looks interesting, keep it up! I got a SR as welll and I'm wondering how to convert it, so any inspiration is welcome!
15358
Post by: Vitruvian XVII
Looking good! Have you thoguht about making the top "bar" line up with the existing hull detail? (if you will be doing this then sorry ) Ive done the detailing now, all thats left is to bust out the powders so i should have detailed pics for you tomorrow Also, thats quite a haul youve got there, dread to think how daunting that must be to look at But, you can do it Tom!!
36934
Post by: logg_frogg
These storm raven conversions inspire me! And look far far better than the dinky little modle GW put out!
I'll be subscibing to this fellow Canadian's thread!
22619
Post by: inmygravenimage
Great blog man, can't believe I've only just found it. Having deep thoughts about SRs now...
22687
Post by: MajorTom11
Vitruvian XVII wrote:
Have you thoguht about making the top "bar" line up with the existing hull detail? (if you will be doing this then sorry )
Yup, that's all part of the cosmetic stuff to come! It should all transition pretty smoothly when I get done! lol don't apologize
30532
Post by: Zefig
Nice gun there, is it one of the bitspudlo ones? I'm really interested to see how those turn out.
22687
Post by: MajorTom11
Yessir, same company. Much larger and meaner looking that gw ones -
31618
Post by: Eggroll
SR looks like it's coming along nicely. Keep up the momentum!
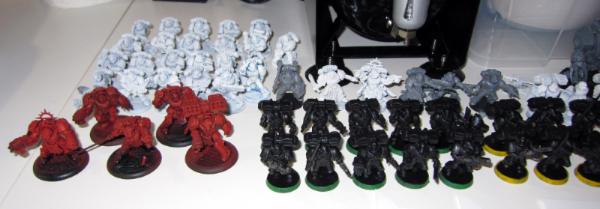
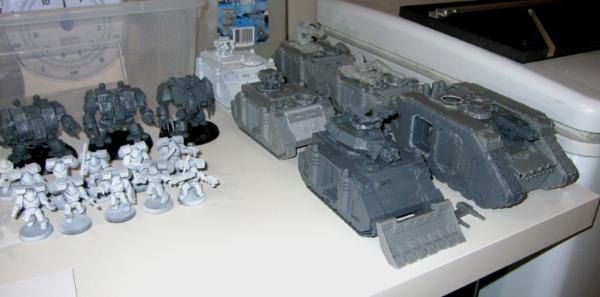
Some good shots of your army...you got a TON of painting work ahead of you. You ever get discouraged looking at all that primered plastic? I usually stick to one to two squads at a time and even then, sometimes it's a huge turn off everytime I see them and am reminded of how much work I still need to do.
22687
Post by: MajorTom11
Yeaaaaahhhh...
It is rough... Though, you and I have an advantage in that we don't actually play, so if we get bored and want to do something else, there is no real impact other than the money spent on the minis, and of course our ocd to finish what we started...
I am not sure I will finish all this, but I saw a ton of good deals on ebay and figured hey, why not! I am def going to do the vehicles and at least 1 squad, airbrush techniques and oil weathering experiments are exciting me!
I am assuming with the airbrush the vehicles must be even easier to get going on the infantry am I right?
31618
Post by: Eggroll
MajorTom11 wrote:Yeaaaaahhhh...
It is rough... Though, you and I have an advantage in that we don't actually play, so if we get bored and want to do something else, there is no real impact other than the money spent on the minis, and of course our ocd to finish what we started...
I am not sure I will finish all this, but I saw a ton of good deals on ebay and figured hey, why not! I am def going to do the vehicles and at least 1 squad, airbrush techniques and oil weathering experiments are exciting me!
I am assuming with the airbrush the vehicles must be even easier to get going on the infantry am I right?
Yeah, my OCD is killing me. Just last week I was thinking about buying all the SM veterans (mk1 and mk2) just so I can have a more complete collection. At least GW won't be releasing anymore BA models.
I find the easiest to do are vehicles > units > hq/elites though the newer kits like the death co and sang guard have so much details and bits they're almost just as bad as the hqs. Airbrush definitely saves a ton of time though. I just primed 3 dreads last night and am going to try and do them all at once.
30967
Post by: Pyronick
OT but is that a Tungsten Carbide wedding ring? Looks identicle to the one I have Love the paint shelves, going to invest in that when we get a house for sure. Having to make stuff fit in an apartment atm is lame!
22687
Post by: MajorTom11
Eggroll wrote:MajorTom11 wrote:Yeaaaaahhhh...
It is rough... Though, you and I have an advantage in that we don't actually play, so if we get bored and want to do something else, there is no real impact other than the money spent on the minis, and of course our ocd to finish what we started...
I am not sure I will finish all this, but I saw a ton of good deals on ebay and figured hey, why not! I am def going to do the vehicles and at least 1 squad, airbrush techniques and oil weathering experiments are exciting me!
I am assuming with the airbrush the vehicles must be even easier to get going on the infantry am I right?
Yeah, my OCD is killing me. Just last week I was thinking about buying all the SM veterans (mk1 and mk2) just so I can have a more complete collection. At least GW won't be releasing anymore BA models.
I find the easiest to do are vehicles > units > hq/elites though the newer kits like the death co and sang guard have so much details and bits they're almost just as bad as the hqs. Airbrush definitely saves a ton of time though. I just primed 3 dreads last night and am going to try and do them all at once.
That is killer trifecta - Collector/Hobbyist/OCD
We can go to those AA meetings together bud lol!
I def will be trying to do sweeping batches, all vehicles steps done to each one at the same time, all infantry red at the same time etc etc. At least for the base coat and zenithal/modulation stuff. Once it comes to brushwork, I may switch back to doing less at once, but honestly, even batching out brushwork can be good as it keeps your pallette and desk less cluttered.
We will see though! I will be going back to finish my NMM dante and the Hybrid Magus right after the SR is finished though. That will complete my SH:Complete project fully in conjunction with having the hybrids painted up by the talented Sigur.
Pyronick wrote:OT but is that a Tungsten Carbide wedding ring? Looks identicle to the one I have Love the paint shelves, going to invest in that when we get a house for sure. Having to make stuff fit in an apartment atm is lame!
Indeed it is, platinum in the middle and tugnsten on the outside... best move ever! I could play street hockey with this thing... it's really great not to have to worry at all about scratching or dinging it, and I also like the color of the metal itself as well!
30617
Post by: Emperors_Champion
Loving the work!
Your blogs are always full of inspiration! Keep it up!
22687
Post by: MajorTom11
Thanks man! Plenty of inspiration on this forum to be had, if it wasn't for all the other's nice enough to help in this blog I probably wouldn't have made the attempt -
That being said, made some more progress tonight... VERY happy with how things are going now, I predict the build will be finished by Sunday night!
17349
Post by: SilverMK2
Wow, you almost have as much unpainted stuff as me
22687
Post by: MajorTom11
lol, oh, it will all get hit hard with the airbrush as soon as I am done building/modding everything!
Long slog though, still have to rip everything off the bases, cork them, re-stick them on etc... also have to build another 20 or so infantry, magnetize the rhinos completely to be convertable to razors, baals or whirlwhinds... same thing with the LR to be able to switch from redeemer, crusader or phobos...
Ok so I have a lot of work ahead of me lol
108
Post by: Orinoco
keep up the good work.
15358
Post by: Vitruvian XVII
30617
Post by: Emperors_Champion
^ Nice SR Vitruvian XVII, pics aren't too bad! Does kind of look like yoda has just force-lifted you out the swamp though! Obviously Raven Guard can't fly like Blood Angels!
Does look awesome though!
Come on MayorTom, we need an update for the BA!
22687
Post by: MajorTom11
Vitruvian, looking good sir! Overall design and sillouette are solid!
I find the blacks could use a bit more in the way of highlights, as at the moment it is tough to make out surface detail. That being said, that could just be the pics. In any case, awesome work!
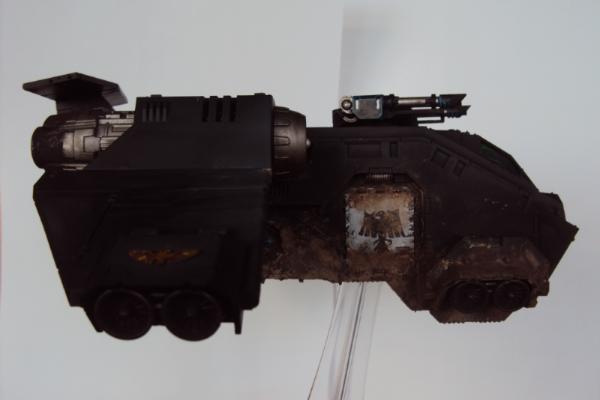
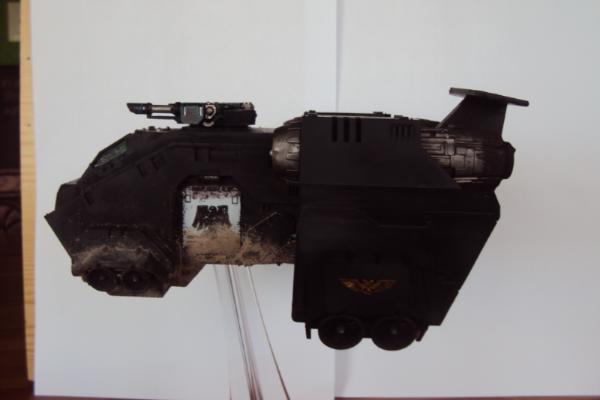
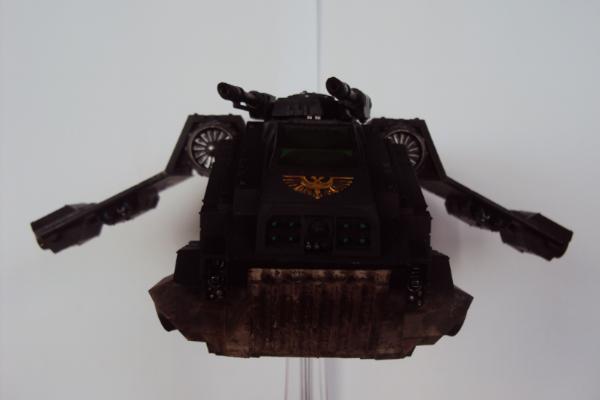
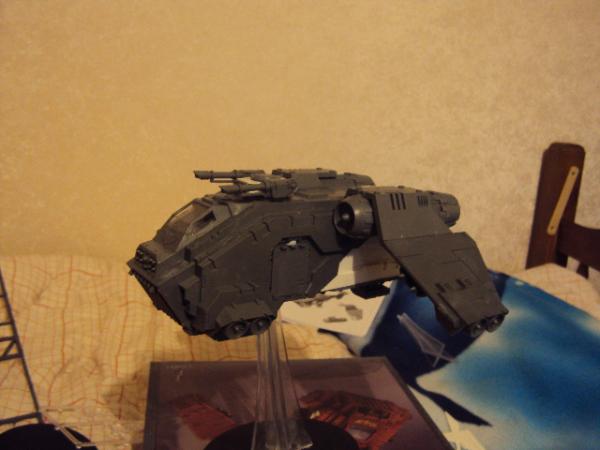
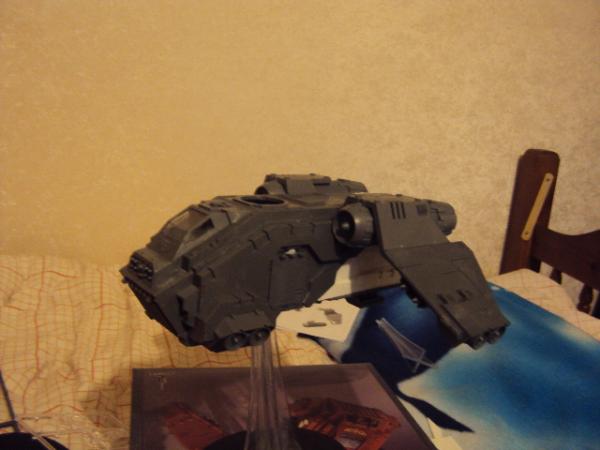
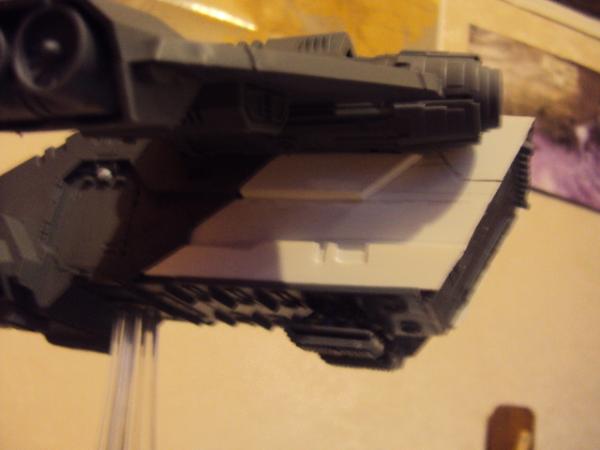
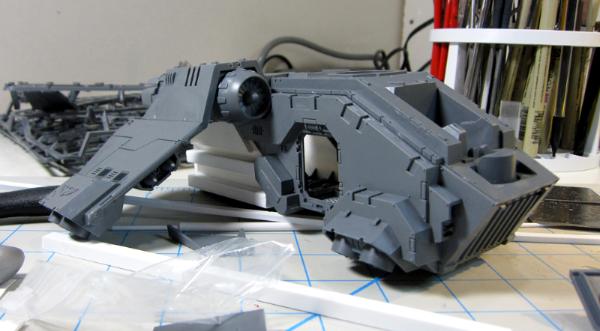
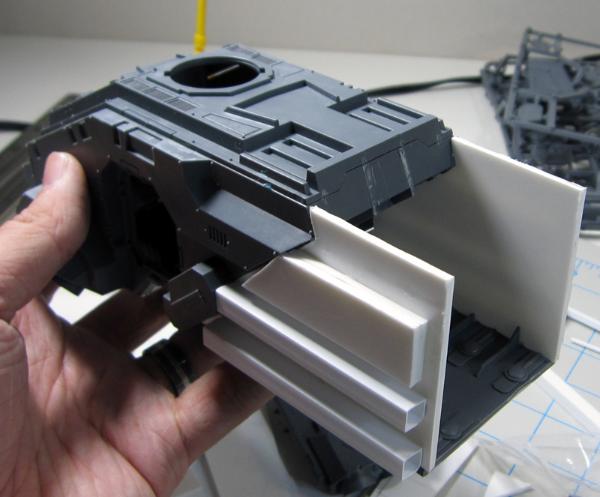
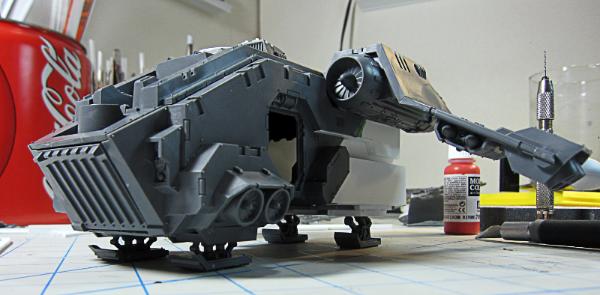
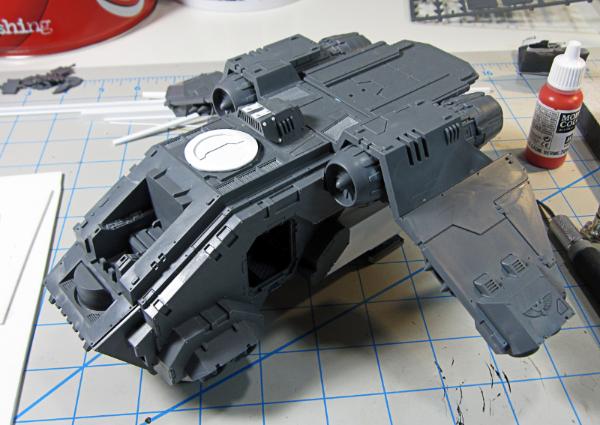
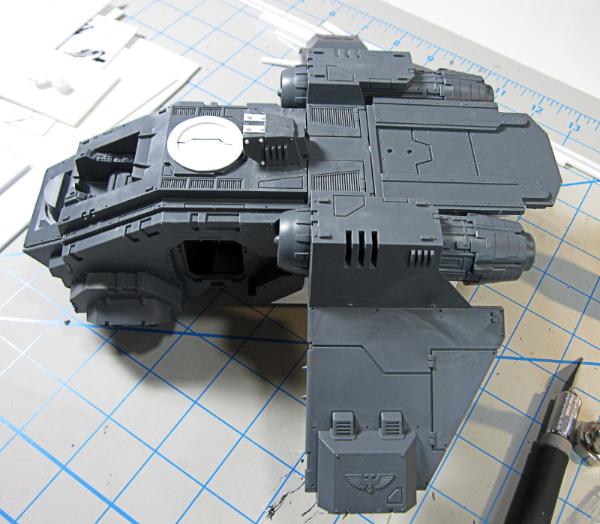
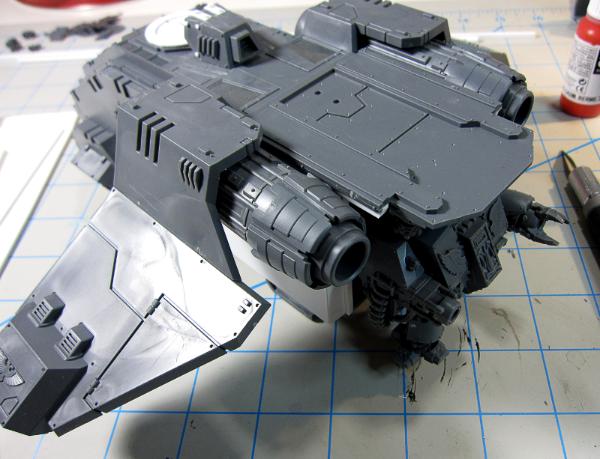
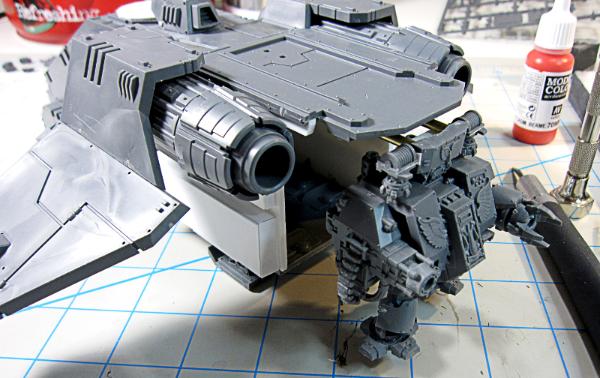
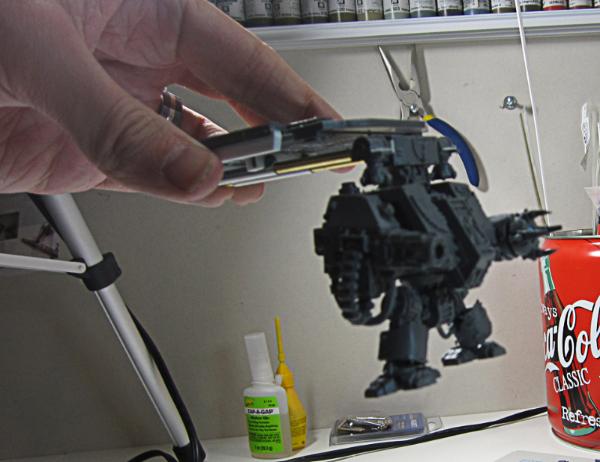
On my front, work is continuing, modded the air intake, made a top hatch to go over the turret, continuing applying cosmetics on top of the underlying structure. Tonight, back doors are going on, dread piston system is glued to the back roof, but needs the actual attachment area to the dread itself.
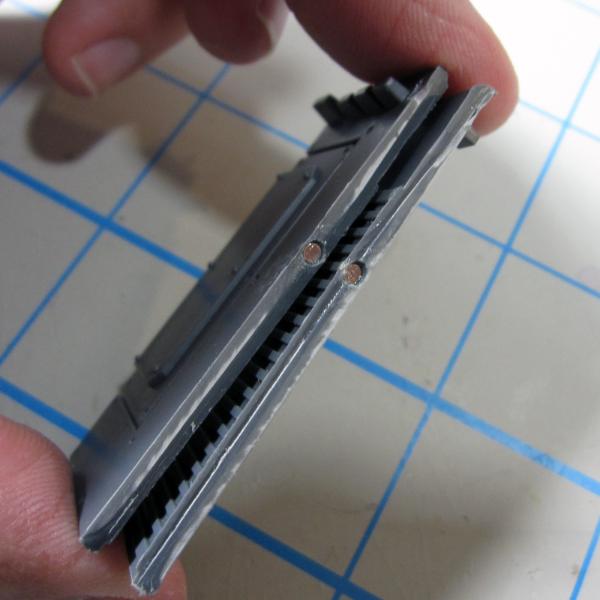
So after that, I pretty much need to create a box casing for the back landing gear, then finally, the last thing will be to figure out the final system for mounting the cannons and boom! Painting time will begin! There I have not glued the roofs on to the front or back section, to facilitate paiting the inside. Same will for for the cockpit area -
Gonna put some pics up later tonight! Automatically Appended Next Post: It's 2 AM, but a promise is a promise!
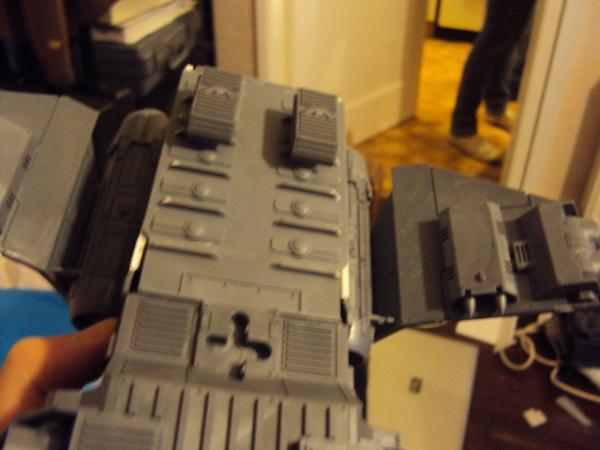
Now, if you were sharp eyed, you noticed that little nick-nack on the ceiling of the rear bay...
That was for -

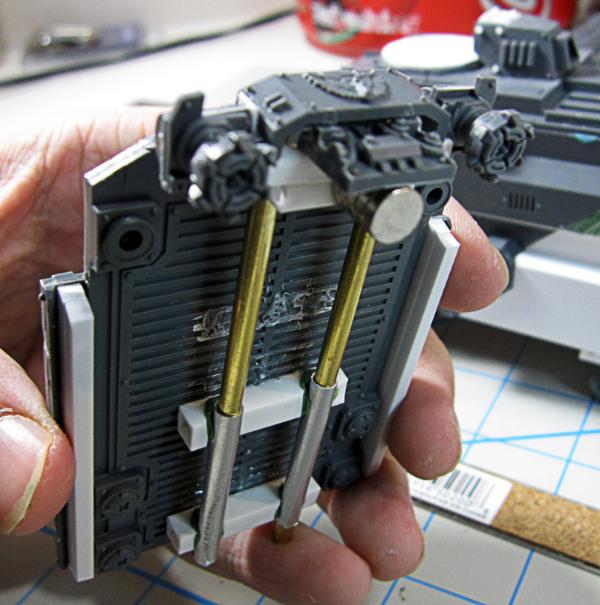
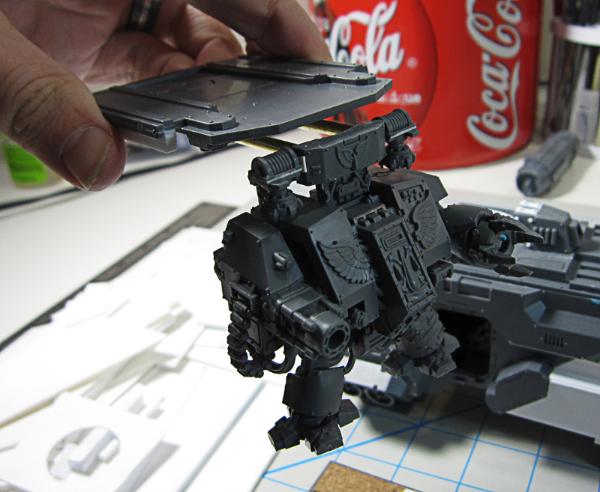
How it slots into the main hull -
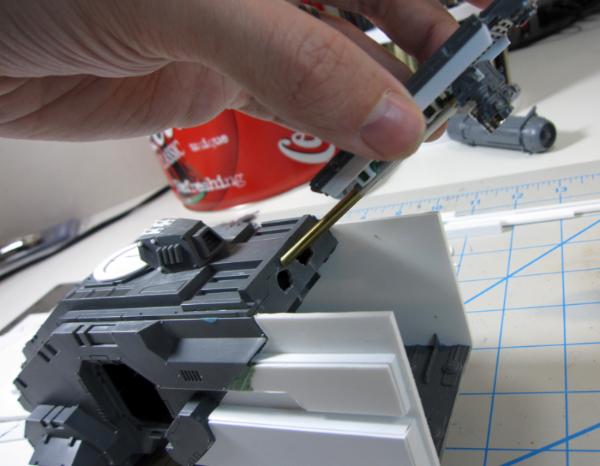
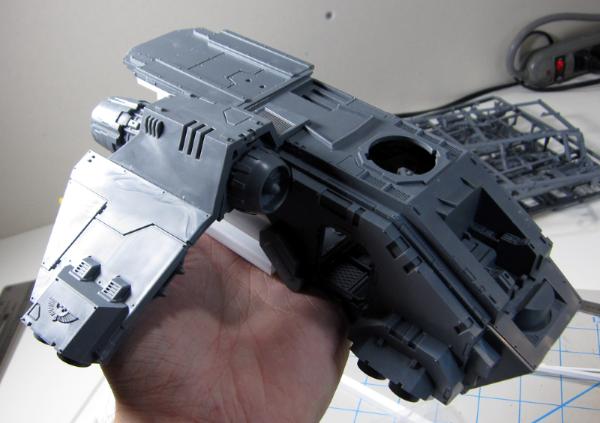
The doors that will be going on in back, pinned and ready for install -
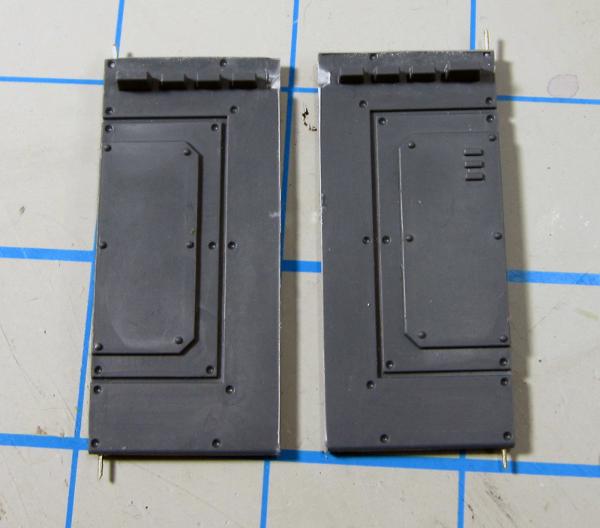
and magnetized to make sure the buggers stay shut -
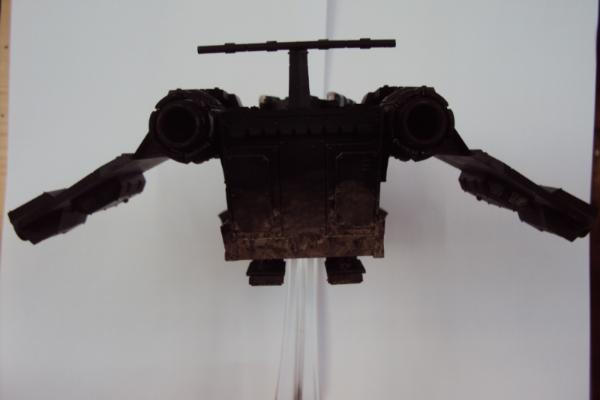
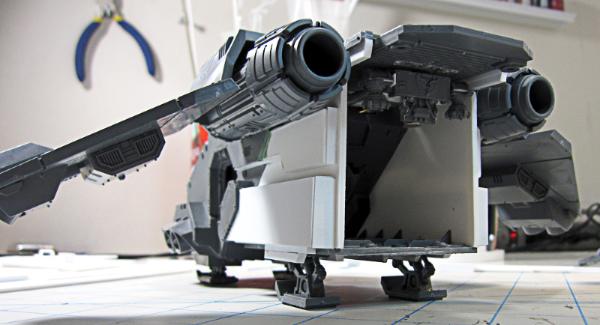
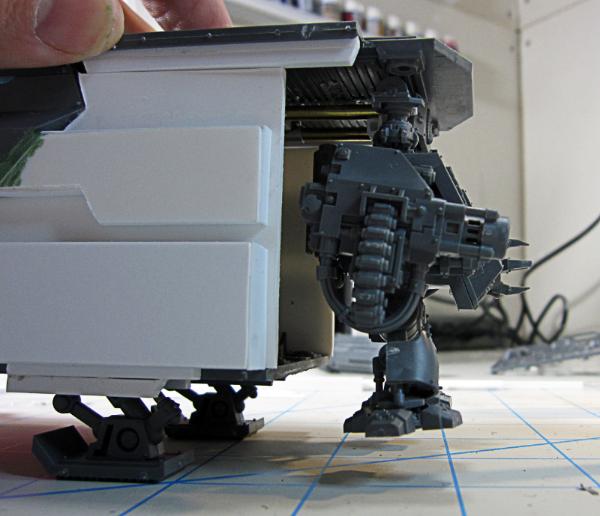
Finally, the wings and top off, to see what was done to clean up and streamline the sides since last we looked, along with the rear landing gear placement -
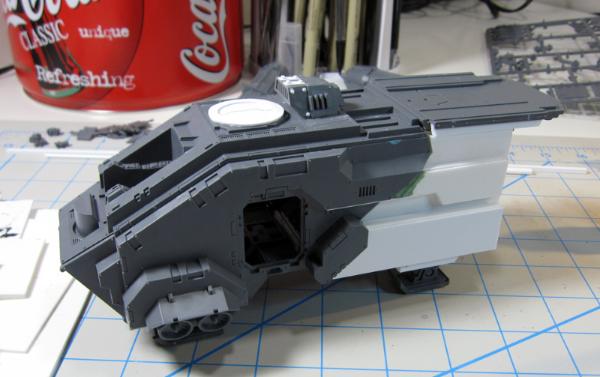
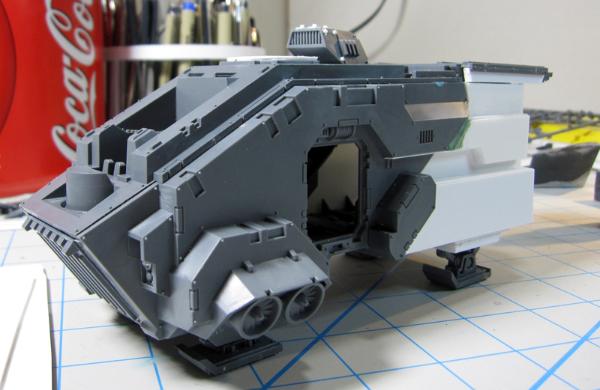
So that's it for today, didn't finish as I had hoped to do this weekend, but still, quite happy with the progress overall! Soon it will be time to figure out the guns, and after that, it is on to painting the interior before the full outer airbrushing begins!
Thanks guys!
15358
Post by: Vitruvian XVII
Very nice indeed, and you said you had no plasticard skills!!
I see you were clever and left the wings off, unlike me
I also love the dread system, pure genius, seriously
Basically, i freaking love it, better than mine already. It was well worth the wait
10575
Post by: vonjankmon
That looks really fantastic! Great job.
9394
Post by: Malika2
What the heck is that cannon on the dread? That looks amazing!
35849
Post by: Rochronos
BEST CONVERSION EVER!
31533
Post by: alexneufeld
Awesome stuff man, nice to see some rapid progress. Looking forward to seeing the finished model. One comment - get rid of the big white plasticard rivets on the F1 vent! Replace with GW ones cut from the interior (that's how I did the front ones on mine), no one will notice missing rivets on the inside!
22619
Post by: inmygravenimage
Very sleek yet chunky; love it. All will to resist buying one and refitting is crumbling.
22687
Post by: MajorTom11
Vitruvian XVII wrote:Very nice indeed, and you said you had no plasticard skills!!
I see you were clever and left the wings off, unlike me
I also love the dread system, pure genius, seriously
Basically, i freaking love it, better than mine already. It was well worth the wait
Lol, I will say that I am persistent, but I am no plasticard jedi lol! Leaving the wings off was based on knowing there would be no way to comfortably get in there to paint from other similar mishaps! I am glad you like everything so far, and thanks for motivating me with your posts too... would def not say 'better' either!
Malika2 wrote:What the heck is that cannon on the dread? That looks amazing!
That is a BA Furioso Frag Cannon, standard in the kit. Wish I could take credit lol!
alexneufeld wrote:Awesome stuff man, nice to see some rapid progress. Looking forward to seeing the finished model. One comment - get rid of the big white plasticard rivets on the F1 vent! Replace with GW ones cut from the interior (that's how I did the front ones on mine), no one will notice missing rivets on the inside!
Alright, I was waiting to see if the larger rivets would bug anyone lol, so they will come off. I found thinner plastirod after doing it lol! I also have archer rivets, so it will be an easy fix -
inmygravenimage wrote:Very sleek yet chunky; love it. All will to resist buying one and refitting is crumbling.
I will be giving a write up on how I did it later, templates aren't quite in the cards anymore due to me kind of making it up as I go, but I can describe how to get there without the hiccups I faced! I think it is a pretty solid model all around, esp with the extended hull. Without the wings, it looks decidedly helicopter-ish, I am debating making an 'in atmosphere' only version if I ever want another one based around that kind of aesthetic. A MajorTom II patter I suppose!
Thanks a lot to everyone, the encouragement certainly helps get through this long process!
31618
Post by: Eggroll
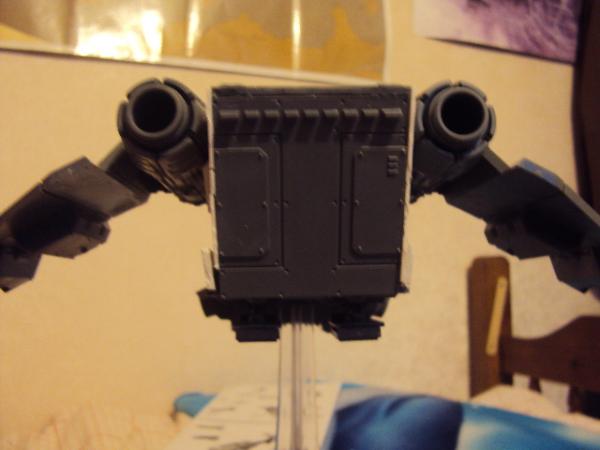
Wow! The rear railings and converted magna grapple for the dread looks awesome. A lot more realistic than GW's standard rope. Looks like you're in the final stretch of building, keep at it. I'm almost tempted to buy a SR of my own now.
9910
Post by: CommissarKhaine
That dread transport system is ace! Consider it stolen . I would try to make the rear mlanding gear pont southwards though, like this: /SR\ if it makes things clear... It would look more stable like that IMO.
22687
Post by: MajorTom11
Eggroll wrote:Wow! The rear railings and converted magna grapple for the dread looks awesome. A lot more realistic than GW's standard rope. Looks like you're in the final stretch of building, keep at it. I'm almost tempted to buy a SR of my own now.
Thanks dude! You should get one, I can't think of anything that would get me to go all out harder than an SR airbrush-off with EggRoll! Now that would be a challenge and a half...
CommissarKhaine wrote:That dread transport system is ace! Consider it stolen . I would try to make the rear mlanding gear pont southwards though, like this: /SR\ if it makes things clear... It would look more stable like that IMO.
Steal away my friend, not like I haven't ripped you off a time or two . I actually debated the gear direction, in the end, I settled in on that orientation because I picture the ship coming in hot and skid landing with forward momentum if you see what I mean? In any case, too late now, they are embedded in and GS'd for stability, getting them out again would be tough!
Great to hear from both of you, thanks for the comments!
18474
Post by: Darth Bob
Ummm...wow this thing is coming along beautifully. I can't wait to see it completed, the thing actually looks like it's capable of carrying a Dreadnought.
Keep up the fantastic work!
10470
Post by: shrike
wow...definitely buying one of those...
just...wow...I give you my third dakka man-hug of excellence...esteemed by...2 other people...lol...not musch by them either...hmm...anyway, it's the thought that counts...
so how goes the chapterhouse law-side of it go?
22687
Post by: MajorTom11
Lol thanks Bob and Shrike -
Will accept a man-hug of excellence so long as it is respectful and involves 3 rapid back pats!
Not sure what you mean about Chapterhouse??
26416
Post by: Young_Logan
Looking good, although may I say the back looks a tad like my mums people carrier. Apart from that it looks really really good. Love the slidy mechanicy stuff
30617
Post by: Emperors_Champion
Dreadnought clamp is awesome!
22687
Post by: MajorTom11
Young_Logan wrote:Looking good, although may I say the back looks a tad like my mums people carrier. Apart from that it looks really really good. Love the slidy mechanicy stuff
Your Mom's mini-van has a dreadnought on the back of it??? AWESOME
Just kidding, I know what you mean. The final steps should help rectify this a touch, but in all honesty, form has to follow funtionality to some degree here. Also, it is an SM vehicle after all lol, boxy is standard!
Emp Champ thanks buddy!
10470
Post by: shrike
MajorTom11 wrote:Lol thanks Bob and Shrike -
Will accept a man-hug of excellence so long as it is respectful and involves 3 rapid back pats!
Not sure what you mean about Chapterhouse??
thinking about the wrong stormraven conversion thread...hits the spot's doing one and talking to CH about selling it...
1478
Post by: warboss
Good job so far, especially on the novel and cool idea of the railing magna grapple.
108
Post by: Orinoco
great work on aligning the side armour.
108
Post by: Orinoco
Any news, majortom?
22687
Post by: MajorTom11
Sadly no, I got sidetracked painting genestealer Magi lol, I really need to get back on the SR too... soon! It's a long weekend, if I can avoid never ending social entanglements then I will try to hit it this weekend!
Thanks for bothering to look at this cooled off thread though bud, it is motivating!
22687
Post by: MajorTom11
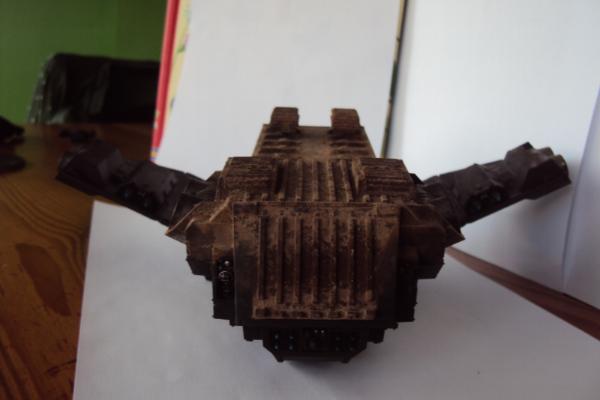
Orionco, thanks for the kick in the butt to get started again!
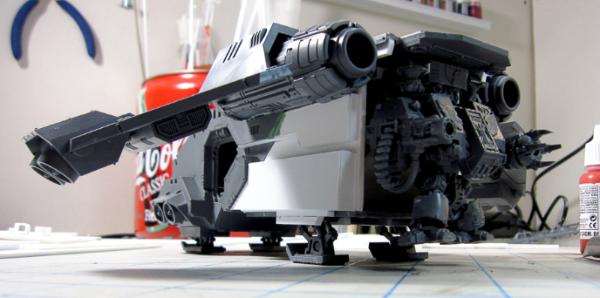
I surprised myself today with the amount of progress I managed to make in a few hours. Panelled and riveted the side extenstion and new intake, installed the back doors, re-adjusted the dreadnought deployment system so the doors can shut snuggly, and also to extend further out too. Lastly, airbrushed the engines, as trying to get at everything once they are glued into the wings would be... unwise.
So, a new bluetac mockup -
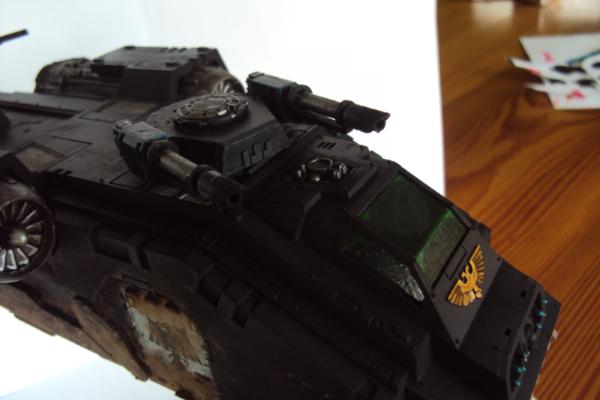
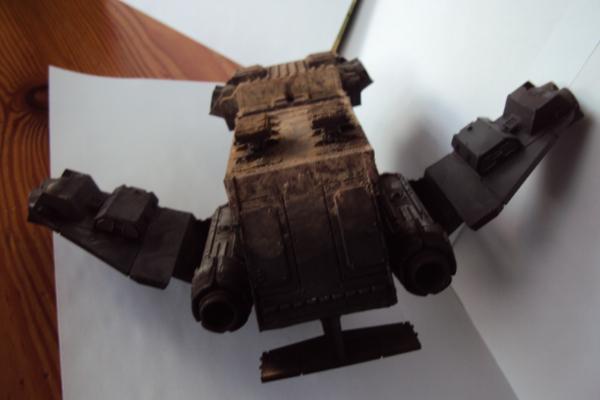
I have decided I will be mounting the Assault cannons right around and under the bloodstrike pods. To me, this is the most logical place to put them that would allow them maximum traverse and coverage. The sheer size of the cannons also makes a hullmount a little weird looking -
Here is where they are going to go -
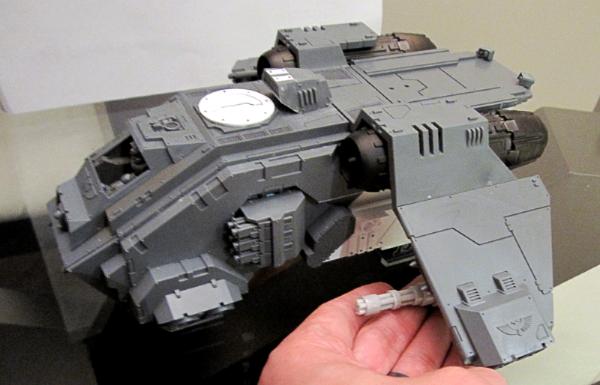
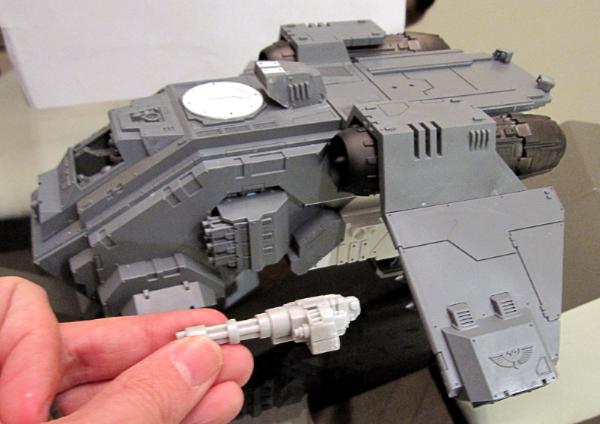
So, that's it for the moment, not much left to go before I'll consider it paint ready! The only big hurtle left will be to install the cannons, and some texturing here and there on some surfaces with additional paneling. Need to fill and straighter a few gaps here and there, and finish the cockpit obviously, but I am really, really happy to be seeing the finish line on this one in terms of building, but, even more excited to bust out the airbrush and hit this baby up with all the scale military tricks I have been studying the past few months!
Thanks for the patience guys, hope the progress is enough to make up for the wait!
42569
Post by: Marcin Ciszewicz
One hundred percent genius work on the cargo bay and its internals. Sure, the Stormraven looks like a flying brick - after all, which Warhammer aircraft, apart from Eldar ones, doesn't - but now it is a more believable brick. Waiting to see it complete.
31618
Post by: Eggroll
Look great tom. About time you did some hobby work. Work faster too, you've got a whole army to do!
9910
Post by: CommissarKhaine
That's a lovely model . I feel the straight back looks a bit odd, but that's just perosnal taste; I angled it on mine, though it was a [insert proper expletive] to put together properly. Will you be adding tail fins or something to the rear?
22687
Post by: MajorTom11
Lol, yeah, the army could be a while!
15358
Post by: Vitruvian XVII
Looking good Tom! Nice progress, I think i agree with Khaine though. The back seemed a bit empty. I listened to him on my SR and feel that it really makes a difference.
Still, your choice at the end of the day!
4042
Post by: Da Boss
You've done wonders with that kit. It really looks like it can do the job it's supposed to, now (ie. deliver a large squad of heavily armoured badasses to battle).
Well done!
22687
Post by: MajorTom11
Heh, thanks boys!
@Vit and CK
The back will be staying as is, both for my own personal preference (I really don't mind it) and one more important reason - In order for my 'Dread Deployment System' to work, the doors have to open outwards from a vertical center-line. If the back were angled, the 3 choices would be to either have a ramp open underneath the dread which defeats the purpose of the system, have trapdoor looking doors opened downwards on a 45 degree angle, which would look silly to me, or stick the dread out so far back that at all times it is sitting basically in open air.
Hope that makes sense! Even though I don't particularly agree with you 2 on this one, I hope you know I still respect and appreciate your opinions and feedback very much!
15358
Post by: Vitruvian XVII
Oh sorry, I meant putting a tail on
36580
Post by: HeRozZ x
likie wot you have done for the dreadnought and magnets i have done that on one of my stormravens
3395
Post by: bra'tac
Love what you have done with the SR definitely an improvement.
Your blog now has been placed under the all seeing eyes of my spynetwork ....... simply said Subscribed .
Cheers,
Bra' tac
108
Post by: Orinoco
Excellent work, Major. I had no idea that I possessed the oratory skill to motivate as such : ) Looking forward to the paint.
22687
Post by: MajorTom11
Thanks boys!
@Vit - I am considering a low profile landspeeder style tail on the back, but, maybe not, as I picture it's attitude being handled by the thrusters and antigrav than by aerodynamics per se. I will be mocking some stuff up to test it out though! Def won't be a big traditional SR tail though -
22687
Post by: MajorTom11
So, this is it, next step paint! I added the tail I mentioned, Landspeeder style. I must say this went a great deal faster now that I am getting the hand of plasticard. Ironically, things tend to work out better when I just eyeball things lol.
Also, Bitchin big AC cannons installed under the missile pods with plausible hydraulics. The cannons are from Bitspudlo if anyone is wondering, they have a thread in News and Rumors.
Finally, I redid the dread deployment system, extended the hydraulics and moved the brackets in a bit to make sure the doors closed. Speaking of the doors, I cut off parts and slotted them with plasticard so that they are removable, this way, I can remove the top middle parts of the door and extend the dread system out without opening the doors. So I have all kinds of options back there, very cool.
*Note- in the pic the doors are wonkey, this is because I didnt blutac the top frame down this time, and didnt notice it had moved. Rest assured, they are flat and flush -
Since these pics were taken, a few icons have been added, and a couple of rivets, but overall, it is time to get airbrushing, starting with the interiors, then metals, then reds. I am really looking forward to this! Modulation vehicle airbrushing, oil washes, liquid mask and more, here I come!
And the last pre-paint shots -
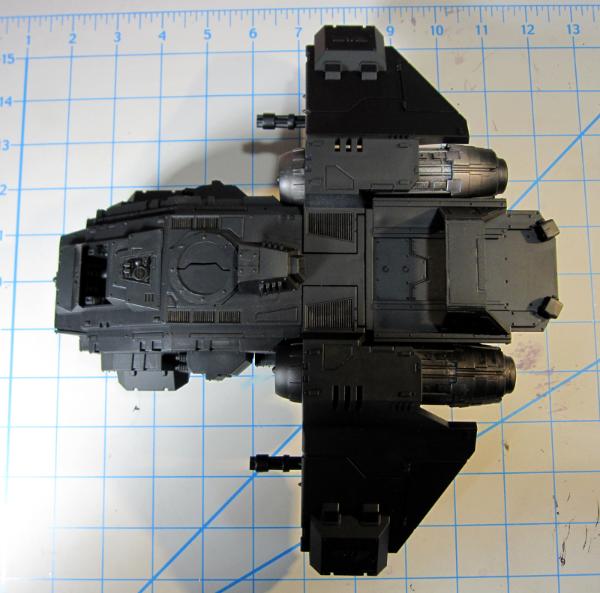
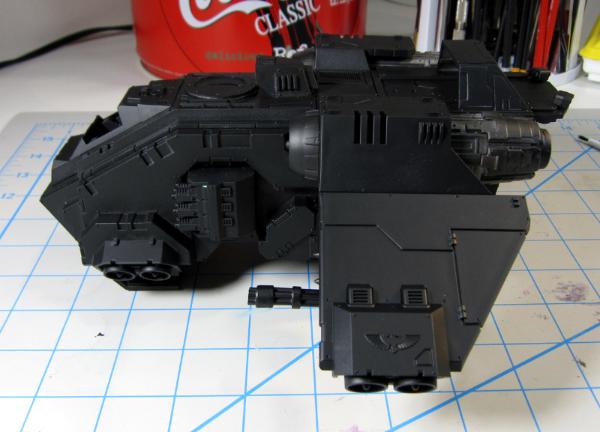
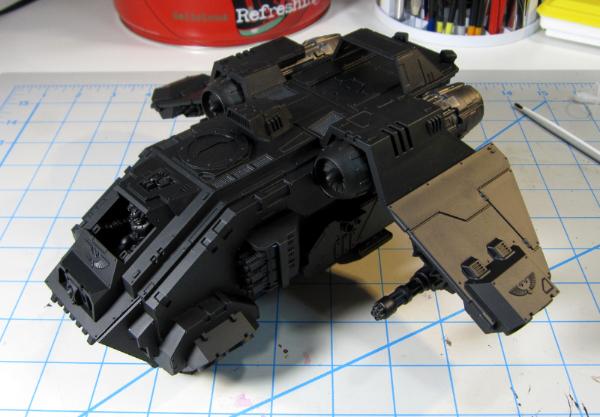
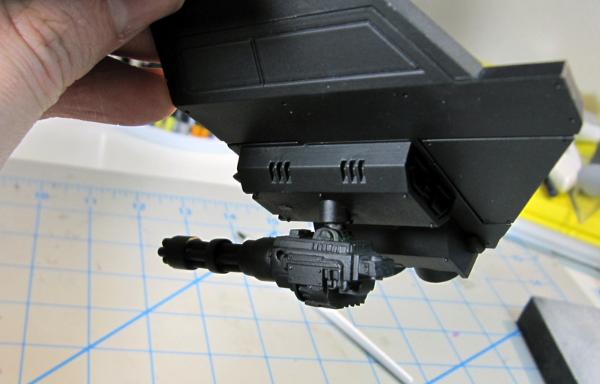
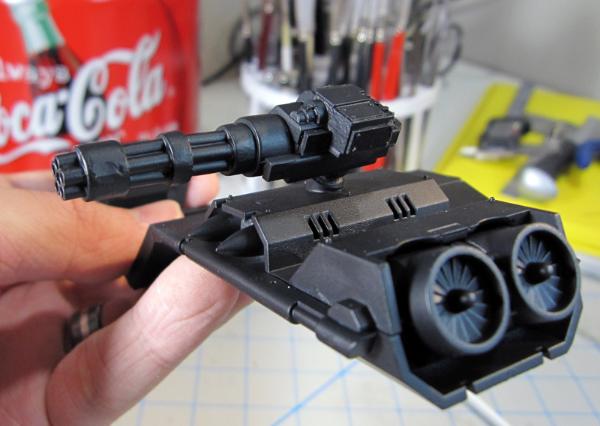
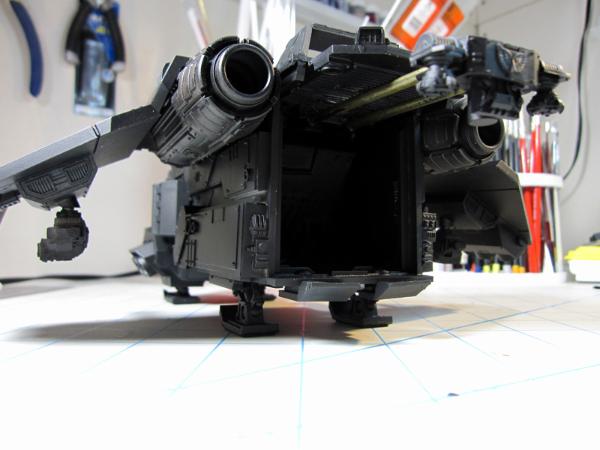
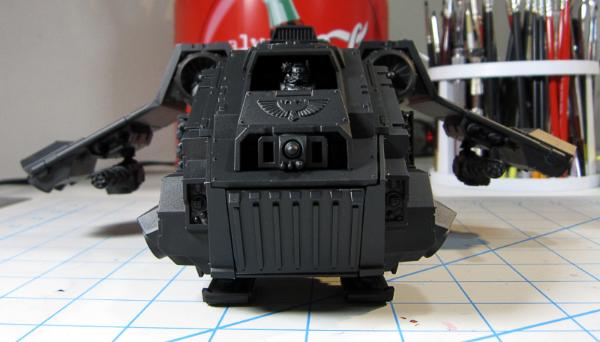
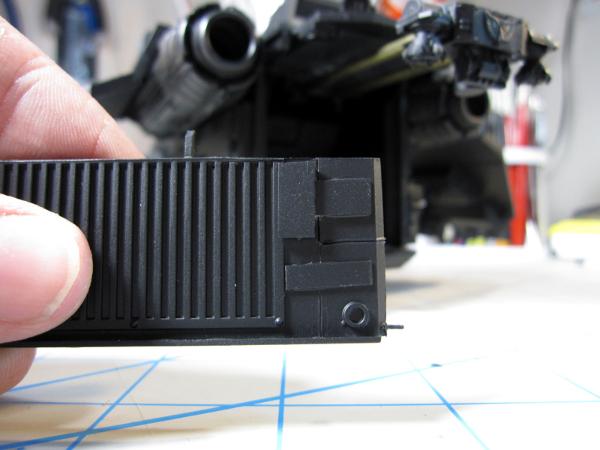
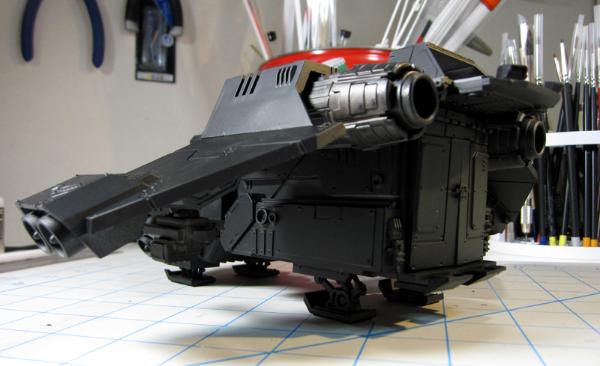
31618
Post by: Eggroll
Finally an update. Rear doors looking good. Are you going to hinge them so they swing open or have them held in with magnets or friction? You should also get a shot of the dread clamp extended with the doors closed. Probably b/c of the black primer but it's a bit hard seeing the details and how the doors work. The setup sounds ingenious though and am really looking forward to seeing it with some paint.
17349
Post by: SilverMK2
Much better with the new tail arrangement.
15358
Post by: Vitruvian XVII
Beautiful, really paid off all the work you've put in!
I always find that with plasticard, if i spend ages measuring the perfect angle and length, i will invariably mess it up. So i just cut where i think it should go and it usually works!!
22687
Post by: MajorTom11
Cheers boys -
@Eggs - The doors are hinged via pilot holes and pins in the doors, there are magnets and a locking mechanism to hold them shut. I will def post pics with the doors shut and arm extended soon too!
9000
Post by: Vargtass
This is marvelous, I thought the Stormraven could not be salvaged, but this even looks sensible!
Kudos for you sir!
22687
Post by: MajorTom11
Sensible eh? I'll take it lol!
108
Post by: Orinoco
excellent work. Deviates slightly from the original blue prints but it's very good.
9910
Post by: CommissarKhaine
Nice one! It always amazes me that GW can't reach full potential with such promising kits such as the stormraven and the dreadknight. Kudos on showing them how it's done!
22687
Post by: MajorTom11
@Orinoco - No plan survives contact with the enemy lol
@ CK - Thanks dude! To be fair, you showed em first
30532
Post by: Zefig
Those AssCans look great under the wings. Works out a lot better than the huge turret. Those are significantly bigger than the stock AssCans, right? Do you think the originals would look too weedy in a similar arrangement?
22687
Post by: MajorTom11
Ya they are huge, literally 3 times as big as the one's that come with the kit, if not even larger! Very happy with them, I like that it the SR now looks like it can do some serious damage
30532
Post by: Zefig
Ahh, jolly good. Guess I'll be waiting for production to pick up again
22687
Post by: MajorTom11
And airbrushing has begun!
The interior AB is done with a mix of browns, tans and greens, some minor osl etc. Detailing will come later by hand -
Exterior is coming along, 3 coats of color are on so far, a very dark brown, a deep crimson and on the wings, up to a blood red. Both my ABs gakked up before I could move on to the main hull though. In the ultrasonic tank now so I can get back to it.
You may notice several little lumps on the surface, not to worry, this is just liquid mask waiting to be removed.
So, as usual, my photography really is a let down, and you can only see the airbrushed fades when items are further back in the background, away from the too close light.
So next steps after finishing up the red, is to add in some black areas. Once that is done, it will be on to a gloss coat, then oil washes. Then a Matte coat, and on to freehanding, metals and symbols...
Now, excuse me, must get back to it!
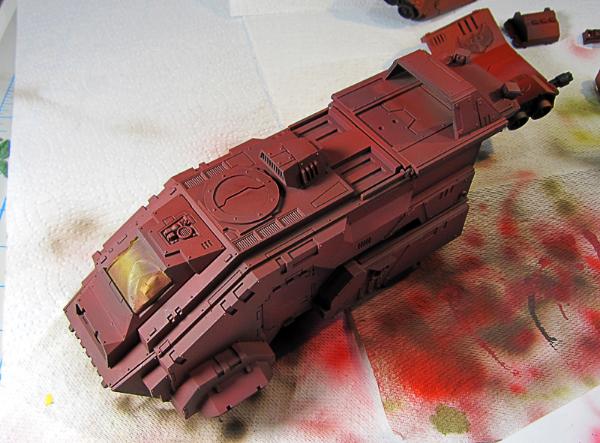
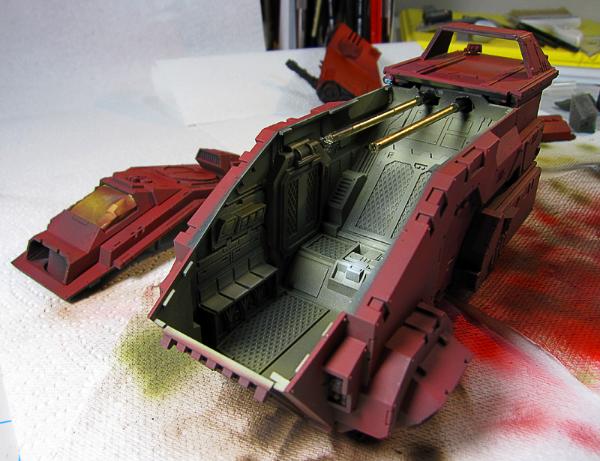
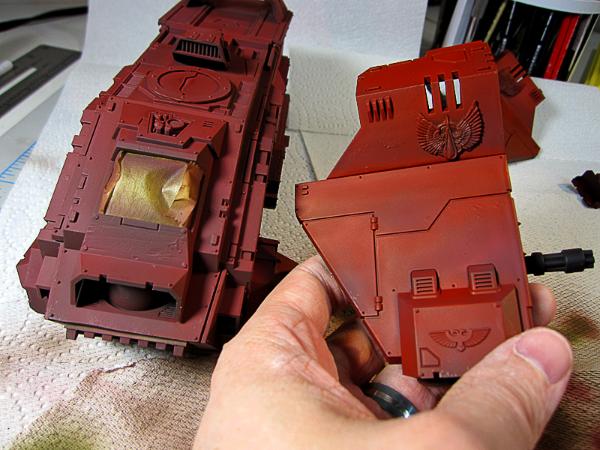
In this one in particular, you can see the gradients on the other wing are evident in the background, but up front, it looks flat red. Both wings are done identically though... go figure...

15358
Post by: Vitruvian XVII
Looking like a good start!
Particularly like the colours on the interior.
20956
Post by: Empchild
Looks smashing!!!
22687
Post by: MajorTom11
Thanks dude!
Just finished the red, very happy, and the modulation worked out nicely. It will show up very nicely next round of pics! I also wiped off the liquid mask, which surprised me with how effective it was... it gives a similar feel to sponge chipping, but since the paint is genuinely recessed when you wipe off the mask, it has more natural lighting, and catches a real deal highlight along the edge.
So, I will be airbushing some black and some hazard stripes, then to the gloss coat to finish up tonight. Tomorrow (hopefully) will be my first go at oil washes and filters
13017
Post by: littleboyblues
I hate airbrushing red. Good luck. I loved your photoshopped design and its pretty swell how your actually going through and making it. I'll keep an eye on this.
Automatically Appended Next Post:
P.S. I love oil washes and filters! They make all vehicles look a gigatrillion times better.
108
Post by: Orinoco
great work, looking forward to more pics of the red!
31618
Post by: Eggroll
About time you got to painting more of the stuff. It's looking like it's coming along nicely! Just got my SR in the mail a week ago and have been too busy to even open it though once I do get around to it, I doubt I'll do as many mods as you have. Also, 40k Radio talked about your grey knight tutorial on their latest podcast though the host calls it "zing-thial"
22687
Post by: MajorTom11
really??? That's pretty awesome they are one of the only gaming podcasts I listen to! Thanks Egg!
What I've shown so far is nothing bud, since the last round of pics, I finished the red (a few more layers made a huge difference btw, modulation is really evident now), peeled the mask chipping, and did fairly extensive stenciling (chevrons and some racing stripes), and did something that worked out really, really nicely:
Inspired by M.ikes's tiny scratches, I uses a sculpting tool (not a knife, this is key) to put 100's of tiny scratches into the hull. What was really awesome, is that unlike M.ikes, they are not painted on, but scratched in. With the AB using so many layers, this means that depending on pressure, I could scratch down to darker/lighter reds depending where, straight to black primed, of, for particularly deep one's, right down to grey plastic. It adds so much variety and subtlety to the chipping, I will be adding this permanently to my repertoire!
The interior grills and cockpit buttons have also been detailed, and the entire model given a gloss coat in prep for the next step, oil filtering and washes...
Gotta say, after so many months of working on this and so many slow downs and frustrations, things are coming together really amazingly right now, all the studying into AB (thanks egg for getting me rolling on that) and other military techniques are finally coming to fruition... Big update should be coming soon!
Cheers bud!
17349
Post by: SilverMK2
Looking forward to seeing you rolling around in oil... wait... that is a different thread!
I know the oil painting article is not exactly detailed for many of the techniques, but I hope it helps somewhat.
35849
Post by: Rochronos
Best Conversion Ever! (of a Storm Raven)
Any tutorials or links on how you got such a brilliant 'in service' look with your paint job?
22687
Post by: MajorTom11
Been a looooong time, but, I am done! Stormraven is all painted up and what an adverture it was... oil washes for the first time, extensive plasticard mods, airbrush modulation, liquid mask chipping... really was a learning project.
I have yet to decide what to do with the base, It will either be a standard rocky base, or, something... a little more diorama ish. I haven't decided how much more time I want to invest in this piece as I have so many other things to work on, can't keep sinking time into the SR forever.
But, the important thing is, it's done!
And here we go -

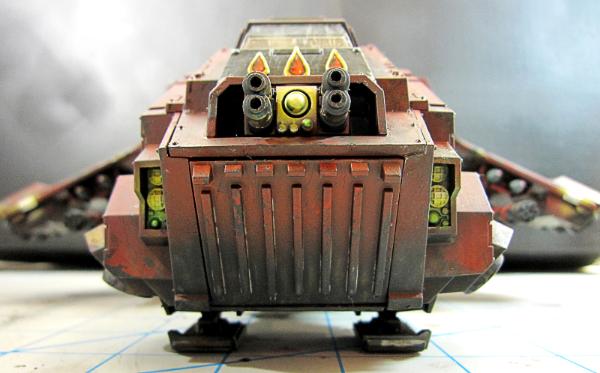


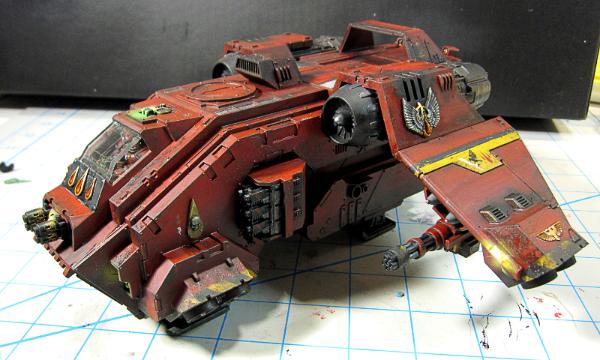
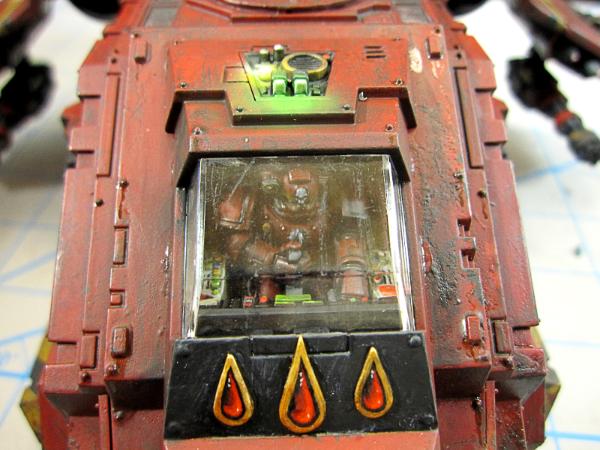
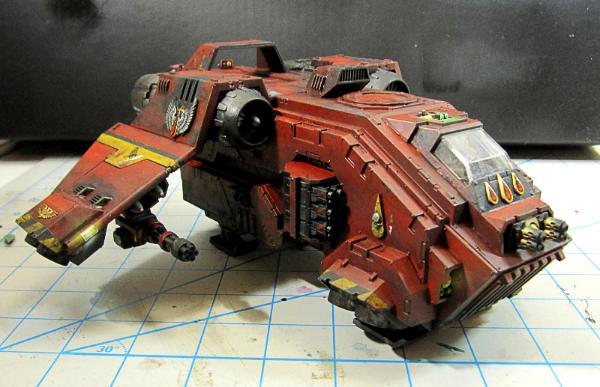
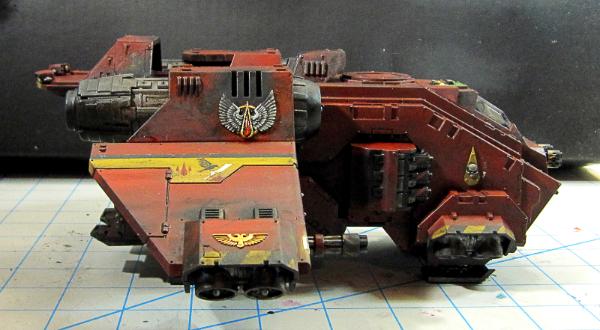
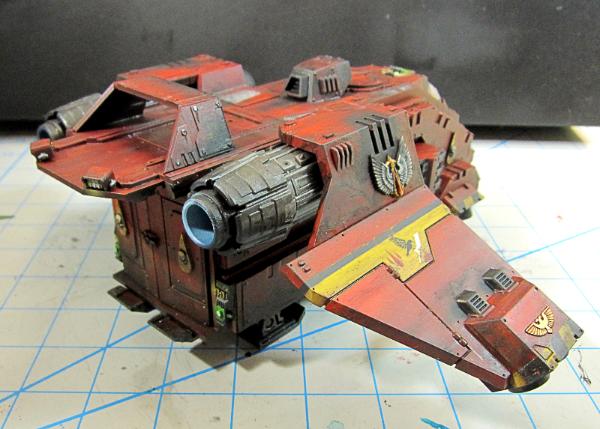
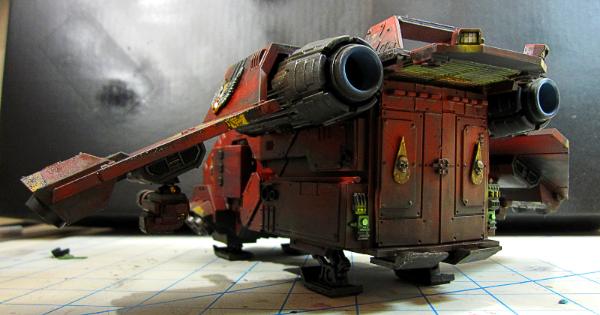
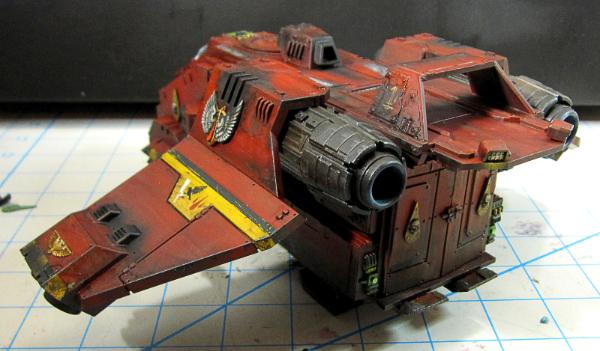
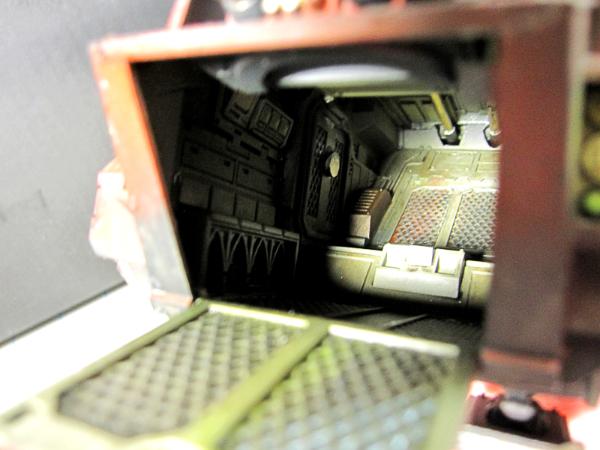
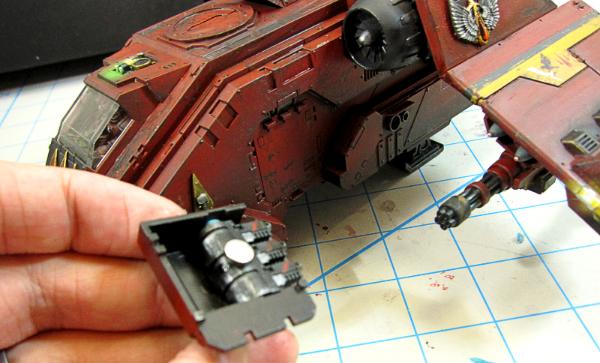
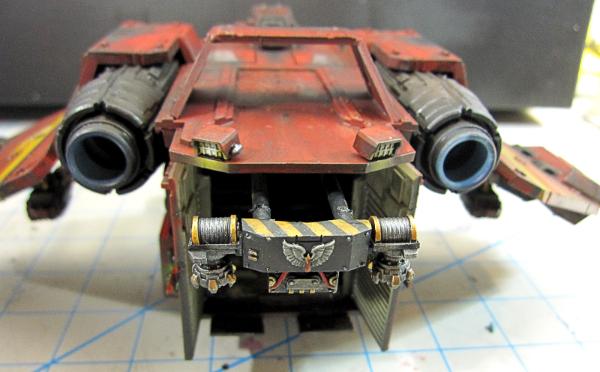
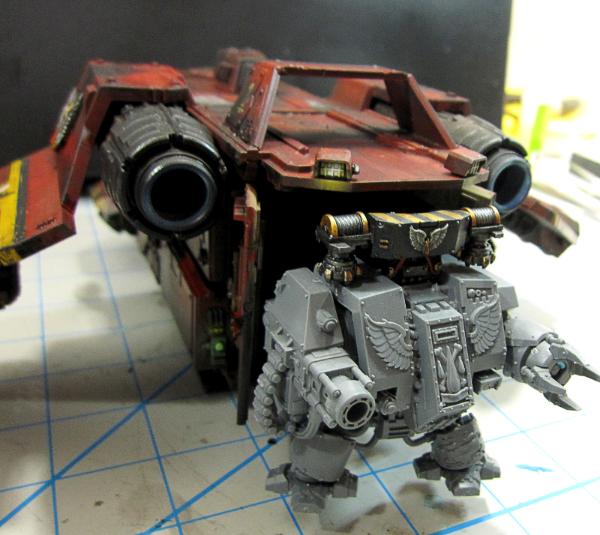
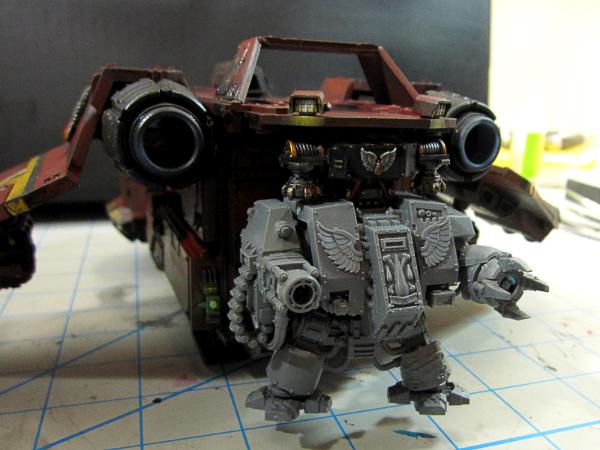
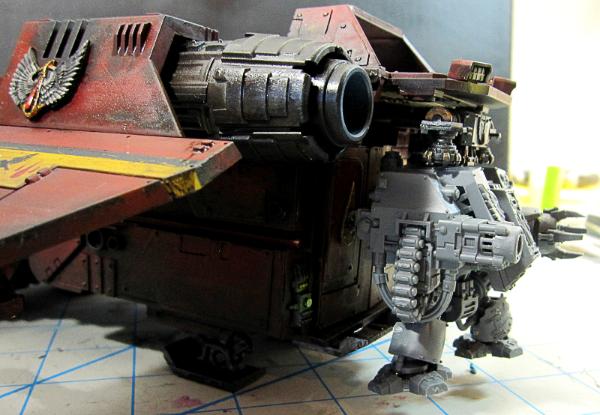
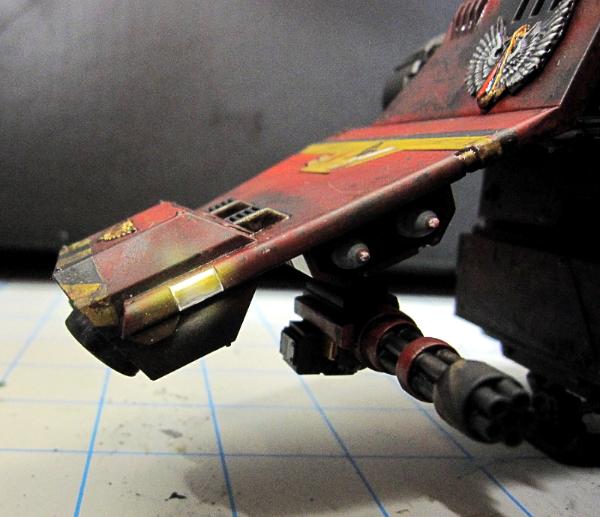
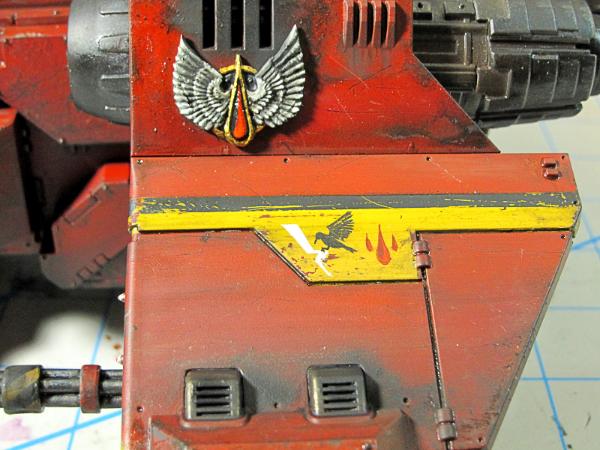
Thanks for motivating me to get this project done!
31618
Post by: Eggroll
Looks great tom! I really like the yellow on the wings, fits it very well and that dreadnought grapple is just sick. Now hurry up and paint the rest of the army
22687
Post by: MajorTom11
Thanks Eggie!
Pretty happy with my first AB'd vehicle... any critiques?
One thing about this model, 1, the nuances of the surface weathering really require zooming in, and 2, the reds are weirdly flattened by my camera, they are far more modulated than it appears too. still fiddling with the setup for photos, but in this case, so much subtle detail is missing :(
4514
Post by: Myrthe
WOW !!! Incredible work, man !! Looks fantastic !!
For the base, how about using the ruined Aquila terrain item from the Honored Imerium set from GW ? Pretty cool with very little time investment ...
1
17710
Post by: Yggdrasil
Hey Tom,
Due to lack of time, I had stayed clear of this blog (and I know I won't be using plasticard for a project until a loooong tim), but I had to step in for the painting, and...
As usual, I'm amazed at your talent... The painting is so realistic, the chips are wonders all by themselves...
Congratulations, I'm glad you got to the end of it!
22687
Post by: MajorTom11
That's not a bad idea Myrthe!
My plan for the extensive version is to create a Baal Rad desert base, with a pair of rad mutants coming out of a cave or tent walking towards some murky water (which would be clear resin, been itching to try that out) and looking up in wonder as the SR flies by. Be a fun little piece, good practice for the resin and fun to make a little campground for them. Again, not quite sure I want to put that much time in to the base, but it's an option.
The aquilla would be cool though! hmmmm..
Yggs, thanks a lot man!
17349
Post by: SilverMK2
Very nice indeed. Now all you need to do is paint the dread
22687
Post by: MajorTom11
All in good time, there are 5 dreads, 5 tanks, 3 drop pods and 100+ infantry that are waiting in line lol!
17349
Post by: SilverMK2
That is one hell of a conga Did the painting with oils article help you at all? And indeed is there anything you want to add to it now you have used oils?
108
Post by: Orinoco
effing epic, Tom. Effing epic.
40490
Post by: HAZZER
Nice paint job! Were did you get those miniguns form?
22687
Post by: MajorTom11
@silver
Yup the article was a good starting point, as well as the tutorials I found online, but honestly I still had trouble with them, and would be using it differently next time.
I am not sure if it the particular brand of thinner I used (Abteilung odorless turpentine), but it ended up a bit syrupy. I had seen several tutorials (Mathieu fontaine covers it a bit on his Dread Miniature Mentor tutorial, and a submarine on youtube) where they use the oils as a filter and not just a pin wash. They both slop on very thinned oil all over the model, but I noticed mine had a bit of a tendency to puddle up. Thinning further at some point just turns it to soup, afterall, it doesn’t evaporate of anything so at a certain point you are just drowning the model.
I think in future I will be using incredibly small dabs of oil, and then blend them in mostly as is with minimal turp, and then wipe of if it proves too much. More of a subtractive approach I suppose.
I would still like to try alternative to turpentine for the oils, I think Mineral Spirits would work too? I also didn’t try out those water soluable oils, so I must give those a go too on something else, maybe the Crassus.
Thanks a lot for all the kind comments guys! Nice to know all those months of work figuring this out weren’t wasted lol!
31320
Post by: Knightley
Tom....
That raven....
Awesome, really really awesome! the weathering, the deep rich red, the conversion. I doff my hat to you.
22687
Post by: MajorTom11
HAZZER wrote:Nice paint job!
Were did you get those miniguns form?
Those are from Bitspludo - http://bitspudlo.com/products/gatling-cannon-platform
Very nice bits from these guys, must say the casting and quality are great!
Knightley wrote:Tom....
That raven....
Awesome, really really awesome! the weathering, the deep rich red, the conversion. I doff my hat to you.
Thanks man, I always appreciate a doffed hat!
9824
Post by: Vet Sgt Ezekiel
Nice work dude.
Airbrush for the win!
Automatically Appended Next Post:
White spirits work best with oils IMO.
Ive been using AK interactives enamel based stuff recently as it drys properly quicker, provides more effects, washes with white spirits, it's easier to manipulate for things like rainmarks and it's premixed saving mess.
22687
Post by: MajorTom11
AK interactives eh? Will have to look into that thanks dude!
22687
Post by: MajorTom11
Very interesting looking stuff!
Have you seen their dvd's? Worth it?
Can you describe the workflow you use and possibly share pics of the results?
This seems like article worthy stuff, perhaps a companion to SilverMK2's oil article?
Last question, I know I am a pest, could you also describe how you use the AB for varnishes? I have never done it, and am a bit weary of spraying varnish (see SH Termie incident of 2010). Do you use vallejo? Do you thin and if so with what?
http://www.ak-interactive.com/
http://www.ibroxmodelismo.com/index.php?main_page=index&cPath=591_592
PS - For those who haven't seen Vet Sarge 'Zeke's site, check it out! His Vendetta was very inspiring for me.
I will be using a similar scheme on my Crassus (I know I know, but in my defense, I did buy it before the meme went full doofey), I am happy with the results on the SR, but white(ish) is a perfect canvas for another go with weathering.
Thanks a lot Ezekiel, you are an eye-opener and generous with your knowledge as usual!
20956
Post by: Empchild
Looks Great Tom,
I actually think I like the magnatised mover for the dred as that is the little thing that brings a story to a model.
43469
Post by: Beasty
I've got a feeling I might have to do this kinda this with my GK Stormraven.... think i may get it out of the box now
22687
Post by: MajorTom11
Check out Chapterhouses StormRaven conversion kit by Hits_the_Spot, that will get you 90% there right off the bat!
22619
Post by: inmygravenimage
I was looking for that on their site, can't find it - am I being dumb, or is the curse of C&D again?
6274
Post by: porkuslime
not quite ready to go live on the CH website.. email or pm them to get in before it is posted..
43214
Post by: jirc
That is epic, love it. Nice work dude!
33018
Post by: medabee
O-0 I cannot beleive that i missed this step by step, and mad at myself for that, this was a wonderful read through.
Amazingly painted, love the redesign and dread mover arms. WOW.
50318
Post by: MakeH
Love the red on the bird!
40490
Post by: HAZZER
Updates? Btw how about checking out my blog too? (link is in signutre).
HAZZER
43845
Post by: Skipphag da Devoura
That is freakin' sweet!
Makes me want to start a Vampire Marine army just so I can copy you.
I love the Dred boom.
Of course, I could make an Orky version for Apoc, to represent a Chin-Ork Warkopta!
So many Looted Ideas!
Again... Beautiful!
|
|