53748
Post by: varl
hello Dakka,
thought it was time I get my sallies blog rolling.
I made some half-arsed attempts at painting fantasy minis back in my teens (I'm in my late 30s now), but nothing since then until I took the plunge early this year and started painting w40k minis. I went with space marines because I love the concept and the Salamanders chapter in particular because I like their fluff. to get started, I picked up the aobr box. I also splurged on one of those 'every color we make in a fancy box' GW kits over the holidays. bit of buyers remorse over that now that I've learned more about paints, but it was still a great price so eh. now, if I could only convince GW to start making chapter-specific kit for them...
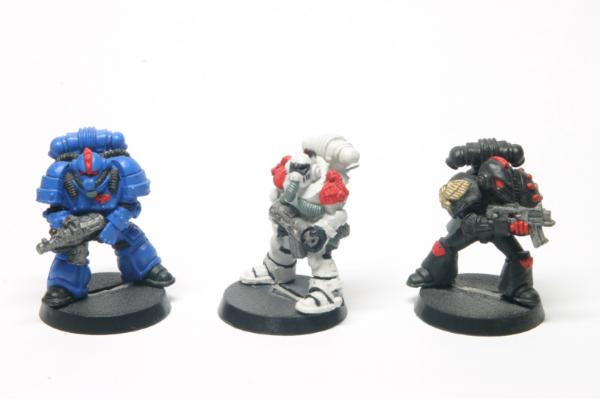
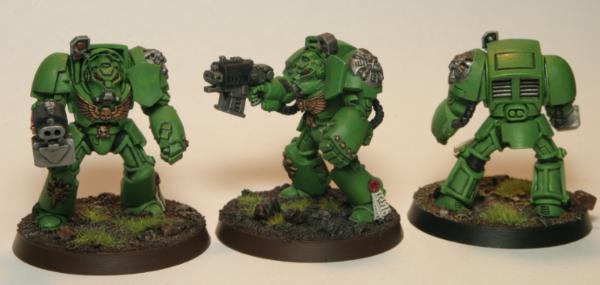
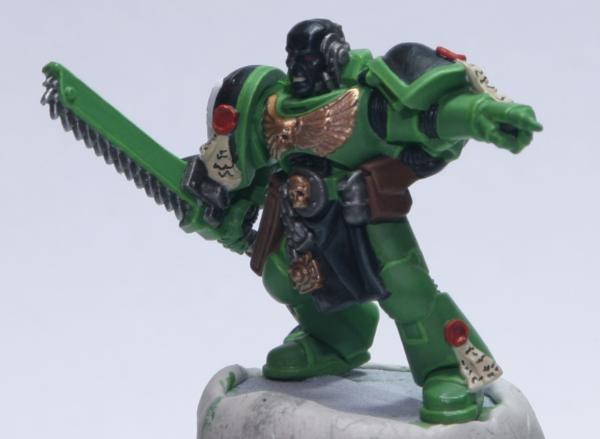
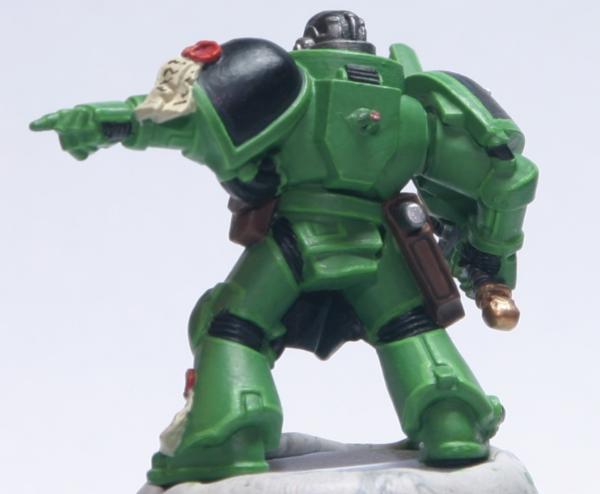
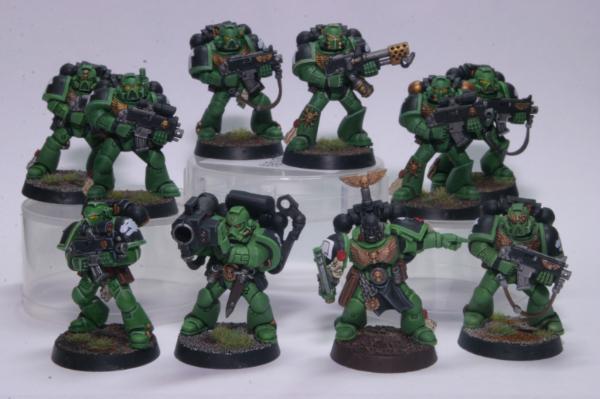
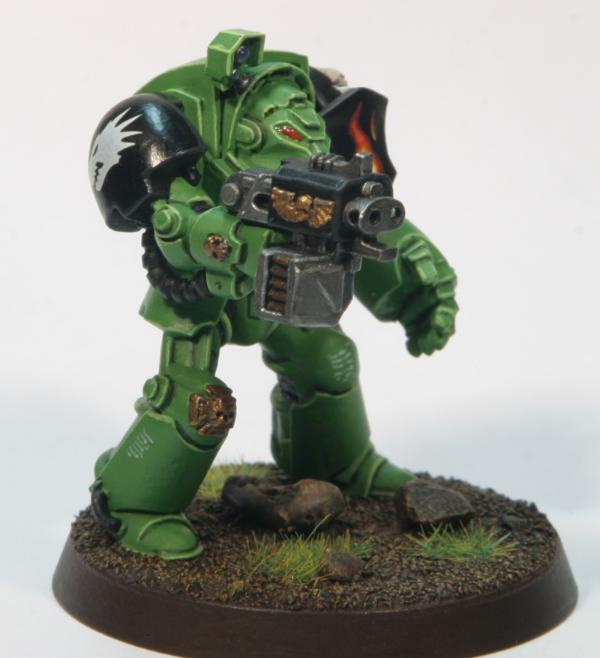
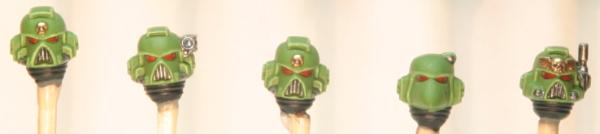
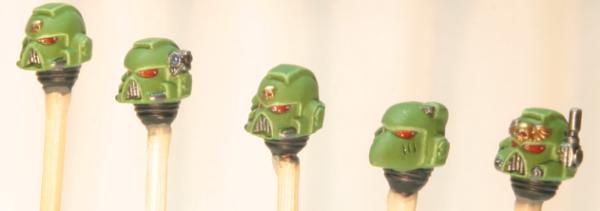
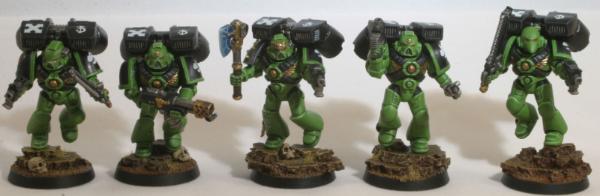
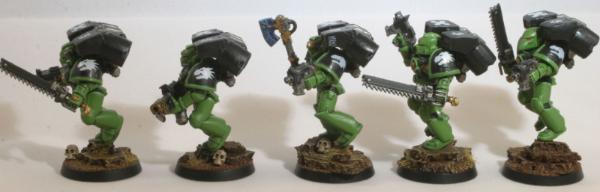
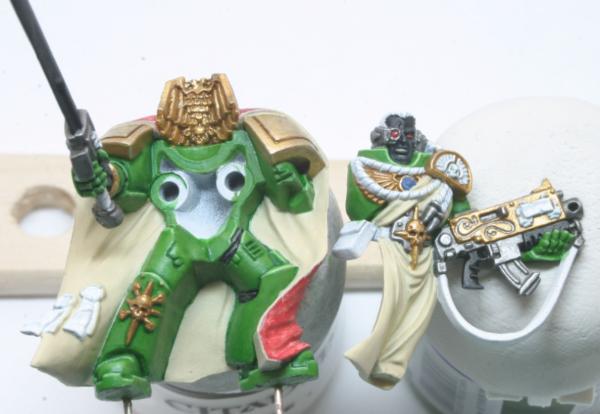
anyway, to kick things off, here's a group shot of the first marines I've painted up.
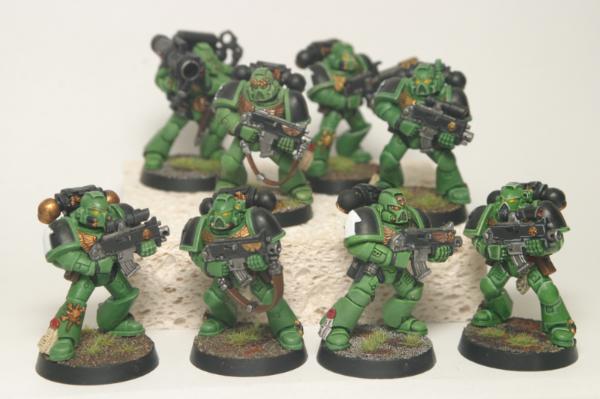
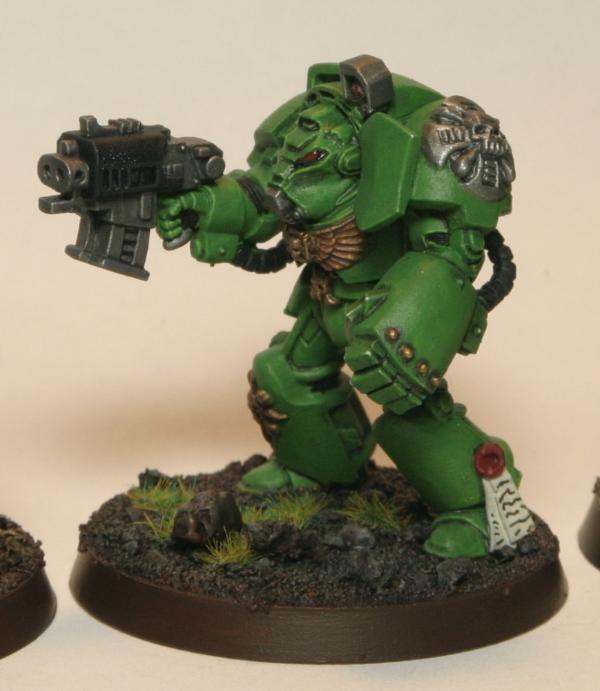
these guys are close done. I still have to apply decals and I think I'm going to change the eyes from yellow to red. the bases aren't great, but I'll leave them for now as a reminder of where I started :p
fairly happy with the color scheme overall, esp since I had to reverse-engineer most it from photos in the SM codex. I haven't found a lot of good sallies reference material so far. I'll be doing much less of the brass/gold detail on the backpacks on future models, I think.
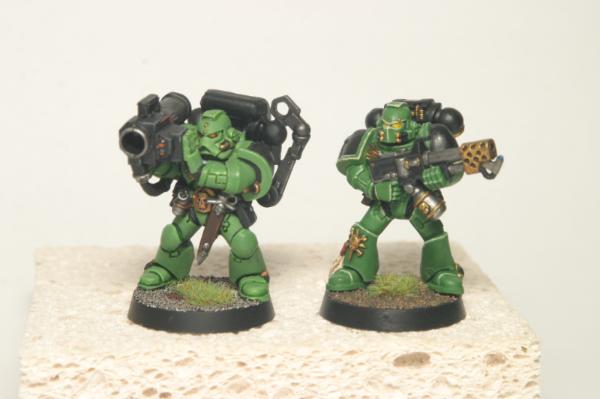
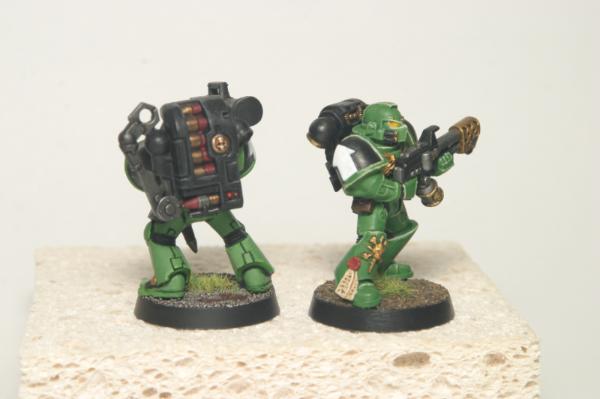
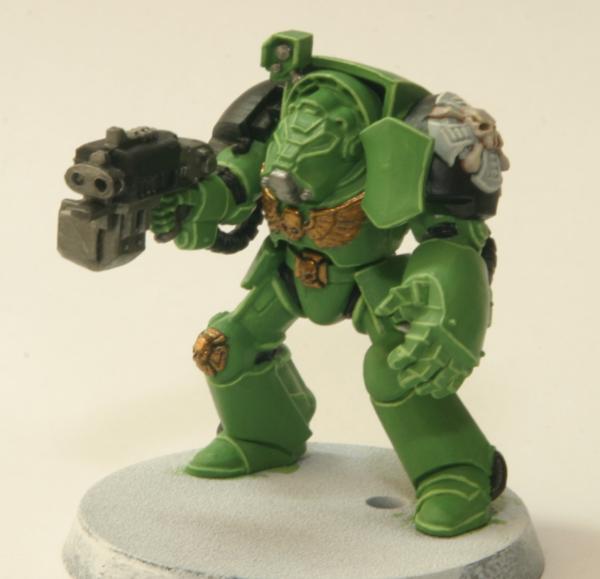
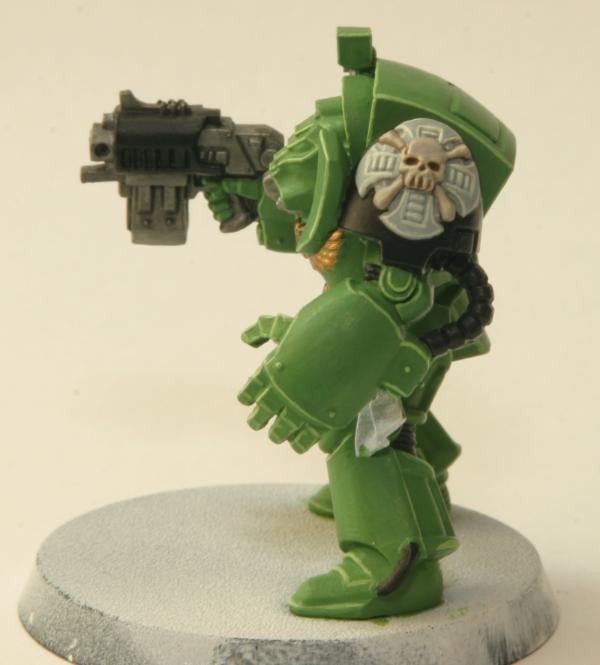
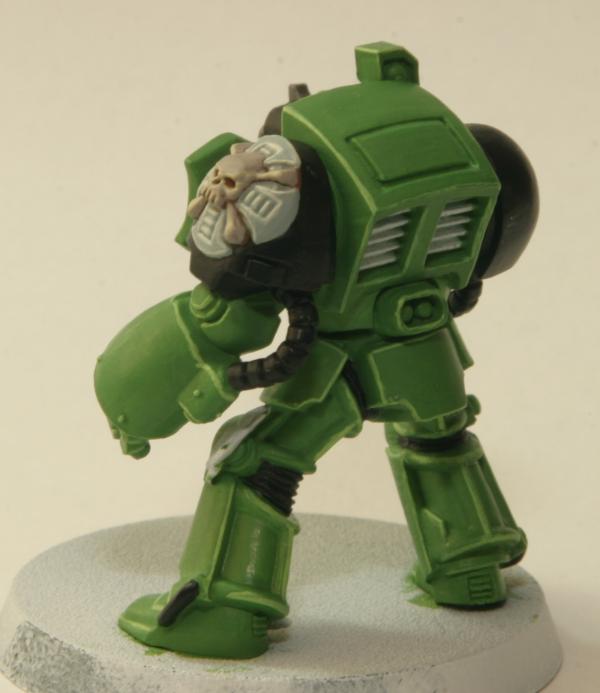
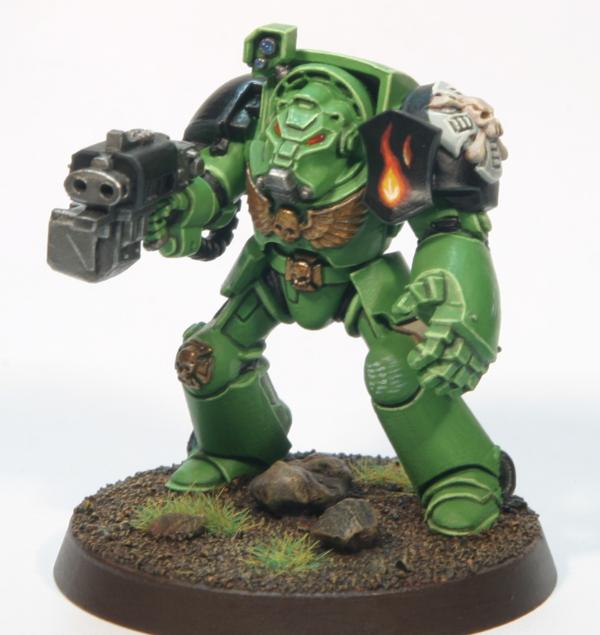
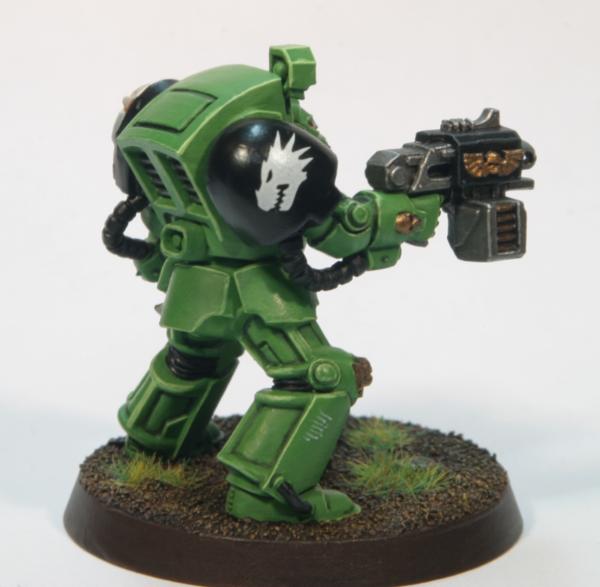
I'm still debating on whether I like the hard highlight scheme (right) or the more subdued highlights (left). the missile launcher marine is the most recent one I've painted and I think I did the flamer marine fairly early on; #2 or #3. would love some opinions on which style folks like better.
I still have to paint up the sergeant and that will complete my first squad (one guy was camera shy and hiding behind the backdrop; oops).
more to come in a bit...
Automatically Appended Next Post:
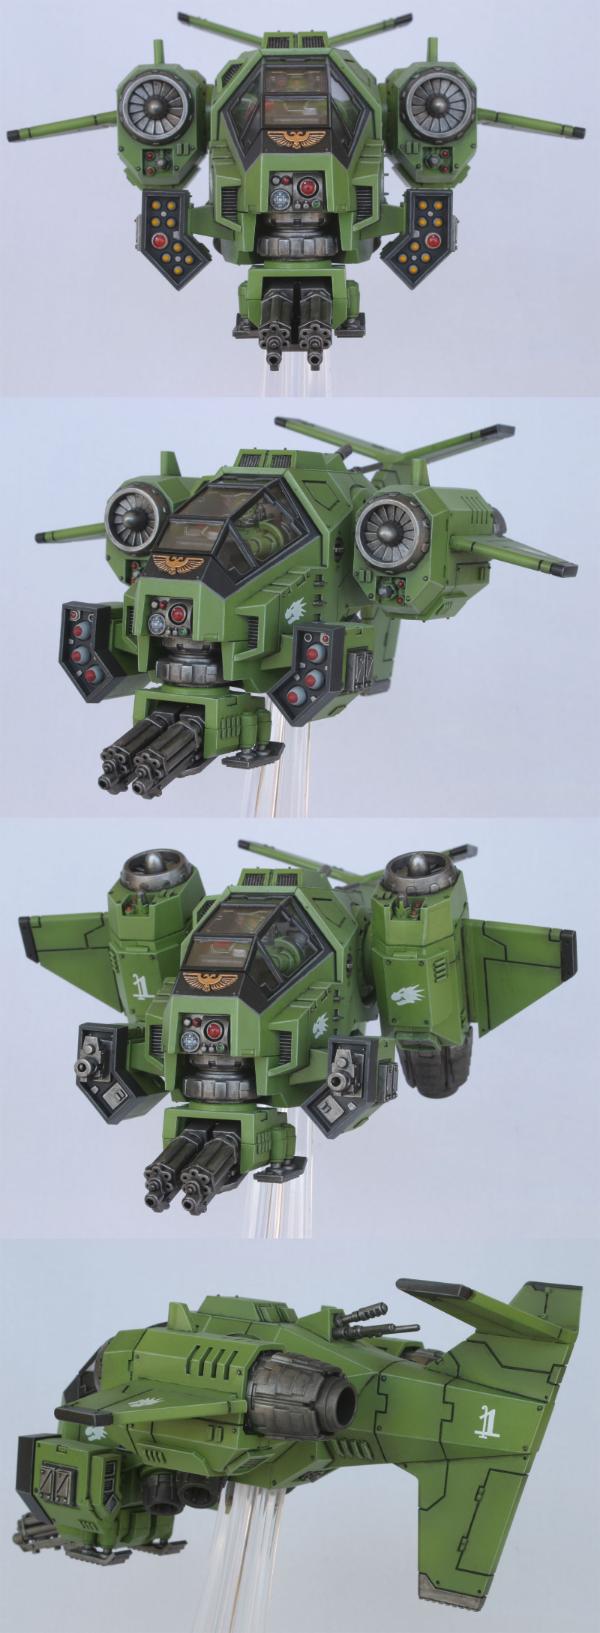
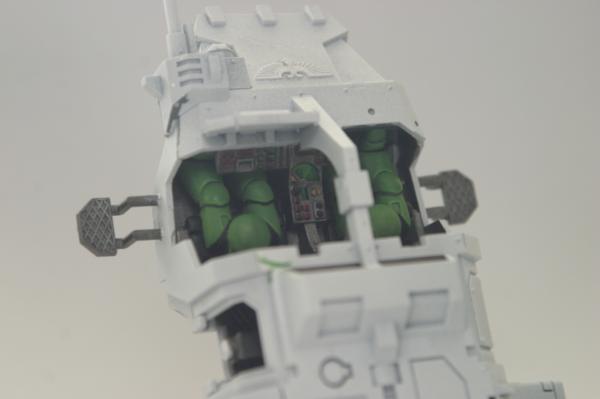
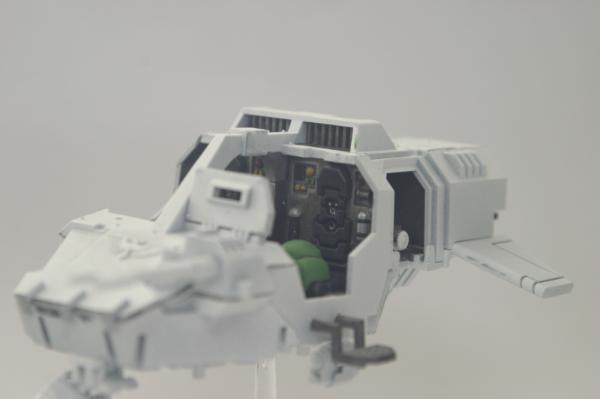
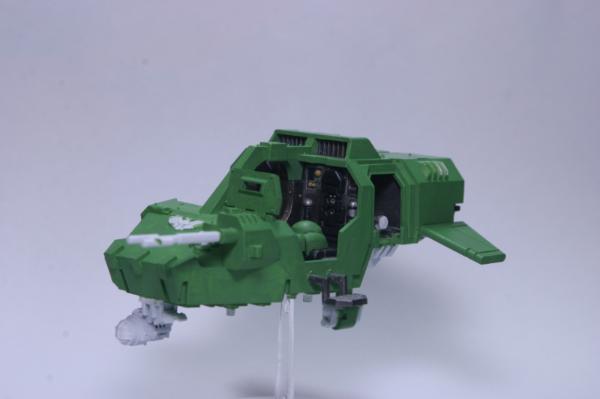
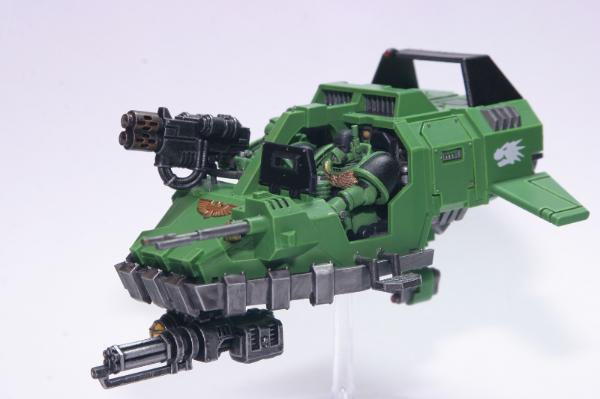
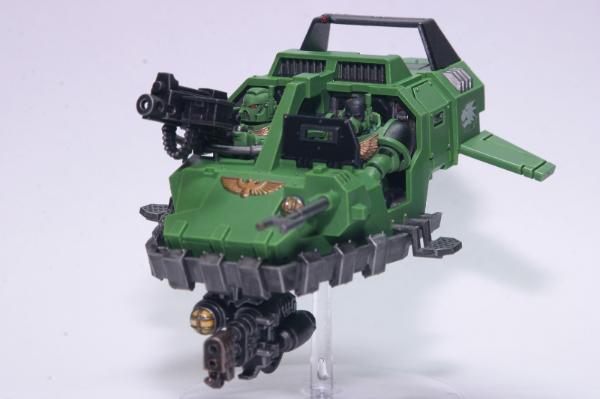
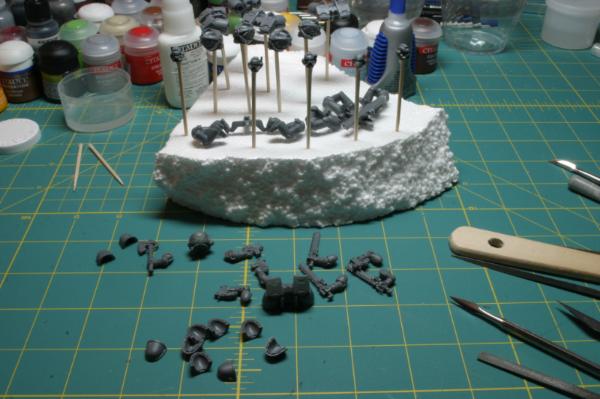
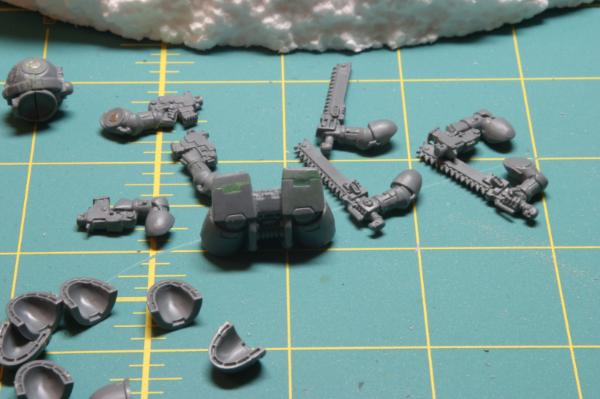
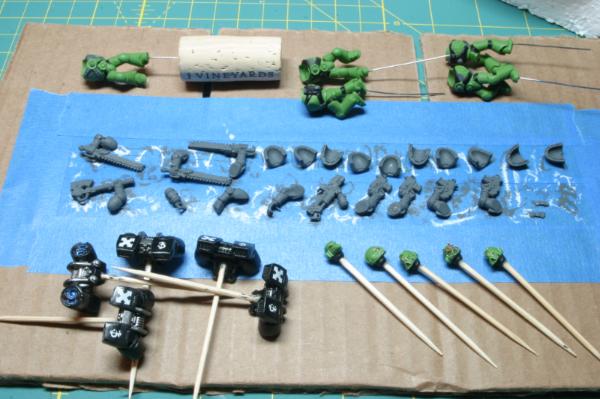
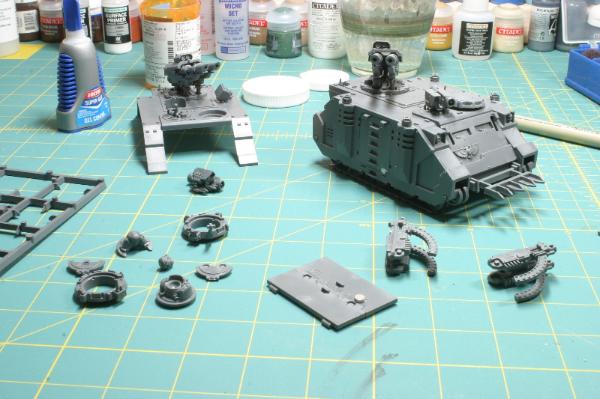
I'm currently working on my first vehicle, a land speeder. I wanted to paint all the interior spaces, so after cleaning up all the bits I dry-fitted everything together to figure out what I could pre-assemble and what I'd have to paint before assembly. wish I'd thought to take photos of this process, but it worked out to these chunks as paintable units:
- crew legs & back wall plate
- dashboard control panel
- crew torsos, shoulders & heads
- crew arms
- assault cannon, heavy flamer, heavy bolter and multi-melta (after magnetizing)
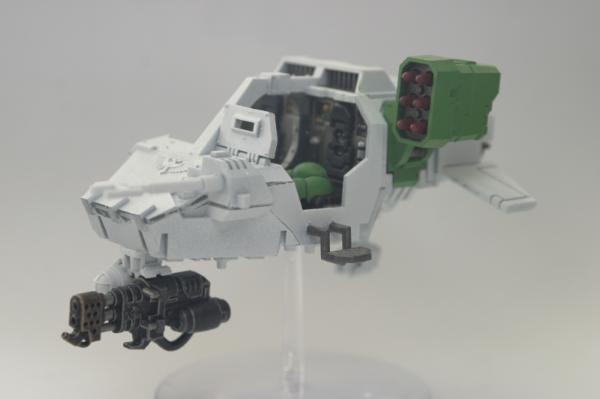
- missile launchers & their doors (after magnetizing)
- regular doors (after magnetizing)
- everything else (will paint after assembly)
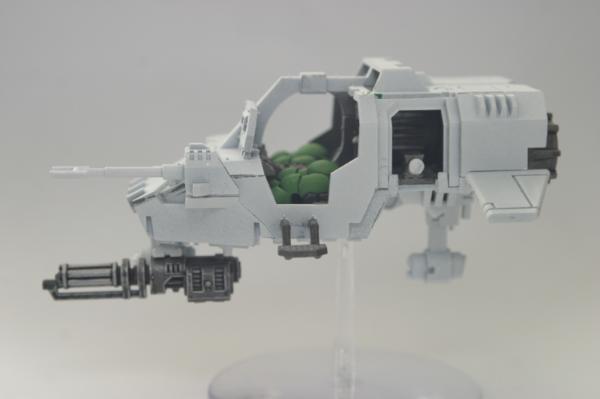
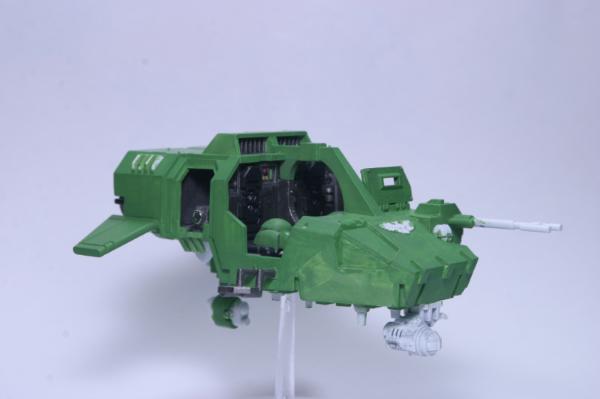
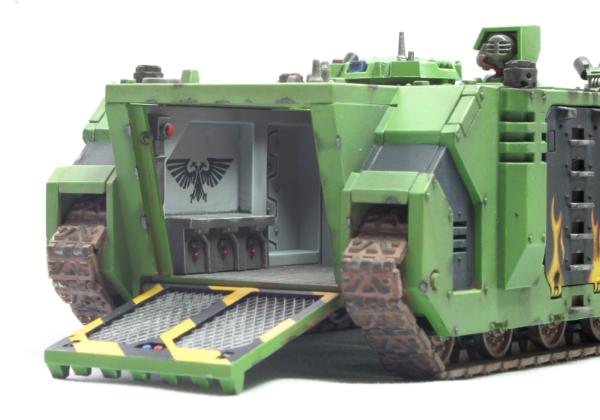
so far, I've got all the interior spaces painted as well as all the weapons and the crew and I have the whole thing assembled except for the crew:
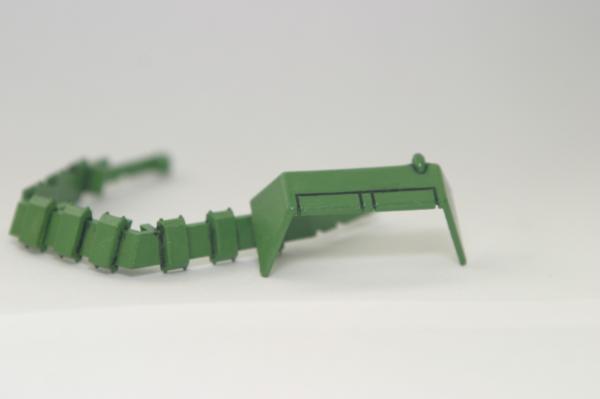
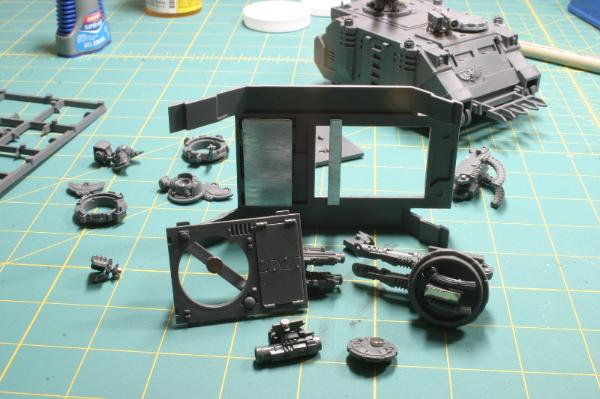
I was inspired to magnetize as much as I could after watching several of catattafish's youtube videos. for the doors, I glued some stacked bits of spru to the floor plates just inside the doorways and then glued a magnet to the side of each stack:
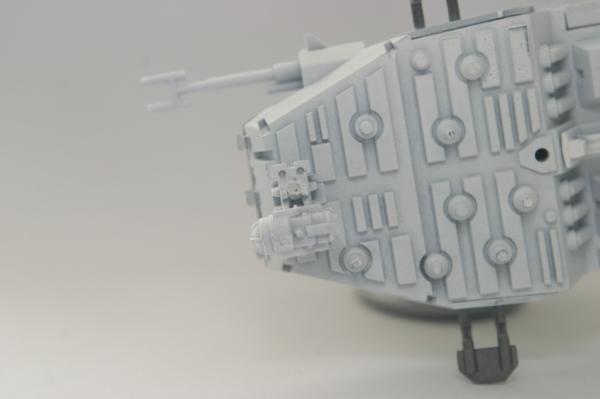
on the doors, I glued a bit of sheet metal to the insides. I could have used magnets here, but having a magnet on just one side is strong enough and using magnet to metal instead of magnet to magnet means I don't have to worry about gakking up the polarity  here's what the inside of the doors looks like:
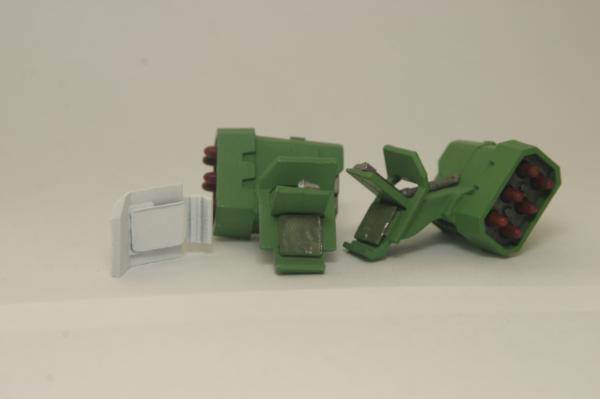
the only bits I had to cut off the doors were the plastic pin-like hinges that let you open and close the doors after assembly. here's what the doors look like when attached:
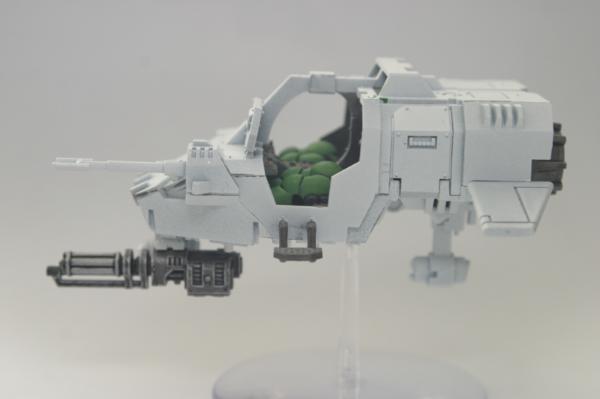
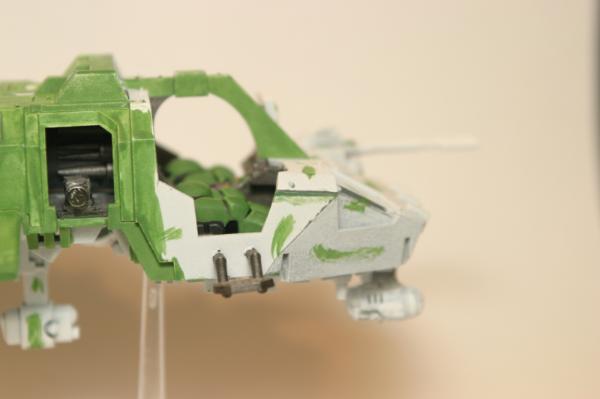
in the two shots above, you can also see that I magnetized the assault cannon and heavy flamer so they can be swapped. I'm a bit less happy with how this turned out; it's not as stable as I'd like (too easy to bump the gun out of alignment, though it doesn't fall off). for this job, I recessed a magnet into the clamp that you're supposed to glue the gun onto (you can see it just above the search light):
on each of the guns, I recessed a magnet into the top at an angle to line up with magnet on the clamp. it was tough to get things aligned properly and even after a good bit of fiddling it's still not quite right. if you zoom in on the heavy flamer photo, you can see that it doesn't sit flush with the clamp. looking back on it, I'd do this differently next time:
- get the bits for a second search light assembly (the light and the clamp)
- glue on gun to each search light assembly
- recess a magnet into the top of the assembly
- recess a magnet into the bottom of the speeder hull where the light assembly is normally glued on
since there are details in the hull that force the alignment of the light assembly, I think this would make for a much more stable way to magnetize the front guns.
I also magnetized the heavy bolter and multi-melta by recessing a magnet into the base of each gun where you'd normally glue it to the hand grips and then I glued a small bit of sheet metal onto the hand grips. I haven't assembled this bit yet as I still have some painting to do, but I'm thinking this will work out well.
more pics as I make progress.
46982
Post by: MrMerlin
What a nice first post!
I'm a big fan of your green, its not too bright and doesnt bite my eyes, very well done!
You asked wich way of highlighting looked better.... I'd say go for the sharp edge highlights, they look great!
The bases look neat, but I think they may look better with a brown rim..... it looks better on a battlefield when the top of the base and the rubble on the board are blended with a pale brown rim.... but that a very minor issue.....
oh and you also got inspiration from cattatafish? I use his skin recipe all the time for my orks!
I'll be back for the next update!
(edited twice for nasty grammar mistakes  )
47729
Post by: HONAW
Wow...... You are very steady with your brush. I must say though that I like the subdued marine better. You know.... if you want a tip..... for the in between parts of the armor with the ridges and the helmet grill. You can paint them silver and then wash it with badab black so that it is black with the highlights built in and they will look great.
22413
Post by: mwnciboo
Good work Varl. especially nice on the cockpit of the Landspeeder. Not enough Salamanders on here.
53748
Post by: varl
@mrmerlin: thanks I'm with you on the bases; they're pretty meh. I'm using a mix of different sands now for more texture and base-coating + dry brushing instead of just washing. looks much better, though I've lots of room for improvement. will get some pics up when my termies are flocked.
@honaw: that's pretty much how I've been doing my helmet grilles lately - a light coat of boltgun metal and then a wash with badabb black. I tried the first few with green instead of metal and they just didn't feel right.
most of the armor in the pics I have up so far was primed white, washed with watered-down DA green (not sure this step is worthwhile), washed again with badabb black, filled in with goblin green and then highlighted to various degrees with snot green. that's loosely based off the process awesomepaintjob used for his salamanders tutorial, but his scheme was darker (looked more DA to me). I'm playing around with doing the black wash after the highlights and also using an oil pin wash instead of something like badabb black; mixed results so far. also tried a final wash with thrakka green, but that was gak. more than a few attempts have ended up in the SuperClean bucket for a nice, long swim :p
I started painting the body of the landspeeder last night, but found a nasty gap that I'll have to fill before I can go much further. the top hull plate for my speeder was all kinds of warped coming out of the box. I had to glue down one side and wait for that to dry before I could put enough pressure on the other side to glue that one down as well. one of the seams must have separated a bit as the glue dried, so I'll be whipping out the GS tonight :( is it common for GW vehicles to have warped hulls? I've got a rhino kit sitting on the shelf and I'm almost afraid to look...
50140
Post by: Sir Samuel Buca
I've been looking for a good Salamanders blog for a couple of weeks. Kudos to you my good sir, I shall be following this closely. Great work so far, loving the nice smooth green.
46466
Post by: San76
mate, i LOVE your salamanders. great even tones, nice solid green. personally i preferred the more subdued highlights...but then again, ive often found with my stuff that what looks great in RL doesn't always look great in a photo.
the interior of that speeder looks amazing and the highlights on the flamer are perfect.
cant wait to see more.
29116
Post by: martian_jo
varl wrote:@mrmerlin: thanks I'm with you on the bases; they're pretty meh. I'm using a mix of different sands now for more texture and base-coating + dry brushing instead of just washing. looks much better, though I've lots of room for improvement. will get some pics up when my termies are flocked.
@honaw: that's pretty much how I've been doing my helmet grilles lately - a light coat of boltgun metal and then a wash with badabb black. I tried the first few with green instead of metal and they just didn't feel right.
most of the armor in the pics I have up so far was primed white, washed with watered-down DA green (not sure this step is worthwhile), washed again with badabb black, filled in with goblin green and then highlighted to various degrees with snot green. that's loosely based off the process awesomepaintjob used for his salamanders tutorial, but his scheme was darker (looked more DA to me). I'm playing around with doing the black wash after the highlights and also using an oil pin wash instead of something like badabb black; mixed results so far. also tried a final wash with thrakka green, but that was gak. more than a few attempts have ended up in the SuperClean bucket for a nice, long swim :p
I started painting the body of the landspeeder last night, but found a nasty gap that I'll have to fill before I can go much further. the top hull plate for my speeder was all kinds of warped coming out of the box. I had to glue down one side and wait for that to dry before I could put enough pressure on the other side to glue that one down as well. one of the seams must have separated a bit as the glue dried, so I'll be whipping out the GS tonight :( is it common for GW vehicles to have warped hulls? I've got a rhino kit sitting on the shelf and I'm almost afraid to look...
Sadly yes it is common for them to be warped slightly. Any kit with large thin flat plastic pieces runs the risk of having some warped or slightly bent pieces. I've found that holding them under hot running tap water and then applying slight pressure helps get them back into the shape you want them in.
Most vehicle kits will have small gaps you'll need to fill with GS or accept. On the Rhino, the most noticeable gap is going to be on the front of the track/hull assembly. There's actually pictures in the SM codex where they didn't even bother filling the gap. Check out page 152, second Rhino from the bottom. You can see the gap on the front of the track assembly right next to the yellow (II) squad marking.
There's practically no way to assemble the Rhino without a little bit of GS gap filling, but it's normally not as bad as the LS.
53748
Post by: varl
@San76 & Sir Samuel Buca: thanks
@martian_jo: how hot are we talking? wear-dish-gloves-or-burn hot or something more finger friendly?
tonight's project: fixing the gap
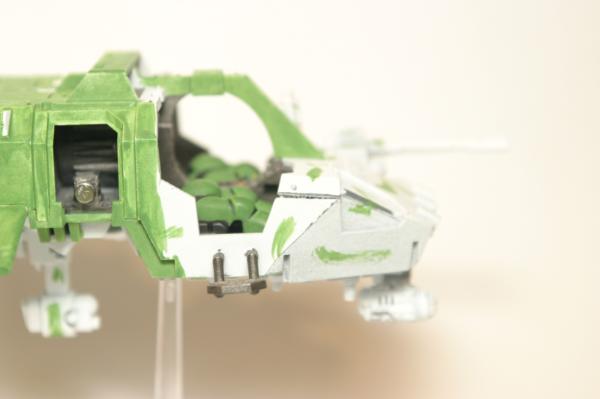
don't mind the random streaks of green paint. those are just to remind me what color I'd decided on for each panel for when I get back to painting. the GS turned out to be a lot easier to work with then I expected, so here's hoping it dries ok. filled a few other minor gaps while I was at it, since I had the GS mixed up anyway. I always seem to mix up waaayyyy more than I need...
now I just have to be patient enough to let it dry. once that's done, a little love with the file and I get to try out using gesso as a primer (and wait for it to dry. again. yay?)
53748
Post by: varl
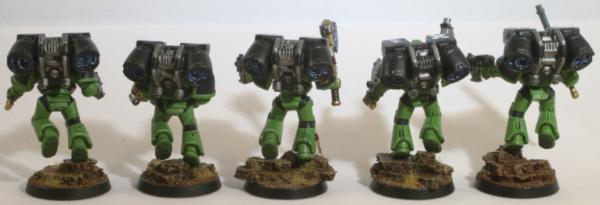
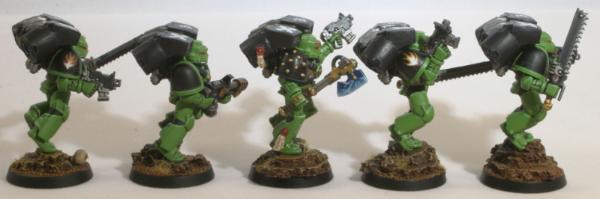
still waiting for the gesso to dry on the speeder. sigh. the gesso looks a bit rougher than I'd expected it to, but it's only been drying for about 8 hours. hopefully it tightens up over the next 16. in the meantime, I finally based the first 3 termies I painted up (apologies for the bad white balance):
the two gents on the left were shaded with a pin wash after the basecoat and highlights were done. the gent on the right was shaded early on with badabb black and then I built up the basecoat and highlights over the top of it, leaving all the crevices dark. which method do you guys like better?
I'm still struggling with getting the pin wash right. looks too grainy to me up close, but I'm not sure if that's due to my technique or the particular oil paint I'm using. you can see what I mean on these bits of the speeder I tested on:
the spoiler came out the way I wanted, but the bumper looks messy. I still have to clean up the excess with mineral spirits, but the grooves in the bumper don't have the fine shading lines I was hoping for. then again, maybe shading all the hull joints on a vehicle like this is overkill. think it's too distracting?
46982
Post by: MrMerlin
Your bases are looking great with a rim!
With the shading I cant really help you, I paint orks and they work in a different way.....
43612
Post by: Rawson
I like the crisp paintjobs you've got going here! And great attention to detail (I was impressed by your landspeeder dials and do-hickeys  ) Will you be adding Salamander iconography at some point?
Keep up the good work!
Rawson
43840
Post by: Deathshead420
Nice shade of green in my opinion. Looking forewords to more.
53748
Post by: varl
thanks guys
@rawson: yeah, I still have to add decals to everyone and I'm also thinking about freehanding some bits of flame on the termies, at least. I haven't sealed anyone, yet, so they're all subject to fiddling still
47729
Post by: HONAW
Nice.... I am a big fan of your work Varl. Salamanders are my favorite Vanilla Codex Chapter.
53748
Post by: varl
just a minor update; haven't had much of a chance to paint for the last few days. I've managed to get the first couple layers of the basecoat onto the speeder:
I'll probably do 2-3 more layers before I start detailing and highlighting, but I'm excited because it's finally starting to look Salamander-ish :p
the gesso I primed my gap repair job with ended up drying a lot rougher then I'd been led to expect, so I had to smooth it down a bit before I could paint. after digging around a bit on dakka, it seems that the black gesso tends to dry smoother than the white and is more forgiving of 'thick' coats of primer. go figure, I used the white stuff I'm testing out the black on the bumper (formerly basecoated green and used to test an oil wash), which I primed tonight, so that I can repaint it metallic instead of green. hopefully the black gesso works out better.
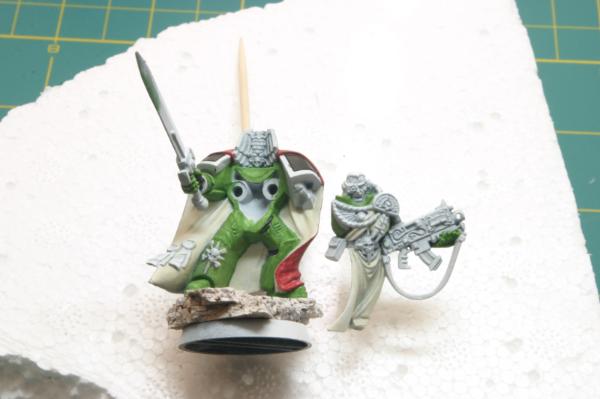
on the side, I've also started working on the last model for my first tac squad, the sergeant:
(pardon the dark photos... will beat sense into my camera later) I've got him basecoated and I've started adding in black and brown details. I'd done the face a week or so back to test out a method for painting black skin. not 100% happy with it, but it's not terrible. at any rate, lots of work left on this guy.
I'm doing a couple things different for this model. firstly, I'm painting his backpack separately and then I'll attach it when I'm done with his armor. for all my earlier marines, I'd glued everything together before I really thought through how I was going to paint all the details. easy mistake to make with the aobr kit since there aren't as many bits to assemble. I won't be making that mistake again, though. having weapons and backpacks separate from the model makes life sooo much easier. slower, to be sure, but easier!
the second difference is that I'm going to try shading after basecoating and highlighting, instead of shading first and then basecoating over it. I've got somewhat low expectations for this idea, but it's always educational to experiment. besides, this guy's already taken a bath in SuperClean twice so a third time won't kill him if this doesn't work out :p
entertaining house guests over the weekend, so won't be getting any painting done for a while. le sigh. Automatically Appended Next Post: @HONAW: thanks for the kind words I noticed a few salamanders in your gallery... is the gent with the power sword and the blue cloak any particular character? it's lovely work!
53748
Post by: varl
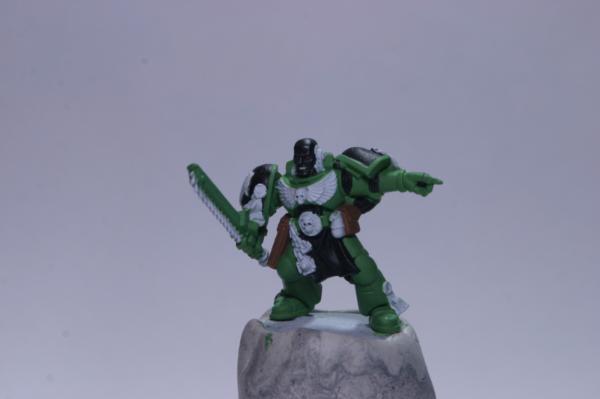
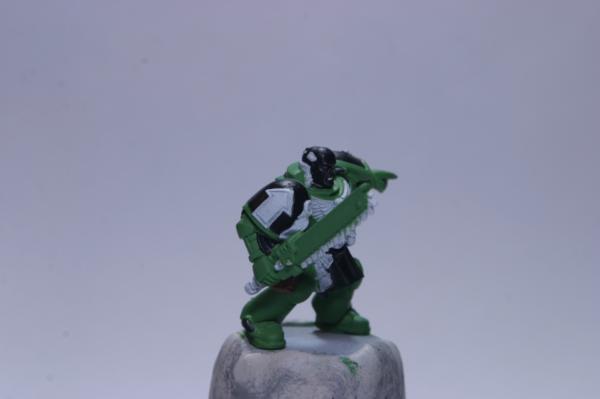
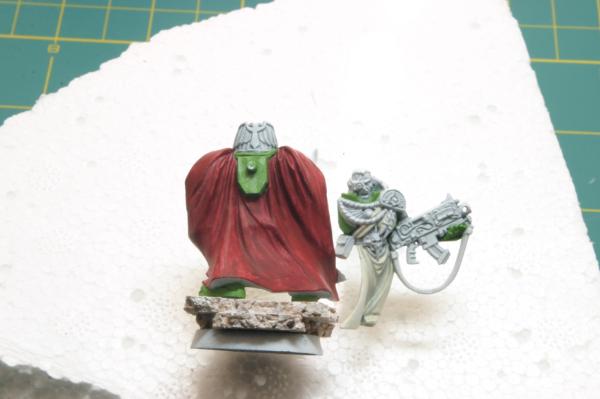
more progress on the sergeant tonight:
(the green is slightly brighter than in real life, as I had to overexpose the photos a bit to get the black detail (face, tabard) to show up)
I've finished with the basecoat, highlighting and detail work, but I still have a bit of cleanup to do (funny what the camera sees that you don't). the tabard is my first attempt at cloth. it doesn't show up terribly well in the photos, what with it being black and all. it's about 7 layers of successively lighter grays on top of a black basecoat. I think it came out reasonably well for a first try, though I'm wondering if the highlights should be brighter. my original plan was to paint some fire on the tabard, but after doing just the highlights for all the folds I was ready to throw in the towel on cloth :p maybe I'll save the flame idea for my captain...
anyway, last big step for this guy is a wash to add some shading. I'm almost afraid to do it because he looks fairly clean right now, but I know he needs it. I'll be using a wash that's a bit lighter than badabb black; more like a medium/dark gray and a bit thinner (home made soft body black wash). I'm debating between washing the entire armor surface or just sticking to the recessed bits.
three questions for dakka:
1. what do you think of the tabard? should I add more highlighting? have I got the shadows in the folds right?
2. what do you think of the lining in around the inside of the shoulder pads? too subtle, not bold enough or just right?
3. should I was all the armor or just touch up the nooks and crannies?
cheers guys
43126
Post by: Pluxtheduck
1) I'd paint the tabard/robes a deep wine red
2)I think it looks good - subtle but definite
3) Wash the recessed areas first to get a feel for it
14881
Post by: Charlatan
1. The shading looks excellent. I'd add a shade brighter highlight if you can. It looks great for us here but I'd guess the detail is hard to see from table distance.
2. Pointy-finger shoulder pad lining looks just right. Chainsword shoulder pad is harder to see.
3. I'd wash all the armor and then go back over with some thin green to touch up any unwanted pools. But that's just what seems more convenient to me.
Keep up the good work, enjoying this. Subscribed.
46982
Post by: MrMerlin
1. I'd keep it as it is, it looks great!
2. Looking good the way it is.
3. Yeah, wash the recesses. You can still wash the rest later if you want to.....
Oh man, if you keep this up you'll be an amazing painter very soon! 
53748
Post by: varl
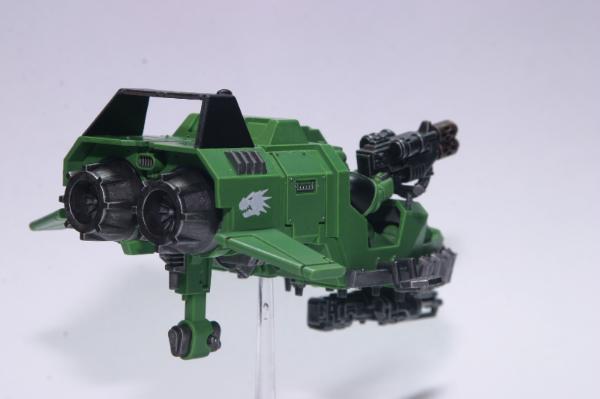
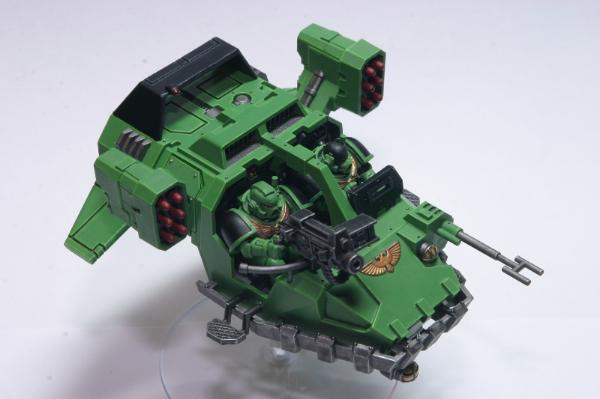
finally got to work on my speeder and, I'm happy to say, it's pretty much done!
(couple more photos in the gallery)
only bits left are to come up with some sort of fancy base and to seal it with a matte varnish. I was briefly toying with the idea of free-handing some flames onto the spoiler, but I think I'll save that for another time as I've got a lot of other models I want to get started on.
quite a few learning experiences doing this guy, not least of which is the realization that speeders have an absurd amount of detail on them :p things I will do differently next time:
- better priming: my priming job frankly sucked. several air bubbles, couple spots where it pooled, couple other spots where the primer was smudged while it was drying, etc. some of these flaws are still visible even after many layers of paint
- more/smoother gap filling earlier in the process: some of the bits of greenstuff I used for gap filing weren't as smooth as they could have been, but it wasn't obvious until it had paint on it.
- different approach to magnetizing the weapons: the doors came out ok, but I have a better idea for how to do the chin mount.
- do more pre-assembly painting: I missed some bits that I didn't realize would be exposed until after I glued everything together. was a beast trying to get a brush in there to touch things up.
- add in some freehand art somewhere
all that said, though, I'm pretty happy with how it came out given that it's my first time painting a vehicle
on another note, I've picked up some micro set & micro sol and started applying decals to all my completed marines. haven't been having much luck with getting the decals to lay flat, though. will be posting about that in the P&M forum once I get some photos ready.
up next, I'll be starting work on my aobr dreadnought.
46982
Post by: MrMerlin
The landspeeder looks great!
Out of interest: Do you drybrush or wash your metal? The "bumper" looks like you washed it badab black, but the asault cannon looks drybrushed.....
53748
Post by: varl
yeah, I painted those bits up in two different ways.
the bumper was originally green, but after looking at some reference photos I decided I wanted it metallic instead. I primed it with black gesso (right over the green - yes, I was that lazy), gave it a few coats of boltgun metal, did some edge highlighting with chainmail and then washed the whole thing with badabb black (a bit heavier than I should have, in hindsight). after that dried, I touched up the highlights on the upper edges with a bit more chainmail.
for the assault cannon (and all the other guns), I started with a black basecoat, applied a heavy drybrush of 1:1 boltgun metal/chaos black, a lighter drybrush of boltgun metal and a very light drybrush just across the edges with chainmail. lastly, I did all the lining in with chainmail. super easy and makes for reasonable-looking dark metal bits. plus, if you screw up while lining-in, it just looks like scratch marks :p
46982
Post by: MrMerlin
I recently found a nice way to do metal. Basecoat mithril silver, and them wash it with several layers of badab black, brown or sepia. that way you can always get the right tone, depending on how much you apply......
53748
Post by: varl
just keep applying wash until you get the shade you want? very interesting idea... have any samples up on dakka?
46982
Post by: MrMerlin
I've only tried it on a few guns and bitz so far.... Looks great! I was thinking about doing a metal tut, so maybe in a few days.....
18690
Post by: Jimsolo
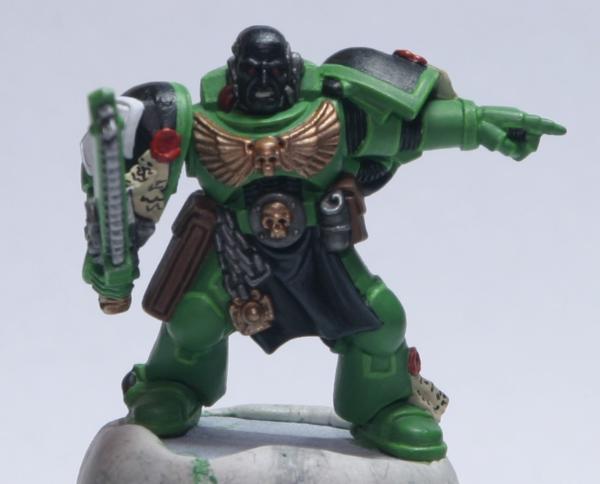
You've got some nice detail work, here. I like the white on the sergeant's tactical symbol, especially. Are you not going with the multi-melta/heavy flamer land speeder? I don't want to try and tell someone else how to play their army, I'm just curious is all. I like your definition in the recesses of your guys. Have you thought about getting a Micron pen for your purity seals? You can cram quite a few more lines on with one of those. I appreciate getting the benefit of your experience, since I also have to do work on a Salamander Land Speeder for my army.
53748
Post by: varl
Jimsolo wrote:You've got some nice detail work, here. I like the white on the sergeant's tactical symbol, especially. Are you not going with the multi-melta/heavy flamer land speeder? I don't want to try and tell someone else how to play their army, I'm just curious is all. I like your definition in the recesses of your guys. Have you thought about getting a Micron pen for your purity seals? You can cram quite a few more lines on with one of those. I appreciate getting the benefit of your experience, since I also have to do work on a Salamander Land Speeder for my army.
thanks
all the weapon options are magnetized, including the missile launchers, so I can set the speeder up with whatever loadout I need. truth be told, I've yet to play a single game of 40k, so I haven't the foggiest of what loadouts work well. I'm in it for the painting, at the moment. I do have to say, though, that the idea of a flamethrower mounted on the front of a fast moving, open cockpit vehicle seems horrifically wrong :p
I've used a micron pen for the last few seals I've done (including the sergeant), but I'm still working on learning where the point of contact for the tip of the pen is. I always feel like I have to leave myself more space to work with, even though the lines it makes are so thin. more practice needed I wonder if micron makes white pens... would definitely look better over green armor than black.
53748
Post by: varl
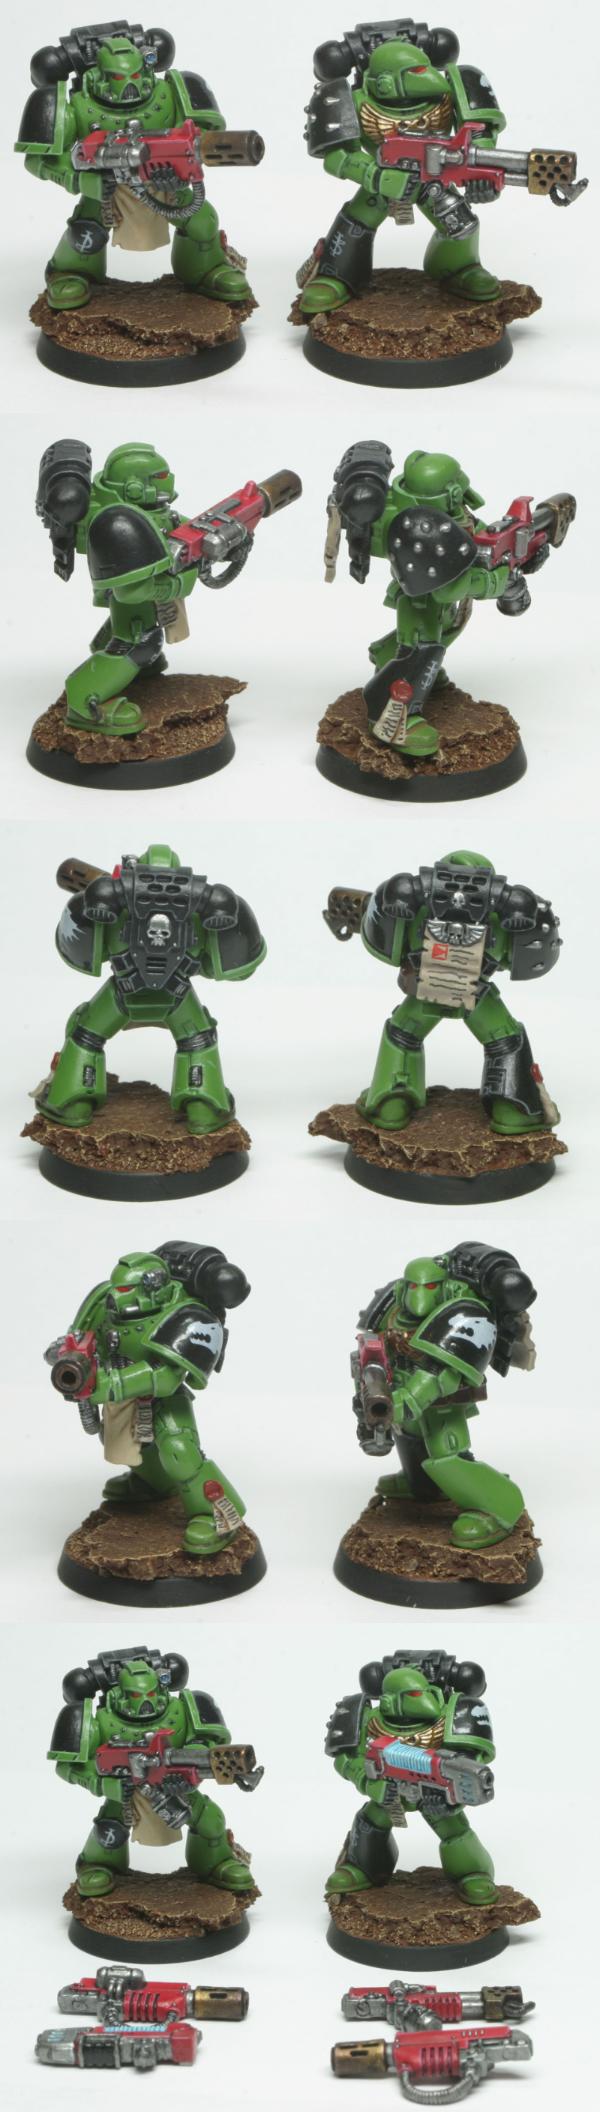
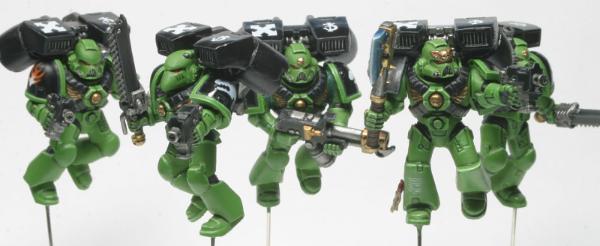
first squad is done!
very excited to finally have a full squad completed (painted, decal'd, sealed). in just this group alone, I can see where my technique changed and improved over the last couple months. the front, left guy was one of the first couple marines I painted and the sergeant's the most recent. I wrote the date on the underside of each base so I can look back on them later and remember my humble beginnings :p
I'll probably go for more detail on my next batch of marines, like squad markings and a bit of freehand here and there. won't be getting to those for a while, though, as I've already got a dreadnought and the last 2 of my termies primed up and ready. in the queue, I've got a rhino/razorback, a 5-man squad of assault marines and another 10-man squad of tactical marines. if I can just keep myself from buying more stuff, I might actually catch up one of these months...
8401
Post by: Gareth
These could really benefit from some shading to add depth. They're quite flat. Also you need to highlight the black skin differently to the black armour. They look too similar. Perhaps some browny/black highlights for the skin would give a warmer more realistic skin tone. Grey highlights on the skin isn't working for me at all.
53748
Post by: varl
@gareth: yeah, the skin is a work in progress. still testing other methods for that; I just don't have too many bald guys floating around to test on at the moment :p as for shading, what would you recommend for that? all of these guys have been washed, to one extent or another. are you talking a stronger/darker wash or some other technique? Automatically Appended Next Post: after much swearing, finally got the basecoat onto my dread: 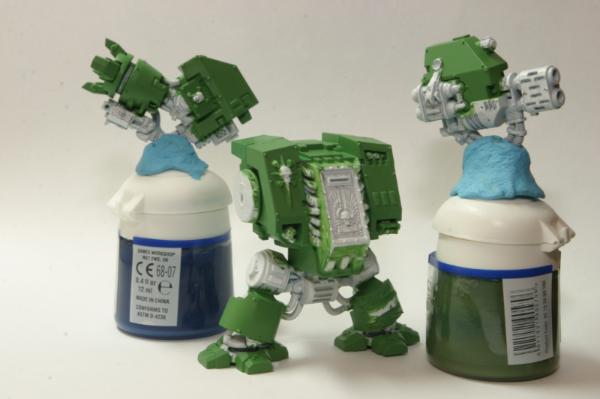 I was having a beast of a time with brush marks until it finally dawned on me that my paint was, of all things, too thin I normally thin 1:1 with water/flow-aid, but for large surfaces I thin it less; around 2:1 paint to water/flow-aid. after painting on 5 layers of this over two nights, I was still seeing brush strokes. I went back to re-read a post on FTW that had helped me in the past and got to thinking that maybe 2:1 was still too thin... a while back, I'd mixed up some 3:1 matte medium to water/flow-aid after reading that some folks like to use that to thin their paints. I wasn't happy with it for my marines because it felt too thick. turns out it's magic for larger surfaces, though. I thinned a fresh batch of green with it at about 2:1 paint to thinner and after just one coat of that all my brush strokes were gone! this is going to be my new go-to thinner for vehicles. wish I'd thought of it sooner. next step is to basecoat all the metal bits...
43612
Post by: Rawson
Gareth wrote:These could really benefit from some shading to add depth. They're quite flat.
I don't think it's shading that is needed: if you zoom in on the pic, most of the squad has nice shading and highlights (just not OTT like usual ). Maybe a bit of weathering would add that pop of realism...
Gareth wrote:Also you need to highlight the black skin differently to the black armour. They look too similar. Perhaps some browny/black highlights for the skin would give a warmer more realistic skin tone. Grey highlights on the skin isn't working for me at all.
I do agree with you here, Gareth. I've never really liked the standard Saly flesh scheme, but I like the idea of adding some brown to the highlights...
Keep up the great work, Varl!
Rawson
53748
Post by: varl
yeah, weathering is definitely something lacking in my repertoire at the moment. I've read up on it a fair bit, but have yet to try it out. the idea of scratching up a perfectly good paint job just hurts my soul :p
43612
Post by: Rawson
varl wrote:yeah, weathering is definitely something lacking in my repertoire at the moment. I've read up on it a fair bit, but have yet to try it out. the idea of scratching up a perfectly good paint job just hurts my soul :p
Yeah, I know what you mean. Just think of it as a symbol of their glorious exploits as warriors of the IoM
53748
Post by: varl
morning dakka,
quick update on my dreadnought:
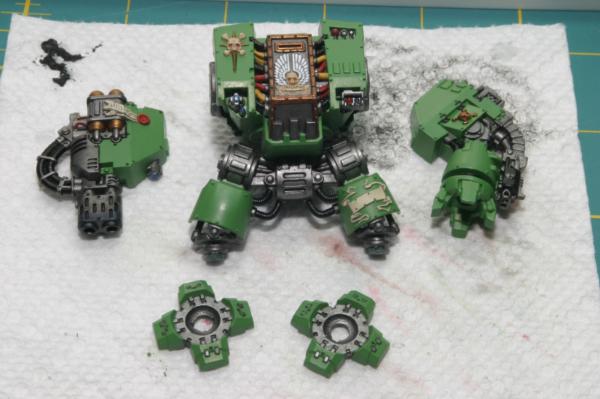
I feel like this guy has taken forever, but he's coming along. I still have to do all the highlighting, touch up a few details, add decals and figure out how I want to do the base. oh, and I need to decide what to write on the leg scroll. any suggestions?
46982
Post by: MrMerlin
Neat, as always..... Now I want to see him finished!
42421
Post by: brother noobicus
Those are coming along nicely. On the dreadnought's scroll you could make up a name for the mostly dead marine inside, or write something firey...Infernus perhaps?
53748
Post by: varl
brother noobicus wrote:Those are coming along nicely. On the dreadnought's scroll you could make up a name for the mostly dead marine inside, or write something firey...Infernus perhaps?
I've already got 'INFERNUS' on the tiny scroll on the sarcophagus
49202
Post by: UnCool Villain
Just Checked out your stuff and I must say I love your guys. The green is really smooth and crisp.
53748
Post by: varl
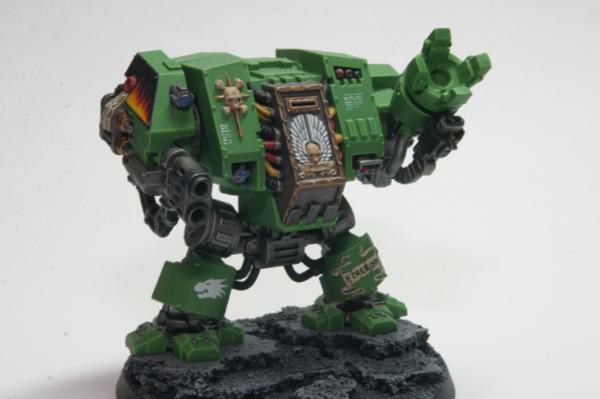
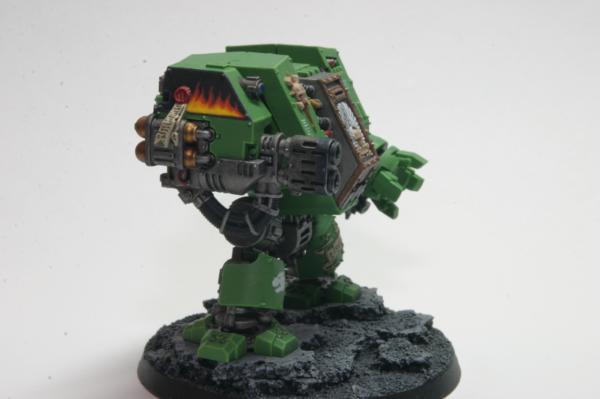
dreadnought is finished!
(yes, even the dreadnought's excited)
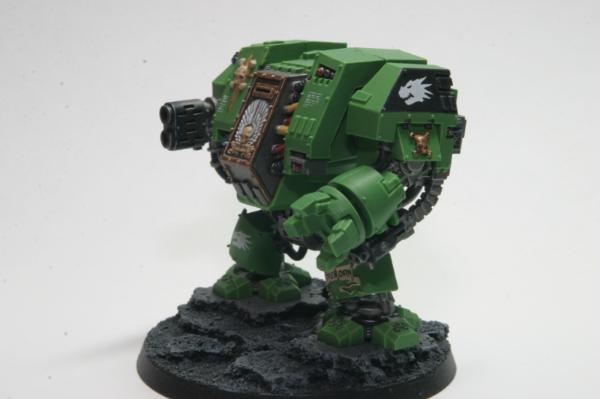
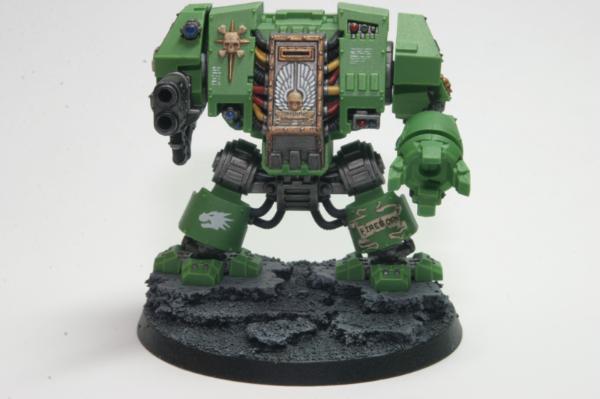
pretty happy with him overall. definitely my best model to date. unfortunately, this was the first model from the aobr set that I built and as I was painting him I realized that I wasn't nearly as vigilant with cleaning up mold lines as I was on later models. so, far from perfect in that regard.
I was originally going to try using tree bark for the base, but I had a hard time finding pieces that were big enough. I ended up using cork, instead, but I'm not super happy with how it came out. I think my first dry-brushing pass was too heavy and I ended up not getting the shading that I was expecting to see. it does look better in person than in the photos, at least. luckily, he's just pinned to the base and not glued down, so maybe I'll replace it some day (yeah, right).
the flames on the MM arm are my first foray into freehand work. I think they came out ok, but I ended up with unwanted texture due to all the layers of paint. it was such a fiddly little area that I had a hard time getting smooth layers on. I tried covering the whole thing in gloss varnish when it was done, much like you would a decal, in the hopes that once I sprayed the whole thing matte some of the texture would be hidden. it sort of worked... now it looks more like a layered decal >.>
getting the text on the two scrolls was an utter nightmare. I'm not really happy with either of them, though I'm very happy with the leg scroll itself (picked up a nifty technique for painting parchment from buypainted's furioso video). for the scroll on the sarcophagus, I just went at it with my smallest brush. for the leg scroll, I tried writing the text on with a super-fine pencil first and then going over it with black paint. it came out a bit neater, but still pretty meh. if anyone has any handy tricks or tutorials for doing lettering like this, I'd be most grateful.
looking at the photos makes me think my highlighting is too subtle for something this large. what do you guys think? I only washed the metal bits and a few small parts of the hull. think it needs more shading?
lastly, I've got a question about sealing. I applied a couple light coats of GW purity seal over the whole model and I can actually see the texture of the varnish. like, if you hold it up to the light, you can see texture. it doesn't look discolored or frosted or anything like that, but is it normal for a matte varnish to be that noticeable? on that note, a few areas that I'd previously varnished with gloss (decals) still look kinda glossy even after the purity seal. is that also normal?
next up, I'll be finishing the last 2 models from the termie squad.
43040
Post by: Mercutio
The details on the sarcophagus and the flames are pretty good for a first attempt. The only criticism I have is that the green looks a bit flat. I can see the highlighting on the feet which looks great but not on the body though that may just be the light.
For the writing you could try a very fine technical drawing pen as a bit of a cheat.
53748
Post by: varl
I see what you mean about the highlights; it's just edge highlighting all the way around. I didn't think I did anything different with the feet, but they definitely stand out more than the other edges. hrm.
I did try using a pigma micron 005 pen for my first try at the sarcophagus scroll, but the line was too thick for that tiny amount of space. I painted over it and tried again with a brush. I used the micron pen for the purity seal and you can see the difference in line size. maybe I'm just too heavy -handed with the pen, but I'm not getting the super-fine lines out of it that I was expecting to :(
53748
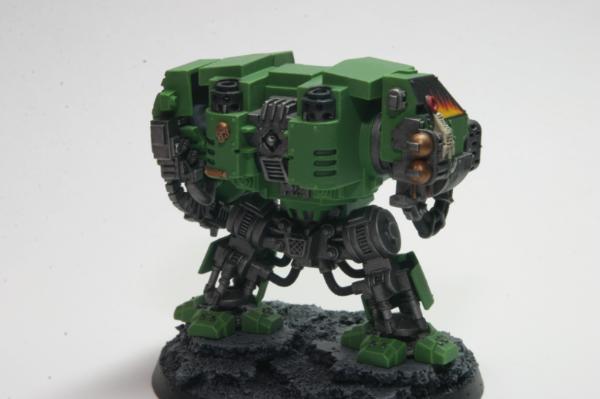
Post by: varl
cheers to everyone that's stopped by since my last post
work continues on my last 2 terminators. I'll be posting one up soon-ish to get some feedback on some new stuff I'm trying out. in other news, I have a bunch of kit coming in the mail including a lightbox setup that, I hope, will greatly improve the quality of my mini photos. oh, and I finally got around to building a display case from ikea for my small (but growing!) army. lugging around a 65" box full of plate glass that weighs 90lbs is FUN! (no, really)
I hope to have some WIP pics of my latest termie up by this weekend.
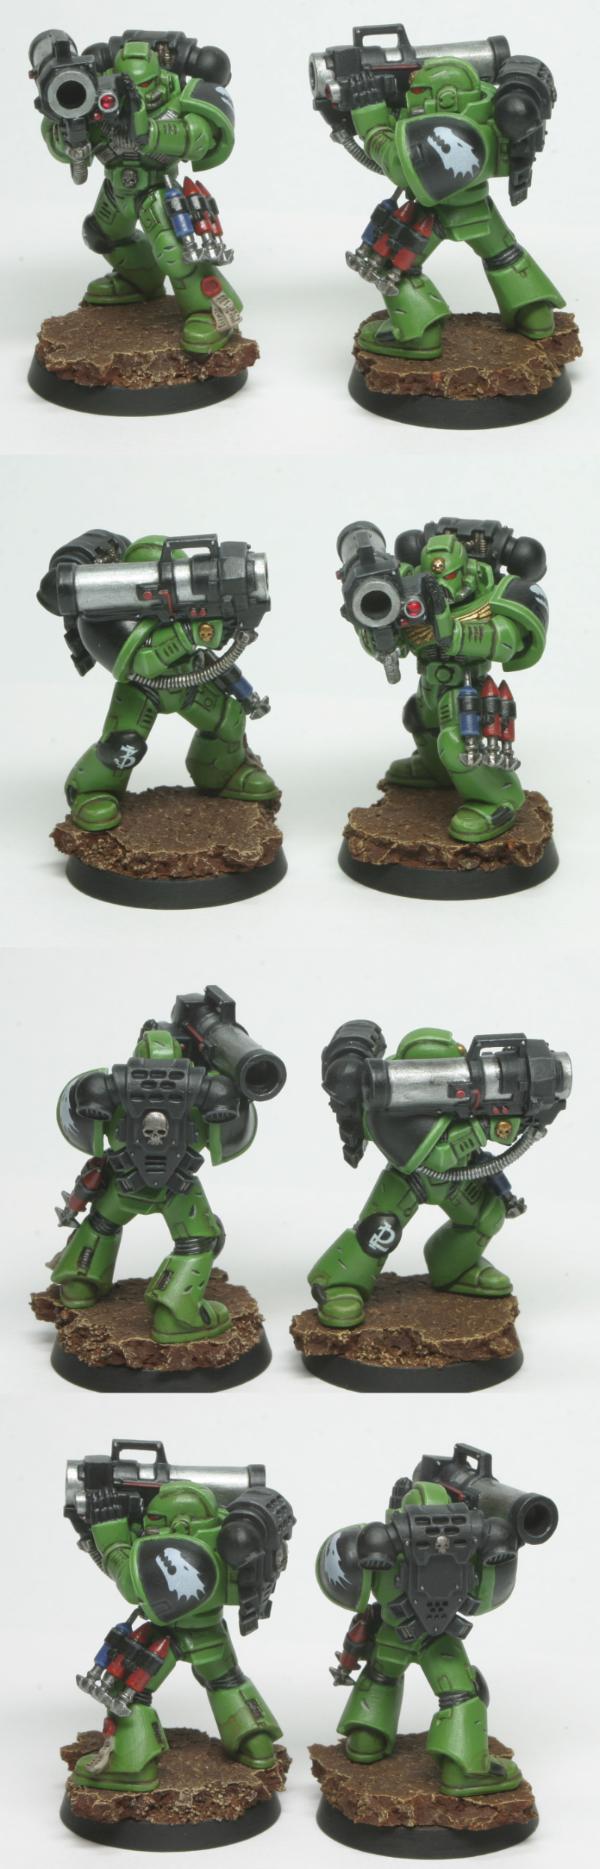
til then! Automatically Appended Next Post: ok, I lied. instead of doing the WIP shots this weekend, I did them this morning I'm going to be posting this over in the P&M forum as well, just to get more eyeballs on it. here's where termie #4 is at:
and here's a shot of one of my earlier termies for comparison:
keep in mind that there's still a lot of work left on termie #4; I need to highlight all the metal, gold & black bits, paint the lenses and eyes, paint the vents on his back, paint the purity seal, add decals and scripture, do a light wash (probably oil-based) and then go back and clean up whatever I borked along the way. oh, and do the base
here's what I'm doing differently this time, and what I'd like some feedback on:
1. much bolder edge highlighting. I've heard from a few folks that my highlighting was too subdued, so I tried mixing some white into my usual scorpion green highlight color. what do people think? too bold? still too subtle? should the highlights be more lined-in instead of just done on the edges? also, how about the highlights on the legs? there aren't a lot of sharp edges there so I ended up painting stripes of highlight color down the center of each of the raised bars along the leg plates instead. good or bad?
2. I took a completely different route with the crux terminatus and painted up the skull to look more like actual bone and the base of the crux to be gray highlighted with white/bleached bone. do you like this better than a metallic (boltgun or gold) version? does it need a wash? if so, should it be the same light, black wash I'll be using everywhere else or something?
cheers guys,
v
53748
Post by: varl
had the day off today, so I was able to finish one of the terminators:
I haven't sprayed him yet, hence why he's a bit shiny in some spots, but otherwise he's all done. lots of changes since my last termie:
- different wash technique
- a post-wash cleanup pass with the base color
- much bolder highlights
- black shoulder pads and shield
- freehand on the shield
- scripture on a few bits of the armor
- different paint scheme for the lenses
- different paint scheme for the crux
- slightly different paint scheme for the base
I'm not happy with the gold; don't feel like I'm getting the right shade from it or good highlights. I just got some new metallics from Vallejo in the mail today, though, so we'll see how those work out. I'm also not sold on the crux paint scheme. I like it a lot better than the washed metallic look I did on my first 3 termies, but I still feel like it's missing something. anyone have any suggestions?
next up is the termie sarge and that will finish off this unit. I'll be happy to have him done because I'm getting tired of painting the aobr units. I'm hoping to get much better results from the next unit since I won't be making the mistake of gluing everything together before painting :p
44232
Post by: DijnsK
gamesworkshop released new transfers with salamanders icons! but there is only a limited supply
43040
Post by: Mercutio
Termie #4 is fantastic! I really like the edge highlighting you've done on him, really gives the armour plates definition. The black shoulder pads are also more fluffy so +1 for that. The freehand is fantastic, it looks seriously good. Do you plan on using this as some sort of squad marking?
I think the bone and grey crux looks great instead of the metallics, it has a lot more definition and really stands out now on that black shoulderpad. With the metallics on green you had before it just didn't grab the eyes in the same way. I'm not sure how you could change it other than maybe switching the grey out for something else. You could maybe make it slightly darker so you get a higher contrast to the bone but then you start to lose the contrast with the shoulder pad.
53748
Post by: varl
@dijnsk: thanks for the tip! that is seriously good news for me
44232
Post by: DijnsK
glad i could help point that out....
to be honest, i dont like that chapter symbol on that terminator facing back... that new transfer sheet will have symbols facing both ways
18567
Post by: CadianXV
Why not simply apply the opposite face of the transfer to the model? You don't lose any of the detail, and it faces the 'correct' way.
Also, love how crisp your base green is!
My Gold recipe: Basecoat Tin Bitz, Layer 1:1 Tin Bitz/Shining Gold, then a watered down black wash. Gives it a quick, antique gold look.
53748
Post by: varl
ha, I feel silly now. I didn't even realize I had the chapter icon facing the wrong way until you guys pointed it out. oops :p
@cadian: that's basically the same recipe I used, except I highlighted with 1:1 shining gold/mithril silver and washed with gryphone sepia instead instead of black. I think it's the highlight I'm not happy with, despite so many tutorials suggesting that color mix.
44232
Post by: DijnsK
CadianXV wrote:Why not simply apply the opposite face of the transfer to the model? You don't lose any of the detail, and it faces the 'correct' way.
Also, love how crisp your base green is!
My Gold recipe: Basecoat Tin Bitz, Layer 1:1 Tin Bitz/Shining Gold, then a watered down black wash. Gives it a quick, antique gold look.
didnt know you could apply transfers with the other way around
46982
Post by: MrMerlin
Wow man, that terminator looks fantastic! Apart from the gold its flawless. Your highlighting skills....Wow!
53748
Post by: varl
and here we have the final member of the terminator squad (finally):

(pardon the amateur photoshop efforts and horrible white balance :p)
I haven't sprayed him down with purity seal yet, so he's a bit shiny in the photos. wanted to take some photos before I sprayed him so I can compare and see if there's a visual difference (been having some issues with my matte varnish).
did a few things different this time 'round, as you can see by comparing with my last one:
- I tried doing a directed wash, as suggested by winterdyne in this thread. I don't think I did a stellar job of it and I'm not very happy with the results, but it was a good learning experience if nothing else.
- changed my method for painting gold; I used the Vallejo Model Color method 2 from this post on attic wars. pretty happy with the results, though I'm still not totally sold on using a gold/silver mix for the final highlight. seems a bit too bright.
- changed the way I do skin. I used this image for inspiration, though what I came up with was more muted. I think it stands out enough from the black armor bits when viewed in person, but it's hard to tell in the photos due to all the shiny. I'm happy with it, though, and will probably stick with it.
aside from the wash, I think the model came out well. the freehand on the shoulder shield came out fair and I like the skin. I like the new approach to gold, too, and will continue to use that. this was my first try at a power weapon and it came out all right, though next time I'll probably use a lighter metallic for the blade (this was done with vallejo air's black metal). lettering continues to be my bane and I rate the chest scroll as a solid meh, at best. definitely room for improvement there
as for the wash, I think it's a great concept (looks gorgeous on winterdyne's models), but a poor execution on my part. it came out best on the greaves, but even there it's not great. rather than getting a smooth gradient of shadow I think it just makes the armor look dirty - and not "weathering" dirty, but more like "it's been handled by a few hundred people with greasy fingers" dirty. bleh. I assume that's mostly due to shoddy technique on my part, but I'm also wondering if it just doesn't lend itself to brighter colors like the green I'm using. I'll be sticking with my old style of just washing the recesses going forward, though I do have a bottle of soft body black wash coming from secret weapon miniatures, so we'll see.
next up, I'll be putting together some assault marines. very excited to be done with the aobr models and to get started on some new stuff
49292
Post by: Eiríkr
Ahhh!
Looking really nice. I adore Salamanders and, were it not for my beloved Emperor's Children, would in all eventualities be building up a Salamander force.
I think the wash came out really nice, especially in the last picture above. May I ask if there was any blending with the green into a darker shade, or up to a lighter one?
44232
Post by: DijnsK
hey the new model is looking good!!
about the face, i still think its a bit too black, a very dark brown will look more natural, but then again it might be the picture.
about the gold i like it! and the salamander emblem is facing the right way!
the power weapon is pretty nice, i think i like the outside better then the inside. the lighting could be a little sharper imho, but i like the colors... i might use metallic black in the future.
this link is to a youtube vid i made with a company champion with a lightning shield and sword
and about the washes, idk which one you used, but you can maybe test different colors... if black doesnt do it for you, you can always try brown or green wash.
overall very nice looking!
53748
Post by: varl
@eirikr: thanks
no blending there, though it's something I want to try my hand at eventually. the transition from light to dark was done via washing. successive layers of wash leading from the middle of the armor plates out towards the edges are supposed to create a smooth gradient of shading. to be honest, I think the photos make it look far better than it does in reality. I had a hard time with the wash creating a tide line in the middle of the armor plates (you can see it as it's worst on the top part of the rear armor). I do think the leg plates came out ok, though.
@dijnsk: the face is very much black. I hear about a deep brown looking more natural, but I'm sticking with the fluff haha, and yes I got the salamander facing the right way this time :p I ended up having to flip the transfer I had over since it was facing the wrong way. wasn't sure it would still stick, but turned out just fine.
for the wash, that's actually thinned down devlan mud (brown). I also tried a red wash (thinking it would contrast well with the green; it didn't. ended up purple-y instead of dark) and I've used black in the past though not for this directed wash technique.
I agree with you about the lightning not being sharp enough on mine; my detail brush is pretty meh right now (replacements are in the mail), so it's tough to get a nice line out of them. that's a nice looking power sword in your vid. I'd be curious to know what colors you used for that.
44232
Post by: DijnsK
i basecoated the sword with necron abyss, then then added enchanted blue for the lightning "glow", gave it a asurmen blue wash to blend it into the necron abyss... then i used thinned down enchanted blue to re-highlight the glow.
then i used a thinned down ice blue to draw the lightning, mixed iceblue with white for the real lightning and finally did some spots and the edges with pure white.
11961
Post by: Ifalna
Your finelining is absolutely fantastic, I am totally impressed.
There is a huge jump between your earlier work and the new termies, using washes to create gradient shading is a brilliant idea.
Subbed!
44232
Post by: DijnsK
crap i typed it all out but it didnt post it... ill have to go through it again...
i basecoated the sword with necron abyss, i then mixed in enchanted blue for the lightning "glow". i gave the sword a asurmen blue wash to bind the enchanted blue and necron abyss together.
after that i rehighlighted the enchanted blue with enchanted blue (leave a bit of the washed blue visible) and then add a little bit of ice blue to the enchanted blue. and kind of blend it into the enchanted blue.
then dilute ice blue with water (30:70) and build up a line for your lightning, aslong as you stay inside your glow its OK.
mix iceblue with skull white (30:70) for the final lightning effect.
then add skull white on the edges of the lightning or where the lightning hits the edge and the tip of the sword.
for the face, i understand that the fluff says they have dark/black skin, but you can basecoat the face black, give it highlights building up a gradient from scorched brown to bleached bone... or a similar technique... but then again its your model so do whatever you want 
53748
Post by: varl
@ilfana: thanks
@dijnsk: thanks for the sword recipe; will file that away for the future. as for the skin, that's an interesting idea. I'd thought you meant to use a dark brown for the basecoat rather than a highlight, hence my resistance to the idea I'll have to give this a whirl when I come across my next bare-headed model.
cheers!
46982
Post by: MrMerlin
Dude, you are improving extremely quickly! I absolutely love the latest termie!
If you continue imroving at this pace, you'll be in the eavy metal team soon lol
53748
Post by: varl
heh, definitely something to aspire to :p thanks for the kind words!
44232
Post by: DijnsK
your welcome, and im glad your not as opposed to the idea as you where in the beginning
53748
Post by: varl
ugh, son of a b... my spray sealer frosted my last two termies :( curse you, purity seal! I'll have a go at recovering from disaster using a gloss spray (when I find one). sigh.
edit: on that note, does anyone have a gloss varnish spray recommendation? I think I've had my limit of GW sprays...
11961
Post by: Ifalna
varl wrote:ugh, son of a b... my spray sealer frosted my last two termies :( curse you, purity seal! I'll have a go at recovering from disaster using a gloss spray (when I find one). sigh.
Dude.. Thats the exact reason I stopped using it :( It's not worth the chance. Sorry to hear that happened.
Brush on matte varnish takes longer but avoids this completely bullcrap.
44232
Post by: DijnsK
varl wrote:edit: on that note, does anyone have a gloss varnish spray recommendation? I think I've had my limit of GW sprays...
thearmypainter.com has some really awesome sprays
53748
Post by: varl
just a quick update:
I picked up some gloss varnish and a different matte varnish (trying out testors glosscote and dullcote, respectively) in hopes of rescuing my terminators. I tried it out on the sergeant, since he was the most frosty and, while it did improve things, it wasn't a complete success. the original texture from the purity seal (think teeny-tiny bumps all over) is still there, but the frostiness is gone. good enough that it's not a total loss, but I'm definitely retiring my can of purity seal.
on another note, assault marines are coming along:
I've got almost all the bits I'll be using cleaned up and reading for priming. I still have to remove the mold lines from most of the shoulder pads and probably a couple of grenade bits as well. one set of arms is missing because I'm waiting for the unit's flamer to arrive in the mail, along with the tactical marine arms to hold it.
here you can see my botched attempt to fill in the gaps on a jump pack with green stuff. green stuff and I are not on speaking terms right now, as I had a hell of an unpleasant morning with it. I'm going to pop by my FLGS tomorrow and pick up a pot of liquid green stuff and see how that works out. based on reviews I've read, I don't have super high hopes for it, but for $5 I'm willing to try it out if it saves me from working more with "real" GS
also in this shot (upper left), you can see that I've magnetized one of the torsos and 2 arms. this will be for my sergeant; I figure he's the only one that may need to change wargear at some point. I'll probably also be giving him melta bombs. they look rather large on the sprue; way too big to hang off his belt. where do people typically attach them to the model?
43612
Post by: Rawson
varl wrote:also in this shot (upper left), you can see that I've magnetized one of the torsos and 2 arms. this will be for my sergeant; I figure he's the only one that may need to change wargear at some point. I'll probably also be giving him melta bombs. they look rather large on the sprue; way too big to hang off his belt. where do people typically attach them to the model?
I like to have the marines holding the melta bombs. You can remove the chain sword from the straight arm version (opposed to the bent arm version), cut out the middle part of the handle of the MB, and "Voila"! Now you have a marine about to blow up a land raider 
Good luck!
Rawson
44232
Post by: DijnsK
ive tried liquid greenstuff on jumppacks but with little success. feel free to try it yourself but the problem with liquid GS is that while it might be good for filling small airbubbles its absolutely terrible for filling large gabs as it reduces in size as it dries.
wish GW had some chainswords without the arms attached. then if you would do what Rawson suggested you can have a chainsword attached to his belt or sticking in the ground or something without having to resculpt the handle
24190
Post by: rodgers37
Some really nicely painted Marines here. Love the green, it just works. And everything about your paint job just looks right.
53748
Post by: varl
update time... assault marines are fully primed (again; had a false start with some white primer and had to do it over) and awaiting painting. while I was waiting for the primer to set, I started color-blocking my aobr captain to test out the color scheme:
this is just a quick slap-and-dash paint job, obviously, but what do people think about the colors? is the red too overpowering against the green armor? should I use the same red on the robe or stick with the same cream color as the cloak lining? I'll be adding some freehand edging to the cloak lining in the same red color. thinking about doing the edges of the shoulder pads in gold rather than green, to help signify the artificer armor he'll be using. maybe also the ring where the gauntlet and the forearm join (it's the white area on the sword arm in the top photo)? not sure what other embellishments to add to make it look more artificer-like.
curious to hear what people think
26416
Post by: Young_Logan
The captain is looking really good, i just love the green that you use, it looks so clear and crisp, keep up the good work
Young Logan
53748
Post by: varl
and back to the assault marines... jump packs are nearly done:
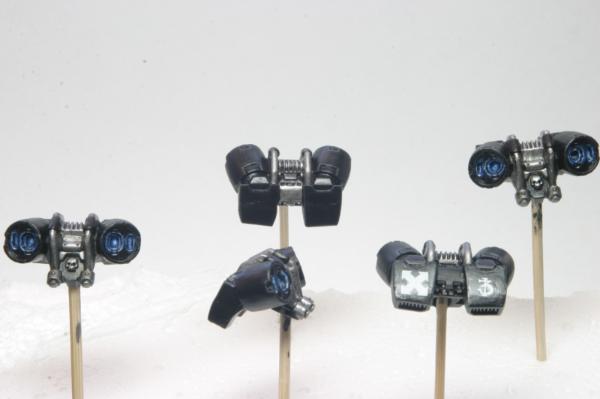
I still have to apply decals to four of them and spray them all with matte varnish (probably won't do that until they're on the models), which is why the black looks so shiny.
I tried my hand at a bit of OSL for the thrusters, based on a tutorial I found here, but I'm not completely happy with how it came out. for one thing, the way I filled in the cracks with GS (intentionally) took away some of the details in the thruster rings so I had fewer edges to work with. second, I feel like the tutorial author blended his colors somehow because color transitions in his photos look way smoother than what I ended up with. at any rate, I like the idea and if/when I do this again I think I'll just simplify it a bit - use 3 colors instead of 5.
I'll be moving on to the assault marine bodies next. instead of my usual GW goblin green for my base color, I'll be using Vallejo's goblin green. three factors led me to this choice: 1) I've been wanting to compare vallejo paints with the GW paints I already have, 2) vallejo uses dropper bottles, which I love and 3) GW doesn't make goblin green anymore. vallejo's goblin green it's a bit darker than GW's when it dries (while dakka's color comparison chart lists them as equivalents, they really aren't), but I'm hoping it will still work with the rest of my color scheme.
we'll find out soon
53748
Post by: varl
small update tonight. I finished the heads for my assault marines:
apologies for the crappy lighting. the colors are cooler than what you see here, but I had to add some frontal lighting to make the highlights visible
I feel like these helmets need a wash. what do you think?
44232
Post by: DijnsK
good looking heads! win!
53748
Post by: varl
update time and a special treat!
work on the assault marines progresses, ever so slowly. heads & jump packs are done. I'm most of the way through base coating the torso & legs and then it's on to arms & weapons and final assembly. I think I may end up magnetizing my flamer marine so I can swap in a standard load-out for him. will probably also magnetize the meltabomb for the sergeant (his arms are already magnetized). they might get finished some time this month :p normally I work on a single model at a time (which seems really slow), so for this squad I decided to do them assembly-line style. ironically, I think this is turning out to be even slower for me than working in a single model at a time. the results should be more consistent between models, though, so there's that.
I was originally thinking that I would do some blending (from the base armor color down to a darker shade) on certain parts of the armor, like the legs and arms, but I've taken a step back from that. after a lot of failed attempts at blending (and glazing) on scrap bits as well as doing some more research, the technique seems a bit overkill for marine-sized models. maybe on a terminator or walker... if I ever figure out how to make blending work. instead, I'm going to try a 2-step highlight instead of my usual 1-step edge highlighting. time will tell if my hand's steady enough for that or not
on an unrelated note, something that's been challenging me lately is working with black. I have a hard time keeping track of the tip of my brush when I'm painting black onto a dark surface. I can't see the tip of the brush unless I hunch over and get really close to it (and I already use a magnifier!). I'm not sure if it's the position of my light, my eyesight going or what, but it's definitely frustrating. I feel like I'm painting half-blind and I don't know where the brush is until I start seeing paint appear on the model. not really sure what to do about it, though.
and now, a special treat of sorts. way back in the mists of time, I tried my hand at painting minis. I think there was a D&D table-top wargame that had caught my interest, so I was doing some units for that (never got around to playing). my interest didn't last for more than few months, but I kept those minis in a shoe box ever since, faithfully moving it from apartment to apartment without ever really looking inside. well, the other night I stumbled across the box, opened it up, and lo and behold what I found within:
I painted these (poorly) when I was about 16 years old. in 11 days, I will be 39 years old. I had no idea what 40k was back then, but 20+ years later these were a treat to find. this is why you don't throw old boxes out (and don't let your parents do it, either)
53748
Post by: varl
good evening dakka,
just a quick note to confirm that I am not, in fact, dead
no progress to share at the moment due to a couple things... firstly, I did some experimenting with washes on the assault marines I had base-coated to try out some different techniques. on the whole, they came out rather terrible :p I'm in the process of re-applying the base coat, so in the next day or two I'll be back to where I was... 2 weeks ago. I did learn some things, though, so I consider it a worthy sacrifice (I did it for science!). the second reason is diablo 3. I think you can all empathize with me on that one
in other news, I took the plunge today and ordered an airbrush. I went with the badger khrome from chicago airbrush supply (yay, free shipping!). I was leaning towards buying a cheapo (masters g23 or something similar) off ebay, but after a bit of research I had concerns about their defect rates and decided to just go with a quality tool instead of taking my chances. I'll be hooking it up a 5lb CO2 tank (no compressor; I live on the 4th floor of an apartment building and don't think the neighbors would be keen). very much looking forward to getting this set up, as I've got a pair of rhinos that I've been putting off building simply because the thought of painting tanks with a brush again was giving me a headache :p
15115
Post by: Brother SRM
What problem did you have with the wash?
53748
Post by: varl
I haven't been happy with the shading I've been doing, so I tried out 4 different washing techniques so I could compare results:
1. slop on badab black
2. slop on secret weapon miniatures (swm) soft body black
3. apply a gloss varnish and then slop on secretweaponminiatures soft body black
4. apply swm soft body black directly to crevices with just the tip of my brush
for #1, I expected sub-optimal results and I was not disappointed in that regard. while the recesses were nicely shaded, the rest of the armor looked like it was covered in soot. no surprises there, but it gave me something to compare the swm soft body black wash to.
for #2, I was quite disappointed with the results as it didn't look anything at all like the product photos on the swm website. it came out much darker and thicker than the badab black wash and dried glossy.
#3 was a similar result to #2, though partly that's due to my gloss coat not being very good. I should have done two layers of gloss varnish, I think, because when I was cleaning up the excess wash with mineral spirits, I ended up stripping some of the base coat off.
#4 came out ok and is the technique I normally use, though in the past I've used badab black. while it confines the wash to where I want it, the issue I have is that there's no gradient to the shading. it's either base color or dark shadow with no graduation leading from the mid-tones to the dark shadows. that's why I was experimenting with other techniques.
after my poor experience with the swm wash in methods #2 and #3, I emailed misterjustin over at swm to ask him about it. he's been super, super helpful in showing me where I went wrong and how to get better results. turns out I was using the wash completely wrong. while the product photos make it look like you just slop it over the whole model, the reality is that that look was achieved by a very careful, directed application of the wash. he's got a great video up on youtube explaining the technique. I can't say enough positive things about swm customer service; he's amazingly responsive to customer questions and such.
based on justin's feedback and suggestions, I've tried applying the swm soft body black wash the "right" way. the results are better, but it's still not quite what I want. I'm having some issues with tide markings where the wash starts. I can clean those up with the base color, of course, but then I start to ruin the gradient effect. I think it's just a matter of practice on my part, but I've got another email in to justin to clarify a few points.
53748
Post by: varl
assault marines will be done "soon"!
work has been kicking my butt of late (10-12 hour days), but I'm still trying to squeeze in an hour or so of painting at the end of each day. all I have left on the marines is edge highlights, decals, final assembly, basing and varnishing. I'm hoping to at least get through the assembly stage this weekend, but I haven't decided how to base them yet so that may take some time. can't wait to have these done because I'm honestly getting tired of looking at all the bitz :p
29449
Post by: weetyskemian44
Pretty flames!
53748
Post by: varl
weetyskemian44 wrote:Pretty flames!
ha, oh yeah... need to do some of that, too :p
53748
Post by: varl
progress!
nearly done with these guys. was hoping to get them finished this weekend, but I'll have to settle for assembled :p
I ran into an issue with putting the arms on the flamer guy and had to greenstuff some gaps in his armpits, so I still have a bit of painting left to do once that GS dries. beyond that, I just have to figure out bases and seal 'em and they're done. more photos when they're finished.
53748
Post by: varl
at long last, my assault marine squad is finally done:
these guys took me so long to finish that even my girlfriend was getting tired of seeing them on my desk!
fairly happy with the results, though towards the end I just couldn't muster up the energy to add more detail. only two guys got fiery shoulder pads (not happy with how either one came out) and just the sergeant ended up with some scripture detail. the grass on the bases isn't quite right, either. one of these days I'm going to have to teach myself how to make a static grass applicator so I can make tighter and taller clumps of grass. still not brave enough to try any weathering, though I know I have to get over that to get to the next level. some day...
anyway, after a looonnnnng delay, I will be getting back to work on my captain. he'll hopefully be the last model I base coat with a brush I've got my shiny new air brush and my CO2 tank; just need a regulator and I'll be ready to learn how to paint all over again. I'm hoping it boosts my productivity significantly, so I can get cracking on everything else I've got piled up (2 razorbacks, another 10 man tactical squad, scout squad, command squad).
cheers and thanks for looking
46982
Post by: MrMerlin
They look really cool as a groop,but I can't make out much of the detail. But if they look as neat as their heads, great job, dude!
53748
Post by: varl
here's a wip shot of my aobr captain:
the armor, metals and face are done. I'm working on the cloak and tabard now and still have to do the leather bits, the hair and the sword and a few other odds and ends (purity seals, cable coming out of his head, etc.). oh, and the backpack/standard thingie. at the rate I'm moving these days, should take me another week or two to finish :p
53748
Post by: varl
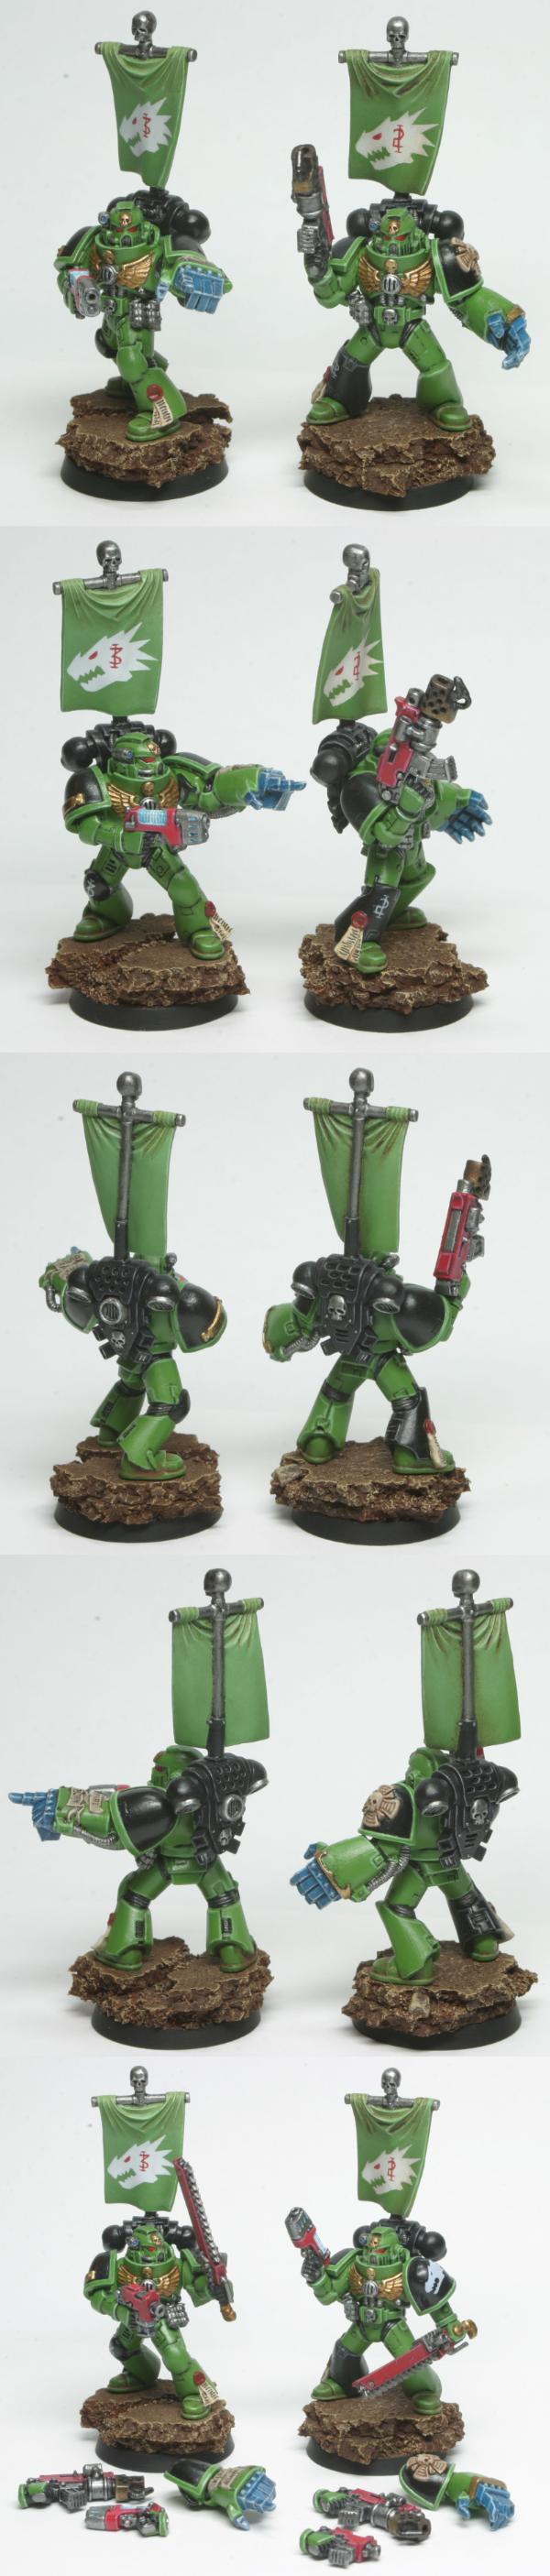
here's the "finished" captain:

I say "finished" because I still have to seal him and I'm also not 100% sure I'm happy with painting the cable coming out of his head yellow. I though I'd do it red at first, but didn't want it to get confused with the cloak and ropes. black would blend in too much and blue didn't really seem to fit. so, yellow... I'm open to suggestions if anyone has a better idea, though.
lots and lots of learning experiences on this model, which is partly why it took so long. it didn't help that I did an abysmal priming job, either (part of the first batch of models I ever spray primed and it came out heavy and bubbly in places). here's a rundown of what I did differently:
Armor
I changed up how I do shading on the armor. instead of using a black wash in the recesses, I followed the technique outlined in this video from JudgeGudge. I didn't use colors with enough contrast between them, though, so the highlights (not the edge highlights) aren't quite as pronounced as they should be. I've picked up some new colors to remedy that for future models. still, given the colors I had available I'm pretty happy with the end result. pretty easy to do, too
Use of Layering
for the tabard and the inside of the cloak, I used layering for the first time. I more or less followed this technique from ron's From The Warp blog, except that I added a white/bleached bone glaze at the end because I thought the shadows looked too deep. while the technique itself is pretty easy to do, I think the colors I chose made it harder than it needed to be. GW's bleached bone is particularly chalky, which makes doing thin layers with it hard (or I'm just thinning it wrong). also, in hindsight, I think I started with too dark a color for the shadows.
for the back of the cloak (the red), I did multiple layers of highlights on the folds and washes across the entire cloak. I didn't want to use layering because the folds were so close together I didn't think I'd have enough room to work. really happy with how this technique turned out, because it's pretty easy to do. the only catch is making sure your wash doesn't pool where you don't want it to. you can see a couple spots near the bottom edge of the cloak where I didn't catch it in time, but it's not too bad.
Power Sword
painting this sword was a nightmare. I literally painted it nine different times. the plan was to try wet blending (for the first time) and go from necron abyss at the hilt up to near-white at the tip and then put lightning effects over that. the first three attempts, I tried to do wet blend using a method from girlpainting (no retarder; just watered down paints). needless to say, I failed I either ended up with no blending or a swirly mess. I made three more attempts using a different method I picked up from awesomepaintjob (using retarder, this time). those also failed (super streaky, lost the white). at this point, I had so much paint on the sword that I had to strip it back down to bare plastic with my knife. after doing some more research, I made two more attempts with wet blending and got a result that was kinda ok at a distance, but still looked crappy up close. at that point, I gave up on wet blending entirely and found this video from Brush And Bolter. so, so much easier then wet blending and the result is even better than what I'd original envisioned. and on the first try, no less! this will be my standard approach to power weapons going forward, I think.
Leather
rather than my usual scorched brown base coat and edge highlight with a lighter brown, I tried out this idea (From The Warp, again). I think it came out well, despite my first wash being a bit blotchy. it gives a nice, warm and worn feel to it. I'll probably use this again in the future.
Hair
I haven't had to deal with hair before. I'm not keen on the orange/red color that salamanders have in the fluff, so I decided to make him gray (captains are old, right?). I base-coated with white and then took thinned down codex gray, wiped most of the paint off on a paper towel and then made rough streaks from front to back. surprisingly easy and looks fair.
Basing
I've decided to stick with a desert rock theme for all my bases (will have to re-base my first tac squad one of these days, to keep things consistent). the only thing new for the captain's base is the use of tall grass. static grass wasn't giving me the look I wanted, so I followed this technique from mr. justin at secret weapon miniatures. it's not quite what I wanted (not bushy enough), but I'm happy with it for a first effort.
overall, I'm really happy with this model. I had a lot of false starts and a lot of re-painting various bits to fix mistakes/failed experiments, but I also learned a lot along the way. I think this represents my best work to date. I believe this means I finally have a playable army, too :p
next up for me is tanks! I've had two razorback kits sitting on my desk for months, but was putting off starting them until I bought an airbrush. well, I bought an airbrush (and finally got all the fittings sorted out. ugh), so now it's time for the tanks. I'll be magnetizing all the weapons and bits so that I can use them as rhinos or razorbacks, of course. I'll try to remember to take some WIP shots along the way, but updates may be few and far between while I'm in the early stages of clean up and assembly.
cheers and thanks for reading,
v
34829
Post by: borneo424
great stuff, cant wait to see the tanks, loving the green and the skin tones, keep up the good work.
53748
Post by: varl
based on some feedback I've gotten in the P&M showcase forum, I'm probably going to make a couple minor tweaks to my captain (try to add part of the chapter icon to the shoulder, re-paint the white scrollwork on the bolter to silver or gold, possibly try adding in some scripture lines on the armor). I won't get around to that until I'm done prepping the tanks for assembly, though.
on that note, here's a couple WIP shots of said tanks:
I've got the first tank completely cleaned up and dry fit (all the extra bitz are inside). I magnetized everything except the side doors. I considered magnetizing those, too, but decided it wasn't worth the effort since there was just a closed interior door right behind it. I did make a point of gluing the side doors in very lightly, though, in case I ever decide to spring for forgeworld replacements (love the products, hate the shipping costs). the weapon turrets for both are done and are magnetized such that I can use the heavy bolters or the lascannons. I've only just started cleaning up the second tank. you can see some of the magnetizing work I did last night in the second photo. mostly all that's left now is sprue removal and cleanup. I'm hoping to have both tanks ready to base coat by this weekend.
I'm pleasantly surprised by how easy these kits go together. based on my first vehicle experience (land speeder), I expected assembly to be much worse in terms of warped panels, il-fitting joints, etc. my only real issue is that the assembled tank seems laughably small when you imagine 10 marines crammed into the back...
58190
Post by: Kjellk
you have some nice Salamanders here,
which colours do you use??
keep up the good work!!
Gr, Kjell 
46982
Post by: MrMerlin
I really like the captain, he's nice and colorfull and has a nice base. Only thing I'd change is the gold on the banner.... it needs more depth imho
53748
Post by: varl
@kjellk: colors for the armor, you mean? it's evolved a bit since I started and I'm in the process of changing it again, but here's what most of my recent marines were painted with:
- base coat with VGC goblin green over a light (white or gray) primer
- apply a directed wash like badab black to only the recessed areas
- go back and clean up any messes from the wash with the base color
- highlight with 1:1 GW scorpion green to GW skull white
- edge highlight 1:3 GW scorpion green to GW skull white
for the captain, I did something different:
- base coat with VGC goblin green over white primer
- apply several layers of very thinned down GW dark angels green to any areas that would be in shadow (recesses, bottom sides of arms & legs, bottom edges of shoulder pads, etc.)
- apply several layers of very thinned down GW scorpion green to areas that would get the most light (upper surfaces of arms, shoulder pads, head, knees, toes, etc.)
- re-apply shadow layers as necessary
- wash the armor lightly with the shadow color to bring everything together
- edge highlight with 1:3 GW scorpion green to GW skull white
the color choices I used for this were too subtle and the highlight/shadow contrast isn't what I set out to achieve. I'll be using different colors but trying out the same technique for future marines. a better explanation of the process can be found here.
@MrMerlin: I purposely left off the shading I would normally do to gold because I thought it would be too much texture for a supple, cloth banner. I wanted to go for more of a golden thread look rather than actual metal. having said that, the amount of raised detail on these "banners" makes me think they'll never be flapping in the wind anyway :p do you think I missed the mark?
53748
Post by: varl
update time:
both rhinos and all their options are fully cleaned up and ready for priming. they're dry-fit for the photo. I'll be painting the hull sections before final assembly as well as all the odds and ends so I can get into all the hard-to-reach spots, paint the inside, etc. I'm excited because these are the first models I'll be using my new airbrush on. hopefully it's not a total disaster :p
21254
Post by: lipsdapips
Like this blog man! The salamanders are clean and crisp. I like the overall results you're getting! Gotta get Vulkan He'Stan at some stage
53748
Post by: varl
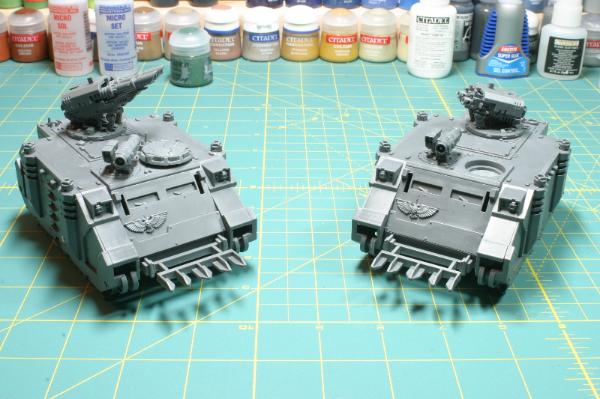
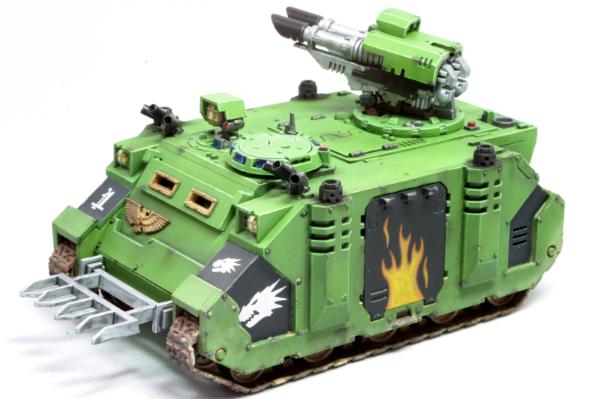
razorbacks are done!
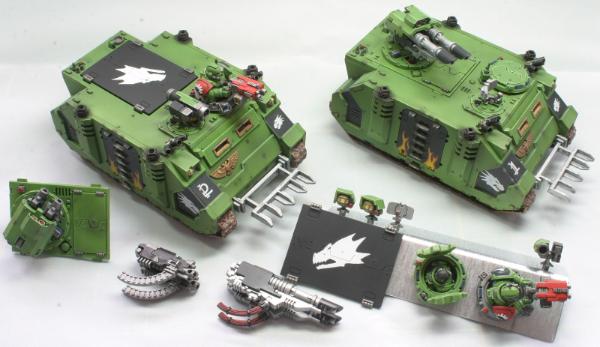
lots of magnets went into these guys:
- the turret weapons are magnetized to each other and then the armor plate cover is magnetized to the top of each weapon; guns elevate freely
- the turret itself is magnetized into the hatch so it rotates freely
- the turret hatch and the regular rhino hatch are magnetized into the bull
- the stormbolter & gunner are magnetized as a single unit so I can swap them with the closed hatch/driver-in-hatch
- the accessory hatch thingie is magnetized so I can swap between HK missile, search light and radar dish
- the dozer blade (ok, it's not really a dozer blade but that's what I'll be counting it as) is magnetized
- the rear ramp is magnetized to help keep it closed
here's a closer looks at each:
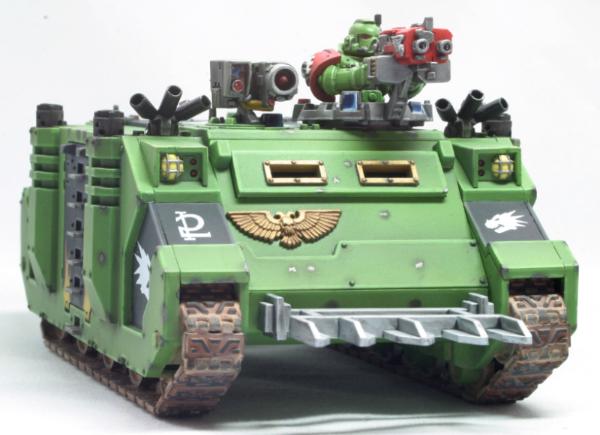
lots and lots of new stuff for me on these guys, not least of which was that this was my first time using an airbrush. there is definitely a learning curve for that thing, but I've gotten a lot more comfortable with it over the course of this project. I'll be honest, though, I've not used it for any sort of detail work yet. I think that's waaayyyy down the road for me :p luckily, I decided to paint the interior first so most of my more painful learning experiences are pretty hard to see. nothing came out horrible (didn't have to strip anything; yay for that), but there are definitely some blotchy bits.
speaking of the interior, here it is:

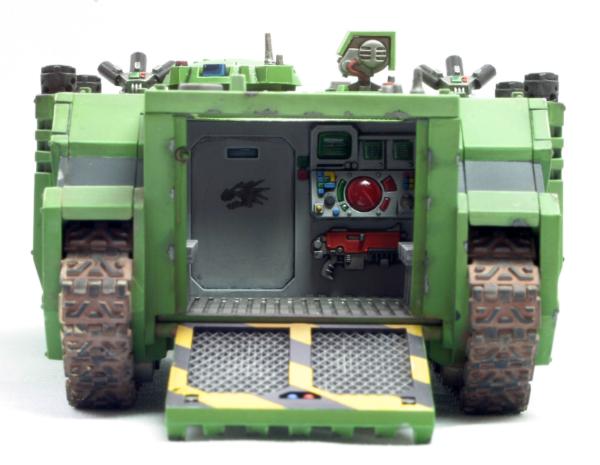
they're basically identical between the two tanks, with only some slight variation on the control console. the two salamanders icons (right wall and driver's hatch) were done by setting down the usual white decals and then painting black over them. I didn't think white would show up well on the gray walls. the aquilla decal was already black, fortunately. it's hard to tell from these photos, but the bench seats are done in boltgun metal an then I dry brushed the bits where armored butts would be buffing the metal one thing I realized that I missed is the ceiling; it's primer gray with random splotches of green over-spray. oh well!
fun fact: sometimes mistakes work out in your favor. if you look closely at the left interior wall, you can see the shading around the rivets on the hatch. that wasn't intentional at all and was the result of me spraying on waaay to much paint (think I had over-thinned it, too). it just happened to collect around all the raised detail as it dried and, presto!, free shading
the inside of the rear hatch was my first experience with masking. I think the stripes are too wide, now that I look at it, but it's good enough. the biggest lesson I took away from this part was that you need to be really careful with masking tape or it will peel your paint right off. I masked the metal bits and painted the yellow first, then laid down more tape for the stripes and added the black. when I removed the tape, I lost a few bits of yellow near the edges that I had to go back and touch up. my tape (cheapo blue painters tape) isn't very sticky, but it's still sticky enough to rip off paint sometimes. for my later masking efforts, I found that sticking the tape to my forearm first lessened the stickiness enough that I didn't have to worry about it (this worked better than sticking it to my table first; probably due to the oils on my skin).
this was my frist time using pigments for weathering (also my first time doing weathering, period). my original plan was to go for a dusty look, to fit in with the dessert rock bases I've been doing for my more recent troop models. after watching lots of videos and trying a few different techniques, I wasn't getting what I wanted. so, I stripped off all the pigments (yay for easy cleanup with water!) and decided to give chipped paint a go instead:
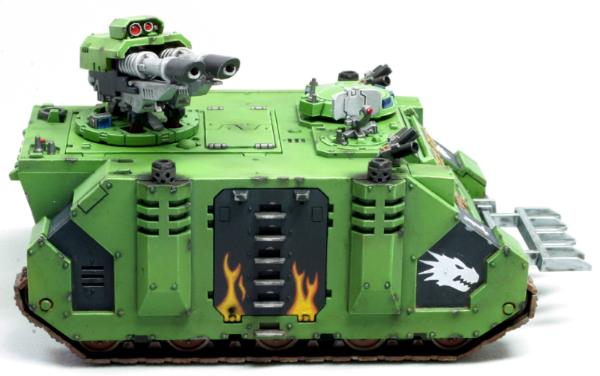
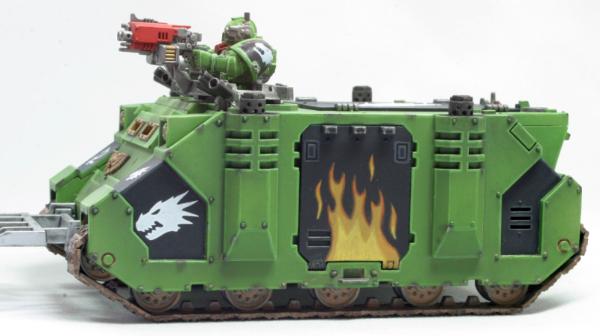
to do the paint chips, I started with a bit of black paint. I added a layer of boltgun metal on top of the black, leaving a little bit of the black showing along the top edge (or all edges if I was painting a corner) to give it depth. then I dabbed a bit of pigment (mix of soot black and dark earth) over that to make it look more scorched or worn. I'm not sure the pigment was the right touch, but it needed *something* to dull down the boltgun metal. I mostly stuck to edges and corners and went with a less-is-more approach. looking at it now, I could probably use a few scratches along the side panels and such. I'll save that for the land raider I'll buy some day as a bonus, I still ended up with a somewhat dusty look because I didn't entirely wash all the pigments off (not for lack of trying, but hey - happy accidents).
I spent a good amount of time on all the accessory bits before I started painting any of the hull sections:
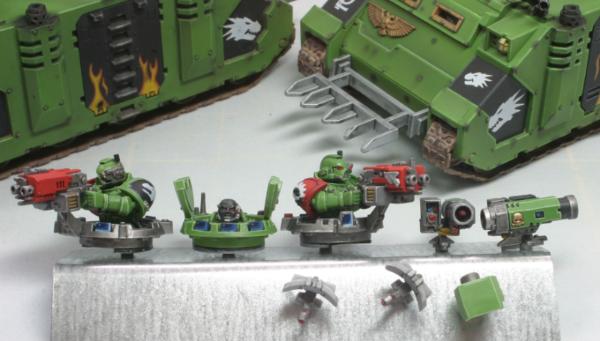
I'm especially pleased with the techmarine shoulder pads and the switch to using red for bolter casings instead of my usual black. I'll be sticking with the red for bolters going forward, as well as using it for chainswords. it just gives it that extra against the green armor that black lacks.
the last bit I want to point out is the top hatches:
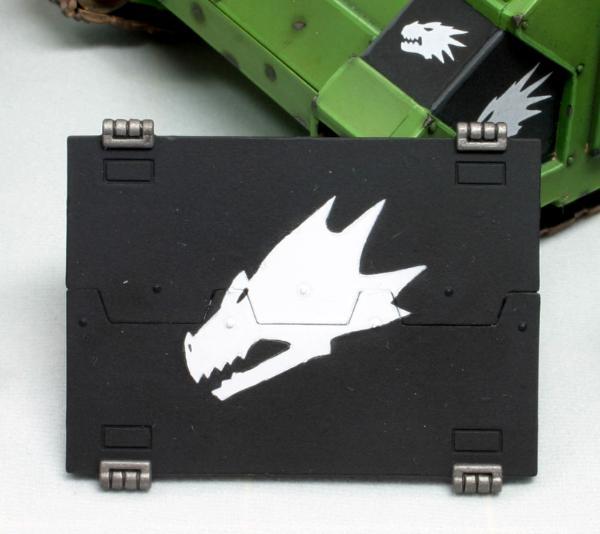
I wanted a chapter icon on there, but none of the decals were even close to large enough and I was very leery of trying to free-hand that design. so, I made my first stencil I found an image of the chapter icon online, scaled it up in photoshop so it was about 1 inch across when printed and made a few copies. I cut out the icon and placed it over a piece of masking tape, then carefully cut the design into the tape and discarded the interior bits. that gave me a piece of masking tape with the negative of the chapter icon, so I just stuck that to the hatch, masked off the rest of it and airbrushed on the white. by carefully peeling the tape back off, I was able to use it for the second hatch as well. I saved the tape stencil on a bit of parchment paper for future use.
not bad for about a month's work and it's nice to finally have some armor for my salamanders. so, so happy I had an airbrush for this, though, because the thought of getting a smooth base coat on the hull with a brush makes me want to cry
in non-tank related news, I did end up making a couple tweaks to my SM captain:
- I added part of a black chapter icon decal to his shoulder
- changed the scroll on the bolter from white to silver
- sealed him
(no new pictures; too lazy :p)
next up will be a unit of scouts with sniper rifles. I picked up some MV lenses recently, so I'm looking forward to seeing how those work out on the sniper rifle scopes.
cheers and thanks for reading!
42470
Post by: SickSix
Nice job!
58190
Post by: Kjellk
those razorbacks are very nice!!! keep up the good work!!
17796
Post by: Slinky
Those razorbacks are great! Automatically Appended Next Post: Heh, just noticed that both I and the previous poster have links to our own Salamanders blogs in our signatures
28808
Post by: Demdiddydizzy
You inspired me to start up my old Salamanders XD Good sir, your work is beautiful, and I can only hope to aspire to be as good as you!
53748
Post by: varl
cheers guys, and thanks for looking
quick update on my scouts:
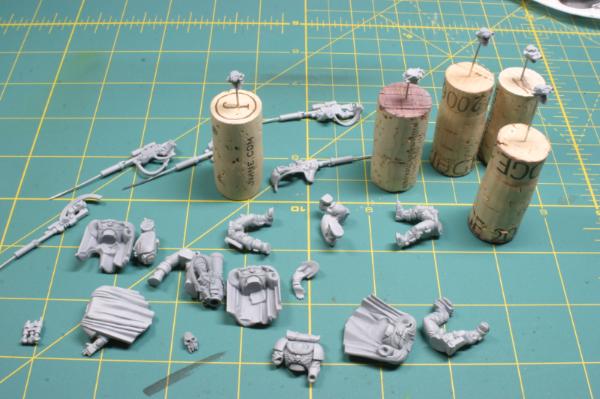
mold lines are cleaned and everyone's primed. going to start painting all the cloth bits tonight.
55253
Post by: Fra Charmelandro
Excellent work which has prompted me to finish enough to get my own blog started. You've convinced me that the only way to get a good result is to put lots of work into it. I hadn't thought of leaving quite so many parts unassembled. One thing I would do slightly differently is to add black to the eye lenses; for me, this gives them more depth. Sadly I don't have any decent photos by way of example so I attach two fuzzy photos of old miniatures to show the various shades I like to use across the lens - like your targetting wotsits but with black.
2
53748
Post by: varl
interesting technique. do you happen to have a photo at about arm's length distance? curious to see the full effect of the illusion.
26416
Post by: Young_Logan
I love the razor back, actaully i love the colour on the entire army, it just looks so clean. Looking forward to seeing more
Young Logan
55253
Post by: Fra Charmelandro
I like to do my lenses like this. More pics in my own gallery - don't want to derail your blog with my unfinished miniatures.
1
31765
Post by: eldartau1987
Nice stuff!
53748
Post by: varl
sniper scouts are done:
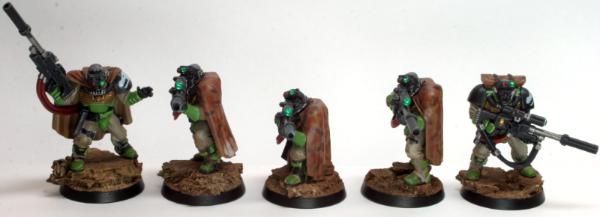
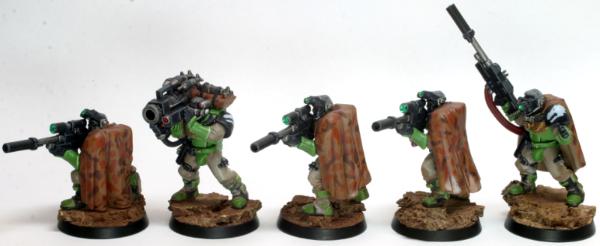
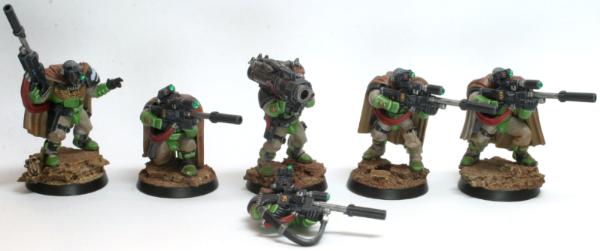
you can see in the last photo that I magnetized one of the pair of legs so I can use either the sniper body or the ML launcher body as needs demand. I discovered a neat trick by accident while doing this. the hole I drilled into the legs for the magnet was a bit too deep, so the magnet ended up being slightly recessed from the surface. as a result, when I put the torso on the torso's magnet pops right into that recess so it's a perfect snap-fit. no sliding around. bit of luck that everything lined up just right, but I may start doing this on purpose in the future.
I had a bit of a matte varnish accident (put on too much), so the black areas are more dull then they should be. I'm noticing from the photos that some of the armor plates are a bit glossier than they should be, too. a result of my attempt to fix the matte varnish mess, no doubt. le sigh. I'm realizing that when airbrushing on vallejo's matte varnish, you have to use it *very* sparingly. I may just stick with satin varnish in the future; bit more forgiving.
anyway, I think my snipers came out alright. I used my airbrush to paint the cloth on the arms and legs, which is the first time I've used it for anything beyond priming, base coating and varnishing. I used three colors and ended up with some nice shading, though it doesn't show up well in these photos. I also tried out using weathering powders on the legs and bases. I think I was way too heavy handed, though, as all the dry-brushed detail on the bases ended up covered by pigment. I also didn't plan the positioning of the feet carefully enough when I put together the cork bits for the rocks. I had a couple cases where the feet were wider than the base. made it work, but it's not ideal. lessons for next time
I was dreading painting the camo cloaks because I was worried about being able to replicate a realistic camo pattern. I don't do well with "random" it ended up being easier then I expected, though. I based the design off the US military's desert camo pattern since I'm doing all my models with desert bases now. I'm not super happy with the colors I picked (I wanted something a bit lighter), but the pattern came out well.
one detail that I'm really pleased with are the mv lenses I used for the scopes and googles. they really pop, even in dim light. I wish I'd found these sooner because they're an amazing little detail and they really add life to the model.
53748
Post by: varl
I live!
just a wee update. plugging away at my two 10-man squads of tac marines:
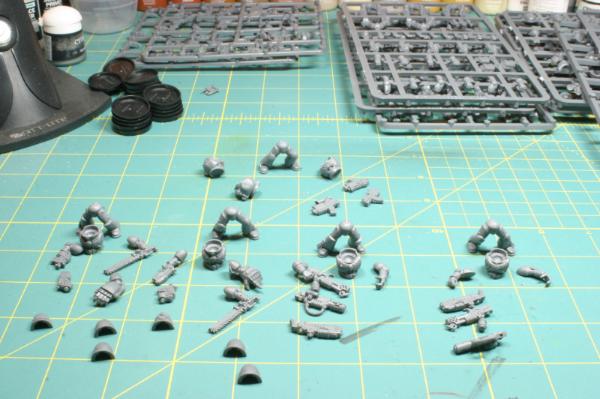
in order to break up the drudgery, I've decided to clean and assemble all the 'special' guys first. so, sergeants, special weapons troops, ML troops, the guys with scopes on their bolters, and a couple grenade throwers. might throw an auspex in there too, just for variety.
it's a bit hard to see in this photo, but I'm magnetizing as much as I can. the weapons on the special weapon troopers are magnetized to the trigger hand so I can easily swap between flamer, melta and plasmagun. I magnetized the bolt pistol and plasma pistol options for the sergeants (magnets in the wrist and hand) and I'll be magnetizing their chainsword and powerfirst arms as well. slightly tedious, since I'll have to do an extra set of shoulder pads, but at least it's the side that gets the decal :p
the plan is to assemble the 'specials' up until it would make painting difficult and then I'll take a break from assembly and paint 'em up. once I'm done with all that, I'll go back and assemble another 5 or so rank-and-file marines and paint those up. rinse and repeat until I'm done.
I've given up on assembly-line painting after trying it out on my 5-man assault marine and scout squads. I just find it soul crushing to have to repeat the same steps over and over again. I realize it's more efficient in both time and materials, but it's not fun and I've got no deadlines I'll prime, basecoat and shade everything in groups, but after that it's one model at a time.
the new chaos stuff is caaaalllliiiinnnngggg to me, but I want to get all the models I've already bought for my salamanders done and painted before I head off on that new front. it's going to be hard to stay focused once I get the new codex in hand, though!
probably won't update much until have some of these guys painted. I can't imagine anyone cares to watch me clean mold lines :p thanks for reading!
31765
Post by: eldartau1987
Varl,
Keep up the good work! I look forward to seeing what this new unit looks like!
53748
Post by: varl
hi gang,
small update. I decided to make combi-flamers for my tac sergeants and wanted to share my results.
I found two common conversions when I searched around a bit:
1. use a stormbolter (either from a termie or from a SM tank sprue), lop off one of the barrel tips and glue your alternate weapon barrel in it's place. easy enough to do and looks good on termies, but on marines I think the gun looks too big.
2. chop off the handle and various other bits from your alternate weapon and then glue it to the top of a standard bolter. not a huge fan of this look, but it gets the job done.
I opted for something like this instead: http://www.40konline.com/index.php?topic=205766.msg2517808#msg2517808
and here's what I ended up with after a couple nights of fiddling:
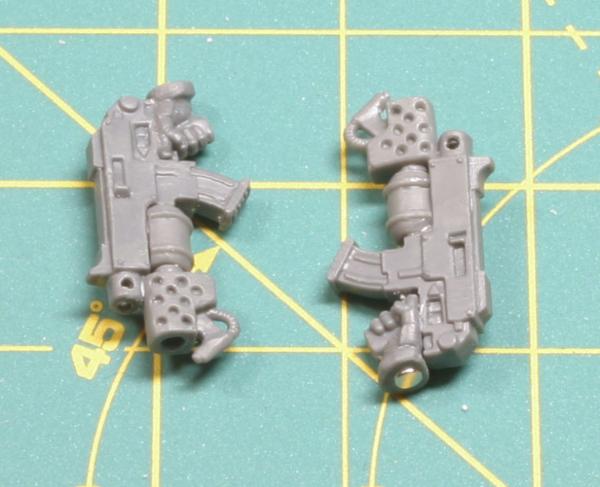

here's what it looks like on one of my soon-to-be sergeants (magnetized, of course):
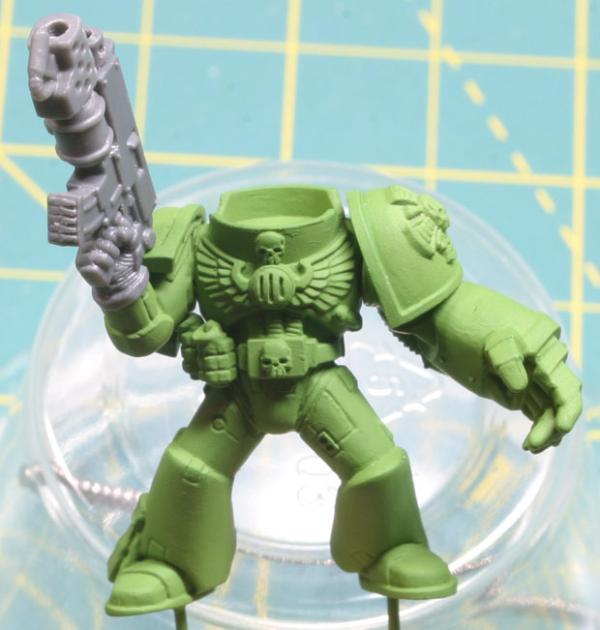
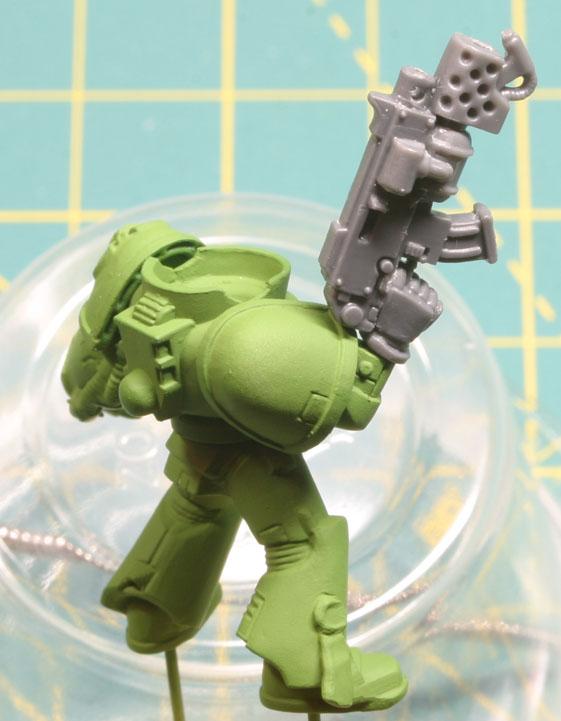
parts:
1 SM bolter (no scope or strap; less to slice off)
1 SM flamer (doesn't matter what chapter since I shaved off the skull/black templar cross anyway)
1 SM gun hand
this is all stuff you can get in the SM tac marine box.
I followed the basic plan laid out in the forum post I linked above, but as I got into it I realized that the sample image in the post was a composite of images made in photoshop to demonstrate the idea and not an actual finished conversion. some of the bits don't fit together quite as nicely as they do in that picture. the flamer tank is much bigger than it appears and there are a couple other things that were a bit off as well. nothing a sharp knife and a file can't fix, but it took a lot more time then I was expecting it to.
an important lesson I learned along the way: clean off all the mold lines and drill out your barrels *before* you start cutting things up. it's way easier to hold onto an entire bolter while you scrape mold lines off the barrel then after you've cut it off. naturally, I didn't do this. learn from my mistake
the one part that didn't come out well is the hands I used. on pistol arms, the wrist and arm are perpendicular; there's no bend in the wrist. on the standard two-handed weapon arms, though, there is a bend in the wrist. using the hand from one of these arms means it doesn't mate up exactly right with the stump on my sergeant's pistol arm. I filed and re-shaped as best I could, and while it's fine at tabletop distance, it's still not a perfect fit and it bugs me.
I think one way to fix this in the future is to not glue the hand to the gun in a straight line. in other words, glue it so that the back of the hand is at a slight angle to the axis of the gun barrel to counter the bend in the wrist. then, just file the wrist down until it's flat. another option would be to cut away the armor ring around the wrist entirely and re-sculpt it from greenstuff. I'll have to try both to see which is easier.
anyway, fun experiment even if it took longer then planned. I've got the parts to make combi-meltas floating around, so I might make a pair of those as well. I'm not convinced I'd ever bother with them on a tac squad, though, so we'll see.
22413
Post by: mwnciboo
Love this model... Funny thing I was looking at that Torso last night trying to work out how to do an ERRANT ARMOUR using that as the base.

I am struggling to find a slightly smaller powerfist, like this one because I think this pose is bad ass. (EDIT found a crappy 2nd Edition Terminator Power Fist, should be able to salvage this!)
I will be copying your awesome Combi-Flamer too, excellent use of a melta-bomb. Good Work.
53748
Post by: varl
If it helps at all, the power fist I used here is from a space wolves kit. Not sure which one as I bought it as bits via ebay. I just shaved off the emblem on the back of the hand.
56004
Post by: Lucarikx
So -SO- much better than the GW one. Lovely Salamanders as well! Lucarikx
53748
Post by: varl
yeesh, a month to the day since my last update. hopefully some new pics will make up for my absence! pics are tall, so I've put each one in it's own spoiler section.
my fully magnetized tactical sergeants:
the banners are meh. I was trying to do some zenithal highlights on the cloth with a lighter green, but applied way more than I thought I had so the color is completely off. the design's a bit bland as well. I think next time I'll probably do the banner in black, with a green border and make the drake head a bit smaller and more centered. other than that, though, pretty happy with the models. each sergeant can choose from a bolt pistol, plasma pistol, combi-flamer, chainsword and powerfist. I'll probably never run the powerfists, but they look cool
next up, my special weapons troopers:
these guys are fully magnetized as well and each one has a flamer, plasmagun and meltagun. there's a magnet in the gun hand and one in the base of each weapon that keeps them in place pretty securely. the only trick is going to be keeping track of all the weapons when they aren't attached.
lastly for today, a pair of heavy weapons troopers with missile launchers:
nothing really special here. I've got 3 boxes of devastators that I'll get around to building one day, so I'll have plenty of other heavy weapon options to swap these guys for as my list requires. got a little too much matte varnish on these guys...
I'm debating on whether I want to add some grass tufts to the bases. they seem a bit plain as-is, so I probably will. considering picking up a box of the mordheim tufts from GW. anyone used 'em before?
58190
Post by: Kjellk
i really like those Sergeants!!!
keep up the good work
53748
Post by: varl
one last update for the year:
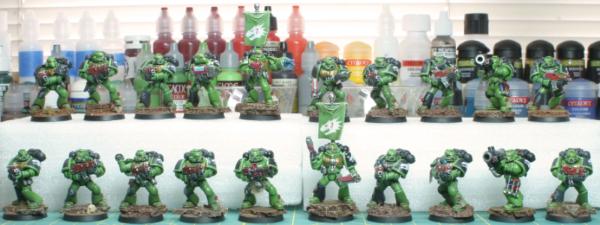
finally got all my tactical marines done this gives me a playable 1000pt army (with some extra odds and ends). I've got one more model in the works, which is a captain in terminator armor to use instead of my aobr captain. once the termie captain is done (he's sitting in pieces after being stripped this morning - gods did the original owner use a lot of glue!), work on my salamanders is going to stop for a while. I still have 3 boxes of devs and a command squad, but those are going to stay on the shelf for now.
2013 is going to be a year of chaos going to start work on a 1500pt night lords army. I'm still debating as to whether I should just add night lords stuff to this P&M blog or if they should get one of their own.
anyway, happy new year and thanks for looking!
46466
Post by: San76
man, these look awesome. its been great to see an army of such well painted figures come together.
personally, i just throw everything into one blog..
top work and happy new year!!
43172
Post by: hemmis92
Wow, those are some great Salamanders!
I do agree on the banners though, they are great but "bland" since they are just big green "handkercheifs" hanging about
I definetely think your other idea sound nicer
Keep up the good work, subbed!
63420
Post by: Charky
You got something really good going on here man! NIce painting, clean and very crisp, looks really good. What type of armylist are you planning to make? And what can we expect to see next?
Keep it up!
53748
Post by: varl
and here's the terminator captain:

this guy was an ebay rescue. I've never seen so much glue used on a single model before. luckily, most of it disintegrated when I dunked it in super clean (or whatever it's called) for a couple days to strip the paint. I had to chip the rest of it off, though... some kind of epoxy, I think. anyway, this was my first time working with a metal model. what a pain in the ass... I'll stick with plastic, thank you. I cleaned off all the mold lines and flash, pinned all the joints and re-assembled the model. for the banner, I followed this tutorial. it didn't come out quite as vibrant as I'd hoped, but that's my fault and not an issue with the tutorial. I had a hard time getting a smooth surface on the banner and I didn't plan the order of my colors very well. if I did it another half dozen times, I think it'd come out pretty solid. still, not horrible for a first attempt and more than good enough for this guy
3333
Post by: milo
Before you move on to the Night Lords, is there any chance we could see a pic of your whole Salamander army together?
53748
Post by: varl
I can definitely do that. will have to figure out how to compose the shot, though... will try to get something up later this week
53748
Post by: varl
by request, here's a shot of the entire army:
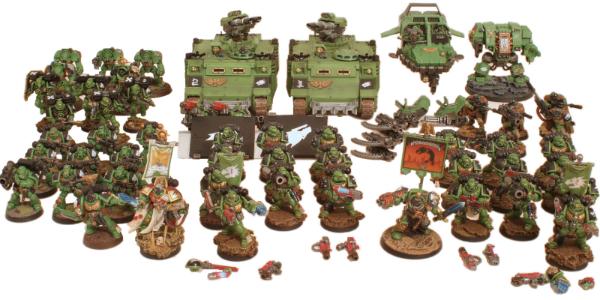
if the image looks a little funny, that's because I chopped out the original background and replaced it with white. my photoshop fu is weak, so it's not a smooth job
anyway, contents of the army are:
1x aobr 10-man tac squad
1x aobr dreadnought; magnetized
1x land speeder; magnetized
1x 5-man assault squad with magnetized sergeant
2x rhino/razorbacks; magnetized (turrets/weapons/radars/searchlights, rear hatch, front spikey bits), fully painted interiors
1x 5-man sniper scout squad with magnetized missile launcher
1x aobr captain
2x 10-man tac squads with magnetized special weapons and magnetized sergeants
1x terminator captain
this was all done over the course of 2012, in roughly the order I have things listed here. the tac squad on the left is the aobr one. my style definitely changed a lot over last year and I learned quite a bit along the way. looking forward to what this year brings
46466
Post by: San76
army looks awesome varl; i cant believe how quickly you've painted these guys to this standard...i think i have finished maybe 5 guys in the time you've been running this blog. top work!
53748
Post by: varl
thanks for the kind words! feels like it takes forever some times :p
17796
Post by: Slinky
I've got painter's block, I've made no progress for ages on mine, so I admire you greatly
53748
Post by: varl
Hope that clears up soon because you have some cool stuff in your gallery. I envy all your FW bits
53748
Post by: varl
Not a painting update, but I did finally play my first game of 40k ever tonight! 1000pts of hot, space marine on space marine action across a terrain-dense 4x4 board. It was a lot of fun. Nice to know that I'll be a player now in addition to a painter/collector. Oh, and I won: 7 to 4
58190
Post by: Kjellk
Congratulations with your victory!!
hope you have a lot more games to play in the future!
58070
Post by: Asuryan
Great looking army! Im almost at a point where I can say I have a fully painted force (which happens to also be Salamanders).
There is something special about fielding figures that you have invested time and passion in painting.
Now is your time to go forth and slaughter many foes. Good Luck.
53748
Post by: varl
well, despite me thinking I wouldn't be painting green for a while I ended up painting up these two guys over the weekend for a game I had last night:

I wanted to try out a different heavy weapon setup for my two tac squads over the missile launchers I took the first game. I started assembling these guys friday night and just barely got everything finished late sunday night so it had time to dry before packing them up monday morning. felt like a last-minute scramble before a big tournament
as it turned out, I didn't get as much use out of these guys as I'd hoped. the terrain was pretty dense, I made a bad deployment choice for one of the squads (blocked my own line of sight. oops) and then I lost one early in the game to some deep striking assault marines. I still have hope for them, though, and will be trying them out in my next game.
my original plan was to spend this year working on my night lords army, but now that I'm starting to actually play games I'll probably be adding to my sallies as well to give me list options.
46466
Post by: San76
as always, they look awesome. sorry to hear you didnt get to unleash them too well....
53748
Post by: varl
update time!
I thought it was time to add a flyer to my army, and here it is:
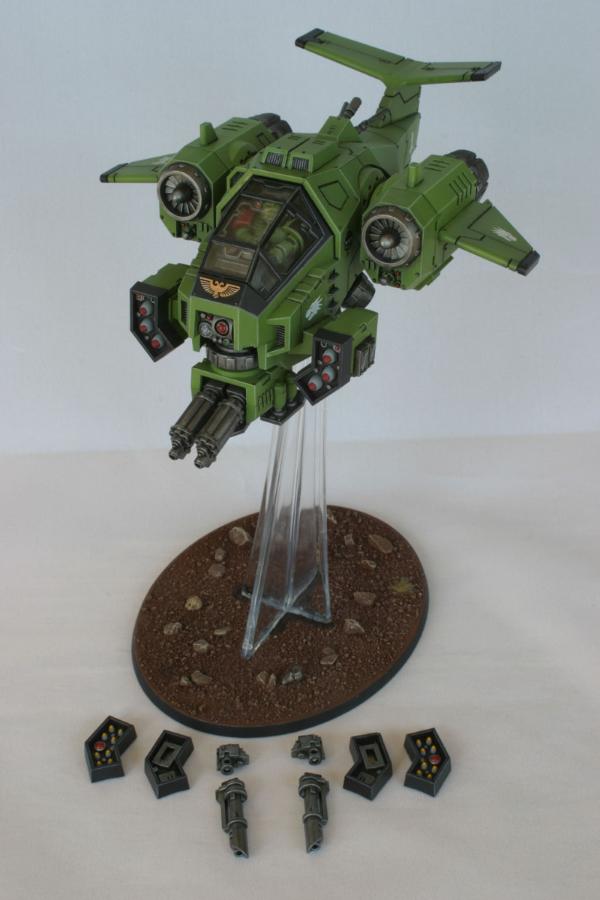
and here are some alternate angles (spoilered due to image size):
the stormtalon is a pretty straightforward model to build. no messy cleanup, warped bits or the like (way better than the landspeeder I built). if you're going to paint it in pieces and then assemble like I did, pay close attention to how everything slots together when you dry fit so you get the right color paint where it needs to go the first time. I did the pilot and the cockpit interior first, then assembled the hull and masked off the cockpit area so I could airbrush the whole thing without making a mess. I left the wings and all the weapons off and painted those separately. gluing the canopy in place was the very last thing I did, after all the varnishes and finishing touches. I didn't want to have to mask it off or risk frosting the acrylic.
one mistake I made was doing final assembly before edge hightlights and the oil wash. I should have left it in pieces for those steps; would have been easier to get into a few spots. another boo boo was in applying the exhaust pigments the first time 'round. I used some alcohol to set the pigments, but it ended up shiny after it dried and also interacted a bit with the metallic color underneath. I ended up doing a second layer of pigment and spraying some matte varnish on as a fixer, which worked much better. last thing I'm unhappy with is the base. I masked off the flight stand all the way down to base, then did my usual glue+rocks+sand layer and painted it up. when I want to peel away the masking tape, I ended up peeling up some parts of the sand/glue layer because they'd bonded to the tape. next time I do a flight stand base, I'll leave about 1mm of the bottom of the stand exposed and just paint it up like the rest of the base. should prevent the masking layer from removing anything important.
in other news, I also painted up 2 lascannon devastators and a dev sergeant. no photos of them at the moment, though. I'll post some when I get around to finishing the squad, but they're low on my todo list at the moment. up next is a drop pod (finally) and after that will be a biker captain w/biker command squad. that should keep me busy for a month or two
17796
Post by: Slinky
Very nice!
Hoping to get the brushes back out and get my Salamanders back on track
46466
Post by: San76
looks awesome Varl. i wouldnt stress over the base, i wouldn't have noticed it if you hadnt mentioned. how did you find the oil wash? ive heard of folks using oils but ive only ever used acrylics myself...
53748
Post by: varl
 San76 wrote: San76 wrote:looks awesome Varl. i wouldnt stress over the base, i wouldn't have noticed it if you hadnt mentioned. how did you find the oil wash? ive heard of folks using oils but ive only ever used acrylics myself...
I may redo it at some point, since it should be easy to strip the sand layer off, but for now it's "done"
oil washes are freakin' awesome. great for little details like grooves, rivets, seams, joints and such. they aren't great for dulling down an entire surface, though, like you might do with badabb black over boltgun metal, for example. the two big pros for oil is that (on a properly gloss-coated surface) the surface tension does all the work for you by seeking out all the nooks and crannies and cleanup is super easy. just hit whatever spot you don't want oil on with a brush dipped in mineral spirits and it disappears. the cons are that oil washes take a bit more prep (you have to gloss varnish the surface before the oil wash, wait a couple hours and then go clean it up, then wait a day for it to dry, then varnish over the surface again to seal the oil in) and you need a dedicated brush. the pros definitely outweigh the cons for me, but I have an airbrush so applying layers of varnish isn't a big deal. I wouldn't want to try it by hand, but I'm sure it can be done that way.
oil washes aren't a replacement for acrylic/ink washes, but I think they are vastly superior for lining in shadows and such.
46466
Post by: San76
ahh nice mate, i might have to try it.
i too have an airbrush but ive never tried varnish through it. do you thin the varnish with anything?
53748
Post by: varl
I use the airbrush-ready vallejo varnishes, so I don't thin them at all. for gloss coating, though, I use future floor polish. works great and super cheap. definitely want to wear a mask if spraying a lot of it, though.
46466
Post by: San76
cheers varl, will have to try and find some round these parts
58703
Post by: lordcommandercorvus
This has finally given me the boost I need to start taht salamander army ive been meaning to do. These are some of the best examples I've been able to find. Simply great.
Also have you got a tutorial on that green.(sorry if I missed it) Thanks in advance,
LordCommanderCorvus
53748
Post by: varl
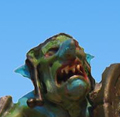 lordcommandercorvus wrote: lordcommandercorvus wrote:This has finally given me the boost I need to start taht salamander army ive been meaning to do. These are some of the best examples I've been able to find. Simply great.
Also have you got a tutorial on that green.(sorry if I missed it) Thanks in advance,
LordCommanderCorvus
thanks for the kind words if you want to see some really kickass salamanders, check out pyriel's gallery. his work is amazing and was a big inspiration for me early on.
the armor recipe has changed over time, but now that I use an airbrush it's dead simple:
1. prime with vallejo gray surface primer
2. base coat with vallejo goblin green
3. edge highlight upper surfaces with a 3:1 mix of white and goblin green
4. black oil wash in all the recesses
I've experimented with doing two-color priming (prime black, then prime white/gray just from the top down; there's a fancy term for this technique but it escapes me), zenithal highlights with a mix of goblin green and white, shading using a darker green or wash in the recesses, etc but so far haven't been happy with any of the results. I think part of that is due to my lack of fine control over the airbrush, though. lots of practice should sort that out eventually
29345
Post by: Nashbashem
Just gone through this blog and I have to say it is brilliant. I love the Salamanders and you are doing them justice.
Very much looking forward to more of your work
68722
Post by: Endriu Death Coy
Hey Varl, great to see someone doing the Salamanders, and doing the faces properly one might add!
Your army looks great!
53748
Post by: varl
thanks for stopping by I have to say, I hate painting salamanders skin. getting the highlights to look right is a pain. I'm enforcing strict helmet discipline on all future marines :p
68722
Post by: Endriu Death Coy
I tend to brush rather than ink wash these days, for "black" skin I'd do a black base, with 2 or 3 progressively lighter brown layers for the highlights.
My daughter has enforced helmet discipline on my BA assault marines, I also magnetized them so I can swap the special weapons and sergeants weapons, she packs a sad if the sergeant has anything but a power sword and plasma pistol.
Me "But I'm fighting the Orks today princess, he needs the power maul"
Maia "No mamiko (Georgian for dad, she is half Georgian), Sergeant Rafen needs his power sword. PUT IT BACK ON!!!!"
53748
Post by: varl
can't argue with a girl that knows her weapons
22413
Post by: mwnciboo
Love your work...
 varl wrote: varl wrote:and here's the terminator captain:
this guy was an ebay rescue. I've never seen so much glue used on a single model before. luckily, most of it disintegrated when I dunked it in super clean (or whatever it's called) for a couple days to strip the paint. I had to chip the rest of it off, though... some kind of epoxy, I think. anyway, this was my first time working with a metal model. what a pain in the ass... I'll stick with plastic, thank you
I've got to say I love Metal, and the reason is the ease with which you can strip them. I buy lots of Job-lots off Ebay and such strip them and ditch them/ my collection is large enough that I can mix and match metals. A bit of Green-Stuff and some additional details and they look Amazing. Plastic is simpler, but you cannot strip them easily and reliably.
Nothing beats a miniature given a second chance at life, they always look better and they make you feel good when you remember what they were and how they look now.

53748
Post by: varl
I can see where you're coming from. it was definitely satisfying to see what I ended up with relative to what I started with on this guy. that said, at this stage in my painting I'm much happier starting off with a clean slate (that I didn't have to spend two days stripping and fixing) it'll be a while before I try another ebay rescue, but I'm sure I will sooner or later. that's where all the best deals are, after all.
68722
Post by: Endriu Death Coy
I began playing back in 2nd edition, I used to modify figures all the time. Explains why I can't feel my fingertips any more though :-D :-D :-D
A small saw blade was a must for those lead figs (they were lead before 40K became popular in the US, then they changed to pewter)
53748
Post by: varl
quick update today. finally put the finishing touches on a drop pod I started last month:
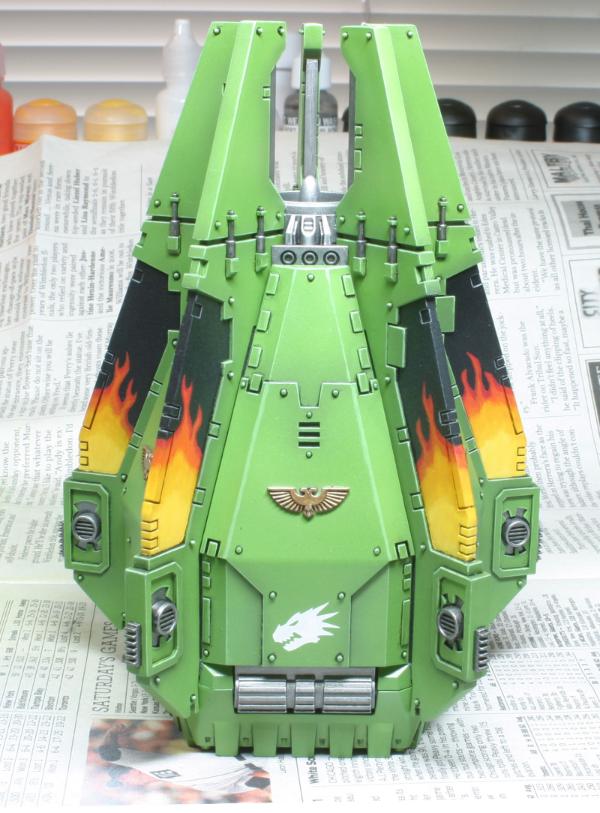

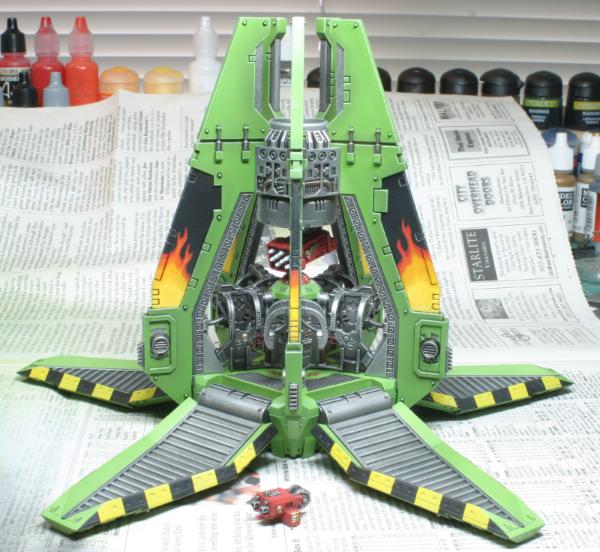
weapons are magnetized, because I just can't help myself.
I remember reading a post about a guy who'd paid about $160 each to have a pair of drop pods painted for him and it blew my mind. I couldn't understand why, as it seemed like a fairly simple model (I hadn't started building mine, yet). a few commission painters that I respect posted in the thread that they thought it was a fair price, sighting that drop pods were a pain in the butt to build. having just completed my first, I can't say I understand why. sure, getting the doors to line up is a bit fiddly, but really? building a landspeeder or rhino seems far worse, in comparison. makes me wonder if I just got lucky with this one...
anyway, next up is a biker command squad. didn't make nearly as much progress on model prep while I was traveling as I'd hoped I would... only 3 models out of 6 cleaned up and ready for assembly. probably won't get paint on them until the end of the month, at best, as I'm having to do more conversion work then I'd planned.
29345
Post by: Nashbashem
Nice work loving the green and flames you've got there
53748
Post by: varl
just a quick look at what's on my desk:
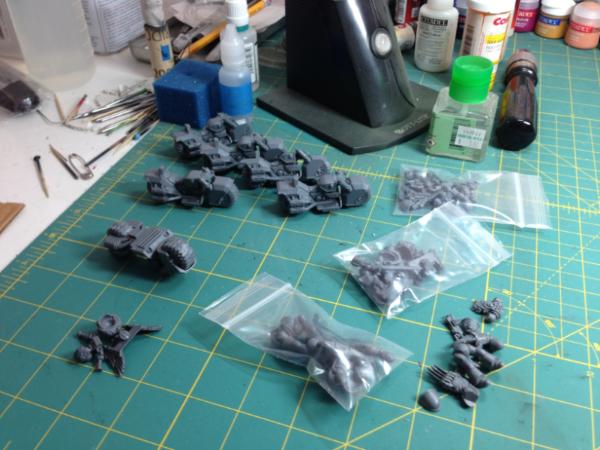
the baggies are models that I've finished cleaning and prepping all the parts for (minus some greenstuff work, which I'll do all at once later). 4 down, 2 to go. I might even manage to start base coating before the end of the month!
58703
Post by: lordcommandercorvus
Pretty pretty drop pod... Looks great! Can't wait to see those bikes done!
17796
Post by: Slinky
Any progress to report?
53748
Post by: varl
as a matter of fact, yes! got my biker captain and command squad done just the other day. everything's all packed up for my move, though, so probably won't have a chance to take photos for at least a week. will post some up once I get settled. thanks for checking
17796
Post by: Slinky
I look forward to seeing them
53748
Post by: varl
ok, finally unpacked in the new apartment and I've had a chance to photograph the bikes:
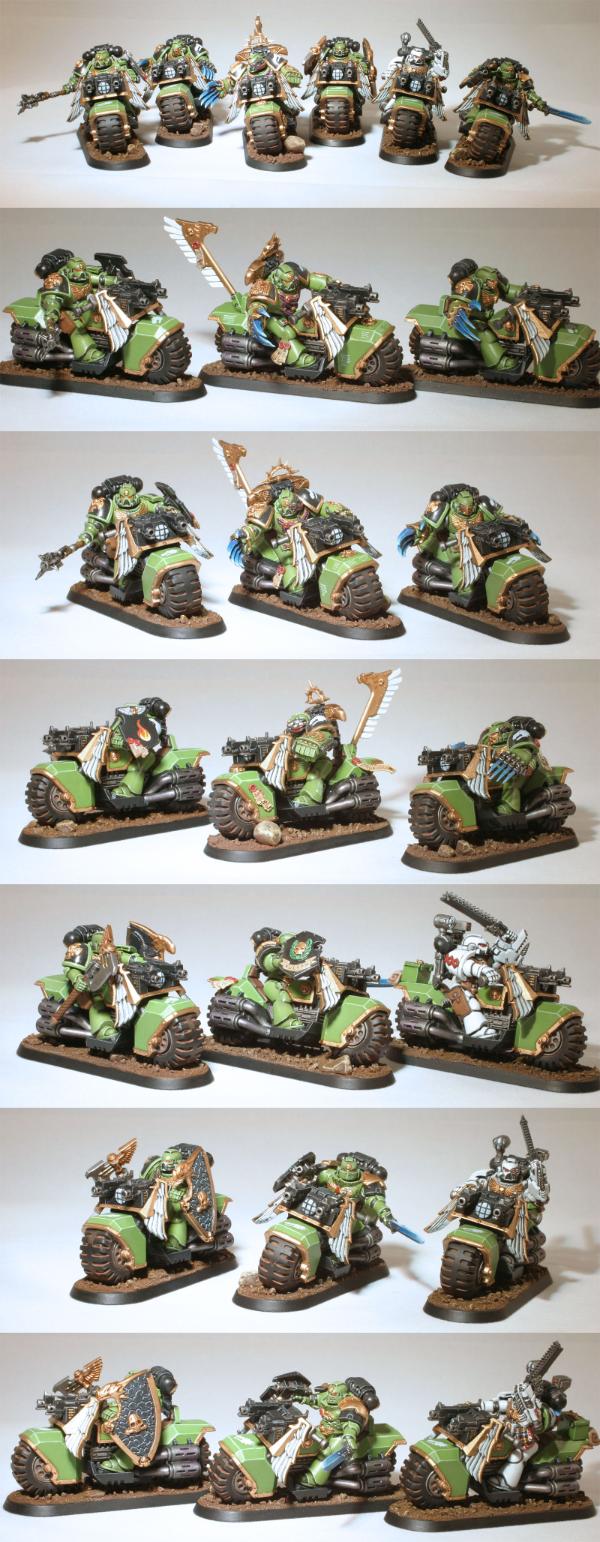
and here's a larger head-on shot:
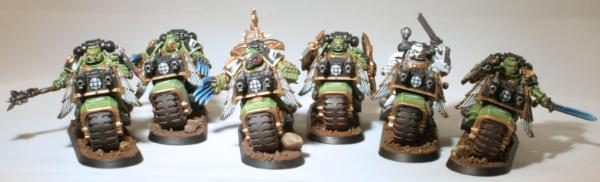
all the arms that stick out are magnetized at the shoulder, as are the two storm shields, for easier transport. I've also put magnets into the tail of each bike so I can stick on things like plasma/melta guns or melta bombs. there was a fair bit of conversion on each of these guys, which made assembly a very slow process. I also spent an absurd amount of time cleaning up the wheels so that you wouldn't see the join line between the two halves of each tire that seems to be so common. *shudder*
pretty happy with them overall. they look sexy on the table. unfortunately, so far they've been an embarrassment in terms of performance. I've fielded them twice now. in each game I've lost one bike to terrain (3+ armor and 5+ feel no pain and he still kills himself driving over some pebbles ). they've won both combats I've managed to get them into, but it was far from a crushing victory each time. I'd originally hoped these guys would be my close combat beatstick, but I just don't think marines have that in them. for 500 points, I expected more... I'll try them for a few more games before I start to proxy them with all plasma or something. here's hoping the new codex breathes a bit of life into the command squad
project for next month is a predator. fully magnetized, naturally!
53748
Post by: varl
predator complete:
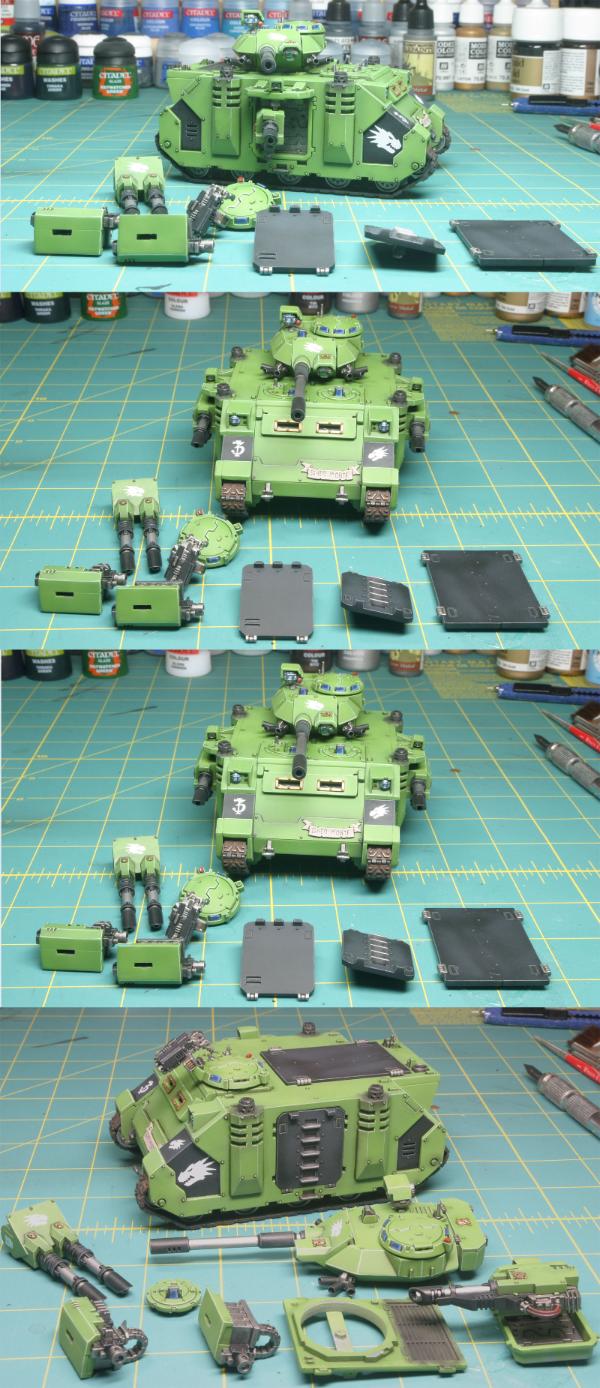
this was a fun model. it actually went together a lot faster than I'd expected. all weapons, turrets, and hatches are magnetized so I can swap them in and out as needed. all the guns retain their full articulation, so I can point them any direction I want. I opted not to paint the inside of this one, even though I may field it as a rhino every now and again. I felt like the return on investment just wasnt there, since I never look at the inside of the other two rhinos I painted. as a result, painting went super fast. pretty happy with this guy and I desperately needed the heavy support unit in my list
next up, I'll be painting more heavy weapon marines. two heavy bolter marines and 2 more plasma cannon marines, I think. I'm looking over various list options now that the new codex is out, but I'm really torn on what I should run. at the moment, I'm leaning towards adding a lot of bikes to my army for grav and melta along with vulkan. I made the mistake of buying a box of centurions when I picked up the new codex, but unless their cost gets faq'd I can't imagine ever running them :(
29345
Post by: Nashbashem
Haha heavy support is also something I lack. Glad to see that magnetizing is too complex, it's something I've been meaning to try.
Pred/Rhino looks ace love the crisp paint job
53748
Post by: varl
cheers nash. I appreciate the kind words should have some heavy weapon marines done by the end of the week. pics to come!
62516
Post by: Warpig1815
They're looking awesome! It's good to see Salamanders getting some attention - they often seem to be forgotten by people. Great work - I'll be keeping an eye on these
53748
Post by: varl
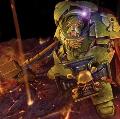 Warpig1815 wrote: Warpig1815 wrote:They're looking awesome! It's good to see Salamanders getting some attention - they often seem to be forgotten by people. Great work - I'll be keeping an eye on these
I think they'll be getting a lot more with the new codex. especially for folks that want to run drop pod lists, sallies got some great buffs even without vulkan. 5 assault marines in a drop pod with 2 TL flamers for less than 100 points? yes, please. can't wait to try out LotD with vulkan. who needs sternguard? :p
76053
Post by: AtlasTelamon
Whoops... there doesn't seem to be anything here.
62516
Post by: Warpig1815
@varl - I wouldn't know too much about the gaming side of 40K - I just prefer the P&M side of it. That said, I'd love to see the Salamanders get a spin-off range of models - be it in the style of the Black Templar upgrade packs or a direct individual codex and the army that accompanies that - ala the recent Dark Angels release. But that's not gonna happen anytime soon (Especially considering that they have a limited edition codex for themselves). Guess I'll just wait until FW release Salamanders stuff
53748
Post by: varl
@sillycybin: I prime with vallejo's gray primer and then base coat with vallejo's goblin green, both with an airbrush. edge highlights are done with a 3:1 mix of white to goblin green and a bit of retarder (not necessary, but makes it a bit easier). I'm experimenting with a two-stage edge highlight now where I do all edges in a less bright mix of white & green (1:1ish) and then just do the upper edges that would catch light in the 3:1 mix. don't think I have any photos up of that, though.
@warpig: yeah, not much on offer for that. FW has a pretty sweet dread and there are some good shoulderpad options from GW. chapterhouse has a few nice bits as well (great storm shields). sadly, I doubt we'll be seeing a full salamanders line anytime soon.
62516
Post by: Warpig1815
@varl - Sooner than you'd think. It's HH mind you, but with the release of the new HH book Massacre there should be the release of Firedrake Terminators (Rumoured to be the only HH unit with Storm Shields) and Pyroclasts - a unit with advanced Flamer tech. Sounds good, but I don't know when they will be released. Presumably sometime between now and Christmas. I'm itching to see them, but I don't think they turned up at UK GD so...
53748
Post by: varl
oooo... well, damn. that might require some purchasing if that ever comes to be...
62516
Post by: Warpig1815
Start saving your pennies then (Or more likely cents ). I imagine that if October is going to be the Iron Hands and possibly Word Bearers month (Maybe with some Emperor's Children thrown in), then November will most likely see Salamanders and Night Lords. Of course that's not taking into account the Death Guard and World Eaters stuff that was being shown at UK GD. All I know for certain is that it is coming soon.
53748
Post by: varl
uh oh... I also happen to collect night lords. this could get spendy...
62516
Post by: Warpig1815
Hehehe, join the club then - my wallet is already weeping. I'll have to check out your Night Lords as I was going to do a contingent of them myself a while back, but I put it off in favour of more Salamanders.
53748
Post by: varl
they're on hold for a bit until I get my salamanders army up to a fully painted 2k list I'm happy with. the catch is that I keep changing my list, so I end up having to paint new models in a never ending cycle :p some day I'll get back to my NL, though.
it's always a tough choice for me between sticking with earlier painting styles to maintain consistency in my army or applying things I've learned along the way and ending up with parts of my force looking way better than other parts. I've been erring on the side of consistency for the most part. the work I did on my NL let me push things up a notch since I didn't have any early work I had to match definitely a slower process, though. all those lightning bolts...
62516
Post by: Warpig1815
I have to admit - they do look awesome. May I have permission to nick that scheme when I get round to doing my own NL?
My own experience of painting Salamanders is to try and push myself to do more advanced techniques, but I have a limited budget to spend on 40K so I'm loath to try techniques that I'll muck up. I think I really need to get an airbrush as a large part of my 40K spending goes on spray cans alone. An airbrush would massively cut down on primer costs.
53748
Post by: varl
by all means, have at it. I claim rights to nothing in this hobby
I hear you on being afraid to mess stuff up. it's definitely slowing me down in terms of getting more comfortable with the airbrush. I know I'm only scratching the surface of what I could do with it, but the thought of having to strip a mostly-painted model and start over makes me very conservative. I need to just suck it up and try stuff or I'll never move my painting game forward
62516
Post by: Warpig1815
Easier said than done though, isn't it. I'm pretty much terrified to take a stab at wet blending even though I could do with being able to do it for Lava bases. 
53748
Post by: varl
Warpig1815 wrote:Easier said than done though, isn't it. I'm pretty much terrified to take a stab at wet blending even though I could do with being able to do it for Lava bases.
a couple things that might help with that:
- practice on the backs of plastic spoons. prime them up like you would any other model and they make great test beds for colors and techniques. and if you mess it up, recycle it and grab another out of your 200 count box :p
- try it with oil paints. they stay workable for hours instead of seconds, so you can focus more on the actual blending instead of racing to beat the clock before both colors dry on you. just have to remember to seal the end result with a bit of varnish before moving on
62516
Post by: Warpig1815
Well that's food for thought! Thanks a bunch - guess I will be having a go at it sometime soon
53748
Post by: varl
got two more plasma cannon and three heavy bolter marines done, to round out heavy weapon options for a few squads:
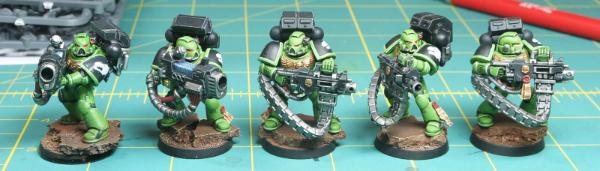
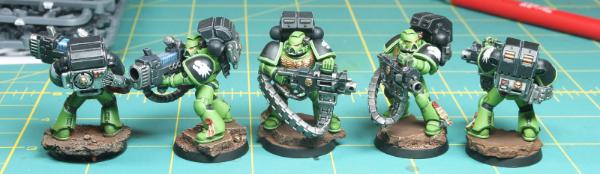
nothing ground breaking here, but I'm definitely getting faster at painting these guys. it's nice to feel some improvement in that arena
next on the list is a squad of fully magnetized centurions. I only plan to run them as a dev squad, but since every single possible bit of wargear for these guys comes in the box I figured I'd just magnetize it all.
29345
Post by: Nashbashem
Yet more smooth paintjobs! Love them
53748
Post by: varl
cheers, mate. slaving away on the centurions right now. so many freakin' tiny magnets... I think each model's going to end up using 26 magnets in the end, but damn if those things won't be configurable!
53748
Post by: varl
just in time for the end of the year, I've finally sat down and taken some photos of what I've worked on recently. it's been a fairly busy time for hobbying; I've just been a slacker about documenting it all. without further ado, here's what I finished up in 2013 (in order of completion):
Devastator Centurions
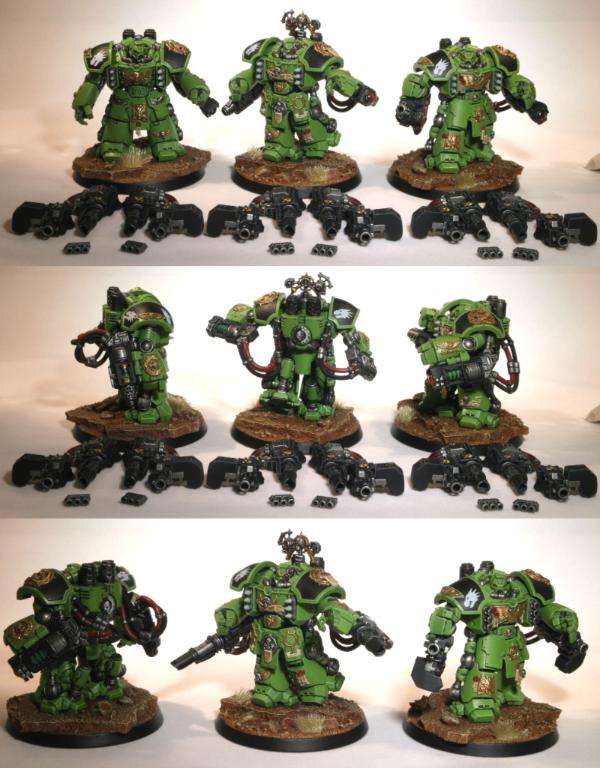
these guys were fairly simple to paint, but a royal pain in the ass to prep because I magnetized *everything*. 18 magnets per model and that's not even counting the assault loadout, which I didn't bother to paint up (I mean, really...). they look dead sexy on the table top, though.
Legion of the Damned
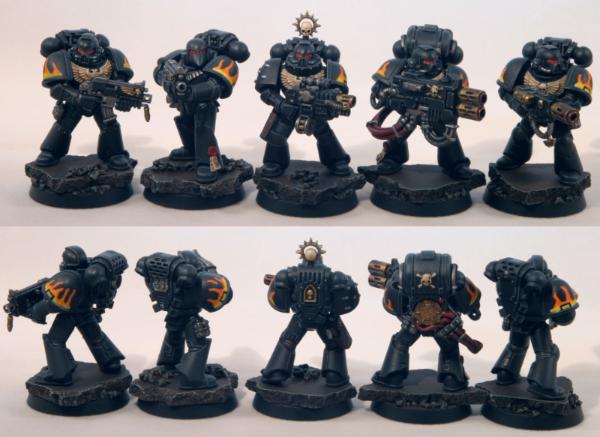
I'm running vulkan in my list these days, and what goes better with vulkan then deep-striking, relentless, master-crafted triple melta-squads that ignore cover and have a 3+ invuln? mmm, melta. these guys were built from the new tactical marine box (and a spare MM I had in my bits box). I hate finecast, so while I do love the LotD sculpts it wasn't going to happen. I had fun painting these guys; great departure from painting green. got a bit more comfortable painting flames as a result of these guys. I'll be doing a second unit in the near future.
Vulkan He'stan
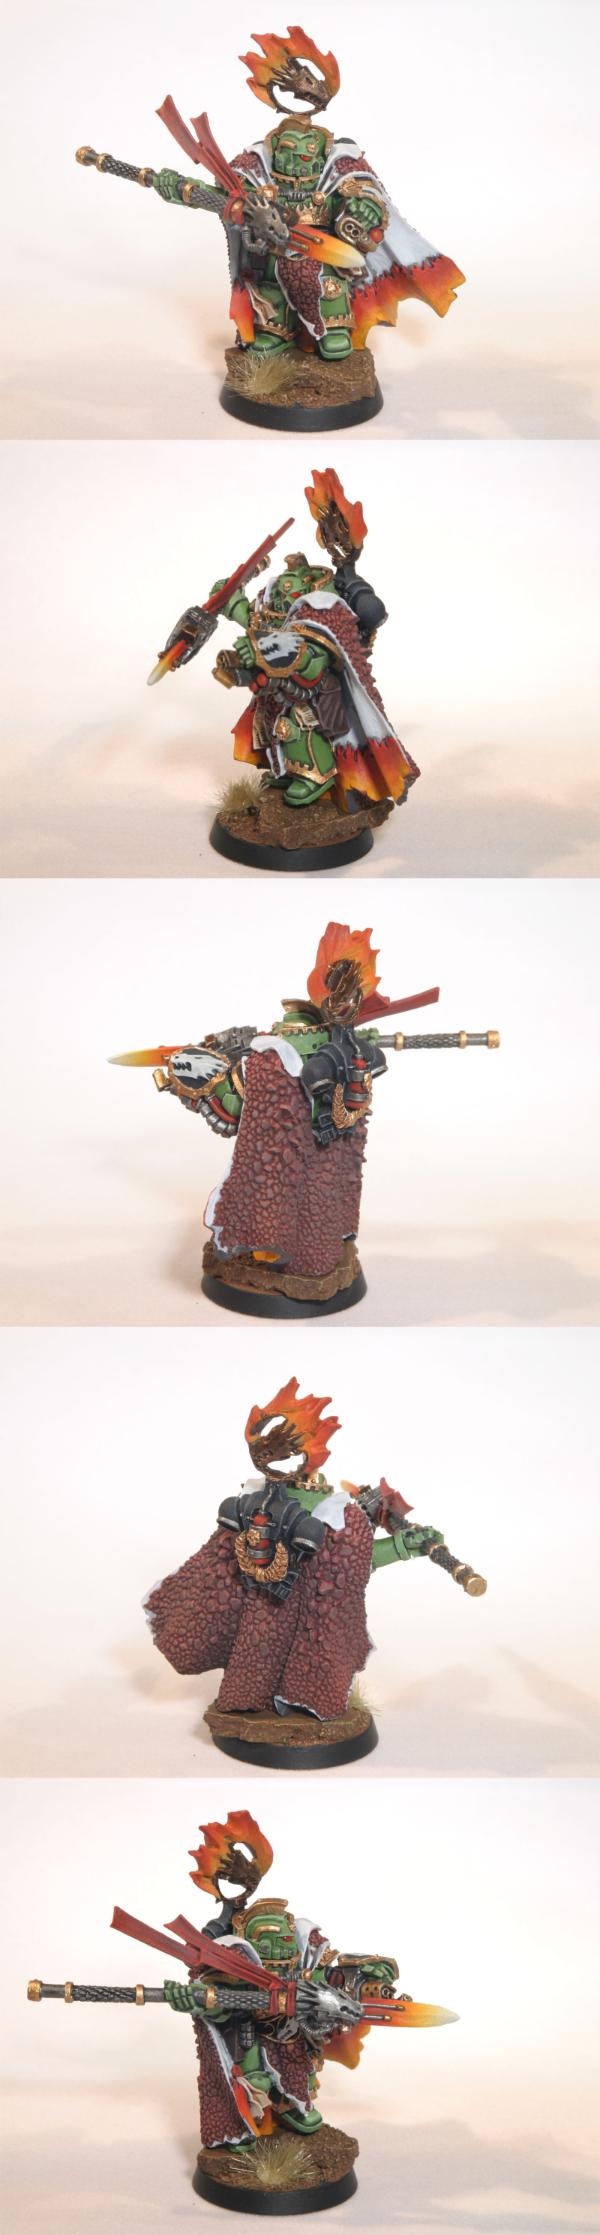
speaking of vulkan, here's the man himself! I hadn't intended to pick up this model, because finecast and I really don't get along. my original plan was to do my own conversion so I could change up the position of the spear and such. however, while browsing the racks at my FLGS last month, I came across this model. apparently the store had special-ordered it for another customer, but the guy never came in to pick it up. I figured it was a sign, so pushed aside my distaste of finecast and picked it up. painting him up didn't take as long as I'd expected it to. I used buypainted's video for color inspiration in several spots. I'm glad I have the model and I think he came out well, but ugh... finecast.
and just for fun, here's a full army shot I took the day after christmas as I was setting up for a 2900 point game. this is every salamanders model I currently own (rhino at the bottom is the magnetized predator), minus a couple of spare heavy weapon marines and a terminator captain. even better, the imperium was triumphant that day!
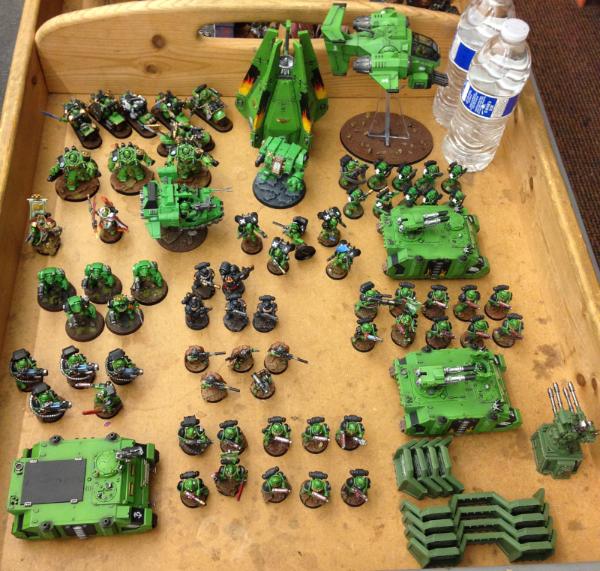
I'm very close to where I want to be with this army. currently, I'm painting up a few spare marines to sub into existing squads now that I don't always bring a heavy weapon. I have another stormtalon and 5-man LotD squad to do and I'm considering a thunderfire cannon (ugh, damn you finecast!). I may add an inquisitor, some servo skulls and a 3-bike squad over the next few months, but I plan to spend most of the year working on my long-neglected night lords army.
happy new year and thanks for visiting!
74097
Post by: TheFireDrake
Truly inspiring, bravo sir
29345
Post by: Nashbashem
That is a sweet looking army! You should be proud
53748
Post by: varl
cheers for the kind words loving your brazen legion CSM force
17796
Post by: Slinky
More great stuff, Varl!
Not a fan of the Vulkan model, but you've really brought out the best in it!
53748
Post by: varl
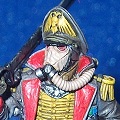 Slinky wrote: Slinky wrote:More great stuff, Varl!
Not a fan of the Vulkan model, but you've really brought out the best in it!
cheers, slinky! yeah, I'm not a fan of the model either. it's got some great detail on it, but the pose is kinda silly and then there's the finecast problems... but, at least he's recognizable
51104
Post by: JBrehaut
As someone who's been spending a lot of time painting Salamanders lately, I have to say this is a fantastic looking army, I only wish I had my models 100% finished and looking as nice as yours!
The green you've used is certainly much different from the green I myself envisaged Salamanders as being, but it really works, especially en masse.
53748
Post by: varl
cheers JBrehaut (and pardon the tardy response) I'm not honestly sure how I ended up deciding on goblin green for the base. in hindsight, it's a bit flat. I wish I'd have gone with something a bit more emerald-y, but I'm committed now :p
good luck with your salamanders!
53748
Post by: varl
hi gang,
just a quick update today. stormtalon #2 is finished:
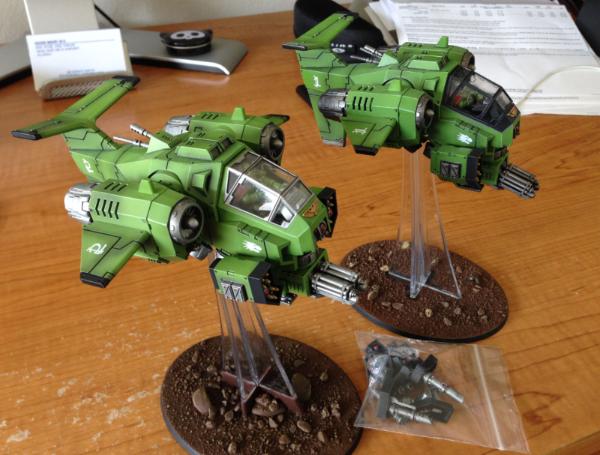
practice definitely helps, as the pre-shading technique I used on the original talon came out much cleaner the second time around. changed up some of the details on the paint scheme a bit, but it's generally the same idea. also changed up how I did the metals(more drybushing, less edge highlighting) and made of point of spending less time on detail that would ultimately be hidden (i.e., some of the stuff in the cockpit).
this is going to wrap up work on my salamanders army for the foreseeable future.I'll probably continue to add new units here and there, but for the most part I'll be shifting focus to my long-neglected night lords army. for those interested, the P&M blog for that army can be found here.
cheers and thanks for visiting!
|
|