| Author |
Message |
 |
|
|
|
|
Advert
|
Forum adverts like this one are shown to any user who is not logged in. Join us by filling out a tiny 3 field form and you will get your own, free, dakka user account which gives a good range of benefits to you:
- No adverts like this in the forums anymore.
- Times and dates in your local timezone.
- Full tracking of what you have read so you can skip to your first unread post, easily see what has changed since you last logged in, and easily see what is new at a glance.
- Email notifications for threads you want to watch closely.
- Being a part of the oldest wargaming community on the net.
If you are already a member then feel free to login now. |
|
 |
2012/07/11 14:50:50
Subject: Varl's Salamanders WIP blog
|
|

Ragin' Ork Dreadnought
Ingelheim am Rhein, Germany
|
I really like the captain, he's nice and colorfull and has a nice base. Only thing I'd change is the gold on the banner.... it needs more depth imho
|
|
|
|
 |
|
2012/07/11 15:43:37
Subject: Re:Varl's Salamanders WIP blog
|
|

Morphing Obliterator
|
@kjellk: colors for the armor, you mean? it's evolved a bit since I started and I'm in the process of changing it again, but here's what most of my recent marines were painted with:
- base coat with VGC goblin green over a light (white or gray) primer
- apply a directed wash like badab black to only the recessed areas
- go back and clean up any messes from the wash with the base color
- highlight with 1:1 GW scorpion green to GW skull white
- edge highlight 1:3 GW scorpion green to GW skull white
for the captain, I did something different:
- base coat with VGC goblin green over white primer
- apply several layers of very thinned down GW dark angels green to any areas that would be in shadow (recesses, bottom sides of arms & legs, bottom edges of shoulder pads, etc.)
- apply several layers of very thinned down GW scorpion green to areas that would get the most light (upper surfaces of arms, shoulder pads, head, knees, toes, etc.)
- re-apply shadow layers as necessary
- wash the armor lightly with the shadow color to bring everything together
- edge highlight with 1:3 GW scorpion green to GW skull white
the color choices I used for this were too subtle and the highlight/shadow contrast isn't what I set out to achieve. I'll be using different colors but trying out the same technique for future marines. a better explanation of the process can be found here.
@MrMerlin: I purposely left off the shading I would normally do to gold because I thought it would be too much texture for a supple, cloth banner. I wanted to go for more of a golden thread look rather than actual metal. having said that, the amount of raised detail on these "banners" makes me think they'll never be flapping in the wind anyway :p do you think I missed the mark?
|
|
|
|
|
|
2012/07/13 08:03:14
Subject: Re:Varl's Salamanders WIP blog
|
|
Morphing Obliterator
|
update time:
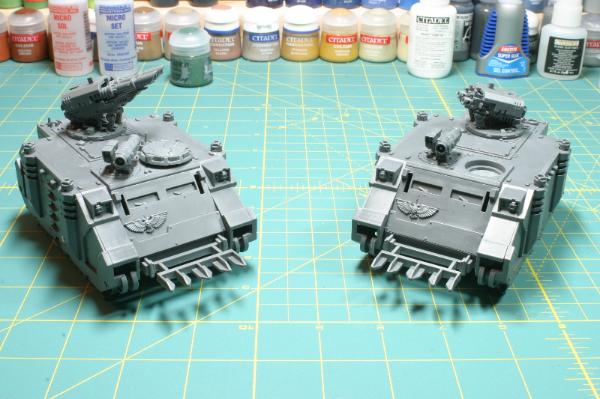
both rhinos and all their options are fully cleaned up and ready for priming. they're dry-fit for the photo. I'll be painting the hull sections before final assembly as well as all the odds and ends so I can get into all the hard-to-reach spots, paint the inside, etc. I'm excited because these are the first models I'll be using my new airbrush on. hopefully it's not a total disaster :p
|
|
|
|
|
|
2012/07/13 11:25:00
Subject: Varl's Salamanders WIP blog
|
|

Scarred Ultramarine Tyrannic War Veteran
|
Like this blog man! The salamanders are clean and crisp. I like the overall results you're getting! Gotta get Vulkan He'Stan at some stage 
|
|
|
|
|
|
2012/08/19 21:44:10
Subject: Re:Varl's Salamanders WIP blog
|
|
Morphing Obliterator
|
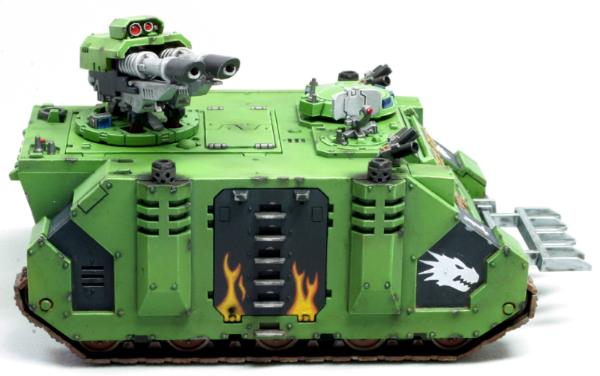
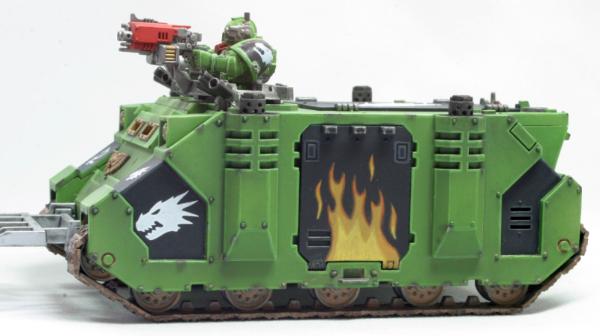
razorbacks are done!
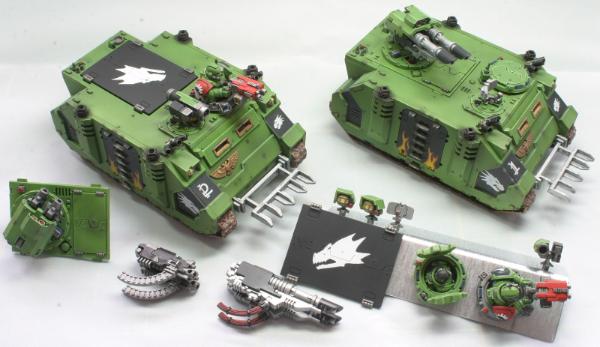
lots of magnets went into these guys:
- the turret weapons are magnetized to each other and then the armor plate cover is magnetized to the top of each weapon; guns elevate freely
- the turret itself is magnetized into the hatch so it rotates freely
- the turret hatch and the regular rhino hatch are magnetized into the bull
- the stormbolter & gunner are magnetized as a single unit so I can swap them with the closed hatch/driver-in-hatch
- the accessory hatch thingie is magnetized so I can swap between HK missile, search light and radar dish
- the dozer blade (ok, it's not really a dozer blade but that's what I'll be counting it as) is magnetized
- the rear ramp is magnetized to help keep it closed
here's a closer looks at each:
lots and lots of new stuff for me on these guys, not least of which was that this was my first time using an airbrush. there is definitely a learning curve for that thing, but I've gotten a lot more comfortable with it over the course of this project. I'll be honest, though, I've not used it for any sort of detail work yet. I think that's waaayyyy down the road for me :p luckily, I decided to paint the interior first so most of my more painful learning experiences are pretty hard to see. nothing came out horrible (didn't have to strip anything; yay for that), but there are definitely some blotchy bits.
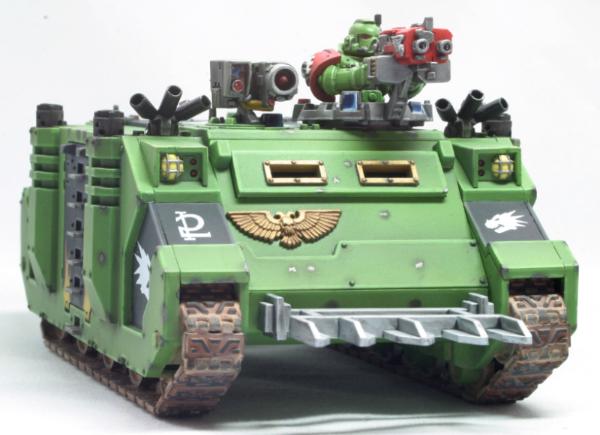
speaking of the interior, here it is:

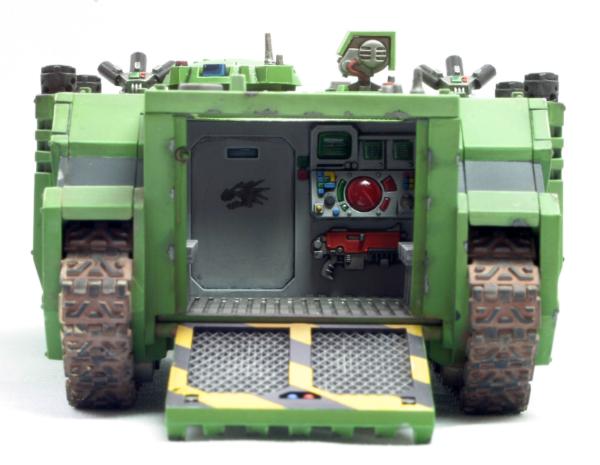
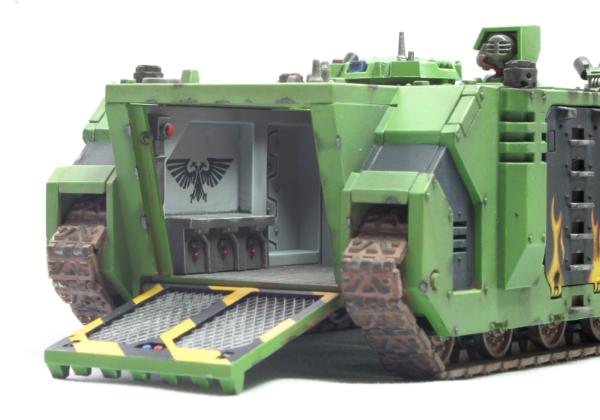
they're basically identical between the two tanks, with only some slight variation on the control console. the two salamanders icons (right wall and driver's hatch) were done by setting down the usual white decals and then painting black over them. I didn't think white would show up well on the gray walls. the aquilla decal was already black, fortunately. it's hard to tell from these photos, but the bench seats are done in boltgun metal an then I dry brushed the bits where armored butts would be buffing the metal one thing I realized that I missed is the ceiling; it's primer gray with random splotches of green over-spray. oh well!
fun fact: sometimes mistakes work out in your favor. if you look closely at the left interior wall, you can see the shading around the rivets on the hatch. that wasn't intentional at all and was the result of me spraying on waaay to much paint (think I had over-thinned it, too). it just happened to collect around all the raised detail as it dried and, presto!, free shading 
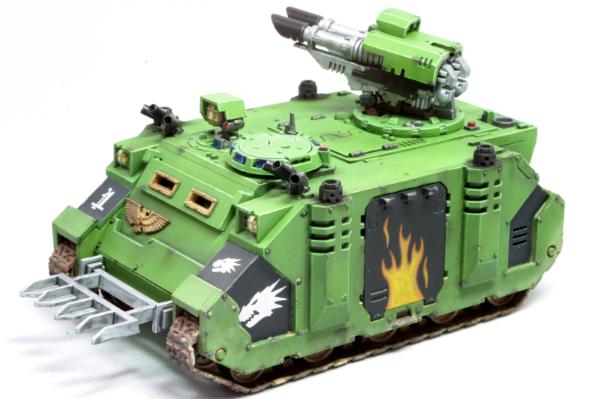
the inside of the rear hatch was my first experience with masking. I think the stripes are too wide, now that I look at it, but it's good enough. the biggest lesson I took away from this part was that you need to be really careful with masking tape or it will peel your paint right off. I masked the metal bits and painted the yellow first, then laid down more tape for the stripes and added the black. when I removed the tape, I lost a few bits of yellow near the edges that I had to go back and touch up. my tape (cheapo blue painters tape) isn't very sticky, but it's still sticky enough to rip off paint sometimes. for my later masking efforts, I found that sticking the tape to my forearm first lessened the stickiness enough that I didn't have to worry about it (this worked better than sticking it to my table first; probably due to the oils on my skin).
this was my frist time using pigments for weathering (also my first time doing weathering, period). my original plan was to go for a dusty look, to fit in with the dessert rock bases I've been doing for my more recent troop models. after watching lots of videos and trying a few different techniques, I wasn't getting what I wanted. so, I stripped off all the pigments (yay for easy cleanup with water!) and decided to give chipped paint a go instead:
to do the paint chips, I started with a bit of black paint. I added a layer of boltgun metal on top of the black, leaving a little bit of the black showing along the top edge (or all edges if I was painting a corner) to give it depth. then I dabbed a bit of pigment (mix of soot black and dark earth) over that to make it look more scorched or worn. I'm not sure the pigment was the right touch, but it needed *something* to dull down the boltgun metal. I mostly stuck to edges and corners and went with a less-is-more approach. looking at it now, I could probably use a few scratches along the side panels and such. I'll save that for the land raider I'll buy some day as a bonus, I still ended up with a somewhat dusty look because I didn't entirely wash all the pigments off (not for lack of trying, but hey - happy accidents).
I spent a good amount of time on all the accessory bits before I started painting any of the hull sections:
I'm especially pleased with the techmarine shoulder pads and the switch to using red for bolter casings instead of my usual black. I'll be sticking with the red for bolters going forward, as well as using it for chainswords. it just gives it that extra against the green armor that black lacks.
the last bit I want to point out is the top hatches:
I wanted a chapter icon on there, but none of the decals were even close to large enough and I was very leery of trying to free-hand that design. so, I made my first stencil I found an image of the chapter icon online, scaled it up in photoshop so it was about 1 inch across when printed and made a few copies. I cut out the icon and placed it over a piece of masking tape, then carefully cut the design into the tape and discarded the interior bits. that gave me a piece of masking tape with the negative of the chapter icon, so I just stuck that to the hatch, masked off the rest of it and airbrushed on the white. by carefully peeling the tape back off, I was able to use it for the second hatch as well. I saved the tape stencil on a bit of parchment paper for future use.
not bad for about a month's work and it's nice to finally have some armor for my salamanders. so, so happy I had an airbrush for this, though, because the thought of getting a smooth base coat on the hull with a brush makes me want to cry
in non-tank related news, I did end up making a couple tweaks to my SM captain:
- I added part of a black chapter icon decal to his shoulder
- changed the scroll on the bolter from white to silver
- sealed him
(no new pictures; too lazy :p)
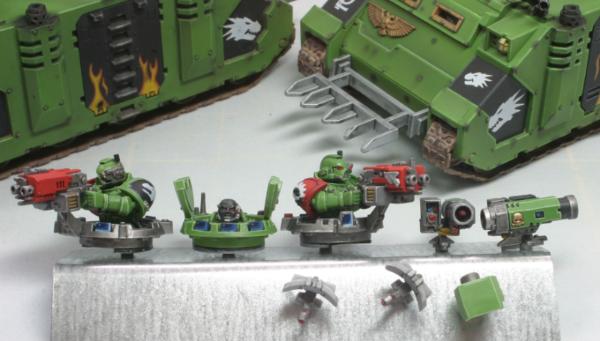
next up will be a unit of scouts with sniper rifles. I picked up some MV lenses recently, so I'm looking forward to seeing how those work out on the sniper rifle scopes.
cheers and thanks for reading!
|
|
|
|
|
|
2012/08/19 22:11:51
Subject: Varl's Salamanders WIP blog (updated: finished razorbacks on page 4)
|
|
Terminator with Assault Cannon
|
Nice job!
|
SickSix's Silver Skull WIP thread
My Youtube Channel
JSF wrote:... this is really quite an audacious move by GW, throwing out any pretext that this is a game and that its customers exist to do anything other than buy their overpriced products for the sake of it. The naked arrogance, greed and contempt for their audience is shocking.
= Epic First Post.
|
|
|
|
|
2012/08/25 12:22:36
Subject: Re:Varl's Salamanders WIP blog (updated: finished razorbacks on page 4)
|
|

Speedy Swiftclaw Biker
|
those razorbacks are very nice!!! keep up the good work!!
|
|
|
|
|
2012/08/25 15:48:46
Subject: Re:Varl's Salamanders WIP blog (updated: finished razorbacks on page 4)
|
|

Longtime Dakkanaut
|
Those razorbacks are great! Automatically Appended Next Post: Heh, just noticed that both I and the previous poster have links to our own Salamanders blogs in our signatures 
|
|
This message was edited 1 time. Last update was at 2012/08/25 15:50:40
|
|
|
|
|
2012/08/25 18:07:36
Subject: Re:Varl's Salamanders WIP blog (updated: finished razorbacks on page 4)
|
|
Land Raider Pilot on Cruise Control
|
You inspired me to start up my old Salamanders XD Good sir, your work is beautiful, and I can only hope to aspire to be as good as you!
|
"So does he cast off a frail mortal frame for something greater and more difficile. So does he become a Dreadnought."
 3000ishpts 3000ishpts
 1500ish pts 1500ish pts
 1000ish pts 1000ish pts
 Alpha Legion + World Eaters 2000ishpts Alpha Legion + World Eaters 2000ishpts
Cryx - 19pts
Khador - 7pts
Legion Everblight - 25pts |
|
|
|
|
2012/08/26 03:29:00
Subject: Re:Varl's Salamanders WIP blog (updated: finished razorbacks on page 4)
|
|
Morphing Obliterator
|
cheers guys, and thanks for looking
quick update on my scouts:
mold lines are cleaned and everyone's primed. going to start painting all the cloth bits tonight.
|
|
|
|
|
|
2012/09/02 19:45:50
Subject: Re:Varl's Salamanders WIP blog (updated: finished razorbacks on page 4)
|
|
Been Around the Block
|
Excellent work which has prompted me to finish enough to get my own blog started. You've convinced me that the only way to get a good result is to put lots of work into it. I hadn't thought of leaving quite so many parts unassembled. One thing I would do slightly differently is to add black to the eye lenses; for me, this gives them more depth. Sadly I don't have any decent photos by way of example so I attach two fuzzy photos of old miniatures to show the various shades I like to use across the lens - like your targetting wotsits but with black.
|
|
This message was edited 4 times. Last update was at 2012/09/02 19:49:54
|
|
|
|
|
2012/09/02 19:51:44
Subject: Varl's Salamanders WIP blog (updated: finished razorbacks on page 4)
|
|
Morphing Obliterator
|
interesting technique. do you happen to have a photo at about arm's length distance? curious to see the full effect of the illusion.
|
|
|
|
|
|
2012/09/02 19:55:07
Subject: Varl's Salamanders WIP blog (updated: finished razorbacks on page 4)
|
|
Veteran Wolf Guard Squad Leader
|
I love the razor back, actaully i love the colour on the entire army, it just looks so clean. Looking forward to seeing more
Young Logan
|
30K Blog: hobbyfromtheaett.blogspot.com
  Bran Redmaws Great Company - 5500pts Bran Redmaws Great Company - 5500pts
30K Space Wolves - 1500pts
 Deathguard -2300 pts Deathguard -2300 pts  |
|
|
|
|
2012/09/04 21:42:49
Subject: Re:Varl's Salamanders WIP blog (updated: finished razorbacks on page 4)
|
|
Been Around the Block
|
I like to do my lenses like this. More pics in my own gallery - don't want to derail your blog with my unfinished miniatures.
|
|
|
|
|
|
2012/09/04 21:46:58
Subject: Varl's Salamanders WIP blog (updated: finished razorbacks on page 4)
|
|
Hoary Long Fang with Lascannon
|
Nice stuff!
|
Check out this comp!http://www.dakkadakka.com/dakkaforum/posts/list/0/498307.page
My P&M Blog:http://www.dakkadakka.com/dakkaforum/posts/list/497661.page
2500 Brothers of Sanguinor
2500  Purifiers Purifiers 
750 : Bad Wolves
2 successful trades: TemplarCoyote, blood angel
P.M. for a reference! K.C.C.O.! |
|
|
|
|
2012/09/09 18:36:09
Subject: Re:Varl's Salamanders WIP blog (updated: finished razorbacks on page 4)
|
|
Morphing Obliterator
|
sniper scouts are done:
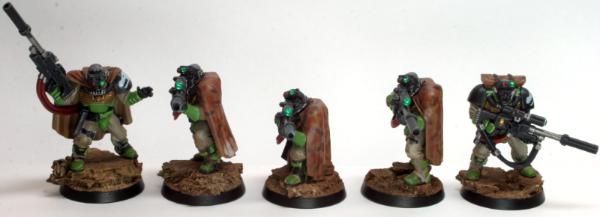
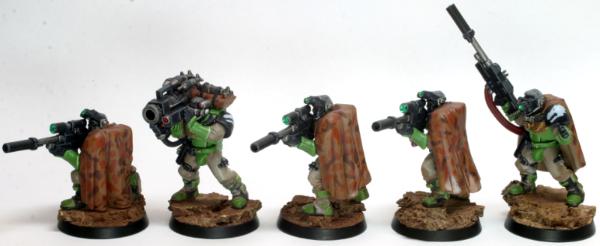
you can see in the last photo that I magnetized one of the pair of legs so I can use either the sniper body or the ML launcher body as needs demand. I discovered a neat trick by accident while doing this. the hole I drilled into the legs for the magnet was a bit too deep, so the magnet ended up being slightly recessed from the surface. as a result, when I put the torso on the torso's magnet pops right into that recess so it's a perfect snap-fit. no sliding around. bit of luck that everything lined up just right, but I may start doing this on purpose in the future.
I had a bit of a matte varnish accident (put on too much), so the black areas are more dull then they should be. I'm noticing from the photos that some of the armor plates are a bit glossier than they should be, too. a result of my attempt to fix the matte varnish mess, no doubt. le sigh. I'm realizing that when airbrushing on vallejo's matte varnish, you have to use it *very* sparingly. I may just stick with satin varnish in the future; bit more forgiving.
anyway, I think my snipers came out alright. I used my airbrush to paint the cloth on the arms and legs, which is the first time I've used it for anything beyond priming, base coating and varnishing. I used three colors and ended up with some nice shading, though it doesn't show up well in these photos. I also tried out using weathering powders on the legs and bases. I think I was way too heavy handed, though, as all the dry-brushed detail on the bases ended up covered by pigment. I also didn't plan the positioning of the feet carefully enough when I put together the cork bits for the rocks. I had a couple cases where the feet were wider than the base. made it work, but it's not ideal. lessons for next time
I was dreading painting the camo cloaks because I was worried about being able to replicate a realistic camo pattern. I don't do well with "random" it ended up being easier then I expected, though. I based the design off the US military's desert camo pattern since I'm doing all my models with desert bases now. I'm not super happy with the colors I picked (I wanted something a bit lighter), but the pattern came out well.
one detail that I'm really pleased with are the mv lenses I used for the scopes and googles. they really pop, even in dim light. I wish I'd found these sooner because they're an amazing little detail and they really add life to the model.
|
|
|
|
|
|
2012/09/25 02:08:17
Subject: Re:Varl's Salamanders blog (updated 9/9: sniper scouts on page 4)
|
|
Morphing Obliterator
|
I live!
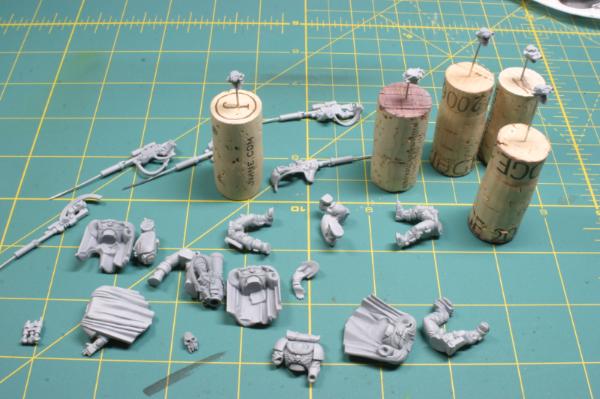
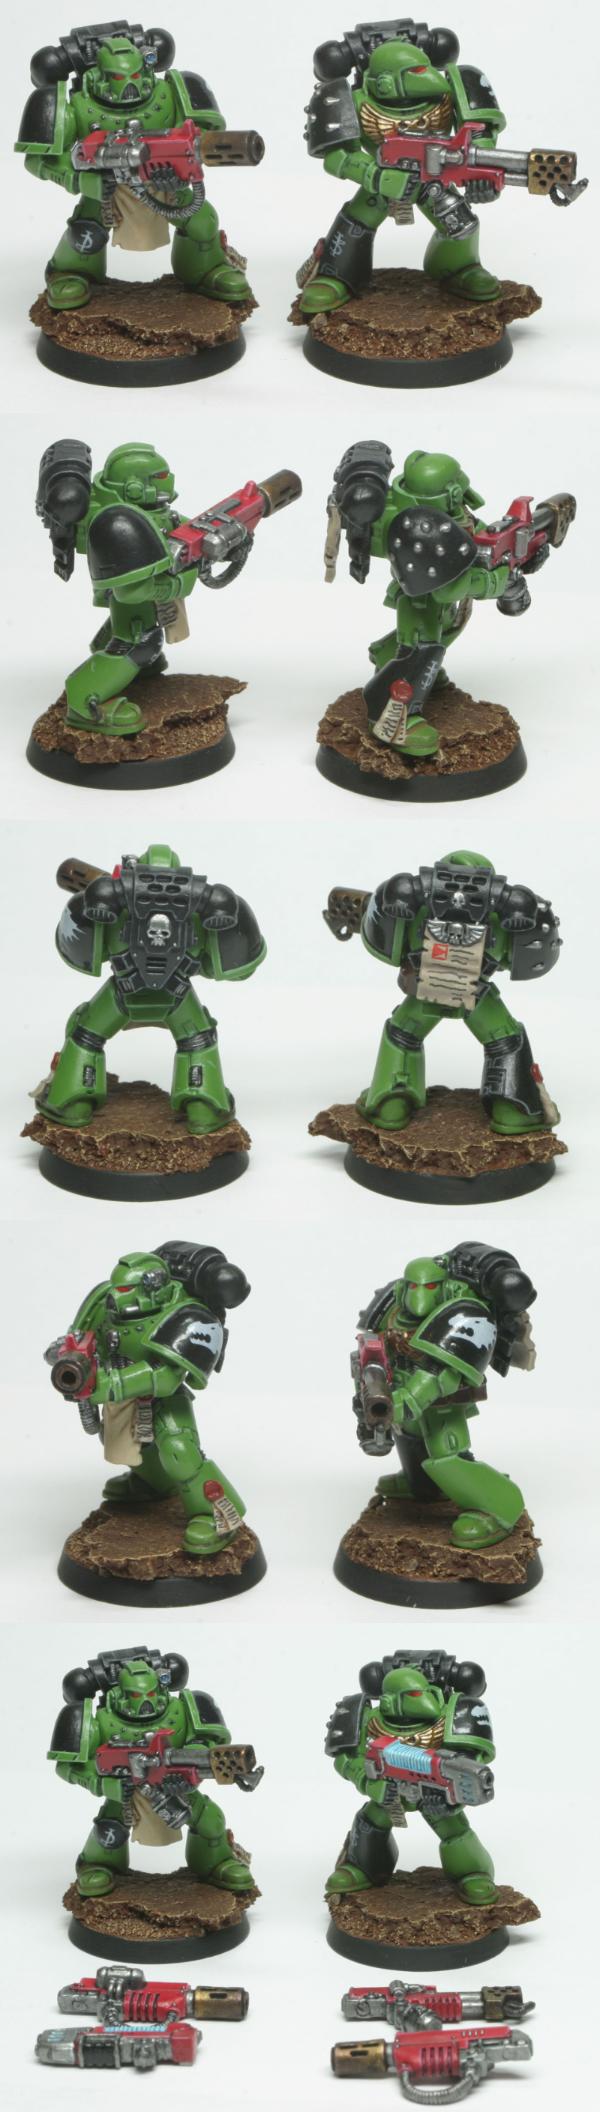
just a wee update. plugging away at my two 10-man squads of tac marines:
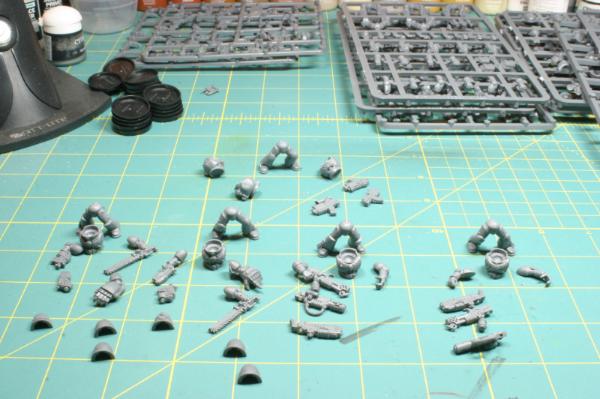
in order to break up the drudgery, I've decided to clean and assemble all the 'special' guys first. so, sergeants, special weapons troops, ML troops, the guys with scopes on their bolters, and a couple grenade throwers. might throw an auspex in there too, just for variety.
it's a bit hard to see in this photo, but I'm magnetizing as much as I can. the weapons on the special weapon troopers are magnetized to the trigger hand so I can easily swap between flamer, melta and plasmagun. I magnetized the bolt pistol and plasma pistol options for the sergeants (magnets in the wrist and hand) and I'll be magnetizing their chainsword and powerfirst arms as well. slightly tedious, since I'll have to do an extra set of shoulder pads, but at least it's the side that gets the decal :p
the plan is to assemble the 'specials' up until it would make painting difficult and then I'll take a break from assembly and paint 'em up. once I'm done with all that, I'll go back and assemble another 5 or so rank-and-file marines and paint those up. rinse and repeat until I'm done.
I've given up on assembly-line painting after trying it out on my 5-man assault marine and scout squads. I just find it soul crushing to have to repeat the same steps over and over again. I realize it's more efficient in both time and materials, but it's not fun and I've got no deadlines I'll prime, basecoat and shade everything in groups, but after that it's one model at a time.
the new chaos stuff is caaaalllliiiinnnngggg to me, but I want to get all the models I've already bought for my salamanders done and painted before I head off on that new front. it's going to be hard to stay focused once I get the new codex in hand, though!
probably won't update much until have some of these guys painted. I can't imagine anyone cares to watch me clean mold lines :p thanks for reading!
|
|
|
|
|
|
2012/09/25 18:54:44
Subject: Varl's Salamanders blog (updated 9/9: sniper scouts on page 4)
|
|
Hoary Long Fang with Lascannon
|
Varl,
Keep up the good work! I look forward to seeing what this new unit looks like!
|
Check out this comp!http://www.dakkadakka.com/dakkaforum/posts/list/0/498307.page
My P&M Blog:http://www.dakkadakka.com/dakkaforum/posts/list/497661.page
2500 Brothers of Sanguinor
2500 Purifiers
750 : Bad Wolves
2 successful trades: TemplarCoyote, blood angel
P.M. for a reference! K.C.C.O.! |
|
|
|
|
2012/10/17 07:38:13
Subject: Re:Varl's Salamanders blog (updated 9/9: sniper scouts on page 4)
|
|
Morphing Obliterator
|
hi gang,
small update. I decided to make combi-flamers for my tac sergeants and wanted to share my results.
I found two common conversions when I searched around a bit:
1. use a stormbolter (either from a termie or from a SM tank sprue), lop off one of the barrel tips and glue your alternate weapon barrel in it's place. easy enough to do and looks good on termies, but on marines I think the gun looks too big.
2. chop off the handle and various other bits from your alternate weapon and then glue it to the top of a standard bolter. not a huge fan of this look, but it gets the job done.
I opted for something like this instead: http://www.40konline.com/index.php?topic=205766.msg2517808#msg2517808
and here's what I ended up with after a couple nights of fiddling:
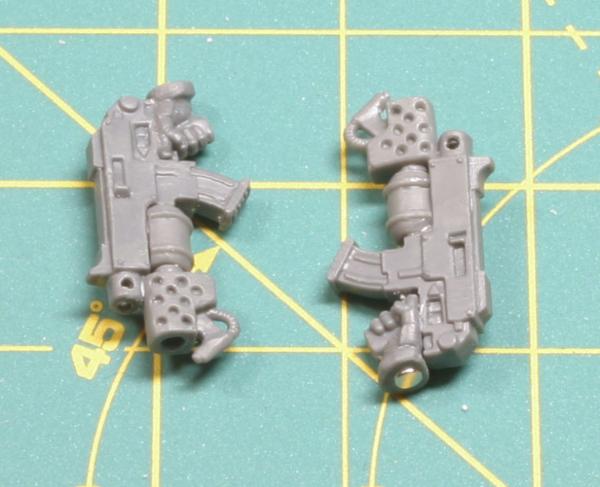

here's what it looks like on one of my soon-to-be sergeants (magnetized, of course):
parts:
1 SM bolter (no scope or strap; less to slice off)
1 SM flamer (doesn't matter what chapter since I shaved off the skull/black templar cross anyway)
1 SM gun hand
this is all stuff you can get in the SM tac marine box.
I followed the basic plan laid out in the forum post I linked above, but as I got into it I realized that the sample image in the post was a composite of images made in photoshop to demonstrate the idea and not an actual finished conversion. some of the bits don't fit together quite as nicely as they do in that picture. the flamer tank is much bigger than it appears and there are a couple other things that were a bit off as well. nothing a sharp knife and a file can't fix, but it took a lot more time then I was expecting it to.
an important lesson I learned along the way: clean off all the mold lines and drill out your barrels *before* you start cutting things up. it's way easier to hold onto an entire bolter while you scrape mold lines off the barrel then after you've cut it off. naturally, I didn't do this. learn from my mistake
the one part that didn't come out well is the hands I used. on pistol arms, the wrist and arm are perpendicular; there's no bend in the wrist. on the standard two-handed weapon arms, though, there is a bend in the wrist. using the hand from one of these arms means it doesn't mate up exactly right with the stump on my sergeant's pistol arm. I filed and re-shaped as best I could, and while it's fine at tabletop distance, it's still not a perfect fit and it bugs me.
I think one way to fix this in the future is to not glue the hand to the gun in a straight line. in other words, glue it so that the back of the hand is at a slight angle to the axis of the gun barrel to counter the bend in the wrist. then, just file the wrist down until it's flat. another option would be to cut away the armor ring around the wrist entirely and re-sculpt it from greenstuff. I'll have to try both to see which is easier.
anyway, fun experiment even if it took longer then planned. I've got the parts to make combi-meltas floating around, so I might make a pair of those as well. I'm not convinced I'd ever bother with them on a tac squad, though, so we'll see.
|
|
|
|
|
|
2012/10/17 08:42:17
Subject: Varl's Salamanders blog; updated 10/17: combi-flamers! (on page 4)
|
|
Lieutenant Colonel
|
Love this model... Funny thing I was looking at that Torso last night trying to work out how to do an ERRANT ARMOUR using that as the base.

I am struggling to find a slightly smaller powerfist, like this one because I think this pose is bad ass. (EDIT found a crappy 2nd Edition Terminator Power Fist, should be able to salvage this!)
I will be copying your awesome Combi-Flamer too, excellent use of a melta-bomb. Good Work.
|
|
This message was edited 3 times. Last update was at 2012/10/17 09:00:31
Collecting Forge World 30k????? If you prefix any Thread Subject line on 30k or Pre-heresy or Horus Heresy with [30K] we can convince LEGO and the Admin team to create a 30K mini board if we can show there is enough interest! |
|
|
|
|
2012/10/17 16:05:24
Subject: Varl's Salamanders blog; updated 10/17: combi-flamers! (on page 4)
|
|
Morphing Obliterator
|
If it helps at all, the power fist I used here is from a space wolves kit. Not sure which one as I bought it as bits via ebay. I just shaved off the emblem on the back of the hand.
|
|
|
|
|
|
2012/10/17 16:12:47
Subject: Re:Varl's Salamanders blog (updated 9/9: sniper scouts on page 4)
|
|
Sadistic Inquisitorial Excruciator
|
So -SO- much better than the GW one. Lovely Salamanders as well! Lucarikx
|
|
This message was edited 1 time. Last update was at 2012/10/17 16:13:12
|
|
|
|
|
2012/11/18 02:03:44
Subject: Re:Varl's Salamanders blog; updated 10/17: combi-flamers! (on page 4)
|
|
Morphing Obliterator
|
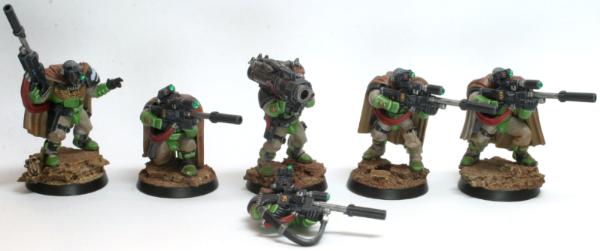
yeesh, a month to the day since my last update. hopefully some new pics will make up for my absence! pics are tall, so I've put each one in it's own spoiler section.
my fully magnetized tactical sergeants:
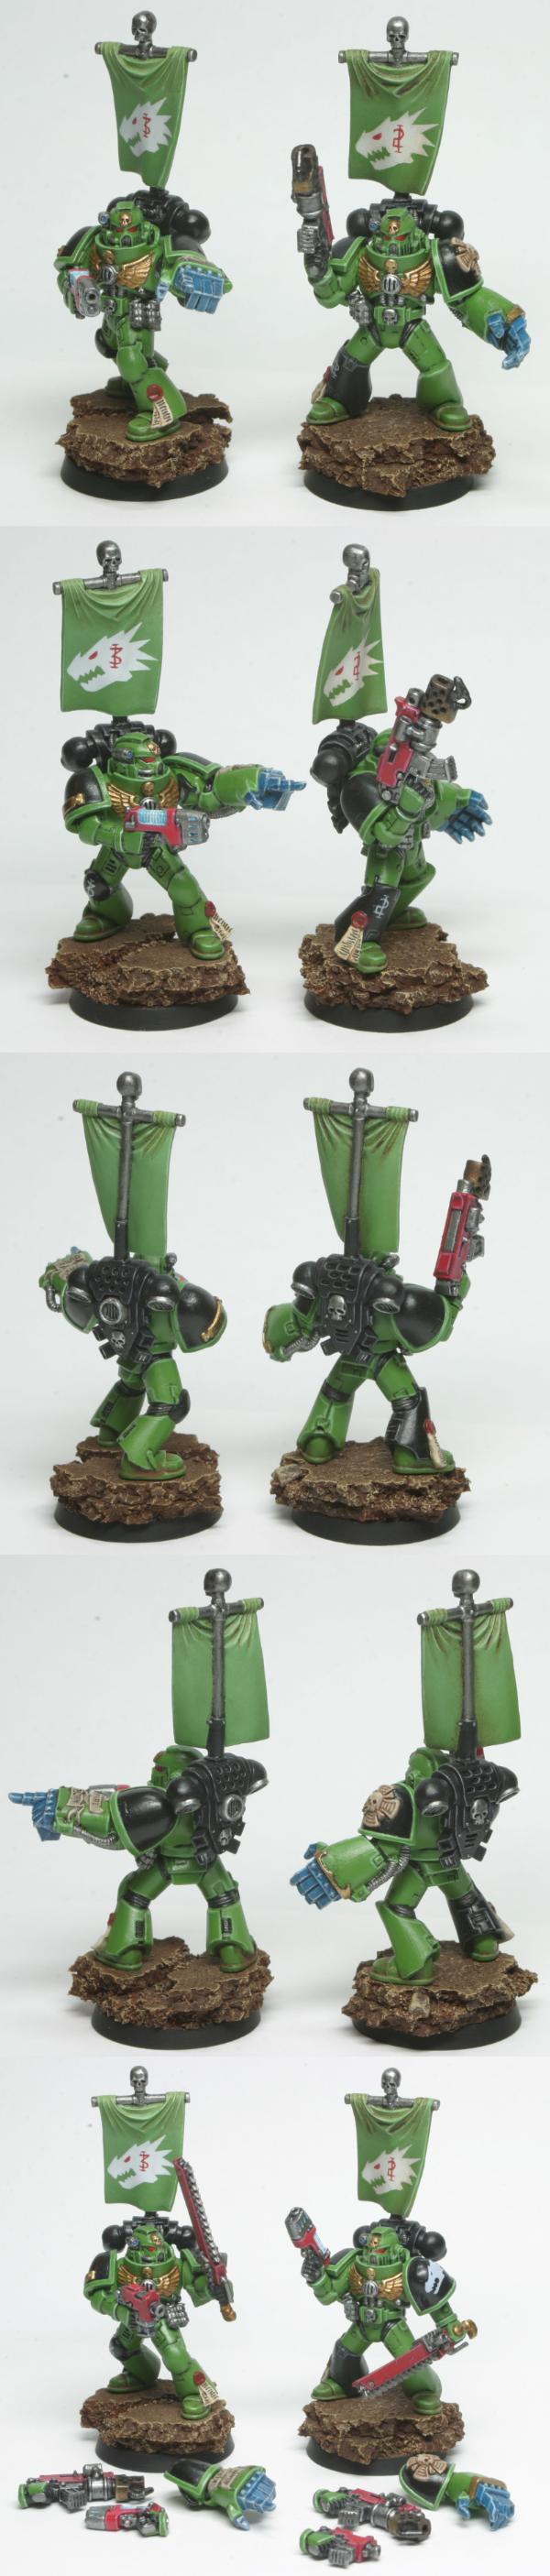
the banners are meh. I was trying to do some zenithal highlights on the cloth with a lighter green, but applied way more than I thought I had so the color is completely off. the design's a bit bland as well. I think next time I'll probably do the banner in black, with a green border and make the drake head a bit smaller and more centered. other than that, though, pretty happy with the models. each sergeant can choose from a bolt pistol, plasma pistol, combi-flamer, chainsword and powerfist. I'll probably never run the powerfists, but they look cool
next up, my special weapons troopers:
these guys are fully magnetized as well and each one has a flamer, plasmagun and meltagun. there's a magnet in the gun hand and one in the base of each weapon that keeps them in place pretty securely. the only trick is going to be keeping track of all the weapons when they aren't attached.
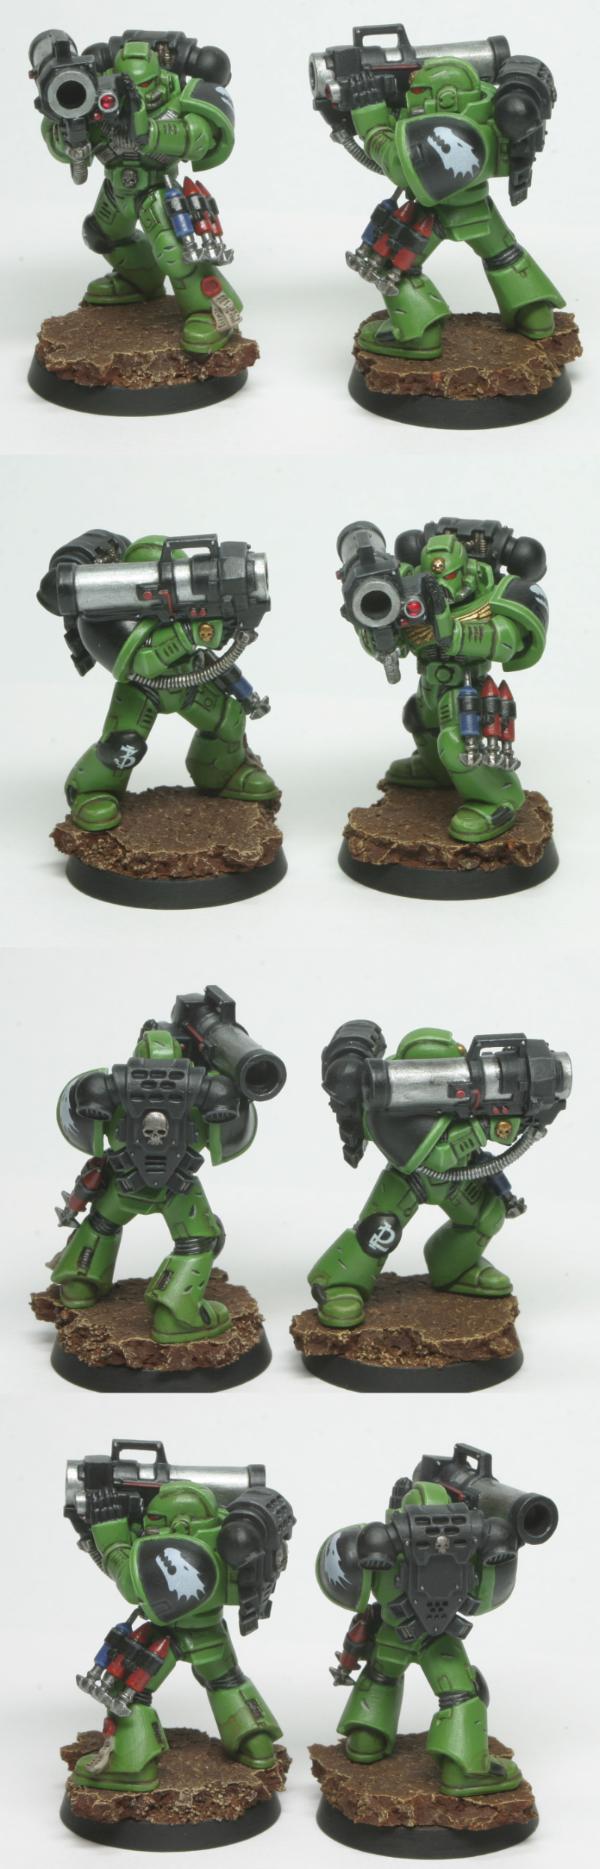
lastly for today, a pair of heavy weapons troopers with missile launchers:
nothing really special here. I've got 3 boxes of devastators that I'll get around to building one day, so I'll have plenty of other heavy weapon options to swap these guys for as my list requires. got a little too much matte varnish on these guys...
I'm debating on whether I want to add some grass tufts to the bases. they seem a bit plain as-is, so I probably will. considering picking up a box of the mordheim tufts from GW. anyone used 'em before?
|
|
|
|
|
|
2012/11/18 09:48:43
Subject: Re:Varl's Salamanders blog; updated 11/17
|
|
Speedy Swiftclaw Biker
|
i really like those Sergeants!!!
keep up the good work
|
|
|
|
|
2012/12/31 23:28:53
Subject: Re:Varl's Salamanders blog; updated 12/31/12
|
|
Morphing Obliterator
|
one last update for the year:
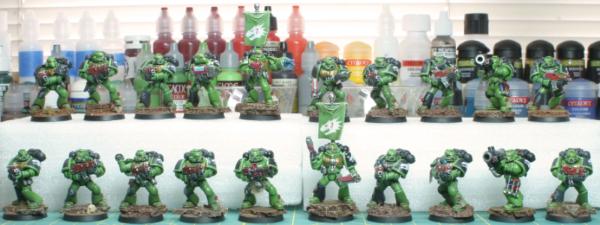
finally got all my tactical marines done this gives me a playable 1000pt army (with some extra odds and ends). I've got one more model in the works, which is a captain in terminator armor to use instead of my aobr captain. once the termie captain is done (he's sitting in pieces after being stripped this morning - gods did the original owner use a lot of glue!), work on my salamanders is going to stop for a while. I still have 3 boxes of devs and a command squad, but those are going to stay on the shelf for now.
2013 is going to be a year of chaos going to start work on a 1500pt night lords army. I'm still debating as to whether I should just add night lords stuff to this P&M blog or if they should get one of their own.
anyway, happy new year and thanks for looking!
|
|
|
|
|
|
2013/01/01 02:19:57
Subject: Re:Varl's Salamanders blog; updated 12/31/12
|
|

Dakka Veteran
|
man, these look awesome. its been great to see an army of such well painted figures come together.
personally, i just throw everything into one blog..
top work and happy new year!!
|
|
|
|
|
|
2013/01/01 13:30:17
Subject: Varl's Salamanders blog; updated 12/31/12
|
|

Sneaky Sniper Drone
Norway
|
Wow, those are some great Salamanders!
I do agree on the banners though, they are great but "bland" since they are just big green "handkercheifs" hanging about 
I definetely think your other idea sound nicer
Keep up the good work, subbed!
|
 Tau sucks at Close Quarter? Meet the Fish Of Fury! Tau sucks at Close Quarter? Meet the Fish Of Fury! |
|
|
|
|
2013/01/01 16:07:39
Subject: Varl's Salamanders blog; updated 12/31/12
|
|
Been Around the Block
|
You got something really good going on here man! NIce painting, clean and very crisp, looks really good. What type of armylist are you planning to make? And what can we expect to see next? 
Keep it up!
|
|
|
|
|
2013/01/07 07:08:38
Subject: Re:Varl's Salamanders blog; updated 12/31/12
|
|
Morphing Obliterator
|
and here's the terminator captain:

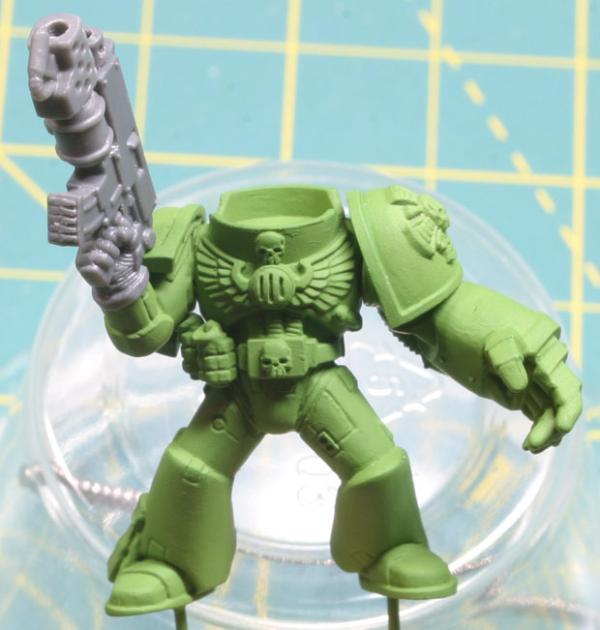
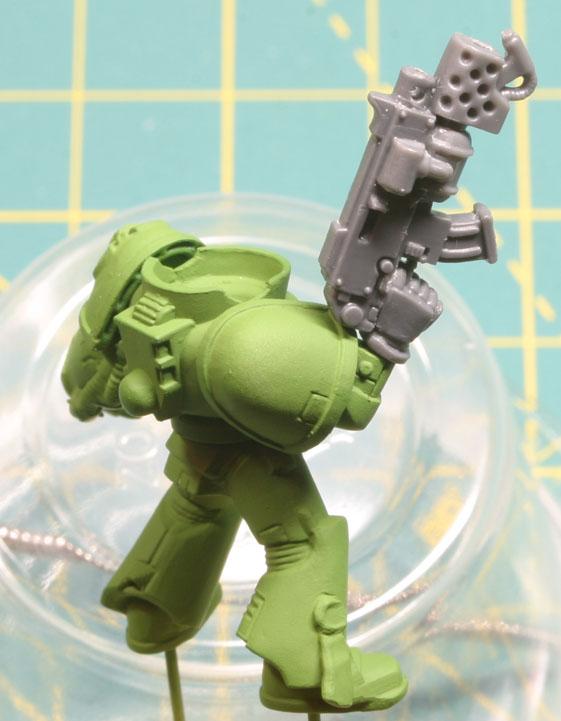
this guy was an ebay rescue. I've never seen so much glue used on a single model before. luckily, most of it disintegrated when I dunked it in super clean (or whatever it's called) for a couple days to strip the paint. I had to chip the rest of it off, though... some kind of epoxy, I think. anyway, this was my first time working with a metal model. what a pain in the ass... I'll stick with plastic, thank you. I cleaned off all the mold lines and flash, pinned all the joints and re-assembled the model. for the banner, I followed this tutorial. it didn't come out quite as vibrant as I'd hoped, but that's my fault and not an issue with the tutorial. I had a hard time getting a smooth surface on the banner and I didn't plan the order of my colors very well. if I did it another half dozen times, I think it'd come out pretty solid. still, not horrible for a first attempt and more than good enough for this guy
|
|
|
|
|
|
2013/01/07 08:53:24
Subject: Varl's Salamanders blog; updated 12/31/12
|
|

Regular Dakkanaut
|
Before you move on to the Night Lords, is there any chance we could see a pic of your whole Salamander army together?
|
|
|
|
|
|
|


 Night Lords P&M Blog:
 ___________________


 Imperial Fist, IG and GK WIP: