| Author |
Message |
 |
|
|
|
|
Advert
|
Forum adverts like this one are shown to any user who is not logged in. Join us by filling out a tiny 3 field form and you will get your own, free, dakka user account which gives a good range of benefits to you:
- No adverts like this in the forums anymore.
- Times and dates in your local timezone.
- Full tracking of what you have read so you can skip to your first unread post, easily see what has changed since you last logged in, and easily see what is new at a glance.
- Email notifications for threads you want to watch closely.
- Being a part of the oldest wargaming community on the net.
If you are already a member then feel free to login now. |
|
 |
2012/03/13 00:05:16
Subject: Varl's Salamanders blog; updated 3/30/2014 - 2nd Stormtalon Completed
|
|

Morphing Obliterator
|
hello Dakka,
thought it was time I get my sallies blog rolling.
I made some half-arsed attempts at painting fantasy minis back in my teens (I'm in my late 30s now), but nothing since then until I took the plunge early this year and started painting w40k minis. I went with space marines because I love the concept and the Salamanders chapter in particular because I like their fluff. to get started, I picked up the aobr box. I also splurged on one of those 'every color we make in a fancy box' GW kits over the holidays. bit of buyers remorse over that now that I've learned more about paints, but it was still a great price so eh. now, if I could only convince GW to start making chapter-specific kit for them...
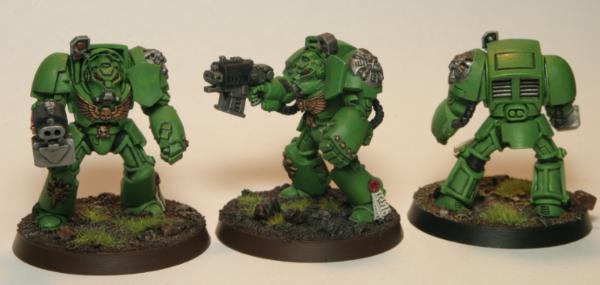
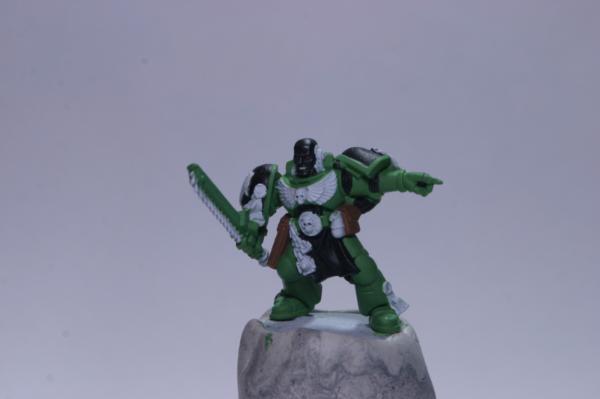
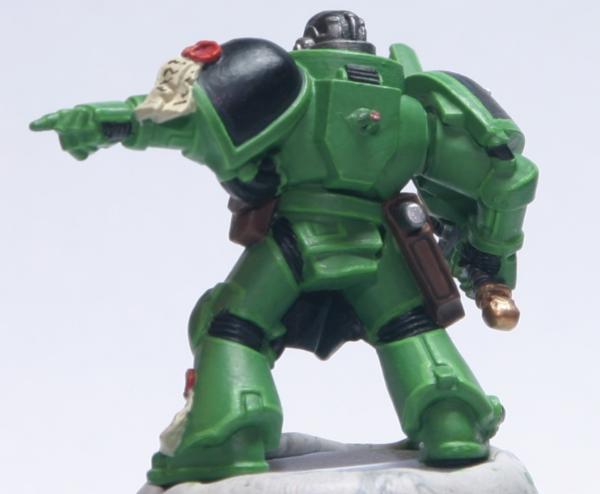
anyway, to kick things off, here's a group shot of the first marines I've painted up.
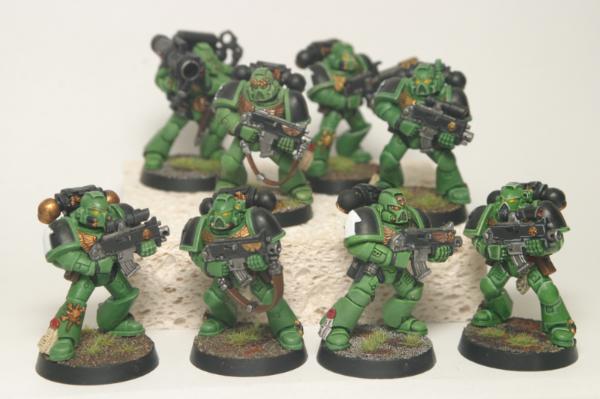
these guys are close done. I still have to apply decals and I think I'm going to change the eyes from yellow to red. the bases aren't great, but I'll leave them for now as a reminder of where I started :p
fairly happy with the color scheme overall, esp since I had to reverse-engineer most it from photos in the SM codex. I haven't found a lot of good sallies reference material so far. I'll be doing much less of the brass/gold detail on the backpacks on future models, I think.
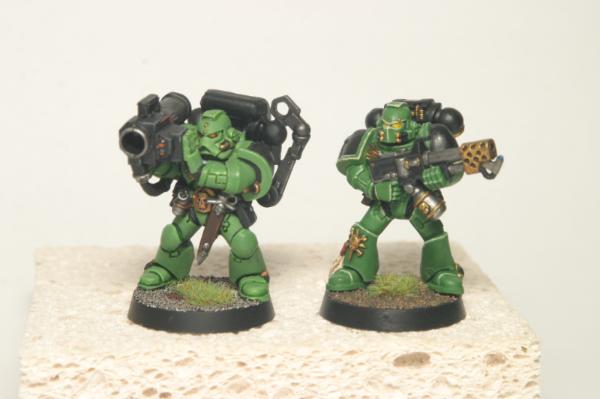
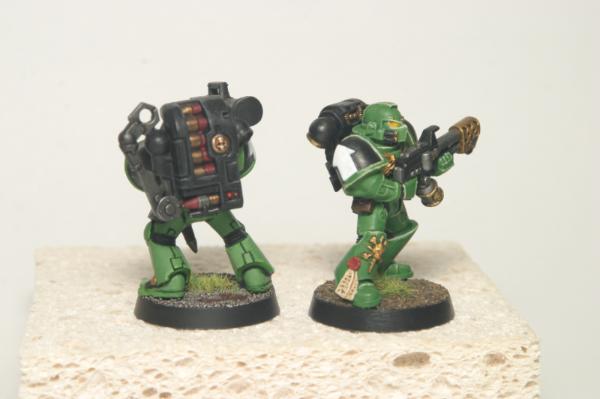
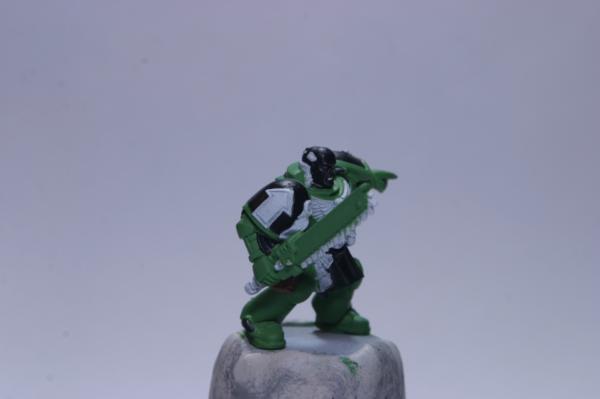
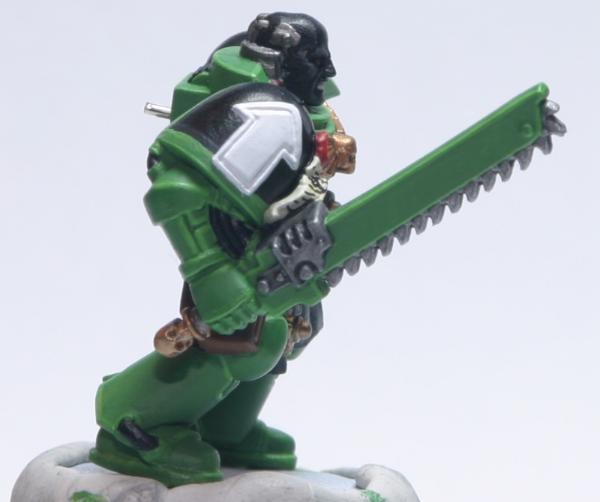
I'm still debating on whether I like the hard highlight scheme (right) or the more subdued highlights (left). the missile launcher marine is the most recent one I've painted and I think I did the flamer marine fairly early on; #2 or #3. would love some opinions on which style folks like better.
I still have to paint up the sergeant and that will complete my first squad (one guy was camera shy and hiding behind the backdrop; oops).
more to come in a bit...
Automatically Appended Next Post:
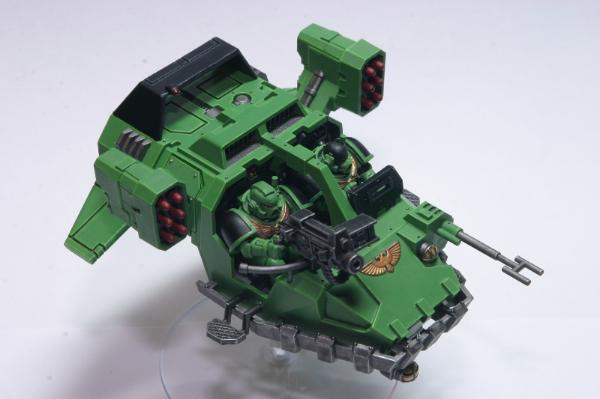
I'm currently working on my first vehicle, a land speeder. I wanted to paint all the interior spaces, so after cleaning up all the bits I dry-fitted everything together to figure out what I could pre-assemble and what I'd have to paint before assembly. wish I'd thought to take photos of this process, but it worked out to these chunks as paintable units:
- crew legs & back wall plate
- dashboard control panel
- crew torsos, shoulders & heads
- crew arms
- assault cannon, heavy flamer, heavy bolter and multi-melta (after magnetizing)
- missile launchers & their doors (after magnetizing)
- regular doors (after magnetizing)
- everything else (will paint after assembly)
so far, I've got all the interior spaces painted as well as all the weapons and the crew and I have the whole thing assembled except for the crew:
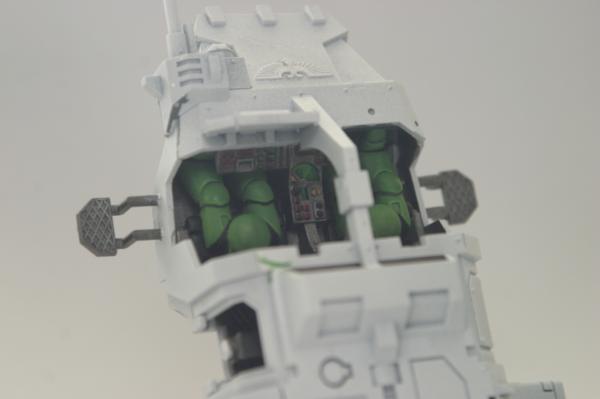
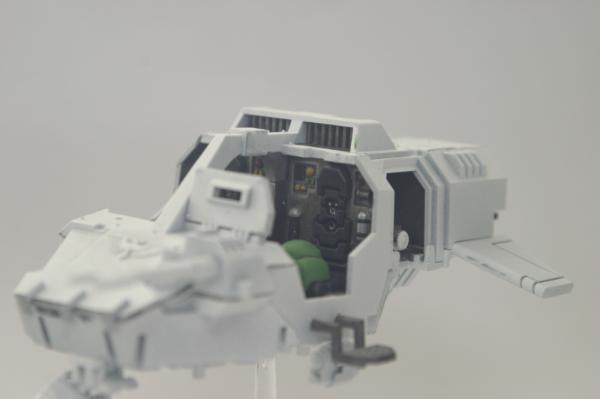
I was inspired to magnetize as much as I could after watching several of catattafish's youtube videos. for the doors, I glued some stacked bits of spru to the floor plates just inside the doorways and then glued a magnet to the side of each stack:
on the doors, I glued a bit of sheet metal to the insides. I could have used magnets here, but having a magnet on just one side is strong enough and using magnet to metal instead of magnet to magnet means I don't have to worry about gakking up the polarity  here's what the inside of the doors looks like:
the only bits I had to cut off the doors were the plastic pin-like hinges that let you open and close the doors after assembly. here's what the doors look like when attached:
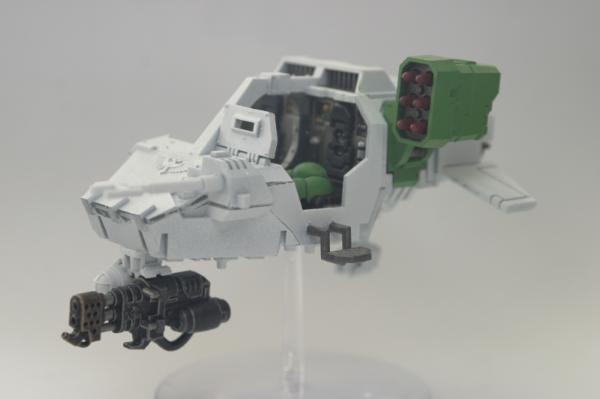
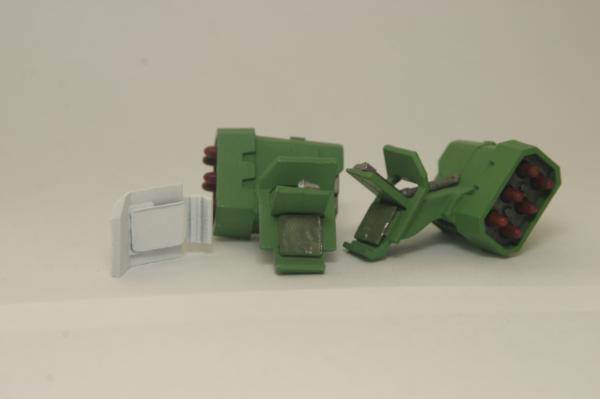
in the two shots above, you can also see that I magnetized the assault cannon and heavy flamer so they can be swapped. I'm a bit less happy with how this turned out; it's not as stable as I'd like (too easy to bump the gun out of alignment, though it doesn't fall off). for this job, I recessed a magnet into the clamp that you're supposed to glue the gun onto (you can see it just above the search light):
on each of the guns, I recessed a magnet into the top at an angle to line up with magnet on the clamp. it was tough to get things aligned properly and even after a good bit of fiddling it's still not quite right. if you zoom in on the heavy flamer photo, you can see that it doesn't sit flush with the clamp. looking back on it, I'd do this differently next time:
- get the bits for a second search light assembly (the light and the clamp)
- glue on gun to each search light assembly
- recess a magnet into the top of the assembly
- recess a magnet into the bottom of the speeder hull where the light assembly is normally glued on
since there are details in the hull that force the alignment of the light assembly, I think this would make for a much more stable way to magnetize the front guns.
I also magnetized the heavy bolter and multi-melta by recessing a magnet into the base of each gun where you'd normally glue it to the hand grips and then I glued a small bit of sheet metal onto the hand grips. I haven't assembled this bit yet as I still have some painting to do, but I'm thinking this will work out well.
more pics as I make progress.
|
|
This message was edited 15 times. Last update was at 2014/03/30 22:23:18
|
|
|
 |
|
2012/03/13 19:09:28
Subject: Varl's Salamanders WIP blog
|
|

Ragin' Ork Dreadnought
Ingelheim am Rhein, Germany
|
What a nice first post!
I'm a big fan of your green, its not too bright and doesnt bite my eyes, very well done!
You asked wich way of highlighting looked better.... I'd say go for the sharp edge highlights, they look great!
The bases look neat, but I think they may look better with a brown rim..... it looks better on a battlefield when the top of the base and the rubble on the board are blended with a pale brown rim.... but that a very minor issue.....
oh and you also got inspiration from cattatafish? I use his skin recipe all the time for my orks!
I'll be back for the next update!
(edited twice for nasty grammar mistakes  )
|
|
This message was edited 2 times. Last update was at 2012/03/13 19:10:52
|
|
|
|
|
2012/03/13 19:52:12
Subject: Varl's Salamanders WIP blog
|
|
Fully-charged Electropriest
|
Wow...... You are very steady with your brush. I must say though that I like the subdued marine better. You know.... if you want a tip..... for the in between parts of the armor with the ridges and the helmet grill. You can paint them silver and then wash it with badab black so that it is black with the highlights built in and they will look great.
|
|
|
|
|
|
2012/03/13 20:00:29
Subject: Varl's Salamanders WIP blog
|
|

Lieutenant Colonel
|
Good work Varl. especially nice on the cockpit of the Landspeeder. Not enough Salamanders on here.
|
Collecting Forge World 30k????? If you prefix any Thread Subject line on 30k or Pre-heresy or Horus Heresy with [30K] we can convince LEGO and the Admin team to create a 30K mini board if we can show there is enough interest! |
|
|
|
|
2012/03/13 21:05:17
Subject: Re:Varl's Salamanders WIP blog
|
|
Morphing Obliterator
|
@mrmerlin: thanks I'm with you on the bases; they're pretty meh. I'm using a mix of different sands now for more texture and base-coating + dry brushing instead of just washing. looks much better, though I've lots of room for improvement. will get some pics up when my termies are flocked.
@honaw: that's pretty much how I've been doing my helmet grilles lately - a light coat of boltgun metal and then a wash with badabb black. I tried the first few with green instead of metal and they just didn't feel right.
most of the armor in the pics I have up so far was primed white, washed with watered-down DA green (not sure this step is worthwhile), washed again with badabb black, filled in with goblin green and then highlighted to various degrees with snot green. that's loosely based off the process awesomepaintjob used for his salamanders tutorial, but his scheme was darker (looked more DA to me). I'm playing around with doing the black wash after the highlights and also using an oil pin wash instead of something like badabb black; mixed results so far. also tried a final wash with thrakka green, but that was gak. more than a few attempts have ended up in the SuperClean bucket for a nice, long swim :p
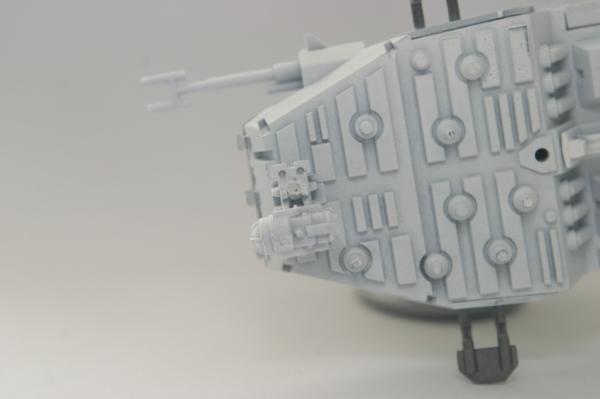
I started painting the body of the landspeeder last night, but found a nasty gap that I'll have to fill before I can go much further. the top hull plate for my speeder was all kinds of warped coming out of the box. I had to glue down one side and wait for that to dry before I could put enough pressure on the other side to glue that one down as well. one of the seams must have separated a bit as the glue dried, so I'll be whipping out the GS tonight :( is it common for GW vehicles to have warped hulls? I've got a rhino kit sitting on the shelf and I'm almost afraid to look...
|
|
|
|
|
|
2012/03/13 23:18:18
Subject: Varl's Salamanders WIP blog
|
|
Steadfast Ultramarine Sergeant
|
I've been looking for a good Salamanders blog for a couple of weeks. Kudos to you my good sir, I shall be following this closely. Great work so far, loving the nice smooth green.
|
|
|
|
|
2012/03/14 00:29:53
Subject: Re:Varl's Salamanders WIP blog
|
|

Dakka Veteran
|
mate, i LOVE your salamanders. great even tones, nice solid green. personally i preferred the more subdued highlights...but then again, ive often found with my stuff that what looks great in RL doesn't always look great in a photo.
the interior of that speeder looks amazing and the highlights on the flamer are perfect.
cant wait to see more.
|
|
|
|
|
|
2012/03/14 00:45:45
Subject: Re:Varl's Salamanders WIP blog
|
|
Brainy Zoanthrope
|
varl wrote:@mrmerlin: thanks I'm with you on the bases; they're pretty meh. I'm using a mix of different sands now for more texture and base-coating + dry brushing instead of just washing. looks much better, though I've lots of room for improvement. will get some pics up when my termies are flocked.
@honaw: that's pretty much how I've been doing my helmet grilles lately - a light coat of boltgun metal and then a wash with badabb black. I tried the first few with green instead of metal and they just didn't feel right.
most of the armor in the pics I have up so far was primed white, washed with watered-down DA green (not sure this step is worthwhile), washed again with badabb black, filled in with goblin green and then highlighted to various degrees with snot green. that's loosely based off the process awesomepaintjob used for his salamanders tutorial, but his scheme was darker (looked more DA to me). I'm playing around with doing the black wash after the highlights and also using an oil pin wash instead of something like badabb black; mixed results so far. also tried a final wash with thrakka green, but that was gak. more than a few attempts have ended up in the SuperClean bucket for a nice, long swim :p
I started painting the body of the landspeeder last night, but found a nasty gap that I'll have to fill before I can go much further. the top hull plate for my speeder was all kinds of warped coming out of the box. I had to glue down one side and wait for that to dry before I could put enough pressure on the other side to glue that one down as well. one of the seams must have separated a bit as the glue dried, so I'll be whipping out the GS tonight :( is it common for GW vehicles to have warped hulls? I've got a rhino kit sitting on the shelf and I'm almost afraid to look...
Sadly yes it is common for them to be warped slightly. Any kit with large thin flat plastic pieces runs the risk of having some warped or slightly bent pieces. I've found that holding them under hot running tap water and then applying slight pressure helps get them back into the shape you want them in.
Most vehicle kits will have small gaps you'll need to fill with GS or accept. On the Rhino, the most noticeable gap is going to be on the front of the track/hull assembly. There's actually pictures in the SM codex where they didn't even bother filling the gap. Check out page 152, second Rhino from the bottom. You can see the gap on the front of the track assembly right next to the yellow (II) squad marking.
There's practically no way to assemble the Rhino without a little bit of GS gap filling, but it's normally not as bad as the LS.
|
DC:80S--G+MB++I++Pw40k93-D++A+++/wWD166R++T(T)DM+
|
|
|
|
|
2012/03/14 04:29:59
Subject: Re:Varl's Salamanders WIP blog
|
|
Morphing Obliterator
|
@San76 & Sir Samuel Buca: thanks
@martian_jo: how hot are we talking? wear-dish-gloves-or-burn hot or something more finger friendly?
tonight's project: fixing the gap
don't mind the random streaks of green paint. those are just to remind me what color I'd decided on for each panel for when I get back to painting. the GS turned out to be a lot easier to work with then I expected, so here's hoping it dries ok. filled a few other minor gaps while I was at it, since I had the GS mixed up anyway. I always seem to mix up waaayyyy more than I need...
now I just have to be patient enough to let it dry. once that's done, a little love with the file and I get to try out using gesso as a primer (and wait for it to dry. again. yay?)
|
|
|
|
|
|
2012/03/15 03:47:32
Subject: Re:Varl's Salamanders WIP blog
|
|
Morphing Obliterator
|
still waiting for the gesso to dry on the speeder. sigh. the gesso looks a bit rougher than I'd expected it to, but it's only been drying for about 8 hours. hopefully it tightens up over the next 16. in the meantime, I finally based the first 3 termies I painted up (apologies for the bad white balance):
the two gents on the left were shaded with a pin wash after the basecoat and highlights were done. the gent on the right was shaded early on with badabb black and then I built up the basecoat and highlights over the top of it, leaving all the crevices dark. which method do you guys like better?
I'm still struggling with getting the pin wash right. looks too grainy to me up close, but I'm not sure if that's due to my technique or the particular oil paint I'm using. you can see what I mean on these bits of the speeder I tested on:
the spoiler came out the way I wanted, but the bumper looks messy. I still have to clean up the excess with mineral spirits, but the grooves in the bumper don't have the fine shading lines I was hoping for. then again, maybe shading all the hull joints on a vehicle like this is overkill. think it's too distracting?
|
|
|
|
|
|
2012/03/15 08:29:12
Subject: Varl's Salamanders WIP blog
|
|
Ragin' Ork Dreadnought
Ingelheim am Rhein, Germany
|
Your bases are looking great with a rim!
With the shading I cant really help you, I paint orks and they work in a different way.....
|
|
|
|
|
|
2012/03/15 09:05:03
Subject: Varl's Salamanders WIP blog
|
|

Pyromaniac Hellhound Pilot
|
I like the crisp paintjobs you've got going here! And great attention to detail (I was impressed by your landspeeder dials and do-hickeys  ) Will you be adding Salamander iconography at some point?
Keep up the good work!
Rawson
|
 The 104th Vostroyan Mechanized The 104th Vostroyan Mechanized
 Rawson's Reboot Rawson's Reboot

Viktor von Domm: nope... can´t do that for the sake of all lving creatures that dwell on earth....
dsteingass: That's like saying "I forgot to tell you who your real father is"
nerdfest09: Rawson speaks the truth! |
|
|
|
|
2012/03/15 09:24:48
Subject: Varl's Salamanders WIP blog
|
|
Humorless Arbite
Outside the DarkTower, amongst the roses.
|
Nice shade of green in my opinion. Looking forewords to more.
|
Every Dakkanaught gets a 4+ Pinch of Salt save.
When you suffer a Falling Sky hit, roll a D6 - on a 4+ the hit is ignored as per the Pinch of Salt save. On a 1-3 panic insues - you automatically fail common sense tests for the next 2 weeks and get +7 to your negativity stat. -Praxiss
|
|
|
|
|
2012/03/15 14:23:45
Subject: Re:Varl's Salamanders WIP blog
|
|
Morphing Obliterator
|
thanks guys
@rawson: yeah, I still have to add decals to everyone and I'm also thinking about freehanding some bits of flame on the termies, at least. I haven't sealed anyone, yet, so they're all subject to fiddling still
|
|
|
|
|
|
2012/03/15 18:59:10
Subject: Varl's Salamanders WIP blog
|
|
Fully-charged Electropriest
|
Nice.... I am a big fan of your work Varl. Salamanders are my favorite Vanilla Codex Chapter.
|
|
|
|
|
|
2012/03/17 07:44:27
Subject: Re:Varl's Salamanders WIP blog
|
|
Morphing Obliterator
|
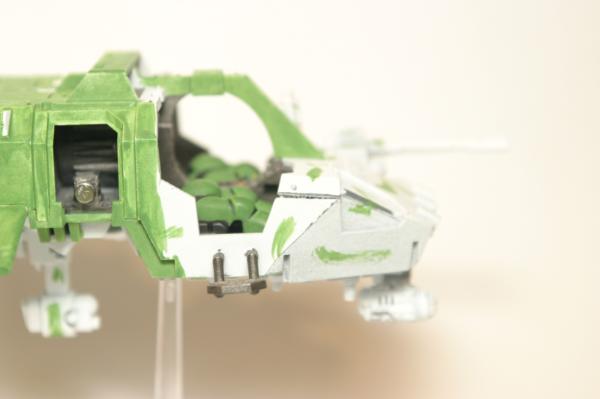
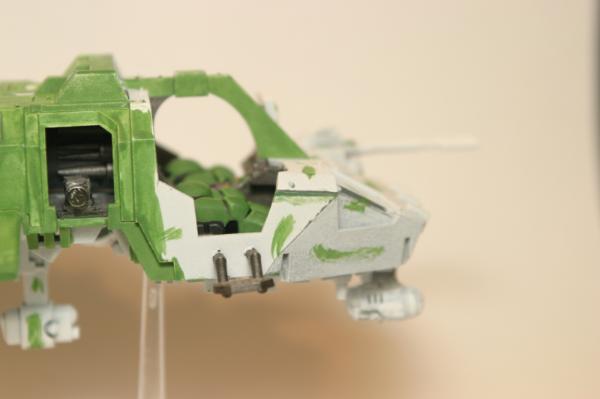
just a minor update; haven't had much of a chance to paint for the last few days. I've managed to get the first couple layers of the basecoat onto the speeder:
I'll probably do 2-3 more layers before I start detailing and highlighting, but I'm excited because it's finally starting to look Salamander-ish :p
the gesso I primed my gap repair job with ended up drying a lot rougher then I'd been led to expect, so I had to smooth it down a bit before I could paint. after digging around a bit on dakka, it seems that the black gesso tends to dry smoother than the white and is more forgiving of 'thick' coats of primer. go figure, I used the white stuff I'm testing out the black on the bumper (formerly basecoated green and used to test an oil wash), which I primed tonight, so that I can repaint it metallic instead of green. hopefully the black gesso works out better.
on the side, I've also started working on the last model for my first tac squad, the sergeant:
(pardon the dark photos... will beat sense into my camera later) I've got him basecoated and I've started adding in black and brown details. I'd done the face a week or so back to test out a method for painting black skin. not 100% happy with it, but it's not terrible. at any rate, lots of work left on this guy.
I'm doing a couple things different for this model. firstly, I'm painting his backpack separately and then I'll attach it when I'm done with his armor. for all my earlier marines, I'd glued everything together before I really thought through how I was going to paint all the details. easy mistake to make with the aobr kit since there aren't as many bits to assemble. I won't be making that mistake again, though. having weapons and backpacks separate from the model makes life sooo much easier. slower, to be sure, but easier!
the second difference is that I'm going to try shading after basecoating and highlighting, instead of shading first and then basecoating over it. I've got somewhat low expectations for this idea, but it's always educational to experiment. besides, this guy's already taken a bath in SuperClean twice so a third time won't kill him if this doesn't work out :p
entertaining house guests over the weekend, so won't be getting any painting done for a while. le sigh. Automatically Appended Next Post: @HONAW: thanks for the kind words I noticed a few salamanders in your gallery... is the gent with the power sword and the blue cloak any particular character? it's lovely work!
|
|
This message was edited 1 time. Last update was at 2012/03/17 07:48:57
|
|
|
|
|
2012/03/20 07:04:52
Subject: Re:Varl's Salamanders WIP blog
|
|
Morphing Obliterator
|
more progress on the sergeant tonight:
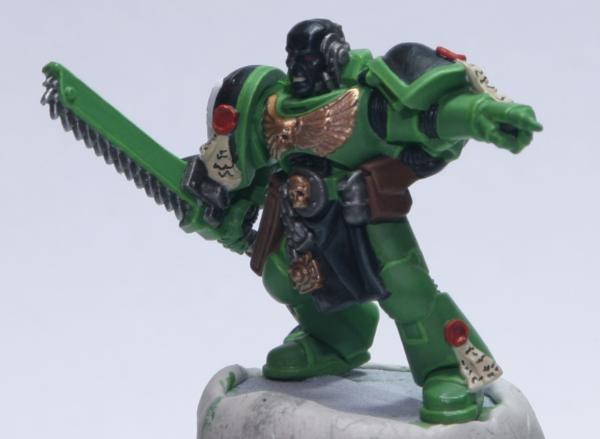
(the green is slightly brighter than in real life, as I had to overexpose the photos a bit to get the black detail (face, tabard) to show up)
I've finished with the basecoat, highlighting and detail work, but I still have a bit of cleanup to do (funny what the camera sees that you don't). the tabard is my first attempt at cloth. it doesn't show up terribly well in the photos, what with it being black and all. it's about 7 layers of successively lighter grays on top of a black basecoat. I think it came out reasonably well for a first try, though I'm wondering if the highlights should be brighter. my original plan was to paint some fire on the tabard, but after doing just the highlights for all the folds I was ready to throw in the towel on cloth :p maybe I'll save the flame idea for my captain...
anyway, last big step for this guy is a wash to add some shading. I'm almost afraid to do it because he looks fairly clean right now, but I know he needs it. I'll be using a wash that's a bit lighter than badabb black; more like a medium/dark gray and a bit thinner (home made soft body black wash). I'm debating between washing the entire armor surface or just sticking to the recessed bits.
three questions for dakka:
1. what do you think of the tabard? should I add more highlighting? have I got the shadows in the folds right?
2. what do you think of the lining in around the inside of the shoulder pads? too subtle, not bold enough or just right?
3. should I was all the armor or just touch up the nooks and crannies?
cheers guys
|
|
|
|
|
|
2012/03/20 07:24:07
Subject: Varl's Salamanders WIP blog
|
|
Horrific Howling Banshee
Brighton, UK
|
1) I'd paint the tabard/robes a deep wine red
2)I think it looks good - subtle but definite
3) Wash the recessed areas first to get a feel for it
|
|
|
|
|
2012/03/20 07:29:23
Subject: Varl's Salamanders WIP blog
|
|
Imperial Agent Provocateur
|
1. The shading looks excellent. I'd add a shade brighter highlight if you can. It looks great for us here but I'd guess the detail is hard to see from table distance.
2. Pointy-finger shoulder pad lining looks just right. Chainsword shoulder pad is harder to see.
3. I'd wash all the armor and then go back over with some thin green to touch up any unwanted pools. But that's just what seems more convenient to me.
Keep up the good work, enjoying this. Subscribed.
|
die all, die merrily |
|
|
|
|
2012/03/20 19:15:39
Subject: Varl's Salamanders WIP blog
|
|

Ragin' Ork Dreadnought
Ingelheim am Rhein, Germany
|
1. I'd keep it as it is, it looks great!
2. Looking good the way it is.
3. Yeah, wash the recesses. You can still wash the rest later if you want to.....
Oh man, if you keep this up you'll be an amazing painter very soon! 
|
|
This message was edited 1 time. Last update was at 2012/03/20 19:16:09
|
|
|
|
|
2012/03/25 08:41:27
Subject: Re:Varl's Salamanders WIP blog
|
|
Morphing Obliterator
|
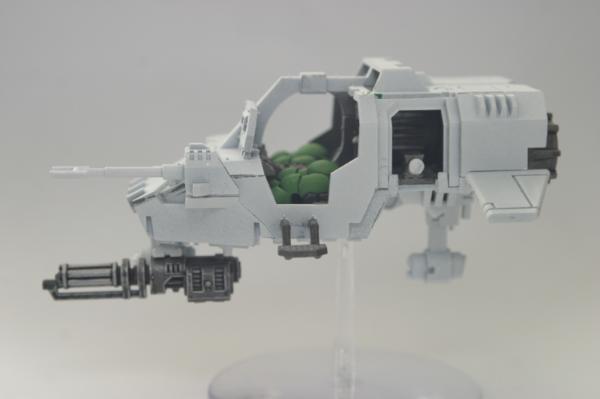
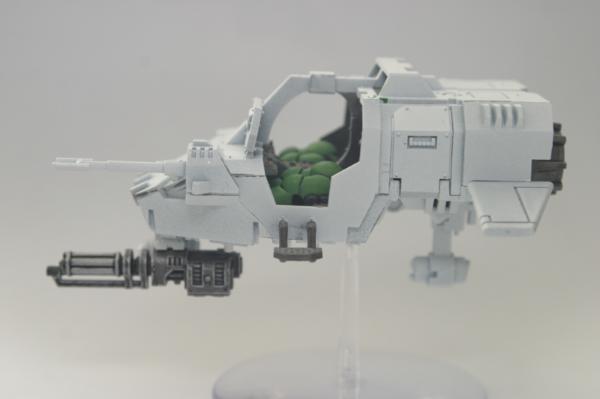
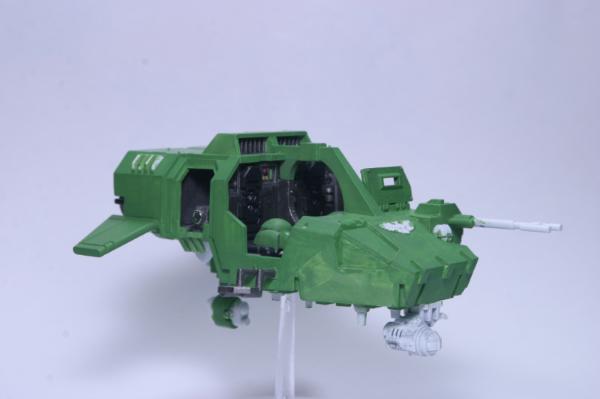
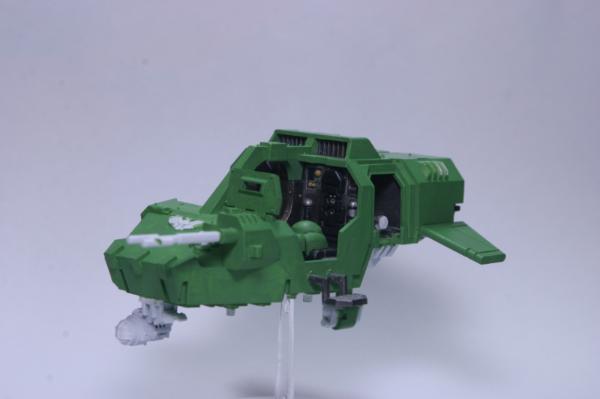
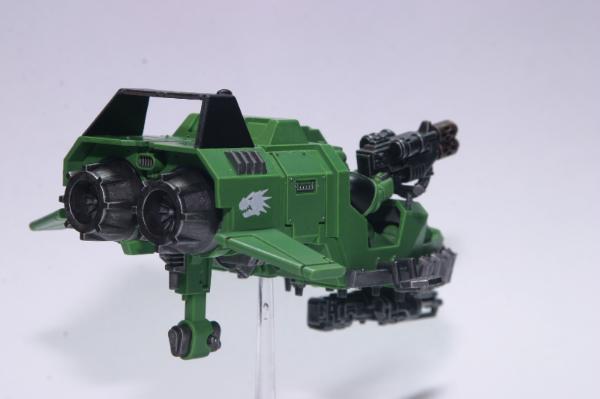
finally got to work on my speeder and, I'm happy to say, it's pretty much done!
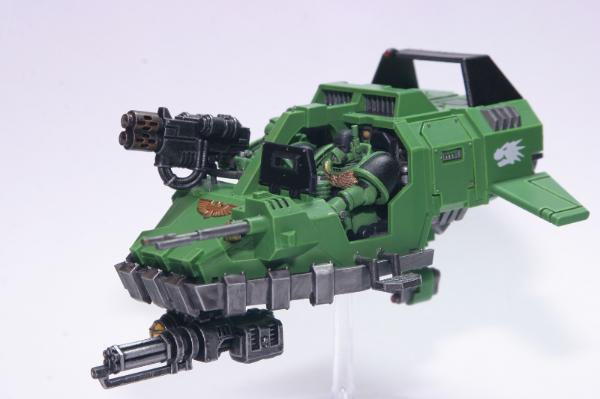
(couple more photos in the gallery)
only bits left are to come up with some sort of fancy base and to seal it with a matte varnish. I was briefly toying with the idea of free-handing some flames onto the spoiler, but I think I'll save that for another time as I've got a lot of other models I want to get started on.
quite a few learning experiences doing this guy, not least of which is the realization that speeders have an absurd amount of detail on them :p things I will do differently next time:
- better priming: my priming job frankly sucked. several air bubbles, couple spots where it pooled, couple other spots where the primer was smudged while it was drying, etc. some of these flaws are still visible even after many layers of paint
- more/smoother gap filling earlier in the process: some of the bits of greenstuff I used for gap filing weren't as smooth as they could have been, but it wasn't obvious until it had paint on it.
- different approach to magnetizing the weapons: the doors came out ok, but I have a better idea for how to do the chin mount.
- do more pre-assembly painting: I missed some bits that I didn't realize would be exposed until after I glued everything together. was a beast trying to get a brush in there to touch things up.
- add in some freehand art somewhere
all that said, though, I'm pretty happy with how it came out given that it's my first time painting a vehicle
on another note, I've picked up some micro set & micro sol and started applying decals to all my completed marines. haven't been having much luck with getting the decals to lay flat, though. will be posting about that in the P&M forum once I get some photos ready.
up next, I'll be starting work on my aobr dreadnought.
|
|
|
|
|
|
2012/03/25 08:53:38
Subject: Varl's Salamanders WIP blog
|
|
Ragin' Ork Dreadnought
Ingelheim am Rhein, Germany
|
The landspeeder looks great!
Out of interest: Do you drybrush or wash your metal? The "bumper" looks like you washed it badab black, but the asault cannon looks drybrushed.....
|
|
|
|
|
|
2012/03/25 22:20:12
Subject: Re:Varl's Salamanders WIP blog
|
|
Morphing Obliterator
|
yeah, I painted those bits up in two different ways.
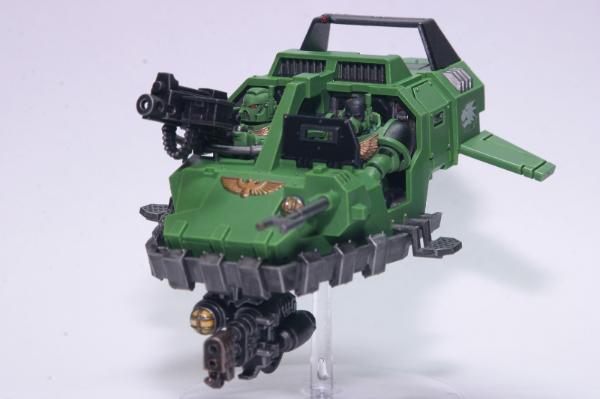
the bumper was originally green, but after looking at some reference photos I decided I wanted it metallic instead. I primed it with black gesso (right over the green - yes, I was that lazy), gave it a few coats of boltgun metal, did some edge highlighting with chainmail and then washed the whole thing with badabb black (a bit heavier than I should have, in hindsight). after that dried, I touched up the highlights on the upper edges with a bit more chainmail.
for the assault cannon (and all the other guns), I started with a black basecoat, applied a heavy drybrush of 1:1 boltgun metal/chaos black, a lighter drybrush of boltgun metal and a very light drybrush just across the edges with chainmail. lastly, I did all the lining in with chainmail. super easy and makes for reasonable-looking dark metal bits. plus, if you screw up while lining-in, it just looks like scratch marks :p
|
|
|
|
|
|
2012/03/25 22:27:49
Subject: Varl's Salamanders WIP blog
|
|
Ragin' Ork Dreadnought
Ingelheim am Rhein, Germany
|
I recently found a nice way to do metal. Basecoat mithril silver, and them wash it with several layers of badab black, brown or sepia. that way you can always get the right tone, depending on how much you apply......
|
|
|
|
|
|
2012/03/25 22:32:06
Subject: Varl's Salamanders WIP blog
|
|
Morphing Obliterator
|
just keep applying wash until you get the shade you want? very interesting idea... have any samples up on dakka?
|
|
|
|
|
|
2012/03/25 22:34:49
Subject: Varl's Salamanders WIP blog
|
|
Ragin' Ork Dreadnought
Ingelheim am Rhein, Germany
|
I've only tried it on a few guns and bitz so far.... Looks great! I was thinking about doing a metal tut, so maybe in a few days.....
|
|
|
|
|
|
2012/03/25 22:42:19
Subject: Re:Varl's Salamanders WIP blog
|
|
Hellish Haemonculus
|
You've got some nice detail work, here. I like the white on the sergeant's tactical symbol, especially. Are you not going with the multi-melta/heavy flamer land speeder? I don't want to try and tell someone else how to play their army, I'm just curious is all. I like your definition in the recesses of your guys. Have you thought about getting a Micron pen for your purity seals? You can cram quite a few more lines on with one of those. I appreciate getting the benefit of your experience, since I also have to do work on a Salamander Land Speeder for my army.
|
|
|
|
|
|
2012/03/25 23:30:46
Subject: Re:Varl's Salamanders WIP blog
|
|
Morphing Obliterator
|
Jimsolo wrote:You've got some nice detail work, here. I like the white on the sergeant's tactical symbol, especially. Are you not going with the multi-melta/heavy flamer land speeder? I don't want to try and tell someone else how to play their army, I'm just curious is all. I like your definition in the recesses of your guys. Have you thought about getting a Micron pen for your purity seals? You can cram quite a few more lines on with one of those. I appreciate getting the benefit of your experience, since I also have to do work on a Salamander Land Speeder for my army.
thanks
all the weapon options are magnetized, including the missile launchers, so I can set the speeder up with whatever loadout I need. truth be told, I've yet to play a single game of 40k, so I haven't the foggiest of what loadouts work well. I'm in it for the painting, at the moment. I do have to say, though, that the idea of a flamethrower mounted on the front of a fast moving, open cockpit vehicle seems horrifically wrong :p
I've used a micron pen for the last few seals I've done (including the sergeant), but I'm still working on learning where the point of contact for the tip of the pen is. I always feel like I have to leave myself more space to work with, even though the lines it makes are so thin. more practice needed I wonder if micron makes white pens... would definitely look better over green armor than black.
|
|
|
|
|
|
2012/03/27 07:37:01
Subject: Re:Varl's Salamanders WIP blog
|
|
Morphing Obliterator
|
first squad is done!
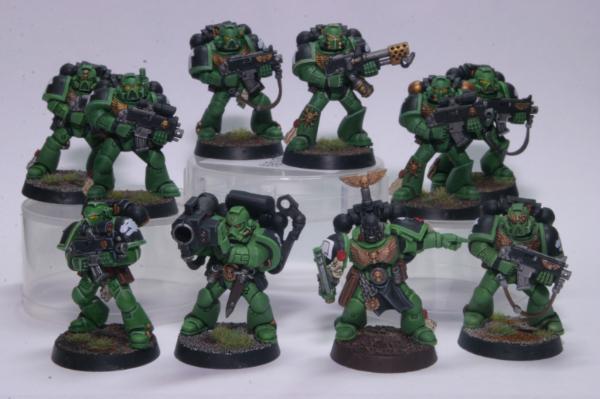
very excited to finally have a full squad completed (painted, decal'd, sealed). in just this group alone, I can see where my technique changed and improved over the last couple months. the front, left guy was one of the first couple marines I painted and the sergeant's the most recent. I wrote the date on the underside of each base so I can look back on them later and remember my humble beginnings :p
I'll probably go for more detail on my next batch of marines, like squad markings and a bit of freehand here and there. won't be getting to those for a while, though, as I've already got a dreadnought and the last 2 of my termies primed up and ready. in the queue, I've got a rhino/razorback, a 5-man squad of assault marines and another 10-man squad of tactical marines. if I can just keep myself from buying more stuff, I might actually catch up one of these months...
|
|
|
|
|
|
2012/03/29 18:31:18
Subject: Varl's Salamanders WIP blog
|
|
Regular Dakkanaut
United Kingdom
|
These could really benefit from some shading to add depth. They're quite flat. Also you need to highlight the black skin differently to the black armour. They look too similar. Perhaps some browny/black highlights for the skin would give a warmer more realistic skin tone. Grey highlights on the skin isn't working for me at all.
|
|
|
|
|
|
|
|
 Night Lords P&M Blog:
  Salamanders P&M Blog:

 Imperial Fist, IG and GK WIP: