63000
Post by: Peregrine
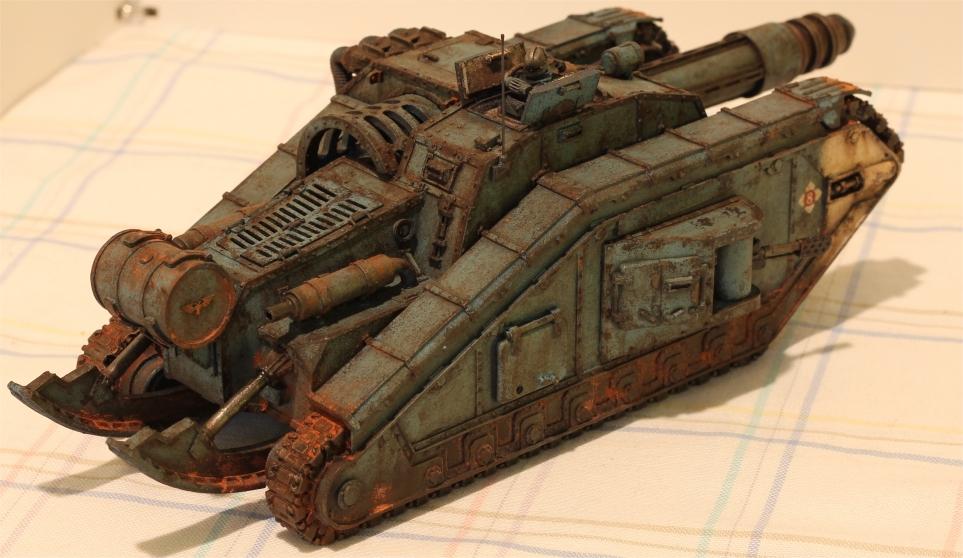
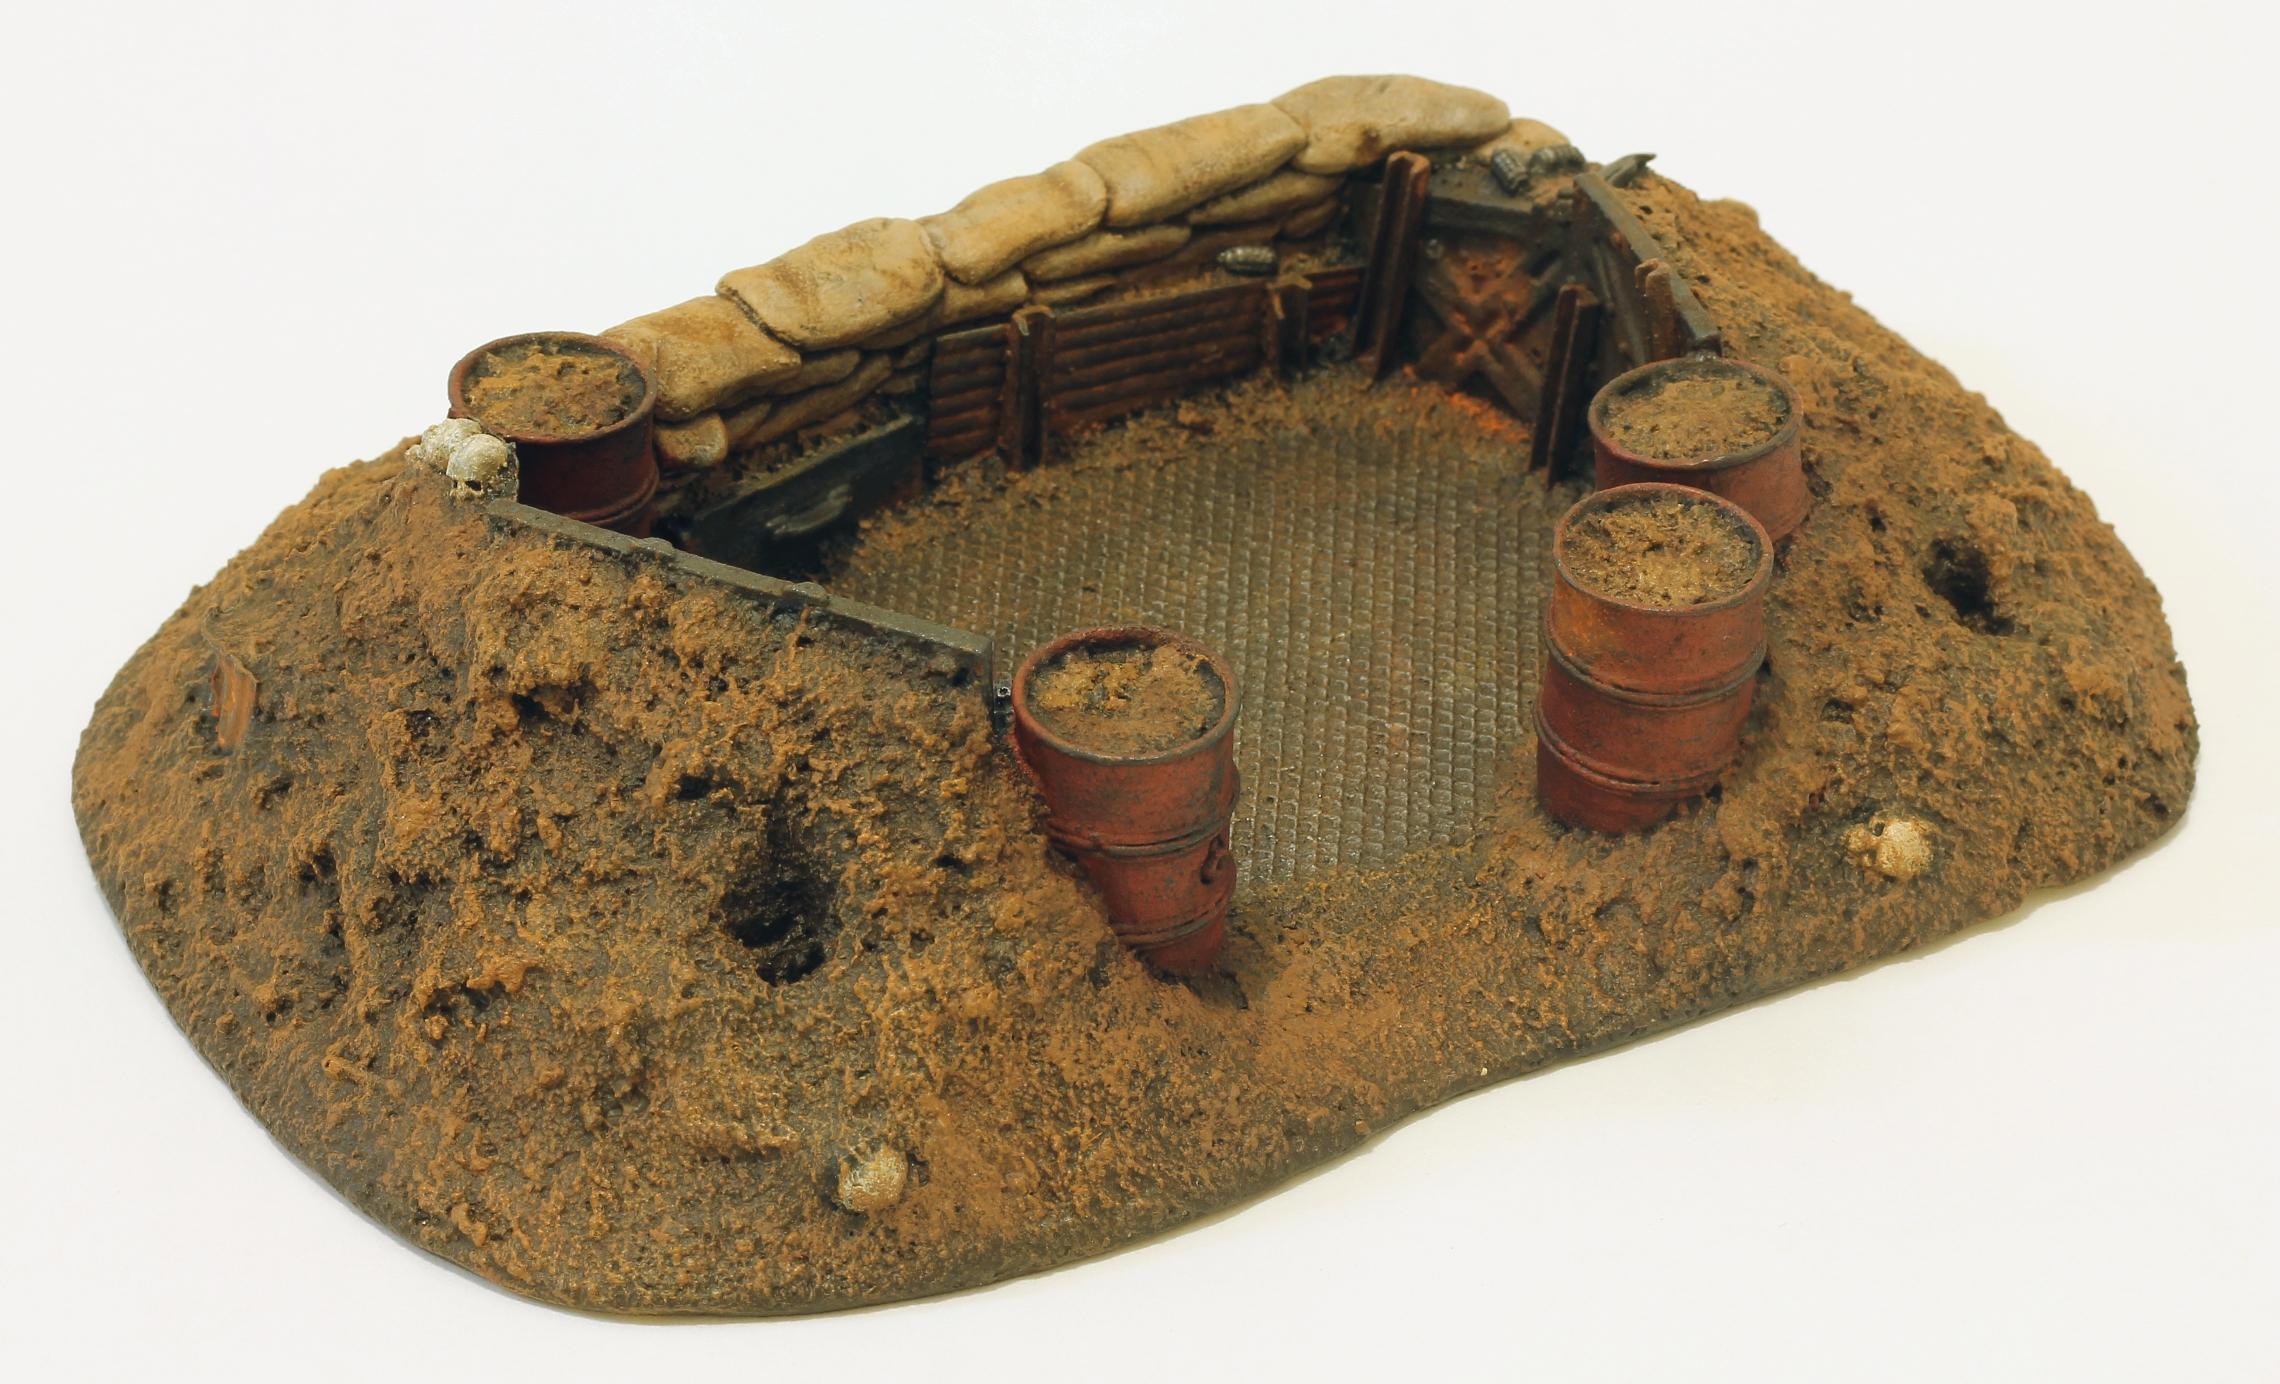
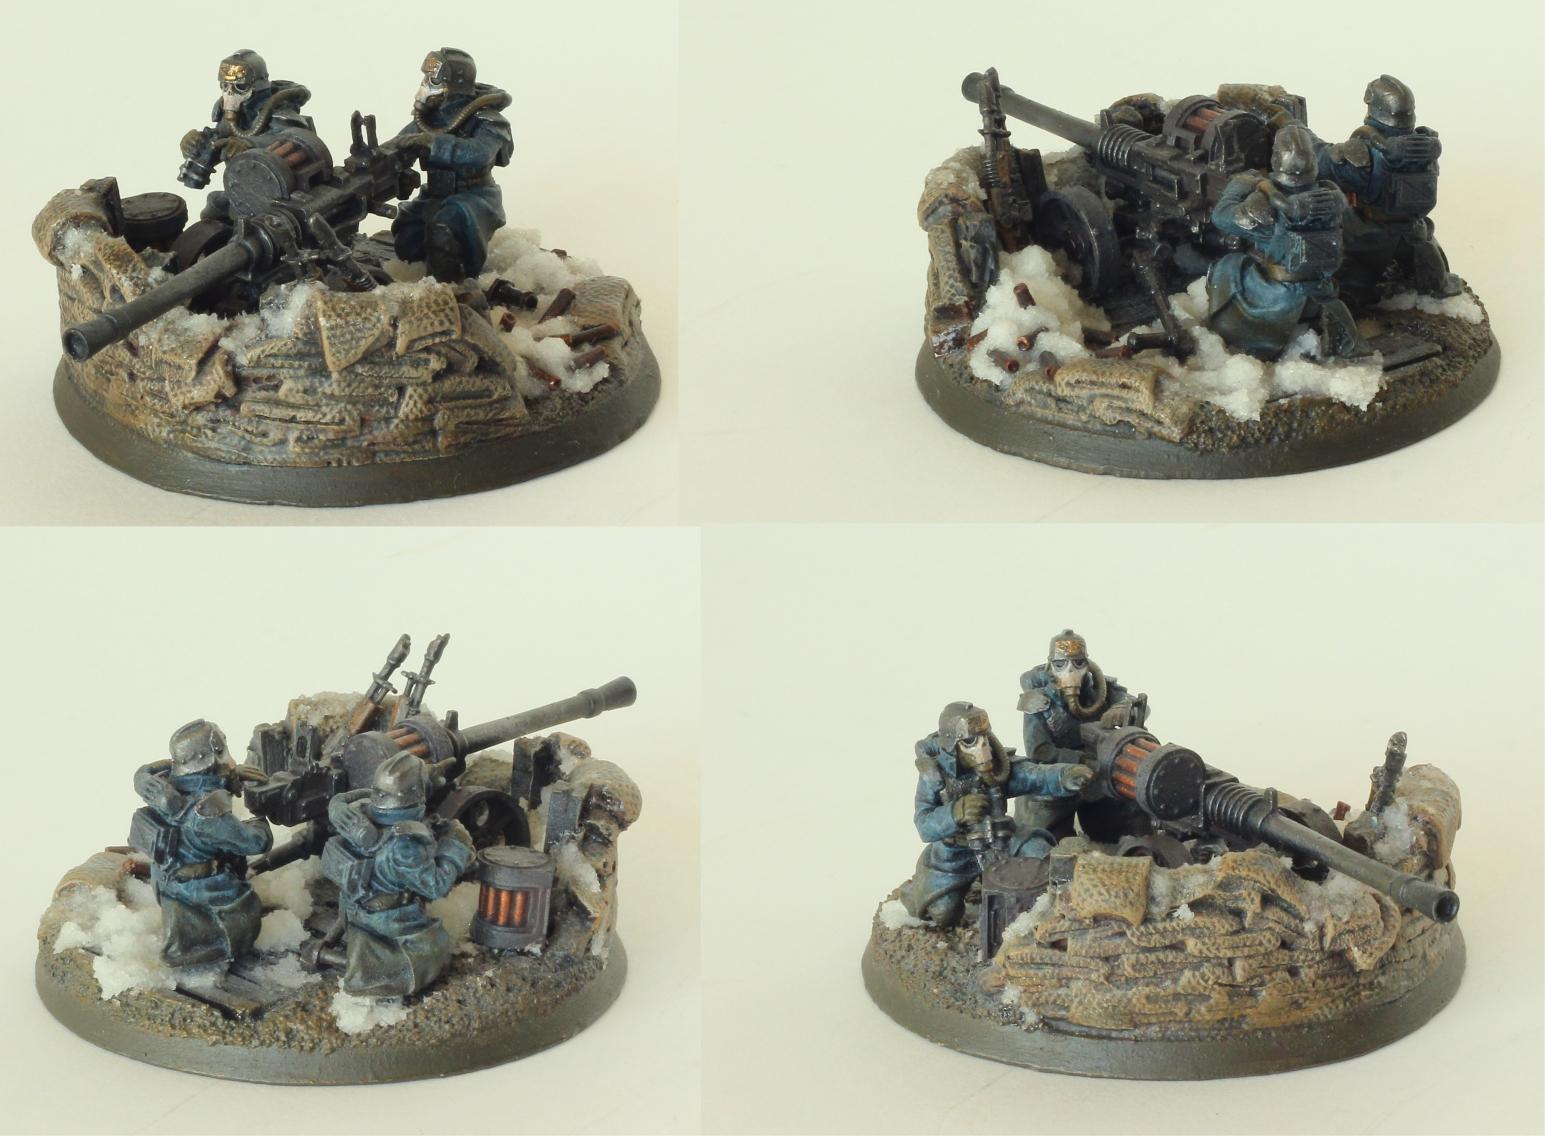
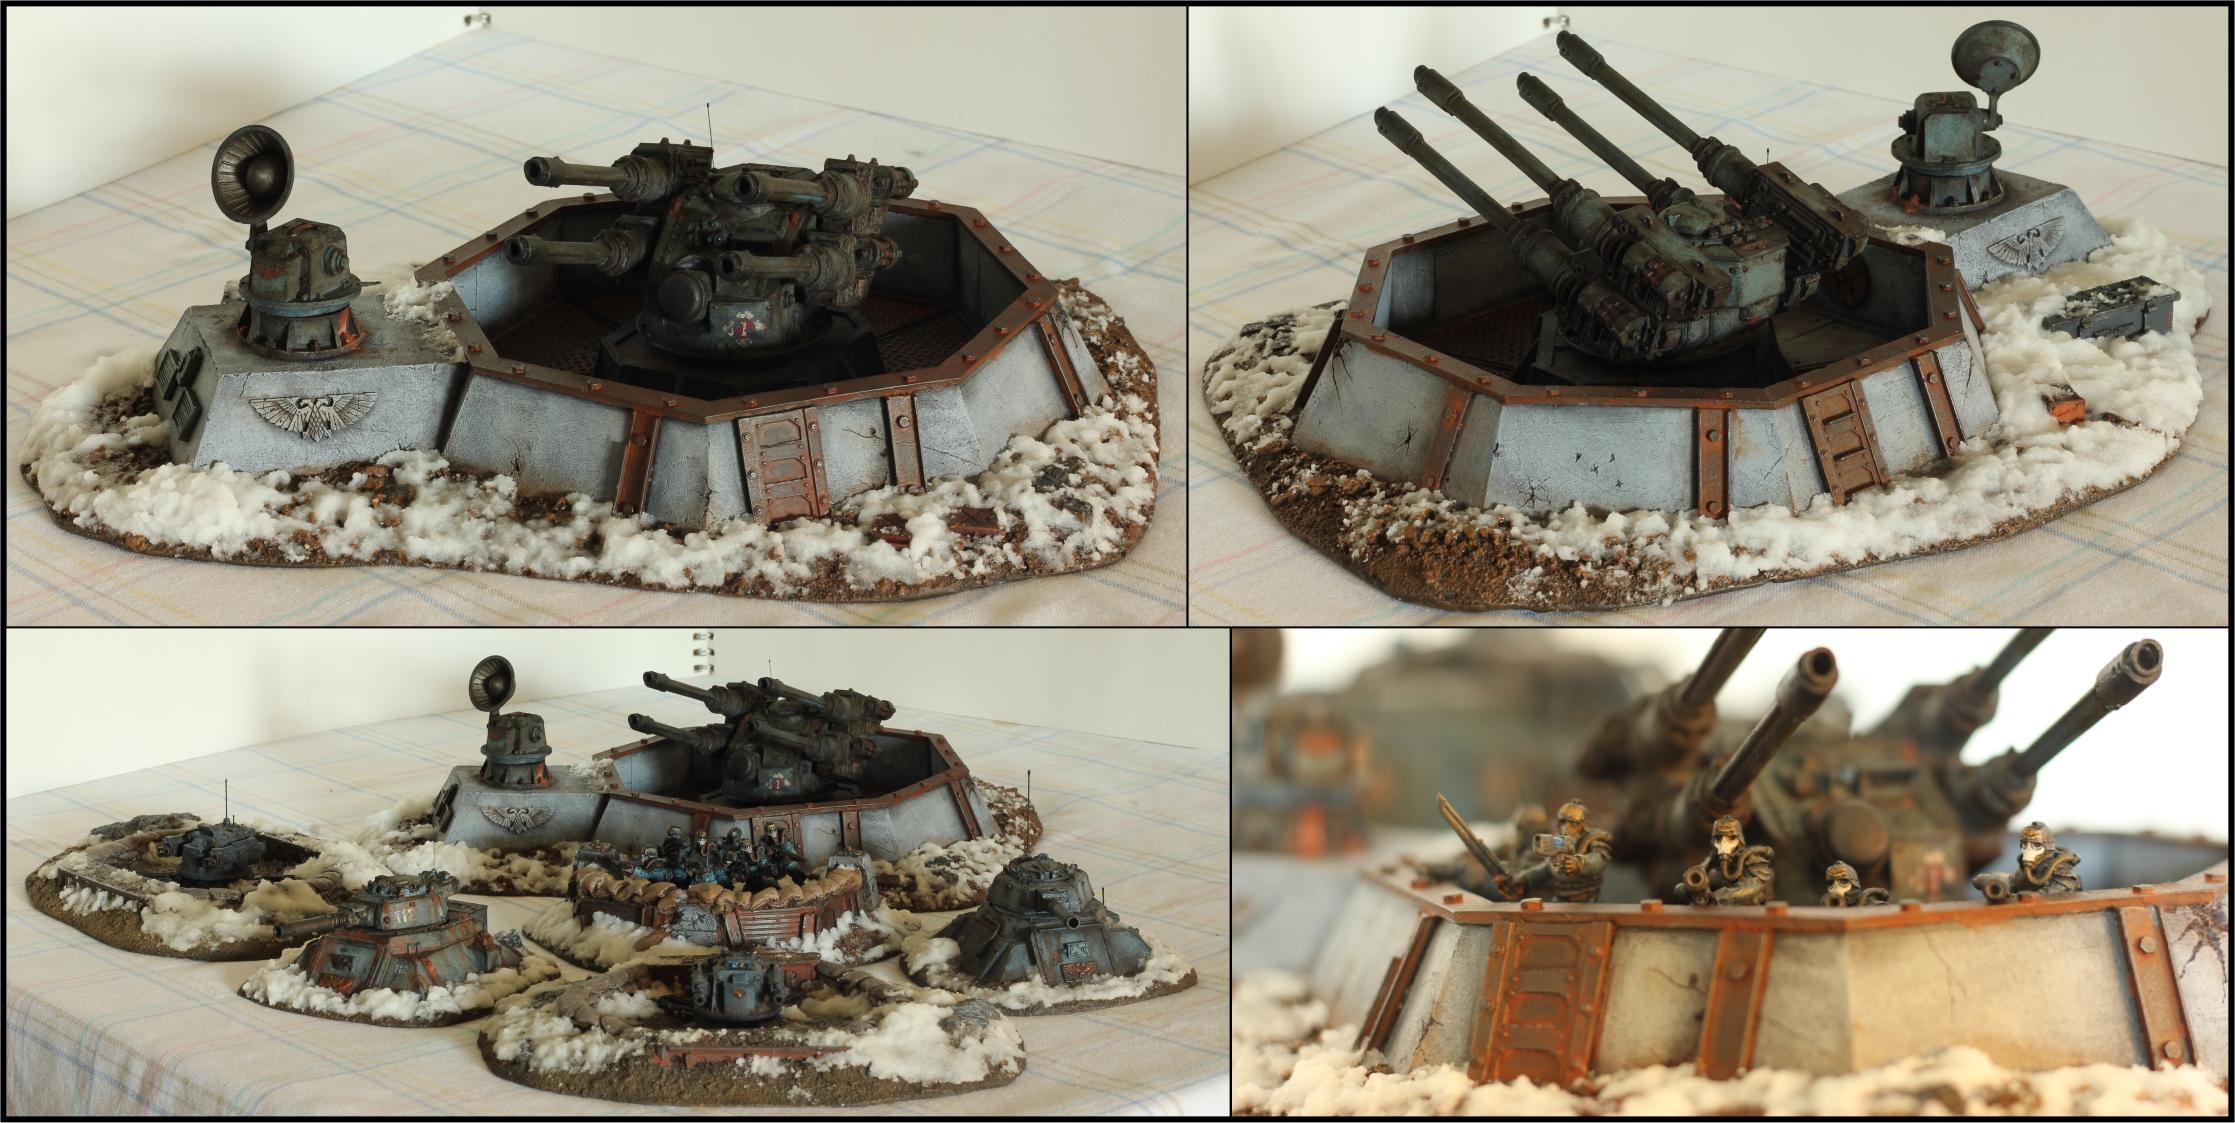
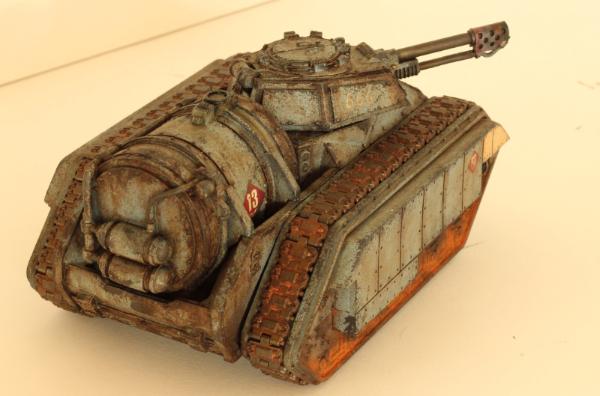
So, with my 5000th post I think it's time to start posting some painting pictures. Wouldn't like to have people thinking I'm just a WAAC TFG who doesn't care about the hobby, after all. So, first in line is my OOP Forge World Hydra empacement (counts as ADL + quad gun) and some other random OOP terrain:
53843
Post by: Ignatius-Grulgor
Very pretty looking stuff, how on earth did you do the snow? I've had a quick go with some vallejo 'foam snow' and it looks awful compared to some of the snow effects on here.
Very jealous of the OOP FW terrain in general, I really wish they hadn't limited the range to 'tiles'. Just missed out on the generator with pylons I wanted and it never seems to appear on ebay.
55033
Post by: LValx
Looks pretty baller.
53916
Post by: dangledorf2.0
I love seeing forgeworld stuff done to justice. Can't wait to see more. 
63000
Post by: Peregrine
It's actually pretty simple: Woodland Scenics soft flake snow mixed with realistic water to get a nice icy slush mixture. It won't have the sparkle and fluff of fresh snow, but the goal here was to have a miserable icy mess.
18474
Post by: Darth Bob
This stuff looks really good. I find that the Death Korps look really good in a snow theme. Will follow this blog closely. 
52163
Post by: Shandara
I always like seeing the guard (and Krieg in particular) with well-built fortifications. Looks great!
28305
Post by: Talizvar
WAAC and TFG is easier to take if the models look fabulous.
You can respect that a person cares enough to make it look good, at least enough to only start name calling by turn four...
All honesty: great work there.
22051
Post by: Barksdale
Nice to finally some pics...
First class job. I wouldn't have expected anything less. Any more to share????
31080
Post by: RandyMcStab
Really impressive, some of the best snow I've seen. Was all the rust done with weathering powders? I've just got some but haveni idea what to do with them.
12313
Post by: Ouze
The snow is especially well done. The rust is also great.
11194
Post by: Krellnus
Very nice stuff so far, I will have to keep an eye on this blog.
72956
Post by: Odd Goblin
Very nice indeed! I'm going to have to do some snow basing now.
71007
Post by: SwampRats45MK
 -that was pretty much my reaction to those valdors and what-not, I'm by no means a bad painter but for love of that is battle worn and awesome I gotta say I'm in awe. Whats the trick to making the rust and whatnot like that? Also how long did it take you to paint all those?
63000
Post by: Peregrine
 SwampRats45MK wrote: SwampRats45MK wrote: -that was pretty much my reaction to those valdors and what-not, I'm by no means a bad painter but for love of that is battle worn and awesome I gotta say I'm in awe. Whats the trick to making the rust and whatnot like that? Also how long did it take you to paint all those?
Painting was probably 10-15 hours per tank (maybe double that if you count cleaning up the parts and preparing them for painting). About half that is the base coat (rather simple TBH), the other half is weathering.
The rust and dirt is done with oil paints (apply dots of paint on rivets and other bits that would collect it, wipe across the surface), with a mix of GW sepia wash and rust-colored weathering powder for the heaviest spots of rust (for example, the metal surfaces on the Hydra emplacement's wall). The paint chipping is done with just a piece of foam and some dark gray paint. The dirt on the tracks and hull (if that's the "rust" you're thinking of, it's really red clay colored mud) is a combination of weathering powders, dark brown for dried mud and dust built up in the corners and on the white interiors, a lighter red-brown on the hull and tracks.
This book is an excellent guide: http://www.forgeworld.co.uk/Modelling-Supplies/IMPERIAL-ARMOUR-MODEL-MASTERCLASS-VOLUME-ONE.html
18474
Post by: Darth Bob
You do a really excellent job making sure your models look like they came right out of the real world. They look very authentic and realistic. The Valdor looks great.
71007
Post by: SwampRats45MK
 Peregrine wrote: Peregrine wrote: SwampRats45MK wrote: -that was pretty much my reaction to those valdors and what-not, I'm by no means a bad painter but for love of that is battle worn and awesome I gotta say I'm in awe. Whats the trick to making the rust and whatnot like that? Also how long did it take you to paint all those?
Painting was probably 10-15 hours per tank (maybe double that if you count cleaning up the parts and preparing them for painting). About half that is the base coat (rather simple TBH), the other half is weathering.
The rust and dirt is done with oil paints (apply dots of paint on rivets and other bits that would collect it, wipe across the surface), with a mix of GW sepia wash and rust-colored weathering powder for the heaviest spots of rust (for example, the metal surfaces on the Hydra emplacement's wall). The paint chipping is done with just a piece of foam and some dark gray paint. The dirt on the tracks and hull (if that's the "rust" you're thinking of, it's really red clay colored mud) is a combination of weathering powders, dark brown for dried mud and dust built up in the corners and on the white interiors, a lighter red-brown on the hull and tracks.
This book is an excellent guide: http://www.forgeworld.co.uk/Modelling-Supplies/IMPERIAL-ARMOUR-MODEL-MASTERCLASS-VOLUME-ONE.html
Well thanks for the explanations and tips, excellent work.
54575
Post by: Capamaru
I really like your weathering and rust techniques . Really nice results there .
73251
Post by: Overlord Thraka
The weathering on these is amazing! Great work here!
63000
Post by: Peregrine
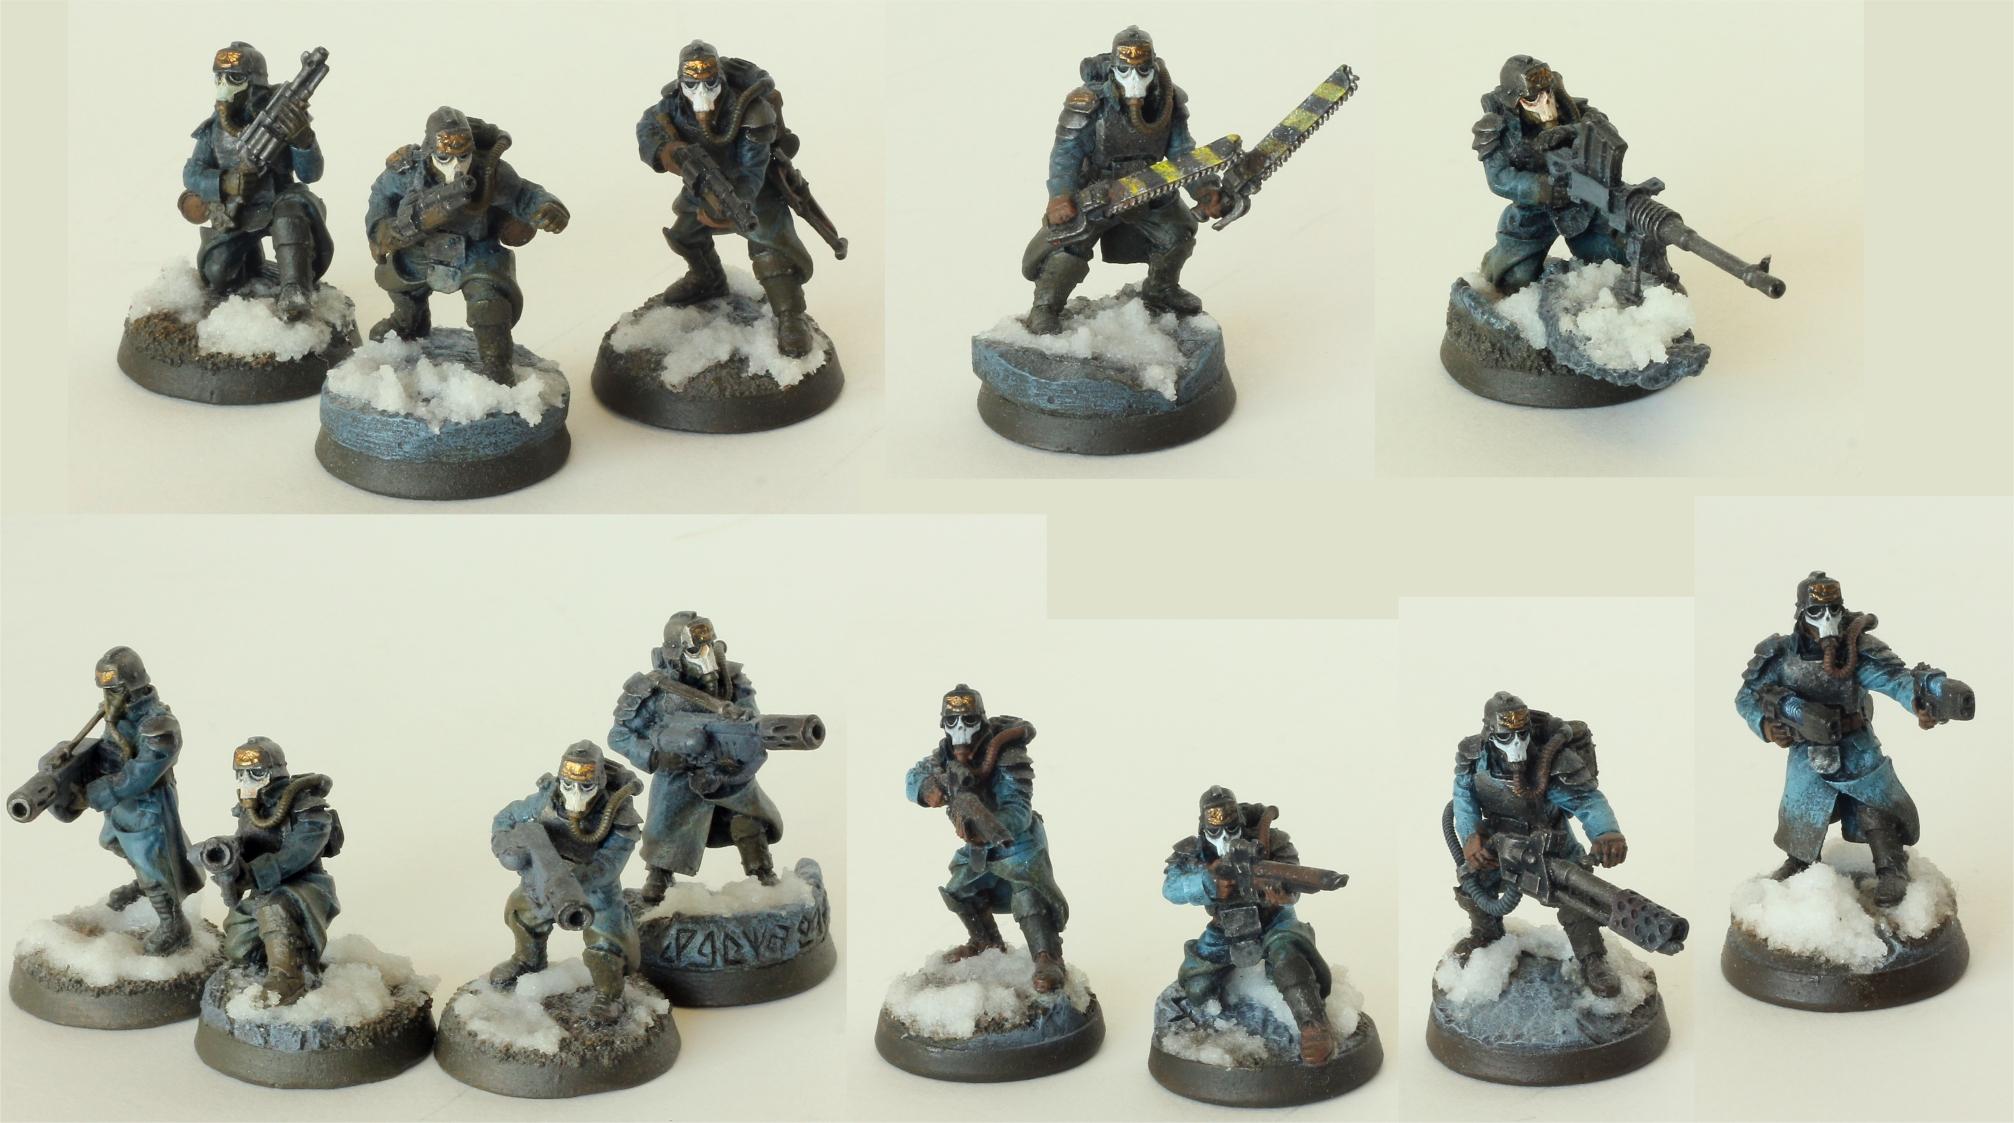
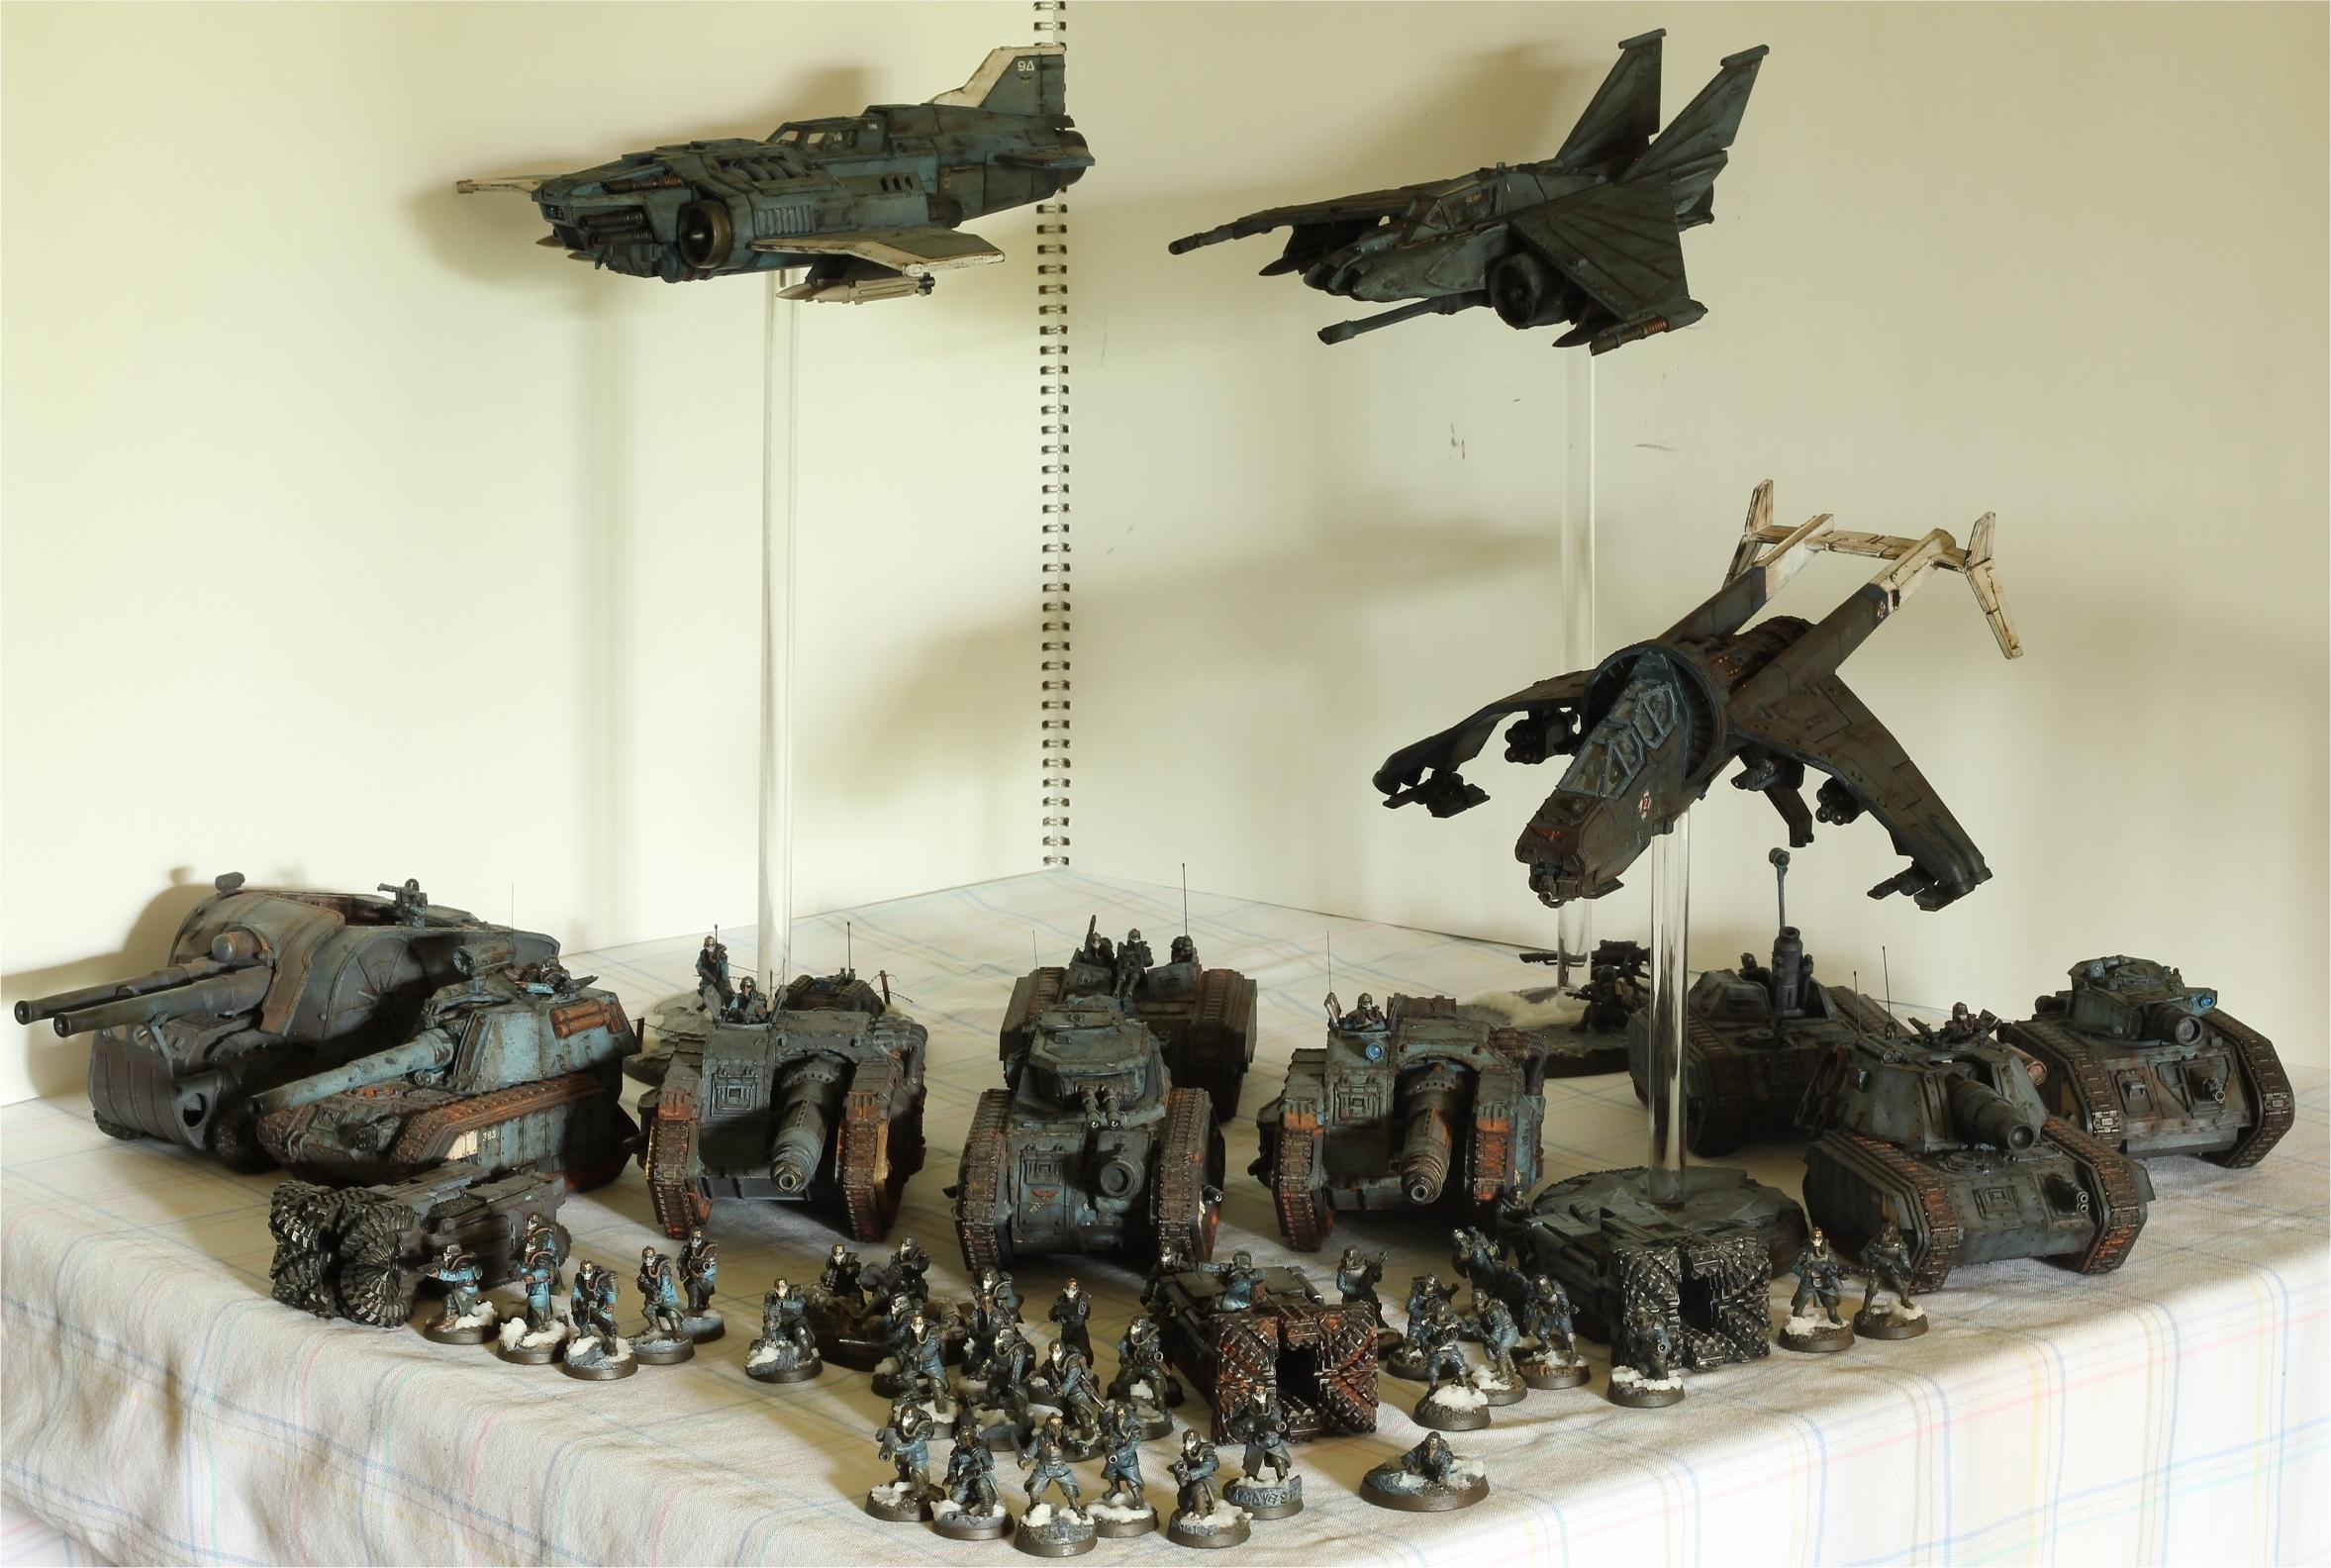
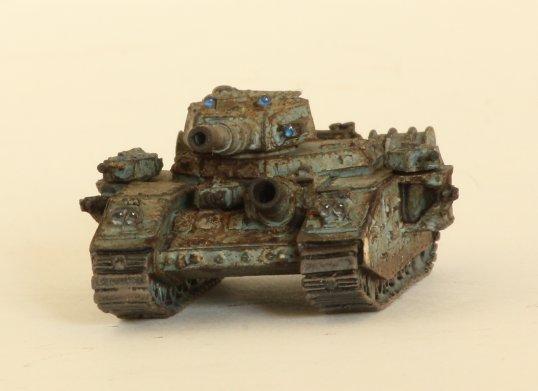
And here's the full army. Well, the part of it that's painted well enough to show off, a few of the less impressive models wouldn't fit on the table. I'll be posting individual pictures of everything as I get around to it, but if there's something you want to see right away just ask for it.
35006
Post by: Medium of Death
Exquisitely painted, gorgeous looking army.
Lost for words.... so... awesome...
21613
Post by: ellis_esquire
Gorgeous army my man - gritty, real, eyecatching, unique, different and skillfully done. Be proud!
53776
Post by: TheLionOfTheForest
Really nice looking guard! I want to see the rest of your army.
9217
Post by: KingCracker
Good gravy, all you gawkers and not a single one of you voted on any of his work? For shame!
That is a mighty impressive army youve got. As a recovering Ork player, I love the weathering and rust work you put into those models 
52163
Post by: Shandara
Very grimdark.
Just how heavy are those flyer bases? Looks dangerous otherwise
35316
Post by: ansacs
Peregrine I am very very impressed. That is one of the best painted DKoK armies I have seen and I love your fortifications.
Is the ADL fort scratch built or converted from something. I see you used the actual FW hydra flakk cannons which is just awesome but I cannot identify the fort itself.
18474
Post by: Darth Bob
I'm jealous of your Lightning. Really wish I could have picked up a few before they removed it from the site and released the new one. The old one was much cooler.
11194
Post by: Krellnus
Those tanks frankly do look amazing.
45857
Post by: SelvaggioSaky
Great army, love the "dirty" look.
Keep them coming!
Kudos for the milestone (5000th post)
63000
Post by: Peregrine
 ansacs wrote: ansacs wrote:Is the ADL fort scratch built or converted from something. I see you used the actual FW hydra flakk cannons which is just awesome but I cannot identify the fort itself.
The fortification is the old OOP Hydra emplacement FW used to make. Like all of the awesome terrain (including all the other stuff in that picture) they used to sell it has been OOP for years because the cost of making giant blocks of solid resin was too high to be profitable.
35316
Post by: ansacs
Peregrine wrote: ansacs wrote:Is the ADL fort scratch built or converted from something. I see you used the actual FW hydra flakk cannons which is just awesome but I cannot identify the fort itself.
The fortification is the old OOP Hydra emplacement FW used to make. Like all of the awesome terrain (including all the other stuff in that picture) they used to sell it has been OOP for years because the cost of making giant blocks of solid resin was too high to be profitable.
That is a shame. FW makes some amazing sculpts. Somebody now just needs to invent a better/cheaper resin for them to use.
On the positive side at least one of their fortifications has been given justice with a great paint job.
73174
Post by: BrotherOfBone
These look really, really awesome! I'd love to see some more ;D Subbed!
11194
Post by: Krellnus
ansacs wrote: Peregrine wrote: ansacs wrote:Is the ADL fort scratch built or converted from something. I see you used the actual FW hydra flakk cannons which is just awesome but I cannot identify the fort itself.
The fortification is the old OOP Hydra emplacement FW used to make. Like all of the awesome terrain (including all the other stuff in that picture) they used to sell it has been OOP for years because the cost of making giant blocks of solid resin was too high to be profitable.
That is a shame. FW makes some amazing sculpts. Somebody now just needs to invent a better/cheaper resin for them to use.
On the positive side at least one of their fortifications has been given justice with a great paint job.
Tis a shame its true, but I would rather them be OOP then the victim of Fineworld TM tbh.
63000
Post by: Peregrine
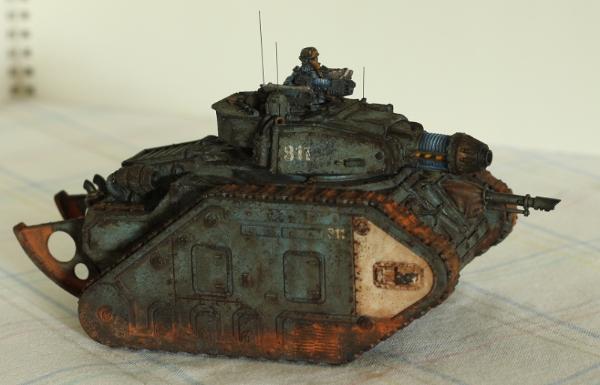
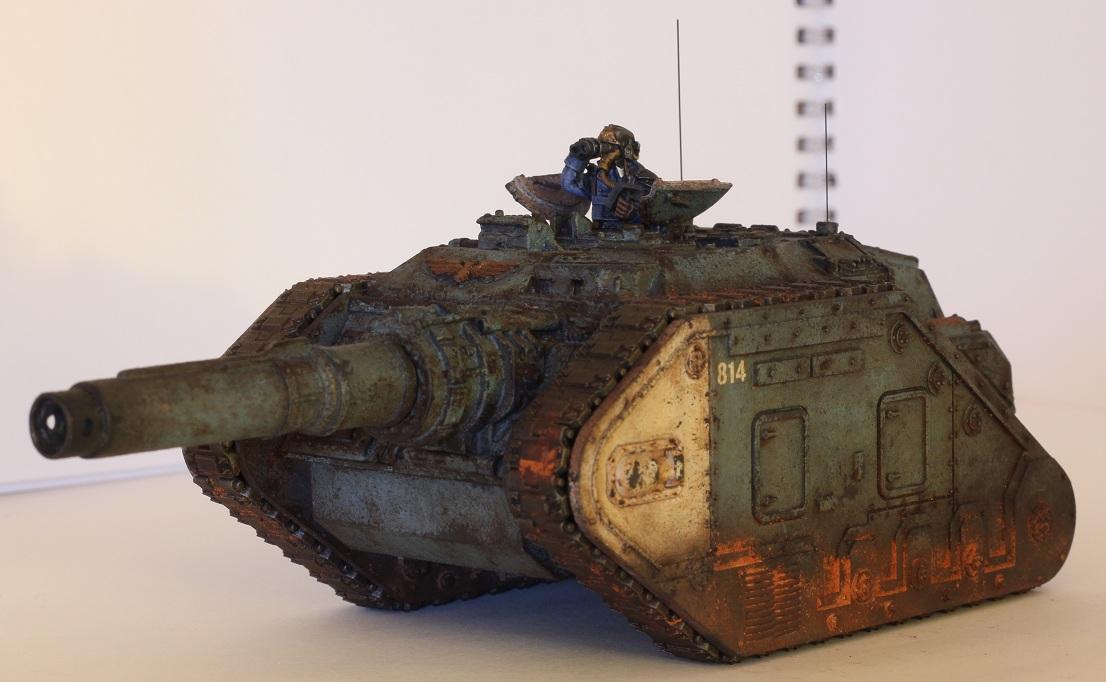
You know you love tanks when you play an armored battlegroup list just so you can enter a LR Executioner in the "best painted troops choice" contest.
53776
Post by: TheLionOfTheForest
Good looking tank. Love the weathering effects!
35316
Post by: ansacs
The plasma gunner in the top hatch is a great touch. Did anyone call fowl when you entered it as troops?
11194
Post by: Krellnus
Lovely tank, the GW kit has nothing on the FW one. Keep up the good work!
60939
Post by: Enigwolf
Peregrine wrote:You know you love tanks when you play an armored battlegroup list just so you can enter a LR Executioner in the "best painted troops choice" contest.

63000
Post by: Peregrine
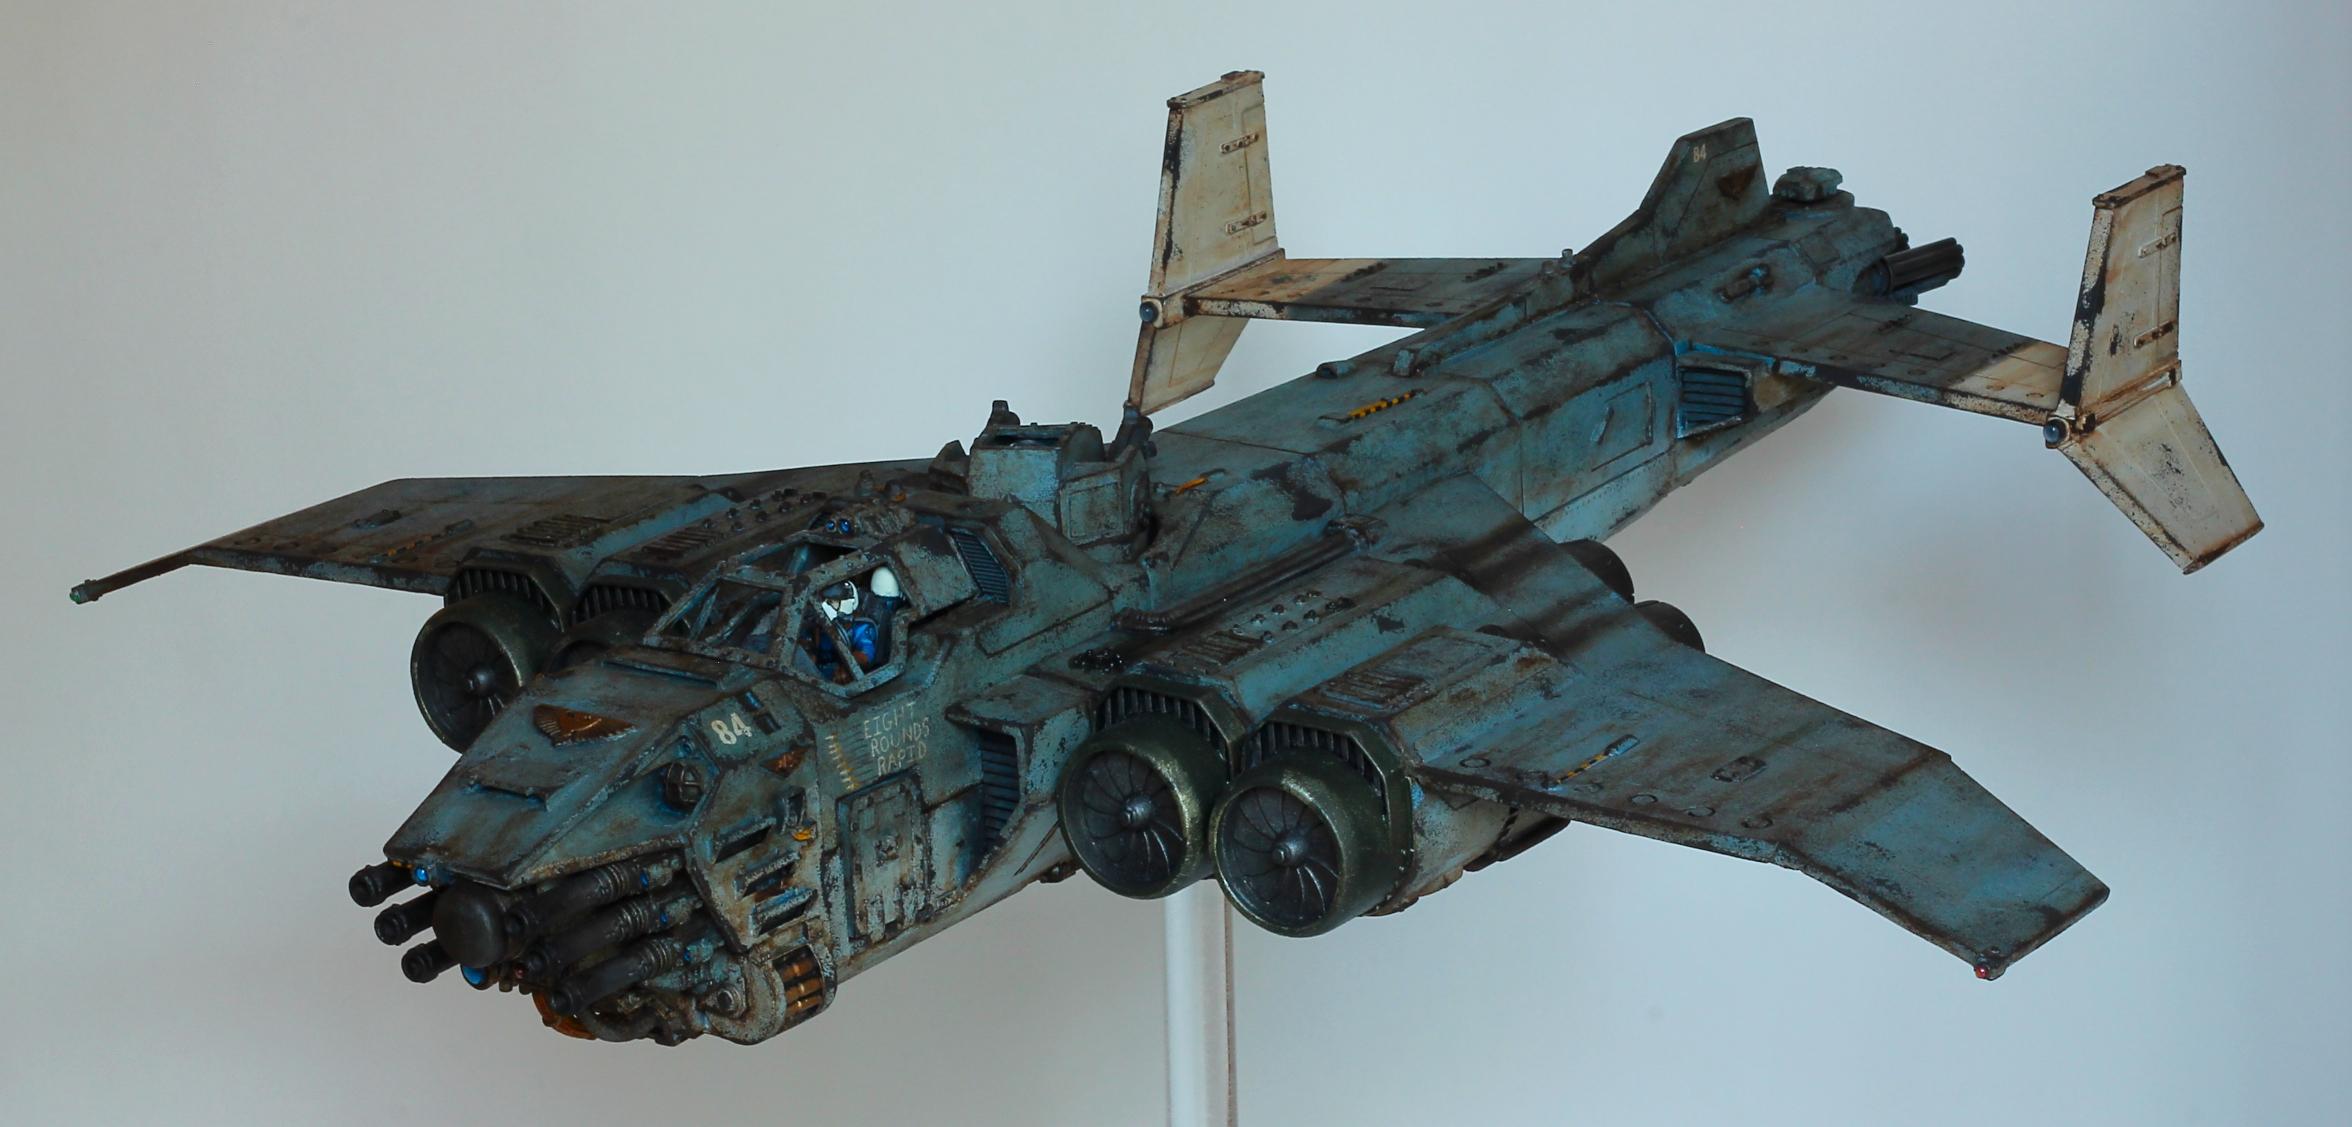
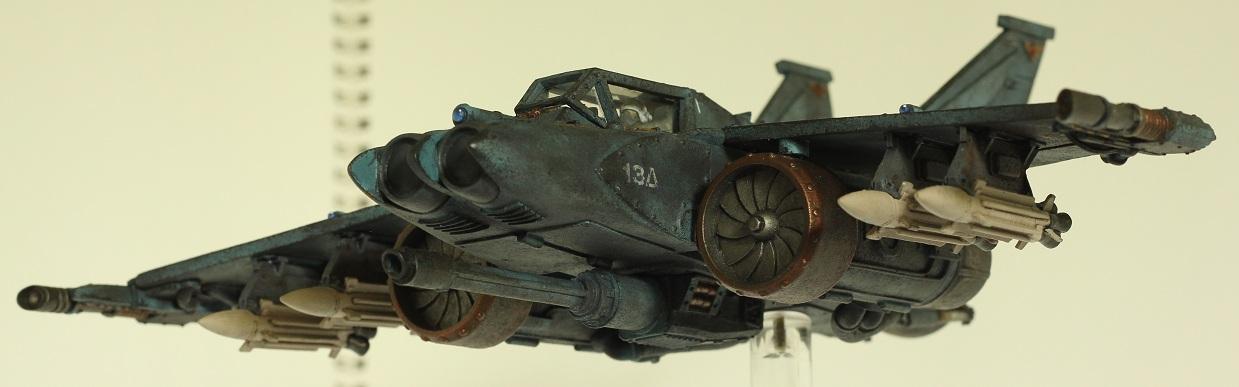
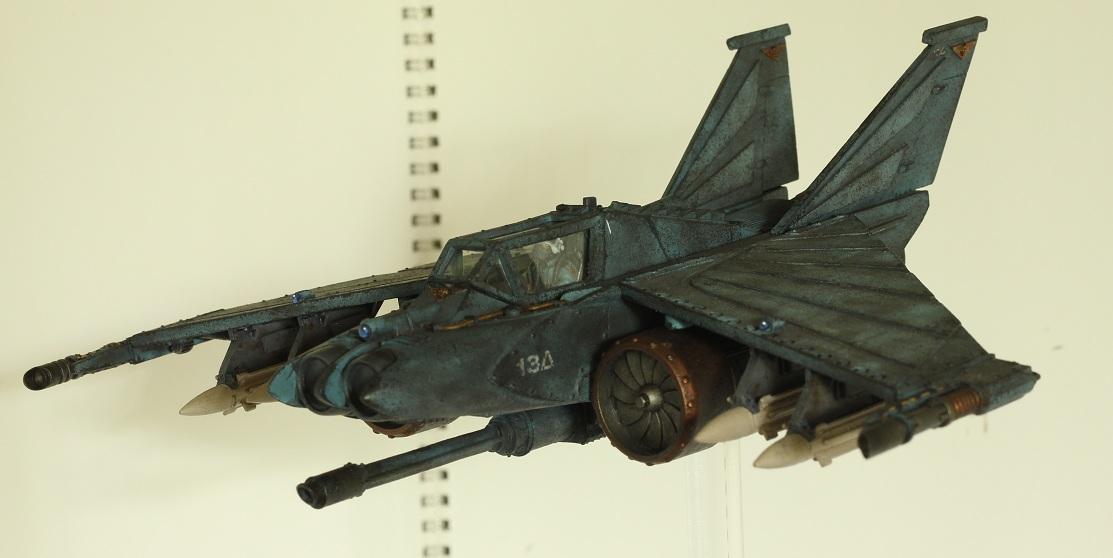
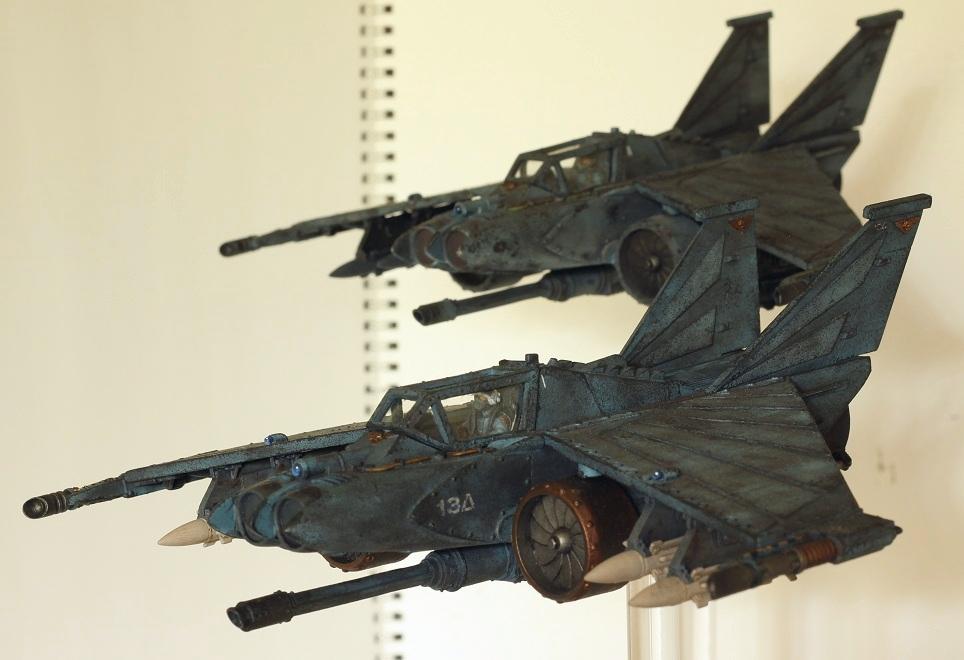
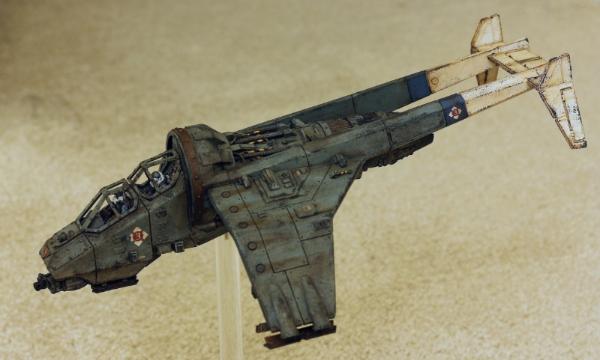
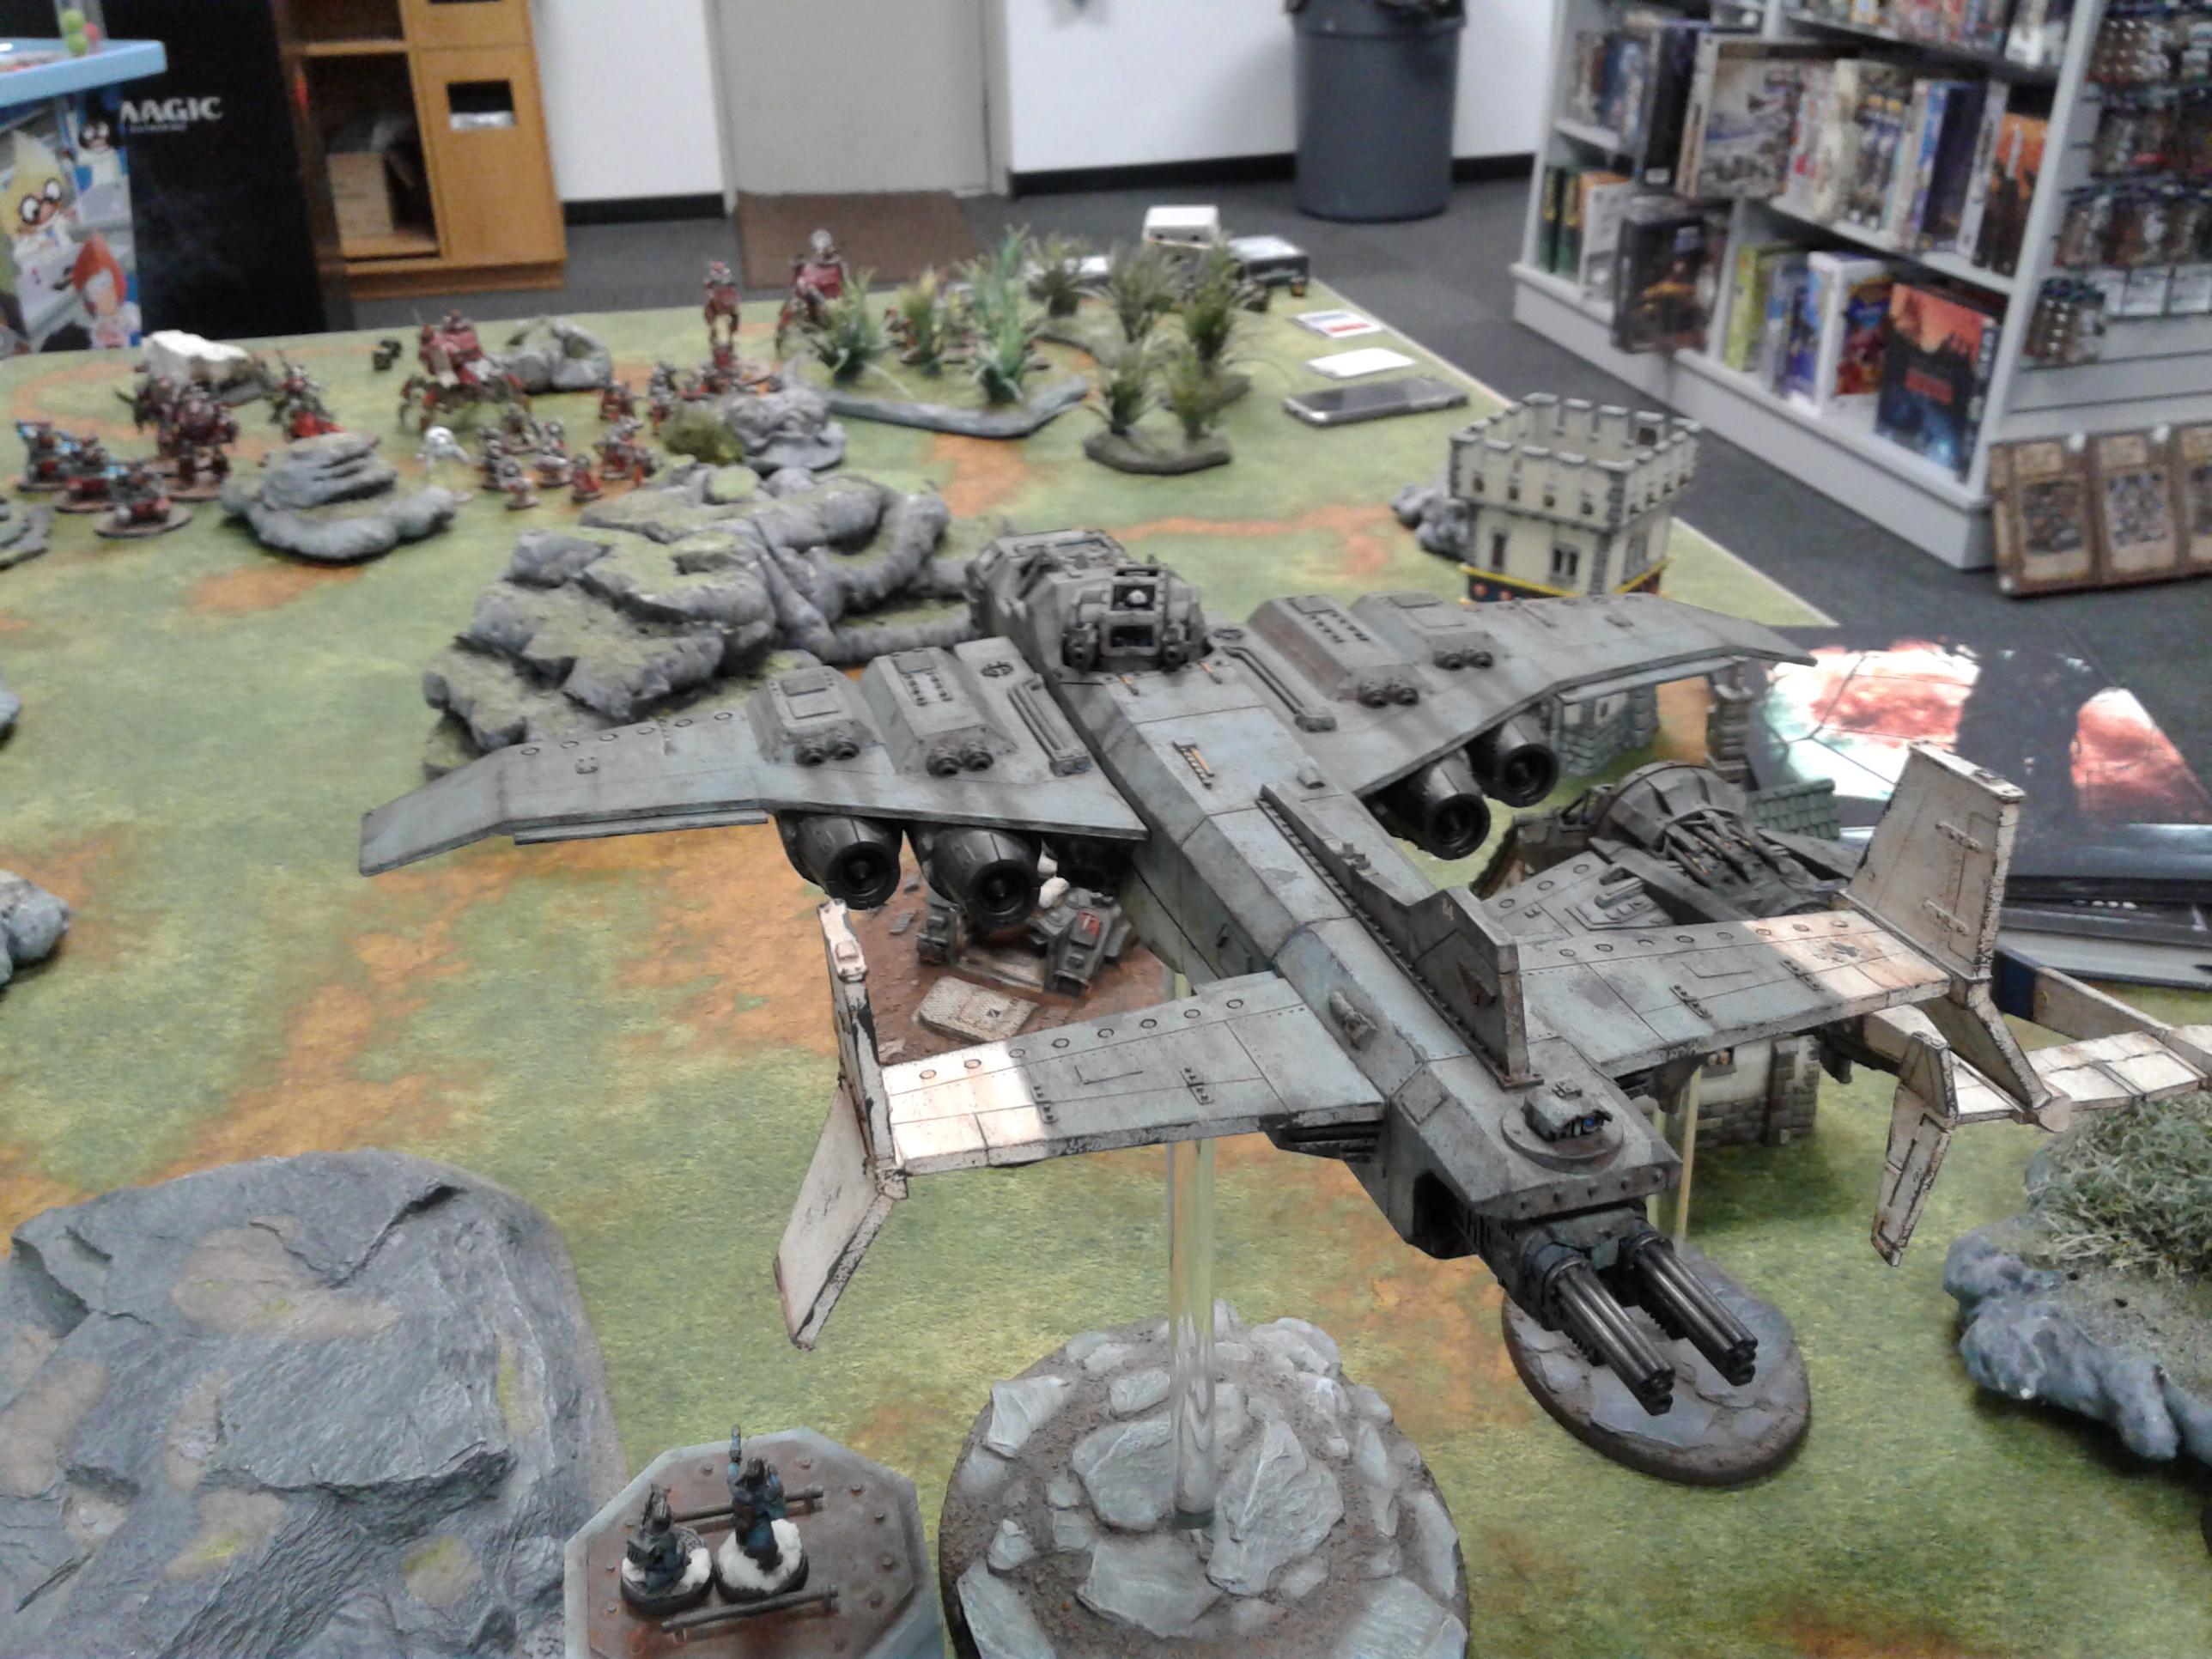
And the other model from the recent tournament, the Lightning fighter. The Voss-pattern one is nice, but you have to love the OOP classic.
60939
Post by: Enigwolf
Gah. I always wanted one of those old ones. :(
6098
Post by: ghostmaker
Awesome stuff, makes me want to work on mine more.
29449
Post by: weetyskemian44
Great - I would love to see more of the big tank with two barrels on the turret, on the far left as I've never seen one of them before.
59386
Post by: Imperial Templari
Amazing, what colour/brand is the light blue/turquoise you are using?
11194
Post by: Krellnus
That lightning is a shockingly good looking piece, the Guardsman on the base are a pretty nice touch, keep up the good work.
Got any WIP for any conversions or other things in the works?
63000
Post by: Peregrine
Sorry to be useless on this, but it's just black/white/blue art acrylics mixed by hand every time I do it. I have no idea what you'd use if you wanted a gaming paint equivalent.
 Krellnus wrote: Krellnus wrote:Got any WIP for any conversions or other things in the works?
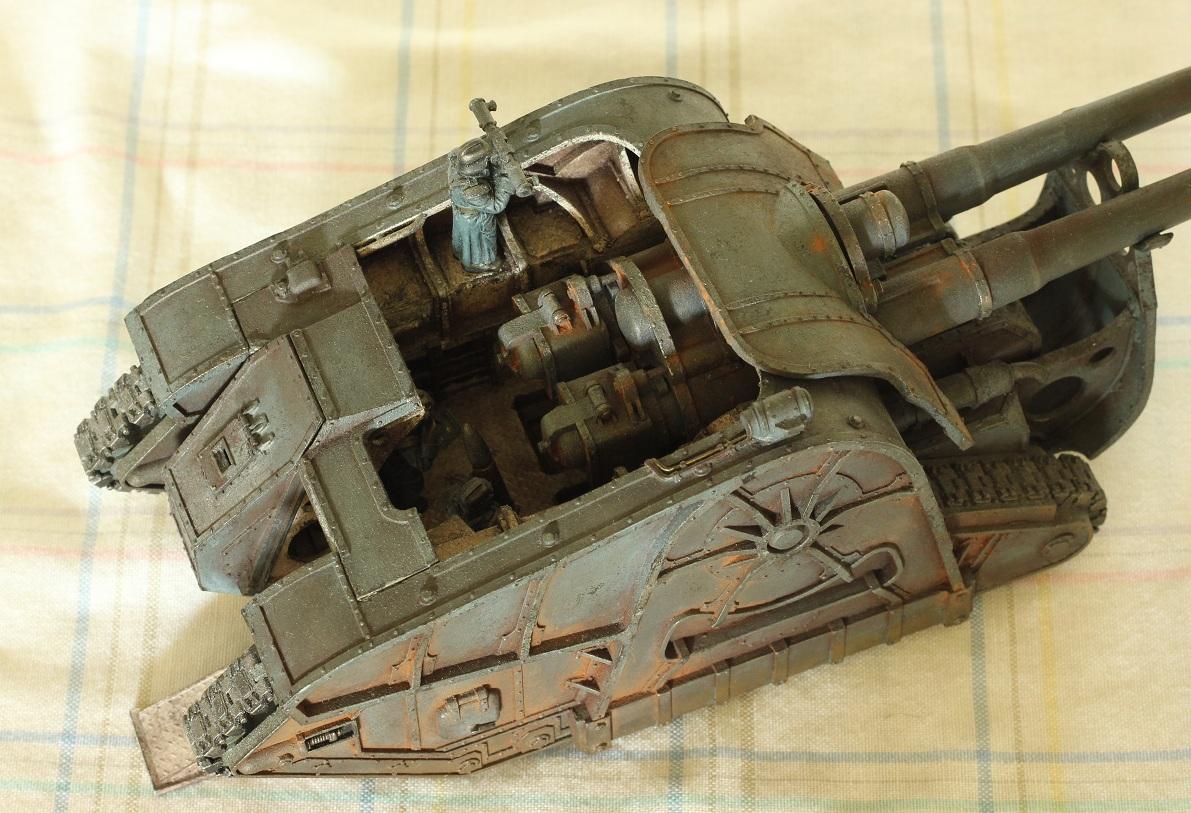
Lots of stuff in progress, a Destroyer tank hunter, a Vulture gunship, and maybe something really big. But I don't usually take WIP pictures since I don't think it's worth the effort of setting up the camera until the model is finished and ready to show off.
You'll probably hate me for this picture then:
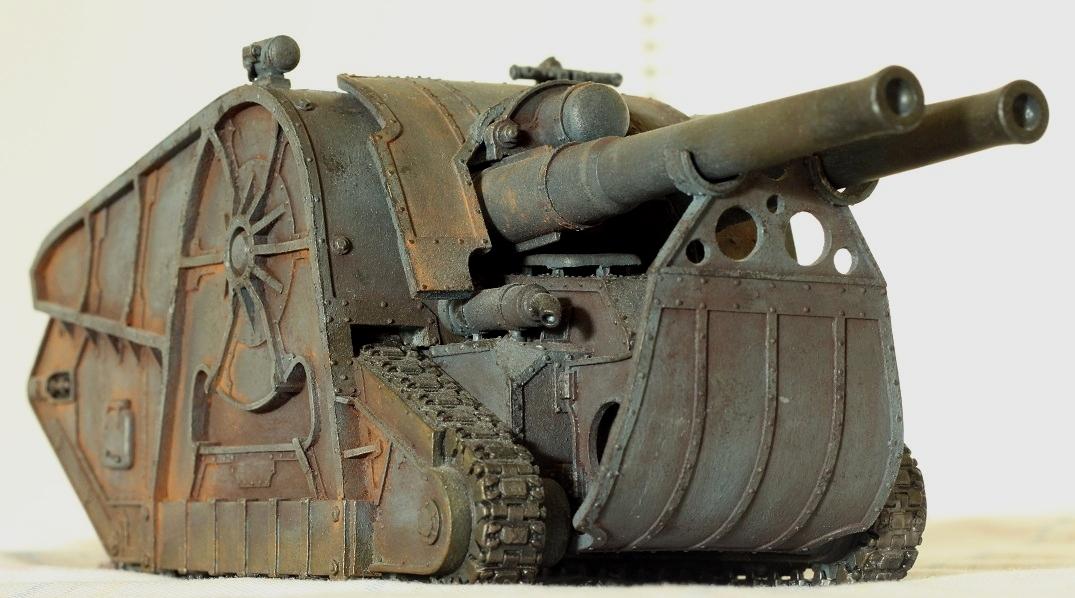
 weetyskemian44 wrote: weetyskemian44 wrote:Great - I would love to see more of the big tank with two barrels on the turret, on the far left as I've never seen one of them before.
It's a Minotaur artillery tank:
60939
Post by: Enigwolf
:( You're evil Peregrine. I'm guessing you have some of the other older FW flyers like their Valk and stuff too?
67367
Post by: MajorStoffer
I really like the texture you seem to have worked into the paint; reminds me a lot of those slapdash T-34s the Russians pumped out in '41, where the steel had lots of imperfections. Adds a really good sense of desperation or age to the vehicles.
The old lightnings really are great, yeah, I know the Voss pattern one fits the aesthetic they designed later better, but the old design is still really solid. One of my friends recently got his hands one one from the 65k+ guard sale posted a while ago, to go with his 3 vultures, 5 vendettas and 2 valkyries, flying git that he is.
63000
Post by: Peregrine
 Enigwolf wrote: Enigwolf wrote::( You're evil Peregrine. I'm guessing you have some of the other older FW flyers like their Valk and stuff too?
Yeah, an OOP Vulture is probably my next project, and I've got a Valkyrie sitting in the box for when I'm in a really masochistic mood and want to deal with the incredibly poor fit on the hull sections. Didn't get an Aquila though, which I kind of regret. I suggest checking ebay, I've seen at least a few Lightnings over the past few months at prices that were barely full retail on the old kit (which is good because I still need #3 and #4).
53776
Post by: TheLionOfTheForest
Peregrine's got all the cool toys  . That Minotaur is sick. If only $$ wasn an issue I would have one of everything FW.
60939
Post by: Enigwolf
Is the OOP Vulture any different from the current one? I thought the difference only lay in the use of the old OOP Valk parts?
51866
Post by: Bobthehero
That is a whole lot of Grenadiers and Engineers there.
You play the DKoK list or IG stand in?
63000
Post by: Peregrine
Codex IG. I wanted to play a veteran army, and until IA12 that meant using the codex list (though with Hades drills instead of Chimeras). In the near future I'll probably get the Rapiers and other appropriate units so I can also use it as the IA12 list.
Enigwolf wrote:Is the OOP Vulture any different from the current one? I thought the difference only lay in the use of the old OOP Valk parts?
It's slightly different in the details. The wings are a bit smaller and have different details (the resin Vulture and Valkyrie actually have different wings and tail booms, unlike the plastic versions), the wing engines don't have the "cap" bit on the end that hides the joint between the wing halves on the plastic kit, the tail doesn't have the conversion bit the Valkyrie kit needs to hold the outer fins in place, the landing gear legs are different, the weapon hardpoints are different (and include special lascannons), and probably a few more things. It wouldn't be obvious if you aren't familiar with the kit, but if you look at them side by side there are some differences.
60939
Post by: Enigwolf
Either I'm blind, or I can't find any pictures of it. I'll wait for you to post some up!
63000
Post by: Peregrine
Enigwolf wrote:Either I'm blind, or I can't find any pictures of it. I'll wait for you to post some up!
If you look at FW's website the painted pictures of the Vulture are the all-resin kit, and the unpainted ones are the new kit with the plastic Valkyrie parts. Since I won't be done with it for a while I've highlighted some of the differences (the different lascannons and hardpoints aren't visible). The easiest one to look for is the raised caps on the wing tip engines: the resin Valkyrie and Vulture have smooth cylinders (except for the rivets), the plastic wings have a raised cap on the end. If you see someone selling a " OOP resin Valkyrie/Vulture" that has the plastic-style end cap you know it's a scam.
1
11194
Post by: Krellnus
The Minotaur is all big and imposing, I love it!
72699
Post by: Traffic Conez
Hot dam so jelly of your awesome Lemun Russ
60939
Post by: Enigwolf
Oh, wow. Peregrine, I bow to your sharp eyes.
63000
Post by: Peregrine
MOAR TANKS.
Destroyer tank hunter:
Tank squadron:
Bigger tank squadron:
60939
Post by: Enigwolf
I like the nice weathered look that the acrylics give your tanks. Especially the line where you can tell that the tanks have been churning through wet mud and it caked over. Well depicted, and from personal experience, pretty accurate too.
11194
Post by: Krellnus
Damn those tanks are amazing!
Who else thinks the FW tanks make the GW ones look like absolute garbage?
It's almost enough to make me fly across the pond to play a game against you.
Almost.
58322
Post by: LeadLegion
Lovely stuff. Your weathering technique is just class.
8266
Post by: Wolf
Damn Peregrine, these models are wonderful, I am very jealous of your army !
49676
Post by: inquisitive inquistor
Truly a masterpiece of an army.
77355
Post by: Roberkhan
Beautyful and evocative! Congratulations!
16387
Post by: Manchu
This thread is crazy inspiring. Playing with those models on the table must be memorable!
75552
Post by: MagosBiff90
awesome weathering on all of those vehicles! looks very impressive.... gives off the kind of feel i would really expect when i think of DKOK! For sure going to be using these as inspiration for my own styling/weathering... whenever I manage to finish my build! Looks awesome!
63000
Post by: Peregrine
Oops. I guess if my thread gets revived I have to post some new stuff? Fortunately there's an Apocalypse game coming up this month so I should have some new stuff to show soon.
35316
Post by: ansacs
Oh if you tell us that we will just keep bumping the thread to force you to show us more goodies.
77194
Post by: Senortaco
APOC!!! Now that's a lot of units for you to show us
79778
Post by: DominusLimum
Brilliant work on the tanks.
I've been working through the Valdor- where did you install the lifting lugs supplied- I cant seem to find them anywhere on the instruction sheet?
cheers,
63000
Post by: Peregrine
Haven't forgotten my obligations here, I've got a couple WIPs that didn't get done in time for Apocalypse but should be done by the next game. As a hint, one of them is #98.
DominusLimum wrote:I've been working through the Valdor- where did you install the lifting lugs supplied- I cant seem to find them anywhere on the instruction sheet?
They go on the front and back of the "bridge" piece that goes across the top of the main gun (the bit where the three pipes connect to). You can see them in this picture:
79778
Post by: DominusLimum
Thanks Peregrine. I've just picked up some auto primer as the resin was very slick even after a couple of washes and a soak over night. Tamiya primer seems to scrape off on the test sprue. your Valdor is the benchmark.
cheers.
35316
Post by: ansacs
Wow, great detail work n the ruins. Even the cracking on the stones looks great.
75552
Post by: MagosBiff90
That Valdor.........
Great looking group! i have just had my first painting experience and i have to say..... i have a long way to go to get th this level.... grimy and dirty but really restrained! Great stuff!
Look forward to seeing more!
Cheers,
59265
Post by: BunkerBob
You evil little man, you suck me and my wallet back into this game with my favorite thing of all time. Tanks, tanks, and terrain.
50541
Post by: Ashiraya
While I am usually no fan of DKoK, I must say I really like your weathering.
52425
Post by: Elnibbus
Big fan of your DKoK Peregrine. I've taken a bite of the bullet and have bought some to do an Ardennes themed army. Not sure how I'm going to go about it so no doubt you'll have some pms inbound for ideas!
77645
Post by: wolfmaster1234
You are a very skilled painter well done.
52054
Post by: MrMoustaffa
Peregrine these models are incredible.
I feel woefully inadequate at my own painting now
28269
Post by: Red Corsair
MOAR! Looking great btw!
63000
Post by: Peregrine
Honestly, I've just been kind of apathetic about painting lately. I'm tired of GW's garbage rules, and I'm tired of having to constantly fight and argue just to be allowed to use my army. I've done a couple X-Wing repaints though, maybe I'll post those if I ever get around to photographing them.
77474
Post by: SHUPPET
Nice DKoK. You just went up a notch on my ladder.
That puts you on notch 1.
62749
Post by: Dr H
Nice work. Good builds, good painting (you shouldn't have to argue to use these models).
Really nice terrain too.
75727
Post by: sing your life
some of the best tracks I've seen.
63000
Post by: Peregrine
A lone gray squadron Y-wing, making a run through a scrapyard of half-finished ships. Bonus points if you can identify my current projects in the background.
1
52425
Post by: Elnibbus
I can see a Minotaur artillery tank...
52163
Post by: Shandara
A FW Marauder Destroyer (I recognise the triple-barreled autocannon and the engine pieces), I recently made one myself as well
21254
Post by: lipsdapips
Mmmmm those are some sexy models, would love to see some more close ups of the infantry ;p
6098
Post by: ghostmaker
Sweet dkok and tanks keep it up !
63000
Post by: Peregrine
Well, finally back to work. I took a WIP shot for comparison purposes, so why not post it here?
(Also, I just noticed that it's friday the 13th, so I guess this one is pretty appropriate!)
1
63000
Post by: Peregrine
And done:
62749
Post by: Dr H
Good job. Very convincing weathering.
35006
Post by: Medium of Death
Another beautiful addition. Really great.
77194
Post by: Senortaco
Excellent weathering and freehand!!
51866
Post by: Bobthehero
How do those transfer sheet go?
I bought one for reasons, and I am not sure if it turns out I'll need, but hey...
76836
Post by: hurtmypony
Your magnificent weathering is so realistic, the thumb I used to scroll through the images on my tablet now requires a tetanus shot.
75552
Post by: MagosBiff90
Incredible work my friend! Going to put it out there and say these are IMHO the best weathered and best looking group of vehicles i have seen! One word.... Inspirational!
23638
Post by: GamesEtc
EXCELLENT Weathering!!!!
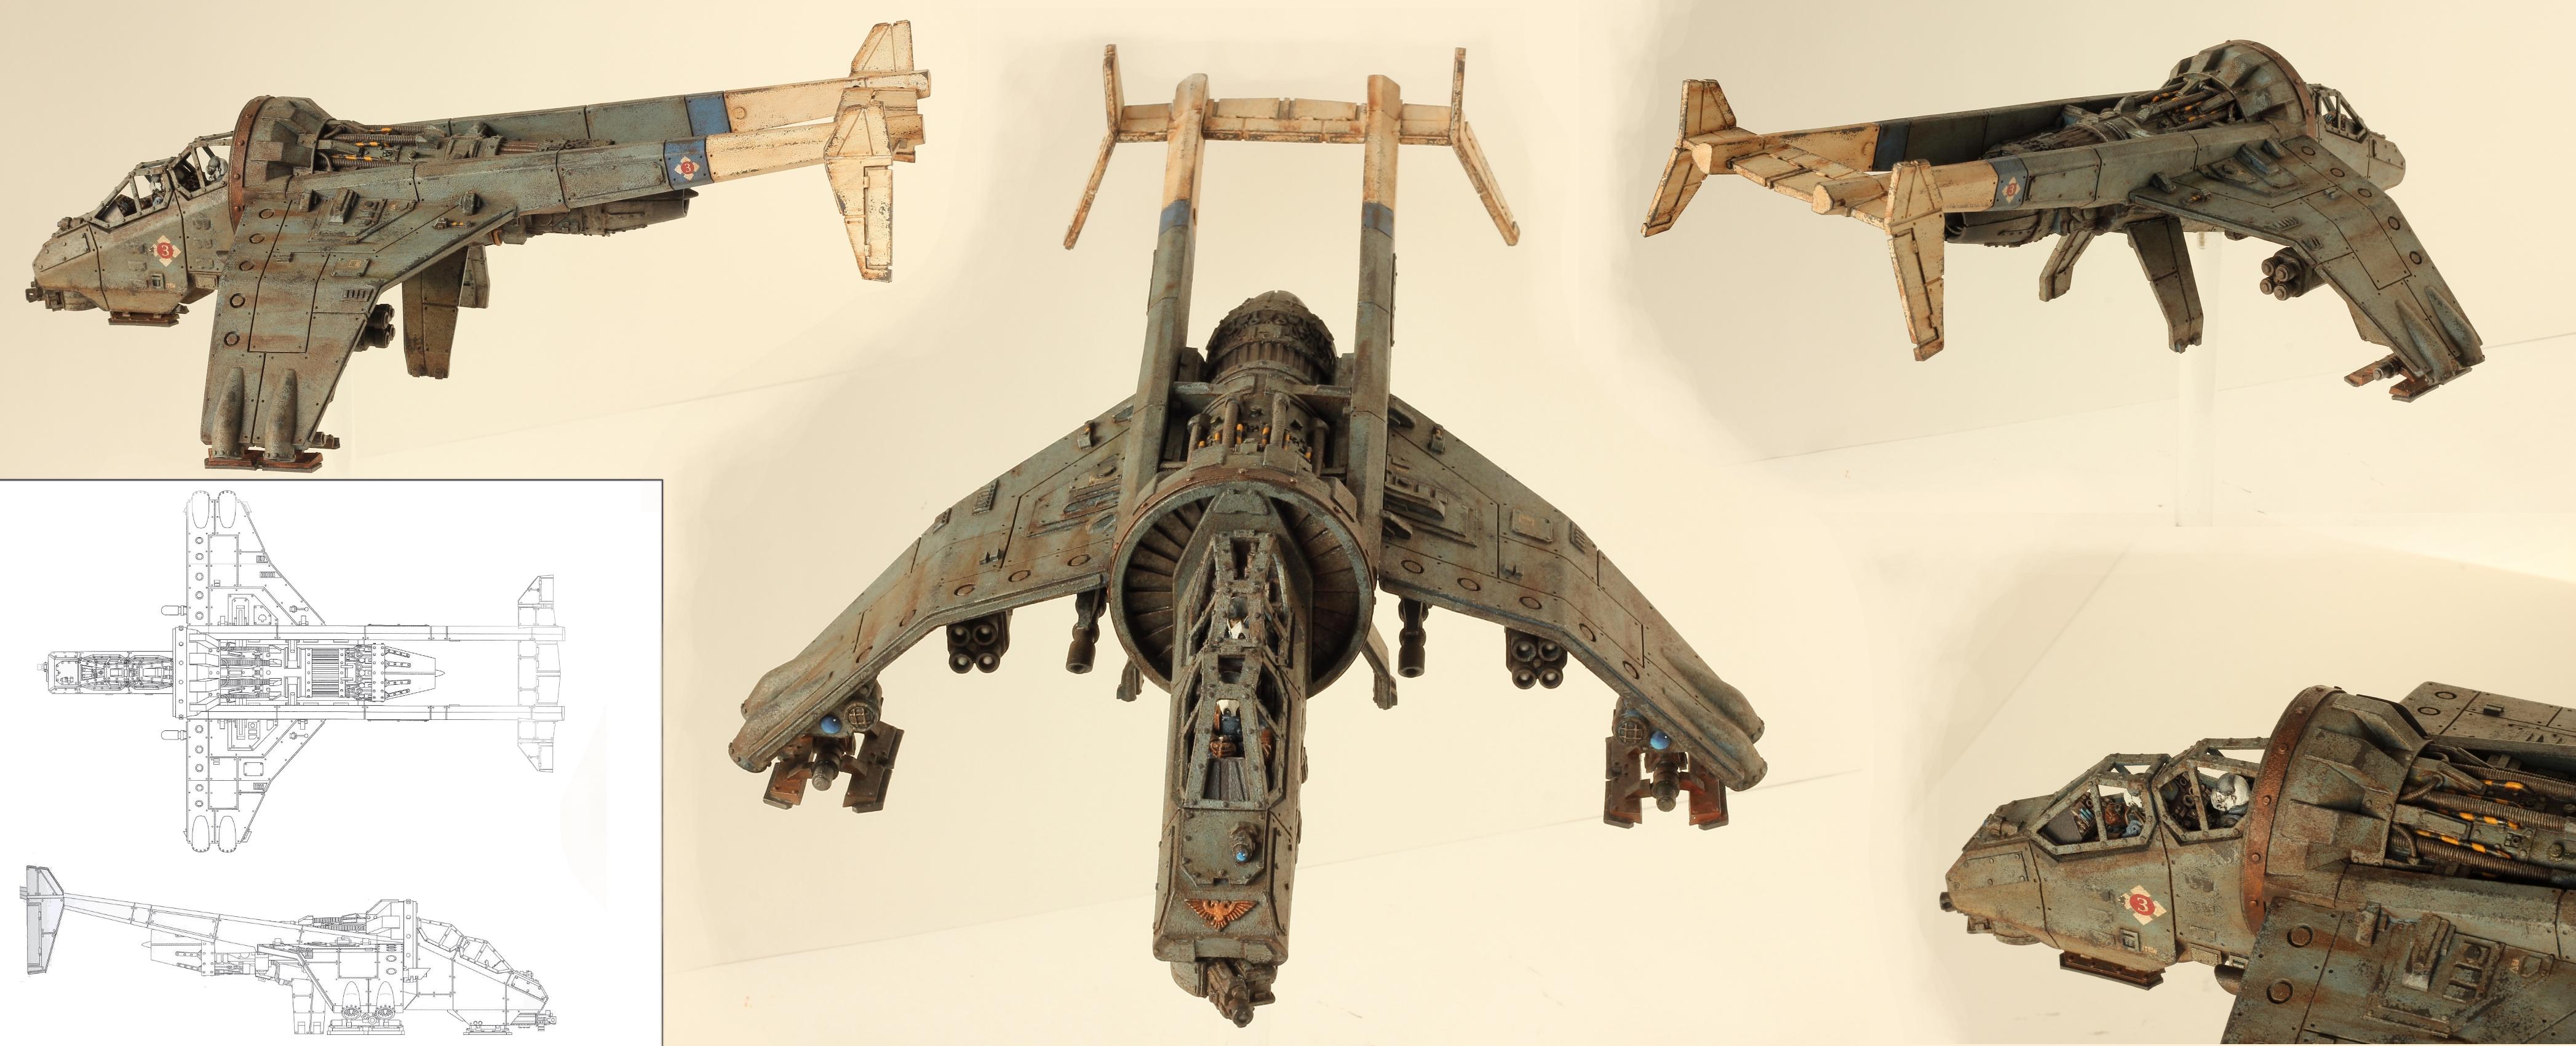
63000
Post by: Peregrine
OMG WTF Peregrine actually finished a model! Here's a preview of the old all-resin Vulture gunship. Better pictures will come soon when I have better light to take them.
35316
Post by: ansacs
That is fantastic. I am glad you finished a model. One of the best models you could finish too.
52425
Post by: Elnibbus
Bloody hell, that's awesome! Something to aspire to
33919
Post by: Moltar
That's an impressive Vulture. Really diggin' the worn and weathered look and the squad markings look great.
74210
Post by: Ustrello
Loving the terrain and the tanks/vehicles man good job
75552
Post by: MagosBiff90
BBBOOOOMMMMMMMM...... that weathering is what i am talking about! Very nicely done indeed! And a sweet looking Vulture! Love the streaks over the wings!
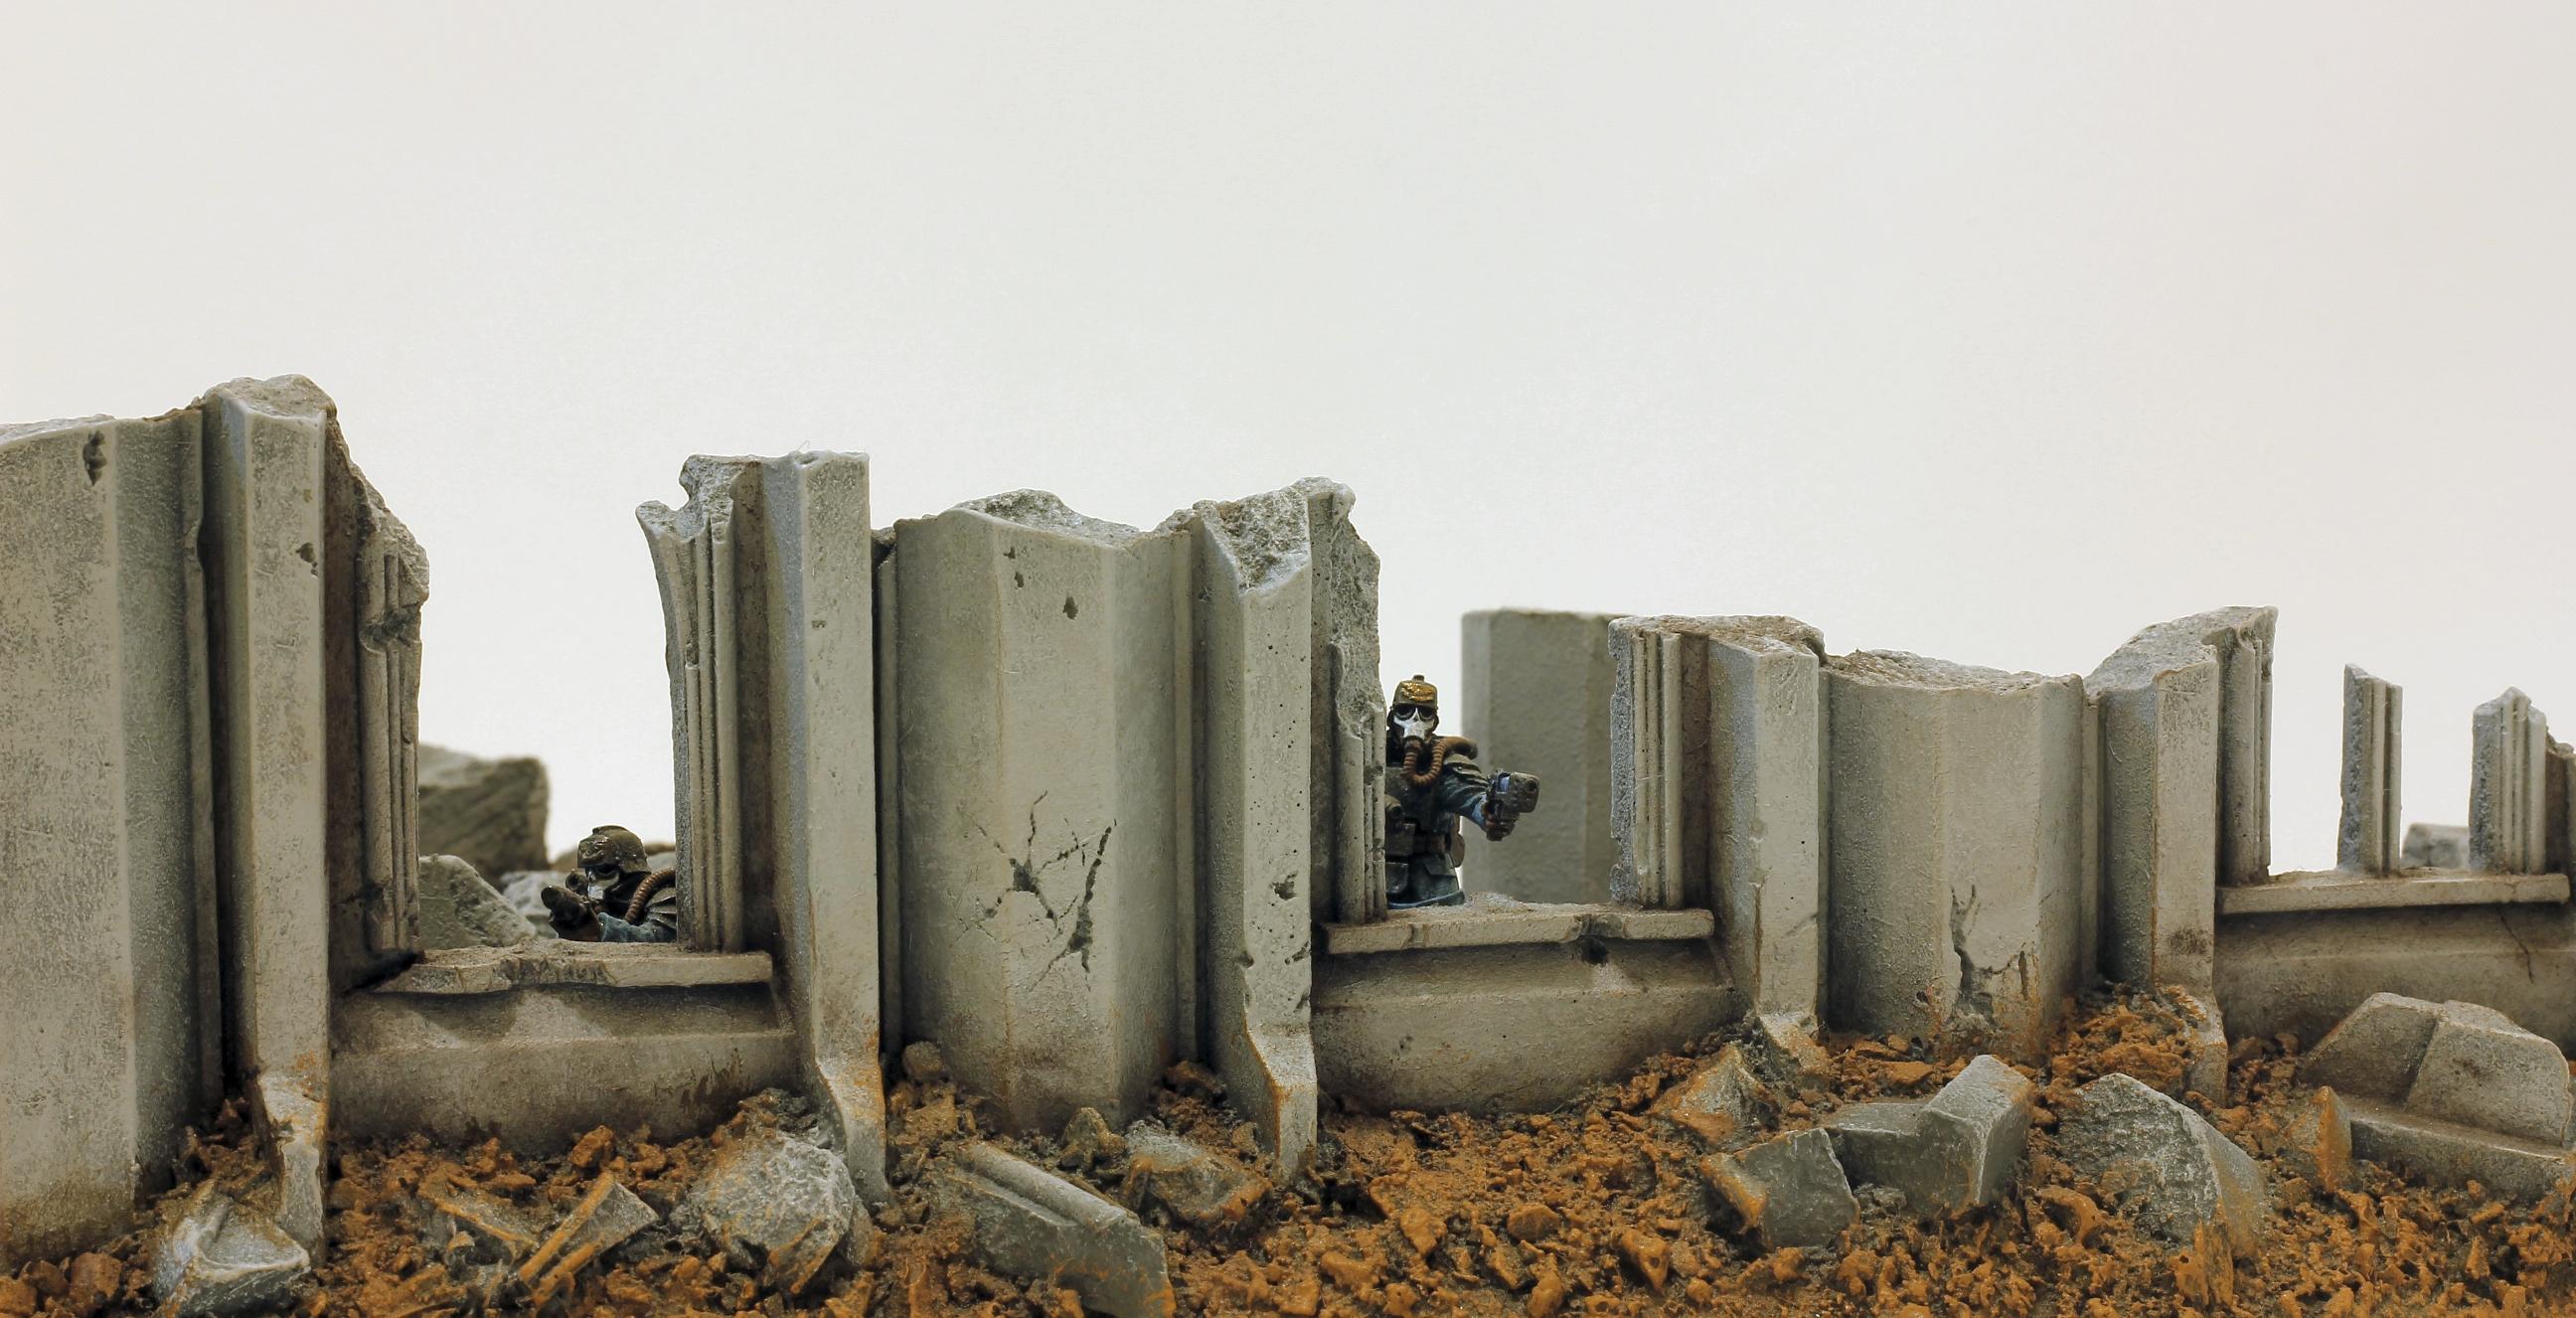
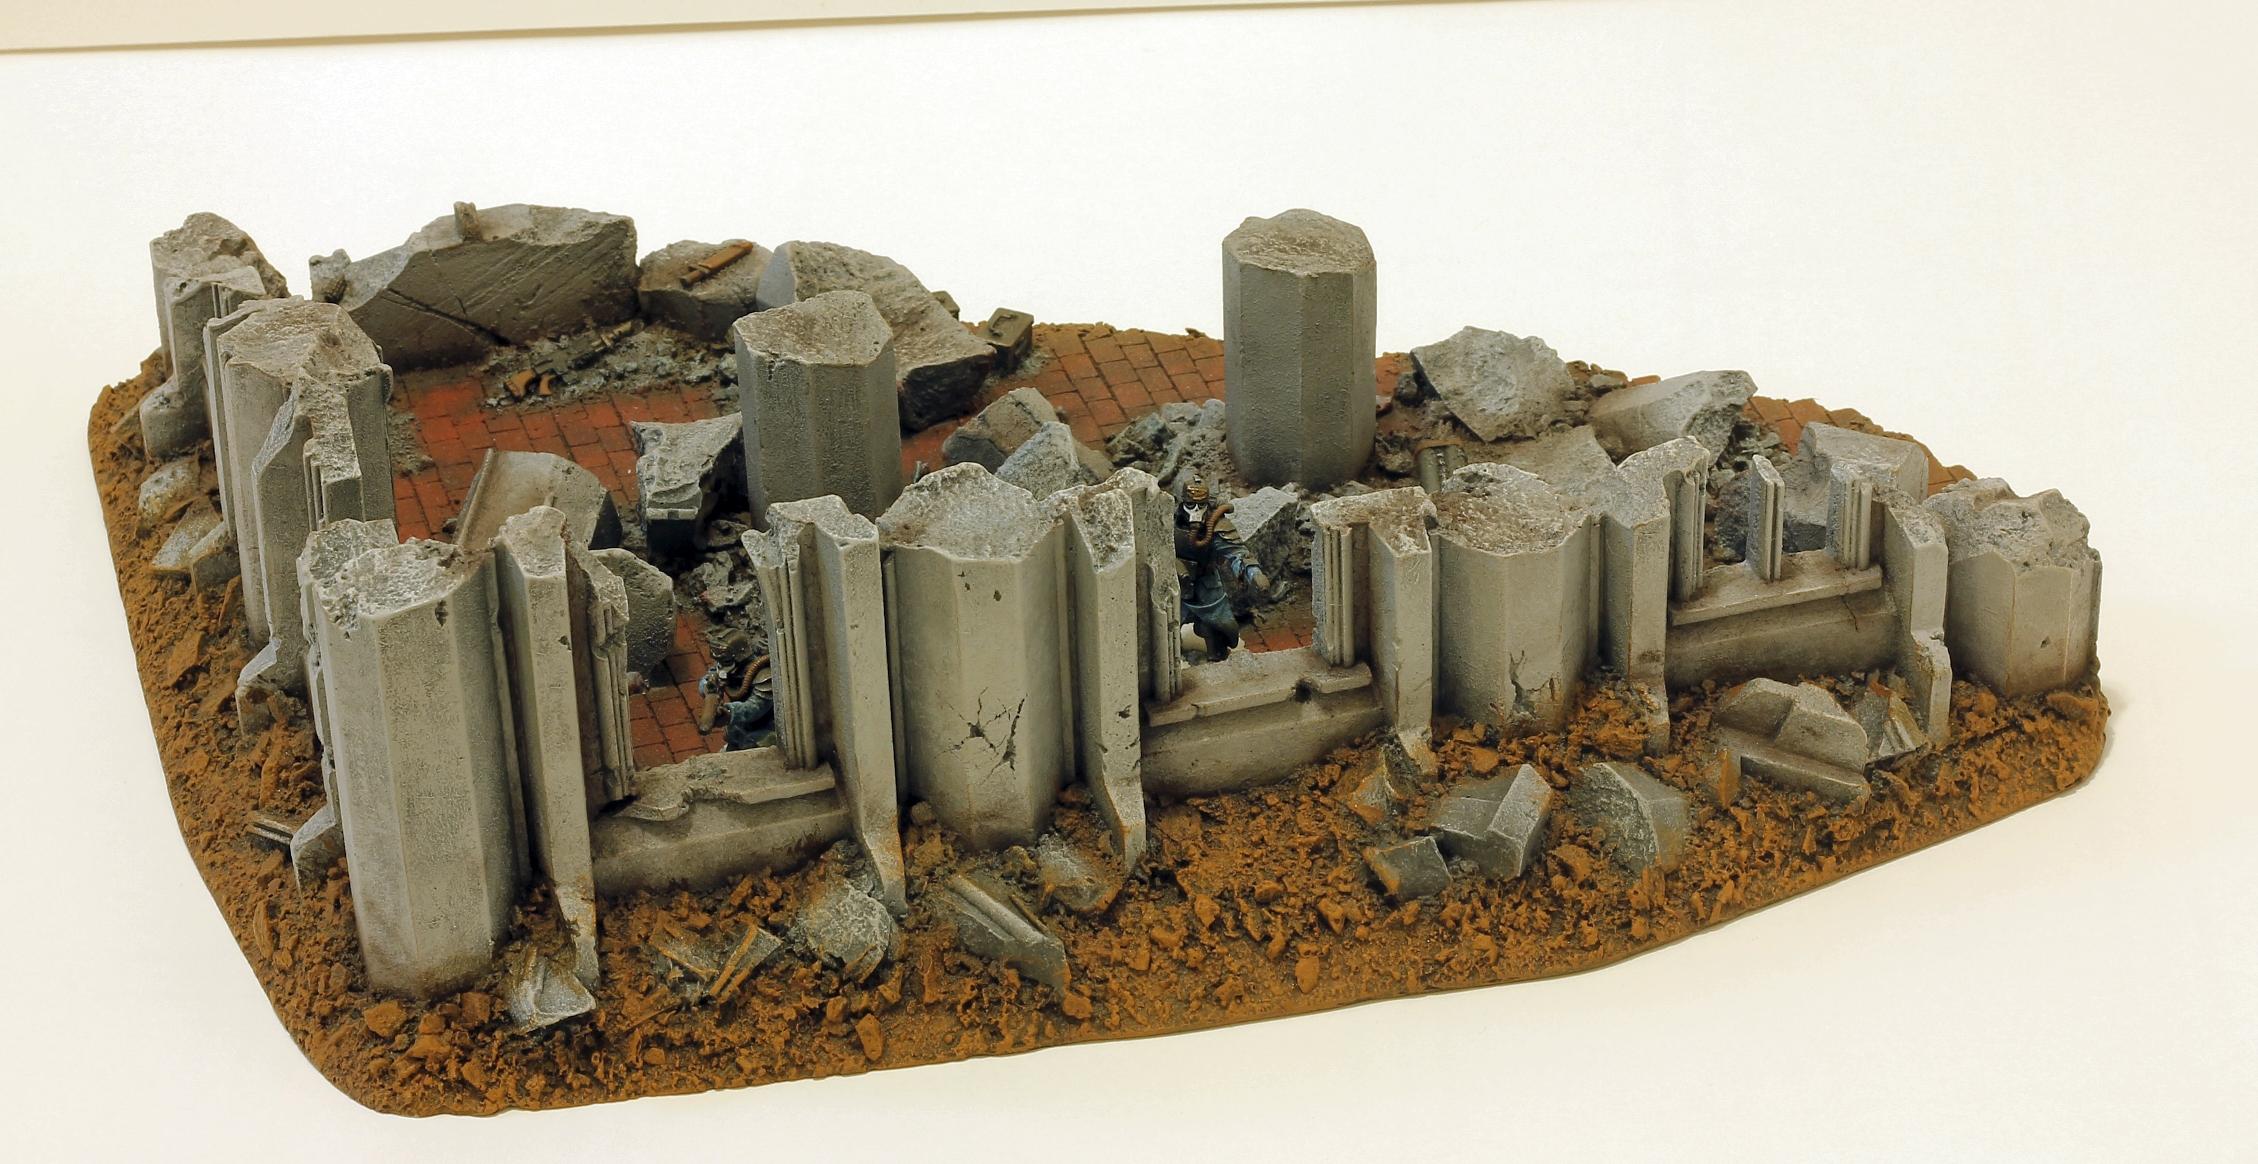
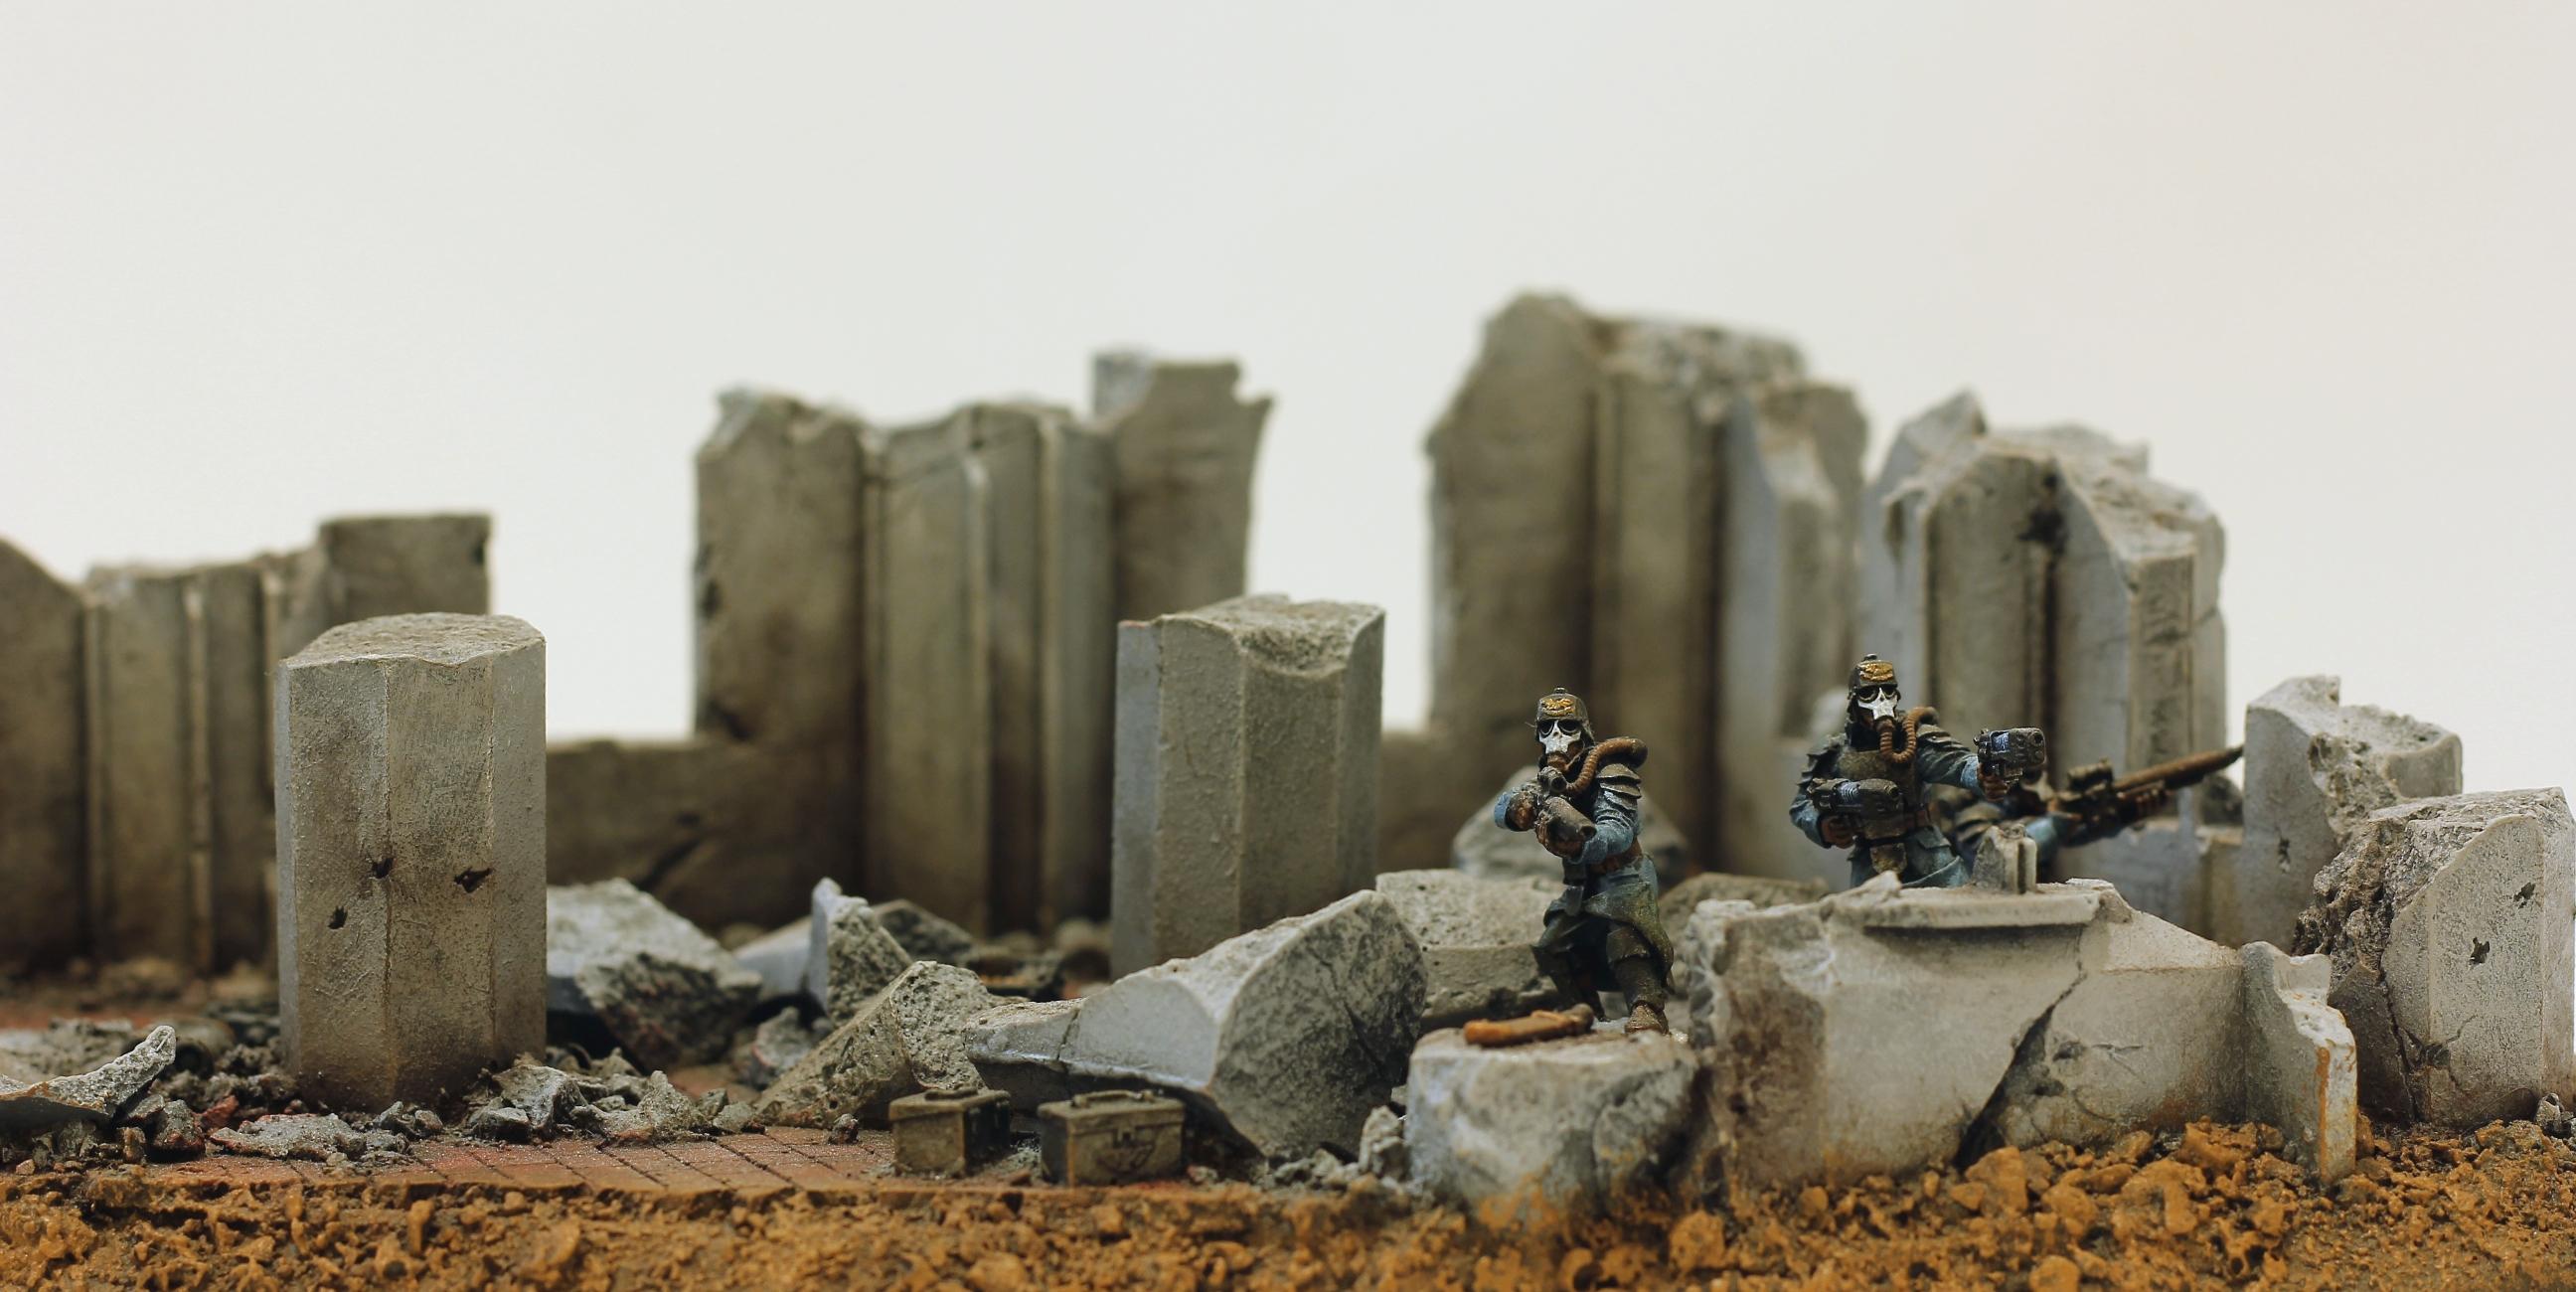
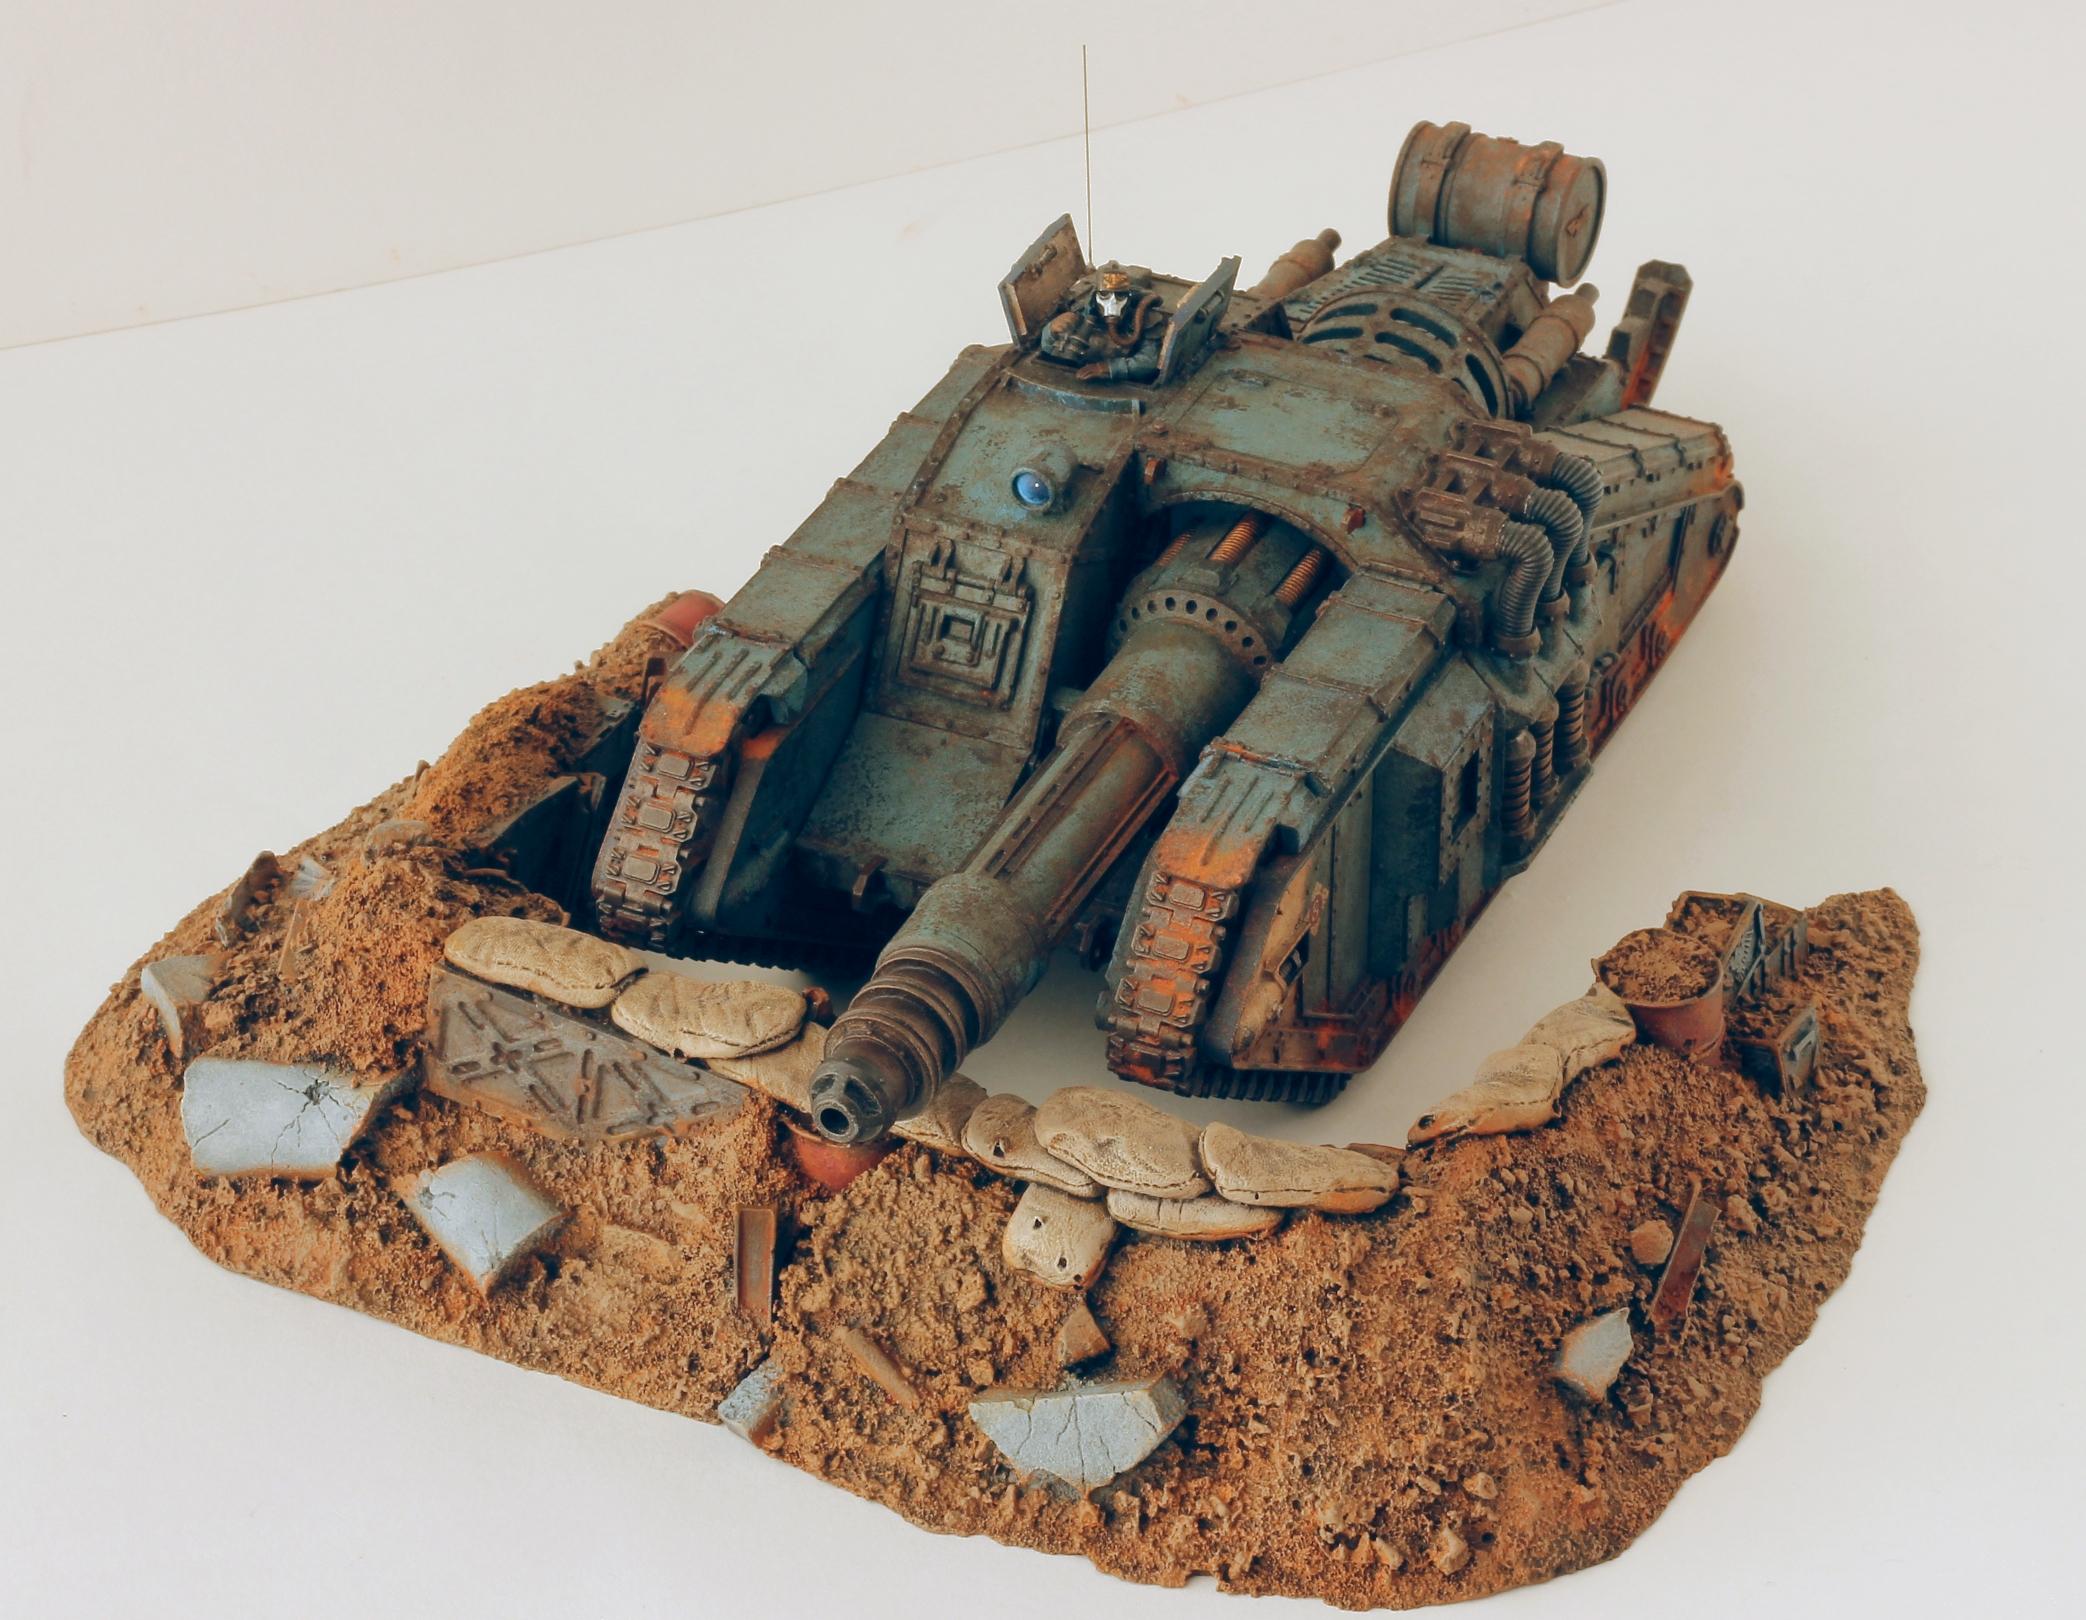
63000
Post by: Peregrine
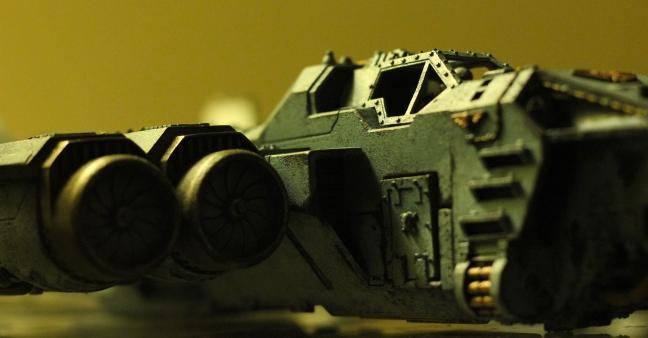
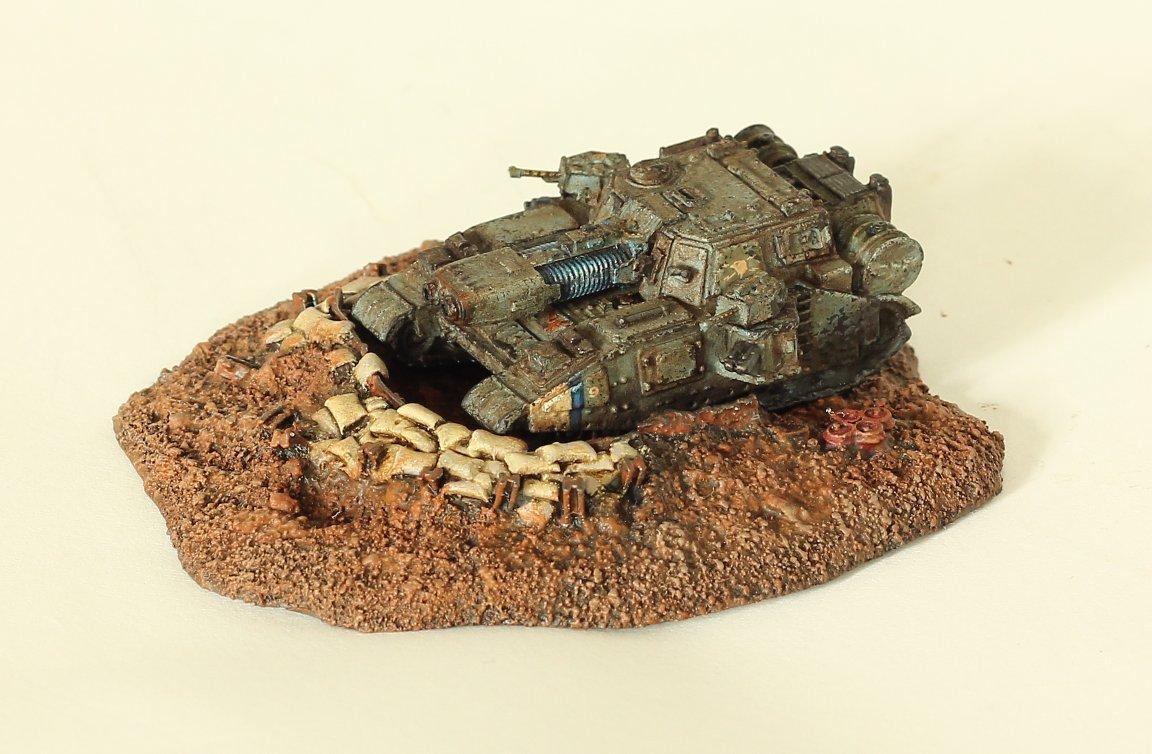
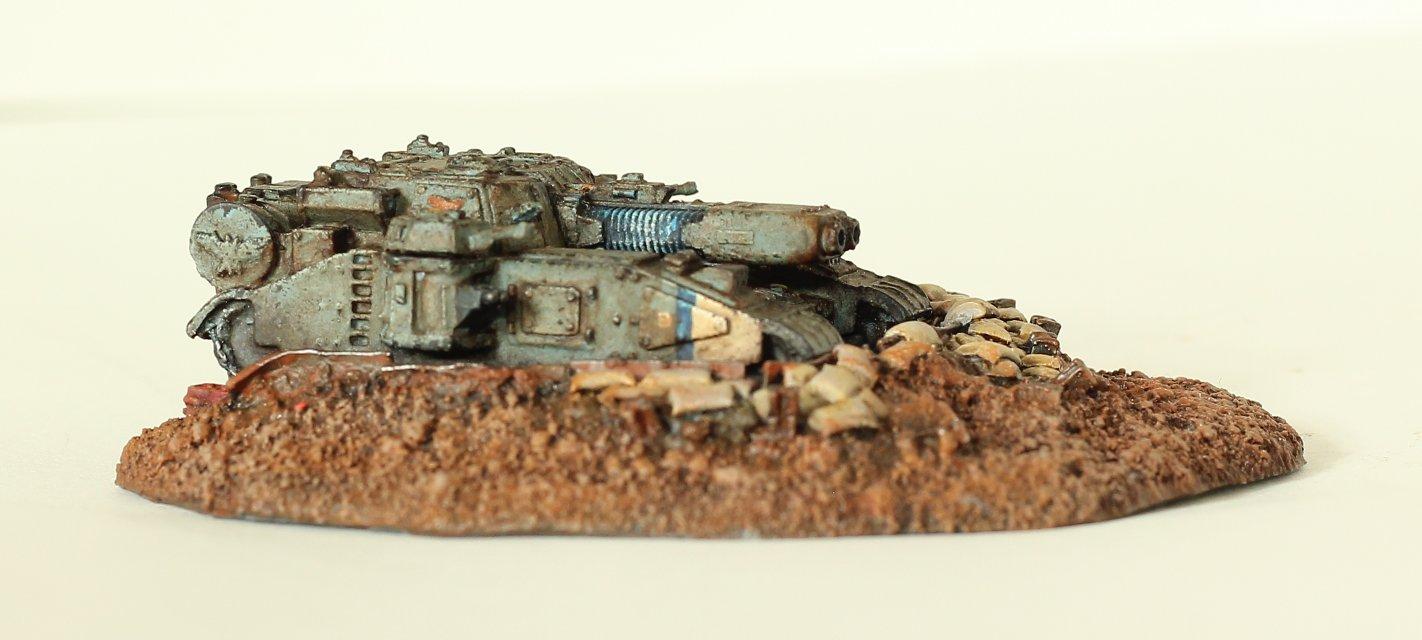
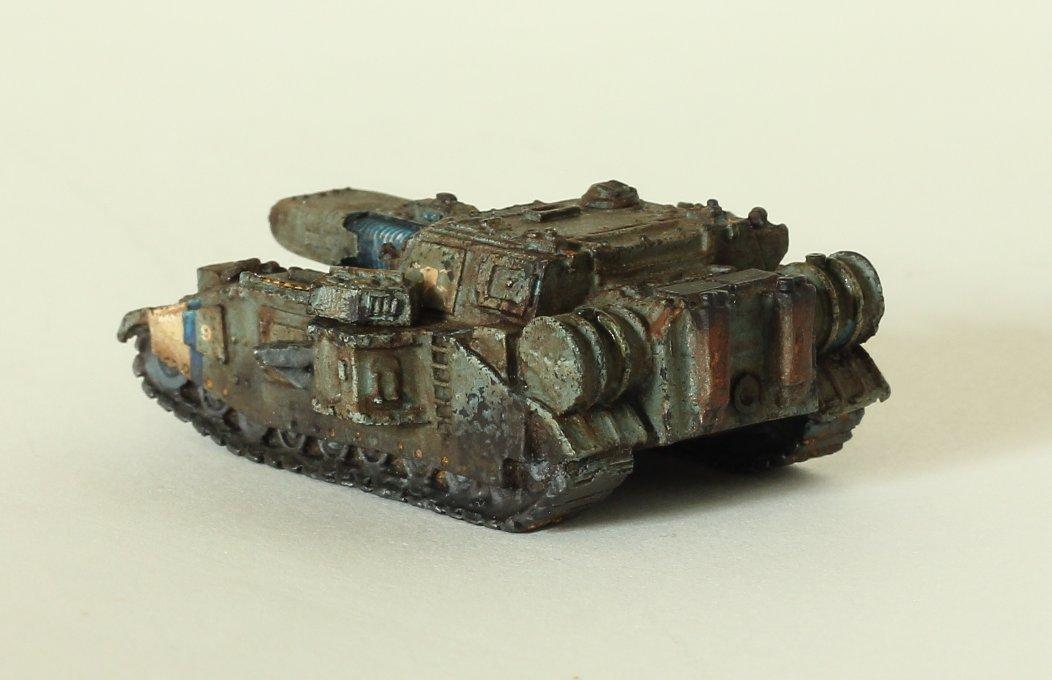
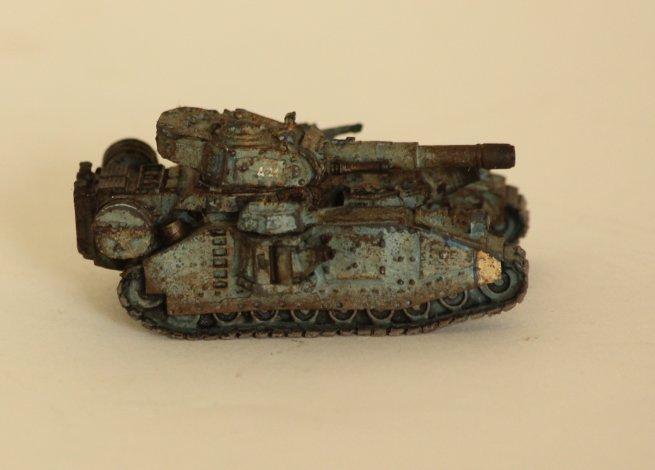
More terrain! This time the OOP FW tank emplacement (with a Valdor that can be found on previous pages).
51486
Post by: Frankenberry
Man, that is some impressive work.
75552
Post by: MagosBiff90
So green with envy at your skills I could be mistaken for a filthy ork!!
Top work! Inspirational stuff!
35316
Post by: ansacs
Peregrine I am always impressed by your work and how you managed to get all these oop forgeworld models. Did you buy them when forgeworld produced them or do you find them on ebay? Either way great work as usual and thank you for sharing.
63000
Post by: Peregrine
 ansacs wrote: ansacs wrote:Did you buy them when forgeworld produced them or do you find them on ebay?
Mostly ebay. I have a list of things I'm looking for, and make a habit of checking ebay at least once a day in case they show up. Patience pays off eventually, I finally got one of my holy grail models (the OOP Shadowsword with the interior detail parts) after years of searching because I saw the model almost as soon as it went up and a tiny bit of the driver's chair was visible through an open hatch in one of the pictures. And it probably helps a bit that I've given up on GW's current stuff, leaving most of my gaming budget free to grab the OOP stuff when it shows up.
The sad thing is that I can't say "all from ebay" anymore, as FW keeps getting rid of older kits in favor of more 30k space marines.
35316
Post by: ansacs
Peregrine wrote:Mostly ebay. I have a list of things I'm looking for, and make a habit of checking ebay at least once a day in case they show up. Patience pays off eventually, I finally got one of my holy grail models (the OOP Shadowsword with the interior detail parts) after years of searching because I saw the model almost as soon as it went up and a tiny bit of the driver's chair was visible through an open hatch in one of the pictures. And it probably helps a bit that I've given up on GW's current stuff, leaving most of my gaming budget free to grab the OOP stuff when it shows up.
The sad thing is that I can't say "all from ebay" anymore, as FW keeps getting rid of older kits in favor of more 30k space marines.
Very nice catch. I have gotten a fair chunk of my collection from ebay as well.
With all your terrain kits I would love to see a full board set up by you. It must look amazing.
BTW Did you paint up some centaur transports? If you feel like sharing I would like to see your take on it.
93291
Post by: Dr.Muchachos
Great stuff, I've never been a fan of painting tanks, I do mostly monster stuff, but your full army shot really makes me want to give tanks another shot. There's some feeling I get when I see rows of massive well painted guns...well other than the "my mutants aren't ever going to make it to his lines" feeling. Really cool stuff.
10842
Post by: djphranq
Great work! I'll have to check out this thread in more detail.
63000
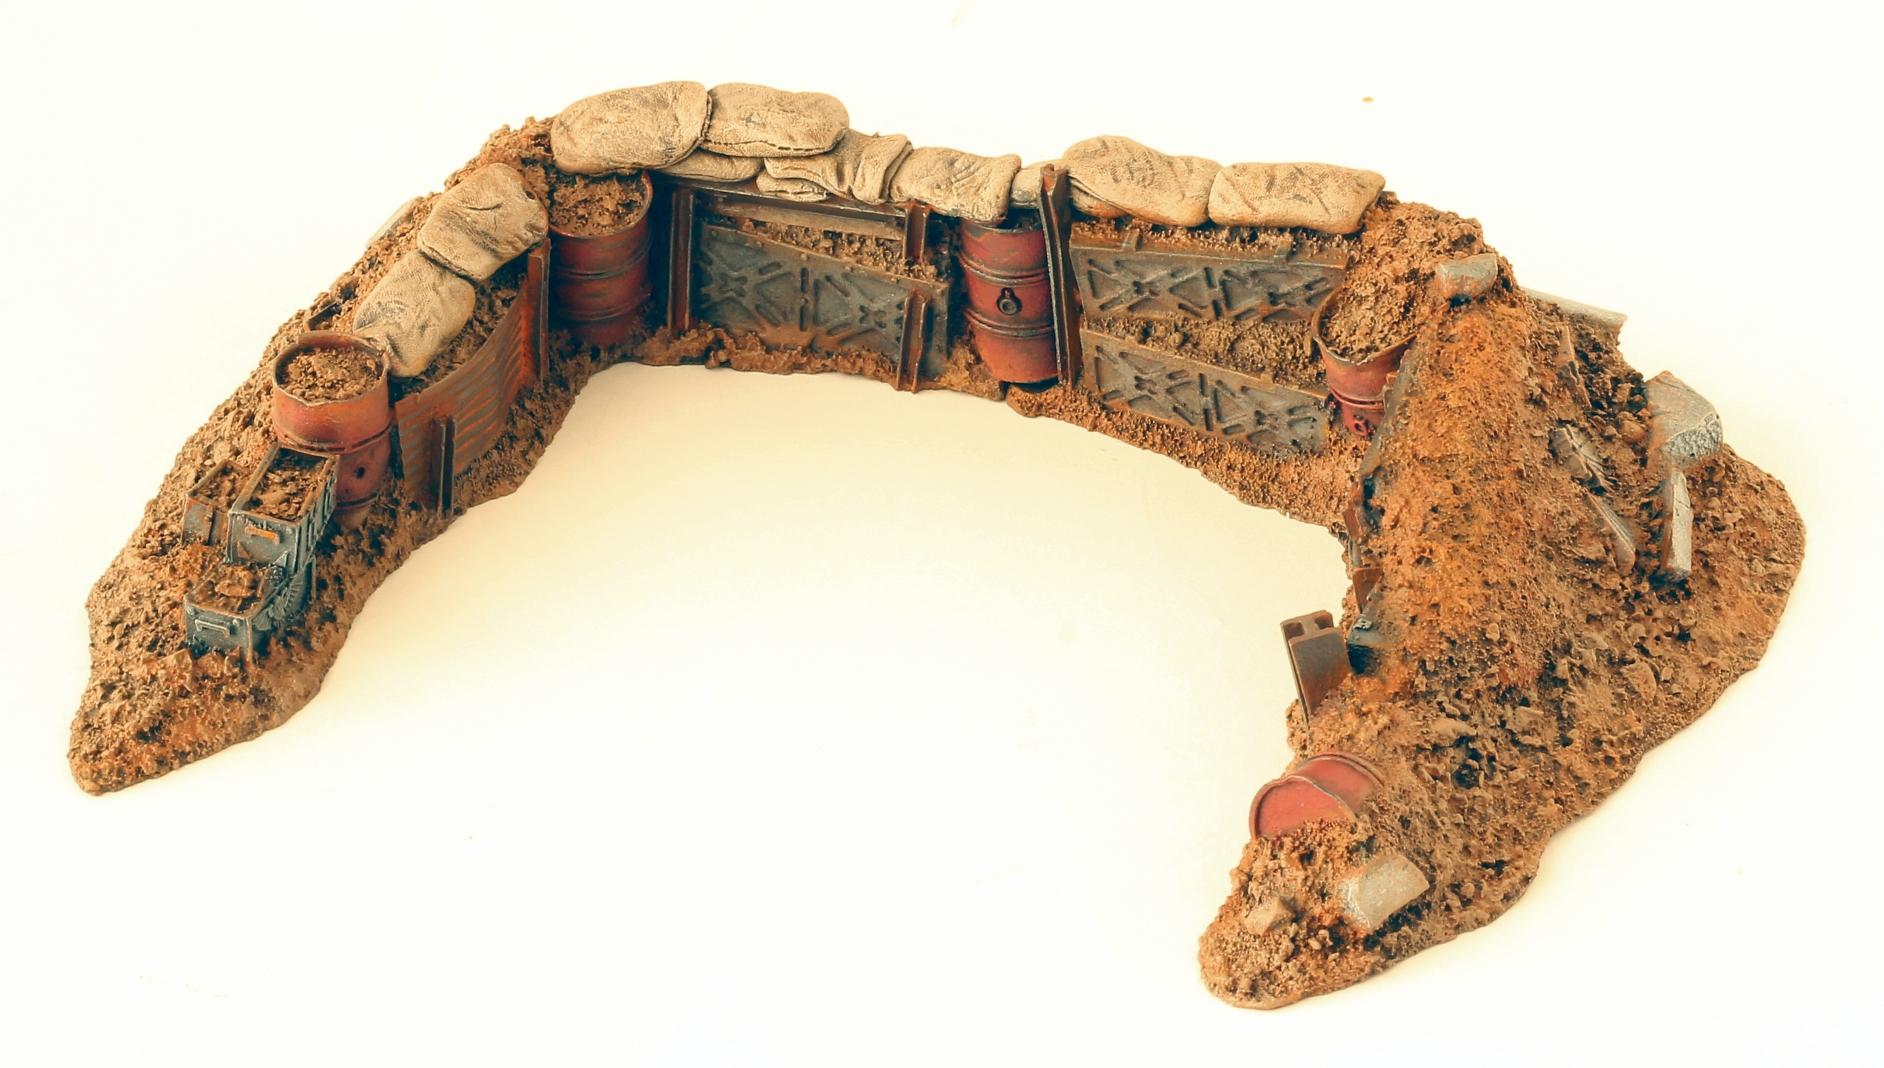
Post by: Peregrine
What? Only five months between updates this time? I'm amazed at how productive I've been! Anyway, here's an OOP FW autocannon pillbox to add to the collection of OOP terrain. Too bad GW can't make stuff like this anymore, instead of the ridiculous Citadel™ Wall™ Of™ FineSkulls™ Bastion™.
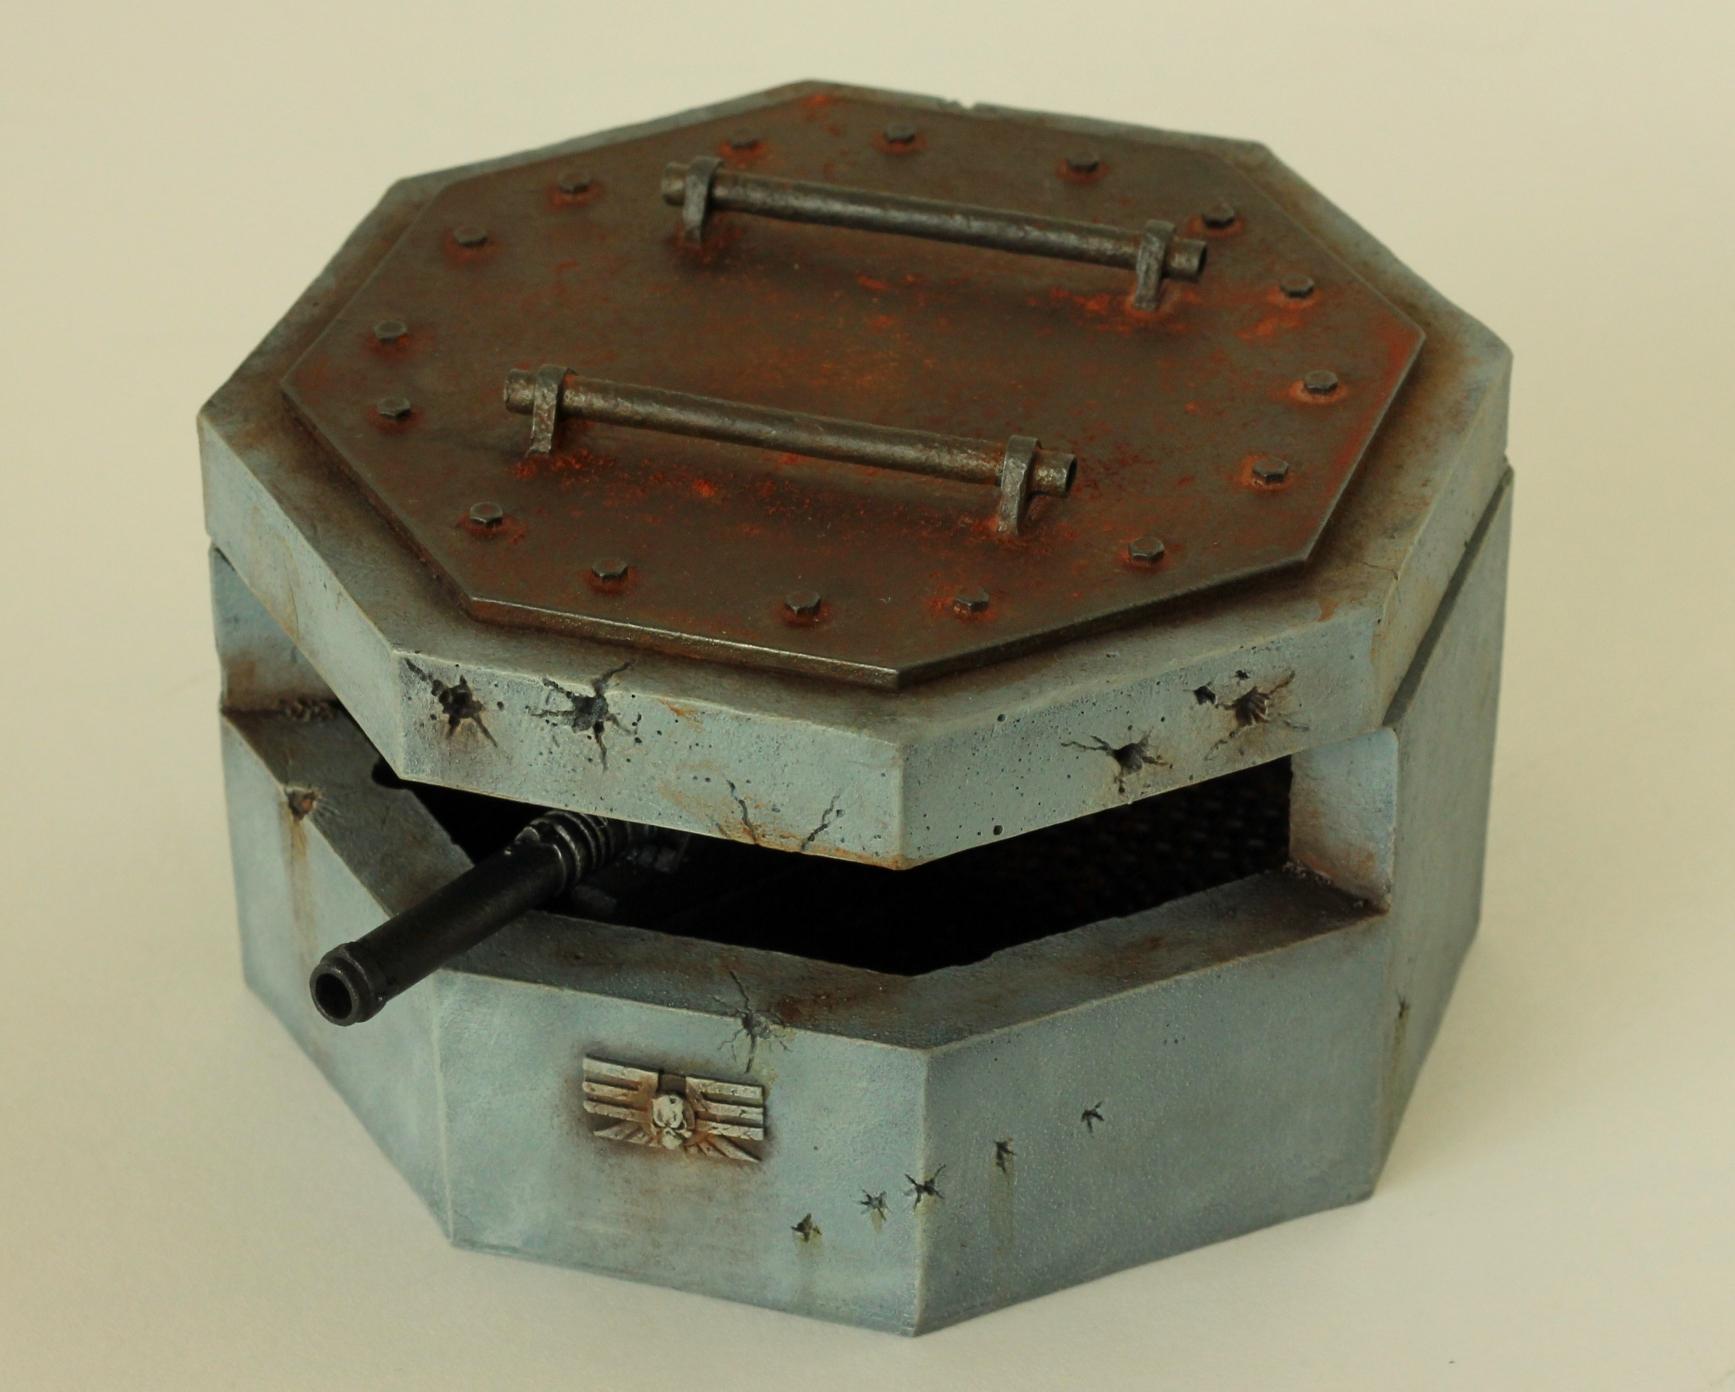
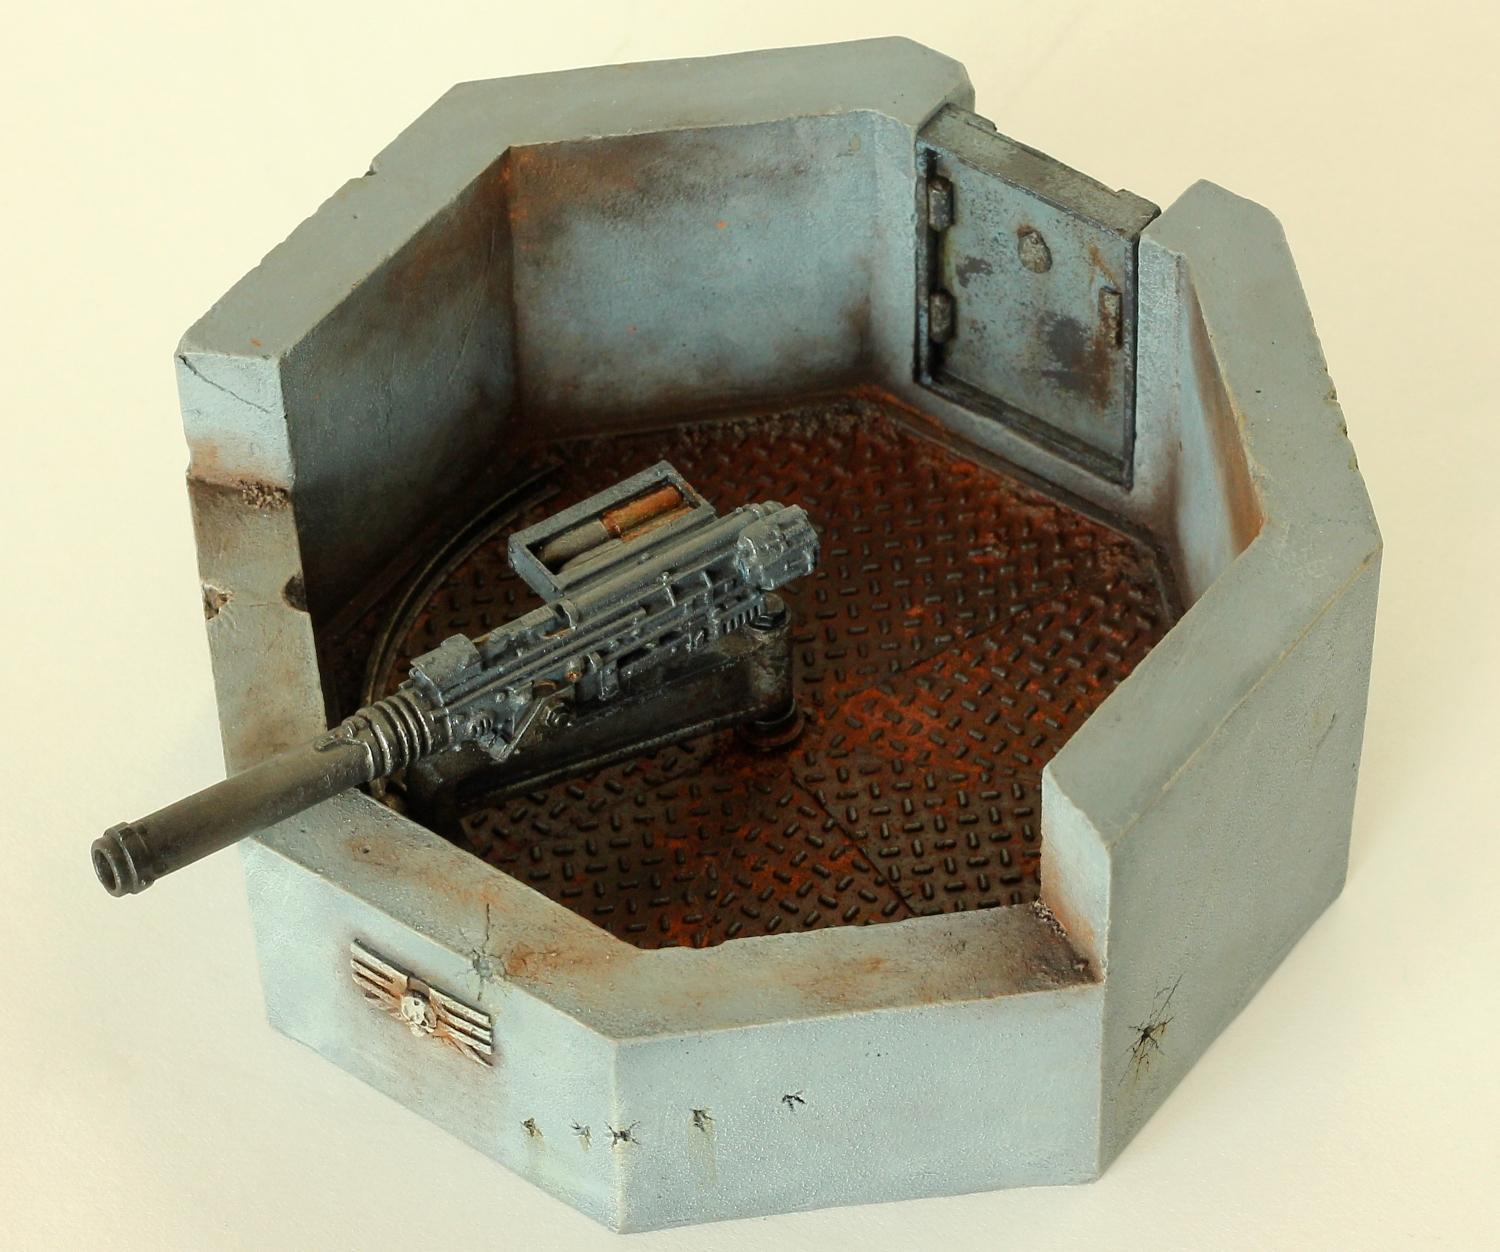
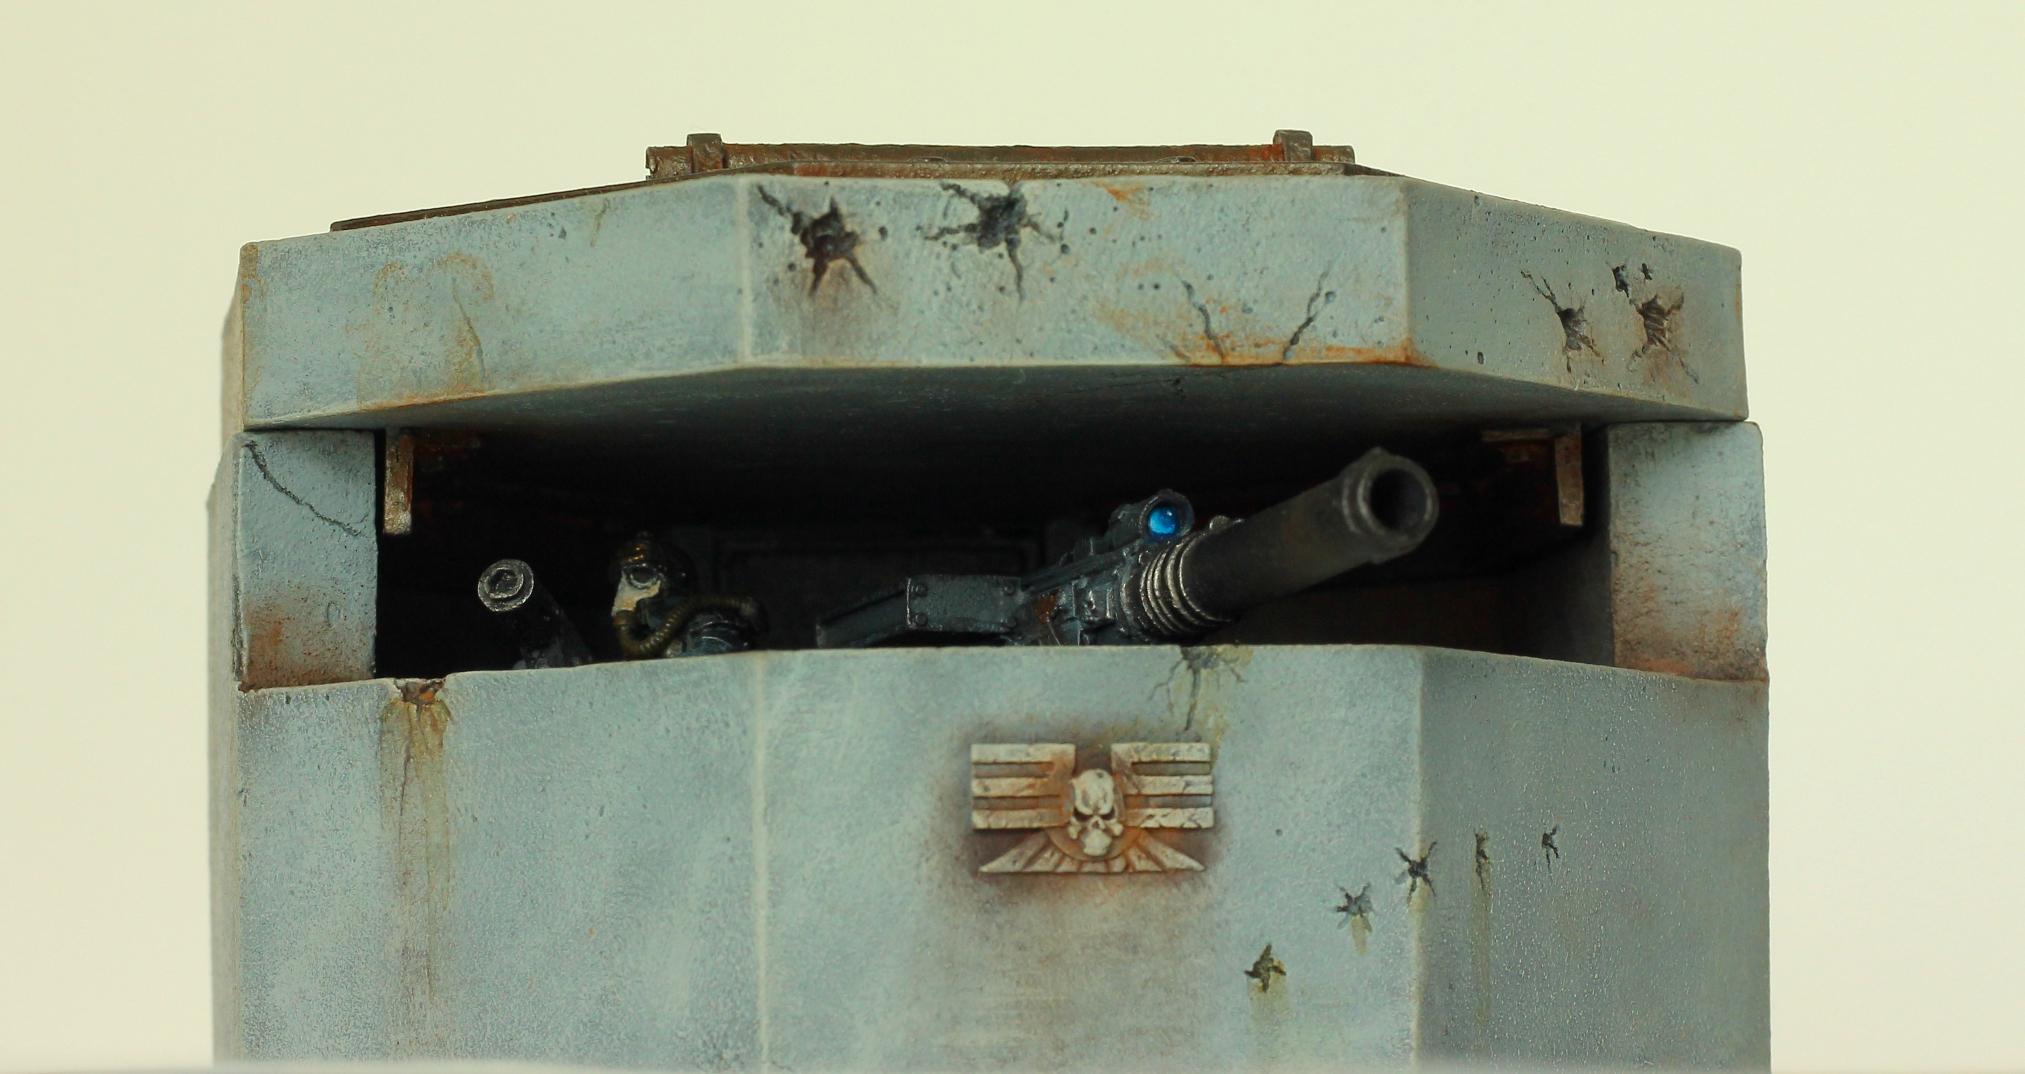
75552
Post by: MagosBiff90
Welcome back into the fold mate!
Love the pillbox...... the details / stains / damage and rust are really impressive!
really like the ammo loader on that canon also....
I have to agree with you that these more austere & IMHO "better" looking fortifications blow the newer pieces out of the water!
The other thing they NEED to bring back is the OOP FW trench pieces..... they were glorious!
Really good looking work mate! DO we have to wait another 5 months for more? I hope not!
63000
Post by: Peregrine
 MagosBiff90 wrote: MagosBiff90 wrote:The other thing they NEED to bring back is the OOP FW trench pieces..... they were glorious!
You'll probably hate me for saying that I have a box full of at least one of every trench piece (a lucky ebay find), waiting to be copied some day when I finally have space to build a full trench table.
There's an unexpected surprise in the weathering stage right now, so hopefully the next update should come within a week.
75552
Post by: MagosBiff90
OOOOoooo you lucky buggar! That was a truly lucky find! I have scoured e-bay for those and only once did I manage to get my hands on one of the trench end gun emplacements!
Don't suppose I could be a real pain and ask if you could get some pic's of the individual parts could I!? Really wanted to have a go at creating something based off of those!
Looking forward to the big reveal in the pipeline!
91488
Post by: Panda21fr
WoooW !
Always inspiring to see such a great work.
Congratulations for the models & the pictures as well.
35316
Post by: ansacs
Peregrine I love your army, terrain, and paint job...I also burn with jealousy. 
61618
Post by: Desubot
Whata cool piece.
cant wait to see that trench table. hopefully within one or two of my life times 
76303
Post by: Warboss_Waaazag
Nice OOP bunker. Looks good. I especially like the rusty weathering on the top.
5946
Post by: Miguelsan
I've been saying this for a long time. Terrain wise I want two things from GW (or Forgeworld) non Imperial terrain and WW1/WW2 fortifications. As Peregrine nice piece shows they can do them, they used to do them so why it's always skulls?
M.
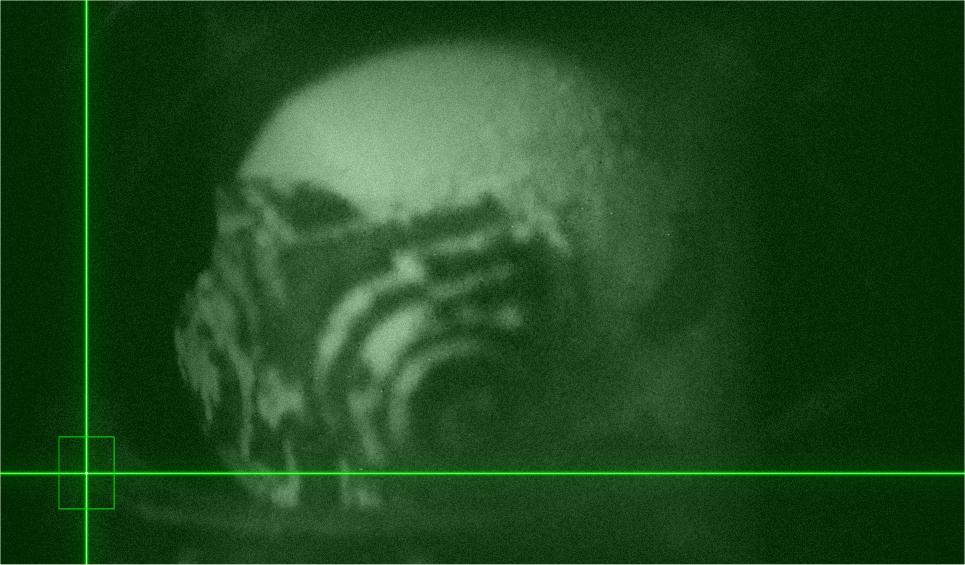
63000
Post by: Peregrine
Anomalous radiation levels detected.
...
.....
Uh, sir, you might want to have a look at this.
...
OH GOD THEY'RE HERE! THEY'RE IN TH-
{screaming}
<< Transmission ends. Final optical datafile attached. >>
<< Praise the Emperor, and may He have mercy on our souls.>>
34514
Post by: 40kFSU
That's actually a fairly disturbing pic. Kudos sir.
63000
Post by: Peregrine
When a hero of the Imperial Guard is mortally wounded they may be granted the honor of a dreadnought, so that they may continue to slaughter the enemy. Mere space marines can only dream of one day being worthy of seeing such a noble and powerful warrior.
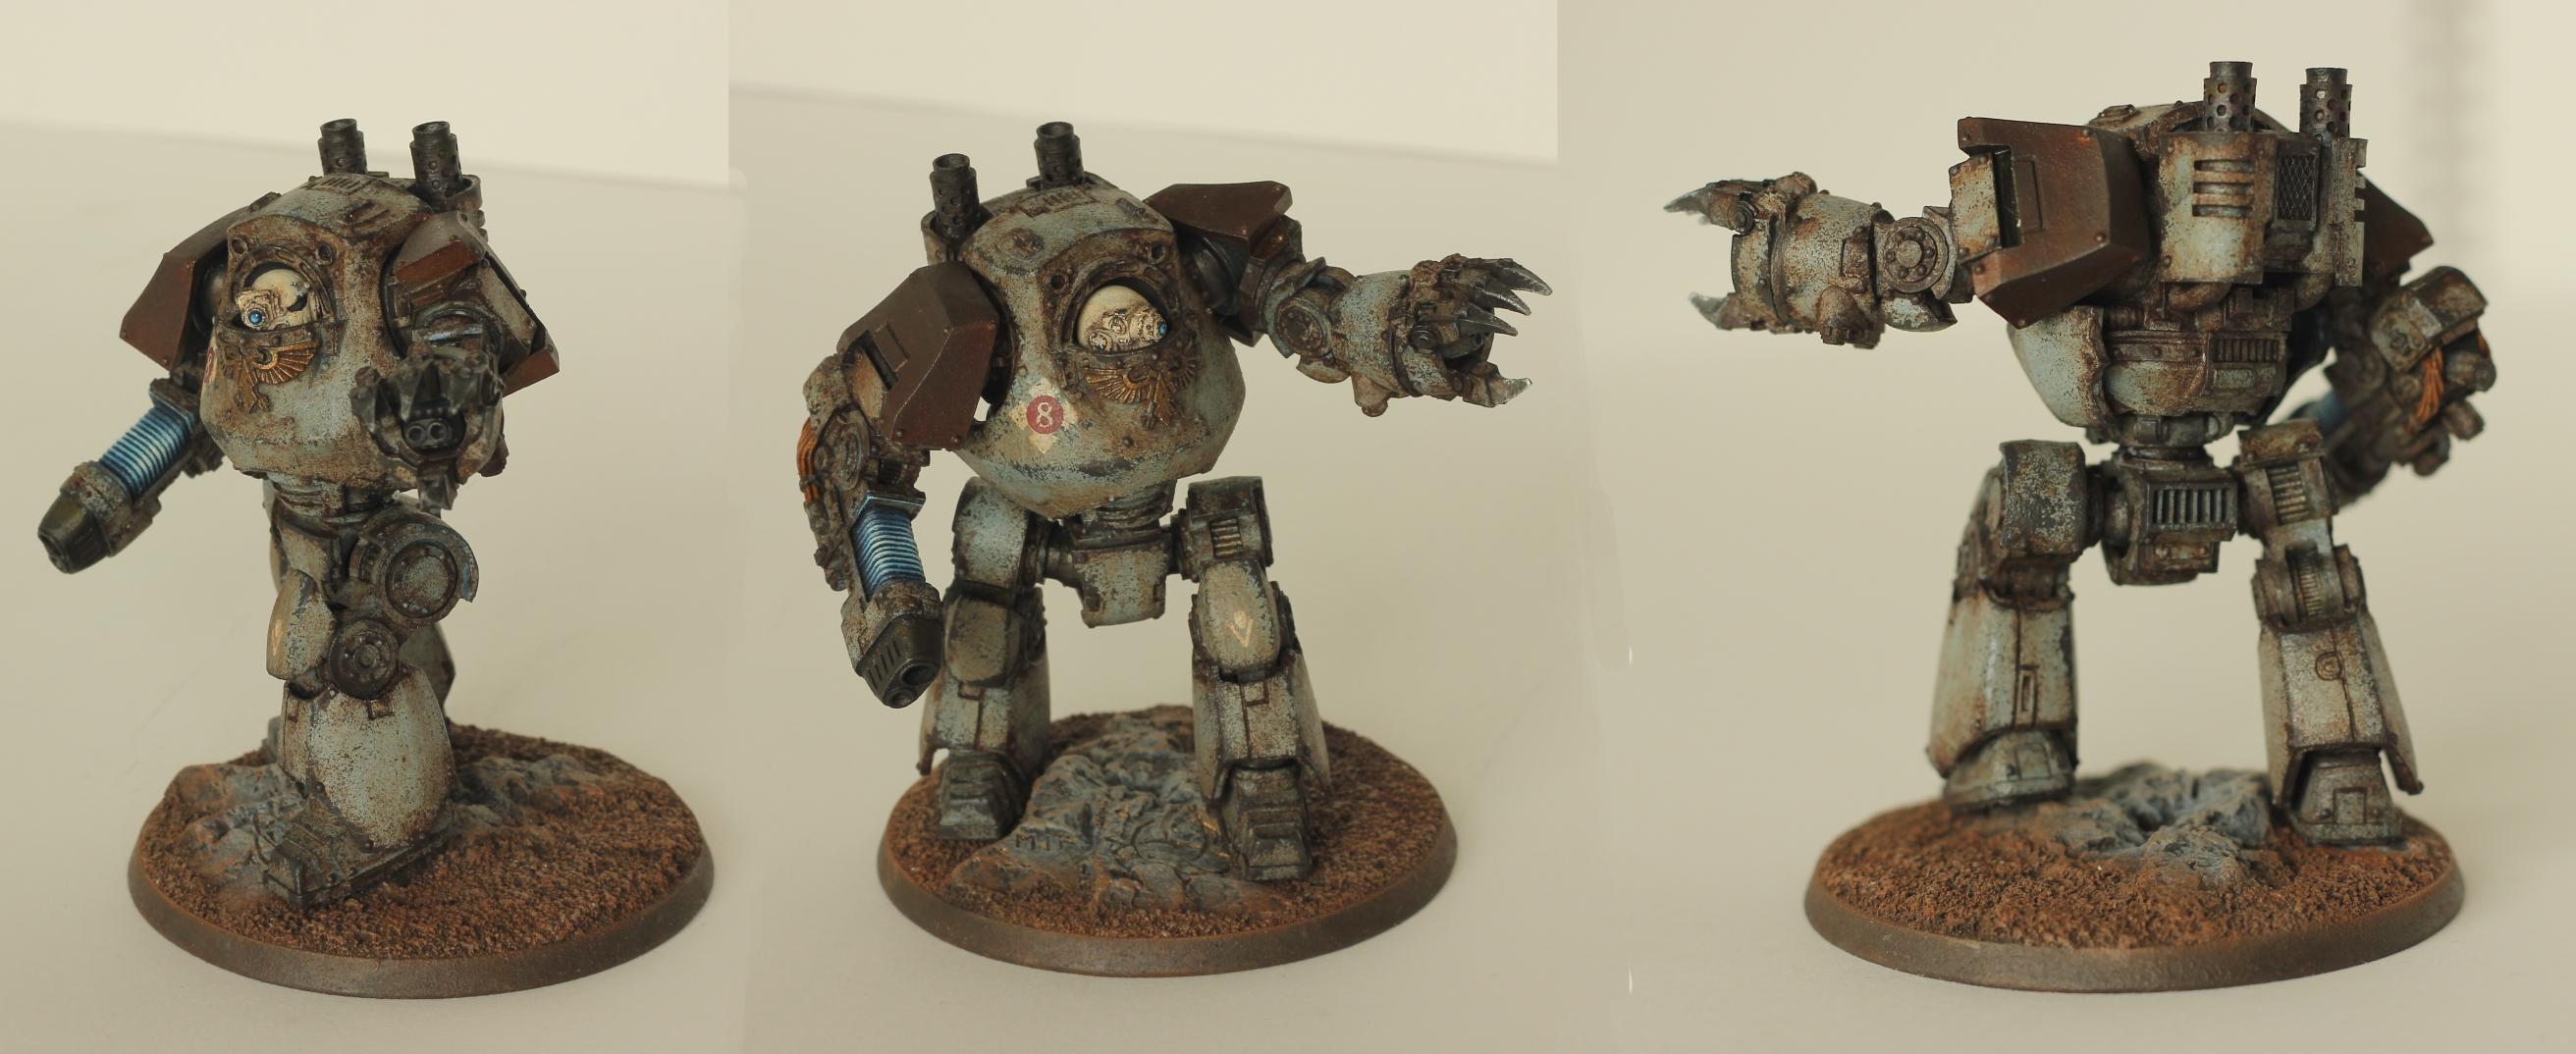
123
Post by: Alpharius
Peregrine wrote:When a hero of the Imperial Guard is mortally wounded they may be granted the honor of a dreadnought, so that they may continue to slaughter the enemy. Mere space marines can only dream of one day being worthy of seeing such a noble and powerful warrior.
What fever dream spawned this?!?
Nice look Contemptor!
35316
Post by: ansacs
Okay Peregrine, I love that. An astartes dreadnought only wishes they could be that bad ass.
Just to be clear; astartes are cupcakes next to the IG.
63000
Post by: Peregrine
After almost six straight hours of painting, this is my painting desk:

That's right, the Marauder Destroyer is finally a WIP and the incredibly tedious base coat is (mostly) done. It only took 4.5 years of staring lovingly at the kit in its box and thinking "oh god it's too big" or "I can't paint well enough to justify it". But now the hardest part is done, and soon I will have my favorite model on the table.
35316
Post by: ansacs
Congrats on the progress. I love that model, good job getting yourself motivated to tackle it.
91816
Post by: Januine
Seriously fantastic weathering on the Dread......beautiful
11484
Post by: Jormi_Boced
Really nice weathering.
89708
Post by: TheManWithNoPlan
I absolutely adore your tanks, and the fliers are seriously badass too.
But I'd really like to see some more of your infantry, personally.
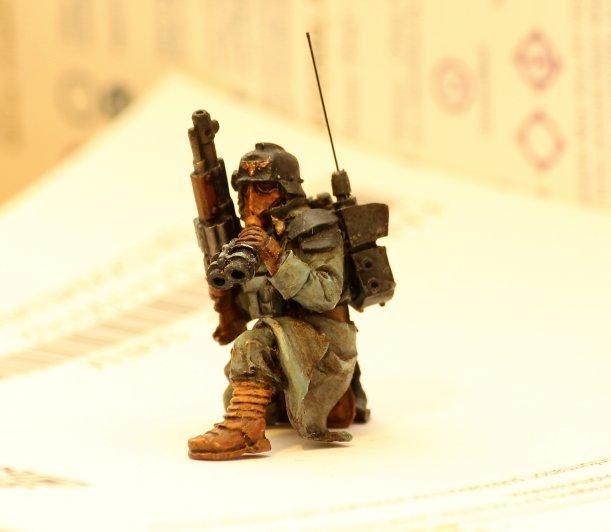
63000
Post by: Peregrine
The infantry are actually pretty boring, and nowhere near the level of my tanks. But I'll see if I can find few of the better ones that might be worth photographing.
60939
Post by: Enigwolf
Good to see you still going strong at this, Peregrine!
75552
Post by: MagosBiff90
Really love that dreadnaught..... the weathering is epic as always! Really love the "spongework"?
For me... and this is a really wee thing... I would love to see some real damage.... some bolter shell holes and maybe some las blasts or something.....
Still... top work!
76685
Post by: Singleton Mosby
Amazing weathering on the Dread and Salamander.
May I ask which colors you use to paint your DKoK soldiers? (I use the exact same color for their coats but think we came there in a different way)
63000
Post by: Peregrine
Hand-mixed from blue/black/white art store acrylics. So, not very helpful information.
60939
Post by: Enigwolf
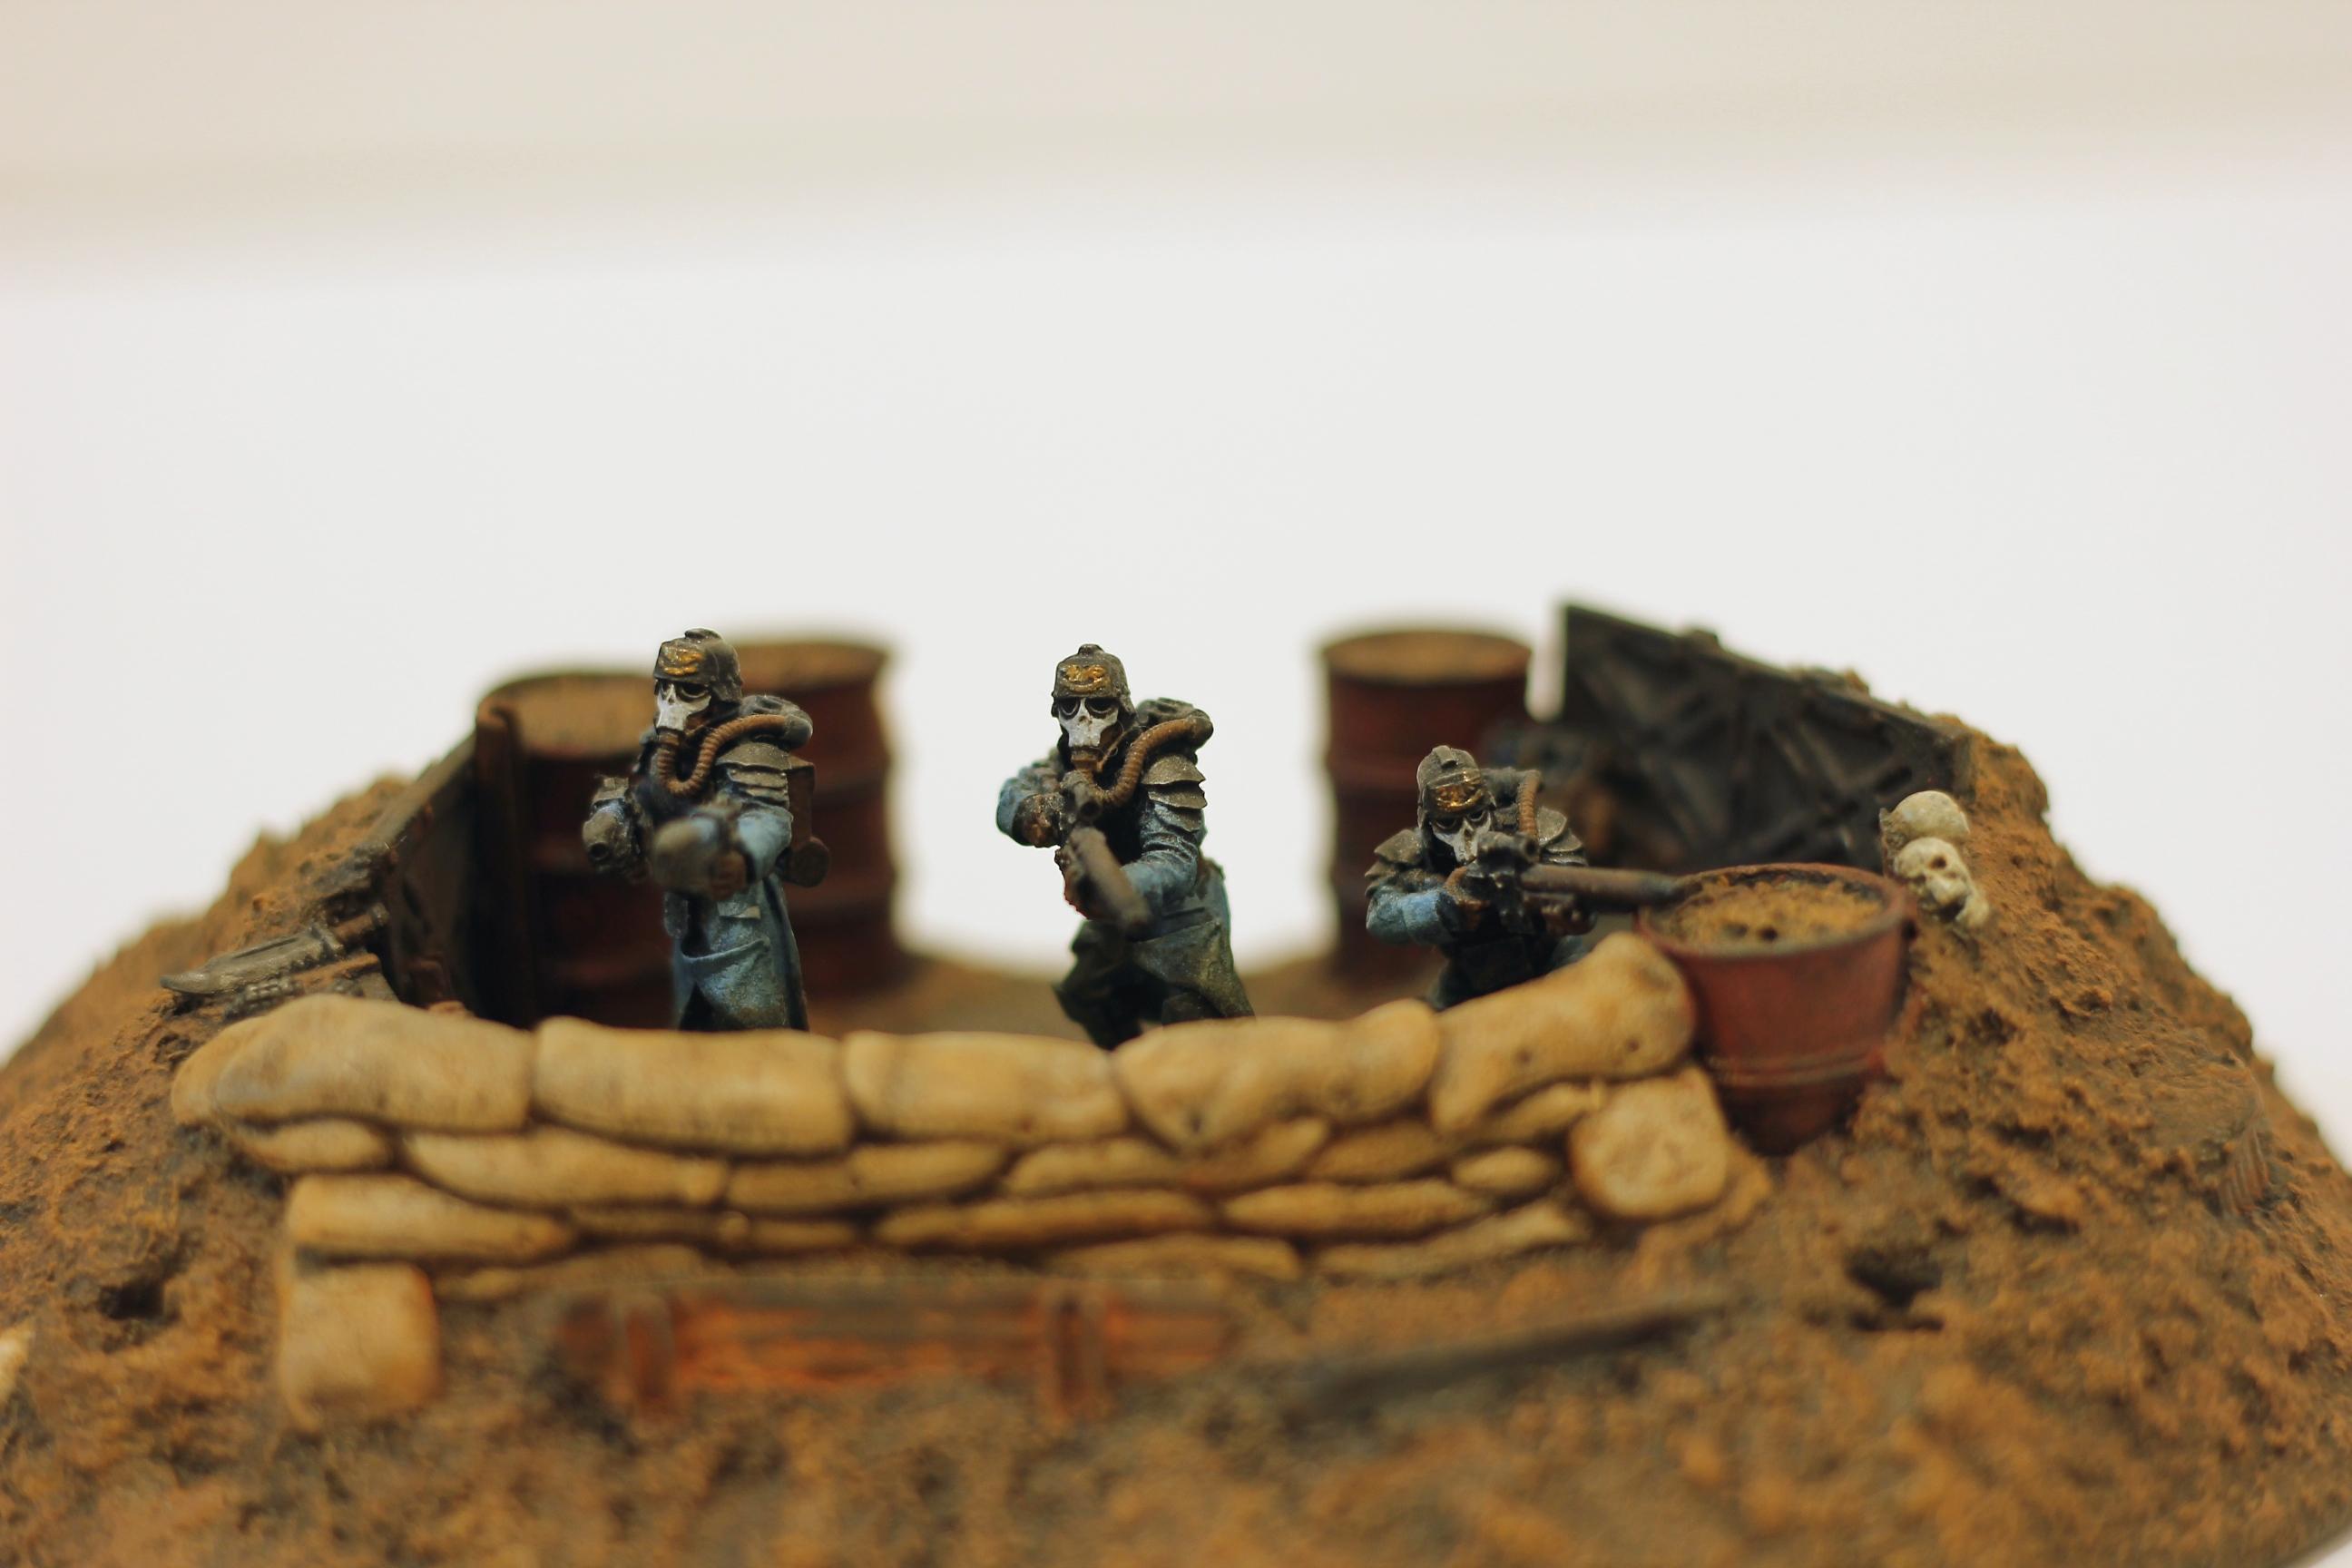
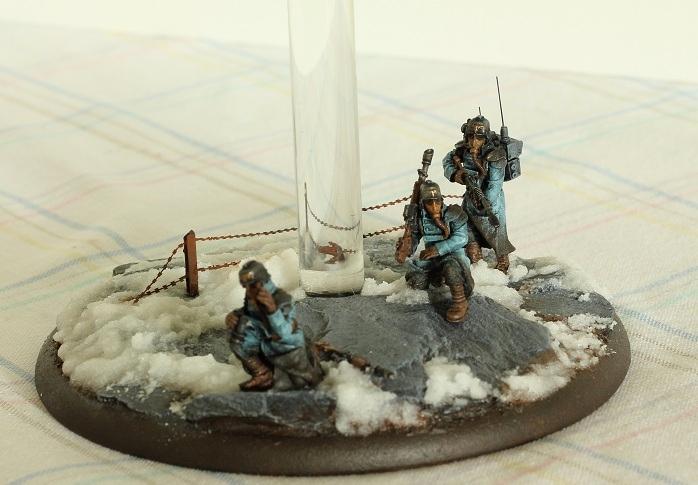
I hate to say it, but the only thing that looks out of place is the snow in the autocannon team. It has the consistency of slushy, half-melted snow, which usually is found flat on the ground rather than stacked up in a pile. Otherwise, great job though! I love how the snow actually "interacts" with the shell casings.
(In hindsight, I wish I remembered to snap more snow reference pictures during the snowstorms in Boston...)
91798
Post by: Greldinard
Nice work on the DKOK.
I adore the dreadnought.
91816
Post by: Januine
Absolutely loving that OPT chimera Peregrine. If I may ask, how did you get such excellent weathering?
63000
Post by: Peregrine
 Januine wrote: Januine wrote:Absolutely loving that OPT chimera Peregrine. If I may ask, how did you get such excellent weathering?
The process, in order:
1) Base coat built up with multiple layers of heavy "drybrushing" (same technique as true drybrushing, but with more paint on the brush) to add some variation and texture to the color.
2) Decals, sealed before and after with clear gloss, then sprayed with matte varnish. Make sure to do these first so that the weathering layers are all applied to them properly.
3) Chipping. Dip a piece of foam (like the stuff GW used to put in the box with metal models) in dark gray (or appropriate color to represent the primer layer underneath the base coat), wipe off most of the paint, press lightly against edges and anywhere that would receive heavy wear.
4) Oil wash. Apply brown oil paint around rivets/panel lines/etc, blend out to cover the whole surface. The end goal is to have the whole surface at least lightly tinted by the wash, but have variation in shade and concentrations around rivets/in dark corners/etc. Optionally, once the first layer has been applied and is still wet (so that you can blend and soften the edges properly), go back and add heavier streaks coming down from rivets where the rain would wash dirt/rust/etc across the surface. You MUST let the oil wash dry for several days before handling the model or trying to paint over it.
5) Soot/grease/etc. Exhaust stains are a heavy drybrush of brown with black added at the very tip and blended into the brown. Oil and grease stains are built up with multiple layers of thinned brown and black ink to blend smoothly.
6) Dirt. Apply dirt colored weathering powders to appropriate places right before sealing with the last spray of matte varnish.
91816
Post by: Januine
Nice!!!! Cheers Peregrine. Picking up a Knight next month and wanting weather the big big fella pretty heavily
76685
Post by: Singleton Mosby
What role does the Salamader get? Is it a Chimera or a Centaur?
51866
Post by: Bobthehero
Its a Salamander, no?
63000
Post by: Peregrine
Yeah, it's a Salamander. Fast open-topped Chimera hull with an AC/ HB/ HF (depending on the variant) and the usual hull HB/ HF. It also has scout, so it's a decent outflanking objective claimer that can occasionally put a few shots into something.
35316
Post by: ansacs
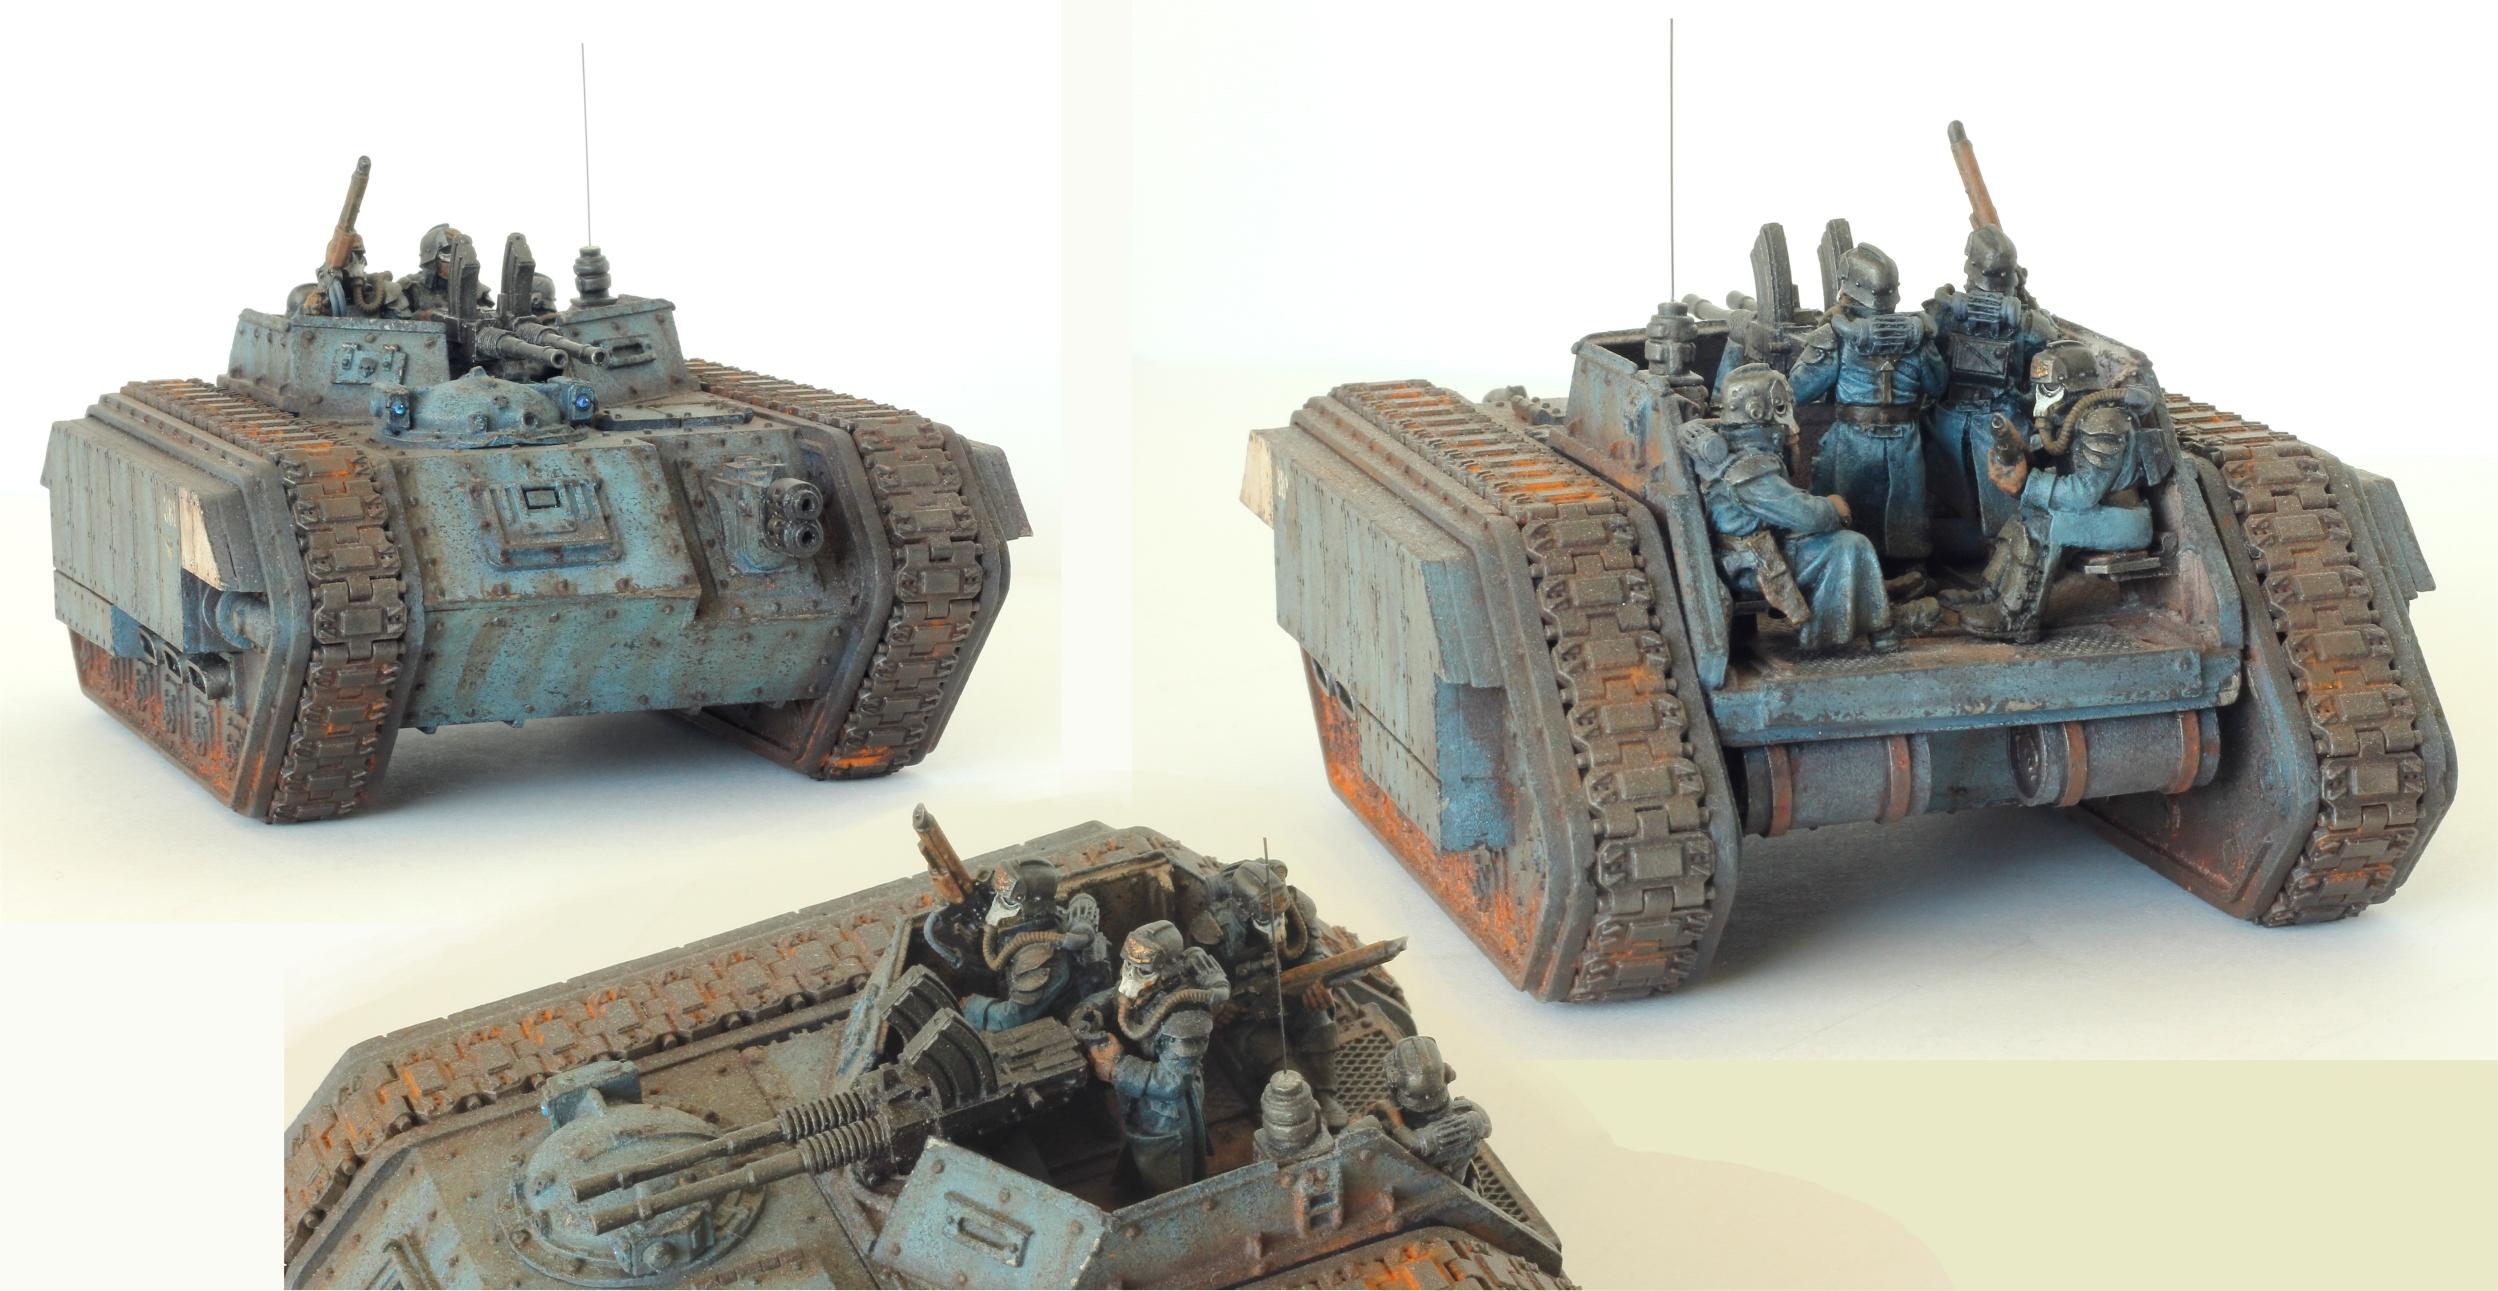
That salamander with the troopers on it is amazing. I really like your HWT as well. The spent ammo casings and sand bags really help to tell a complete story.
63000
Post by: Peregrine
Progress for the progress god! There is finally light at the end of the tunnel on this thing.
60939
Post by: Enigwolf
Peregrine wrote:Progress for the progress god! There is finally light at the end of the tunnel on this thing.
Is that the Marauder Destroyer cockpit? I'm loving the glossing you did on the screens. The whole thing is bringing back memories of the Gav Thorpe short "Acceptable Losses" from over a decade ago.. Ahh, the days.
63000
Post by: Peregrine
Yep. And updates for the update throne!
75552
Post by: MagosBiff90
MMOOOAAARRR!!!!!
74538
Post by: Ether
Seriously impressive. Thanks for posting these!
How do you like the acrylic rods for your flight stands? Did/do you have any trouble with the bases?
280
Post by: Spacewolverine
Your rust is incredible and very realistic. Love the snow and the terrain. First time I've seen this thread. Thanks for posting updates!
63000
Post by: Peregrine
Ether wrote:How do you like the acrylic rods for your flight stands?
Much better than the standard GW flying base (which my FW flyers don't have sockets for anyway). The simple rod looks neater than the ugly and bulky GW X shape, and the extra height looks a lot better. The only downside is that the way I've mounted them (no ugly socket on the model, just balanced on the rod with a pin for stability) combined with giving heavy resin models a higher center of gravity makes them more vulnerable to being knocked over, as I've had the misfortune of finding out the hard way. It's worth it for the aesthetic improvement IMO, but you do have to be very careful with them. Though maybe it's not so bad with plastic kits since they're a lot lighter than my resin aircraft.
Did/do you have any trouble with the bases?
None at all. I buy them pre-drilled so I just stick the rod in once the scenery is done.
95191
Post by: godardc
Your thread is just so...realistic, everything seems so real !
It is really impressive.
Thanks for sharing !
91468
Post by: War Kitten
Those are some of the best looking death korps I have ever seen. Outstanding work. I'll be keeping an eye on this
63000
Post by: Peregrine
This is an old model, but I finally got around to getting some decent pictures of it (be sure to view it at full size, the image is huge):
52201
Post by: evildrcheese
Very nice. It really is a great model.
EDC
51486
Post by: Frankenberry
Again, Peregrine, your skill at presenting what appear to be truly 'used' weapons of the Imperial Guard is simply astounding - I am green with envy.
As for the Marauder cockpit, I've heard from different folks that getting the two crew members to sit nicely in the actual cockpit is quite a feat - as FW parts tend to suffer from the few and far between 'bent' syndrome. I must say though, yours are breathtaking, did you have any issues building that monster?
63000
Post by: Peregrine
 Frankenberry wrote: Frankenberry wrote:As for the Marauder cockpit, I've heard from different folks that getting the two crew members to sit nicely in the actual cockpit is quite a feat - as FW parts tend to suffer from the few and far between 'bent' syndrome. I must say though, yours are breathtaking, did you have any issues building that monster?
No problem with the actual fit, the parts were all just fine. The only problem is that you have to put the crew in before you glue the cockpit floor in, since you have to lift the back one up a bit to slide the front one in and the control panels across the back one's lap lock it in place. Thankfully I test-fit everything before gluing it and figured it out before it became a problem.
As for the rest of the model, not too many issues besides the usual warped parts. The engines had to be filed down a bit on their inside surfaces (not visible on the finished model) to get the wings to fit properly, and the tail section has a bit more of a gap than I'd like, but overall it was no worse than any other FW kit I've built. The main thing to know about building one is that you MUST pin it together. It's a really heavy model with a lot of weight on some of the joints. You should be able to assemble the whole kit (other than small decorative parts like the cockpit window frame) with just your pins, the only thing the glue should be doing is keeping the pinned parts from sliding back out of their sockets.
84696
Post by: Da Stormlord
Great paint scheme, the faded blue is perfect.
76303
Post by: Warboss_Waaazag
Smashing! I love the tail on that thing. Great paint job.
63000
Post by: Peregrine
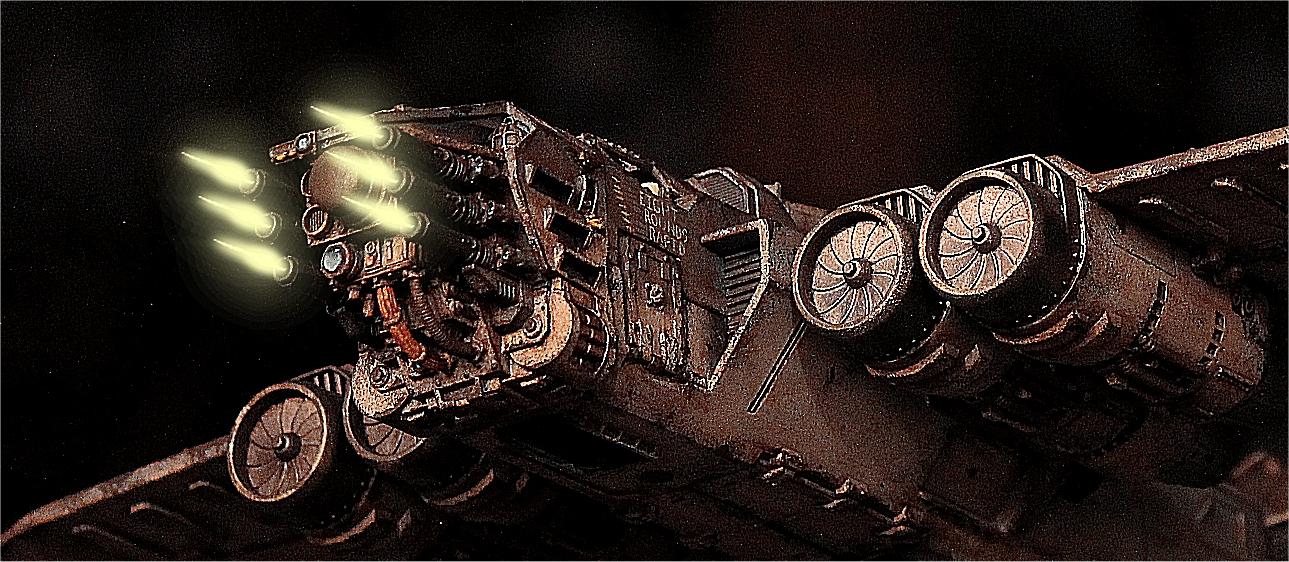
Well, it's the middle of the night, so I suppose I'll post a shot from my latest night fight:
42839
Post by: stonned_astartes
Such a nice model, always think it should be bigger for some reason haha might be because i never see it in comparison.
63000
Post by: Peregrine
 stonned_astartes wrote: stonned_astartes wrote:Such a nice model, always think it should be bigger for some reason haha might be because i never see it in comparison.
Oh, it's a big model. Size comparison with a LRBT:
91816
Post by: Januine
Gorgeous work!
6772
Post by: Vaktathi
That Marauder looks awesome, I really love those massed autocanon gunbarrels.
91468
Post by: War Kitten
The Marauder looks great! It just looks so menacing. How does it do in game? I've considered picking up some FW stuff for my Guard when I get around to expanding them
52201
Post by: evildrcheese
Very cool. And that is a big model. Does it use a regular flying base?
EDC
42839
Post by: stonned_astartes
Peregrine wrote: stonned_astartes wrote:Such a nice model, always think it should be bigger for some reason haha might be because i never see it in comparison.
Oh, it's a big model. Size comparison with a LRBT:
That what i call a bomber!
63000
Post by: Peregrine
No idea, I haven't had a chance to use it yet. My impression of the rules is that it's a decent unit, not so terrible that you auto-lose by taking it but not anywhere near top-tier power.
Oh god no. On a regular flying base you'd have bomber pieces all over the floor within minutes, and it would look ridiculous being half a wing-length off the table. Right now it's on a large resin base specifically designed for LoW models and an acrylic rod, and eventually I'm going to put it on a custom diorama base.
63000
Post by: Peregrine
People keep asking how I do the weathering on my tanks, so now I'm finally going to take some step-by-step shots of the process with my next LRBT.
STEP 1: BASE COAT
Paint the base color and add any decals for squadron markings, etc. I do the base color with heavy drybrushing (more of a damp brush than a dry brush), building up from dark to light over the entire surface of the model. Adding a little shading depth in the low spots is a useful benefit, but the main goal is to add some color variation. Paint isn't going to fade or get dirty in nice even patterns, so a little variation breaks up the large areas of smooth color. Keep it subtle though, just enough for your eye to read it as a complex surface and not a single uniform color. The one thing I do NOT do is any detail bits that shouldn't have paint chipping on them (exposed metal, etc). The chipping step is not precise and will get chips on those areas, so don't bother painting them yet.
Once the base coat is done make sure to add all decals, using the standard gloss -> decal -> gloss -> matte process. It's important to get them on at this point because you need all of the weathering layers to apply to them or it won't look right.
 STEP 2: CHIPPING
This is representing areas where the paint has worn away to expose the primer layer beneath it, and also helps to add some depth and emphasize edges. Mix a dark gray or dark gray-brown shade, depending on your preferences. Pure black look unnatural, so don't go quite that far. Dip a piece of foam (I use the backing foam from metal models) in the paint, then wipe off most of it like you would for drybrushing. Then press the foam against the model just enough to leave spots of paint, without turning into a heavy blob. Focus on edges and areas that would see the heaviest wear, but add at least a few chips in the middle of flat surfaces to break up the uniform color. How heavily you do this is personal preference. Use a very light touch if you want just a little wear like any tank will immediately accumulate, do it heavily if you want an old beat-up tank.
 STEP 3: FINAL BASE PAINTING
Now that the chips are done you go back and add the things that wouldn't be chipped. In this case it's bare metal like the gun barrels, the yellow and black hazard stripes on the turret cables, etc. The only thing I don't do at this step is lenses, since I've found that the final matte varnish layer tends to dull them too much.
Also in this picture you can see some of the soot stains on the gun barrel. These are done with a heavy drybrush of brown, building up towards the source of the exhaust and fading out away from it. Then go back and repeat the process with black, pure black at the very end and quickly fading out to brown.
91816
Post by: Januine
Very nice and consise tutorial there Peregrine. End result looks the business
63000
Post by: Peregrine
 Januine wrote: Januine wrote:Very nice and consise tutorial there Peregrine. End result looks the business
Just to clarify, the tutorial isn't over. I'll be posting pictures as I do stuff, but there are several layers that need to dry for a day or two before moving on to the next step. Next up is the oil wash, but it can really tear up acrylic paint that isn't completely cured (in this case, all of those nice paint chips could be rubbed off) so I'm going to wait a while before doing it. Then it's probably another week or more, depending on the weather, before adding the weathering powders, and finally oil/grease stains and lenses.
(That's on top of a week or so for the decals after doing the base coat. A tank like this takes about a month to finish, depending on how the weather is for spraying the dullcote layers.)
63000
Post by: Peregrine
And, after a nice long break to let the paint dry, we come to the next part of the tutorial:
Step 4: Oil Wash
WARNING: THIS STEP WILL DESTROY YOUR WORK FROM PREVIOUS STEPS IF YOU DO NOT ALLOW THE PAINT TO FULLY CURE FIRST. UNDERSTAND THE DIFFERENCE BETWEEN CURING AND DRYING, AND ALLOW SEVERAL DAYS AT MINIMUM BEFORE STARTING.
That said, welcome to the part where the tank really comes to life. The goal here is to accomplish two things:
1) Add the assorted dust/staining/etc that will accumulate on a heavily-weathered vehicle.
2) Add more depth and shading to the rather plain base coat.
The reason for using oil paint here is that it takes much longer to dry than acrylics. Without drying re tarder added acrylic paint will be dry and permanent (short of tearing up everything trying to remove it) within minutes of putting it on the model, and will start to become difficult to work with within seconds. Oil paint, on the other hand, remains "wet" for hours to days. If you don't like something you can just use a wet brush to fix it, or even wipe the paint off entirely and start over. Of course the drawback here is that your paint will remain wet for hours, and vulnerable to damage for several days at least. You'll have to handle your parts very carefully if you don't want to rub the paint off, and think carefully about how you're going to hold each piece as you paint it.
Now, I said this is a wash, but it's really more of a filter. You're trying to change the color of the model to a dirty brown tint, not add heavy shadows like a true wash. You're going to cover the whole model with it and not worry about which areas would be in shadow (though just because of the nature of a wash you'll get some shadowing). So, how to do it:
1) Thin down some burnt umber paint. I use Winsor and Newton water soluble paint (for cleanup convenience), but whatever your local art supply store has will work. You're aiming for a thickness a little heavier than GW paints straight out of the pot.
2) Paint small dots and streaks onto the model. Aim for rivets, corners where dirt could collect, etc. Don't worry too much about precision, you're going to wipe most of it elsewhere, but if you're going to have darker areas they might as well be in the appropriate places. Use very small dots if you only want a light shift in color, use lots if you want a heavy brown where the base color is barely showing through. I usually cover a whole part (turret, side of a tank, etc) at once so everything blends together across the entire surface.
3) Dip a brush in thinner (or water, if you're like me and use the water soluble kind) so it's wet but not overloaded. Brush it over the painted-on spots so the paint starts to thin and flow across the entire surface like a wash.
4) Adjust the placement of the paint to suit your preferences. Push the wash around with a brush to collect it where you want the darkest shades. Add thinner/water to areas you want to lighten, or even wipe off some of the wash. Add paint directly onto the damp model and blend it in if you want a spot to be darker. Add a spot of paint and drag it along the surface if you want a distinct streak, but remember that you'll be doing oil and grease stains later. If you get tide marks be thankful you're using oil paint instead of an acrylic wash, and just soften them with a damp brush. This is where you fine-tune the look of the model and exactly what you do will depend on how you want it to look.
5) WAIT. Don't touch any painted surfaces for a few hours at least. When you do finally handle your parts do it very gently and try to touch as little of the model as possible. Let the parts dry for at least a few days before you do anything else with them, and if you can wait a week or more it's even better. In fact, just put the model on a shelf for a month and work on something else for a while.
Now, the clever readers might be thinking that some of this sounds familiar. This is really just a very simplified version of weathering techniques that are popular in the historical modeling community. It won't look as nice, but it's a lot faster! If you want better results you'll need to use multiple colors and a lot more blending instead of just throwing a wash across the whole model. But I think it looks good enough for the gaming table.
Anyway, the final result of this step:
See you in a month with the next step. The end is in sight!
91816
Post by: Januine
Loving this whole tut peregrine. Thx for taking the time to put it together. Really nice and indepth. Definitely gonna give oils a base. Till next month
13225
Post by: Bottle
Yeah, great stuff so far!
63000
Post by: Peregrine
And, after returning from a long forum vacation, we're back with the next part of the tutorial:
Step 5: Weathering Powders
WARNING: THE OIL PAINT FROM THE PREVIOUS STEP MUST BE COMPLETELY DRY (TAKING SEVERAL DAYS AT LEAST) BEFORE YOU START APPLYING WEATHERING POWDERS. WET OIL PAINT ABSORBS THE POWDER AND CREATES HEAVIER STAINS WHEREVER THE WET PAINT WAS.
WARNING: WEATHERING POWDERS ARE NOT RUB-PROOF. THE VARNISH LAYER SEALS THEM AGAINST CAREFUL HANDLING, BUT ROUGH TREATMENT WILL WIPE THEM OFF. BE NICE TO YOUR TANKS.
Now that you've added stains and shading to the tank with the oil wash the next step is to add dry dirt and dust. Weathering powders are good here for two reasons:
1) They allow very soft edges. You can blend them out almost to the point of transparency, leaving nice gradual transitions between colors.
2) They behave like real dirt. Because they actually are fine powders they accumulate in low spots that would collect real dirt, leave marks behind when wiped across a surface, etc. You can pretty much stick them on the model like the real thing and get the right result.
What exact colors and locations you use depends partly on personal preference and partly on what kind of environment your model is in fluff-wise. You can get a whole range of earth tones to fit any look you want to do, so pick the ones you like best. I personally use a very dark brown for accumulated dust/dirt, and a brighter reddish color for fresh mud. But if, for example, you're painting an army on ash wasteland bases you'll probably want different colors.
Once you've picked your color(s) it's time to put them on the model. Apply them directly into the places you want to put dirt, and use a dry paintbrush to push them around. Focus on areas that would get a lot of dirt on the real tank: corners on the floor of a transport, wheels and tracks, etc. Once you have a look you like spray on a layer of matte varnish to seal the powder in place. This is definitely a trial and error thing, so practice on some scap parts before committing to your favorite centerpiece model. For example, the matte varnish will usually reduce the effect a bit, but some colors seem to suffer more than others.
And, again, because this is important: the matte varnish seals the powder in place against light handling (picking a tank up carefully without rubbing anything, dusting it with a soft paintbrush, etc), but does not make it rub-proof. Rough handling will wipe off some of the powder. If you don't want to treat your tanks with this level of care then I suggest omitting the weathering powder step entirely.
That said, here's where we are now:
Next and final step is oil/grease stains, and then we're done!
103789
Post by: griffomate
I literally made an account just to comment on this blog, this is some breath taking stuff man! I hope you update the final step for your painting guide soon, I'll be utilizing these techniques on my valkyrie shortly and eventually my vulture gunship (when i get around to doing all the fun stuff you have to do with resin... ) the marauder bomber looks insanely good!
63000
Post by: Peregrine
griffomate wrote:I literally made an account just to comment on this blog, this is some breath taking stuff man! I hope you update the final step for your painting guide soon, I'll be utilizing these techniques on my valkyrie shortly and eventually my vulture gunship (when i get around to doing all the fun stuff you have to do with resin... ) the marauder bomber looks insanely good!
Well, making an account just to comment is certainly praise! I think I'll probably get the tutorial finished this weekend, I've been working on some X-Wing ships recently but it's time to finish up the LRBT as soon as the weather dries up enough for spraying.
63000
Post by: Peregrine
And finally I took a break from X-Wing stuff and finished the tutorial.
Step 6: Oil and Grease
Remember how we were saving this until after the matte varnish because oil and grease stains are supposed to be shiny? Now it's time to do them. You want to use inks for this, and I mean actual inks, not GW washes. Washes and acrylic paint in general dry with a matte finish, inks have the right glossy shine. And you want to be patient, build up your stains with many thin layers so you have nice natural-looking blending. Start with heavily watered down brown ink and flood the source of the stain then drag it down the model in the direction of gravity. You should only have a very faint trace of brown as it fades out towards the end of the stain, soak up any excess with a clean brush if you have more than that. Let it dry, then repeat with another layer. Continue adding layers (about 2-3 more usually), covering a little less area each time. Then do the same with watered down black, only very close to the source of the stain. Finally, if you want a little extra shine, mix about 50/50 black ink and gloss varnish and paint it on around the heaviest spots of oil/grease.
It's kind of a subtle effect on top of the other weathering, but a couple examples are on the thin metal patch on the main gun and two of the axle "cap" things on the side of the tracks in the second picture.
Step 7: Final Details
Not a whole lot to say here, mostly this is just painting in a few small details that you don't want to put a layer of matte varnish on. I've found that lenses get dull and "flat" looking if you do them before the final varnish layer, so I paint them last (using the standard method, nothing special here). If you have any really bright shiny metal areas you'll probably want to save those as well. The antenna (also added here) is just a bristle from a cheap paintbrush I got at the hardware store, and looks a lot more in-scale than the usual plastic ones.
103794
Post by: JustaerinAtTheWall
Love the tank! Definitely look very grimy and worthy of a DKoK army!
91816
Post by: Januine
Fantastic extended tutorial. Really indepth and what a awesome final result. Thx so much for taking the time to put All this down. Great stuff Peregrine.
89756
Post by: Verviedi
Wow, that tank is gorgeous. I'd love to play a game against such a wonderfully painted army!
Also, thanks for the tutorial. I'll be sure to try some of your techniques for grime and mud on my Tau.
280
Post by: Spacewolverine
Have to agree, that is one of the best Leman Russes I've seen painted. Nice work and I love the glowing blue light!
63000
Post by: Peregrine
I'm finally back to some 40k stuff instead of X-Wing. So, continuing with the theme of OOP FW models, here is a Stormblade:
63000
Post by: Peregrine
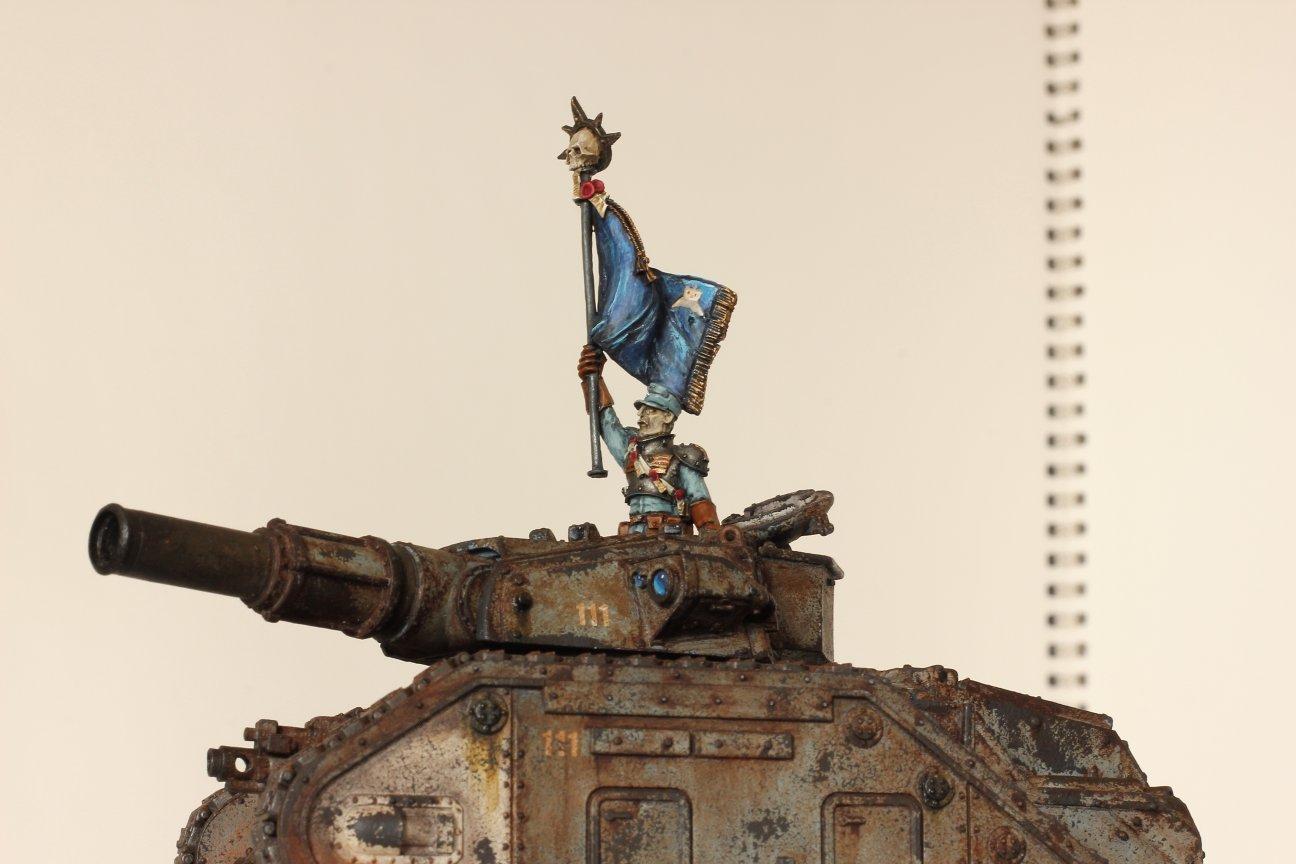
Finally, another 40k model done! General Grizmund, commander of the 1st Narmenian Armoured Regiment:
91816
Post by: Januine
Fanfeckingtastic work as ever Peregrine. Ur tuts on weathering are still bookmarked and greatly appreciated. Top work
89756
Post by: Verviedi
Beautiful. I love the kitten and the uniform color.
93489
Post by: Gordon Shumway
I love your weathering. Is it a salt technique?
63000
Post by: Peregrine
The sequence of posts starting here explains the weathering. The TL;DR of it is sponge chipping + oil wash, no salt at all. I don't have an airbrush, so as much as I'd like to try some of those techniques it's not an option.
91468
Post by: War Kitten
Grizmund looks great! I need to try that weathering technique for myself too...
75552
Post by: MagosBiff90
yeh..... that's some inspirational weathering right there!! Also... really like the pale skin tone you have used for the general! Really nice and it works well IMHO
63000
Post by: Peregrine
Just to prove that Peregrine is not idle, my current WIP:
63000
Post by: Peregrine
Almost there...
81837
Post by: Cleatus
Looking good!
89756
Post by: Verviedi
That is beautiful. I love the glass effects on the cupola, and the little details in the rear and outside of the tank. Weathering is excellent as well. I really need to try that tutorial out.
92803
Post by: ZergSmasher
Looks pretty good! The weathering is perfect for giving the impression that this vehicle has been sitting here for a while. Is this piece just for display, or is it intended to be used as terrain or an objective in a game?
93489
Post by: Gordon Shumway
That is absolutely spectacular
63000
Post by: Peregrine
 ZergSmasher wrote: ZergSmasher wrote:Is this piece just for display, or is it intended to be used as terrain or an objective in a game?
Could be terrain, if I feel like hauling my own terrain to a store. Mostly it's a display piece for my collection of OOP FW stuff.
91468
Post by: War Kitten
That Wrecked Chimera is gorgeous! It'd make for a great objective in a game.
5345
Post by: mtcwalker
love this thread! keep up the great work
91816
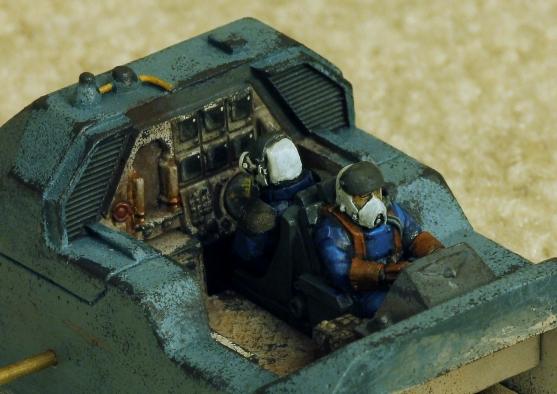
Post by: Januine
Superb stuff as ever peregrine. Really love ur vehicles. Did/would you ever do a tutorial on the interiors of ur vehicles like the chimera? Would be really useful. Cracking effects
52425
Post by: Elnibbus
Very nice work indeed. Lovely interior and weathering detail.
81007
Post by: brushcommando
I love the sandbags around the top hatch. Gives it a nice battlefield improvisation vibe.
75552
Post by: MagosBiff90
I must admit.... this is directly up mine street!! really loved the look of this model for a long time! Really well done.. and those paint skills of yours and the weathering make it look particularly real and effective!! That iron / grey / blue colour of your armour is a cracking backdrop to really make the reds and oranges of the damage pop out!!
63000
Post by: Peregrine
Januine wrote:Did/would you ever do a tutorial on the interiors of ur vehicles like the chimera? Would be really useful.
I'll see if I can remember to take some pictures next time, but it's pretty much the same as the rest of the weathering except with a little heavier use of weathering powders than on the exterior. And even that's getting scaled back a bit, I think.
110789
Post by: Naffathun
Really awesome. I love the antenna. Did you make it from wire?
63000
Post by: Peregrine
Single hairs from a cheap hardware store paintbrush, actually. The problem with wire is that it's too easy to get a permanent bend if you aren't extremely careful with it at all times.
109029
Post by: CATS
You do weathering ridiculously good and it fits the krieg theme super well, all around love it! I should try similar techniques on my kriegers.
61618
Post by: Desubot
Peregrine wrote:
Single hairs from a cheap hardware store paintbrush, actually. The problem with wire is that it's too easy to get a permanent bend if you aren't extremely careful with it at all times.
What about spring steel or piano wire?
100273
Post by: STG
deleted bc it was unhelpful.
63000
Post by: Peregrine
Back from the dead (AKA "new job is hell and eats all of my time") with a quick warmup project to make sure I remember how to do my color scheme: a Baneblade for my superheavy squadron.
50724
Post by: orkybenji
Nice. It looks like it just got dredged up from the bottom of the sea!
23558
Post by: zedmeister
Epic work
63000
Post by: Peregrine
Hah. Finally someone gets it.
Also, new work finally. The preparations from NOVA are beginning.
Better pictures to come once I have better light and get the base finished. But for now, I'm pleased with it. I've done some color changes (using a lighter VMC blue gray instead of the old hand-mixed color, dark gray/black armor plates instead of bare metal, and an oil wash on the cloth areas) and spent some more time refining the highlights and shading. It's extra time per model, but I think it's worth it.
51866
Post by: Bobthehero
That's pretty freaking cool
1787
Post by: howie
Damn. Those are some worn tanks. Think I may have to take a leap out of your books and do some hardier weathering on my vehicles.
Thanks for the tutorial.
Keep up the good work and il be keeping my eyes peeled for updates.
103329
Post by: ShredderShards
Do you have a post that collects the whole, or most, of your army?
63000
Post by: Peregrine
Not recently. There are a few group shots on the front page, but those are pretty old. I don't have as much table space at home anymore to set up a proper light box so it's kind of hard to get a full-army shot.
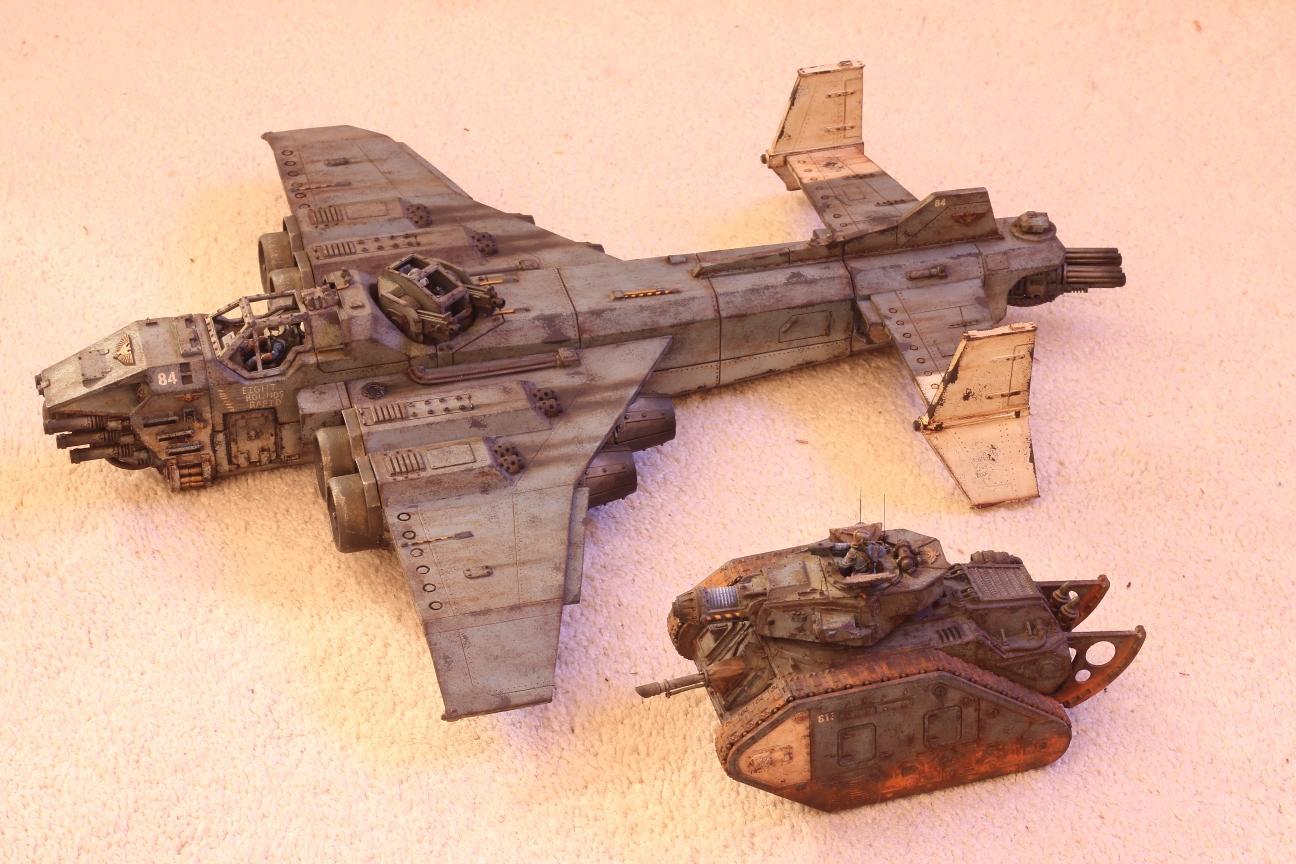
Minor not-really-an-update update, the Marauder Destroyer is still the most beautiful model in 40k.
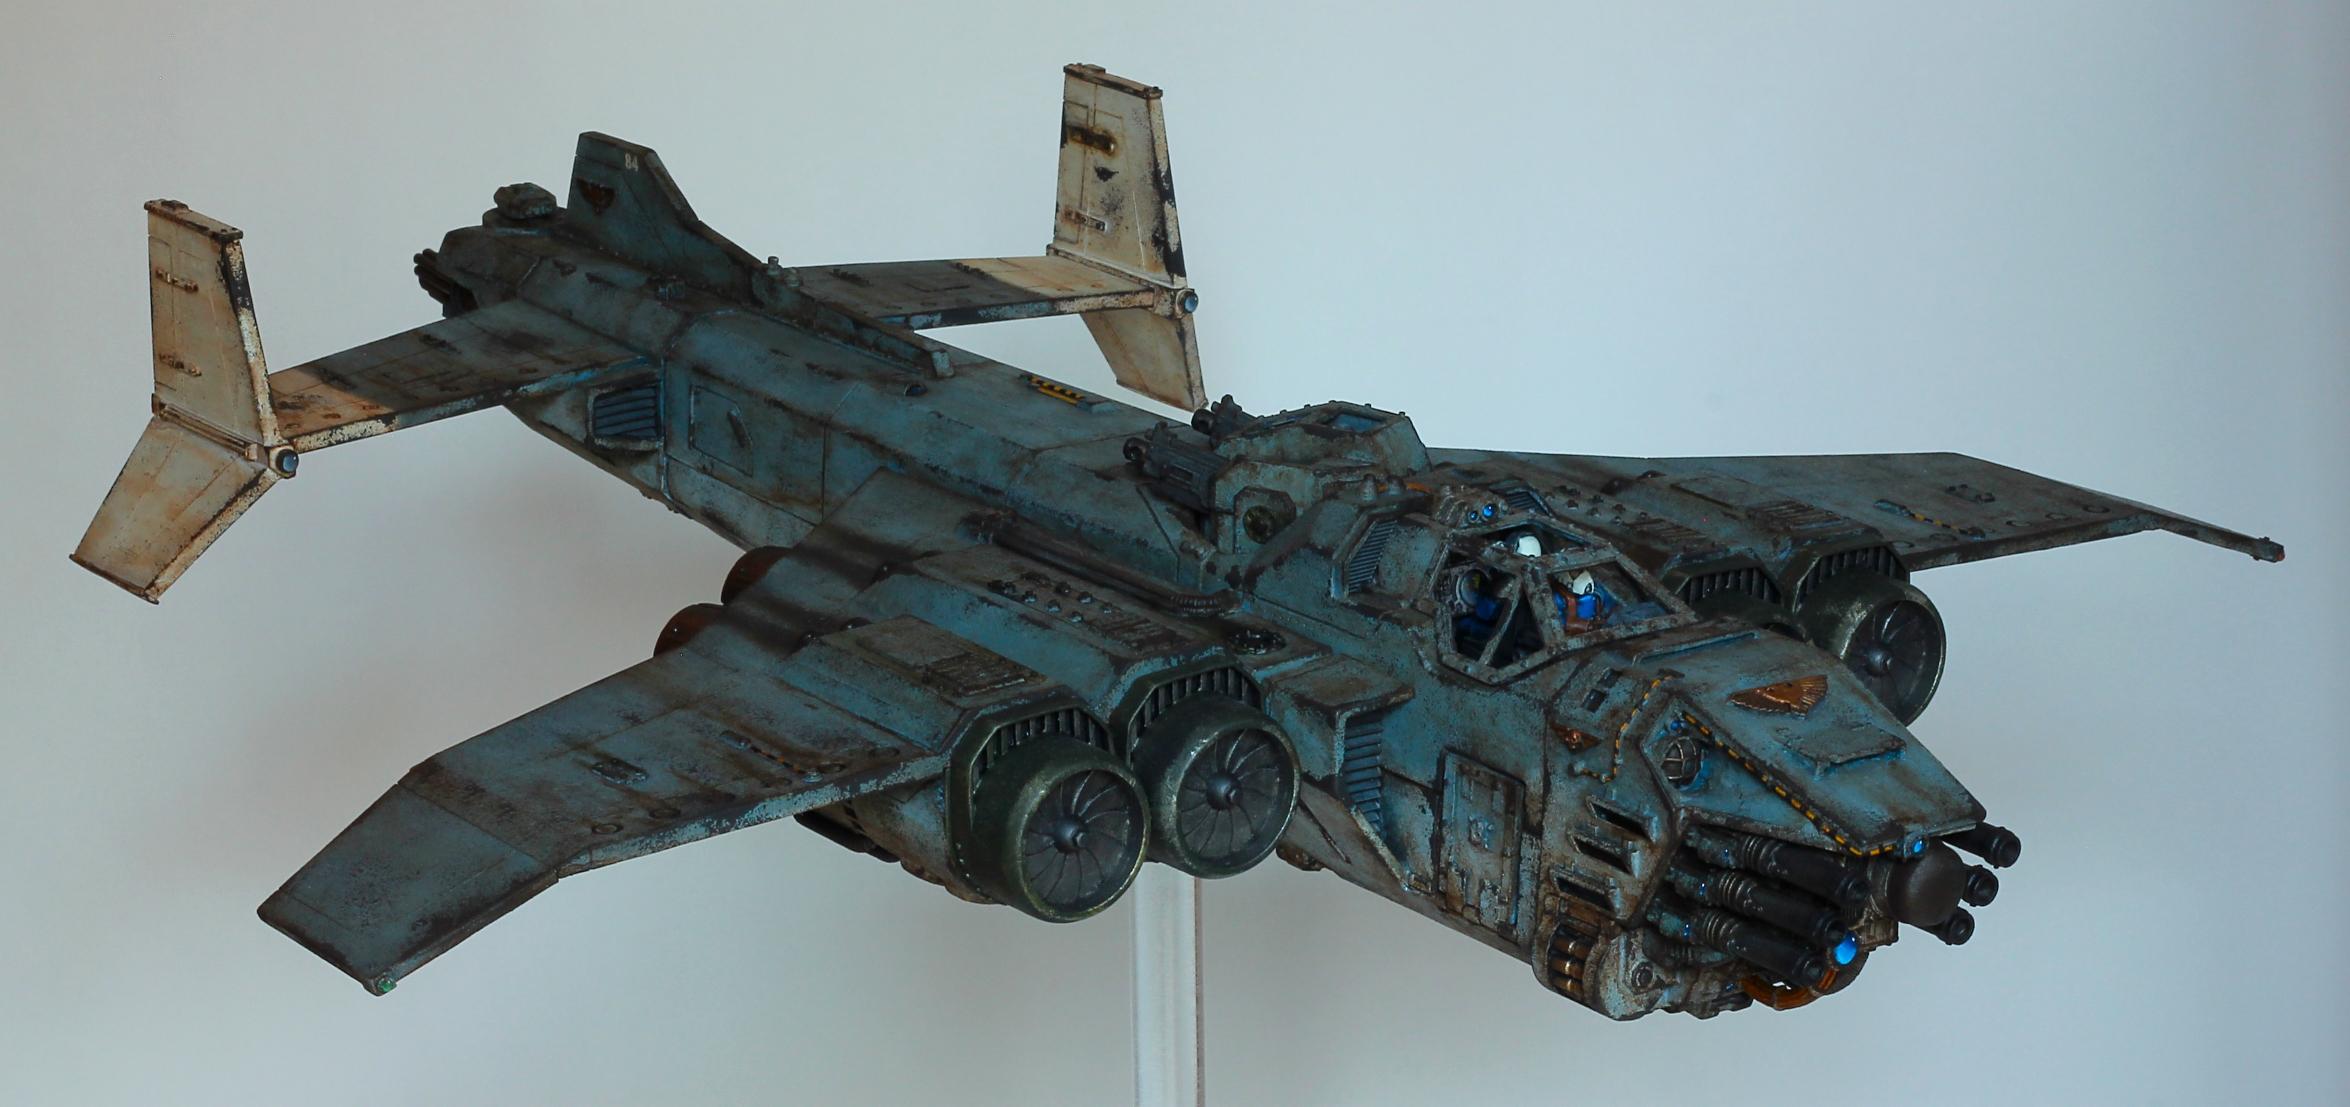
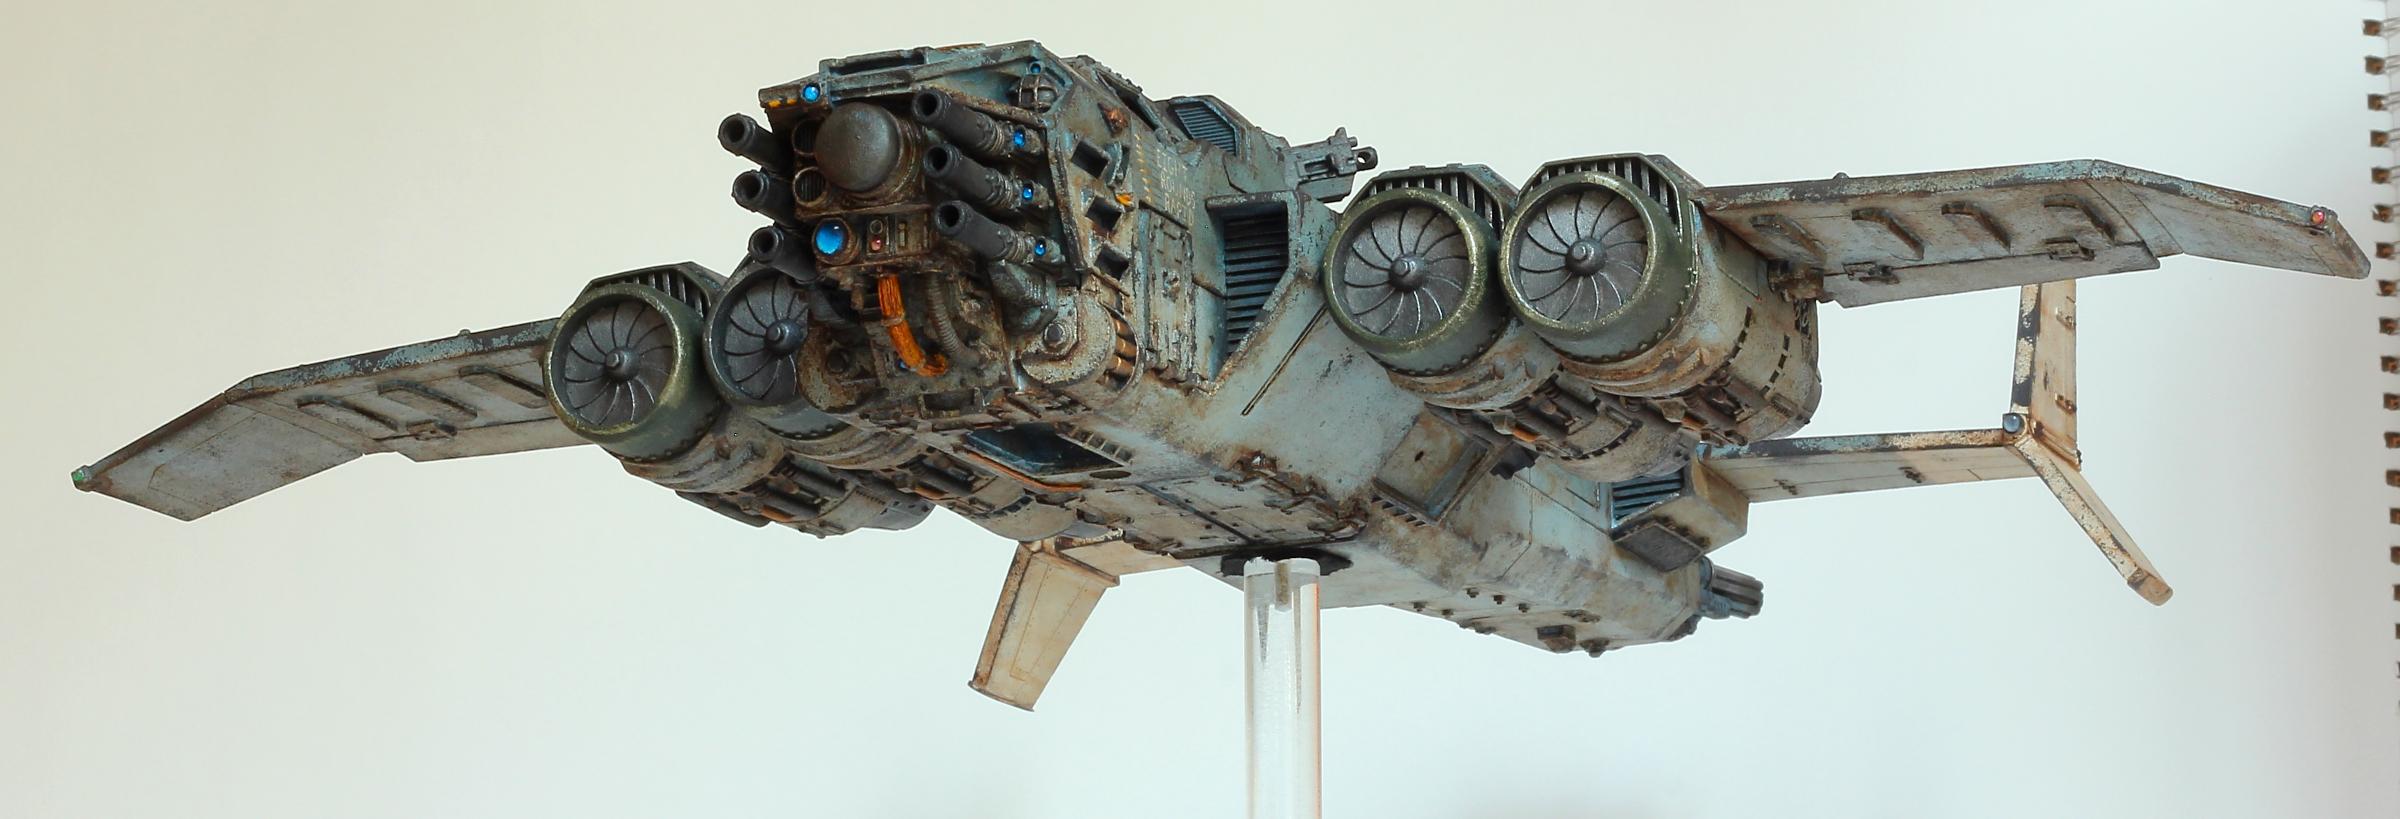
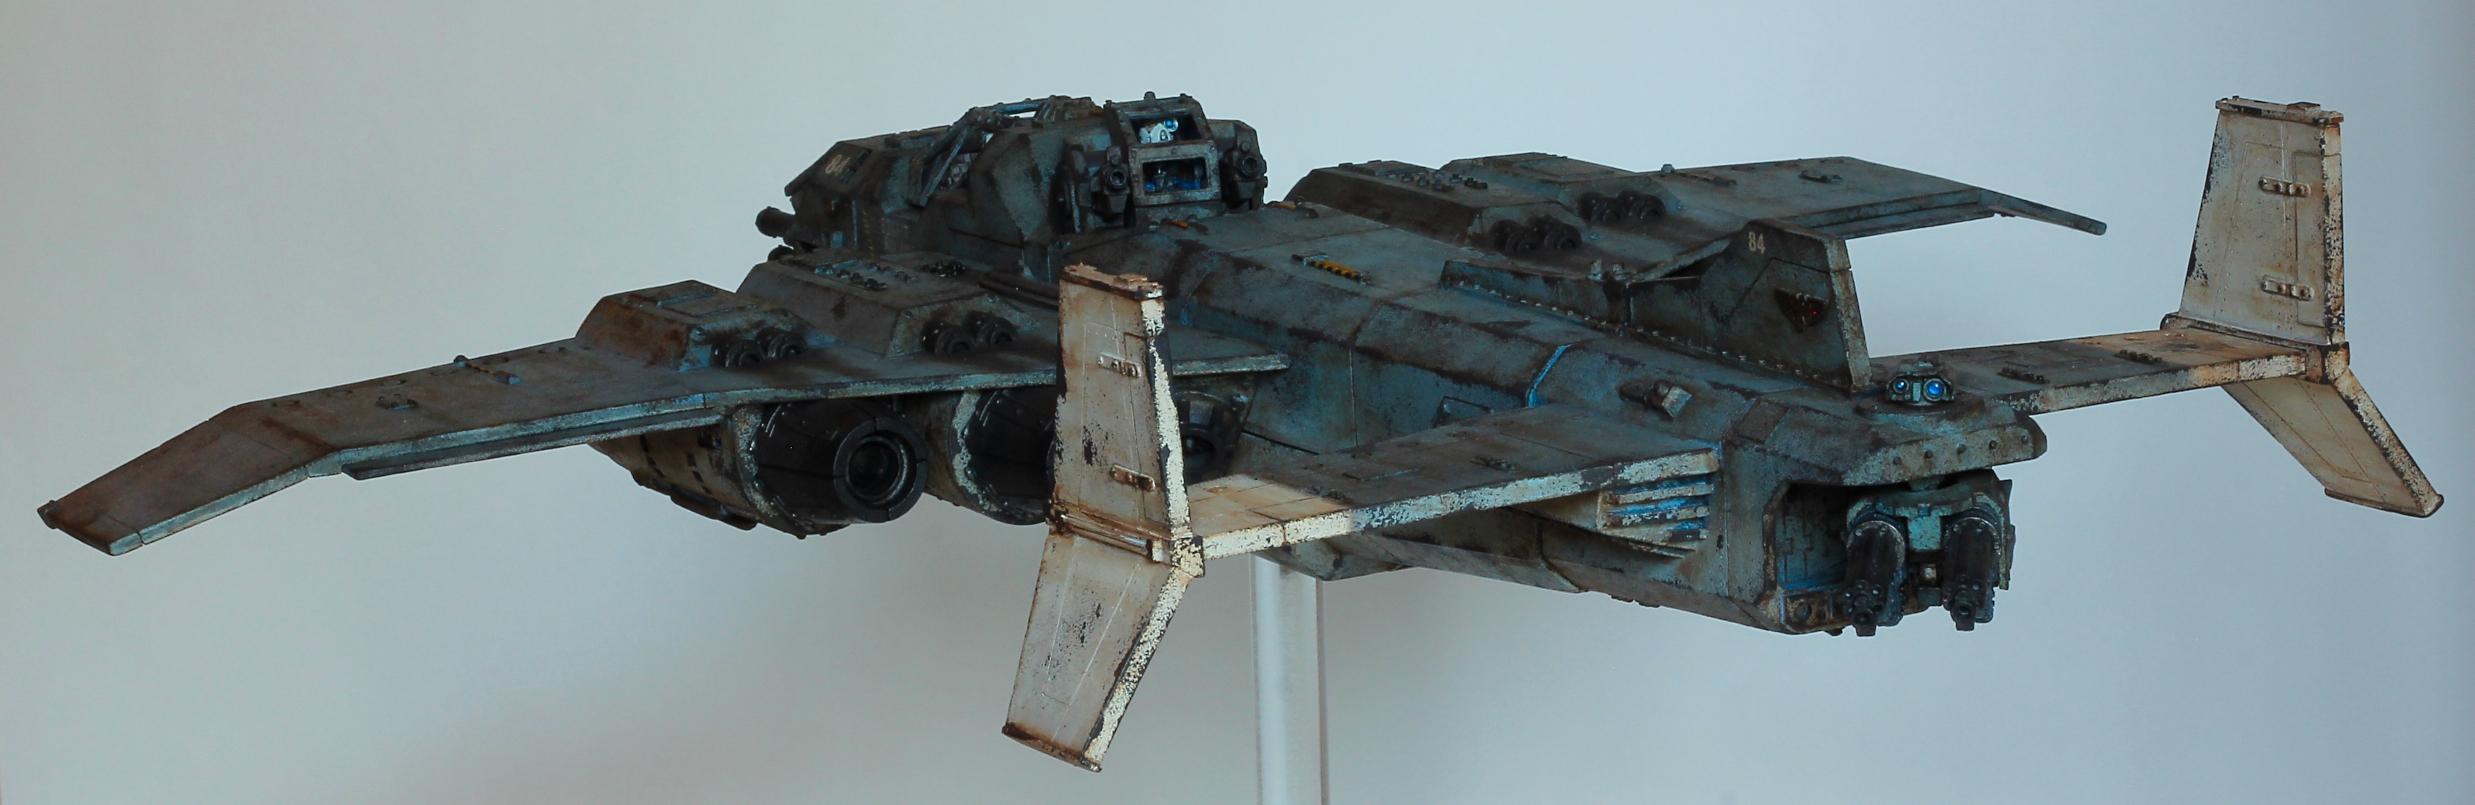
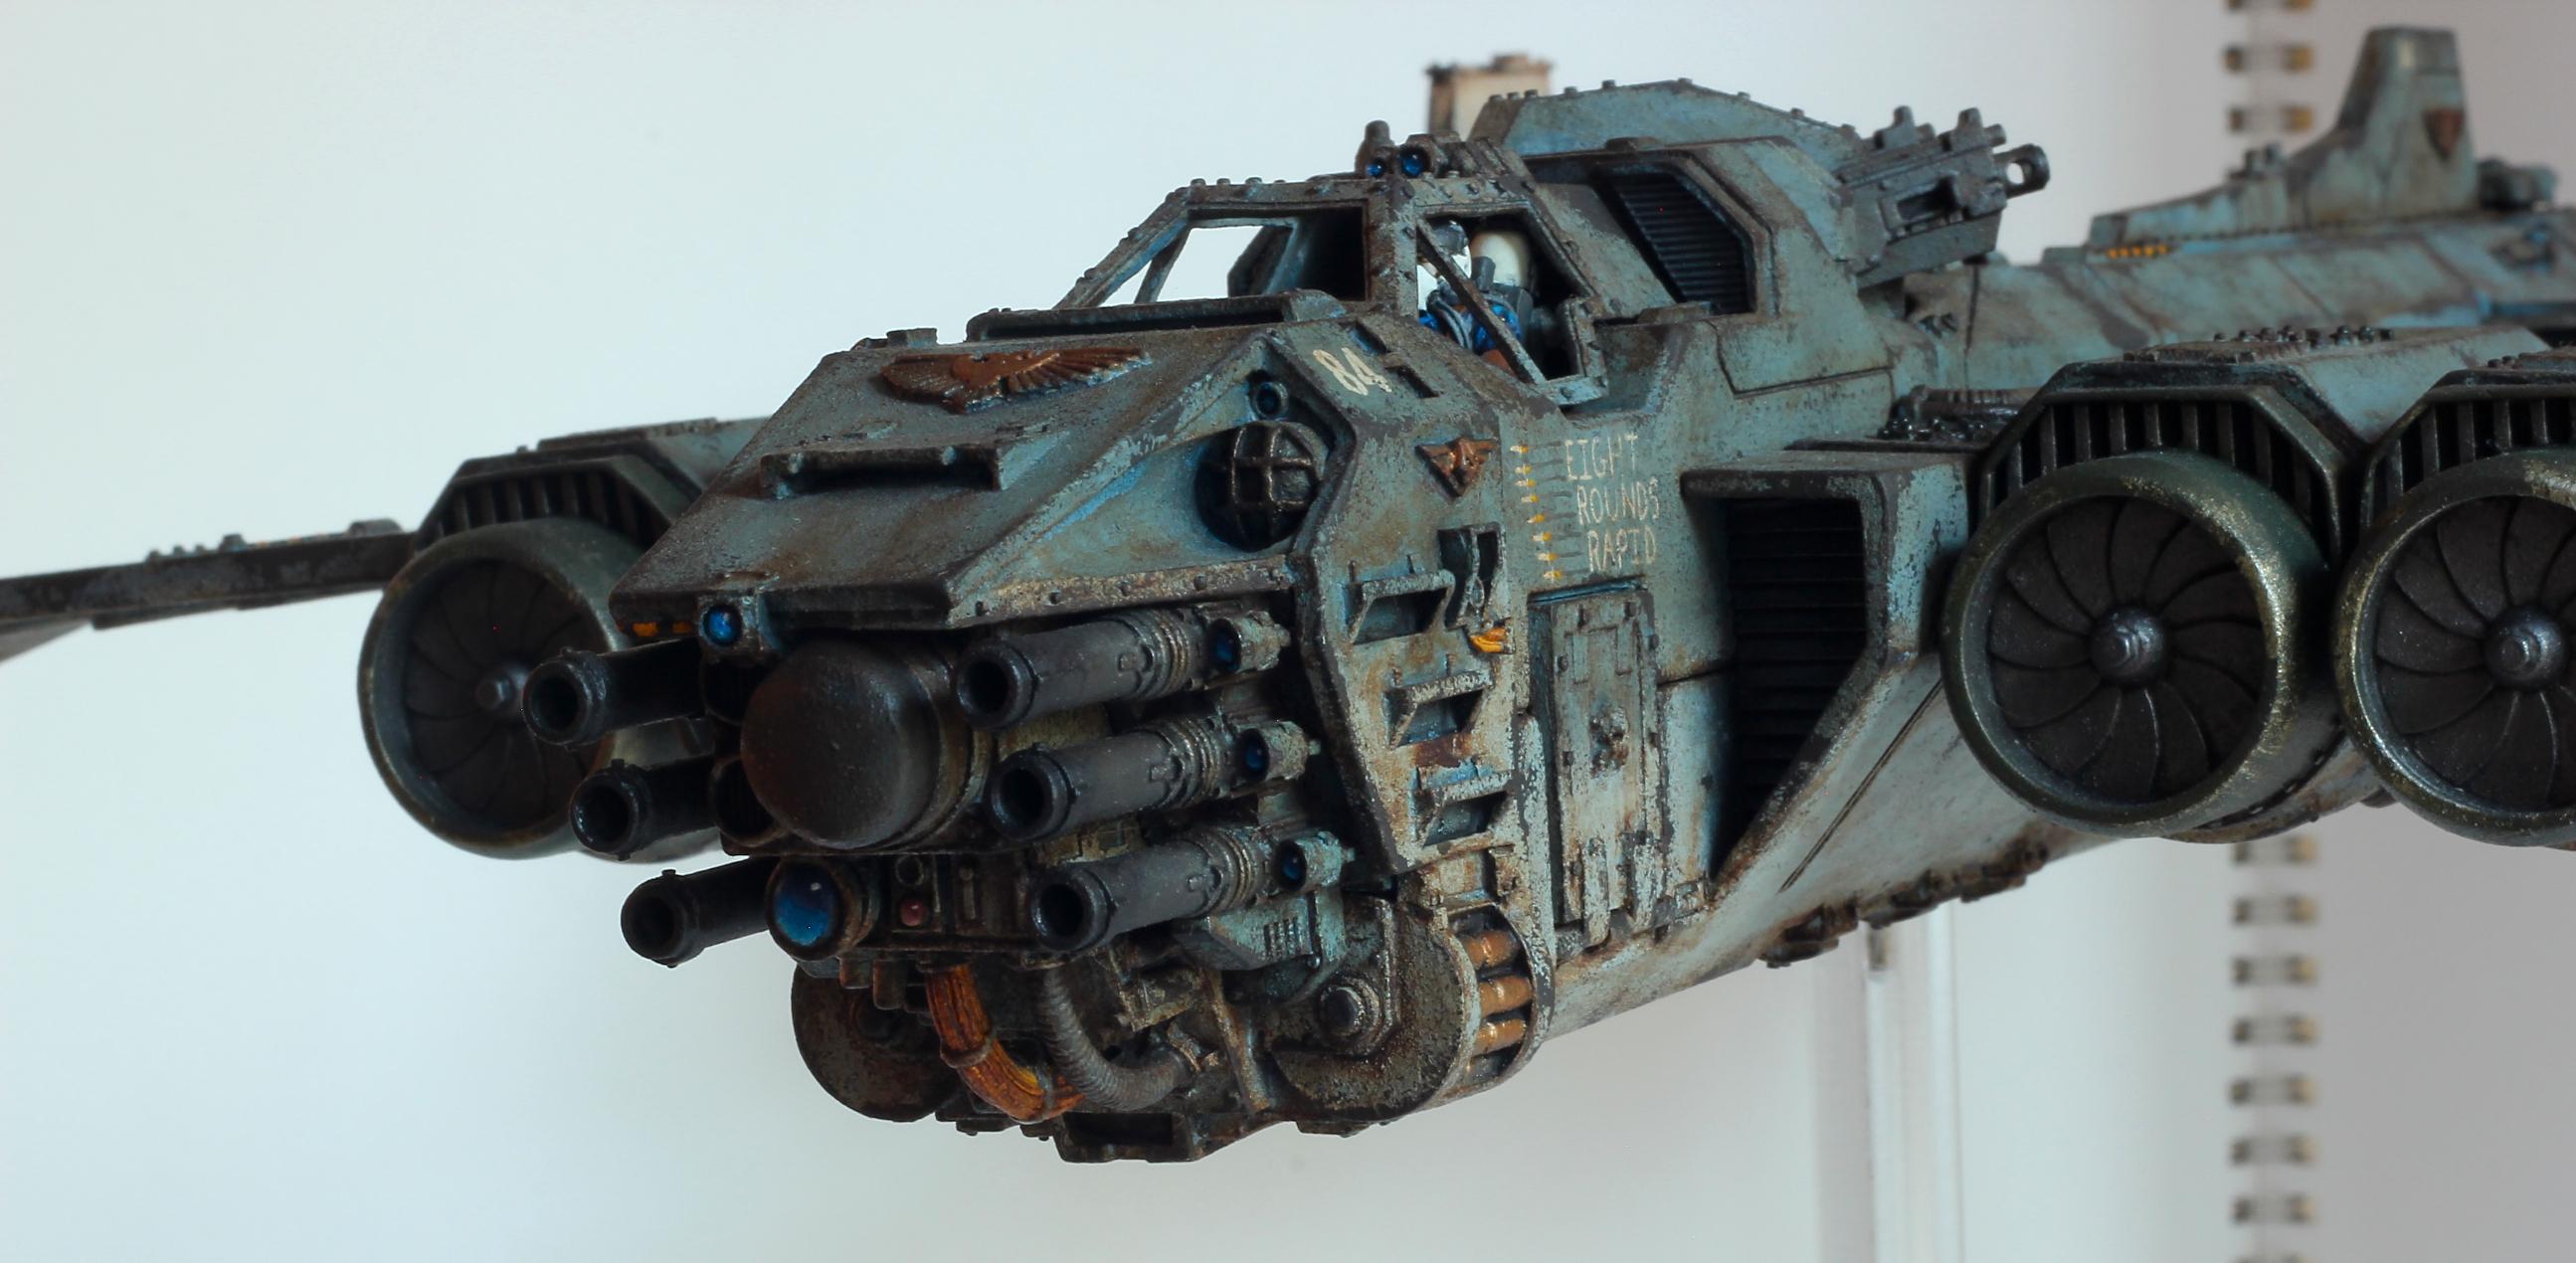
Warlord 8-4, target in sight. We are starting our run.
1787
Post by: howie
Lovely model! Nice and grubby, in the future are you going to put any wing markers or Squadron indicators on it?
I used to have one, but then it swan dived off a the 4th shelf of my model collections, ending in catastrophic wing disintegration. ended up selling it for scrap to an ork player.
63000
Post by: Peregrine
So, apparently I'm terrible at taking pictures, but I have been painting! Consider this a preview.

51866
Post by: Bobthehero
I like that
51870
Post by: Ezki
You got some really great stuff going on here!
Browsed trough the whole thread on one go.
I like the weathering on the vehicles. And those terrain pieces, man are they awesome!
Really inspiring stuff.
|
|