| Author |
Message |
 |
|
|
|
|
Advert
|
Forum adverts like this one are shown to any user who is not logged in. Join us by filling out a tiny 3 field form and you will get your own, free, dakka user account which gives a good range of benefits to you:
- No adverts like this in the forums anymore.
- Times and dates in your local timezone.
- Full tracking of what you have read so you can skip to your first unread post, easily see what has changed since you last logged in, and easily see what is new at a glance.
- Email notifications for threads you want to watch closely.
- Being a part of the oldest wargaming community on the net.
If you are already a member then feel free to login now. |
|
 |
2015/06/24 05:39:19
Subject: Re:Peregrine's DKoK - Updated 6/19: something big is almost here!
|
|

Douglas Bader
|
Yep. And updates for the update throne!
|
There is no such thing as a hobby without politics. "Leave politics at the door" is itself a political statement, an endorsement of the status quo and an attempt to silence dissenting voices. |
|
|
 |
|
2015/06/24 12:23:48
Subject: Re:Peregrine's DKoK - Updated 6/19: something big is almost here!
|
|

Member of a Lodge? I Can't Say
|
MMOOOAAARRR!!!!!  
|
|
|
|
|
|
2015/10/07 17:17:08
Subject: Peregrine's DKoK - Updated 6/19: something big is almost here!
|
|
Rookie Pilot
Ohiowa
|
Seriously impressive. Thanks for posting these!
How do you like the acrylic rods for your flight stands? Did/do you have any trouble with the bases?
|
|
|
|
|
2015/10/07 17:25:34
Subject: Re:Peregrine's DKoK - Updated 6/19: something big is almost here!
|
|
Land Raider Pilot on Cruise Control
|
Your rust is incredible and very realistic. Love the snow and the terrain. First time I've seen this thread. Thanks for posting updates!
|
|
|
|
|
2015/10/08 05:39:28
Subject: Peregrine's DKoK - Updated 6/19: something big is almost here!
|
|
Douglas Bader
|
Ether wrote:How do you like the acrylic rods for your flight stands?
Much better than the standard GW flying base (which my FW flyers don't have sockets for anyway). The simple rod looks neater than the ugly and bulky GW X shape, and the extra height looks a lot better. The only downside is that the way I've mounted them (no ugly socket on the model, just balanced on the rod with a pin for stability) combined with giving heavy resin models a higher center of gravity makes them more vulnerable to being knocked over, as I've had the misfortune of finding out the hard way. It's worth it for the aesthetic improvement IMO, but you do have to be very careful with them. Though maybe it's not so bad with plastic kits since they're a lot lighter than my resin aircraft.
Did/do you have any trouble with the bases?
None at all. I buy them pre-drilled so I just stick the rod in once the scenery is done.
|
There is no such thing as a hobby without politics. "Leave politics at the door" is itself a political statement, an endorsement of the status quo and an attempt to silence dissenting voices. |
|
|
|
|
2015/10/11 17:48:29
Subject: Peregrine's DKoK - Updated 6/19: something big is almost here!
|
|

Inquisitorial Keeper of the Xenobanks
|
Your thread is just so...realistic, everything seems so real !
It is really impressive.
Thanks for sharing !
|
|
|
|
|
|
2015/10/30 19:04:37
Subject: Peregrine's DKoK - Updated 6/19: something big is almost here!
|
|
Ultramarine Master with Gauntlets of Macragge
What's left of Cadia
|
Those are some of the best looking death korps I have ever seen. Outstanding work. I'll be keeping an eye on this
|
TheEyeOfNight- I swear, this thread is 70% smack talk, 20% RP organization, and 10% butt jokes
TheEyeOfNight- "Ordo Xenos reports that the Necrons have attained democracy, kamikaze tendencies, and nuclear fission. It's all tits up, sir."
Space Marine flyers are shaped for the greatest possible air resistance so that the air may never defeat the SPACE MARINES!
Sternguard though, those guys are all about kicking ass. They'd chew bubble gum as well, but bubble gum is heretical. Only tau chew gum
|
|
|
|
|
2015/11/04 06:29:47
Subject: Re:Peregrine's DKoK - Updated 6/19: something big is almost here!
|
|
Douglas Bader
|
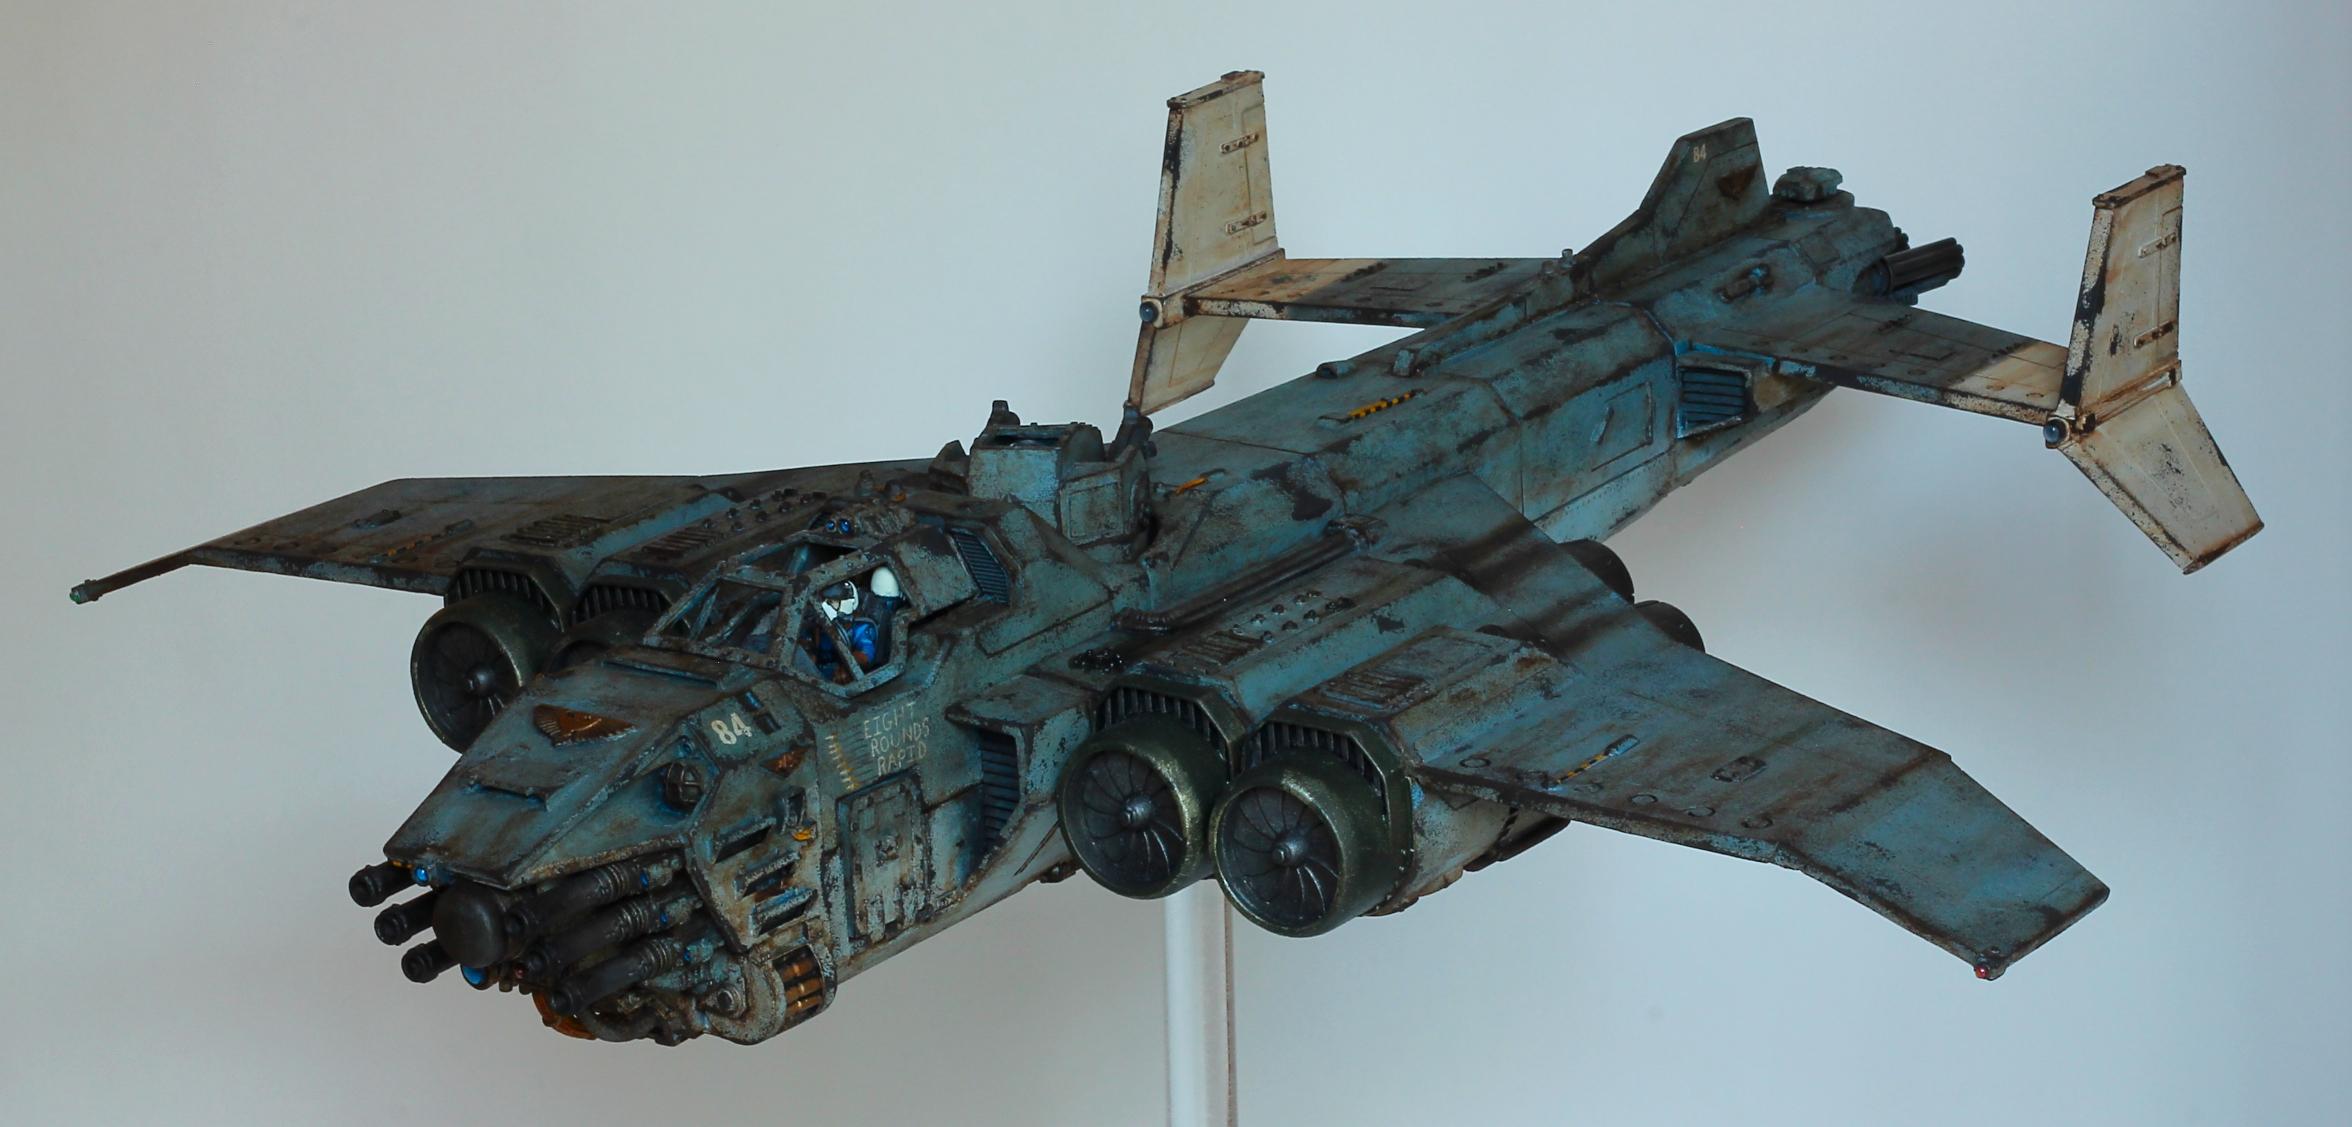
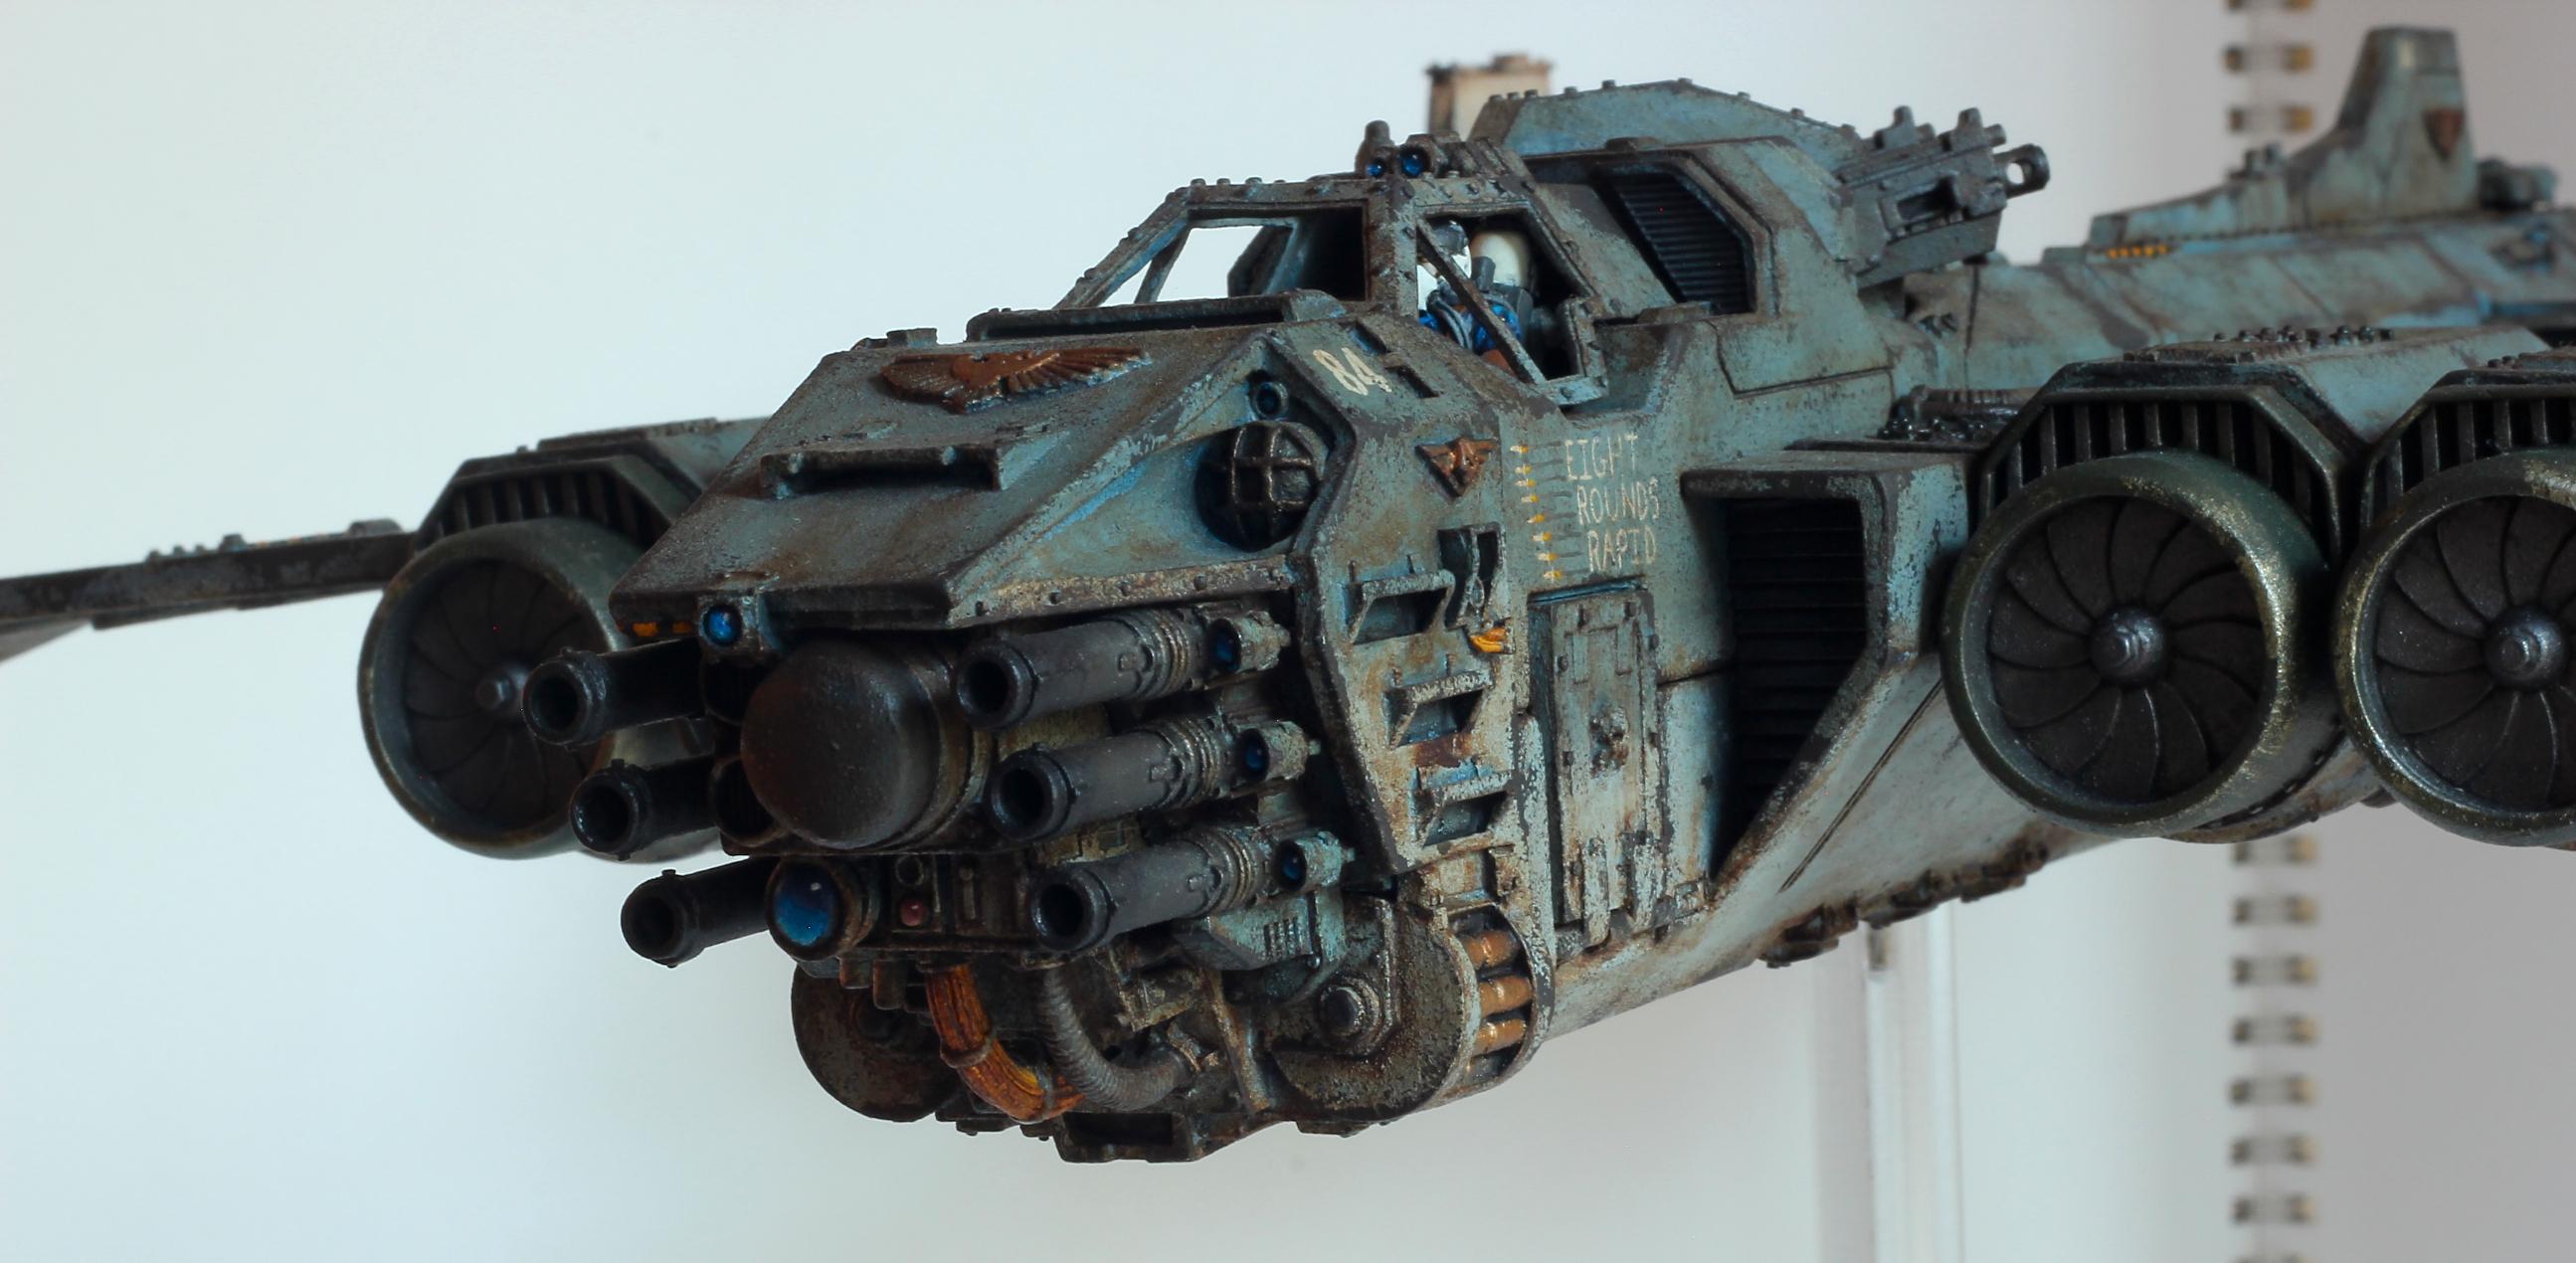
This is an old model, but I finally got around to getting some decent pictures of it (be sure to view it at full size, the image is huge):
|
|
This message was edited 1 time. Last update was at 2015/11/04 06:30:20
There is no such thing as a hobby without politics. "Leave politics at the door" is itself a political statement, an endorsement of the status quo and an attempt to silence dissenting voices. |
|
|
|
|
2015/11/04 07:58:52
Subject: Peregrine's DKoK - Updated 11/4: Vulture Gunship
|
|
Pious Palatine
|
Very nice. It really is a great model.
EDC
|
|
|
|
|
2015/11/04 15:06:02
Subject: Peregrine's DKoK - Updated 11/4: Vulture Gunship
|
|
Longtime Dakkanaut
|
Again, Peregrine, your skill at presenting what appear to be truly 'used' weapons of the Imperial Guard is simply astounding - I am green with envy.
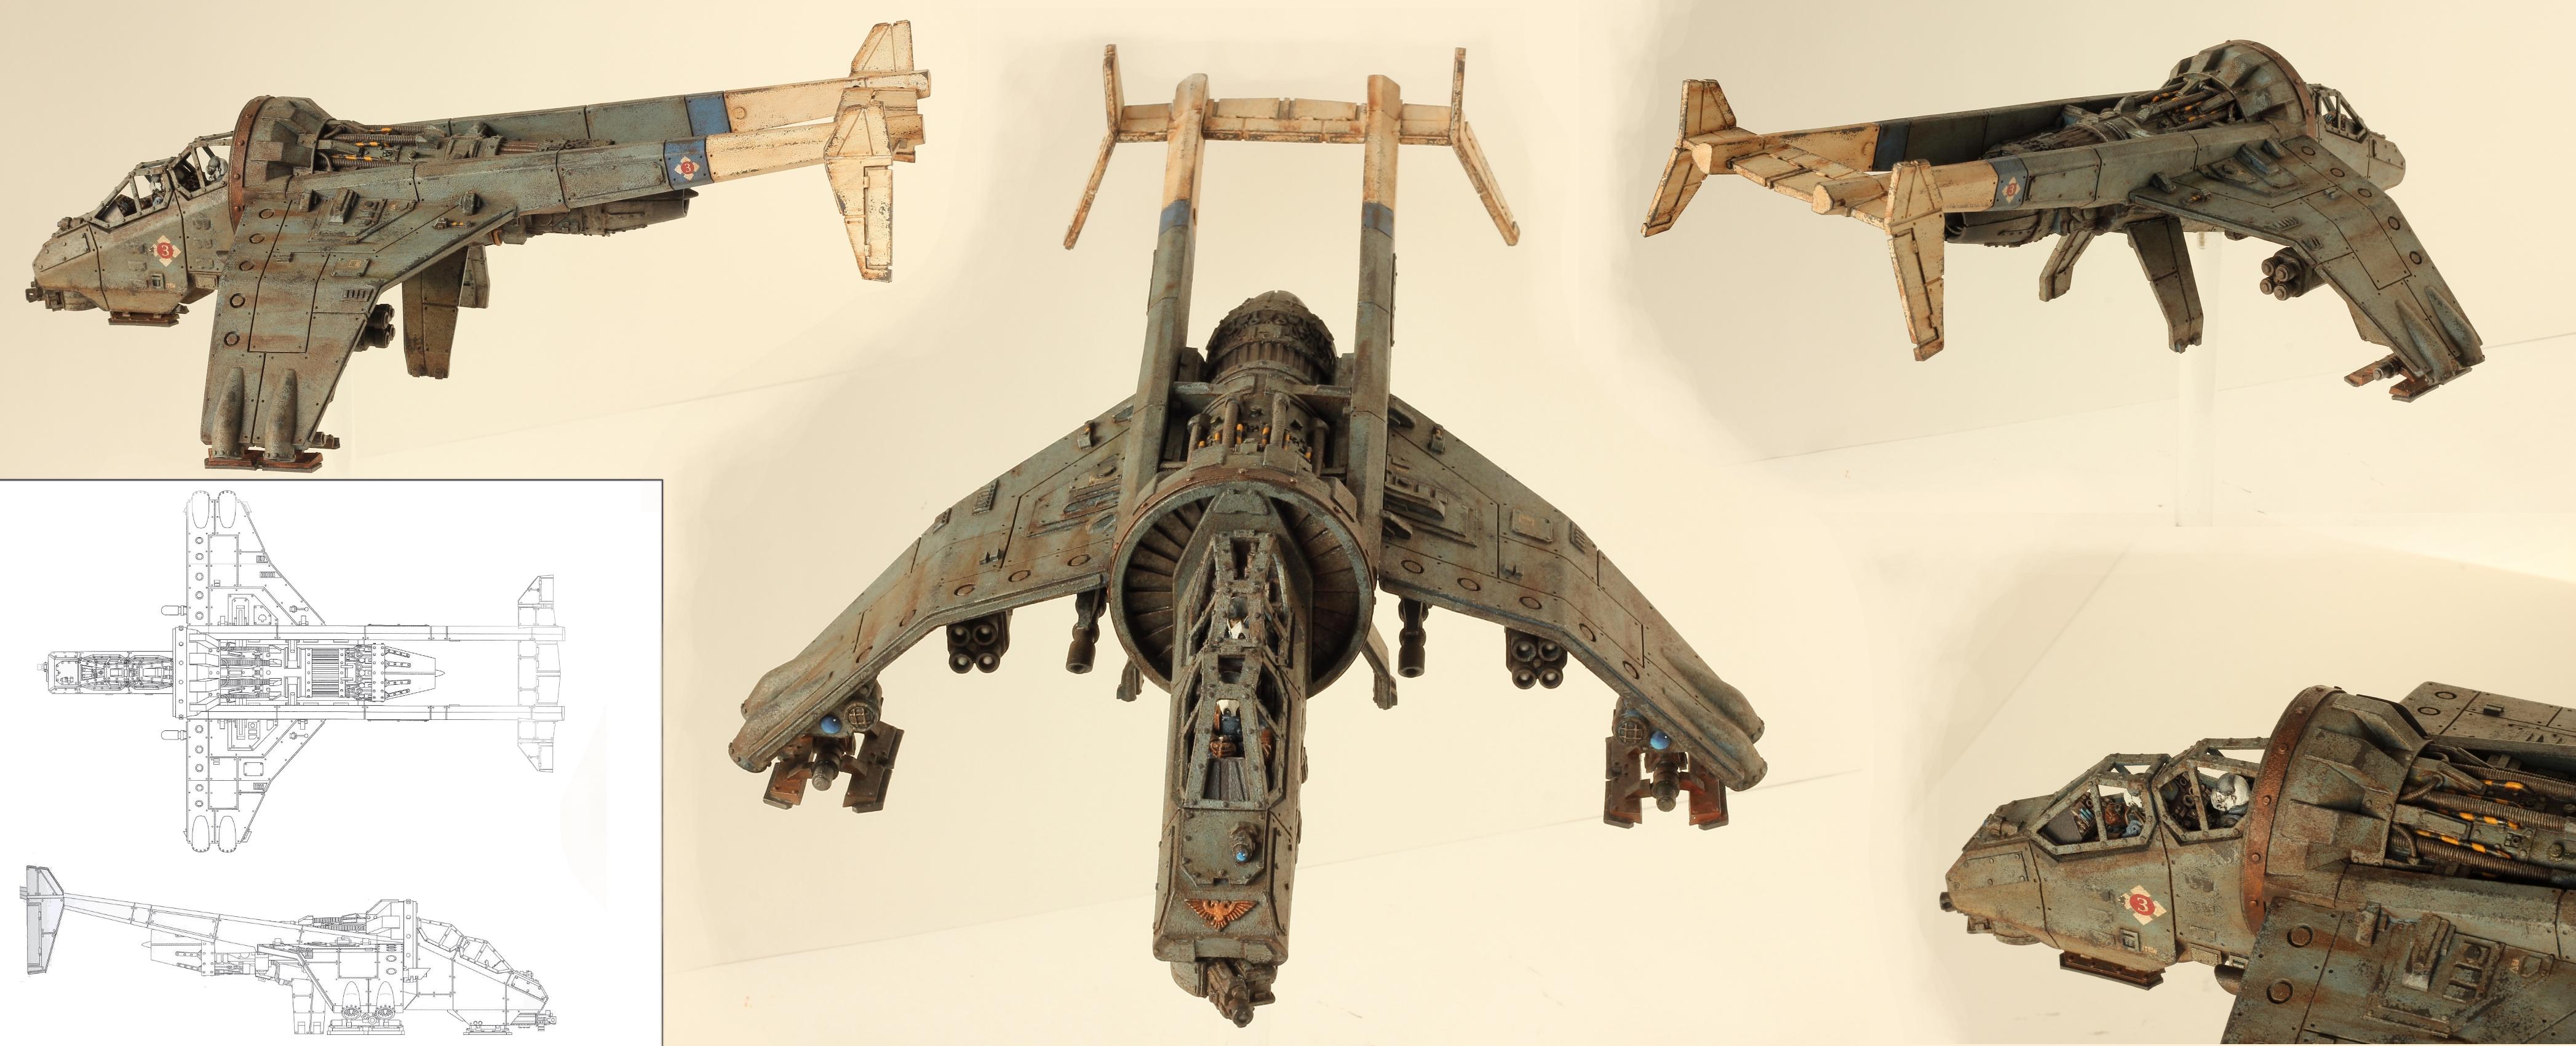
As for the Marauder cockpit, I've heard from different folks that getting the two crew members to sit nicely in the actual cockpit is quite a feat - as FW parts tend to suffer from the few and far between 'bent' syndrome. I must say though, yours are breathtaking, did you have any issues building that monster?
|
|
This message was edited 1 time. Last update was at 2015/11/04 15:06:32
 Shadowkeepers (4000 points) Shadowkeepers (4000 points)
 3rd Company (3000 points) 3rd Company (3000 points) |
|
|
|
|
2015/11/04 20:44:20
Subject: Peregrine's DKoK - Updated 11/4: Vulture Gunship
|
|
Douglas Bader
|
 Frankenberry wrote: Frankenberry wrote:As for the Marauder cockpit, I've heard from different folks that getting the two crew members to sit nicely in the actual cockpit is quite a feat - as FW parts tend to suffer from the few and far between 'bent' syndrome. I must say though, yours are breathtaking, did you have any issues building that monster?
No problem with the actual fit, the parts were all just fine. The only problem is that you have to put the crew in before you glue the cockpit floor in, since you have to lift the back one up a bit to slide the front one in and the control panels across the back one's lap lock it in place. Thankfully I test-fit everything before gluing it and figured it out before it became a problem.
As for the rest of the model, not too many issues besides the usual warped parts. The engines had to be filed down a bit on their inside surfaces (not visible on the finished model) to get the wings to fit properly, and the tail section has a bit more of a gap than I'd like, but overall it was no worse than any other FW kit I've built. The main thing to know about building one is that you MUST pin it together. It's a really heavy model with a lot of weight on some of the joints. You should be able to assemble the whole kit (other than small decorative parts like the cockpit window frame) with just your pins, the only thing the glue should be doing is keeping the pinned parts from sliding back out of their sockets.
|
There is no such thing as a hobby without politics. "Leave politics at the door" is itself a political statement, an endorsement of the status quo and an attempt to silence dissenting voices. |
|
|
|
|
2015/11/04 22:52:19
Subject: Peregrine's DKoK - Updated 11/4: Vulture Gunship
|
|
Tail-spinning Tomb Blade Pilot
In a chair, staring at a screen
|
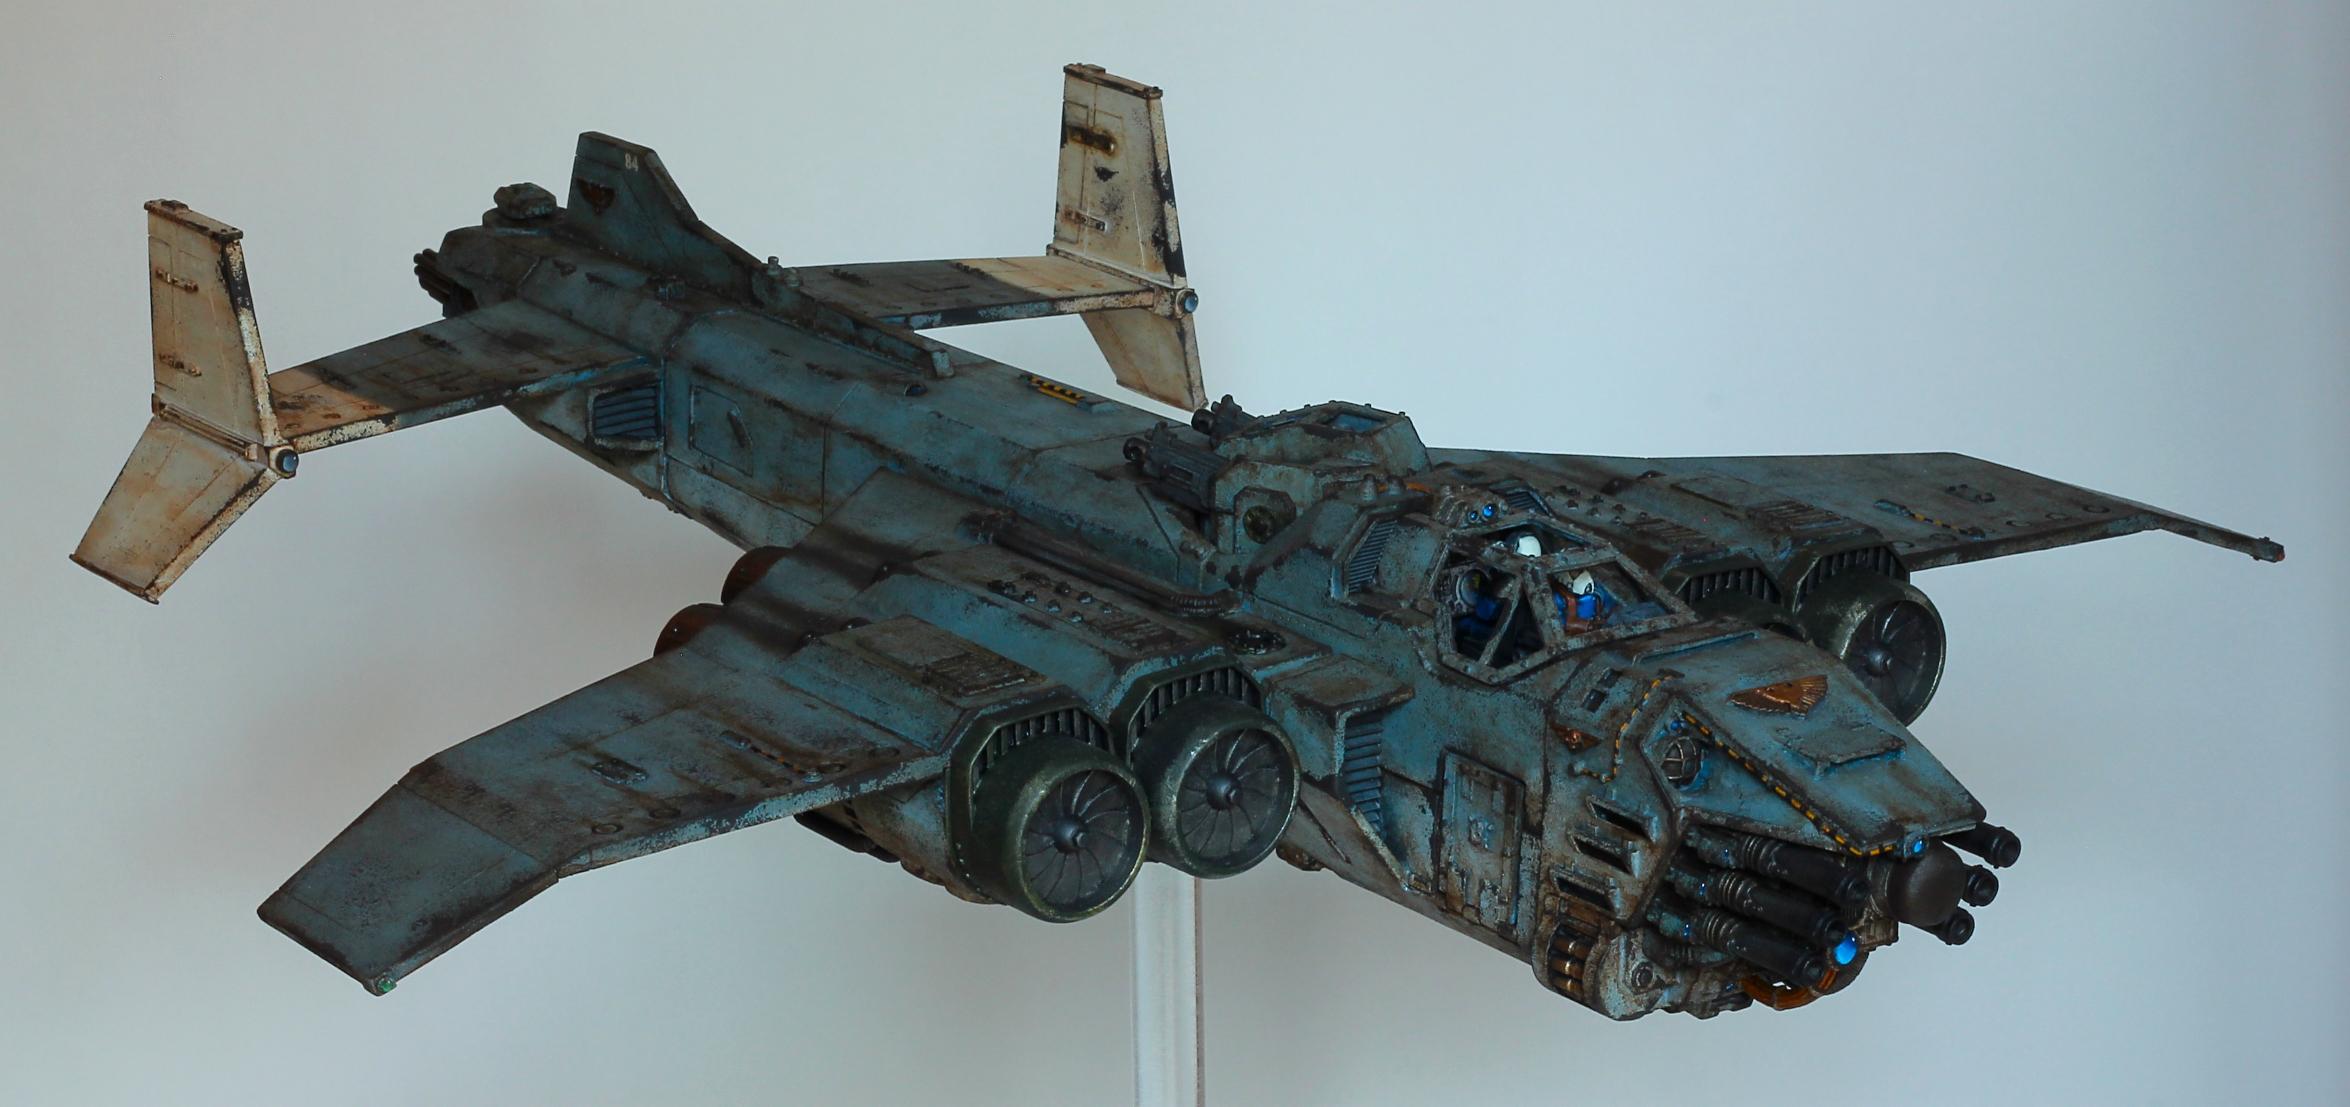
Great paint scheme, the faded blue is perfect.
|
 1500 pts 1500 pts
 2000pts 2000pts |
|
|
|
|
2015/11/05 03:07:10
Subject: Peregrine's DKoK - Updated 11/4: Vulture Gunship
|
|
Ragin' Ork Dreadnought
Deep in the Outer Boroughs of NYC
|
Smashing! I love the tail on that thing. Great paint job.
|
|
|
|
|
|
2015/12/10 09:15:56
Subject: Re:Peregrine's DKoK - Updated 11/4: Vulture Gunship
|
|
Douglas Bader
|
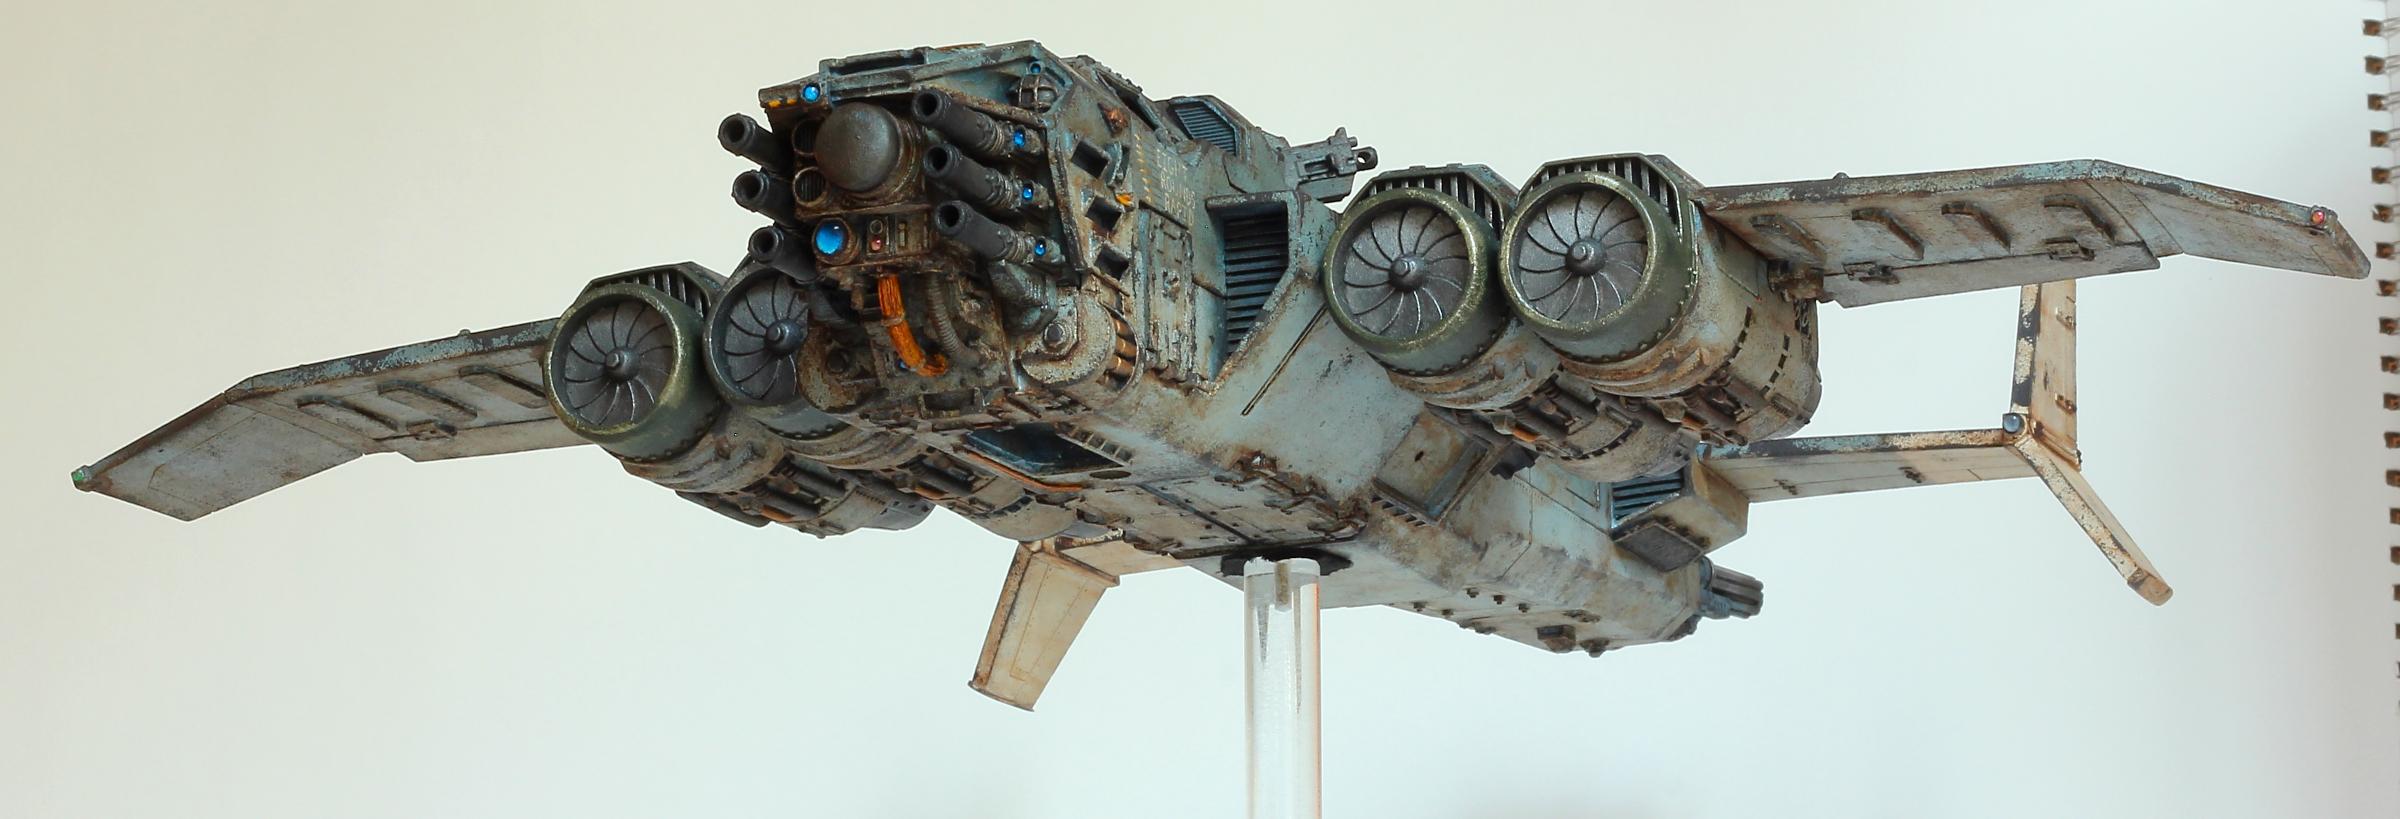
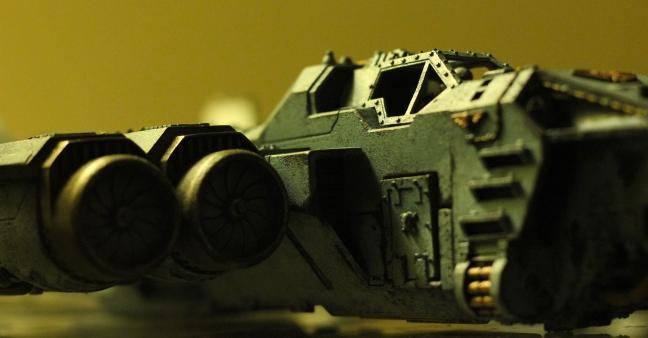
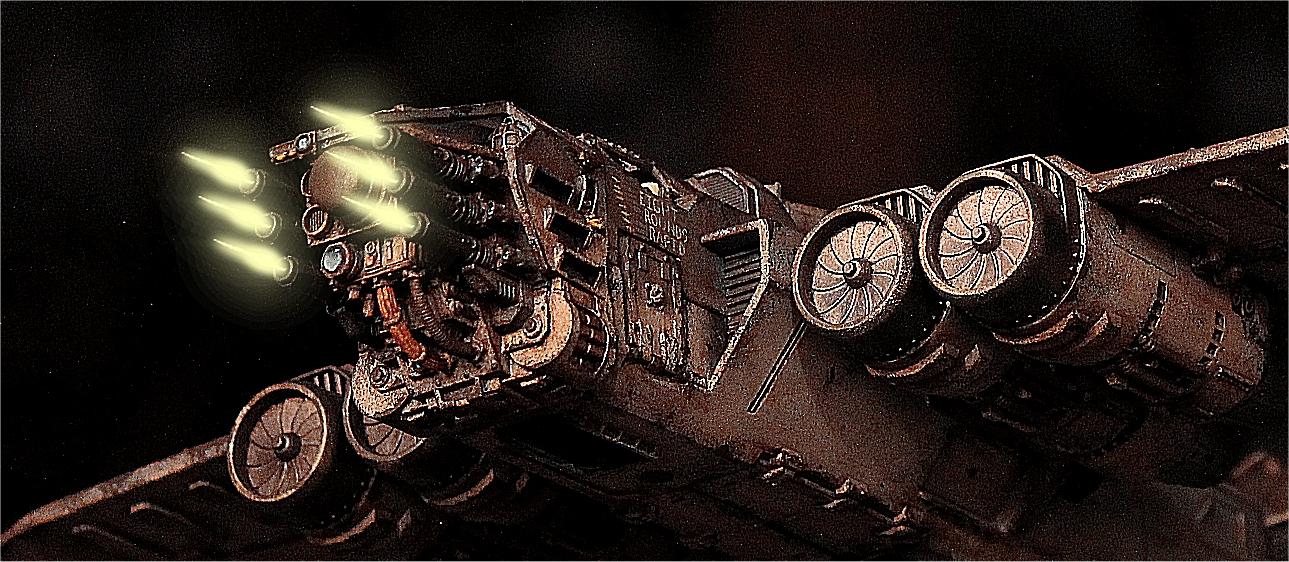
Well, it's the middle of the night, so I suppose I'll post a shot from my latest night fight:
|
There is no such thing as a hobby without politics. "Leave politics at the door" is itself a political statement, an endorsement of the status quo and an attempt to silence dissenting voices. |
|
|
|
|
2015/12/11 02:05:46
Subject: Re:Peregrine's DKoK - Updated 12/10: Midnight Update
|
|
Douglas Bader
|
|
There is no such thing as a hobby without politics. "Leave politics at the door" is itself a political statement, an endorsement of the status quo and an attempt to silence dissenting voices. |
|
|
|
|
2015/12/11 02:20:38
Subject: Peregrine's DKoK - Updated 12/10: MARAUDER DESTROYER
|
|
Growlin' Guntrukk Driver with Killacannon
|
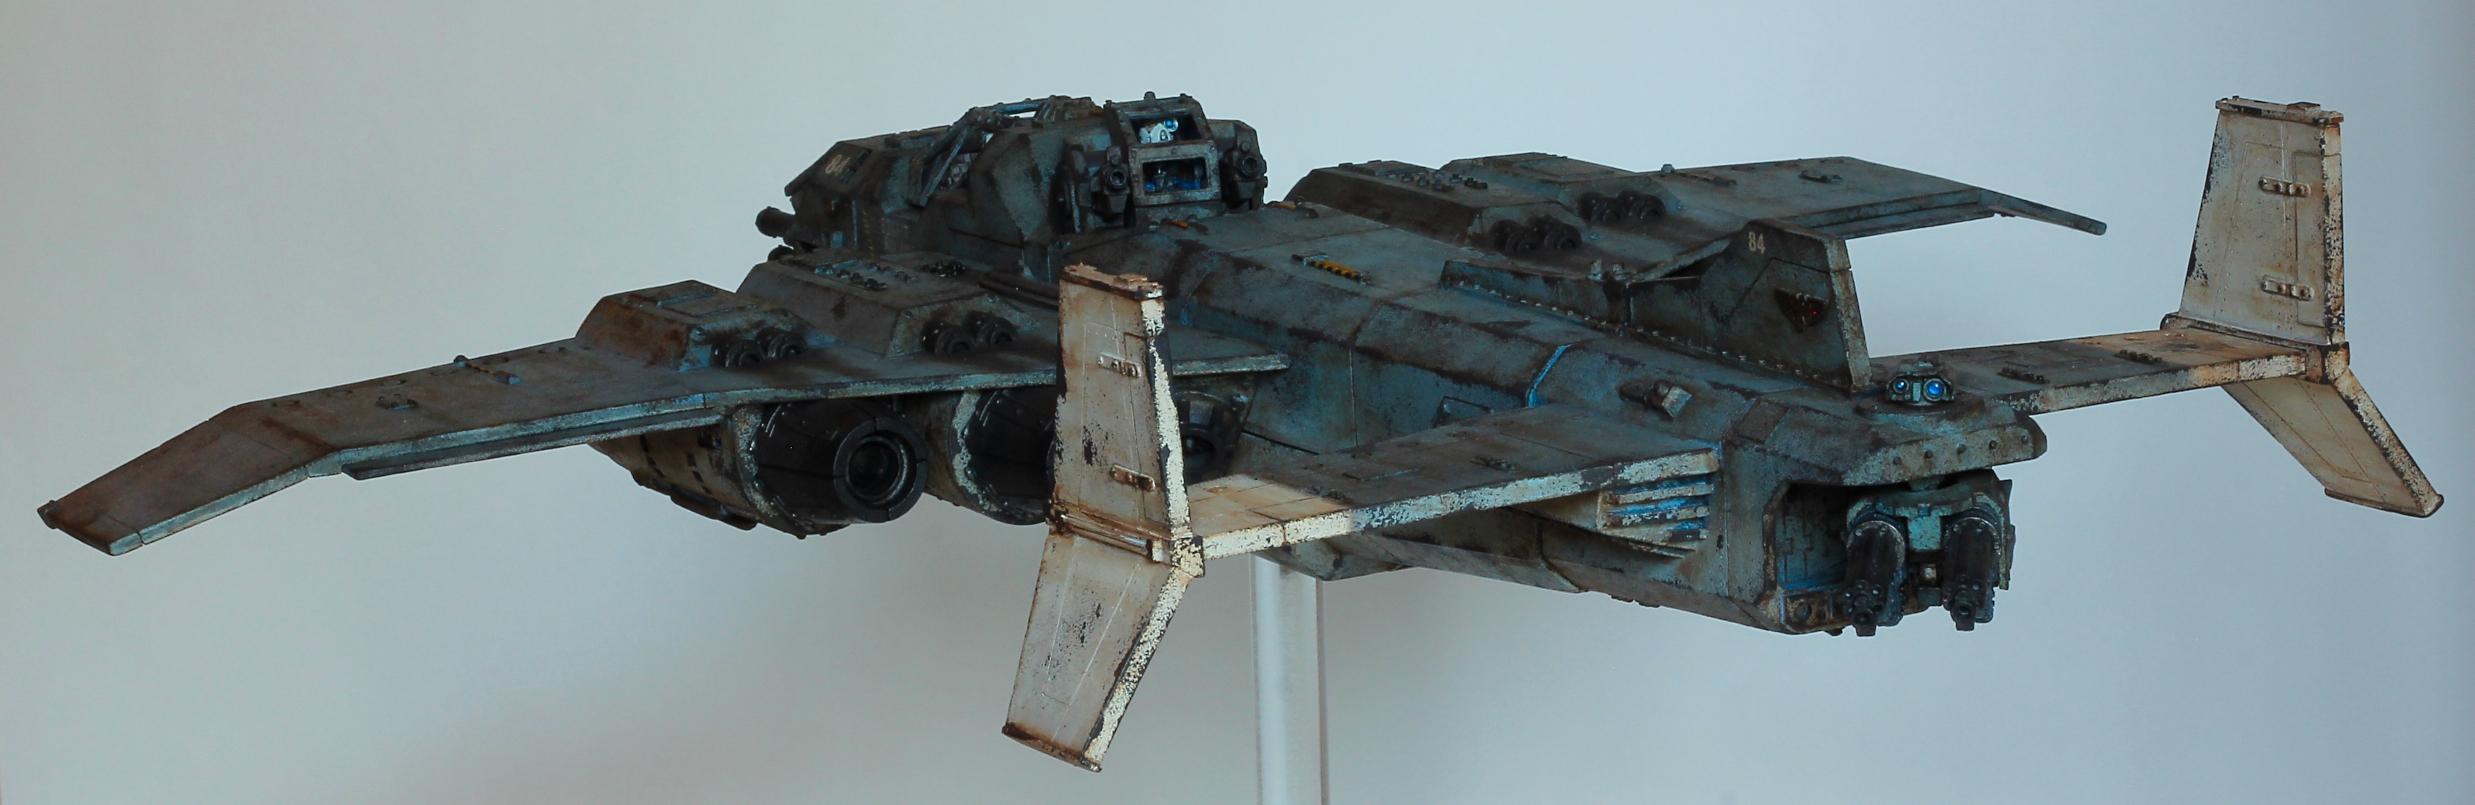
Such a nice model, always think it should be bigger for some reason haha might be because i never see it in comparison. 
|
|
|
|
|
|
2015/12/11 03:05:22
Subject: Peregrine's DKoK - Updated 12/10: MARAUDER DESTROYER
|
|
Douglas Bader
|
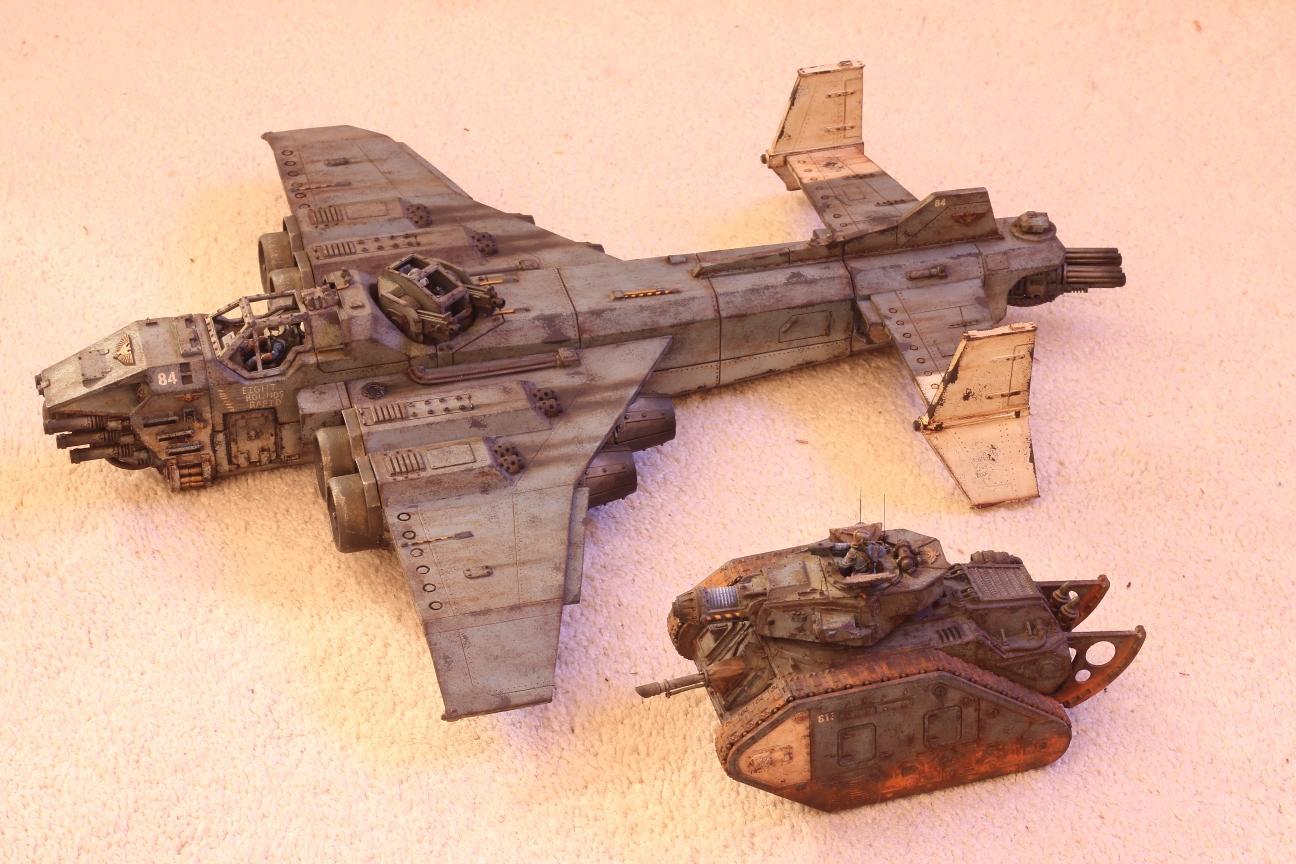
 stonned_astartes wrote: stonned_astartes wrote:Such a nice model, always think it should be bigger for some reason haha might be because i never see it in comparison.
Oh, it's a big model. Size comparison with a LRBT:
|
There is no such thing as a hobby without politics. "Leave politics at the door" is itself a political statement, an endorsement of the status quo and an attempt to silence dissenting voices. |
|
|
|
|
2015/12/11 03:53:39
Subject: Peregrine's DKoK - Updated 12/10: MARAUDER DESTROYER
|
|

Arch Magos w/ 4 Meg of RAM
|
Gorgeous work!
|
|
|
|
|
|
2015/12/11 04:07:01
Subject: Peregrine's DKoK - Updated 12/10: MARAUDER DESTROYER
|
|
Imperial Guard Landspeeder Pilot
On moon miranda.
|
That Marauder looks awesome, I really love those massed autocanon gunbarrels.
|
IRON WITHIN, IRON WITHOUT.
New Heavy Gear Log! Also...Grey Knights!
The correct pronunciation is Imperial Guard and Stormtroopers, "Astra Militarum" and "Tempestus Scions" are something you'll find at Hogwarts. |
|
|
|
|
2015/12/11 05:11:01
Subject: Peregrine's DKoK - Updated 12/10: MARAUDER DESTROYER
|
|
Ultramarine Master with Gauntlets of Macragge
What's left of Cadia
|
The Marauder looks great! It just looks so menacing. How does it do in game? I've considered picking up some FW stuff for my Guard when I get around to expanding them
|
TheEyeOfNight- I swear, this thread is 70% smack talk, 20% RP organization, and 10% butt jokes
TheEyeOfNight- "Ordo Xenos reports that the Necrons have attained democracy, kamikaze tendencies, and nuclear fission. It's all tits up, sir."
Space Marine flyers are shaped for the greatest possible air resistance so that the air may never defeat the SPACE MARINES!
Sternguard though, those guys are all about kicking ass. They'd chew bubble gum as well, but bubble gum is heretical. Only tau chew gum
|
|
|
|
|
2015/12/11 06:43:40
Subject: Peregrine's DKoK - Updated 12/10: MARAUDER DESTROYER
|
|
Pious Palatine
|
Very cool. And that is a big model. Does it use a regular flying base?
EDC
|
|
|
|
|
2015/12/11 12:26:03
Subject: Peregrine's DKoK - Updated 12/10: MARAUDER DESTROYER
|
|
Growlin' Guntrukk Driver with Killacannon
|
 Peregrine wrote: Peregrine wrote: stonned_astartes wrote:Such a nice model, always think it should be bigger for some reason haha might be because i never see it in comparison.
Oh, it's a big model. Size comparison with a LRBT:
That what i call a bomber!
|
|
|
|
|
|
2015/12/13 01:58:54
Subject: Peregrine's DKoK - Updated 12/10: MARAUDER DESTROYER
|
|
Douglas Bader
|
No idea, I haven't had a chance to use it yet. My impression of the rules is that it's a decent unit, not so terrible that you auto-lose by taking it but not anywhere near top-tier power.
Oh god no. On a regular flying base you'd have bomber pieces all over the floor within minutes, and it would look ridiculous being half a wing-length off the table. Right now it's on a large resin base specifically designed for LoW models and an acrylic rod, and eventually I'm going to put it on a custom diorama base.
|
There is no such thing as a hobby without politics. "Leave politics at the door" is itself a political statement, an endorsement of the status quo and an attempt to silence dissenting voices. |
|
|
|
|
2016/01/03 23:40:01
Subject: Re:Peregrine's DKoK - Updated 1/3 and onward: weathering tutorial
|
|
Douglas Bader
|
People keep asking how I do the weathering on my tanks, so now I'm finally going to take some step-by-step shots of the process with my next LRBT.
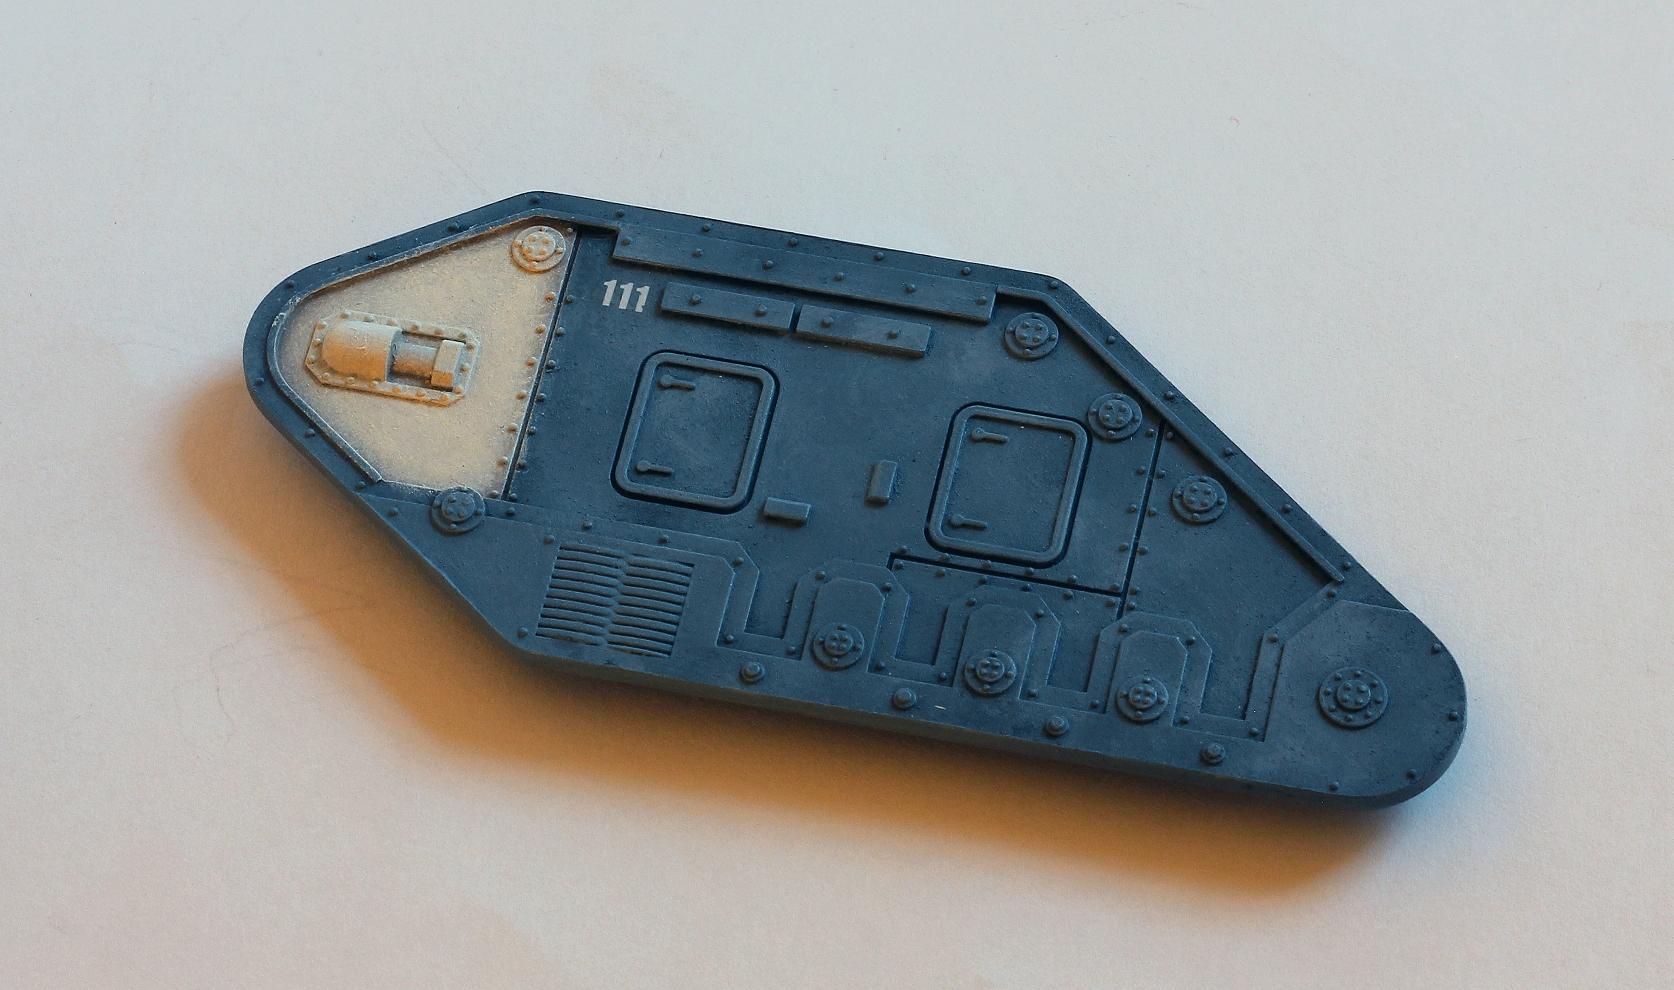
STEP 1: BASE COAT
Paint the base color and add any decals for squadron markings, etc. I do the base color with heavy drybrushing (more of a damp brush than a dry brush), building up from dark to light over the entire surface of the model. Adding a little shading depth in the low spots is a useful benefit, but the main goal is to add some color variation. Paint isn't going to fade or get dirty in nice even patterns, so a little variation breaks up the large areas of smooth color. Keep it subtle though, just enough for your eye to read it as a complex surface and not a single uniform color. The one thing I do NOT do is any detail bits that shouldn't have paint chipping on them (exposed metal, etc). The chipping step is not precise and will get chips on those areas, so don't bother painting them yet.
Once the base coat is done make sure to add all decals, using the standard gloss -> decal -> gloss -> matte process. It's important to get them on at this point because you need all of the weathering layers to apply to them or it won't look right.
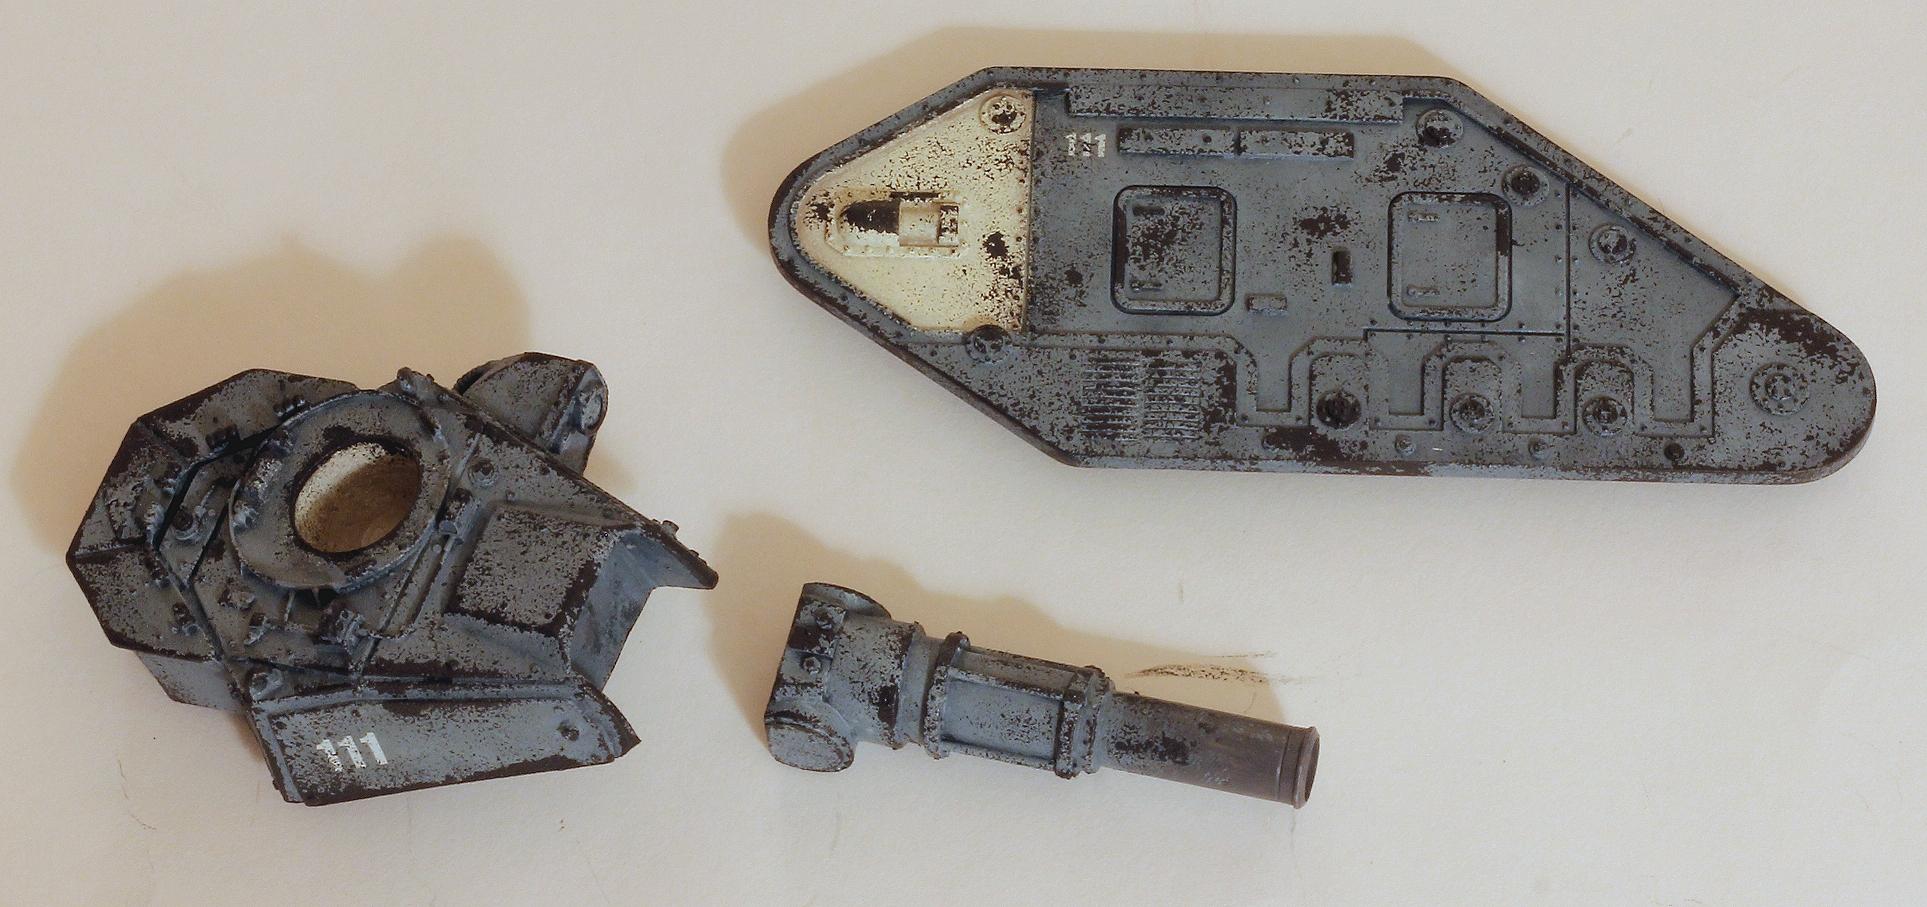
 STEP 2: CHIPPING
This is representing areas where the paint has worn away to expose the primer layer beneath it, and also helps to add some depth and emphasize edges. Mix a dark gray or dark gray-brown shade, depending on your preferences. Pure black look unnatural, so don't go quite that far. Dip a piece of foam (I use the backing foam from metal models) in the paint, then wipe off most of it like you would for drybrushing. Then press the foam against the model just enough to leave spots of paint, without turning into a heavy blob. Focus on edges and areas that would see the heaviest wear, but add at least a few chips in the middle of flat surfaces to break up the uniform color. How heavily you do this is personal preference. Use a very light touch if you want just a little wear like any tank will immediately accumulate, do it heavily if you want an old beat-up tank.
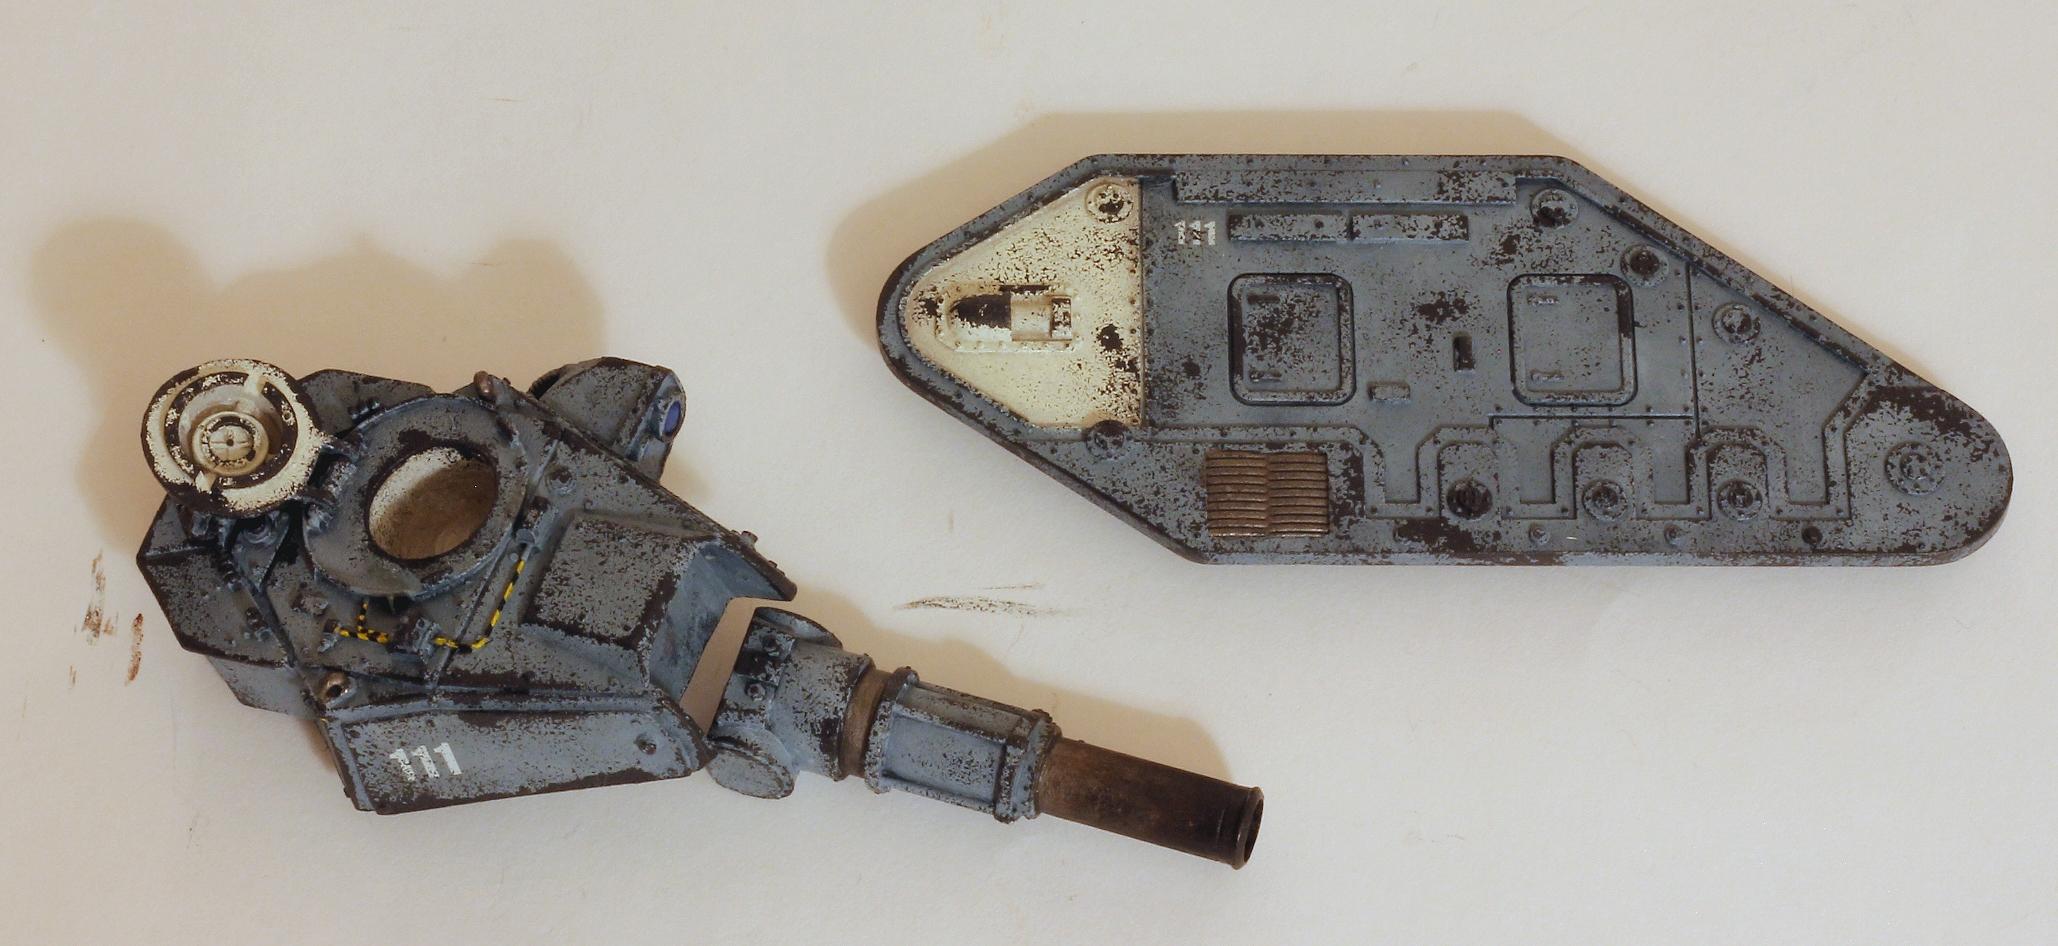
 STEP 3: FINAL BASE PAINTING
Now that the chips are done you go back and add the things that wouldn't be chipped. In this case it's bare metal like the gun barrels, the yellow and black hazard stripes on the turret cables, etc. The only thing I don't do at this step is lenses, since I've found that the final matte varnish layer tends to dull them too much.
Also in this picture you can see some of the soot stains on the gun barrel. These are done with a heavy drybrush of brown, building up towards the source of the exhaust and fading out away from it. Then go back and repeat the process with black, pure black at the very end and quickly fading out to brown.
|
There is no such thing as a hobby without politics. "Leave politics at the door" is itself a political statement, an endorsement of the status quo and an attempt to silence dissenting voices. |
|
|
|
|
2016/01/04 03:53:28
Subject: Peregrine's DKoK - Updated 1/3 and onward: weathering tutorial
|
|
Arch Magos w/ 4 Meg of RAM
|
Very nice and consise tutorial there Peregrine. End result looks the business 
|
|
|
|
|
|
2016/01/04 04:43:32
Subject: Peregrine's DKoK - Updated 1/3 and onward: weathering tutorial
|
|
Douglas Bader
|
 Januine wrote: Januine wrote:Very nice and consise tutorial there Peregrine. End result looks the business
Just to clarify, the tutorial isn't over. I'll be posting pictures as I do stuff, but there are several layers that need to dry for a day or two before moving on to the next step. Next up is the oil wash, but it can really tear up acrylic paint that isn't completely cured (in this case, all of those nice paint chips could be rubbed off) so I'm going to wait a while before doing it. Then it's probably another week or more, depending on the weather, before adding the weathering powders, and finally oil/grease stains and lenses.
(That's on top of a week or so for the decals after doing the base coat. A tank like this takes about a month to finish, depending on how the weather is for spraying the dullcote layers.)
|
|
This message was edited 2 times. Last update was at 2016/01/04 04:46:20
There is no such thing as a hobby without politics. "Leave politics at the door" is itself a political statement, an endorsement of the status quo and an attempt to silence dissenting voices. |
|
|
|
|
2016/02/13 12:18:56
Subject: Re:Peregrine's DKoK - Updated 1/3 and onward: weathering tutorial
|
|
Douglas Bader
|
And, after a nice long break to let the paint dry, we come to the next part of the tutorial:
Step 4: Oil Wash
WARNING: THIS STEP WILL DESTROY YOUR WORK FROM PREVIOUS STEPS IF YOU DO NOT ALLOW THE PAINT TO FULLY CURE FIRST. UNDERSTAND THE DIFFERENCE BETWEEN CURING AND DRYING, AND ALLOW SEVERAL DAYS AT MINIMUM BEFORE STARTING.
That said, welcome to the part where the tank really comes to life. The goal here is to accomplish two things:
1) Add the assorted dust/staining/etc that will accumulate on a heavily-weathered vehicle.
2) Add more depth and shading to the rather plain base coat.
The reason for using oil paint here is that it takes much longer to dry than acrylics. Without drying re tarder added acrylic paint will be dry and permanent (short of tearing up everything trying to remove it) within minutes of putting it on the model, and will start to become difficult to work with within seconds. Oil paint, on the other hand, remains "wet" for hours to days. If you don't like something you can just use a wet brush to fix it, or even wipe the paint off entirely and start over. Of course the drawback here is that your paint will remain wet for hours, and vulnerable to damage for several days at least. You'll have to handle your parts very carefully if you don't want to rub the paint off, and think carefully about how you're going to hold each piece as you paint it.
Now, I said this is a wash, but it's really more of a filter. You're trying to change the color of the model to a dirty brown tint, not add heavy shadows like a true wash. You're going to cover the whole model with it and not worry about which areas would be in shadow (though just because of the nature of a wash you'll get some shadowing). So, how to do it:
1) Thin down some burnt umber paint. I use Winsor and Newton water soluble paint (for cleanup convenience), but whatever your local art supply store has will work. You're aiming for a thickness a little heavier than GW paints straight out of the pot.
2) Paint small dots and streaks onto the model. Aim for rivets, corners where dirt could collect, etc. Don't worry too much about precision, you're going to wipe most of it elsewhere, but if you're going to have darker areas they might as well be in the appropriate places. Use very small dots if you only want a light shift in color, use lots if you want a heavy brown where the base color is barely showing through. I usually cover a whole part (turret, side of a tank, etc) at once so everything blends together across the entire surface.
3) Dip a brush in thinner (or water, if you're like me and use the water soluble kind) so it's wet but not overloaded. Brush it over the painted-on spots so the paint starts to thin and flow across the entire surface like a wash.
4) Adjust the placement of the paint to suit your preferences. Push the wash around with a brush to collect it where you want the darkest shades. Add thinner/water to areas you want to lighten, or even wipe off some of the wash. Add paint directly onto the damp model and blend it in if you want a spot to be darker. Add a spot of paint and drag it along the surface if you want a distinct streak, but remember that you'll be doing oil and grease stains later. If you get tide marks be thankful you're using oil paint instead of an acrylic wash, and just soften them with a damp brush. This is where you fine-tune the look of the model and exactly what you do will depend on how you want it to look.
5) WAIT. Don't touch any painted surfaces for a few hours at least. When you do finally handle your parts do it very gently and try to touch as little of the model as possible. Let the parts dry for at least a few days before you do anything else with them, and if you can wait a week or more it's even better. In fact, just put the model on a shelf for a month and work on something else for a while.
Now, the clever readers might be thinking that some of this sounds familiar. This is really just a very simplified version of weathering techniques that are popular in the historical modeling community. It won't look as nice, but it's a lot faster! If you want better results you'll need to use multiple colors and a lot more blending instead of just throwing a wash across the whole model. But I think it looks good enough for the gaming table.
Anyway, the final result of this step:
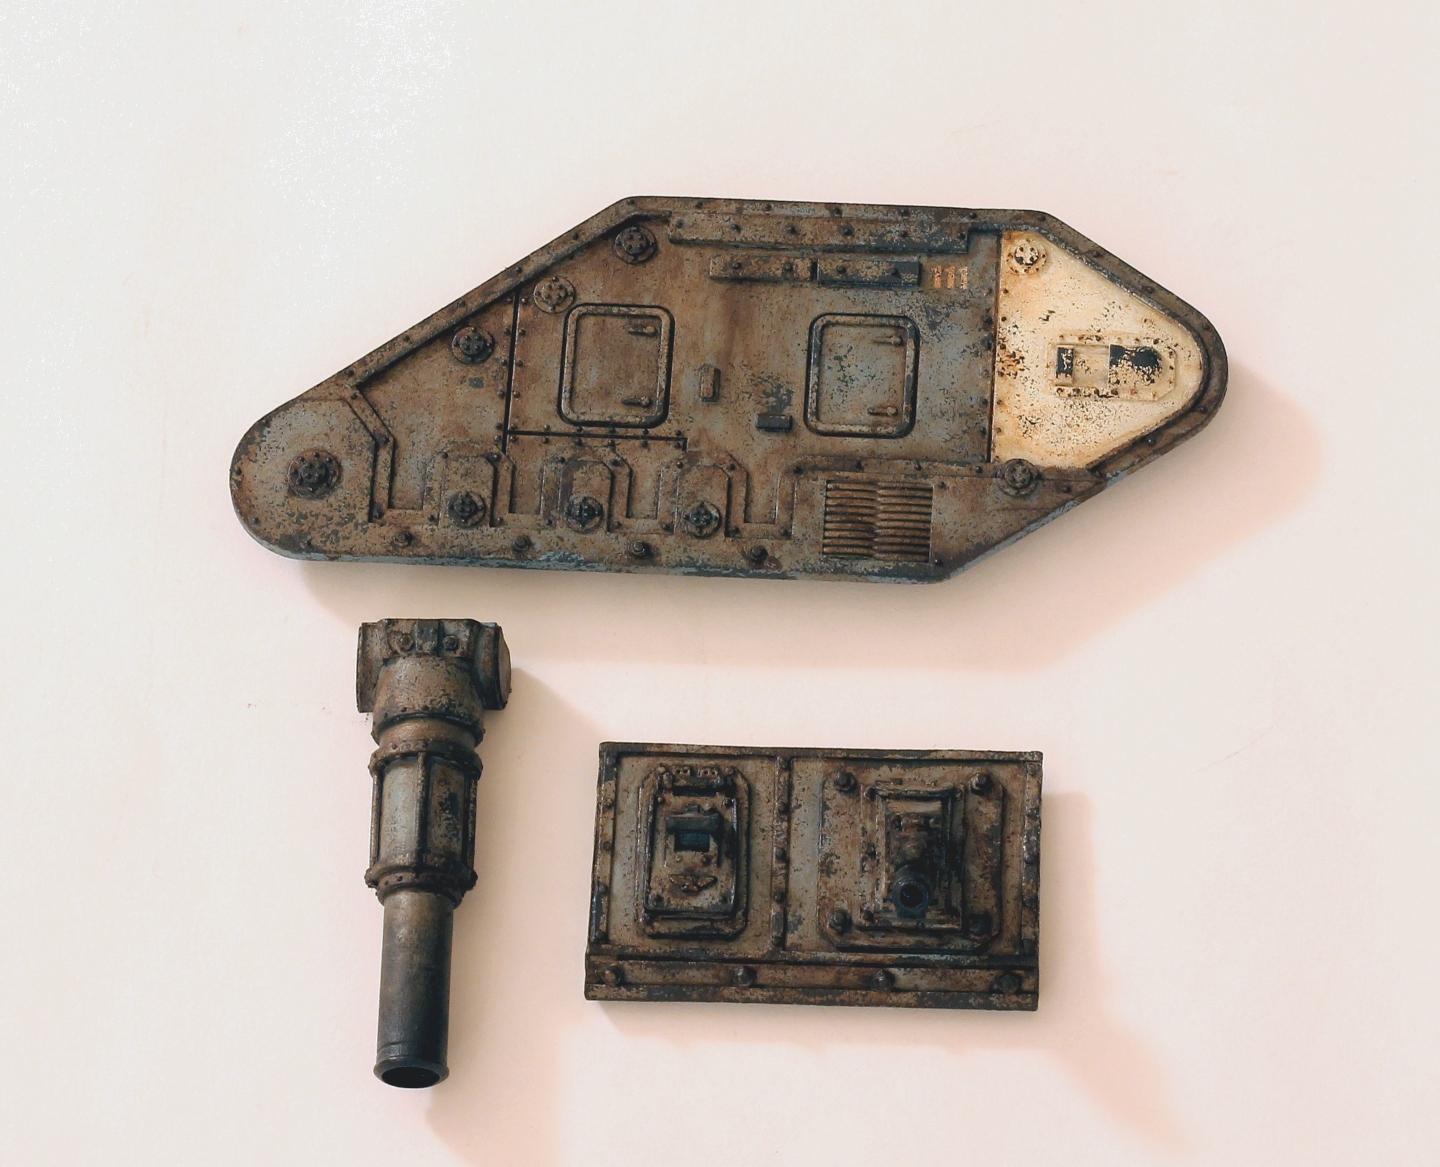
See you in a month with the next step. The end is in sight!
|
There is no such thing as a hobby without politics. "Leave politics at the door" is itself a political statement, an endorsement of the status quo and an attempt to silence dissenting voices. |
|
|
|
|
2016/02/13 12:56:59
Subject: Peregrine's DKoK - Updated 1/3 and onward: weathering tutorial
|
|

Arch Magos w/ 4 Meg of RAM
|
Loving this whole tut peregrine. Thx for taking the time to put it together. Really nice and indepth. Definitely gonna give oils a base. Till next month
|
|
|
|
|
|
2016/02/13 13:04:39
Subject: Peregrine's DKoK - Updated 1/3 and onward: weathering tutorial
|
|
Arch Magos w/ 4 Meg of RAM
|
Yeah, great stuff so far!
|
Bye bye Dakkadakka, happy hobbying! I really enjoyed my time on here. Opinions were always my own :-) |
|
|
|
|
2016/04/16 00:54:29
Subject: Re:Peregrine's DKoK - Updated 1/3 and onward: weathering tutorial
|
|
Douglas Bader
|
And, after returning from a long forum vacation, we're back with the next part of the tutorial:
Step 5: Weathering Powders
WARNING: THE OIL PAINT FROM THE PREVIOUS STEP MUST BE COMPLETELY DRY (TAKING SEVERAL DAYS AT LEAST) BEFORE YOU START APPLYING WEATHERING POWDERS. WET OIL PAINT ABSORBS THE POWDER AND CREATES HEAVIER STAINS WHEREVER THE WET PAINT WAS.
WARNING: WEATHERING POWDERS ARE NOT RUB-PROOF. THE VARNISH LAYER SEALS THEM AGAINST CAREFUL HANDLING, BUT ROUGH TREATMENT WILL WIPE THEM OFF. BE NICE TO YOUR TANKS.
Now that you've added stains and shading to the tank with the oil wash the next step is to add dry dirt and dust. Weathering powders are good here for two reasons:
1) They allow very soft edges. You can blend them out almost to the point of transparency, leaving nice gradual transitions between colors.
2) They behave like real dirt. Because they actually are fine powders they accumulate in low spots that would collect real dirt, leave marks behind when wiped across a surface, etc. You can pretty much stick them on the model like the real thing and get the right result.
What exact colors and locations you use depends partly on personal preference and partly on what kind of environment your model is in fluff-wise. You can get a whole range of earth tones to fit any look you want to do, so pick the ones you like best. I personally use a very dark brown for accumulated dust/dirt, and a brighter reddish color for fresh mud. But if, for example, you're painting an army on ash wasteland bases you'll probably want different colors.
Once you've picked your color(s) it's time to put them on the model. Apply them directly into the places you want to put dirt, and use a dry paintbrush to push them around. Focus on areas that would get a lot of dirt on the real tank: corners on the floor of a transport, wheels and tracks, etc. Once you have a look you like spray on a layer of matte varnish to seal the powder in place. This is definitely a trial and error thing, so practice on some scap parts before committing to your favorite centerpiece model. For example, the matte varnish will usually reduce the effect a bit, but some colors seem to suffer more than others.
And, again, because this is important: the matte varnish seals the powder in place against light handling (picking a tank up carefully without rubbing anything, dusting it with a soft paintbrush, etc), but does not make it rub-proof. Rough handling will wipe off some of the powder. If you don't want to treat your tanks with this level of care then I suggest omitting the weathering powder step entirely.
That said, here's where we are now:
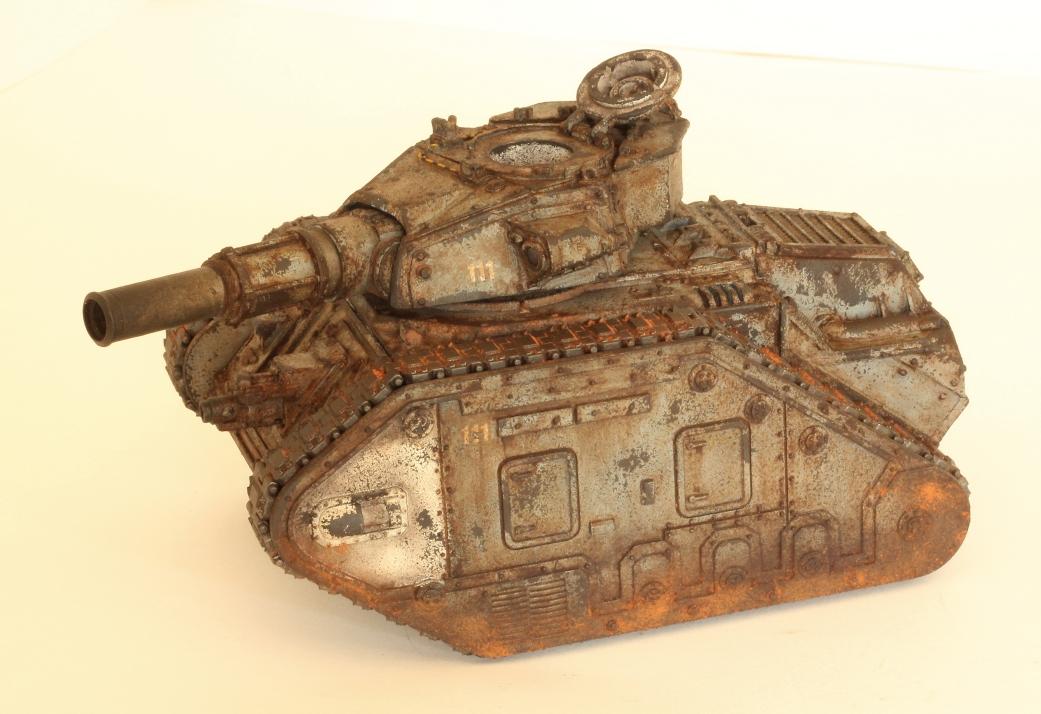
Next and final step is oil/grease stains, and then we're done!
|
There is no such thing as a hobby without politics. "Leave politics at the door" is itself a political statement, an endorsement of the status quo and an attempt to silence dissenting voices. |
|
|
|
|
|
|