70053
Post by: GrimDork
Hey folks! You may or may not have seen my other Blog here on Dakka, but I've decided to make a second for.. reasons.  Nothing fancy, but I'm making some dioramas for family and friends as gifts moving forward and I plan to do a couple yet this year. I think I may have introduced them to my P&M blog so I need to hide the WIP and discussion from their scrutiny in another blog  SO here we are!
If you are unfamiliar with the other blog, you'll soon notice that I'm a bit long-winded, it seems to be something I can't readily help, feel free to just scroll for pictures if you want 
So I've got two dioramas in mind for this year, the first will come due in the middle of august so I've only got a bit under 3 months to complete it. The second I think is more like november, I'll figure out exactly when later. Humorously enough, I've just received the order for the lion's share of the components for the later diorama, got the birthdays mixed up maybe I dunno. It doesn't matter, they're not going to go bad!
Let's describe the dioramas then, shall we?
The first is for a big Doctor Who fan, and I've come up with something that's been getting increasingly elaborate...
I was thinking of something simple but the idea kind of exploded while i was thinking on my way home from work. I've pretty much got to sketch this one out it will be hard to describe, but that won't stop me from trying
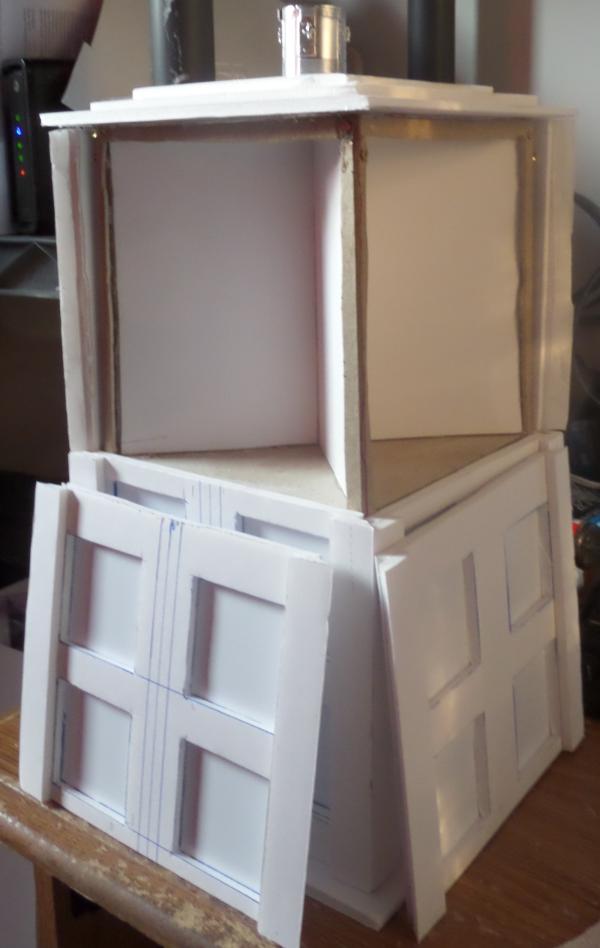
Ideally, I'll make a foot-ish tall tardis that's 6-8" wide or so (sizes pending change once I do some more scheming), with a 6" tall section that has removable sides on all four faces. The center will be a mini tardis, I want to use the one from reaper bones but I may have to use papercraft or scratchbuild one as this is due well before bones 2 will even *think* about shipping. Anyhoo, now put an X through the 4 corners of the mini tardis stretching to the corners of the floor/ceiling of the larger tardis/display box. This will give me 4 little display areas 6-8" wide by 6" high and so on, with the tardis showing in the background with a little foreground space to include a doctor and various companions/villains.
SO it's basically gonna be four mini dioramas in a stylized display box that shouldn't look too bad on it's own. At first I was just gonna do the 4 mini dioramas, but the display box is just too cool not to try. So now I've got to order four doctors (might have to double up on one of them) and probably a couple of companion models... If I see a really nicely scaled villain from the same site(s) I'll nab it, otherwise I'll scratch/convert what I need. Each side will be a different scene. Probably something industrial, something historical, something future, and maybe something just weird I dunno yet.
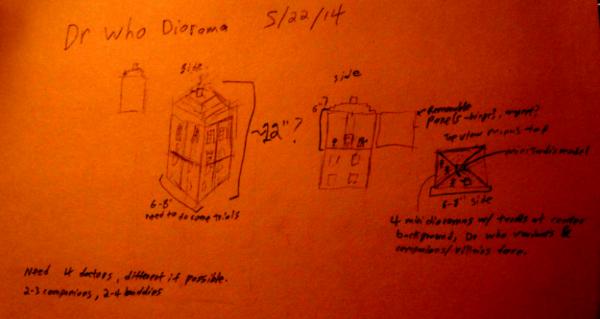
really rough sketch, image quality kind of suffered, shouldn't have let dakka autocorrect it
I've got till the middle of August, so it's kind of ambitious to try to do this in the short time, but we'll see! I'm not above pushing the date back and giving her an empty box with an IOU if it makes the final result better! I'll see about posting up a *really* rough sketch later if I can get at my camera without upsetting Madame Toddlerington (aka my daughter )
The second diorama, for which I have all of the parts now, is samurai themed. I almost went and got some period-specific historical samurai... but then I remembered Corvus Belli made ninja models, and was helpfully reminded that they also did a Miamoto Mushashi samurai as a merc, and I switched themes to future/samurai
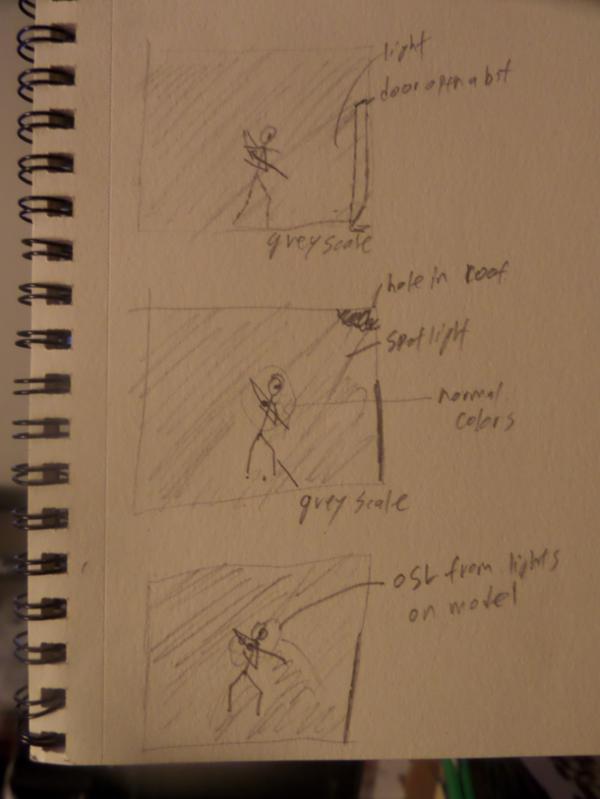
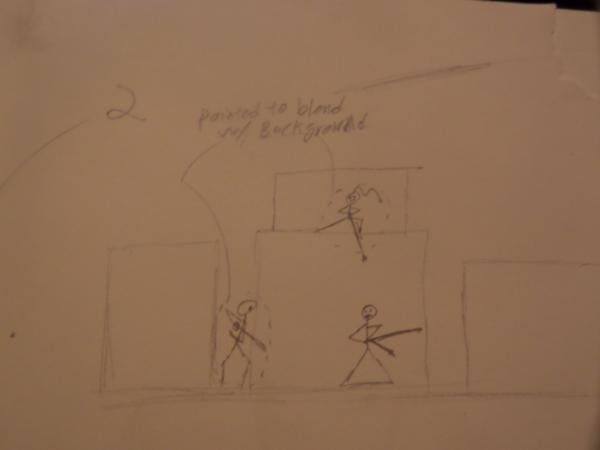
I don't want to take up a huge amount of desk space here, so I'm going to start with a rough "restriction" of a 6x6" cube, though I might not hold terribly rigidly to that. Basically, the samurai has been marked for death and several ninjas have been dispatched to do the deed. I'm not going to modify the models any more than I have to, preferably none. I specifically picked these models specifically because I thought they'd look good squaring off in terms of poses and the direction they're looking, etc. I do want to try to step of my game painting wise, I'm considering trying some NMM and maybe some OSL from a street lamp or something, but only if I can make it look good while doing such things. The general layout will involve one ninja fighting the samurai on a bridge/walkway/something elevated and narrow, with another ninja perched up higher training a sniper rifle on the samurai as backup. I want to do some dust/dirt/etc weathering where appropriate, and would like to do some injuries as well. If I can come up with a good way to do it, I want to give the samurai a couple of rips in the cloth of his outfit but only with paint, I don't want to gouge the model. The fighting ninja will also probably have an injury, but less than the samurai. I may use some deadzone tiles to use for the terrain over which they are fighting.

The right and center minis will be fighting on a bridge/ramp/thing, the sniper ninja will be perched off to the left and higher up, aiming down at the samurai.
Thanks for stopping by! Automatically Appended Next Post: http://heresyminiatures.com/shop/index.php?main_page=index&cPath=2_64
http://heresyminiatures.com/shop/index.php?main_page=product_info&cPath=2_60&products_id=318
Looks like I've found all of my doctors, a companion, and maybe a baddie or two! Could still use another companion or two and more villain options, but heresy is gonna get some business for sure.
65162
Post by: TheDraconicLord
Mmhhhh, delicious. You have been on a roll with the terrain building, Dioramas look like a perfect match to keep practicing your skills and make something even cooler to boot.
I'm not a huge doctor who fan so that one I'm a little "meh".
But the Ninja and Samurai one, oh yes, lovely, that one sounds lovely and I'll be eager to see the WIP.
70053
Post by: GrimDork
I 'kind of' like Dr who, so it won't be hard to work on it.
Recall excited for the 'duel', but I'll have to step up my game to do what I want.
Thanks for popping by
Hope to get some work done on one or both with the long weekend.
73251
Post by: Overlord Thraka
TARDIS huh? Subbing.
70053
Post by: GrimDork
Haha sweet. Nearly ready to order most/all of the minis and I hope to finalize my plans over this long weekend. I may wait for our new hobby lobby to open to look around for materials for the larger Tardis, may go look at a different store tomorrow.
Basic dry fitting makes me think 8'' may be a better width than 6, but we'll see after some more testing.
54374
Post by: Chemical Cutthroat
Came for the Doctor.
Stayed for the Infinity models.
70053
Post by: GrimDork
Sounds like a shirt
70053
Post by: GrimDork
Alrighty folks, didn't get any actual work done today, but I did go on a supply run to get some things for both projects.
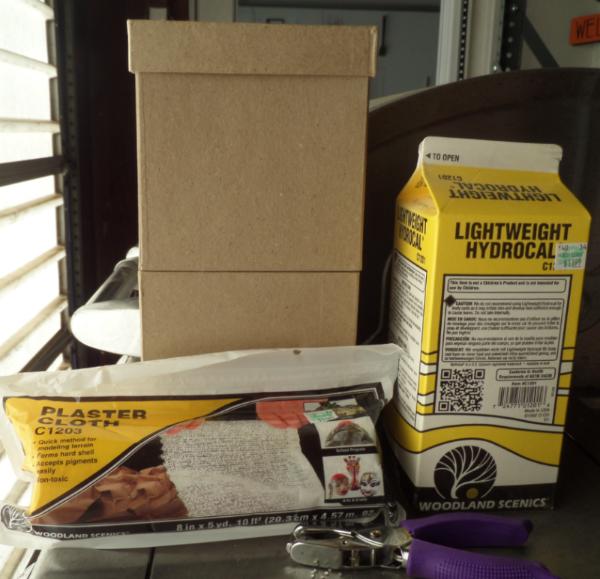
The two woodland scenics items are mostly going towards the samurai showdown diorama, bu they'll come in handy if I do a cave or similar for one of the Who panels. The hole punch will be nice for rivets, though they're a bit large, which may or may not come in handy for a more industrial Who panel. Good thing to have in any case. The two boxes may possibly serve as the basis for the Tardis. They're a bit on the smaller side of my guesses at size, which has pros and cons. If I keep with the smaller size, it will make everything more manageable in terms of overall scope, but the space available for the panels will be pretty tight.
I've reconsidered a couple of ideas I've had for the samurai showdown layout, I may do some sketches or do some rough mocking up later on. If I do I'll put up some pictures in a few hours. I'm seriously considering painting the individual components of these figures separately (the arms, mostly, for these guys), but we'll see. I may just glue them together and sort them out like usual. Still trying to decide if I want to paint them on nails like I usually do, or figure out something different to help with any source lighting (if I go through with the attempt).
The Dr. Who project needs work sooner though, and to that end I'm gonna go put in the order for the doctors and a couple of extras from Heresy miniatures (as long as the shipping and delivery ETAs aren't terrible!).
More soon. Automatically Appended Next Post: **Update** Ordering minis from the UK can get pretty rough, half as much shipping as product and it's gonna take a bit... but I've got four doctors, a companion, and a villain on the way!
Now I'm gonna go see about another mini, looks like someone in the US produces a Dalek, it's not an amazing sculpt but at the same time it may well be better than something I'd scratchbuild myself. Probably still gonna cost me as much as an infinity mini and not be nearly as nice, but oh well!
70053
Post by: GrimDork
I should have said in the first post... this is going to be more of a slow play / long con of a blog. The Hobby Time blog updates even if there isn't a lot to say, here I intend to show you some progress each time I post. Unless I've got a question or I'm replying to one of you, of course. Once I get fully stuck in to the projects, we should see updates reasonably often anyway, just wanted to let people know the difference I guess.
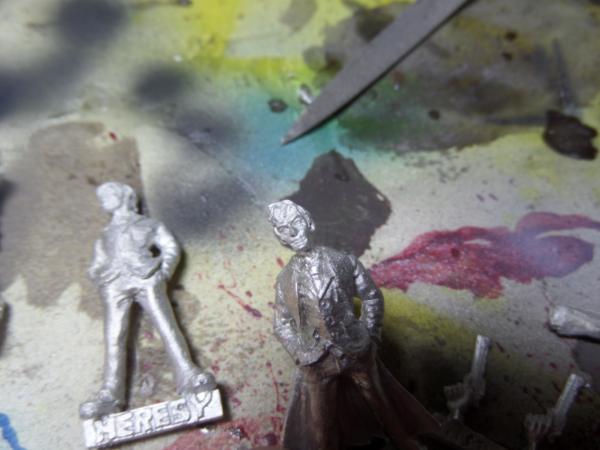
Ok, I've had these for a little bit but I haven't gotten around to doing anything with them but these pictures.
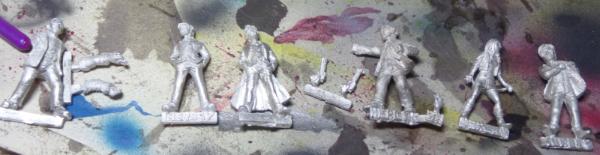
These came in way earlier than I thought they would, thanks Heresy
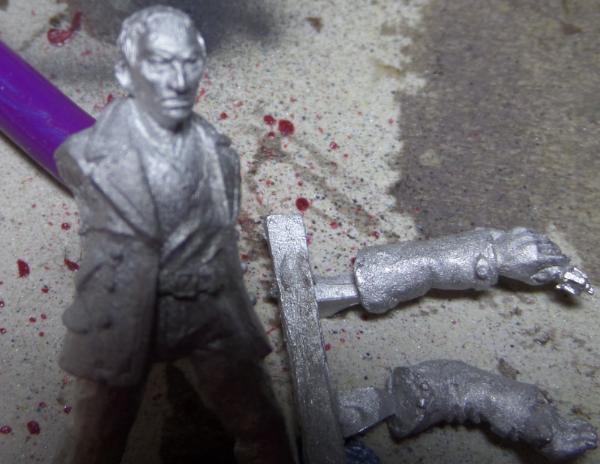

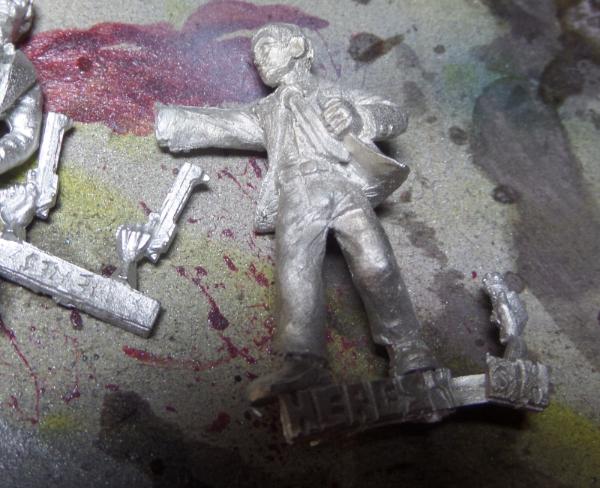
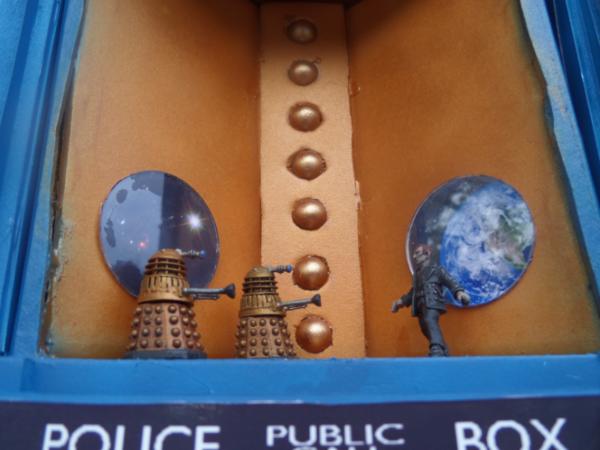
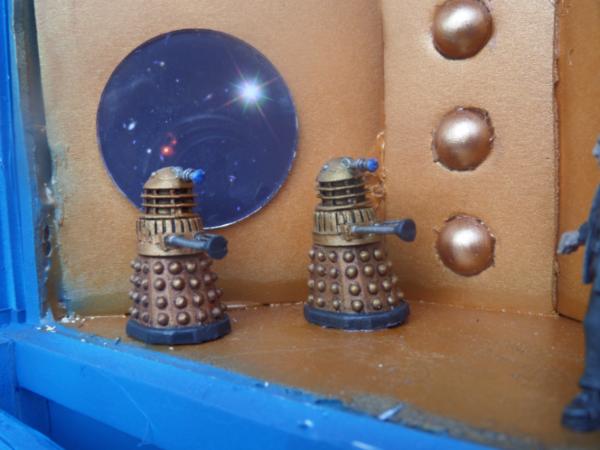
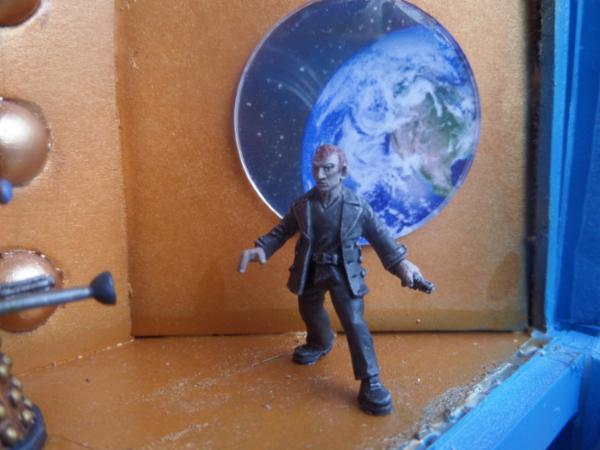
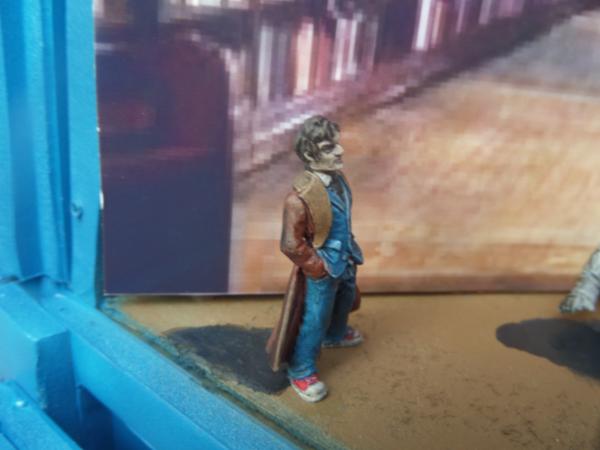
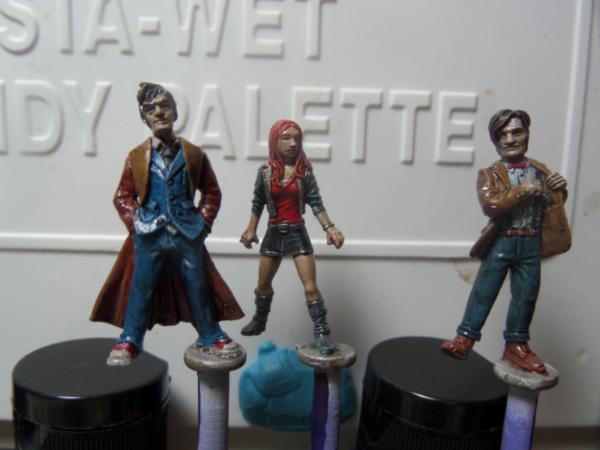
This is the Master, the rest are pretty self-explanatory I think. Sweet bonus pistols too, but I've got to go with the sonic/laser screwdriver thing.
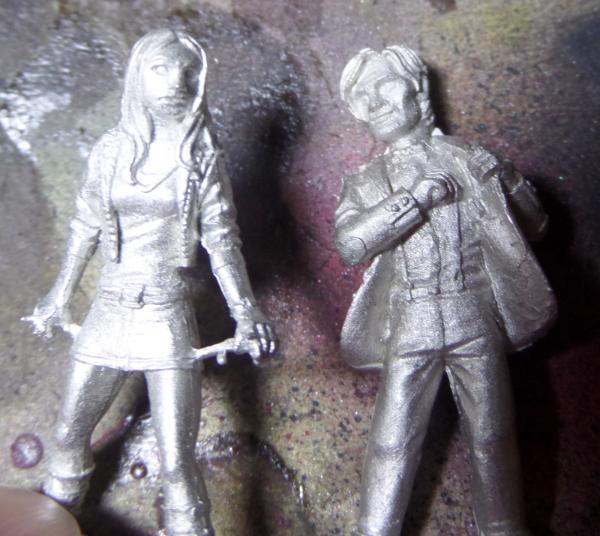
I'm happier with the doctor than I am with Pond. Her face is a bit oddly shaped, big mouth. Might try to sort it out with some filler or at the painting stage. Might turn out nicer than I thought too.
Everything has pretty minimal mold lines and just a bit of flash. I'll trim them up and get the couple glued that need it pretty soon. Pretty happy with the quality of the casts and the quality of the lookalikeedness of them. $5-6 a piece isn't bad, especially if you're in the UK and don't have to pay nearly the shipping I did
I'll be mounting these up on nails for painting as is my way, just as soon as I get around to cleaning and assembly.
I would like to ask a favor of you folk before I go. I've got 4 panels to fill, and six minis. Got any suggestions for scenes to fill out the panels?
One of the 10th doctors should be going up against the master, probably won't need additional minis for that one. The 11th doctor and Pond can go together, they may or may not need a bad guy... thoughts?
The 9th doctor will need a villain, who would you guys suggest? I can get daleks in this scale from a US company, probably another 10 bucks to buy and ship.
What should I do with the other 10th doctor, he doesn't have a companion OR a villain at the moment.
Another bit of brainstorming... What do you guys think about the central mini Tardis tying in all four of the panels. Good idea, or overly complicated and won't add enough to bother?
I'm keeping an eye out for a better base for the display box Tardis as well. Next update should have some paint down, big box work, or sketch/builds for the Infinity diorama.
Thanks for watching
77159
Post by: Paradigm
I've been looking forward to those pics of the Dr Who models, I've been considering buying them for a while now. Thanks for the nice shots.
As for scene ideas (warning, possible nerd mode ahead):
Doc 9: Facing down the Dalek in Van Statten's museum. You'd just need a Dalek, some chains, some tool-type stuff and industrial looking equipment. It would be quite a dark scene, so pose some nice contrast.
Dr 10 and the Master: Assuming you don't mind the scene being 'outside' the Tardis, I think the obvious ones would be either the bridge of the Valiant (flying aircraft carrier) with the Master doing his whole 'here's my grand plan, deal with it' thing. It should allow nice setting between the two characters and not need that much work. Alternatively, perhaps their final confrontation in the Missile Yards. Doc and Master face off, with huge missiles behind them by the hundred (a photoshopped background?). The basing for this would be easy, just rock and sand.
Doc 10 solo: It sounds strange, but a good one for this could actually be just a white wall, with the Doctor staring at it (probably a side-on display). After he loses Rose in Doomsday, he spends a long time just staring at this blank, white wall, which could be pretty 'artistic' if you were to frame it right, and make a nice contrast to the dark Dalek scene.
11th and Pond: Perhaps a Tardis interior, with the door opening outwards (into the back of the box) with a generic space backdrop (a nebula or something). One of the main promo pics for series 5 was just that, Amy and the Doc looking out into 'all of time and space'.
Hope that gives you some ideas, I can provide pics tomorrow if you aren't familiar with the scenes. I think they'd give a nice mix of dramatic and peaceful, light and dark, active and passive. I'm not a fan of the idea of linking them all together via the central piece, I think that would be too complicated and also limit the scenes you could do.
70053
Post by: GrimDork
The way you depict the scenes, the mini Tardis would detract. The tardis was kind of a tie-in for the four scenes... but really they're pretty obviously tied in by proximity and being inside of the outer Tardis display box.
If you don't mind posting pictures, go for it. I vaguely remember everything, but perhaps not in exactly the way you are describing. The wall bit may be cool if I can do it artistically so it doesn't look like a cop out.
In my musings I've flirted with printed backgrounds. Probably gonna be the easiest way to do everything and make it look nice, I'll have to balance it with foreground objects. The 10/master showdown on the helicarrier thing... weren't there some stairs?
115
Post by: Azazelx
If you're doing a Doctor Who diorama, you pretty much need to have Daleks. Having Cybermen is borderline mandatory, but you don't get a choice on the Daleks. It's just required.
By Law, I believe.
77159
Post by: Paradigm
OK, here's pics: Dr 9 and Dalek:  Dr 10 and The Master: Valiant:  Should give you an idea of the layout. Obviously the scene is not the one I mentioned, though. The 'Shipyards':  This, with loads of rockets in the background. Dr 10 'White Room'  Dr 11 and Pond:  Best I could find, but you'd only want the door, the wall behind it and maybe half the raised section and console.
70053
Post by: GrimDork
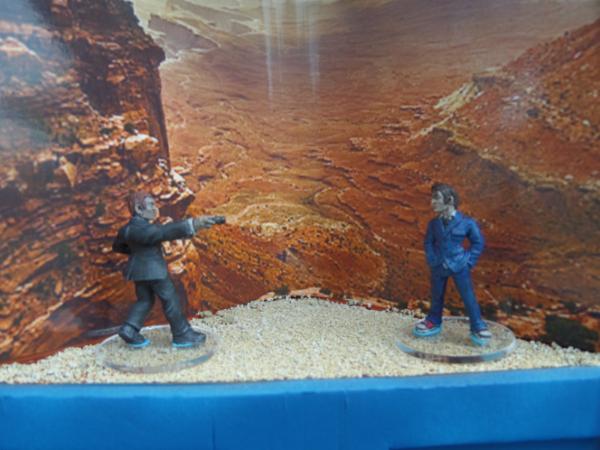
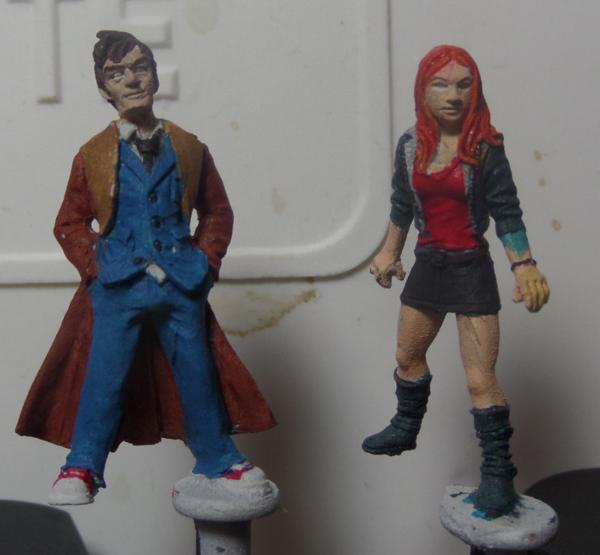
Cool, thanks for the pictures, they should help. I'll probably just go back and rewatch the episodes in question. A couple of pictures to keep me a man of my word:   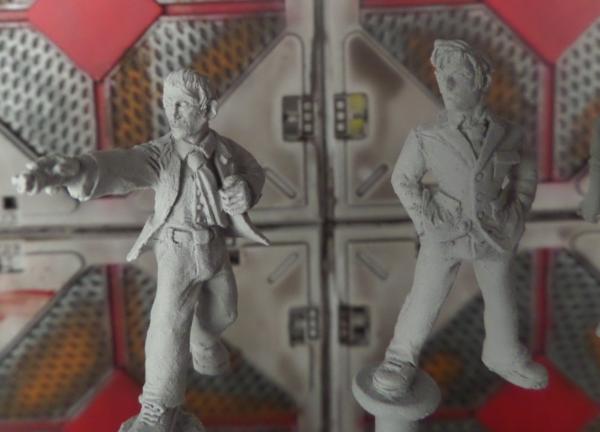 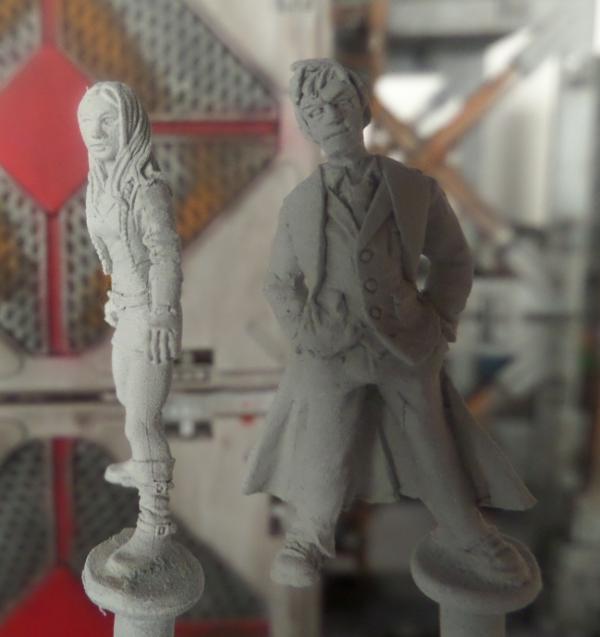 Might have to go back and address that lingering fine mold line on Amy's leg. They look even nicer with paint on them, really happy with these so far and I think the faces are quite convincing. Now... on to the real reason for my post. I require more assistance! I'm starting to wonder if the whole 'put an X in the box and have 4 scenes' thing is really the way to go. It was the only way to go with an integrated mini tardis anchoring each scene, but we've kind of moved past that, I think. I could, for example, make the outside look like the Tardis as intended, but have both doors open into a large scene. Or perhaps two scenes. I could have something going on on top of the tardis display, one of the doctors fighting a dalek around the central flashy light bit perhaps... and then have a window open on the back displaying the second version of Doctor 10, possibly with a little turnstyle deal so you can see all of the mini. What do you fine readers think? Was the original Idea the best? Have I struck upon something superior? Do you want me to make a picture to better explain what I'm talking about? I'm kind of partial to having the front doors open now... Hell, you could even have an inside-ish joke... the inside could be the bridge of the tardis with pond and doctor 11, possibly with a plaque or title somewhere that says something to the tune of "it's actually a bit smaller on the inside" or similar But if I do the main doors opening into a scene, how do I use up all 4 doctors, Pond, the Master, and the obligatory dalek or two I'll order eventually? I guess I could stack 4 scenes on top of each-other with the floor/ceiling of each of them in common... HRMMM..... Help me out folks
77159
Post by: Paradigm
To be honest, I think that given you have the 4 doctors, the 4-scene split is the way to go, and I think the original way of framing it would be the best and most dynamic way of doing that. I'm almost thinking that stacking them would be too reminiscent of a set of shelves.
That said, I may have misunderstood the new idea, so a drawing might clear that up.
On a side note, those minis do look much better primed (I mean, they were good before, but now they're great.) Are they 28mm heroic scale, or closer to 35mm, out of interest?
70053
Post by: GrimDork
Oh yeah, I haven't done any scale shots yet have I? I'll try to correct that in the next couple of days for sure.
Yeah, I'm not sure stacking all 4 scenes would be the best. Probably something like having one or two on the inside of the opening doors, another in a window on the side/back, and maybe even a couple of them doing something dramatic on the roof of the display tardis. But maybe I'm just getting antsy and the original plan is best.
70053
Post by: GrimDork
Whoops, sorry, still no scale shots, I'll get around to them. I'd say they're 28-30mm, they're a bit thicker than the Mantic and Infinity minis I've been working with, but they aren't as disproportionate as guardsmen. Somewhat truescale, but chunkier than those I mentioned. Bah, I'll take some pictures soon. 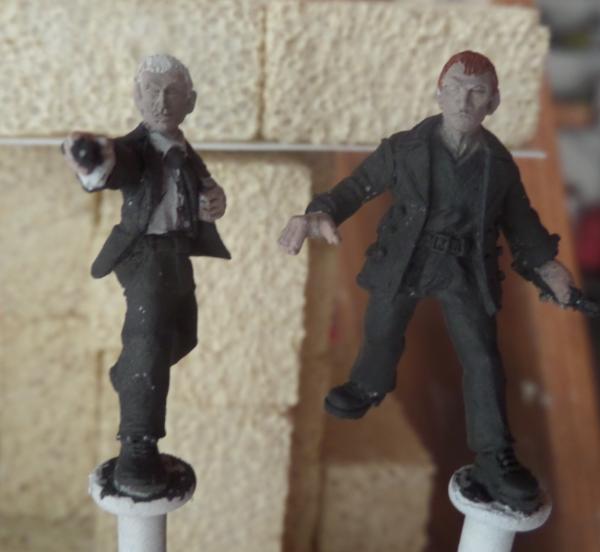 Ok, now we're in business. I got some random Infinity stuff out of my system and I'm beginning to paint the Dr. Who minis. So far it's just a base coat for the two simplest/most boring color schemes. 9 is all black, so the challenge with him will be to make the jacket, shirt, and pants all look like different tones of black. The jacket may get a gloss top coat, with extreme almost white edge highlights. The pants will get something softer. The shirt only has a couple of folds so I'll just pick a highlight a shade different from the others. Boots can be like the jacket. The master wears a black suit and tie, though his stuff can match, boots shinier though. At least he has a white shirt to break it up. I've come to a bit of a thing though. If he's in a business suit he should have brown hair, it was later on when he came back that he had bleached blond locks... but I think it made him scarier, y'know? Thoughts? Would blond hair and the suit be too telling a mixup to Dr Who aficionados? Gonna knock these two out quick as there's not a whole lot that I even can do for them, I'll take my time hilighting and such, I just mean there really isn't a whole lot to do. The others should be a bit more interesting color wise. I may also go ahead and order a couple of Daleks, seems like a requirement for this sort of thing!
57098
Post by: carlos13th
 GrimDork wrote: GrimDork wrote:
I may also go ahead and order a couple of Daleks, seems like a requirement for this sort of thing!
You seem to have misunderstood. Its more than a requirement its clearly the law.
70053
Post by: GrimDork
Its OK, they're ordered, possibly even shipped by now. They should be here before I have the first crop painted.
Still dreading making the display box portion... I'm rubbish at smooth straight lines and stuff like that. There's a reason I ordered a bunch of battlezones terrain and haven't made a foam core ruined city by now.
57098
Post by: carlos13th
Its the infinity stuff I am looking forward the most. I want all three of those models. Cant you just make the diorama for me Grim? Or send me the models as a create your own Diorama.
77159
Post by: Paradigm
Those minis do look detailed, and it's easier to see the quality with a bit of paint on them.
RE: The Master, it depends on what scene you're going for, if there is one. Personally, I'd go with the brown hair, but it depends on how much of a whovian the recipient of the diorama is as to whether you'd get away with the 'wrong' colour.
70053
Post by: GrimDork
Hell, if it's something I would notice (I may be picky, but I'm only like, kind of interested in the show), then it's probably too much. Oh well, he'll be scary either way.
@Carlos, I would if I were Oprah, as it is these dioramas are costing me too much as it is =/ I'm kind of getting sad about having to give them away once as it is
I'll start the Infinity Dio as soon as the Who one is done, I've only got till the middle of august and it's gonna take me some time to figure out the box.
57098
Post by: carlos13th
Figured the chances of that working were slim to none.
70053
Post by: GrimDork
I keep eying the three of them and having evil thoughts of making a japanese sectorial force, but i bought them for the diorama and that's where they're going by golly! I've done some mocking up for the display box interior, i think i'm going to go ahead with this design and start throwing glue around because if i don't... i'll never get done. Pardon the infinity figures, most of the who minis are up on nails to be painted.  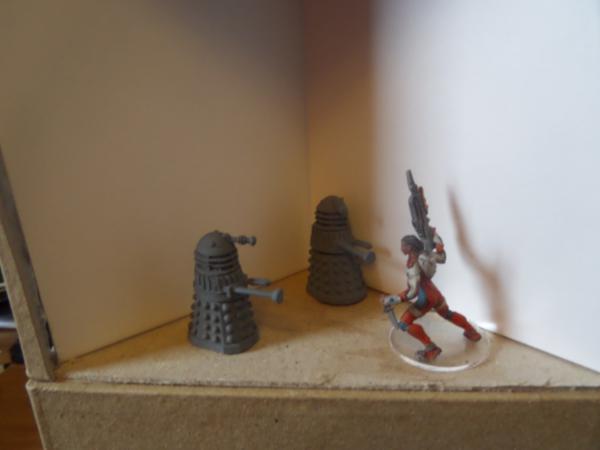 So, you can see each panel has a very small working area, even when you consider that they probably won't be based. 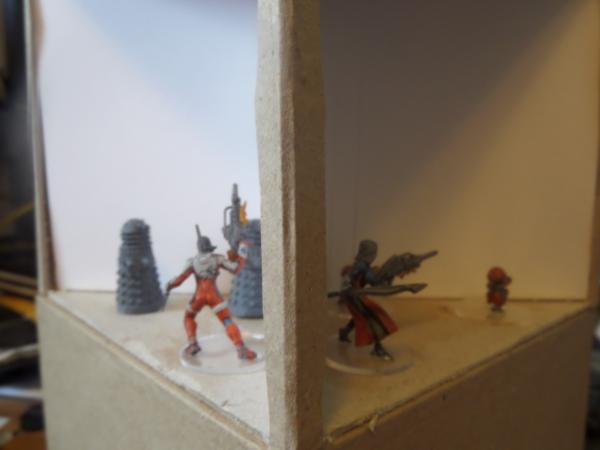 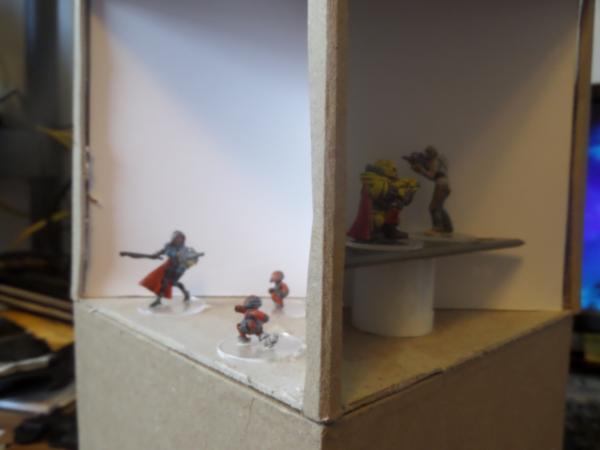 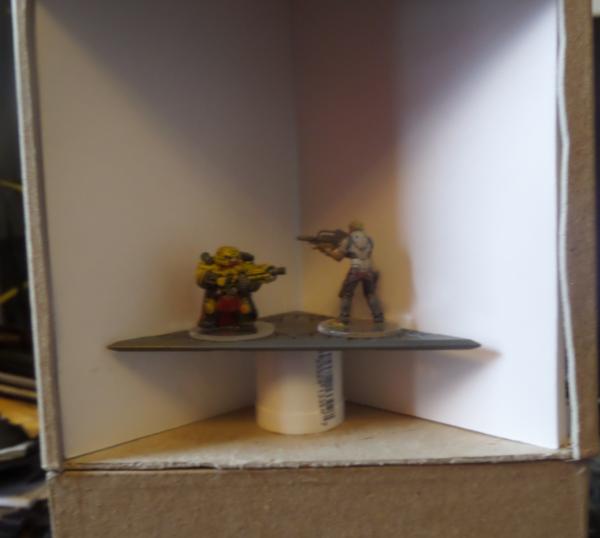 This is an extremely alpha mockup for the 10th doctor and the master facing off, i'm thinking of some kind of raised platform, probably with printouts of a sky/ocean view as seen from the valiant's windows, or something. 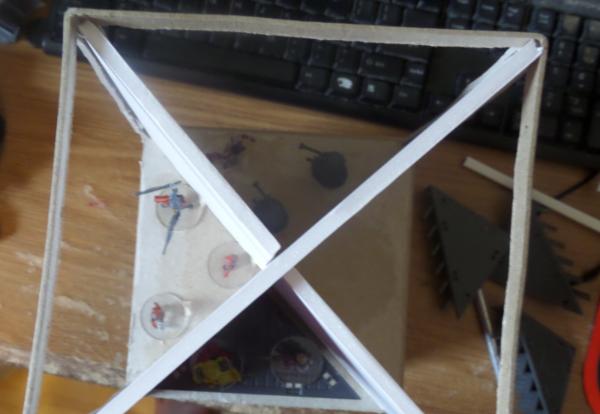 Top down, though the lid will be glued in place before it's over. I'm going to try to do some 3d background and texture as well, but where appropriate, i'll be using my printer to get some extra detail cheater style. What do you guys think about a cave scene for dr 11 and Amy? I could put them on the sides and put that sinister glowing white time crack thing down the middle. I could even put a scorch mark for where Rory was, but i'm not sure the figures are showing enough emotion to justify that, thoughts? I'm probably going to put dr 9 fighting both daleks in an industrial setting. I was thinking of making a pressmold so i could have a bunch of daleks in the background, deactivated like it was a dalek production facility he was trying to destroy.. but if i do that i'll probably use the printer due to limited space in the scene as it is. Still trying to come up with a good idea for the 10th doctor. I did notice that hobby lobby had a reasonably cheap lunar landing set and that the figures, while a bit ham-handed, were approximately the right size for 28mm... i was thinking of getting it just to have a nearly-properly sized vehicle to use as a base, maybe scratchbuild a lot of stuff on top of it to make a future military jeep type thing for casting (and for a totally unrelated project to this)... but now i'm wondering if i shouldn't get the fugging space man, give him the gun that came with the master, and do that scene where the astronaut shoots him!? I could print out a beach scene if i remember where it happens correctly, put the sand on the floor with them standing next to the surf, gun aimed but not yet shot... whooo unless you guys talk me out of it i think i may have my fourth scene
77159
Post by: Paradigm
Looks like a decent set up. I like the idea for the cave scene and the crack, there's maybe even an opportunity for some OSL in there if you were feeling up to it. As for the multi-Dalek idea, what about the interior of a Dalek ship (which featured in his last episode as 9) as that could give you an awesome backdrop and add a very sci-fi scene (at the moment, there's not really one of those in the plan.
Only issue with the Astronaut scene is... well, that was the 11th Doctor! (sorry! ) That said, if you wanted to use an astronaut then there's perhaps something from Waters of Mars that would work. There was a lot of running around in spacesuits in that episode.
Failing that, what about some scene involving the Tardis? Either the interior or exterior, it could work and be fairly 'generic' while still iconic.
70053
Post by: GrimDork
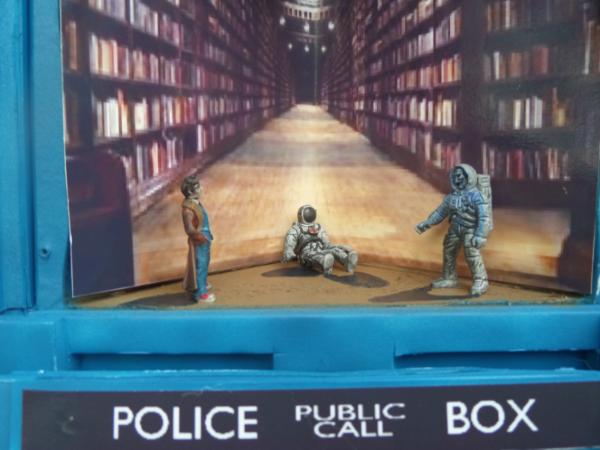
Huh, you're probably right then, i thought maybe the astronaut first showed up when he was dr10 but my memory is probably foggy, what about the superlibrary episode then, with the creepy shadowthings inside the space/hazard suit? I might be able to make the sitting astronaut in the set into a backing away in terror astronaut, and then have the standing one menacing him and the doctor?
77159
Post by: Paradigm
 GrimDork wrote: GrimDork wrote:Huh, you're probably right then, i thought maybe the astronaut first showed up when he was dr10 but my memory is probably foggy, what about the superlibrary episode then, with the creepy shadowthings inside the space/hazard suit? I might be able to make the sitting astronaut in the set into a backing away in terror astronaut, and then have the standing one menacing him and the doctor?
Now that is a very cool idea! Could work very nicely indeed.
70053
Post by: GrimDork
Drat, i should have picked it up, oh well should be there this week, stinky hobby lobby and being closed sundays. Automatically Appended Next Post: 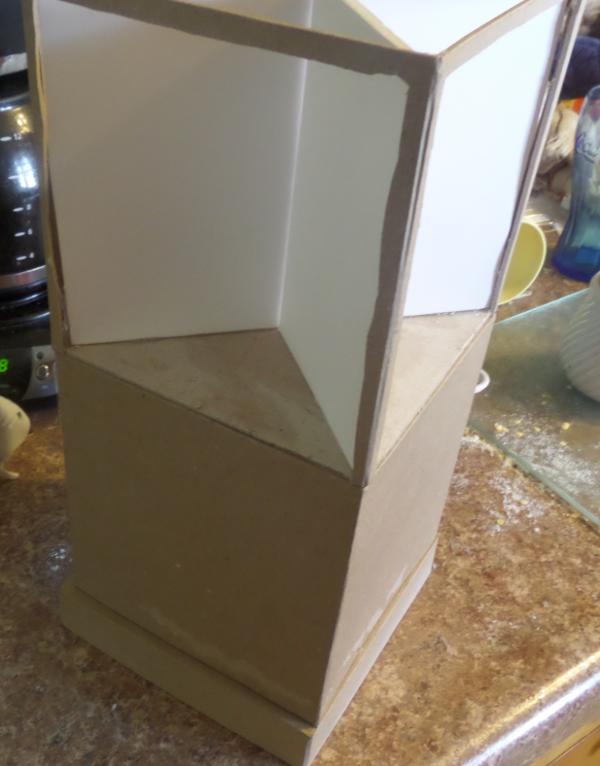 Got the base internal structure glued together. Then i stressed about a surface for the exterior, at which point i remembered my evergreen plasticard sheets: 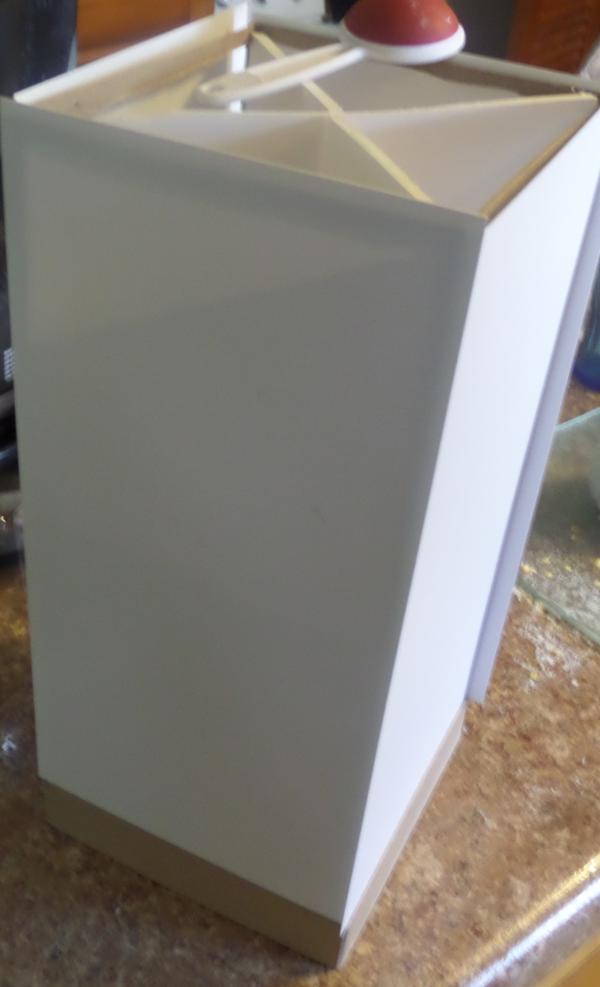 I've trimmed them to fit better since this shot. I'm tentatively going to use carefully cut foamboard for the panels on the outside, we'll see if the first one I prototype works out. I"ll have to do something for the corners too, since they're kind of an outside part framing everything else, but i'll figure that out when i get to them. The top should be easy, one piece of foamboard on the top, then a smaller one on top of that, just need to figure out a reliable method for making the foam inside a bit more uniform... The bottom should be easy too, essentially just another square of foamboard. I'm far from having the tardis sorted, but i'm getting more confident that it'll get done now. Oh, if i hadn't mentioned it, i'm planning on building each of the four panels, then cutting the finished structures at the halfway point to make the top of each panel removable. The bottom halves will be glued in some way, and for the top halves i'm still thinking magnets. I'm also considering using some kind of clear plastic inside the top window frames, potentially allowing you to see in to the displays, a little bit. Hoping to get some more concrete work done on the blue box tonight, and to do some painting before long. I did do most of the edge highlighting for the black on the first two figures, but there's a lot left to go. Automatically Appended Next Post: 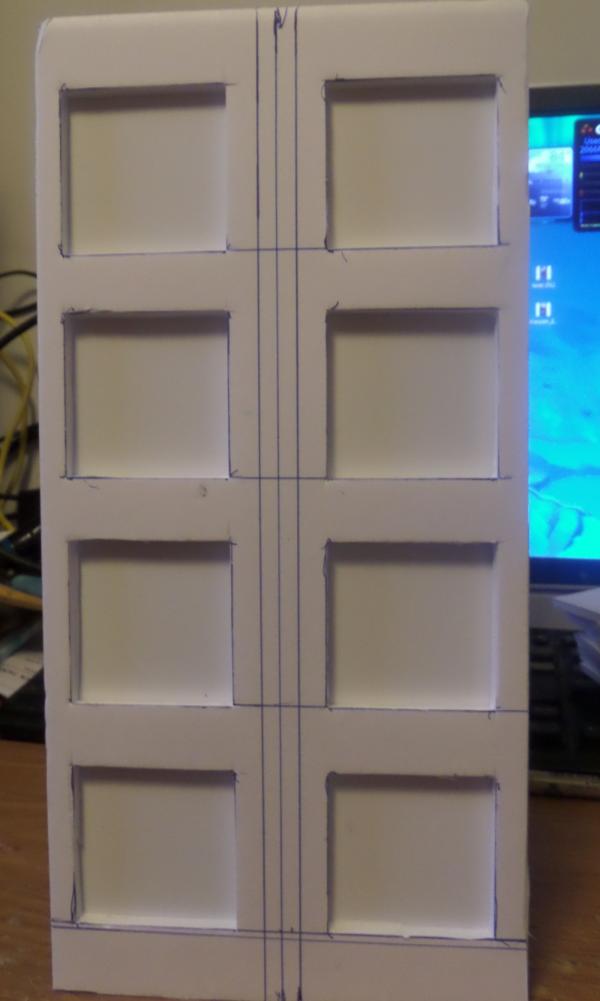 I've somehow managed to measure twice cut once for... well, once! These aren't perfect, but they're fairly close to centered and somewhat like the pictures of the tardis you can find via google. I think the panels/windows are a bit deeper than standard, but this was easier that plasticard and i'm not sure i could have made that look any better or even as good. I've used this first side as a template and have the squares drawn out on the other three panels, and i've got a second panel cut. I'm planning on using some form of clear plastic, maybe salvaged from blister packs, for the windows up top to make it more obvious that there are contents to be viewed. I'm starting to get excited about the project, once the tardis is built, i'll be back into the realm of things with which I'm familiar.. small scale scenery and 28mm minis. I'm gonna see about picking up those astronauts tomorrow or sometime this week. I just looked the vashta narada back up and... eesh. That one's gonna be tough... I was thinking they were a pitch black face plate, but no.... I'm apparently going to have to free hand a freaking glowing skull. But... totally gonna try it! I've been wanting to paint a skull pattern on the face plate of one of my Infinity models for awhile now, so this will be a more extreme example I can use by way of practice.
115
Post by: Azazelx
That's looking great. Unfortunately, I'm not up to speed on New Doctor stuff. I got halfway/two thirds through Tennant's run before I got distracted, and that was a few years ago now, too. I'll need to go back and catch up when I get time.
Time?
Geddit?
Ok, that was an unintentional pun to start with. I just thought I'd draw attention to it in a lame way. 
70053
Post by: GrimDork
Over the last couple of years I've watched from the start of the newer series to some point partway through matt Smith's tenure. But I only watched it once and often in the background. But gGoogle image search is filling in *most* of the blanks.
I see what you did there Automatically Appended Next Post: Ok idea crew, i need your help!
I'm trying to decide how to do the walls for the tardis, in terms of mounting them to the box such that the display area is viewable. There's the original method where all 4 side panels are split down the middle and they just pop off, held in place by magnets, but i'm starting to think that this will get really hairy around the corners...
There's also the possibility of splitting the sides down the middle, the front doors would open, the sides would all also open like doors just because... giving it kind of a jewelry box feel maybe. This would add the area under the display but i could easily fill that with a quote applying to the scene, or simply a title with a cool background involved. This would use hinges, probably 2-3 per side, or a total of 8 sets for the double door style. May or may not be easy to work with re:corners.
The last idea is to do a single hinge, each side panel swings all the way out. This would be a bit easier than the second method, and use less minihinges... but it would be harder to have multiple sides of the display open at once.
Any thoughts or suggestions? Need to see a picture to know what i'm rambling about? Gonna go source some hinges and spacemans now. I think i'm tentatively planning to cut the visor area out and hollow it, fit a skull from a skeleton mini into it, paint it -including back-lit glow effect maybe- and cover the gap with 5 minute epoxy, which should dry clear enough to show all the detail, maybe give that a light blue glaze to make it more obviously some kind of glass. Ehh?
70053
Post by: GrimDork
So here's me trying to work out how to do this opening the box thing...
Hinge on the left side, do this for all facings, resolve the corner bits by attaching appropriate components to the far side of each front panel.
Idunno about this one... seems pretty rough. I'm not inspired by how the hinge works in this position, and i'm not convinced i can make the corners of the box look good doing it this way. The double door pattern is just this twice, so probably even less readily viable.
Even if i resolve the corner bit to look nice, if you open one side, the side to the clockwise of it will have to open slightly too... dunno.
It doesn't look too bad open, but i dunno, seems like too many drawbacks.

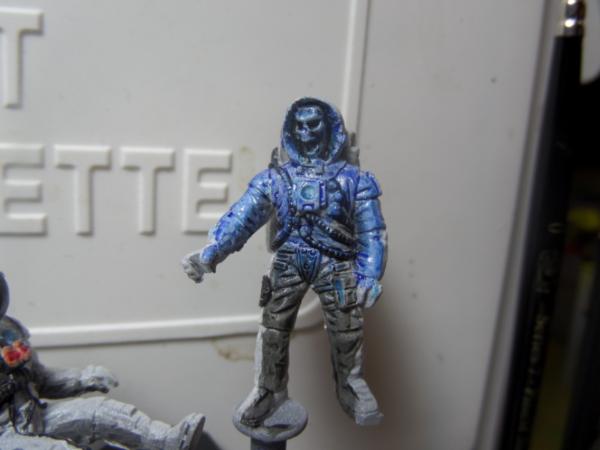
So i think these astronauts are going to be perfect stand-ins for the survival/hazmat suits they were using in that episode with the library and the vashta nerada. The face plates are large, it should be very easy to carve the one up to get a skull in there.
Going to look into more work with the top/bottom split for the visible panels... maybe i'll make the corners such that they're attached to the panels that come off... Automatically Appended Next Post: Yeah... it's going to be tricky business... but i think that's the way to do it. Make the top half of each facing removable via magnets following the original plan. Put the correctly sized corner bit on each wall/frame/thing, very carefully cutting the closest thing to a 45 degree angle I can manage from the outside edge to the inside, so that adjacent wall sections will meet up with flush corners. Will probably have to do some fudging here, but i'll make it happen... Then, simply cut the whole thing in half, so there's a top and a bottom. All four bottoms will get glued around to the base of the tardis, then the tops will have magnets set both into the underlying body, and to the back of each of the removable panels.
I'm not sure if this is the ideal way to do it, but it sounds doable with enough effort. As soon as the bottom wall panels are in place, i can put on the bottom panel, the base, and once all of the magnets are set.. the top should be cake. Then I can start working out the layouts and materials for the scenes. I'm thinking I may have to try some OSL after all, the time crack scene, and quite possibly the library scene, could definitely benefit. I'd be a fool to make a creepy skeleton faced space suit thing, and not have the other one with two shadows, poor sucker.
50896
Post by: heartserenade
Oh my, nice project!
I have been hesitant to buy those not-Doctor minis because of the fact that I didn't like how they were painted on the website. Looking at your pics, the 10th Doctor without the trenchcoat is just fine as with the 9th one. The 10th with a trenchcoat's face is just weird for me.
As for the girl companions, I find the ones made by Crooked dice more appealing, as well as their version of 11th.


Also I think with the right paintjob I can make her a bit more like Clara:

70053
Post by: GrimDork
I liked their Rose especially, but I wanted to order from just one site due to shipping costs, and heresy had the largest concentration if what I was after.
70053
Post by: GrimDork
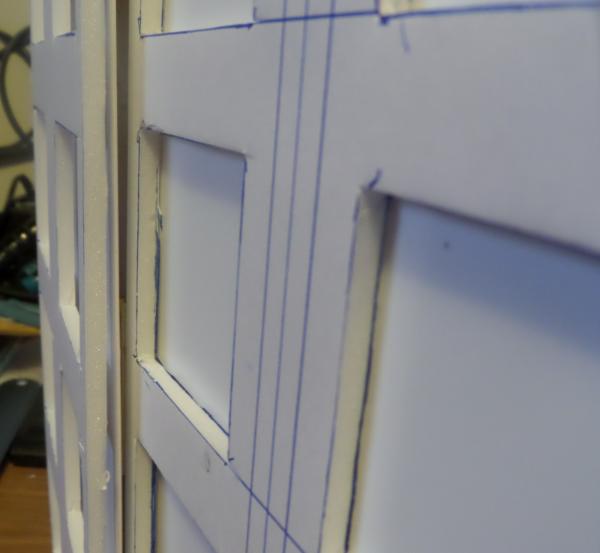
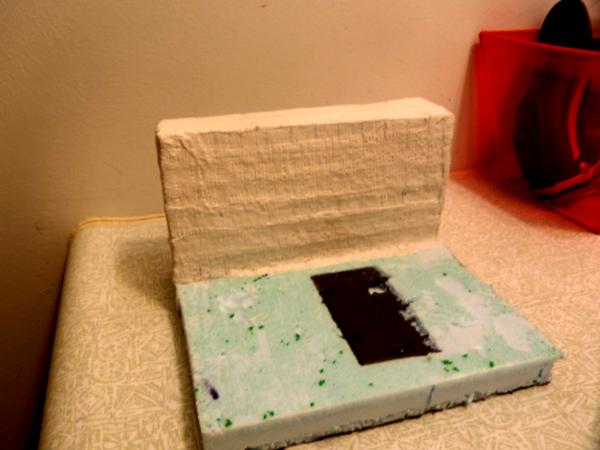
Ok so last night I had a couple of beer-equivalents of the hard lemonade variety and decided that, given the amount of time left in the project (30 or less days!), a policy of ''glue em all, and let future grimdork sort them out'' was appropriate. Of course now that i am future grimdork... i can only agree with my past self, crap has got to get done or i'll fail my deadline. So anyway, i attached all of the plasticard backings to the foamcore walls, and then cut out the corner strips and applied them to each of the walls as well. I was going to try to cut them to fit before gluing too far ahead, but it looks like i'm going to have to trim them down slightly to make things work anyway. One of those things that, if i were a contractor or an architect, i'd have known how to measure it properly to make things fit, but i got pretty close on a guess and regret NOTHING! Ahem... So here's where we are now:
Wall sheets, ready to be temporarily set in place so I can figure out the corners.
Getting there, there will probably be gaps like that everywhere until things are glued down into place, and even then. I may have to use some filler/tape or something to make the edges nice and smooth.
So, i've still got 10 models to paint now, damn extra astronauts... and it's going to be a little harder to bust a few of them out. The scenes with the vashta nerada and the time crack are both screaming for me to try some lighting effects, i don't have a lot of time... but i think both scenes are worth it, so we'll see what i can do! I think the construction of the tardis is coming along reasonably well, the next part will be tricky, though cutting them in half once they're ready shouldn't be so hard if i'm careful... and the top and bottom parts should be simple as well. Fixing up the scenes will come after that, and shouldn't be terribly complicated, but it's all about time isn't it?
More once i have it!
77159
Post by: Paradigm
Looks good!
For lighting, resort to the trusty airbrush if you're short on time. There's some good tutorials around on it, I think, and it's fairly quick once you get the hangs of it.
70053
Post by: GrimDork
I may have to try that! I've kind of been meaning to anyway.
--Progress update--
Got some paint on the master and the 9th doctor, i'm not sure if its the press of time, lack of motivation, or simplicity of the models (they're nice, but they just don't have as many potentially unnecessary details as my infinity and deadzone minis)... but I think they both may be ready for dipping. I had a mikes hard lemonade before painting, and managed to get both sets of eyes pretty solid on the first try... maybe one beer-equivalent is the trick to steady hands?
I also got the astronauts trimmed up, they're of a soft, rubbery plastic... kind of like bones but probably not as nice. Going to source some skeleton heads in a bit to see if i've got a good fit for the VN dude, the other one is just gonna have a normal glace faceplate. Might dip the doctor and master too, to get it done. If they don't come out looking perfecto... i can just further highlight the black or whatever is needed.
--update--
The dipping is considered successful, though I think i'm going to go back and put some layers on the faces by hand... the minitare rugged skin turned out a little too grey after the dip. I think it may have needed another layer, but a bit warmer of a fleshtone should help as well, so i'll go ahead and do that once they're dry. Still... effectively 2/10 who minis painted, so that's a decent start!
54374
Post by: Chemical Cutthroat
Yeah, the Dr. Who minis I've seen, while accurate sculpts, do tend to be more on the bare-bone side in terms of detail, so they get painted up fast.
Is the one chica in the scarf/coat/skirt supposed to be an actual Dr. Who character? I had linked the model to my girl when I saw it with the caption, "Hey! I found a model version of you!"
Her being a giant Whoovian (or whatever they call themselves), that would make it all the better.
The spacemen will be fun to see what you do with them. I was thinking about doing what you're planning with the skull on another model, and I remember thinking something like 'How hard can it be! I'll just..."
And that never got done.
50896
Post by: heartserenade
Yeah, that's Amy from Dr. Who. Can't find an actual screencap but this will give you an idea:

54374
Post by: Chemical Cutthroat
Ah! Okay.
My girl is putting me through the ringer on all of it. Just got through #9's season. I really liked him.
70053
Post by: GrimDork
I did too, though apparently that puts me in the minority. The next guy is probably my favorite, though, which probably puts me in the majority
I'll post up dr 9 and the master after awhile, though i still wanna do some fixing on the faces before i seal them to take out the gloss from the dip.
77159
Post by: Paradigm
9 is awesome as the Doc, I really wish he'd had another series or two. He was a great actor and the character they wrote him with is one of the best. I'm not sure it's a minority that like him, to be honest, it's more he tends to get sidelined/forgotten as he had such a short run.
70053
Post by: GrimDork
Ahh, well maybe that's it, i certainly wouldn't mind if they had done more episodes with him.
Went ahead and sealed the models, i figure i can touch up the faces over the sealer, and now they're done just in case i hit a time crunch. Automatically Appended Next Post: 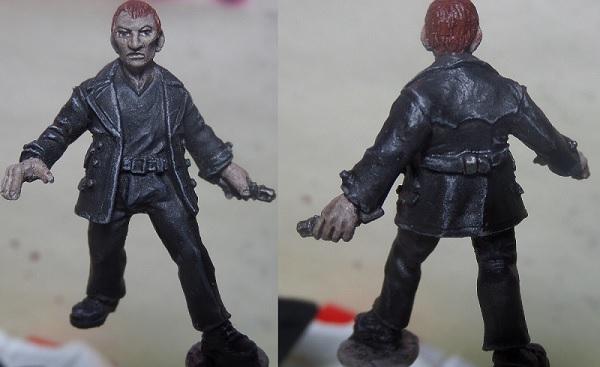
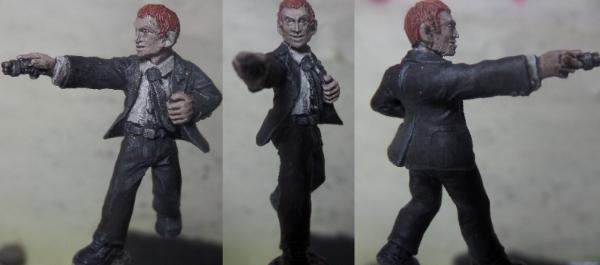
Ignore that they look slightly grainy.. i'm not sure where that's coming from, they do not look like that in person... kind of weird. So, yeah, i think the faces need a bit of touching up, under the eyes, especially, where i drew the dot down into a line to make a smooth dot after cleanup.. looks like i need another pass with the flesh tone to clean up the remnants of the line.
Simple models, simple paint job, but each should look cool when put into their scenes.
70053
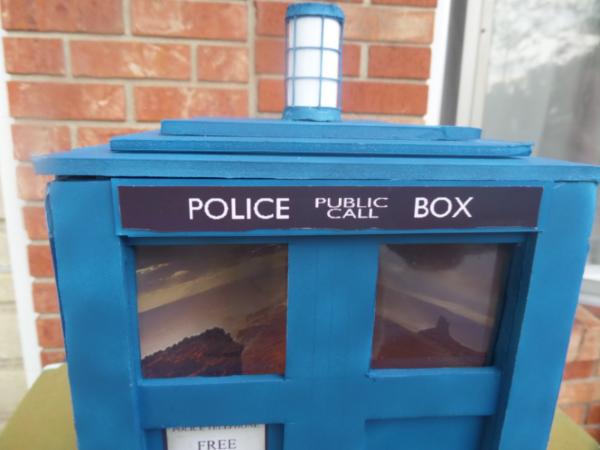
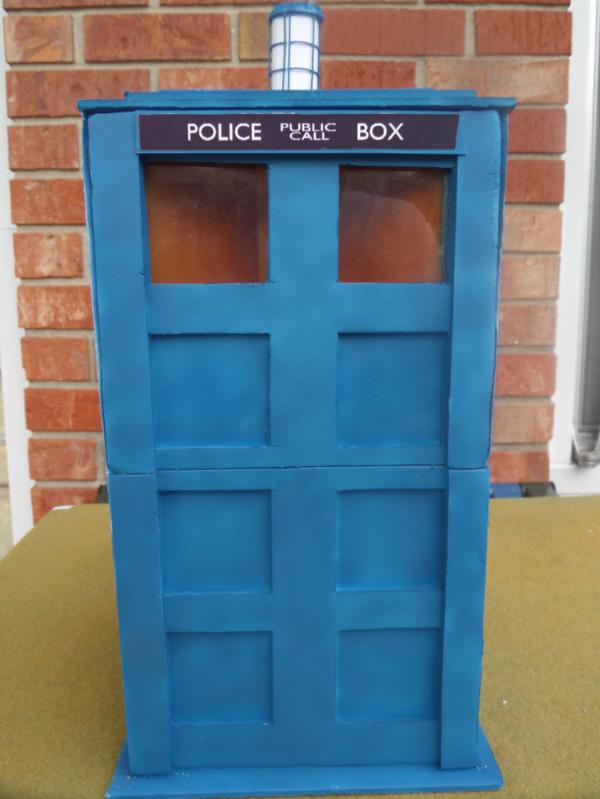
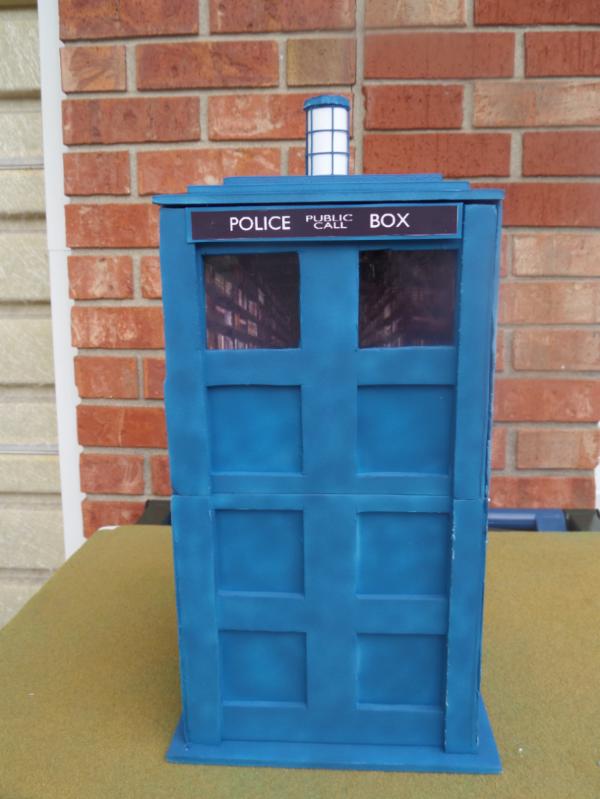
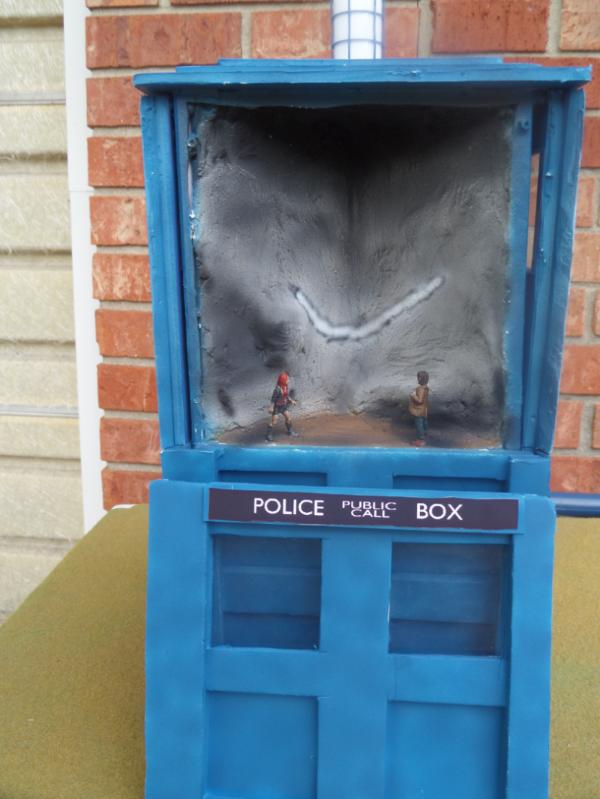
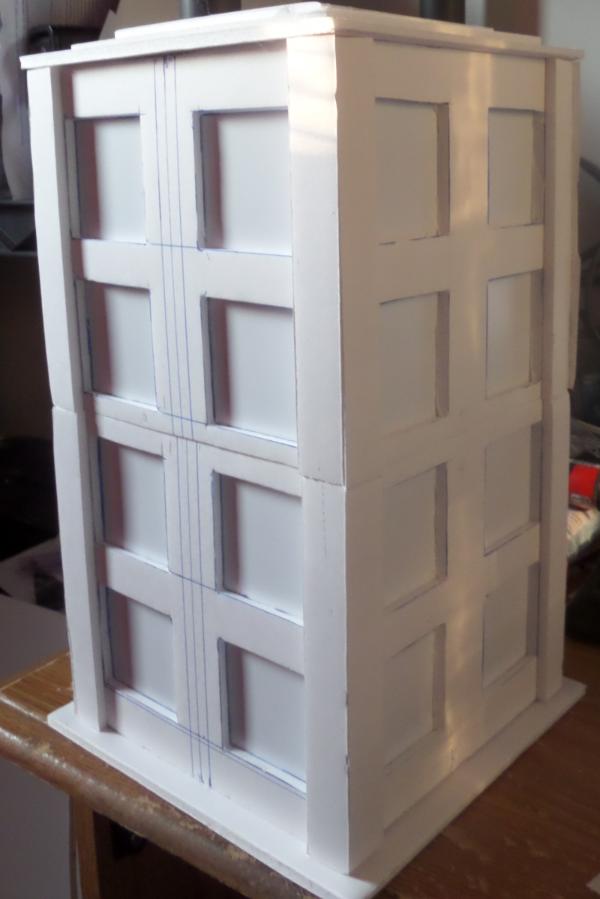
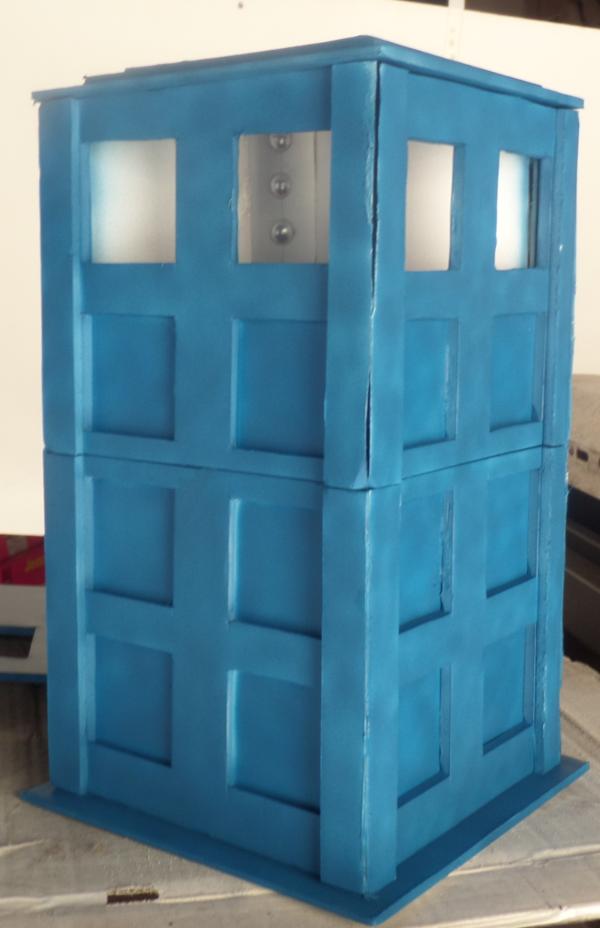
Post by: GrimDork
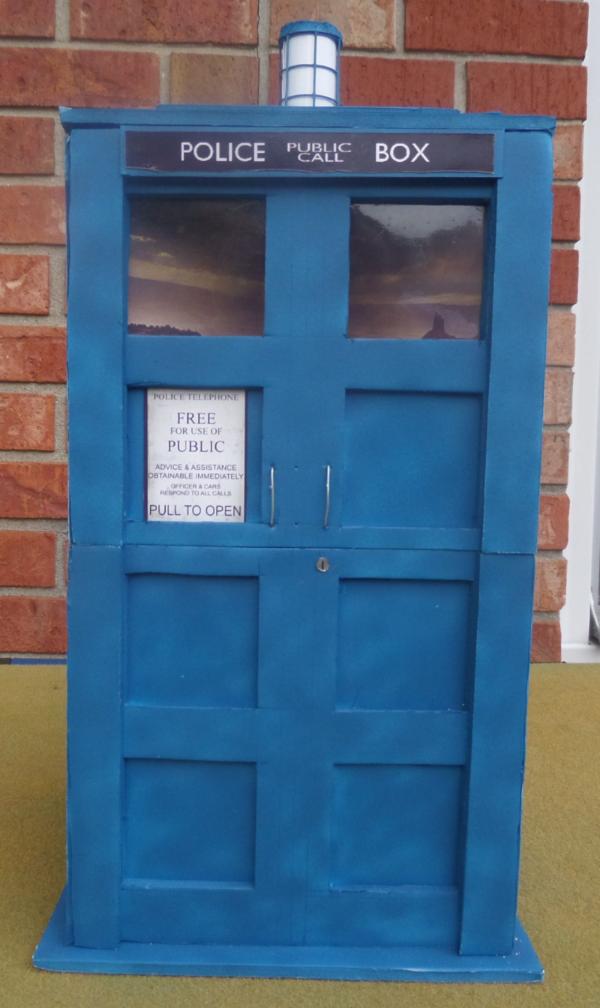
Alright, got some work done, the tardis is almost finished... i think. I need to devise a light to go up top, and put in the plates across the top that declare it as a police box, a couple of handles on one of the faces... the notification paper on the front i'll just print out after it's all painted.. Oh and i need to cut out the top panels and put in the ''glass'' too... so a bit of work left, but the foamboard construction is finished.

Given that this is well out of my comfort zone and skill set... i'm reasonably happy with it!

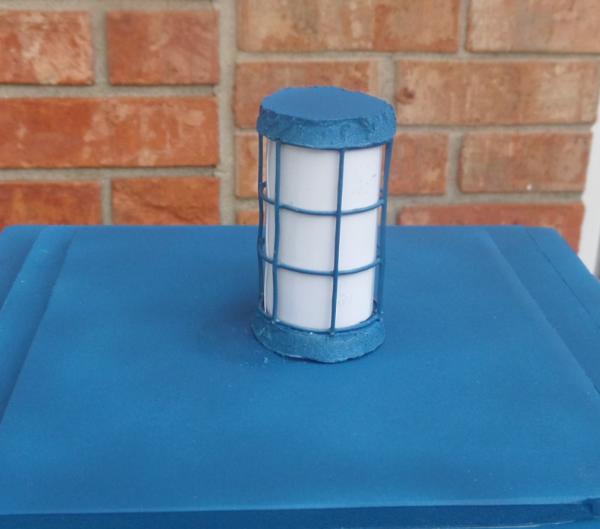
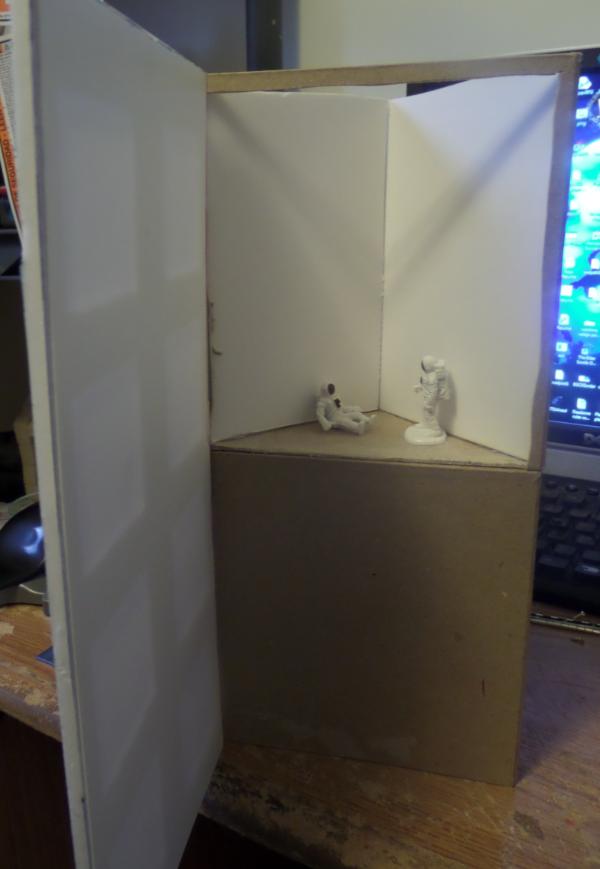
Here you can see the open viewable scene areas. You can see the magnets/metal bits if you squint, i may try to obscure them a little bit before it's over. I need to find or fashion a good replacement for that proxied silver drum up there, the light is pretty iconic and i can't leave it off, though i won't be going for leds or anything.
The thing i love least about this is the foamcore, the edges that show, primarily. Without using tape, which will just peel up eventually, how does one obfuscate the foam edges showing? I'm going to give it some thought, maybe google around a bit.. but if i can't figure it out i'm just going to move on.
I showed you the best corner, the rest of them have some more flaws i need to try to sort out, and one is really bad... i may try to separate the corner piece there entirely and add a new one i can cut to a better fit.
Now I need to build the scenes... and paint all of the figures, just 8 to go! I've got a bit over three weeks, this is gonna be a pretty nasty crunch but we'll see what happens!
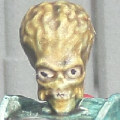
Oh, got this guy ready to paint too...
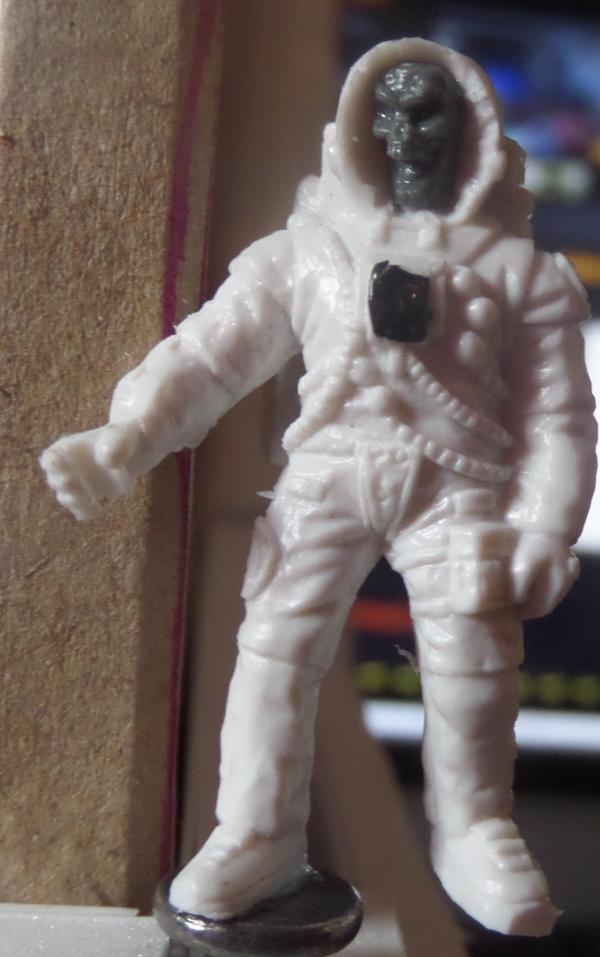
Gonna paint the skull and paint the area around it lit up like in that one episode... then i'm gonna try to cover the whole thing with 5 minute clear epoxy and hope the features show through.

If anyone was unclear as to what the skeleton space man was attempting to approximate... Speaking of... i may try a similar lighting for the scene, dark in places so the skull face can be backlit light that, with enough light to prominently display the doctor, and to have the downed space suit guy throwing two shadows...
77159
Post by: Paradigm
Looks good, and the lighting plan sounds cool too, it would add a nice sense of drama to the scene and allow you to play with contrast a lot.
70053
Post by: GrimDork
Yeah, though adding in things with which i am unfamiliar into a time crunch is probably foolish... but i don't care i'm gonna try to do it anyway.
115
Post by: Azazelx
That's looking great. Good luck getting it in for the time limit!
70053
Post by: GrimDork
Whew.. just the 3 weekends to go, with little time/will to work during the week... gonna get close. Few more updates for you guys:
Nearly completed tardis.
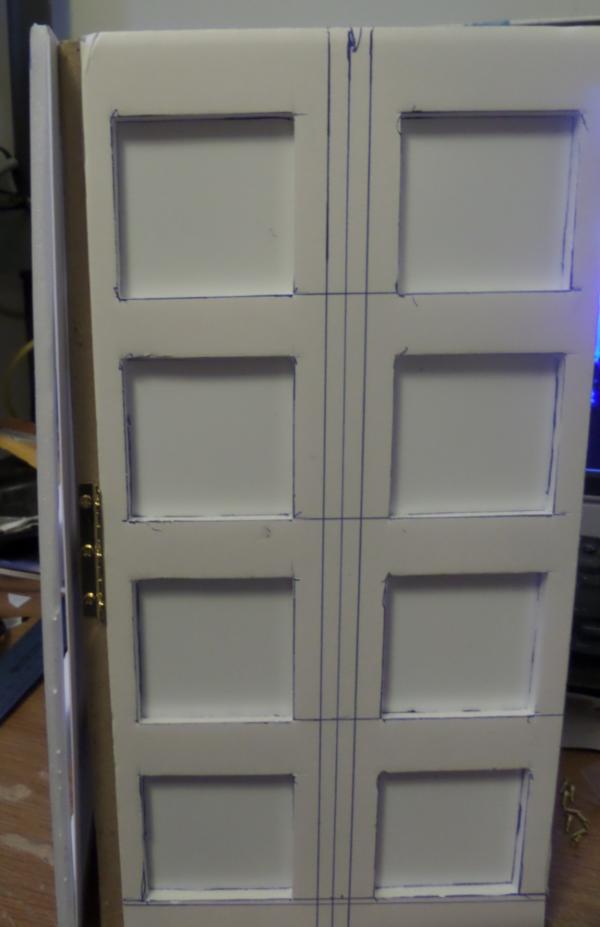
Panels come off, yay magnets! Any suggestions for what to use as a base to build the light on top?
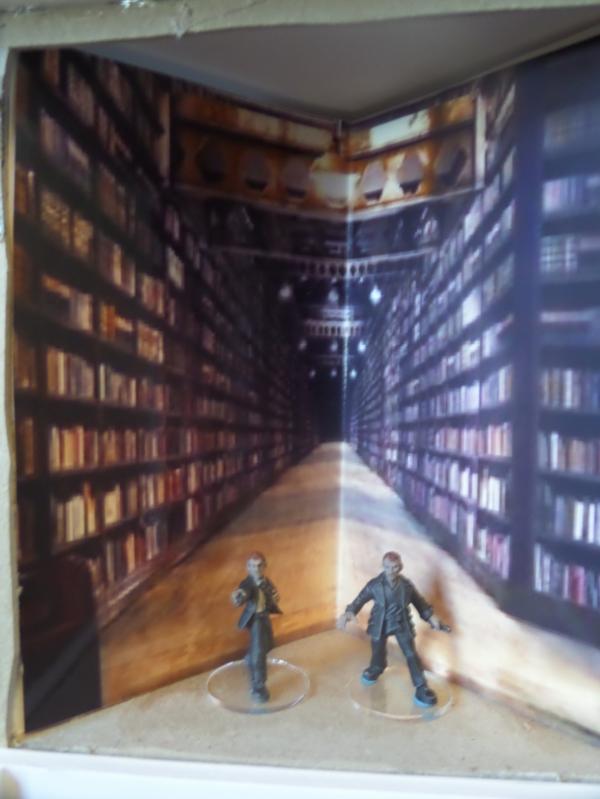
Backdrop for the library scene. I'd love to do physical stacks and such but there's neither room nor time to do so! Be critical of this step, as it's simple to adjust the background by printing another sheet and cutting it differently.
The crease is almost too off-center to the left, no?
Too glossy?
Too big?
Too lazy?
Gotta get the tardis finished and painted in the next week or two, and the rest of the figures done as well. Automatically Appended Next Post: 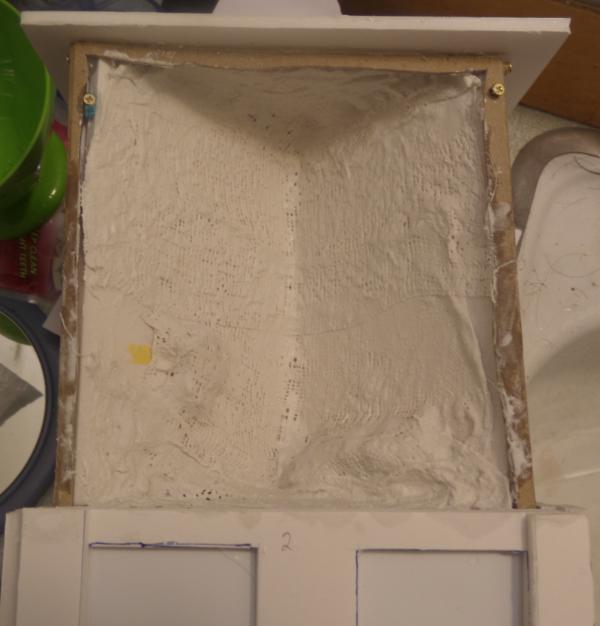
Cave scene, used casting plaster to establish a base for me to go over with the hydrocal stuff. Can't work on the box at all for awhile while i let it dry, may paint daleks tonight!
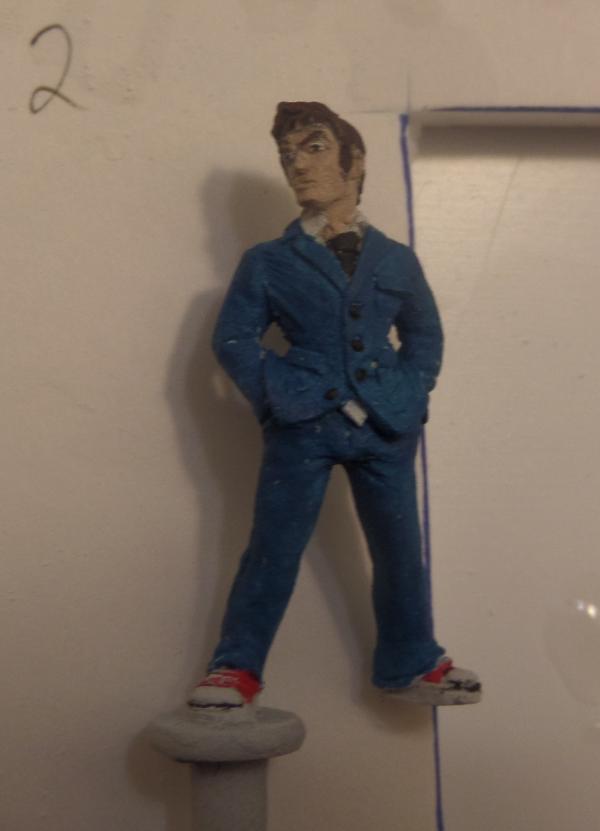
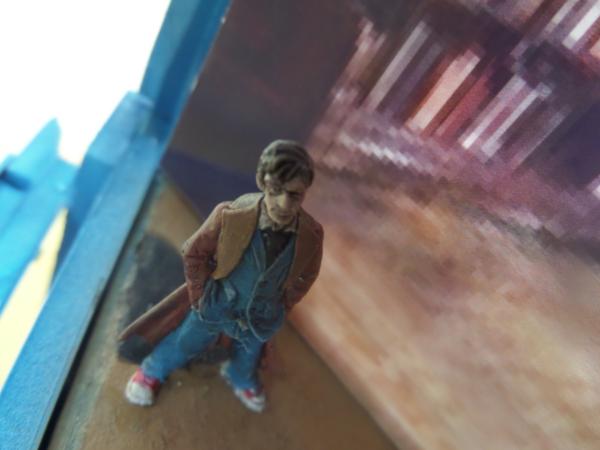
10th doctor, went with classic blue suit and red sneakers, i need to bring the first two models hair into line with this, they all have a similar dark brown going on. Maybe a bit of touchups and some highlights... then the dip! Automatically Appended Next Post: More:
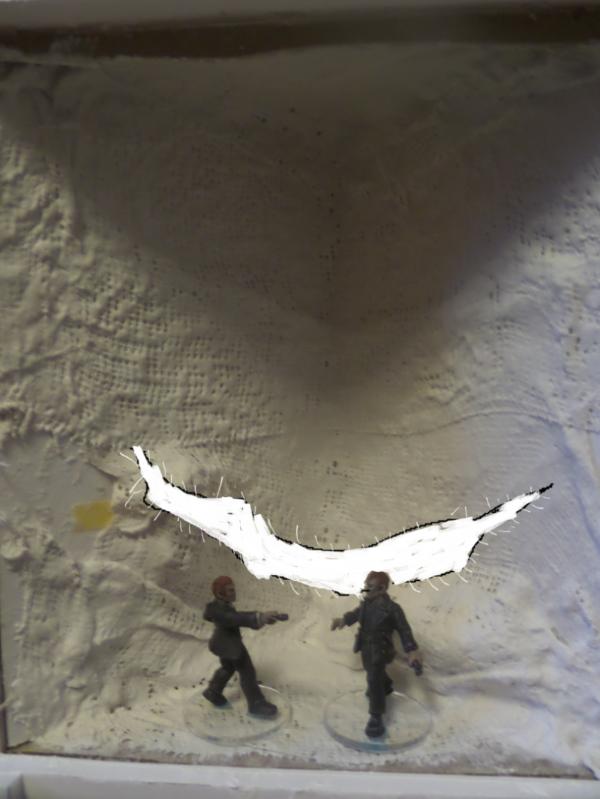
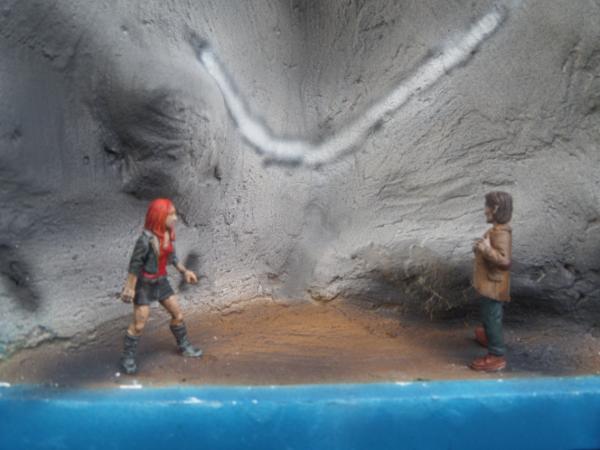
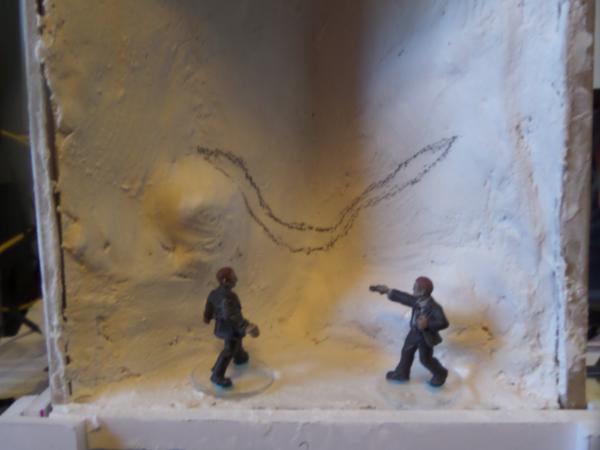
Will probably paint the time crack rather than give it a physical structure, thus paintbrush edit for emphasis... probably put it slightly above the rock jutting out on the left wall, so i can do some shadows under said rock. Gonna give this a layer of that hyrocal stuff and smooth it to look like cave walls. The floor in that scene of the show was actually dirt, but it will probably get the same treatment as the walls and just painted differently, maybe some flock here and there.
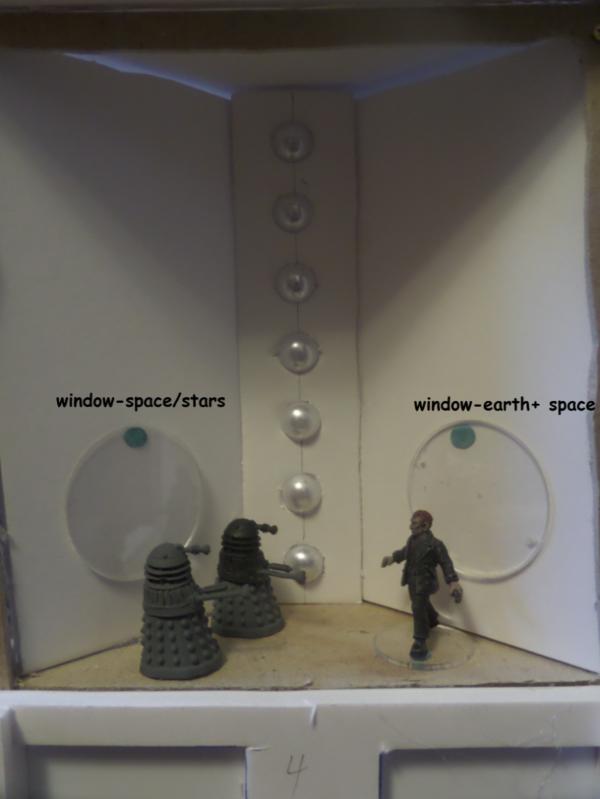
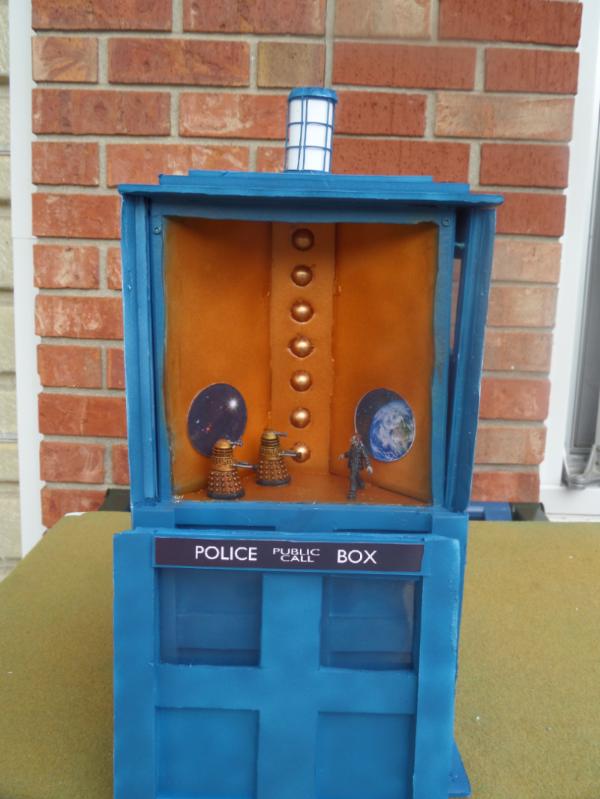
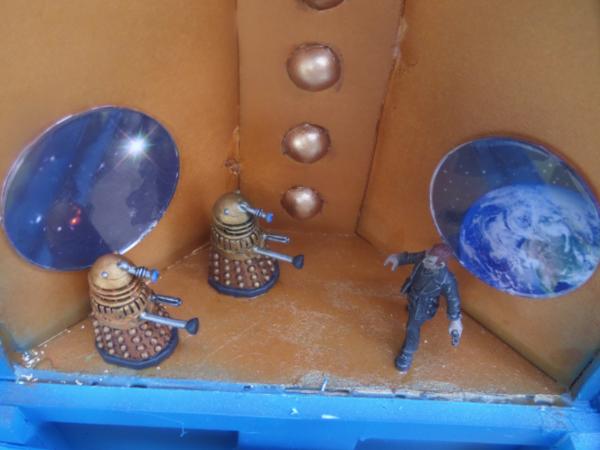
I figure this looks kind of like a dalek space ship interior... it's got a vertical wall panel with large studs in it, reminiscent of the panels on the lower half of daleks themselves, the large windows will involve a starscape behind the daleks, and the earth and stars behind 9th doctor, vaguely implying that he's protecting it. Will print something out on photo paper for the window images, considering doing an edge around the window panels, not sure, i will if there's time and i can find something suitable. Will be painted in the same brass/copper style as i'll be doing the daleks.
Might try to paint the daleks tonight, that would leave only the source lighted minis to do, and i'll have to get their scenes a bit further along before i can do them. Automatically Appended Next Post: I've also done a wash of a thinned down pva glue on some of the surfaces of the tardis, gonna see if i can seal the paper/foam sections to make them a bit more uniform for painting, but I will brook no peeling glue ruining the paintjob down the road... so we'll see!
115
Post by: Azazelx
Coming along nicely. It'll really start to shine once you get some paint in those panels!
70053
Post by: GrimDork
Thanks! I wanna paint today but I may have too much time left on the insides. Need to do the hydrocal early today so it'll dry in time.
57098
Post by: carlos13th
115
Post by: Azazelx
Spray, spray, spray!
70053
Post by: GrimDork
Wow... just... what the feth.... that was... stupid and terrible yet... awesome.
I mean... dr who usually doesn't fight at all... and then dalek AND cybermen? But it was still kind of hilarious too.
I think the cave will be ready but i've still got to get the scene with the master lined out before i'm comfortable spraying.
57098
Post by: carlos13th
Ho Ho Ho Ho Ho
70053
Post by: GrimDork
Haha!
Paint is going down folks, lots and lots of blue right now, got some left though. I've got to do the insides as well, and finish the rest of the models.. but we're moving along nicely!
Still looking for advice for the light on top.
Also, totally changed the setting for the master vs 10th doctor, it's still somewhat appropriate though.
77159
Post by: Paradigm
Nice work so far, this is really coming together now.
70053
Post by: GrimDork
Haha, you should have waited to say that after this next update, gimme about 3 minutes! Automatically Appended Next Post: 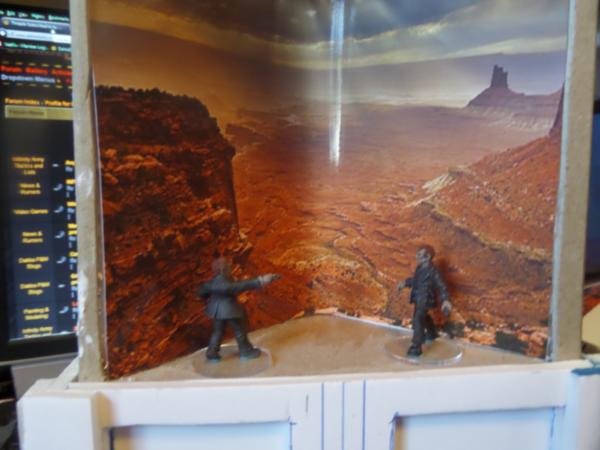
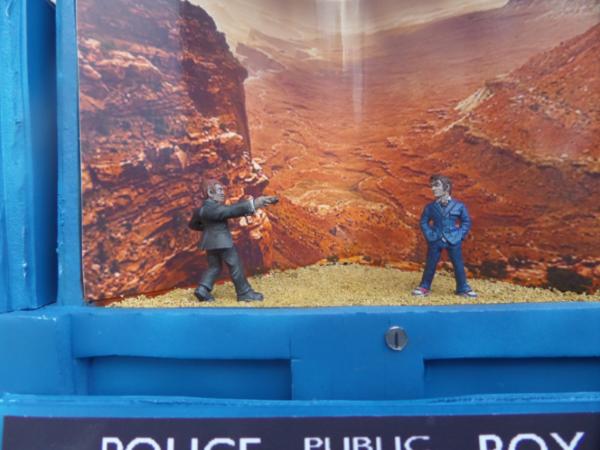
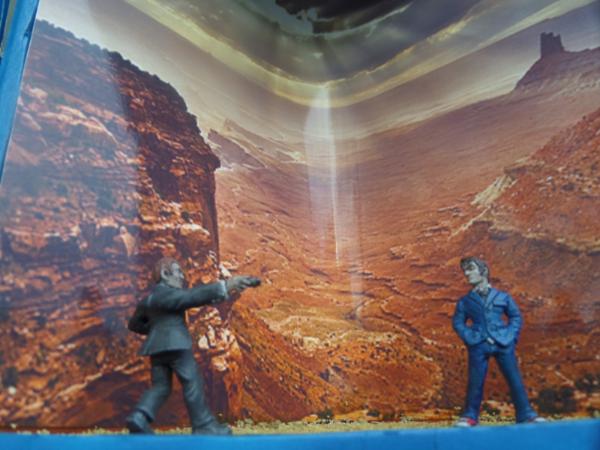
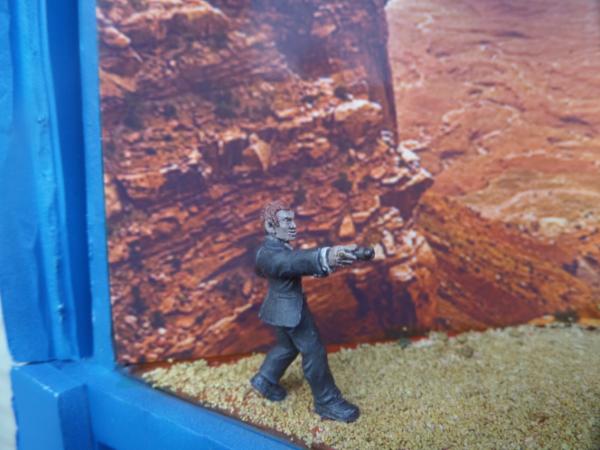
A little artistic license, they were at a canyon though no sonics/lasers and they didn't actually fight. Gonna sand/gravel mix over the floor and add some shrub/flock as well.
Here you see the more or less finished cave surface with the placeholder time crack, gonna be different than i thought but i should be able to get some shadows to play with!
Wooosh...wooosh... Woot! Now we're talking about getting closer!

Still functions, the interior triangle shapes will be the colors of the scene, blue everywhere else.
How does one highlight something at this scale? Should i try to drybrush it a little, edge highlight? Do a little darker then lighter touches with the airbrush? Good enough already?
77159
Post by: Paradigm
I say again
I wouldn't highlight, to be honest. At this scale, light itself will do all the highlighting needed.
70053
Post by: GrimDork
I like the way you think, sir, there is a greater chance i'd screw it up trying to highlight than make it look better anyway. Just need to do the interiors now. Cave i'll try to do entirely with the airbrush, some gradient nonsense and shadows blah blah. Really, the crack in the show didn't make that much light, but what fun is that! The dalek quarter is done, only needs a spray of copper and then brass on the studs. Well, and the windows/scenes, but that's all on top of the painting. The other two scenes.. library i'm gonna see about painting the floor brown and carefully drawing lines for wood grain... maybe, the real draw will be the double shadow anyway... and the 10th/master showdown just needs the ground sprayed and then surfaced. Gonna try painting the ground orange to go with my grand canyon backdrop, and then doing the balast w/o painting it.. but we'll see. Automatically Appended Next Post: Hmmm... Interiors! 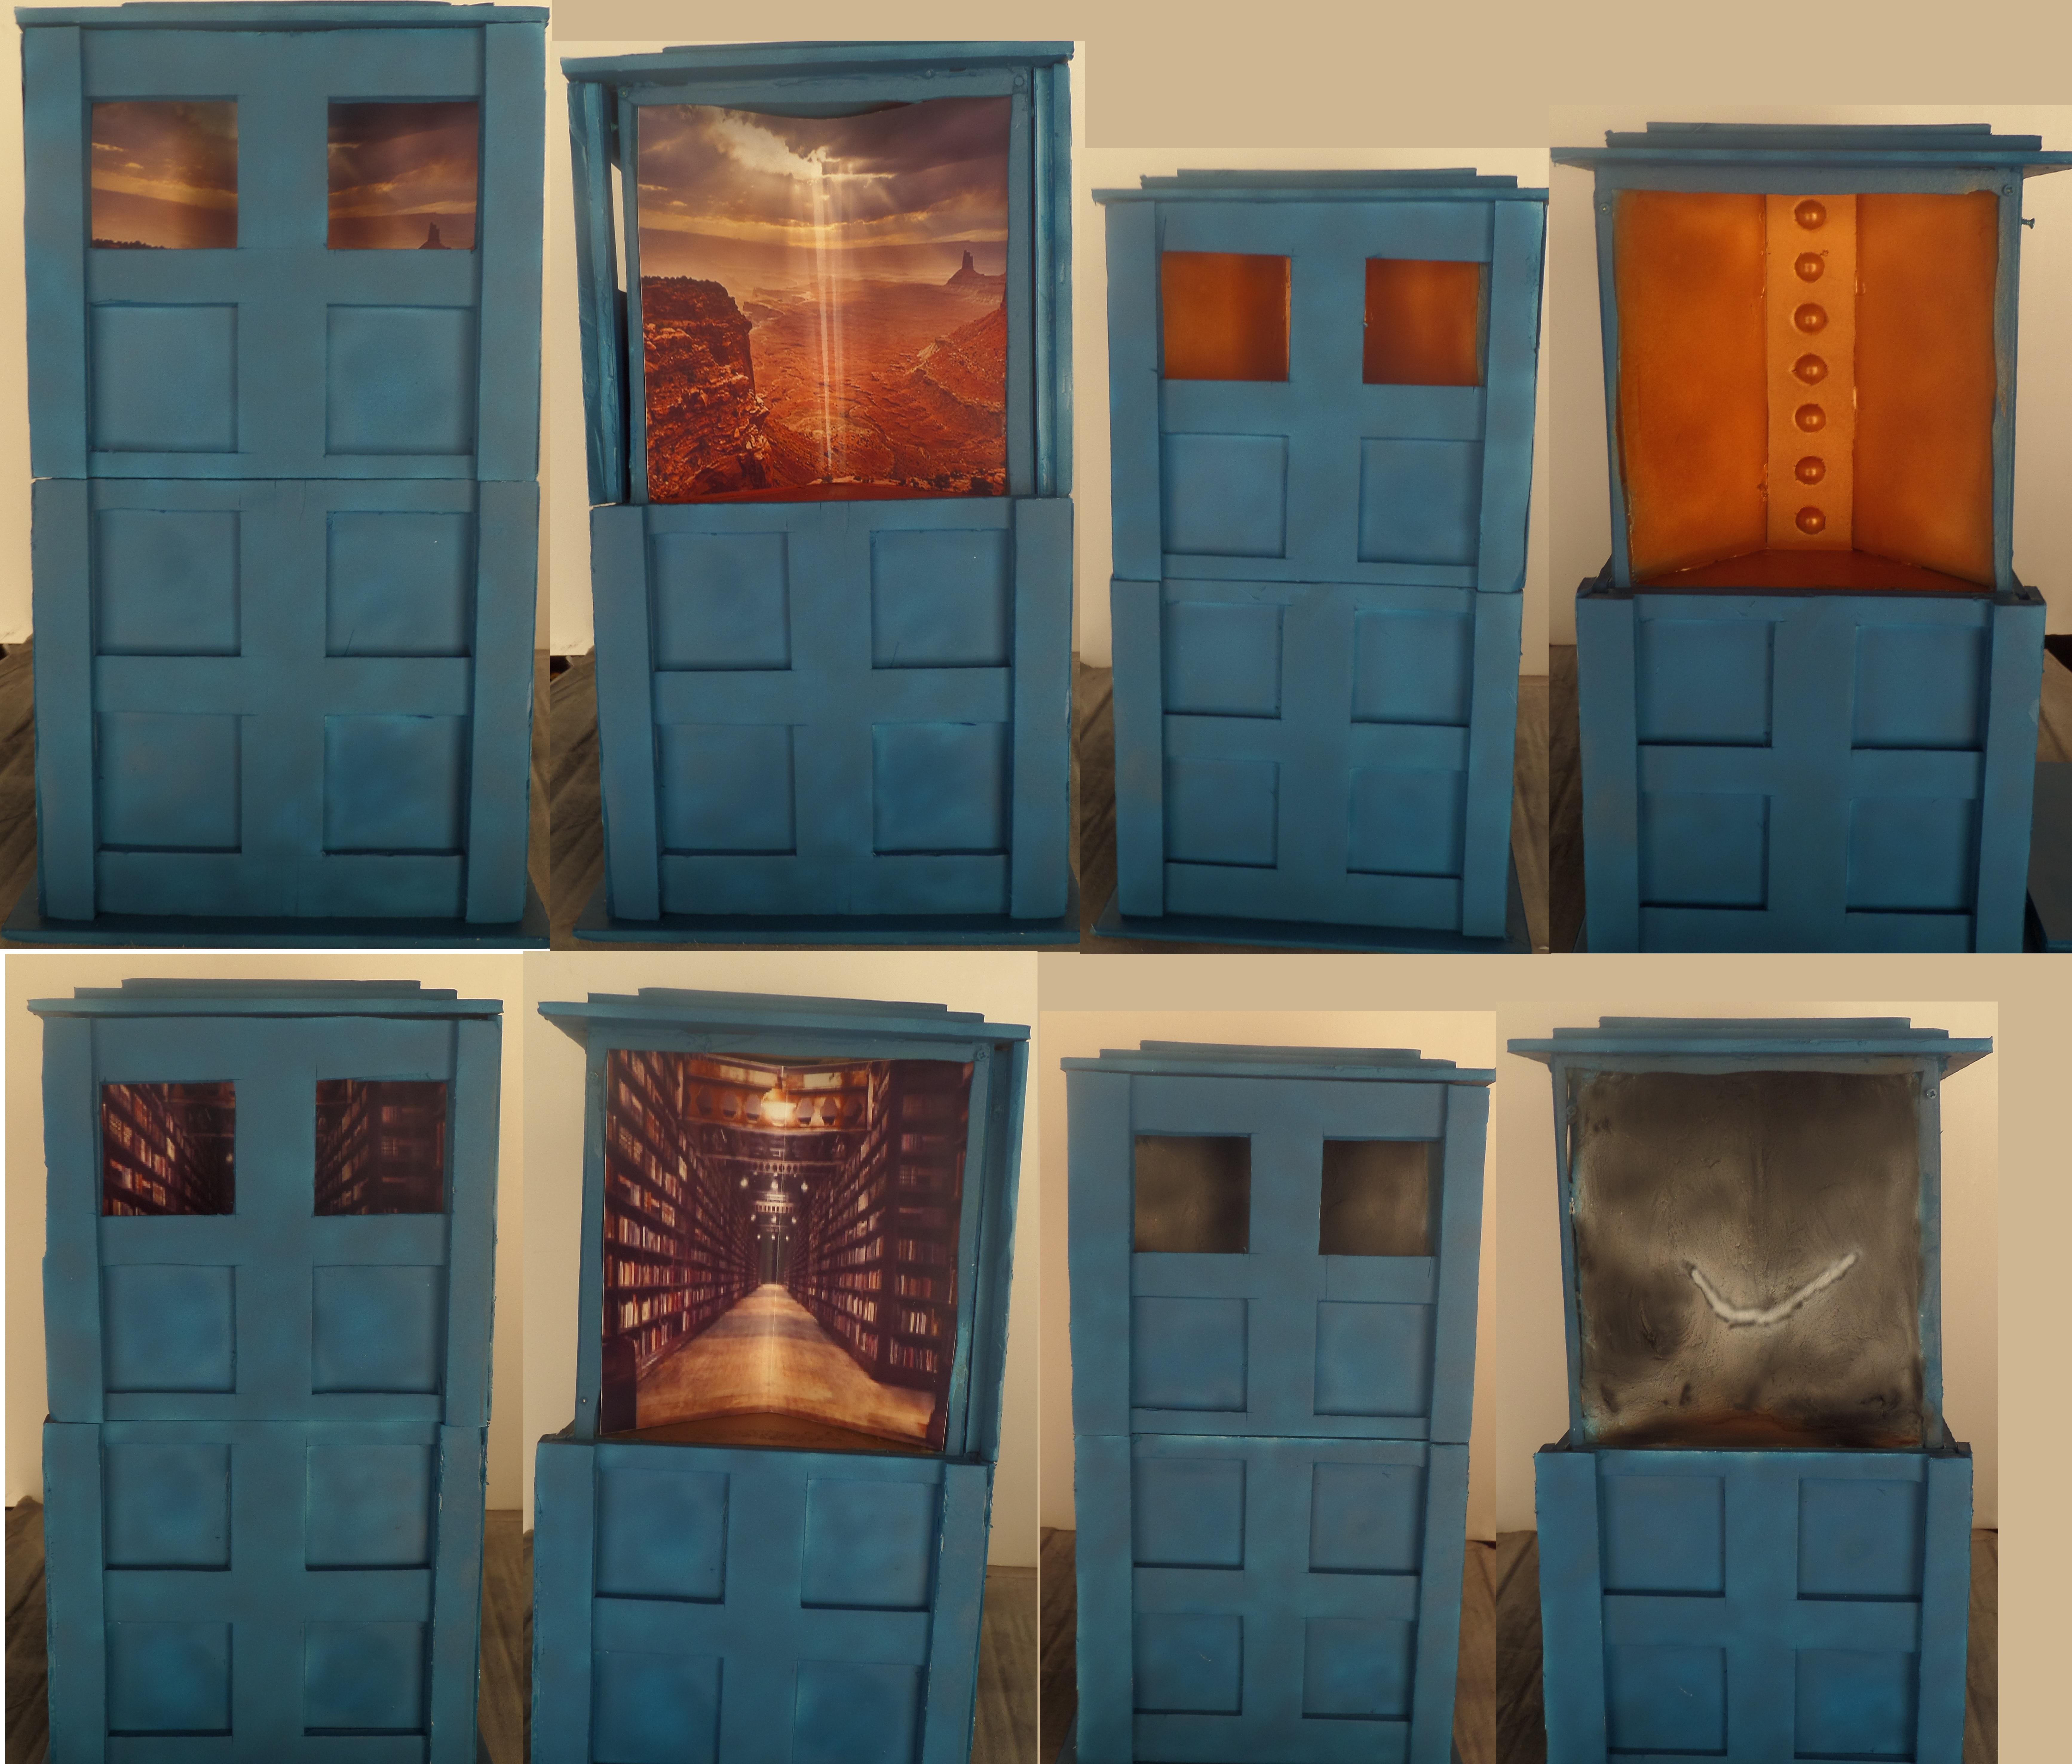
54374
Post by: Chemical Cutthroat
Well it is certainly coming along!
Did you do the epoxy in the skelly heads yet? I'd make sure to test out what you're doing beforehand on something to make sure it dries clear enough to see the skull. And they might need to be a bit brighter than normal so they're still visible. Goopy stuff, however transparent, has weird light-bending properties sometimes.
Good call with using the photo backgrounds. I particularly like the Dalek one.
72556
Post by: Red Harvest
Whoa. Very cool.
70053
Post by: GrimDork
Skele guy still needs painted yet. The library and canyon are printed. The dalek scene is a piece of foamboard with large 'pearl' beads set in place, airbrushed bronze, going to put some windows yet. The cave scene is plaster cloth and hydrocal/plaster/whatever you wanna call it.
Hoping to get a lot done this weekend, have had some slowdown over the week.
70053
Post by: GrimDork
I'll see to pictures as I get the chance, I've done a bit of work. Canyon scene-based, the talus/ballast/fancy sand is down. I'll let you guys look at it and you can let me know if it needs some washes or is GtG. Dalek ship scene- windows added. I'm kind of torn on doing window frames, they're like port-holes kind of. I'll post it up when I can and you guys can advise perhaps. 10th doctor sans coat is finished, gave him a wash of ghost tint: blue to cover up the little specks of white showing, and dipped. Dip made him look better, it's disturbing how well it works. Daleks are sealed, they did not get dipped, the drill-spin and flick methods for removing excess dip were both impossible due to the magnets. The copper went down fairly well, though I put down several layers of brass on the little nubby things on the bottom half, and it just isn't showing up to me. I instead washed the copper parts with ghost tint: brown, and tried to miss the parts what were supposed to be shinier. I think they're obviously daleks and it works for me. Still need to prime the astronauts, and to paint the last 5 models belonging to the lit scenes. I'm probably not going to do super dramatic contrast, I just want enough light in the library to make two thrown shadows obvious, and the glowy skull-face a bit more noticeable. And looking back at the episode with time crack in that cave, it didn't really produce a whole lot of light, slash, the light was pretty even. I still wanna have the portions facing the light brighter though. I cut and glued a couple of windows, have six more to do and should have just enough material to do it. I need to cut out the frames though, I want to do something simple, probably just little strips of plasticard, either stock white or airbrushed blue. While I was printing the scenes for the windows, I printed out 4 police public call box signs, and the little informational paper that goes on the front door, and I cut out 4 backing pieces upon which to mount the callbox signs. I should have made them a touch larger, in retrospect, but I think we'll manage. Images when I get the chance to take some photos! Automatically Appended Next Post: 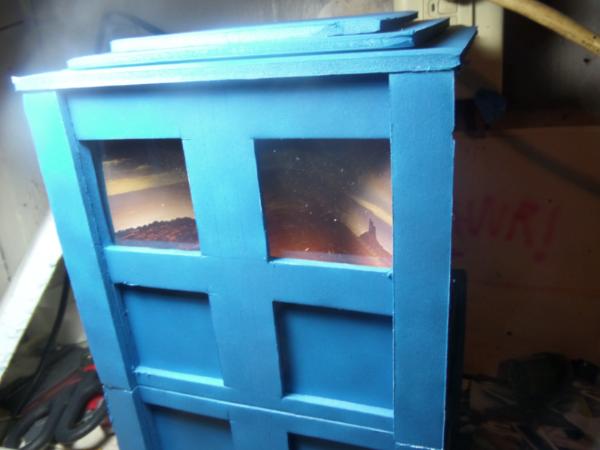 So here's one panel with the 'glass' in, though I still need to frame it to match the concept. 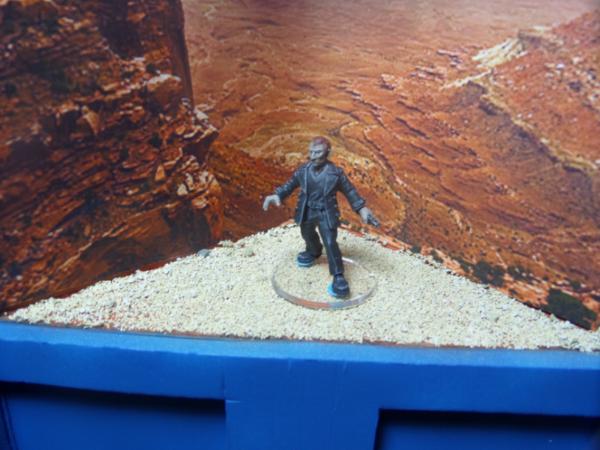 10th Doctor is drying, so 9th Doctor is helping show off the canyon scene. Do the rocks look rocky enough, or do I need to do some washing, or outright painting of them? 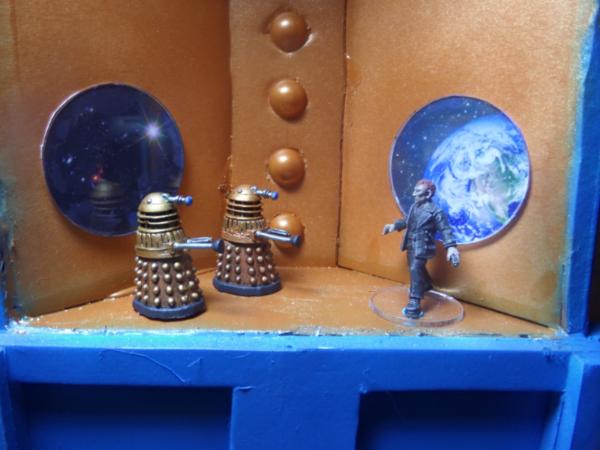 Boom. Aside from gluing everyone in place... this scene could be done. I quite like how it's turned out so far, though I may try to get the studs in the wall to show up a bit differently for contrast. Do the windows need some kind of frame? Ideally, I'd have just cut the wall out to fit them snugly. Hell... I may still do that though everything is glued now. What say you fine folks? Hmm.. another thought is that I could paint the rim of the 'glass' copper to match the wall, implying a setting. Still have 5 more minis to paint, 6 more windows glass and then frame, the little flashy light for the top, and that's just about it.
77159
Post by: Paradigm
Looks neat, especially the Daleks. I'd do a wash on the sand just to add a little more definition, maybe a dark brown to tie it in to the surroundings.
70053
Post by: GrimDork
Yeah. The larger talus stuff has some different colors, but the smaller ballast stuff is pretty uniform. Looks boring.
115
Post by: Azazelx
Looking fantastic. Maybe a dark wash around the wall studs - just around their edges to make them pop a bit more. I'll also second the comment about the sand. If you have time, either frames or recessing those windows would make them look even better.
70053
Post by: GrimDork
Thanks.
I'm leaving the windows for towards the end but I'm considering it for sure. Sand has been washed with a mix of brown and golden yellow tint. I wanted to do the studs in brass, but my airbrush brass is being problematic via normal brush. I may try it with the AB before the end. And a wash around them should help them look even better, so thanks for that
I've just positioned the last 5 minis and marked the shadow zone on their nails so I'll know how to paint them. I've got 2-3 options as I see it.
Do everything by hand, try to improve my weak blending skills.
Paint them just like the first five, then airbrush a thin black ink/ghost tint on the shadow zone to darken them.
The astronauts I'm probably going to do with the airbrush almost entirely except for small details, probably start them grey, airbrush the shadow area like above, and then thin white going the other way.
We'll see what works.
76303
Post by: Warboss_Waaazag
This looks neato!
70053
Post by: GrimDork
Thanks
72556
Post by: Red Harvest
Work on the blending skills. You'll want those for Infinity minis.
Good progress. Very cool idea and nicely realized.
70053
Post by: GrimDork
I'm feeling the time crunch, without a deadline I could have been more professional about some things... but I'll be honest and say I do kind of like knocking stuff out over taking a huge amount of time.
Blending would probably be nice to have for my infinity stuff. We'll see if I can put up with something so time consuming though, I'm pretty lazy.
70053
Post by: GrimDork
Time crunch! I've got all of 10 days left to finish this project, and when you consider only two of those days are weekend days that I"ll be working... ouch. I've got GenCon next weekend, so that leaves until about wednesday next week to finish the Dr Who 'Rama up. Just gotta finish some details on the box, I may have an idea for the light on top even, and paint the last five models. I think because of the time crunch, my first attempt at lighting will be to paint one of the models normally like the first five, and then dust it lightly from behind with either black paint or ink/wash/glaze with the airbrush. This may or may not work to my satisfaction, but I think I need to try something quick to have enough time to finish up.
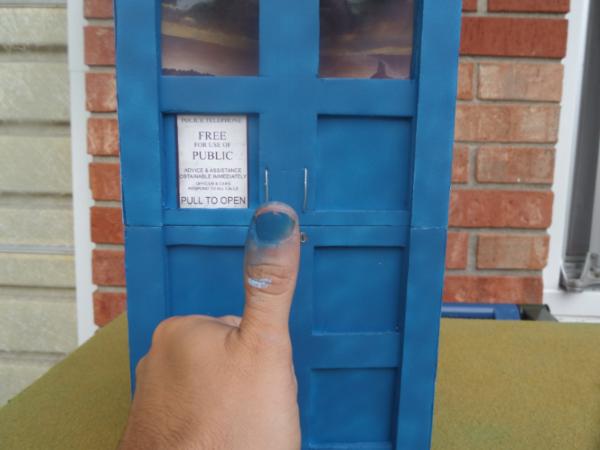
Any suggestions for the frames for the window panes? I've half a mind to leave them alone for enhanced visibility... but they seem like an almost iconic detail and the outside of the tardis is pretty simple as it is.
70053
Post by: GrimDork
Just to prove I didn't blab about a time crunch and then promptly sit around doing nothing...
Just some base colors down. Though the dip will take care of shading for the most part, there's still more work to do, and clean up. I'm going to try to get the boots and jacket looking a bit more like that faux fur/suede light/medium grey stuff uhh...

Kind of like that... but I swear I've seen it with a bit more range from dark to light.
Anyway, seemed appropriate maybe.
I decided to do the blue suit again on the second 10th doctor for better contrast with the brown coat, same reason I kept the red shoes instead of the cream colored version he'd have been more likely to wear with the all brown. Need to research colors for 11 more since I'm less familiar with those episodes, and figure out the astronauts. I'm gonna get everyone painted properly because I know the recipient isn't going to care about source lighting. If there's time, I'll go back and redress it, but I've still got some things to do to the police box yet.
78187
Post by: Thraxas Of Turai
After a dip and cleanup they should look great. No idea how to go about the faux leather/suede though. I hope that whoever is getting the diorama box will appreciate the time and hard work that has gone into it Grim.
70053
Post by: GrimDork
Its for my sister, she's a Dr Who nut so I think she'll like it. I'm gonna wash and highlight the boots until they look right instead of just straight dipping them now.
Kinda hope to get the painting done today. Gotta make the outside presentable too.
78187
Post by: Thraxas Of Turai
You can do it! That is a lovely gift for your sister, the next step is to get off the internet for a bit (meant in the nicest and most positive way possible!).
70053
Post by: GrimDork
Haha, I know what you meant Daughter is napping, perhaps I'll make some progress. Automatically Appended Next Post: Just so ToT quits hassling me to work... ( )
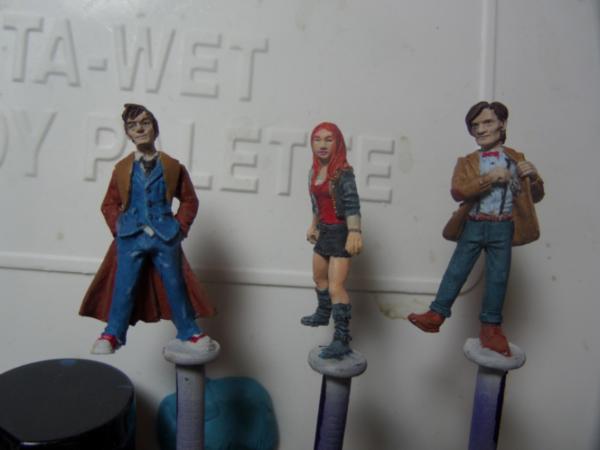
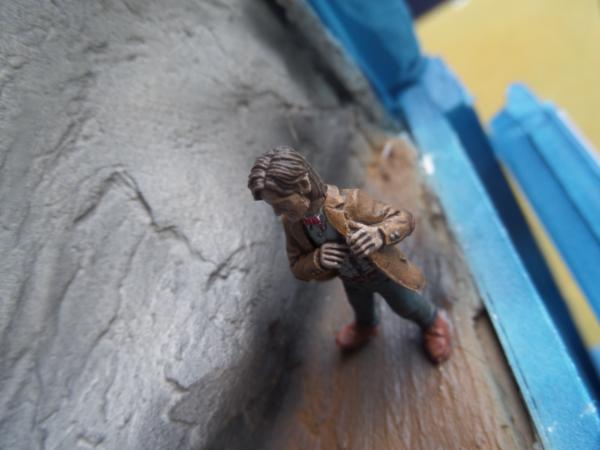
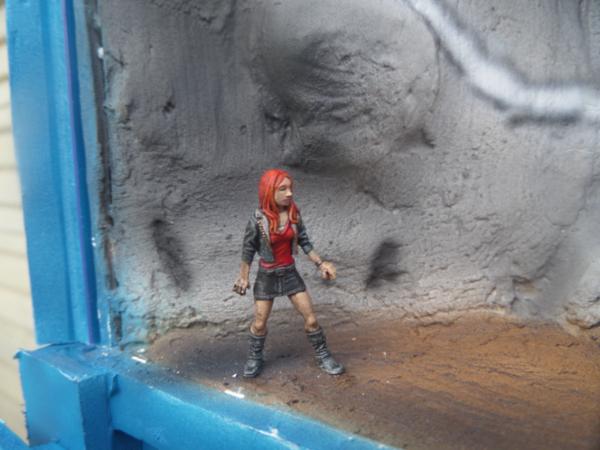
I think these three are just about ready for dip. I'm gonna go charge up the compressor so I can get the last two astronaut minis ready to paint as well. Automatically Appended Next Post: I'll reserve final judgement for after the dippening (should be a word...), but I'm really liking the colors for Pond and the 11th Doctor. You might have to click the image and zoom in, but I managed to get everyone's eyebrows (actually I just *now* did 11th doctor, it's missing from the picture). And I think I managed to do the lipstick for pond subtly enough that you notice it but she doesn't look like a clown. I really need to do some research into faces, I know you can add some expression and play with the age by subtle blending and highlights, but I'm just not that good yet... plus time crunch.
I'm just happy to have gotten 3 sets of eyes more or less right and remembered the eyebrows and such. I would like to stripe 11th doctors shirt subtly but I don't think I've got a steady enough hand to do it, especially not in a hurry.
72556
Post by: Red Harvest
They look good. I'm sure you'll finish in plenty of time.
The internet is to occupy us while we wait for the paint or glue to dry
70053
Post by: GrimDork
^The man Quoth the Truth!
Space suits re-primed, I think I'll dip the others here in a minute so they're ready to work with in the morning...
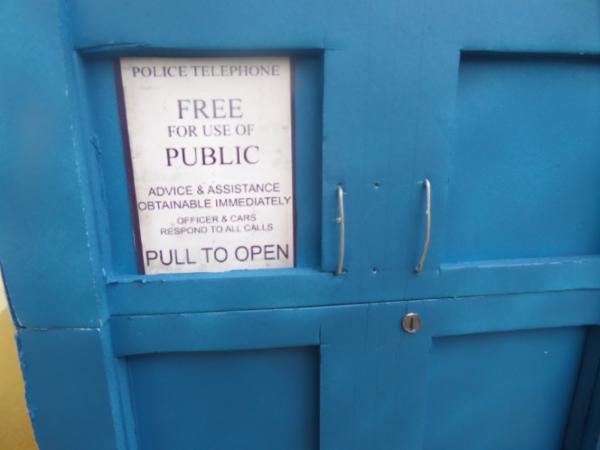
Trying to sort out a little logistical thing with the 'police box' signs and how they're going to be mounted. Then it's just handles for the front door (decoration only) and the light on top. Trying to get the things that I need to do outside my hobby room (airbrushing mostly) done during nap time.
Automatically Appended Next Post:
Going to call the dip a success. 11th doctors eyes are harder to see now for some reason, maybe the paint wasn't dry. I may have to fix them but everything else looks better than when it went in, woot!
Gonna do the 'police box' pieces now.
115
Post by: Azazelx
Tick-Tock, Clarice...
70053
Post by: GrimDork
Meep!
Now I'm stressed and terrified!
Daughter woke up before I could finish the police box additions, but they will be easy and won't take long to dry. I need to finish the spacemen tonight and try to dip them so they'll be workable tomorrow.
70053
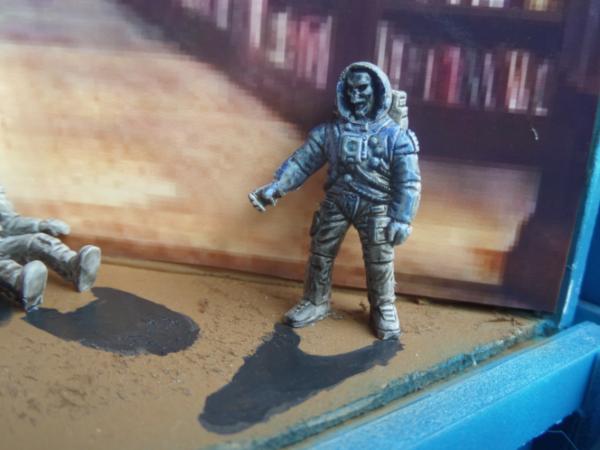
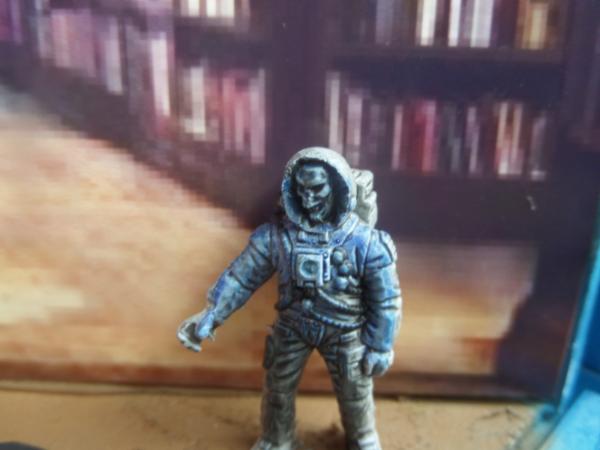
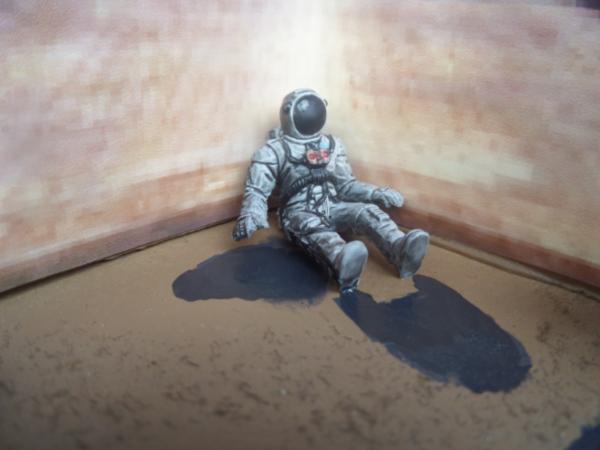
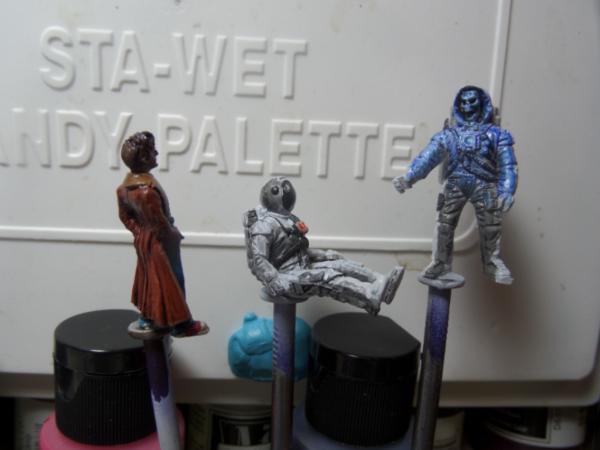
Post by: GrimDork
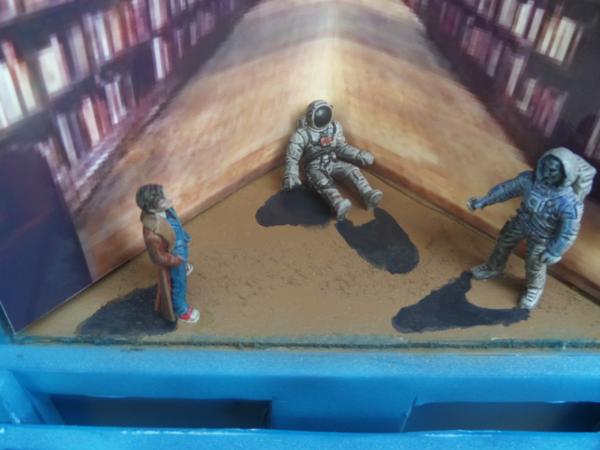
Roughly posed as they'll go in the library scene.
Should I go over the shadowed portion of the doctor to help him fit the environment suits? Is the shading on them too bad to go along with? The blue source light from the standing suit's chest... how can I make it better? I think the idea is there... but it's kind of rough.
How can I improve?
Here are the three from yesterday after dip, looking good to me, trying to decide if I want to black wash the shadowed portions a bit before I seal them.
Thanks for watching guys, as soon as I can get to the airbrush the outside is going to be close to finished, just gotta do the light on top and consider the windows.
77159
Post by: Paradigm
Looks fine to me, if you want to up the OSL's effect then paint a brighter shade on the hard edges facing the source, and then even brighting on the source itself, looks great as-is, though!
70053
Post by: GrimDork
Sounds good, I blue-washed the effected area to tie it in and things got a bit more muted. I just about have my light sorted for the top too.
78187
Post by: Thraxas Of Turai
Looks good to me, captures the atmosphere of those spooky scenes from the episode. The ultimate would be to have button to press that plays "Hey, who turned out the lights?" on a loop!
Great to see you getting through so much work over the weekend. How much work remains on the actual Tardis itself?
70053
Post by: GrimDork
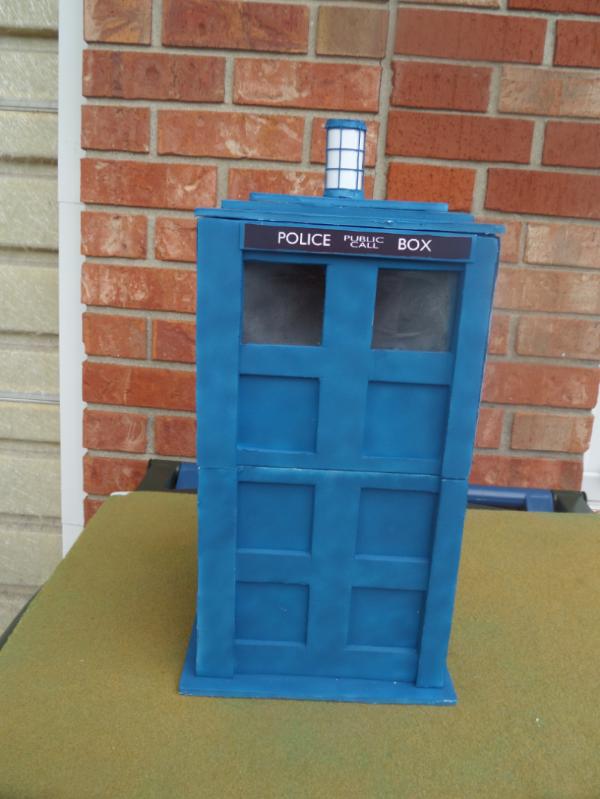
Not much, I finally figured something out for the light on top that should be good enough. The whole tardis is kind of weird, being made of foamcore board, kind of like something made of legos, it has tiers instead of slopes and stuff. Doesn't bother me though, and my sister is getting it for free so she hopefully won't complain I've got to airbrush the components of the light and the bars that will mount the ''police public call box'' signs blue. Then I've got to attach the bars and assemble the light, then attach it as well. I've got to put on the paper signs, including the information poster for the front door, and maybe sort out some handles. I want to put bars on the windows, but if it doesn't happen I'm just going to call it artistic license so you can see in through them better. So I dunno, maybe an hour or two total on the outside? If I'm slow or overly cautious, It may be more like 30 minutes if you don't count drying times. And the figure are all painted, just need to be secured in place. And maybe some black washes (on the shadowed portions) on the last three to go with the mood lighting of their scenes. Maybe. What do you guys think? Automatically Appended Next Post: Ok pretty much got it, just need to wait for the dip on the astronauts to cure so I can seal them, and I've got to glue everyone down. I need some kind of handles for the front, thoughts? Automatically Appended Next Post: Well I rushed things along and got done today, woot! I delivered it, sister liked it quite a bit. I'll call the project a success. I may do a postmortem later but I managed to slightly burn a couple of my fingers earlier cooking so I don't feel like typing that much atm. Pictures to follow, got a few batches to upload. http://www.dakkadakka.com/gallery/images-70053-42591_Thinking%20Of%20Who.html ^Gallery, in case I get lazy and don't post them up tonight.
115
Post by: Azazelx
Looks great - and good to see that your sister loved it as well.
77159
Post by: Paradigm
Very impressive, a worthy gift and a project to be proud of! Great stuff!
70053
Post by: GrimDork
Thanks guys
This blog will probably slow down a bit as I take a break and do a palette cleanse before my next diorama, but I've had an idea that should keep me moving through synergy.
So the gist, I've decided to --tentatively-- do a 2x2' deadzone board with kind of a desert outpost theme. This is not a diorama, but an alternative to the normal city mat and DZ tiles. How it ties in... I'm going to pioneer the techniques for the board while doing my samurai/ninja diorama. The Samurai is a merc and the ninjas will go where he goes to hunt him, so he just happens to have been caught in a futuristic desert outpost. This will let me work out the methods for my desert board, get started on my next diorama right away without feeling like I have to, and just win through synergy in general.
So, I'll be back with updates as I have them, probably some slow down due to GenCon and unboxing posts on the other blog for a week or two.
78187
Post by: Thraxas Of Turai
Great stuff it is great that your sister appreciates the work. A great idea, and you executed it really well. The next project sounds cool as well. Enjoy your rest, enjoy Gencon and hen come back with a bang.
70053
Post by: GrimDork
Thanks
Much enjoyment anticipated and I'll probably be fiddling with parts if the next rama soon.
I haven't decided yet... but the next loer terrain comp just started and I've had an idea... it would technically be a diorama too so it would go here.
30672
Post by: Theophony
Nice completed diorama grimdork .such a clever idea for a gift, much better than a blank piece of paper inside her envelope . I never got into dr. Who, either the old ones or the newer series, just never took the time.
72556
Post by: Red Harvest
The Dr Who series are an acquired taste. I never acquired it either. However, it has its fans, and I'm glad that they have a show they enjoy.
This diorama is fantastic. A neat idea and so well executed. A wonderful gift.
Dioramas are explicitly welcomed GrimD. So, bring it 
70053
Post by: GrimDork
Thanks guys
I think it came out a bit more.. I dunno... simple than I'd have liked but I only get so much time to hobby so I did what I could.
I've watched most of the recent doctor who stuff... definitely not a 'Whovian' but I can understand them.
@Red, just posted on your comp page, probably biting off more than I can chew but we'll see Automatically Appended Next Post: Rough concept of what I might do for the LoER comp round 11.
Building all of the terrain from scratch most likely, just placeholders there.
70053
Post by: GrimDork
Yeah that last thing didn't pan out, it was going to run pretty close to the infinity samurai/ninja Diorama in terms of due dates and I had to cancel, lame, I know.
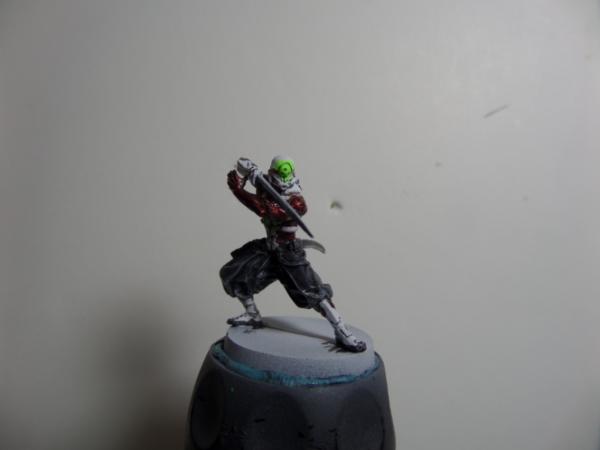
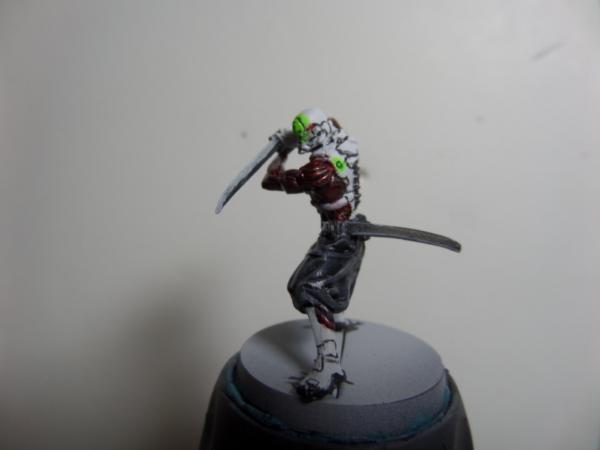
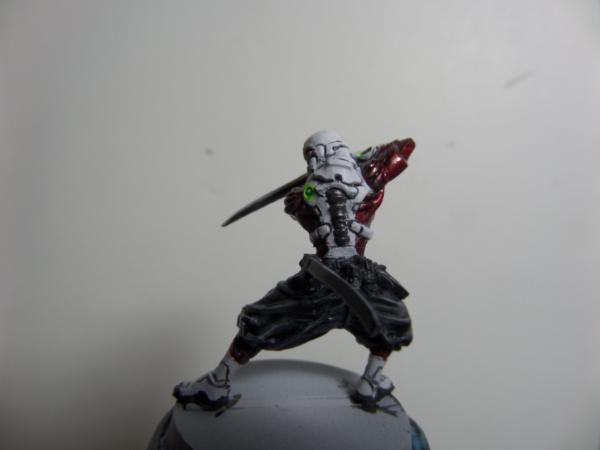
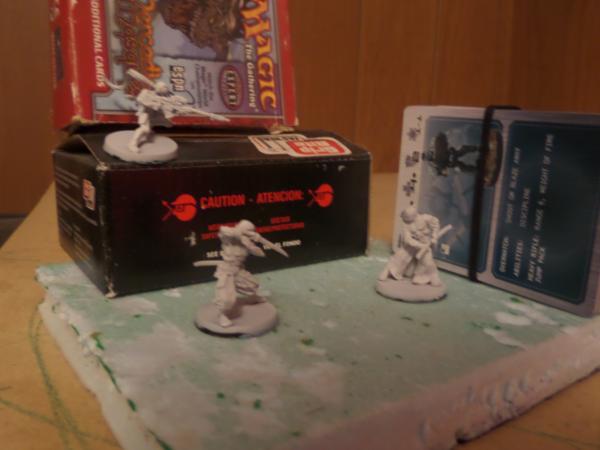
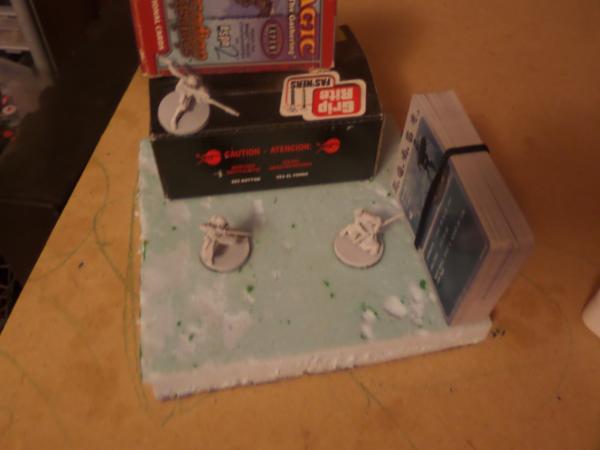
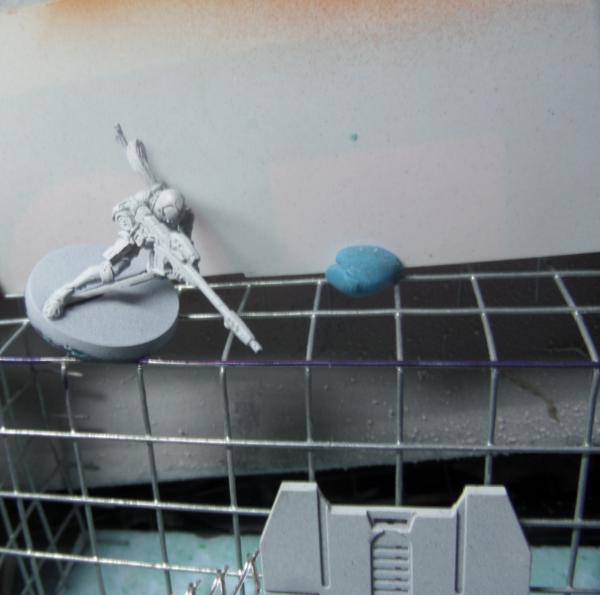
But here are the models I'll be using for the next diorama:

Mushashi, a ninja sniper, and an oniwaban ninja.
77159
Post by: Paradigm
Neat models! Looking forward to seeing where this goes.
70053
Post by: GrimDork
I may see if my inferior drawing skills allow me to make a sketch for my reference, if successful, I"ll share it.
57098
Post by: carlos13th
Looking forward to this.
70053
Post by: GrimDork
Everything is primed, going to start researching techniques for the OSL on the oniwaban and the disappearing sniper ninja. Mushashi is just going to get my best effort but no fancy techniques. Automatically Appended Next Post: Got a few sketches coming in a minute. Should give a basic idea of what I'm working towards.
Automatically Appended Next Post: 

So the big question is: should I put the oniwaban inside a building hiding in the shadows with some form of OSL, *or*, should I put the oniwaban on street level with his back to a building (maybe some graffiti, or other items to make it interesting) using active TO camo to blend in like the sniper?
The first makes the tension in that the samurai is opening a door cautiously while a shot is being trained on his position, the second makes the tension as the samurai has sensed the hidden ninja and is preparing to swing blind to defeat his opponents attack.
Thoughts?
I'm also considering moving the sniper ninja to more of a corner to give her some distance, will probably play around with that a bit as I get the scenery started.
70053
Post by: GrimDork
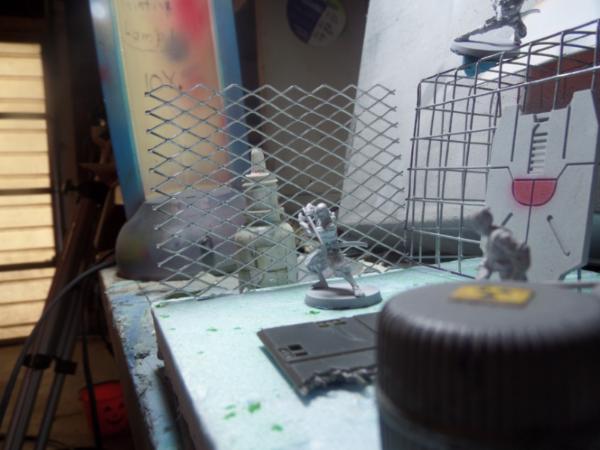
After some quick mock-ups I think I may have to go with something more like this.
The oniwaban needs to be left and mushashi needs to be right, it's the way they're sculpted, you're kind of looking at both of their backs if I flip them. Also, 3 buildings is almost too much, makes it hard to see everything.
Now what, though? How to paint the oniwaban on the ground. I could do something similar to the camo effect on my malignos?
Kind of grey-scale the 'hidden' portion maybe like it's cycling out of camo, with a bit of a blue tint and bright blue/white lines where the camo has already dropped. I can't really paint him like the environment because it'll be open behind him. I guess I could to imply a building behind him but that may not be obvious enough to sell it.
Also will need to mount the sniper at a downward angle or she'll look stupid. Still planning on painting her like a billboard behind her. Automatically Appended Next Post: Here's more:
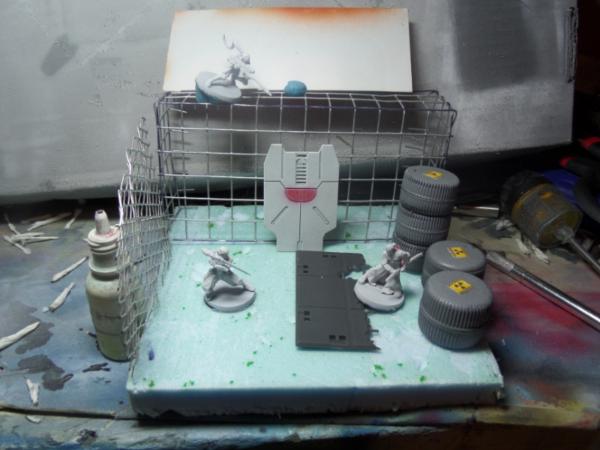
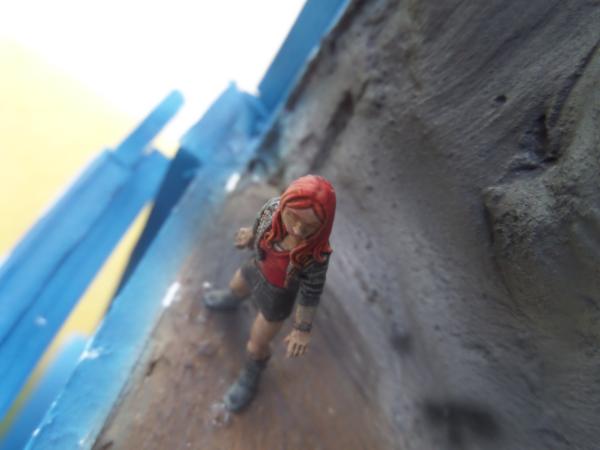
Gonna go with this, proceeding to glue everything into place. The building will get a texture and the ground will too, will probably add a fence post for the mesh fence, and I'll be creating new barrels for the dio since I"m giving it away.
This should be fun, I can put the mesh pattern on the TO camo effect, should look cool if I manage it

Will probably make the set's barrels taller so he won't have the option to just hop them
She's gonna need some bit of scenery to help achieve that angle.
70053
Post by: GrimDork
A couple of layers of the plaster cloth stuff over the wire mesh. The building has a crooked look, but I don't think I really mind. I need to plan and arrange for anything that's going to be set in, like the door and any windows or advertising boards, before I apply the outer layer of plaster stuff. I may also attach a railing of some kind to the roof as I want those in my eventual board. Slow going, I may have to deploy this gift late.
The barrels will build up fast, may even try to do those later today since they're so easy... And the fence won't take a lot of work. I'm still trying to decide how to paint everybody though.
Does Miyamoto Mushashi have a distinctive color/style to his outfit? Like those flower-pattern (not sure what you call the cloth, its not a kimono, just don't know the name) 'suits' or did he usually wear dark brown or something?
57098
Post by: carlos13th
I beleive on men the top part is a Kimono or possibly a Shitagi http://en.wikipedia.org/wiki/Shitagi . Bottom part might be a Hakama which is worn over the Kimono.
http://en.wikipedia.org/wiki/Hakama
I dont know of any pattern, colours or dress type closely associated with Mushashi beyond tales of him being rather unkempt.
Here are two depictions of him


I would say black or red for the armour as they were the most common armour colours. For the clothes underneath either go for Deep Blues, some dark greys or Brown depending on what works best with your armour type.
I have a tutorial somewhere for simple patterns on Samurai clothing. I will dig it out for you.
70053
Post by: GrimDork
Huh. Are those, by chance, by the same artist? The pants are pretty much the same... Google search would seem to suggest nothing really concrete about clothes, I could probably go with a flat single tone or do something neat like those above, and those would be a much better attempt to get better at painting so... Thanks Thanks for looking for the tutorial btw, appreciated
57098
Post by: carlos13th
There is a more complex guide somewhere but this should be useful.
http://www.flamesofwar.com/Portals/0/all_images/WargamesIllustrated/ArticlePics/WI312%20Web%20Files/ArchiveArticles/WI278-WEBPaintingSamurai.pdf
A few pages down under simple cloth patterns.
Also you might find inspiration in this painting guide which shows how to paint several unarmoured Samurai from the Koryu Buntai from Northstar. Something I have to order at some point.
http://nstarmagazine.com/RONIN_1_1.htm
Hope that helps mate.
Automatically Appended Next Post:
No idea if the artist is the same mate. If you want to mimic that design for a miniature I recommend simplifying it by drawing t of five straight lines next to each other with the ones in the middle being larger and the ones on the outside being smaller which should form a nice simple triangle design similar to the one in the pictures. That should create a similar look.
70053
Post by: GrimDork
The links are handy, thanks! Actually quite a bit more interested in painting Mushashi now that I have some patterns in mind.
I guess the Oniwaban ninja should probably just be black though huh.
Automatically Appended Next Post:
I'm thinking of a similar thing, maybe triangles, maybe asterisk/flower shaped, but blue for the pants. I wanna do a blend though, should I do light waist to dark hem, or dark waist to light hem?
57098
Post by: carlos13th
Just black might be a bit boring.
Maybe a different colour like a like grey/blue or maybe light brown paper colour or something for the areas that are green on the official model.

Or take a leaf out of metal gears book

70053
Post by: GrimDork
Hmm interesting.
Maybe I'll try something at the bottom of the pants that isn't a horizontal line, just so I can be a snowflake
I almost want to paint the green parts of the arms metal to imply that he's got prosthetic arms for fighting, or at least partial power-support like a HI but just in certain places... but there's no way I'll finish the project AND randomly master NMM to a degree that I'm happy with it.
57098
Post by: carlos13th
70053
Post by: GrimDork
Link seems busted.
Automatically Appended Next Post:
But I follow, muscle suit. That may not be a bad idea at all.
57098
Post by: carlos13th
70053
Post by: GrimDork
Might be a bit of a challenge to paint the arms to look like muscle but boy it could certainly look cool! It would also make me feel better about leaving the pants black.
Automatically Appended Next Post:
Maybe to make it more obvious they're supposed to be mechanical muscles I could paint silver then do the linework with black, then red glaze/wash. Hmm... Could paint it more like an anatomical model too...
57098
Post by: carlos13th
Really looking forward to seeing these painted up.
Its also made me really want to dive into the infinity JSA at some point but I have models from Arianda, Nomads and Haqq to paint up first.
70053
Post by: GrimDork
Yeah. I'm starting to get more interested now. And I kind of want both the Oniwaban and Mushashi too. Might have to pick another of each up some day.
57098
Post by: carlos13th
They are both great models I was going to go for JSA just to get an excuse to use Mushashi but I saw an Ariadna Highlander starter box for less than half price and went for that, mostly cos I love the SAS guy.
70053
Post by: GrimDork
Yeah those are cool.
68139
Post by: Barzam
 GrimDork wrote: GrimDork wrote:Might be a bit of a challenge to paint the arms to look like muscle but boy it could certainly look cool! It would also make me feel better about leaving the pants black.
Automatically Appended Next Post:
Maybe to make it more obvious they're supposed to be mechanical muscles I could paint silver then do the linework with black, then red glaze/wash. Hmm... Could paint it more like an anatomical model too...
This will wind up giving you a metallic red scheme. Go with this and do up the hard armor bits on his body in white and you ought to wind up with a pretty striking looking Oniwaban.
70053
Post by: GrimDork
As you say, am I keeping the leggings black at this point?
57098
Post by: carlos13th
I would say go the anatomical model root myself. Keep the black though in order to stick with the ninja theme.
68139
Post by: Barzam
Most people tend to stick with either black or very dark grey pants on the Oniwaban. I'd stick with the dark colored pants as well unless you want to try designing him to go with a specific environment.
70053
Post by: GrimDork
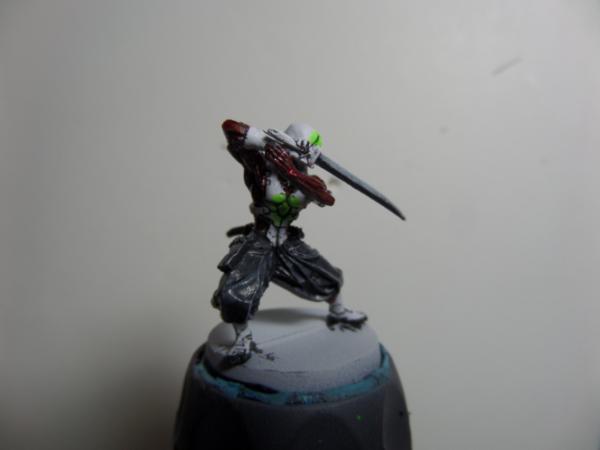
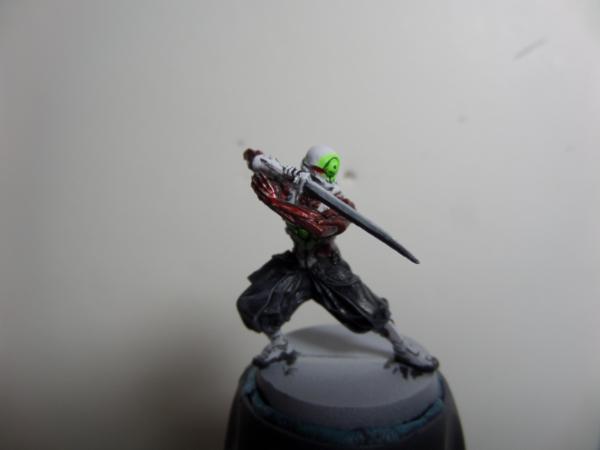
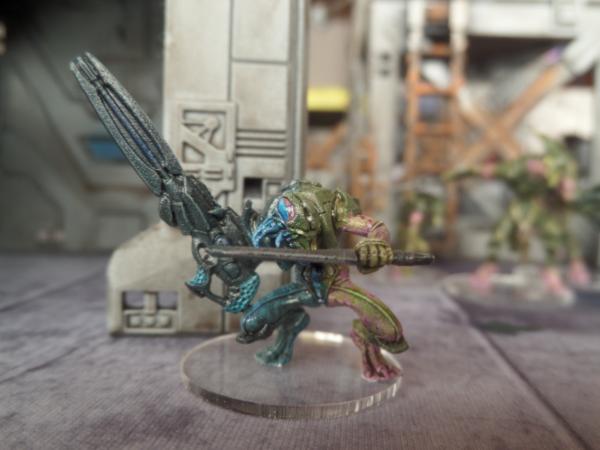
Yeah I think you guys have it, black pants are most likely in. Bit of progress: 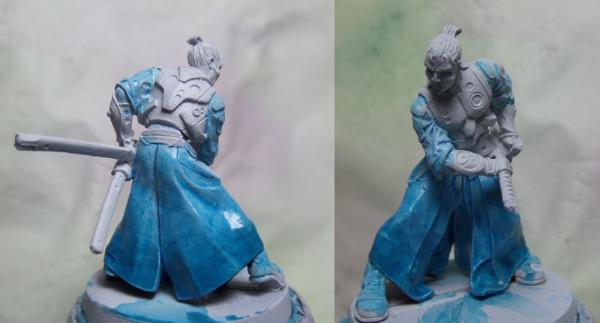 I could have picked a more neutral blue rather than the teal but I dunno it kind of works. I'm thinking of doing dark red armor, shiny black is also an option, thoughts? Still planning on a pattern on the cloth in white, may or may not stick to the triangle/lines thing. 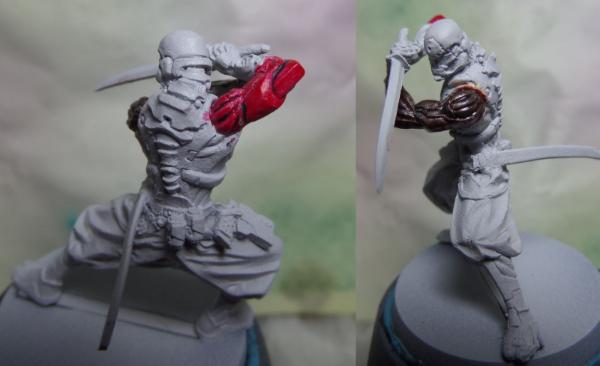 Ran into a snag on this dude. None of my inks or glazes are an appropriate red color to get the metallic red I wanted. What about doing the bright red with black in the recesses? Obviously it would need highlighted and stuff but just as a general idea? I'm thinking to keep the armor around the red as white, and the pants will probably be black. The sword will probably be black with white along the edge like a Bleach soul reaper sword. A lot further behind than I'd like to be but at least I've got paint down on the models. Please to giving your guidance and criticisms, they are much appreciated at all times!
70053
Post by: GrimDork
Help appreciated! Which final layout should I go with? 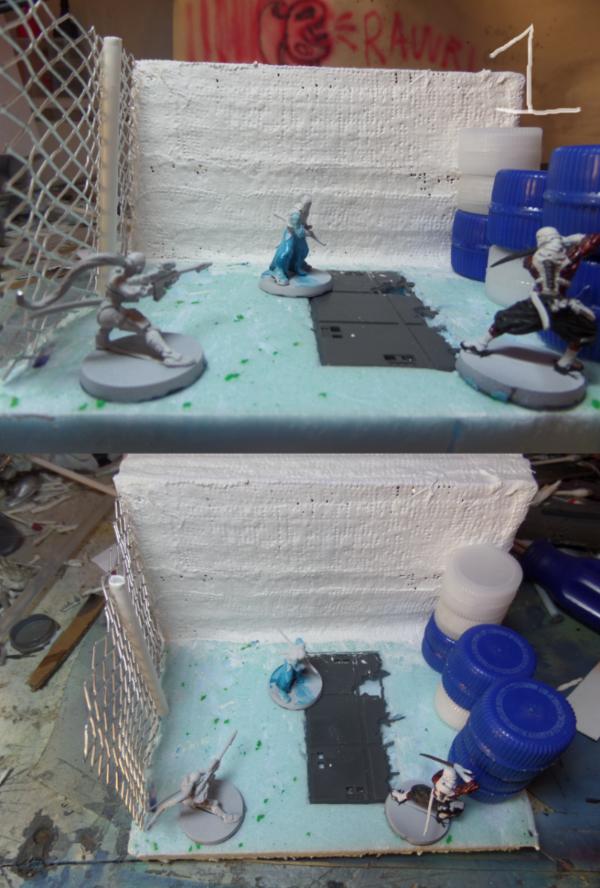 OR 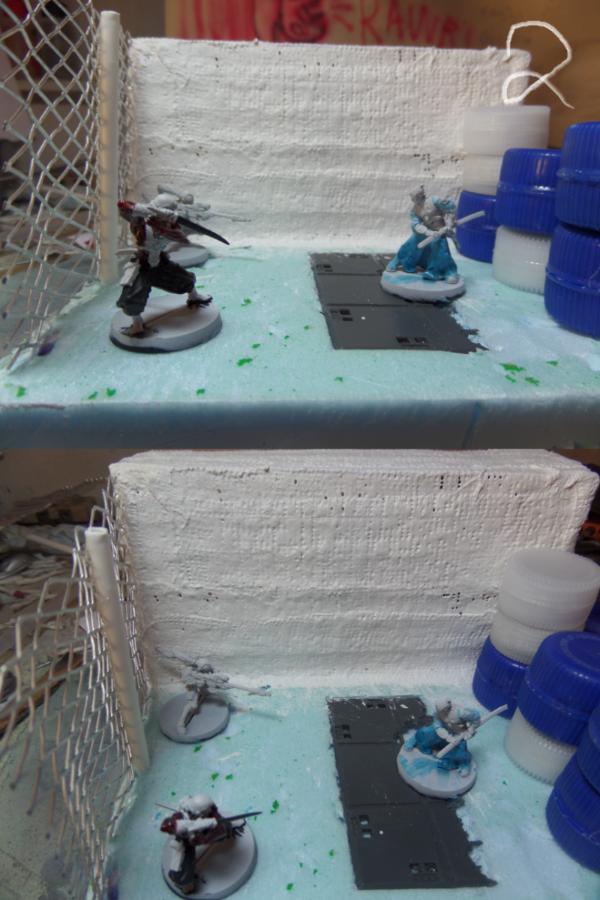 OR 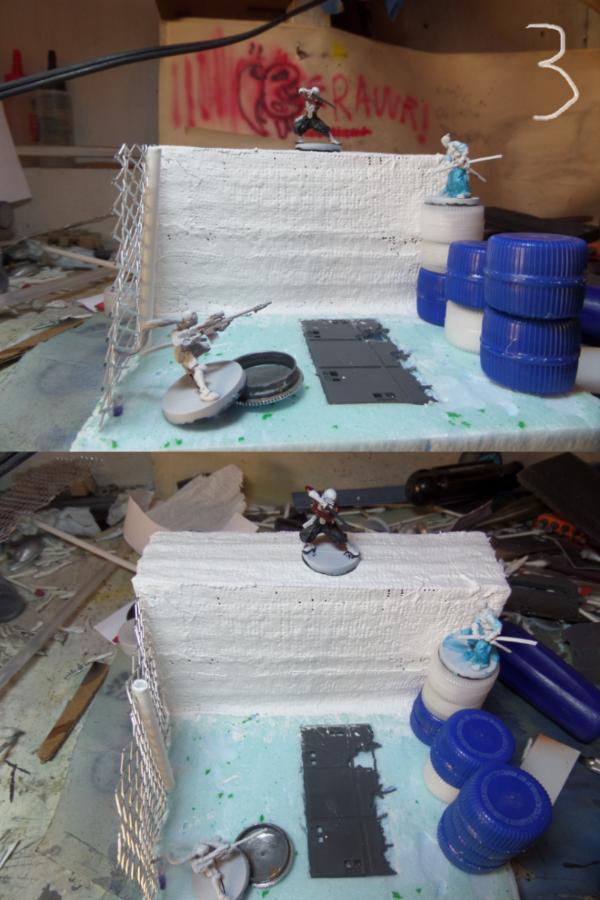 OR 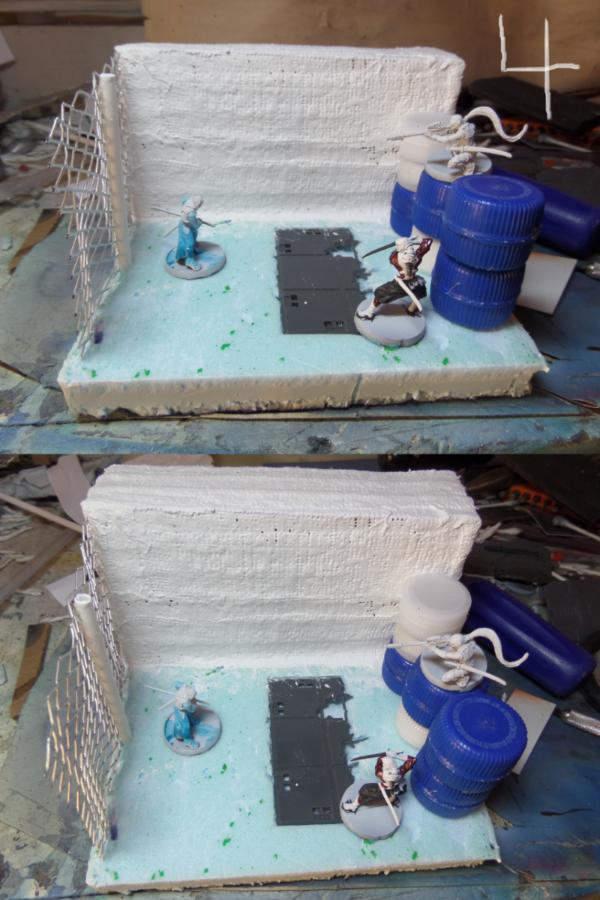 OR  I'll still do a camo effect on the sniper ninja but I'm not as concerned with blending her into the wall as I was before. Which is the most dynamic/best position for the actors? I also made a poll if anyone reads this first and is bored http://www.dakkadakka.com/dakkaforum/jforum.page?module=posts&action=list&topic_id=621538&viewResults=true
57098
Post by: carlos13th
Best one is Mushashi with his back against the wall. Gives the impression his only way out is through them.
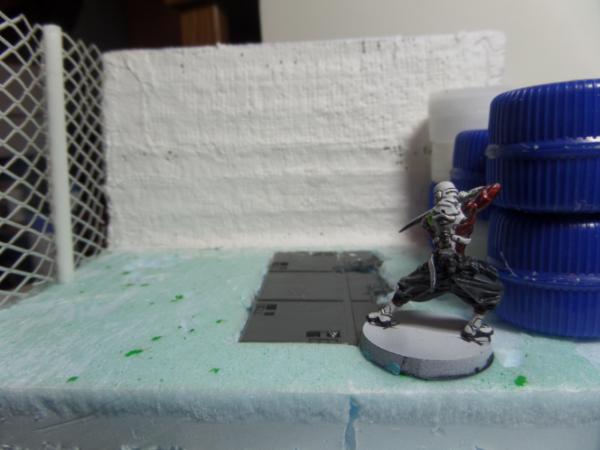
70053
Post by: GrimDork
So that's one vote for position 1. I don't disagree, though I'm pretty wishy washy about the whole thing atm. I really wanna grit down and paint though so that's why I'm asking for help
57098
Post by: carlos13th
Paint the guys first then worry about position.
30672
Post by: Theophony
Definitely it the back against the fence, his sword should do quick work of that, or he should do the Jackie chan/Tony Jaa thing and run up the fence/wall and go over. I have his back against the wall myself as the way the diorama is set up like a horseshoe then you are looking directly at the main character instead of side on.
29795
Post by: EyeamRai
I like 1 and 4 the best.
70053
Post by: GrimDork
From all if my various sources 1 and 4 are pretty far ahead. 1 a bit more so.
With 1 I can also probably paint the sniper to match the sand a bit too, while partially cycling out of stealth.
68139
Post by: Barzam
I kind of prefer the sniper on a raised position. I like 4 best since you've got the Oniwaban cutting off the samurai's escape route while the sniper covers him.
The Oniwaban is looking good, too. If I even get one, I think I may have to do something similar. the red artificial muscle with the white plating really does give him a striking appearance.
89231
Post by: ckig
I like number 4 composition best as well. I think the sniper looks better up high too. On the ground he looks weird to me, unless he had some cover. But he's TO camoed so he doesn't need it (I'm talking in a diorama sense)so it'd be weird. So yeah, put him up high I say
10972
Post by: Ruglud
Number 1 is cool, but going to be difficult to see the two figures in the foreground, so my vote goes for number 4 as it has the same tense 'backed into a corner' feel but you can still see all the protangists...
70053
Post by: GrimDork
Soooo yeah. Sorry about the mega-delay :(
I was shooting for november 17th and found out the bday was like the 5th or something, was confusing it with someone else =/
That kind of temporarily crushed my enthusiasm but I've got a bit more work done so pictures:
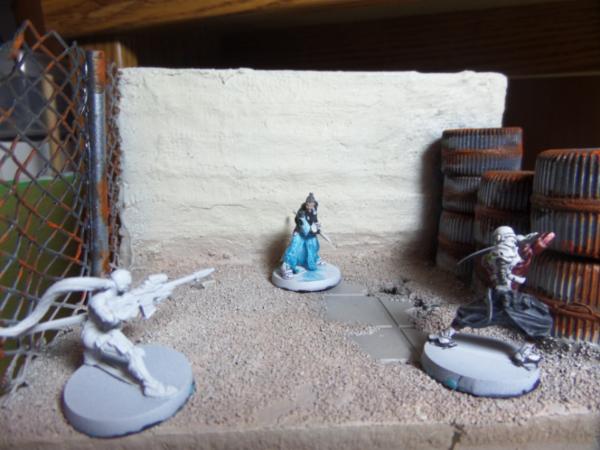
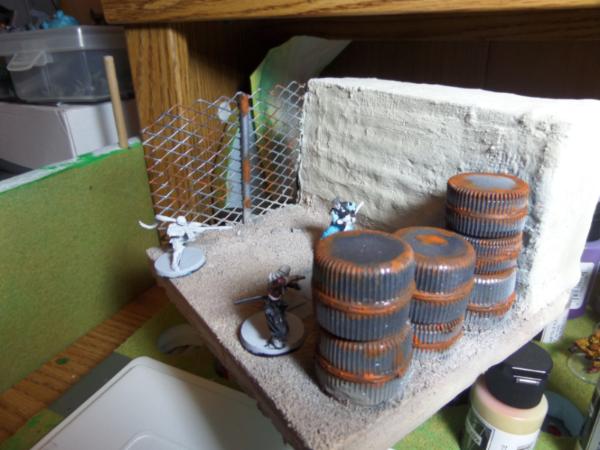

Also a request, I'm looking for suggestions for finishing out the piece. Does it need some grass? I'm thinking it's kind of a desert/wasteland/dry lake bed or something, but maybe some tall grasses? I was thinking a tumbleweed type plant blowing past the empty space between the combatants could also work Or should I just leave the sand plain with no plants (irrespective to the tumble weed, that's a separate idea).
I was going to put warning labels on the barrels but this is supposed to represent a desert/wasteland/whatever outpost and I doubt they have many safety rules or regulations there y'know? Plus I went a little happy with the rust and it would be a bit harder to add them in now. Well not on top, which is not where they usually label barrels, but since these are so rough on the edges it would make more sense in a way. Should I add some warning labels? I can get rid of the rust in the middle of the barrels on top, or add a label and have the rust showing through or whatever.
I decided against any doors or windows here. I get the feeling that the building may be larger than the set piece, but the barrels are creating an effective wall, there could be an access/employee/personnel door just on the other side but out of reach. I'm thinking the wall should either have some kind of graffiti or maybe some posters, or both. Thoughts?
How about scatter on the ground, I already asked about plants but what about some loose papers or magazines etc? Too much, too minor, or just what I need?
As always thanks for looking. I'm planning to have this done in time to make a christmas gift out of it so I should *hopefully* be updating a bit more.
57098
Post by: carlos13th
I think there needs to be something on the wall. Graffiti a poster a door (Maybe a chained one), maybe even some tools or equipment leant up against the wall anything to break up the background.
Some dry looking grass tufts would help break up the ground a little too.
I think the OSL on the Ninja is a little too OTT. Also the white makes the ninja look a little unfinsihe, though that could just be because I know you primed it white.
70053
Post by: GrimDork
I think the ninja will look more complete when he's off of his base. His feet may be getting dusted up a little bit too to help tie him into the board. Oh and he's already had the OSL toned well back, I just didn't update this blog with any pictures of it
I need to think of some good posters/warning signs etc. I'm thinking about putting the warning-you-about-zombies-without-saying-zombies sign up on the fence... I'm not sure about graffiti. The DBX logo could look cool but this is being done with Infinity models.
Maybe some Nomad graffiti, REPENT in typical tagging style possibly sending a confused/mixed message
Something big may take too much focus though, wonder if I can come up with a good poster somewhere.
70053
Post by: GrimDork
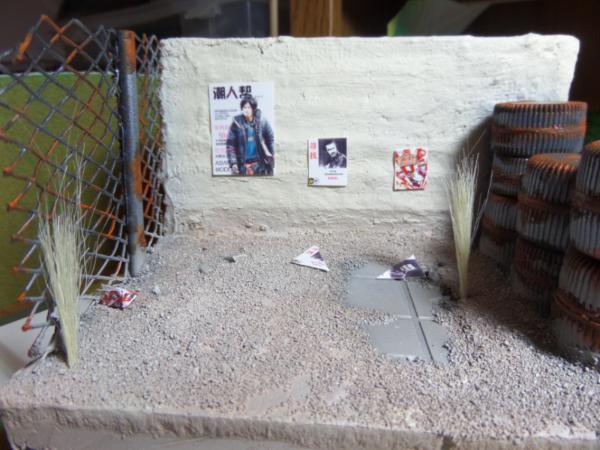
Alright got some more scatter.
What do you guys think about the layout for the posters and scattered bits, nothing that's new in this picture has been permanently secured yet.
Do you think the placement of the grass works? What about the arrangement of the posters on the wall. The bounty notice for mushashi on the ground is meant to look like he tore it down and dramatically slashed it with one of his swords for emphasis, he was in the process of doing the other but his assailants showed up right then.
Magazine by the fence look ok?
Does it need more?
Less?
Thanks for looking
Oh btw, posters were all nabbed from the same person who made them for his Yu Jing board so props to him for making them in the first place
57098
Post by: carlos13th
Can you chuck the models back in place and take another picture mate would help with the composition.
Personally I don't like the tall grass the placement is fine and ensures its not blocking sight of anything important. It just sticks up too far to be the only foliage around in my opinion. It looks too arficial I think because its too tightly clumped at the bottom and too wide and tall at the top. If its possible to cut a little off the bottom I think it would work better.
70053
Post by: GrimDork

More like this?
I'll get you the picture shortly.
70053
Post by: GrimDork
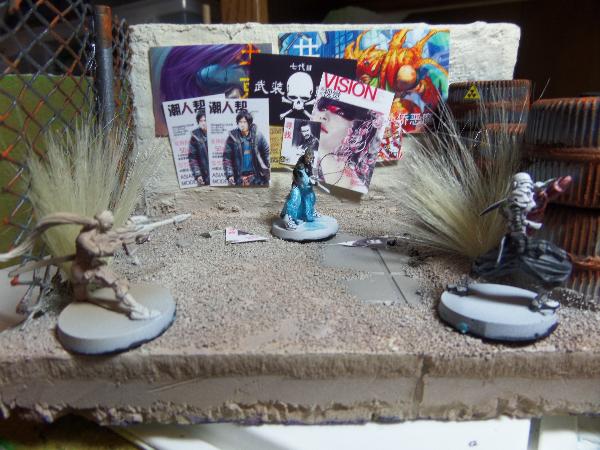 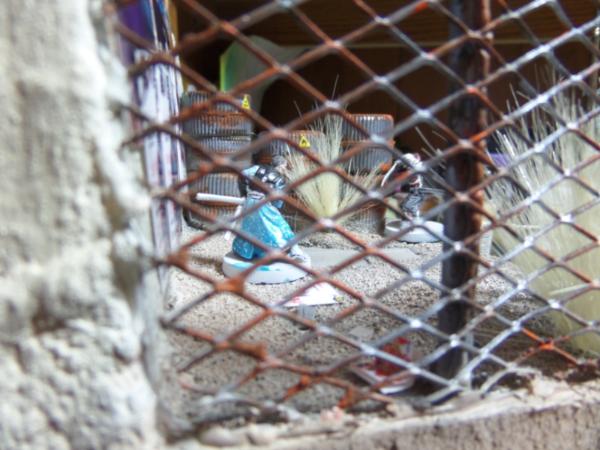 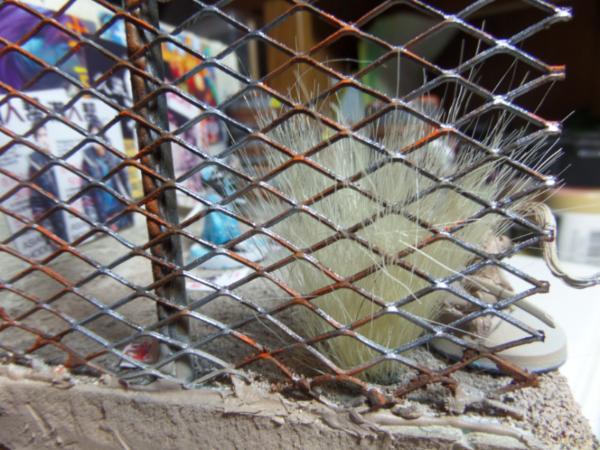 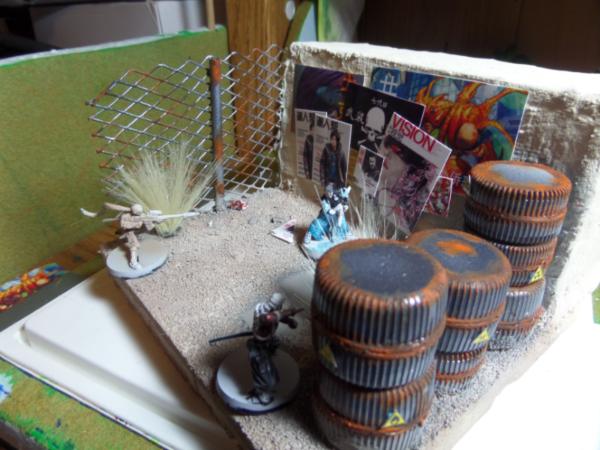 All of the images will be flattened out and weathered up a bit for final implementation, this is just another test. I think I like the extra clutter though. What about the grasses, too much? I like them a lot better like this than before for sure. What about the little hazard signs on the barrels?
57098
Post by: carlos13th
The grass looks a lot better much more natural. Posters are maybe a little much though. Think it makes the background too busy and takes away from the models a little.
70053
Post by: GrimDork
So here we've got the posters, trash, grasses, and warning labels all glued down with all of the paper stuff weathered a little bit. I think the stuff on the ground may need a light dusting of the sand color. Most of the posters and labels got some brown/orange washing to simulate rain and dirt mixing and dirtying them up. May not be enough yet, they probably need some rips too, but that may be difficult given the material.
So anyway:
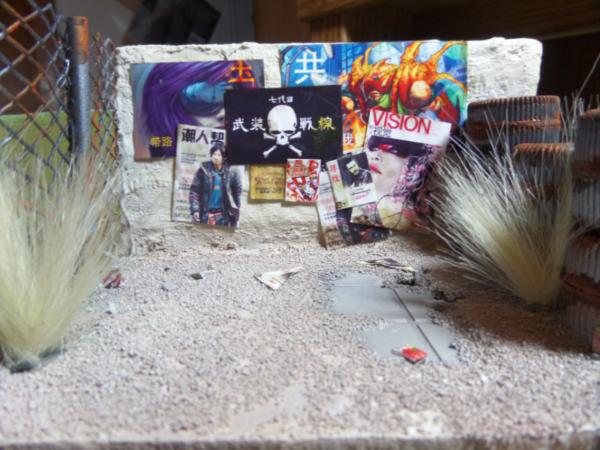
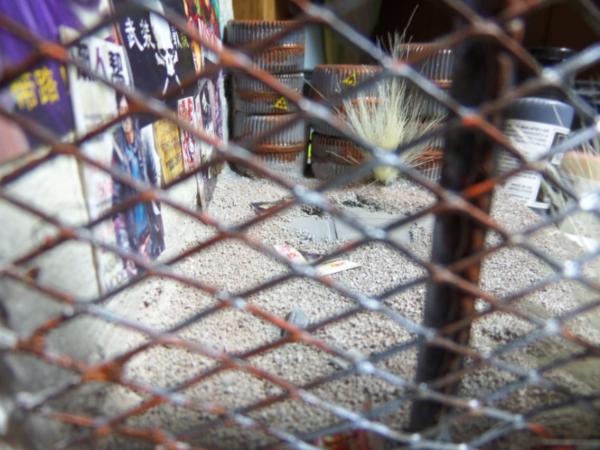
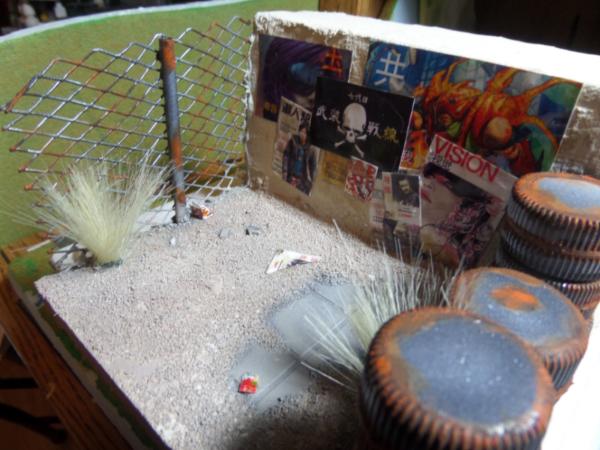
If I don't do any more work, I think I can be happy with it at this point, but we'll see what I have time for after I get the ninja and mushashi finished.
70053
Post by: GrimDork
And here's my efforts on the sniper assassin. I decided the armory bits should be white to match up with the other ninja, made a nice stab in the dark for a glass effect on the helmet, did a bit of pink hair (probably needs another highlight) and a wash of the brown parts.
It's kind of hard to leave her like this, but you aren't really supposed to be noticing the brown so much since it's optical camo. I hope she looks good when installed into the dio. Thoughts?
I may do a little bit more work and then seal her, but it's not like that would prevent me from coming back and re-touching. May move on to Mushashi and make a stab at getting this done.
1
57098
Post by: carlos13th
Maybe have the nearest leg decloacked too if it's not too much effort.
Helmet looks great btw.
70053
Post by: GrimDork
Thanks. It wouldn't be hard to have the knee sticking out but I have two compelling reasons not to:
1.) Most of the things that are showing are 'sticking out' like the field only goes so far or is being shut down and it's like folding in on itself, anyway *reasons* that the extremities are the first things out. The knee isn't sticking out that far, though it's hard to tell from that one angle.
2.) (possibly more importantly) that leg is going to be largely hidden from a bush and it hurts me to do details that will never be seen
She's more or less done, so is Mushashi. I foresee potentially getting them both done tonight and sealing them. But I probably won't get them all on the display base because I'll want to give the sealer time to cure before I manhandle them to saw their slotta-bases off. But maybe tomorrow morningish.
57098
Post by: carlos13th
Understandable. Just figured slightly more non cloaked might make you happier with it.
Really looking forward to seeing this done. You have inspired me to make a last of us diorama for a friend btw.
29795
Post by: EyeamRai
I think she looks really good.
Glass on the helmet = Success!!
70053
Post by: GrimDork
Honestly I kind of want to get another ninja with sniper rifle and paint her in this scheme from the ground up. Even a whole JSA faction, I'm really liking the white and black colors in conjunction with the armor/uniforms. I'm planning on doing a similar scheme to this with my corregidor/qapu khalqi forces but I think it really shines on the JSA units. But she's doing her job and I'm ok with her staying as is. She's one of the antagonists and she's *supposed* to be blending in so I'll live Your dio sounds cool, I'm curious to see your 28mm interpretation of this clacker or clicker or whatever they are, aside from vaguely terrifying I'm quite liable to rush things and buzz those two off of their bases tonight. Oniwaban is already sitting on the dio lol. @EyeamRai ninjaed me lol, thanks
30672
Post by: Theophony
Sorry, no time to read other suggestions, but how about a sign or something that WAS vertical that he may already have sliced in half. You know like the bamboo poles they always show people chopping/slicing with their swords.
70053
Post by: GrimDork
Hah, that could be cool. I think I'm about locked in at this point... but at least he *did* already slash a wanted poster of himself Automatically Appended Next Post: http://www.dakkadakka.com/gallery/images-70053-44376_Samurai%20Showdown.html Automatically Appended Next Post: I'll do a proper update about it tomorrow or later on tonight. Please bear with the simple gallery photo dump for now. I'll see about doing a post mortem too as this is definitely not what I was originally planning on several levels.
|
|