96252
Post by: LeCacty
Ugh that metal is so good
35419
Post by: Lamby
Thanks LeCacty
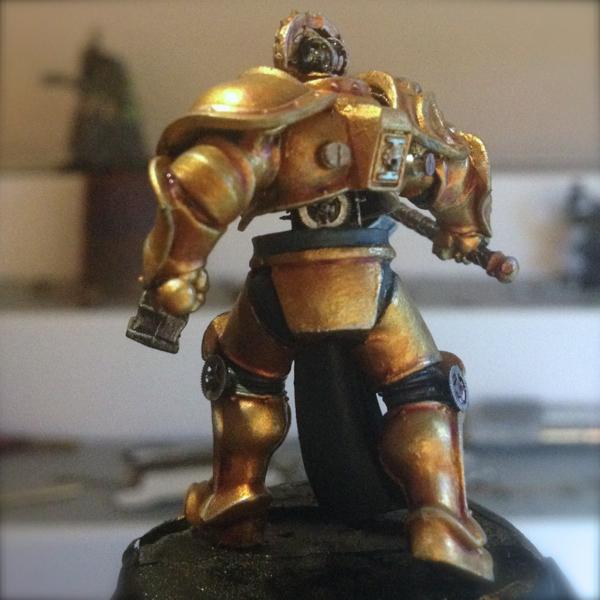
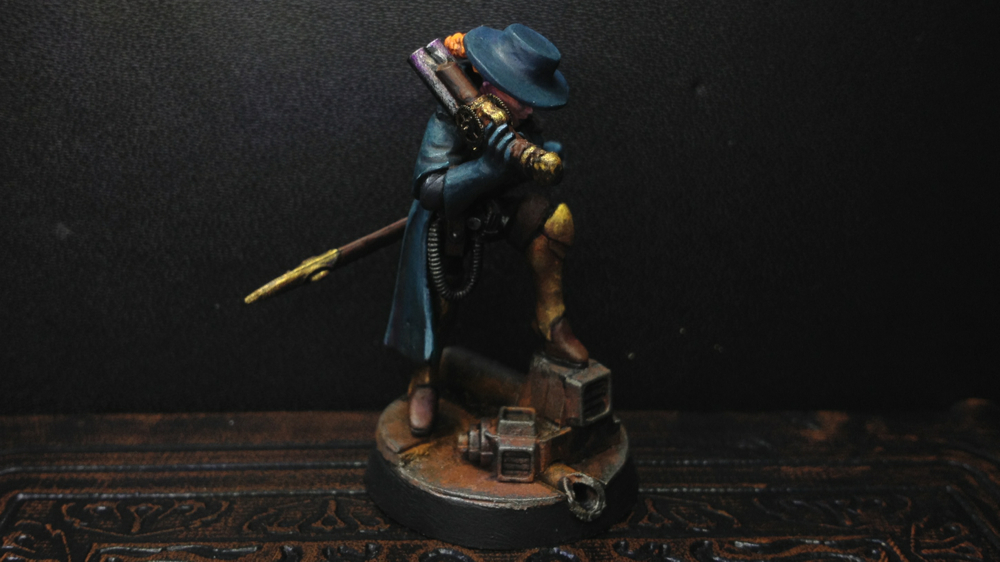
The Clockwork Custode is painted - here's some bad pics to whet the appetite before I get him based and take some decent pics:

And here's Fury the Gunslinger primed up on the painting table:
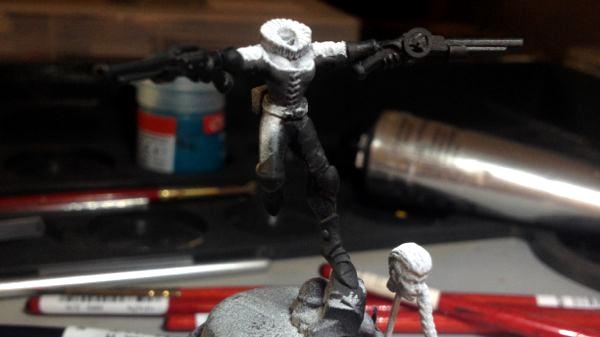
Sniper is almost done... no pics yet 
Thanks for looking!
52201
Post by: evildrcheese
The changes to the Snipers gun are very funky. Great work.
EDC
84360
Post by: Mymearan
Nice work on the sniper, love the cloak and the hair color. Also really like your leather, mind sharing the recipe?
35419
Post by: Lamby
evildrcheese wrote:The changes to the Snipers gun are very funky. Great work.
EDC
Thanks EDC - I felt it really needed slimming down from the first design
Mymearan wrote:Nice work on the sniper, love the cloak and the hair color. Also really like your leather, mind sharing the recipe?
Thanks Mymearan.
My current recipe for leather:
Vallejo Flat Brown
Heavy drybrush with Citadel Wrack White, creating texture as well as highlights
Brown oil wash, get it dark in the recesses using a little Black as well
Vallejo Armour Brown glaze
Another lighter drybrush, trying to hit edges only
Very light Purple wash (I use the old GW Liche Purple, but the new Drucchi Purple shade will work) in small areas

35419
Post by: Lamby
Fury the Gunslinger is painted!
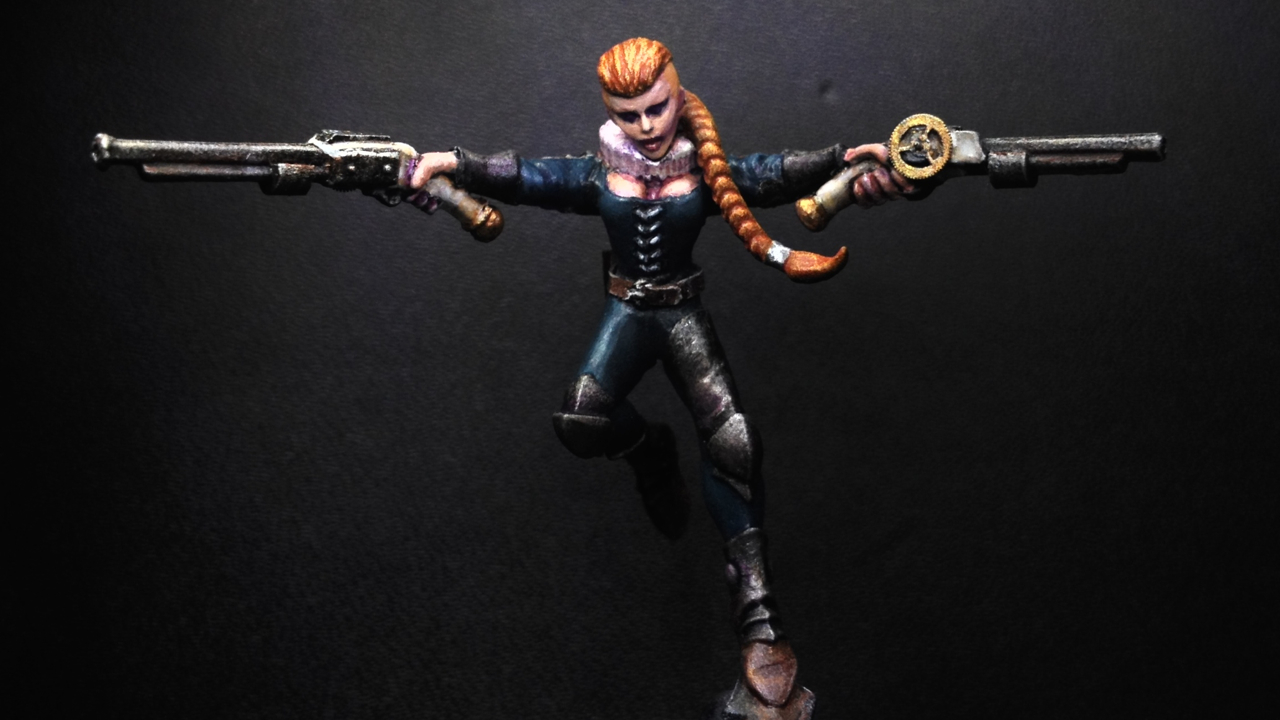
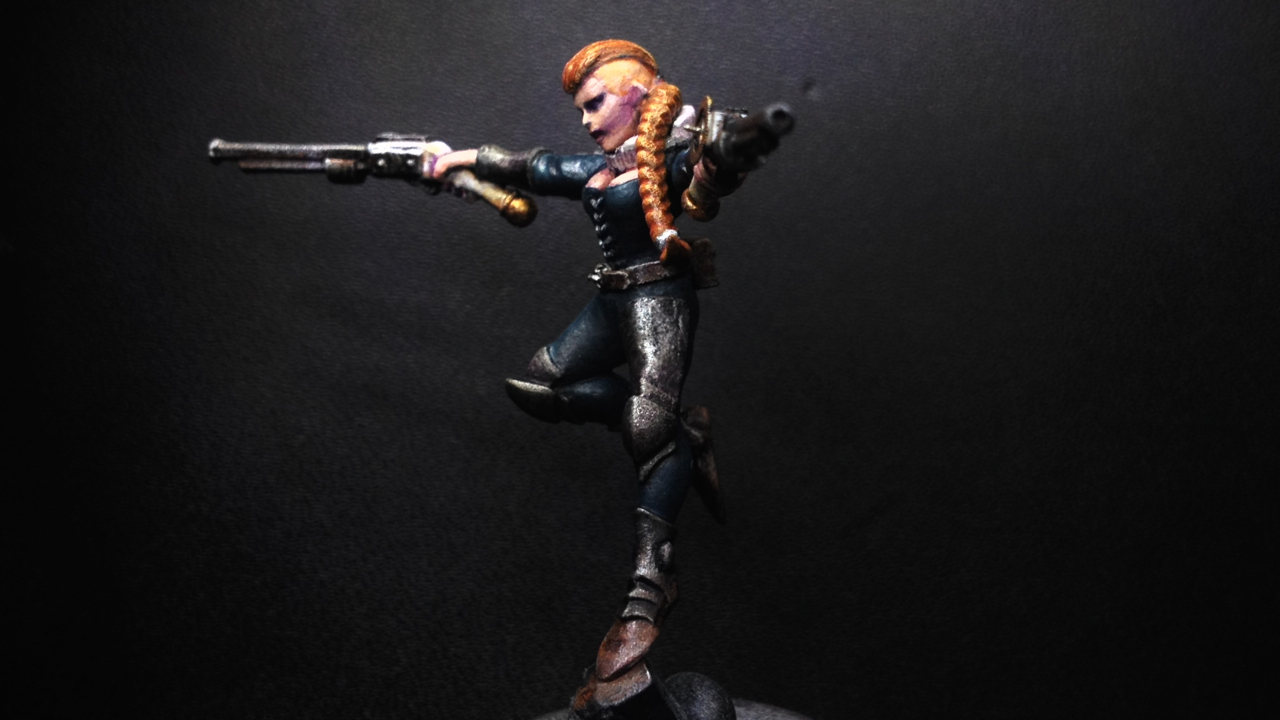
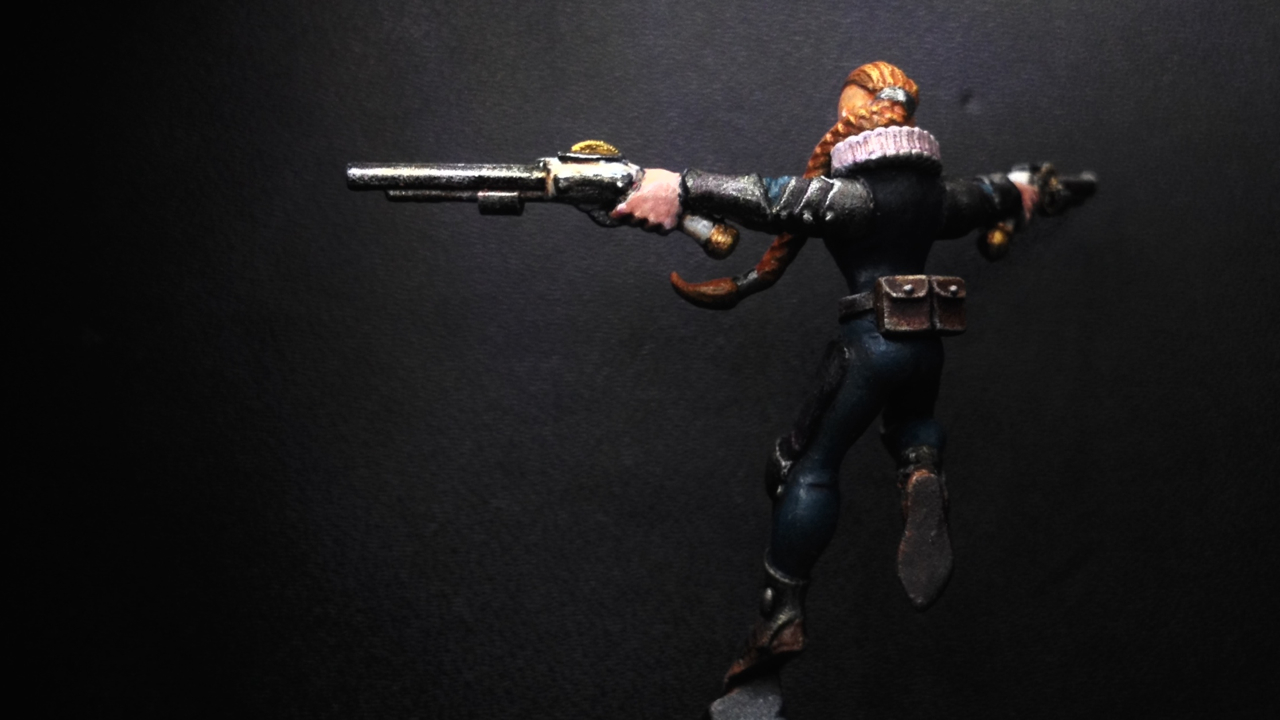

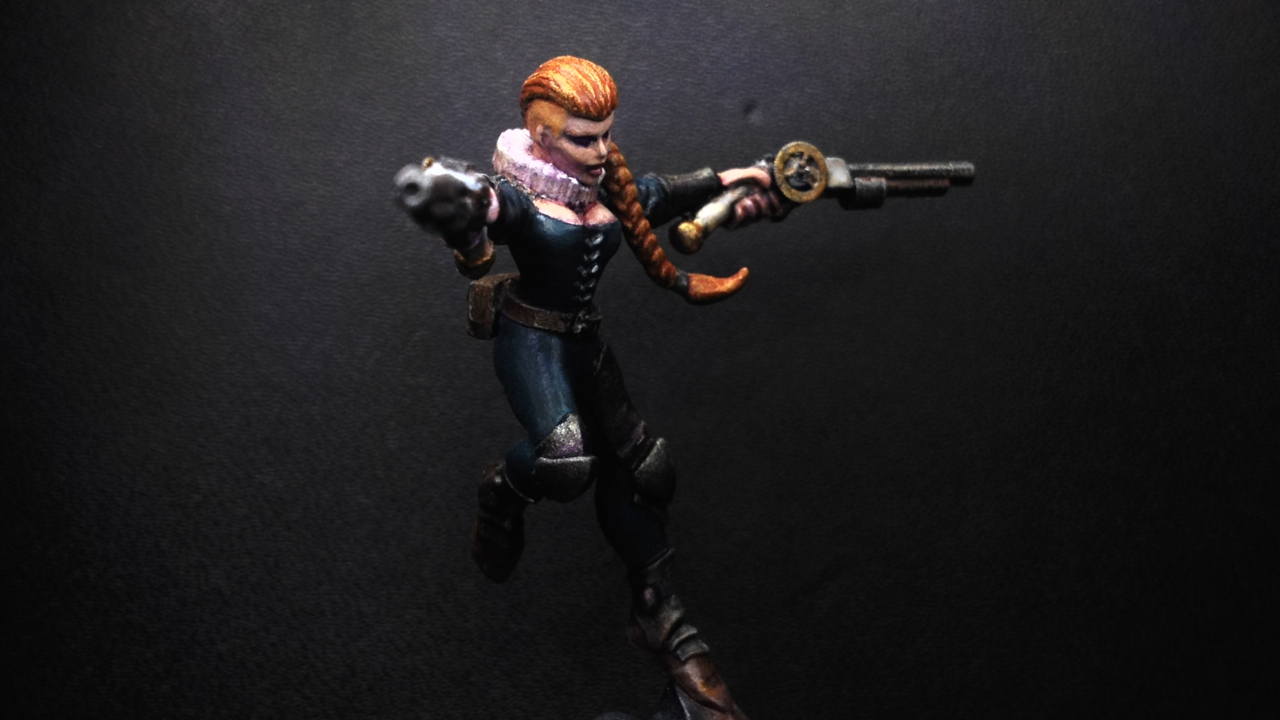
Even built a base - it'll be all rusted and grimy and slimy when it's done, but just couldn't get it painted before the Easter long weekend.
More bases are underway, and the Assassin and the Crew-Gunner are currently PIP, hope to complete them next week.
Happy Easter!
54500
Post by: hk1x1
I love the paint job on that Clockwork Custode, but even more than that, I love the idea of a clock work knight marching into battle, brilliant .
95538
Post by: KernelTerror
Wooah, that gunslinger is outstanding, her clothing has some conquistadorish nobleness that contrasts very nicely with her complexion.
But we expected no less.
92460
Post by: aku-chan
That gunslinger is fantastic!
91816
Post by: Januine
She's fantastic - great look. Sweet work 
306
Post by: Boss Salvage
Great job on the lass, face & hair in particular
- Salvage
64018
Post by: Freytag93
Wow... The gunslinger and the sniper are absolutely fantastic!  Great work mate. Your conversions are always inspiring to see.
52201
Post by: evildrcheese
Awesome work on the gun-slinger, very characterful.
EDC
35419
Post by: Lamby
hk1x1 wrote:I love the paint job on that Clockwork Custode, but even more than that, I love the idea of a clock work knight marching into battle, brilliant .
KernelTerror wrote:Wooah, that gunslinger is outstanding, her clothing has some conquistadorish nobleness that contrasts very nicely with her complexion.
But we expected no less.
aku-chan wrote:That gunslinger is fantastic!
Januine wrote:She's fantastic - great look. Sweet work
Boss Salvage wrote:Great job on the lass, face & hair in particular
- Salvage
Ssshh - Don't tell anyone but I had to redo the face and hair 4 times...
Freytag93 wrote:Wow... The gunslinger and the sniper are absolutely fantastic!
Great work mate. Your conversions are always inspiring to see.
evildrcheese wrote:Awesome work on the gun-slinger, very characterful.
EDC
Thanks for your comments hk1x1, KernelTerror, aku-chan, Januine, Boss Salvage, Freytag93 and evildrcheese!
After a medium-length deployment hiatus, I'm back in business!
Bases for the Ordo Xenos crew are built and awaiting paint:
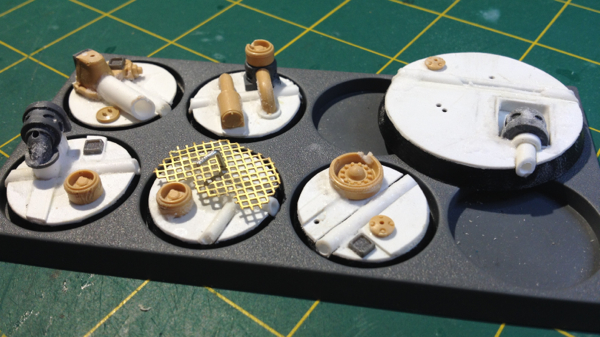
Have almost completed the Assassin but since it's been a few months since last painting, I'll warm into renewed painting of the ladies by doing the bases first, I think.
Cheers!
52201
Post by: evildrcheese
Awesome looking bases. Can't wait to see 'em with some dudes on.
EDC
35419
Post by: Lamby
ah... that would be 'dudettes'
and Thanks!
35419
Post by: Lamby
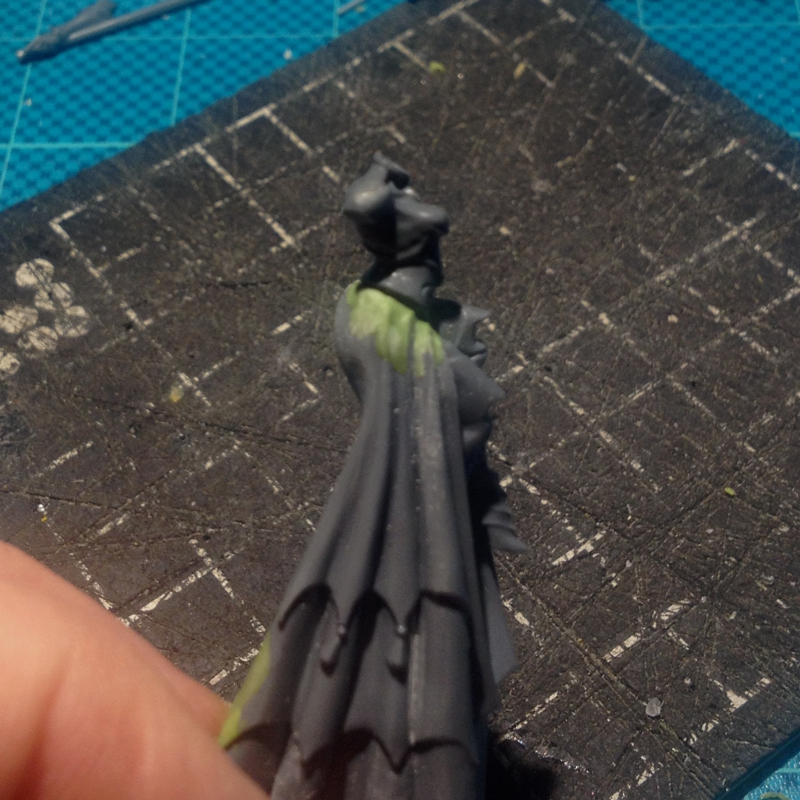
Meanwhile, something new and wicked this way comes...
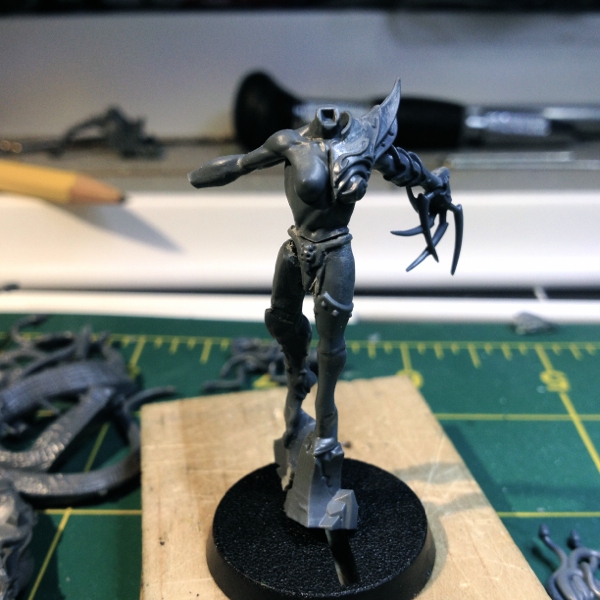
Not sure if this is a Wretched Sons deamonette or a stand-alone piece - we'll see
35419
Post by: Lamby
And... Bases!
Finally managed to get some paint on the Ordo Xenos bases - mostly done, just some pastels and some color nuances after each model is mounted.
Here's a quick step by step, in pics:
Vallejo Model Air Rust is slapped on roughly:
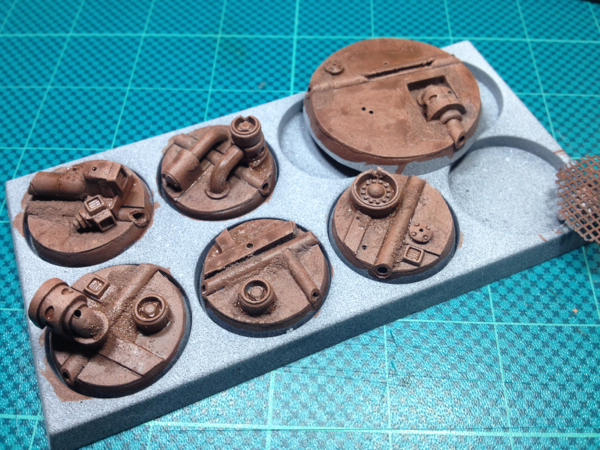
Black and VJ Rust is smeared on for variation:
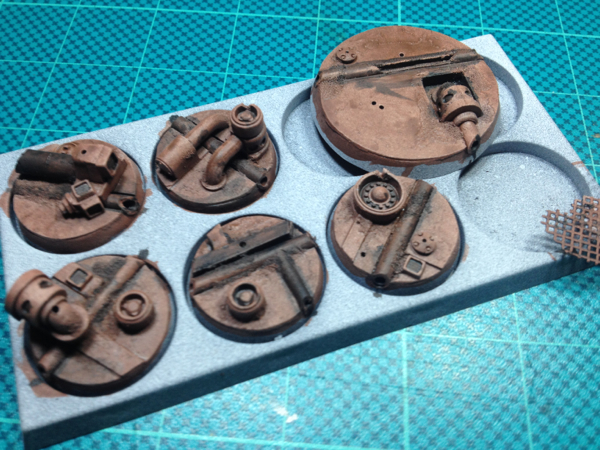
Ryza Rust is drybrushed onto the PVA/bicarb patches:
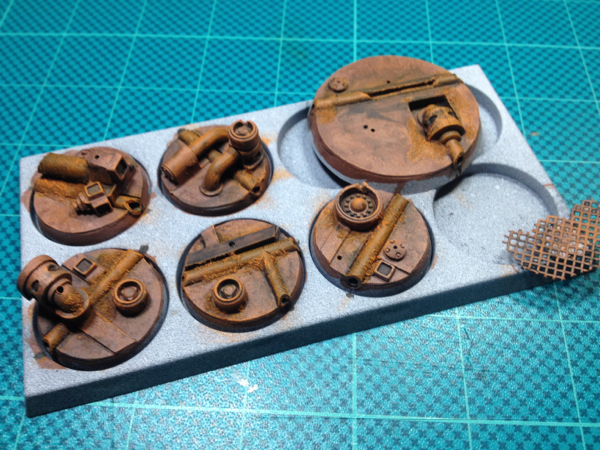
Boltgun Metal is sponge-dabbed on the edges and random patches:

After gloss varnish spray, black oil paint is washed into crevices and used to add to the oil streaks, and a second drybrush of Ryza Rust is applied:
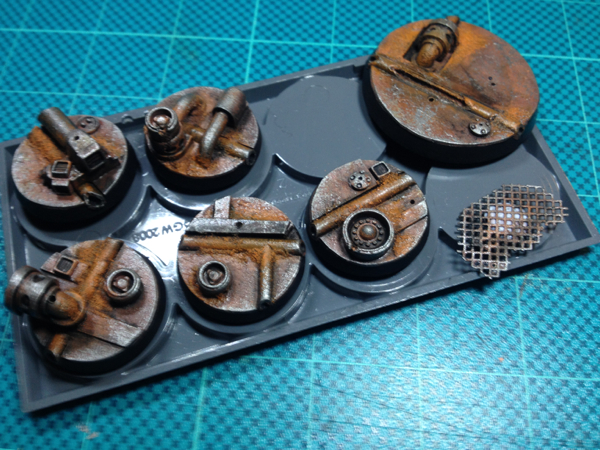
Thanks for looking!
101497
Post by: Heretic Tom
Can't wait to see Gutrot painted, awesome stuff, great work!!
22619
Post by: inmygravenimage
Quality use of bicarb there!
52201
Post by: evildrcheese
Bases are looking brill.
Very excited to see how that deamonette progresses, looks like it'll be a great piece already.
EDC
35419
Post by: Lamby
Heretic Tom wrote:Can't wait to see Gutrot painted, awesome stuff, great work!!
Haha - me too! One more Heretic to build before I paint the current crop of Wretched Sons, including Gutrot
inmygravenimage wrote:Quality use of bicarb there!
Thanks!
evildrcheese wrote:Bases are looking brill.
Very excited to see how that deamonette progresses, looks like it'll be a great piece already.
EDC
Cheers EDC!
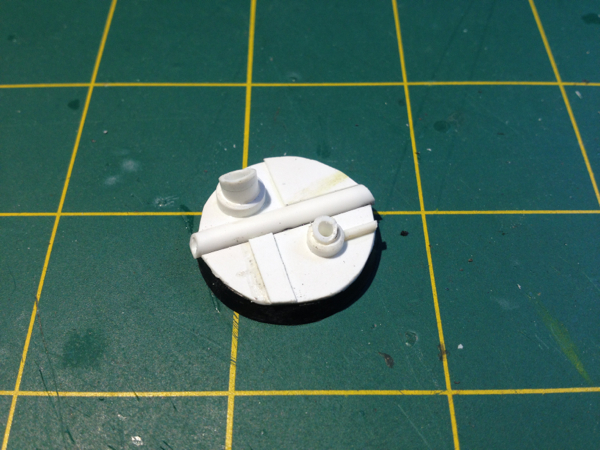
A few people have asked how I built the Ordo Xenos bases, so here's a quick tutorial on... Building Bases!
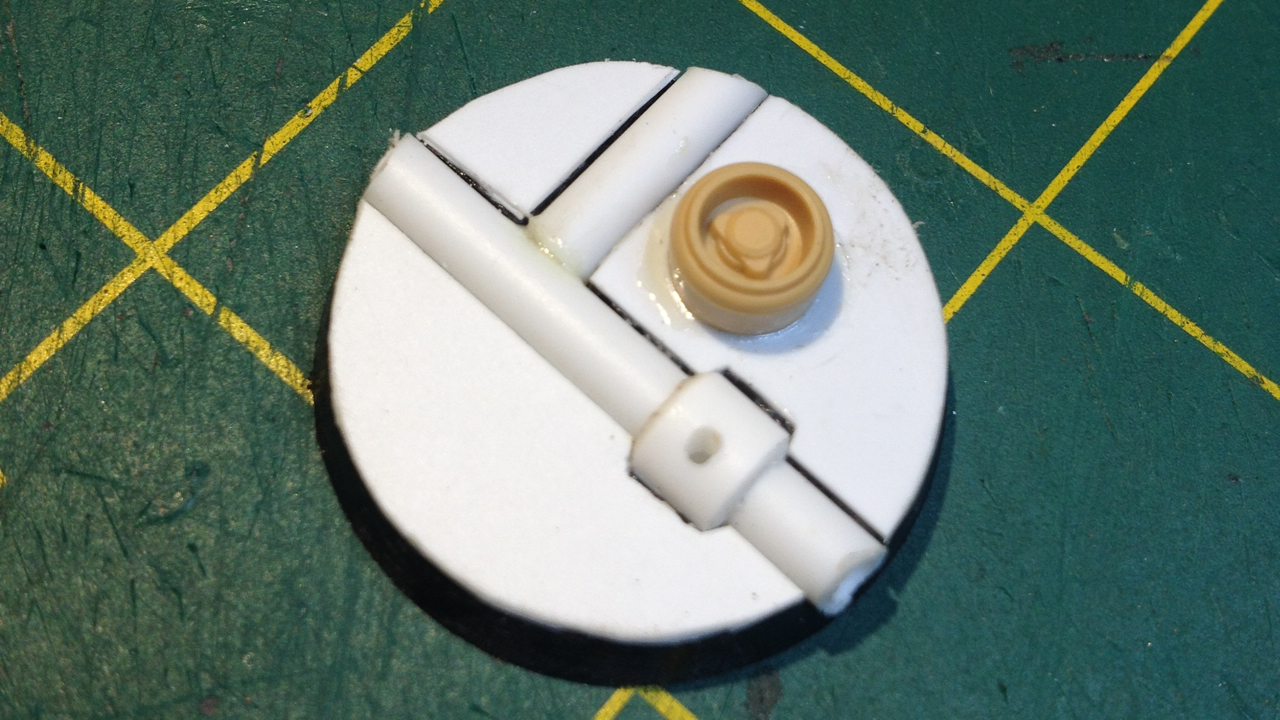
Find a standard GW slotted base:
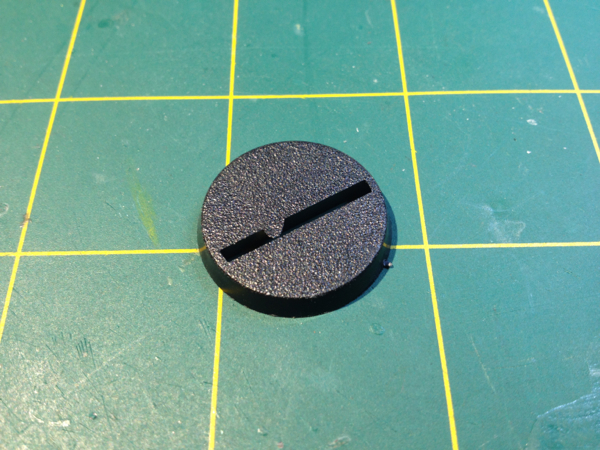
Attack it furiously with a round file to get this cut-out:
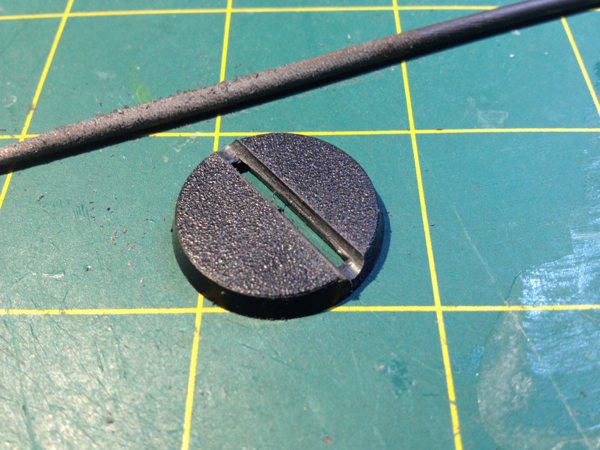
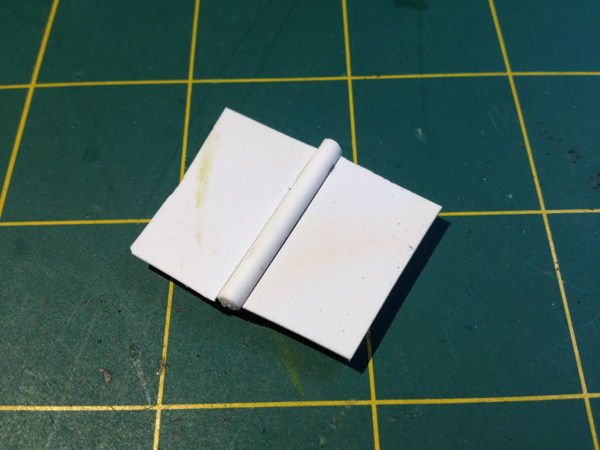
Glue appropriately-sized styrene tubing into the cut-out:
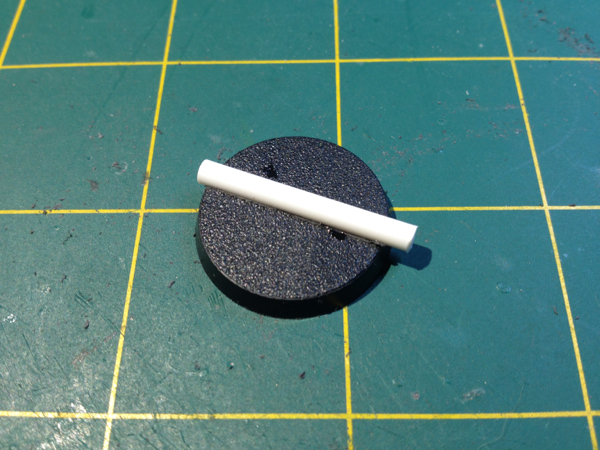
While that dries, glue some 1mm styrene sheet down:
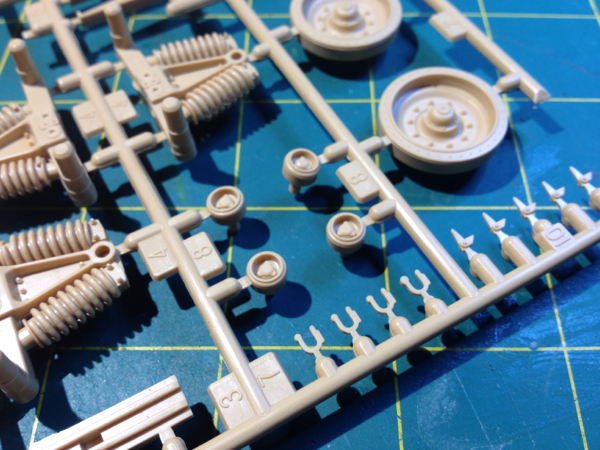
And while that all dries, go to a hobby store and buy the cheapest 1/35th scale tank you can find - these are an awesome greeble source, I bought 2 for $10 about 3 years ago and still have heaps of parts left:
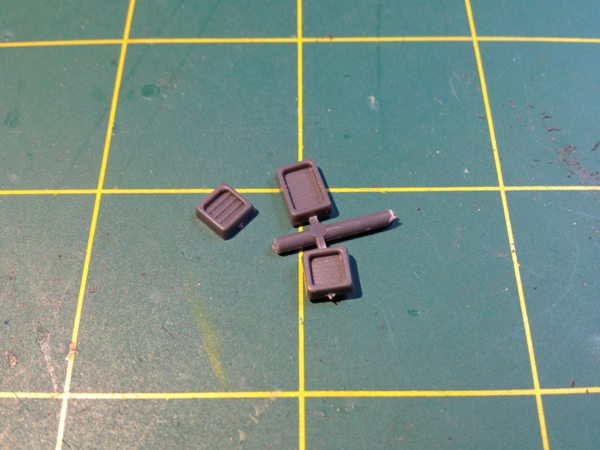
Also, these Kotobukiya Gundam parts aren't cheap, but make great greebles for bases too:
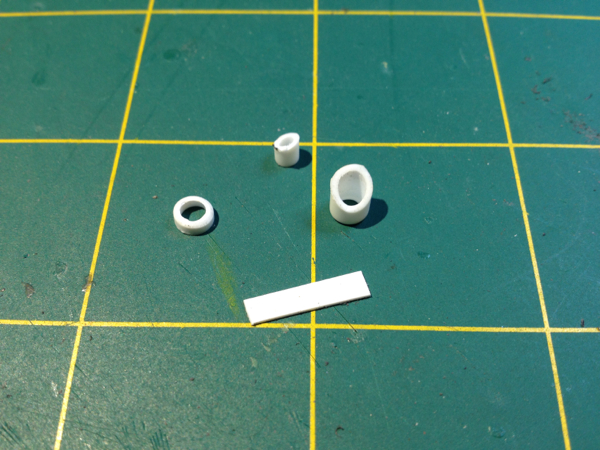
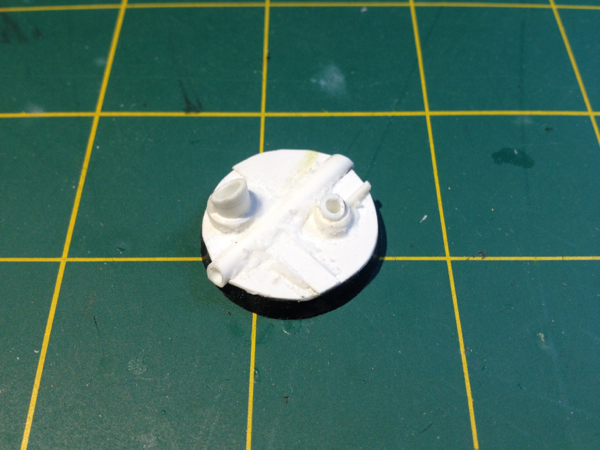
Because this base was a quick throw-together specifically for the tutorial, I grabbed some cut-offs from my greeble tub (What? You don't keep your cut-off scrap? Start now!) - really, anything will do:
Play with your greebles and right angles and straight lines to get the end result - you can see I've cut away the excess styrene sheet and sanded it roughly to match the base edges. I've also elevated some areas - sometimes this is random, sometimes it's specifically to mount a character:
Rust time! Just dab PVA on where you want really decent rust...

And sprinkle Bi-Carb soda over the whole thing:
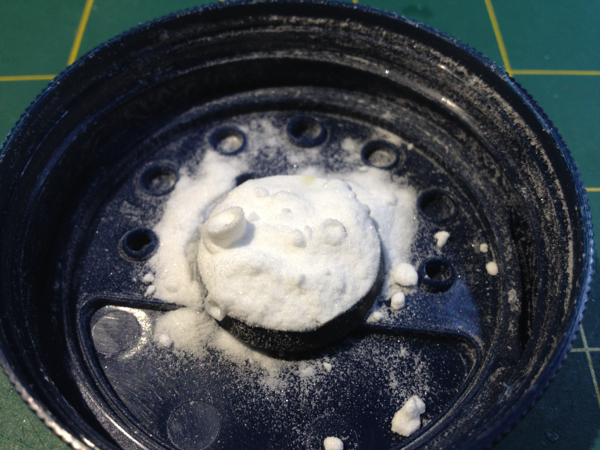
If you've overdone the PVA and your base looks like a decent snowfall just occurred, scrape away the excess with a toothpick - sometimes less is more!
Then follow the previous painting tutorial and viola - rusty goodness!
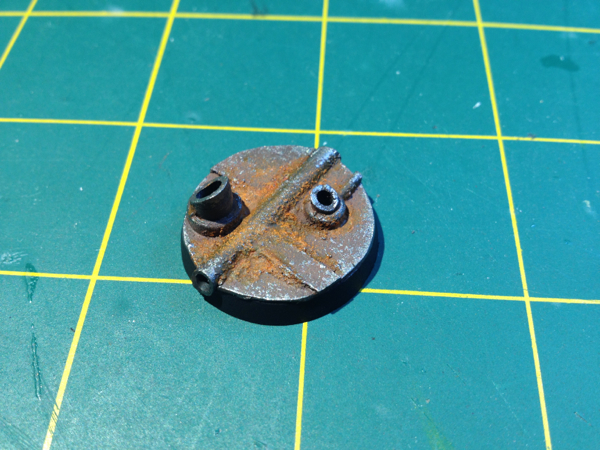
This base took about 30 minutes to make, including speeding up the drying of the PVA with a hair dryer, and about 20 minutes to paint to this basic level.
You can get some really dense and complicated Urban jungle just by adding layers of stuff - for example, the big Ordo Xenos base (destined to hold the Mech Suit) needed the deep rectangular cut-out with a big pipe greeble in it because the Mech Suit is so large.
You can go to town a bit with the paint job as well: hazard stripes always look good on bases, crackle paint (when it plays the game - fickle bloody stuff) looks awesome too.
Enjoy!
* No bases were killed or injured in the making of this tutorial *
91816
Post by: Januine
Great tut and fantastic result
101497
Post by: Heretic Tom
Awesome, thanks for the tutorial.
62749
Post by: Dr H
Good job. The bases look nice (and rusty).
35419
Post by: Lamby
Januine wrote:Great tut and fantastic result
Heretic Tom wrote:Awesome, thanks for the tutorial.
Dr H wrote:Good job. The bases look nice (and rusty).
Thanks all! The Sniper and Fury the Gunslinger are finally based:  New completed Ordo Xenos soon!
52201
Post by: evildrcheese
Awesome tutorial on the bases, that's really useful.
Fury and the Sniper look really cool.
What's next on the agenda?
EDC
35419
Post by: Lamby
 evildrcheese wrote: evildrcheese wrote:Awesome tutorial on the bases, that's really useful. Fury and the Sniper look really cool. What's next on the agenda? EDC
Thanks EDC - and next up is this: The Assassin of Inquisitor Kallatar's retinue stalks the Underhive at last! 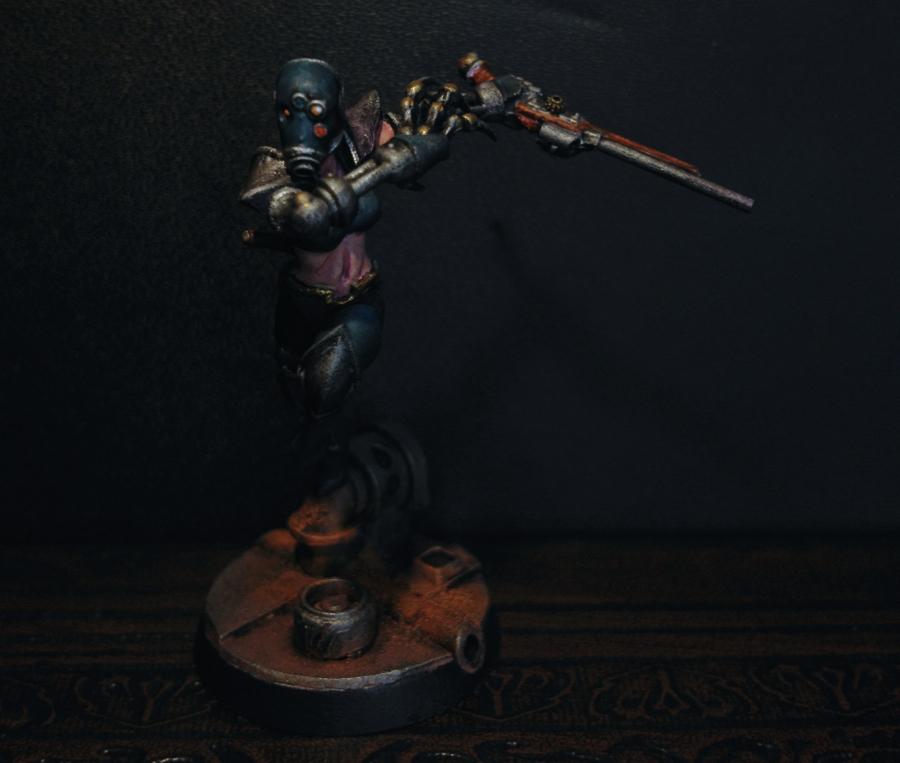    Thanks for looking!
95538
Post by: KernelTerror
Amazing, this is a great renaissance assassin. And the cloth matches the gunslinger perfectly, that warband is going to be a masterpiece.
68152
Post by: JoeRugby
Awesome...just awesome.
Really inspiring thank you for sharing.
306
Post by: Boss Salvage
 Lamby wrote: Lamby wrote:The Assassin of Inquisitor Kallatar's retinue stalks the Underhive at last!

*UNF*
- Salvage 
105203
Post by: ShireGuy
I've been watching this thread for a little while as a lurker before signing up, so I have come out and say that your work is outstanding. A lot of really colourful characters put together in some truly inspiring ways.
A big thumbs up to you!
35419
Post by: Lamby
KernelTerror wrote:Amazing, this is a great renaissance assassin. And the cloth matches the gunslinger perfectly, that warband is going to be a masterpiece.
JoeRugby wrote:Awesome...just awesome. Really inspiring thank you for sharing.
Boss Salvage wrote: Lamby wrote:The Assassin of Inquisitor Kallatar's retinue stalks the Underhive at last!
*UNF* - Salvage
Um... UNF? ShireGuy wrote:I've been watching this thread for a little while as a lurker before signing up, so I have come out and say that your work is outstanding. A lot of really colourful characters put together in some truly inspiring ways. A big thumbs up to you!
Thanks guys, all comments appreciated! So I couldn't resist a triplet pic: 
62835
Post by: IGtR=
Such a great grouping, they really look like they are in the same scene as it were
306
Post by: Boss Salvage
UrbanDictionary: UNF
Group shot looks triply great
- Salvage
35419
Post by: Lamby
IGtR= wrote:Such a great grouping, they really look like they are in the same scene as it were
Boss Salvage wrote: Group shot looks triply great - Salvage
Thanks guys! Meanwhile, Paint ][n Progress:  
62749
Post by: Dr H
Great paint work, Lamby. All looking lovely.
52201
Post by: evildrcheese
Very cool. Love the power boots (count as power fists???  )
EDC
89168
Post by: youwashock
Excited to see these two finished. Looking good so far.
68152
Post by: JoeRugby
Looking good dude can't wait to see them finished
35419
Post by: Lamby
Dr H wrote:Great paint work, Lamby. All looking lovely.
Thanks Dr H!
evildrcheese wrote:Very cool. Love the power boots (count as power fists??? )
EDC
Stomp stomp stomp!!! Thanks evildrcheese!
youwashock wrote:Excited to see these two finished. Looking good so far.
JoeRugby wrote:Looking good dude can't wait to see them finished
Thanks guys!
Ordo Xenos retinue - the Samurai:


Two to go...
Thanks for looking!
68152
Post by: JoeRugby
she looks great
Particularly like the work on the skin tone on her cleavage
89168
Post by: youwashock
She came out awesome. Love the last close- up.
82832
Post by: Inevitable_Faith
That samurai is amazingly well done. This entire thread is incredibly inspirational. Thank you very much for sharing and I'm looking forward to seeing more.
67097
Post by: angelofvengeance
Will you be adding some shiny new Deathwatch to your Ordo Xenos stuff then?
Some great stuff in here btw. Love the "power boots"
52201
Post by: evildrcheese
Great work on the 40k samurai, really well done.
EDC
35419
Post by: Lamby
JoeRugby wrote:she looks great
Particularly like the work on the skin tone on her cleavage
I bet you say that to all the girls...
youwashock wrote:She came out awesome. Love the last close- up.
Thanks!
Inevitable_Faith wrote:That samurai is amazingly well done. This entire thread is incredibly inspirational. Thank you very much for sharing and I'm looking forward to seeing more.
Thanks!
angelofvengeance wrote:Will you be adding some shiny new Deathwatch to your Ordo Xenos stuff then?
Some great stuff in here btw. Love the "power boots"
Deathwatch - probably in the next phase - just really want to finish painting this group first.
And Thanks!
evildrcheese wrote:Great work on the 40k samurai, really well done.
EDC
Thanks EDC
Newly painted Inqu][sitor mini coming soon (probably tonight - just need to get some decent photos)...
Meanwhile, the Wolfen has made a return on my blog The Dying Ground (link in sig).
Cheers all!
82832
Post by: Inevitable_Faith
Amazing work Lamby, I really love this model. Flawless conversion. The danger striping on the gun make for great contrast but it's weathered in so nicely it really does feel at one with the rest of the painting. Stellar job.
95538
Post by: KernelTerror
What a beauty ! Brilliant design and flawless realisation. This model really tells a story, and despite her equipment being pretty over the top, it still is completely believable.
Well done, once again.
62749
Post by: Dr H
Top job, Lamby. She looks great.
68152
Post by: JoeRugby
Another lush mini
35419
Post by: Lamby
Inevitable_Faith wrote:Amazing work Lamby, I really love this model. Flawless conversion. The danger striping on the gun make for great contrast but it's weathered in so nicely it really does feel at one with the rest of the painting. Stellar job.
Thanks Inevitable_Faith!
KernelTerror wrote:What a beauty ! Brilliant design and flawless realisation. This model really tells a story, and despite her equipment being pretty over the top, it still is completely believable.
Well done, once again.
Thanks KernelTerror!
Dr H wrote:Top job, Lamby. She looks great.
Thanks Dr H!
JoeRugby wrote:Another lush mini
Thanks JoeRugby!
Thanks again to everyone who commented!
Finally, Inquisitor Kallatar is done!
Unfortunately I can't seem to get a decent photo of her face - anyway, here she is:


8745
Post by: Llamahead
Daannngggg that's good.
62749
Post by: Dr H
Looks excellent, Lamby. From the pose to the paint.
86460
Post by: Cap'n Facebeard
Wowee, looks fantastic!
35419
Post by: Lamby
Llamahead wrote:Daannngggg that's good.
Dr H wrote:Looks excellent, Lamby. From the pose to the paint.
Cap'n Facebeard wrote:Wowee, looks fantastic!
Thanks all!!! “Hell is something you carry around with you. Not somewhere you go." - Neil Gaiman, The Sandman Thruster downdraft kicked up a cyclone blast of dust and tiny bones. Behind her the Rogue Trader dropship leaped raptor-like back into the sky, ostensibly to provide covering fire, though - rather more pragmatically - the Captain was getting well clear of the impending storm about to be unleashed. Kallatar couldn’t blame the Captain for not wanting to be part of this fight, she herself had been dreading it for fifteen years, since the day the Kroot Pathfinder Blel Kadri had found her and delivered the grim news - the daemonhost Skvorax had survived the Ordo Malleus purge known as the Xolomon Deviance, and was loose in Imperial space. The purge of the Brood rogue moon had gone sour fast; ninety-nine Grey Knight Astartes died in the horror of the so-called victory. They died because she had failed to convince Huges de Ardens, the Brimstone Inquisitor, to utilise her more radical methods - like arming the moon’s native Kroot with Inquisition weaponry, as an example. De Ardens wouldn't consider arming filthy xenos - so the Kroot fought anyway, and died in their thousands alongside the Knights. She blamed herself for that, too. And so they formed the strategy that today was reaching culmination, fifteen years later. The ground beneath her boots started to vibrate from heavy weapons fire. In the tunnel system below de Ardens and his Ordo Malleus battle-retinue were commencing the engagement of the Enemy daemonhosts. Off to the east, eye-watering light bursts and rolling thunder marked the Deathwatch kill-team skirmishing with the traitorous Wretched Sons. On yet another unseen front, the Skeleton Crew heavy mercs were cleaning out a vast nest of sacrificial human cultists. All of these attacks were diversions; the true thrust into the heart of the enemy stronghold - to find Skovorax and defang the snake – fell to the Ordo Xenos strike force. Kallatar herself was armed with the weapon that was capable of killing a creature like Skovorax, the Relic Blade Hellbringer - the recovery of that cursed weapon was another tale in itself. The usual players were lined up: Fury the Gunslinger, toting her twin long-pistols Hell and Vengeance; the Sniper with her Imperial Guard-issued nalwood-stocked sniper rifle capable of killing anything within 2000 metres; the bio-mech Assassin, hidden-faced, razor-clawed, who relished in the act of murder; the clockwork-enhanced Samurai wielding her ancient blades; and the heavy-mech Wild Child, armed with that Tau gauss-gun that could punch a hole through Titan armour. Somewhere up ahead, Skvorax was waiting. Kallatar wondered then if any of them would survive. 
86460
Post by: Cap'n Facebeard
Excellent work, they are brilliant individually and even better as a group.
62749
Post by: Dr H
Great looking group. Well done.
My favourite is Inquisitor Kallatar, then Ms. armour-legs.
52201
Post by: evildrcheese
Looking good, they work really well as a group.
EDC
100928
Post by: Alaricuk
They all look really good. Super paint work
35419
Post by: Lamby
Cap'n Facebeard wrote:Excellent work, they are brilliant individually and even better as a group.
Thanks Cap'n! Dr H wrote:Great looking group. Well done. My favourite is Inquisitor Kallatar, then Ms. armour-legs.
Thanks Dr.H! - I'm still not sure whose my fave - the stomping Wild Child was an easy paint, things just worked on her paint-job - Kallatar was a labour-intensive love/hate relationship, had to repaint bits of 6,7 times! evildrcheese wrote:Looking good, they work really well as a group.
EDC
Thanks EDC! Alaricuk wrote:They all look really good. Super paint work
Thanks Alaricuk! And so, with the femme fatales of the Ordo Xenos complete, it's onto a (sort of) new project:  
52201
Post by: evildrcheese
*knows nothing about casting and doesn't understand what's going on. Still impressed*
So this thing will remove air bubbles by creating a vacuum?
EDC
76303
Post by: Warboss_Waaazag
evildrcheese wrote:*knows nothing about casting and doesn't understand what's going on. Still impressed*
So this thing will remove air bubbles by creating a vacuum?
EDC
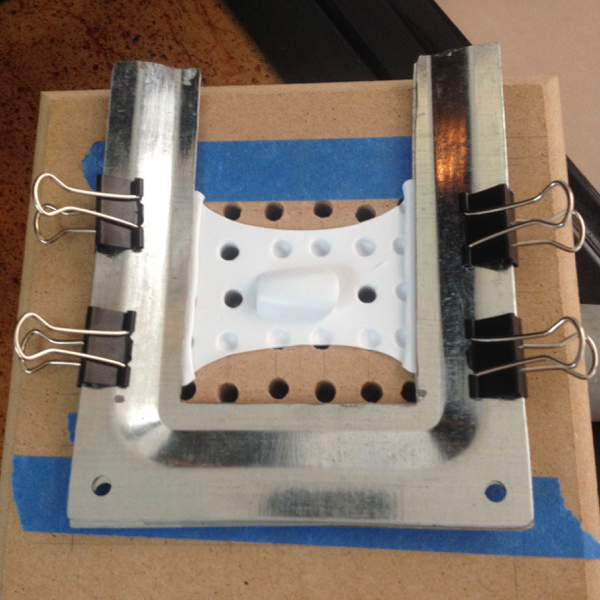
A vacu-former uses a vacuum to suck a softened sheet of plastic over a positive form, thus creating, rather quickly, a formed plastic part. In this case it looks like either a ship hull or an Imperial knight shoulder pad, but it could really be anything. I haven't really been following this blog very closely.
@Lamby: How did you make it, I'm curious to know. I've been meaning to make one myself but keep putting it off. How did you heat the plastic sheet? Automatically Appended Next Post: Also, I can't believe you finally finished the Wild Child. I remember when you started that project, months and months ago. She looks great!
35419
Post by: Lamby
evildrcheese wrote:*knows nothing about casting and doesn't understand what's going on. Still impressed*
So this thing will remove air bubbles by creating a vacuum?
EDC
Warboss_Waaazag wrote:
A vacu-former uses a vacuum to suck a softened sheet of plastic over a positive form, thus creating, rather quickly, a formed plastic part. In this case it looks like either a ship hull or an Imperial knight shoulder pad, but it could really be anything. I haven't really been following this blog very closely.
@Lamby: How did you make it, I'm curious to know. I've been meaning to make one myself but keep putting it off. How did you heat the plastic sheet?
Also, I can't believe you finally finished the Wild Child. I remember when you started that project, months and months ago. She looks great!
EDC - WW is correct - another great explanation here: https://www.youtube.com/watch?v=WXhJHArFsrM WW - the vacuum box is an MDF box, I drilled holes into it, plus a hole in the side to take the vacuum cleaner hose - the styrene sheet holder are 2 halves of a metal drain cover which I cut in half, clamped together with bulldog clips - I hold the metal thing in the griller with a pair of tongs, watch the styrene deform, then place it over the buck (vacuum cleaner on, obviously) Works like a charm - I even found some cheap PETG plastic sheets and formed a clear canopy - which was the goal of the whole exercise anyway Cheers all!
61618
Post by: Desubot
Oh baby awesome. just a regular vac can do that?
35419
Post by: Lamby
So long as the vacuum box is small - mine's about 15 x 15 cm, about 5cm high Meanwhile... Kroot are cool - so one of the Rogue Trader crew is going to be a Kroot! I just really like making guns... Took an old Kroot shooter rifle:  And the corresponding Tau rail-rifle bit:  Chopped off the front of the Kroot rifle, and the back end of two Tau rail-rifles. Added a holographic site-ring (watch part), a techy bit (Admech) on the side, and a magnet/pin combo:  Which allows the Kroot operator to employ a rail-carbine...  Or a rail-rifle:  More soon. Thanks for looking!
44112
Post by: Kepora
RAIL. RAIL rifle. >:T looking cool, though! Hopefully with this new age of "mini codexes" we'll see the Kroot get a similar treatment and some new models.
P.S. - the "barrel" of the rail rifle is upside-down on that last pic. 
35419
Post by: Lamby
 Kepora wrote: Kepora wrote:RAIL. RAIL rifle. >:T looking cool, though! Hopefully with this new age of "mini codexes" we'll see the Kroot get a similar treatment and some new models. P.S. - the "barrel" of the rail rifle is upside-down on that last pic.
haha - so it is! - I thought GW was going to retcon Kroot out of existence? hopefully not
35419
Post by: Lamby
More WIP work on the Kroot - who really needs a name...
Frankensteined together Kroot lower legs and Admech Skitarii upper legs to get this:

Sculpted in the missing upper leg sections (where the robes cover on a Skitarii), disguised the leg joins and the waist join:

Added a holstered Tau pulse pistol, decided it was a bit boring, so added the suppressor (whole thing is pinned for pre-painting removal).
Also added GS belt strips, and the start of the chest-harnesss:

2nd pin added to take a knife, and more harness work:

Chest pouches in place, battle-bra style harness completed - the right shoulder had to be reduced to allow the carbine's butt to fit:
 GS
GS/epoxy-glued a small power-unit into place, later there'll be a cable to the shooter's weapon:

Obviously some sanding/clean-up required:

Progressing well, me thinks...
22619
Post by: inmygravenimage
Frakenkroot!
62749
Post by: Dr H
Nice job on the Vac-former. Very interesting. 
Good start on the latest.
35419
Post by: Lamby
inmygravenimage wrote:Frakenkroot!
Hahaha - well, it's not a bad name...
Dr H wrote:Nice job on the Vac-former. Very interesting.
Good start on the latest.
Thanks Dr H - a bit of trial and error, but I got there in the end
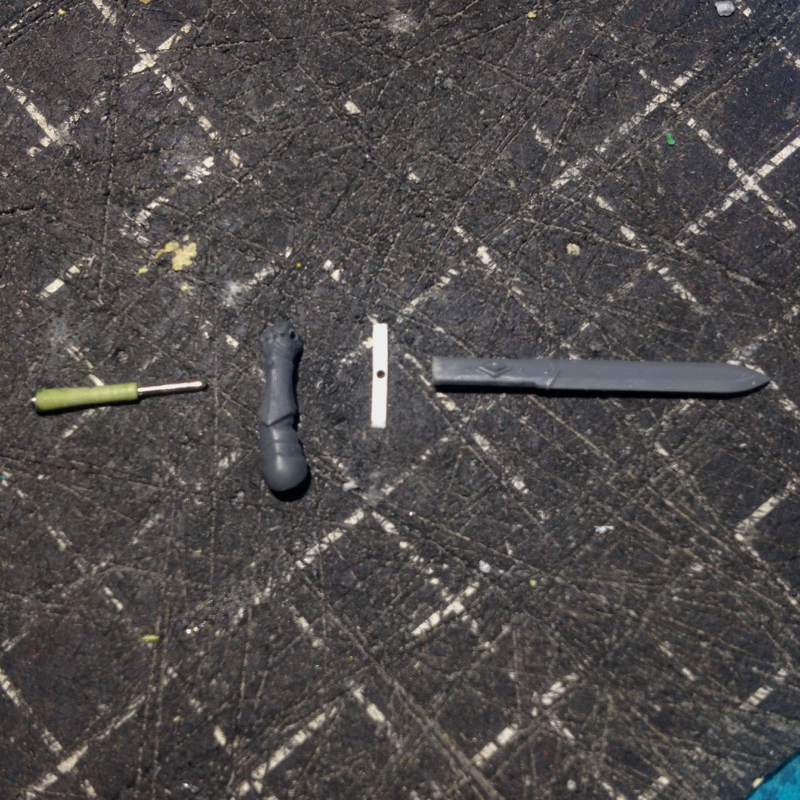
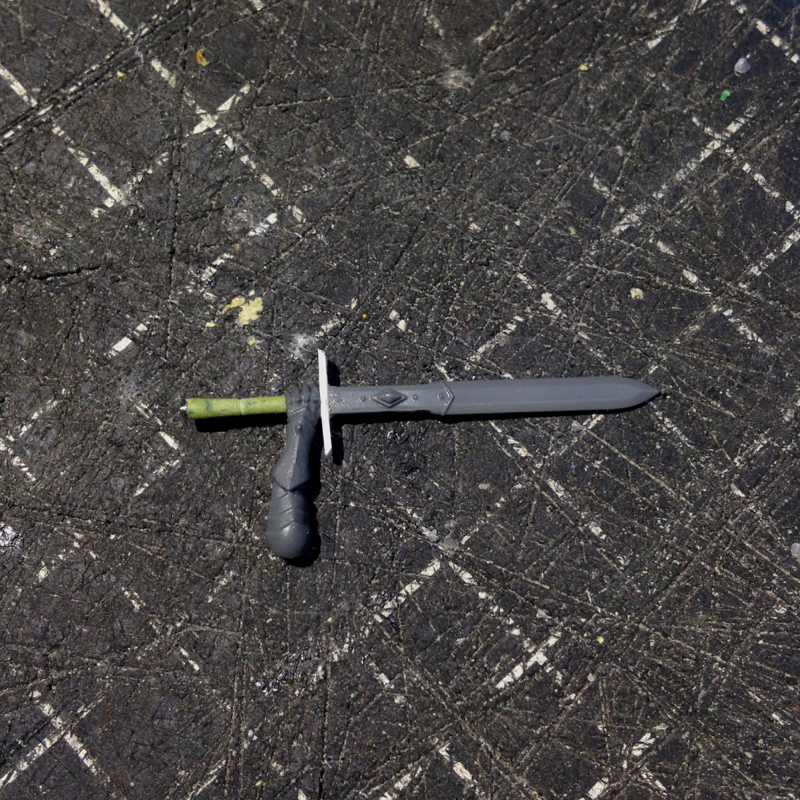
Working on the Captain again - new arm, new gun, and new name!
When we last saw Illyria Winter, she looked like this:

First job was to re-profile the blade into a thinner shape.
Then it was onto the surgical table for a new cyber-mechano arm - mostly due to the developing fluff, which is taking on a life of its own... but that's another story - also, because I didn't want to have to sculpt another sleeve:

Chopped the old arm off at the wrist, connected it to the new arm:

Made a slightly better version of the HandCannon - I always wanted a revolver-style weapon for her, and the Admech bitz once again have come to the party - don't worry about the extending piece of brass pin, it'll get the chop later... unless I decide to add a cable running to a power-unit elsewhere on her:

Also note the sculpted/brass chain-link webbing buckles, front and back - and here's the arm in place too:

Currently trying to decide if I need to smooth out that shoulder armour plate...
Cheers, me hearties!!!
28415
Post by: lone dirty dog
Been a while since I posted here but once again all inspiring, love the way you manage to pull everything together and blend it so well.
However I do find it so frustrating that you manage to acheive that space pirate vibe so well, just with a hint of SP thrown in for good measure.
Take this current incarnation the perfect posture of power and leadership, but somehow you still manage to invoke a sense of anarchy and rebellion.
That's what I love about your miniatures the story they create in my mind, just by their attire and weapon they create a story and history.
52201
Post by: evildrcheese
Nice. Both the Kroot-mech and Captain are looking brilliant.
EDC
82832
Post by: Inevitable_Faith
Your GS sculpting skills are only matched by your creativity and clever use of bitz for conversions. I'm in awe. Great job, can't wait to see this painted up too.
68152
Post by: JoeRugby
Amazing stuff as per usual dude
35419
Post by: Lamby
lone dirty dog wrote:Been a while since I posted here but once again all inspiring, love the way you manage to pull everything together and blend it so well.
However I do find it so frustrating that you manage to acheive that space pirate vibe so well, just with a hint of SP thrown in for good measure.
Take this current incarnation the perfect posture of power and leadership, but somehow you still manage to invoke a sense of anarchy and rebellion.
That's what I love about your miniatures the story they create in my mind, just by their attire and weapon they create a story and history.
Inevitable_Faith wrote:Your GS sculpting skills are only matched by your creativity and clever use of bitz for conversions. I'm in awe. Great job, can't wait to see this painted up too.
JoeRugby wrote:Amazing stuff as per usual dude
evildrcheese wrote:Nice. Both the Kroot-mech and Captain are looking brilliant.
EDC
Thanks guys!
Behind her the Rogue Trader dropship leaped raptor-like back into the sky...
That single phrase from the Ordo Xenos retinue story sparked a desire to create the raptor-like dropship.
A healthy dose of Aliens, Halo and Firefly pretty much assured that the dropship would have to be VTOL.
When designing ships in 3D, you start with the engines, so a bitz-bargain Hemlock fighter hull became the first donor kit:

Engine internal support structures from styrene tubing (these intakes have since changed):

The engines on their own looked a little plain, so I decided to build a wing-nub for the outside edge.
Styrene tube made the starting shape:

Sculpted the wing-nub as symmetrical as I could over the tubes - here's the 'master' in place after drying and some vigorous sanding:

Vacuum-formed it twice, one for each engine - it's not quite symmetrical, but I'll fix that later with putty:

Back to the VTOL thrusters - you can see the wing nubs in place now, and the at-right-angles part is the putty 'buck' form for the rotator:

Here's the buck on the vacuum chamber, ready for forming:

A perfect pull!
4 x parts were made, then glued over the grey plastic parts (from the Hemlock kit):

Glued, sanded, puttied and awaiting 2nd sanding - also, the dark green parts are the wings (from a 1/48th Apache kit, modified heavily):

While ship parts dried and set, I finally got the arms to fit Krooty McKrootFace - I somehow ended up with the incorrect left arm, so a bit of jiggery was required to get it into place - going to hide the left shoulder with armour:

And tried a test run of another hair design for Illyria Winter:


Thoughts?
Thanks for looking!
52201
Post by: evildrcheese
Amazing work on the drop ship, I like you so casually decide to make something and it's already jaw dropping.
I'm digging the ponytail on Illyria, looks really good.
EDC
92460
Post by: aku-chan
Wow! Some awesome converting going on in here!
I also like Illyrias new ponytail.
62749
Post by: Dr H
Nice work. Liking what I see.
68152
Post by: JoeRugby
Really cool stuff, your thread is always an inspiration
35419
Post by: Lamby
evildrcheese wrote:Amazing work on the drop ship, I like you so casually decide to make something and it's already jaw dropping.
I'm digging the ponytail on Illyria, looks really good.
EDC
Thanks EDC!
- Don't be fooled, there's hours of work in the transport so far... and I having keep going back and rebuilding stuff because I don't forward-plan enough...
aku-chan wrote:Wow! Some awesome converting going on in here!
I also like Illyrias new ponytail.
Thanks aku-chan!
- I'm still wavering back and forth between plait and pony-tail
Dr H wrote:Nice work. Liking what I see.
Thanks Dr H!
JoeRugby wrote:Really cool stuff, your thread is always an inspiration
Thanks JoeRugby!
Probably the last thing I need to be doing is creating yet another character - but another character means another weapon build!
Conversion progress in pics:


Thanks for looking!
52201
Post by: evildrcheese
That looks awesome. Barely recognisable as a Tau weapon originally. I'm really glad you post the wip pics.
EDC
101497
Post by: Heretic Tom
Newest iteration of Captain Winter is looking really good.
62749
Post by: Dr H
Nice job on the gun.
35419
Post by: Lamby
evildrcheese wrote:That looks awesome. Barely recognisable as a Tau weapon originally. I'm really glad you post the wip pics.
EDC
Thanks EDC - those pics do nothing to reveal the exercise in applied frustration that build was
Heretic Tom wrote:Newest iteration of Captain Winter is looking really good.
Thanks Heretic Tom!
Dr H wrote:Nice job on the gun.
Thanks Dr H - hopefully the completed character will be less of a struggle and equally worthy
And so - Onwards!
After lots of building, tearing down, rebuilding again, the drop ship has her VTOL thrusters and wing-mounts!
Mounted those 1/48th Apache wings - I can't seem to saw straight, so a lot of time is spent repairing bad cuts:

Remember those vacuum-formed halves from a post or two ago - here they are glued and puttied into reasonably symmetrical rotators.
Two different sizes of brass rod run through the mid-line of the rotators and pass through the spine for support:

Same position as above, different angle - note the new styrene card construction forward of the wing-mounts to blend the flightpod and hull - some 1/72 Cobra parts will go there next.
Also shortened the flight-pod rear part (under the styrene curved piece) and the Tau Devilfish 'spine' by about 5mm each, bringing the flightpod back 1cm - just looks little better, though that Devilfish part reminds me of a Cylon raider...

The original concept had a matching wing-mounts behind the rotators, but it was just too thick for the overall design - so after playing around with some cut-offs from a 2nd Helmock hull, discovered this covering bit - needs blending work, but I like it!

Cheers all!
62749
Post by: Dr H
Lamby wrote:... I can't seem to saw straight, so a lot of time is spent repairing bad cuts:..
I have the same problem. I can use all manner of rulers, measure everything as much as you like, mark it all carefully, and as soon as the saw comes out it all goes wonky.
Looks great though.
68152
Post by: JoeRugby
Really exciting stuff dude
43612
Post by: Rawson
Wow, exciting progress on the drop ship! Glad to see you've taken your work to the next level Go big or go home, right?
52201
Post by: evildrcheese
Looking really nice. A ride befitting of an inquisitor!
EDC
35419
Post by: Lamby
Dr H wrote: Lamby wrote:... I can't seem to saw straight, so a lot of time is spent repairing bad cuts:..
I have the same problem. I can use all manner of rulers, measure everything as much as you like, mark it all carefully, and as soon as the saw comes out it all goes wonky. Looks great though.
Haha - exactly - and I can't seem to drill straight holes either! JoeRugby wrote:Really exciting stuff dude
Thanks JoeRugby Rawson wrote:Wow, exciting progress on the drop ship! Glad to see you've taken your work to the next level Go big or go home, right?
Right! Thanks Rawson! evildrcheese wrote:Looking really nice. A ride befitting of an inquisitor!
EDC
Thanks EDC - or a certain Rogue Trader Captain Progress... Used some 1/72 Cobra hull parts to straighten the lines of the curvy Hemlock, and added the inner-rotator parts (the white styrene tubing):  So now I'm trying to decide if I leave the rotators exposed as in the next two pics:   Or... Go with the aerodynamic curved piece over the rotator, as in the next two pics:   Thoughts?
62835
Post by: IGtR=
Awesome start, and I'm loving watching this evolve
43612
Post by: Rawson
Do those engines actually pivot on the model? That would be sweet!
What's the belly going to look like? Room for the whole war band? I fear the jets, as cool as they are, will look underpowered with any transport capacity modeled...
62749
Post by: Dr H
Good work.
It makes sense to cover the working parts with armour, but it's a shame to hide your work.
Maybe add some vents at the rear of those armour pieces so we can see in, but don't collect bugs as it flies.
35419
Post by: Lamby
IGtR= wrote:Awesome start, and I'm loving watching this evolve
Thanks IGtR!
Rawson wrote:Do those engines actually pivot on the model? That would be sweet!
What's the belly going to look like? Room for the whole war band? I fear the jets, as cool as they are, will look underpowered with any transport capacity modeled...
Thanks Rawson!
- Do those engines pivot? of course they do (manually though, no electronics)
- The interior will have space for four seated harnesses, possibly a ramp gunner, and the pilot - the models themselves won't really fit because of bases and arms/weapons hanging out, but the intent is there
- There is a rear engine as well
Dr H wrote:Good work.
It makes sense to cover the working parts with armour, but it's a shame to hide your work.
Maybe add some vents at the rear of those armour pieces so we can see in, but don't collect bugs as it flies.
Thanks Dr H - i like the idea of the open vents.
And so, onto some micro work - which means powering on through the build of the Rogue Trader mercenary firing the converted Tau weapon I showed a few posts ago.
He is pretty rough around the edges at the moment - none of the arms are glued in, just pinned, there's a bit of GS sculpting to do on that right pants leg, and he needs the little 'character' detailing to finish him.
He's wearing a powered set of limbs to add to his combat ability, but as I was starting on the second one, I thought he might look better if the left mech-arm was damaged, as if he'd been hit - or I can build him carrying a third weapon?


Thoughts?
30703
Post by: Ork_Intelligence
Transport is looking great, can't wait to see it finished.
52201
Post by: evildrcheese
Mercenary is looking cool, I think some cables hanging out of the damaged servo arm would really help give it that damaged and inoperable look.
EDC
35419
Post by: Lamby
Ork_Intelligence wrote:Transport is looking great, can't wait to see it finished.
evildrcheese wrote:Mercenary is looking cool, I think some cables hanging out of the damaged servo arm would really help give it that damaged and inoperable look.
EDC
Thanks guys!
So, after some really helpful comments and critiques here's two quick re-mods of the Quad-Gunner - again, nothing is glued or cleaned-up, so really he's rough.
Mod 1 - Reloading, arms down:


Or Mod 2 - Reloading, arms up:


Primary issue with Mod 2 - Arms up sort of says 'I surrender'...
Thoughts?
43612
Post by: Rawson
I'm loving the quad-arm concept! Very unique!
I vote for arms down, but with some modifications: right now they look like they're just hanging there, until closer inspection reveals the great details you've built. If nothing is glued yet, can you move them closer together so that the purpose is more clear? What if you swapped the hands to look like they face backwards (instead of the current face forwards but work behind the back). That might also help with achieving a more purposeful look.
How's the drop ship coming?
Keep up the great work!
35419
Post by: Lamby
 Rawson wrote: Rawson wrote:I'm loving the quad-arm concept! Very unique!
I vote for arms down, but with some modifications: right now they look like they're just hanging there, until closer inspection reveals the great details you've built. If nothing is glued yet, can you move them closer together so that the purpose is more clear? What if you swapped the hands to look like they face backwards (instead of the current face forwards but work behind the back). That might also help with achieving a more purposeful look.
How's the drop ship coming?
Keep up the great work!
Thanks Rawson!
- Arms have changed drastically, final pre-paint WIP soon!
- dropship on hold - no time at the moment to devote to it
First time ever doing the ubiquitous check-pattern - with authentic battle damage!


Hopefully I'll get him based for presentation soon
35419
Post by: Lamby
Finally back at it - a little anyways.
Three bases ready:

And the gun-toting dude is down to a single multi-directional secondary gun arm:


Cheers all!
62749
Post by: Dr H
Good progress Lamby.
62749
Post by: Dr H
He's certainly not someone you want to run into in a dark alley; those eyes.
Nice work, Lamby. They look great.
8330
Post by: kestral
Your attention to detail is pretty amazing. Great stuff - especially 4 armed dude!
89168
Post by: youwashock
That guy is intense.
35419
Post by: Lamby
Dr H wrote:He's certainly not someone you want to run into in a dark alley; those eyes.
Nice work, Lamby. They look great.
Thanks Dr H!
kestral wrote:Your attention to detail is pretty amazing. Great stuff - especially 4 armed dude!
Thanks kestral! ... tho now, he's only a three-arm dude
youwashock wrote:That guy is intense.
Thanks youwasshock! the head is an awesome sculpt
ROGUE TRADER CREW WiPS!
Two of the crew almost at painting stage, and a new crew member is under construction.
Firstly, Ratty's robes are completed, so he's ready for paint:


The operator with his gun-arm is about 95% completed, just some minor detailing on the backpack required.
I forgot to add the gun-arm in the first pic, and then noticed the pistol is missing its barrel!


And a new hard-hitter is on the table!
Those Imperial Guard kneeling legs took a lot of sanding to shape into female booty!
Underpinned the GS around her arms and torso, 2nd layer required next to construct an 'armour-bra' that is a more armour, less bra

Currently she has a hole in the back of her head - that will be filled with radically re-sculpted hair.
Went for a P90 look on the primary weapon - the secondary pistol is over-large, but what the hell - this girl likes her guns!

Thanks for looking!
106439
Post by: Ynneadwraith
Nice! I really like the rat-like mutant dude. Must copy that if that's ok
13225
Post by: Bottle
Wow, this is a fantastic conversion. I love the colour scheme too, that deep green with the spot colour of orange on the backpack is perfect.
62749
Post by: Dr H
Nice work. Like the pose on the new girl.
82832
Post by: Inevitable_Faith
That hair looks great to me.
106439
Post by: Ynneadwraith
Great work! I'm a fan of the hair too
35419
Post by: Lamby
Inevitable_Faith wrote:That hair looks great to me.
Ynneadwraith wrote:Great work! I'm a fan of the hair too
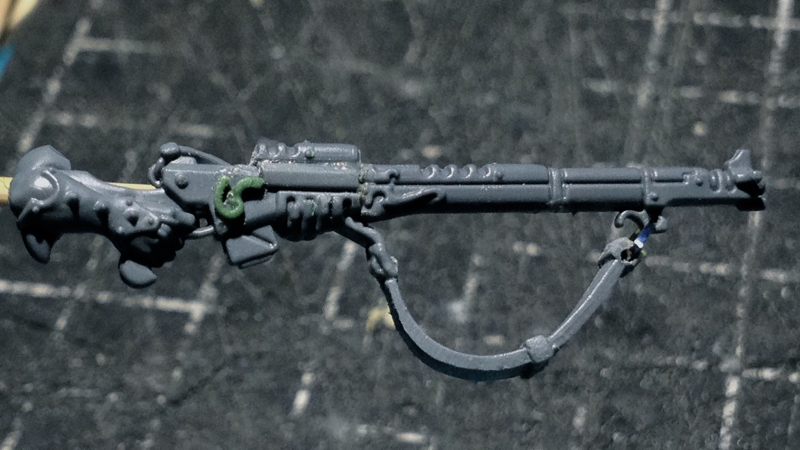
Thanks guys!!! And Rogue Trader crew member number three - the Operator:       Thanks for looking!
82832
Post by: Inevitable_Faith
Great looking model and paintjob, looks nice and grimdark. That gun looks especially great to me, big, chunky and seems like it'd make nice deep thuds as it spits lead. Us it a voversion of a Tau pulse carbine and, melta-gun and... hmm not sure what the front block is, green stuff maybe? Either way its very well converted, I like it.
89168
Post by: youwashock
He looks great. Love the flamin' orange beard and brows.
106439
Post by: Ynneadwraith
Sweet! I like the veritable cannon of a machine gun he's wielding
62749
Post by: Dr H
Lovely job, Lamby. Looks great.
35419
Post by: Lamby
Inevitable_Faith wrote:Great looking model and paintjob, looks nice and grimdark. That gun looks especially great to me, big, chunky and seems like it'd make nice deep thuds as it spits lead. Us it a voversion of a Tau pulse carbine and, melta-gun and... hmm not sure what the front block is, green stuff maybe? Either way its very well converted, I like it.
Thanks Inevitable_Faith!
- the front block was U-shaped styrene bar, drilled through carefully!!!
youwashock wrote:He looks great. Love the flamin' orange beard and brows.
Thanks youwasshock!
Ynneadwraith wrote:Sweet! I like the veritable cannon of a machine gun he's wielding
Thanks Ynneadwraith!
Dr H wrote:Lovely job, Lamby. Looks great.
Thanks Dr H!
More Inq soon - meanwhile go check out my Wretched Sons blog (link in sig)
76303
Post by: Warboss_Waaazag
Ooo! Nice hrud!
89168
Post by: youwashock
Those puff n' slash sleeves are too good. All around great model.
35419
Post by: Lamby
Warboss_Waaazag wrote:Ooo! Nice hrud!
youwashock wrote:Those puff n' slash sleeves are too good. All around great model.
Thanks guys!!!
Captain Illyria Winter makes another appearance, with added skulls on the knees of her boots and new hair.
She's ready for paint now too, I think...
I'm just still not entirely sold on her blade, I may rebuild it:


And another member of Illyria Winter's crew makes her first WIP appearance.
She's simple and complex in equal measure
An unconverted Dark Elf Witch body with added Sister's of Silence arms and blade.
I had to slice off the left arm at the wrist to get it to fit - o the swearing :( it took to get that arm in place!

The head is the lower jaw from a Dark Elf Witch and the upper from the Admech Skitarii Rangers, with the pipes and breather cut away.
After working on the Hard Girl I was sick of cutting up Dark Elf Witch hair (pics of her coming soon) so the skull-cap thing was the best way around it without using a bald Sister's head.

The Sister's sword is pinned so I can remove it for painting.
She just needs some micro-sculpting on her belt and armour-bra to 40k them a bit.
In other Rogue Trader news, the Hard Girl is finally ready for paint, though because I primed her black a while back she doesn't photograph well.
After I re-prime her with zenithal black and white I'll see if a final before-painting pic is forthcoming.
That's it for now - thanks for looking!!!
62749
Post by: Dr H
Good job on Illyria. Like the new hair.
I like the sword. See how it is once primed, maybe.
Nice new addition too.
35419
Post by: Lamby
 Dr H wrote: Dr H wrote:Good job on Illyria. Like the new hair.
I like the sword. See how it is once primed, maybe.
Nice new addition too.
Thanks Dr H!
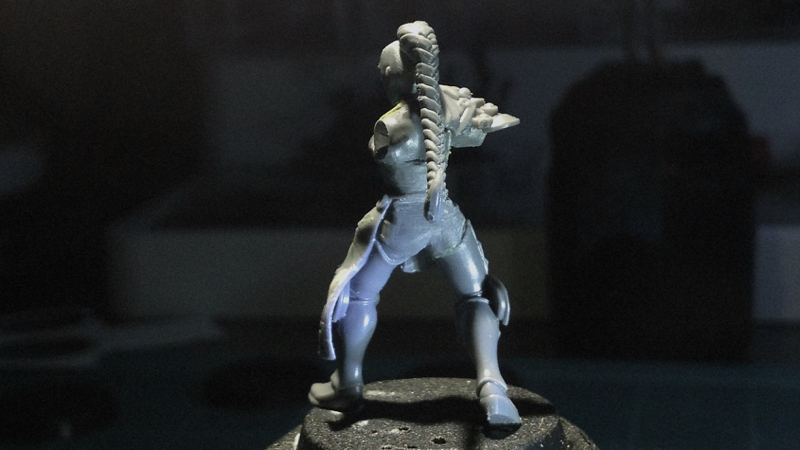
The Sword Sister (shown WIP in the last post) didn't seem to fit with the rest of the Rogue Trader crew, so I was thinking she needed a new group around her when I found a Daemonette body lying randomly in a bitz tub...
... And so the idea for new femme fatale - the Witch Hunter Tessene - and her Ordo Hereticus retinue strode onto the stage, to stand (and fight) alongside Kallatar's Ordo Xenos retinue and Illyria Winter's Rogue Trader crew.
Took the Daemonette body, sliced off the top of the torso and jammed half a Sisters of Silence torso in there - you can also see where I started to cut away the claw feet with the intention of sculpting boots:

Some butt repair required after removing the tail a little too exuberantly:

There's a possibility I'm guilty of over-using Witch Elf heads...
So, decided to use a bald Sisters head - well, half of it anyway; here she is with her skull opened up and prepped to receive a half-section of Witch Elf hair - that distinctive Sisters of Silence grill-mask will be modified into a gas-mask:

Boot toes sculpted - they require some more sanding to slim them down a little - a GS strip glued along the join of the Daemonette and Sister's torso, and the first round of sculpting hair (again with the hair sculpting! will I never learn?) to fix the flat inner half of the Witch Elf hair:

She certainly has a Witch Hunter's attitude in that stride!

Thanks for looking!
22619
Post by: inmygravenimage
Sassy! Love the wips, highly informative
89168
Post by: youwashock
Absolutely love the new girls.
95173
Post by: ROTTEN_FACTORY
I'm first time here, and i must say: great conversions with the big focus on details!
62749
Post by: Dr H
Nice work again, Lamby.
Yeah, the problem with converting and scratch-building models is it leads to many branching projects. More the merrier.
35419
Post by: Lamby
inmygravenimage wrote:Sassy! Love the wips, highly informative
youwashock wrote:Absolutely love the new girls.
ROTTEN_FACTORY wrote:I'm first time here, and i must say: great conversions with the big focus on details!
Dr H wrote:Nice work again, Lamby.
Yeah, the problem with converting and scratch-building models is it leads to many branching projects. More the merrier.
Thanks guys!!!
Finally back to painting.
PIP of the Hard Girl...
It's possible I could've made a harder mini on which to paint the skin, but I doubt it!
Note the new head scarf - I didn't manage to get a decent pic of it prior to priming.
Anyway:

22619
Post by: inmygravenimage
She has a real Twi'Lek vibe to her. I can see her running some kind of rebel insurgency
35419
Post by: Lamby
Haha thanks, I guess she does look like Twi'Lek - but I'm telling you right now, there's no way I'm painting her green after doing that skin!!!
48715
Post by: PossumCraft
She looks ace, and the skin tone has come out beautifully
35419
Post by: Lamby
Thanks! ... maybe soon I'll get back to painting her...
Finally back - and back to the Witch Hunter:
More hair added with GS, and settled on the big sword from the Sisters for the right arm - the sword will be getting some detailing (next post):

And a Witch Elf left arm - the weird size discrepancies will get sorted (translation: hidden) with an upper arm cuff to match the left leg - there's a modified pistol to fit to the left hand.

You might also note I cut the mask down and stripped the boots back - not sure what to do with the mask, while the legs will probably get armour greaves on her shins, and skull knee-caps for the win!
Short post, just good to be back at the desk!
Thanks for looking!
8330
Post by: kestral
Ratty is a fabulous figure! Great conversions all around.
89168
Post by: youwashock
Nice to see you working again!
35419
Post by: Lamby
kestral wrote:Ratty is a fabulous figure! Great conversions all around.
Thanks kestral!
youwashock wrote:Nice to see you working again!
Thanks youwasshock!
WIP 3 on the W][tch Hunter:
Didn't like the hilt on the Witch Hunter's sword so of course I messed with it:

Filled in the lightning bolt and added a bauble for interest:

Fitted the pistol to her left hand - made from a Witch Elf knife hand and lower part of the hilt, and an Admech Sicarian autopistol minus the magazine and barrel extension:

Then I glued in the left arm, added the cuff to hide the crappy join, and also added some of those baubles to the corset (kinda hard to see in this pic):

Next, some sanding and clean up work, GS the hair, GS the right arm where it joins the shoulder, add an armour collar and then figure how what I'm going to do with her mask - either turn it into a gasmask, or hide it with a highwayman's scarf, or go drastic and transplant a new face onto the head.
Thanks for looking!
89168
Post by: youwashock
Looking quite nice.
Maybe a veil for the face?
62749
Post by: Dr H
Welcome back around these parts, Lamby.
Good work. Like the gun.
28415
Post by: lone dirty dog
Sorry been a while since I checked in but glad I did, well you have been busy and nice to see some of the models I last saw in partial build complete.
Firstly congrats on creating a muted pallet with just a splash of colour, I really envy people who can create this look successfully.
Well there has been so much progress that it would take way too much time to run through so I will pick out a few, gunslinger captures some wild western vibe and epic pose, wild child so much creativity in that beast that just amazes me every time I see it, inquisitor Kallatar pose and pallet superb love those heels as well , assassins, love the creepiness and the mechanical aspects of the design, seems to make them less human and more fitted for their purpose, as for the samurai, now this was never up there as one of my favourites but since you painted it wow, the dark clothing in contrast to the face paint just makes it so much more menacing, great choice and works so effectively. Now the Captains sword is a master piece I want one of these splendid work once again, your craftsmanship with metal is top notch and just continues to impress and stun me. Now Hard Girl the skin colour looks fantastic, I know you say you couldn’t have chosen a harder model for it but it’s stunning and reminds me so much of those cyber punk artworks I used to drool over, the head band really pulls the head together as well and blends it seamlessly.
Which brings me to my one complaint the RT Mercenery / operator why did you remove the bionic arms ? I loved the whole aspect of that it was like a modern gunslinger and looked awesome, why o why did you remove them  So there we are if I missed anything I apologise as everything is awesome from design, creation and paint top job keep it coming
35419
Post by: Lamby
youwashock wrote:Looking quite nice.
Maybe a veil for the face?
Thanks youwashock - I'm attempting the gas mask first, because if I stuff it up I can cover the mess with a scarf/veil thingy.
Dr H wrote:Welcome back around these parts, Lamby.
Good work. Like the gun.
Thanks Dr H!
lone dirty dog wrote:Sorry been a while since I checked in but glad I did, well you have been busy and nice to see some of the models I last saw in partial build complete.
Firstly congrats on creating a muted pallet with just a splash of colour, I really envy people who can create this look successfully.
Well there has been so much progress that it would take way too much time to run through so I will pick out a few, gunslinger captures some wild western vibe and epic pose, wild child so much creativity in that beast that just amazes me every time I see it, inquisitor Kallatar pose and pallet superb love those heels as well , assassins, love the creepiness and the mechanical aspects of the design, seems to make them less human and more fitted for their purpose, as for the samurai, now this was never up there as one of my favourites but since you painted it wow, the dark clothing in contrast to the face paint just makes it so much more menacing, great choice and works so effectively. Now the Captains sword is a master piece I want one of these splendid work once again, your craftsmanship with metal is top notch and just continues to impress and stun me. Now Hard Girl the skin colour looks fantastic, I know you say you couldn’t have chosen a harder model for it but it’s stunning and reminds me so much of those cyber punk artworks I used to drool over, the head band really pulls the head together as well and blends it seamlessly.
Which brings me to my one complaint the RT Mercenery / operator why did you remove the bionic arms ? I loved the whole aspect of that it was like a modern gunslinger and looked awesome, why o why did you remove them So there we are if I missed anything I apologise as everything is awesome from design, creation and paint top job keep it coming
haha LDD - great commentary, thanks!
- I'm glad the Samurai came thru with the paint job - she was a lot of work!!!
- I aim to finish painting the Hard Girl after Xmas and hopefully produce results!
- with the Operator, I just couldn't get him to work from all angles, mostly I think because he was so dynamic in the first instance - I do plan to take the quad-arm aspects of him and make a more static member for the new Ordo Heriticus team!
Phew! - Thanks again guys!
So here's the attempt at the gas mask - not sure yet if it's going to work, needs some more detailing in the middle I think... thoughts?

And some final detailing on the pistol:


Pistol in hand - a better view of the upper arm cuff - and also added a new neck part, as the previous one was a) too small, and b) wouldn't stay glued in:

Thanks for looking!
95627
Post by: EmberlordofFire8
Great looking pistol! Nice work!
28415
Post by: lone dirty dog
First bloody terrible picture can’t see bugger all ha ha ha, ok looking past the light bouncing of the metal (filter cartridges) and the shadow across the front of the face mask I get what you are asking about.
I would say build out the face mask section to represent the nose covering as it looks a little flat, also some kind of section around the mouth area to represent a voicing mechanism.
Pics to give you an idea but more sci fi
The Machine pistol is coming together nicely, the ornate design down the side really adds character to the model, maybe some kind of sight on the top that reflects design down the side would be cool ?
35419
Post by: Lamby
EmberlordofFire8 wrote:Great looking pistol! Nice work!
Thanks EmberlordofFire8!
lone dirty dog wrote:First bloody terrible picture can’t see bugger all ha ha ha, ok looking past the light bouncing of the metal (filter cartridges) and the shadow across the front of the face mask I get what you are asking about.
I would say build out the face mask section to represent the nose covering as it looks a little flat, also some kind of section around the mouth area to represent a voicing mechanism.
Pics to give you an idea but more sci fi
The Machine pistol is coming together nicely, the ornate design down the side really adds character to the model, maybe some kind of sight on the top that reflects design down the side would be cool ?
Yes LDD, bad pic - I'll have to undercoat the metal pin heads before the next pic!
- my intention is to glue a tiny piece of styrene sheet to the inner section of the mask to bulk it back out a little, because (as pointed out on another forum) its too flat atm, looks like she has no nose of mouth and probably drill small holes in the part so it looks more like a grill
Thanks for the imagery
28415
Post by: lone dirty dog
Sounds like a plan mate and look forward to seeing the alteration, no worries hope the pics help
35419
Post by: Lamby
 lone dirty dog wrote: lone dirty dog wrote:Sounds like a plan mate and look forward to seeing the alteration, no worries hope the pics help
Yep they did - see below - Thanks LDD!
WIP work on a new character, the Scout - kind of threw her together over the last few days and didn't take a lot of pics, so these are basically end-of-construction pics, with only green-stuff patch-up work to go.
Took a rifle/arm from a Necromunda sprue (similar to this one):

And an Admech rifle (again, similar to this one):

And the boring Necromunda rifle becomes a much cooler Scout rifle:

Torso is from an old Dark Elf Cold One Knights, left arm is the now-staple Admech 'bionic' to attach to the left hand on the rifle:

Made the kneeling legs from a Tau Fire Warrior and some Dark Eldar legs various, with a bit of choppy-chop on the back foot to get it into position:

And yes - that is a Witch Elf screaming face as a (hopefully) cool shoulder pauldron - belt from the Necromunda sprue:

And with rifle in position:


Still hunting around for a decent head for the Scout - we'll get back to that later...
Speaking of heads - the on-going saga of the Witch Finder's gas-mask continues:

Pretty sure I'm done with the mask - now just to green-stuff that last hair strand:

Thanks for looking!
89168
Post by: youwashock
The legs on Scout are magnificent. Really choice modeling. The mask looks good as well.
28415
Post by: lone dirty dog
Yes have to agree the scout legs are some great conversion work, your eye for piecing is rather amazing.
I also like the use of the DE knight torso, not something that springs to mind for such a conversion but reinforces the heritage.
The only thing I have a little issue with is the rifle, don’t get me wrong you have meshed them together well but they still look like to separate pieces.
I think you need to reflect the ornate detail from the Ad-Mech rifle on to the Escher, to blend it into one piece would benefit from some simple GS work which I know you are more than capable of doing successfuly.
35419
Post by: Lamby
youwashock wrote:The legs on Scout are magnificent. Really choice modeling. The mask looks good as well.
Thanks youwasshock! That mask almost undid me...
lone dirty dog wrote:Yes have to agree the scout legs are some great conversion work, your eye for piecing is rather amazing.
Thanks LDD!
lone dirty dog wrote: I also like the use of the DE knight torso, not something that springs to mind for such a conversion but reinforces the heritage.
That DE torso has a long history of failing to fit a myriad of conversion attempts... so I'm really happy to find somewhere to use it, and with the consistent GW up-sizing each new range, those old DE torsos are now just the right size
lone dirty dog wrote:The only thing I have a little issue with is the rifle, don’t get me wrong you have meshed them together well but they still look like to separate pieces.
I think you need to reflect the ornate detail from the Ad-Mech rifle on to the Escher, to blend it into one piece would benefit from some simple GS work which I know you are more than capable of doing successfuly.
Goddamn you

Better?
PS - this is absolutely the smallest and fiddliest thing I ever attempted to sculpt...
33872
Post by: Turaxa
Take this as constructive criticism on what is shaping up to be a great figure, but have you considered modifying the strap so that the front end attaches to the cleat that's near the gun's muzzel? The rear attachment point looks solid but overall the strap seems a little short.
106439
Post by: Ynneadwraith
Kickass fiddly detail work! I'm very impressed
Now...to think up something else fiendishly fiddly to suggest in an offhand manner
28415
Post by: lone dirty dog
It’ll do :
62749
Post by: Dr H
Nice work, Lamby.
72534
Post by: complex57
This is absolutely fantastic. Keep up the awesome work.
35419
Post by: Lamby
Turaxa wrote:Take this as constructive criticism on what is shaping up to be a great figure, but have you considered modifying the strap so that the front end attaches to the cleat that's near the gun's muzzel? The rear attachment point looks solid but overall the strap seems a little short.
Goddamn you ...
Ynneadwraith wrote:Kickass fiddly detail work! I'm very impressed
Now...to think up something else fiendishly fiddly to suggest in an offhand manner
No more please!!!
lone dirty dog wrote:It’ll do :
Thanks!
Dr H wrote:Nice work, Lamby.
Thanks!
complex57 wrote:This is absolutely fantastic. Keep up the awesome work.
Thanks!
So, thanks to Turaxa made the change to the strap on the Scout's rifle, here's the (admittedly better looking) result (although it looks like I'll need to sand the new strap bit down a little thinner):
Meanwhile; took a Sisters of Silence body, added the bare back of a Daemonette, and did some cut-n-sand sculpting to give her a proper butt to get this:


The head is a Daemonette head with the weird hair cut off and the skull sanded bald, and an Eldar Wyches hair part added:

As usual, it's about this point in construction where I start to wonder what load-out she's going to get...
Thanks for looking!
28415
Post by: lone dirty dog
Early stages always have me guessing as to where you’re going with a model, the legs and torso match up quite well.
Those demonette heads always have that weird forehead, so are you going to be making her look more human ?
The Wyches hair is a good call.
35419
Post by: Lamby
lone dirty dog wrote:Early stages always have me guessing as to where you’re going with a model, the legs and torso match up quite well.
Those demonette heads always have that weird forehead, so are you going to be making her look more human ?
The Wyches hair is a good call.
Thanks LDD - often, it's the same for me... I mash some bits together and get sort of 1/4 of the way in and have to then think: " Mmm, how to finish?"
- Ah, the Daemonette head - I'm tempted to whack a pair of steampunk googles on her and be done with it but I'll probably end up doing some frustratingly tiny micro-surgical sculpting to 'humanise' her...
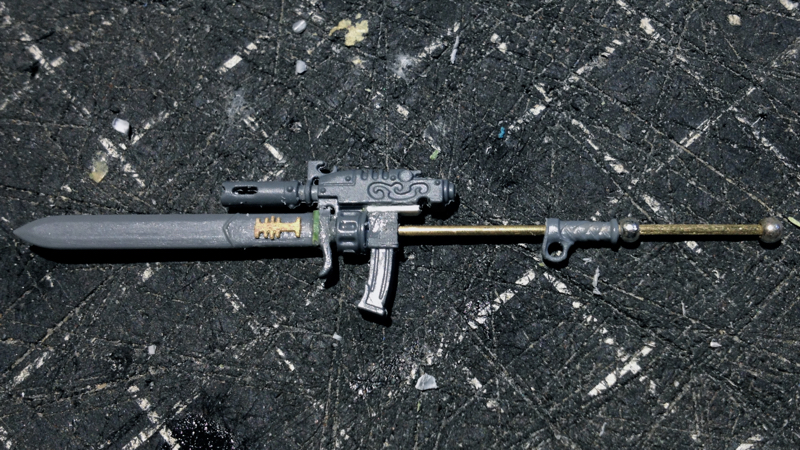
And so: thanks to Lysimachus, the new Witchfinder retinue member has found her calling - as a Gladiatrix!
And with that - and the new GW Custodes release - came the idea for her weapon: the Gun-Spear!
Started with the coolest gun ever designed by GW:

Some careful knife work (to retain that wonderful detailing) and some re-gluing brings us to this:

Added a Sisters of Silence right forearm to the right upper arm and drilled through the fist to insert the brass rod for the basic 'spear' haft:

Drilled through the magazine-well and power-thingy to position the gun then trimmed and oh-so-very-carefully drilled into that Sister's blade to get the basic concept sorted for the Gun-Spear:

And an Escher arm combined with the Sister's open hand gives us the left arm:

Next up - a firing mechanism for the Gun on the Spear haft, some sort of power-source, maybe some cabling, and clean up the gun-to-blade transition.
Still working up the nerve to resculpt the Daemonette forehead and nose...
Thanks for looking!
28415
Post by: lone dirty dog
I’m loving the stance you have created with her, it’s almost like a guard stepping forward in a defensive manner, that moment before actually attacking.
How you decide to combine weapons is a mystery to me, any idea as to the finish for the bottom section of her boom spear ?
Good luck with the forehead detailing it’s a real pain trust me ha ha
Also I have to say as much as I can admire other people’s conversion and builds I never really wish to own them, however I have found myself wishing quite a few times to owning yours so for that I say well done sir ........ and I hate you for it lol 
62749
Post by: Dr H
Nice work. Good pose.
71611
Post by: DarkSoldier
Why does that weapon have both a sickle and drum magazine? Does it have some sort of dual-feed system so the wielder can switch between two different ammo types for various targets?
35419
Post by: Lamby
lone dirty dog wrote:I’m loving the stance you have created with her, it’s almost like a guard stepping forward in a defensive manner, that moment before actually attacking.
How you decide to combine weapons is a mystery to me, any idea as to the finish for the bottom section of her boom spear ?
Good luck with the forehead detailing it’s a real pain trust me ha ha
Also I have to say as much as I can admire other people’s conversion and builds I never really wish to own them, however I have found myself wishing quite a few times to owning yours so for that I say well done sir ........ and I hate you for it lol
Thanks LDD!
- See below for bottom section ideas...
- I cheated and sanded the forehead bump away, then sculpted a new nose - see below
Dr H wrote:Nice work. Good pose.
Thanks Dr H!
DarkSoldier wrote:Why does that weapon have both a sickle and drum magazine? Does it have some sort of dual-feed system so the wielder can switch between two different ammo types for various targets?
Hi DarkSoldier - I'm not sure but I think the round thing on these Admech weapons is not a drum magazine but a power-supply... or it could be a dual-magazine set-up, as you say
Detailing ideas for the Gun Spear - might add a skull above the trigger-handle.. might also add a power-unit down towards the base...
And I take it back - the little detail on the Scout's gun is not the smallest thing I've ever sculpted - this new nose for the Gladiatrix is!


Needs a bit more careful sanding with some super-fine paper - it wasn't until I took these pics I noticed it's a bit crooked at the bottom but I think I'll leave it like that cos it looks like it's been broken - and she's a Gladiatrix after all!
Thanks for looking!
21254
Post by: lipsdapips
So much character in all of these miniatures! I envy and admire your ability to sculpt and convert with such proficiency. Great stuff!
62749
Post by: Dr H
Noses are tricky to do at this scale. Good job.
28415
Post by: lone dirty dog
Yes I agree with Dr H nose are a fiddly thing to do, either build in stages or carve back to shape.
Personally I build in stages as I hate carving as if you over do it the whole lot is knackered, so good luck with the shaping mate
35419
Post by: Lamby
 lipsdapips wrote: lipsdapips wrote:So much character in all of these miniatures! I envy and admire your ability to sculpt and convert with such proficiency. Great stuff!
Thanks lipsdapips! Dr H wrote:Noses are tricky to do at this scale. Good job.
Thanks Dr H! lone dirty dog wrote:Yes I agree with Dr H nose are a fiddly thing to do, either build in stages or carve back to shape. Personally I build in stages as I hate carving as if you over do it the whole lot is knackered, so good luck with the shaping mate
Thanks LDD! - I actually drilled through her weird septum and sculpted version 1 over the pre-existing end of her nose - Version 2 I ended up cutting away her original nose entirely and sculpted in the new nose as one piece - which was then scraped down even smaller with a blade - I won't be doing that again The Witch Hunter and the Gladiatrix are done (only some minor clean up required before spraying.) Here's the Witch Hunter with hair and coat-tails complete:    Ah crap - just noticed the hole in her left shin whoops! And the Gladiatrix, nose surgery and Gun Spear complete, left arm and belt kit added:      One retinue member to go - I wonder who/what she will be... Thanks for looking!
8330
Post by: kestral
Great sculpting. I have mixed feelings about the nose surgery but it was skillfully done!
89168
Post by: youwashock
Lethal ladies are looking lovely.
28415
Post by: lone dirty dog
Sounds like the nose has been a little challenging but the end result is looking good, although it still looks a little flat towards the end/tip of the nose unless you want that unique look.
How you missed that whole though ha ha
You say the witch hunter is finished but her feet look a little WIP, I think the model could benefit from some detailing like buckles and maybe some kind of sole that blends into the heel pins.
35419
Post by: Lamby
kestral wrote:Great sculpting. I have mixed feelings about the nose surgery but it was skillfully done!
Thanks kestral!
youwashock wrote:Lethal ladies are looking lovely.
Thanks youwasshock!
lone dirty dog wrote:Sounds like the nose has been a little challenging but the end result is looking good, although it still looks a little flat towards the end/tip of the nose unless you want that unique look.
How you missed that whole though ha ha
You say the witch hunter is finished but her feet look a little WIP, I think the model could benefit from some detailing like buckles and maybe some kind of sole that blends into the heel pins.
Thanks LDD!
- tbh, the nose-job is just to get a different face from the standard GW ones; femme faces are quite lacking if you don't want the screaming Dark elf look
- see below for the sad tale of the Witch Hunter...
Yes, yet again, a return... and of course, rather than finishing anything - returning with a new character!
A quick explanation in my defence: since my last post the Witch Hunter suffered a calamitous casualty at the teeth of Chaos - otherwise known as my cat  - the only portions that survived were the arms and the head, as they were detached at the time of the creature's assault
I started rebuilding her - hopefully even better than before - but the motivation soured a little, so to breathe life back into my mojo, I've started on another character - though I'm not quite sure where she fits in the cantos of either the Rogue Traders, Kallatar's retinue, or the Witch Hunters... or possibly even something new.
Anyways - since I have quite a few of these old Daemonette bodies lying around, I started with one them:

And with the long skirts of Neferata from the Mortachs of Nagash:

Off with her legs!

Working on getting rid of the hanging jewel-things - sometimes over-exuberant knife work means greenstuff/milliput repairs:

And here's the body and the skirt together - took a bit of knife-work to get the torso to sit facing forward rather than sideways like Neferata's torso sits:
And here's the components of the left arm and sword - I set the Dremel up as a lathe to turn the greenstuff/milliput hilt:
And all attached:
Hopefully there'll be much more to come in a better timeframe than previously!
And as always - thanks for looking!
62749
Post by: Dr H
Shame to hear of the daemon-feline assault.
Good start to the new addition.
Nice sword.
69676
Post by: Big H
Dremel as a lathe !
Mind. Blown 
Could you send a pic, a tutorial or link on how to set this up as I have a "spare" Dremel !
21254
Post by: lipsdapips
Good headway on a cool character! Let's hope that the inquisition apprehends this fowl beast that savaged your miniature :(
306
Post by: Boss Salvage
 Big H wrote: Big H wrote:Dremel as a lathe !
Mind. Blown
Could you send a pic, a tutorial or link on how to set this up as I have a "spare" Dremel !
Seriously. I was still thinking about this this morning and shaking my head in wonder.
Great start on the new gal, even if she's being birthed from tragedy 
- Salvage
89168
Post by: youwashock
She is looking quite grand. Way to rebound from disaster!
28415
Post by: lone dirty dog
As far as resurrections goes I think this is actually an improvement and the body posture makes for an interesting pose.
I think the cat has actually inspired a build here, maybe you found your muse
35419
Post by: Lamby
Dr H wrote:Shame to hear of the daemon-feline assault. Good start to the new addition. Nice sword.
Thanks Dr H! Big H wrote:Dremel as a lathe ! Mind. Blown Could you send a pic, a tutorial or link on how to set this up as I have a "spare" Dremel !
Thanks Big H Here you go - Dremel (fake Dremel anyway) as a lathe:  This shows lathing detail into brass tubing - to lathe a 50/50 mix of GS and milliput, I stick a blob of the mix on a wire or pin, roll the blob into a sausage and leave enough pin extended so I can insert the pin into the collet of the Dremel head - I'll take some pics next time I'm doing it lipsdapips wrote:Good headway on a cool character! Let's hope that the inquisition apprehends this fowl beast that savaged your miniature :(
Thanks lipsapips! Boss Salvage wrote: Big H wrote:Dremel as a lathe ! Mind. Blown Could you send a pic, a tutorial or link on how to set this up as I have a "spare" Dremel !
Seriously. I was still thinking about this this morning and shaking my head in wonder. Great start on the new gal, even if she's being birthed from tragedy - Salvage
youwashock wrote:She is looking quite grand. Way to rebound from disaster!
Thanks youwasshock! lone dirty dog wrote:As far as resurrections goes I think this is actually an improvement and the body posture makes for an interesting pose.
I think the cat has actually inspired a build here, maybe you found your muse
Thanks LDD! - I'm still rebuilding the original Witch Hunter, the skirt is yet another new character Thanks all!!! K][LL YOUR DARLINGS... To move ahead, sometimes you have to kill your darlings... Suffering from some major hobby mojo for some time now - it's been well over a year since I last put paint-to-model, for instance - I decided that while the idea of building the Captain's 'raptor-like' dropship was (and remains) a goal, the execution of the Hemlock conversion had gone awry; meaning, I had the top, the tail, and the VTOL thrusters, but couldn't come up with a decent hull and flightpod design that took the fighter and made it a dropship - which after all, was the initial intention. So - typically me - I started on a new ride for the Rogue Trader crew and the Inquisitor Kallatar's retinue. Recently inspired of the brilliant techno airships of the artist Ian McQue 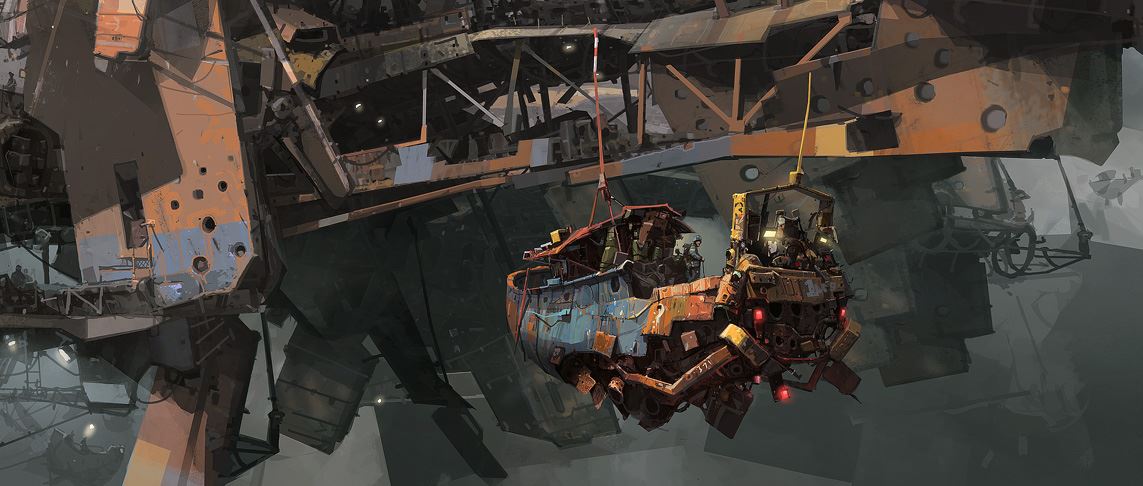 ... and discovering the more retro look of the Kharandon airships - vs the ultra-sleek Eldar Hemlock - work commenced on converting an Arkanaut frigate into a 40k-esque Inquis][tor/steampunk transport... Though I quickly discovered that scale-wise, there was no way the frigate could conceivably carry enough people to function as a troop-transport; so another quick change of tack (haha - see what I did there?) and the frigate-into-transport plan morphed into the frigate-into-Gun Skiff plan. So first up - what else? - guns!!! Upper turret with twin-linked rotating 100mm cannon - made from some Imperial Guard tank bits and strips of styrene: 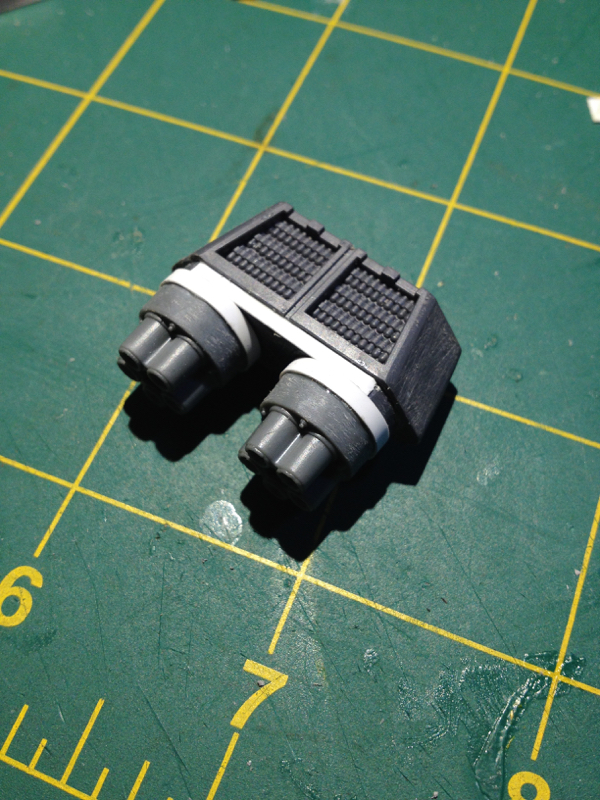 Of course, then I realised those midget rounds in the mag-trays are just too small calibre for the barrels size, so covered them up with some styrene sheet and milliput/greenstuff: 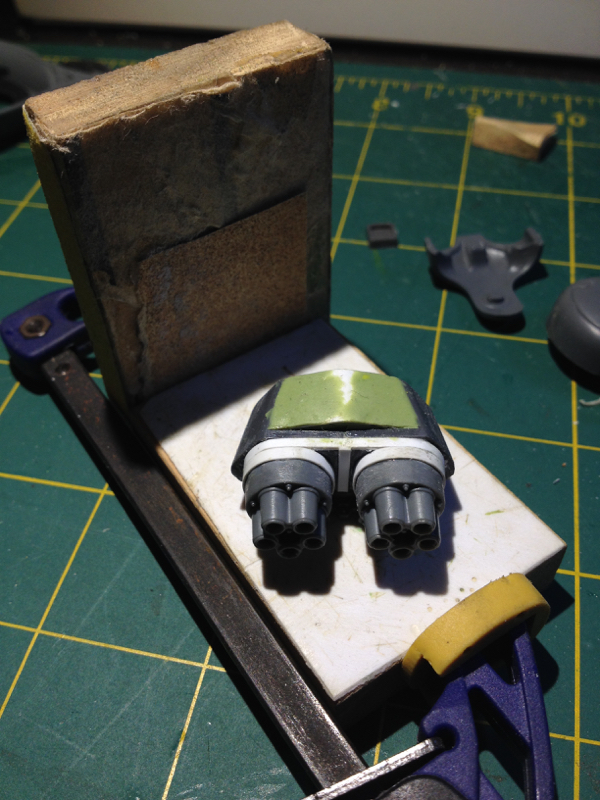 With the upper deck cannon fleshed out, time to build the lower turret that will replace the mouth/beard of the Arkanaut frigate - so took this old Tau turret shell: 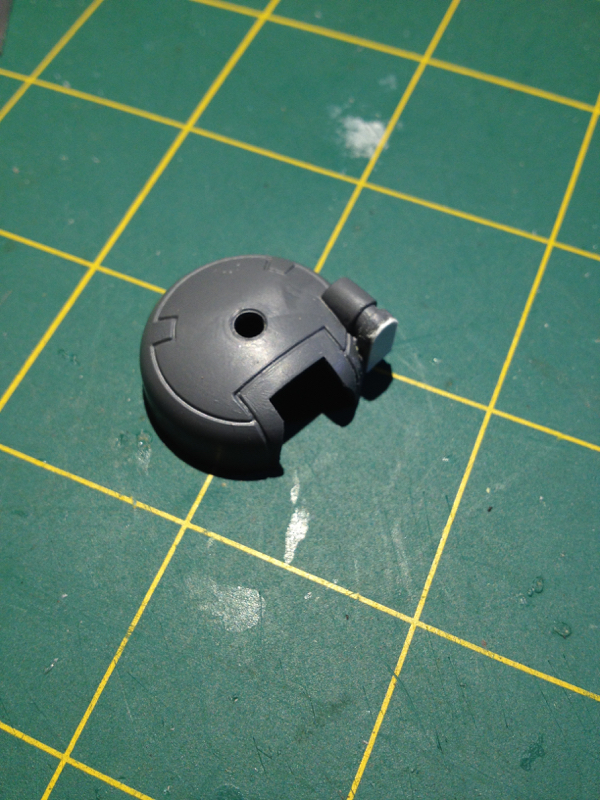 Added a styrene rim to this plumbing tubing: 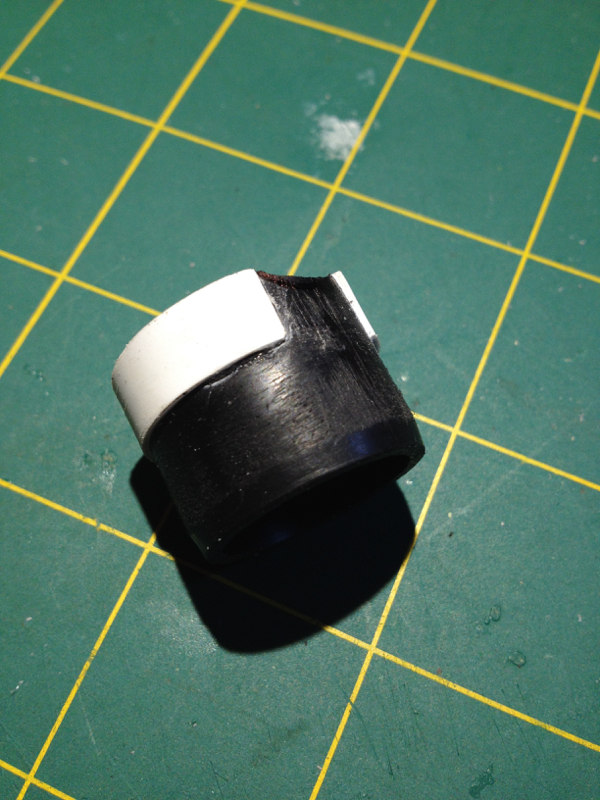 Detailed up the mini-gun barrel from the Nemesis Dreadknight: 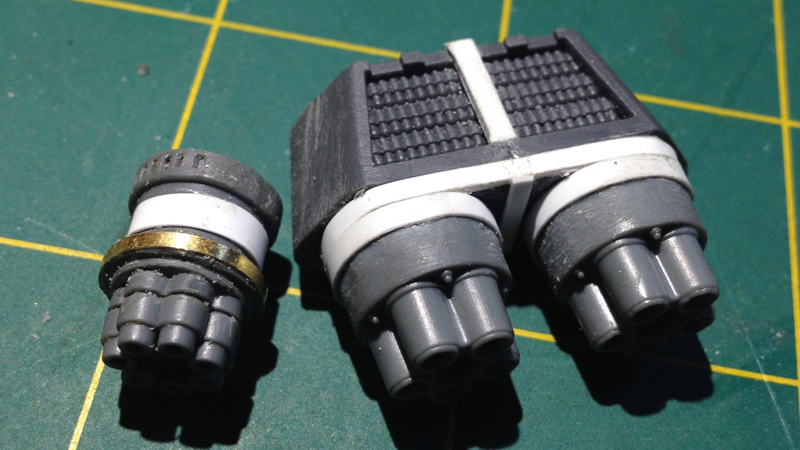 and look at that - a Minion gun! 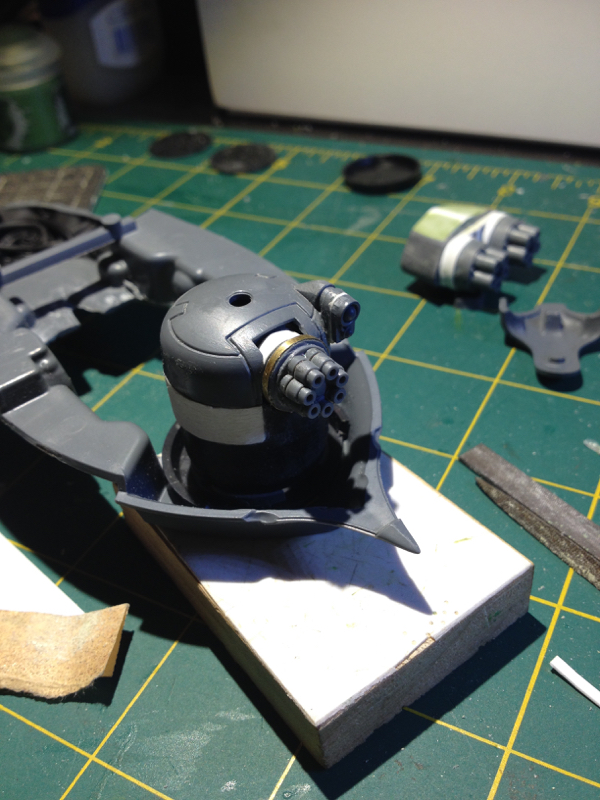 Made some additions to the frigate's turret bed: 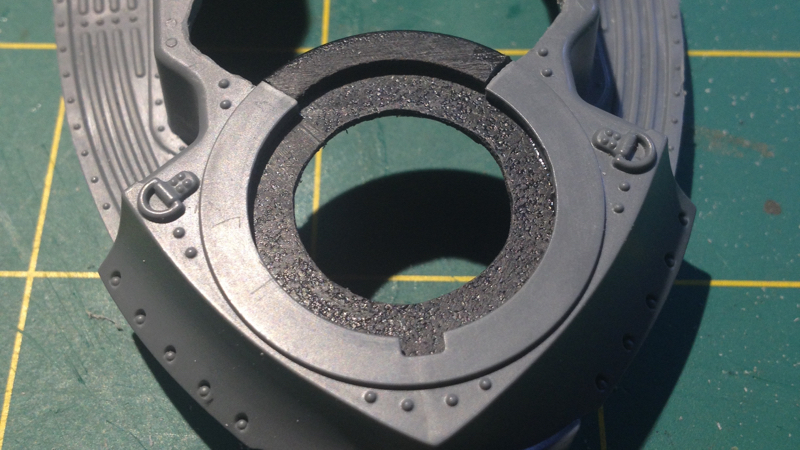 Then used some superglue dots and a handy clip-thingy to tack the hull halves together...  Then took a hacksaw and carefully... OMG what have I done!!!  Oh well, too late to back out now!!! So I just kept cutting and sanding... 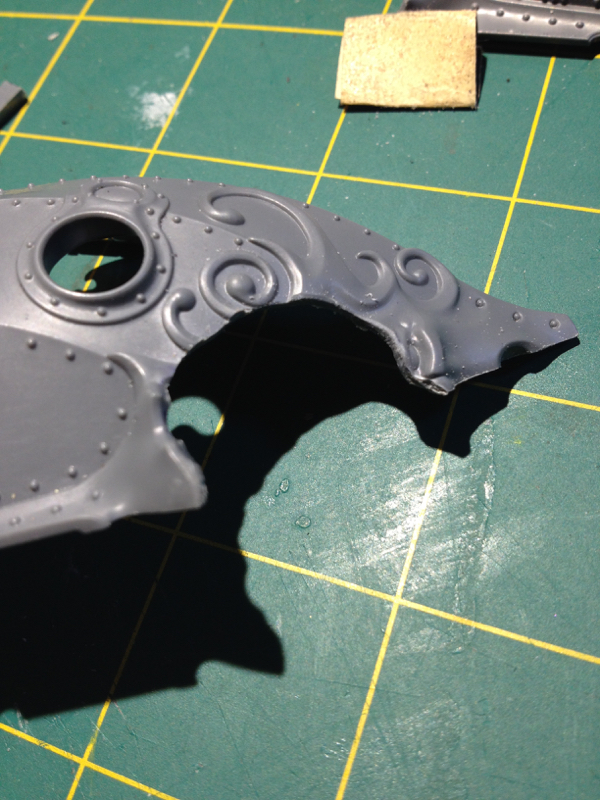 Until we ended up with this: 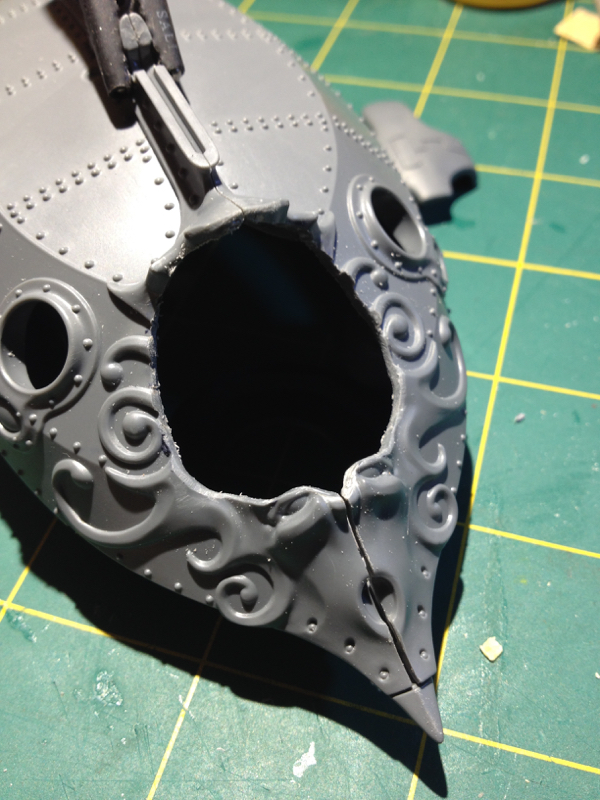 Aaaaaand... Unfortunately, the lower turret support pylon doesn't quite fit in the hole yet, so no pic today of the weaponry in place. Tune in soon for more mad modelling adventures!
89168
Post by: youwashock
This promises to be grandiose.
30344
Post by: monkeytroll
Catching up on a few missed years. Great work as always. Loving the rogue trader crew, and the ideas for both ships.
Had to Google arkanauts - bloody hell, just been expressing my surprise at various kits that have appeared in the last few years, now have to add dwarves air ships to that list and
Look forward to seeing you chop that up.
35419
Post by: Lamby
youwashock wrote:This promises to be grandiose.
Cheers youwashock!
monkeytroll wrote:Catching up on a few missed years. Great work as always. Loving the rogue trader crew, and the ideas for both ships.
Had to Google arkanauts - bloody hell, just been expressing my surprise at various kits that have appeared in the last few years, now have to add dwarves air ships to that list and
Look forward to seeing you chop that up.
Thanks monkeytroll!
On with the WIP.
Here's where we left off the build last time:
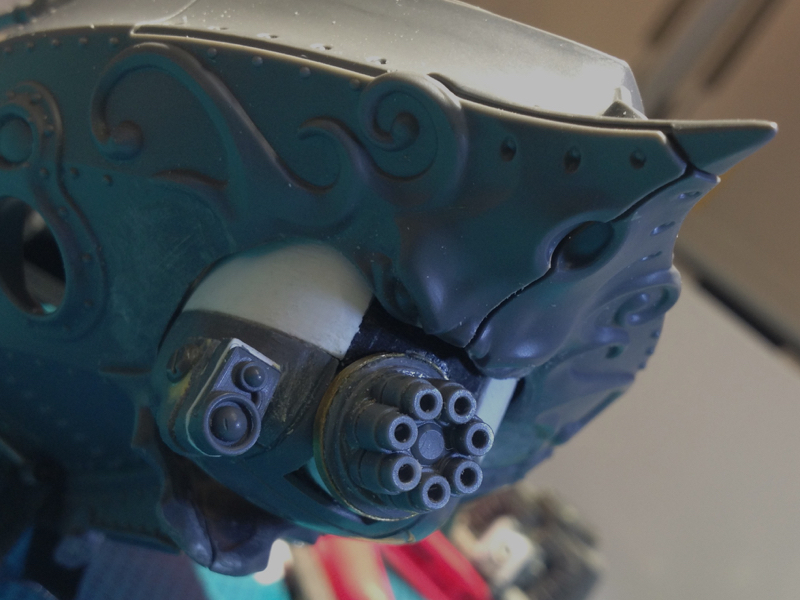
Kharadron Beardy-Face now Mini-Gun Angry Face!
Deciding to leave the guns alone for a bit, it was time for some work on the stern of the ship.
Took some 1/35th tank parts, part of a Space Marine Centurion power-pack, and lengths of old wire - mostly DC power leads and bits of Iphone cable my daemon-cat has chewed off electronic devices around the house - and threw it all together into some tech detail that nobody will ever see again after this.
Next - the McQue-esque engine cut-out.
Eyeballed the curve on the hull halves, drew a reference line, took one of those "O frack what am I about to do?" breaths, and let rip with the Dremel...
Leaving this:
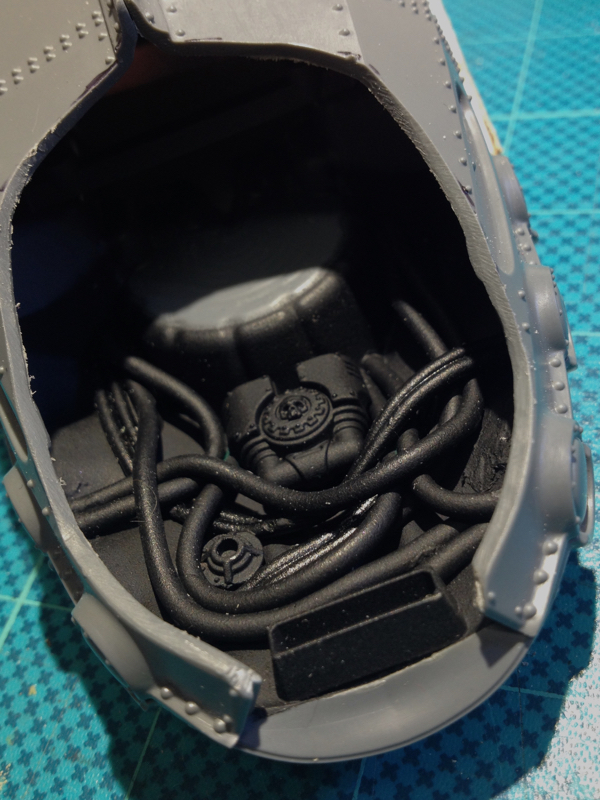
Then took some engine parts from the Space Marine vehicle range, added some caps of those squeezy mini-bladders and sketched out some thrusters:
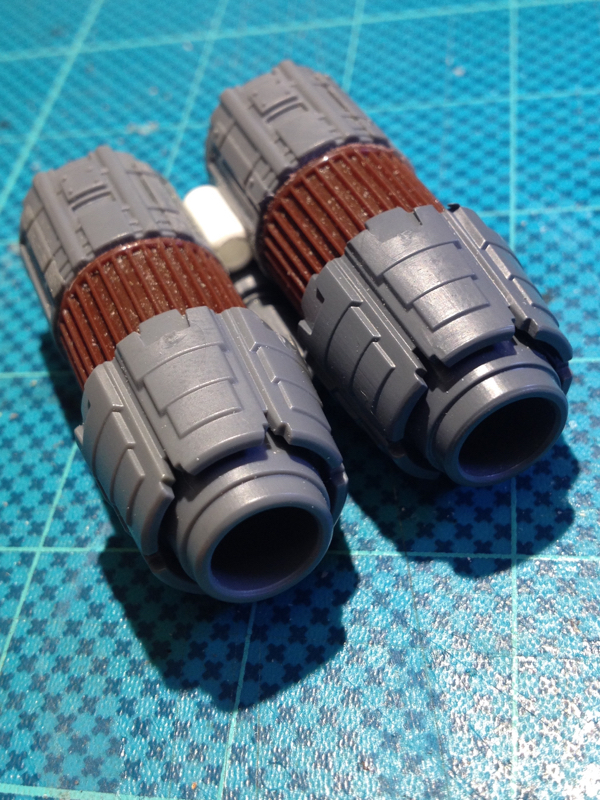
Might have to trim a fraction more out of the hull where the nozzles are just touching, but I like it so far:
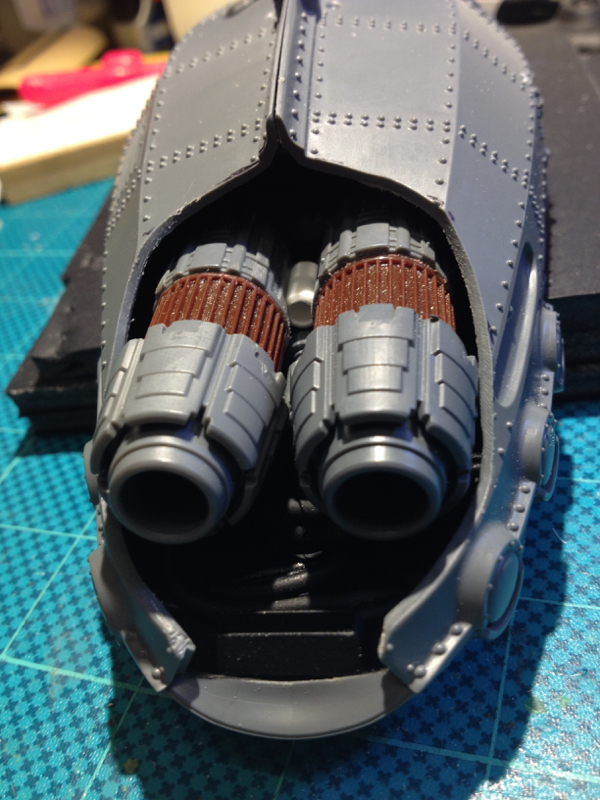
Remember, this is upside down for construction purposes - the skiff flies the right way up!
Then it was back to the guns.
Added some detail to the back of the twin-linked cannon using a part from a Hemlock Wraithfighter, a random plastic ring from something cut in two, and another 1/35th tank part cut in half to get the two yellow bits:
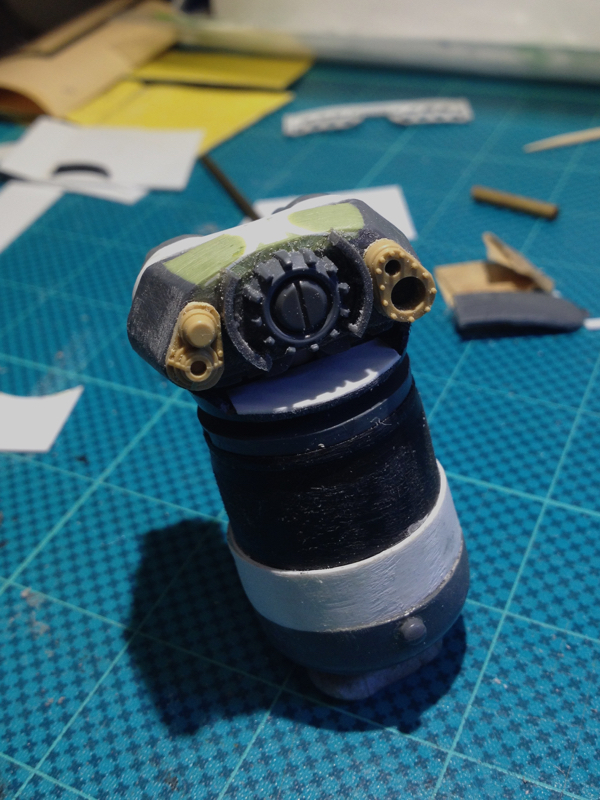
And then finally got both upper and lower weapons in place for a pic:
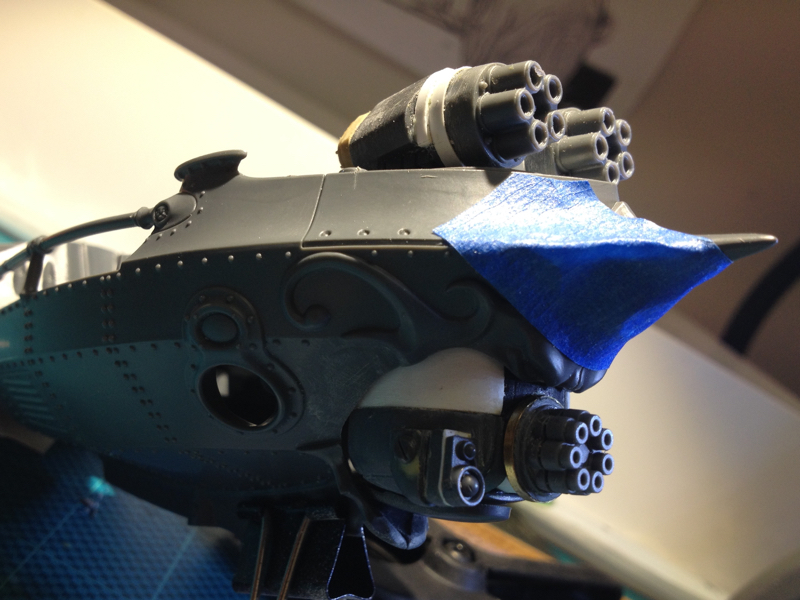
Still lots to do but I'm feeling the vibe with this one!
Thanks for looking!
22192
Post by: whalemusic360
Very cool so far. Really like the concept behind it.
95627
Post by: EmberlordofFire8
I might have to make one of these...
69676
Post by: Big H
So much genius here!
Really really cool ! I am watching the airship for all the ideas I can mine for my own stalled projects, and the Dremel lathe is just awesome and so simple actually, like most good ideas !
22619
Post by: inmygravenimage
I love varied uses of bottle caps, makes my little LoeR heart sing.
62749
Post by: Dr H
Good work. liking what I'm seeing.
35419
Post by: Lamby
whalemusic360 wrote:Very cool so far. Really like the concept behind it.
EmberlordofFire8 wrote:I might have to make one of these...
Big H wrote:So much genius here!
Really really cool ! I am watching the airship for all the ideas I can mine for my own stalled projects, and the Dremel lathe is just awesome and so simple actually, like most good ideas !
inmygravenimage wrote:I love varied uses of bottle caps, makes my little LoeR heart sing.
Dr H wrote:Good work. liking what I'm seeing.
Thanks all!!! Back again with more Gun Skiff gun stuff - a curved barrel shroud for the upper mini-gun. Xbox grill looked perfect for what I had in mind, except there's no way to bend it into the shape I needed - so did some prep work on it prior to vacuforming: 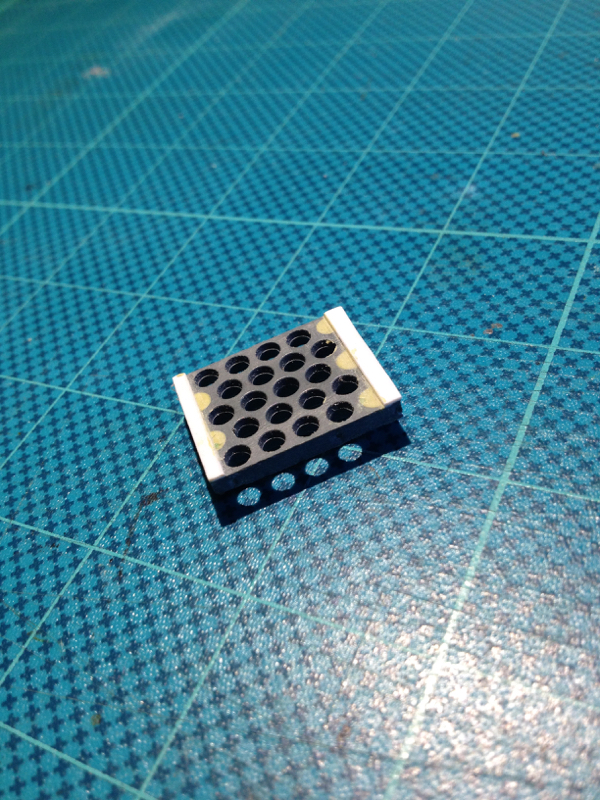 Used the home-made vacuformer to make a thinner and therefore flexible copy: 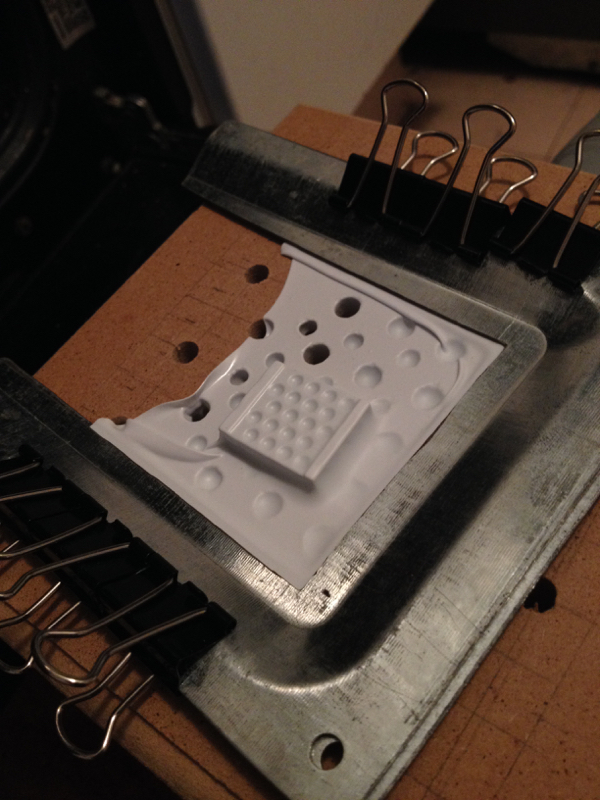 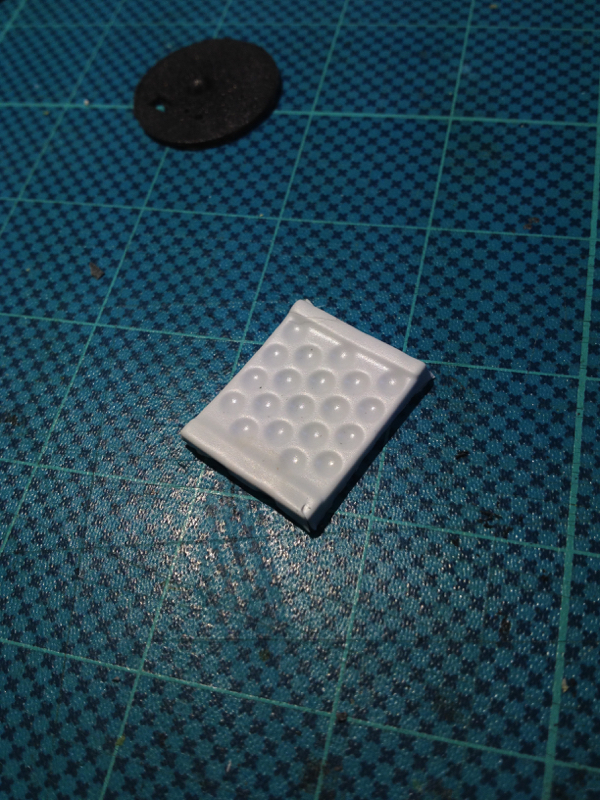 Sanded it until the bumps became holes, cleaned the holes up with a sharp blade: 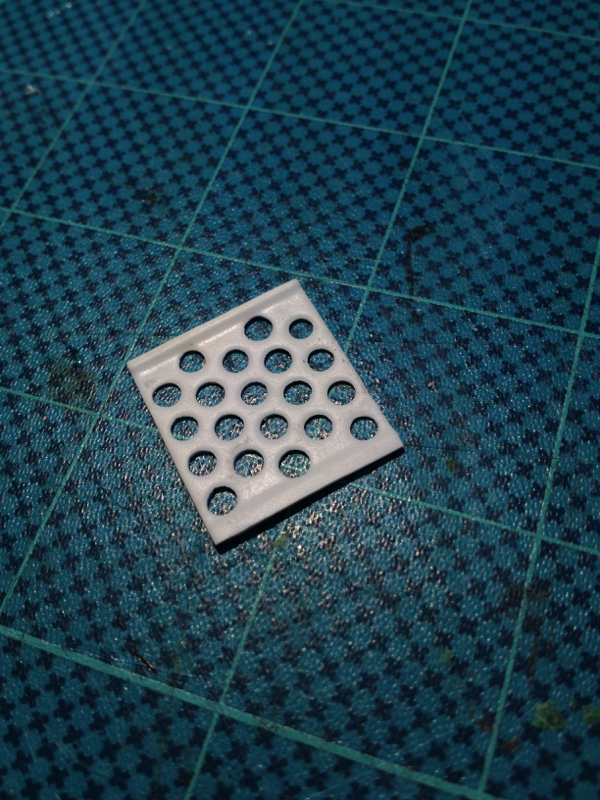 Cut it in half through the middle and glued up this structure: 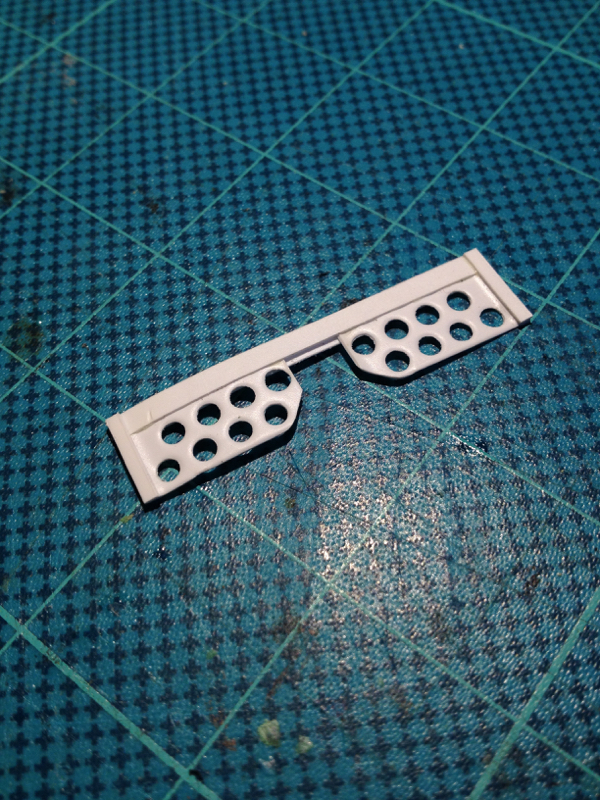 Undercoated the inside with Krylon black, then used boiling water to bend it into shape... 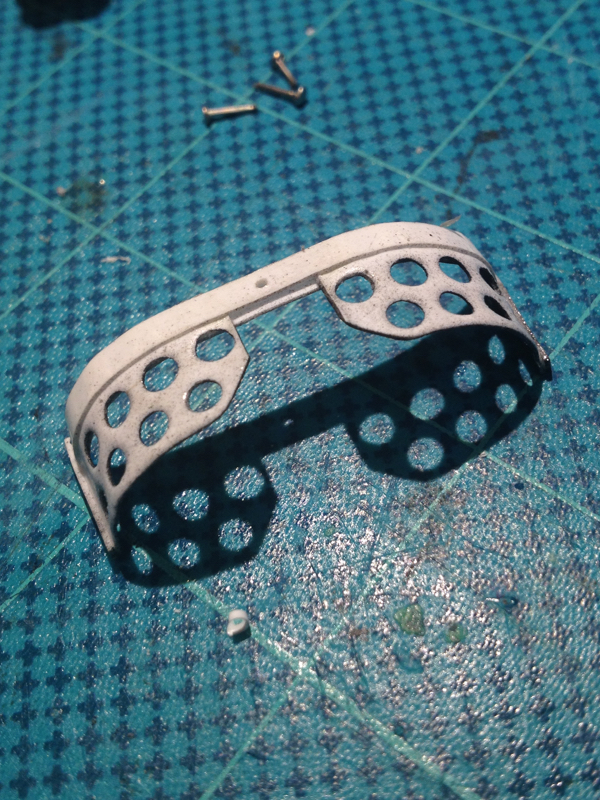 And glue and aggressive clamping did the rest: 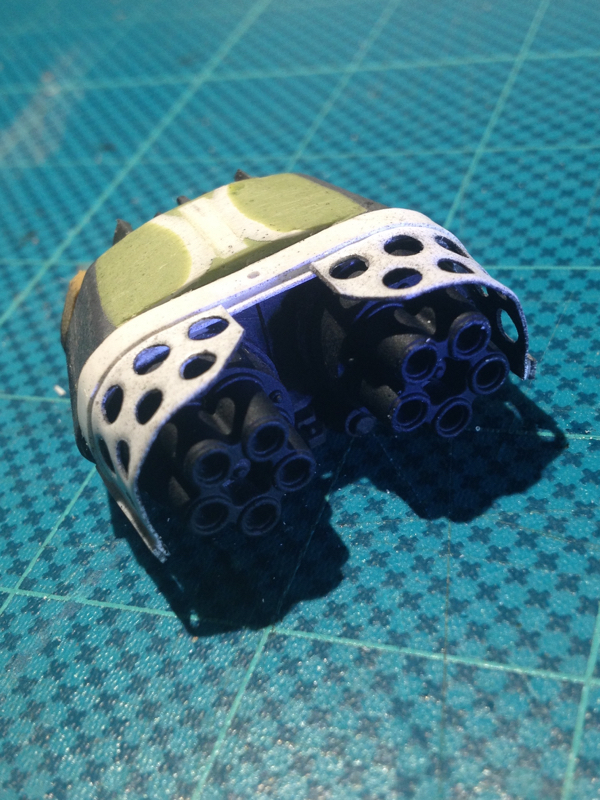 Hopefully I'm done with the gun detailing, so next time it will be back to the engines! Thanks for looking!
22619
Post by: inmygravenimage
Lamby wrote:
Used the home-made vacuformer to make a thinner and therefore flexible copy:
Of course you did. Because you're some kind of arcane, mad technowizard who conjures up a vacuformer out of a bit of ply, bulldog clips and a hoover 
Amazing stuff, I'm awestruck.
69676
Post by: Big H
 inmygravenimage wrote: inmygravenimage wrote: Lamby wrote:
Used the home-made vacuformer to make a thinner and therefore flexible copy:
Of course you did. Because you're some kind of arcane, mad technowizard who conjures up a vacuformer out of a bit of ply, bulldog clips and a hoover
Amazing stuff, I'm awestruck.
This.
I consider myself quite handy at knocking things together and creating stuff from other items, But you are killing it!
Perhaps you could start a thread or article on your handy machines ??!!??
(Only half in jest....)
22192
Post by: whalemusic360
How most people would do it:
Get plasticard.
Cut plasticard.
Bend and poke holes in plasticard.
How Lamby does it:
Take apart Xbox.
Modify fan vent from Xbox.
Build vacuformer.
Make vacumold of Xbox bit.
Trim vac made shape.
Sand the hell out of it.
Cut to desired shape.
Build parts from plasticard.
Heat and bend.
All for a heat shield that is a minor detail! You are crazy man.
96209
Post by: MacPhail
Man, really excellent scratchbuilding... I'm working backwards with 20 pages to go and already I'm inspired on multiple levels. Well done!
30344
Post by: monkeytroll
You had me at home-made vacuformer.
35419
Post by: Lamby
inmygravenimage wrote: Lamby wrote:
Used the home-made vacuformer to make a thinner and therefore flexible copy:
Of course you did. Because you're some kind of arcane, mad technowizard who conjures up a vacuformer out of a bit of ply, bulldog clips and a hoover
Amazing stuff, I'm awestruck.
Thanks inmygravenimage!
- vacuformer explanation below
Big H wrote: inmygravenimage wrote: Lamby wrote:Used the home-made vacuformer to make a thinner and therefore flexible copy:
Of course you did. Because you're some kind of arcane, mad technowizard who conjures up a vacuformer out of a bit of ply, bulldog clips and a hoover
Amazing stuff, I'm awestruck.
This.
I consider myself quite handy at knocking things together and creating stuff from other items, But you are killing it!
Perhaps you could start a thread or article on your handy machines ??!!??
(Only half in jest....)
Thanks Big H!- vacuformer explanation below!
whalemusic360 wrote:How most people would do it:
Get plasticard.
Cut plasticard.
Bend and poke holes in plasticard.
How Lamby does it:
Take apart Xbox.
Modify fan vent from Xbox.
Build vacuformer.
Make vacumold of Xbox bit.
Trim vac made shape.
Sand the hell out of it.
Cut to desired shape.
Build parts from plasticard.
Heat and bend.
All for a heat shield that is a minor detail! You are crazy man.
Haha thanks whalemusic360!
- I'll try to explain a little of my madness...
- I attempted to drill out a series of holes in a plasticard sheet but it never quite worked out - either my holes would be slightly out of alignment, or the larger drill bit would tear in the hole
- I salvaged that old Xbox from a sidewalk throwout years ago... I've used a lot of the mesh bits on bases!
- The grill holes were the right shape, size and distance apart - so it made made a good template
- A homemade sanding block with really aggressive sandpaper made short work of it - about 10 minutes of sanding
MacPhail wrote:Man, really excellent scratchbuilding... I'm working backwards with 20 pages to go and already I'm inspired on multiple levels. Well done!
Thanks MacPhail!
monkeytroll wrote:You had me at home-made vacuformer.
Haha thanks monkeytroll!
Since the homemade vacuformer seems to be a bit of a hit, here's a pictorial explanation:
- The vacuum chamber is an MDF craft box.
- I drilled an admittedly quite haphazard series of holes in the lid, and drilled out a hole in the side slightly larger than the hose on my vacuum cleaner
- To get a seal I used strapping tape, it has a rough external texture that grips around the vacuum cleaner nozzle.
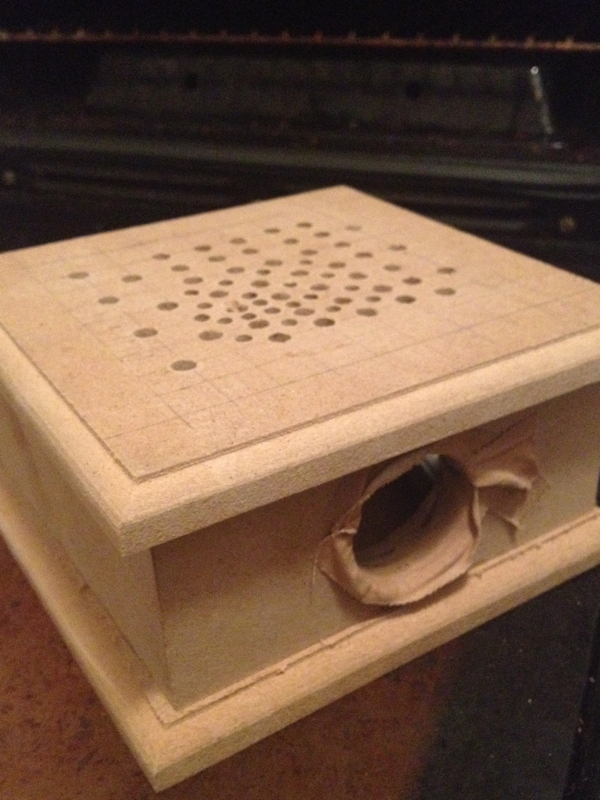
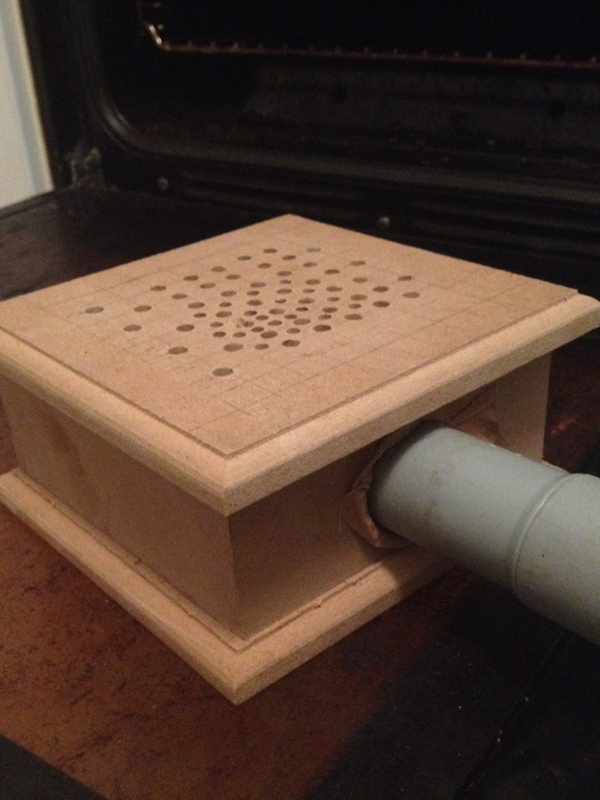
To do the actual vacuforming, you need:
- A vacuum cleaner
- A heat source - I just use the griller in my oven
- A buck - the thing you want to make a copy of - in the case above it was that piece of Xbox grill
- Some sheet styrene
You clamp the styrene between a metal frame of sorts:
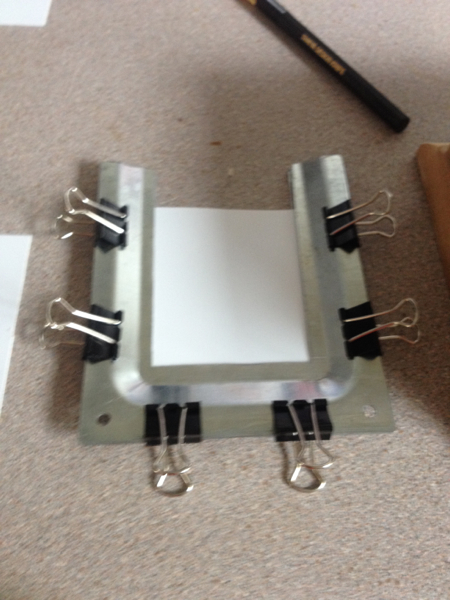
Turn the vacuum cleaner on with your buck on the top of the vacuum box.
Allow the styrene sheet to deform under your heat source until it's sagging about the same height as your buck.
Whip the hot styrene out and quickly drop it over the buck - the vacuum cleaner sucks the hot styrene sheet down over your buck and hopefully makes a good copy (otherwise known as a pull)
Points:
- Use a pair of BBQ tongs not your fingers to hold the frame under the griller heating element - things get hot fast!
- Your buck has to be able to take the heat of melting styrene
- To get a good pull, raise your buck slightly above the actual vacuum chamber top - for the Xbox grill I glued some sprue to get a little height
This mini vacuformer was my test build - I plan to make a bigger one.
As usual, this was not my idea originally - watch this video from Fon Davis:
https://www.youtube.com/watch?v=WXhJHArFsrM
And this one from Bill Doran at Punished Props:
https://www.youtube.com/watch?v=Gx66mS7U2vY&t=1s
Thanks!!!
44814
Post by: alabamaheretic
dude this thread is nuts it gets better and better
69676
Post by: Big H
At the moment I don't know why I need a vac former, I just know I'm going to build one first chance I get !
30344
Post by: monkeytroll
Excellent work, thanks for the explanation.
Big H - once you build one you'll find plenty of uses I'm sure. Same as every other tool we make or buy
62749
Post by: Dr H
Good work, Lamby. On the model and the vac-former.
35419
Post by: Lamby
alabamaheretic wrote:dude this thread is nuts it gets better and better
Big H wrote:At the moment I don't know why I need a vac former, I just know I'm going to build one first chance I get !
monkeytroll wrote:Excellent work, thanks for the explanation.
Big H - once you build one you'll find plenty of uses I'm sure. Same as every other tool we make or buy
Dr H wrote:Good work, Lamby. On the model and the vac-former.
Thanks all for your kind comments!
On with the show:
I blame Star Wars.
Well, Star Wars modellers to be correct - and mostly this guy
Tagamo Modelworx
I learned more about lighting models in one night binge-watching his videos than any amount of reading Instructables and the like.
But as I was watching, this thought snuck into my brain: Lighting models - mmmm...
So of course, not content with my usual OCD-style modelling, now I'm adding LEDs to the engines - cos why make it simple when you can make it insanely detailed, right?
Not wanting to spend too much money on all this, found a LED bike light in the junk pile, and harvested the twin watch-battery power supply and the LEDs from it.
Of course, had to mod the power supply a bit by adding the leads - which meant I had to learn to solder, cos up till now my electronics experience comes from making circuits in simple IED training aids (real life job) where we twist and tape, as the training aids invariably get blown apart... anyway:
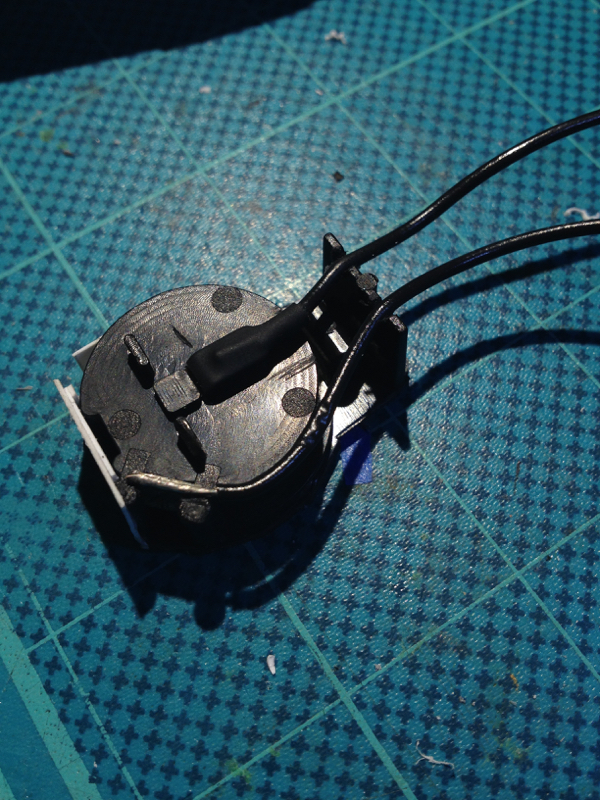
And here's the harvested LEDs with resistors added:
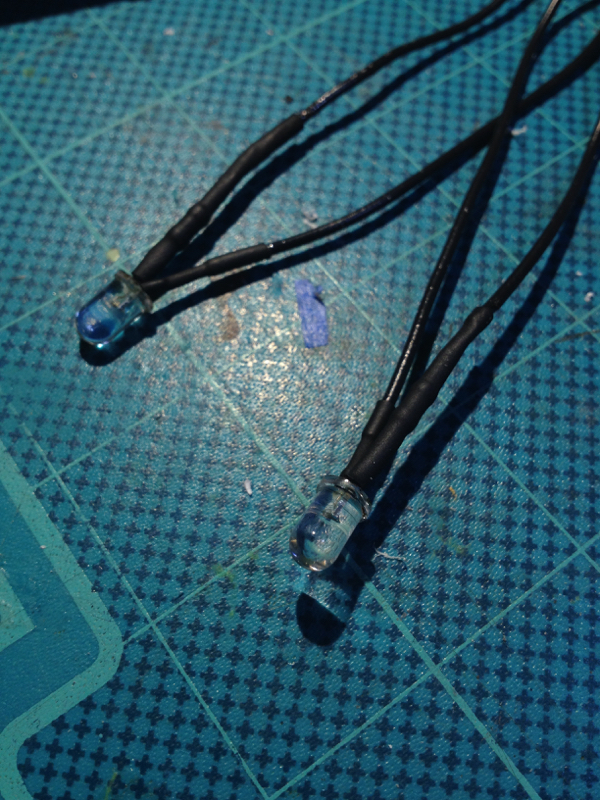
Took a switch from an old Nerf gun - yes, you read that correctly :
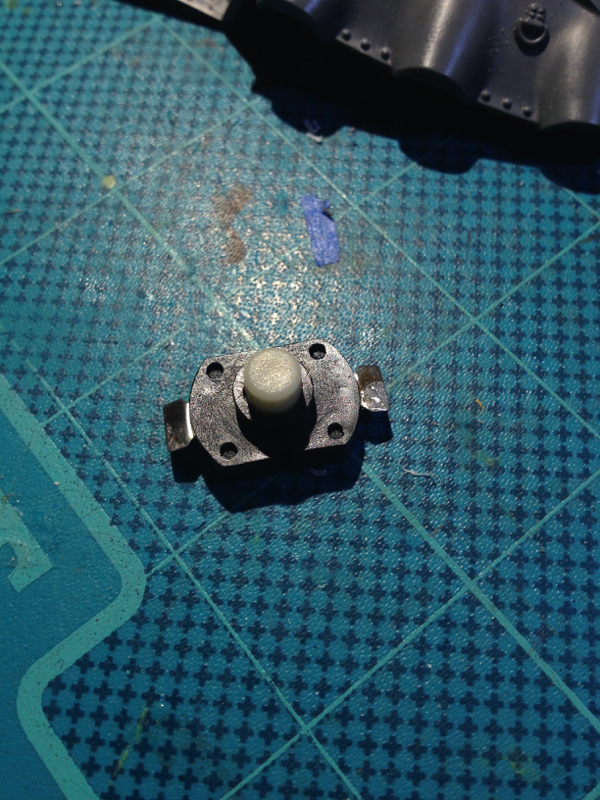
Made a hole in the side of the decking to take the switch:
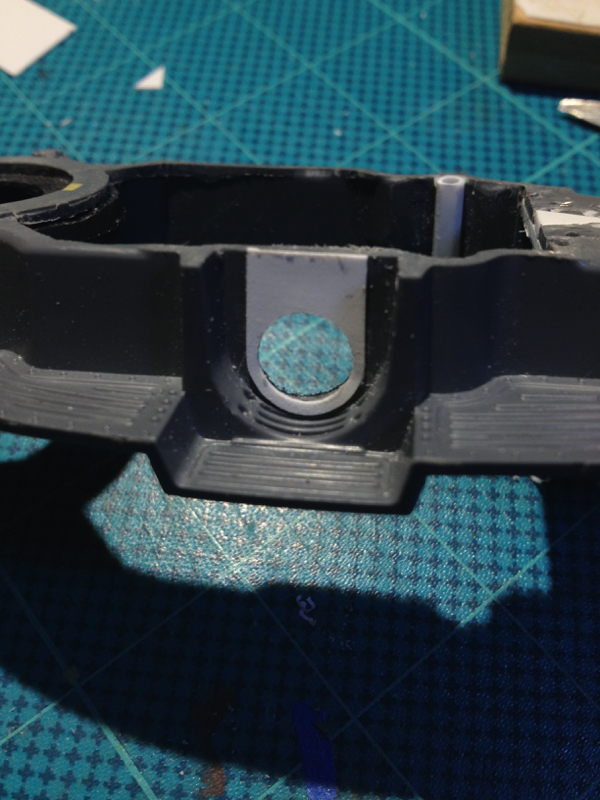
And added some detail to hide the fact it is indeed, a switch:
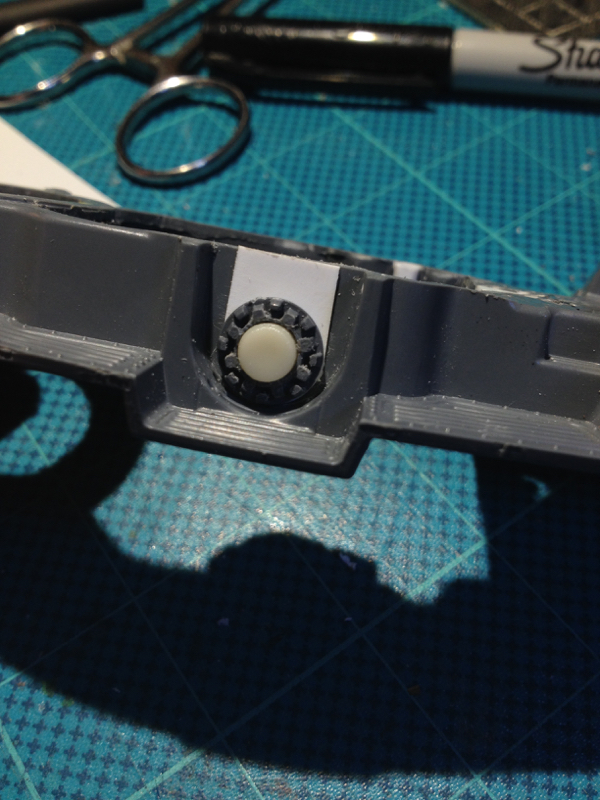
Then, in the interest of keeping up the momentum of the actual design and building of this thing, I left off the electronics there til another day.
Looking at the main engines I thought they looked a bit plain, so made these pipes:
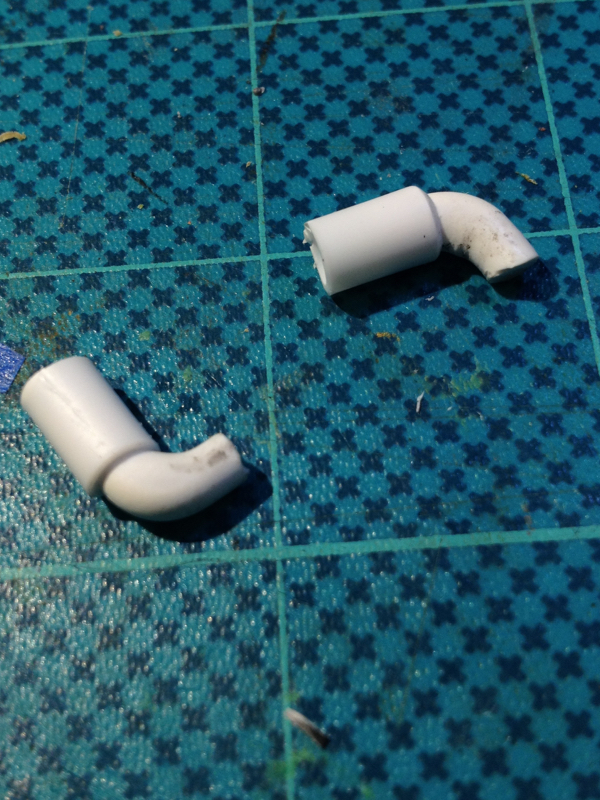
And added them to the inner cylinders:
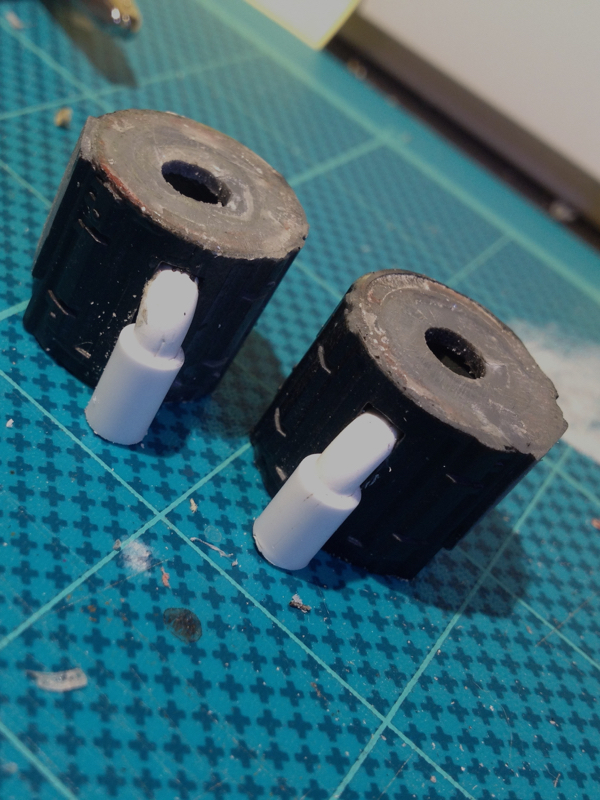
Then I mixed up a batch of epoxy and glued both engines together, and completely failed to take a pic when they were done, whoops.
More to follow!
22619
Post by: inmygravenimage
More mad science? No final pic?! You filthy tease!
30344
Post by: monkeytroll
Well obviously it needed lights
35419
Post by: Lamby
inmygravenimage wrote:More mad science? No final pic?! You filthy tease!
Haha yes sorry about that - will get to it today (hopefully...)
monkeytroll wrote:Well obviously it needed lights
Of course - once I saw those light rigs in the Star Wars models I was hooked
35419
Post by: Lamby
Real life pause over - time to get these fething engine lights done! Engine detailing: 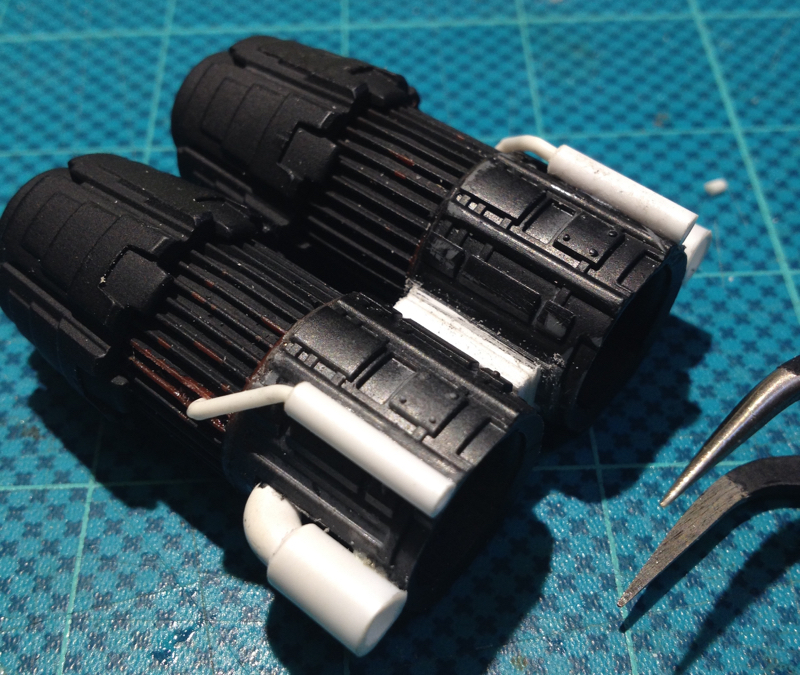 And covered with Krylon Fusion primer: 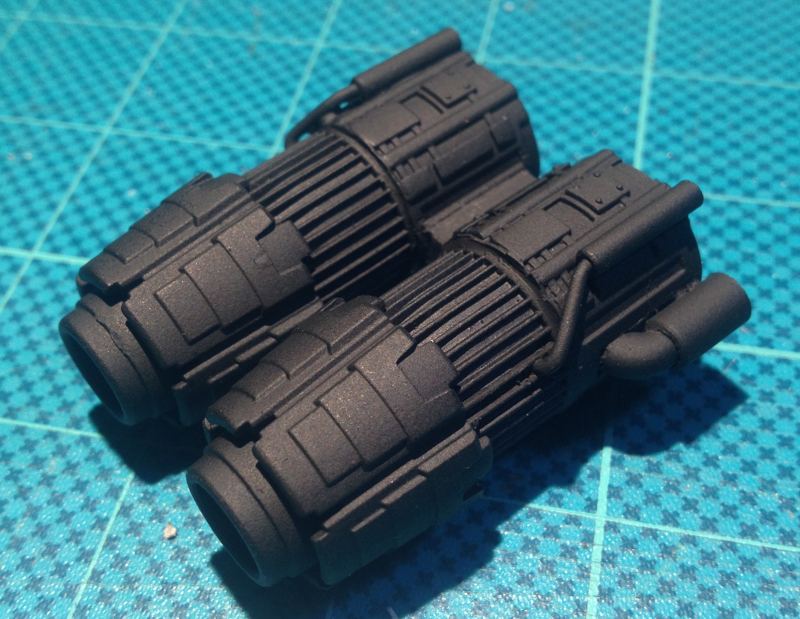 Added supporting braces internally to the top deck cavity: 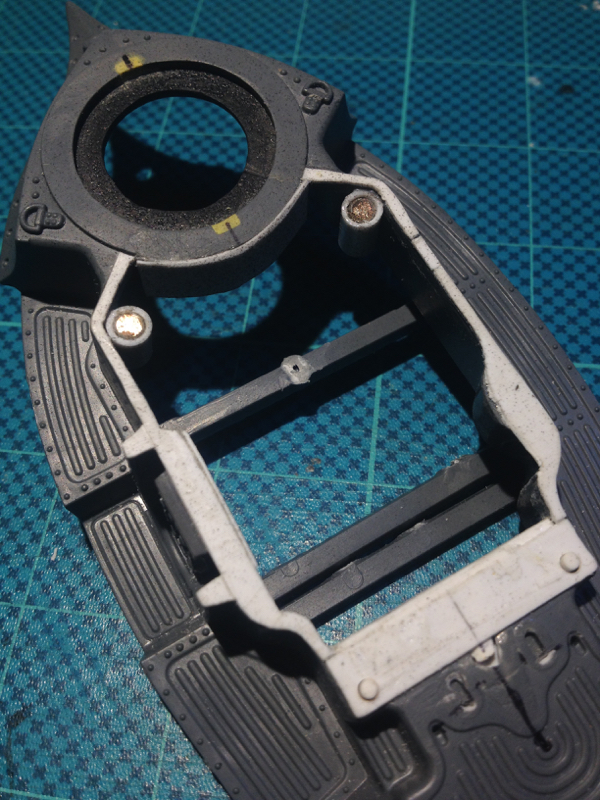 Note the magnets to take this removable though as yet un-detailed decking plate: 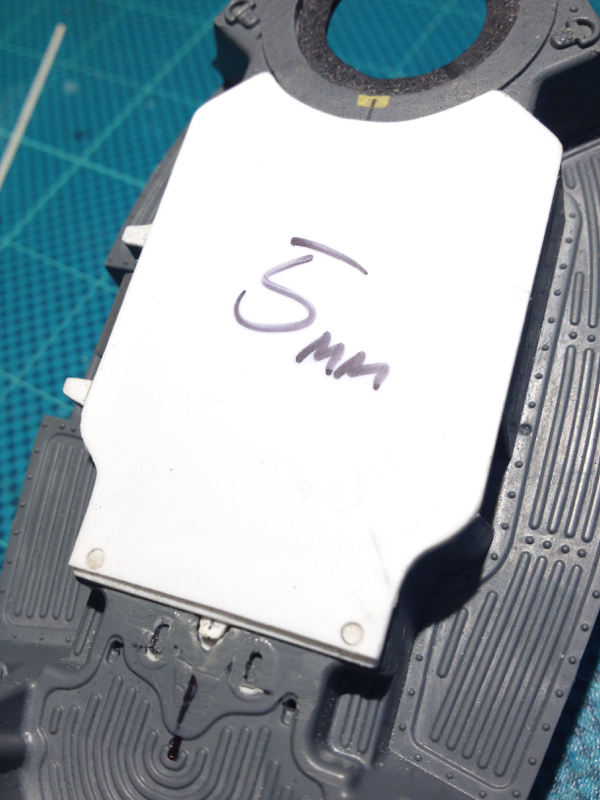 Finished soldering (and re-soldering... and re-re-soldering...) the wiring harness and tinted the bright white LEDs with Tamiya Clear Blue - which worked surprisingly well:  Seriously underestimated the size of the wiring harness vs the cavity, and spent a lot longer than it should have taken to get it all to fit: 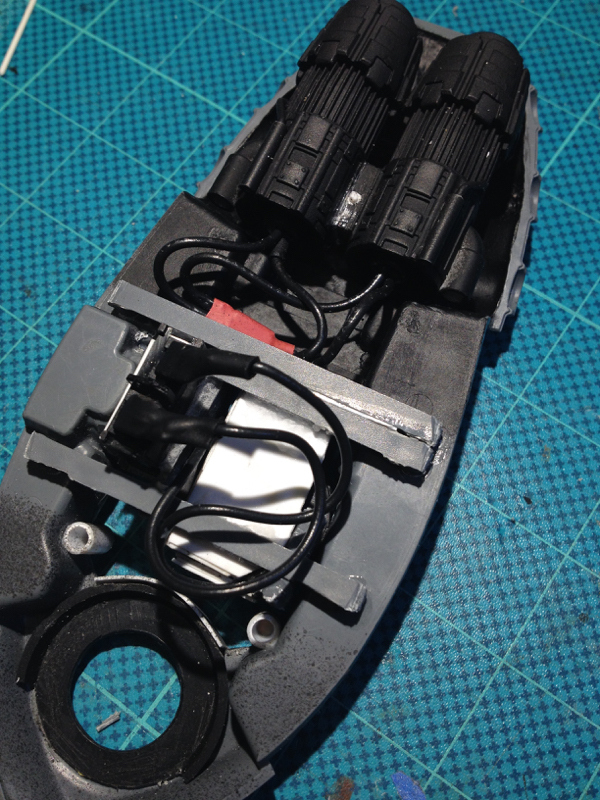 You might notice the switch has been changed out - the Nerf gun switch decided to cease working about after I'd soldered everything up the first (two) times, so I caved in and bought a good solid switch - which is why the top decking is now removable: 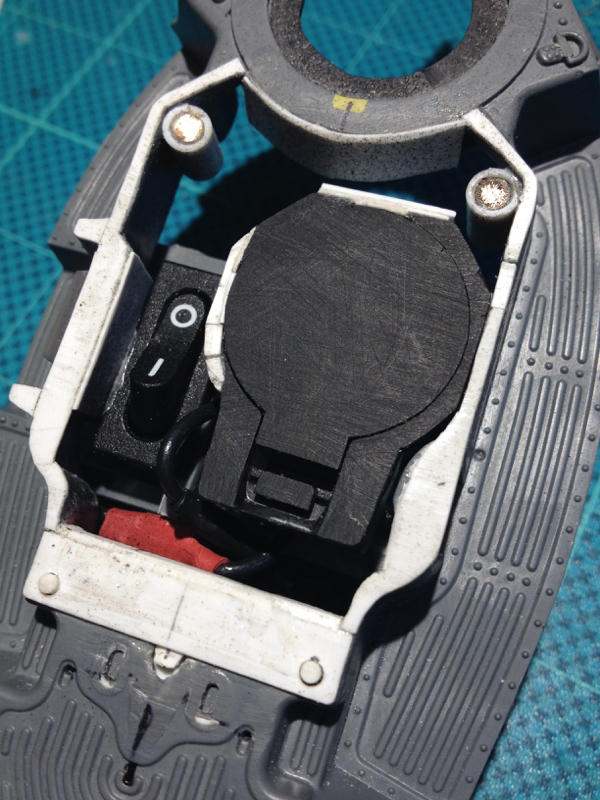 Finally though - we have engine lights! 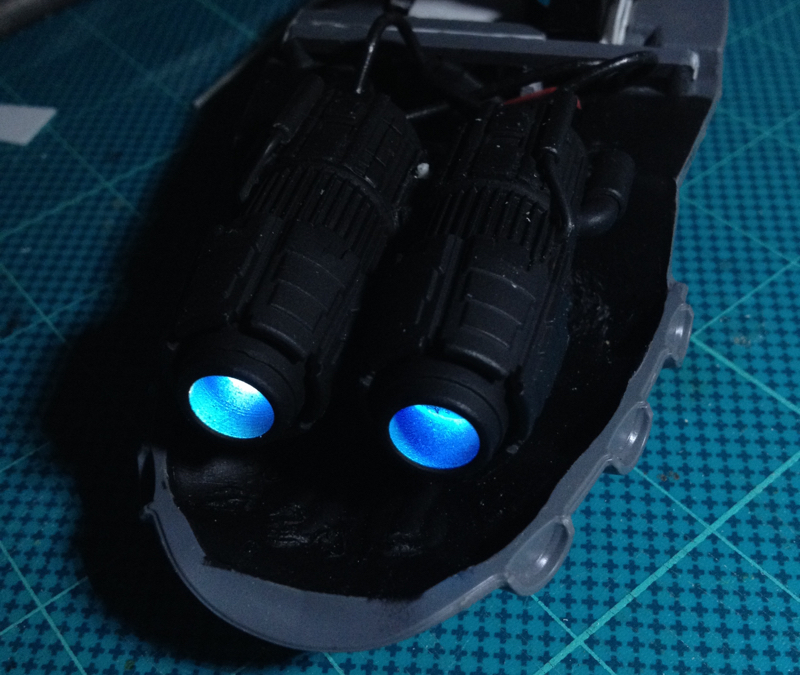 Things I have learned during this process: 1. Good soldering is a lot harder than it looks 2. Test, test and re-test your circuit after every step! 3. Harvesting LEDs and battery mounts and switches for free is good in theory but in practice, not so much Now I can (hopefully) speed up the rest of this build! Thanks for looking!
30344
Post by: monkeytroll
Definite thumps up from me....
96209
Post by: MacPhail
Wow... Very cool work on those engines. I suddenly want to build a fully mechanized Elder or Tau force just to light the whole thing with blue engines...
62749
Post by: Dr H
Worth the effort. Looks cool.
35419
Post by: Lamby
MacPhail wrote:Wow... Very cool work on those engines. I suddenly want to build a fully mechanized Elder or Tau force just to light the whole thing with blue engines...
Dr H wrote:Worth the effort. Looks cool.
Thanks guys!
With the thrusters completed (for the moment anyway) moved on to detailing the removable top deck plate.
Found some 1/35th tank drive wheels, a Landraider turret ring, and a Space Marine bike wheel, glued them together to make a bit of an engine, then cut them in half - you'll see why shortly:
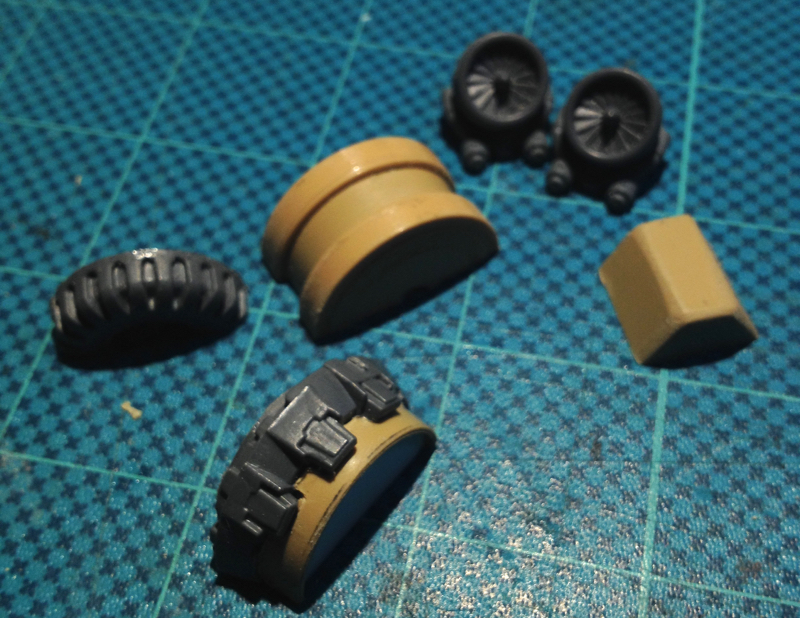
As there's a switch and battery pod under the deck plate, I'm going to have to fake the look of the supposedly cylindrical upper engine section, so built the small edge around the inner rectangular shape of the deck plate:
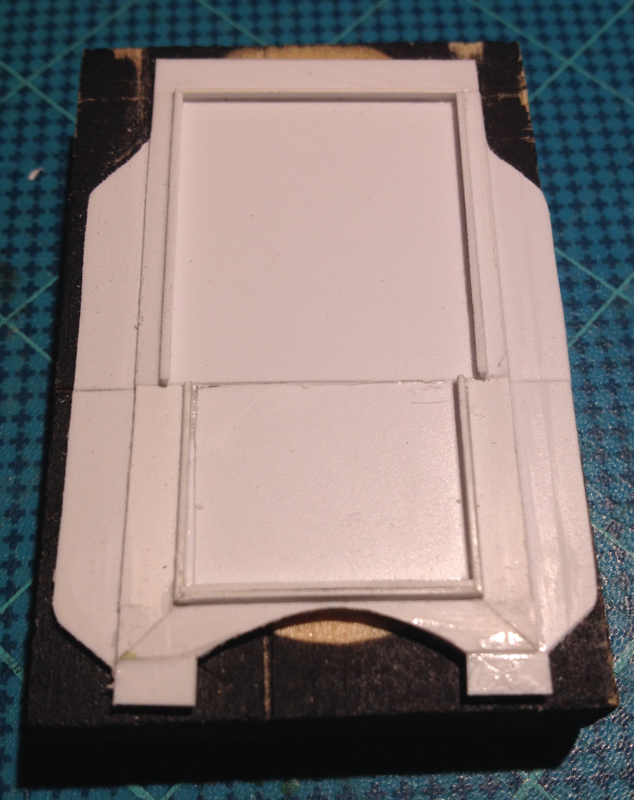
Here's the engine sections fitted into the cutout - the main intakes are two Space Marine backpacks with a small turbine fan from one of the Space Marine flyers added:
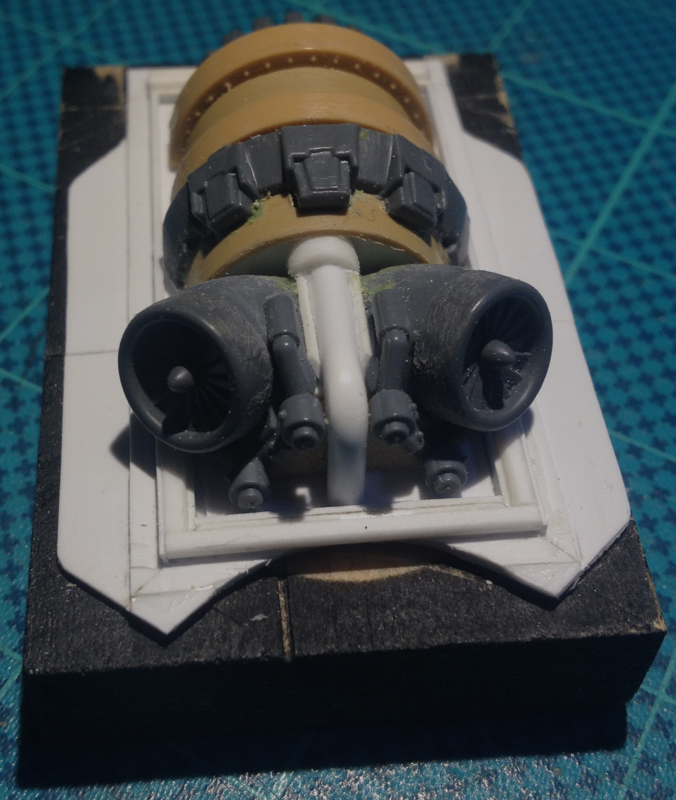
And here's how it sits with the main turret in place:
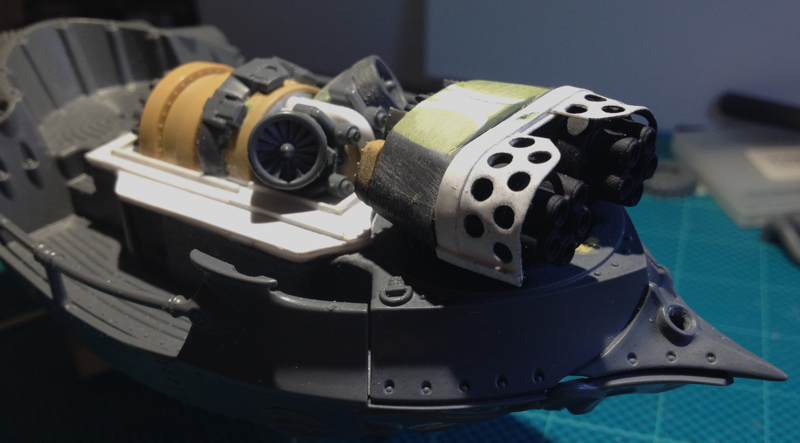
Thanks for looking!
62749
Post by: Dr H
Good engine 'bash. Nice idea for a lid.
35419
Post by: Lamby
Thanks Dr H!
Decided to add more weight and depth to the removable upper deck, so added styrene and a GS/milliput mix:
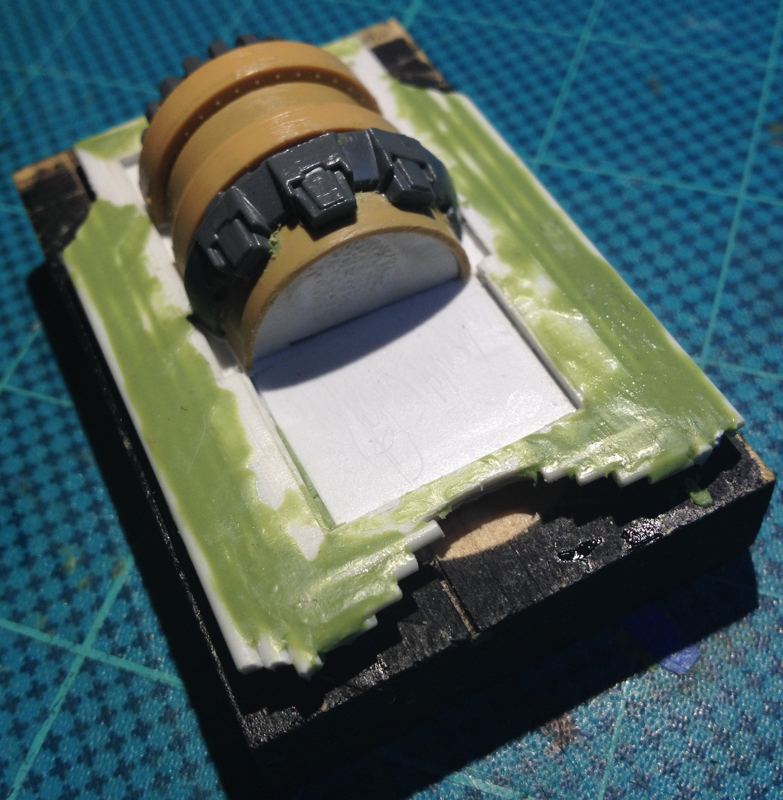
Then cut to shape and sanded smooth, and here's the result:
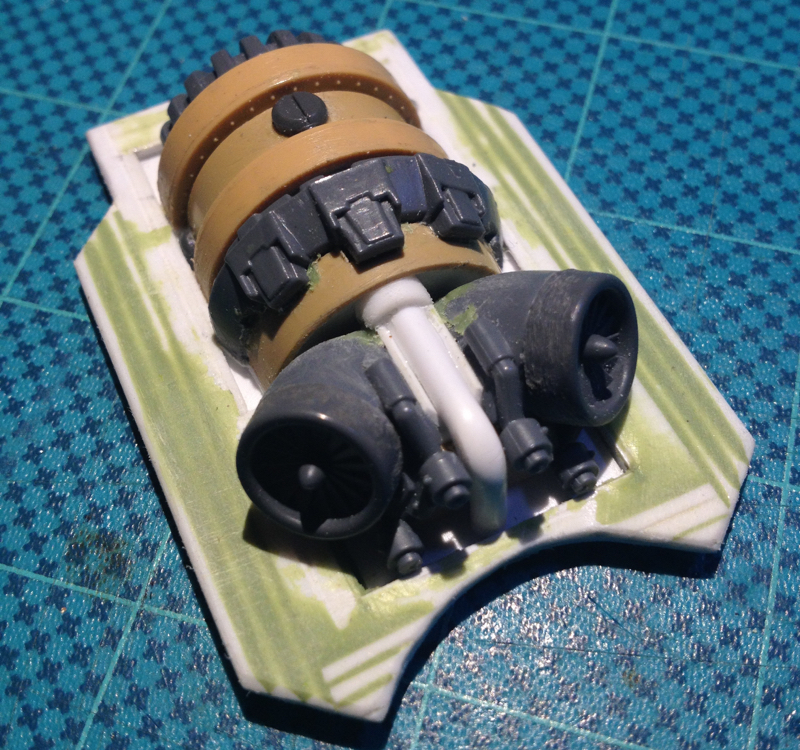
I may end up going back in to add a line or two of rivets, but for now, it's done.
Moving on - the gaps where the air-ballon support structures usually attach have been bugging me for a while, so time to fix that:
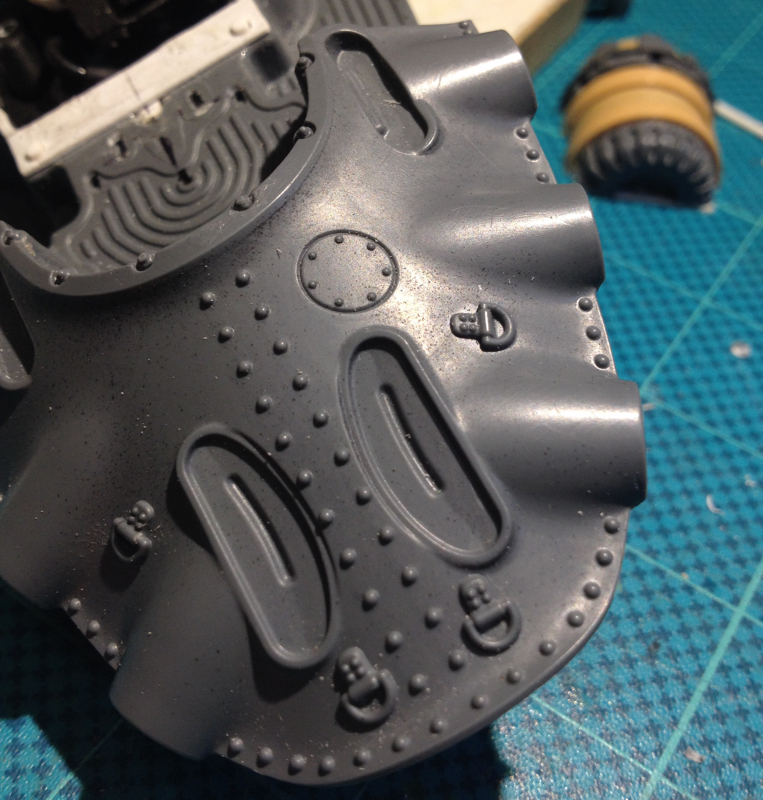
Took two of these Gundam vent thingys:
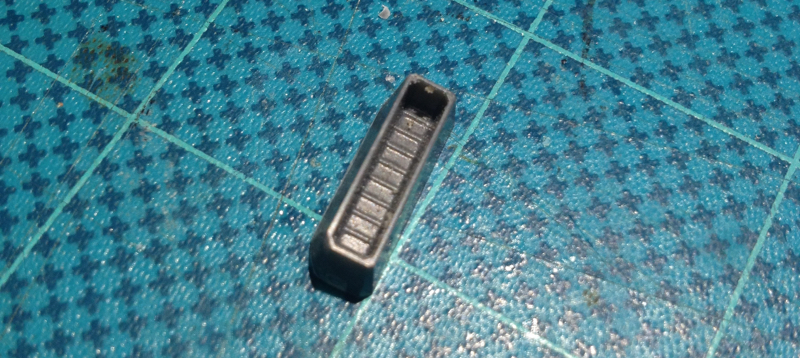
Which fairly obviously are the wrong shape, so a bit of styrene and GS/milliput shaping and sanding, and we end up with this:
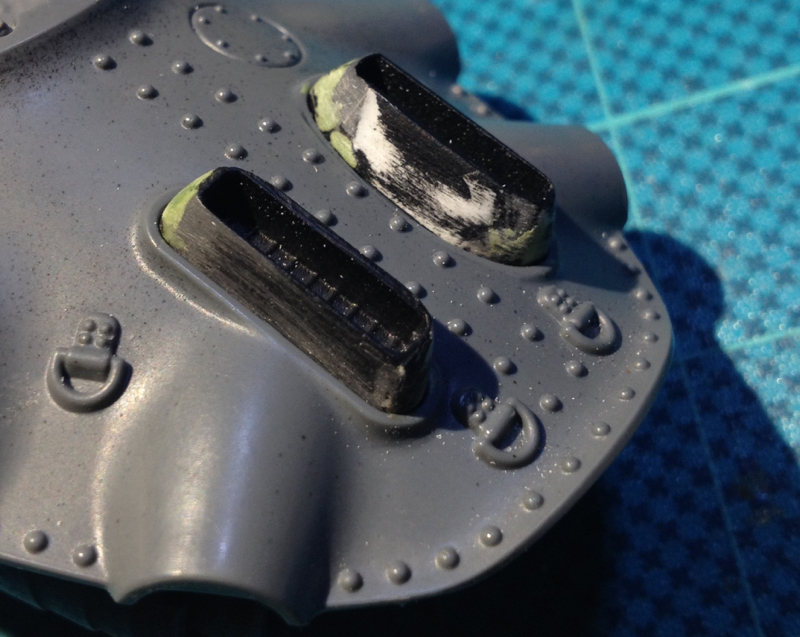
Thanks for looking!!!
62749
Post by: Dr H
Nice job. Good adaptations. Automatically Appended Next Post: Quoted for rollover.
Lamby wrote:
Decided to add more weight and depth to the removable upper deck, so added styrene and a GS/milliput mix:
Then cut to shape and sanded smooth, and here's the result:
I may end up going back in to add a line or two of rivets, but for now, it's done.
Moving on - the gaps where the air-ballon support structures usually attach have been bugging me for a while, so time to fix that:
Took two of these Gundam vent thingys:
Which fairly obviously are the wrong shape, so a bit of styrene and GS/milliput shaping and sanding, and we end up with this:
Thanks for looking!!!
35419
Post by: Lamby
Thanks Dr H!
Just back from yet another work-related hiatus, so on with the show!
With the more complicated phase of the build coming to an end (I think), time for more detailing.
Made the helm pedestal using an old Warhammer gravestone and the larger Ironclad wheel:
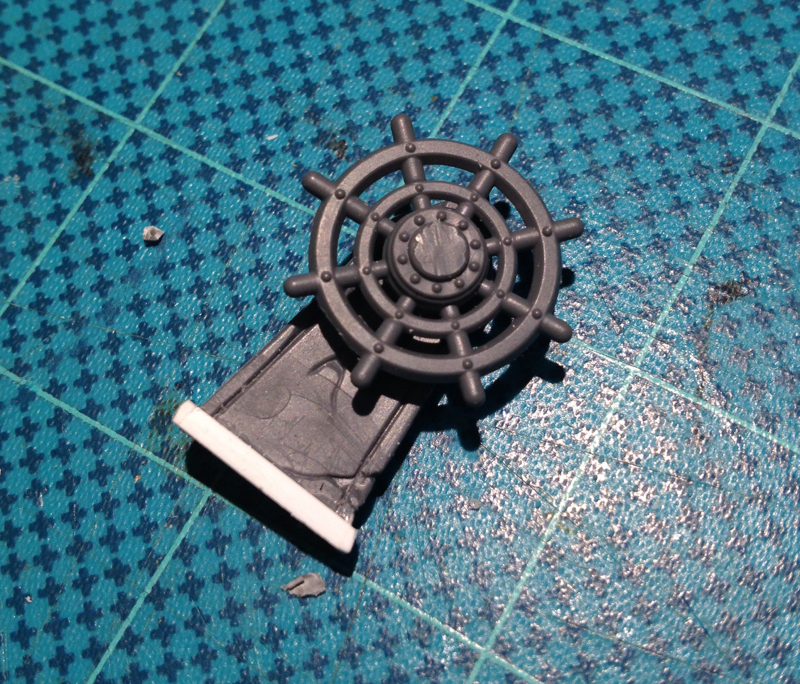
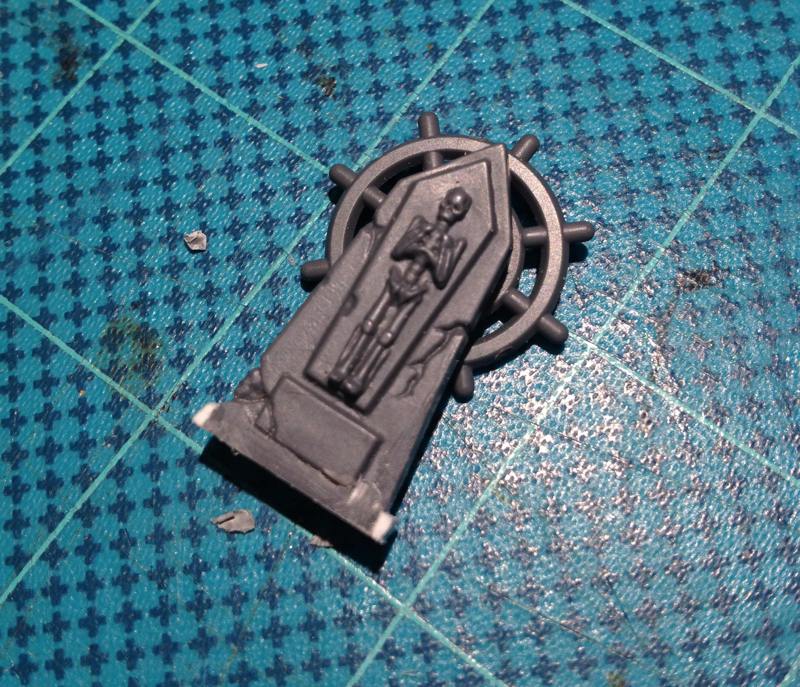
Added some more bits to the engine area (everything not sprayed black) including a sheet-styrene bulkhead - most of these bits will never really be seen of course...

Then took the plumbing and gauge from this unused section of the Frigate:
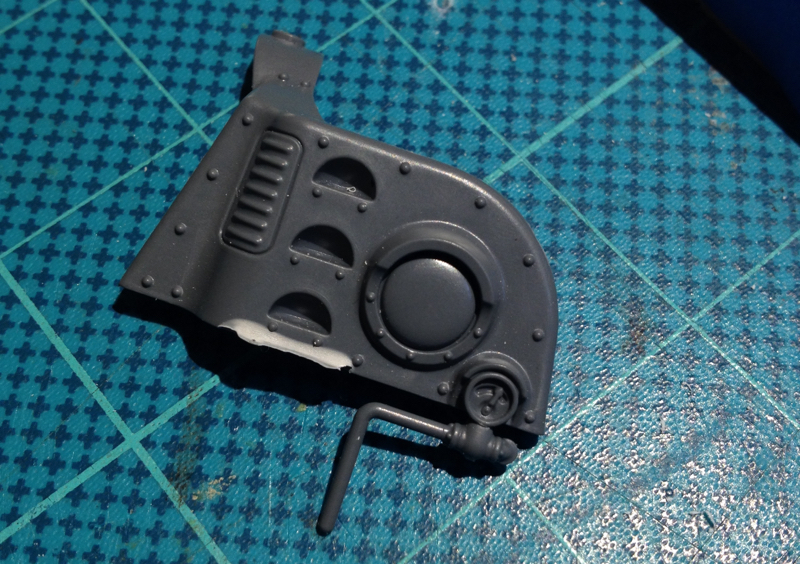
and attached it to the side hull:
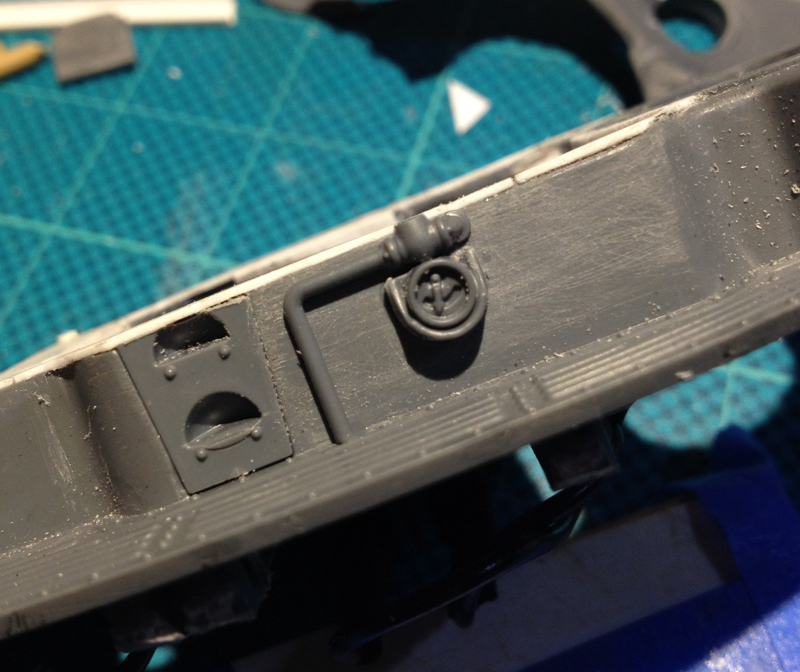
Plenty more to follow, thanks for looking!
22619
Post by: inmygravenimage
That's a genius bit of kitbashing on the wheel there
35419
Post by: Lamby
Thanks inmygravenimage!!!
62749
Post by: Dr H
Good use of parts.
35419
Post by: Lamby
Thanks Dr H!
So, another round of detailing over the last two weeks.
Took the sealing tab off a honey squeeze-container:
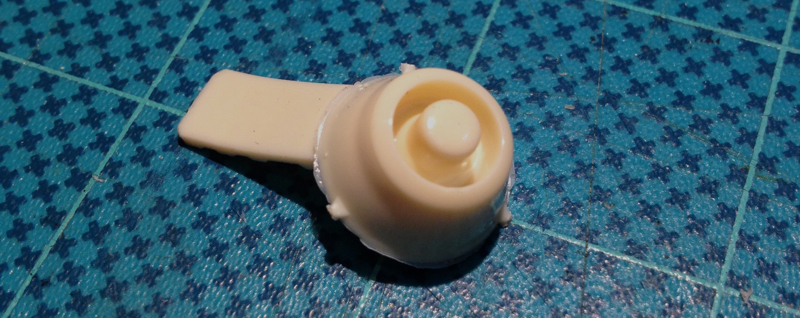
Spent some time on the Dremel-lathe:
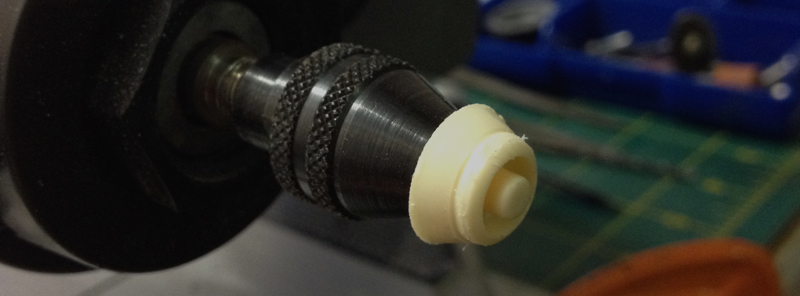
Ended up with this fill-in greeblie:
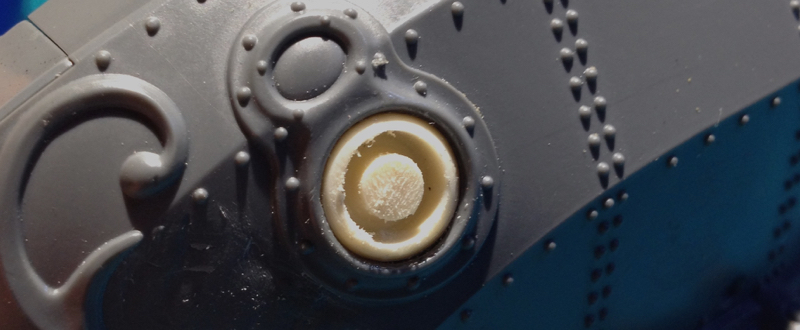
Next up - took this vent thingy from the Frigate kit:
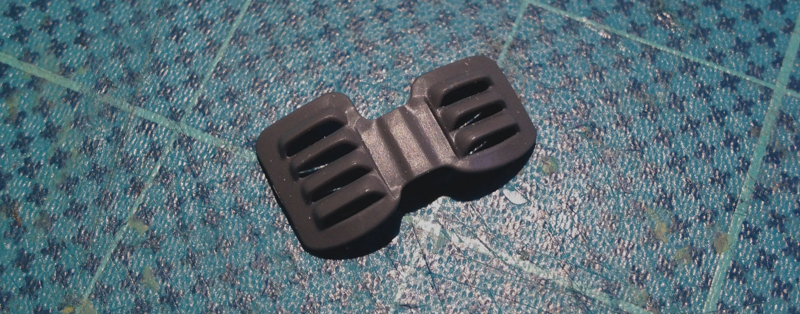
And with some slice n dice and some fiddly styrene work:
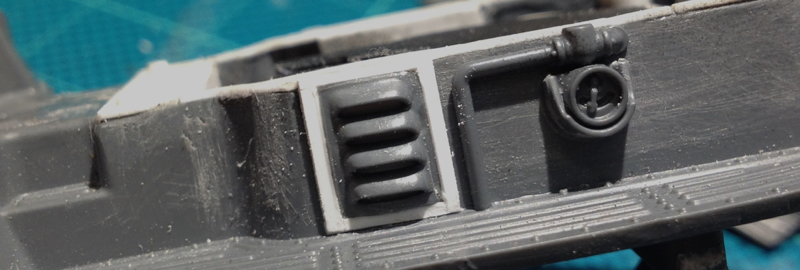
Moving on - been wondering for a while what to do with these wing stubs:
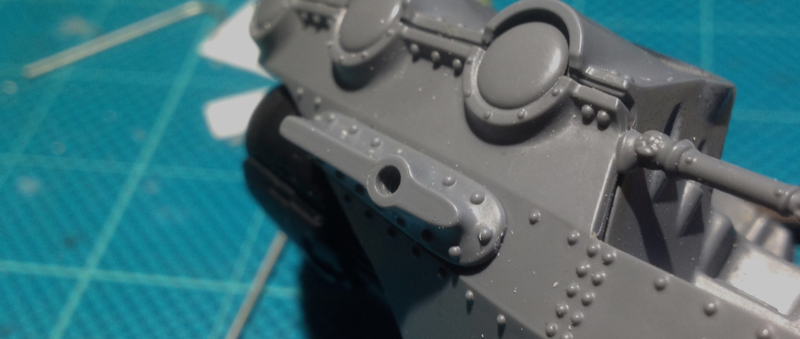
Tried the wing minus the propellors:
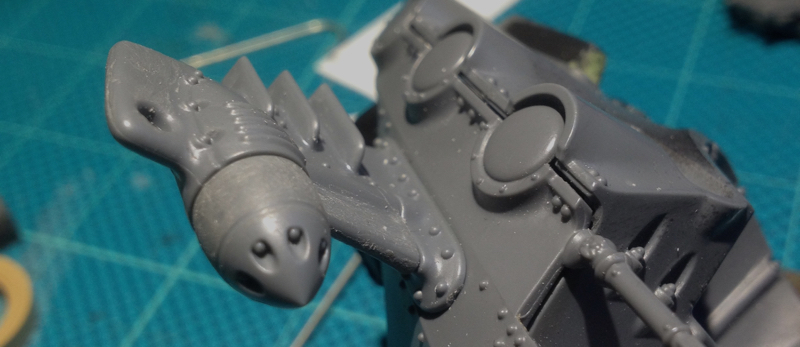
But didn't like them cos overall they seemed to unbalance the model.
So I went on a bitz hunt through many, many containers of plastic crack, and eventually found a set of rocket-pods from a 1/35th scale Cobra (I think...) which with a bit of slice n dice ended up looking like this:
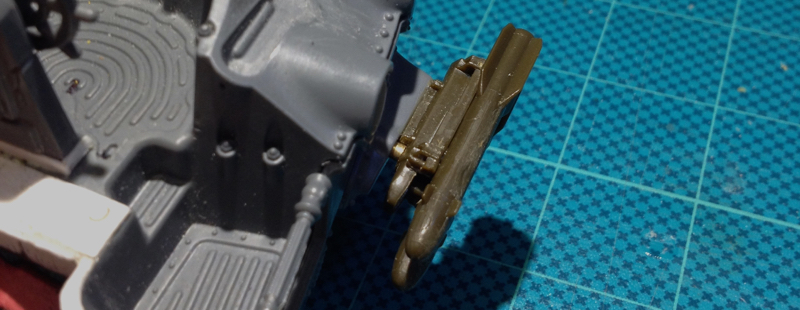
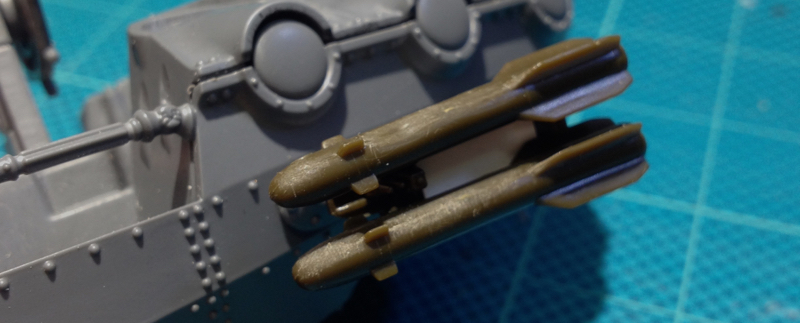
Then finished up the week with some minor details:
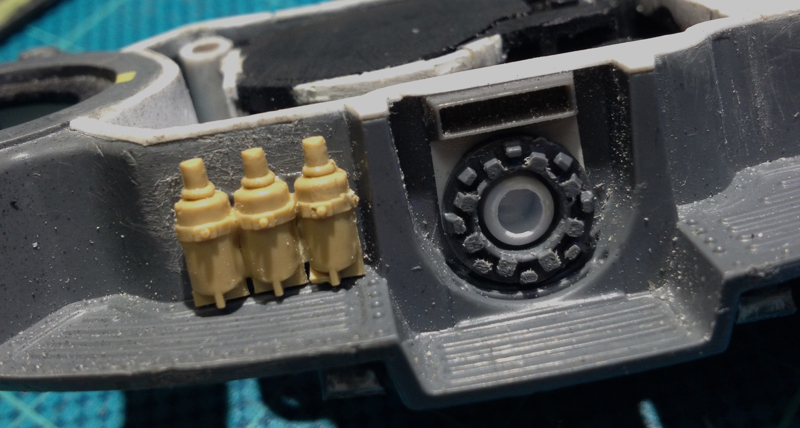
Next week I'll be gluing the hull halves on, building the last of the housing for the chin-turret, then a final round of detailing and the end is nigh!
Thanks for looking!
62749
Post by: Dr H
Good job.
What do you use for a cutting tool with your dremel lathe? I did a bit the other week and found my razor saw the most useful, but felt like I needed something better.
Can't go wrong with some Hellfire missiles.
35419
Post by: Lamby
 Dr H wrote: Dr H wrote:Good job.
What do you use for a cutting tool with your dremel lathe? I did a bit the other week and found my razor saw the most useful, but felt like I needed something better.
Can't go wrong with some Hellfire missiles.
Thanks Dr H!
Generally I use small files when lathing, and switch to sandpaper (glued to a cardboard strip for some strength) to finish.
I've also use a mini-hacksaw blade and a pocket knife
Michael the Giant Sword Maker michaelcthulhu uses a much bigger setup than we miniature-makers i.e. a massive drill press; but he uses a grinder as his cutter - so I do wonder if a second Dremel might be the answer, especially for harder substances?
13817
Post by: Carlovonsexron
I'm loving this conversion so much! It's an inspiration!
30344
Post by: monkeytroll
Some lovely detailing there
35419
Post by: Lamby
Carlovonsexron wrote:I'm loving this conversion so much! It's an inspiration!
monkeytroll wrote:Some lovely detailing there
Thanks!
As I mentioned a while back when presenting this character's WIP for the first time, I'm still undecided as to where she fits into the cantos.
But as I'm waiting on a final set of bits to complete the Gun Skiff and commence painting it, I decided to glue the torso to the skirt/leg section, pin and glue the arms and GS the connections:
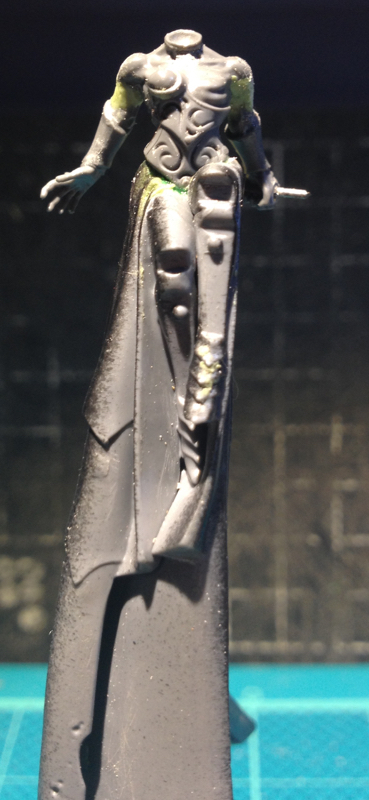
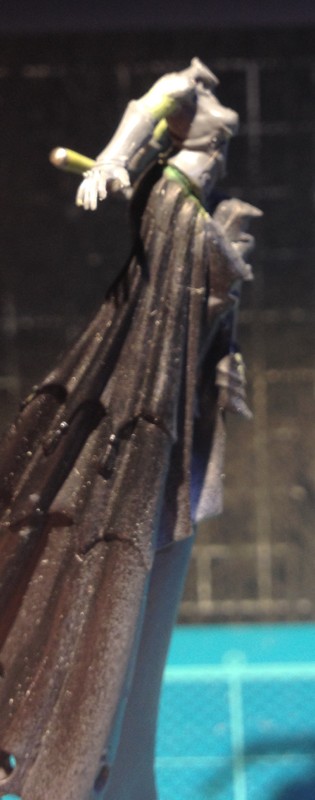
Sharp-eyed viewers may notice that the sword seems to missing both its cross-guard and blade - that's because the previously built styrene cross-guard snapped off.
So I removed the blade, then took this watch part:
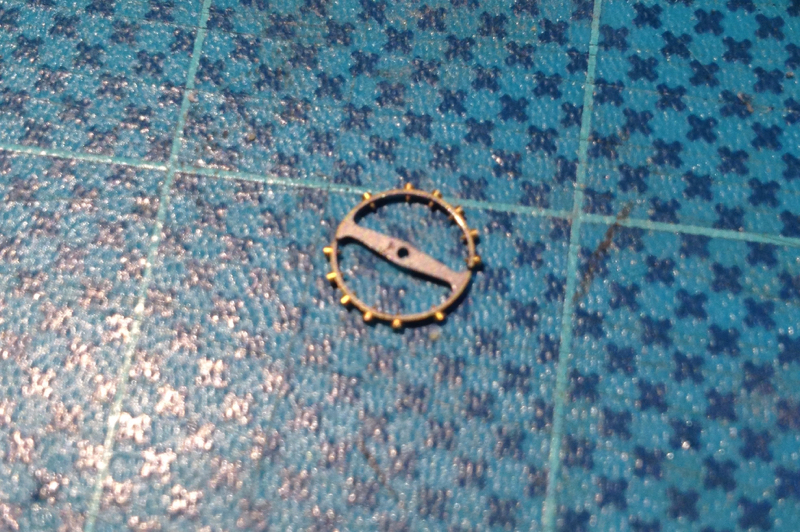
And reduced it to this:

And then GS/glued it back onto the protruding pin, which leaves us with this:

So, now I'm faced with the usual converting-a-Daemonette dilemma, which is basically having to sculpt the missing female breast... but:
What if I was to leave the torso as is?
Thoughts?
As always - thanks for looking!
30344
Post by: monkeytroll
Plenty of reasons for a character to have just one, and as you still have to decide where she sits, then there's plenty of potential for creating story there. As long as the rest of the figure looks like it's not a daemonette then it should be fine.
Alternatively things like a half-cape or some kind of bandolier could be used.
22192
Post by: whalemusic360
I think if you left it as is, it is to obviously a demonette torso instead of whatever re-imagined goodness you have in mind.
35419
Post by: Lamby
monkeytroll wrote:Plenty of reasons for a character to have just one, and as you still have to decide where she sits, then there's plenty of potential for creating story there. As long as the rest of the figure looks like it's not a daemonette then it should be fine.
Alternatively things like a half-cape or some kind of bandolier could be used.
whalemusic360 wrote:I think if you left it as is, it is to obviously a demonette torso instead of whatever re-imagined goodness you have in mind.
Thanks monkeytroll and whalemusic360!
While I can write a decent fluff piece explaining the missing breast, I think I'll be forever explaining how she is NOT a daemonette i.e. the mini on its own will not tell the story properly, and as whalemusic points out, it still looks like a daemonette torso.
I like the idea of a half-cape - might experiment with that a little.
Thanks for your input!!
13817
Post by: Carlovonsexron
I wonder if getting some "blue stuff"/"oyumaru" to make a mold of the right breast with green stuff. would help. I can't figure out if you could just flip a molded brest over to make it match.
35419
Post by: Lamby
Carlovonsexron wrote:I wonder if getting some "blue stuff"/"oyumaru" to make a mold of the right breast with green stuff. would help. I can't figure out if you could just flip a molded brest over to make it match.
Thanks for your input, Carlosexron!
- so, no; can't just copy the right breast because the weird armour swirl has to be mirrored
- however, if I sculpt a bit more armour over the right breast, then I'll use blue-stuff to make a GS/milliput copy - then go back in with a sharp needle and do the detailing
- pics in a few days
For now:
Last detailing round on the Gun Skiff!
Took these fore mast parts:
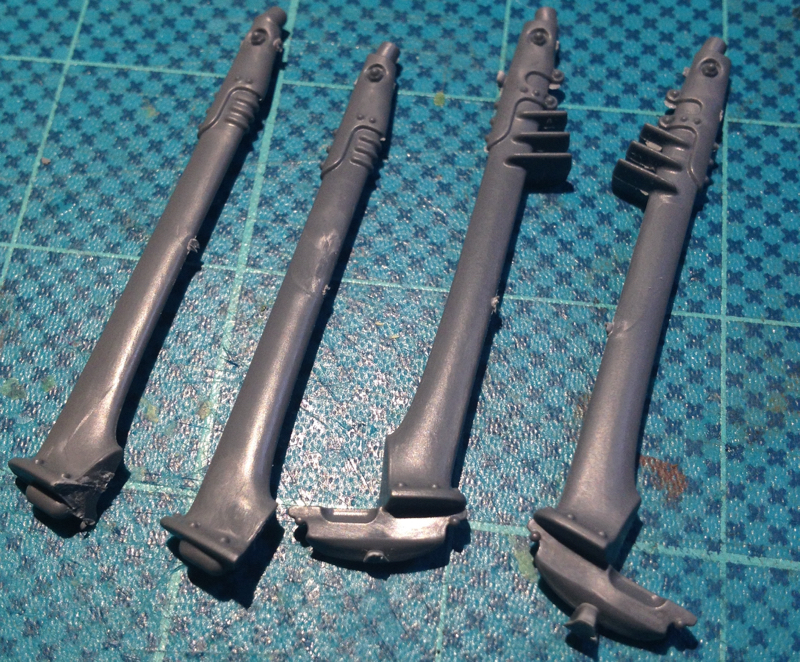
Glued them up, sliced them down, and glued them into place:

Did a similar thing with the aft masts, but added some skulls for a bit of swag:


And finally, this hole has been bugging me for a long time:
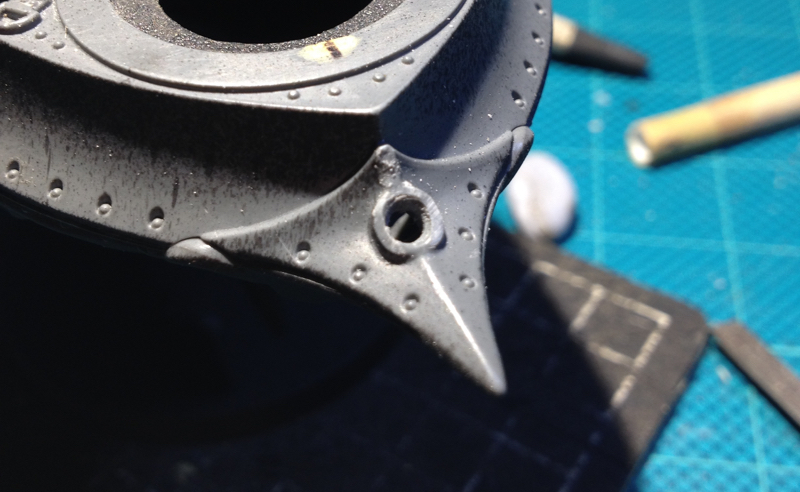
So took this wing bit and the good old brass etch ][ part:

And ended up with this:

And I'm happy to report I started on the first layers of paint tonight.
Thanks for looking!
22619
Post by: inmygravenimage
Gloriously bonkers, as always. She's a beast!
62749
Post by: Dr H
Good detail work.
On the boob issue: As an alternative option, rather than add the missing boob, have you considered removing the "spare" boob? Either leave it flat-chested, or sculpt on a non-boob-armour armoured chest piece. Go against the sci-fi grain and have more realistic armour. Just to be different...
But it would give you a nice space for detail.
95191
Post by: godardc
Ok so this is the first time in my life that I read a full 30 pages blog in a row !
How have I missed this blog for so long ?!
You are an artist, sir, and you paint as well as you convert.
My two favourites are the jaw-dropping female inquisitor with hat, simply one of the best inquisitor I have seen, and the simple but effective gunner of the Rogue Trader (the others are awesome too, don't worry^^).
Keep it up with the great stuff !
I would have one question, however: how do you do ? Do you have a big box of bitz and you randomly try things, or do you have an idea then you buy the bitz ? The GW range is so huge
35419
Post by: Lamby
inmygravenimage wrote:Gloriously bonkers, as always. She's a beast!
Thanks!!! Dr H wrote:Good detail work. On the boob issue: As an alternative option, rather than add the missing boob, have you considered removing the "spare" boob? Either leave it flat-chested, or sculpt on a non-boob-armour armoured chest piece. Go against the sci-fi grain and have more realistic armour. Just to be different... But it would give you a nice space for detail.
Thanks Dr H! - I'm sculpting 2nd breast now, but I may come back to your idea as it's rather intriguing... godardc wrote:Ok so this is the first time in my life that I read a full 30 pages blog in a row !
How have I missed this blog for so long ?!
You are an artist, sir, and you paint as well as you convert.
My two favourites are the jaw-dropping female inquisitor with hat, simply one of the best inquisitor I have seen, and the simple but effective gunner of the Rogue Trader (the others are awesome too, don't worry).
Keep it up with the great stuff !
I would have one question, however: how do you do ? Do you have a big box of bitz and you randomly try things, or do you have an idea then you buy the bitz ? The GW range is so huge
Hi godardc - thanks for your comments! Kallatar is still probably my most satisfying creation... not the hardest - I think that honor belongs to the Samurai (forged steel swords and those fething sleeves!!!) - but my most satisfying because she came out exactly as I envisioned her the moment I saw the original mini... also, I really wanted to do a male to female conversion because I'd never seen anyone do it before. Mostly I don't think too hard initially about a concept, I sort of see a pic of a mini and a conversion idea will gestate ... Sometimes the idea comes instantly - for instance, the Gutrot conversion came the moment I saw the model! Sometimes it takes a while; in the case of the Wild Child mech suit, I hated the actual mini, but the idea of a female wearer started to grow and I was in the midst of building the the other steampunk retinue for Kallatar and slowly, slowly... I also hunt for cool looking bits amongst the GW range and see what happens in my chaotic mind... My creative side is suppressed by my work - which is both tactical and technical - so it's overactive and I have more ideas than time to create them. I usually come up with a character, write lots of notes in my little notebook of secret stuff that no-one ever sees, even my wife! - and then start looking at either bits I have... and usually have to buy some other bits, some of which I might not use In the case of the female minis - I don't like the GW range in general when it comes to females - though it's getting better, I will admit - so I'm always trying to come up with a better female. Mostly tho - it's the expanding story that seems to drive my mini designs - if you start reading the fluff from the very beginning, you'll see each new retinue has some connection to the progressive storyline. I'm also heavily influenced and inspired by other modellers, especially Migsula - he's the reason I started on True Scale marines (before everyone started making them the easy way, using Primaris marines...) Meanwhile... Extremely short one pic update - Gun Skiff on the painting bench with first rust layer added and handy Ian McQue reference pic in the background! 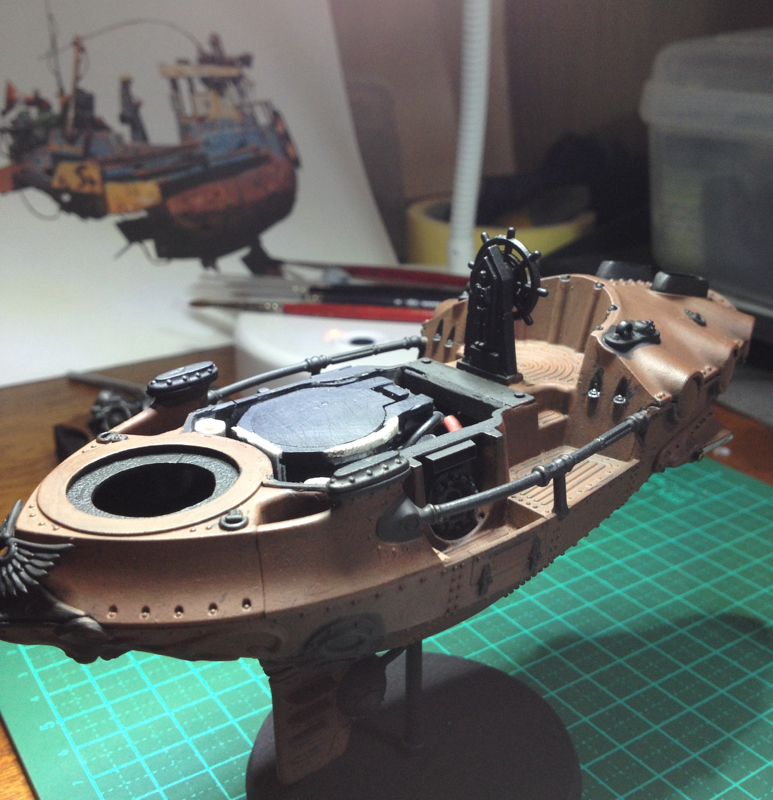
95627
Post by: EmberlordofFire8
I honestly cannot wait until it's finished. What colour is the figurehead going to be? I think an oxidised bronze would look amazing, but that might just be me...
35419
Post by: Lamby
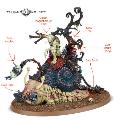 EmberlordofFire8 wrote: EmberlordofFire8 wrote:I honestly cannot wait until it's finished. What colour is the figurehead going to be? I think an oxidised bronze would look amazing, but that might just be me...
Thank you EmberlordofFire!
You've guessed correctly - a few pieces of metallics like the wing-emblem will be a brass/bronze with green/blue oxidation, to compliment and contrast the rusty steel effect much of the rest of the model will have.
Painting at last - slowly, but still...
Need to do a test run of some Tamiya spray colors as I don't own an airbrush.
So, following the first layer of Vallejo Flat Brown, did some drybrushing/speckling with GW Ryza Rust, then some sponging-on of GW Leadbelcher to get this:
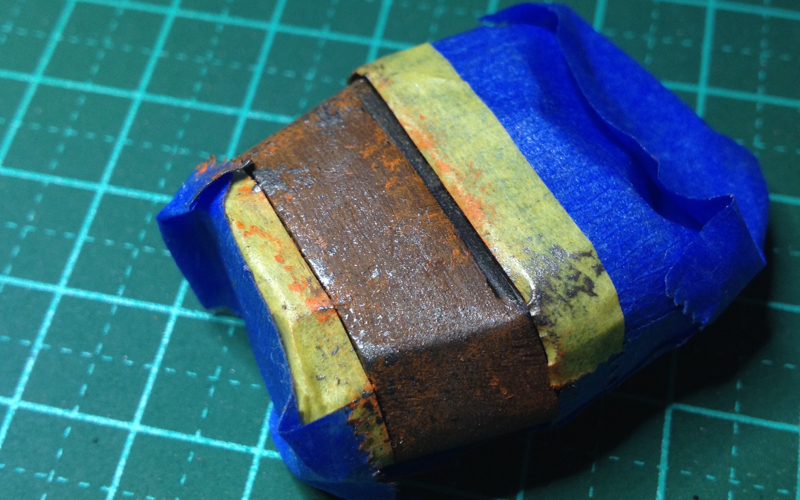
I really like this effect, so much of the hull below the 'waterline' will be bare metal/rust - adds interest because the whole model won't be just one or two painted surfaces.
Following a protective gloss varnish coat, sprinkled salt onto the wet surface:
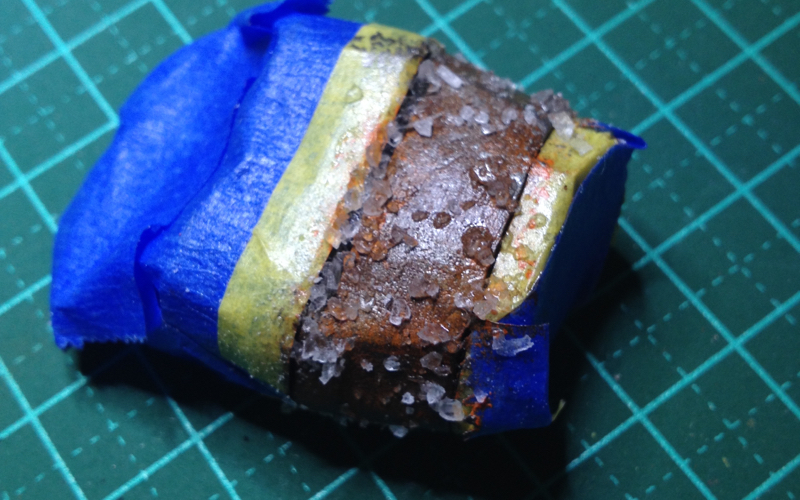
Unfortunately the water-method seems to dissolve a lot of the salt, so I will have to invest in some cheap hairspray - also, with hairspray as the medium between the gloss coat and the sprayed color layer, you can selectively remove areas with a bit of light scrubbing with a stiff brush or toothbrush or even a toothpick.
Then sprayed Tamiya Flat White over the top:
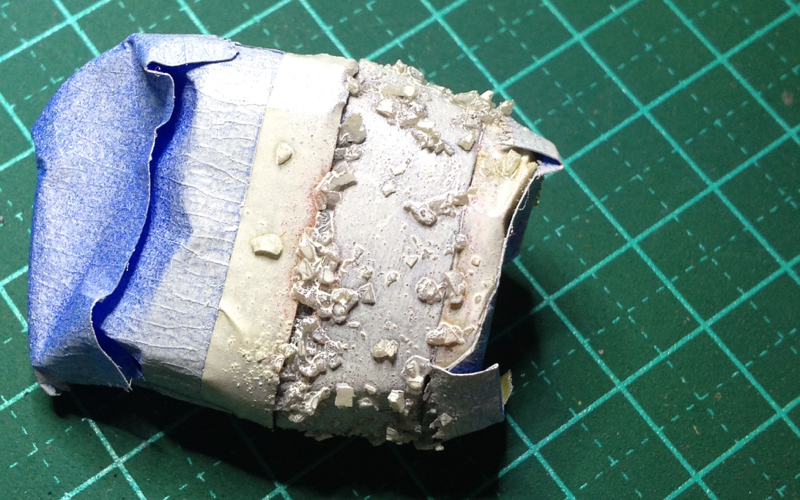
Which left me with this effect:
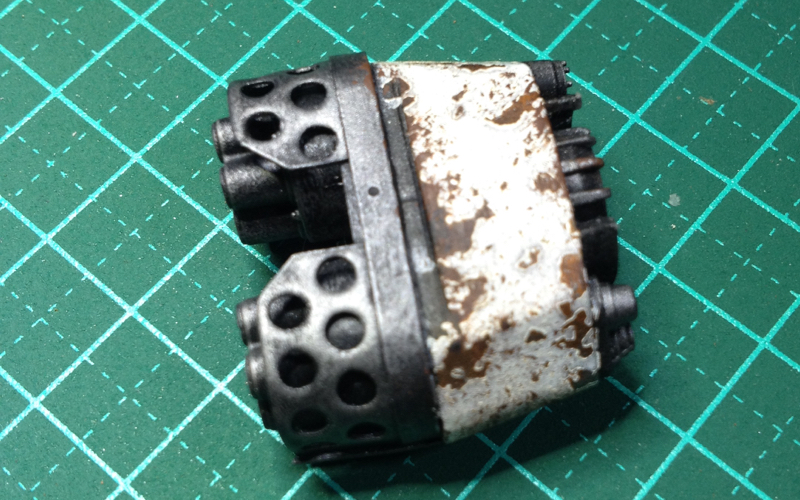
Now, you might notice the Flat White has flowed around the salt and left a small raised edge - this was due to over-eager spraying on my behalf.
While I'm okay with the result, I'll be redoing it next weekend (no hobby time during the week at the moment.)
Things I'm going to change are:
Brush on a Ryza Rust/VJ Orange mix to lighten the VJ Flat Brown rusty undercoat;
Let the gloss coat dry overnight;
Crush the salt more so the chips are smaller and more random - also sponge on liquid frisk in some targeted areas where I need the rust to show through;
Spray the Tamiya Flat White in a series of layers with drying time between them.
Thanks for looking!
89168
Post by: youwashock
Never cease to amaze. Like, ever.
22619
Post by: inmygravenimage
That's a serious salt weather tutorial there
30344
Post by: monkeytroll
Oh, that's lovely that is. Some proper distressing.
I actually like the raised edges in places, as though the oxidation is pushing at the paint.
62749
Post by: Dr H
Good job on the rustiness.
Yeah, the raised paint can be due to the rust underneath bubbling it up.
69676
Post by: Big H
Awesome work.
I have to agree, the slight raised edge does look exactly like rust bubbling the paint, I'd leave it as a happy coincidence!
35419
Post by: Lamby
youwashock wrote:Never cease to amaze. Like, ever.
inmygravenimage wrote:That's a serious salt weather tutorial there
monkeytroll wrote:Oh, that's lovely that is. Some proper distressing.
I actually like the raised edges in places, as though the oxidation is pushing at the paint.
Dr H wrote:Good job on the rustiness.
Yeah, the raised paint can be due to the rust underneath bubbling it up.
Big H wrote:Awesome work.
I have to agree, the slight raised edge does look exactly like rust bubbling the paint, I'd leave it as a happy coincidence!
Thank you kind sirs!
Second test run for the Gun Skiff with hairspray, salt and Tamiya spray colors:
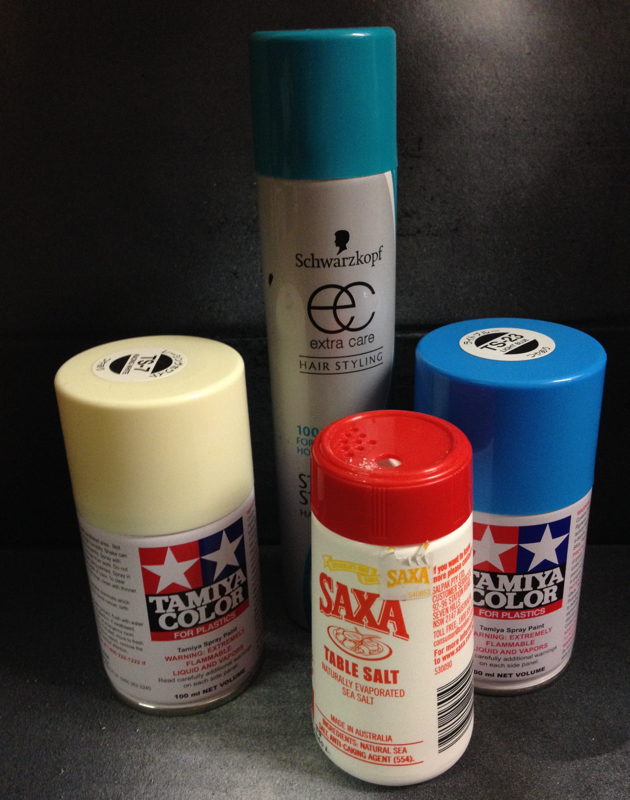
Bit of salt overkill - after this test I've decided to use a mix of the larger salt bits from the previous post and this regular size:
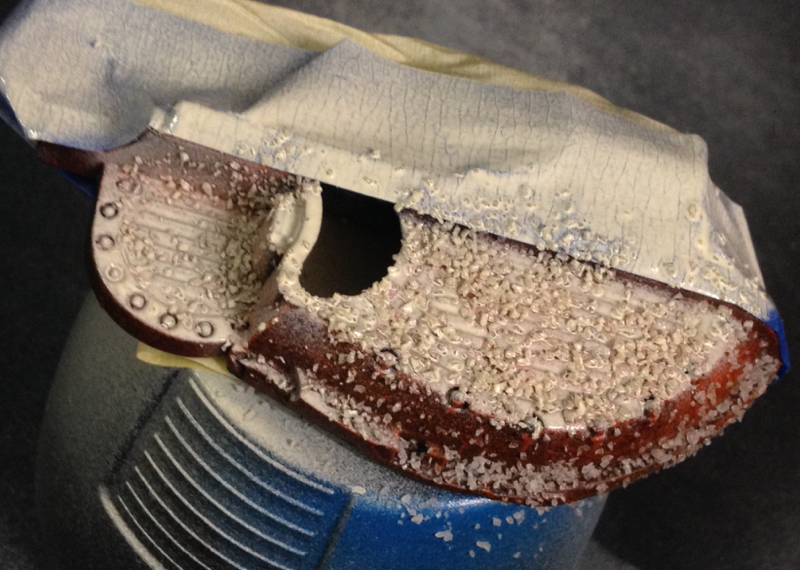
And here's the result after masking the flat white spray and applying the blue:
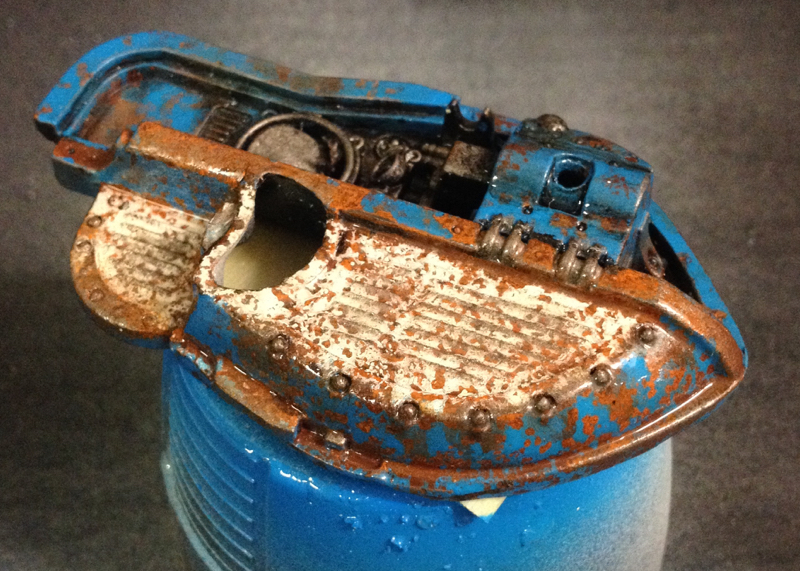
Using the hairspray makes it easier to get the salt to stick but I did leave it on for too long before spraying the colors, so it was a bit sticky at this stage - so, since the Tamiya sprays are gloss anyway, I applied Tamiya flat clear spray to knock it back to matte.
I'll do some test with painting over the matte coat with oil washes and some lighter blue highlights, but I think I now have a decent recipe and - more importantly - a sequence of layers to paint the actual Gun Skiff next weekend.
Also noted that on average 80% of people who commented (across 4 forums) said they liked the overdone paint effect, so I'm taking that onboard and will 'wet' spray on the final version, rather than here where it was 3 light 'dry' coats.
Finally, I now have an Instagram account inquisitor_lamby, where I will post updates to my blog, now renamed from The Dying Ground to Inqu][sitor
Thanks for looking!
30344
Post by: monkeytroll
In that one the effect on the blue looks to have worked better - I'm guessing that's a result of the ridged area. Still all looks great though
35419
Post by: Lamby
 monkeytroll wrote: monkeytroll wrote:In that one the effect on the blue looks to have worked better - I'm guessing that's a result of the ridged area. Still all looks great though
Thanks monkeytroll!
I think you're right; though I tested out drybrushing some silver onto the ridges over the flat white and it's just made the effect less clear, unlike the blue.
My solution is to do the silver areas over the rust coat but before the spray coat - then after removing the salt and because of the hairspray layer, I can carefully scrape back the flat white on the ridges... hopefully!
68152
Post by: JoeRugby
Lovely stuff dude
well as lovely as rust can be anyway
62749
Post by: Dr H
I think the second attempt is a bit too evenly spread. The first attempt is more random in the size and position of the rusty areas.
Rather than sprinkling the salt all over the piece, try placing the salt in occasional large clumps with areas of minimal salt between, and focus some rusty areas where water would gather and where the paint would be chipped off from impacts etc. less can be more. Think of the rust areas as trying to join up rather than stay separate.
35419
Post by: Lamby
JoeRugby wrote:Lovely stuff dude
well as lovely as rust can be anyway
Haha thanks JoeRugby - personally, I love rust
Dr H wrote:I think the second attempt is a bit too evenly spread. The first attempt is more random in the size and position of the rusty areas.
Rather than sprinkling the salt all over the piece, try placing the salt in occasional large clumps with areas of minimal salt between, and focus some rusty areas where water would gather and where the paint would be chipped off from impacts etc. less can be more. Think of the rust areas as trying to join up rather than stay separate.
Thanks Dr H!
Agreed, and you'll (hopefully) see in this update I targeted with the salt rather than complete randomness.
Thanks guys!
A painting update!
Missiles first: Vallejo Sand sponge-chipped with GW Leadbelcher:
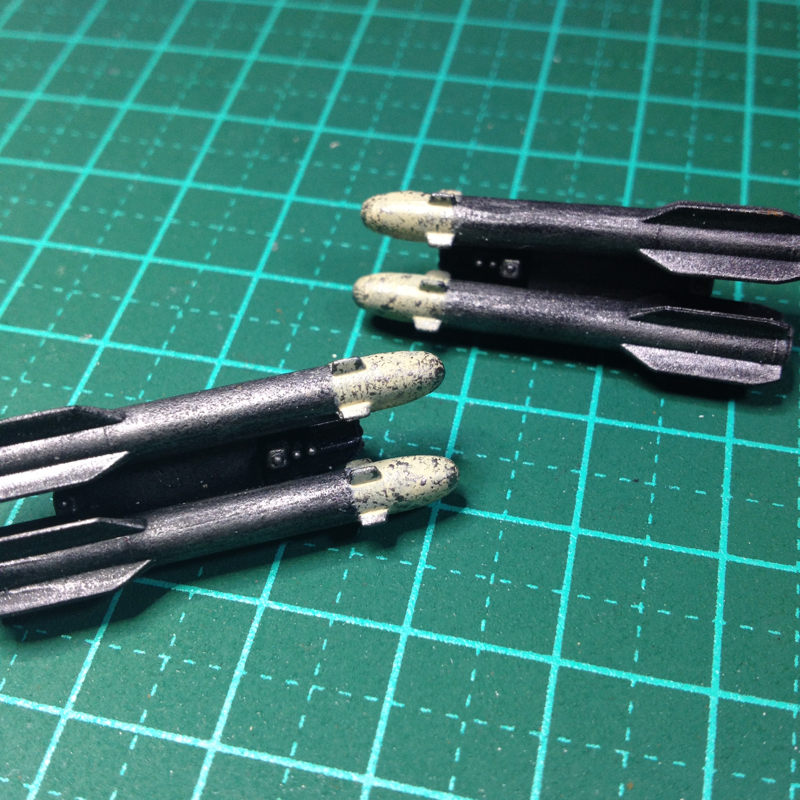
Then the hairspray + salt technique with the Tamiya Racing White on the upper decking - this particular white is a pain to work with, to get decent coverage it has to be almost too thick:
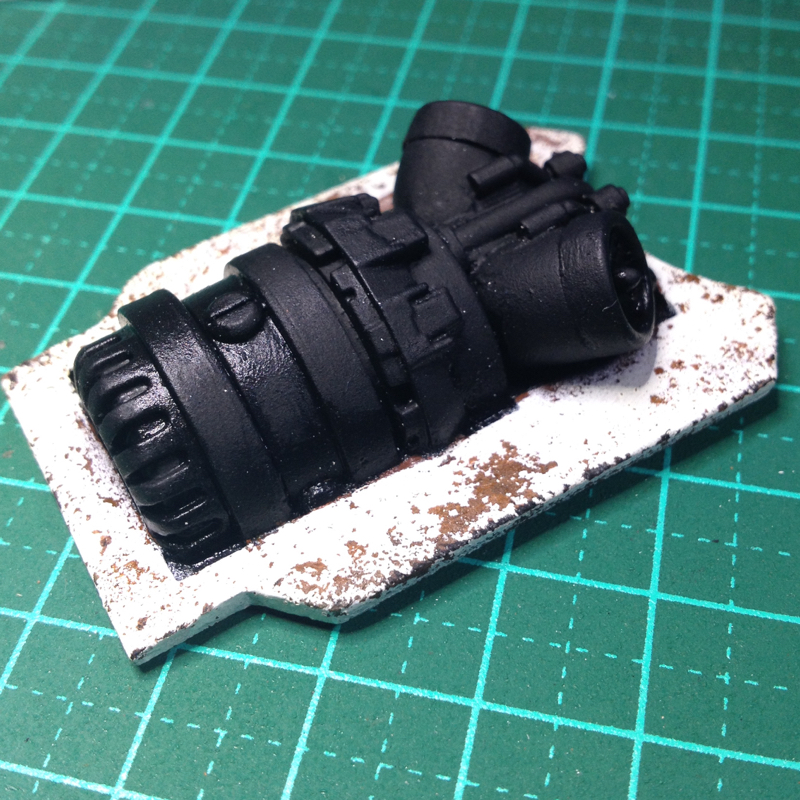
On this side you can see an ugly and unrealistic straight edge of rust vs paint - my masking was rushed, so lesson learned there - I went back in after this pic with a toothpick and scraped away at the straight white edge to get a more natural look:
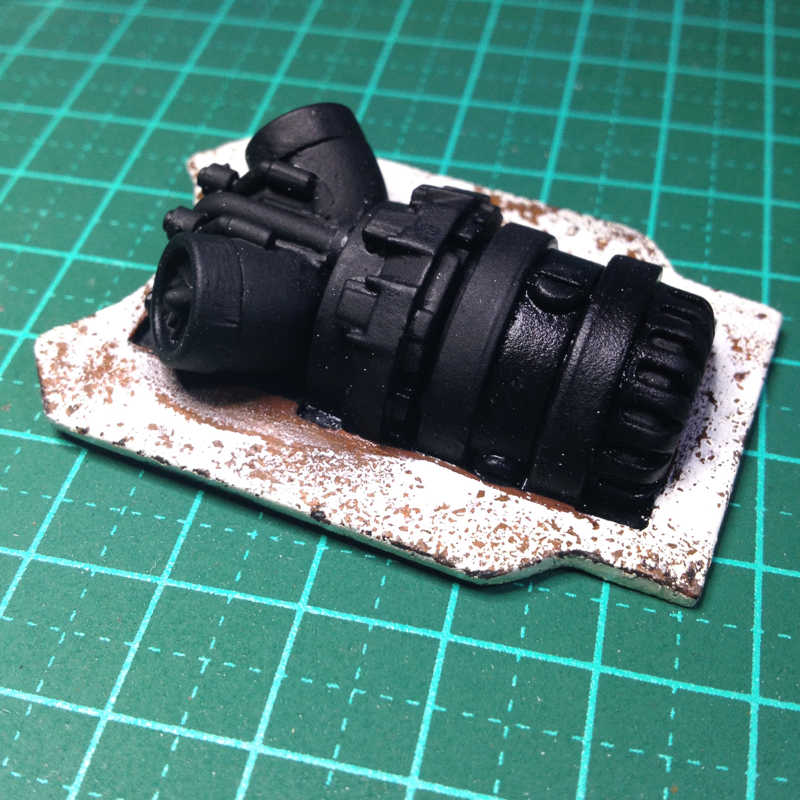
Third time lucky on the upper turret
35419
Post by: Lamby
Another painting update - applied the salt+hairspray technique to the lower turret using the Tamiya Light Blue - which is much more user-friendly than the Racing White!
Also applied the hairspray in a 3 lighter coats instead of the drenching I gave it in the second test - the lighter coats appear to give better control over the actual chipping process:
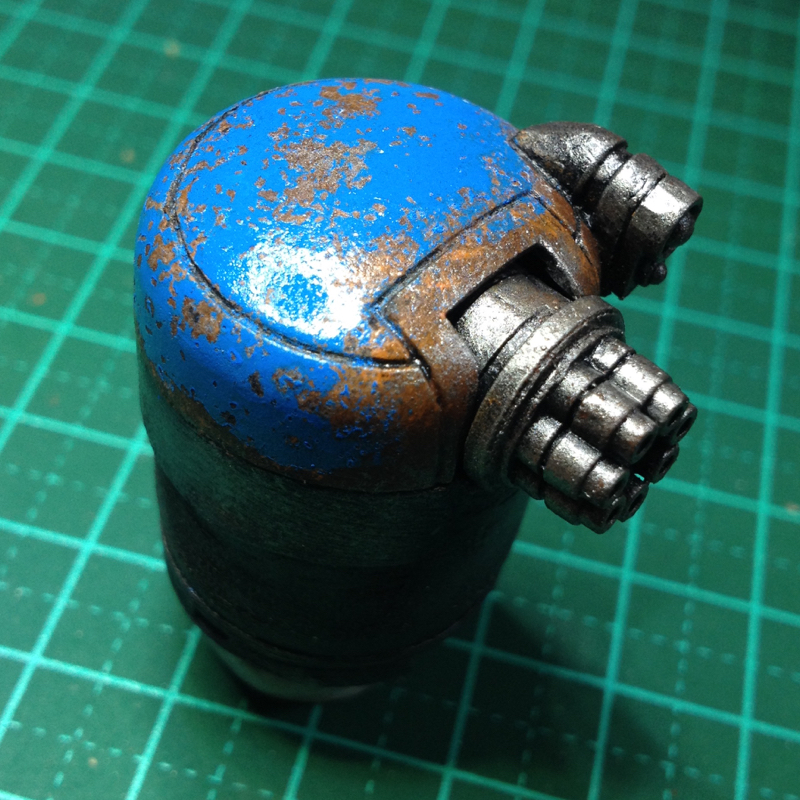
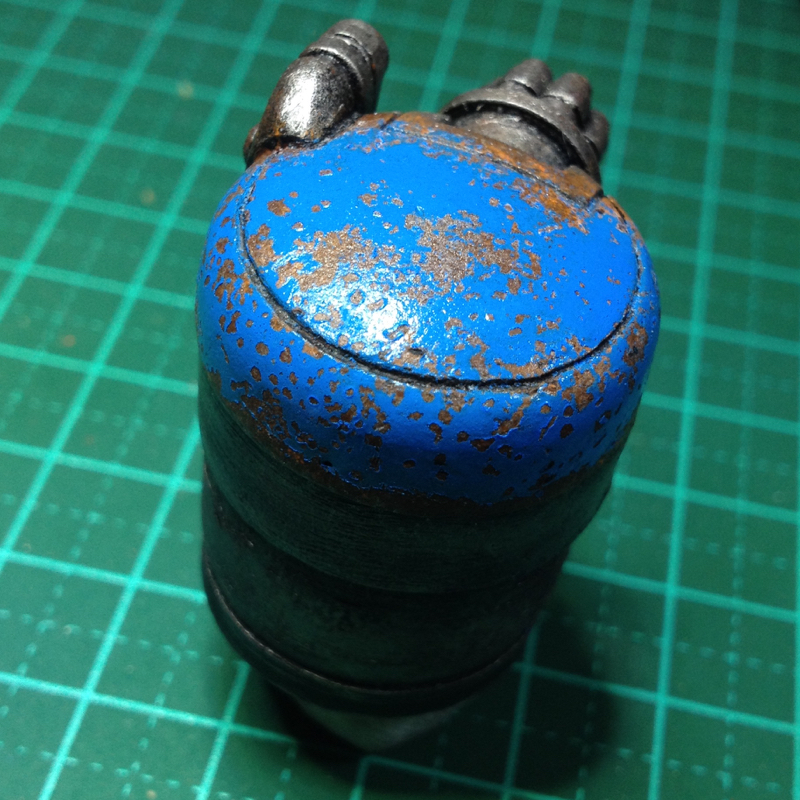
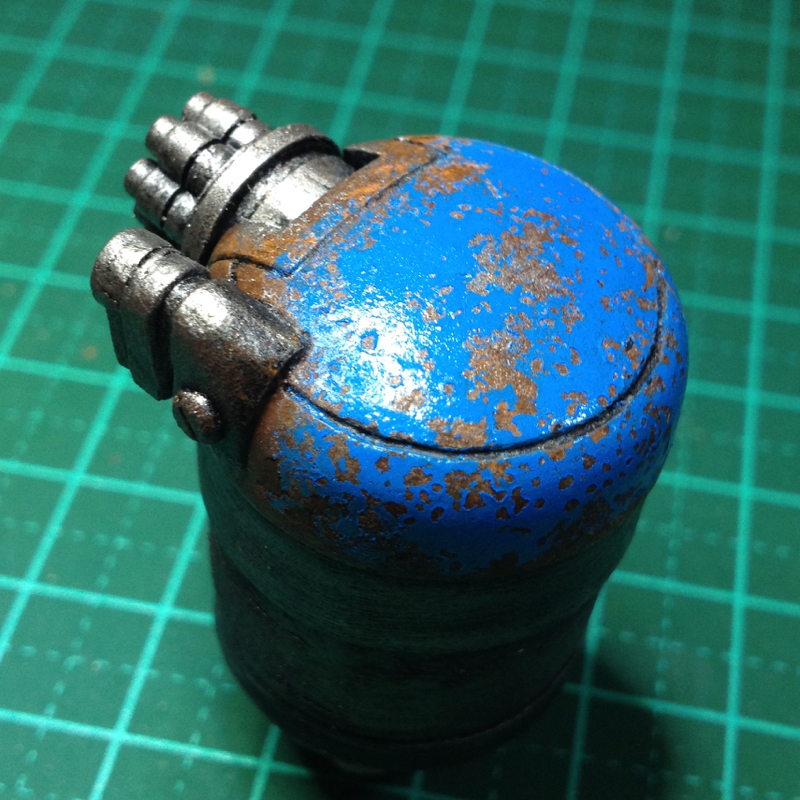
Next up - applying the blue to the hull itself.
Thanks for looking!
62749
Post by: Dr H
Good work. Looking nice.
30344
Post by: monkeytroll
Great work on the lower turret, that is some textbook rusting right there. Very nice indeed
35419
Post by: Lamby
Dr H wrote:Good work. Looking nice.
monkeytroll wrote:Great work on the lower turret, that is some textbook rusting right there. Very nice indeed
Thanks guys!
And that's the spraying of the hull finished!
Next up - detailing the metallics (silver and brass), maybe some hazard striping, then oils and pastel-powders - oh, and the engine parts, mustn't forget those!


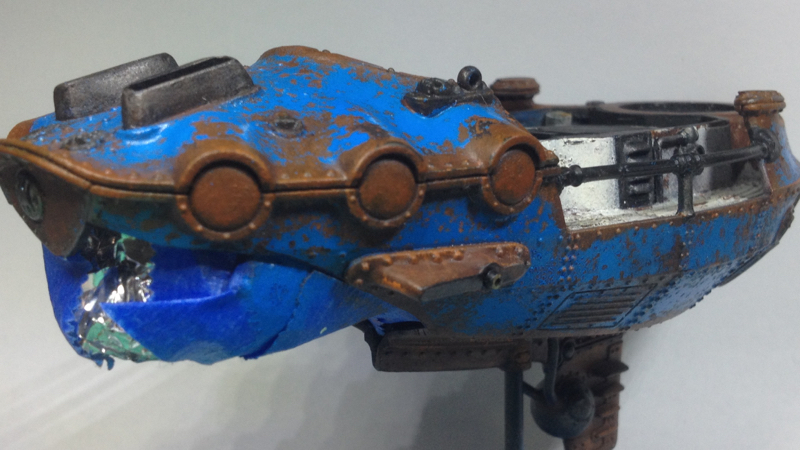
Thanks for looking!
22619
Post by: inmygravenimage
Simply stunning.
I've just re-read the last couple of pages to get my head round the salt weathering. Tried it the other day, and instead it turned to a weird slime; I don't know whether that's an mdf thing, a too-cold thing, or just not coarse enough salt. Any further tips?
92460
Post by: aku-chan
That is some impressive rust, great job!
30344
Post by: monkeytroll
Looks stunning already. Good job.
69676
Post by: Big H
Chipping looks great , nice work mate !
35419
Post by: Lamby
inmygravenimage wrote:Simply stunning.
I've just re-read the last couple of pages to get my head round the salt weathering. Tried it the other day, and instead it turned to a weird slime; I don't know whether that's an mdf thing, a too-cold thing, or just not coarse enough salt. Any further tips?
Maybe too much hairspray?
aku-chan wrote:That is some impressive rust, great job!
monkeytroll wrote:Looks stunning already. Good job.
Big H wrote:Chipping looks great , nice work mate !
Thanks All!
Painting test on some scrap, trying out a recipe for dirty old brass:
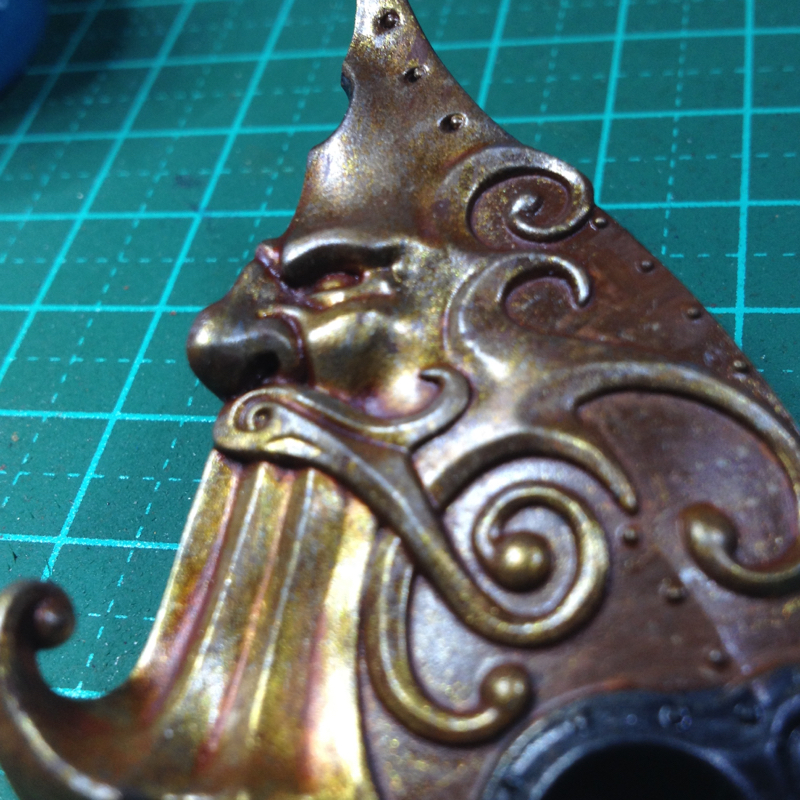
Added verdigris made from GW hawk turquoise and a drop of VJ pale green 50/50 with VJ glaze medium:
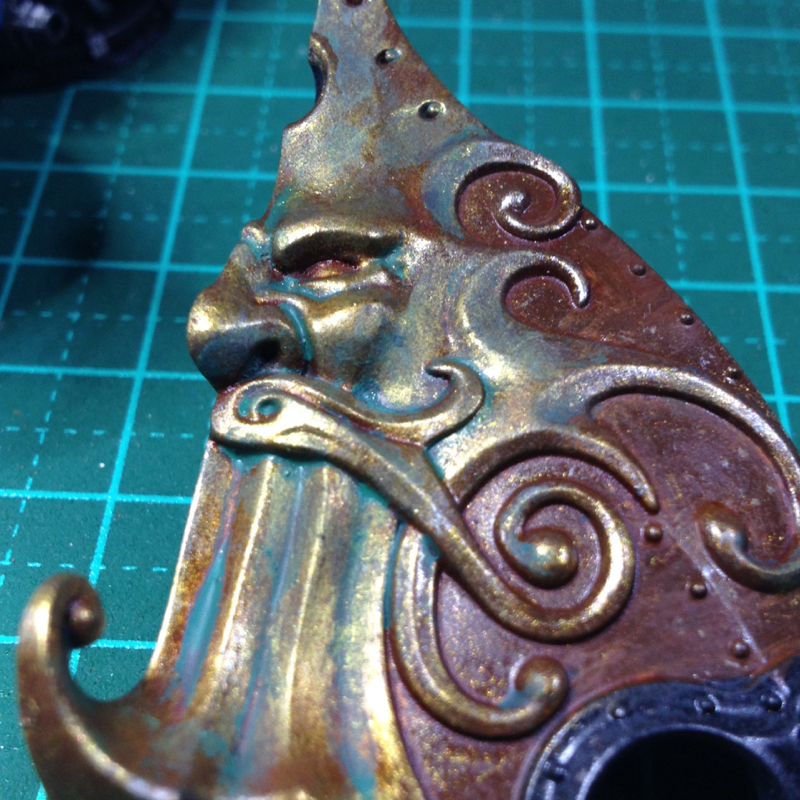
Also repainted the upper turret the same blue as the hull rather than the white as it was throwing off the balance of the model as a whole:
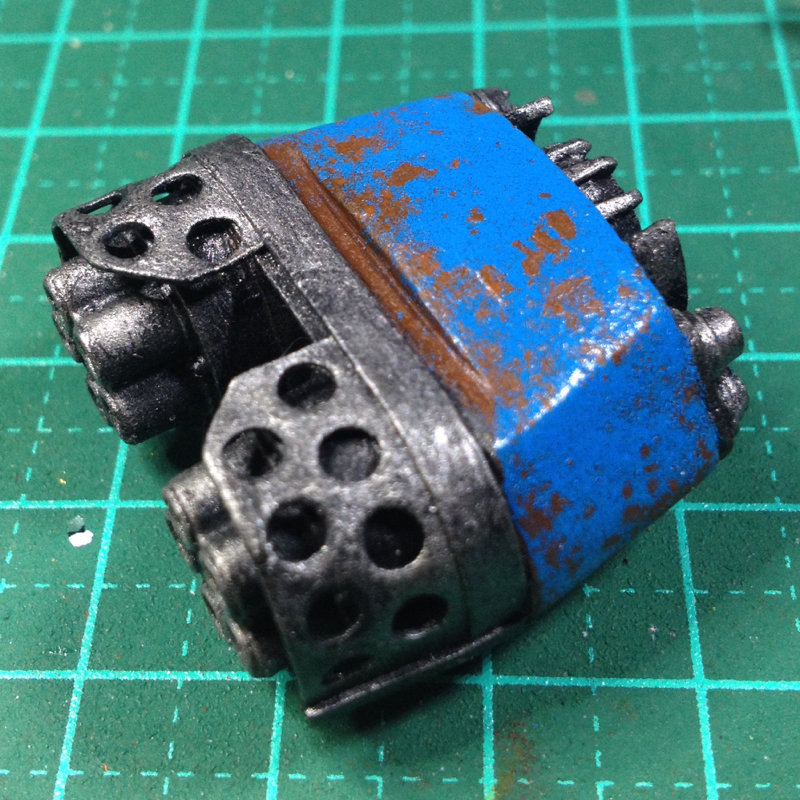
Next up: back to the Gun Skiff and onto oils!
30344
Post by: monkeytroll
I do like that brass
62749
Post by: Dr H
Nice job, Lamby. Looking good.
35419
Post by: Lamby
monkeytroll wrote:I do like that brass
Dr H wrote:Nice job, Lamby. Looking good.
Thank you both!
And here goes 2019...
In an effort to actually finish a model this year, just rebuilt some bases for the Rogue Trader crew:
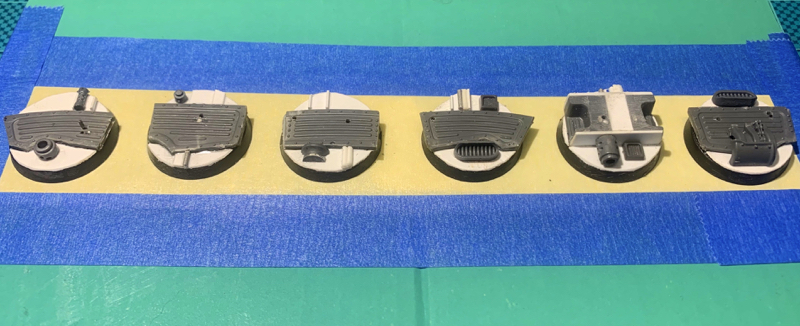
Used some leftover decking from the Gun Skiff build to better match the crew with the craft.
Thanks for looking!
35419
Post by: Lamby
Even small progress is progress, right?
Managed to rust up those new bases:

And that's all since real life kicked in again 2 weeks ago ...
Thanks for looking!
89168
Post by: youwashock
Real life. Always such a deterent to progress. That brass is too beautiful for words.
22619
Post by: inmygravenimage
That's some nasty, tasty rust you've got there
96209
Post by: MacPhail
Beautiful work... both the rust effect and the salt weathering are top notch. Your brass is amazing too! Is that recipe posted anywhere, by you or another? With or without the verdigris it's got wonderful depth. I have a classic squad of Arbites that it would look awesome on.
68152
Post by: JoeRugby
All progress is good progress dude.
35419
Post by: Lamby
youwashock wrote:Real life. Always such a deterent to progress. That brass is too beautiful for words.
inmygravenimage wrote:That's some nasty, tasty rust you've got there
MacPhail wrote:Beautiful work... both the rust effect and the salt weathering are top notch. Your brass is amazing too! Is that recipe posted anywhere, by you or another? With or without the verdigris it's got wonderful depth. I have a classic squad of Arbites that it would look awesome on.
JoeRugby wrote:All progress is good progress dude.
Thank you all for your kind words of months past...
It's been a while...
At the end January this year I reached a point where I just couldn't sit at the hobby desk to paint or build anymore - basic lack of free time when at home, too many hours at work, and hobby exhaustion took its toll, and for while I couldn't see myself ever modelling again...
As you can see, not the case - while I've yet to get enough time to start building again, I've managed a few hours here and there in recent weeks to get the Rogue Trader crew onto their new bases (as seen in the previous post) and also complete the acrylic painting on the last two, which means everyone is now ready for oils - Insert deliberately obscure pic:

Hopefully it won't be 8 months again before the next post!
Thanks for looking!
89168
Post by: youwashock
Welcome back, man. Let's see you work that magic again.
22619
Post by: inmygravenimage
Good to have resurrected!
68152
Post by: JoeRugby
Welcome back dude looking forward to more
1124
Post by: Captain Brown
Welcome back Lamby.
I think of my hoppy and painting time (which is very limited with a little one, work, medical, house and friends) as a stress reliever...even if I only can add a magnet or add one colour of basecoat. Just by doing that I use it as a calming exercise and it works for me to get a little done and the creative juices flowing.
Cheers,
CB
35419
Post by: Lamby
youwashock wrote:Welcome back, man. Let's see you work that magic again.
inmygravenimage wrote:Good to have resurrected!
JoeRugby wrote:Welcome back dude looking forward to more
Captain Brown wrote:Welcome back Lamby.
I think of my hoppy and painting time (which is very limited with a little one, work, medical, house and friends) as a stress reliever...even if I only can add a magnet or add one colour of basecoat. Just by doing that I use it as a calming exercise and it works for me to get a little done and the creative juices flowing.
Cheers,
CB
Thank you all!!!
Oils - I have a love/hate relationship with oil paints.
For dirty washes on bases, can't beat them, hence:

Black and brown dirty goodness, right?
But trying to use oils on miniatures has been relatively unsuccessful, so today this happened:

As to success / non-success of this endeavour, pics soon... oooh, the suspense!!!
35419
Post by: Lamby
Mmmm... so I'm calling this oils experiment a non-success, primarily due to the time it takes to achieve effects that I can achieve faster with acrylics.
Here's the result anyway, the lower portion of the Captain's jacket with green and white oils:

And here's the Hard Girl, with a comparison of Ratty's robes in acrylics - Vallejo Dark Sea Blue with added White, and purple in the shadows; you can clearly see the Blue oils are a completely different tinge, and don't match the retinue colors at all:

I'm not calling the oils experiment a failure, it has been interesting though frustrating - the learning curve for oils is a lot steeper than I envisaged, and as I have so little time for any hobby these days I need to stick with what I know.
Full pics of the Rogue Traders coming soon!
22619
Post by: inmygravenimage
Inspiring colours there buddy.
1124
Post by: Captain Brown
Lamby,
Looking forward to the finished Rogue Traders.
Cheers,
CB
35419
Post by: Lamby
inmygravenimage wrote:Inspiring colours there buddy.
Captain Brown wrote:Lamby,
Looking forward to the finished Rogue Traders.
Cheers,
CB
Thanks guys! After a wait of nearly a year, here's the fifth member of the Rogue Trader Crew - The Hard Girl: 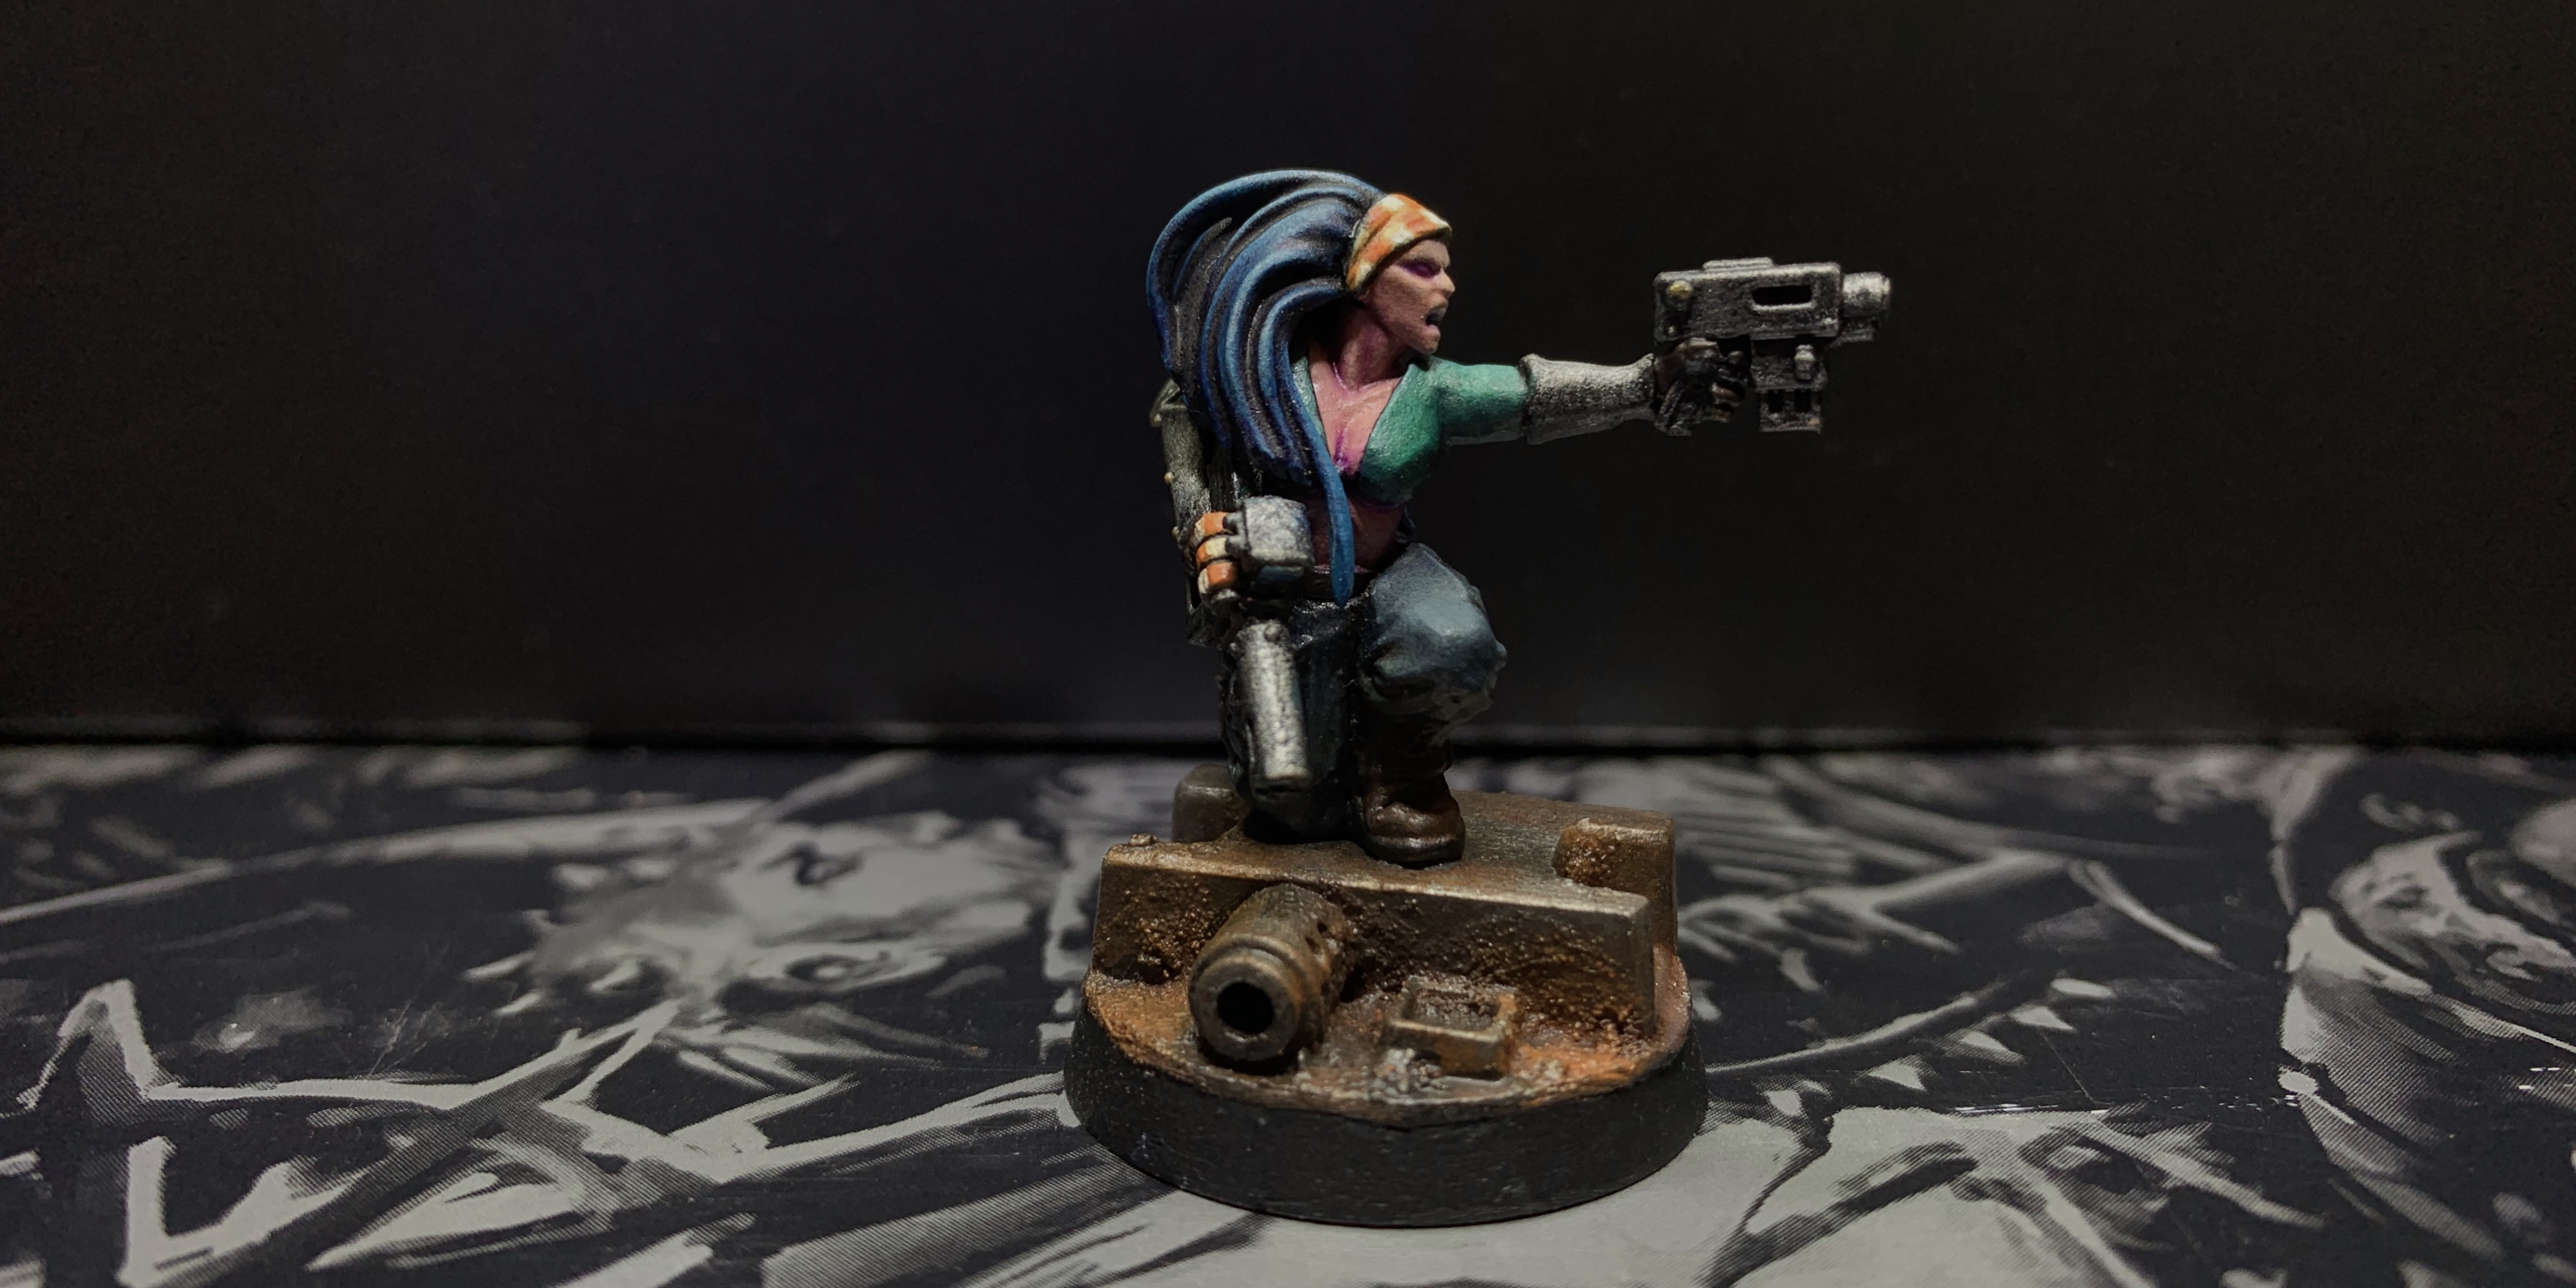 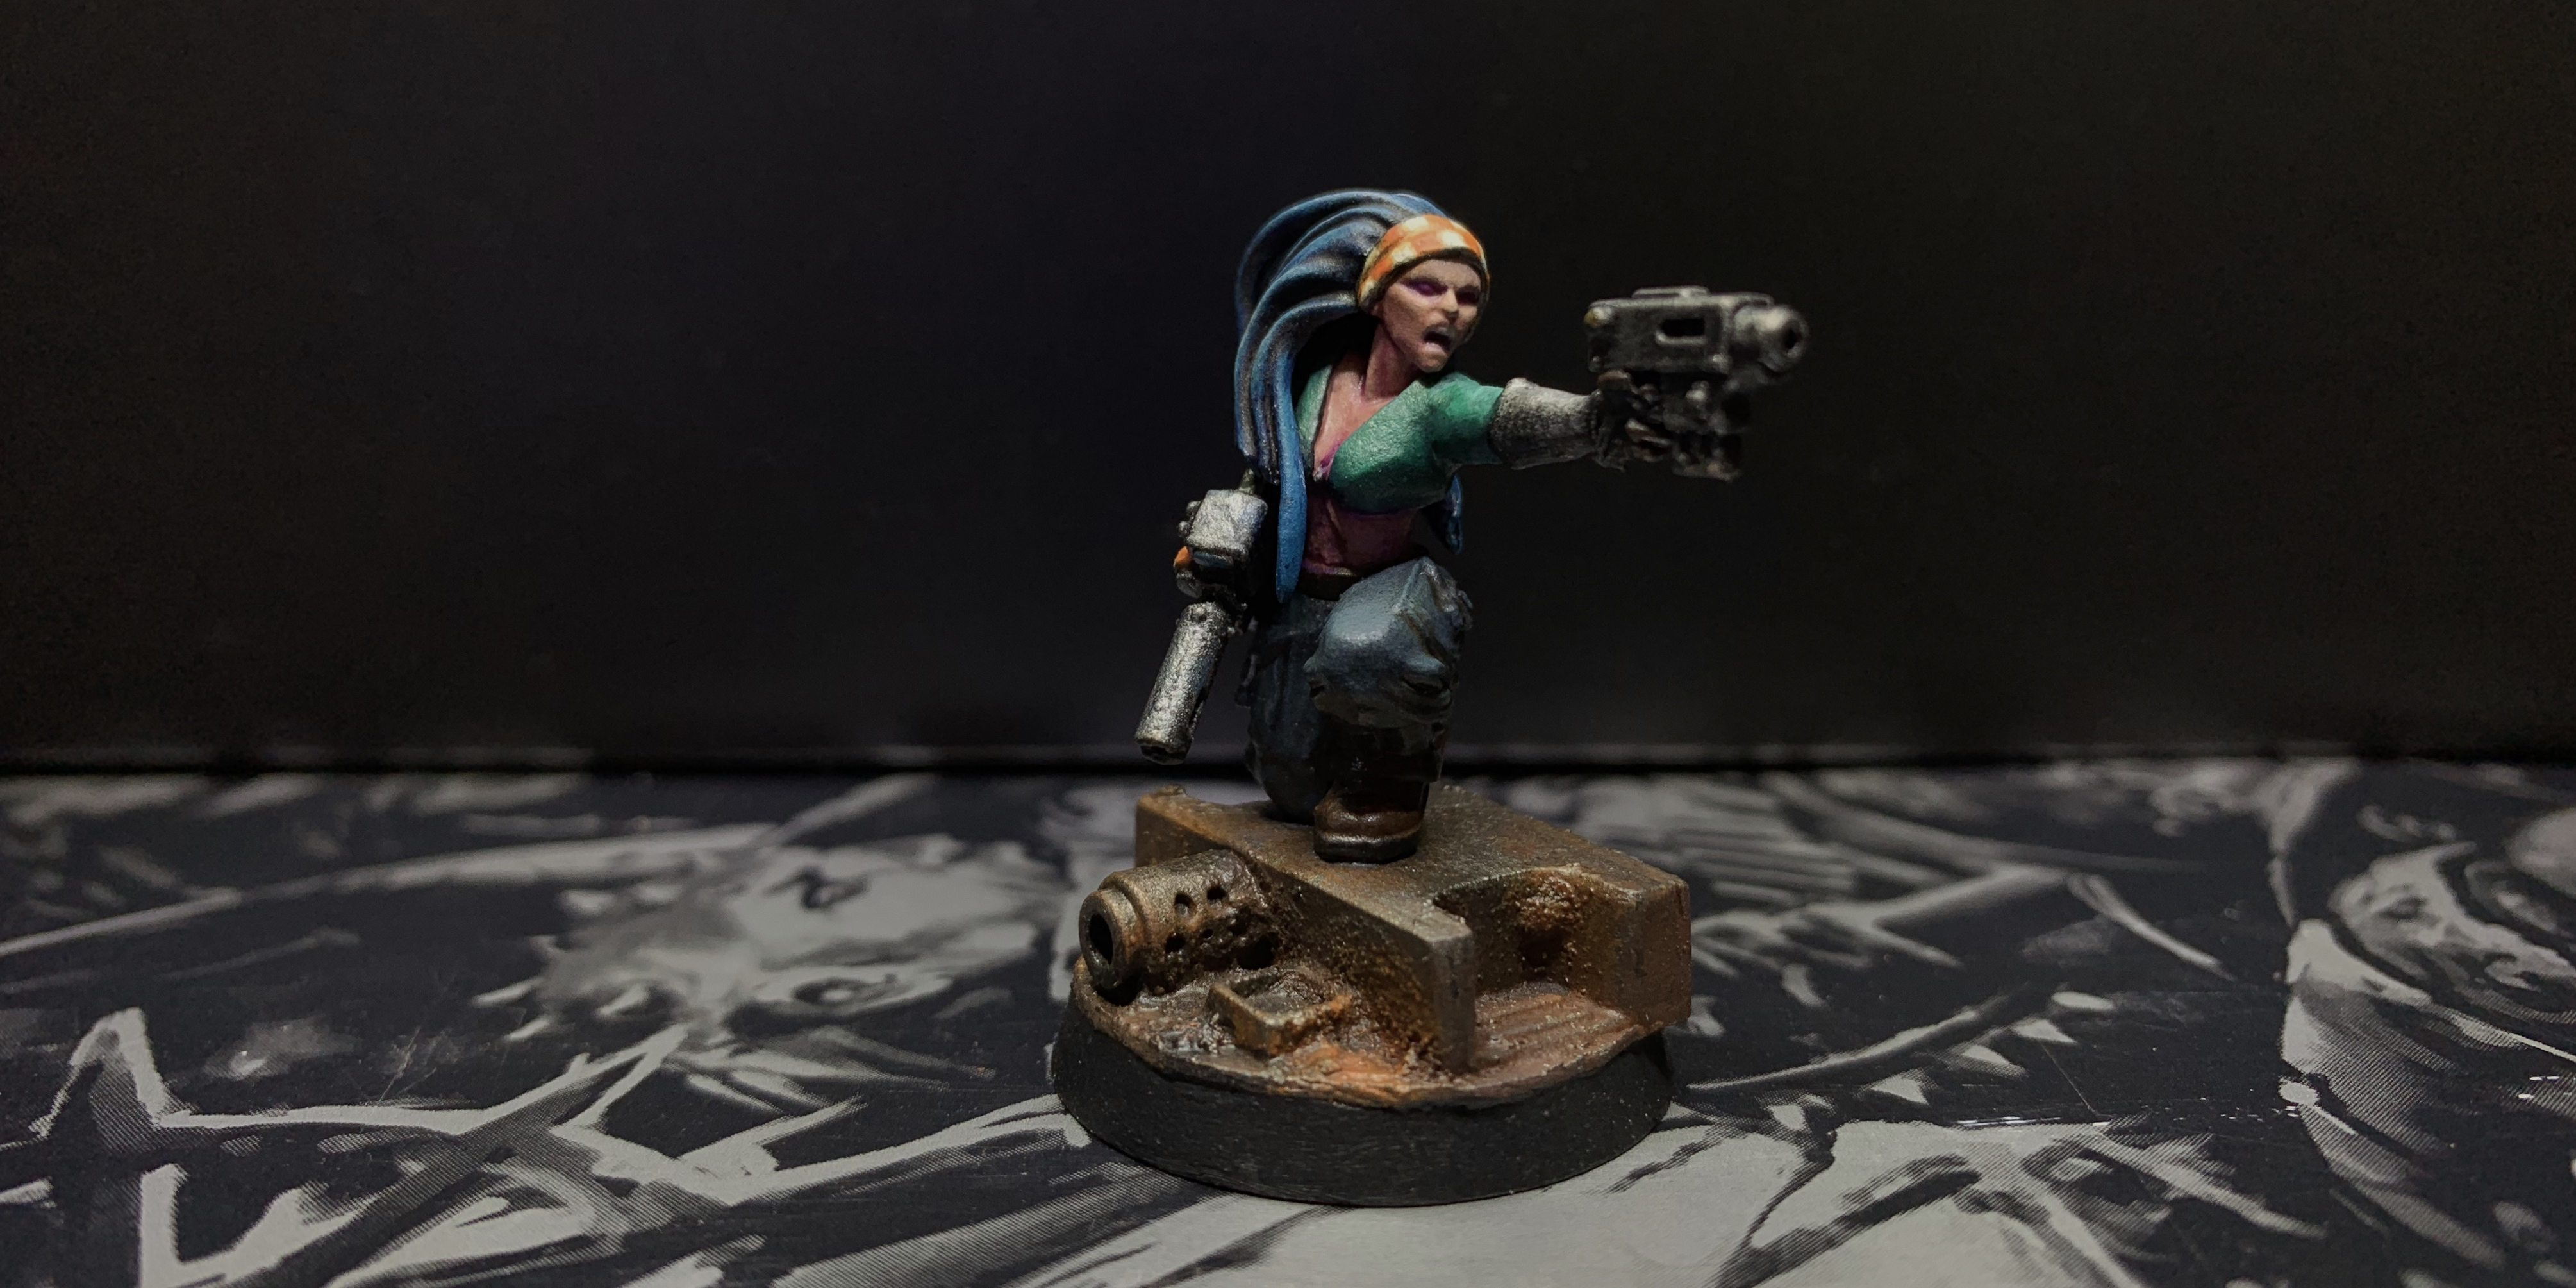 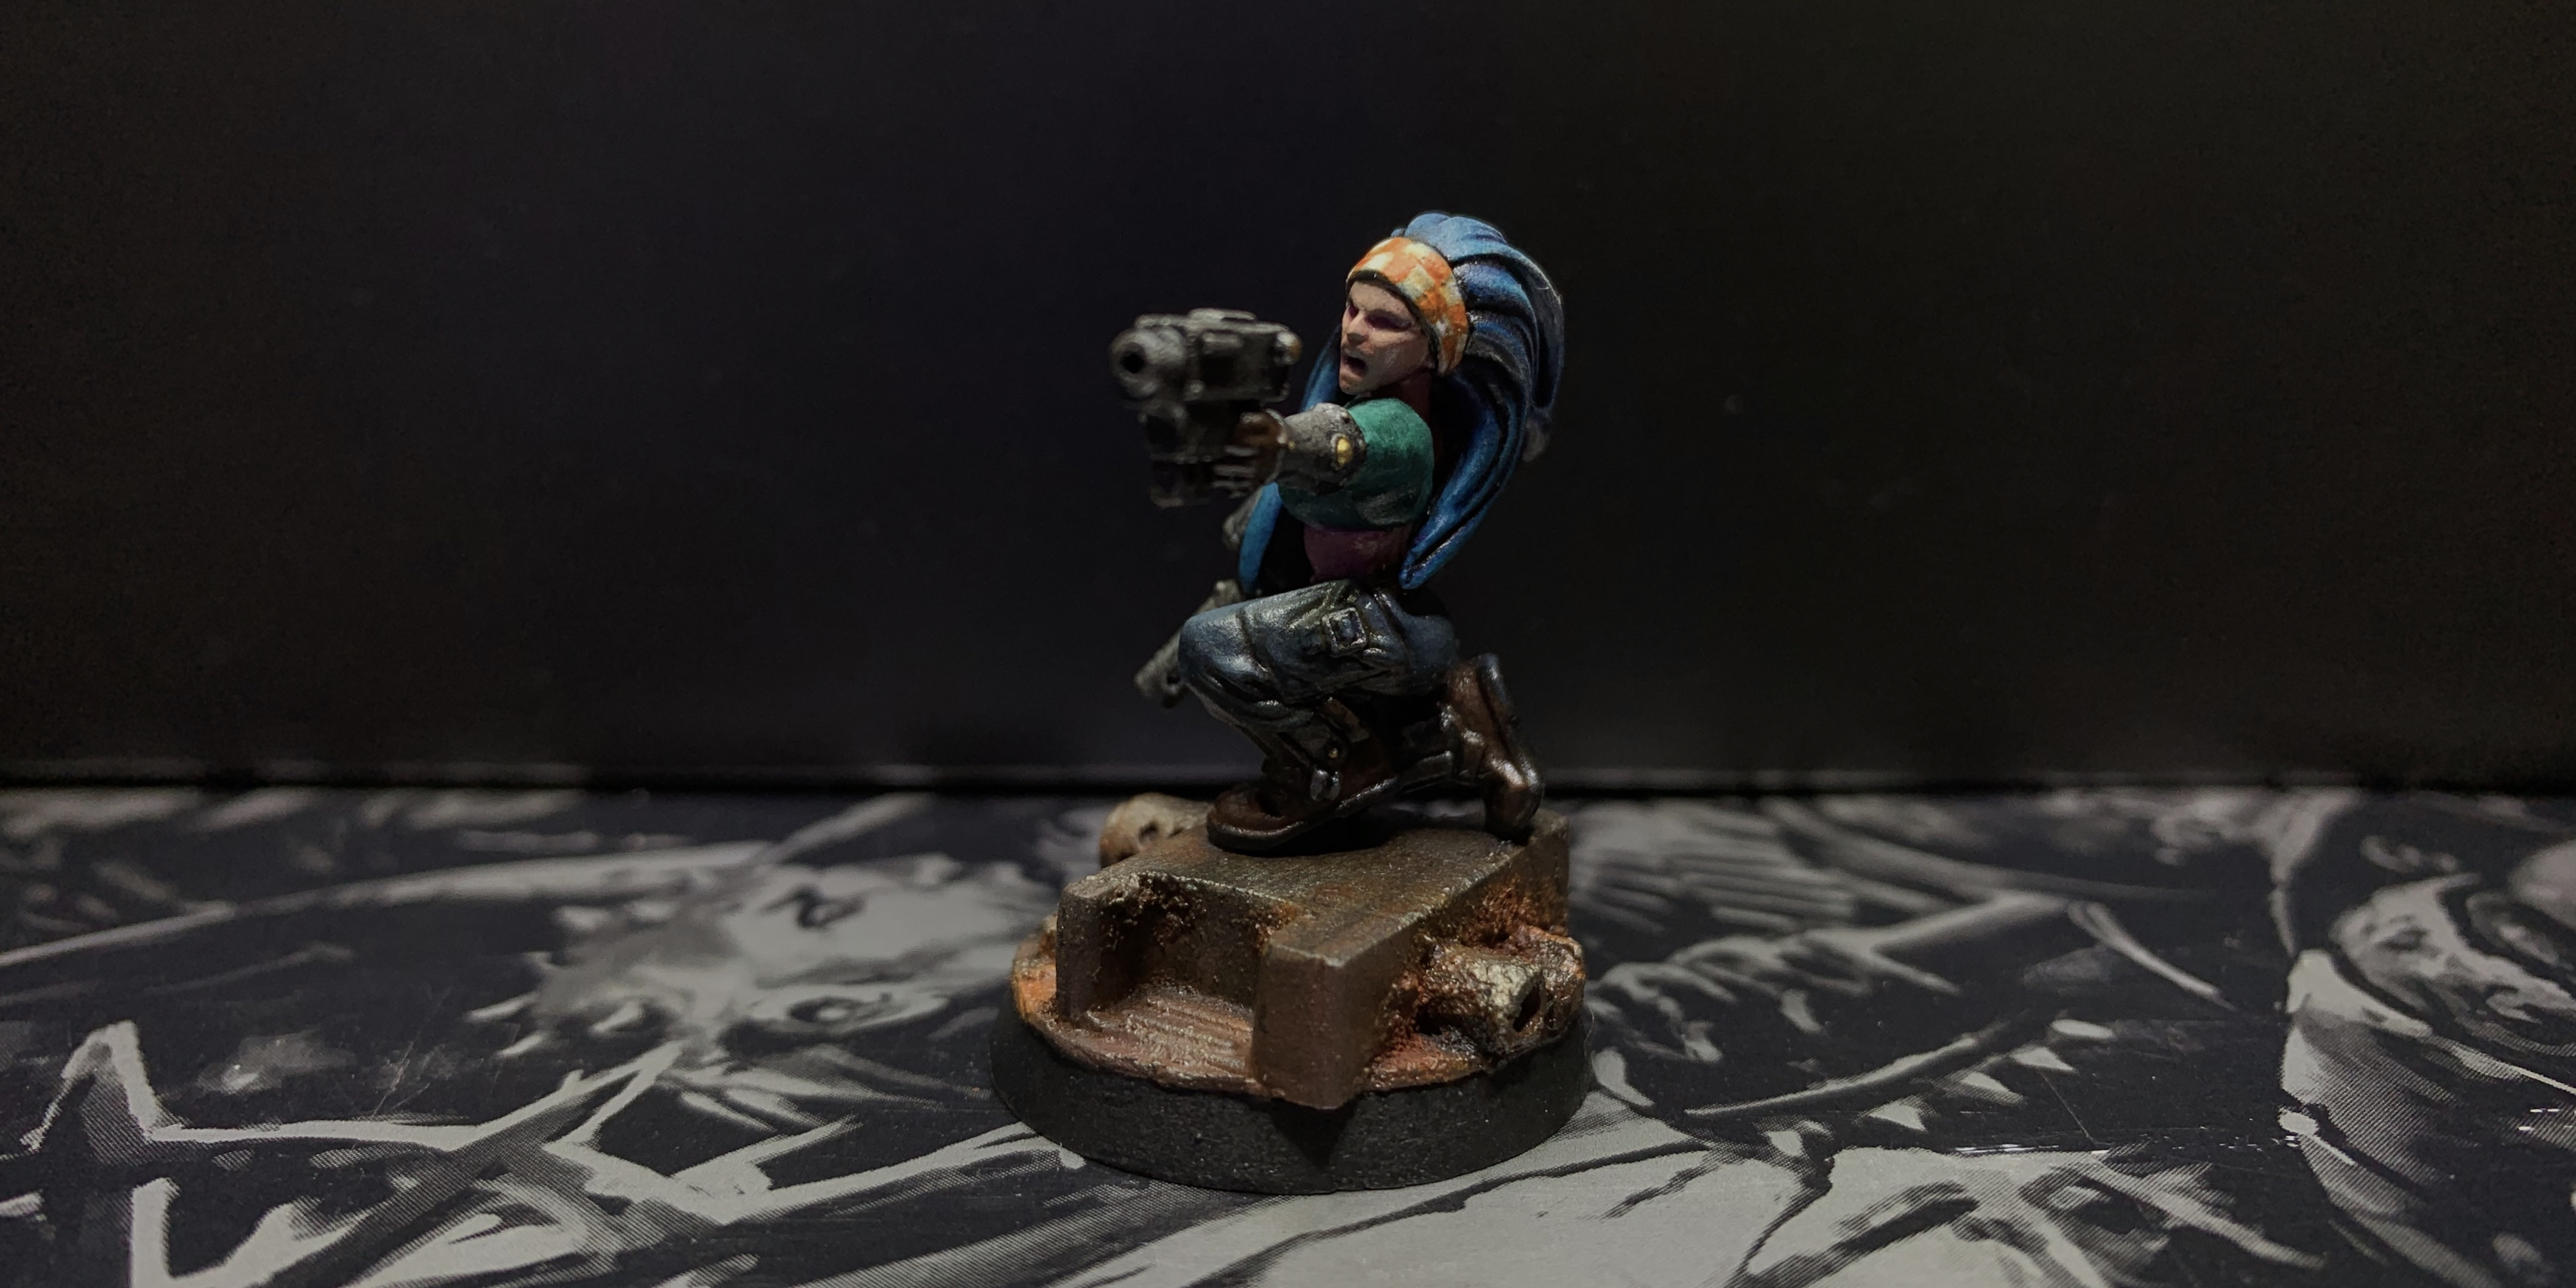 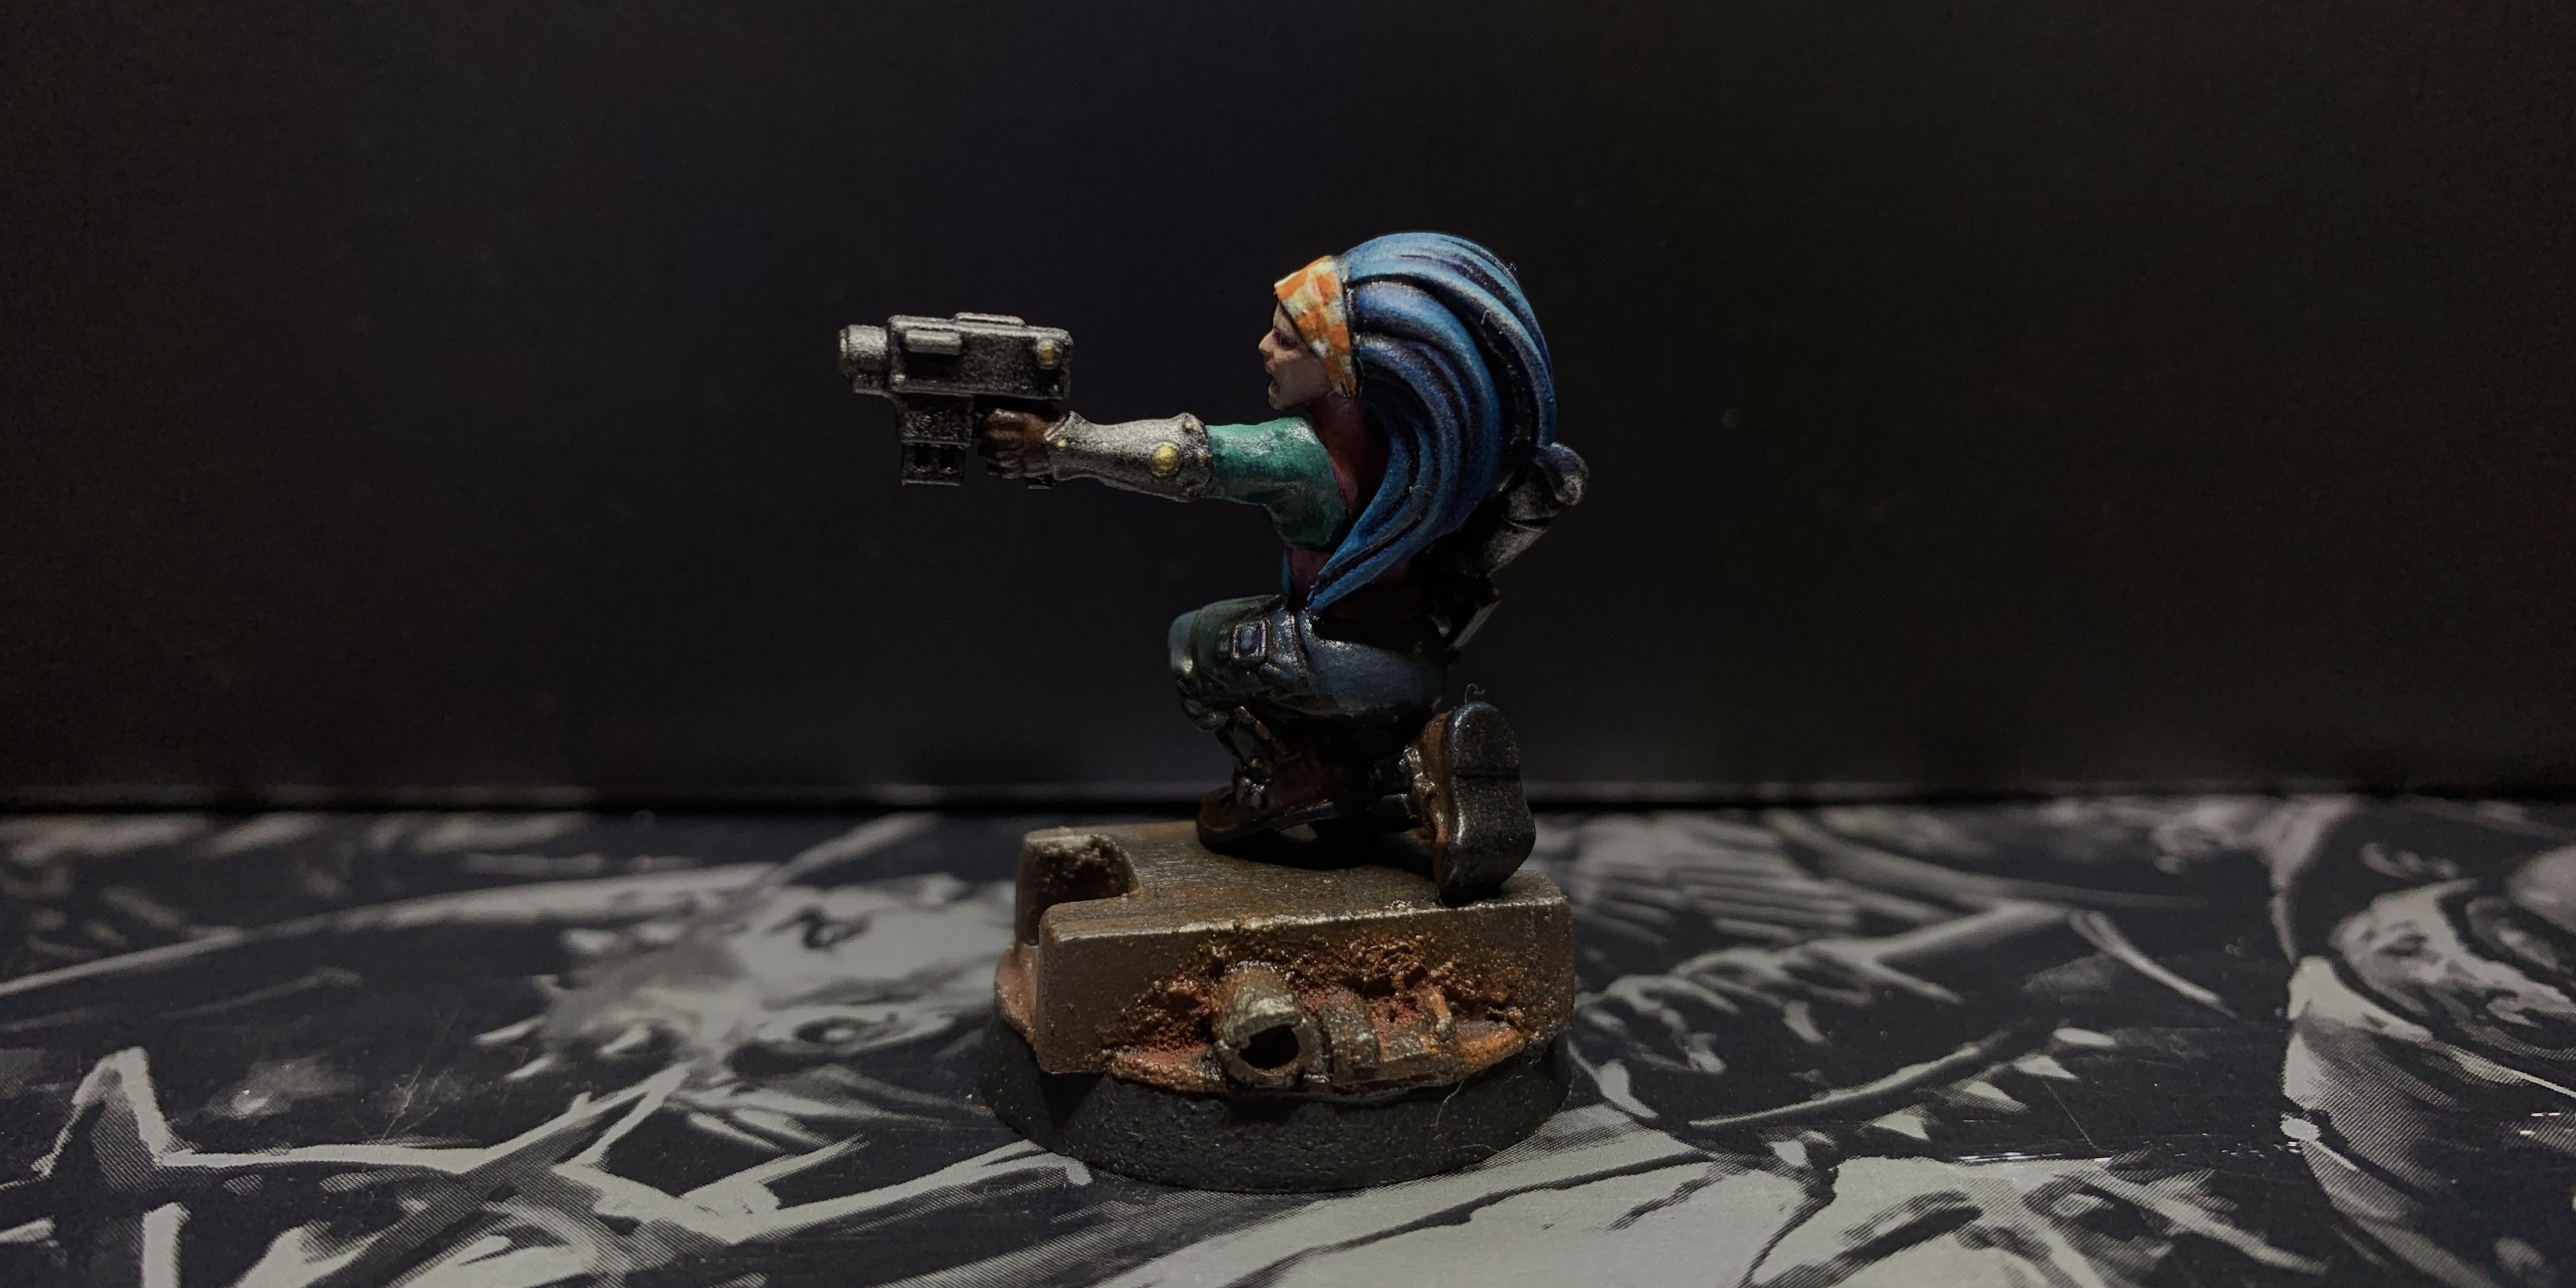 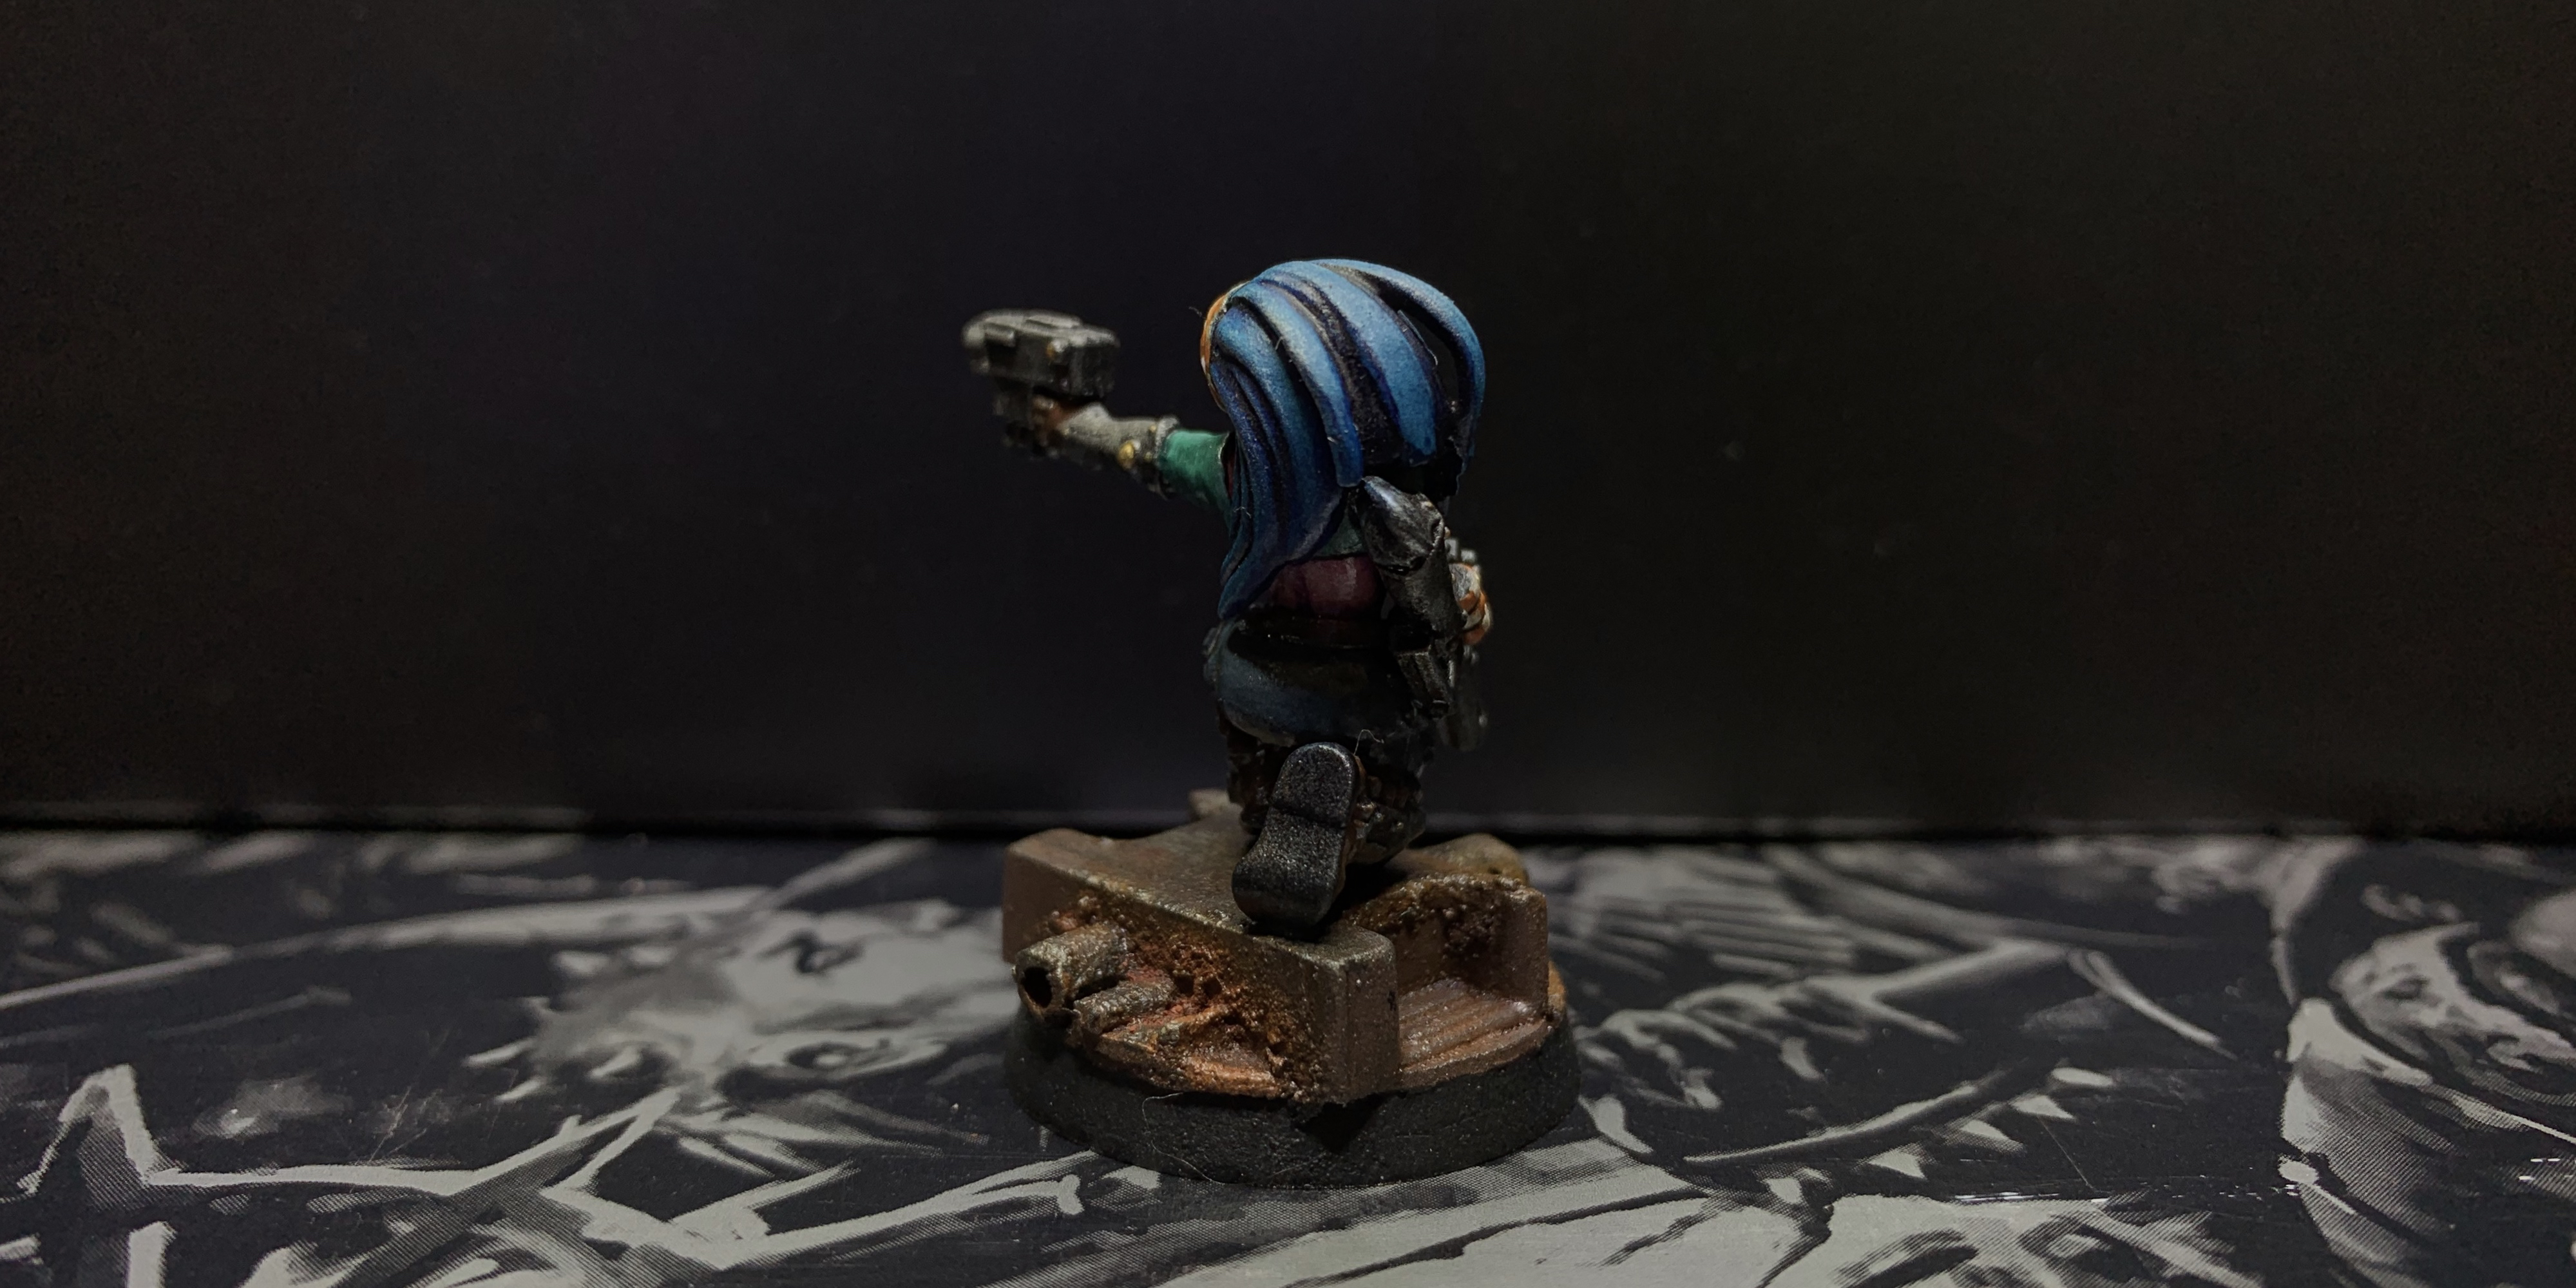 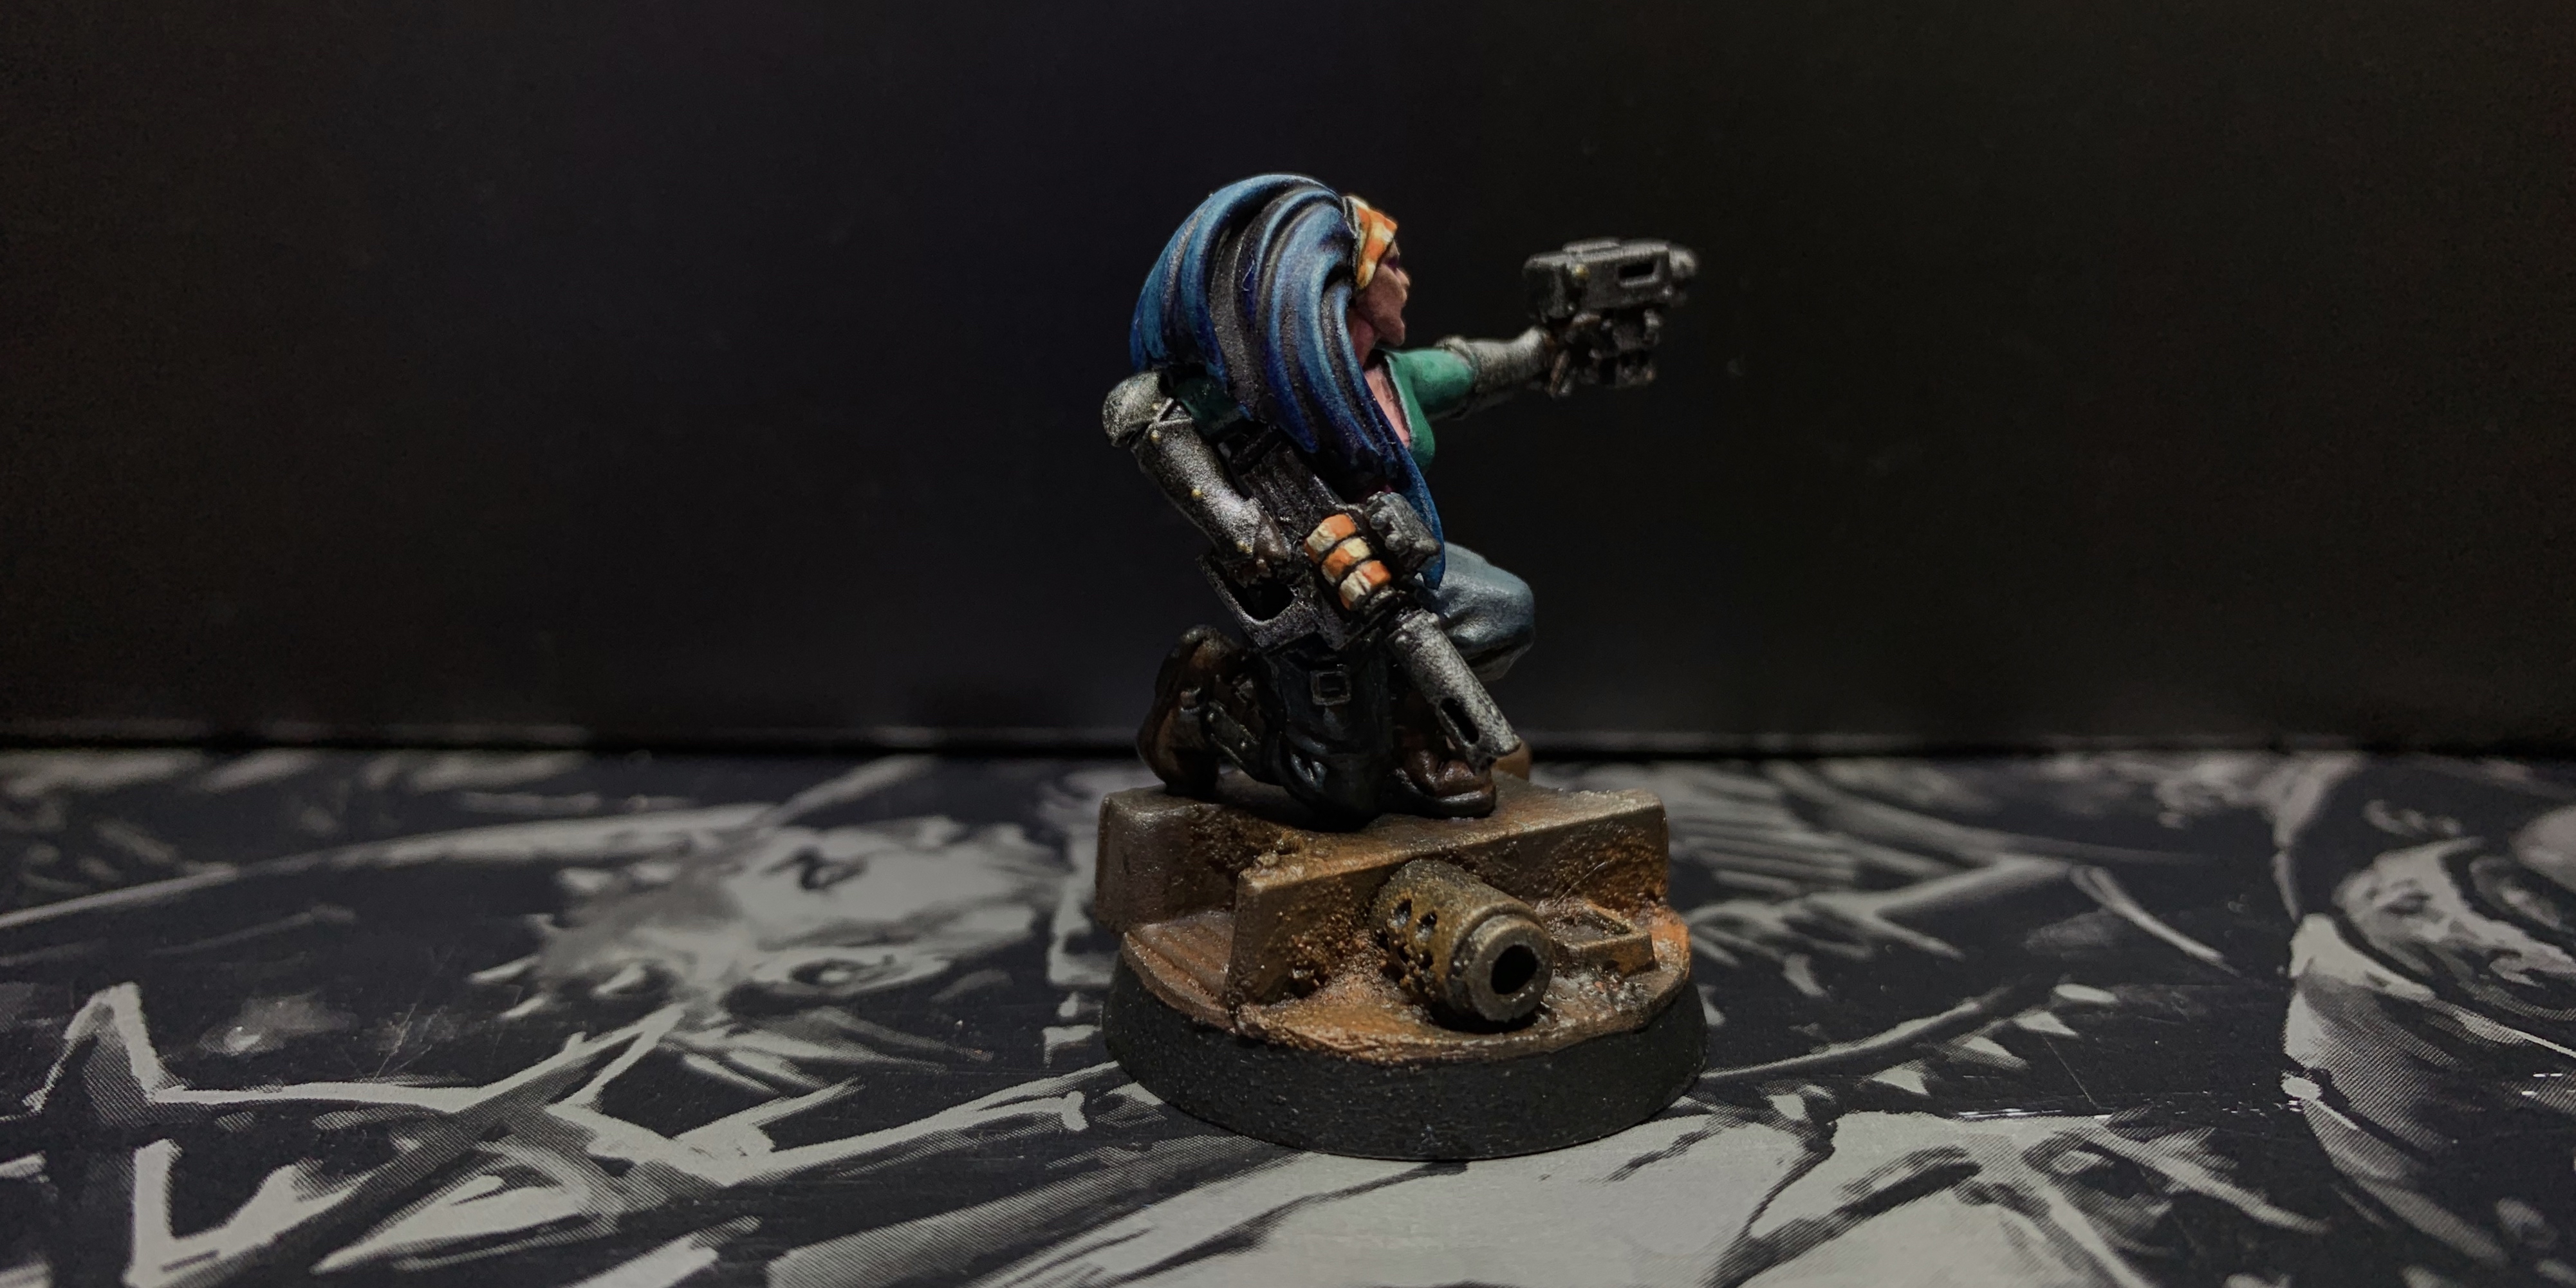 And, in case you'd forgotten what the remainder of the crew looked like, here's some links: The Kroot: https://mebelamby.wordpress.com/2017/03/17/rogue-trader-crew-the-kroot/ Nails the Gunner: https://mebelamby.wordpress.com/2017/03/18/rogue-trader-crew-2-the-gunner/ The Operator: https://mebelamby.wordpress.com/2017/05/07/rogue-trader-crew-the-operator/ The Death Maus (formerly Ratty): https://mebelamby.wordpress.com/2017/05/28/rogue-trader-crew-ratty/ Thanks for looking!
89168
Post by: youwashock
Stellar model. Worth the wait.
35419
Post by: Lamby
Thanks!
So, now she’s been completed, here's a little painting WIP of the Hard Girl from my oils experiment.
In pic 1 her hair is lacking definition:
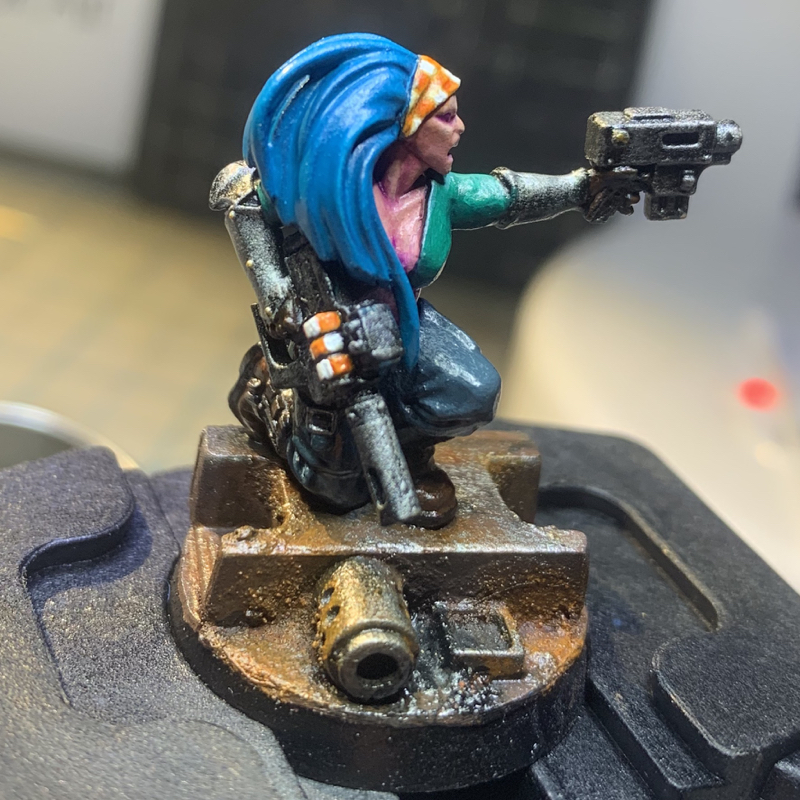
Pic 2 shows the palette:
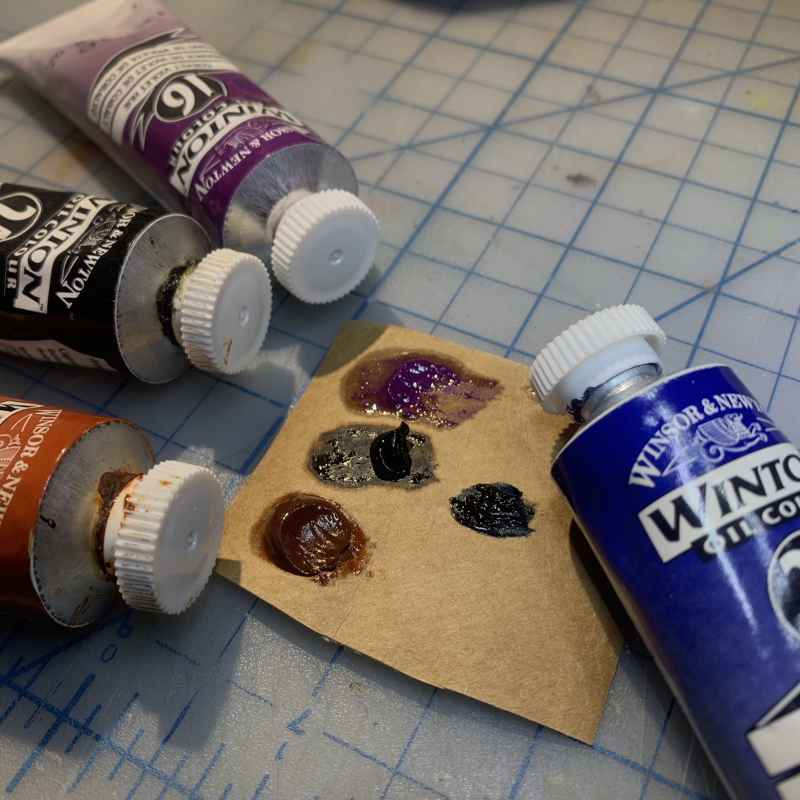
Pic 3 shows the darkened oil wash - I applied this thick wash over gloss varnish to the hair, dried it somewhat with a hair dryer, then using a clean brush and white spirits, cleaned the dark wash from the upper surfaces to regain highlights.
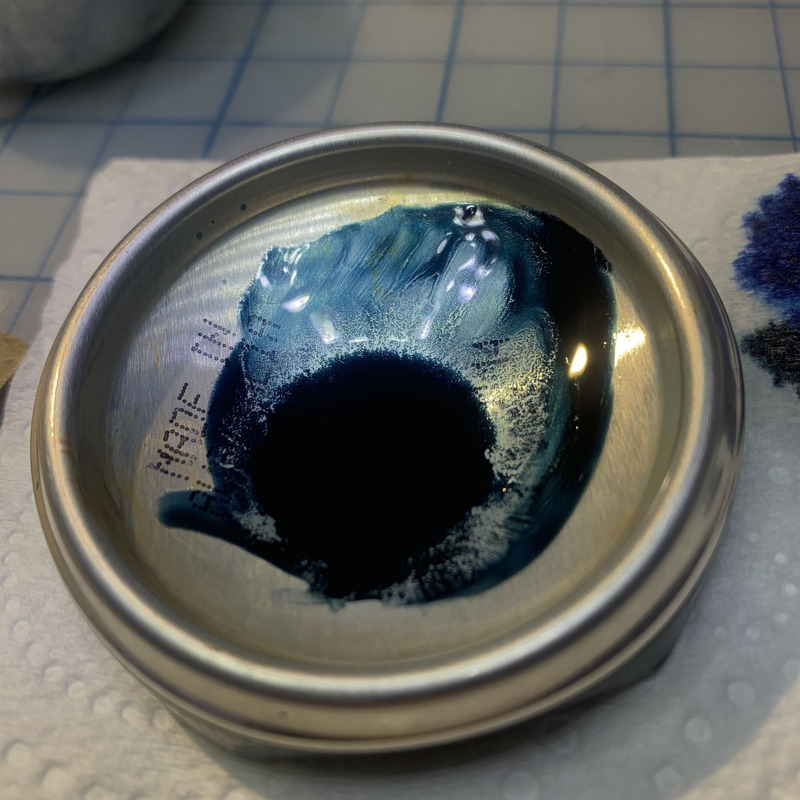
Pic 4 shows the results after one application - ultimately I went back with another oil wash and then carefully dry brushed GW Uthulan Grey over the upper area and some edges, but in this case I’m calling the oils successful - despite the drying time.
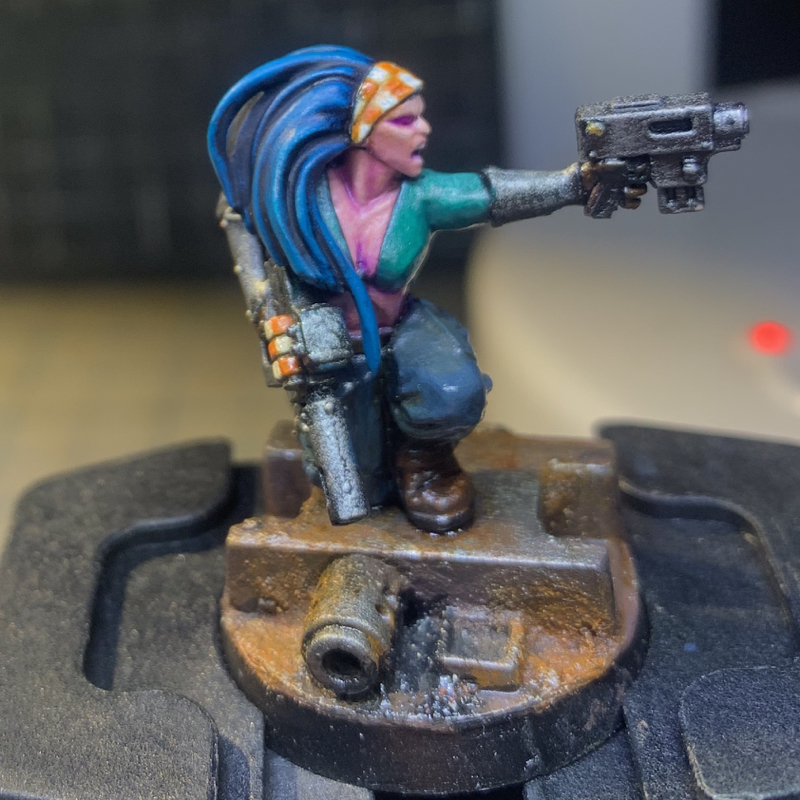
The previous post shows the end result - I also did a brown and purple wash over the pants, with the same clean-up routine to keep the wash under control.
Thanks for looking!
35419
Post by: Lamby
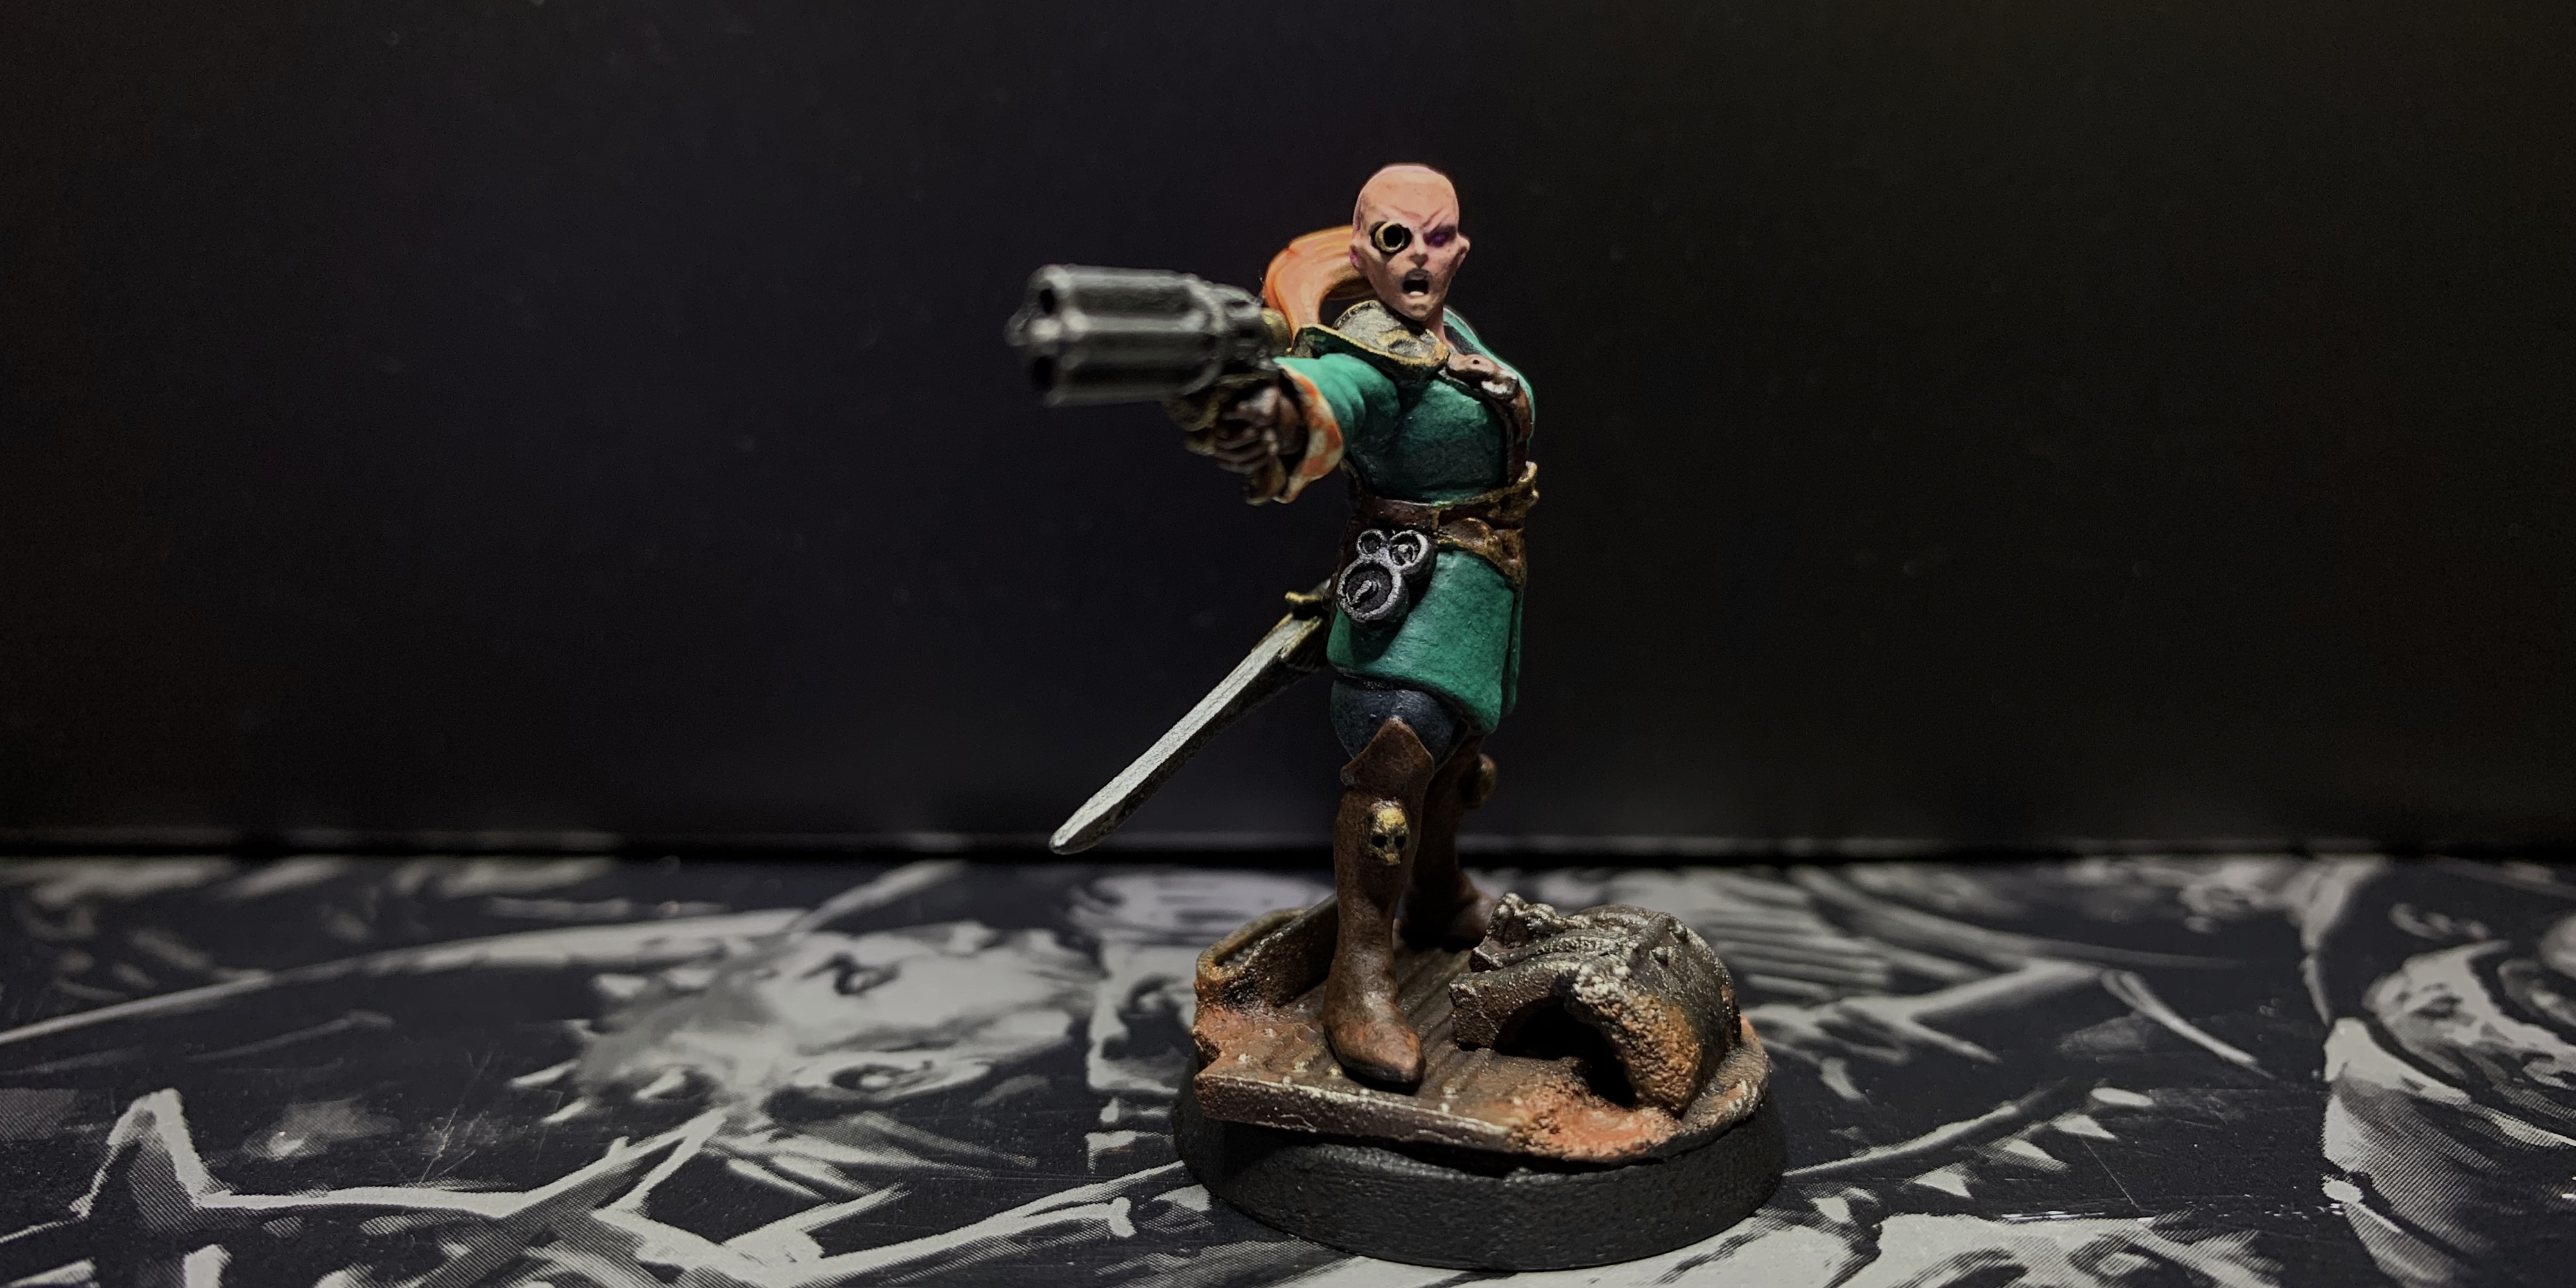 + One hundred years before today… On a glass platform suspended above the desert, Illyria watches the pre-dawn illuminate the Rust Yards. In her black-metal hand is the precious Warrant: freedom freshly inked on ancient paper, stamped with the Imperial seal. + + Beside her stands the Inquisitor whose life she saved a year ago. + + Illyria’s father had been starship crew, retired into the Administratum of the Winter Hive; tales of intergalactic adventure, wondrous planets and exotic xenos fuelled Illyria’s young imagination, as unknowingly the creeping lung rot seeping through the ventilation from the sump-gas pools slowly killed her parents. On the day her father died - a week after her mother, and a week before Illyria’s twenty third birthday - Illyria decided no matter the cost, she would escape Hive life to the stars. Her parents had owned their small hab, so she had a place to live, though it was borrowed time now; every breathe in Winter Hive was killing her. She found herself a job at the docks driving mech-loaders, started looking for ship-crew work, though the story was always the same: no-one wanted to hire an inexperienced girl with no spacer skills. Her search for escape grew more and more frustrating, until the day she saved the life of a stranger. Walking home from the docks, she turned a corner and - snapshot image: ghost-light smouldering off a golden sword cast aside on the deck plates; a dying woman in blood-drenched gold armour straining to reach the fallen sword, intestines trailing from her like tentacles; and the creature that had done the damage rising above them both, wreathed in fire and shadow and the stench of the warp. A moment’s non-decision, a tableau of weird; a point in time where fates are changed. Because she had no reason not to, Illyria stepped forward and picked up the sword. At the time, it only cost her an arm. + 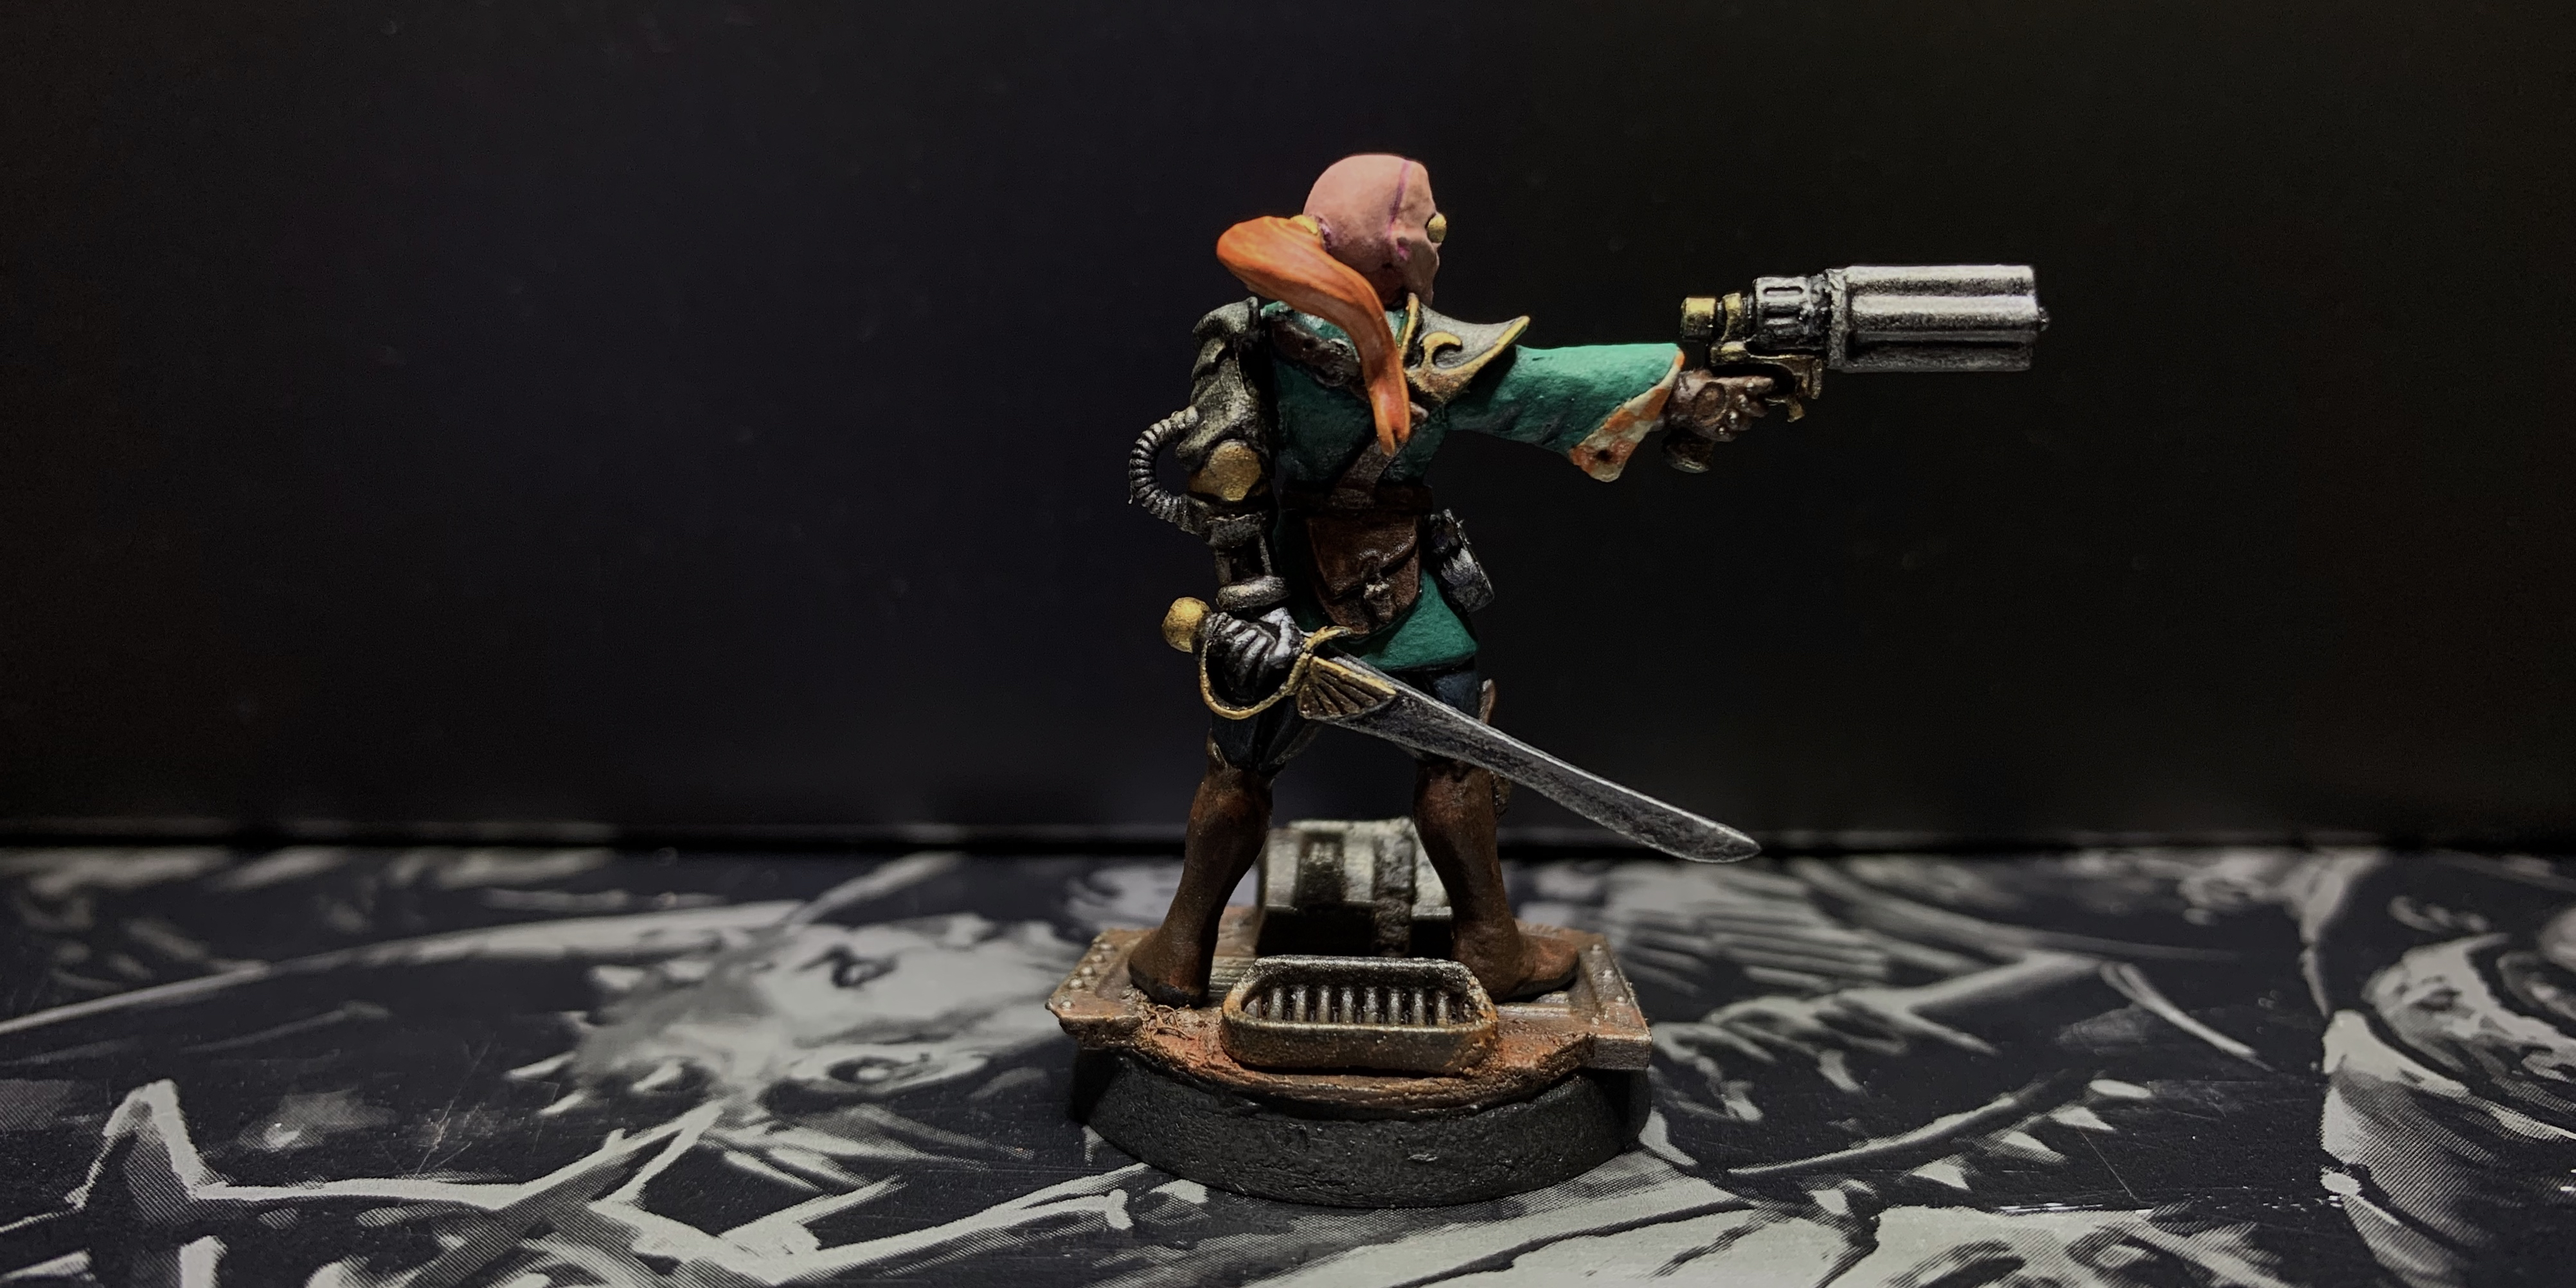 + Desert wind catches the long tails of the Inquisitor’s coat, reveals the sheathed ghost-light sword. (Ever since she touched it, Illyria hears its whispers in her dreams). “So,” the Inquisitor says. “The Warrant is yours.” Illyria nods. “Your debt is repaid.” “Let me be the judge of that.” Scattered across the desert in front of them are ten million abandoned starship hulls, surrounded by ten billion scattered starship parts. Overhead, Rust Mechanicus factory-platforms drift, cyber-tentacles and servo-claws reaching down to pluck treasure from the junk, those parts evolving into engines, weapons and hulls back up on the platform decks. Across the local sector, the Rust Yards are known as the place where broken things are reborn. The Inquisitor says: “Choose.” Illyria frowns. “I don’t understand.” “A Rogue Trader captain is useless without a ship; so choose one.” Before Illyria can say anything, the Inquisitor holds up a warning hand. “However; don’t thank me, Illyria of Winter Hive - one day you may regret picking up my sword.” At the time, as Illyria flexes her new bio-mech arm and dreams of her own ship that will take her away from the Hive and this world, she thinks she understands the Inquisitor’s words well enough. It is only today, the day of the assault on the hive of Skovarax, this day a century later - the day she loses her face - that Illyria Winter understands the true price of saving Inquisitor Kallatar. + 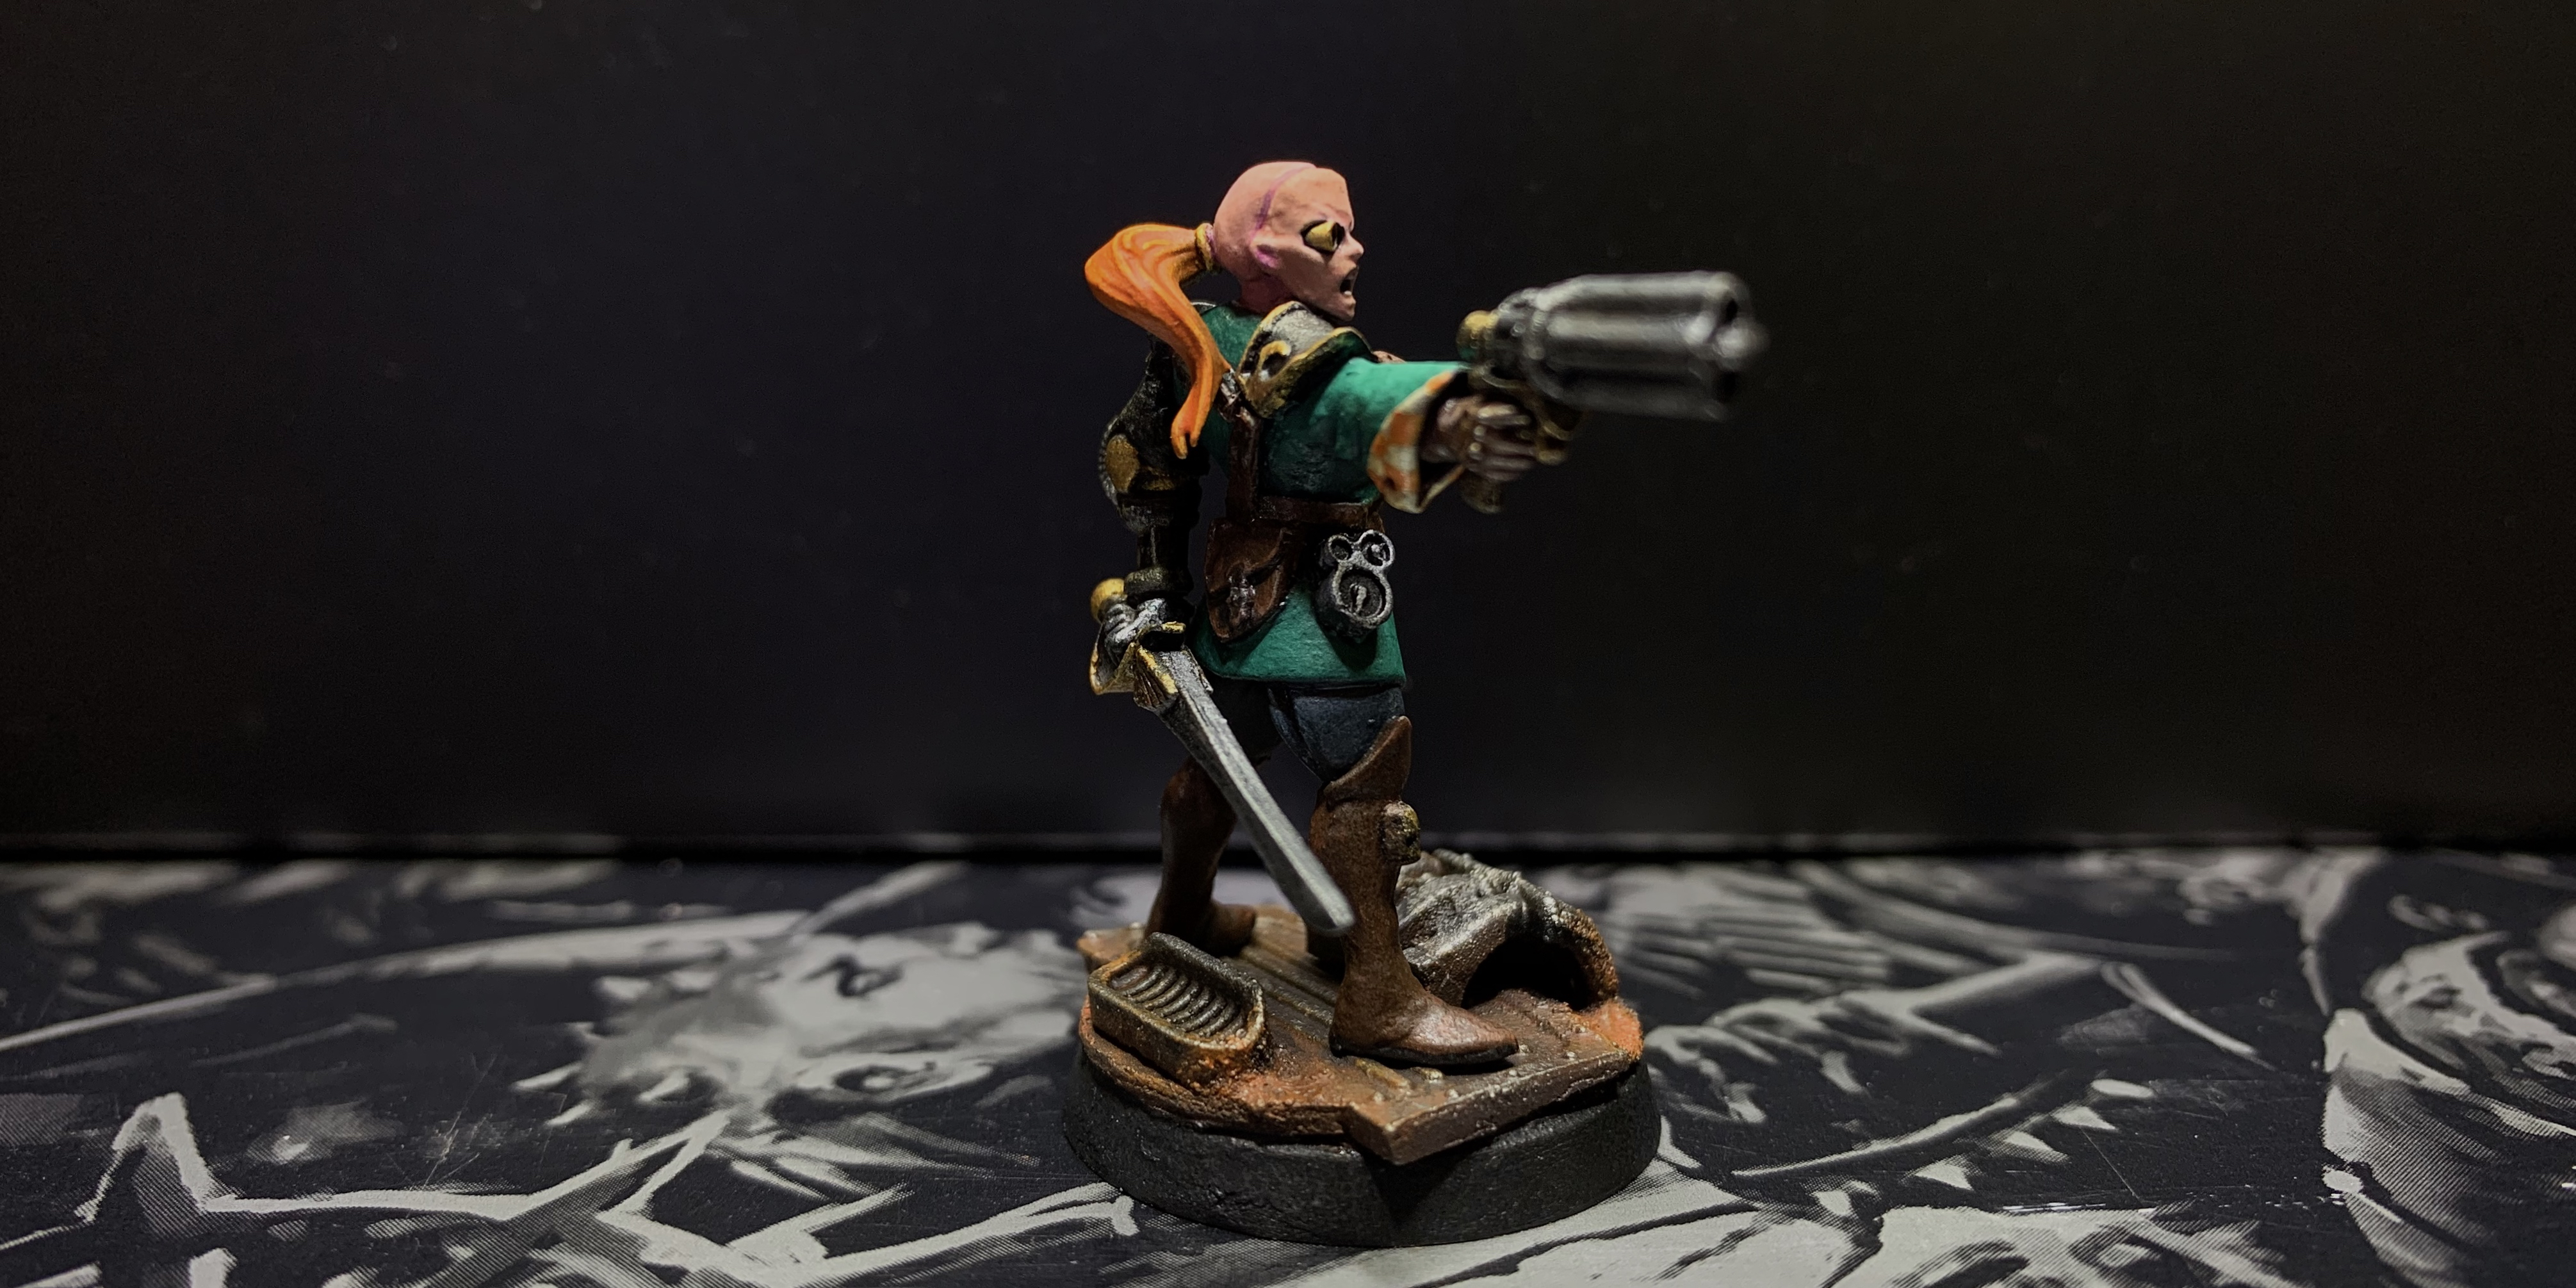 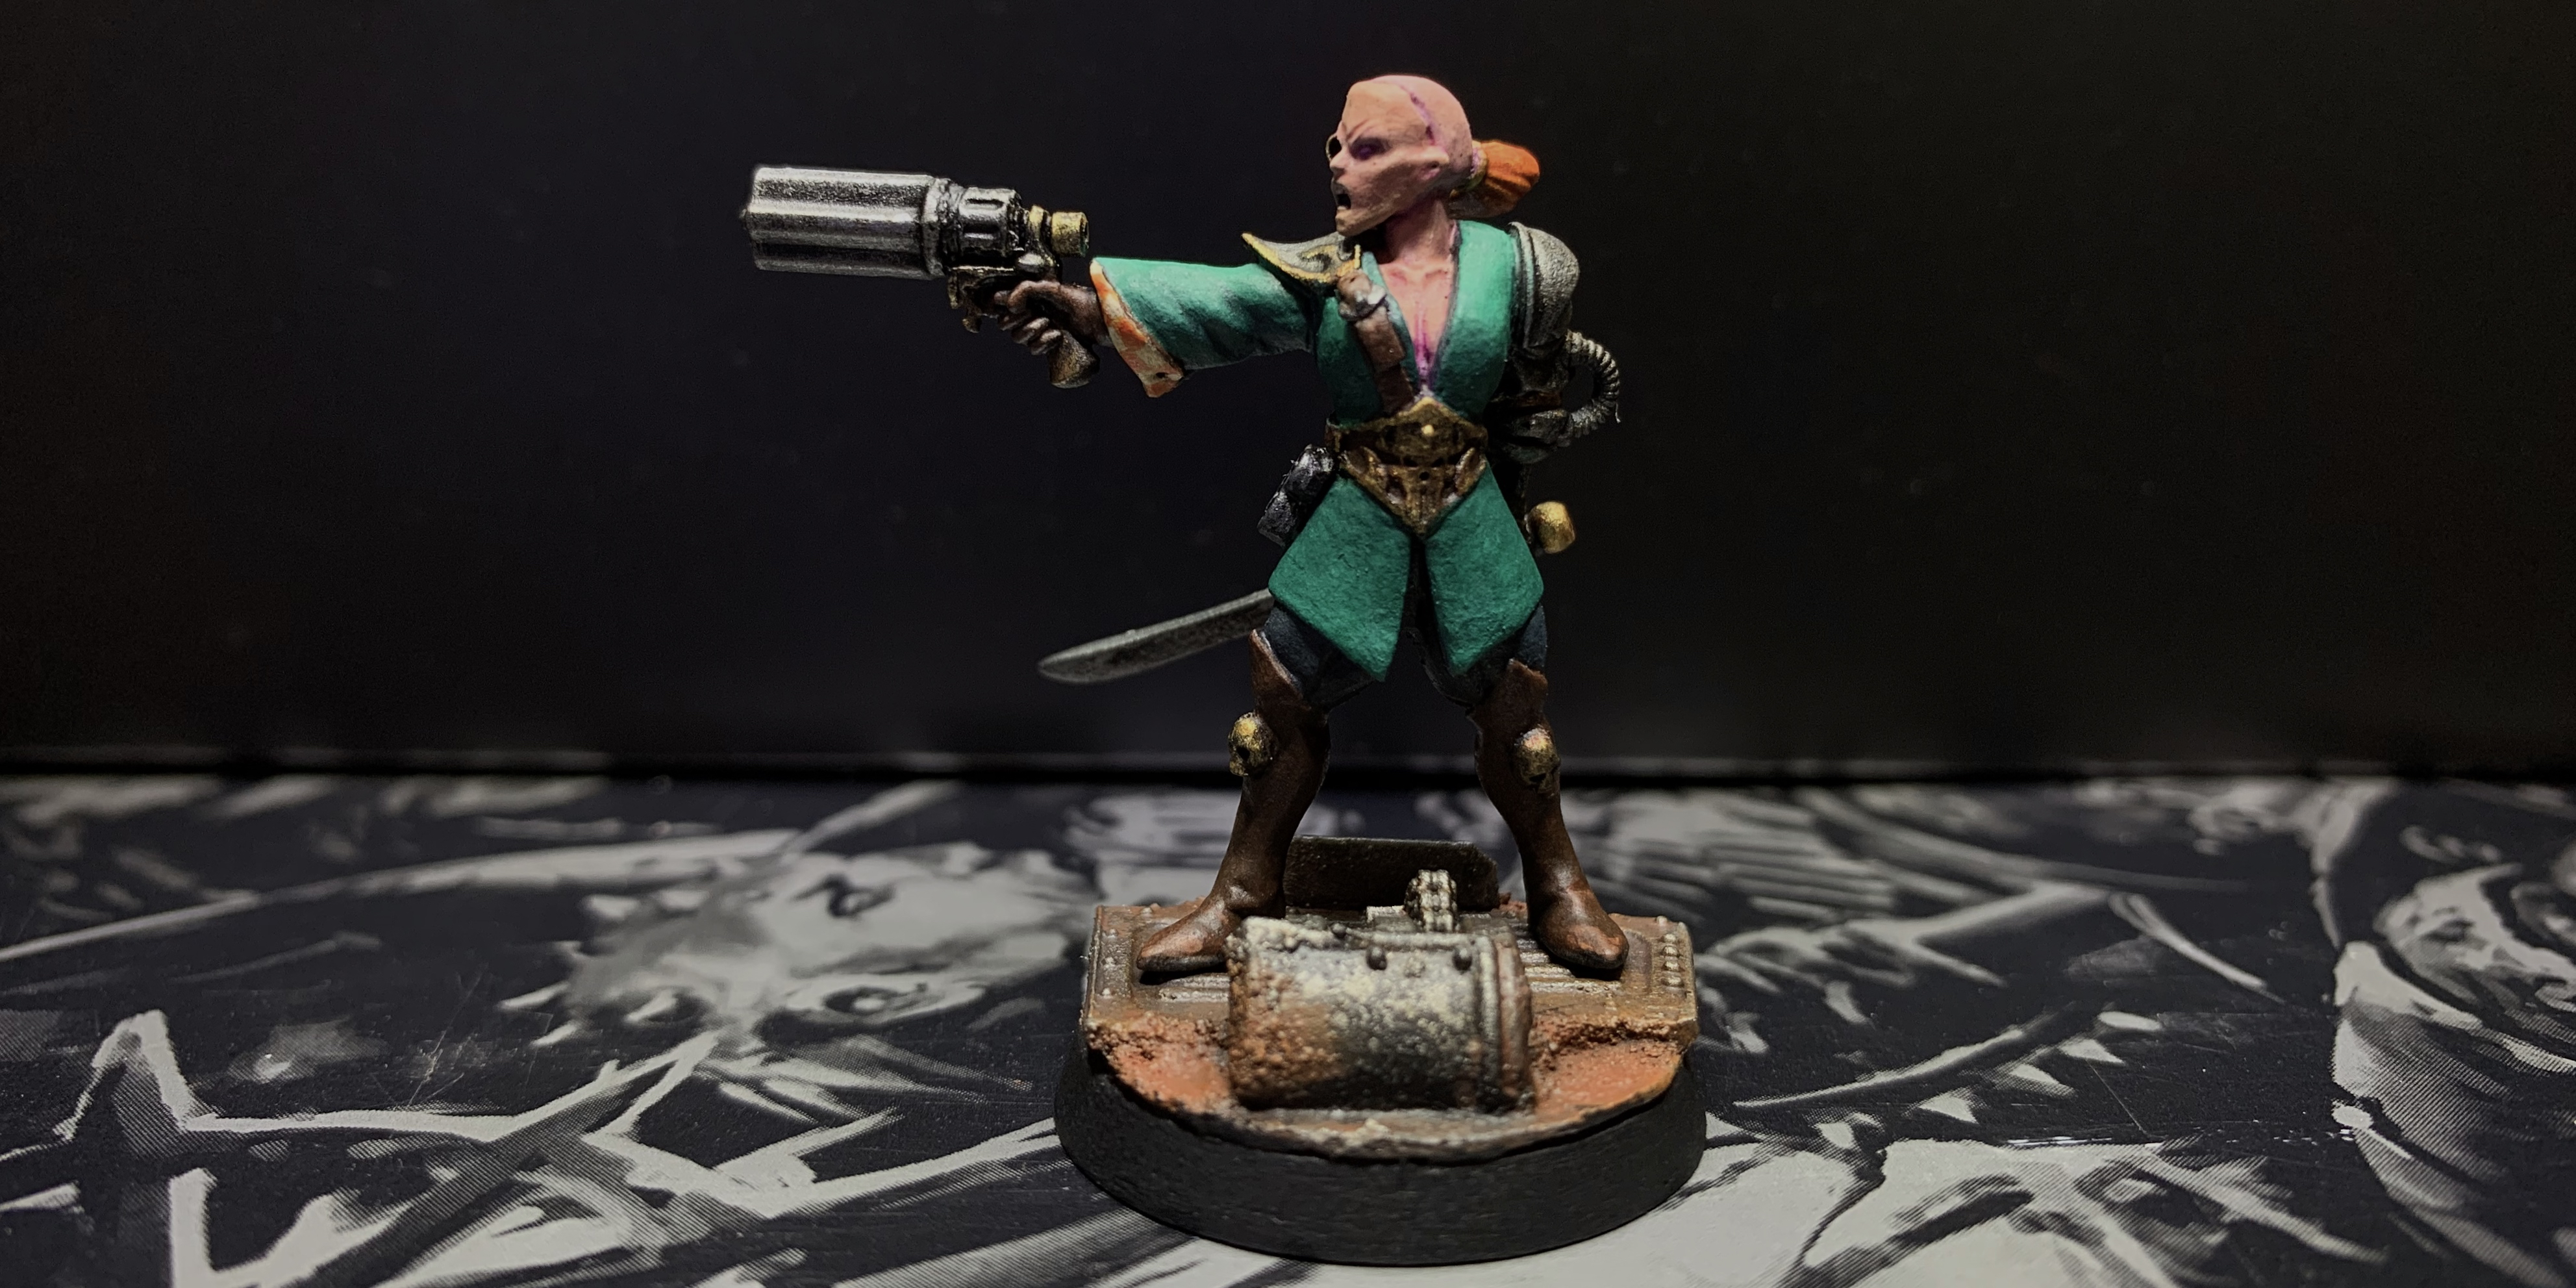 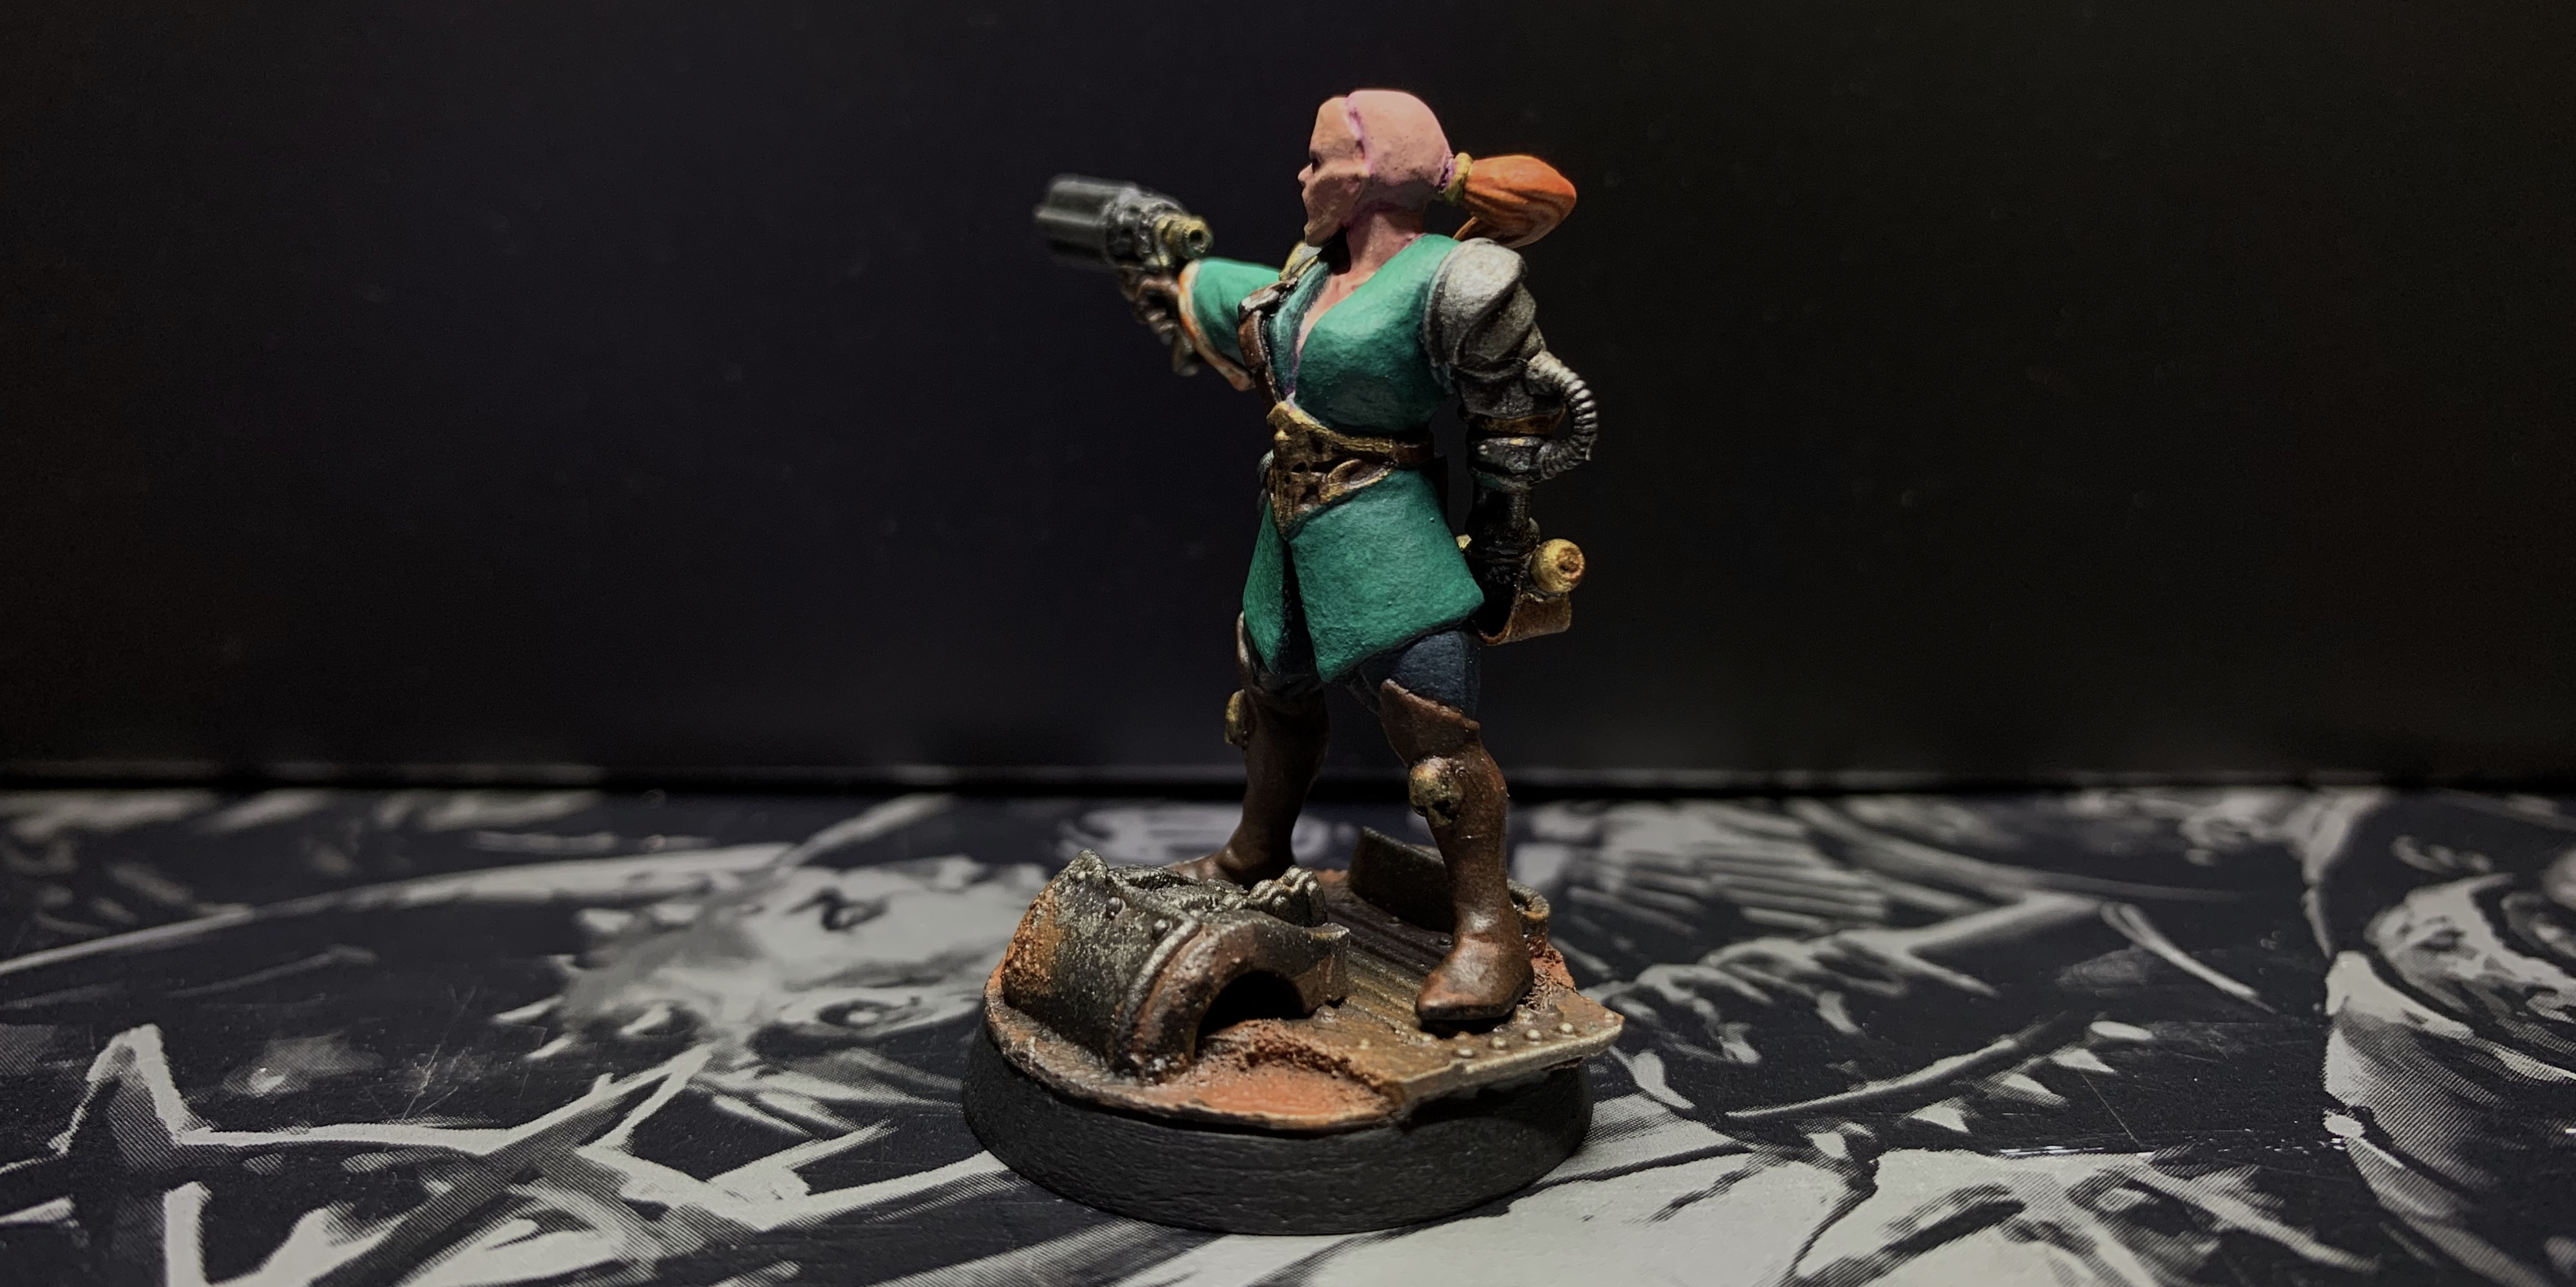 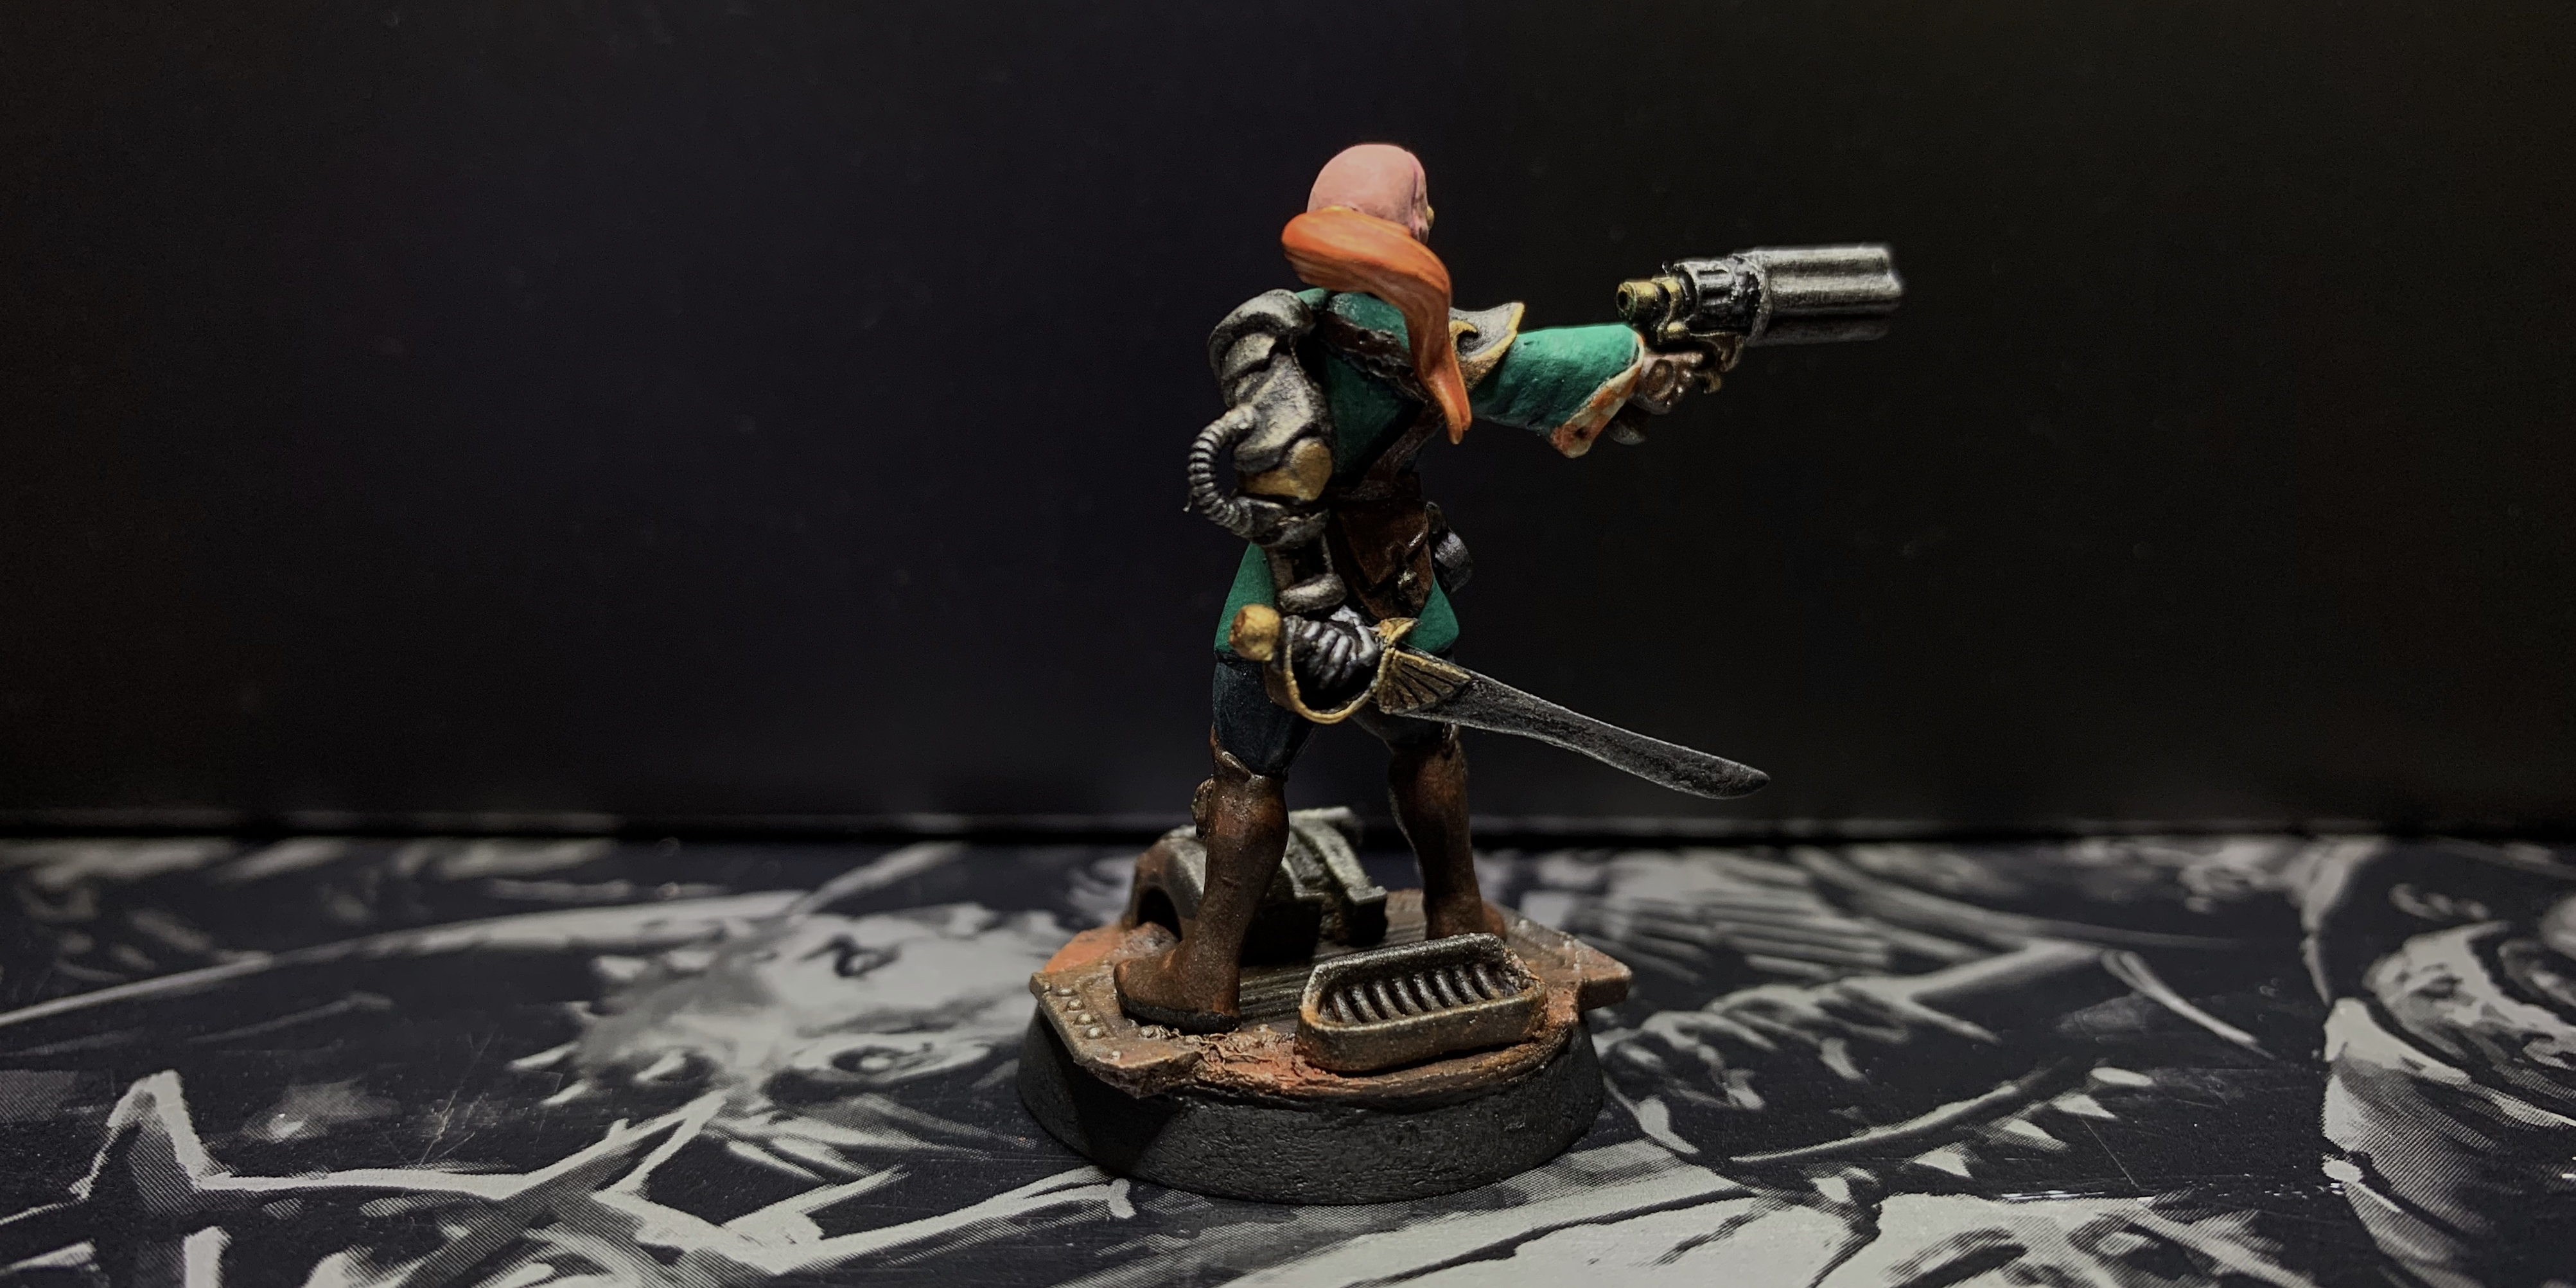
89168
Post by: youwashock
Magnificent.
10505
Post by: Mellon
Awesome!
1124
Post by: Captain Brown
Nice story to go with the figures.
Cheers,
CB
35419
Post by: Lamby
youwashock wrote:Magnificent.
Mellon wrote:Awesome!
Captain Brown wrote:Nice story to go with the figures.
Cheers,
CB
Thanks All!
When you don't seem to be making progress, make bases...
Doing a lot of minor fiddle bits on a few new models gets me frustrated because at times you just can't see real progress being made - so to keep the mojo high, I often just make bases!
The Necromunda bases are nice but you know by now I can't leave any model unconverted, so this:
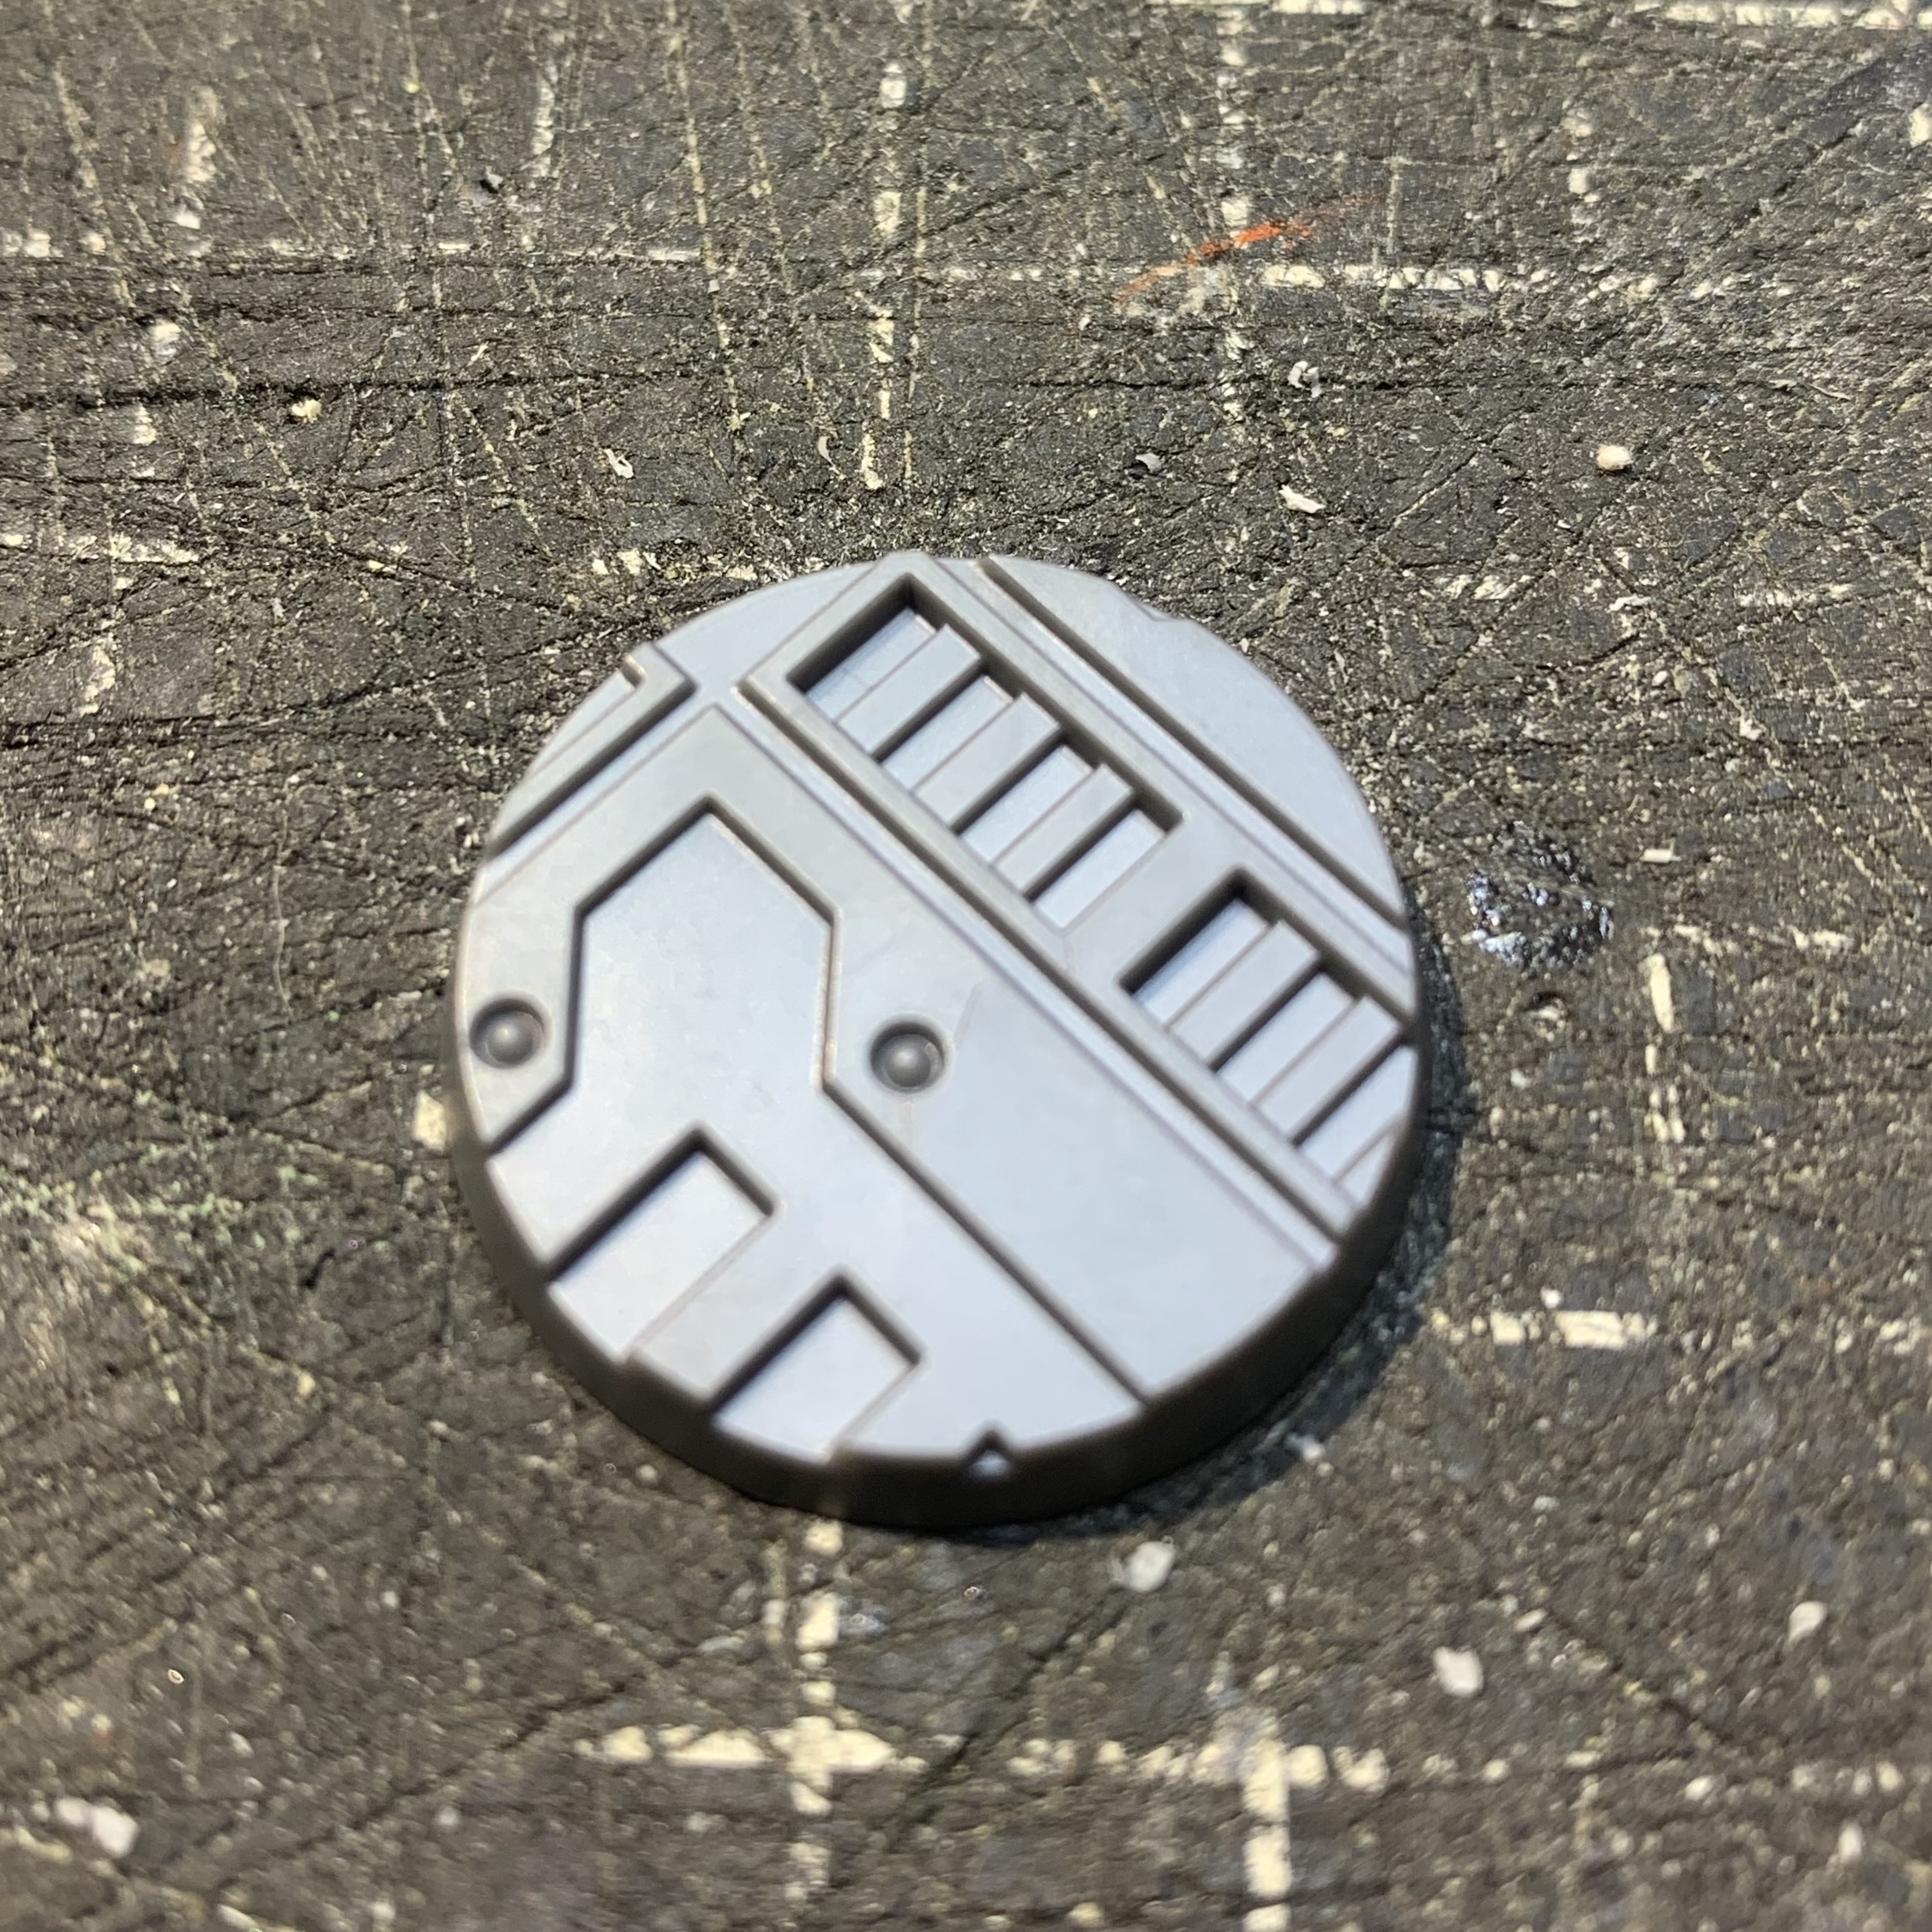
Became this:
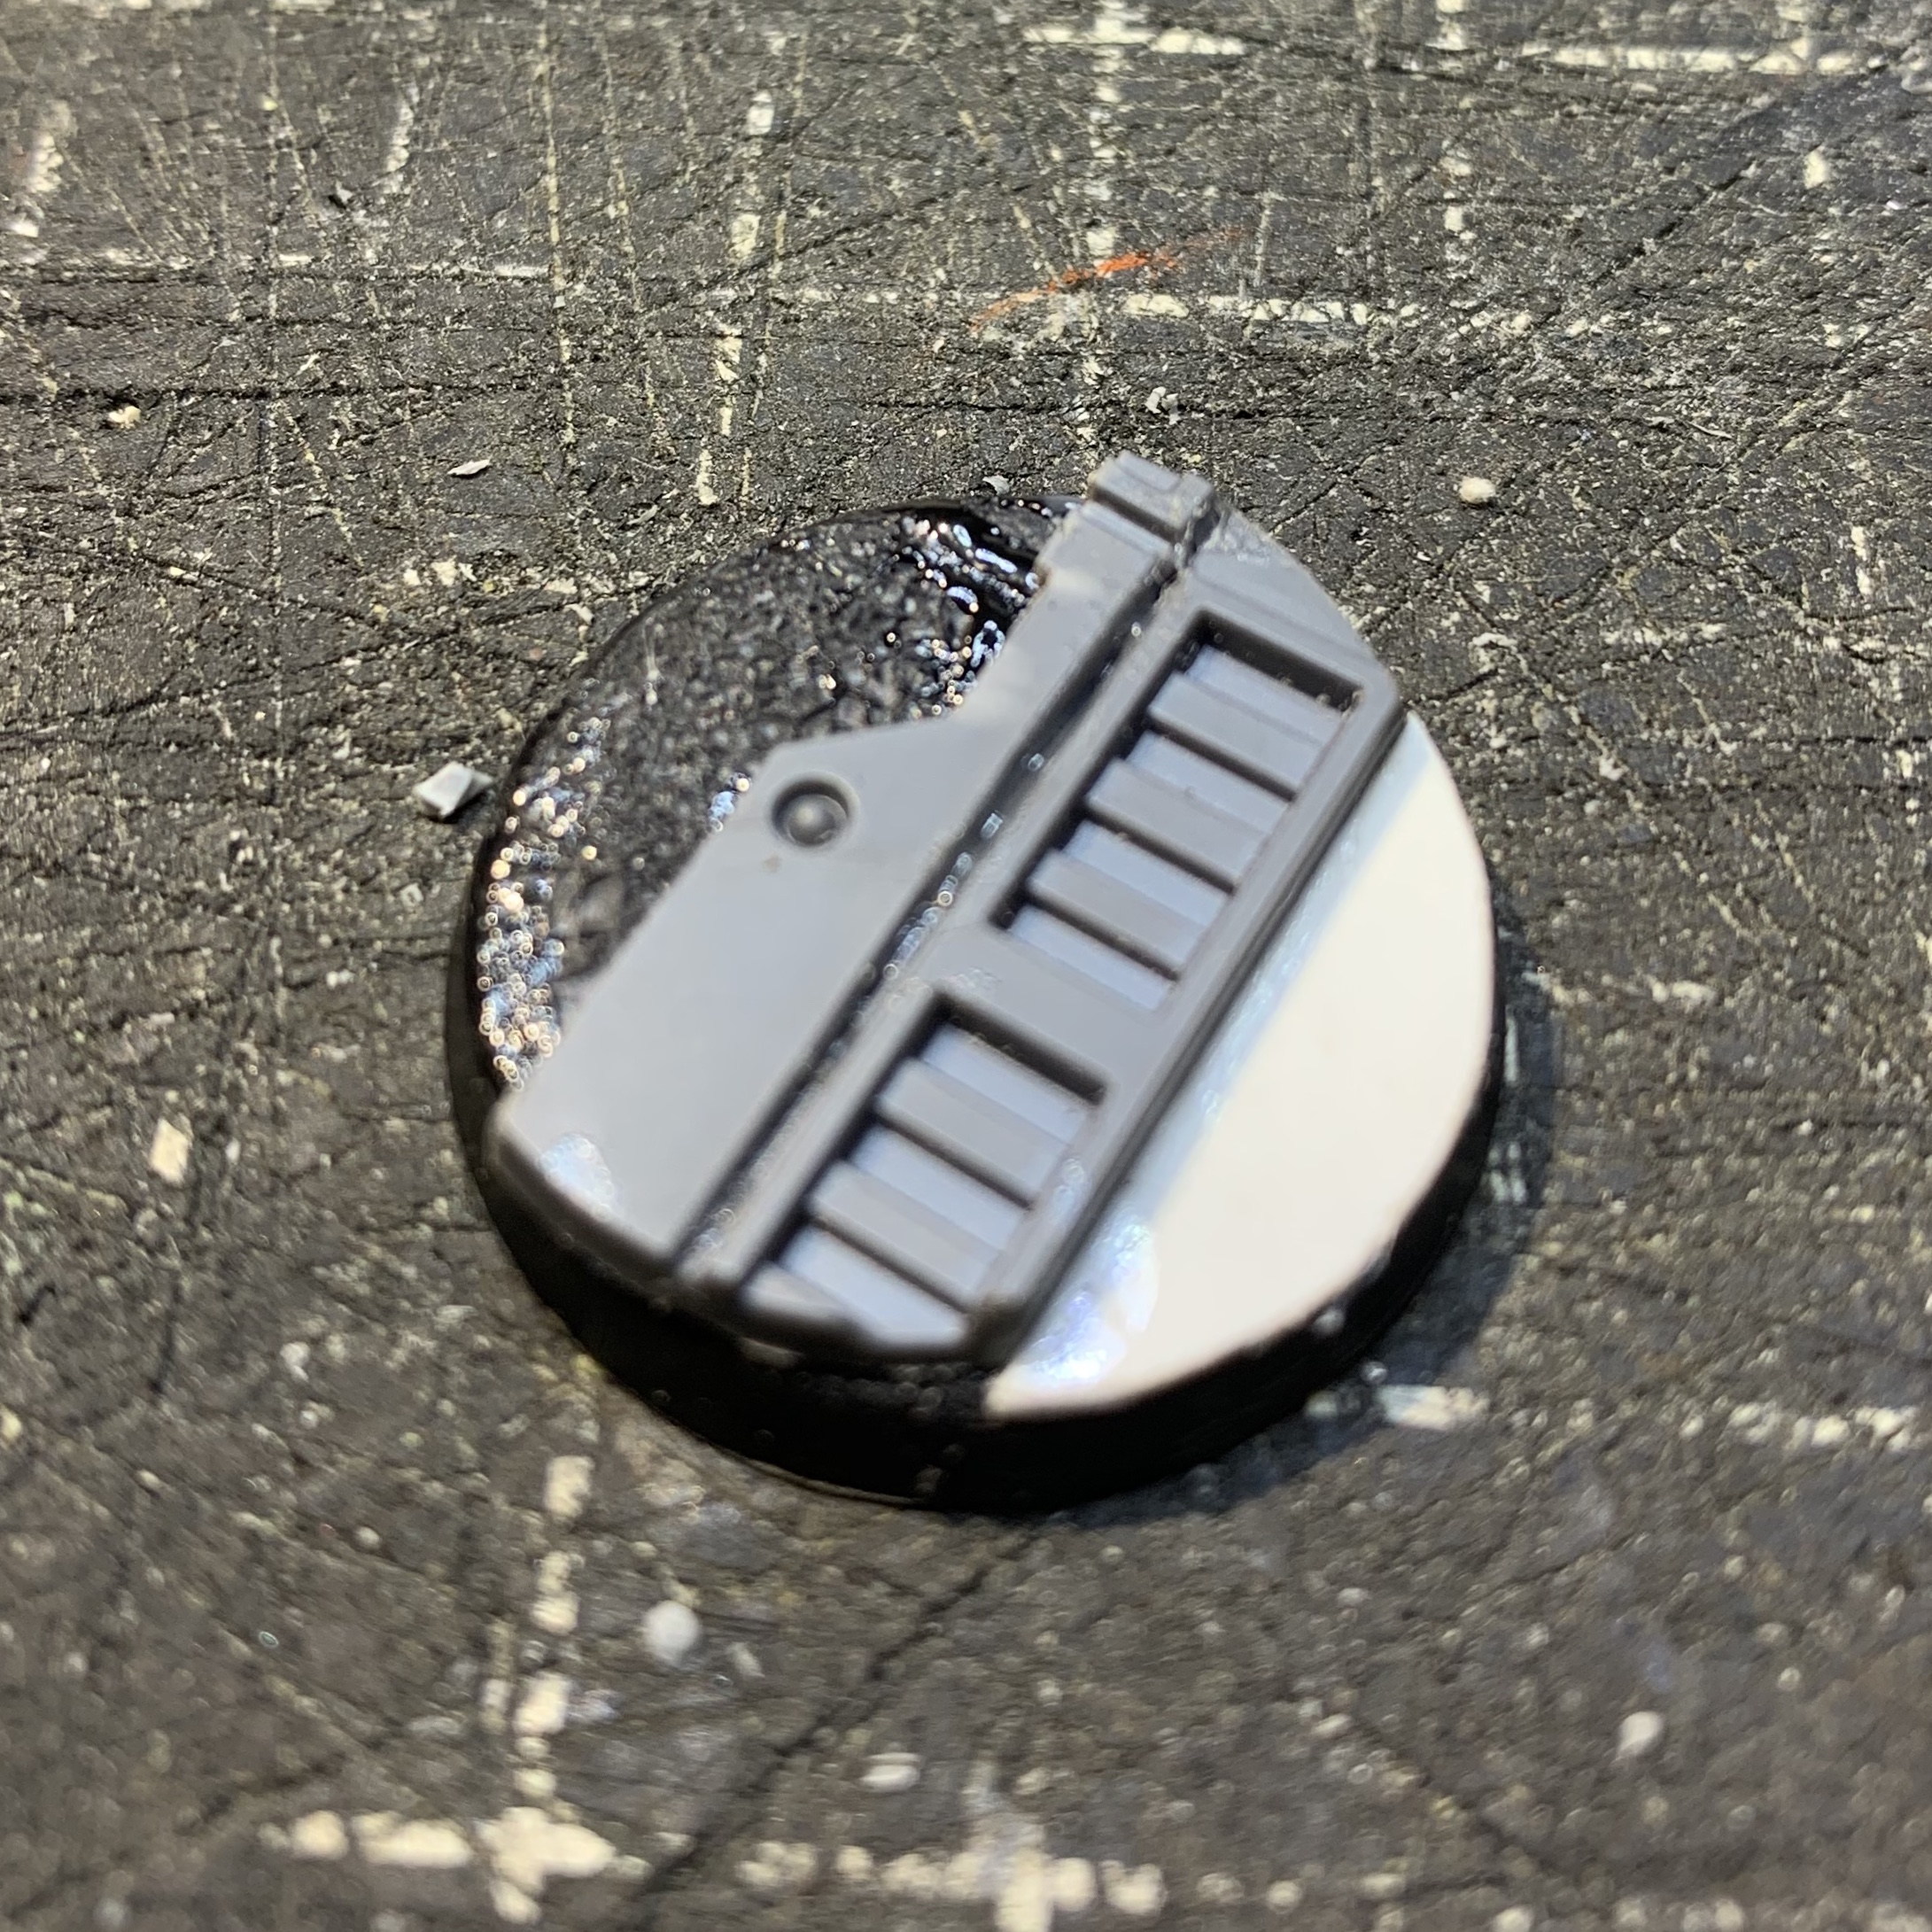
Which then became this:
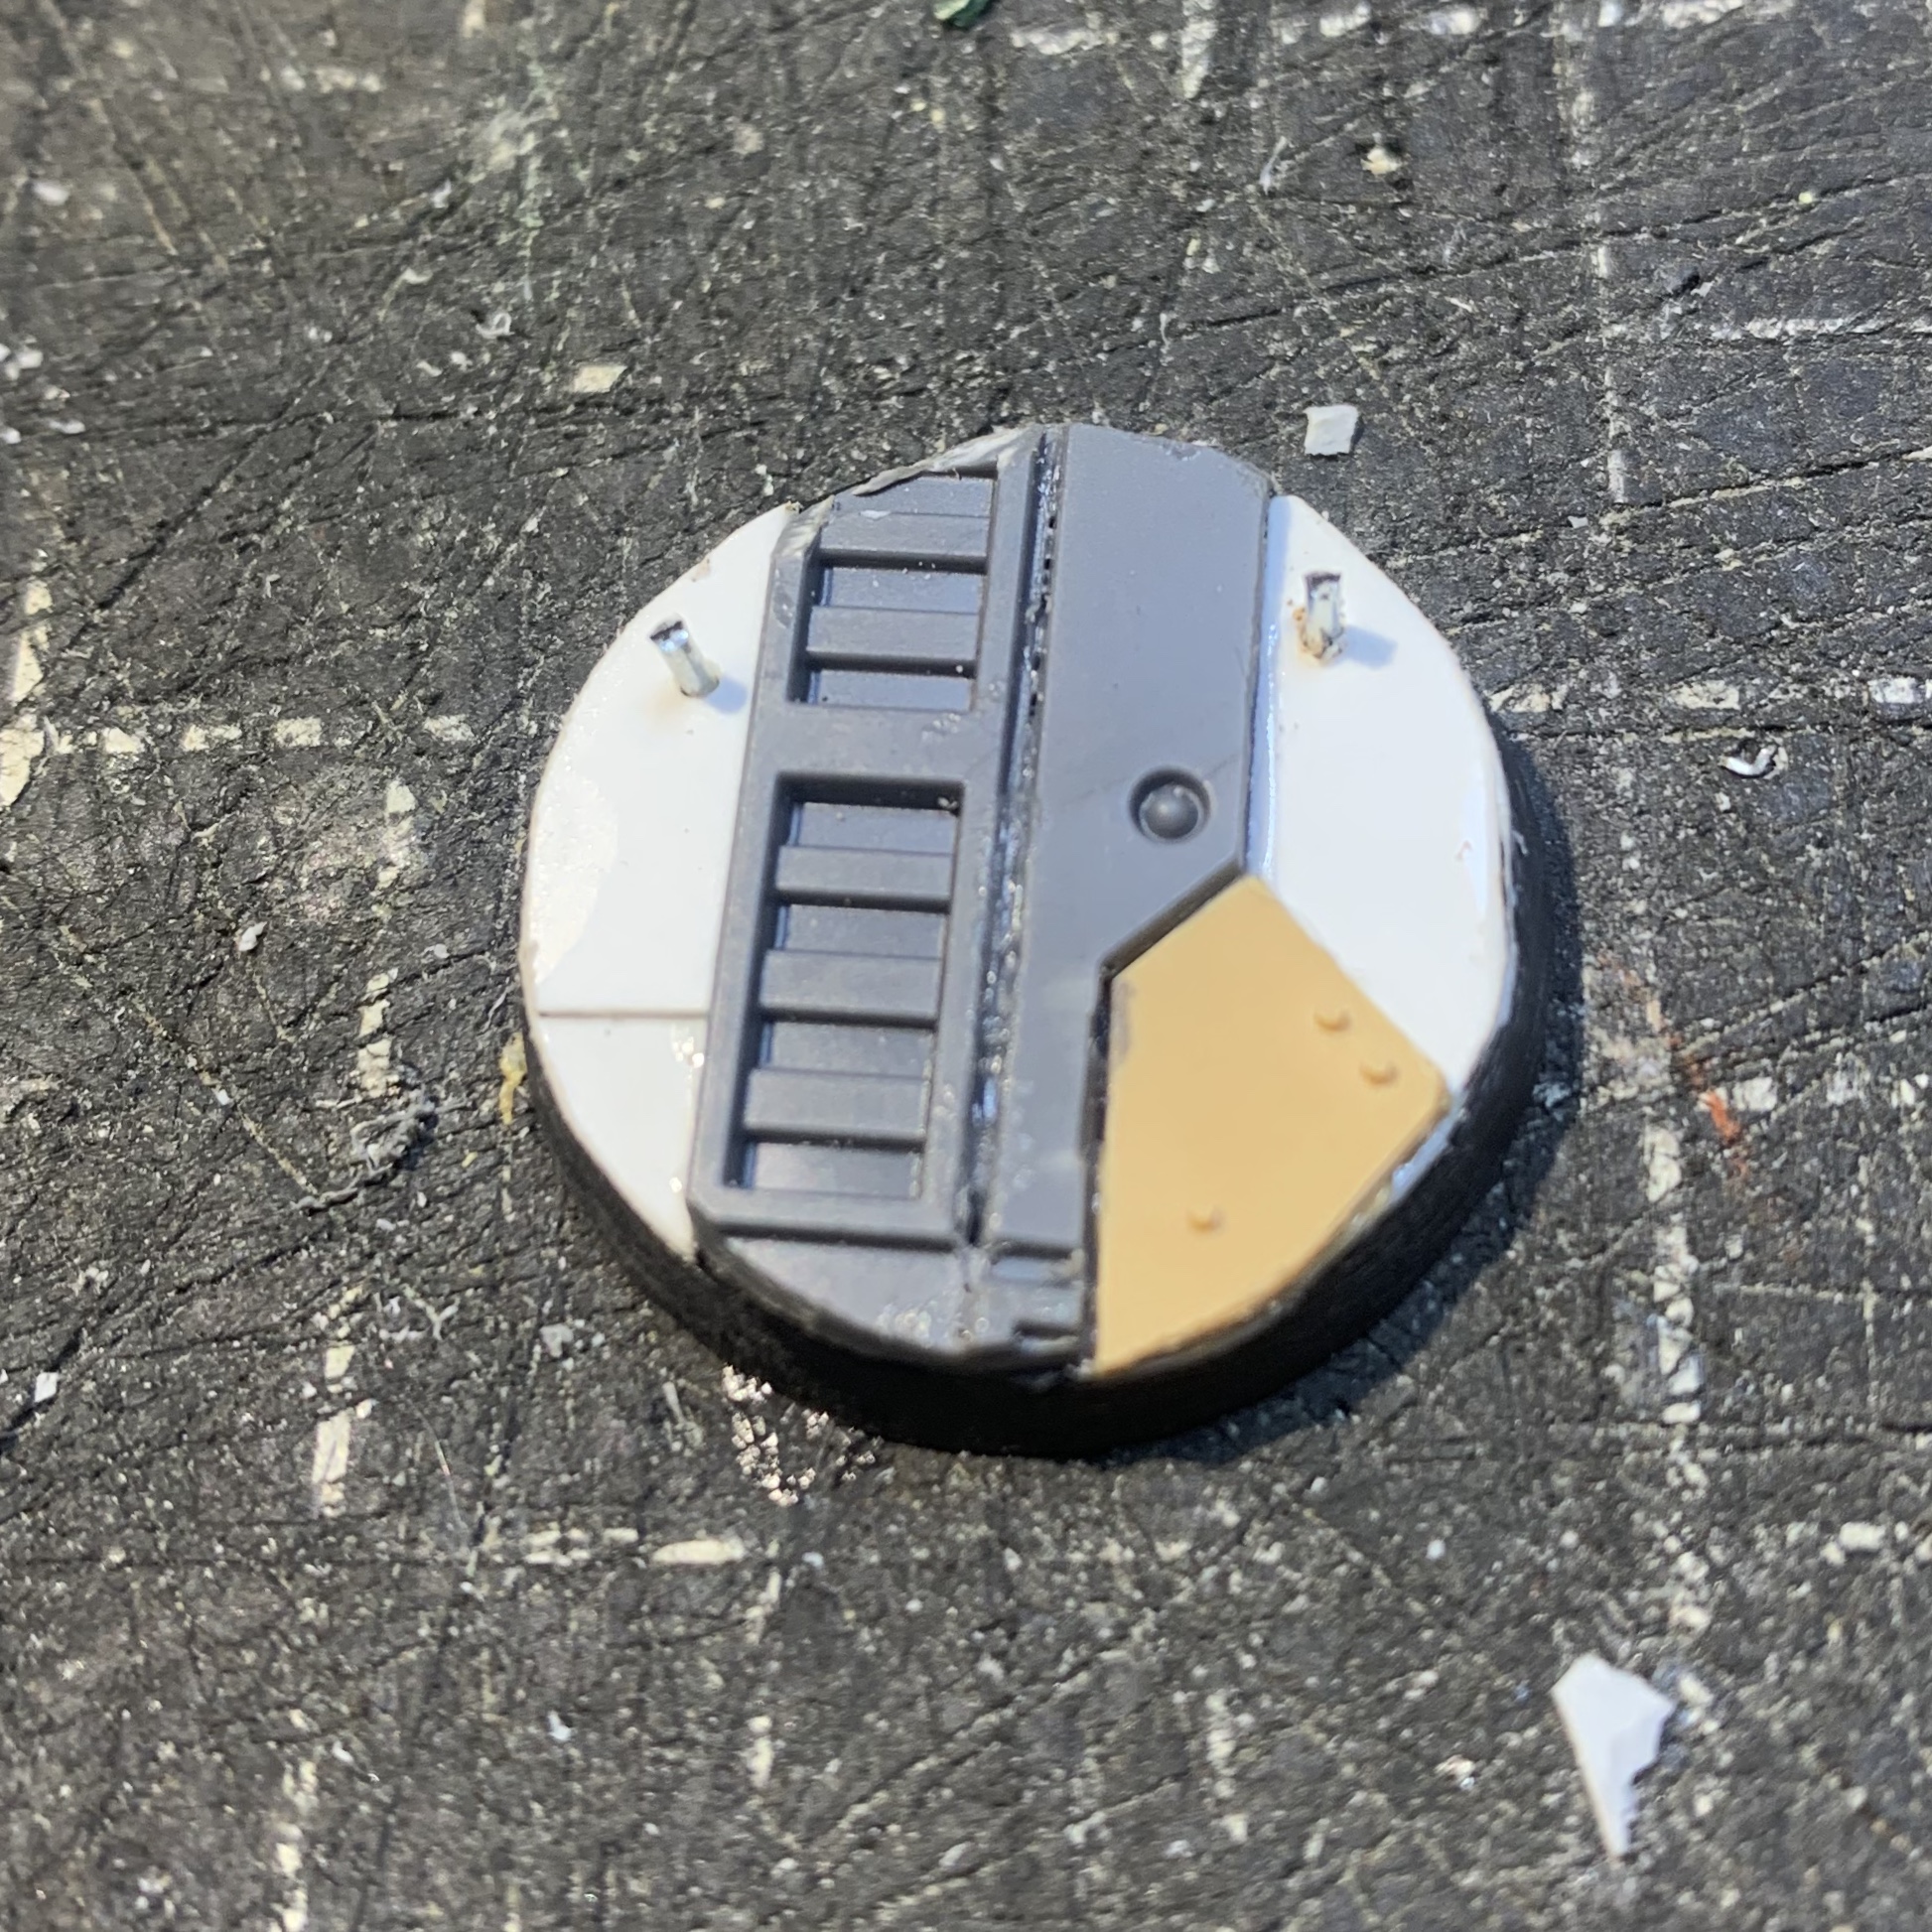
More to follow - thanks for looking!
62749
Post by: Dr H
Good job on getting the squad finished. Look great.
35419
Post by: Lamby
 Dr H wrote: Dr H wrote:Good job on getting the squad finished. Look great.
Thanks Dr H!
Something new is coming...
Having taken the better part of four years to complete both the Ordo Xenos and Rogue Trader crews, and with the Ordo Hereticus crew almost ready for paint, I was recently writing fluff vignettes when the inter-linked story took off on its own in a direction I'd not ever envisaged - but am now really excited by.
I'll do a fluff reveal in a bit - after the Witch Hunters - but here's a little taste of someone new - the Hoplite:
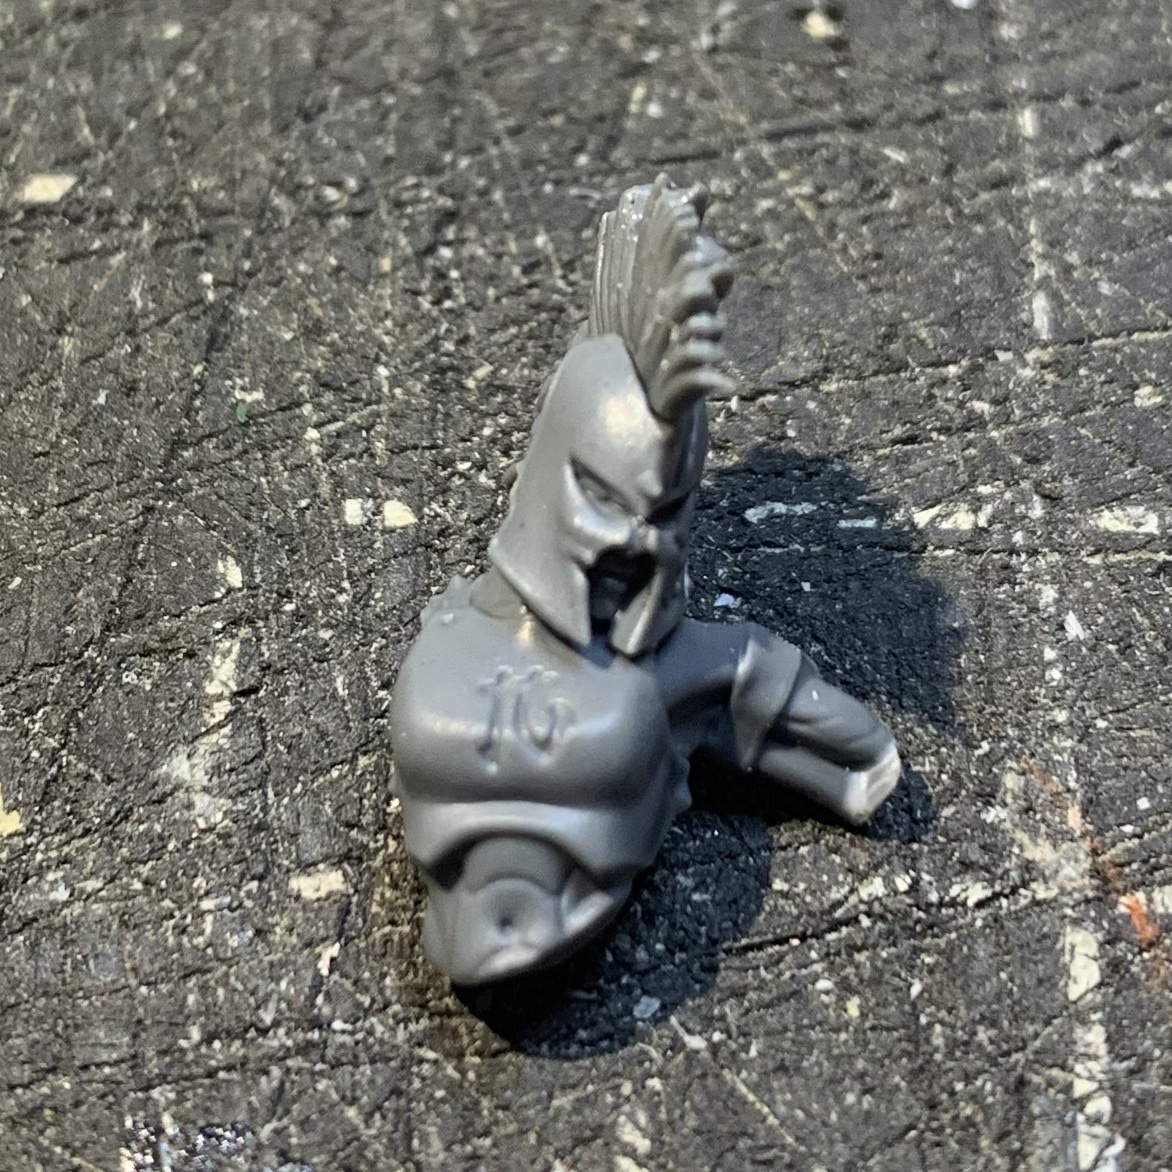
She's so far made of a Melusai torso and the leftover head from one of the Splintered Fang.
I've forgotten to take a pic of the new left forearm, it's from the Witch Elves banner bearer, but it's now a spear.
The spearhead started life as an old Blood Angels sword:
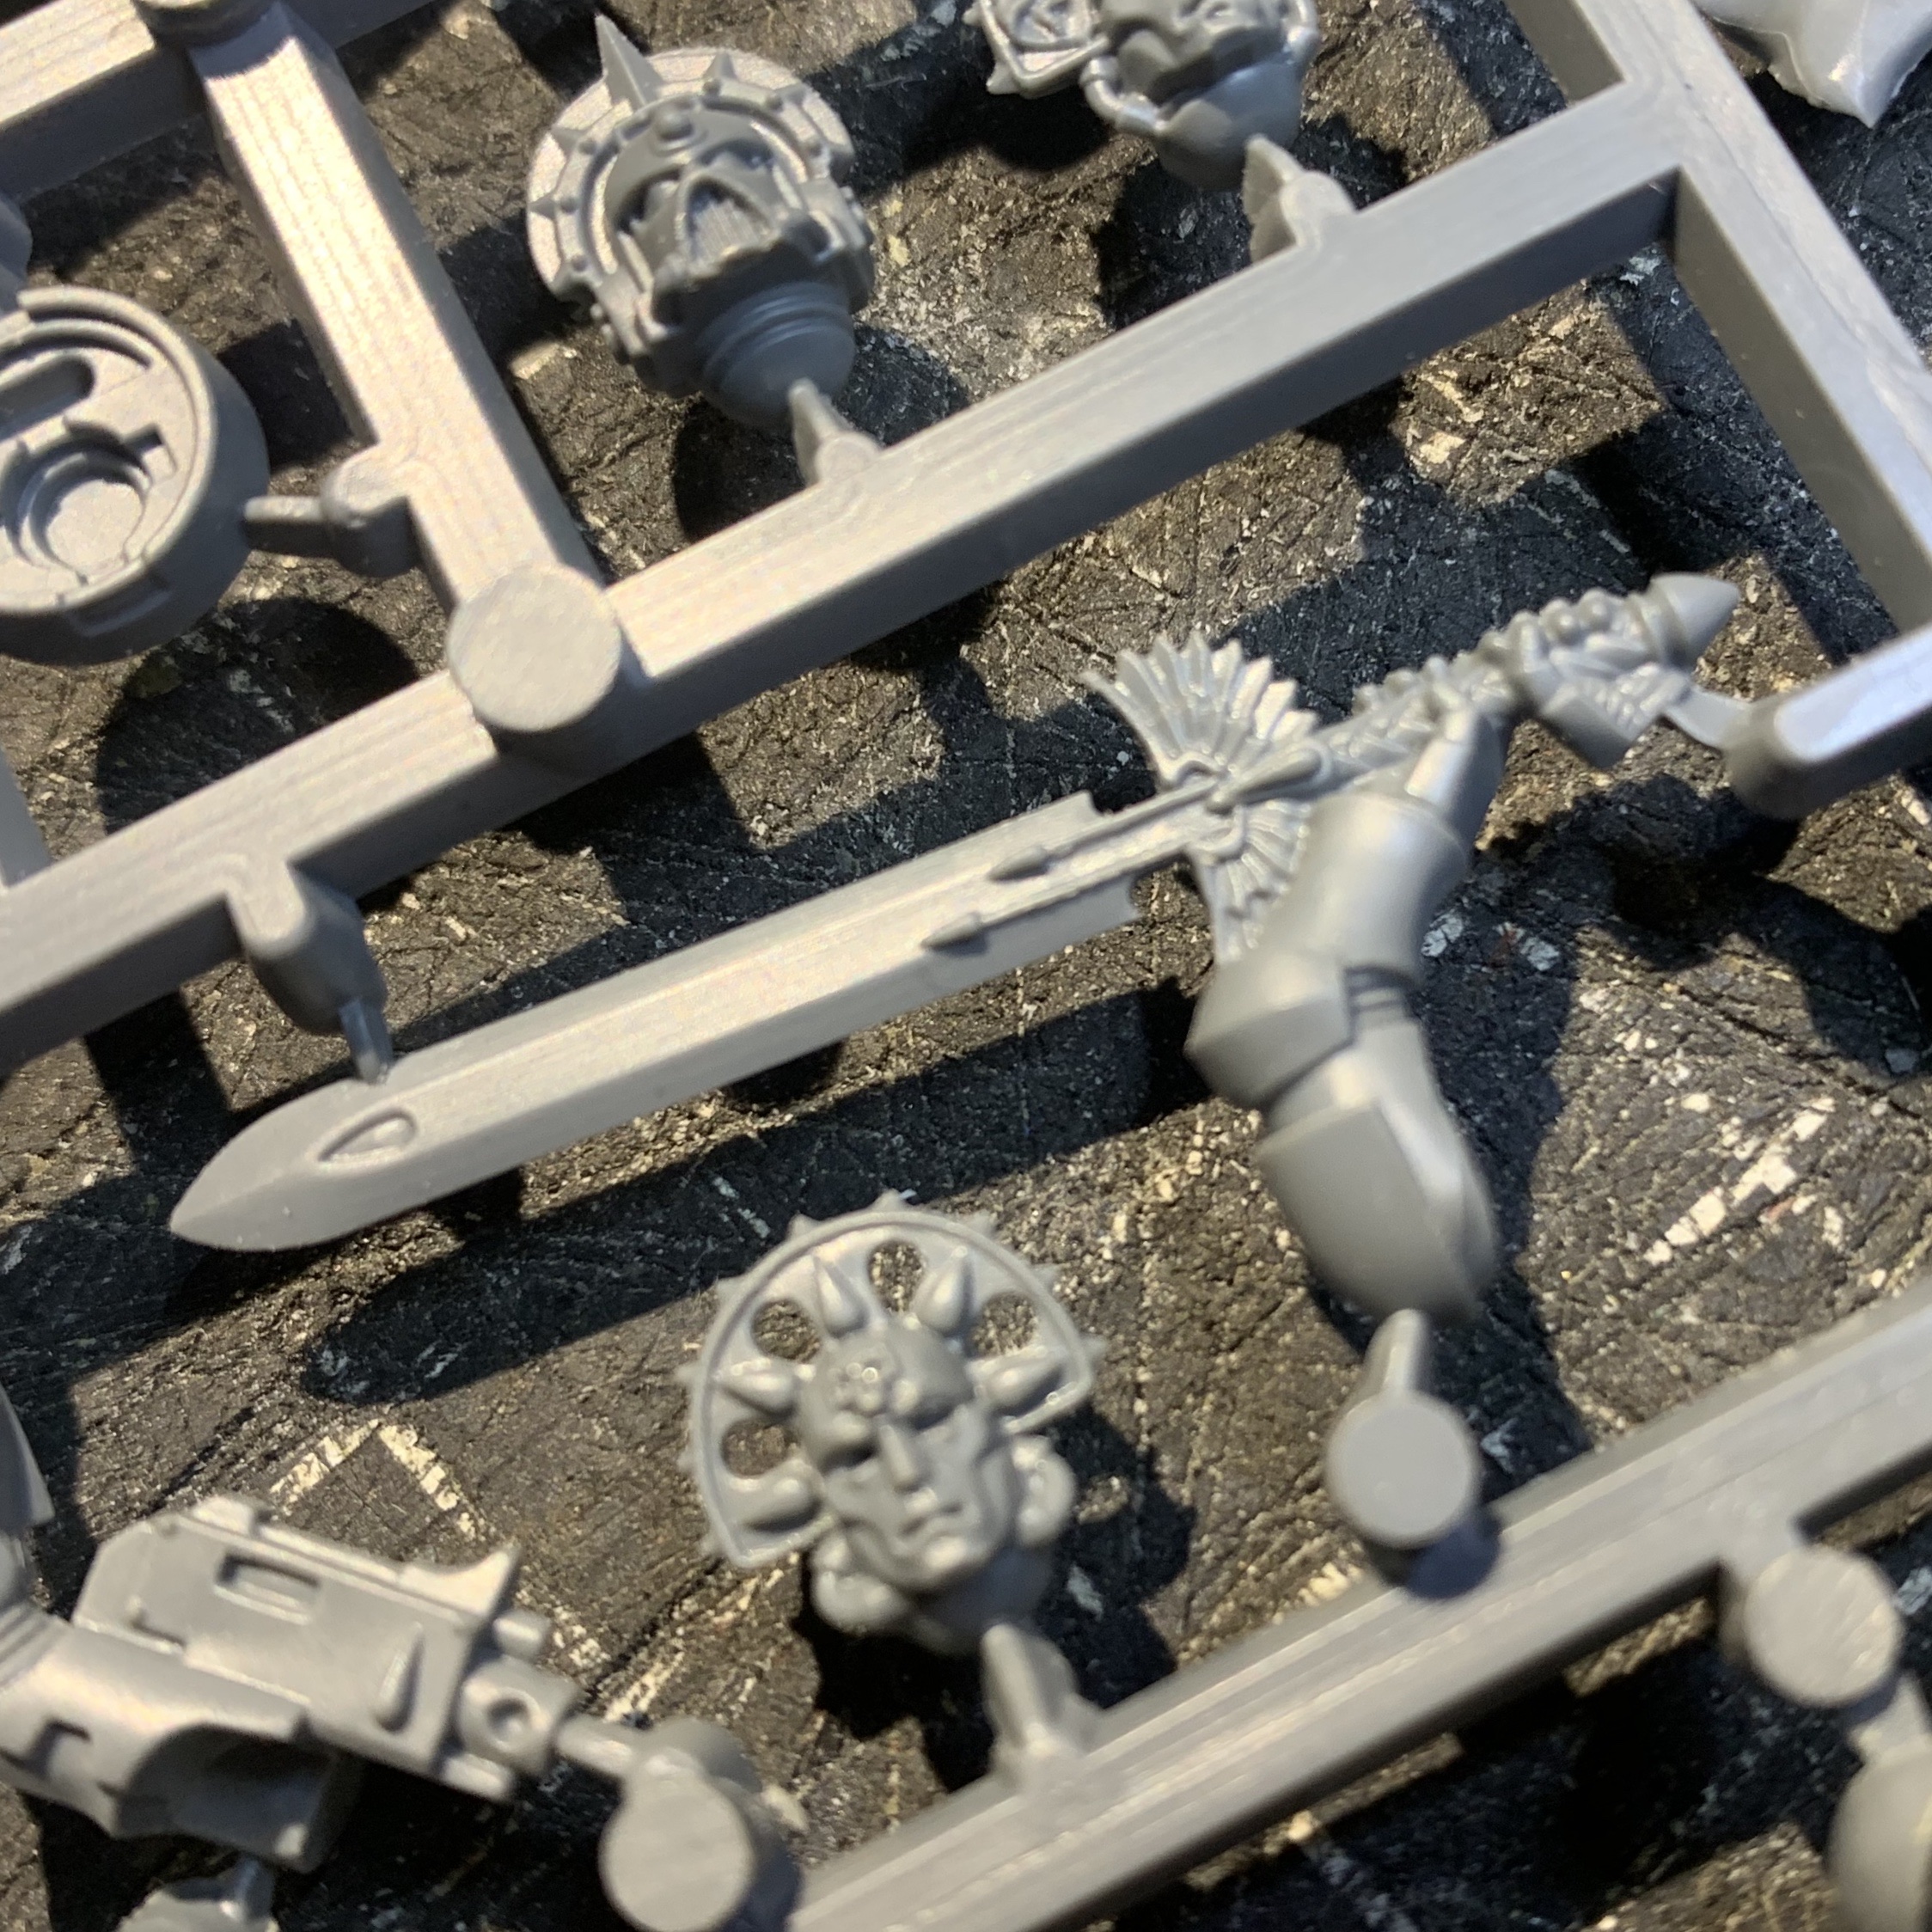
Which - after much faffing about with knives and files and brass and a hacksaw and metal files and epoxy became this:
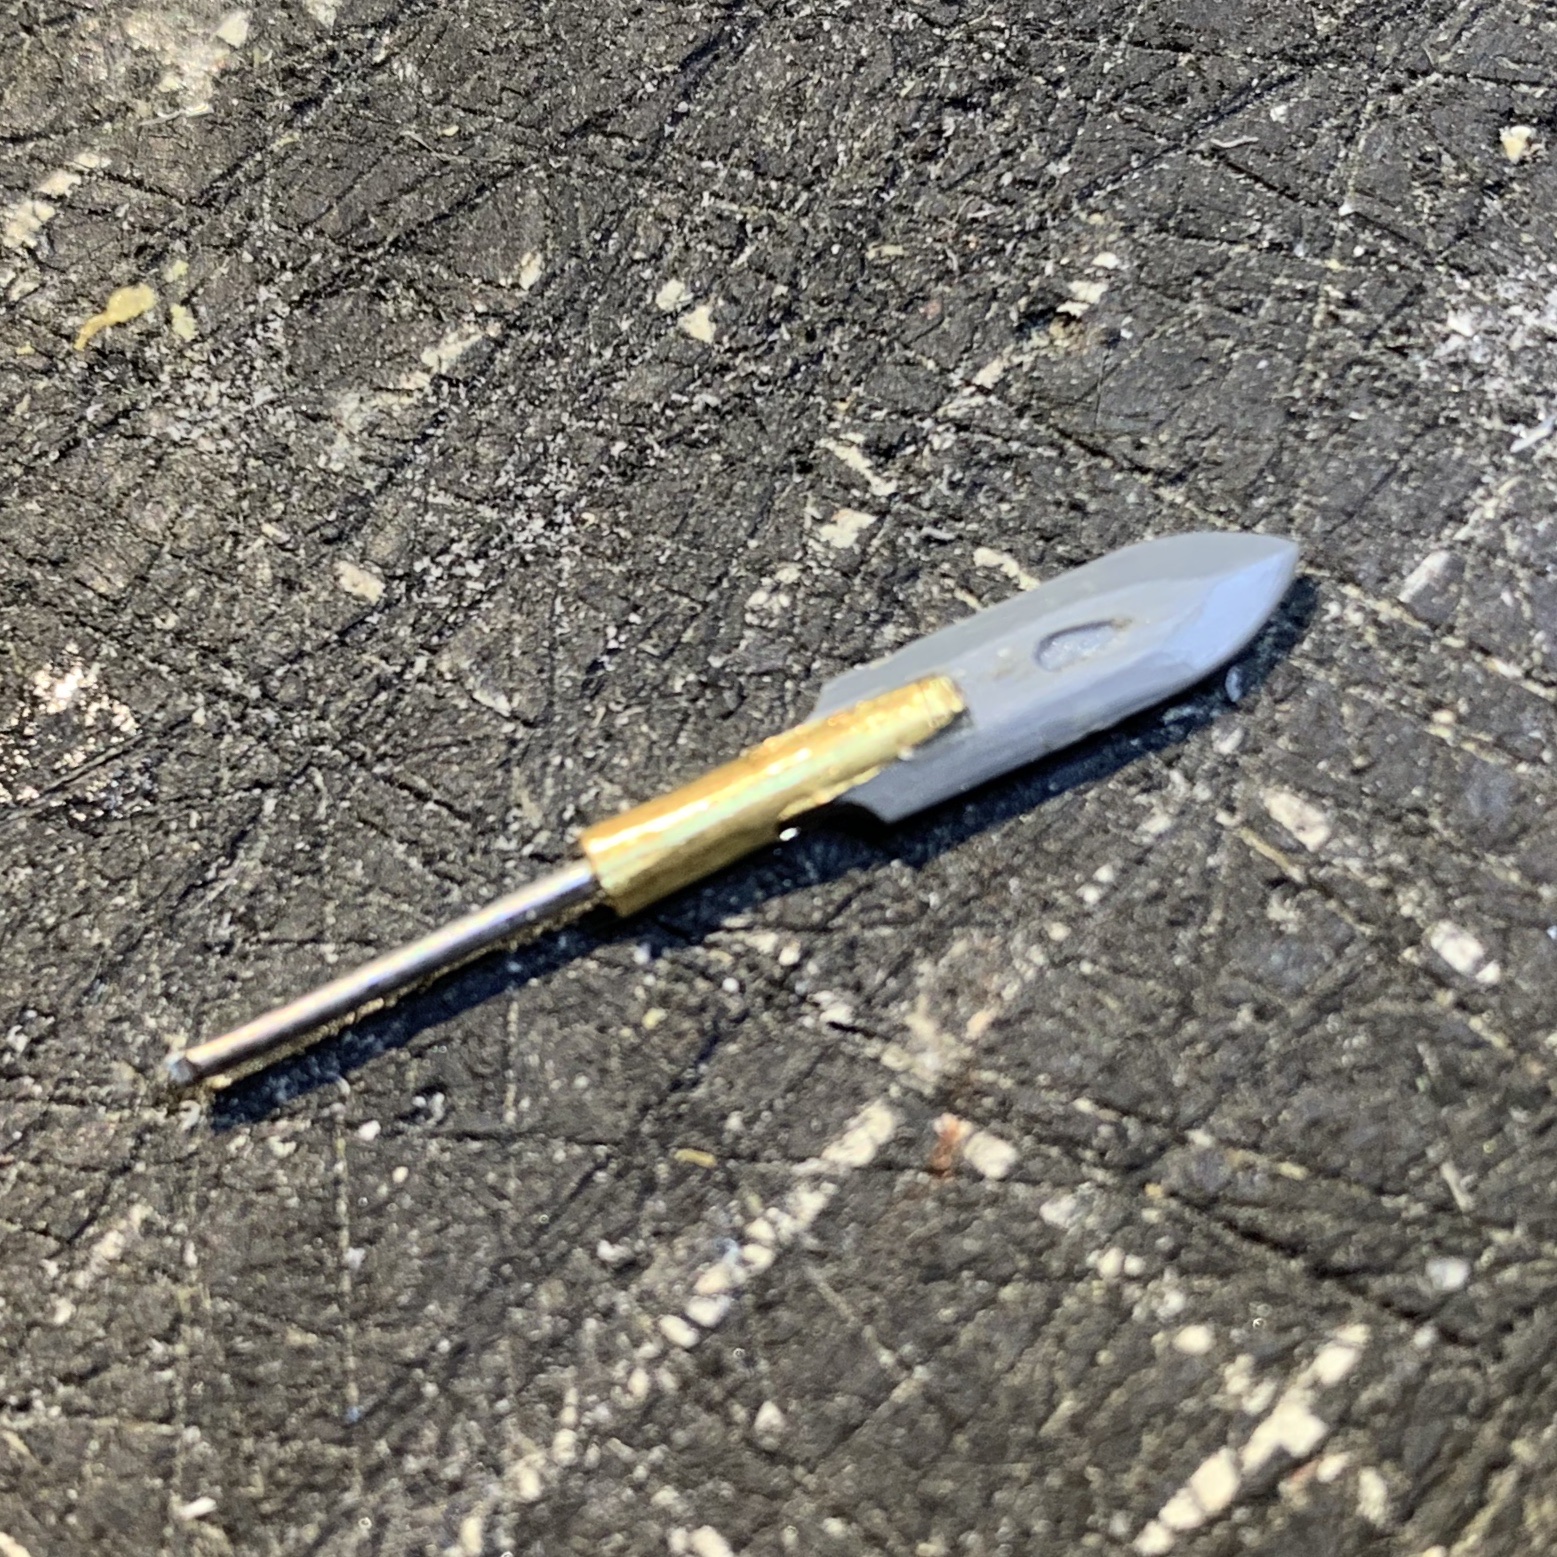
Need to fill in the teardrop and file the brass a little, but I'm pretty happy with it so far.
Thanks for looking!
22619
Post by: inmygravenimage
That's very nice. I'm just working on some custom Amazons so interested to see where you go with this.
89168
Post by: youwashock
This has the makings of greatness.
35419
Post by: Lamby
inmygravenimage wrote:That's very nice. I'm just working on some custom Amazons so interested to see where you go with this.
youwashock wrote:This has the makings of greatness.
Thanks guys!
Completed four of the five (possibly six) bases for the Witch Hunter retinue:

One of them was for the Witch Hunter Interrogator, a very lazy conversion to be honest:

After she stared at me accusingly for a few weeks from the 'to be painted' shelf, I ditched the whip and went for a second (bigger) gun, and some quick-load magazines:


It was then noted by a few 'other' forum members that both weapons looked like they were drum-fed, rather than curved-mag fed - which is how it reads visually.
I've seen others make some nice models with the Escher sculpts but I just don't seem to be able to with the base models - so after looking at the lazy conversion from the previous post I realised she was going to have to be reduced to a blank canvas.
(this is a 2nd body - the original still exists):

The coat is gone too - but let's move on!
Made a new weapon arm:

Made an addition to the rear armour section to hide some over-exuberant knife work:

And then added the left arm, which brings us to the basic concept:

The over-shoulder weapon is going to be a sort of power pole-arm/axe, the gun-arm will be aiming with the head aligned...
It was about now I realised there were two distinct concepts going on here (from the same base model) - so the on-the-shoulder axe lady above has been shelved, and I'm back to detailing the coat-and twin-gun lady - new head inbound.
Any and all suggestions are always welcome!
In addition, as part of my (currently secret) post-Witch Hunter project, a certain character will be holding the weapon (in pic below) down by their side, and you don't have your finger on the trigger when you do that!
So, took the two bits here:

Cut and combined them to make this - safety first!

Next I cut the hand off the arm and slotted a pin through the hand into the weapon to make the lower section of the grip - but I forgot to take a pic, so until next time...
More to follow.
89168
Post by: youwashock
Always cool to see the creative process at work. Looking forward to seeing how they turn out.
35419
Post by: Lamby
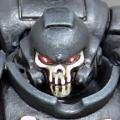 youwashock wrote: youwashock wrote:Always cool to see the creative process at work. Looking forward to seeing how they turn out.
Cheers!
So:
I realised there's two distinct concepts going on with the same base model, so decision made - the Witch Hunter Interrogator will be wearing the coat.
Of course if you've been following along for a while you know nothing in my modelling is ever quite that simple...
You see, since I'd adapted the coat from its proper Escher to fit this one with the straighter stance, it didn't fit over the right shoulder properly... and so this happened:
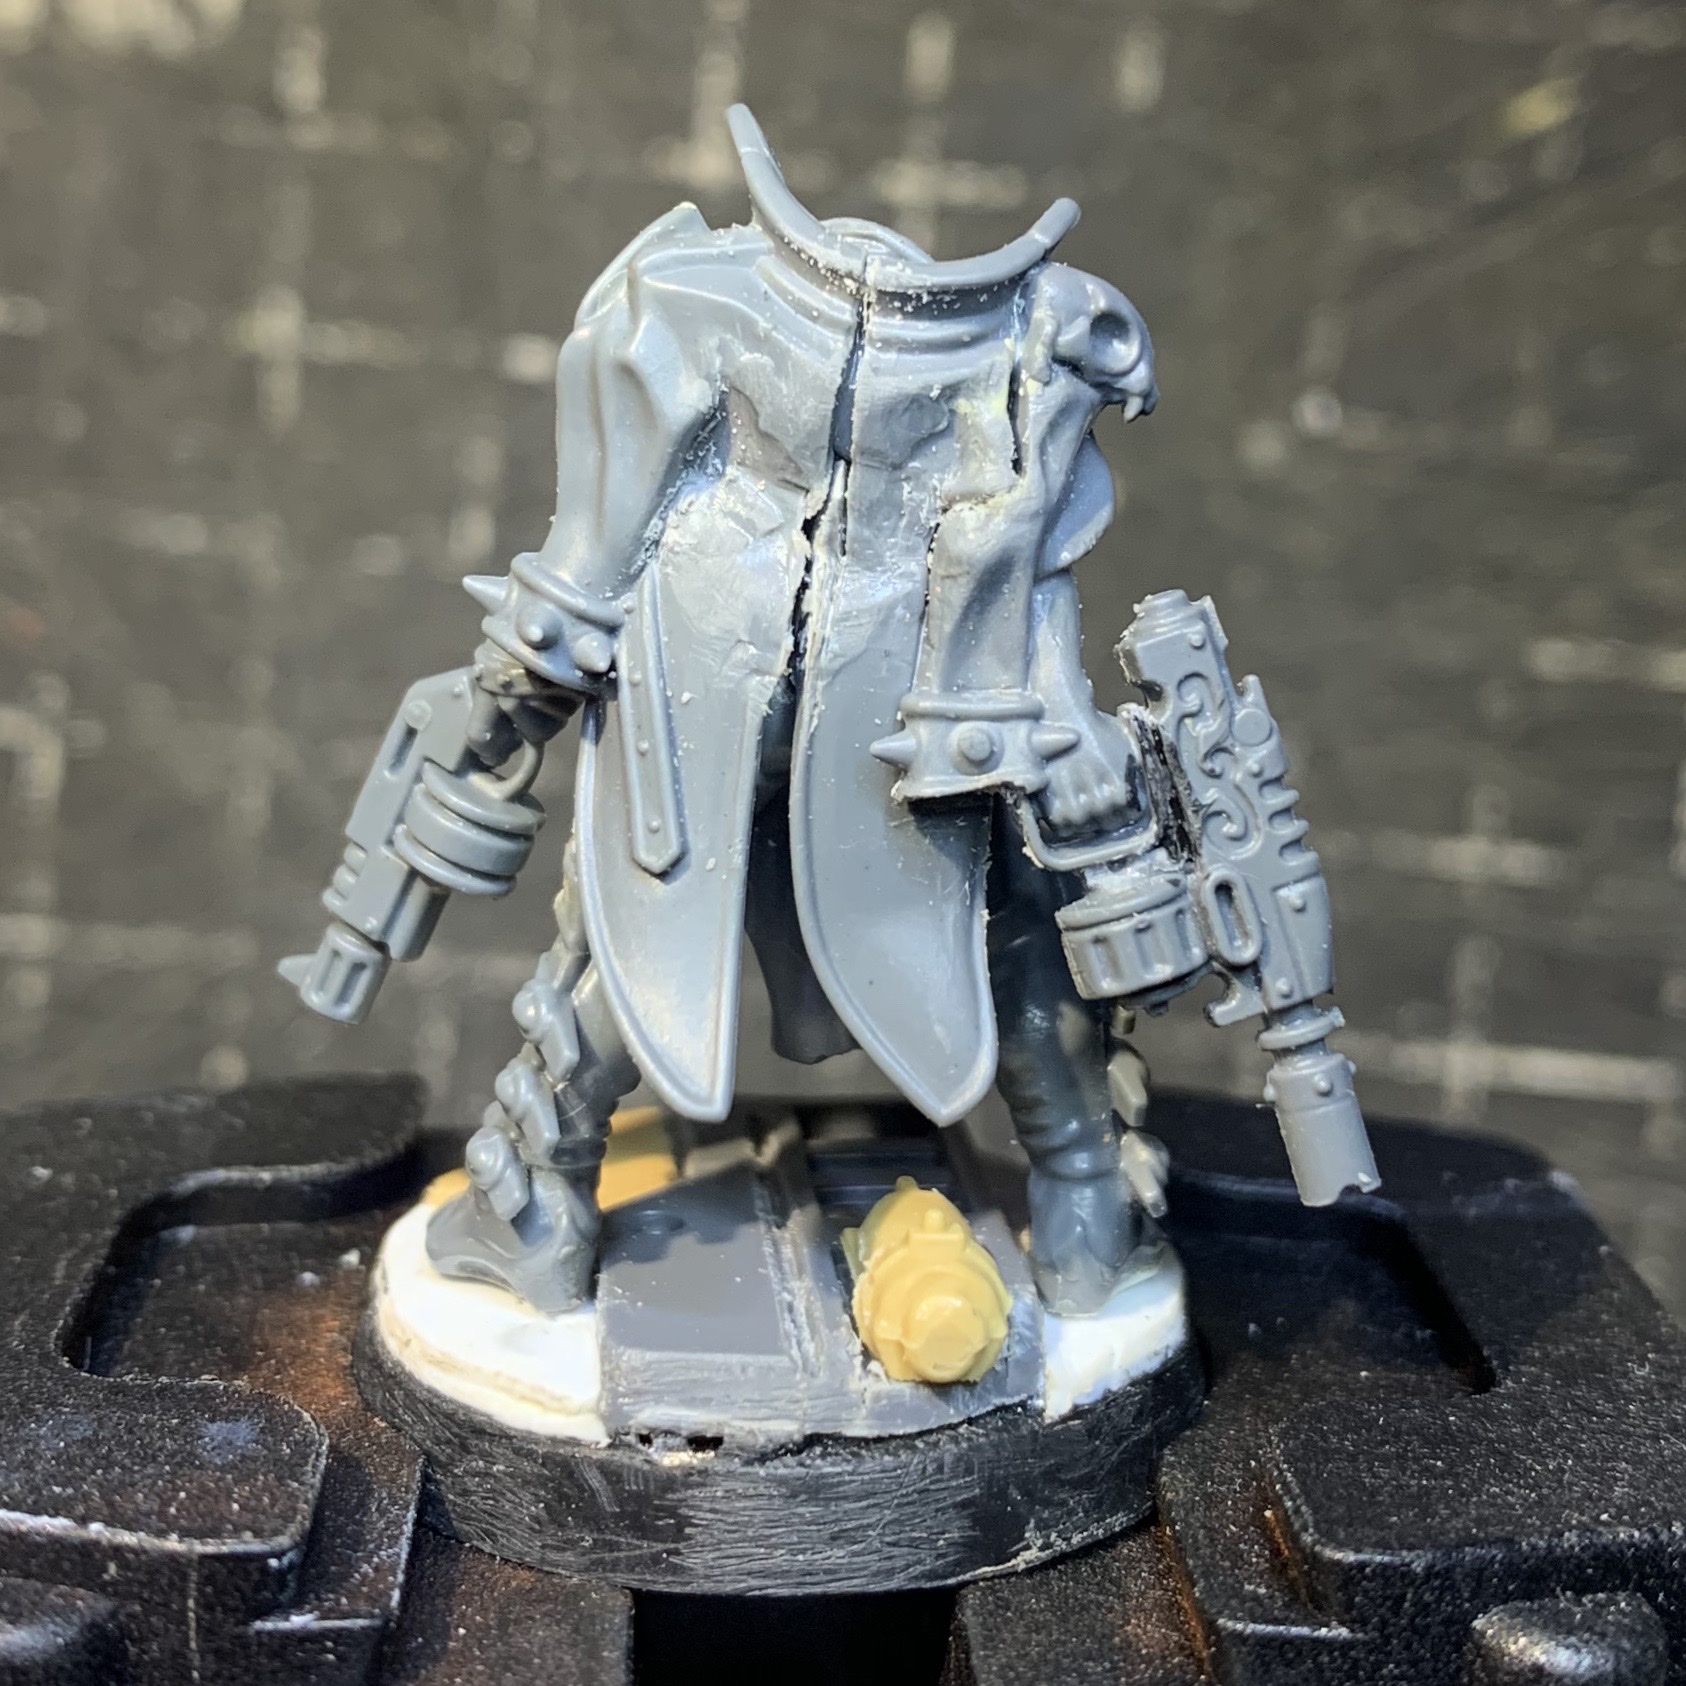
Which then meant this had to happen:
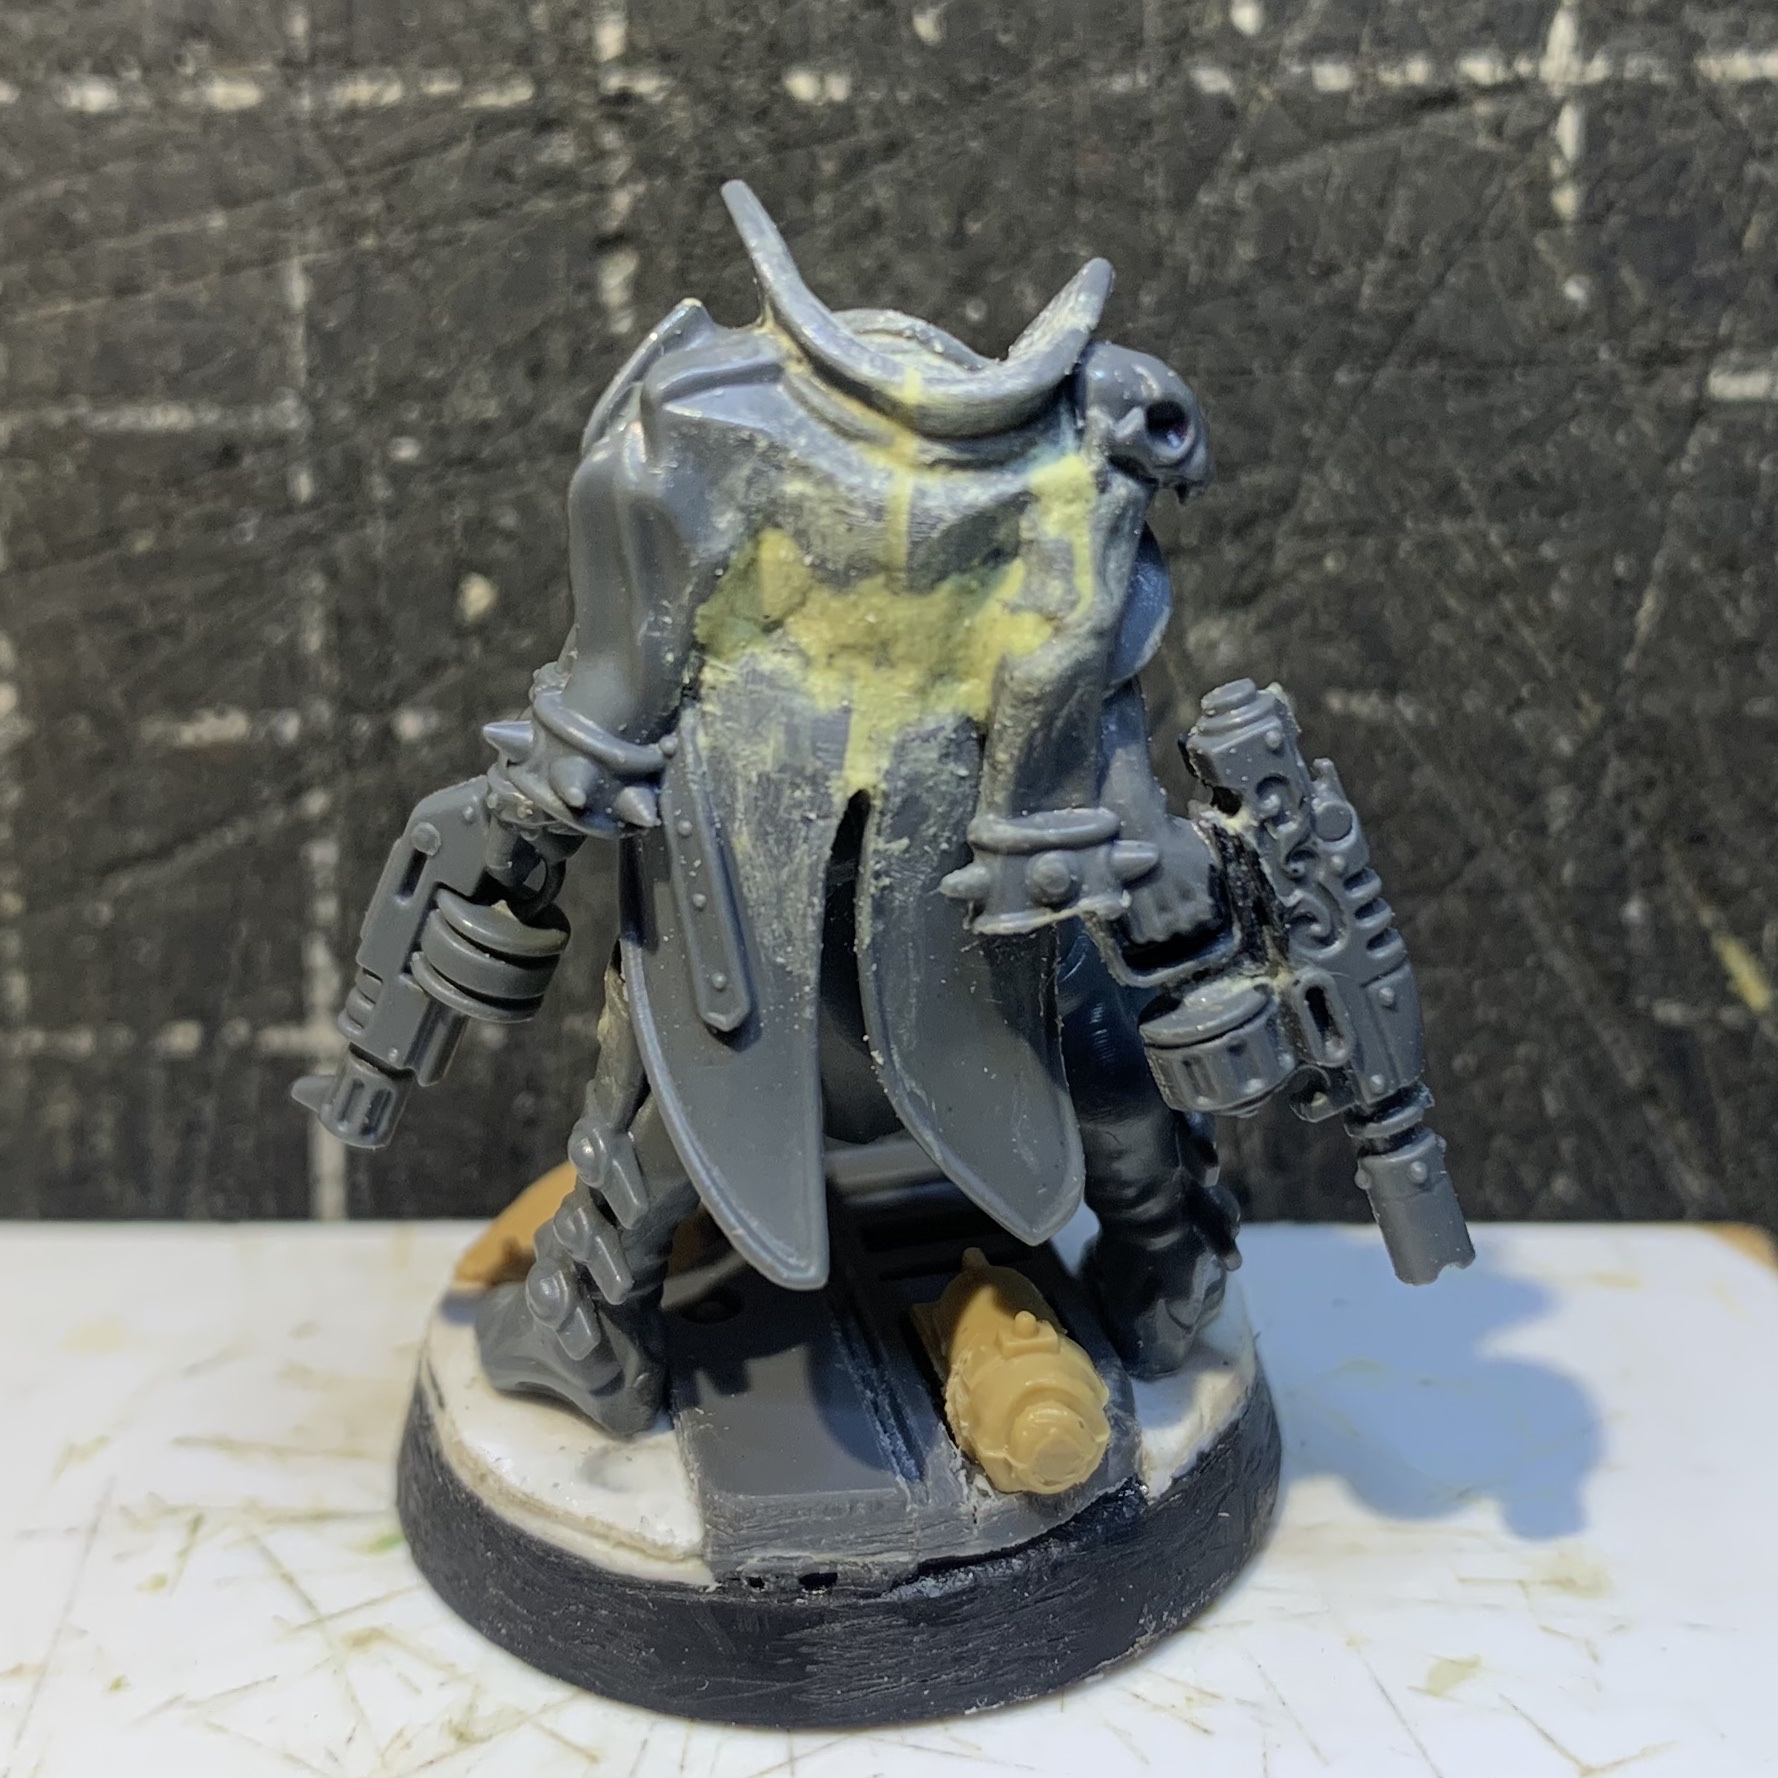
Milliput paste to the rescue!
Note the weird emblem is gone too - might be a nice space for some freehand... if I ever get around to painting them
111605
Post by: Adeptus Doritos
Just an FYI- Delaque arms work pretty good with Escher torsos.
And if you cut their weapons right, they marry up perfect with Van Saar weapons.
It's nice to see someone making something for =][= and it's not one of those Blanchitsu models that just looks gross and stinky.
35419
Post by: Lamby
 Adeptus Doritos wrote: Adeptus Doritos wrote:Just an FYI- Delaque arms work pretty good with Escher torsos.
And if you cut their weapons right, they marry up perfect with Van Saar weapons.
It's nice to see someone making something for =][= and it's not one of those Blanchitsu models that just looks gross and stinky.
Thanks! - Good to know about the Delaque arms!
HEAD SHOT!
Made a new head for the Interrogator.
Took the goggle-mask head from the Genestealer Cult Brood Brothers and cut away the gas mask portion.
Then cut free the lower half of an AoS Witch Elf face and mashed the upper and lower together:
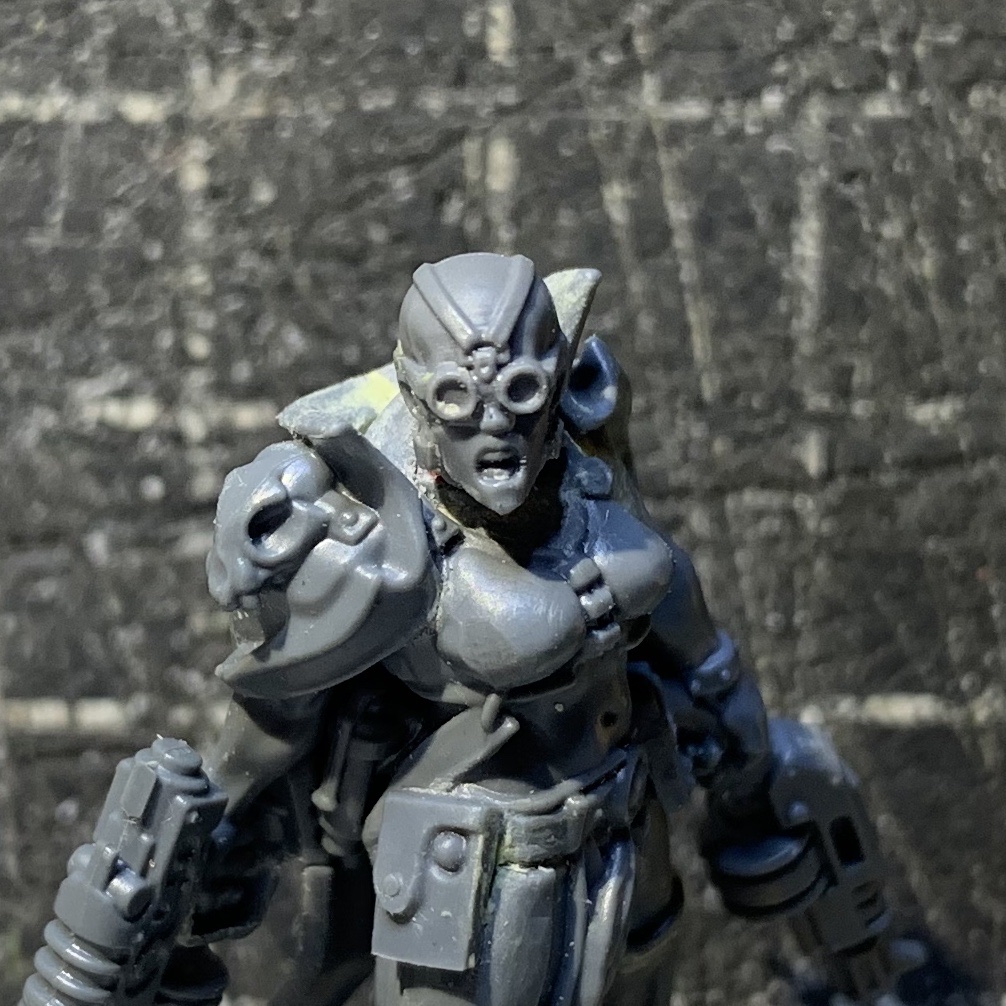
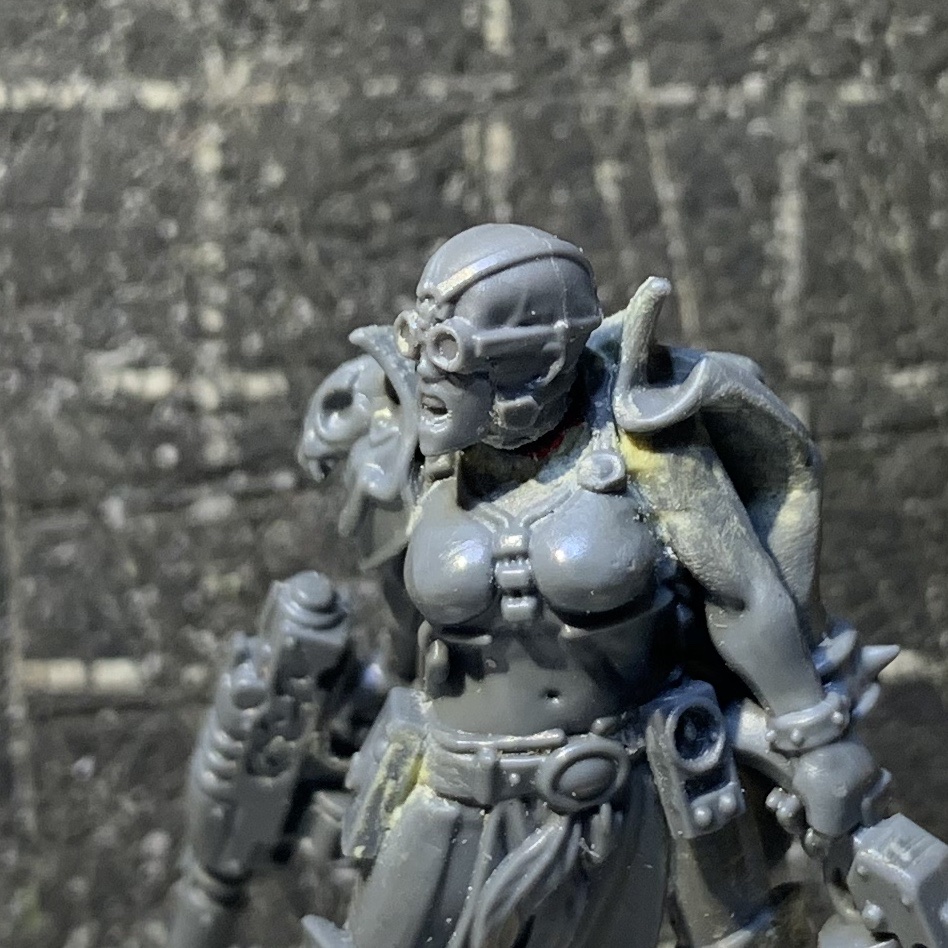
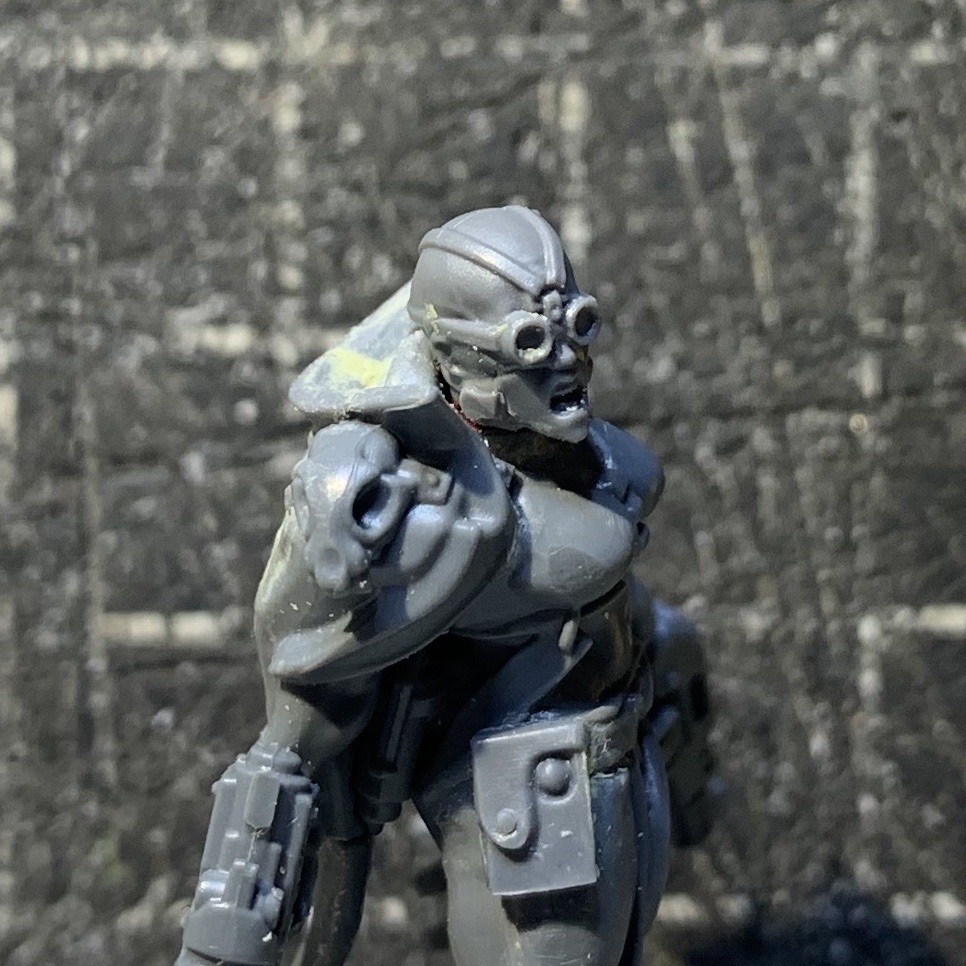
Came out pretty well I think!
I might add a hair-tail later but for now she is done.
Onwards:
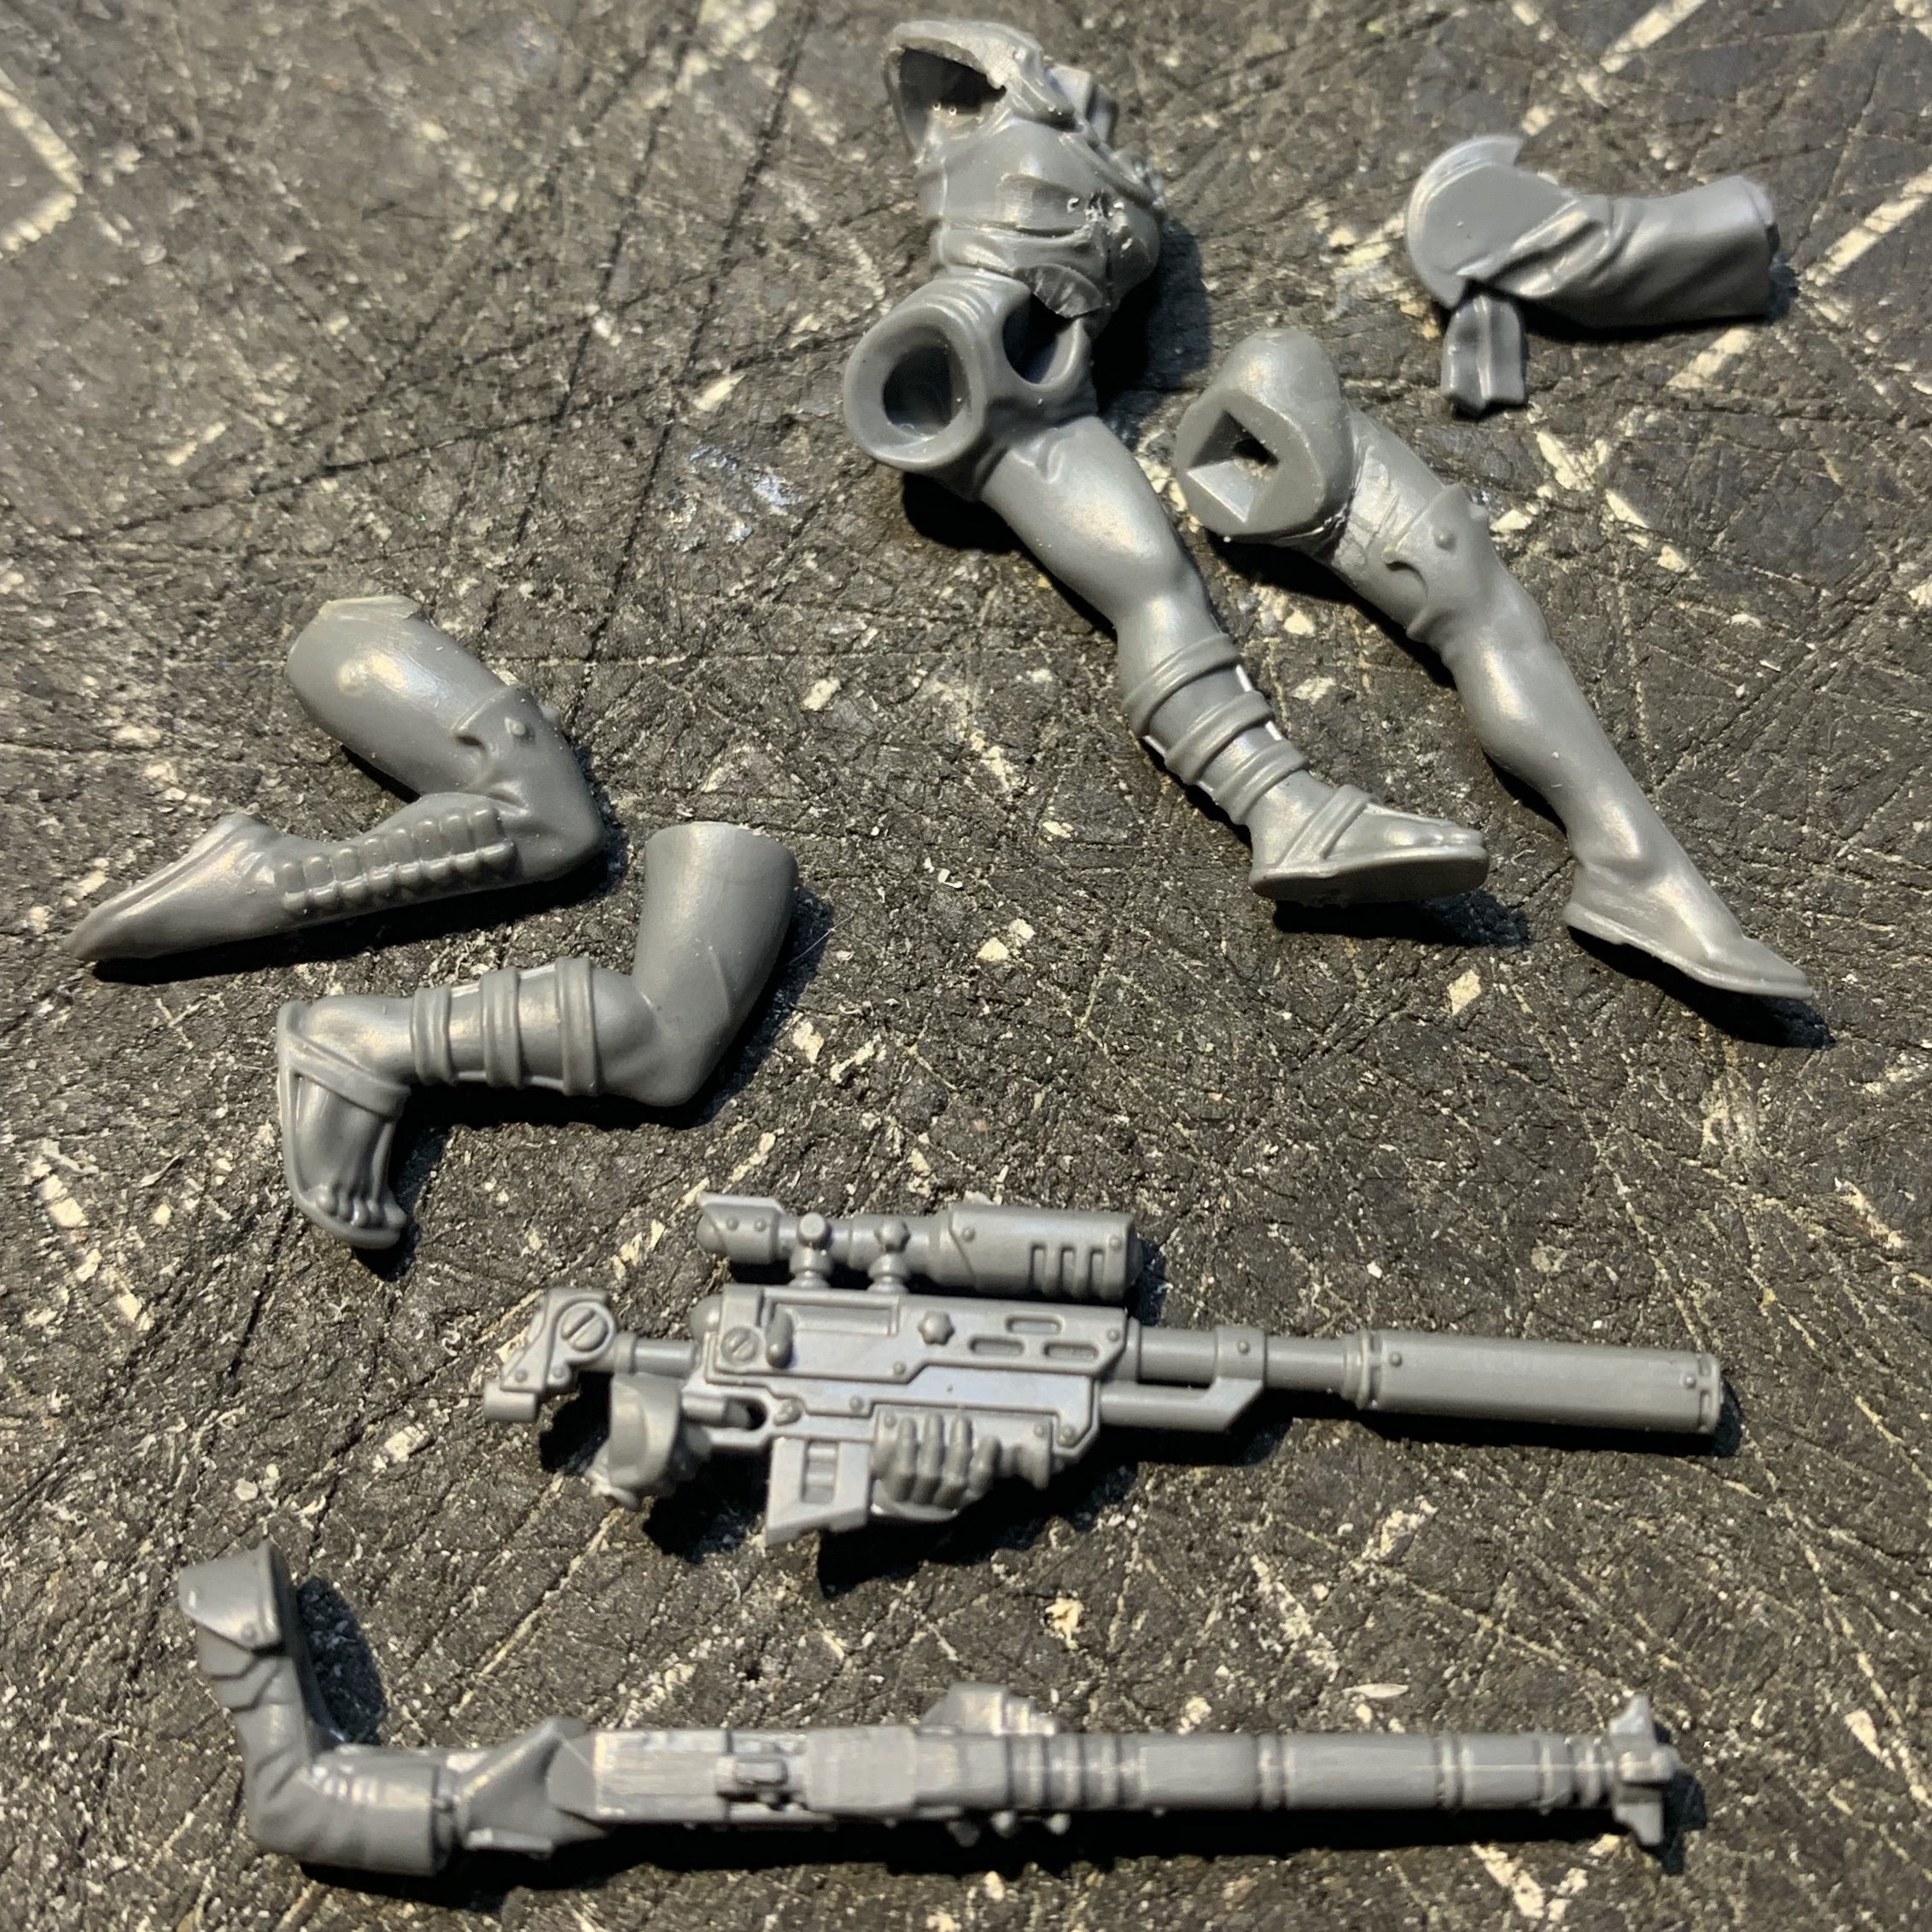
89168
Post by: youwashock
Getting a Riddick vibe now. Very interested in the next model. Curious what is going to stay and what is going to go.
35419
Post by: Lamby
youwashock wrote:Getting a Riddick vibe now. Very interested in the next model. Curious what is going to stay and what is going to go.
Thanks youwasshock!
You might have to wait a while, as I'm jumping between projects at the moment... hence:
Assass][n-Executioner - W][P
Away back - after completing the retinue of Inquisitor Kallatar - I posted this bridging piece of the story:
Ordo Sicarius
At the time it was only an introduction for the Rogue Trader Captain Illyria Winter and her crew, but the idea of an Assassin-Inquisitor and a little band of murderers took hold, so I did some work on Imadeus back here:
The Undecided
While Imadeus hasn't progressed much further (soon to be rectified, hopefully) I have done a few simple changes to the excellent 'Knosso Prond, Death Cult Executioner' model from the Rogue Trader boxset, to create the start of an Assassin-Executioner - one rung up the Ordo Sicarius training ladder from an Assassin-Apprentice.
Took the leading arm and head of Knosso and this warfan from the 'Warcry Cypher Lords Thrallmaster':
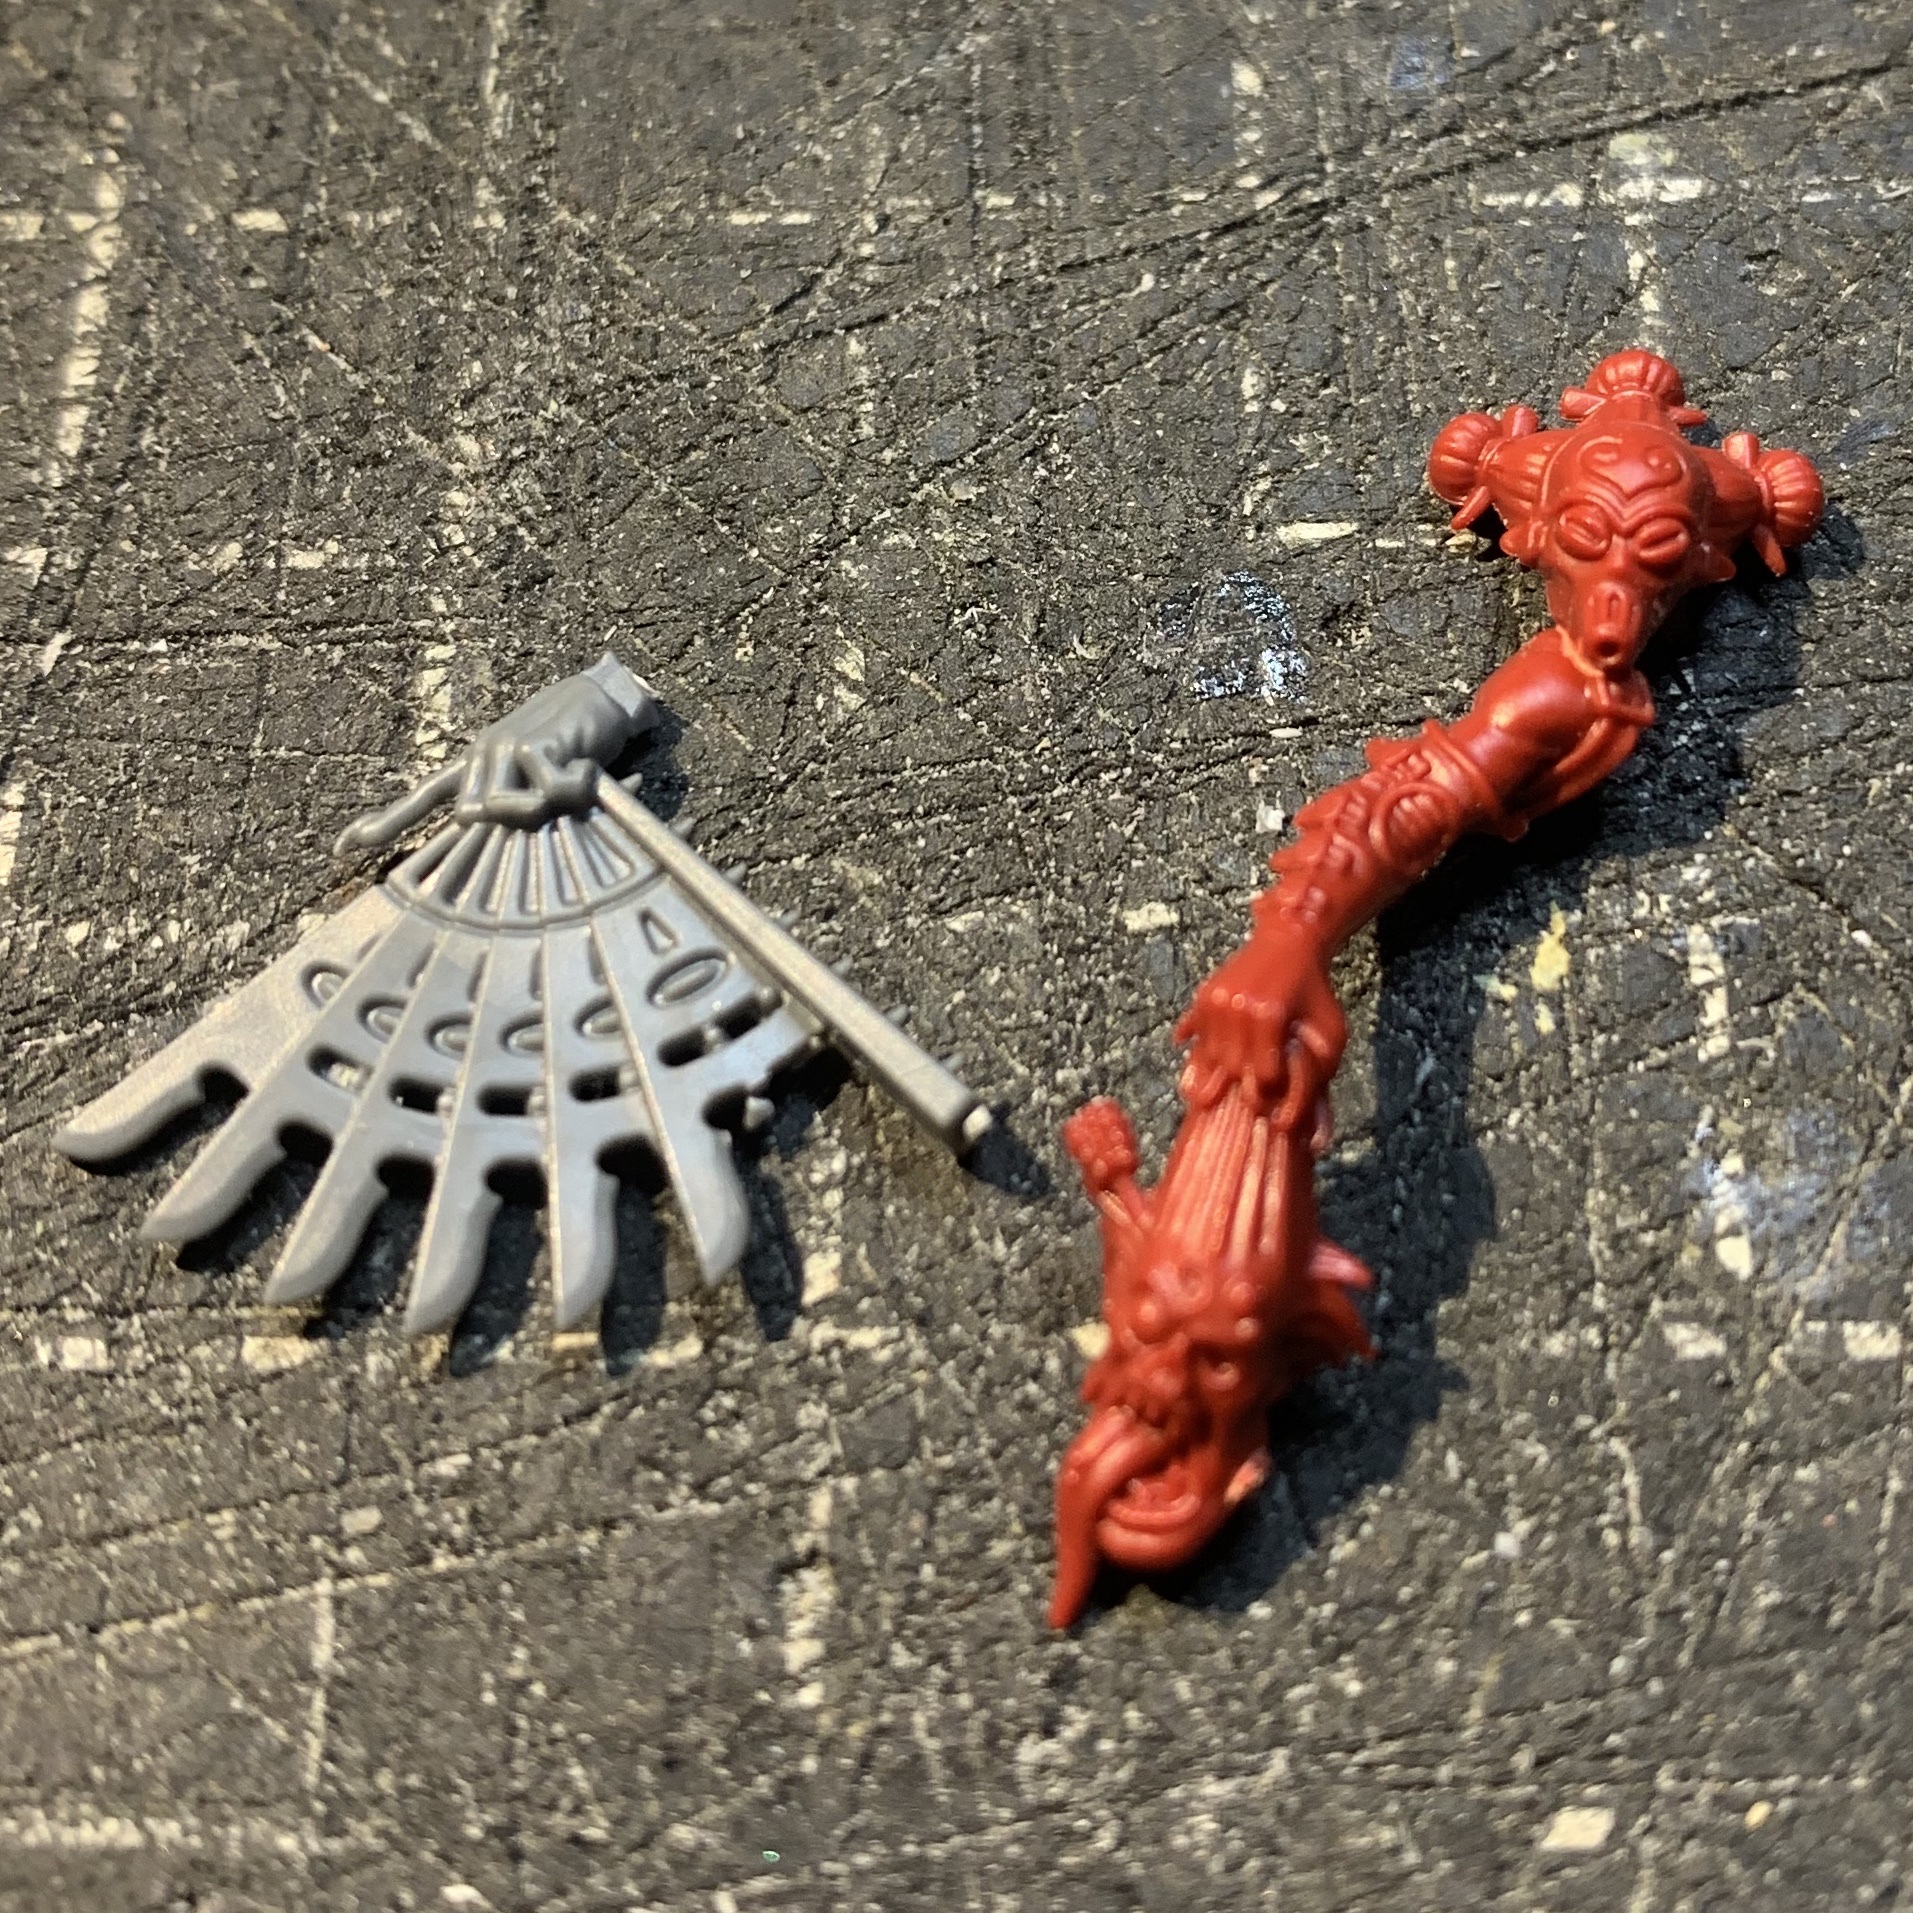
Sharp-eyed readers will note the warfan is held by a left hand, so I cut it off carefully, reduced the fan by one blade, and added a random right hand from the Melusai kit:
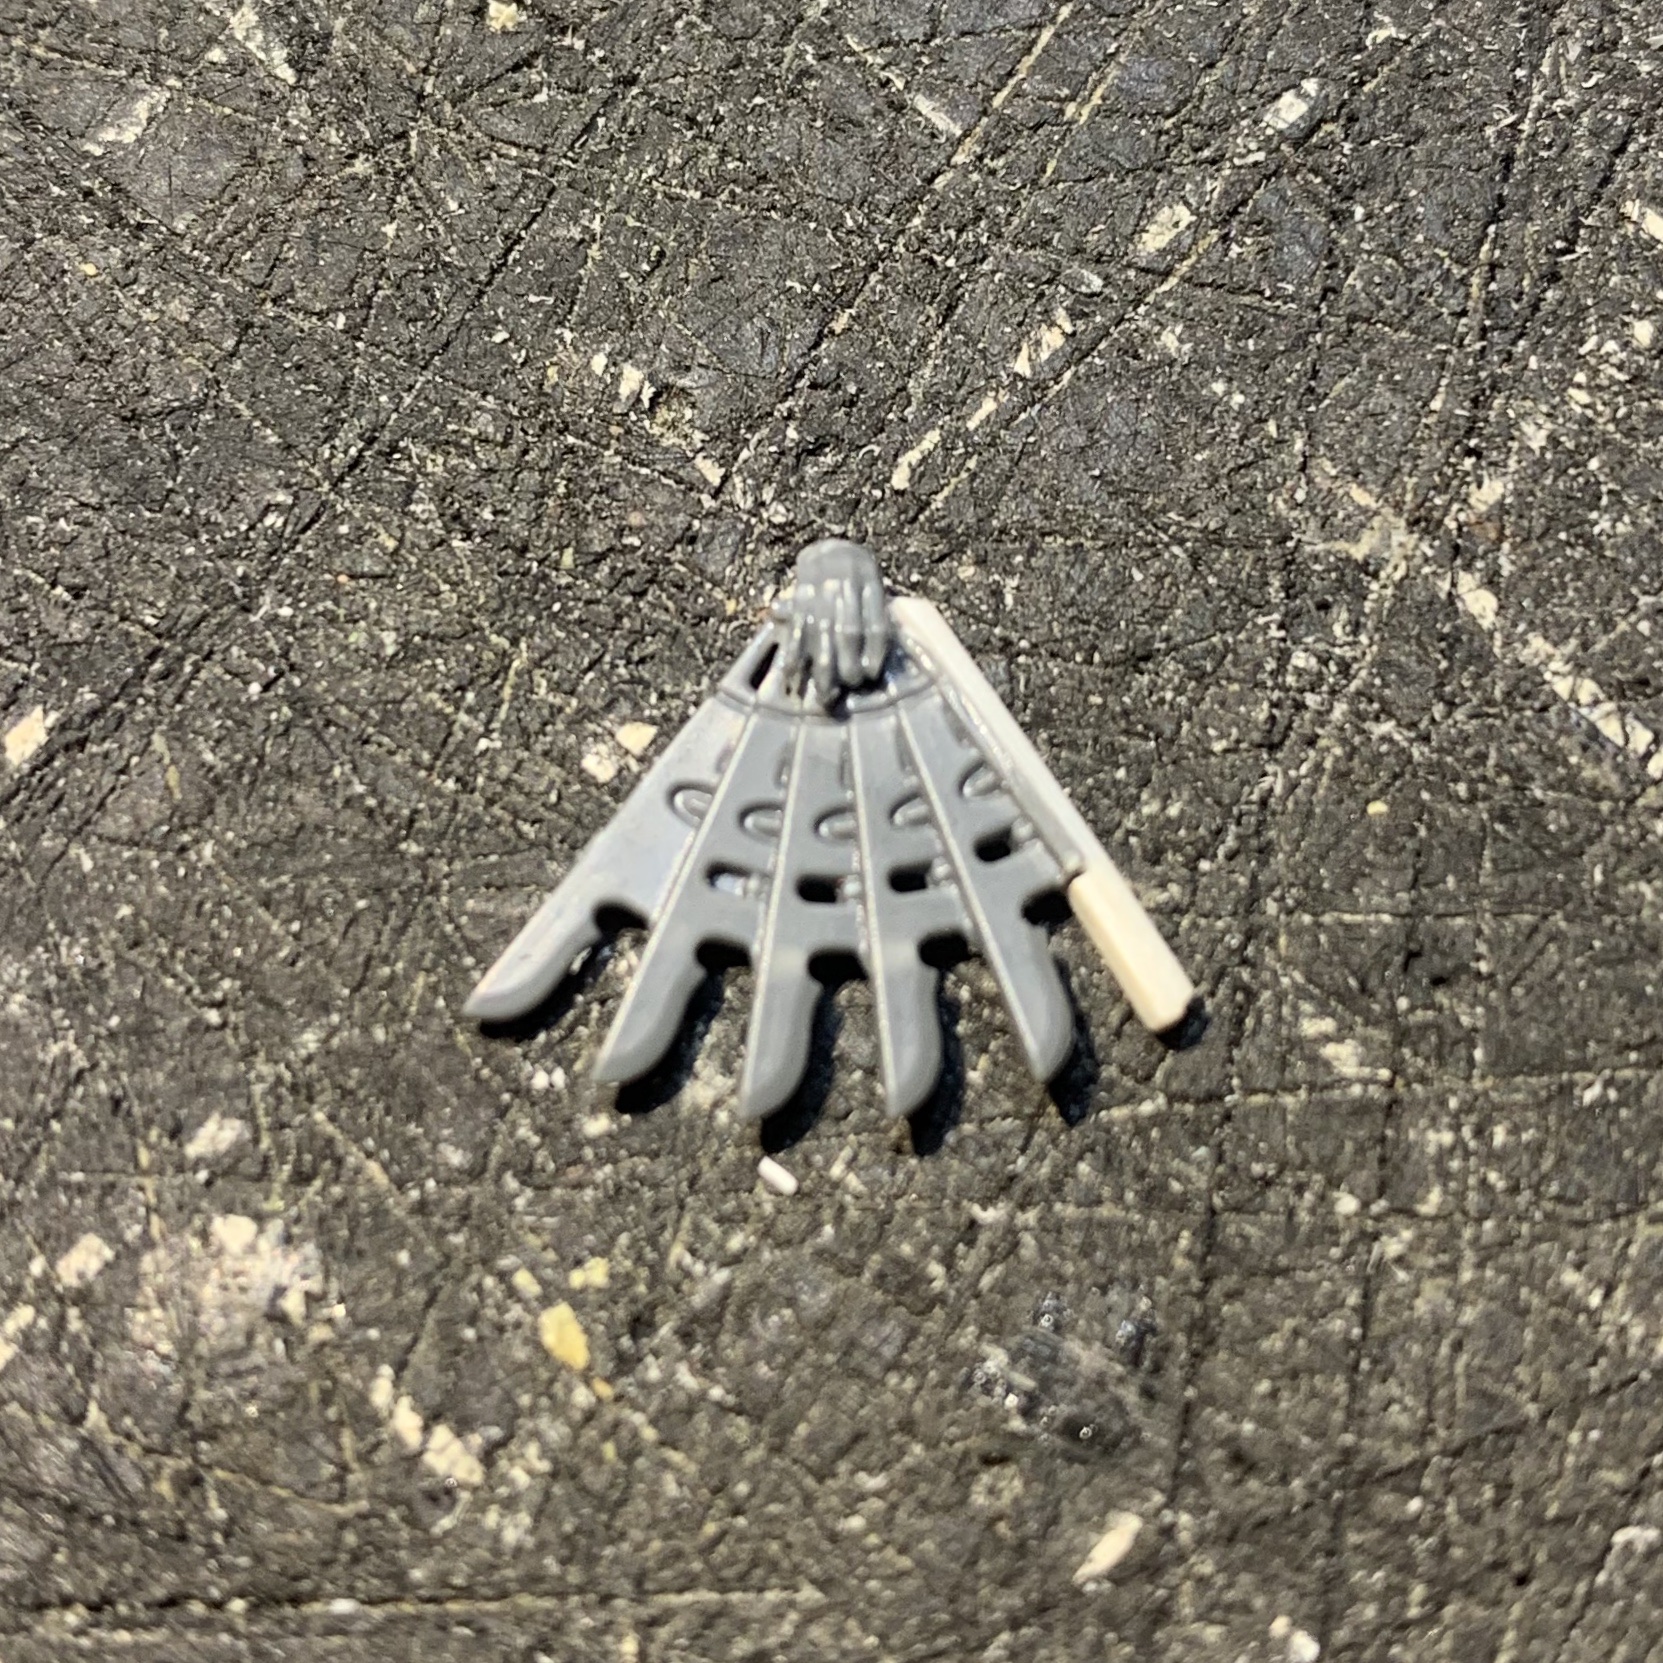
It sounds so easy when you type it it - but it wasn't...
Connecting that hand to the cut-away forearm of Knosso was also not an easy thing, but eventually I managed it - also cut off one of her weird triple Leia-buns, and added a pony-tail from a Sisters of Silence head - here she is so far:
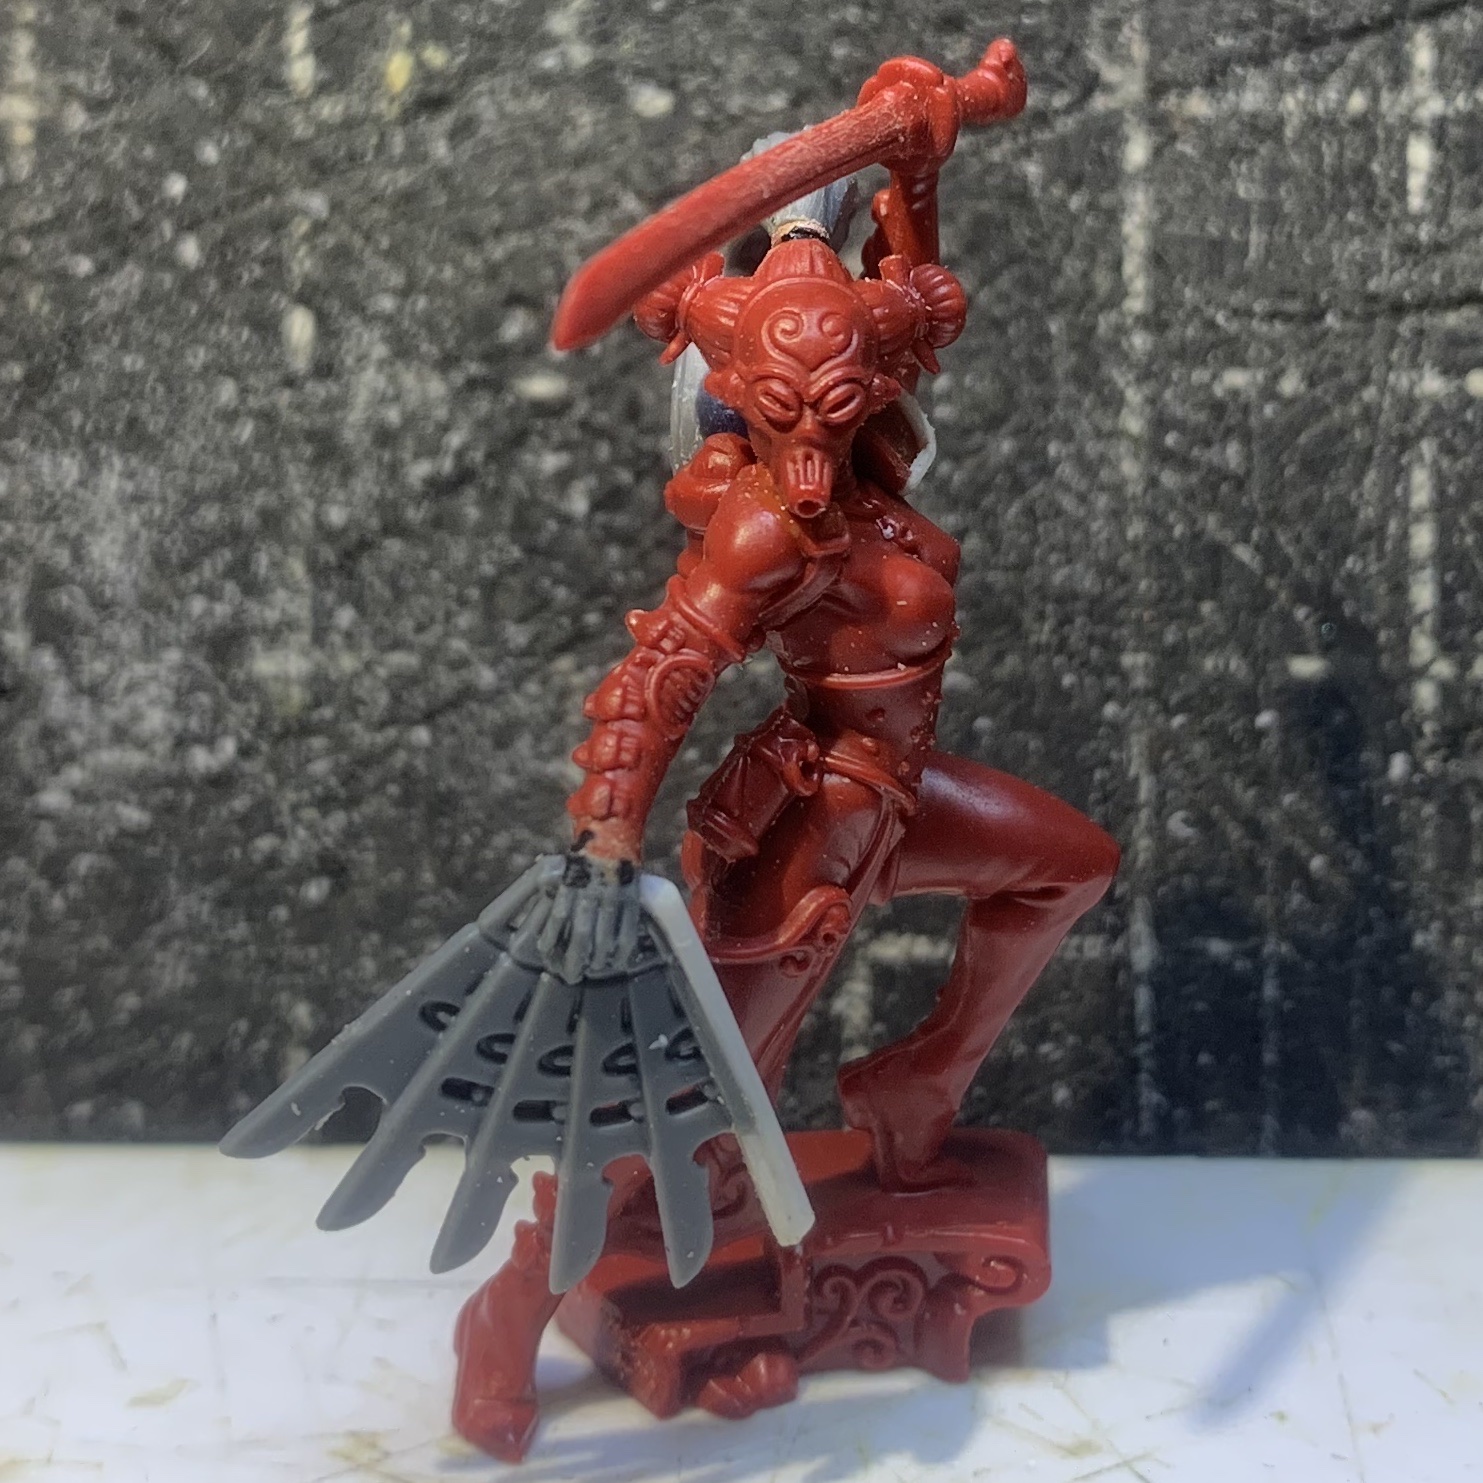
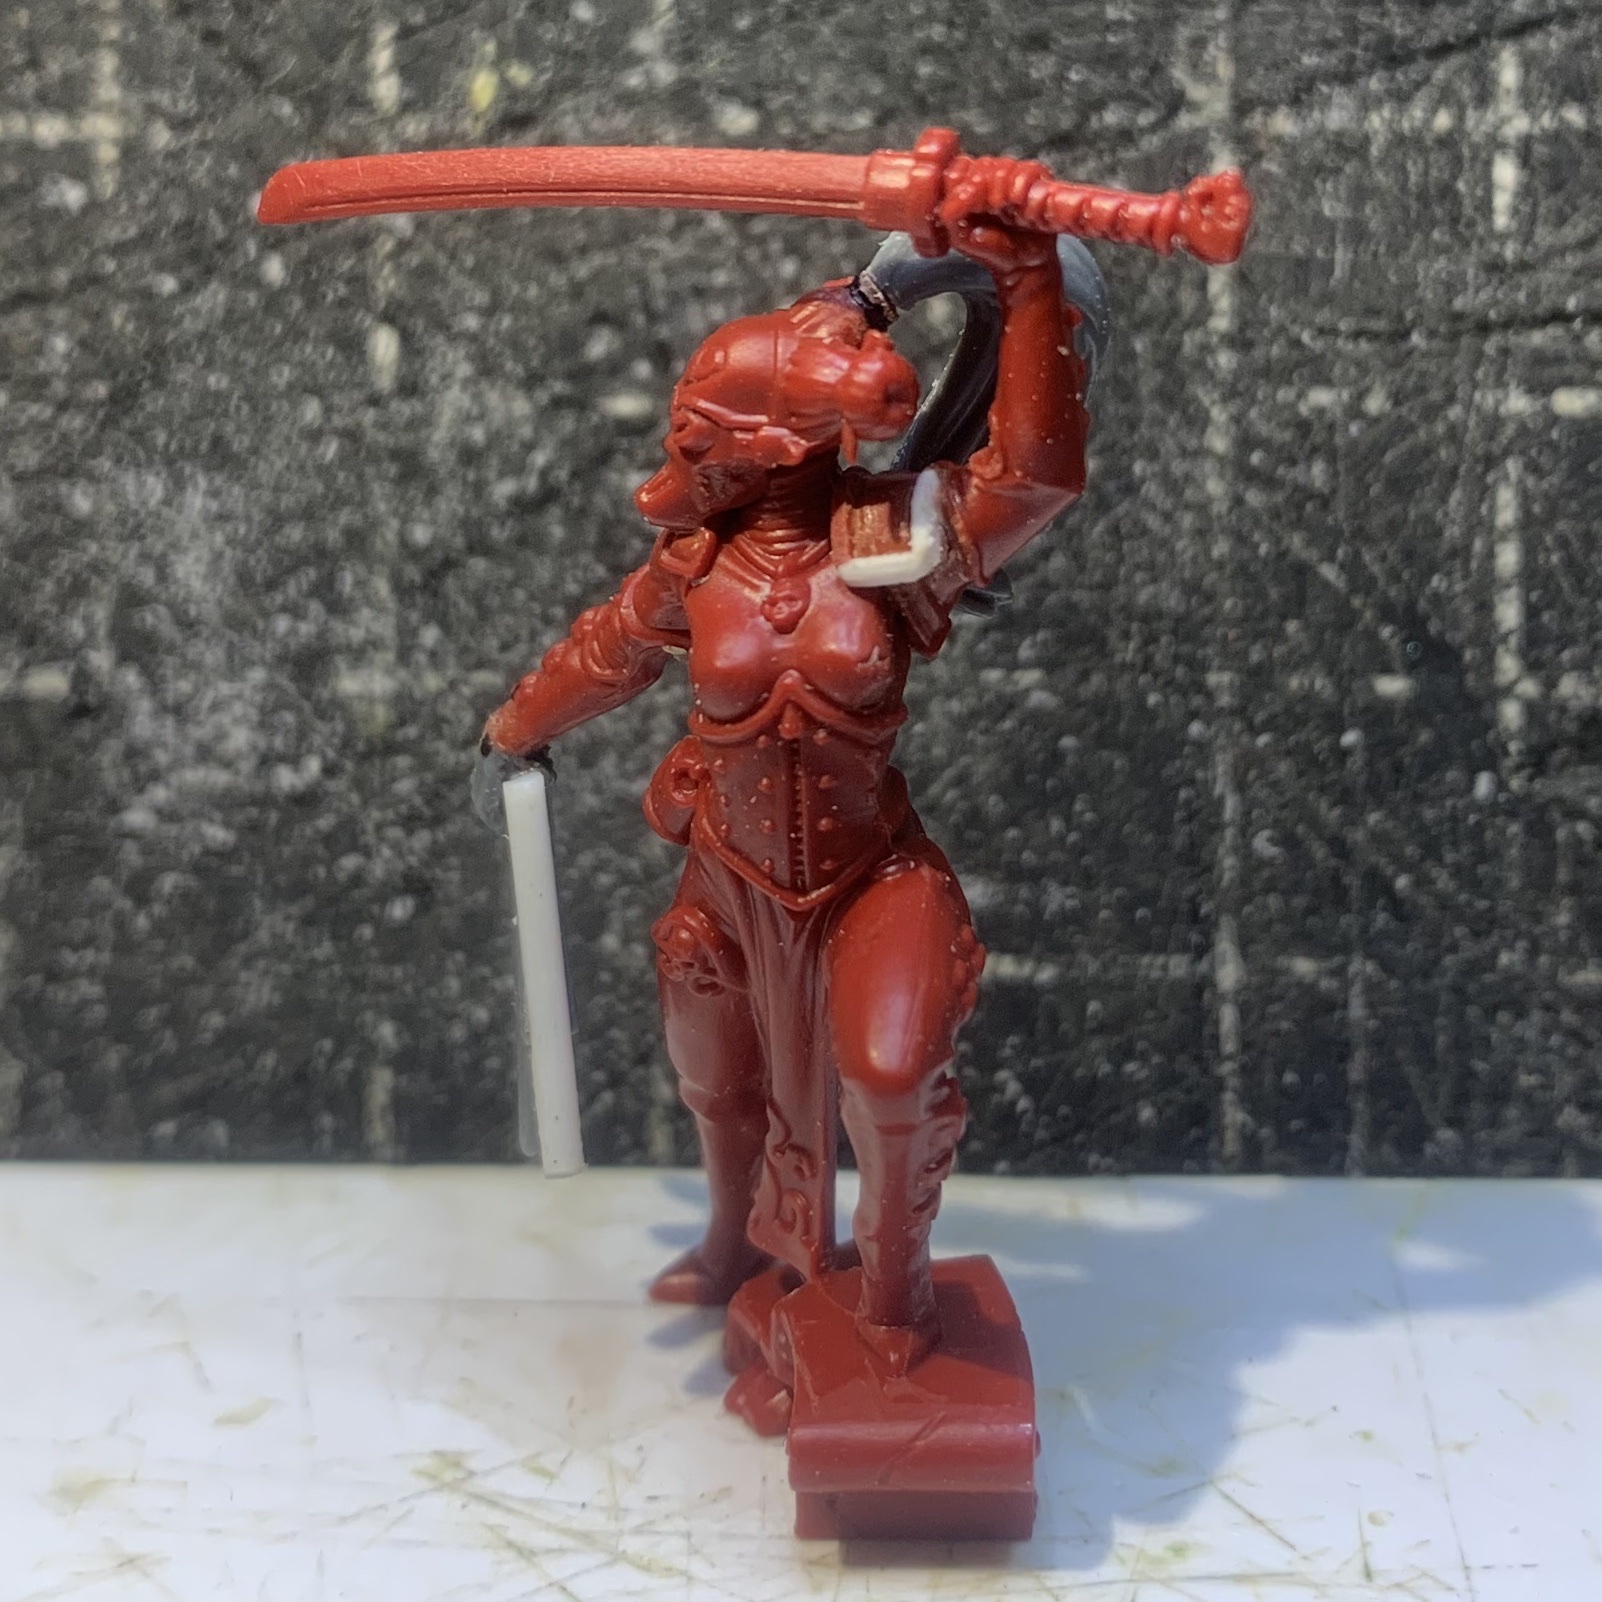
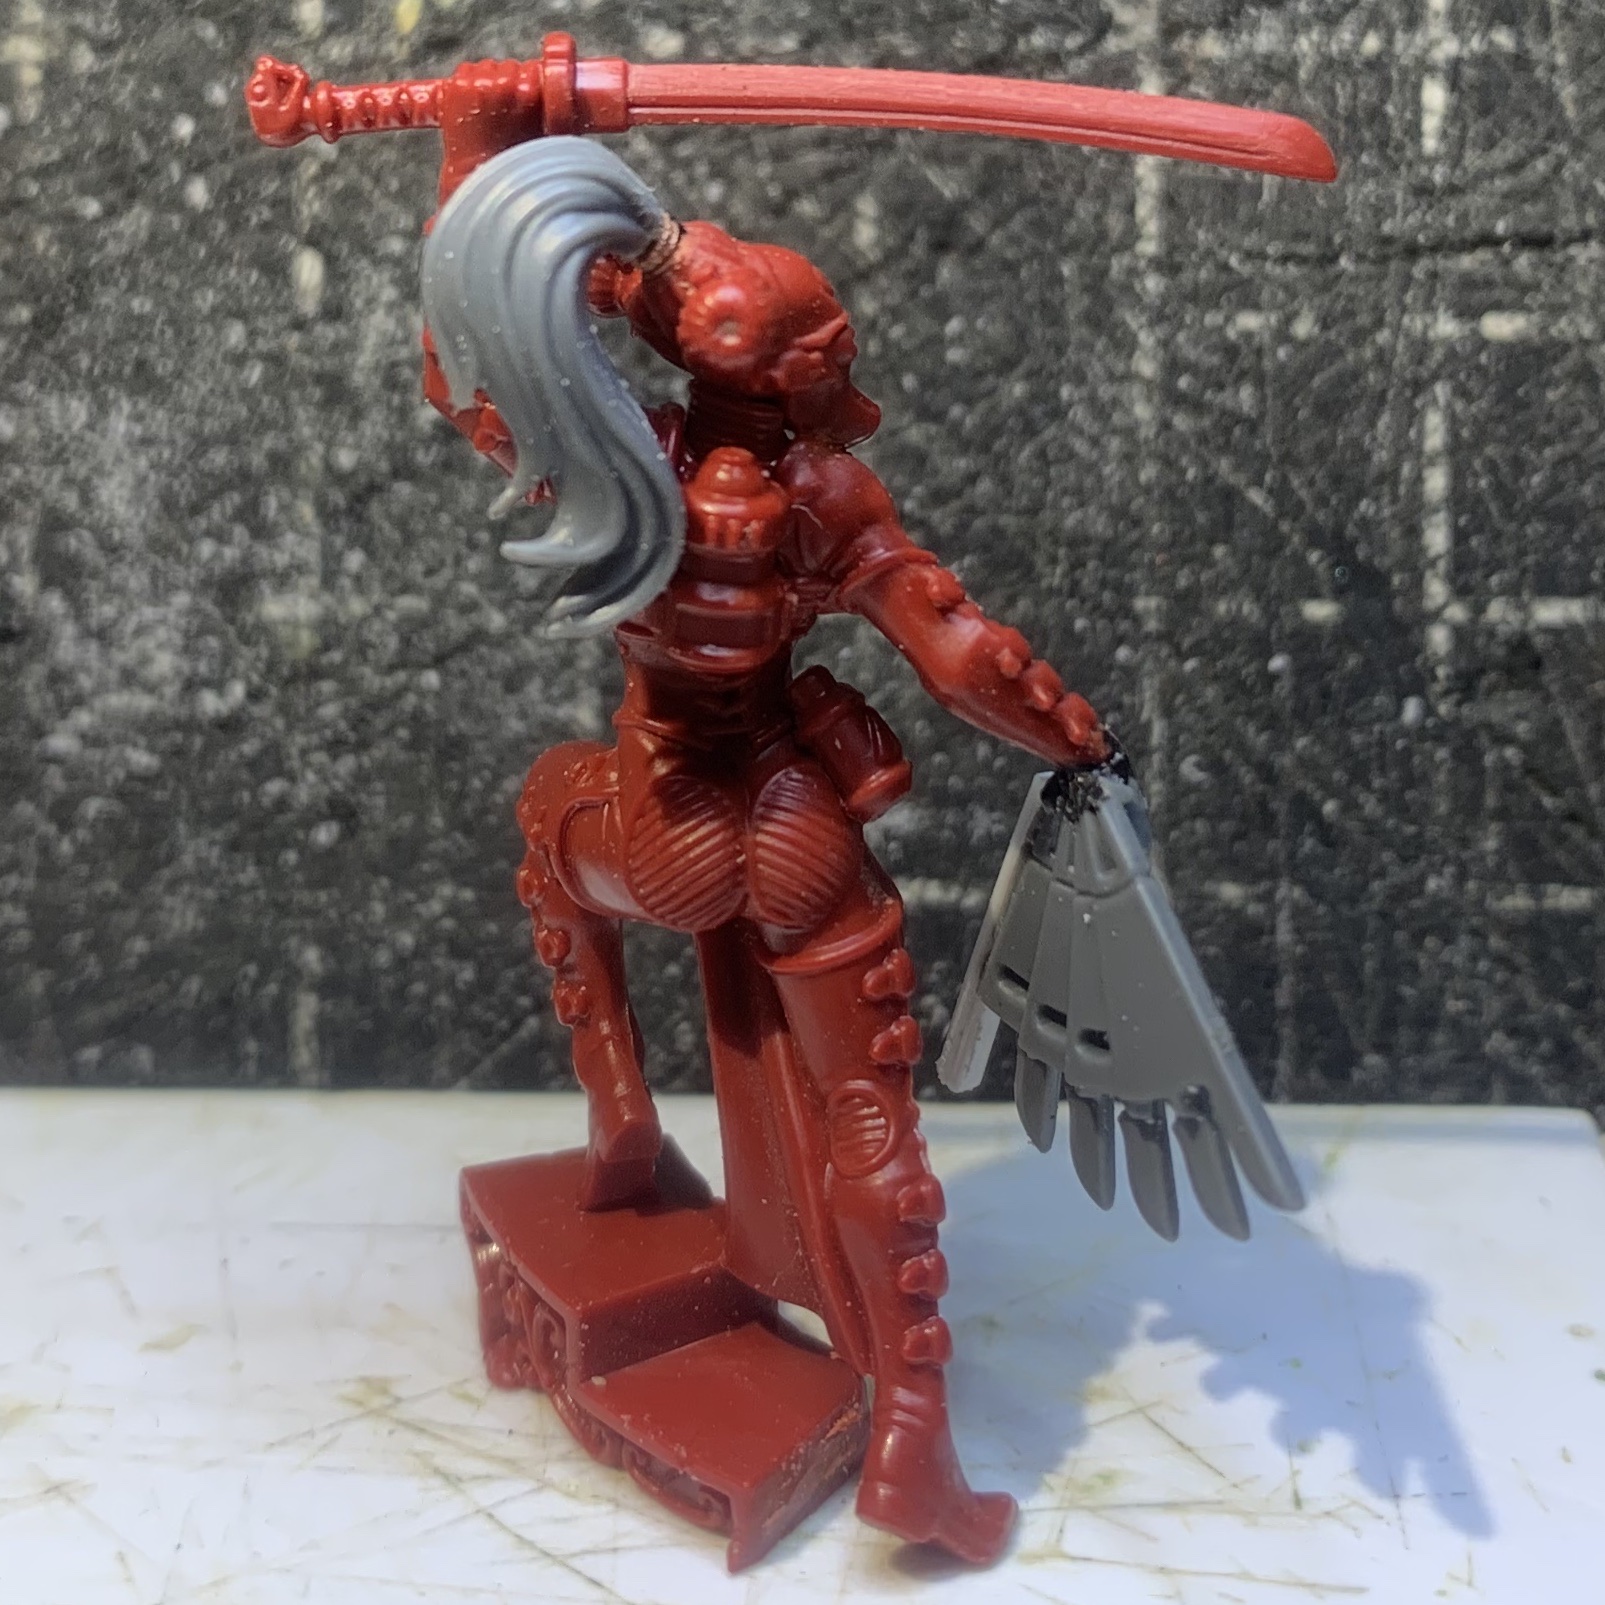
There is a thumb on the back of the fan, it's currently hidden by that black-goop which is Loctite Instant Adhesive 481 - usually I only use for bonding metal to styrene, but here it has strengthened the tiny wrist joint.
I also shaved off those grenades on her left shoulder armour, which meant some repair work where the white styrene strip can be seen - I have also damaged her left arm down near the armour-plate, and her left breast, all of which will need a sculpting/sanding fix too (sigh).
The pod-shaped unit on her back will get a little mod, and I'm going to do some mods to her head, just unsure exactly what yet - I don't like her eyes, so possibly some form of vision-tech maybe wrapping around from the side of her head, and will fill in the love-heart symbol on her forehead too.
As always, thanks for looking!
22619
Post by: inmygravenimage
You really are a mad wizard
306
Post by: Boss Salvage
You know, Prond might be one of the nicer female sci-fi minis GW has done. Helmet is a bit goofy but her dimensions and pose are both real solid - also that Infinity-style muscle fiber / ribbed venting butt Excited to see the end result!
89168
Post by: youwashock
Nice bit of microsurgery on the fan. Made a neat model even better.
1124
Post by: Captain Brown
Lamby,
Conversion seemed to have turned out well.
Cheers,
CB
62749
Post by: Dr H
Nice work on all the things.
35419
Post by: Lamby
inmygravenimage wrote:You really are a mad wizard
Boss Salvage wrote:You know, Prond might be one of the nicer female sci-fi minis GW has done. Helmet is a bit goofy but her dimensions and pose are both real solid - also that Infinity-style muscle fiber / ribbed venting butt
Excited to see the end result!
youwashock wrote:Nice bit of microsurgery on the fan. Made a neat model even better.
Captain Brown wrote:Lamby,
Conversion seemed to have turned out well.
Cheers,
CB
Dr H wrote:Nice work on all the things.
Thanks inmygravenimage, Boss Salvagw, youwasshock, Captain Brown and Dr H!
Inspiration is a strange thing.
Found this image on Pinterest - 'Commando' by artist Jomaro Kindred:
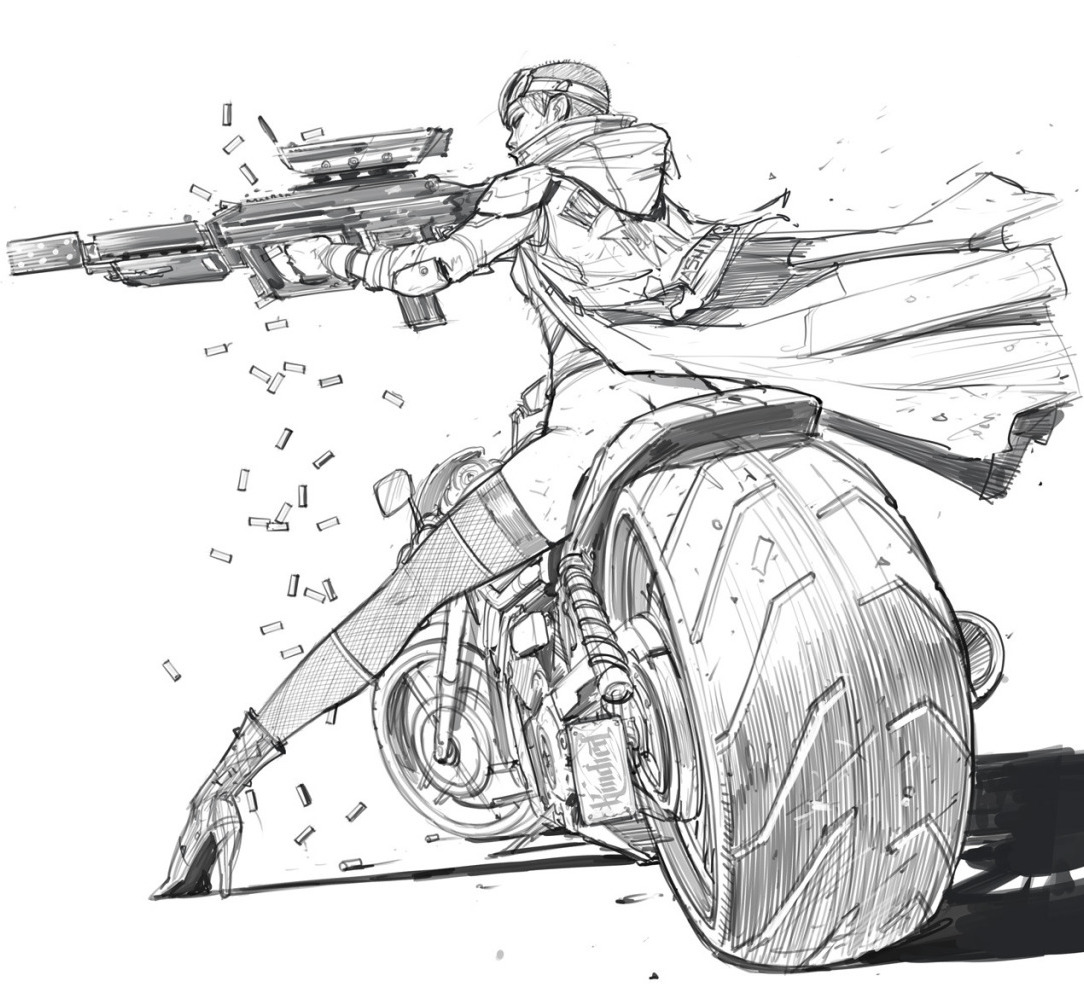
Not very Inquisitor or 40k, right?
Apparently, my mind disagrees.
Take an Eldar jetbike, some Atalan Jackal bits, some brass and styrene tubing sizes various, some pins, some Superfine milliput (and apparently some cat hair, too).
Add the two-sword-wielding Warcy Corvus Cabal femme, swap out her sandal-wearing legs for some Harlequin thigh-high boots.
Mash it all together with a lot of different glues and swearing, and you get this:
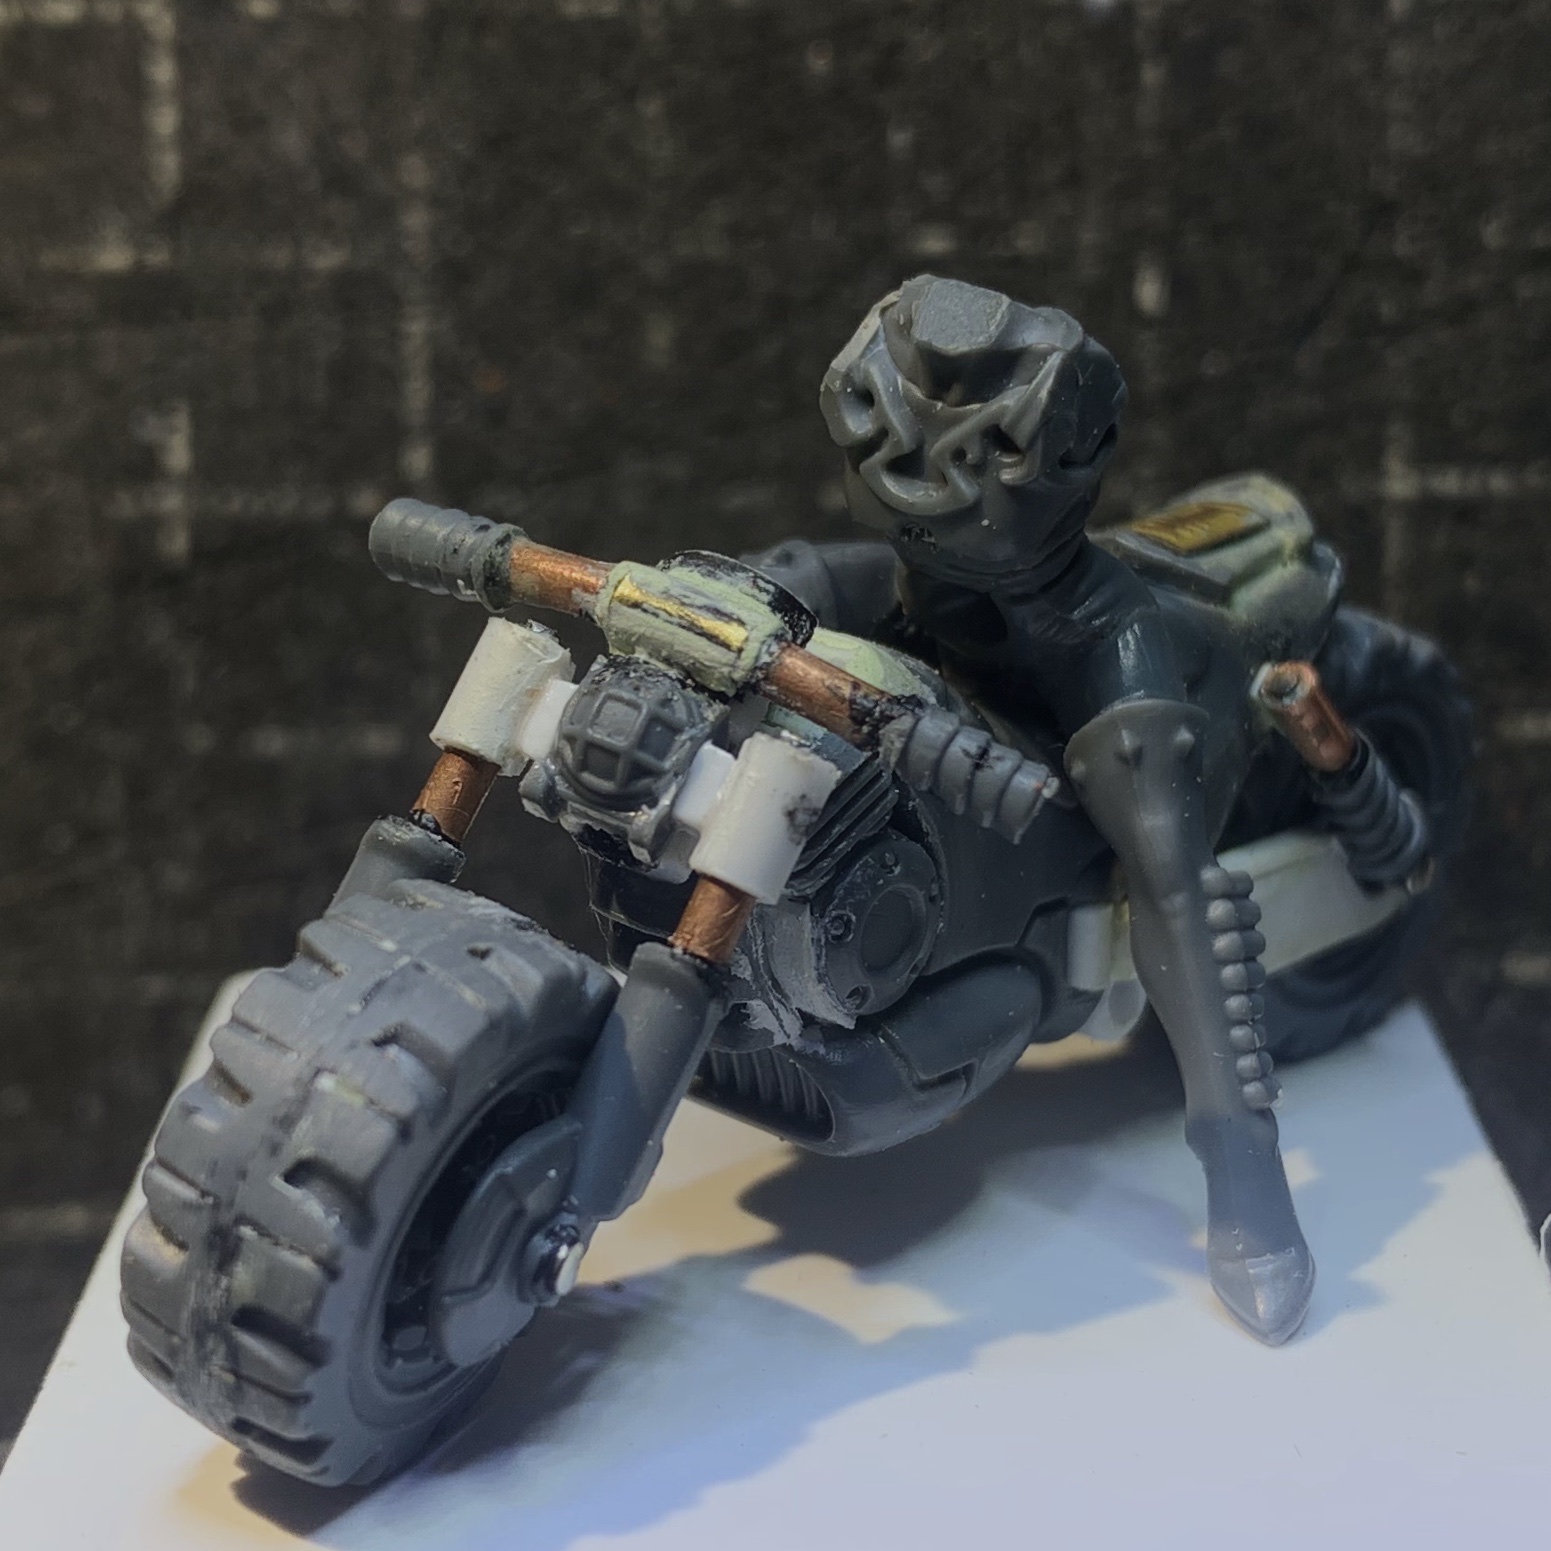
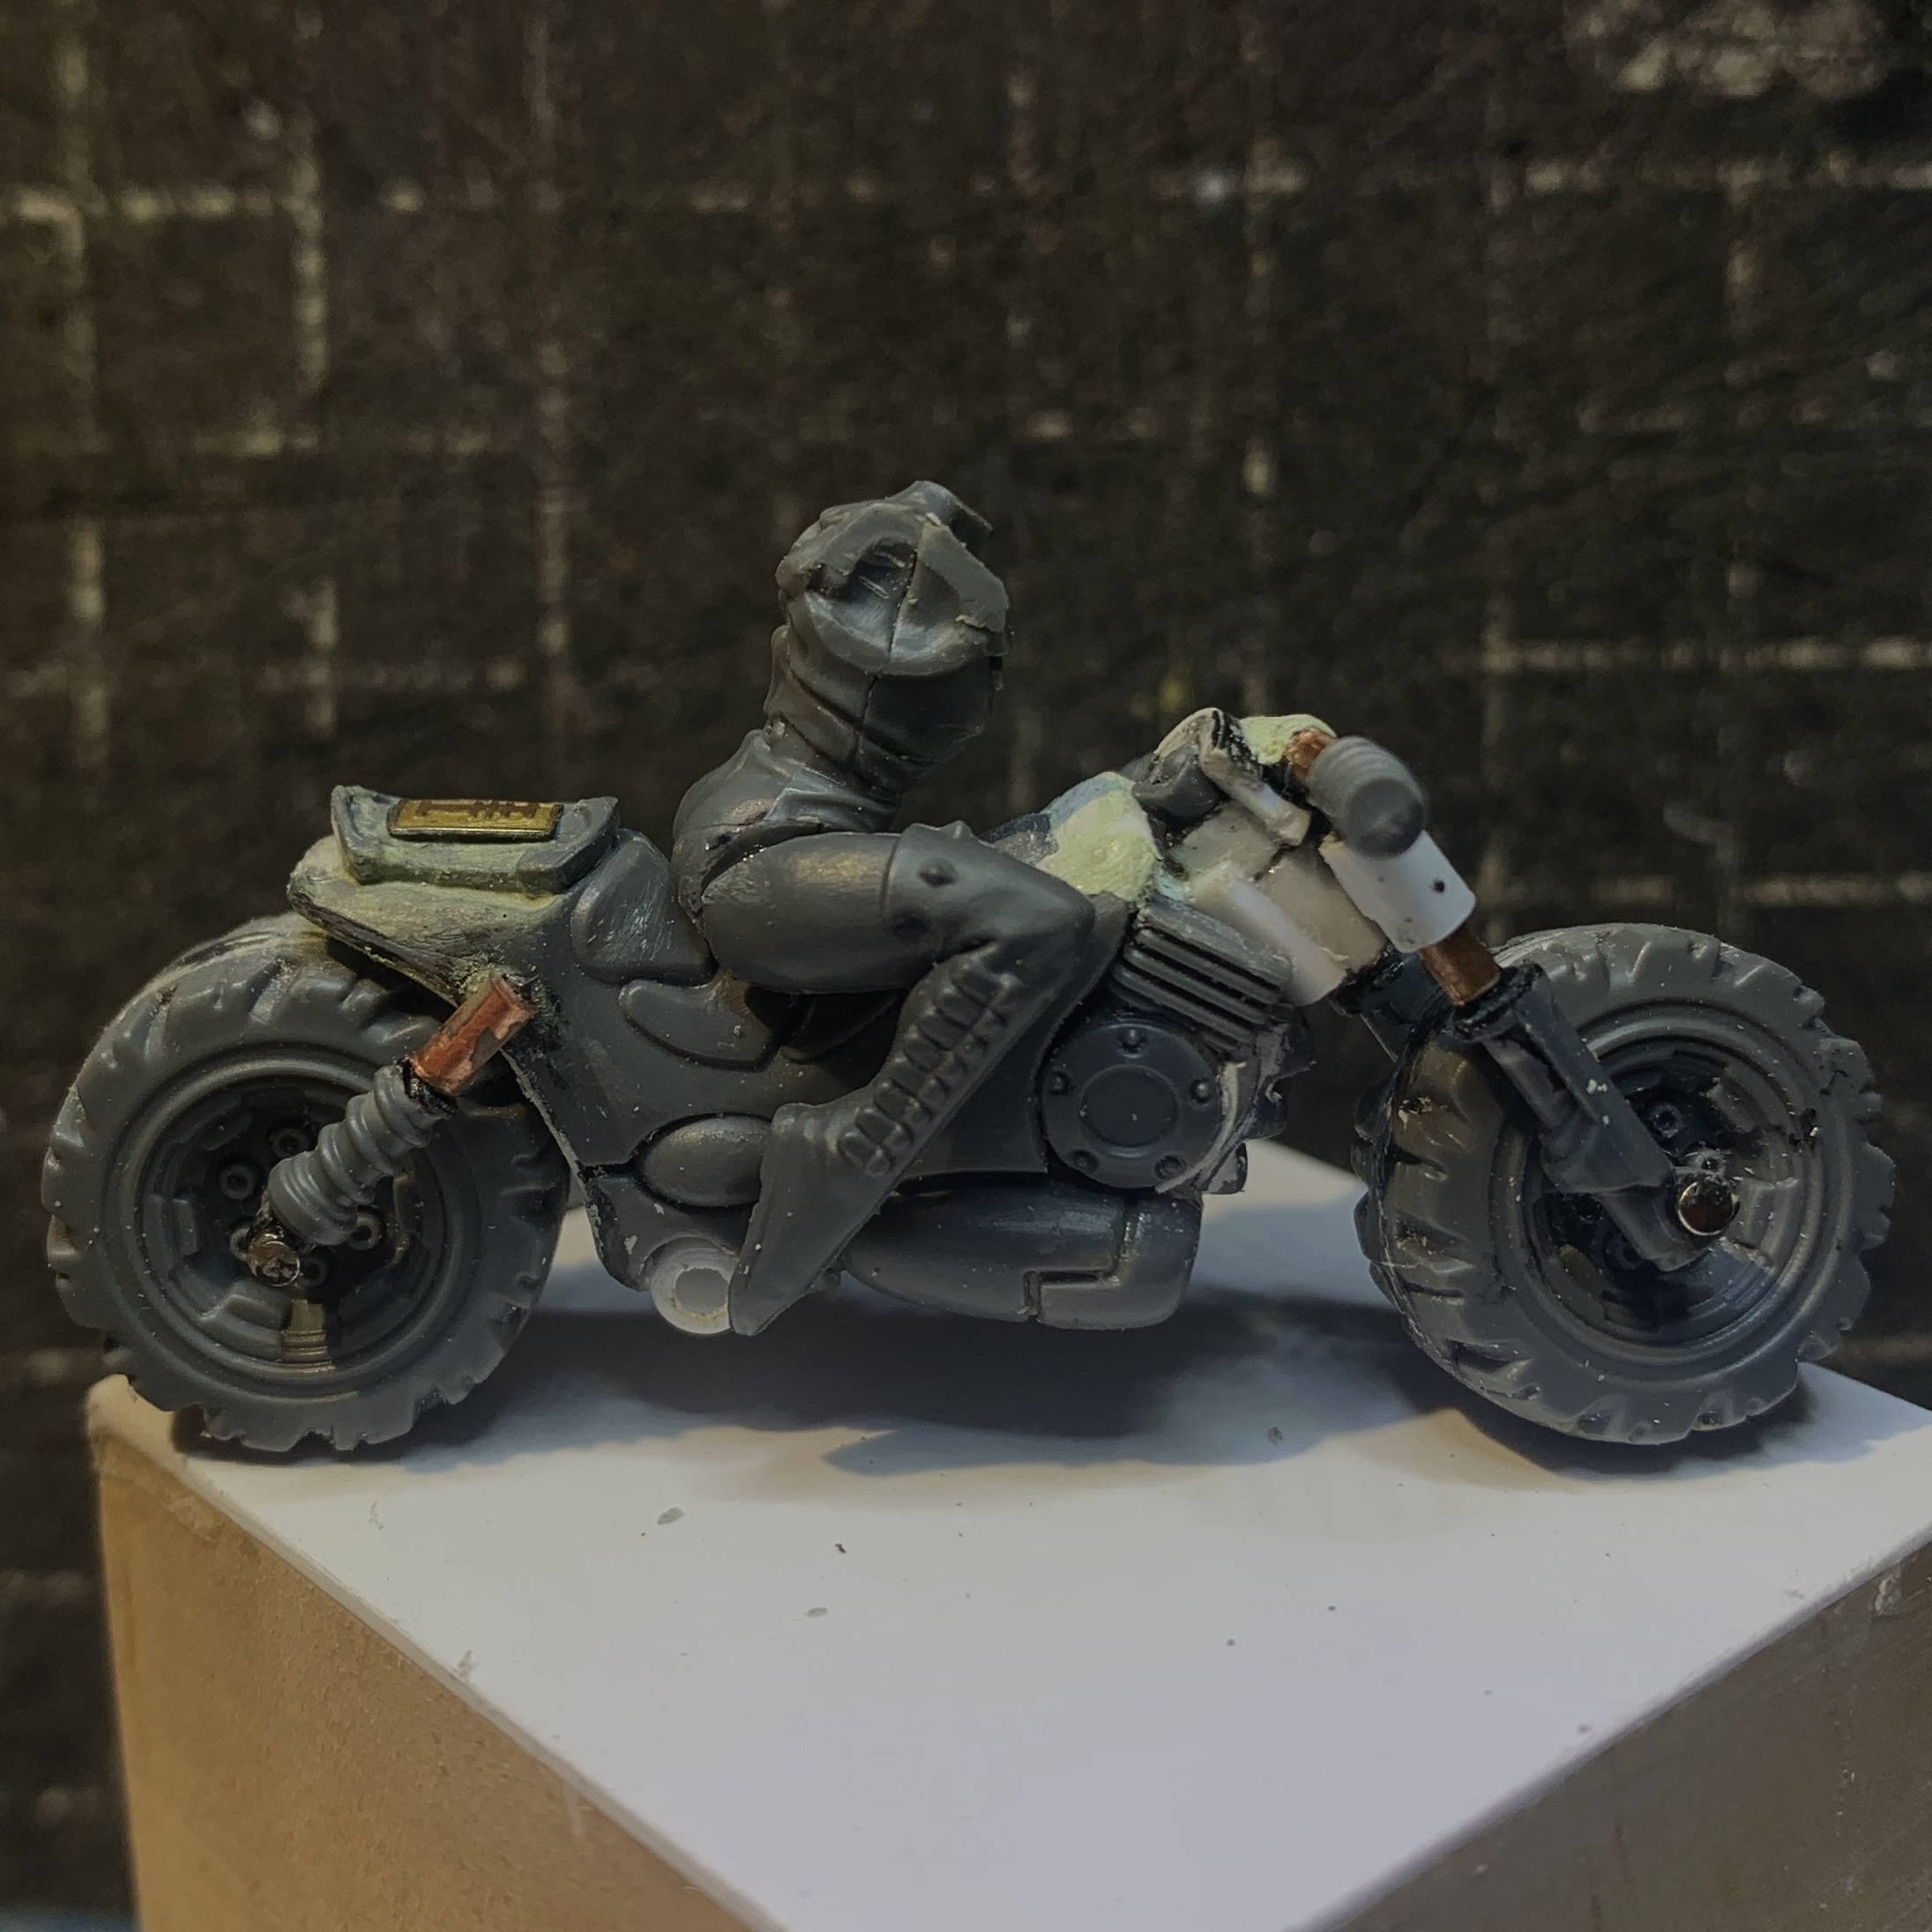
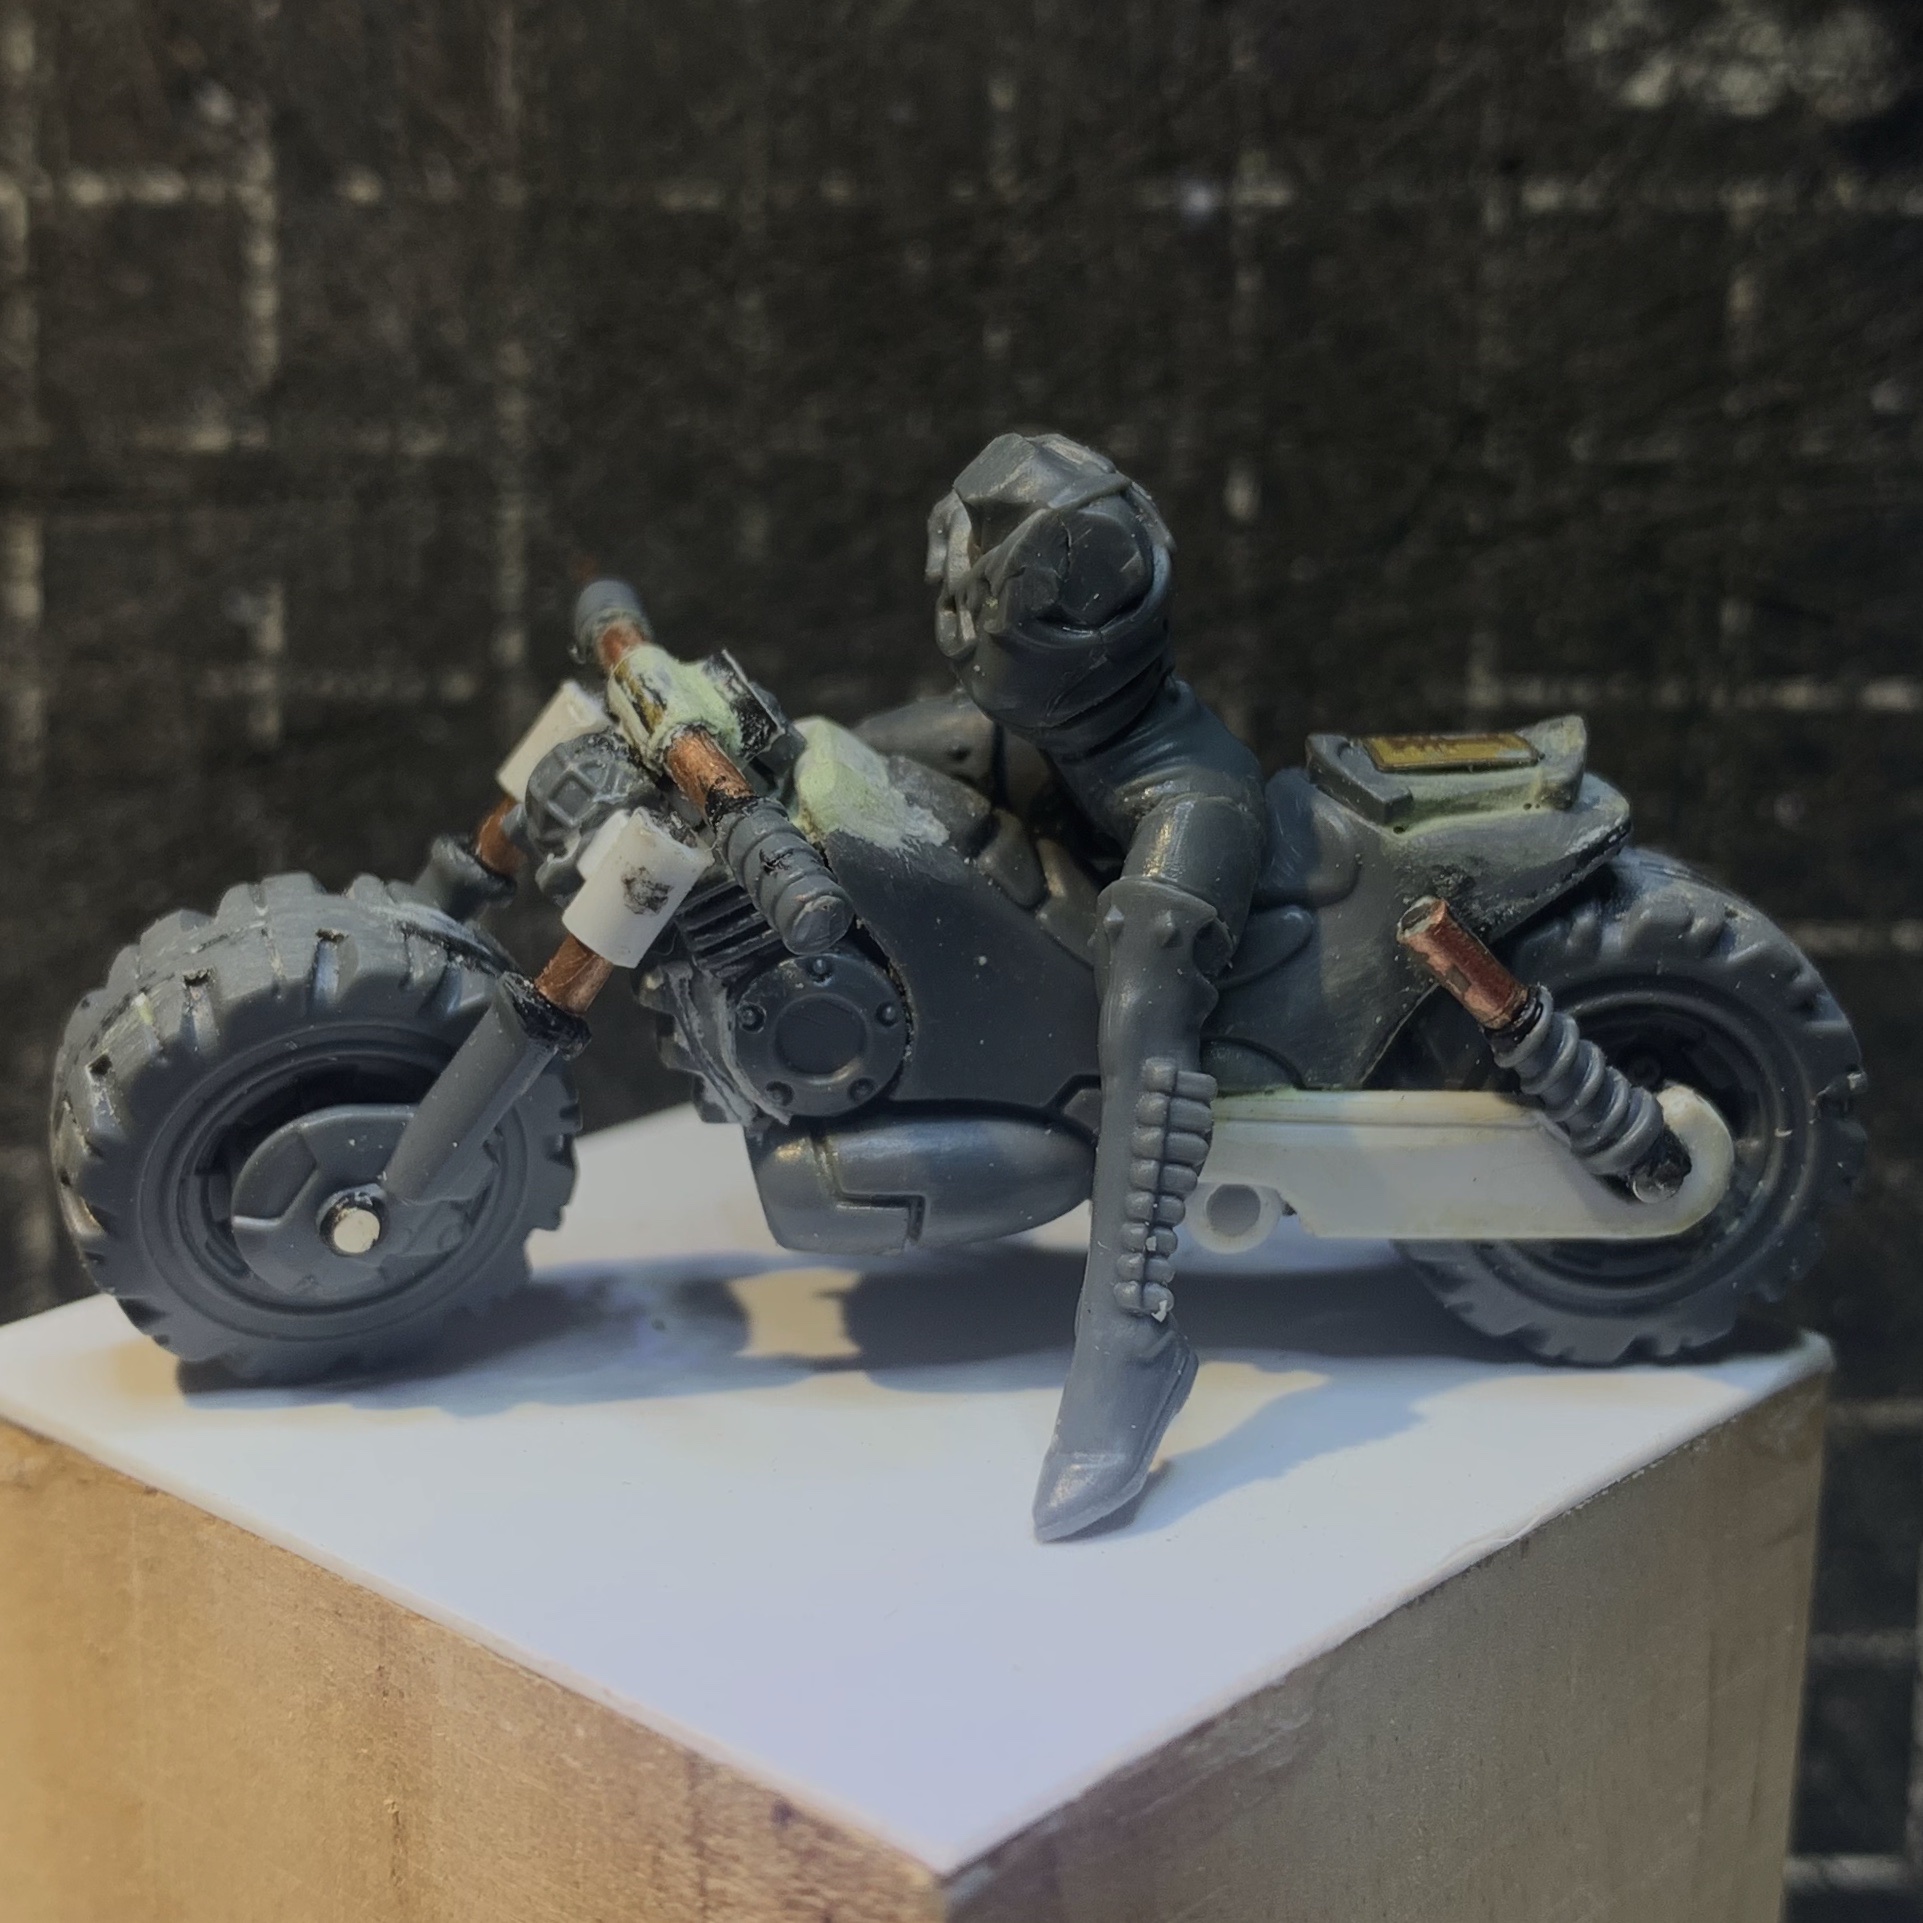
Of course, her name is Harley, right?
Couple of W][p pics - not many cos I was in the zone.
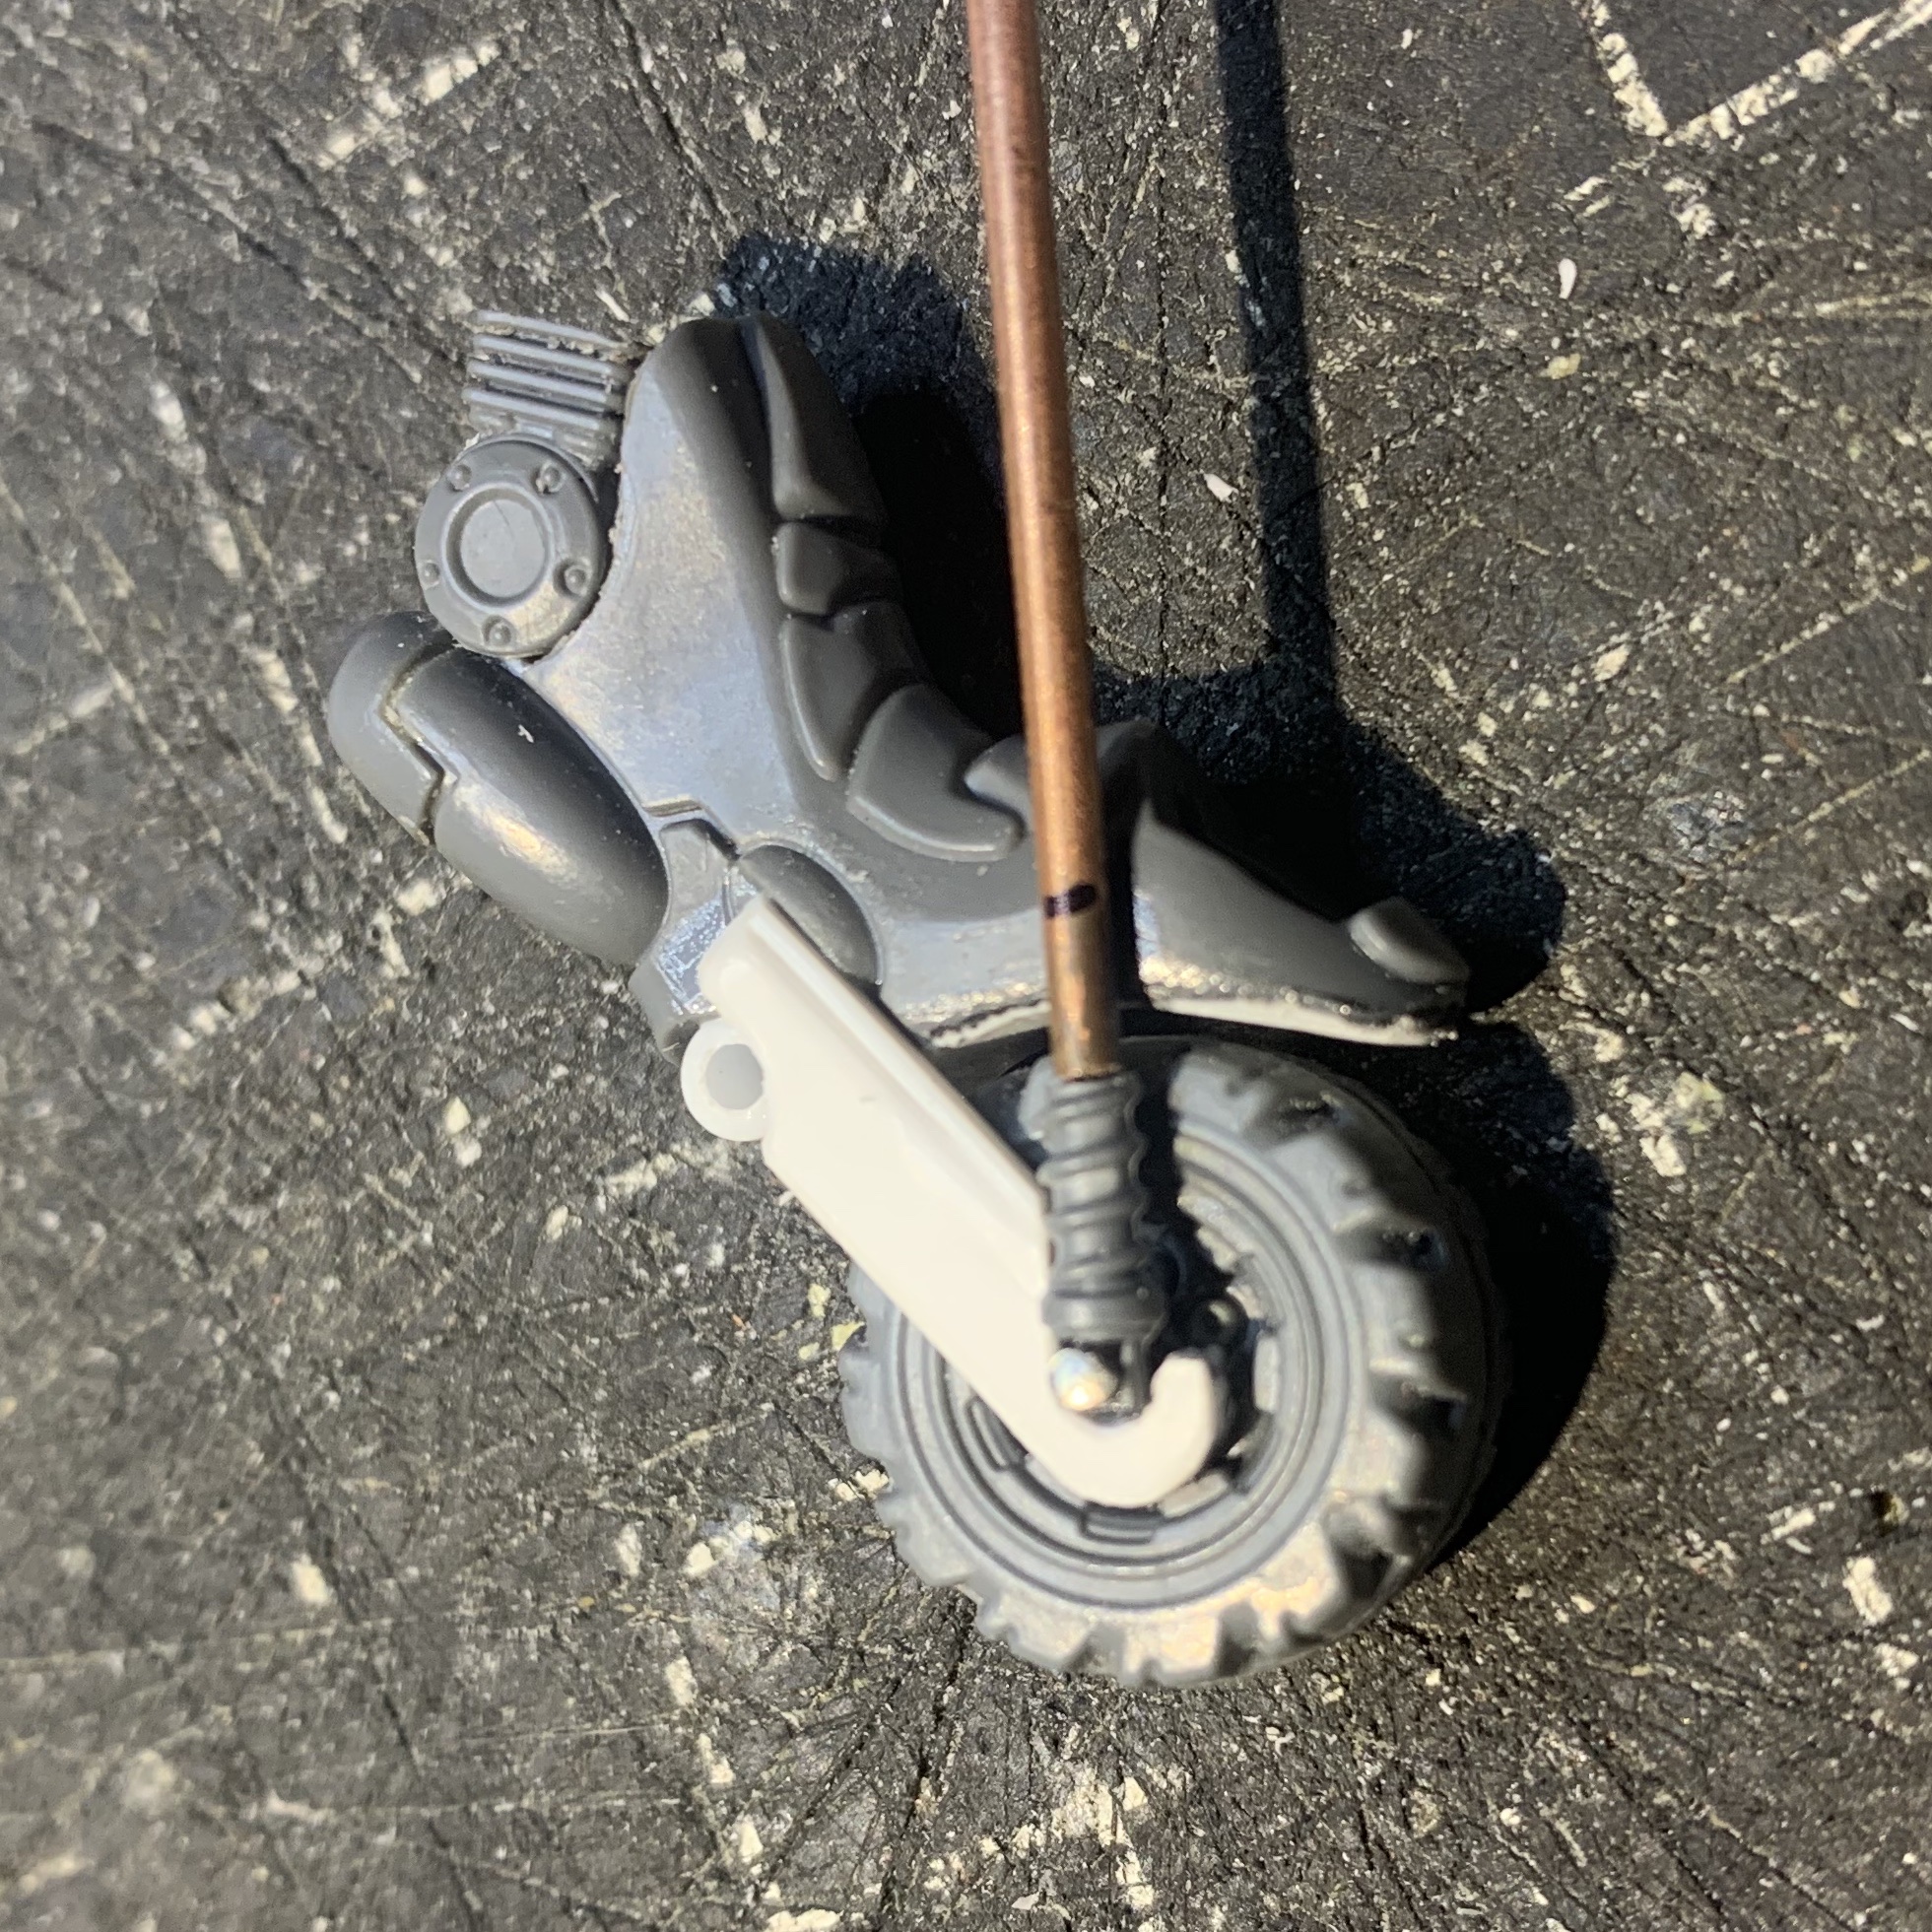
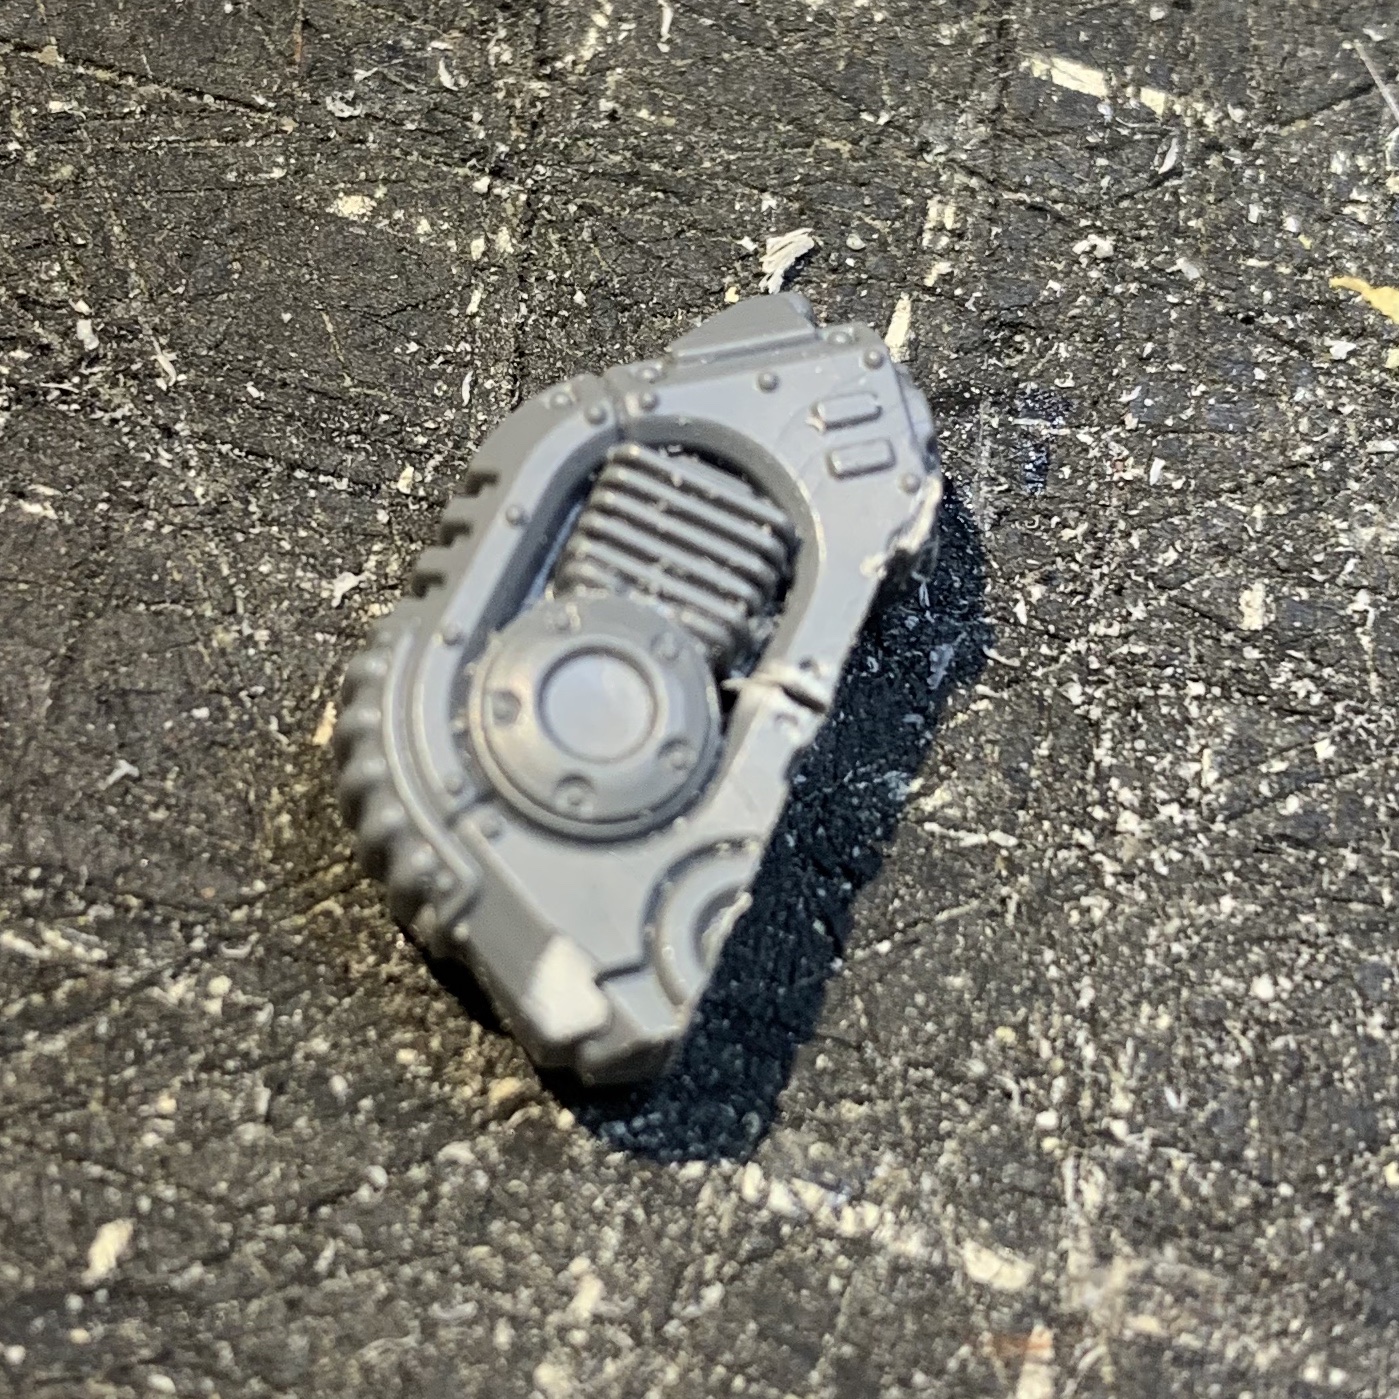
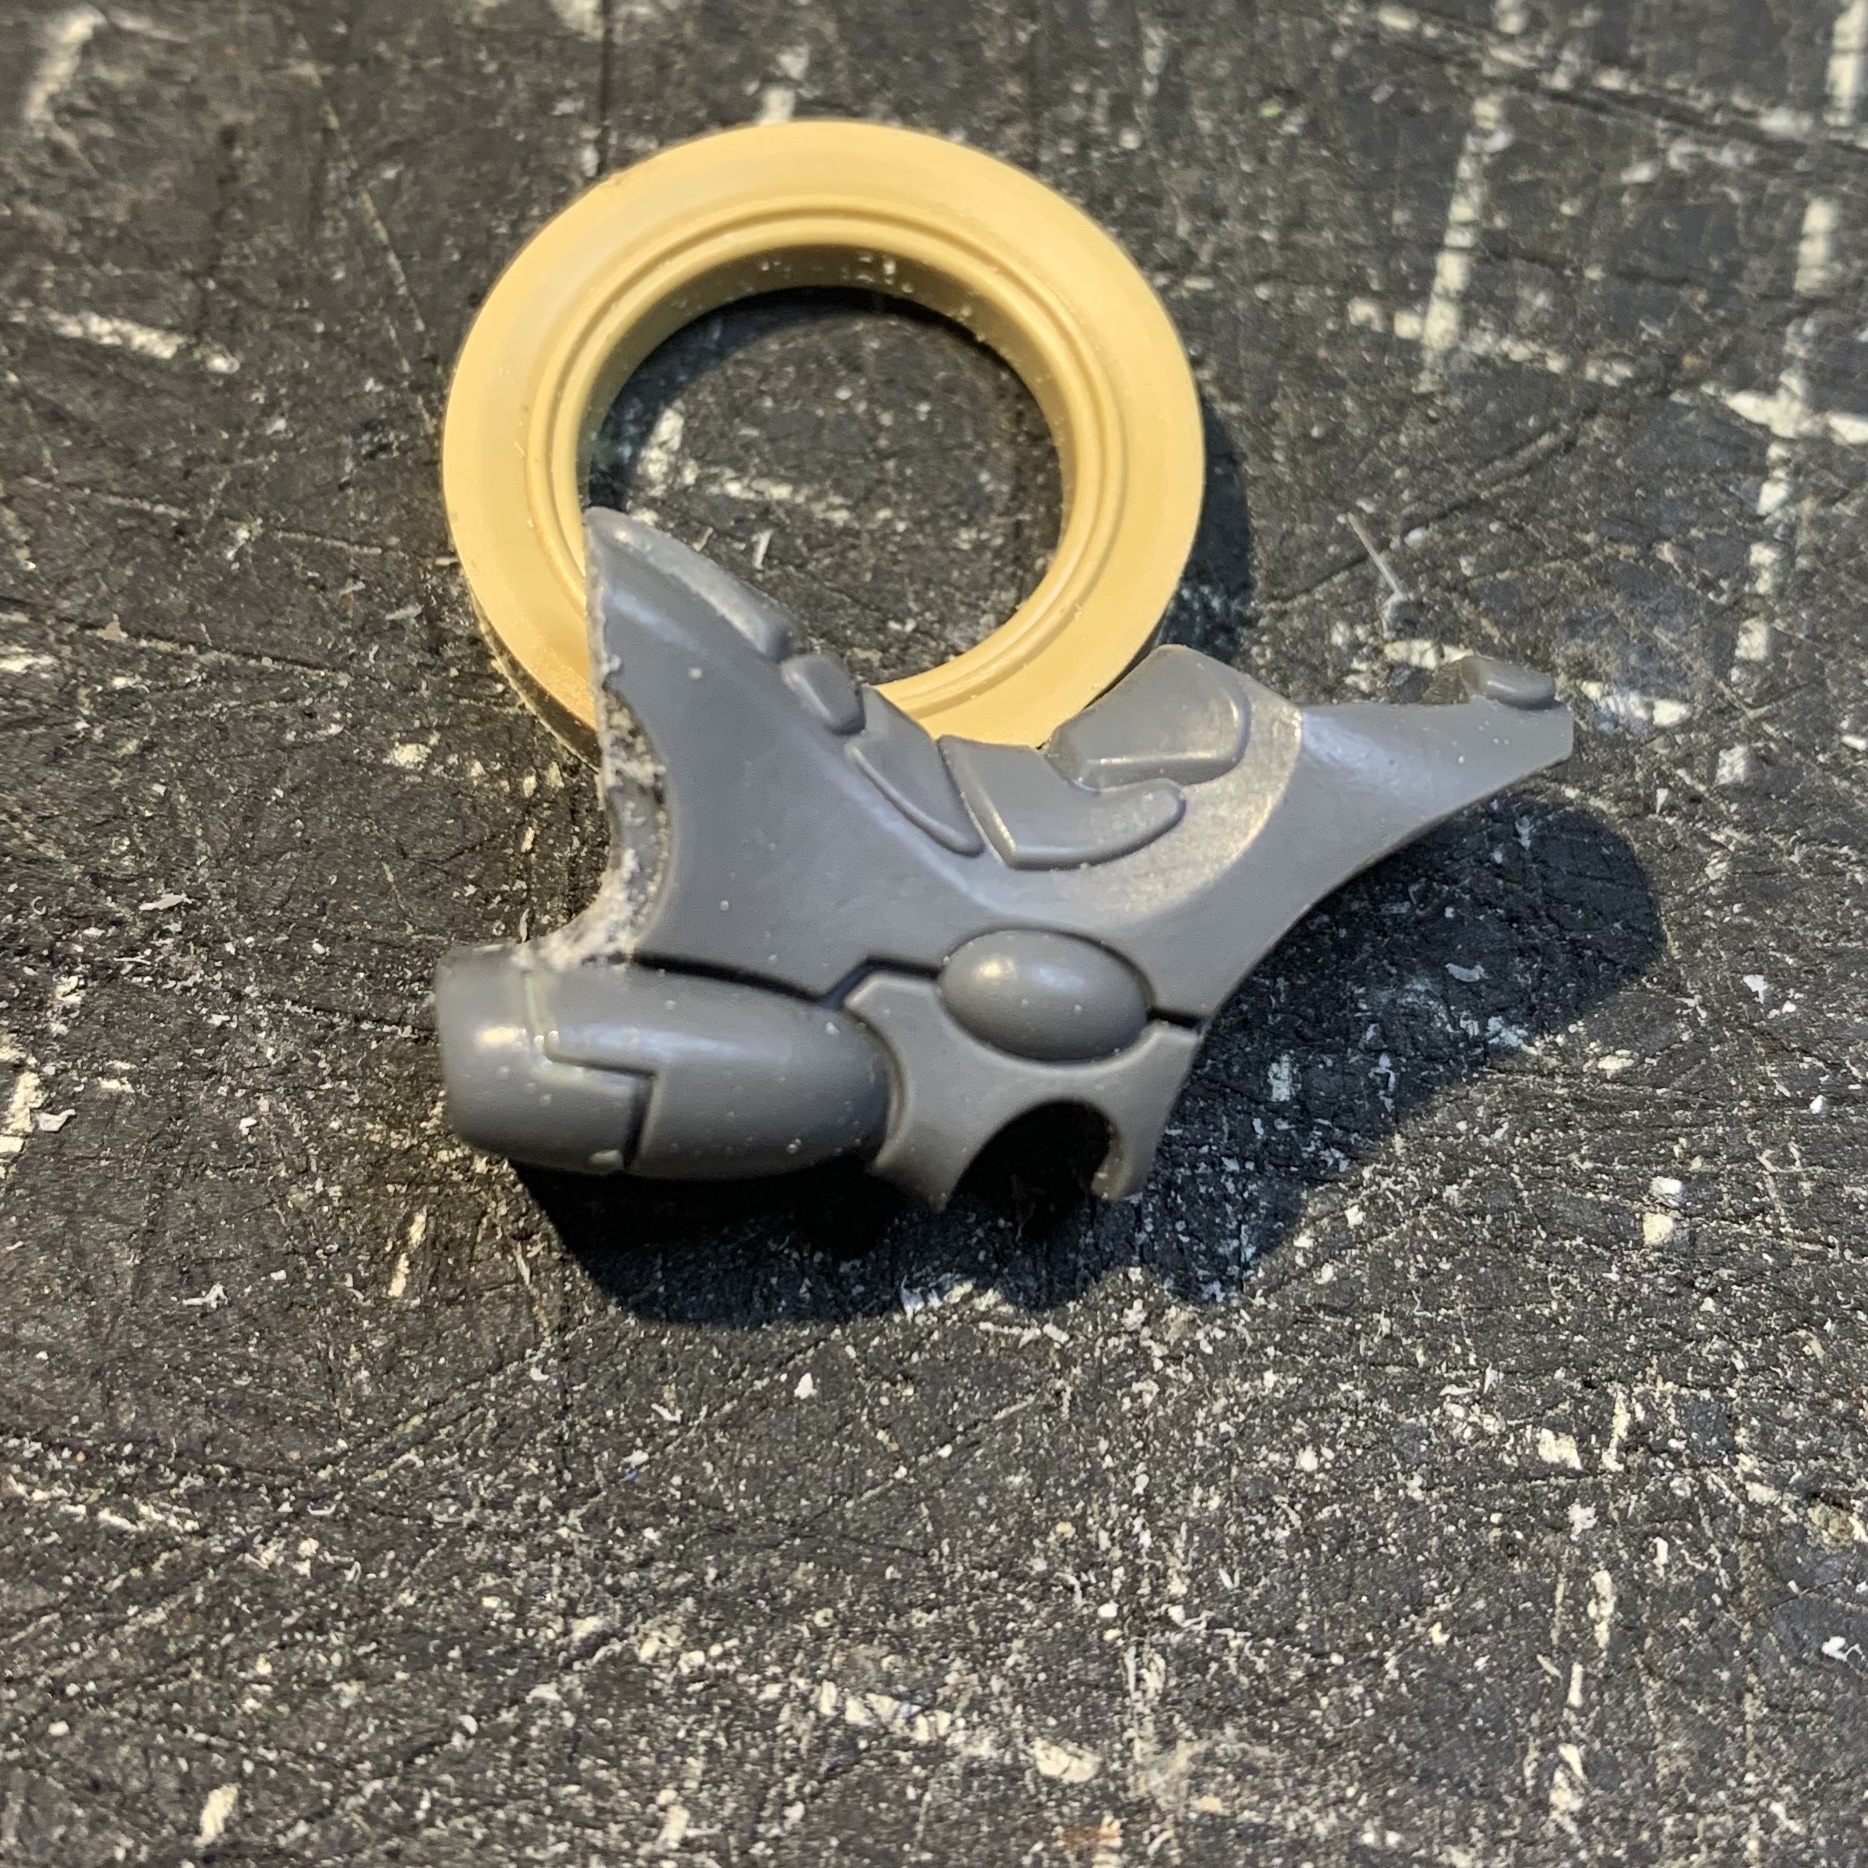
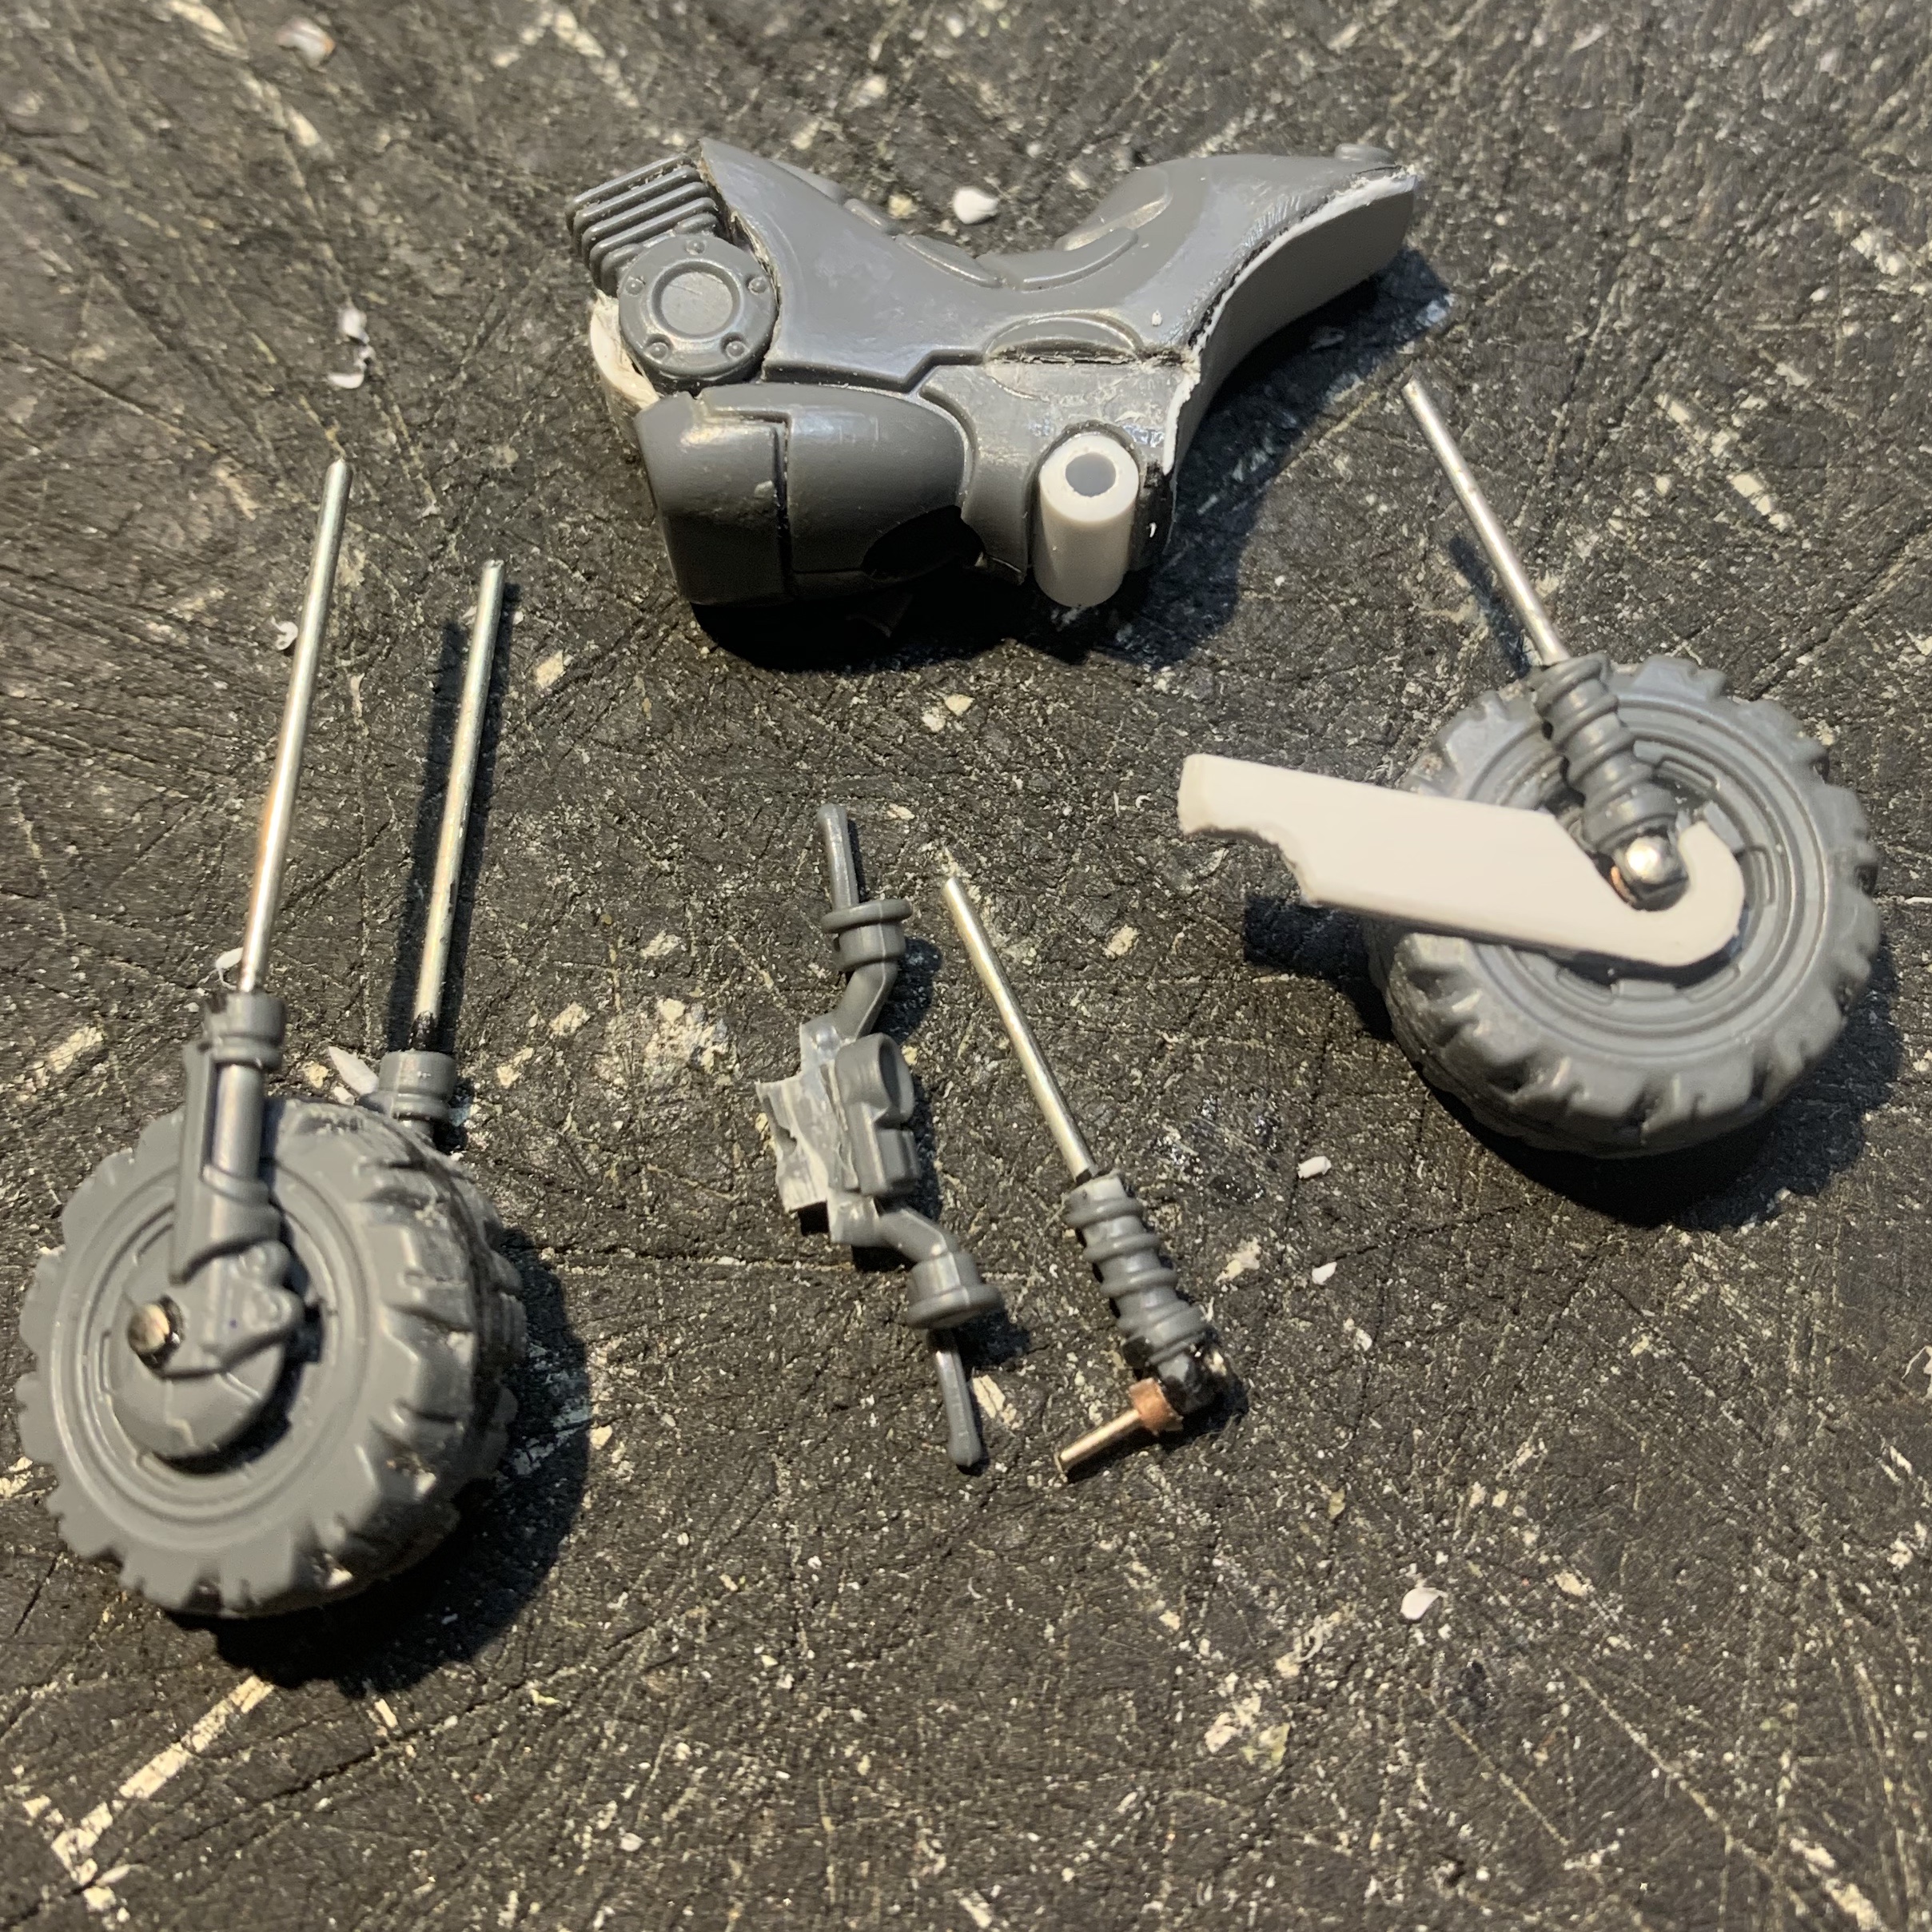
89168
Post by: youwashock
That's amazing. Glad you went with the inspiration.
111605
Post by: Adeptus Doritos
Love the work in here, and none of it looks like bad Blanchitsu. Inquisitor is one of those games that needs TLC, and could use a revisit from GW at some point- maybe at least some WD love.
Got two warbands, one of which is "A Deathwatch Marine" and the other is an Inquisitor and her Retinue. Sadly, the Inquisitor was lost on a recent outing and I'll have to replace her. Since it's been a while since our group played, I might pitch the idea that she went missing. Bring her back all beat up.
92460
Post by: aku-chan
Fantastic bike!
Also great job on the assassin, you've improved an already pretty great mini.
1124
Post by: Captain Brown
Wow Lamby, exquisite conversion for the bike.
Cheers,
CB
62749
Post by: Dr H
Nice bike.
22619
Post by: inmygravenimage
That bike is crazy good
|
|