21480
Post by: btoliver311
Of course.
I really like the exoskeleton idea too. Might try it again for a veteran or scion squad. Something like

Or

21480
Post by: btoliver311
21480
Post by: btoliver311
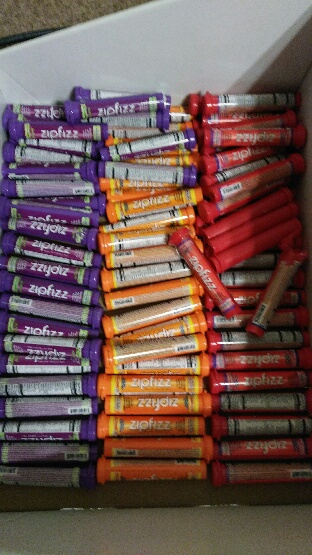
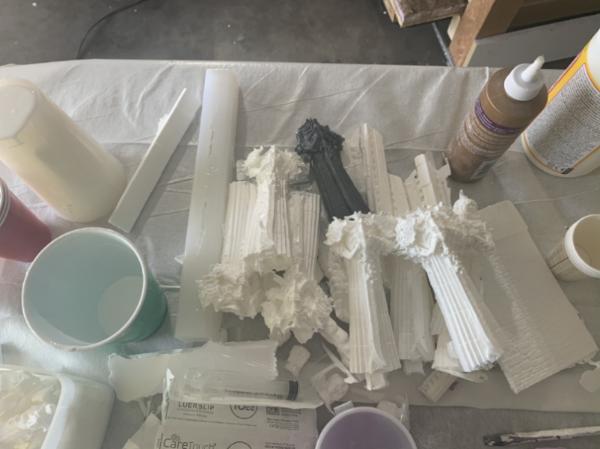
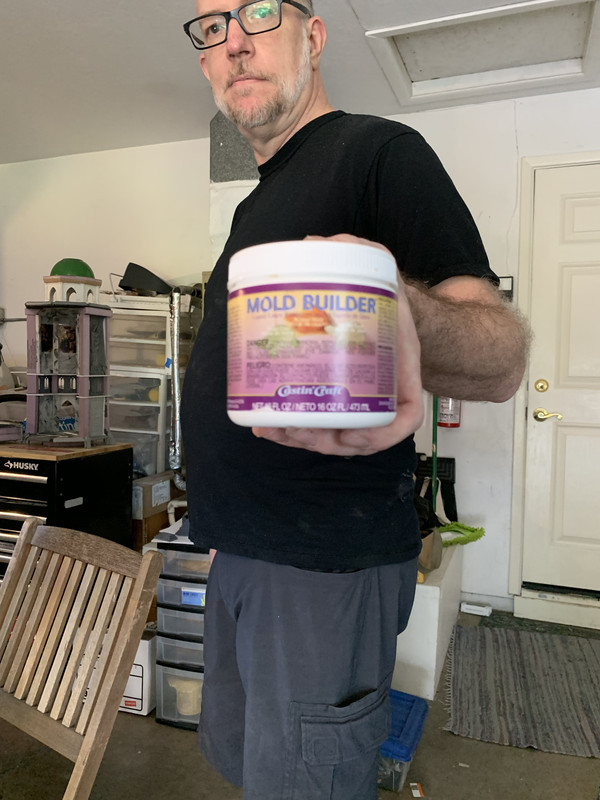
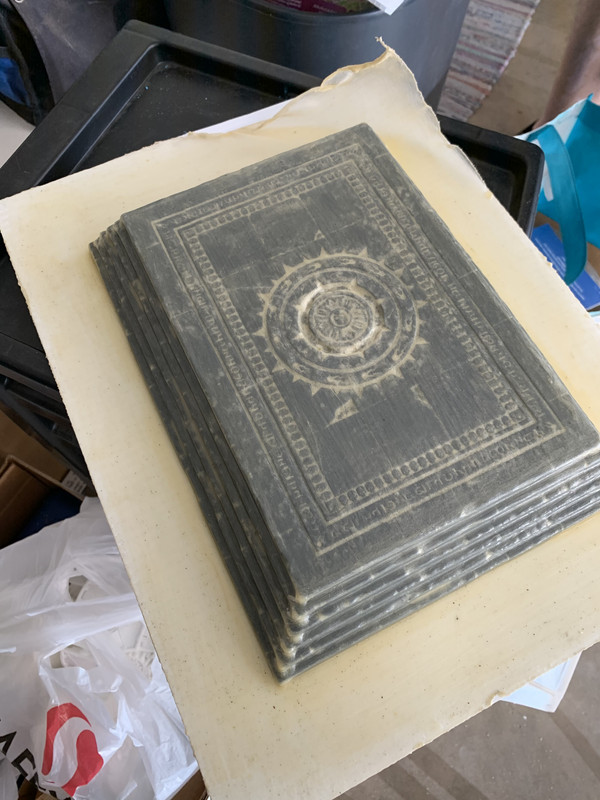
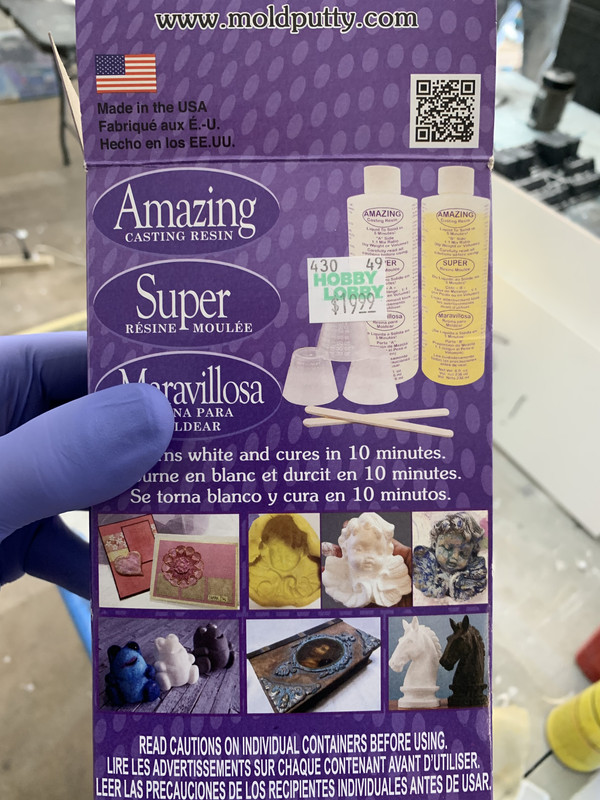
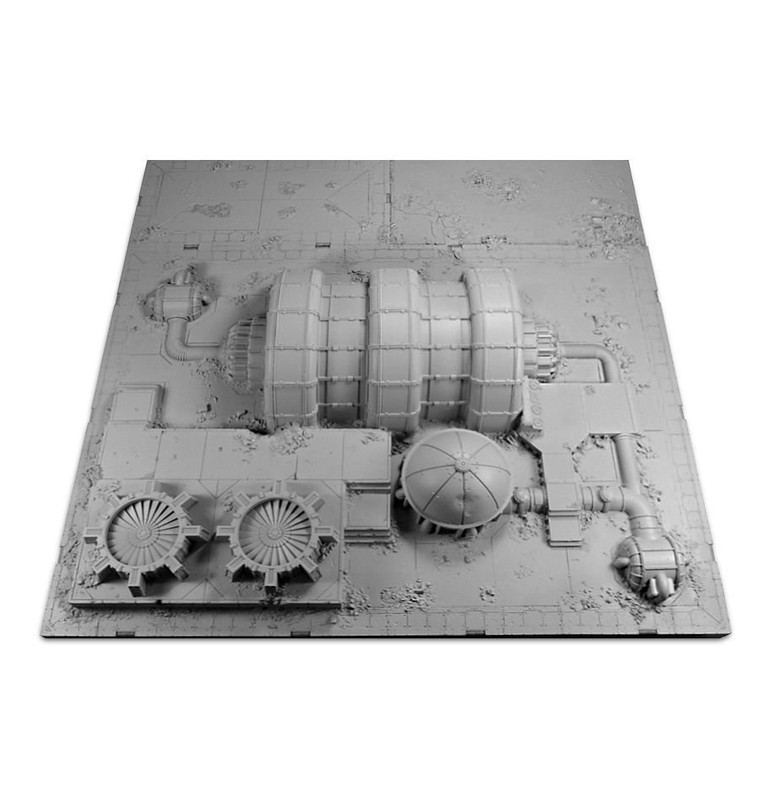
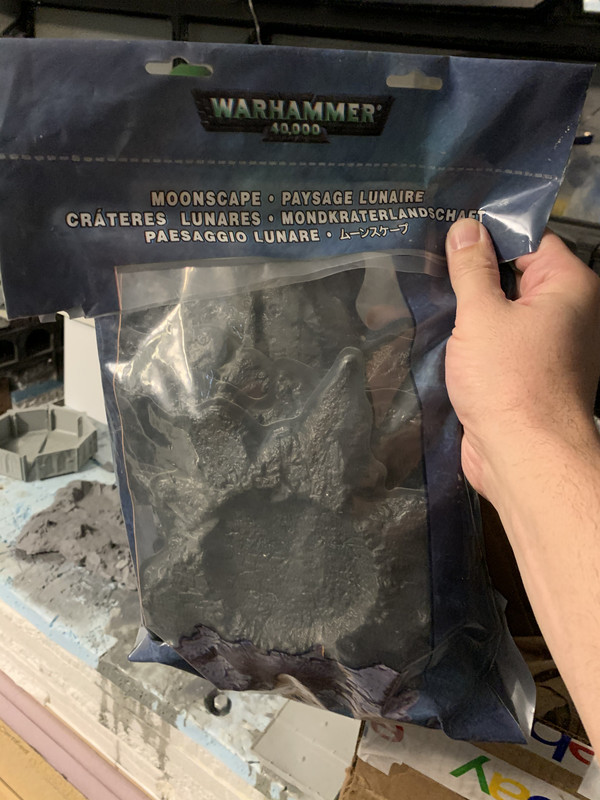
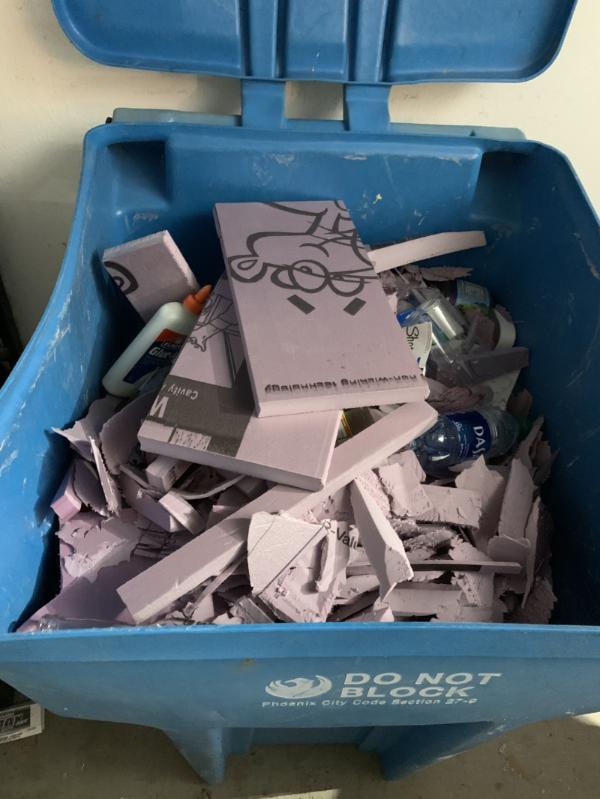
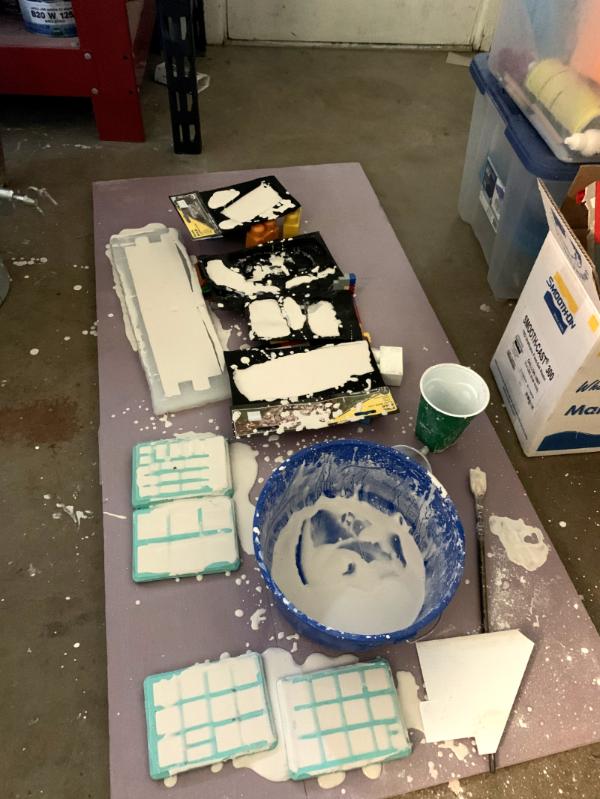
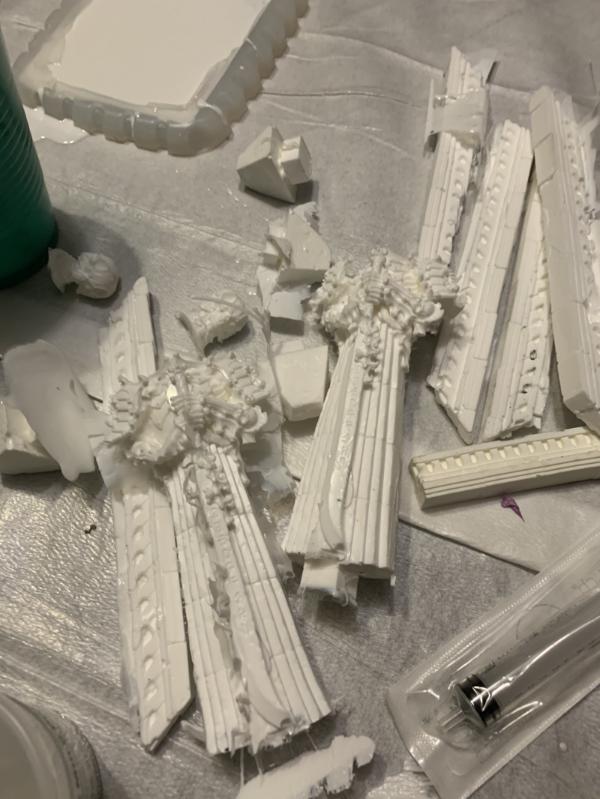
Didn’t get any work done on the board but I did get some more OOP terrain from a friend and am going to make myself some molds and casts of them along with some other stuff I’m doing for my wife and son. Not sure I need it or will use it but man they’re cool
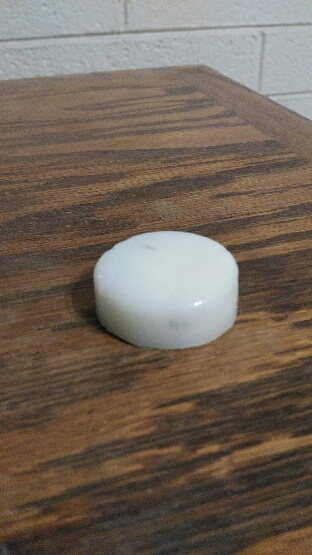
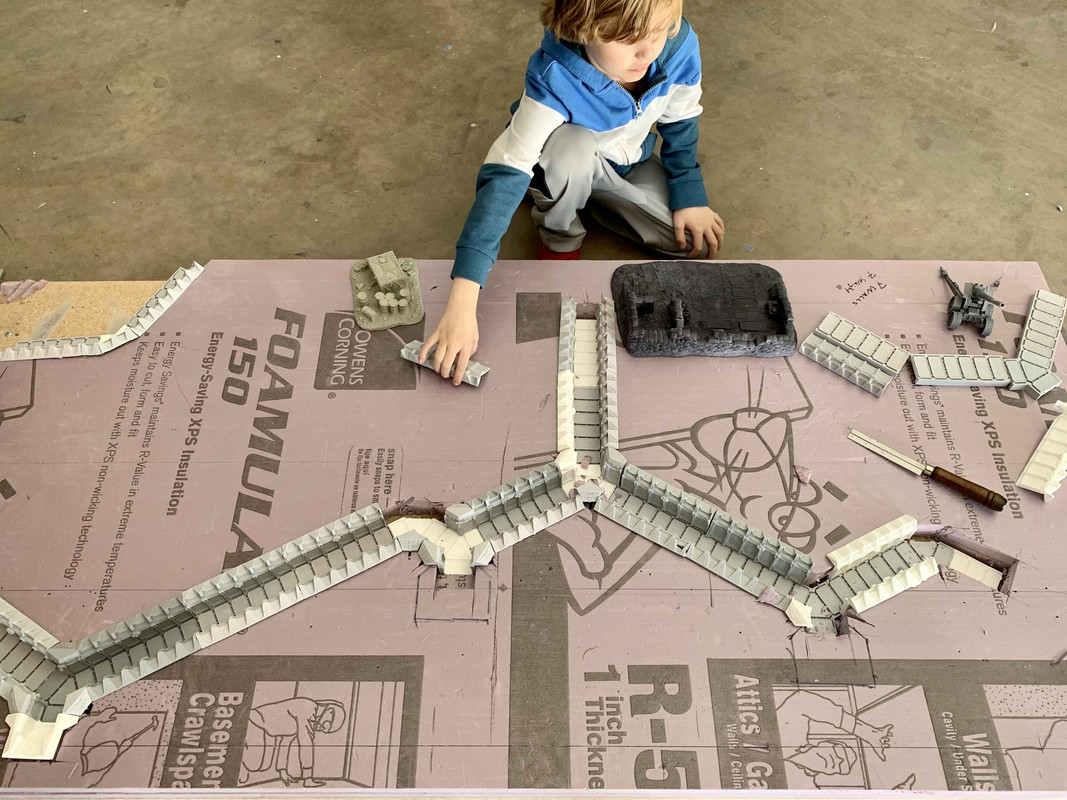
And with the beginning of their mold boxes
21480
Post by: btoliver311
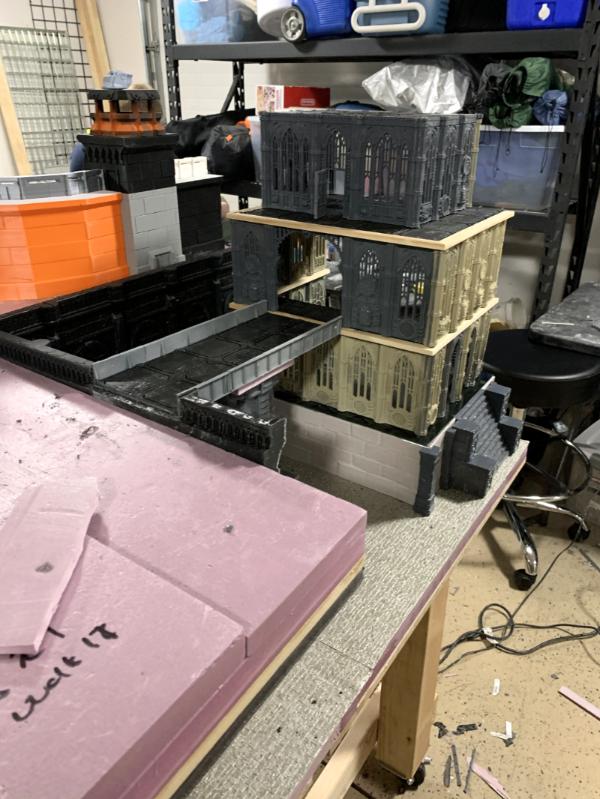
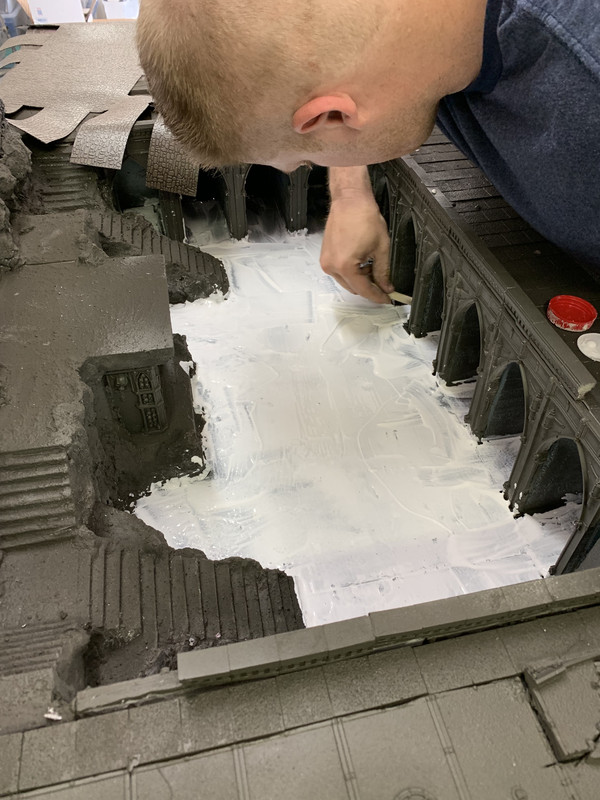
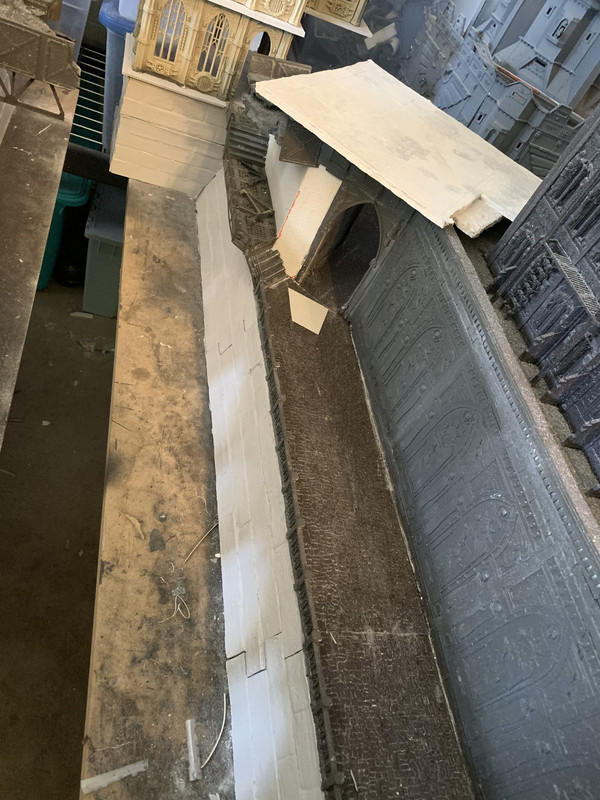
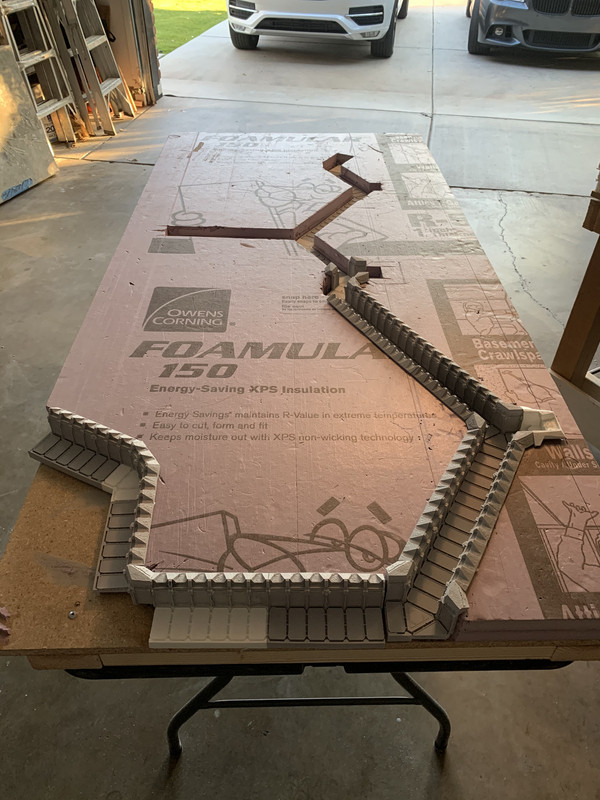
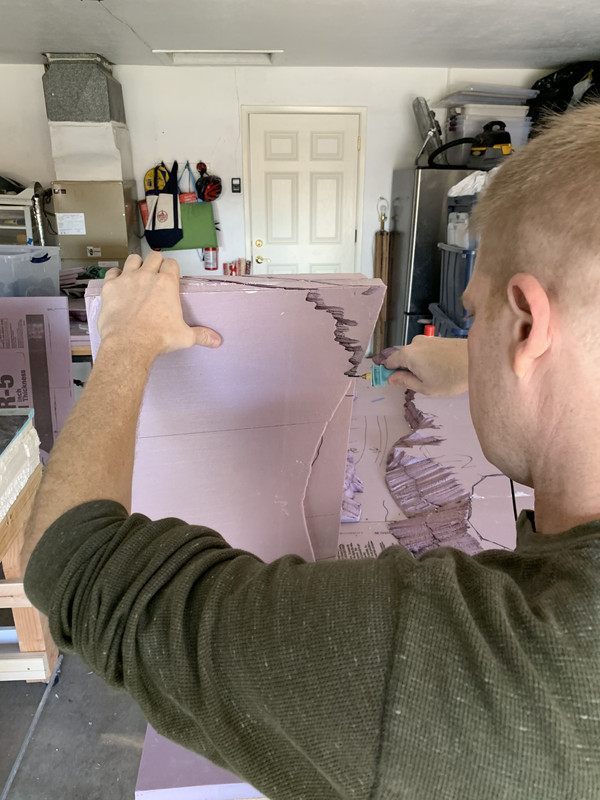
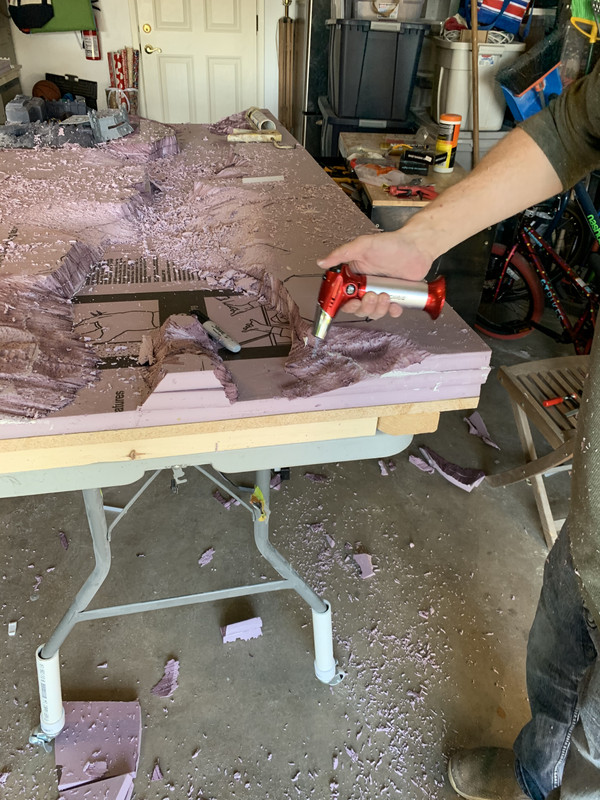
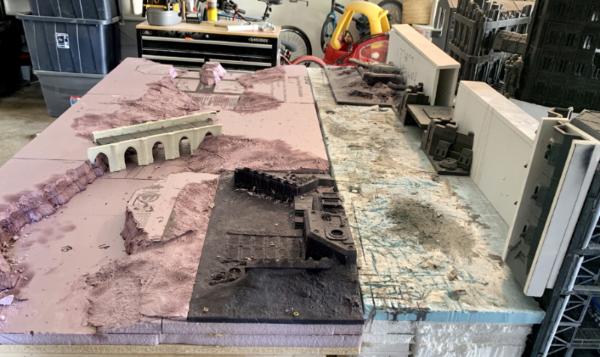
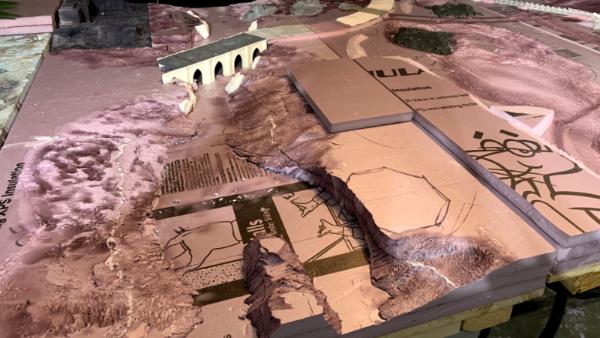
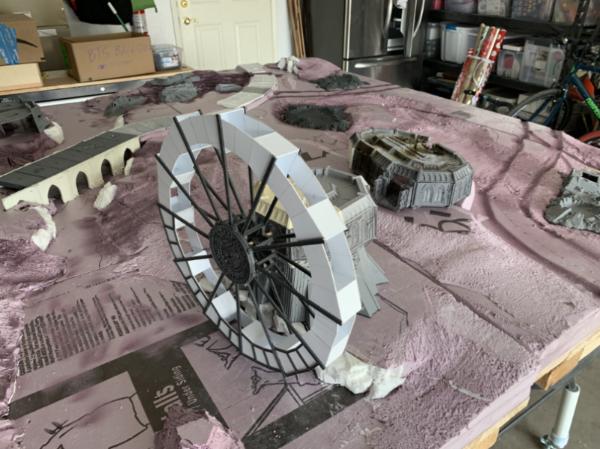
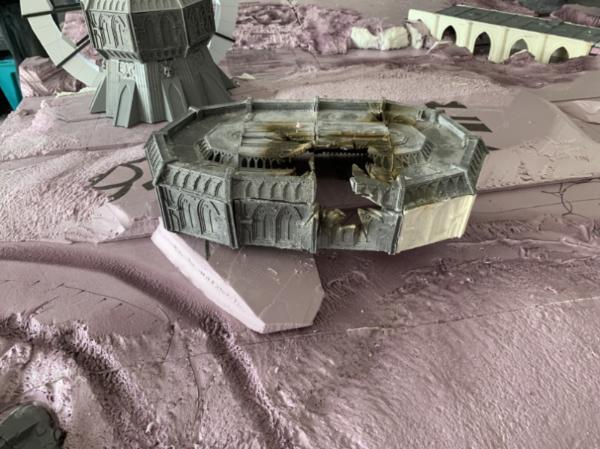
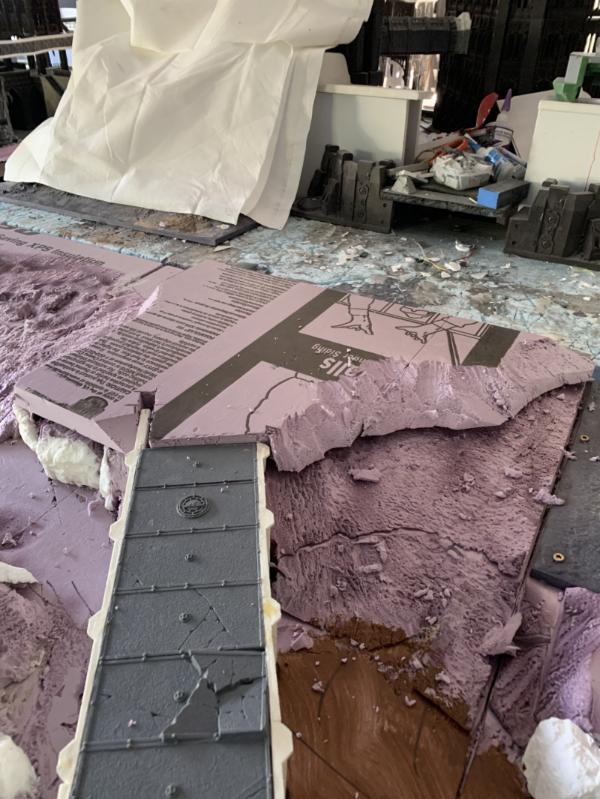
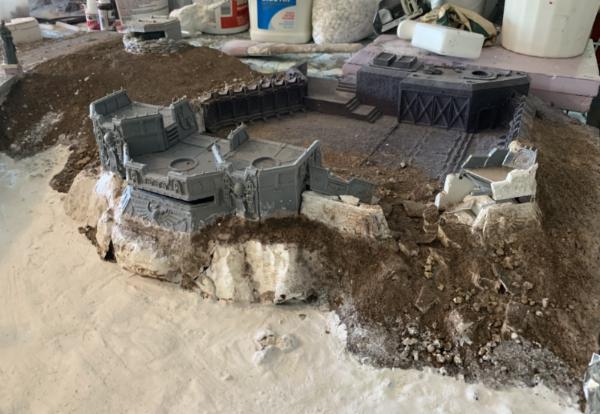
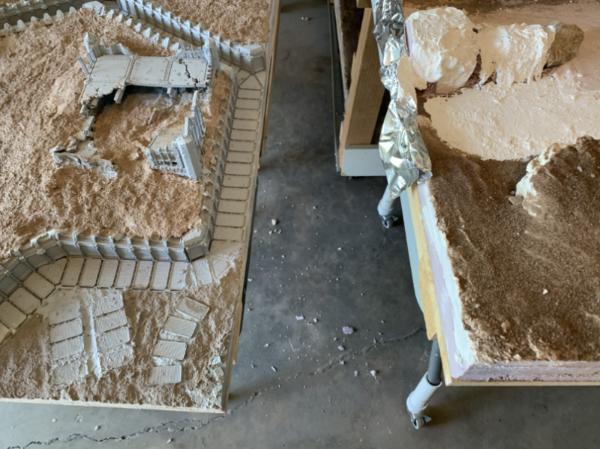
Started work on the cathedral mountain/plateau/cliff area again.
First we sprayed expanding foam around the old hill to make it bigger (I wouldn’t recommend spray foam for hills. IMO it’s to flexible and I’m afraid it will give and crack but I’ve seen a lot of youtubers do it)
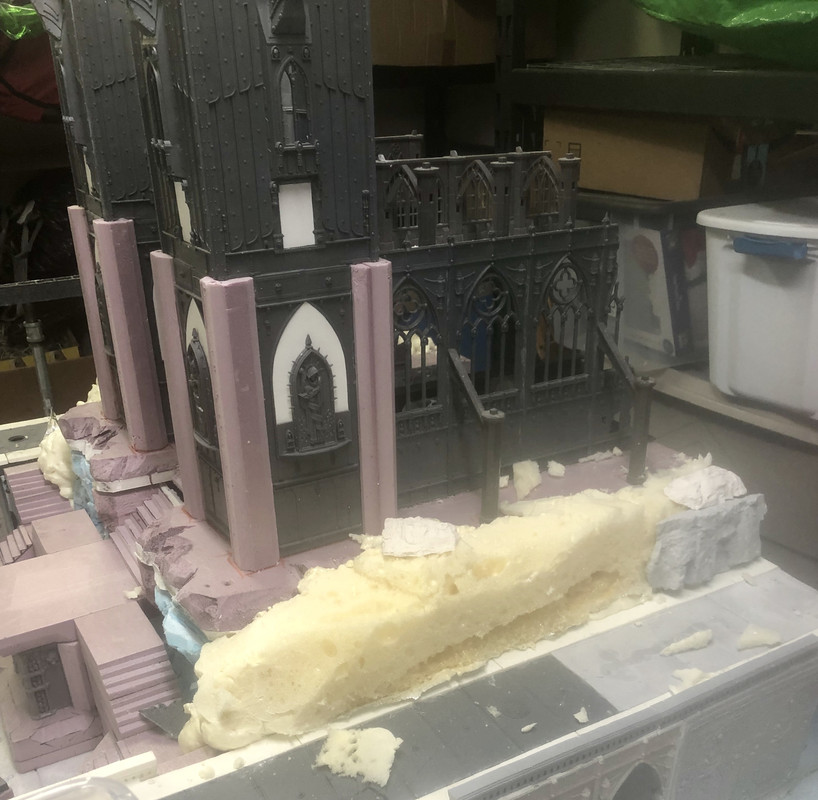
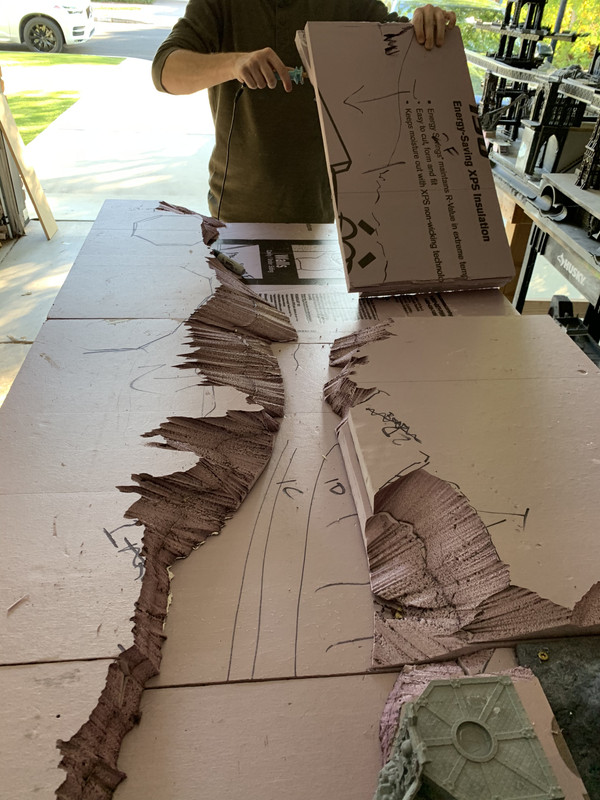
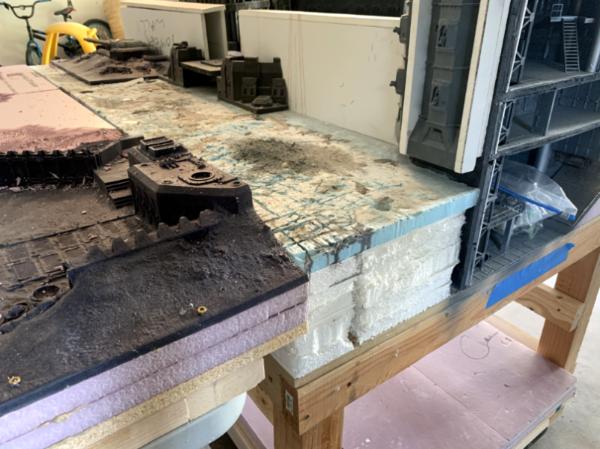
Then we cut back along the horizontal seem. Remember the top which the cathedral sets on is removable
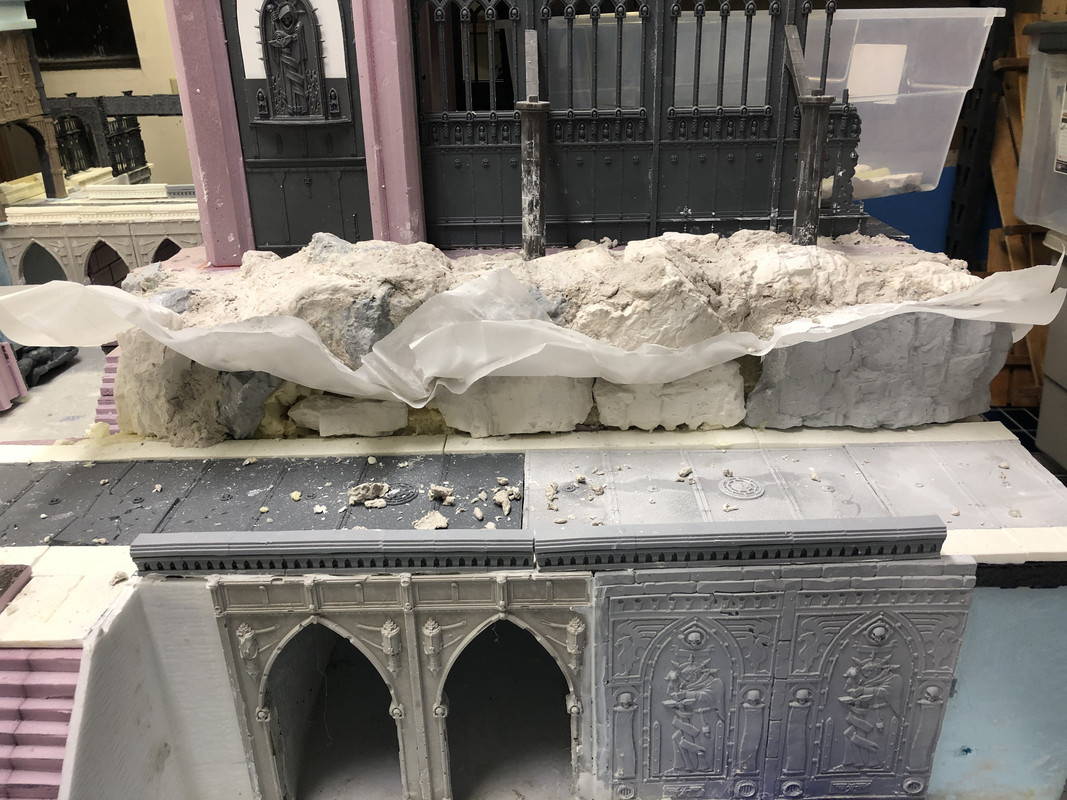
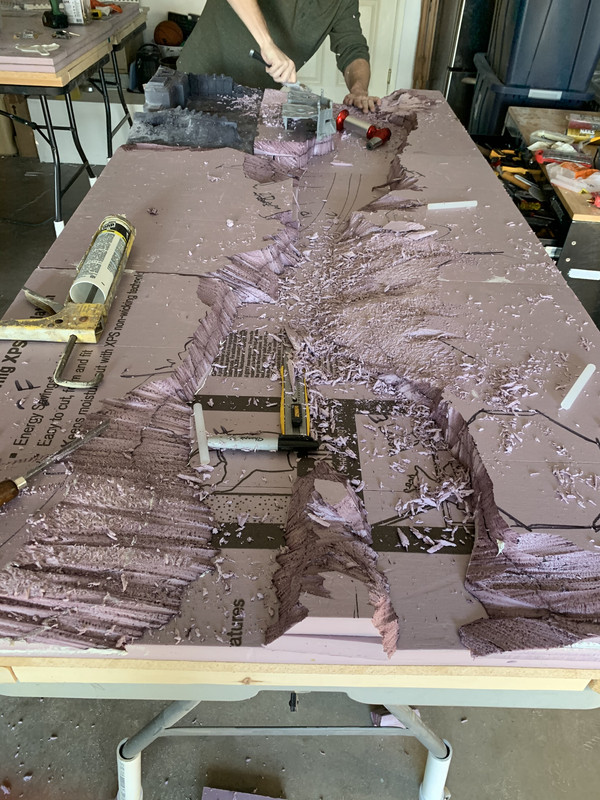
After this we glued our plaster cliff facings, from woodland scenic molds, on. These were either glued to the bottom or top sections taking care not to glue to both
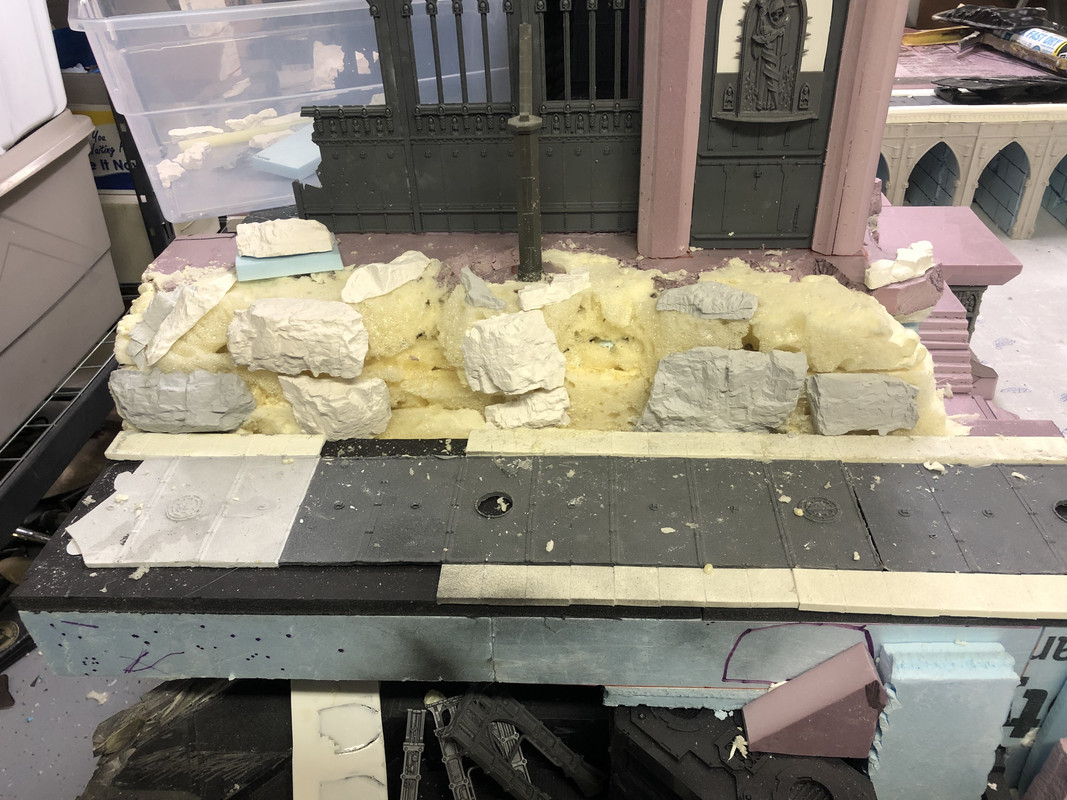
After this we separated the sections and put in our wax paper

And the last part we got to was adding in the plaster compound between all the rock casts (40%-45% casting plaster, 40%-45% eco/non-harmful insulation fiber - for bulk, 10-20% water)
 Automatically Appended Next Post:
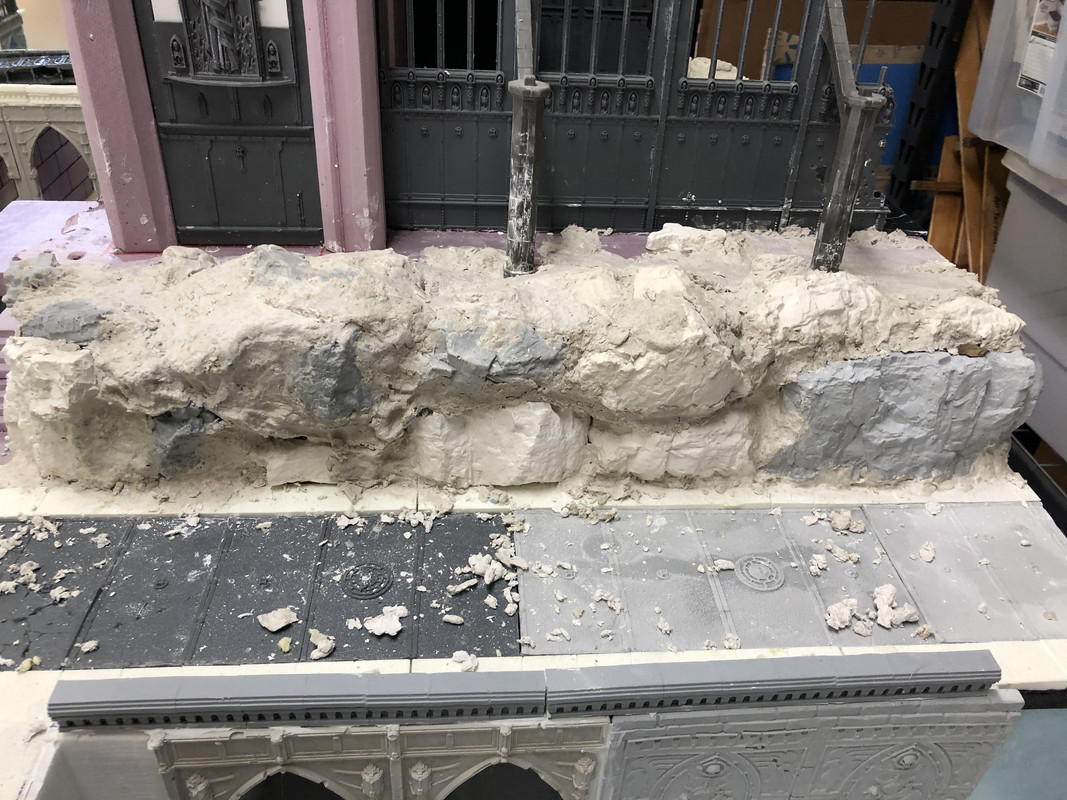
122642
Post by: kasrkin122
Do your kids miss their legos?
61615
Post by: JeffyP
Long time lurker. Just wanted to pop in to say HOLY CRAP MAN THIS IS GREAT! You guys don't get nearly enough praise here. Please keep up the fantastic work. This project has been so cool to follow.
10667
Post by: Fifty
The ambition of this is incredible. I wish I could one day play on it.
21480
Post by: btoliver311
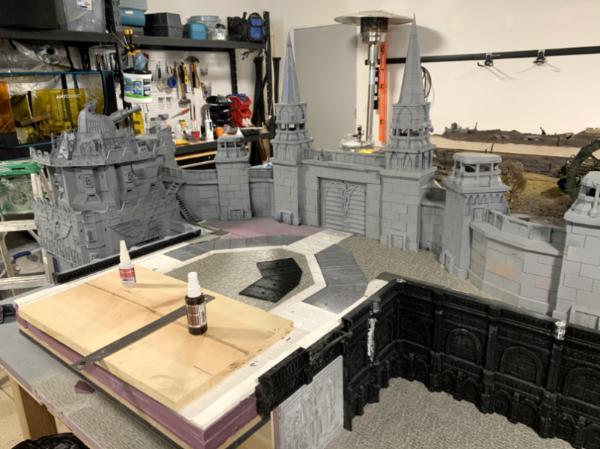
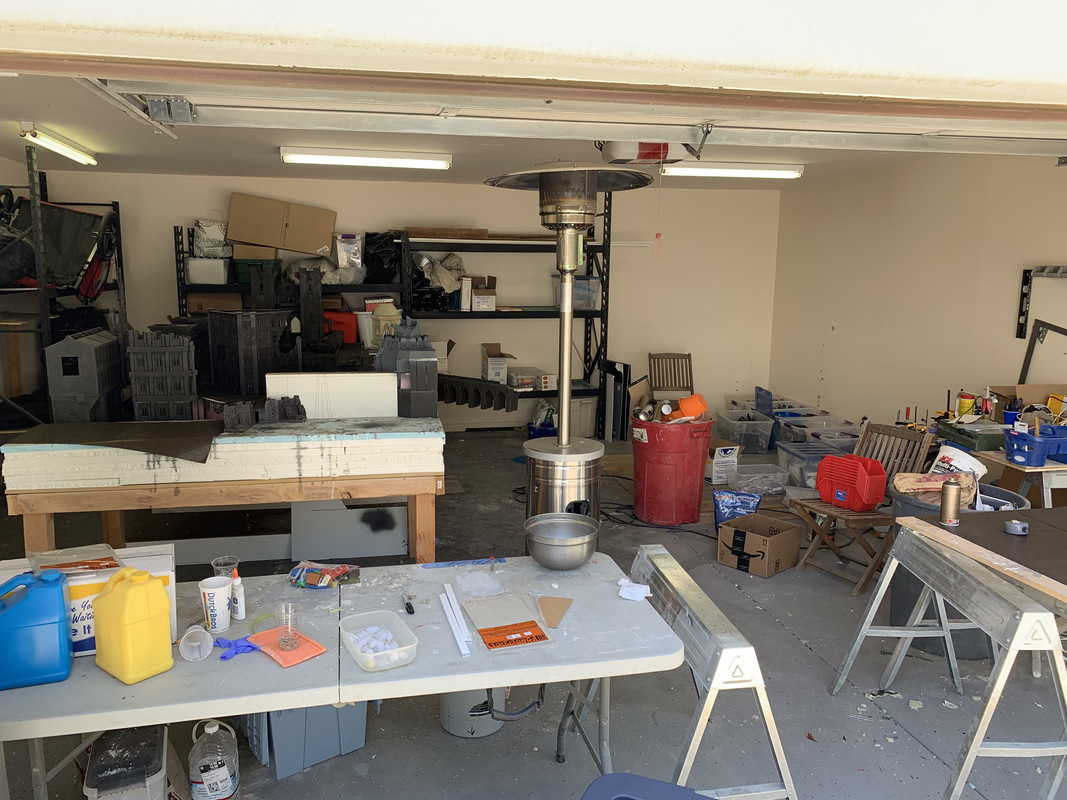
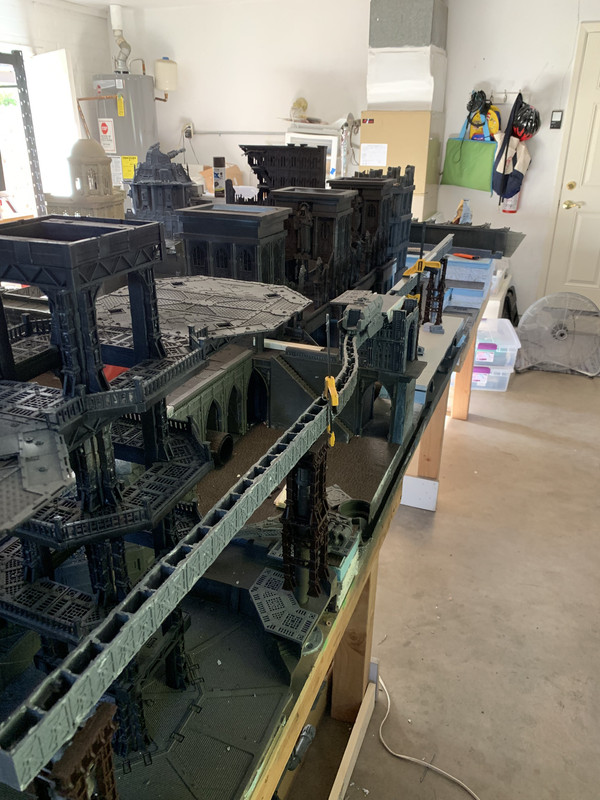
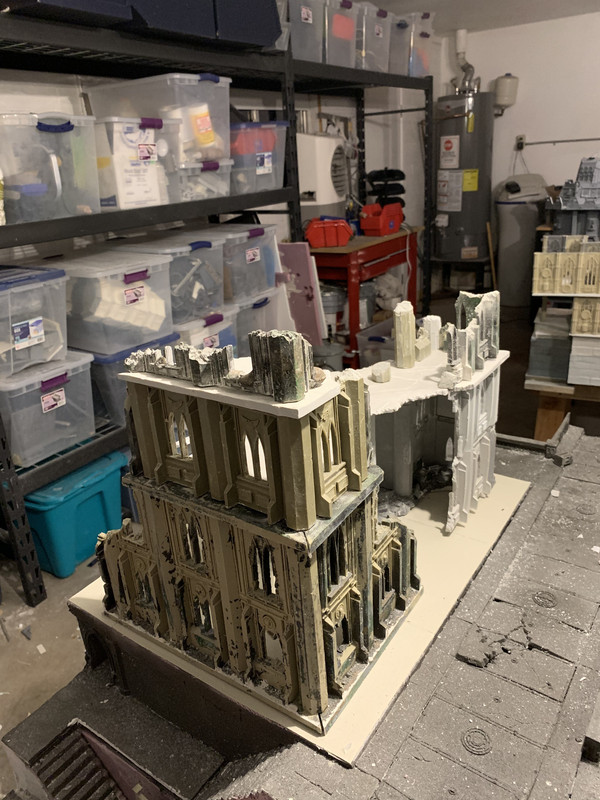
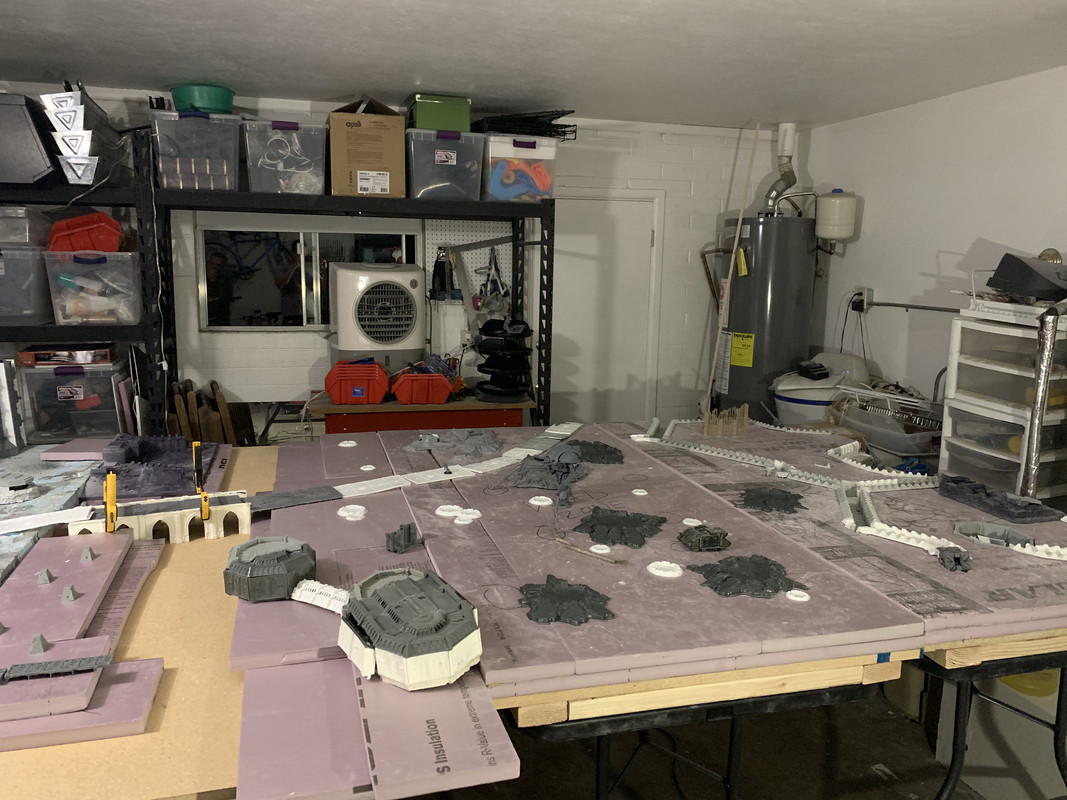
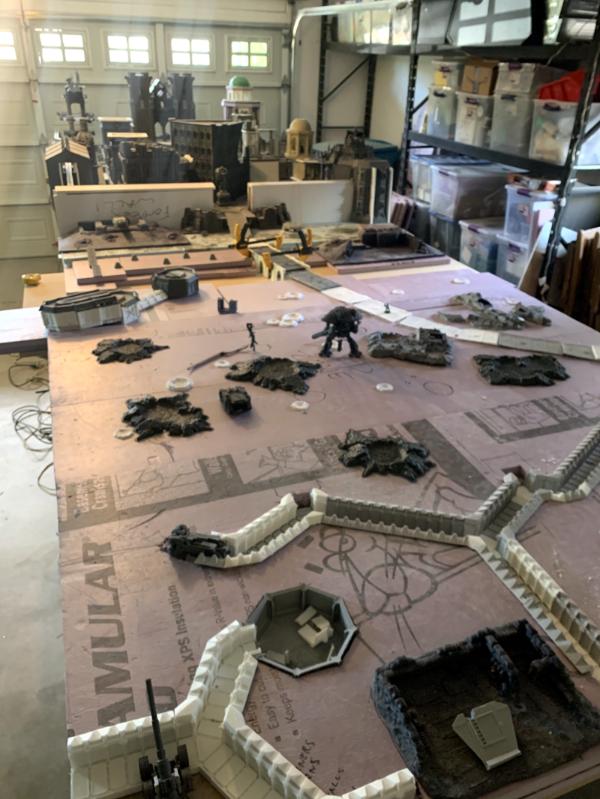
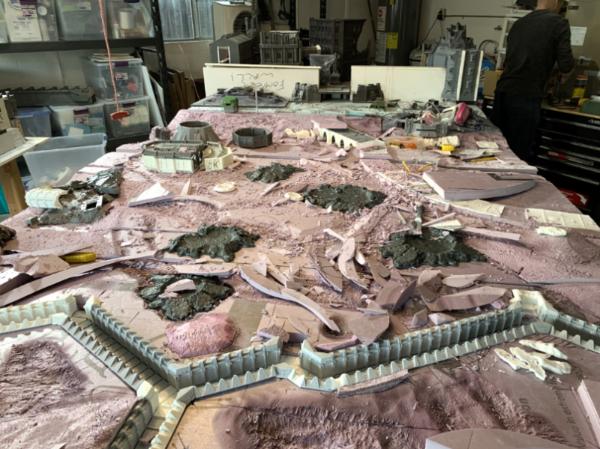
It’s been a very long time since our last post but we are still getting a few hours in here and there on this beast.
Thought I would jump on Dakka and at least document our big move.
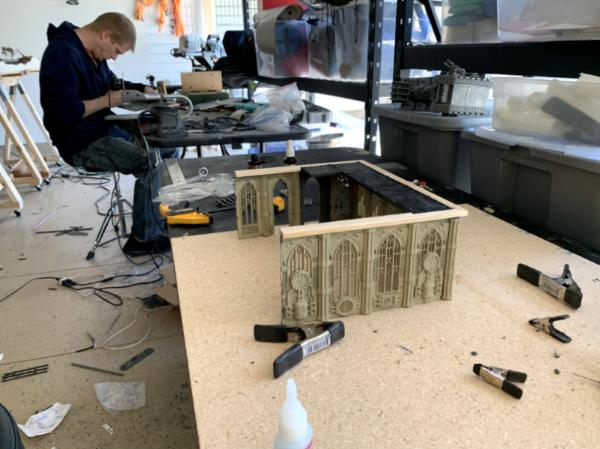
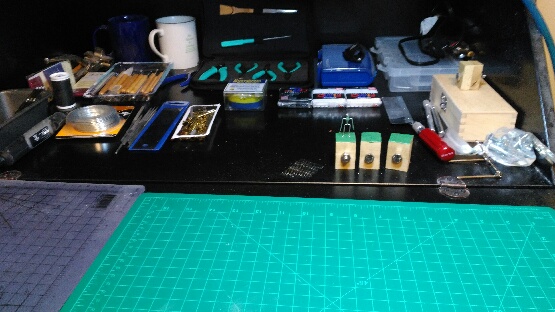
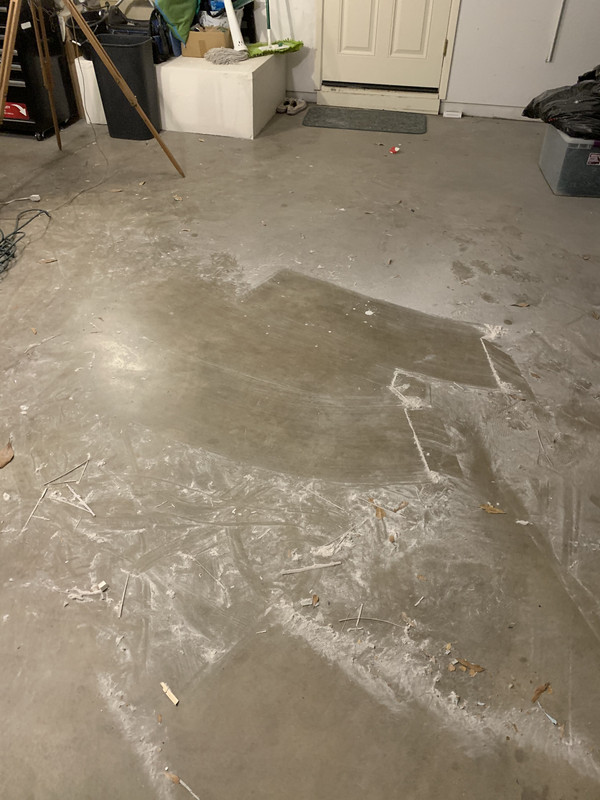
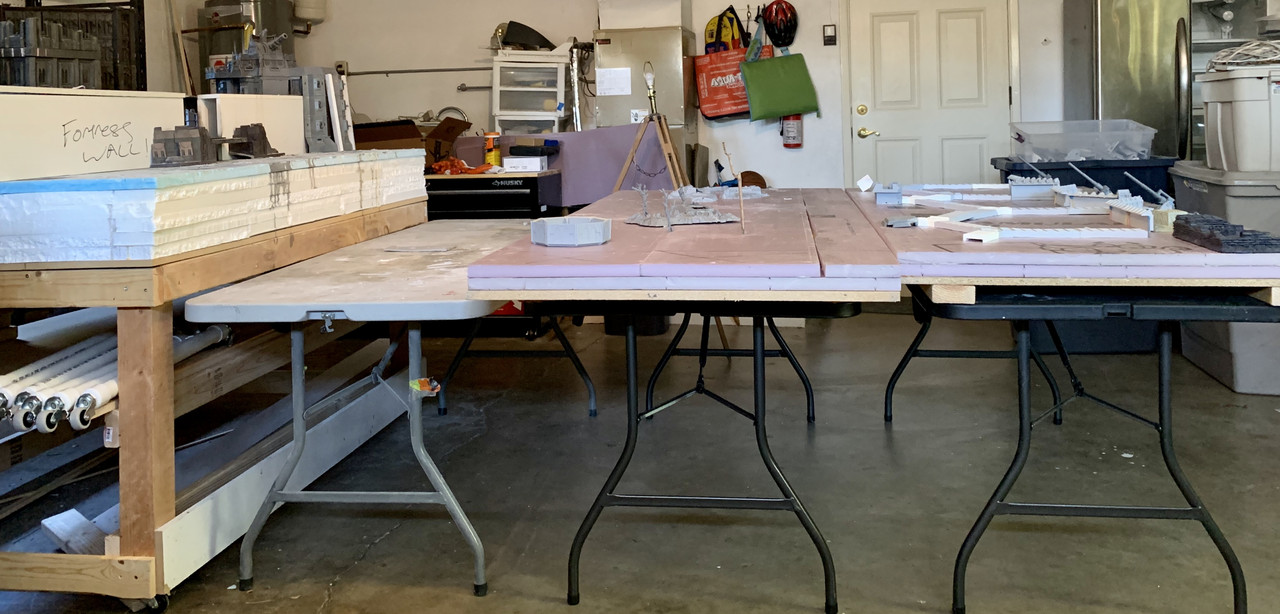
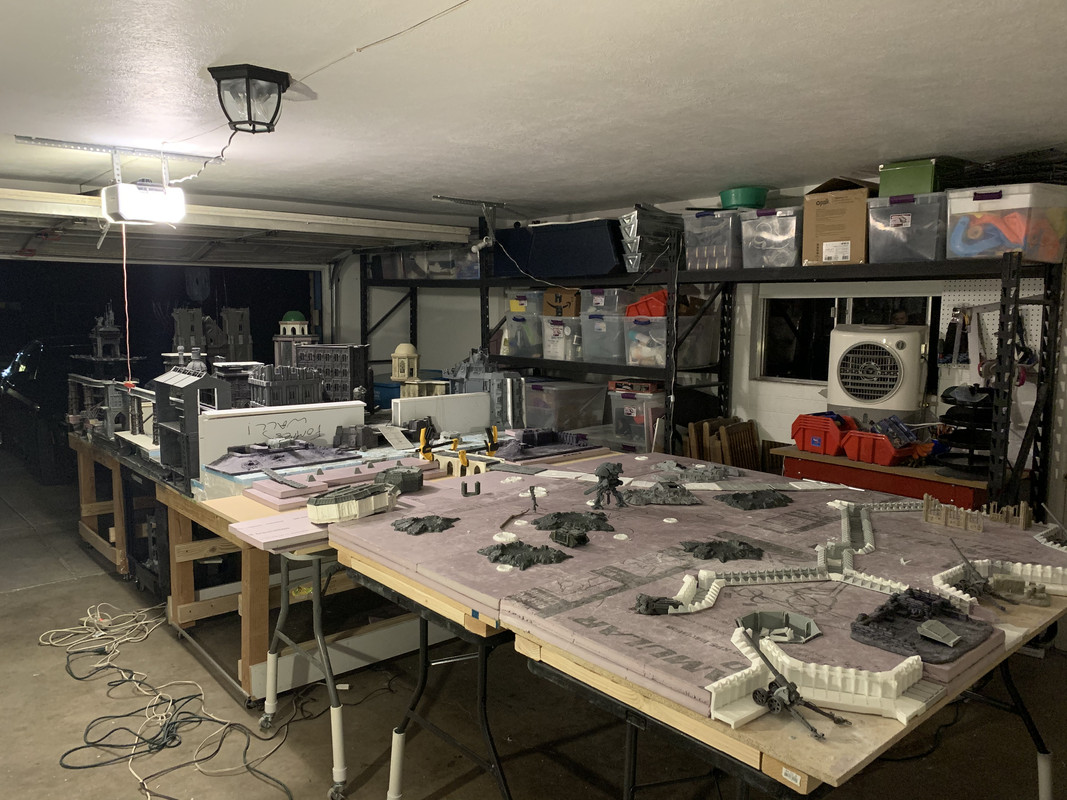
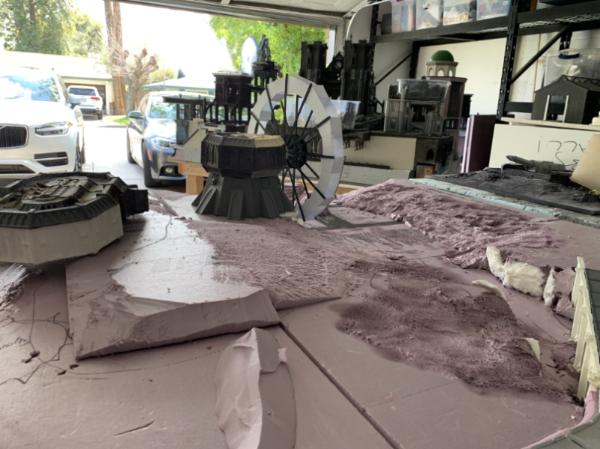
First picture was the current state of the lab this morning. The amount of modeling stuff and mess I have is insane
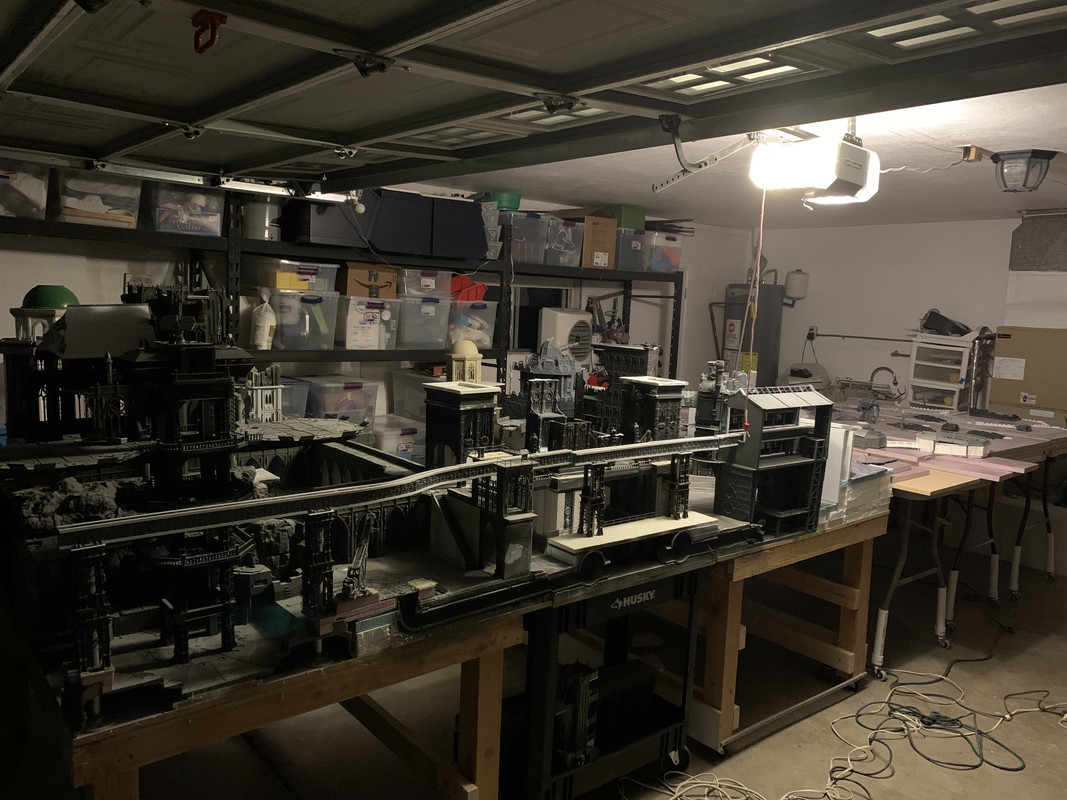
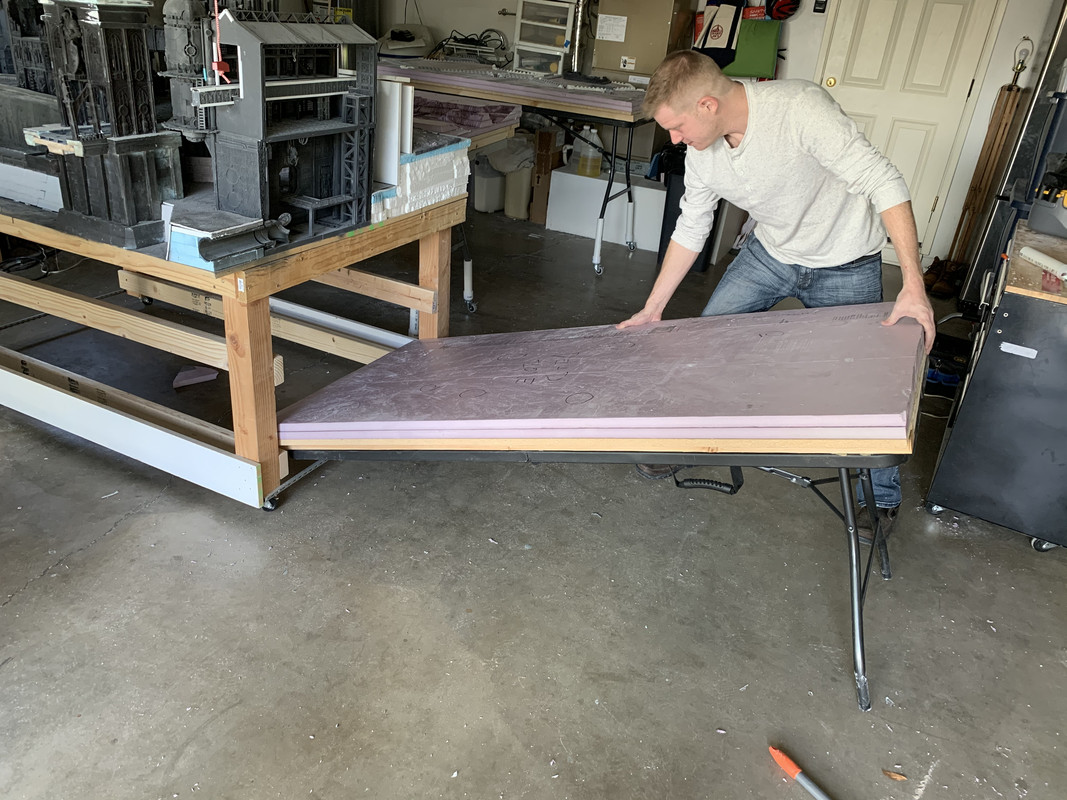
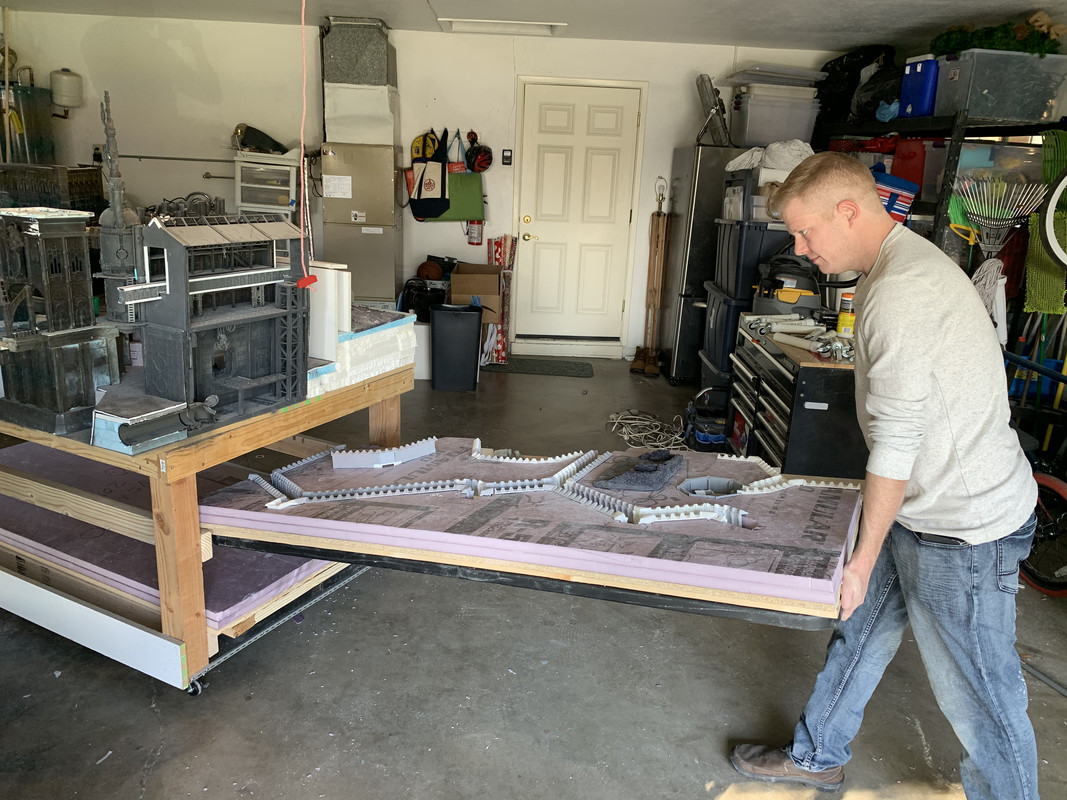
We alway knew the model would be moved a lot so we planned ahead and built it modular. Here are the two main halves with the taller buildings removed:
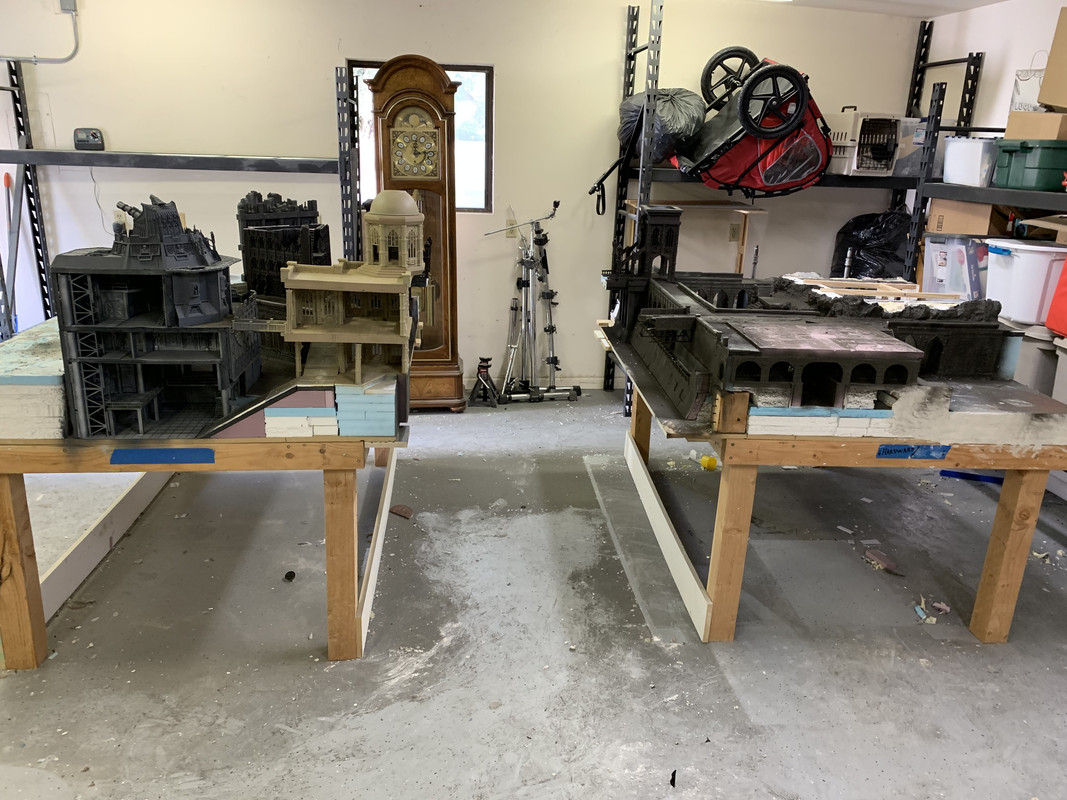
And here are some of those detached pieces:
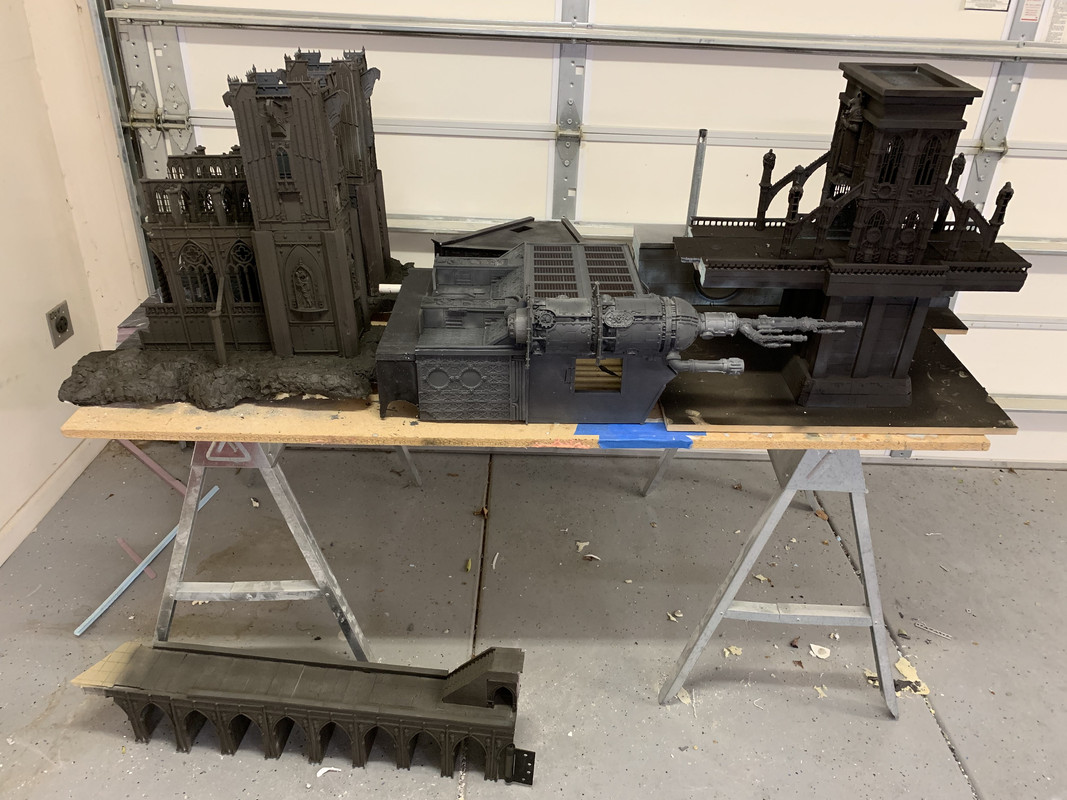
Now we are ready to roll. It took two trips for the truck (obviously. One for each half):

Plus two loads for all the bin of material
And two suv loads for the detached buildings:
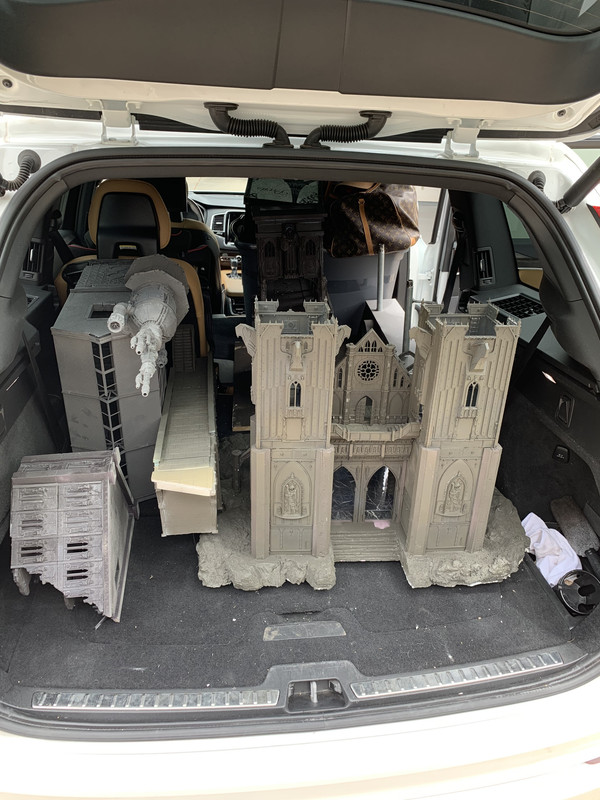
In the future we will use a uhual!
Here’s everything in its new home:
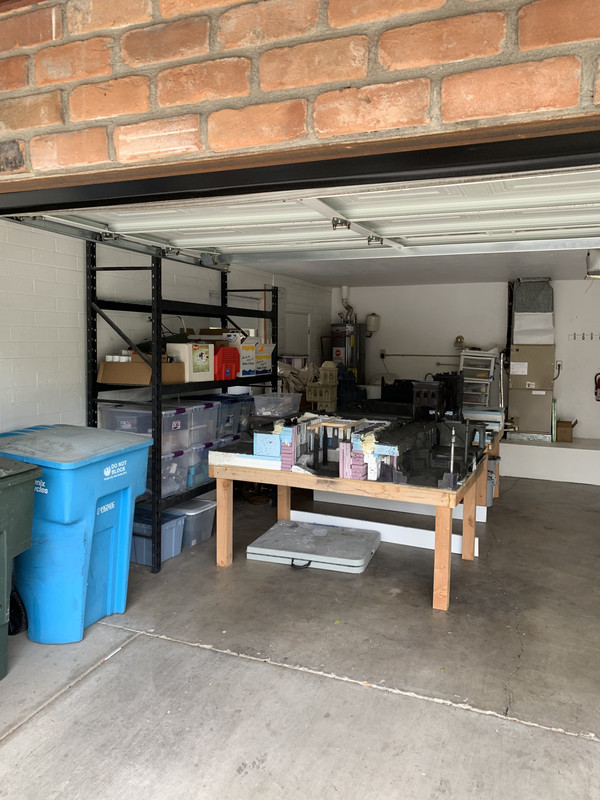
Moving is never fun but Adding all this stuff to our mix really made things interesting. The laborers who helped were also very confused. I just told them to watch out for heretics
We will be posting more once I finish the actual move next weekend. As you may have seen we put some base paint coats on some things too
62565
Post by: Haighus
The blog lives!
I am glad you have moved that behemoth safely! I'd love to see something like that drive past on the back of a pick-up! 
Looking forward to seeing more progress updates once you have settled in.
21480
Post by: btoliver311
Right! Could you imagine what my neighbors think?
98217
Post by: Skinflint Games
Glad to see you mad bastards are still on the case!
30672
Post by: Theophony
Mobile battlefield 
76685
Post by: Singleton Mosby
That's fun to see on the road.
21480
Post by: btoliver311
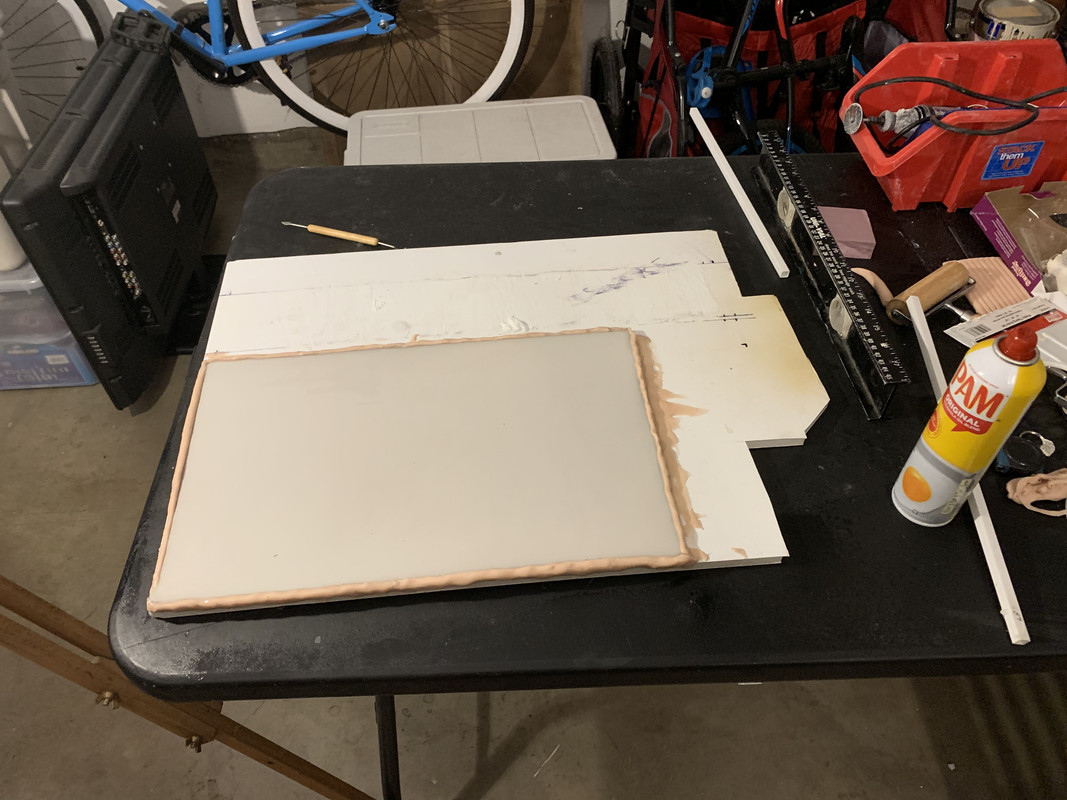
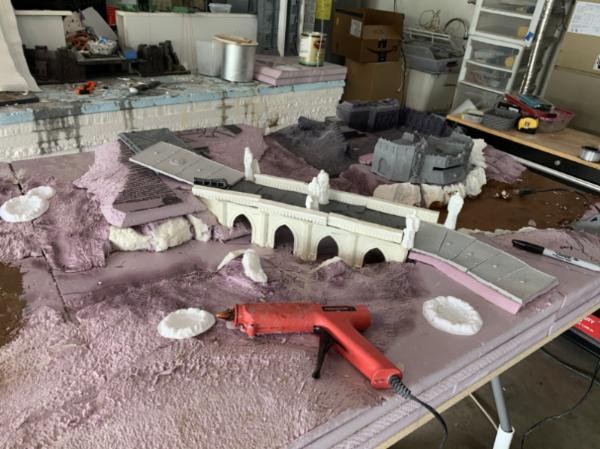
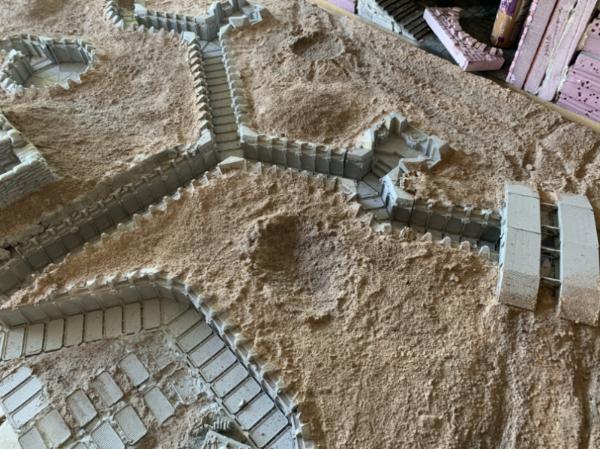
Another project we have been working on is trying to figure out all of the cobblestone flooring all over the map.
Originally we had done the strategy we saw in a lot of blogs, where modelers would get dollar tree poster board, take the paper off one side and and use the green stuff world rollers to get the design.
But it turns out that stuff is super weak and I can’t figure out how to reinforce it at all. I’ve tried Elmer’s glue, industrial strength glue, gessto, latex paint, everything and there is no way it will be strong enough to hold up during play. After this we moved on to different clays and apoxys like milliput, sculpture, etc. and those were impossible to work with (for our type of board at least)
Here’s an example of how dinged up some of the existing foam stuff was:
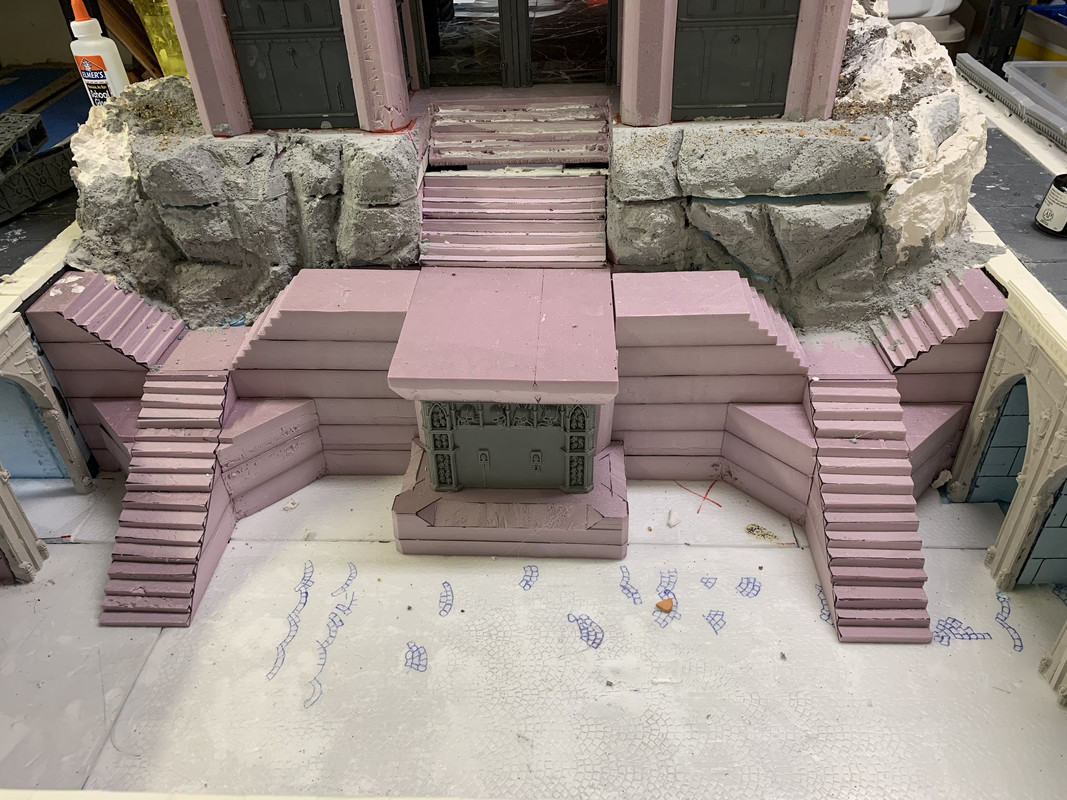
I reached out a lot and got no help. So imo these rollers just are not as useful as I thought they would be for a big project. Which is sad because the idea is dope
Anyhow, I think we finally found something that will work. I found these long rubber mats that are used for Christmas scenery. They make pebble courtyards for winter dioramas and have decent detail and are pretty strong and easy to cut
[url=https://postimg. cc/jCy1Kr68 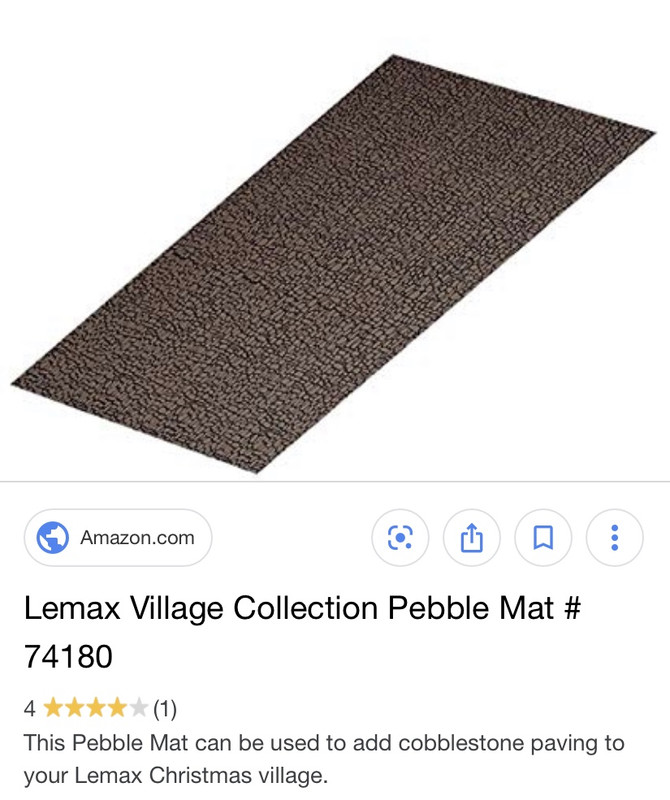 [/url]
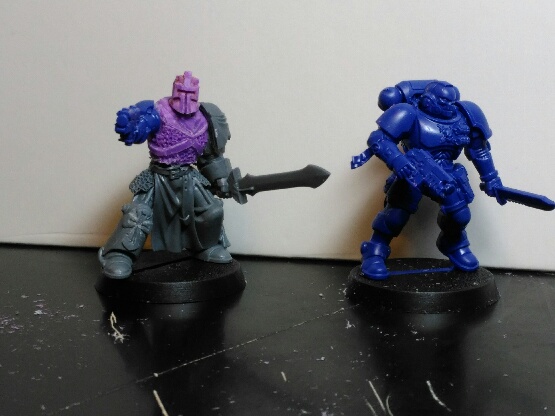
Here’s what it looks like next to some of my miniatures
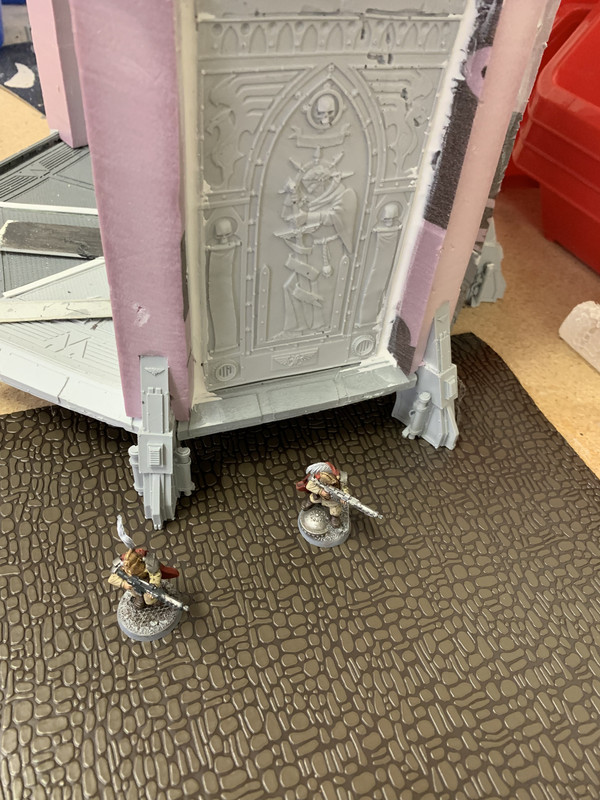
Putting it in place:
And glued down:
Hope it works. All this trying to get these rollers to work stuff has really slowed us down
Thanks all. Post soon
62565
Post by: Haighus
That stuff looks really good!
21480
Post by: btoliver311
Hey guys,
I feel like kirque and I got a lot done today. Mostly it was getting more cobblestone in

But we also got some pavers on the spill way which allowed us to put the posts on the monorail and see what the whole track will look like intact.
Having this first semi-coat of paint on, even if I don't like any of the colors really helps with figuring out where all the little gaps are. It allowed me to spend some of my time finishing up little projects that were 90% of the way there. Like the banisters and some of the courtyard walls.
Not bad for the first modeling day in the new casa. Too bad it was 110 outside and not much better in the garage!
21480
Post by: btoliver311
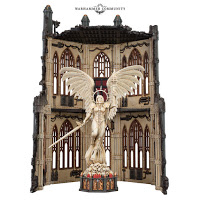
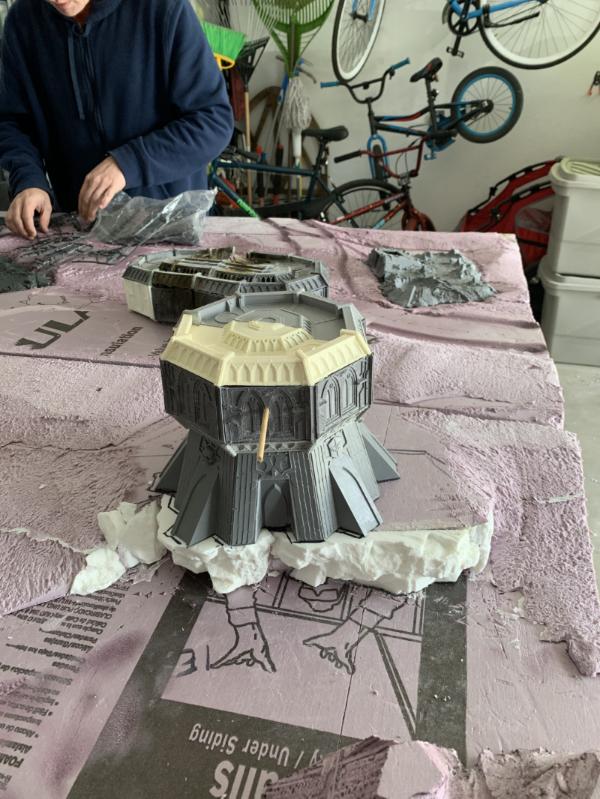
Wanted to get opinions on some details I wanted to add to the cathedral?
What do you think of using these Warhammer Mausoleums as confessionals attaches to the inside walls? Any better ideas to set them up?
Also, I know the benches are super small but they are all I can find. Do you think they are passable?
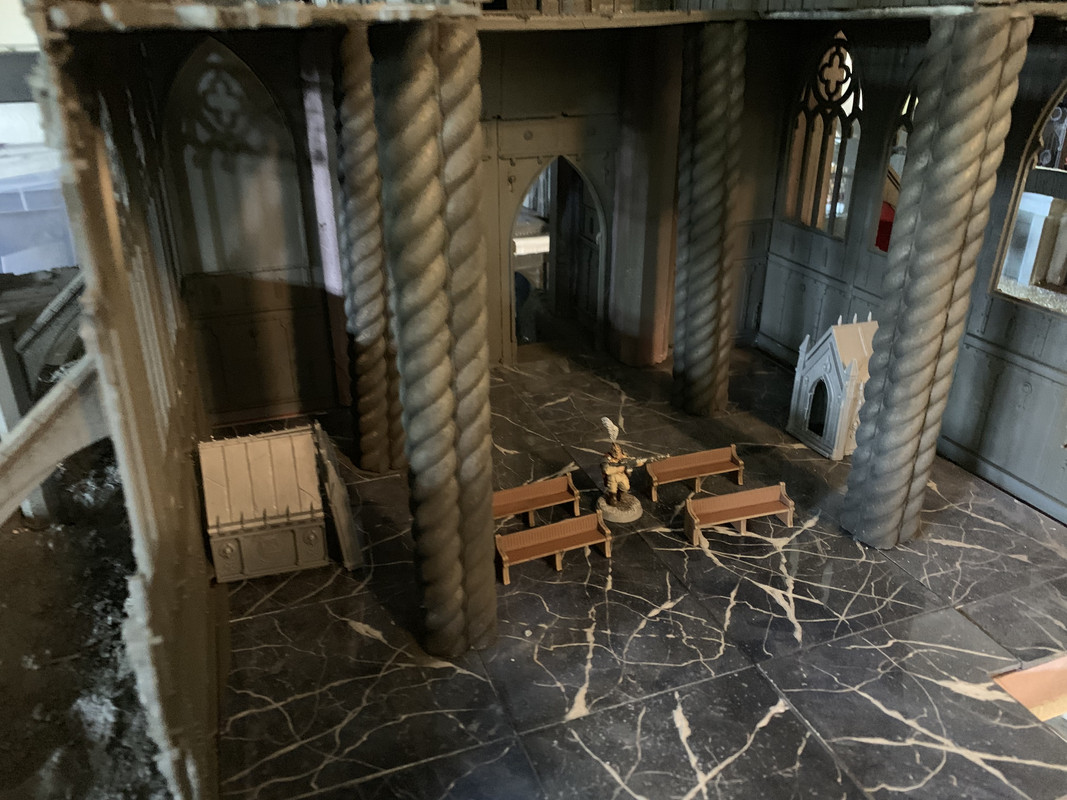
I have all 3 versions but I think the one on the right is the best. What about cutting it in half for each side?

120033
Post by: Excommunicatus
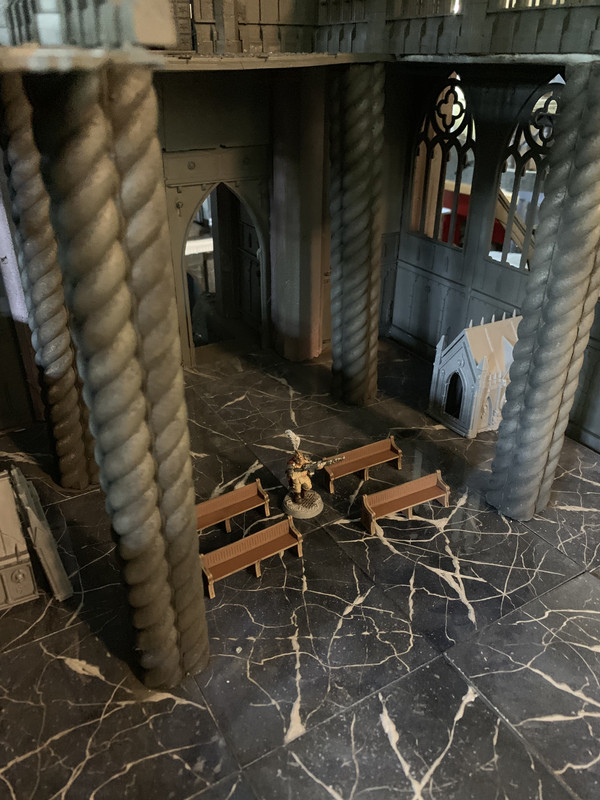
I'm confused, are they not exactly the right scale?
They look to me like they are. It's been a while since I entered a church but IIRC the back of the pews definitely did not reach up to my lower back, or even hip. I'm 6'4 and I think your dude is supposed to be 6'...
Take the dudesman off his base and I think that's exactly what you'd see; the back of the pew reaching to his hip-ish.
62565
Post by: Haighus
I agree that the benches look fine in scale- the pews in most modern churches are short backed. If you are really wanting the full medieval look, then yes, they are a little low-backed.
Another option is to do some boxes- look at interior shots of old cathedrals, the space is broken up by a lot of different styles of furniture. If you want the inside to be a very close-quarters battle, you could really go wild on this front.
As for the confessional- I think cutting the mausoleum in half would look best- then it isn't too large. You could even cut both of them in half and have them side-by-side on both sides of the cathedral.
98217
Post by: Skinflint Games
BEYOND awesome
21480
Post by: btoliver311
Thanks guys!
I’m glad you all think the benches work. I’ll also take your ides on cutting the mausoleum and putting them side by side
108429
Post by: g0urde
Amazing work, as always!
if you are looking for some furnitures that fit the W40K scale, check this website out:
https://www.petitepropertiesltd.com/
I ordered a lot from them and everything works perfectly.
Looking forward to your next post!
Max
21480
Post by: btoliver311
Weren’t able to work on the table this weekend due to kirque throwing out his back. So I decided to spend my afternoon reorganizing my dudes and bits. They were in cardboard boxes before. Now I have the troops In Pick foam and bits in Stanley stackable tool bins.
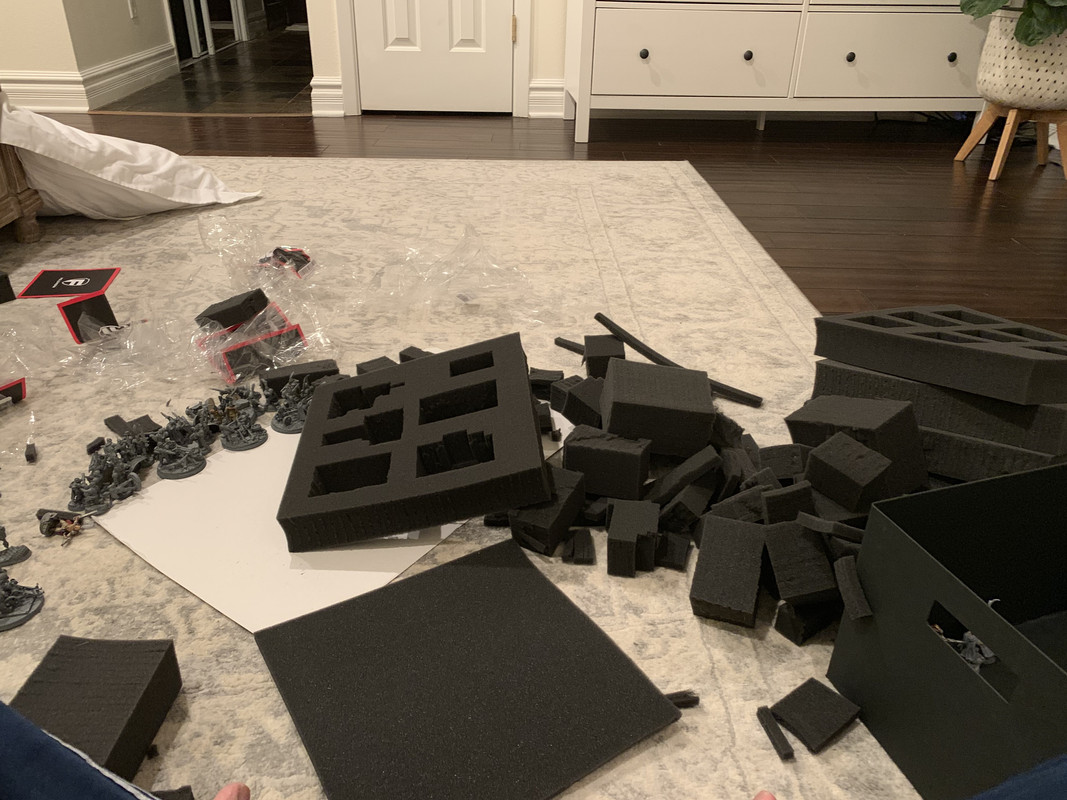
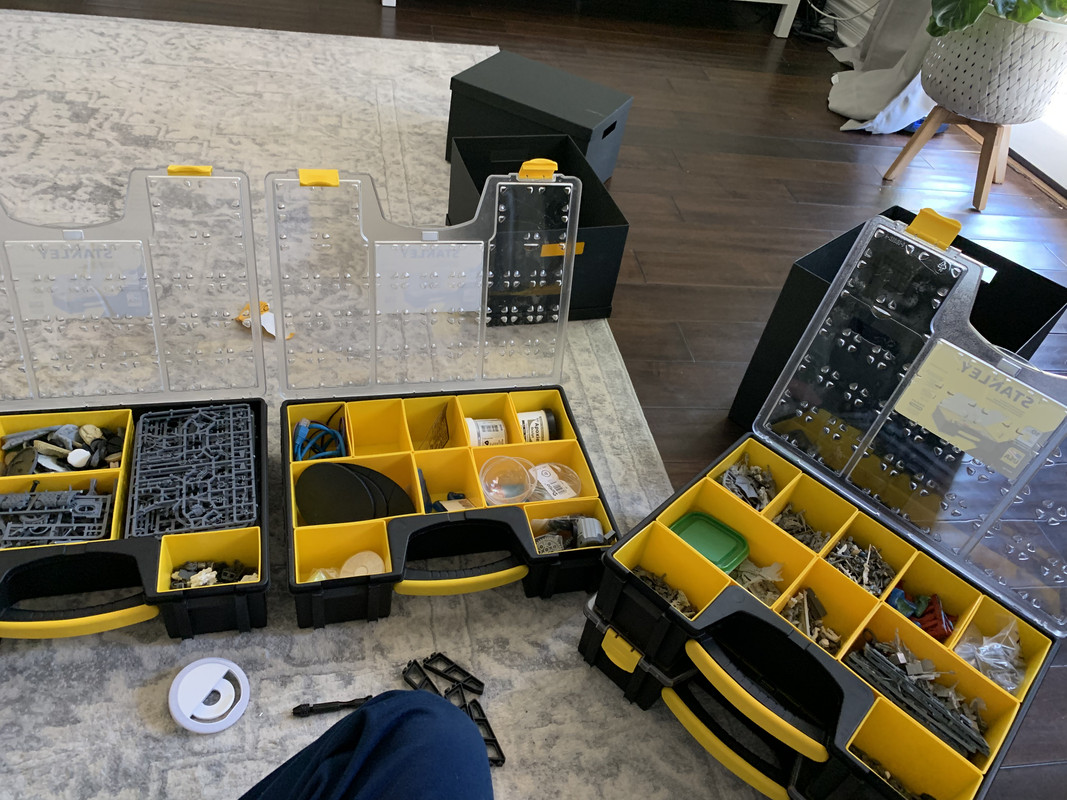
I feel the net gain is minimal but at least I tried
101140
Post by: =Angel=
I've a tool box with bits and I can tell you that wasn't time wasted. When its conversion time and you'd like a marine head, you can sift through a bunch of heads rather than dig through piles of sprues. That kind of efficiency will help you keep enthusiasm up and allow you to get to the good part faster.
95627
Post by: EmberlordofFire8
Oh boy, I missed this blog.
Those stairs are awesome! Definitely my favourite architectural feature, and they'll make for really fun games.
21480
Post by: btoliver311
So I know it seems like this table build is taking us forever and that’s true but it’s not just because we only get like 4 hours to work on it every other weekend. It’s also because we spend a ton of time making sure it’s sturdy enough for regular play. As we’ve mentioned before we want to take it to a FLGS and leave it for a while for others to use. What we don’t want is something so fragile it will get broken all the time. So we end up spending a lot of time securing things
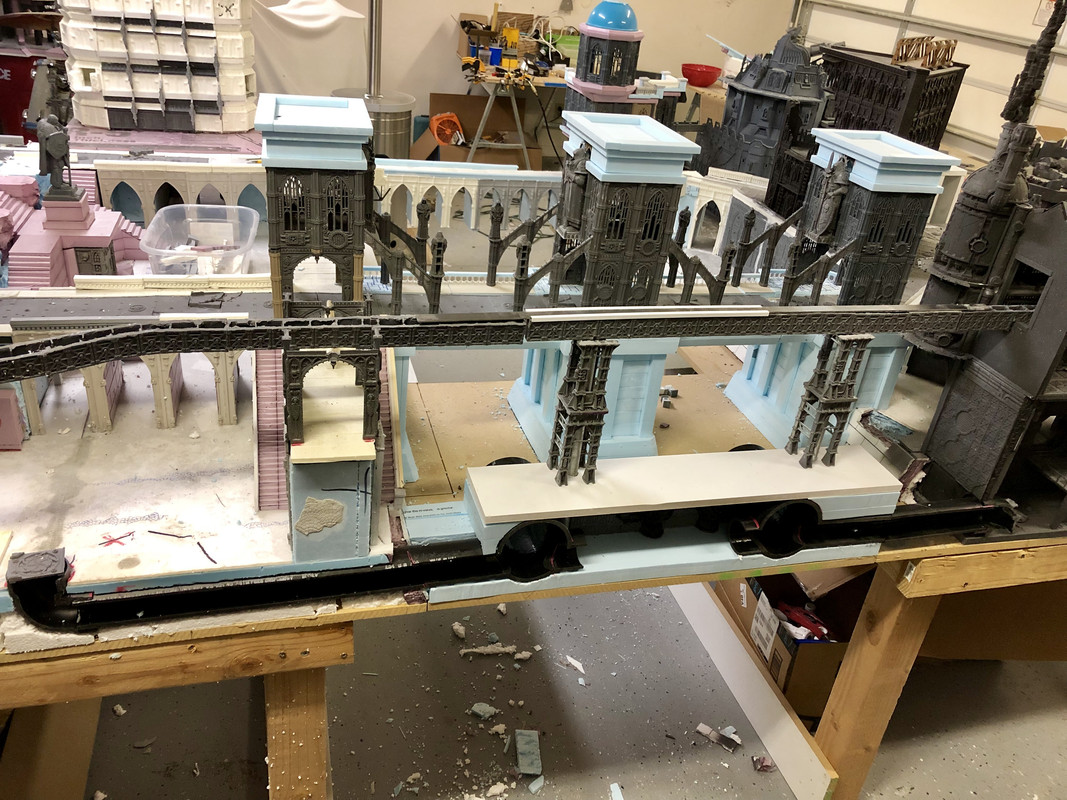
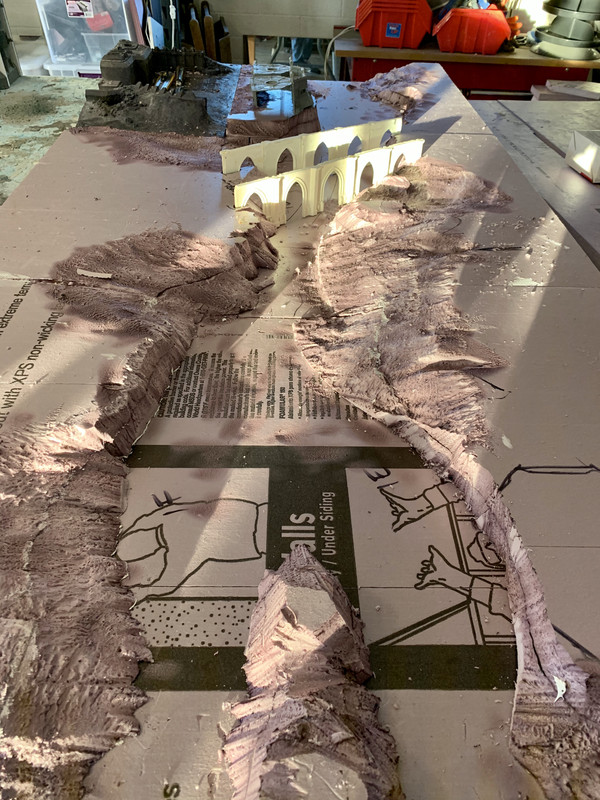
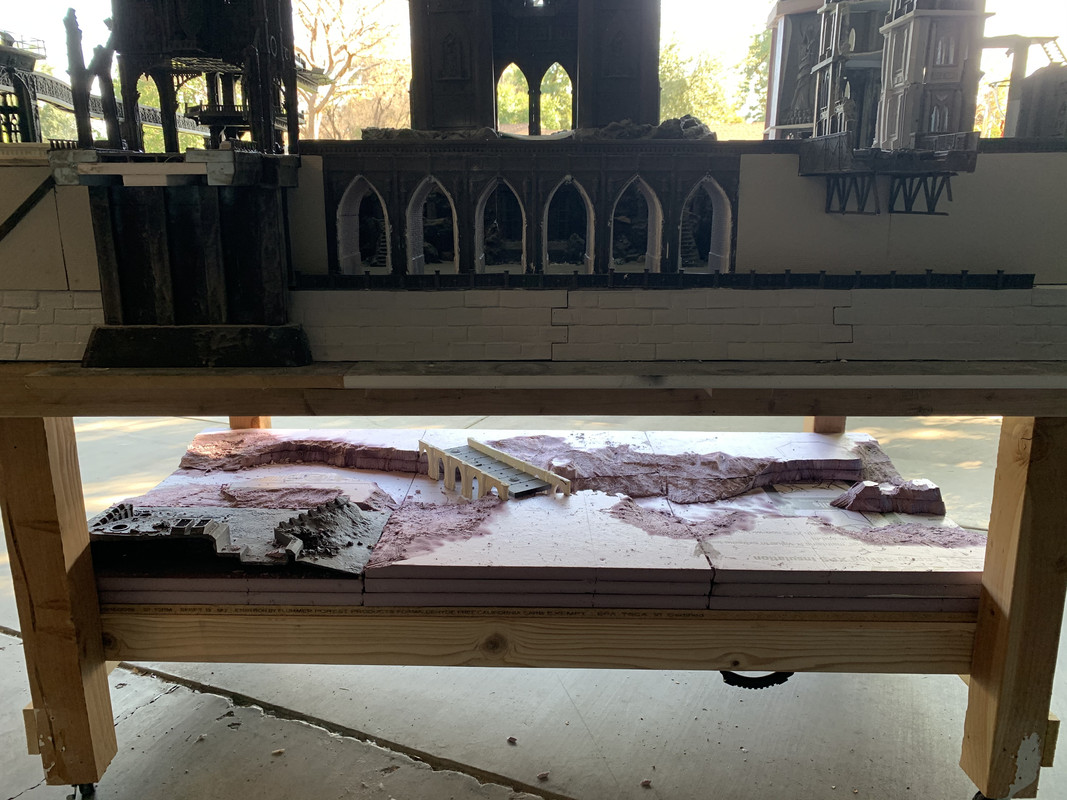
I also thought it would be cool to take these two pics if I haven’t shared them in awhile. The table has to be stored in halves right now so it makes looking at the two sections from the view of the river a lot easier
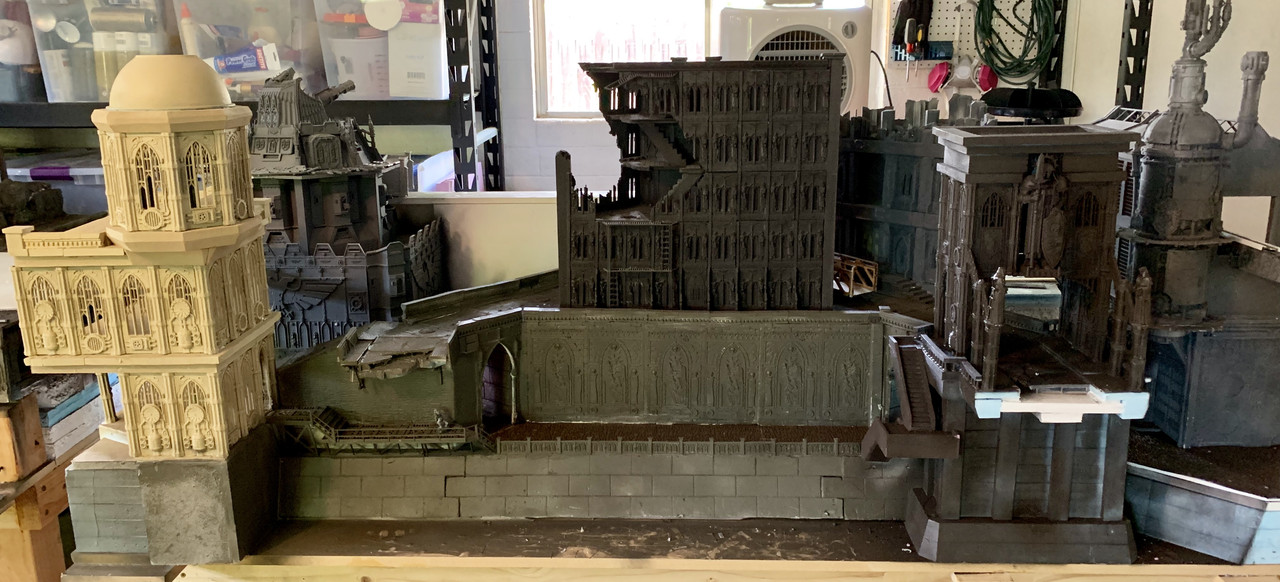
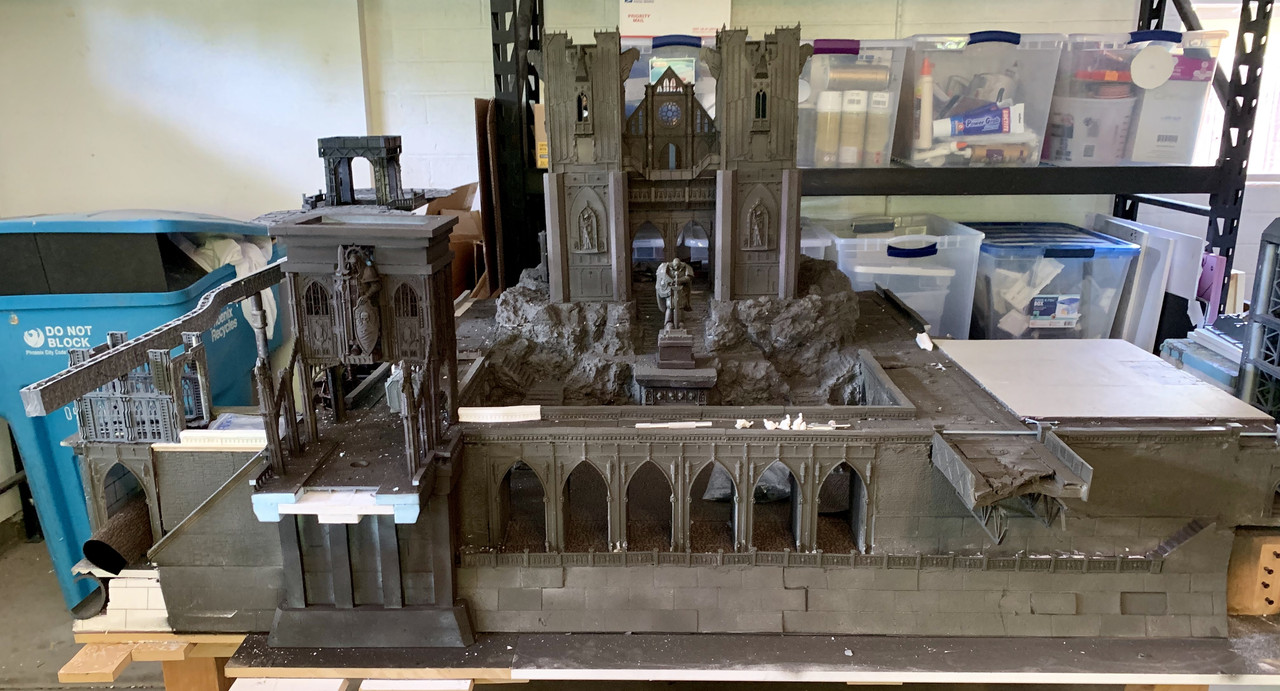
Obviously several buildings are missing.
Thx
90488
Post by: The Riddle of Steel
This continues to be one of my favorite projects on Dakka. I just love the scale and scope and hope you can finish it someday. There is so much inspiration here, even though I know I could never approach anything like what you guys have done.
Epic.
-Rids
98217
Post by: Skinflint Games
The longer it takes, the longer we get to gawp in amazement. Take all the time you need, as fans we're just enjoying the ride :-)
123945
Post by: balmong7
Holy gak this is amazing. You guys are insane and dedicated.
96209
Post by: MacPhail
Fantastic. I really love that you integrated some natural rock, and your process looks really effective. I'm going to be working with some expanding foam in a similar application at some point,so I might need to swipe your recipe for plaster. Nice work, it's really coming together!
21480
Post by: btoliver311
Thanks for all the positive feedback guys!
@macphail I do not endorse expanding foam as a solution for most if not all modeling terrain. It just ends up having too much give if you carve into it. Once the outside crust is gone It’s really just too sponge like. This means whatever you put over it could easily crack.
I/we like pink foam and a hot wire foam cutter way more
This is my favorite video on the technique
https://youtu.be/6rSP0OYnpG4
101140
Post by: =Angel=
 btoliver311 wrote: btoliver311 wrote:Thanks for all the positive feedback guys!
@macphail I do not endorse expanding foam as a solution for most if not all modeling terrain. It just ends up having too much give if you carve into it. Once the outside crust is gone It’s really just too sponge like. This means whatever you put over it could easily crack.
I/we like pink foam and a hot wire foam cutter way more
This is my favorite video on the technique
https://youtu.be/6rSP0OYnpG4
Thoughts on using it to fill moulds? I've thought about making large structural elements like pillars or building facades by spraying the stuff into moulds but I'm not sure how well that would work.
21480
Post by: btoliver311
Im going to assume we are talking about molds like woodland senics. I don’t want to sound like an expert with any of this stuff and I’m sure there are way better resources but..
I most definitely would NOT fill any molds with expanding foam. Not only is the stuff pretty weak it also has no detail and in my experience also sticks to molds. Thus ruining them. I would only use dental plaster (with a vibrating table set up) or 2 part resin for a quicker set time.
Merlin’s magic plaster and Smooth-cast resin are the brands I use
Automatically Appended Next Post:
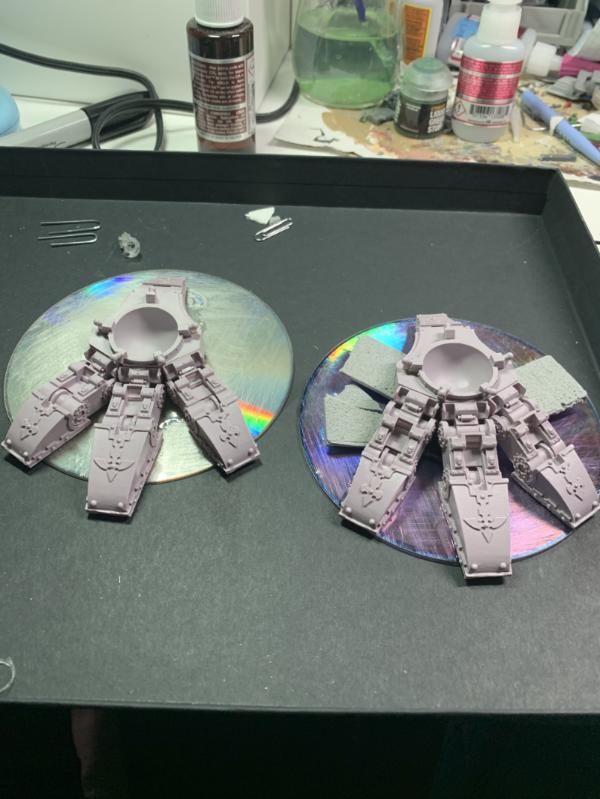
I also thought I would post a quick picture of my WIP.
Please note that even though it my seem like I work on this stuff a lot I can not tell you the last time (if ever) I completed painted an entire squad for 40k. So go easy on me
Does any one have a good matte spray varnish recommendation?
Better pics coming soon.
13664
Post by: Illumini
Those shots across the river look so imposing. Really cool that you guys will be borrowing the table to your FLGS, and smart thinking with ensuring it can handle heavy gamer paws.
21480
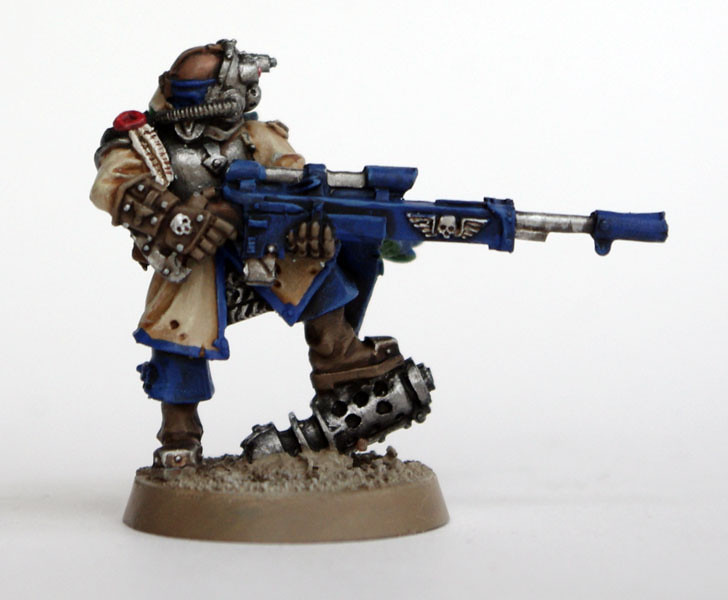
Post by: btoliver311
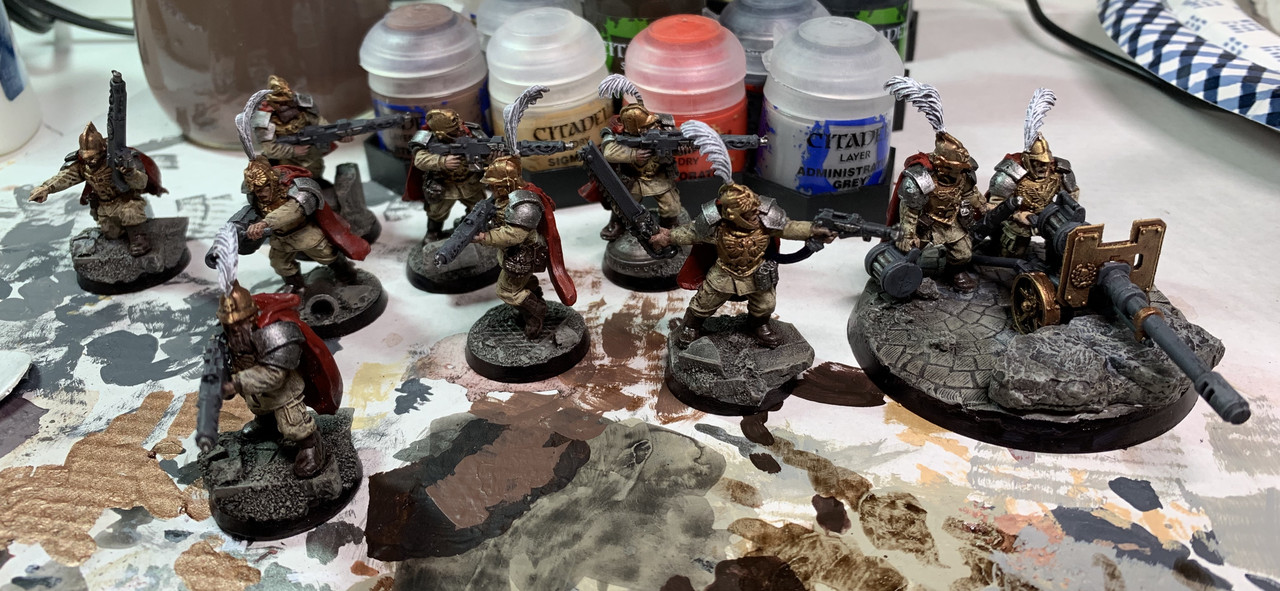
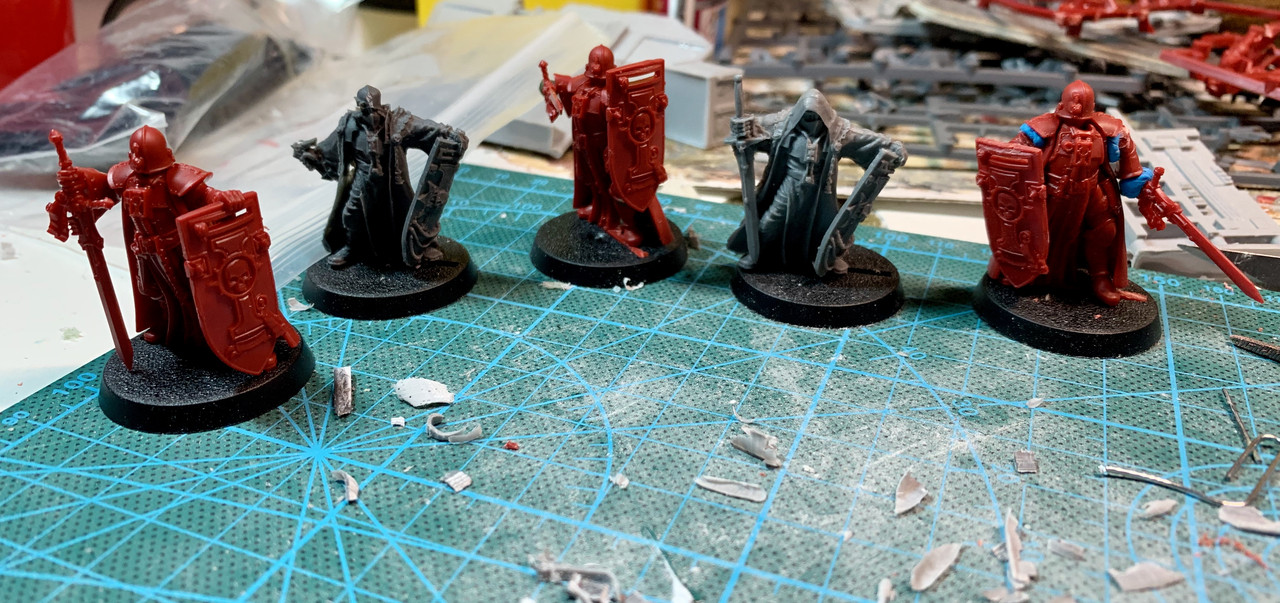
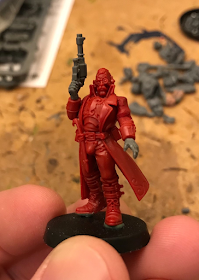
Some better pictures of my first planetary guard squad.
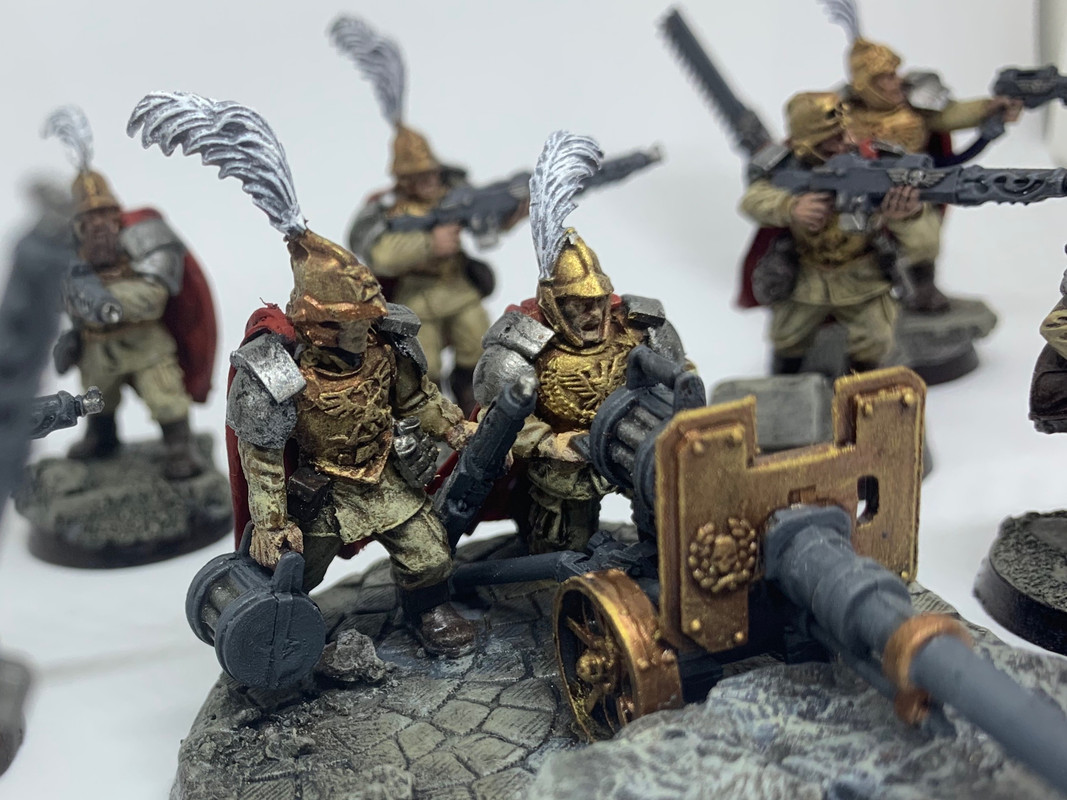
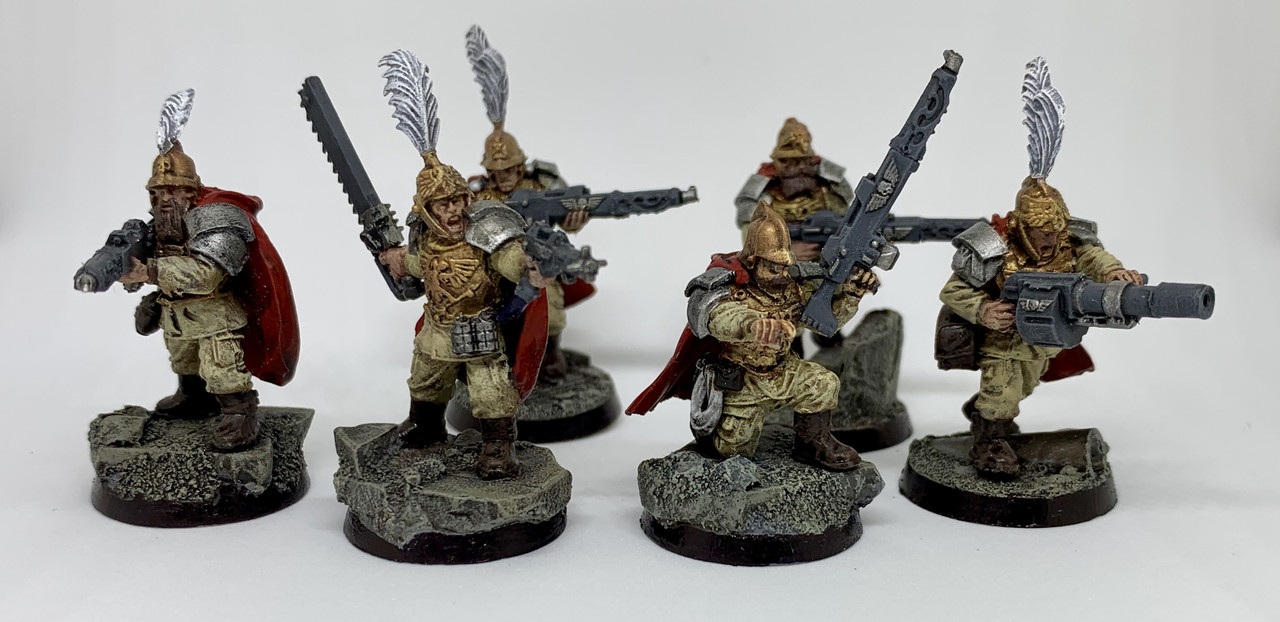

Still need a matte varnish and some dirt pigment if anyone has any recommendations or tutorials
90488
Post by: The Riddle of Steel
Very nice. I like the fancy medieval look and the color scheme with the accents of white feathers and red capes really make them look sharp and stand out on the table.
-Rids
21480
Post by: btoliver311
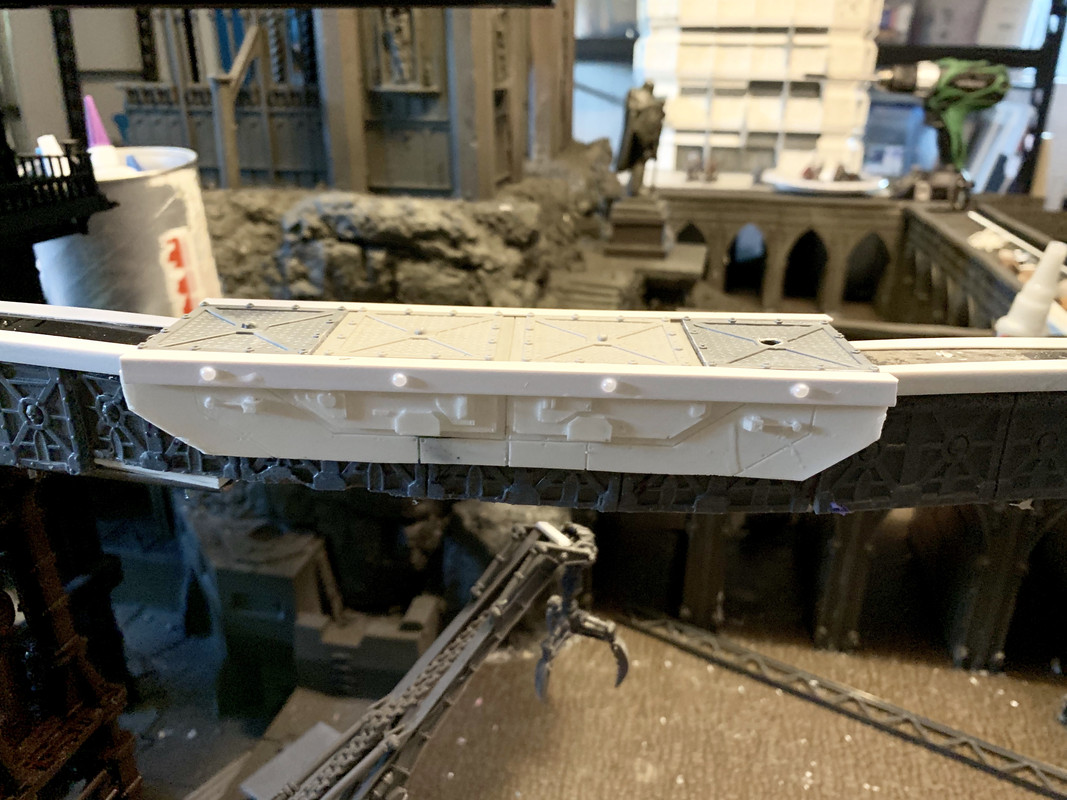
Decided to update the monorail train car a little. With a longer but not as wide bed.
New length but Old wing height
Remagnetized
Lower height on the wings
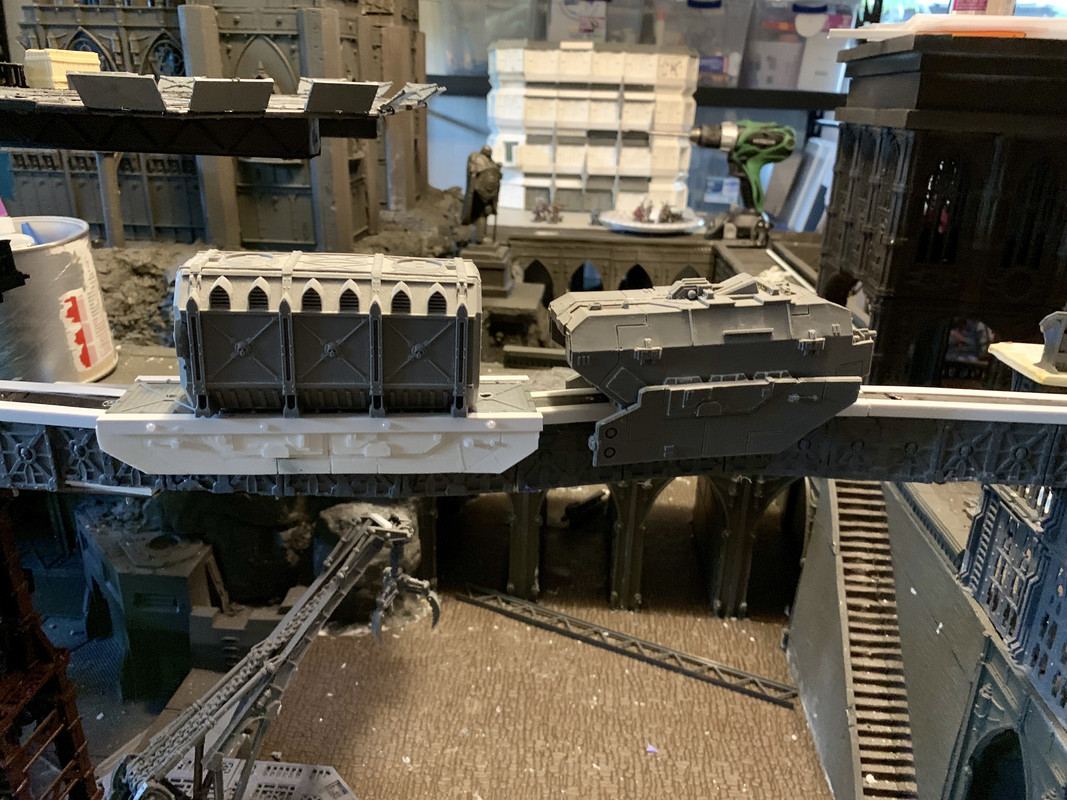
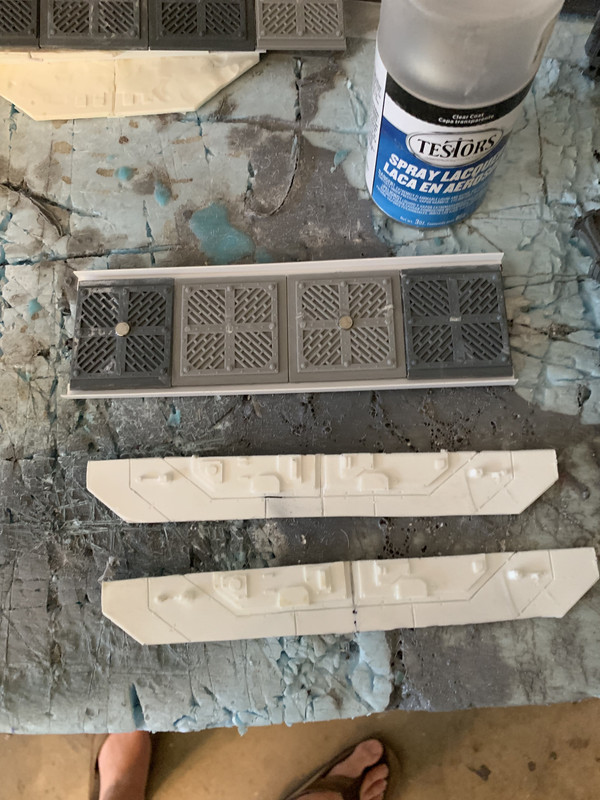 Automatically Appended Next Post: Automatically Appended Next Post: The new flat car put together
And with the train
21480
Post by: btoliver311
Hey guys,
Here’s an updated video of the whole city in its current state. This jade the completed monorail track, the control tower and new cobblestone
https://youtu.be/qFGuDzyAEtk
Still a long ways to go but I think it’s coming along, Thanks
123945
Post by: balmong7
This is super cool to see. When looking at the images it's hard to get a sense of the board as a whole.
21480
Post by: btoliver311
Thanks. Does anyone know how to chain the title of a thread? Would like to update ours
120033
Post by: Excommunicatus
Click 'Edit' on the top-right of the OP.
90488
Post by: The Riddle of Steel
Thanks for the video. It’s the only way to fully appreciate the scale and overall layout. This project is so amazing and so full of inspirational ideas. Keep going!
-Rids
21480
Post by: btoliver311
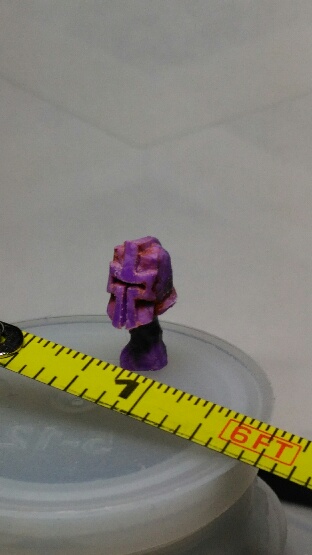
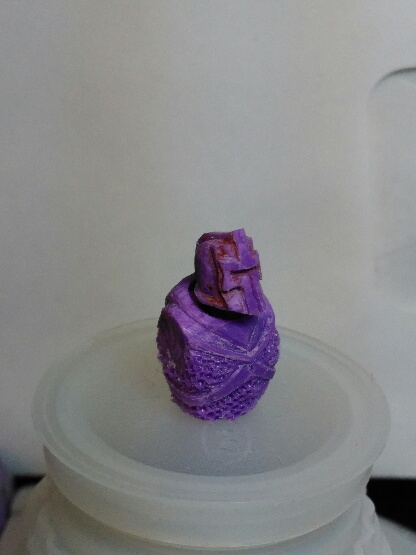
In case anyone wanted to know what Kerque is up to. He’s now sculpting his own custom minis out of green stuff
I think this guy is supposed to by a steam-punk version of some friend of his

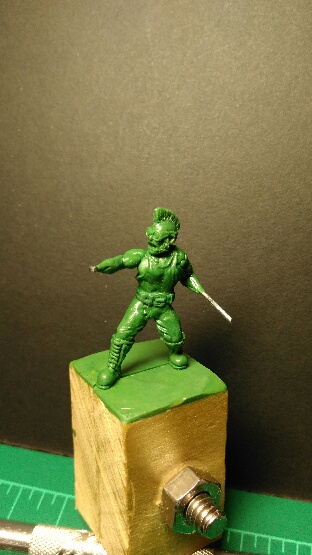
For his first sculpt I’m really impressed. Don’t tell him though. I’m afraid to loose his help on the board if he starts doing too many of these
98217
Post by: Skinflint Games
Holy crap, that's amazing! Keep Kerque chained up in the basement creating more of the same
95627
Post by: EmberlordofFire8
I almost couldn't find this thread with its new name. I can't believe it's nearly done, keep up the great work!
21480
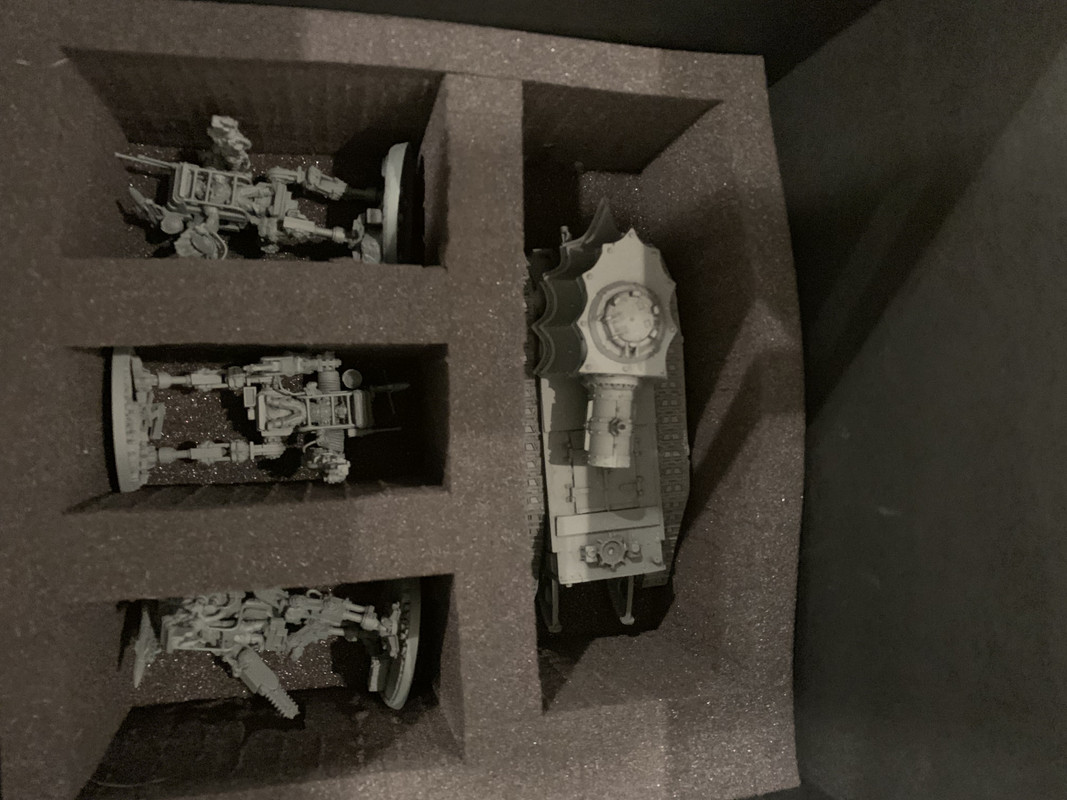
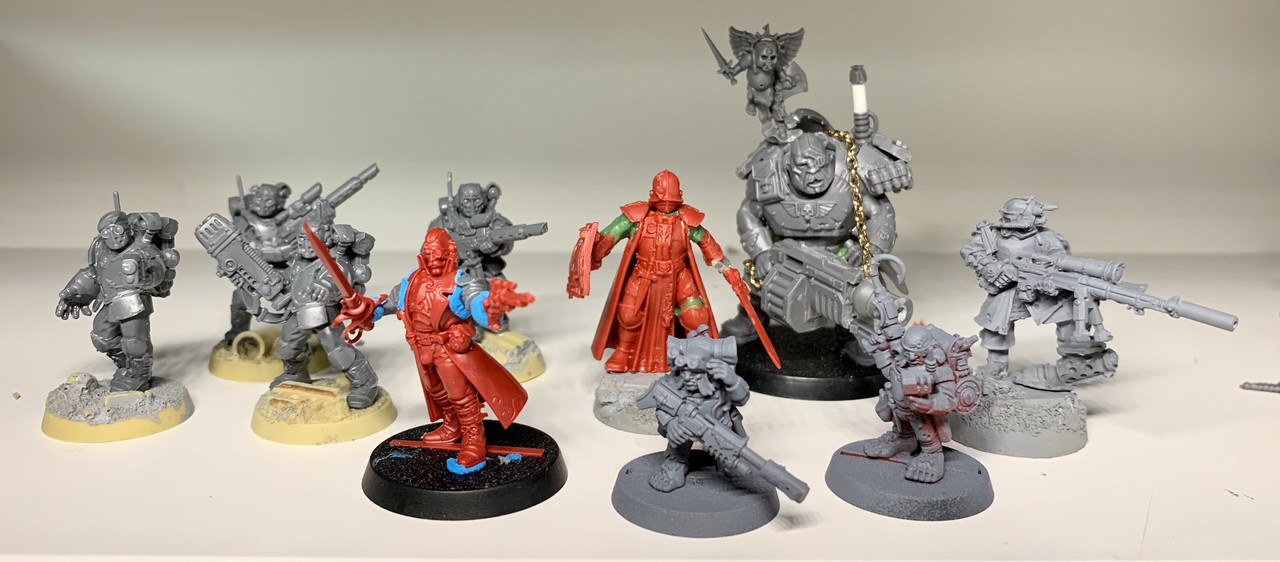
Post by: btoliver311
What’s up guys, I know this is a painting and modeling thread but just wanted everyone to know I started trying to play my planetary guard (Vostroyan) for the first time yesterday. Here’s the list so far and my questions. I’m looking for a lot of specific guard/ Vostroyan advice if you have any
https://www.dakkadakka.com/dakkaforum/posts/listByUser/0/21480/14.page
Oh and the wip for the final squad I had to throw together just to get a brigade
1124
Post by: Captain Brown
btoliver311,
I see a really old Imperial Guard Officer body over on the right. Have not seen one of those in years.
Cheers,
CB
21480
Post by: btoliver311
Yeah, I’ve been saving them to use on airship/zeppelin I’m planning to build but needed a dude fast.
Thinking about starting that build but doubt anyone at my flgs would be down with that count as
21480
Post by: btoliver311
Why can’t I just buy and build the perfectly good models GW makes the way they come?
Why do I insist on making this so different and hard? Who in their right mind buys the throw away casts from recasters, then takes those parts makes molds of his own, then casts, just to glue together with plasticard and come out with models that don’t look near as good.
My models would be so much better and cheaper if I at least used off the shelf stuff and would be cheaper too!
Case in point - WIP of newest tank
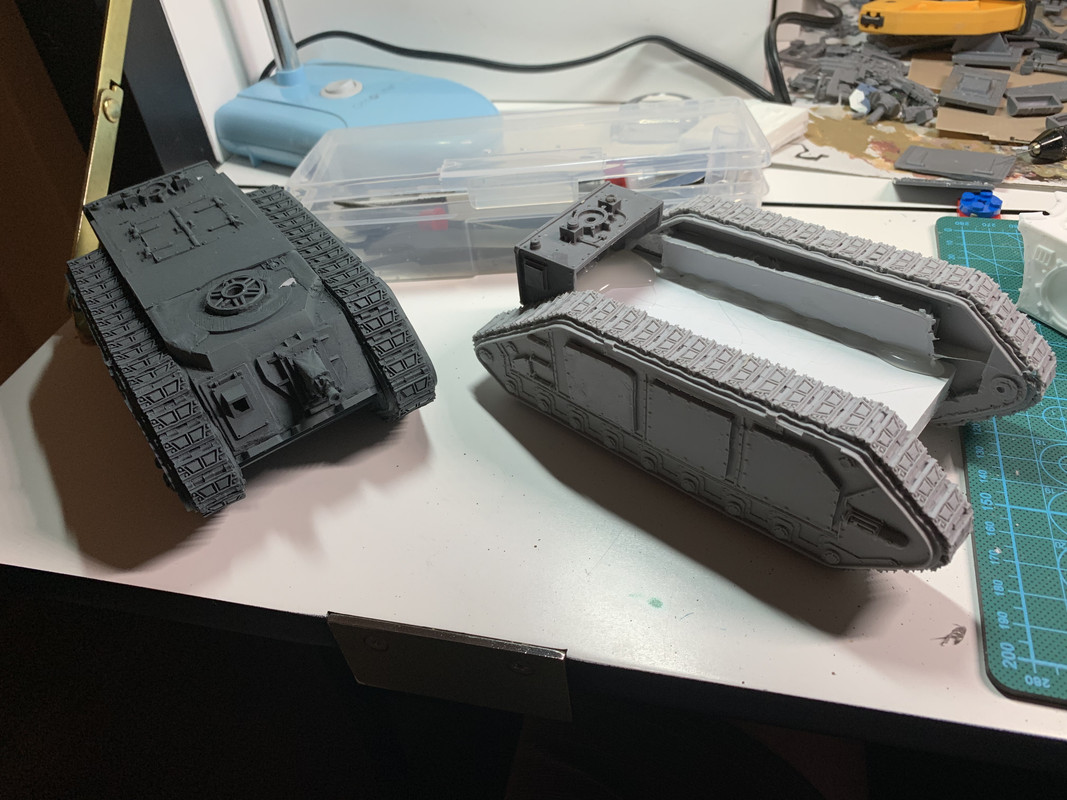
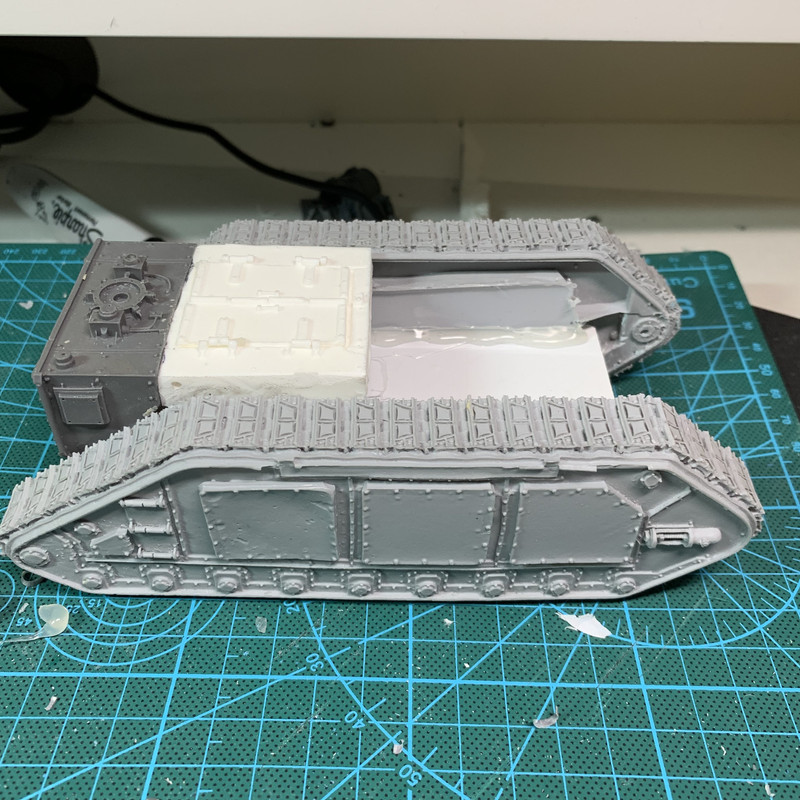
Let’s add some legos too

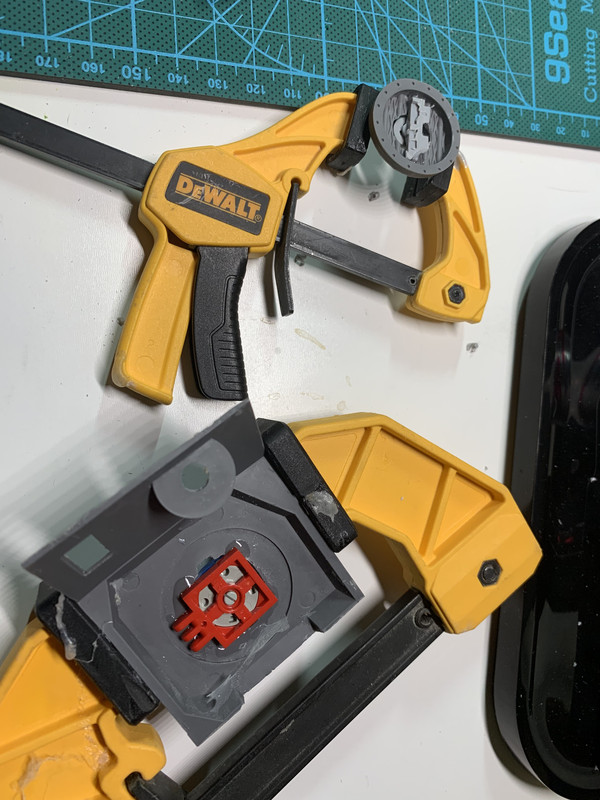
But I am proud of my punisher cannon conversion
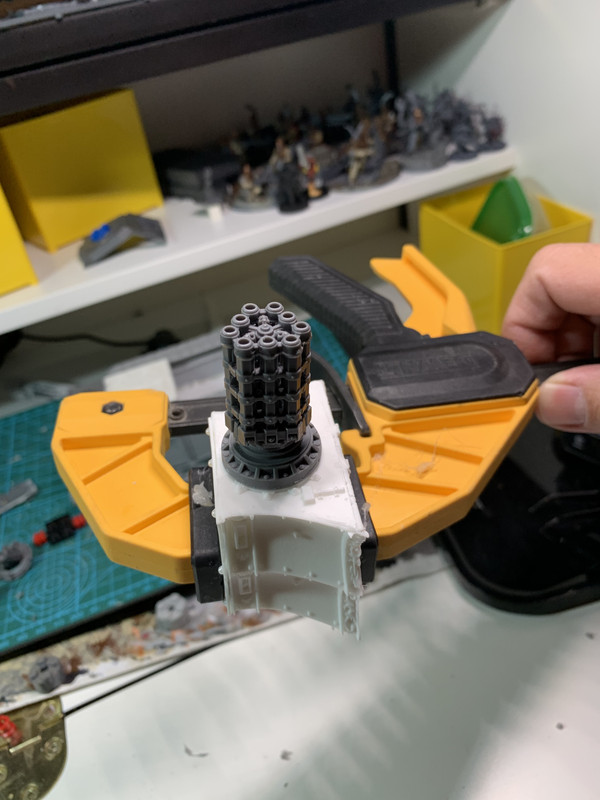

END RANT
21480
Post by: btoliver311
End here’s a pick of my new punisher cannon leman about to loose it’s last wound before even getting a shot off
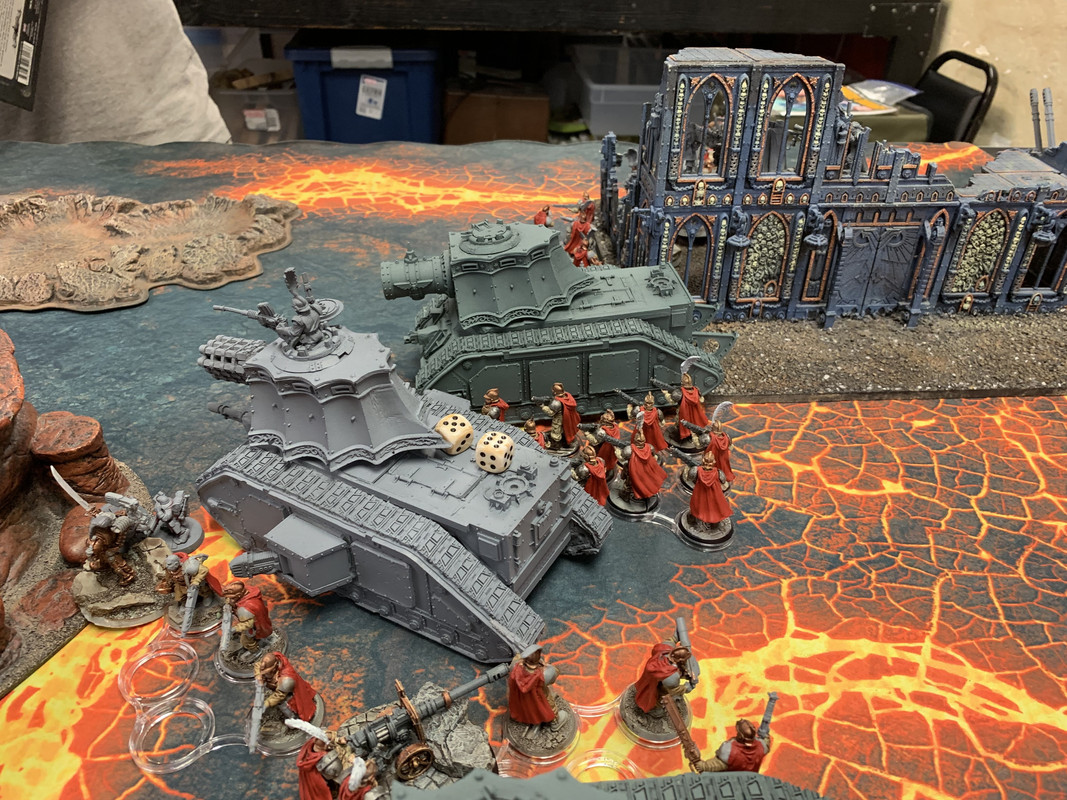
Looks like I’m better suited for building terrain. Which is why most of you are here anyway. So check out the new toys we just got!
So now we just have to decide if we are going to get started on the 10’ of dead zone and the siege army’s trench line that goes In front of the city now OR if we want to finish the city itself first?
Also, we might have an opportunity to get the forge world fortress walls. Keep your fingers crossed!!
21480
Post by: btoliver311
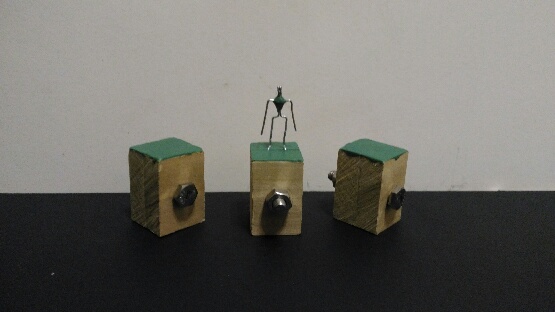
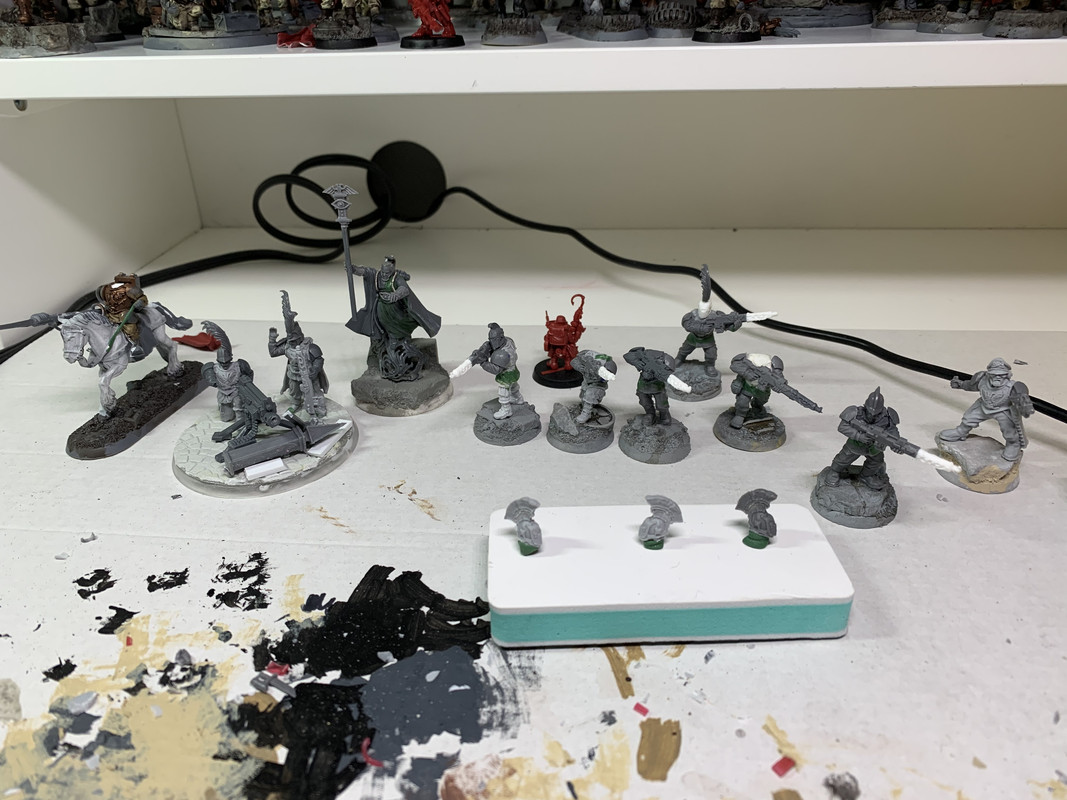
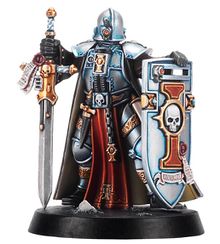
So I got a half dozen of the new crusader minis from Blackstone off eBay.
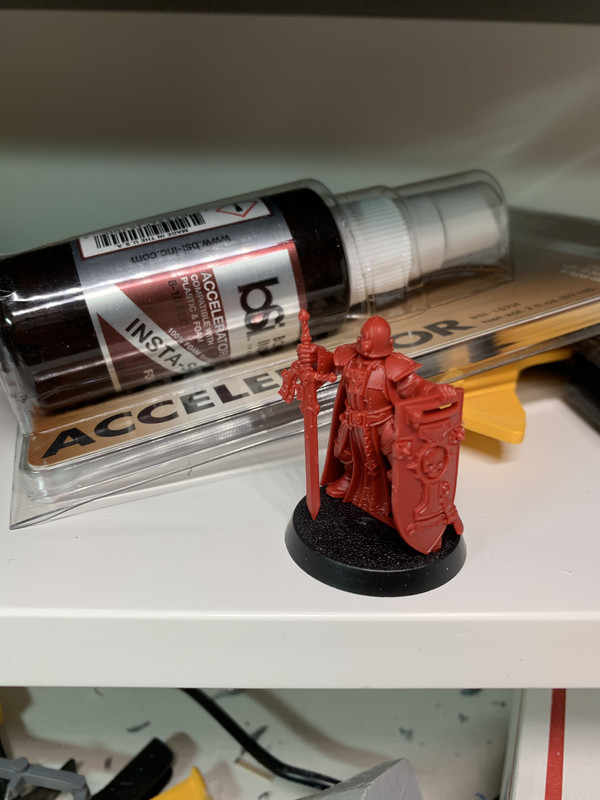
So I’m having to try my hand at carving them up and fixing back up with green stuff
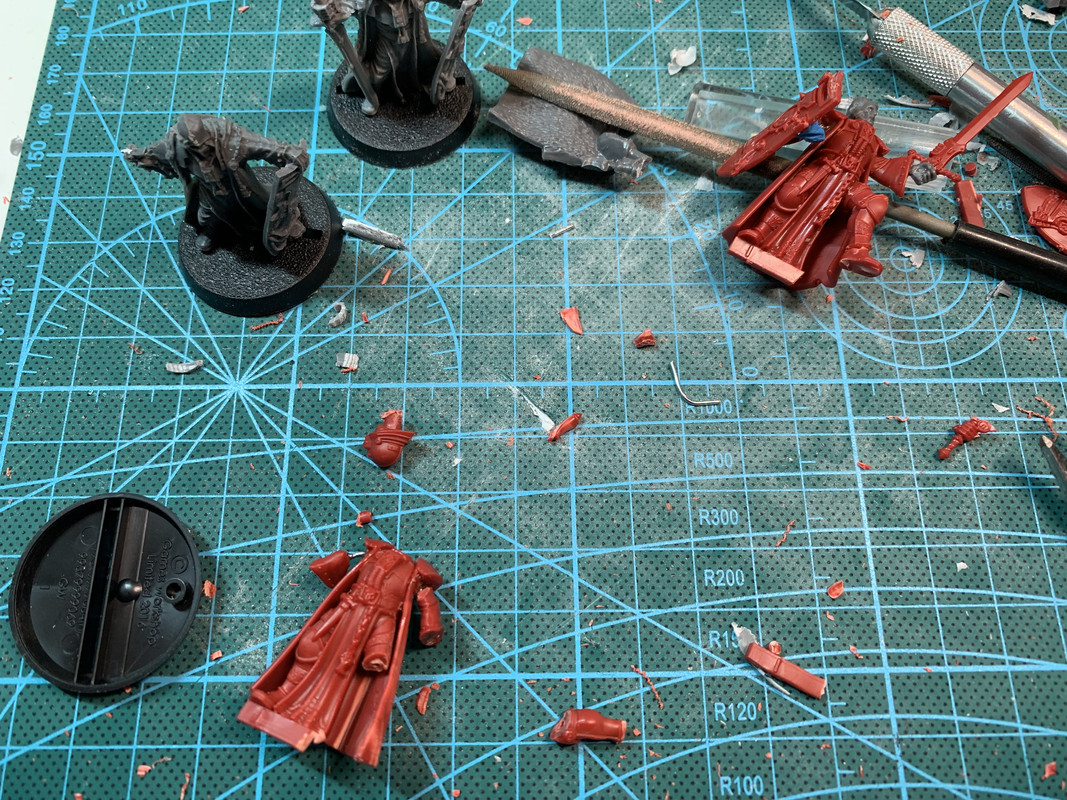
Here are some of my pose ideas using blue tac
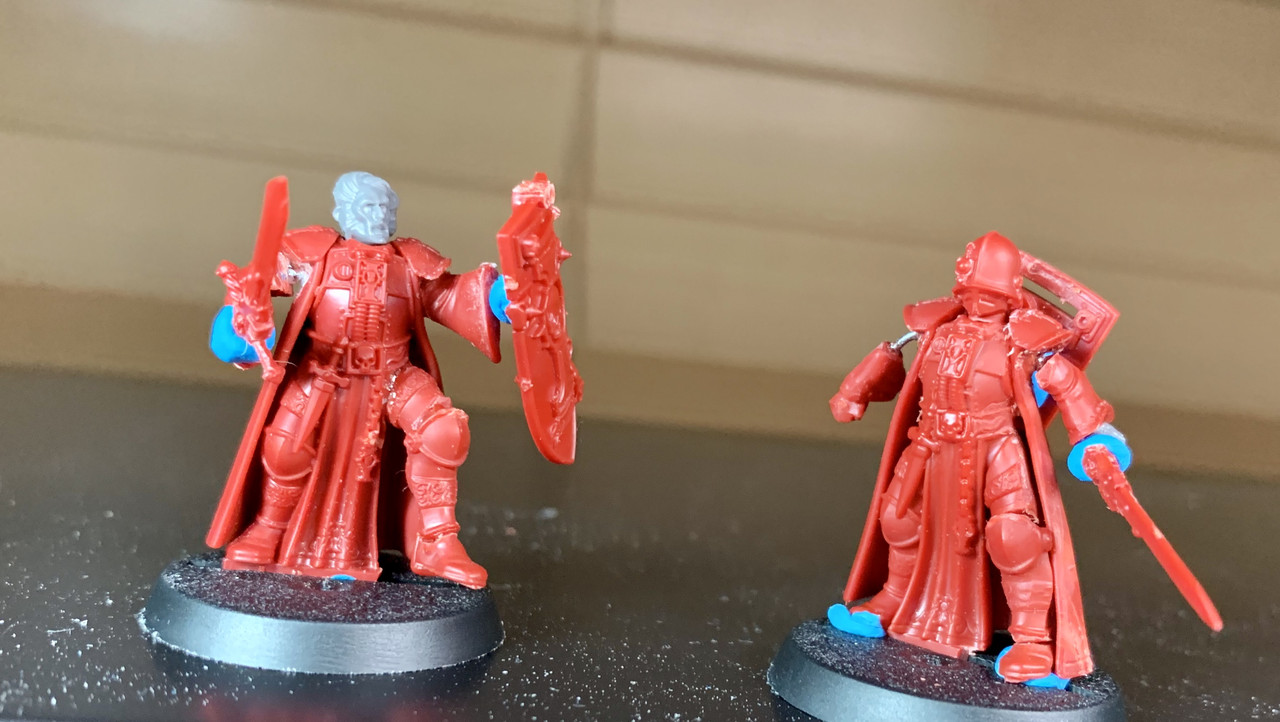
dude in the middle kirque did. You can also see how short the old crusader models are on either side of it
Here’s tonight’s first round of green stuff. You can also see my attempted bash of an old crusader with the new

95627
Post by: EmberlordofFire8
Those look promising! Can't wait to see how they turn out.
21480
Post by: btoliver311
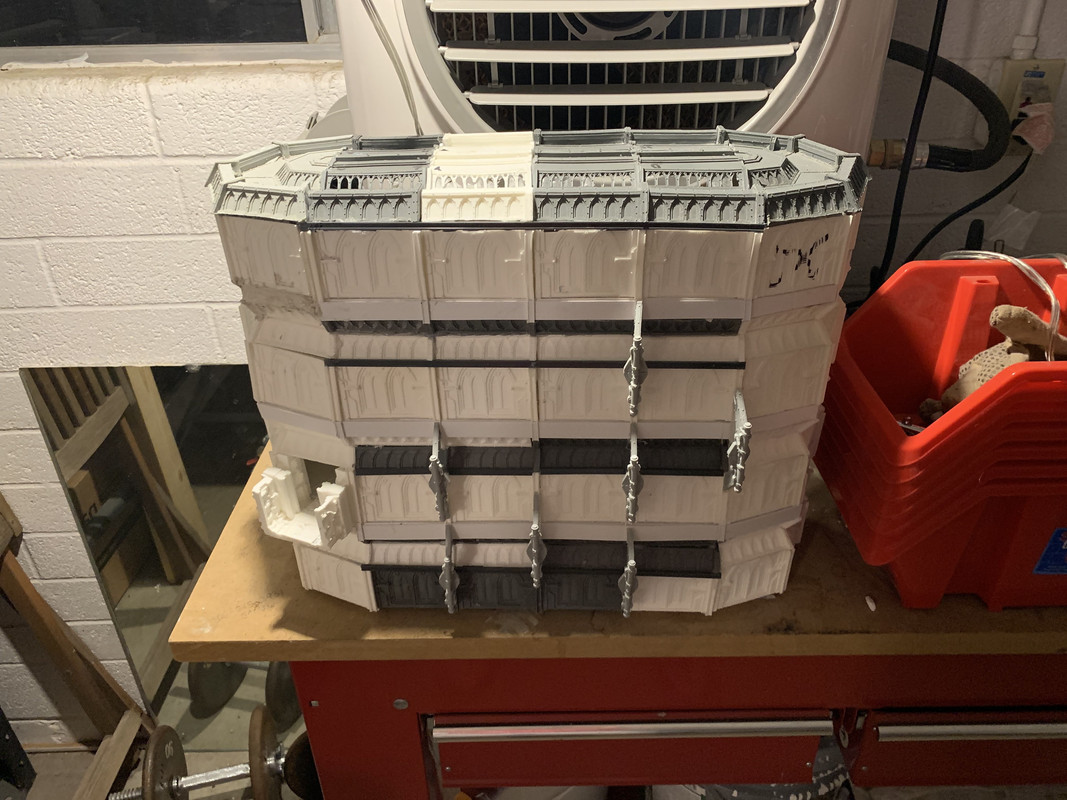
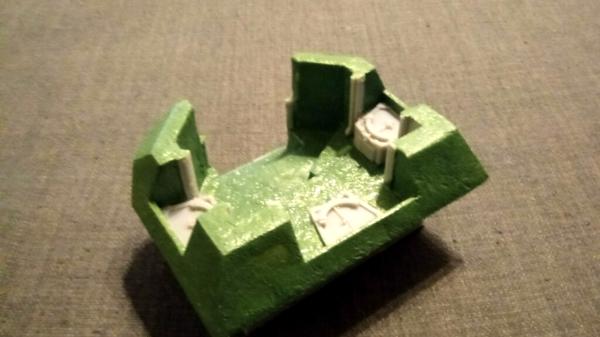
I’m sorry to say it but I/we are going to have to scrap the hab building/buildings from the table project. I’ve dumped a ton of time and money into just this one building but it’s just taking too much effort to make it look even ok and it’s totally slowing us down.
Here’s were we got

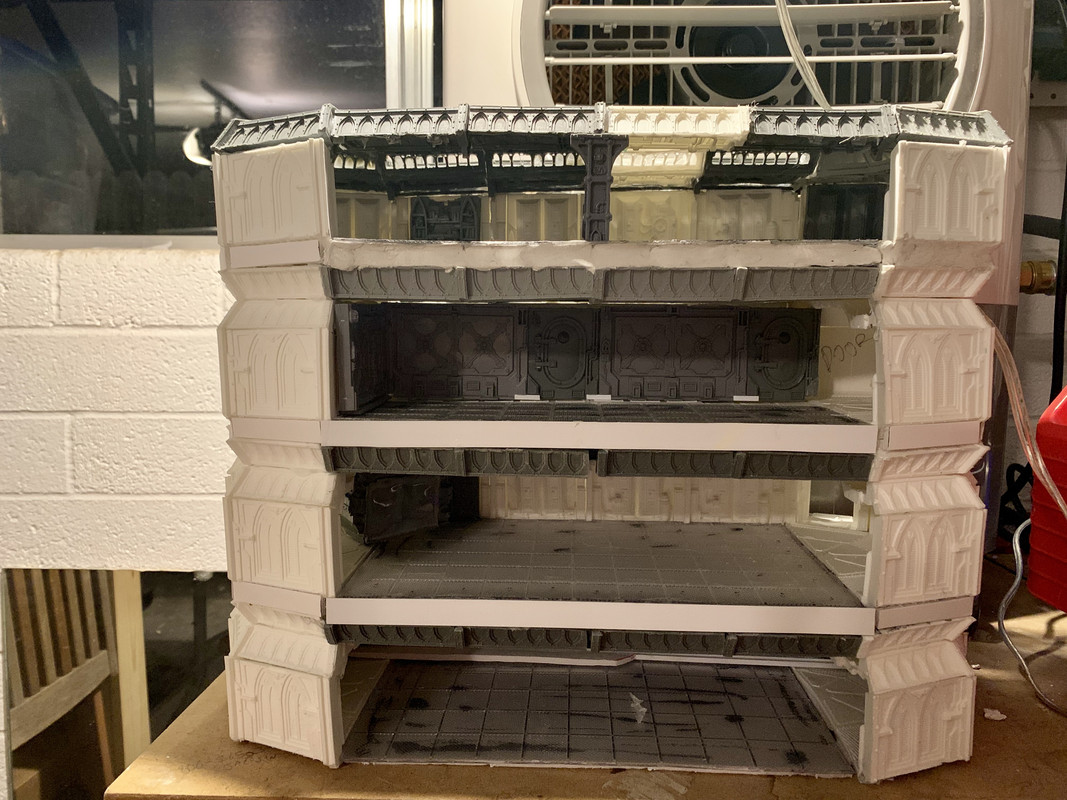
Maybe some day I can dust it all off and use the casts the way they were meant to be used for a single story space station but for now it’s going into storage. Thanks again to my friend who let me borrow their original. I hope you need a couple extra pieces
101140
Post by: =Angel=
*sad trombone noises*
A pity, I think there was a lot of potential there. Commiserations, but you're probably right to make this call.
Best of luck with the rest of the board.
21480
Post by: btoliver311
Good news!
Meet Ken, our new diorama partner. 6 hands are way better than 4 so things are finally starting to move.
He’s also showing us about slip molds so we can cast extra parts without wasting so much silicone and resin.
21480
Post by: btoliver311
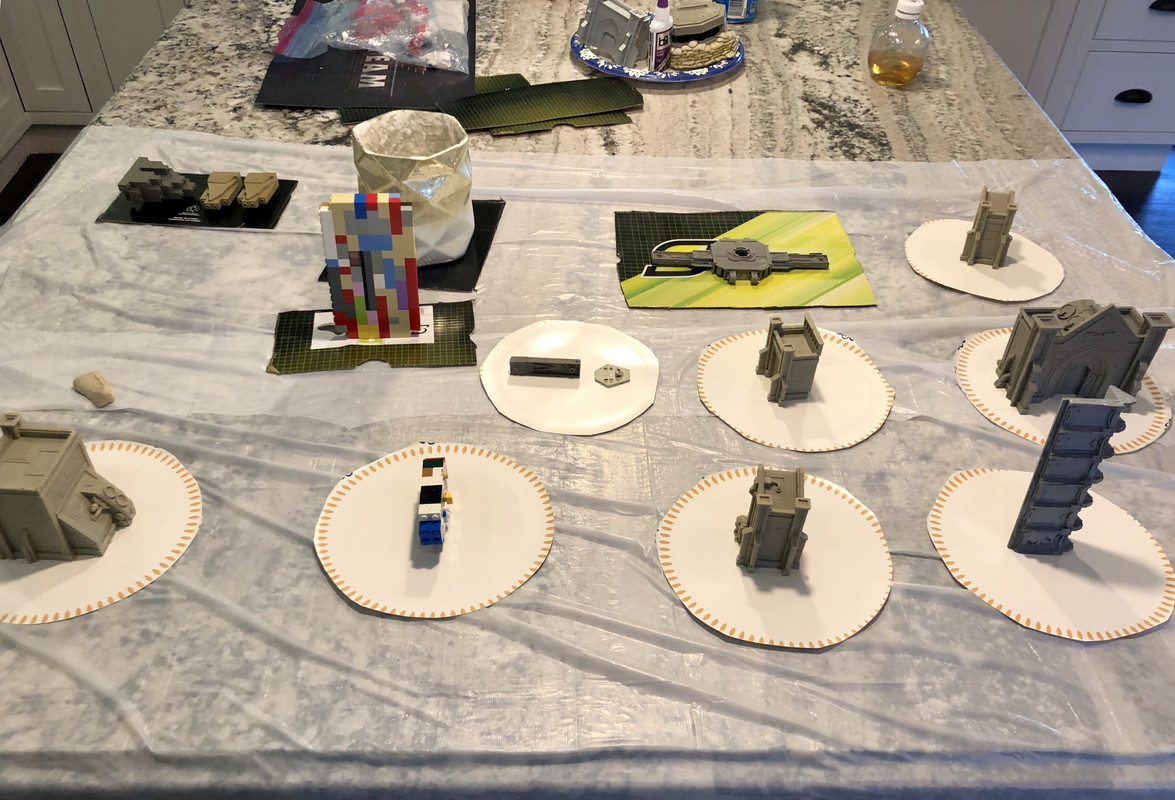
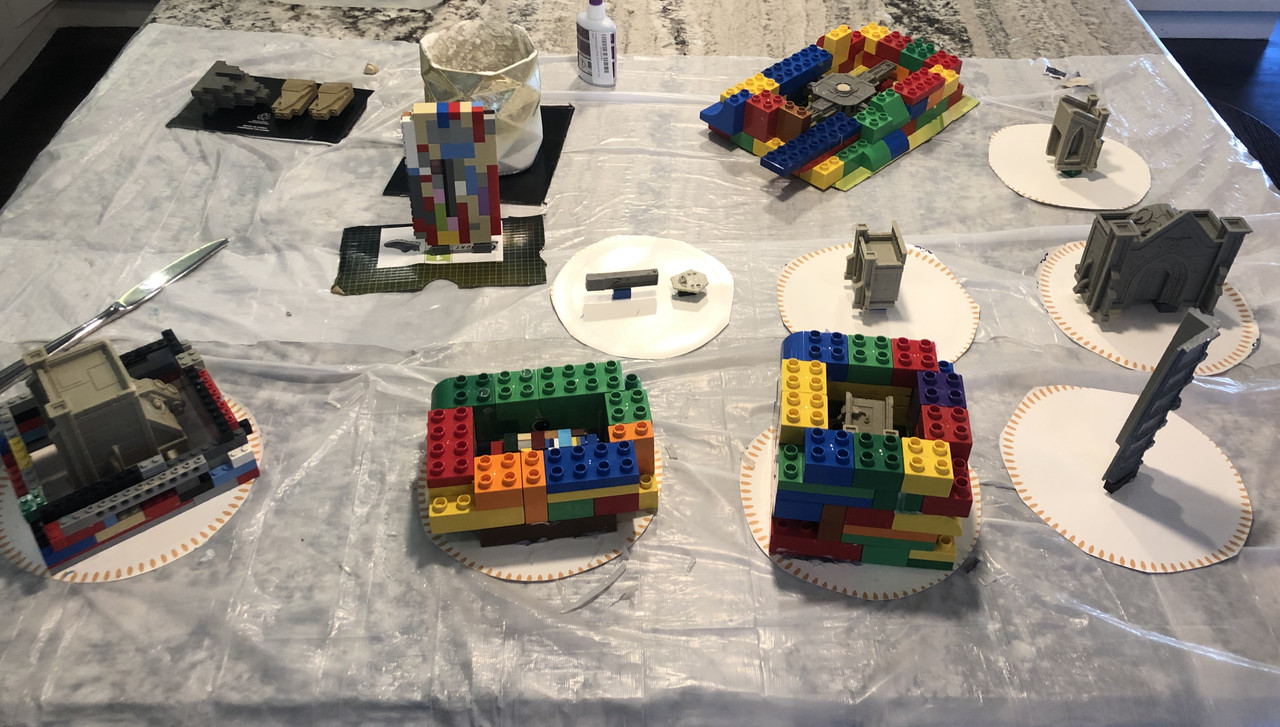
Ok, so I don’t know anything about kill team but I want to make a Rouge trader themed kill team. I really want the maximum amount of character out of each player and a lot of diversity and customization
This is what I’m thinking
Janus Draik / commander - 50
: Heirloom Pistol, Monomolecular
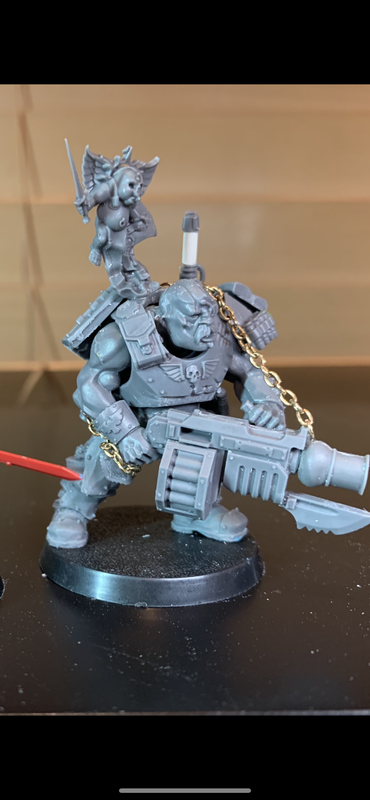
* my new Ogryn/Ogryn - 26
: Frag bomb, Ripper gun
*2x Scion/ Gunner, - 26
: Hot-shot volleygun
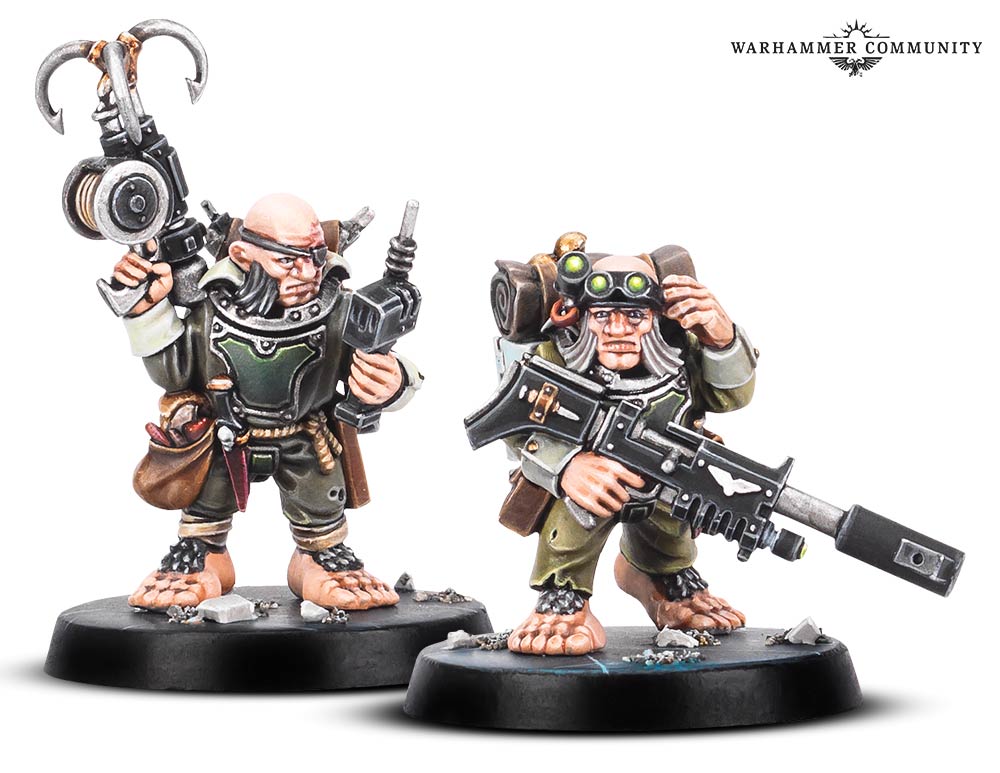
* Rein - 8
: Sniper rifle, Stub pistol
* Raus - 10
: Demolition charge, Stub pistol
* Scion Gunner - 13
: Grenade launcher or plasma or melta

* Tempestor - 10
: Chainsword, Hot-shot laspistol
* Special Weapons Gunner (sniper)- 6
: sniper rifle, Frag grenade
Didn’t have a pic of my sniper but would use existing base on this same model
*one of my converted Gotfret de Montbard- 20
: power sword and storm shield
*Another scion gunner - 10
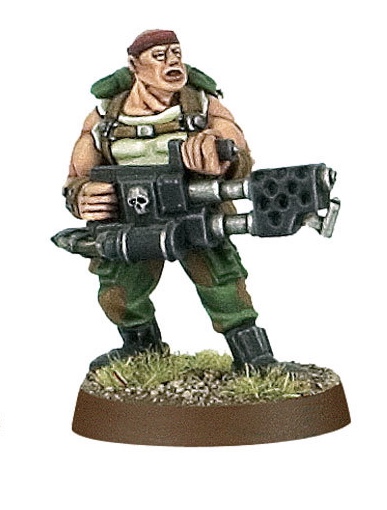
*Special Weapons Gunner (veteran )- 8
: flamethrower, Frag grenade
Some sort of catachan model, with a big flame thrower and cigar or something. Somehow I don’t have these bits though
What do you guys think? Would they be fun to play?
I think the modeling will be fun
101140
Post by: =Angel=
In my limited kill team experience- sniper rifles aren't great. The ranges involved in killteam don't favour really long range shooting or heavy weapons. The sniper specialisation tends to get given to plasmagunners so they can reroll their overheats.
High damage attacks are good to reliably remove models (and get around flesh wounds) whereas high volume attacks (flamers, volleyguns) are good at overcoming hit penalties and chipping away at multiple wound models.
The sniper rifle has neither. You'll be shooting without the range penalty, but with the cover penalty, as you can't reposition without taking another penalty yourself.
Having said that, Rein and Raus look fun to use. The Ogryn could be fun too, and the RT has some interesting rules and abilities.
21480
Post by: btoliver311
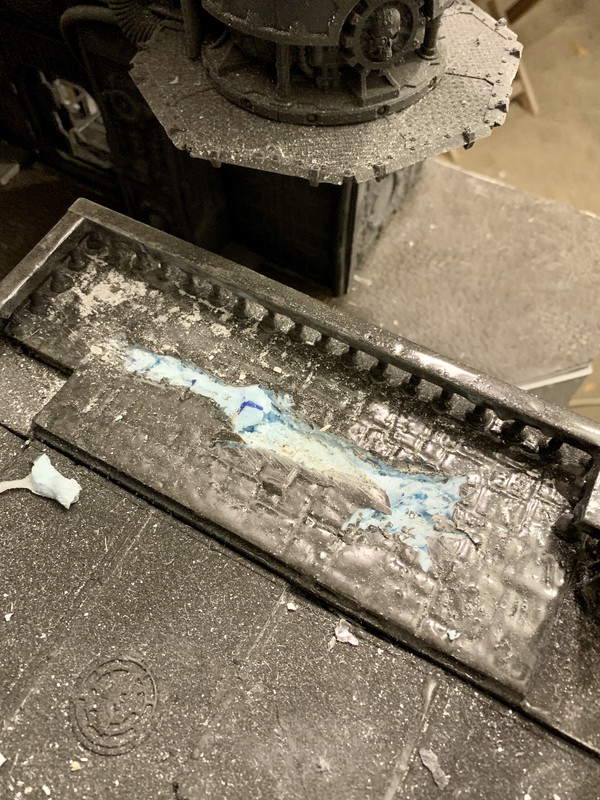
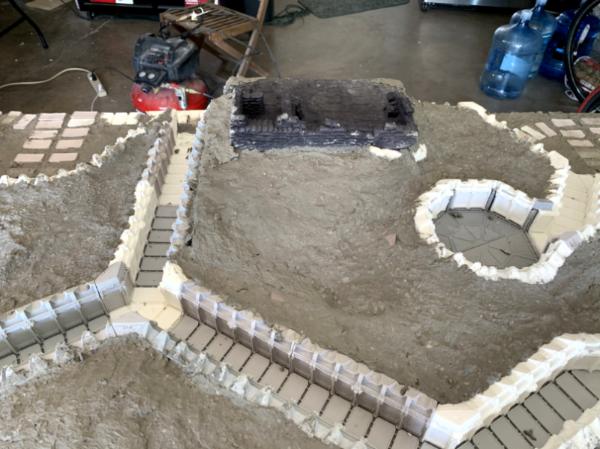
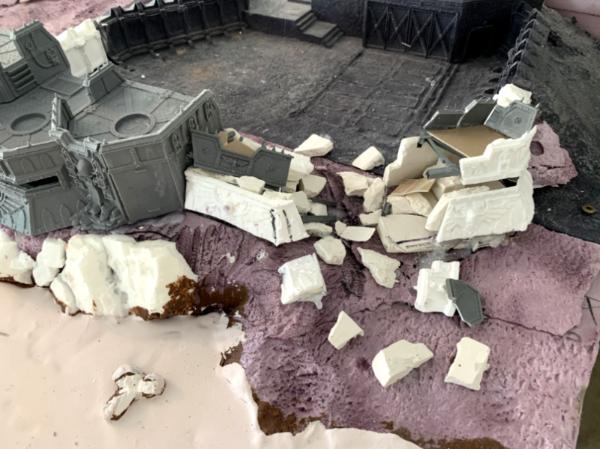
A little bit of what We’ve been up to.
Like the old styrofoam cobblestone main level that had to be covered with rubber cobblestone because the foam wasn’t strong enough to to hold up to play (or paint really) so to must everything else that’s styrofoam go. Meaning another 8 steps back to make 1 forward but oh well.
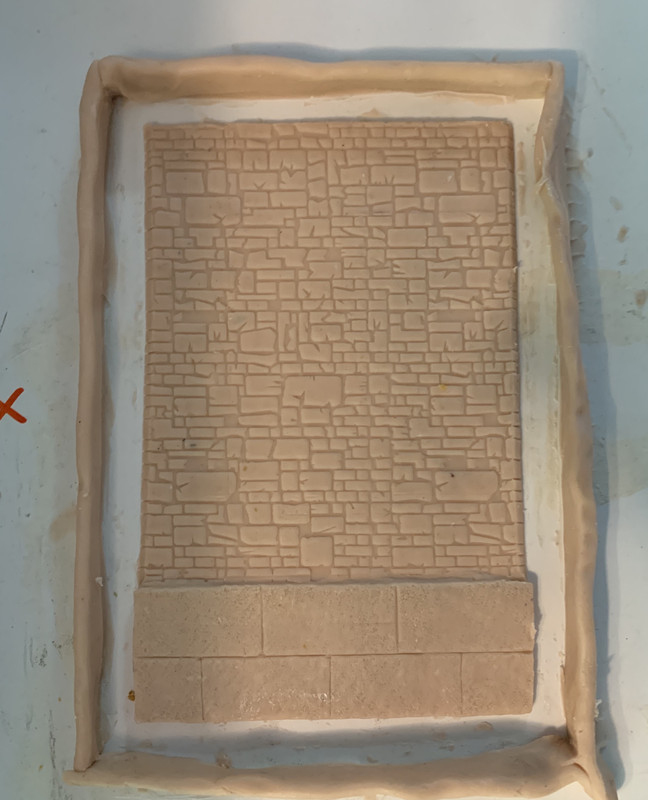
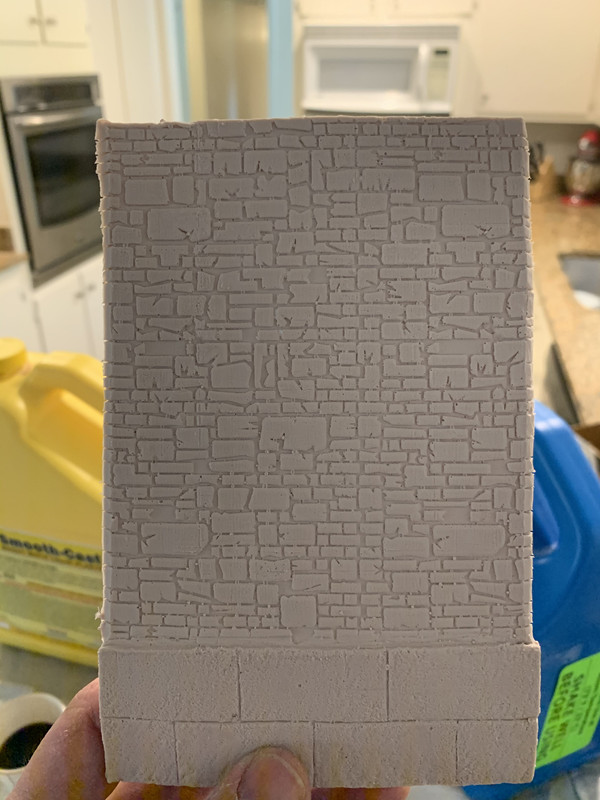
So we have had to make molds and cast of a ton of different brick patterns
First is about a dozen 2’ x 6” large block walls for the canal walls. This were a must as modeling water destroys foam and would never have worked. Kirque hand carved the positives in clay. Then pushed in the stone texture with the side of some broken foam.
The mold and cast:
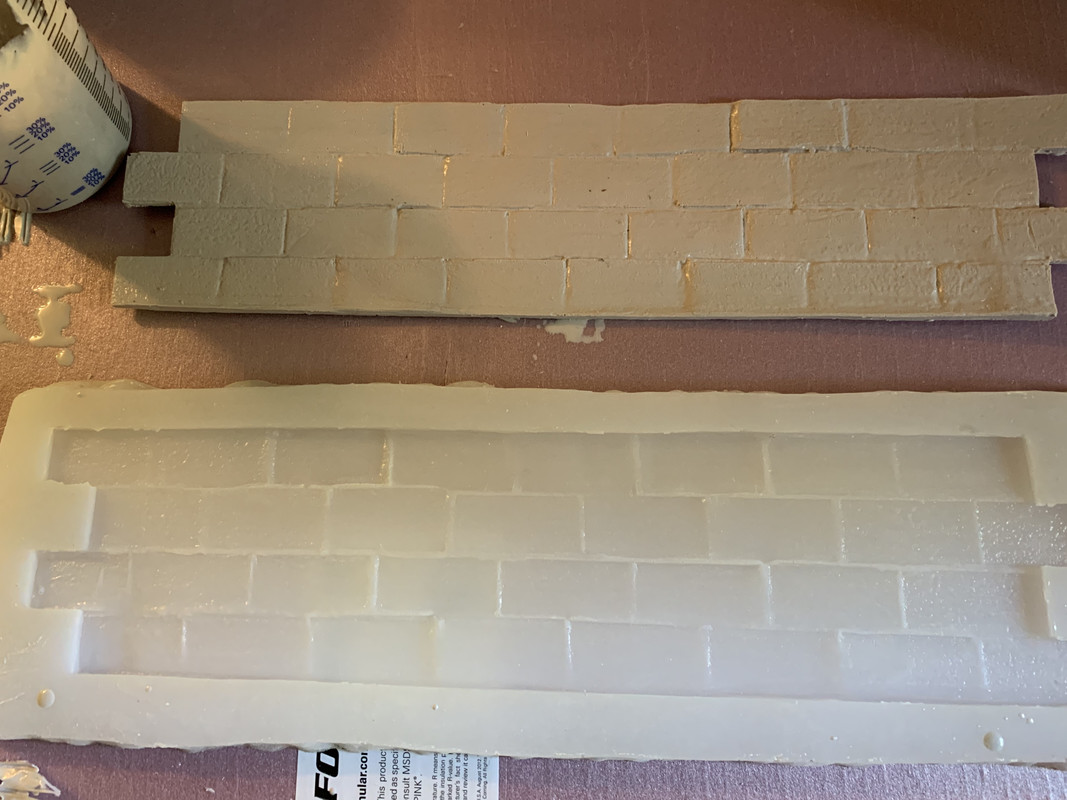
Here’s one side:
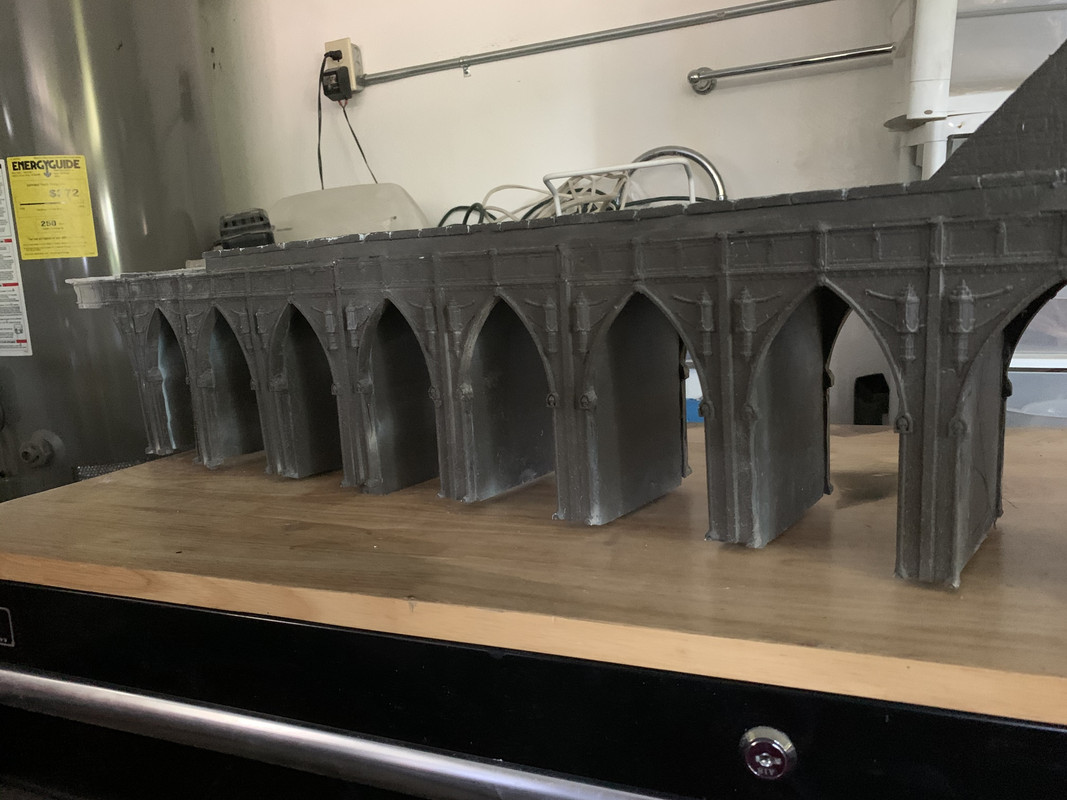
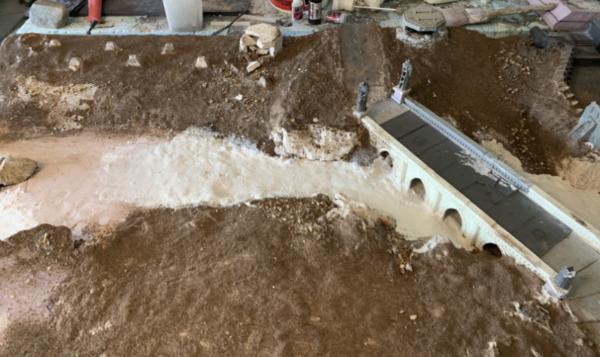
The next largest project we had was all of the small tunnels (there are 28 of them), these always needed better detail and again the dozen that go across the river were going to be an issue.
Here’s my work station this week:

One of the casts ( these were made using the foam roller. At lest we found a use for them)
Oh, and an example of the tunnels I’m referencing. (This is the man- bridge, that also swings open to let player onto the middle of the table)
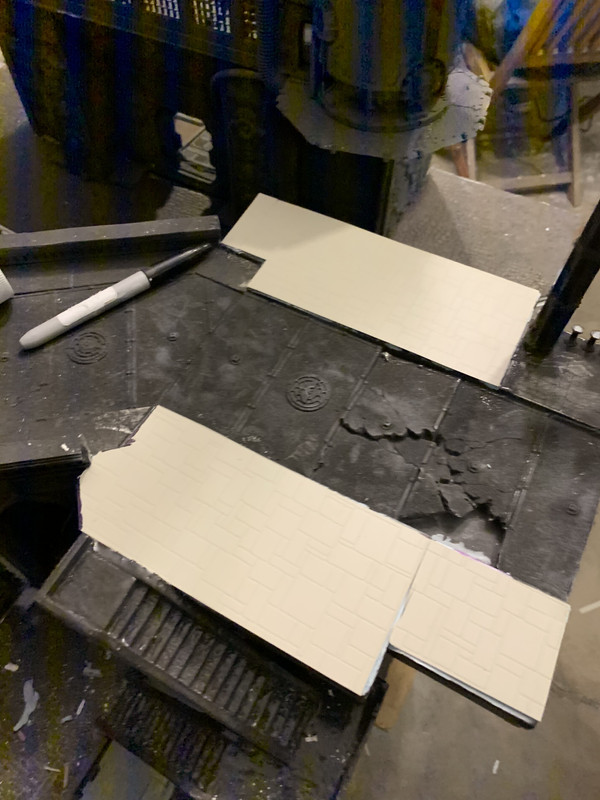
We also had to redo the floors for the governors mansion. these aren’t very exciting but the structure is going to look much better builds out of resin vs the thick styrofoam floors

21480
Post by: btoliver311
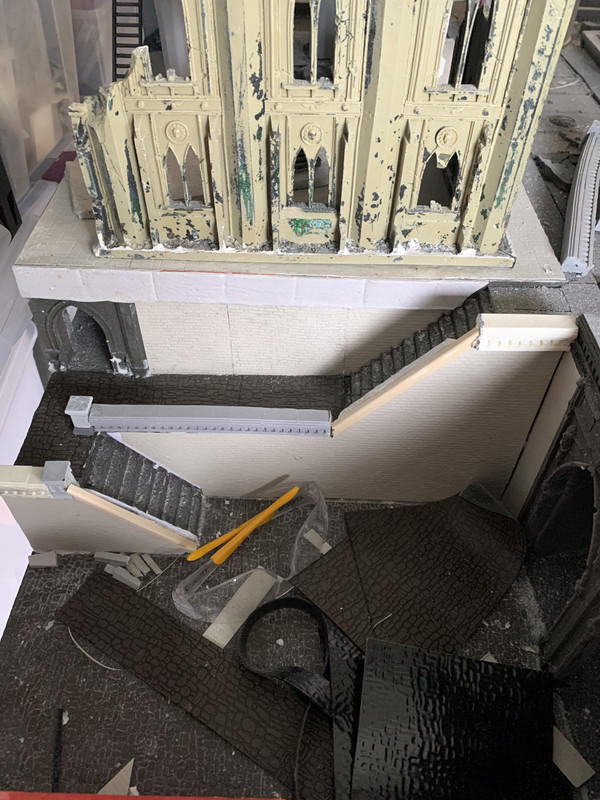
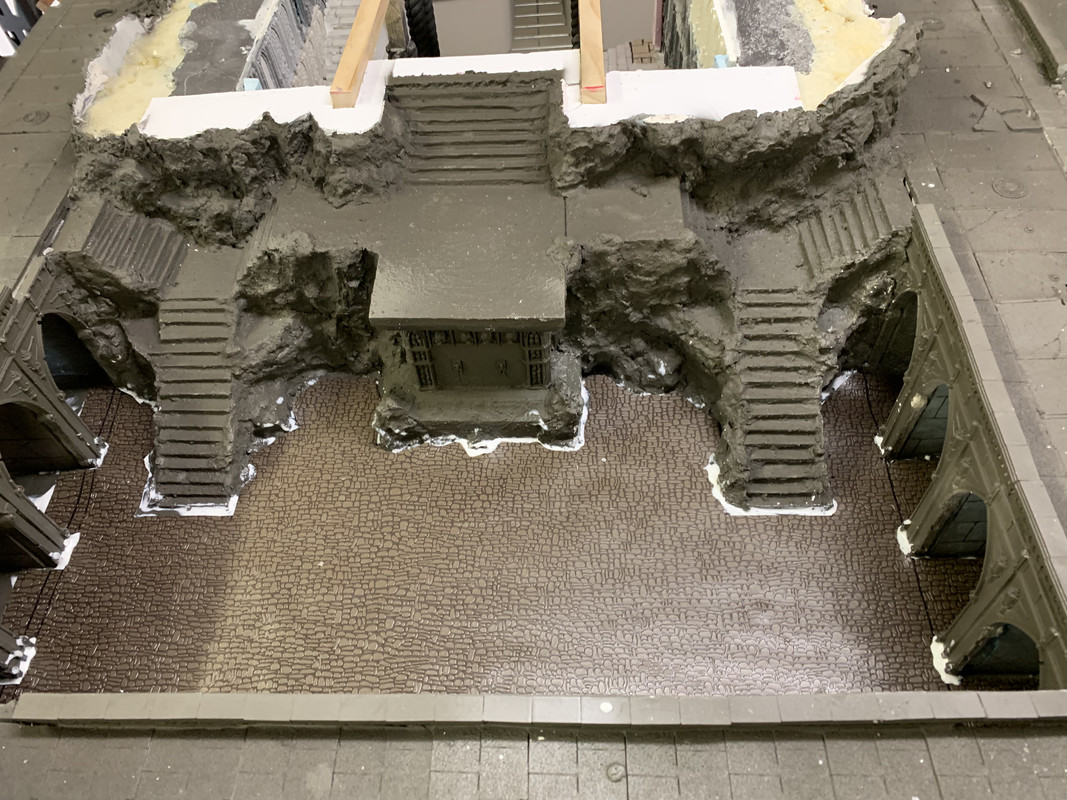
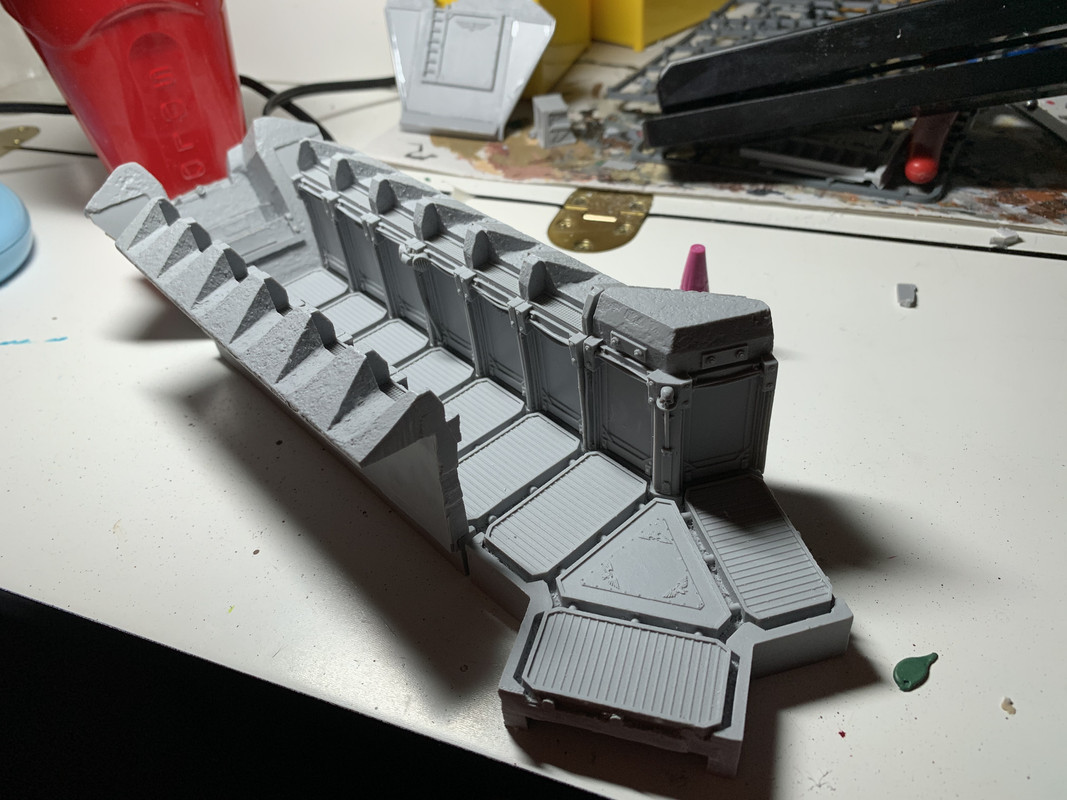
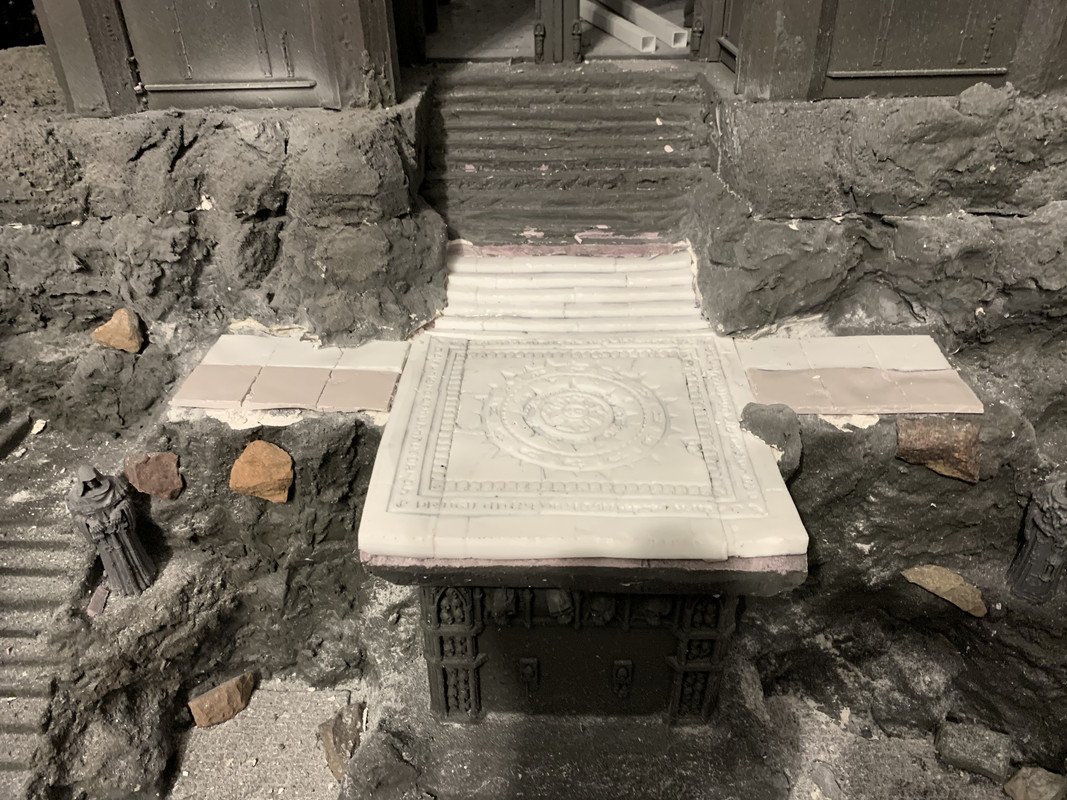
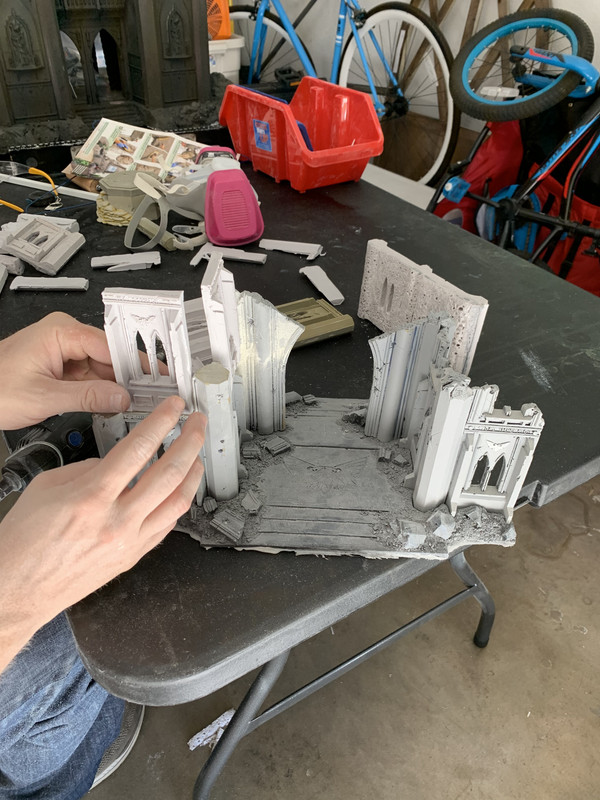
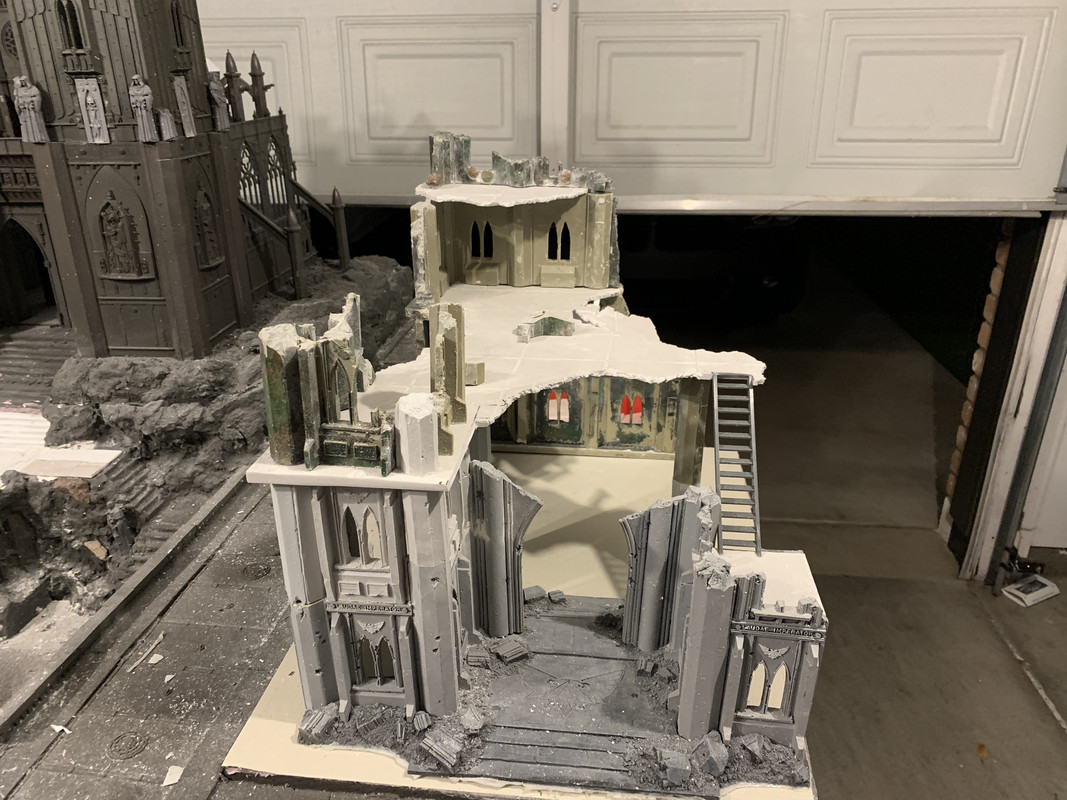
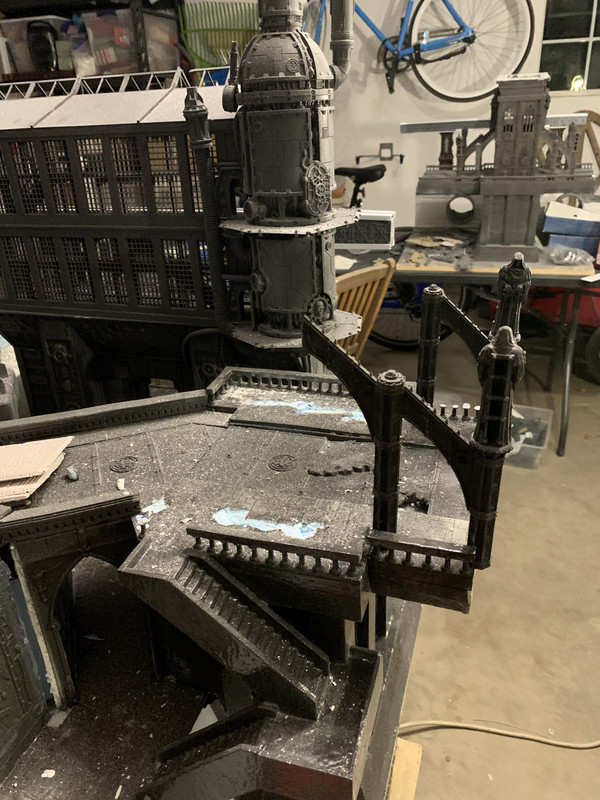
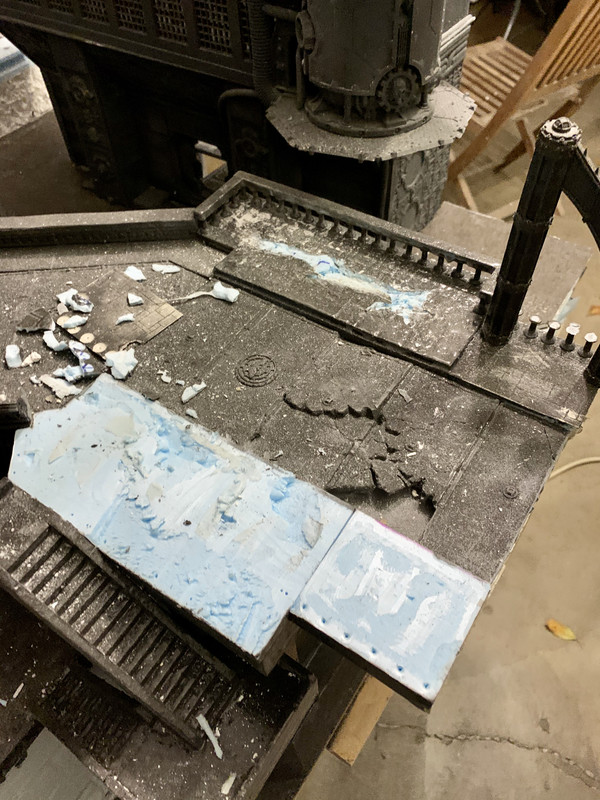
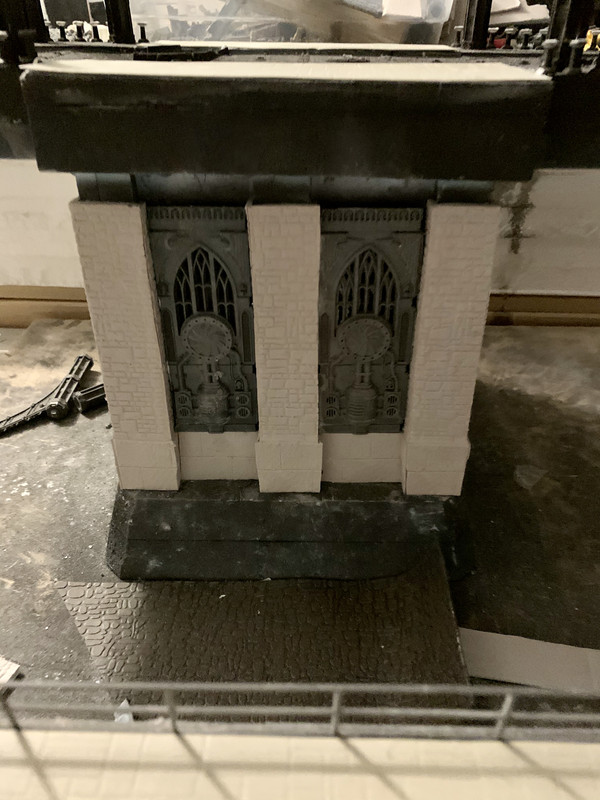
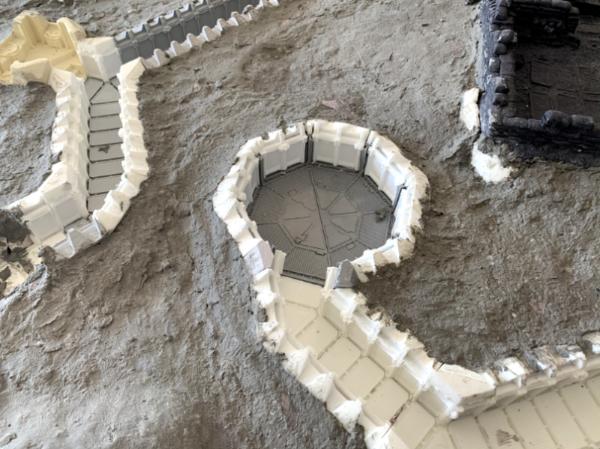
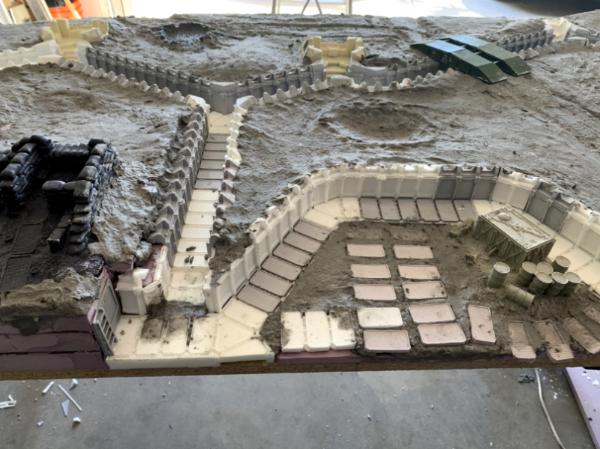
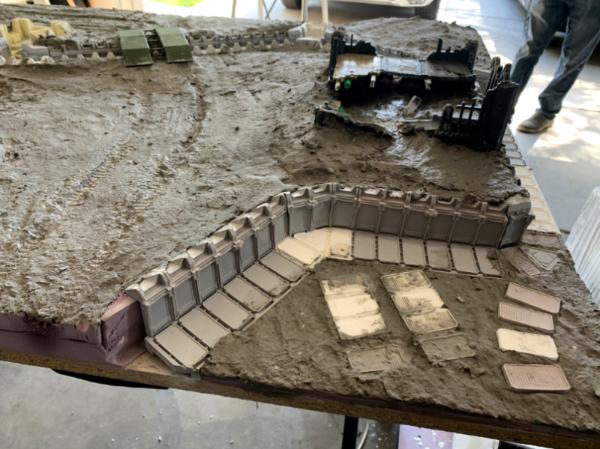
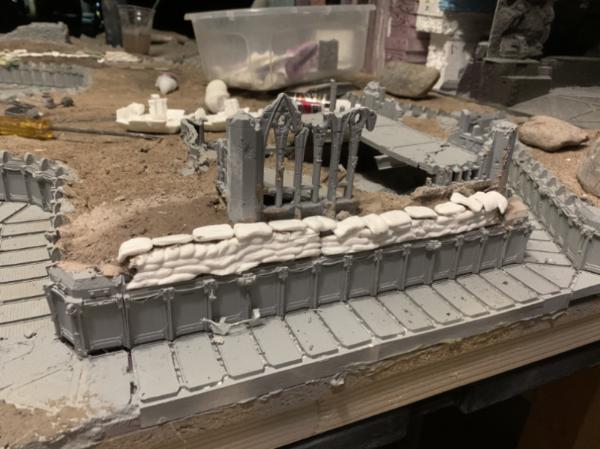
The changes and updates continue.
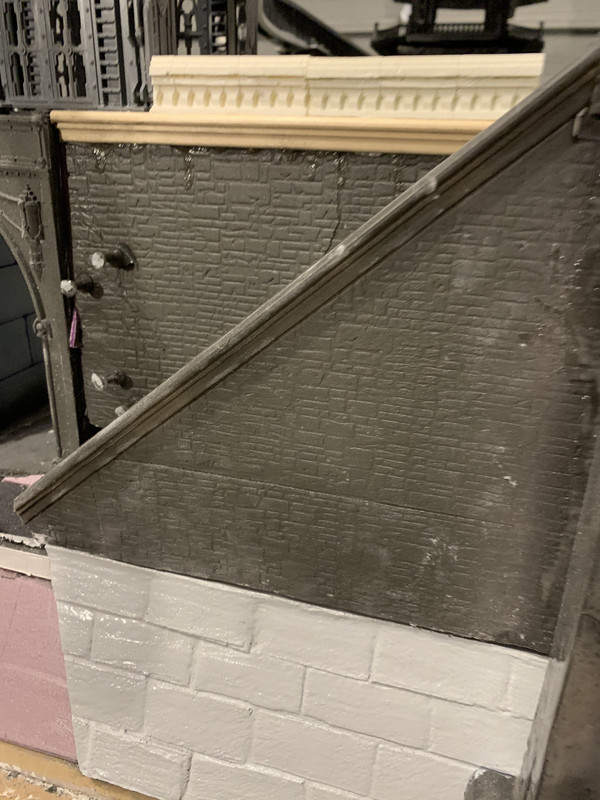
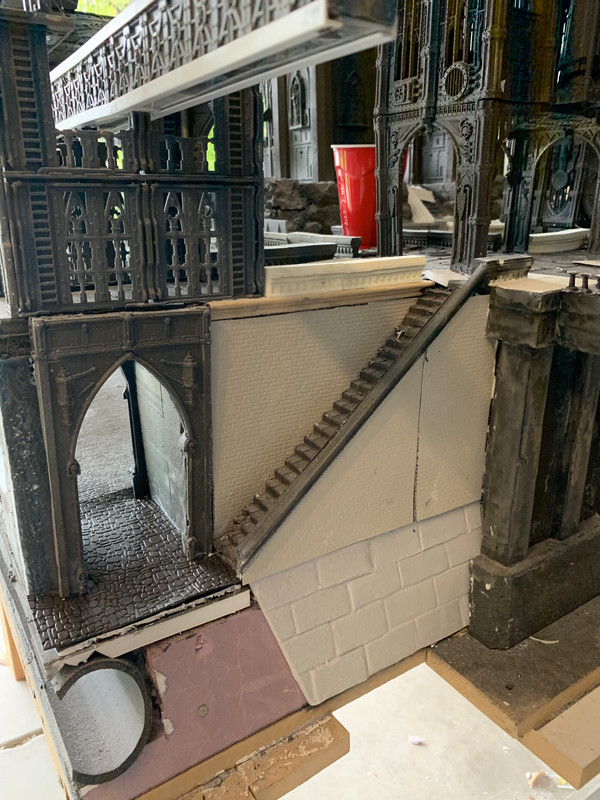
We decided the staircase in front of the cathedral which was originally just made from carved styrene covered in plaster didn’t have enough detail
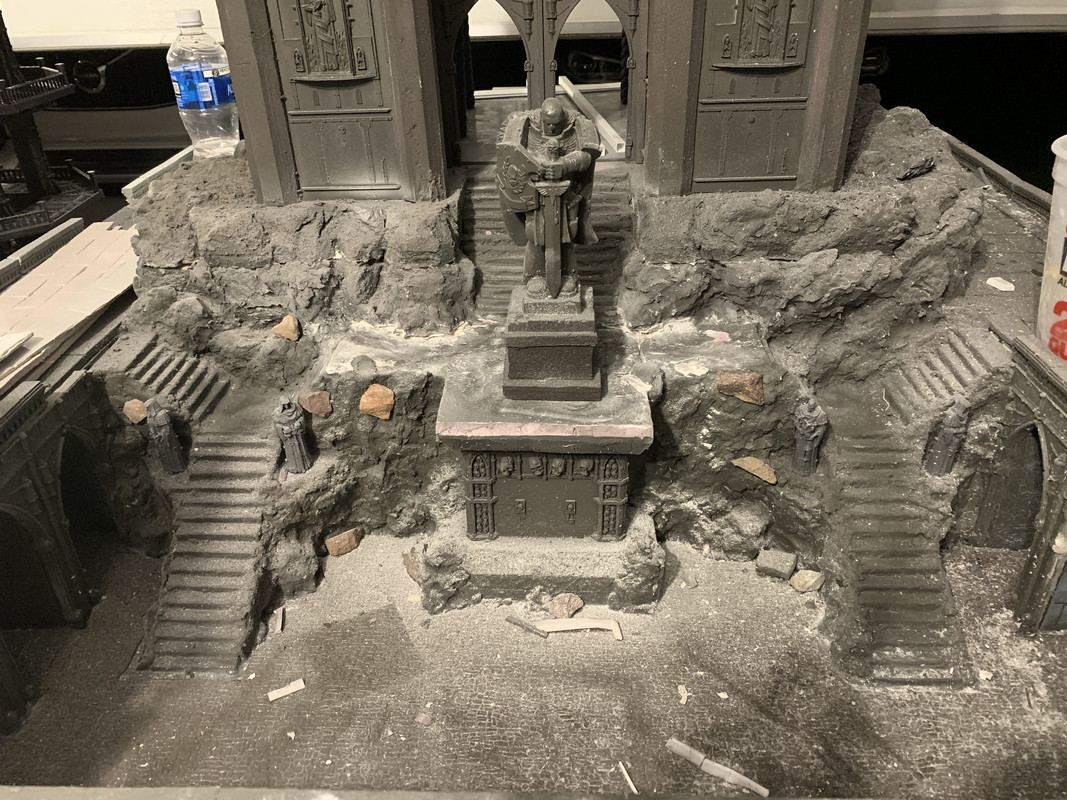
So we looked for good war hammer stairs to use and found the Dominion of Sigmar: Hallowed Stormthrone And started making really thin slip casts of those stairs
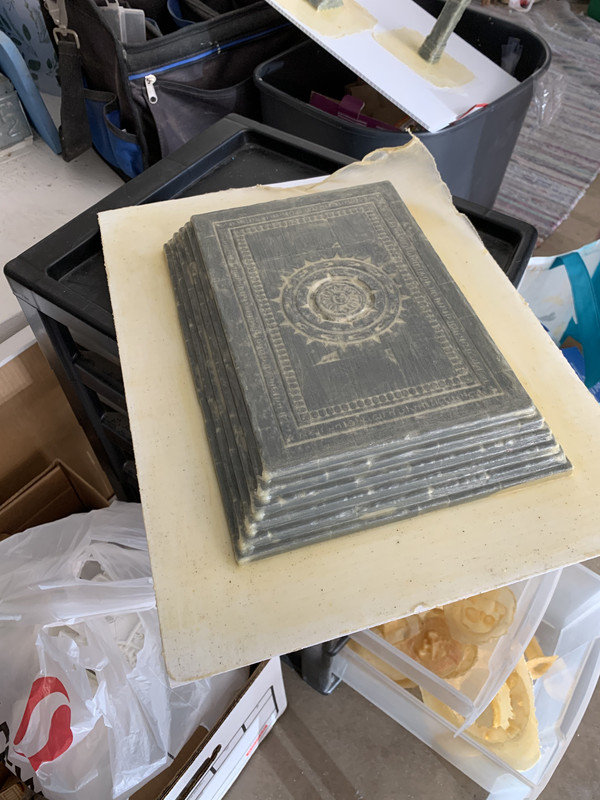
Here’s the beginning of the new look. I’m pretty excited
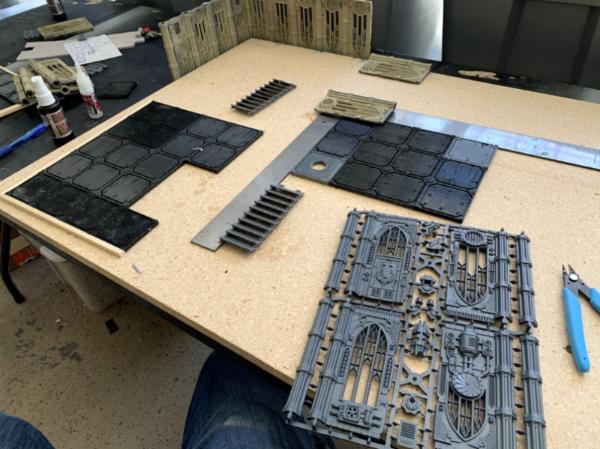
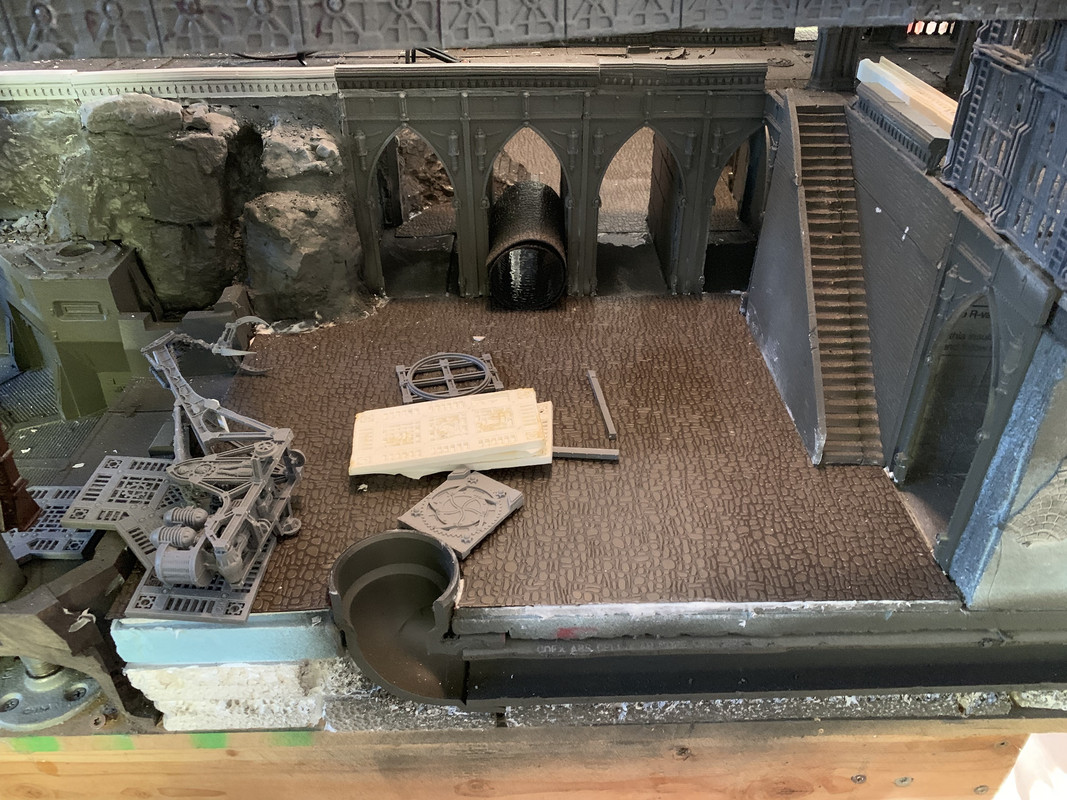
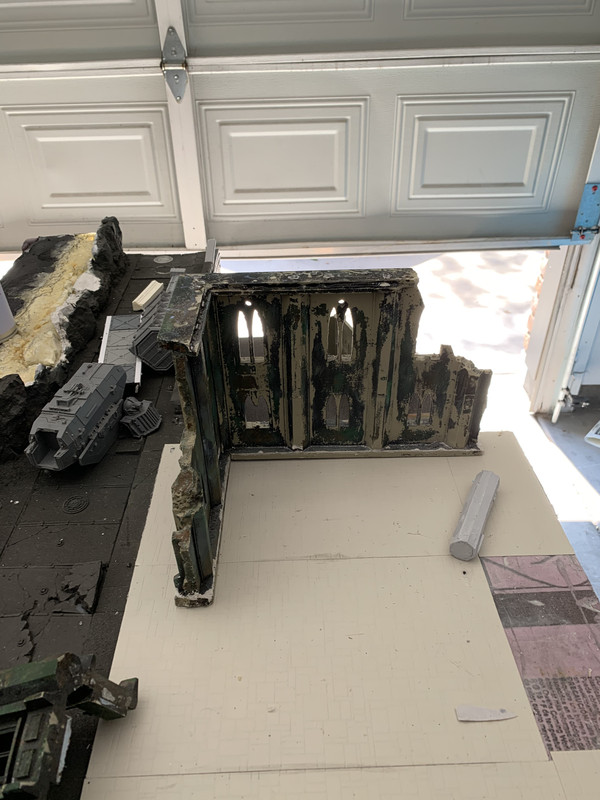
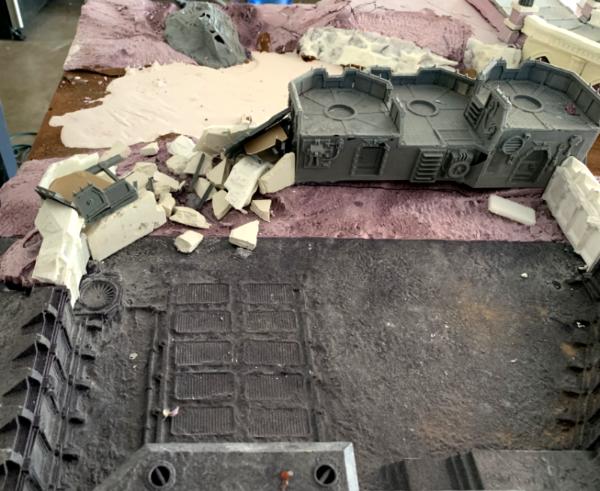
Also, as we mentioned before, we removed the Hab project from the table.
When we got the hab it originally replaced a building we made out of the old forge world city fight ruins

Now with the hab gone we put them back, with some serious adjustments though with the use of our large custom reason flooring sheets

21480
Post by: btoliver311
Man, our board gets no love since I changed the name of the thread. Crazy that that looses all of our followers
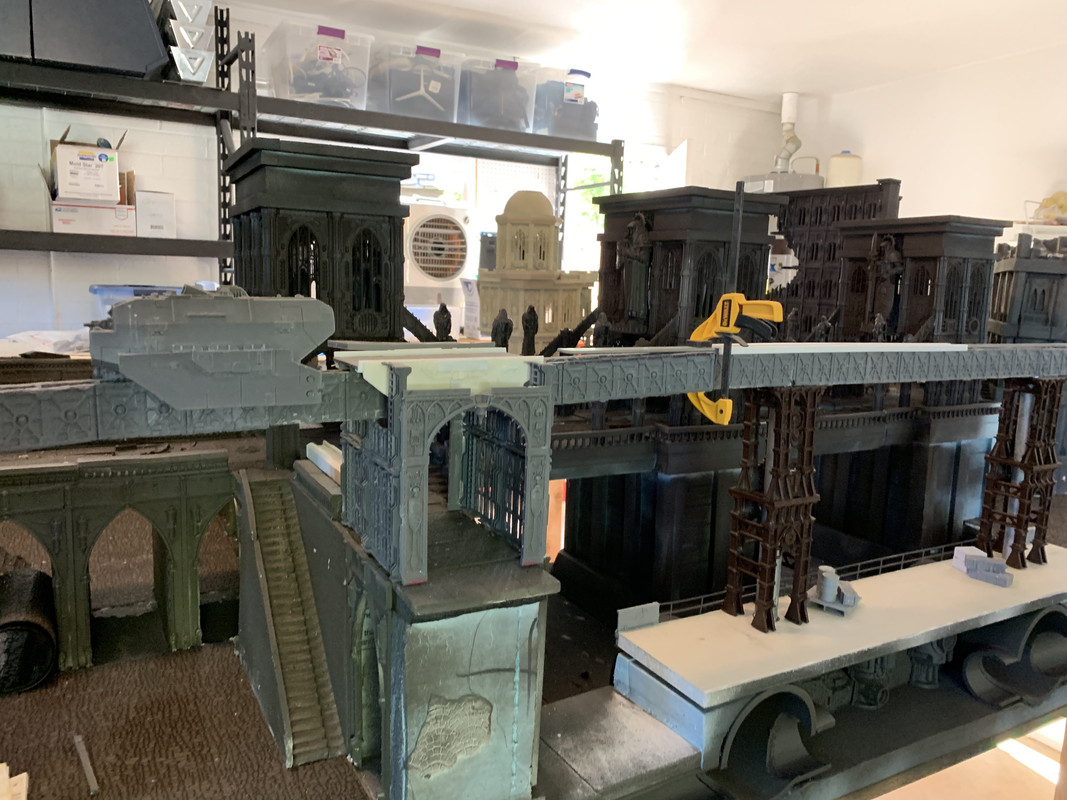
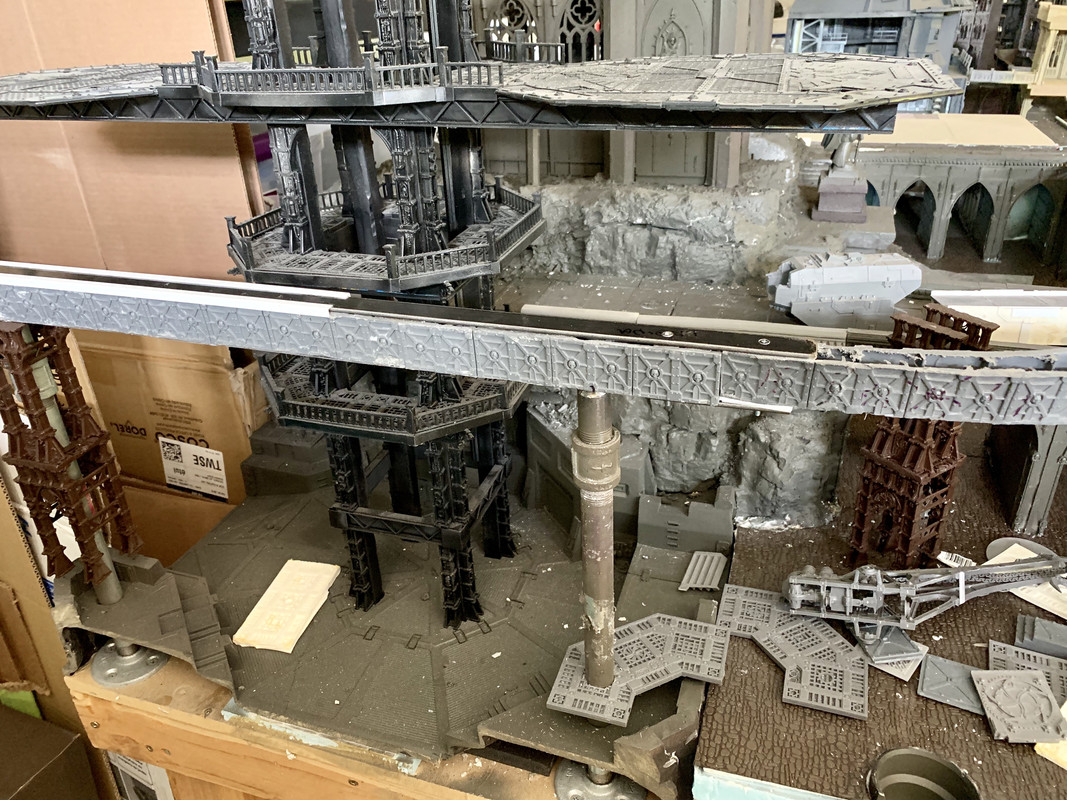
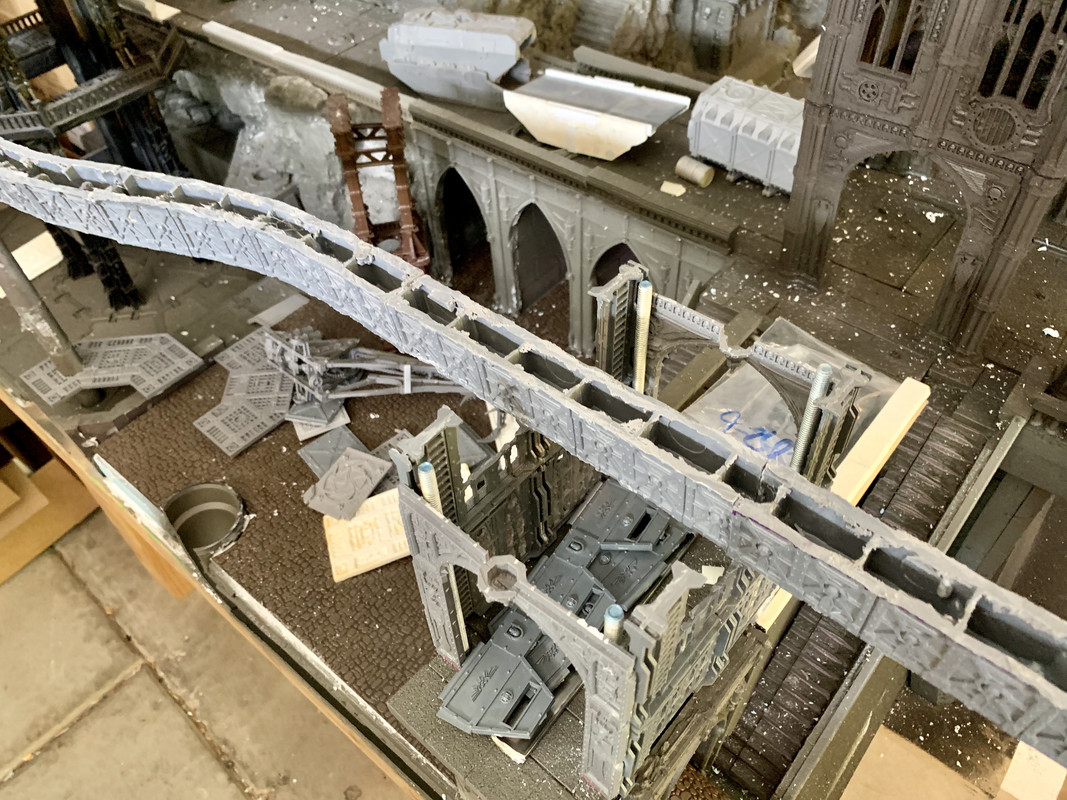
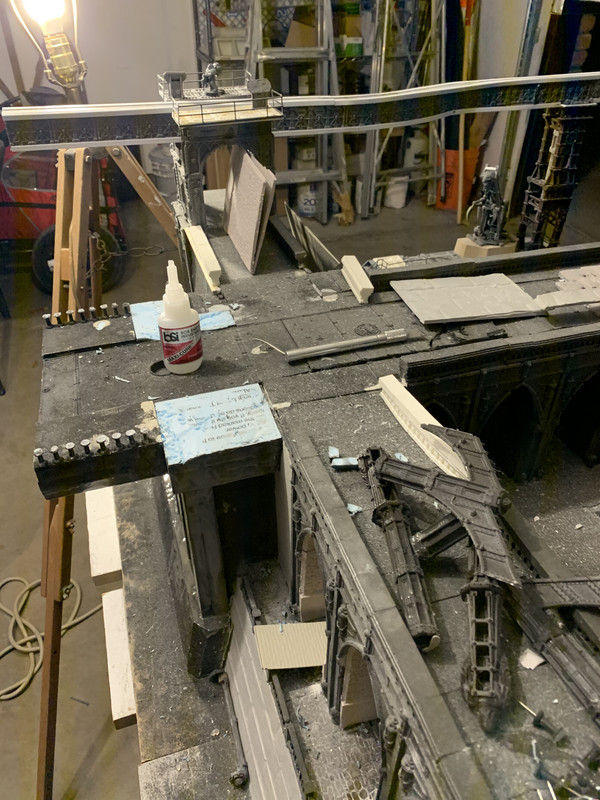
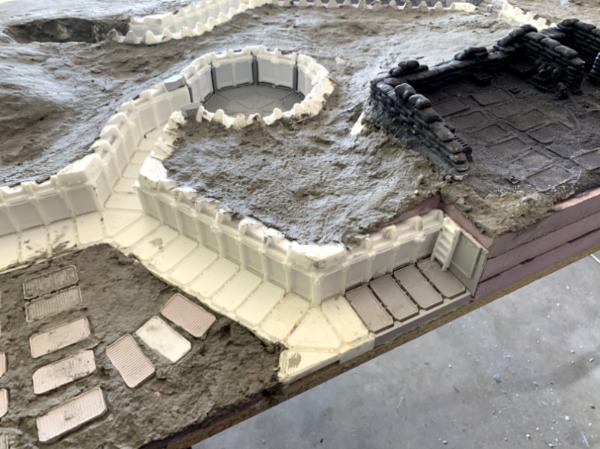
Anyways, we also updated the bridge connecting the front two buildings using some parts from the forge world anphelion base
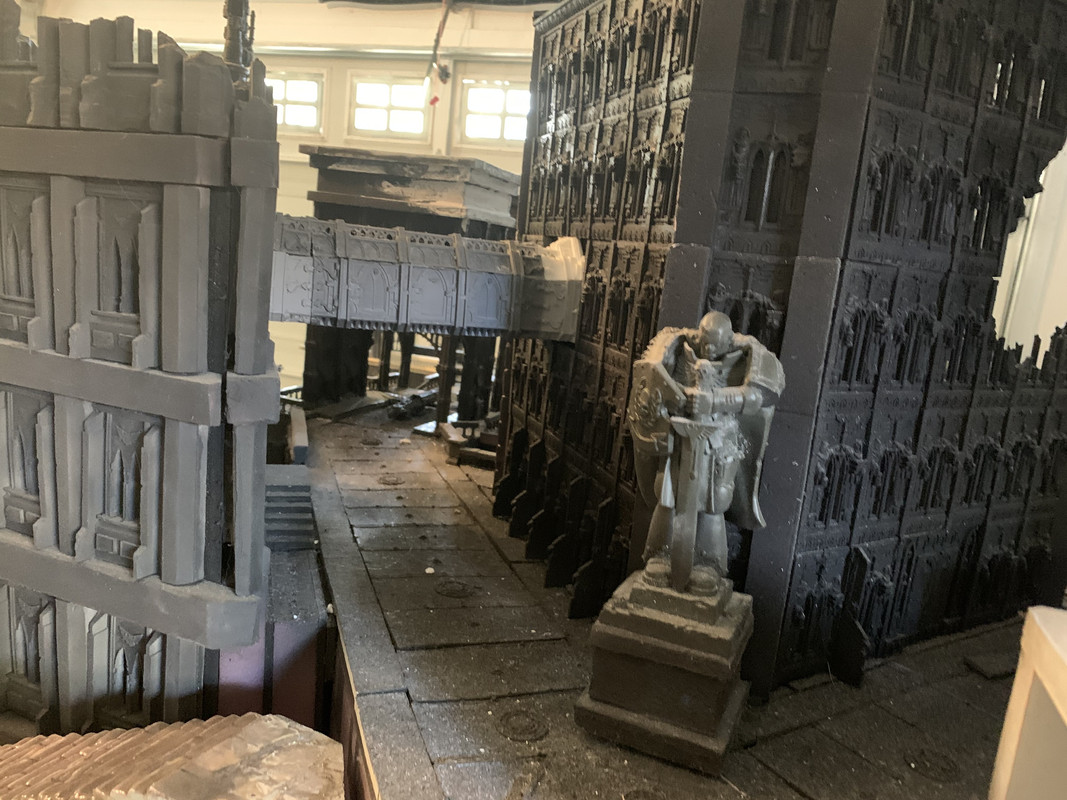

You’ll also see we decided to move the space marine statue up to the front of the city
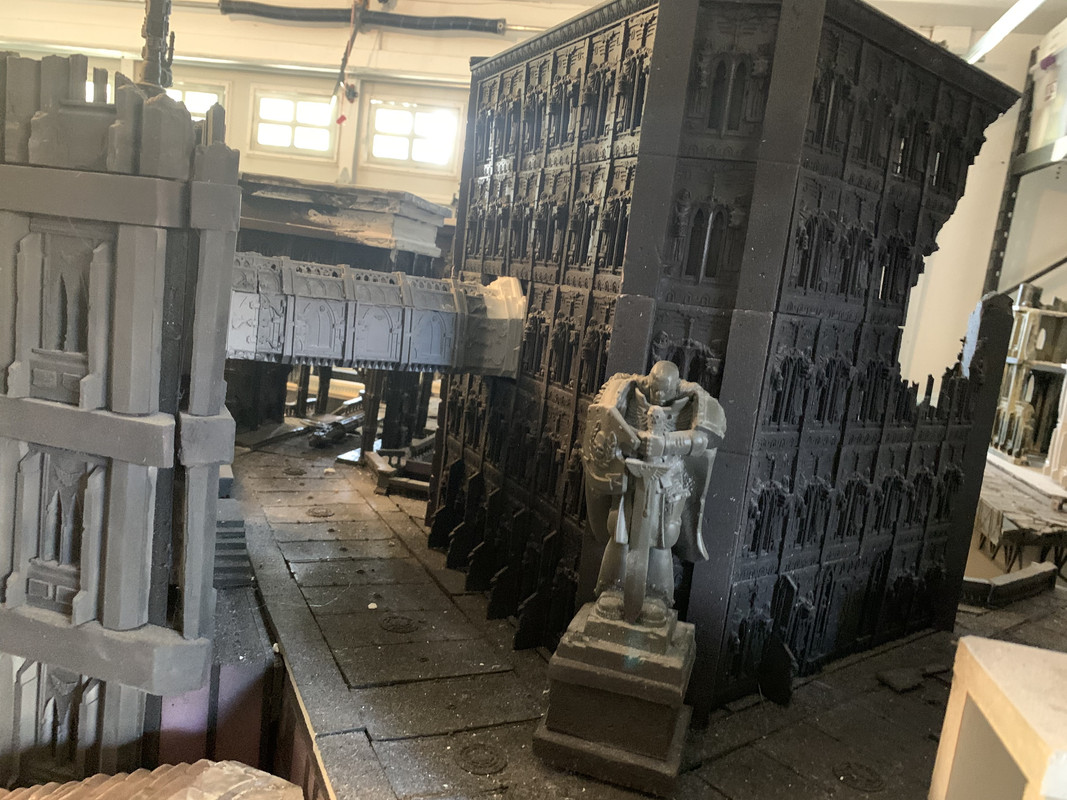
I think this helps the entrance a lot and will look really good framed by the forge world fortress wall towers (YES this is really a possibility! Fingers crossed)
105865
Post by: Rolsheen
I like the look of the new hab, I think it fits in better style wise with the rest of the buildings.
76303
Post by: Warboss_Waaazag
I'm so floored by the scale of this build. The old building thst got removed is a stunning piece of architecture, both in terms of if it were a real building and in terms of the project's scale and complexity. I'm a little sad to see it go, but understand your decision. This whole board is an incredible and inspiring build.
120033
Post by: Excommunicatus
Cigars are easy. It's just a tiny roll of GS glued in to the mini's gob.
Paint it brown, put a dot of red on the end for the 'cherry' and maybe lightly drybrush that bit with a touch of grey for ash.
Then say "I love it when a plan comes together."
98217
Post by: Skinflint Games
You people are utterly insane, but my god that is in amazing build
21480
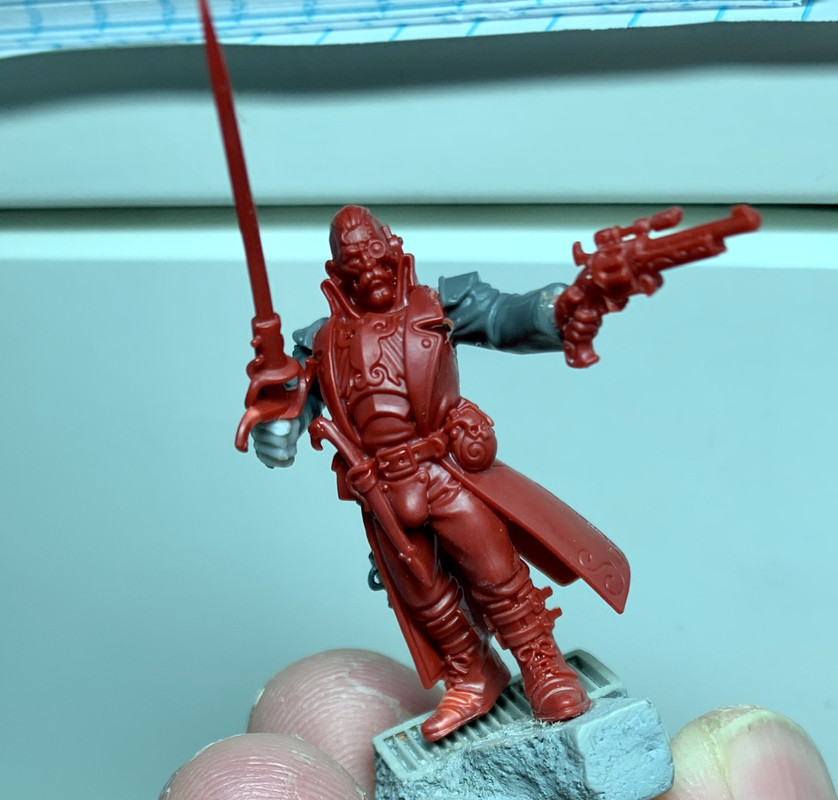
Post by: btoliver311
I know it’s not the most interesting part of this thread but here’s that specialist AM kill team I’m working on
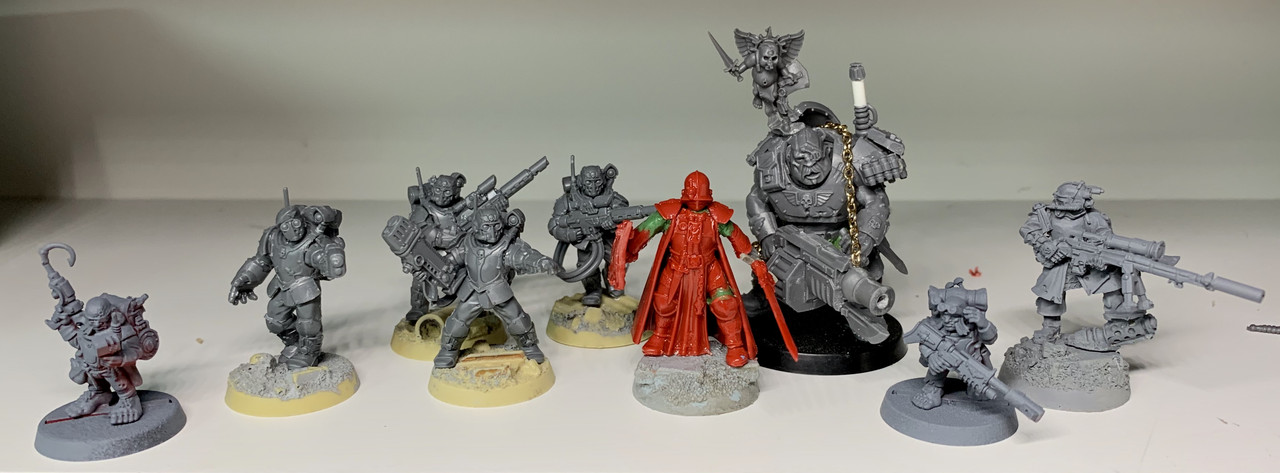
And their WIP rouge trader leader

The crew together
2326
Post by: shasolenzabi
Very killy looking group you got there! 
21480
Post by: btoliver311
Glued together but still needs green stuff
62565
Post by: Haighus
Ahh, I love checking in on this thread. The city is coming along great! The bridge is a nice addition.
21480
Post by: btoliver311
What bridge? This one?
Like everything else it was built with foam pathways and some of the walls. We had to pull it up last night so we can replace the sidewalk with plasticard next week. 2 steps forward. One back
21480
Post by: btoliver311
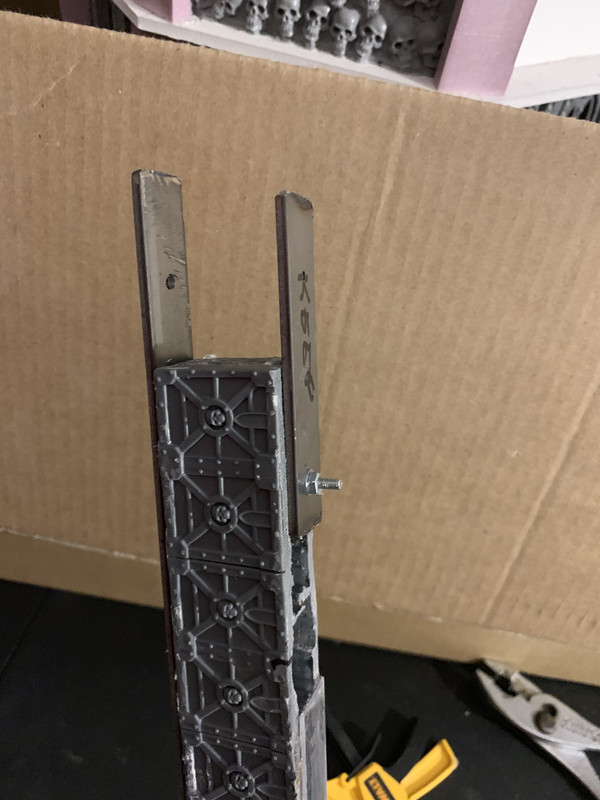
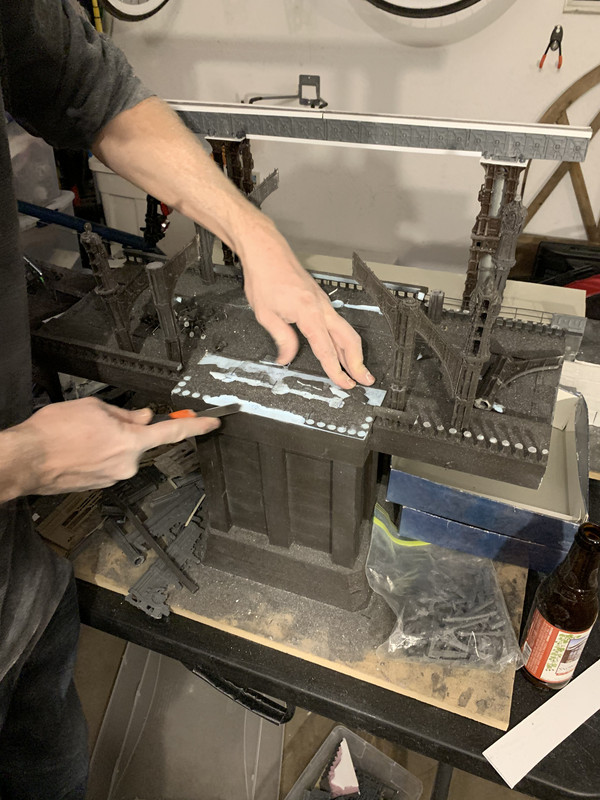
Hey guys,
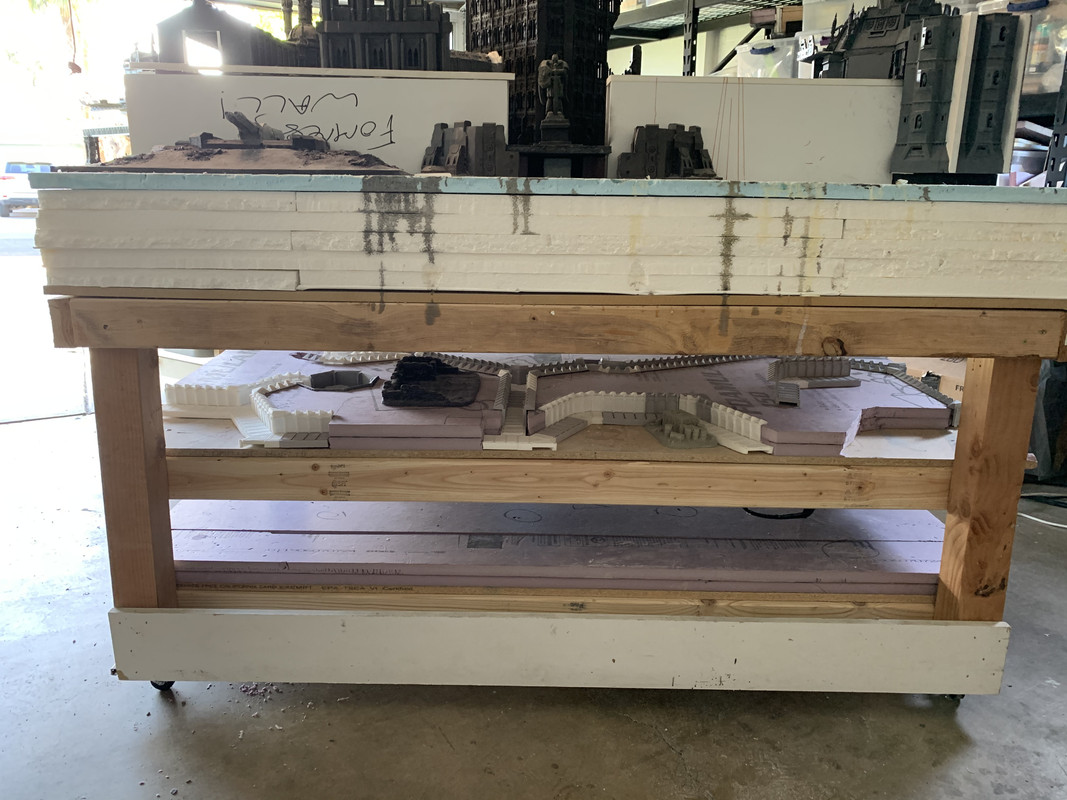
Need you advice and ideas on how to fix/update the legs for our 3 tables.

I’m really afraid the legs could snap on either of these tables pretty soon because we keep dragging them across the floor so I want to get the thing on rollers. Also, Once we move this to our FLGS the legs are going to need to be able to fold in our come off. The door to the store is only 36”
So what I think I want is 4-5 (2 for each table and 1 more small one for the damn piece in between) cart/rolling tables. That I can just set and secure the table tops to, but also easily remove when we take it to the store
The current tables are
71” x 49”
Middle damn piece
30” wide by 25 3/4” deep
To the floor
30” from plywood
28.5” from 2x4s
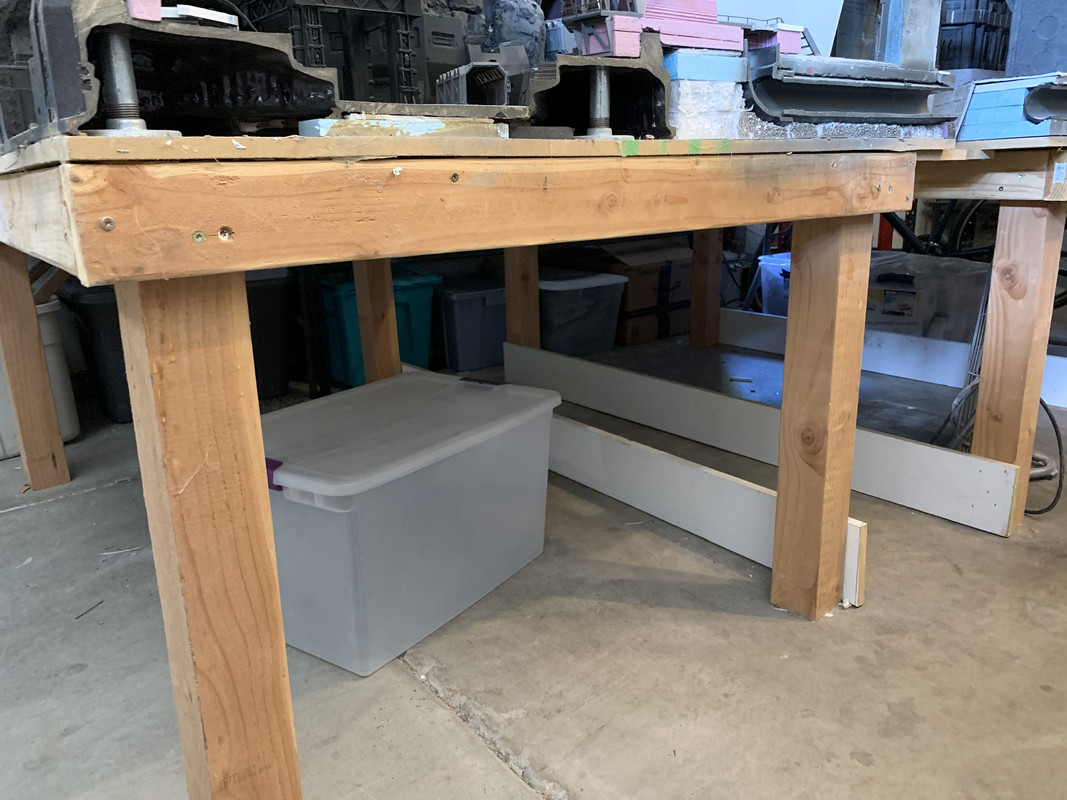
I would think it would be best if the new stands sat inside the fame. Those dimensions are a little small, with part of the mDF for the river sticking out past
Table inside 41” wide
Table length 67” inside
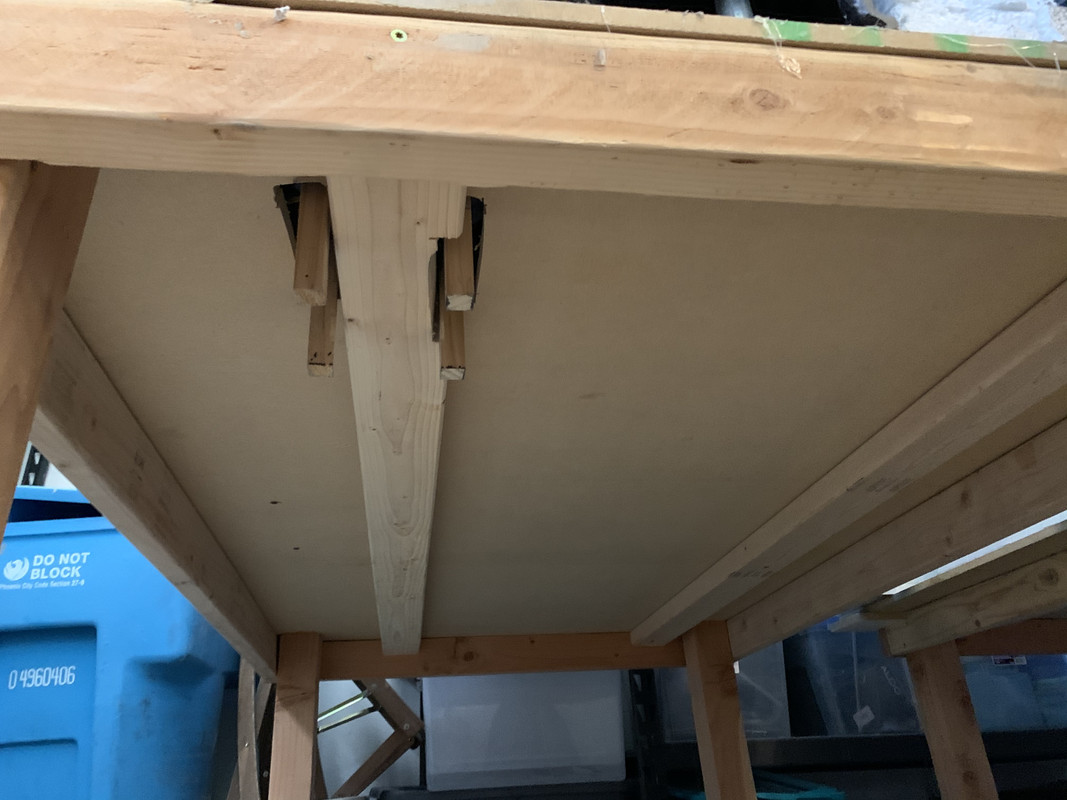
(This is a pick without the damn section)
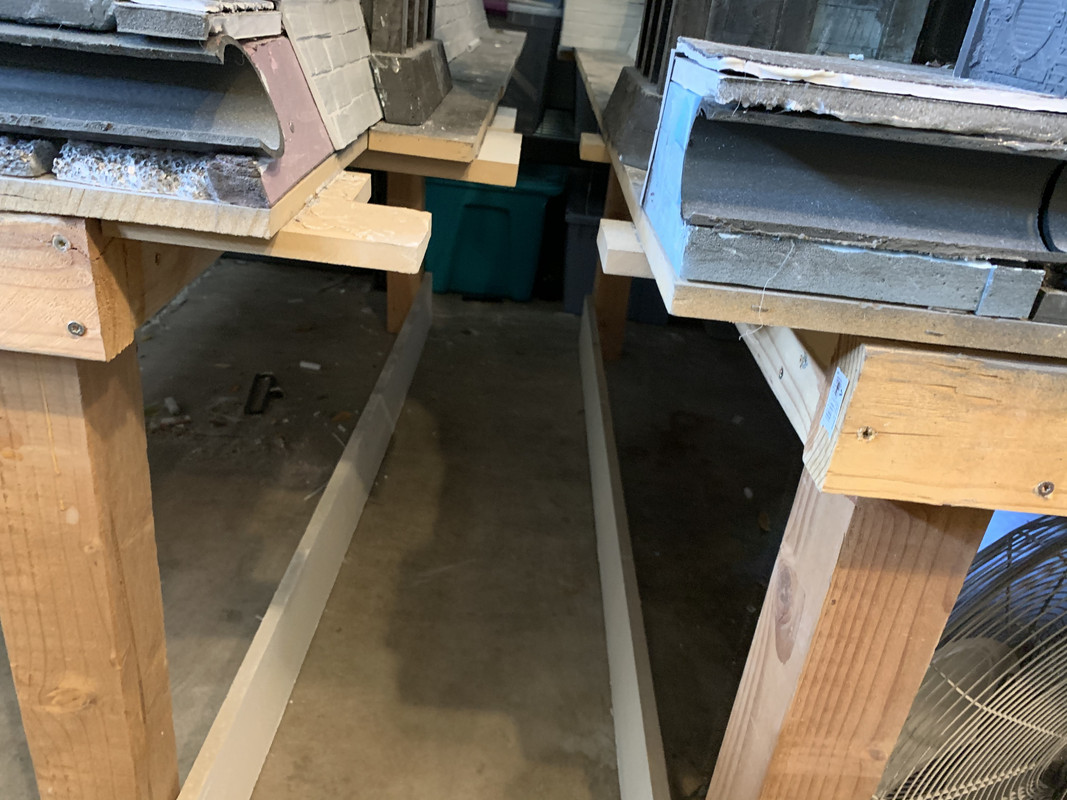
(With the damn/bridge insert) it just sits on wood biscuits that stick out from the main two tables. This needs its own stand/cart too
Please give me your thoughts and any links you have. I would really prefer to buy some stands and not have to completely build new legs myself. I’m guessing the tables each weight between 200-250lb
Thx
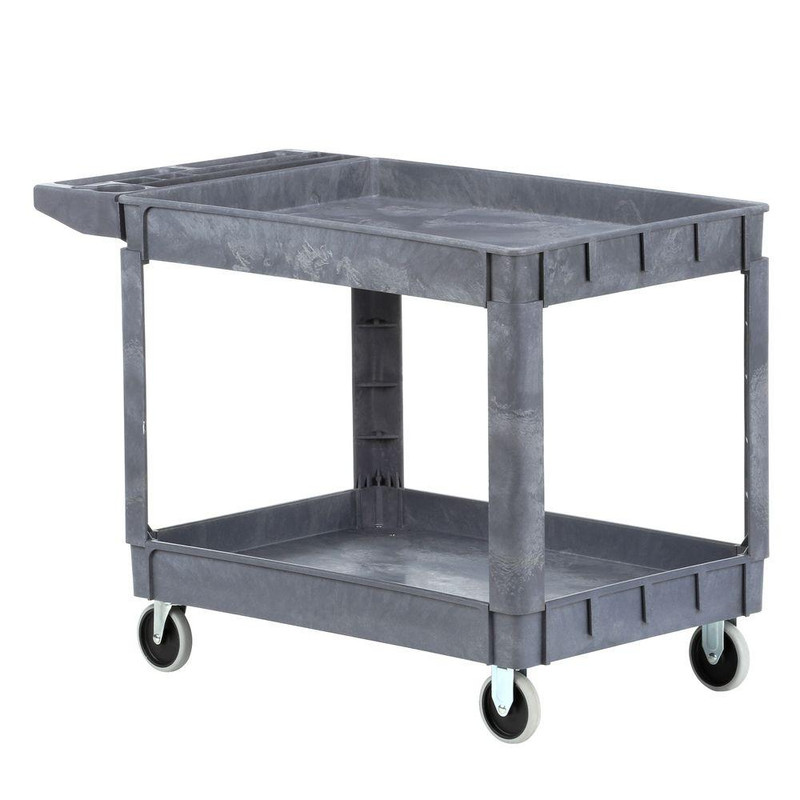
Automatically Appended Next Post: I’m considering 4 plastic utility carts but there still on 36” wide and I’m worried about tipping
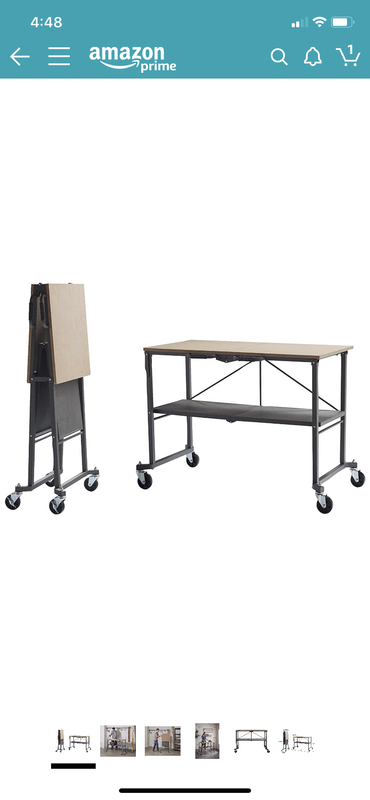
These fold up tables look good too but they are really $$$
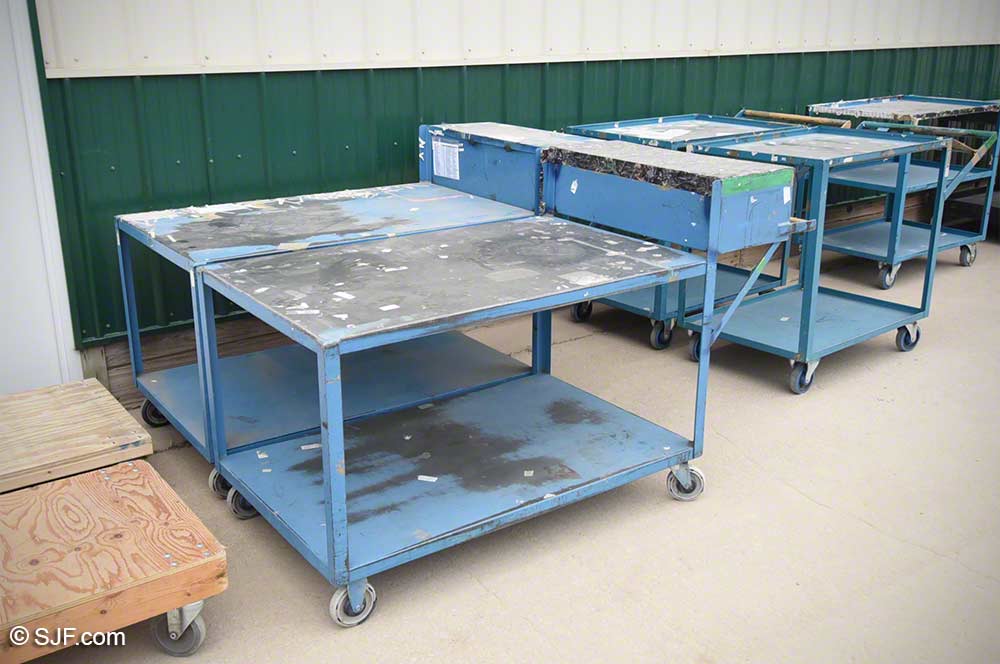
What I would like are some large metal carts like these but don’t know where to find in phx
62565
Post by: Haighus
The plastic trolley looks way to flimsy if you are worried about durability with the thich wood you are currently using.
Also, is wheels not at risk of being knocked/jolted out of alignment during a game, and potentionallly dropping elements/models onto the floor if gaps open up? You could use something with lockable brakes, but that is going to raise the price. You could also just use bricks or something as wheel chocks, but that introduces trip hazards around the table for people to land on it and break stuff.
I wonder if you are better off making the table more amenable to dragging rather than going the wheel route. Perhaps you could reinforce the legs by adding braces connecting each leg near the bottom, and add glide pads to the bottom of each leg to reduce friction when moving? There are adhesive teflon pads and the like you could stick to the foot of each leg. That would still allow movement without making the table to prone to being nudged out of whack.
In terms of getting the table in through the door, removable legs would work- connect everything with nuts and bolts rather than screws and it will be reasonably easy to take apart. With the amount of weight on that board, and the need for it to be durable to cope with regular gaming use, I'd be hesitant to go for an actual folding mechanism.
105865
Post by: Rolsheen
Your probably better off drawing up a table, getting a metal shop to make it for you. might be cheaper than the Amazon ones.
21480
Post by: btoliver311
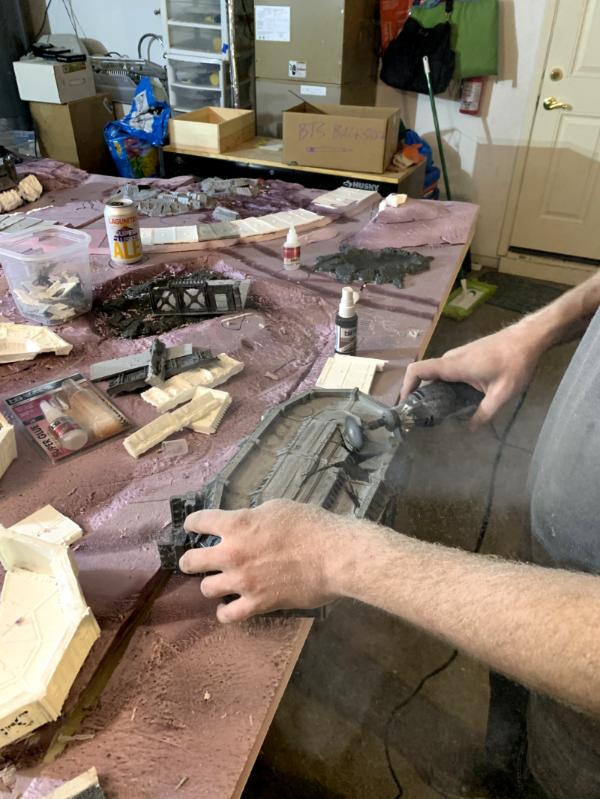
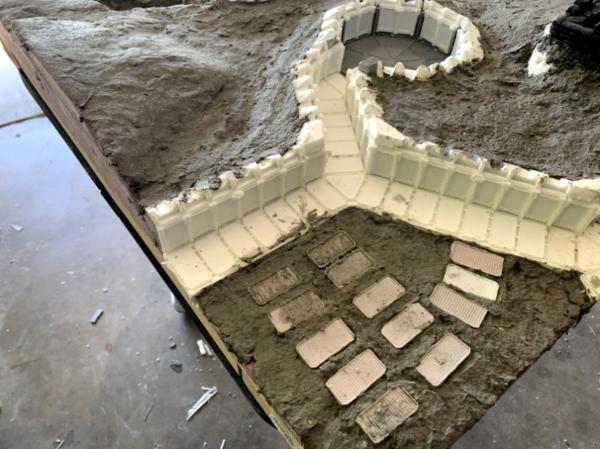
The process of covering almost everything that’s exposed styrofoam continues:
Up now is the bridge we had to partially demo last post. Here’s a before pic of the bottom

And the top face after the towers were removed (you’ll see how bad the thin layer of resin looked over the carved pavers)
and after the original styrofoam floors were removed
And the WIP new peers
And the replacement plasticard pavers

Hope you’re all well.
94352
Post by: Roknar
Really impressive work, keep it up.
21480
Post by: btoliver311
Thanks!
We are having a white Christmas here in Phoenix with all of the resin dust.
Maybe I ask Santa for a respirator
62565
Post by: Haighus
I really like the use of Sector Imperialis components between the buttresses on the pier. Very effective!
21480
Post by: btoliver311
21480
Post by: btoliver311
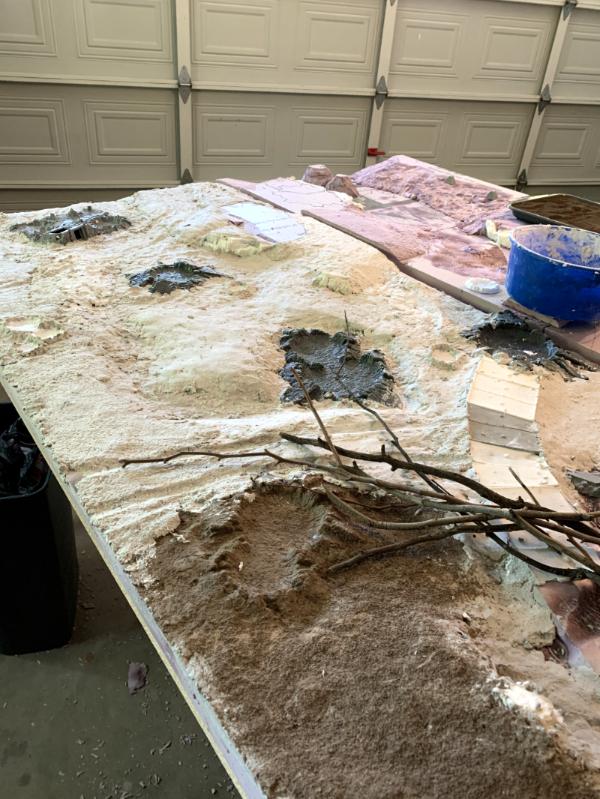
Hey guys,
This wasn’t my intended post but I thought I would go ahead and show you what we’re working on anyhow. I had wanted to show you the Process for our new tables and there storage but kirque wasn’t able to make it over to help finish them.
Anyhow, I figured I’d post them anyhow and get everyone’s input on how to proceed. Just know we still have rolling risers to put on all three tables and they will be the same height as the city board.
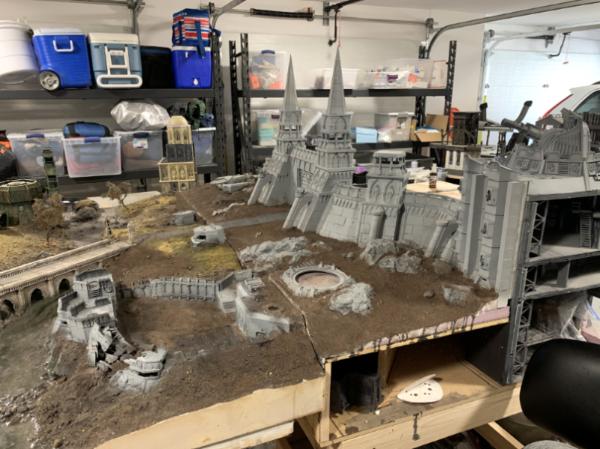
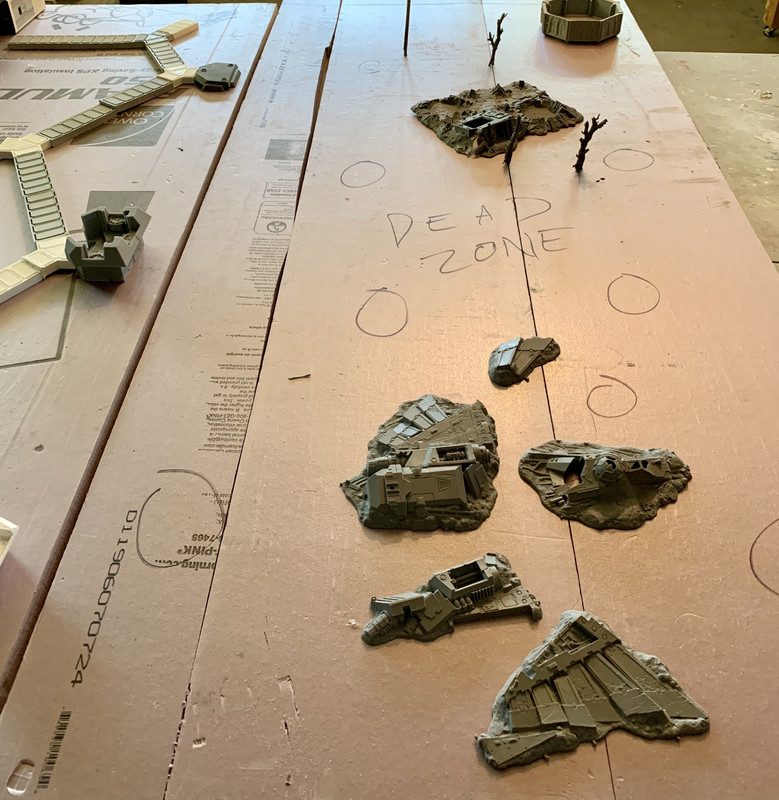
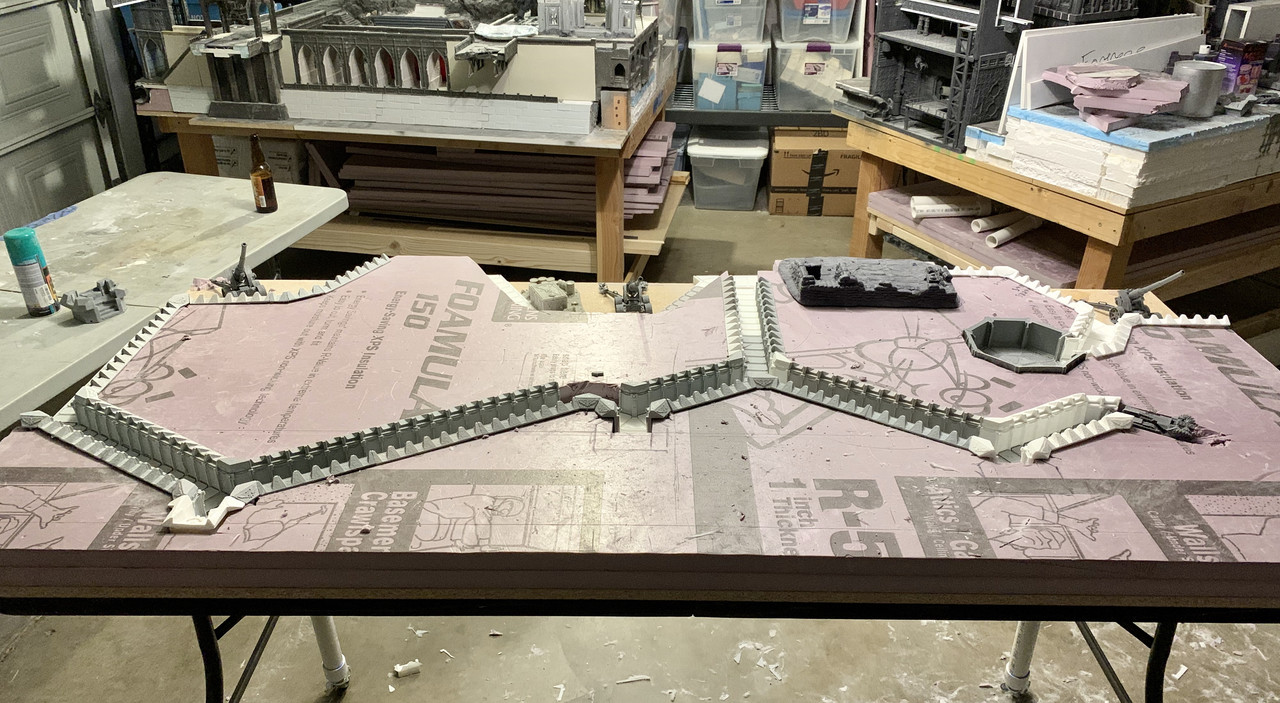
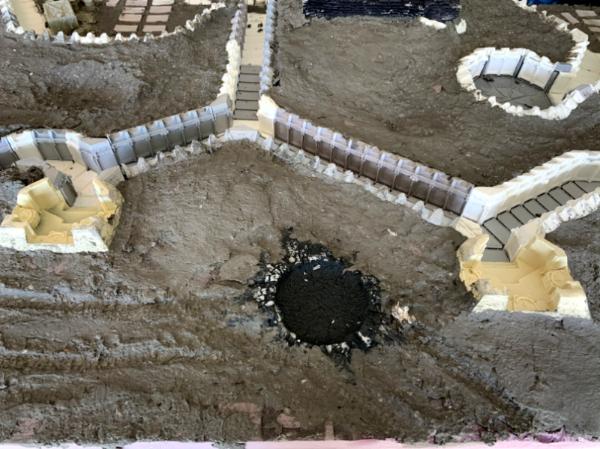
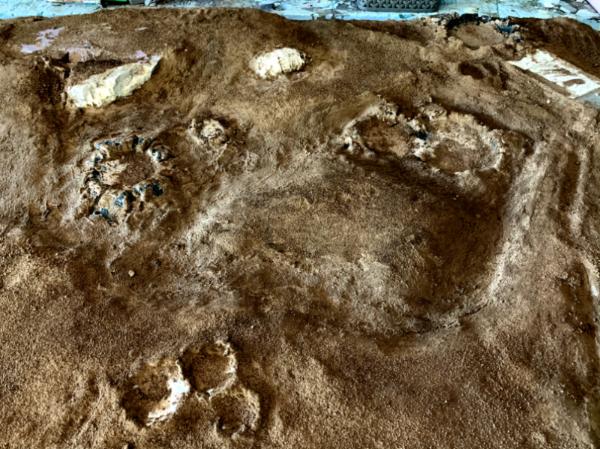
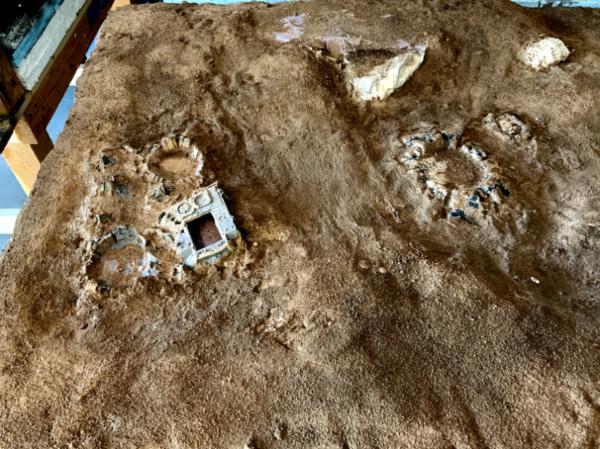
So here it is, the beginning layout for the battlefield and siege trenches in front of the city.
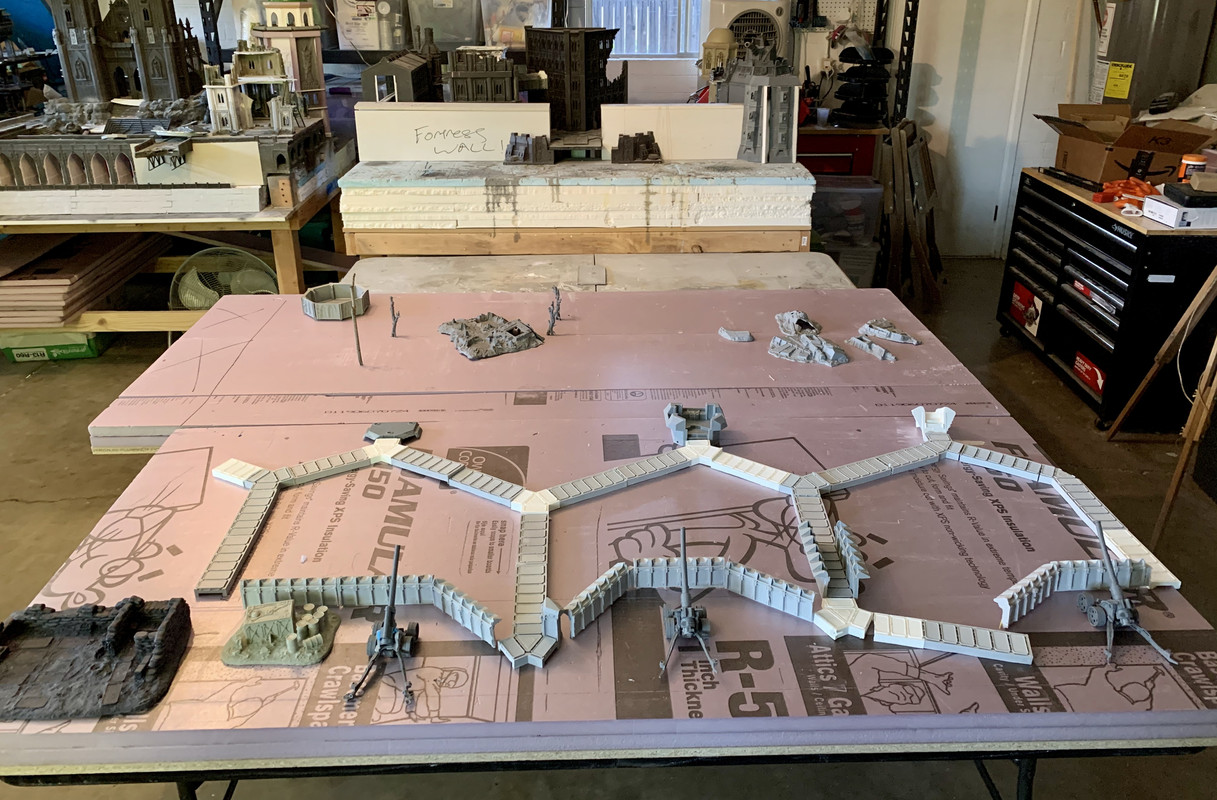
The section is actually 3 separate 34” deep by 6’ wide folding tables that all store under the city board.
We’ve divided it up into 3 distinct sections:
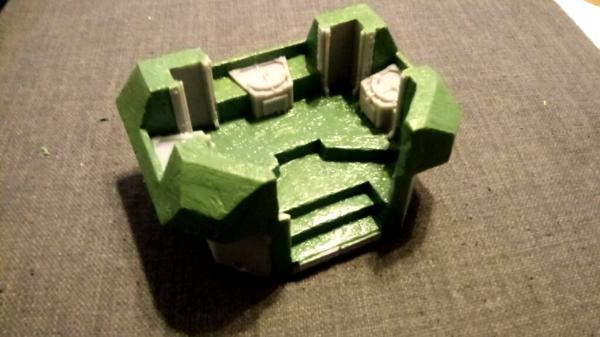
1) the siege army trench system. Which includes 3 pill boxes, 3 dugouts for earth shakers and a command post
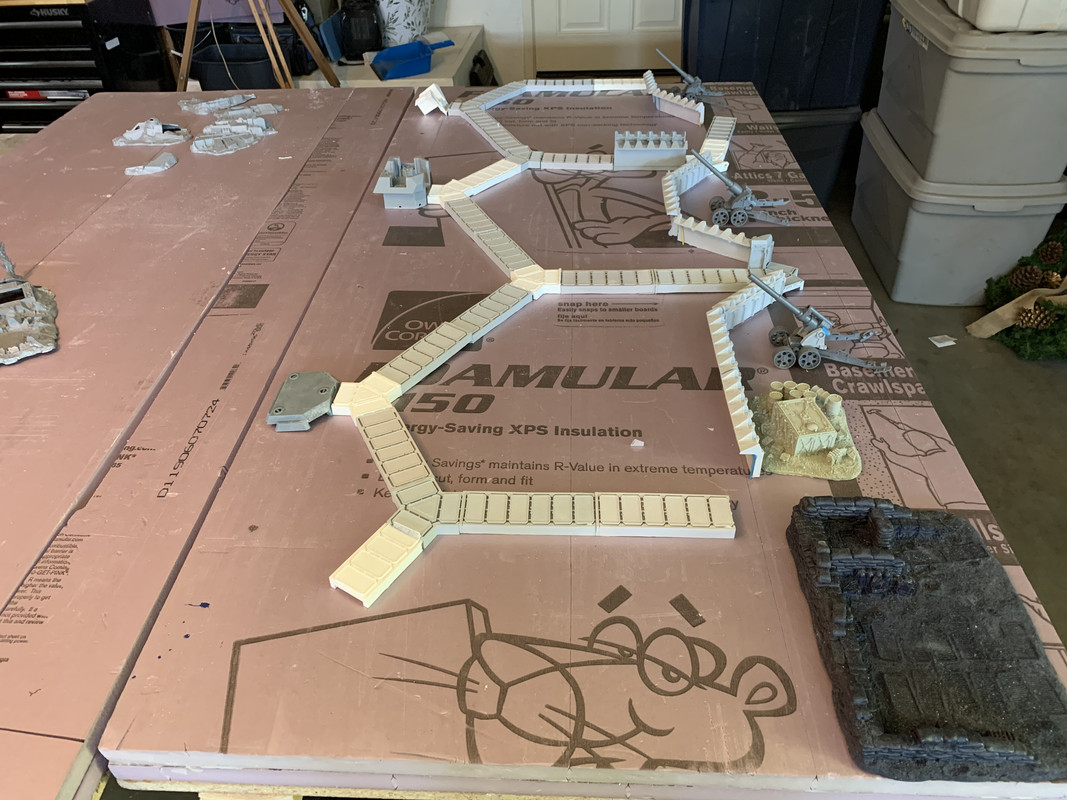
I’m toying with the idea of having the command post at ground level VS buried like the rest of the section
I think it might also spill into one of the battery dugouts. Might also include a fuel dump there

The mortars/battery areas are the rear section of the trench system. Each one will be it own little half octagon
Note the pill boxes are still very much a work in progress. We couldn’t find any for sale anywhere so we had to do a 3D print. This still needs to get texture added to match the rest of the forgeworld trench system and then have a mold/casts made
2) DEAD ZONE
Section/ table 2 is the dead zone. The area between our city defenses and the siege army trenches. I picture this mostly just blast craters, that blown up rino, a few dead trees and the crashed (I forget the name) Aquila flyer maybe?
We might add like a Hab or some sort of blown up farm thing out there idk
3) ????
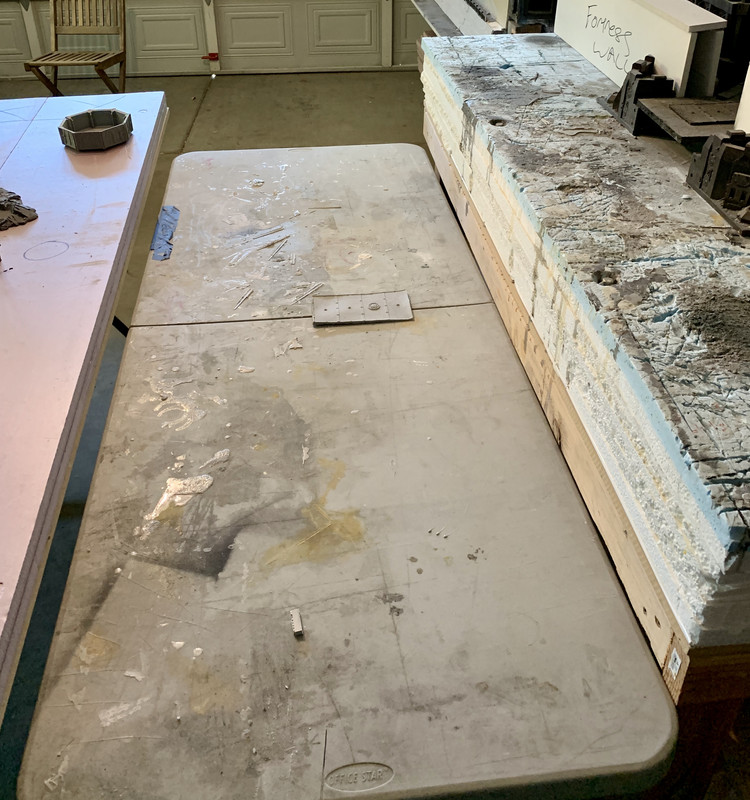
Table 3 is still kind of an unknown. I think it’s needed to make the outside section as big as the city but not sure what goes on it or where it goes.
Should it go right in front of the city walls and have more defenses put on it? Forge world has some cool bunkers? Maybe a side entrance?
Should it go behind the trench line and be more blown up buildings? We have a ton left but why would there be stuff out side the city walls?
Should the dead zone just be bigger to expand large scale battles?
Anyhow, let me know why you think guys. Anything I’m missing in the trenches? Anything else we’re not thinking about?
Cheers
21480
Post by: btoliver311
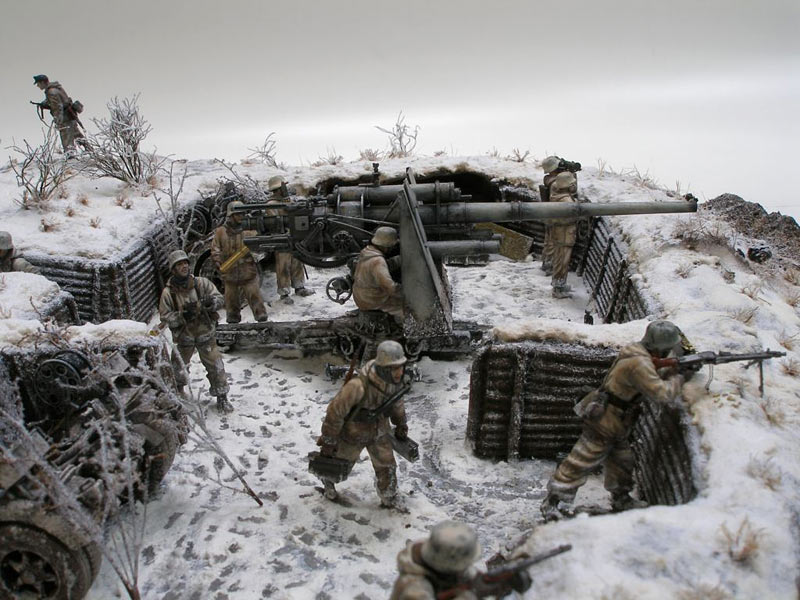
The concept will actually look a lot like the sector 477 diorama from Imperial Armor master class 1 but I honestly didn’t see this book until later
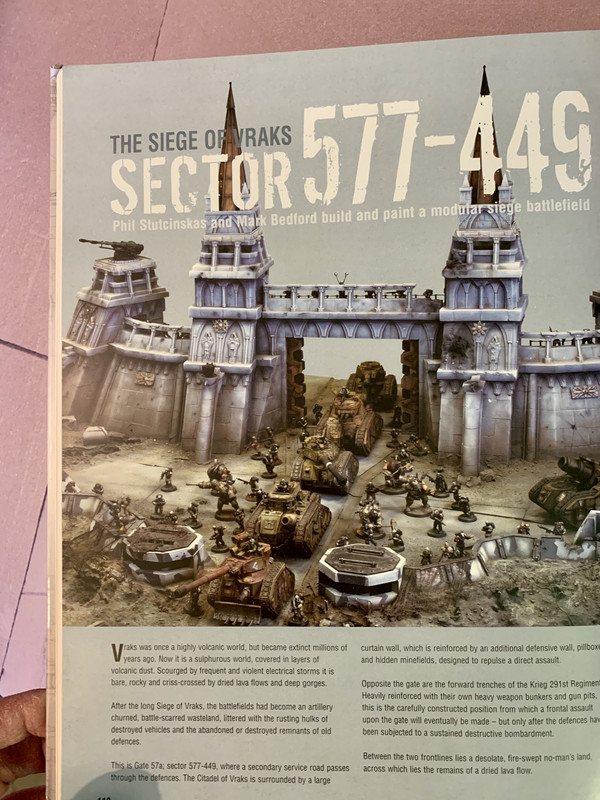
I do really like it though. Especially the small diorama at the end with just the earth shaker cannon
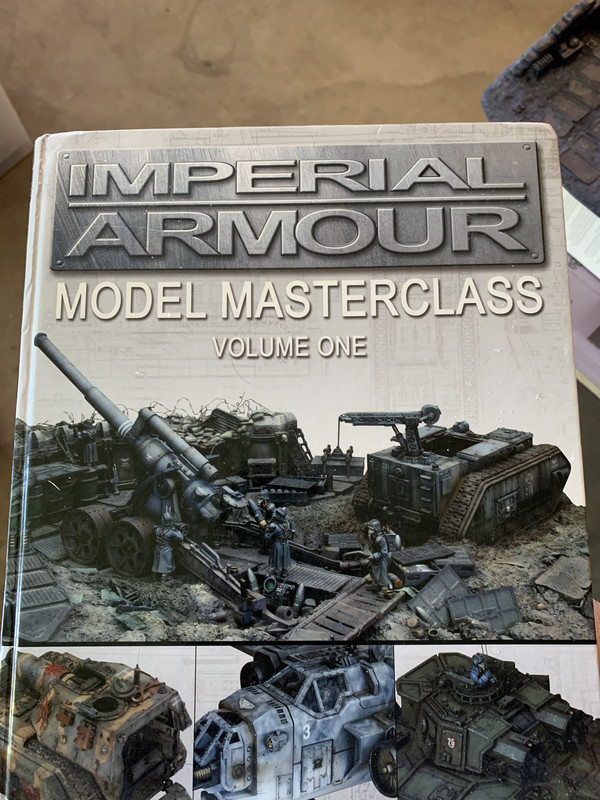
I think ours will differ slightly by including more trees and a lite snow fall. Like this
30672
Post by: Theophony
How about an underground entrance to the city on the third board. Possibly a rail system that is being used to get supplies into the city. Shield generator near the entrance that the batteries are targeting when the supplies are inbound to try and force a breach.
21480
Post by: btoliver311
I’m in.
Maybe I’ll use these two sets?
90488
Post by: The Riddle of Steel
I’m continually blown away by the scope and scale of this. The city is crazy enough and now you are adding an equal size board outside the city. Wow.
I like the idea of underground entrances to the city such as tracks, sewers, tunnels, etc. It gives a place for more action to happen, especially for some commando infantry troops to shine in more of a Zone Mortalis setting, where they would be pretty useless in an assault on the walls with all the big guns blowing everything to bits.
62565
Post by: Haighus
Wow! That is insanely impressive. It is amazing to se so many OOP FW terrain pieces.
The other thing that would make sense outside the city walls would be a shanty town of those unfortunate enough to not gain entry to the city proper. A large scale war on the planet would undoubtedly create refugees, who would be unlikely to be allowed to enter a city carefully rationing in preparation for a siege.
It doesn't take long for a thriving economy to pop up servicing such communities.
Then make it look like the first victim of the battle for the city- smashed and burnt slums, craters, corpses/skeletons, some items that look like the occupants left in a hurry in surviving shacks.
You could even add an area where it looks like the city defenders were trying to clear the town away from the walls themselves to open up fire lanes, with rockgrinder bulldozers or something, prior to the attack. After all, such a settlement would provide cover to any assaulters.
21480
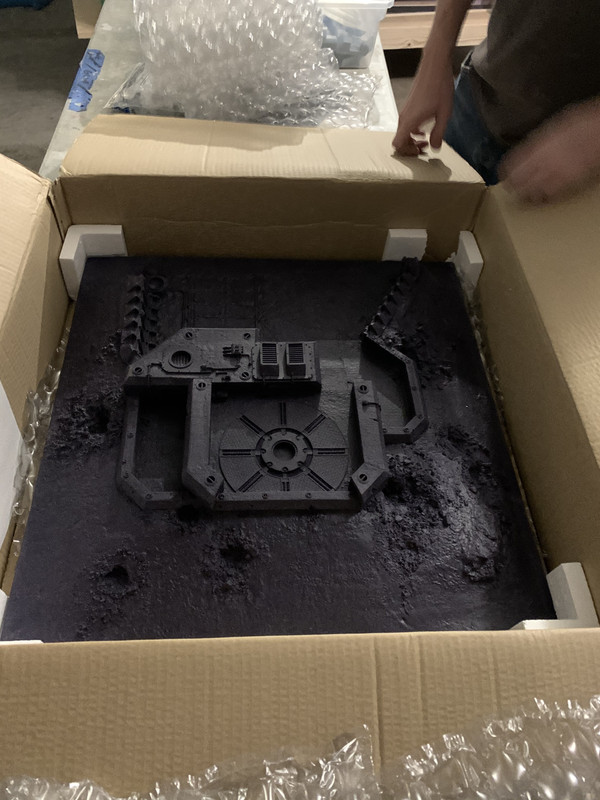
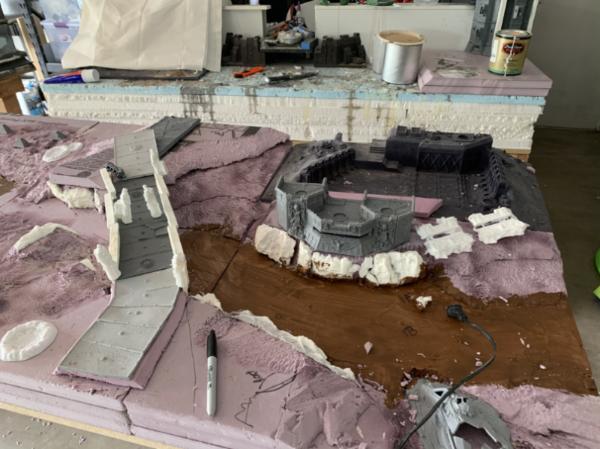
Post by: btoliver311
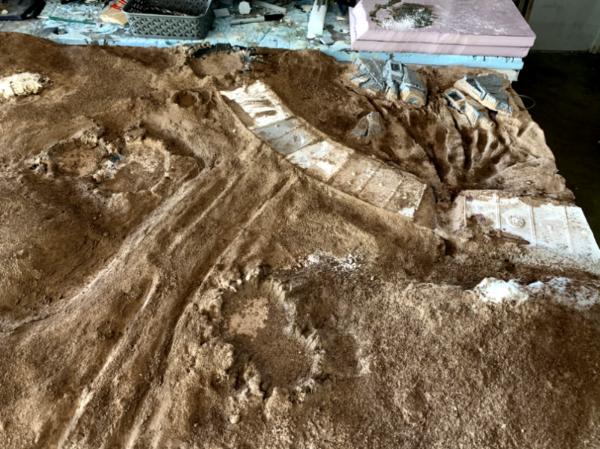
Quick update to show we got some of the trench line cut out and installed today
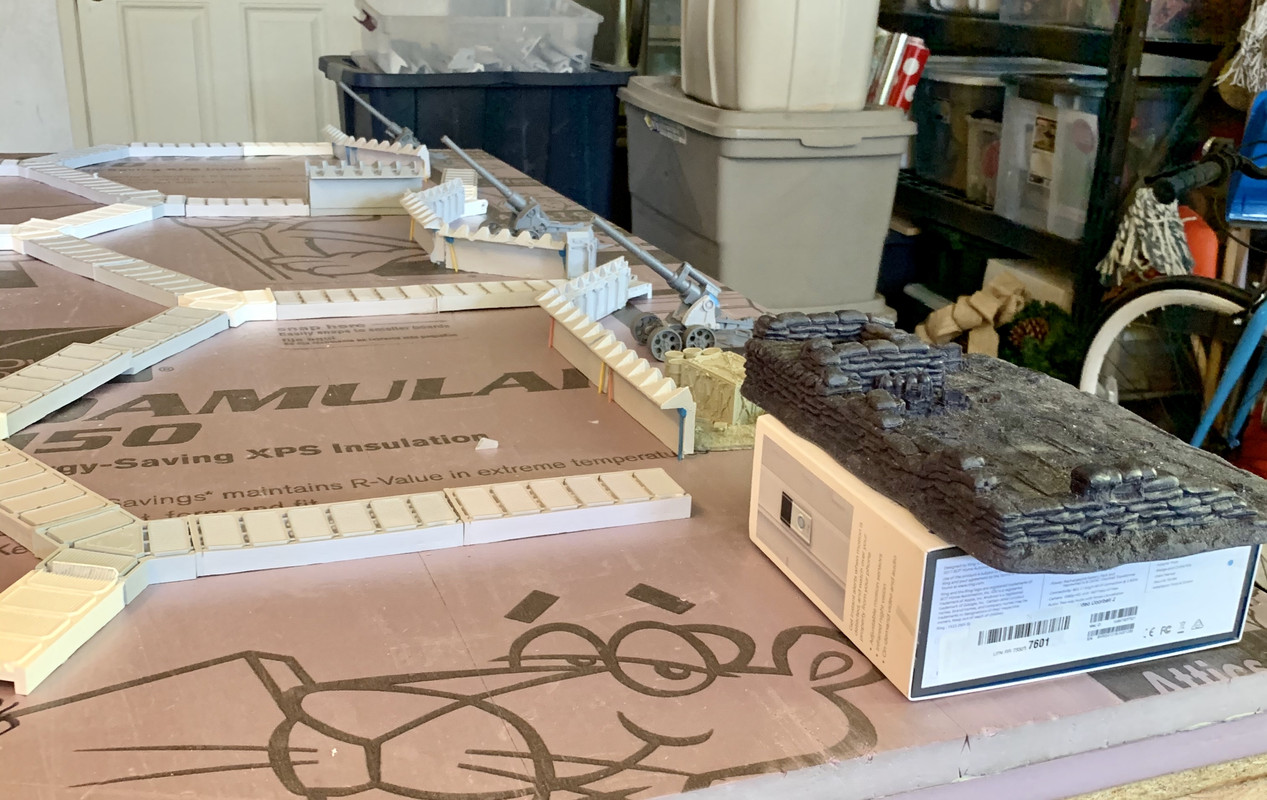
Also received these in the mail
Never seen them in person before and they’re huge
21480
Post by: btoliver311
Was going to take the day off but the boy thinks we need to make more progress
21480
Post by: btoliver311
What’s up everyone,
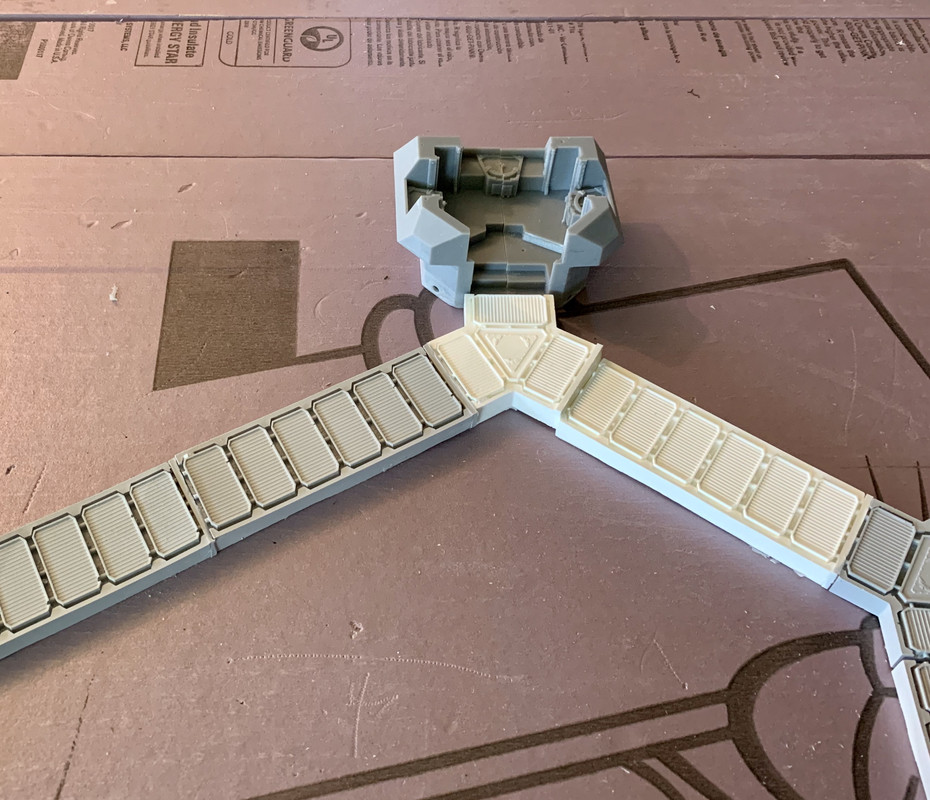
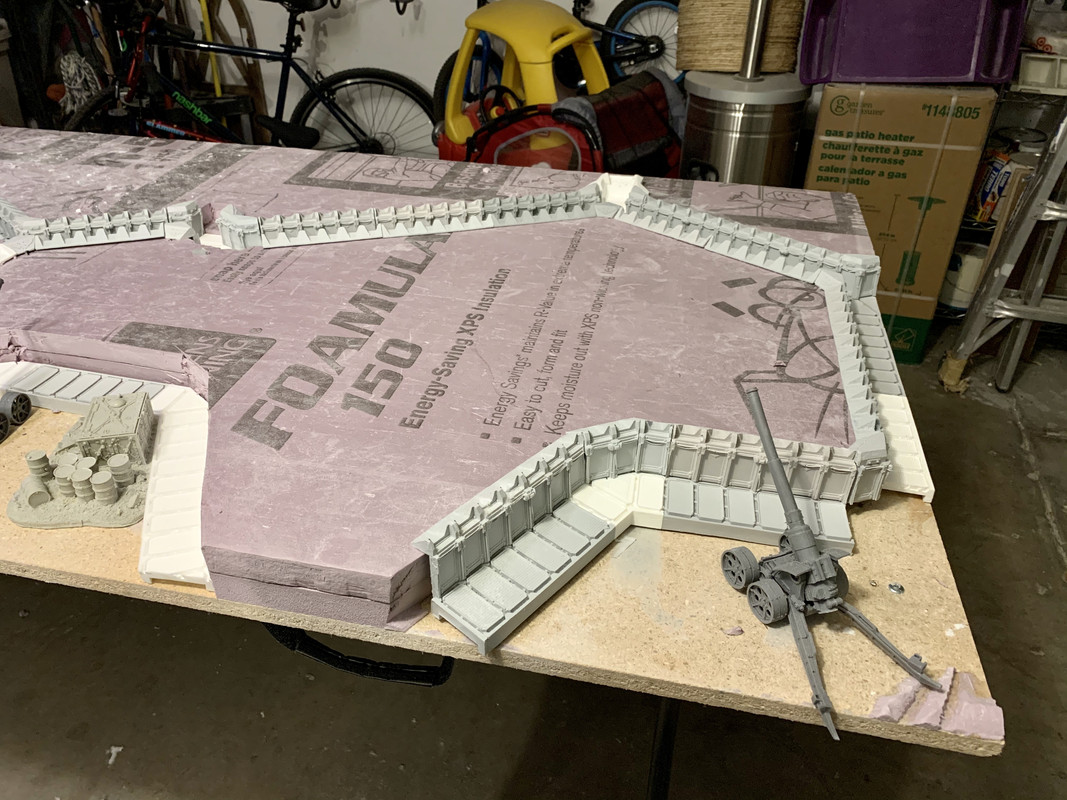
Kirque came by last night and put in some work on the trench system. We are pretty close to having all the pieces in. Still need to cast the bunkers and finish off one cannon area.
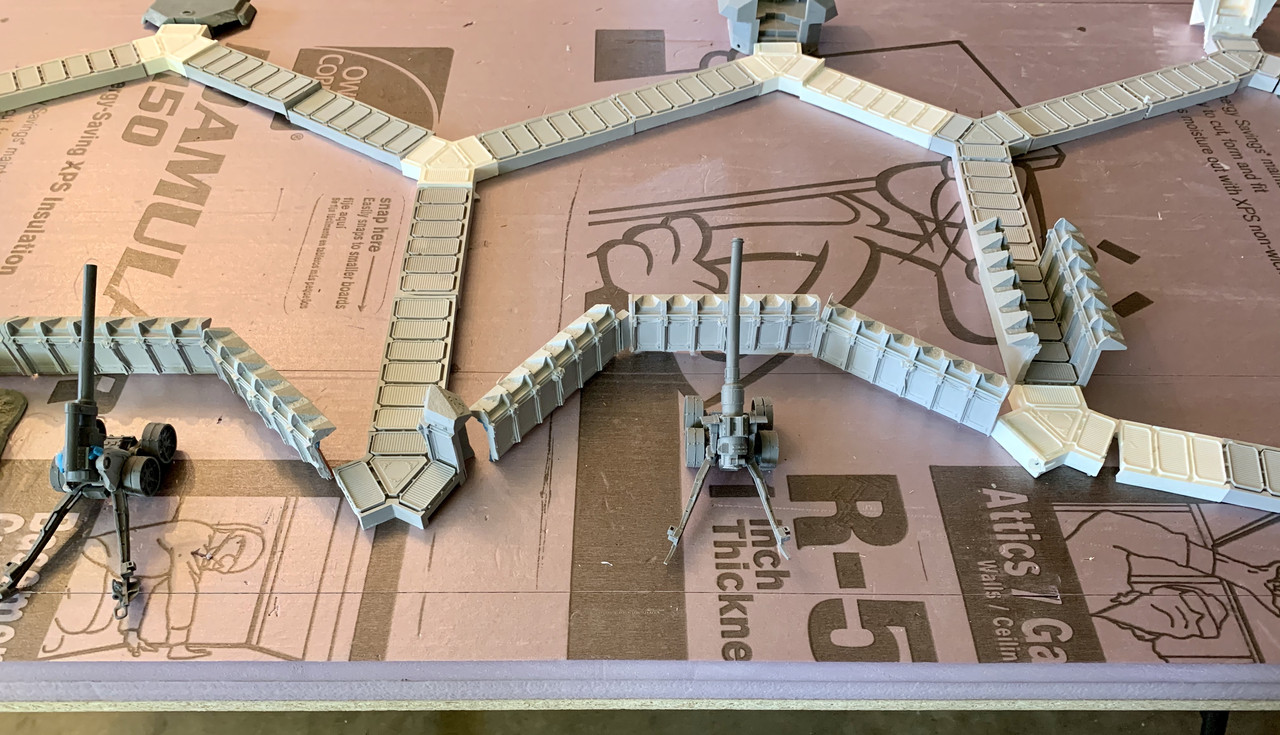
You’ll see in this pic the hexagon area we are adding for an AA gun and the front trench that we are going to have under construction using a hades drilling machine
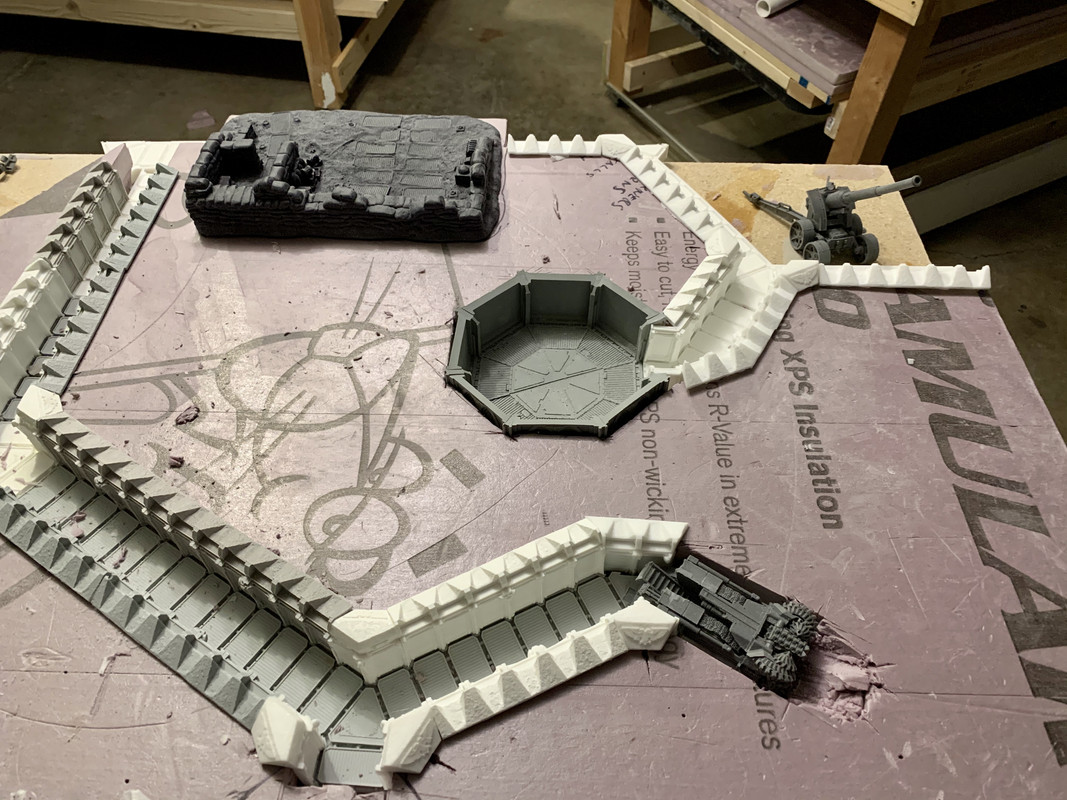
Back right cannon
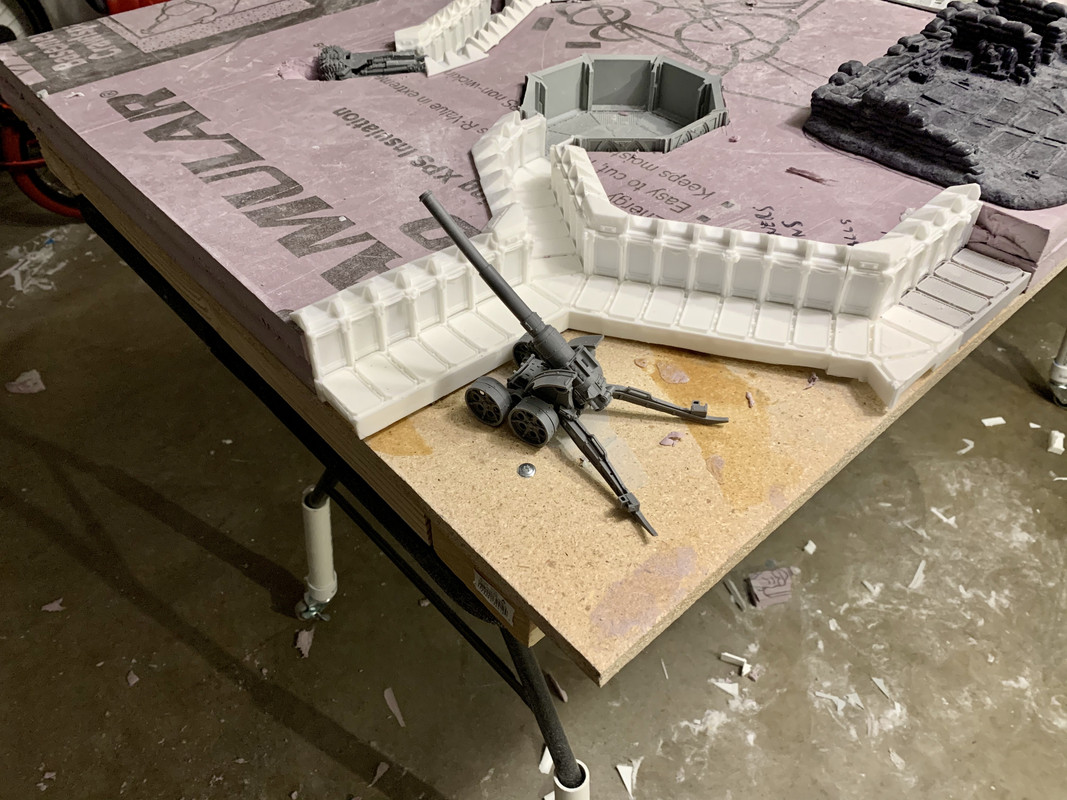
Middle cannon. The sand bag section is going to stay at forum level as a command post/look out. There will be ladders up from the trench

Back left trench
62565
Post by: Haighus
It's coming together great!
I particularly love the Hades, awesome little detail!!
21480
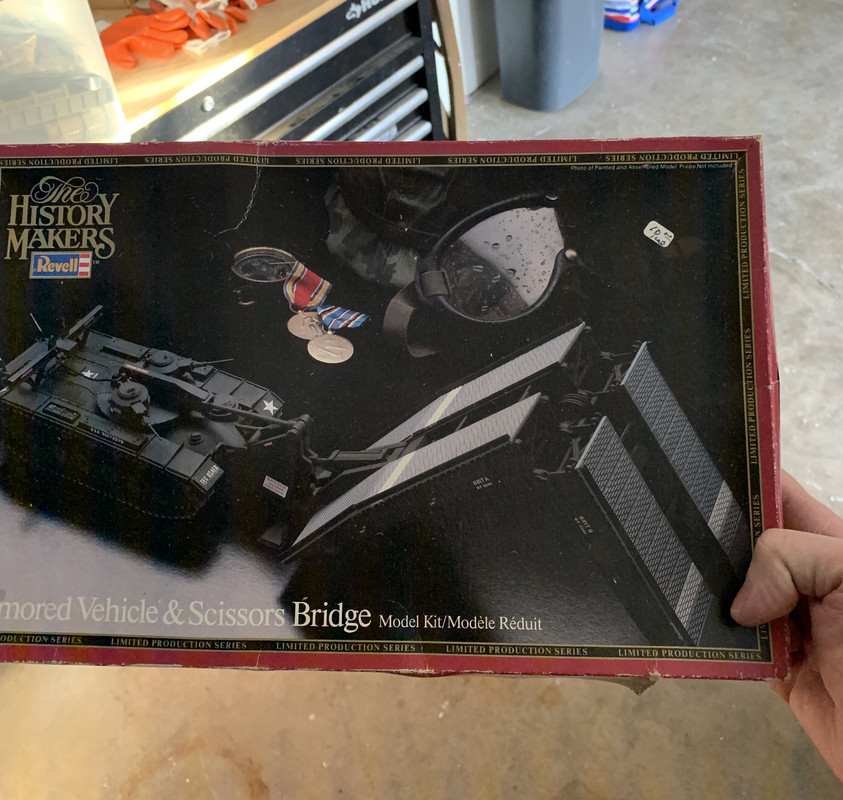
Post by: btoliver311
Got a couple care packages too
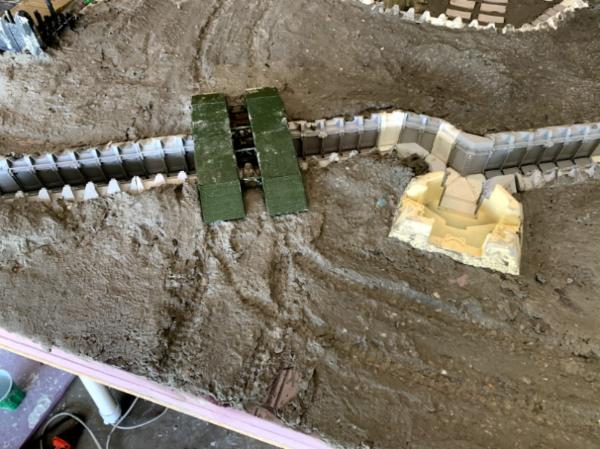
I think we will split this hi to two parts. 1/2 back entrance into city. Other 1/2 forward defense cannon
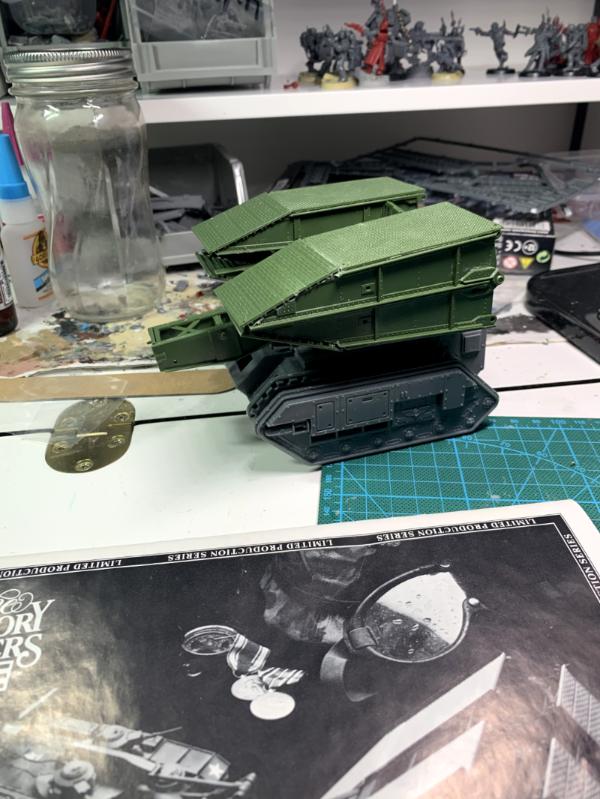
and I think this will make a pretty cool conversion on a chimera chassis and give us a way to get tanks over the trench line
21480
Post by: btoliver311
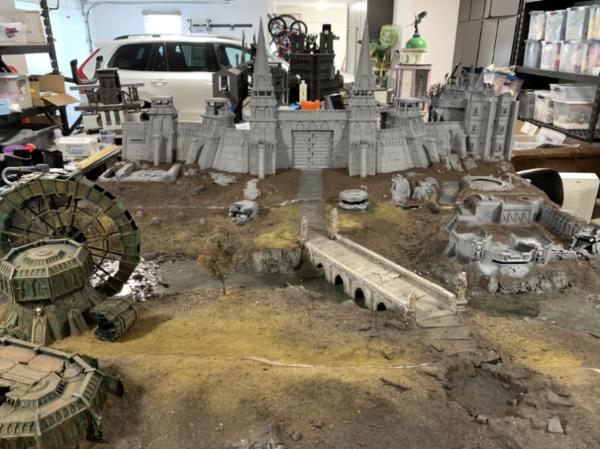
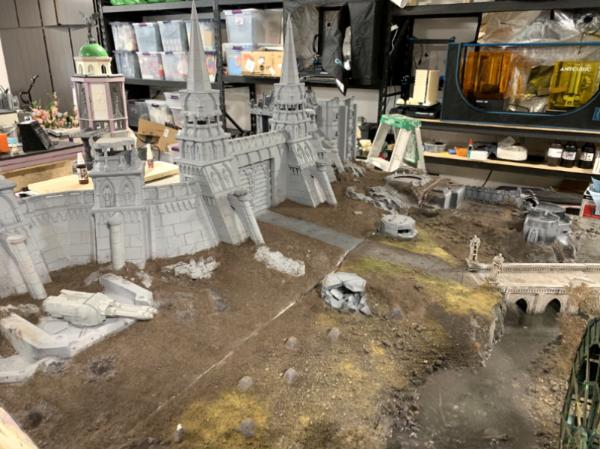
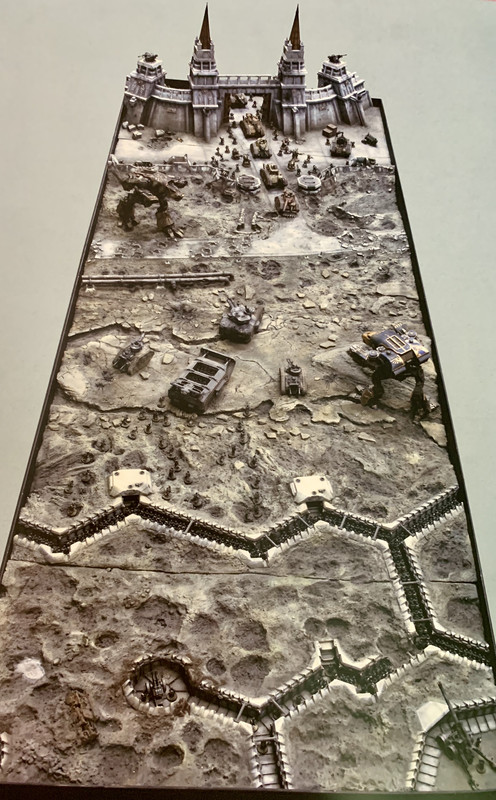
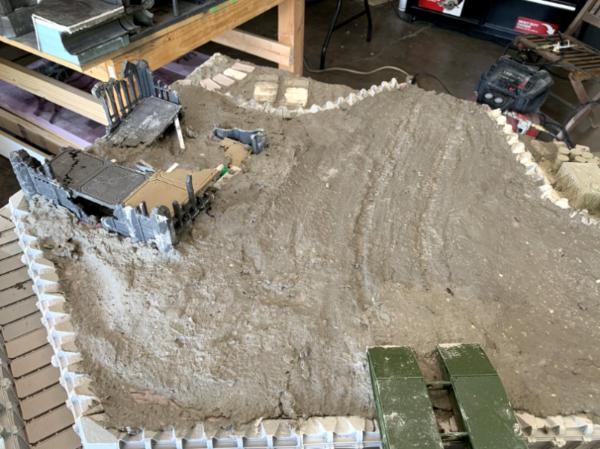
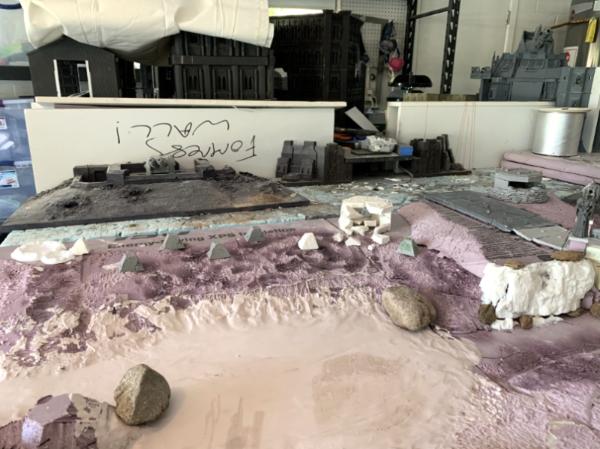
Sorry for the super crappy pictures. We were just playing with layouts tonight and I want to at least post some pictures of the scale of this thing. With the three new boards in front of the city we are at 19’!
Again sorry for the lighting. I’ll take better soon
The trench and deadman’s land

We think the first board in front of the wall is going to have a wide dried out or frozen river bed. The city bank will have more defense bunkers and a second military entrance. The plains bank will have a windmill/hydro-farm we are building from the Forge World Anphelion Base sections we never used

Another view
Obviously just a layout test. Finals will be much less flat
Thanks again for the great ideas. I think we are incorporating a lot of them
90488
Post by: The Riddle of Steel
The scale of this is truly unbelievable. The trench system and river bed look amazing. Good luck getting this ambitious project done someday! I can’t wait to see a game played on here. This 20ft table might finally be big enough to justify transporting a Tauros with a Sky Talon Valkyrie and give some reason to use that model!
120033
Post by: Excommunicatus
At some point, doesn't the size of the board start being a problem for actually playing on it?
A 19' board is just Earthshakers firing at each other for six turns, surely?
1823
Post by: MegaDave
 Excommunicatus wrote: Excommunicatus wrote:At some point, doesn't the size of the board start being a problem for actually playing on it?
A 19' board is just Earthshakers firing at each other for six turns, surely?
Nah, that's what droppods and teleporters are for!
btoliver311: Great job on the board so far, it's looking amazing and I can't wait to see it finished!
71547
Post by: Sgt_Smudge
Excommunicatus wrote:At some point, doesn't the size of the board start being a problem for actually playing on it?
A 19' board is just Earthshakers firing at each other for six turns, surely?
Can't speak for the creators, but if I was making a board like this, I'd use it far more for either multiple games going on (ie, a battle inside the walls against enemy elite infiltrators, and a battle in the no-man's land, etc etc), or as a rolling campaign (overwhelming numbers from the besieging force, pushing the defenders into the walls over a series of games).
21480
Post by: btoliver311
Exactly what sgt smudge said
I think/hope when we take it to the local game store they will do something like what you’re saying. Some times multiple games where they roll the 5 separate boards apart and use them separately, other times for huge games with multiple people playing, sometimes multiple kill zones, multiple necromunda games, and I hope at least for the first month some sort of campaign where you have to play multiple phases of the siege.
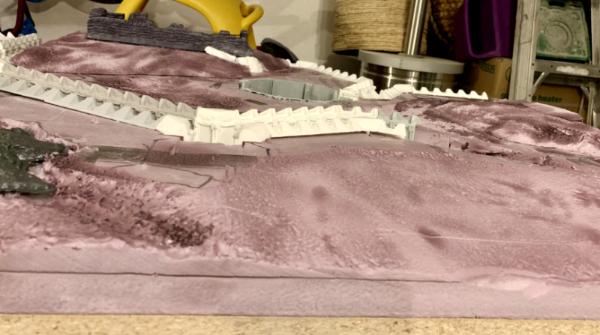
But if that fails we do have earthshakers  Automatically Appended Next Post: Automatically Appended Next Post: Here’s some WIP pics of the dry river/creek
First we glued down one flat layer of styrofoam
Then drew out the design
Then took pieces of approximately 1.5’ x 1.5’ glued hem together
Then kirque cut the banks with a hot knife. Trying to get a good mix of slopes for easy crossing and more vertical walls to glue rock faces to
Then i glued all the sections down
Then we went about Sanding the banks to make them a little more gently sloped
Then we got to the fun part which was busting out the butane torches to smooth out the slopes
 Automatically Appended Next Post:
 Mostly smoothed out with bridge placement
21480
Post by: btoliver311
I think I mentioned how the tables will store but hadn’t shown pictures yet.
As you can see, each city table has racks under them to store the three folding tables that make up the areas outside the city (dried river, dead zone & tench)
We just lift off the roller risers we made from pvc, fold the tables up and slide them under
19’ table nicely tucked away
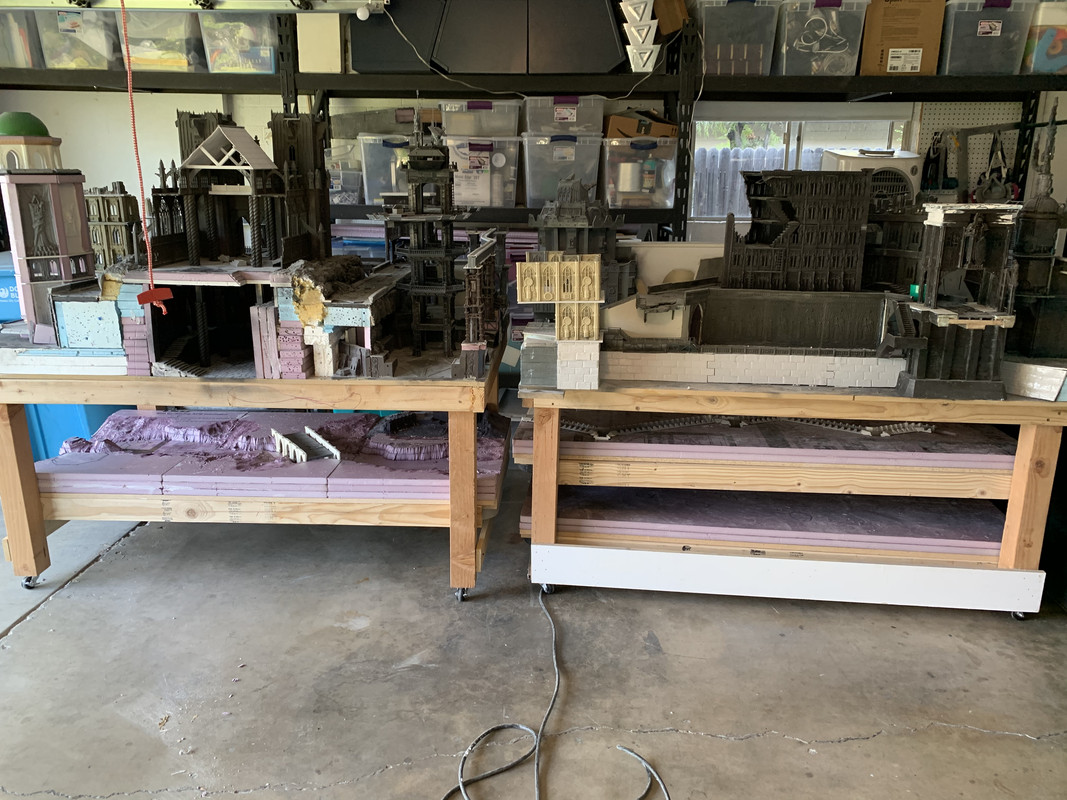
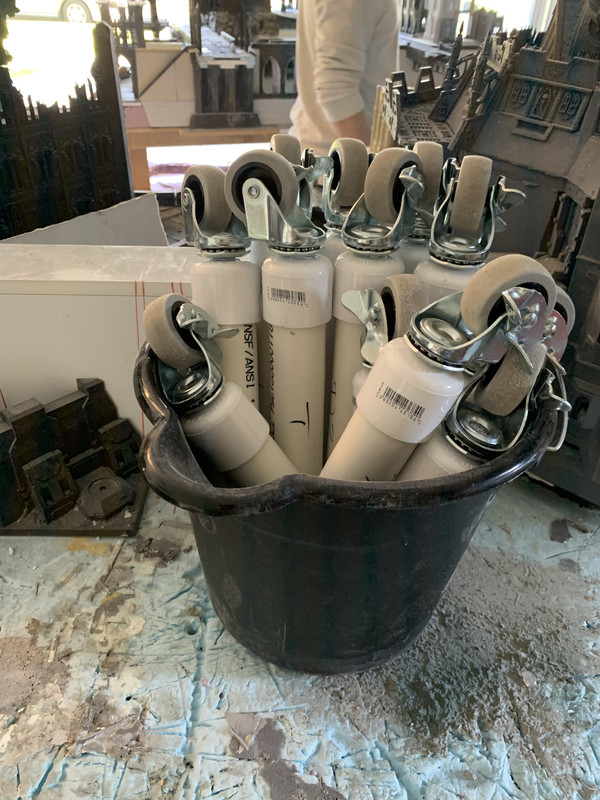
Plus a bucket of risers
21480
Post by: btoliver311
He guys, I need some advice/direction
I would like to get a few more people checking out this blog. I feel like we lost a lot when I changed the name.
I read that to get on the homepage we have to use Dakka image hosting. But I can’t figure out how to copy images in my gallery back to the p&m forum. Can someone explain (to an idiot) how to embed Dakka gallery images?
Also, does anyone know if an old thread like ours with older images hosted outside Dakka (postimg) can still go onto the front page? I’m guessing it’s ok and it just has to do with them needing an image from their site to post and link back to?
And, if anyone knows, How do we get mods to see our thread and then post to home page? Our images aren’t that great when compared to finished model (which is what I mostly see there) but they are huge in scale I feel
Thanks in advance. If you have any advice on posting video I’d take that too
My attempt (3rd) at pasting an image out of Dakka gallery:
71969
Post by: NowhereMan
I don't have the answers to your questions, but I can tell you that I got here from the project logs section on the front page, so you must be doing something right!
I love the board, it looks like it'll be an absolute blast to play on.
I suggest adding some pipes coming out from under the city walls and draining into the river. Maybe even making them a potential entrance or something.
21480
Post by: btoliver311
You’re the second person to suggest that nowhereman.
Consider it voted in! Thx for the front page update too Automatically Appended Next Post: Also here’s a recent quick video of the board
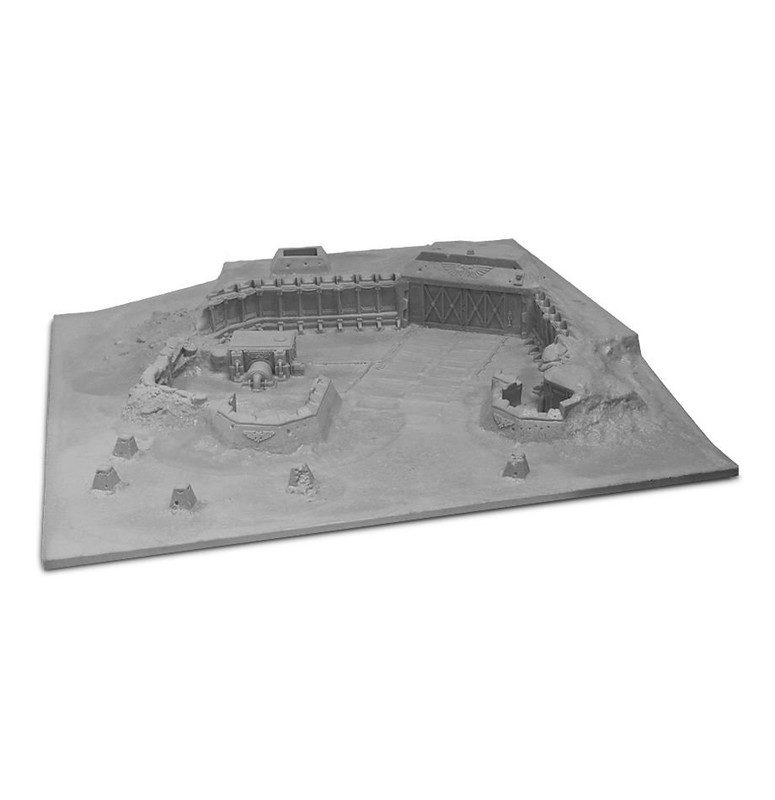
https://youtu.be/oweIoomUgGo Automatically Appended Next Post: Here are some pics or the Realm of Battle Imperial Primus Redoubt we cut in half.
It will act as a side military entrance into the city bastion. Think return of the Jedi
We will add a playable tunnel connecting the two
120033
Post by: Excommunicatus
When you click on your pic in the Gallery, there's a bunch of options on the right, either just next to or just below your pic.
Select what size you want to display from the drop-down and then Ctrl+C the url that's generated just below it.
10667
Post by: Fifty
Where did you find that tiny Knight out in the no-man's land? Oh, wait, normal Knight, huge board...
21480
Post by: btoliver311
Ha!
I think warhound Titan would look a lot more to scale. Maybe I ask for one for my bday
How much do those go for on the secondary? Maybe if I’m really lucky I can find someone to trade for 400 pounds of terrain bits!
21480
Post by: btoliver311
Hey,
Does anyone know when this piece is coming out?
I think it’s pretty much a given we have to have it right?
88921
Post by: Stevefamine
This should be in a codex/rulebook when its done
101140
Post by: =Angel=
Should but won't.
Look at all the really nice oop stuff you can't buy!
You can cast duplicates to stretch your purchases!
21480
Post by: btoliver311
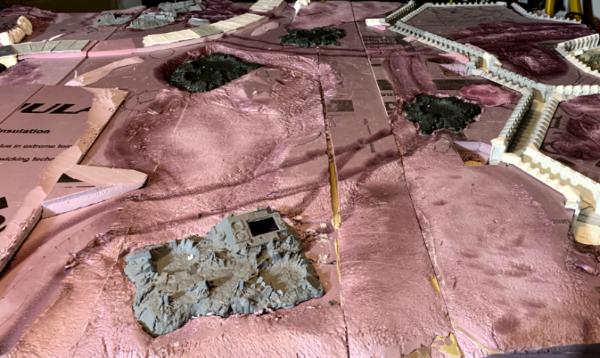
Worked a little on adding some more dimension to the trench board last night. Obviously this will all be topped of with our plaster/eco-insulation mix but this will help build the basic shapes and contours
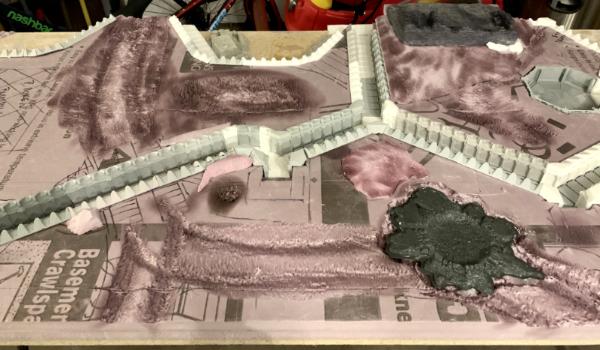
Also got the bridge and some initial rock formations glued onto the dry creek board
121268
Post by: Gwyn chan 'r Gwyll
Playing on these boards is going to be one of the best experiences of every player's lives. These are gorgeous!
76303
Post by: Warboss_Waaazag
This project is incredible. Immense, never-ending, and superb.
98217
Post by: Skinflint Games
You people are utterly insane. This thing is on a par with that mental centerpiece at Warhammer World - certainly deserving of a White Dwarf article at least!
21480
Post by: btoliver311
Wow. Thanks guys!
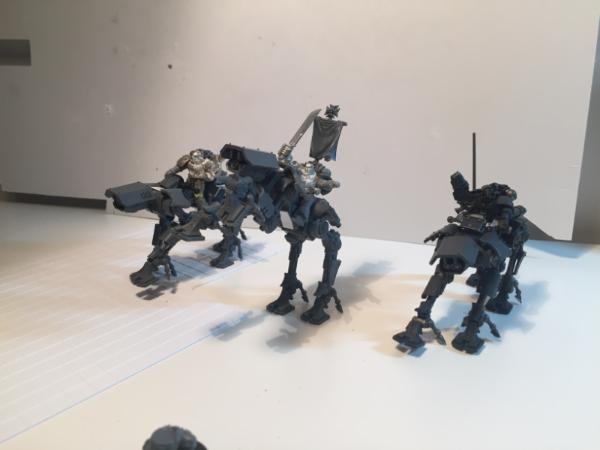
We’ll take all the positive motivation we can get.
Also, I saw the new mechanis Calvary today and I gotta say I still think mine from 5 years ago are better
97911
Post by: posermcbogus
IMO the best project on this entire forum. I love drooling over your updates! Great work, please never stop.
21480
Post by: btoliver311
Hey guys,
Do you remember the 3D printed forgeworld trench bunker?
Well kirque finished adding texture to it. This way it matches the rest of the set and is pretty darn close to the original if you ask me.
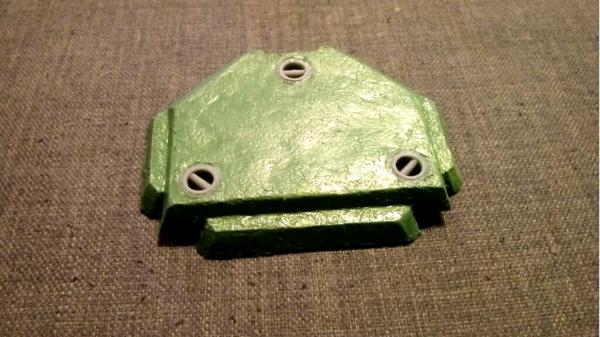
Hope to make a mold of it and even cast one or two for our table tonight. More pics of that to come
21480
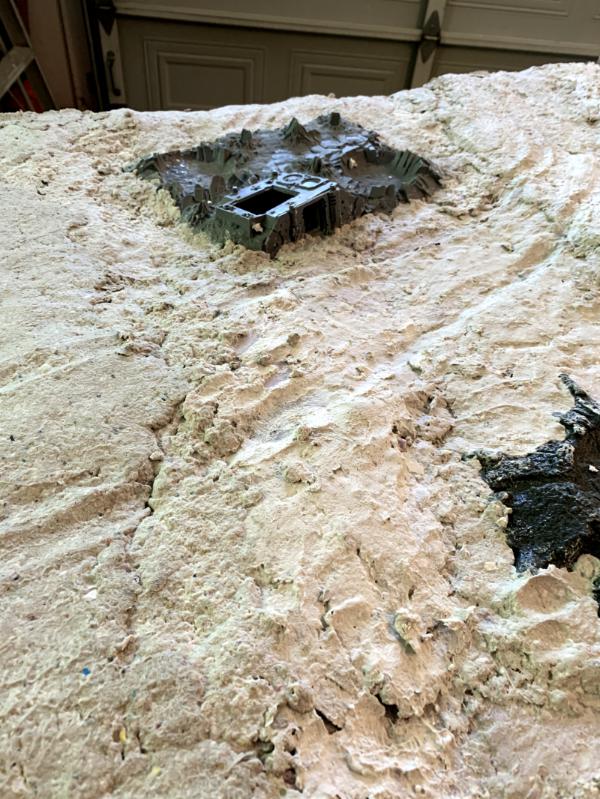
Post by: btoliver311
OR we will spend another day just carving and Mel it omg styrofoam
Lots and lots of styrofoam
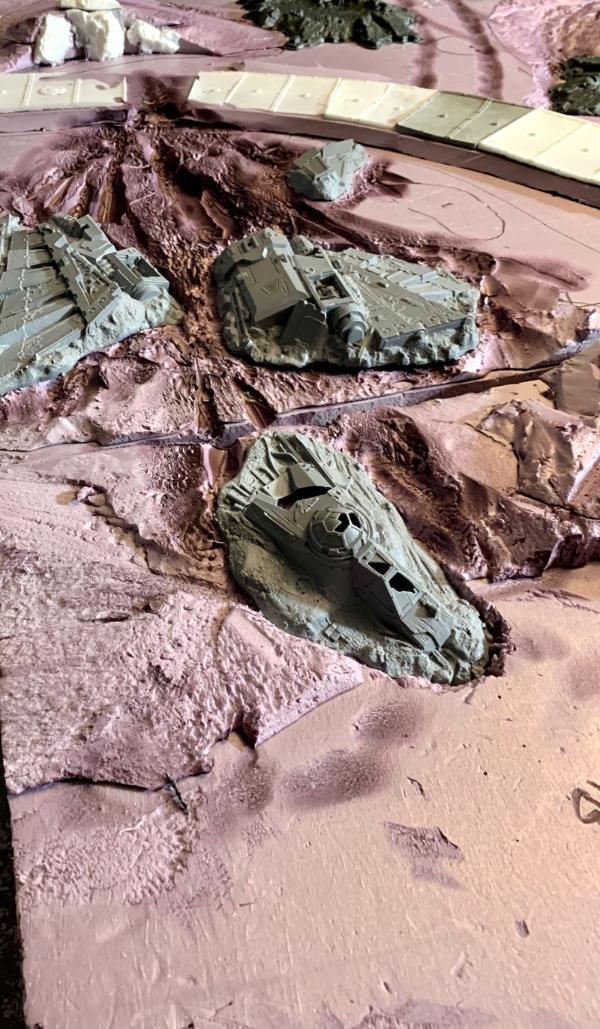
Here’s how the middle board (dead mans land) looks with the new topography and pieces added
On the far side a Aquila lander crashed into the dry creek
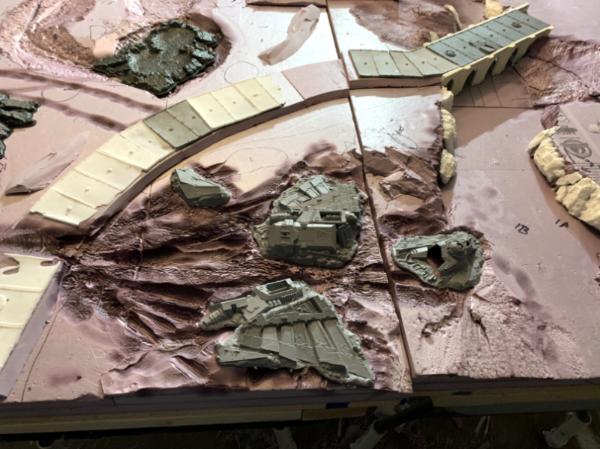
On this side we are adding one more hill layer where the water wheel/mill will sit
1823
Post by: MegaDave
Board is coming along nicely. And that IS a lot of styrofoam!
62565
Post by: Haighus
I'm intrigued by the mill. I am greatly lookng forward to seeing what kind of idea you come up with for a techno-gothic water-wheel.
The outside boards are coming along great. I really like the addiiton of tyre tracks leading to the wrecked rhino
21480
Post by: btoliver311
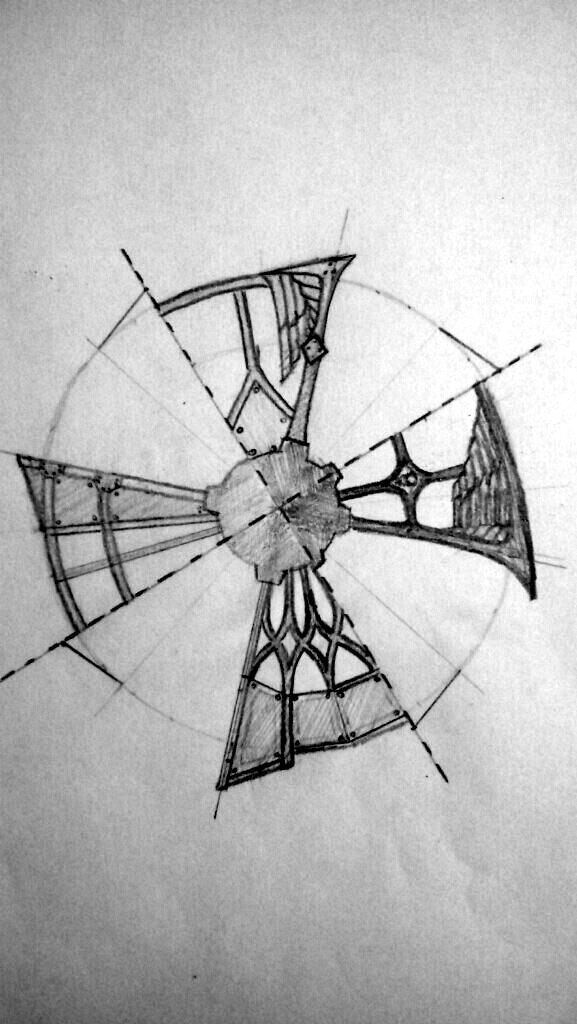
A drawing kirque just sent me of some concepts for the water wheel/mill
90488
Post by: The Riddle of Steel
I like the Aquila lander crash site how you added the trenches and skids where it hit the ground and came apart. Those are the nice touches you can do when you build a board with the terrain built-in like this.
1124
Post by: Captain Brown
Impressive board work there btoliver311.
Sincerely,
CB
21480
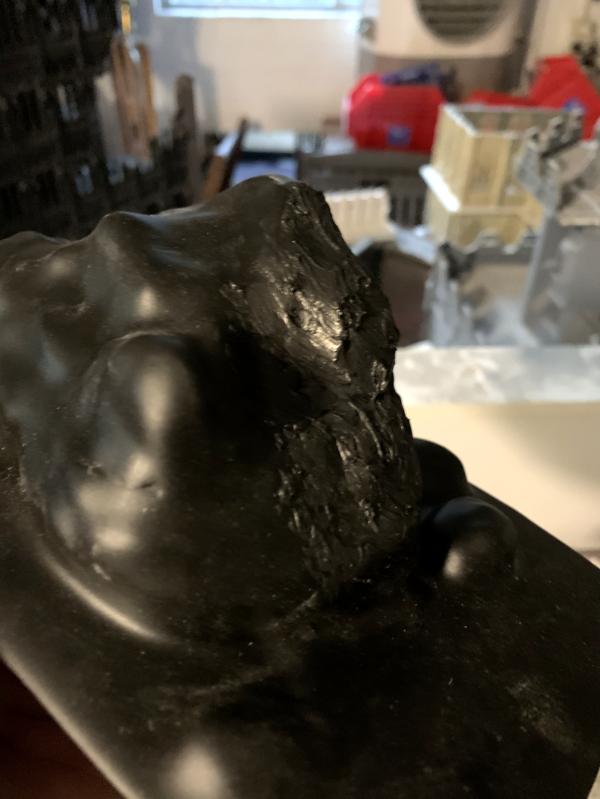
Post by: btoliver311
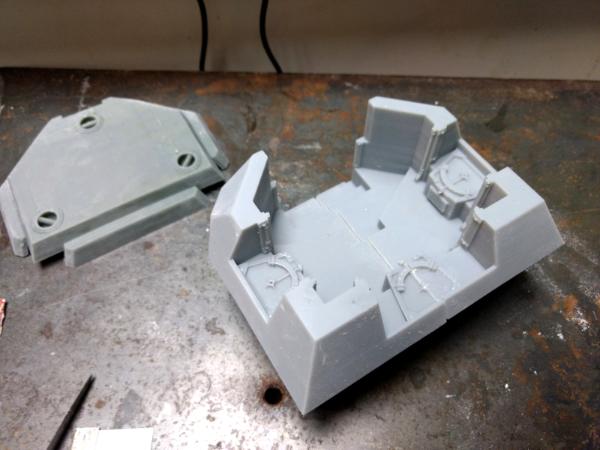
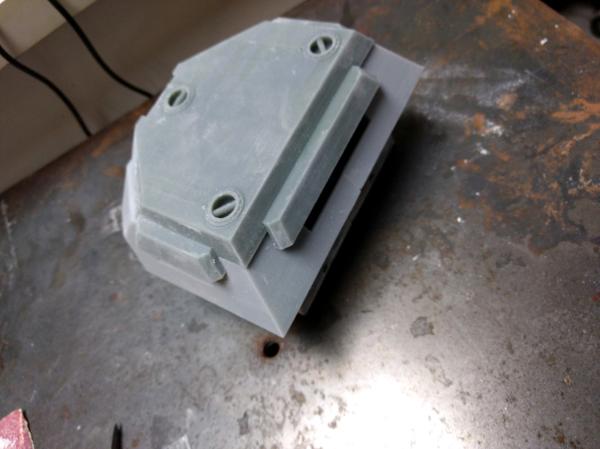
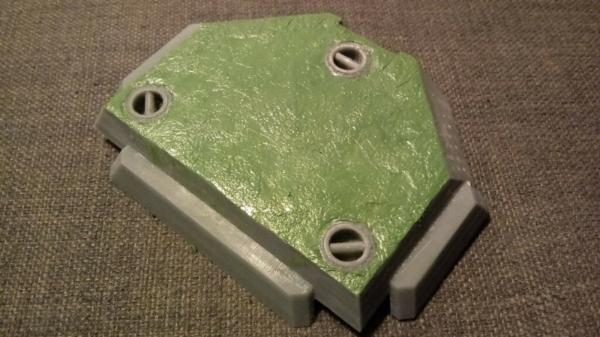
Ok. You all remember the forge world bunker from the trench set I had to 3D print and then texture because we couldn’t find one fore sale? We we did the mold and first cast today.
The bunker base came out great.
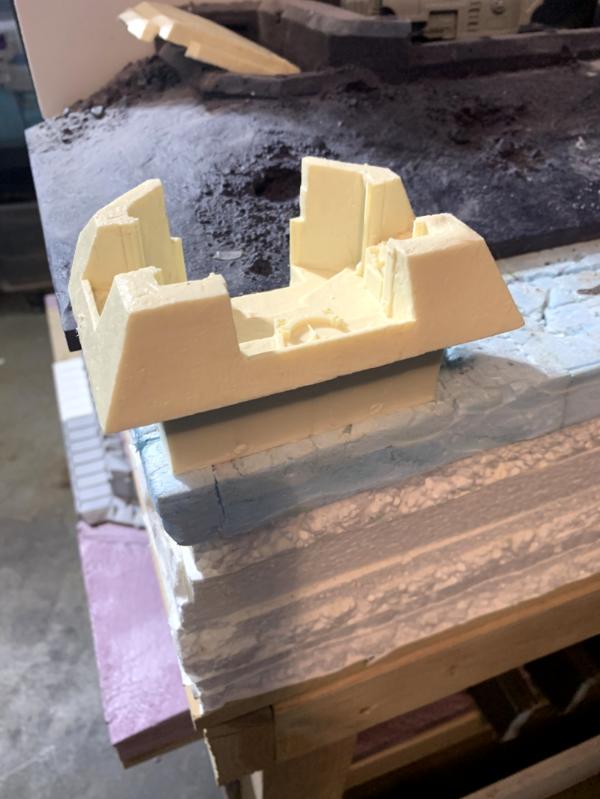
The roof however did not. The were a ton of air bubbles and the whole roof curved up.
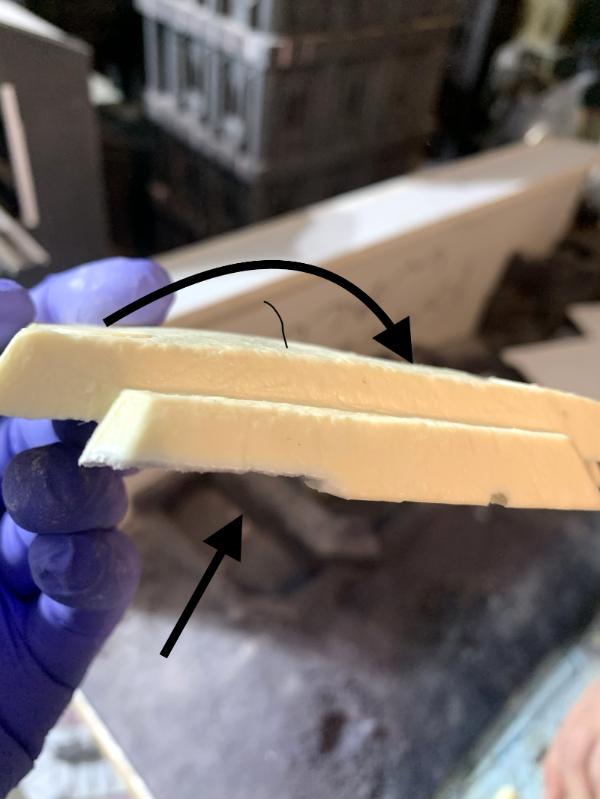
We think this is because the model itself was originally 3D printed and there is actually a very thin area in between the ceiling of the bunker and the exterior that is hallow. When put into the compressor pot this force this area to expand and pop.
Basis of our theory

$20 of silicon in the garbage again but we are filling the dead space with glue and will try again soon. At least the base looks good!
WIP mill pics forth coming
21480
Post by: btoliver311
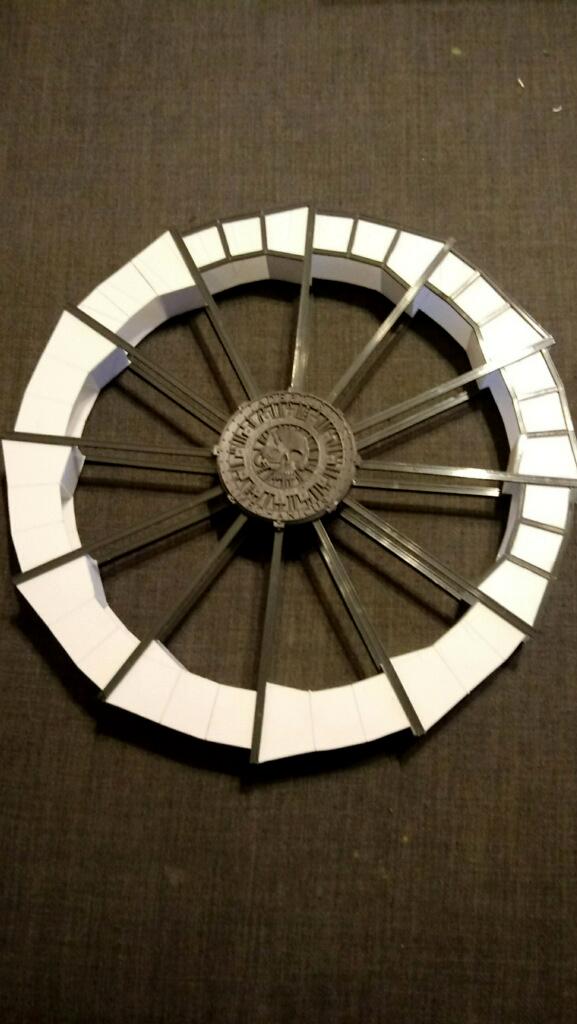
Pretty sure kirque didn’t want me to post pics of his mill yet but whatever
Just know these are still very early on.
Here is the base of the mill/waterwheel. It will connect to a slightly larger hab unit
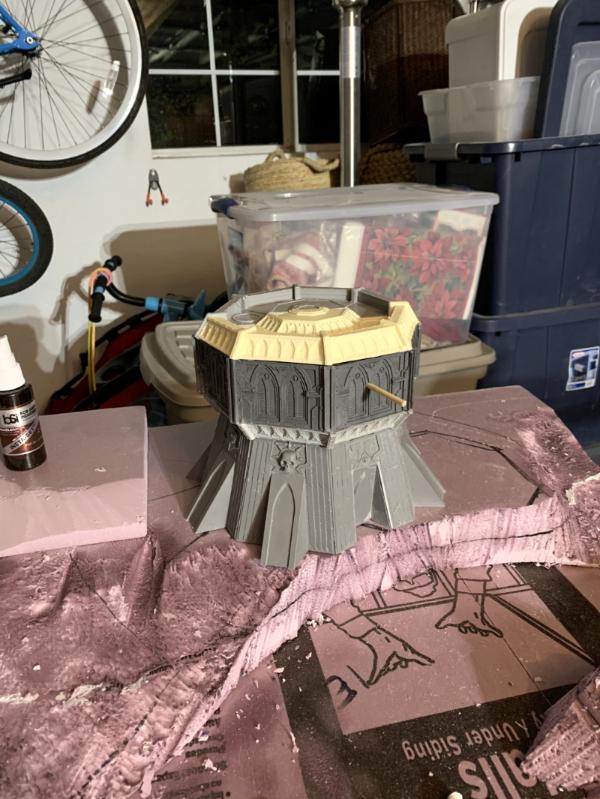
Here are the beginnings of the wheel itself
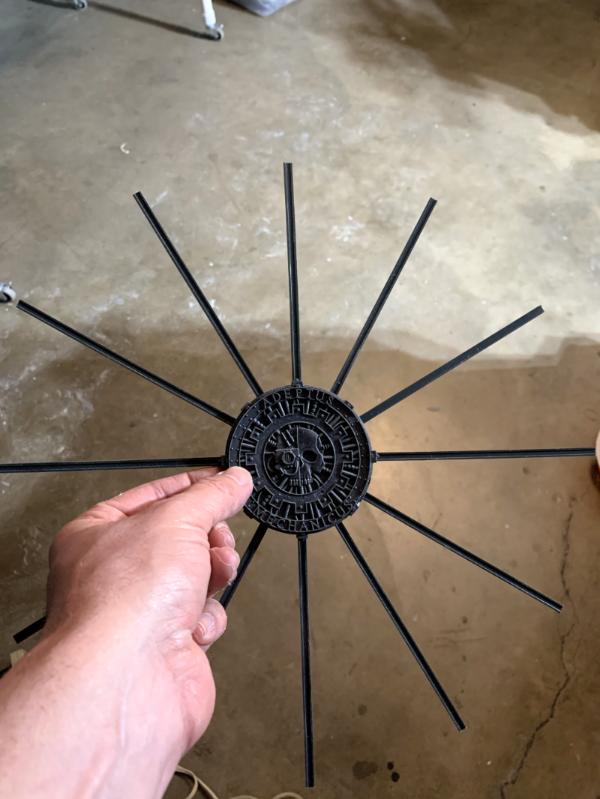
And a couple with the wheel on
1823
Post by: MegaDave
Really interesting use of parts, it will be cool to see it finished
518
Post by: Kid_Kyoto
I love the Adeptus Mech water wheel!
The easiest simplest technology known to man and they put their cyber skull cog on it. Really shows how superstitious the Imperium can be.
They'll take credit for anything won't they?
21480
Post by: btoliver311
Lol
Maybe I should put their logo on all the plaster castings im working on today too
 Automatically Appended Next Post:
 Hey guys,
Does anyone have a good recommendation for glue for plaster castings going onto a vertical Extruded Polystyrene wall?
123945
Post by: balmong7
I feel like we are getting the point where we will need another video update detailing this progress. Maybe at the end of the month or something.
76303
Post by: Warboss_Waaazag
And I thought my projects were ambitious and never rending. This board is incredible.
21480
Post by: btoliver311
Thanks guys. I’ll definitely shoot another video once we get some plaster onto the exterior city boards. I hope that’s in the next couple weeks but who knows with this mill build.
Here are a couple things I’m working on
1) better rock formations for exterior board and dry creek bed.
The rock mold we had were just too small imo so we got some new ones form woodland scenics. These will work much better for long creek runs or other exposed areas in the fields
These are nice and deep too.

Which is good but they are also a little cheap. Everyone I’ve ever purchased has gotten a rip pretty quickly. The best solution. Right Stuff silicone repair for car hoses. Found at your local car parts store
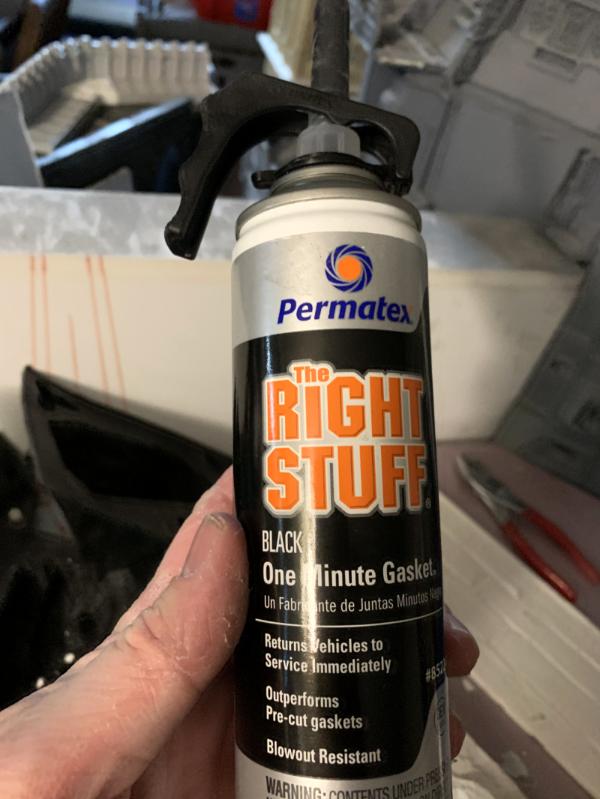
This can be used to glue molds back together or other mold adhesive needs. Here it is spread over the outside of my brand new rock mold to glue a tear back together
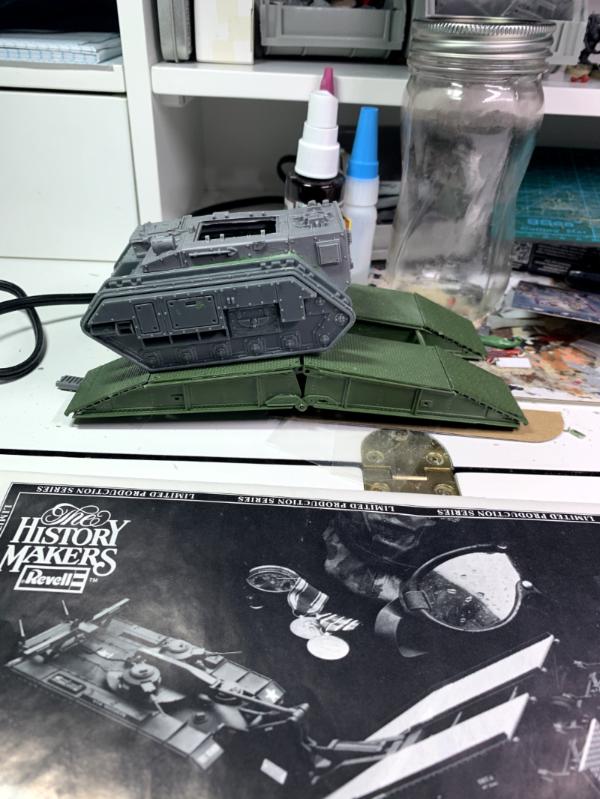
2) converted chimera bridge layer
Still very much a WIP.
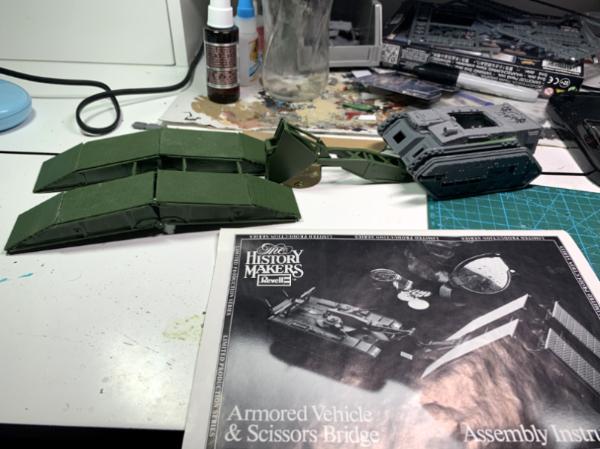
Not even sure if I will be able to have it working. May just end up being just the bridge glued onto the board somewhere but we will see
90488
Post by: The Riddle of Steel
Wow, the mill is going to be great. And very unique idea, too.
95627
Post by: EmberlordofFire8
Holy
Jesus
I don't hop on Dakka for three months and suddenly my favourite battlefield project has not only become insanely detailed, but also doubled in size??!!! I seriously can't wait to see this project finished.
Also, as for the Chimera Bridge thingy, you could consider replacing the joints with metal rods, so it moves in a smoother manner.
113383
Post by: Kawauso
I love watching this project unfold but the scope creep gives me some serious anxiety.
Not that I'm one to talk with my own hobby projects, but still.
Can't wait to see more, all the same!
21480
Post by: btoliver311
Decent point on the scope creep but I think it’s ok for a few reasons:
1. because we always really wanted a section outside the city. Hence me trying so hard to track down trench models
2. We are stalling just a little in hopes of getting a set of forge world imperial fortress walls
3. We need a break from some of the City projects we were stuck on
4. I Honestly don’t think any of the battlefield section boards are going to be nearly as difficult as the city projects. It lets us express ourselves and make progress at a much quicker pace which is very motivating for the project as a whole
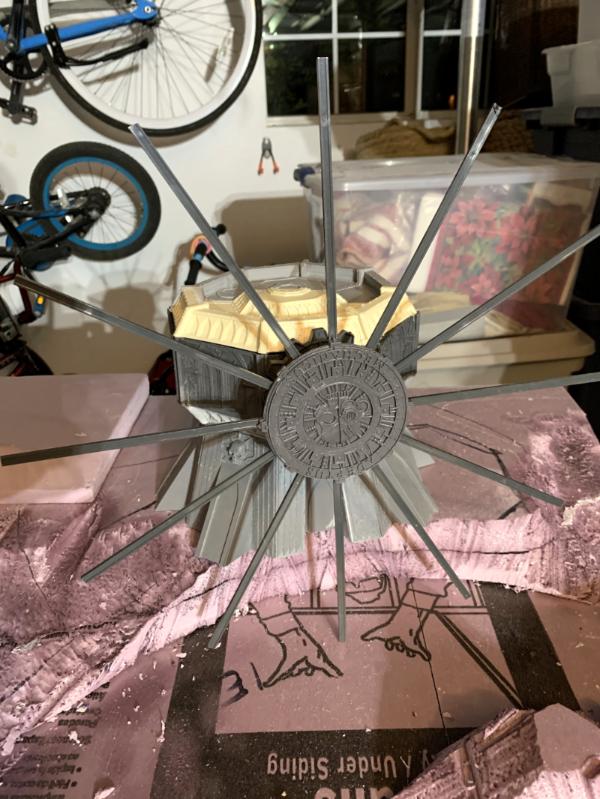
I’m also excited for kirque’s mill. Here’s an update pic of one spoke

Thanks again guys. I hope to make some better progress this weekend and will post soon
21480
Post by: btoliver311
90488
Post by: The Riddle of Steel
Every part of this endeavor is an impressive project on its own, and the mill is certainly no exception. The scratch building is looking great so far.
21480
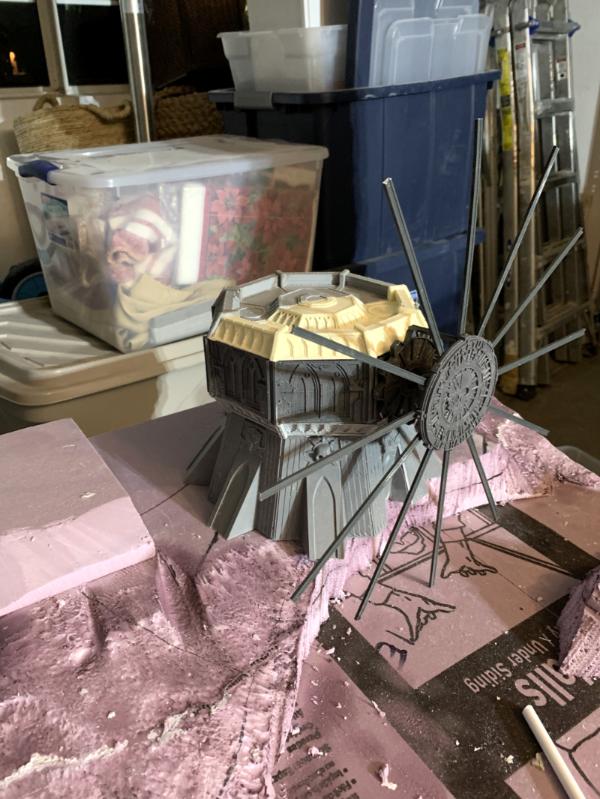
Post by: btoliver311
Yeah. I really like it. Here are some More WIP pics of it and it’s accessory building in place
There will be a connecting tunnel

With the wheel off
And adding some battle damage to the building
21480
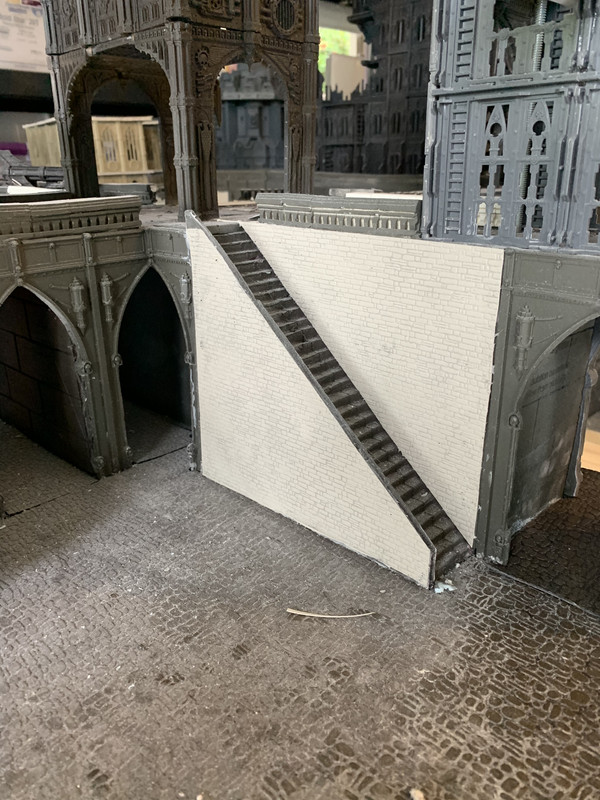
Post by: btoliver311
And what I’ve been working on.
Replacing on the stairs and walkways in front of the cathedral. If you can tell this is a pain but they just didn’t look good enough.

Now I think I need to make new railing casts for the stairs too. Ugh
88921
Post by: Stevefamine
Keep it up dude - this is dad/homeowner goals in the future for me!
If you ever use reddit - we'd love for you to post your stuff ont he Terrainbuilding board they have there. This is literally INSANE
95627
Post by: EmberlordofFire8
I was just going to say that bit with r/TerrainBuilding. This project would quite probably be one of the best ones ever posted on that sub.
21480
Post by: btoliver311
Hey ember and Steve,
Great idea. I Iove me some Reddit. I follow that sub and never thought our project fit but maybe I’ll give it a shot the day we do our plaster or something like that.
Thanks
21480
Post by: btoliver311
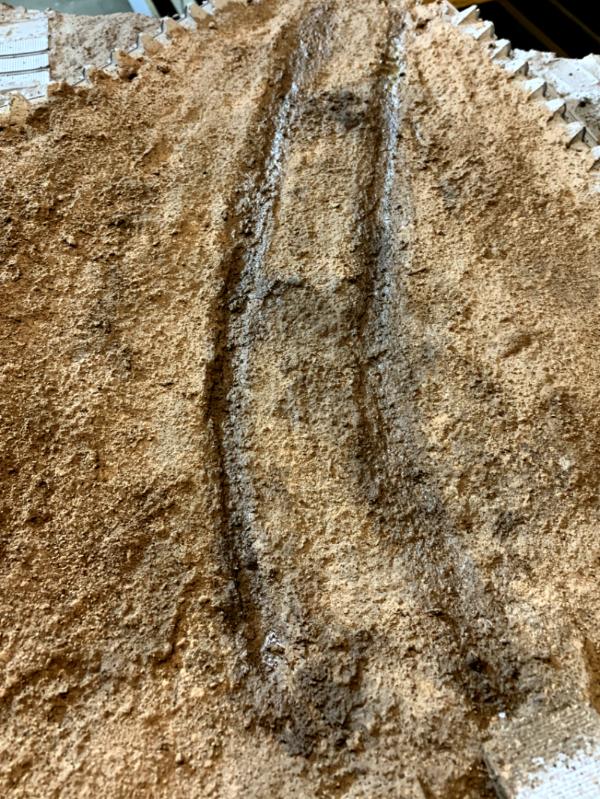
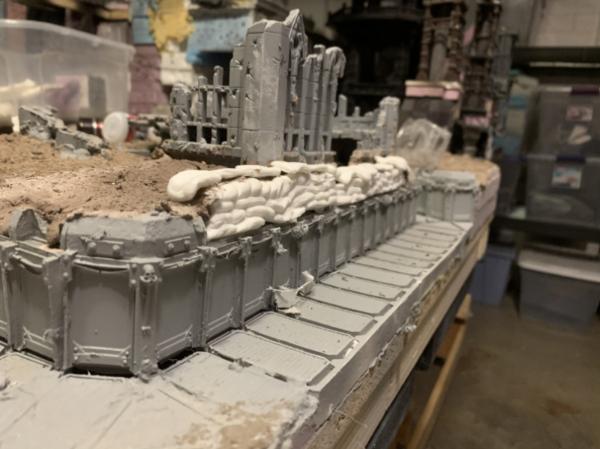
Project update:
Added plaster to one of the three exterior boards today.
Mix is:
2 cups plaster
2 cups eco insulation
1.5 cups water
2 squeezes brown paint
2 squeezes black paint
Time lapse video here:
https://youtu.be/CPWfm-pwY_s
Photos
im really happy with the texture. Let us know your thoughts
Next steps:
Greenstuff sandbags, tons
Soil and brown grout mix painted over board
Then, on to next board obviously
121268
Post by: Gwyn chan 'r Gwyll
Nice tracks around the bridge!
17738
Post by: Briancj
Please be wary of textured paint/grout, ti'll take out the textures you've made/fill in your road tracks if not careful!
--B.
21480
Post by: btoliver311
Thanks Brian. I’ll do some testing and go light on the application
Here’s what I’m working on during the quarantine
10667
Post by: Fifty
It is a wonder to be hold. I look forward to each update.
Do you have an expected completion date yet?
121190
Post by: zahnib
Wow this is a huge project! Look forward to seeing your progress
21480
Post by: btoliver311
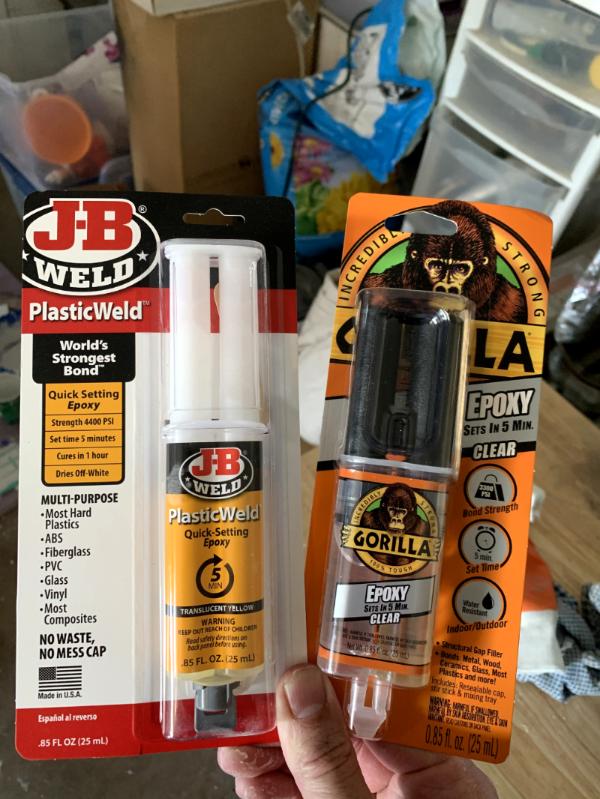
Hey guys,
Does anyone have experience with epoxy weld type products? Like: Are they really required for titans, how should I be mixing the two parts and what are they best used for?
I would prefer to just use super glue, pinning and quick set for the Titan. This two part epoxy says it takes 10 hours to cure
21480
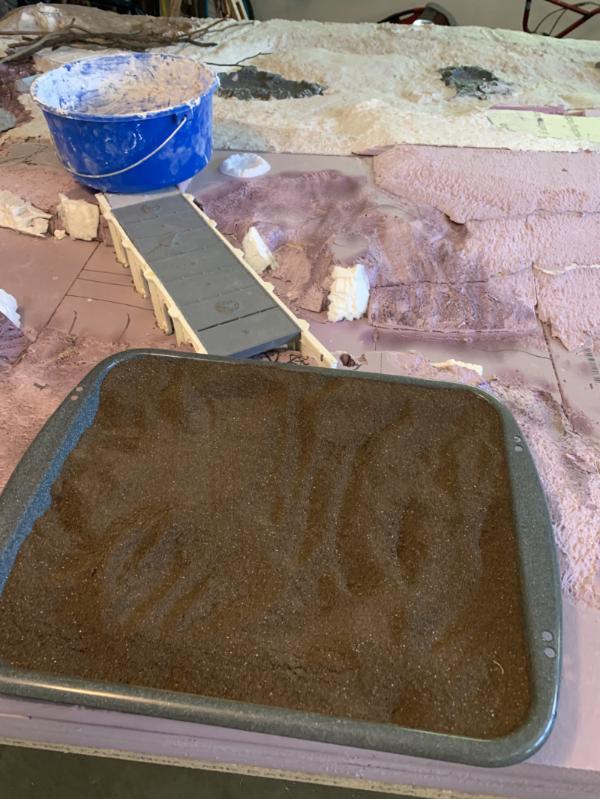
Post by: btoliver311
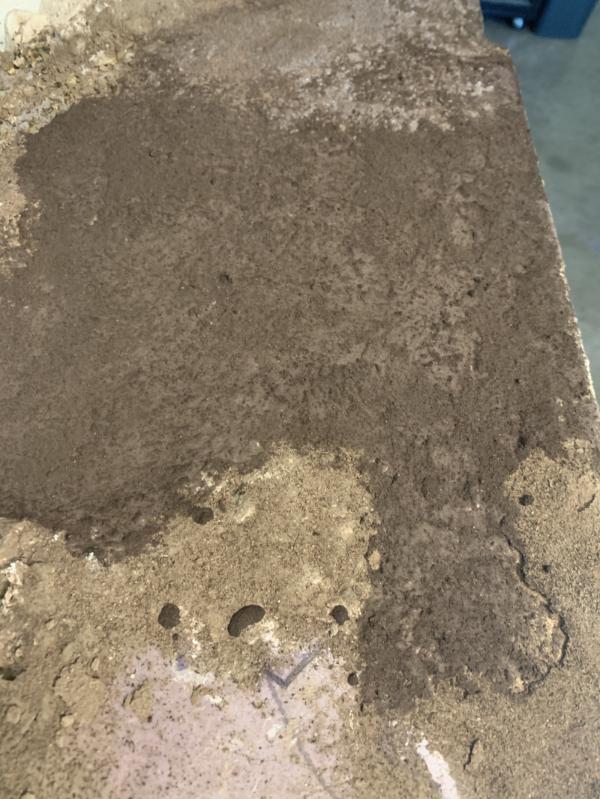
Just spending my Saturday morning baking some dirt.
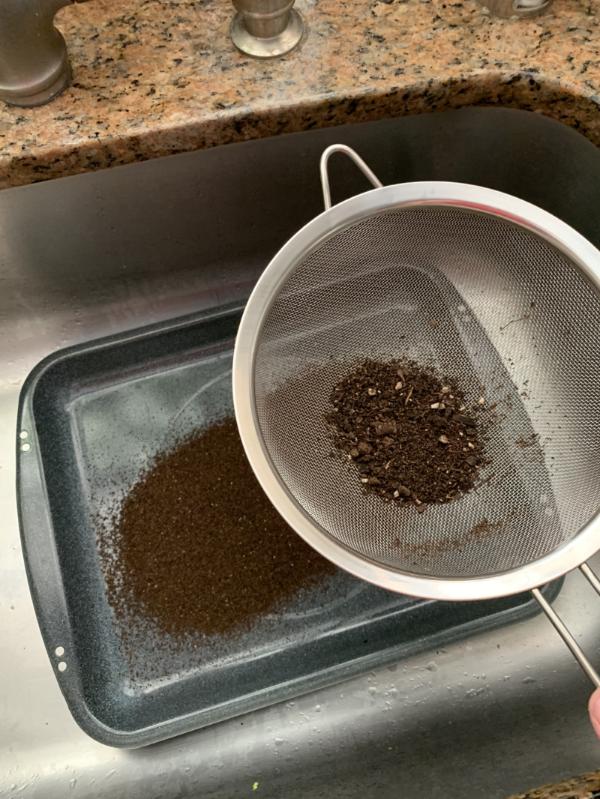
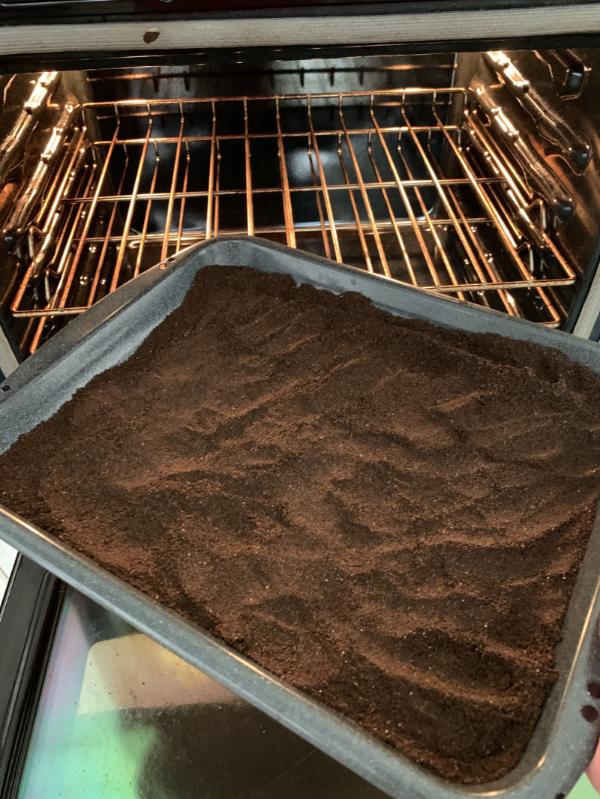
Finished product
Close up 1. (I love the texture)
Close up 2
The compound is 1 part dry soil/1 part sanded grout (polygrout- earth color)
Some of the areas are premixed with the water glue and some black paint to be a little more muddy. The rest is elmers glue brushed on, 50/50 mix sprinkled on, then sprayed with alcohol, then sprayed with 50/50 glue and water mix
Time lapse of the process
https://youtu.be/XyVc58ntLco
121190
Post by: zahnib
Looks great! That dirt looks really dirty
21480
Post by: btoliver311
Got a layer of the base plaster (plaster/eco-insulation) on the middle (no mans land) board last night with the Mrs.
Came out a lot clumpier than the mix we put on the trench board.
Not sure why but will probably add another just sand and plaster layer before moving onto the soil/grout mix. Which I had just started baking
Not sure how I’m going to find plaster right now though :(
11150
Post by: DaRealJDB
Absolutely stunning work!
21480
Post by: btoliver311
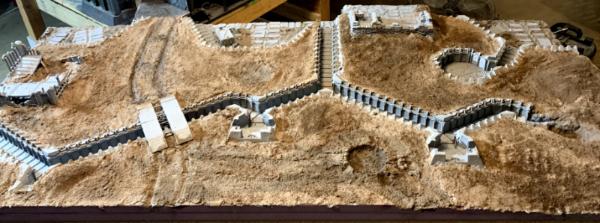
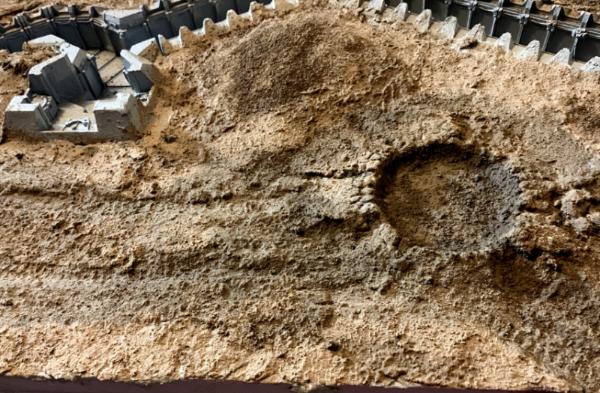
Not much action on here. I hope this post finds you all well and staying safe
I’m continuing to use my extra time (isn’t much. Work is actually busier) to work on the board.
Here’s the dead zone with the plaster and the grout/soil mix
62565
Post by: Haighus
Looking good! I am continuing to follow this with interest Automatically Appended Next Post: btoliver311 wrote: I’m continuing to use my extra time (isn’t much. Work is actually busier) to work on the board.
I feel your pain, I'm in the same boat!
21480
Post by: btoliver311
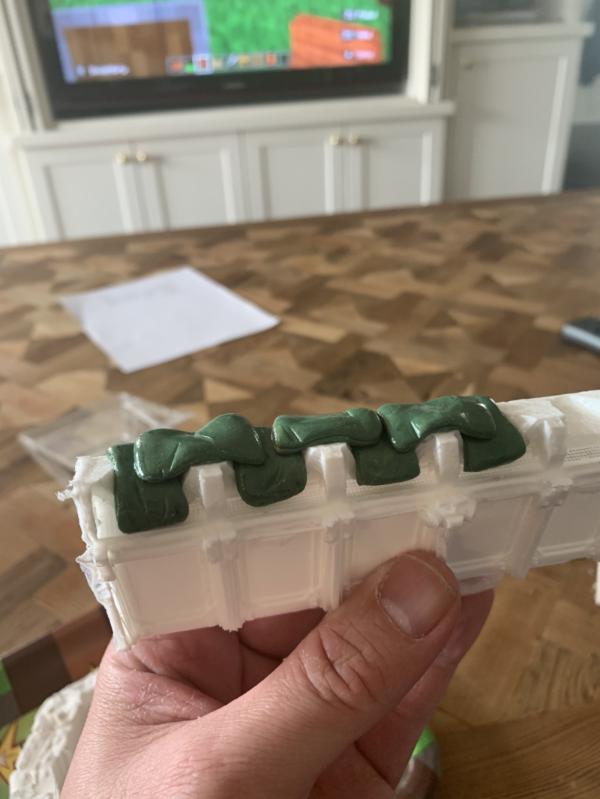
Made a half dozen sandbags out of greenstuff. They looked good for a bit but then I just kept messing with them. Hope the thumb prints look like texture later
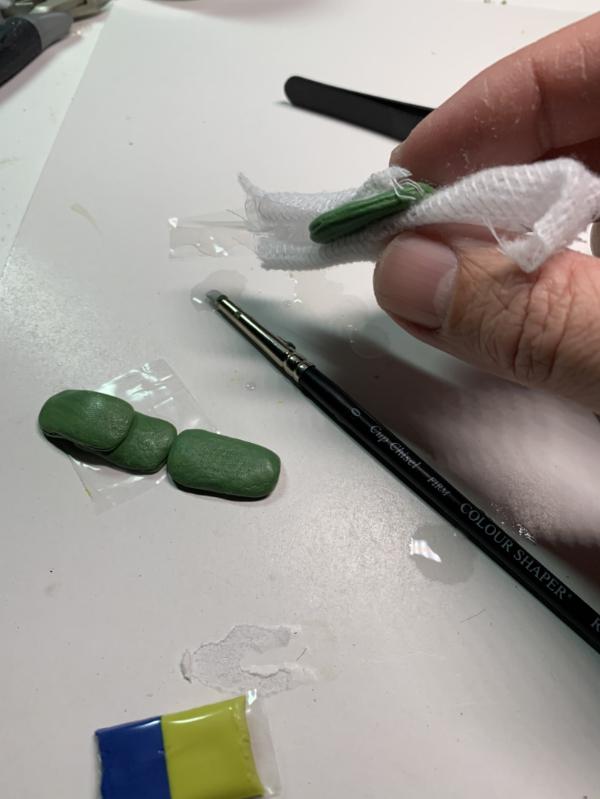
Then I made another half dozen and applied them onto the top of the trench walls. They obviously set differently There due to all the ups and downs, they had to be sculpted to sag more. However, the first thing I did was cover the resin wall in Vaseline so I could pull them back off
Now I’ve taken them all out separately. Glued each one to a one by one Lego and set them in a small tray to make molds because we are going to need a lot!
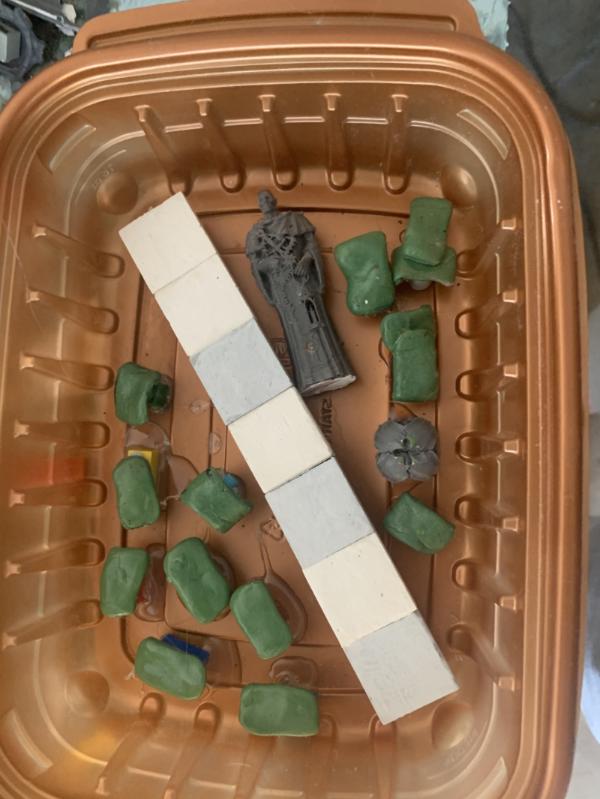
I poured the silicone a few hours ago so hopefully I’ll be able to cut out and post an update tomorrow
121190
Post by: zahnib
How many sandbags are you estimating? What kind of resin do you sue for your casts?
51870
Post by: Ezki
Had a lot of catching up.
Phenomenal work there! The size of this project amazes me. Keep it up!
The deadzone and the trench board are both looking really good and realistic.
Those sandbags turned out well. Most of mine looked a bit like bricks when I was making a much smaller trench display board.
21480
Post by: btoliver311
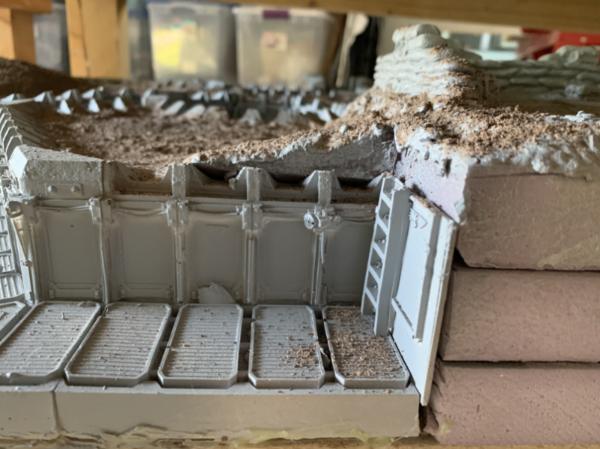
I’m not sure how many sand bags but at min I need to cover these areas where We dug our trench lower than the forge world trench plate walls
Didn’t have the best luck with the first set of sandbag casts. Lots of air bubbles but I did a second batch under pressure and about half of them came out.
Still, doing 10 at a time was going to take too long so I busted out a new product I haven’t tried before called aluminite mold putty
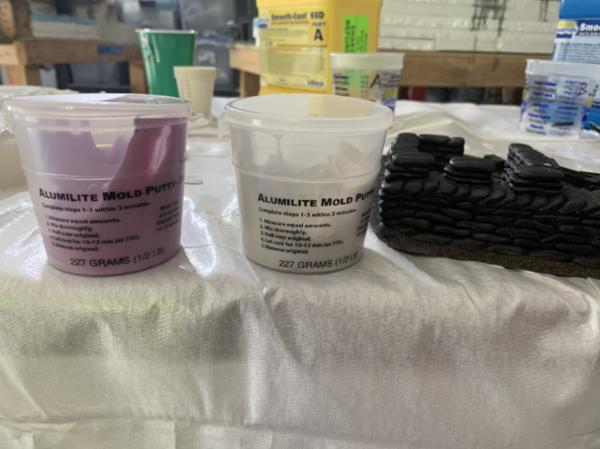
Not the most detail, and is prone to tear but It makes a really quick mold (pot life is like 3 min). So I stuck it to the side of a friends terrain piece that has a bunch of sandbags and made a surface mold.
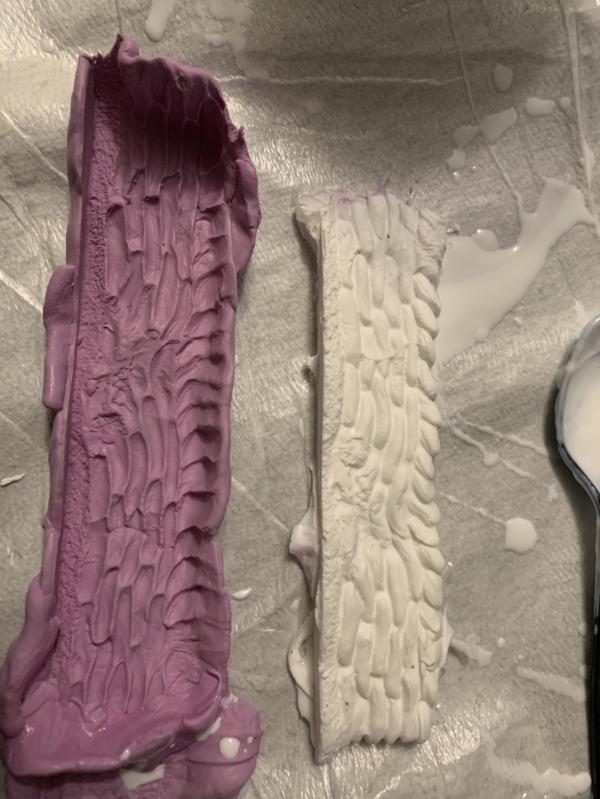
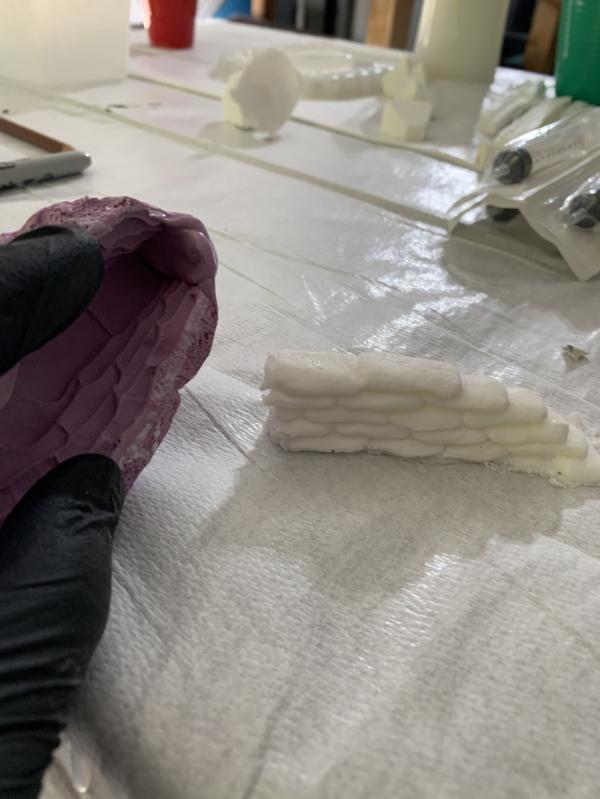
I’ll cut these down for the sides and ends and cover the exposed or bad areas with my own
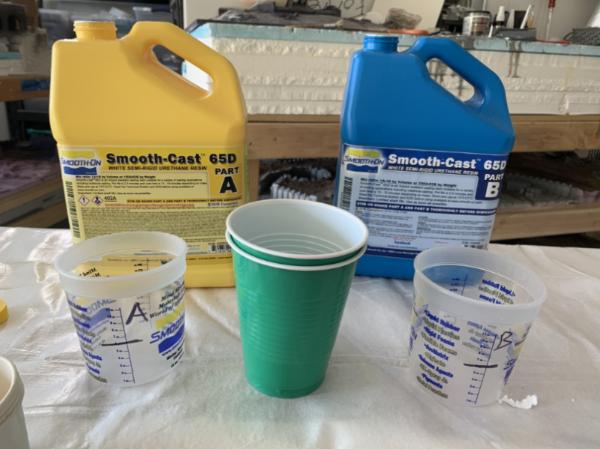
Oh, the resin I use is usually smooth-on 20-t but for some reason they gave me 65d this time, which I am not liking very much
121190
Post by: zahnib
I've heard good things about Smooth-On. Did you use that for the Forge Wolrd parts as well? Far out, what a huge project!
21480
Post by: btoliver311
Yes. Their stuff is the best I’ve found. Mainly because of the fact all the ranges I’ve used from them have been 1:1 which makes the process much easier
Just know, Casting can get expensive too. In my case it makes sense simply due to the high number of casts I need. With smaller numbers due to the learning curve, accidents and high material costs it can make a project pretty unaffordable really fast
But on the upside, it’s the only option if you need 8+ Bone-tithe Nexus Statues for the corners of a building. Even if they are a little sloppy
21480
Post by: btoliver311
121190
Post by: zahnib
How do you find it in terms of durability?? Yeah, I can imagine it takes a bit of practice which would be pricey and tools like a pressure pot would help with better results.
For old terrain that is OOP it seems like a great solution. The old Citadel ruins and jungle trees, as well as the larger scenery pieces that were made from a hard foam-like material, are prime examples.
21480
Post by: btoliver311
Great question and example.
I like smooth-ons silicone “mold star” a lot too. The durability I get is probably around 18 good casts then It starts to rip and degenerate from there
The forge world ruins were some of my, if not my, first casts before I had a pressure pot and was just doing surface casts. You’ll see they make up two of my large buildings. I should have done the whole set in better quality before I chopped them all up :(
But I still have a box of semi-decent quality plaster wall sections
121190
Post by: zahnib
Hmm, good to know. I'd love to start experimenting with casting. I've got a bunch of original FW Cities of Death terrain and it would be nice to be able to expand on it without taking out a mortgage  Also being able to make some 3rd edition jungle forests would be great, although they would be finicky to cast I think. Can you still get alright results without a pressure pot?
21480
Post by: btoliver311
DO IT! What better time to learn how to cast and make a modular or fixed jungle ruins board!!
old forge world ruins covered in vines and mixed with 3rd editor trees would be amazing! A lost city. That could be combined with anything from chaos artifacts to web gates.
Like I said before the forge world ruins are the best thing to start with. You don’t even need a pressure pot to start with the ruins. If you are ok with them having flat backs you can start with surface casts. Look further back in this thread to see.
After that you can upgrade to pressure. Harbor freight has pots for less than $100 but the investment increases if you don’t have a compressor.
I’m excited for you. Get some silicon and get going man
——————————————————————————————————————————————————————————-
Automatically Appended Next Post:
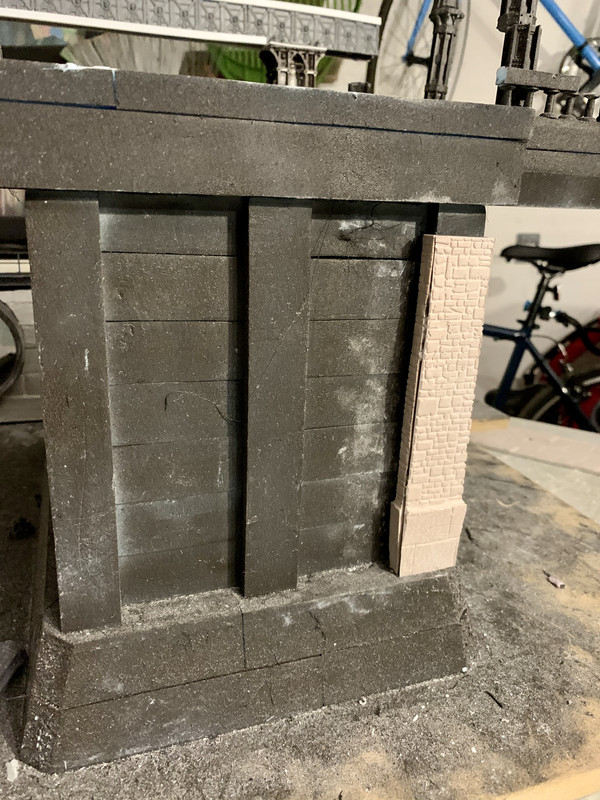
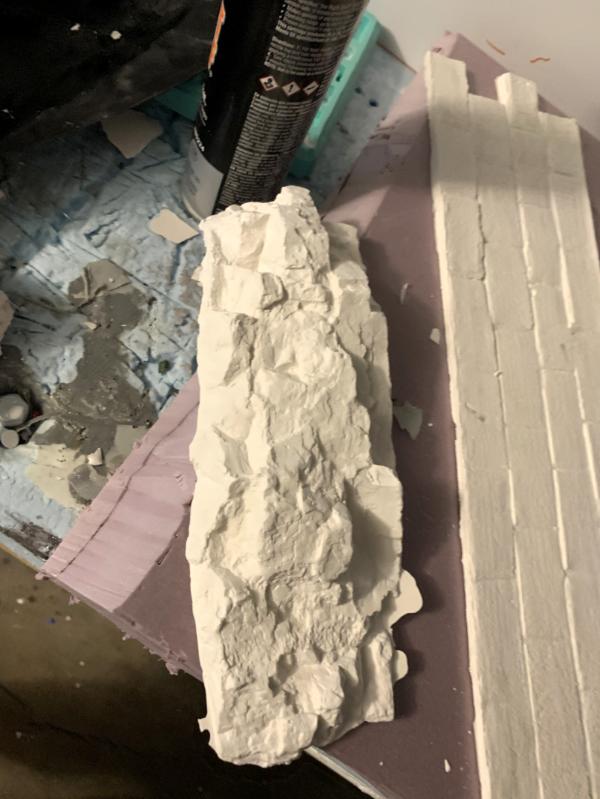
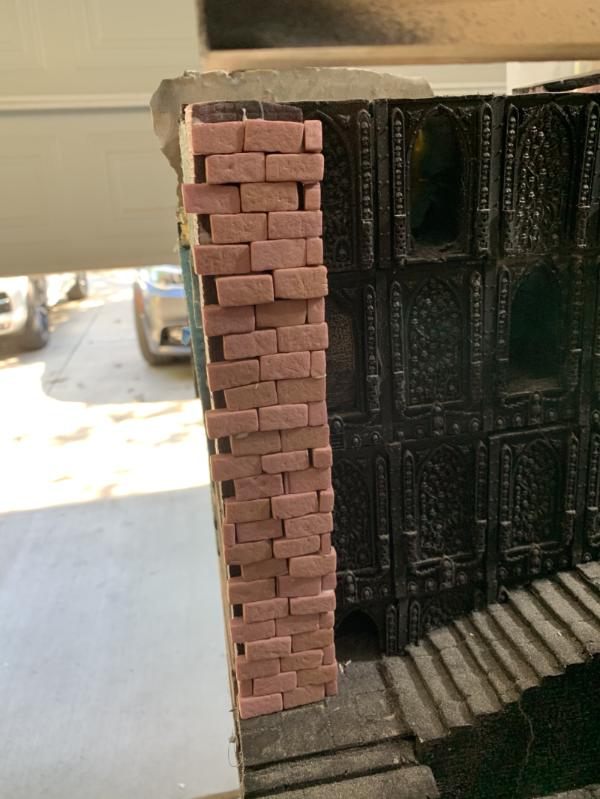
EXTRUDED STYROFOAM!
This may seem like something we should have explored Early but honestly I felt like we kind of did. All of the foam we tried to use rolling pins on didn’t work and the large river was foam but was never going to hold up once we added resin.
I think the biggest issue we had was we could never find a product that could make styrofoam strong enough to stand up to play.
But considering all of the ground surfaces are now made out of some plastic product or resin mold we made I think it’s safe to explore extruded foam for some of the vertical surfaces
That and I just keep seeing all these huge awesome projects made out of nothing but extruded foam and I can’t understand how they can build tables out of that and we can’t.
After watching several videos by Jeremy at black magic craft. I decided to give it a shot again. Here’s my first pillar
And a video I made about the whole process
https://youtu.be/GKtYKgTOxvQ
Here’s a link to the black magic crafts channel
https://www.youtube.com/channel/UC2Rlv-ug-mtnXuMwlpcqFgg
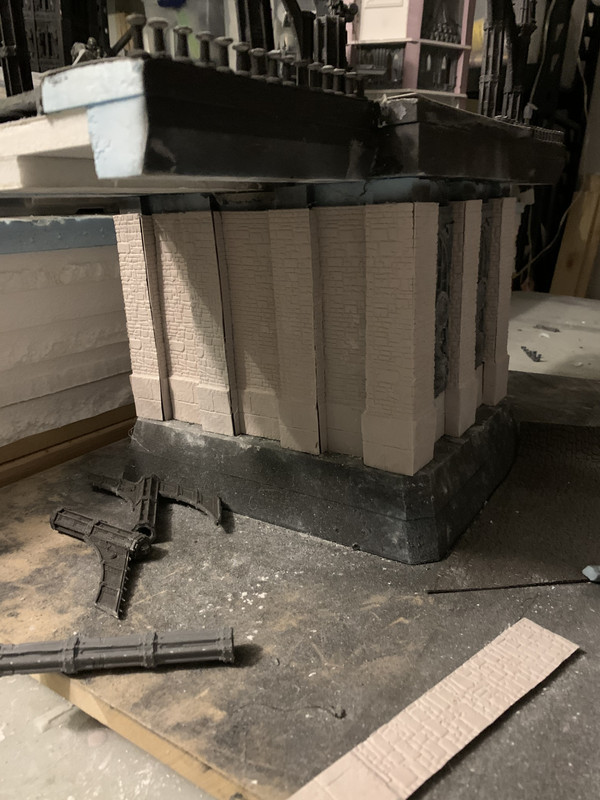
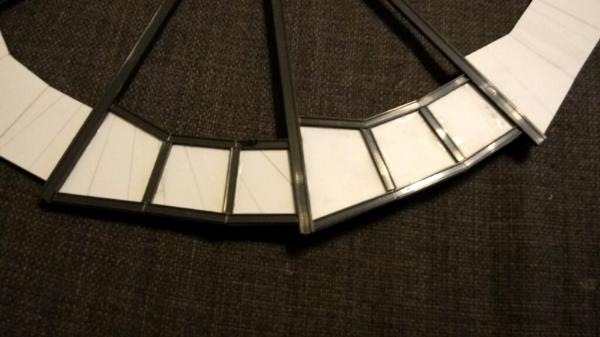
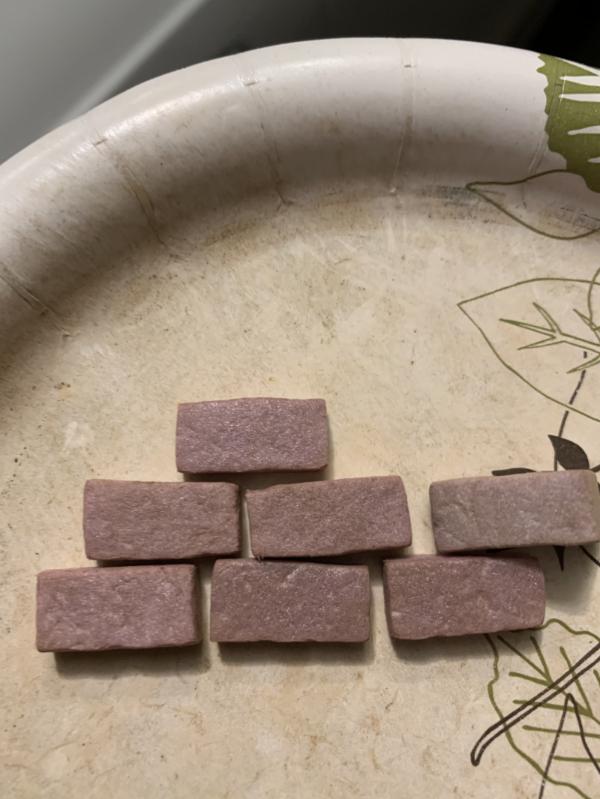
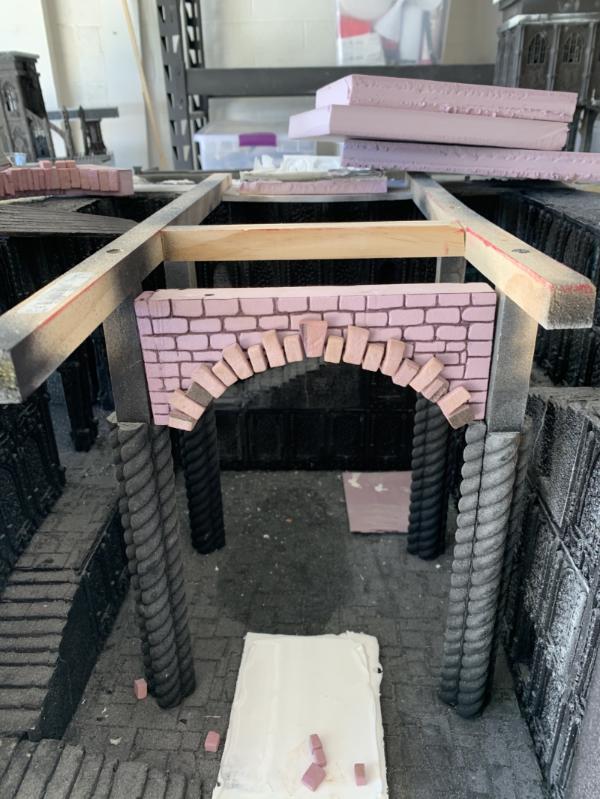
One thing I can’t figure out are arches. So I cheated. What do you think about this mix of the individual brick technique mixed with the carved/drawn on option?
121190
Post by: zahnib
btoliver311 wrote:DO IT! What better time to learn how to cast and make a modular or fixed jungle ruins board!!
old forge world ruins covered in vines and mixed with 3rd editor trees would be amazing! A lost city. That could be combined with anything from chaos artifacts to web gates.
Like I said before the forge world ruins are the best thing to start with. You don’t even need a pressure pot to start with the ruins. If you are ok with them having flat backs you can start with surface casts. Look further back in this thread to see.
After that you can upgrade to pressure. Harbor freight has pots for less than $100 but the investment increases if you don’t have a compressor.
I’m excited for you. Get some silicon and get going man
You've read my mind! Originally I was planning on theming my collection around a war-torn city in the midst of being destroyed but looking through some old 3rd edition sourcebooks the idea of making my battlefield an overgrown ruined city has really taken hold. But those jungle tree kits are ludicrously expensive to pick up. I've also been looking into pewter casting to replace some missing hands on some second-hand Wolfen models I picked up. Ahh, so many projects! Your enthusiams is insipiring!
Good to know about the pressure pots. We don't have Harbour Freight in Australia unfortunately but I'll have a look at some local hardware stores and see what they've got.
Extruded foam stone-work is looking great With the archway, I think maybe making them less pronounced would sell the effect more.
21480
Post by: btoliver311
Ugh. You’re right. Just cut foam corners that thin is still too hard for me. Maybe I can fake it
Yeah. If you can’t tell I really like your jungle them for a table. There are a lot of other options for trees too
Maybe just start with casting your FW ruins
121190
Post by: zahnib
btoliver311 wrote:Ugh. You’re right. Just cut foam corners that thin is still too hard for me. Maybe I can fake it
Yeah. If you can’t tell I really like your jungle them for a table. There are a lot of other options for trees too
Maybe just start with casting your FW ruins
What if you just sliced through it lengthways with an x-acto? Haha, I'm excited now as well! Although yes, I think starting with casting some ruins would be a good idea before I go too wild with plans. It looks like Smoooth On isn't so easy to get here but I'll keep my eyes out. In the meantime, I'll just have to live vicariously through watching your progress
33564
Post by: Vermis
This sums up my feelings after reading through 26 pages:
https://www.youtube.com/watch?v=1DNbkKBW0K8
A spectacular sight, an awe-inspiring journey, and a bit trippy.
For the arch, I think take a cue from the flagstones you did a while back: cut (or mark) bits of stone to fit the individual gaps and crannies that appear. I have a feeling you were going to do that for the finished product anyway, but I thought I'd emphasise it because the arch stones do look a bit laid-over the rest of the brickwork, rather than integrated, and you did mention that bit of a blind spot with arches.
I don't think you have to have the arch stones projecting from the wall, or have arch stones with different, alternating heights. For the latter, those that I see in an image search usually have plain old irregular stones built on top, filling in the spaces. The others have more even arches, surrounded by even, rectangular bricks. (Cut to fit against the arch, obviously) Personally, I'd go with marking all the brick shapes into the one piece of foam, though I can understand if you want to go with other methods and looks, for effect.
21480
Post by: btoliver311
I’ve put some of this foam stuff on hold. to be honest this is mainly because the final fantasy 7 remake just came out but also because I think I need some better tools to get this done right. Cutting thinner brick, corners and arches just isn’t possible with what I have. So I ordered a guider pro and arch template from the company black magic craft recommended, shifting lands.
https://shop.shiftinglands.com/
Looks like pretty cool stuff. I’ll demo when I get it and let you know what I think
33564
Post by: Vermis
That's an irresistible combination of nerdy gear and manly DIY tools. Looking forward to see what happens when you get them, and when you come up for air.
121190
Post by: zahnib
Oh wow, I just checked out Shifting Lands site, that looks like some awesome gear! Those brick cylinders especially. I'll second Vermis, look forward to seeing what you get up too with the new tools.
21480
Post by: btoliver311
Just so everyone knows I’m still around
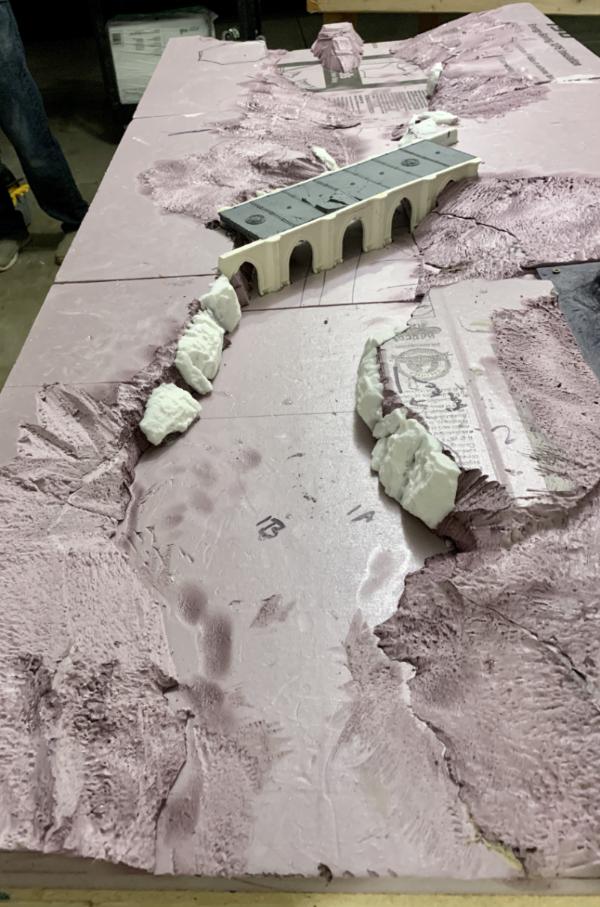
This morning I’m working on the river table. I’m trying to get a few things done before I add the insulation plaster mix.
First is getting the other side of the river raised some so the road will go on a slope up to the wall entrance because that city road is much higher
After that I want to finish up the bridge itself and get the railings and some statues in
I also plan to make a second blown up bunker on the right side that will be kind of shattered into the dry creek
And of course I need to put more rocks in and finish the road
121190
Post by: zahnib
Looking good! That destroyed bunker might look even cooler if the creek still had some water in it. Some semi-submerged rubble would look ace
84491
Post by: gobert
This board, can you even call something this huge and awesome a board? It doesn’t seem to do it justice. Sorry, this board is amazing and just keeps on getting better and better every time I stop by for a peek. It just occurred to me though, shouldn’t the main opening on the bunker be facing the opposite bank of the bridge and looking down on the road?
21480
Post by: btoliver311
Thanks gobert,
Not sure I completely follow in the bunkers though. I have two pill boxes. The blown up one covering the batch that is to the left of the road and the one with sandbags to the right of the road, which I assume is the one covering for the bridge.
There’s also the big bunker down front on the dry creek which blocks the back/secret entrance to the city (think return of the Jedi). Also a large part of that is destroyed

Now to put some plaster/insulation mix on
10667
Post by: Fifty
It is still mind-boggling.
Do I remember rightly that you said this was going to live in your friendly local gaming store? I need to know where, so I can try to book a holiday there!
21480
Post by: btoliver311
Hey guys,
Really need your help and advice. I got the 50/50 soil/ grout mix added to the board Sunday and am pretty concerned with the results( please ignore the dry creek. That is just a base plaster coat. It will get a sand crackle affect later)
Though I’m really happy with the texture and maybe even color I have some issues.
First being I’m colorblind and the two people I’ve had look at it asked me what it was supposed to look like. One went so far as to ask if it was an alien planet.
So, I want to know if you all think the coloring is ok? Or what you think I should do to correct it. I was hoping not to paint. That’s why I went with the dirt/grout combo. But if I have to I can airbrush and drybrush. If that’s your recommendation. Please provide specific colors. OR I could sprinkle a different grout? Or are their other terrain materials I should consider?
Issue #2: the boards don’t match. The new one is way darker than the trench board. Maybe this is due to drying time but I think it could be because of the fact I used so much more alcohol and pva mix over the top
So if we do have a color problem, I’ll probably need to address both boards.
Big picture, like everything else I’ve done my colorblindness and materials are screwing me up.
Any advice on products I can use to address would be appreciated. Again the look I’m going for WAS supposed to be WWII trench/mud/dirt (think beginning of 1917). But if it’s taking on a different look that’s workable or you have a better idea I’m all ears
Thanks
121268
Post by: Gwyn chan 'r Gwyll
The colour is sandy. Perhaps the issue is the texture is muddy, but the colour is sandy, so there's a bit of dissonance coming from that. It needs to be more dark brown if you're looking for 1917 trenches. A red tint is also good to get it looking more like mud and soil and less like sand.
120033
Post by: Excommunicatus
I don't agree. The new, non-trench board -as pictured - looks like every construction site I ever saw in Britain or Canada.
18980
Post by: Arakasi
The darker, non-trench board colour looks fine to me. If it is meant to be dry mud, then probably close to perfect. Wet mud will probably need a gloss or semi gloss finish (and will help protect it too!).
The other board is quite a bit lighter and looks more like sand.
I mean, painting the whole thing will obviously bring the colours in line, but if you want to save some effort, I'd do some experimentation on some small patches. Specifically, I'd try a dark brown wash mixed with gloss varnish. You may just need a heavier ratio of the brown for the lighter board, or apply several times (in which case you may only need the varnish on the last one), in order for the end result to be close enough.
This is how I would attempt it on miniature bases anyway. Not sure how well it applies to a whole board! Awesome project by the way
21480
Post by: btoliver311
Thanks guys
I think your all pretty spot on. I appreciate the feedback that The trench board looks good but Way lighter
And the creek board also looks good but way darker
It’s really weird that the same material got such different affects. But they were applied slightly differently and one had way more glue/ alcohol
Your points about experimentation are key though. If I can duplicate the creek board process/ color I could go back and mix that over that board and get it darker. Maybe I could even duplicate the sand coloring again to and mix that over the creek.
Either way, doing three boards in this technique at different times probably wasn’t prudent.
Automatically Appended Next Post:
What about grass or other flocking tips?
I think it needs some but it should probably be pretty sparse right?
121190
Post by: zahnib
Like the others have said texture-wise I think you're all good. Colours are a tad off but I think your best bet is painting all boards once they're done to tie them all together. Luke Towan has some really good videos on flocking and natural terrain environments as well as general hobby goodness, check him out.
21480
Post by: btoliver311
Hey all,
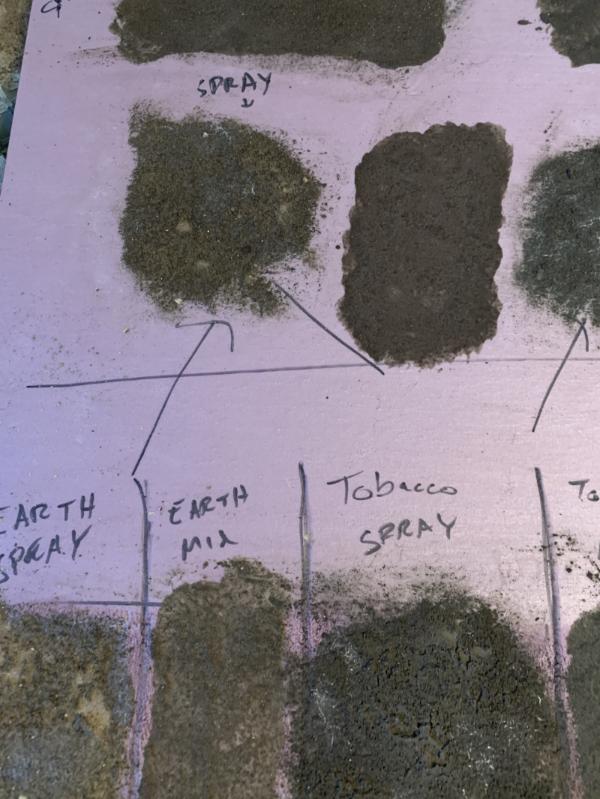
While I totally agree and understand I/we will probably have to go back in and paint the exterior boards I decided to give it one last shot to get a base grout/soil mix that was the color I was looking for. This would help a ton for the areas where we just want to apply the mix over pre- painted areas like the trenches
Anyhow, I went and got a few more brown grouts (nonsanded variety this time. A direct recommendation from Luke Towan).
The darkest colors Home Depot had were Sable And coffee. From there i made a test board with those two colors and my existing sanded Earth color grout. Each color was applied in two ways: Spray (brush glue on, sprinkle grout/soil and spray with watered down glue) and Mix (soil/grout mixed in cup with water and glue and applied with brush).
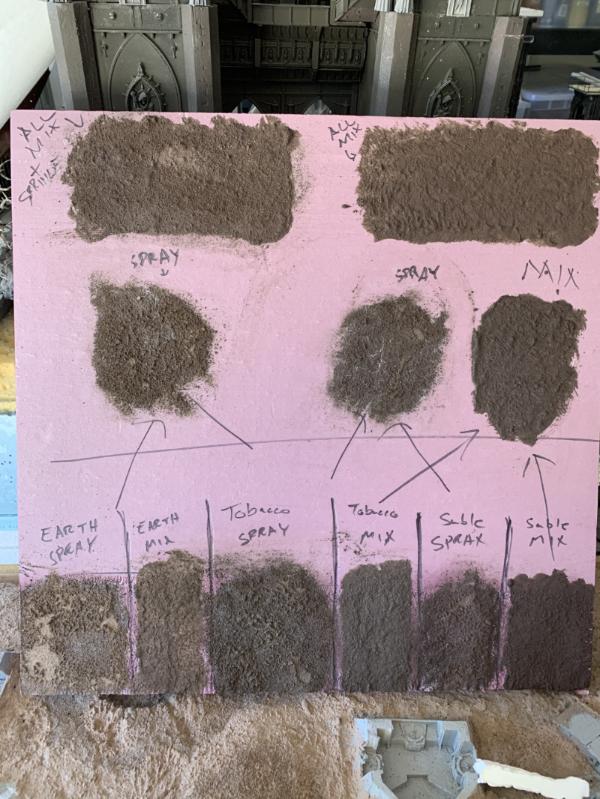
I also tried a few mixes.
I talked to a few people ( my son and wife) and they said they weren’t very good colors for what I was looking for but I would like to hear all of your thoughts?
From there I decide to try a mix I missed in the original (sable and earth). And I think it could be a winner at least for a base that could be dry brushed over.

In relation to the others (not labeled one)
I also threw a little on the board (the darker area)
What do you all think?
For reference I think these are the looks I’m going for:
Not mine. Sorry for not giving credit. I’ll try to find
And some shots from 1917 which are the color and feel we want


Anyhow. Hope you’re all well. Let me know your thoughts on the color, style and texture
Thx
18980
Post by: Arakasi
Initially I was leaning towards the sable mix, but looking at the bit you threw on the board, you know what might also work? Just vary it in patches across the board. The problem with two table sections being different shades is that it looks wrong / breaks immersion. But, if you make irregular areas different shades (and perhaps blend between the areas) - it will probably end up looking even more natural than a single colour. Added benefit - you will never need to "correctly match" ever again. Just a thought.
Automatically Appended Next Post:
(Also - very impressed with the lengths of testing you went with here)
121268
Post by: Gwyn chan 'r Gwyll
I think the bit you threw on the board looks good, but I think Arakasi has it right, if you want it to look like 1917, notice how in the first picture the mud they're sitting in is lighter than earth they're leaning on. Patches of the Sable or the Sable/Tobacco mix would be my favourite to have that dark mud look (you're right though that you don't want it so dark that detail disappears)
66384
Post by: Oestergaard
I think I might have said it before, but I'll gladly say it again: Awesome work!
As for the trench board you couldn't find the source for:
https://beyondthetabletop.com/armies-of-parade-2016-krieg-trench-board
21480
Post by: btoliver311
Yes! Philip from beyond the table top. Man that thing is awesome
Great point Gwyn and one I think a few others made as well.
Do you really think the coffee colors are ok? Everyone else has been steering me towards sable and earth mixes
But I get What you’re all saying is we should attempted to get a range of dirt and mud textures/colors onto the board. Which I agree with. I just want to try and have:
- First, One solid base tone to use for the majority and work Either lighter or darker depending on the area.
- then to see if these other colors can blend into each other well
- and of course colors that look like they represent soil
- and hopefully get this without having to paint over the products. Meaning the colors come from the mixed material. Dry brushing and washes being the exception
I’m probably overthinking all of this and a lot of it is probably just due to my colorblindness. I bet once kirkee gets to come back over he will be able to modulate all the colors right, I just don’t know how so am asking all of you.
Along some other lines: what areas do you all think should be darker vs lighter? I was thinking maybe the banks of the dried creak should be lighter and sandier? And the trench board should be darker and muddier, while the middle dead mans land should have tons in the middle
if I do go with a slightly darker muddier board overall, what kind of trees on ground cover would make sense?
Also, got my amazon dork package for the month in the mail. Airbrush to help start painting the board, liquid latex for protecting the trees I want to make and the d&d starter set because I obviously need another hobby
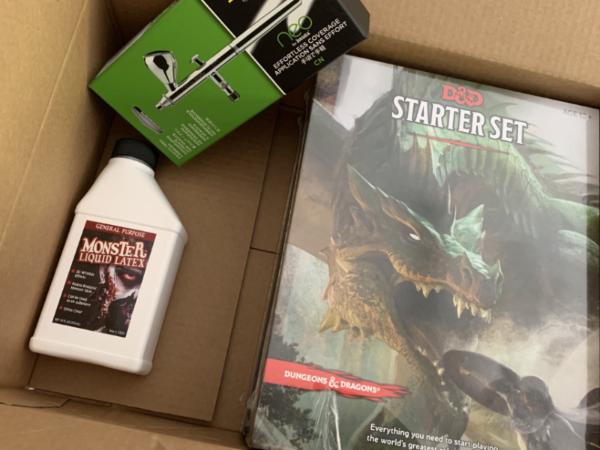
Oh! I also got milliput for the first time and love it. It’s going to help fill a ton of gaps I hope and make sand bags much faster
21480
Post by: btoliver311
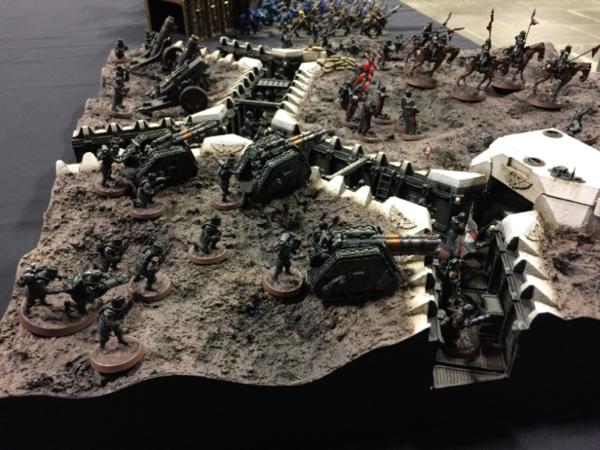
Morning everyone,
I spent last night adding sandbags to some of the deeper trench areas. Im pretty happy and think they add some character
Right now I just have them on The rightmost communication/reserve trench
And I also put them holding up the high mounds on both sides of the center communications/reserve trench

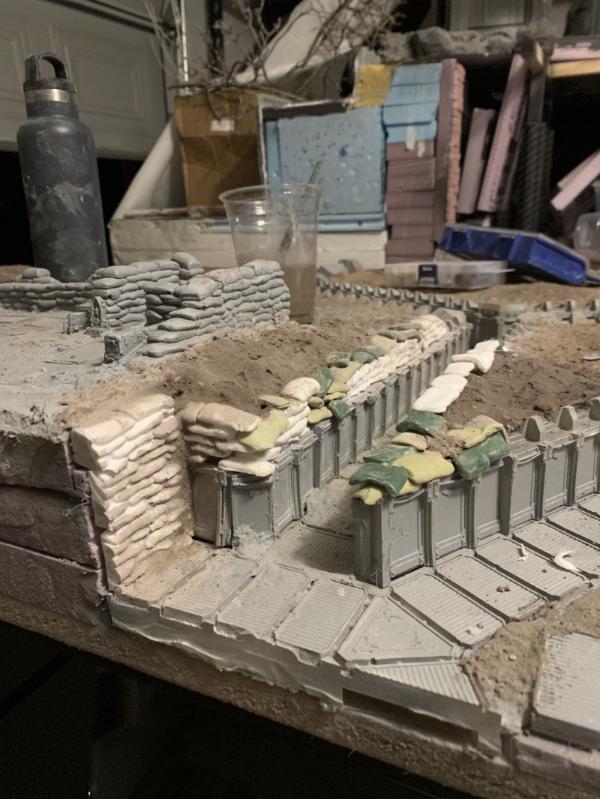
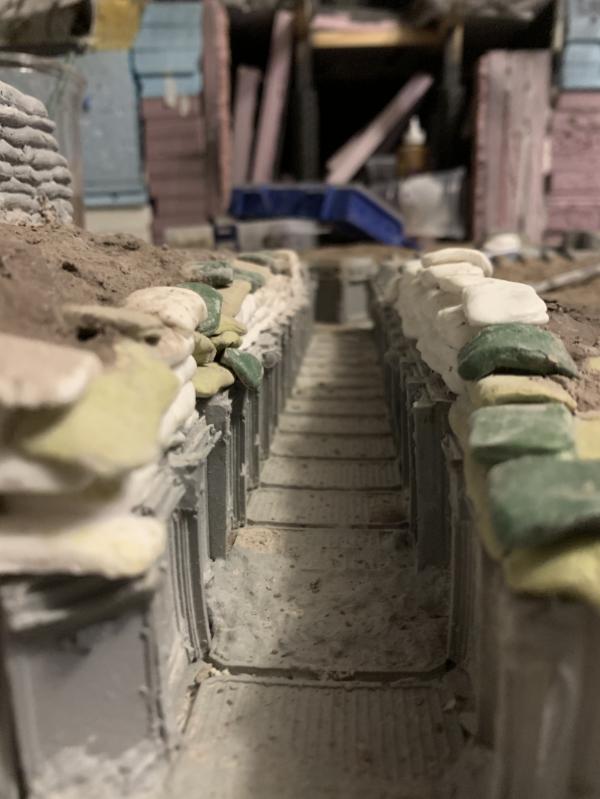
Any ideas on where I should add more? I don’t want to do too many as I’d like to get to some coloring tonight but I know the forward trench needs some. Maybe in front of one of the pill boxes and open gun nest? Maybe a few other scattered randomly across the front line?
121190
Post by: zahnib
The sandbags look great! They add a lot of character I think. In terms of the colouring for your earth, as others have said above, I think a mixture of colours would be good. In the comments section on Philip's display board post, he goes over how he did his mud, maybe give his method a crack? Also I wouldn't worry too much about the colour of your earth mixture if you're planning on drybrushing it all later. The drybrushing should tie it all together and any underlying variation in colour might actually save you on some washes!
The board is looking great though! I really like the combination of old Citadel ruins and the Forgeworld trenches along with your sandbags
98217
Post by: Skinflint Games
Man, this thing is going to deserve it's own room at Warhammer World by the time it's done
21480
Post by: btoliver311
Hey everyone,
I took your advice and mixed multiple colors for the ground cover. I think this came out pretty well. I did a base on everything with the earth/coffee grouts and soil, then added some smaller sections on top of just earth grout & soil (the lighter areas), then did some more sections, slightly larger, on top in just sable grout and soil (the darker areas). I think the variation helps. What do you think? How are the colors? Do you think maybe another light sprinkling of the earth/coffee to lighten it up and bring it all together?
Color key:
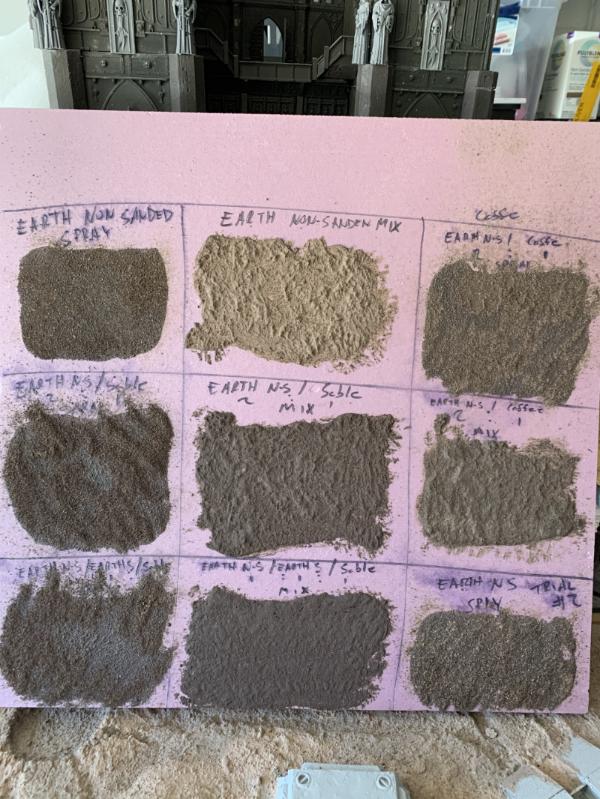
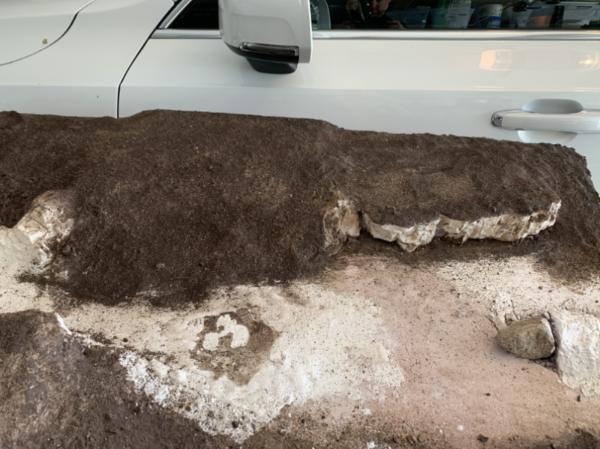
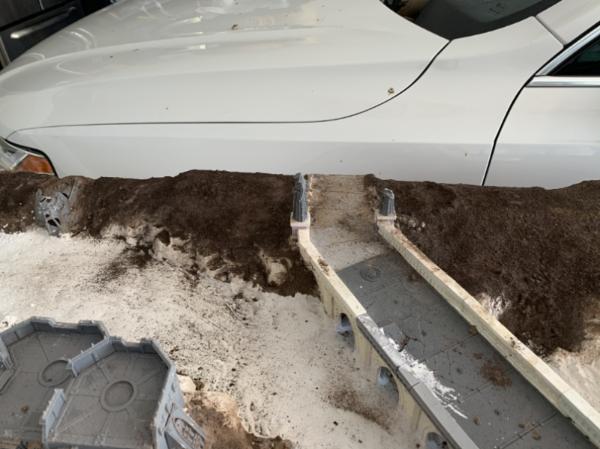
Looks a little lighter up close
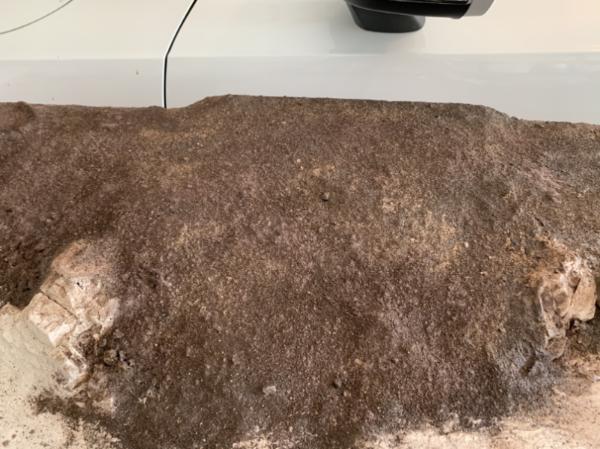
On another positive note. I think I got the glue mix down now. I’m spreading glue down (not watered down), sprinkling the mix, applying 50/50 isopropyl alcohol/ water, & finally litter lay soaking it 3-4 times over with a 50/50 glue water mix out of a spray bottle. This stuff is hard as a rock now
126587
Post by: OscarWao
I‘m impressed with the workmanship throughout. Thank you for documenting your progress here.
121190
Post by: zahnib
I think that's looking pretty good! The bottom picture looks to have a nice variety of colours. Glad to hear you've found a good glue method as well
73124
Post by: moskolector
Nothing more than WAHO!!!!
13664
Post by: Illumini
That was certainly the right call to mix them, much more realistic looking
21480
Post by: btoliver311
Hey guys,
Finally got the new ground cover mix on the Trench Board. Took a bit because I wanted to get some base layers of paint down first
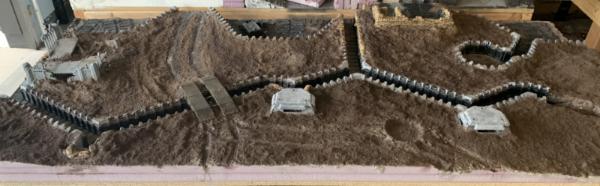
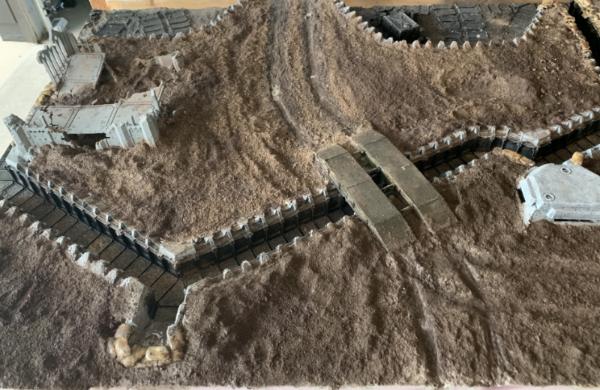
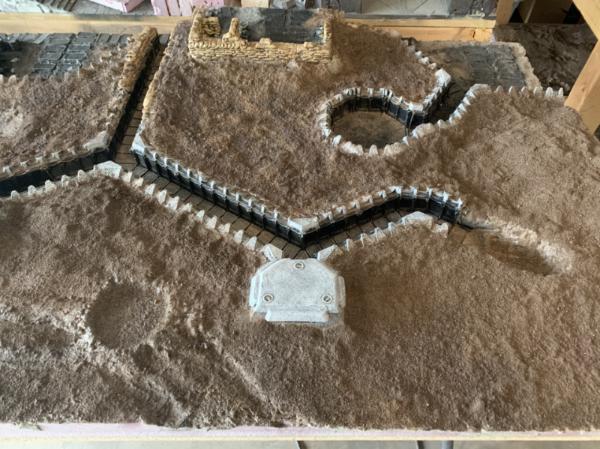
Pairing still needs some work but you’ll see I got a base and wash on the sandbags, a grey base, wash and highlighting on the cement pill boxes/trench tops and a dry brushing of gunmetal inside a lot of the trench areas
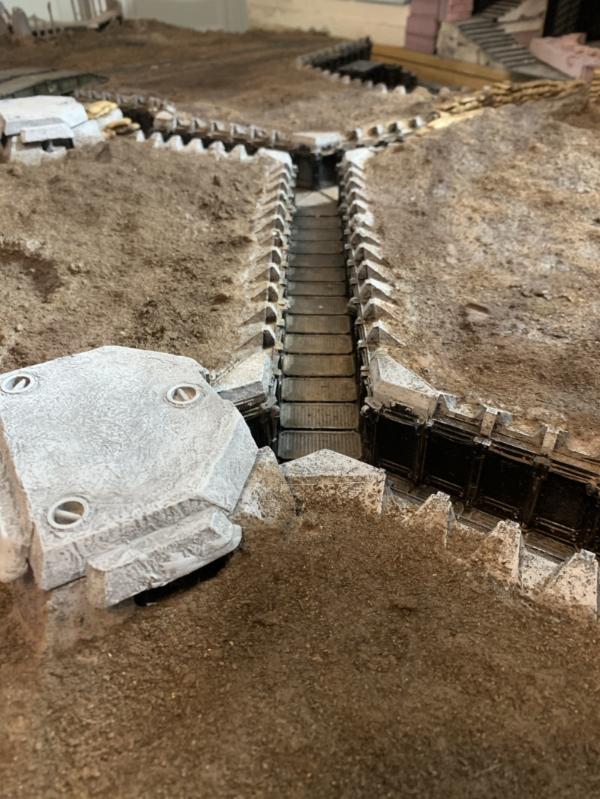
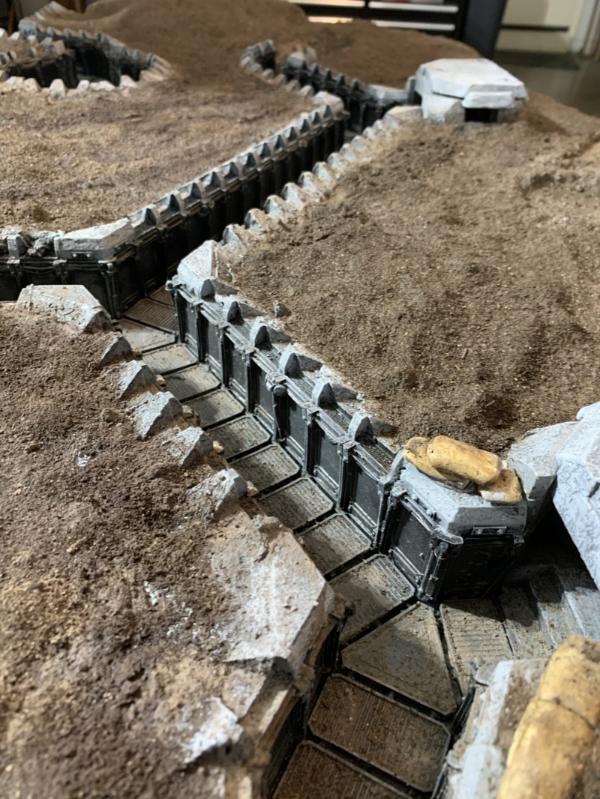
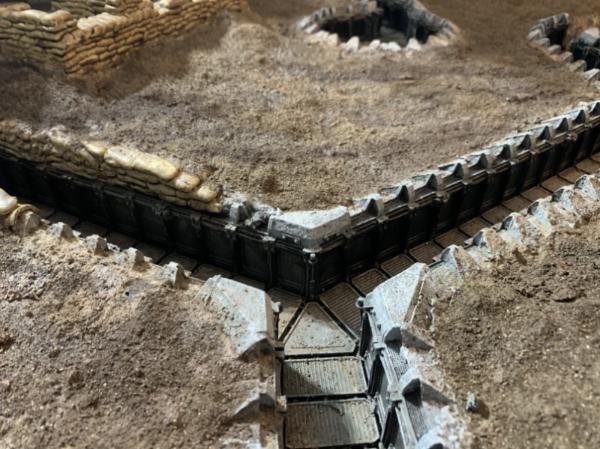
Hopefully I can finish up the base metal coat this week so I can finishing adding dirt/mud into the back cannon positions
Then I’ll probably need to wash everything and highlight the trench. Sandbags obviously need to be painted too
What do you all think? I like the darker soil. I think it will help the light snow fall pop
13664
Post by: Illumini
Good to see some paint on the board as well, overall it looks smashing. The bunkers look a bit too light, but that could be the photo
121190
Post by: zahnib
The earth is looking great!! Awesome to see some paint on other parts of the trenchwork as well. I'm not sure if its intentional but in the second last photo is that a bit of pooling water? If so I really like it, if not could be a nice addition to some of the deeper and older holes in the battlefield
21480
Post by: btoliver311
Spent yesterday making a mess.

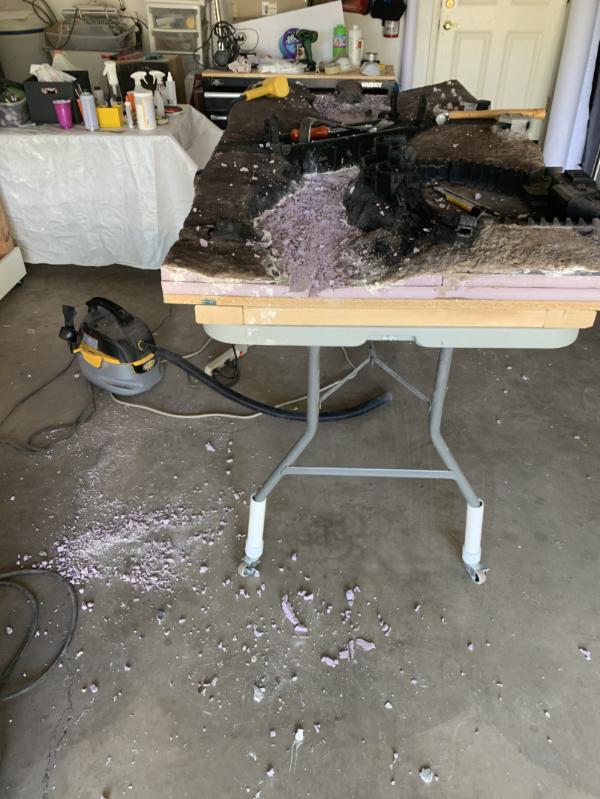
Translation carving the dry creek board deeper to make it semi-flowing creek. I still need to do a ton to this board but thought I would at least post an update. The concept now is to have the creek/river flowing but really shallow in most spots or have rock build up to make fords to indicate that it is crossable/playable.
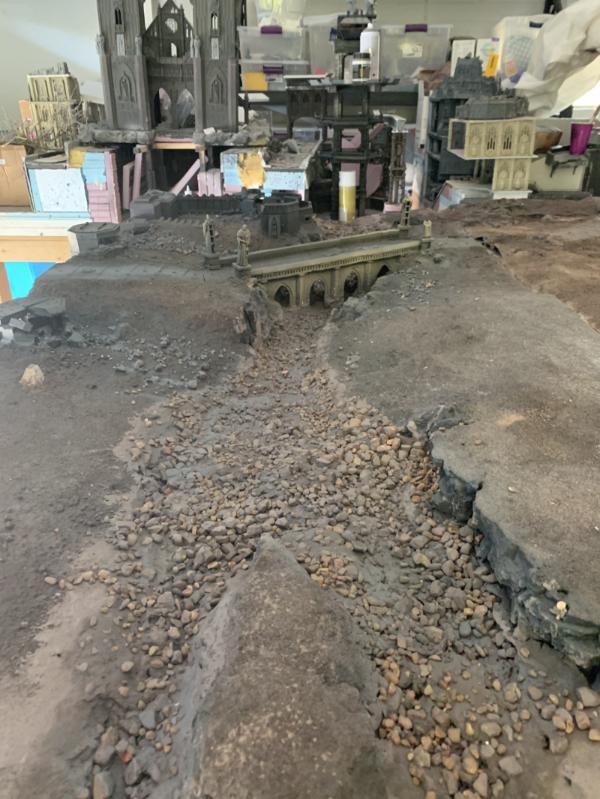
We also got some the the corrected soil mix on the middle “dead zone” table but the colors are a bit off from the “trench board”. Will need to put another coat of the dark mix on to blend the two. * note the creek board doesn’t have the correct soil mix or colors on it yet either
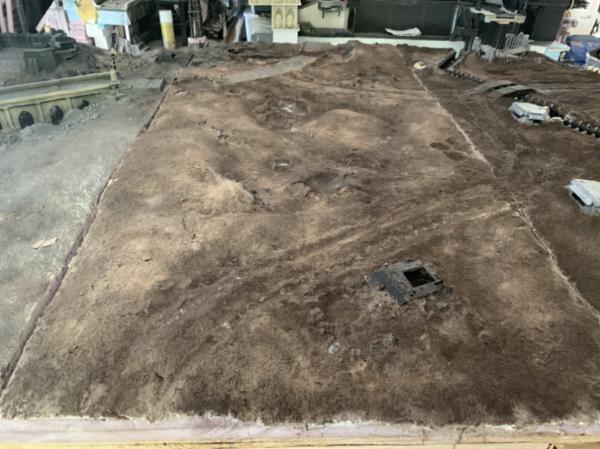
And some shots of the three together since it’s been a bit
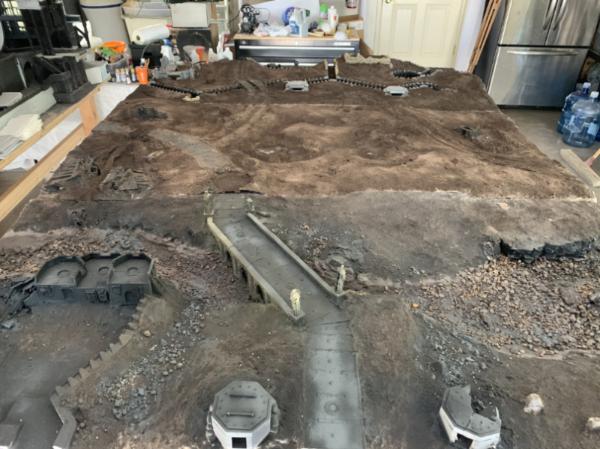
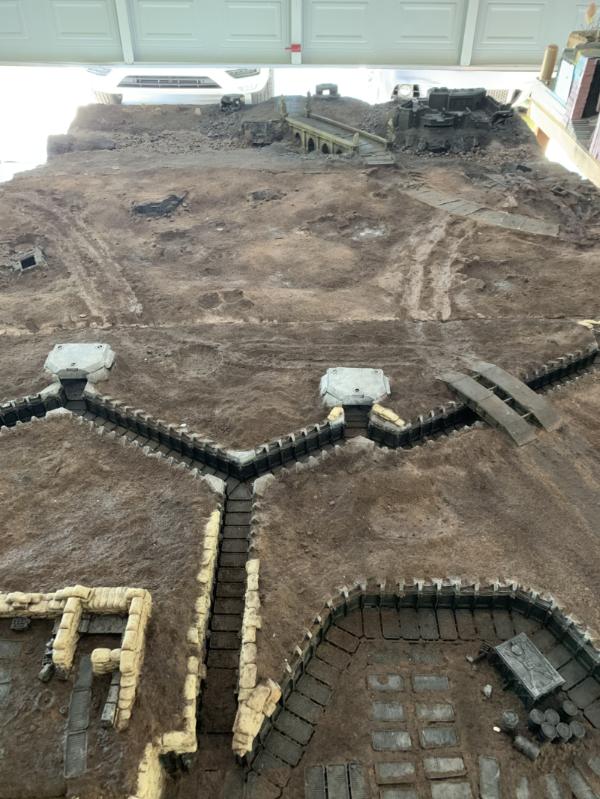
121190
Post by: zahnib
Far out dude its looking awesome!
18980
Post by: Arakasi
It's looking really good now (the soil - the rest was always looking good!). You really only need to put the main emphasis in blending across the board joins - that is what stands out as "unnatural" - and then randomise to taste.
84491
Post by: gobert
The soil seems to be getting closer. Will you be mixing up a batch to dot around all three boards once you’ve done the creek board?
21480
Post by: btoliver311
Yes. I did a blend batch yesterday but I don’t think it turned out so great. I did the good dark mix all over all three but then a light mix sprinkled over them more sparingly. That would have been ok maybe but I thought there was too much lighter mix and decided to hit with the air compressor to get a little of the lighter mix off. Instead it blew the lighter all over all the middle board. I didn’t get a picture either so I’ll need to reassess when I get back from vacation but It’s not great.
At this point I’m about over trying to match the grout mixes and boards. I plan on blending with spray paint or airbrush from here. Maybe 1 or two more colors. Hopefully I can keep the variants I have and not use much paint but just enough to blend. The texture is fine
Here’s a picture of the boards how I left them and the reason my car is always filthy

98217
Post by: Skinflint Games
Dude, that is one fething beautiful mess
114533
Post by: Harbringerxv8
The full trench board looks amazing. Very evocative, with plenty of interesting quirks littered throughout. The ground looks wonderful on each individual segment, but I'll echo what others have said that there is a bit of an artificiality at the joints. Maybe a final drybrush over those areas to tie them together?
This is a fantastic project.
21480
Post by: btoliver311
As posted previously trying to get all the colors to match on the three board using the different soil and grout mixtures just wasn’t working.
To blend the tables back together we had to bust out the spray paint.
Here’s the before
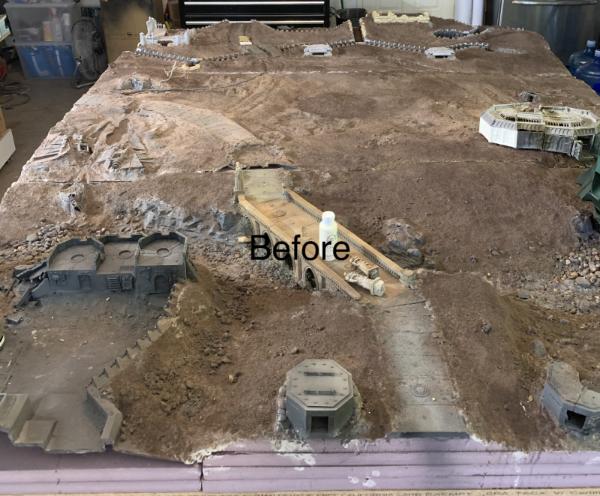
And the after(with titan for scale)
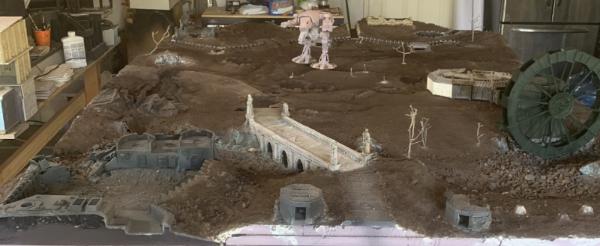
It’s a little too monotone now but I plan to do another grout/soil pass without a lighter shade. I also kind of think the darker dirt will pop more with the snow.
Here’s the view from the other side
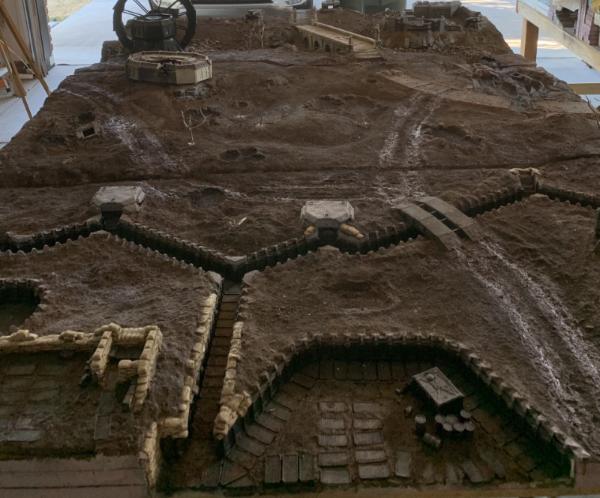
You might also notice we have a place keeper trees in and placed the WIP wind/water mill on the table
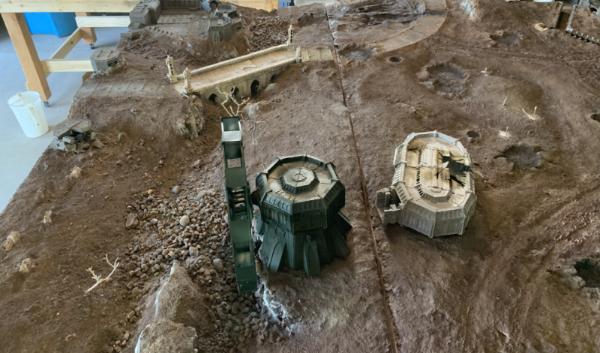
Still a ton to do but at least the major color disparity issue is behind us
117025
Post by: Emperors will
Holy cow that is looking crazy good.
29465
Post by: fingol23
This board would be such a dream to play on. The tracks running across the trench and no mans land boards are a great touch.
121190
Post by: zahnib
That's looking awesome btoliver311! The spray really tied those board pieces together. And I think you're right regarding the dark soil working better with the snow. It'll help give that wet frozen ground look.
The board is looking really good, nice to see a casual titan placed for scale And that waterwheel is huge!!
21480
Post by: btoliver311
Thanks guys,
I’m feeling more comfortable with the table too.
I also just started making the trees no idea what I’m doing but it’s kind of fun. Like making little drunk bonsai trees
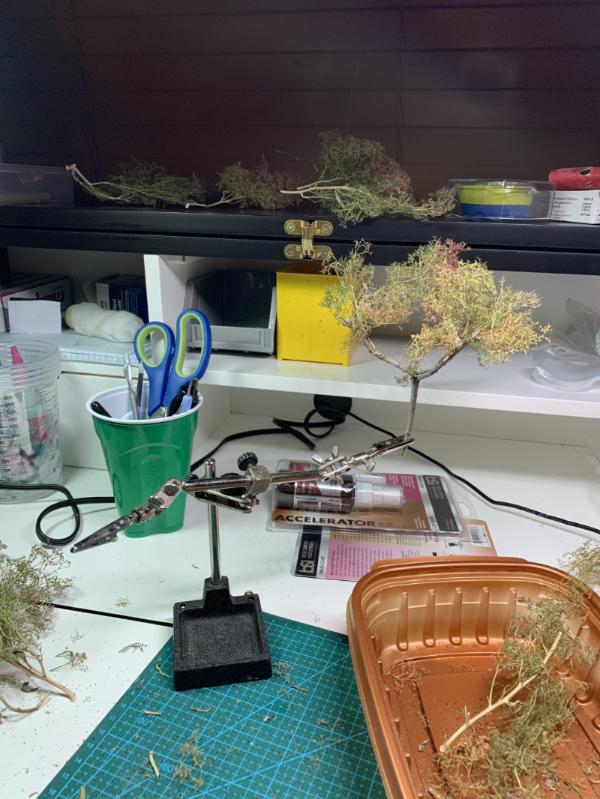
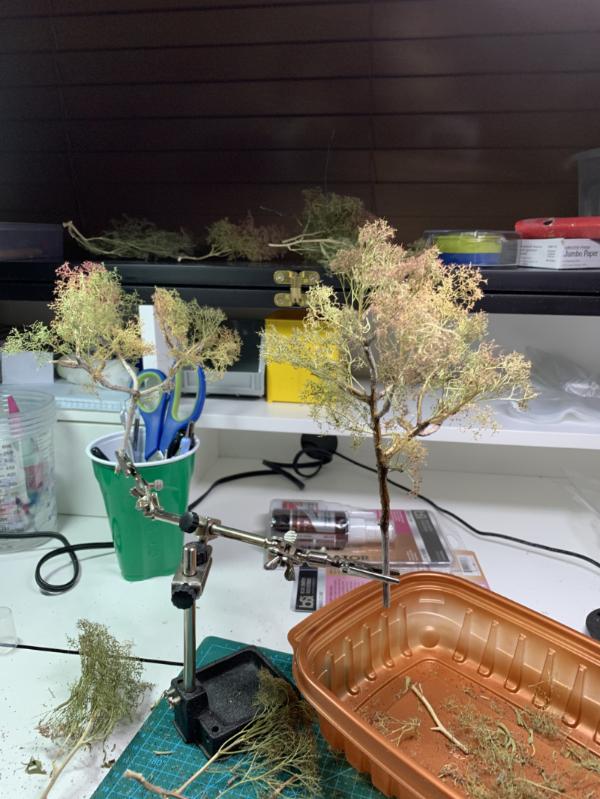
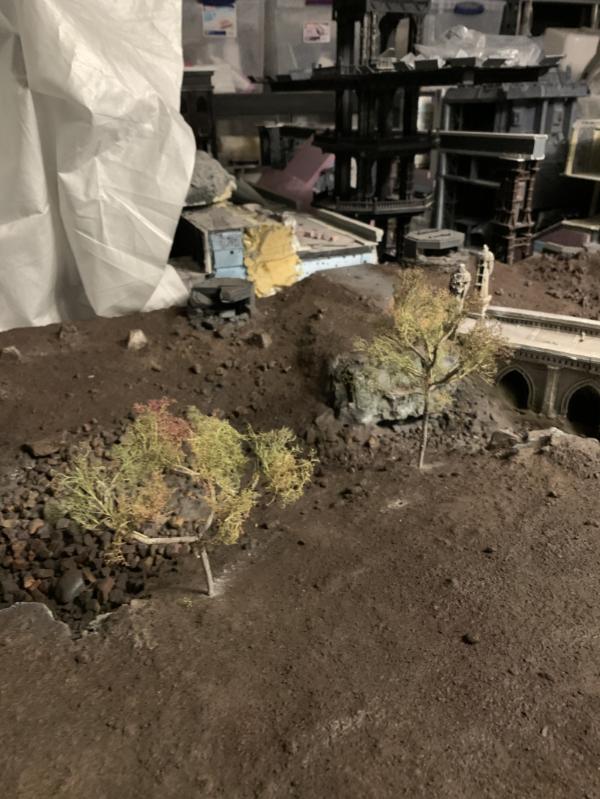
What do you think?
Any one have experience with theses?
I’m not planing to flock them. I think they should be leafless and just have a sprinkle of snow. However I think the color could be off. Should we paint them? Maybe grey or brown?
121190
Post by: zahnib
Those trees look great! The colour does seem more like summer or autumn though. Also if they are on a blasted battlefield maybe fewer branches and no foliage? Like those classic pictures of the Somme. But as I said the trees themselves look top-notch, maybe just a bit out of place
21480
Post by: btoliver311
@zahnib
Can you explain that process? I don’t think I fully understand how all the trees had their branches blown off. Was there just that much shelling that they were all hit at some point? We’re the fires as well? We’re there larger concussions?
I’ve read about it a little bit I guess just understand how everything was hit. Maybe just areas? And In that case I will definitely try to imitate in my dead zone but want some of the other areas to have a couple unmolested trees
18980
Post by: Arakasi
I suspect he means like your inspiration shots for the mud - check out the trees in those same images.
121190
Post by: zahnib
btoliver311 wrote:@zahnib
Can you explain that process? I don’t think I fully understand how all the trees had their branches blown off. Was there just that much shelling that they were all hit at some point? We’re the fires as well? We’re there larger concussions?
I’ve read about it a little bit I guess just understand how everything was hit. Maybe just areas? And In that case I will definitely try to imitate in my dead zone but want some of the other areas to have a couple unmolested trees
I'm not totally sure of the exact process but I would guess a combination of blast waves and shrapnel from constant shelling would just shred anything less sturdy than a trunk. I had a quick wee look and it turns out the particular picture I had in my mind was from the Battle of Passchendaele which I'll pop below. Good thinking with having a bit of variety though. That could be a good way to show areas of more intense fighting.
 Automatically Appended Next Post: Automatically Appended Next Post: Arakasi you got it mate
21480
Post by: btoliver311
Yeah, I’m just trying to figure out how to incorporate some of these type of trees with this dead zone look for one area but also have some other areas with some fuller. With the snow fall and far less blast craters I think the table may be more of a cross between this dead mans style and battle of the bulge. Automatically Appended Next Post: I guess the point was I’m trying to decide how the trees were destroyed so I can indicate that on my board. Like I was thinking the ground would need to all be scorched and black across the whole area due to fire but if it’s really from shelling I don’t have enough craters Automatically Appended Next Post: Old pic but the Possible tree layout
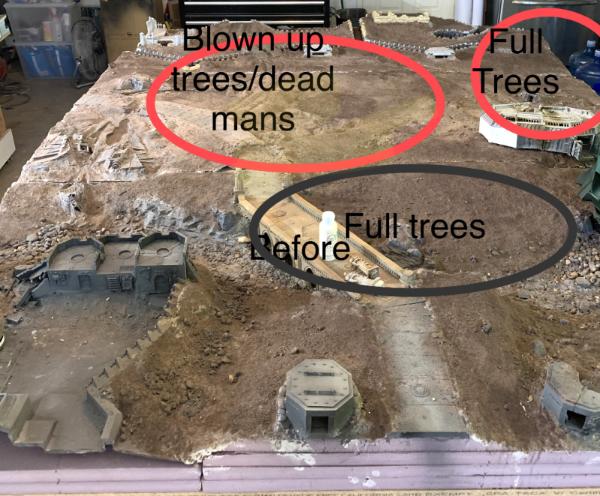 Automatically Appended Next Post: Automatically Appended Next Post: And here’s the goals for the light snowfall
From a tutorial online. Can’t source now
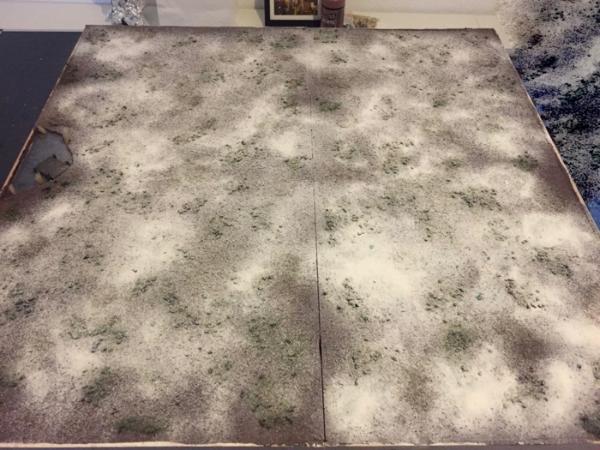
And the technique product I will be using is from Luke’s Aps Witcher diorama
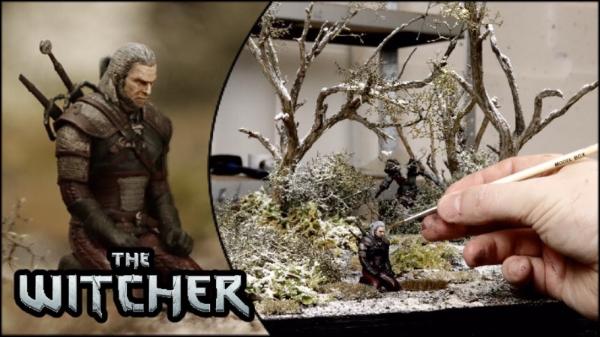 https://youtu.be/21ddQphUhoE
18980
Post by: Arakasi
I suspect your full trees are going to make the most sense in the "quietest" areas of the battlefield - ie not next to or between anything that could be bombed, shelled, shot through etc. That... doesn't leave a lot of areas .
Sheltered between buildings with limited fire arcs might work too - between your two marked Full Trees areas above - protected by the sloping river bank and bunker.
Alternatively, one or two "lucky" lone trees could pretty much go anywhere.
17738
Post by: Briancj
A note, planted trees cannot be moved during gameplay. Sometimes, they really get in the way.
My thoughts would be to ensure the trees are out of the way.
--Brian
21480
Post by: btoliver311
Not the best picture but we Made some progress today that I wanted to show
Trees glued in, mill painted, more dead/blowup trees added and some sand (which really needs to be blended in better) added.
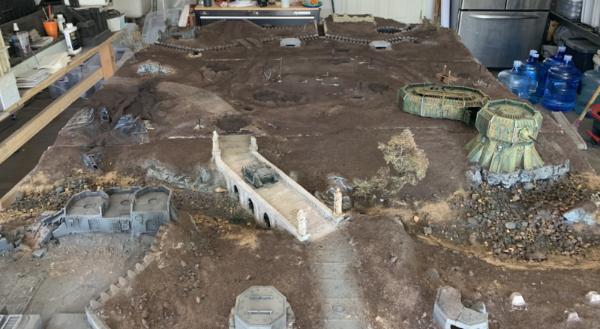
From the other side:
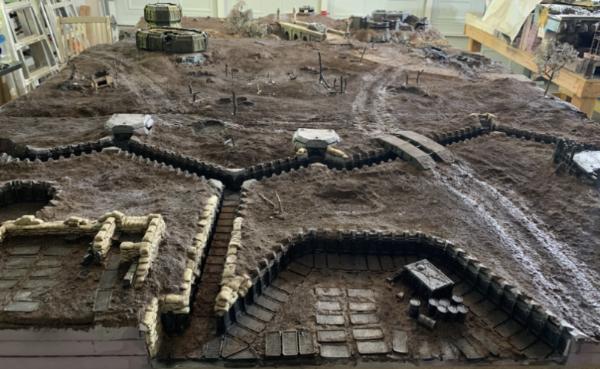
The mill a little closer (still needs the water wheel, the side posts added and to get ground/plaster pushed up to it.

And per our discussion about how the trees should be dead/blasted we added a bunch more and pushed the live trees towards the creek and board sides but they aren’t showing great in the photos.
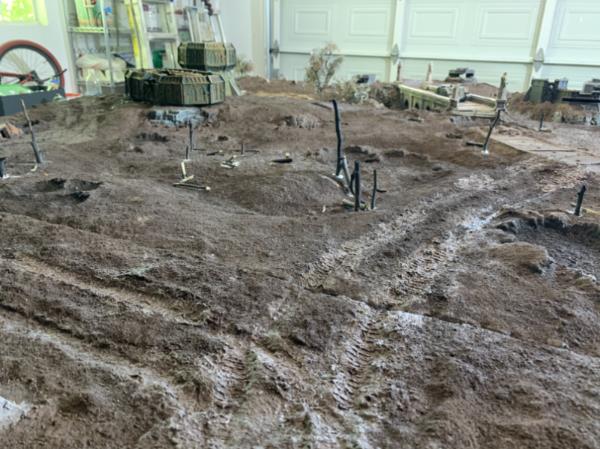
And another angle I just thought was kind of cool
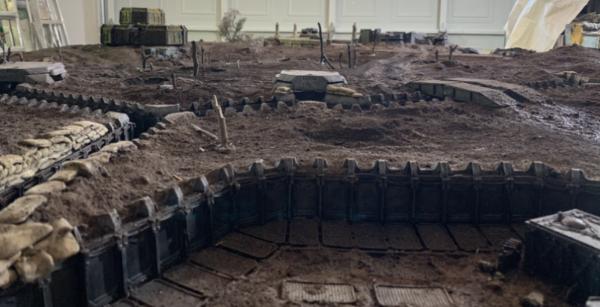
121268
Post by: Gwyn chan 'r Gwyll
The dead trees really add a lot to the board in terms of realism, fantastic.
69802
Post by: BigJim
This is amazing! Really looking forward to seeing those trees!
126796
Post by: maxwin
Awesome work, looks amazing!
121190
Post by: zahnib
Looking good! Nice to see that old Rhino on the bridge as well
21480
Post by: btoliver311
Sooooo this is what I got done today
One crater
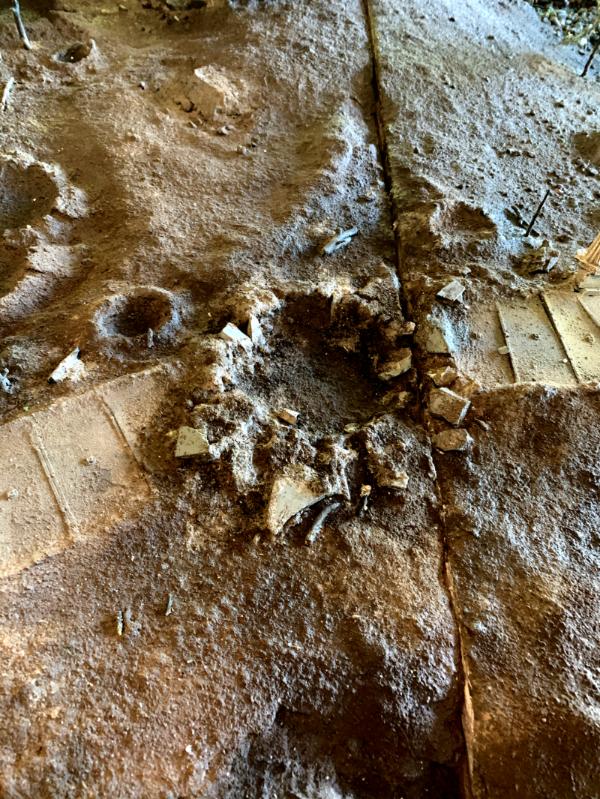
And this is what kirque finished
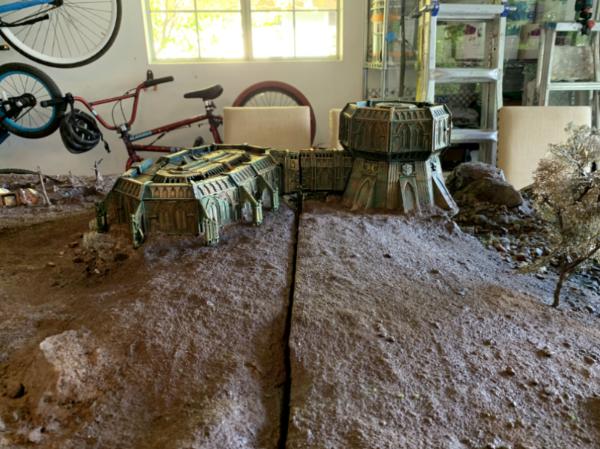 Automatically Appended Next Post:
 The mill ended up on a table split so the connection had to be cut
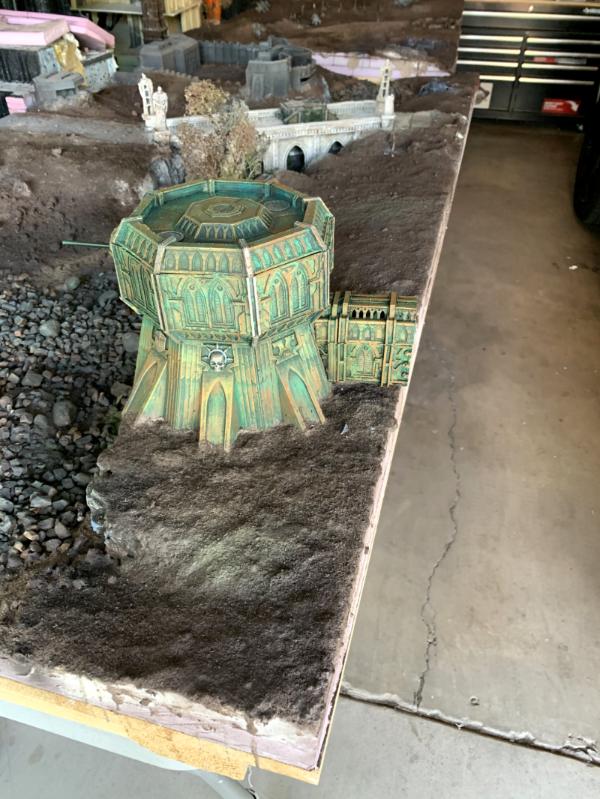
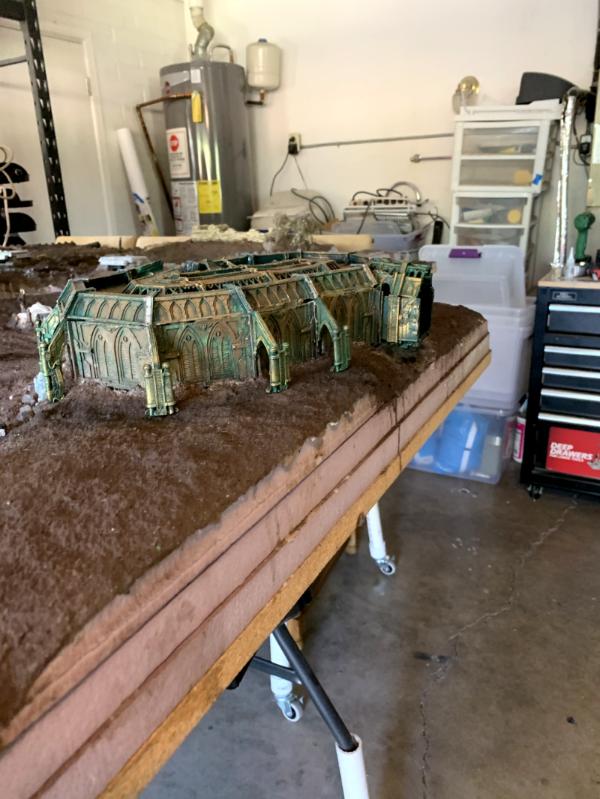
108429
Post by: g0urde
Absolutely magnificent! Always a pleasure to follow your thread.
123945
Post by: balmong7
This board is really coming together. You guys should take the table on a world tour when it's done so we can all appreciate the workmanship and maybe play a game or two on it.
88080
Post by: ciuncky
Impressive stuff, i must have wasted at least half an hour of company time browsing this!
I love scratchbuilding myself too, and this would be what i'd do if i had plenty of space, ideally a full room just for gaming. Mancave, anyone ?
Keep at it man! Ya got yourself a new subscriber haha
21480
Post by: btoliver311
Here are all the ground covers we have prepped to put on the table prior to a light snow cover later. Would like to get some feed back from the community for where you all think these should go?
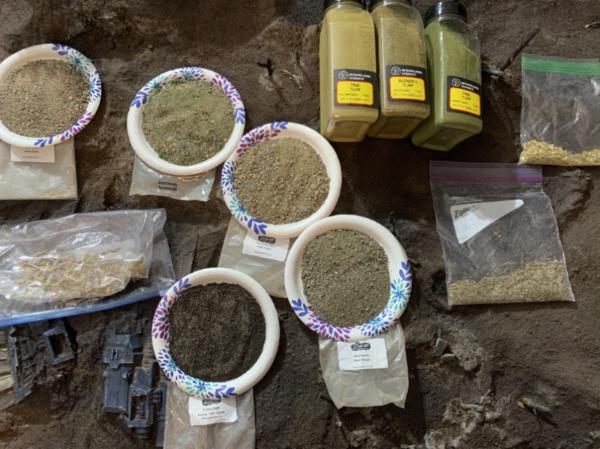
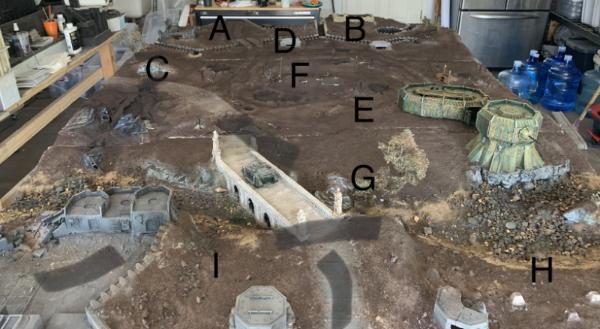
SAND ROCK MIX:
Unfortunately all of the ready base stuff from geek gaming look super close to one another and are pretty light. Where would you put this?
- along the creek
- in front of rock croppings?
- anywhere else?
DEAD FOLIAGE:
Agian pretty light outside of the forest ground cover by geek gaming.
- was thinking just mixing again and piling around the dead trees?
GRASSES (fine yellow, burnt grass and earth blend):
-again should I just mix these or use separate?
- what areas? I’d like to avoid anywhere near the trenches or in the dead zone proper.
- maybe the big hill by the mill
- and the other two small hills?
21480
Post by: btoliver311
Couple Quick videos of the whole trench board
First in its current state Before we added flock, ground cover and water effects
https://youtu.be/sCLr1md32ZU
And here is thr after ground cover and some water effects
https://youtu.be/lXIcALQzZTU
Light snow and more water soon
121190
Post by: zahnib
Looks great! Hopefully you'll have better luck with the water on your second pour
21480
Post by: btoliver311
Anybody on Dakka still? We are finally back it it with a new table and some 3D printers
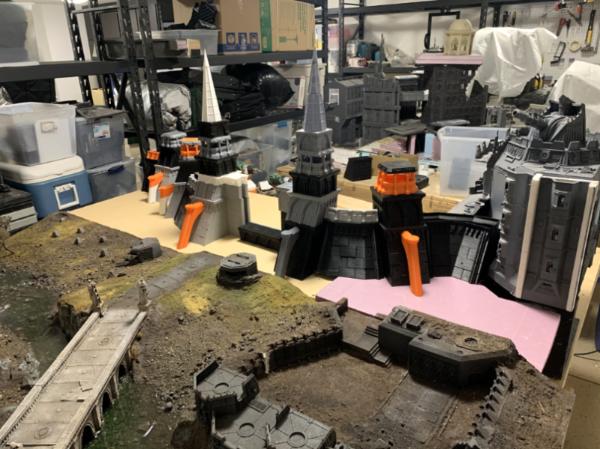
13664
Post by: Illumini
Good to see you are still alive and kicking.
3D printed fortress walls for the win!
123945
Post by: balmong7
A new table!? How big is this board going to get? lol
21480
Post by: btoliver311
Freakin big.
Here’s a view from the back.
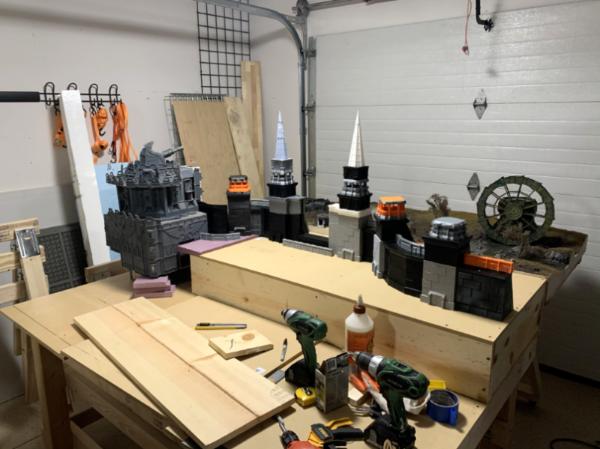
123945
Post by: balmong7
Good god. I think we may really need another full video tour of this table here in the future. I wish I had the space and carpentry ability to put together a table like this.
1124
Post by: Captain Brown
There is no way Mrs. Captain Brown would let me monopolize the garage like that.
CB
98217
Post by: Skinflint Games
You people are insane. Good on you, long may it continue!
21480
Post by: btoliver311
As requested, an updated video with all 6.5 tables that total 23.5’ in length!
We’ve obviously added a lot more work to our plates but I’m really liking the layout and feel more now.
https://youtu.be/8bKgWYtuha0
And here are some pictures but honestly it’s pretty hard to capture this whole thing
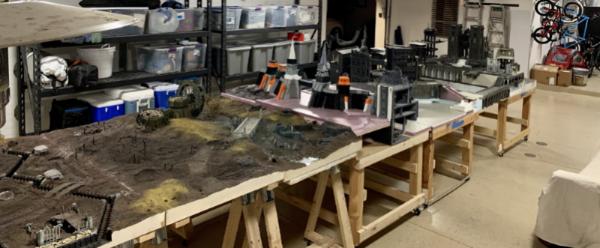
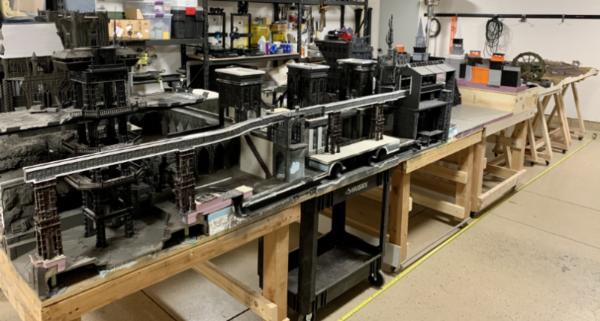
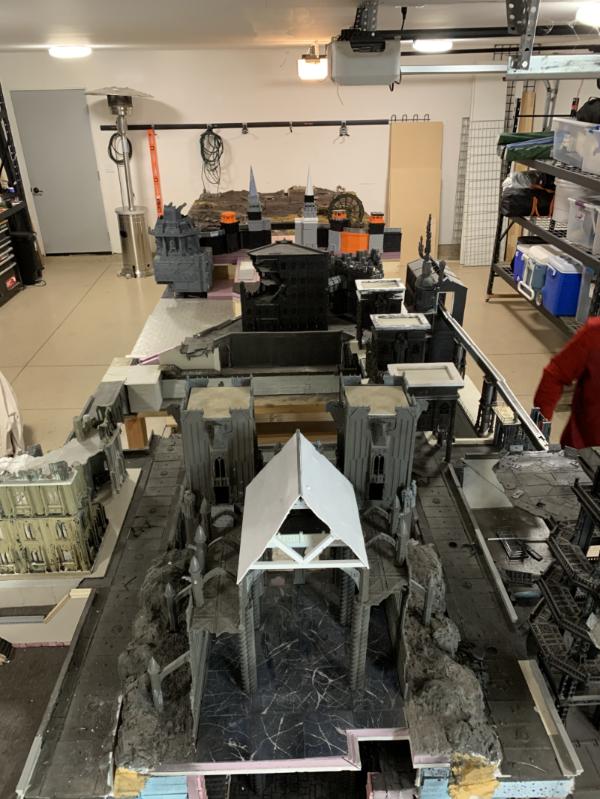

13664
Post by: Illumini
That view from the trenchline is great, looks truly terrifying to make the assault on the giant walls.
123945
Post by: balmong7
This table genuinely seems worth making a trip out to you to play on whenever it's finished. lol
98217
Post by: Skinflint Games
balmong7 wrote:This table genuinely seems worth making a trip out to you to play on whenever it's finished. lol
Agreed, and I say this from across the Atlantic
62835
Post by: IGtR=
Wow, just awesome.
I love the statement "honestly it’s pretty hard to capture this whole thing". I imagine a Praetorian general stood on the far end stating this to his staff officers. Never mind the practicalities of getting phots that do it justice!
Thanks for sharing
20609
Post by: Tyranid Horde
The scale of this is pure madness, great photos and WIPs!
29465
Post by: fingol23
Honestly every time you post an update I get more jealous of the people who will get to play on this thing.
21480
Post by: btoliver311
Another Quick video update
We are working hard
https://youtu.be/n59WDA6atEI
51870
Post by: Ezki
This is just madness! But in a good way.
Missed a few updates and boy has the table grew!
I like the video updates, you guys really seem to be having fun with the build
21480
Post by: btoliver311
121268
Post by: Gwyn chan 'r Gwyll
You guys are ridiculous!
61615
Post by: JeffyP
This project is truly inspirational! You guys are doing such cool work. Please keep posting even though you don't get enough love on here. And please please please post to instagram or reddit! You'd bring your work to so many more people. Keep it up!
21480
Post by: btoliver311
Haven’t done much lately. I got the resin printers working on some stairs, balconies and a bunch more sector mechanicus risers for the monorail extension.
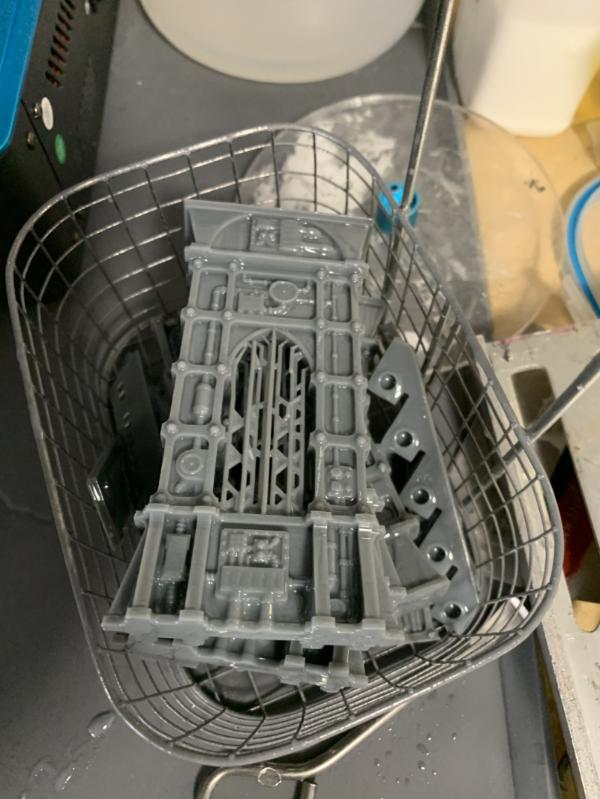
However I don’t think I’ve posted part of the new lower courtyard kirkee built. It’s right across from New building. I really like the wide stairs. Feels a lot more open and playable. On the right you will see one half of the frame for the tunnel that runs the width of the board. This might also be the first picture of the new paver material. I saw a Reddit post with some guy who used this vinyl wallpaper that looks like stones so we got a bunch. So we are ripping up all the old stuff and replacing with this. Ignore the color obviously
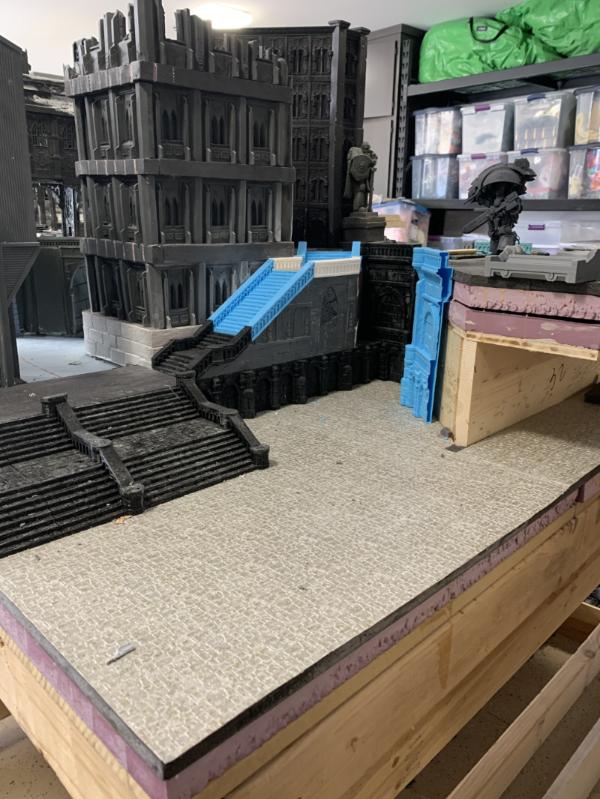
21480
Post by: btoliver311
121268
Post by: Gwyn chan 'r Gwyll
Oh wow.
Oh
Wow.
Imposing!
88921
Post by: Stevefamine
I want to be you when I own a house and have room for a table like this
Keep it up!
21480
Post by: btoliver311
thanks guys. my hope is to get it out to some of the big gaming conventions. does anyone know if that is that a thing?
13664
Post by: Illumini
That looks so amazing, real inspiring work!
123945
Post by: balmong7
I mean if you contact the conventions during their planning phase and say "I have this and would like to display it/make it available for play during the con" they may very well help you set it up.
Awesome to see paint on it.
62565
Post by: Haighus
Oh wow, that is a thing of beauty assembled together.
21480
Post by: btoliver311
Here are three small displays my friend, kirque/Doug, who I am building the board with just made and painted for his nephews.
He made these from insulation foam, cardboard and card stock. All miniatures were found free online and printed on his Mars pro. I can only hope our final table comes out half as good as these
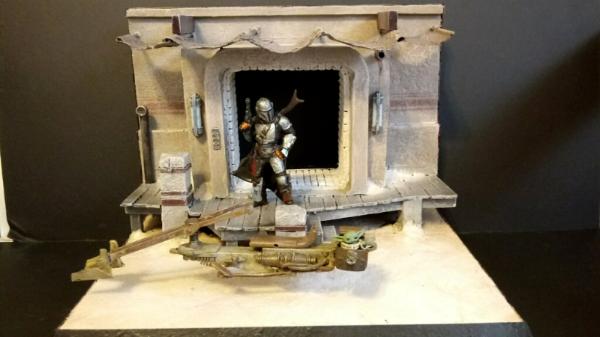
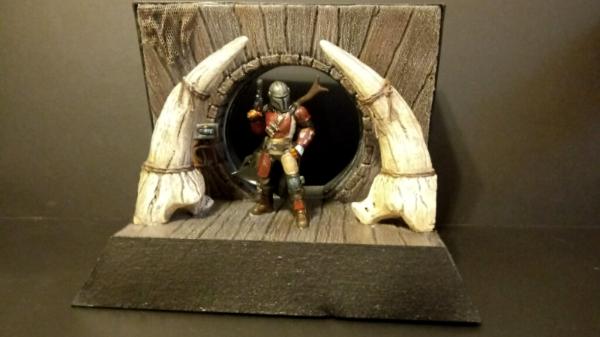
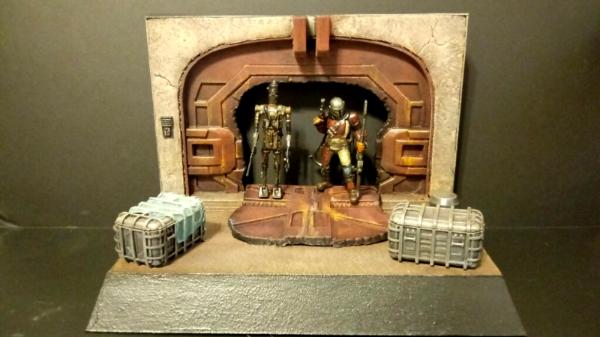
Table updates coming soon. We have been working on the expanded mono rail line, tunnel and new front steps for the cathedral
121268
Post by: Gwyn chan 'r Gwyll
Brilliant little displace scenes!
86442
Post by: bobbuilder
been a while since i checked in on this, fantastic
62835
Post by: IGtR=
Marvellous little diorama!
Thanks for sharing
86442
Post by: bobbuilder
really like the river and ground around it, epic build
98217
Post by: Skinflint Games
Wow. Bravo, you magnificent pair of maniacs!
121190
Post by: zahnib
Yesssss it continues! I had worried that the board was no more when I was last on here! It looks like you've made some rather large additions! Can't wait to see some more progress. And as balmong said I'm sure if you reached out to some local conventions/tournaments they would be more than happy to have your board as a centre piece of some sort
129174
Post by: zaza87
hi there, is the board still progressing? No update for a while!
88921
Post by: Stevefamine
Wonderful! cant wait for more
21480
Post by: btoliver311
Quick Update: Both Doug and I are still alive and have every intent to get back to this project q3 2024. We are pretty deep into other dorky projects: trying to get into the San Diego Comic-con costume competition AND a custom DnD campaign with all 3d printed buildings and a custom matching Unreal active map.
62565
Post by: Haighus
Glad to hear it
13664
Post by: Illumini
That is good news
121268
Post by: Gwyn chan 'r Gwyll
Excited to see what's next, in that case!
518
Post by: Kid_Kyoto
Following!
121190
Post by: zahnib
btoliver311 wrote:Quick Update: Both Doug and I are still alive and have every intent to get back to this project q3 2024. We are pretty deep into other dorky projects: trying to get into the San Diego Comic-con costume competition AND a custom DnD campaign with all 3d printed buildings and a custom matching Unreal active map.
Yesssss, the prodigal sons return!!
98217
Post by: Skinflint Games
Absolutely, this project is too damn awesome too see abandoned
|
|