| Author |
Message |
 |
|
|
|
|
Advert
|
Forum adverts like this one are shown to any user who is not logged in. Join us by filling out a tiny 3 field form and you will get your own, free, dakka user account which gives a good range of benefits to you:
- No adverts like this in the forums anymore.
- Times and dates in your local timezone.
- Full tracking of what you have read so you can skip to your first unread post, easily see what has changed since you last logged in, and easily see what is new at a glance.
- Email notifications for threads you want to watch closely.
- Being a part of the oldest wargaming community on the net.
If you are already a member then feel free to login now. |
|
 |
2020/04/04 12:14:18
Subject: 6’ x 10’ Cities of Death Board WIP (updated with video, custom ventrillion, tanks and monorail)
|
|

Regular Dakkanaut
|
How many sandbags are you estimating? What kind of resin do you sue for your casts?
|
|
|
|
 |
|
2020/04/04 12:47:24
Subject: Re:6’ x 10’ Cities of Death Board WIP (updated with video, custom ventrillion, tanks and monorail)
|
|

Sinewy Scourge
|
Had a lot of catching up.
Phenomenal work there! The size of this project amazes me. Keep it up!
The deadzone and the trench board are both looking really good and realistic.
Those sandbags turned out well. Most of mine looked a bit like bricks when I was making a much smaller trench display board.
|
|
|
|
|
|
2020/04/05 03:10:23
Subject: 6’ x 10’ Cities of Death Board WIP (updated with video, custom ventrillion, tanks and monorail)
|
|

Boosting Black Templar Biker
|
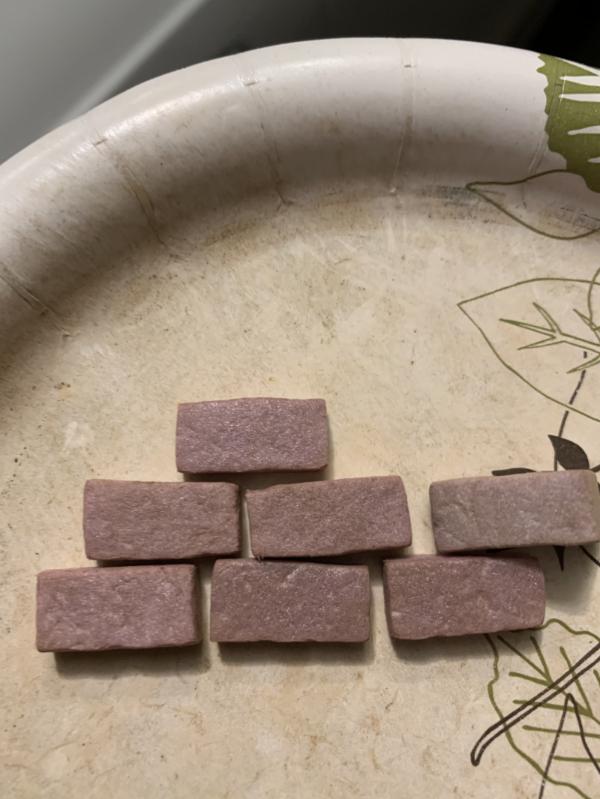
I’m not sure how many sand bags but at min I need to cover these areas where We dug our trench lower than the forge world trench plate walls
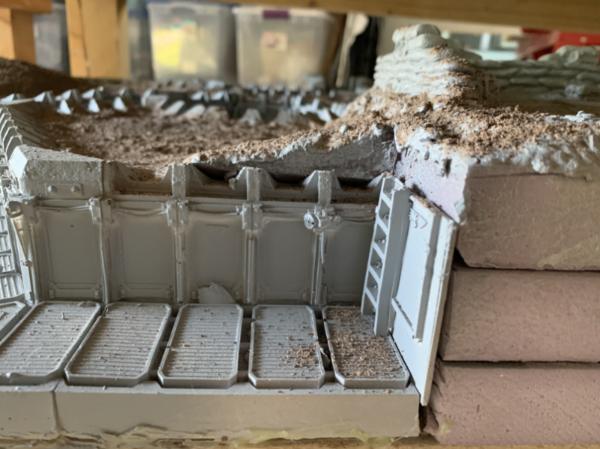
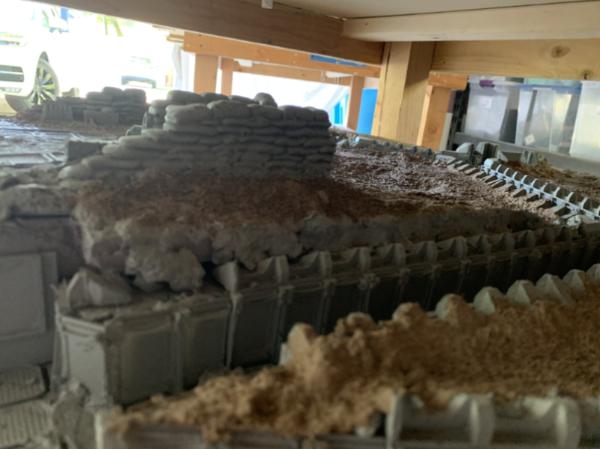
Didn’t have the best luck with the first set of sandbag casts. Lots of air bubbles but I did a second batch under pressure and about half of them came out.
Still, doing 10 at a time was going to take too long so I busted out a new product I haven’t tried before called aluminite mold putty
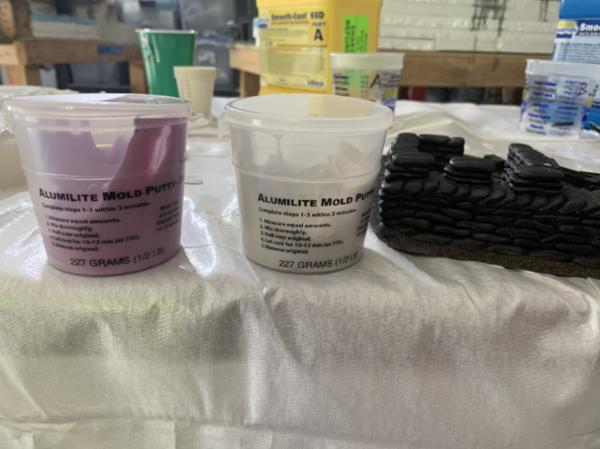
Not the most detail, and is prone to tear but It makes a really quick mold (pot life is like 3 min). So I stuck it to the side of a friends terrain piece that has a bunch of sandbags and made a surface mold.
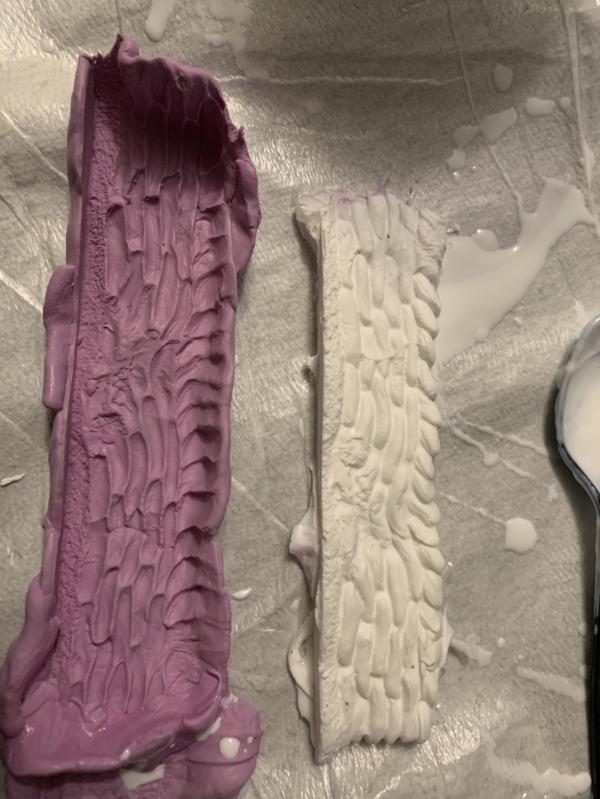
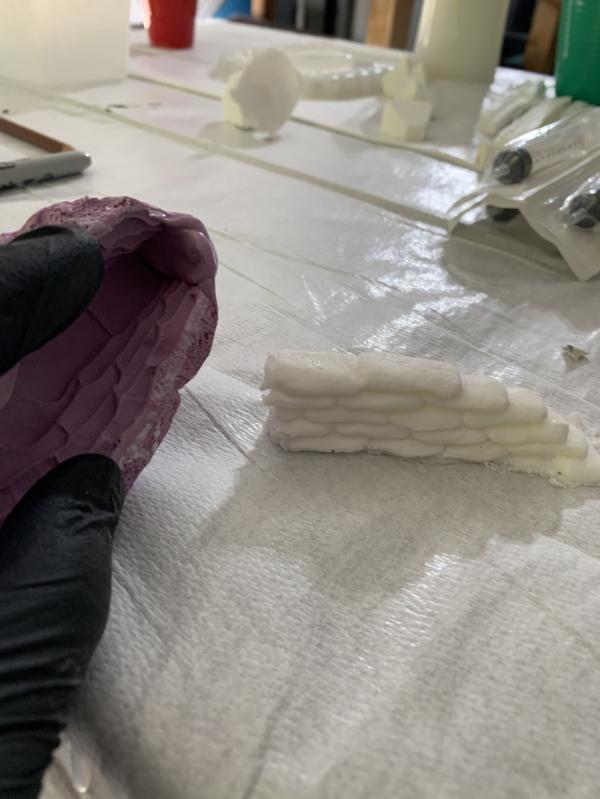
I’ll cut these down for the sides and ends and cover the exposed or bad areas with my own
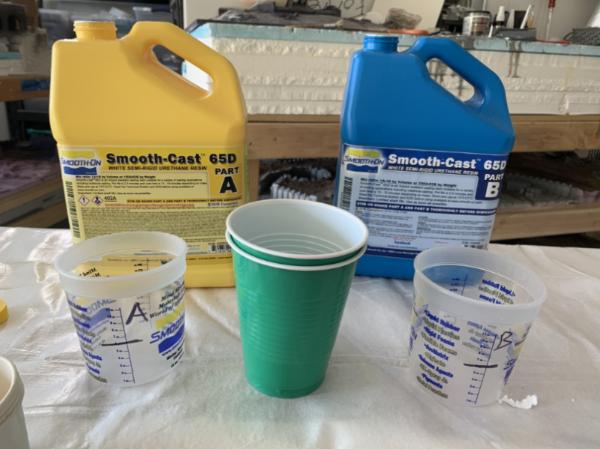
Oh, the resin I use is usually smooth-on 20-t but for some reason they gave me 65d this time, which I am not liking very much
|
|
This message was edited 2 times. Last update was at 2020/04/05 03:14:27
|
|
|
|
|
2020/04/05 08:26:08
Subject: 6’ x 10’ Cities of Death Board WIP (updated with video, custom ventrillion, tanks and monorail)
|
|
Regular Dakkanaut
|
I've heard good things about Smooth-On. Did you use that for the Forge Wolrd parts as well? Far out, what a huge project!
|
|
|
|
|
|
2020/04/05 13:57:51
Subject: 6’ x 10’ Cities of Death Board WIP (updated with video, custom ventrillion, tanks and monorail)
|
|
Boosting Black Templar Biker
|
Yes. Their stuff is the best I’ve found. Mainly because of the fact all the ranges I’ve used from them have been 1:1 which makes the process much easier
Just know, Casting can get expensive too. In my case it makes sense simply due to the high number of casts I need. With smaller numbers due to the learning curve, accidents and high material costs it can make a project pretty unaffordable really fast
But on the upside, it’s the only option if you need 8+ Bone-tithe Nexus Statues for the corners of a building. Even if they are a little sloppy 
|
|
|
|
|
2020/04/06 02:49:49
Subject: 6’ x 10’ Cities of Death Board WIP (updated with video, custom ventrillion, tanks and monorail)
|
|
Boosting Black Templar Biker
|
|
|
|
|
|
2020/04/06 22:07:29
Subject: 6’ x 10’ Cities of Death Board WIP (updated with video, custom ventrillion, tanks and monorail)
|
|
Regular Dakkanaut
|
How do you find it in terms of durability?? Yeah, I can imagine it takes a bit of practice which would be pricey and tools like a pressure pot would help with better results.
For old terrain that is OOP it seems like a great solution. The old Citadel ruins and jungle trees, as well as the larger scenery pieces that were made from a hard foam-like material, are prime examples.
|
|
|
|
|
|
2020/04/06 23:03:24
Subject: 6’ x 10’ Cities of Death Board WIP (updated with video, custom ventrillion, tanks and monorail)
|
|
Boosting Black Templar Biker
|
Great question and example.
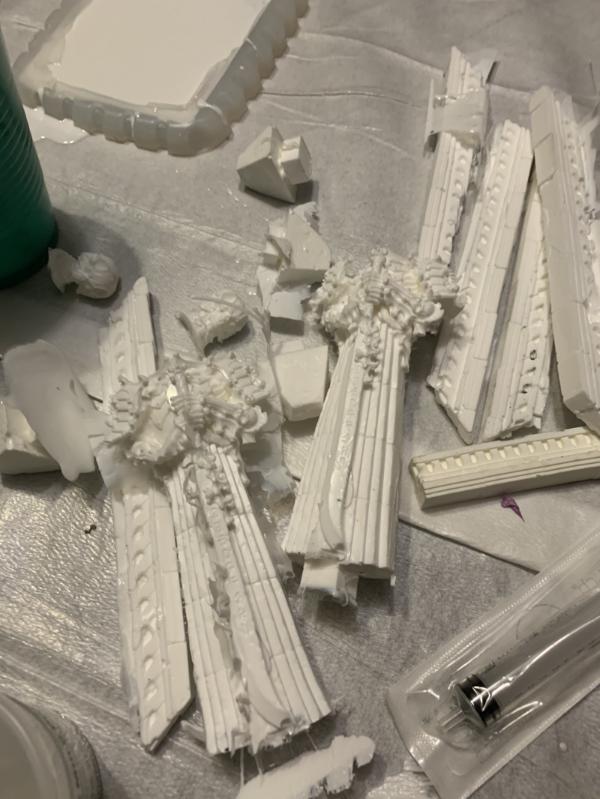
I like smooth-ons silicone “mold star” a lot too. The durability I get is probably around 18 good casts then It starts to rip and degenerate from there
The forge world ruins were some of my, if not my, first casts before I had a pressure pot and was just doing surface casts. You’ll see they make up two of my large buildings. I should have done the whole set in better quality before I chopped them all up :(
But I still have a box of semi-decent quality plaster wall sections
|
|
This message was edited 1 time. Last update was at 2020/04/06 23:04:24
|
|
|
|
|
2020/04/10 09:56:13
Subject: Re:6’ x 10’ Cities of Death Board WIP (updated with video, custom ventrillion, tanks and monorail)
|
|
Regular Dakkanaut
|
Hmm, good to know.  I'd love to start experimenting with casting. I've got a bunch of original FW Cities of Death terrain and it would be nice to be able to expand on it without taking out a mortgage  Also being able to make some 3rd edition jungle forests would be great, although they would be finicky to cast I think. Can you still get alright results without a pressure pot?
|
|
This message was edited 1 time. Last update was at 2020/04/10 09:56:40
|
|
|
|
|
2020/04/10 17:29:20
Subject: 6’ x 10’ Cities of Death Board WIP (updated with video, custom ventrillion, tanks and monorail)
|
|
Boosting Black Templar Biker
|
DO IT! What better time to learn how to cast and make a modular or fixed jungle ruins board!!
old forge world ruins covered in vines and mixed with 3rd editor trees would be amazing! A lost city. That could be combined with anything from chaos artifacts to web gates.
Like I said before the forge world ruins are the best thing to start with. You don’t even need a pressure pot to start with the ruins. If you are ok with them having flat backs you can start with surface casts. Look further back in this thread to see.
After that you can upgrade to pressure. Harbor freight has pots for less than $100 but the investment increases if you don’t have a compressor.
I’m excited for you. Get some silicon and get going man
——————————————————————————————————————————————————————————-
Automatically Appended Next Post:
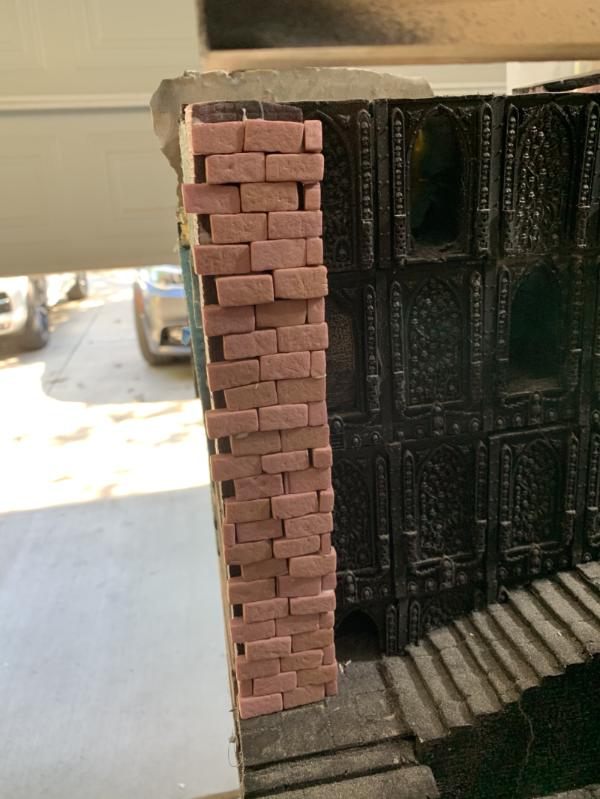
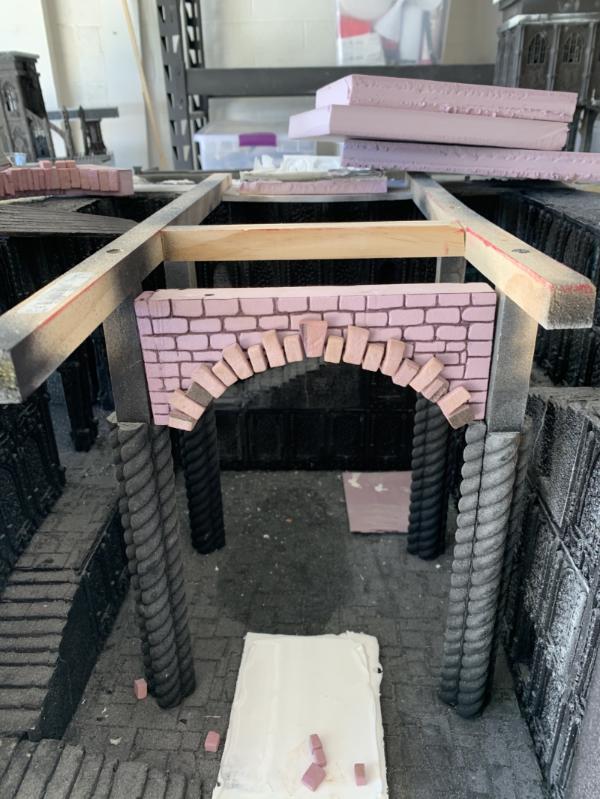
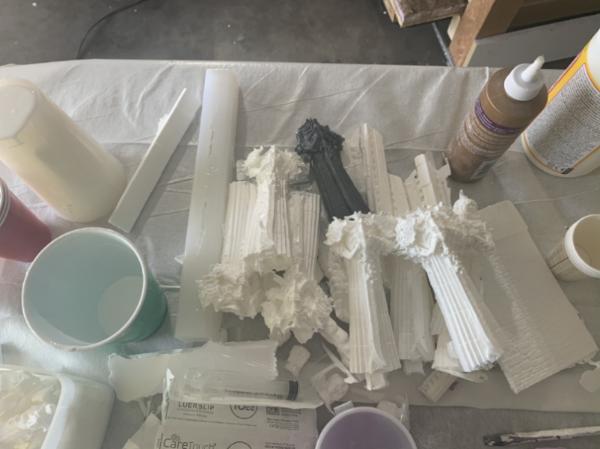
EXTRUDED STYROFOAM!
This may seem like something we should have explored Early but honestly I felt like we kind of did. All of the foam we tried to use rolling pins on didn’t work and the large river was foam but was never going to hold up once we added resin.
I think the biggest issue we had was we could never find a product that could make styrofoam strong enough to stand up to play.
But considering all of the ground surfaces are now made out of some plastic product or resin mold we made I think it’s safe to explore extruded foam for some of the vertical surfaces
That and I just keep seeing all these huge awesome projects made out of nothing but extruded foam and I can’t understand how they can build tables out of that and we can’t.
After watching several videos by Jeremy at black magic craft. I decided to give it a shot again. Here’s my first pillar
And a video I made about the whole process
https://youtu.be/GKtYKgTOxvQ
Here’s a link to the black magic crafts channel
https://www.youtube.com/channel/UC2Rlv-ug-mtnXuMwlpcqFgg
One thing I can’t figure out are arches. So I cheated. What do you think about this mix of the individual brick technique mixed with the carved/drawn on option?
|
|
This message was edited 3 times. Last update was at 2020/04/10 21:10:53
|
|
|
|
|
2020/04/11 11:36:29
Subject: 6’ x 10’ Cities of Death Board WIP (updated with video, custom ventrillion, tanks and monorail)
|
|
Regular Dakkanaut
|
 btoliver311 wrote: btoliver311 wrote:DO IT! What better time to learn how to cast and make a modular or fixed jungle ruins board!!
old forge world ruins covered in vines and mixed with 3rd editor trees would be amazing! A lost city. That could be combined with anything from chaos artifacts to web gates.
Like I said before the forge world ruins are the best thing to start with. You don’t even need a pressure pot to start with the ruins. If you are ok with them having flat backs you can start with surface casts. Look further back in this thread to see.
After that you can upgrade to pressure. Harbor freight has pots for less than $100 but the investment increases if you don’t have a compressor.
I’m excited for you. Get some silicon and get going man
You've read my mind! Originally I was planning on theming my collection around a war-torn city in the midst of being destroyed but looking through some old 3rd edition sourcebooks the idea of making my battlefield an overgrown ruined city has really taken hold. But those jungle tree kits are ludicrously expensive to pick up. I've also been looking into pewter casting to replace some missing hands on some second-hand Wolfen models I picked up. Ahh, so many projects! Your enthusiams is insipiring!
Good to know about the pressure pots. We don't have Harbour Freight in Australia unfortunately but I'll have a look at some local hardware stores and see what they've got.
Extruded foam stone-work is looking great With the archway, I think maybe making them less pronounced would sell the effect more.
|
|
|
|
|
|
2020/04/11 15:52:30
Subject: 6’ x 10’ Cities of Death Board WIP (updated with video, custom ventrillion, tanks and monorail)
|
|
Boosting Black Templar Biker
|
Ugh. You’re right. Just cut foam corners that thin is still too hard for me. Maybe I can fake it
Yeah. If you can’t tell I really like your jungle them for a table. There are a lot of other options for trees too
Maybe just start with casting your FW ruins
|
|
|
|
|
2020/04/12 00:32:23
Subject: 6’ x 10’ Cities of Death Board WIP (updated with video, custom ventrillion, tanks and monorail)
|
|
Regular Dakkanaut
|
btoliver311 wrote:Ugh. You’re right. Just cut foam corners that thin is still too hard for me. Maybe I can fake it
Yeah. If you can’t tell I really like your jungle them for a table. There are a lot of other options for trees too
Maybe just start with casting your FW ruins
What if you just sliced through it lengthways with an x-acto? Haha, I'm excited now as well! Although yes, I think starting with casting some ruins would be a good idea before I go too wild with plans. It looks like Smoooth On isn't so easy to get here but I'll keep my eyes out. In the meantime, I'll just have to live vicariously through watching your progress
|
|
|
|
|
|
2020/04/12 03:35:59
Subject: Re:6’ x 10’ Cities of Death Board WIP (updated with video, custom ventrillion, tanks and monorail)
|
|

Posts with Authority
|
This sums up my feelings after reading through 26 pages:
https://www.youtube.com/watch?v=1DNbkKBW0K8
A spectacular sight, an awe-inspiring journey, and a bit trippy.
For the arch, I think take a cue from the flagstones you did a while back: cut (or mark) bits of stone to fit the individual gaps and crannies that appear. I have a feeling you were going to do that for the finished product anyway, but I thought I'd emphasise it because the arch stones do look a bit laid-over the rest of the brickwork, rather than integrated, and you did mention that bit of a blind spot with arches.
I don't think you have to have the arch stones projecting from the wall, or have arch stones with different, alternating heights. For the latter, those that I see in an image search usually have plain old irregular stones built on top, filling in the spaces. The others have more even arches, surrounded by even, rectangular bricks. (Cut to fit against the arch, obviously) Personally, I'd go with marking all the brick shapes into the one piece of foam, though I can understand if you want to go with other methods and looks, for effect.
|
|
|
|
|
|
2020/04/14 14:10:45
Subject: 6’ x 10’ Cities of Death Board WIP (updated with video, custom ventrillion, tanks and monorail)
|
|
Boosting Black Templar Biker
|
I’ve put some of this foam stuff on hold. to be honest this is mainly because the final fantasy 7 remake just came out but also because I think I need some better tools to get this done right. Cutting thinner brick, corners and arches just isn’t possible with what I have. So I ordered a guider pro and arch template from the company black magic craft recommended, shifting lands.
https://shop.shiftinglands.com/
Looks like pretty cool stuff. I’ll demo when I get it and let you know what I think
|
|
|
|
|
2020/04/14 15:40:33
Subject: 6’ x 10’ Cities of Death Board WIP (updated with video, custom ventrillion, tanks and monorail)
|
|
Posts with Authority
|
That's an irresistible combination of nerdy gear and manly DIY tools. Looking forward to see what happens when you get them, and when you come up for air.
|
|
|
|
|
|
2020/04/15 01:52:35
Subject: 6’ x 10’ Cities of Death Board WIP (updated with video, custom ventrillion, tanks and monorail)
|
|
Regular Dakkanaut
|
Oh wow, I just checked out Shifting Lands site, that looks like some awesome gear! Those brick cylinders especially. I'll second Vermis, look forward to seeing what you get up too with the new tools.
|
|
|
|
|
|
2020/04/18 16:15:13
Subject: 6’ x 10’ Cities of Death Board WIP (updated with video, custom ventrillion, tanks and monorail)
|
|
Boosting Black Templar Biker
|
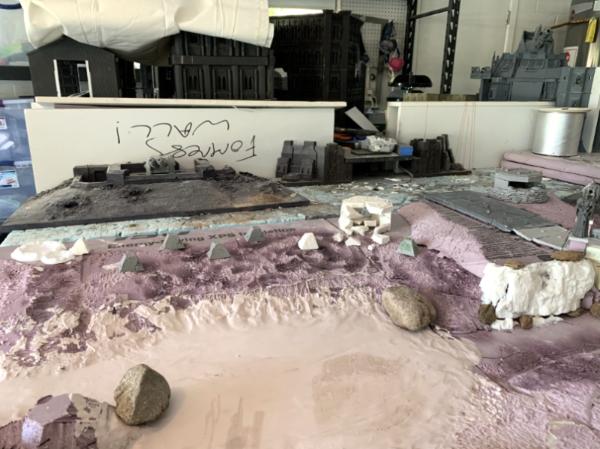
Just so everyone knows I’m still around
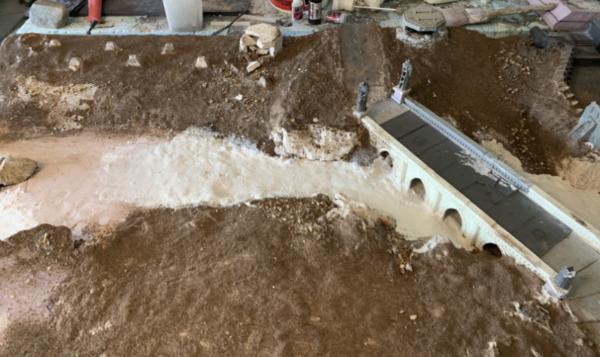
This morning I’m working on the river table. I’m trying to get a few things done before I add the insulation plaster mix.
First is getting the other side of the river raised some so the road will go on a slope up to the wall entrance because that city road is much higher
After that I want to finish up the bridge itself and get the railings and some statues in
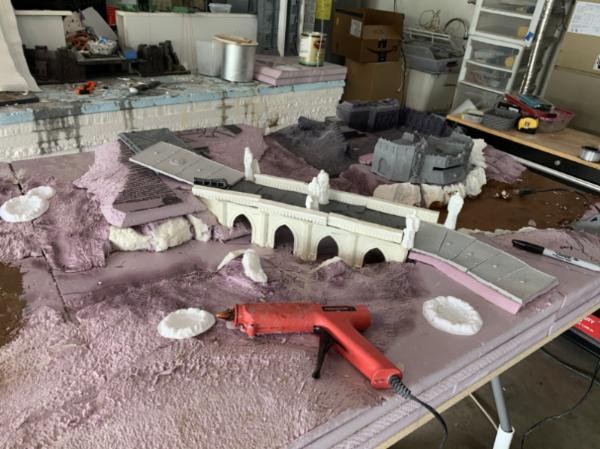
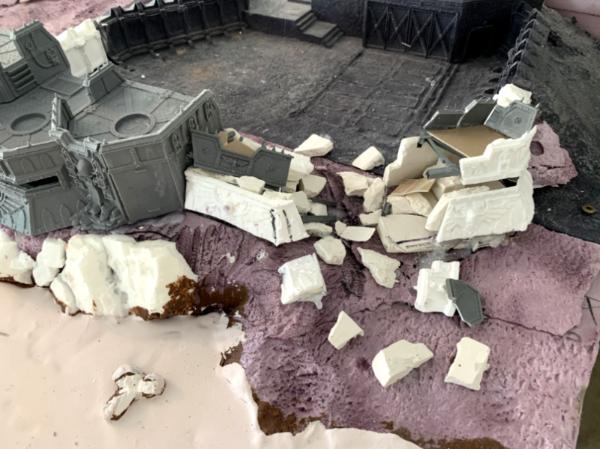
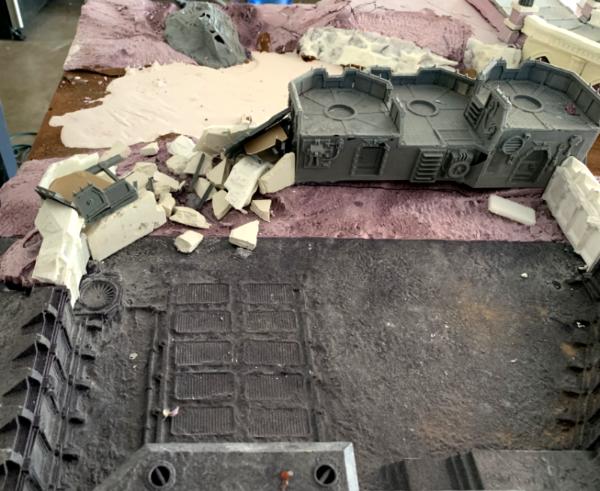
I also plan to make a second blown up bunker on the right side that will be kind of shattered into the dry creek
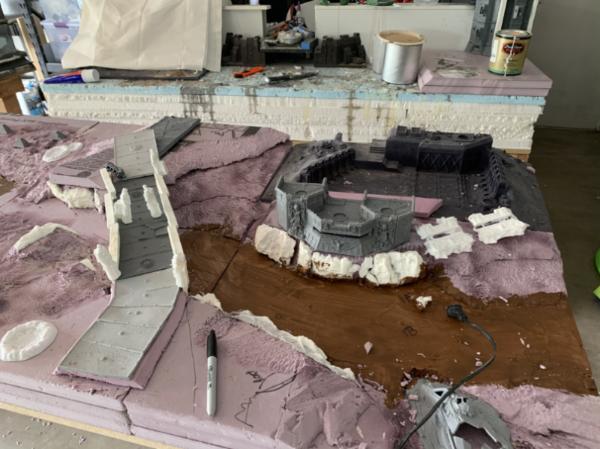
And of course I need to put more rocks in and finish the road
|
|
|
|
|
2020/04/18 23:31:47
Subject: 6’ x 10’ Cities of Death Board WIP (updated with video, custom ventrillion, tanks and monorail)
|
|
Regular Dakkanaut
|
Looking good! That destroyed bunker might look even cooler if the creek still had some water in it. Some semi-submerged rubble would look ace
|
|
|
|
|
|
2020/04/19 09:37:49
Subject: 6’ x 10’ Cities of Death Board WIP (updated with video, custom ventrillion, tanks and monorail)
|
|
Ancient Venerable Dreadnought
|
This board, can you even call something this huge and awesome a board? It doesn’t seem to do it justice. Sorry, this board is amazing and just keeps on getting better and better every time I stop by for a peek. It just occurred to me though, shouldn’t the main opening on the bunker be facing the opposite bank of the bridge and looking down on the road?
|
Goberts Gubbins - P&M Blog, started with Oldhammer, often Blackstone Fortress and Void Panther Marines, with side projects along the way |
|
|
|
|
2020/04/19 17:54:13
Subject: 6’ x 10’ Cities of Death Board WIP (updated with video, custom ventrillion, tanks and monorail)
|
|
Boosting Black Templar Biker
|
Thanks gobert,
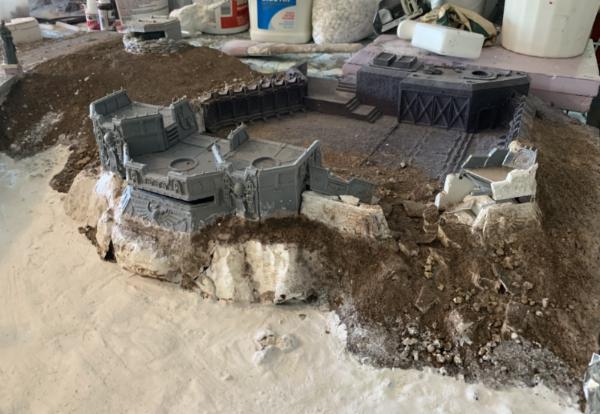
Not sure I completely follow in the bunkers though. I have two pill boxes. The blown up one covering the batch that is to the left of the road and the one with sandbags to the right of the road, which I assume is the one covering for the bridge.
There’s also the big bunker down front on the dry creek which blocks the back/secret entrance to the city (think return of the Jedi). Also a large part of that is destroyed

Now to put some plaster/insulation mix on
|
|
|
|
|
2020/04/20 12:01:19
Subject: 6’ x 10’ Cities of Death Board WIP (updated with video, custom ventrillion, tanks and monorail)
|
|
Longtime Dakkanaut
The ruins of the Palace of Thorns
|
It is still mind-boggling.
Do I remember rightly that you said this was going to live in your friendly local gaming store? I need to know where, so I can try to book a holiday there!
|
|
|
|
|
|
2020/04/22 18:38:14
Subject: 6’ x 10’ Cities of Death Board WIP (updated with video, custom ventrillion, tanks and monorail)
|
|
Boosting Black Templar Biker
|
Hey guys,
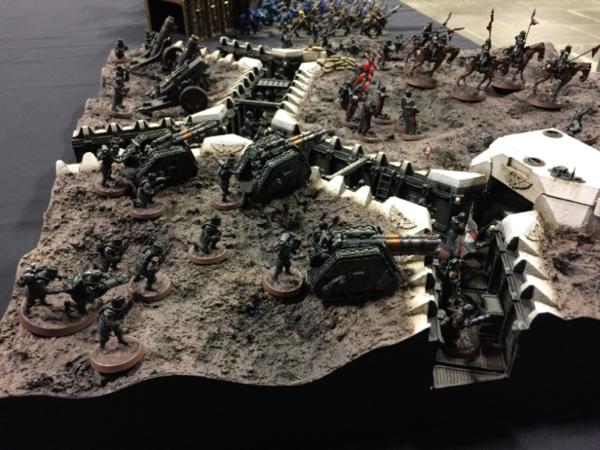
Really need your help and advice. I got the 50/50 soil/ grout mix added to the board Sunday and am pretty concerned with the results( please ignore the dry creek. That is just a base plaster coat. It will get a sand crackle affect later)
Though I’m really happy with the texture and maybe even color I have some issues.
First being I’m colorblind and the two people I’ve had look at it asked me what it was supposed to look like. One went so far as to ask if it was an alien planet.
So, I want to know if you all think the coloring is ok? Or what you think I should do to correct it. I was hoping not to paint. That’s why I went with the dirt/grout combo. But if I have to I can airbrush and drybrush. If that’s your recommendation. Please provide specific colors. OR I could sprinkle a different grout? Or are their other terrain materials I should consider?
Issue #2: the boards don’t match. The new one is way darker than the trench board. Maybe this is due to drying time but I think it could be because of the fact I used so much more alcohol and pva mix over the top
So if we do have a color problem, I’ll probably need to address both boards.
Big picture, like everything else I’ve done my colorblindness and materials are screwing me up.
Any advice on products I can use to address would be appreciated. Again the look I’m going for WAS supposed to be WWII trench/mud/dirt (think beginning of 1917). But if it’s taking on a different look that’s workable or you have a better idea I’m all ears
Thanks
|
|
|
|
|
2020/04/23 14:04:41
Subject: 6’ x 10’ Cities of Death Board WIP (updated with video, custom ventrillion, tanks and monorail)
|
|

Grisly Ghost Ark Driver
|
The colour is sandy. Perhaps the issue is the texture is muddy, but the colour is sandy, so there's a bit of dissonance coming from that. It needs to be more dark brown if you're looking for 1917 trenches. A red tint is also good to get it looking more like mud and soil and less like sand.
|
|
This message was edited 1 time. Last update was at 2020/04/23 14:05:22
|
|
|
|
|
2020/04/23 14:16:46
Subject: Re:6’ x 10’ Cities of Death Board WIP (updated with video, custom ventrillion, tanks and monorail)
|
|
Painlord Titan Princeps of Slaanesh
|
I don't agree. The new, non-trench board -as pictured - looks like every construction site I ever saw in Britain or Canada.
|
|
|
|
|
|
2020/04/24 00:39:17
Subject: 6’ x 10’ Cities of Death Board WIP (updated with video, custom ventrillion, tanks and monorail)
|
|
Ragin' Ork Dreadnought
|
The darker, non-trench board colour looks fine to me. If it is meant to be dry mud, then probably close to perfect. Wet mud will probably need a gloss or semi gloss finish (and will help protect it too!).
The other board is quite a bit lighter and looks more like sand.
I mean, painting the whole thing will obviously bring the colours in line, but if you want to save some effort, I'd do some experimentation on some small patches. Specifically, I'd try a dark brown wash mixed with gloss varnish. You may just need a heavier ratio of the brown for the lighter board, or apply several times (in which case you may only need the varnish on the last one), in order for the end result to be close enough.
This is how I would attempt it on miniature bases anyway. Not sure how well it applies to a whole board! Awesome project by the way
|
|
|
|
|
|
2020/04/24 02:53:39
Subject: 6’ x 10’ Cities of Death Board WIP (updated with video, custom ventrillion, tanks and monorail)
|
|
Boosting Black Templar Biker
|
Thanks guys
I think your all pretty spot on. I appreciate the feedback that The trench board looks good but Way lighter
And the creek board also looks good but way darker
It’s really weird that the same material got such different affects. But they were applied slightly differently and one had way more glue/ alcohol
Your points about experimentation are key though. If I can duplicate the creek board process/ color I could go back and mix that over that board and get it darker. Maybe I could even duplicate the sand coloring again to and mix that over the creek.
Either way, doing three boards in this technique at different times probably wasn’t prudent.
Automatically Appended Next Post:
What about grass or other flocking tips?
I think it needs some but it should probably be pretty sparse right?
|
|
This message was edited 1 time. Last update was at 2020/04/24 02:55:25
|
|
|
|
|
2020/04/25 08:05:39
Subject: Re:6’ x 10’ Cities of Death Board WIP (updated with video, custom ventrillion, tanks and monorail)
|
|
Regular Dakkanaut
|
Like the others have said texture-wise I think you're all good. Colours are a tad off but I think your best bet is painting all boards once they're done to tie them all together. Luke Towan has some really good videos on flocking and natural terrain environments as well as general hobby goodness, check him out.
|
|
|
|
|
|
2020/04/29 23:02:00
Subject: 6’ x 10’ Cities of Death Board WIP (updated with video, custom ventrillion, tanks and monorail)
|
|
Boosting Black Templar Biker
|
Hey all,
While I totally agree and understand I/we will probably have to go back in and paint the exterior boards I decided to give it one last shot to get a base grout/soil mix that was the color I was looking for. This would help a ton for the areas where we just want to apply the mix over pre- painted areas like the trenches
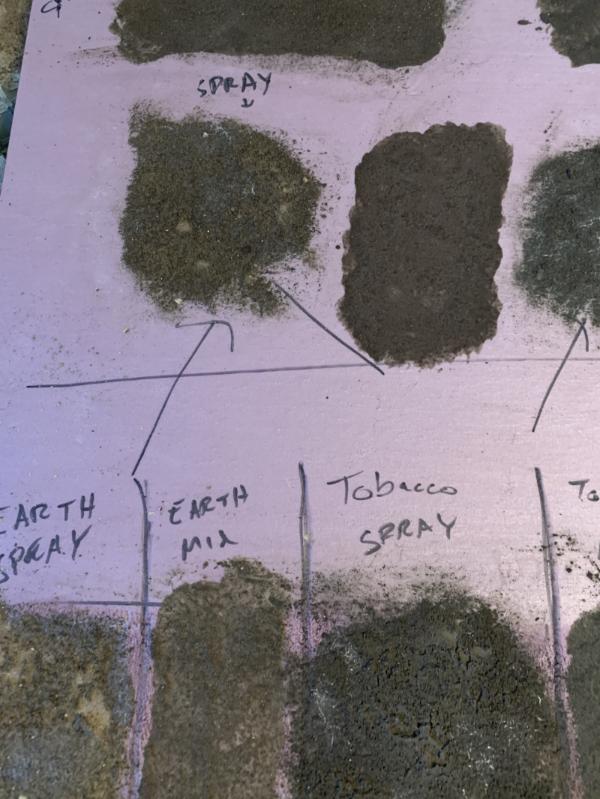
Anyhow, I went and got a few more brown grouts (nonsanded variety this time. A direct recommendation from Luke Towan).
The darkest colors Home Depot had were Sable And coffee. From there i made a test board with those two colors and my existing sanded Earth color grout. Each color was applied in two ways: Spray (brush glue on, sprinkle grout/soil and spray with watered down glue) and Mix (soil/grout mixed in cup with water and glue and applied with brush).
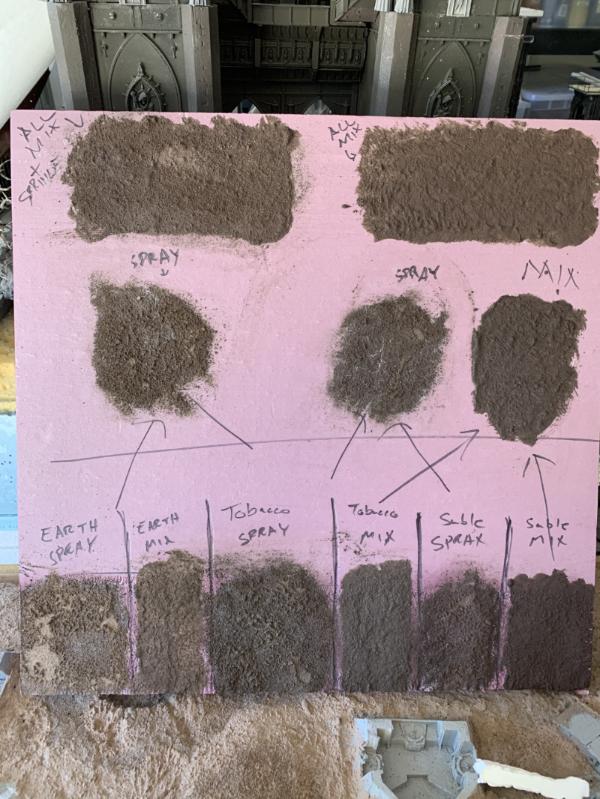
I also tried a few mixes.
I talked to a few people ( my son and wife) and they said they weren’t very good colors for what I was looking for but I would like to hear all of your thoughts?
From there I decide to try a mix I missed in the original (sable and earth). And I think it could be a winner at least for a base that could be dry brushed over.

In relation to the others (not labeled one)
I also threw a little on the board (the darker area)
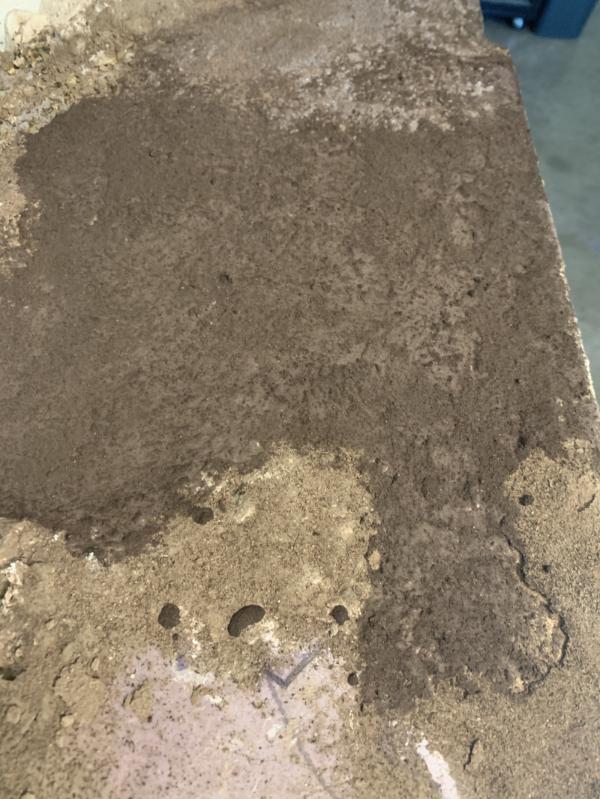
What do you all think?
For reference I think these are the looks I’m going for:
Not mine. Sorry for not giving credit. I’ll try to find
And some shots from 1917 which are the color and feel we want
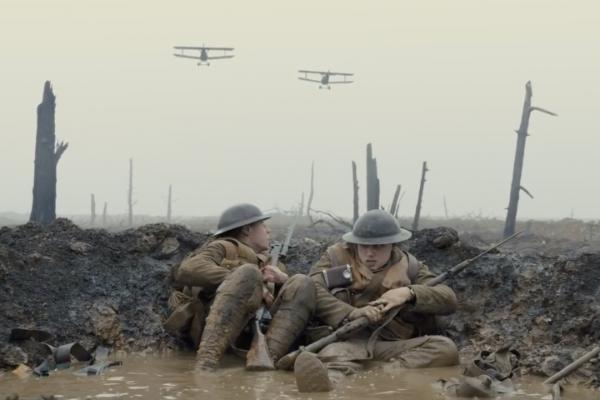
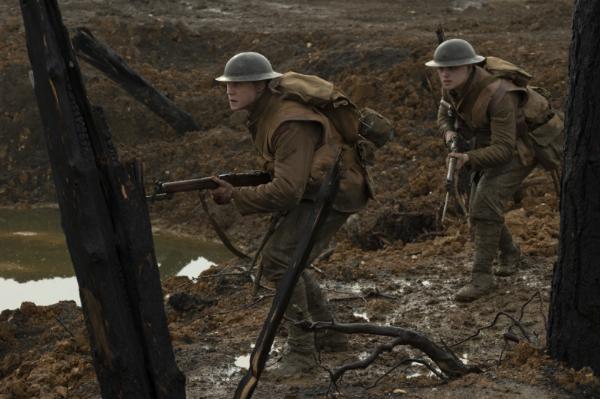
Anyhow. Hope you’re all well. Let me know your thoughts on the color, style and texture
Thx
|
|
This message was edited 3 times. Last update was at 2020/04/30 01:48:03
|
|
|
|
|
2020/04/30 01:07:54
Subject: 6’ x 10’ Cities of Death Board WIP (updated with video, custom ventrillion, tanks and monorail)
|
|
Ragin' Ork Dreadnought
|
Initially I was leaning towards the sable mix, but looking at the bit you threw on the board, you know what might also work? Just vary it in patches across the board. The problem with two table sections being different shades is that it looks wrong / breaks immersion. But, if you make irregular areas different shades (and perhaps blend between the areas) - it will probably end up looking even more natural than a single colour. Added benefit - you will never need to "correctly match" ever again. Just a thought.
Automatically Appended Next Post:
(Also - very impressed with the lengths of testing you went with here)
|
|
This message was edited 1 time. Last update was at 2020/04/30 01:09:22
|
|
|
|
|
|
|

 Imperial Knights: The Avengers Initiative
 Da Dark Angelz
 Arakasi vs Infinity