Forum adverts like this one are shown to any user who is not logged in. Join us by filling out a tiny 3 field form and you will get your own, free, dakka user account which gives a good range of benefits to you:
No adverts like this in the forums anymore.
Times and dates in your local timezone.
Full tracking of what you have read so you can skip to your first unread post, easily see what has changed since you last logged in, and easily see what is new at a glance.
Email notifications for threads you want to watch closely.
Being a part of the oldest wargaming community on the net.
If you are already a member then feel free to login now.
2018/06/17 07:44:01
Subject: Imperial Knights: The Avengers Initiative
"There was an idea; Stark knows this. Called the Avengers Initiative. The idea was to bring together a group of remarkable people, see if they become something more. See if they can work together when we needed them to. To fight the battles that we never could."
―Nick Fury
Yup, I need to 40K that up a bit
Personal Background
Spoiler:
I've pretty much been MIA since July 2013. Played some 6th, less 7th (if any). I was invited to join a team in the WATC (Western Australian Team Challenge) 40k in April 2018. For anyone who remembers my Orks (Da Dark Angelz), there should be no surprise that there was no way I would have 1500pts built and painted in time. So I borrowed a Deathwatch (Index, pre Codex) army in need of a "little" work. I converted a paint stripped Landraider Redeemer to a Crusader, magnetising the sponsons. Painted it, a Watch Master and 10 Deathwatch marines to minimum standard (except the red). Got my butt kicked but had a great time, and inspired me to rejoin the hobby.
My hobby preferences generally run to playing, modelling, then painting, but my "convert everything" Orks, along with using every boy as an opportunity to improve my painting, often caused some progress frustration. This, the lack of news on the Ork Codex (at the time) and seemingly one dimensionality of the Ork Index (I've been lurking/incognito on DakkaDakka since March) wasn't inspiring me. On the other hand, the small numbers of the Deathwatch, and the Codex around the corner, was. I came to the realisation I need a small model count army that I can complete and play with so I can continue to take my time with my Orks. I briefly toyed with Adeptus Custodes before realising Imperial Knights would be even less models and a Codex due out soon (now here).
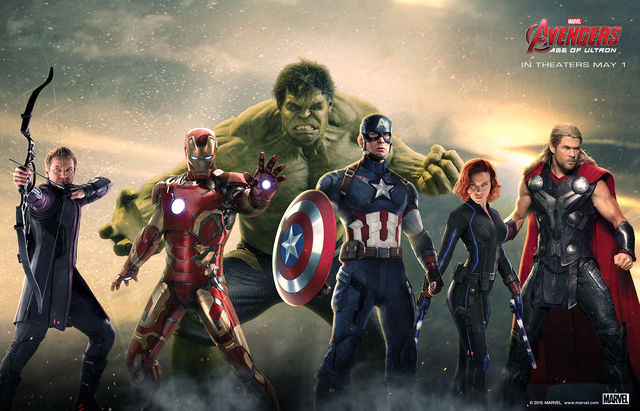
Welcome! Welcome to my "Imperial Knights: The Avengers Initiative" painting and modelling blog. Here I will be capturing my progress, from start to finish, of my 1500 point Imperial Knights army. The theme, if you haven't already guessed, will be Marvel's "The Avengers", with such possibilities as:
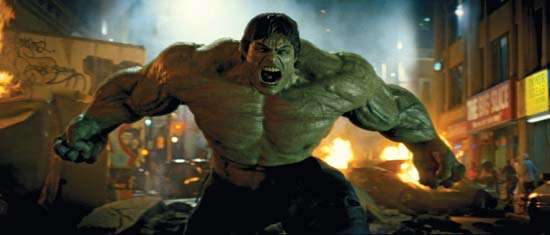
A Hulk inspired Gallant.
An Iron Man Canis Rex (potentially with arc reactor.)
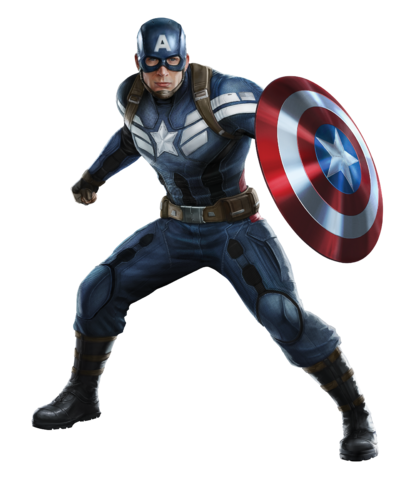
A Captain America with Haemotrope Reactor shield.
A Thor Valiant and his mighty Thundercoil harpoon/hammer Mjölnir.
And various less central characters as Armigers - a Hawkeye Helverin, perhaps a Warglaive Black Widow.
They will, of course, be fighting over the ruins of an Imperial (New York) city.
There should be plenty of modelling opportunity (and challenge) to posing the Knights in something recognisable as an iconic pose of the Marvel character whose colours they will be painted in. Not to mention the additional challenge that Imperial customisation work brings over the Ork customisations I am used to. Additionally, everything will be magnetised, even if not completed straight away, to allow for thematic options as well as keeping my play options open now and in the future. All this whilst attempting to keep the 40k aesthetic as well.
As this is literally starting from scratch, there are no pictures yet. I hope to rectify this shortly, but don't expect finished models any time soon - this will be a relatively slow burn project - set your expectations accordingly! For those of you that do decide to follow along, questions and suggestions are most welcome.
Well, I better hit "Submit" on this so I can start work!
Goals
1500 points painted Imperial Knights army.
Built and painted in the iconic poses and colours of Marvel superheroes, whilst also maintaining the 40k aesthetic.
Customisable with all options (magnetisation).
Learn to use my airbrush and compressor.
Learn to use my lightbox.
Potentially play around with some LEDs and electronics.
Update this blog with my progress at least weekly.
Progress
Codex Imperial Knights acquired.
Forgebane half acquired.
Helverins acquired.
Honoured Imperium acquired.
To Do
Halve Forgebane.
Investigate Helverin and Warglaive sprues for magentisation possibilities.
Find pictures of the iconic poses of Marvel superheroes I wish to use.
Confirm a list swapping the Helverin and a Questoris for a Dominus.
Start cleaning up and building Helverin.
Later
Acquire Imperial Knights: Renegade (July).
Acquire Haemotrope Reactor (July).
Acquire Sector Imperialis Large Base Detail Kit (July).
Acquire Castellan or Valiant (July) or Preceptor/Canis Rex (pending availability).
Lists Current 1500pt list I'm playing around with:
Gallant (Hulk)
Crusader with Rapid-fire Battle Cannon and Stormspear Rocket Pod (Iron Man)
Errant with Stormspear Rocket Pod (Captain America)
Helverin (Hawkeye)
1498pts.
It is possible to switch the Rapid-fire Battle Cannon and Thermal Cannon between the Crusader and Errant (becomes a Paladin). Also need to look into dropping the Helverin and a Questoris for a Dominus - Valiant (Thor) or Castellan (TBC).
This message was edited 1 time. Last update was at 2018/07/17 16:07:34
Having just returned from a few years out myself I am not overly familiar with some of the knight stuff, but this does seem the sort of project that you love, and sounds hella fun to me.
I do like that you needed a small model count army, so went with Knights - because they'll be real quick to finish with the level of customisation you put in
Eagerly looking forward to this, only thought I will leave for now is will there be a Nick Fury type somewhere? (Do knights have infantry? Fury as a Magos, with admech as Agents of Shield? Don't know enough to have valid ideas)
Off topic I forgot how long it takes to prep images for the blog. I may need to see if I can speed that up some. I also forgot how long it take me to write the blog entry...
Off to a good start, managed not to bust goal 7 in my first week. Also, pictures in second (this) post.
Housekeeping Ah, monkeytroll and Imperial Monkey - I now feel like I never left. Welcome McMagnus Mindbullets. I can't say I'm overly familiar with Imperial Knights either, but I'm sure I will be by the end of this. You will notice I haven't put a timeline on completion - I never said they would be quick to finish - just faster than any other faction I might look at Could you see me completing 15 Adeptus Custodes faster? Would you even want to? . One has to play to their strengths after all.
Theme No plans currently for Nick Fury type. Knights don't have infantry, but you are in line with my thinking that I can always bring in Guard or Admech to represent S.H.I.E.L.D. et al - so perfectly valid so far. I'm just not going to be distracted by that now.
Progress
Forgebane halved.
Familiarised myself with the Helverin and Warglaive sprues.
Found pictures of the iconic poses of Marvel superheroes I wish to use.
Started Helverin (arm magnetisation below).
It took a while to investigate the Helverin and Warglaive sprues, digest the instructions, and come to conclusions about the magnetisation potential. Mainly due to overzealousness on my part. There are a number of parts that you are instructed not to glue, for posability. It wasn't until I watched some of GW's Duncan building and painting videos that I realised this wasn't meant to be left posable at the very end. Much to my relief actually, I don't even want to consider painting posable parts. I considered leaving the shoulder joint unglued (it swivel locks), until I realised that with the shoulder pad in place you will never get it out. It could be magnetised, but I'm still not convinced that would solve the shoulder pad issue. There is also a valid point against too much magnetisation (heresy!)
The obvious magnetisation point is in the middle of the arm, where it attaches to the gun or ccw mounting point. Perusing some "magnetising your Armiger" videos I see others magnetise the ccw to its mounting point as well. I decided against this. There is not a lot of room to work in there, the smaller magnets won't provide the friction required to keep the cleaver in place, larger magnets don't allow for covering (see later) and won't slip into place easily. I even considered magnetising the two pieces of the ccw mounting point to snap together. I'll risk GW coming out with an alternative ccw that re-uses the existing ccw mounting point. If they do, I guess I'll have a reason to learn casting or 3d printing . I can't cover up any mistakes Orky style.
To Do
Post pictures of the iconic poses of Marvel superheroes I wish to use.
Choose pose for Helverin.
Continue building Helverin.
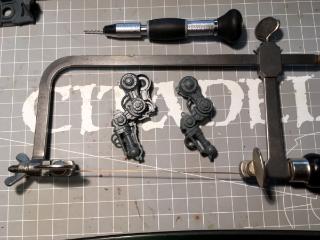
Magnetising Armiger Arms Here I have laid out for inspection all of the current mounting points and the upper arm they attach to. You can see a 6mm x 1.5mm magnet fits perfectly into the join slot, and is already restrained by the existing plastic.
The side view, including a closer look at how the ccw mounting point actually works.
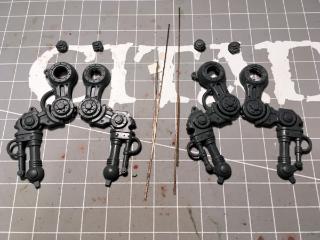
Measuring the connection point diameters. At this point I hadn't decided on whether to mount the magnet in the narrower or thicker part of the upper arm. There is only 4mm available for the narrower part, and almost 7mm for the thicker. This would mean a 2mm magnet for the narrower part (3mm doesn't give us enough surrounding plastic), and this seemed iffy to me - so decision made - I will go the thicker route.
I've cut off the ends of the upper arm pieces, including the thinner part. Here you can see the original upper arm, top and side views of the cut upper arms and the cut pieces.
No more "close enough is good enough" Orky measuring for me - these are precision Imperial machines! A handy trick I picked up from another video was using the mould lines as a guide. I place a ruler across the mould lines and score the plastic using my hobby knife. I then eyeball the perpendicular and again using the ruler, score the other way. These should be almost perfect! (I'm going to have to remember this for drilling barrels in future.)
Using the scored guide, I drill small 1mm pilot holes.
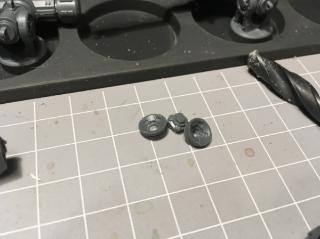
Before drilling the actual holes, I need to choose my magnet diameter and height. Rule of thumb is to use the biggest magnet you can fit. Still, it doesn't hurt to check. Here I have the contenders - a 5mm x 1.5mm, a 3mm x 3mm and a 3mm x 1.5mm.
First up, the 3mm x 1.5mm. Basically the test is to see if it can keep the weight of the gun horizontal through some distance of plastic. I use the hull plastic as a test here. This is a fail.
The 3mm x 3mm fairs much better - a pass.
So does the 5mm x 1.5mm - another pass.
Given I have some depth to play with, and for covering later I prefer more plastic around the magnet, I choose the 3mm x 3mm and drill the 3mm hole. There is an air hole inside the upper arm piece which makes for a good place to stop drilling.
Always pays to do a test fit - although make sure you can still remove the magnet for gluing later! In this case (not shown), I apparently needed a slightly larger drill bit - or I have put my 2.8mm in the 3.2mm place...
Another trick I only picked up recently from a video - taking my triangular file, I have carved a small groove down one side of the hole. This will allow air and glue to escape from beneath the magnet when I glue / push it into place.
All cleaned up and ready for magnet insertion.
All the pieces cleaned up and ready for magnet insertion. I superglue the magnet into the gun. Then apply the plastic glue. Then superglue the other side of the magnet before pressing together. The arm magnets have superglue applied to the bottom end (closest to insertion point), are then pushed in, and then the arm pushed against the cutting mat to ensure they are flat. Oh, and make sure you have all of your polaritys correct before gluing! Polarity check twice, glue once!
Glued! Here I have the last of my quarter (or maybe eighth?) mm plasticard sheet. I have some more of both on order. I'll be using this to "top" or cover the magnets. I do this for three reasons. One, it ensures the magnet is never coming out. Two, paint adheres better to the plasticard than the magnet. Three, especially where the magnets would be in direct contact (not actually the case here), my experience is that two magnets coming into direct contact regularly leads to paint chipping.
Here you can see I have plastic glued the "tops" on. Also, I glued the other guns and reaper chain-glaive together while I was here. I'm trying something new - I have only cleaned up the connection points between the weapon halves. I'll clean up the weapons once the plastic glue has set.
Trim the bulk of the "top" off using a hobby knife. I actually stand these up on their end and cut directly onto the mat for this step.
Then carefully trim closer to the desired result. The final goal is for this to be flush with the existing plastic. For this step, you just don't want to over do it.
Then carefully trim and file until flush with the existing plastic.
I'm done!
Connection and friction is still good - these aren't going anywhere.
Well, I'm never going to complain about how slowly anyone else works with a straight face am I?
If you did Custodes I'm disclosure they wouldn't be out of the box, so I'd tag along and
Nice explanations as always, going to be interesting seeing your take on an engineering type approach to ensure that Imperial precision is maintained. (Imperial, blasters, precision....stormtroopers.....nah)
Housekeeping Welcome youwashock. Thanks. Hulk should be good - I envision adding extra cabling to bulk out his frame / define musculature.
I don't know, monkeytroll, you seem to be moving quite quickly by all accounts . The options for customising Custodes was alluding me last I looked. A challenge for another time.
Theme No progress of note so far, just cleaning up Armiger parts. However, I need to start thinking about the pose of the first Armiger, so a post about the theme I'm going for seemed appropriate to potentially elicit some feedback.
Due to reasons I won't be getting my hands on Knight kits until next month. Still, it seems best to start there.
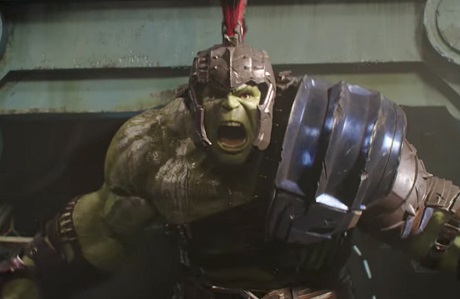
Questoris Hulk
Spoiler:
I had trouble finding an image of this pose with the legs completely visible. Basically head forward, arms back and the legs should be: left leg forward and bent (possibly on something) and right leg behind. As mentioned above, I expect to add some extra cabling to bulk him out and possibly define some of the musculature. Should be quite intimidating . The second image also gives me some painting options past pure green.
Questoris Iron Man
Spoiler:
The second image is what I originally had in mind. I think I actually prefer the openess of the first however.
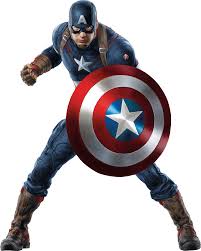
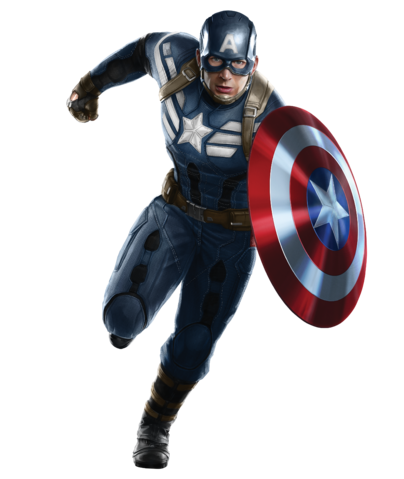
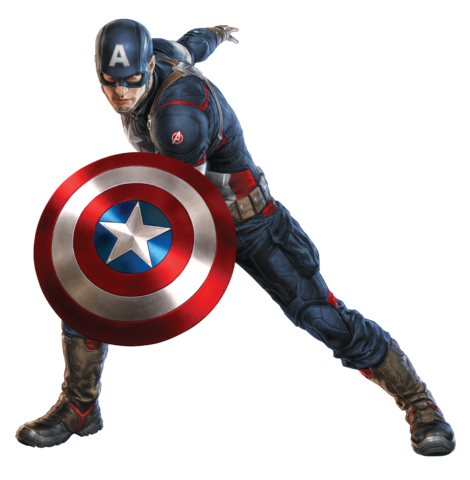
Questoris Captain America
Spoiler:
Again, preferences are from left to right, top to bottom. Second image may be too defensive / boring. Third and fourth options are more challenging I suspect.
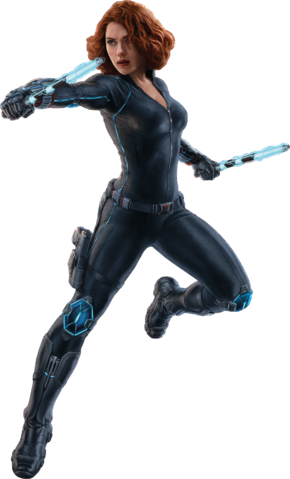
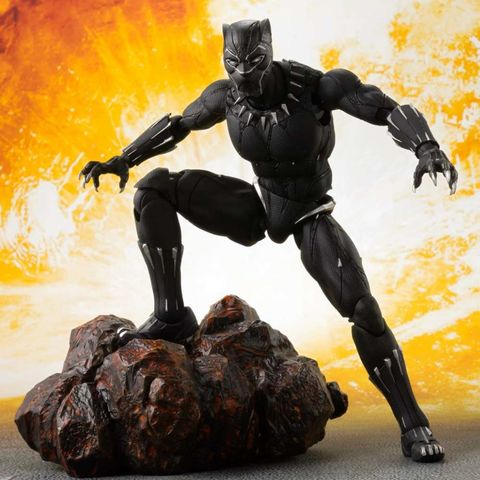
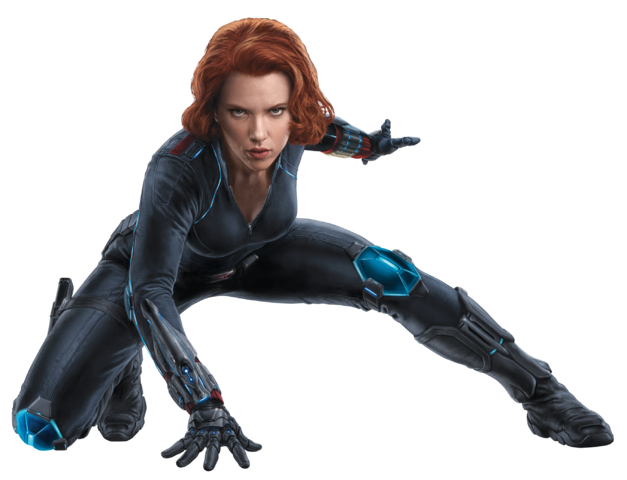
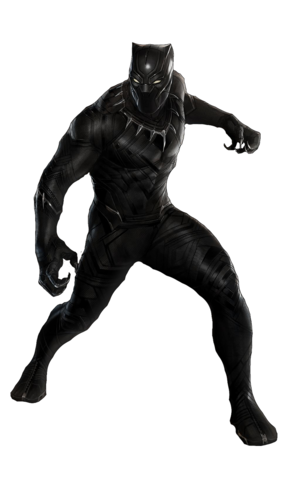
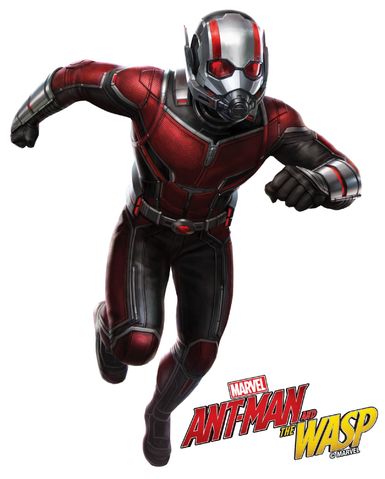
Warglaive Black Widow / Black Panther / Ant-man
Spoiler:
Third image may be too challenging. Obviously would need to place on terrain to maintain model height .
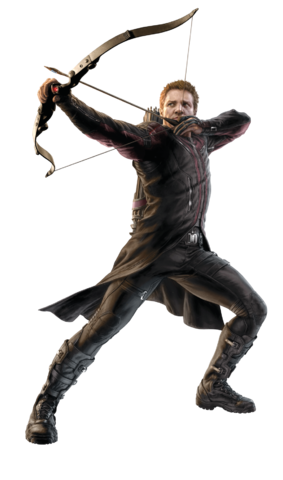
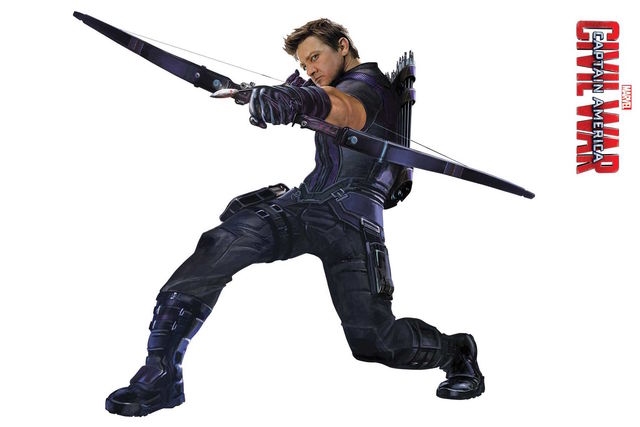
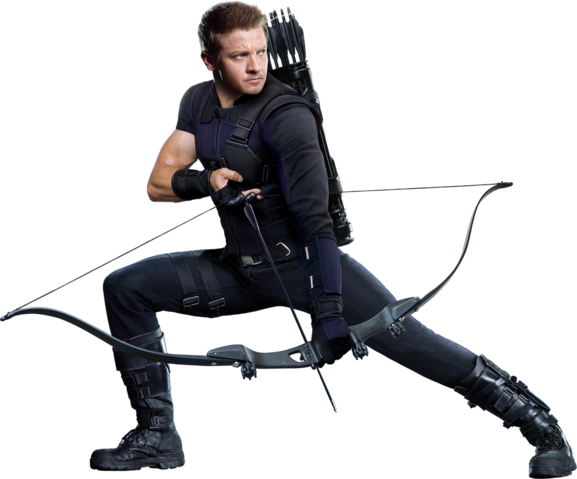
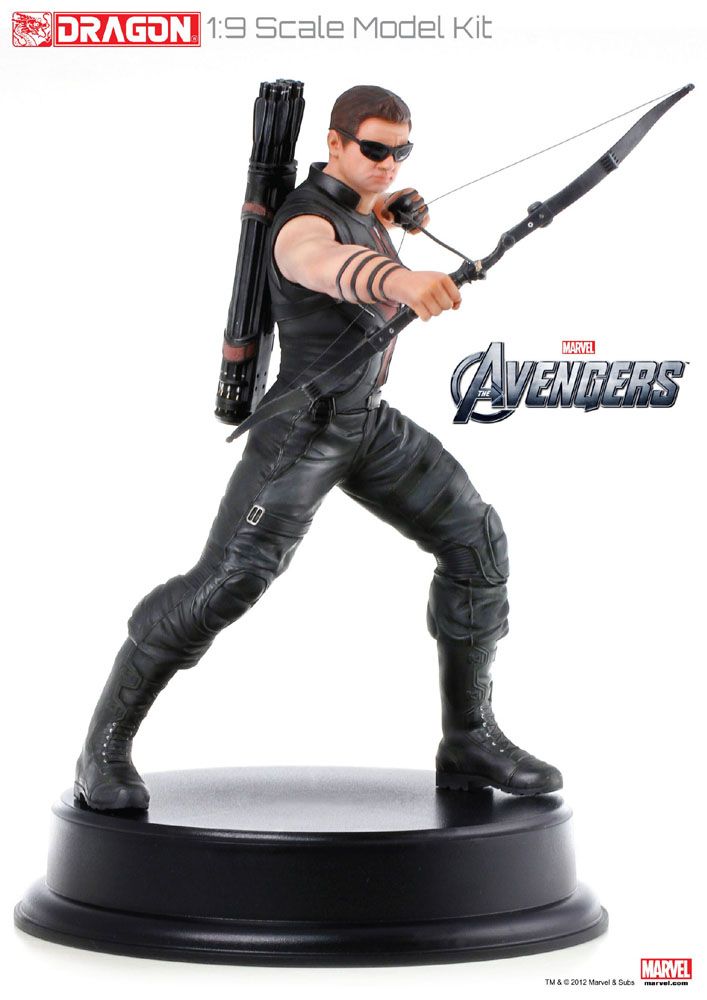
Helverin Hawkeye
Spoiler:
And this is where I am currently. Again, second and third images might benefit from being placed on terrain to maintain model height. In most cases I expect to be firing down not up - and yet - unless persuaded otherwise I'm currently opting with the first image.
Oh I don't know, with losing and weapon customisation you could probably do something like, oh I don't know...Custodes Avengers? Don't know where that came from....just came to me and
Anyway..
Bits availability may be an issue, but posability might be improved by making the questoris legs digitigrade to match the armigers. Bits from the dunewalker legs seem to be the most popular choice for this.
Poses seem like good choices, have you also looked at images from the comics? May suggest some helpful details or options.
Was expecting Thor, a giant hammer seems a suitable ccw for knights after all.
Surely Ant-man would be better left till later when you look at infantry? An epic scale knight seems the logical choice.......unless you go full titan
Hawkeye shooting up seems fine to me, plenty of excuses for firing at an angle, even without rule of cool.
How much weapon customisation are you planning? Doesn't look like Helverin Hawkeye is getting a giant 40k crossbow Black Panther getting claws rather than chain weapon, repulsors for Stark, wristguns for Natasha?
monkeytroll, monkeytroll, monkeytroll - you will be the death of me! Not every army has to be Avengers... and no, I wasn't planning on excessive weapons customisations - I am trying to complete this after all!
I'm actually finding the Armiger legs, interesting, due to the three segments. I was hoping the Questoris might be easier for only having two (easier to visualise in a human pose). Any links to use of bits from the Dunecrawler legs used with Questoris would be most appreciated - I don't seem to have stumbled across any so far in my travels. I suspect I'll form more of an opinion when I have the Questoris in hand.
Image search has been pretty much limited to Google. None from the comics made my shortlist - but then I would hardly call my efforts exhaustive. If anything, I find the movie versions more realistic, which I can visualise better on the model. Again, any particular image references would be appreciated.
At the moment I'm saving Thor for the Valiant. The harpoon should make a good hammer substitute, or I might modify it into one - that's a bit further down the track and somewhat depends on when the Canis Rex model becomes available. I have, probably preemptively, been thinking I'll have less posing options with the Dominus class for some reason as well. It's bad enough I suspect I can't get any movement in the Questoris arms above the shoulders.
Ant-man was just a good running pose . Your suggestions are fun, they just don't fit my current goals. Maybe some light relief for when I inevitably need a break from all of the seriousness.
As stated above, I'm not planning on excessive weapon customisations, especially for Armigers. The weapons are / will be magnetised - I can always swap in more characterful ones later, perhaps. The problem really is one of precision and time. I think I'll have enough on my plate with the posing and painting!
I've already determined I can't do Hawkeye's first image above. The problem is not the legs, but the torso, head and arms. While the head can face a different direction to the torso, the arms (well, at least one) are restricted because the shoulder join is so far back on the torso. It can at best do 45 degrees across the body and looks awkward. It is possible to have the body point in the direction of the face and bow, but then this looks odd at the waist and loses the difference in facing of the head and torso.
This probably rules out the third image too. The stance in the second image seems painful on reflection. In fact, looking at Google images again, most archer stances are just going to be hard due to the direction of the torso and arms. Now that I know what I am looking for (or not looking for), I found a couple more options:
Spoiler:
The first image is simplest, and shouldn't require any modification to the model as far as I can see (too boring?). The second image is more what I had in mind with changing the stance, but the torso and arms are pointed in a much closer direction.
I prefer the second image there, tends more towards iconic than static as in the first.
I can see where the digitigrade legs could be more hindrance than help when copying human (or even superhuman) poses. I was wondering if they might give a little more flexibility in posing, guess you'll figure that out as you progress with the Armigers.
Basic pose, but this highlights the piece in question, although it does look maybe a little small here:
Oh no! Attention of a MOD! (Runs screaming from the thread) . Sticks head back in long enough to say this is looking like it will be awesome....no pressure . (Screams and runs out before the MOD can catch him)
LOL, Theo your mind is an amazing place, never change.-camkierhi 9/19/13
I cant believe theo is right.. damn. -comradepanda 9/26/13
None of the strange ideas we had about you involved your sexual orientation..........-Monkeytroll 12/10/13
I'd put you on ignore for that comment, if I could...Alpharius 2/11/14
2018/06/25 22:26:28
Subject: Re:Imperial Knights: The Avengers Initiative
Third party seller making bits like shields, hammers, and extended knee joints. Figured it would be useful to see what's out there and how it fits together.
Housekeeping Thank you for the links monkeytroll. The sad thing is, while I was aware of both of those threads, I missed the Dunecrawler additional segment - even with the red circles and arrows. This is exactly why it pays to have a P&M blog. I will be keeping an eye on the other thread too.
Thanks McMagnus Mindbullets.
Welcome whalemusic360 and Theophony. Hopefully the "good" kind of attention. Do you still have that looted dread?
Progress Hardly surprisingly, I agree with monkeytroll and prefer the second Hawkeye image above. The more I look at the Armiger legs, the more I am worried about getting that level of posability out of the kit. Eventually you just need to start cutting things and see where the plastic lands. First step, I need to remove the ball joints so I can manipulate the lateral movement of the legs. The plan was to keep the detail intact to use in a greenstuff mould later.
Tools and Armiger legs ready to go.
I made a pilot hole in the ball joint.
Drilled through and then threaded the coping saw blade through the hole.
Carefully saw around the detail while trying to avoid the flat inner disc.
Arakasi 1 - Armigers 0.
Good thing I have dozens of spare coping saw blades.
Arakasi 4 - Armigers 2.
Cleaned up the outside - not quite as precise as I would like. Only two of them are going to be seen though. I realised I need two things for the inside - a replacement ball joint and a recess for it to sit in. I found some of the former (technically hemispherical domes) direct from Plastruct - I guess I'll be waiting on those for a while. The latter was a perfect job for a high speed steel (HSS) drill bit I would never have thought would touch plastic.
I'm not sure the ball joint detail will be usable, but I have three more sets of legs to make my mould from, so hopefully a non issue. Interestingly, had I not been trying to save the ball joint detail, I probably could have just drilled the whole thing.
ETA on Questoris Knights, 10 days...
This message was edited 1 time. Last update was at 2018/07/02 14:18:39
where am I? *looks around* Well i'm...errr...I...I...don't know!
I think that Ant-man might be a bit small for a knight....maybe he should be an Armiger The hulk and Iron man poses look really good. For Captain America (Captain Imperium?) You could maybe do the pose where he is on one knee having just decapitated a something with his shield? I can't find the image from the film at the moment, and it might be a tricky conversion, but it would look very distinct - I've not seen the kit's composite parts so it's a bit of a blue-sky-idea for now.
Imperial Monkey
MAY YER BOLTER NAE FALTER!!!!
2018/06/29 07:08:12
Subject: Imperial Knights: The Avengers Initiative
Silly suggestion, but maybe track down one of the old epic-scale imperial knights for the Ant-man?
Work in progress p&m blog :
United Colors of Chaos , Relating my ongoing battle with grey plastic...
2022 hobby running tally: bought: 71, built: 45, painted: 17, games played: 3
10000pts 4000pts 5000pts 1500pts
2018/07/02 14:45:38
Subject: Re:Imperial Knights: The Avengers Initiative
Housekeeping / Theme Corrected a mistake above - it was a high speed steel (HSS) drill bit, not a wood drill bit.
I was initially thinking Ant-man for an Armiger rather than a Knight - but he does do both very small and very large. Maybe I should just wait for Adeptus Titanicus. Oh, and finish the other goals first.
I think I know which pose you are suggesting Imperial Monkey - is that with the shield striking horizontal or vertical? There is another one with the shield back ready to throw too...
Welcome ChaosDad! There are no silly suggestions, merely distracting ones .
Progress Glued the waist together and let it set overnight.
Then removed the, leg cabling? This frees up the leg locking mechanism, but also allows me to do the next step.
Filed down the leg cabling 45 degrees to centre (technically a bit more on the first/left one). I'll now be able to rotate the leg ball joint 45 degrees in any direction. I'll have to green stuff fill in the gap with more cable. Should be doable.
Legs in perfect condition before hacking.
Remove cables. I'll replace these later, probably with guitar string wire, but I also have a tentacle maker on the way (for cables, not tentacles, obviously).
Separate the top leg segments. Not as clean as I'd like, but it will be mostly hidden. No plan to make the models pristine, so some forced battle damage is okay too. Should have tried to cut as close to centre as possible, rather than to the upper segment. I have to replace the separating plastic anyway.
The joints don't actually provide a lot of movement. Here is the cut version (all three segments) collapsed as small as possible, compared to the shorter of the stock legs. Bottom should be inline, so the difference can been seen at the top.
And the extended version compared to the longer of the stock legs. A bit more range here.
What it might look like. You have to imagine the legs at 30 to 45 degrees from front, rather than the 90 degrees shown here.
Same again, but raising the knee on the right side of the image.
Changing the orientation of the right (of image) leg. Probably what I'll end up with, and angled 30 degrees "back". It's actually very hard to work out how this will, well, work out!
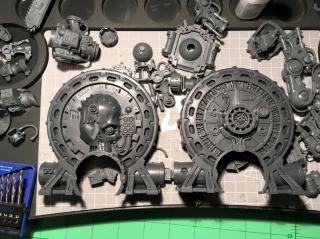
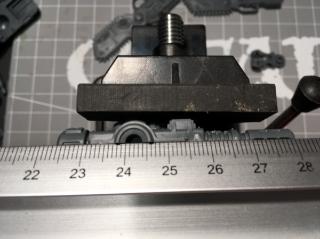
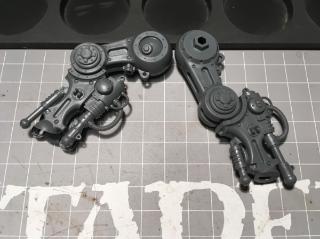
Left - Mechanicus leg plate. Right - Imperium leg plate. If you thought there was not much joint movement available before...
...the Imperium leg plate pretty much removes any thought of any, at all!
Thankfully the Mechanicus one knows what it is doing, and will have to be the choice on the extended leg. I was planning to mix and match, so that's okay. I suspect I could trim the Imperium one and tidy up with green stuff if I *had* to.
Another small quirk - one side of one of the legs is not like the other three!
Nice work so far - and I don't think I've used my saw like that before, I would likely have kept scoring through with my knife to do something similar, think your way is much better and quicker
You're right, not a lot of room for extra compression on those legs, just got mine today and wondering how much leg changing will occur with them. Interestingly, I don't have one slightly different ankle joint like yours.... Also in the warglaive kit there is only the mechanicus option for thigh guard...You're using the forgebane kit right?
I have a pair of Warglaives from Forgebane and a pair of Helverins. Must be the Helverin leg - I'll check later. Imperium options are in the Helverin kit.
Hemispherical domes arrived today, and due to Renegade appearing missing on the Oz GW site, I'll be attempting to bring the Questoris ETA to today .
This message was edited 1 time. Last update was at 2018/07/04 01:04:29
Cutting the leg in half went a lot more smoothly than the Armiger, and provides a reasonable amount of articulation to boot. (Right is an original uncut leg for comparison.)
If I raise the knee (and allow for a non-horizontal foot) the difference between it and the original becomes more pronounced.
This is with the stock other leg. I suspect this doesn't need any further work for the Hulk stance.
I'm considering modifying the toe arrangement for Hulk into an "Anisodactyl" arangement (look it up!) There isn't a lot of colour to the Hulk, but he does have nails as far as I can tell, and this would provide more visibility. They could also be curled over whatever he is standing on. Thoughts?
Talking about what to put under the raised foot, a civilian or military vehicle hood (or bonnet) - with attached vehicle - seems appropriate. Although I'm not sure it is raised *that* high - even with depressed suspension and a suitable dent. Open to ideas for suitable vehicles or other options.
I'll be investigating magnetising the arms while I give it some more thought.
Agree with your thoughts on the feet, feels like a better representation, and curling them over sounds like a no-brainer - depending on whatever it actually is he's standing on obviously
Maybe a buggy? That should provide a bit of height whilst not being overly large. Ork or civilian. Do you have any ideas for the general basing theme? I'm guessing urban suits the overall theme slightly better, more recognisable.
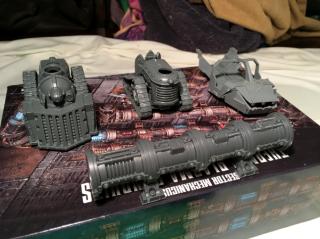
Housekeeping / Theme @monkeytroll: Plan is for the basing theme to be the ruins of an Imperial (New York) city. Trying for civilian rather than Ork - although the Ork buggy is probably about the right size. I've got a spare Landspeeder Storm, although it looks like it may be a bit large. Birthday drops are now in / complete - so I also have access to Sector Mechanicus Galvanic Servohaulers (may also be too big?), Munitorum Armoured Containers and Thermic Plasma Conduits (these may be just perfect, although less vehicle looking of course!)
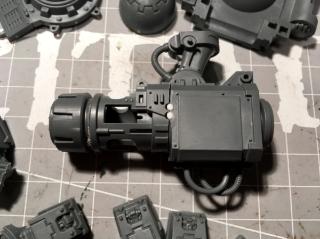
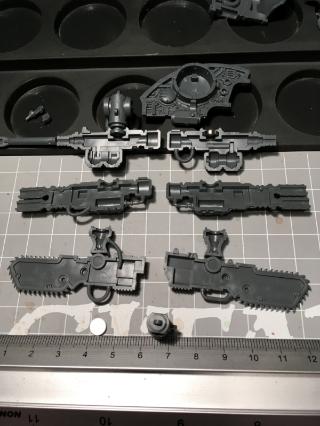
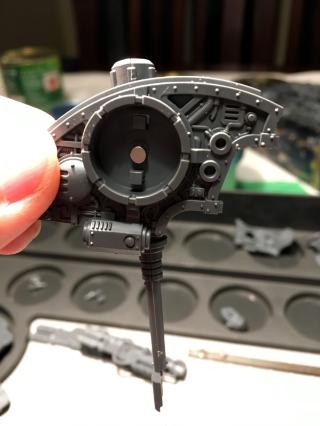
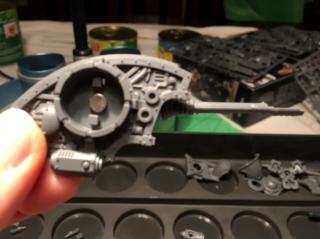
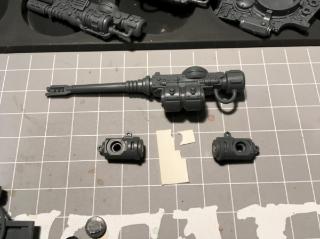
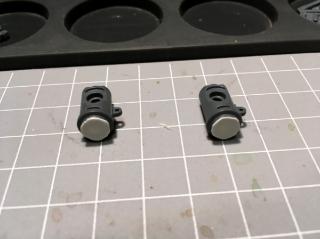
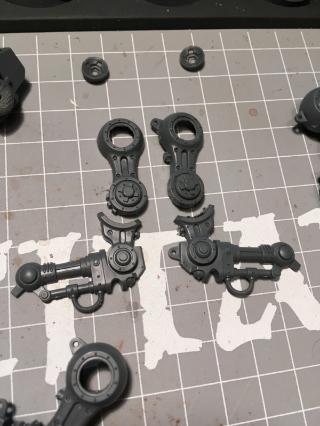
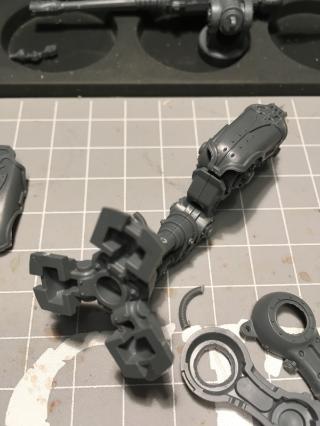
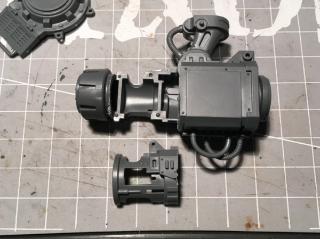
Progress Prep work for the Thermal Cannon (TC) / Rapid Fire Battle Cannon (RFBC) magnetisation. Having a brief look around, I've seen people magnetise the Heavy Stubber hopper separately (fiddly) or simply glue in place and cut out a piece of the Thermal Cannon body to fit around it (hmmm). Decided to try a third option - I'll attach it to the RFBC shield and have it attach with that. But to do this, and have it slip on and off easily, I need to remove some of the ridges it catches on. Two pieces removed here.
Probably easier to see looking front on (the two cut outs bottom right.)
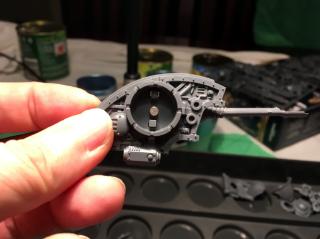
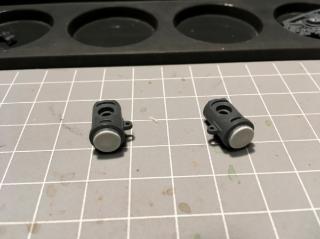
Again, brief research suggests most people just assemble the Thermal Cannon options at the rear. But I'm not most people. Given I hope to have saved a fiddly piece in the Heavy Stubber hopper, I make up for it here, cutting one side of the main gun housing into three so I can have the middle part lift out.
Put together with the middle part left out (plan is to magnetise it obviously.)
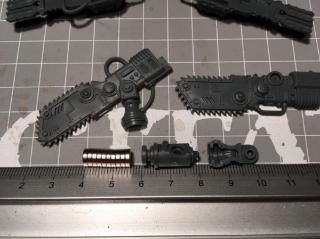
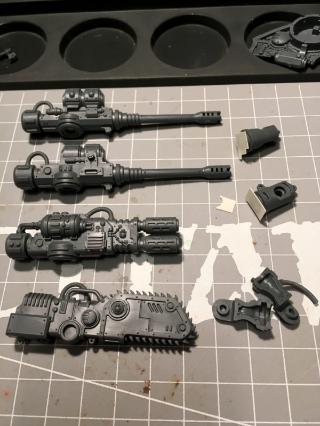
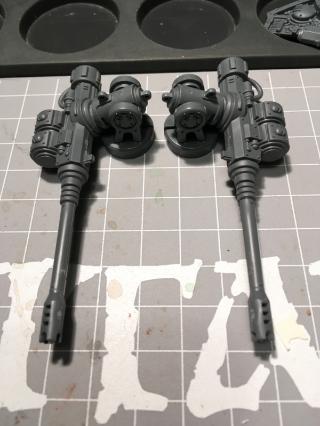
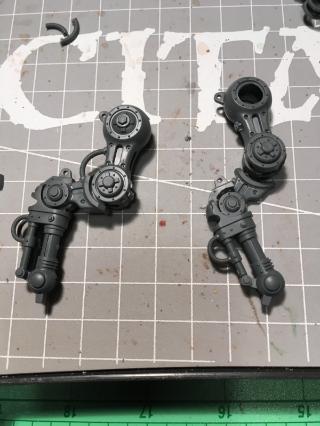
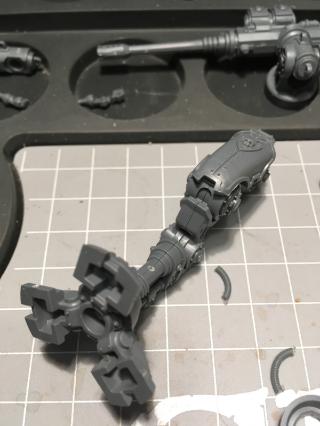
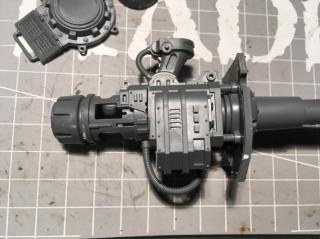
Which means I should be able to make the perfect Thermal Cannon assembly or...
...the perfect Rapid Fire Battle Cannon assembly - in theory anyway.
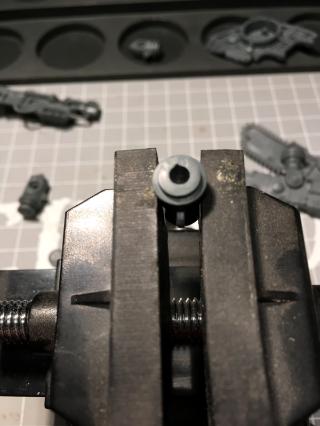
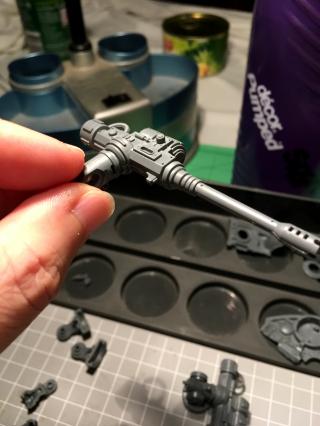
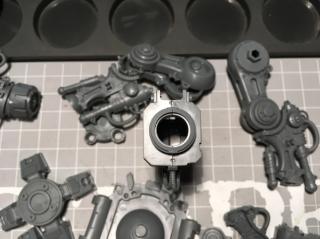
You might notice in the previous image a couple of dimples - this was needed so that the magnetised piece can come down on top of the Thermal Cannon main piece (where the pipes on the left go). Here I drill them out so I can replace with curved plastic pieces. For the next one, I'll drill these *before* cutting the side into three.
Rod glued in on one side. Still need to wait for it to harden, then snip flat and clean up - but should look better.
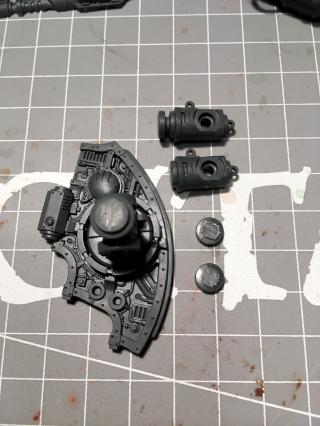
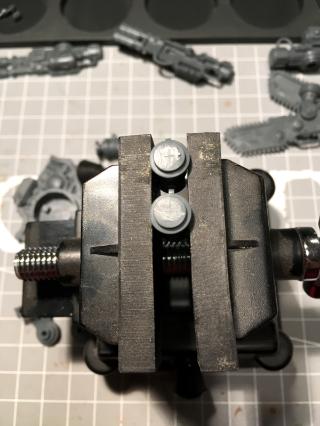
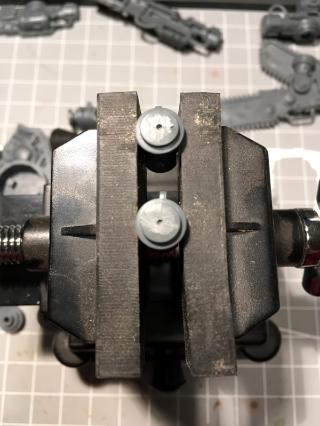
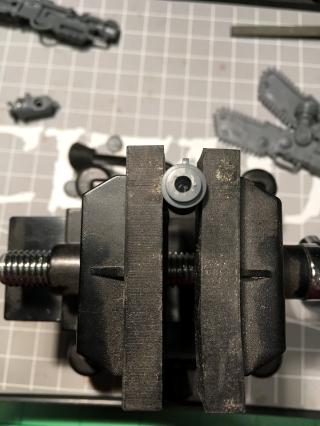
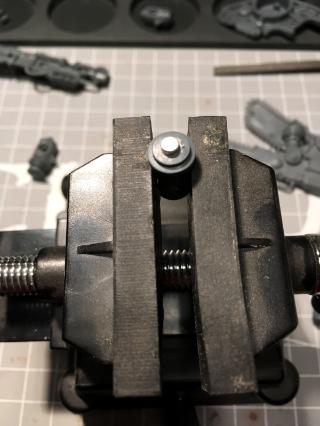
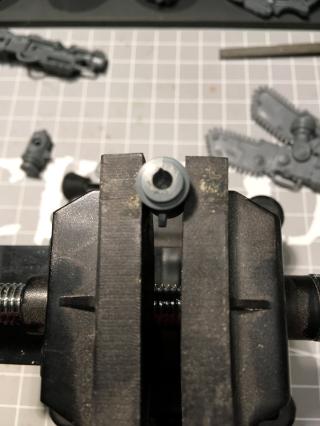
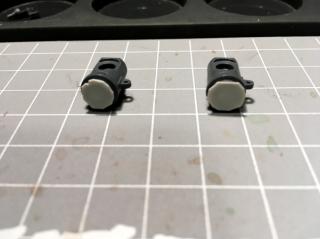
Progress The hemispherical domes I purchased were clear, so I decided to do a plastic glue test.
First attempt was inconclusive, perhaps too stingy on the plastic glue.
Second attempt I used more glue, and glued another piece of regular plastic at the same time. We have a winner (I can't pry either off with my fingers easily.)
I'll be following this with great interest, as I love the MCU! Looks like a lot of hard conversion work.
My armies (re-counted and updated on 11/7/24, including modeled wargear options):
Dark Angels: ~16000 Astra Militarum: ~1200 | Imperial Knights: ~2300 | Leagues of Votann: ~1300 | Tyranids: ~3400 | Stormcast Eternals: ~5000 | Kruleboyz: ~3500 | Lumineth Realm-Lords: ~700
Check out my P&M Blogs: ZergSmasher's P&M Blog | Imperial Knights blog | Board Games blog | Total models painted in 2024: 40 | Total models painted in 2025: 21 | Current main painting project: Warhammer 40k Leviathan set
Mad Doc Grotsnik wrote: You need your bumps felt. With a patented, Grotsnik Corp Bump Feelerer 9,000.
The Grotsnik Corp Bump Feelerer 9,000. It only looks like several bricks crudely gaffer taped to a cricket bat.
Grotsnik Corp. Sorry, No Refunds.
2018/07/16 04:23:05
Subject: Re:Imperial Knights: The Avengers Initiative
It was when I realised the weapons were not those of the armigers...... Vehicle sounds more Hulk-y, maybe time to reverse roles and make an imperial civvy vehicle out of an ork buggy.....
Toes definitely more suitable for the big guy. Just confirming those are not glued in place yet, as you haven't wrapped them over any scenery.
Housekeeping Welcome ZergSmasher! Your questions should be answered below monkeytroll.
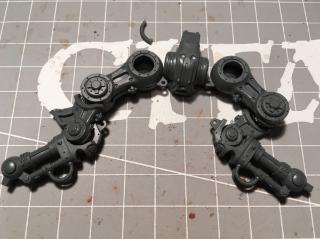
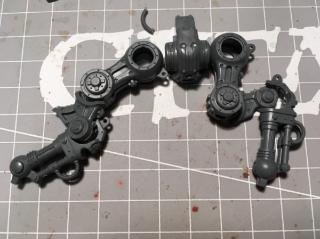
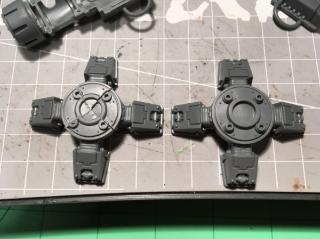
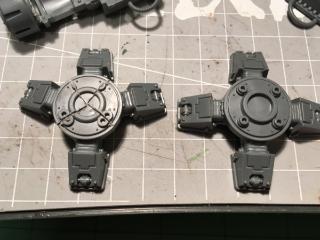
Hulk Progress Cleaned up the protruding plasticard rod from the Thermal Cannon / Rapid Fire Battle Cannon right third housing. Not technically Hulk specific - as a Gallant he won't be using either, but I like options. I'll be doing the same for the rest.
Thermal Cannon piece in place.
Rapid Fire Battle Cannon piece in place. Still trying to work out the best place to put the magnets for these and how to attach them. Both pieces, especially the RFBC, have a sizeable cavity on the connection side.
Current potential items to go under the Hulks forward raised foot. I think at this stage I need to actually finish the leg positioning first. Not sure I want to create an Imperial civvy vehicle - but I have been searching for inspiration just in case .
Toes definitely not glued in place yet. I've drilled through the pivot point/rod of the front middle toe - here you can see some plasticard rod slotted through the hole.
Then I cut through the toe so it can actually pivot on the replacement plasticard rod. I'll greenstuff the flexible covering once I settle on a position. I have also completed this step for one of the other toes.
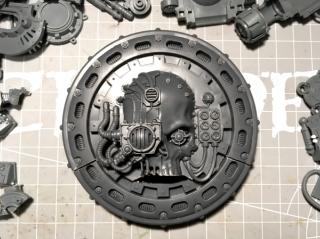
Captain Imperium Progress What's this?
I give you, Captain Imperium's Shield!
Had to share that one - and put it in my first post too!


 Imperial Knights: The Avengers Initiative
 Da Dark Angelz
 Arakasi vs Infinity


 Could you see me completing 15 Adeptus Custodes faster? Would you even want to?
  . One has to play to their strengths after all.
 . I can't cover up any mistakes Orky style.


 . (Screams and runs out before the MOD can catch him)


 10000pts
  4000pts
  5000pts
  1500pts


 ~16000 Astra Militarum:
  ~1200 | Imperial Knights:
  ~2300 | Leagues of Votann:
  ~1300 | Tyranids:
  ~3500 | Lumineth Realm-Lords:
  ~700
~700