| Author |
Message |
 |
|
|
|
|
Advert
|
Forum adverts like this one are shown to any user who is not logged in. Join us by filling out a tiny 3 field form and you will get your own, free, dakka user account which gives a good range of benefits to you:
- No adverts like this in the forums anymore.
- Times and dates in your local timezone.
- Full tracking of what you have read so you can skip to your first unread post, easily see what has changed since you last logged in, and easily see what is new at a glance.
- Email notifications for threads you want to watch closely.
- Being a part of the oldest wargaming community on the net.
If you are already a member then feel free to login now. |
|
 |
2018/07/17 21:49:03
Subject: Imperial Knights: The Avengers Initiative
|
|

Stone Bonkers Fabricator General
A garden grove on Citadel Station
|
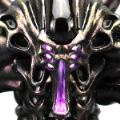
That is some very clean leg reposing. Can't wait to see some big dude holding that giant skull icon.
|
ph34r's Forgeworld Phobos blog, current WIP: Iron Warriors and Skaven Tau
+From Iron Cometh Strength+ +From Strength Cometh Will+ +From Will Cometh Faith+ +From Faith Cometh Honor+ +From Honor Cometh Iron+
The Polito form is dead, insect. Are you afraid? What is it you fear? The end of your trivial existence?
When the history of my glory is written, your species shall only be a footnote to my magnificence. |
|
|
 |
|
2018/07/17 21:55:55
Subject: Imperial Knights: The Avengers Initiative
|
|

Twisting Tzeentch Horror
|
Woah. That's all sooooooo cool. That shield looks awesomeeee.
Keep up the fantastic work!
|
 insaniak wrote: insaniak wrote:
You can choose to focus on the parts of a hobby that make you unhappy, or you can choose to focus on the parts that you enjoy.
|
|
|
|
|
2018/07/17 22:13:27
Subject: Imperial Knights: The Avengers Initiative
|
|
Fixture of Dakka
|
I really like those first two vehicle mock-uos, particularly the middle version.
And Cap's shield is awesome 
|
|
|
|
|
|
2018/07/19 03:51:12
Subject: Imperial Knights: The Avengers Initiative
|
|
Walking Dead Wraithlord
|
Oh, wow. That shield is going to be too good.
|
|
|
|
|
2018/07/20 17:21:46
Subject: Re:Imperial Knights: The Avengers Initiative
|
|

Ragin' Ork Dreadnought
|
Housekeeping
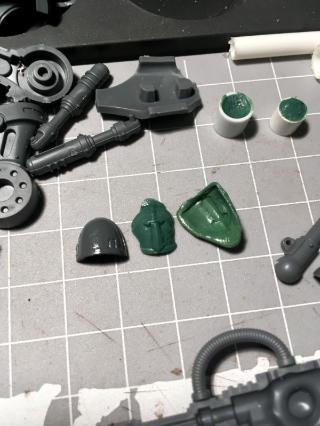
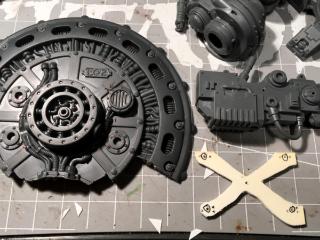
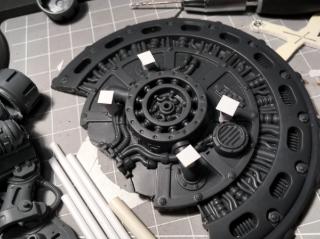
Thanks everyone for checking in. The shield came out better than I expected. I can't take credit for the idea (I've seen it done elsewhere) - but I haven't seen it done as a complete circle. It's big though...
@monkeytroll: Those first two vehicle mock-ups are just stock from the Sector Mechanicus Galvanic Servohaulers - so nothing special - but you probably already knew that.
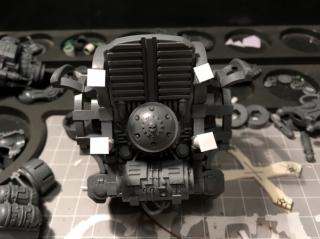
Captain Imperium Progress
Reverse of Captain Imperium's shield.
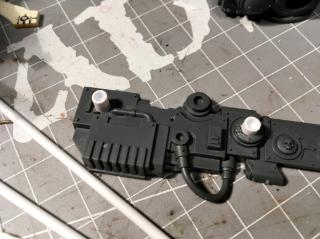
Hulk Progress
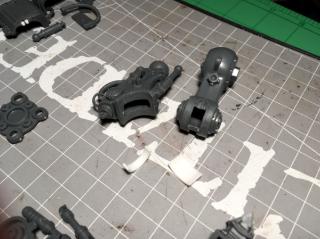
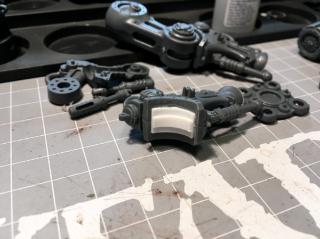
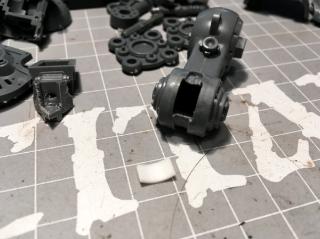
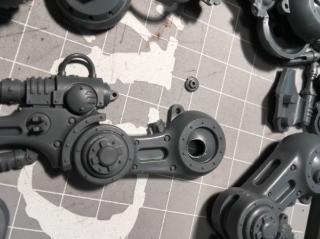
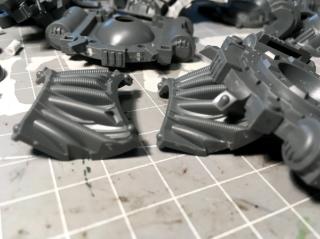
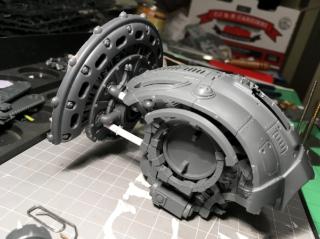
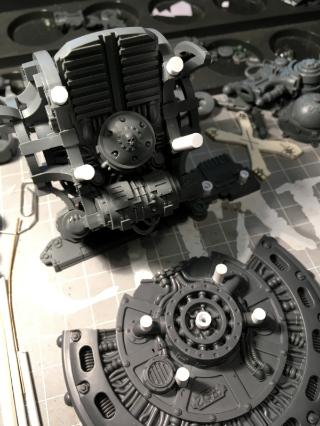
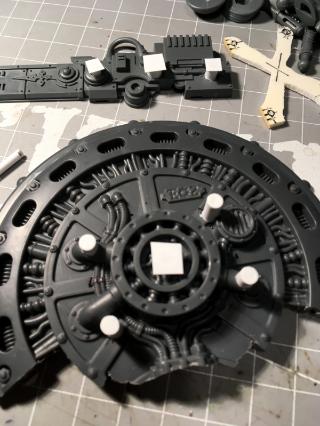
At some point, you just have to start gluing. I've half cleaned up the leg parts for gluing, including removing the original connection points on the top piece (thigh?) You can see the replacement join pieces I have prepared (the small pieces of plasticard rod).

Here the larger join piece is glued in place.
And the smaller one glued on top. I'll trim to size and clean up once the glue sets. This should neatly fit the gap left in the thigh.
Catchya.
|
|
|
|
|
|
2018/07/21 13:32:32
Subject: Re:Imperial Knights: The Avengers Initiative
|
|
Fixture of Dakka
|
Nope....no idea  I've been out for so long I have no idea what's what anymore, constantly getting surprised at conversions that turn out to be stock models
|
|
|
|
|
|
2018/07/21 13:32:35
Subject: Re:Imperial Knights: The Avengers Initiative
|
|
Ragin' Ork Dreadnought
|
Spotted this pic on youwashock's blog.
Another good reference for the Hulk pose - mainly how I imagine the legs given it isn't as clear in my current reference pics.
|
|
|
|
|
|
2018/07/22 22:12:47
Subject: Imperial Knights: The Avengers Initiative
|
|
[MOD]
Making Stuff
|
Cool project. I'm keen to see how it comes together.
|
|
|
|
|
|
2018/07/23 07:46:24
Subject: Imperial Knights: The Avengers Initiative
|
|

Crazy Marauder Horseman
Poland
|
I'm waiting for more
|
|
|
|
|
2018/07/23 08:16:39
Subject: Imperial Knights: The Avengers Initiative
|
|

Jealous that Horus is Warmaster
|
I'm very impressed with your progress and the "cleanness" of it all... I was looking forward to your results because I'm one to like franchise mashups, but now I'm really looking forward to your results because I'm going to learn a bunch of techniques to convert my own knights along the way.
Awesome stuff!!
|
Work in progress p&m blog :
United Colors of Chaos , Relating my ongoing battle with grey plastic...
2022 hobby running tally: bought: 71, built: 45, painted: 17, games played: 3
 10000pts 10000pts  4000pts 4000pts  5000pts 5000pts  1500pts 1500pts |
|
|
|
|
2018/07/23 09:27:15
Subject: Imperial Knights: The Avengers Initiative
|
|
Stealthy Grot Snipa
|
Love this. Love everything about it. Miles out of my league, but subbed anyway, will see what tips I can learn/ borrow/ steal from OP's fantastic work so far!
|
|
|
|
|
|
2018/07/28 01:56:56
Subject: Re:Imperial Knights: The Avengers Initiative
|
|
Ragin' Ork Dreadnought
|
Housekeeping
You turn away for just one second, and comment deluge!
@monkeytroll: I'm glad I didn't assume then.
@insaniak: Welcome! I still keep up with your workbench blog.
@Frodeck: Welcome! Here is a smidge more just for you.
@ChaosDad: Thank you. I've learnt a lot myself on DakkaDakka - be it through other blogs or feedback on my own - so happy to give back.
@Skinflint Games: Welcome! Remember - it is only out of your league *for now*. Everyone has to start somewhere.
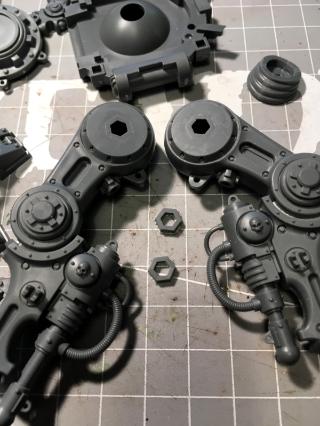
Progress
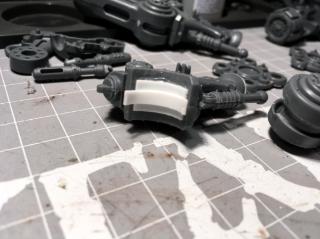
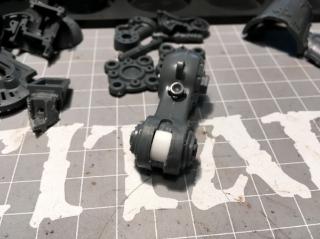
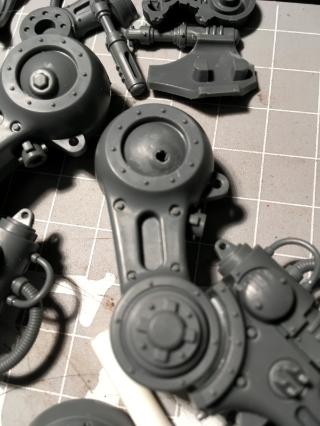
Trimmed and terrific.
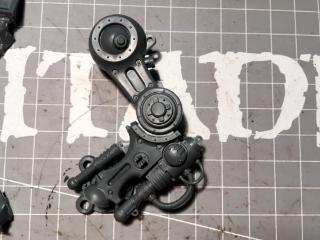
Full range of the forward articulation, showing the gap between the upper and lower leg segments caused by the original cutting now replaced with plasticard. Full forward range is a moot point - one of the legs (the other one) is already in the forward most position (if you actually want to use the knee plate anyway).
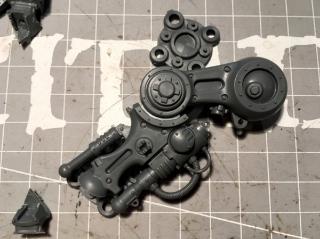
Full range of the backward articulation, and the whole point of this exercise. Interestingly, the range is determined by the length of the groove in the upper leg segment, at the point it narrows to form the closing semicircle.
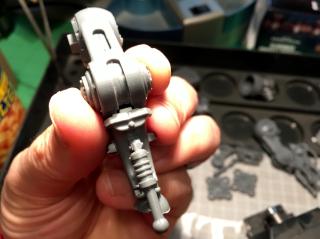
Front on view of the backward articulation, whereby I discover there is a gap. Grrrr. It isn't covered by the knee plate. Double grrrr. A normal person might think this is good enough. I know it is just going to bug me...
So, I need to fill this hole. I plan to do it with this piece of plasticard. Yes I wish I had realised this before gluing the upper leg together. This is basically a slow operation of filing the plasticard until it sits on the top and bottom edges - without going too far so that it just falls in.
Success. There are still gaps. I will green stuff them. Now I need to find my green stuff - I'm sure I had plenty, but it appears to have been well packed in our move of a year and a half ago...
Meanwhile I think I can safely glue the hips together.
And add the extra hip detail. I couldn't possibly regret this later?
Catchya!
|
|
|
|
|
|
2018/07/28 22:50:58
Subject: Re:Imperial Knights: The Avengers Initiative
|
|
Fixture of Dakka
|
Just remember that it wouldn't be a planning error, it would be a trial run to establish procedures........ 
|
|
|
|
|
|
2018/07/29 03:14:13
Subject: Imperial Knights: The Avengers Initiative
|
|
Stoic Grail Knight
|
Cool stuff good luck!
|
Hydra Dominatus
World Wide War Winner |
|
|
|
|
2018/07/30 00:18:58
Subject: Re:Imperial Knights: The Avengers Initiative
|
|
Grim Dark Angels Interrogator-Chaplain
|
The amount of work it takes to repose a Knight looks just as daunting as I thought it would be, but you seem to be making it work. Keep it up!
|
|
|
|
|
|
2018/07/30 14:32:28
Subject: Re:Imperial Knights: The Avengers Initiative
|
|
Ragin' Ork Dreadnought
|
Housekeeping
@monkeytroll: That it is. Just feels like I should have caught it. Trying not to screw up expensive models . Learning experience for next time (myself or anyone else).
@ghostmaker: Welcome and thanks!
@ZergSmasher: Hopefully it will be worth it in the end... I've started now, I'll see it through.
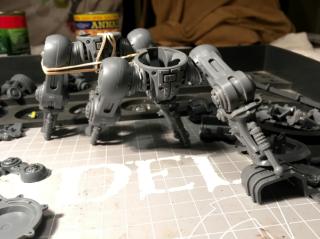
Progress
Dude, where's my green stuff? Thankfully it was in the first box I sorted. Not sure how I missed it the first time...
Green stuff applied to gaps in the top of leg.
Left overnight and sanded.
Look ma! No gaps!
One of these is not like the others...
Playing around with the legs and hips, checking my references - of course I now decide I need to remove the, piston covers(?), from the hips so that I can re position them. Also I think I've just realised I need to move the external nut placement on both legs too - and of course, again, I've already glued one together...
Catchya!
|
|
|
|
|
|
2018/07/31 20:03:21
Subject: Re:Imperial Knights: The Avengers Initiative
|
|
Fixture of Dakka
|
All those years as a mek showing their mark?
Joking aside, this is some nice clean building you're doing here, I'm positive this work is going to be massively helpful to those following....
|
|
|
|
|
|
2018/08/03 05:25:04
Subject: Re:Imperial Knights: The Avengers Initiative
|
|
Ragin' Ork Dreadnought
|
Housekeeping
@monkeytroll: Thanks - I hope so.
Progress
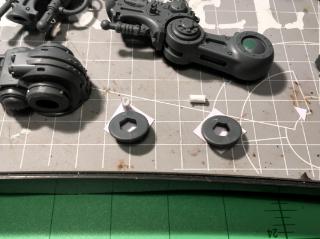
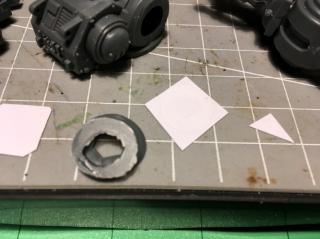
Sometimes hobby, like life, has its ups and downs. I thought I was going to get away without modifying the external leg nuts at the hip joint. Apparently not. With that realisation behind me, I can focus on moving forwards again.
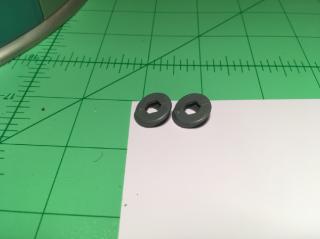
First thing, I wanted to remove the current leg nut - preferably whole so I can use it for a green stuff mould. For my first attempt, I tried using a wood drill bit from the back - figuring it might just pop out. Here you can just see the tip of the wood drill bit attempting to break the surface - not quite as centrally as I had hoped.
Also, having a hole off centre on one side makes drilling a pilot hole centrally from the other side... challenging.
It came out, pretty much as expected - but not really in any condition to be reused or used for a mould. It also left a large hole in the ball joint for me to fill in later.
Learning from my mistakes, for the glued upper leg, I drill my pilot hole first, then use the wood drill bit to effectively shave down the nut. There is no nut left over from this process, but the hole to fill is a lot smaller.
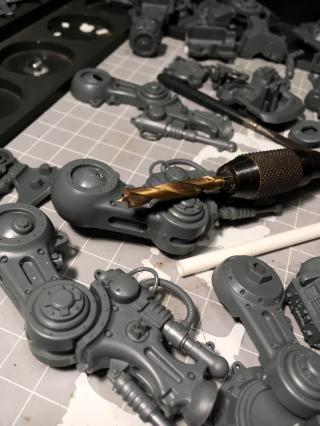
The wood drill bit in question.
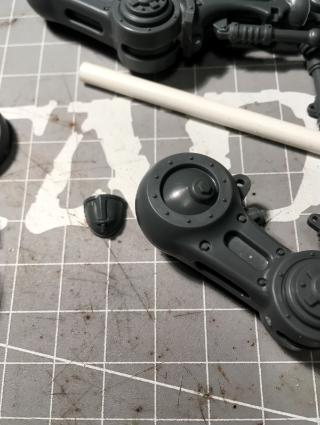
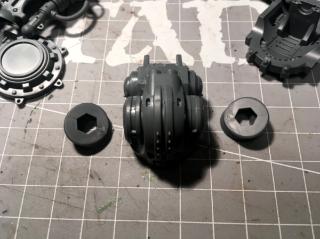
Having removed my Questoris leg nuts, I turn to the issue of replacing them. One of my goals for this project is doing some mould work, and this would seem well suited to a green stuff mould. Before I attempt this on my expensive Questoris leg nuts, I find another similiar (in detail) piece of less care factor to practise on. This Dark Angels sword is not complex, and comes complete with a curved surface and some nearby details I'm not interested in.
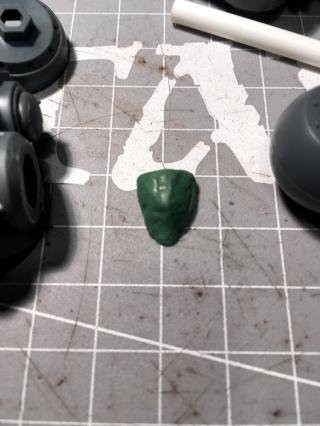
I apply some of the wife's bees wax (with permission) and push the green stuff down over the top.
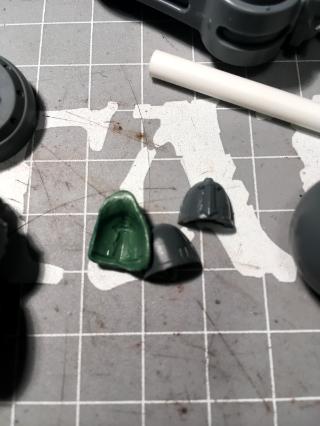
The following morning the green stuff mould comes away without issue - perfect! Shown here is a target blank pauldron to try it out on. It is however, a bit flimsy, which has me thinking about ways to make it a bit more solid.
A piece of plasticard (possibly just plastic in this case) tubing looks like it will provide something to hold onto and maintain structural integrity whilst fitting snugly over the hip nut.

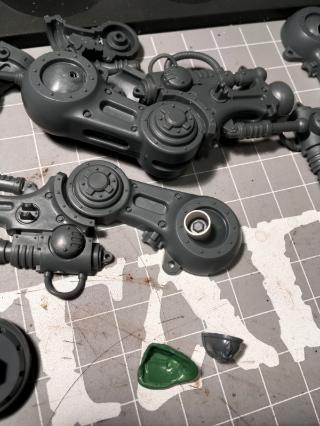
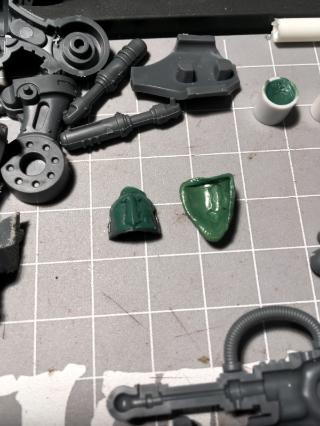
As always, I created too much green stuff, so not only did I make my Questoris hip nut mould, I also filled in the hip ball joint holes (the larger hole will need a bit more later to get the curvature right) and made my Armiger hip nut mould as well using the same principles. They are looking pretty good to me - always nice to end on a high note.
Catchya!
|
|
|
|
|
|
2018/08/03 06:18:36
Subject: Re:Imperial Knights: The Avengers Initiative
|
|
Fixture of Dakka
|
Interesting project Arakasi.
Nice to see someone doing detailed conversion work on their knights, as it gives me hope for my own when I get around to building them.
|
|
|
|
|
|
2018/08/03 21:07:39
Subject: Re:Imperial Knights: The Avengers Initiative
|
|
Fixture of Dakka
|
See, I'd have gone to my hex rod or my collection of model nuts and bolts for that, but trying out press-moulding on such a seemingly simple piece is a sensible idea - I think my first attempt was at a whole track unit, which understandably didn't work out so well
Good call on the armiger nut too, the questoris ones are a bit more obvious in their placement, but it would be easy to miss it on the armigers as they have a more central placement.
|
|
|
|
|
|
2018/08/11 02:20:19
Subject: Re:Imperial Knights: The Avengers Initiative
|
|
Ragin' Ork Dreadnought
|
Housekeeping
@Snrub: Welcome! Yeah, I just can't help myself. I will look out for when you get started on yours.
@monkeytroll: So, here's my bit of heresy, I don't have any hex rod or large enough model nuts and bolts  . Yet, obviously.
Progress
If anyone cares, this was the test press mould output. Fiddly due to the thinness of the mould, and I managed not to get a perfect impression.
I also got a fair amount of the pad itself created from the excess green stuff. Both of these issues should not exist with the actual hip nut moulds - but I guess I'll confirm that later.
Finally take off the leg locking nuts - these are just getting in the way.
Test pose with blu tack. On closer inspection, the front foot is not going to be lifted very high off the ground at all. Re-examining my references, I don't think it was ever off the ground or on something. He is also going to be a bit lower than standard (reference model behind).
I decided to replace the plasti removed by the cut with quarter mm plasticard sheet.
First glue attempt came away. This is the retry. Hopefully I got actual plasticard sheet and not something... else...
Catchya!
|
|
|
|
|
|
2018/08/13 17:51:30
Subject: Imperial Knights: The Avengers Initiative
|
|
Preacher of the Emperor
|
This project is looking great! Always good to see more extensive knight conversions, especially loyalist ones! Can't let traitor knights have ALL the fun.
|
|
|
|
|
|
2018/08/14 05:29:05
Subject: Imperial Knights: The Avengers Initiative
|
|
Walking Dead Wraithlord
|
This build is getting intense. Solid and meticulous work.
|
|
|
|
|
2018/08/16 08:43:24
Subject: Re:Imperial Knights: The Avengers Initiative
|
|
Fixture of Dakka
|
I'll be honest, I'm just assuming I have some hex the right size....I forget what I have when I'm in full swing, after a few years out I have no idea what or even where so many of my supplies are
Press pad looks ok, I'm sure the nuts will come out just fine.
Interesting that your first attempt at replacing the plastic failed to glue....
|
|
|
|
|
|
2018/08/18 07:47:49
Subject: Re:Imperial Knights: The Avengers Initiative
|
|
Ragin' Ork Dreadnought
|
Housekeeping
@Zefig: Welcome and thanks. Two reasons to keep this loyalist - to practise more precise customisation and to reduce time to completion by limiting scope
@youwashock: Thanks.
@monkeytroll: Haha! Another benefit of a completely new project - I pretty much know I don't have most things. I'll need to do a stock take before going back to Da Dark Angelz... Maybe we both can. Plastic glue fail discussed below.
Plasticards Ain't Plasticards
The glue failed again. On closer inspection of the "plasticard" sheet I had purchased, it was ABS not HIPS. This was what I was worried about with the half spheres from Plastruct, and why I did a glue test on them. I just let the term "plasticard" blind me to thinking all plasticard is HIPS.
For anyone not aware, plastics ain't plastics. As in, there are many different types of plastic, they have different properties, and often require different glues. Games Workshop plastic is High Impact Polystyrene - or HIPS. If you don't work with anything else, its generally not an issue. But, in more general modelling, you often come across Acrylonitrile Butadiene Styrene (ABS) and Cellulose Acetate Butyrate (Butyrate or CAB) as well as others.
As far as I can tell (Google research), Plastruct Plastic Weld seems to be the gold standard for "permanent bonding of most dissimilar plastics". But it ended up easier just to order some Evergreen polystyrene sheets. Well, apart from not having it yet (should turn up this week). Plastruct won't ship their Plastic Weld internationally, ebay sellers are all located out of Oz and I'll be paying +400% for postage. Local Australian sellers all appear out of stock. I'll keep my eyes open though. Also open to any alternatives anyone has had experience with.
Now, back to our regularly scheduled programme...
Progress
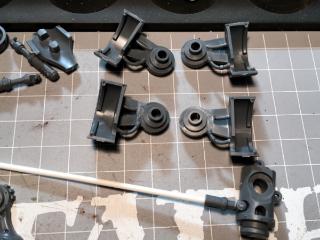
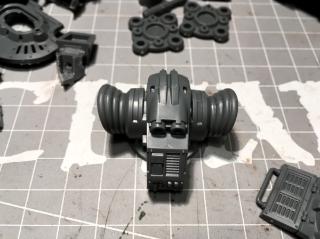
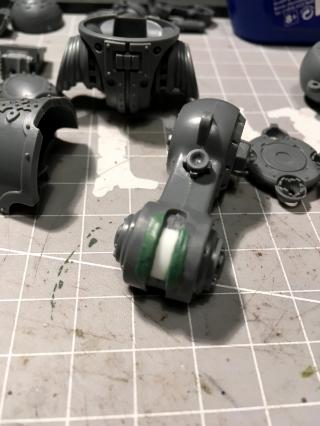
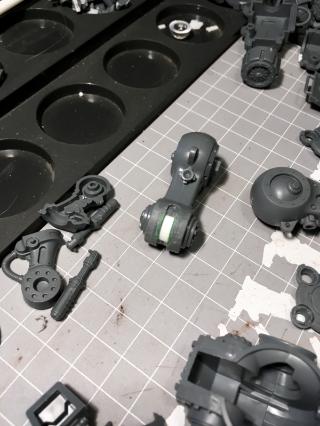
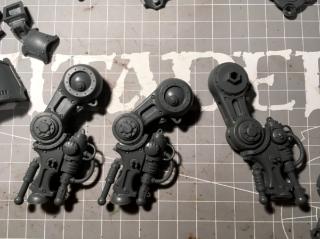
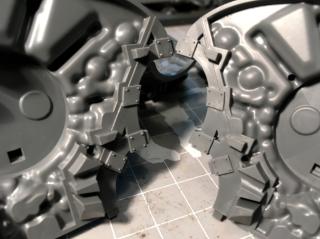
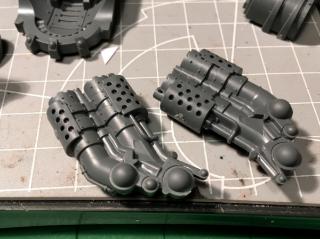
While I wait for my *actual* polystyrene sheet to turn up, I've moved on to the shoulders. The Hulk stance requires the shoulders to swivel up more than designed. Here I have removed some plastic detail in the way of this (bottom set) and prepare to extend the piston.
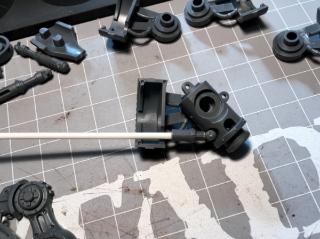
Here you can see the new angle required, and the need for the piston extension. As a side note, there is an upper limit to how far these can be pushed out, limited first by the angle the piston allows and secondly by the shoulder pad that sits over it. Both could be dealt with, but are unnecessary for my requirements.
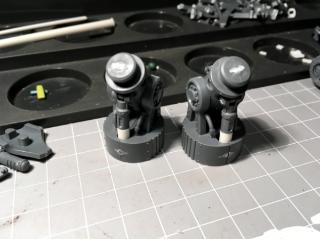
The finished (unglued, uncleaned up) shoulder joints with piston extensions.

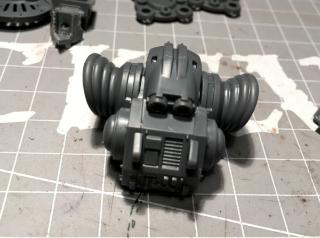
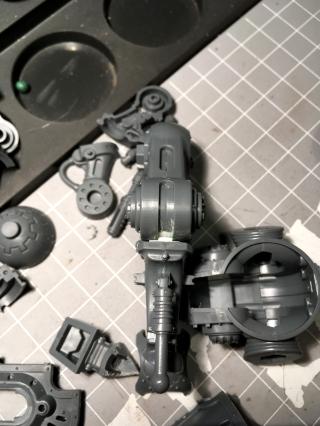
May as well remove the peg from the end of the upper arm joint and drill my magnet holes while I'm here - even if I don't have the plasticard to top it off at the moment.
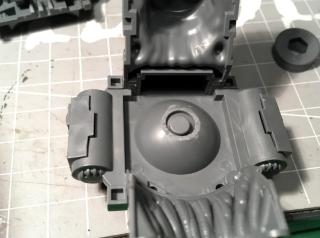
Shoulders cleaned up and glued in the background. In the foreground, I'm starting to play around with how to magnetise the waist at the angle I expect I'll want.
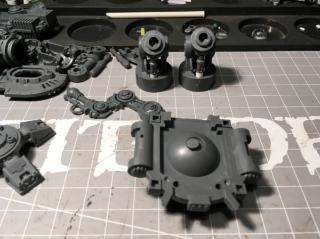
Decided I need more of the upper torso together to judge how much space I have. Here I've glued and cleaned up the waist base piece, the front to it, and started on the left hull side.

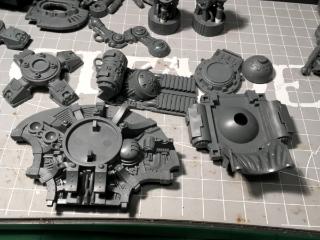
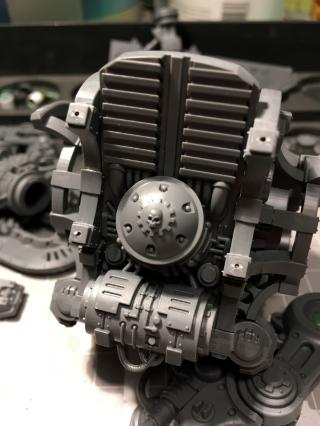
Boring, but progress, most of the pieces of the torso cleaned up and glued, though still separate.
They don't put this in the instructions - here I've shaved off one of the rivets on the central square (on both pieces) where it gets in the way of a flush finish with the back piece.
The fit for the front wasn't perfect either, although that appears to be because I welded the front part to the base a little too snugly. I've widened the central gap on the right piece for a snugger fit with the sides.
May as well glue the exhausts together while I'm here (still need cleanup - I just clean up along the join before gluing).
As it happens, I would have been better off sorting the waist magnetisation before gluing anything on. I'm thinking about placing some plasticard across the hole, and drilling the hole for the locator into it. To do that, I'll need more surface area for the join, so I've filed down the top in readiness.
Catchya!
|
|
|
|
|
|
2018/08/18 09:58:33
Subject: Re:Imperial Knights: The Avengers Initiative
|
|
Fixture of Dakka
|
Definitely worth keeping an eye out for Plastic Weld, your google-fu was strong there, I consider it an essential part of my tools.
Bad rivet placement by GW, heretical behaviour, the Inquisitors need to visit their forge.
Hadn't realised you were magnetising the waist too. Just for storage/transport reasons? (And the fact that you can, of course  )
|
|
|
|
|
|
2018/08/19 03:41:08
Subject: Re:Imperial Knights: The Avengers Initiative
|
|
Fixture of Dakka
|
Surprising how almost-readily poseable this rather static kit can be. A little work goes a long way it seems.
Interesting stuff regarding the plastics. I'll have to keep my eye out for some plasti-weld for future projects.
|
|
|
|
|
|
2018/09/15 14:08:11
Subject: Re:Imperial Knights: The Avengers Initiative
|
|
Ragin' Ork Dreadnought
|
Housekeeping
@monkeytroll: Yes, magnetising the waist for storage/transport reasons. And painting assemblies. And obviously because I can .
@Snrub: I'm still not convinced how poseable the kit is just yet...
@everyone: Apologies for breaking my seventh goal, its been almost a month instead of one week since my last entry. There were some delays on acquiring the right type of plasticard sheet and the legs and positioning is still giving me conniptions. I could make smaller entries to space it out, but that feels like cheating.
Progress
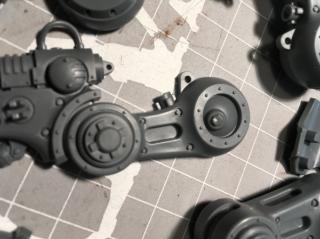
I was going to bide my time magnetising the arms, but then realised I need to work out the shield mounting points first. So back to Captain Imperium it is.
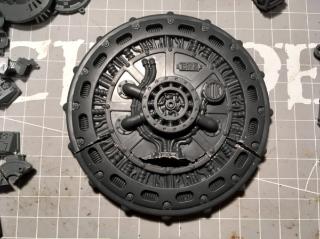
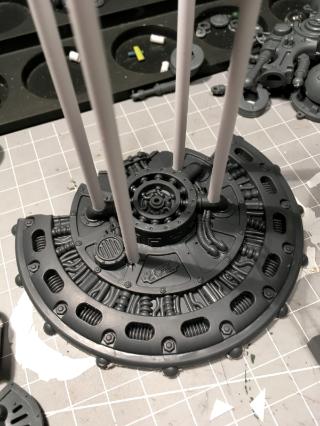
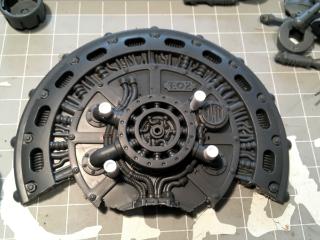
The shield will be mounted to the back of Captain Imperium. Where there would be Cogs or Eagles, I will place mount points. Here I've drilled guide holes. The curvature that makes the bottom points further recessed is making calculations... difficult.
Here is the back of the shield, the reaper sword, and a plasticard template with my best bet for the hole locations. You can see I had several goes, the black circles are the final ones.
Using the template I drill the mounting holes on the shield back and glue in the mounting points.
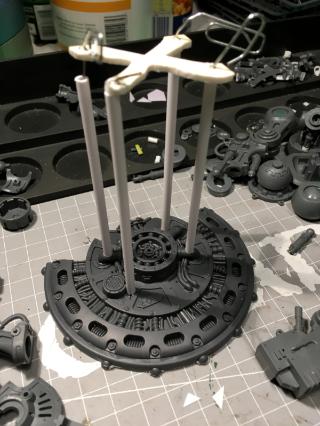
Uing the template to try to keep them straight and in the correct orientation while the glue sets.
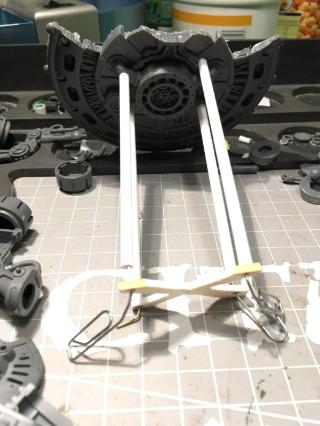
Reorientation to get the correct "lean".
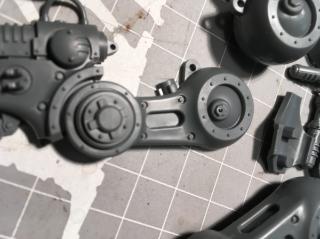
Cut down. You can see the inner rods here. They also provide a recess for the magnets.
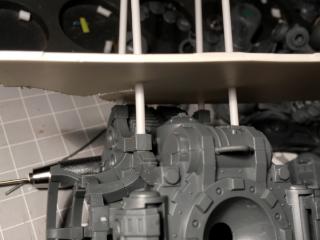
Same deal, but on the mounting points on the Knight itself.
Again, cut down and showing the inner rods and recesses.
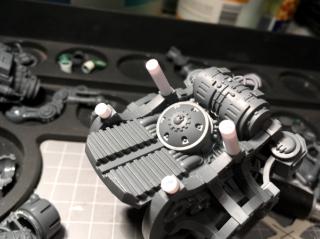
Magnets in place in the shield.
Topped with 1/4mm plasticard sheet.
Same for Knight mounting points.
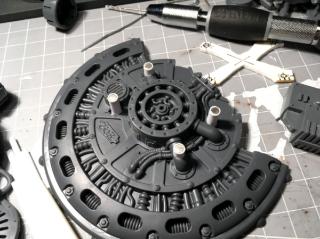
The plan is to move the shield to the arm of the currently "Rotated Ion Shields" Knight. Here I'm putting the mount points onto the Reaper sword.

Now with a central magnet position as well.
It's working!
Trimmed the plasticard toppers to match the mounting tubes.
It's still working!
Almost to the same place for the Reaper sword and shield.
Catchya!
|
|
|
|
|
|
2018/09/16 18:43:38
Subject: Imperial Knights: The Avengers Initiative
|
|
Liberated Grot Land Raida
|
Arakasi! That must have been.. well, years, really! . Glad to see you back here, and excellent work on your avengers. Following with interest
|
A Squeaky Waaagh!!
Camkhieri: "And another very cool thing, my phones predictive text actually gave me chicken as an option after typing robot, how cool is that."'
Meercat: "All eyes turned to the horizon and beheld, in lonely and menacing grandeur, the silhouette of a single Grot robot chicken; a portent of evil days to come."
From 'The Plucking of Gindoo Phlem' |
|
|
|
|
2018/09/16 19:08:08
Subject: Re:Imperial Knights: The Avengers Initiative
|
|
Fixture of Dakka
|
Nicely done.
Are you going to extend out the back hulk any to merge the mounting tubes in, or just build out the base of the tubes? Or option 3??
|
|
|
|
|
|
|
|


 Imperial Knights: The Avengers Initiative
 Da Dark Angelz
 Arakasi vs Infinity

 ~16000 Astra Militarum:
  ~1200 | Imperial Knights:
  ~2300 | Leagues of Votann:
  ~1300 | Tyranids:
  ~3500 | Lumineth Realm-Lords:
  ~700
~700

 Order of the Sable Heart
 Grave Knights