Hi all, I'm Blockade, long time lurker, first time poster. Back in the day I had a blog on the Independent Characters Forums before that disappeared, and I've decided to make one here so I'm not hunting through thousands of photos on my iPhone. I'm excited to share some terrain boards and scenery that I've been working on, some minis I paint, and anything else that comes to mind!
Automatically Appended Next Post: These are some of my older builds. Some of which are still mine, others were commissioned by friends for display boards.
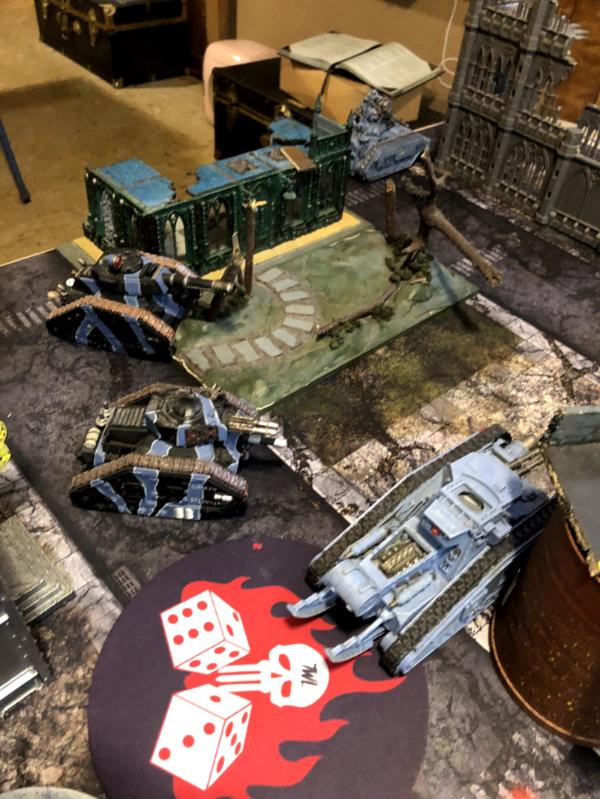
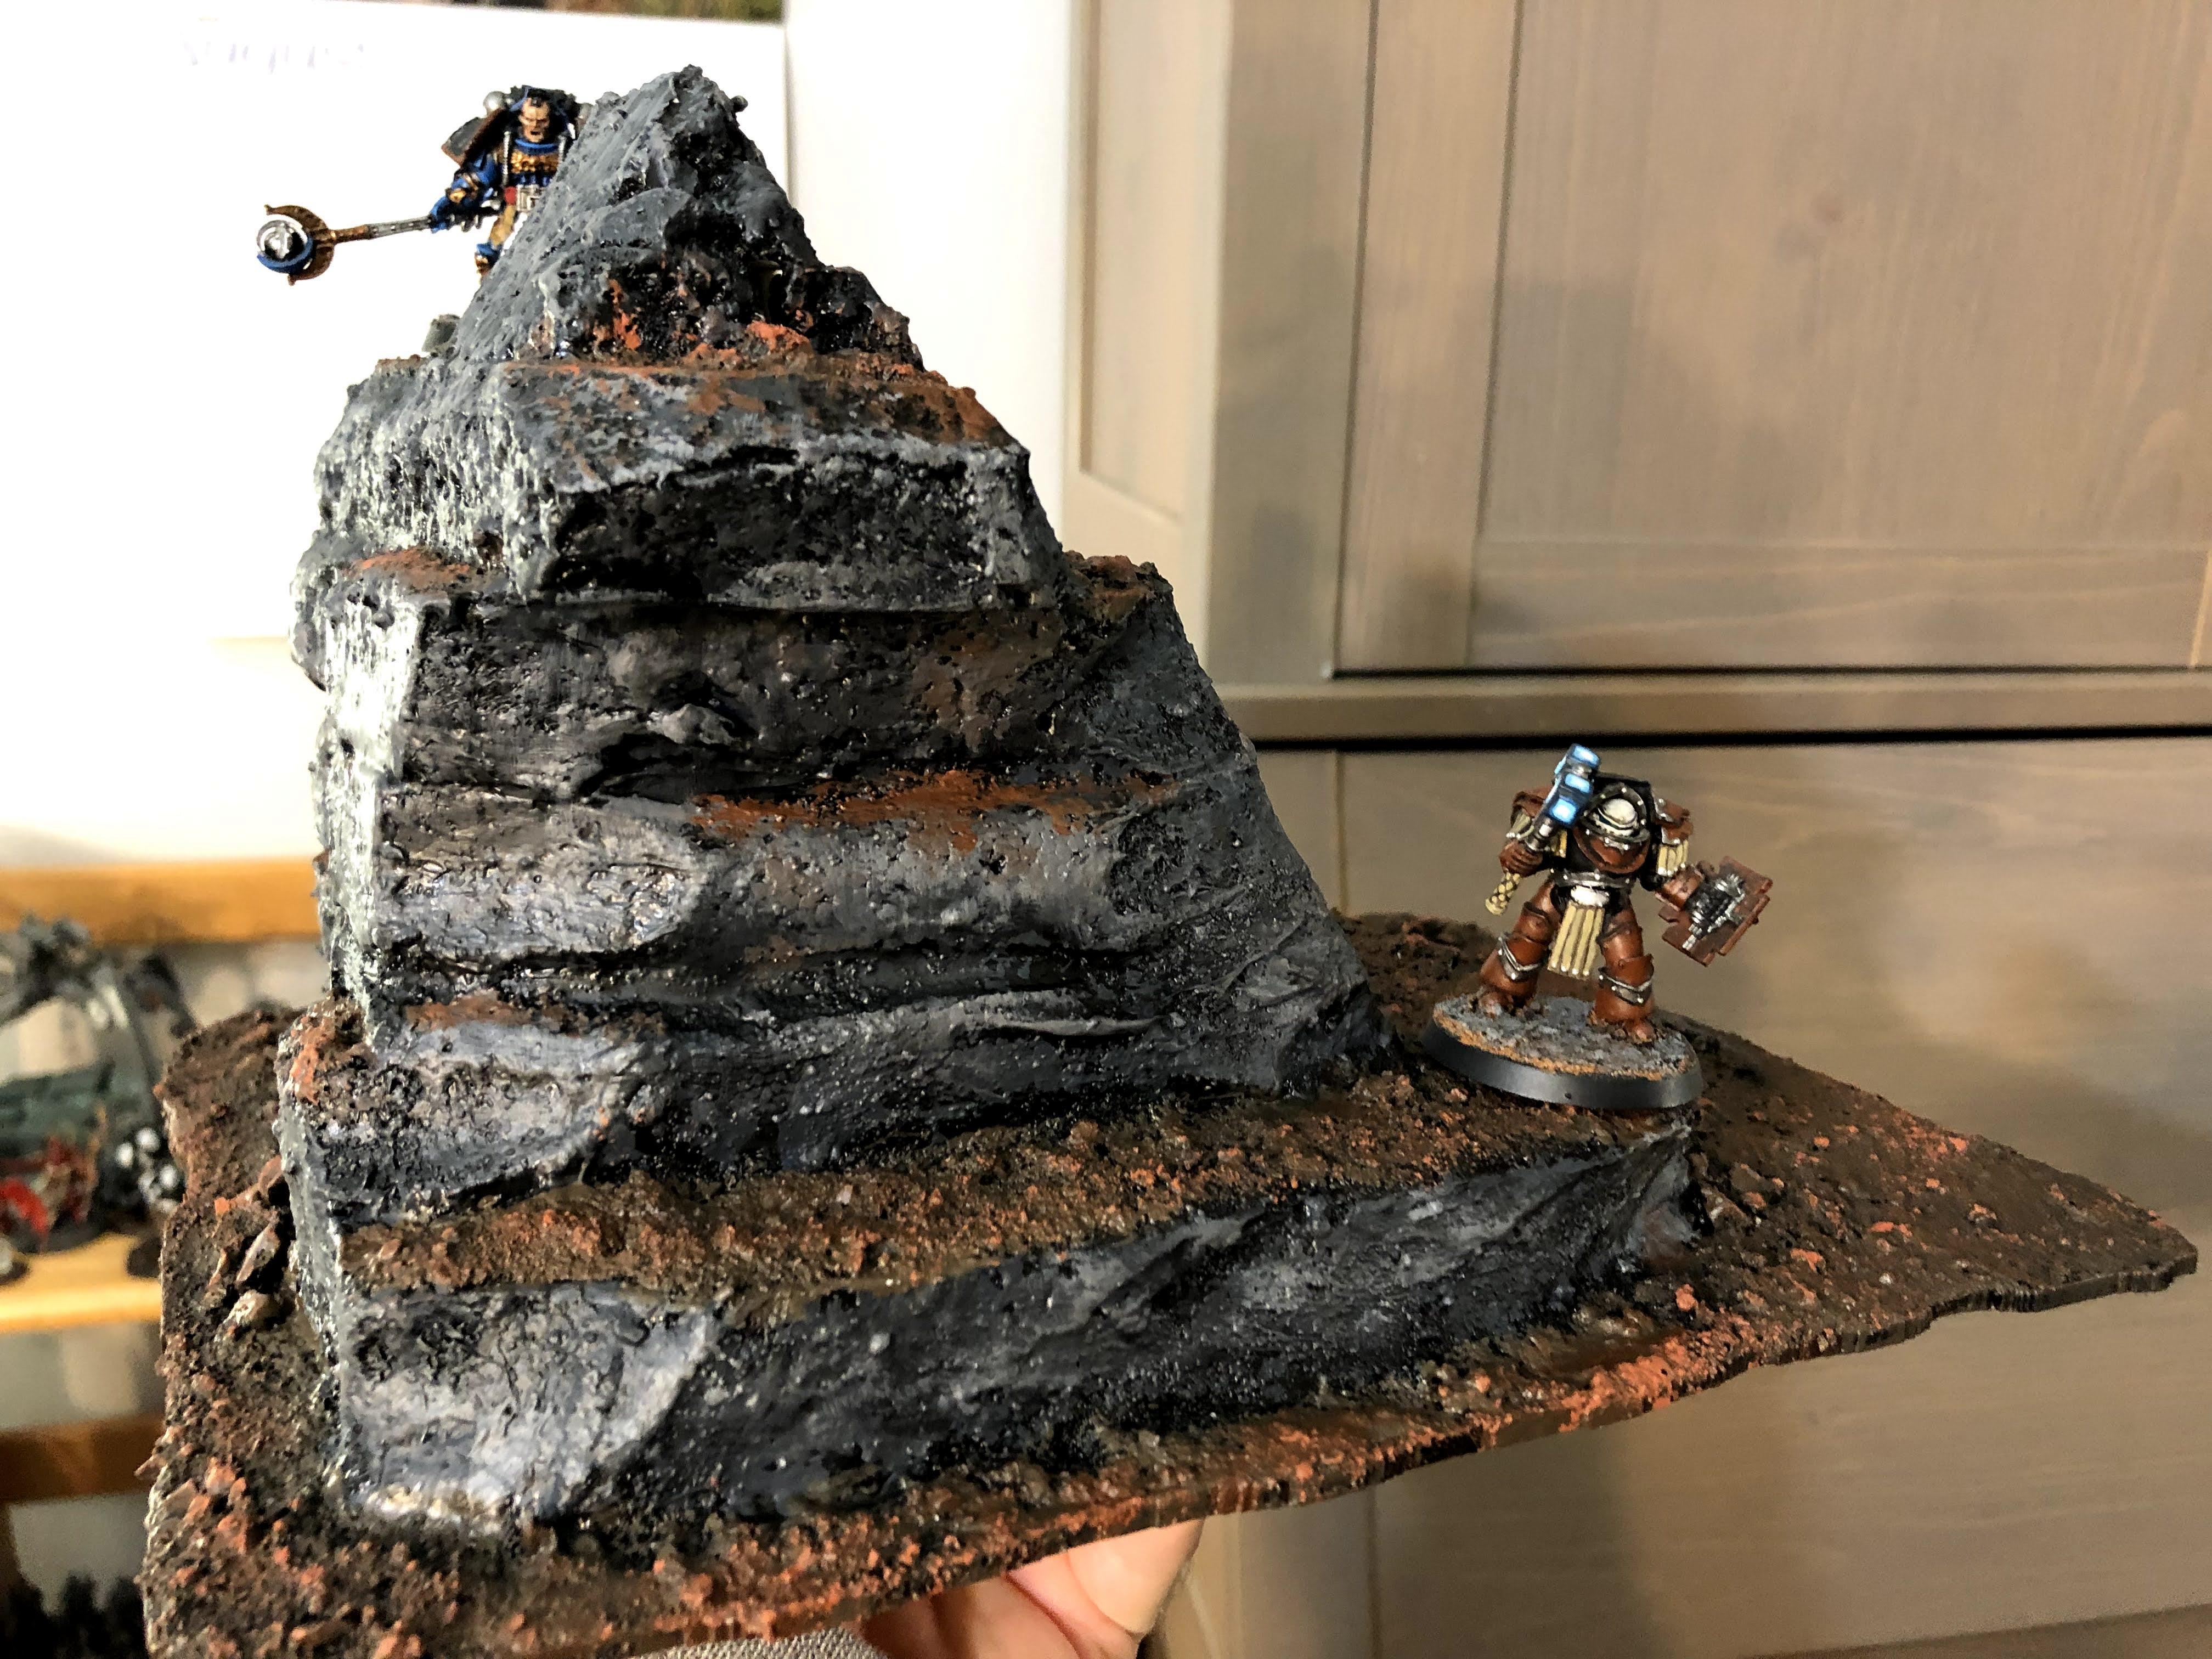
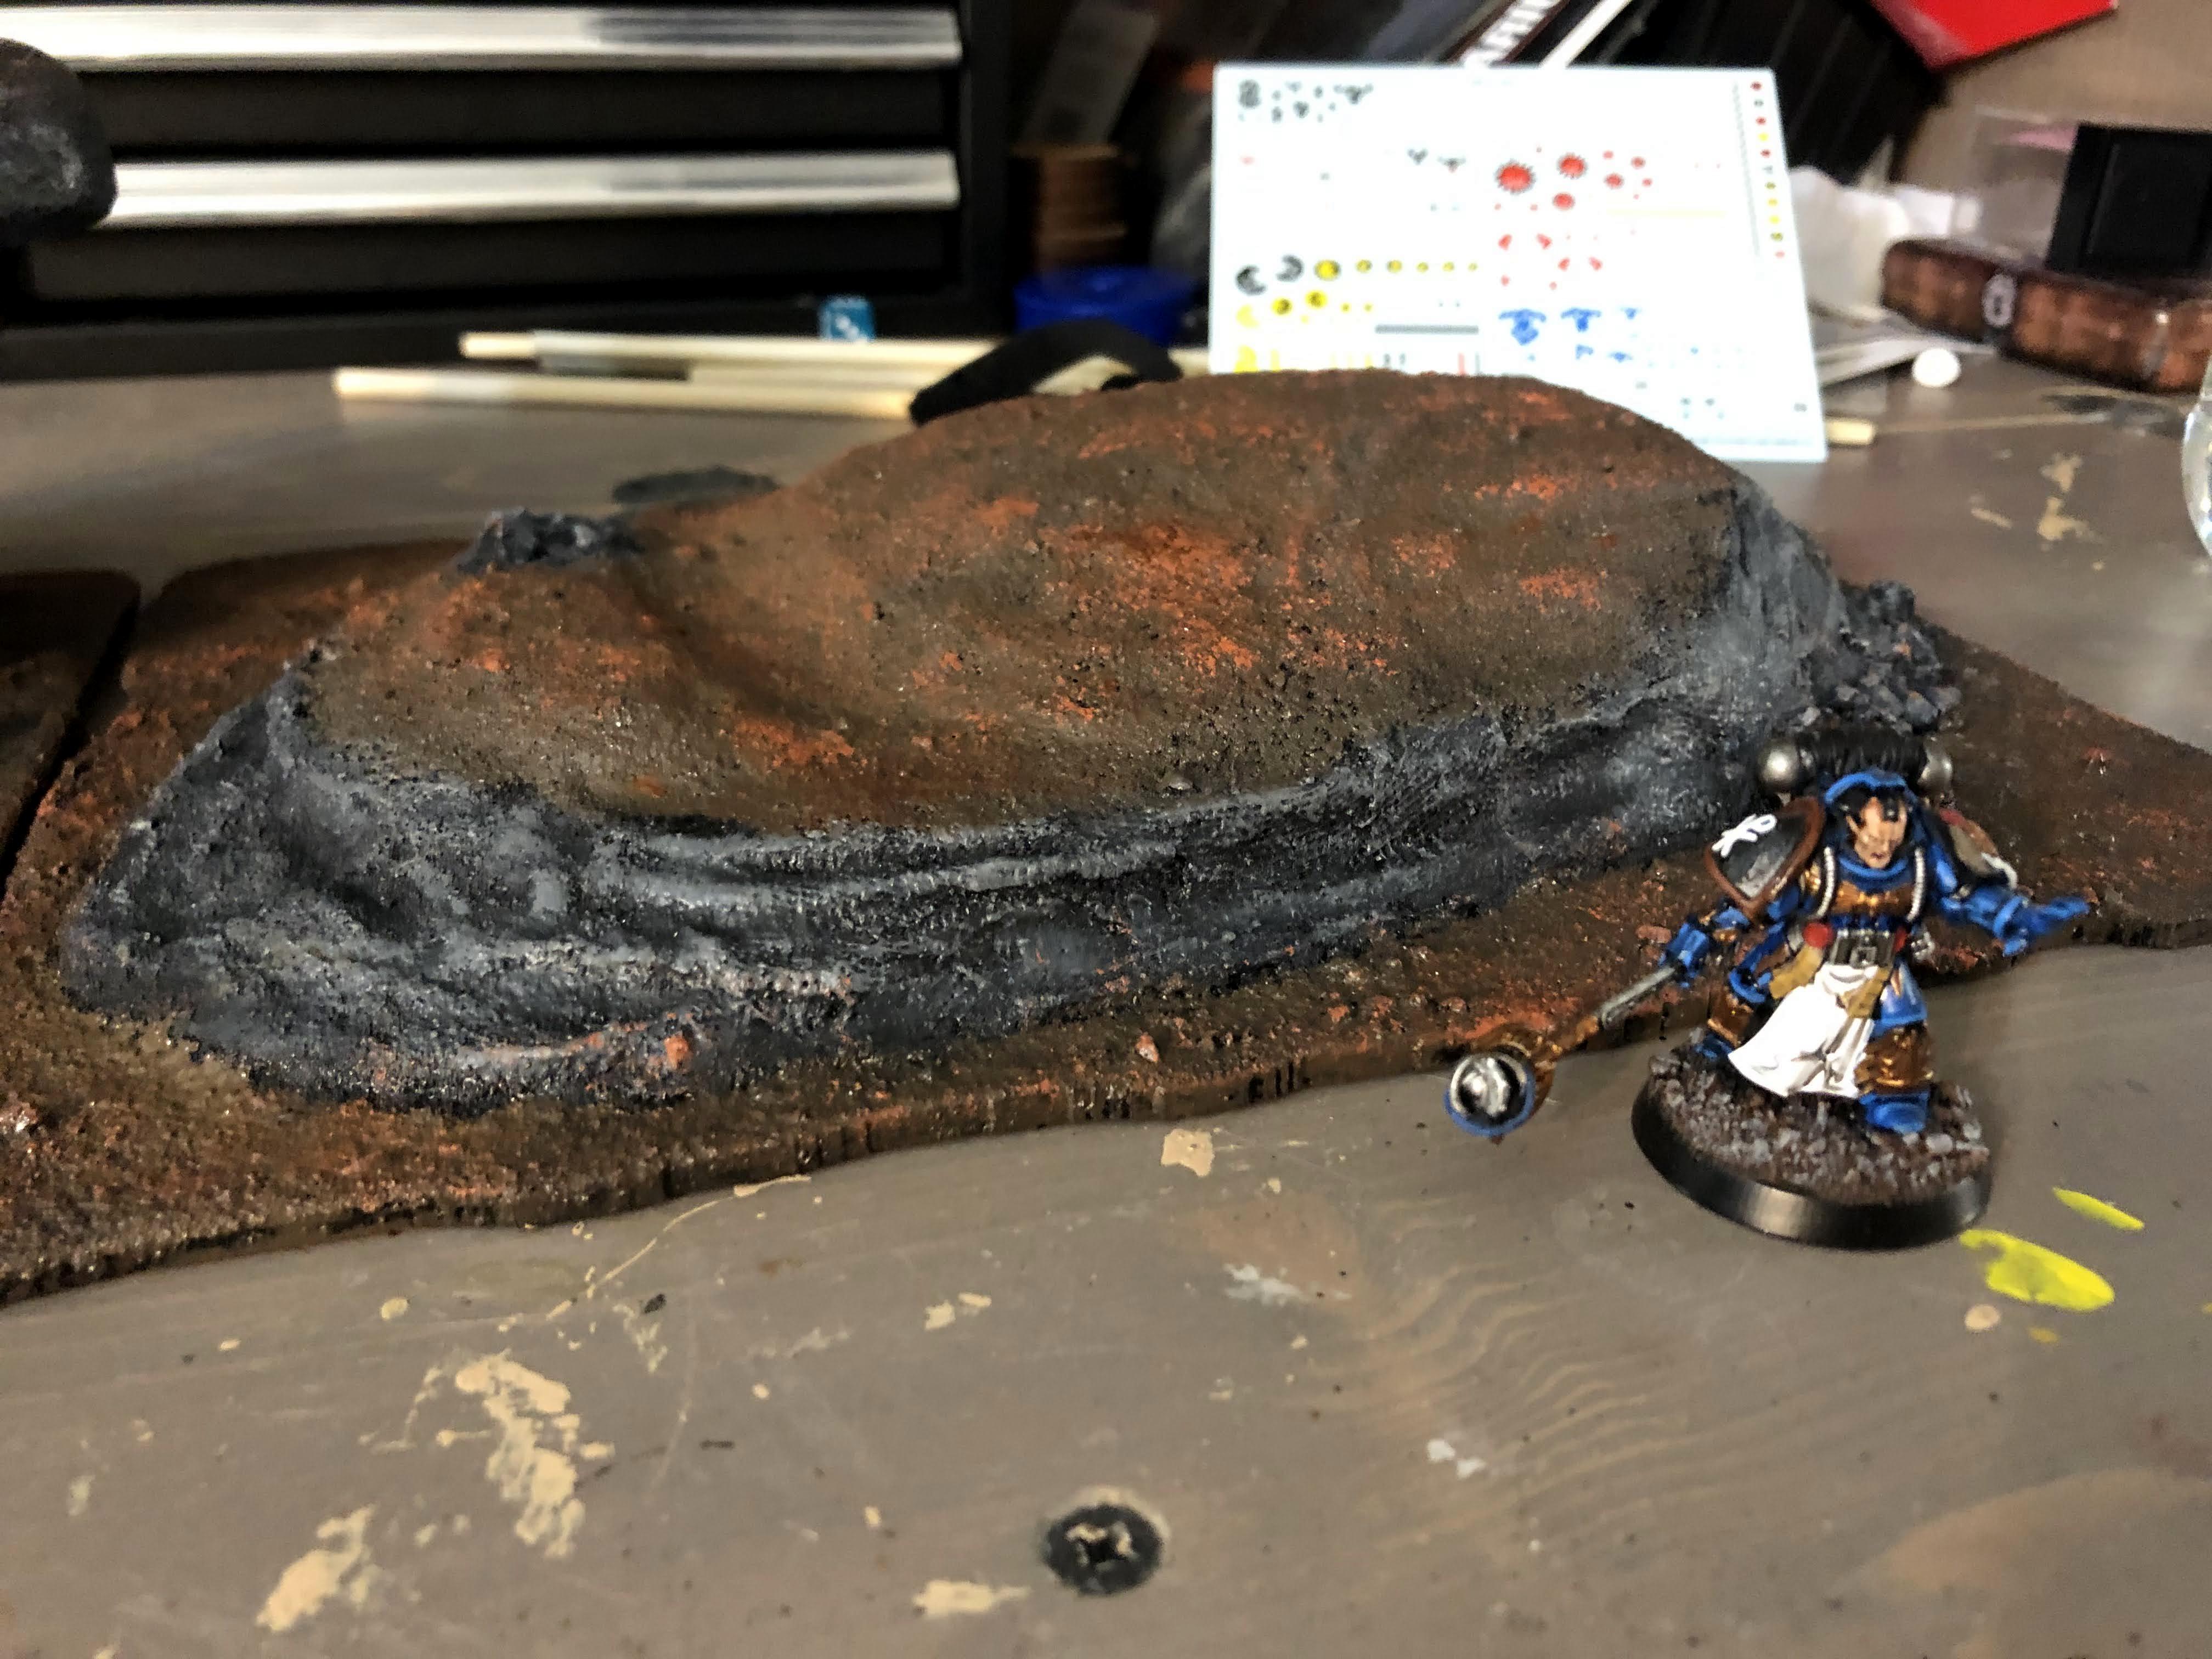
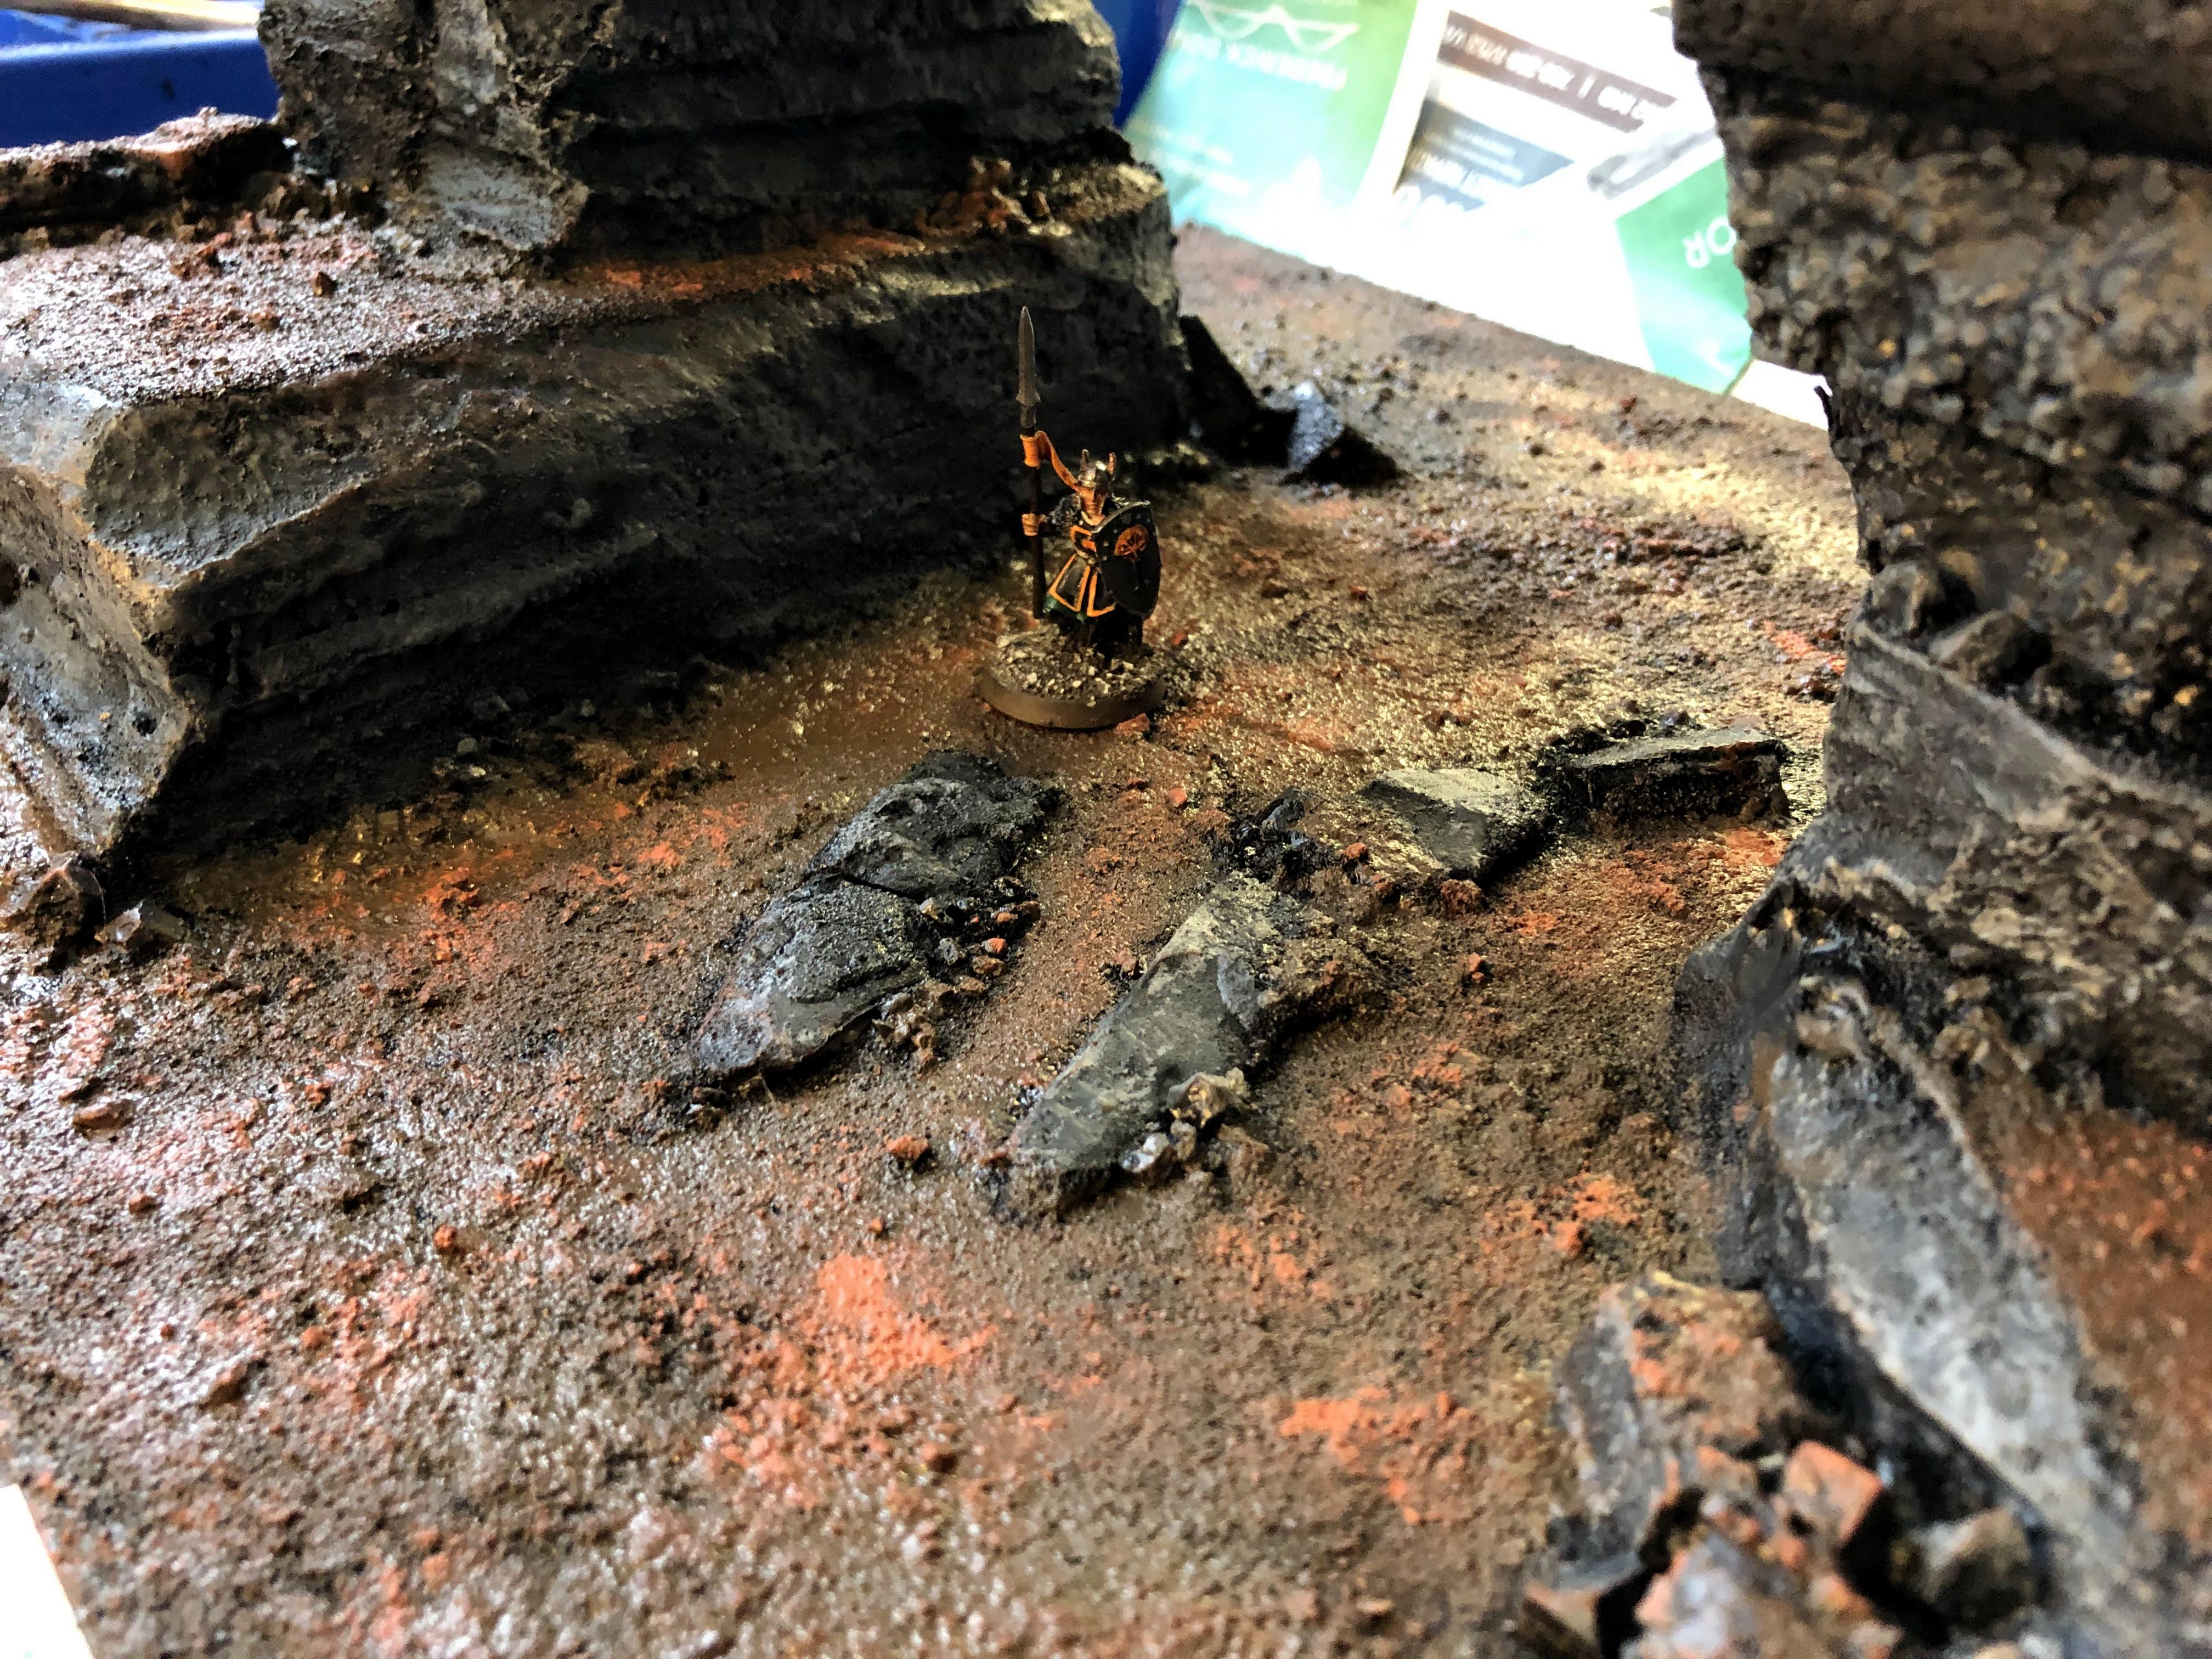
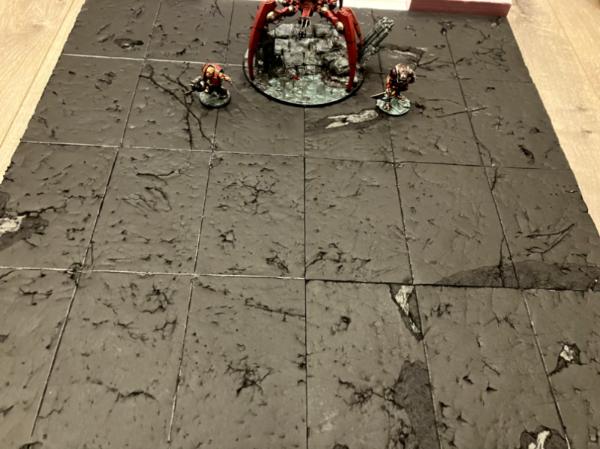
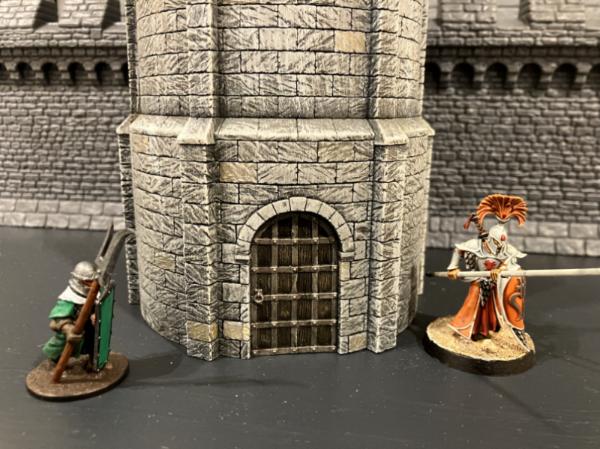
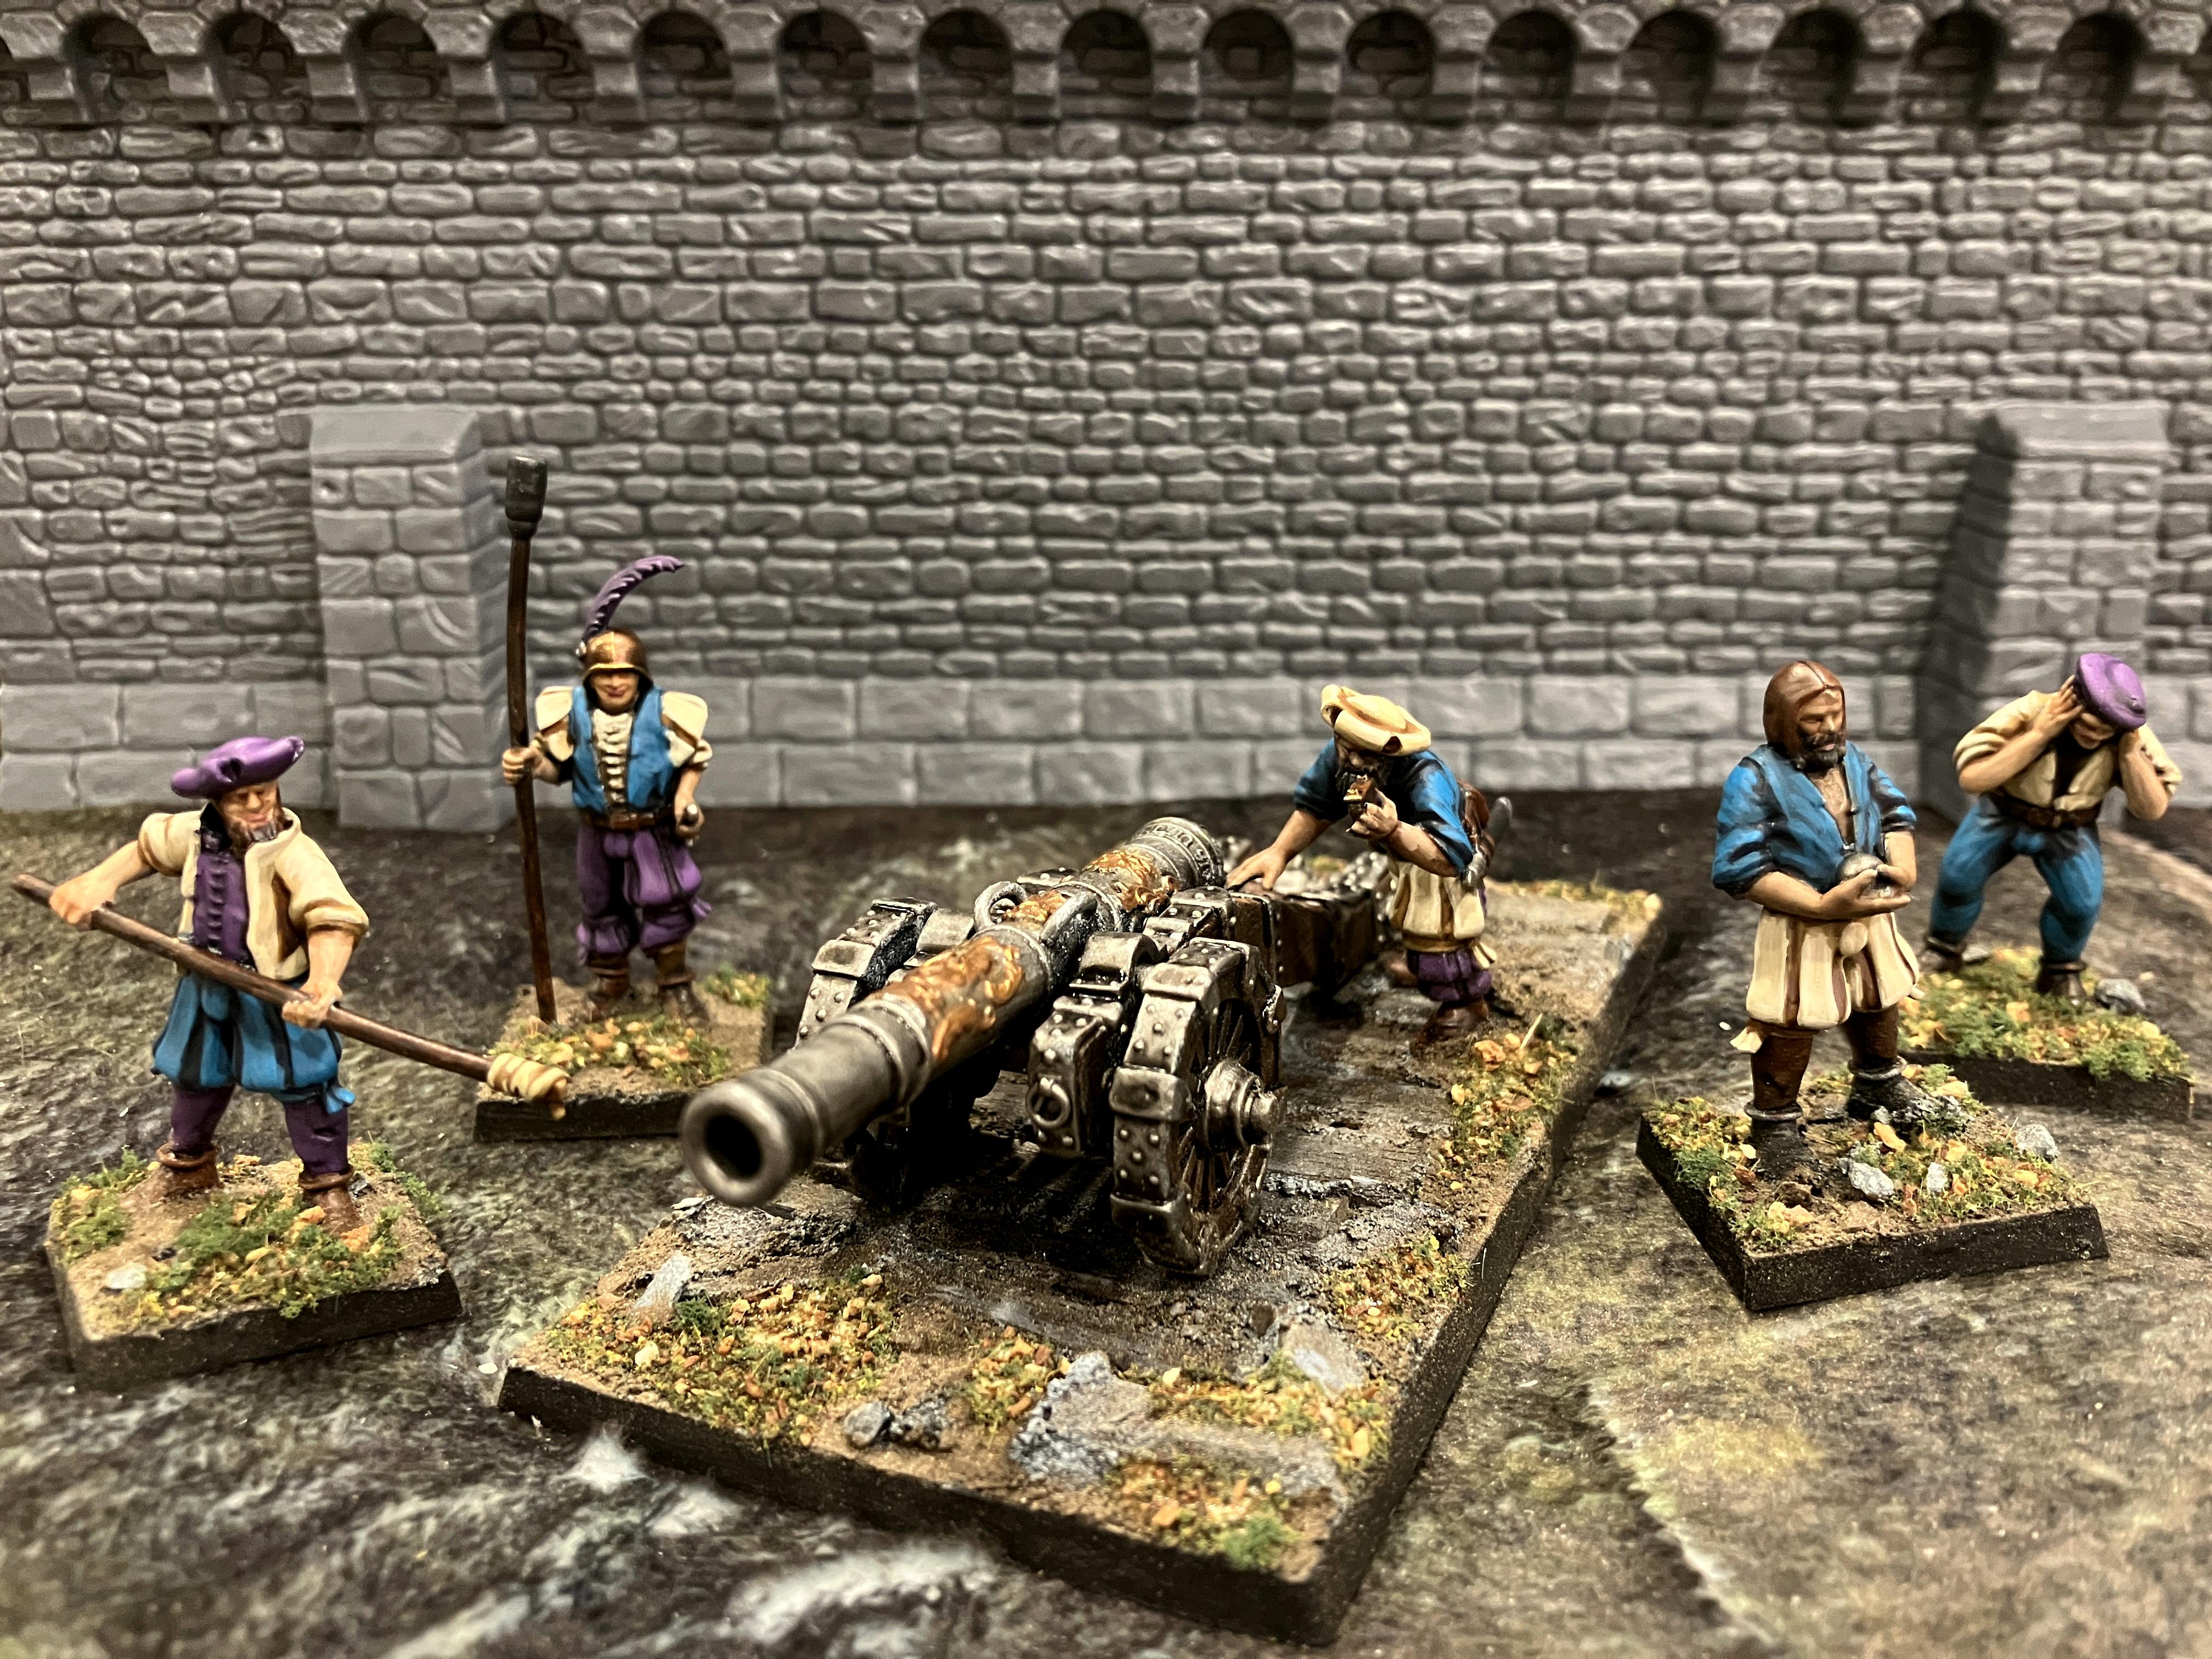
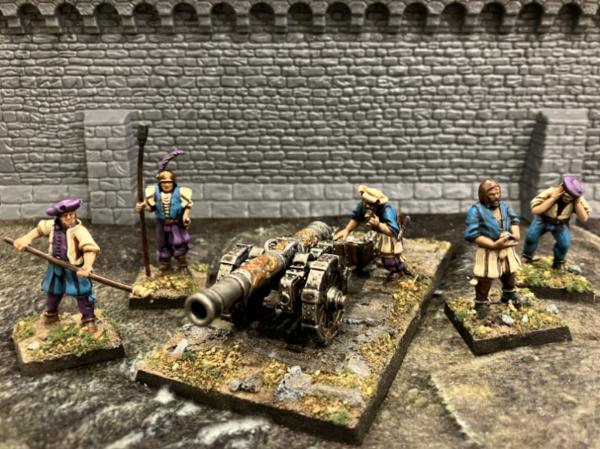
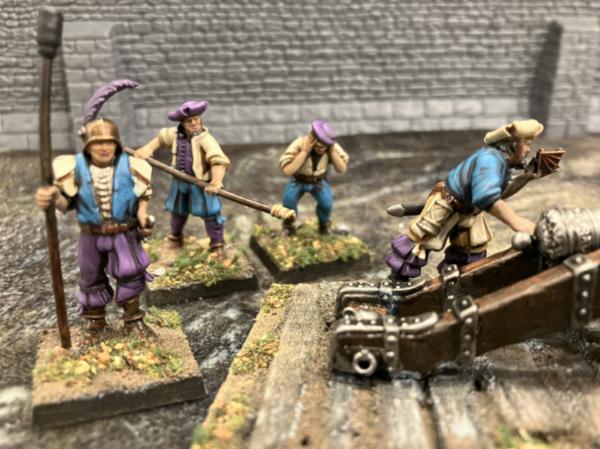
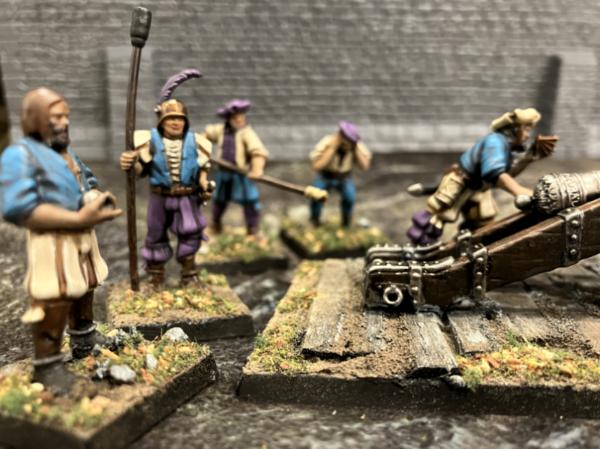
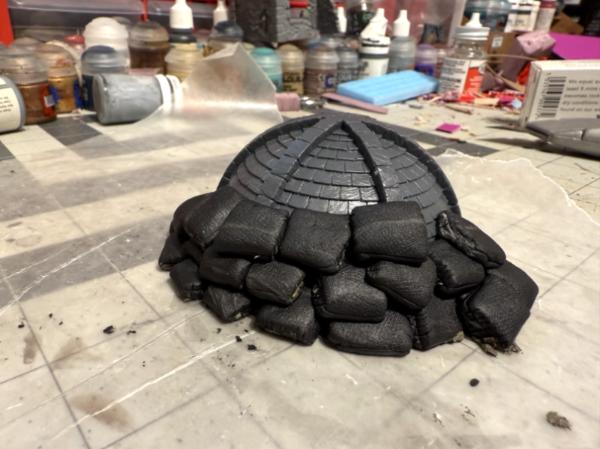
This board was for an Adepitcon display. Lots of muddy wash went into this board!
[/img][/img]
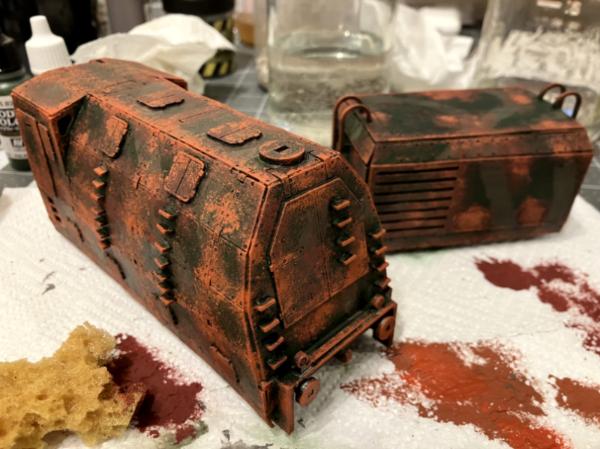
This was my own display board. I wanted to use an MDF train set I had for a display board in our store's competition. I didn't win (lost to the gentleman next to me who had a display board with a full titan!).
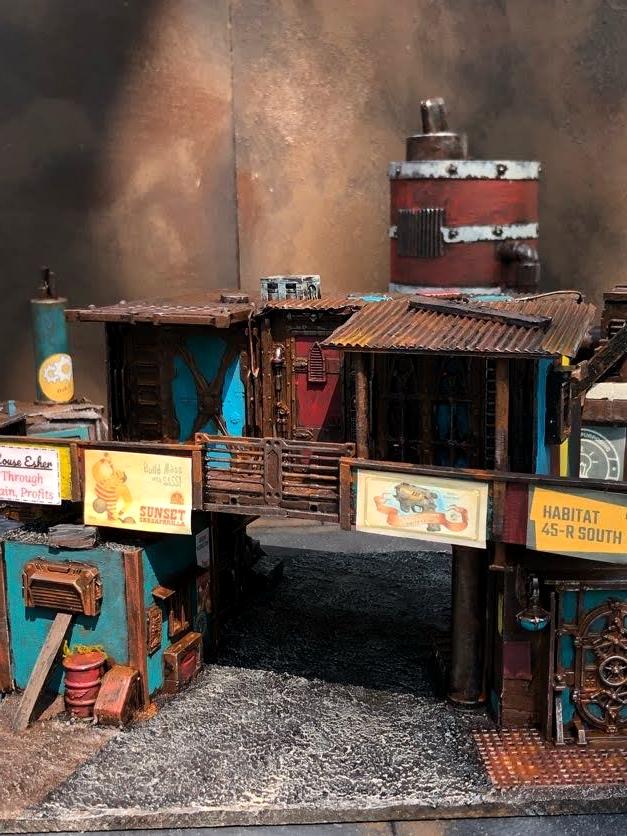
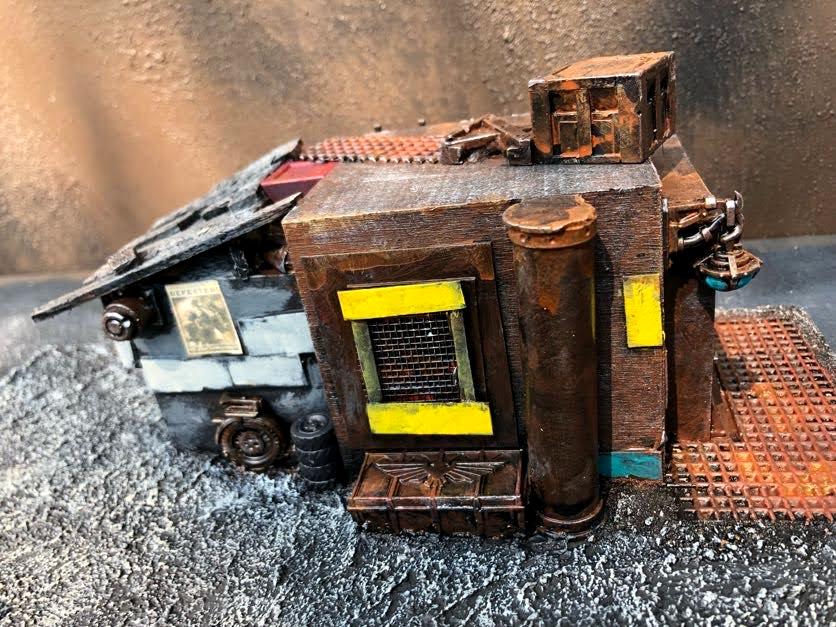
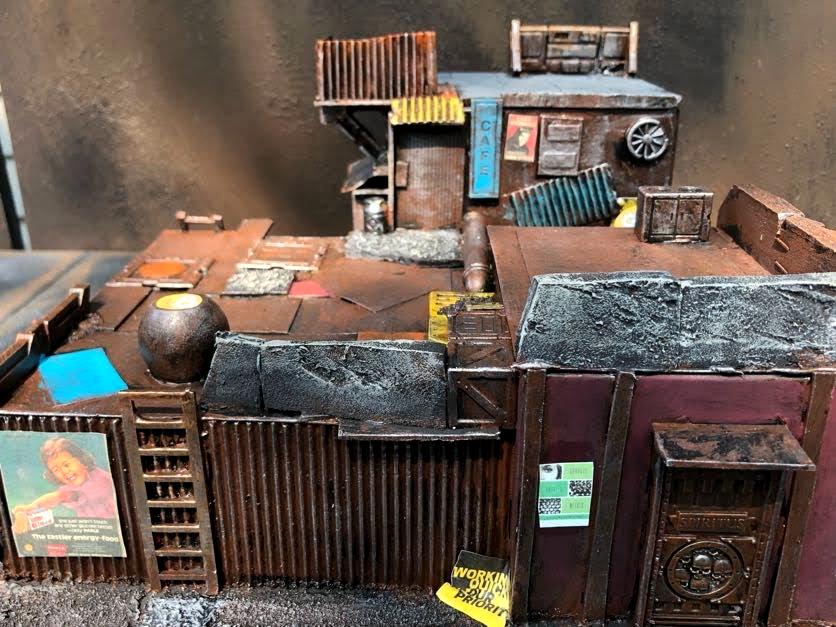
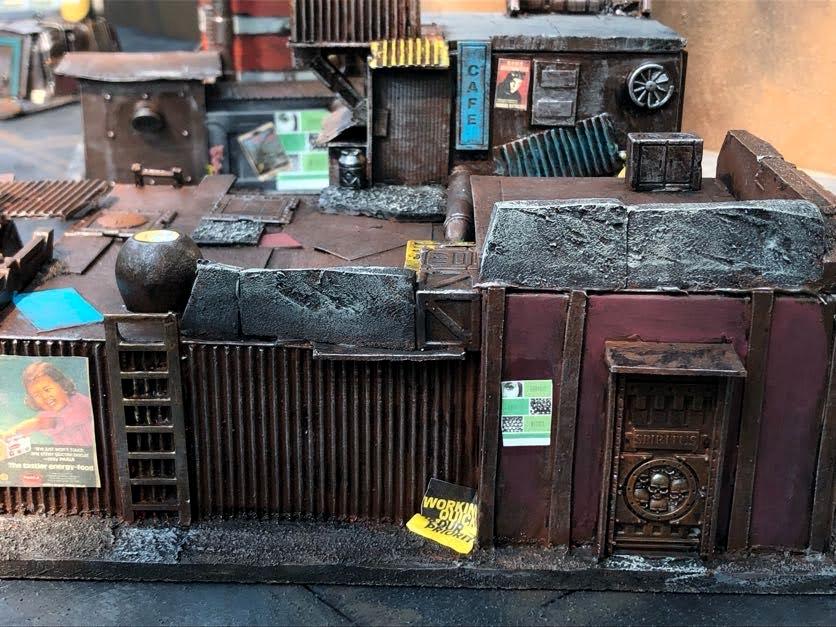
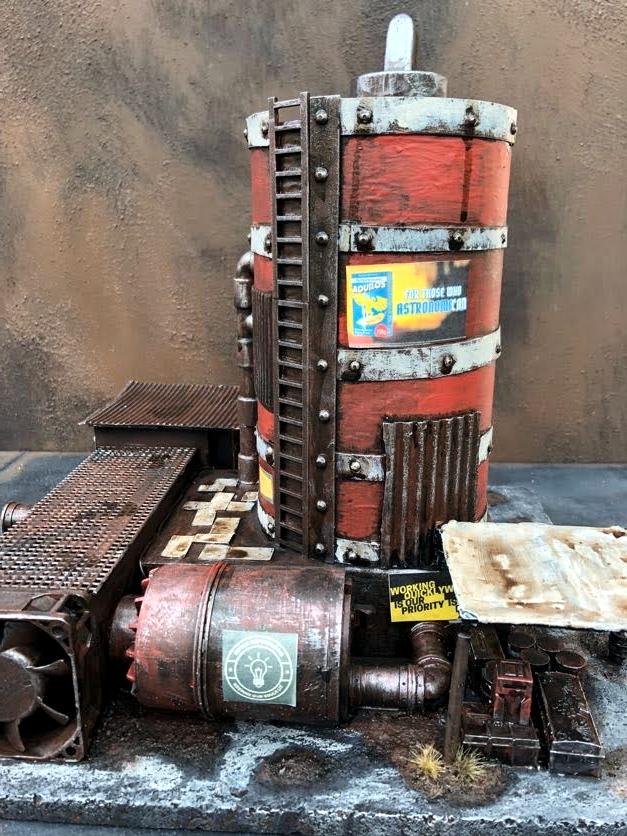
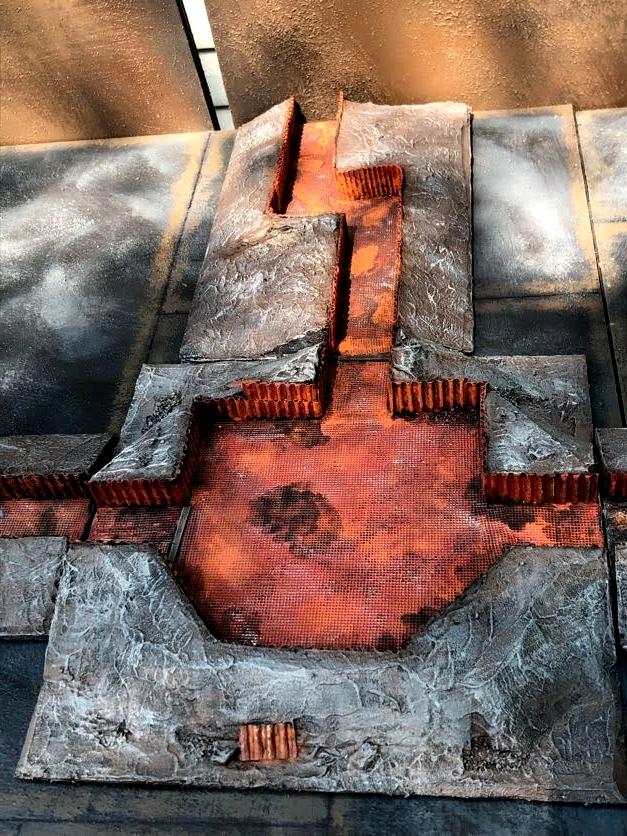
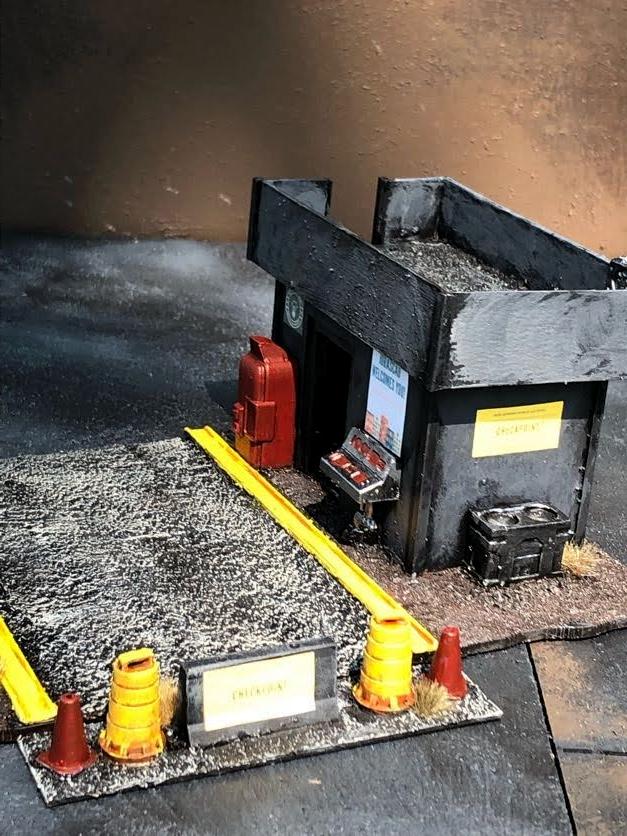
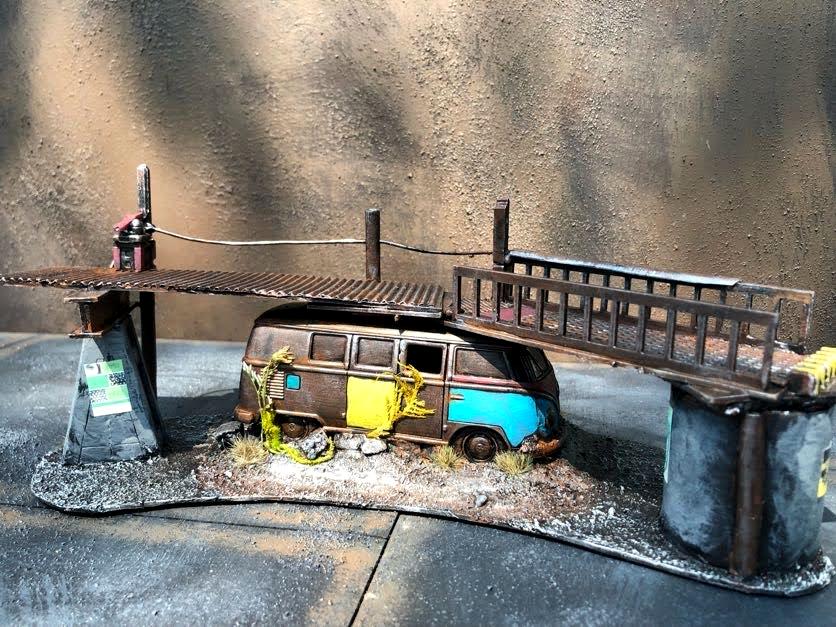
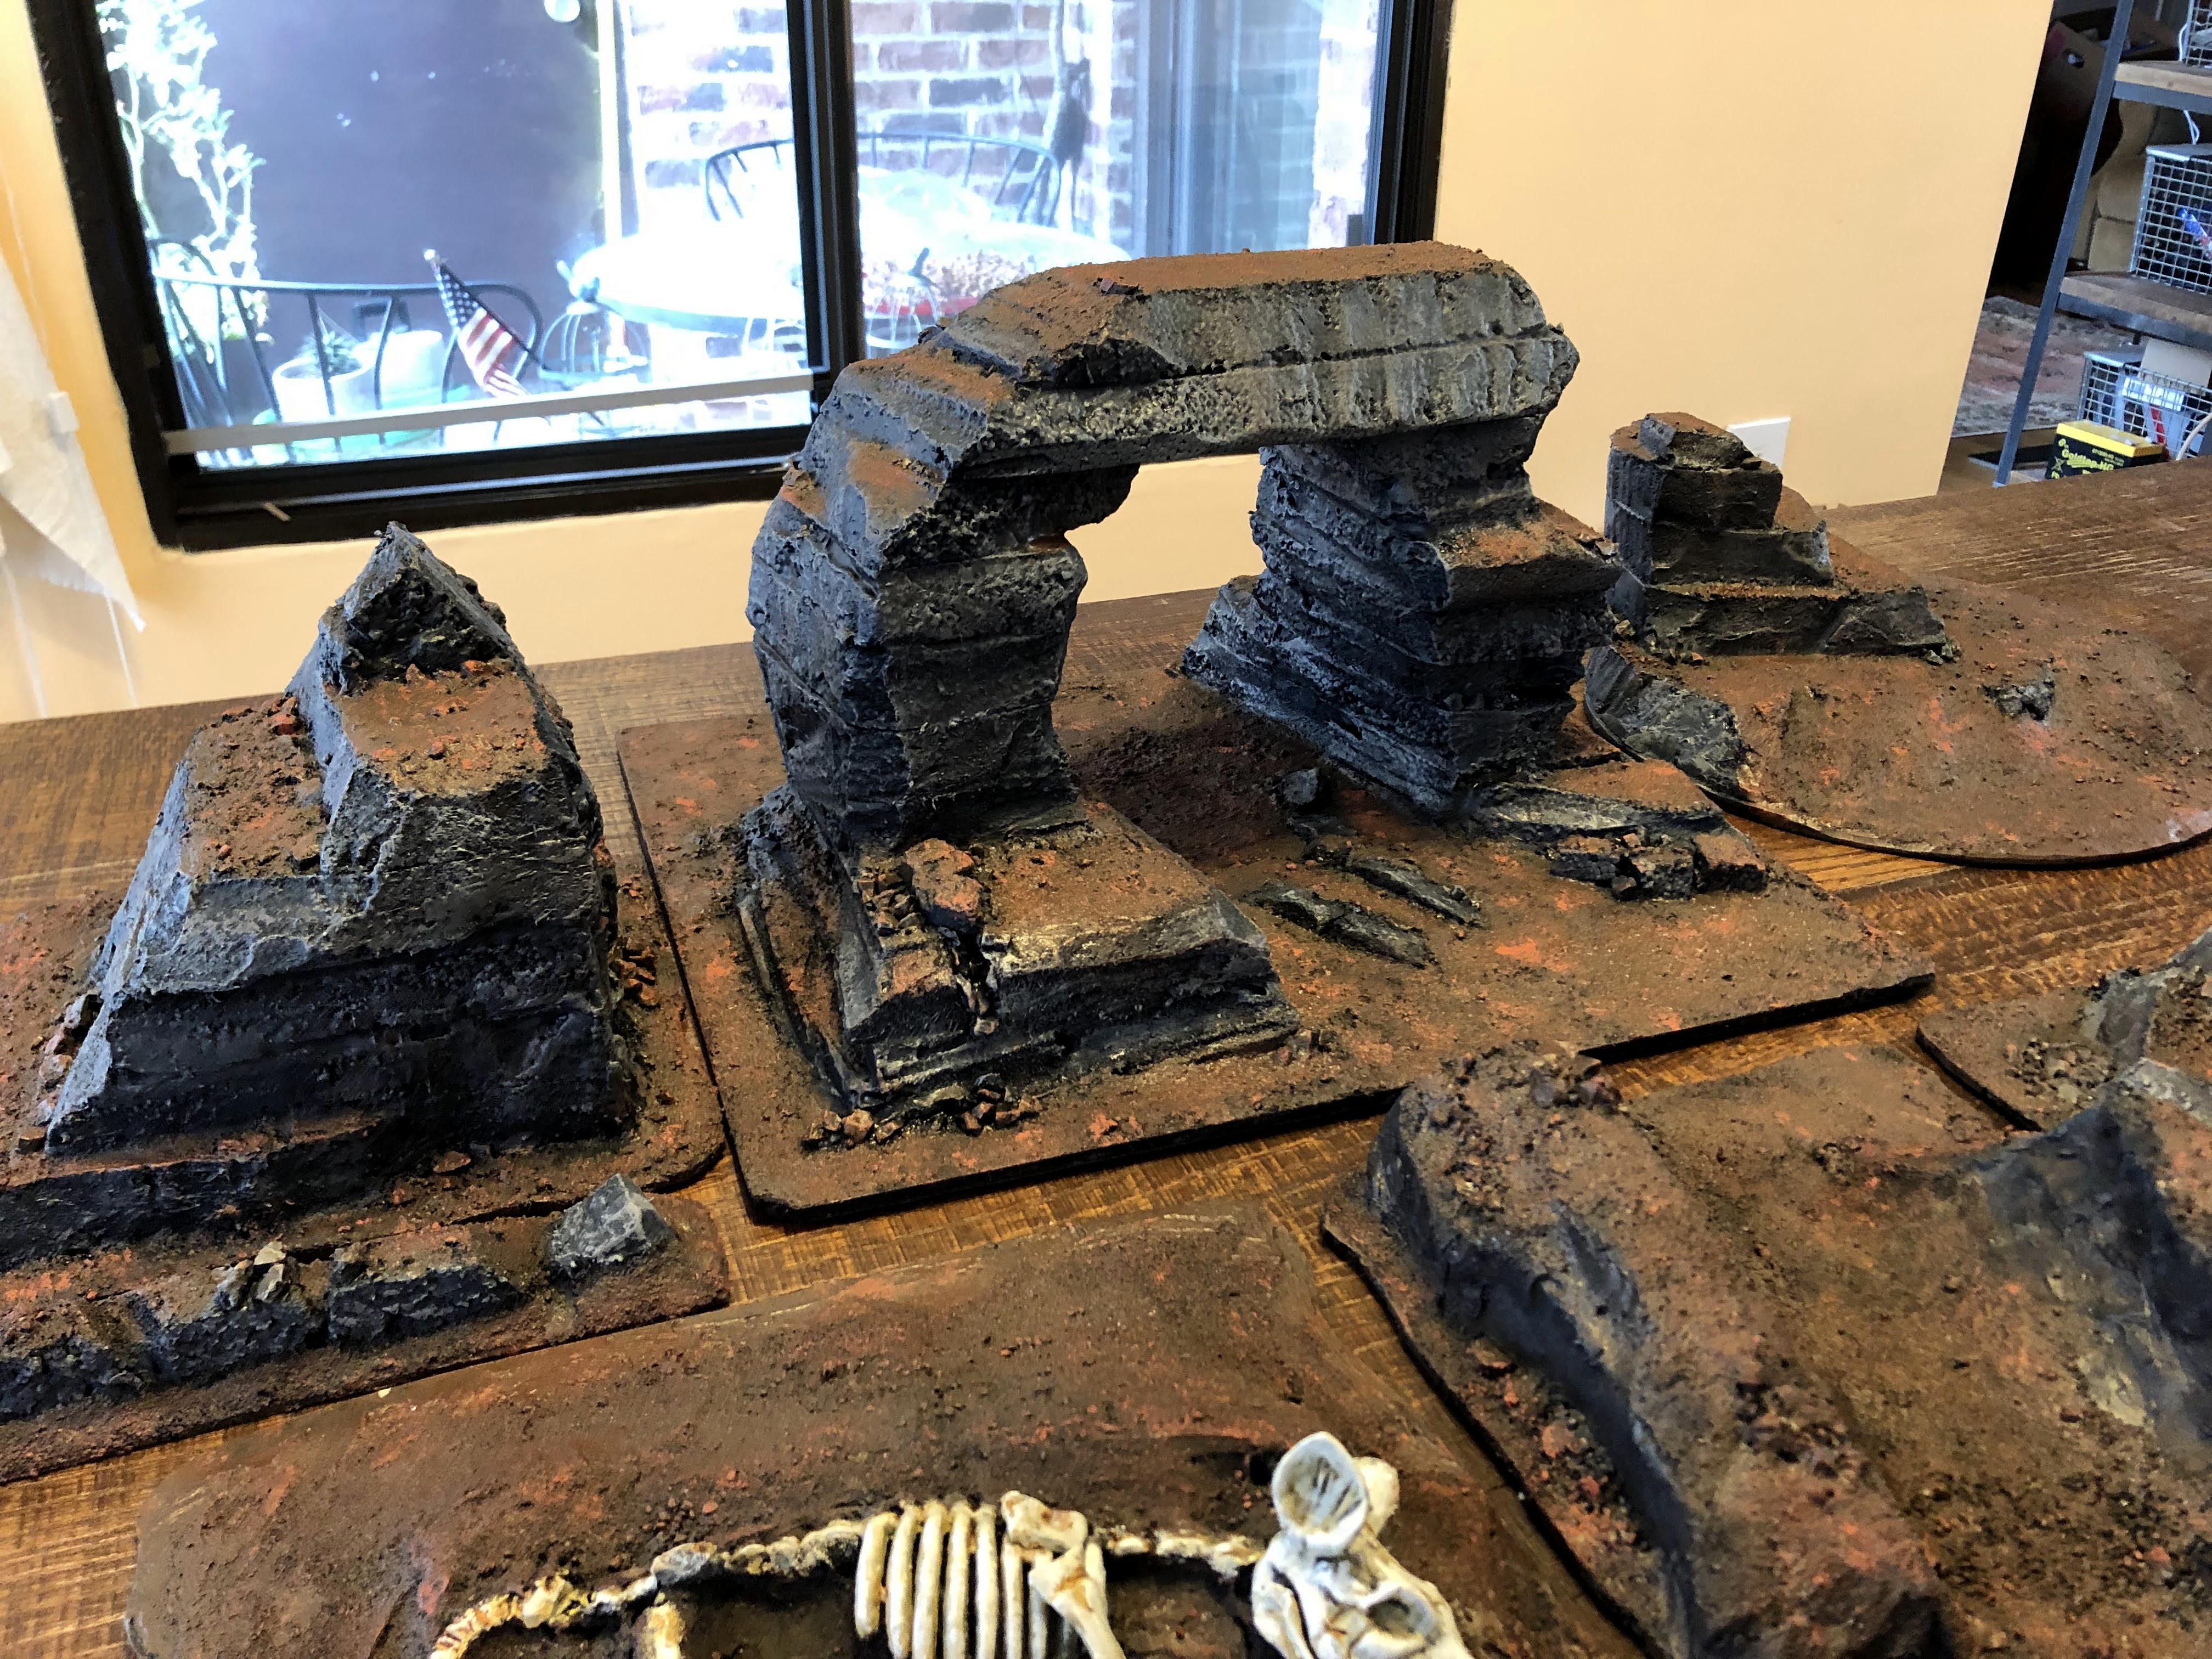
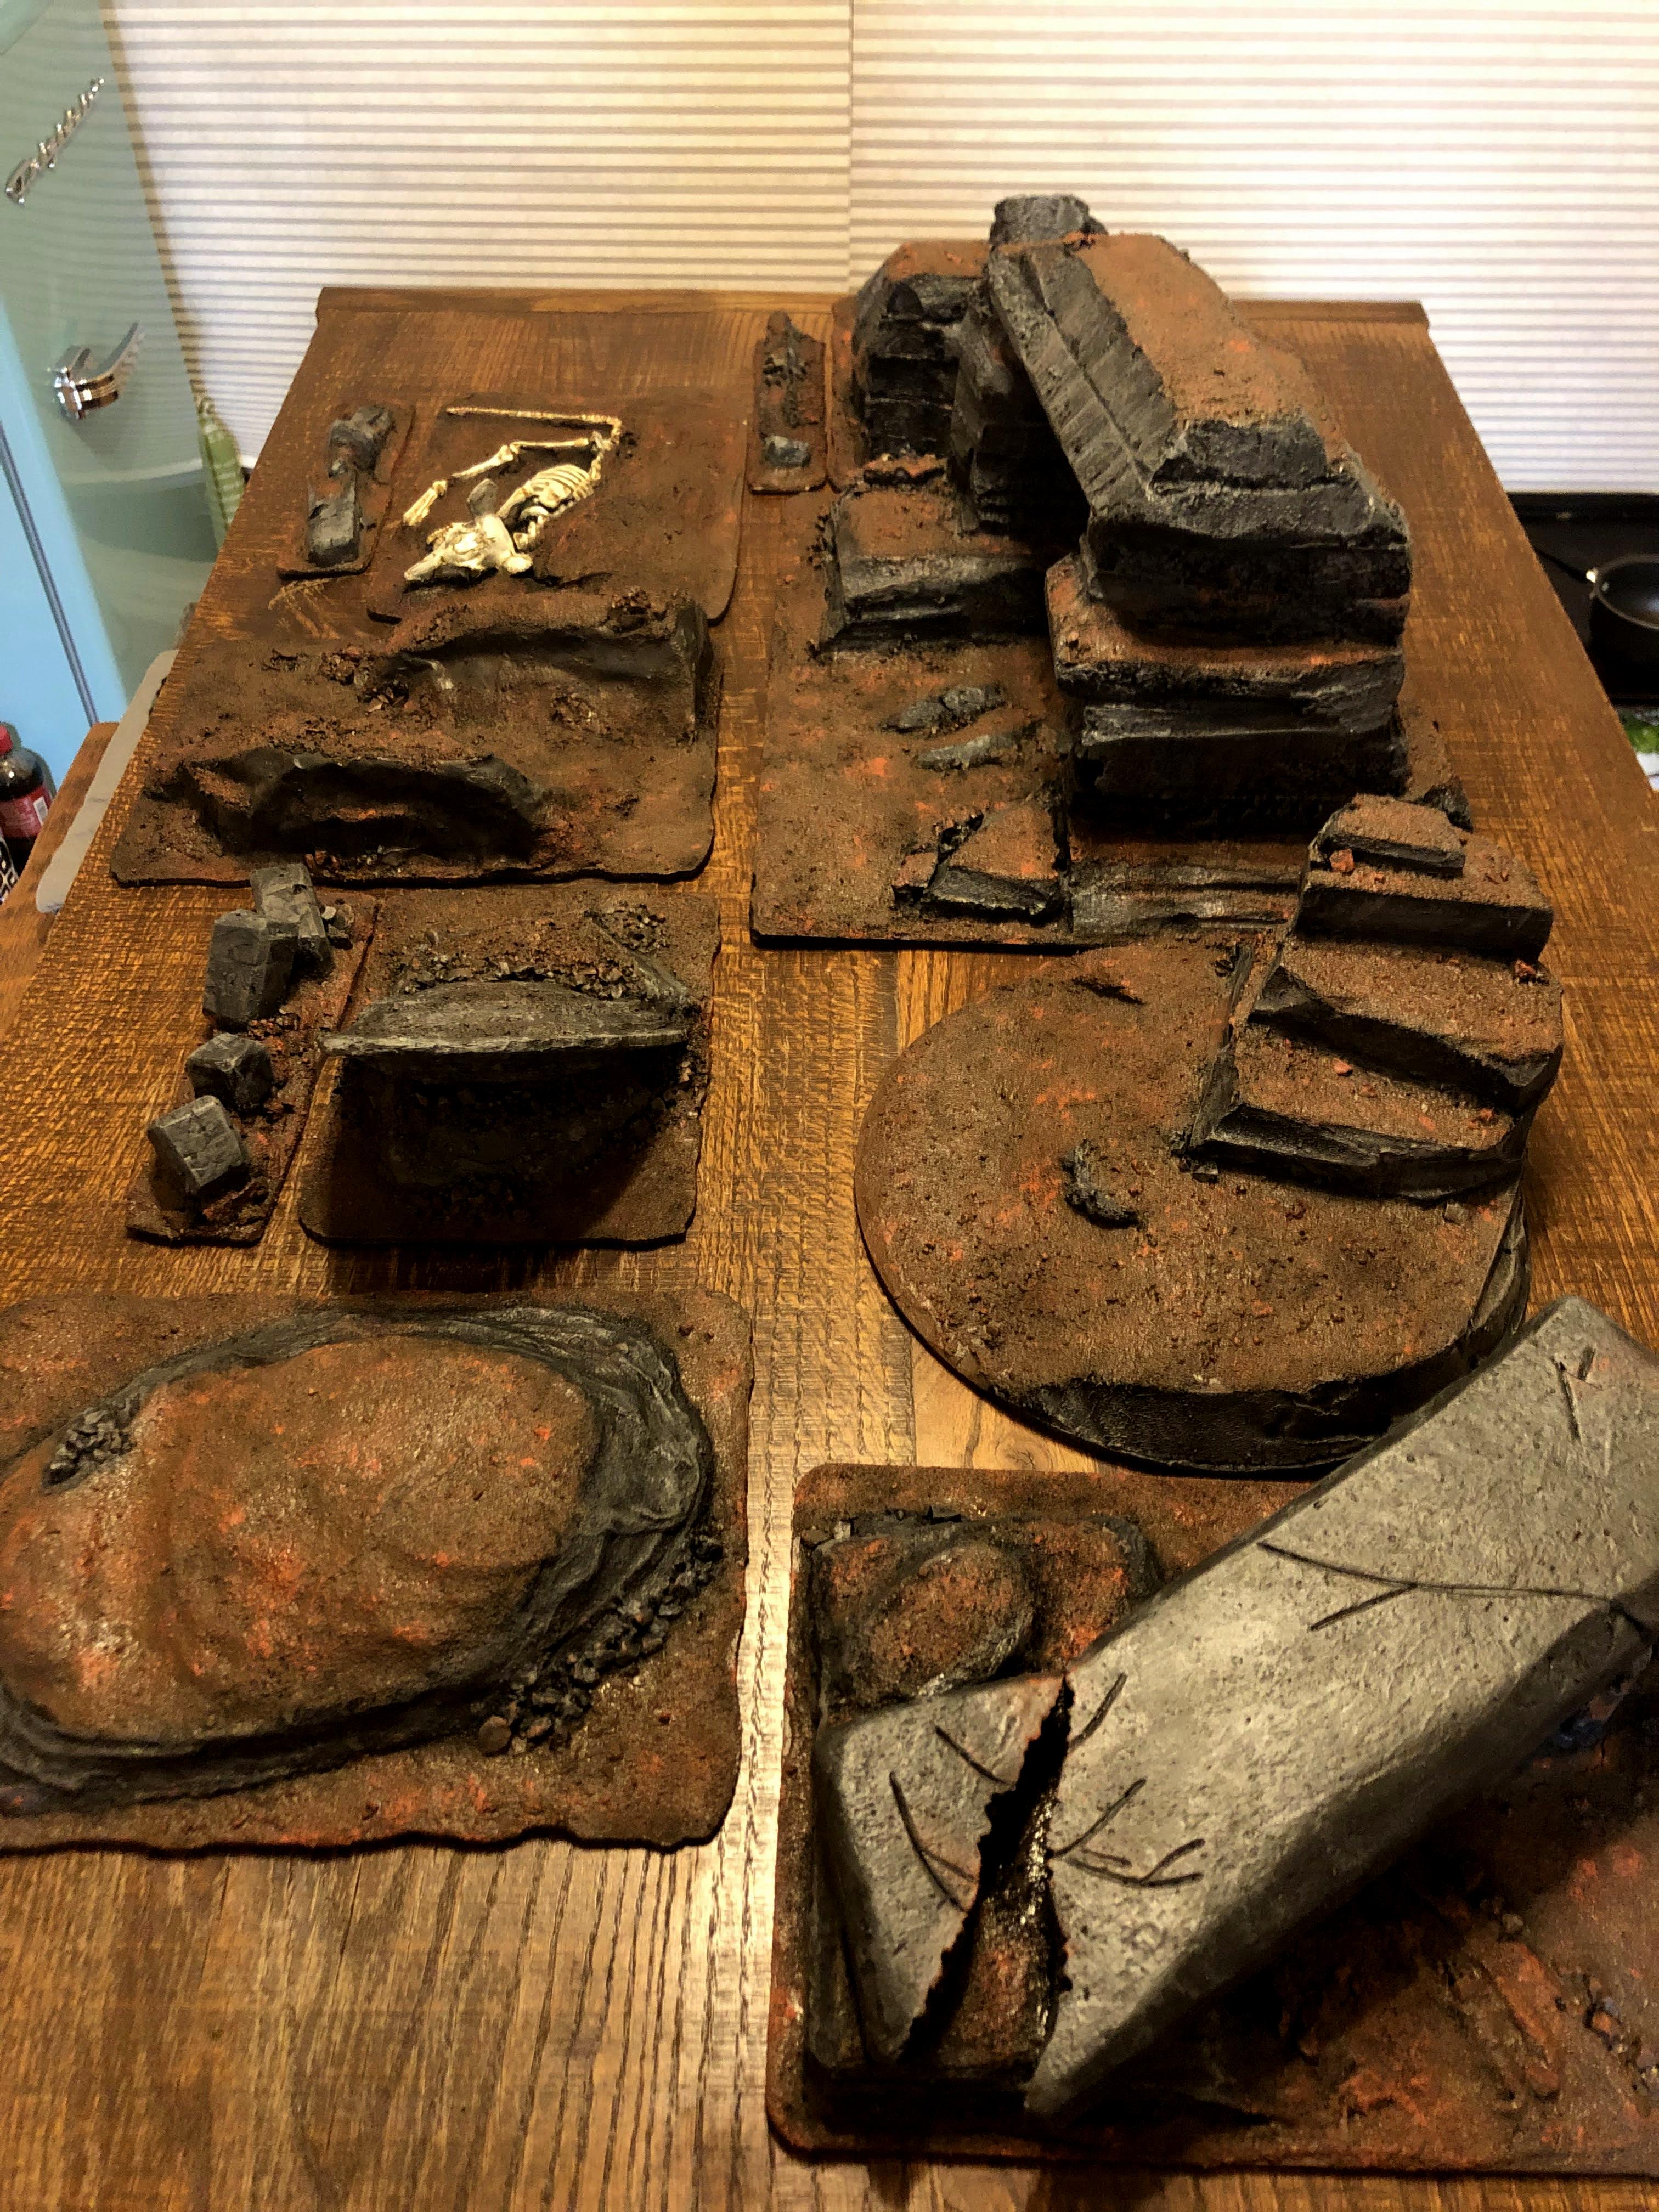
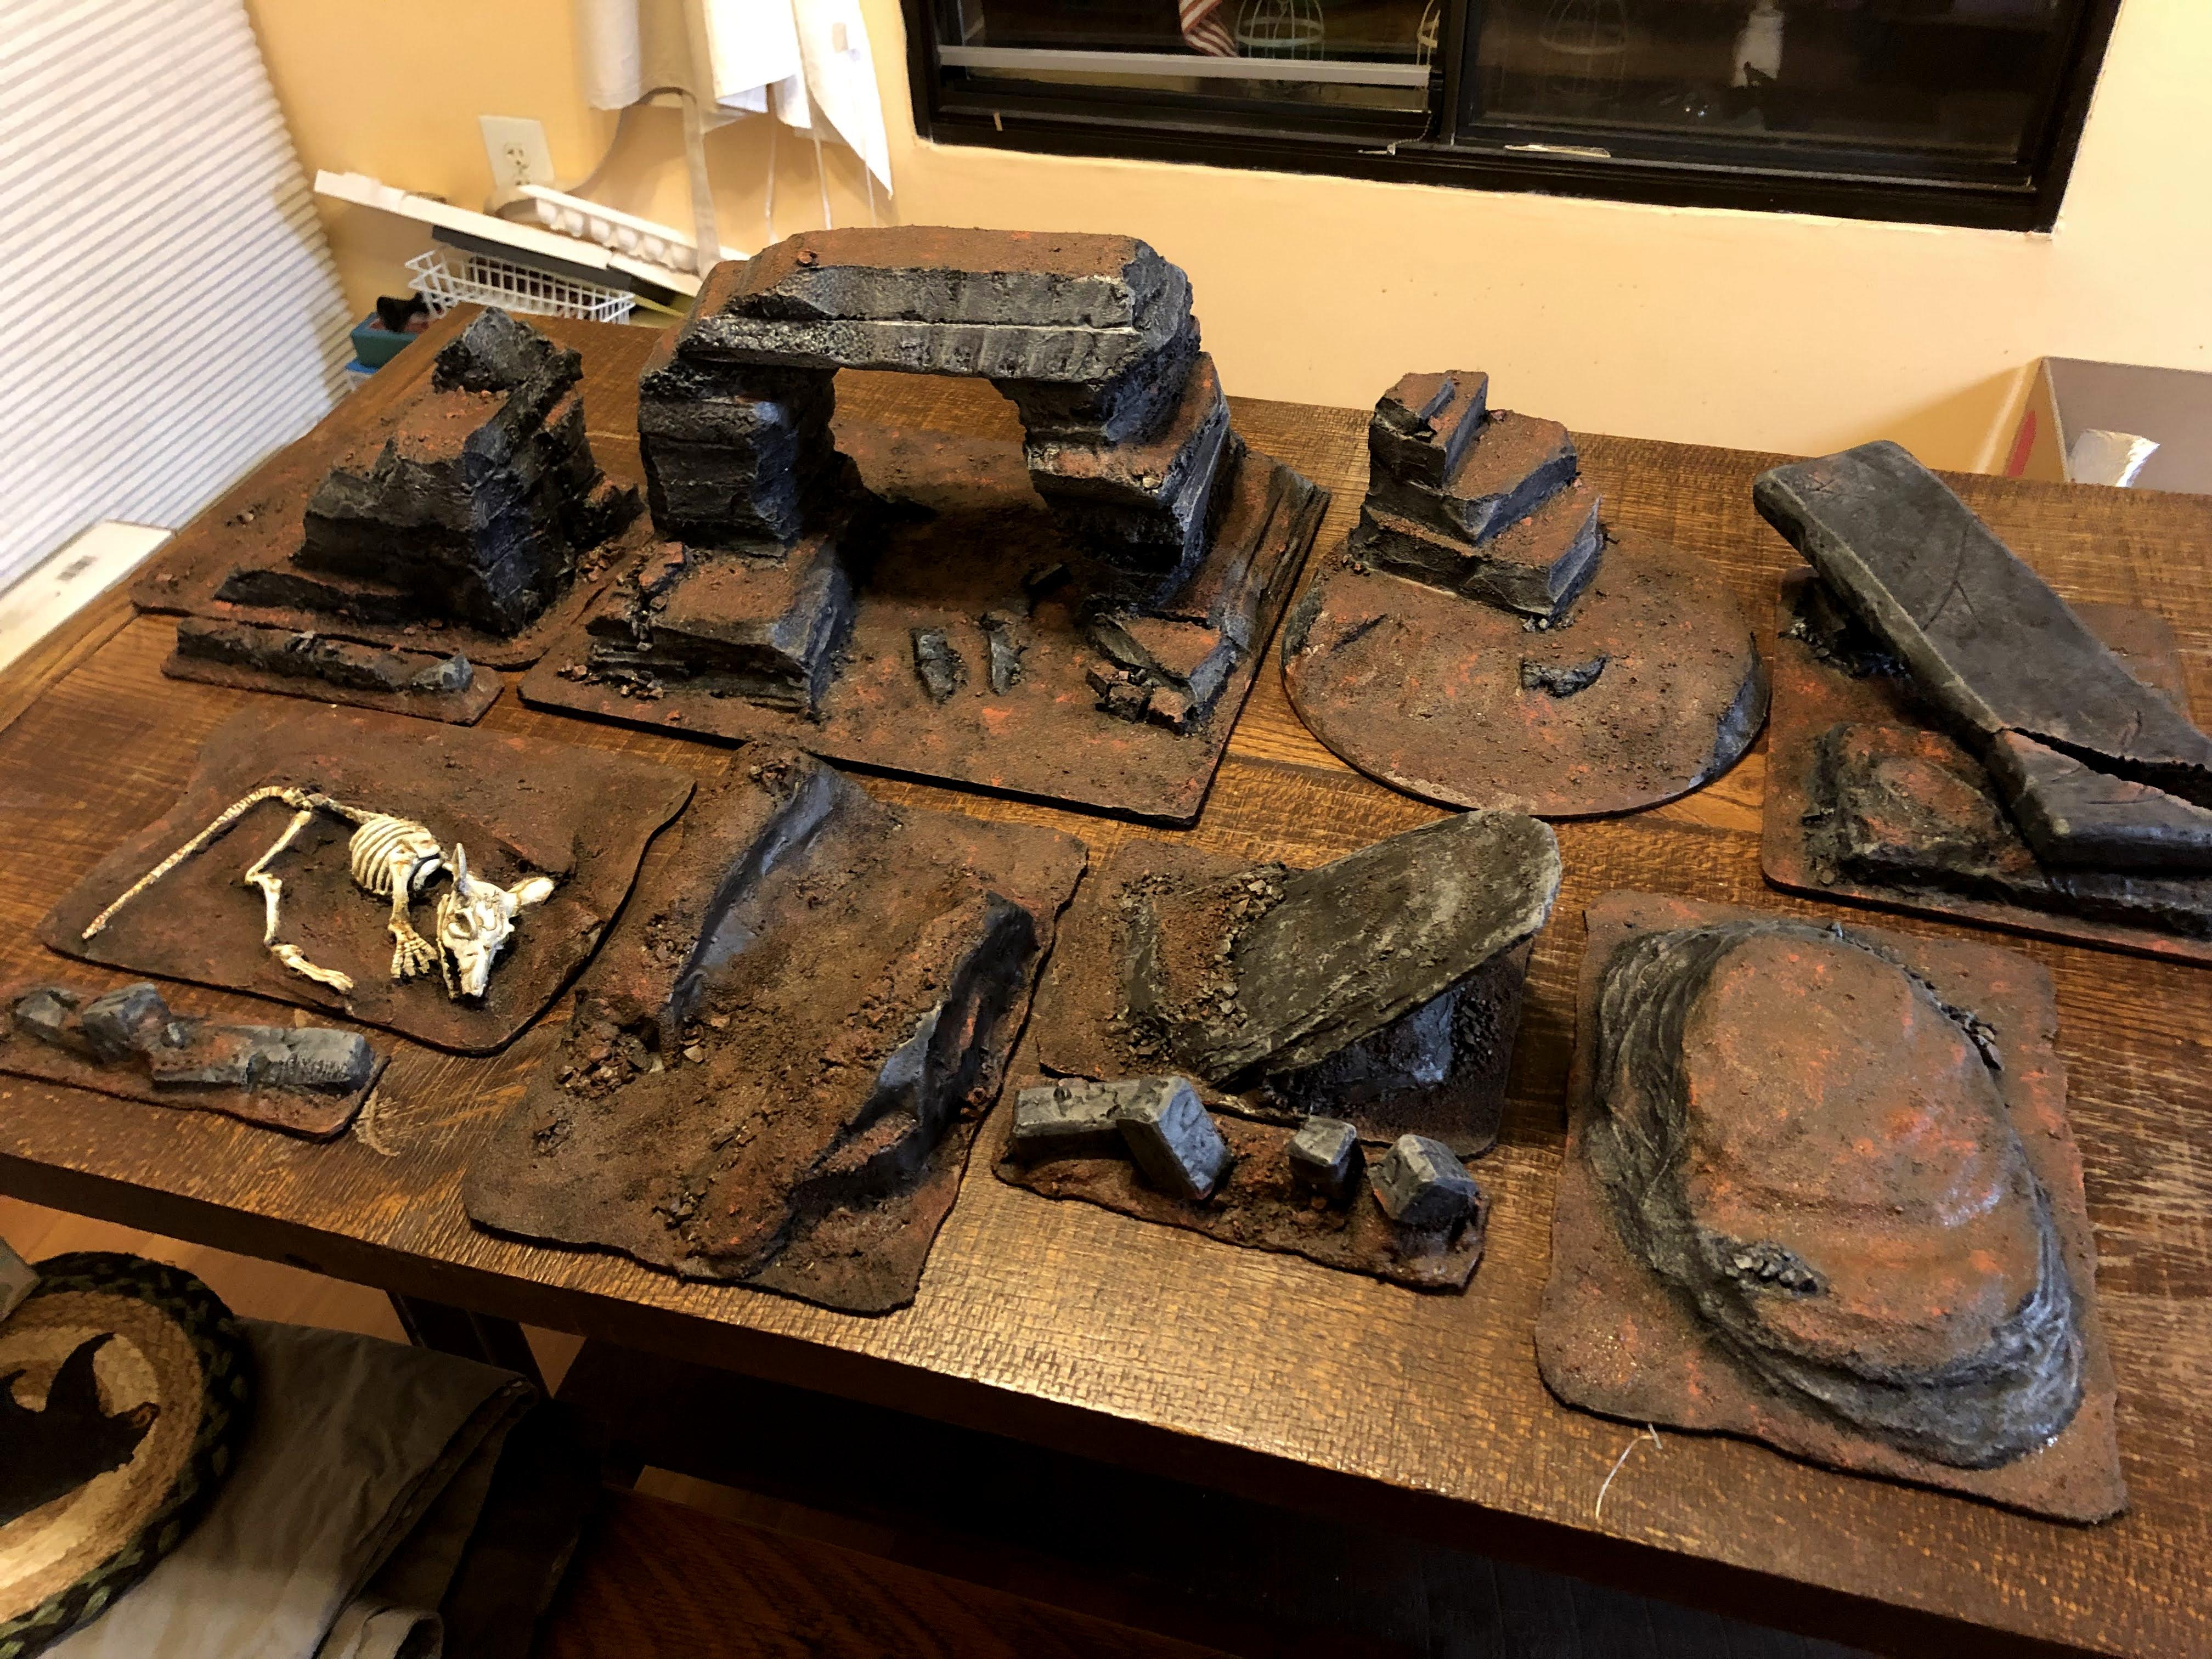
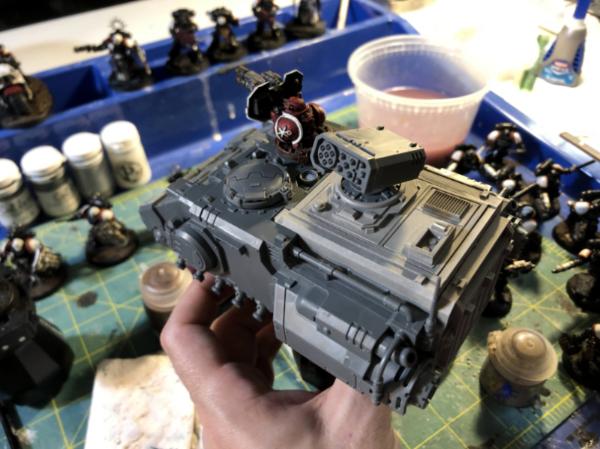
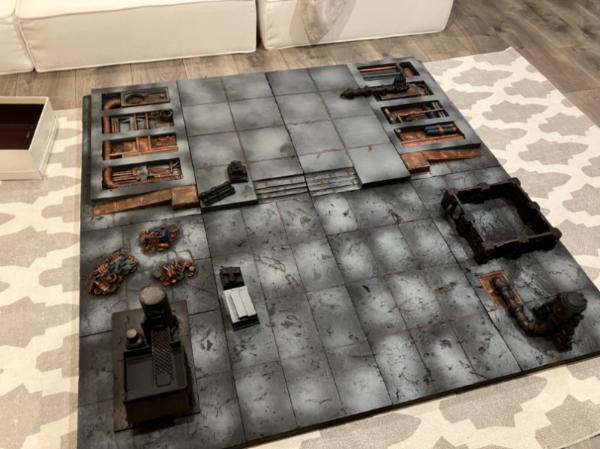
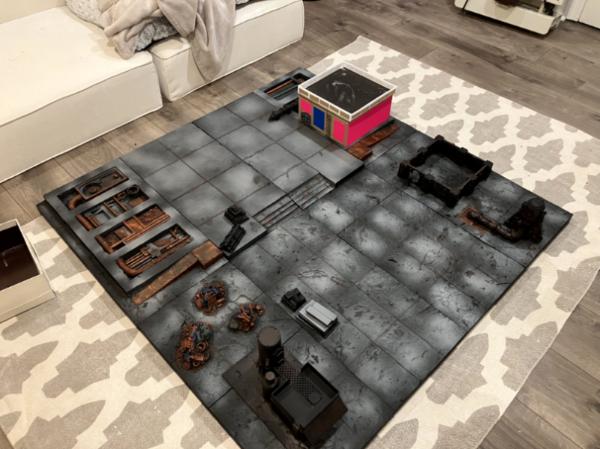
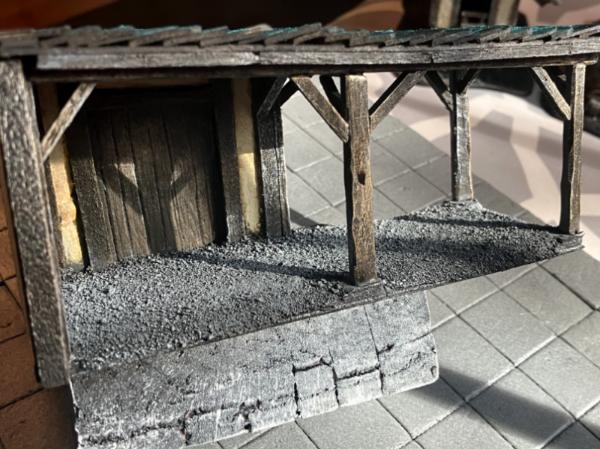
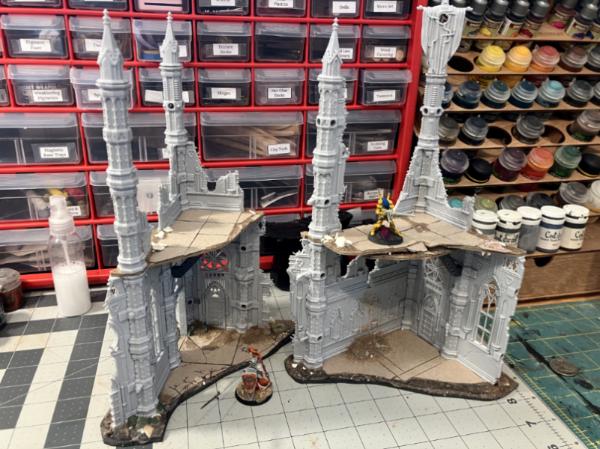
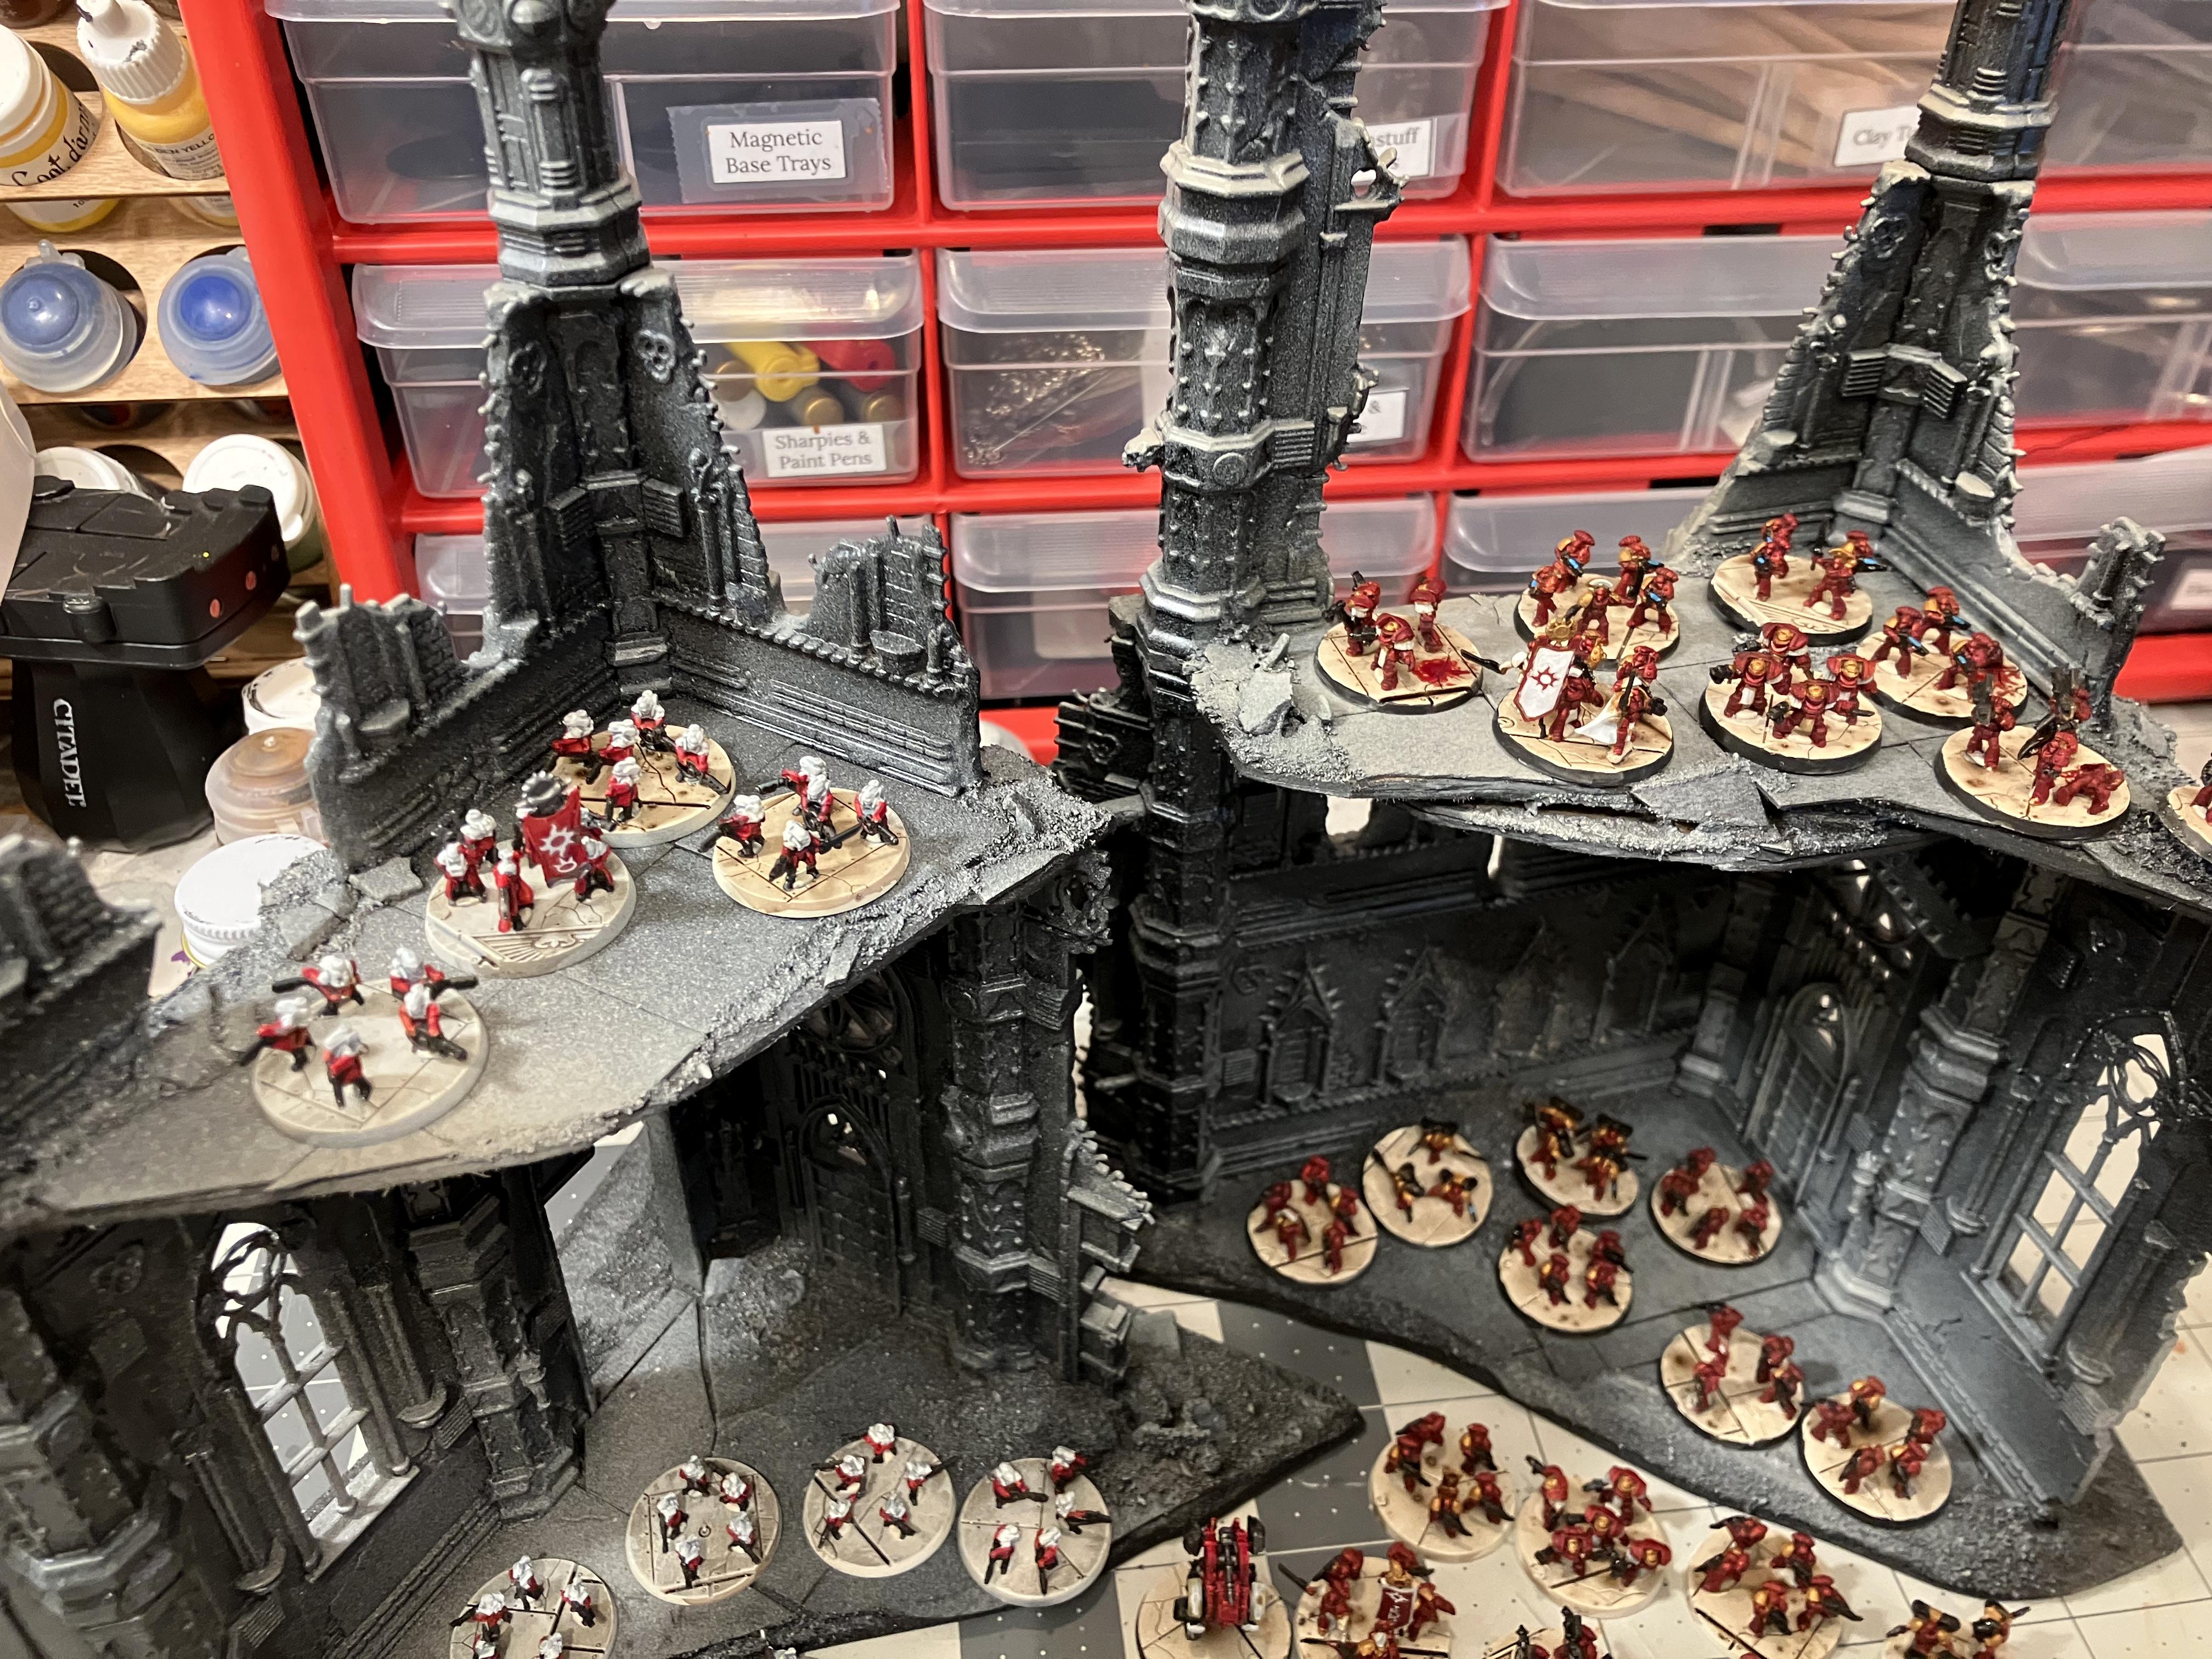
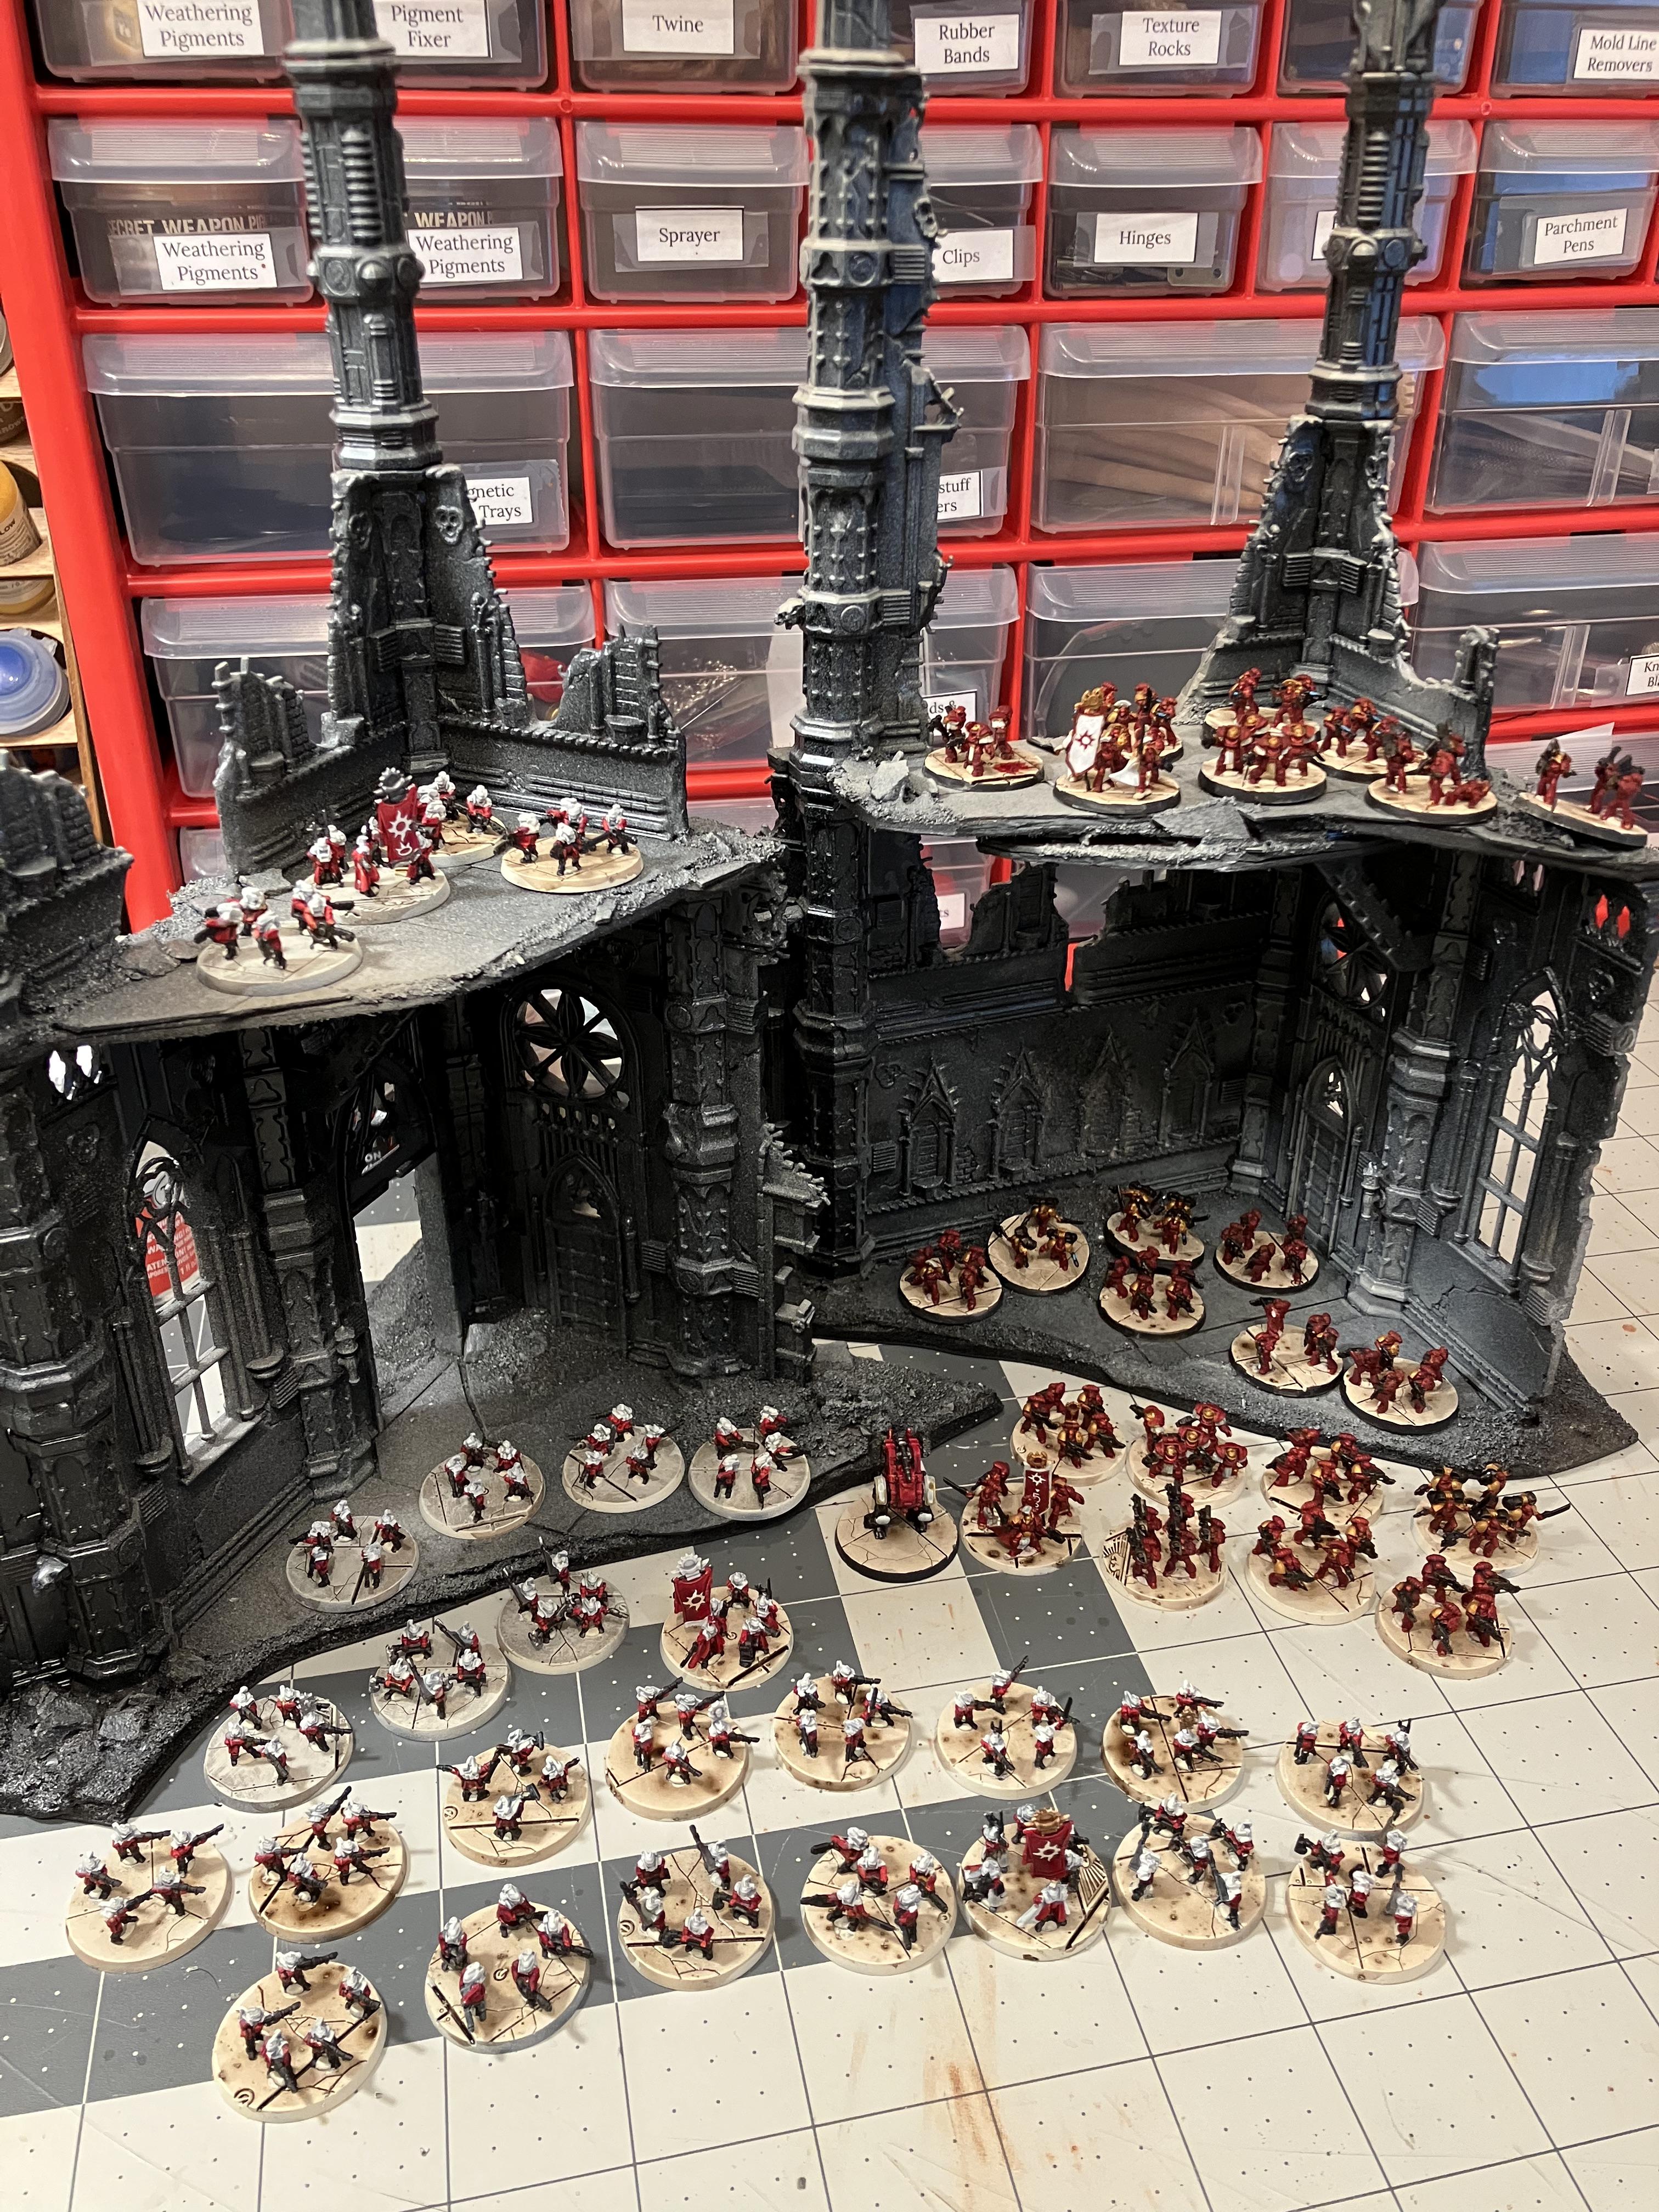
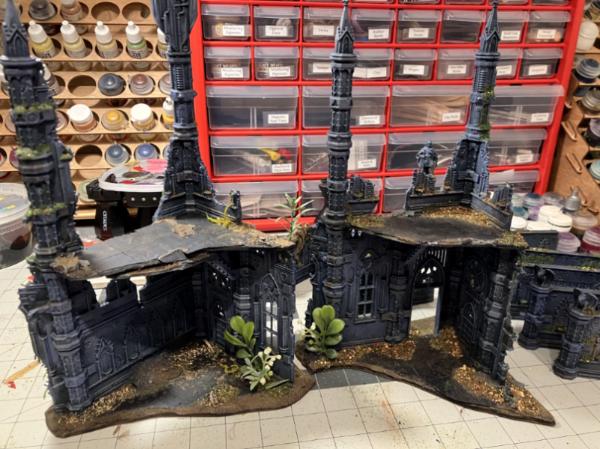
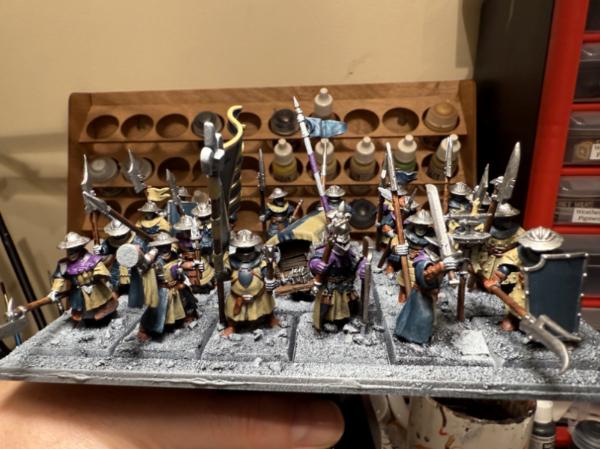
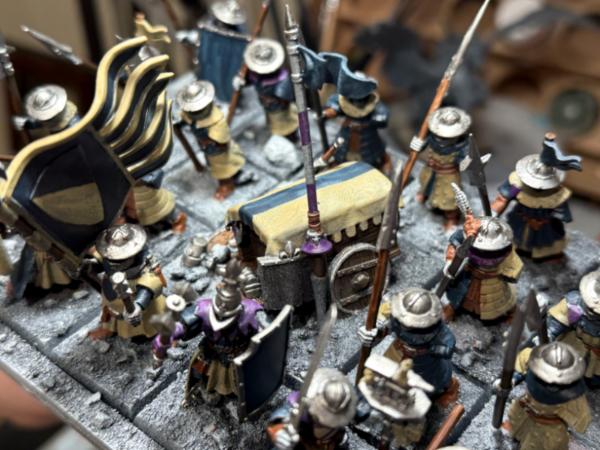
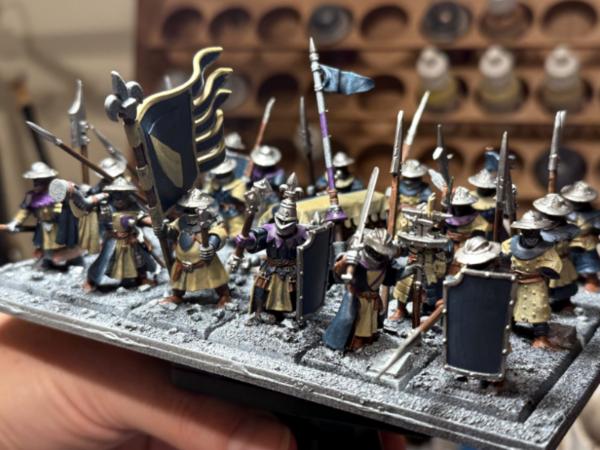
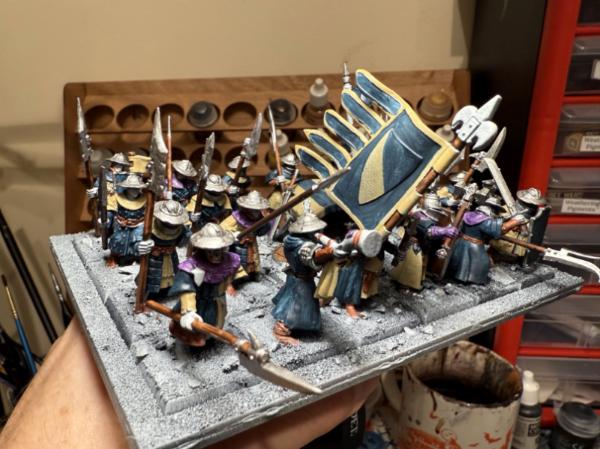
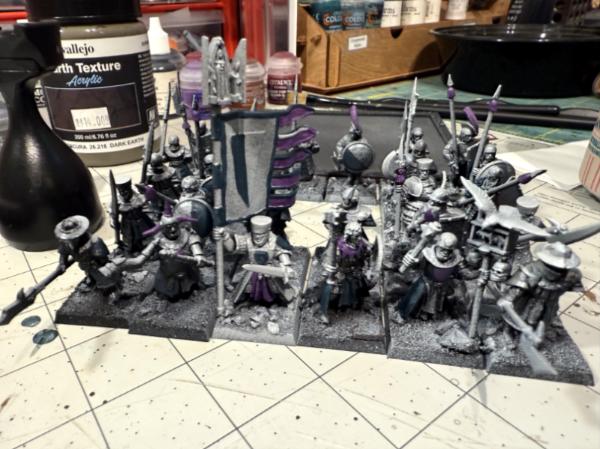
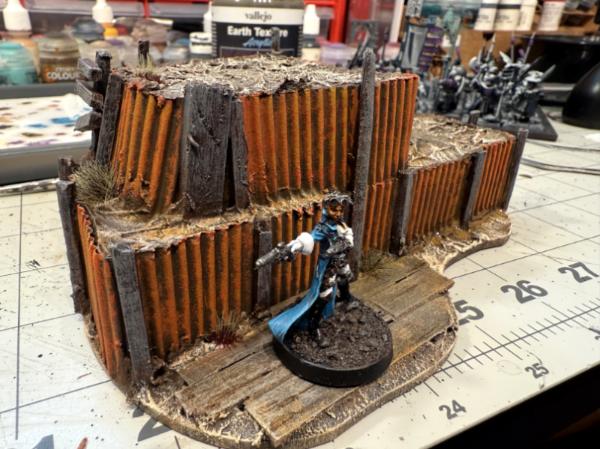
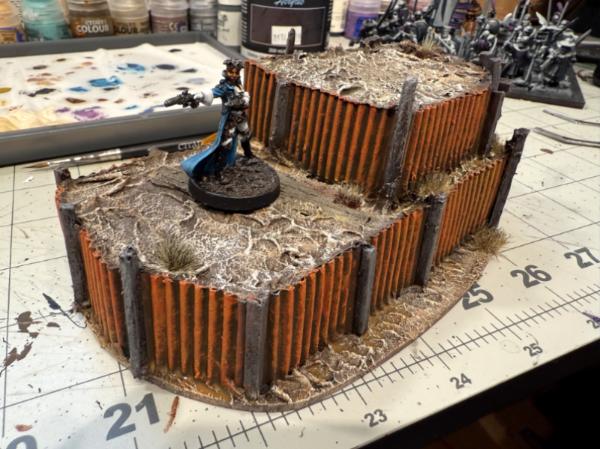
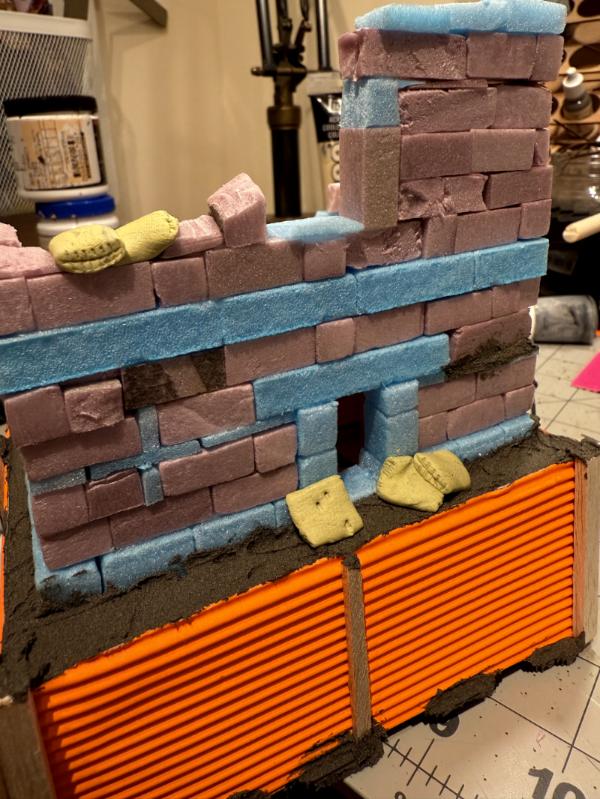
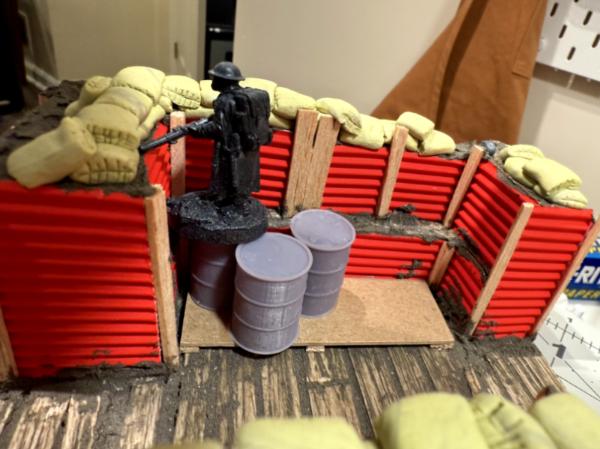
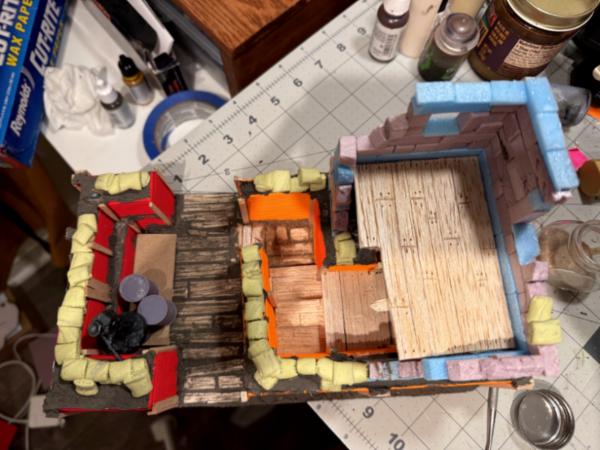
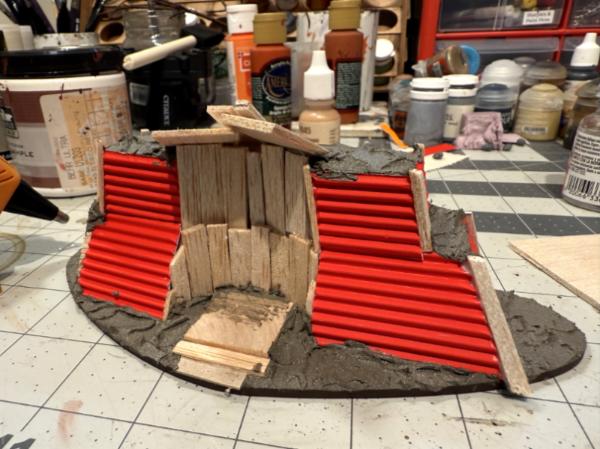
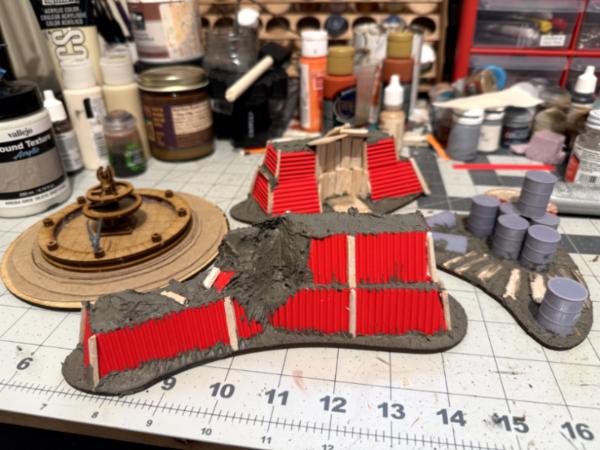
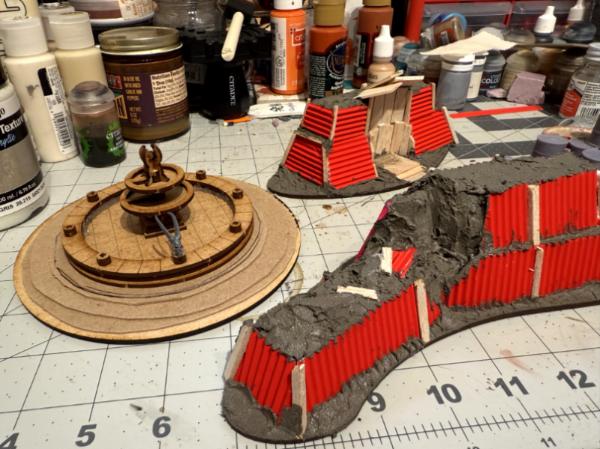
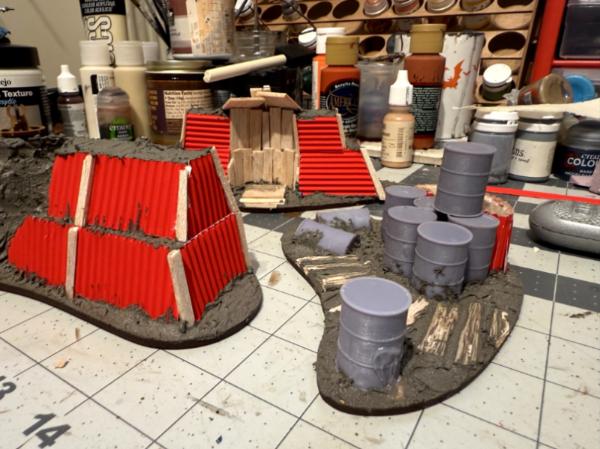
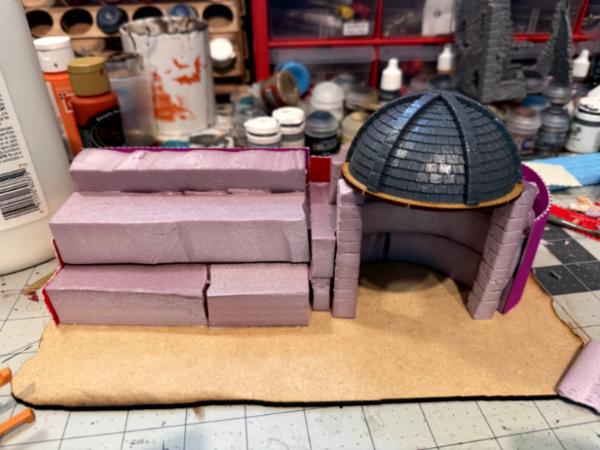
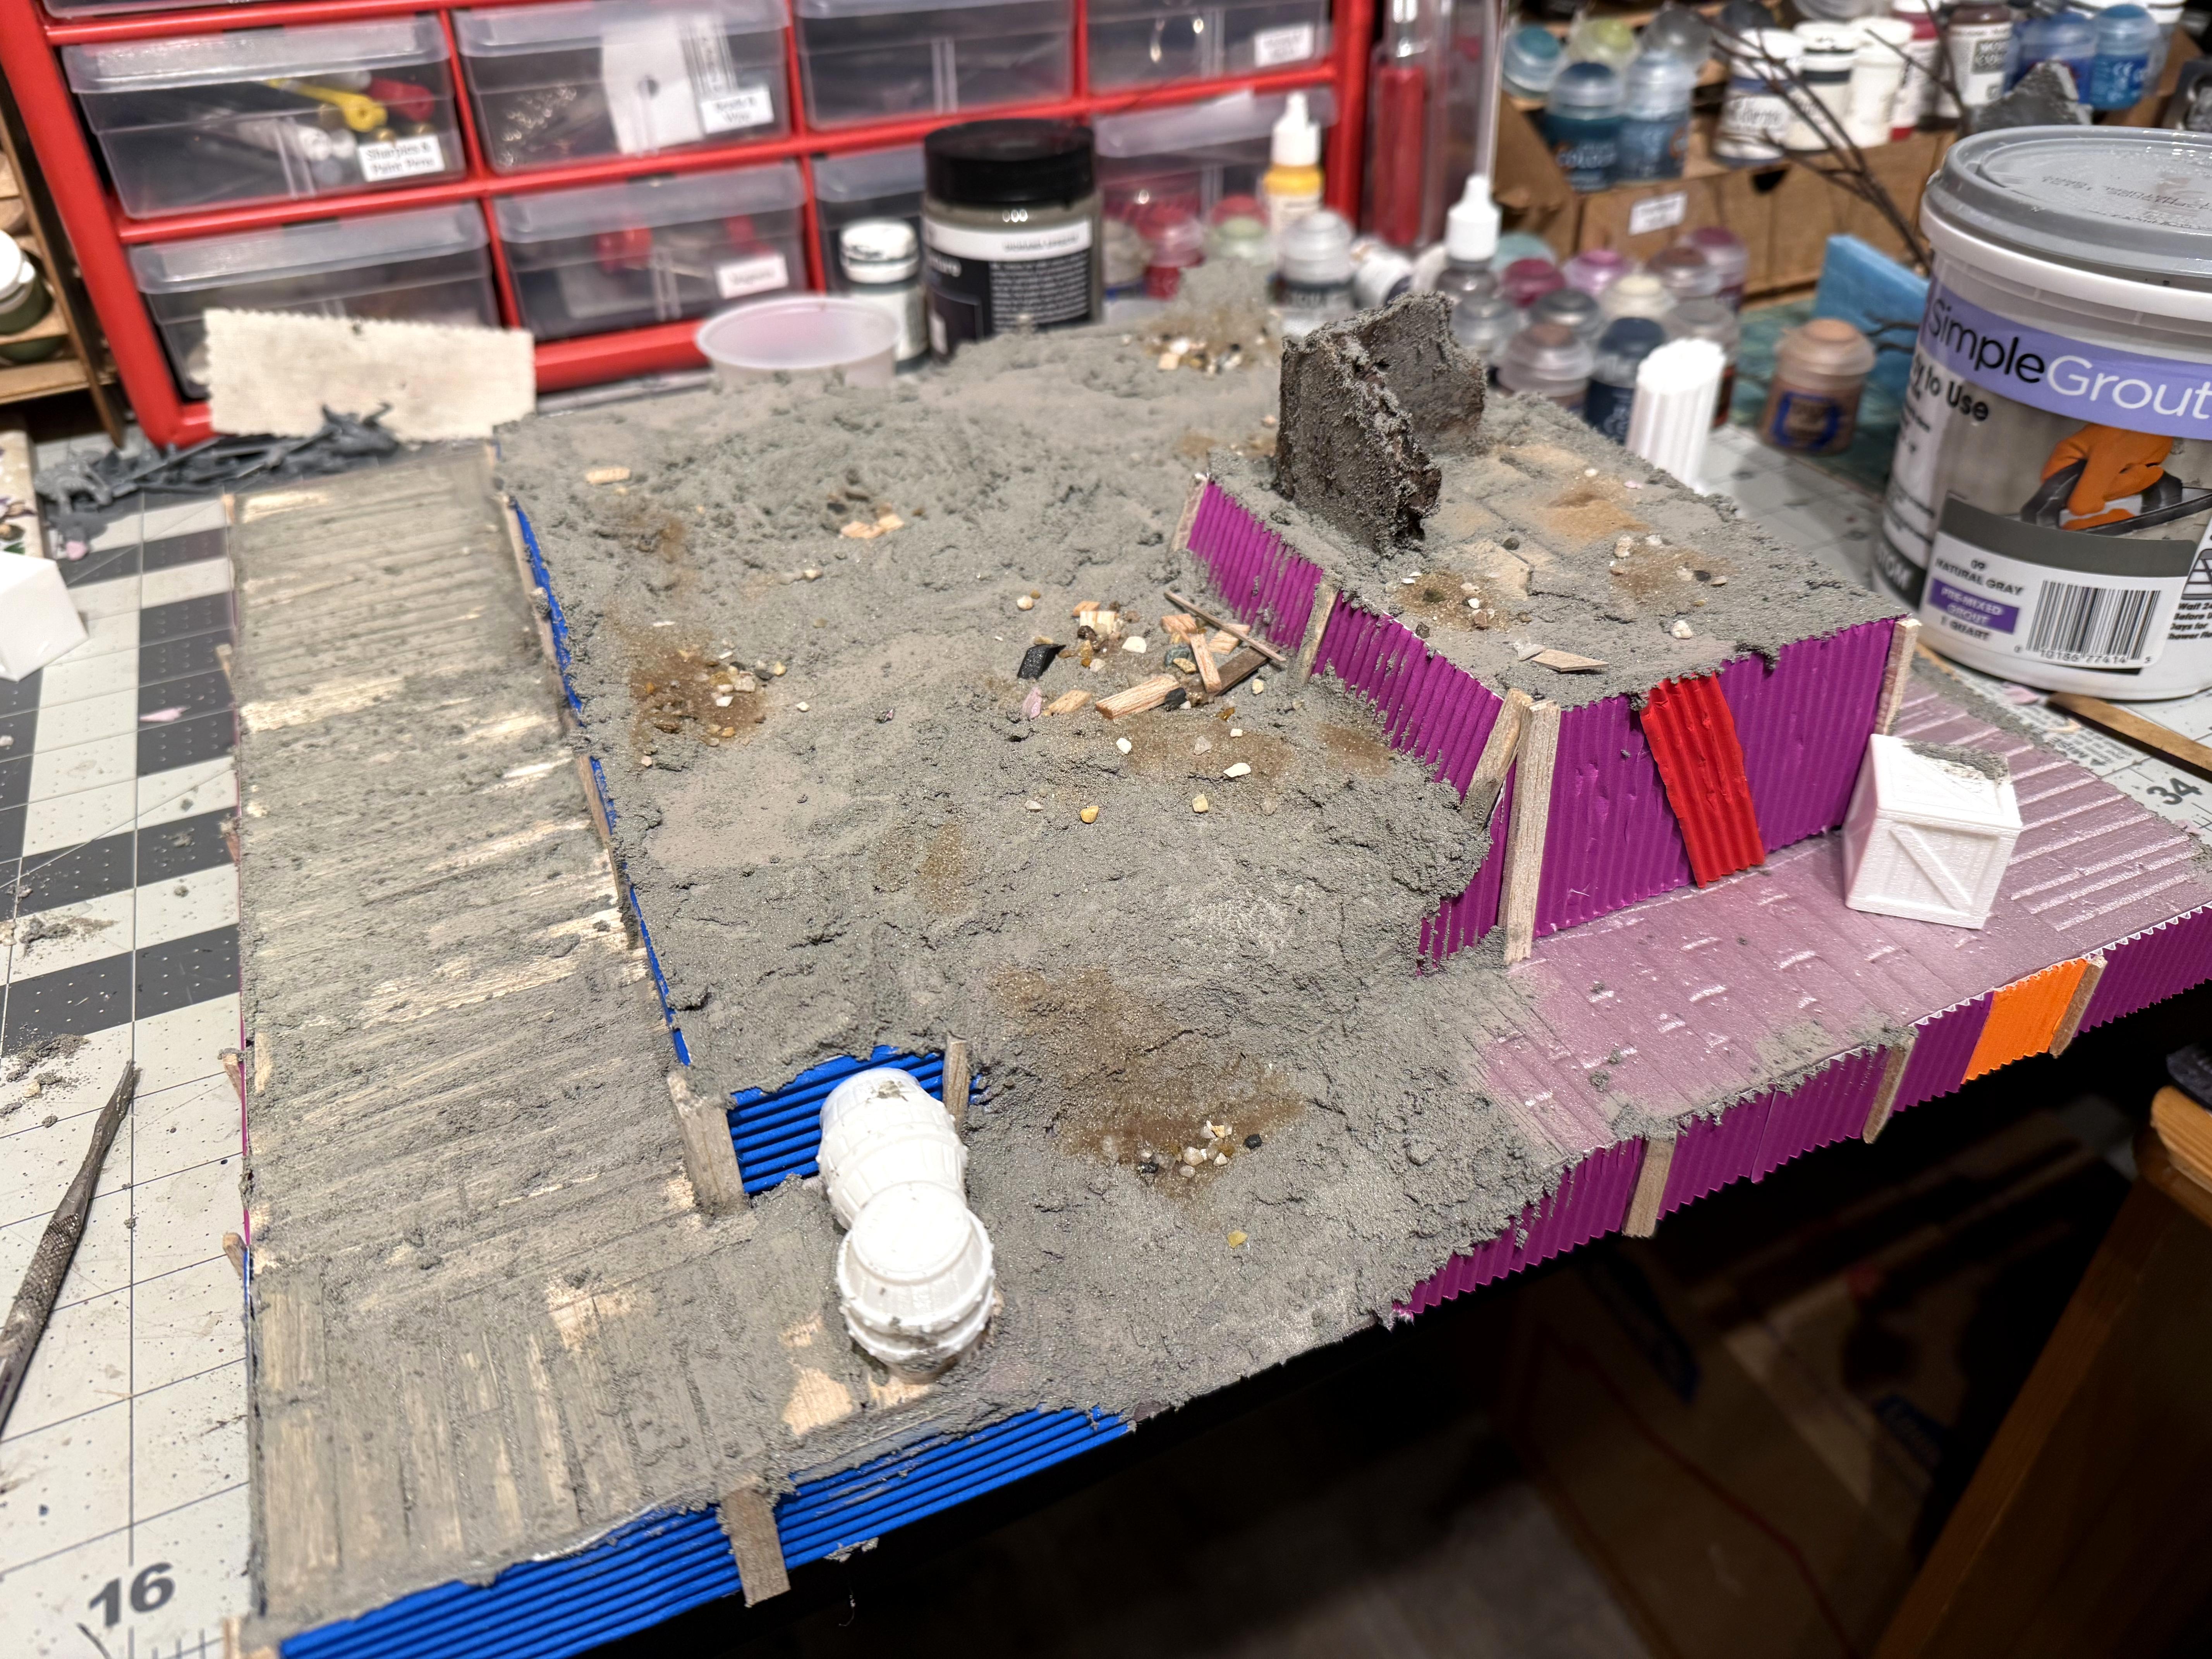
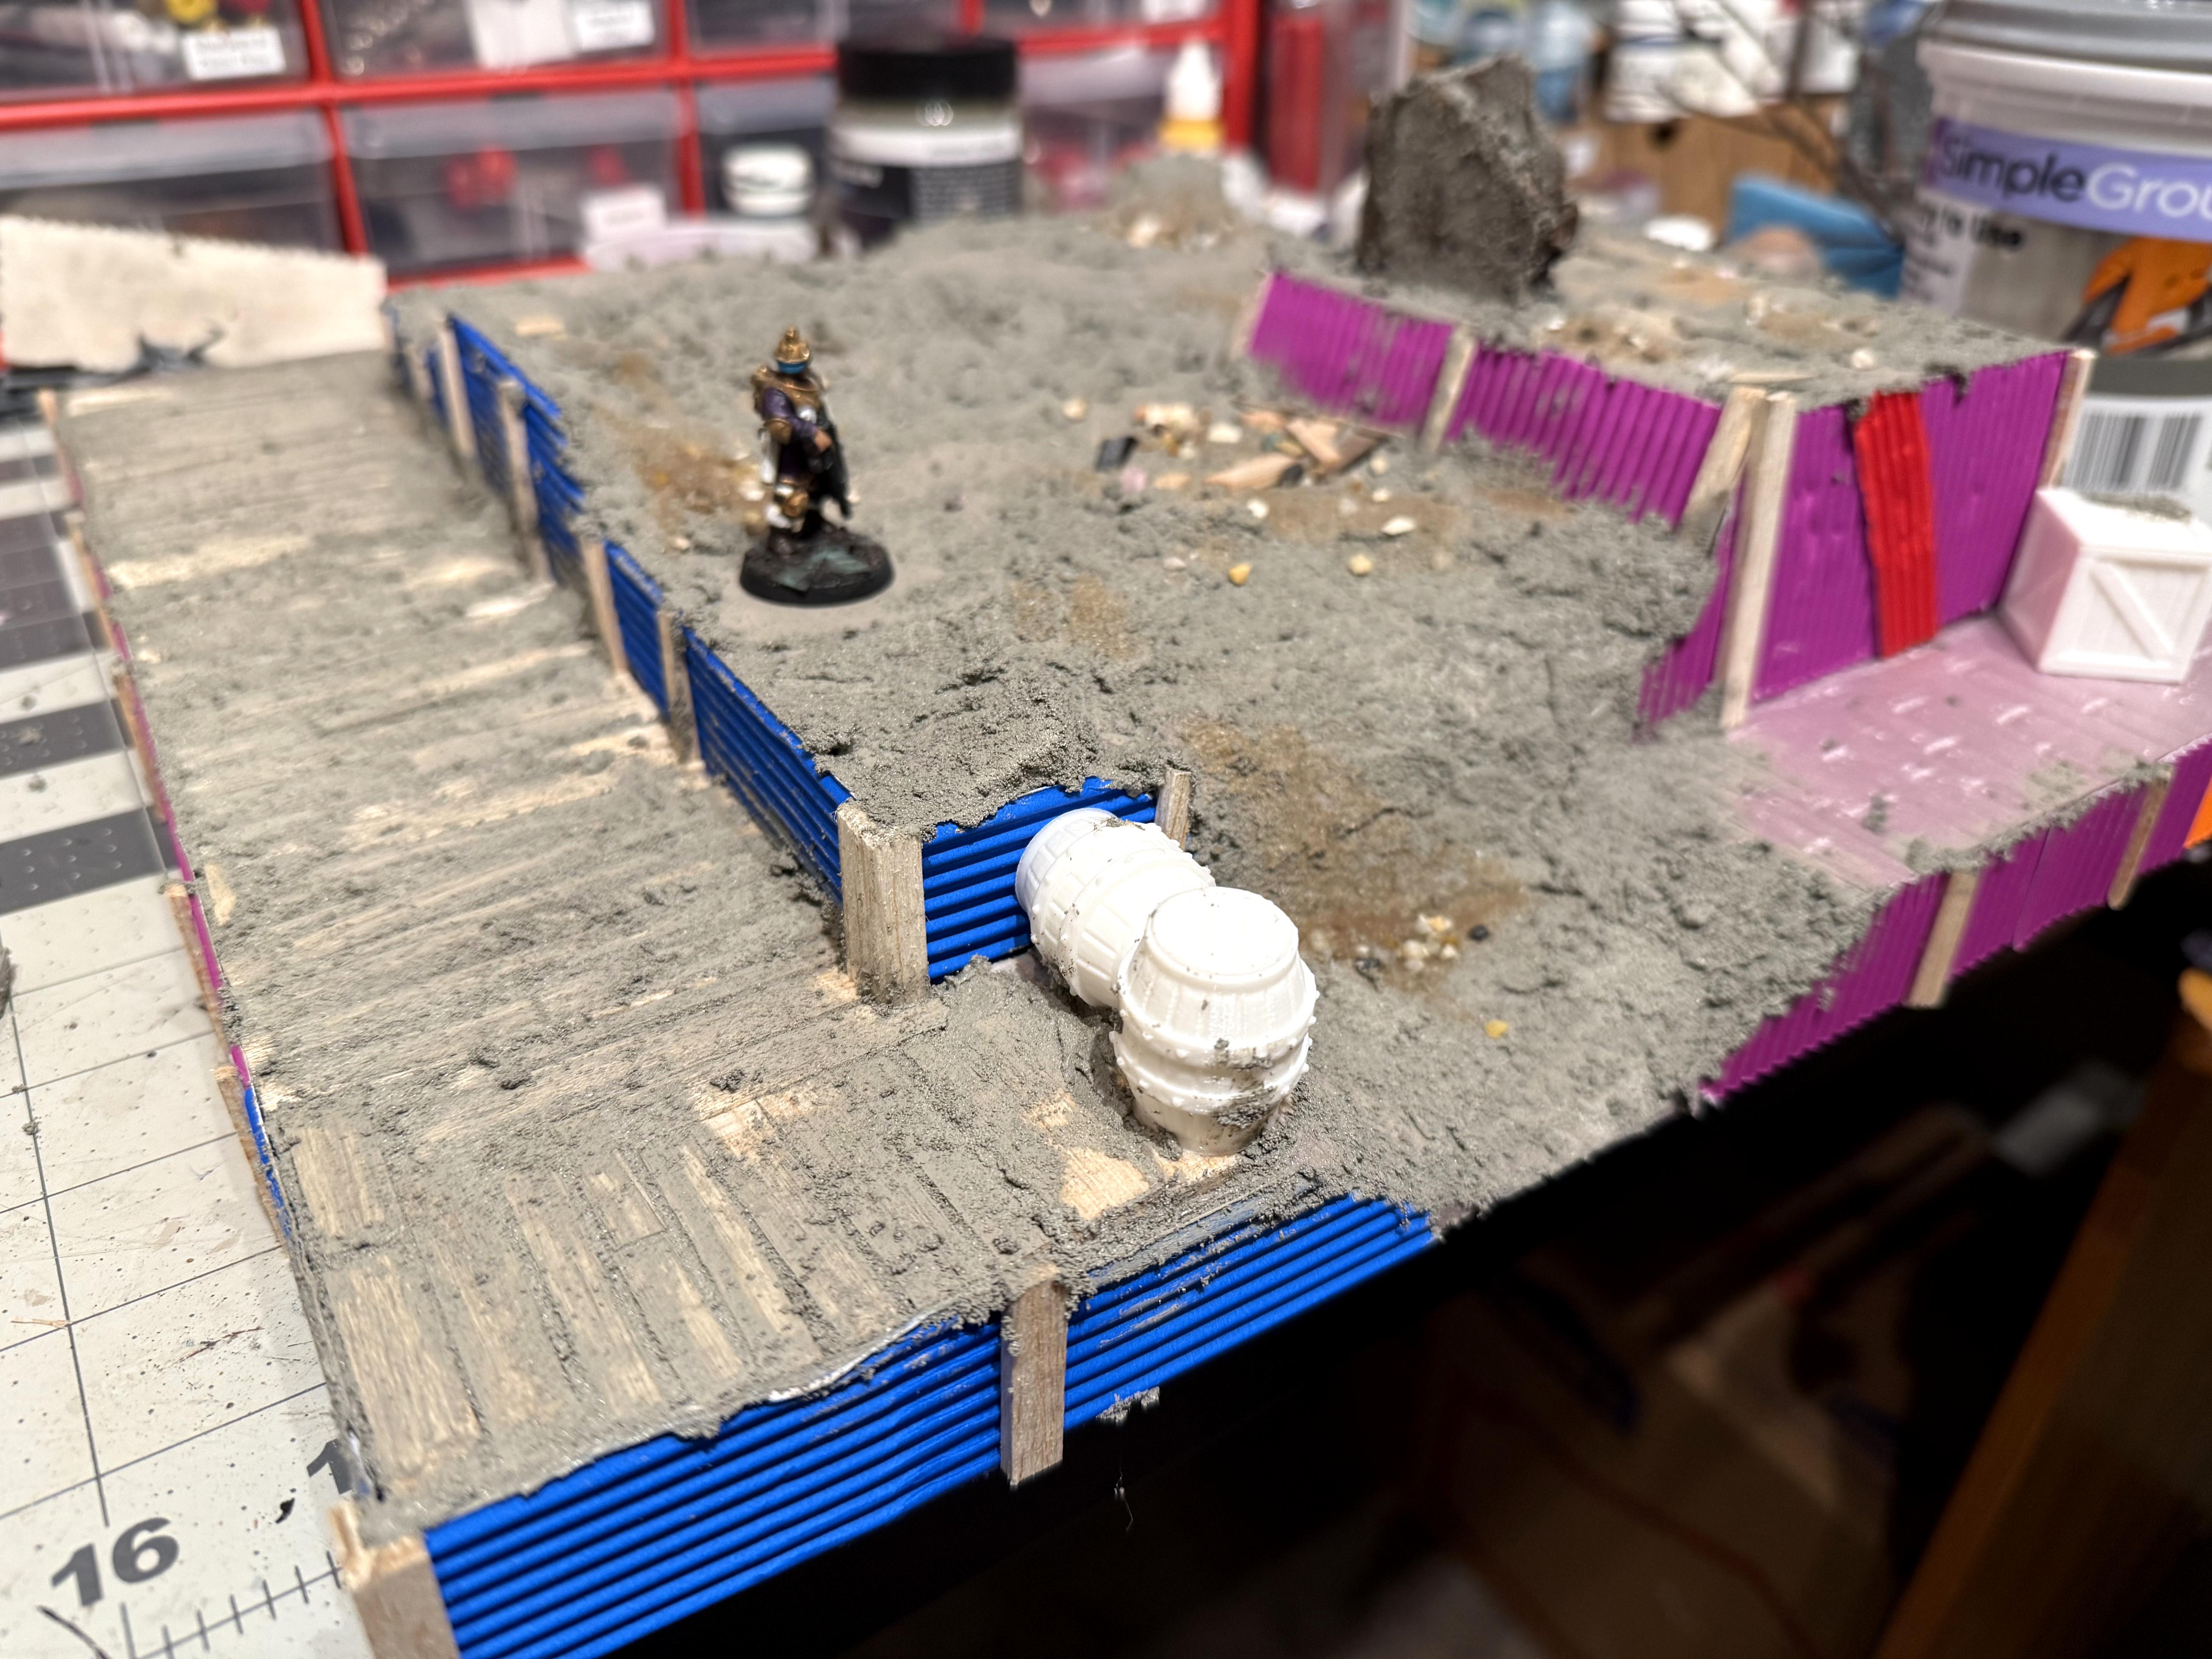
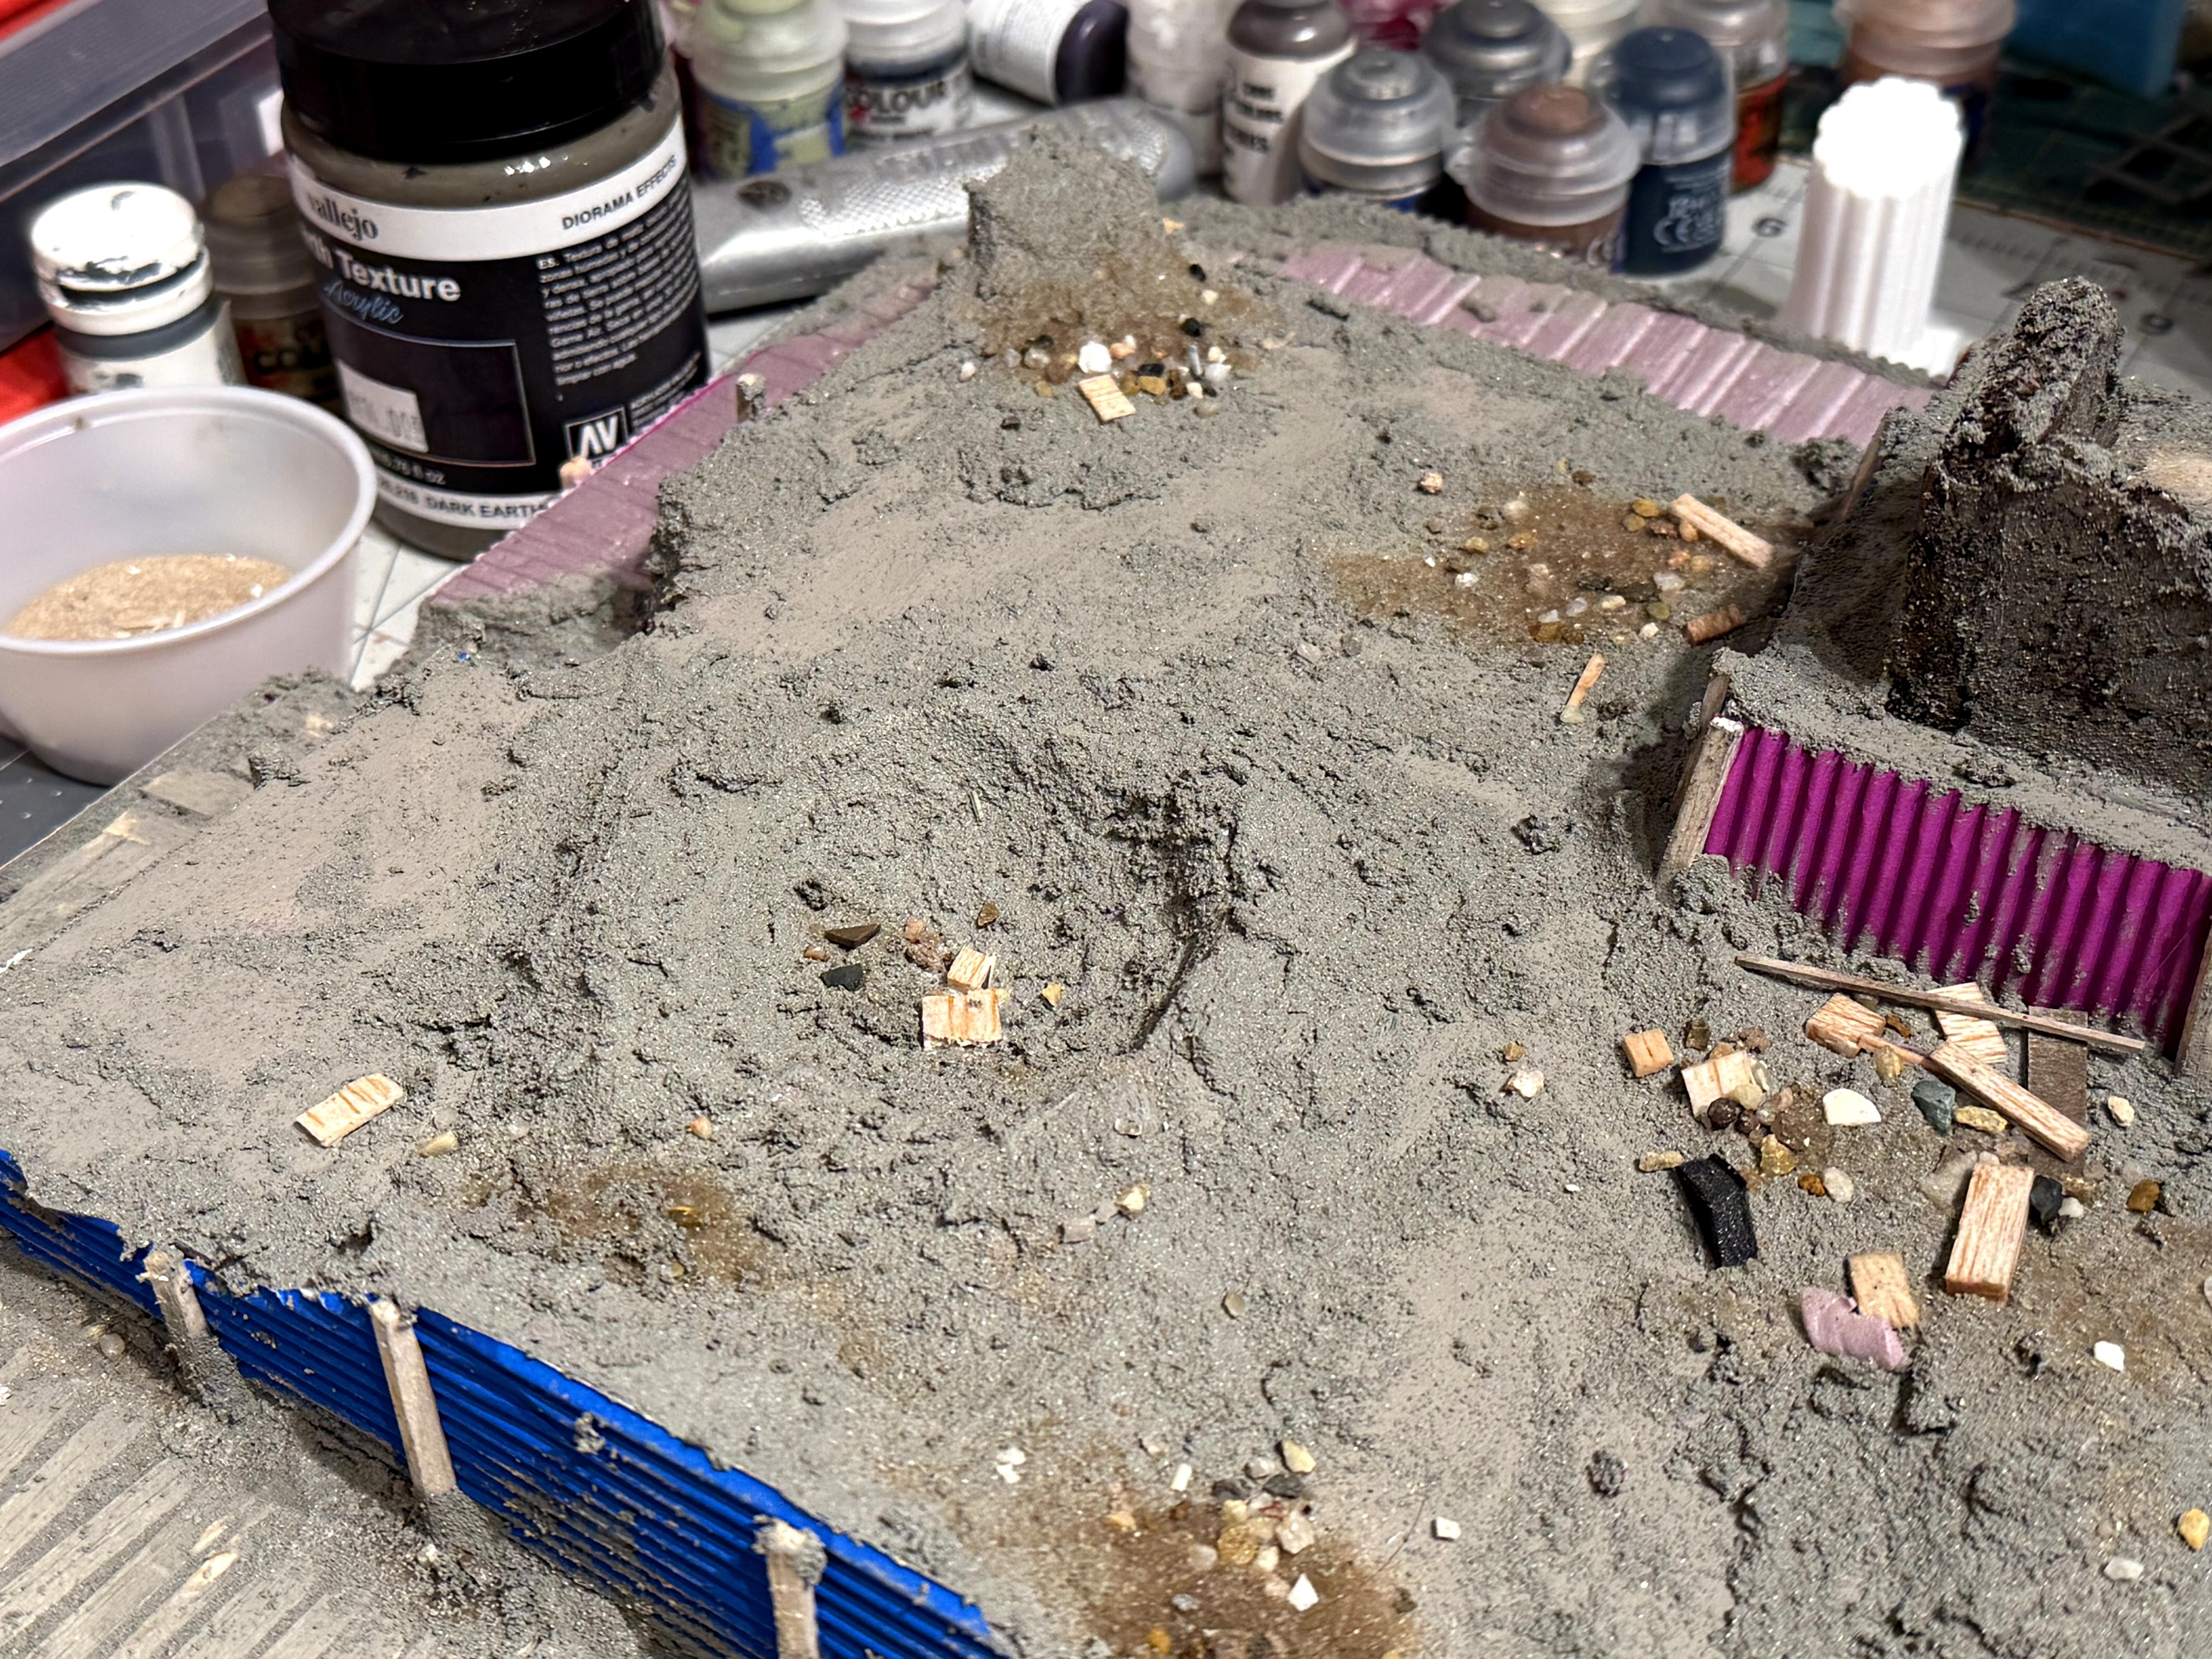
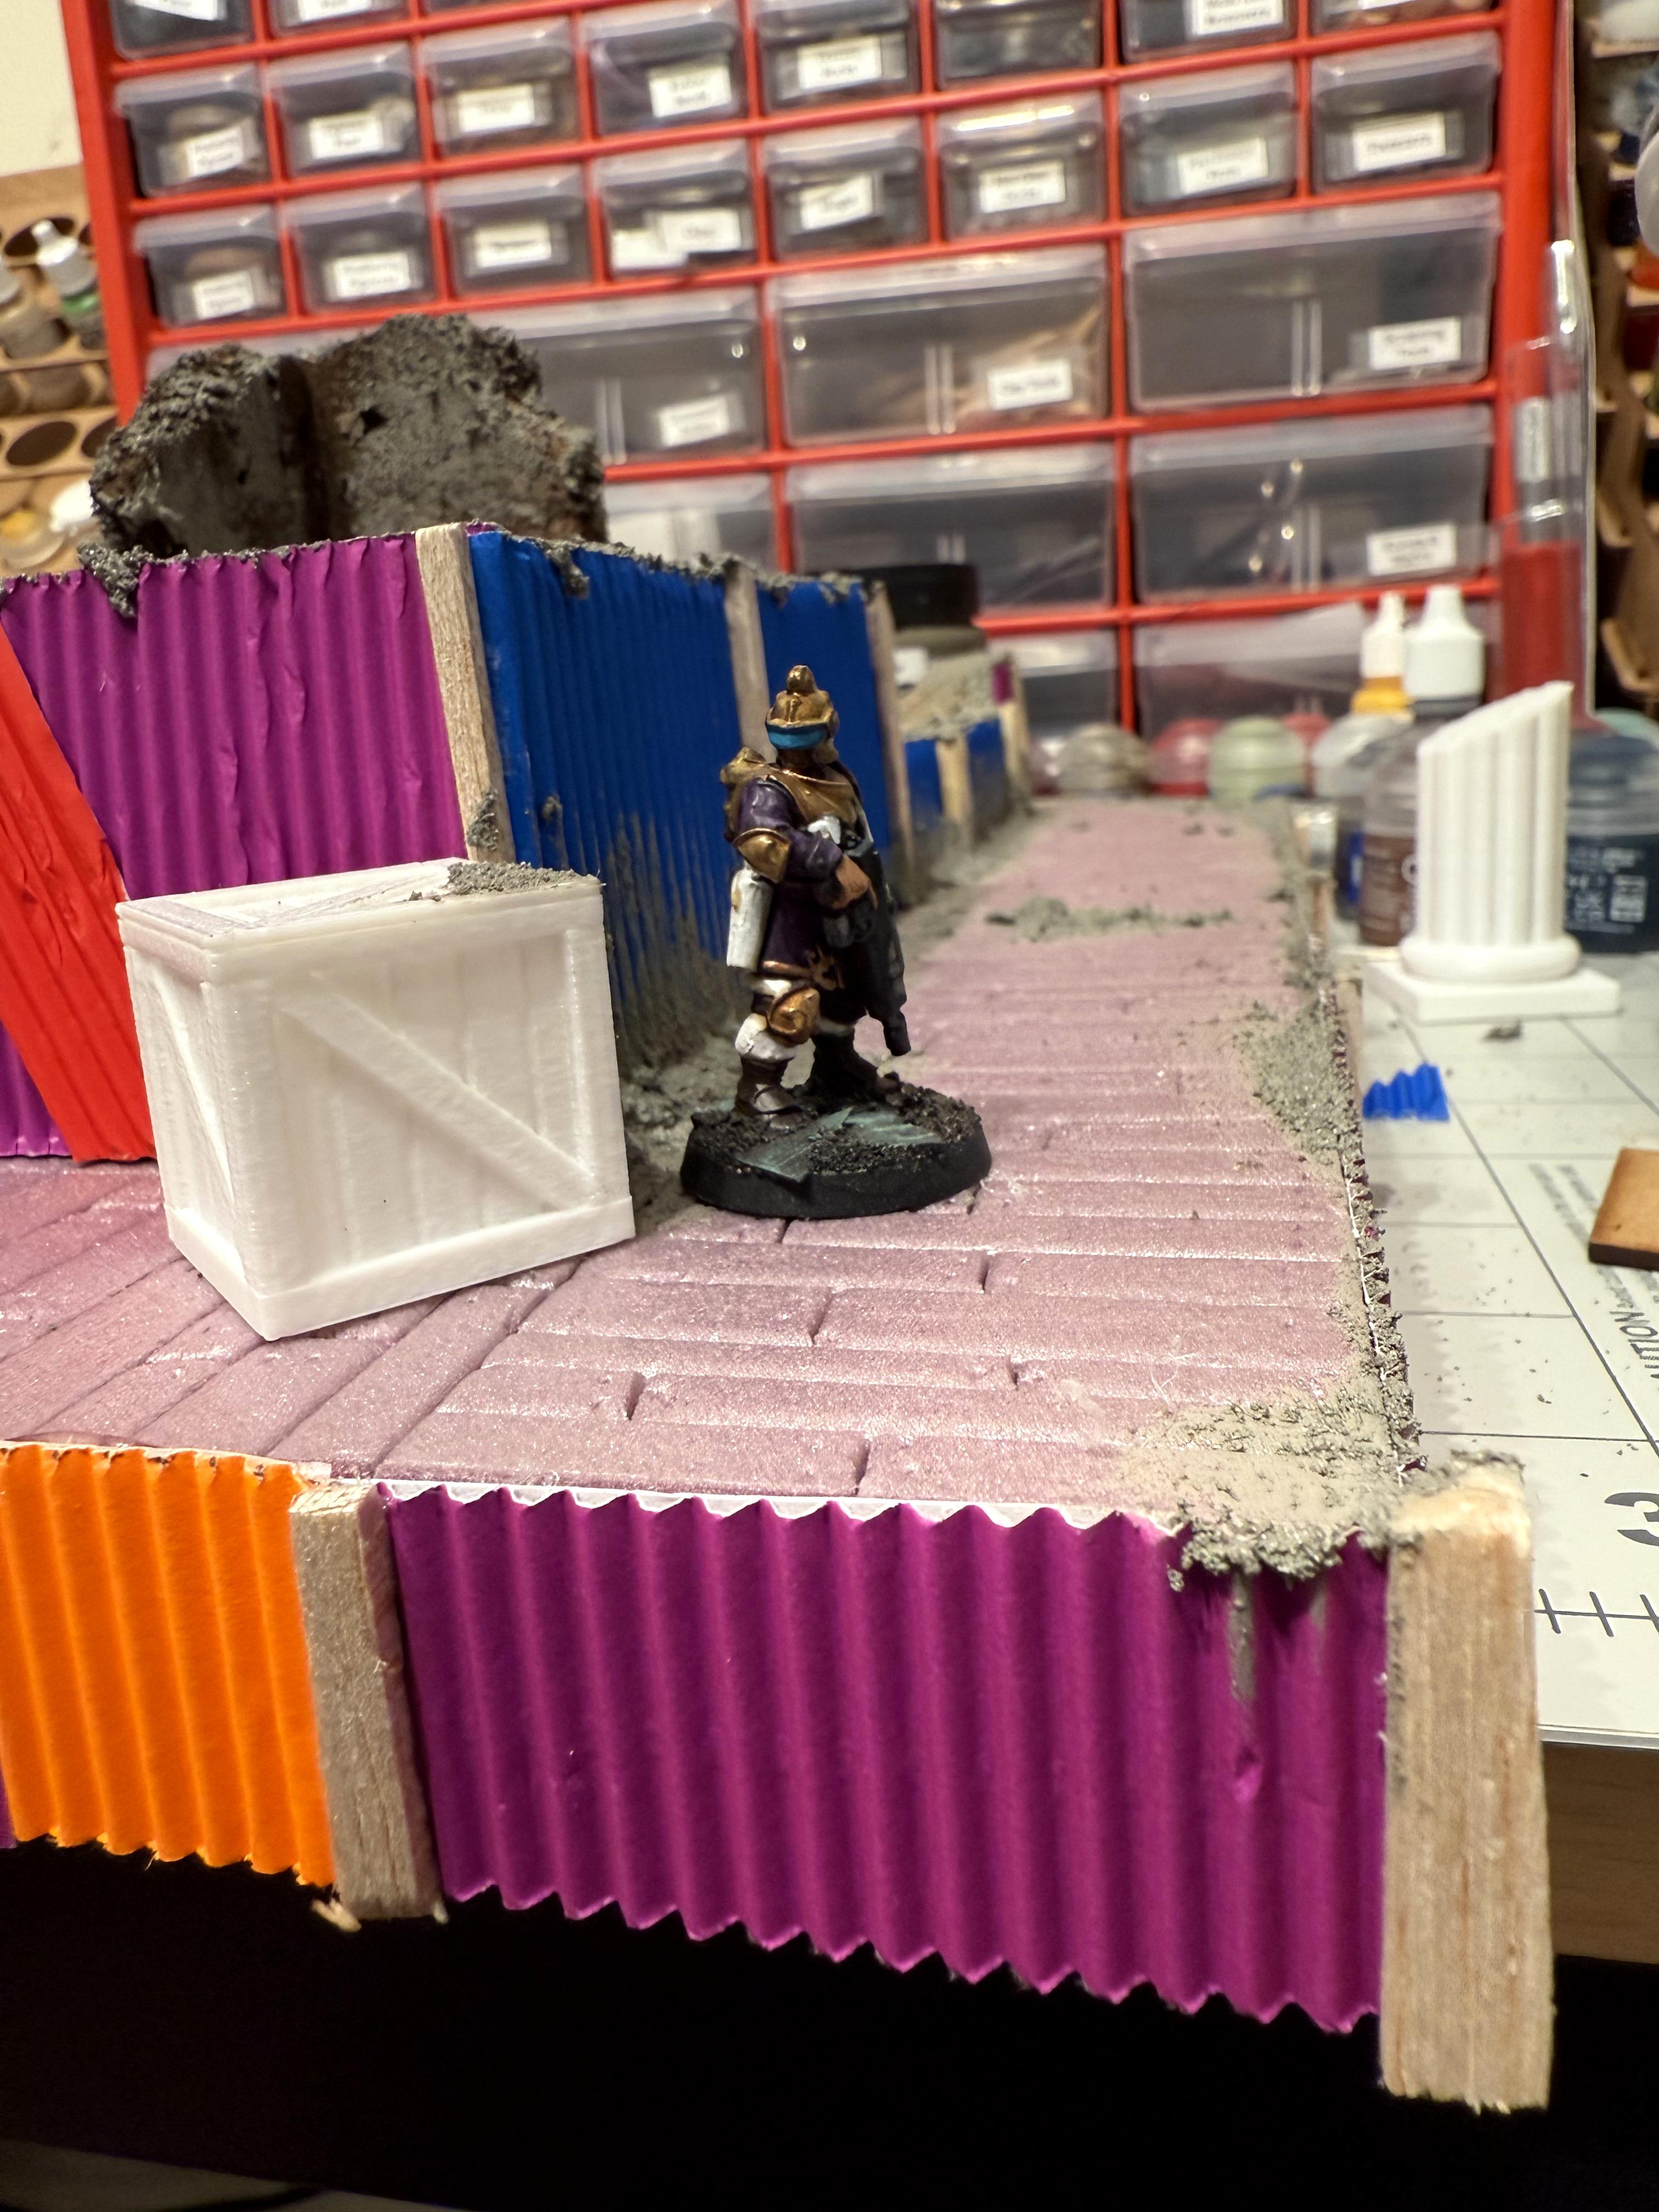
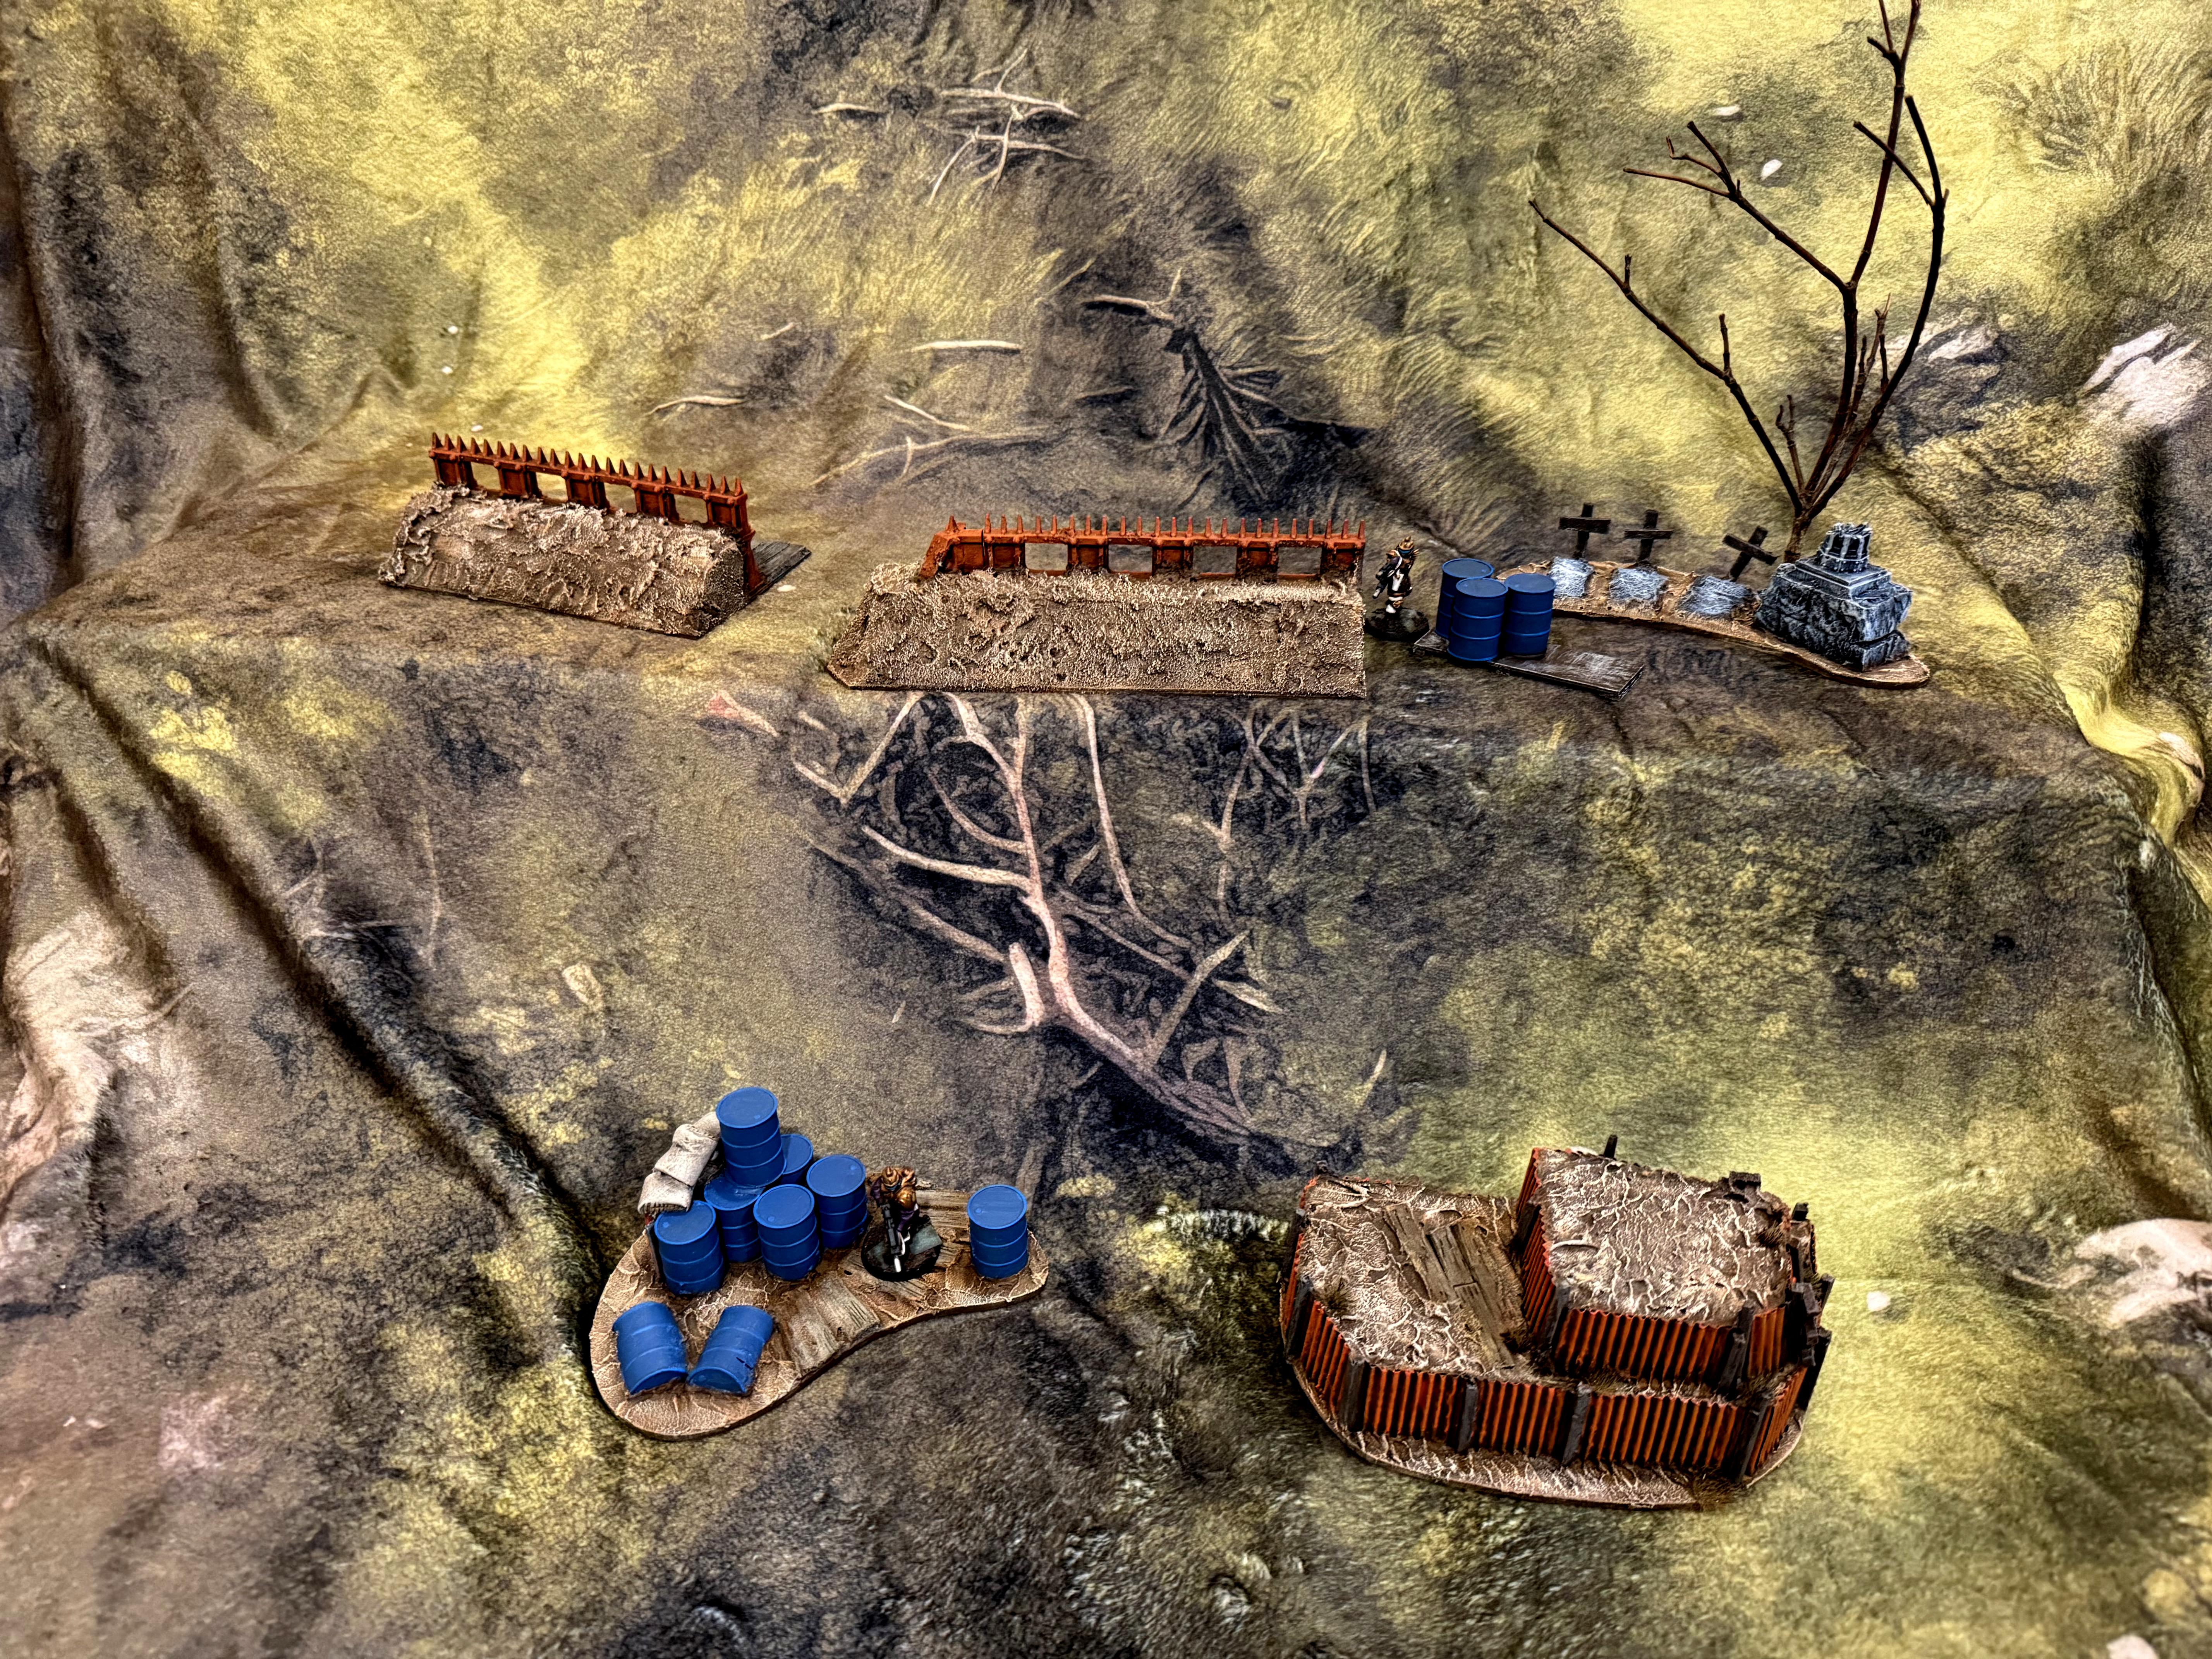
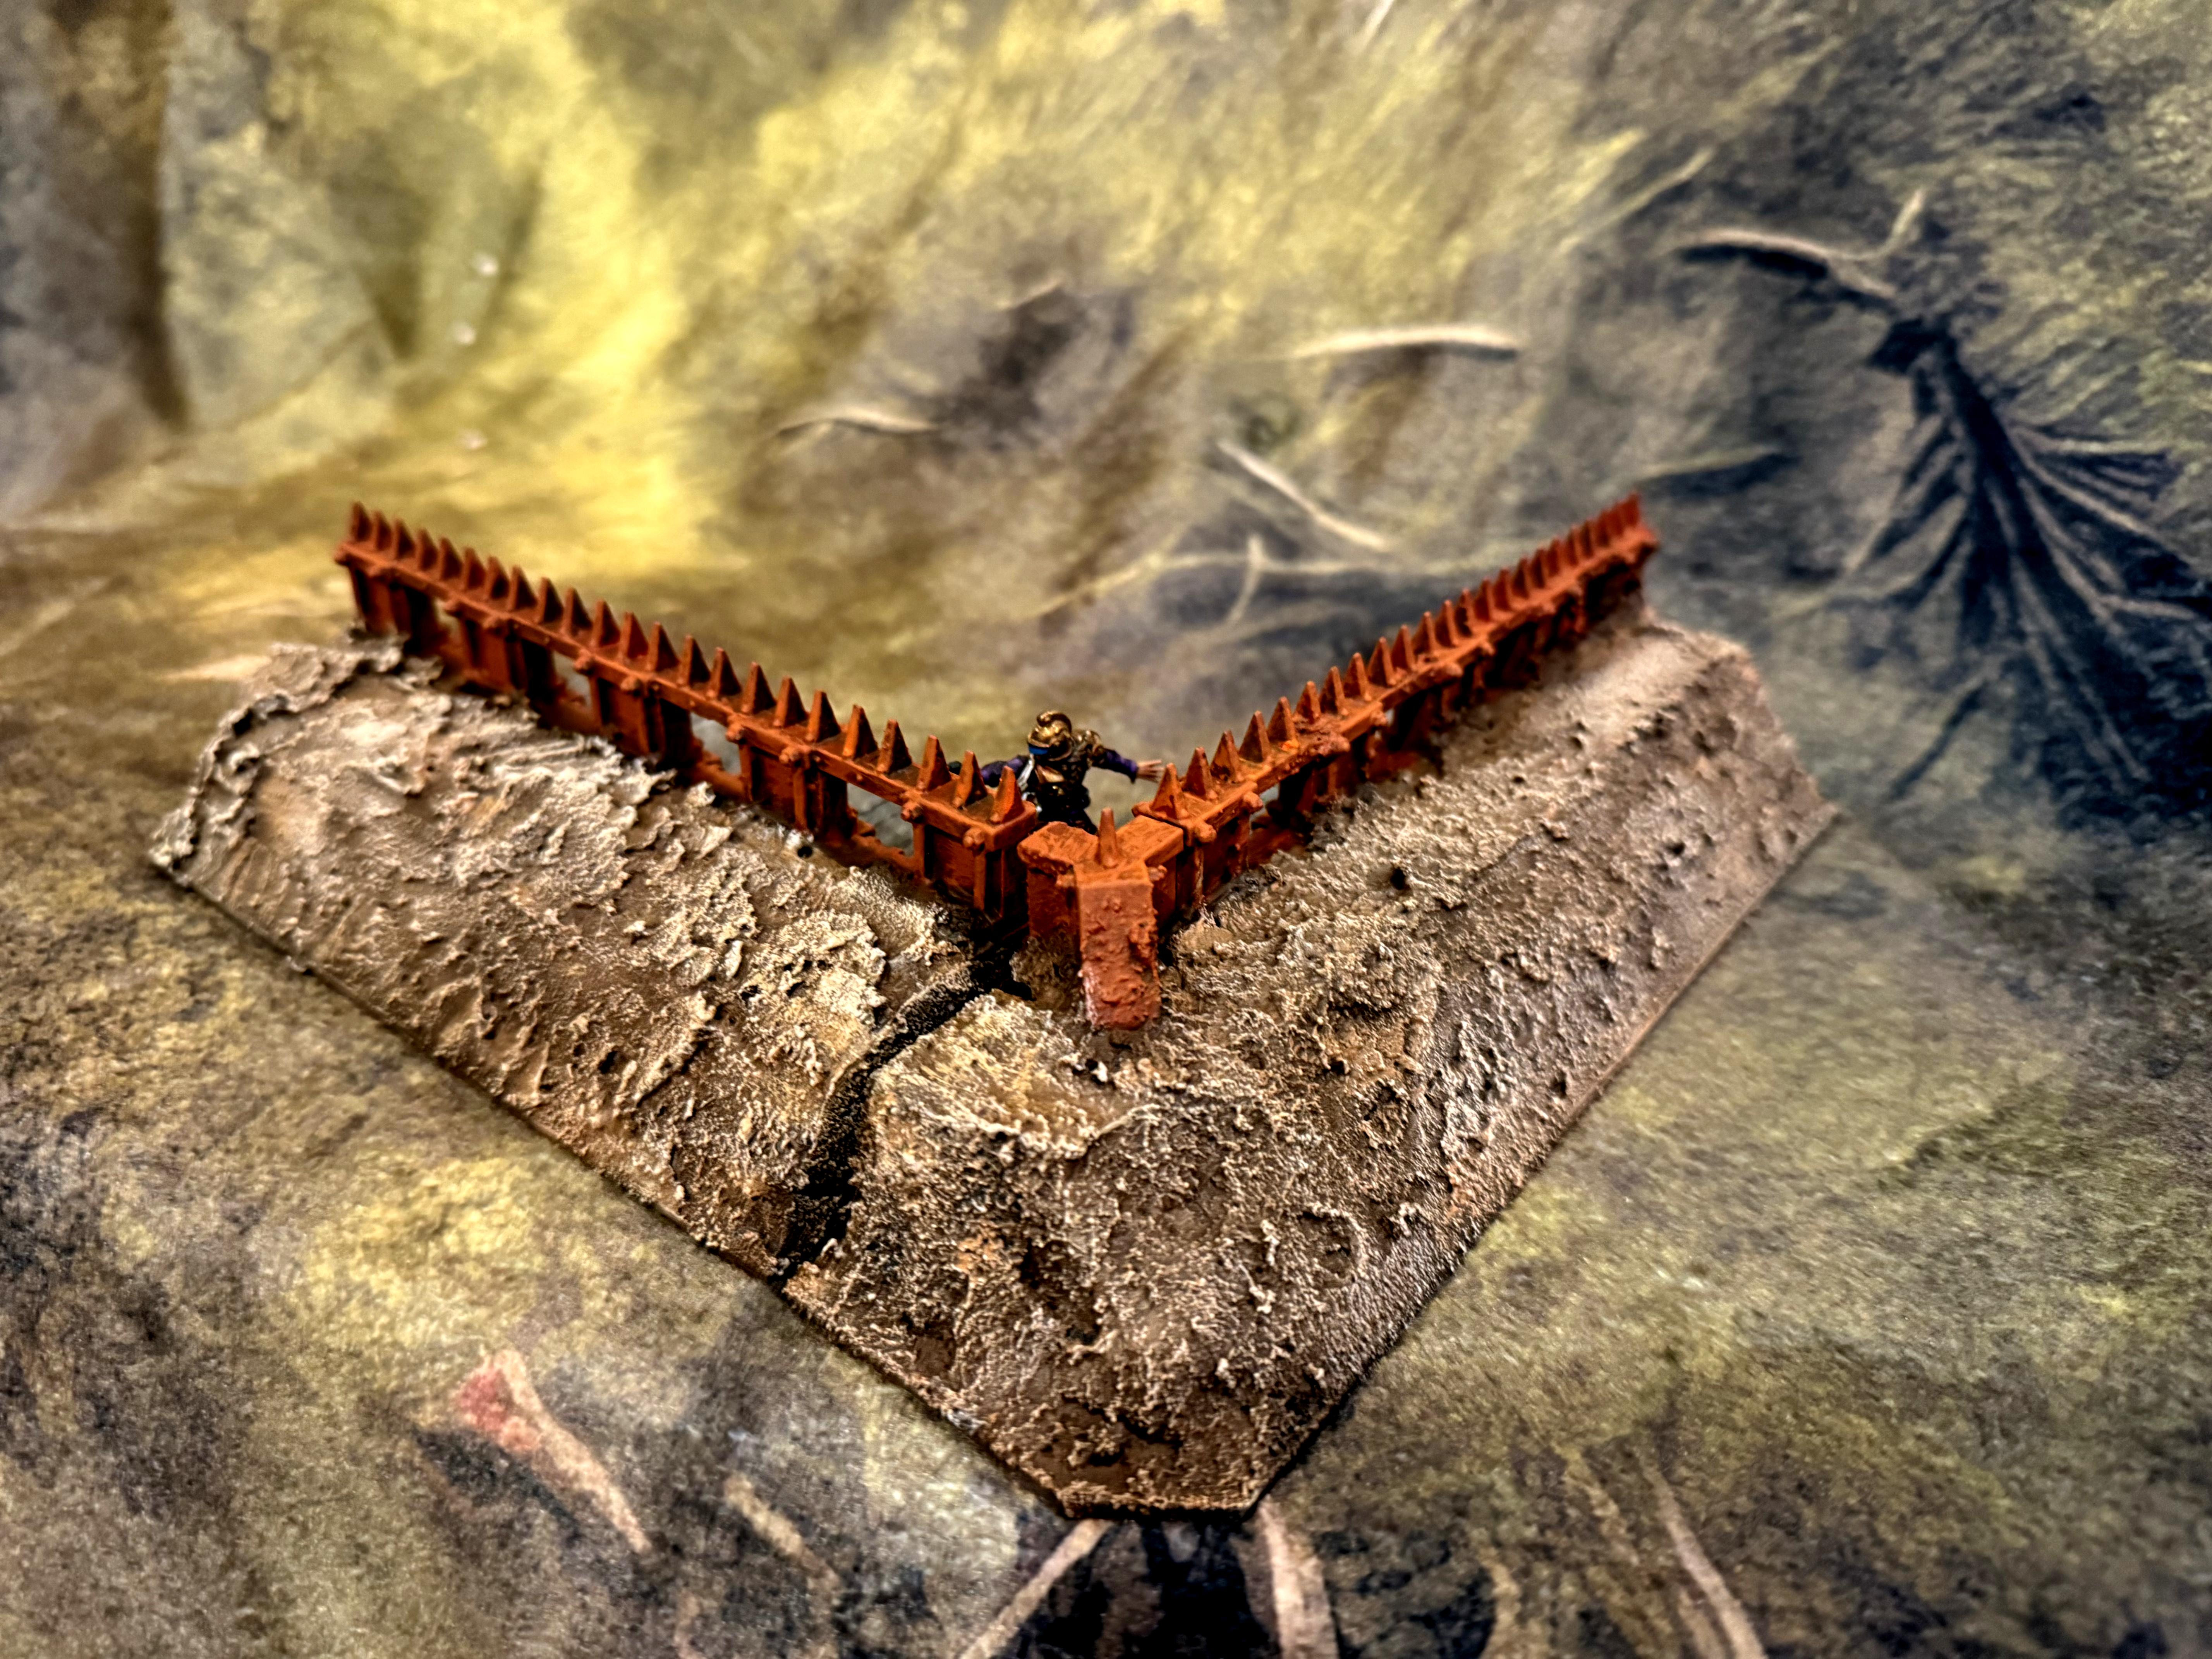
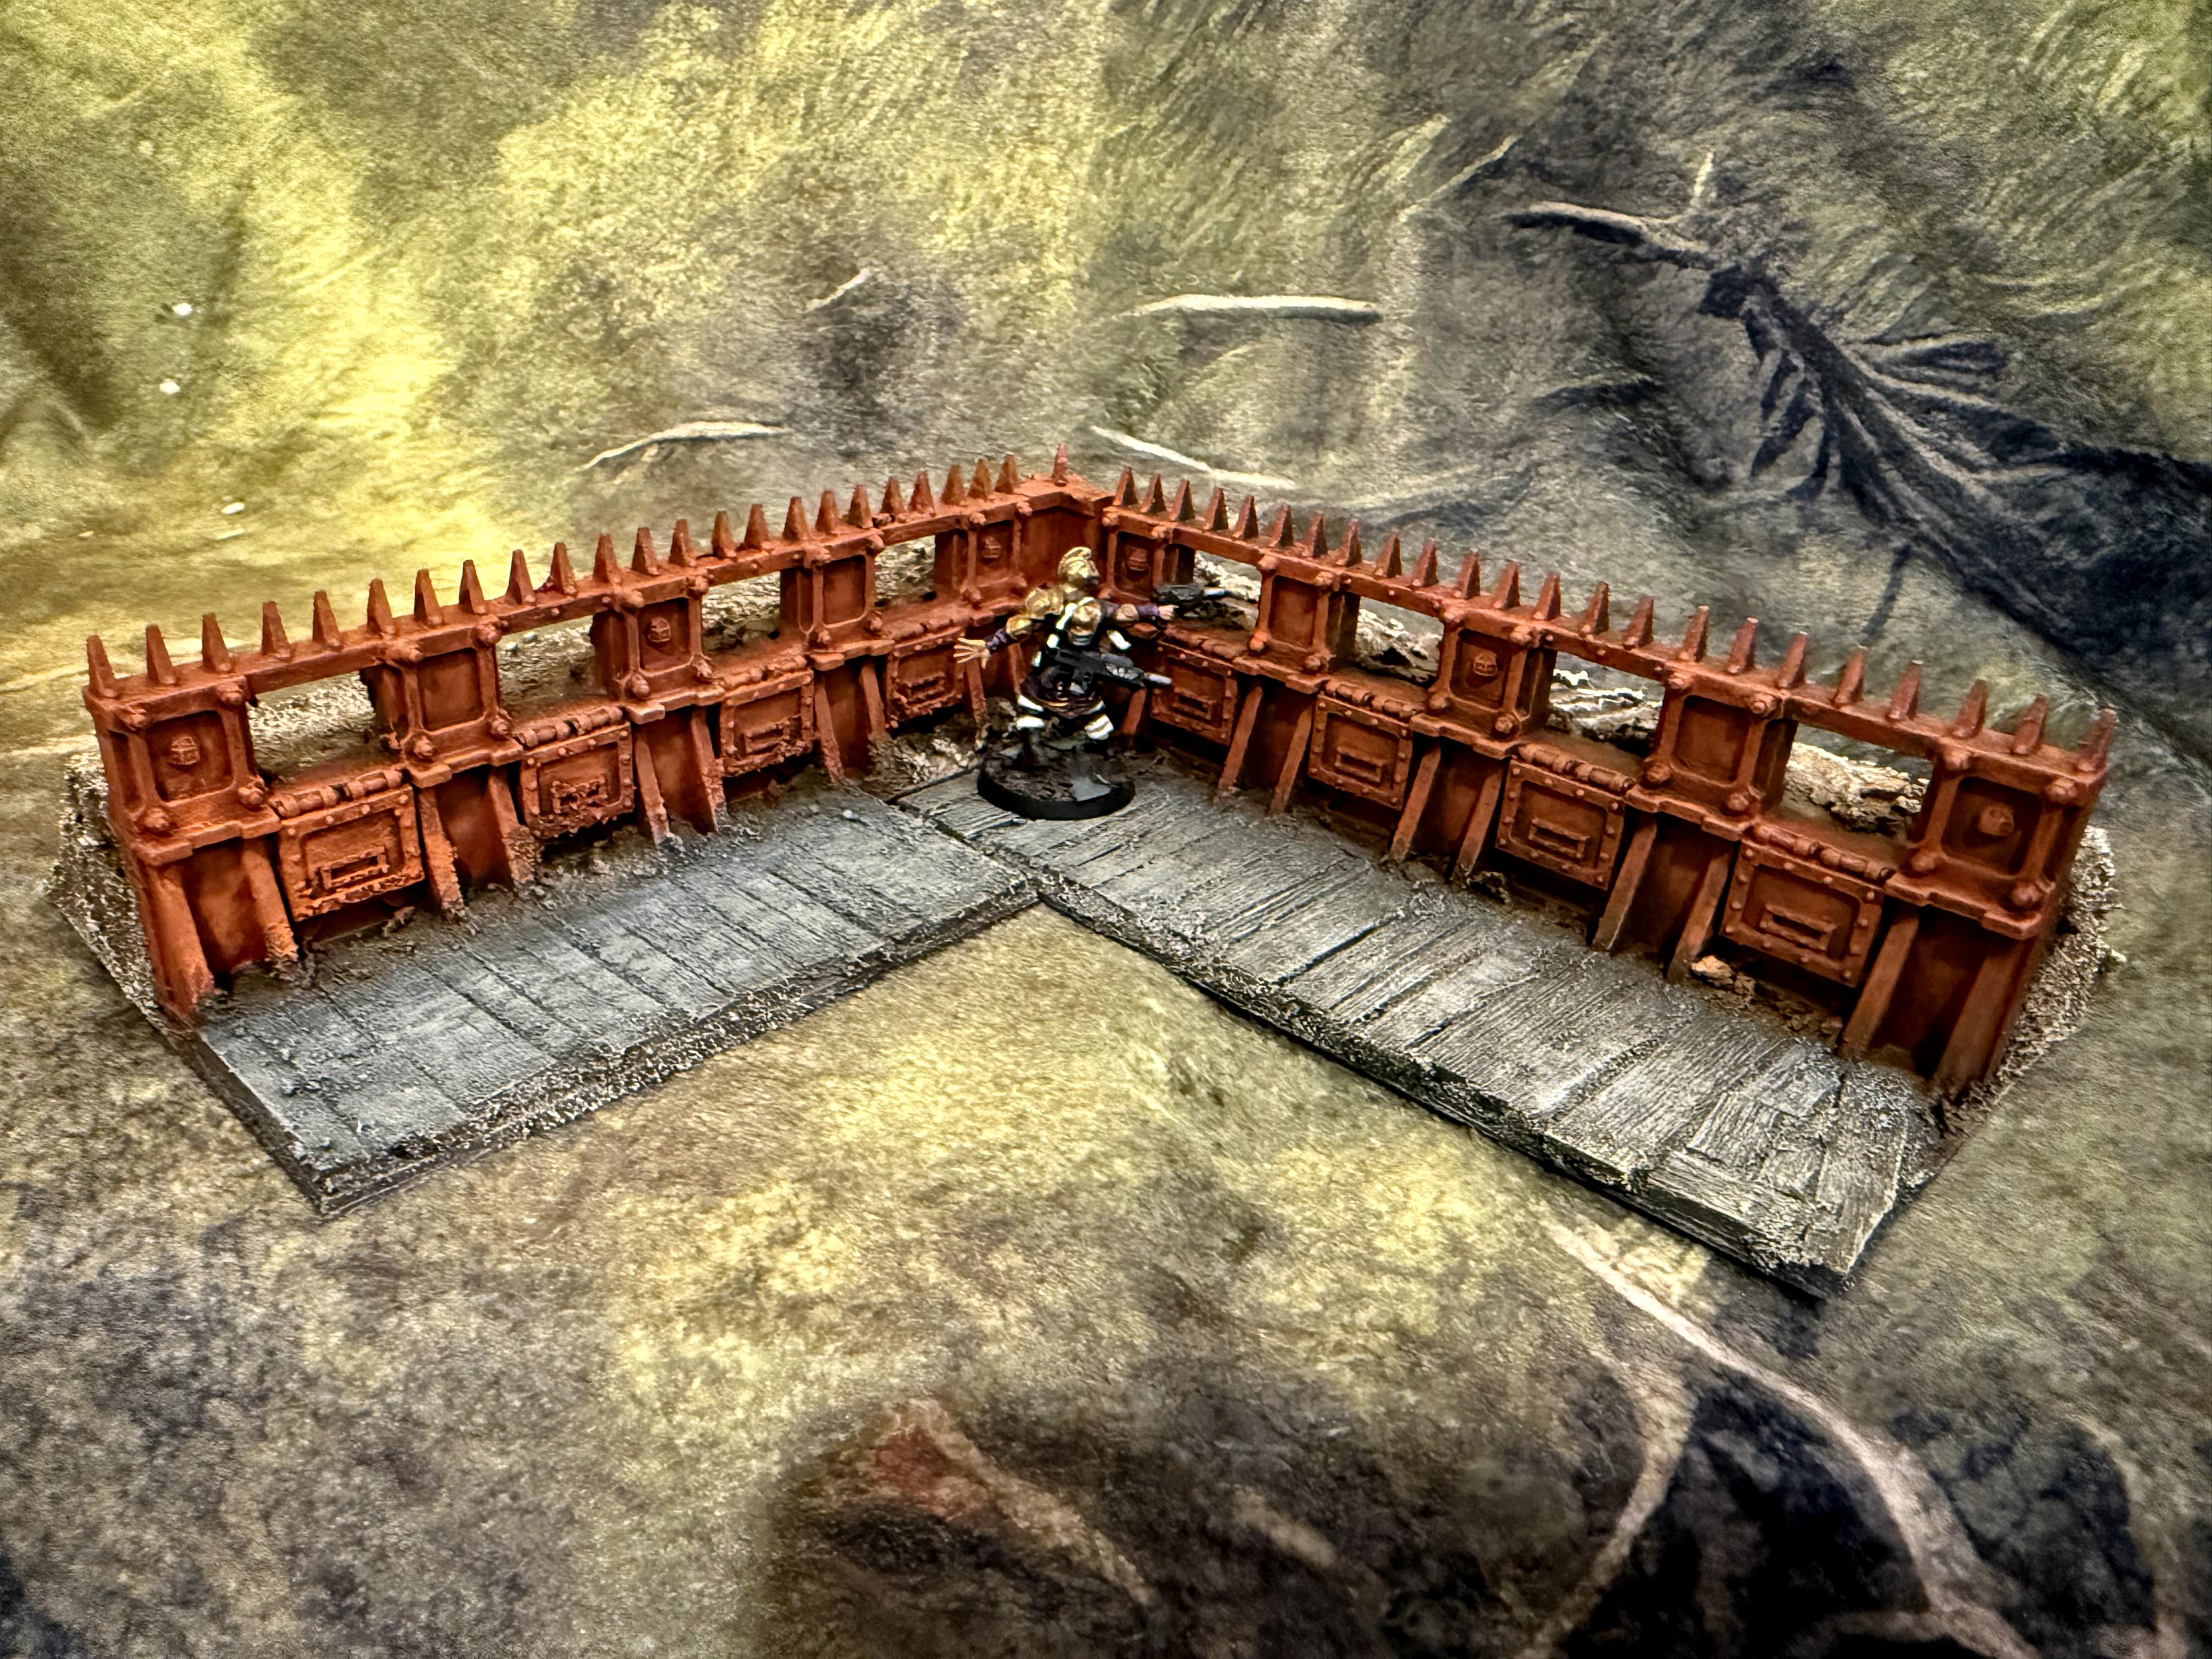
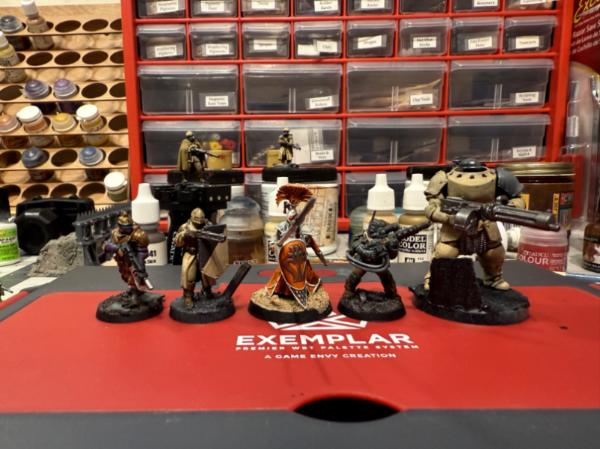
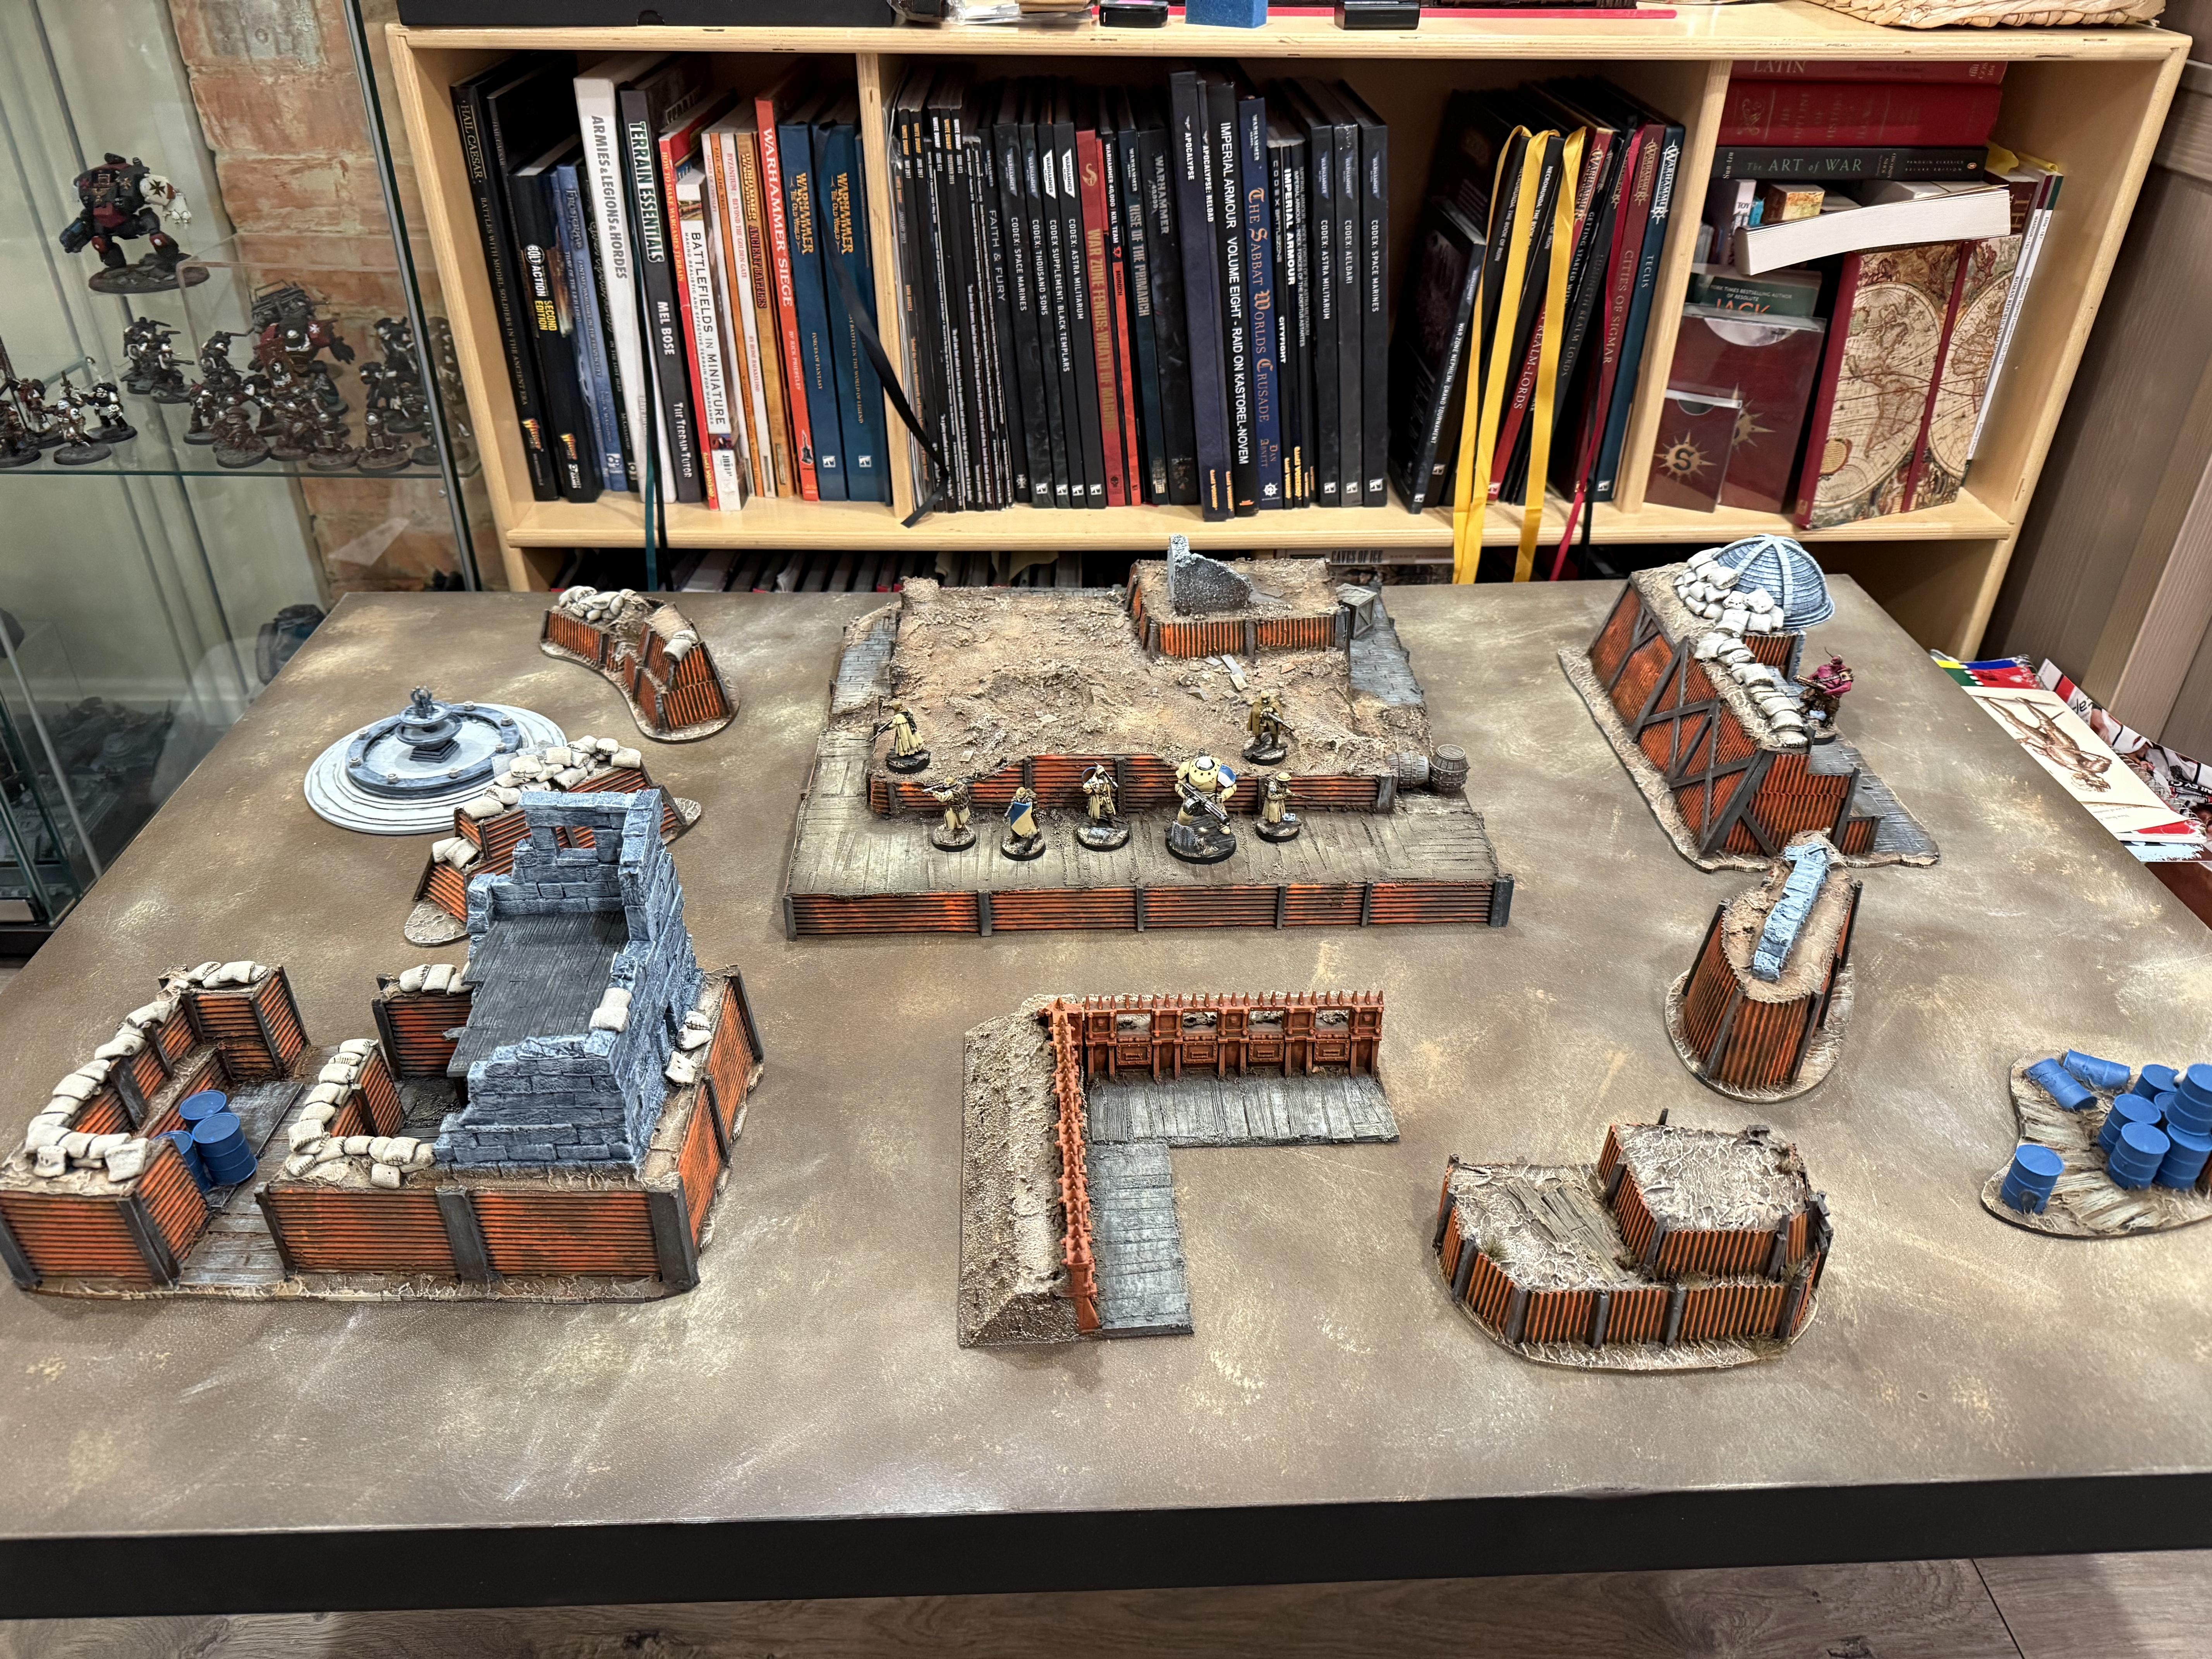
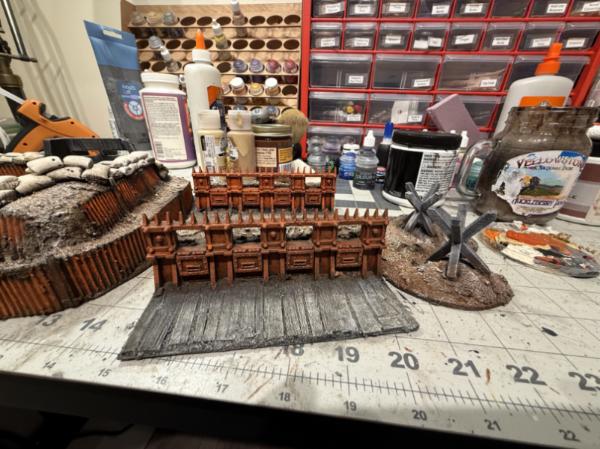
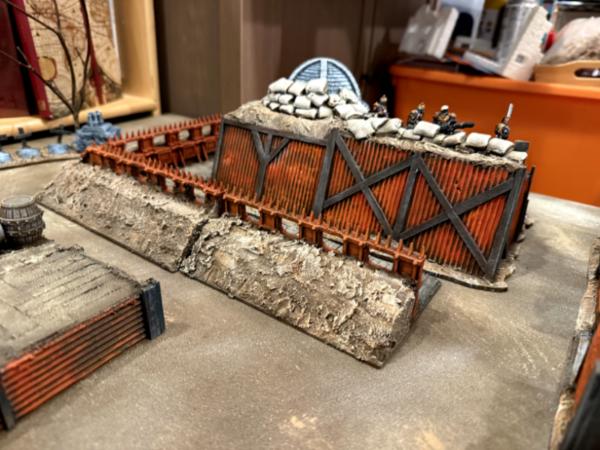
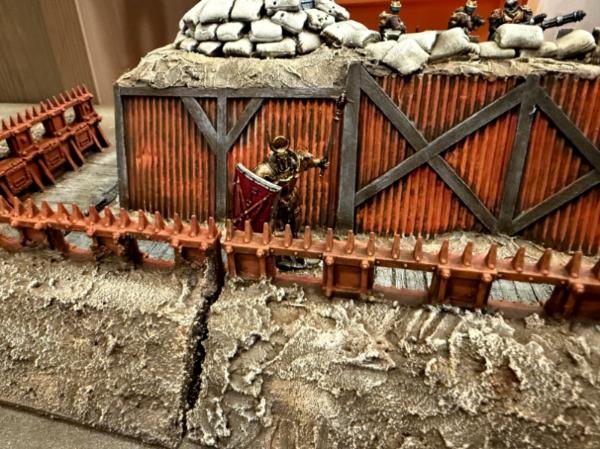
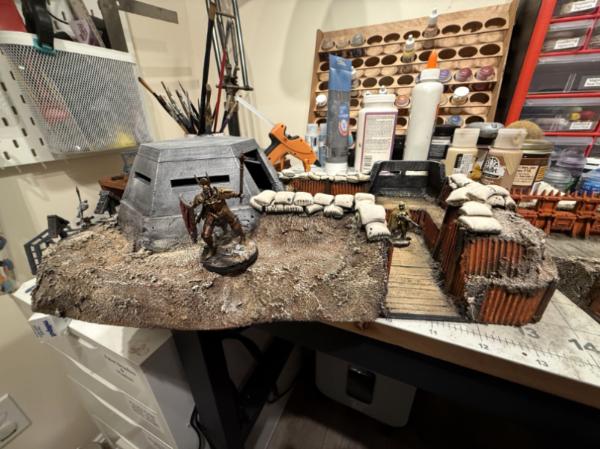
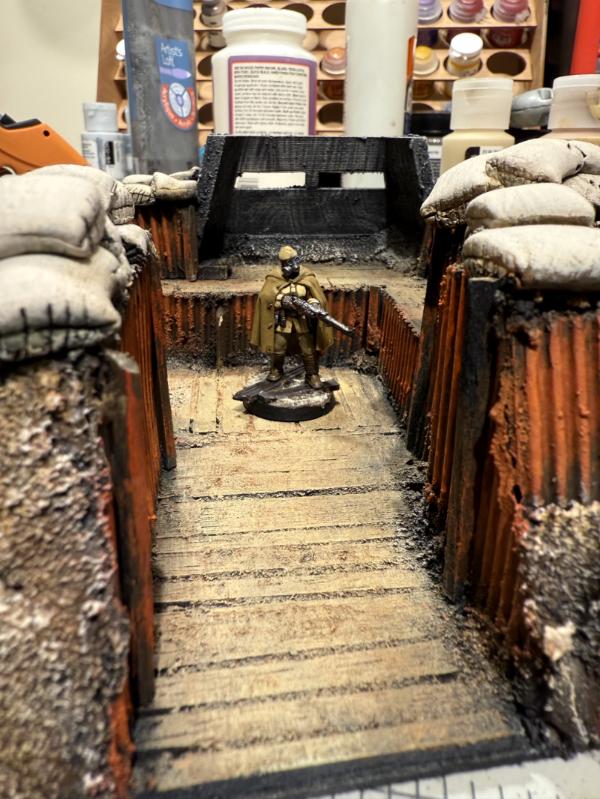
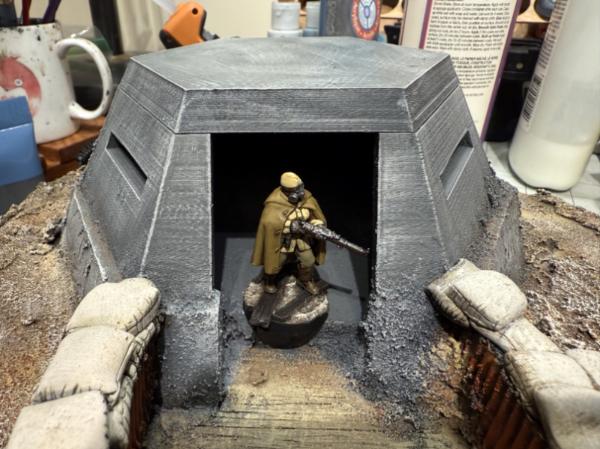
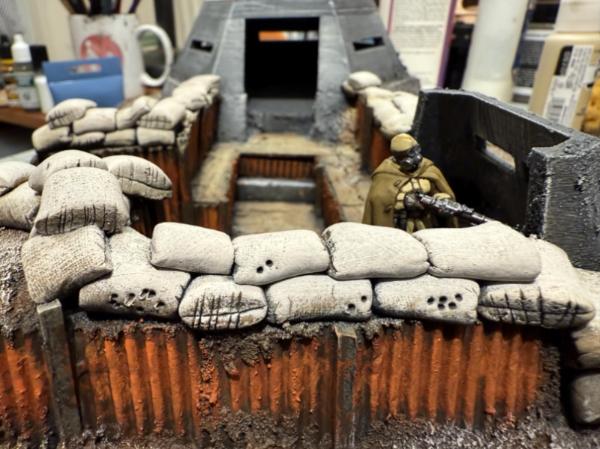
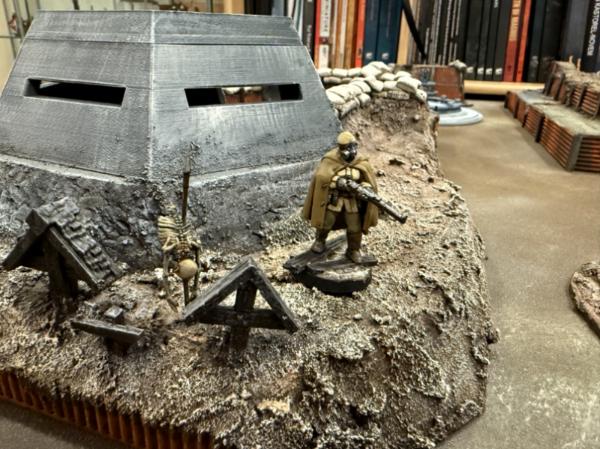
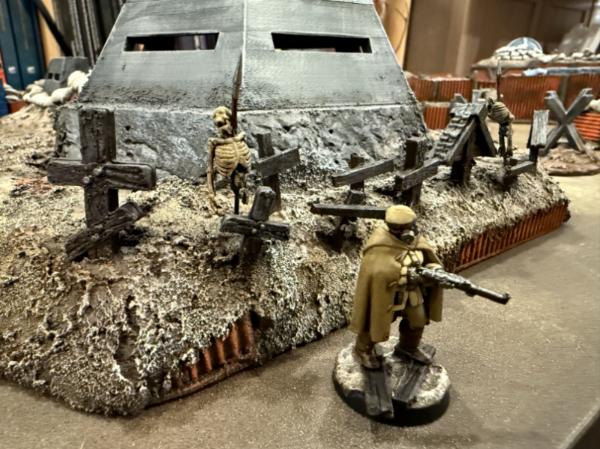
Wanted to share this most recent commission work I did. Request was for an inhabited slum area in a 40k setting, plus a set of modular trenches. I assembled, built and painted a 10x4 board (five 2x4's!) with three larger pieces (1ft x 1ft) and six smaller pieces, plus enough trenches to cover 48 inches (the entire board).
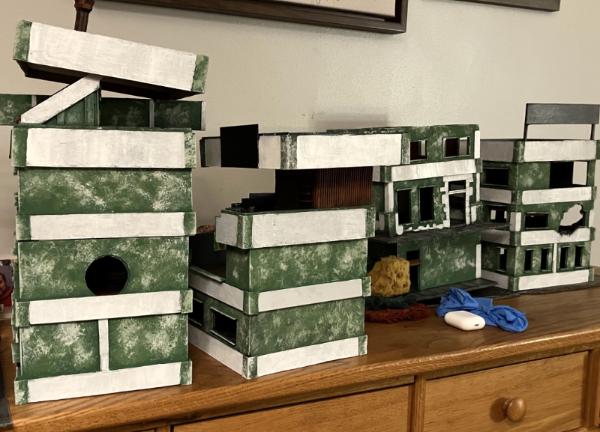
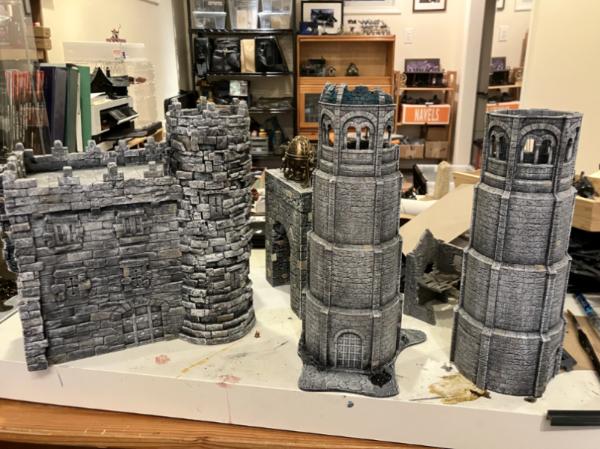
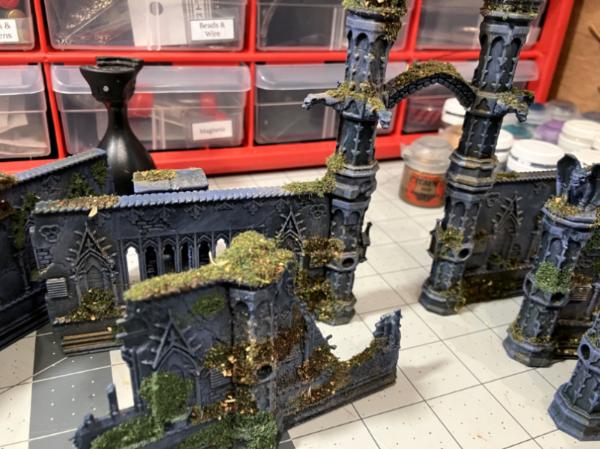
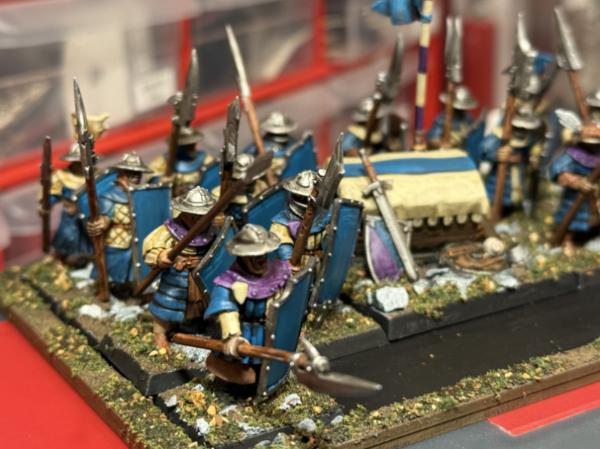
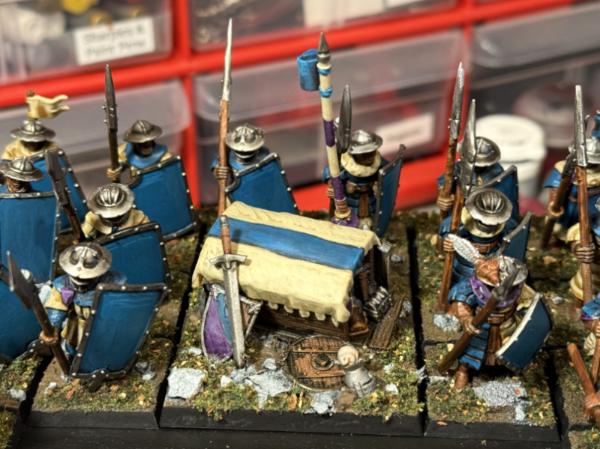
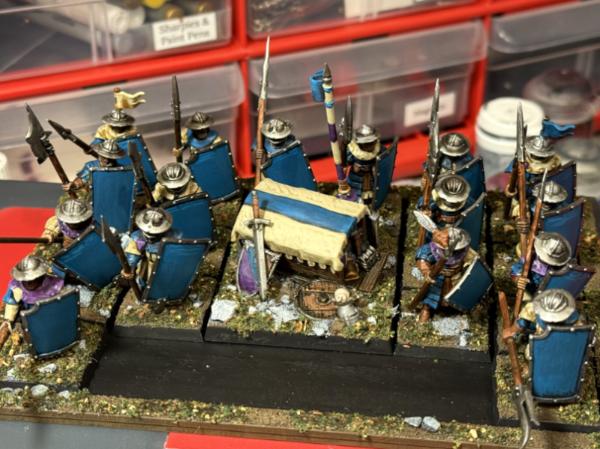
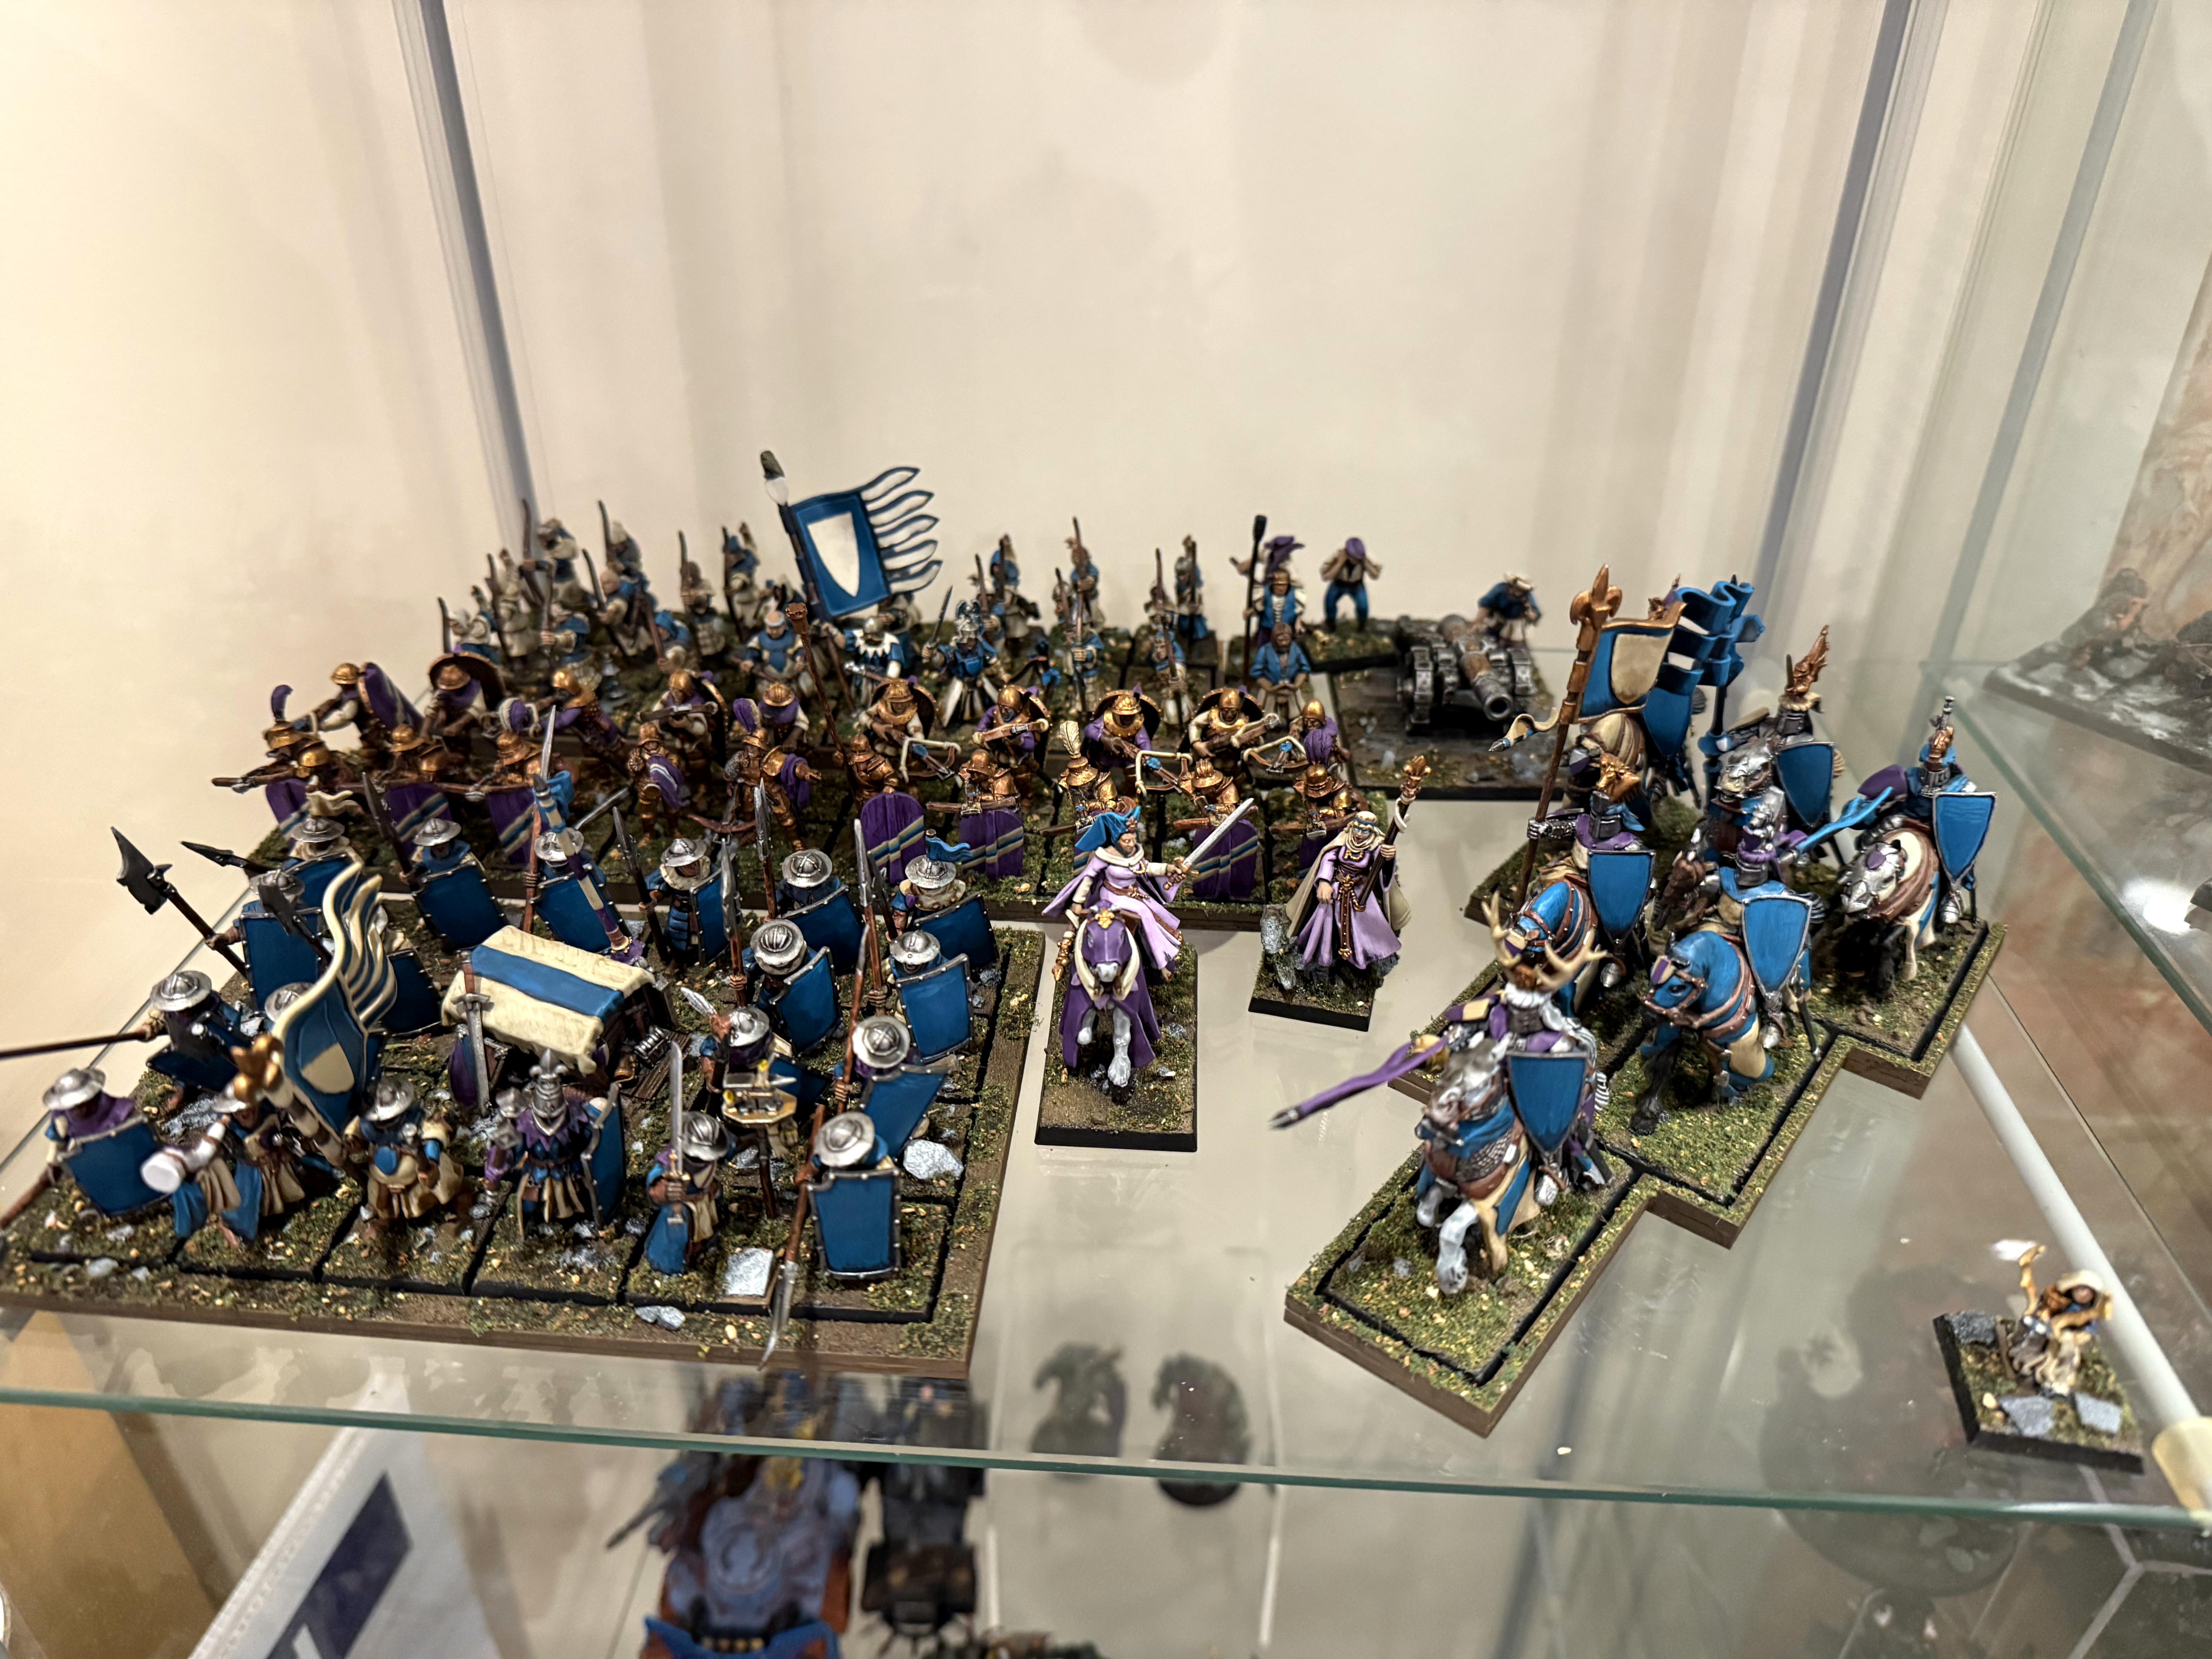
I've grouped the illustrations together. Large projects deserve large posts! First up a finished group shot!
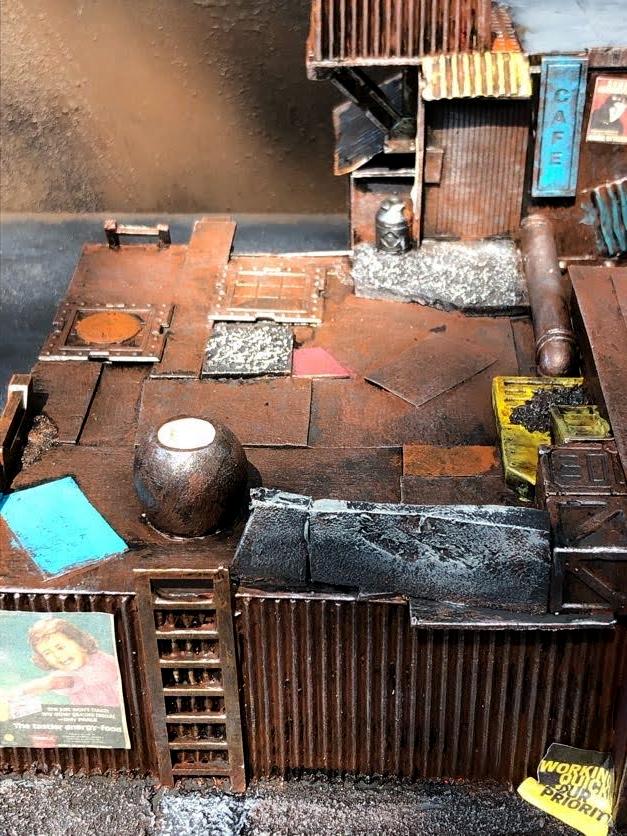
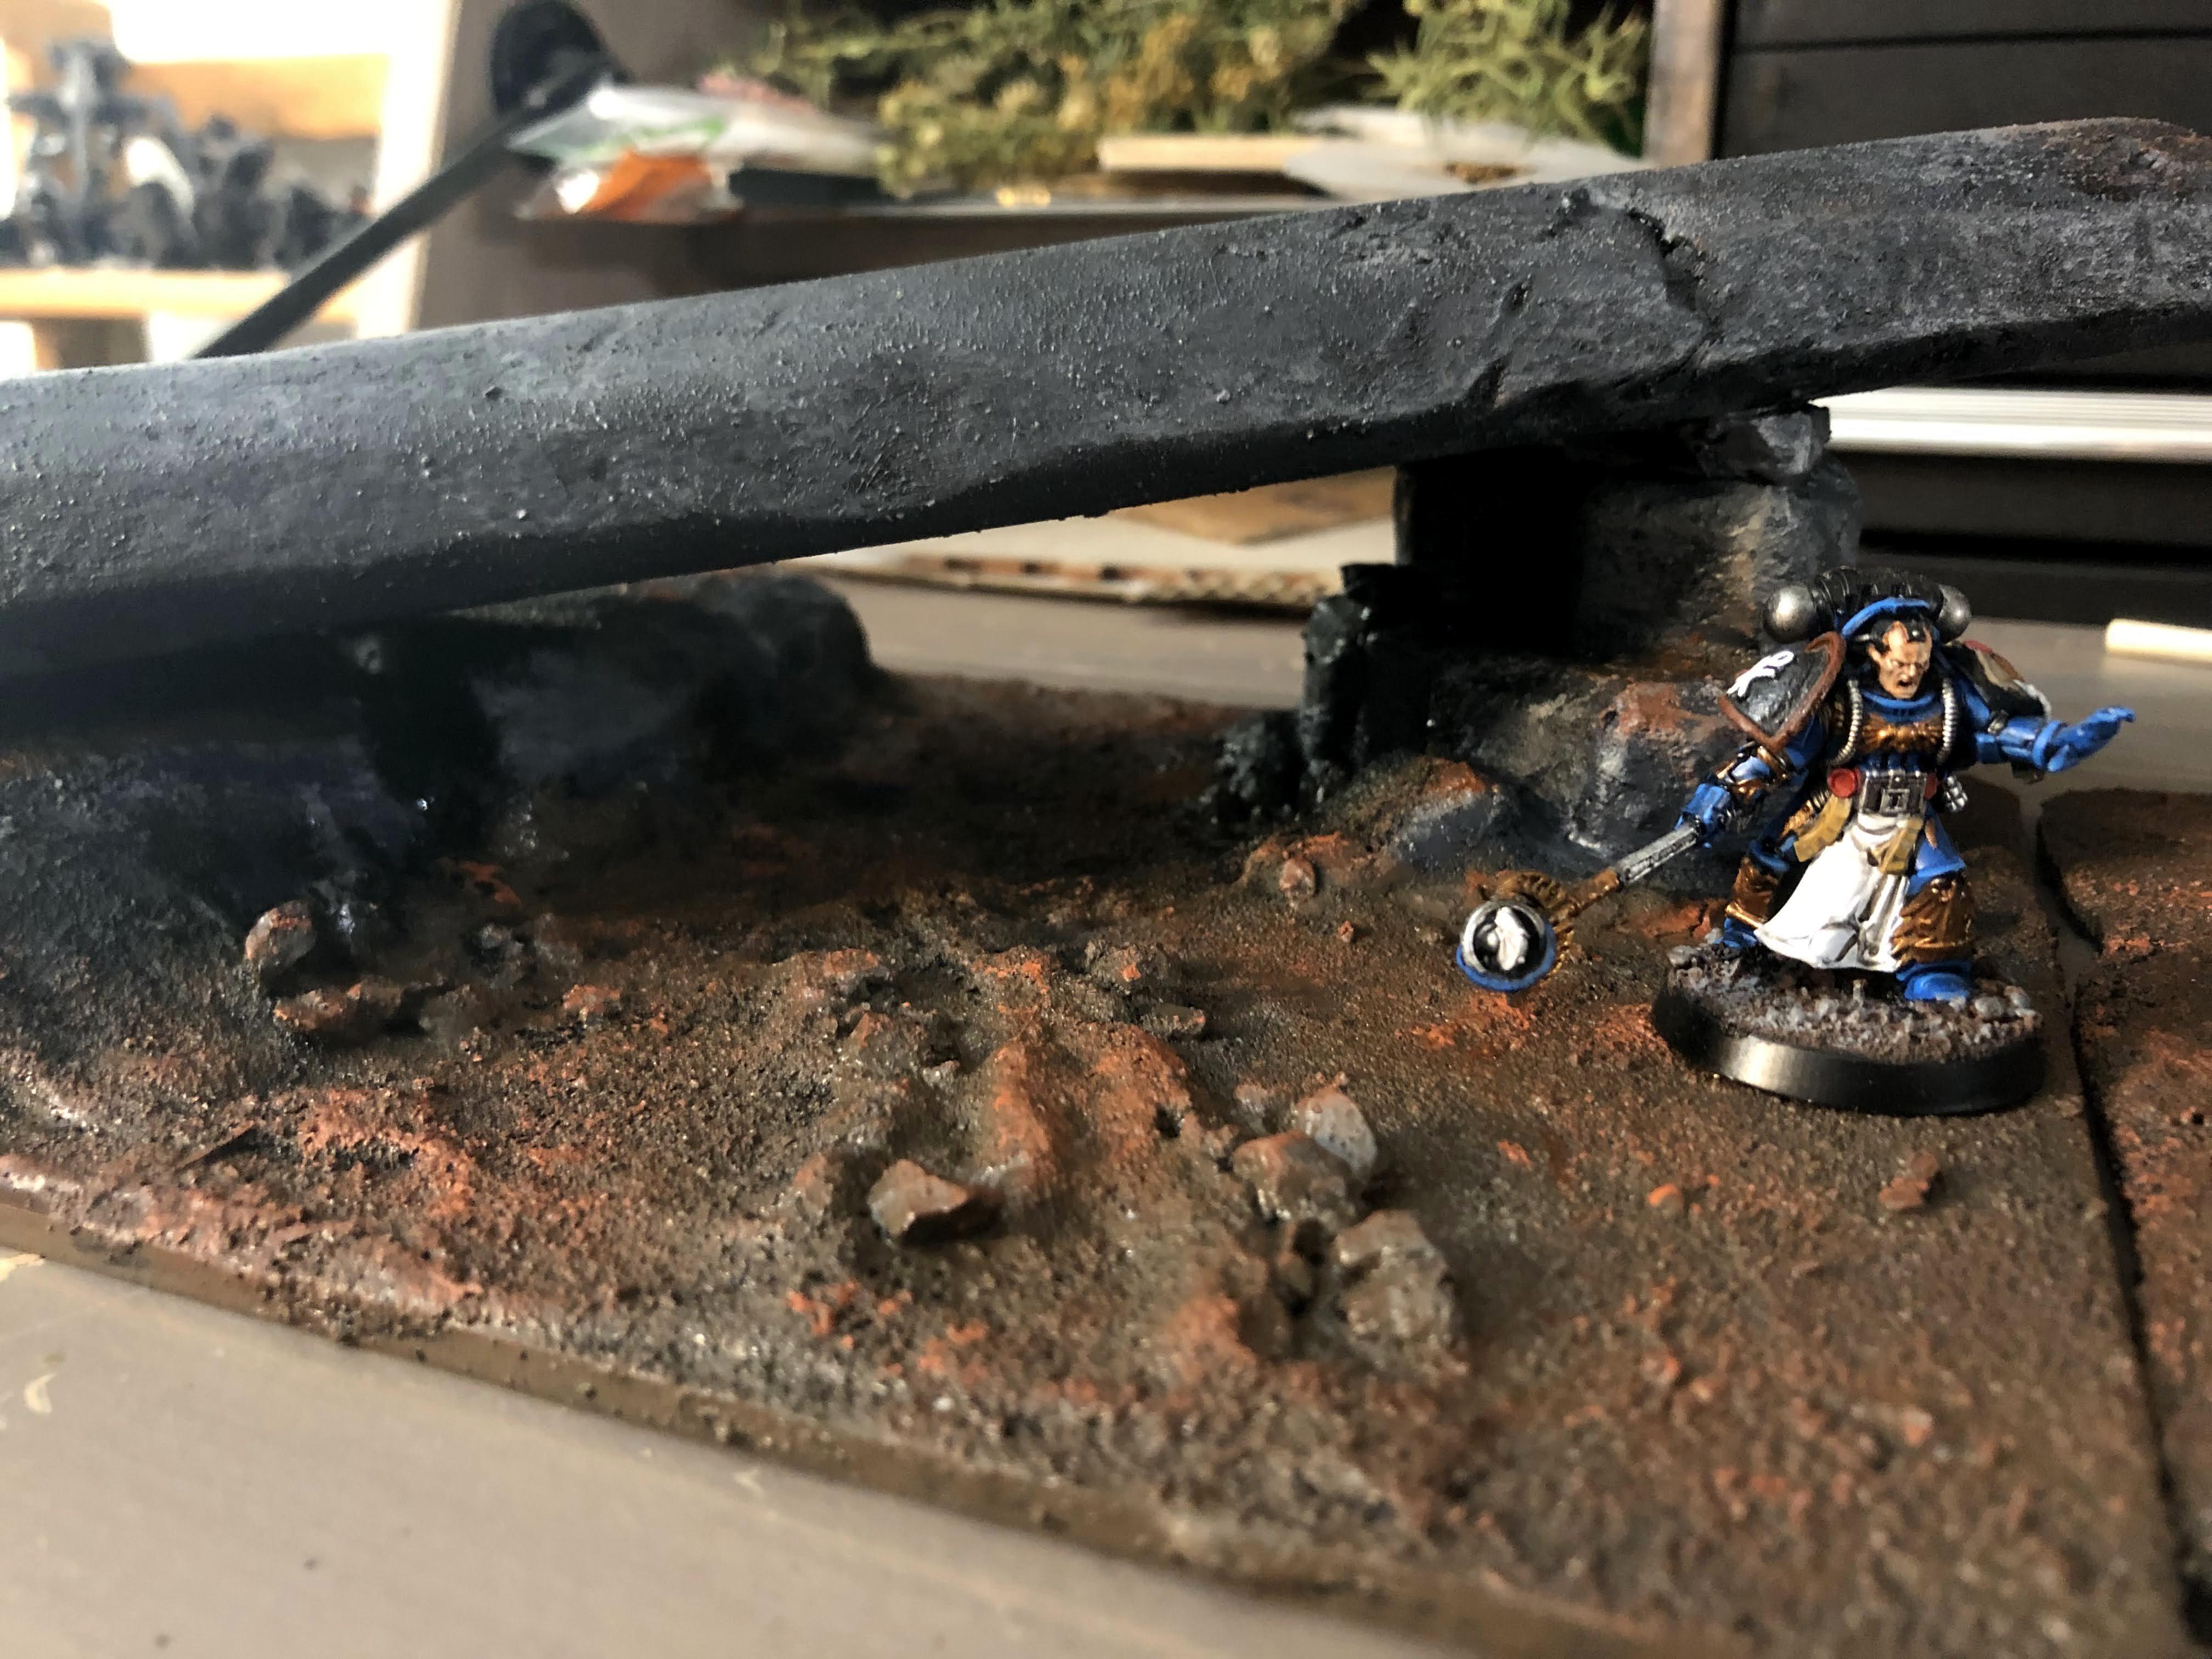
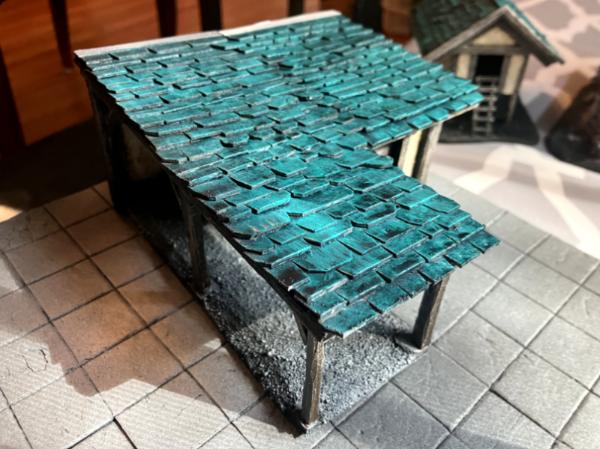
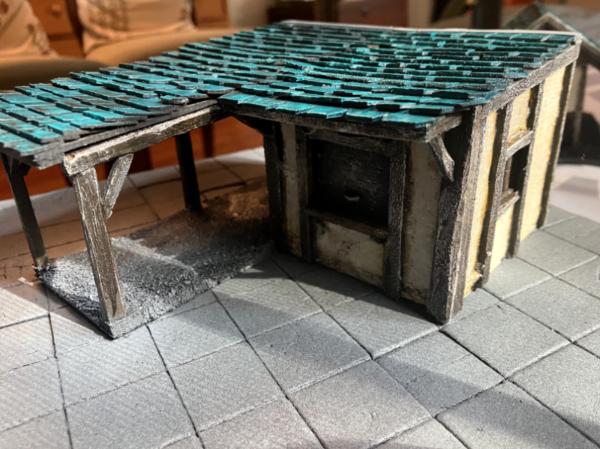
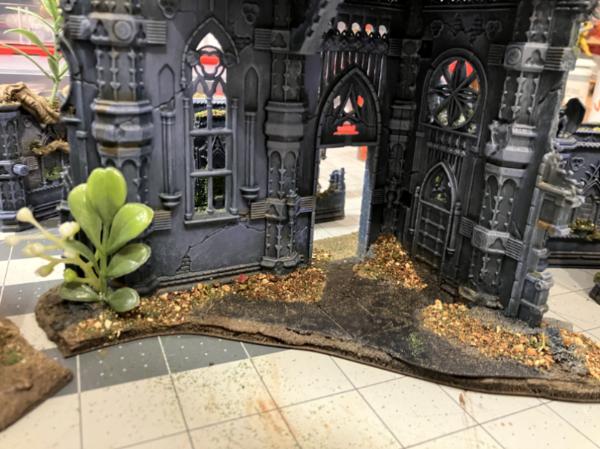
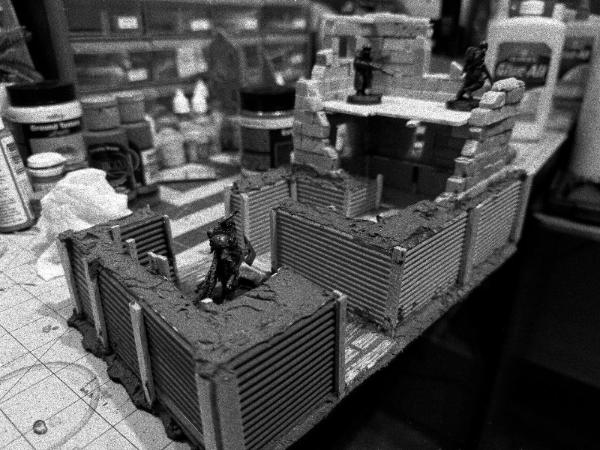
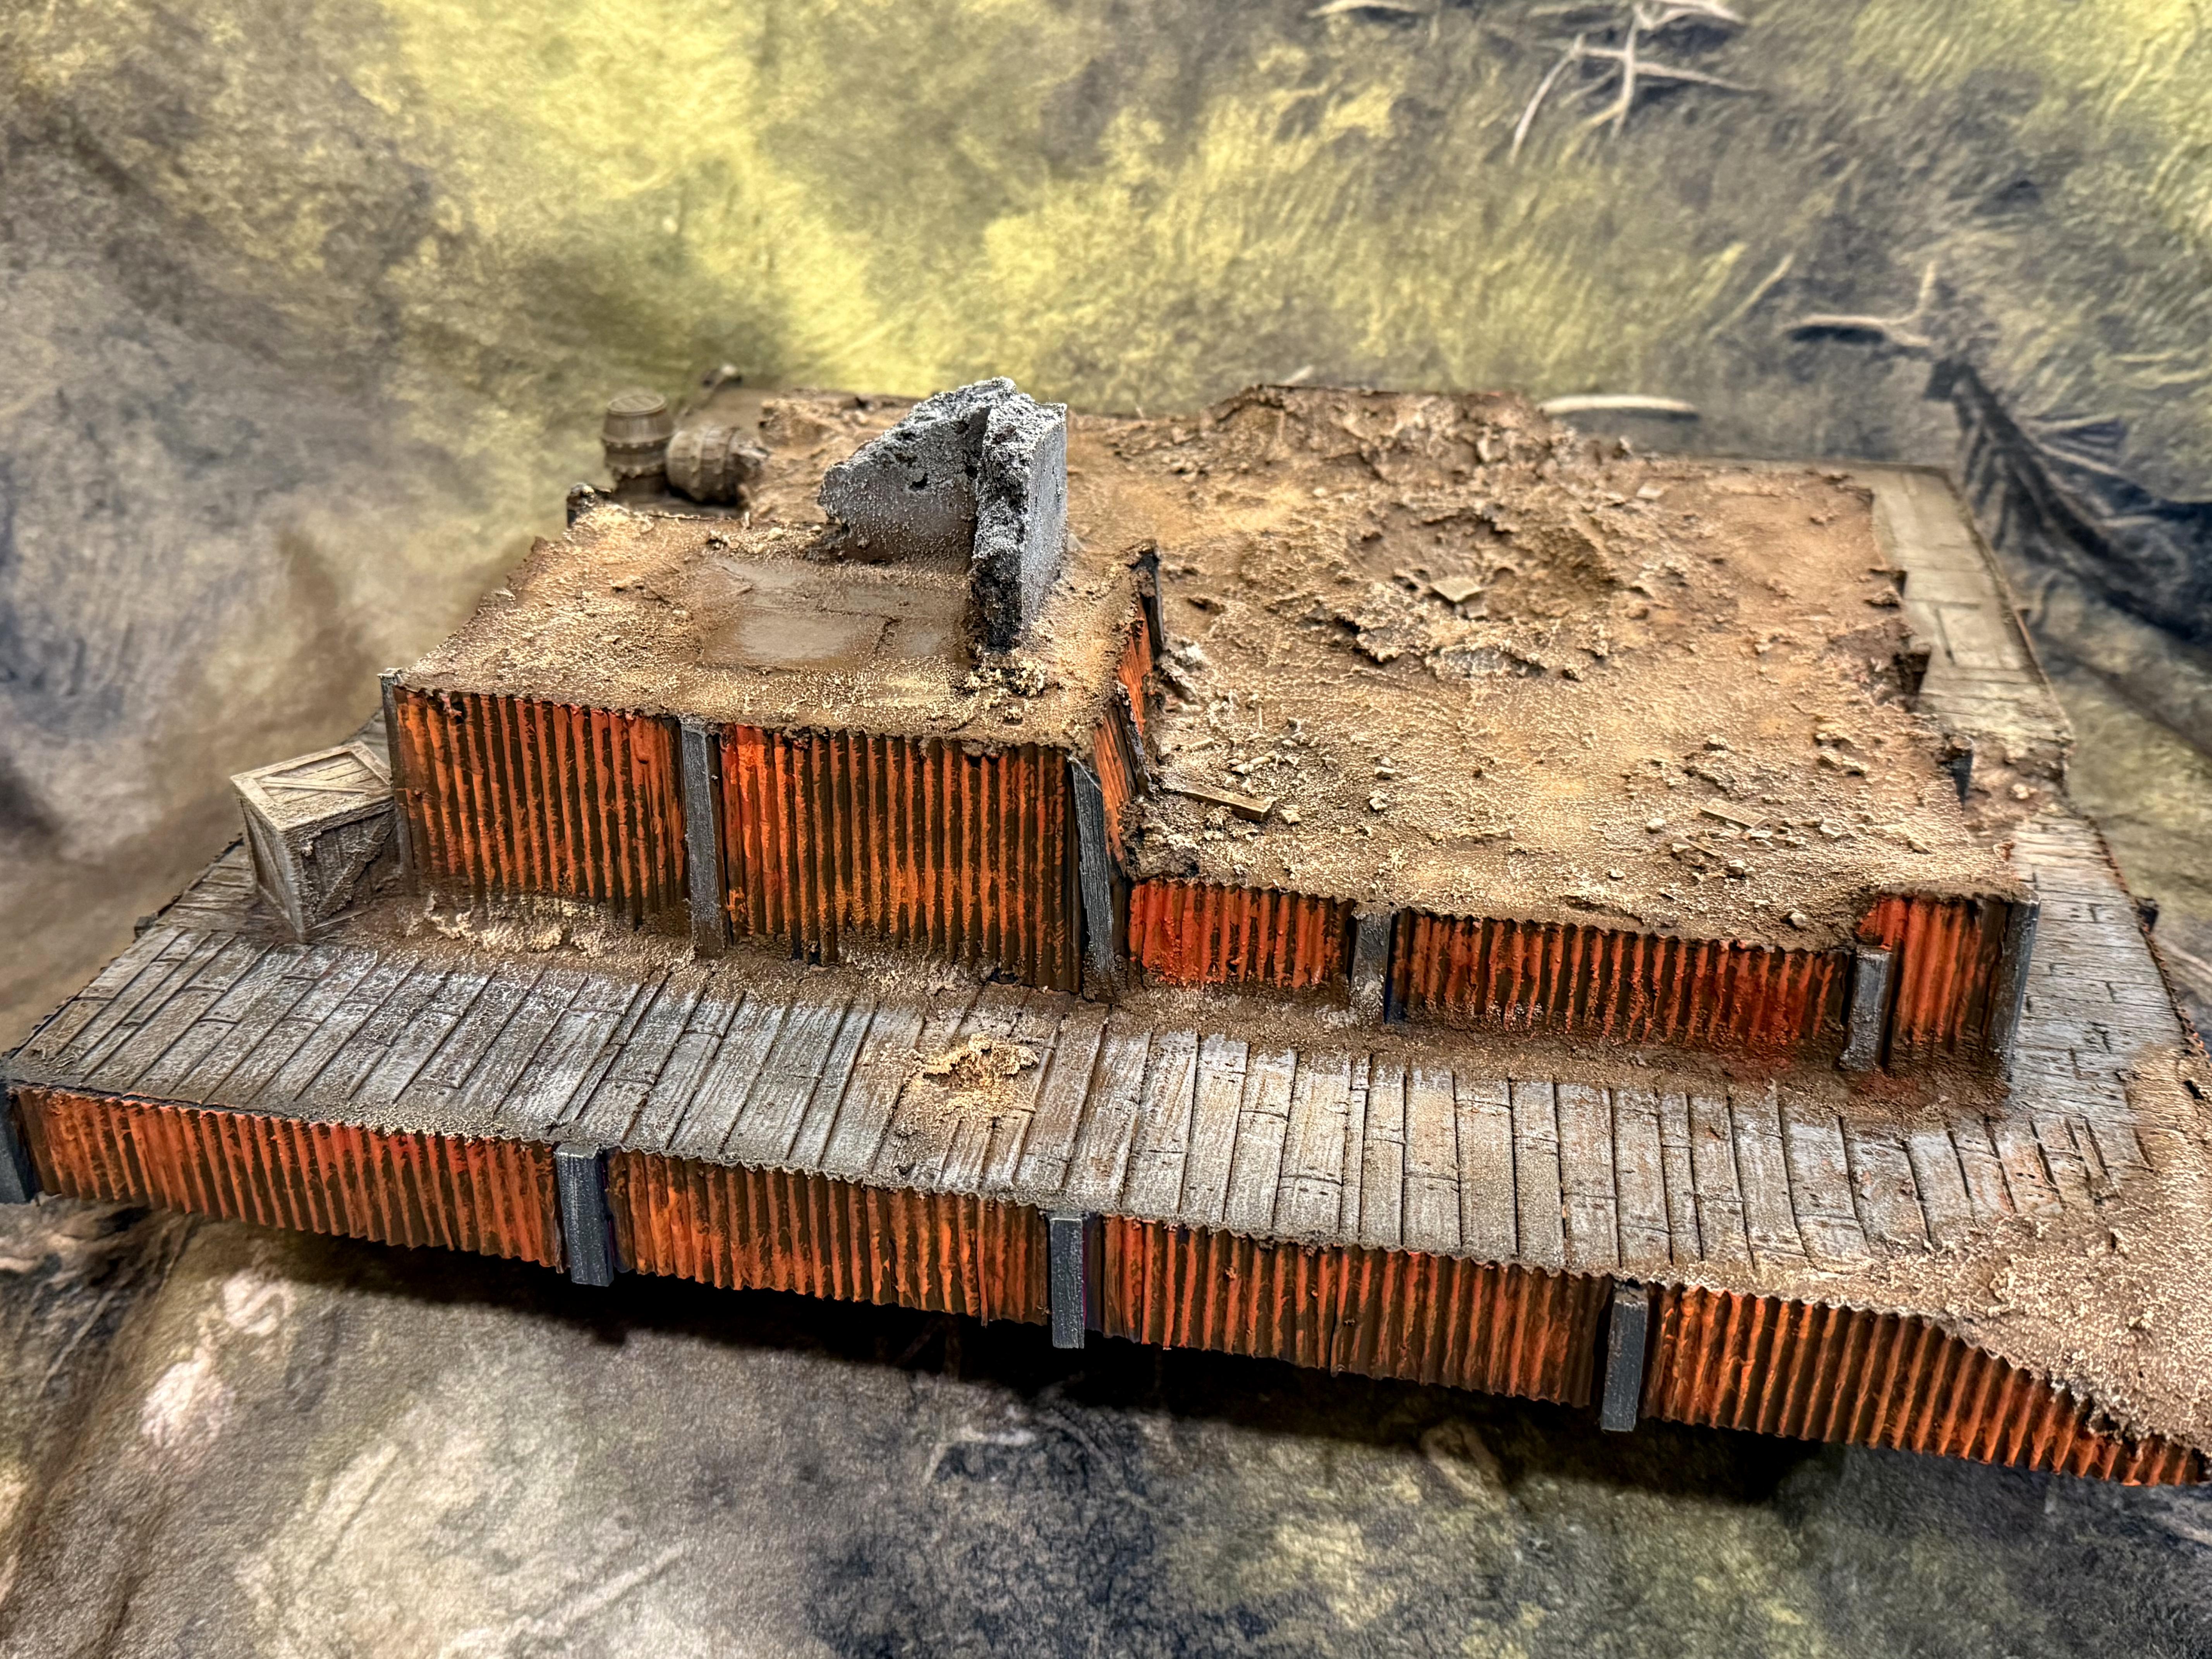
Now onto the smaller pieces. My process to building terrain involves thinking of a story about who lives there and why. This helps me design the structure and gives me impetus to actually, well, making it look lived in. I'll go through them one by one, likely through a few posts so people don't get bored of me
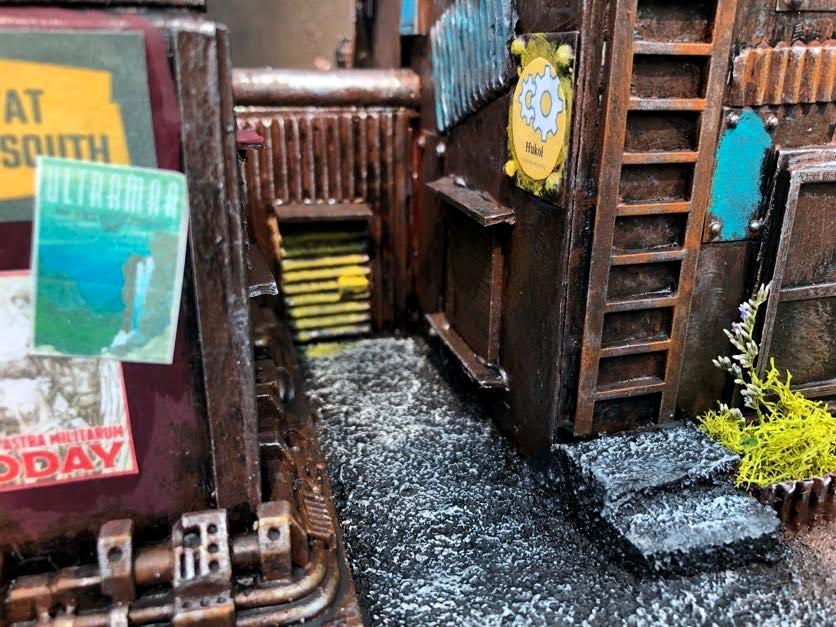
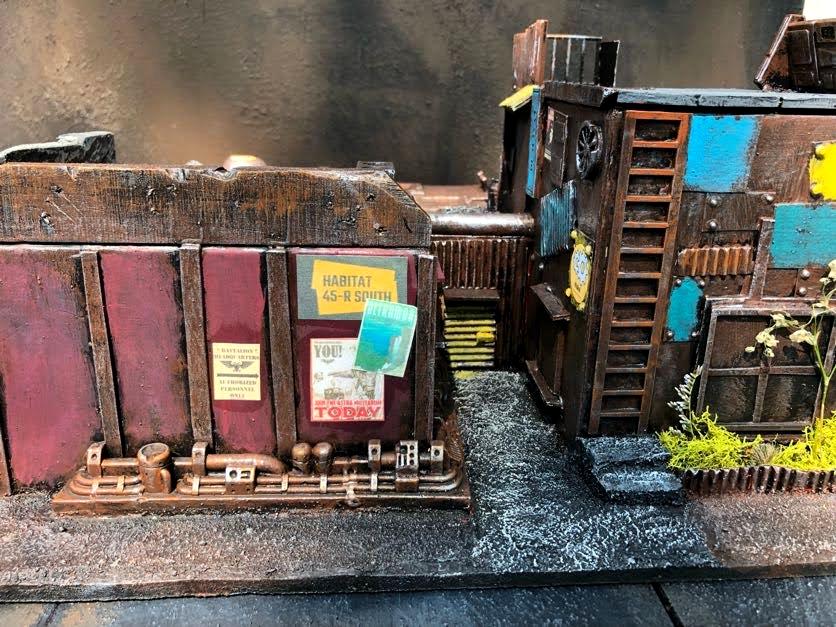
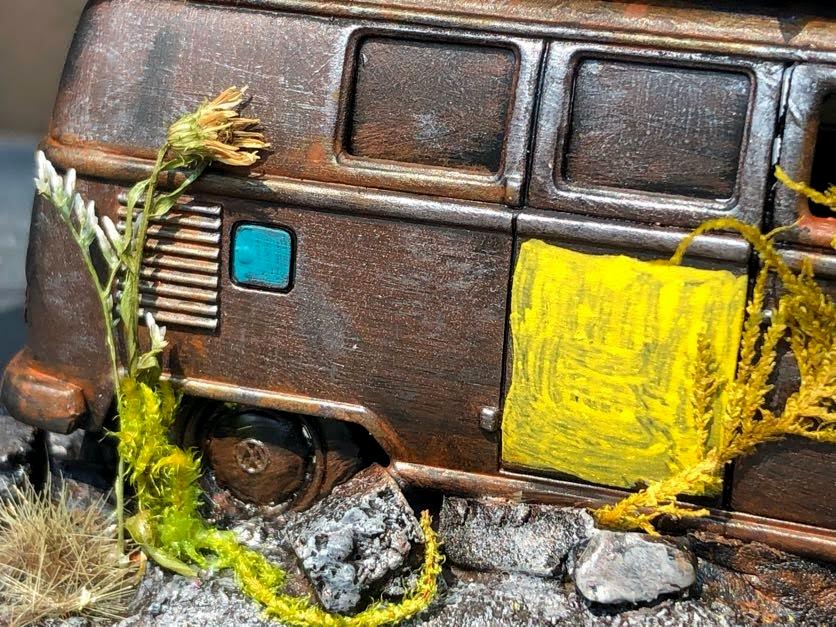
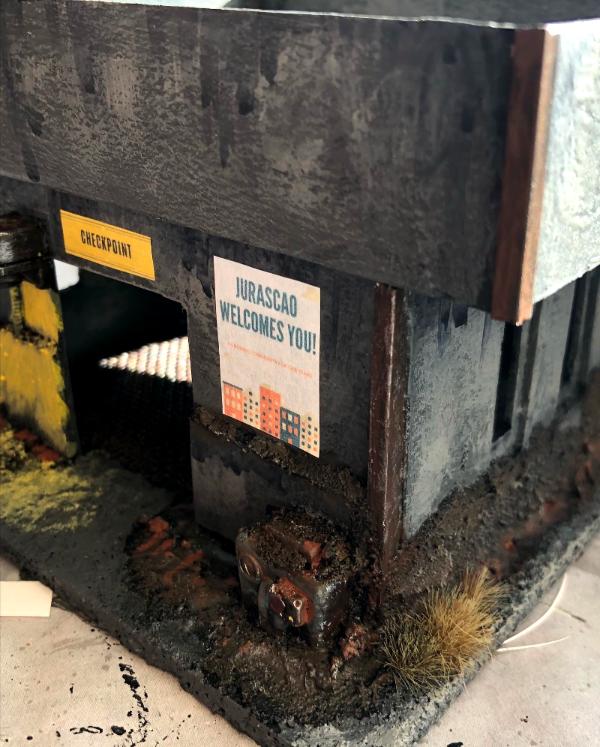
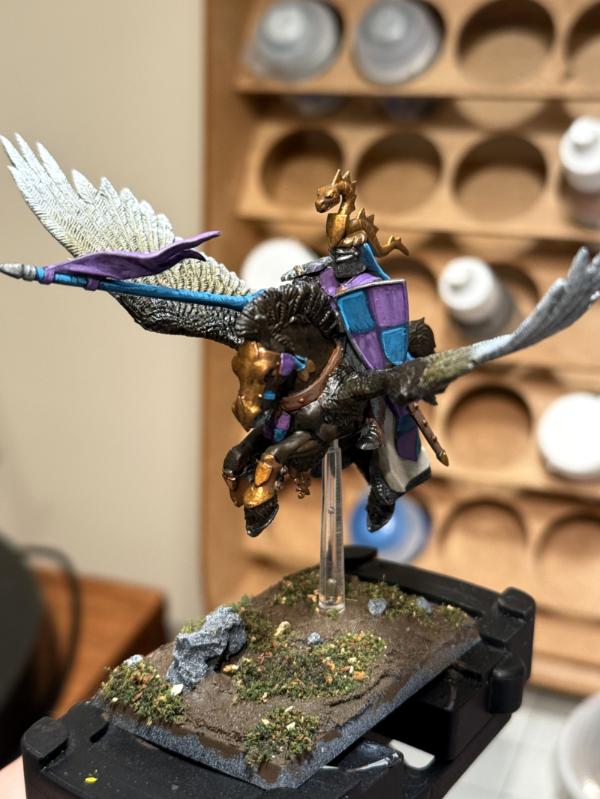
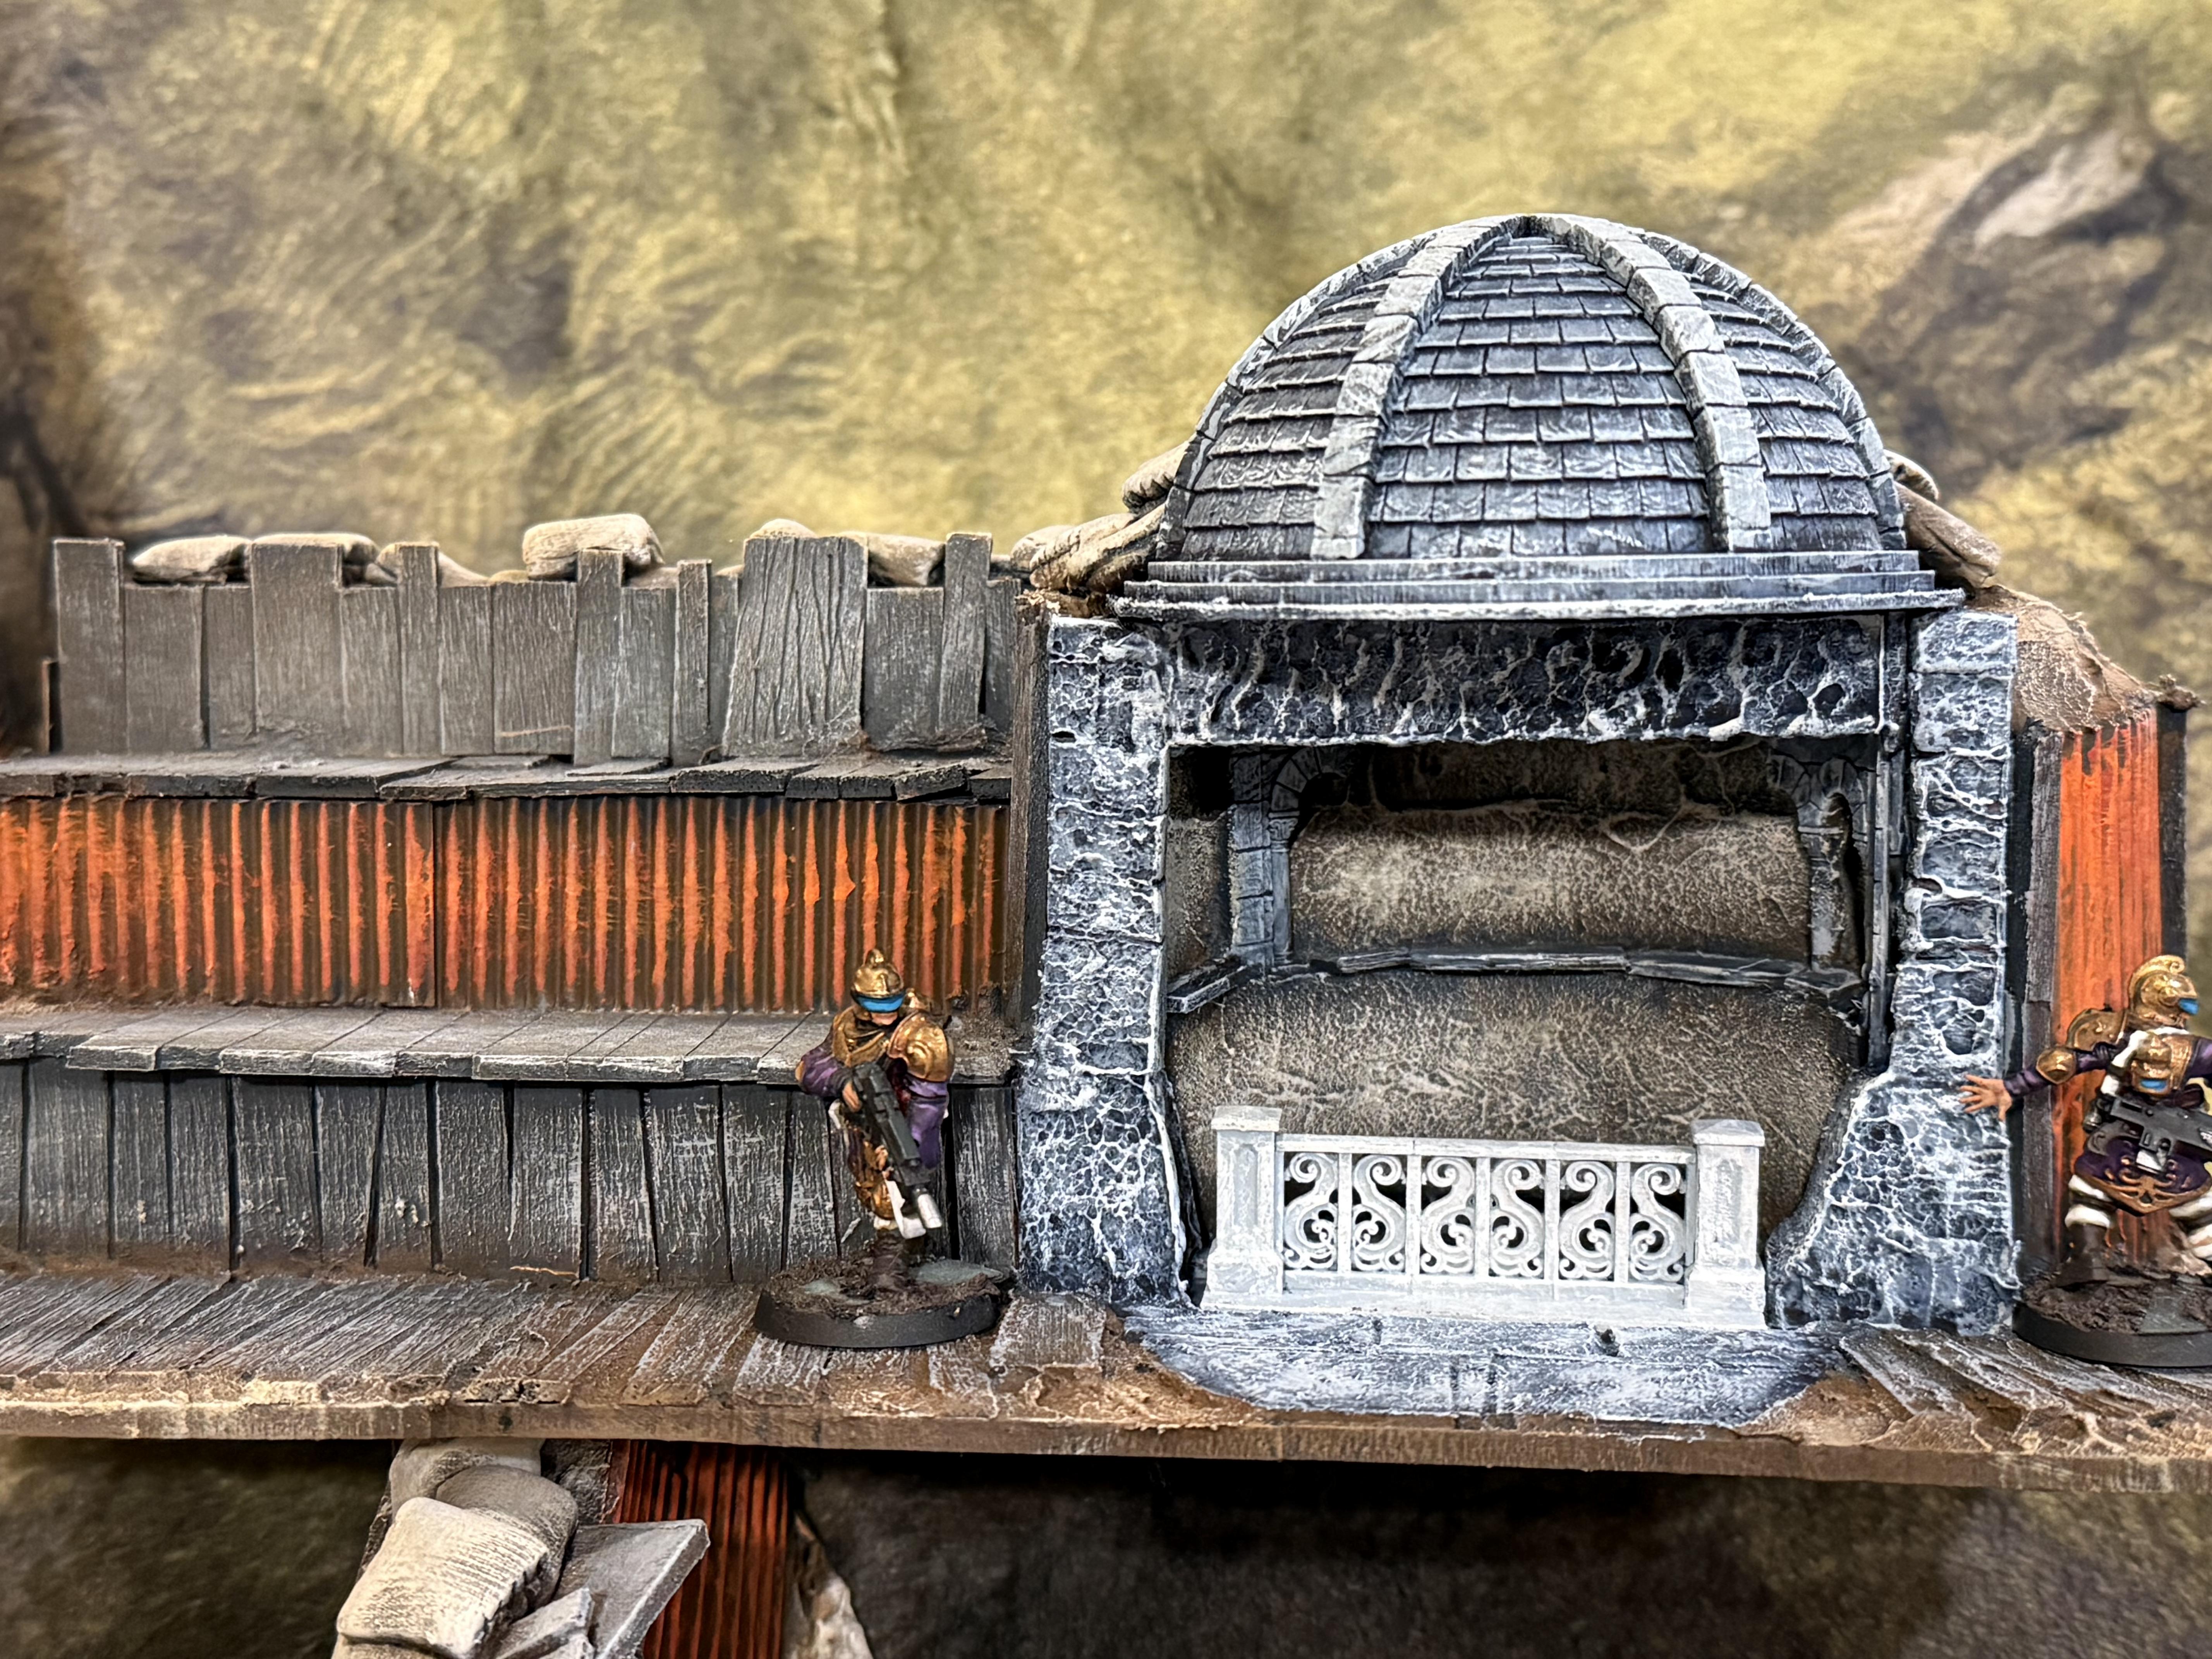
Jurascao Roadway Arch-Style Habitat: Inhabitant Clearance Level Bravo. Typically located along both minor and major thoroughfares throughout the Jurascao district.
Population: 11
Residences: Two - 1 Large, 1 Small
Commercial Activity: Hukol Processing and Distilling [Medicinal Purposes Adjacent]
Proprietor:Atchuq S. Zubgeb (Also owns the 2nd floor dwelling in the same building)
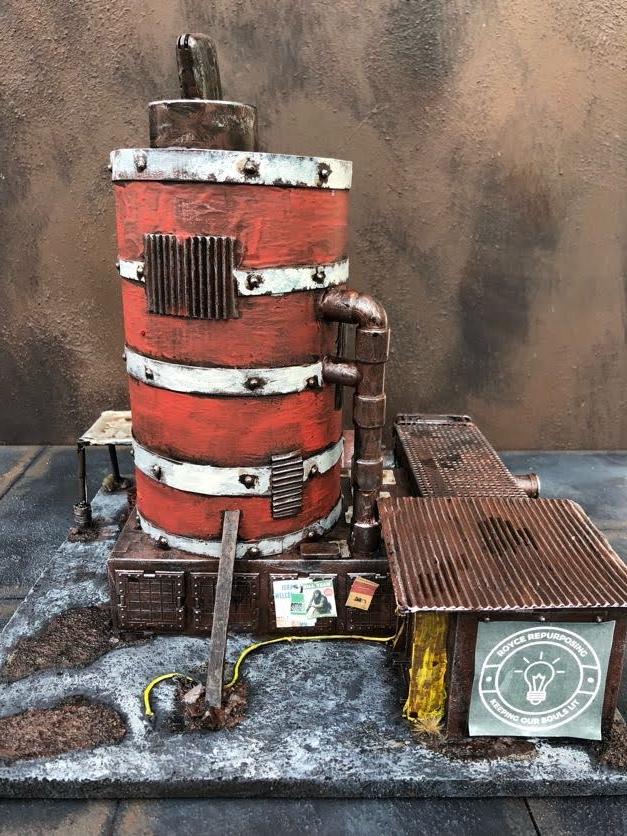
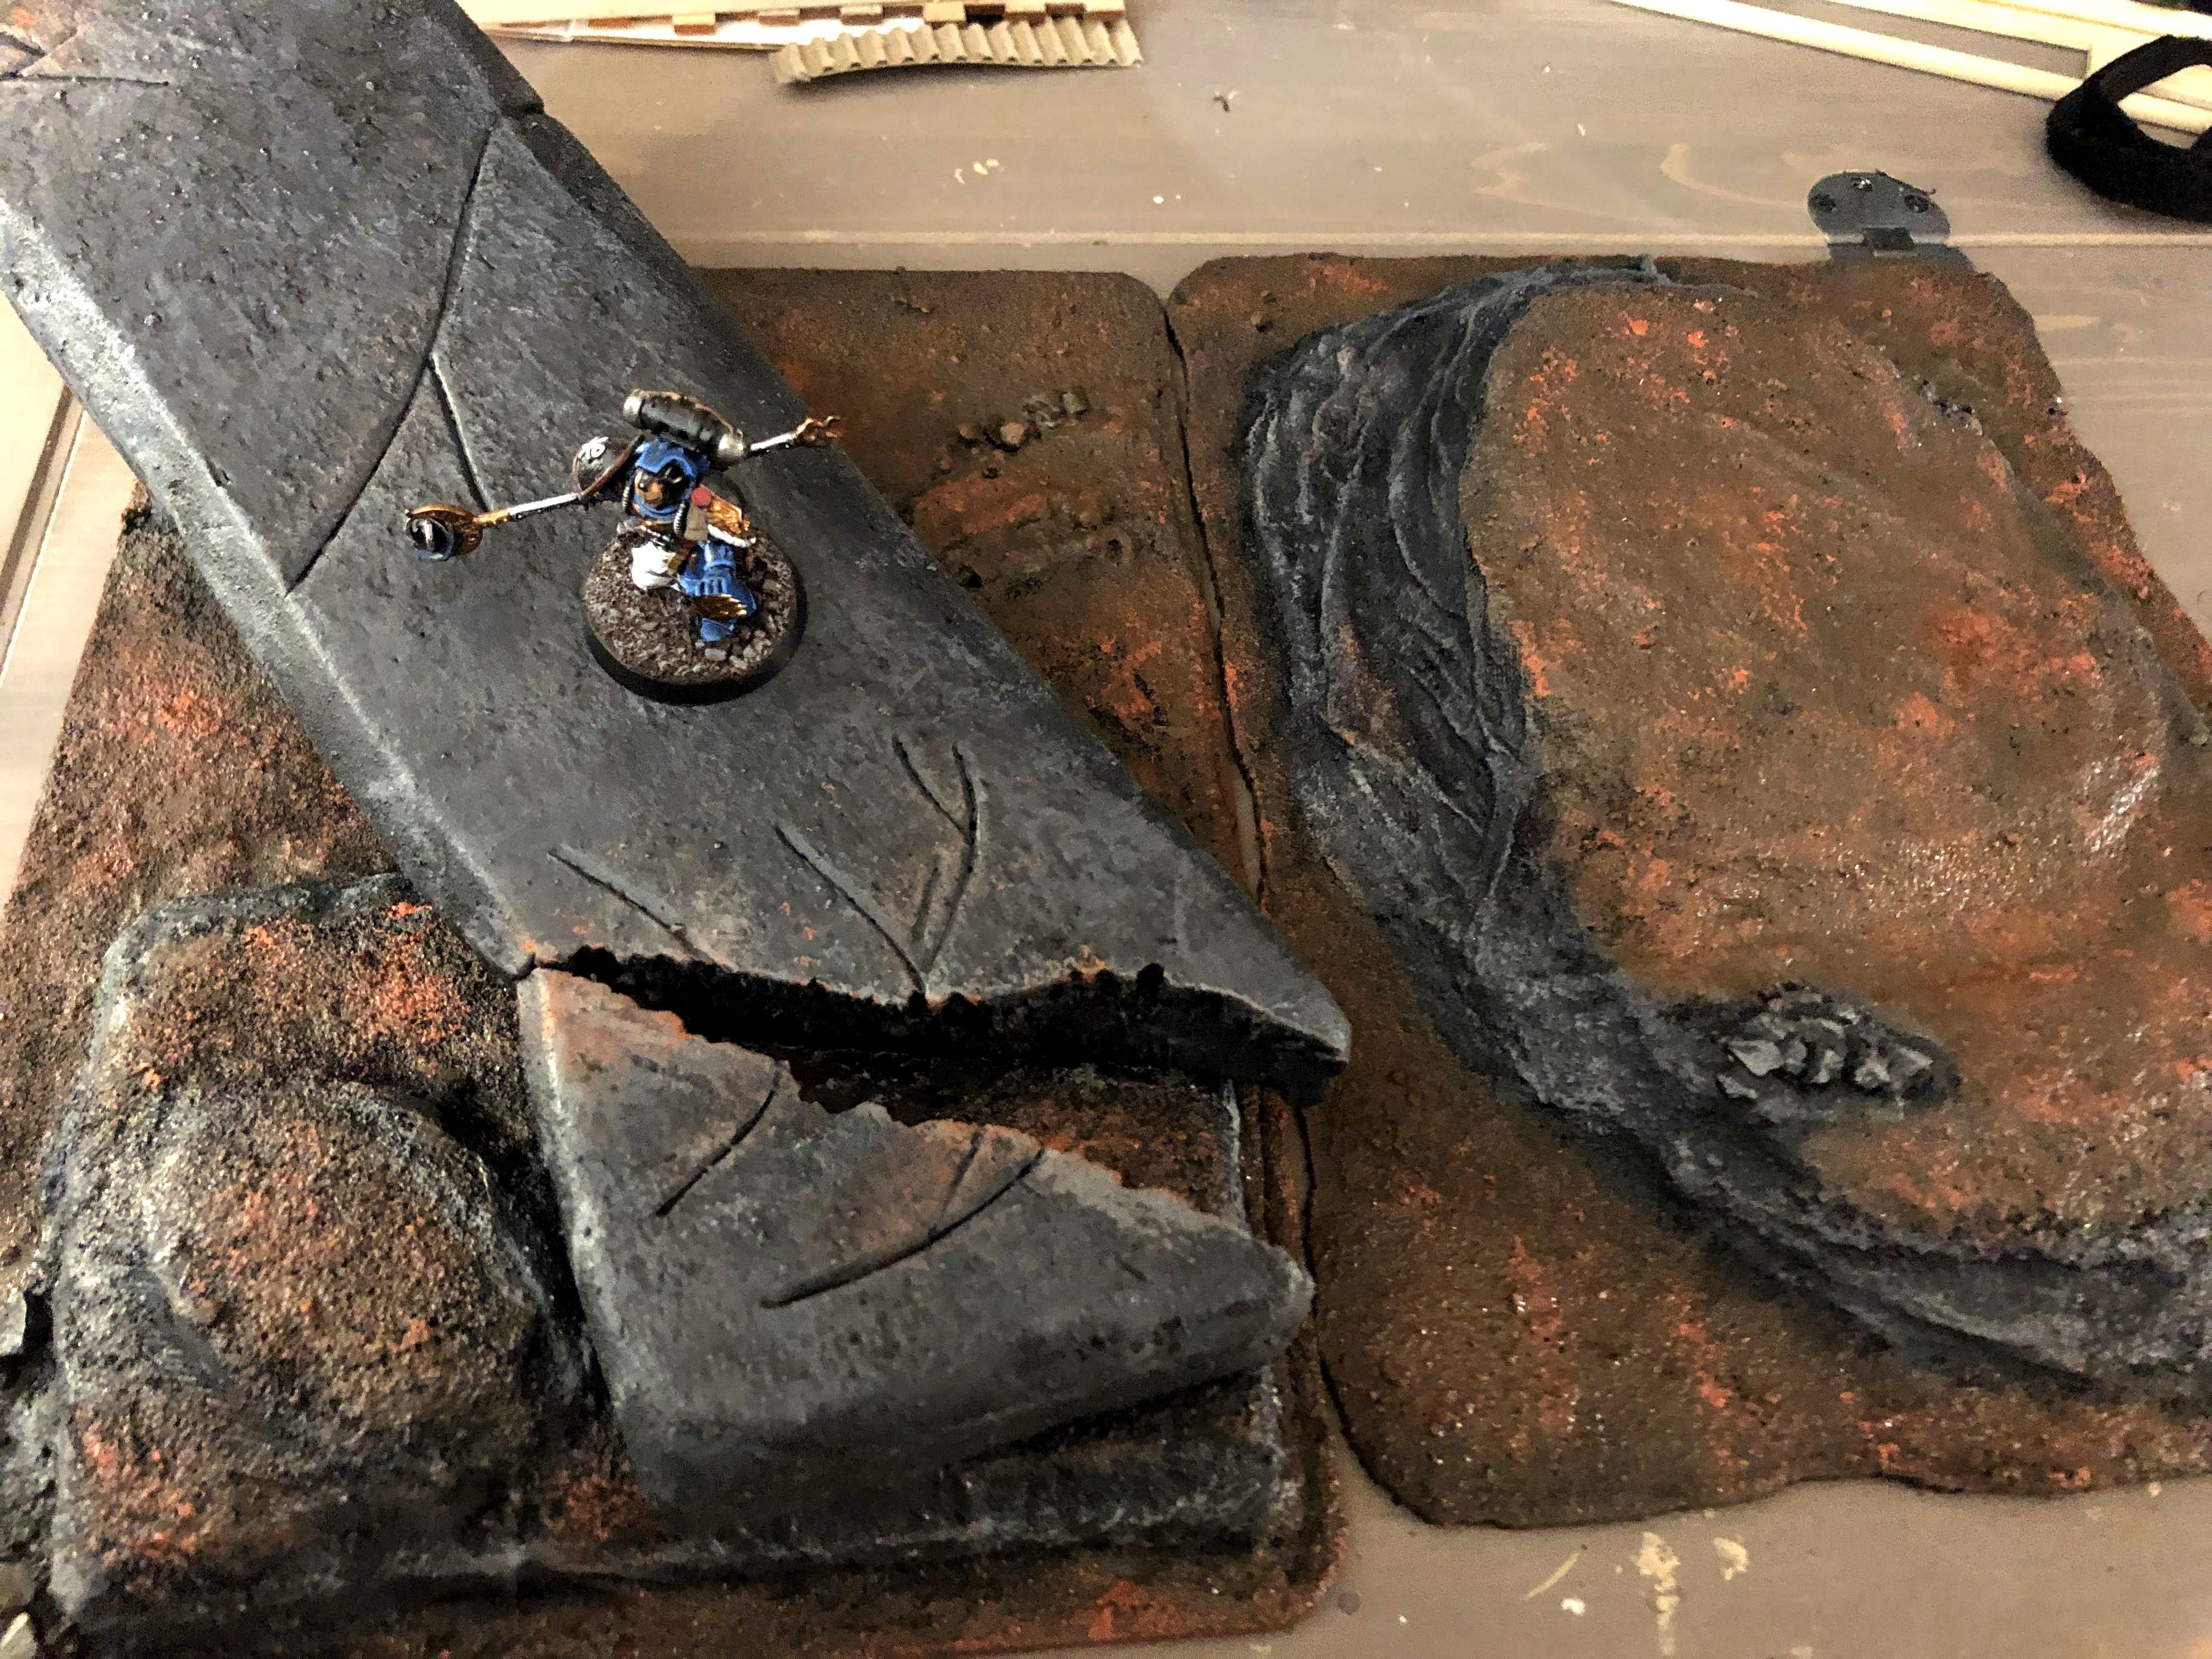
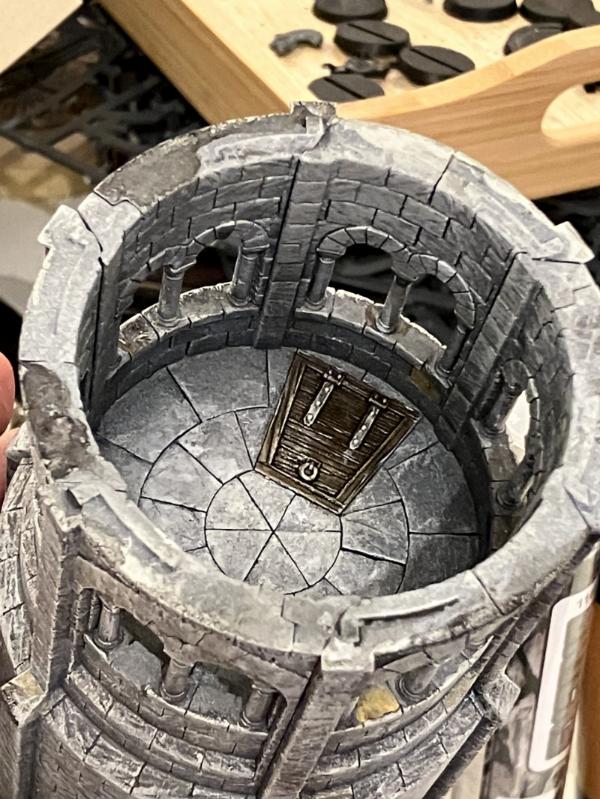
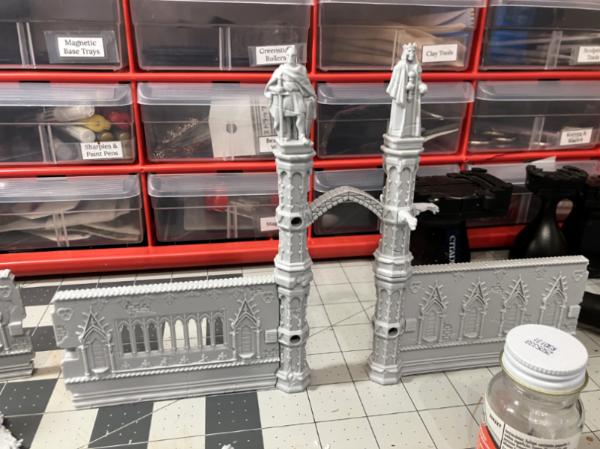
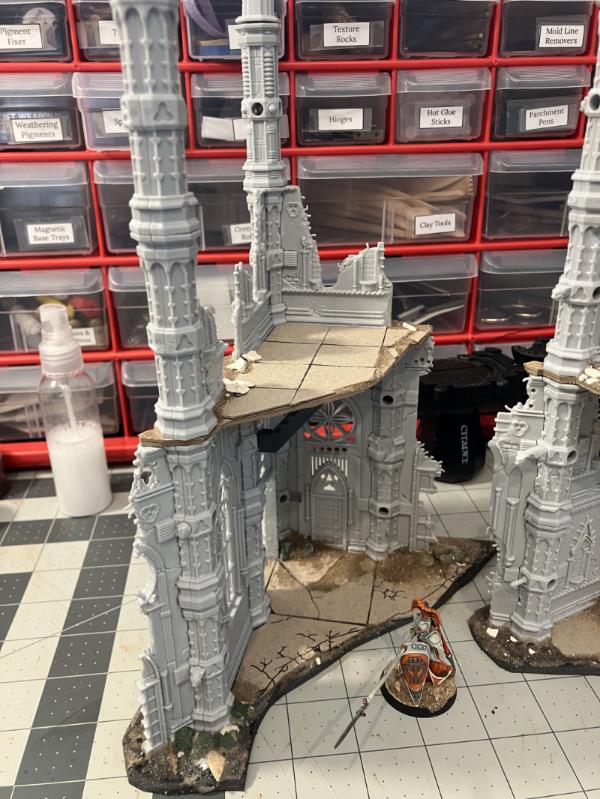
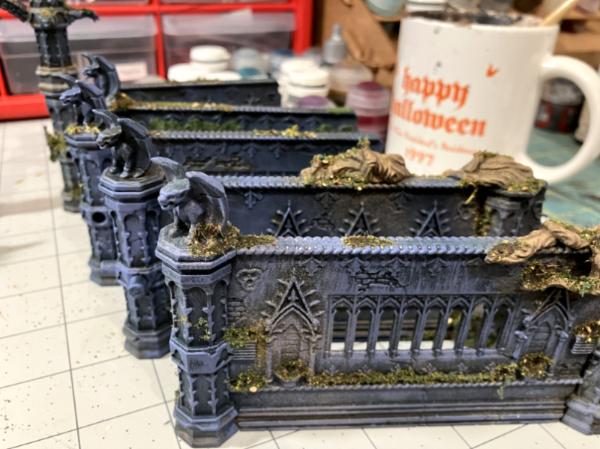
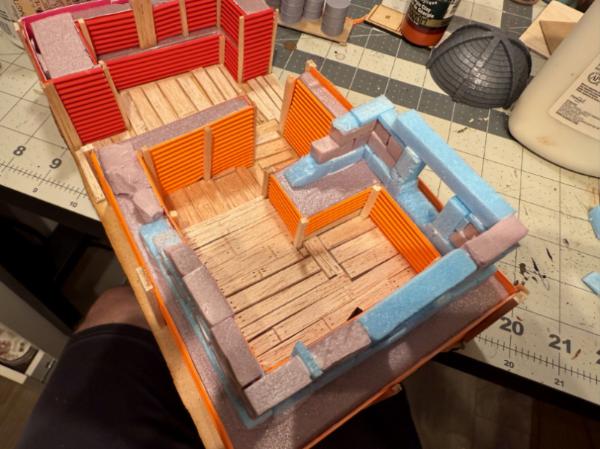
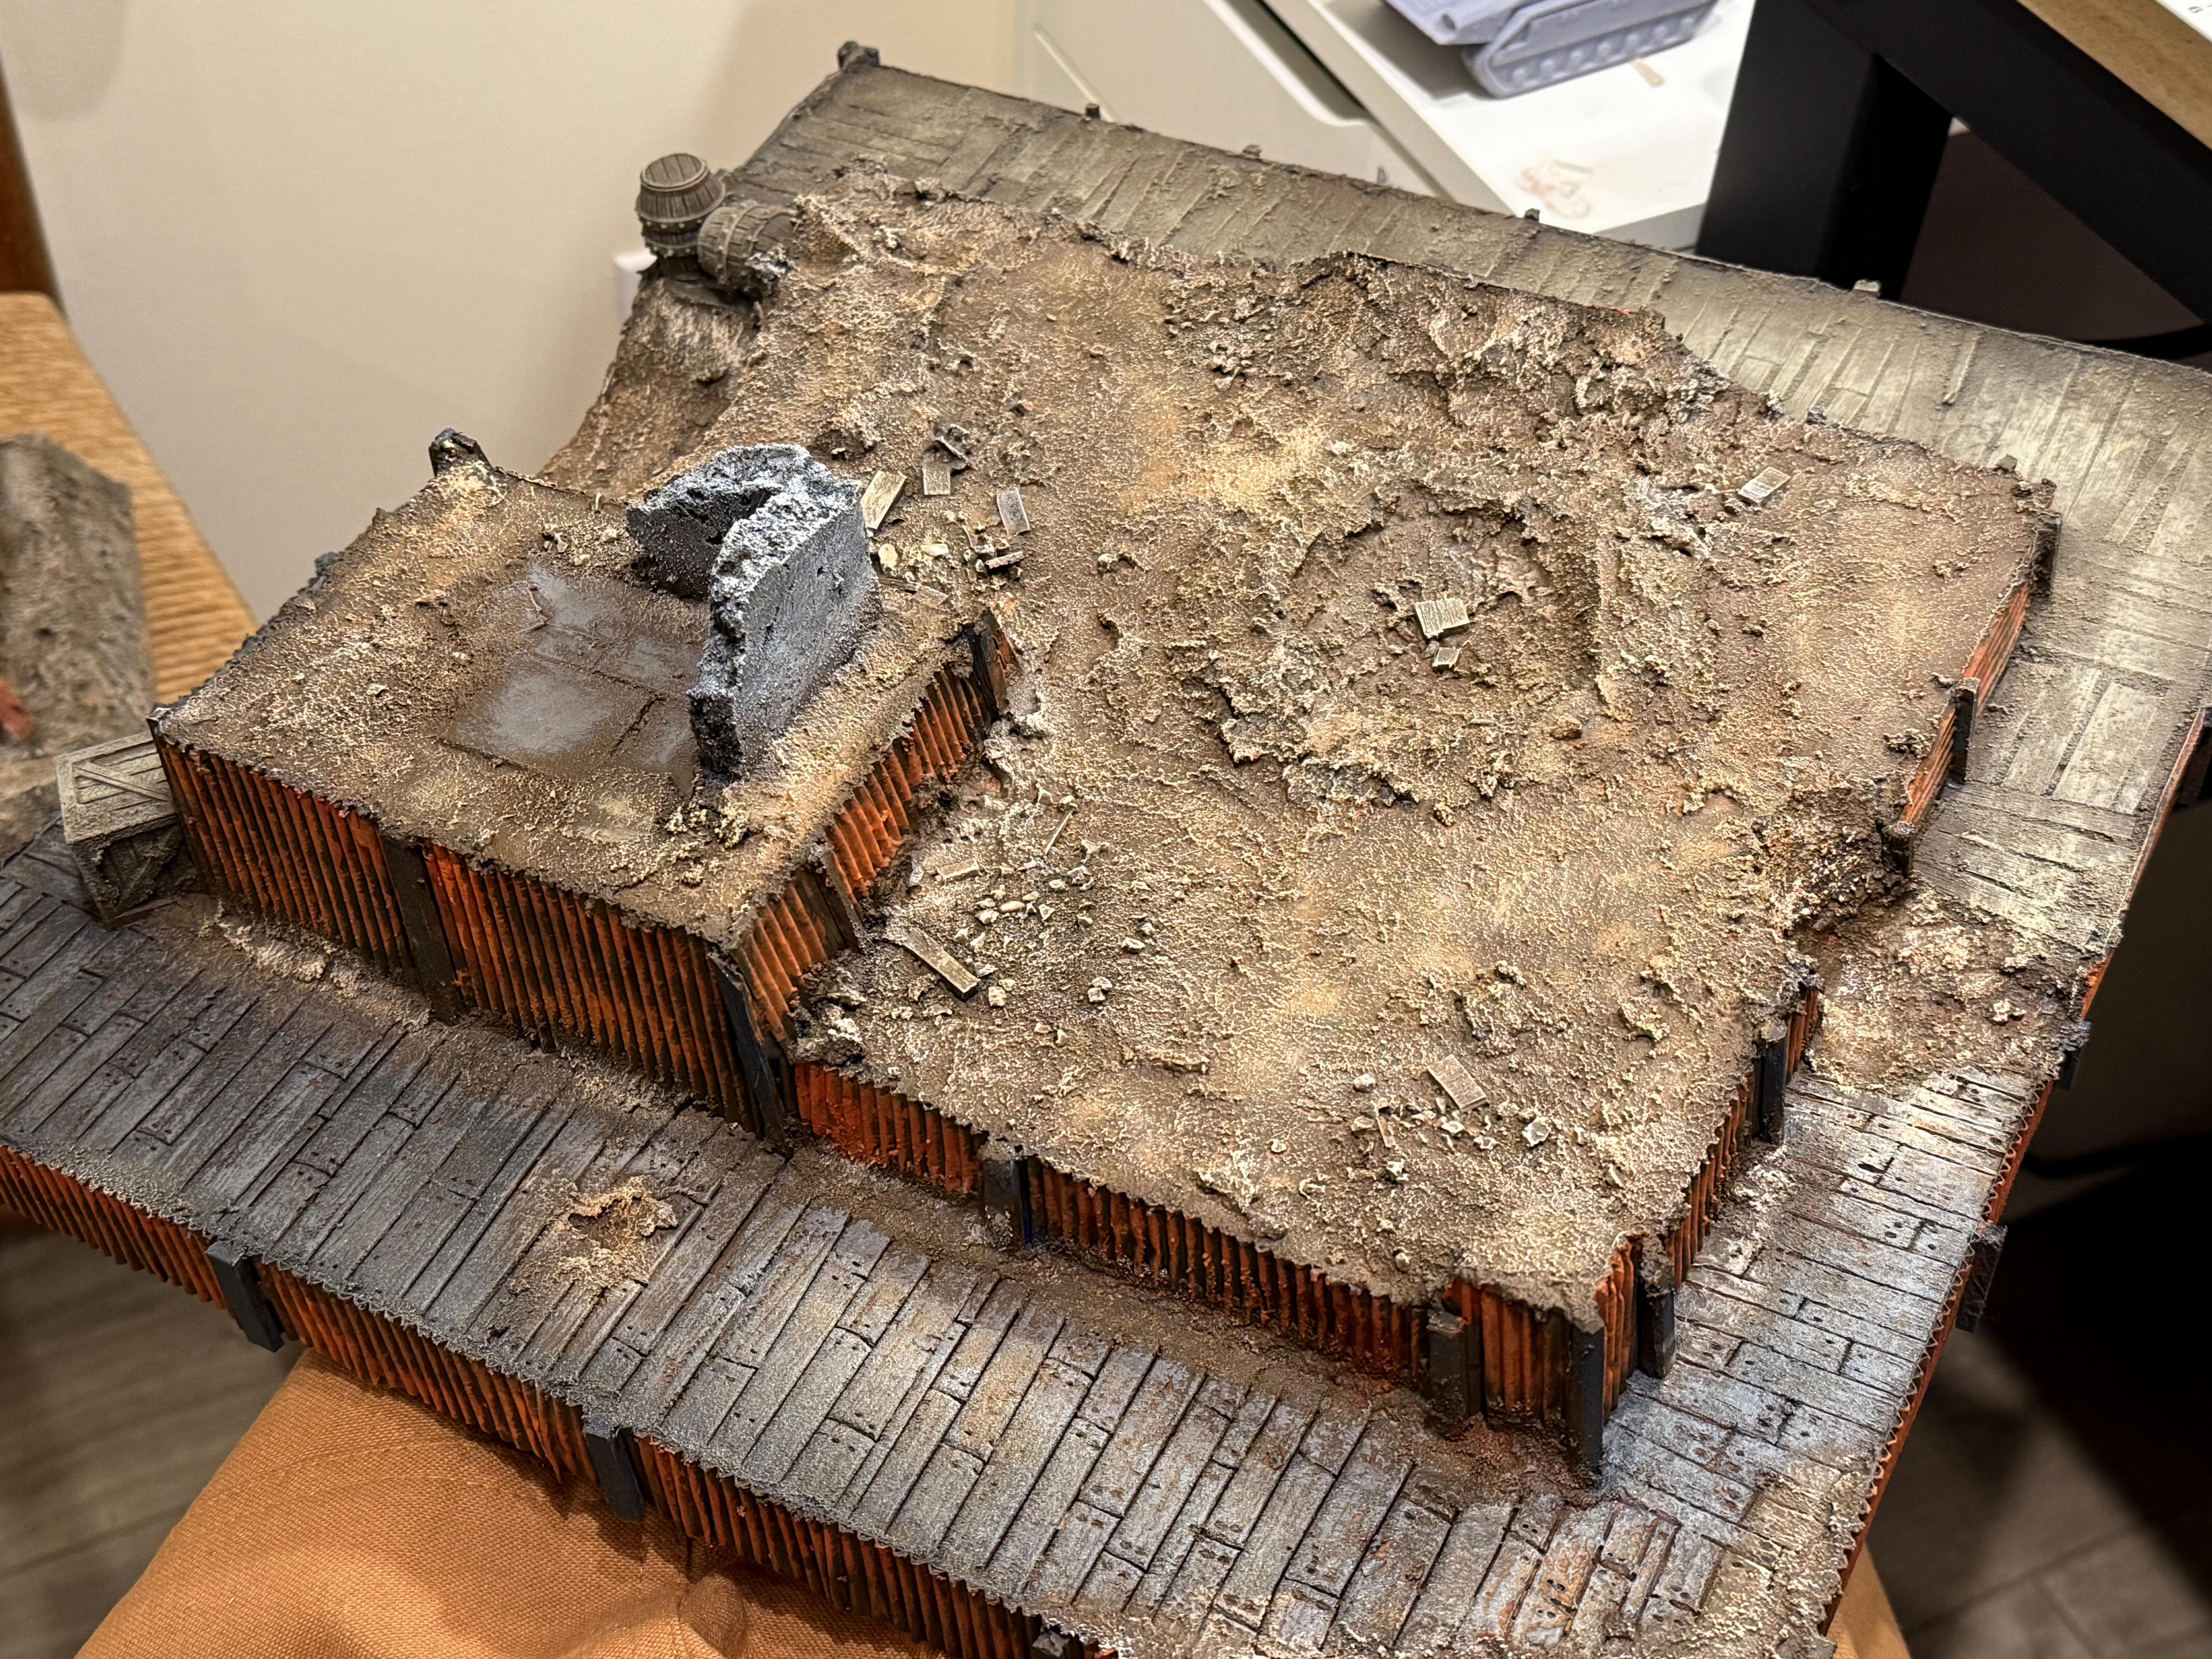
These are the two pillar components with the top portion removed.
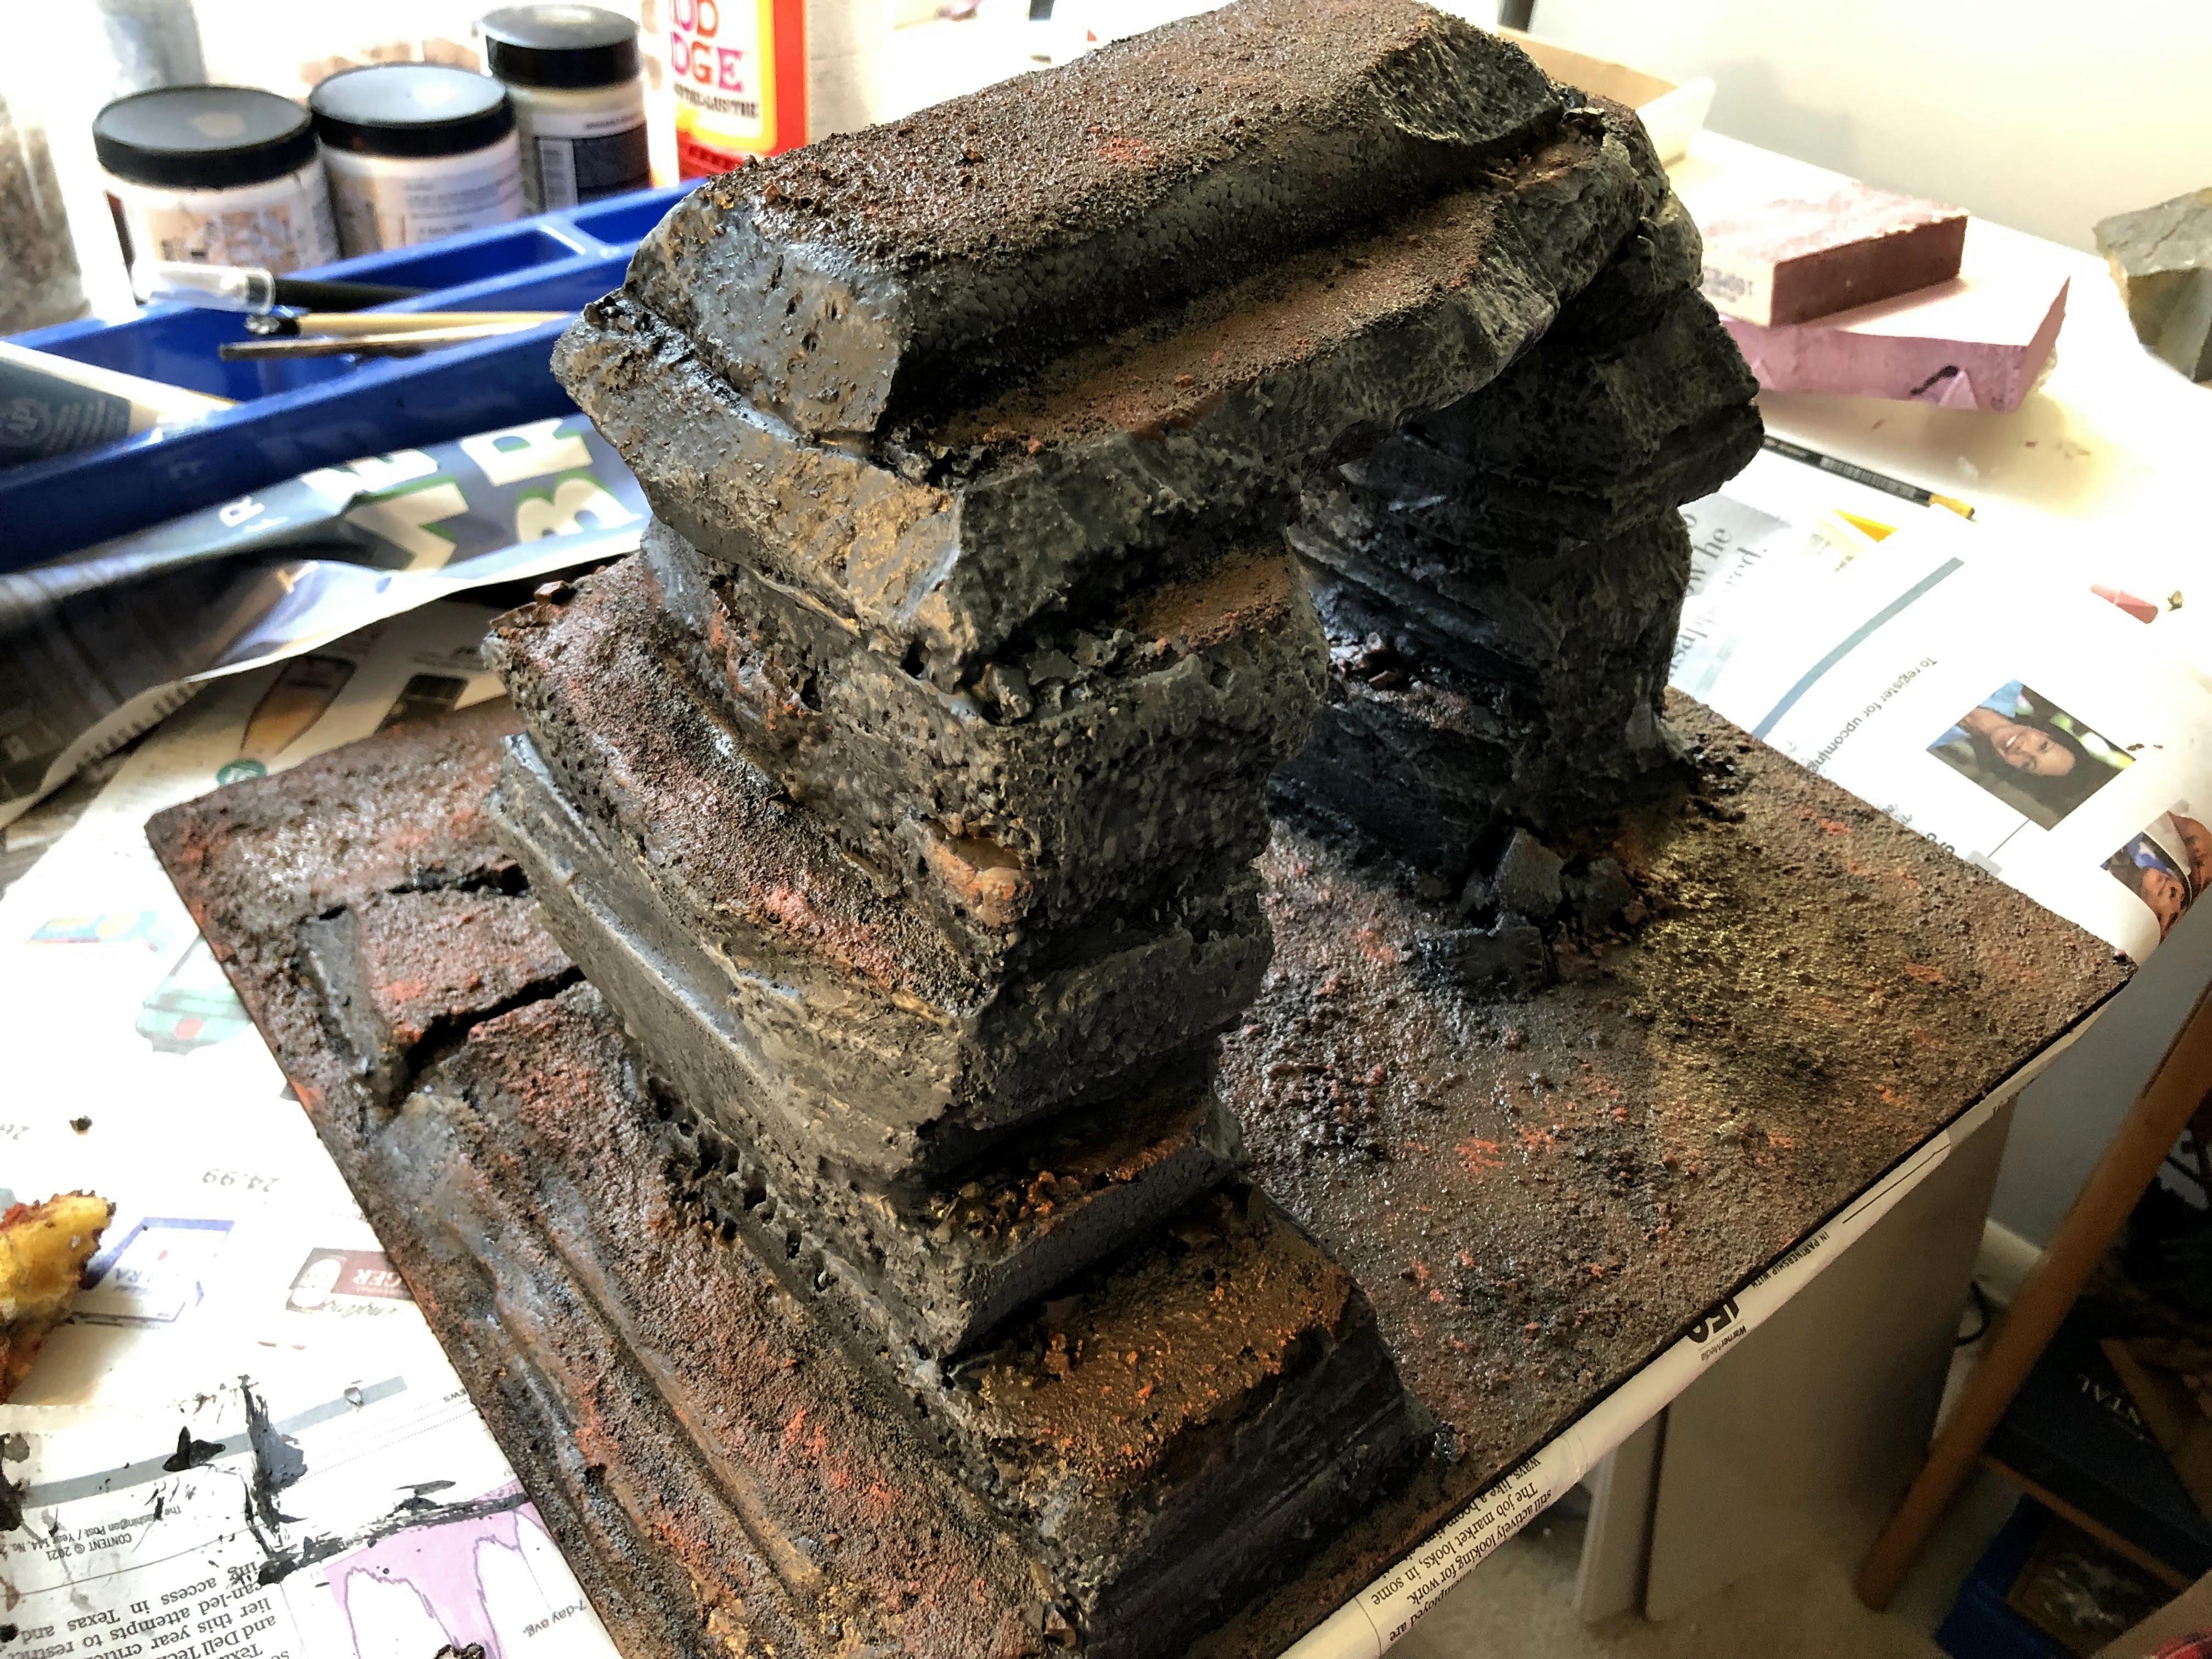
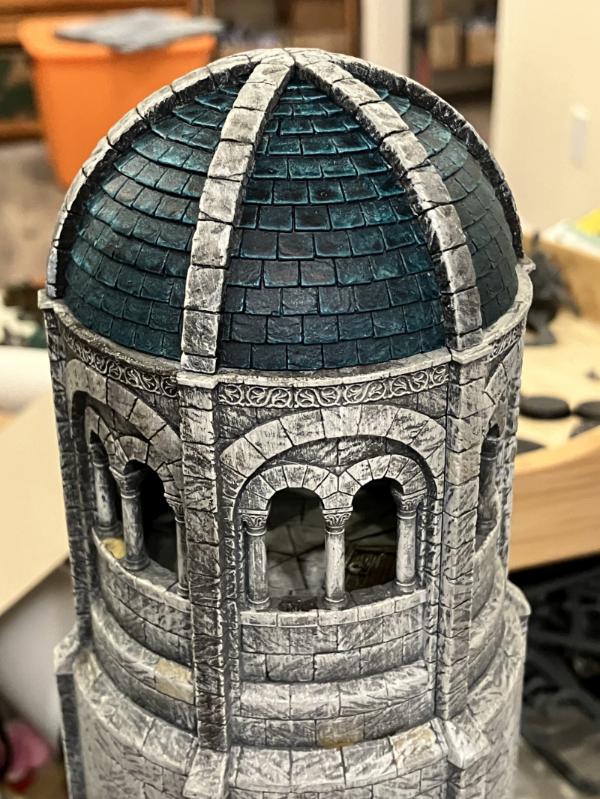
This is the top portion, which you can see is removable and could be used as an additional terrain piece!
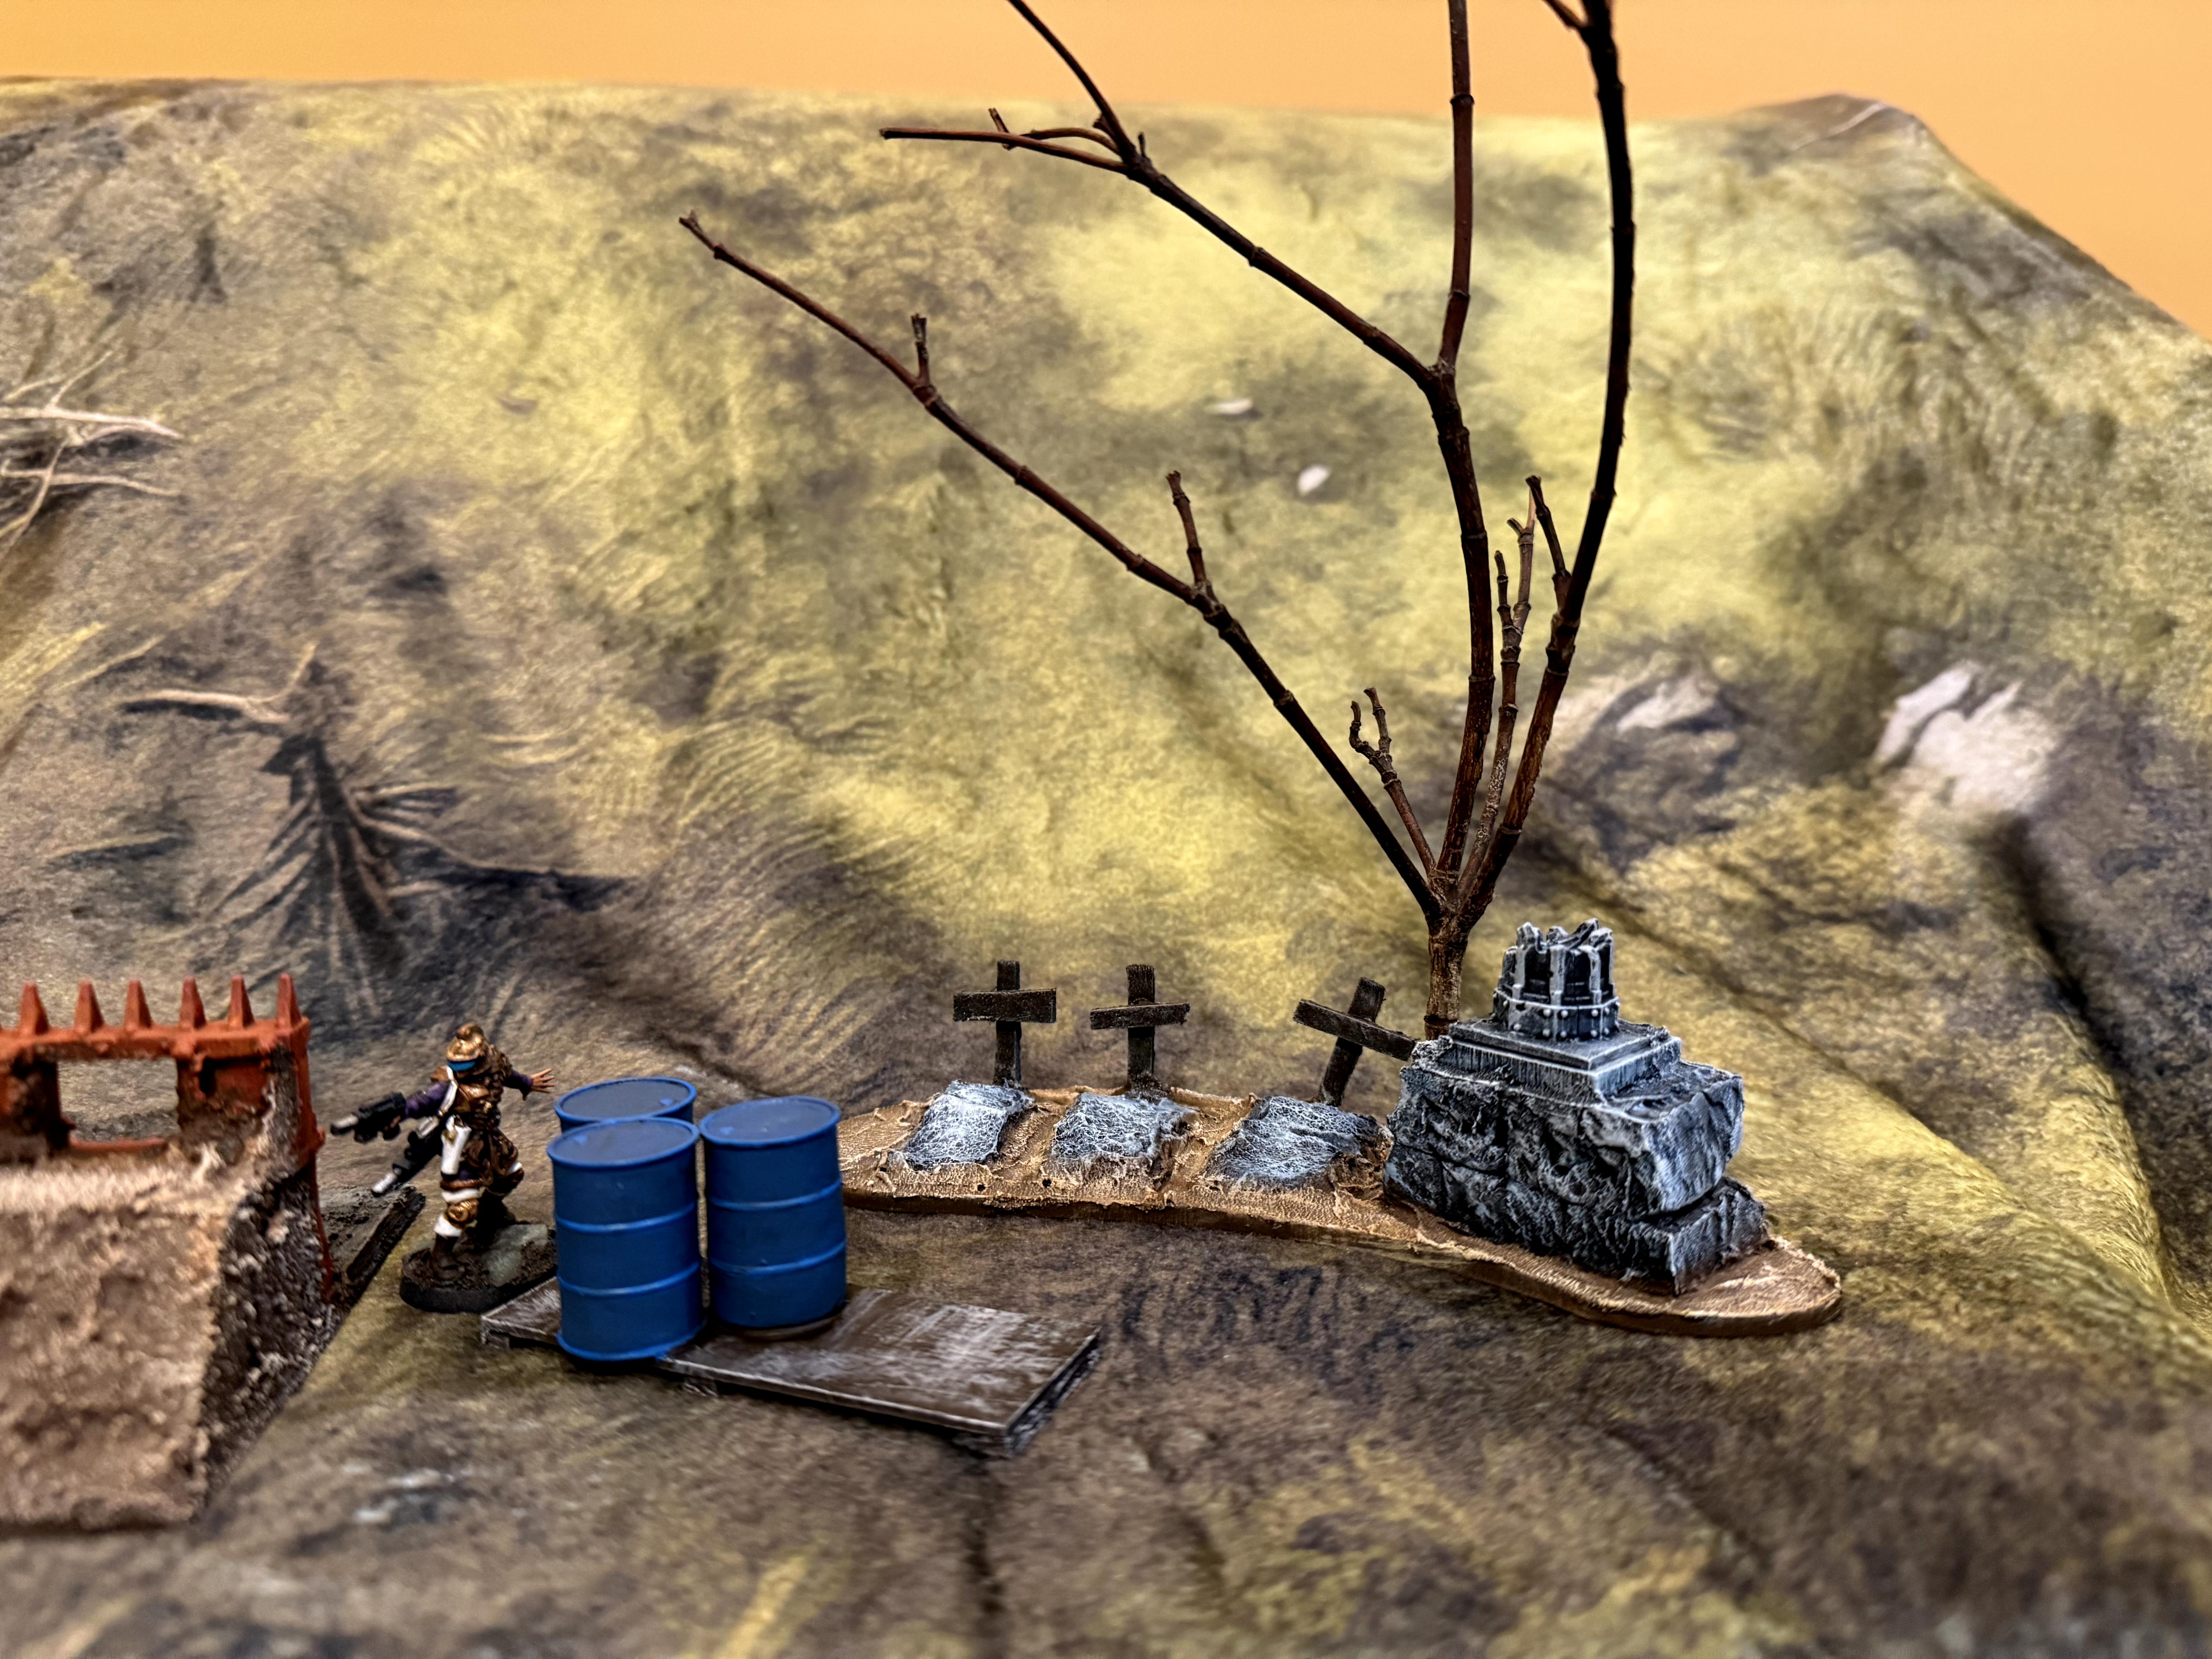
Some more detail on the posters. I make some of them myself, some I find through Warhammer Community, others I sourced online.
Just finishing posting some of my most recent work. Then on to new things!
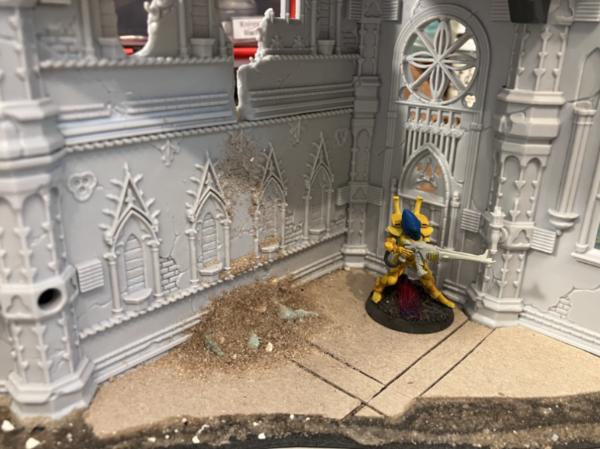
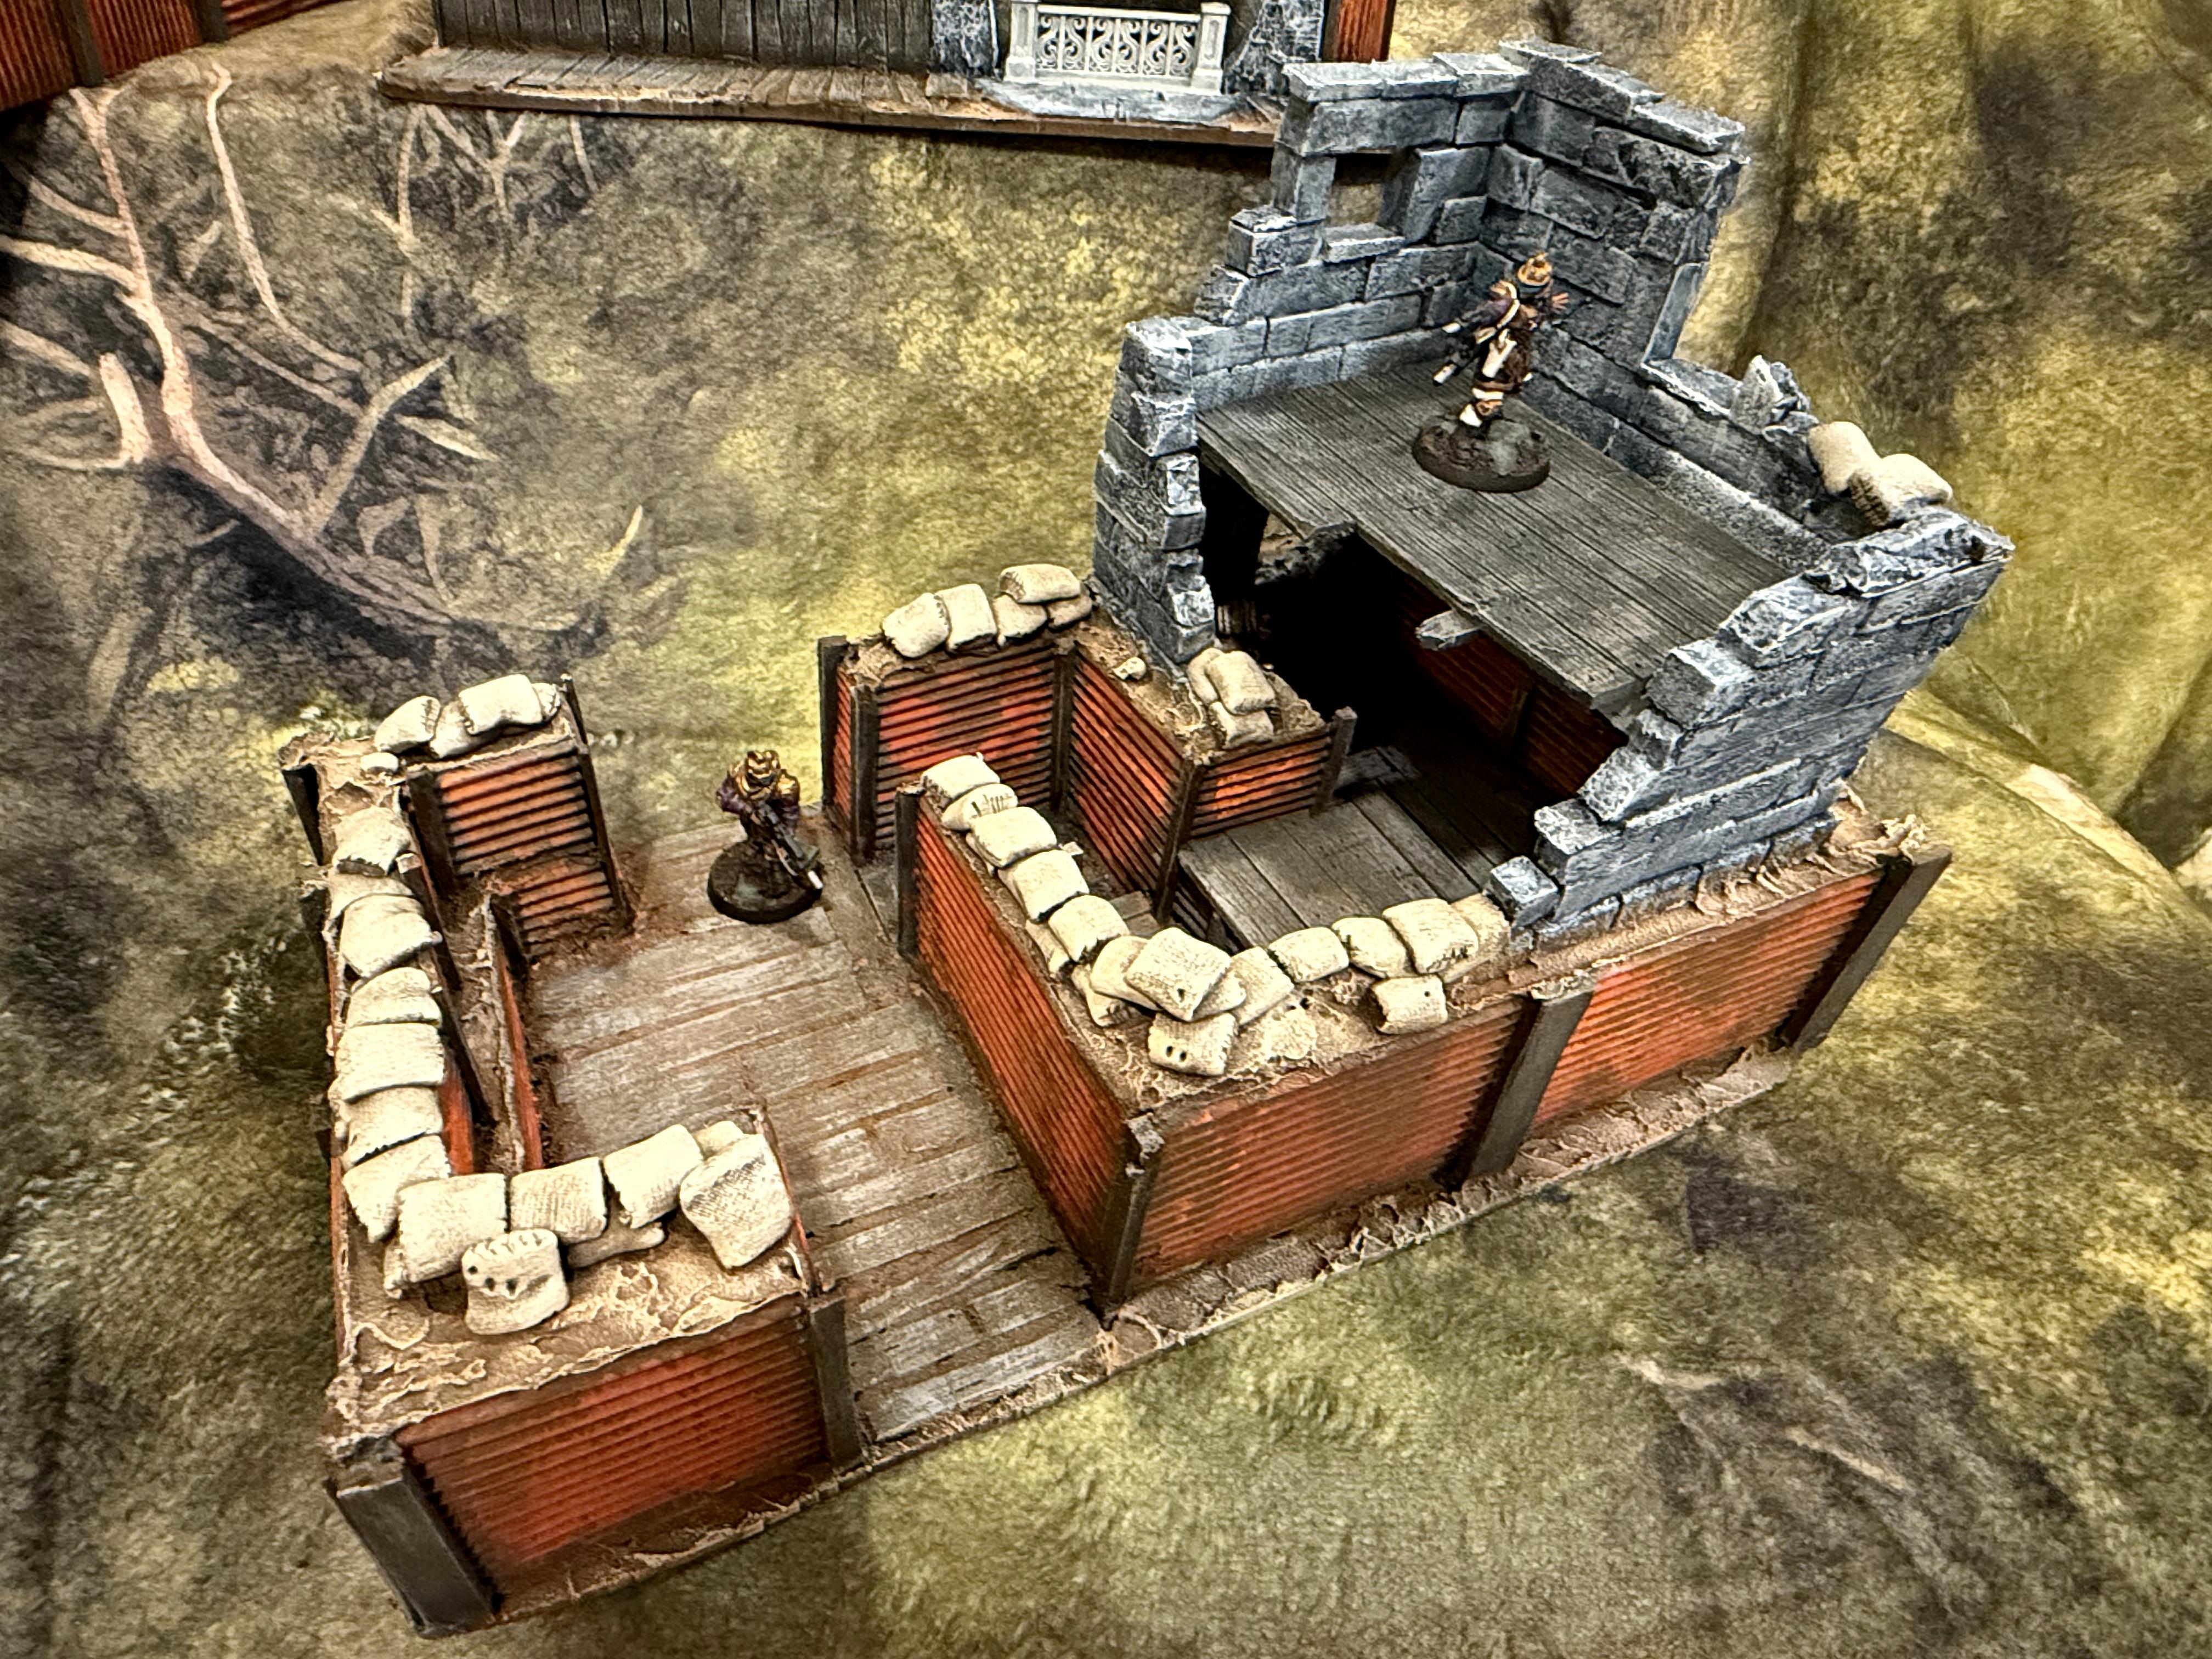
Something I most proud of here is the work with the plants. I feel like a lot of the urban terrain I see is completely devoid of life. No plants or algae or anything. I think it actually brings a touch more realism to these pieces.
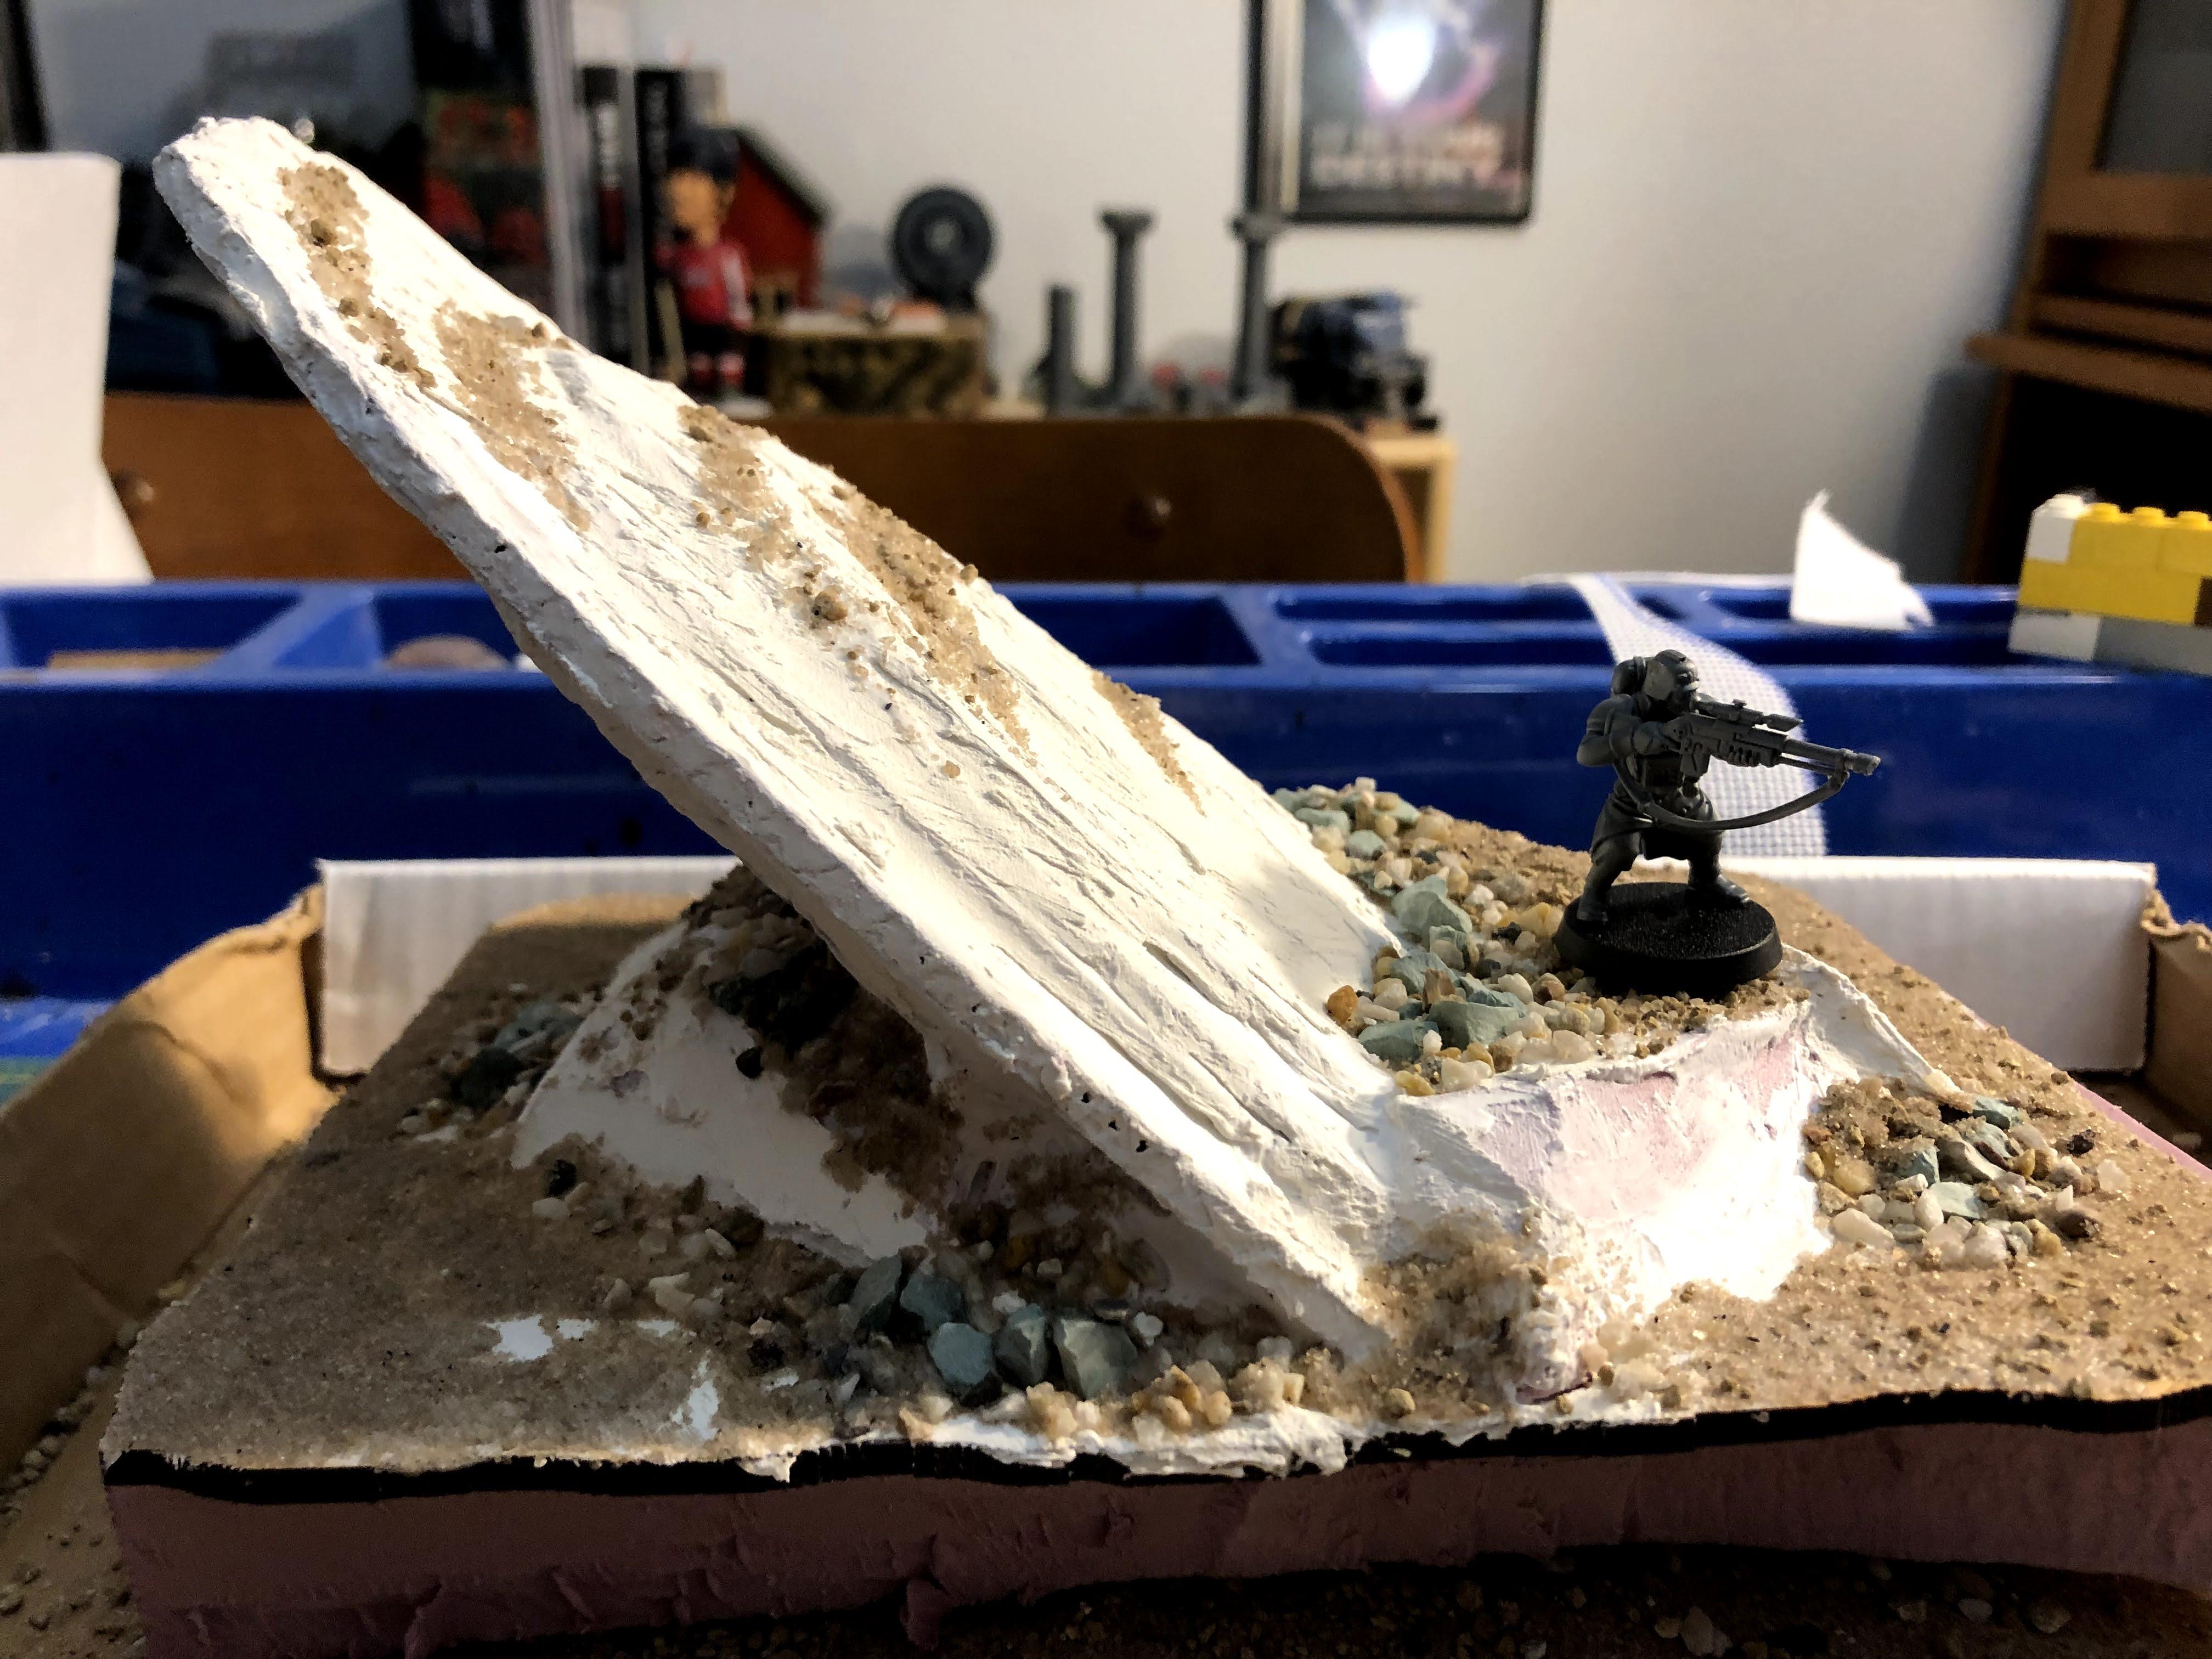
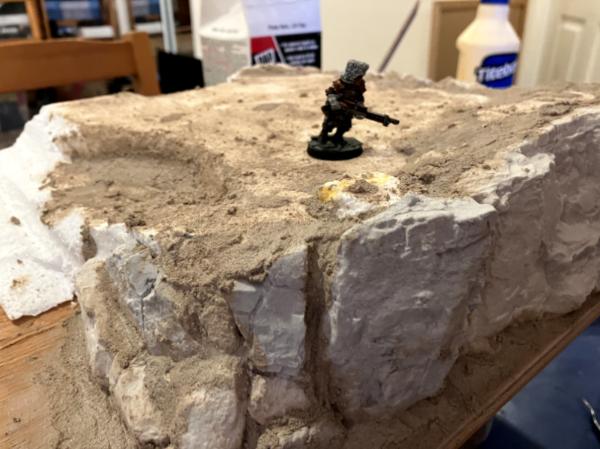
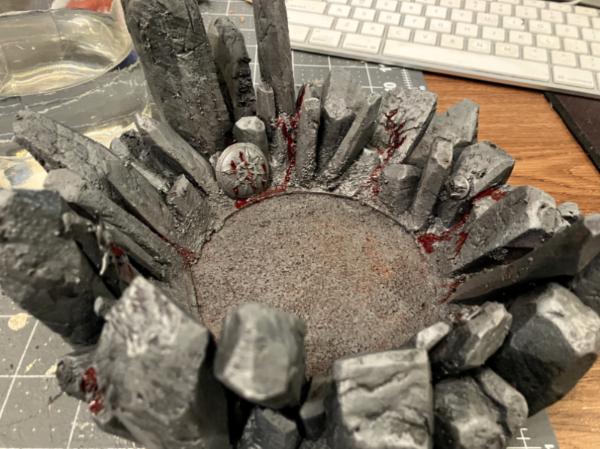
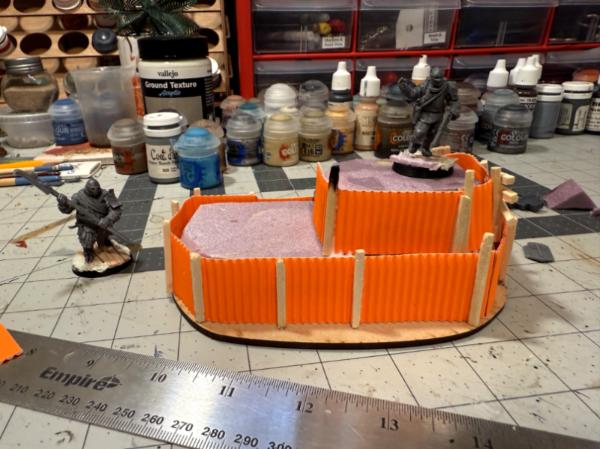
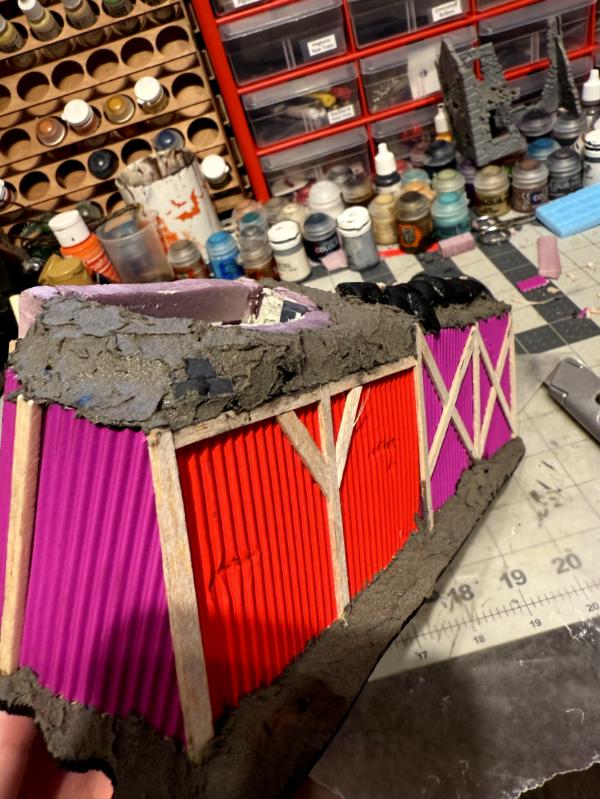
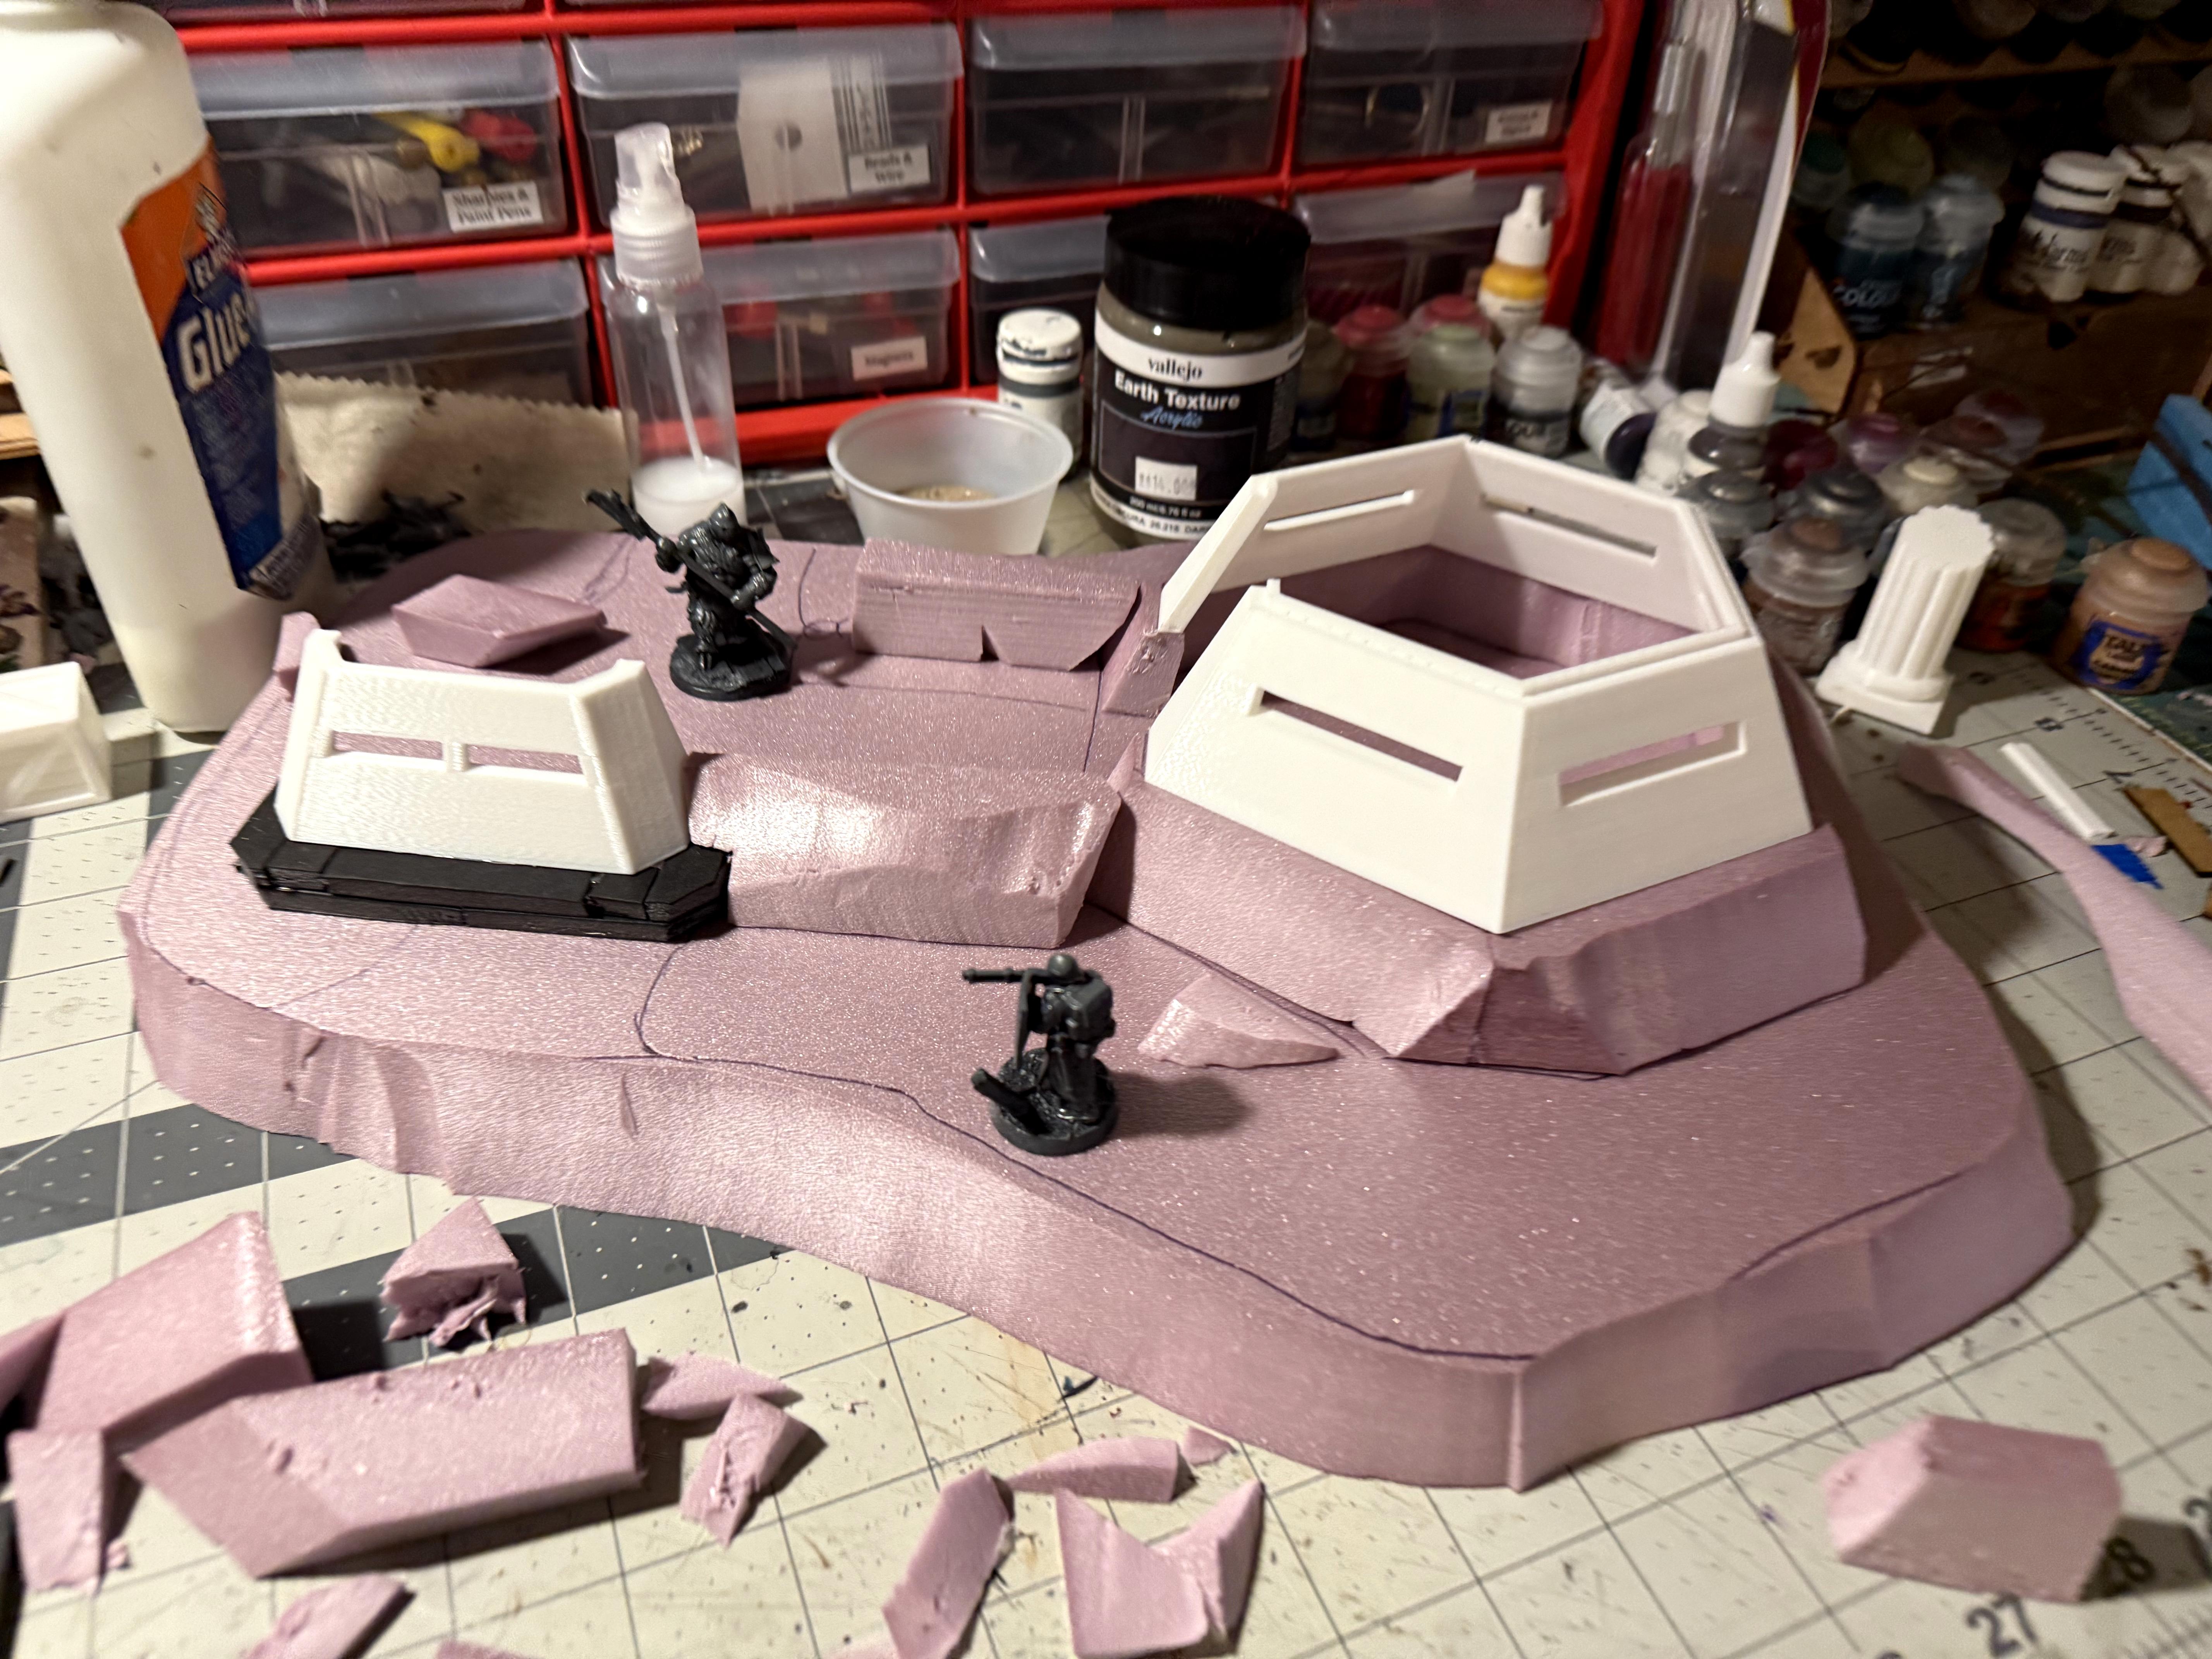
Working on parts of a badlands set, and wanted to try some new things. Finished up two missing trench pieces of the city commission, and tested out some new design techniques instead of ordering MDF terrain for a building under construction. C&C always appreciated. Sorry for the somewhat quirky shots, wasn't able to get the best shots as I rushed.
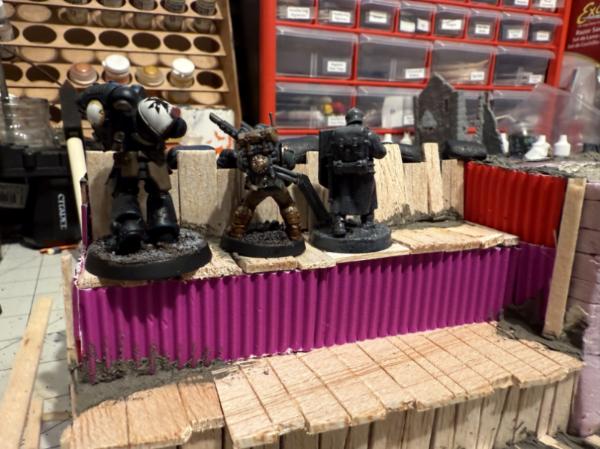
First layout of the t-section & gun pit.
Some additional detail.
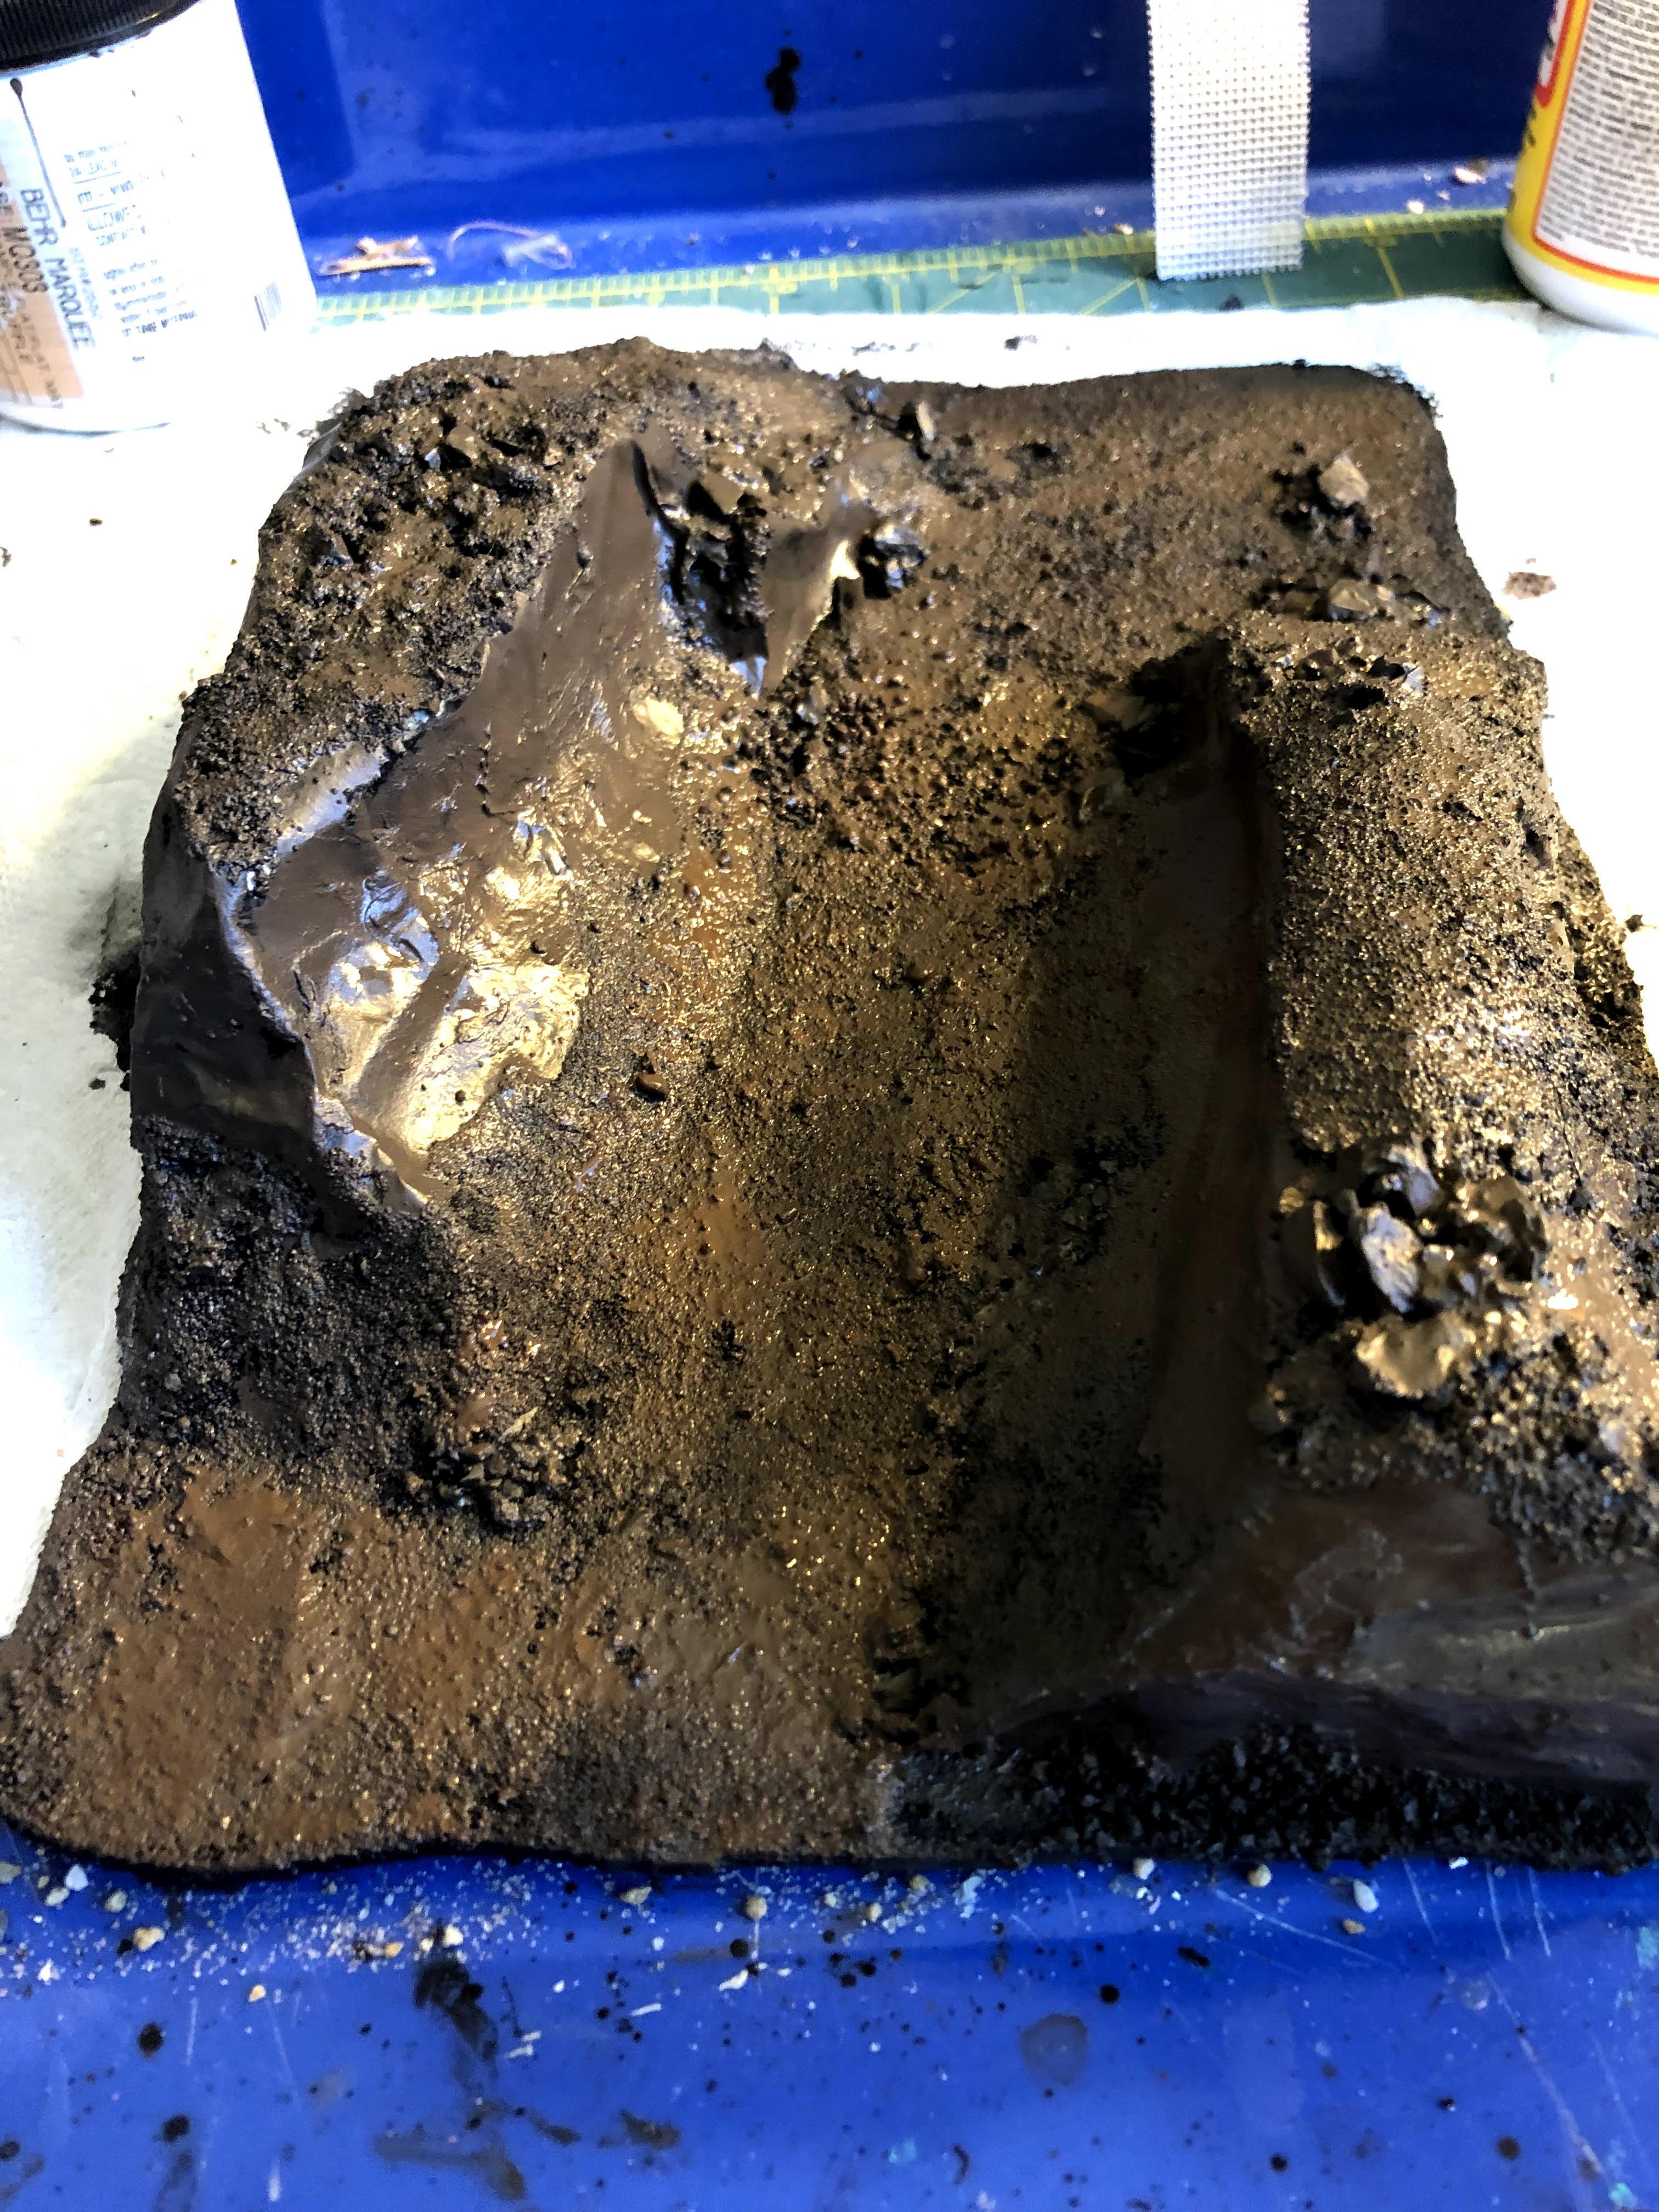
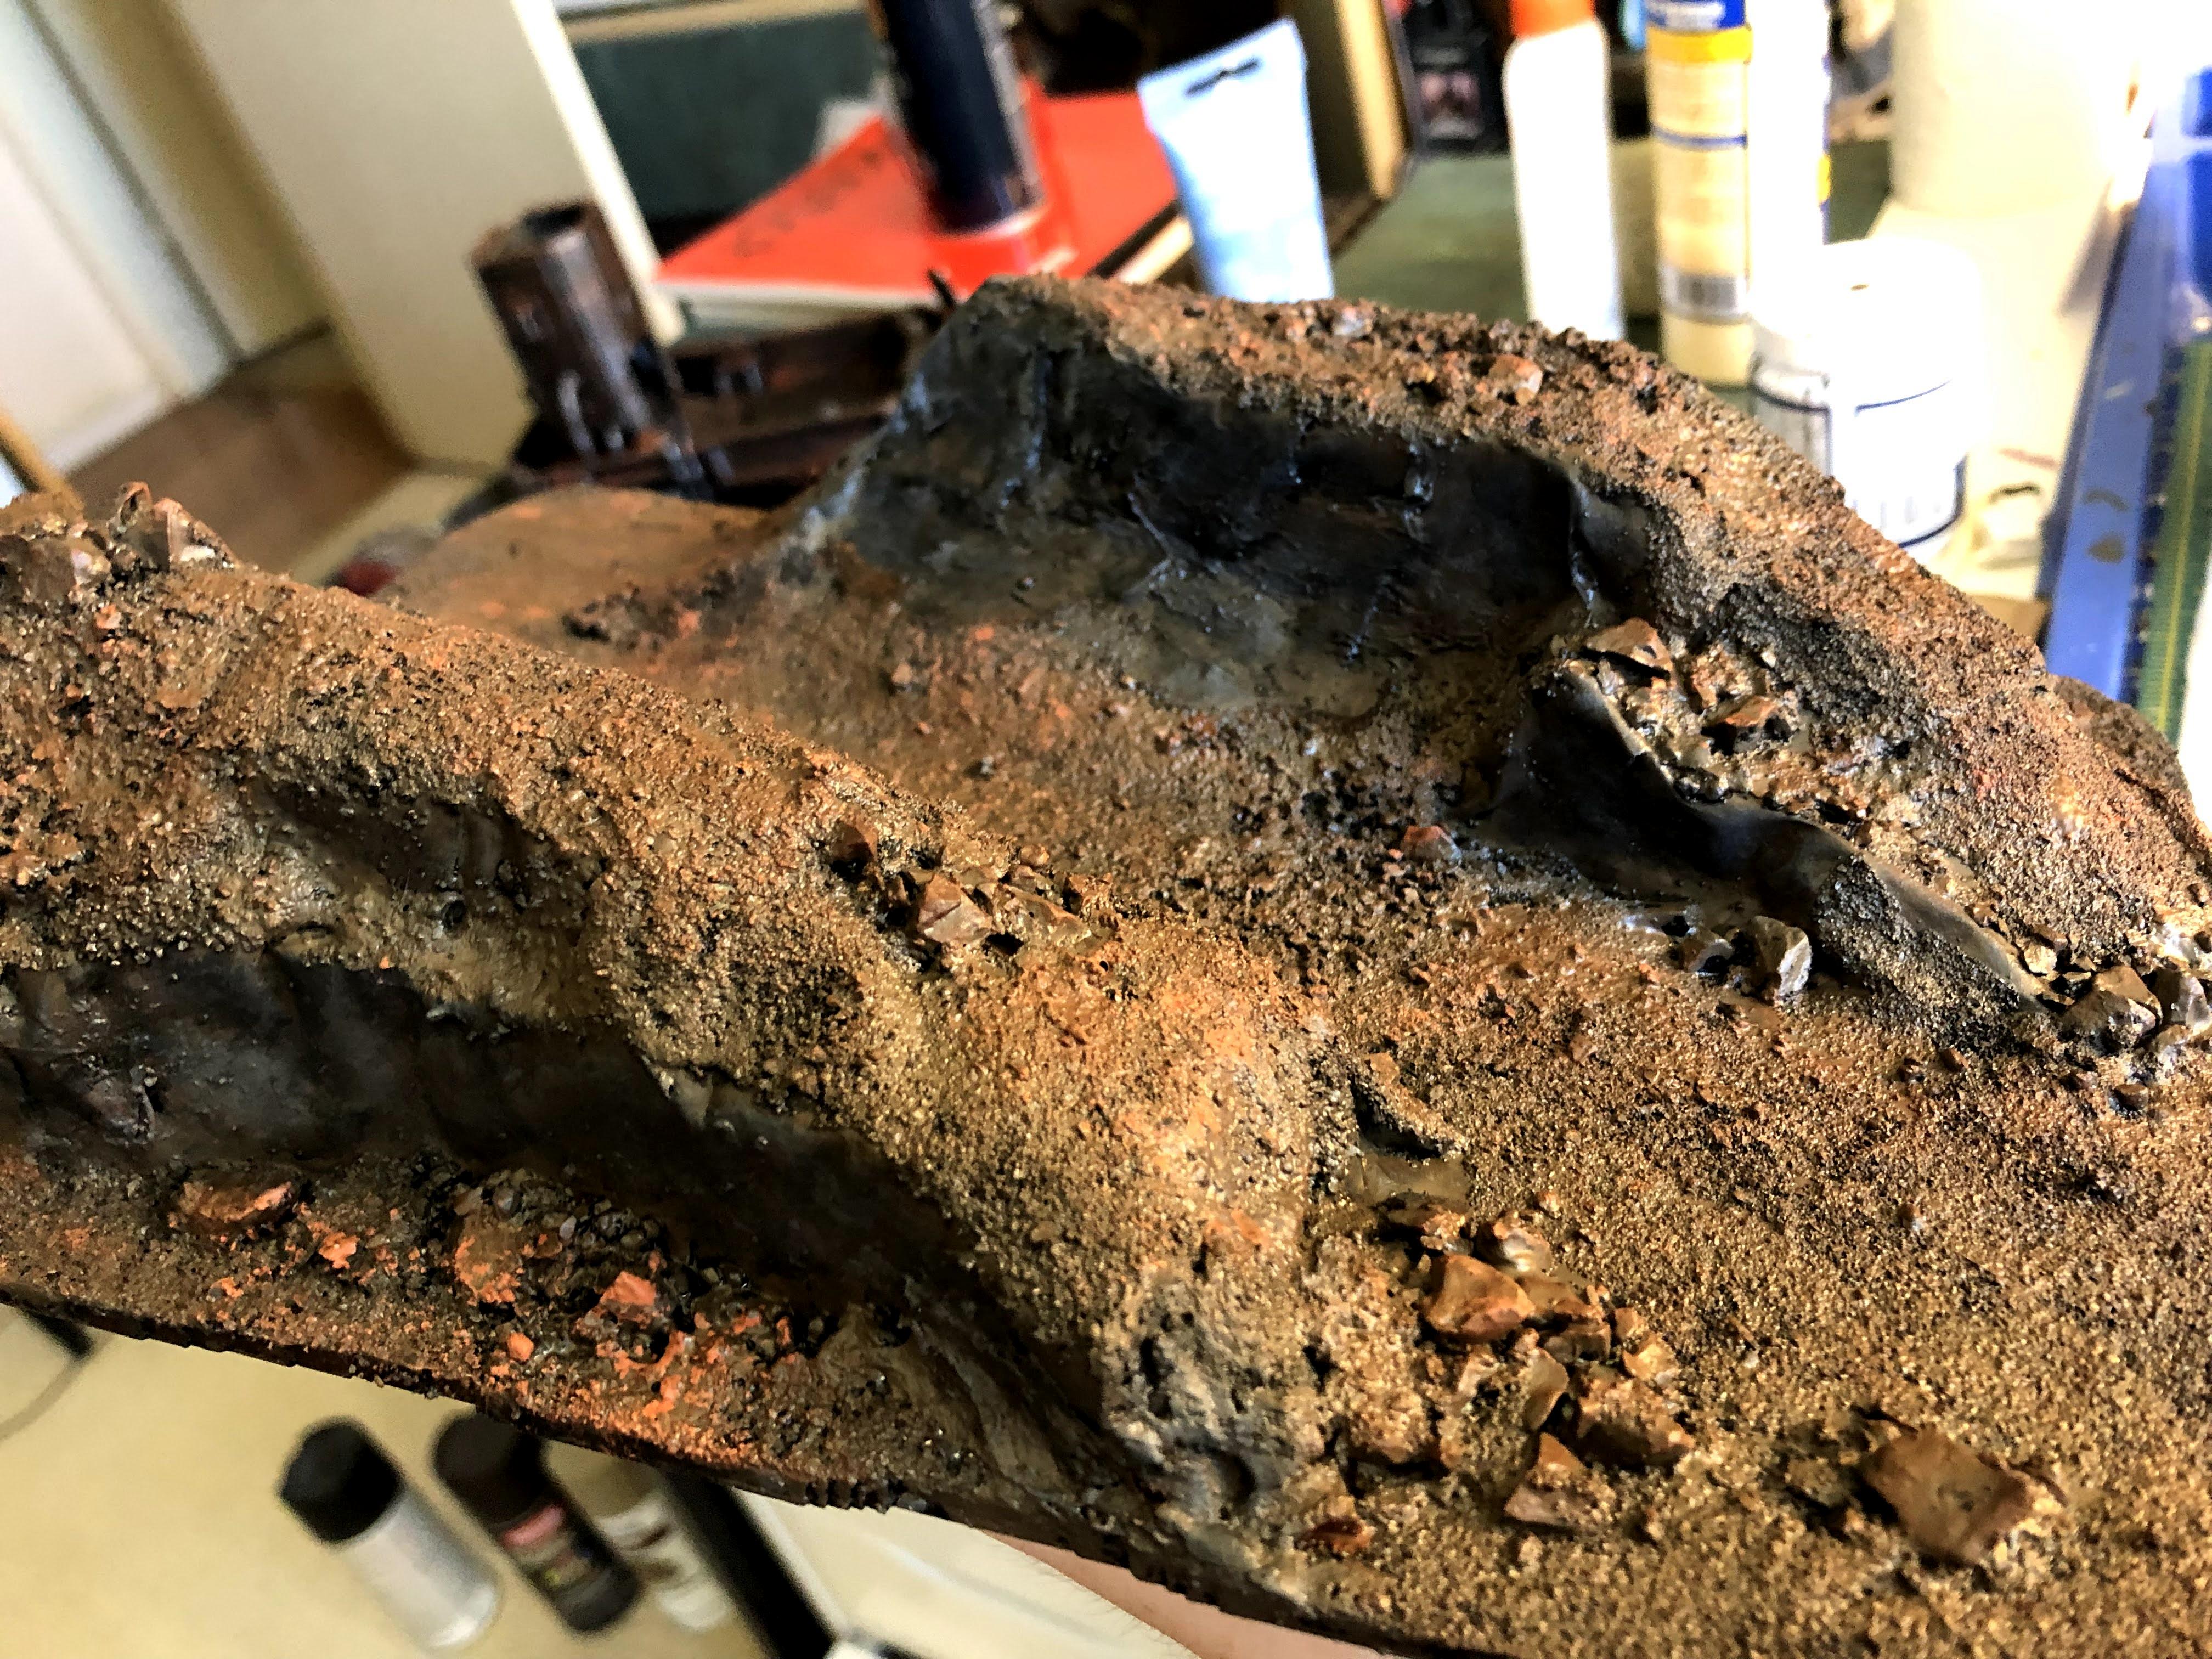
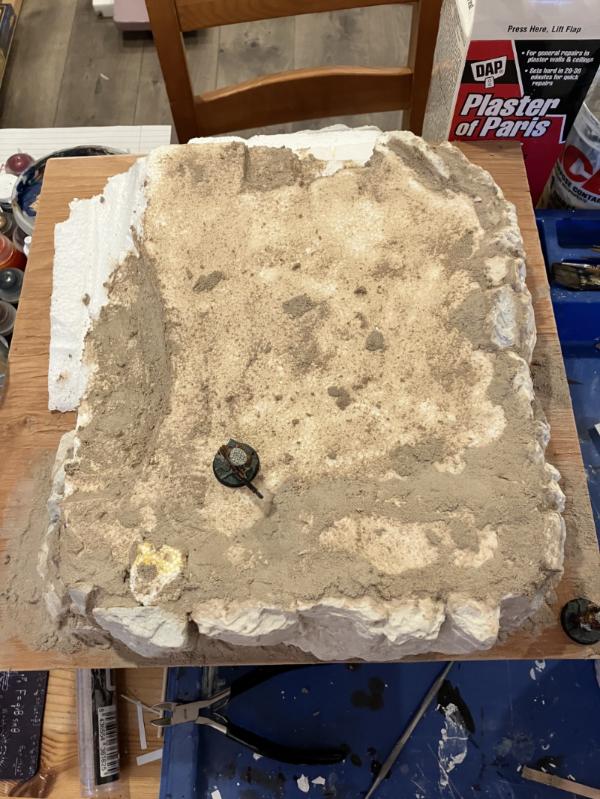
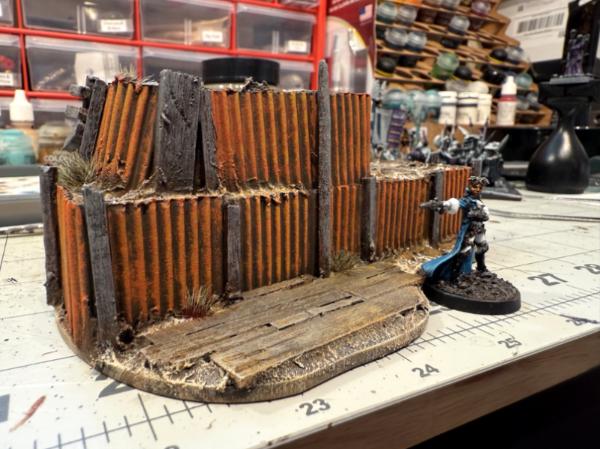
Adding the corrugated cardboard and texturing material (if I did this again, I'd be using sand and glue mix rather than the more pricy Vallejo groun cover, but I'm stuck in that I want it to match.
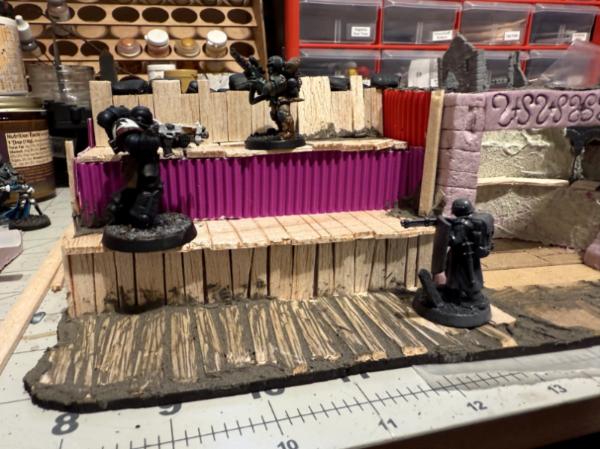
Adding the 'metal basing' trench lining.
I've painted it but forgot to upload pictures! Grr! Naturally I was too busy building something else.
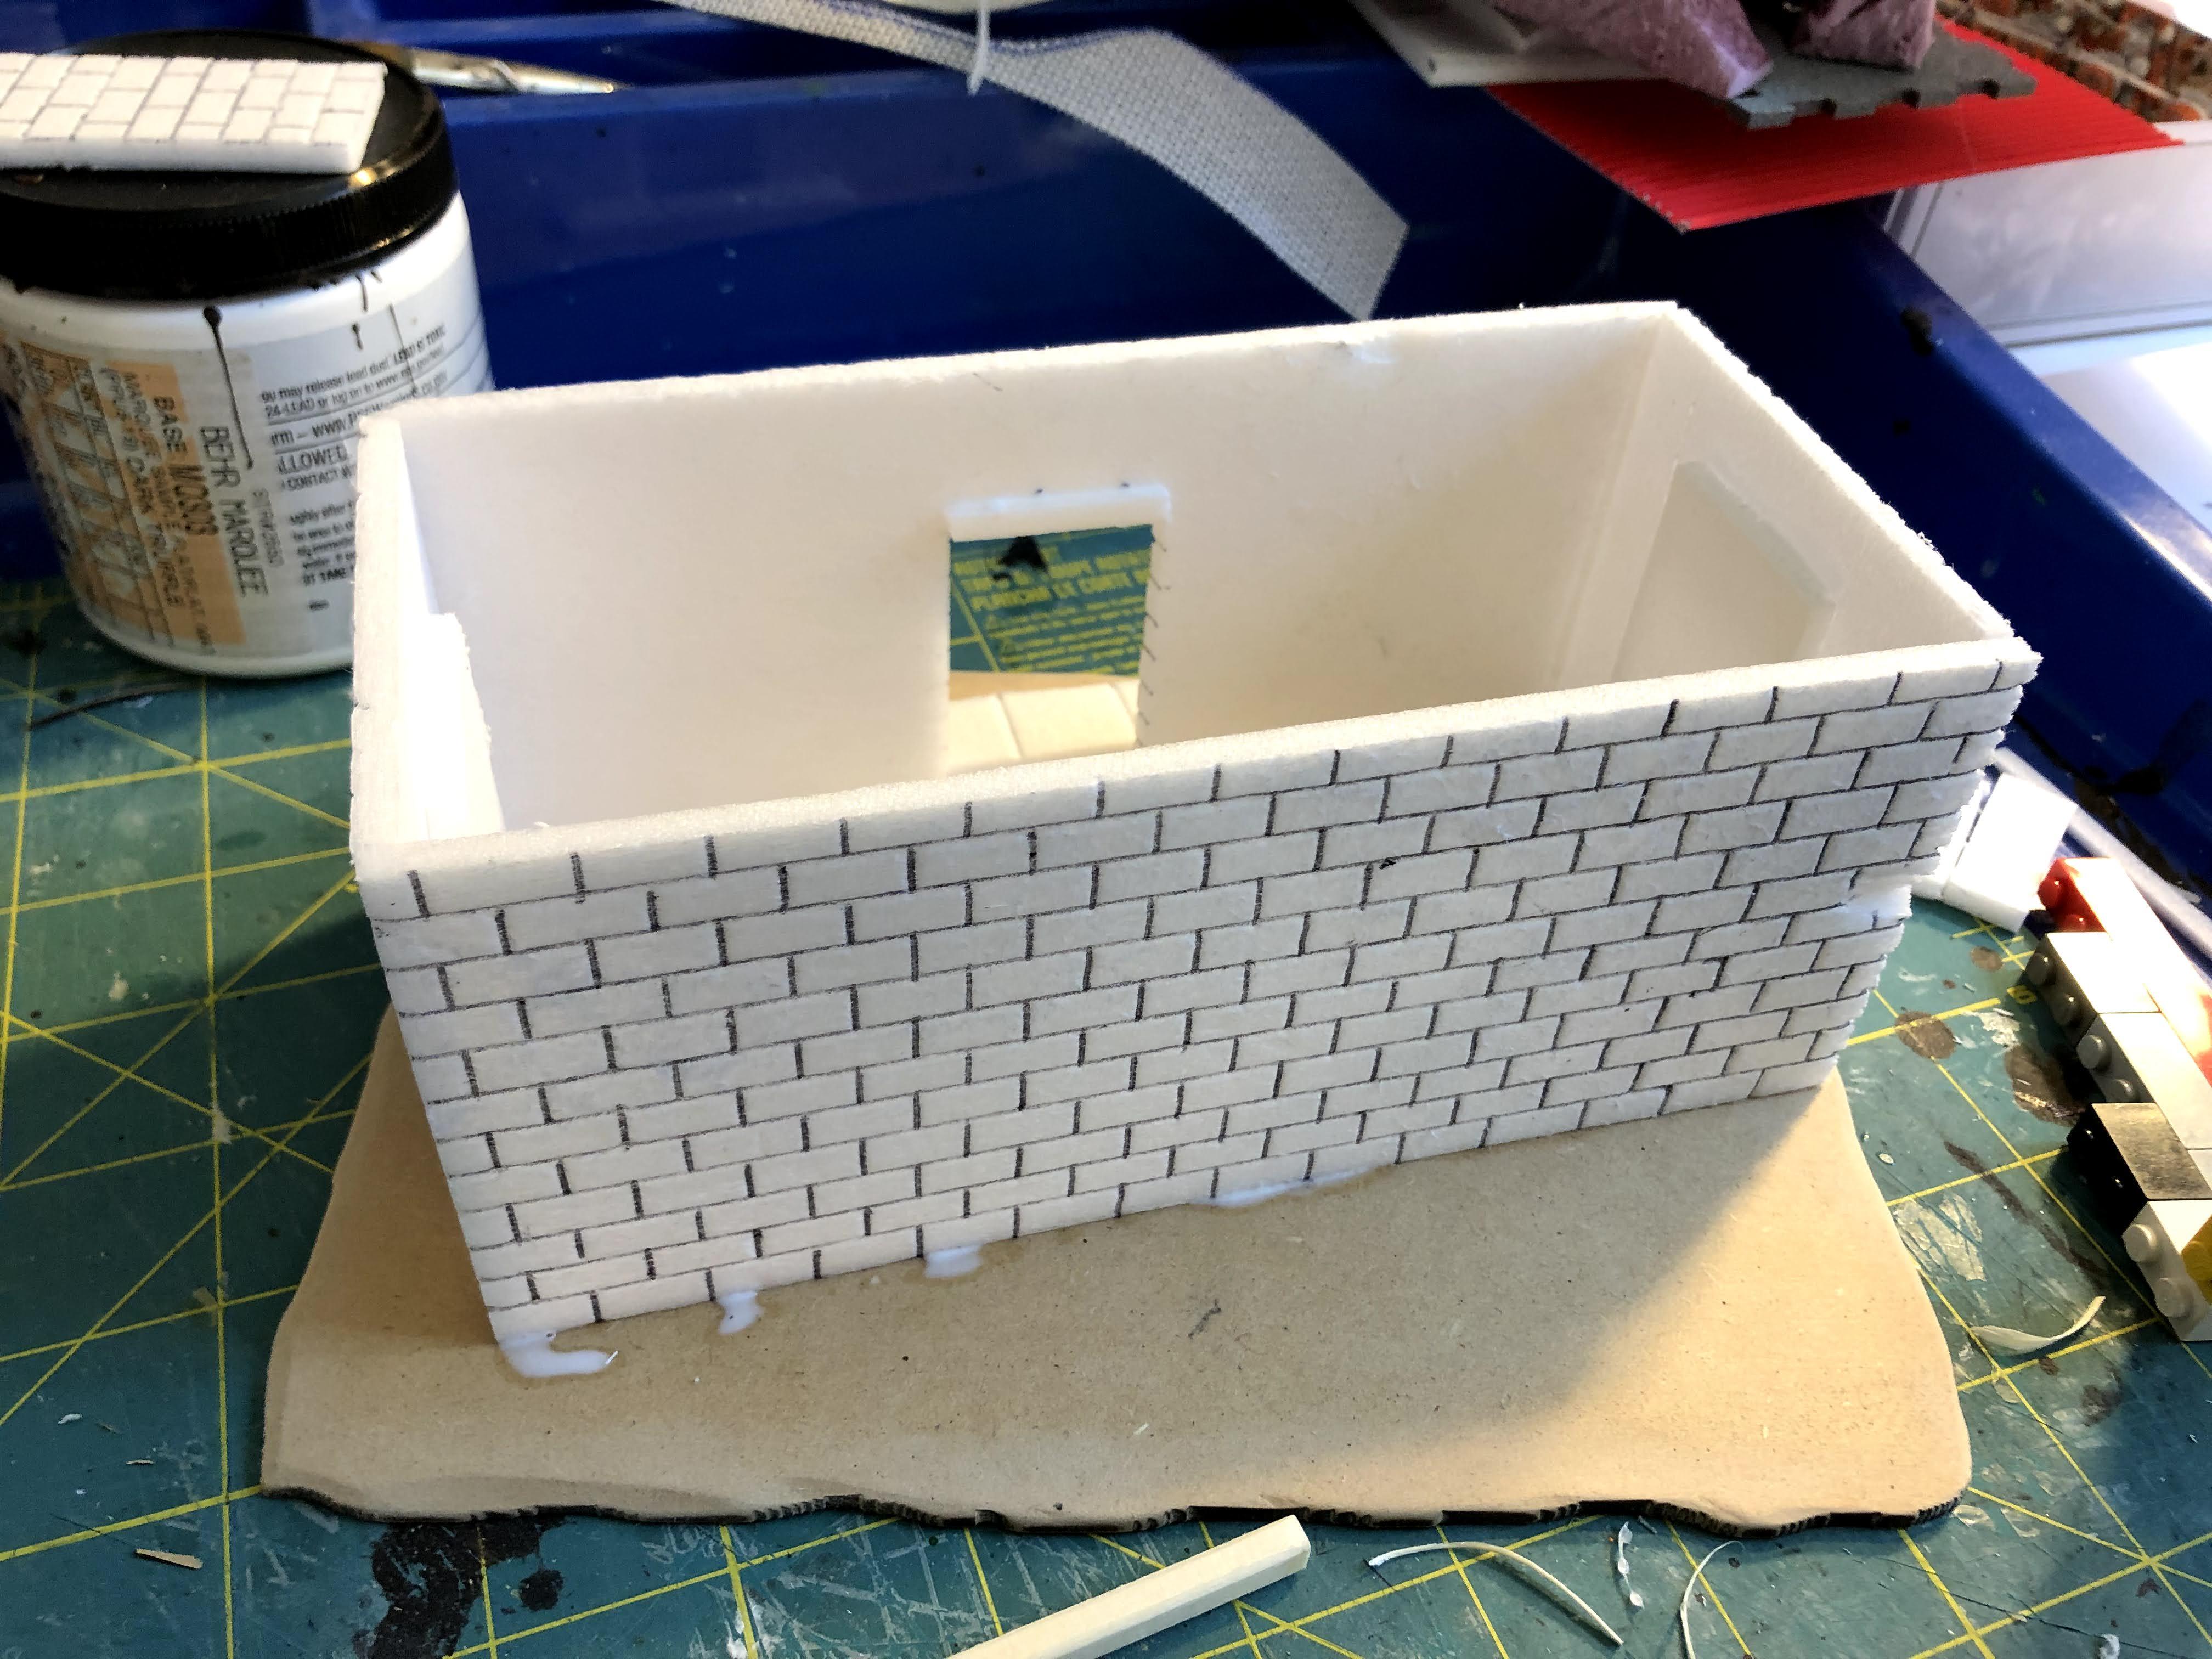
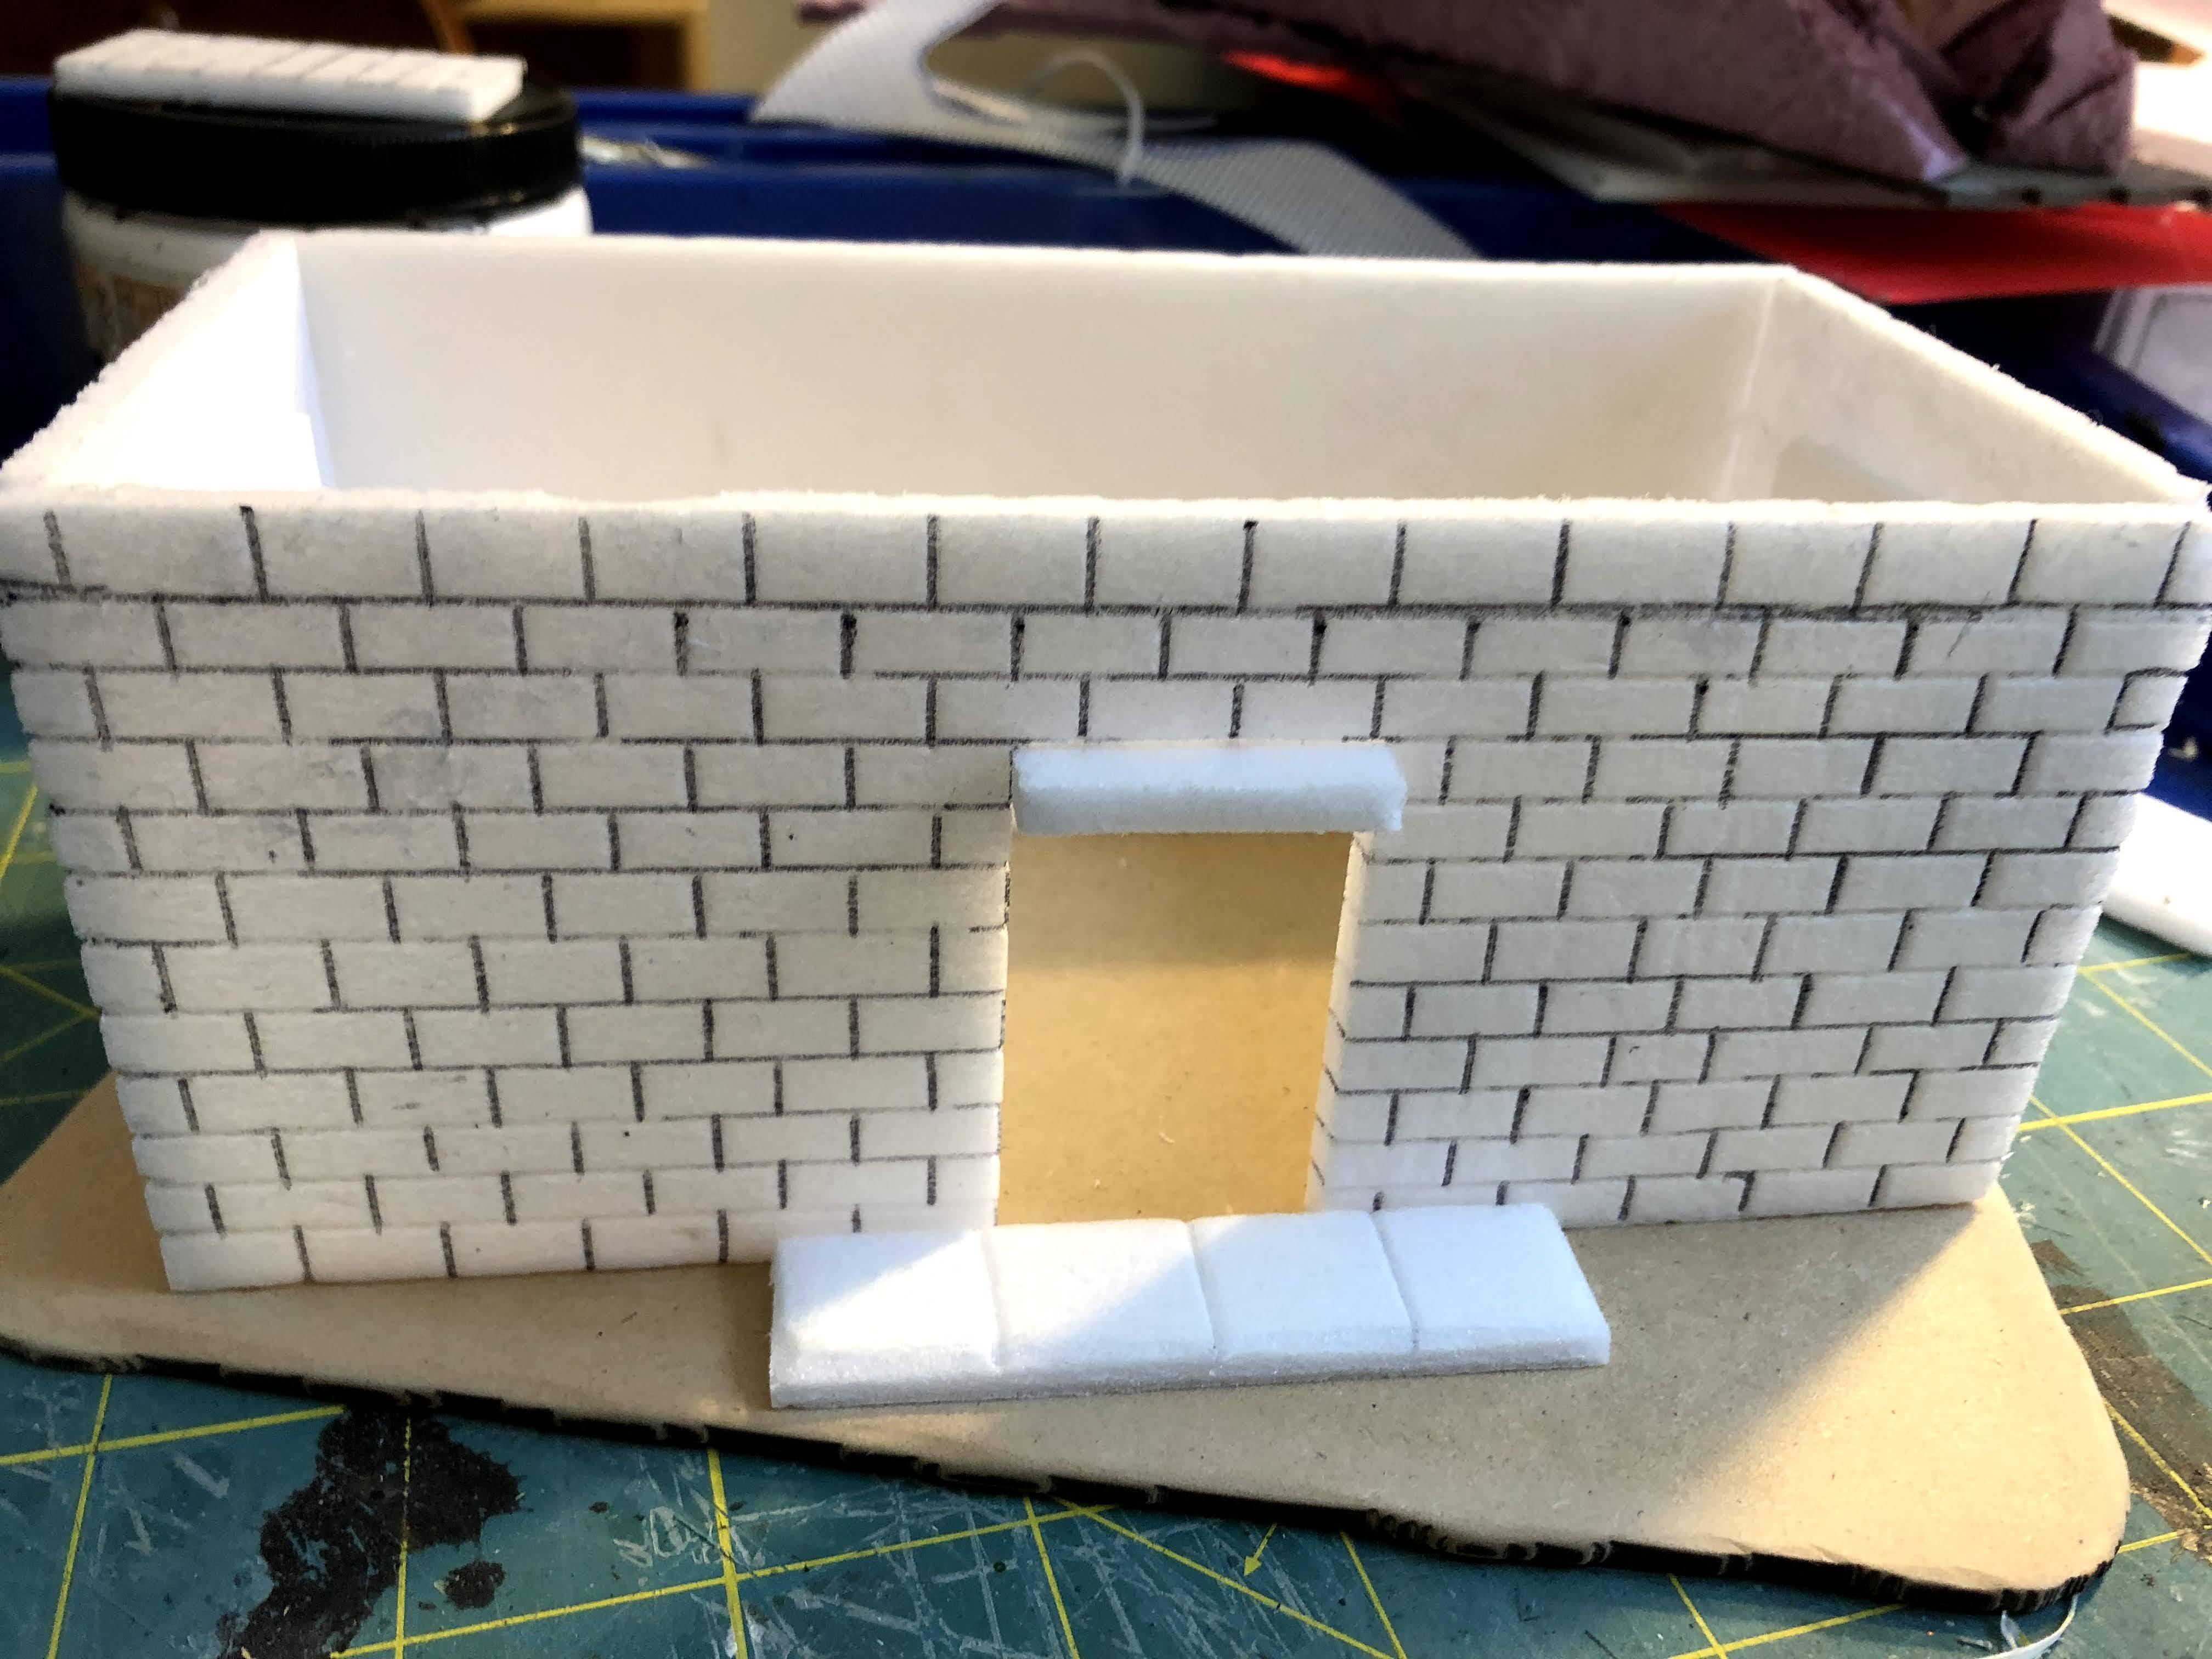
An under construction home. Trying to use foamboard to build in more detail than I've ever really attempted before.
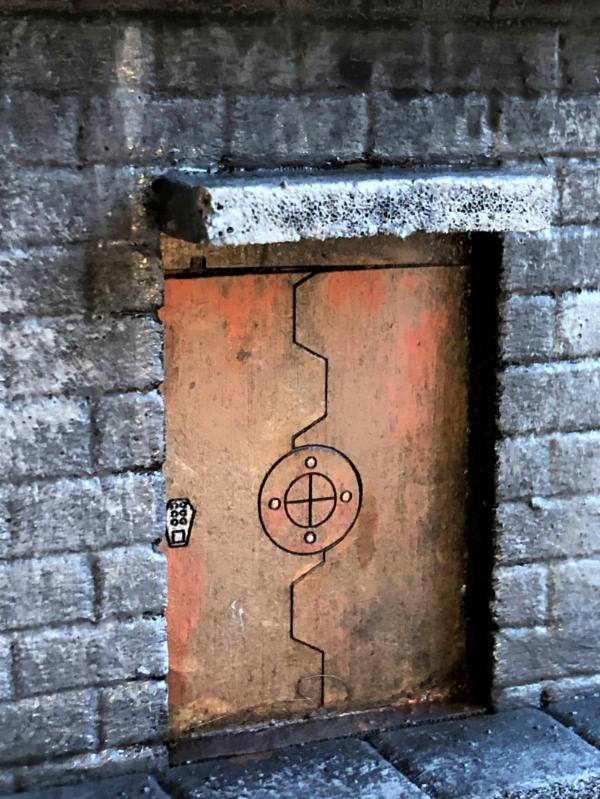
Front side - the door will be higher up so there's not a 'step down' I also didn't want windows in the front as this wasn't going to be a building minis could go in. In retrospect I could have added them (maybe I still can, realistically).
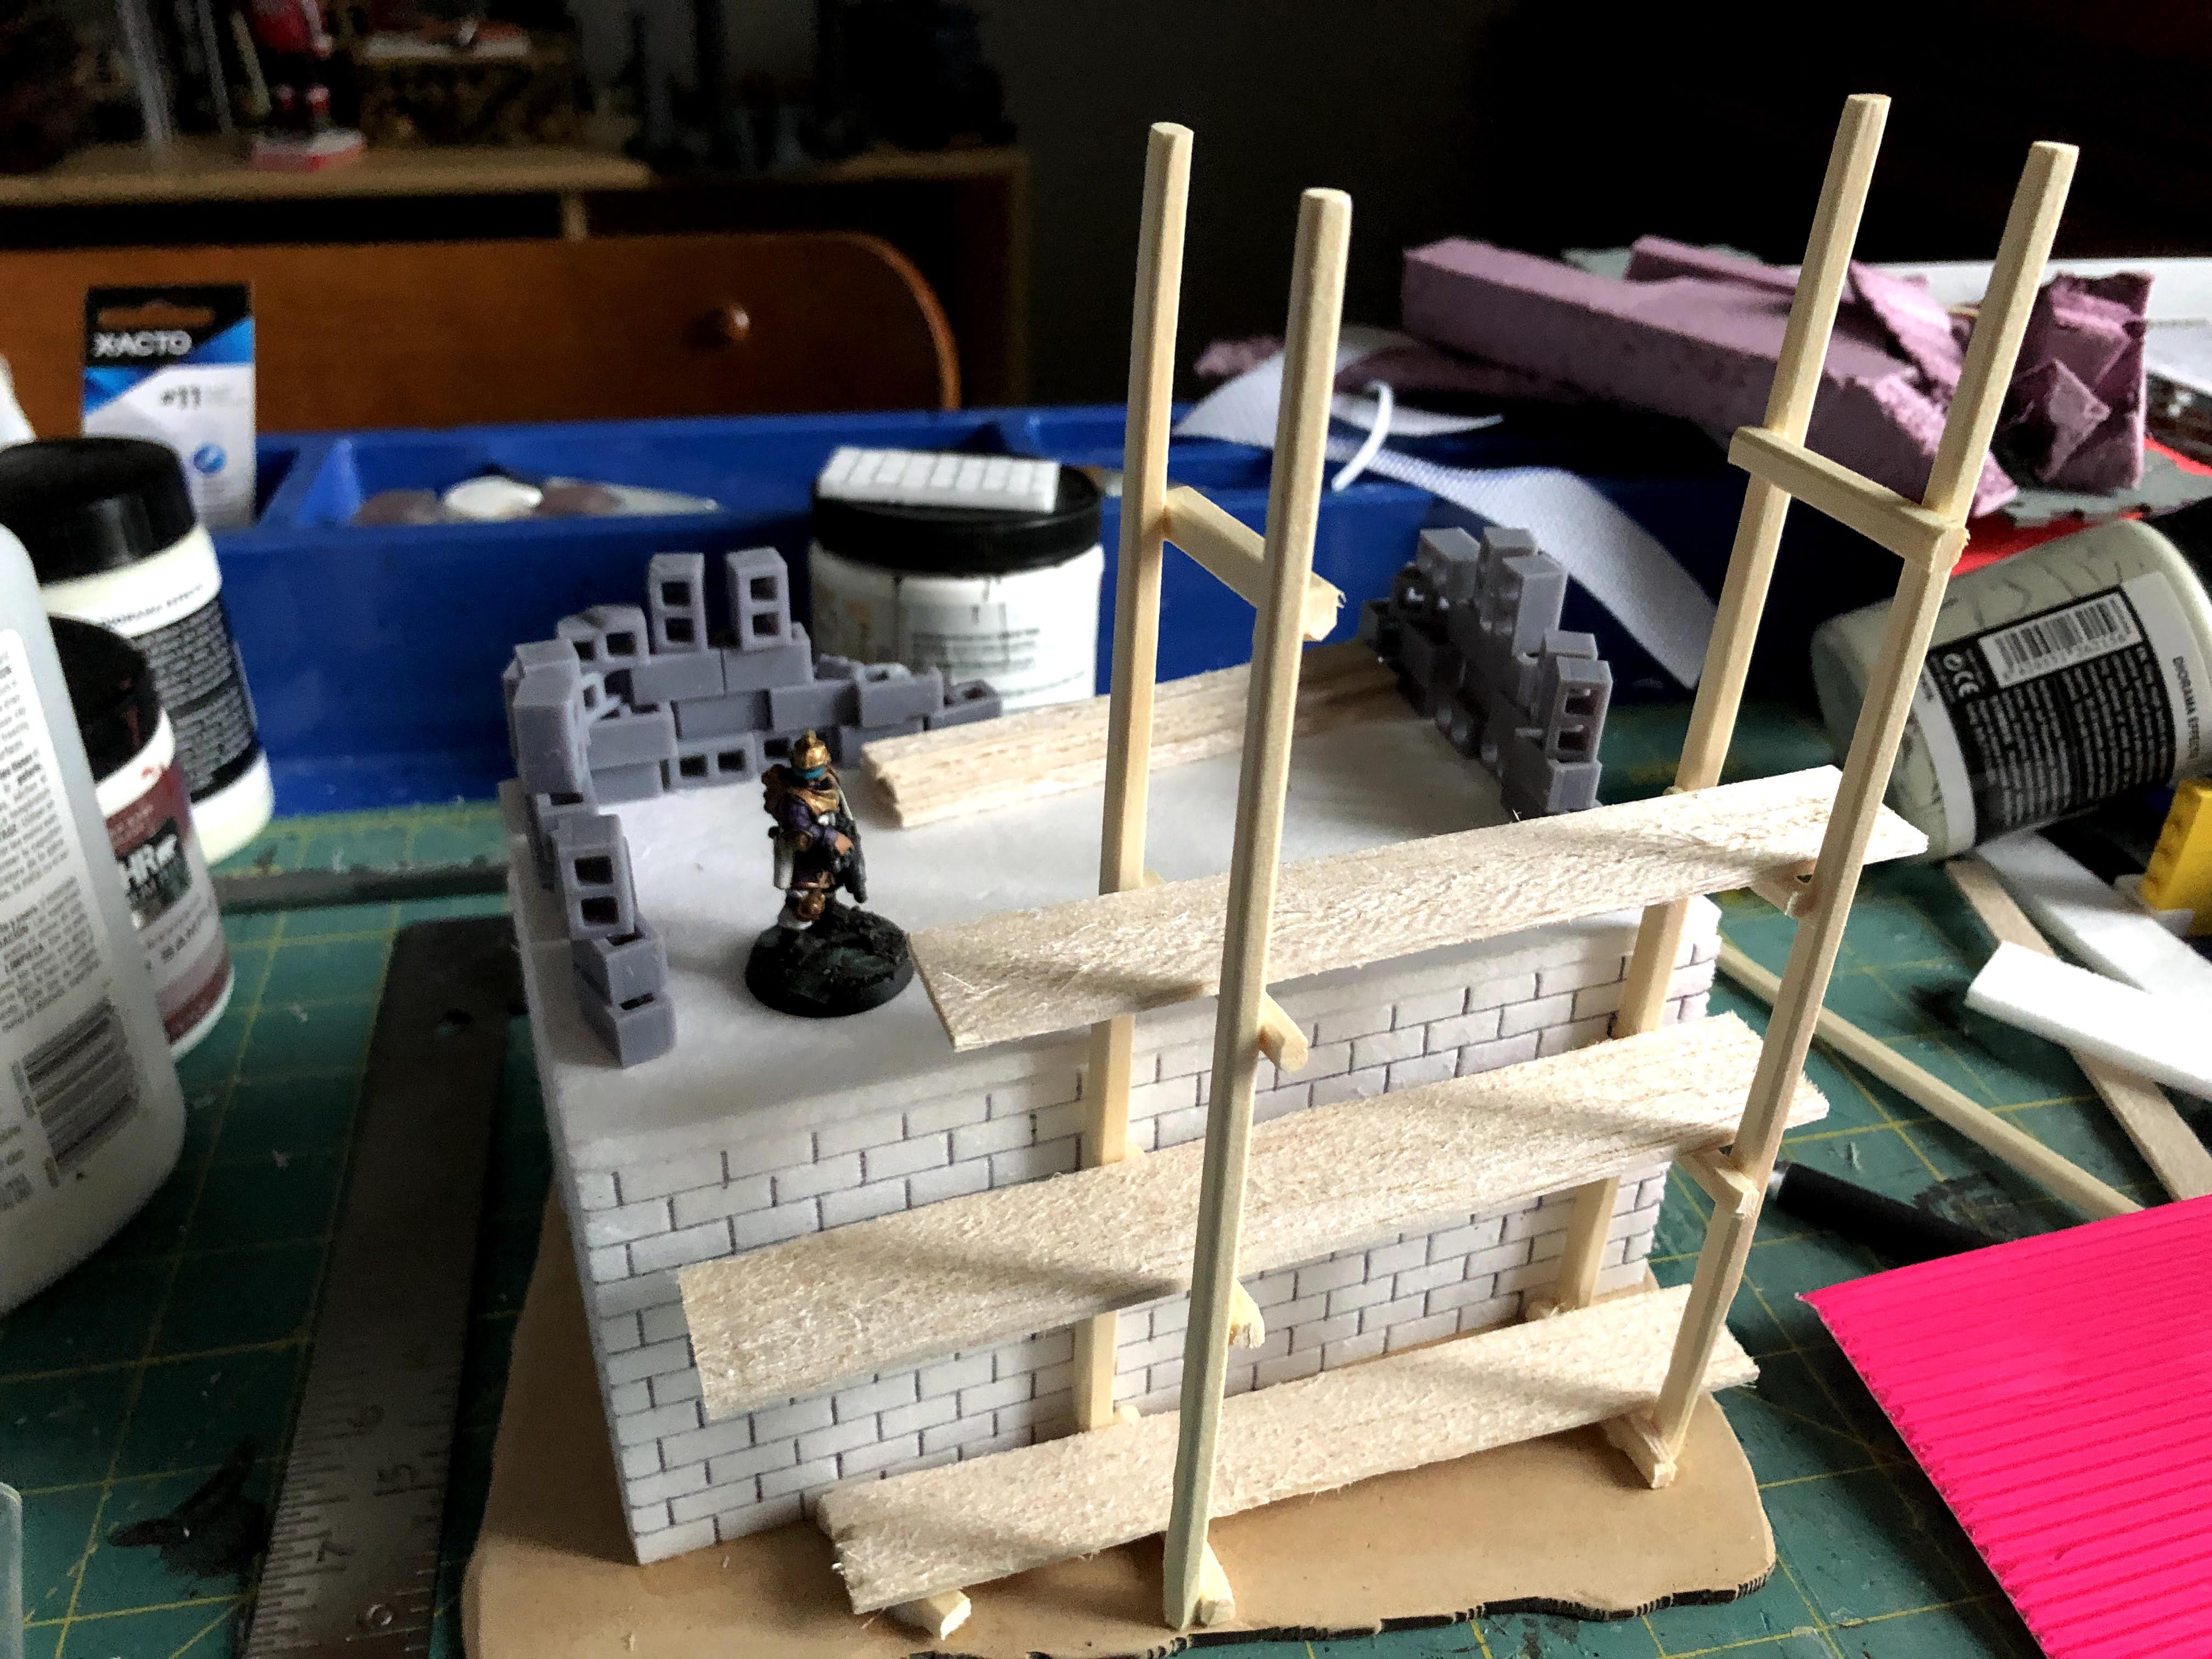
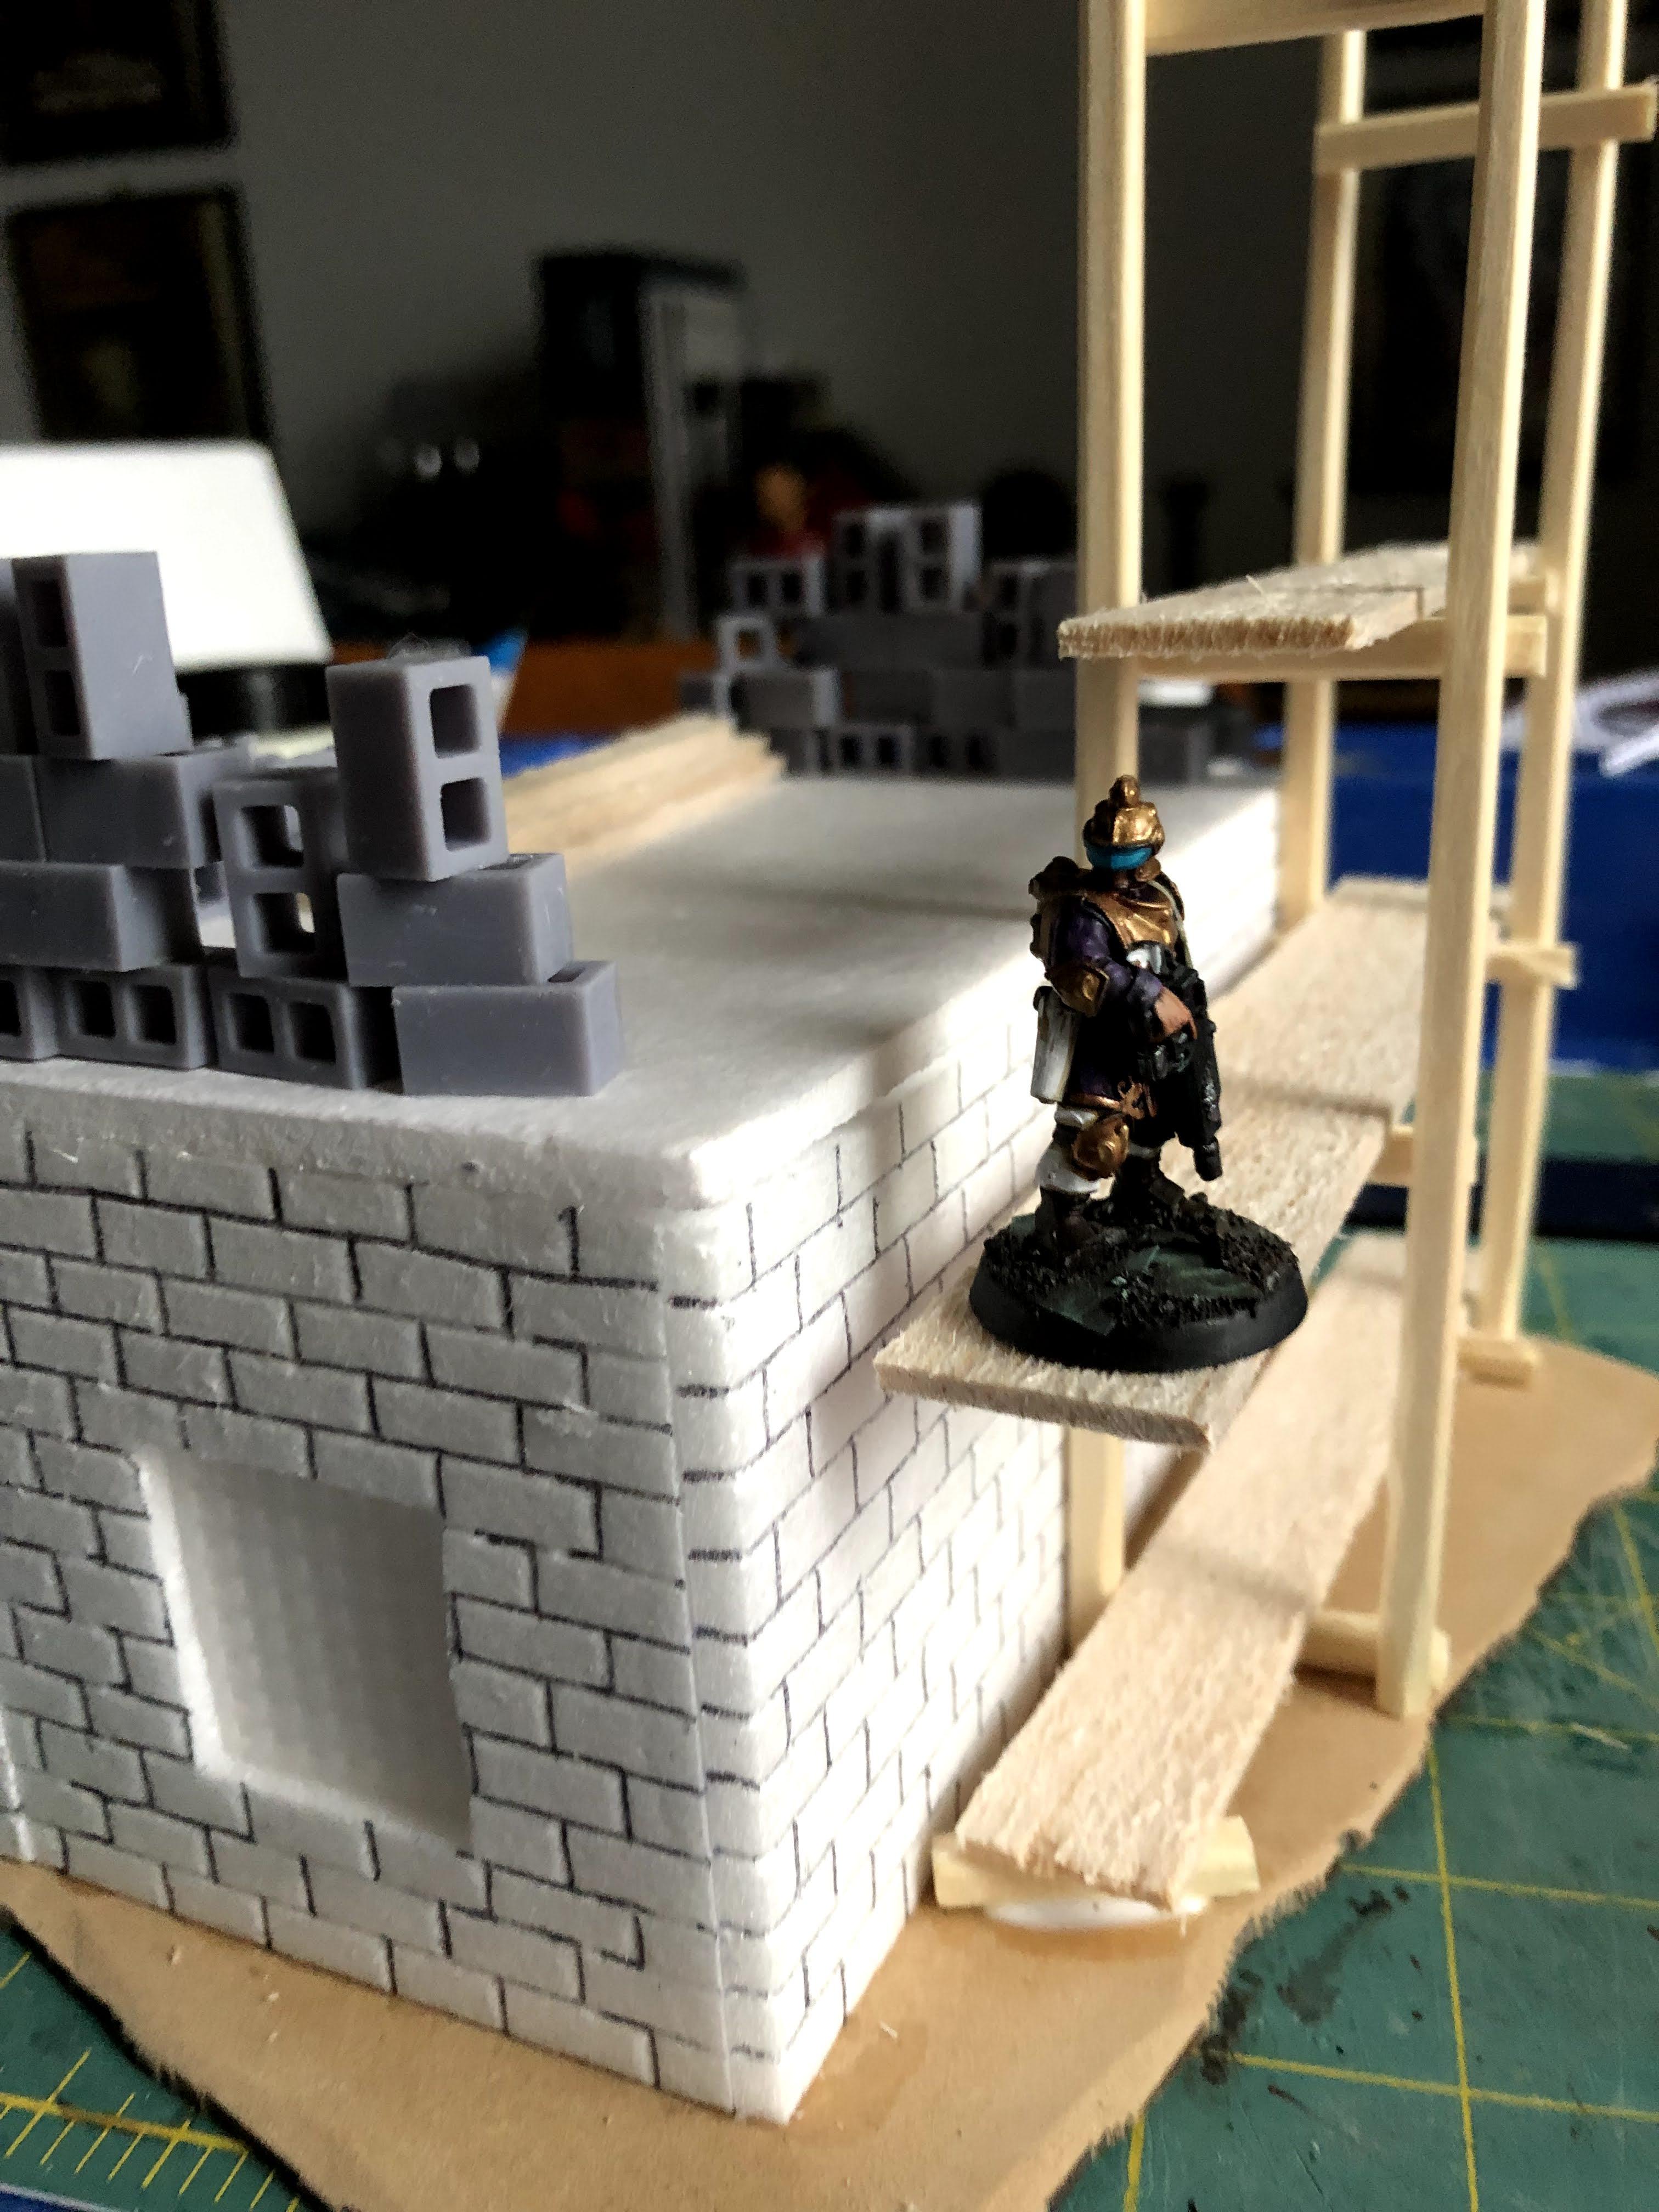
Using some 3-D printed bits and some balsa wood I worked to create a 'second floor under construction' look.
Zoomed in look at the texturing I put on the second floor to make it look like a concrete pad (Modge pod allowed to dry slightly, then swirled on).
Added some scaffolding in the back. A ladder will be the last addition. One more photo!
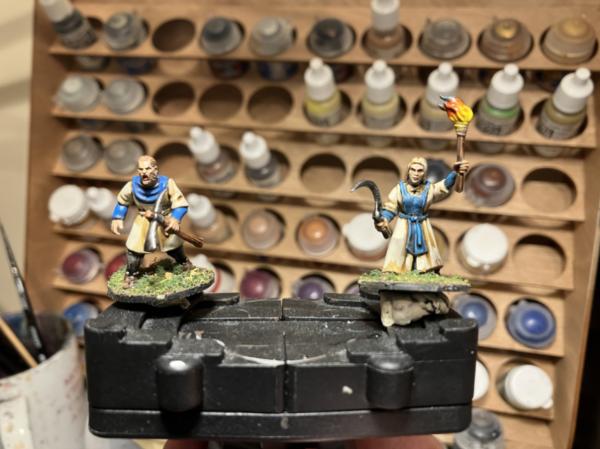
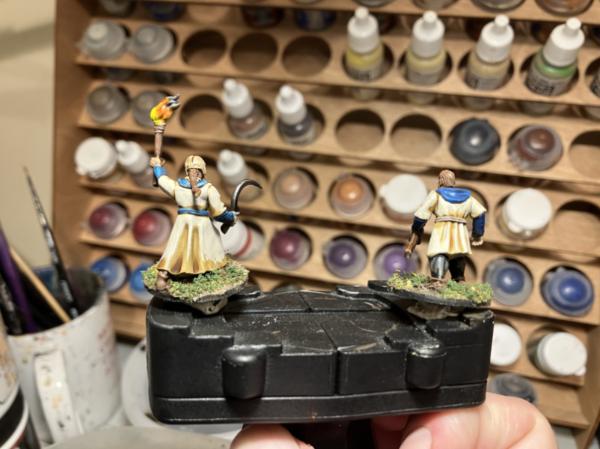
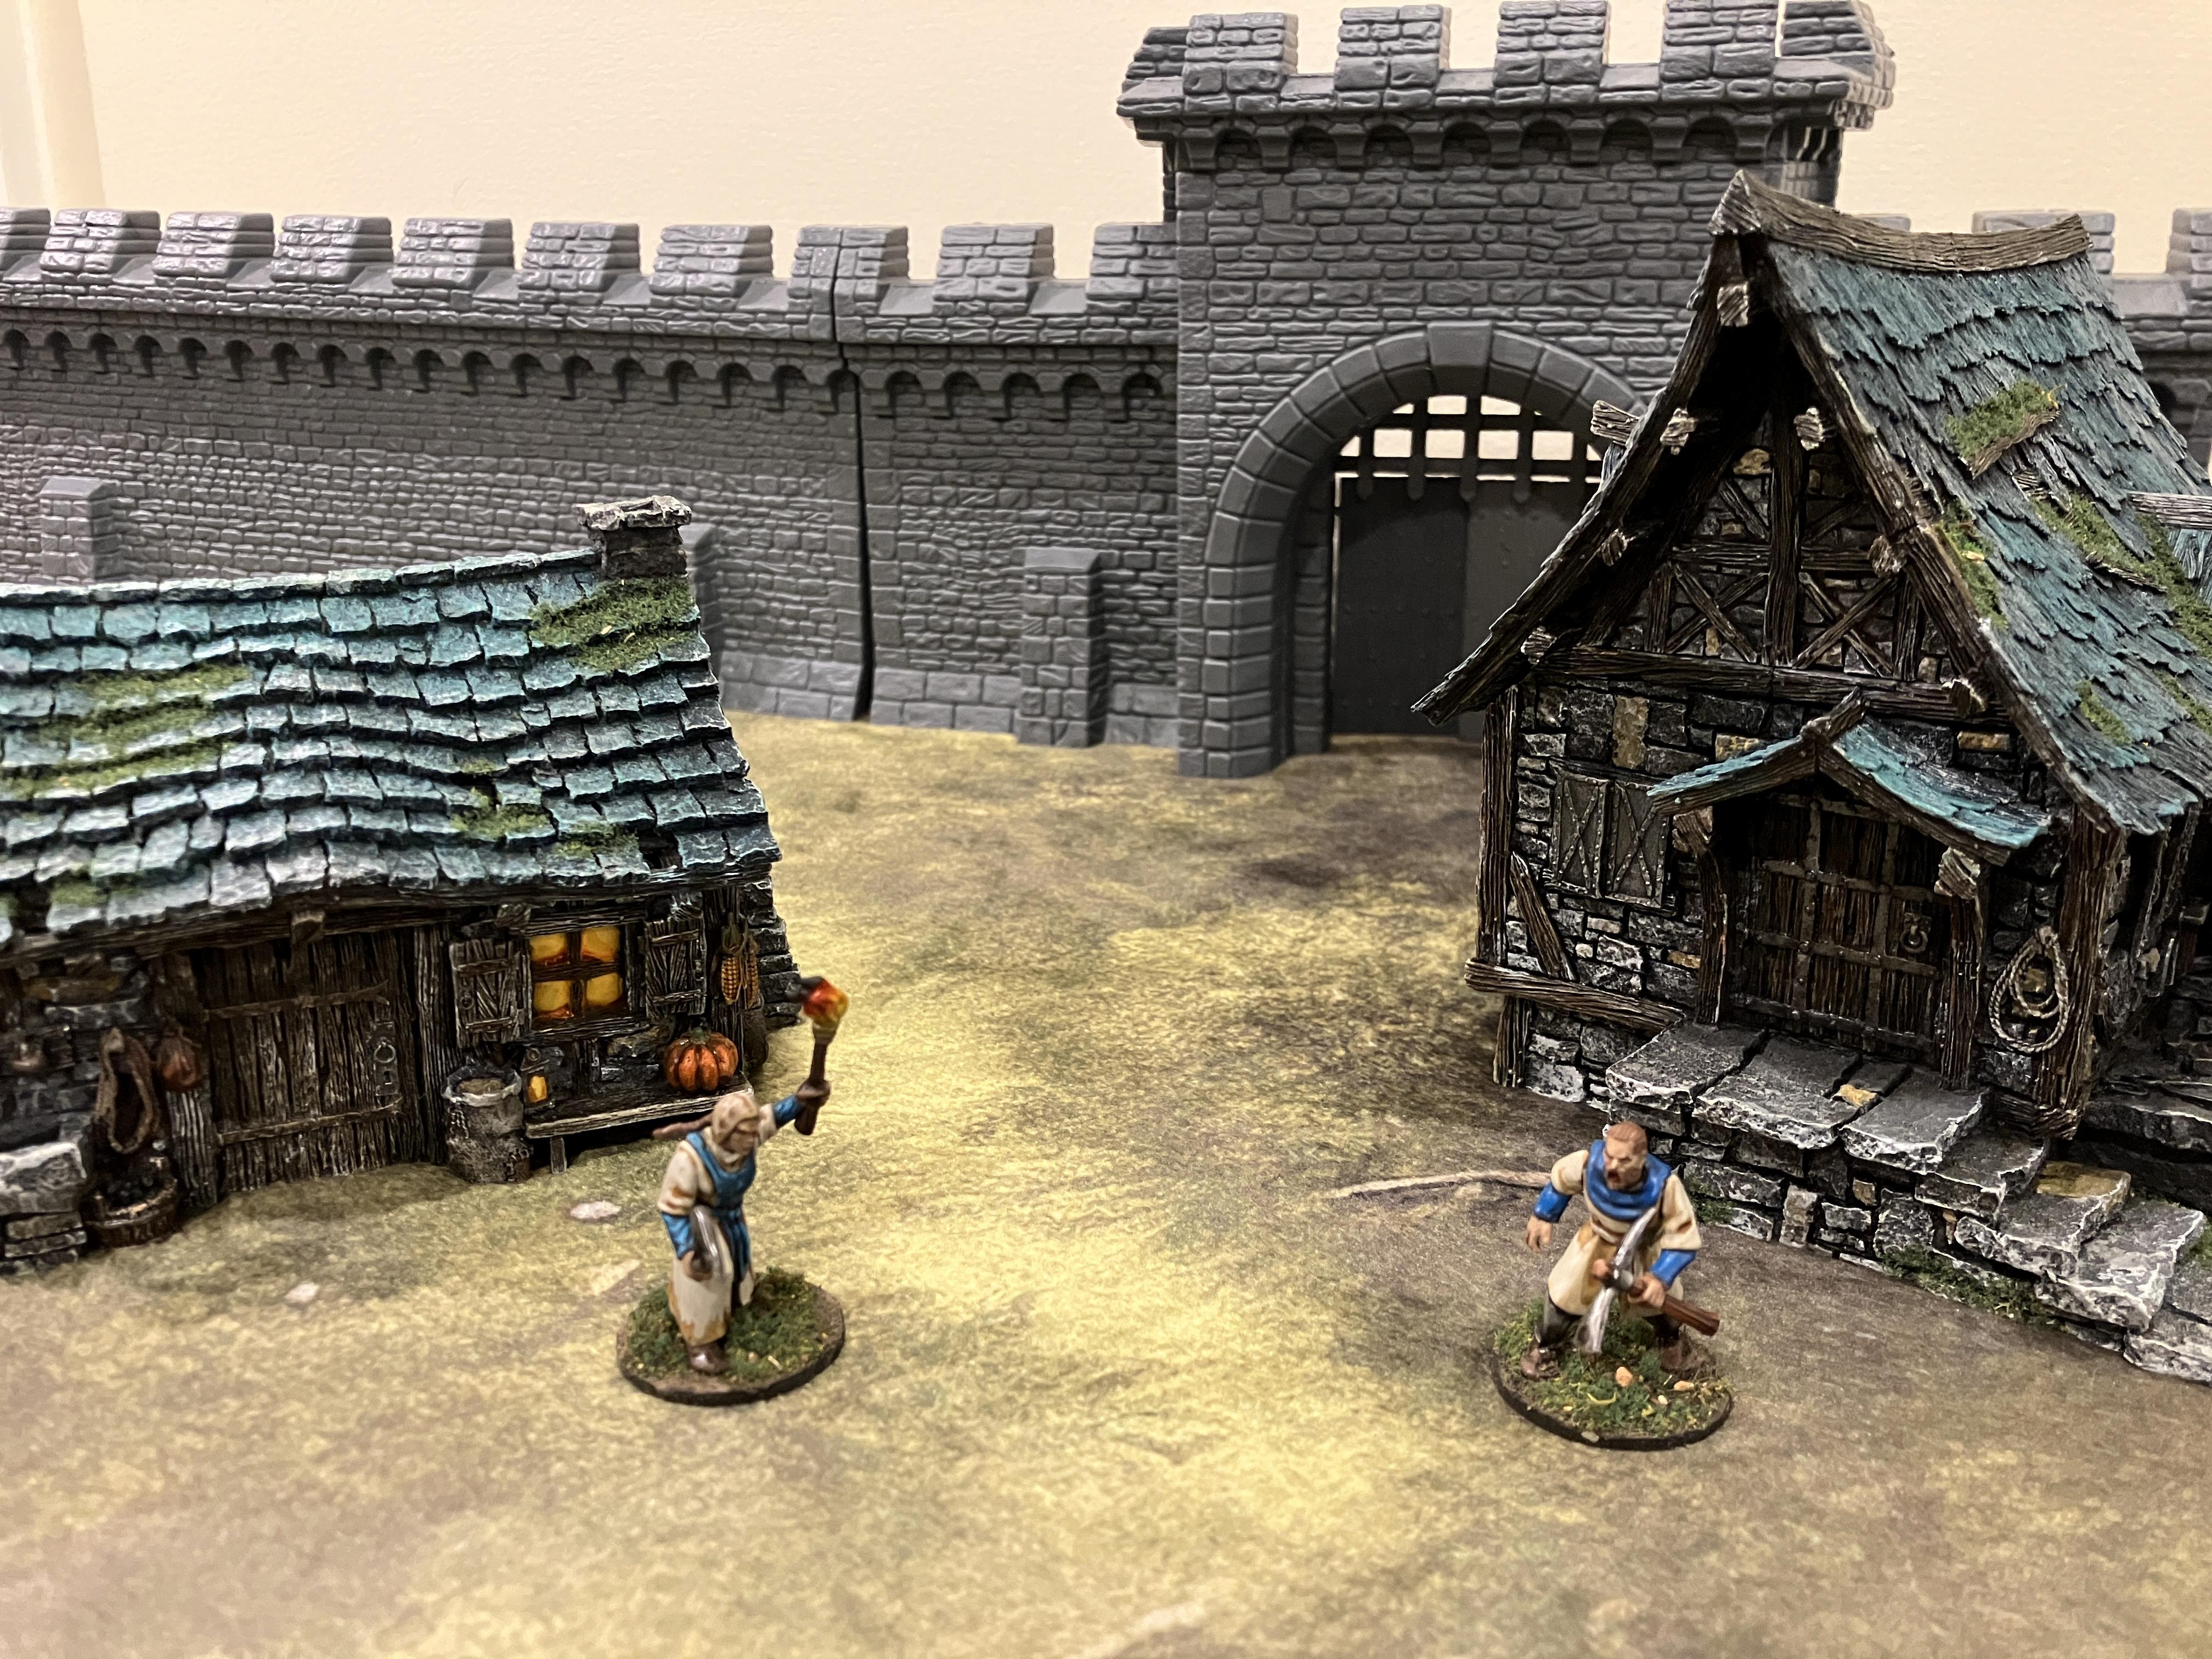
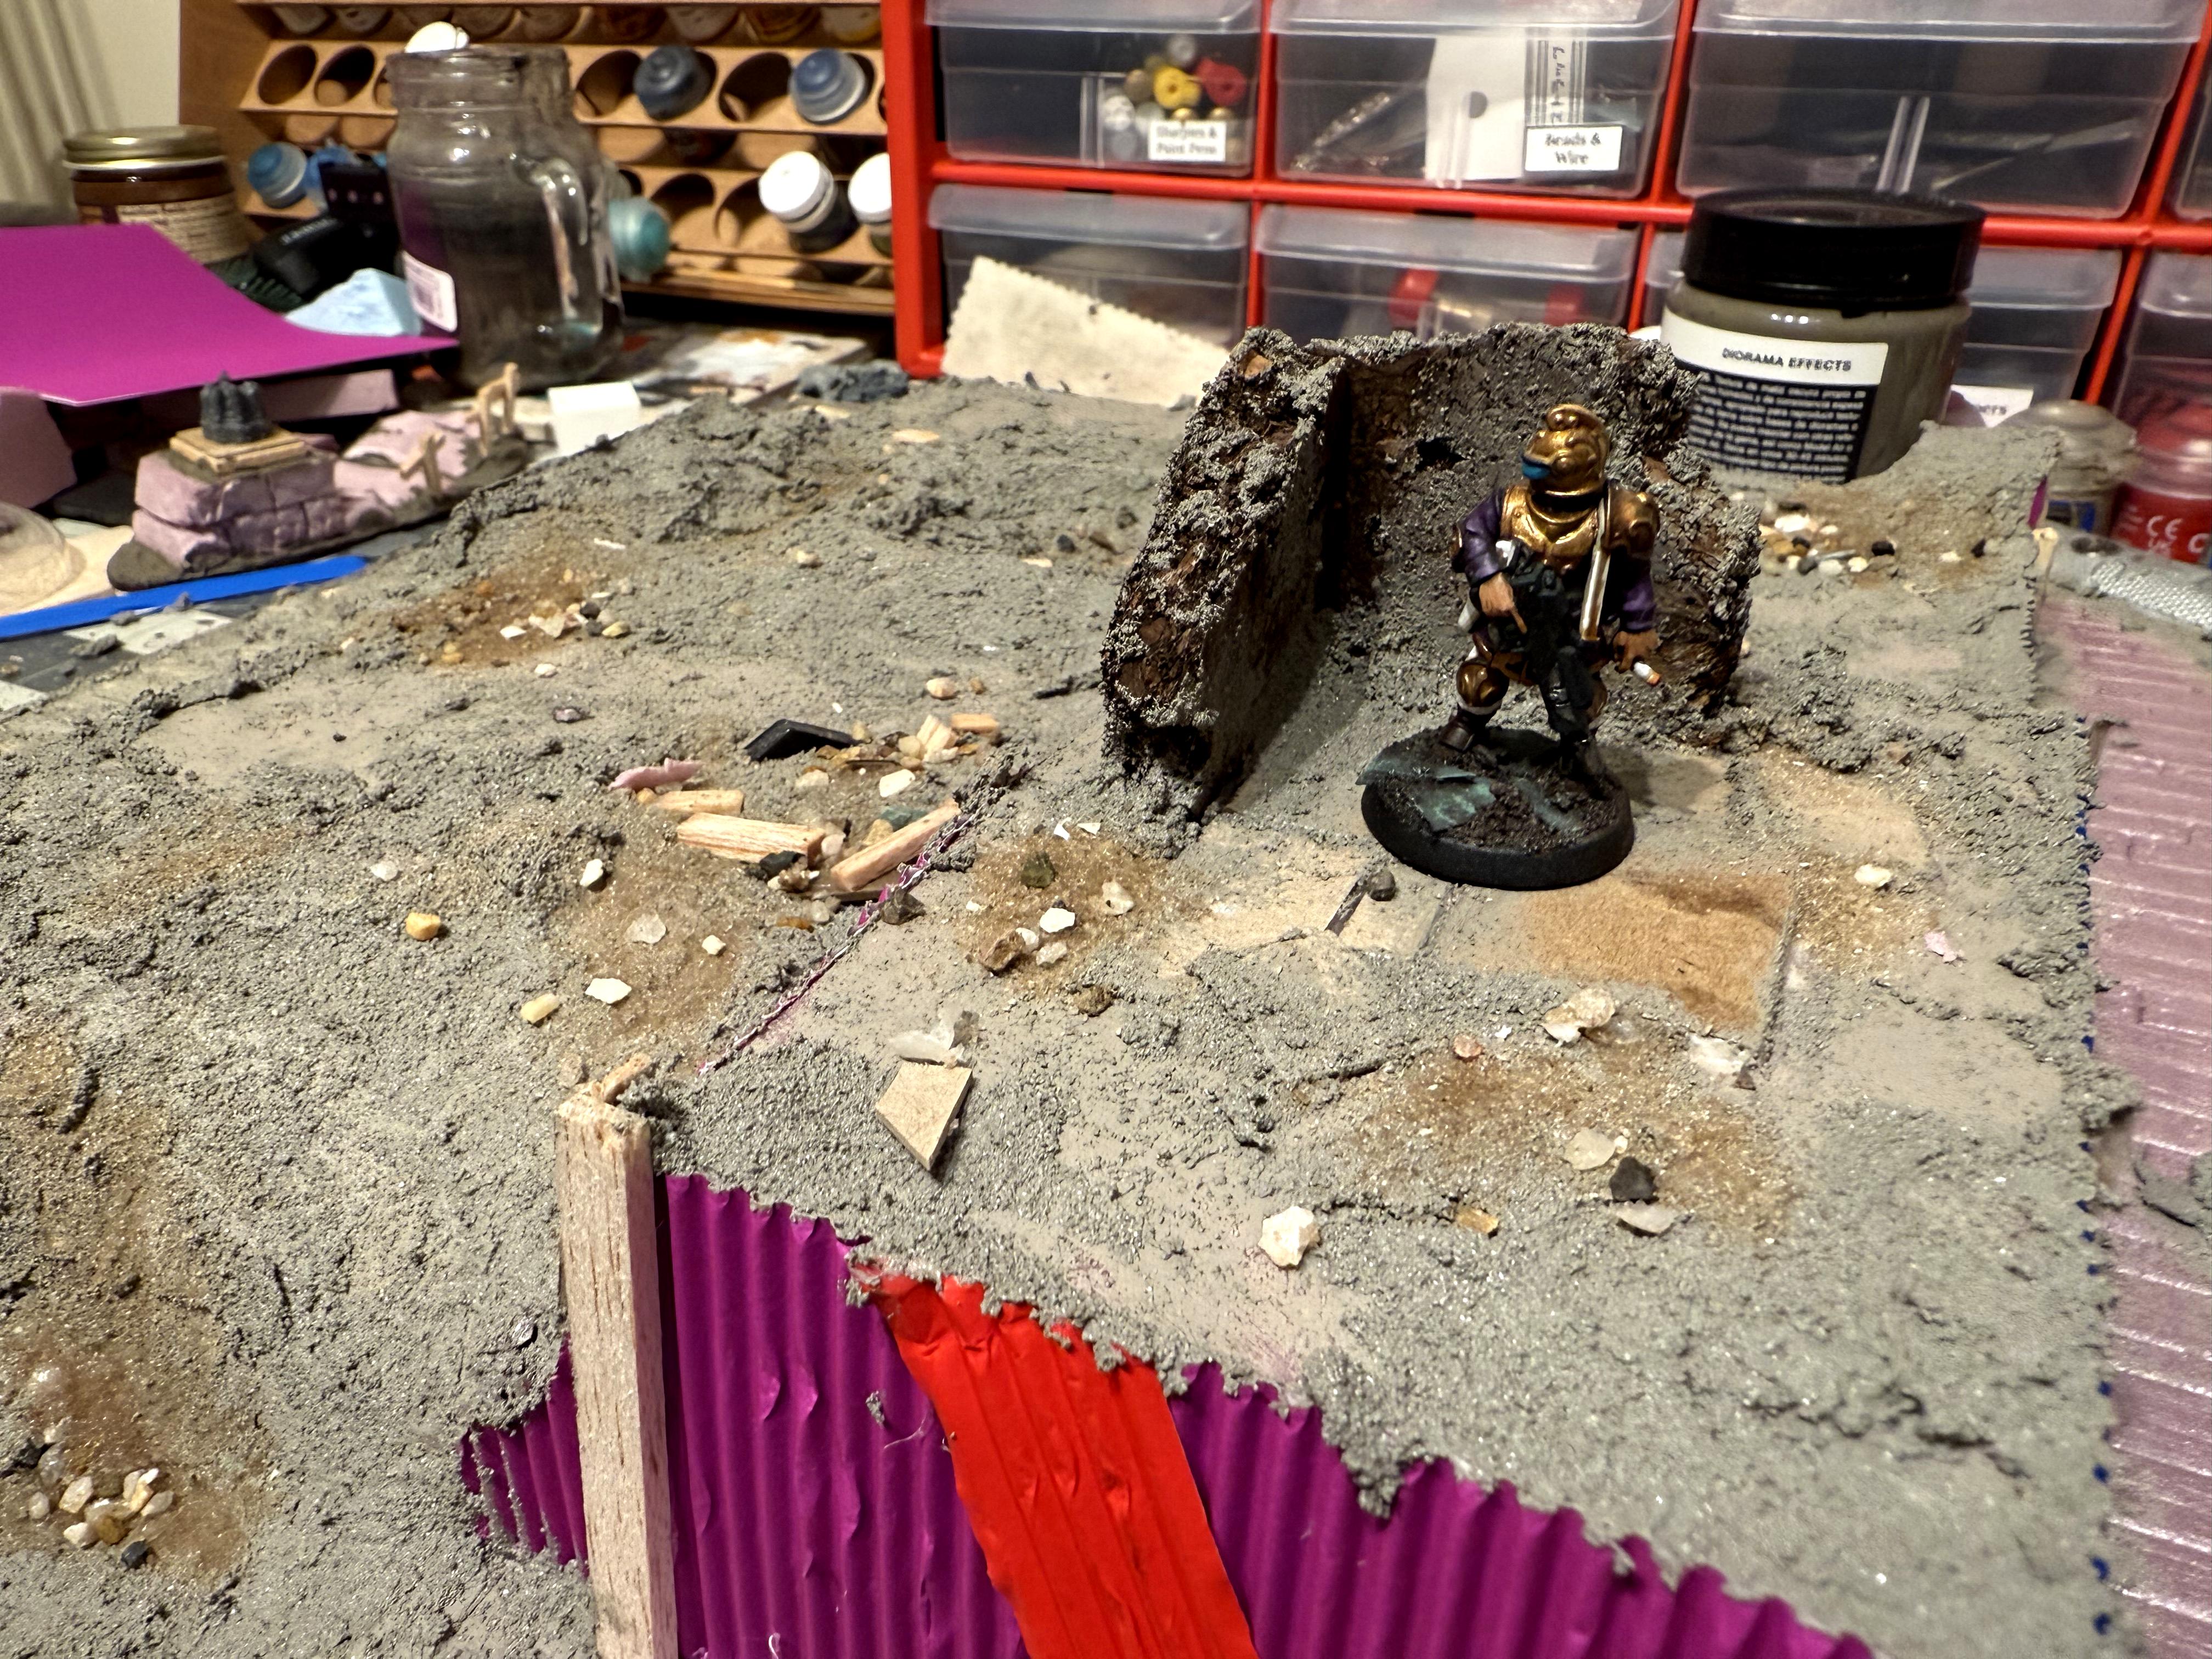
Firstborn Grenadier Krenil surveys the ruins. He is not pleased that it's not painted, but also should he be smoking around a construction site?
cygnnus wrote: Nice gritty look! Looks very much lived in.
It would be an honor to kill some xenos scum in those humble abodes.
Valete,
JohnS
Thanks!
Unfortunately, now that I've looked at my Elucidian Starstriders more closely (been using them as Scions in my Vostroyan List) I now want 5 more to make a squad of ten. Sigh. Just when you thought you'd managed to avoid buying yet more minis.... (he says with three shopping carts open on multiple websites).
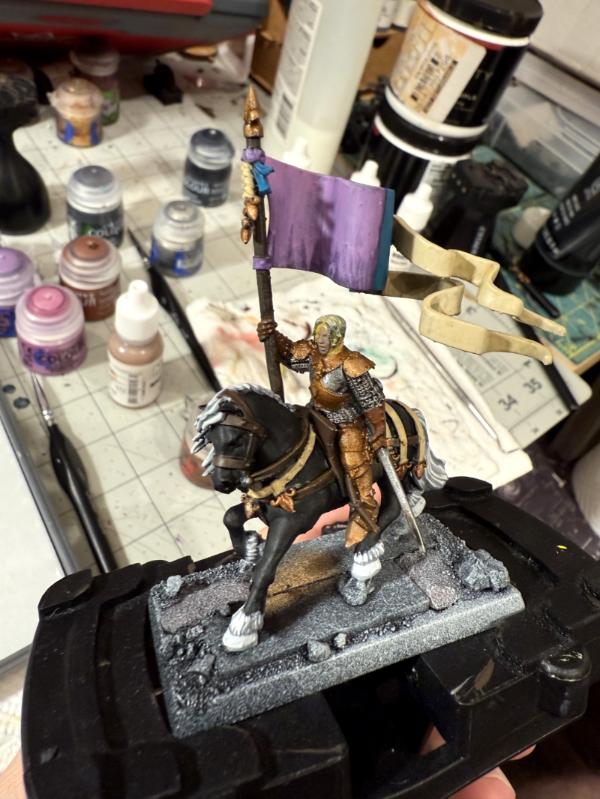
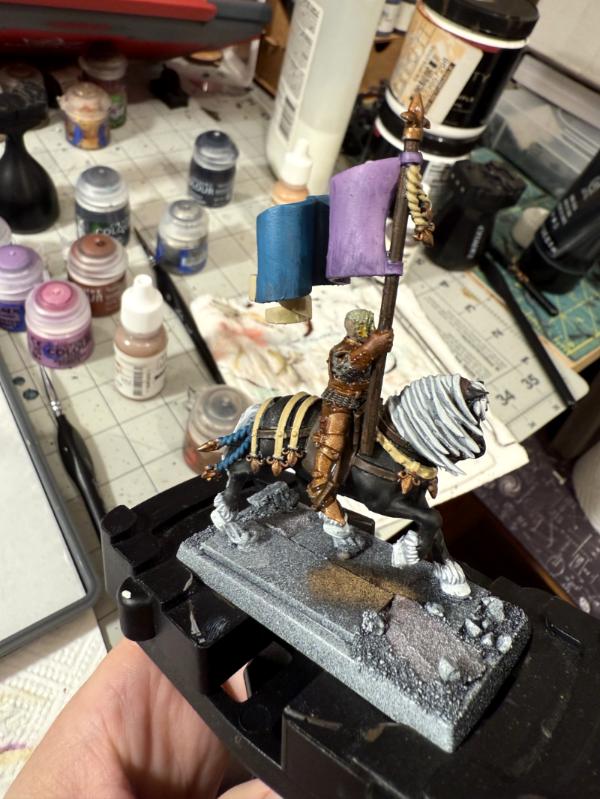
Greetings! Back again with another update since I finally finished my test piece for this next stage in this commission. I also managed to sneak in a game day where my Lydian Lancers got an outing and managed to go 1 and 1.
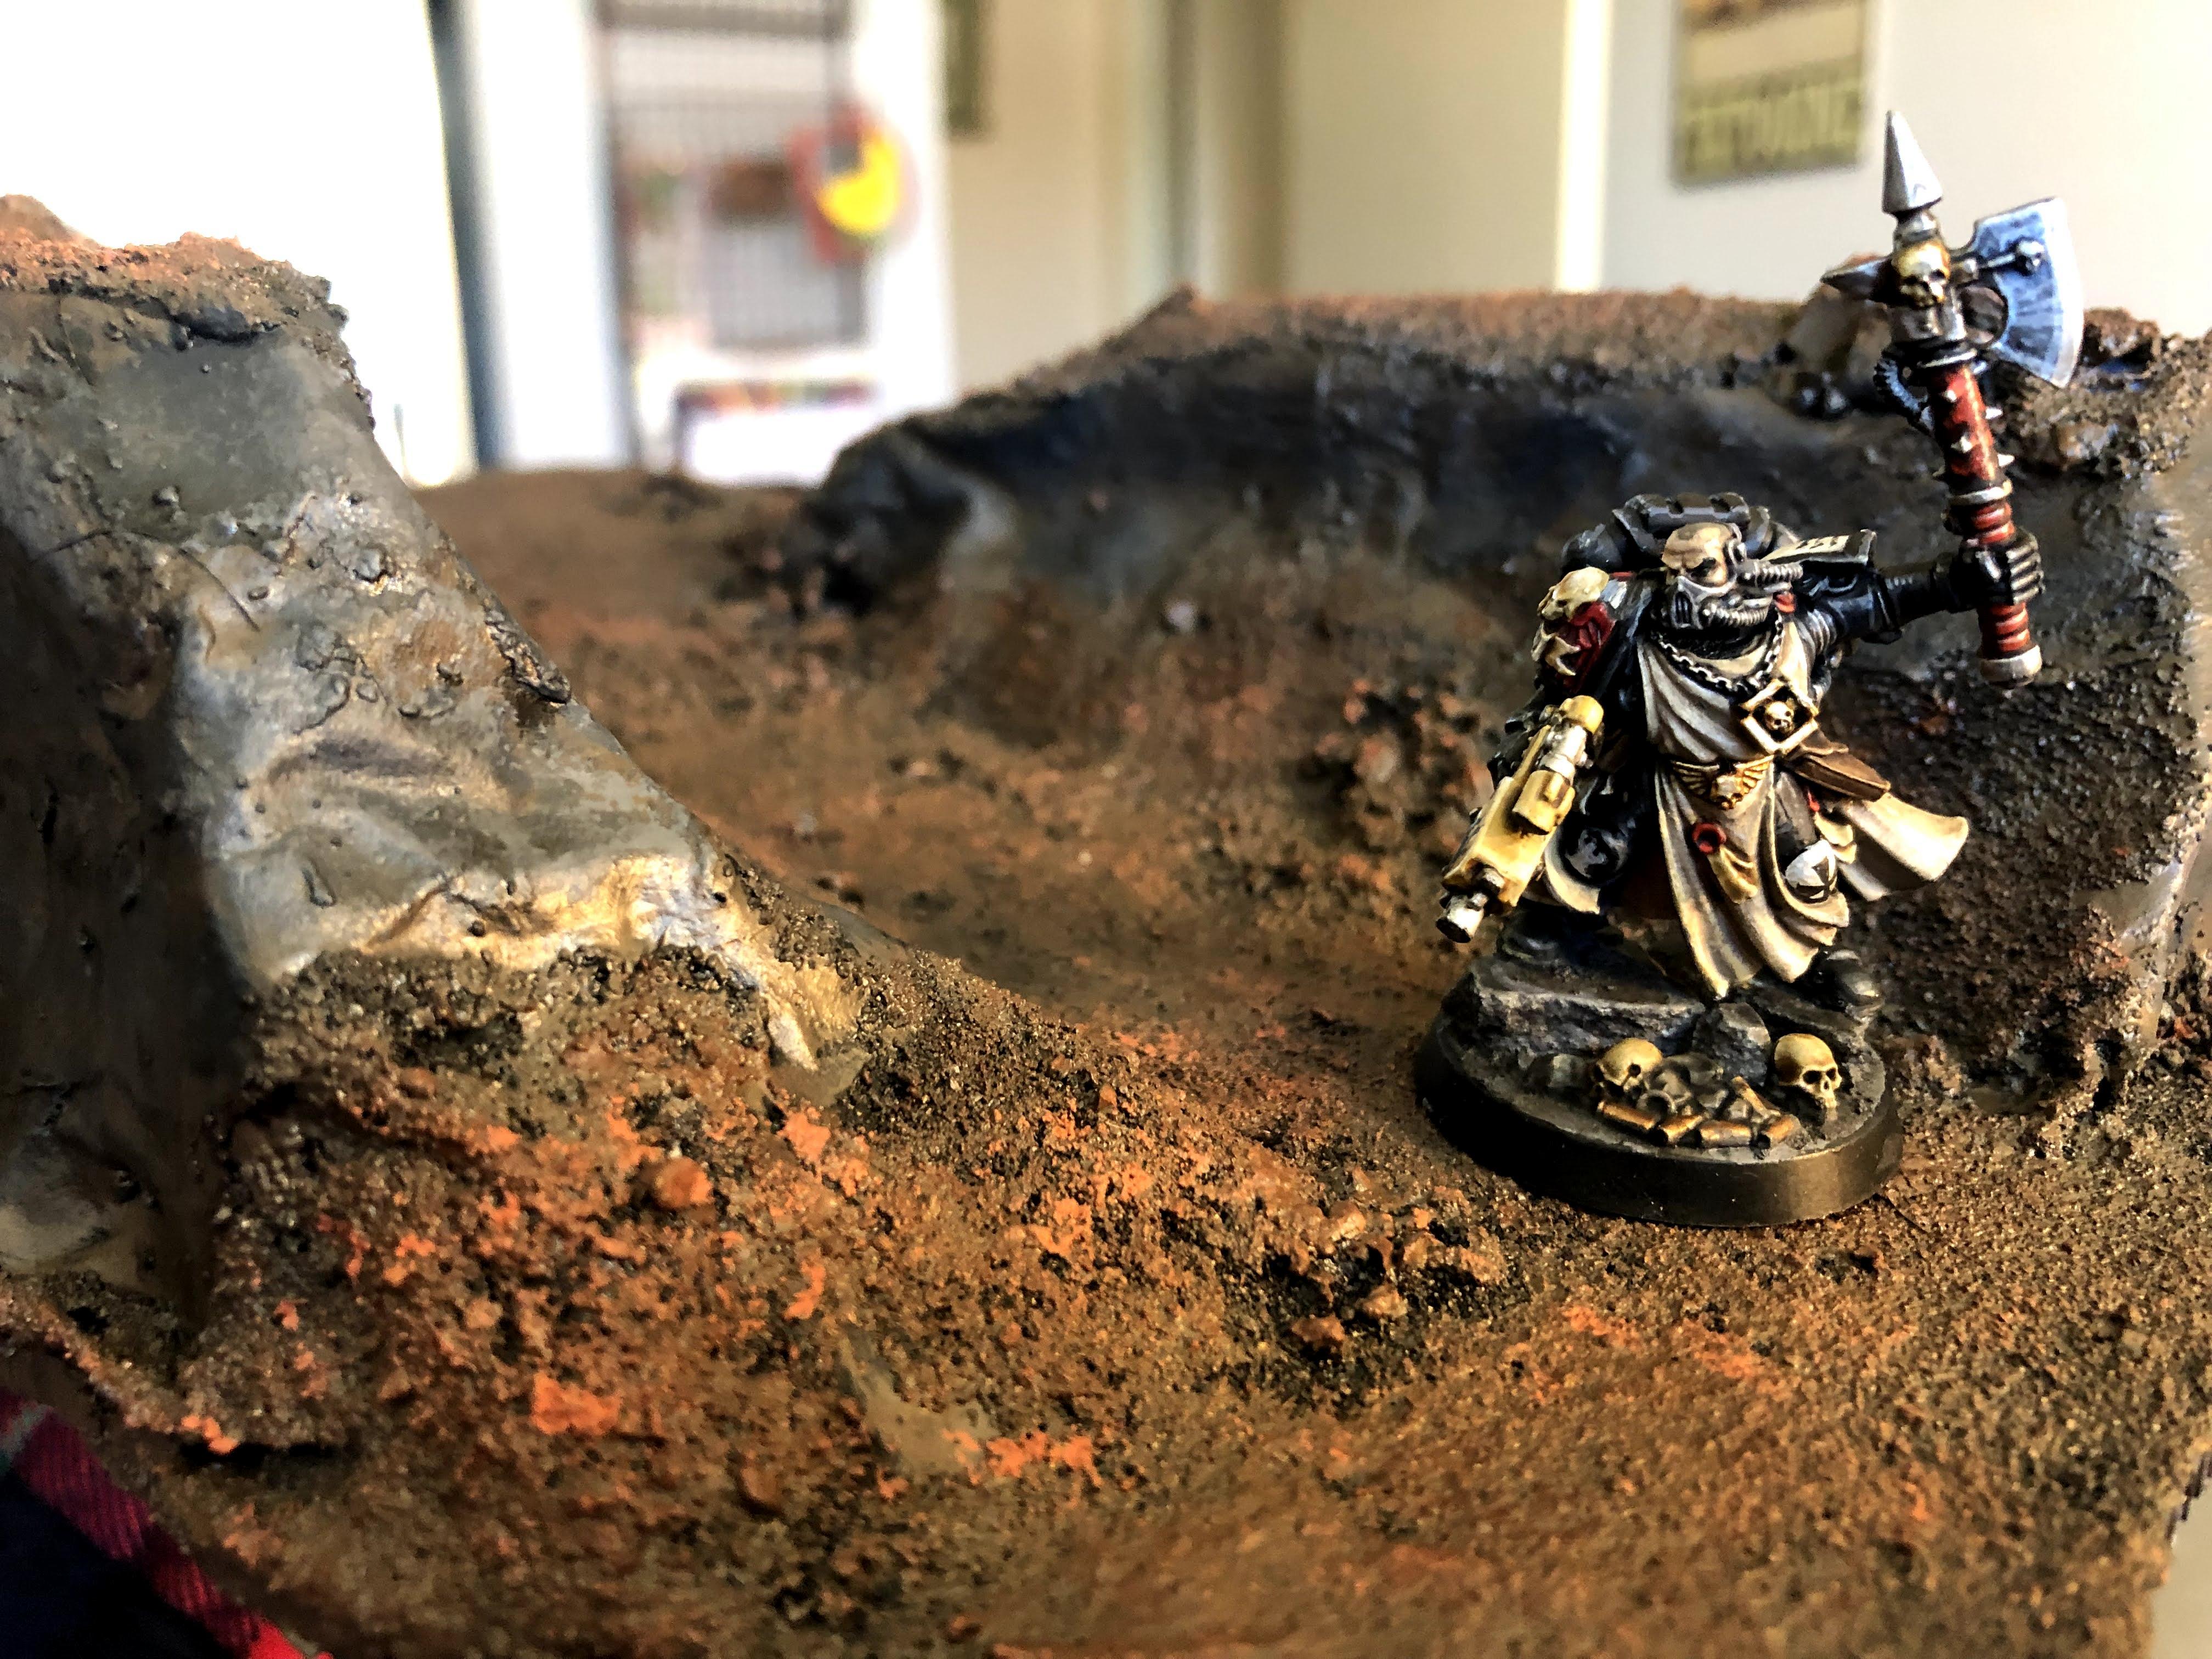
Without further ado, here's some badlands pictures with in progress photos. As I've said, I'm testing out some ideas, and liked what I did with this piece a lot, but I decided to spend some additional money on Plaster of Paris bandages to really give these hills some added 'umpf'.
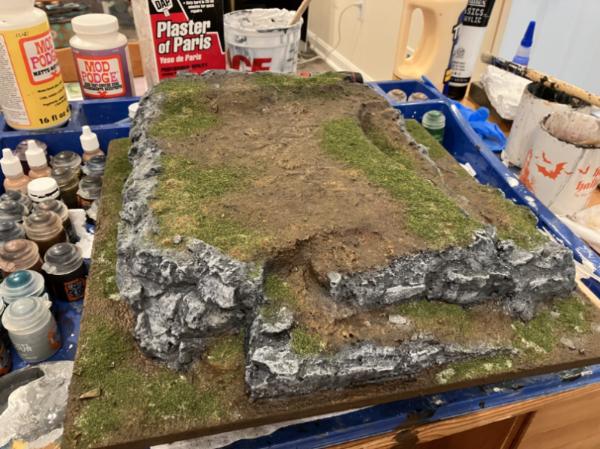
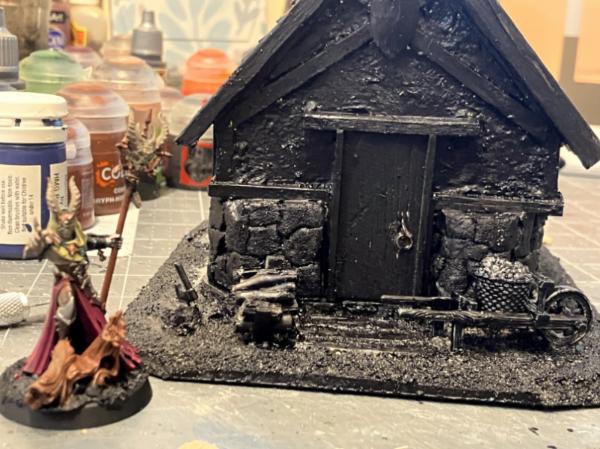
Onto Painting! I started with a base coat of black paint mixed with PVA and some Modge Podge.
Brown house paint (Swiss Chocolate Valspar) is painted over the ground terrain.
And then I promptly took no in between shots. However, I did record the process in my painting journal. After a base of Swiss Chocolate, It was a drybrush of Burnt Umber and then a sponge dabbing of Red Iron Oxide on the ground / textured sections. For the rocks, I did my usual Dark Grey, sponge lighter grey, wash black (3:1) ratio. In retorspect, I will switch around and do the rock components first so I don't get the black wash all on the brown. But I tidied it up and I think it looks serviceable.
I still have to hit it with a matte varnish spray, so that should tone down the shininess a little. But that's for another day, as today I got some games in! You'll see my current Vostroyan minis, plus a recent acquisition I'll have to paint up asap.
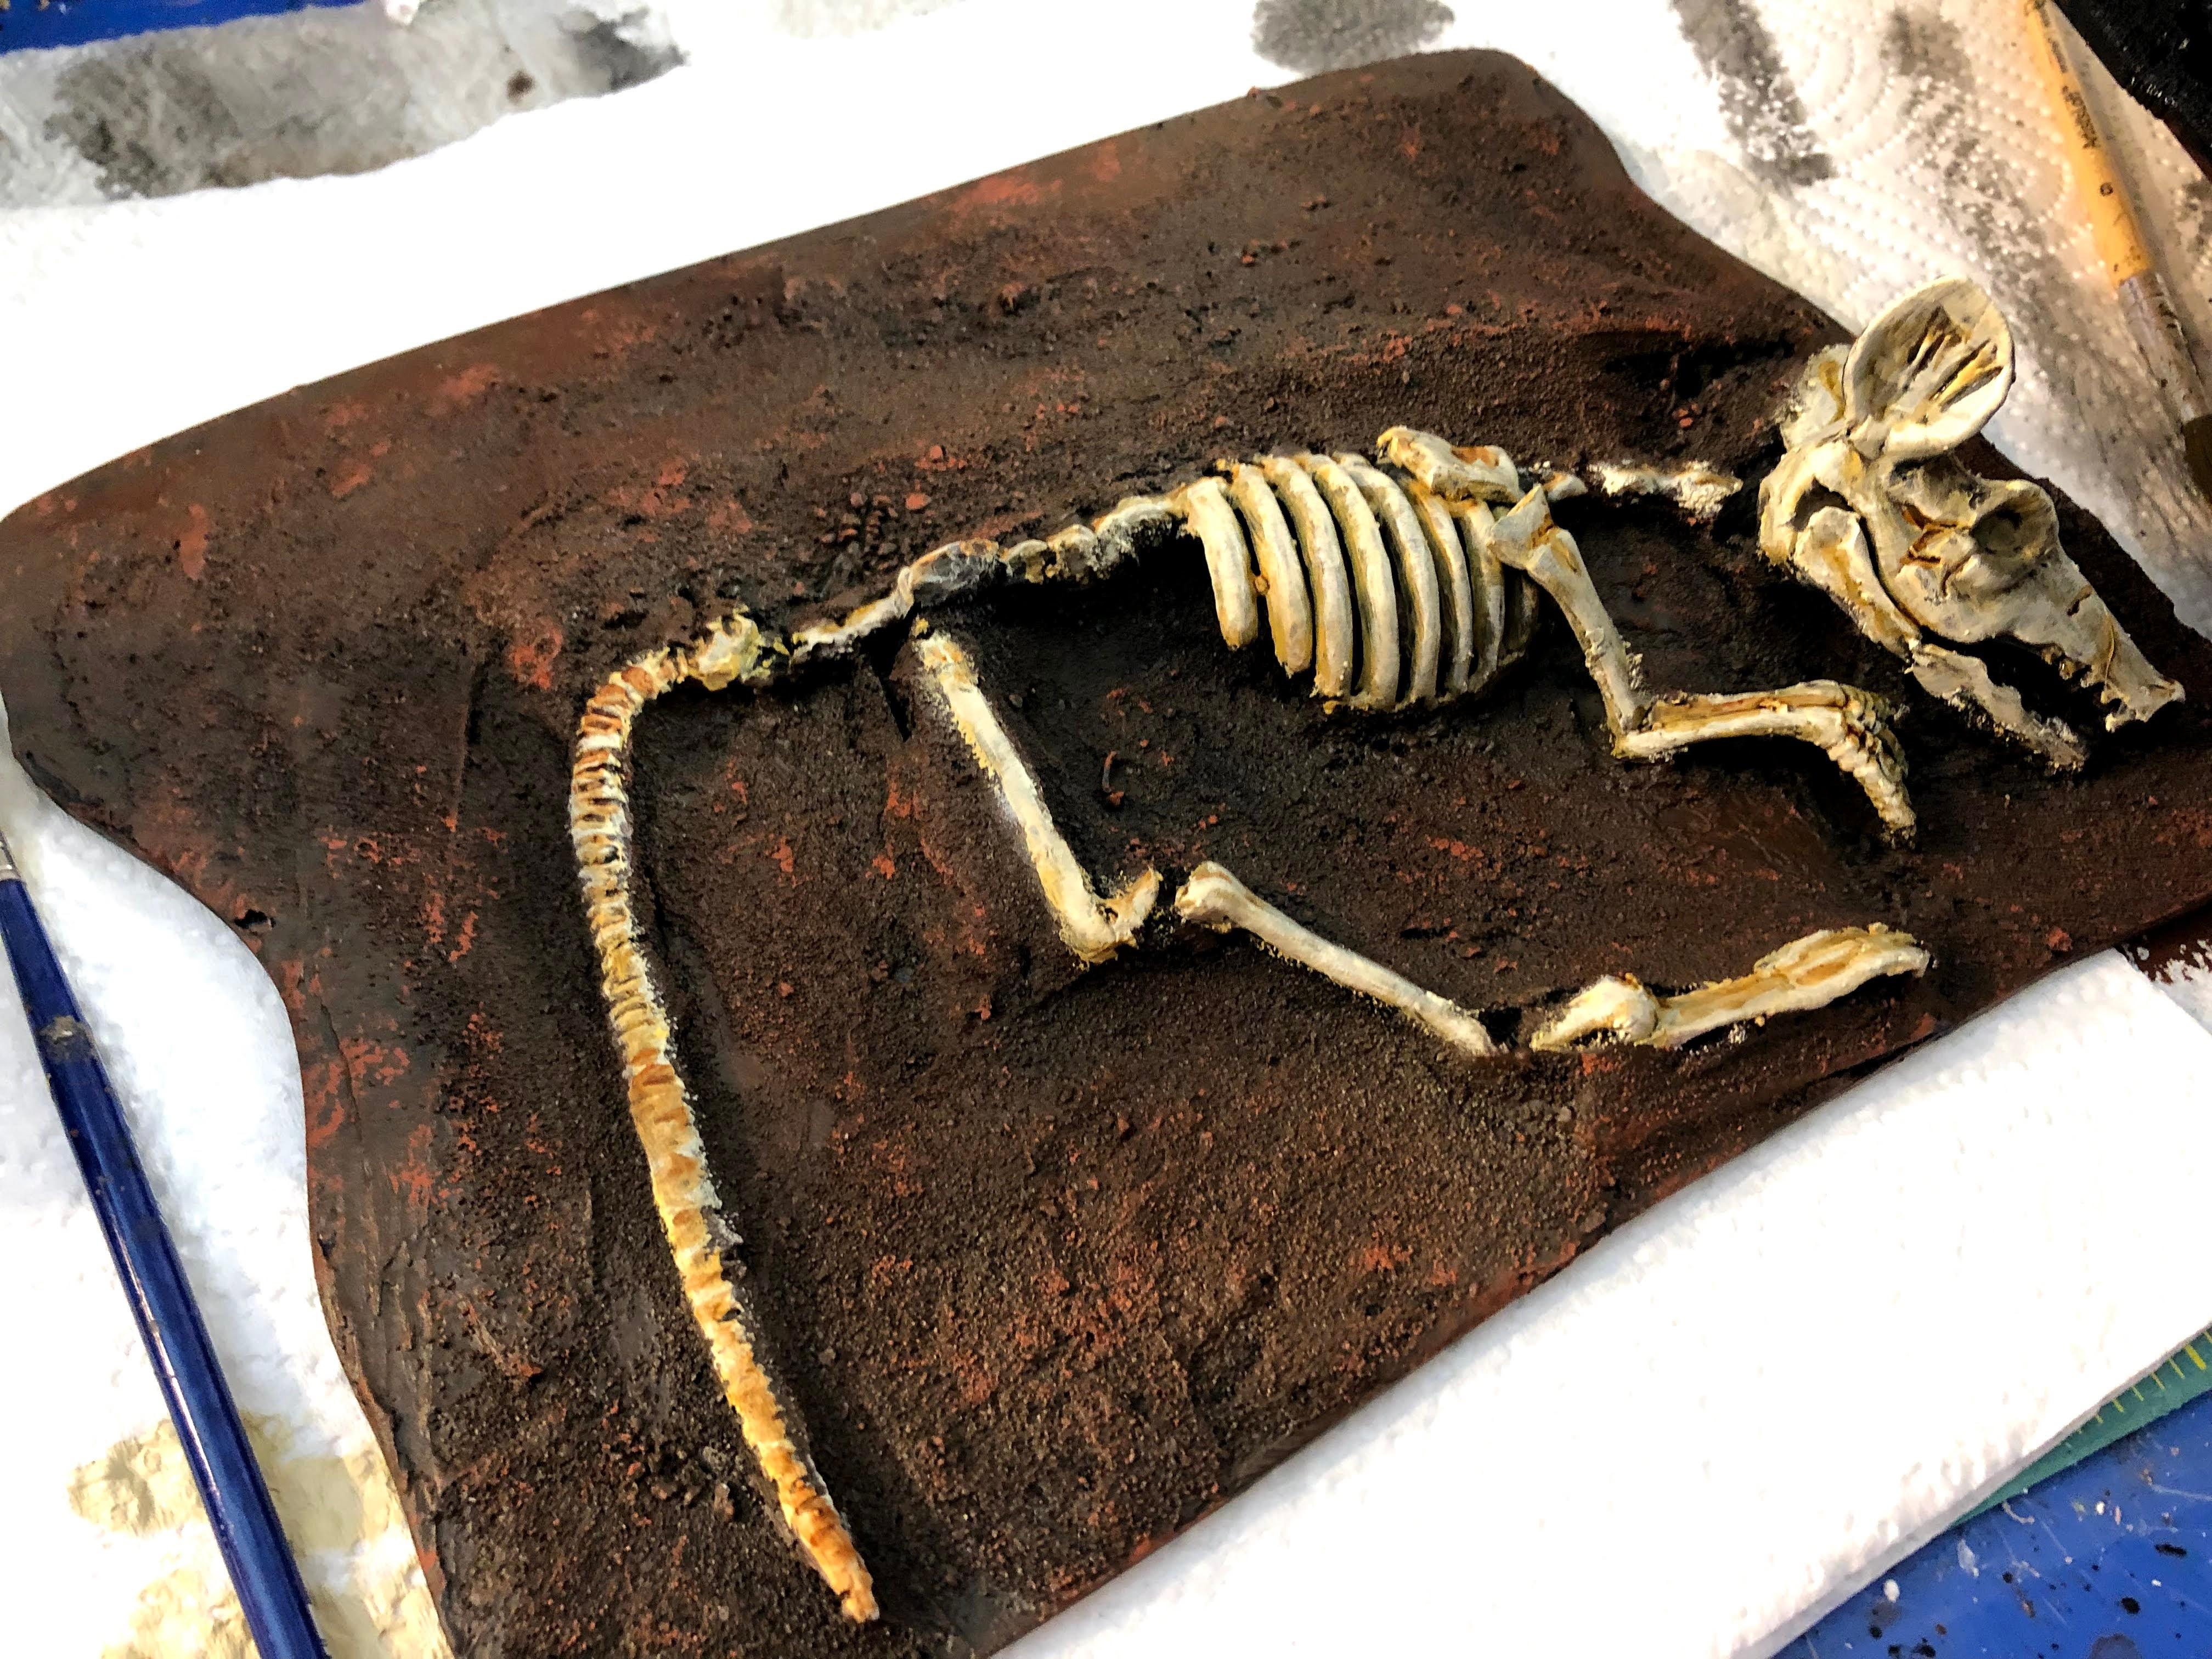
Made some more progress on the terrain board this week. Looking pretty snazzy if I do say so myself. I need to add some withered plants and such, but I figure I'll do that when I'm closer to being done with all of them and do it in one go. As usual, made from MDF bases, with some pink or white insulation foam (White in this case, a new experiment for me), and then covered in caulking and modge podge. Have to say, wouldn't really do it that way again, the caulk was hydrophobic and made painting a real chore (as I had to keep hiding lots of tiny bits of white caulk that poked through the paint.) So I'll test out how it looks when I spray paint it instead of manually brushing it and see if that does better (unless someone knows better). Otherwise I'll have to go back to filler and I'm not certain I like how durable it is. Skeleton is from a michaels halloween sale (and broken apart with pliers).
I think I did a pretty good job hiding the origins of the foam, (although it is obviously a foam mountain).
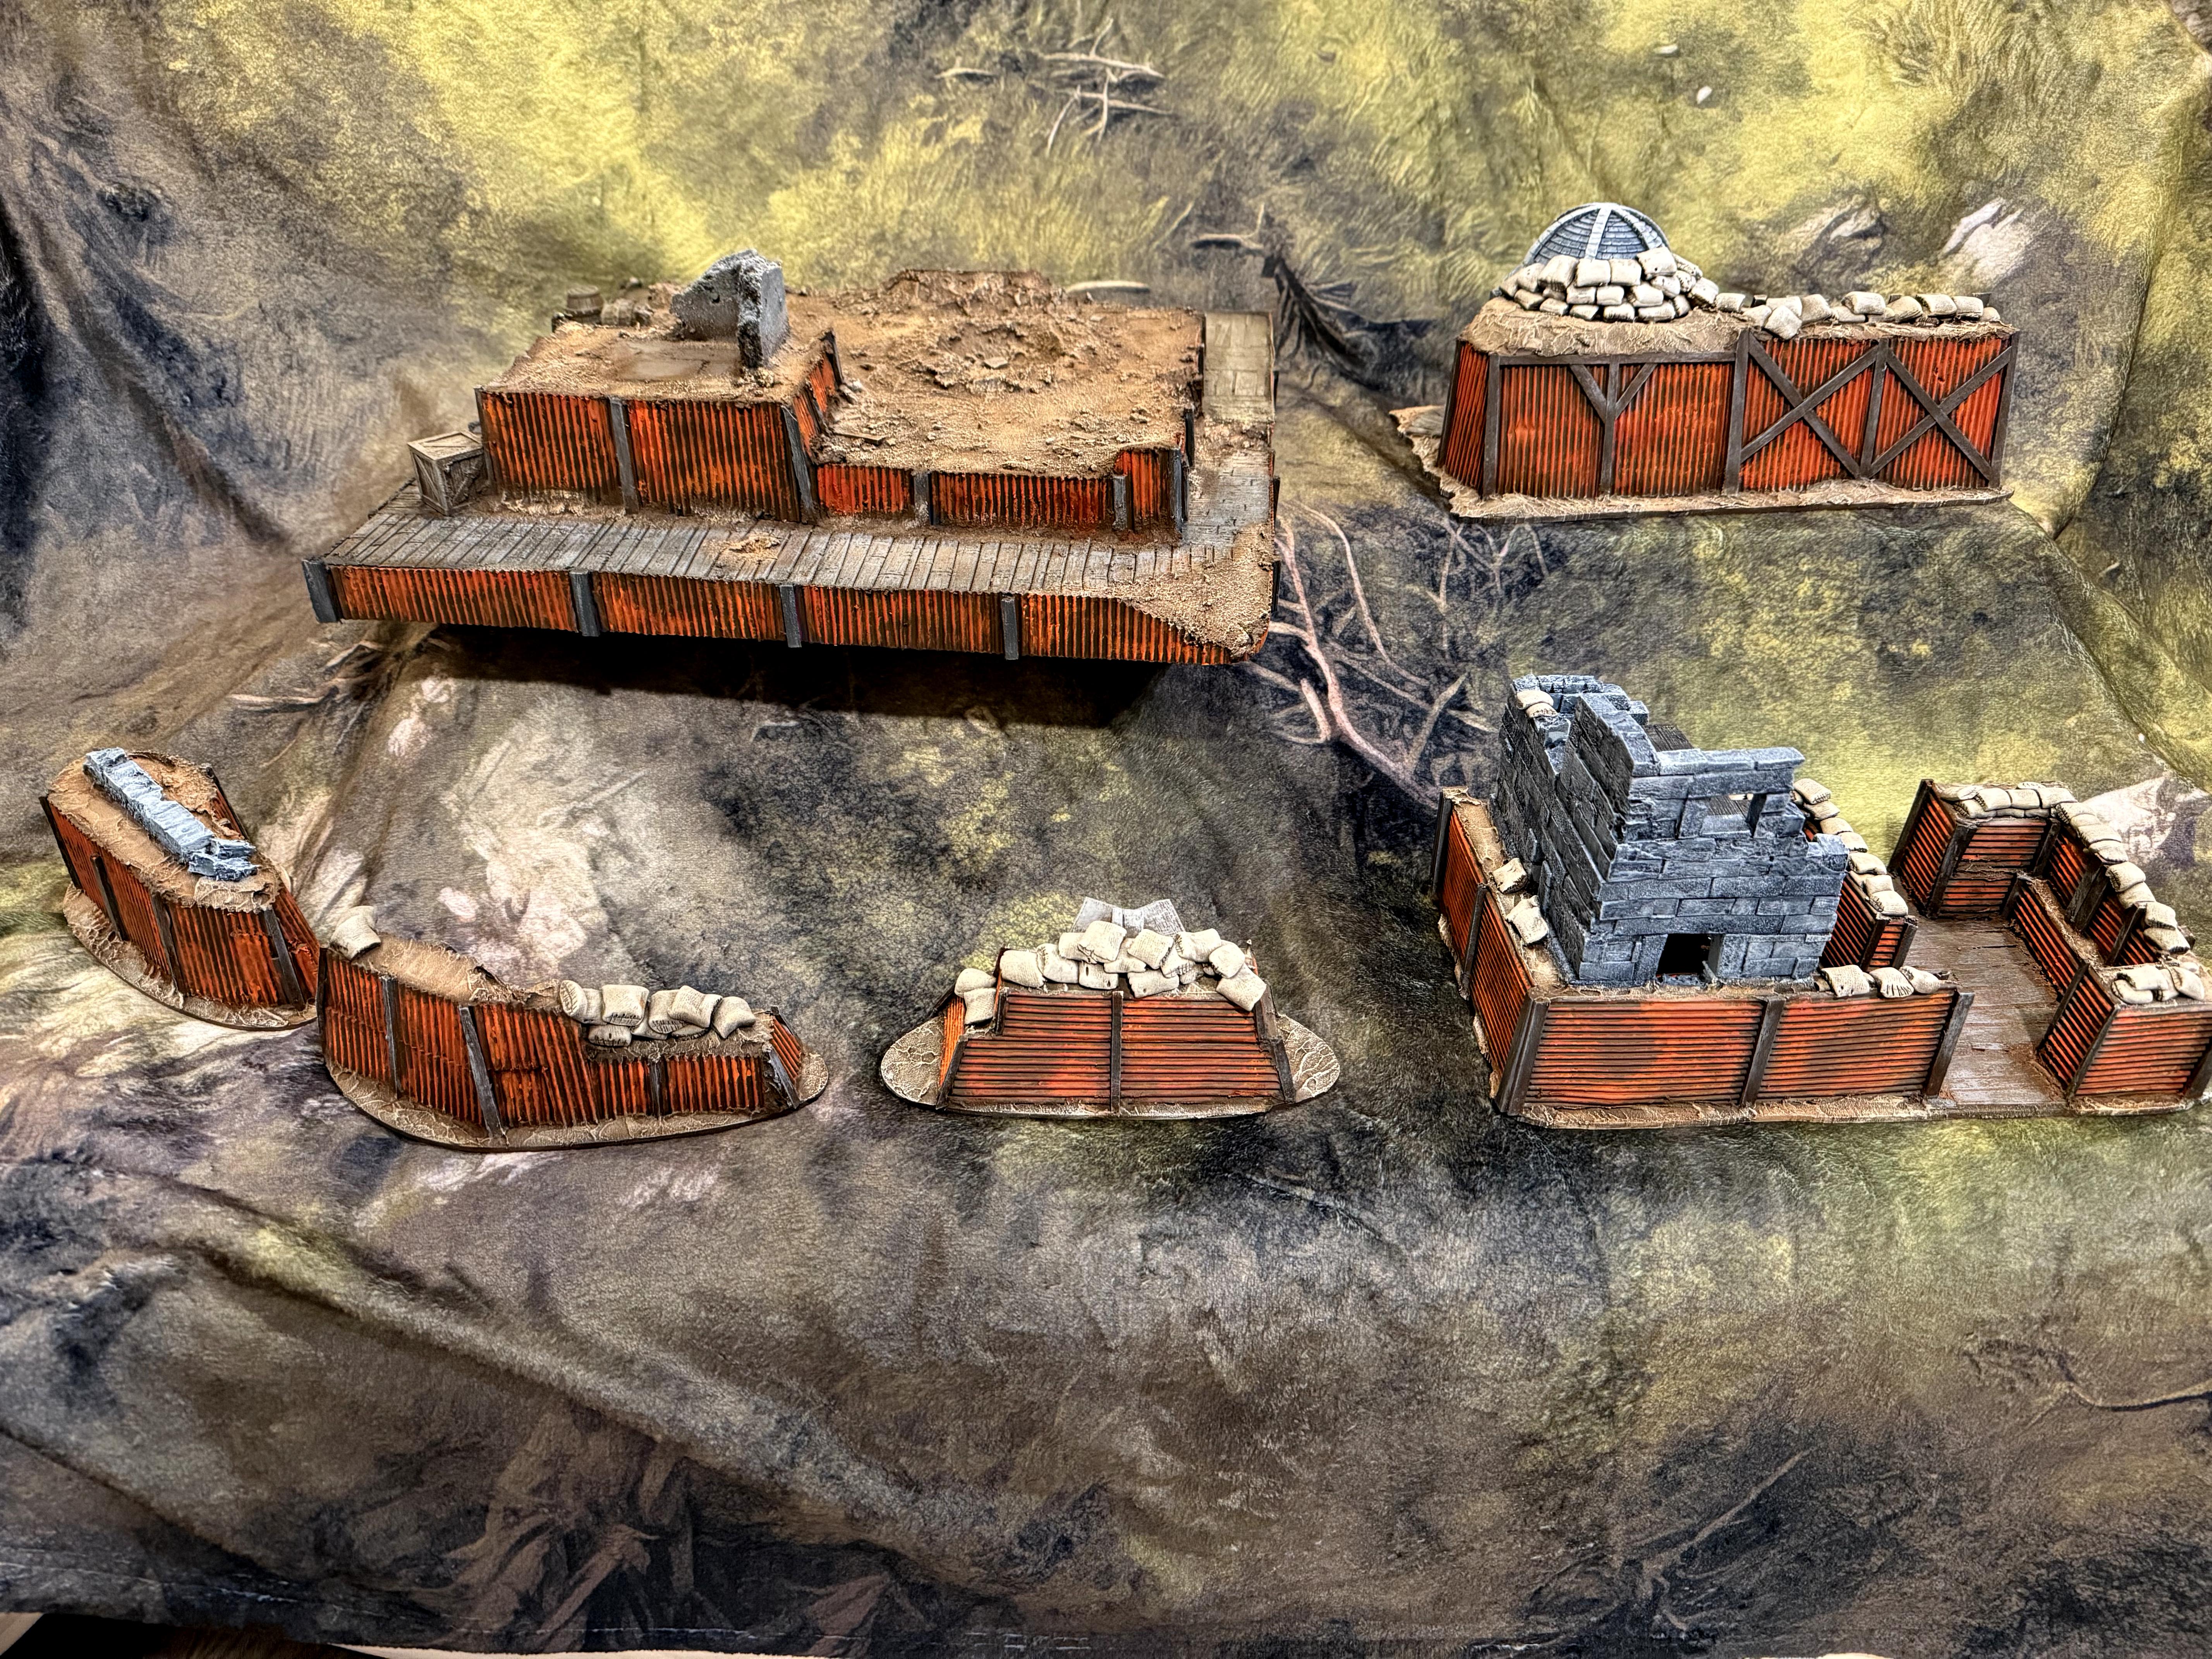
After a rough week, here's the final view of all the terrain I built for this commission. I'm excited as I actually got to test out plaster of paris bandages as part of some construction techniques, and found it to be both enjoyable and super useful. Here's some WIP shots first.
Now some slightly better finished shots.
Now a few total family shots!
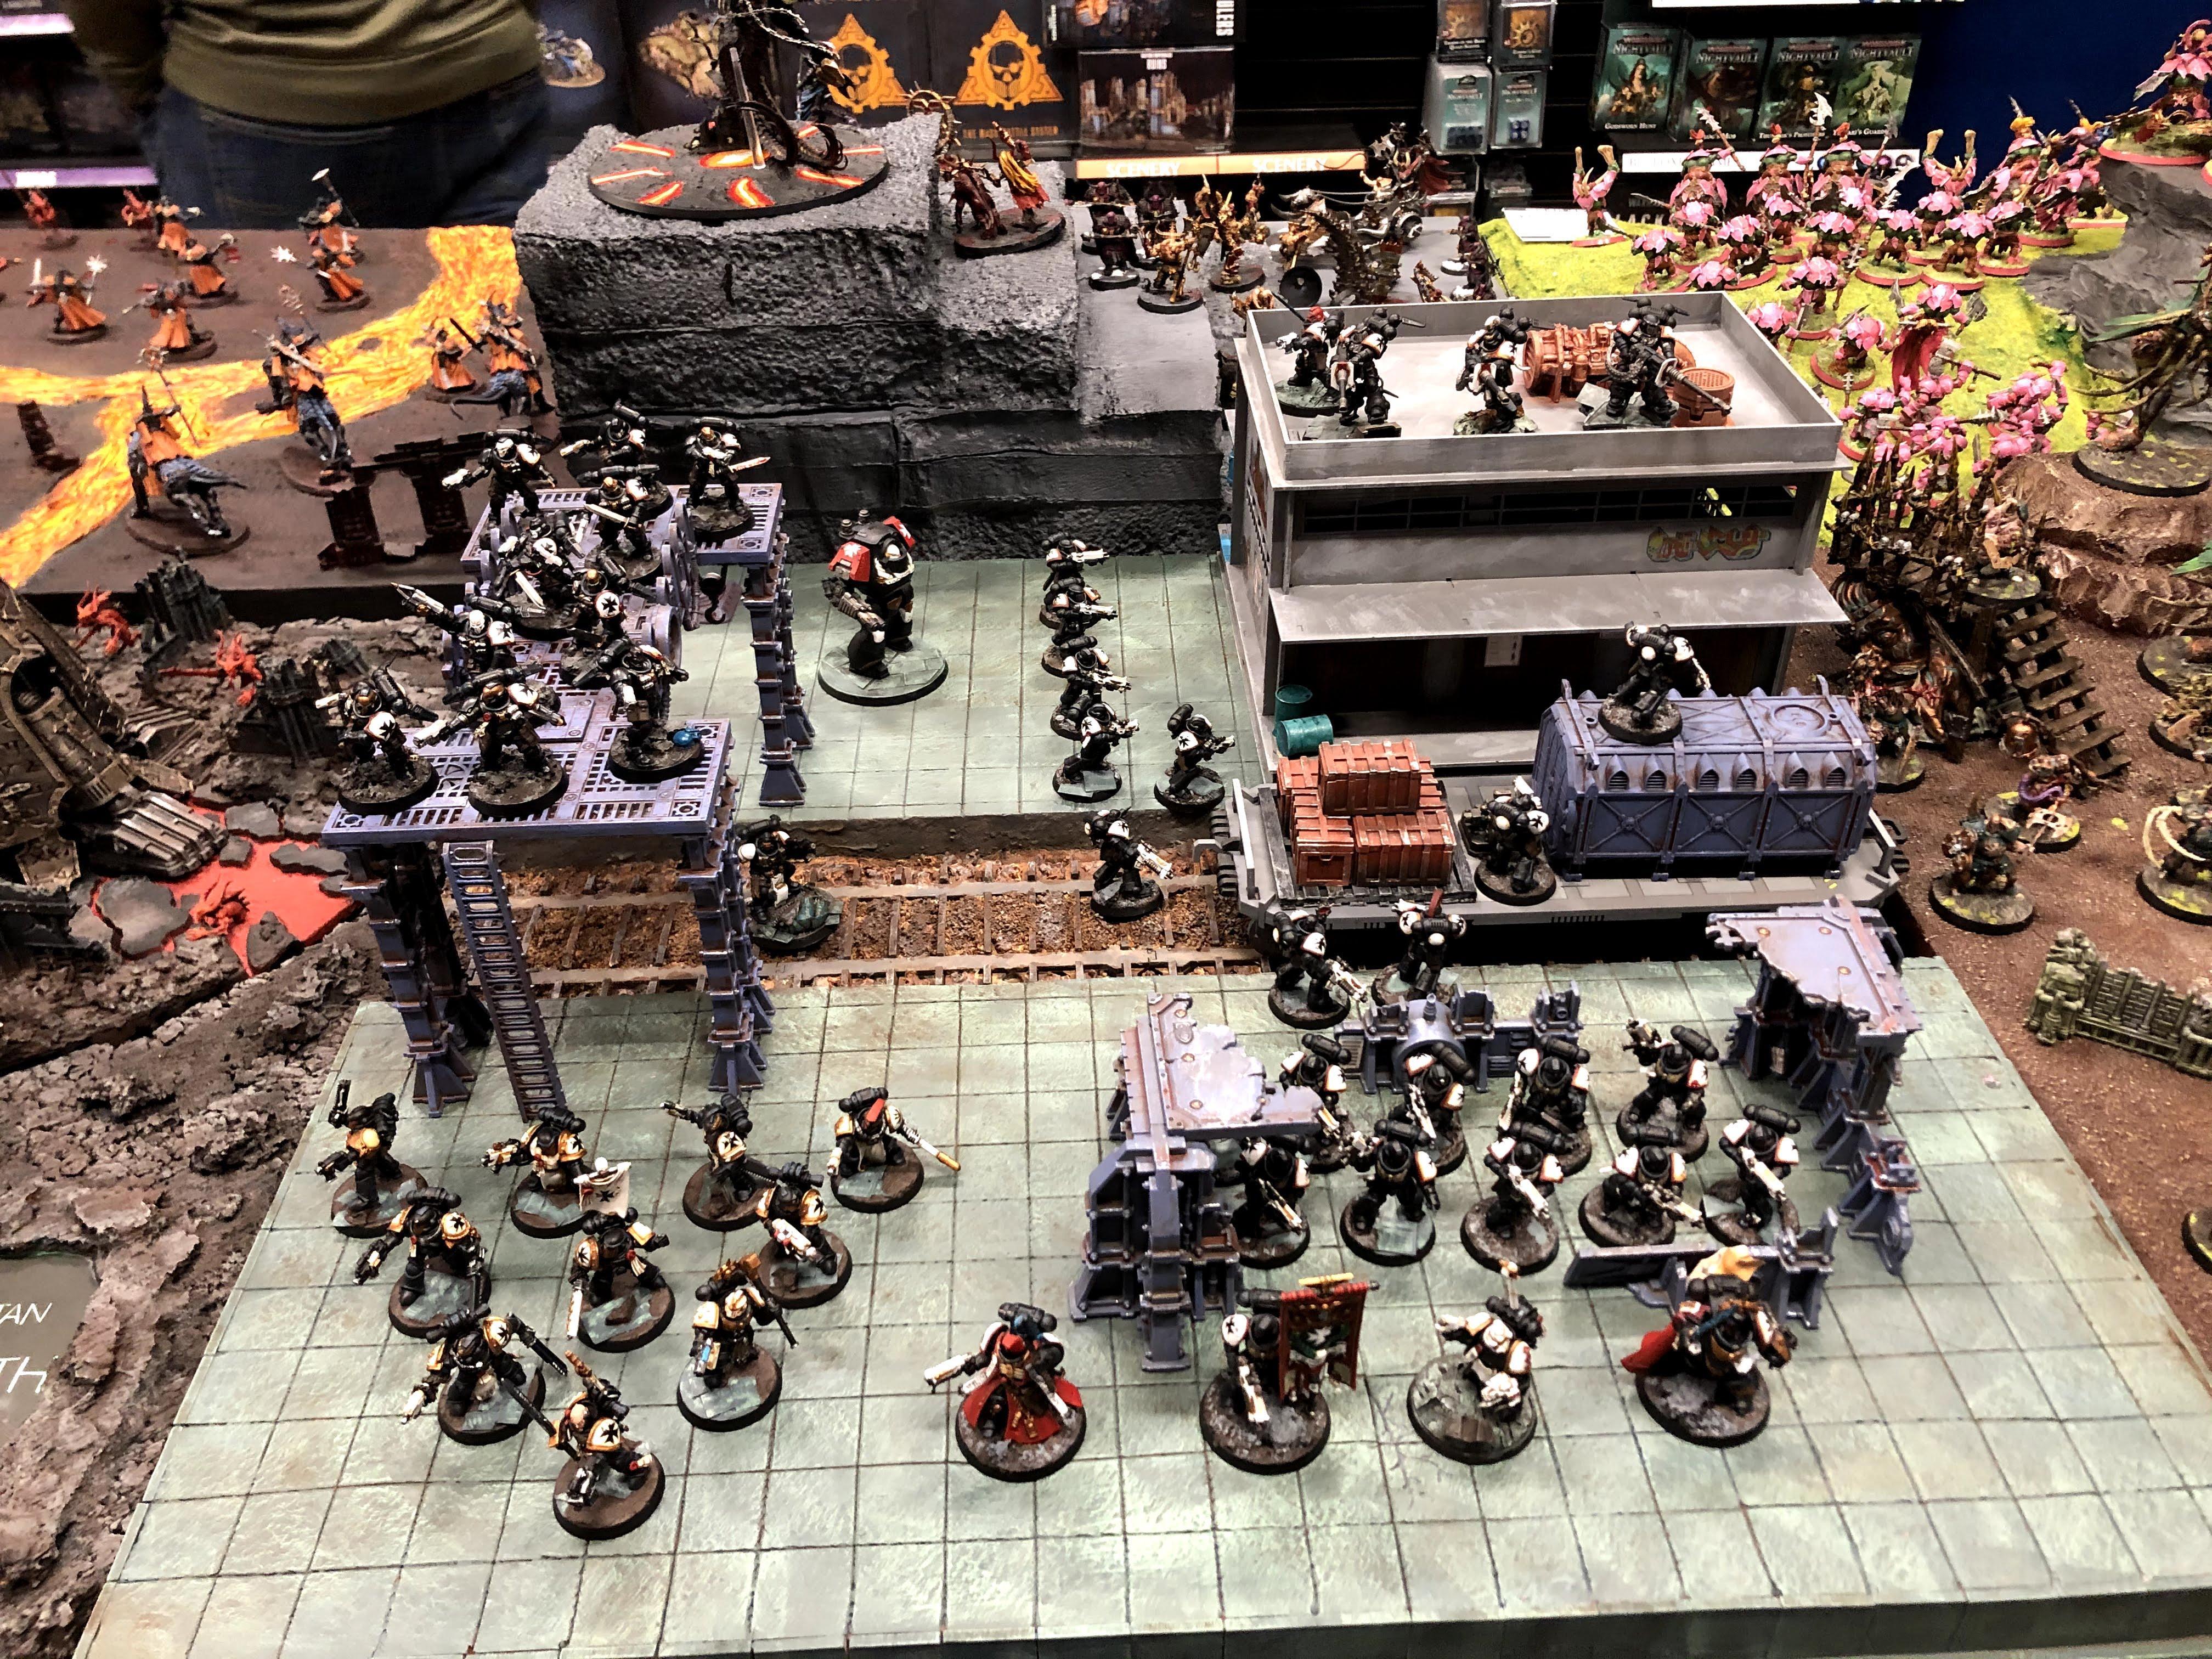
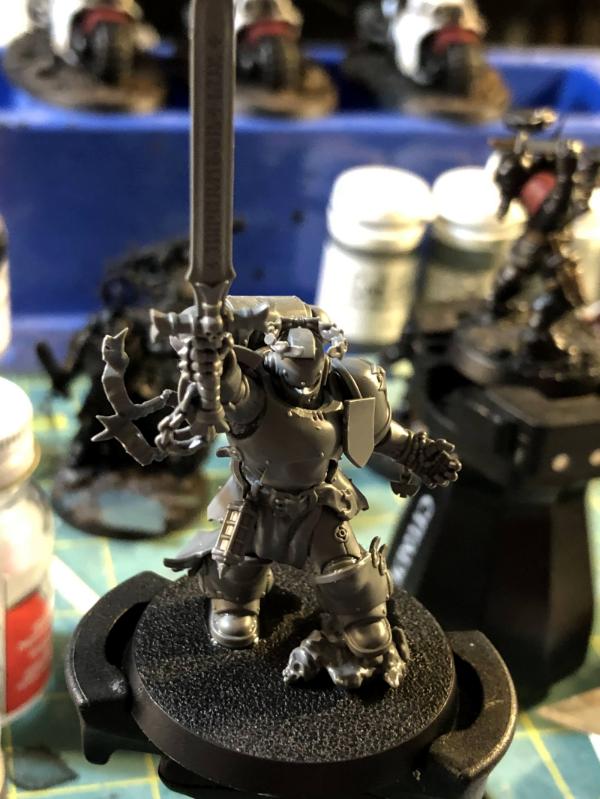
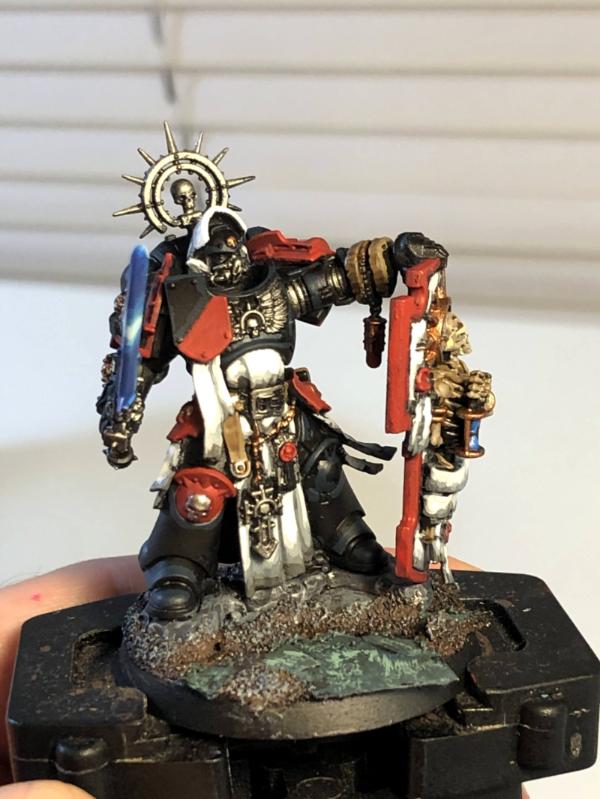
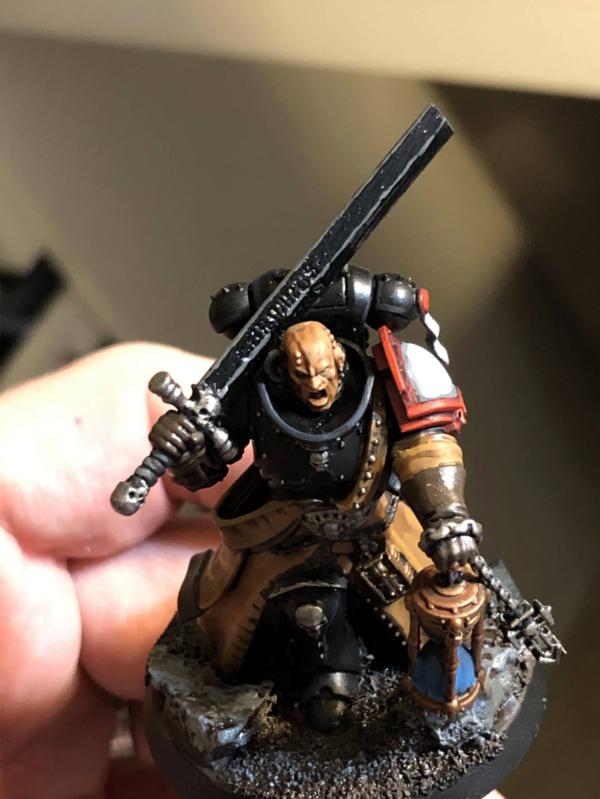
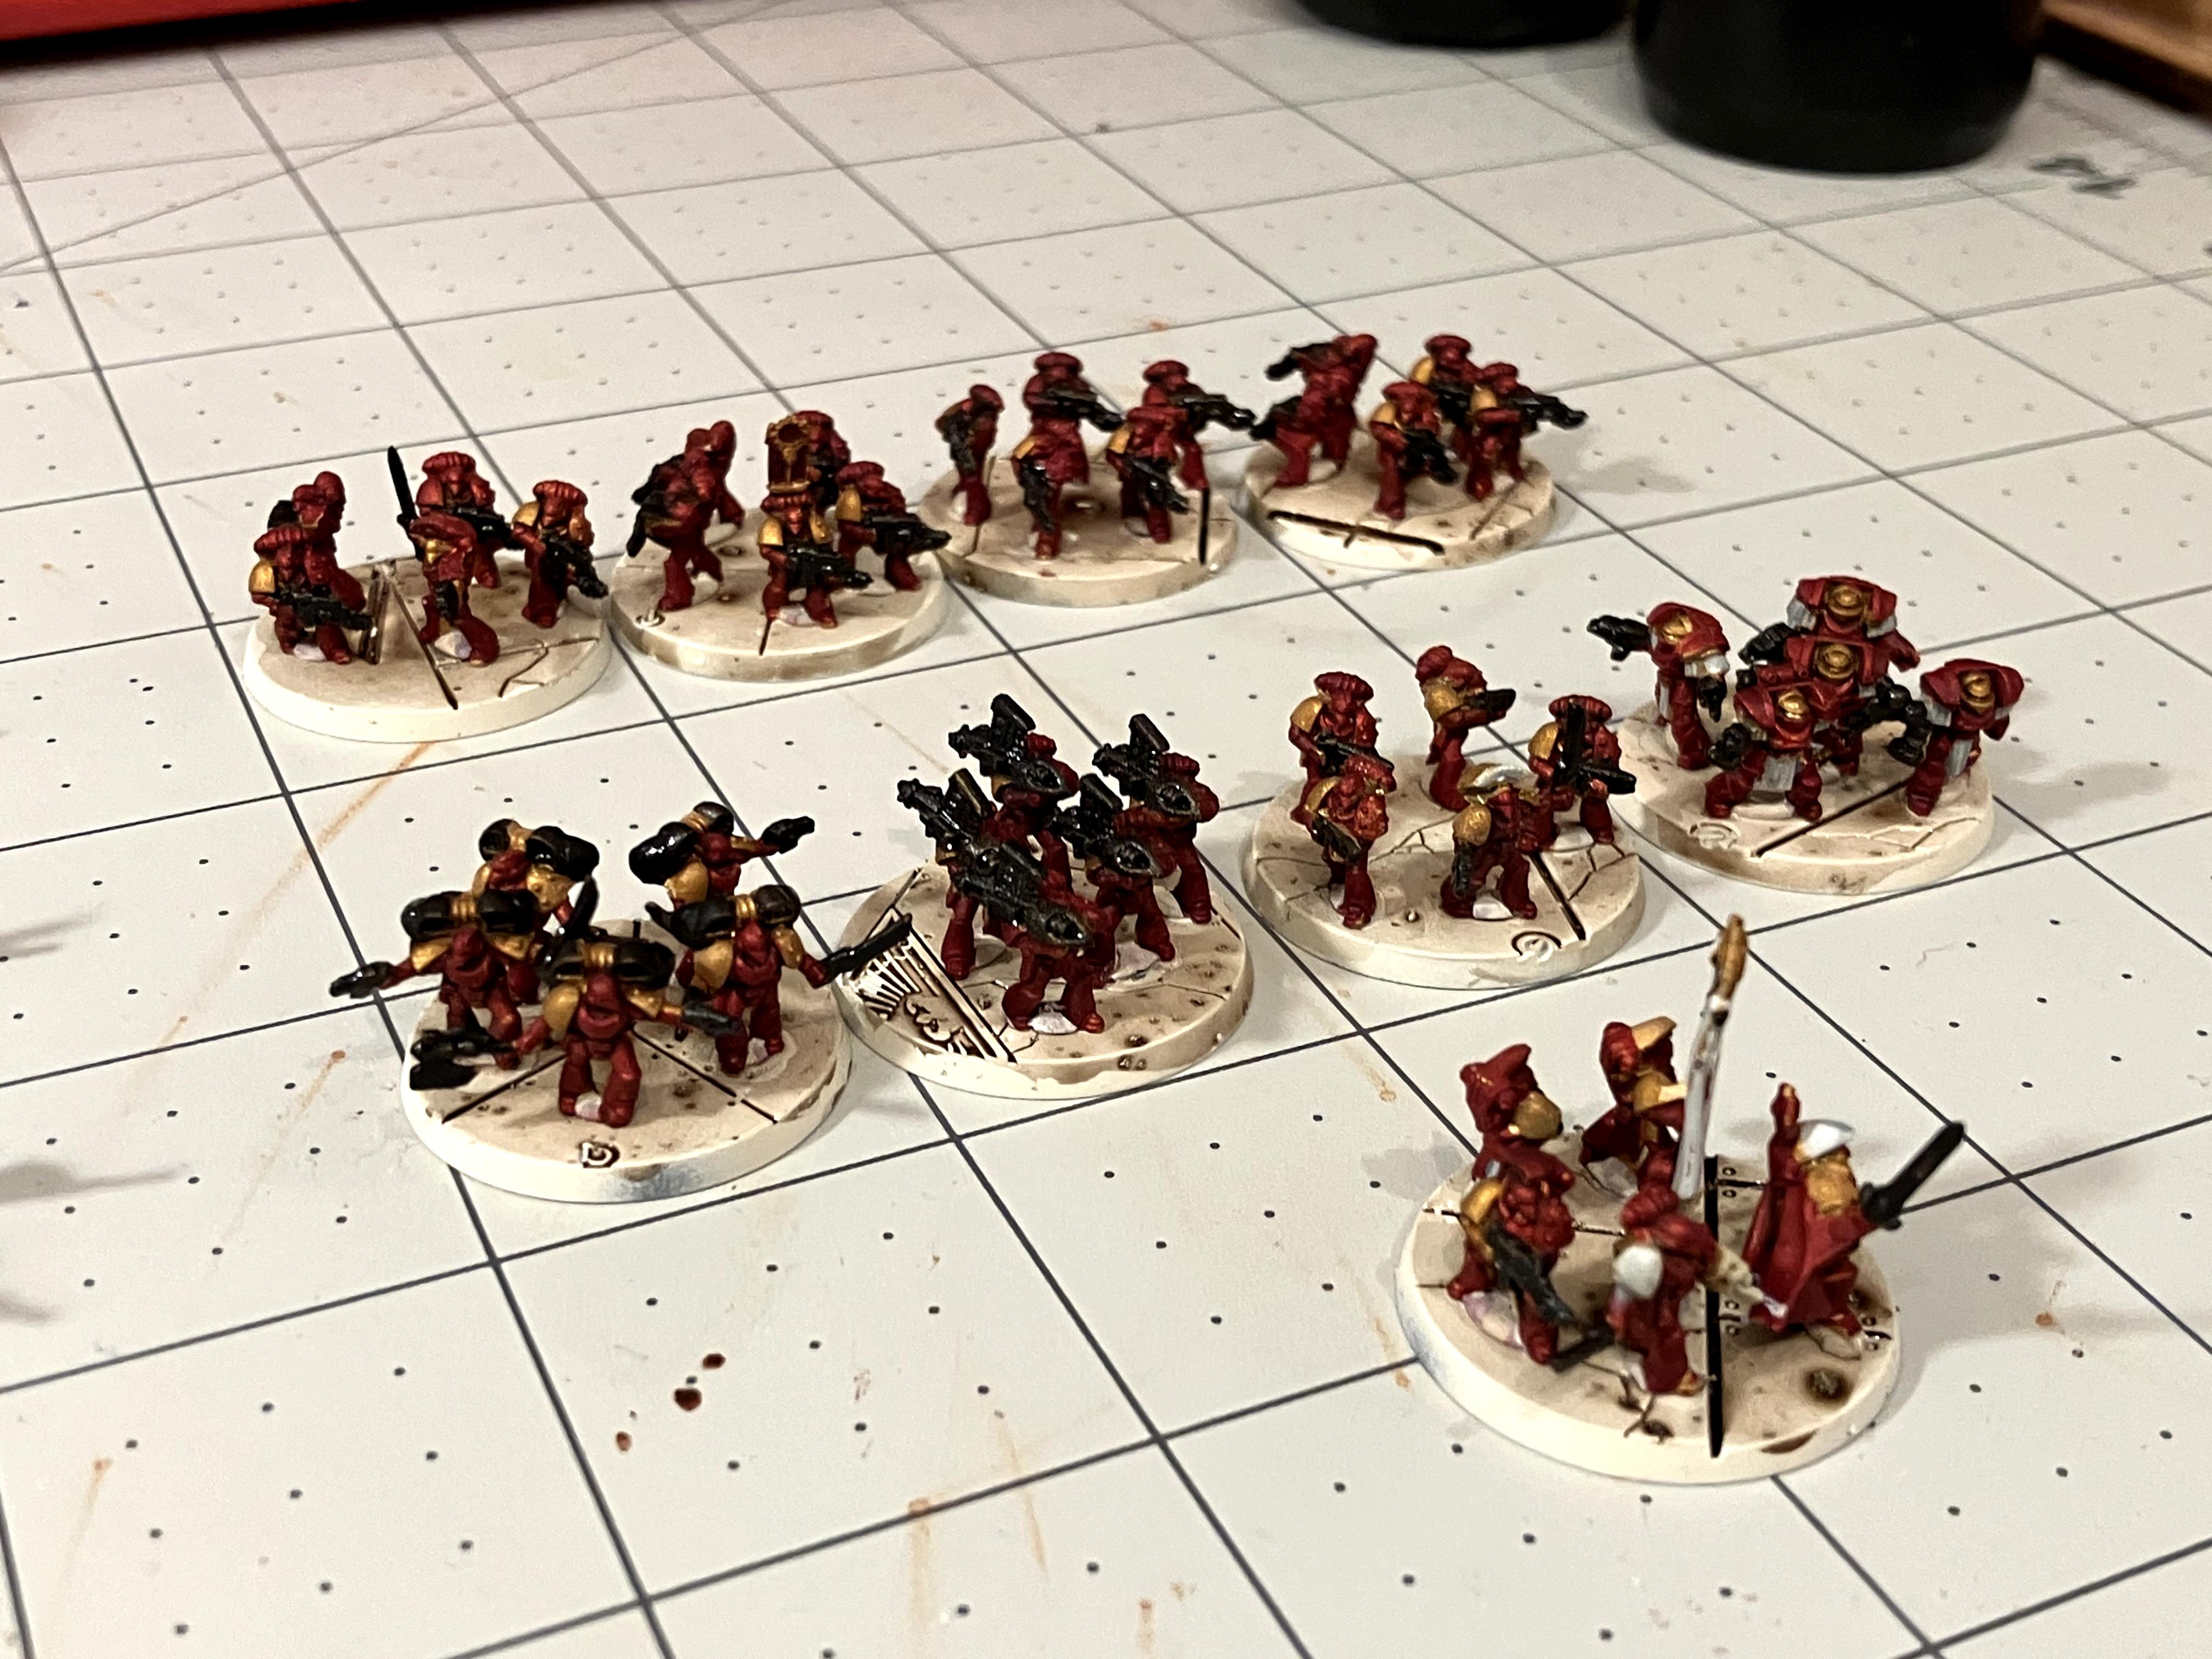
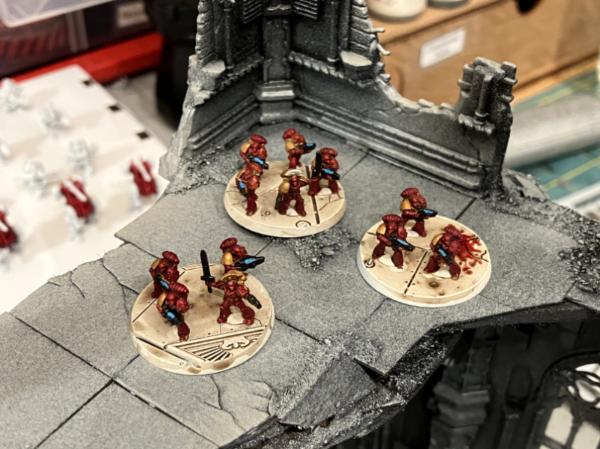
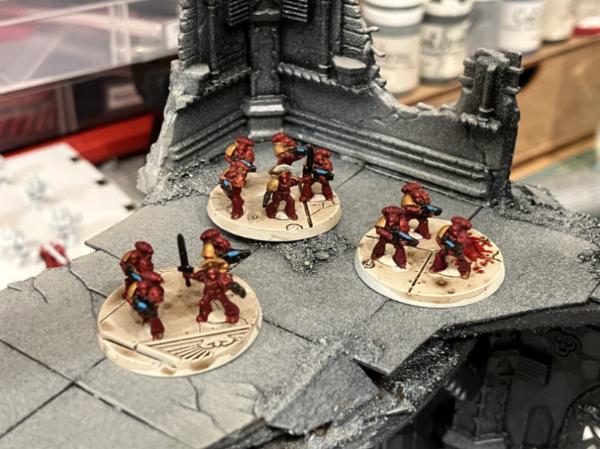
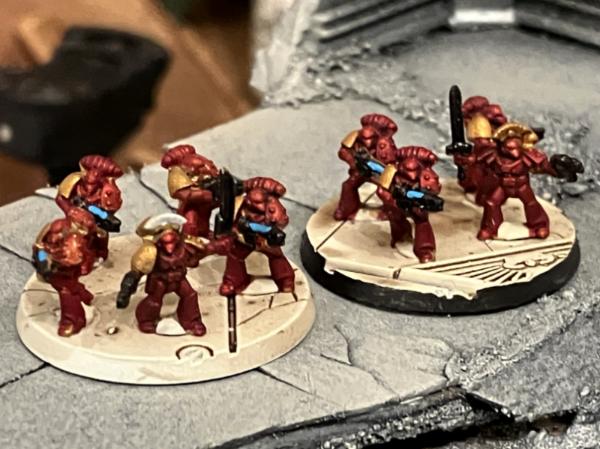
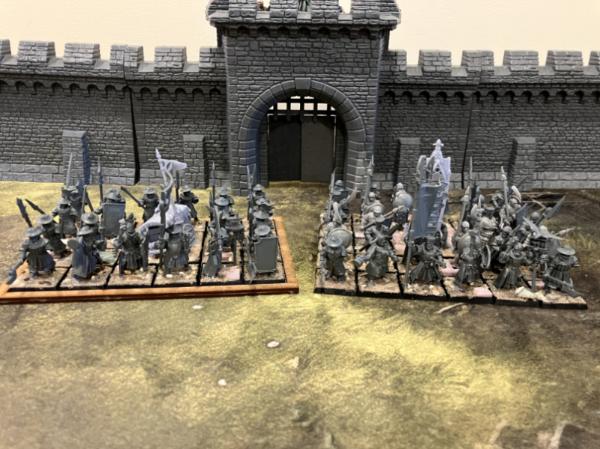
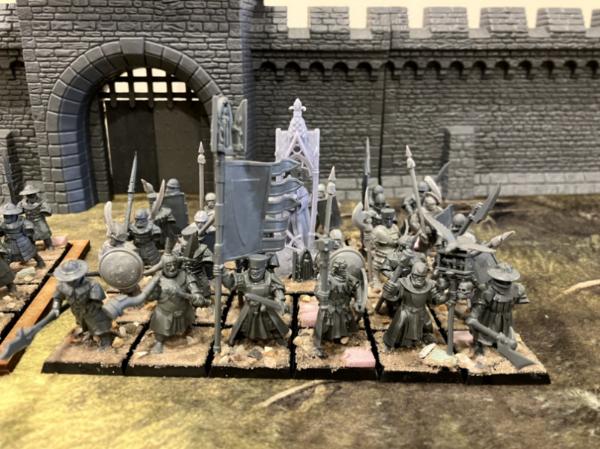
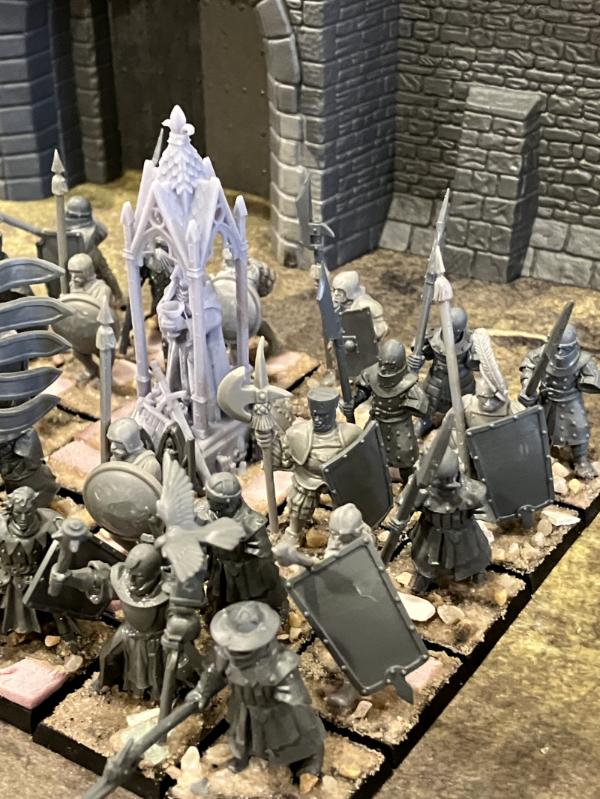
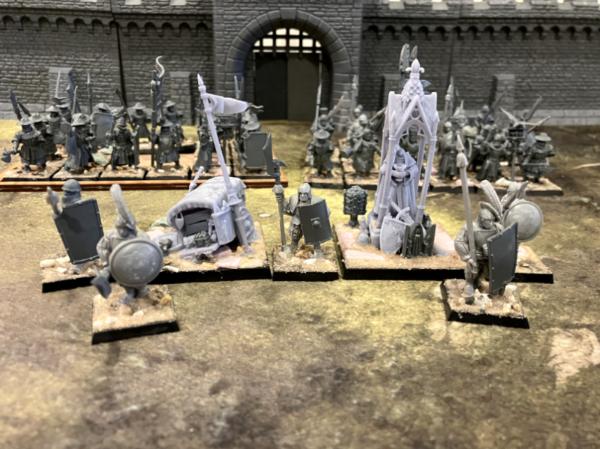
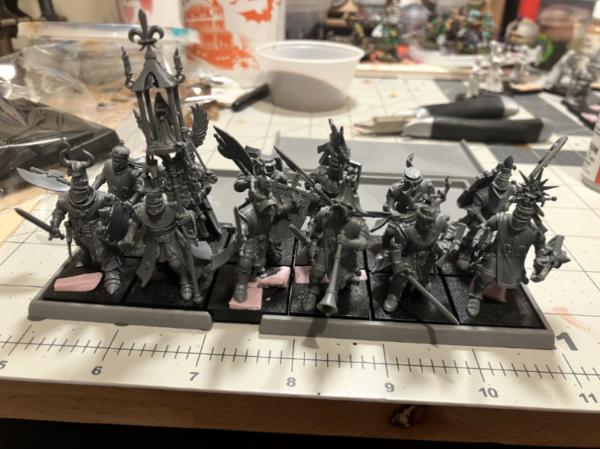
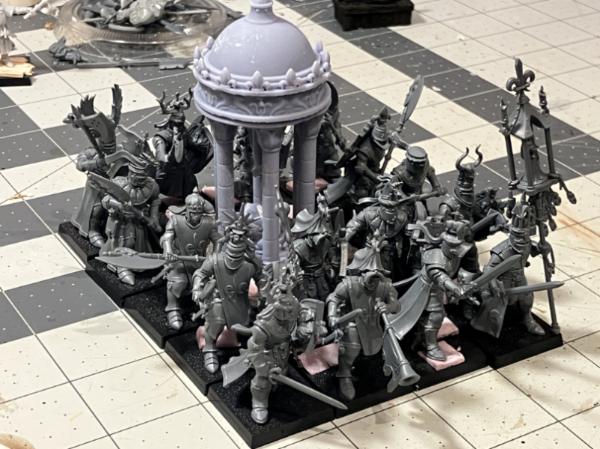
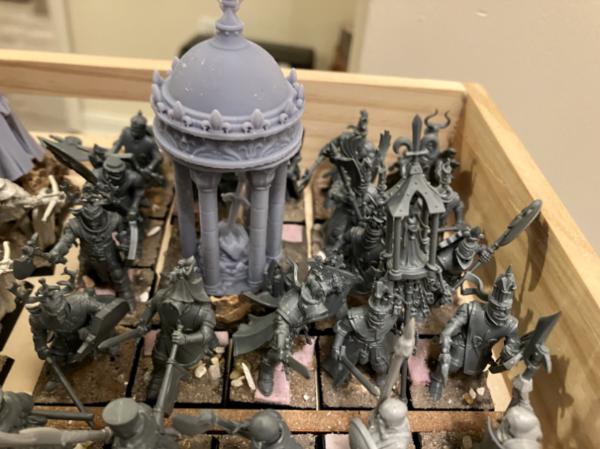
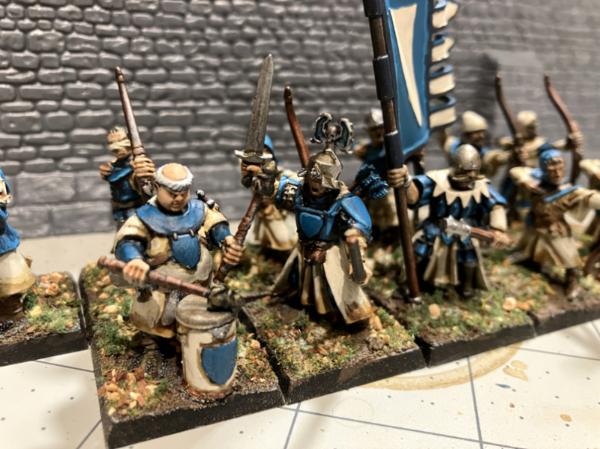
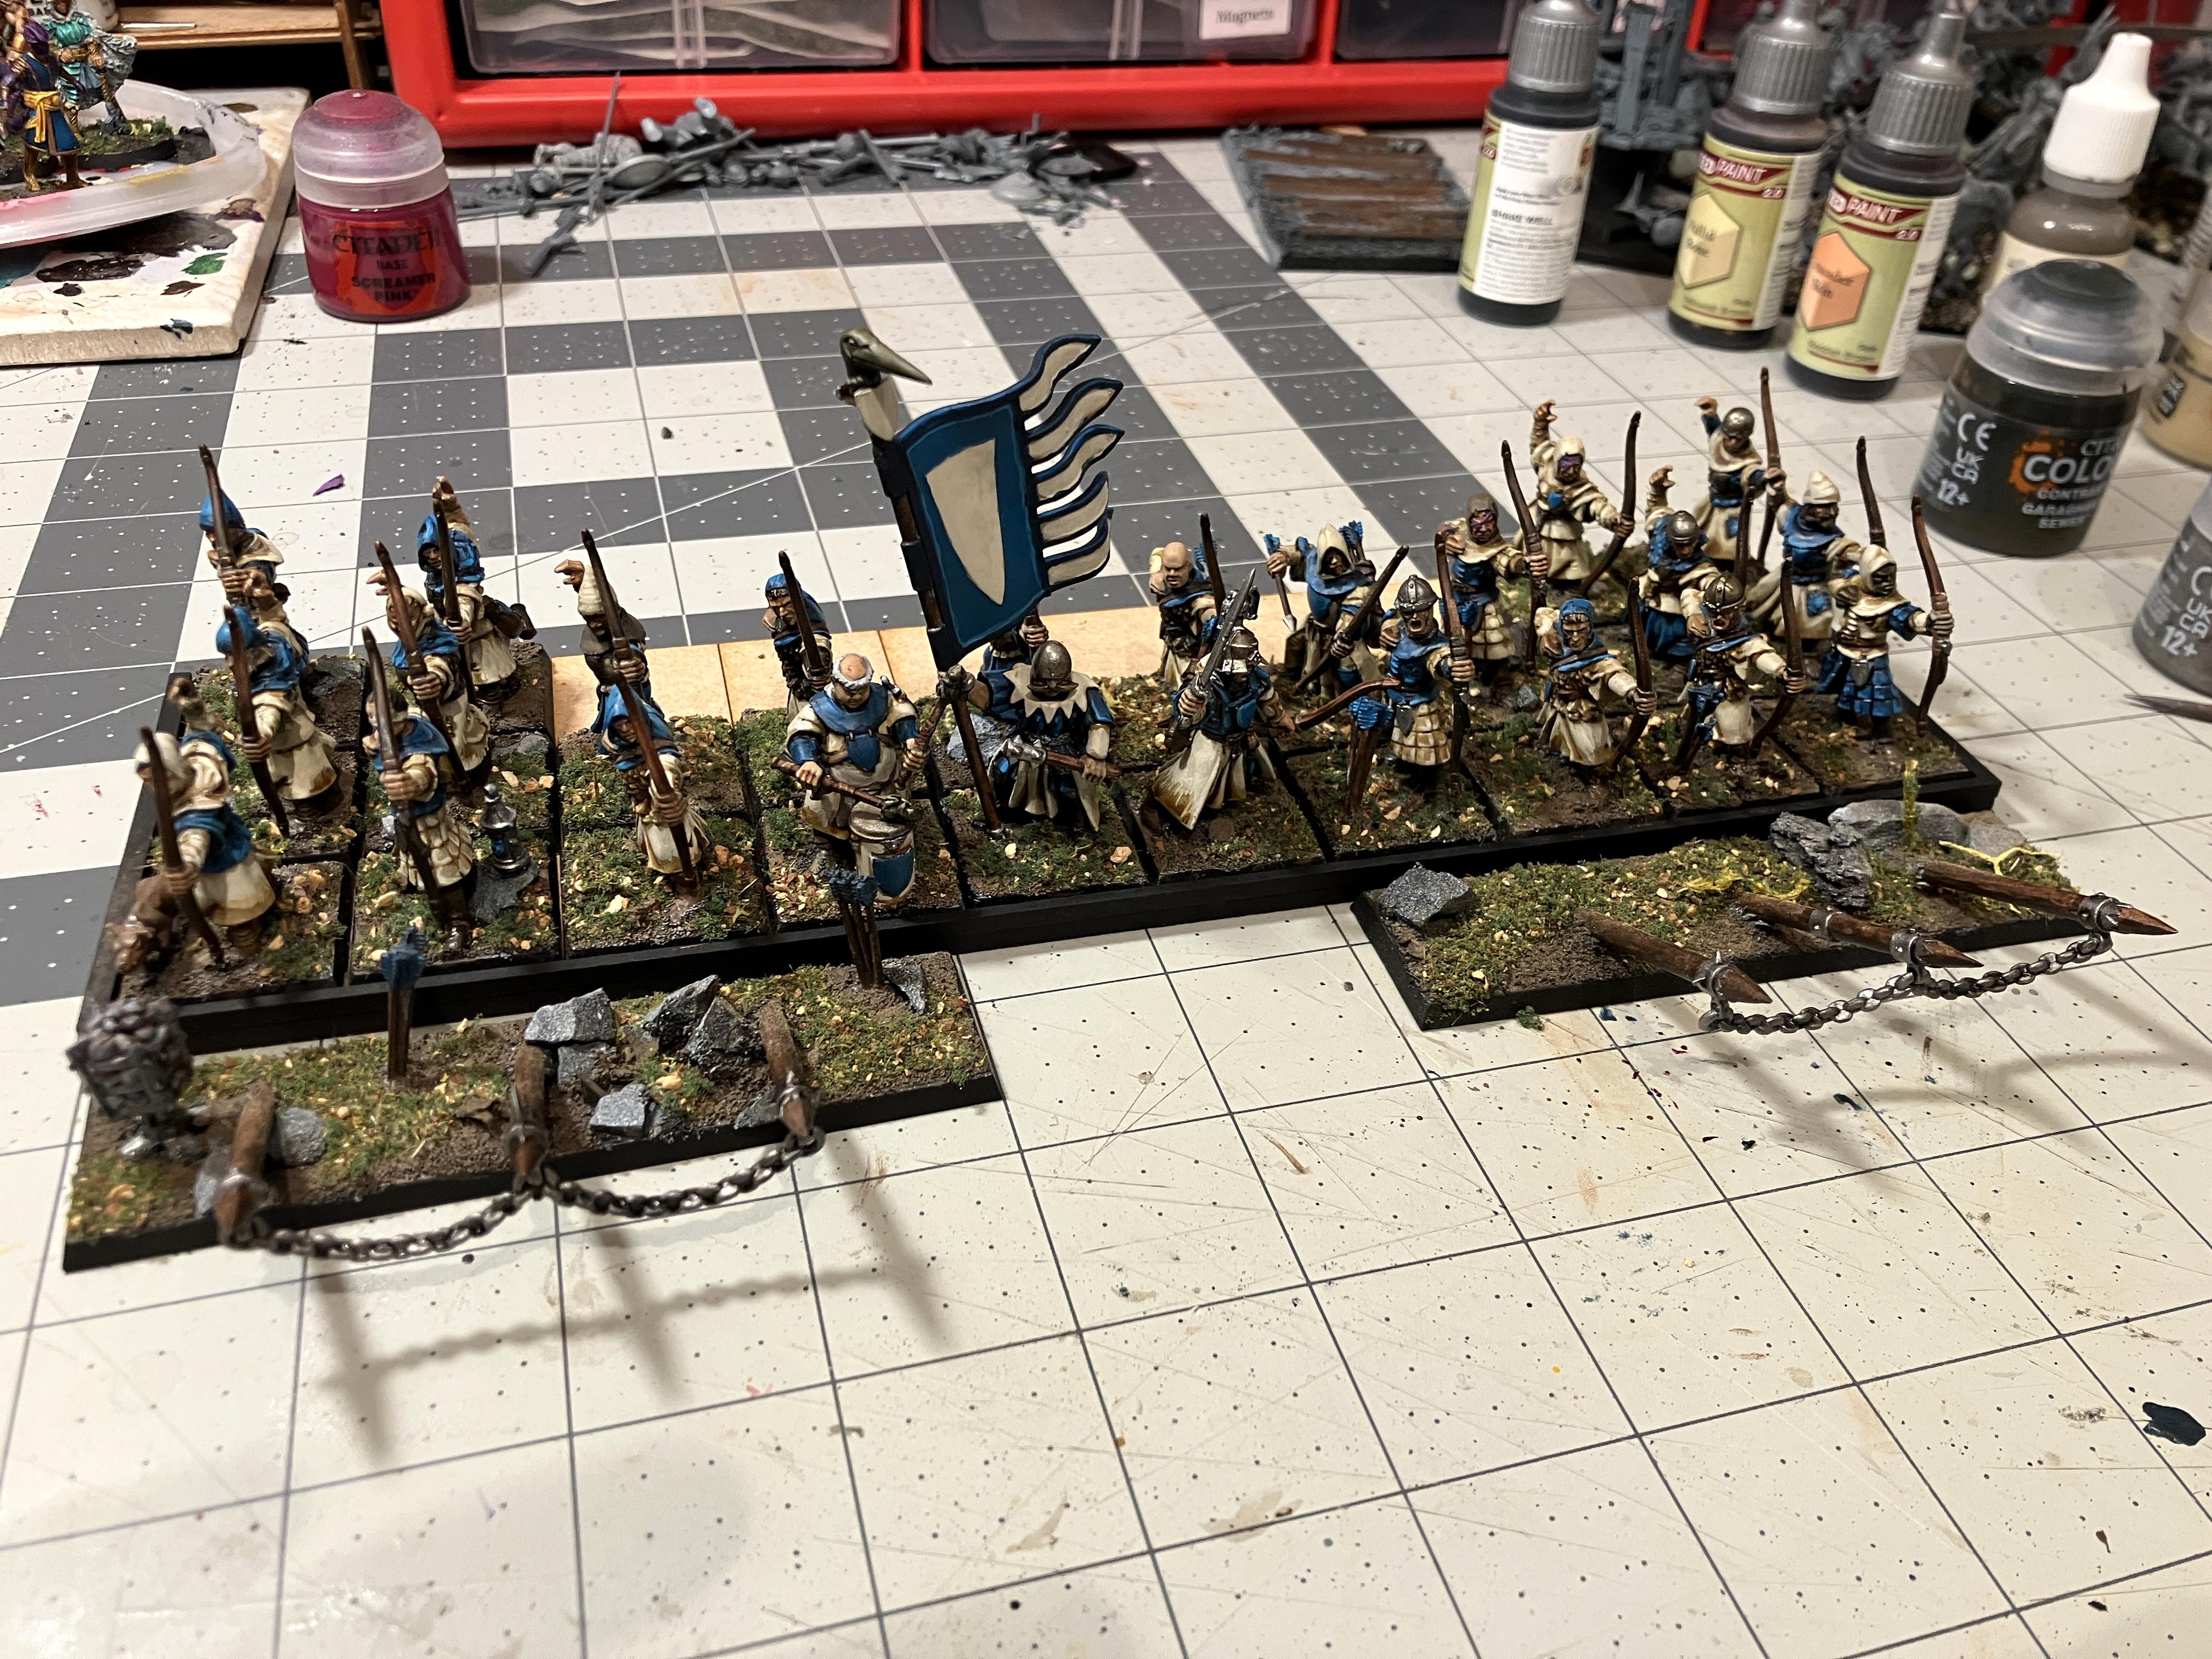
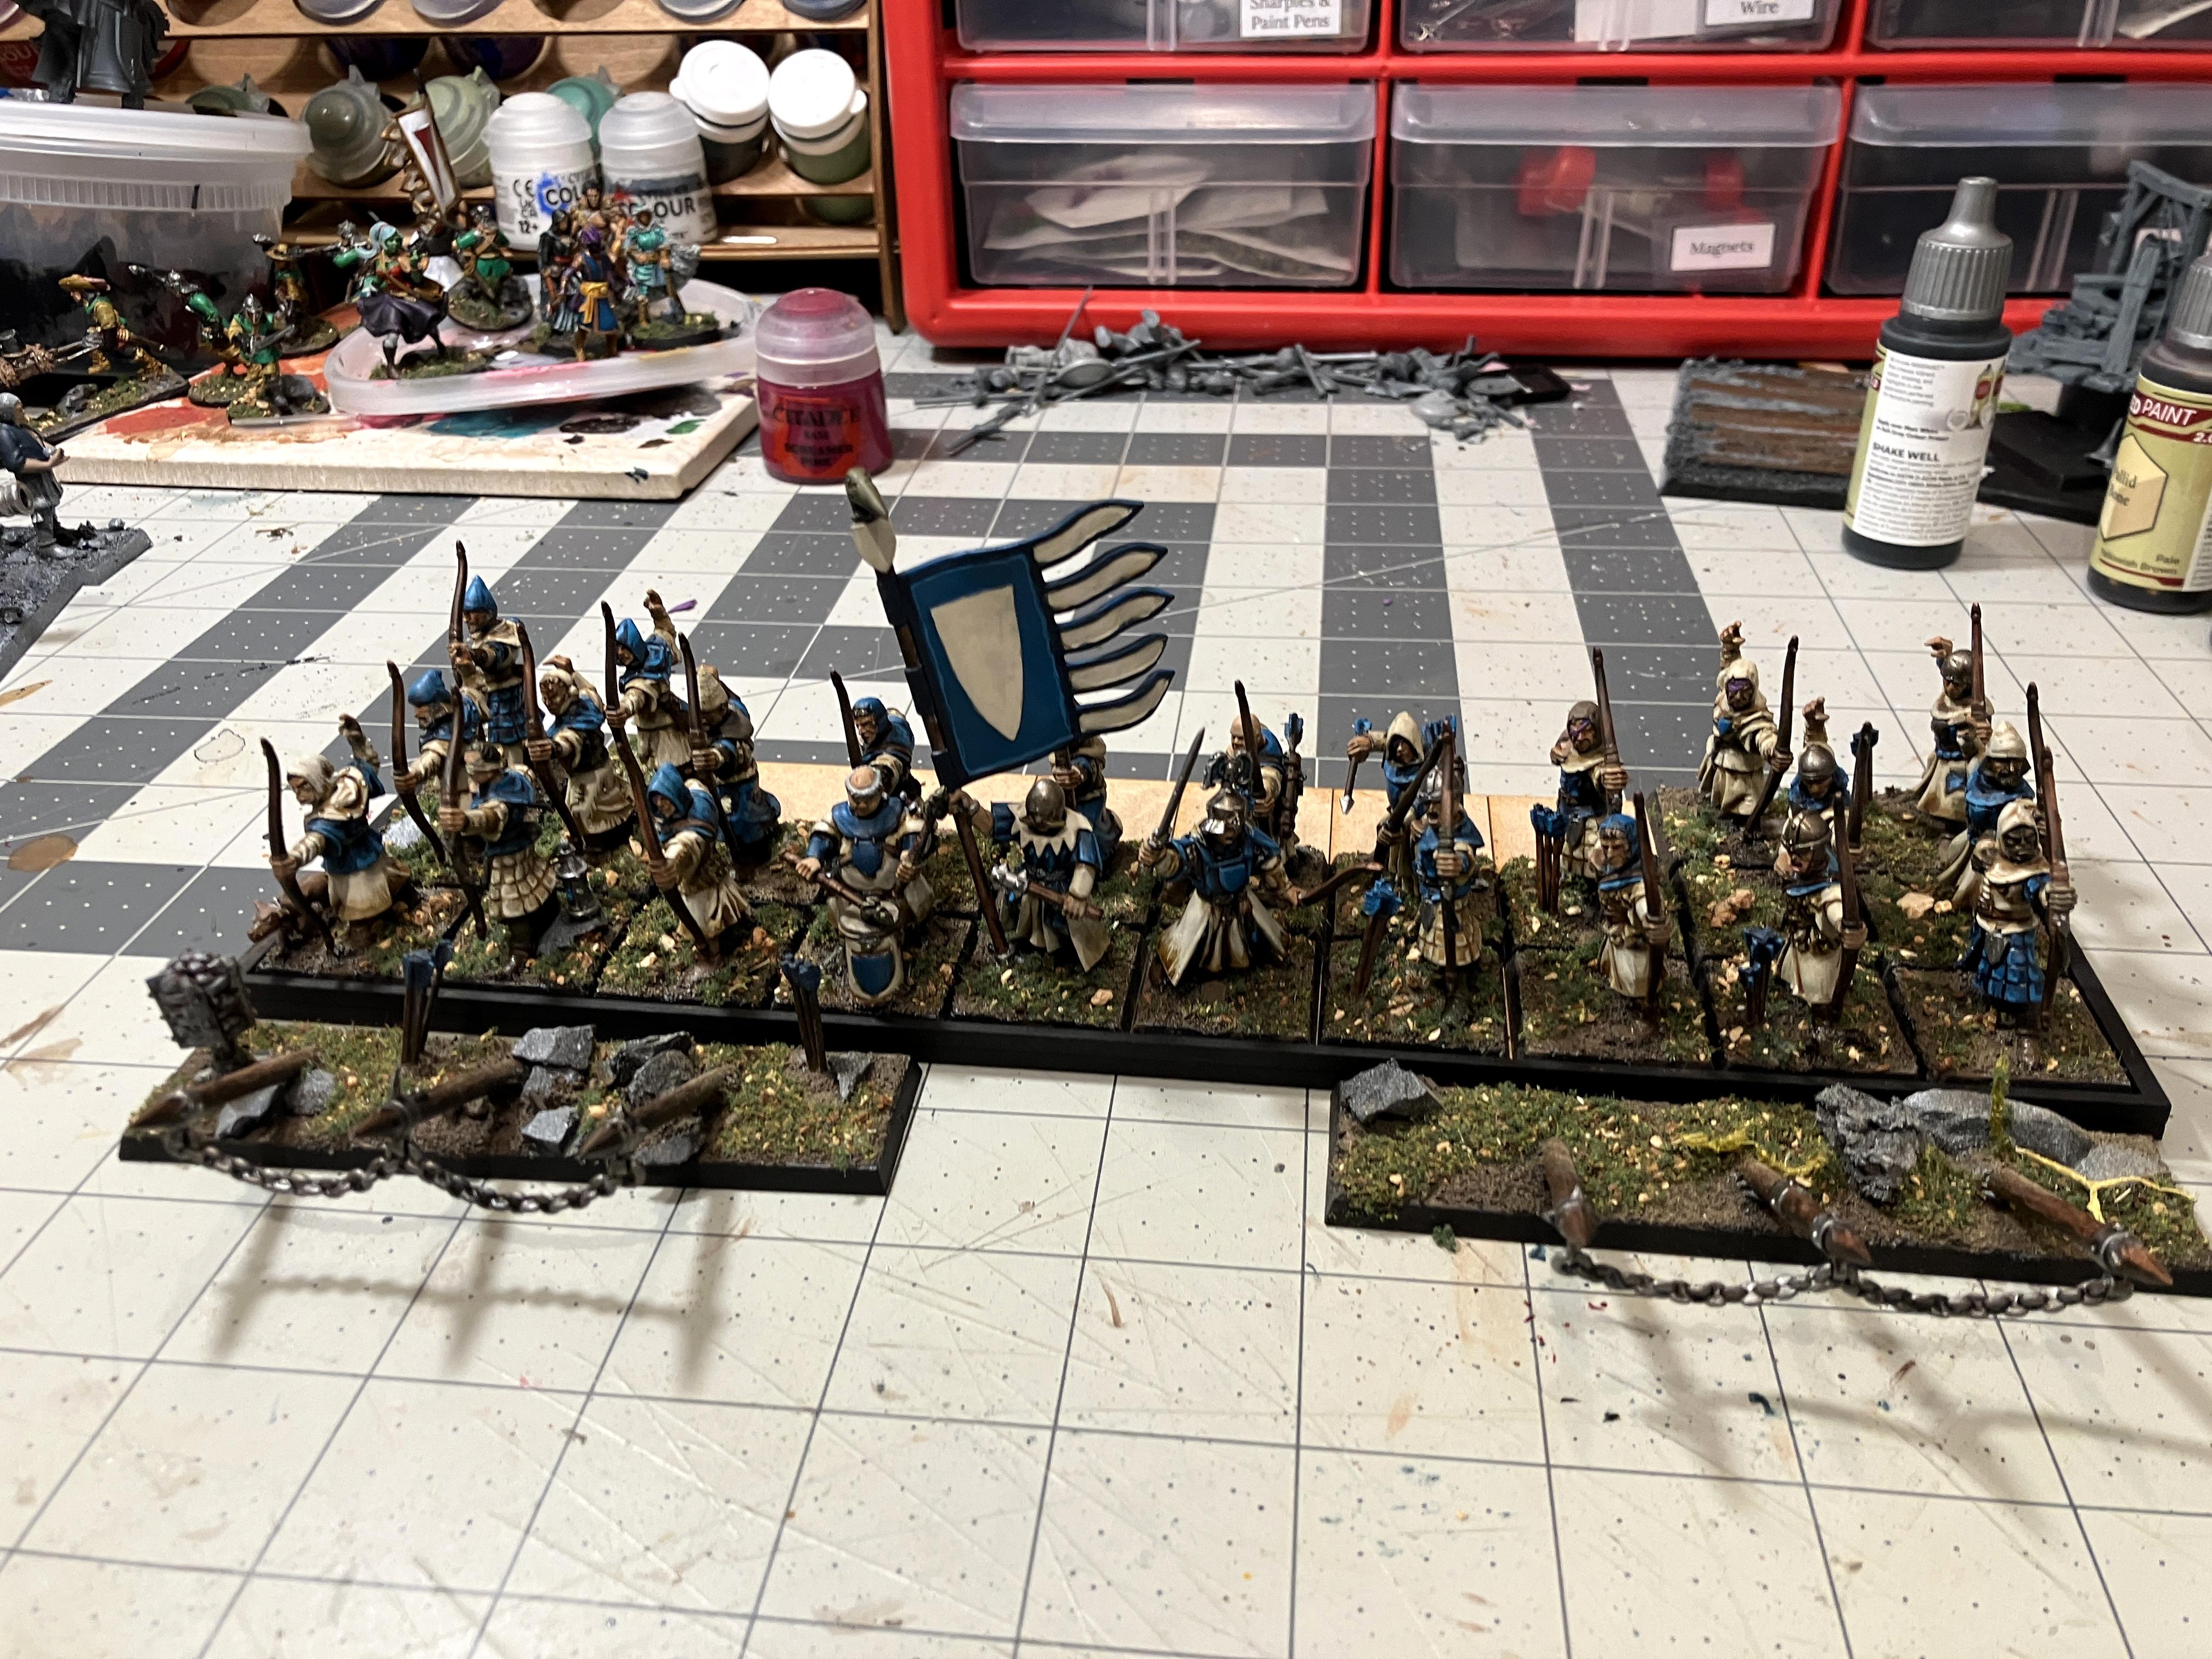
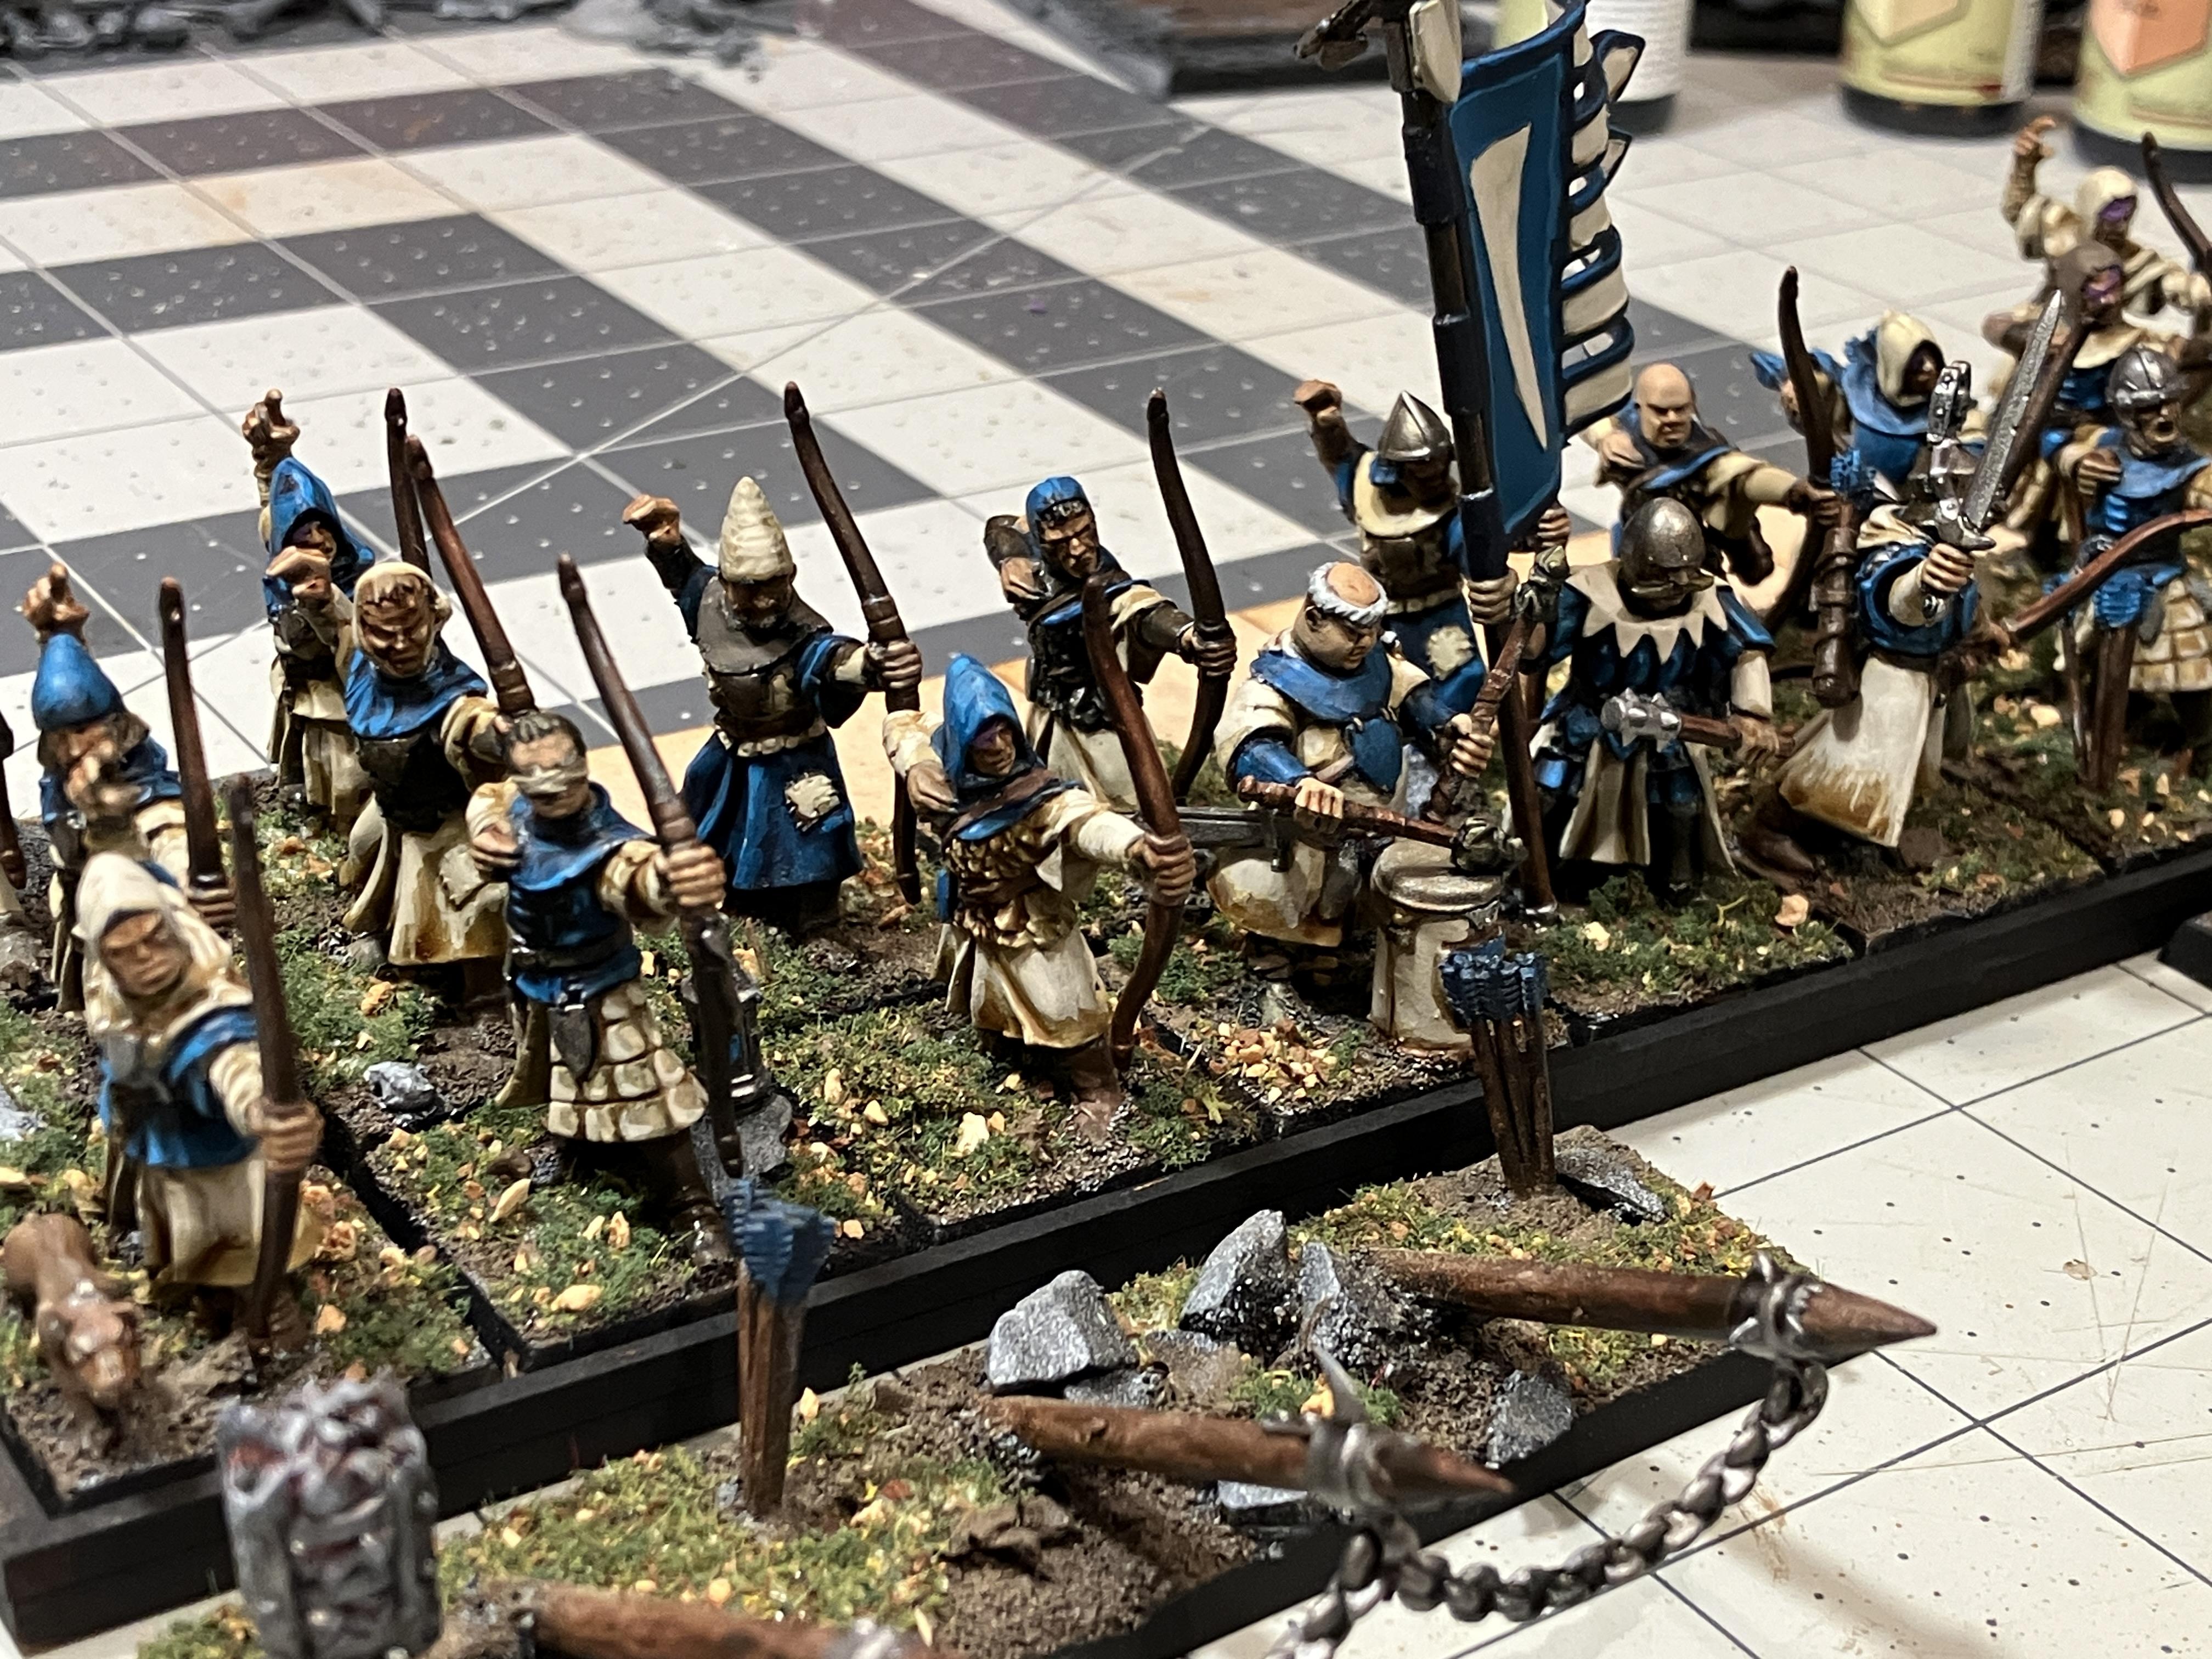
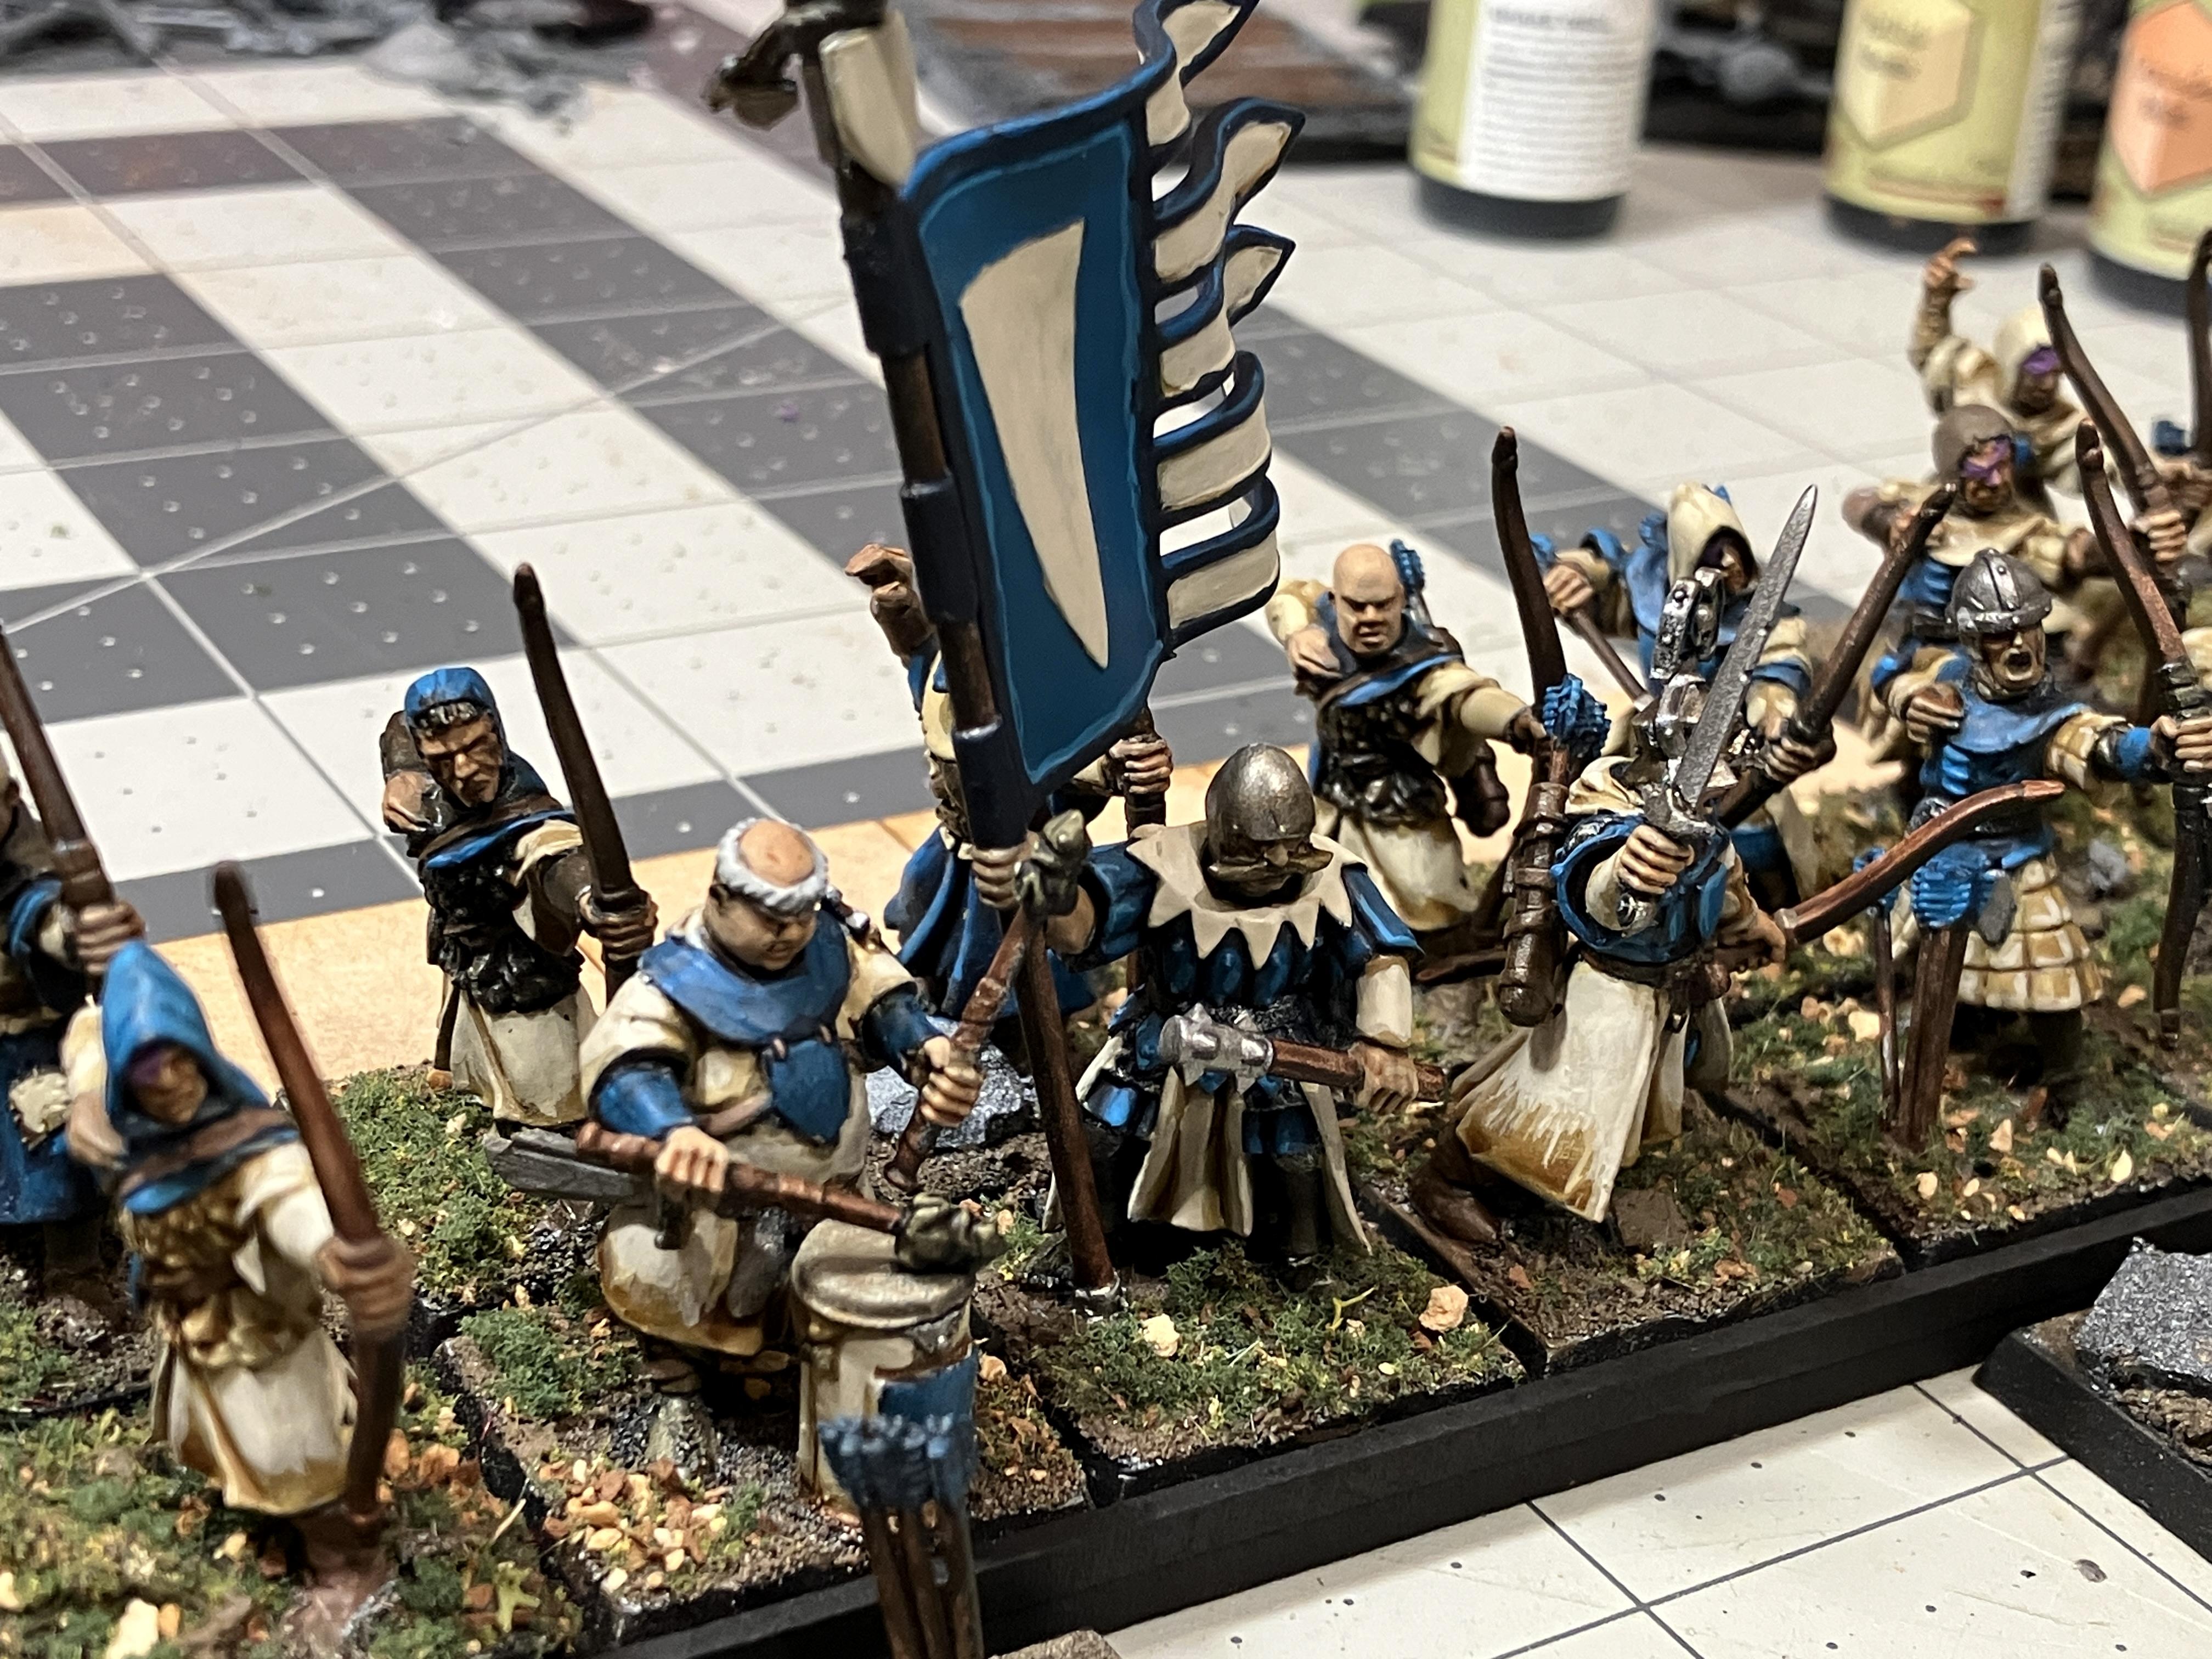
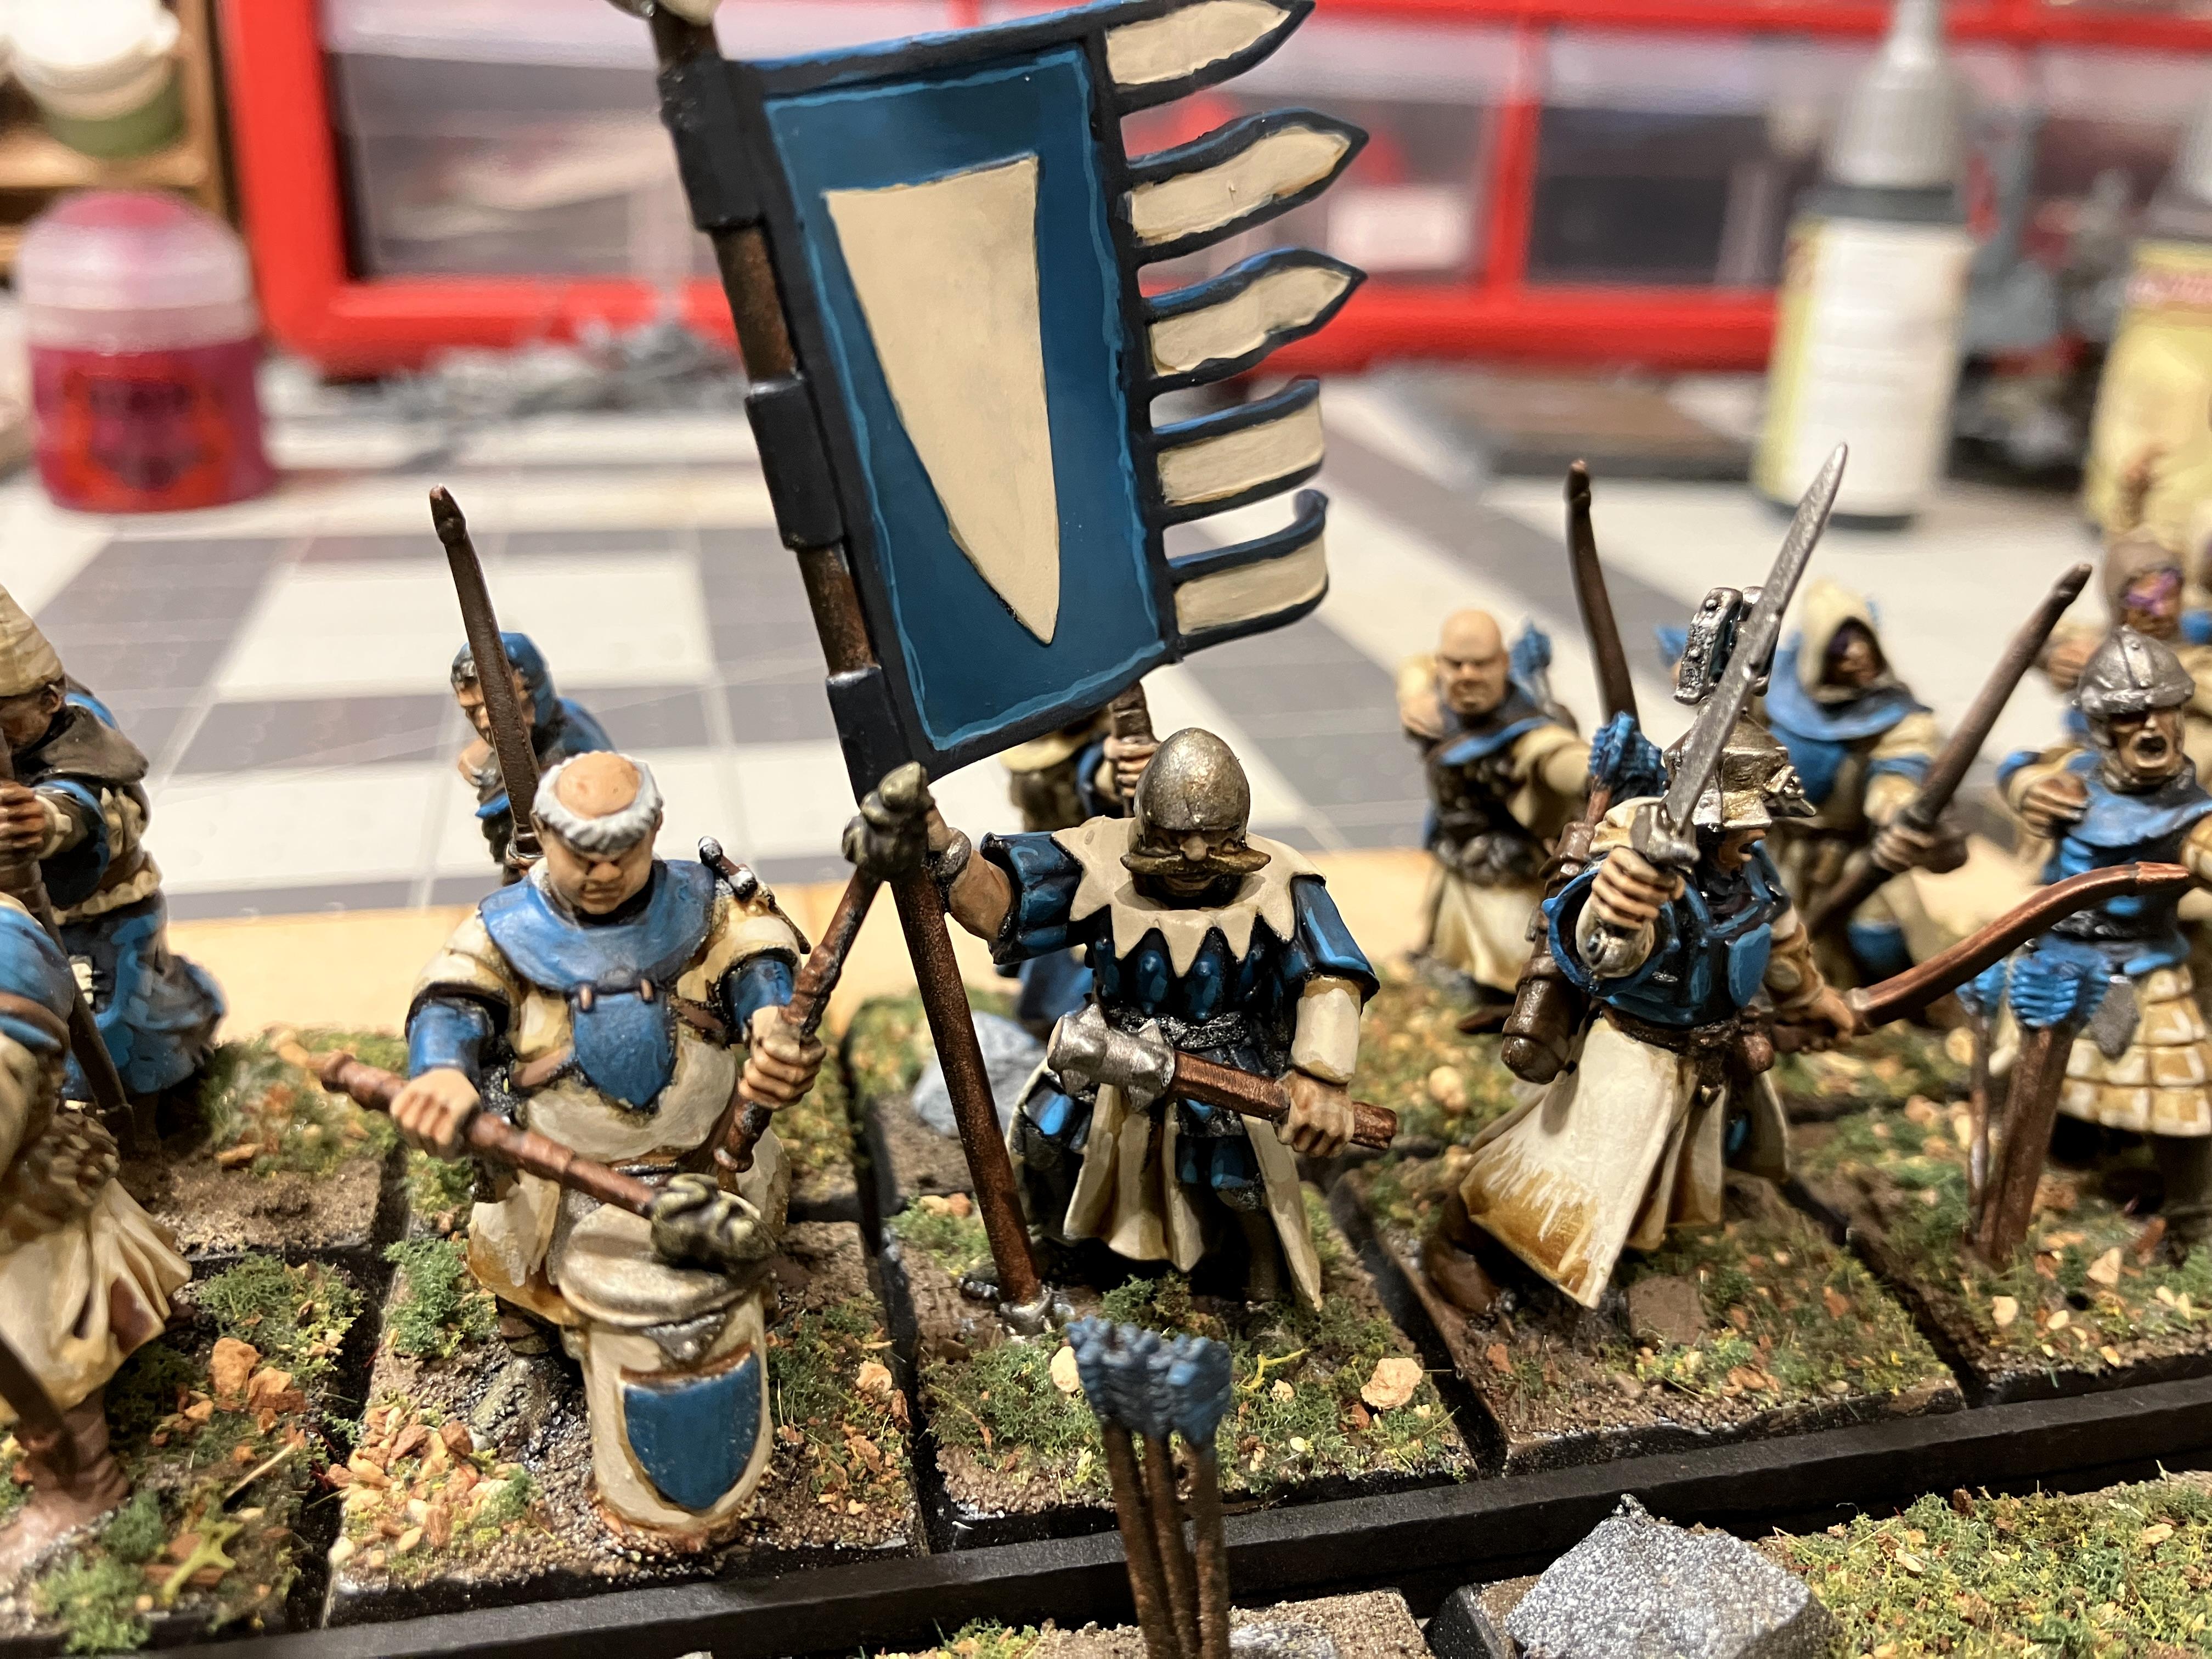
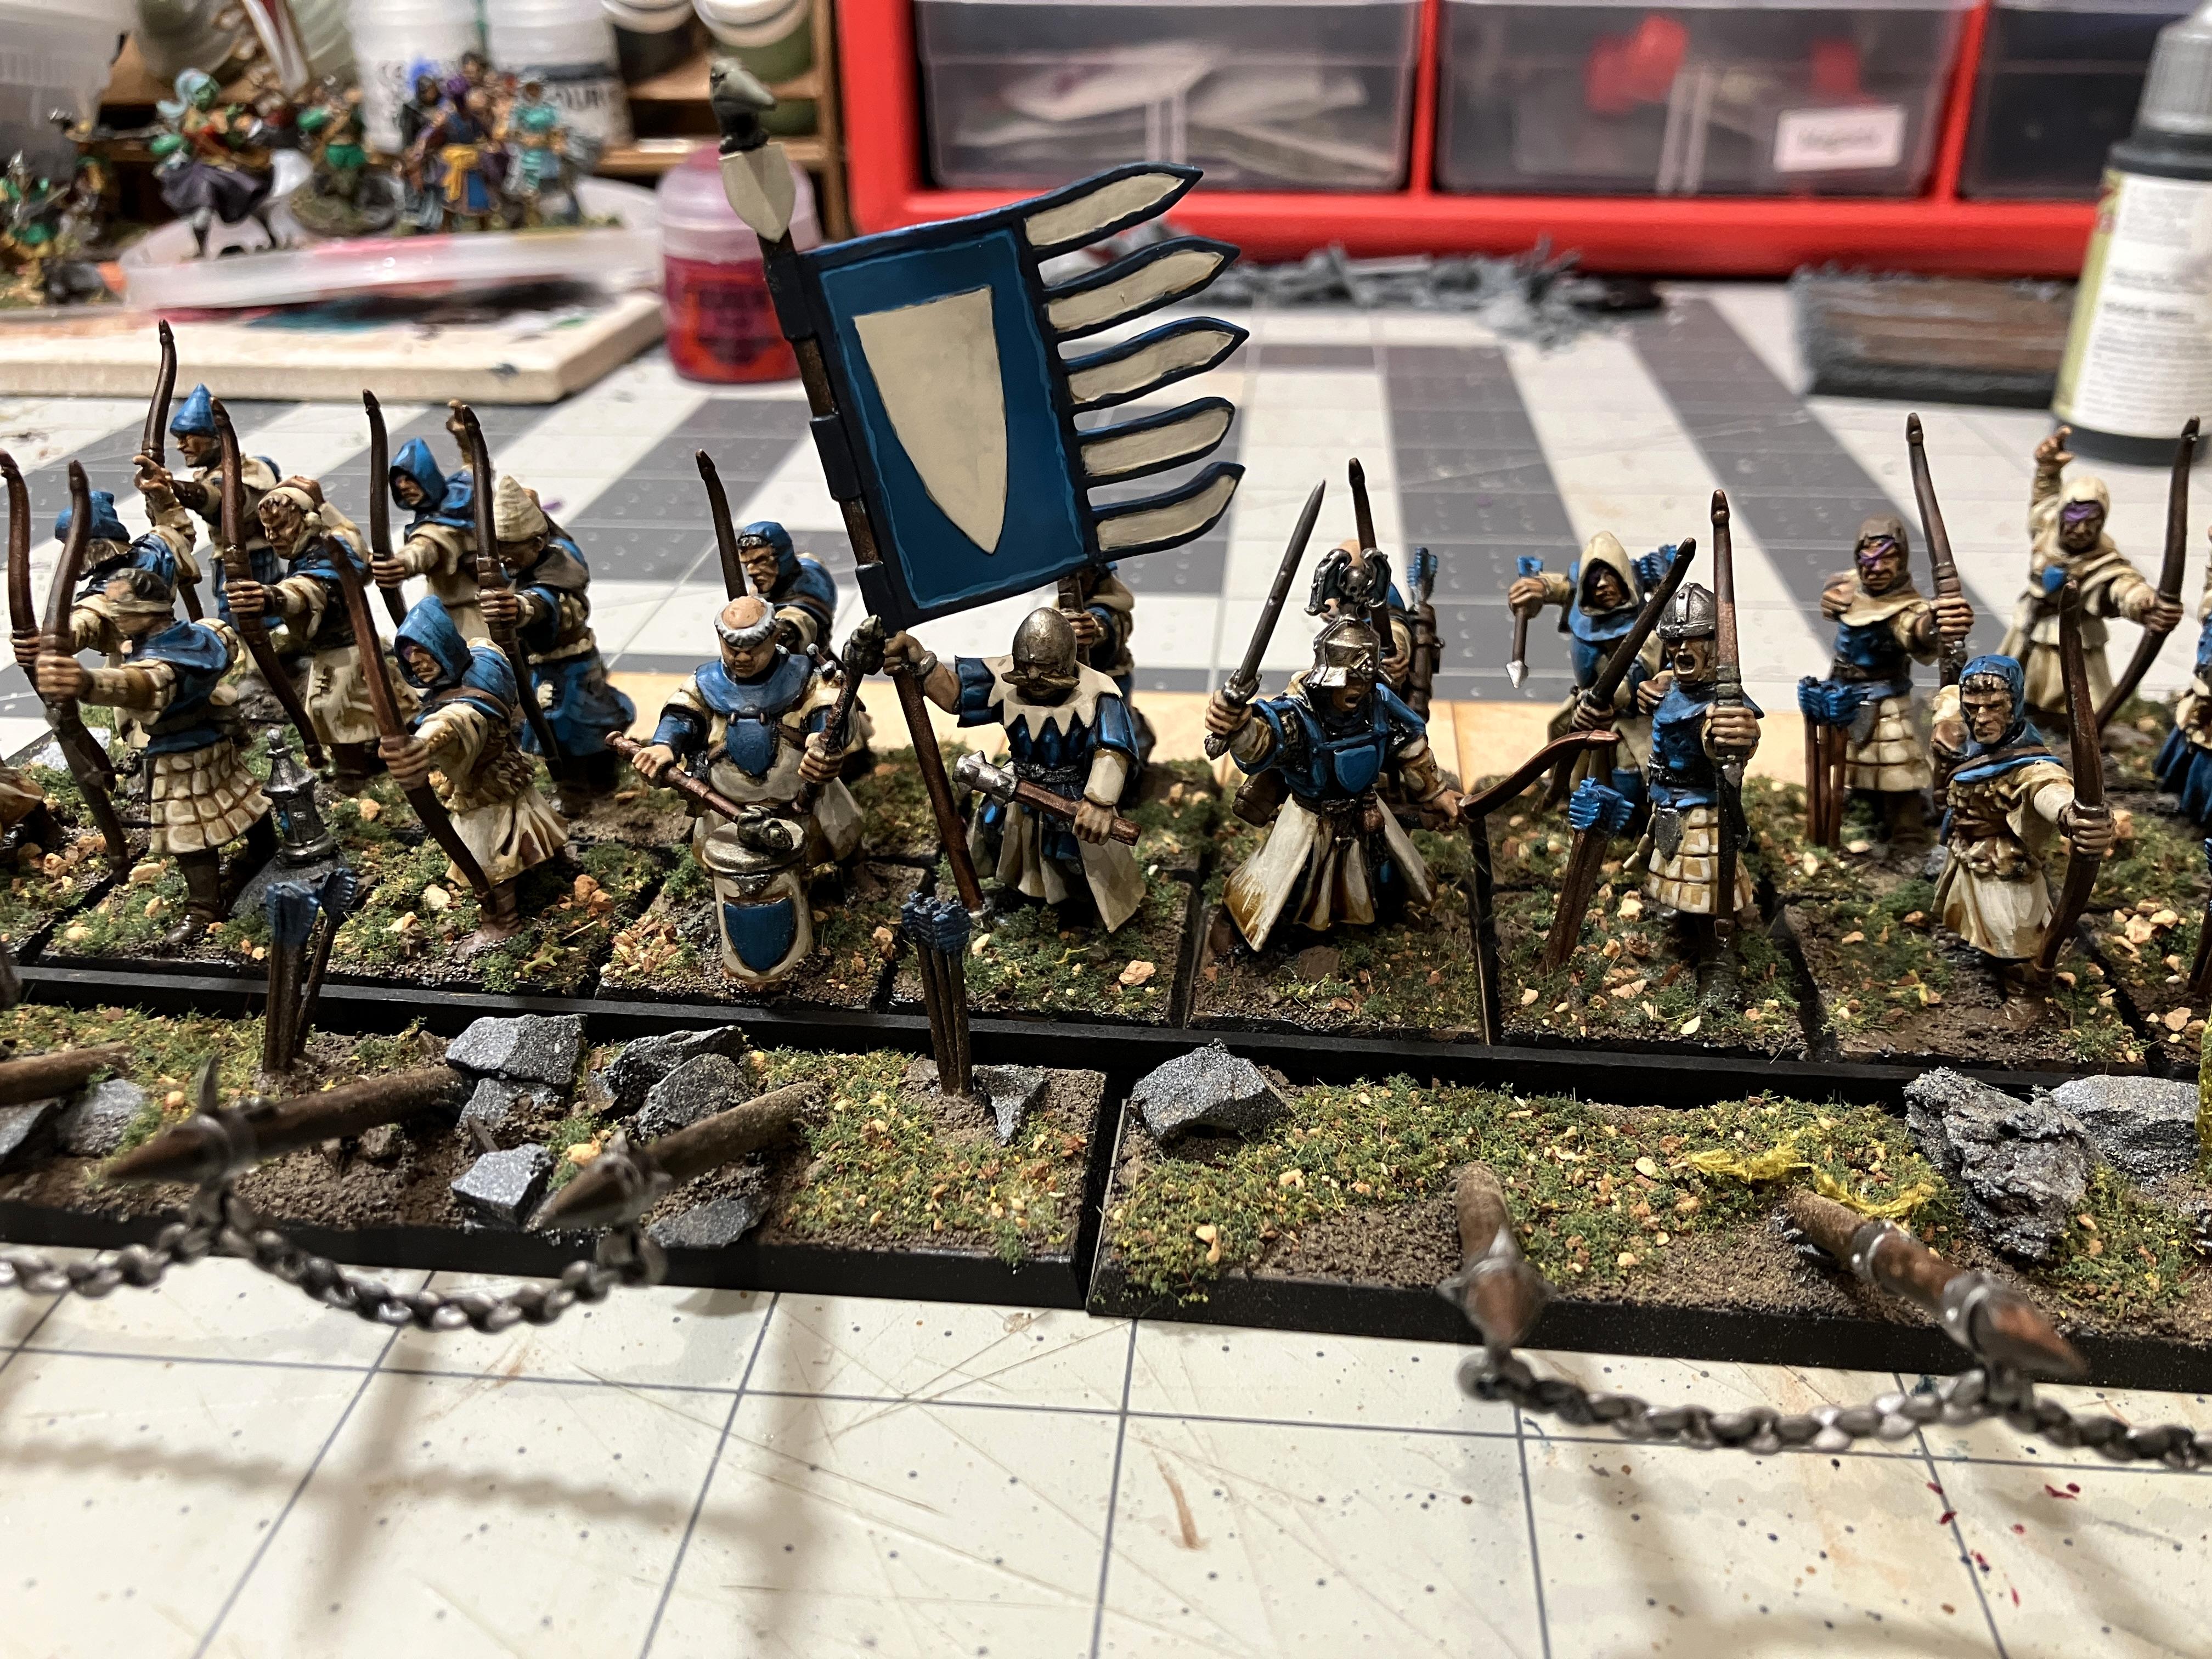
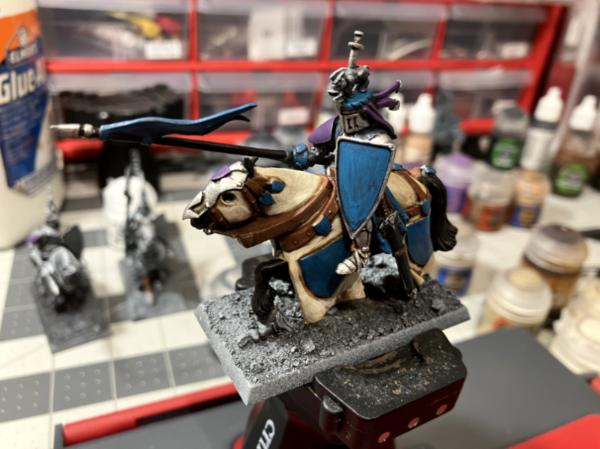
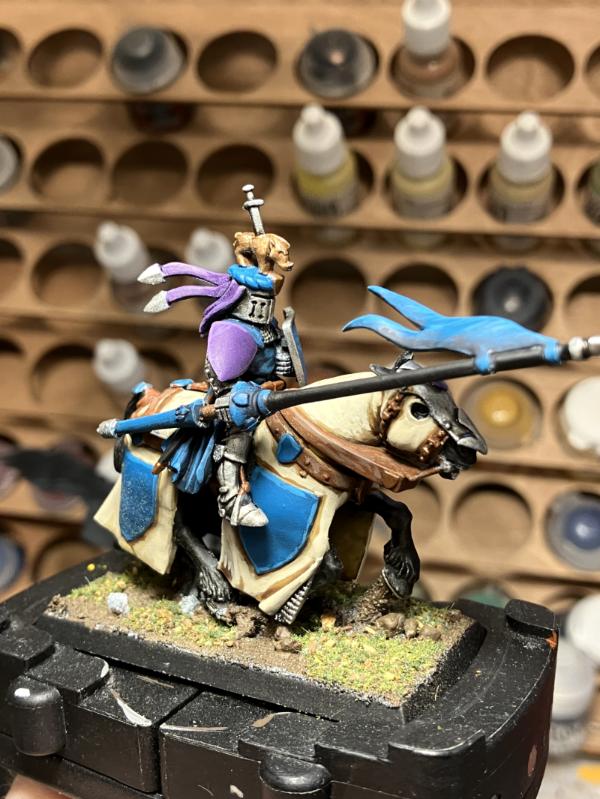
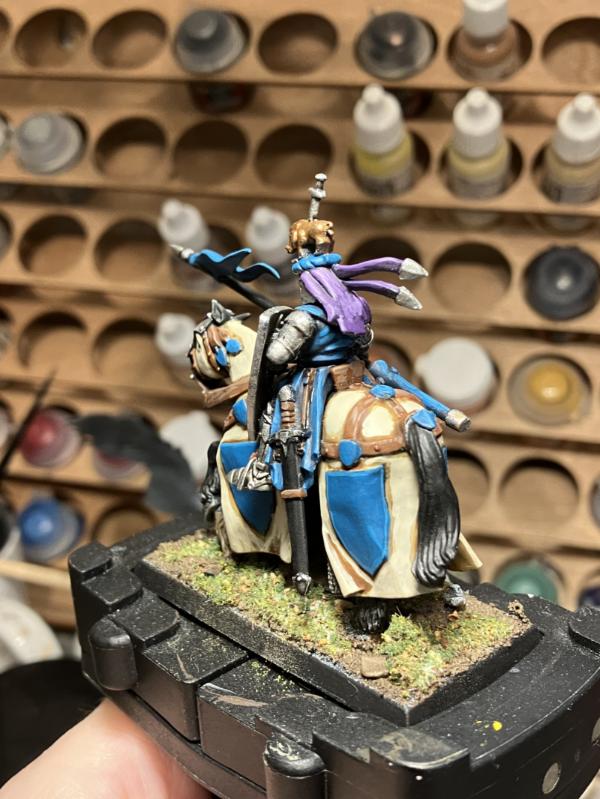
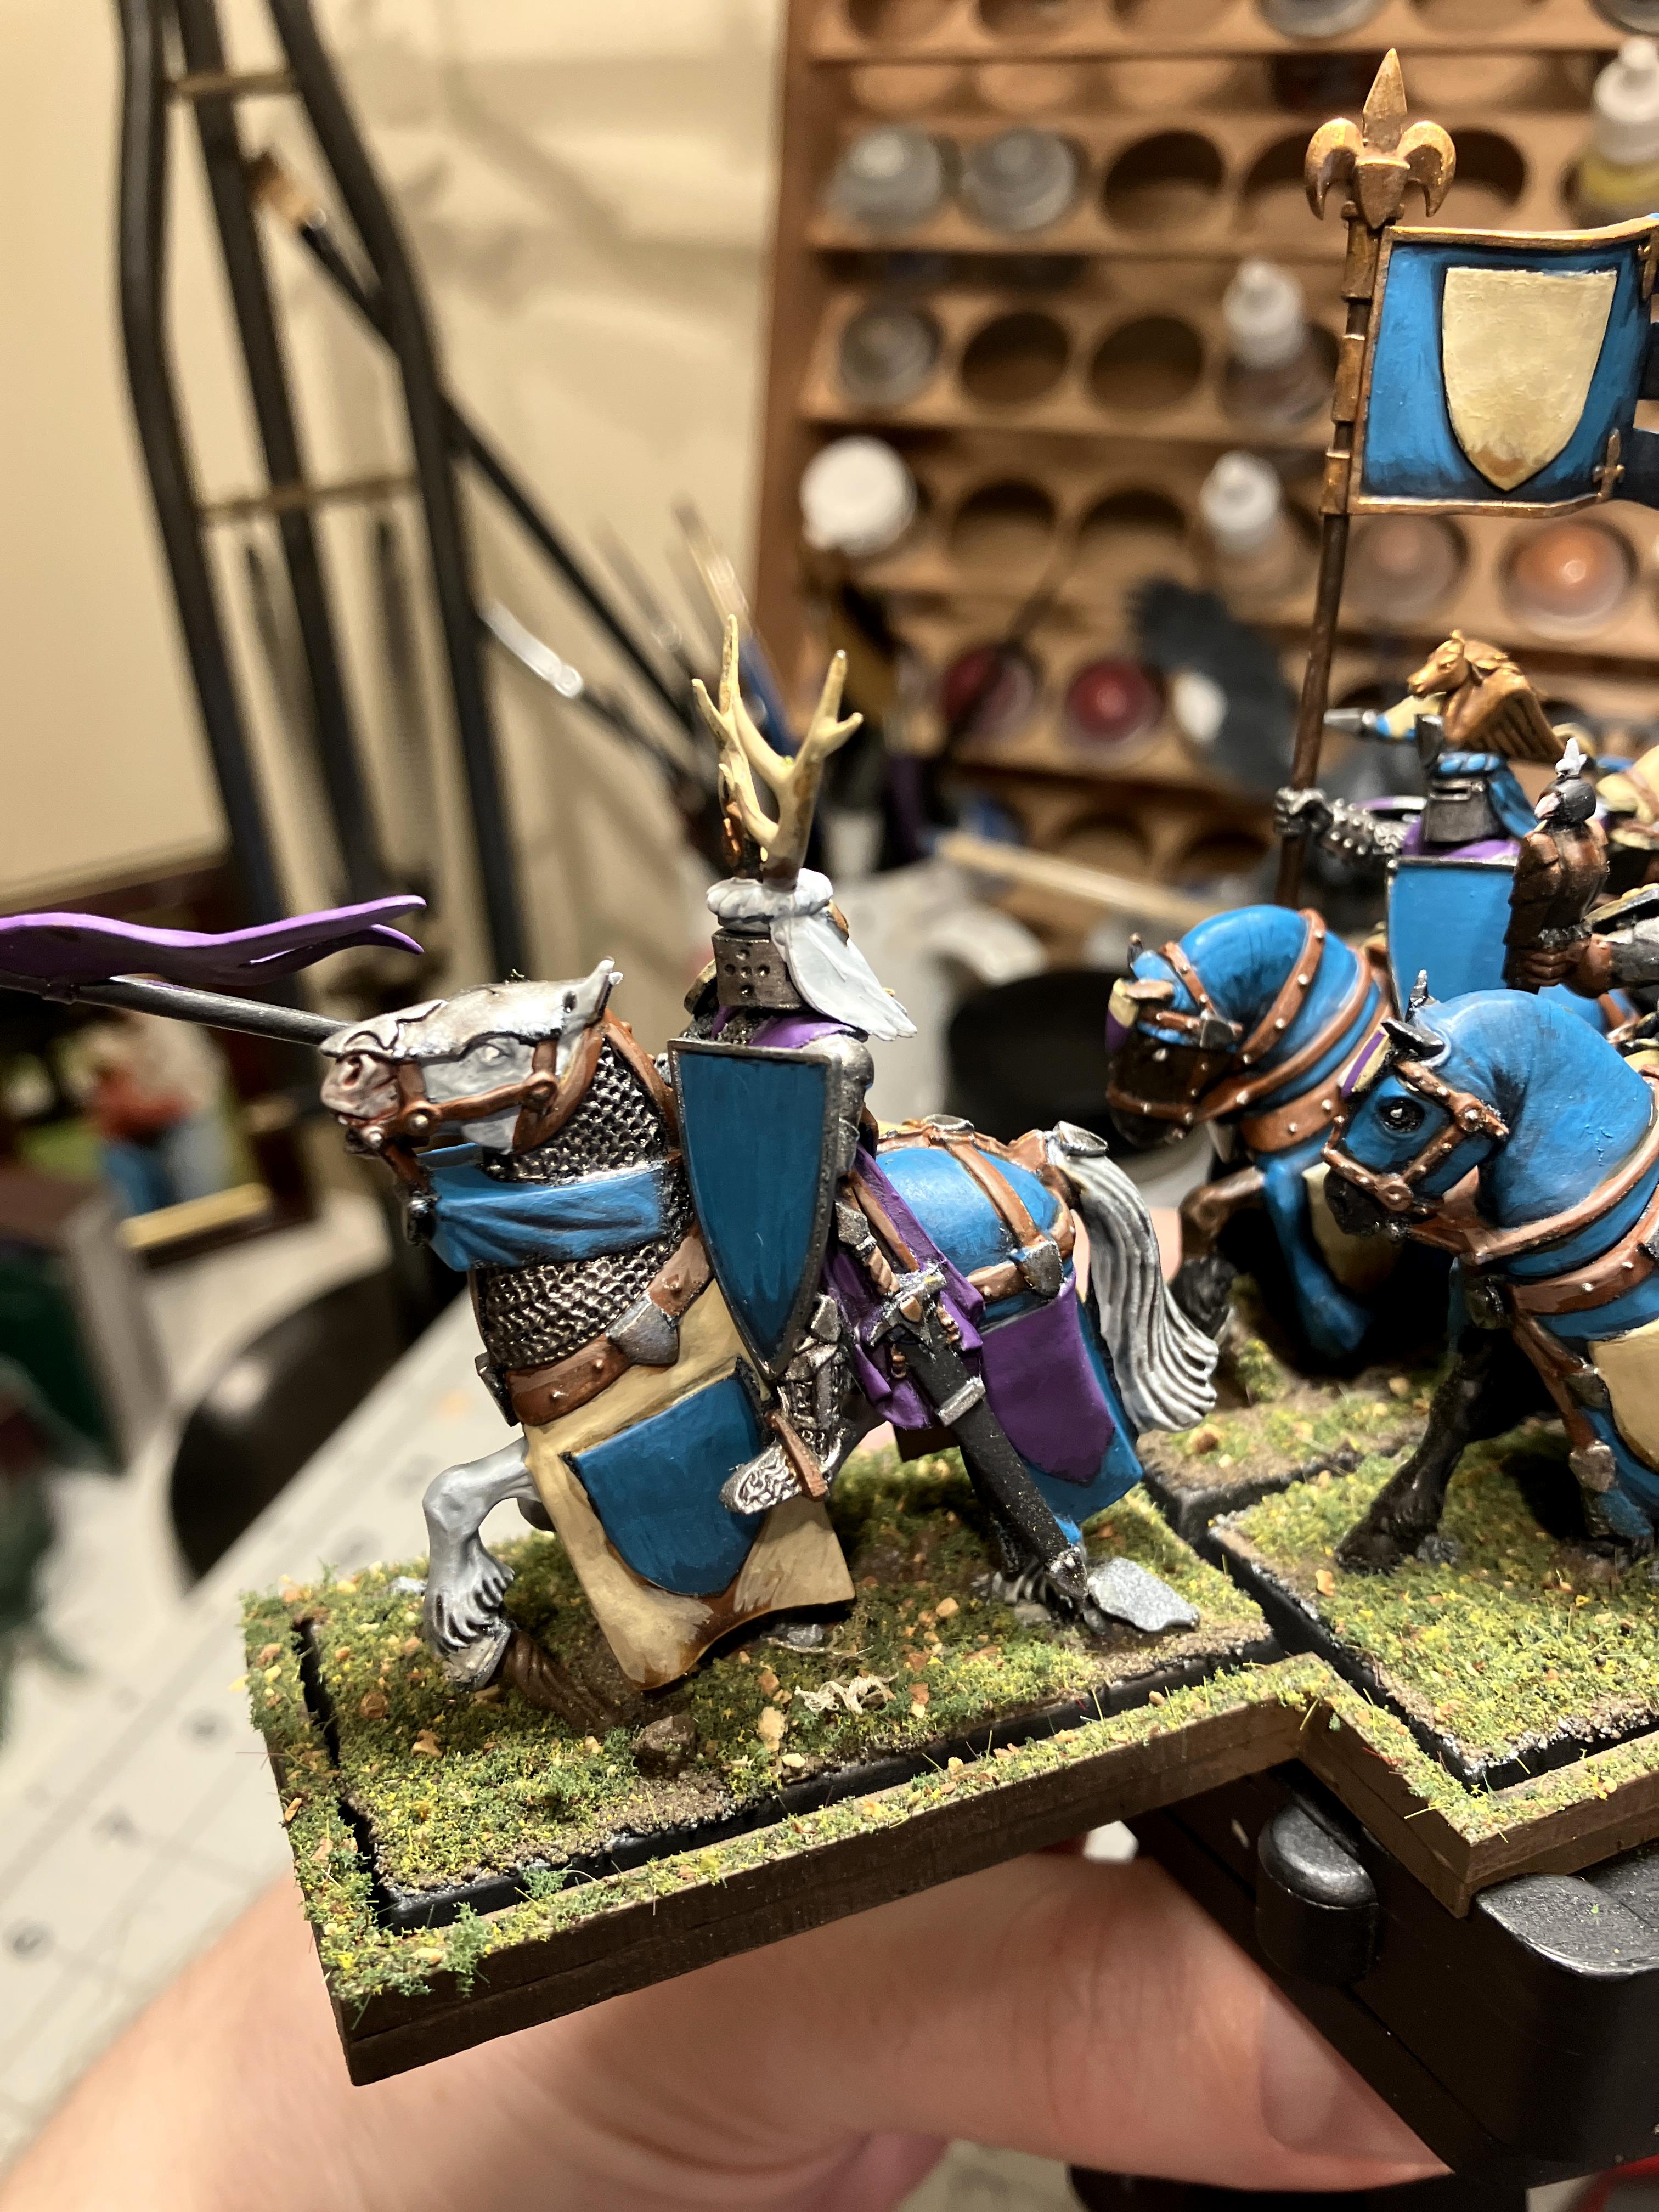
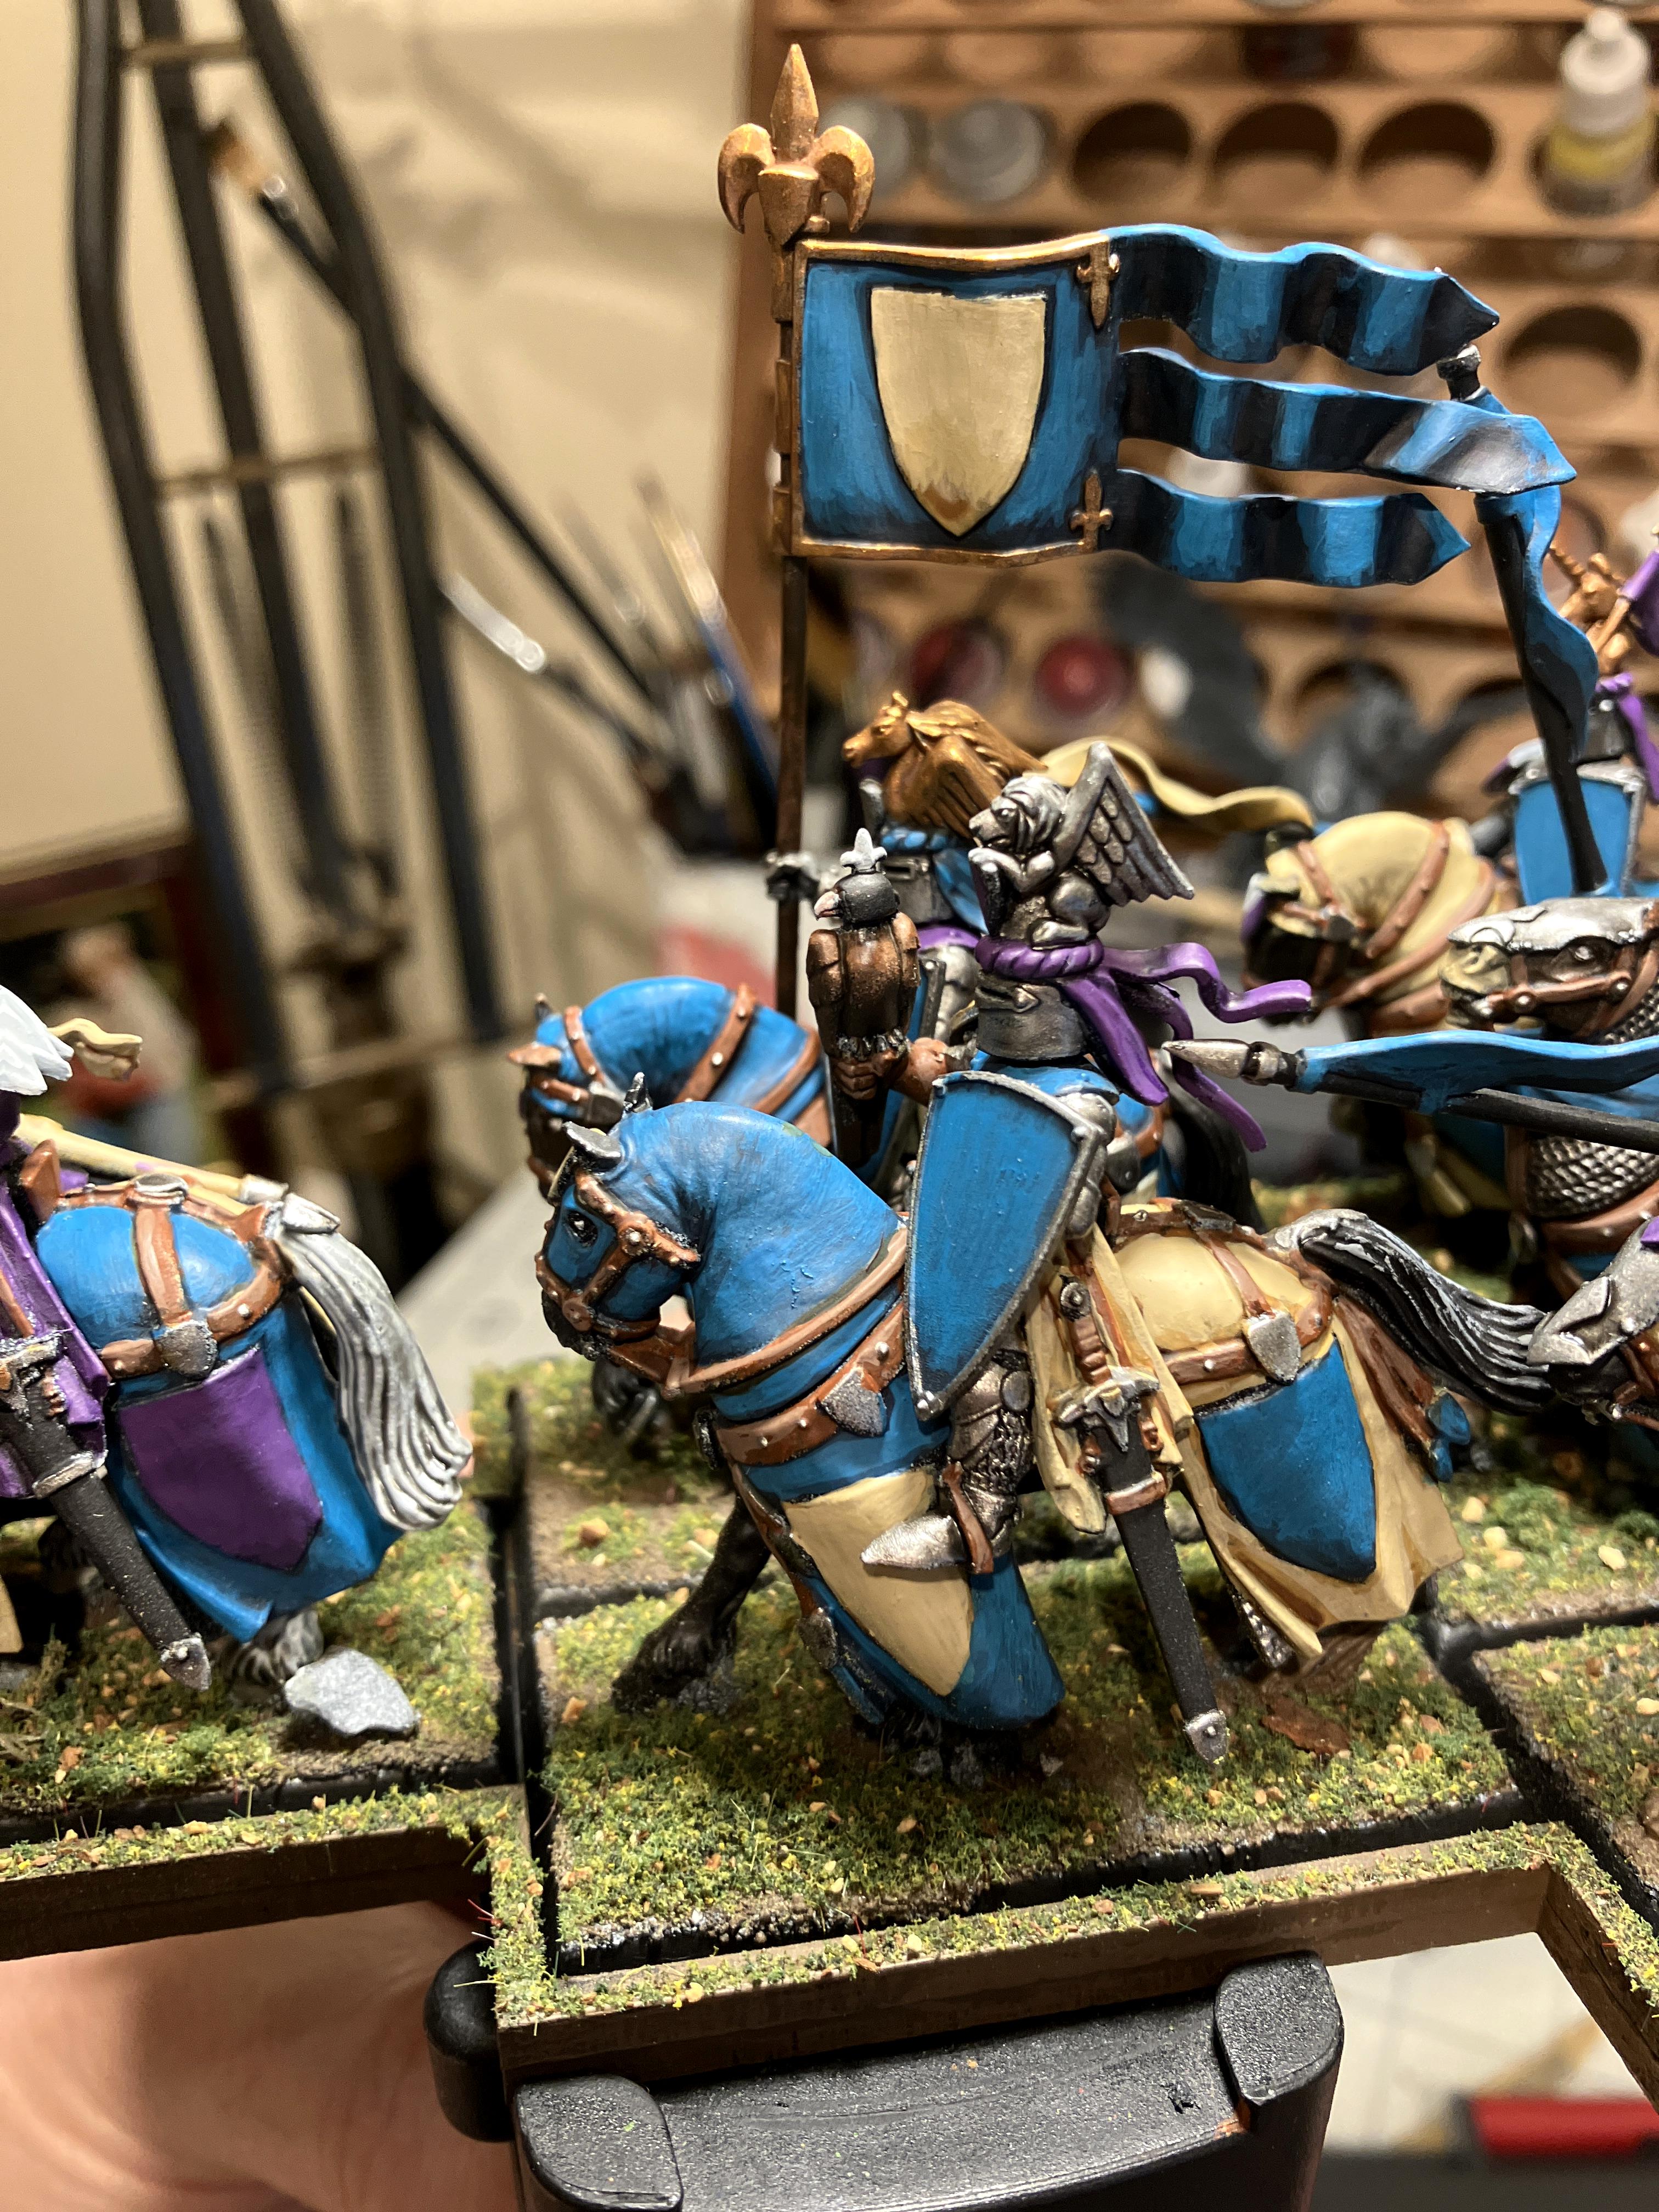
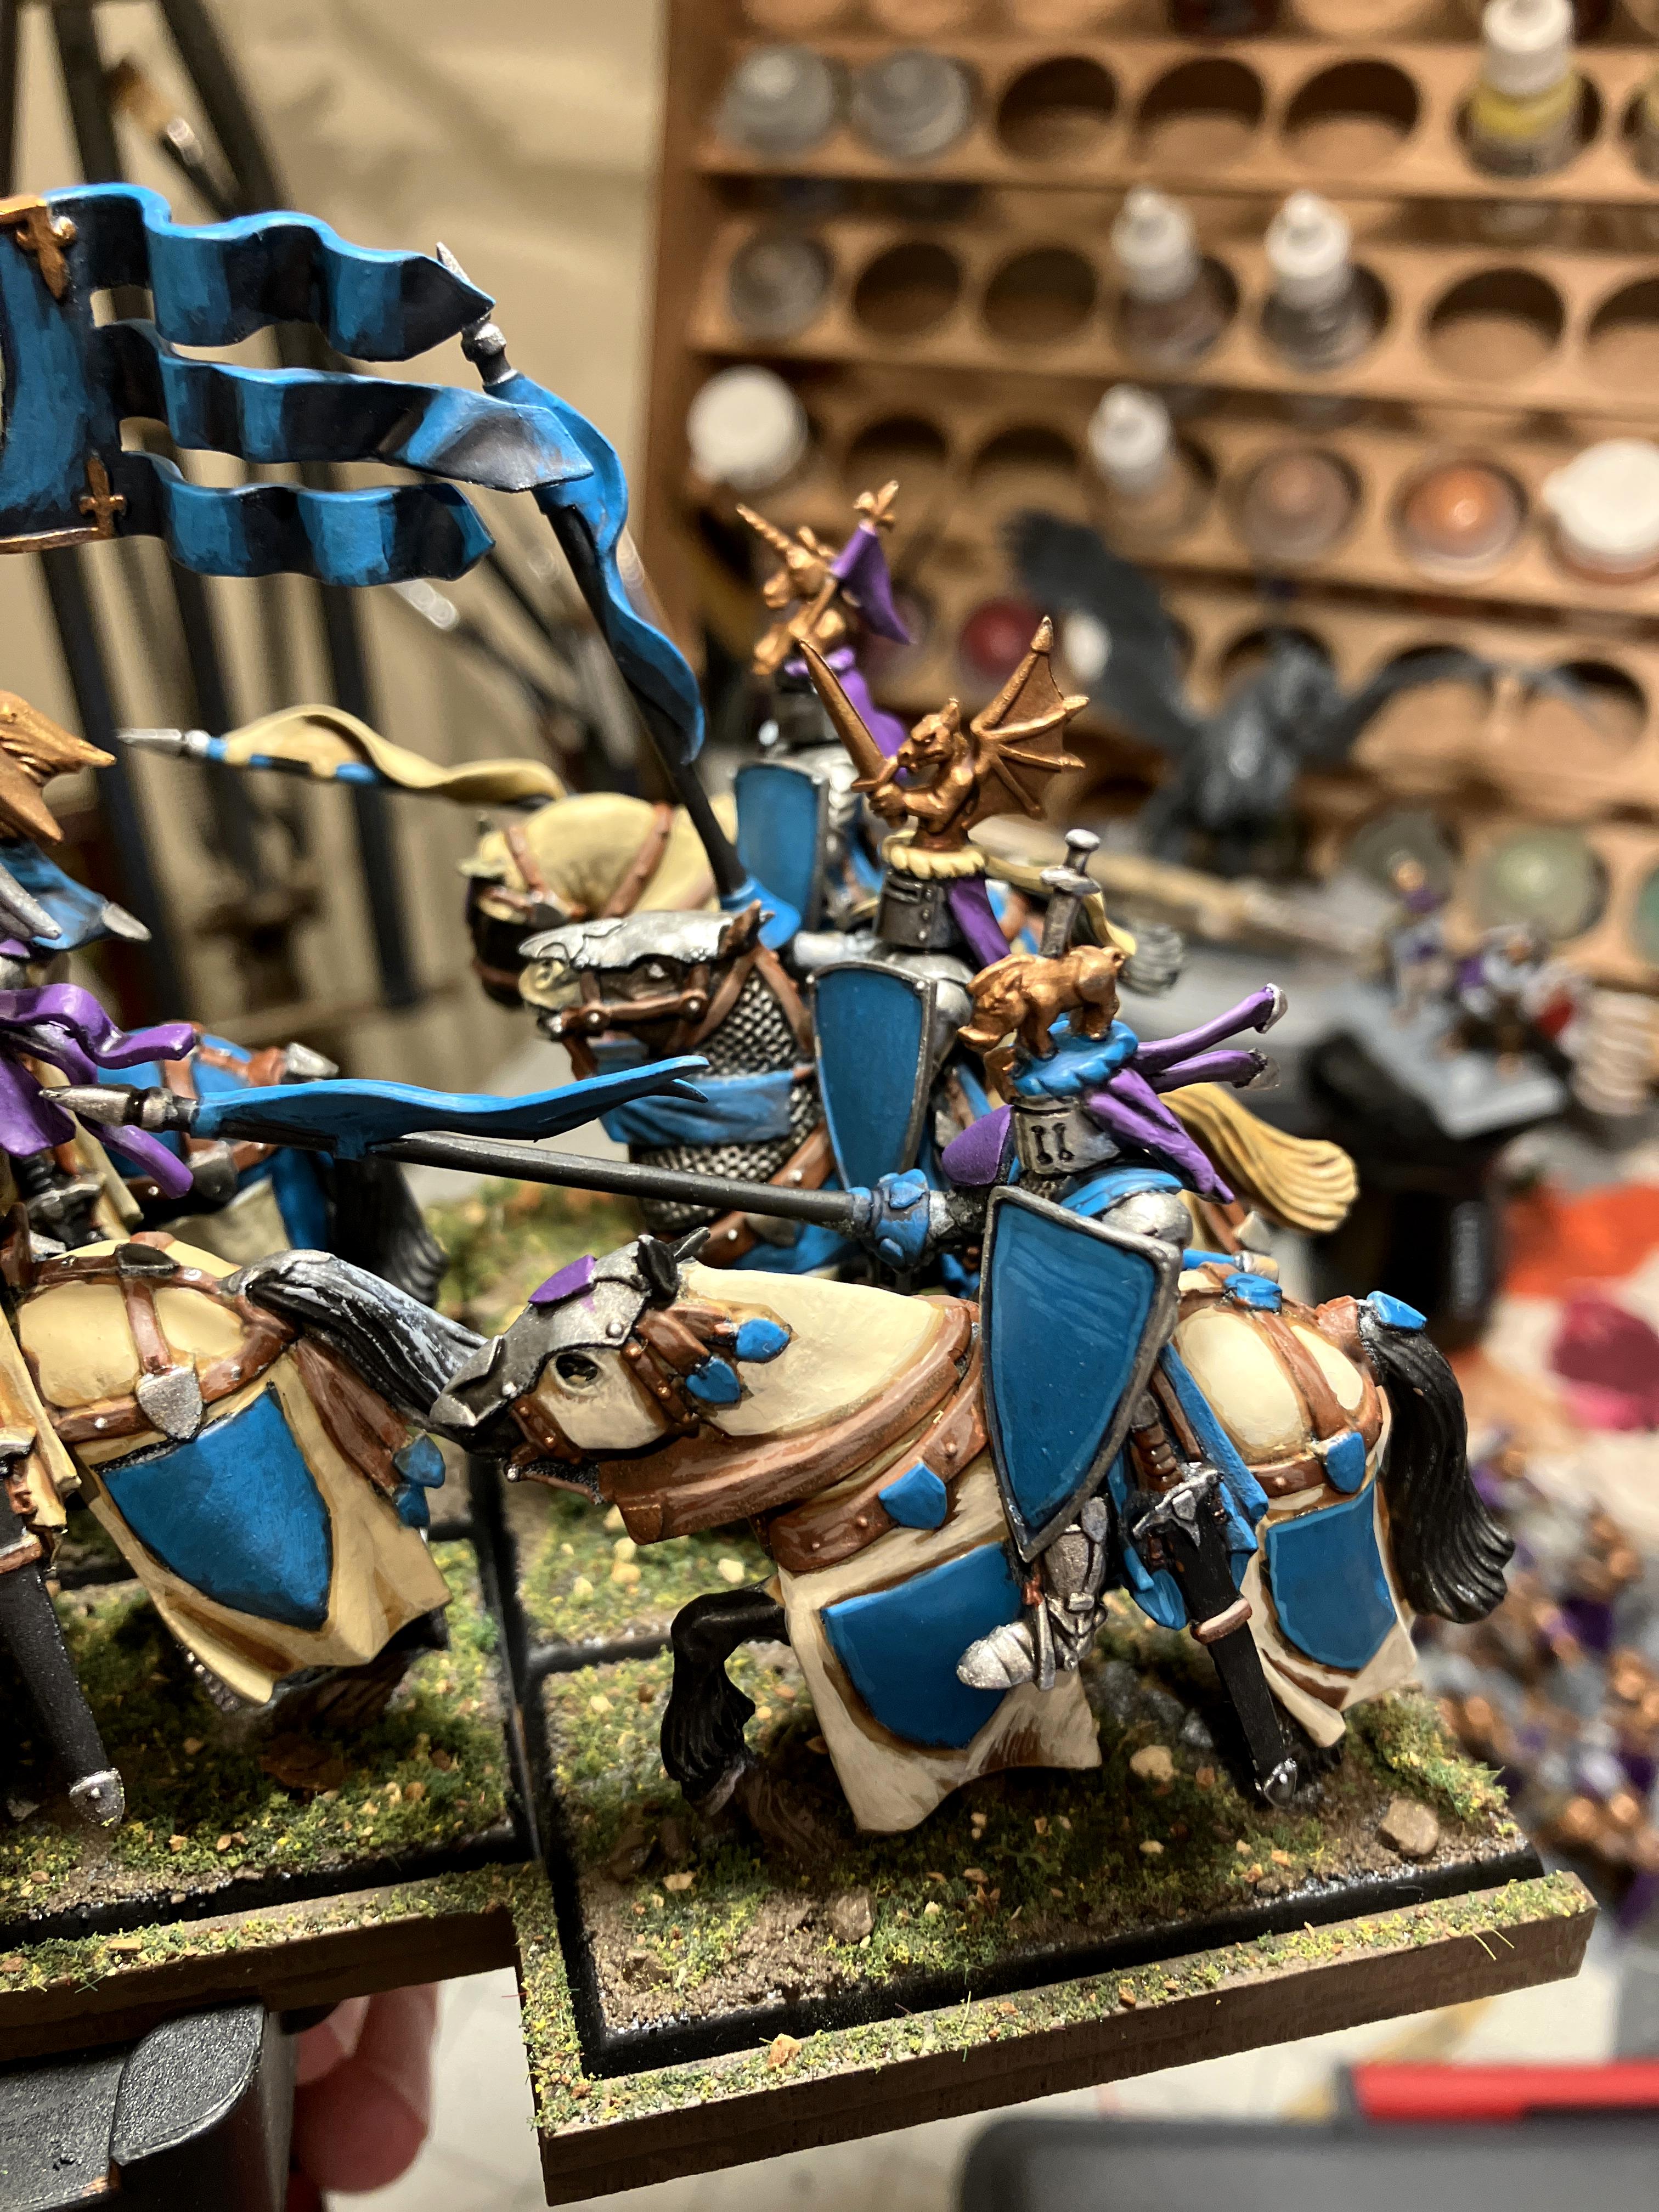
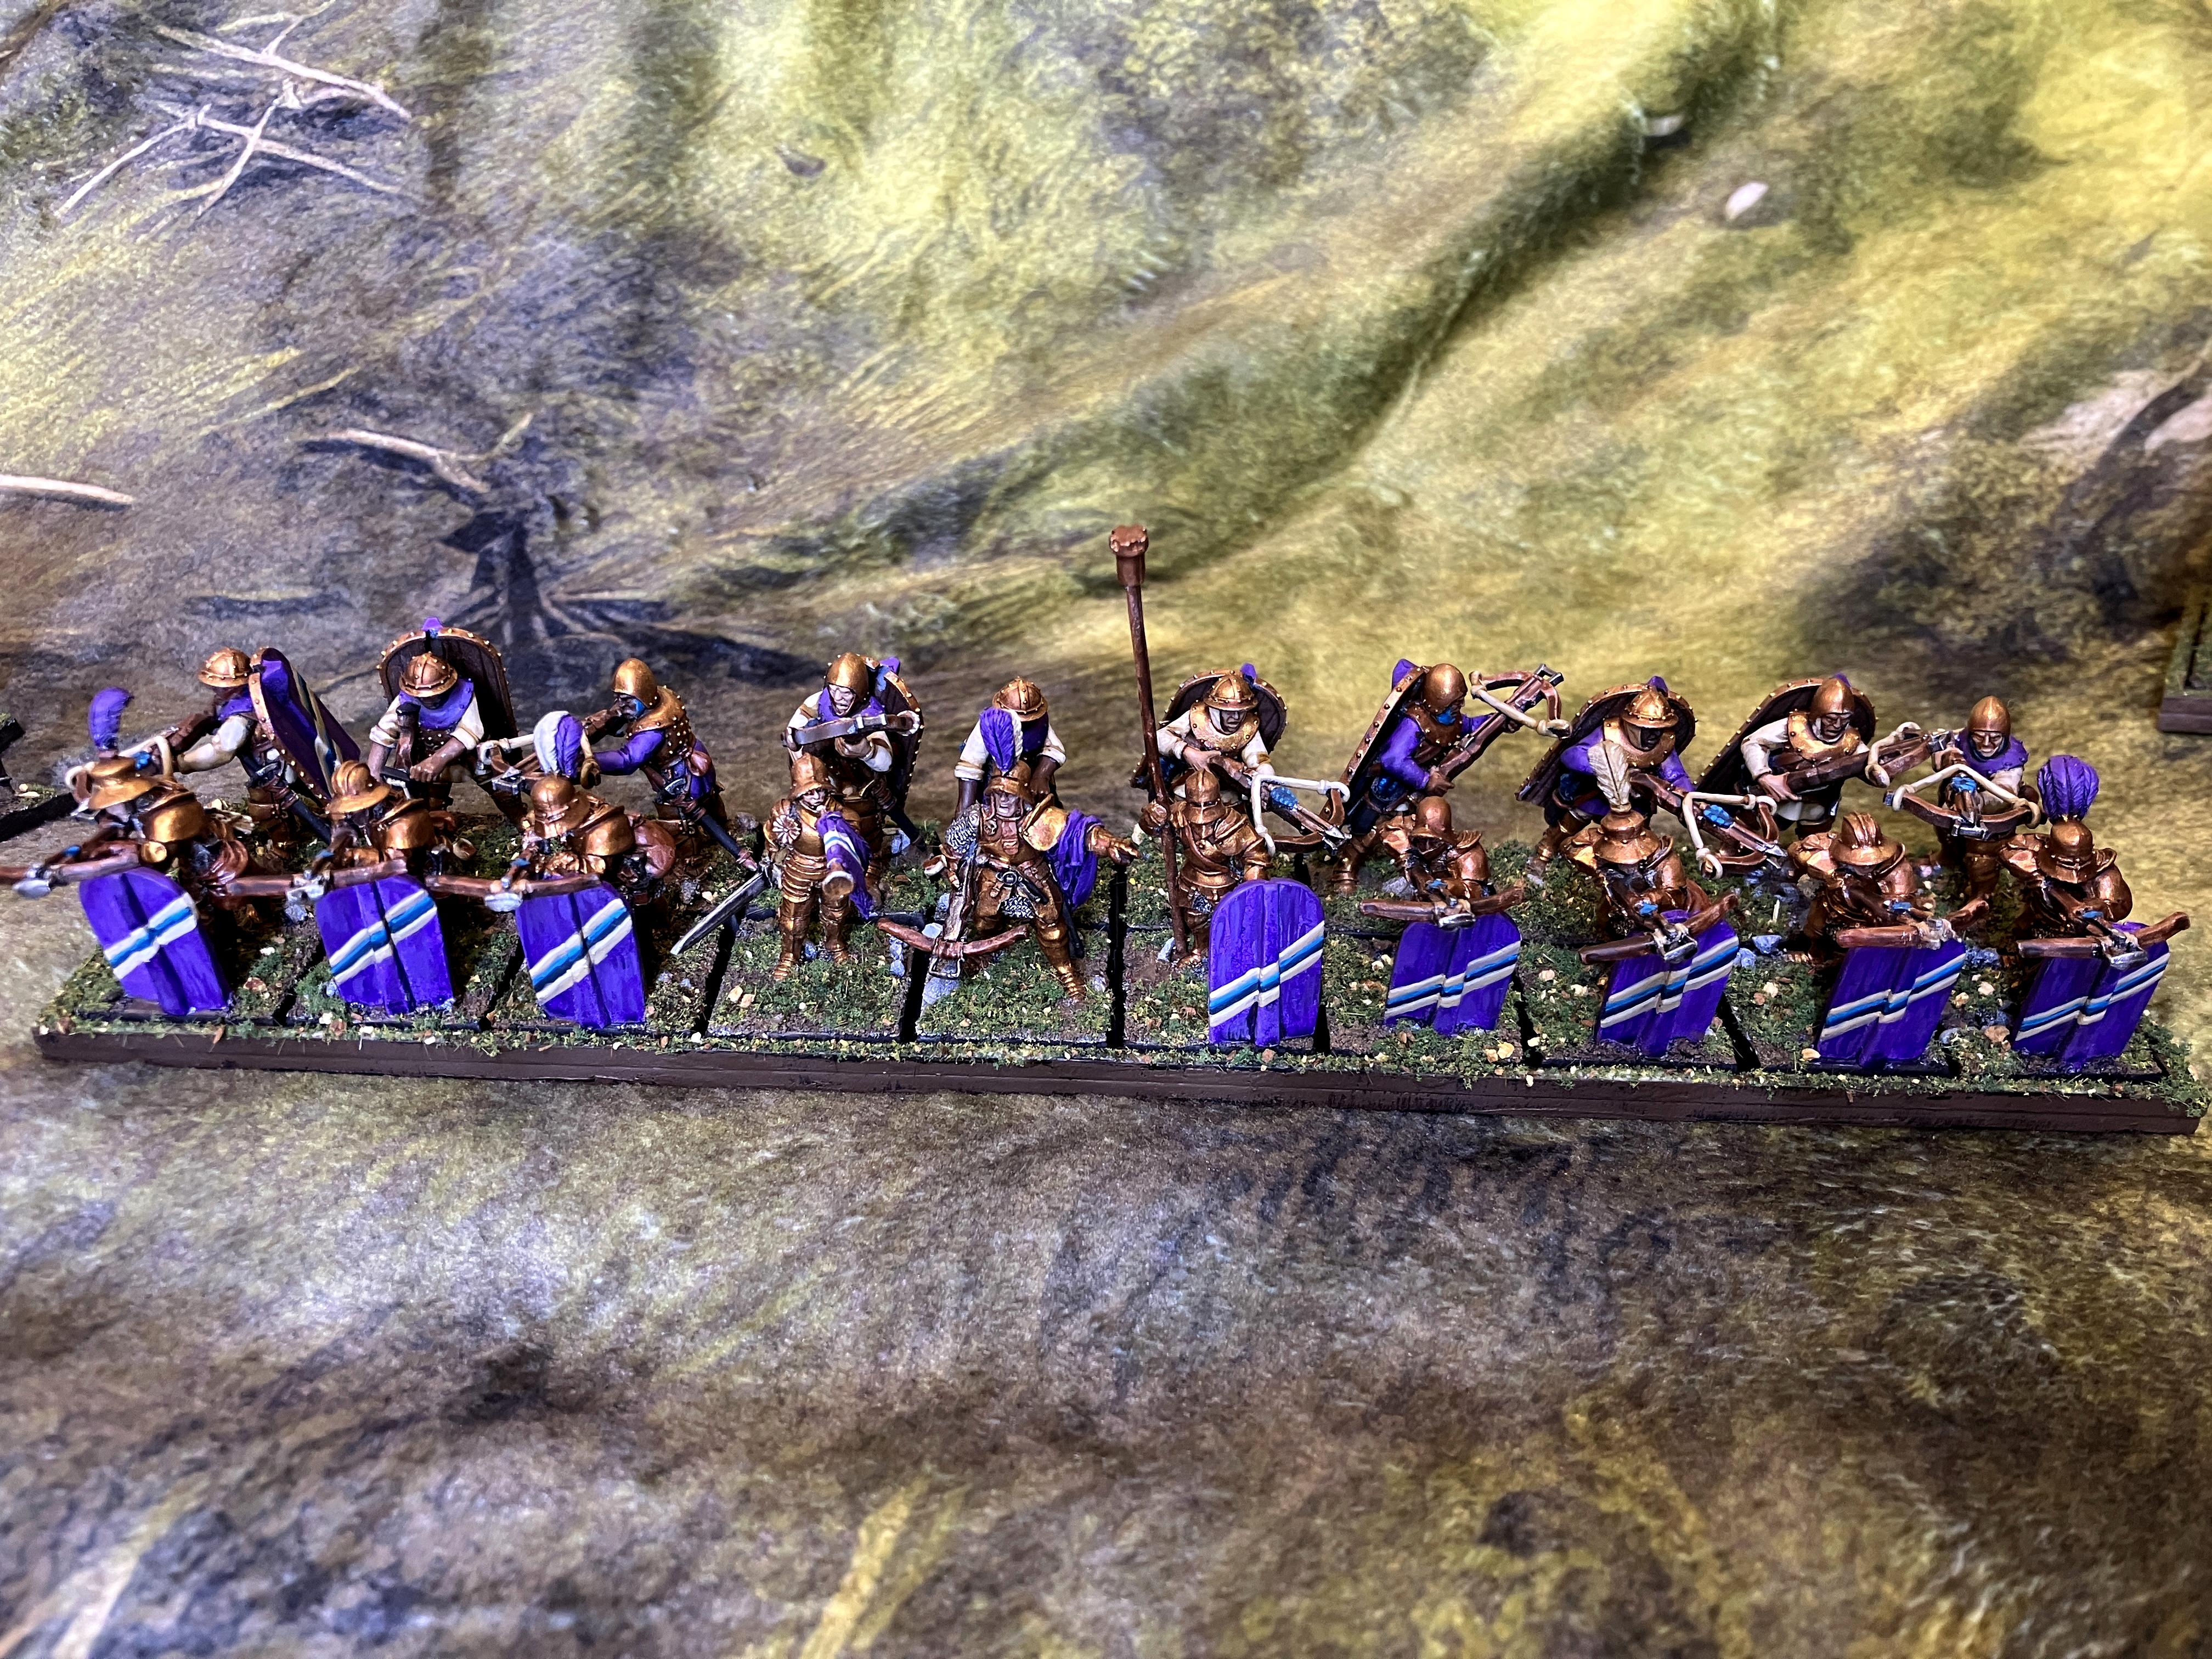
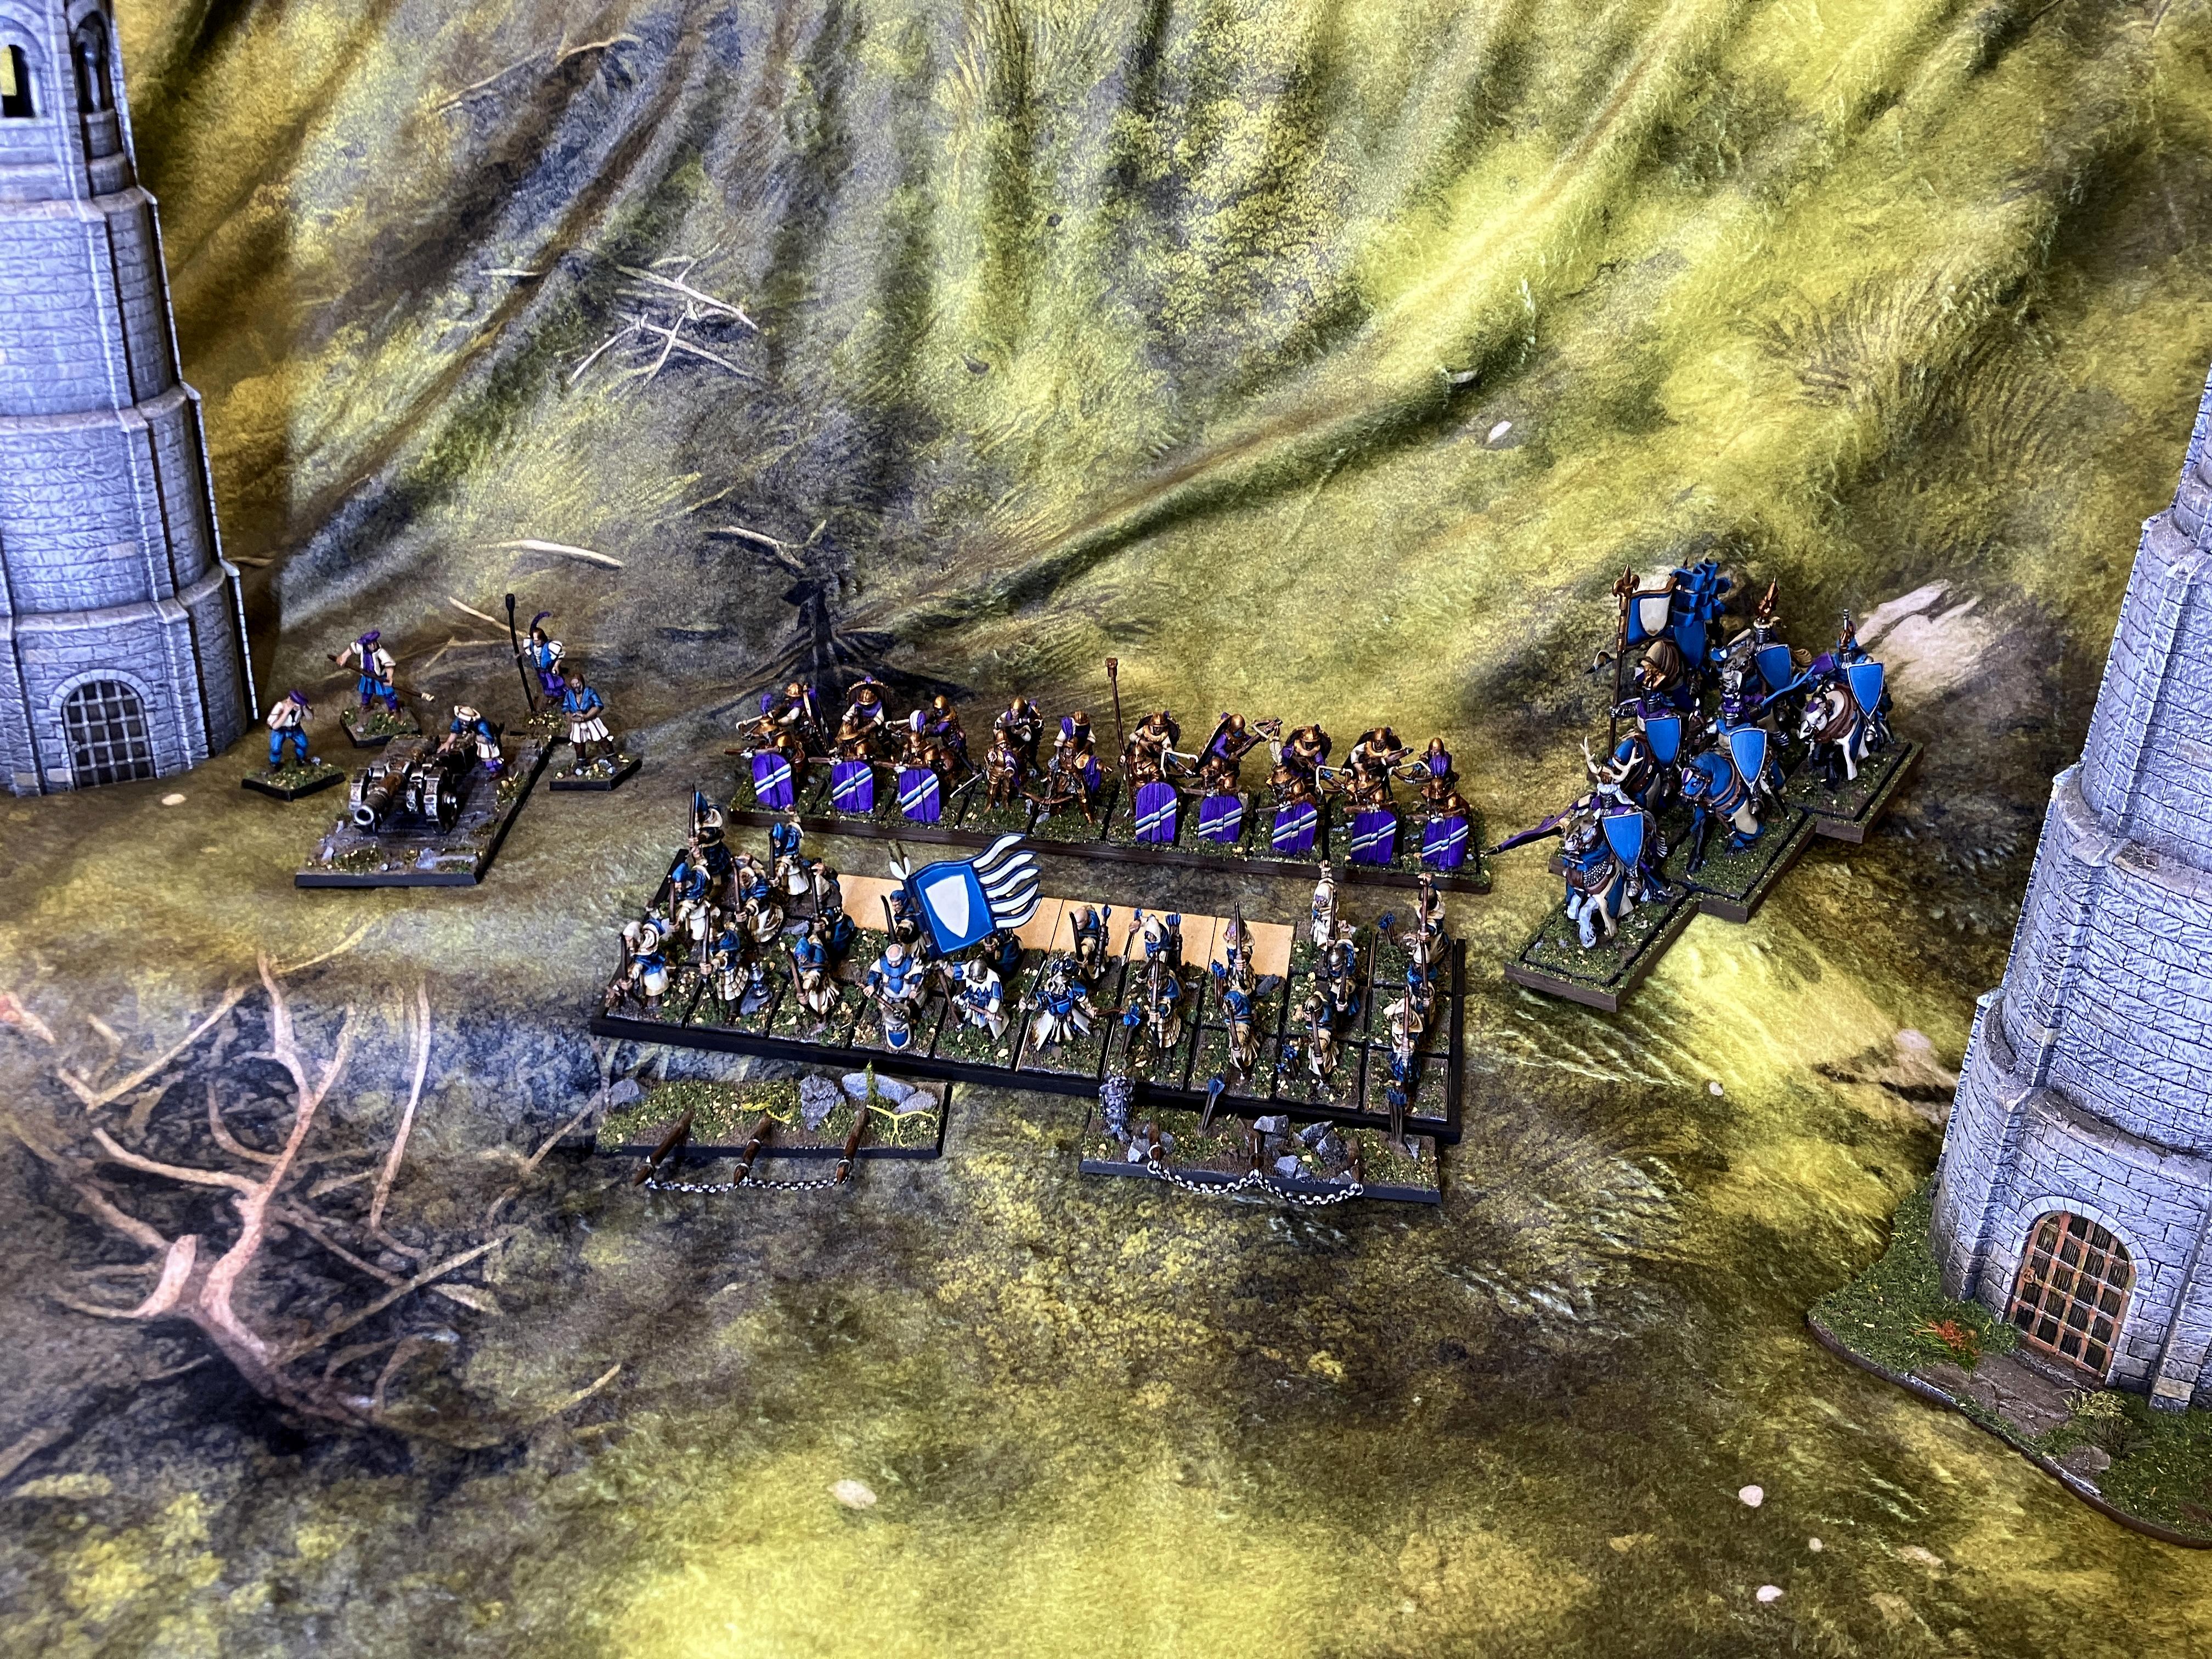
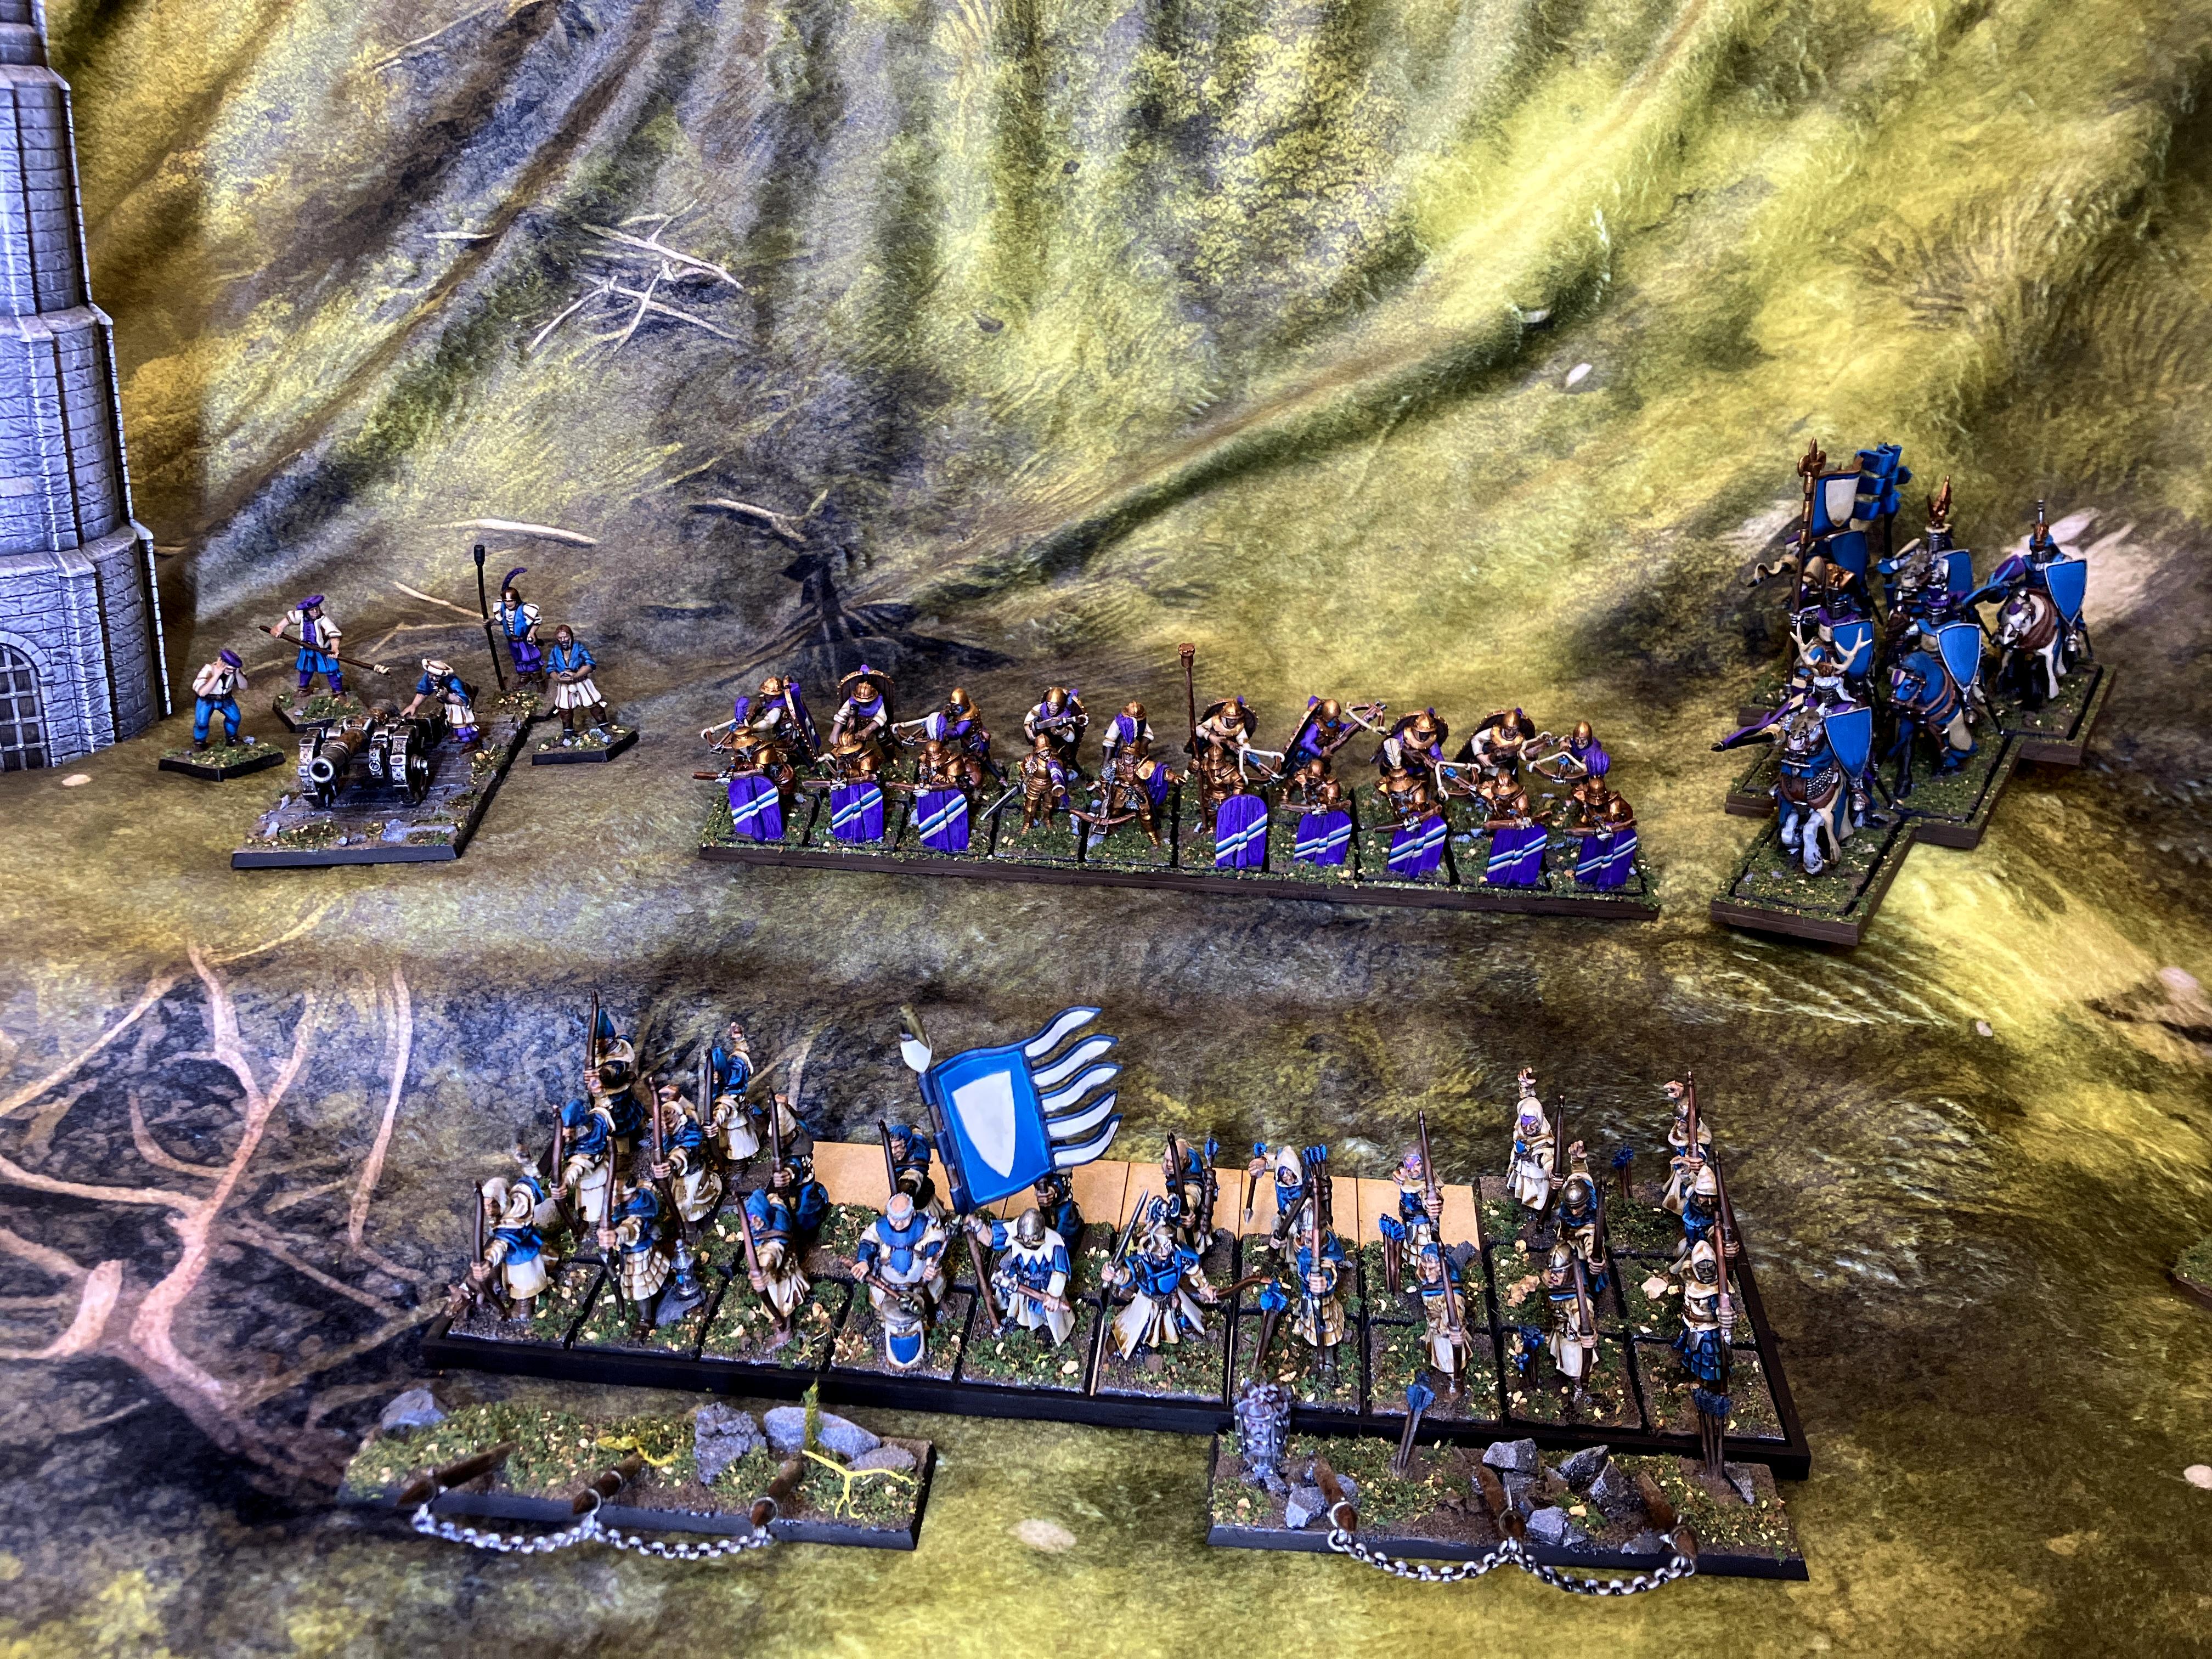
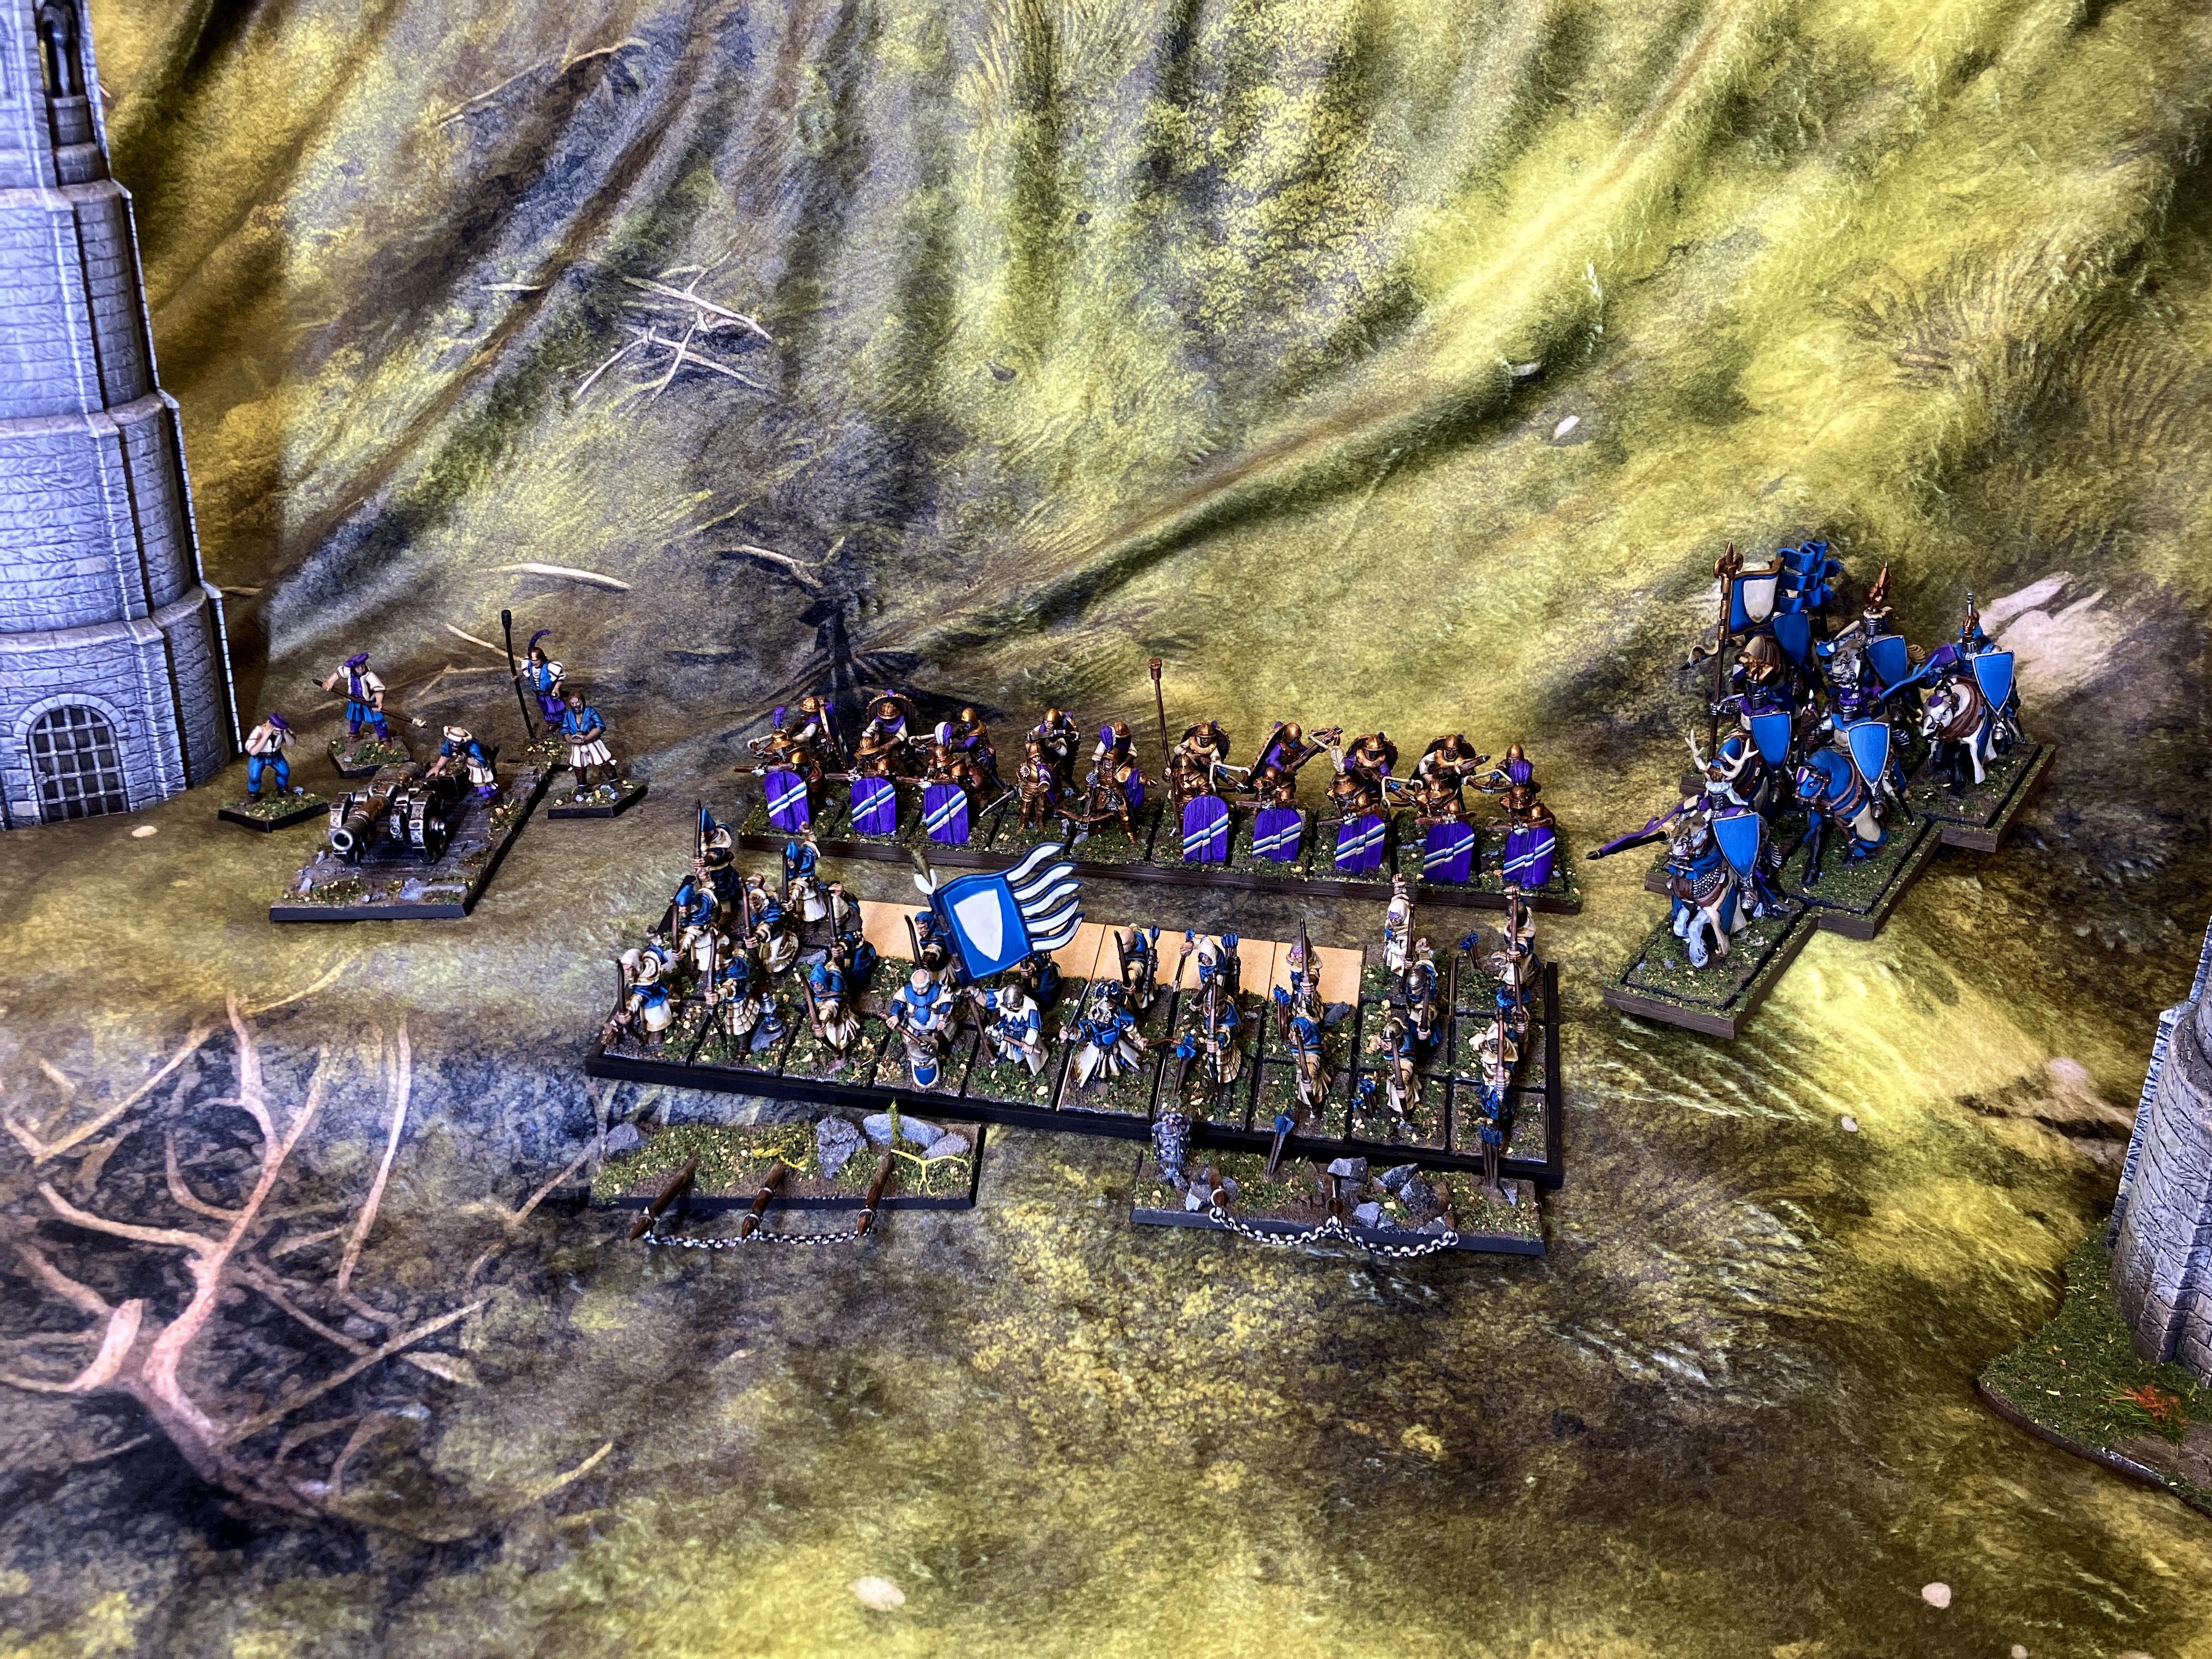
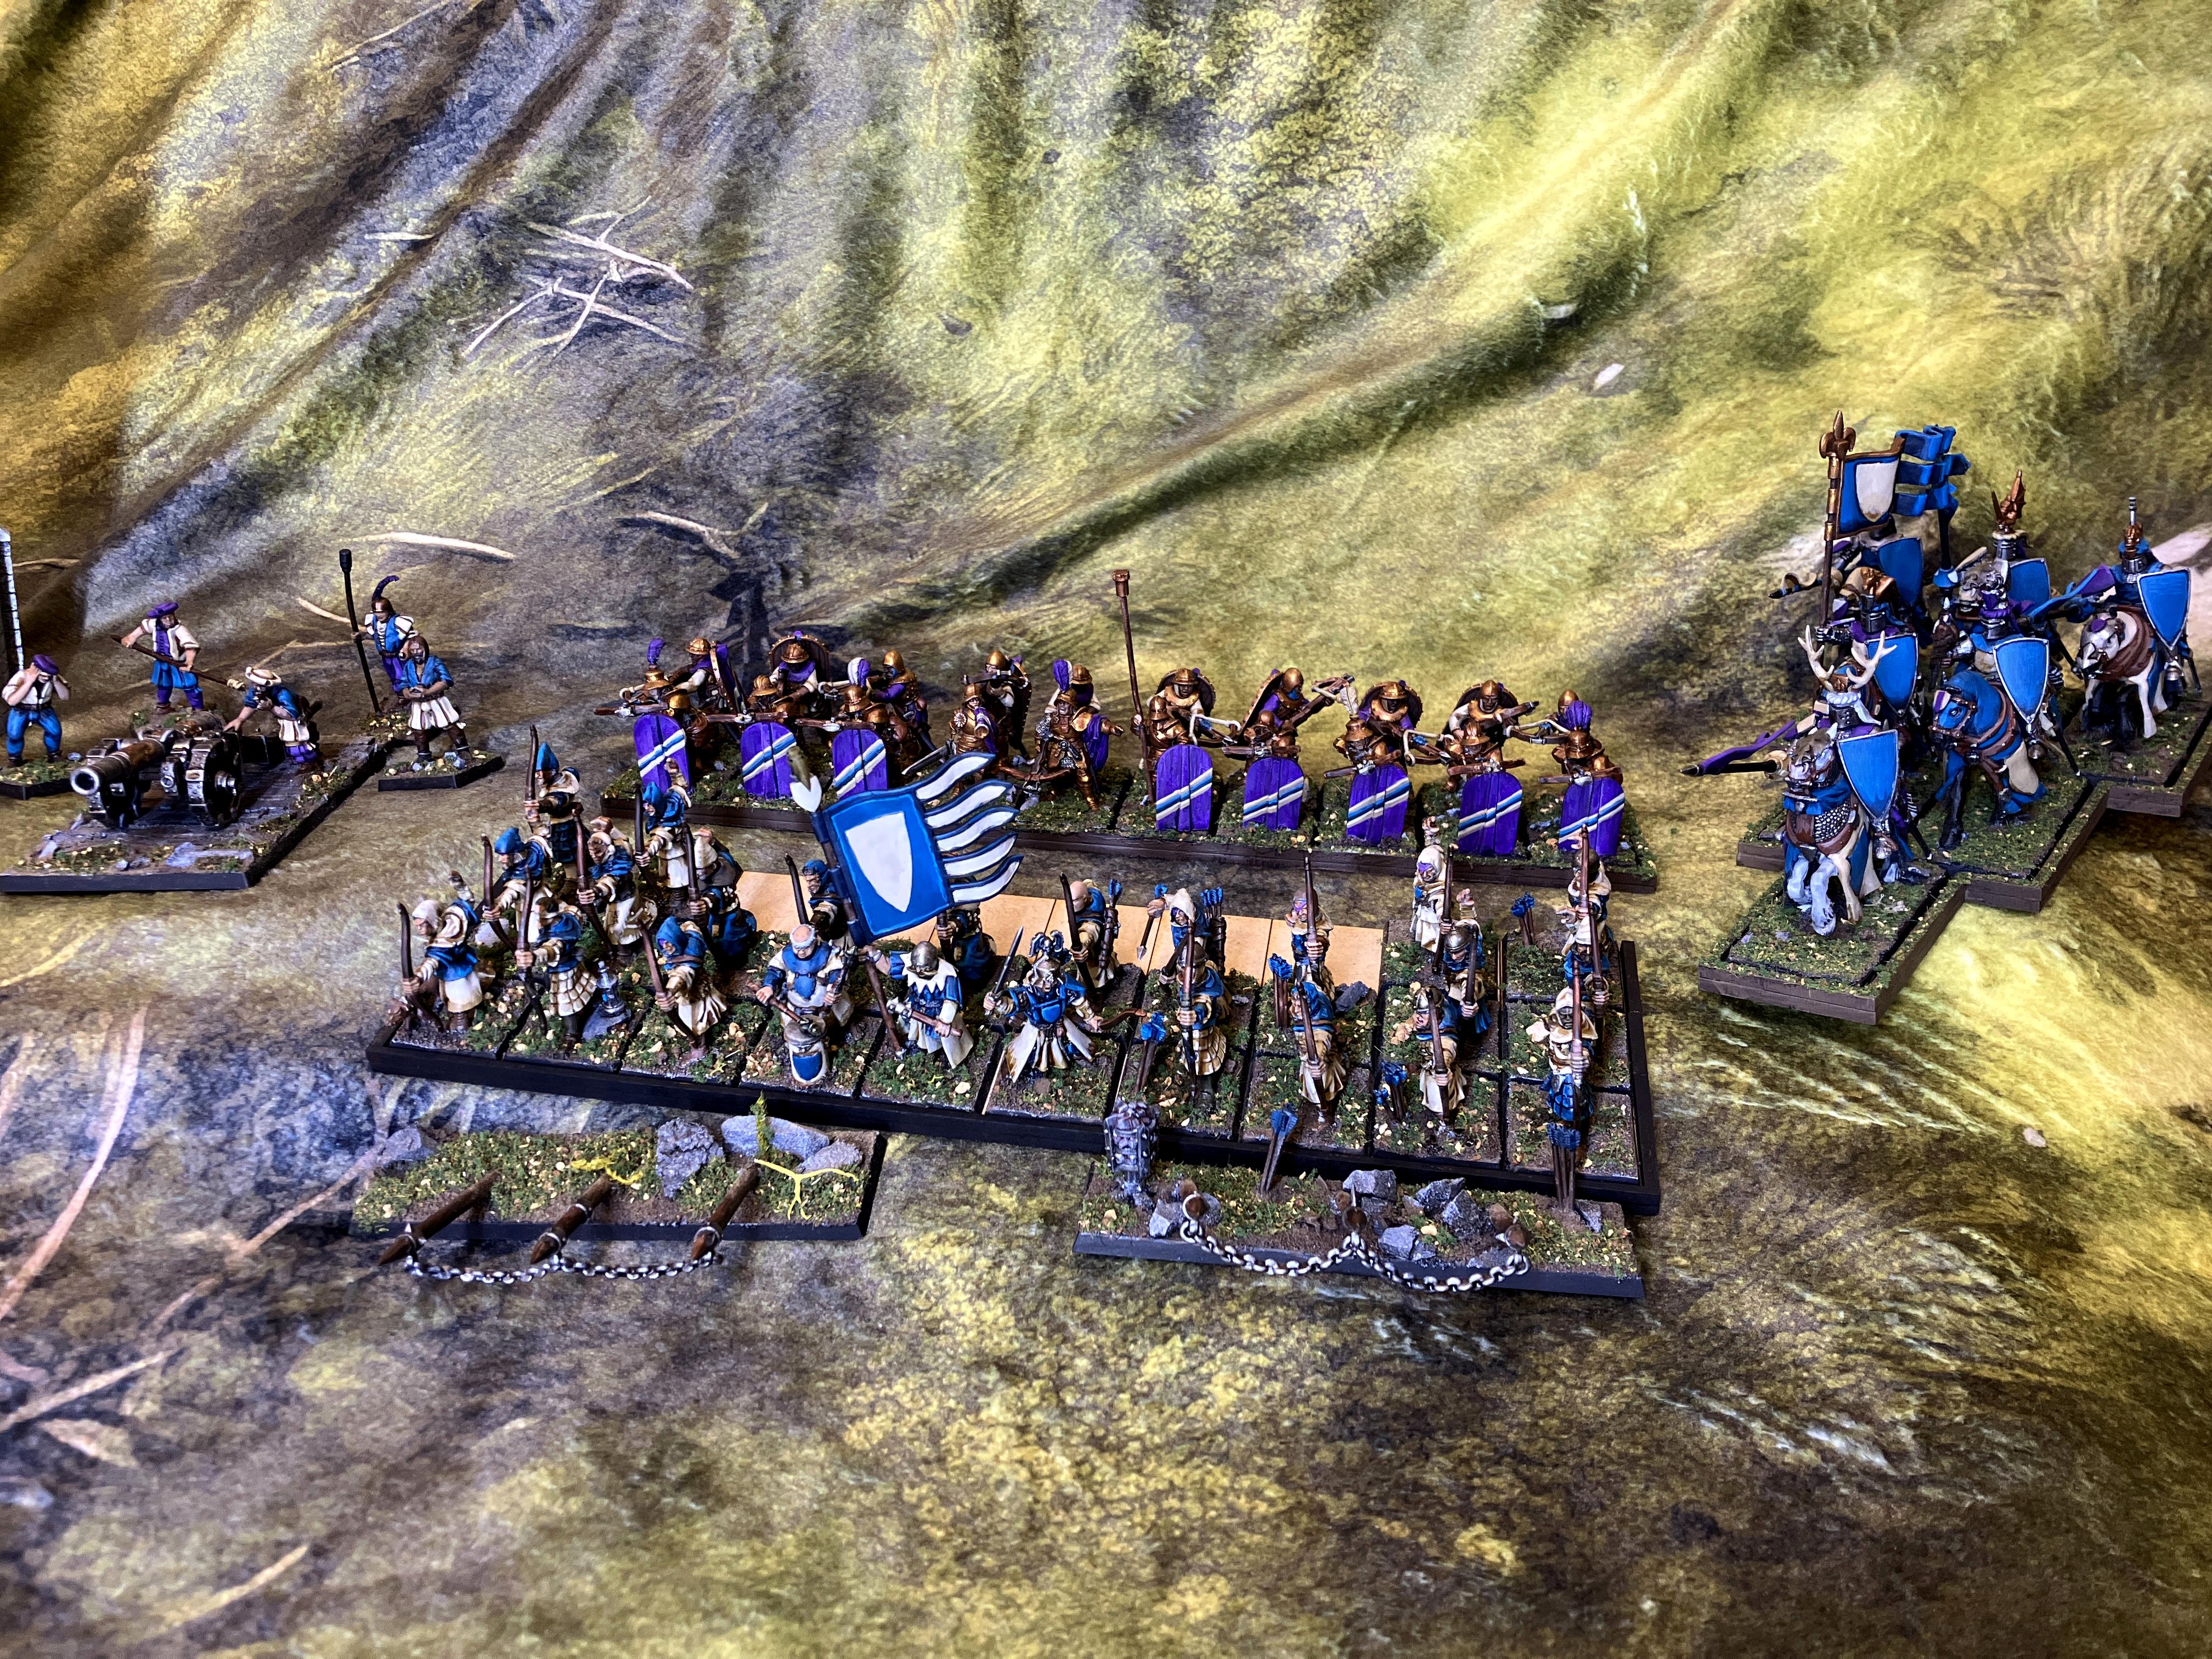
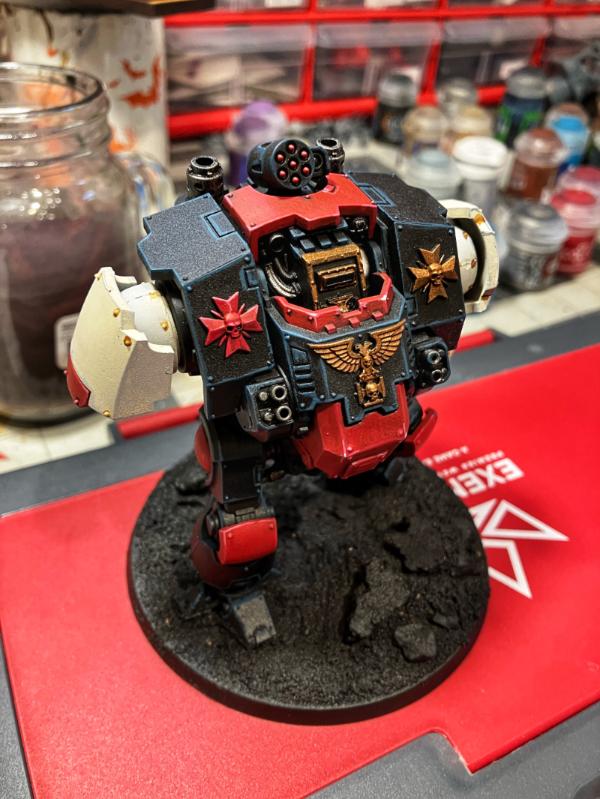
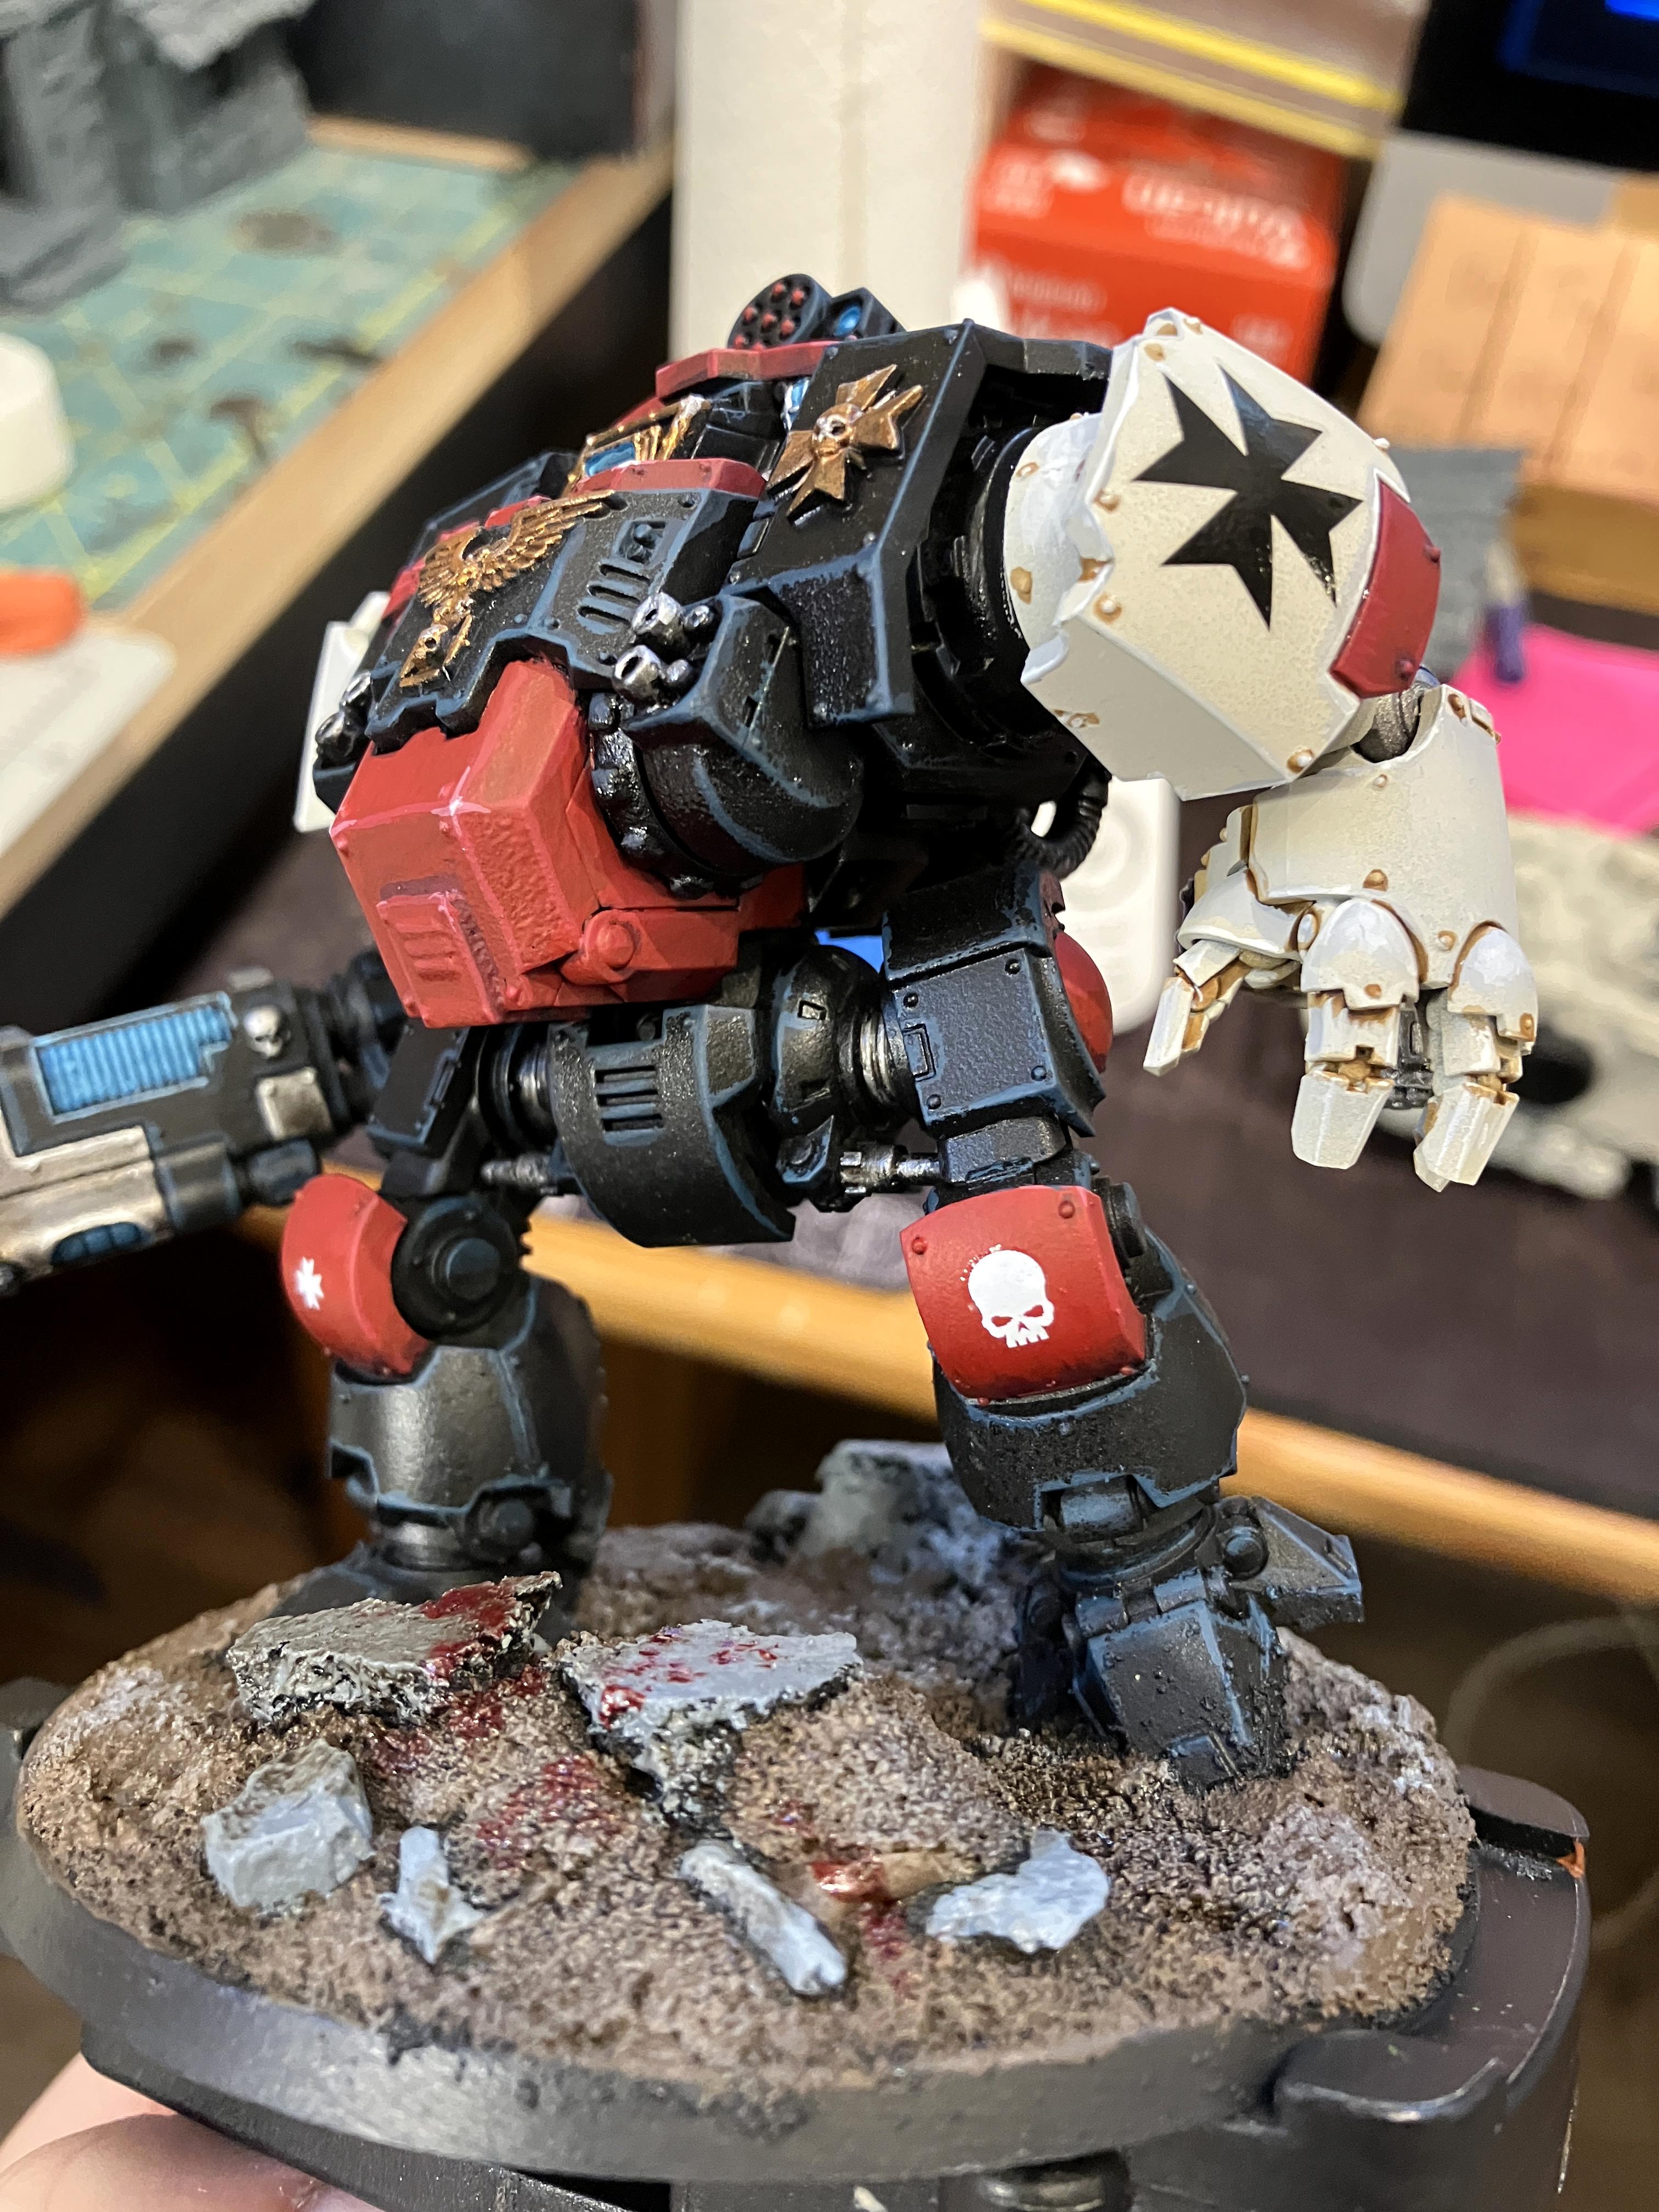
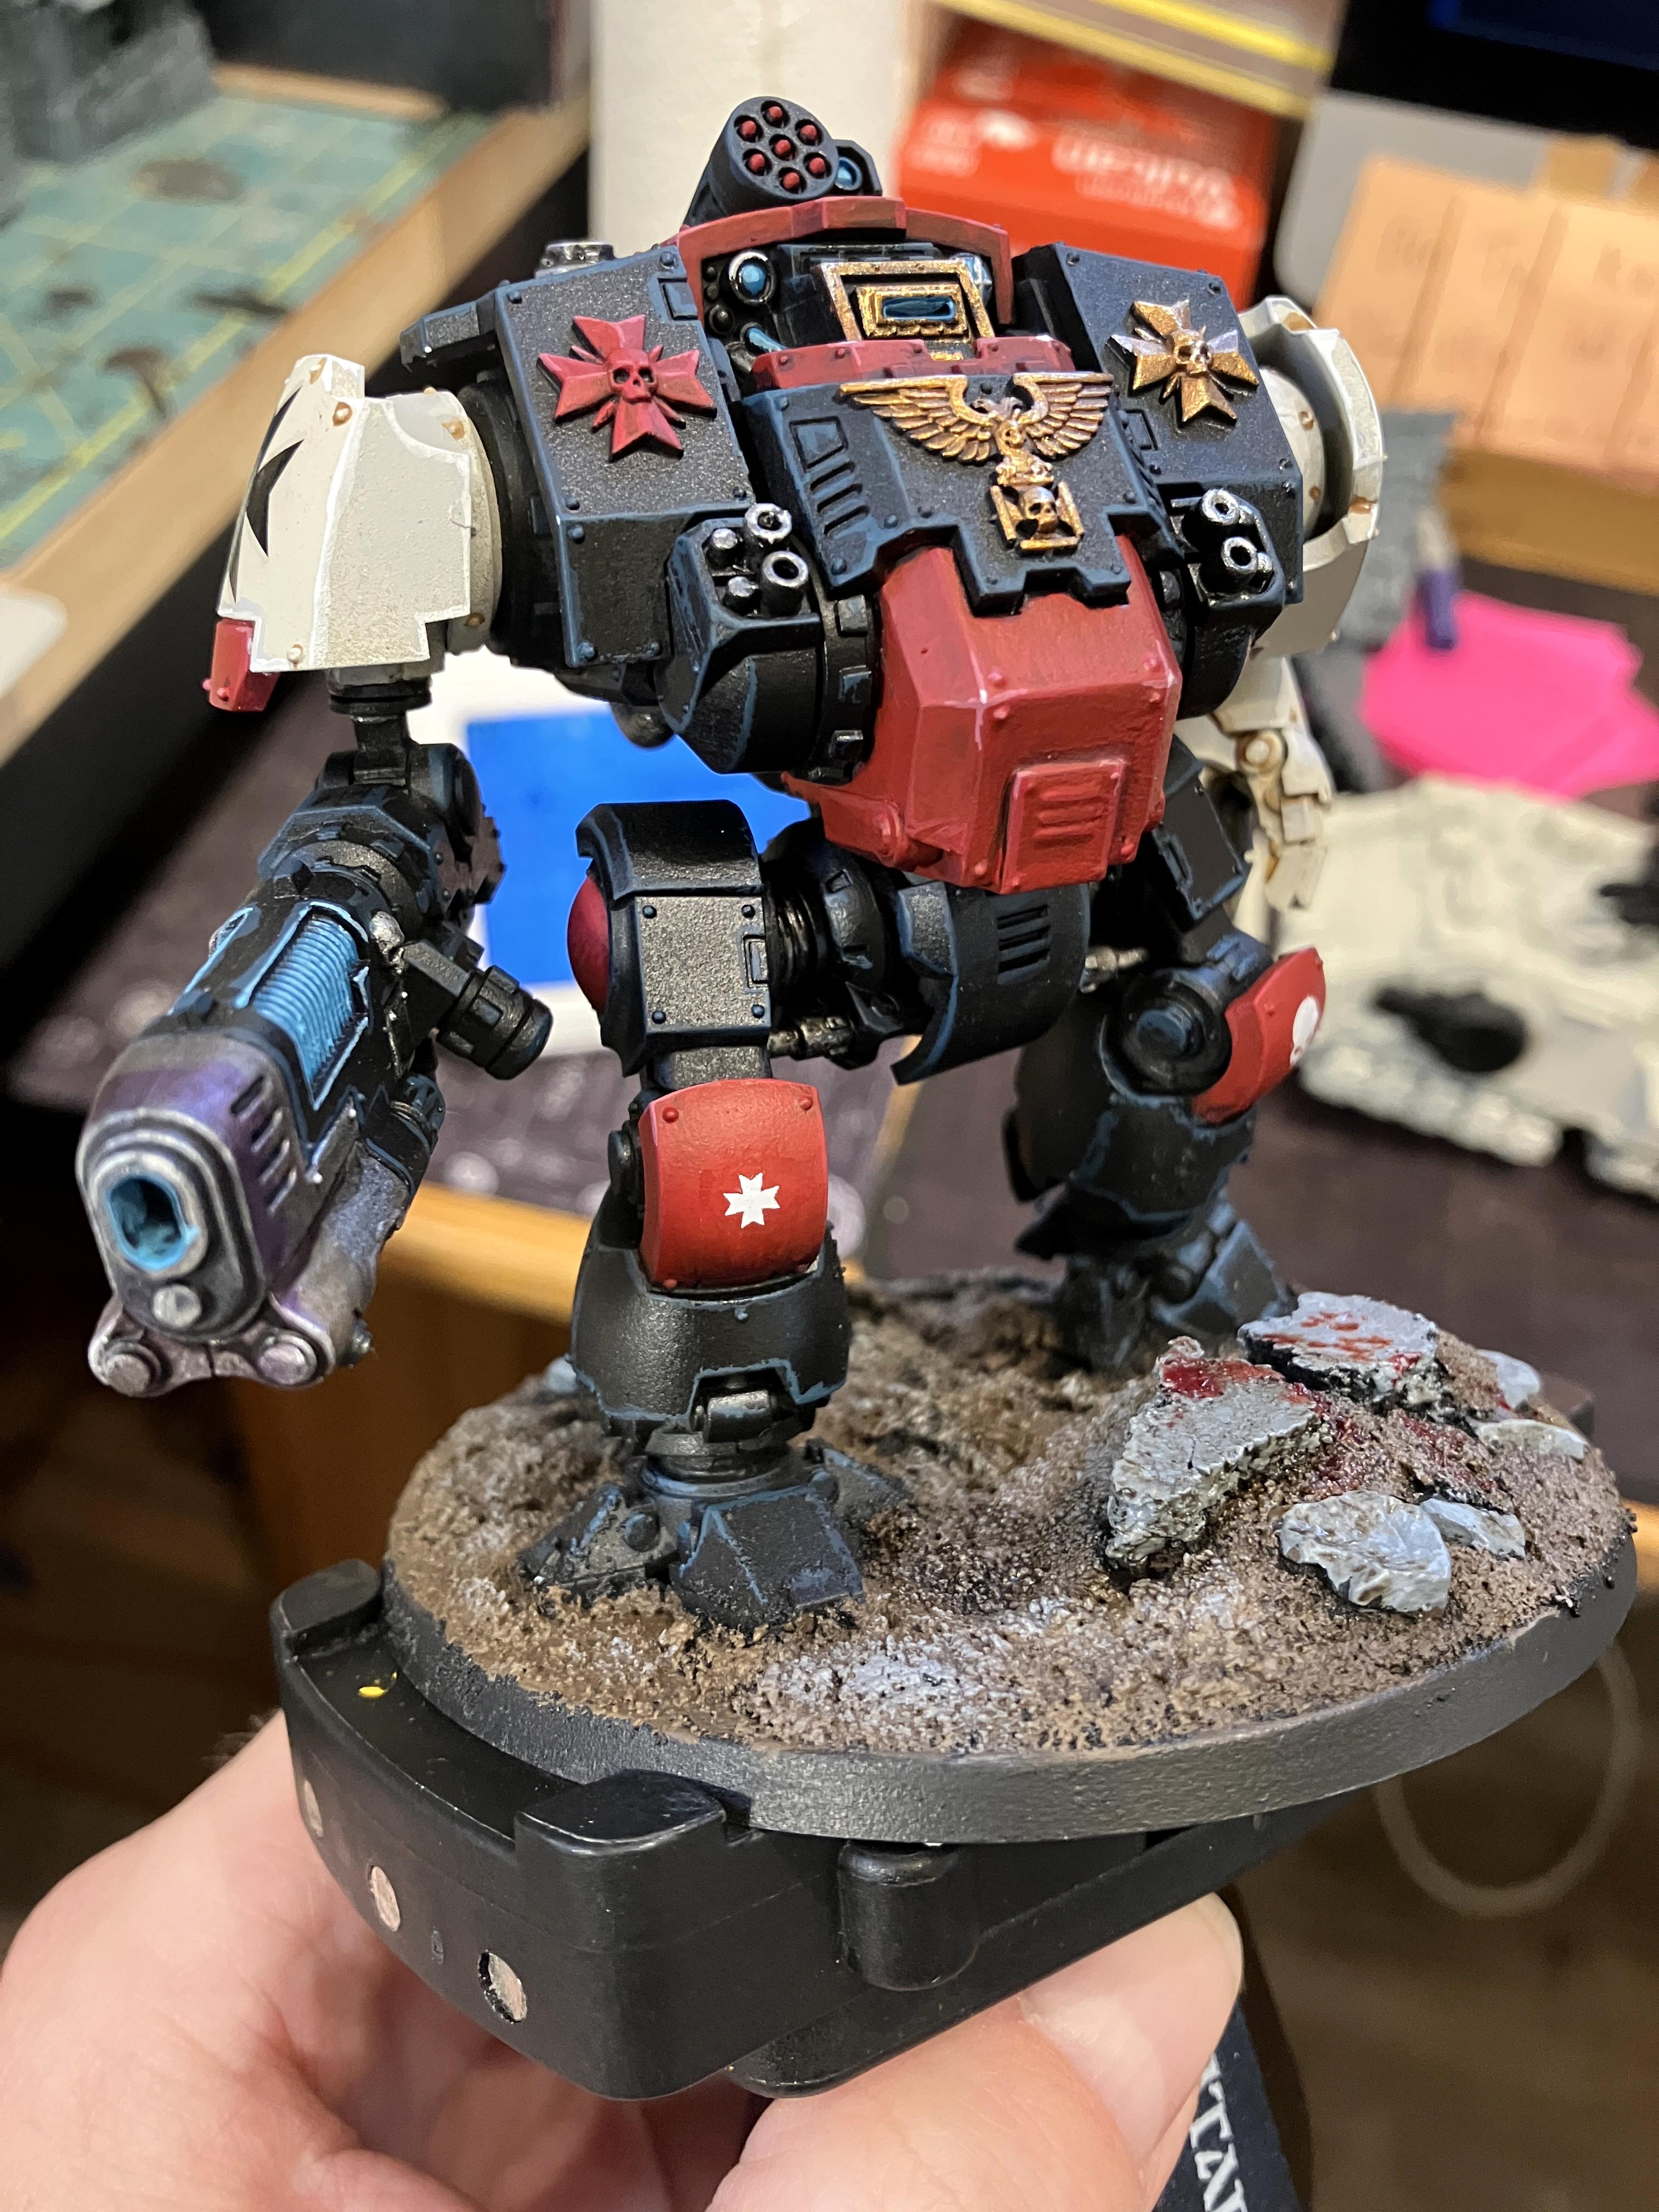
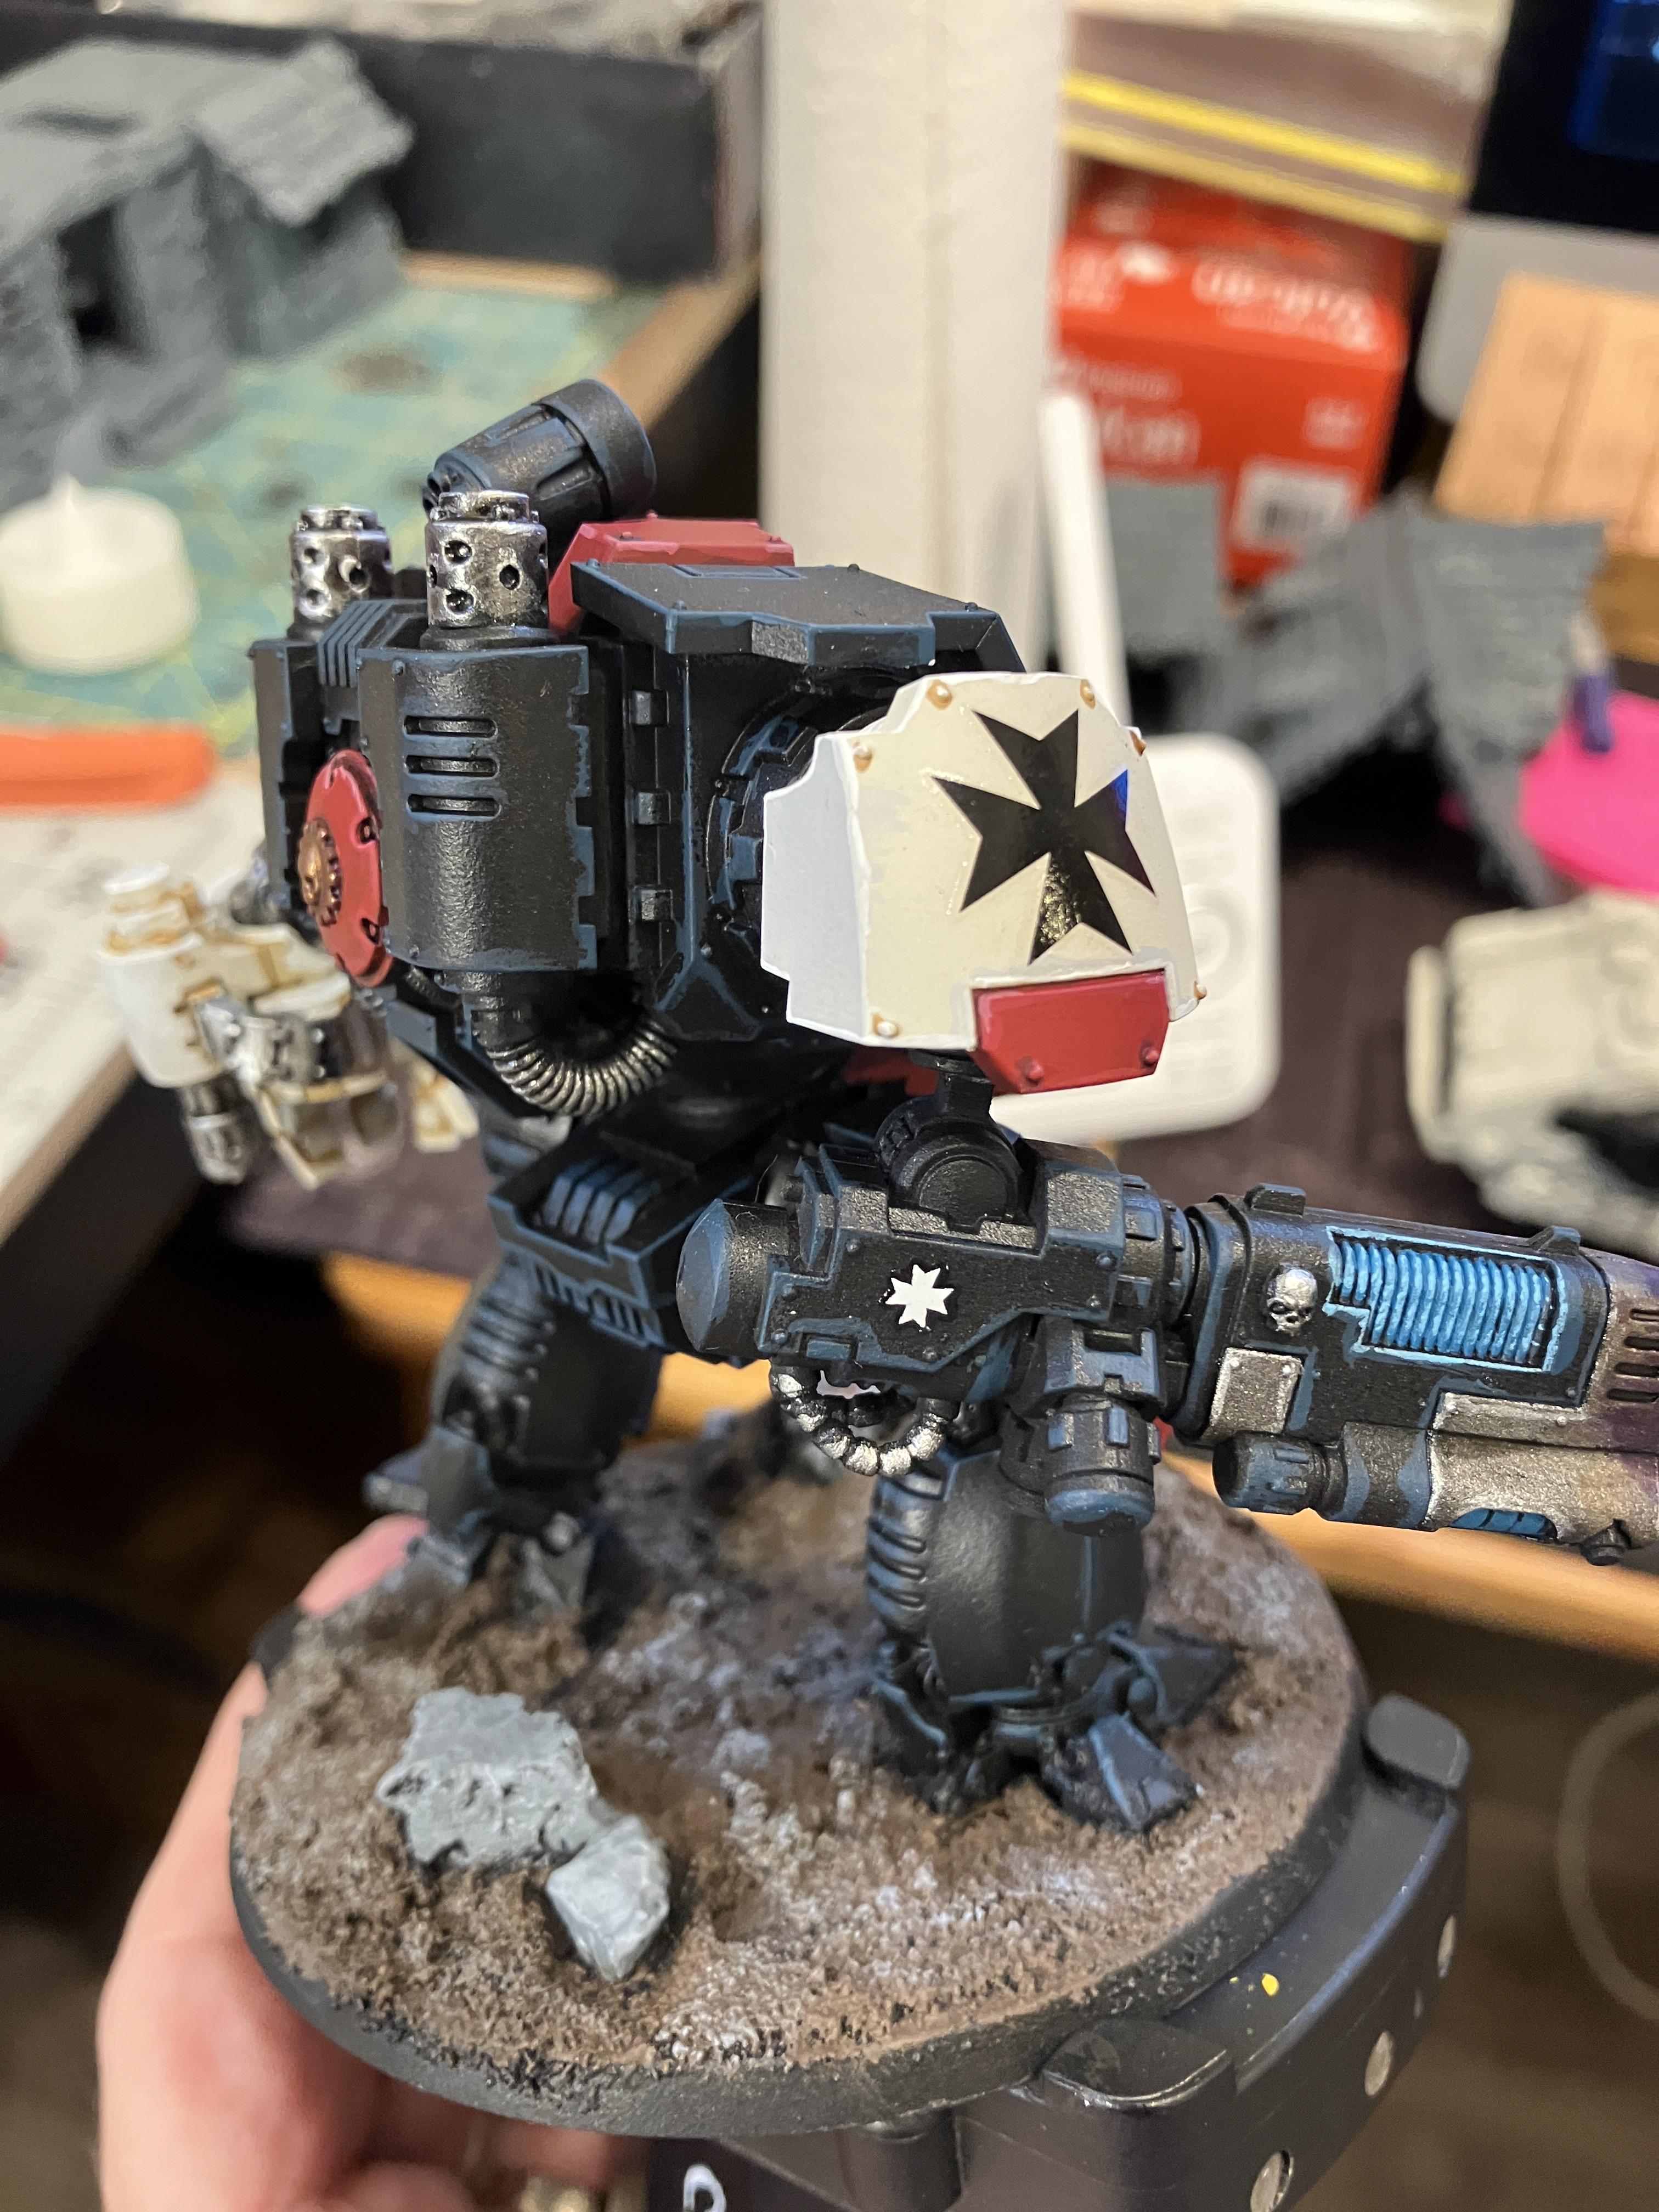
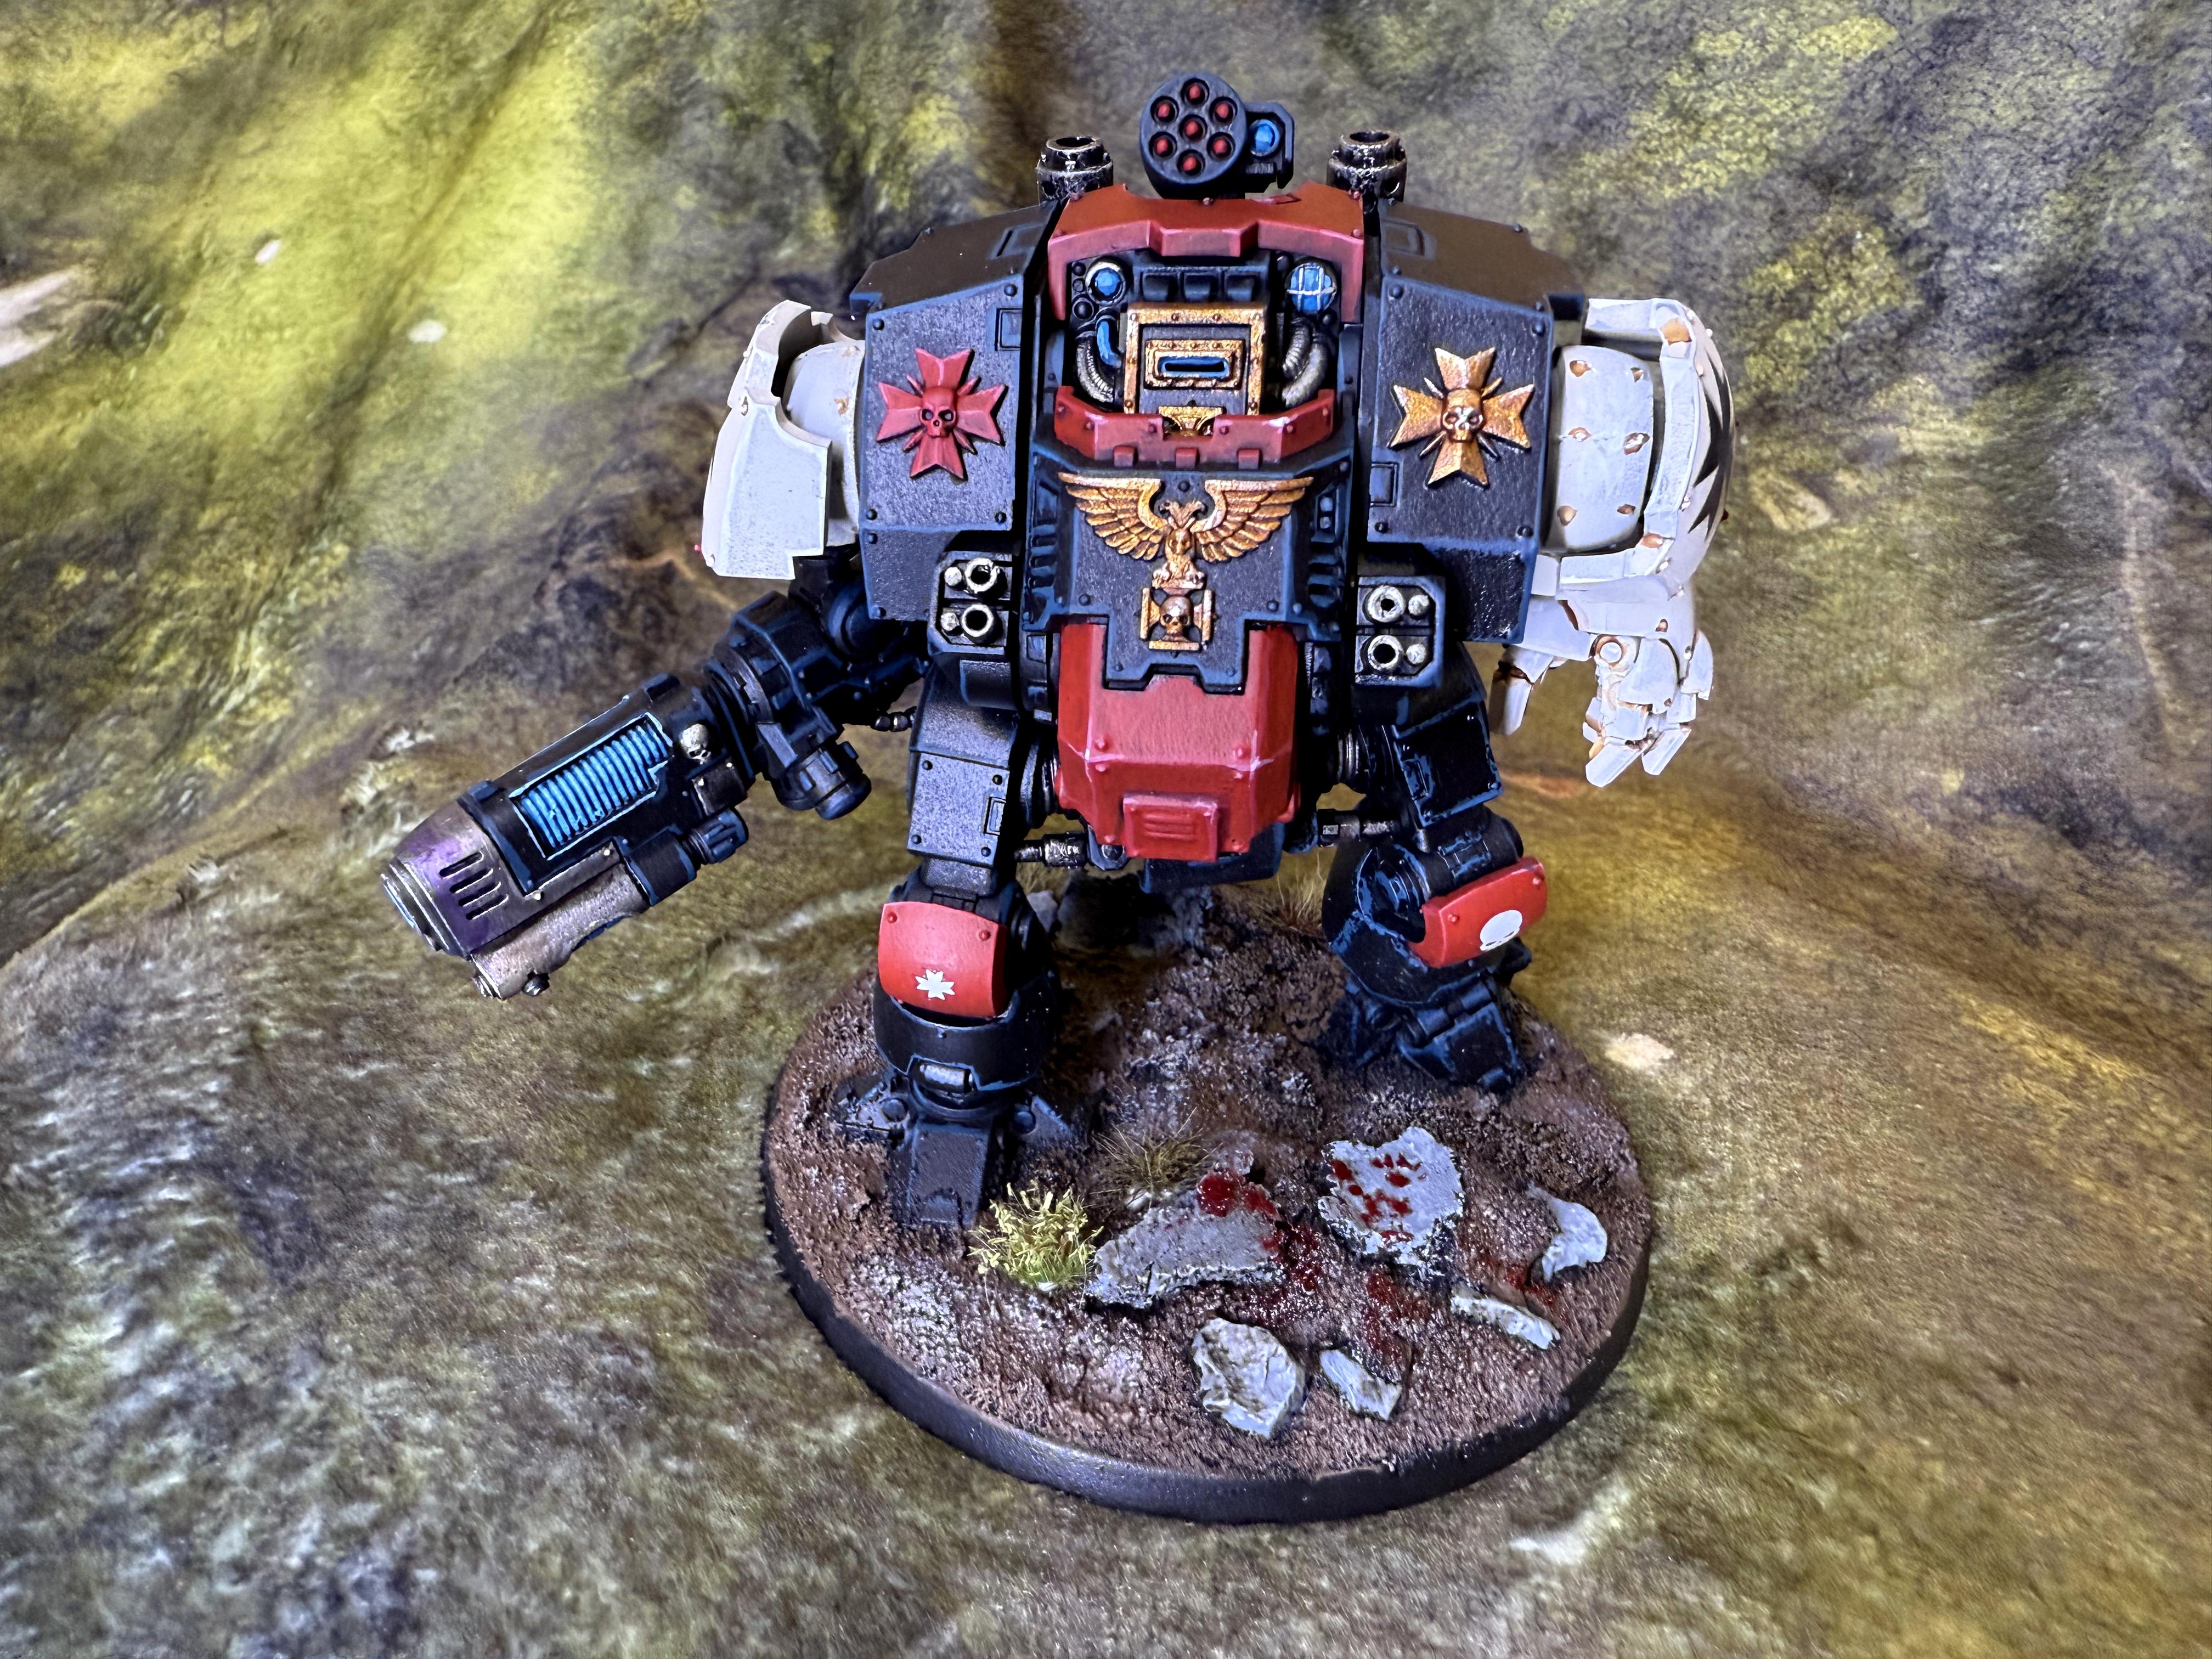
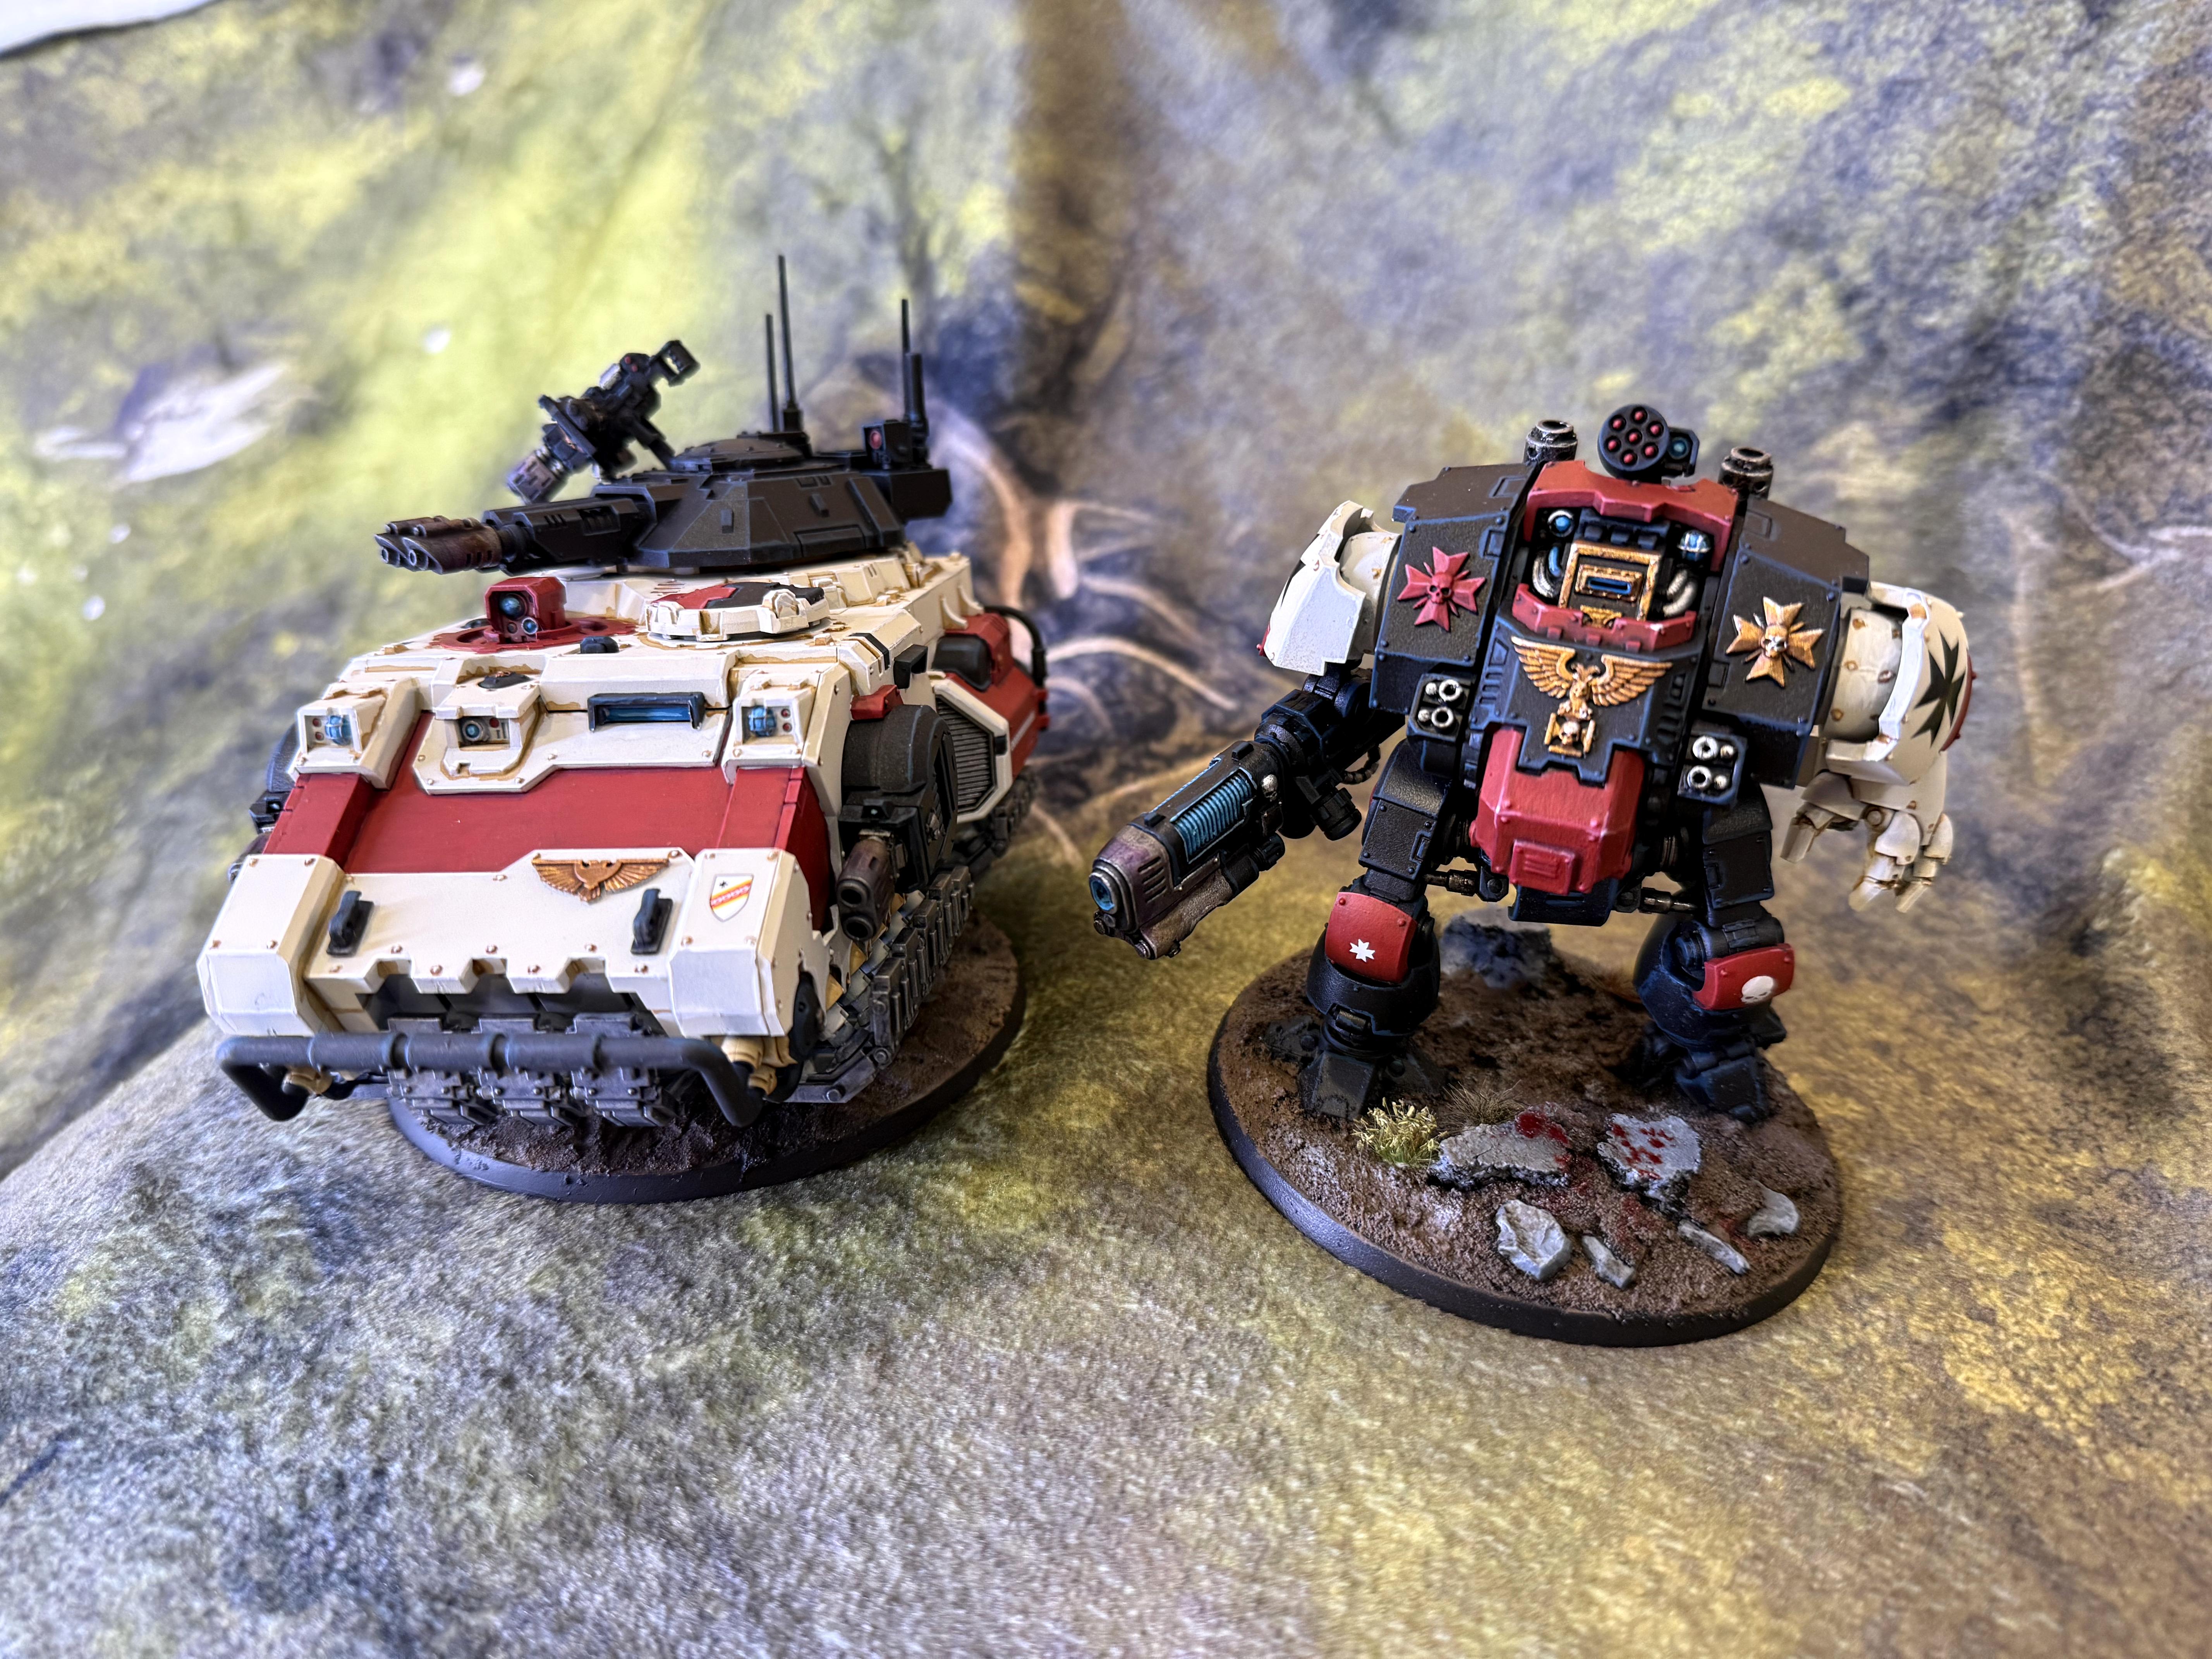
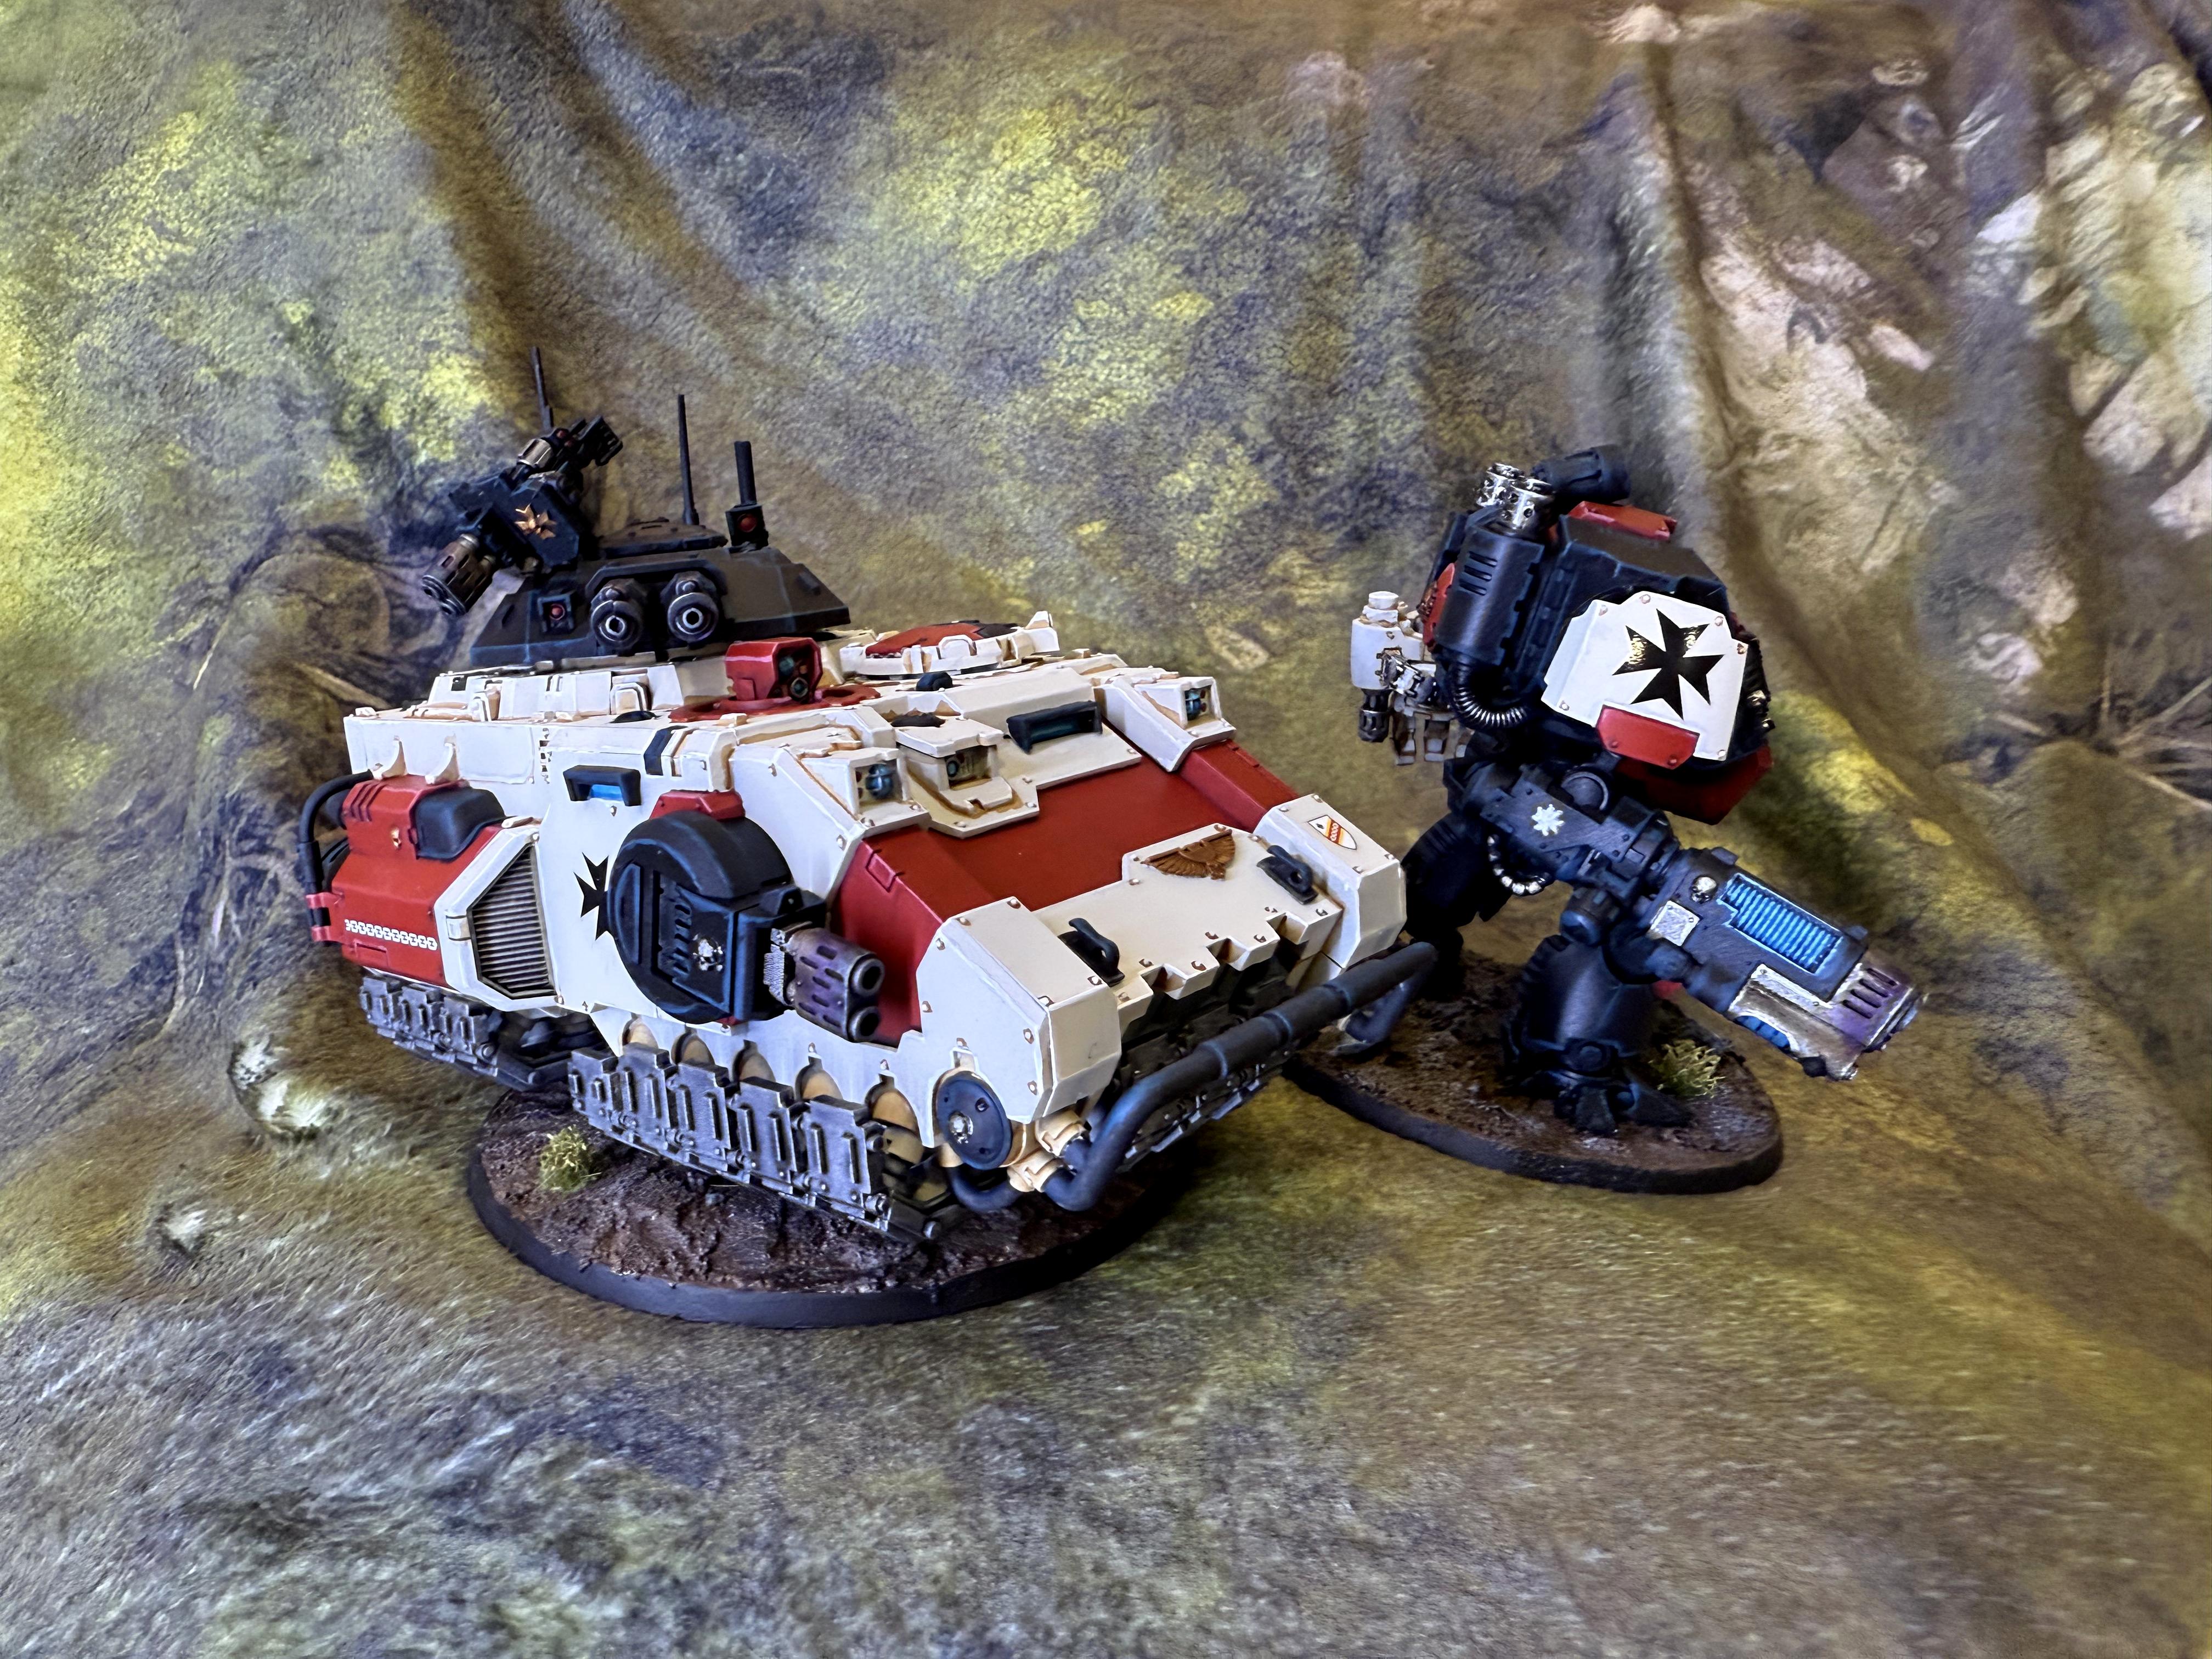
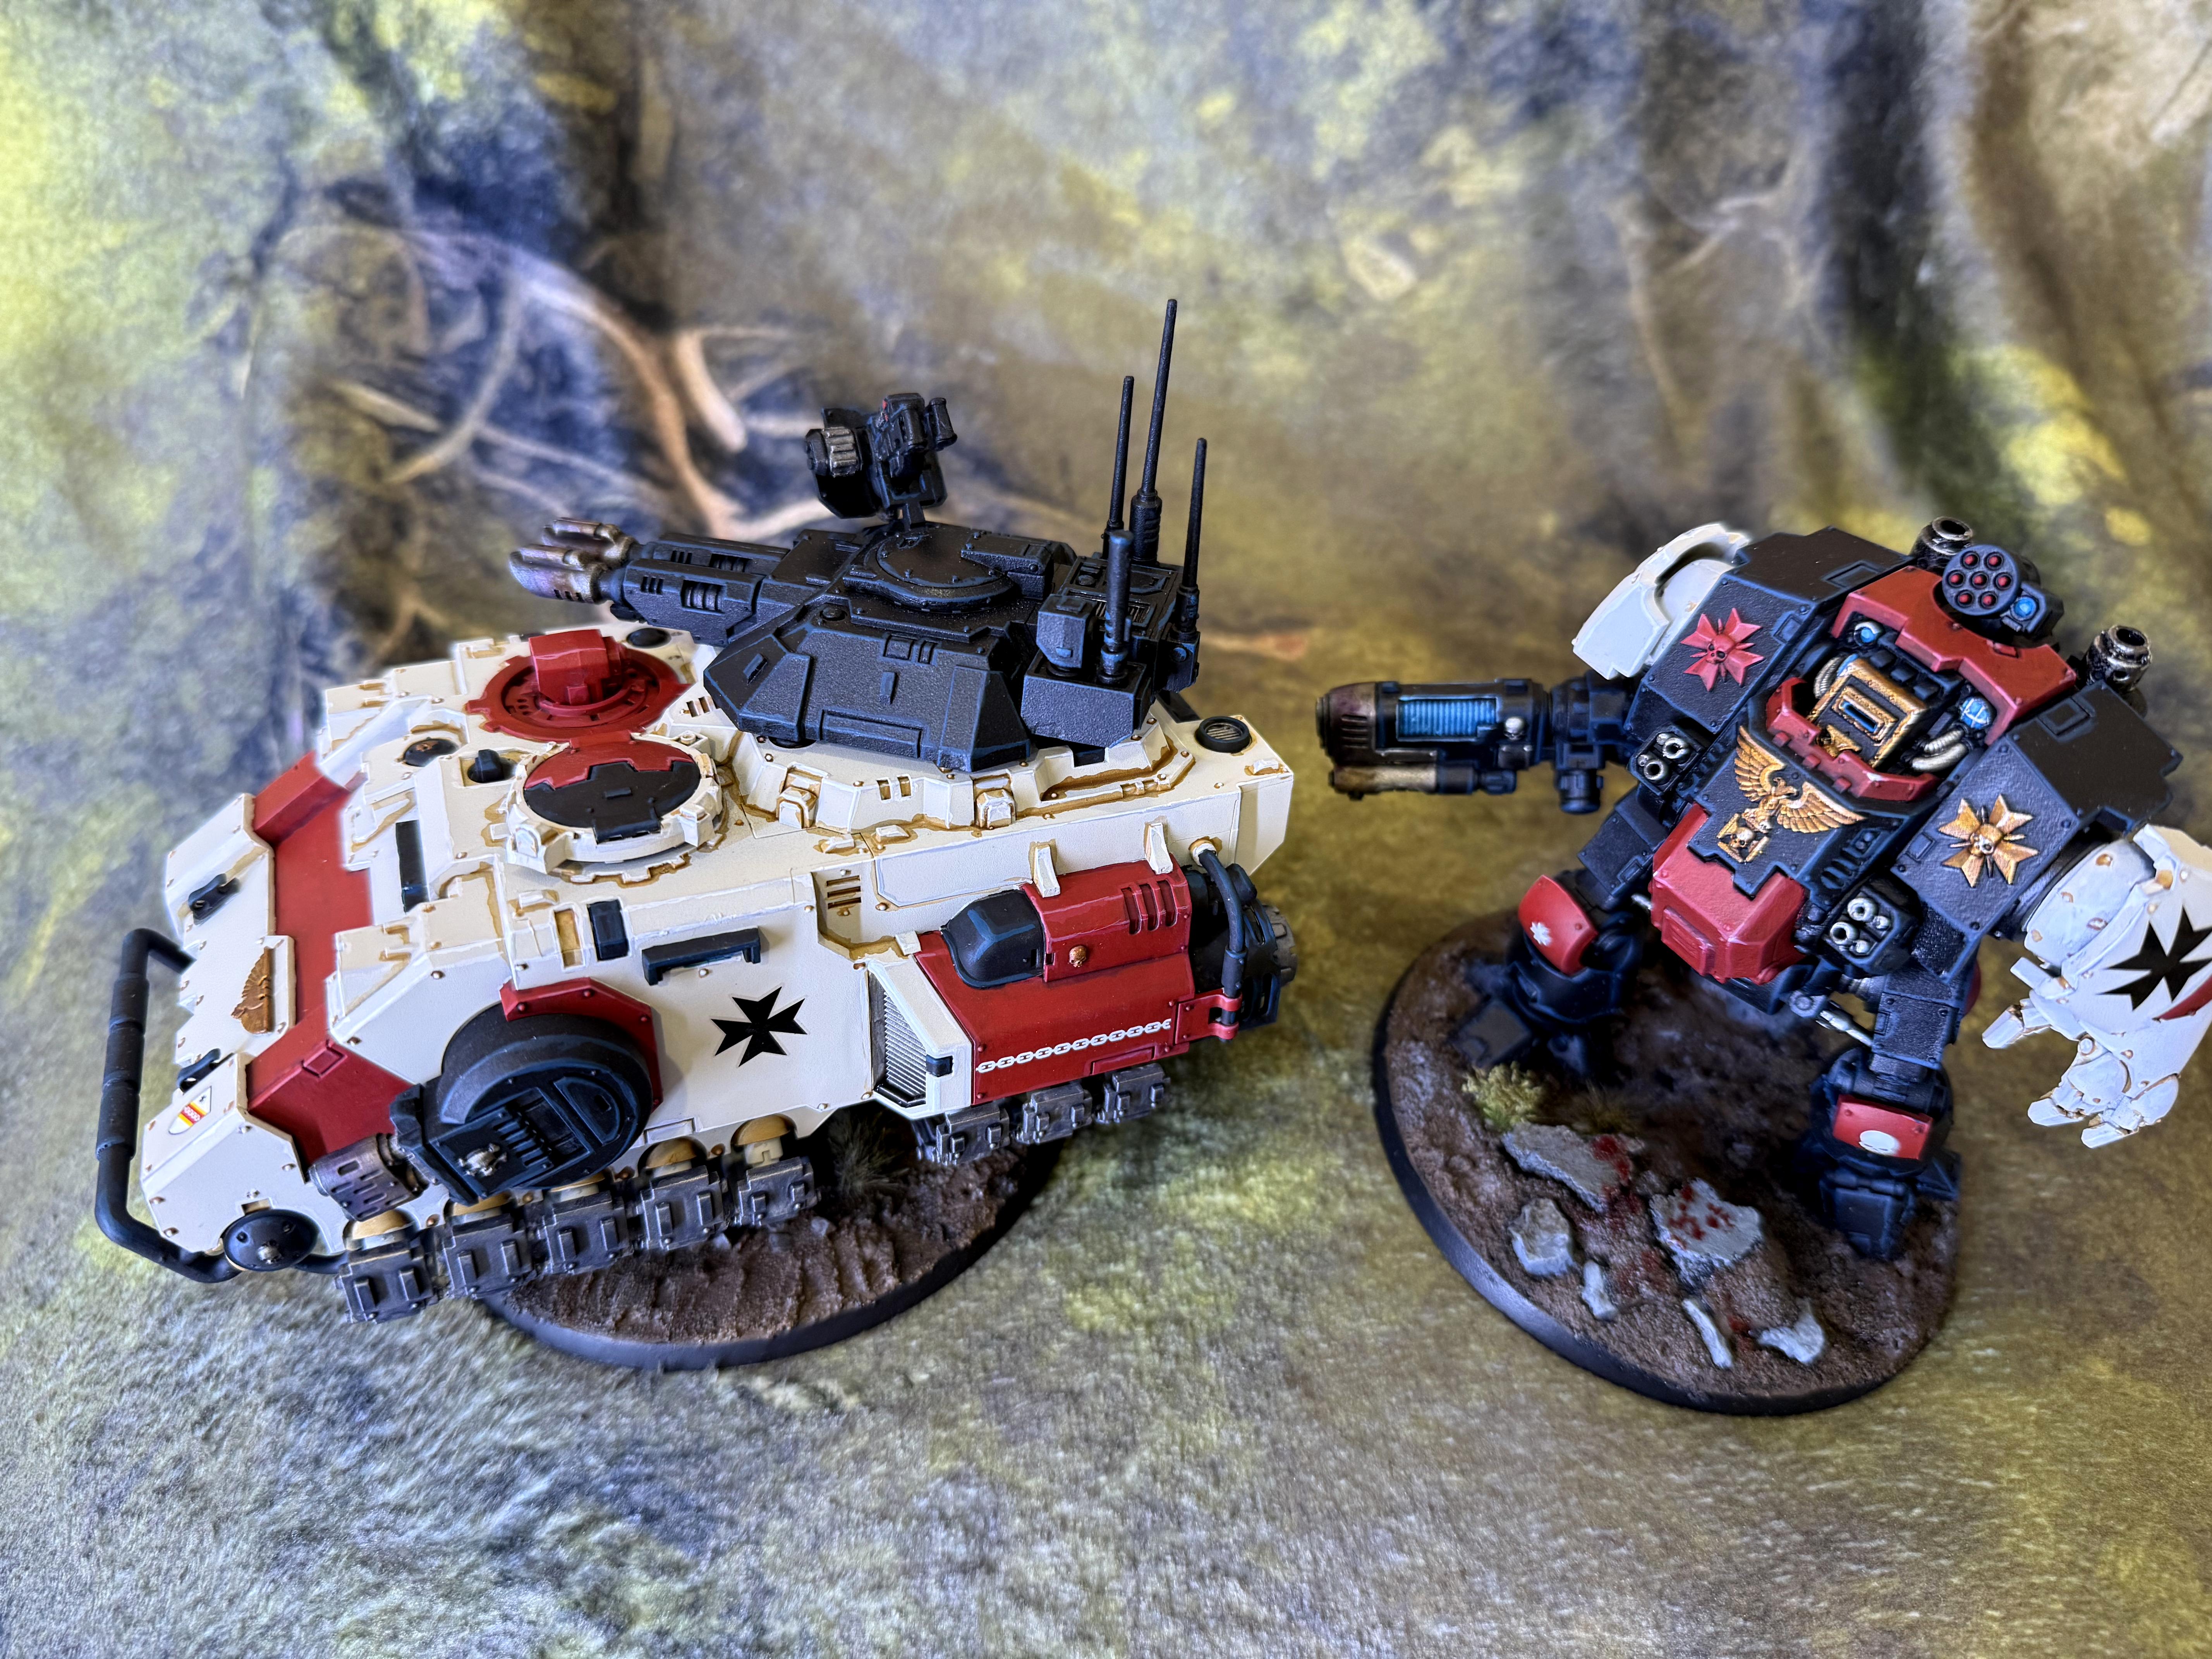
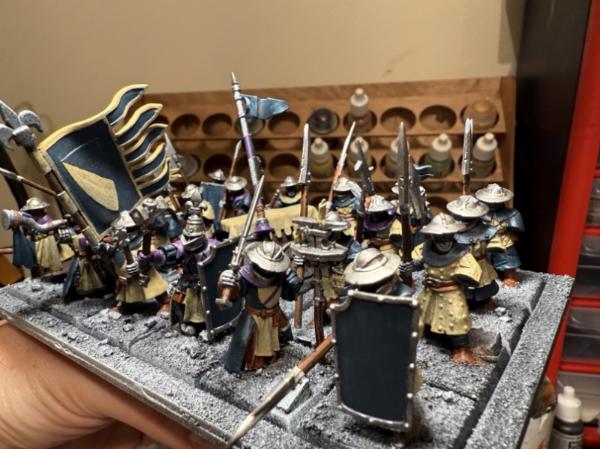
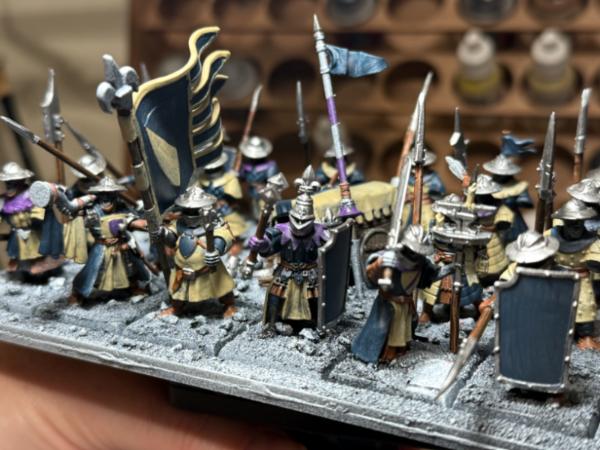
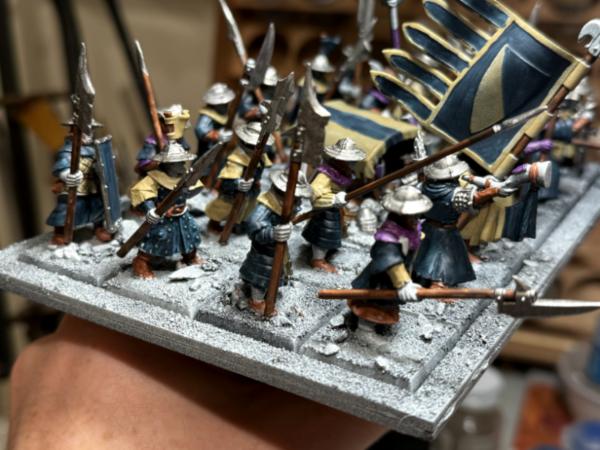
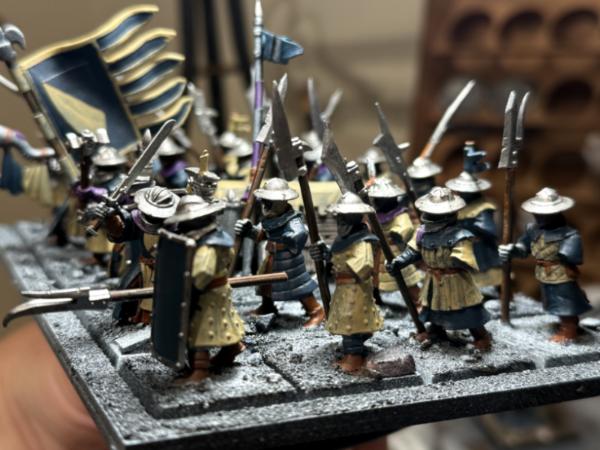
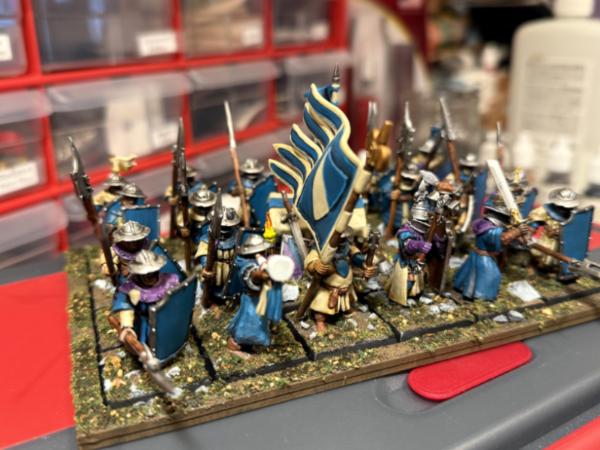
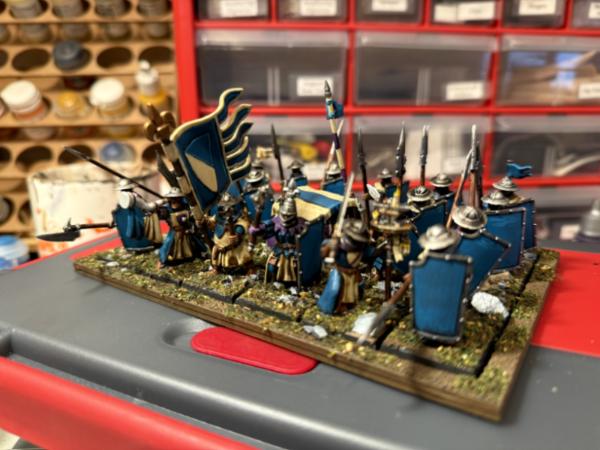
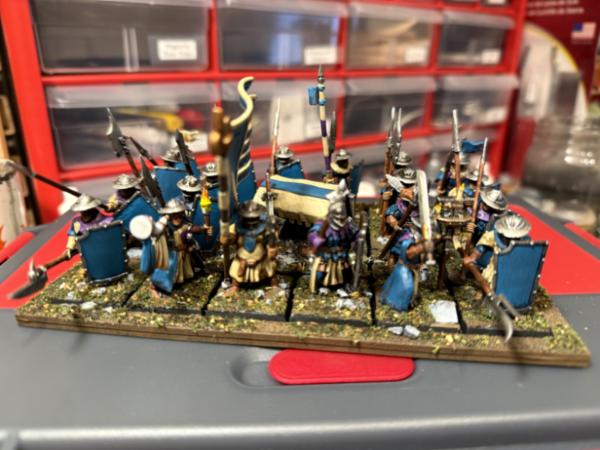
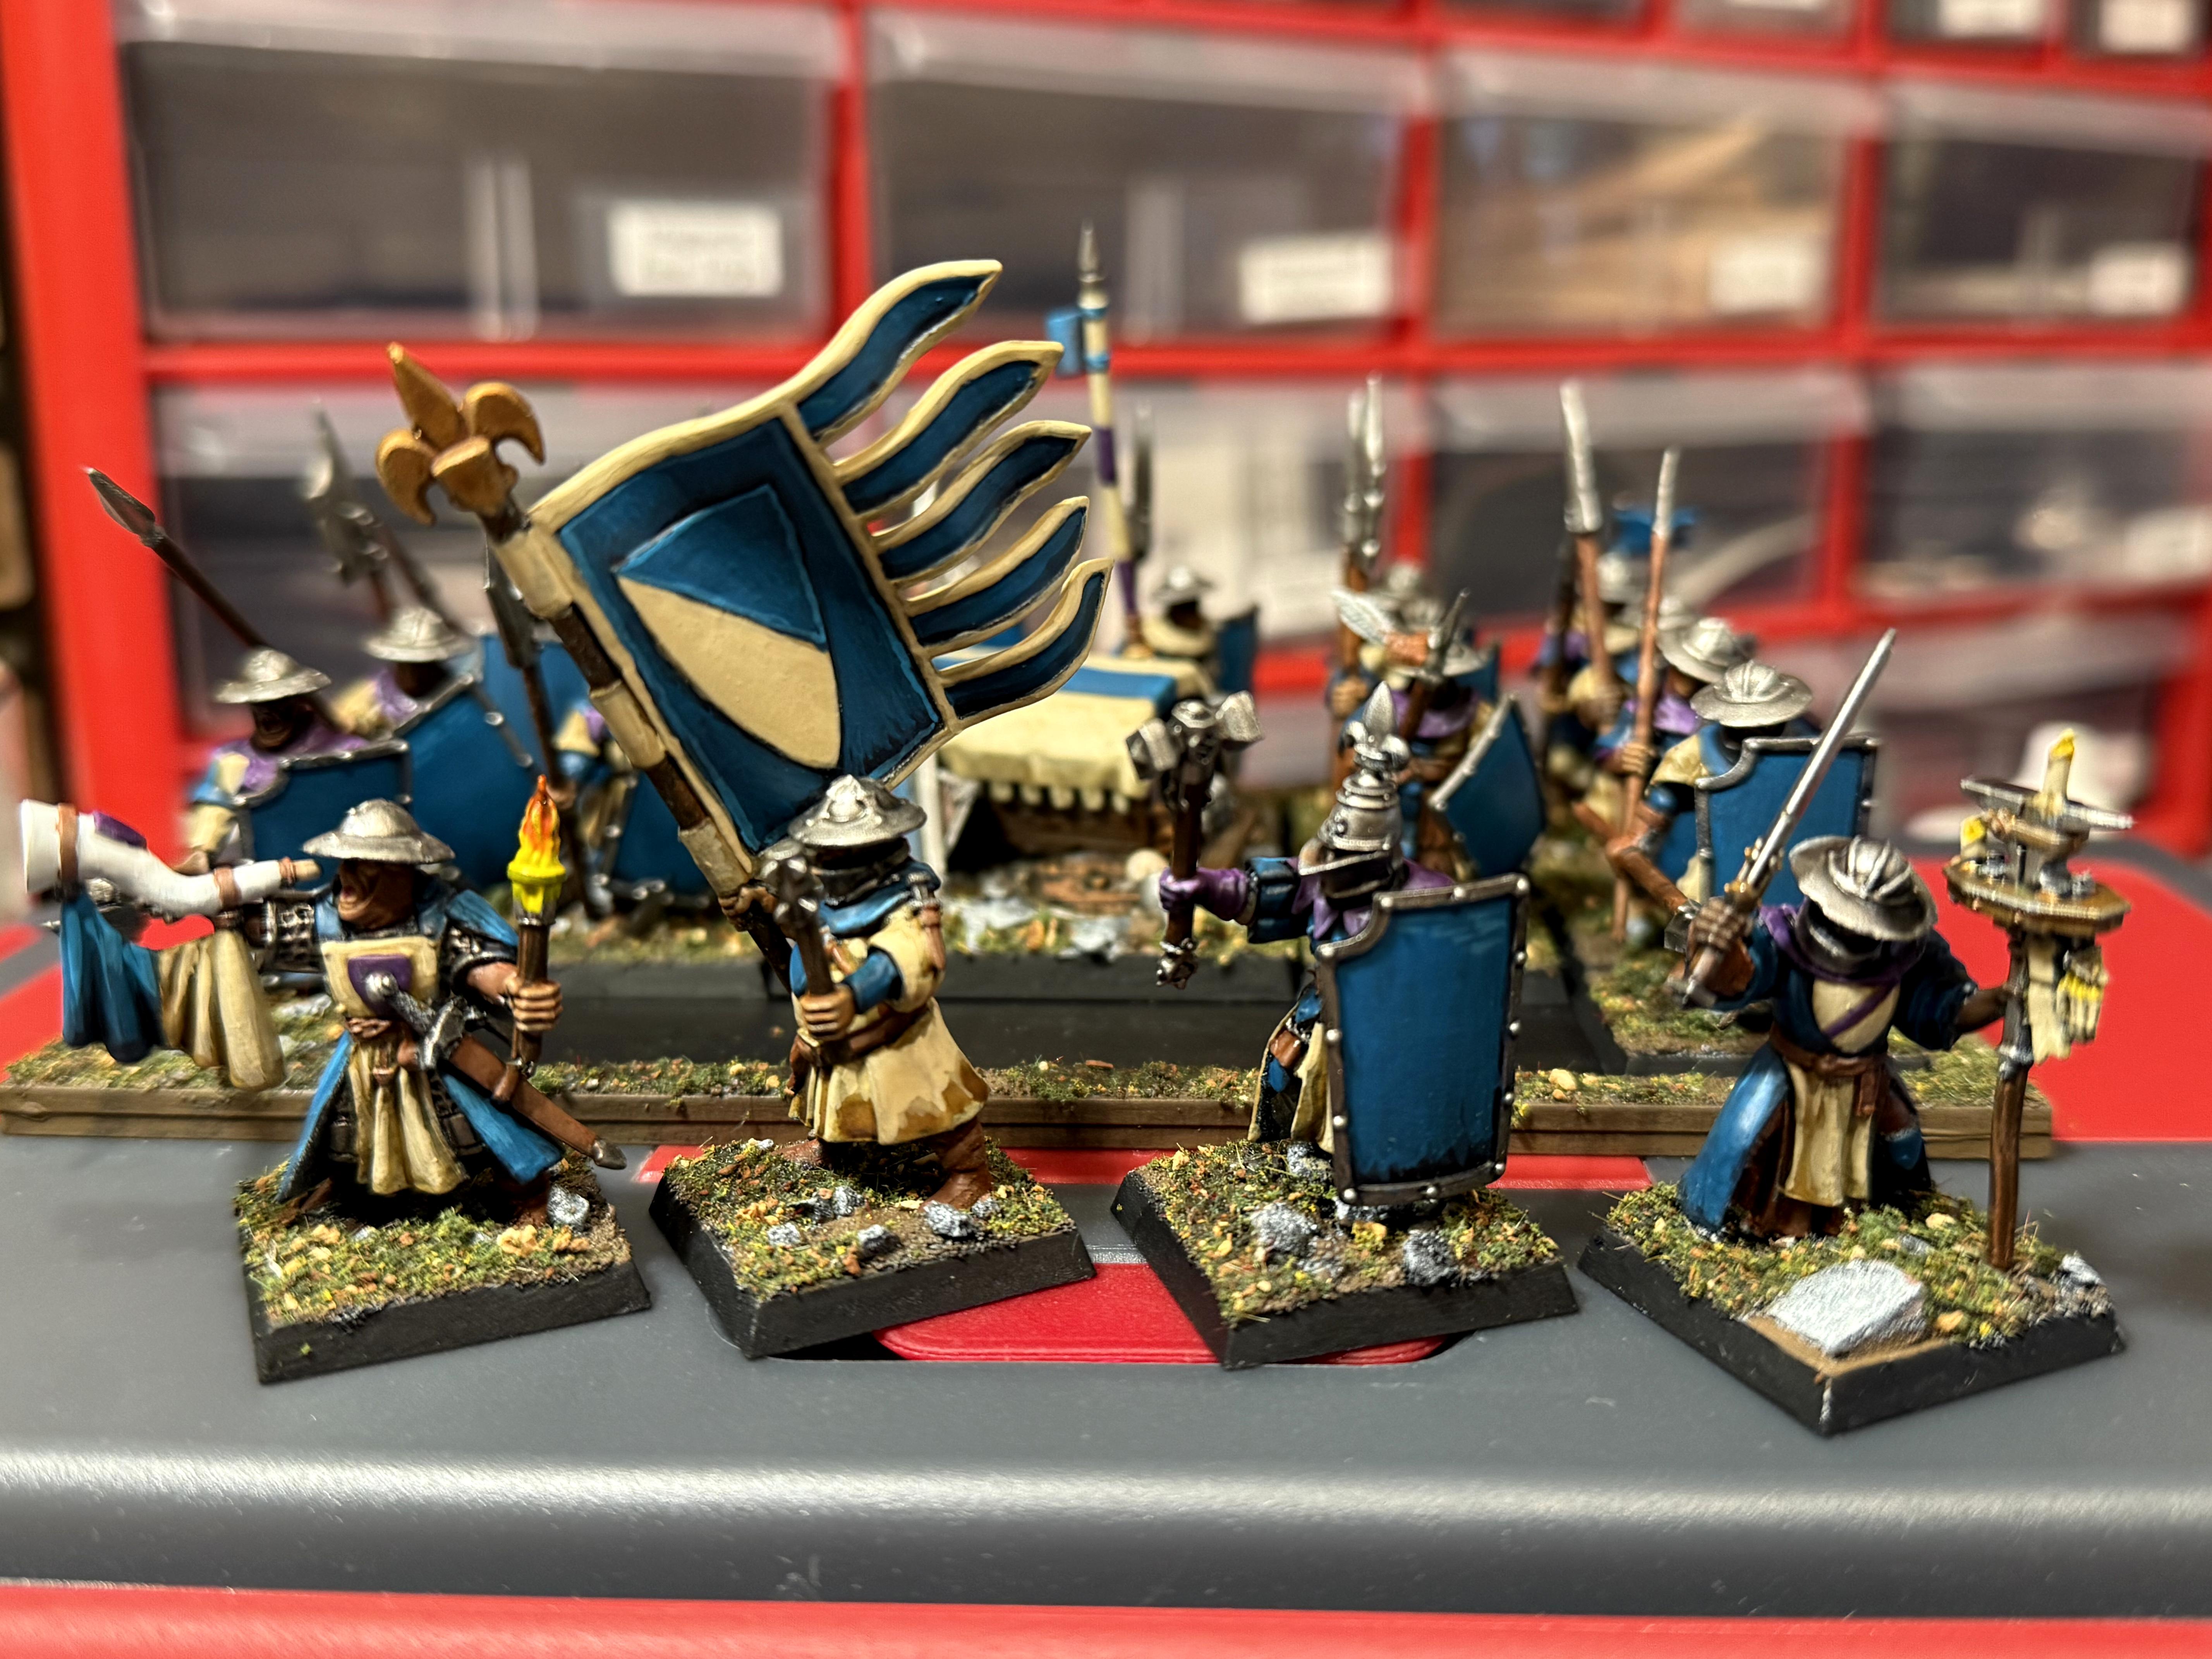
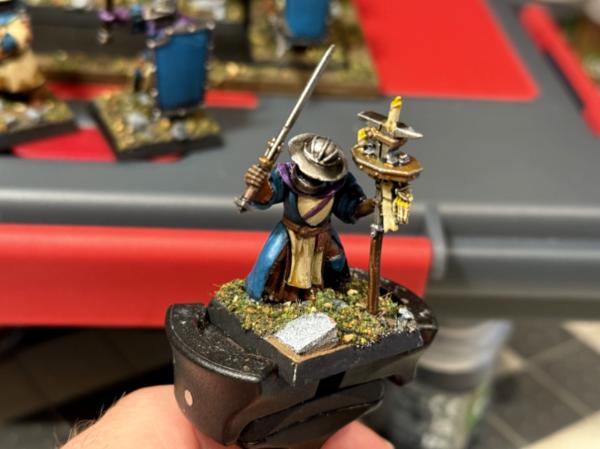
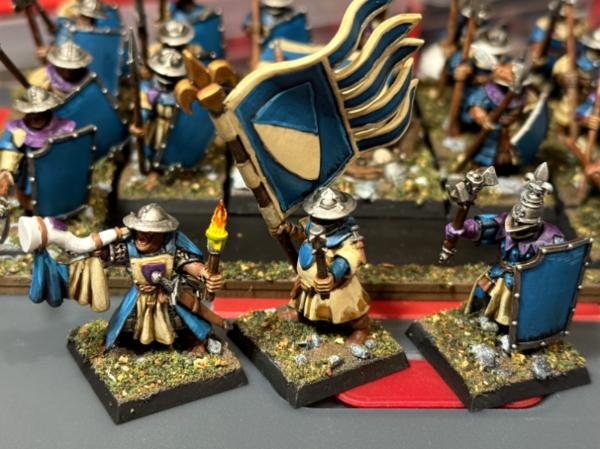
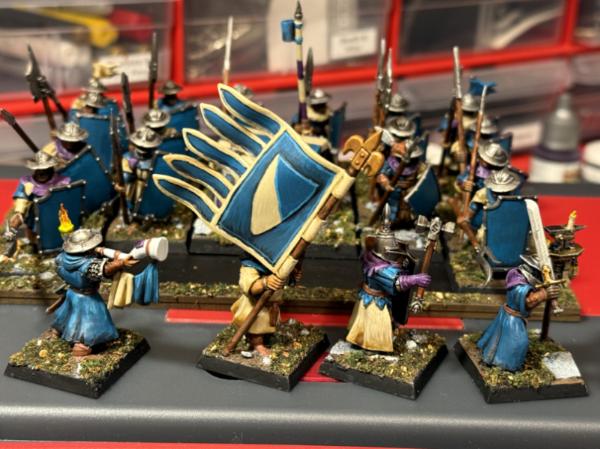
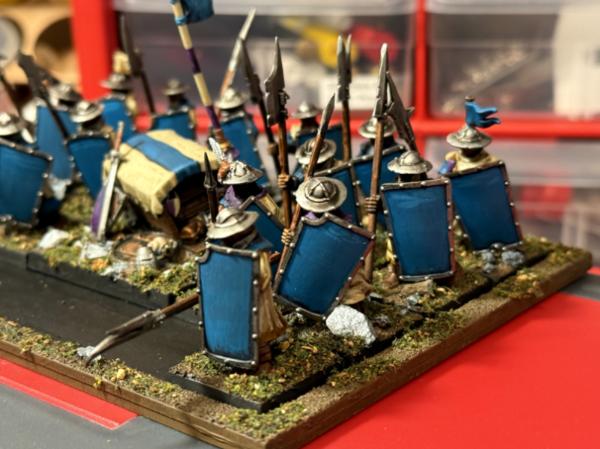
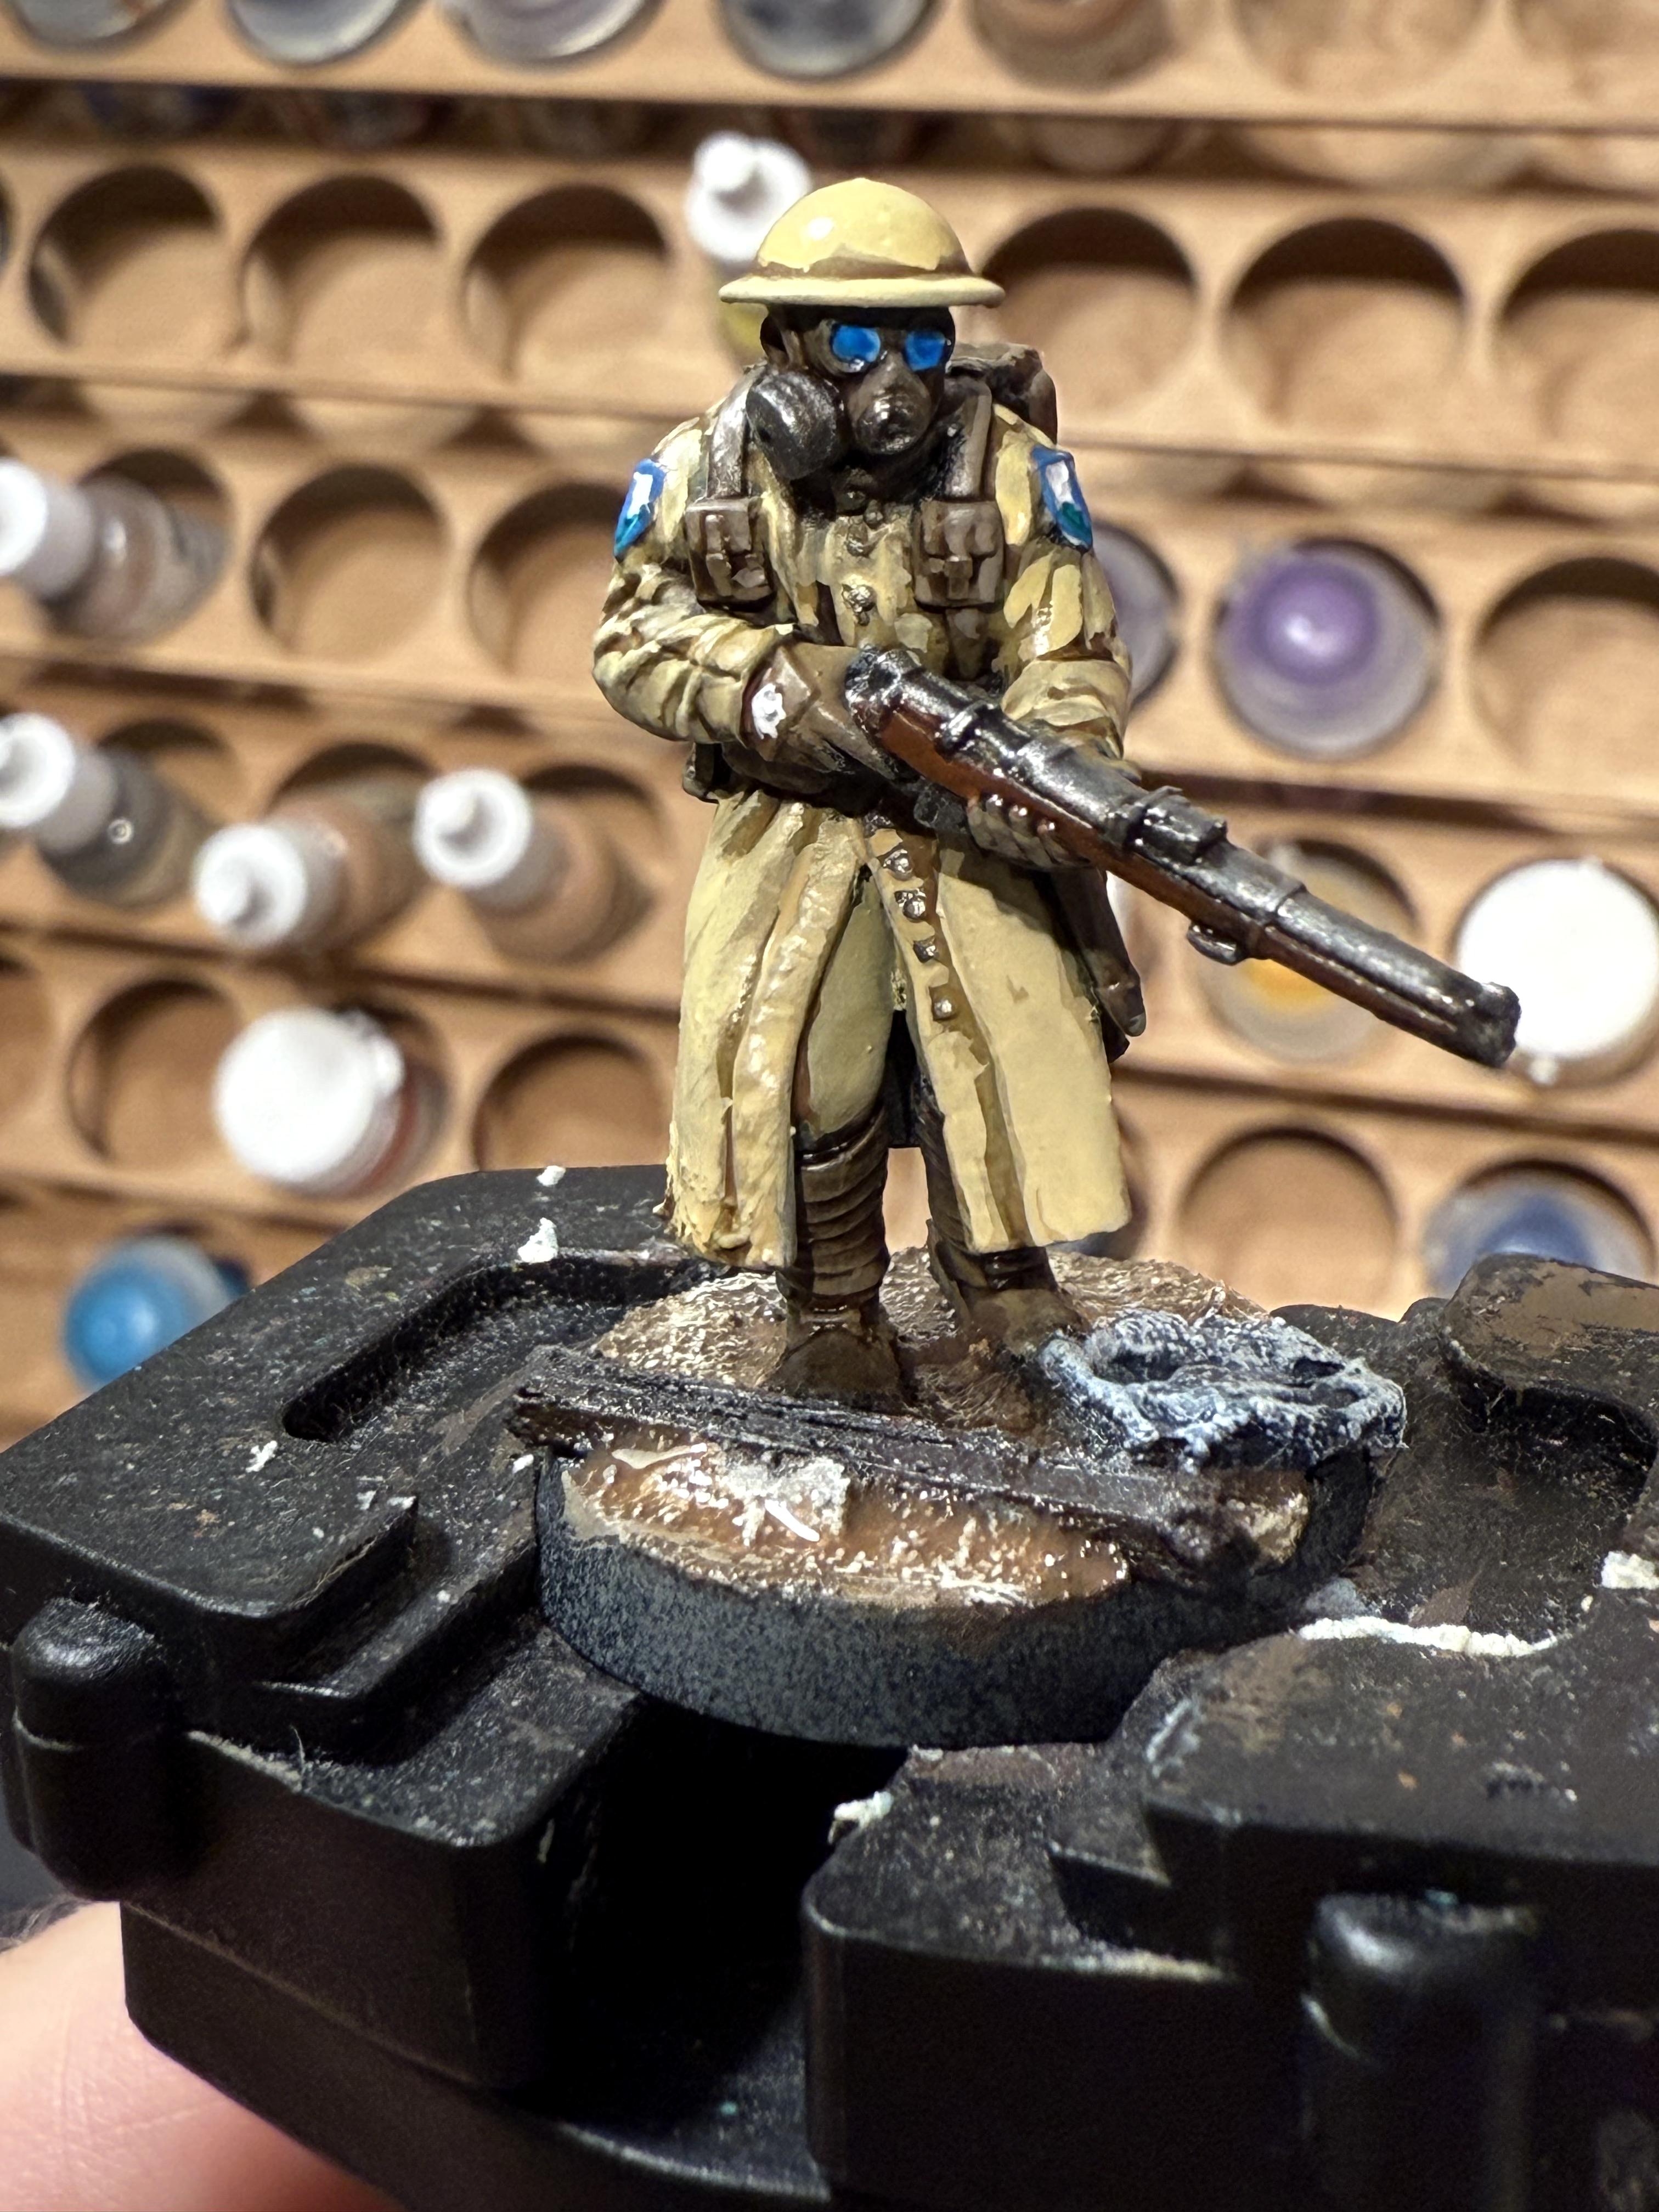
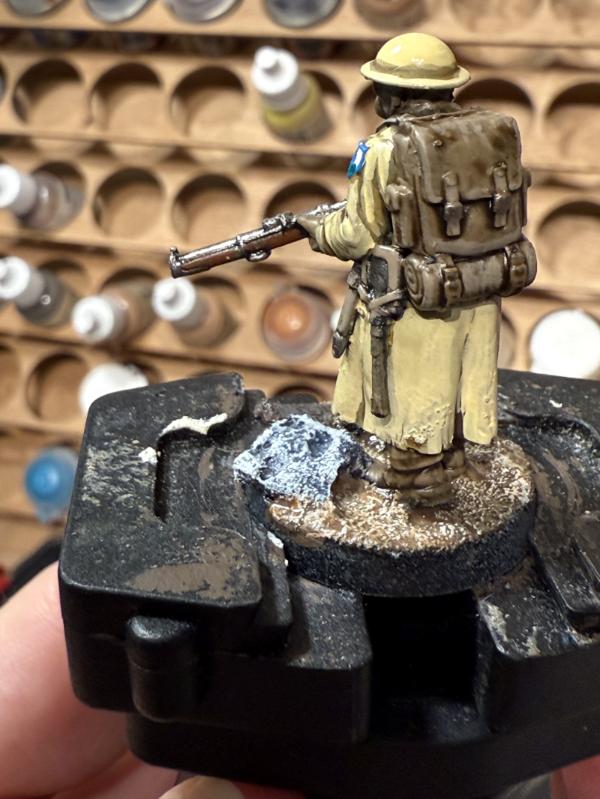
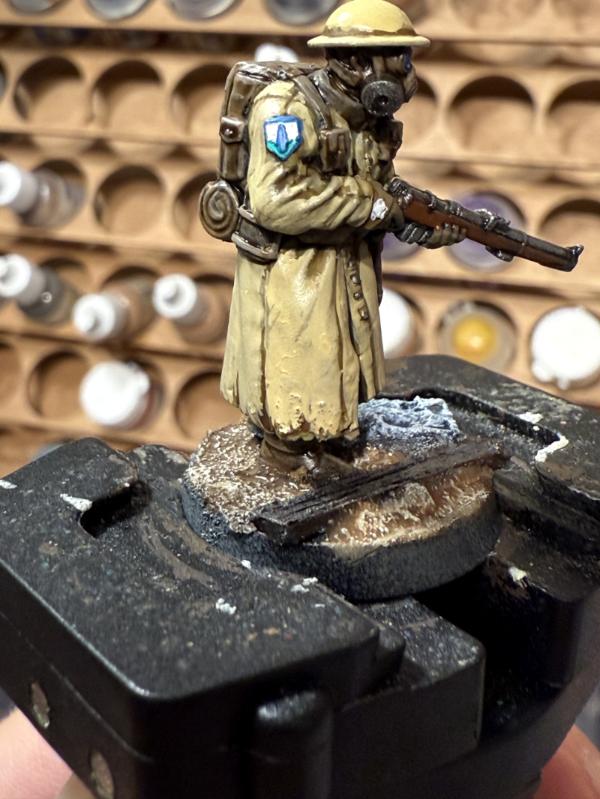
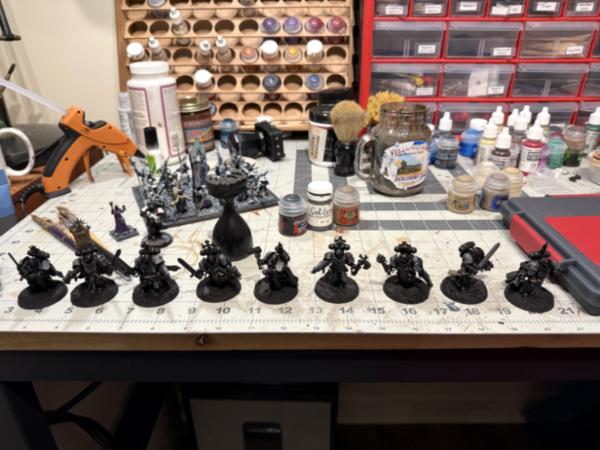
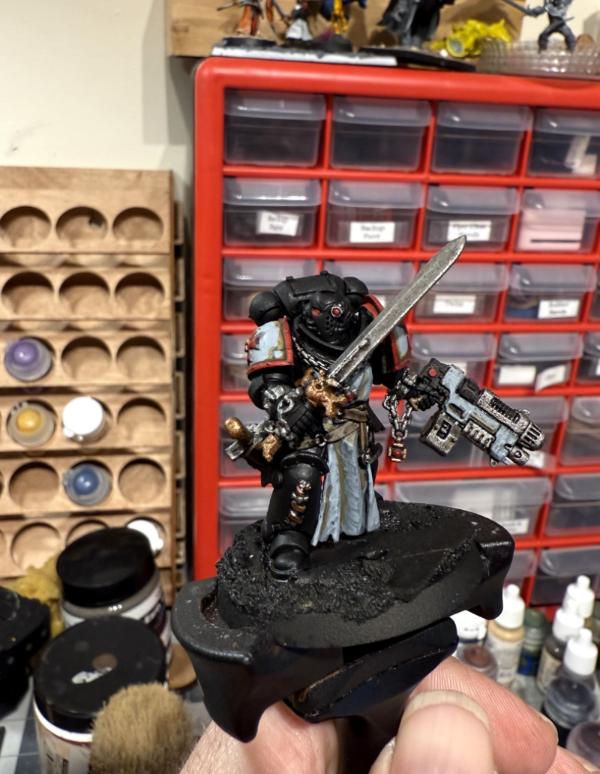
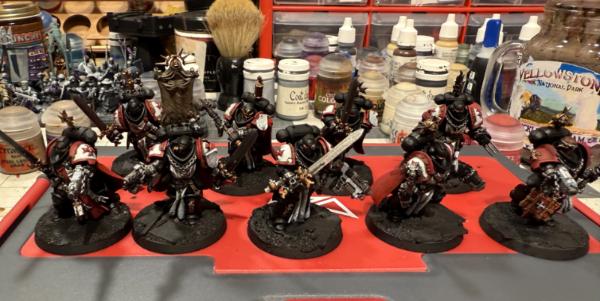
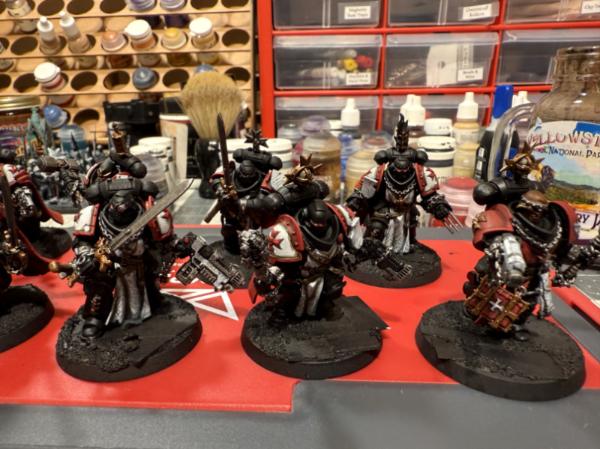
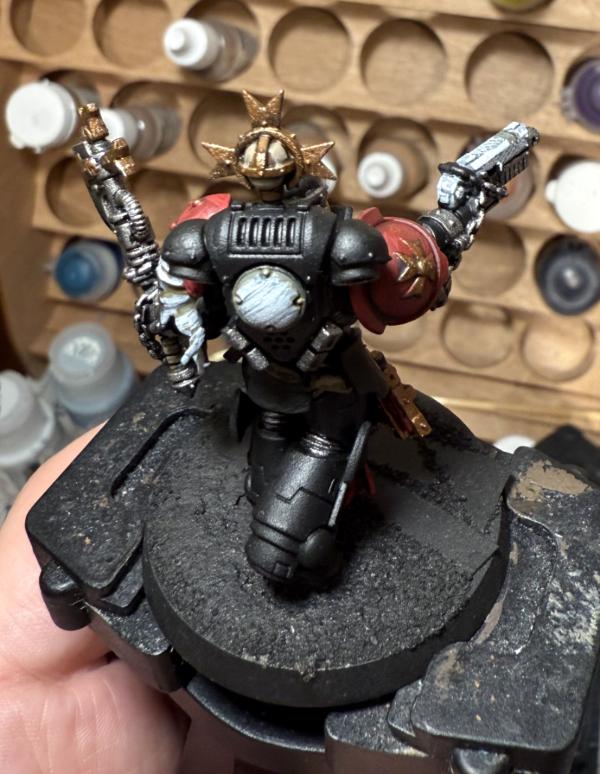
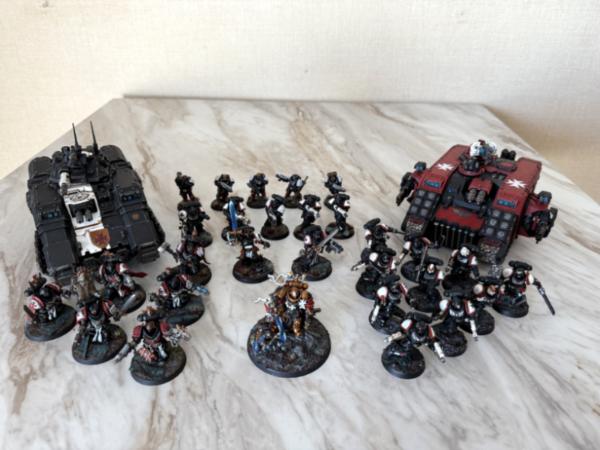
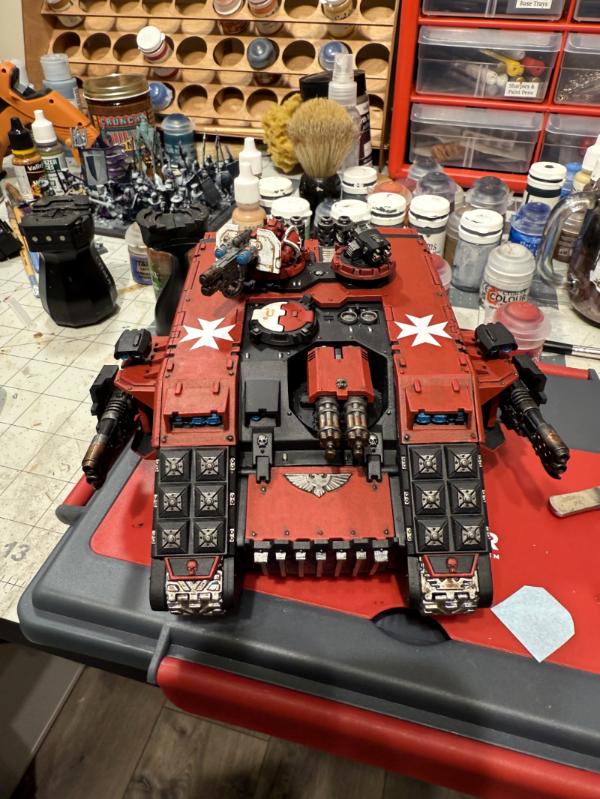
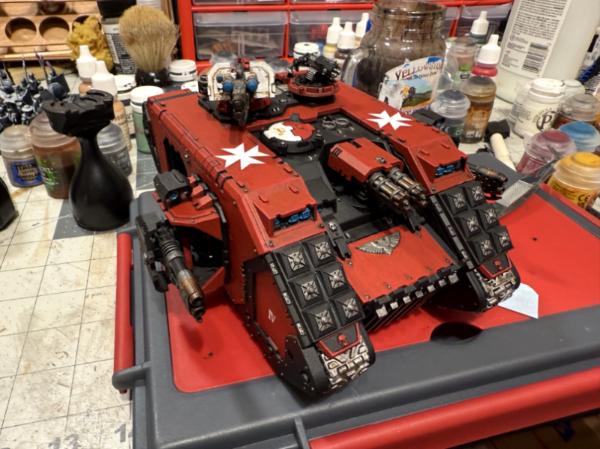
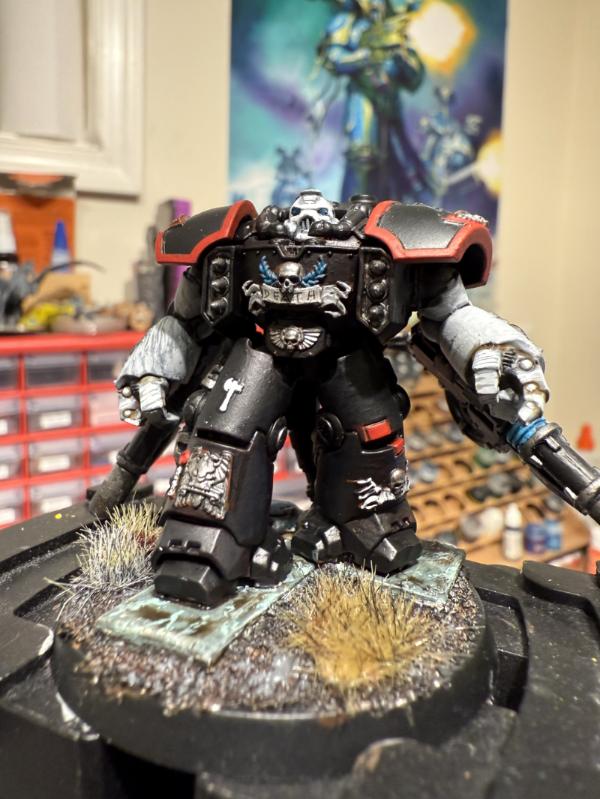
Now (finally) onto miniatures - specifically my Black Templar army!
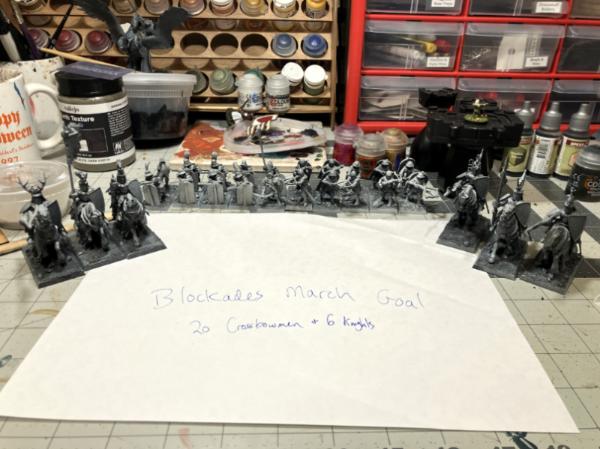
Been getting my Black Templar army ready for Shorehammer this December, and I think I've finally landed close to my list. For those of you who don't know, Shorehammer is a Highlander Style, 1250 point, one-day, three game tournament in Ocean City, Maryland (Eastern Shore). I really enjoy the highlander format as it forces everyone to think outside some of the meta choices and use things that rarely see the light of day!
My list is roughly as follows
Bladeguard LT w/ Relic (WL)
Emperors Champion
Ten Assault Intercessors
Five Infiltrators
Three Aggressors (Flamers!)
Three Outriders
Three Bladeguard
Judicar w/ Relic
Three Eradicators
Incursor w/ MM & Rocket Launcher
This has the dual benefits of making me paint a lot of things that weren't already painted, and also feilds a pretty nasty double punch list that goes pretty well with their new codex. On to the photos! You'll see I was/am also painting up a bladeguard ancient/veteran that I was originally planning on using instead of the judicar, but some friends convinced me that having fight last was better than giving my bladeguard +1 to hit in CC. Onto the photos. As always, C&C is appreciated, especially for the list.
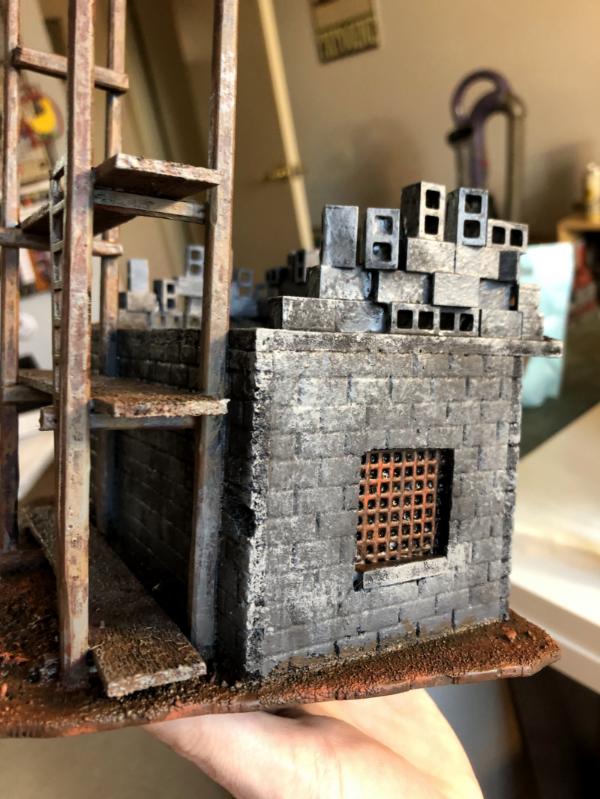
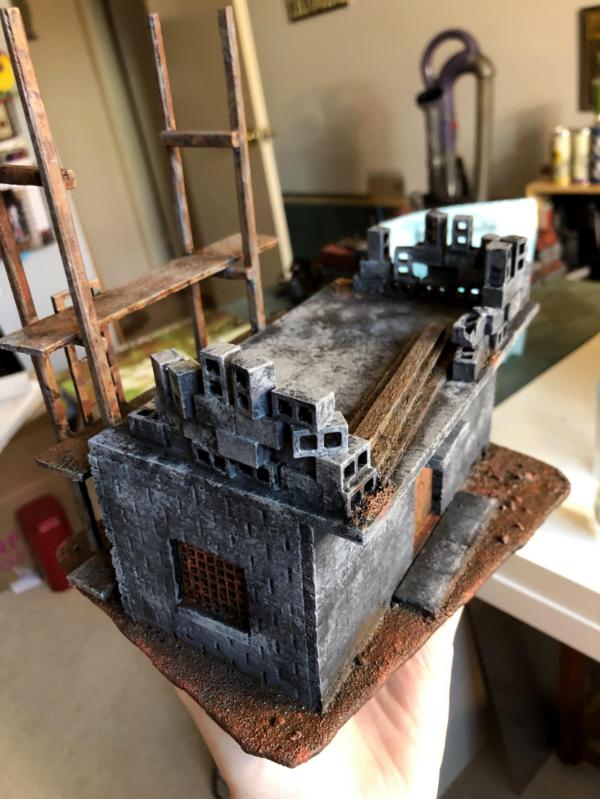
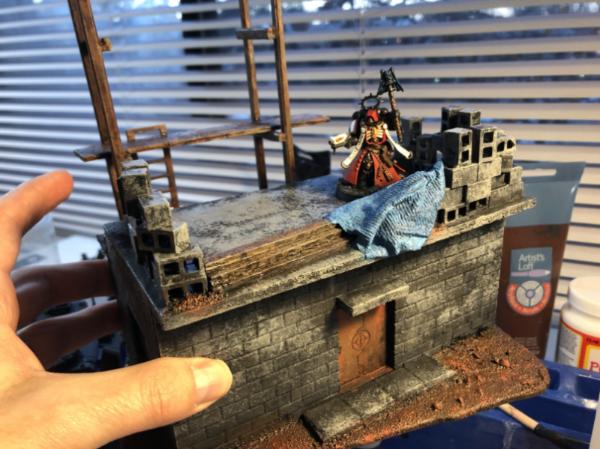
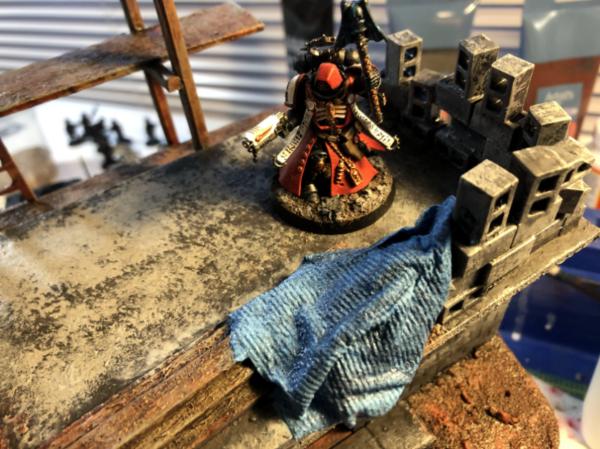
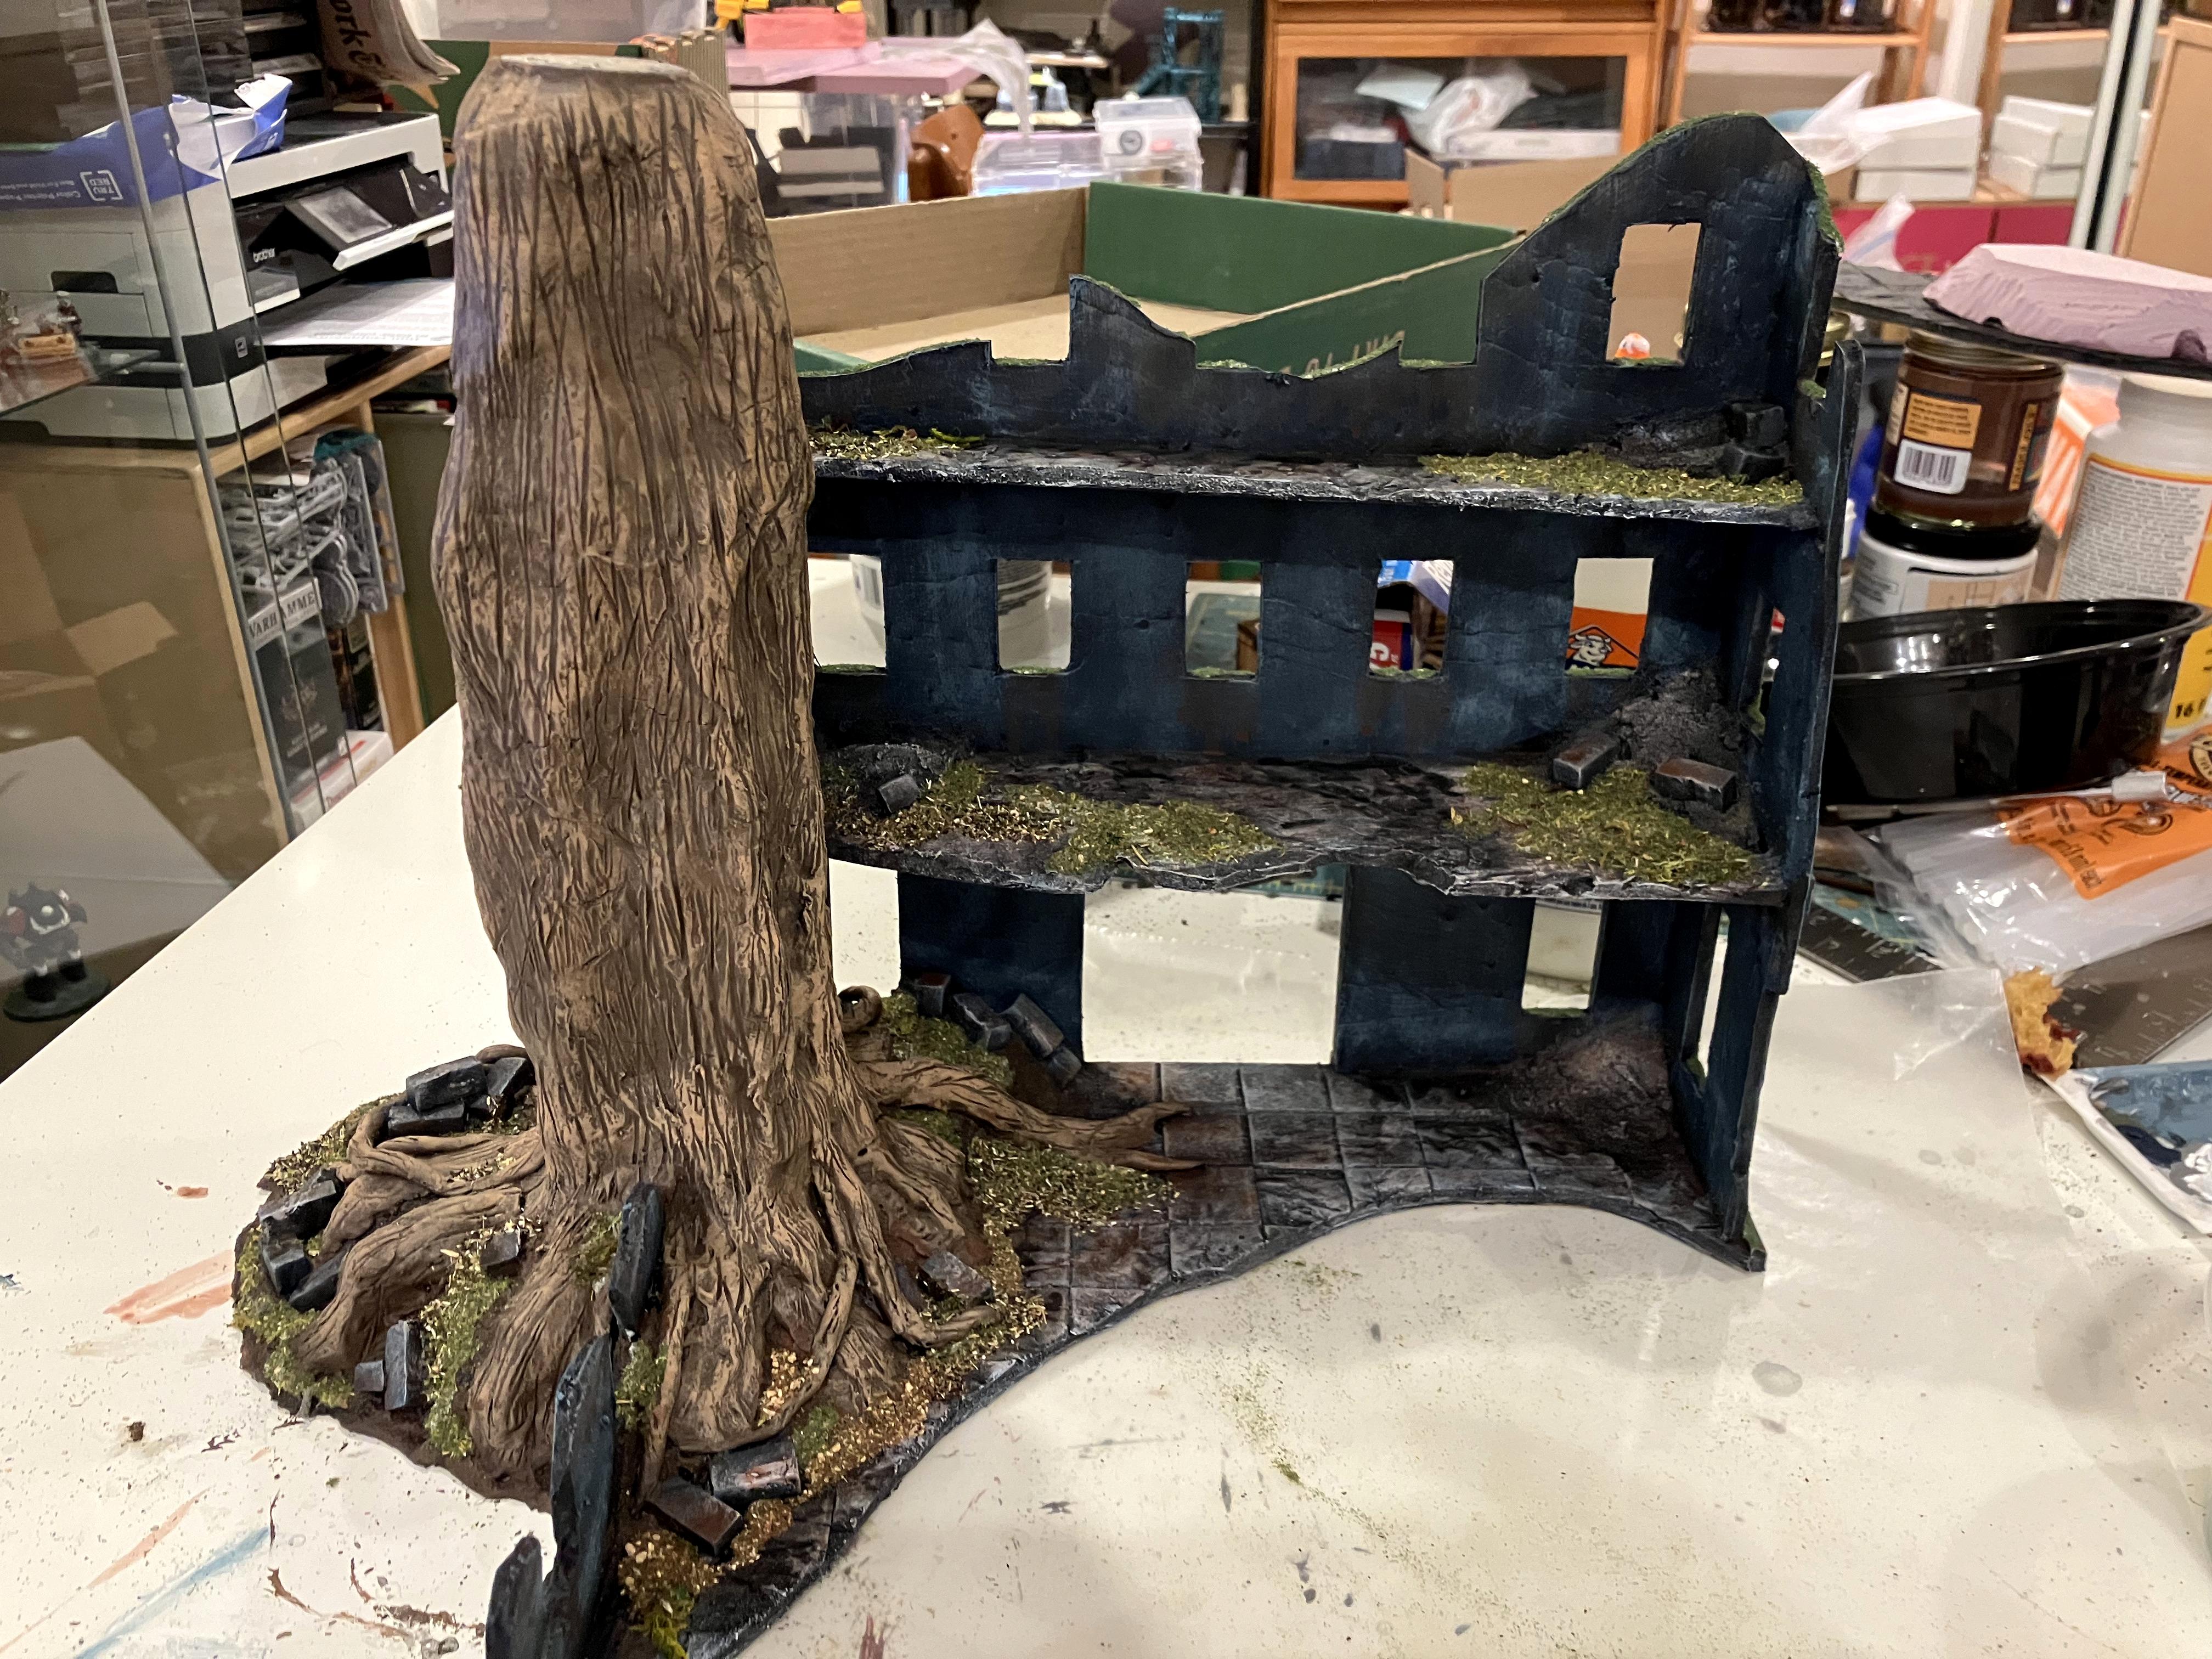
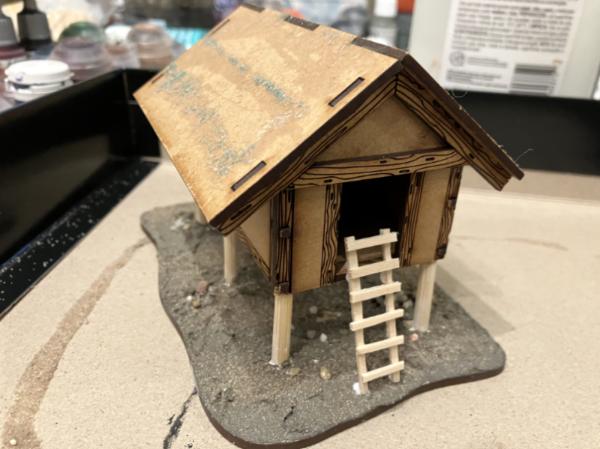
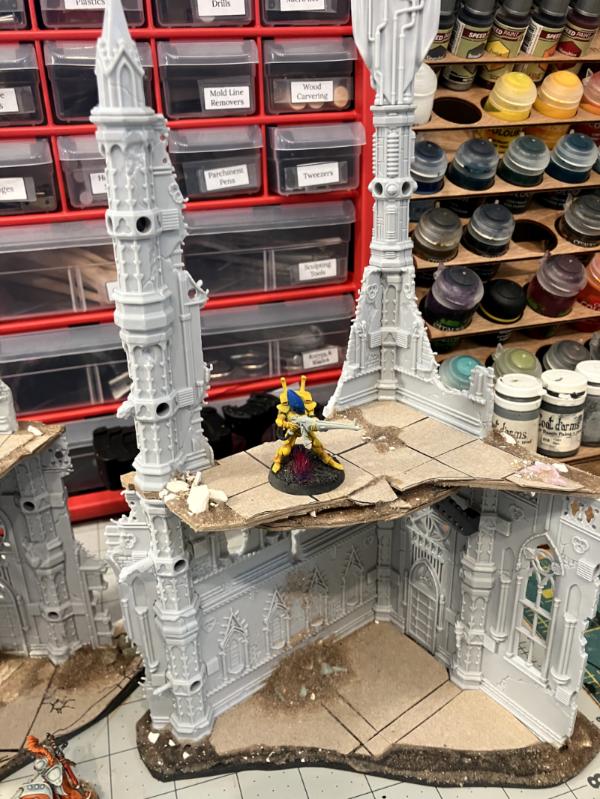
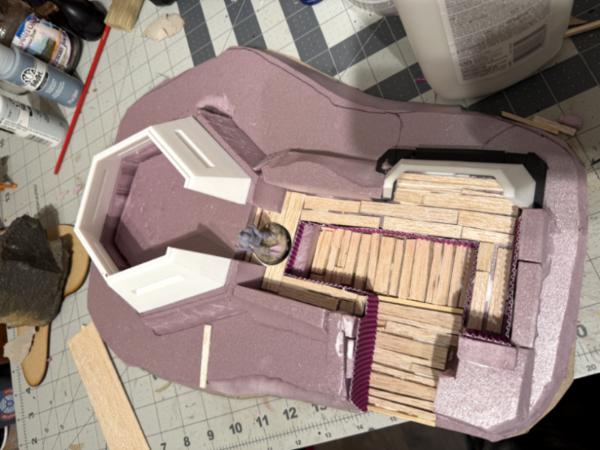
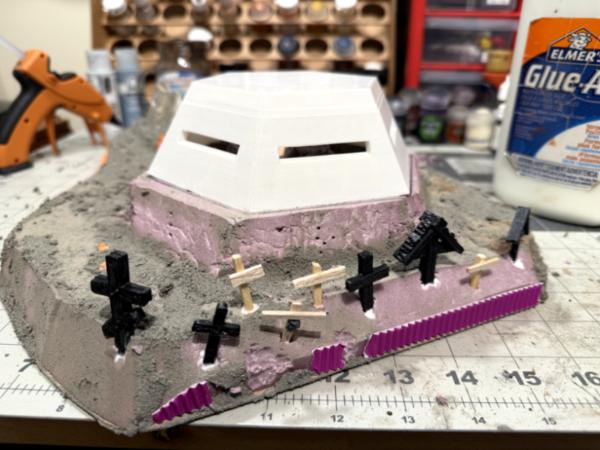
Happy Thanksgiving to all my American Friends. It's a quiet day here, so I figured I'd upload some photos of my latest project. I'm gradually working on a continuation of my Jurascao terrain commission, and the theme of this smaller section is 'under construction'. Lots of Warhammer 40k boards are full of destroyed and damaged terrain (naturally!) but I wanted this board to represent a living, breathing settlement that was under attack. Building is made completely from foamboard, scored with a pen and a ruler, on an MDF base with a few 3-D printed cinderblocks to add some realism. It's super lightweight but is pretty strong!
Painting in Progress
Mostly finished.
A tissue dipped in modge podge, caledor blue paint & drakehoff nightshade wash.
Given one final coat of glass modge podge to make it look like a plastic-ish tarp.
Thoughts? Comments? Feedback? I'll post again soon with my Black Templar updates!
Gwyn chan 'r Gwyll wrote: Great looking terrain, especially that tarp, your technique worked really well!
Thanks! It's literally just tissue, modge podge and blue paint, but it's so simply I'm kicking myself for not using it earlier on other things! Took forever to dry, ended up sticking it in front of a fan to help it dry out faster!
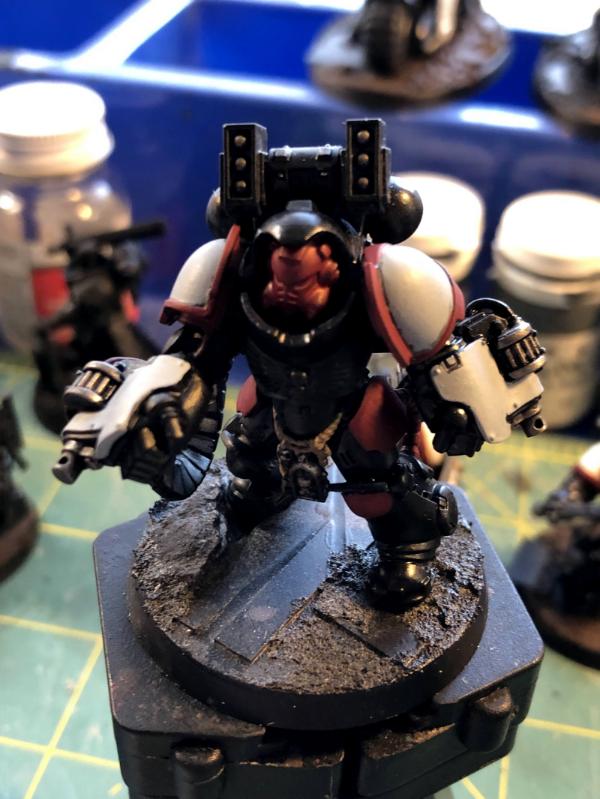
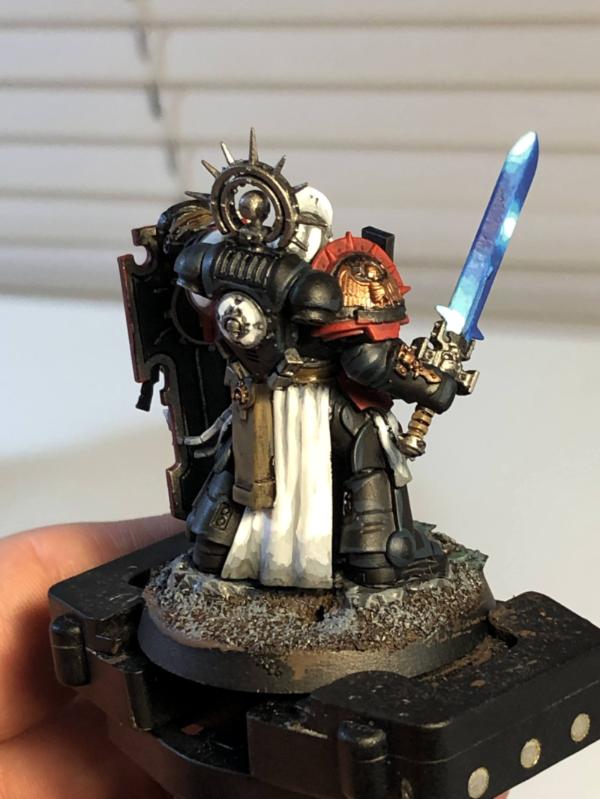
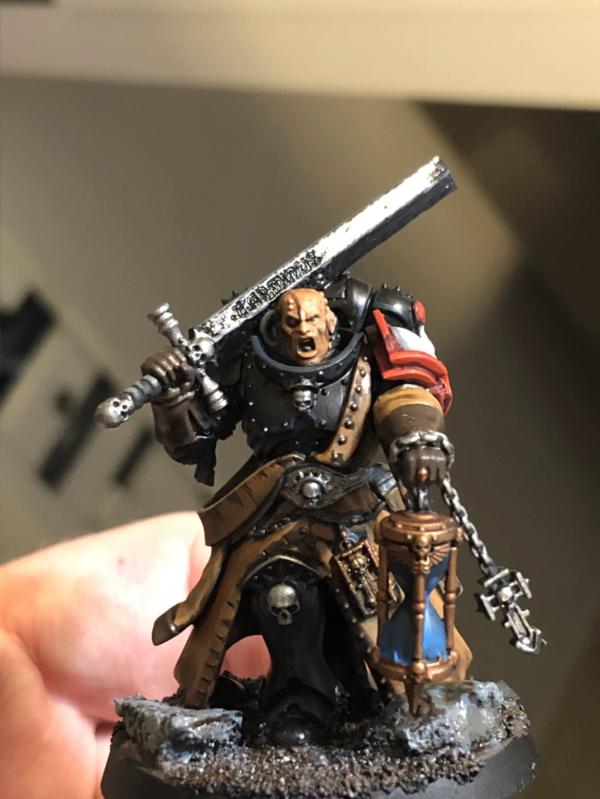
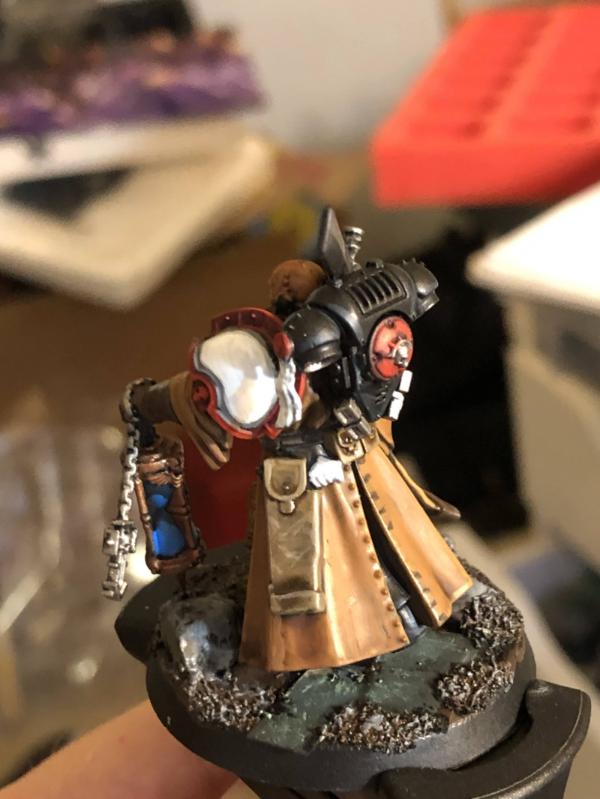
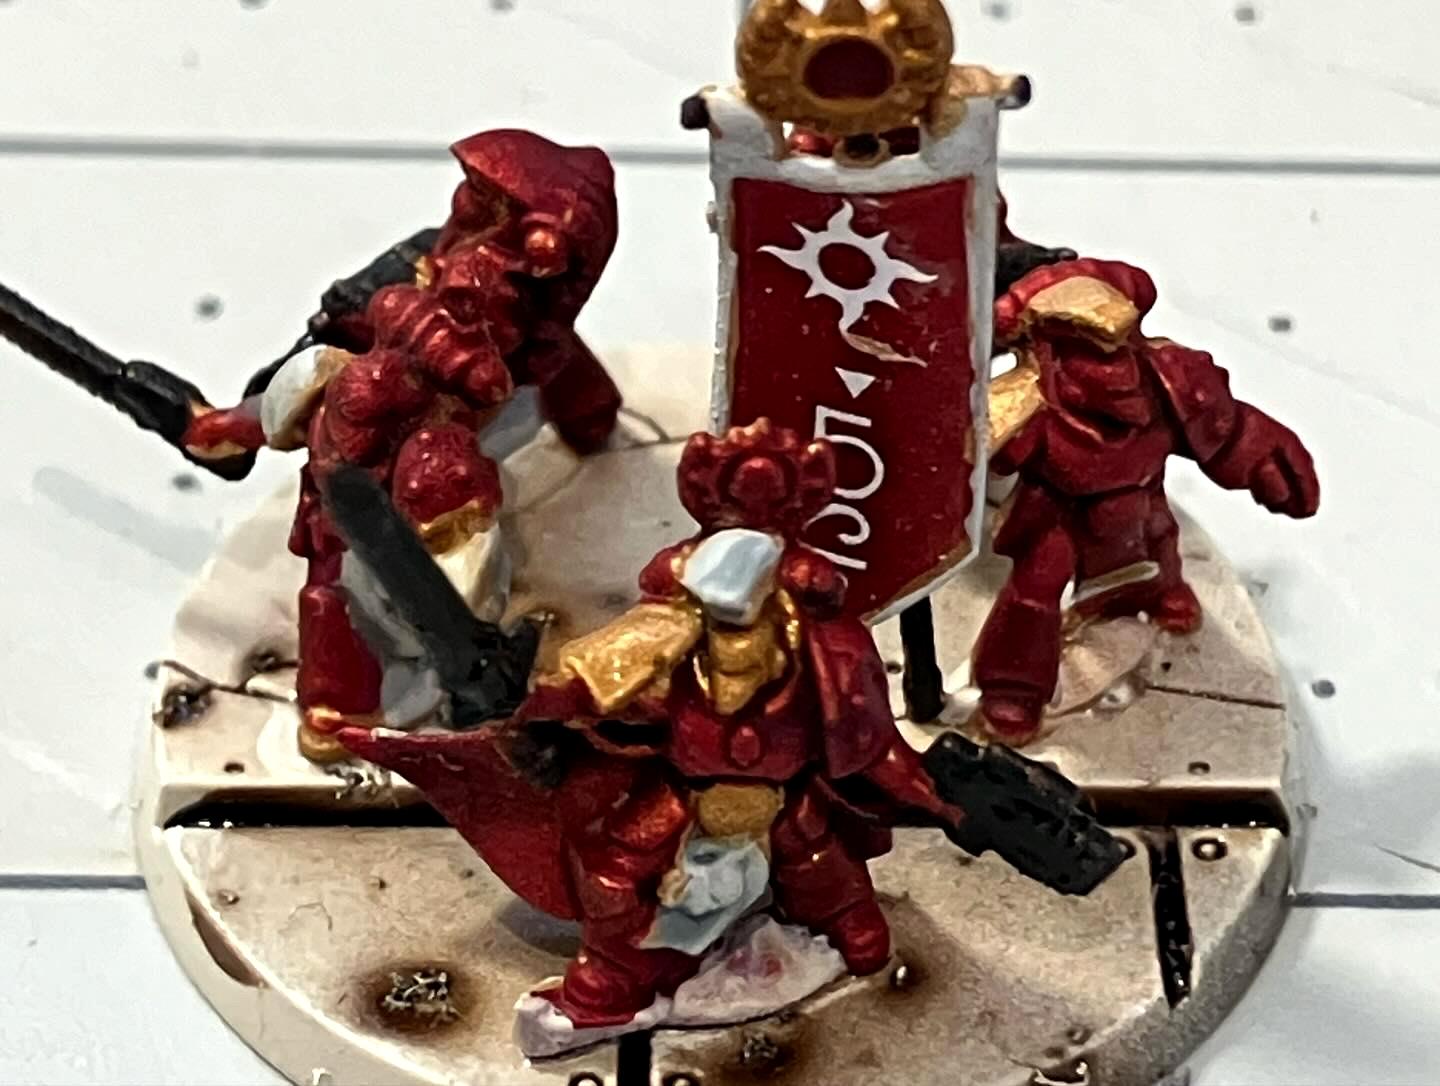
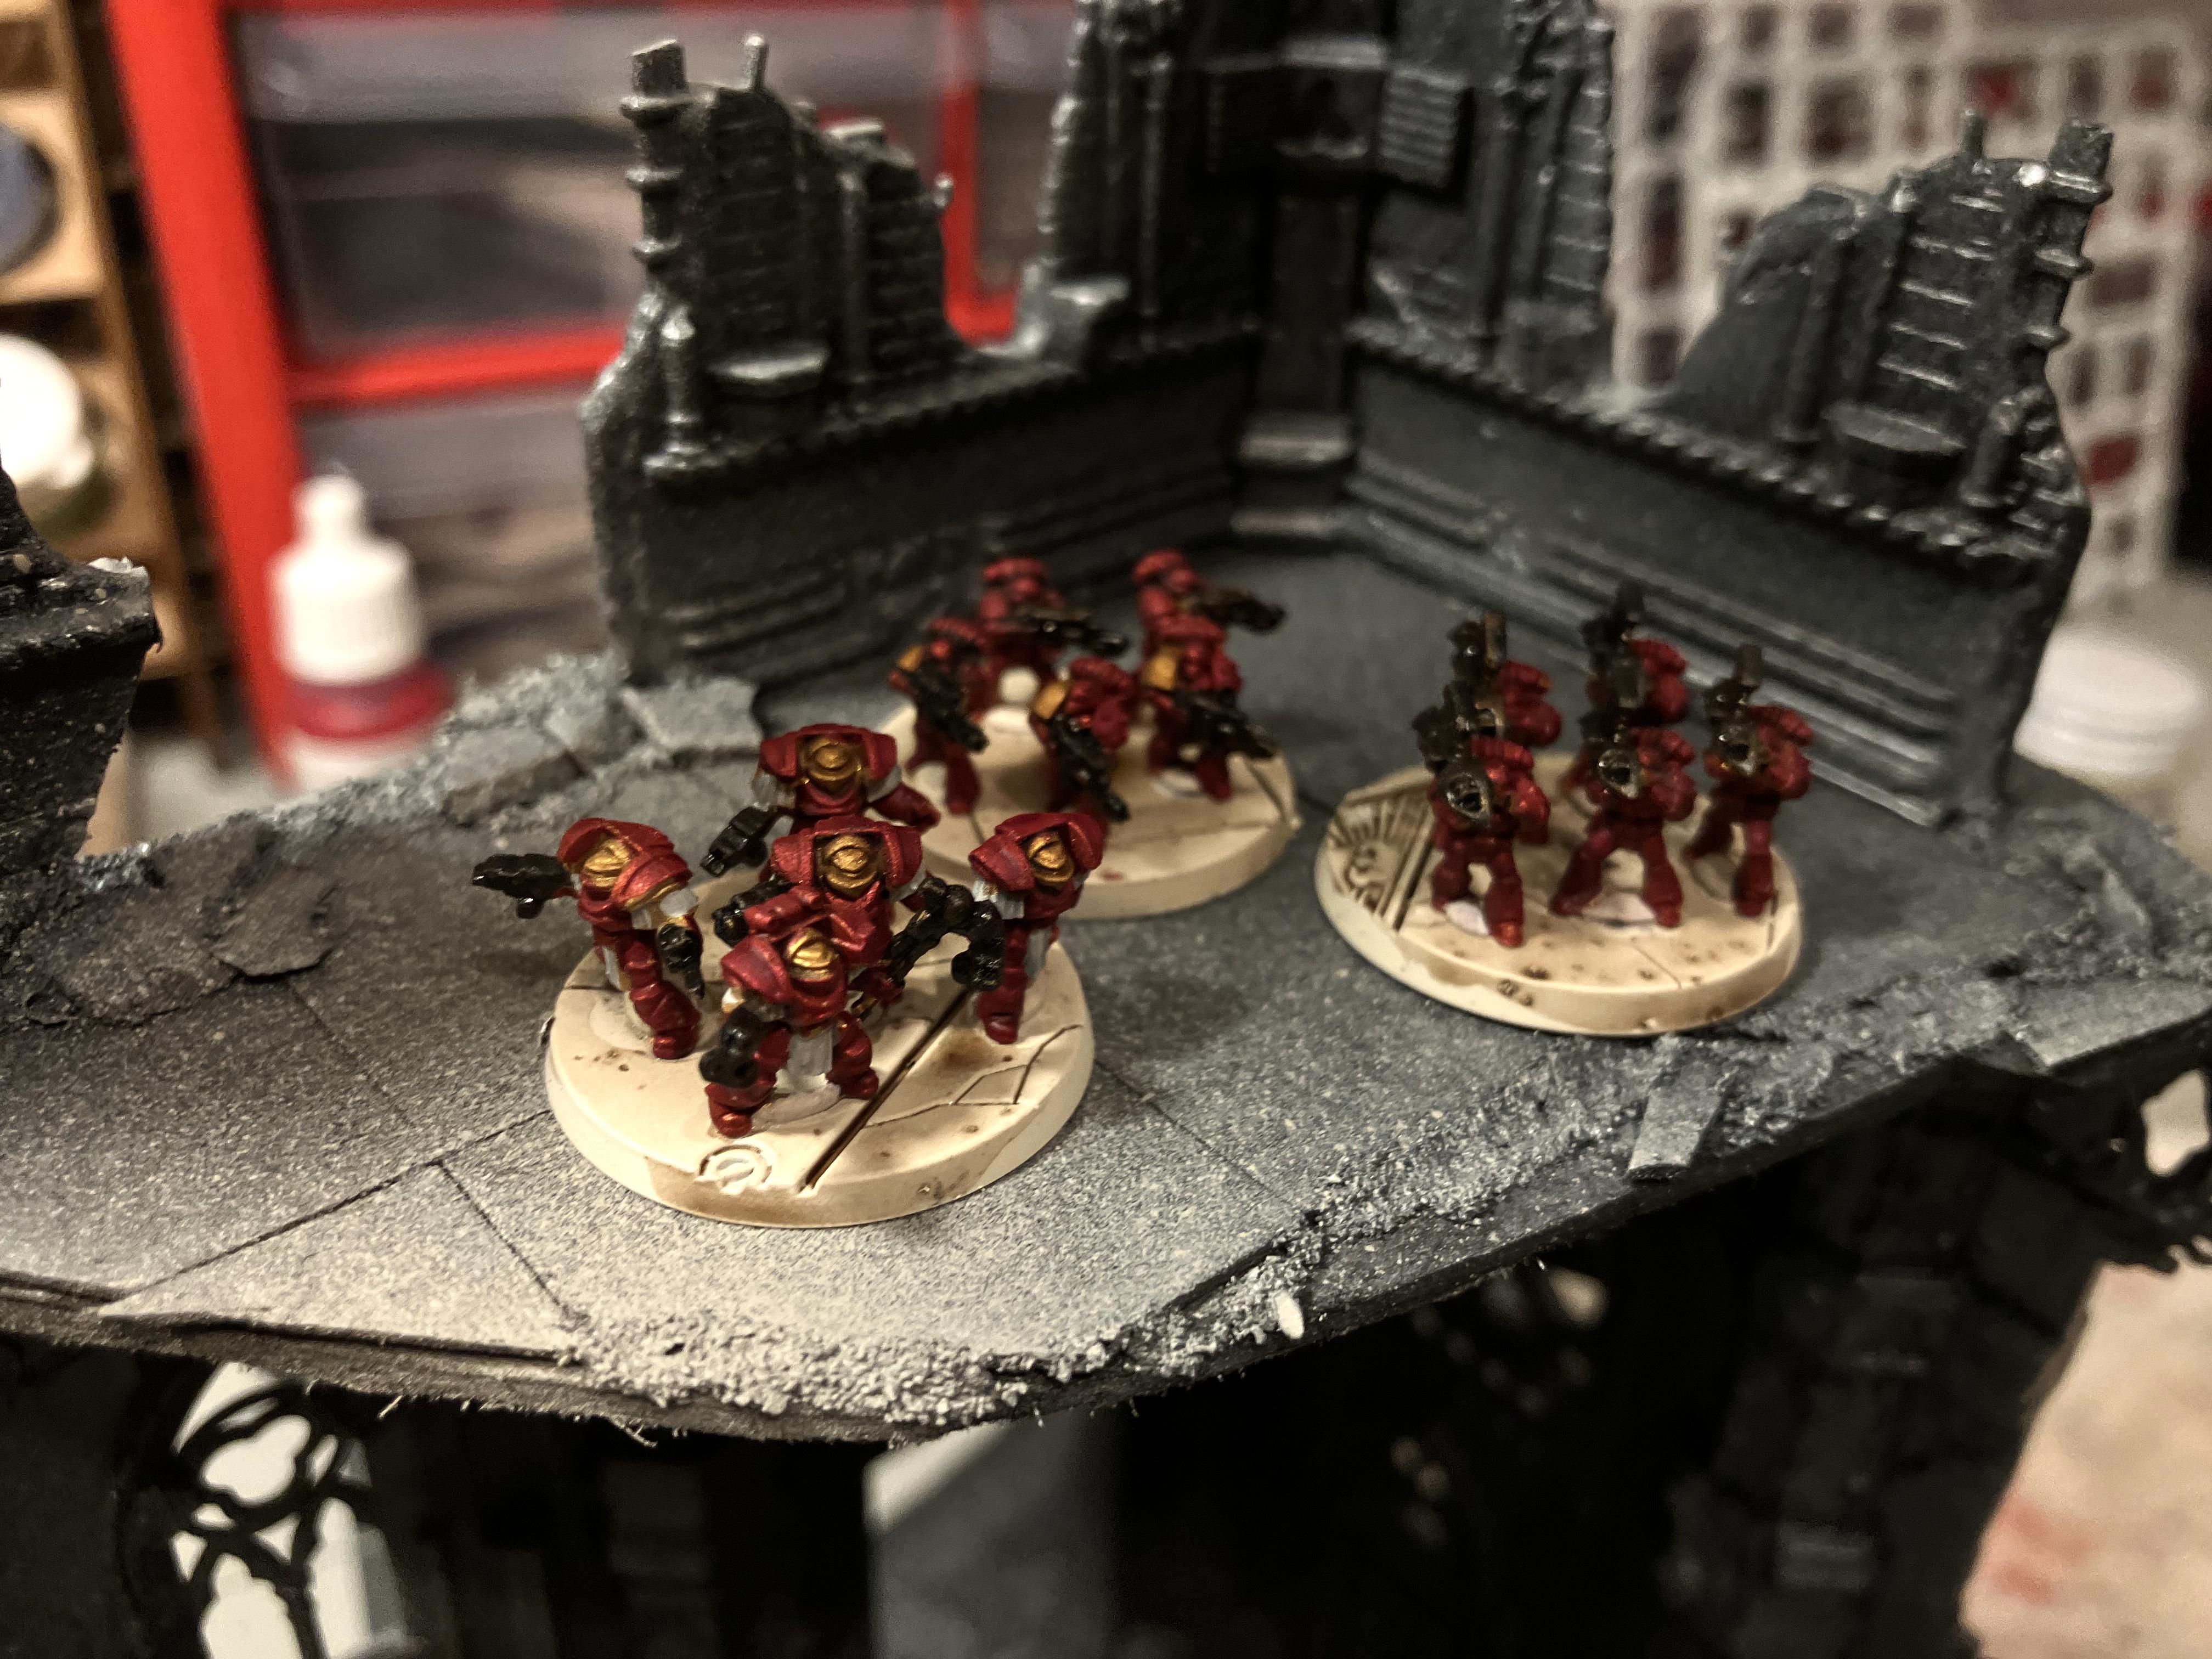
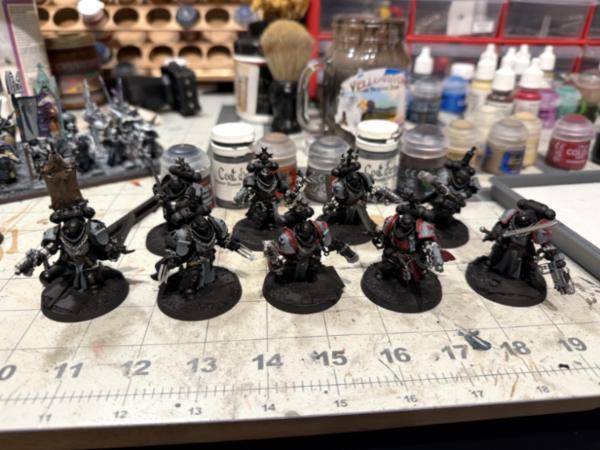
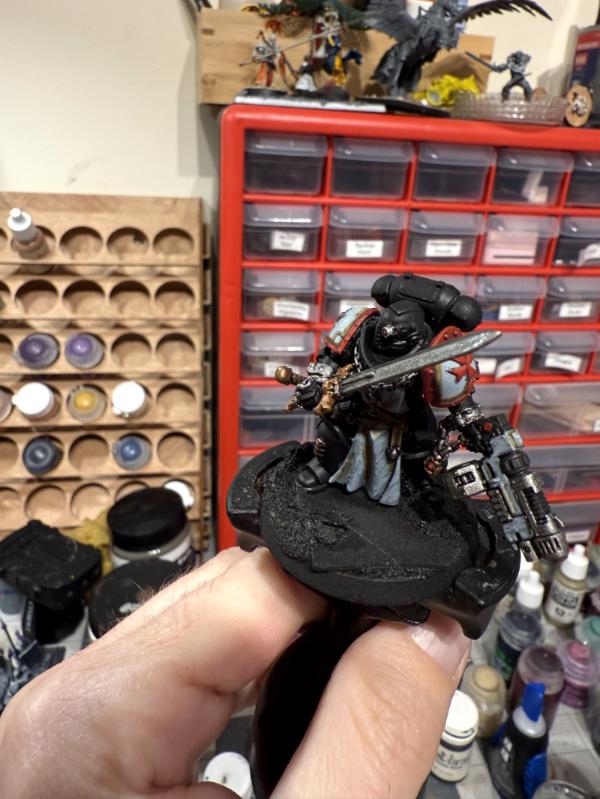
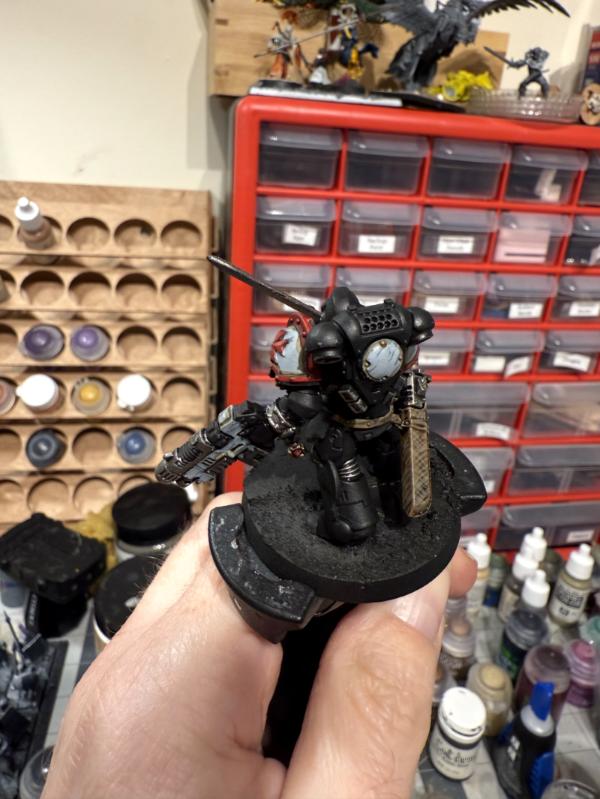
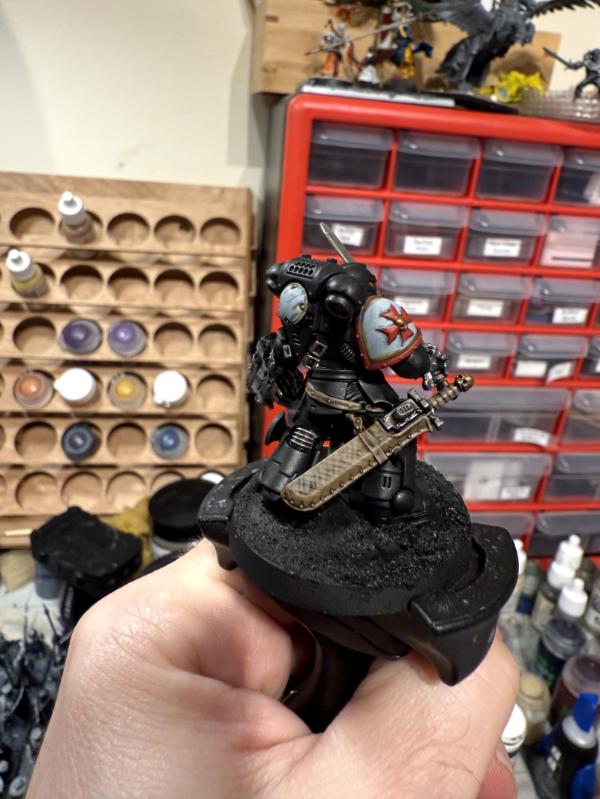
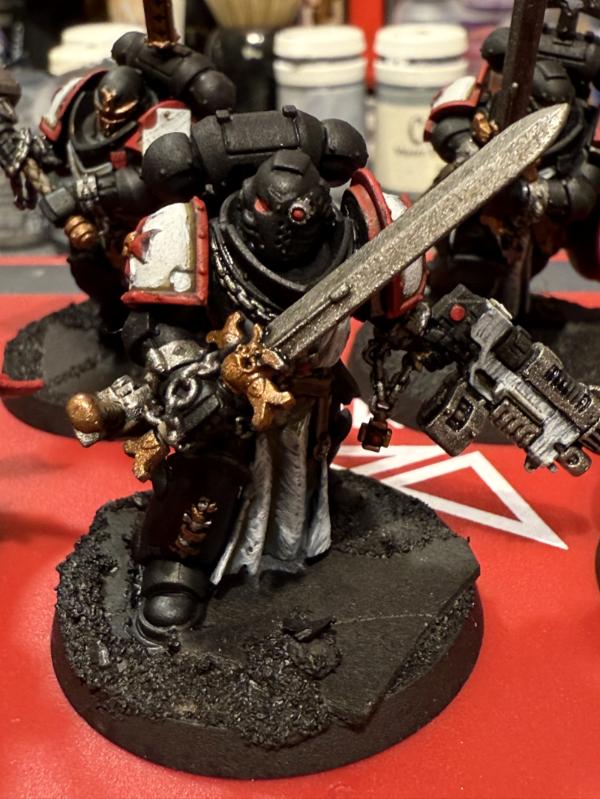
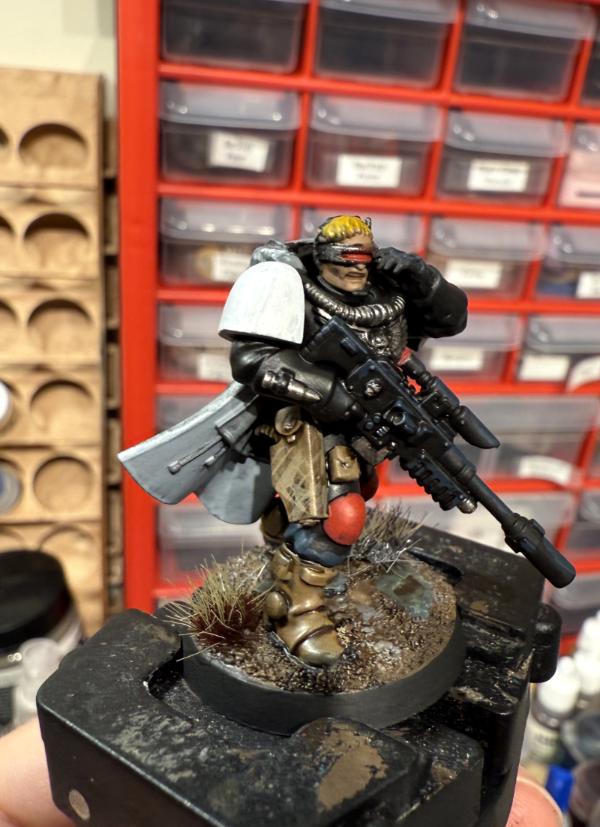
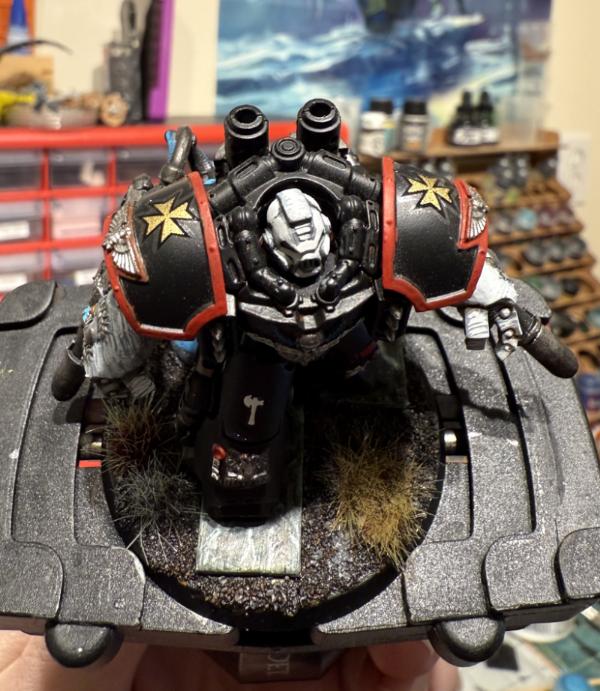
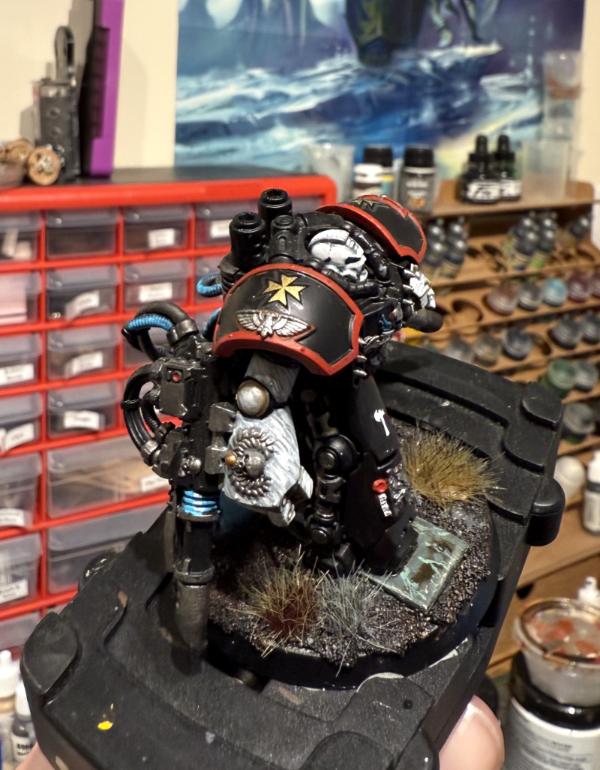
Here's some more Black Templar photos of a bladeguard captain (he gets to be a bladeguard sergeant in the tournament this week, but he's also painted!)
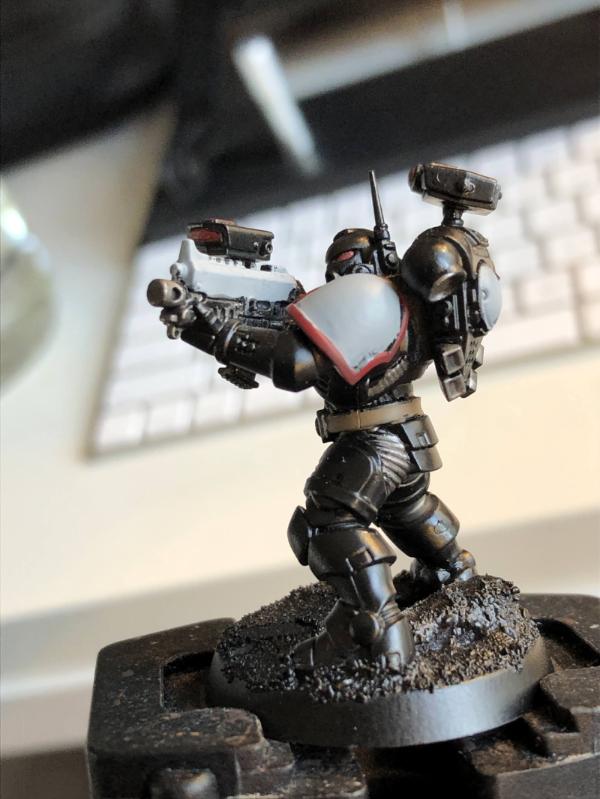
Also painted up a Judicar. He likes to team up with the Bladeguard and or the Assault Intercessors and make some people fight last. That, plus the lovely Crusader's Helm relic lets me push a unit into the assault doctrine early for more attacks and nastier chainsword moments.
Tried using some glossy modge podge to make the sword black and glossy, but I'm not super pumped about it. Can't deal with it now but may end up changing it in the future.
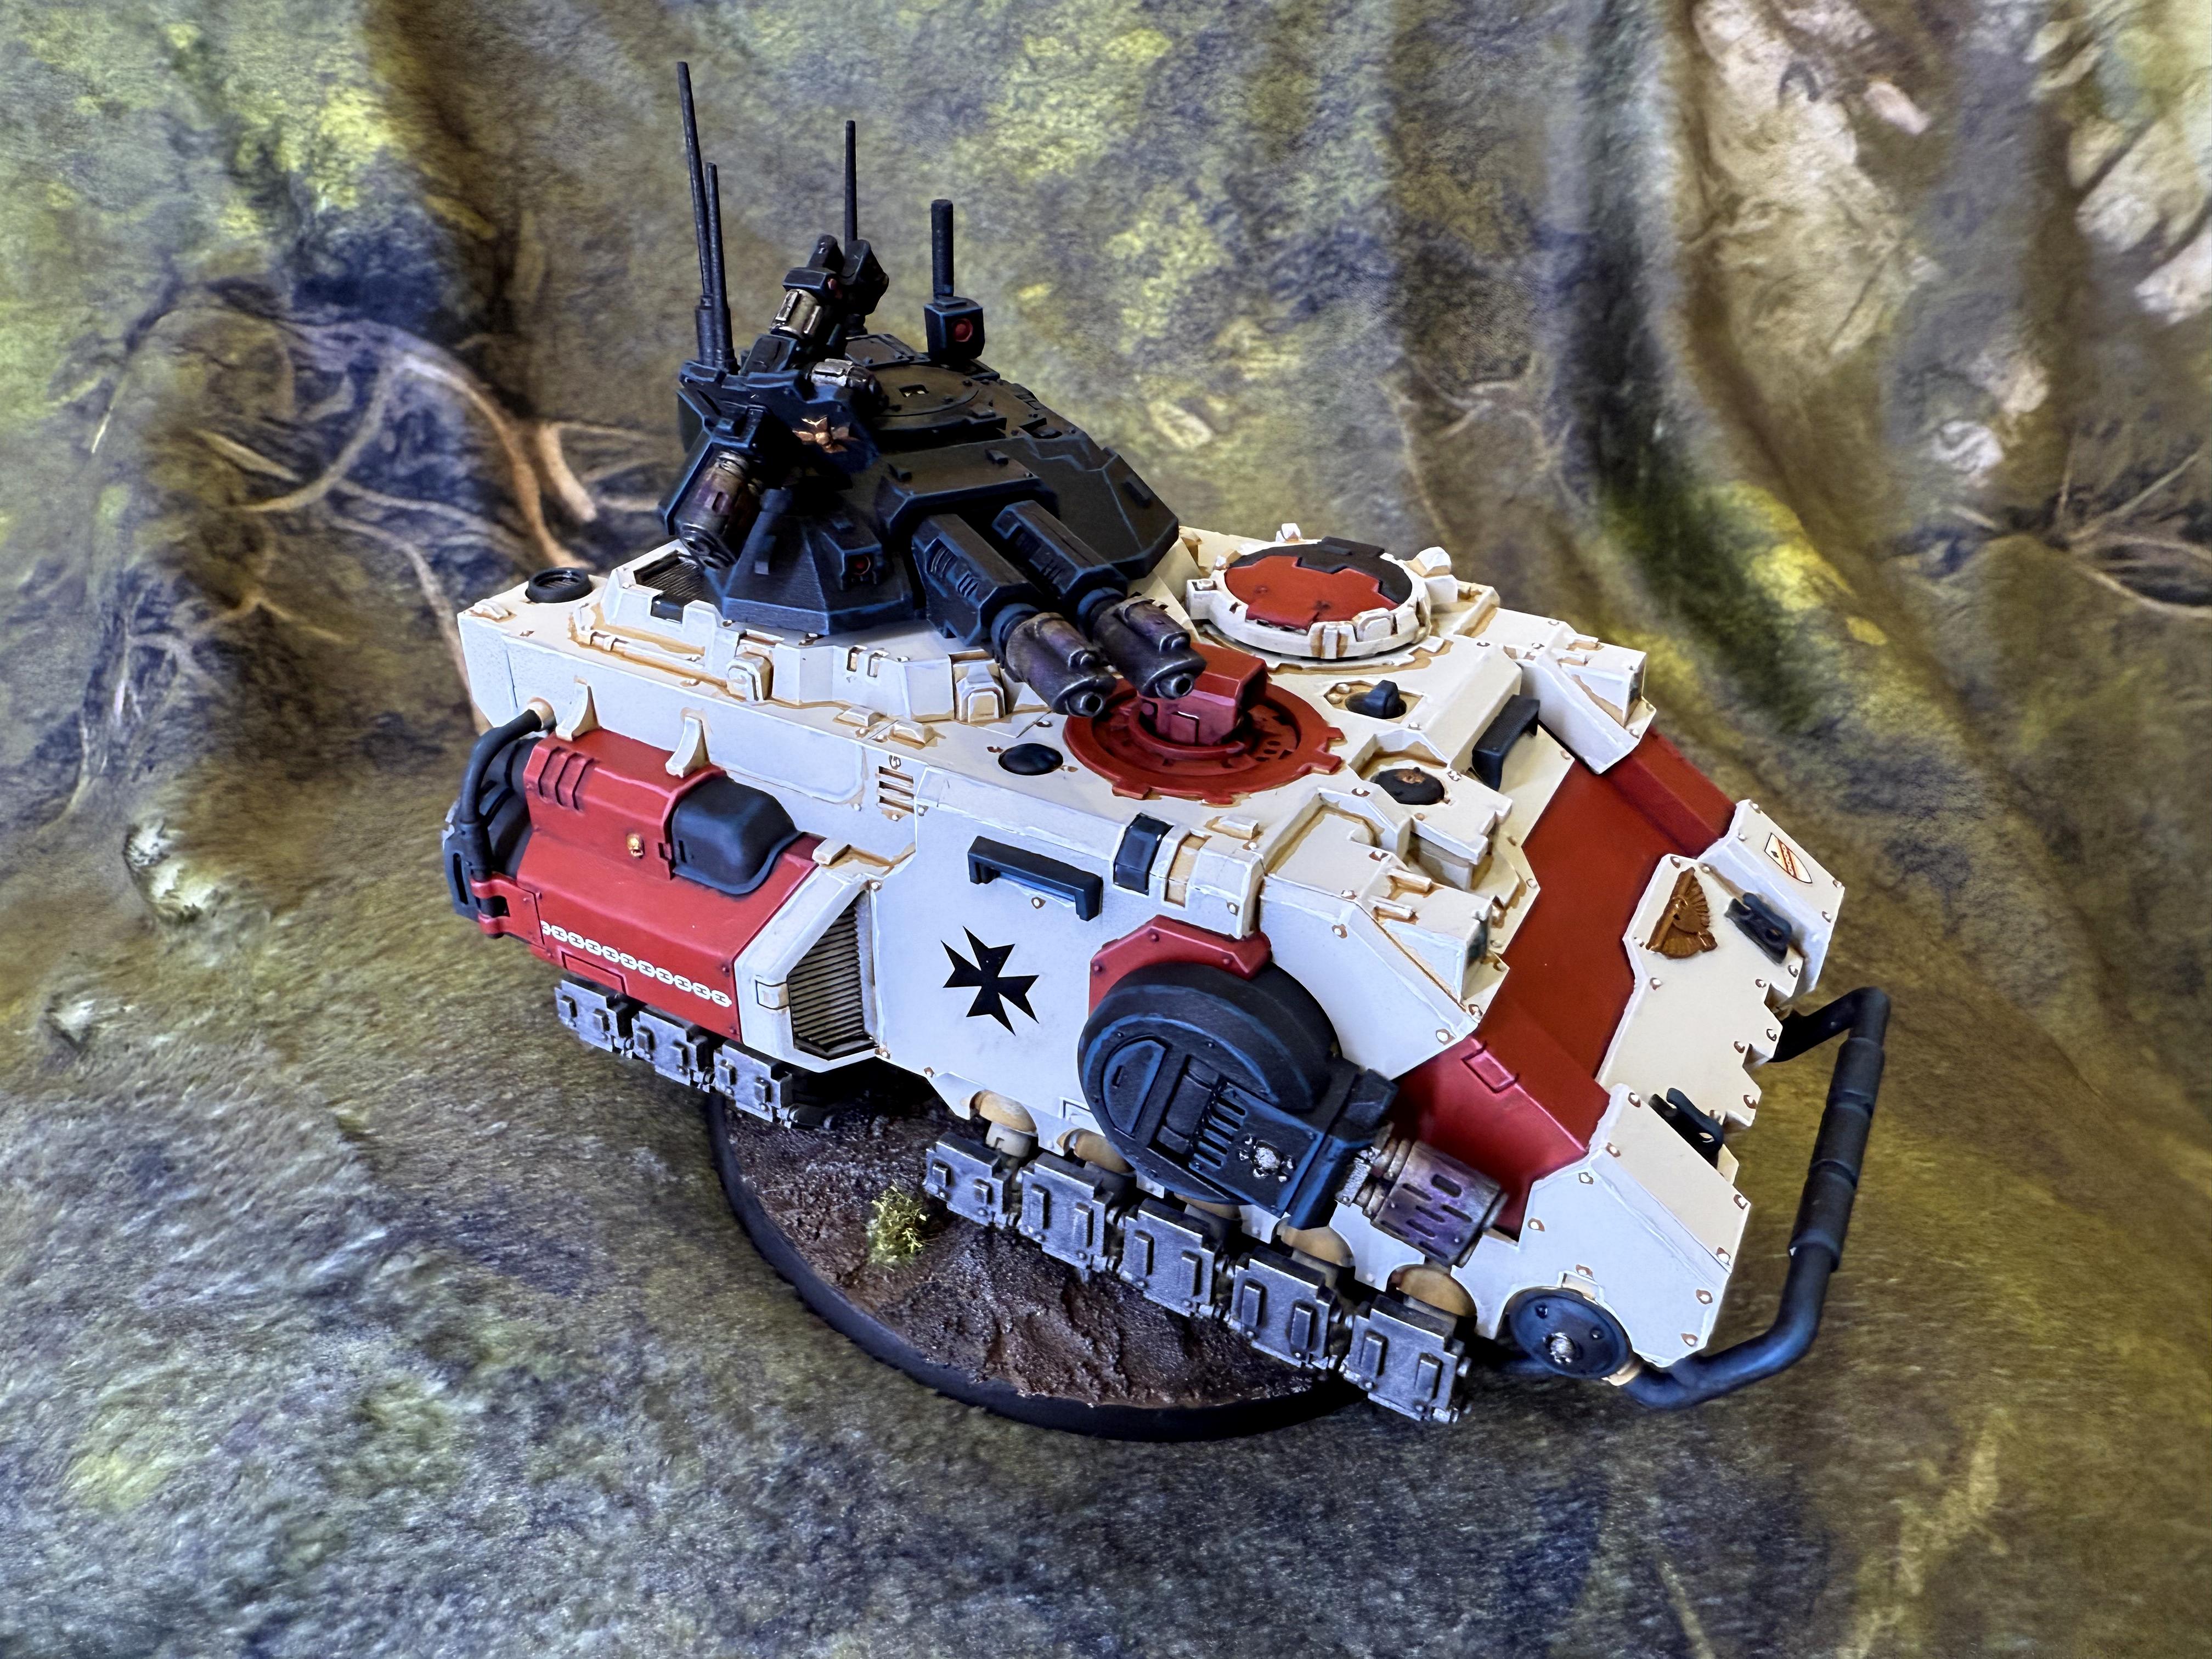
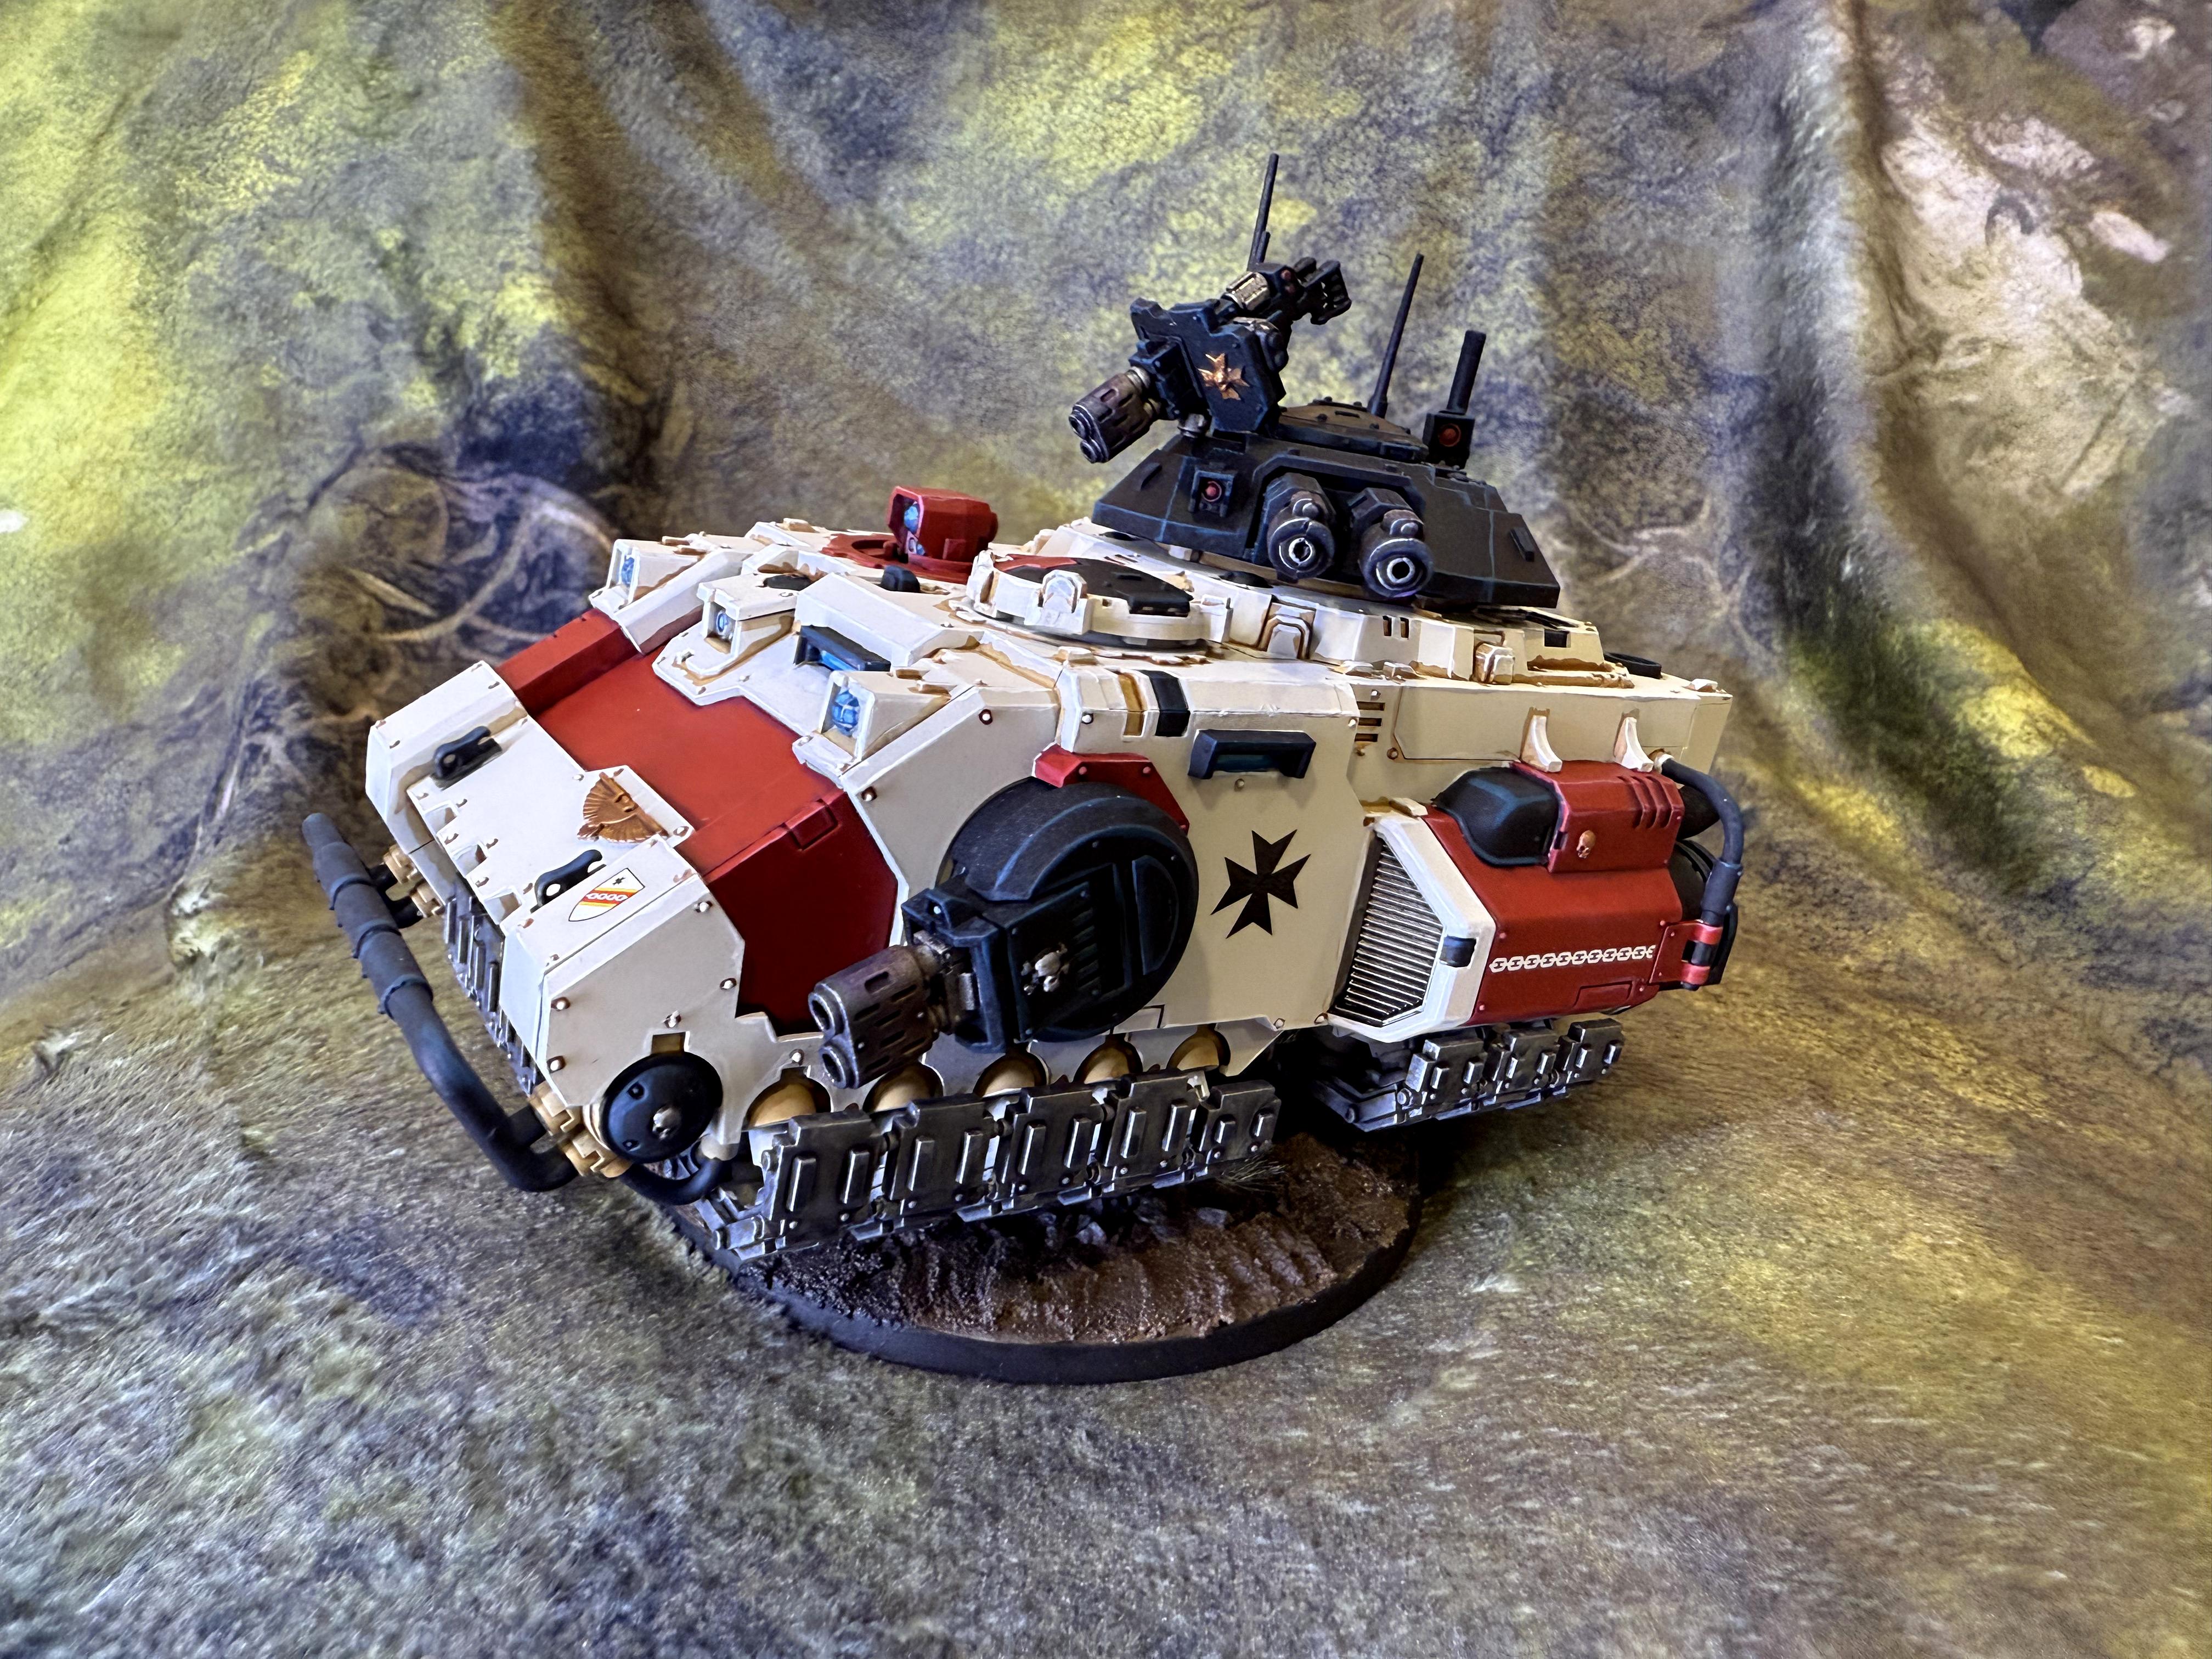
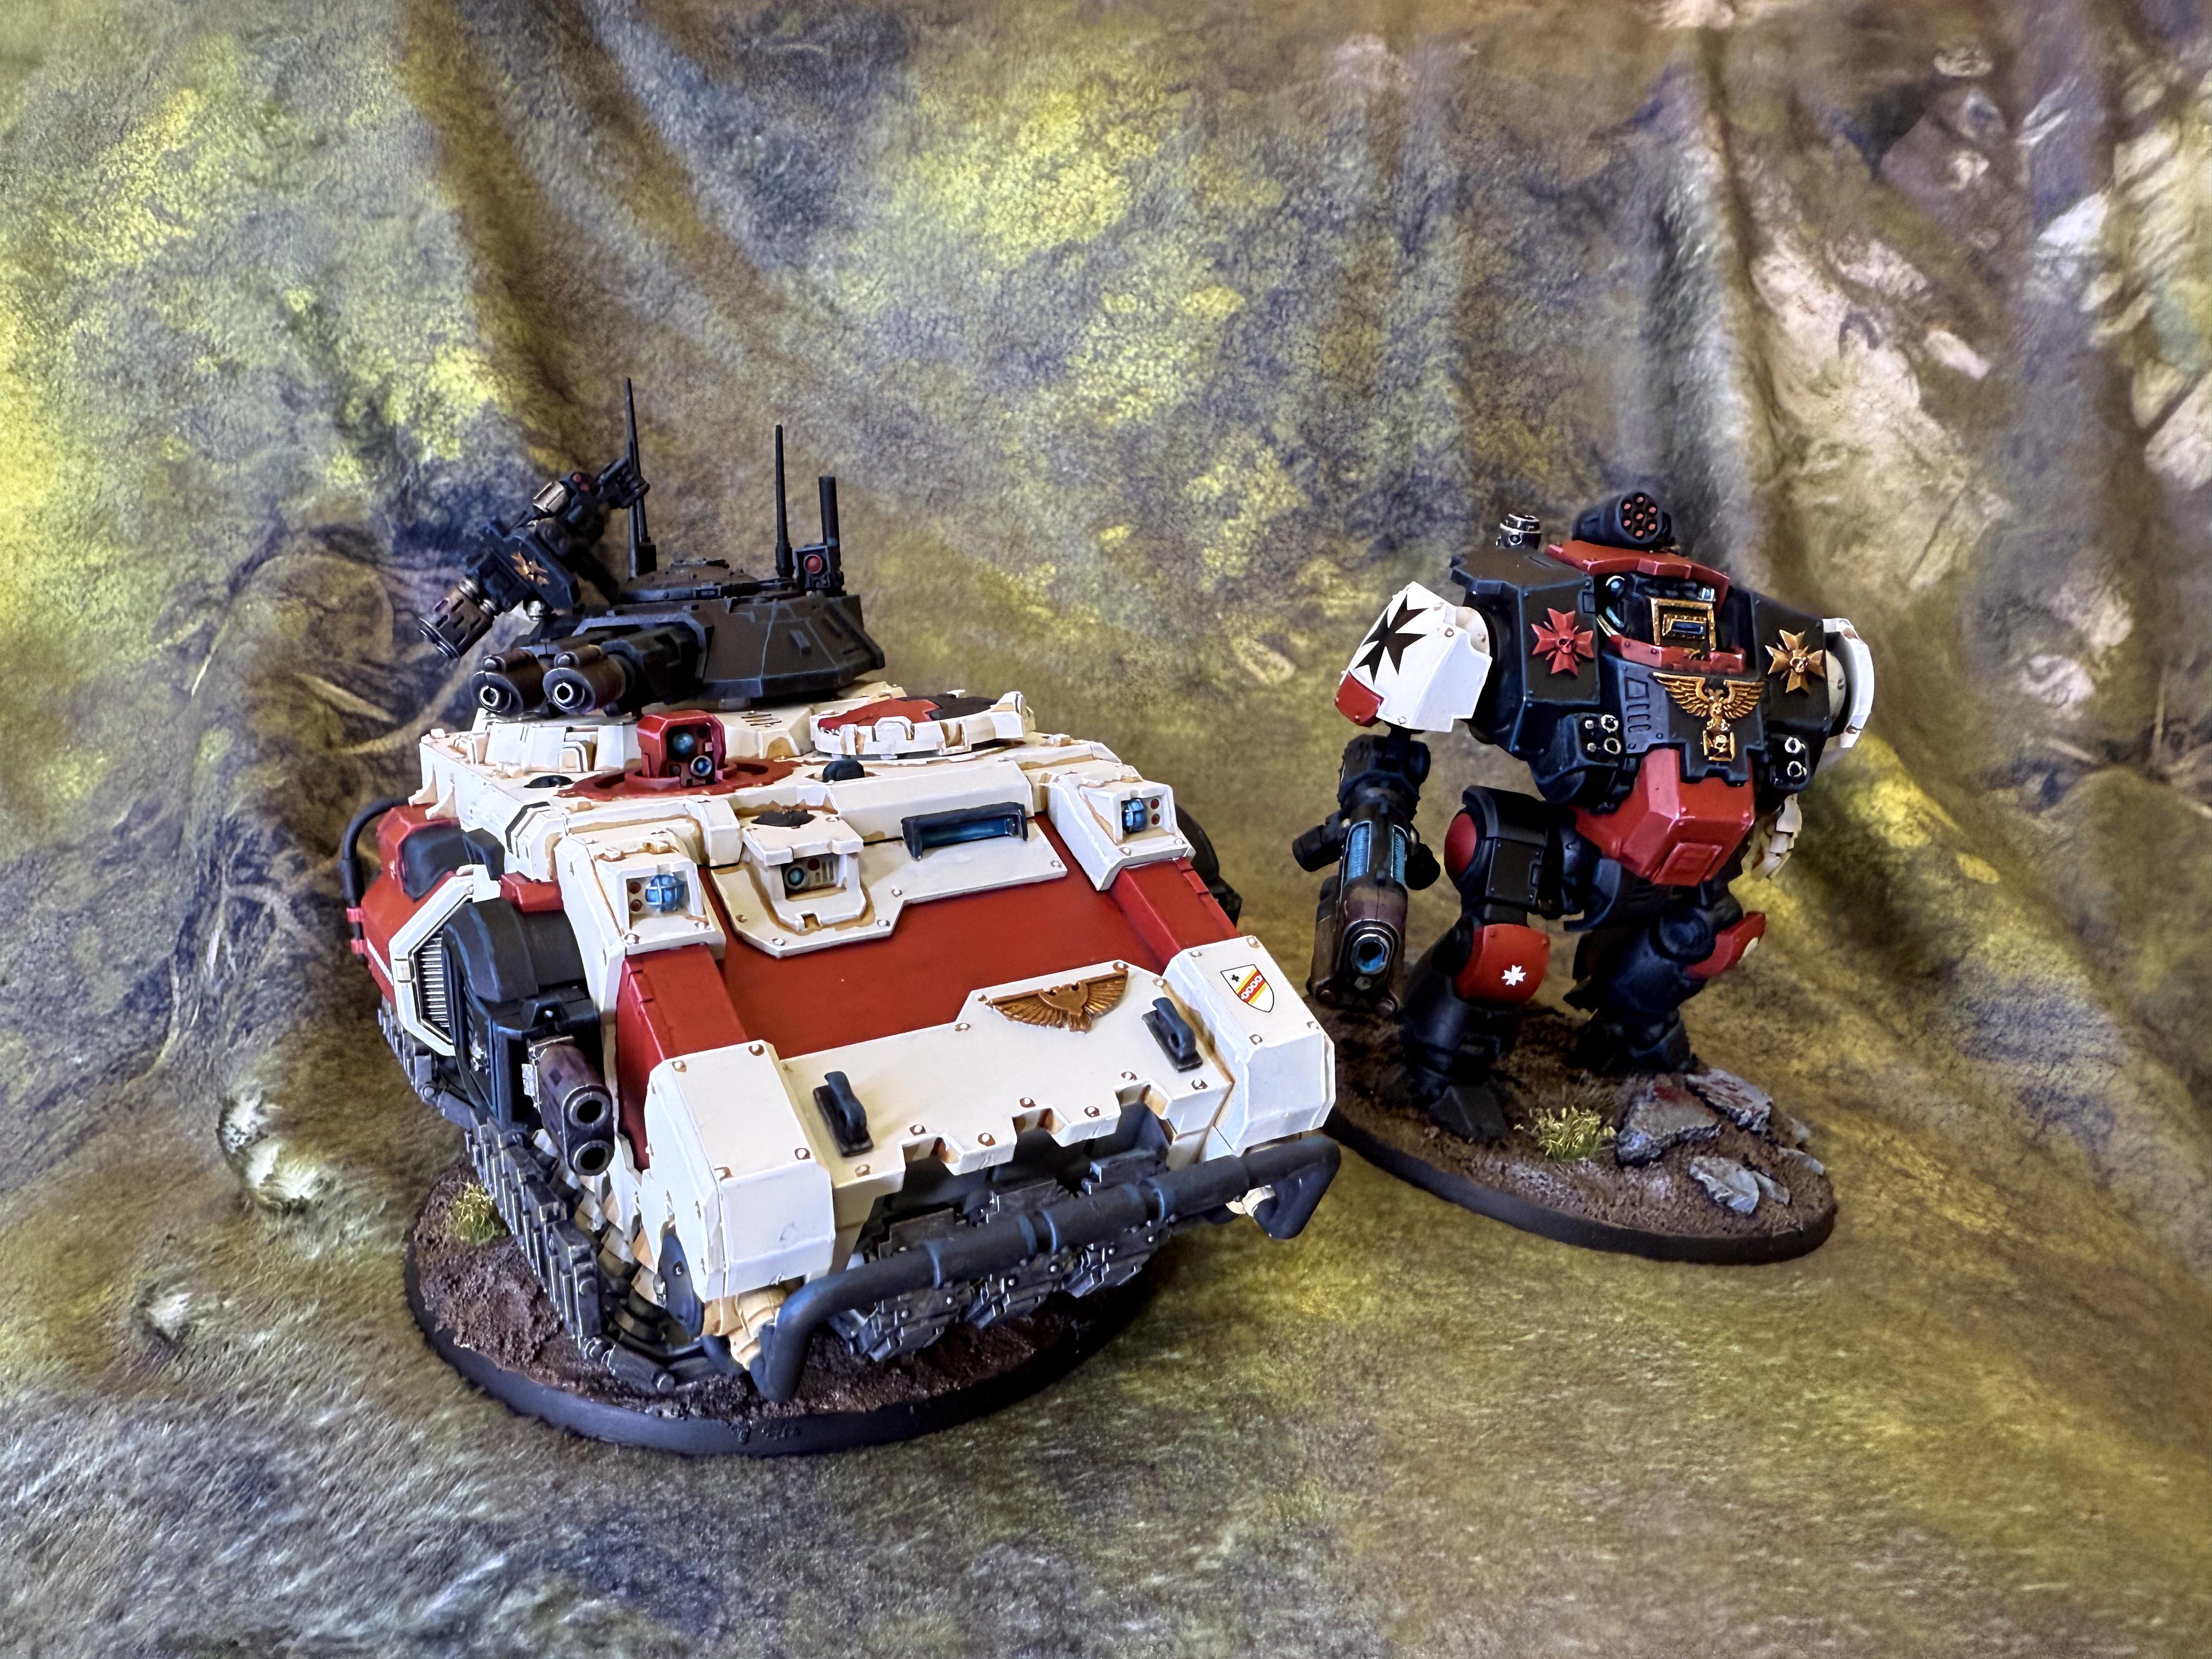
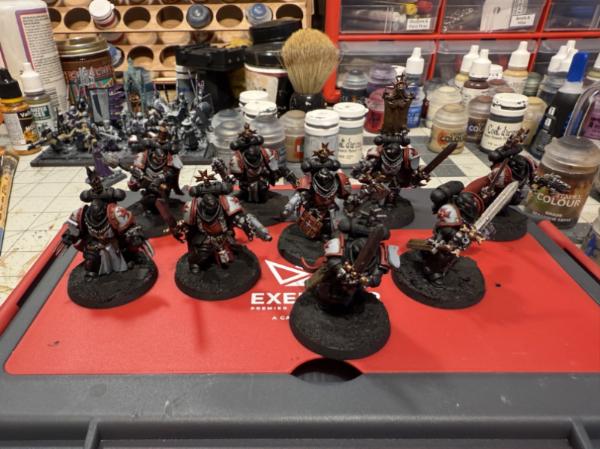
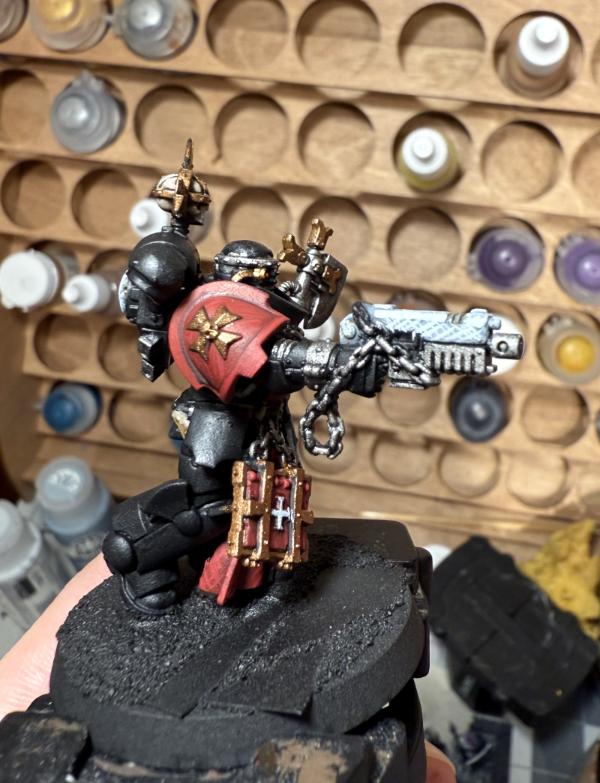
Finally, while I'm done with the Emperor's champion and the impulsor, I haven't uploaded those photos yet. Here's what I've got!
C&C always appreciated!
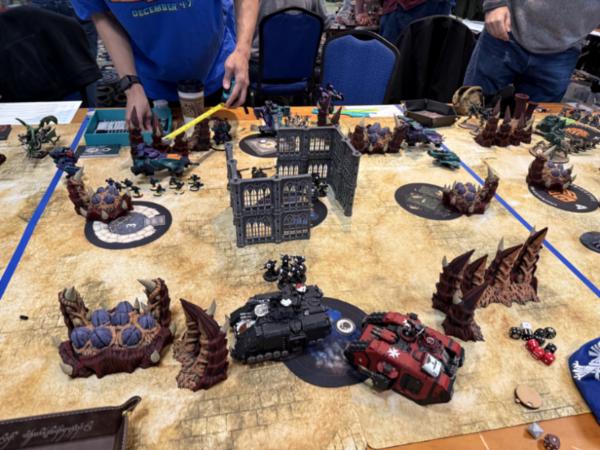
Just got back from Shorehammer the other day, a highlander tournament in Ocean City, MD. Had a blast, went 3-3 in all games over the weekend. Definitely had a better finish than start to the weekend, as my teammates and I got trounced in a (difficult and rules-wise slightly frustrating) narrative mission. Lost a practice game, then my first game of the highlander. I managed to rally with my 2nd and 3rd games and win a friendly match with essentially the same army that night. Did I take many photos? Not at all - I was way too busy having fun.
Shorehammer List - 1250 Point Highlander List - no repeats of units, minimum 2 troop units.
+ HQ +
Primaris Lieutenant - Warlord
Master of Arms, At the start of the fight phase, it can fight first. Add one to the Warlord’s Attack characteristic
Tannhauser's Bones (Relic) - All Wounds done to the bearer are done at D1.
Judicar w/ The Crusader’s Helm (Extra Relic, -1 CP) - Add 3 in. to the bearer’s aura abilities, in the command phase, you may select one friendly BT core unit within 9 inches and place them into the Assault Doctrine until the next command phase.
+ Heavy Support +
Eradicator Squad
Eradicator Sgt & 2x Eradicators: 3x Melta rifle, 3x Bolt pistol
+ Dedicated Transport +
Impulsor
Assault Vehicle - May disembark after normal move - Capacity: 6 Primaris Models
1 x Belilicastus Missile Array, 2 x Fragstorm Grenade Launcher, 1 x Multi-Melta
++ Total: [ 1,250pts] ++
Overall, lost to super fast armies - Ork Buggy & Vehicle army, and a highly mobile Space Wolf army that got off a turn one charge. Managed to beat a salamander army nearly the same as my own, then beat a mostly infantry ork list. That last game was full of several brutally painful moments for my opponent, as I blocked one of his 'da jumps' and then he perils on the next one. He lost an entire squad of the rocket boys on overwatch to flamer aggressors (ten men!) Finally, he managed to charge my bladeguard in a last ditch attempt to claim Engage on All fronts in the last turn, only for the Judicar to force him to fight last, then the bladeguard cutting him to shreds.
Had fun, can't recommend it enough. While there are definitely some things the entire tournament could do to improve next year (mainly around delegating jobs, having more TOs and perhaps improving the terrain, I know that there have been some recent challenges in that regard. Throw in COVID and you get a perfect storm type situation. Here's hoping next year will be better. As my goal is always to win at least one game in the tournament, I'm happy I've now managed to get to two! I think next year I'll aim for winning two games in the tournament and being at a net positive for the weekend!
Lessons Learned: Combat squading the assault intercessors proved to be the winning formula as I could do Retrieve Octarius Data on one side while moving up on the other side, and them switching. It also forced my opponent to split fire and made them a bit more versatile. Considering I didn't do this in the first game and lost a ten man squad to a thunderwolf cavalry cross board charge, it seems like the best switch to make.
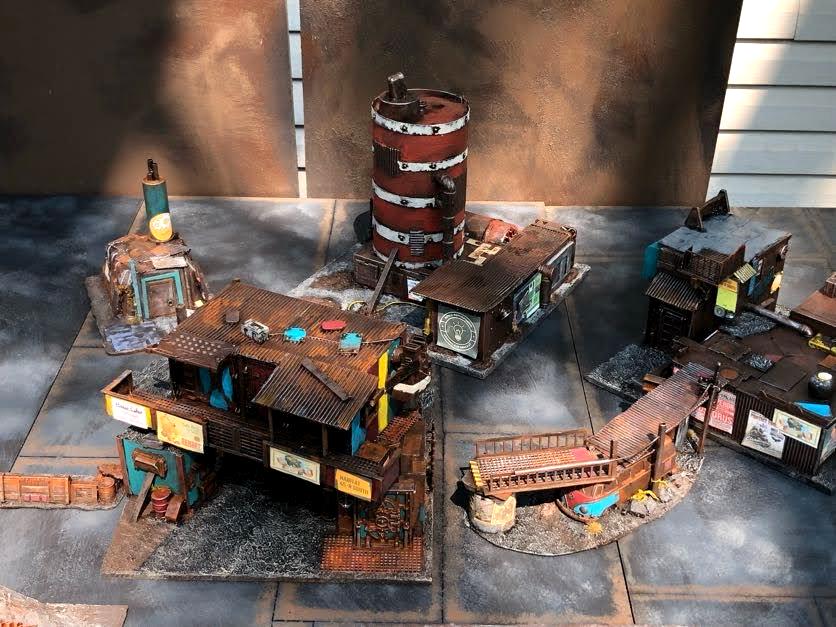
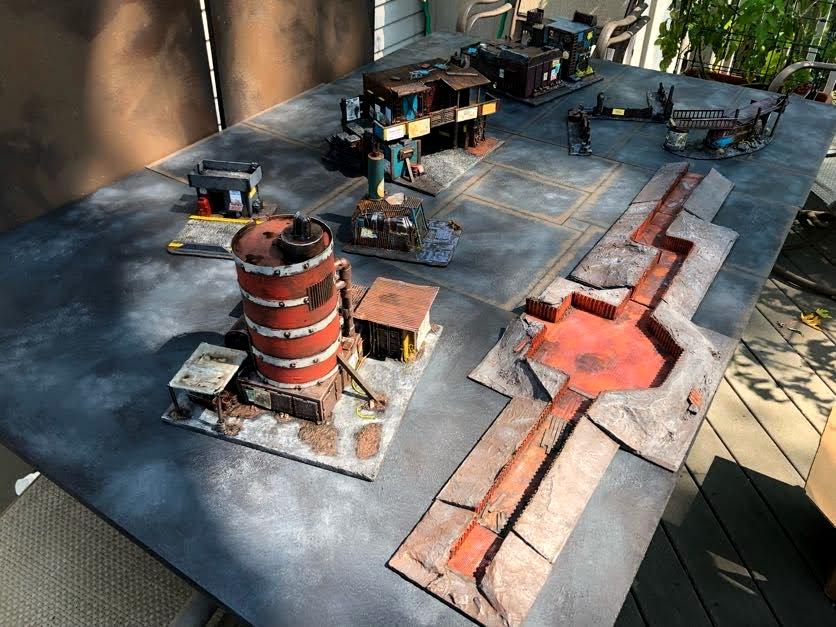
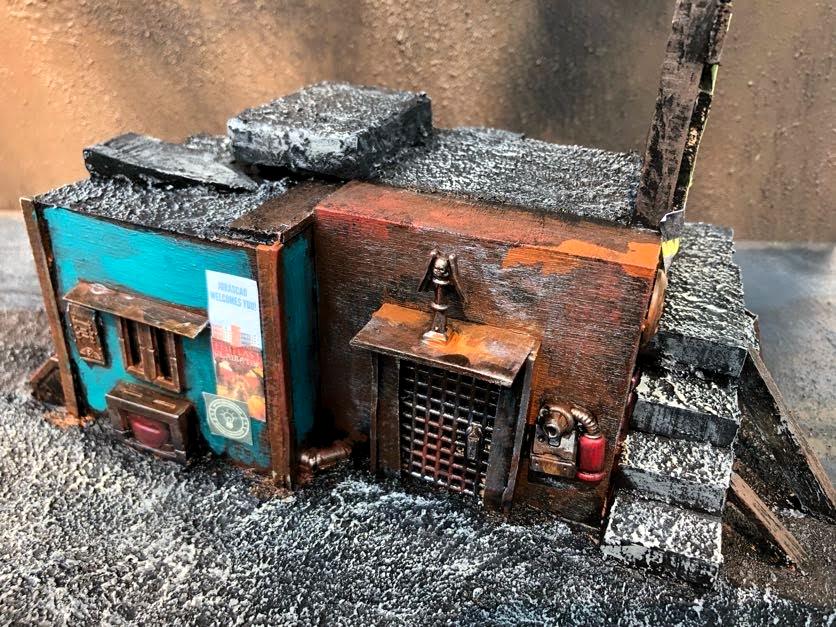
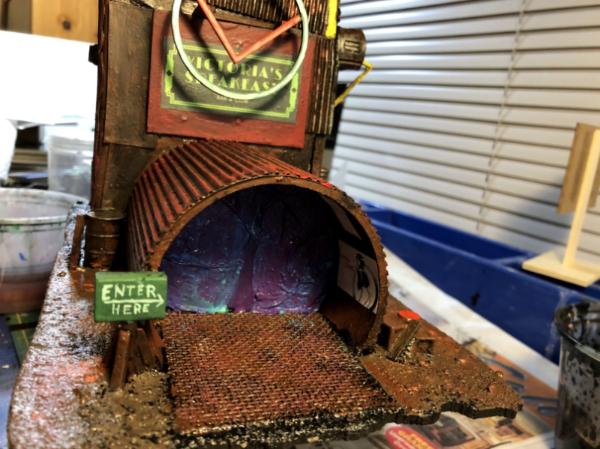
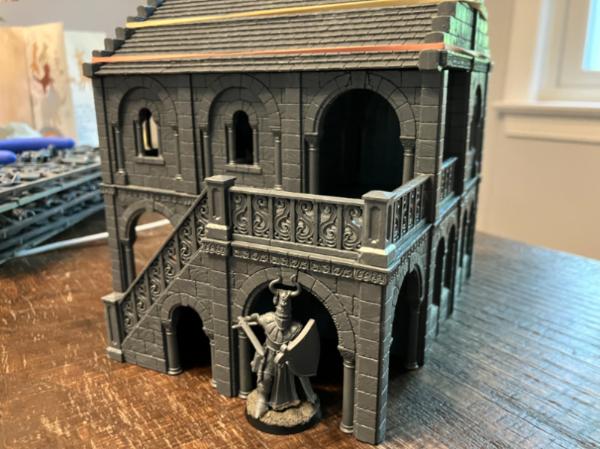
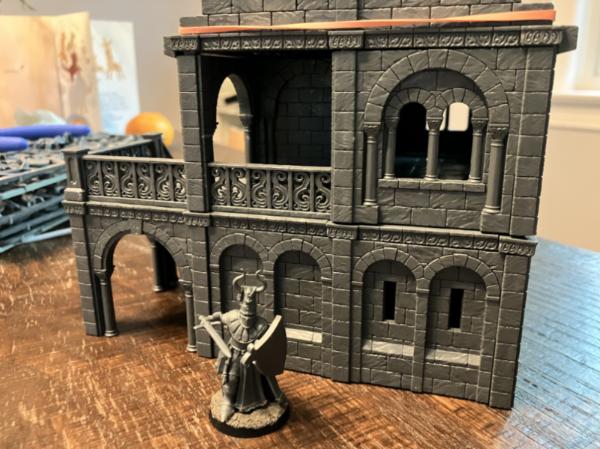
Finished up a commission the week before Christmas and finally got around to putting up the photos here.
Idea was a smaller building footprint, but providing for another element of 'life' to the community of 'Jurascao' as I've created earlier. The neighborhood was missing a local late night (or perhaps, early morning) watering hole, thus Victoria's Speakeasy was built. I followed much of Black Magic Craft's paint process for the base undercoat (Modgepodge + black paint, then a brown paint and drybrush with some silver/metallic colors), but in keeping with the town's color theme I went to town on colors and even tried to make a neon sign.
I'll post another building in this commission tomorrow, then post a lovely heretical construction I've been building!
I actually made many of them. Some I located online (especially those from the Cyberpunk video game), others were captured from GW's websites, but I made most of the more recent ones using Canva, which is a great little tool that lets you make posters, fliers, etc. I've collated a variety into a giant google shared drive. Send me a PM if you're interested so I can share that with you.
How do you print out the posters? Is it just printed on paper, cut up, and then stuck on with PVA glue, possibly with another coating of PVA or a varnish over top?
Gwyn chan 'r Gwyll wrote: How do you print out the posters? Is it just printed on paper, cut up, and then stuck on with PVA glue, possibly with another coating of PVA or a varnish over top?
Actually yes, I just print them out with a standard inkjet printer. I think people often get better results with laser printers, but I don't own one so it's not an issue. I actually use modge podge, put a little bit behind it, then carefully put it on. It works better when you can then matte varnish it at the end (which makes sense, in order to seal whatever it is you want). You can use PVA, but I find modge podge is a bit thicker and less watery, and thus doesn't blur the ink as much.
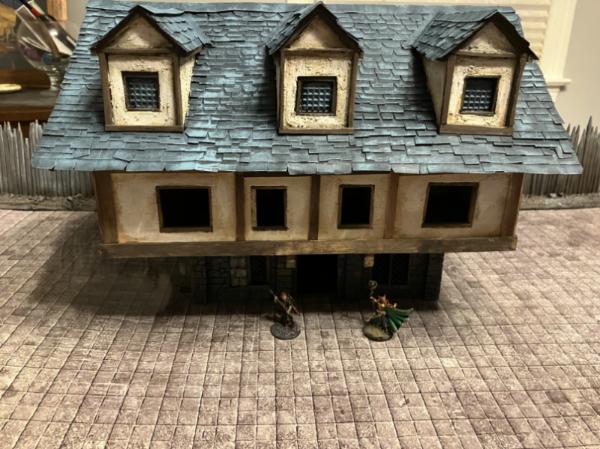
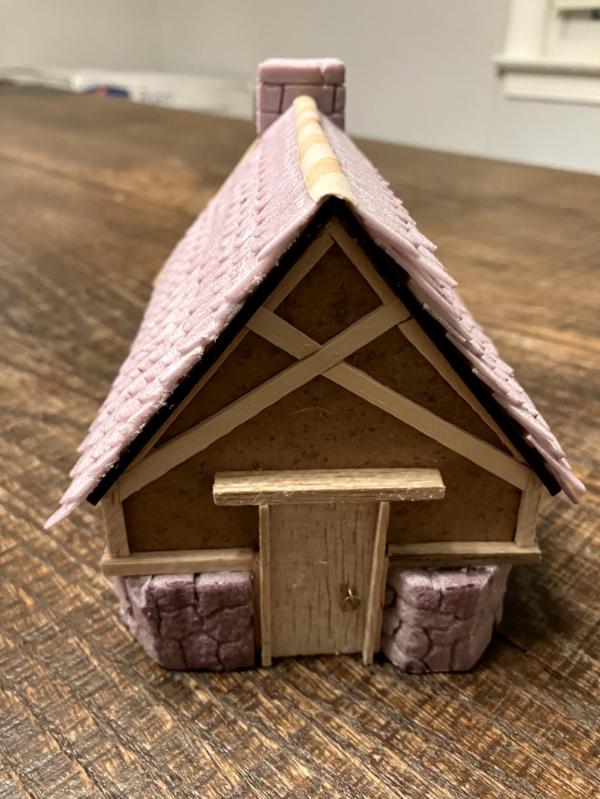
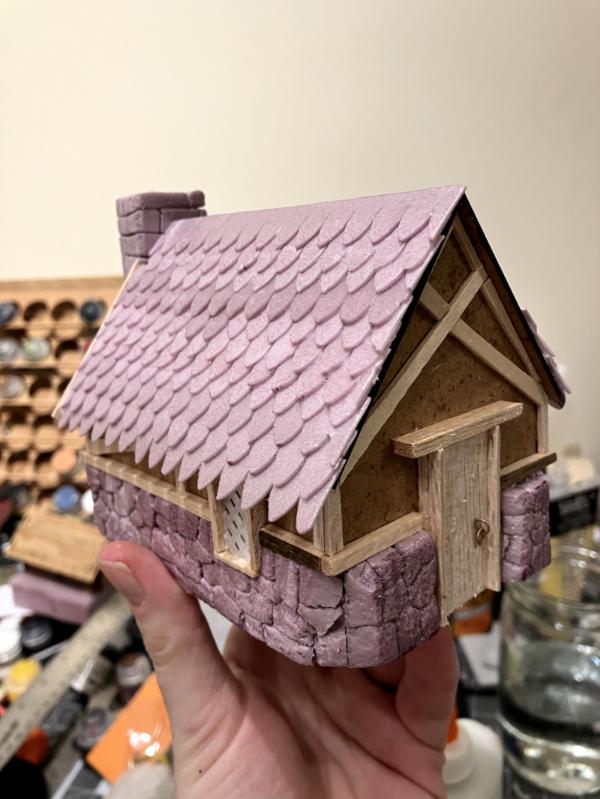
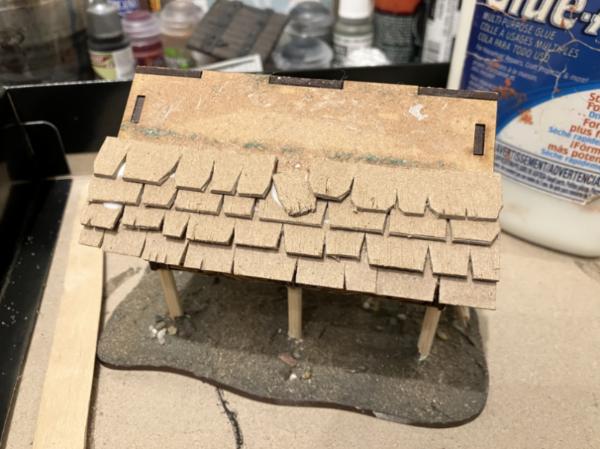
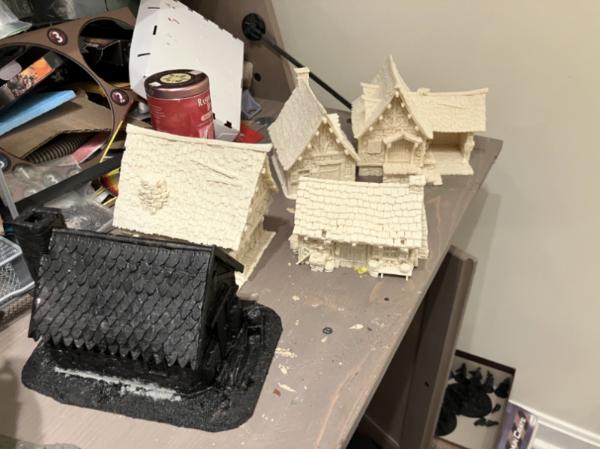
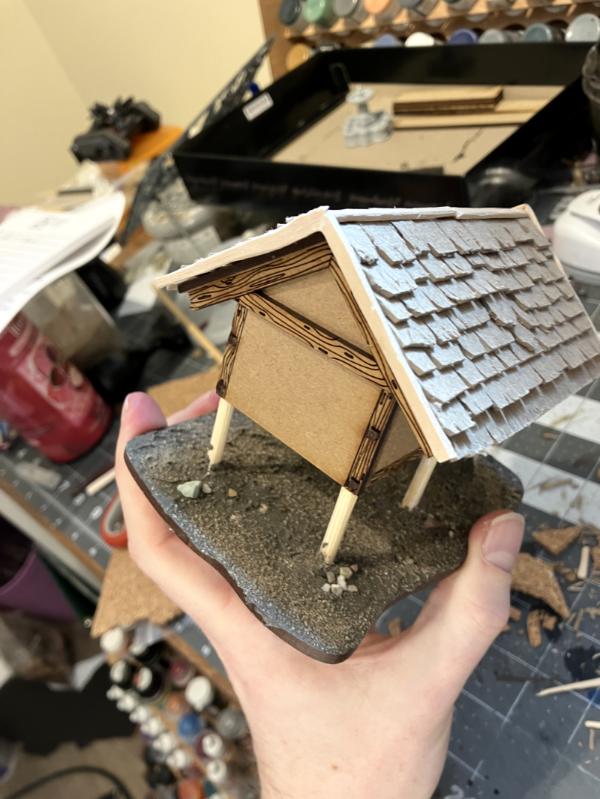
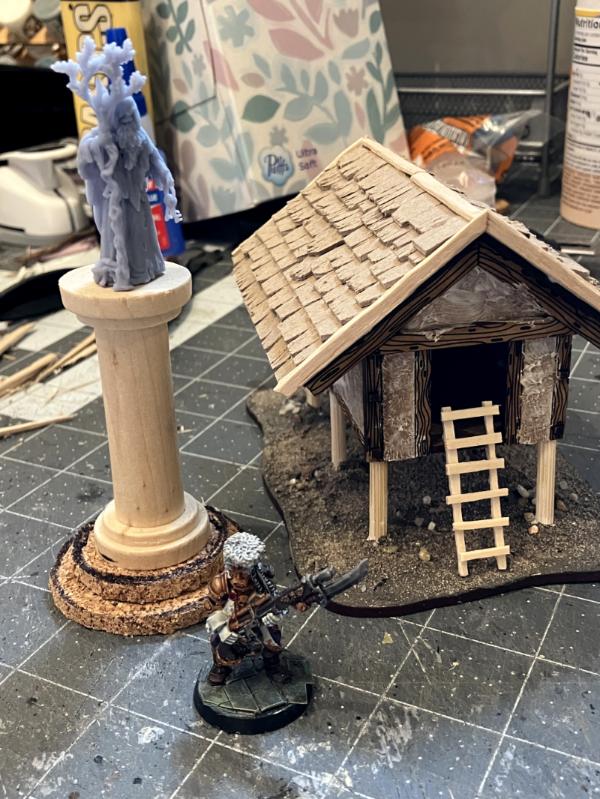
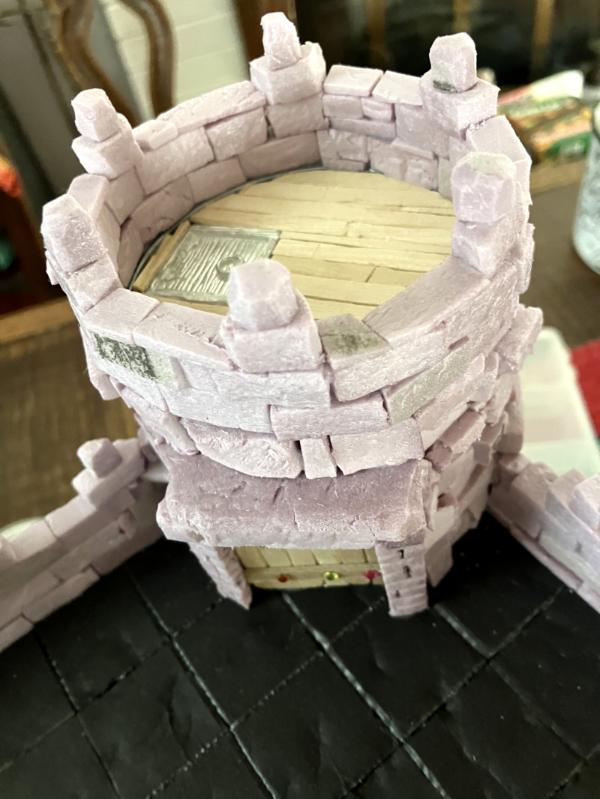
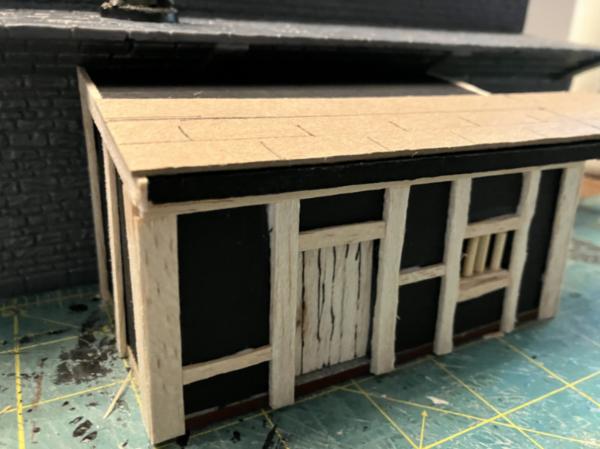
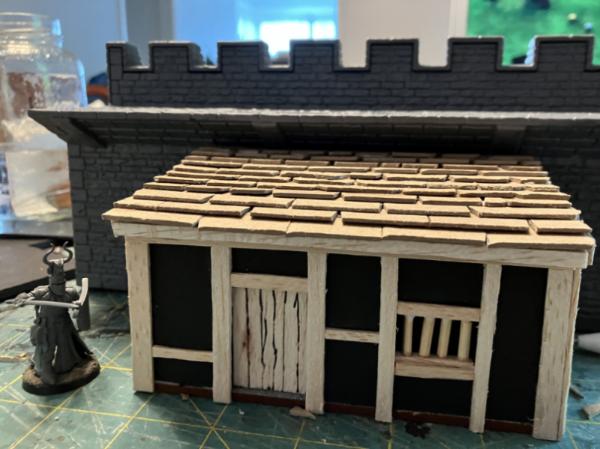
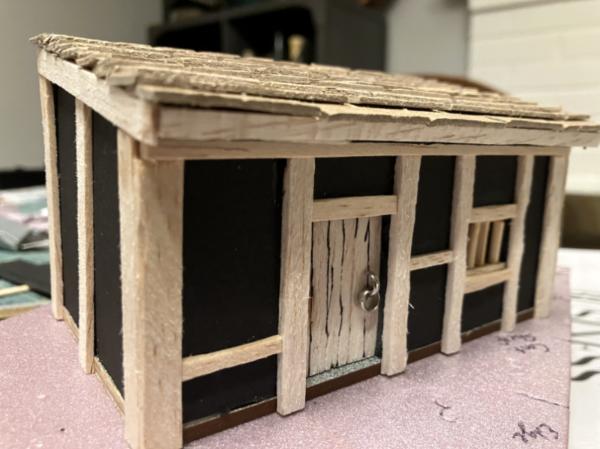
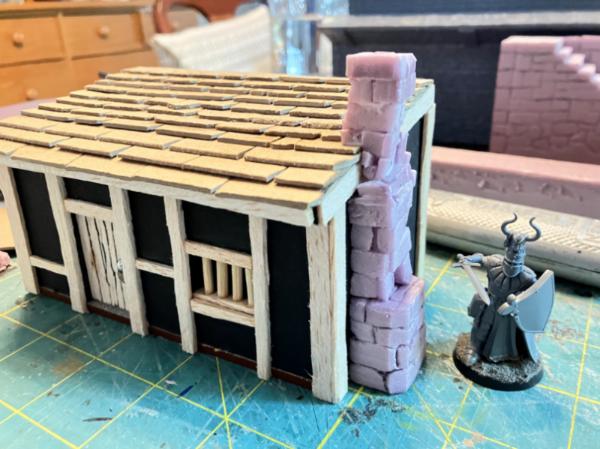
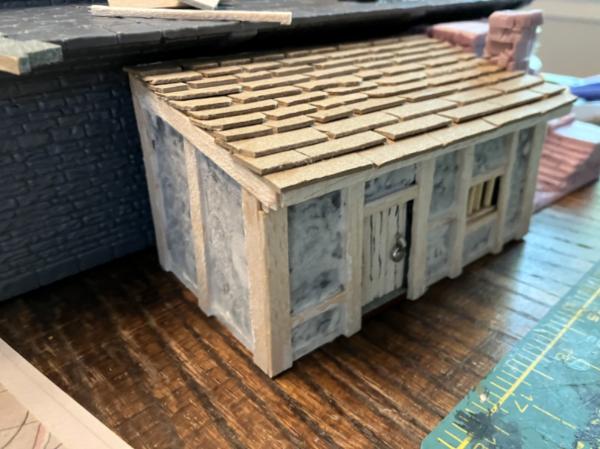
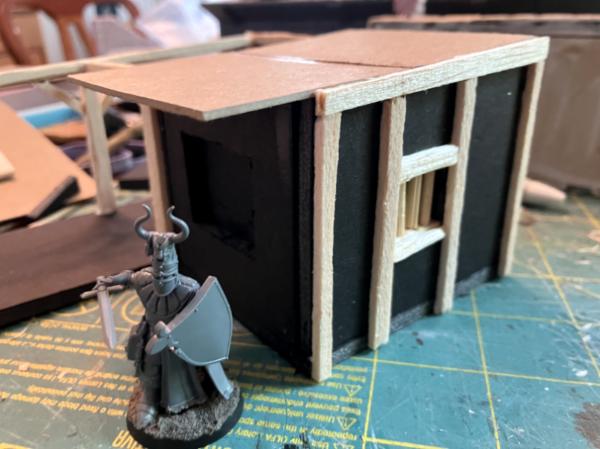
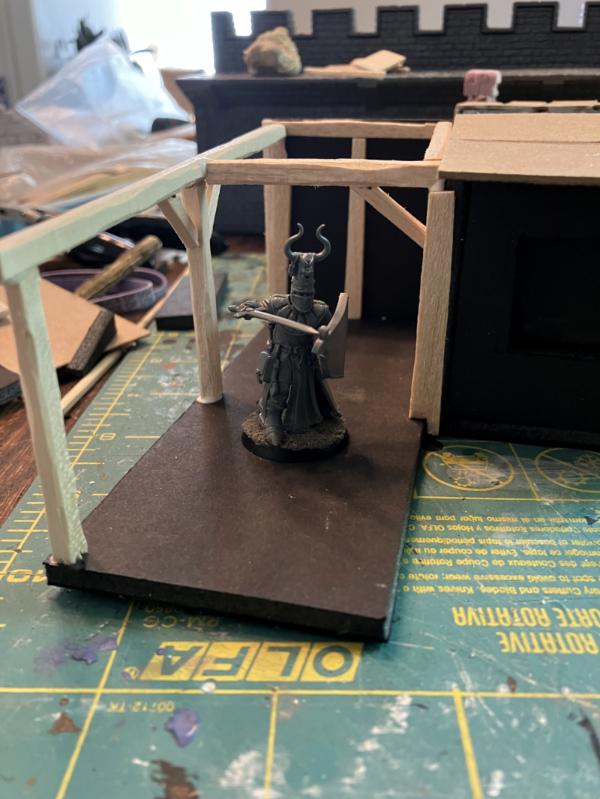
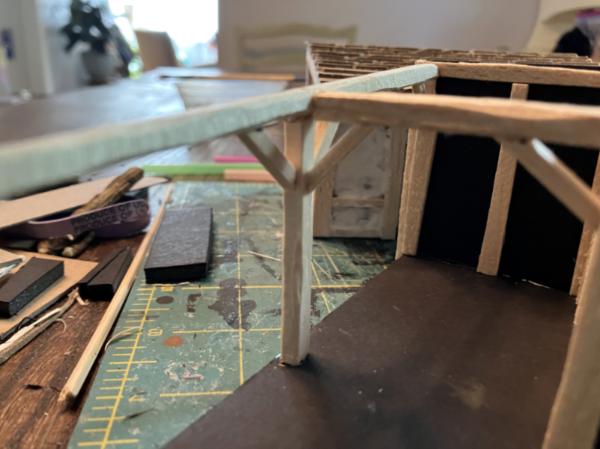
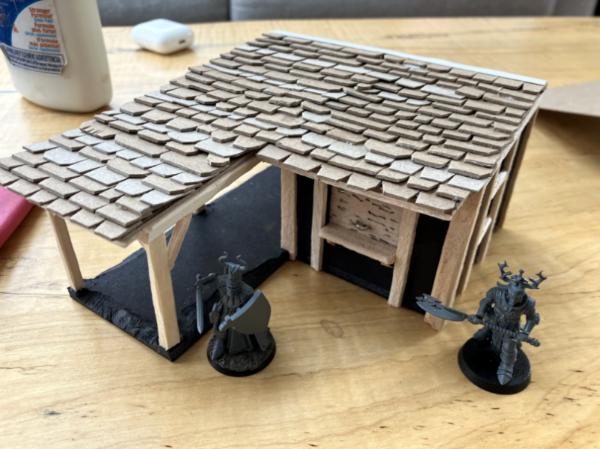
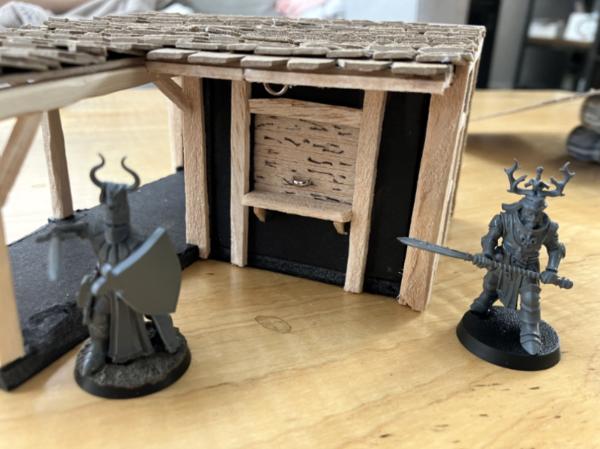
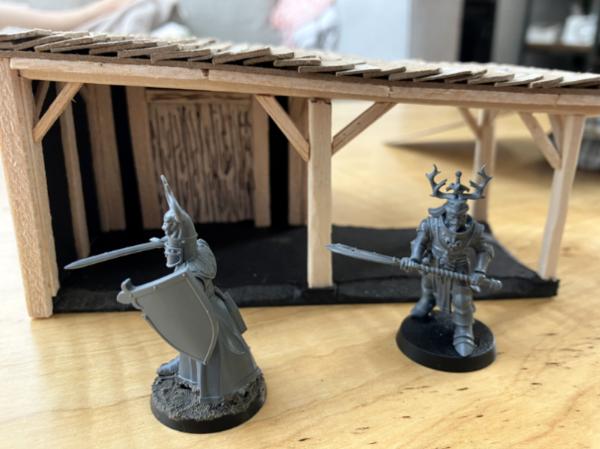
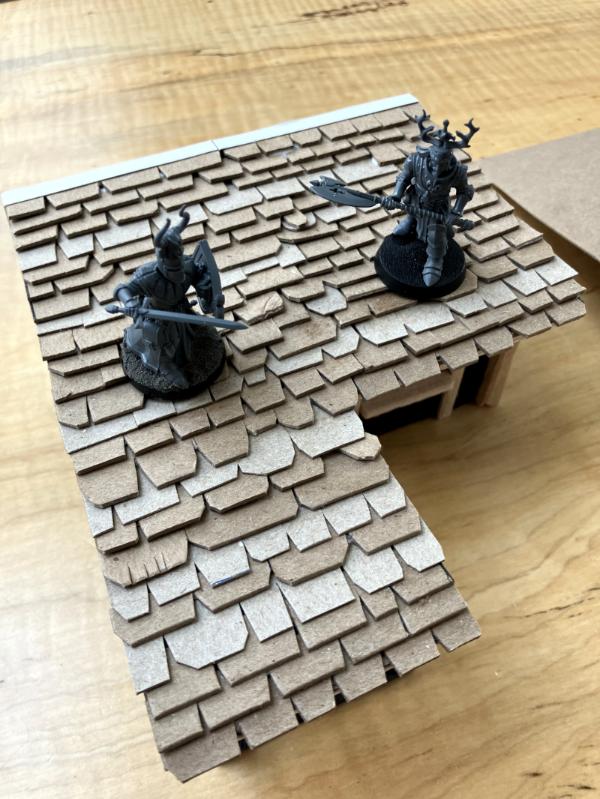
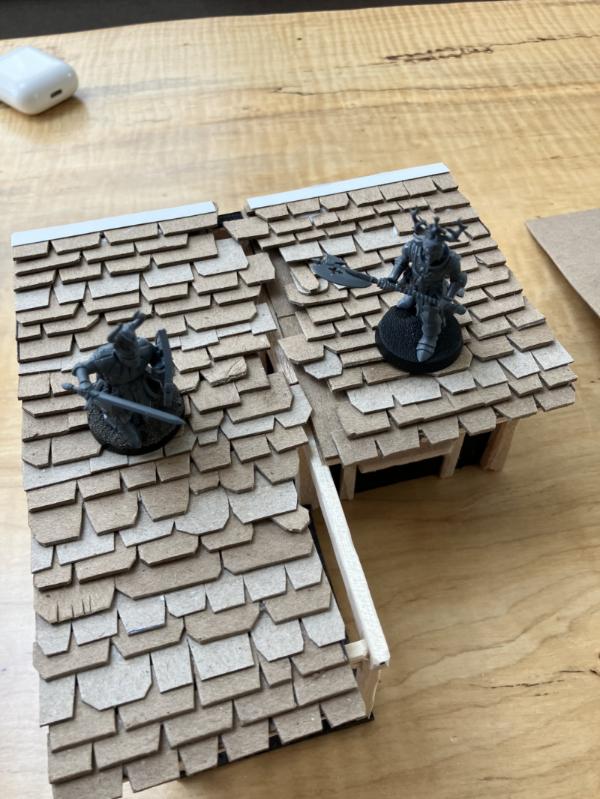
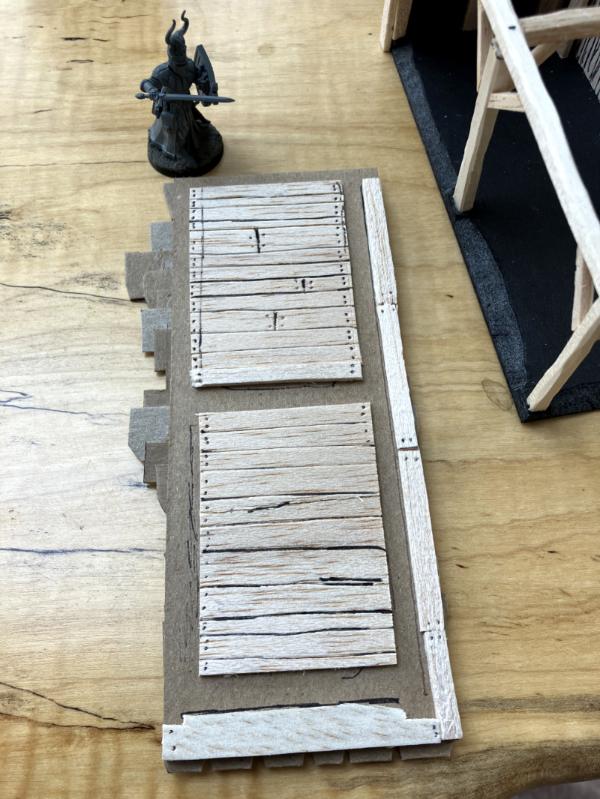
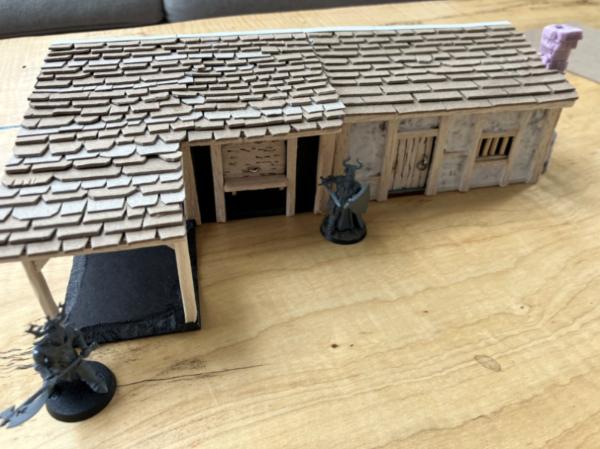
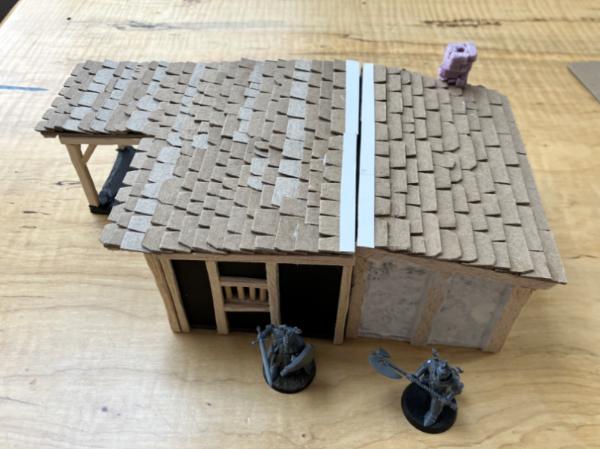
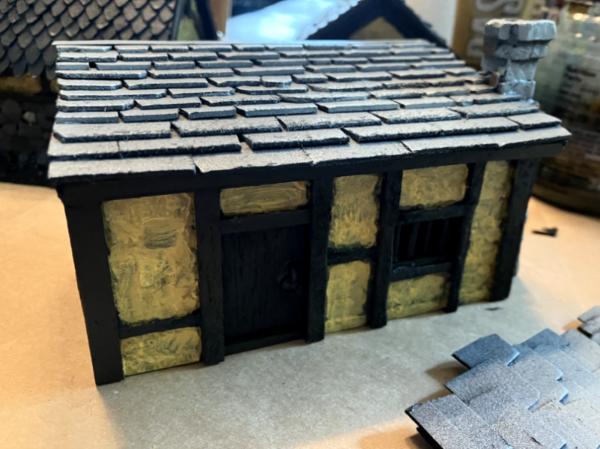
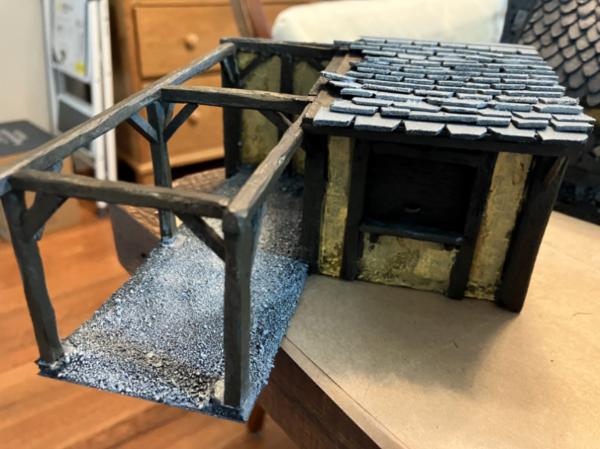
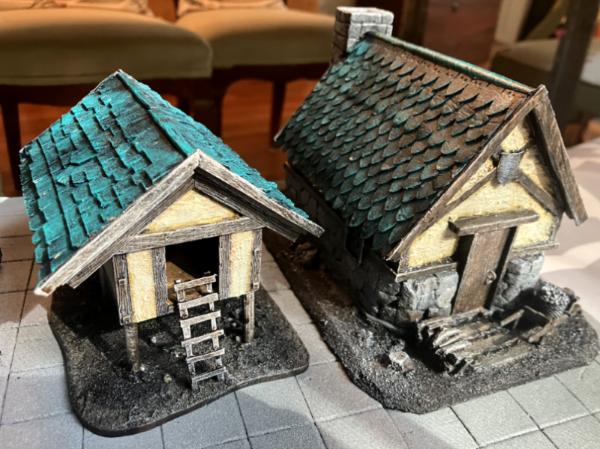
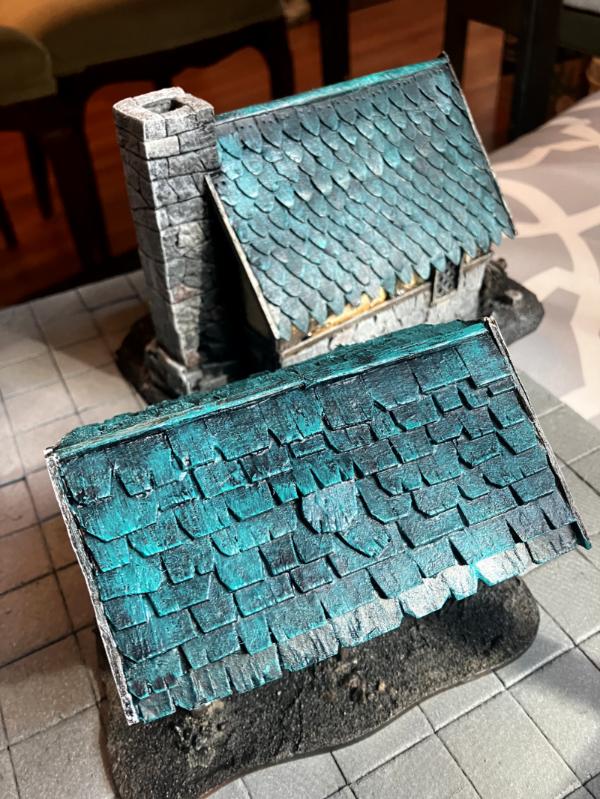
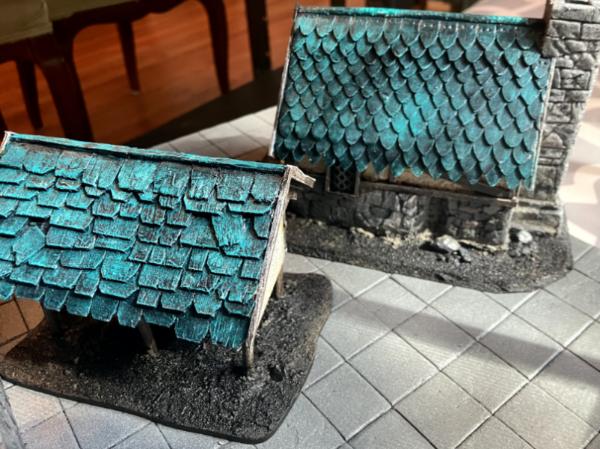
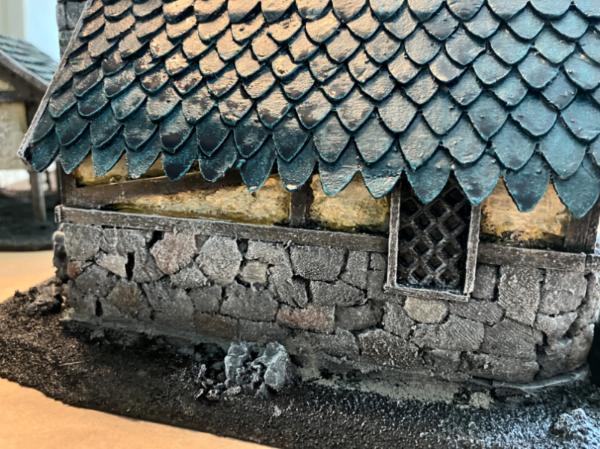
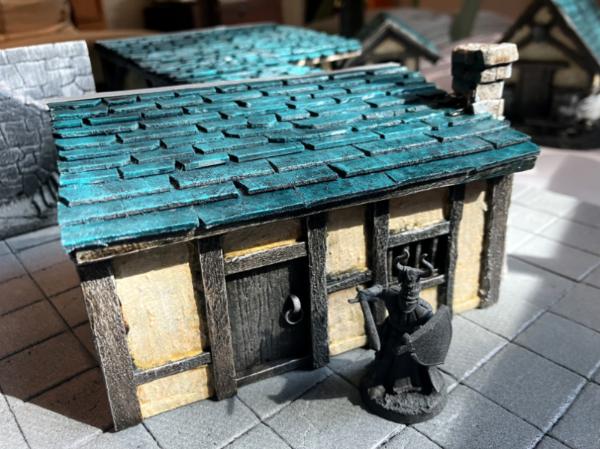
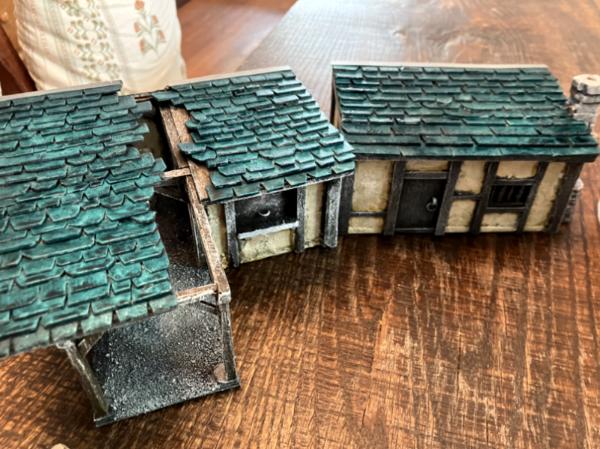
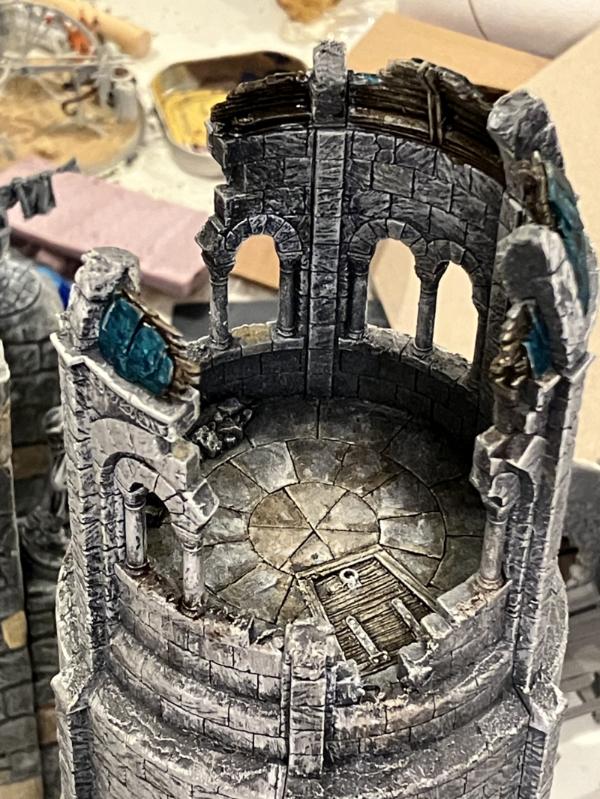
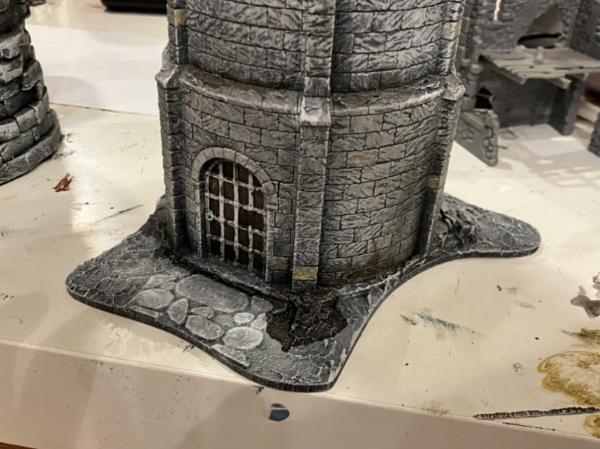
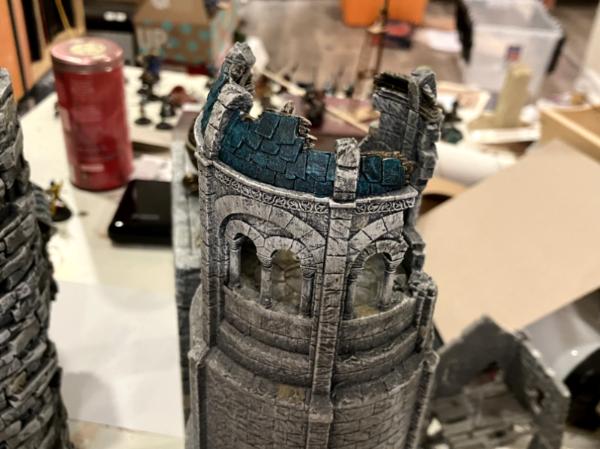
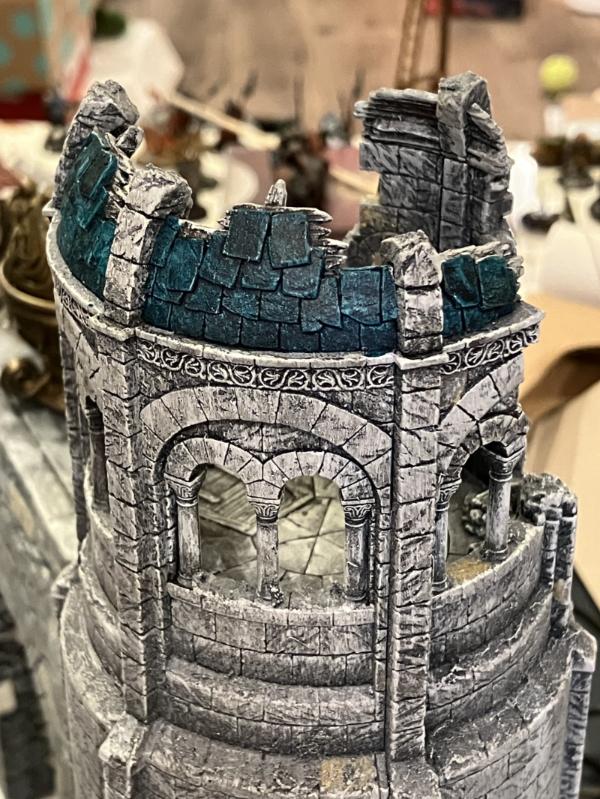
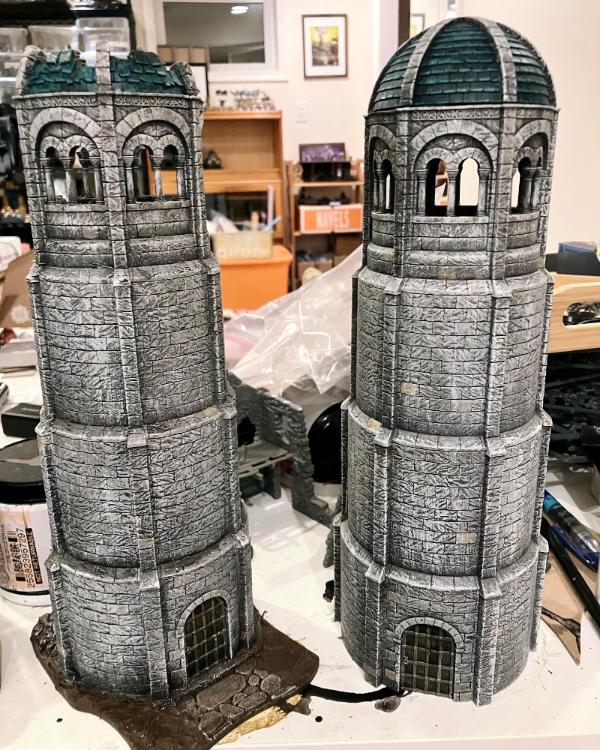
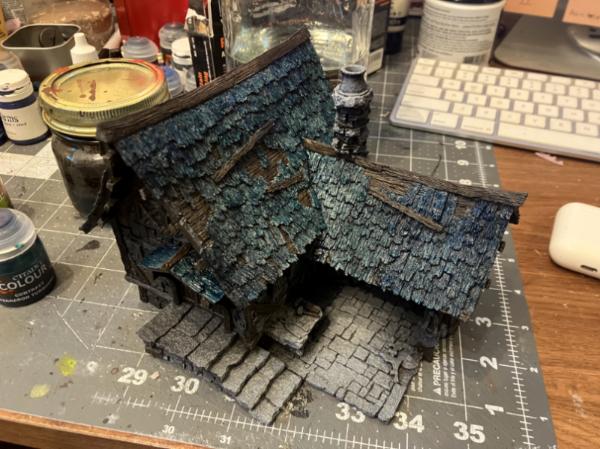
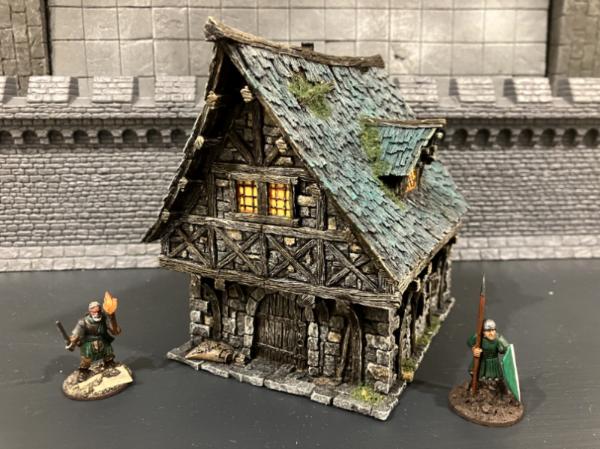
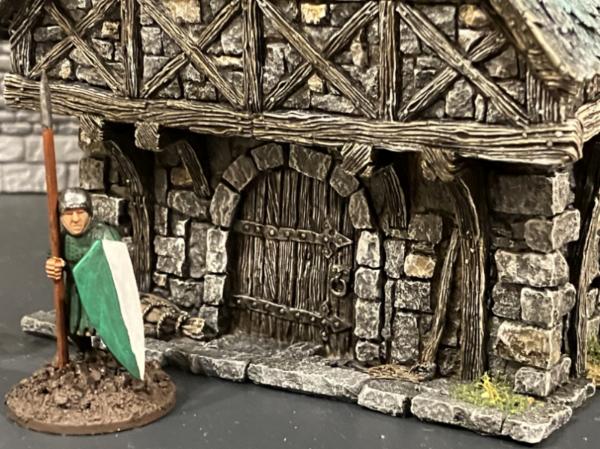
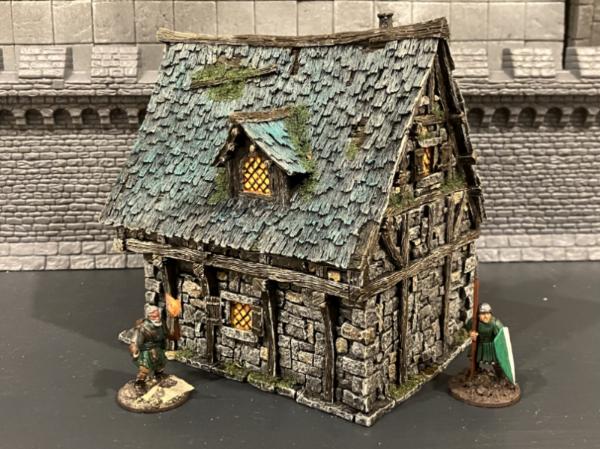
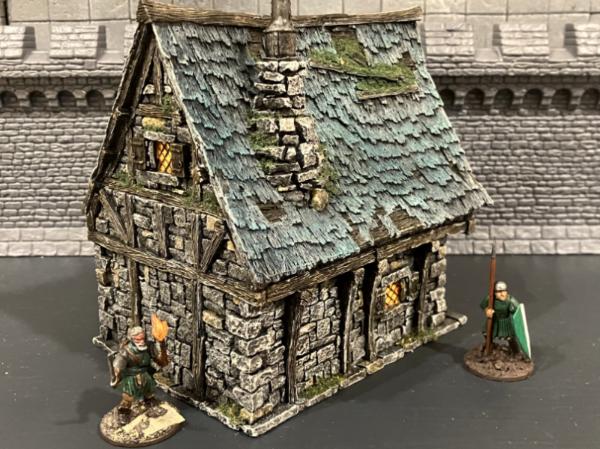
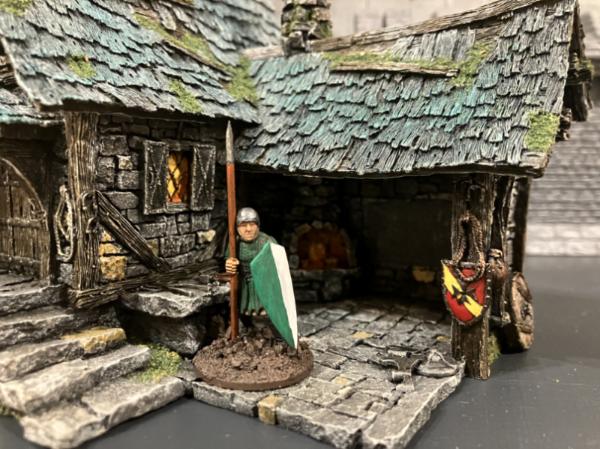
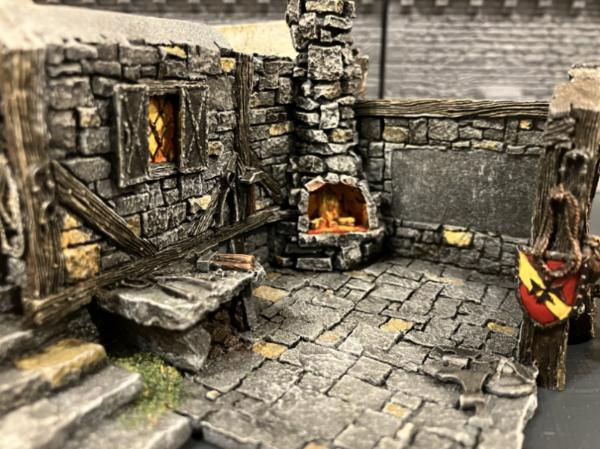
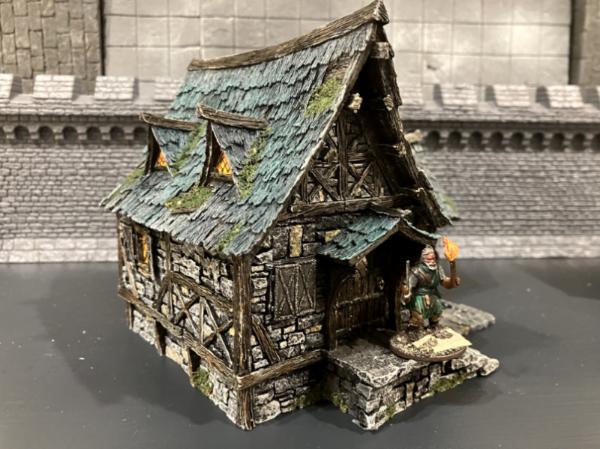
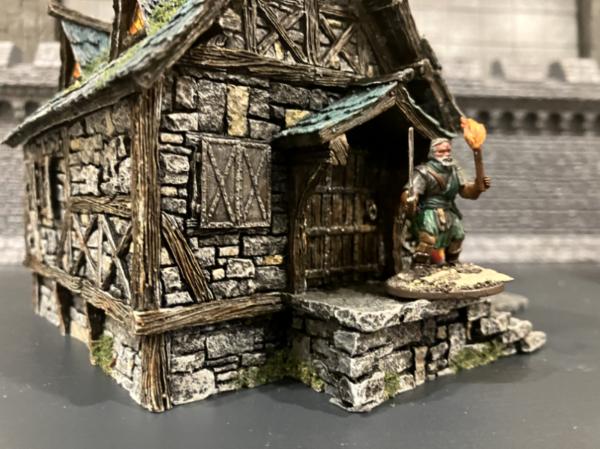
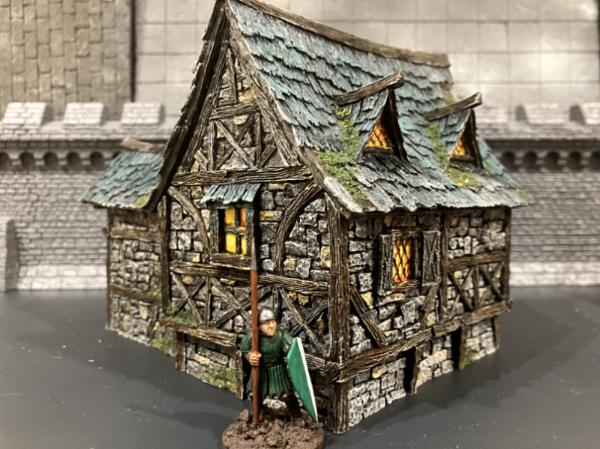
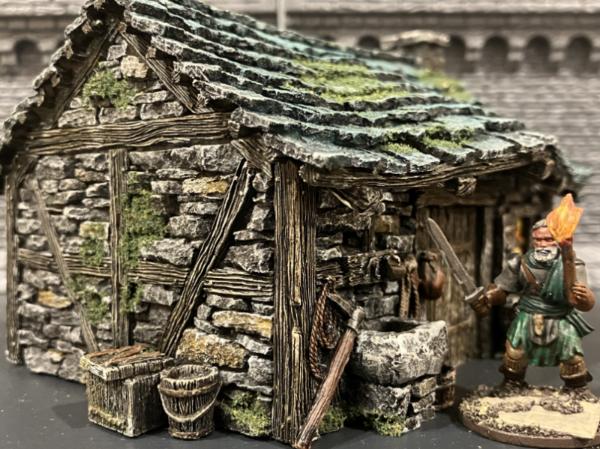
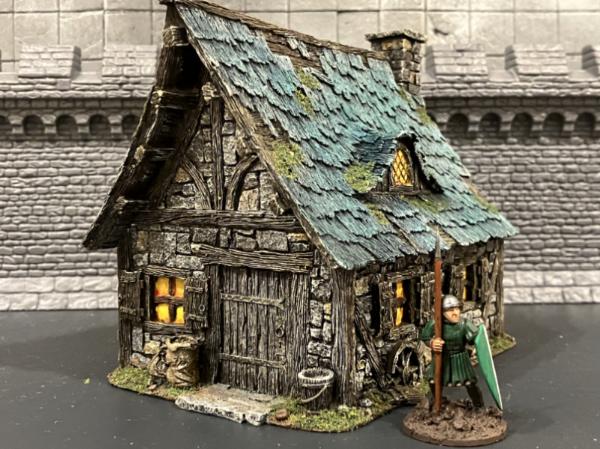
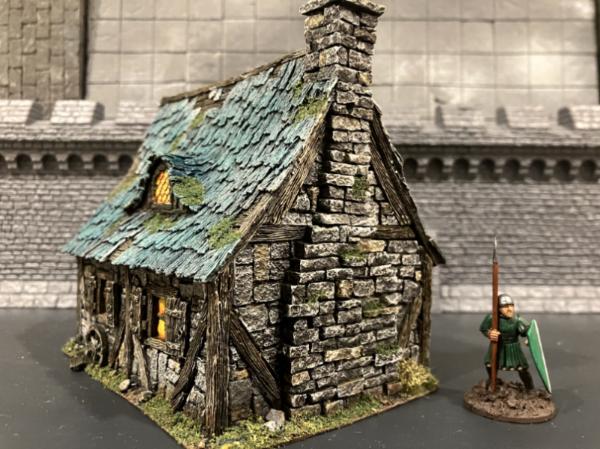
Some WIP and finished shots of the D&D tavern I recently finished building. Still need to put the door together with a hinge so it can open. I use this for both middle school gaming and at home gaming.
You can see the first work on my windows here. It took a while to figure out which way of assembling them would be the best.
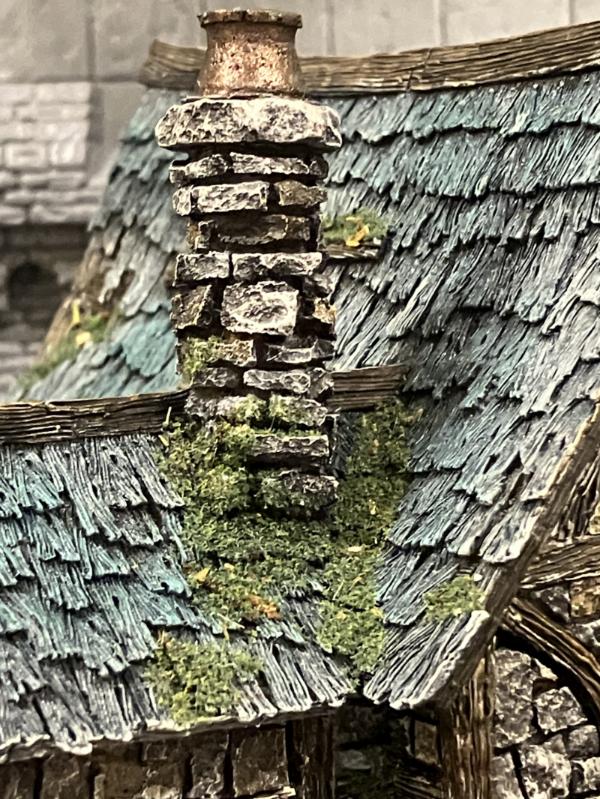
Here is the view of the back side. The chimney is in two pieces, connected with a bamboo rod. This allows me to build the (planned) smaller roof to turn this large building into a much smaller tavern or small farmhouse as needed.
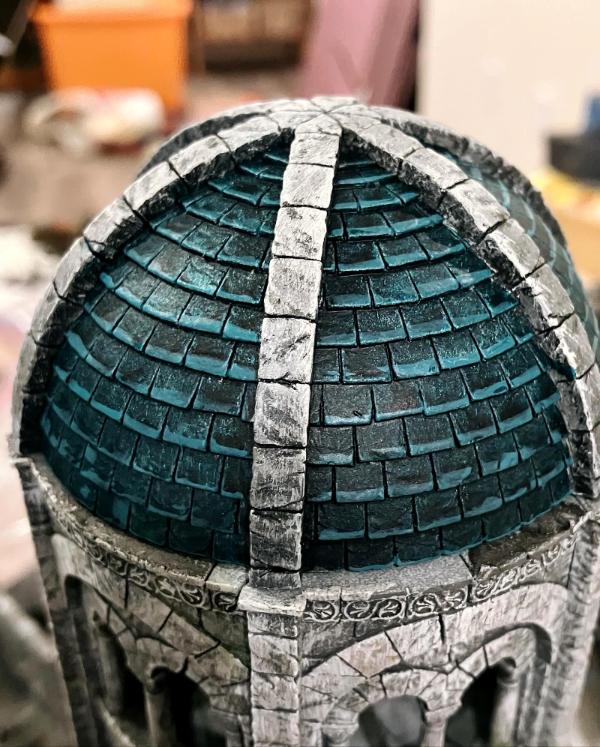
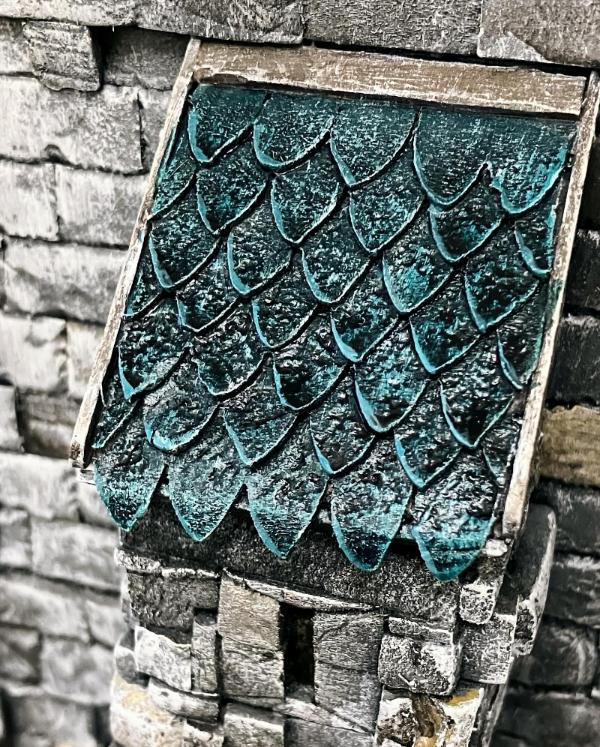
First layers of paint on the roof!
Drybrushing the roof.
Darker photo, sorry!
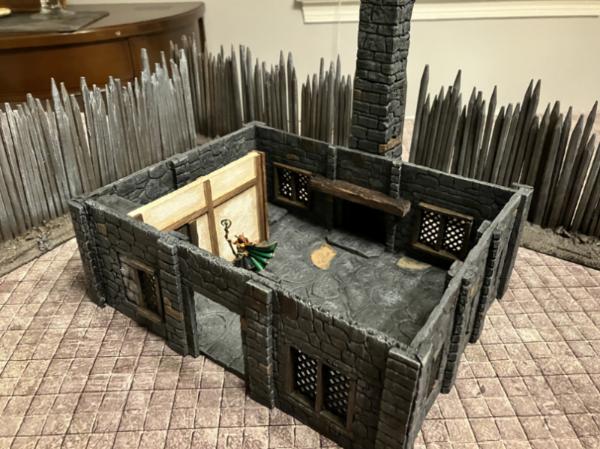
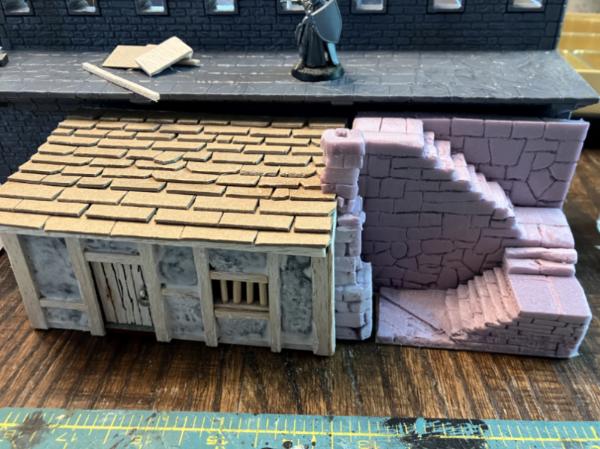
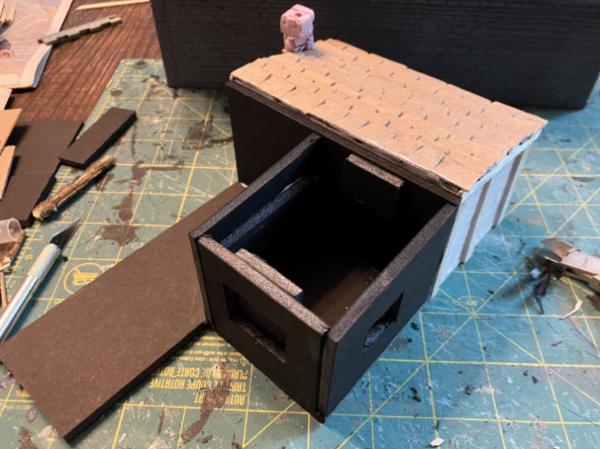
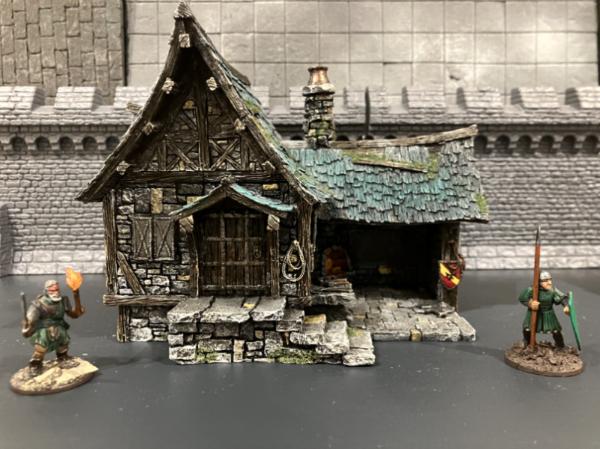
Close up of the interior of the second floor. It is removable and contains spaces for characters to hide, interact in, etc.
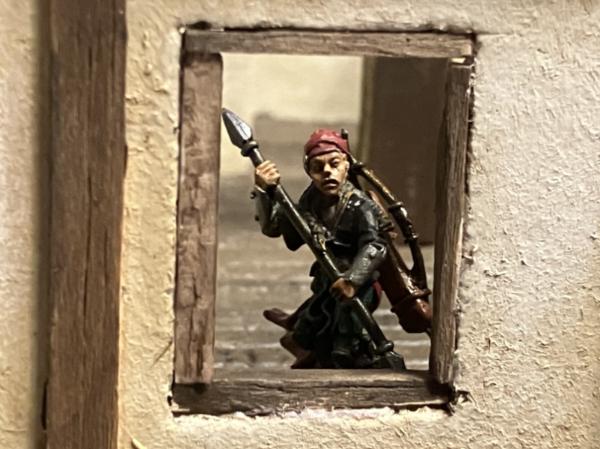
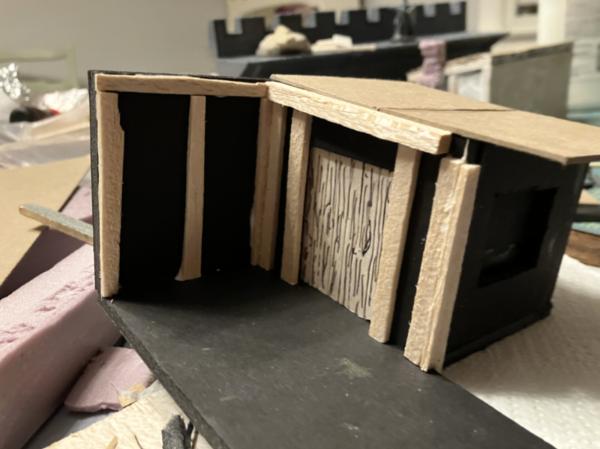
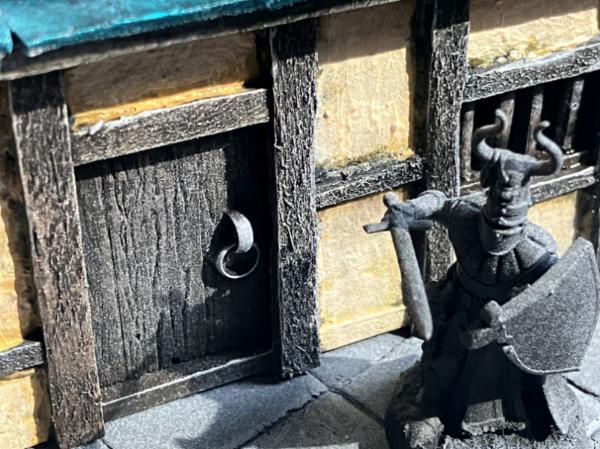
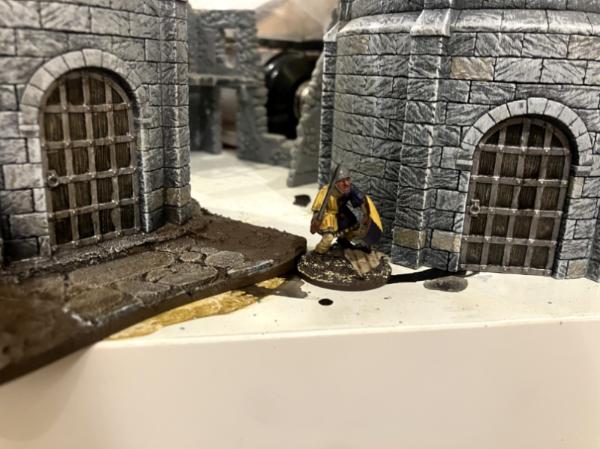
Close up of the interior of the main floor tavern and the basement door - doesn't lead anywhere, but it ***could!***
Better view of the overall design of the main floor and the finished windows.
Realized I hadn't posted these in a while, so I figured I should share...
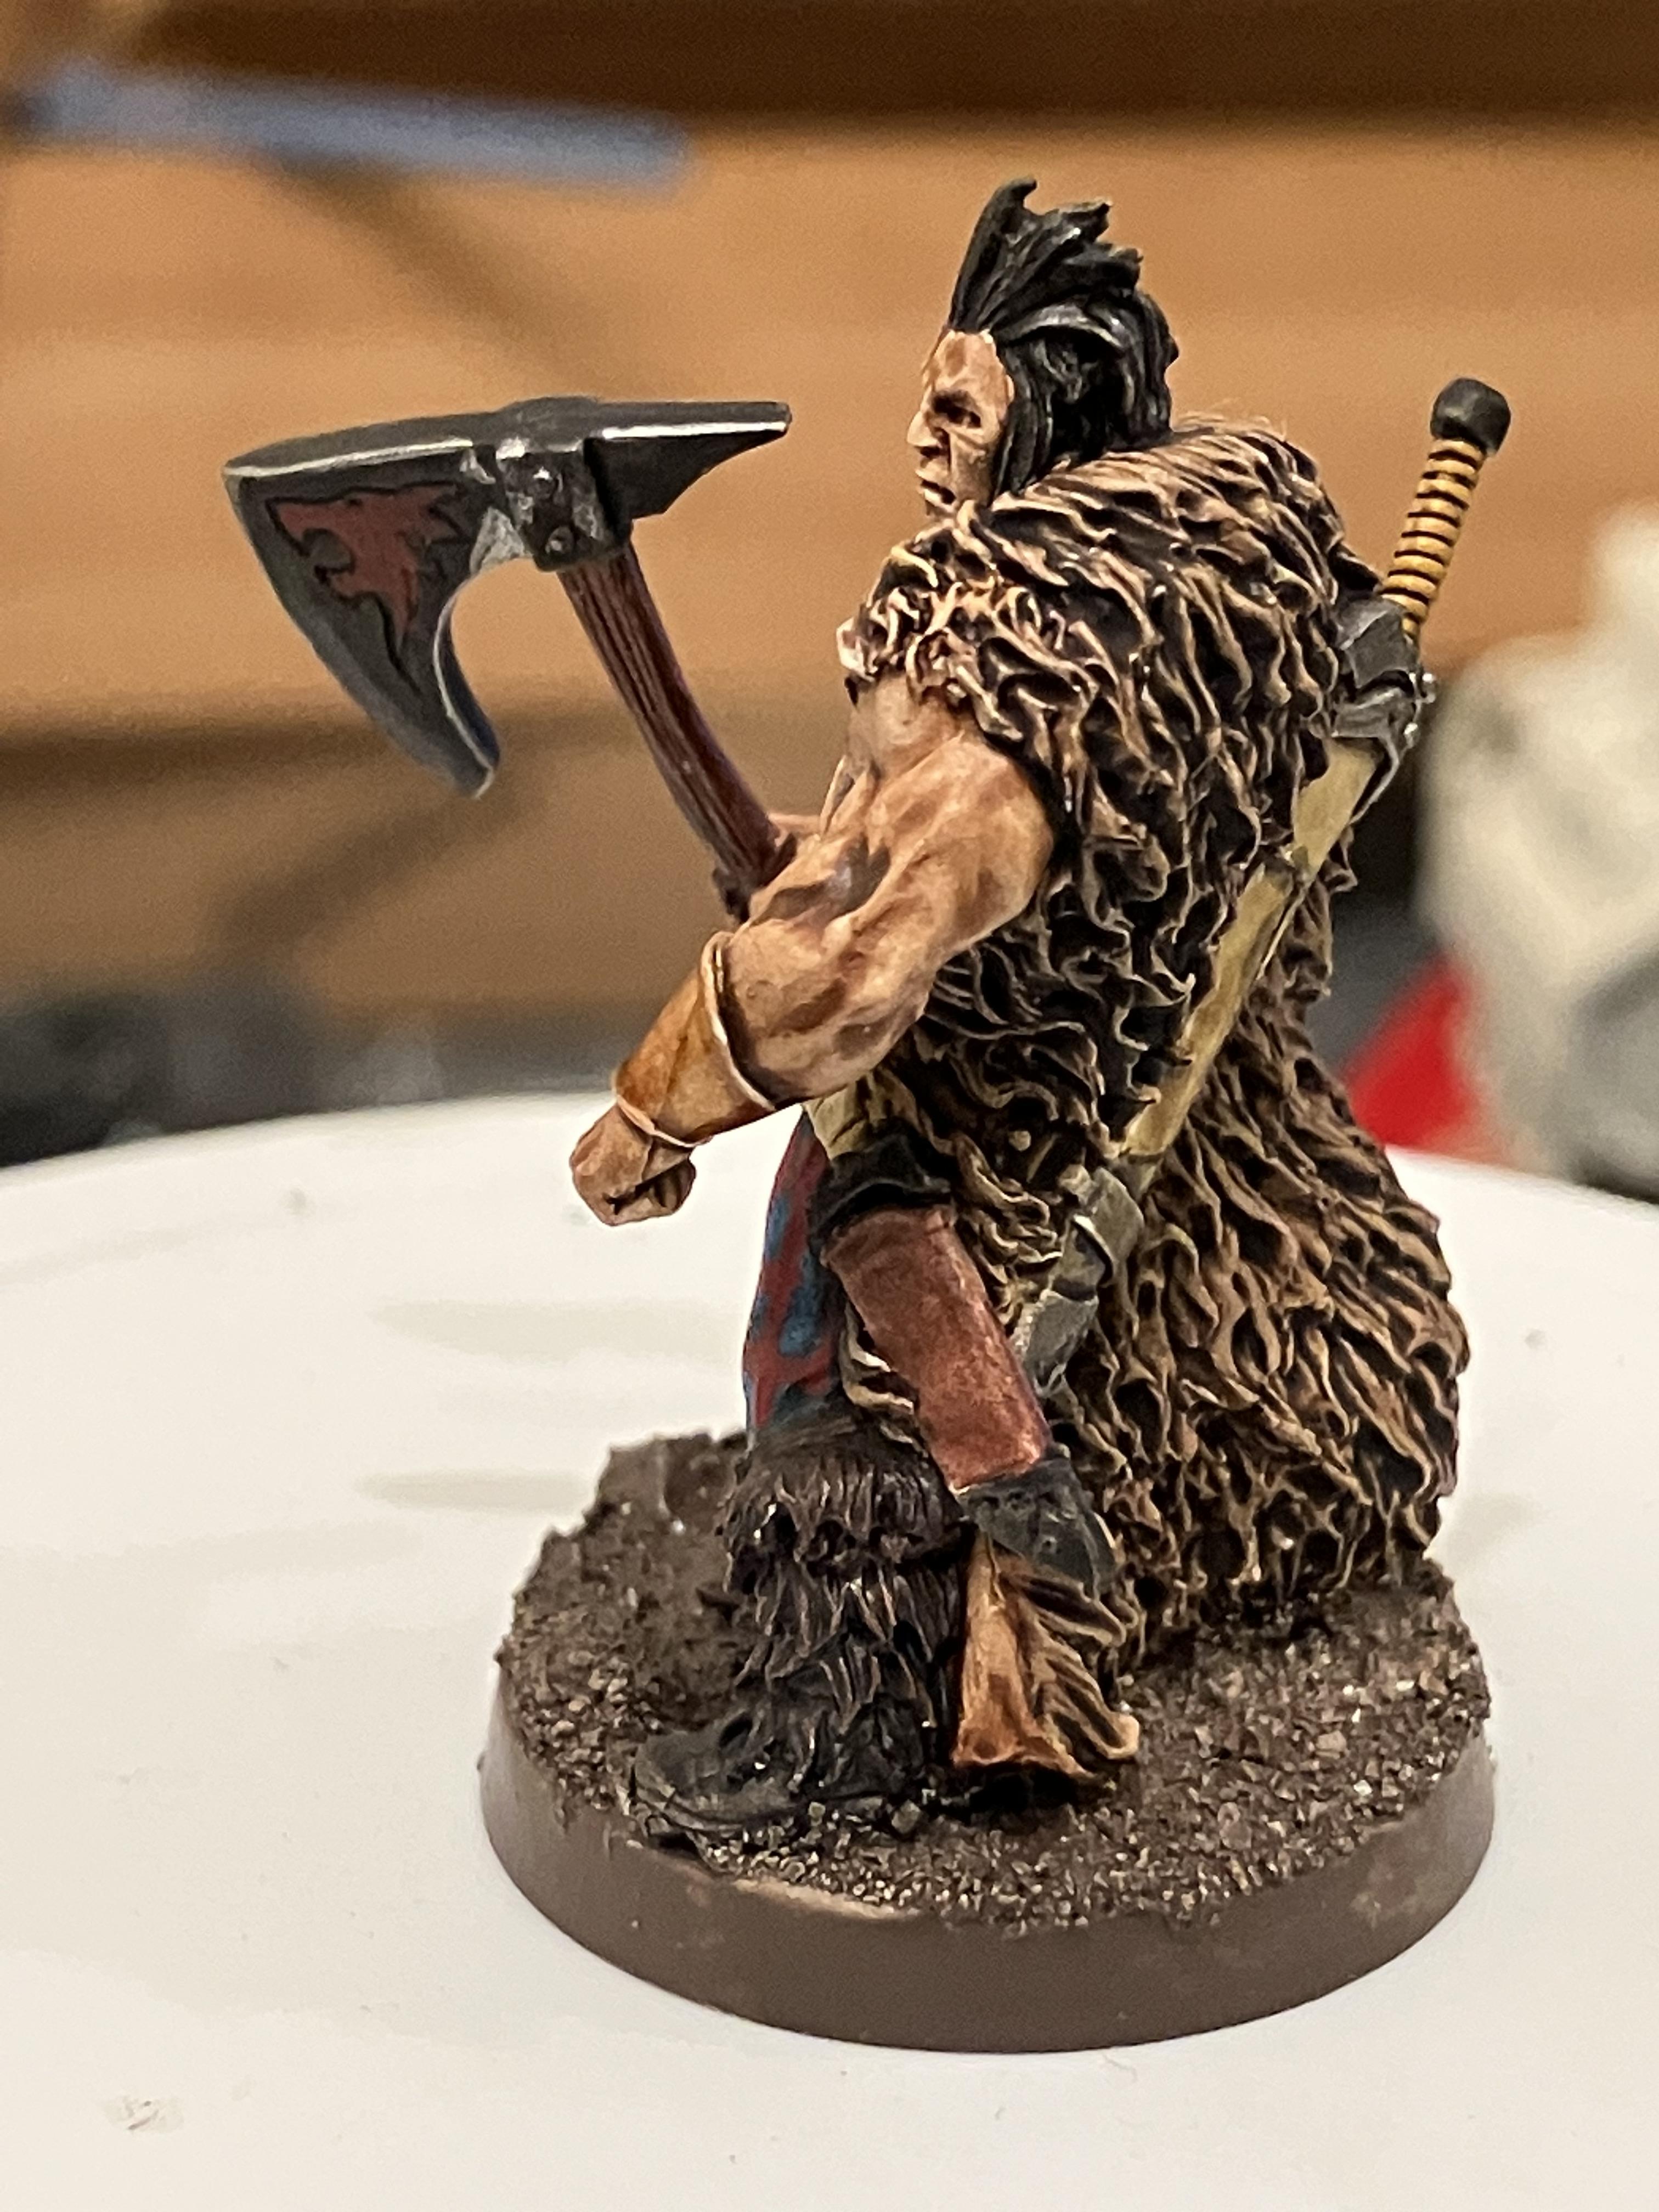
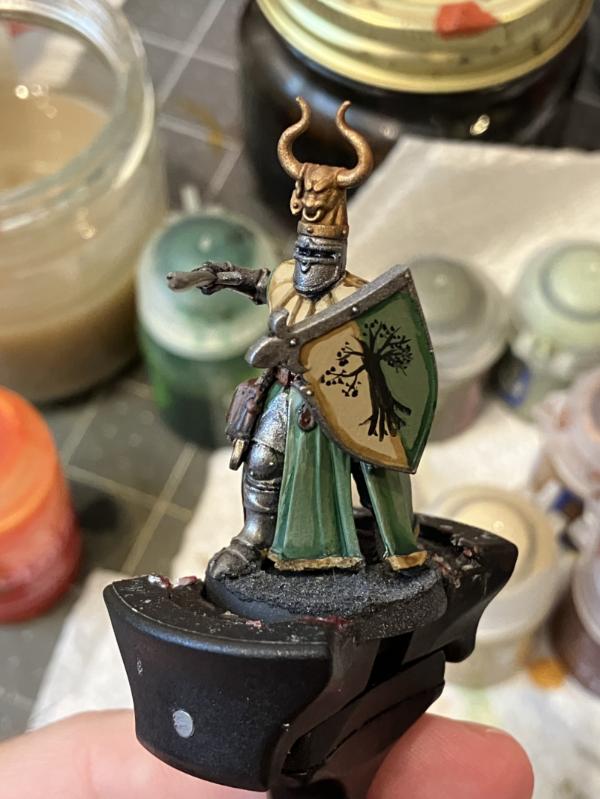
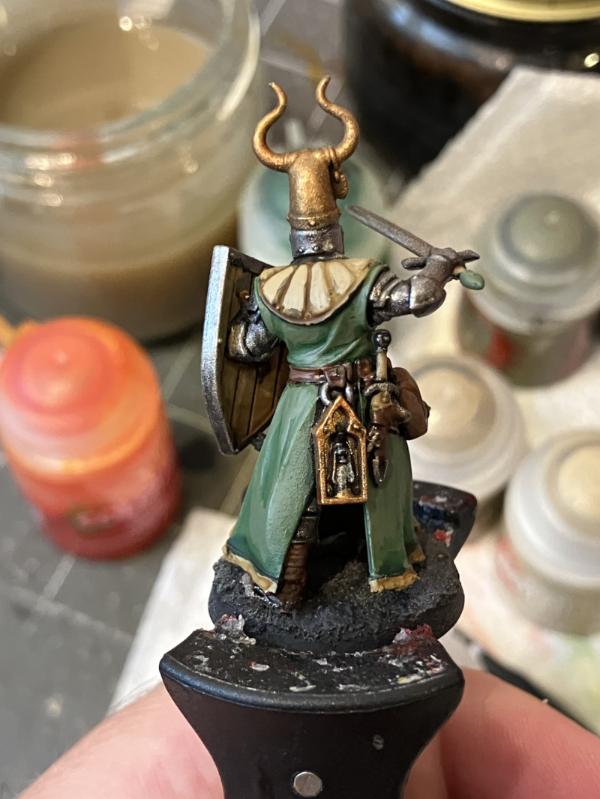
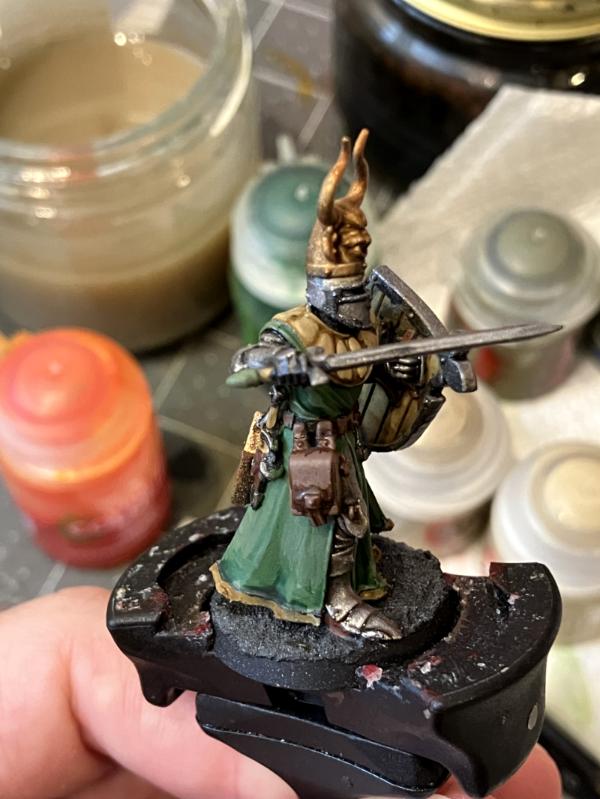
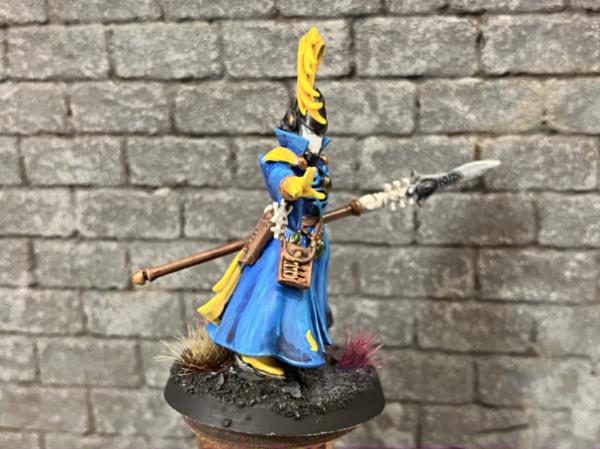
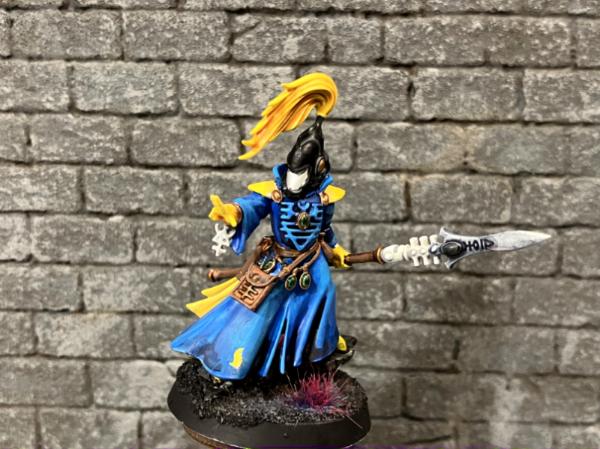
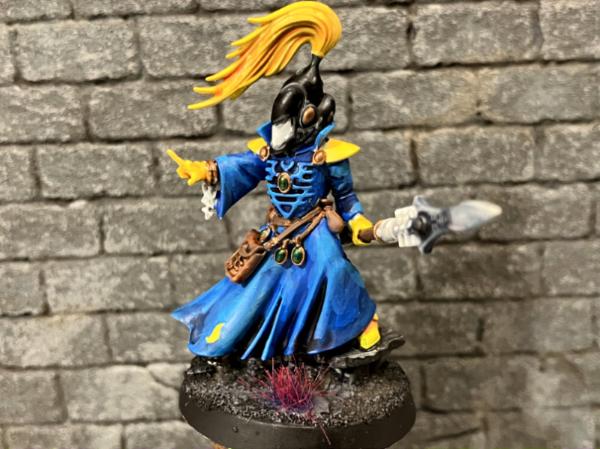
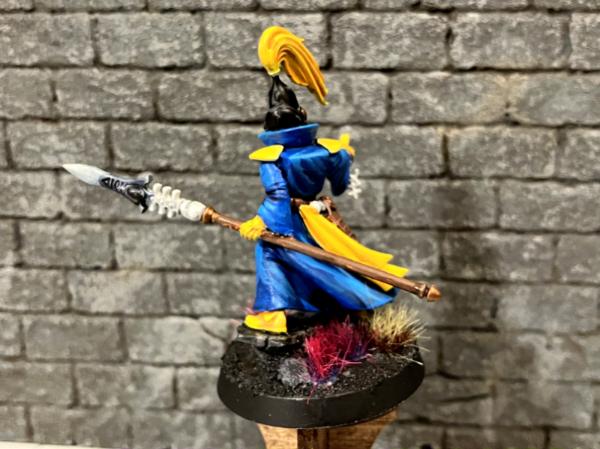
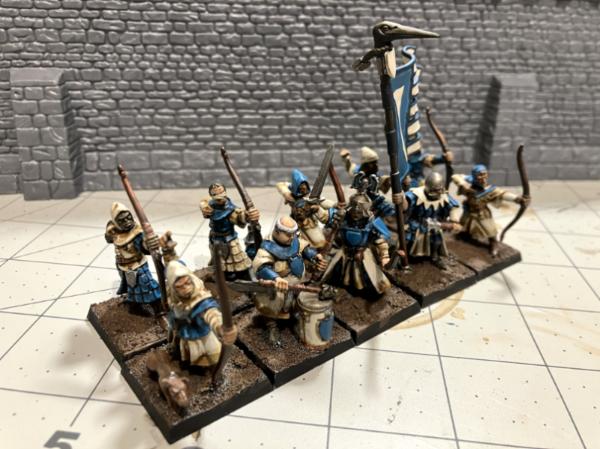
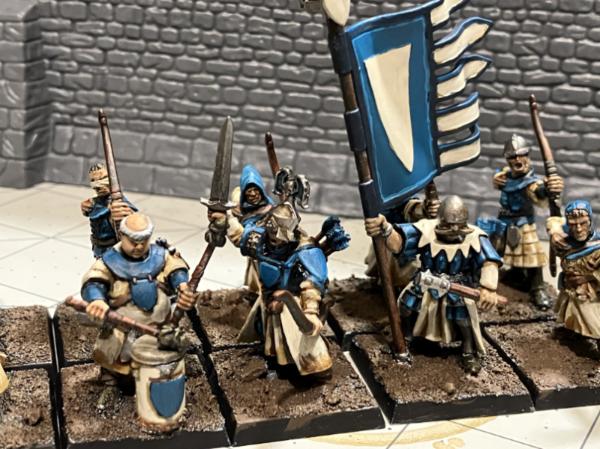
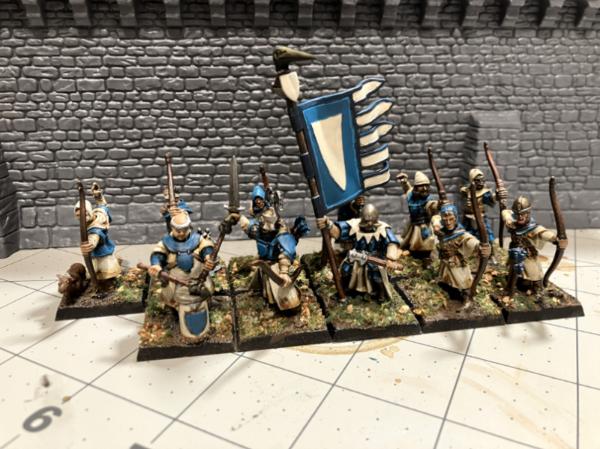
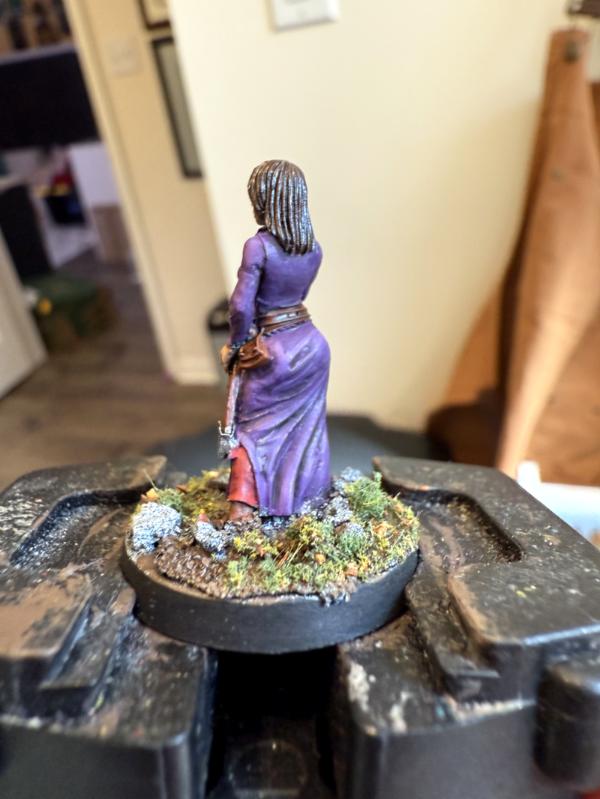
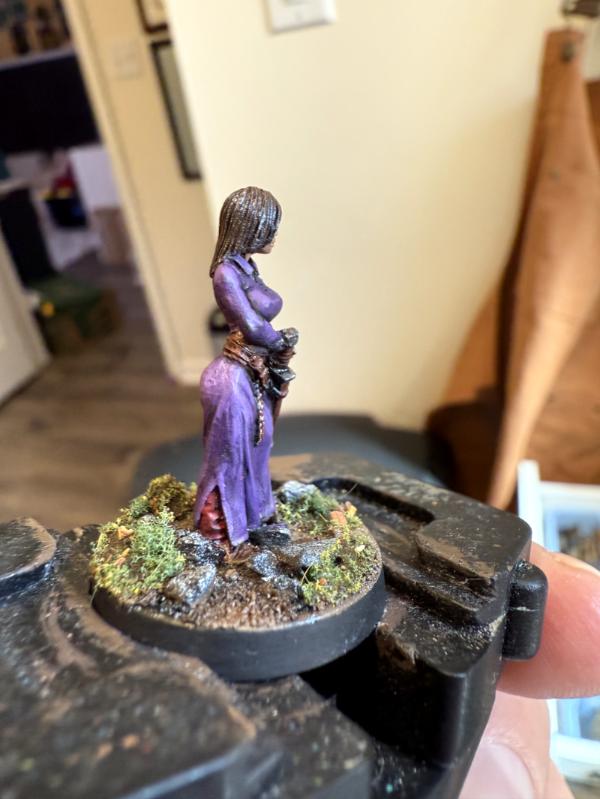
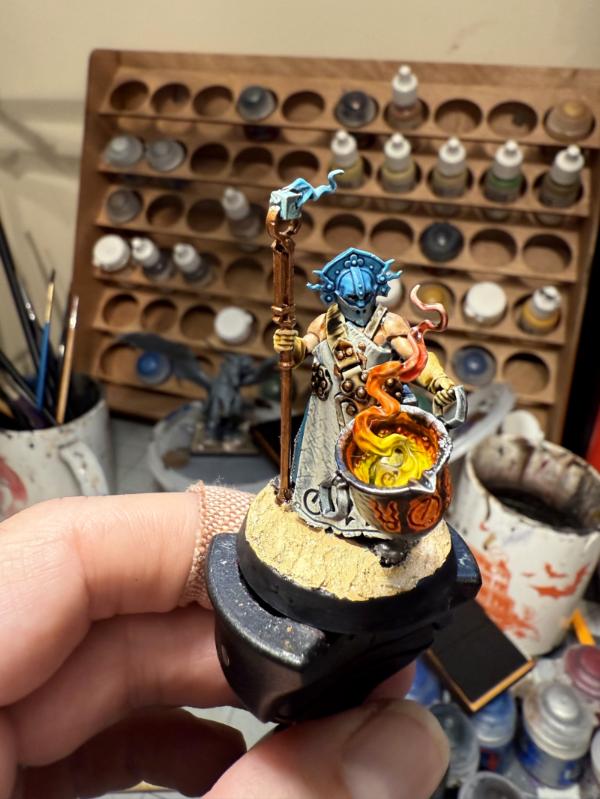
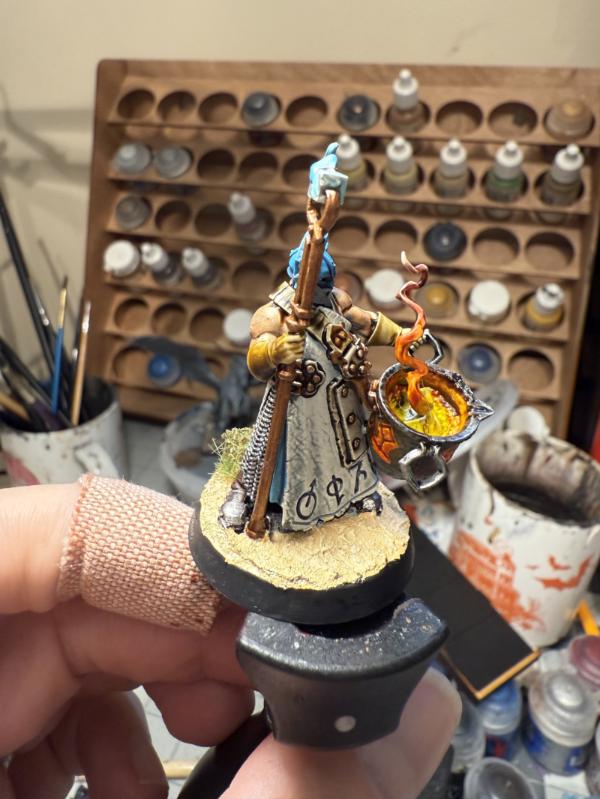
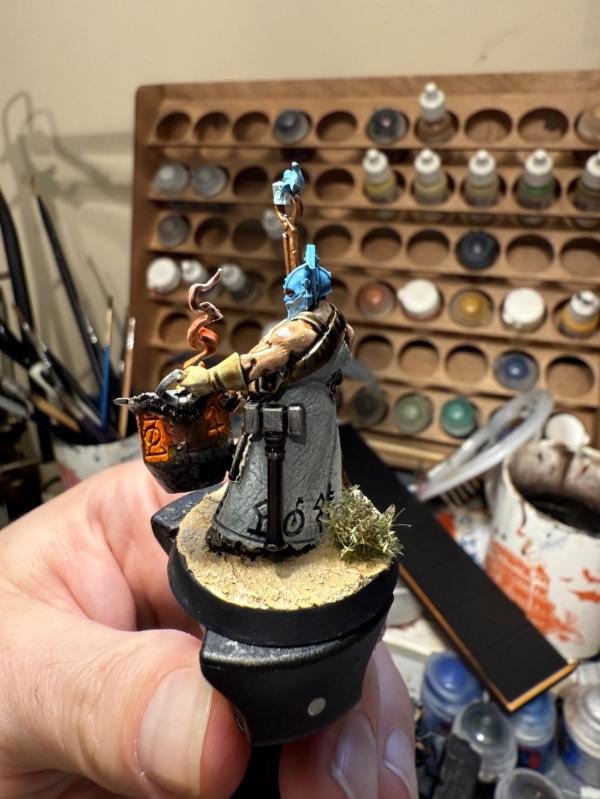
First up, Corag the Barbarian - Love the Hasslefree mini here.
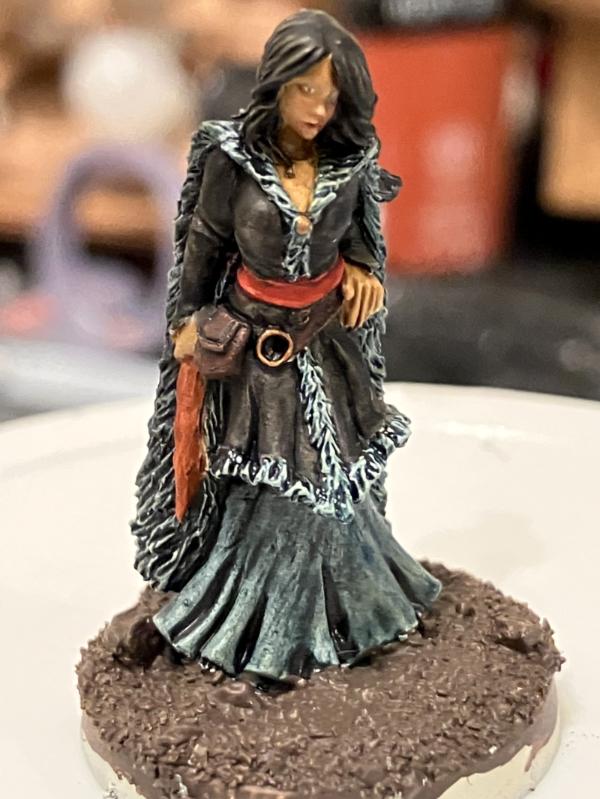
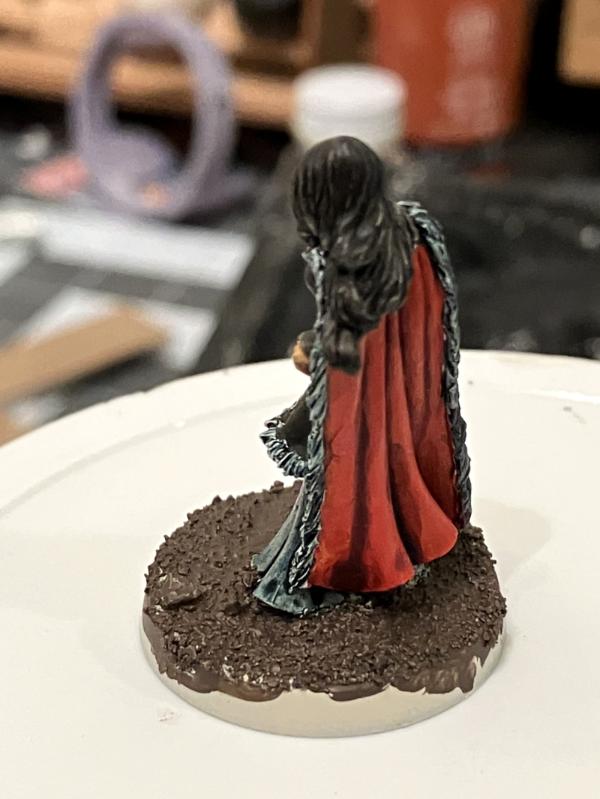
Then it's our witch (Which, no pun intended) is actually playing the witch class for our D&D campaign (Available on DM's Guild somewhere) whose name I am blanking on. I actually got an eyeball painted in there. That was nervewracking.
makeitorky wrote: I love how her cloak/wrap turned out. Thank you for sharing
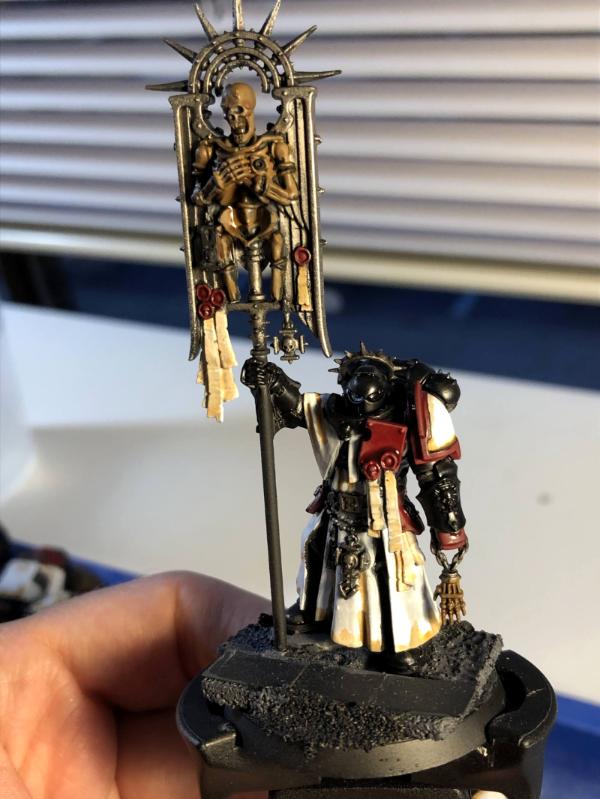
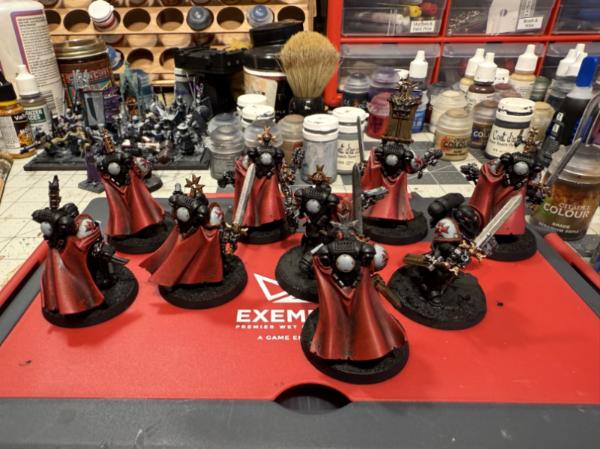
While I'm by no means a beginner painter, I can't claim much credit - the two contrast black paints show their worth here - the darker black is the new Black Legion one, while the more grey exterior is the older Black Templars black. The red is more my traditional recipe - Khorne Red, Mephiston Red layering, Carronburg crimson in the recesses.
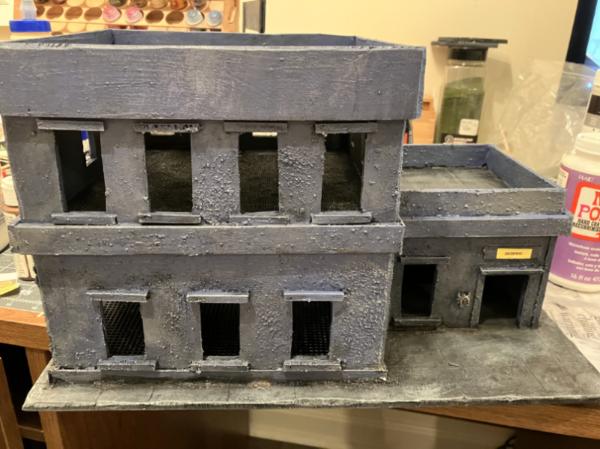
Built up another series of modular buildings. Of course, I realized now I didn't take many pictures of the buildings (eek). So enjoy the last of them, this police station. The roof parts of both sections, and the upper floor, are removable and slot into each other. Made with minimal interior decoration (other than posters) to allow the most movement and model placement.
Finally, enjoy this solo shot of the massive church I built. The base is 2ft x roughly 18 inches. I didn't aim to make it this massive when I started building it, but then I think things may have gotten a bit away from me.
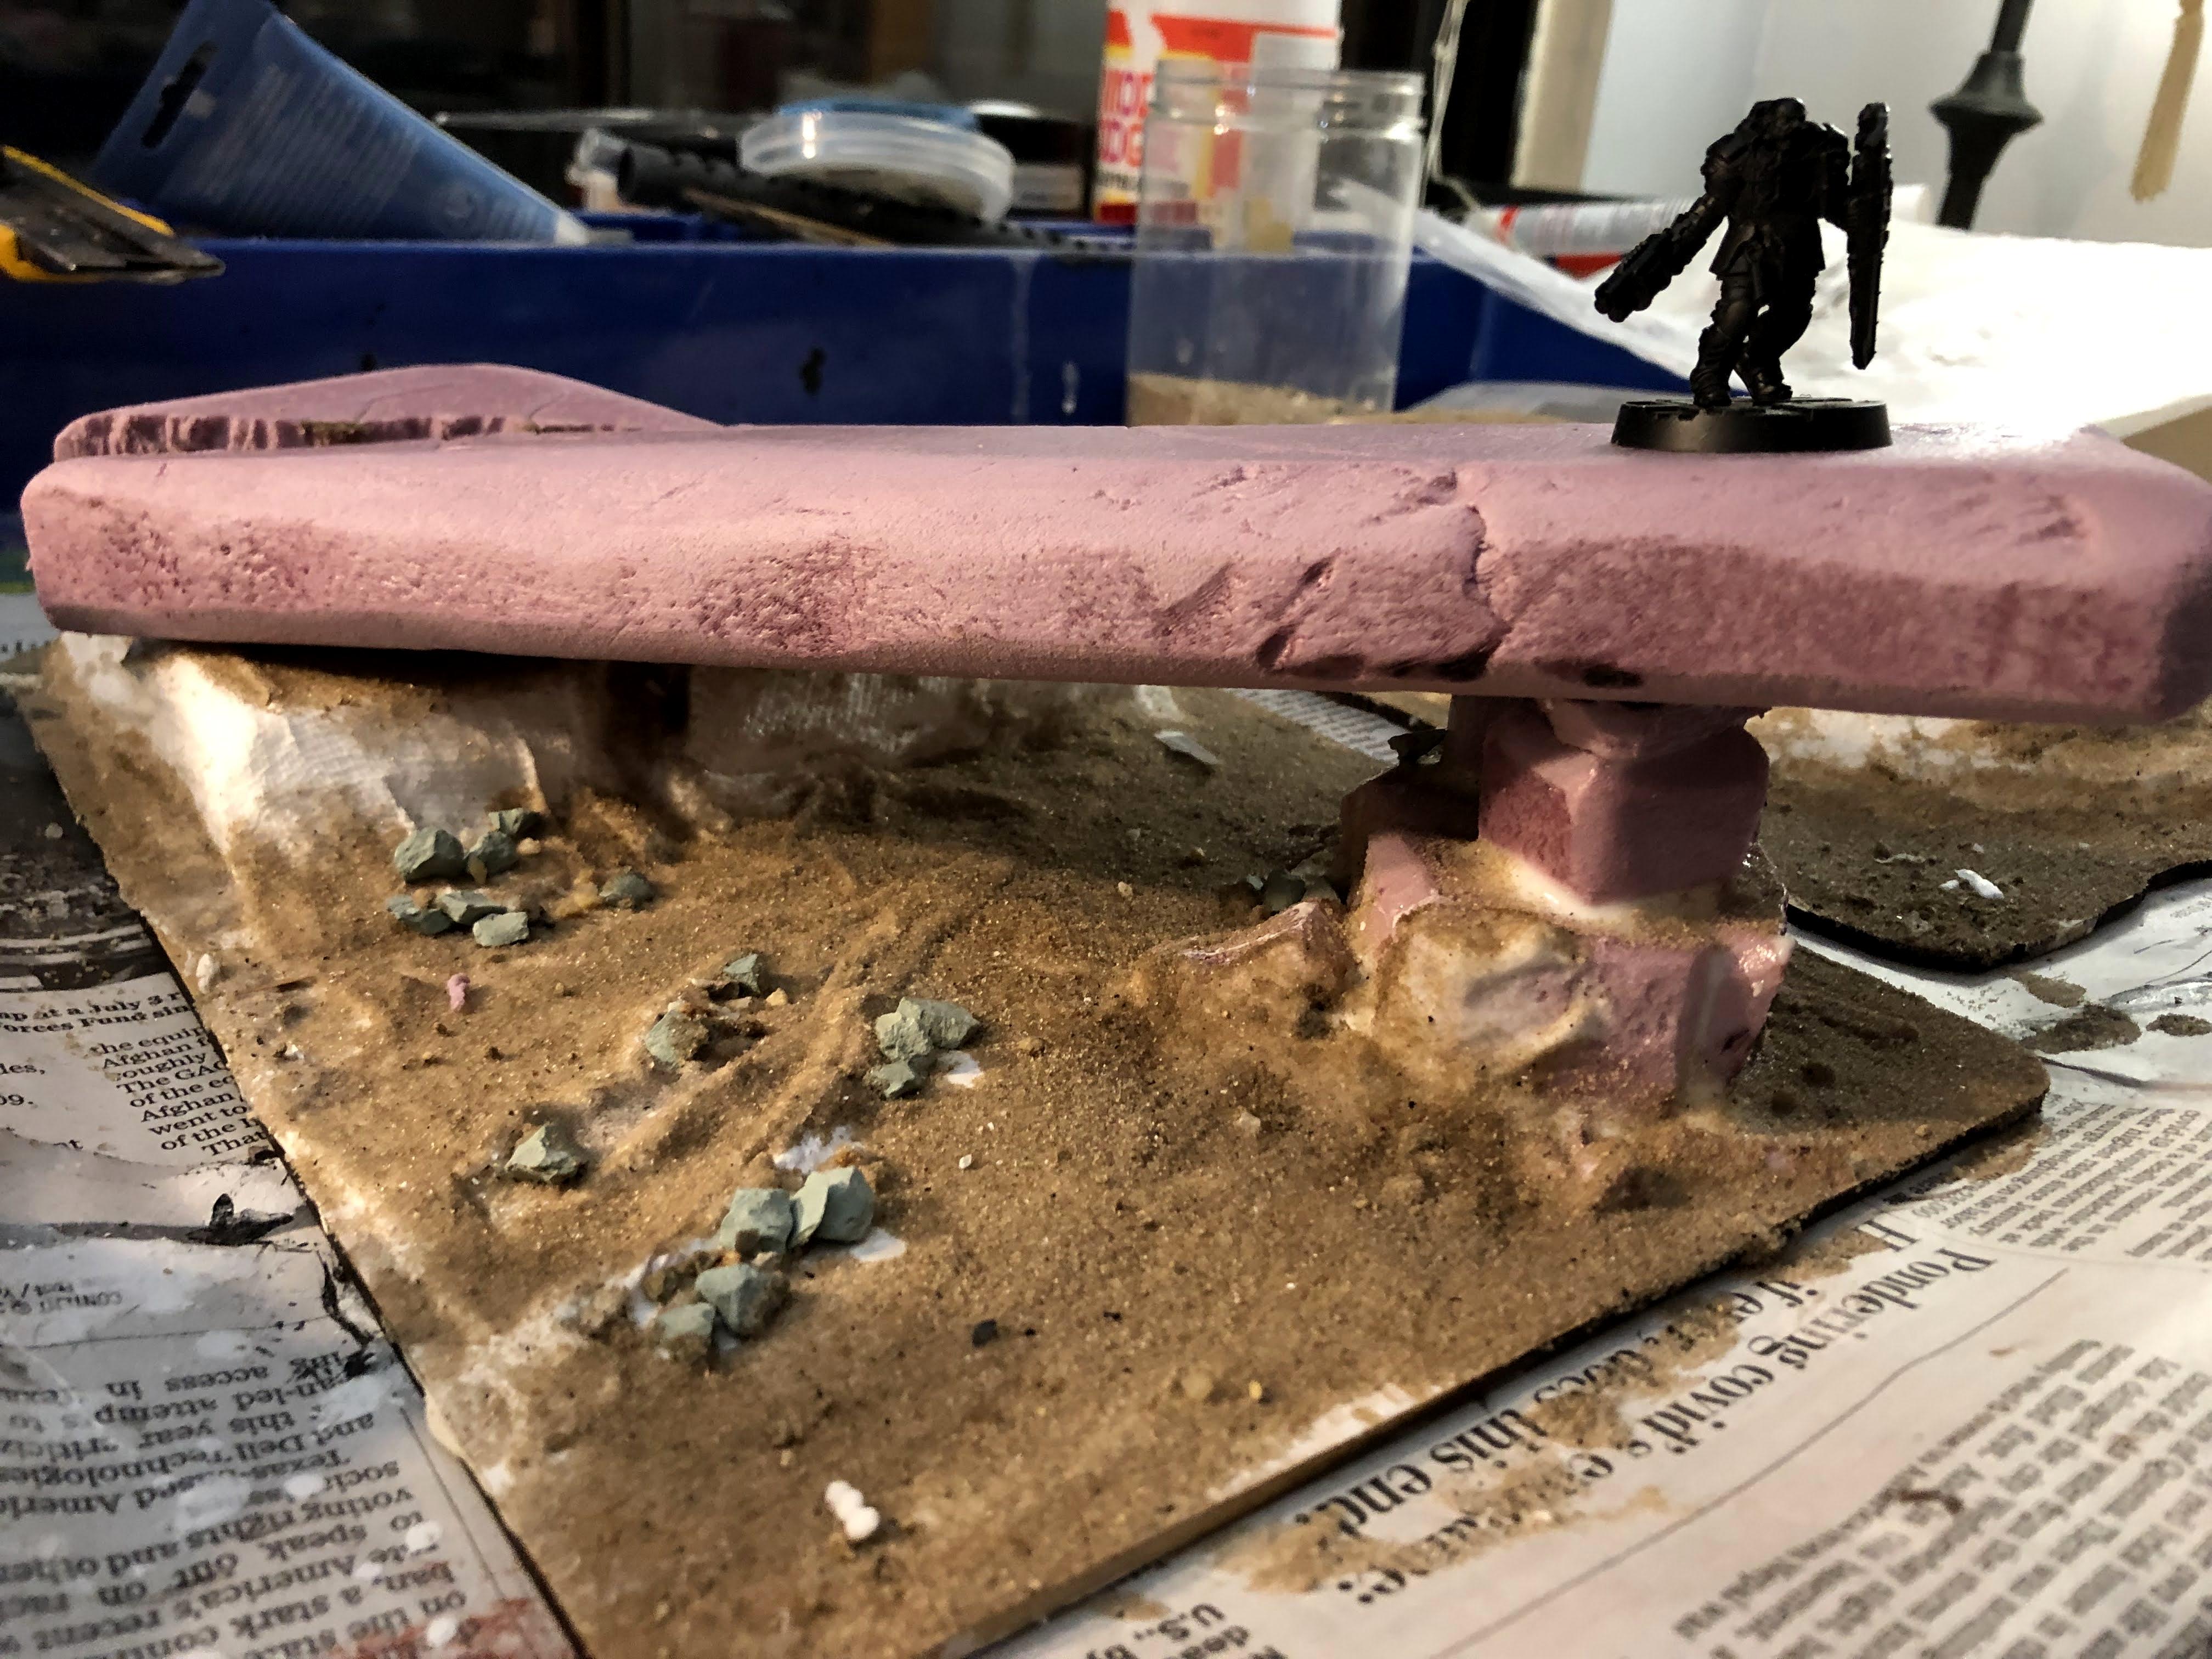
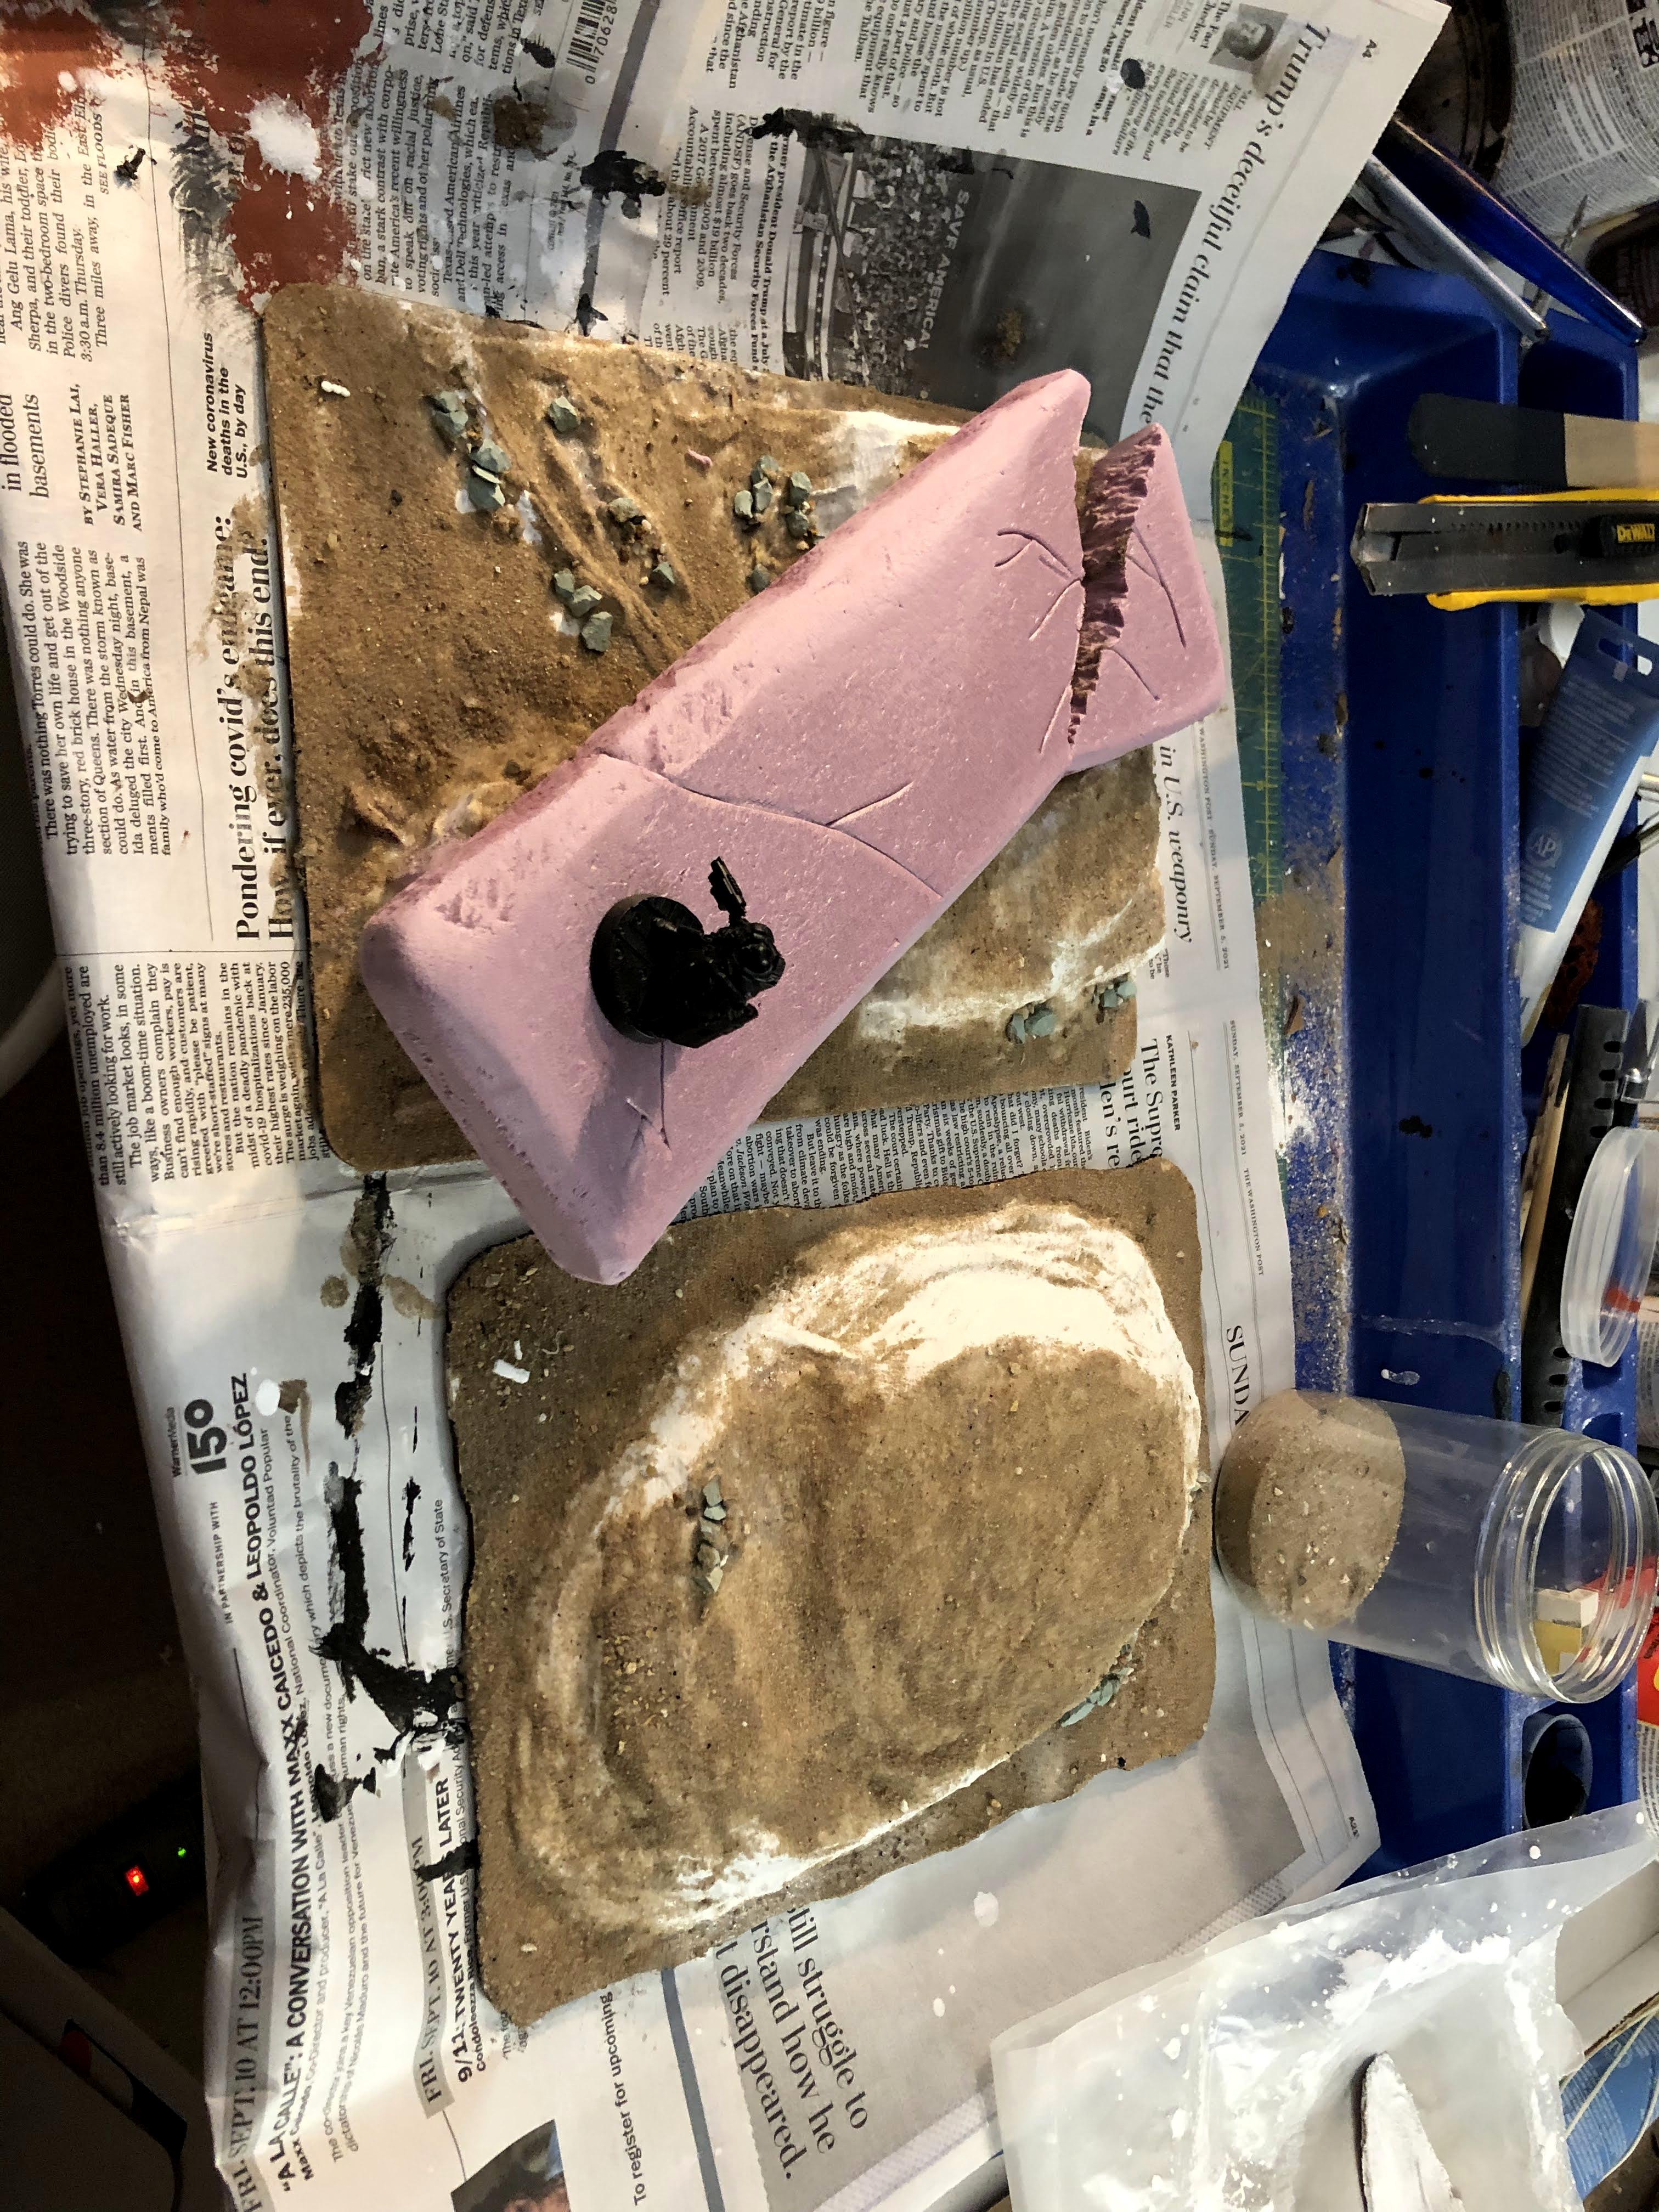
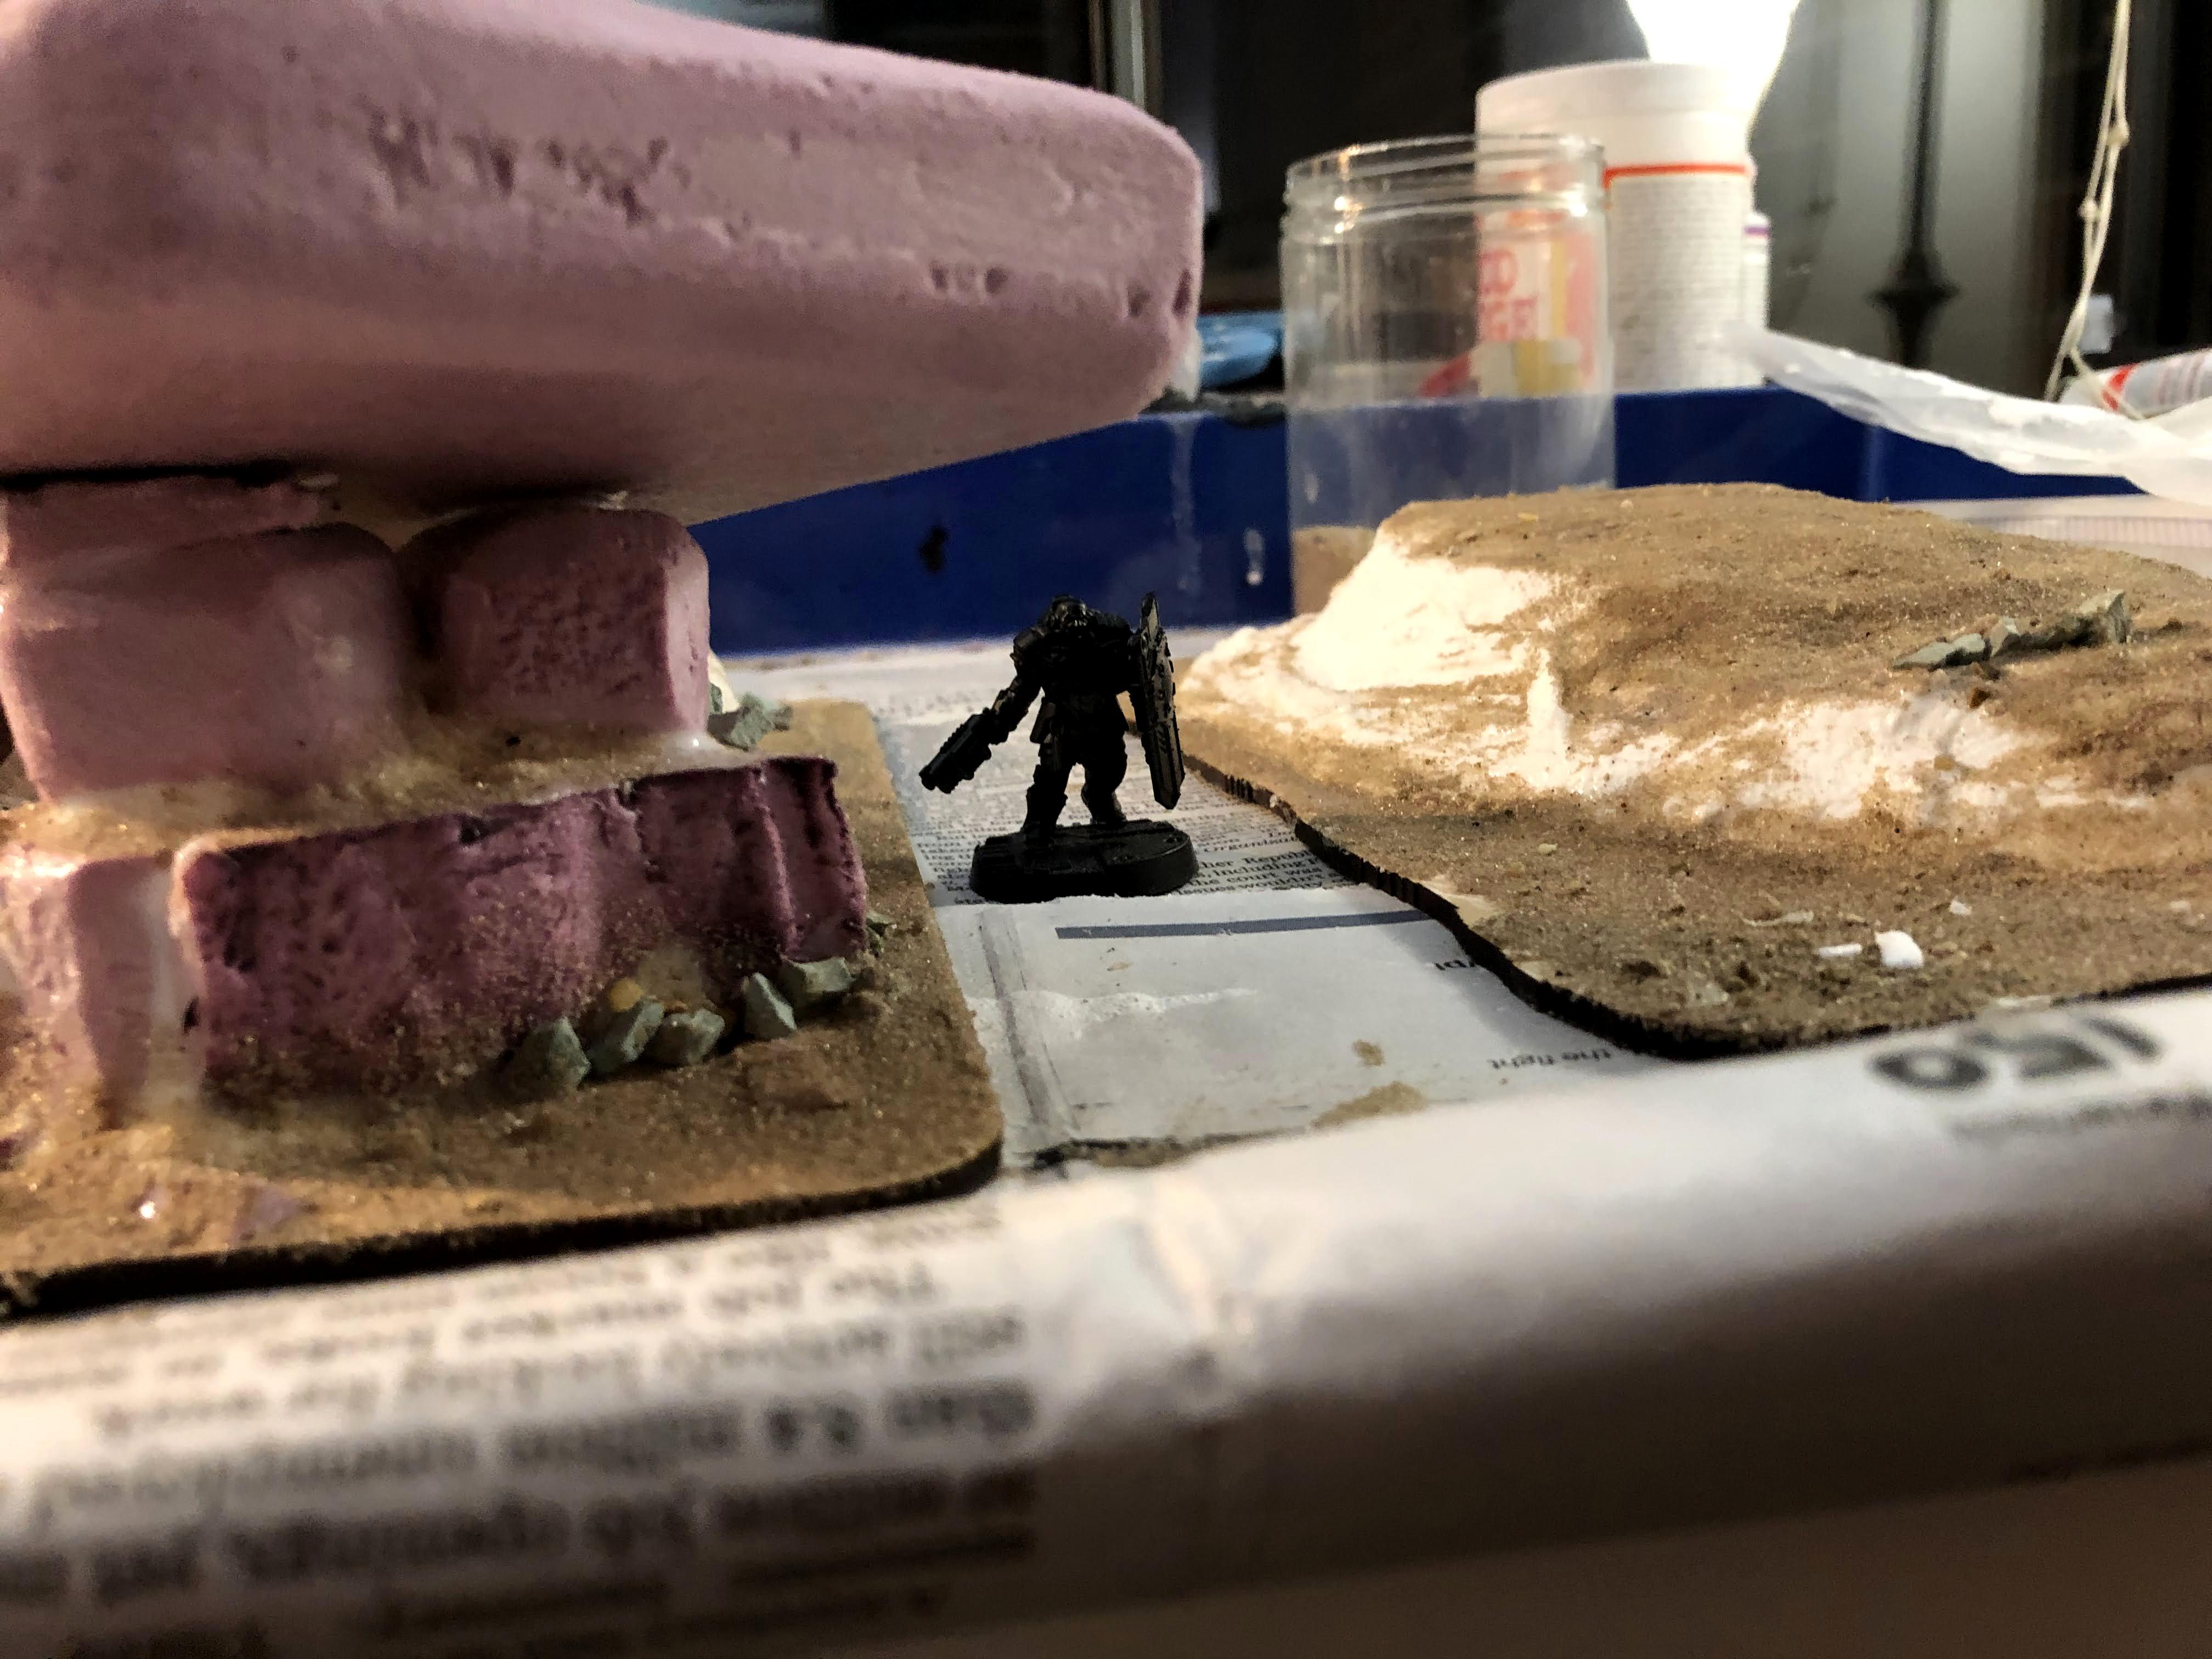
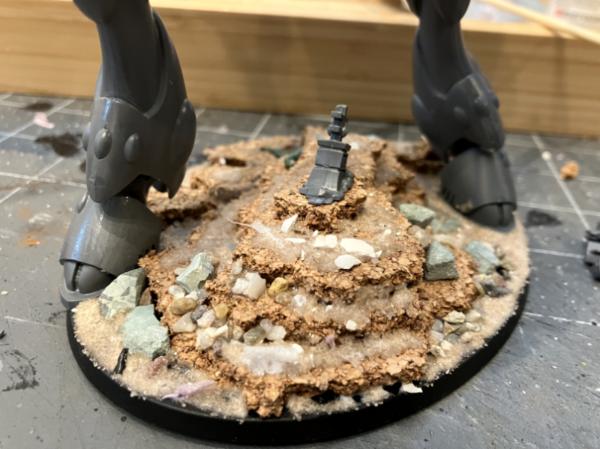
Here's another cleared WIP from the 'random inspiration' Pile. A nice sized hill for wargamming or TTRPGs. I've now used it for both. Base is a piece of found plywood, followed by cheap white crumbly sytrofoam. I used rock profiles from Woodland Scenics (and plaster of paris, not the strongest but I'm on a not spending money and using what I have kick. I used pre-mixed grout to help connect and hold all the pieces together, as well as putting it in the places most likely to be touched by people and damaged (tops of the rocks, corners, etc). Mod Podge and black paint formed the basecoat, then just painting and flocking. Hope you like the results. Its' roughly 12x12.
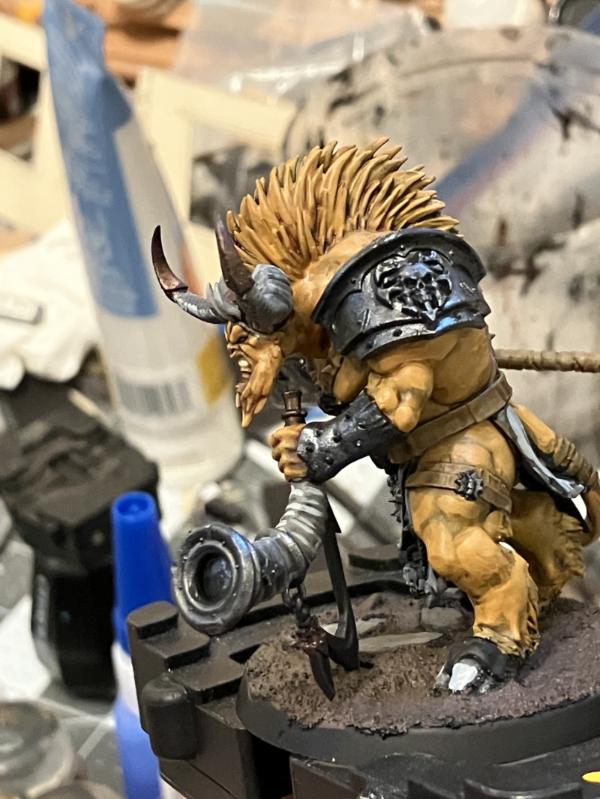
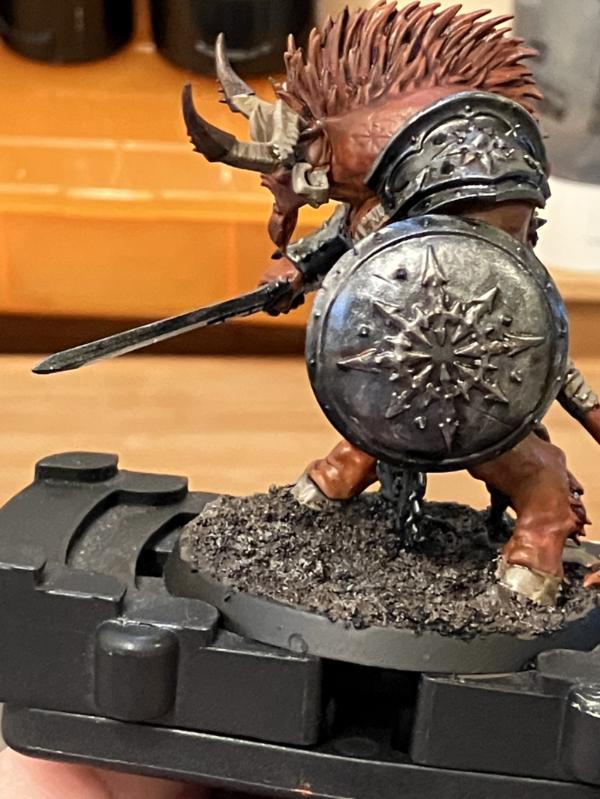
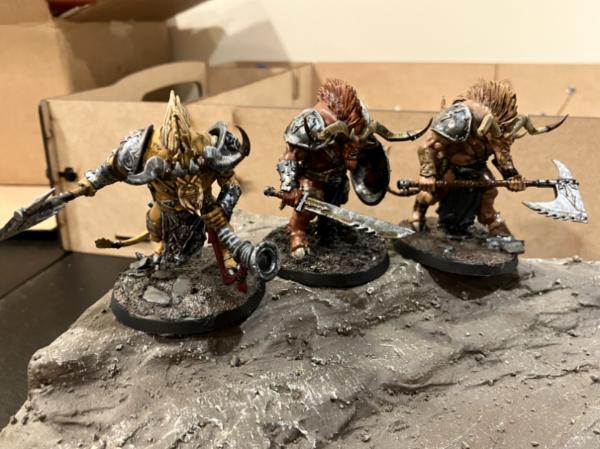
While these weren't on the forefront of my to paint list, I built and painted these in the last few days as some large monsters for my D&D campaign. I don't have a chaos list for AoS (or Warhammer old world, for that matter) but painting up a few of these Ogroids has been a nice change of pace. I went for a more muted and mixed pallet, so that the focus is more on the heroes more brightly painted minis.
First up is the big one with a massive Axe. I loved this mini, and the PCs were absolutely terrified of him after he dropped their paladin on one hit (Nat 20, plus max damage roll)
Next up is the Musician. Once the PCs discovered he could heal, they targeted him real quickly.
Finally, the leader. He soaked up so much punishment, especially with the shield upping his AC and his 'Chaotic Recovery' ability.
Now some not amazing shots of all three together. I pulled out one of the NPC heroes for them to face down against.
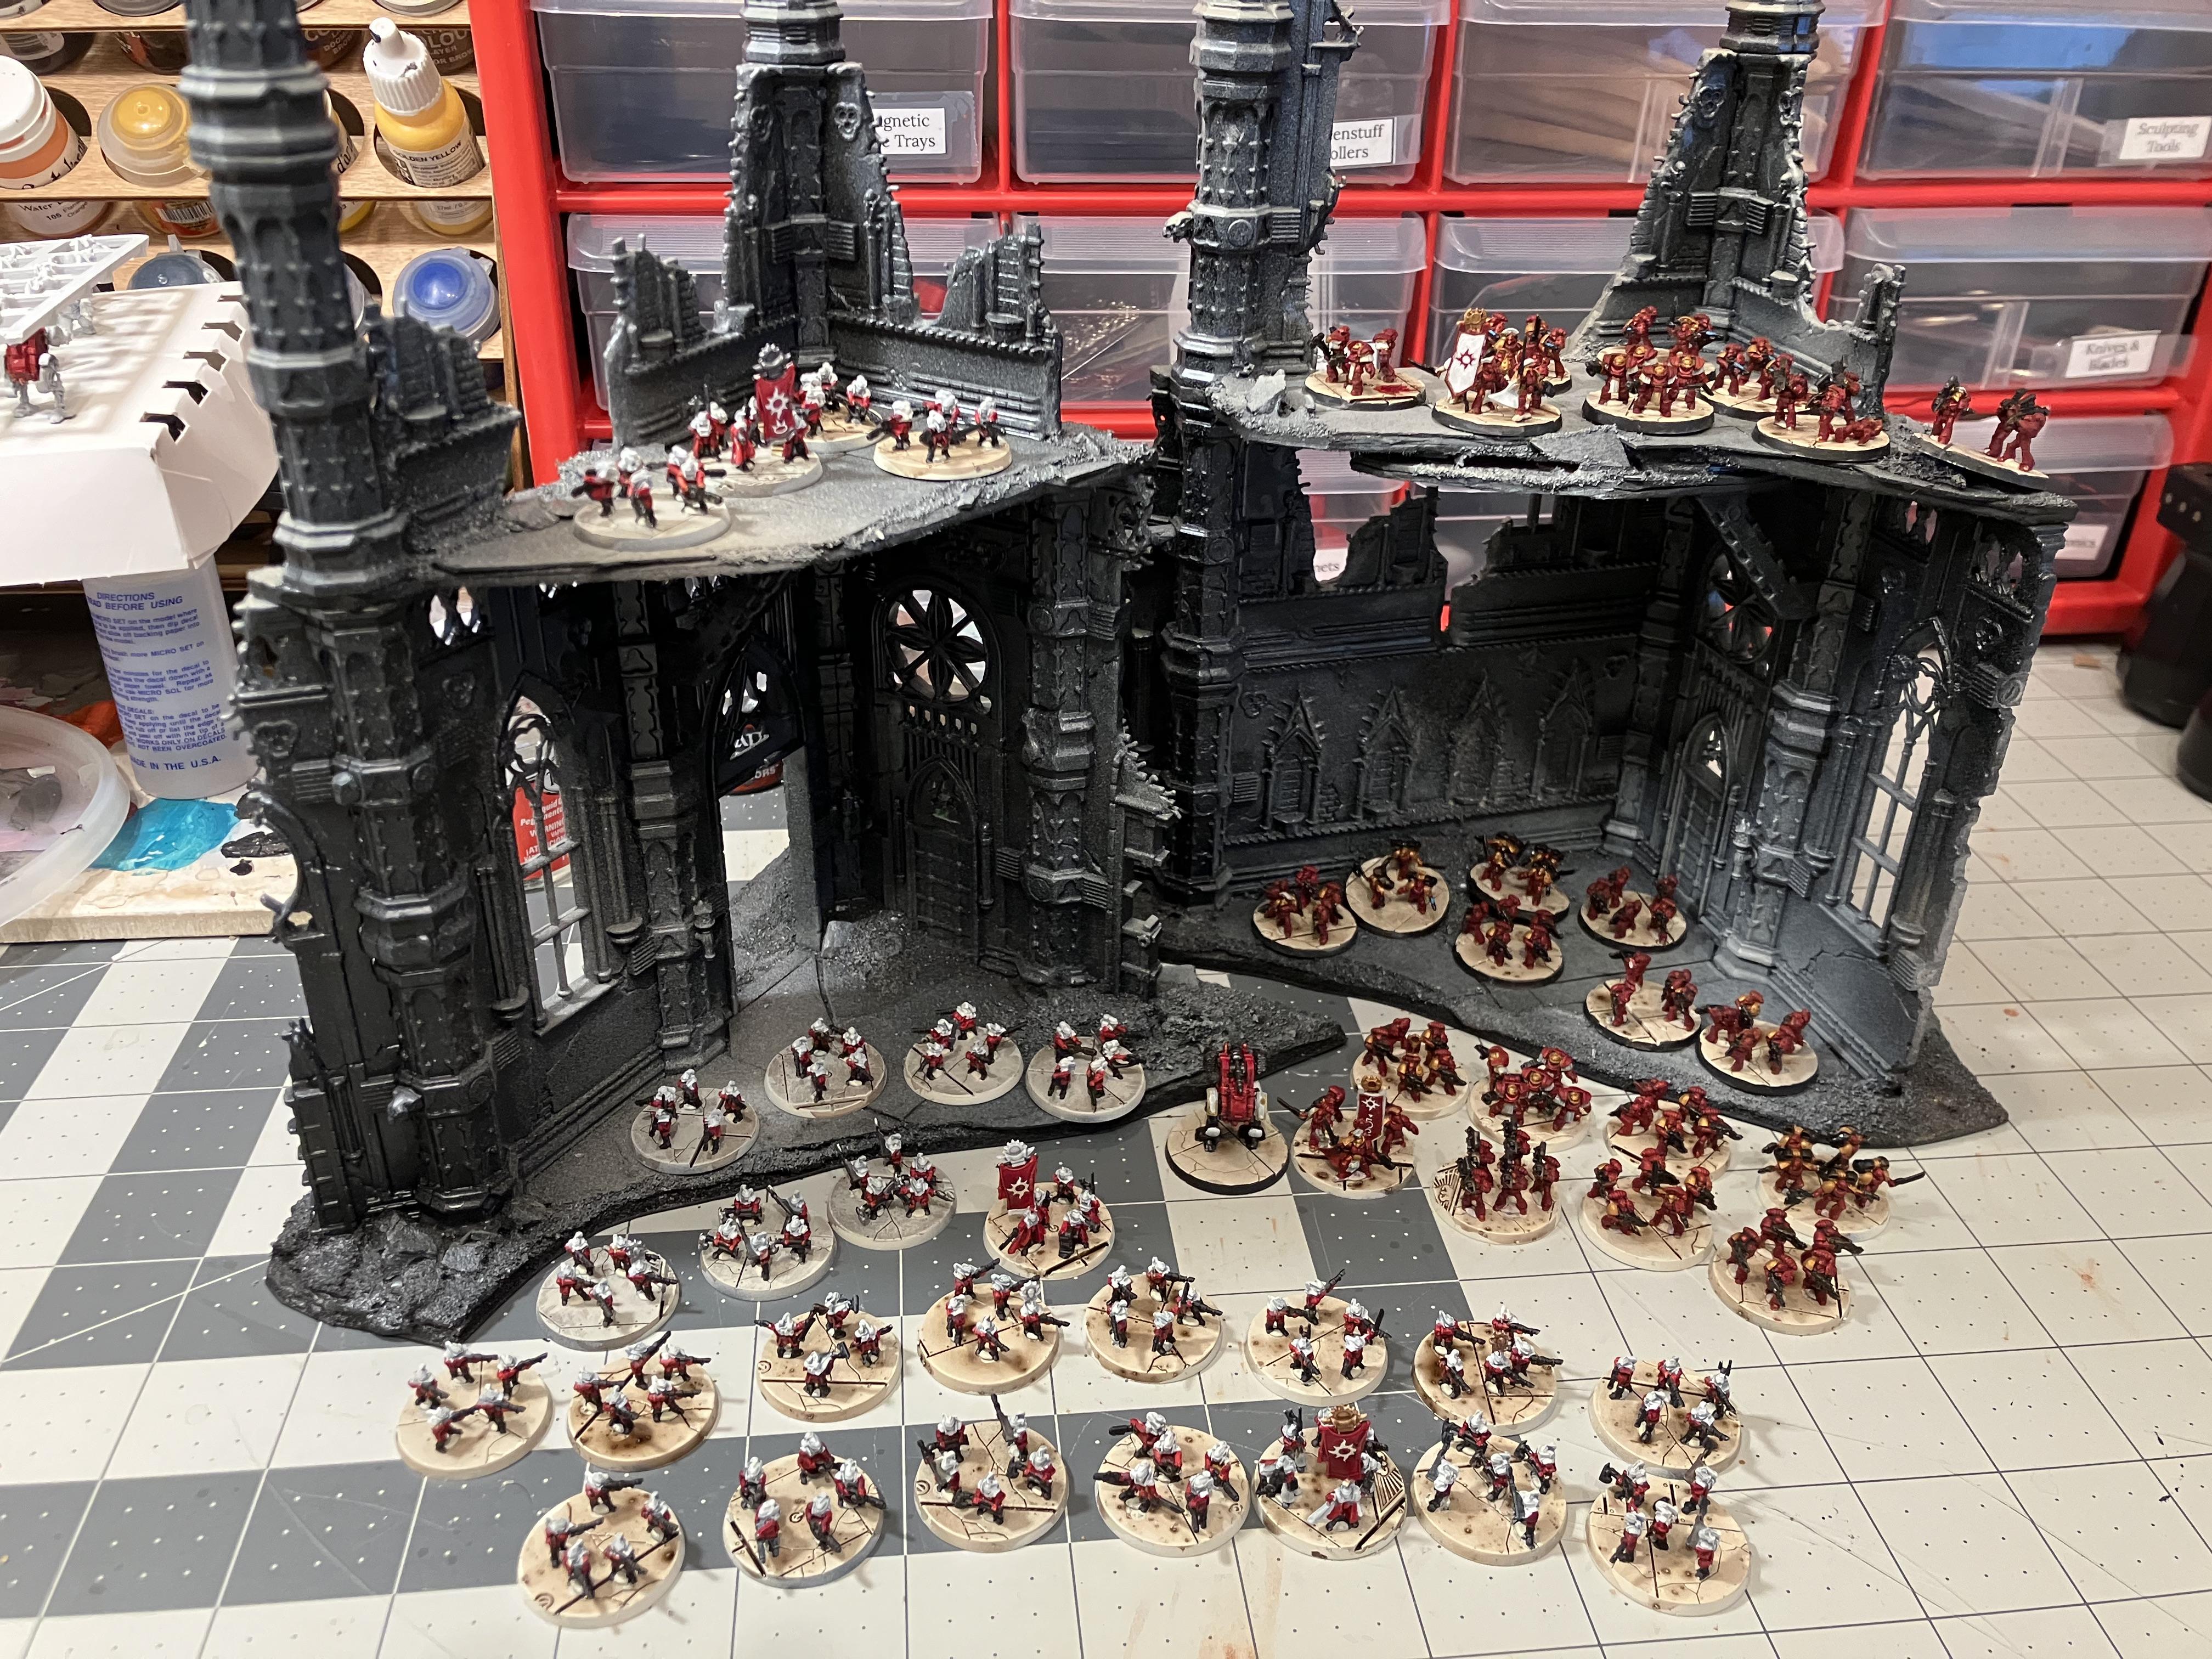
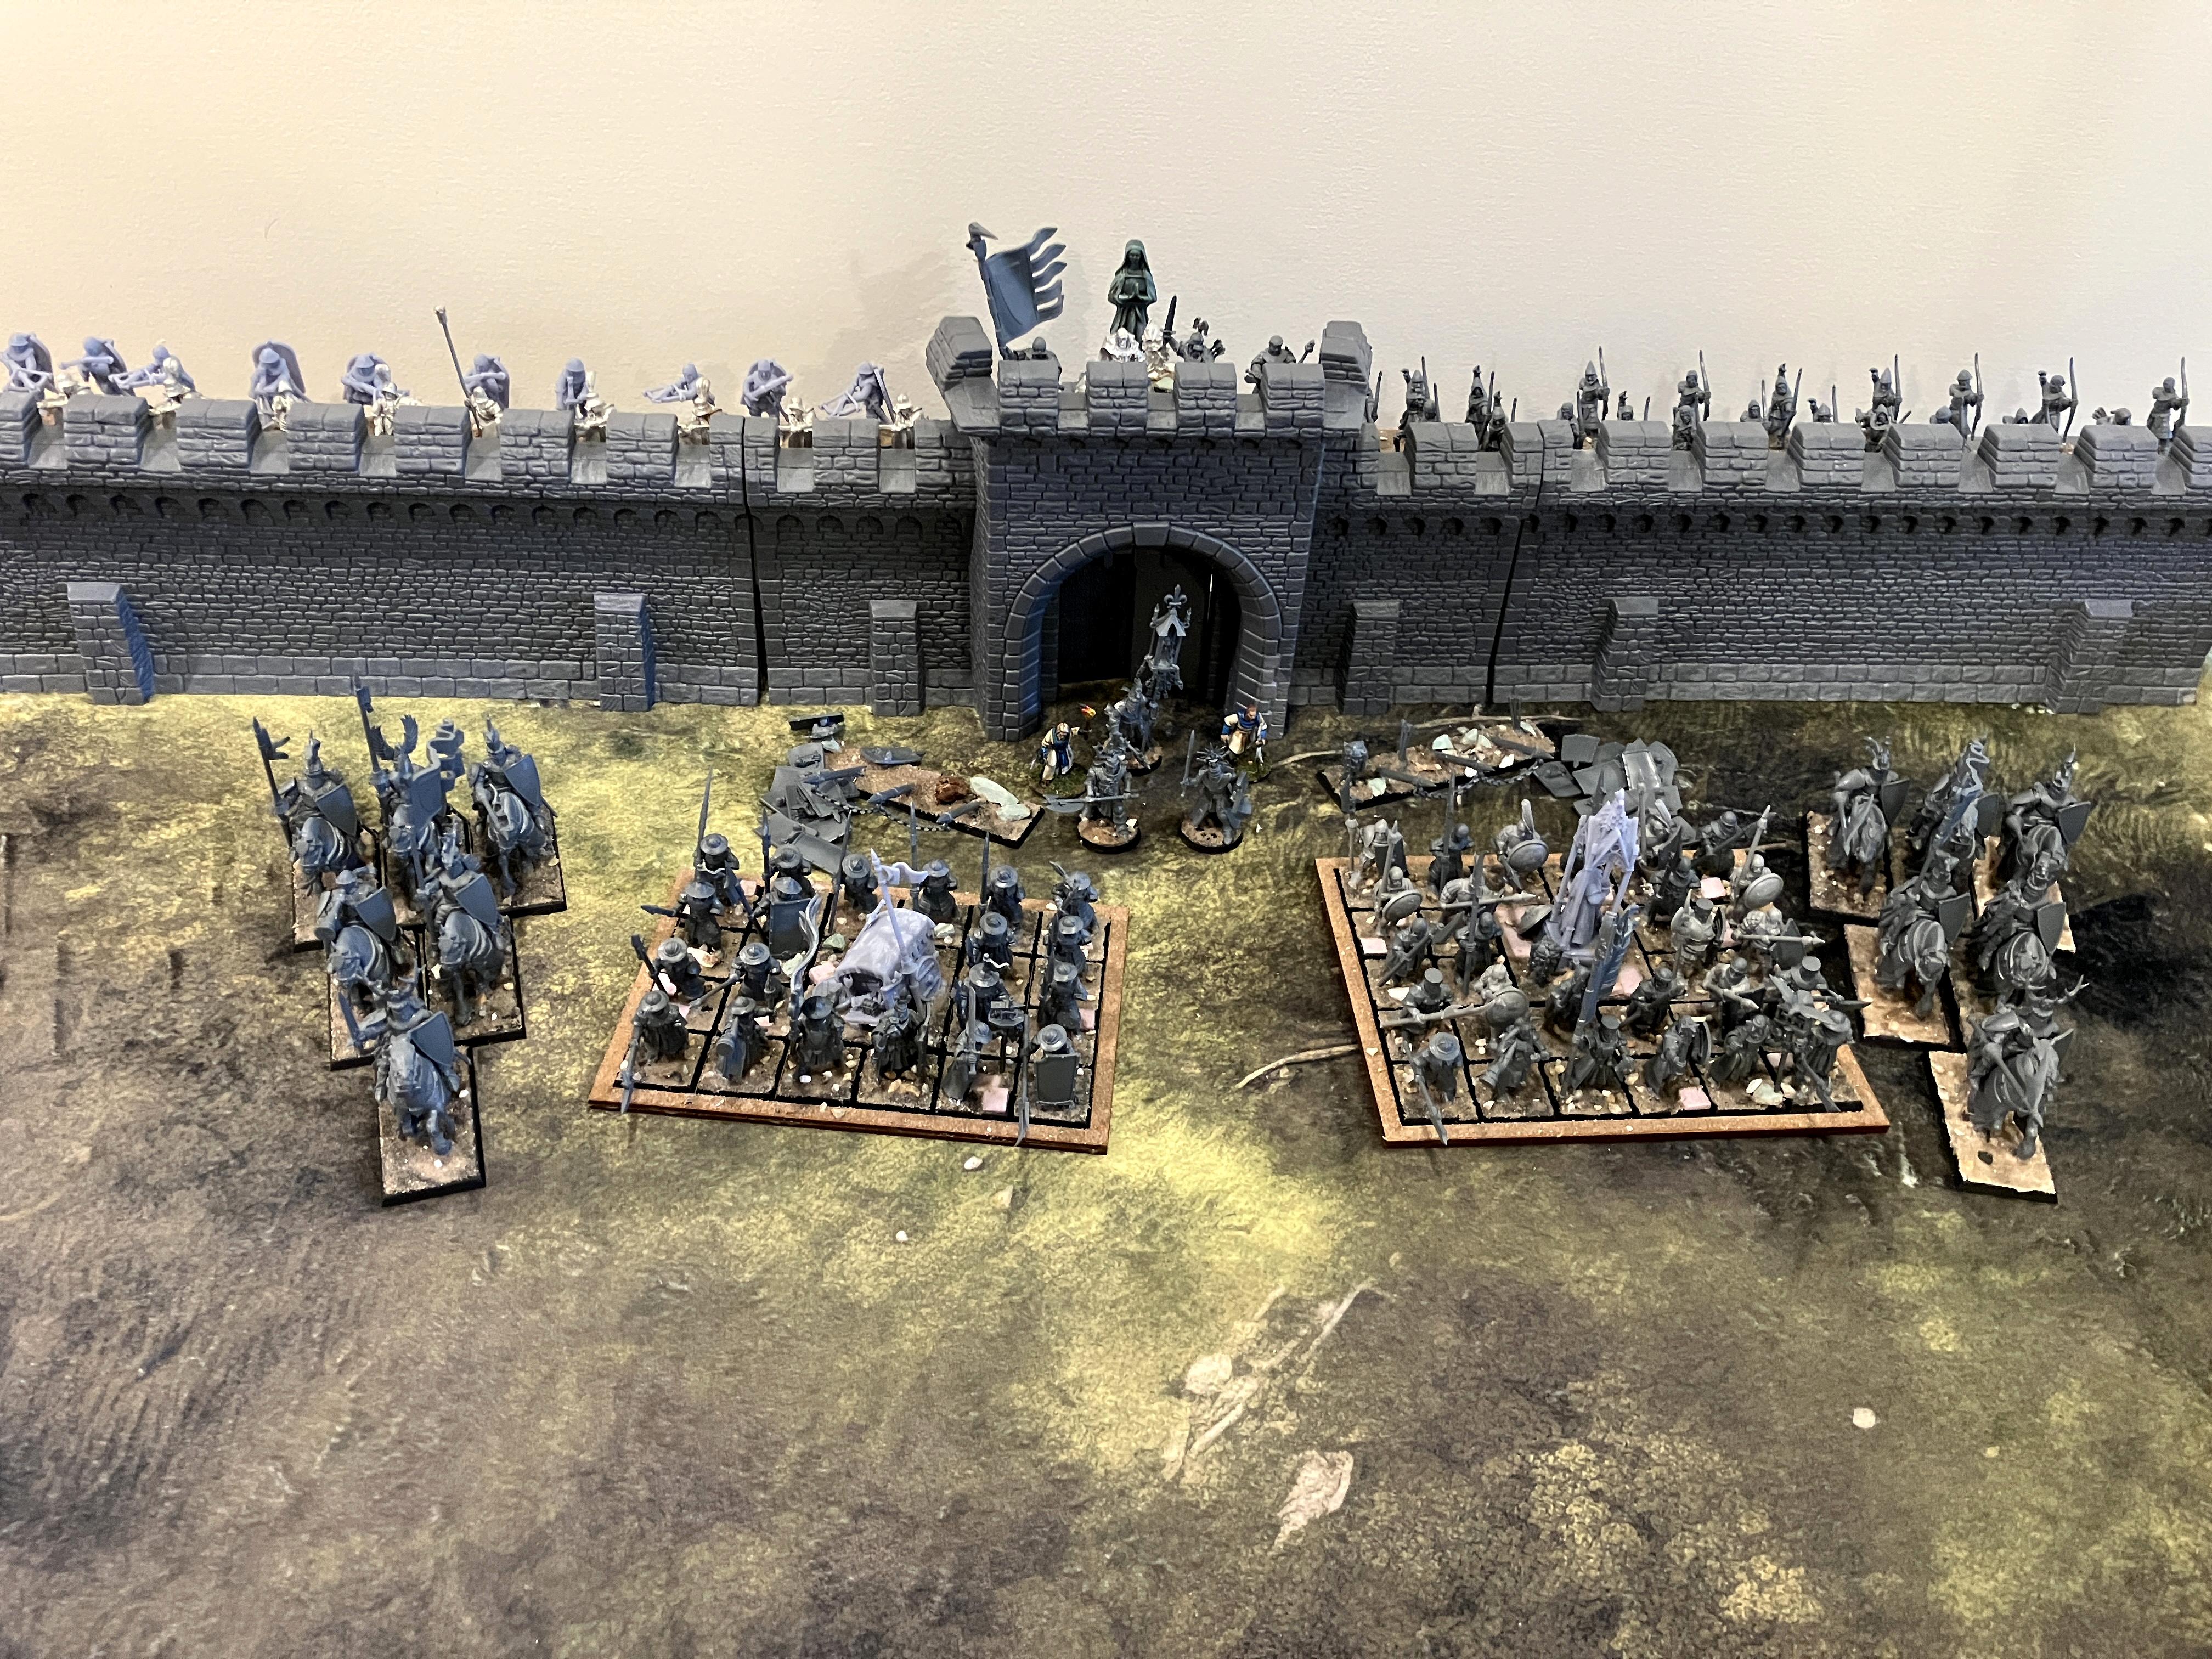
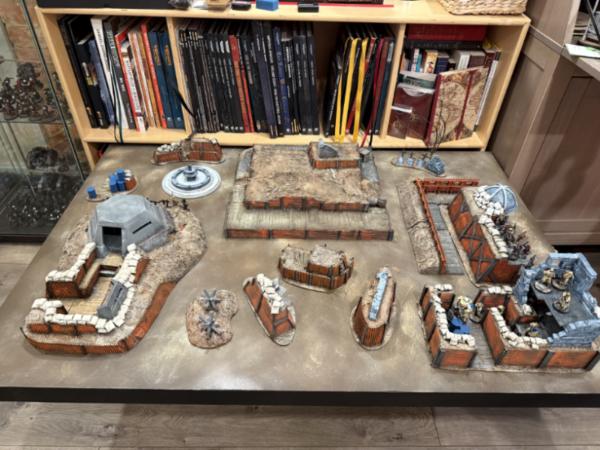
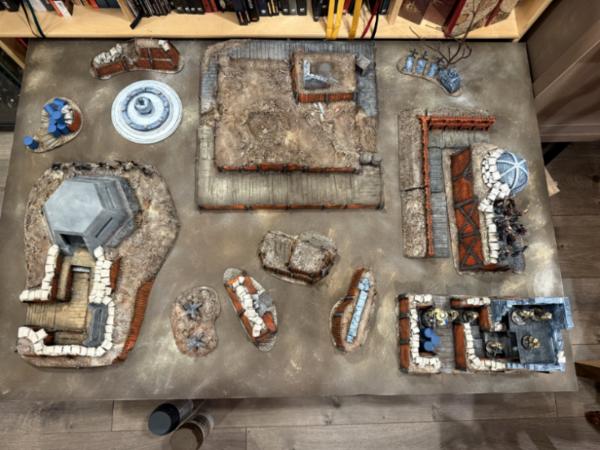
Get ready for another photo heavy dump of this latest commission!
My friend asked me to design and build a display board for his Trios Army at NOVA. If you've seen his army, you couldn't forget it! It's the one with all the World Eaters and Bezerkers replaced with Beastmen, including an amazing Angron Cow conversion. So here's the process with the ending first, then all the WIPs.
Forgive the poor quality of photo - I've been told the lighting there wasn't great. In typical fashion for me, taking better quality photos at home was not a priority here.
Special Shout out to Black Site Studios for their AMAZING modular boards which made this incredibly easy to do from a base point of view.
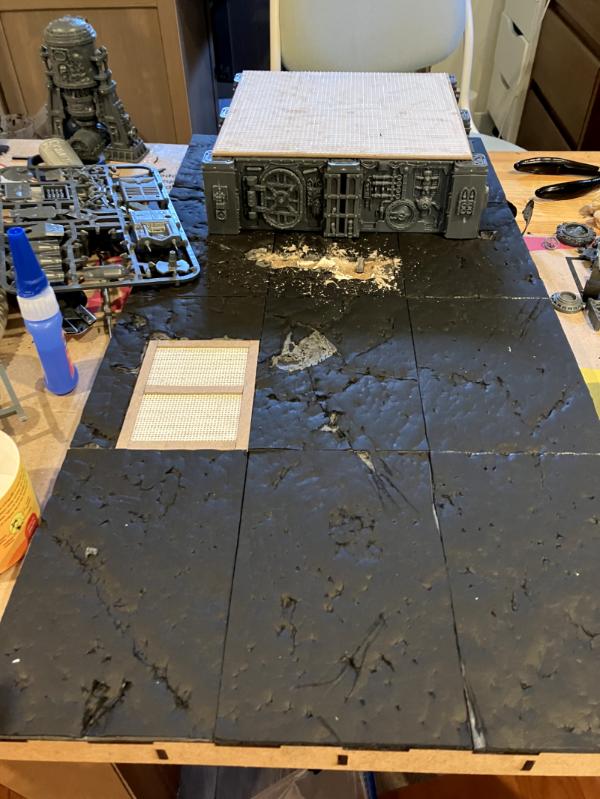
Here's some WIP shots of the board itself. Made using black 'Professional Foamboard' from Michaels, which is a bit more pricy but it feels stronger than regular foamcore. Four of their big packs seemed to cover most of the board. I used off cuts and smaller pieces and a few other pieces to fill in the rest. Half the board was 'concrete' like so. The other half was raised industrial or stone blocks.
Here you can see an example of how I ensured that there was some differentiation. Two of the base concrete tiles are slightly different - one has this grate and more damage, the other one has some industrial debris embedded into it. This is the only 'non flat' one, so it goes on top of the pile when stacked!
How the based boards stacked up to the raised boards behind it.
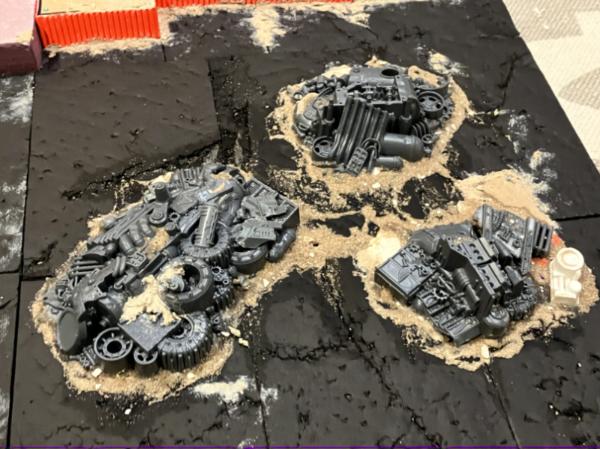
How I made the pipe boards - you can see the general process. I raided my various bitz boxes heavily for this. Funnily enough, the same client has my first display board, which includes part of a vacuum cleaner tube. This commission has the other piece as you can see on the far right of this picture.
How the board looked once done.
There were several other configurations possible, including a raised central platform, or with the raised pieces all along the side.
Realized I never posted these, so I'll do so now. As usual, I'm not the best with the camera, but I promise I will do better for the next one (Which is coming right around the corner!) Once again - these are some of the final images from the industrial board commission I worked on. All terrain tells a story, and I really enjoyed building the story for this set.
Like I said - not the best photos on the planet, but I think we all get the gist.
A very enjoyable thread- I'll be following to see what new (and even more prolific) items you put out!
I'm a big fan of 'found materials' construction, so love seeing all the improvisations that work perfectly as building materials for your several projects. The multi-gabled roof building a little bit back is massively impressive- the shingles alone must have taken you a fair amount of time to cut out. Your building under construction, with the scaffolding and the cinderblocks awaiting assembly for a second story- is extremely realistic. I saw houses in Egypt that looked almost exactly the same- the reason being that the owner pays a lower rate of tax on an 'unfinished' building than on a completed one; some 'unfinished houses' had been in state of 'unfinished' for years.
Your badlands pieces are a lot of fun and very well done, considering it looks like you are using hobby knives and box cutters, rather than an electric foam cutter. Whcihever method yyour using, it's yielding some very rugged terrain that's great just fer lookin' at as well as playing.
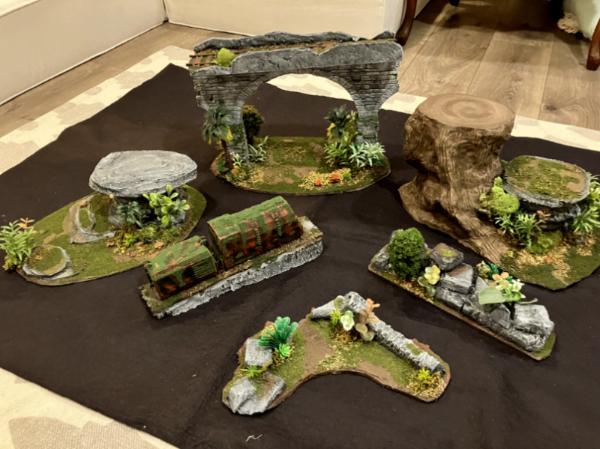
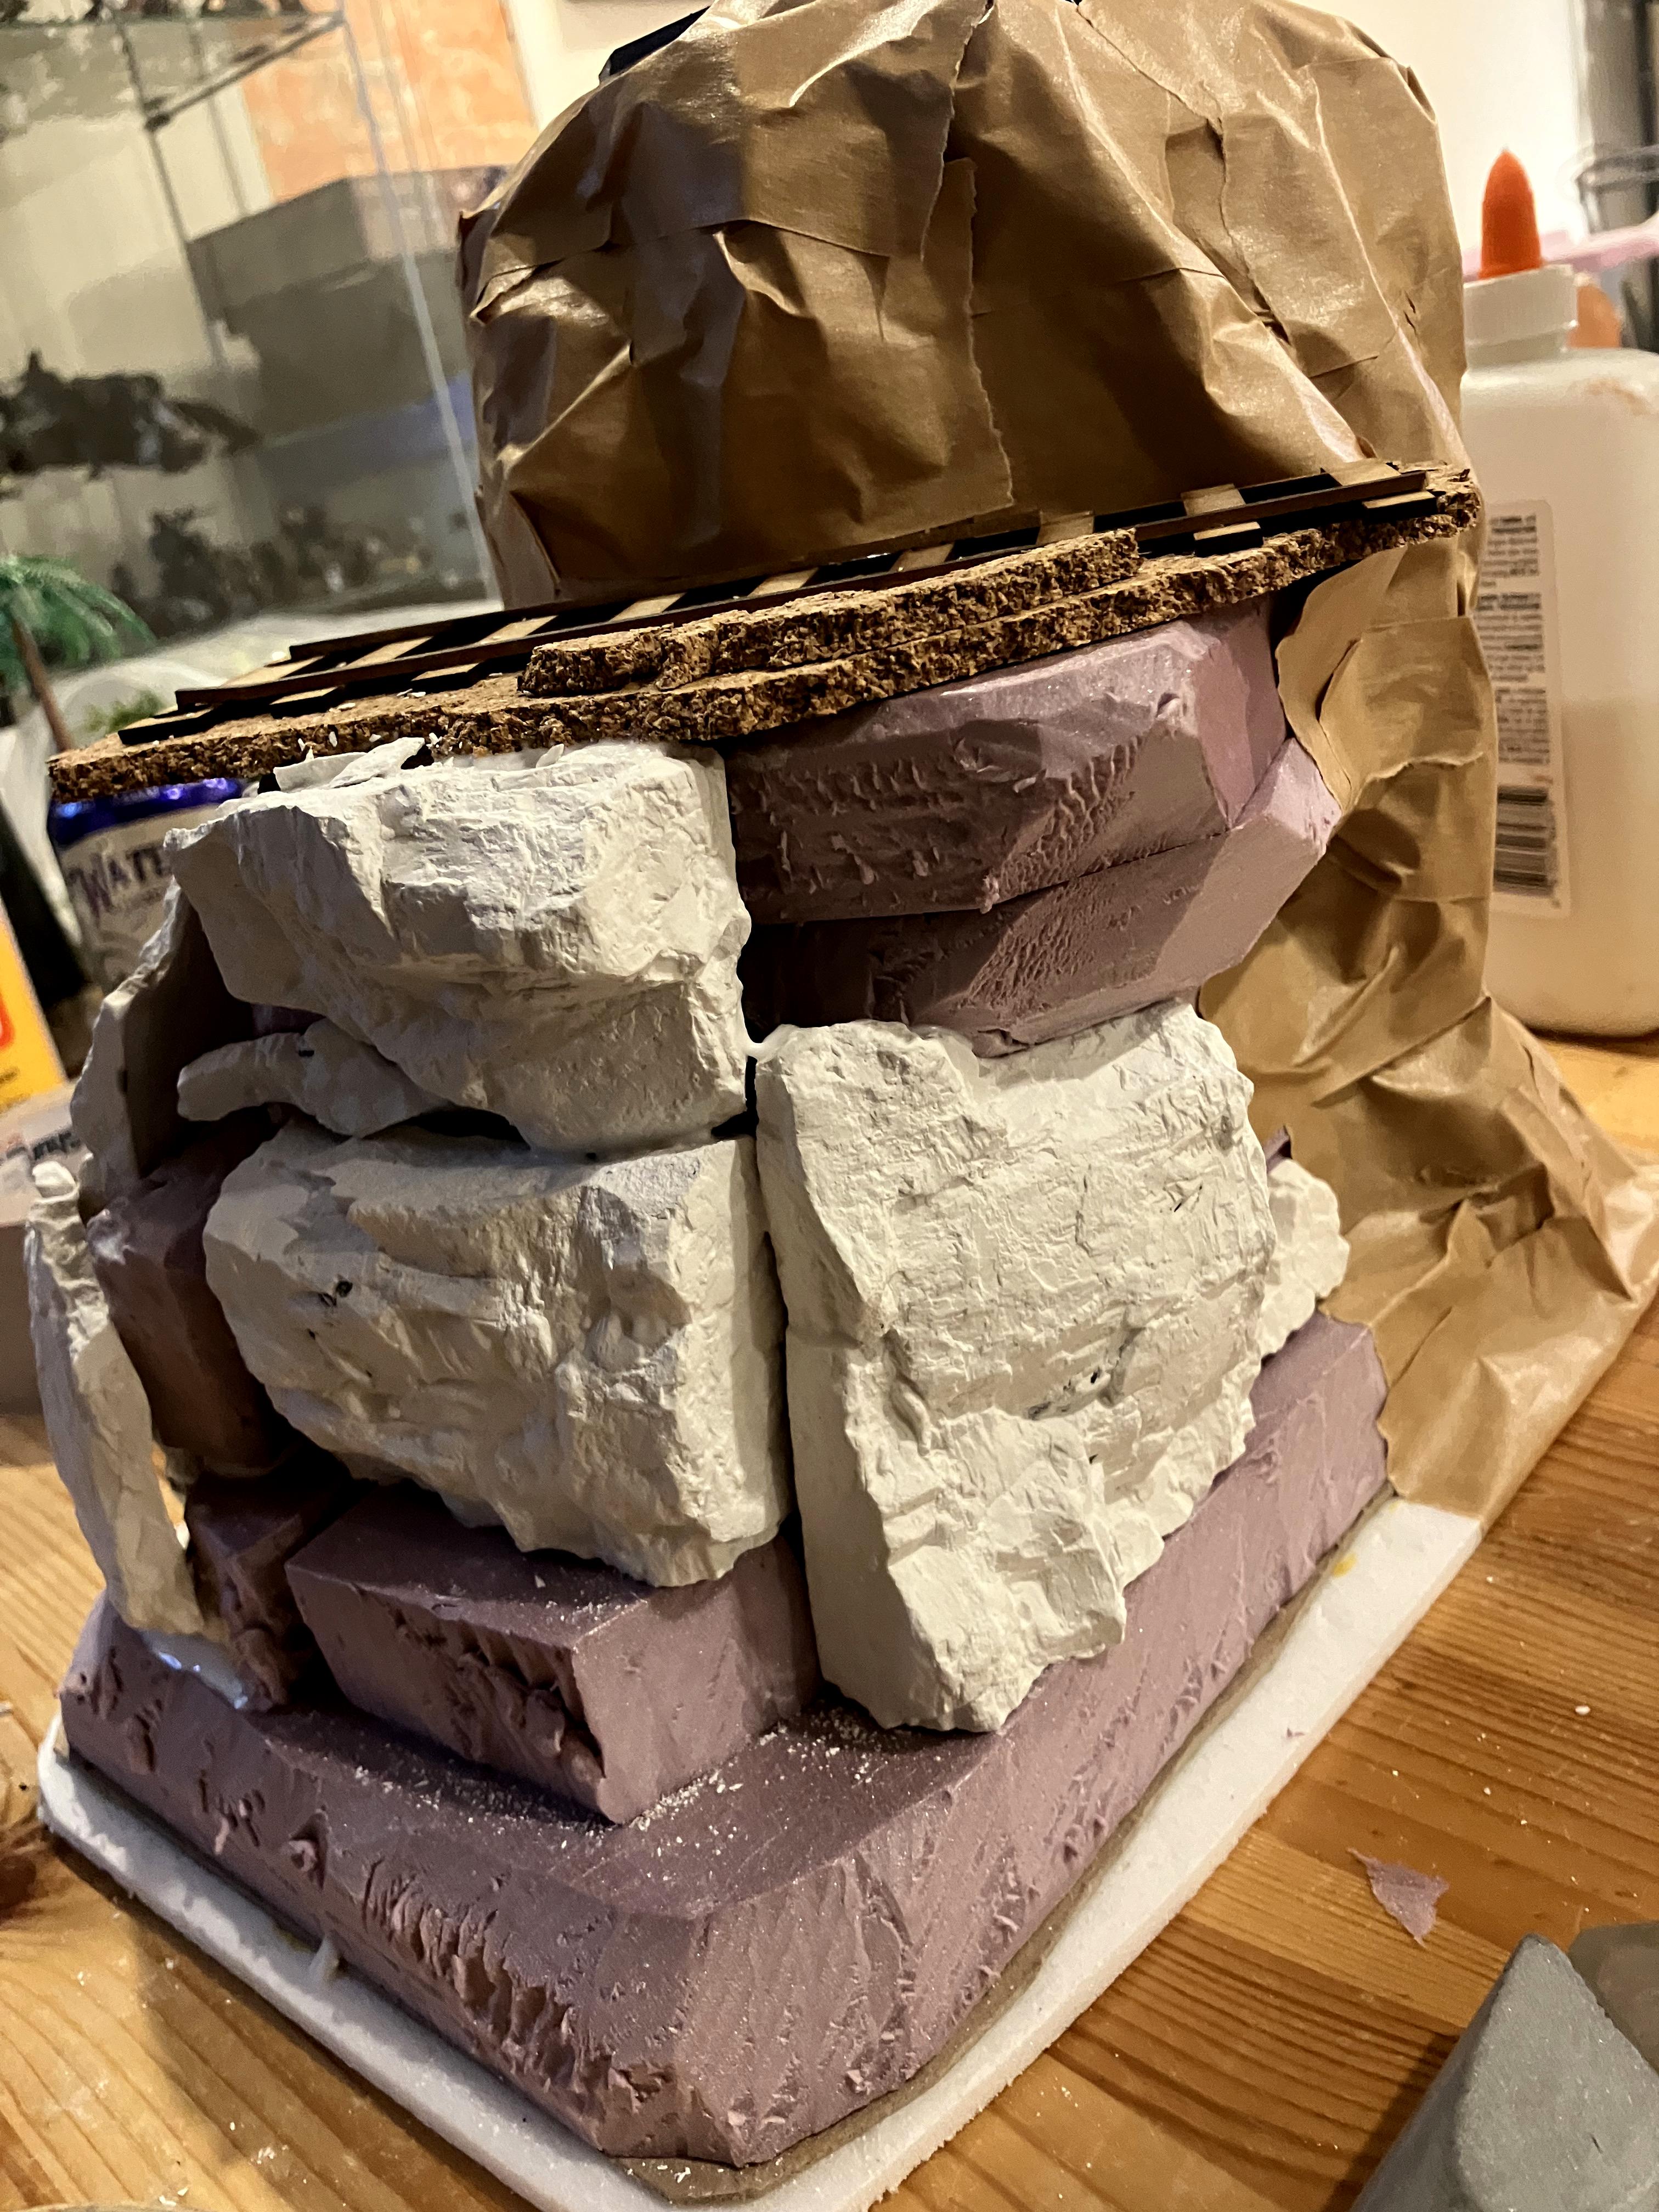
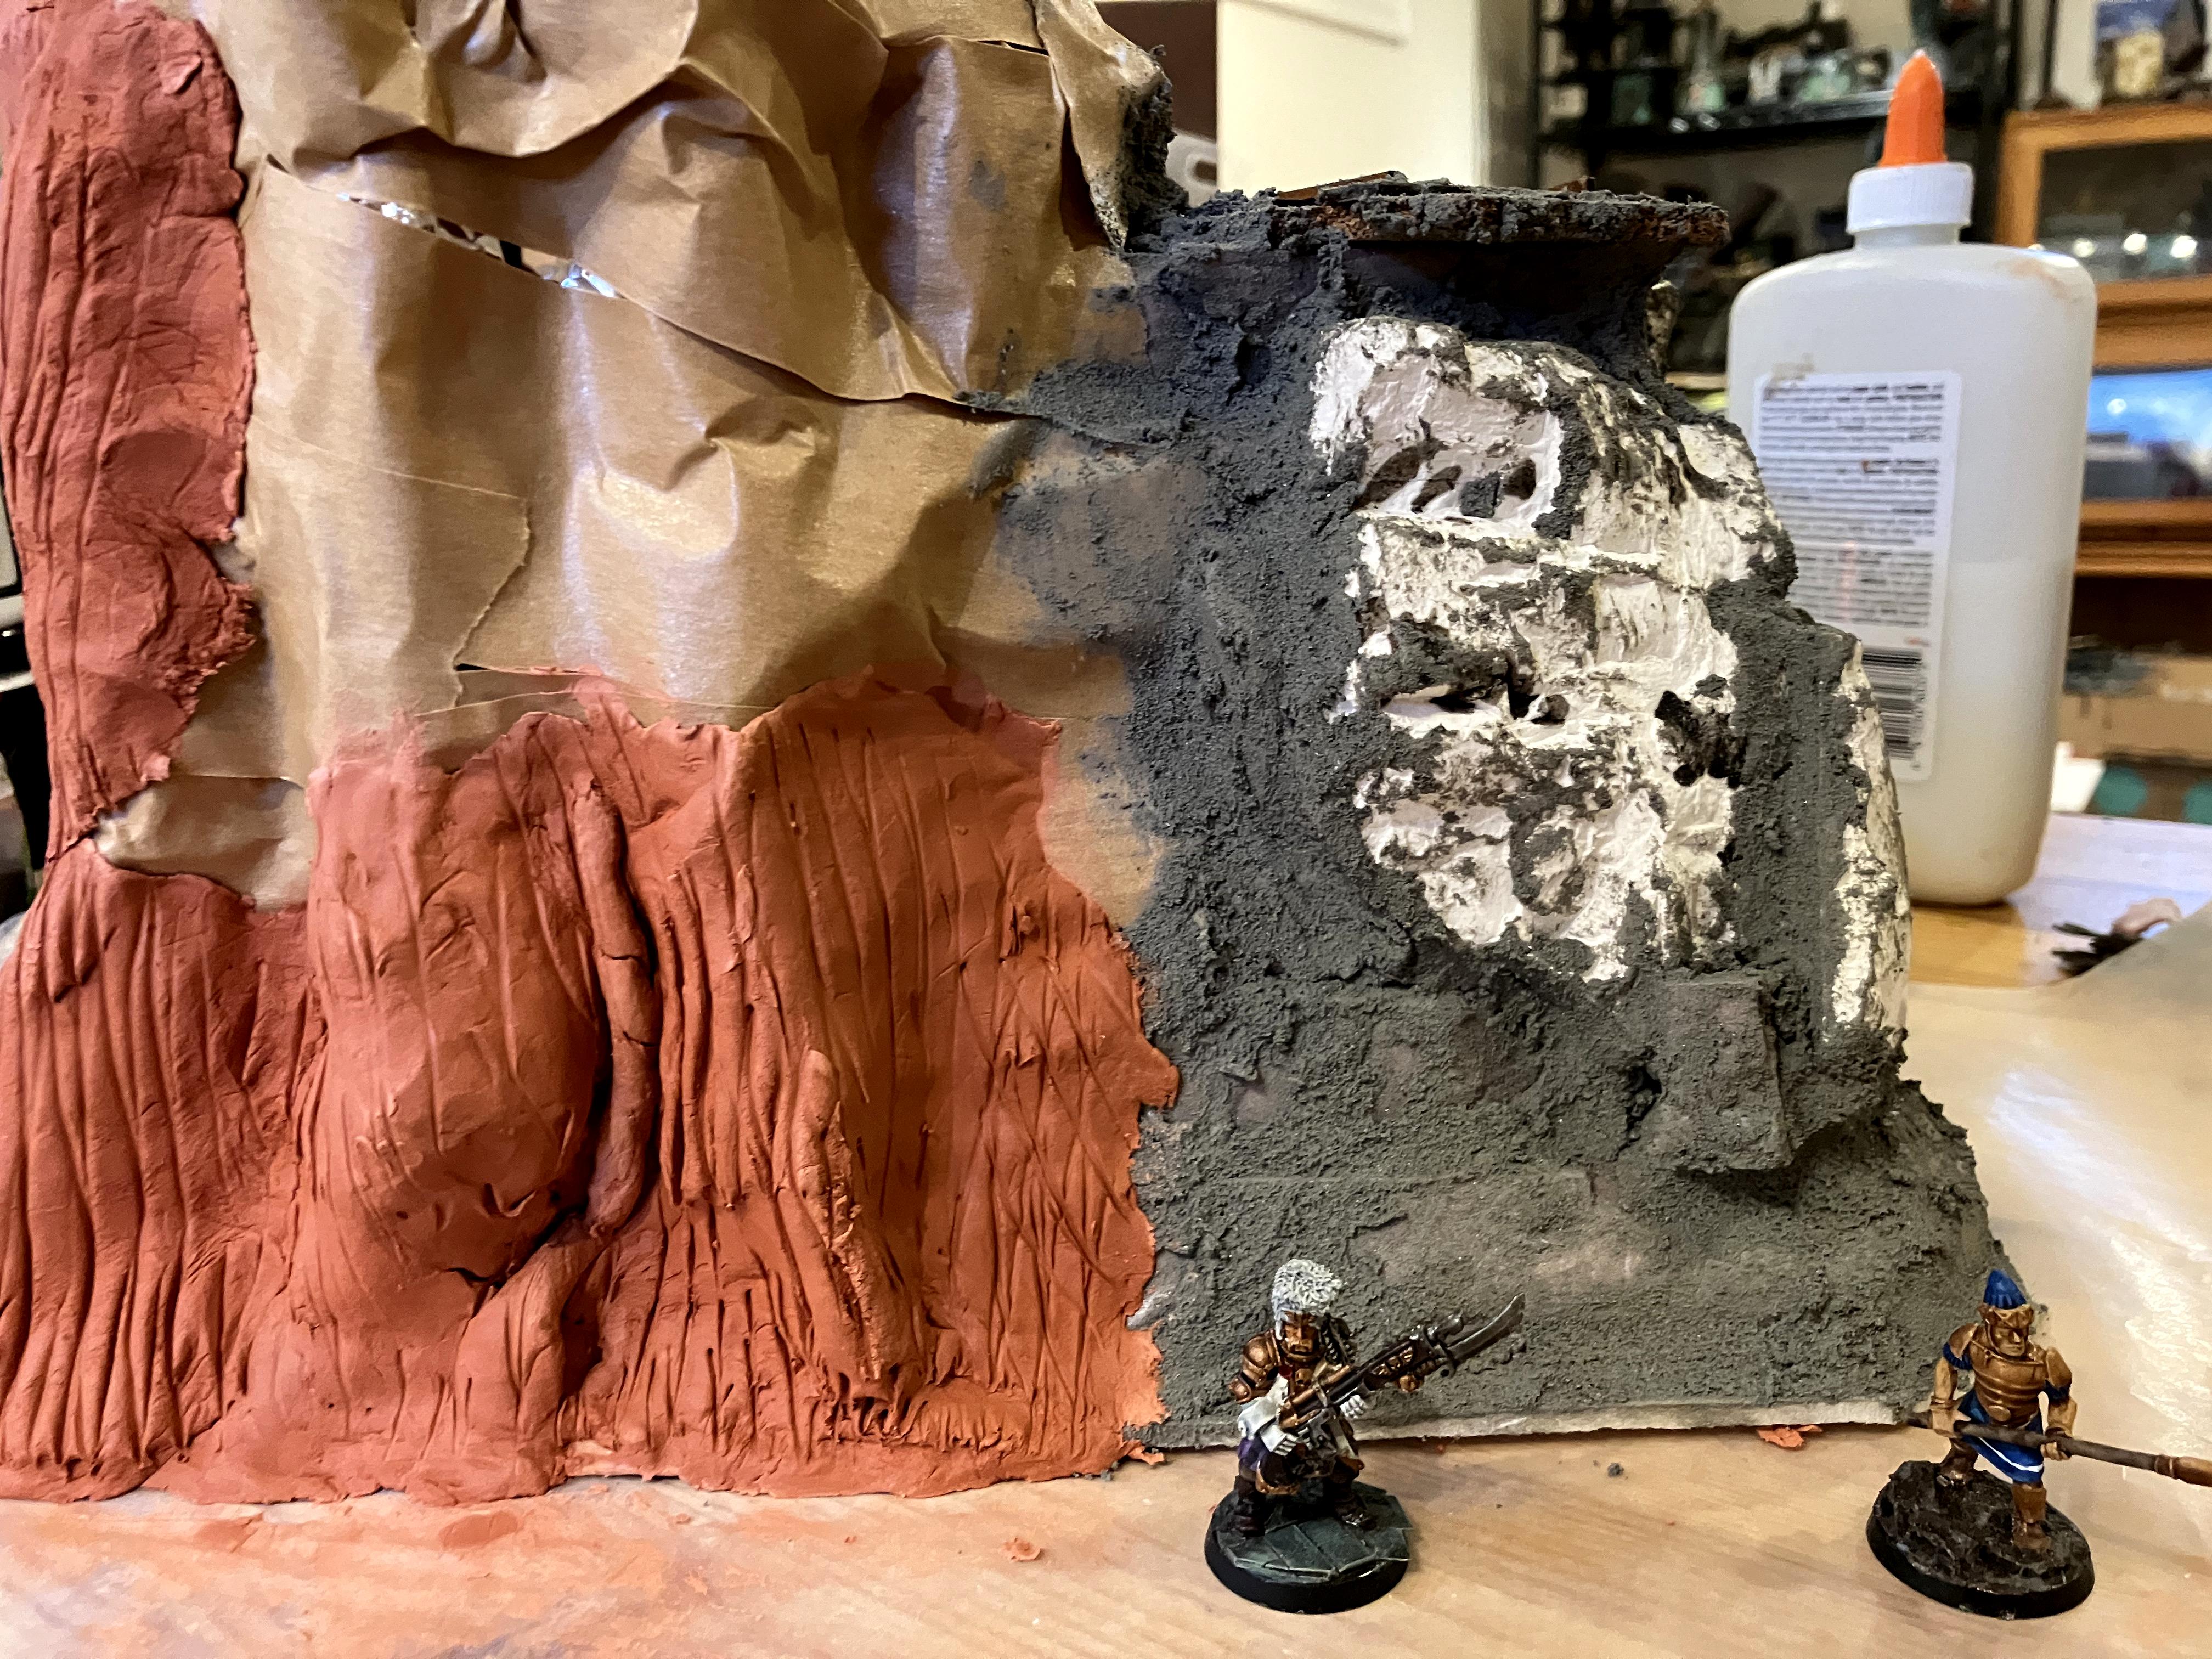
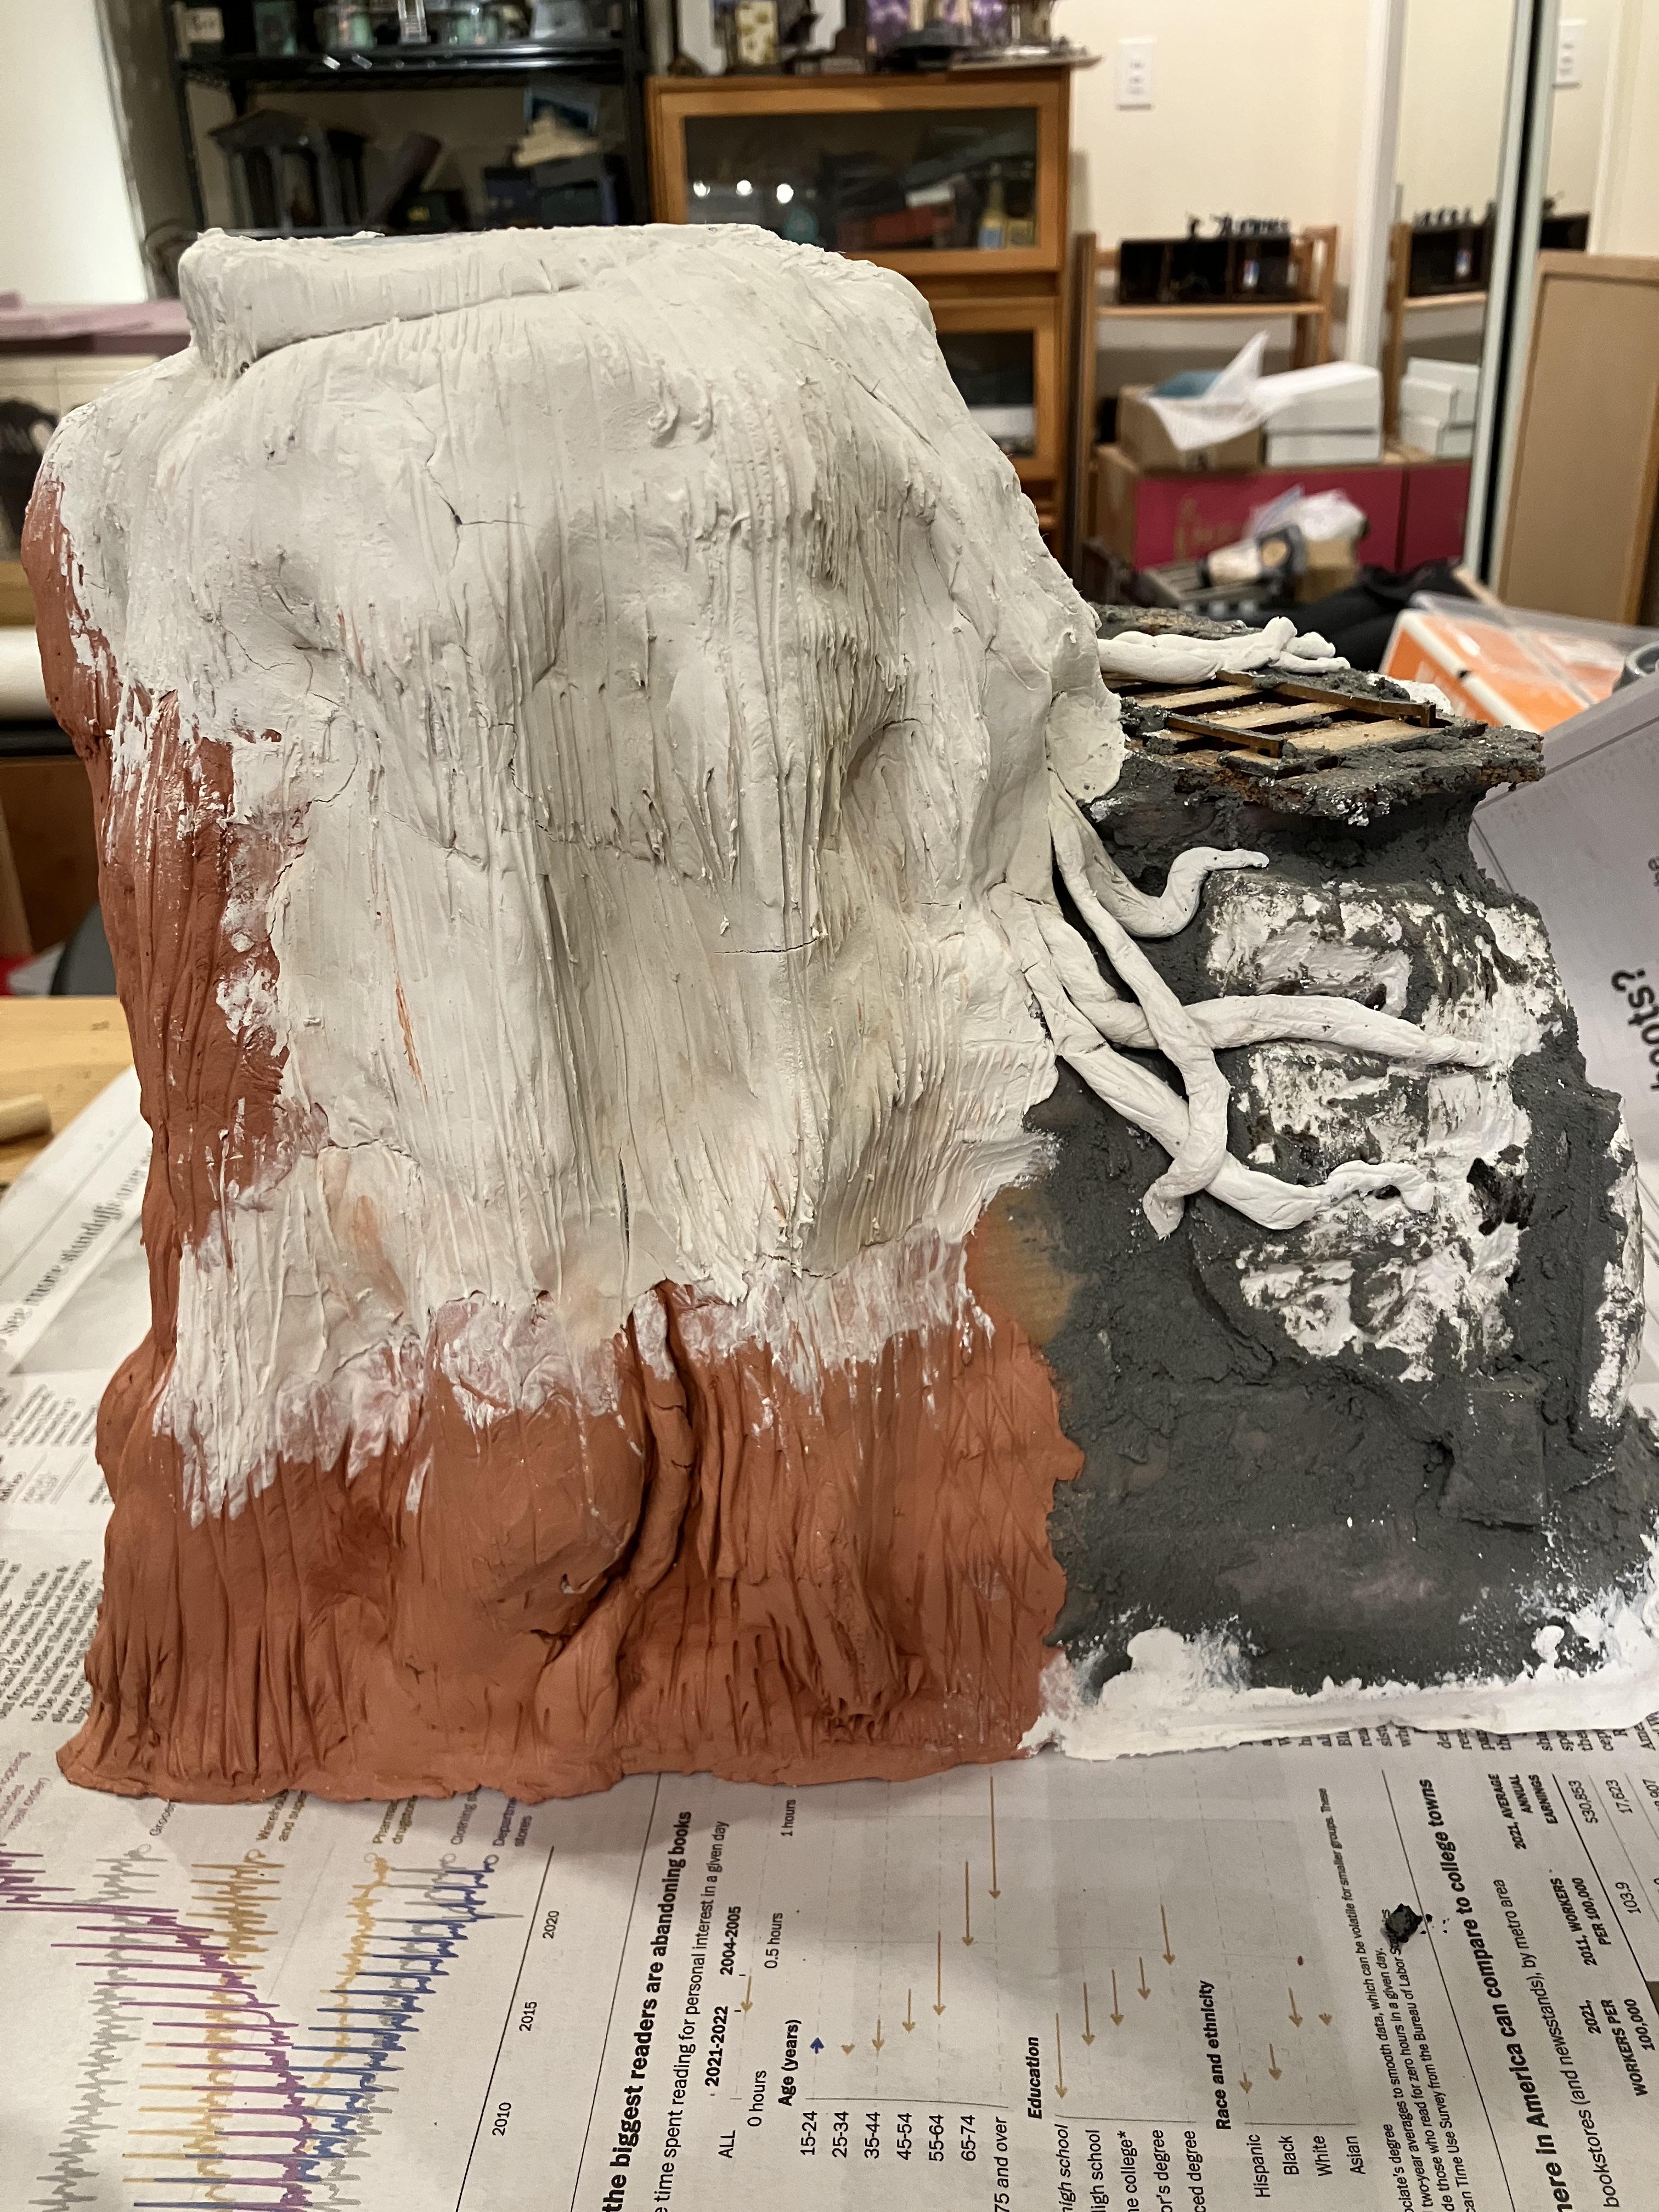
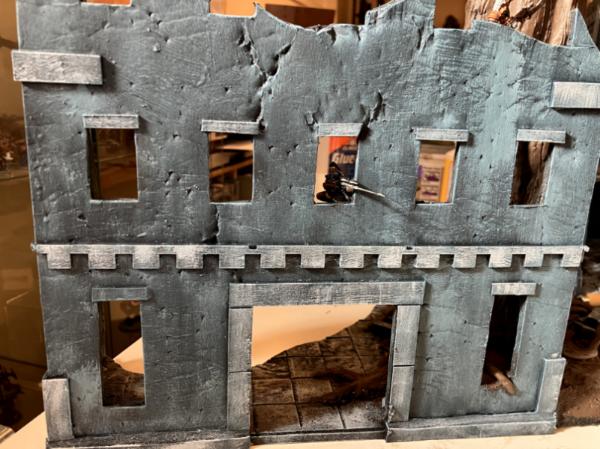
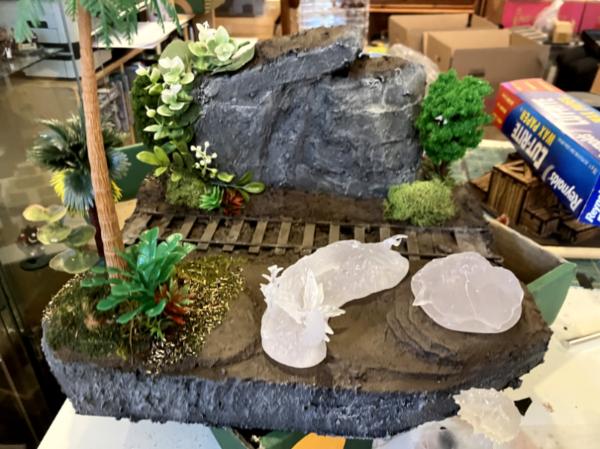
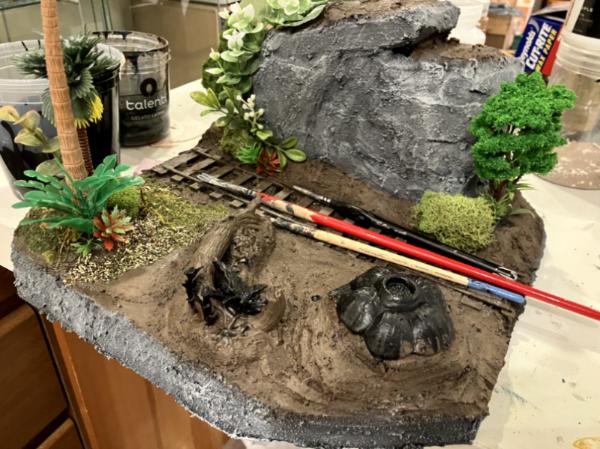
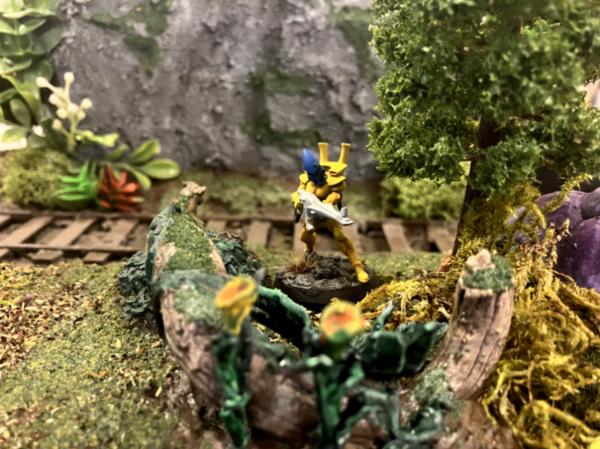
Well...More work been done on other projects. I'm behind in posting, so it's another large photo dump! Client wanted jungle/long abandoned planet being reclaimed by nature. Heavy on the nature, lighter on the 'touches of civilization' So I gave it my best shot. Jungles are always tricky because of the necessary plant cover - too plastic, and it's relatively durable, but also easily seen as aquarium terrain. Go more expensive, it's more realistic in the miniature world, but also way more fragile and unlikely to survive much gameplay. I think I managed to strike a balance here. The client also wanted the terrain to be large enough to hide his knights army. So tall tree trunks and ruined stone structures it is! As always, feedback appreciated.
The whole commission finalized.
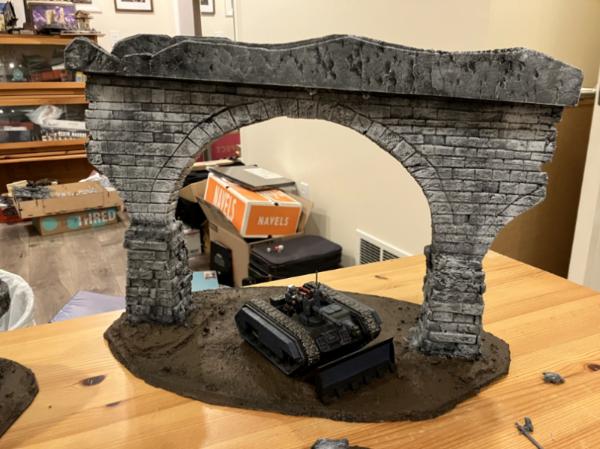
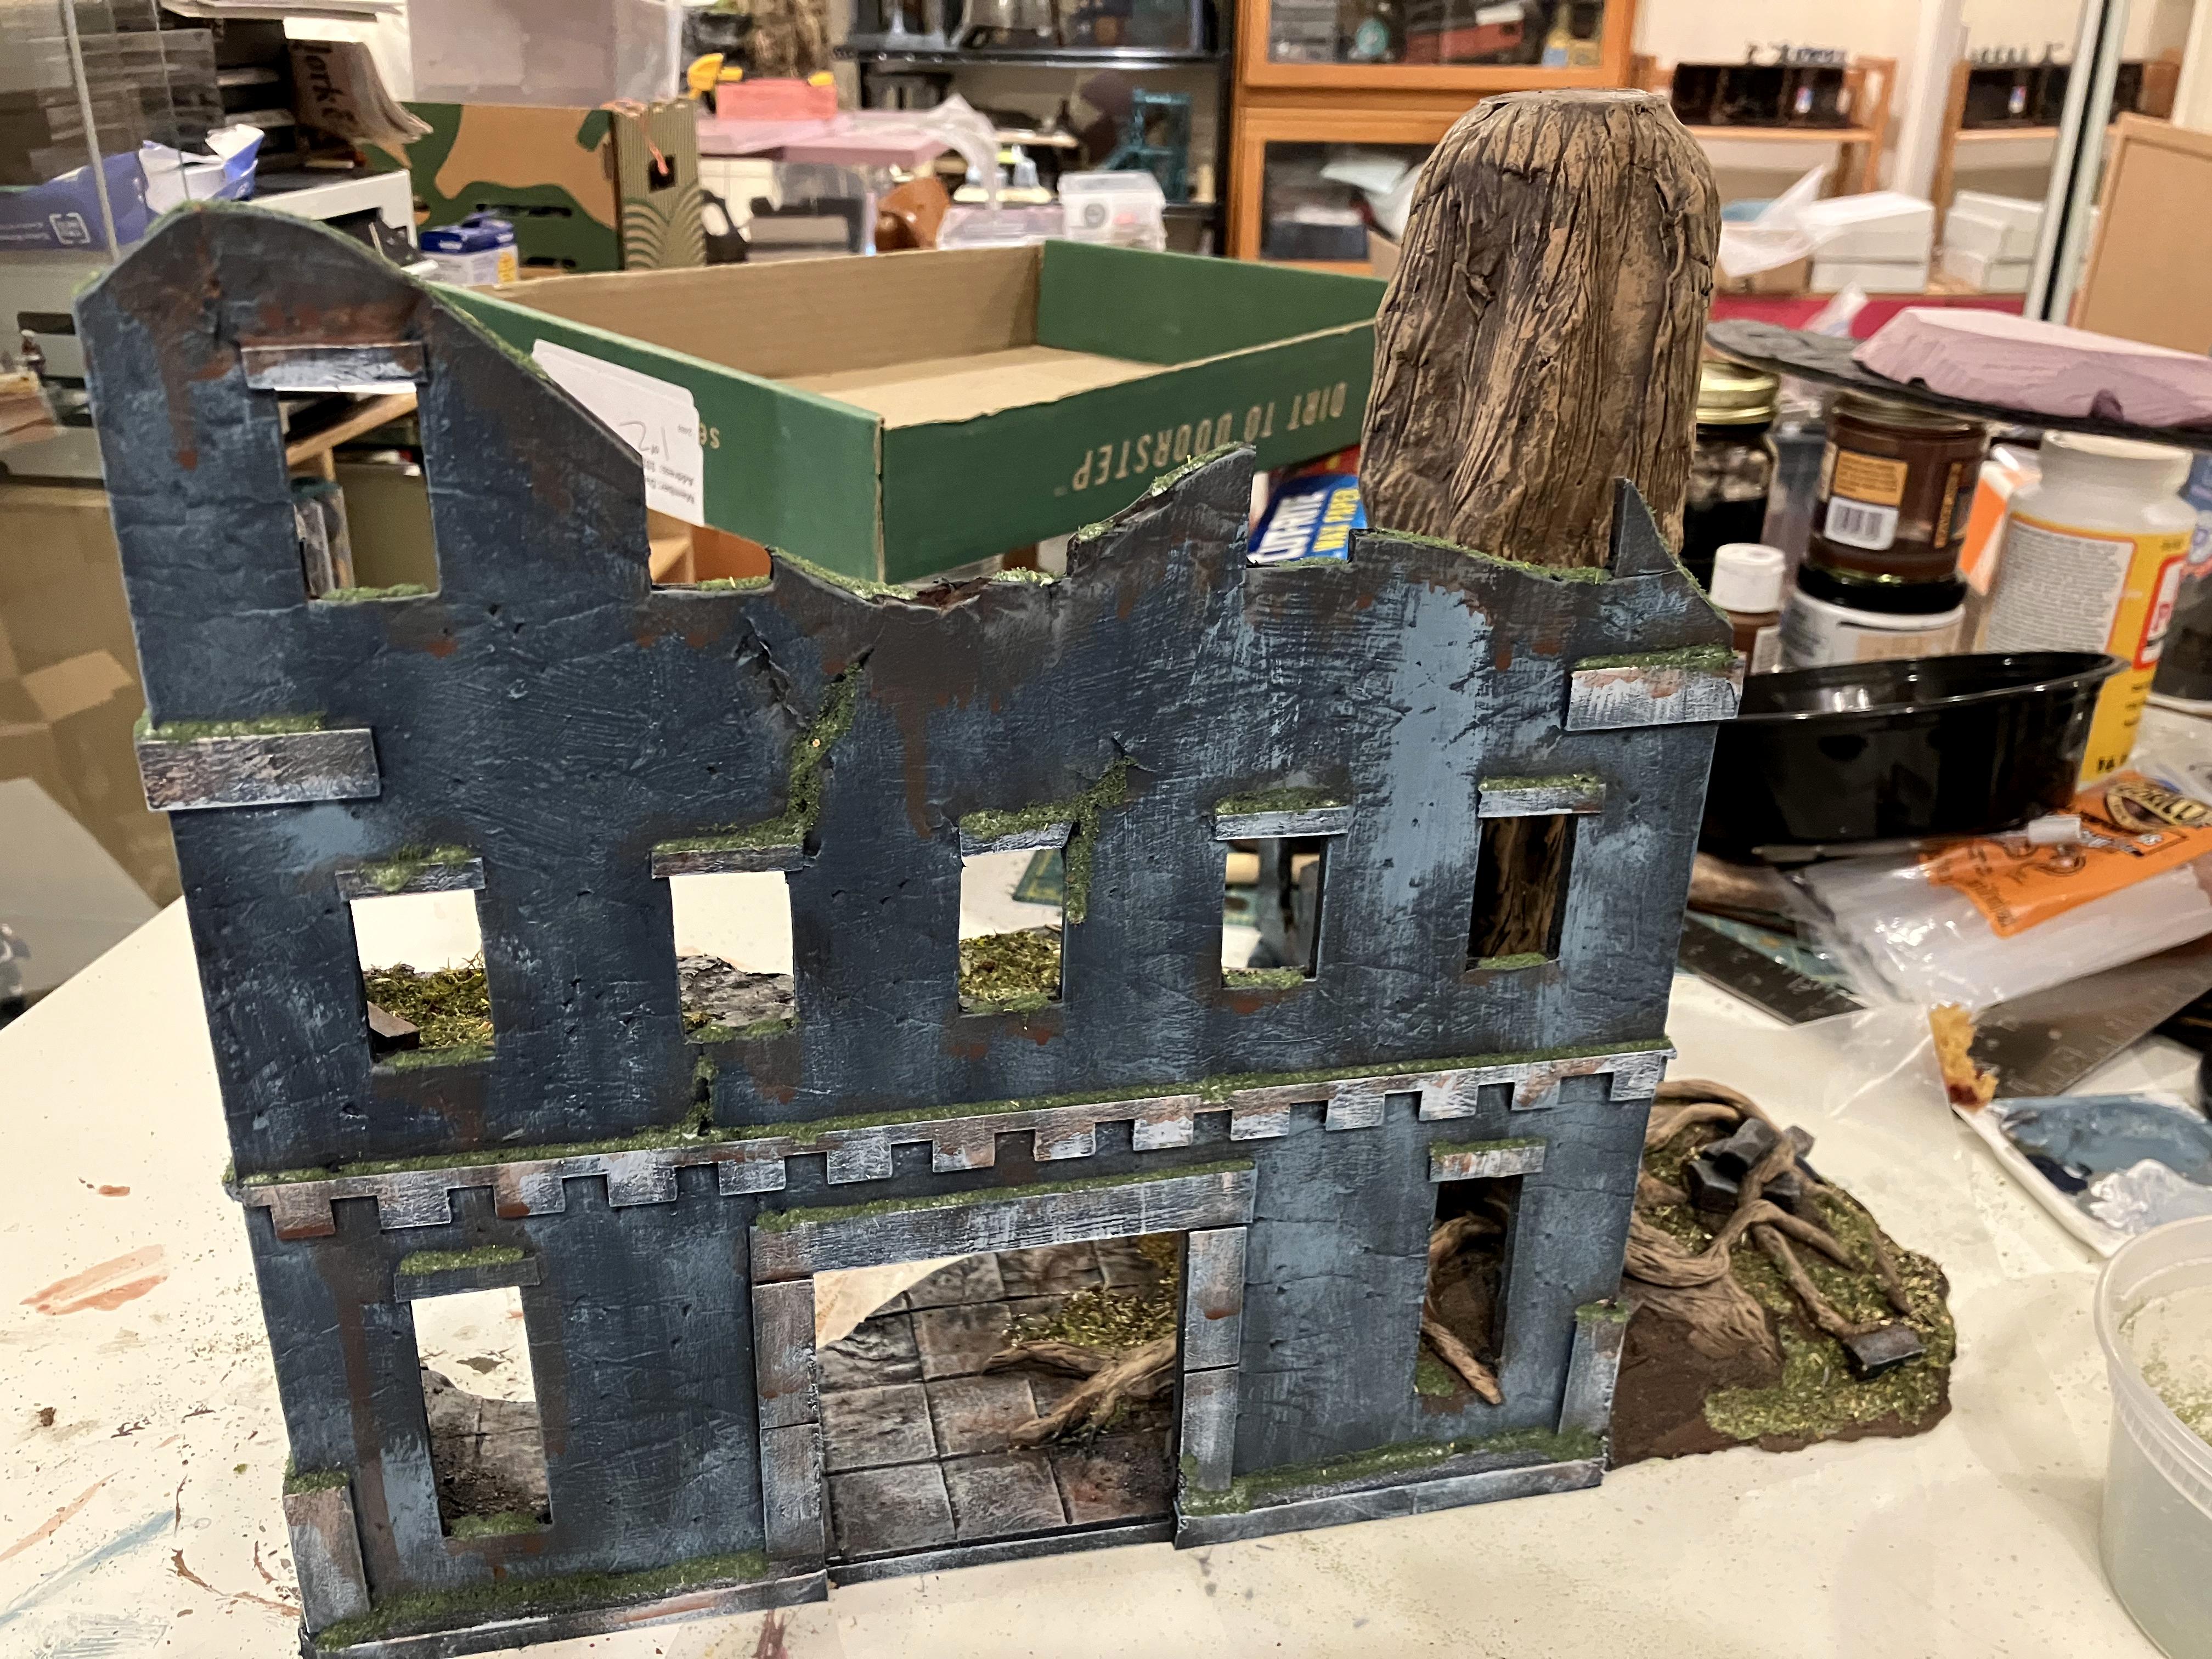
The ruined stone bridge WIP to final.
Several of the large pieces WIP to final.
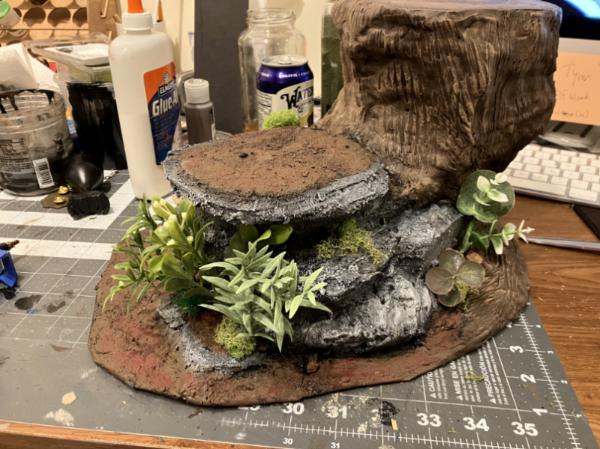
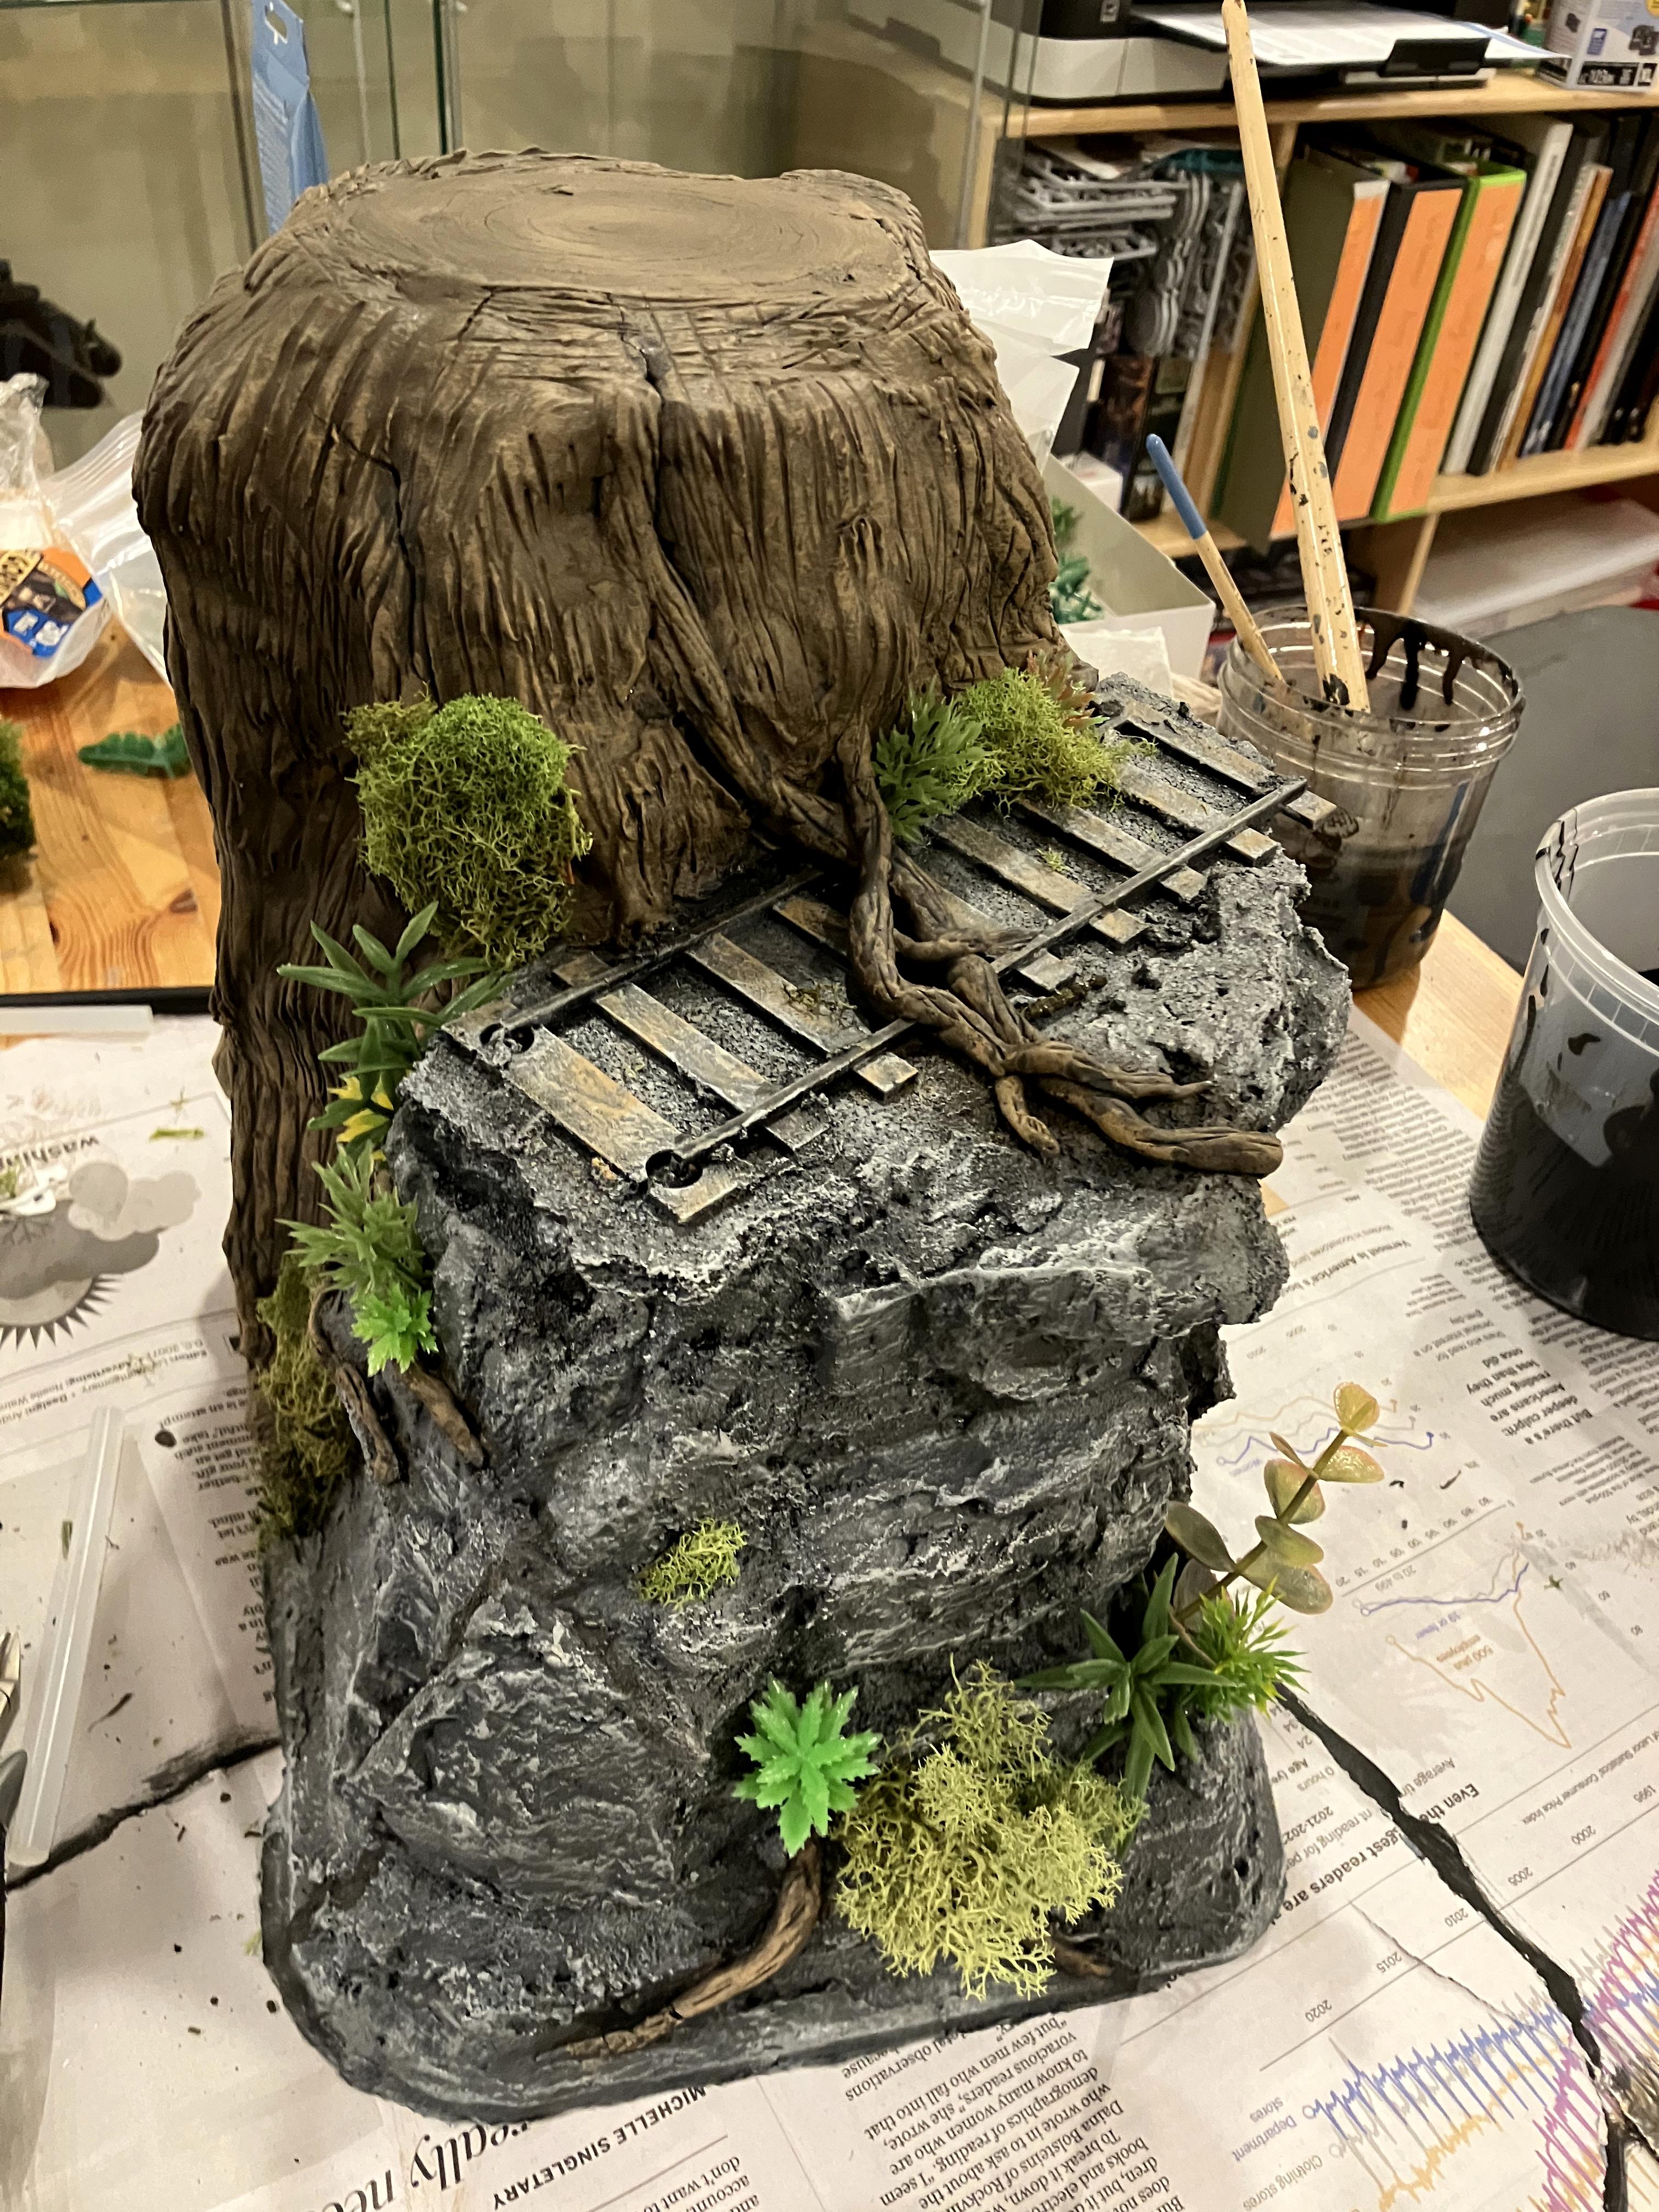
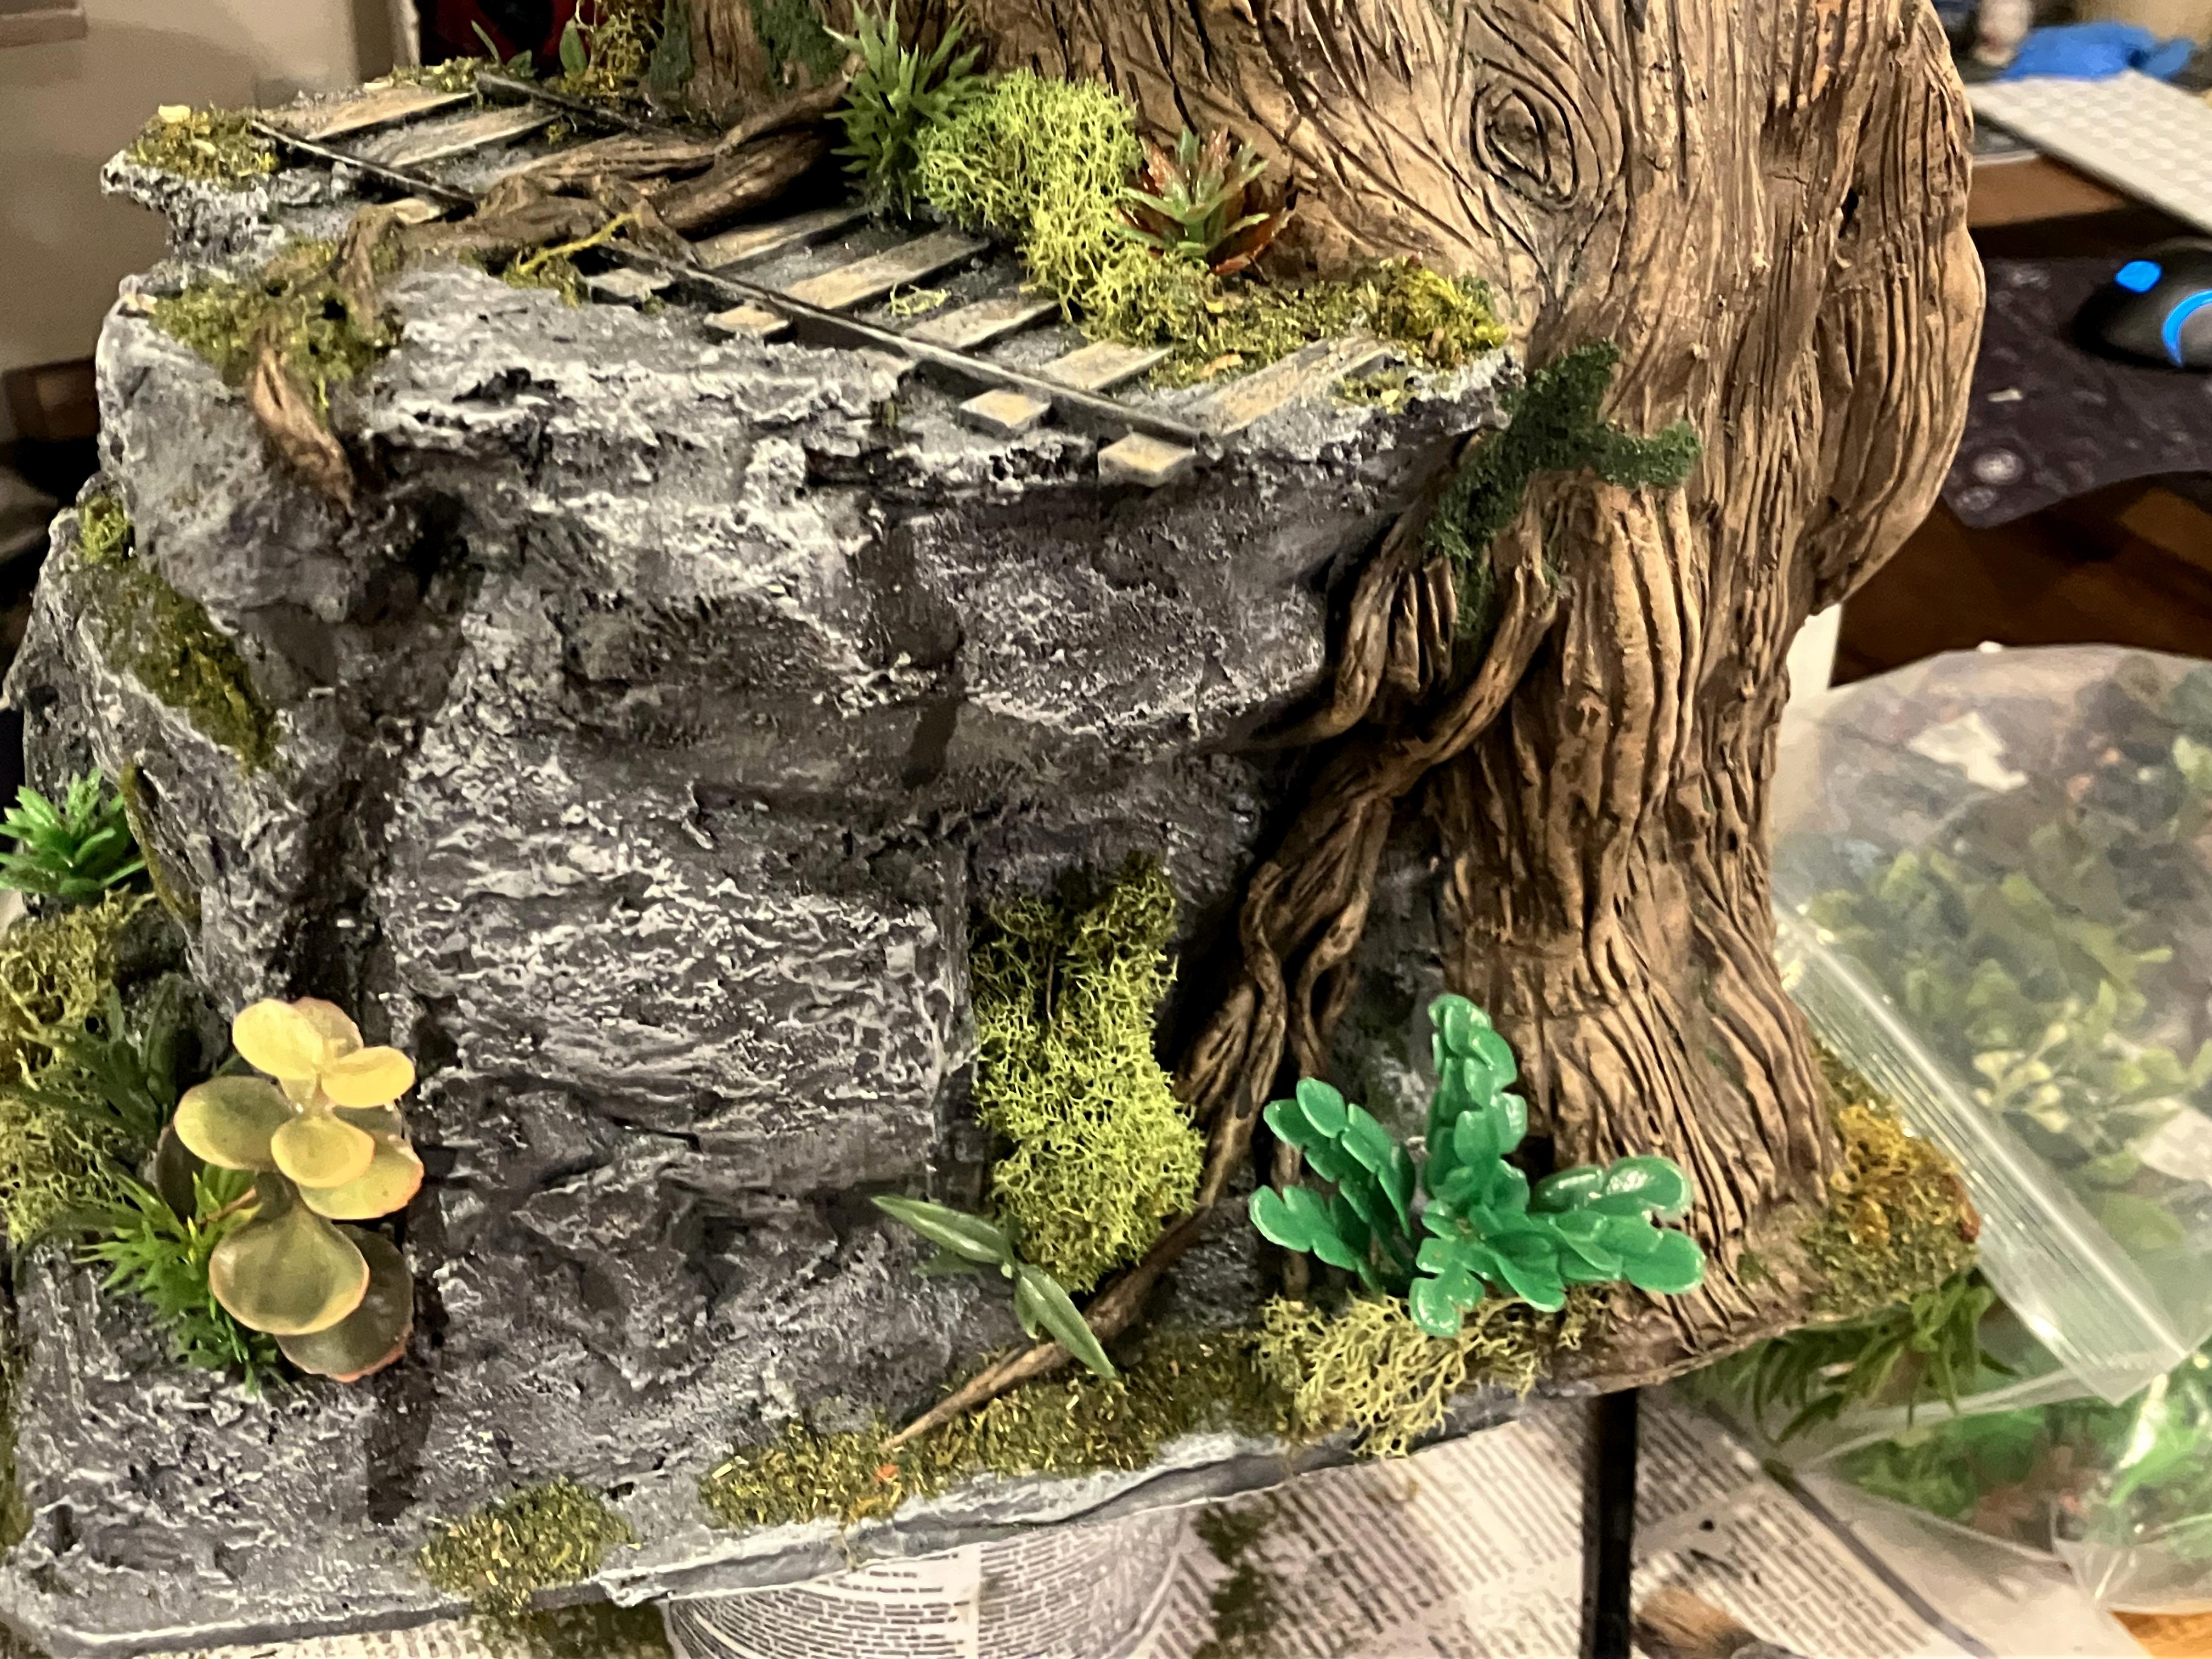
This piece was designed to be a massive tree trunk growing into the side of an embankment over many years.
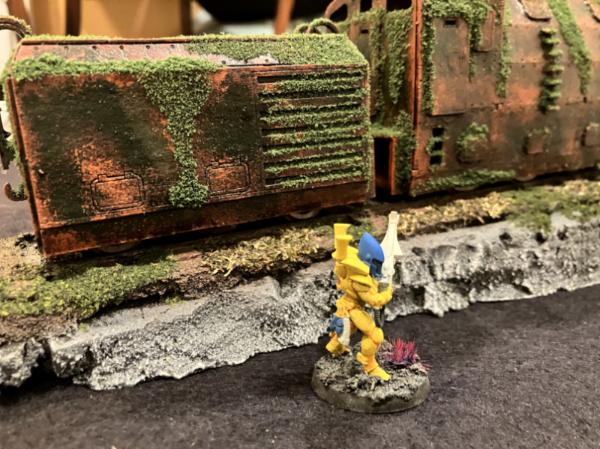
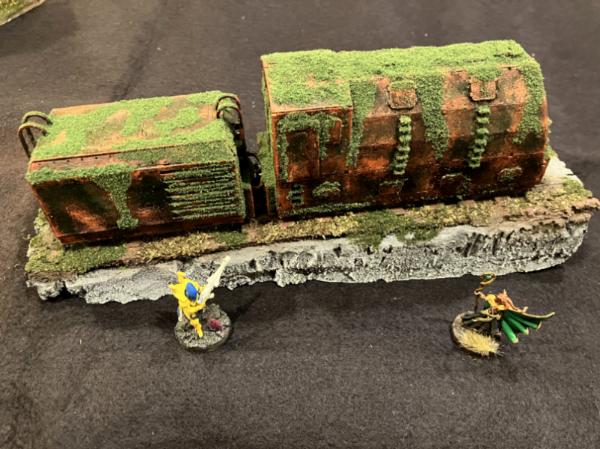
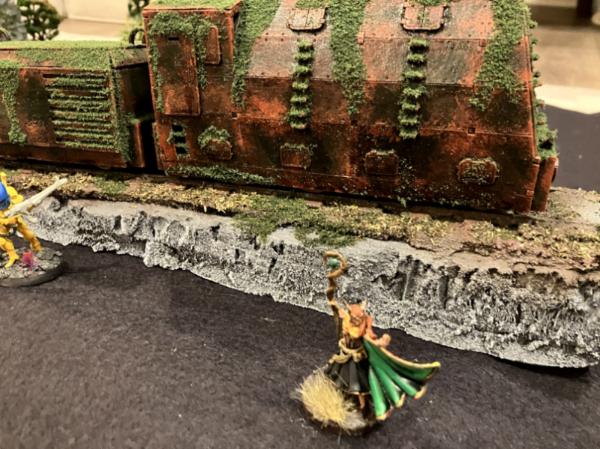
Some more barricade sized terrain - somehow I didn't upload the last of the three pieces, but that's fine, these two are better looking, and the train one is honestly my pride and joy in the weathering department.
Most of this was done with knife, ruler, and various thickness of foam - I do have a small handheld foamcutter, and I used that to help make the arch, but I don't have the space for a larger one (although I definitely want one, and I probably could find the space....) To make the big trees, I used clay and aluminum foil to build up the definition of the sides of the tree.
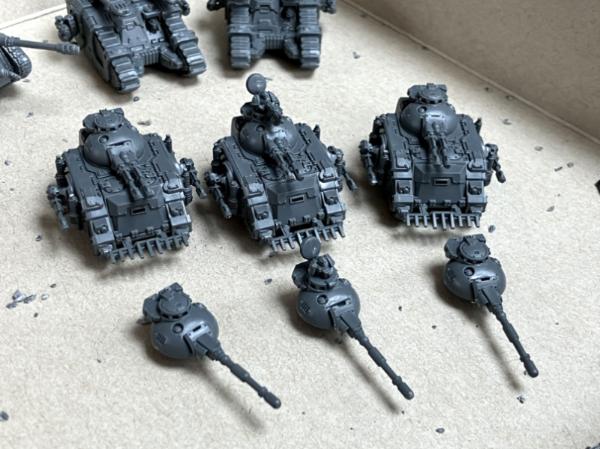
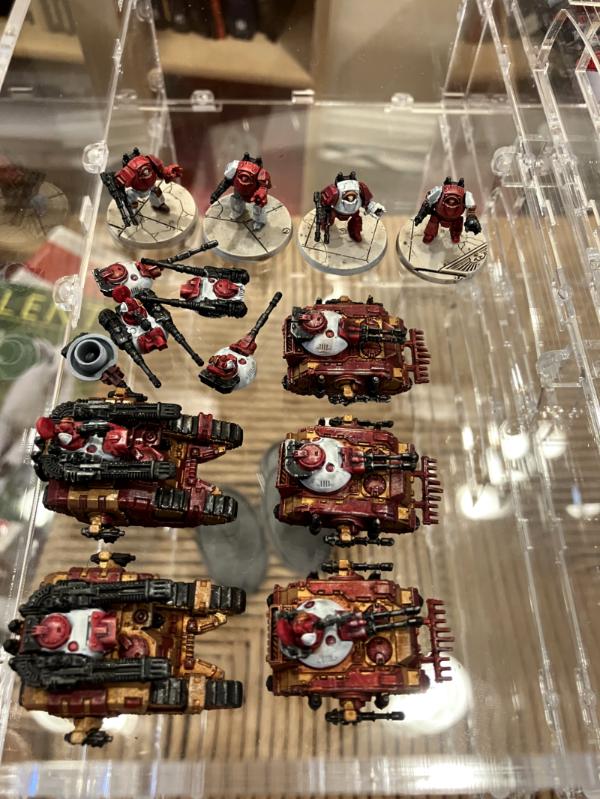
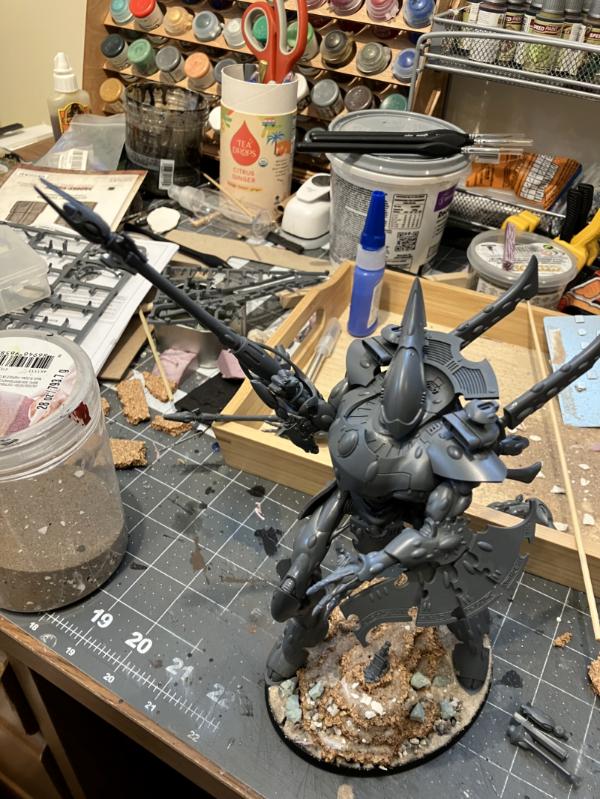
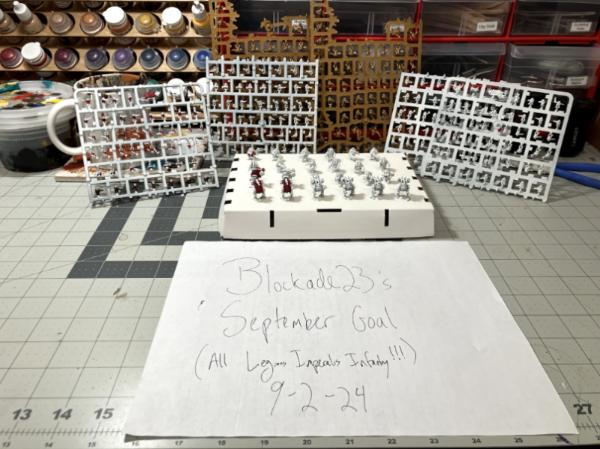
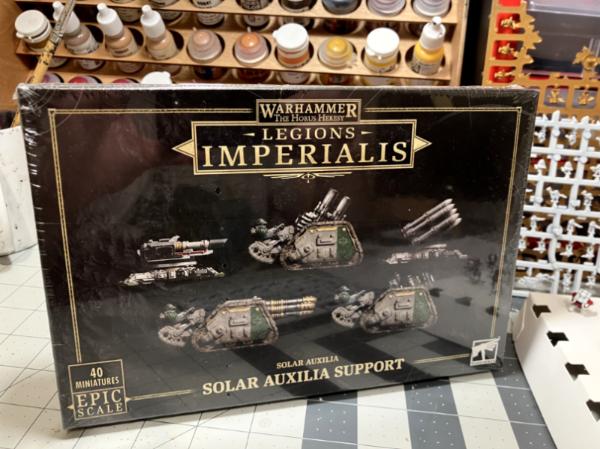
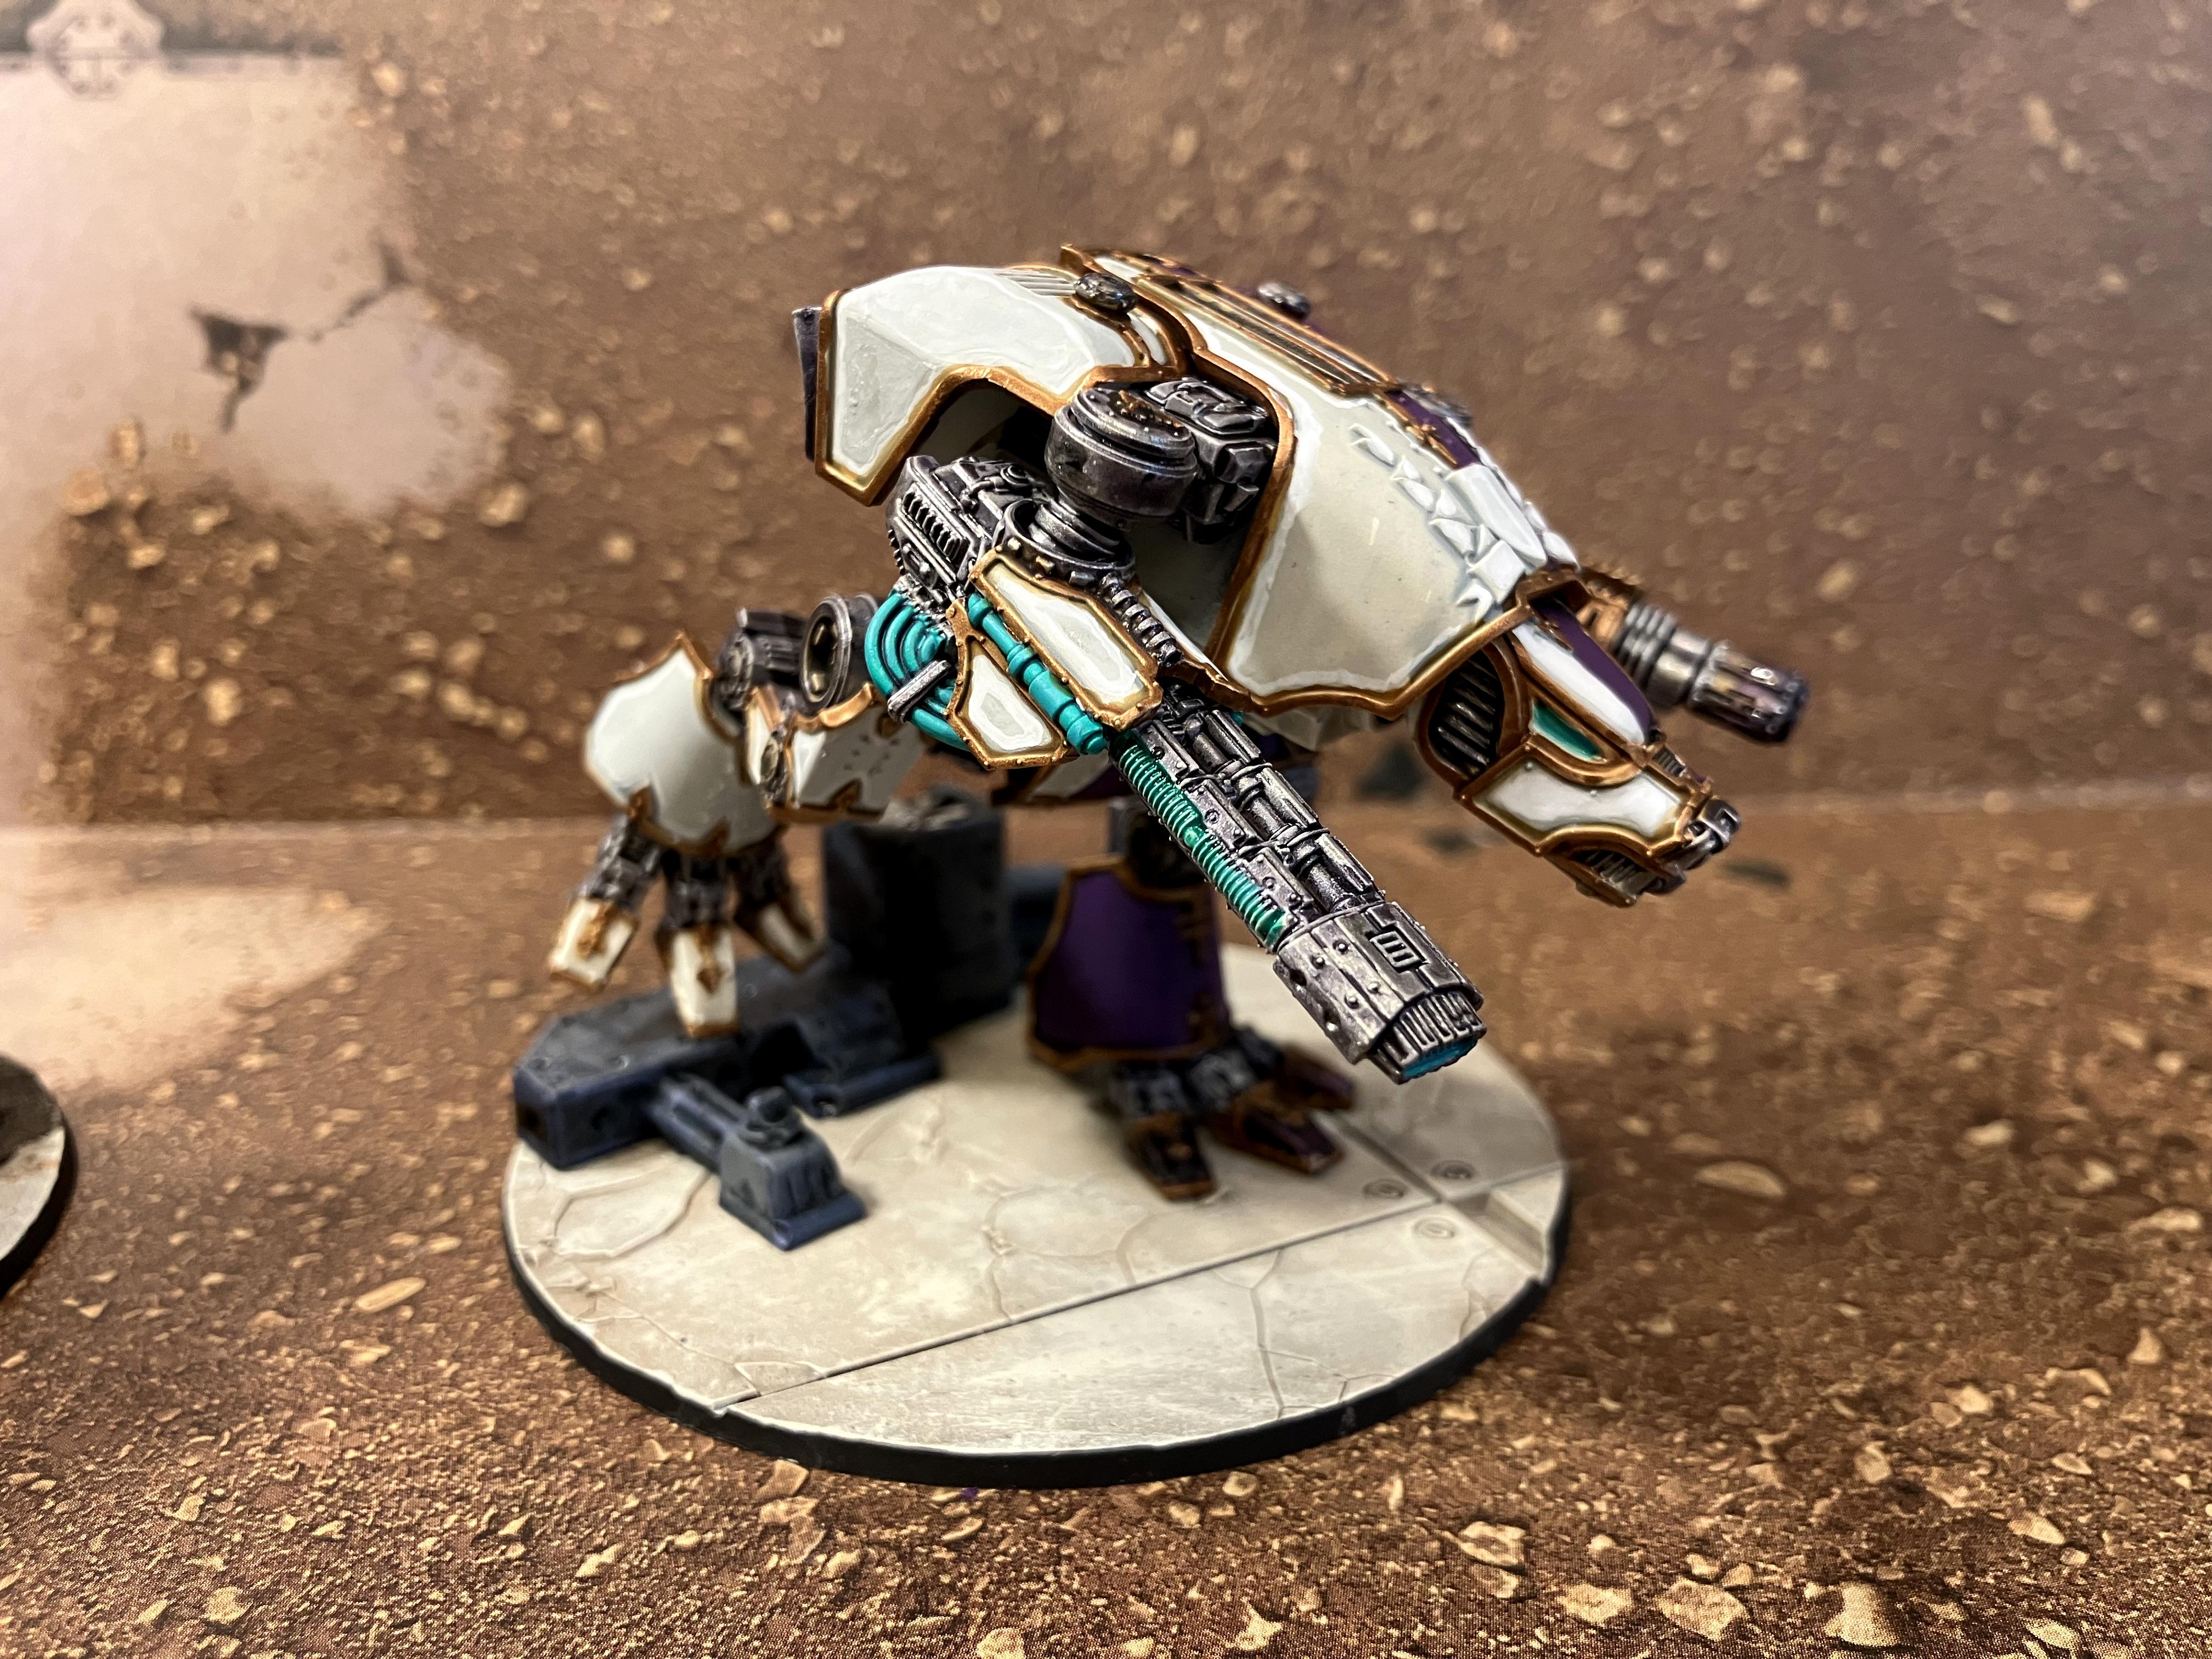
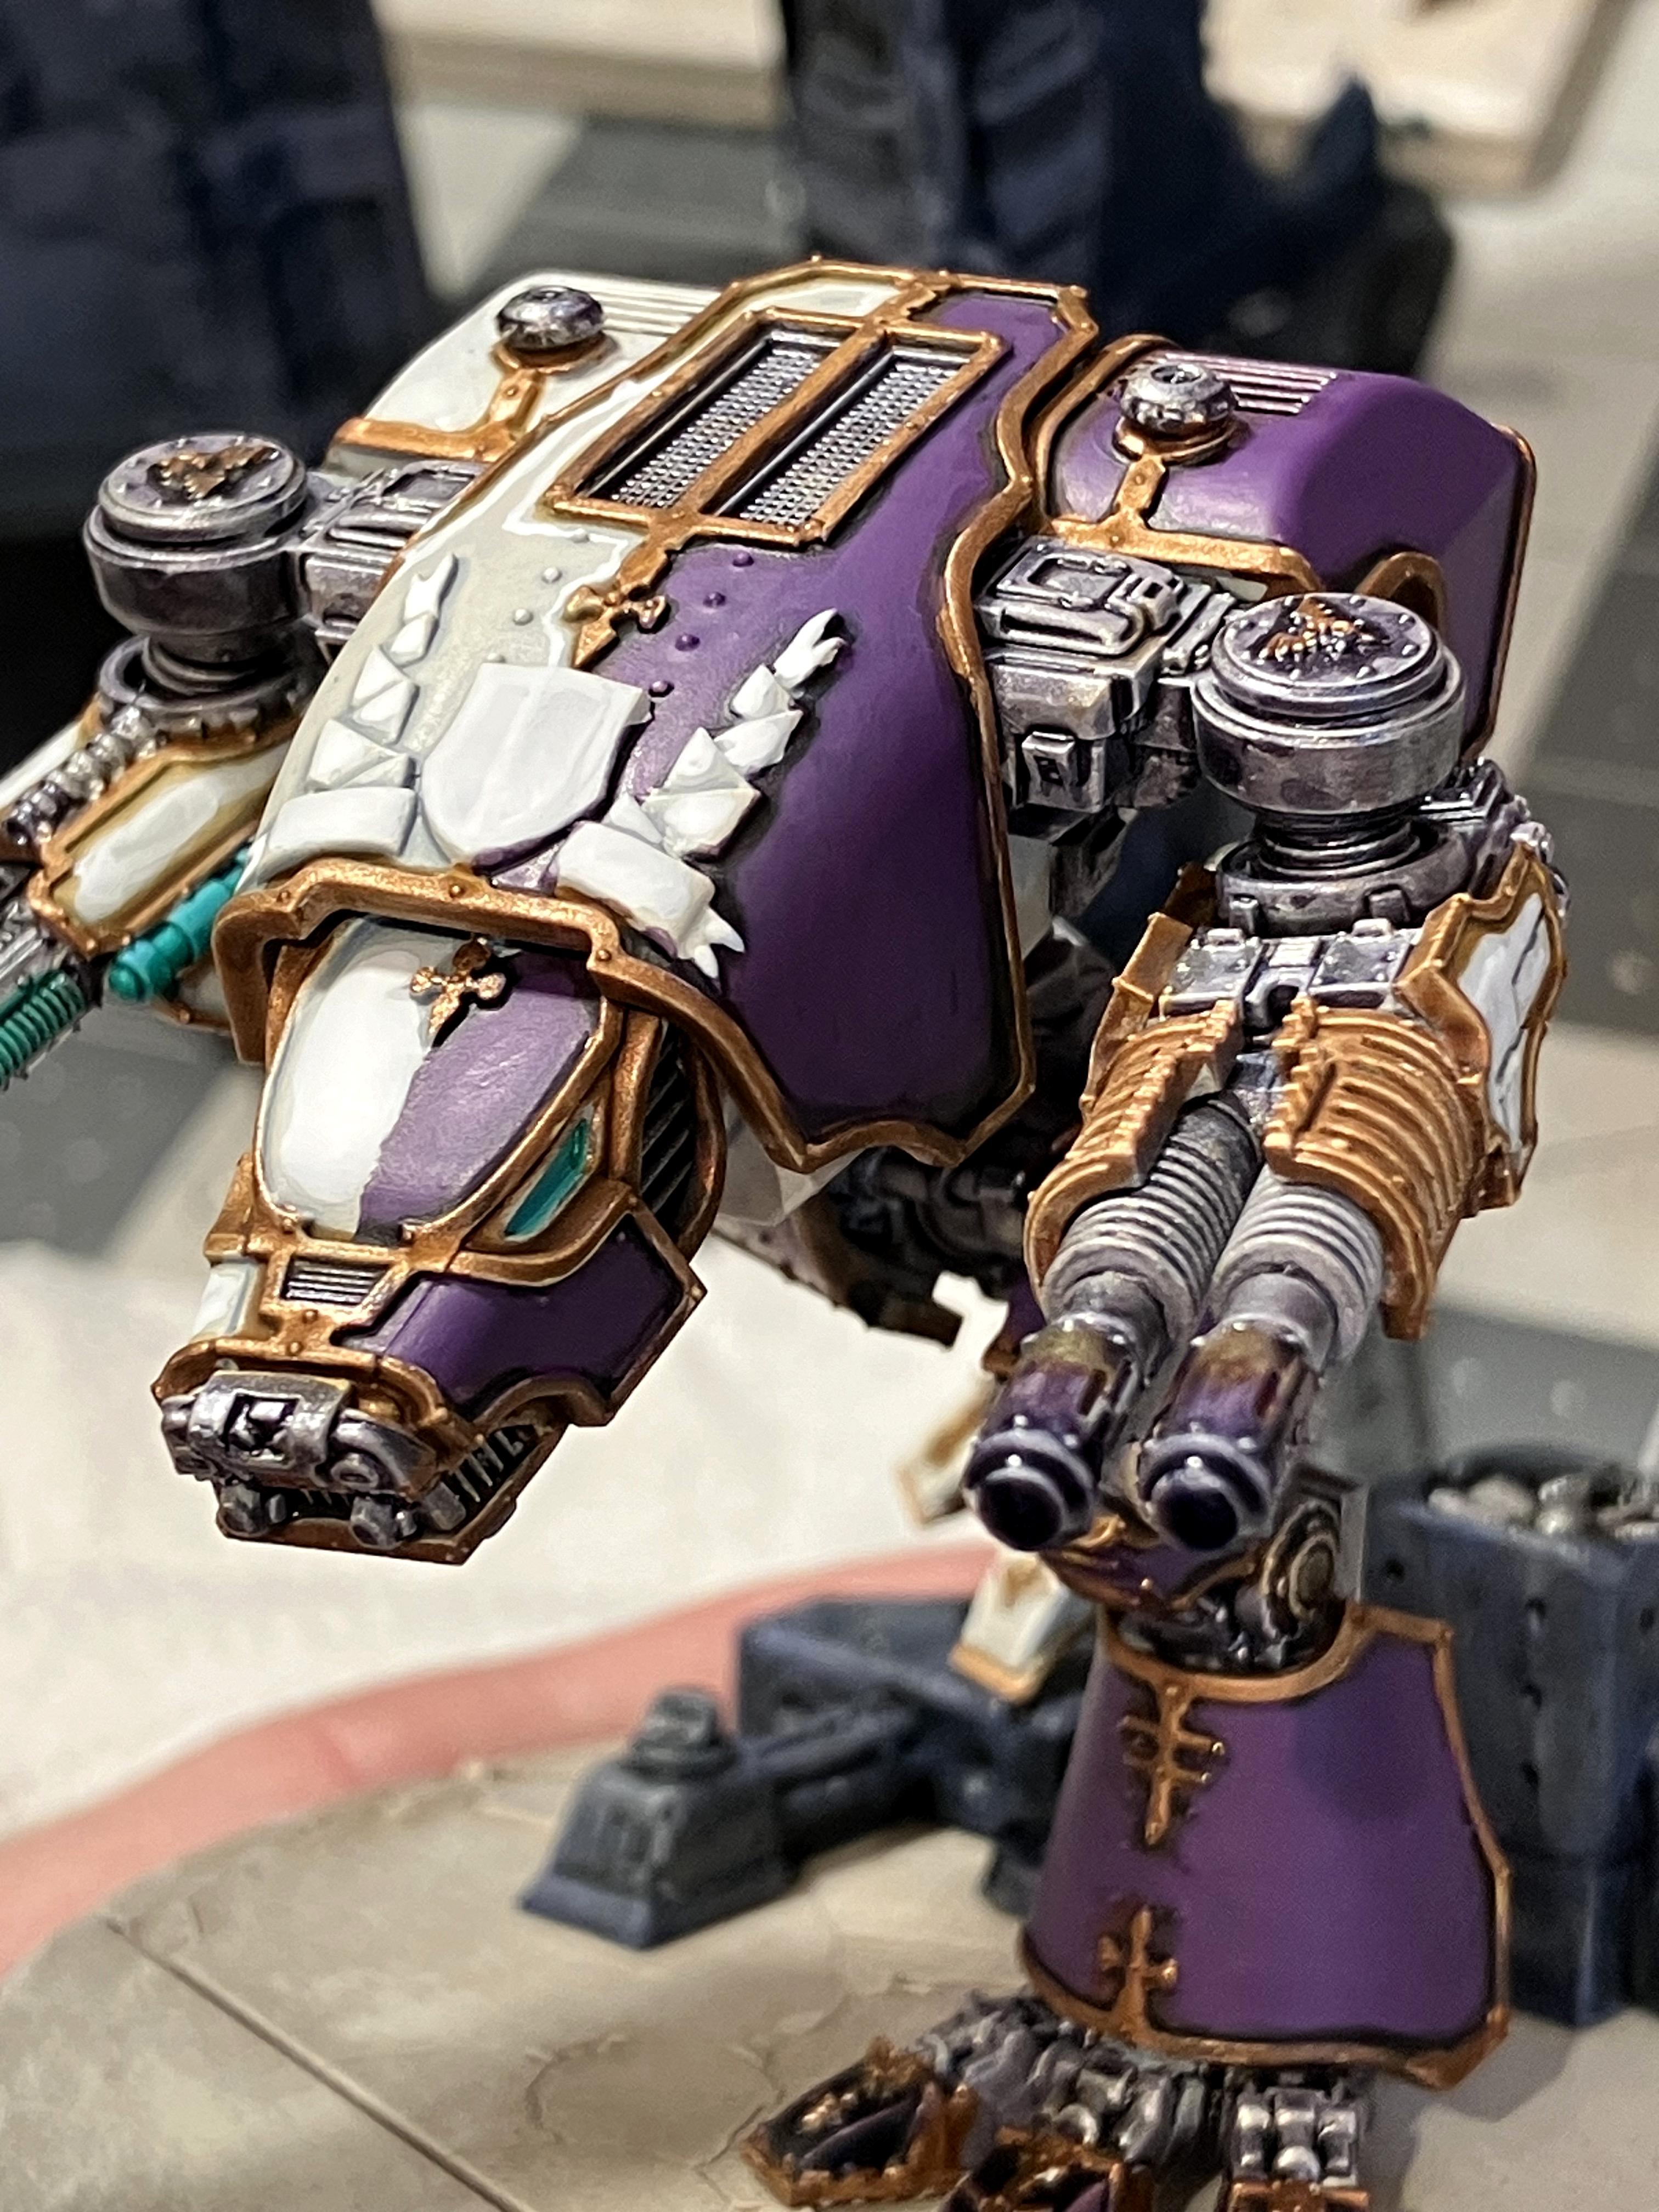
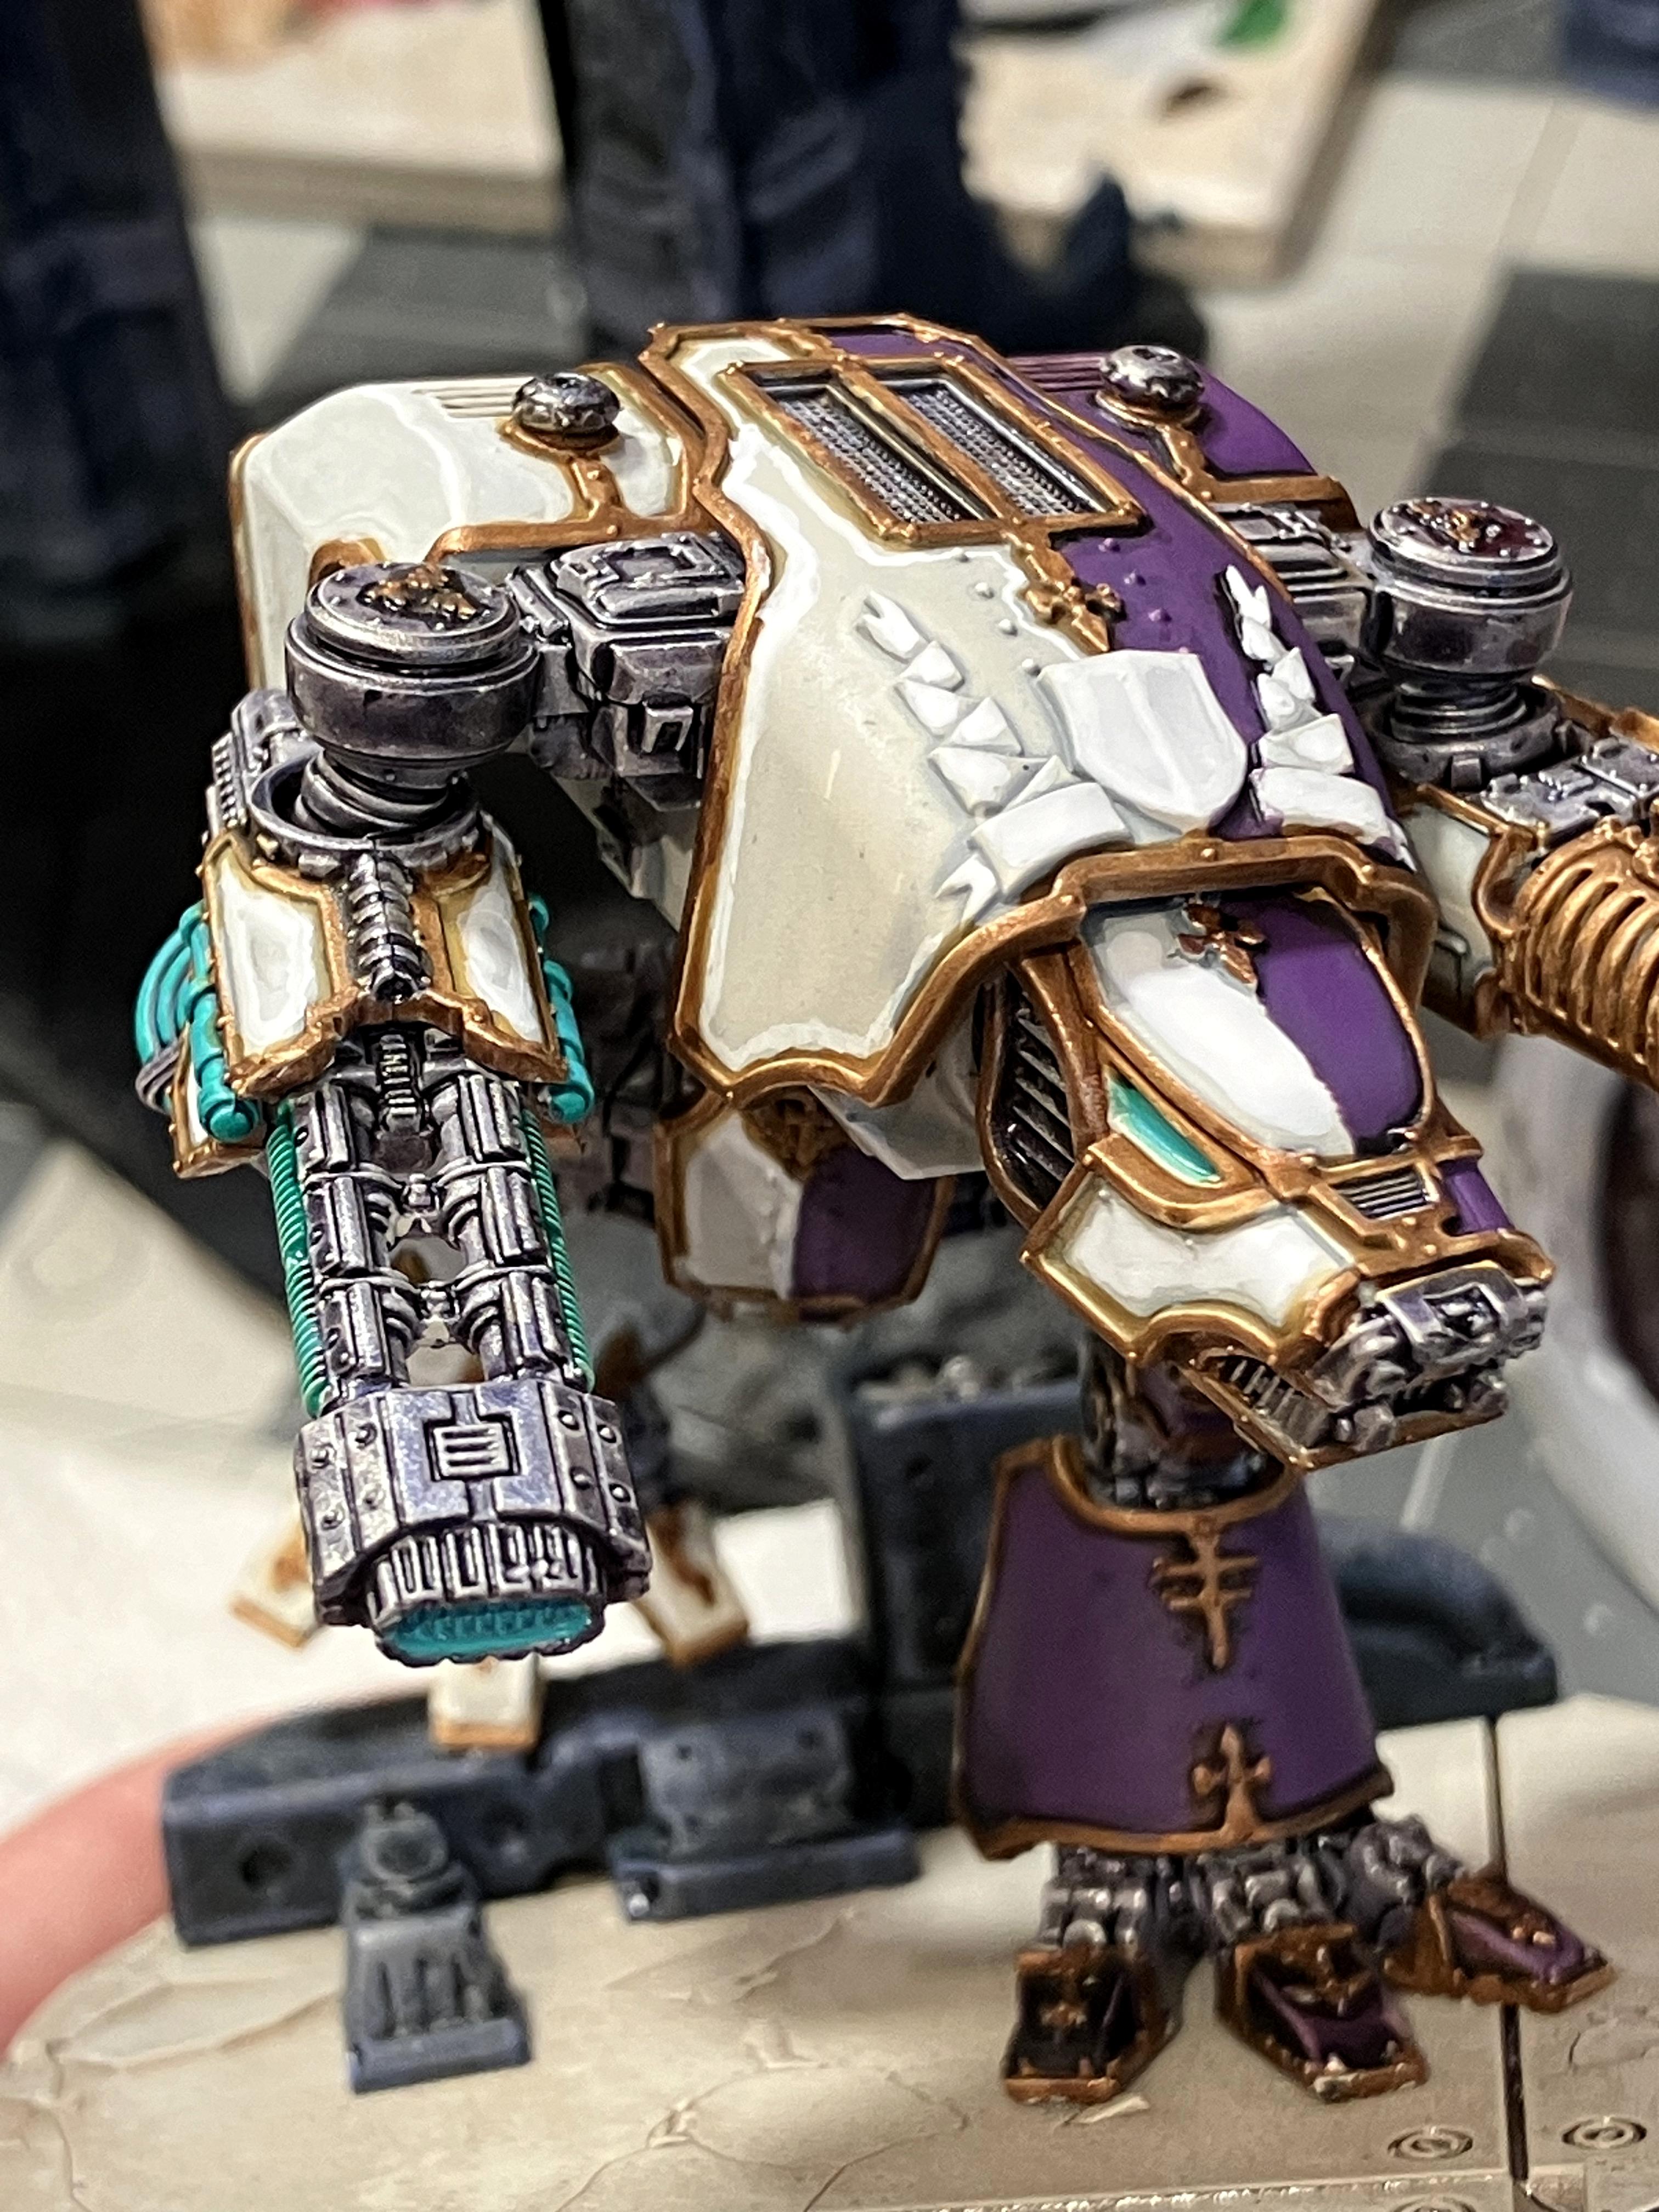
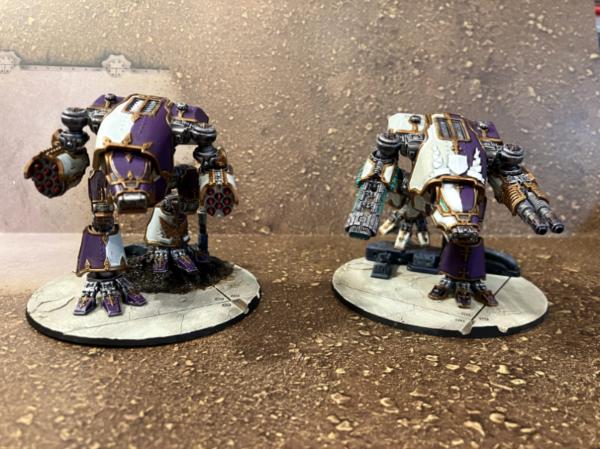
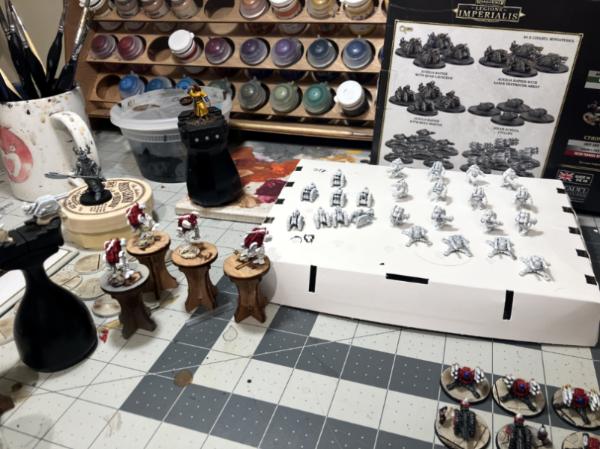
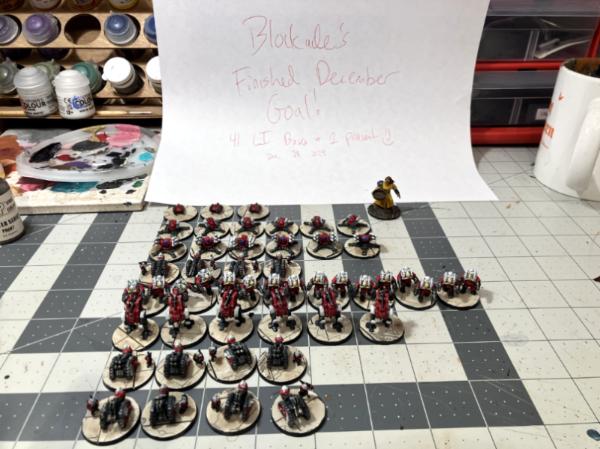
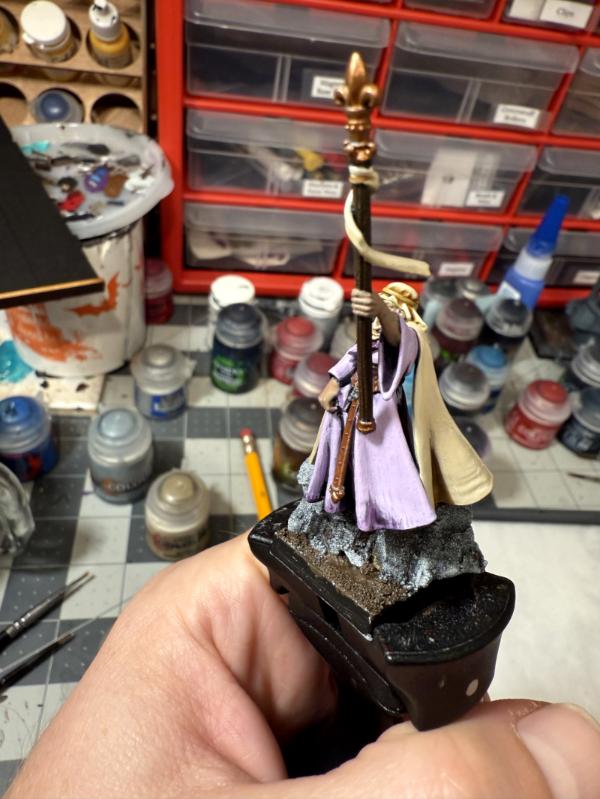
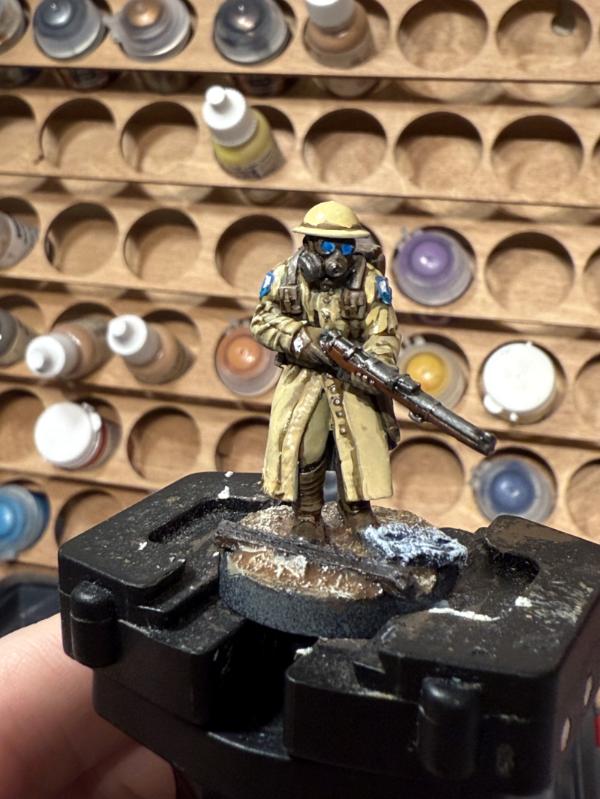
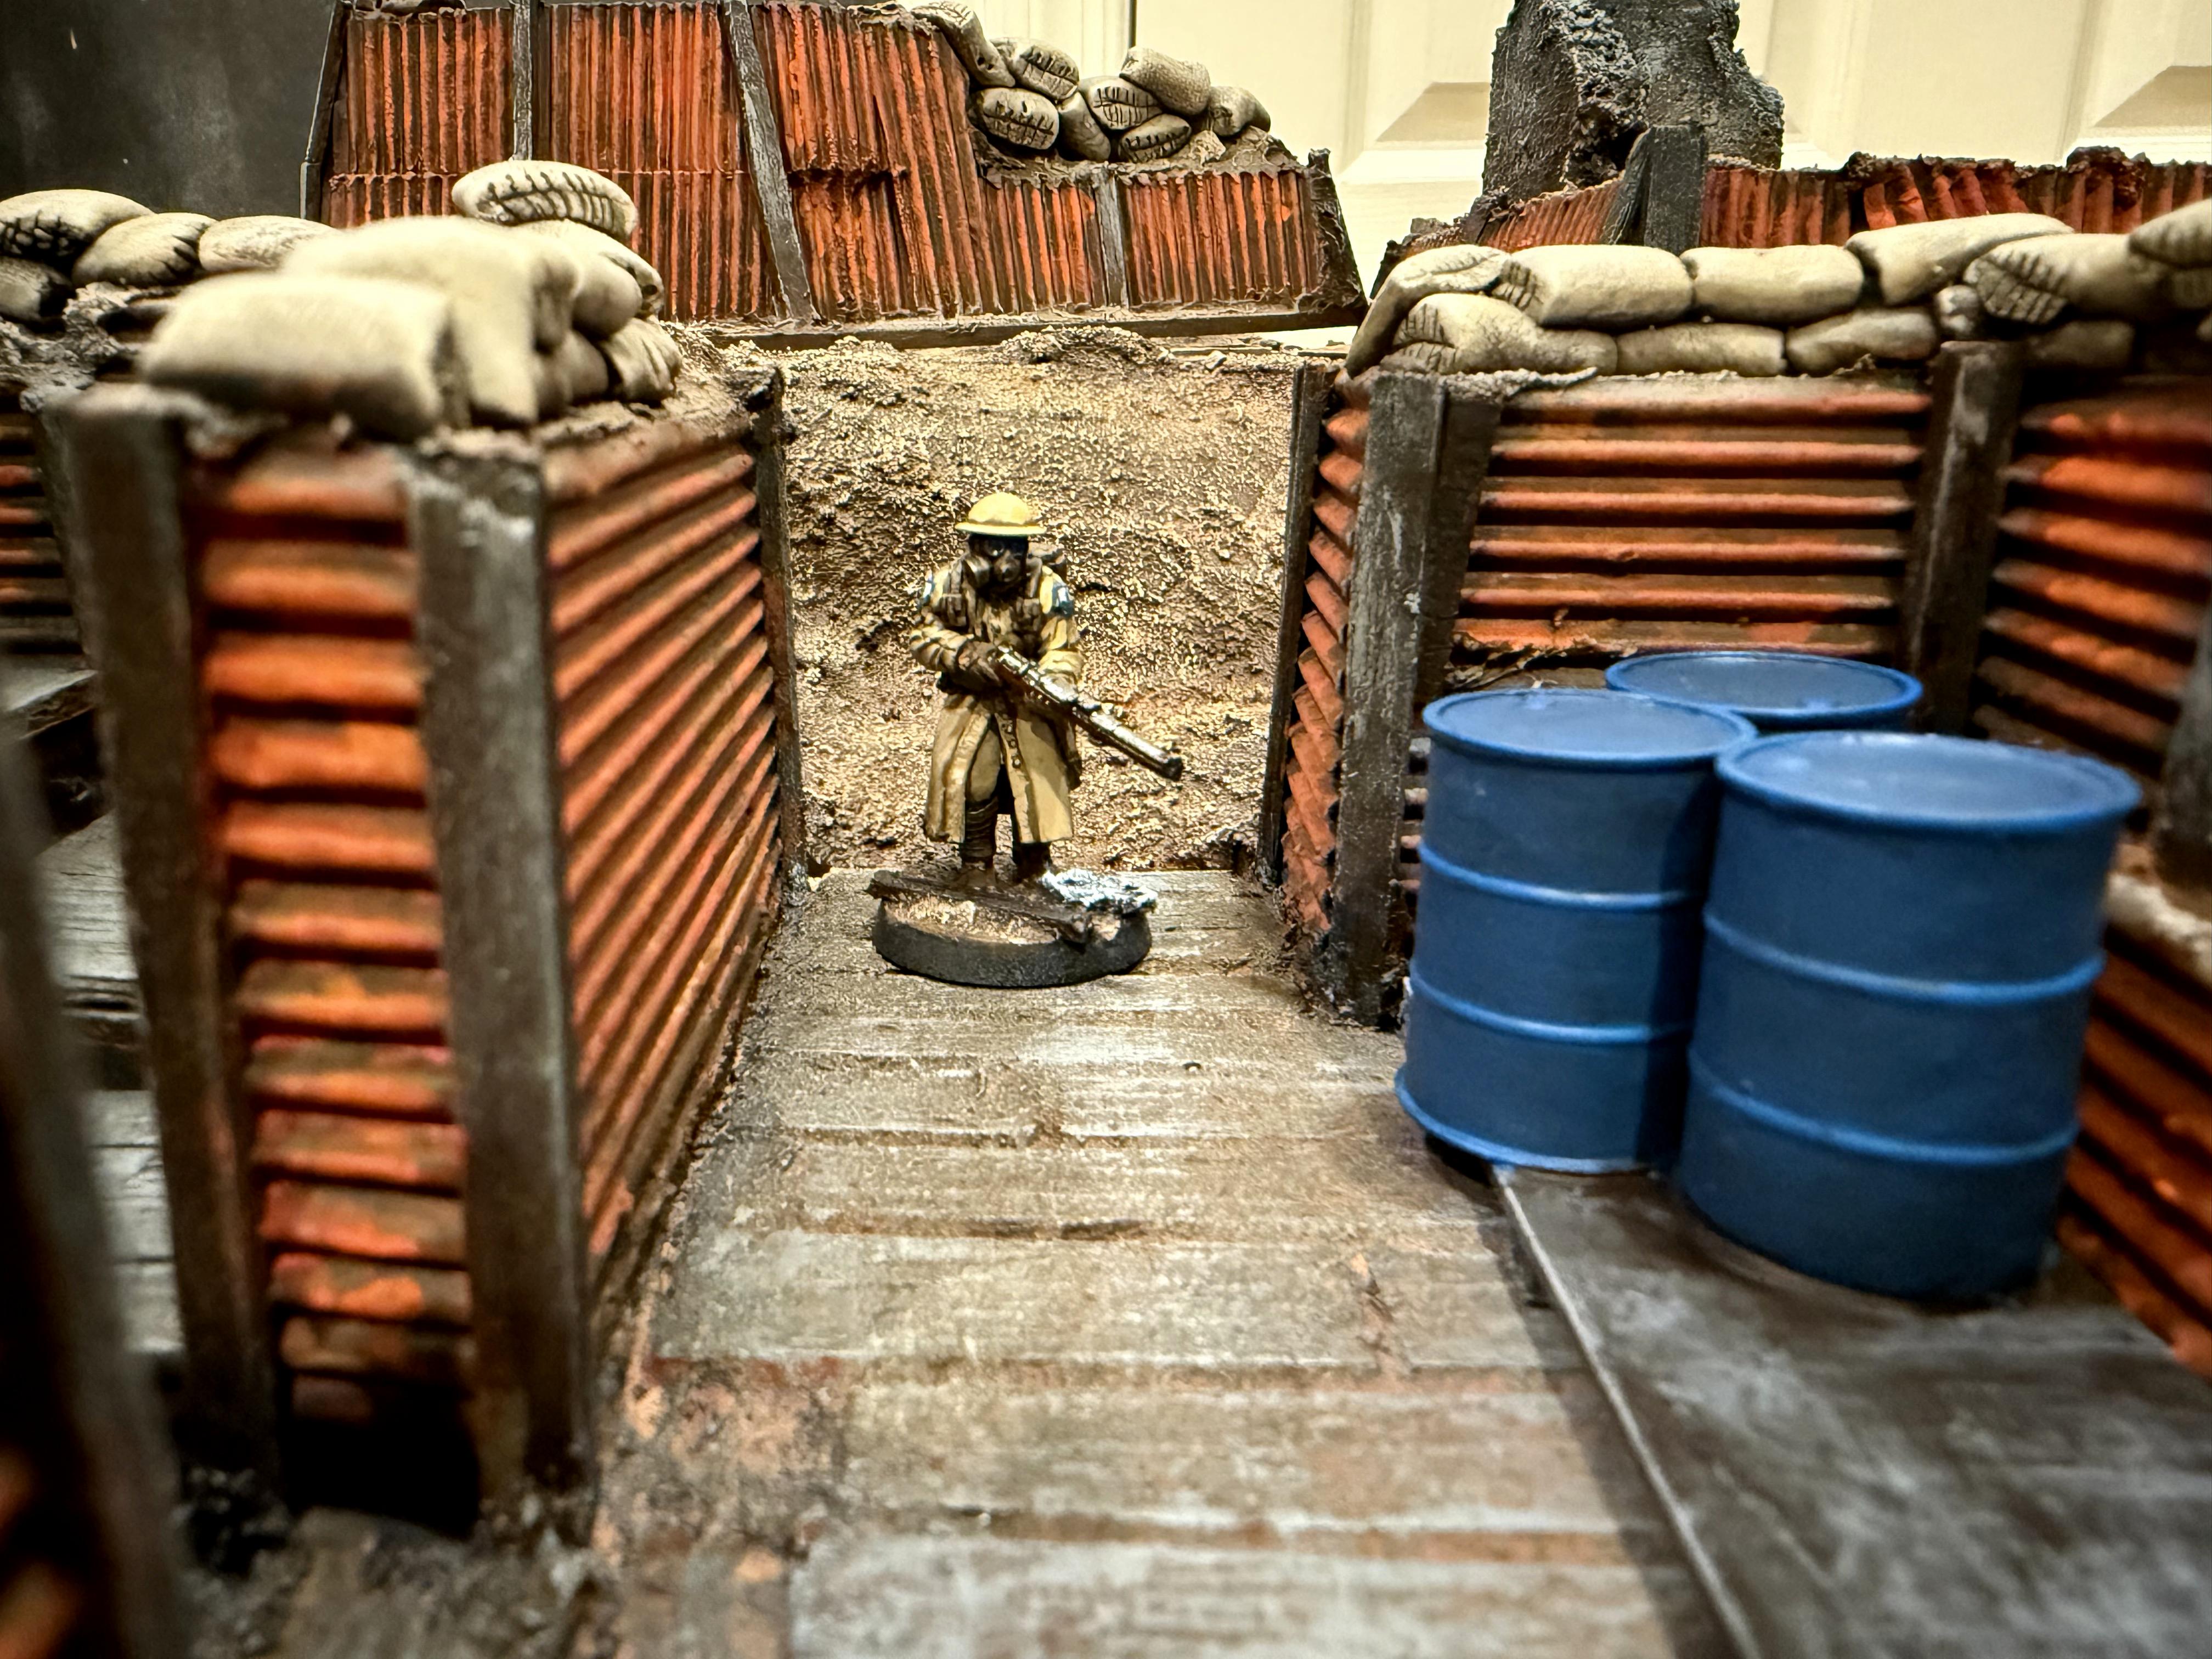
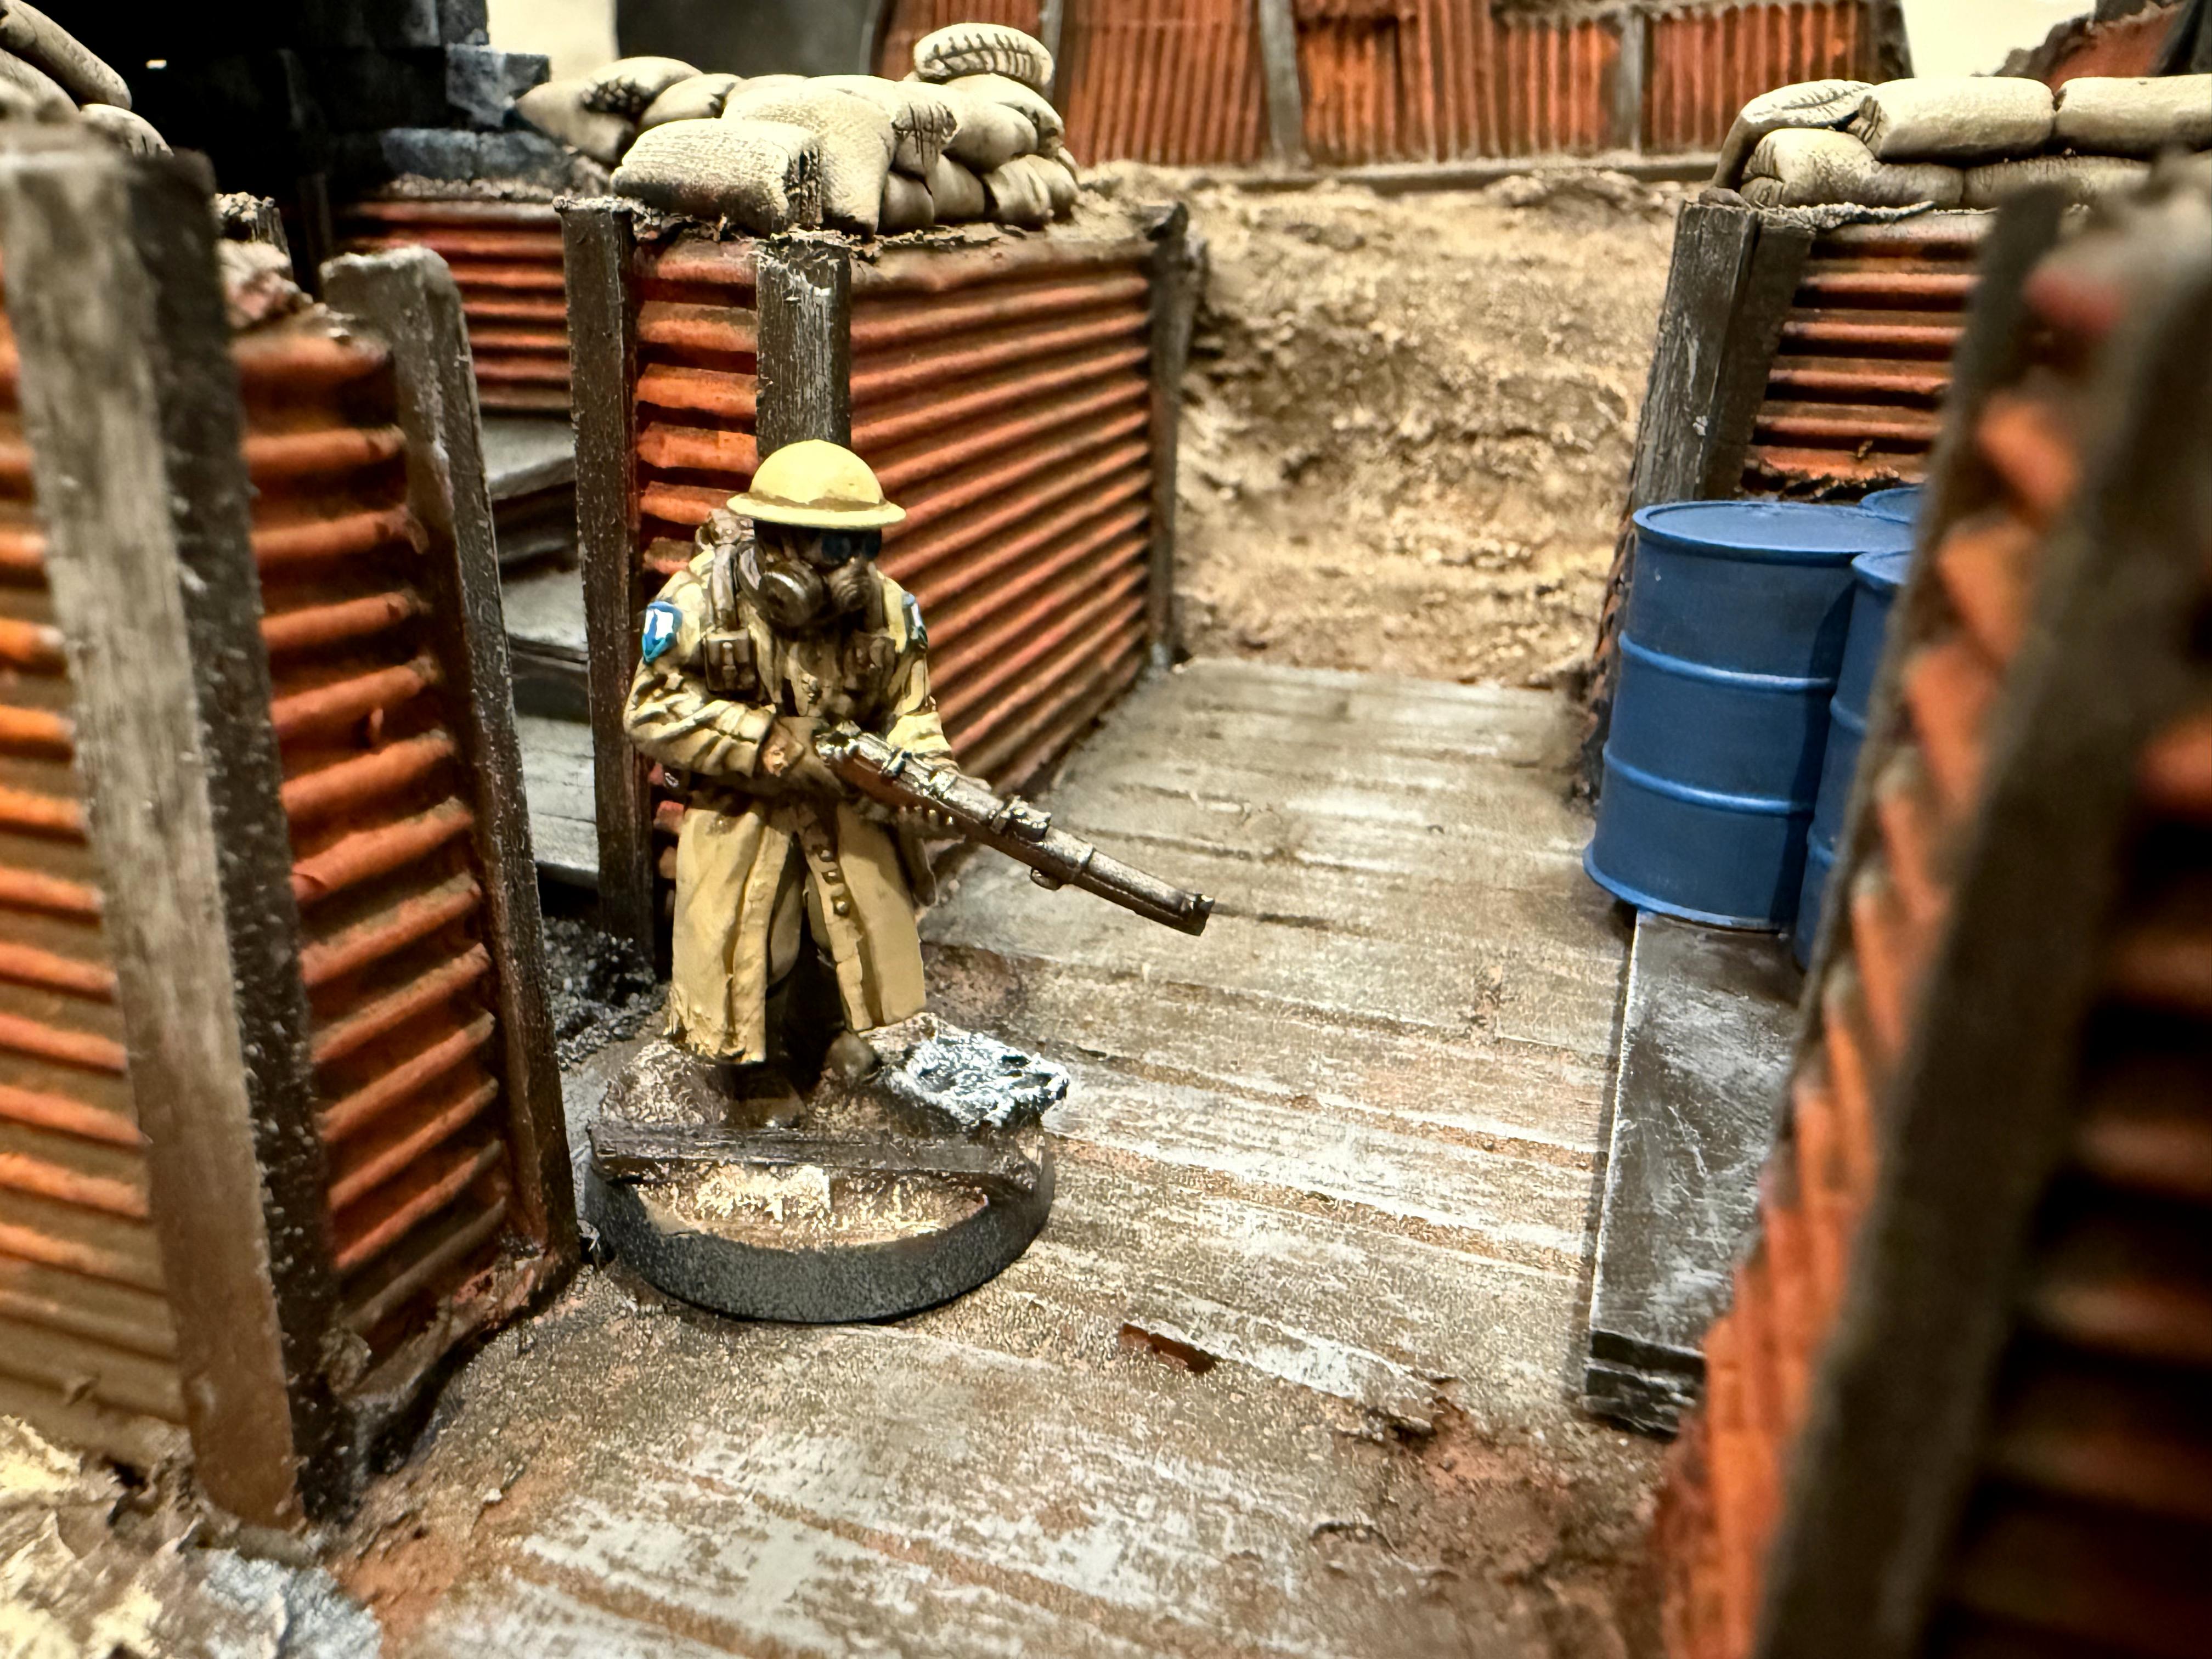
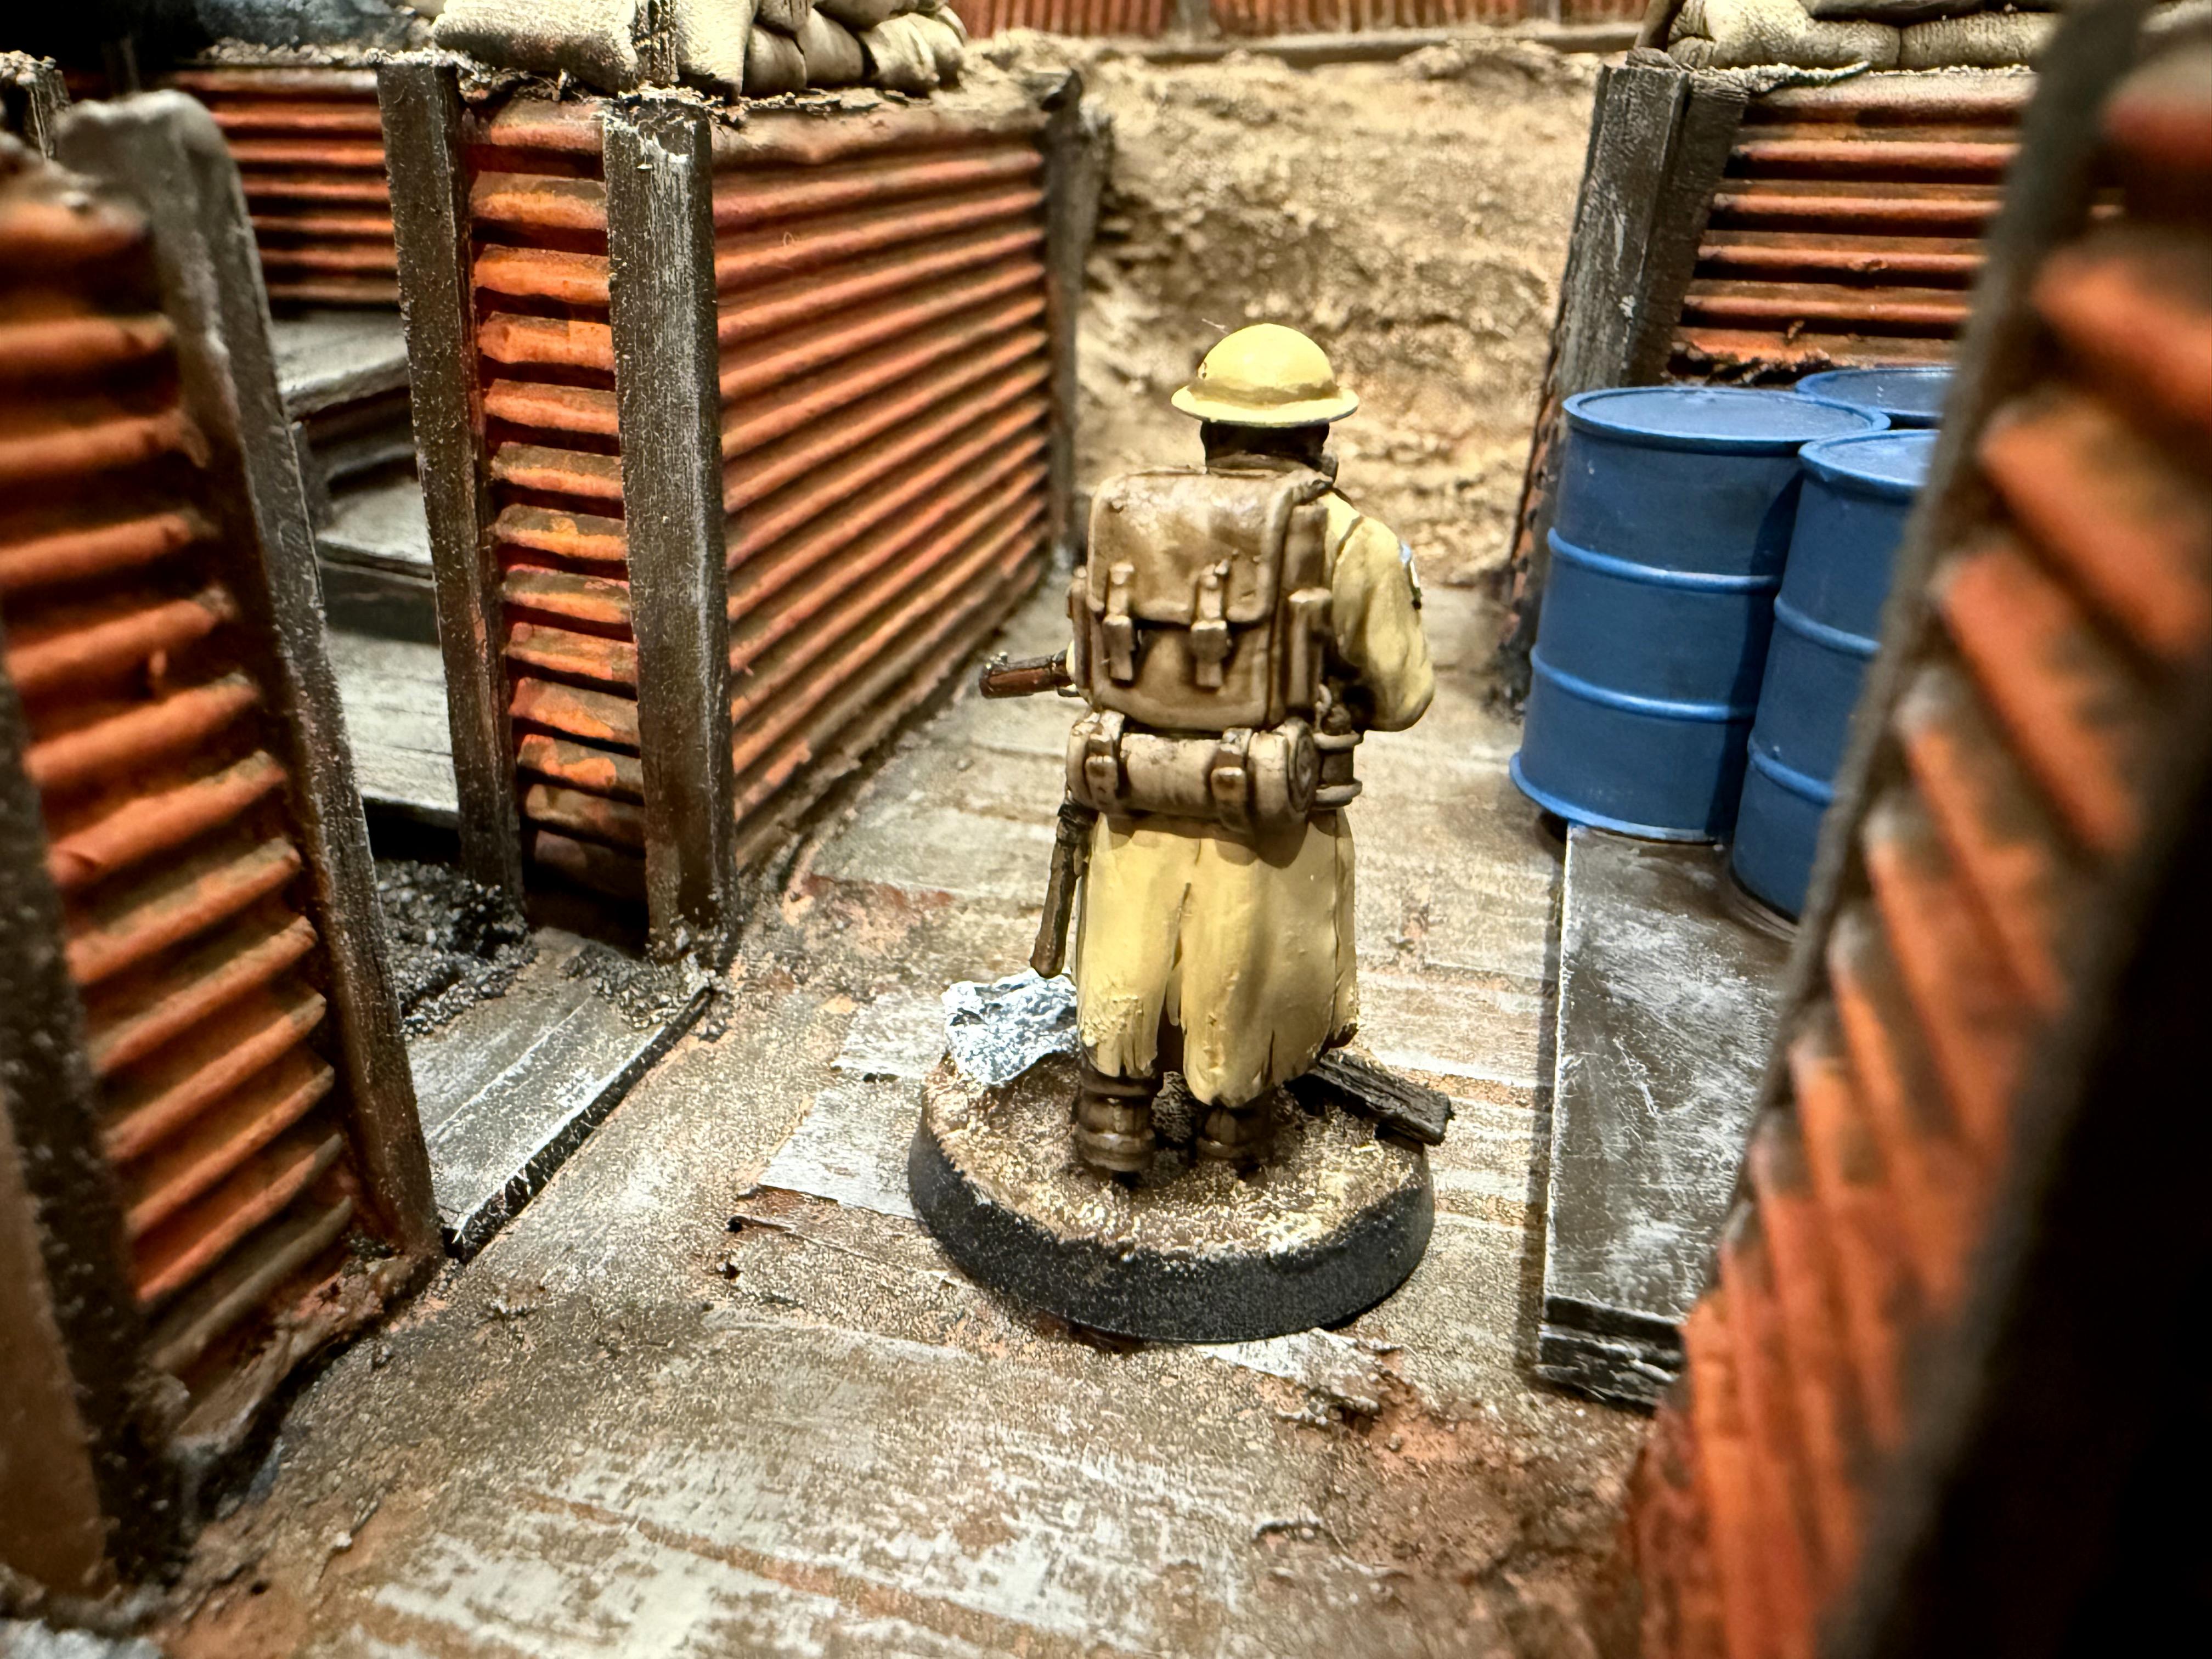
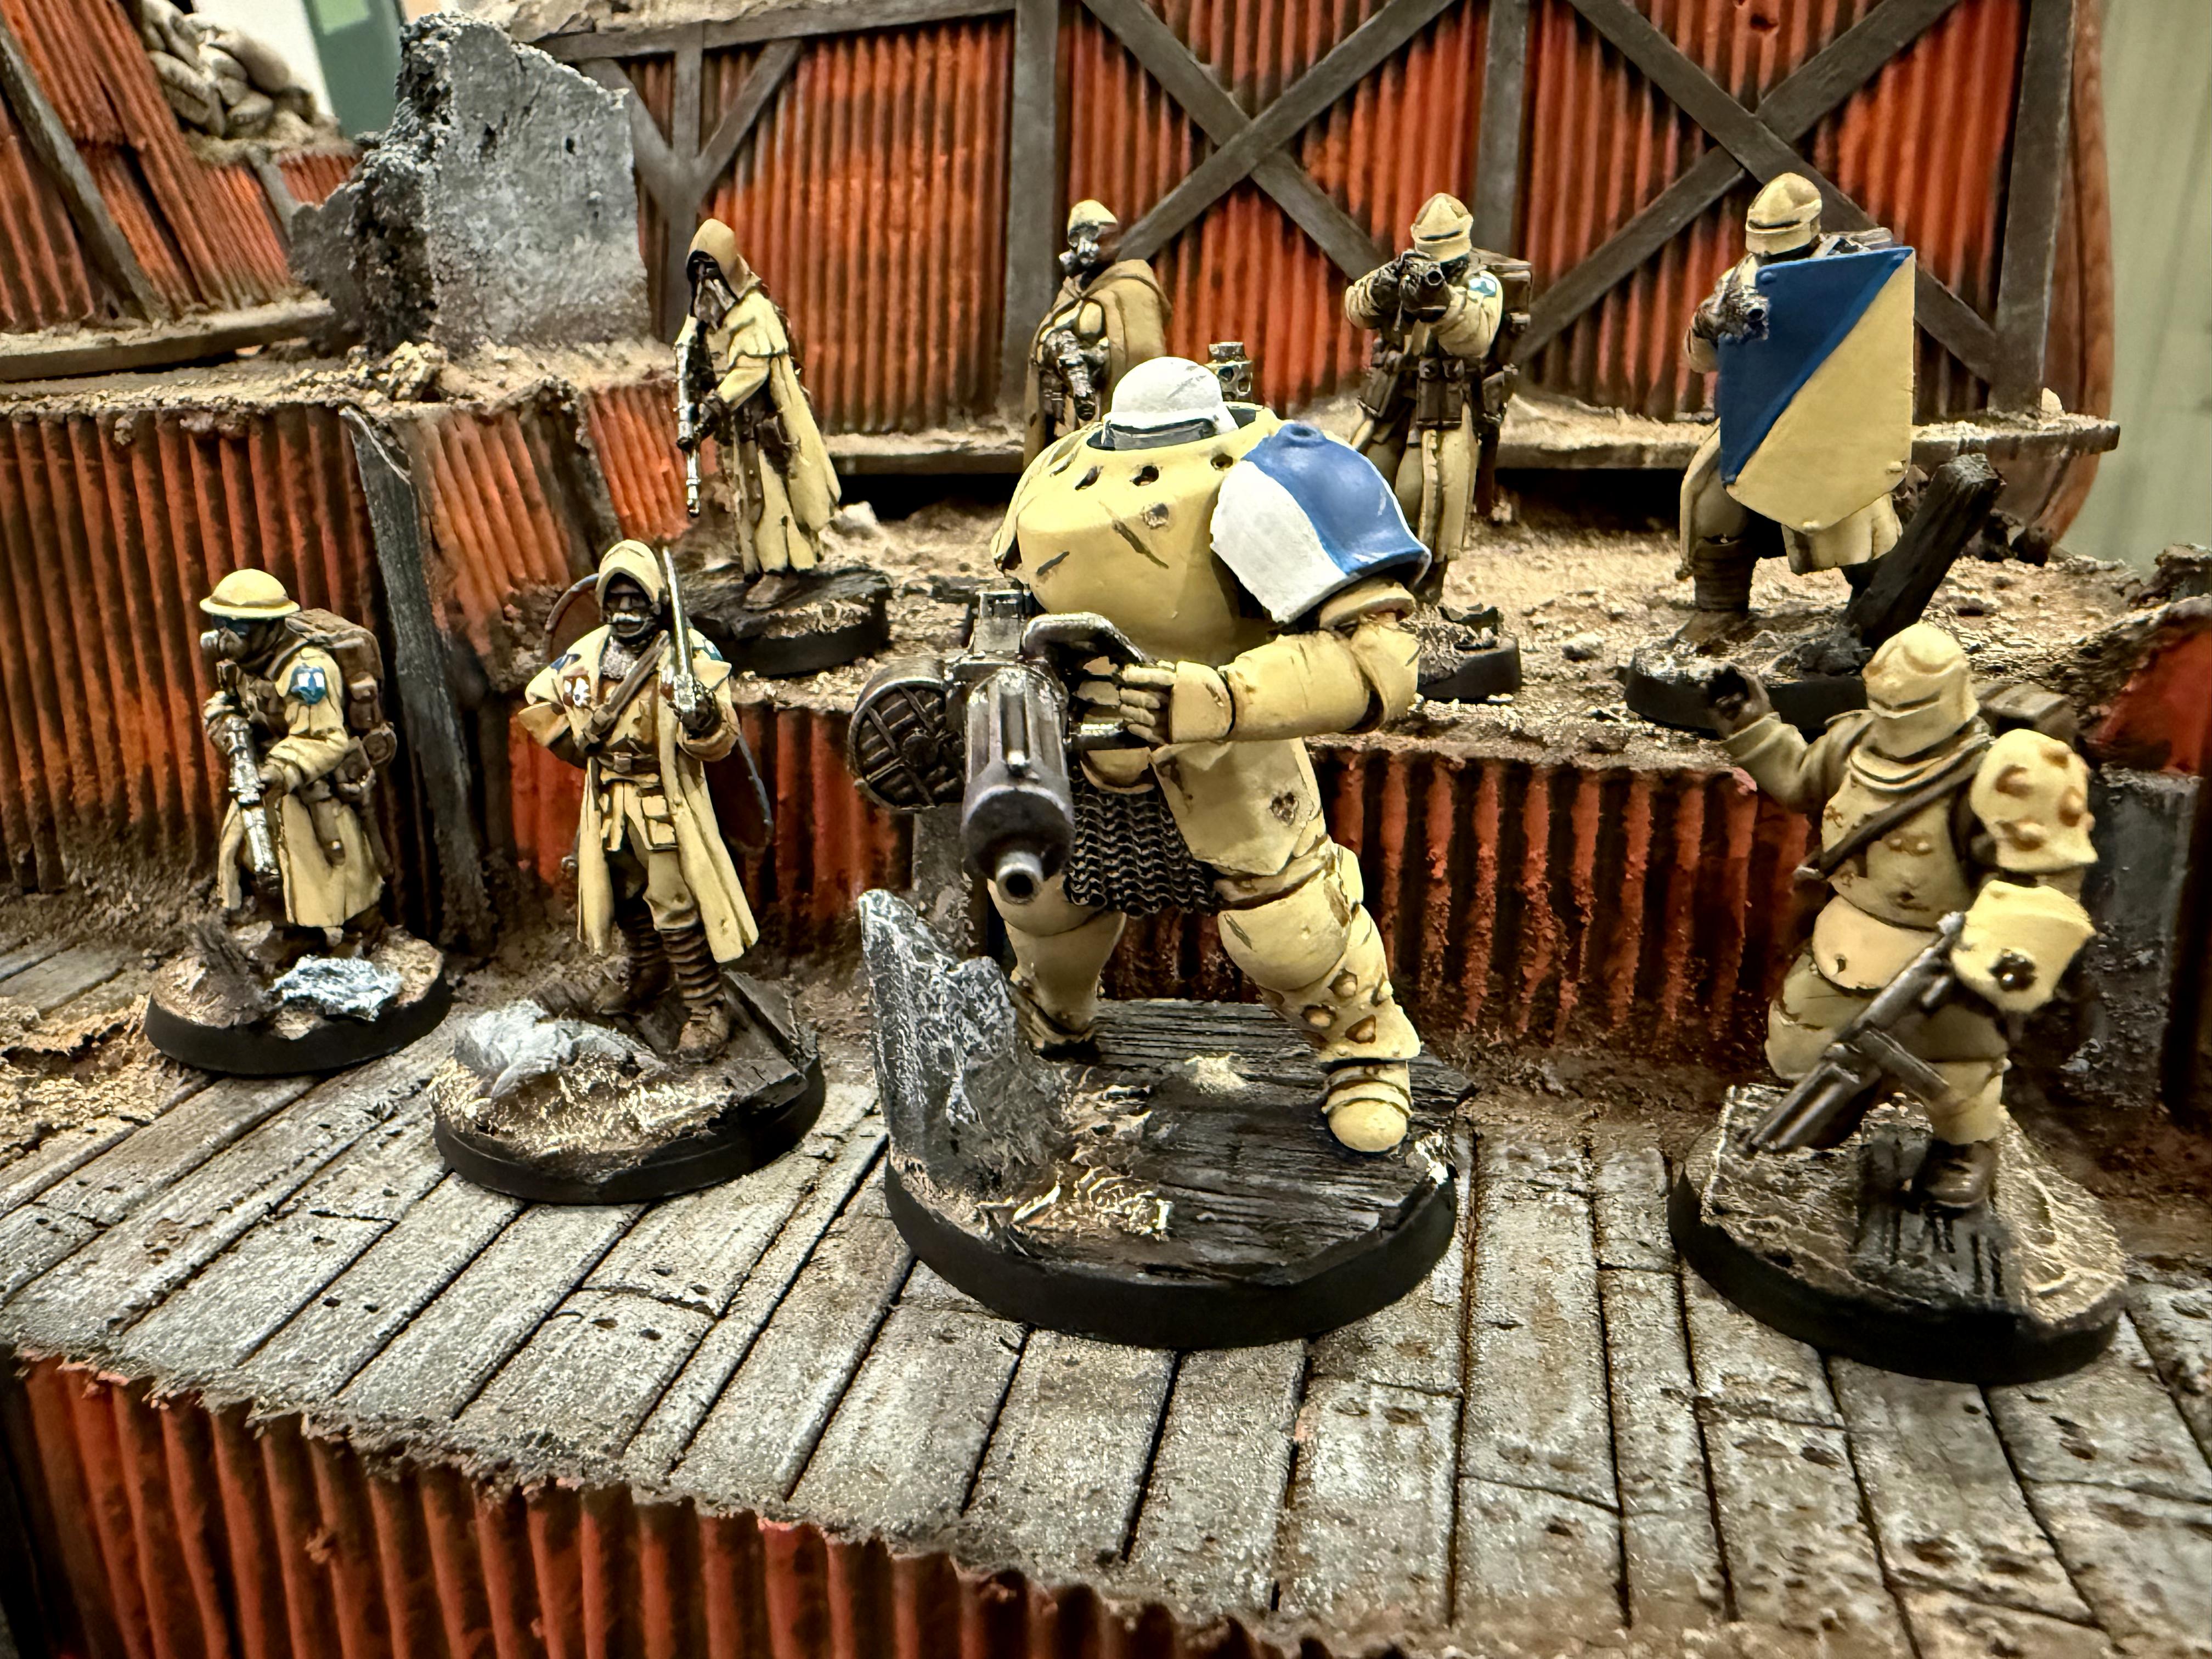
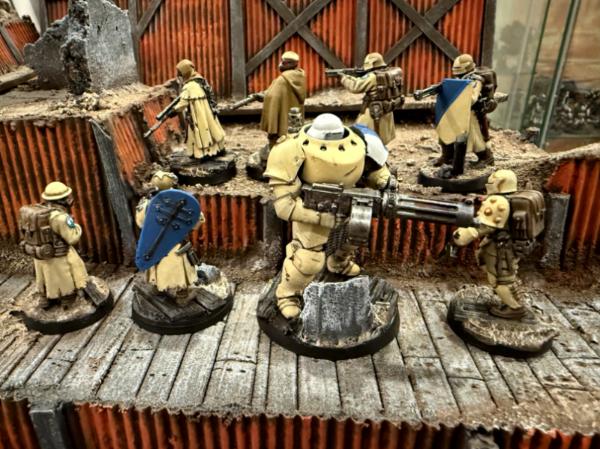
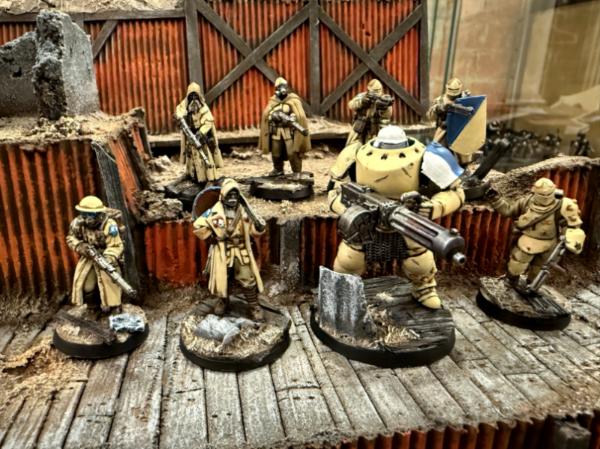
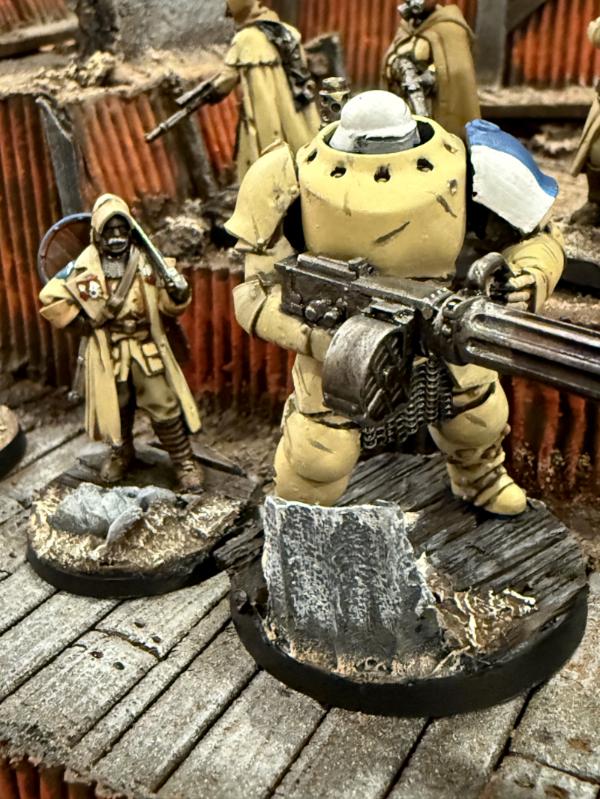
Hi all! Hope your holiday season is going well, full of friends and family and hobbying. I've been busy with diving into my Legions Imperialis starter set (and a single extra box of the Auxilia Infantry). Overall plan is to build a mostly Auxilia defense force modeled as Prospero Spireguard Auxilia. While these forces did not see much action outside of the burning of Prospero, a group of loyalist Thousand Sons and their Spireguard allied to the Legio Xestobiax formed a core defense of the Zhao-Arkkad Enclaves. This is the first of their enlistments.
First, the building and mustering.
The Space Marine Tanks come with extra turrets, but the Auxilia do not (at least in the starter set)
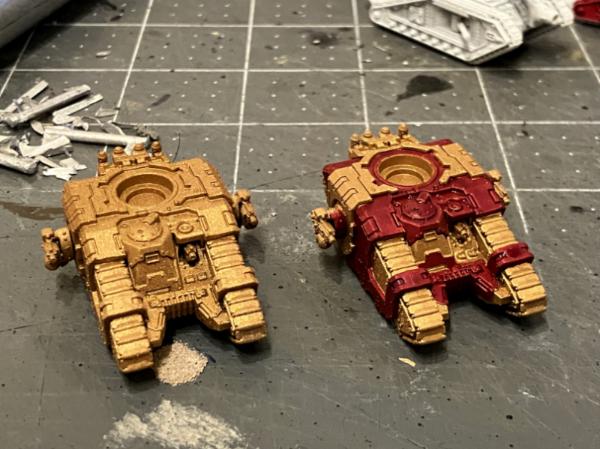
I focused on the Spireguard Auxilia first. Paintjob is White Scar primer, Black Legion for the tracks and weapons, and Flesh Tearer's Contrast Paint over the turret and outer track components.
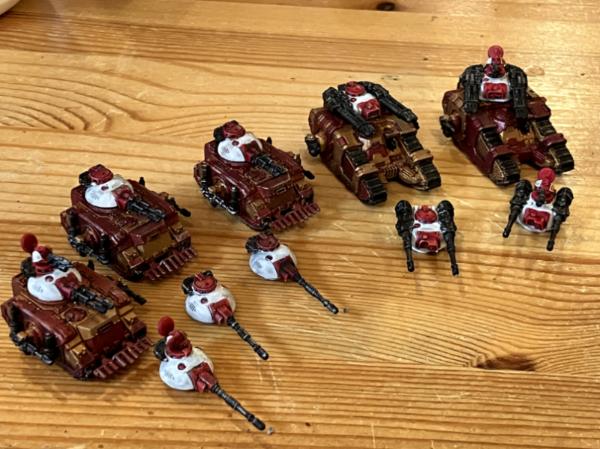
The final paint scheme without drybrushing.
A test scheme for the auxilia lasfusiliers proper.
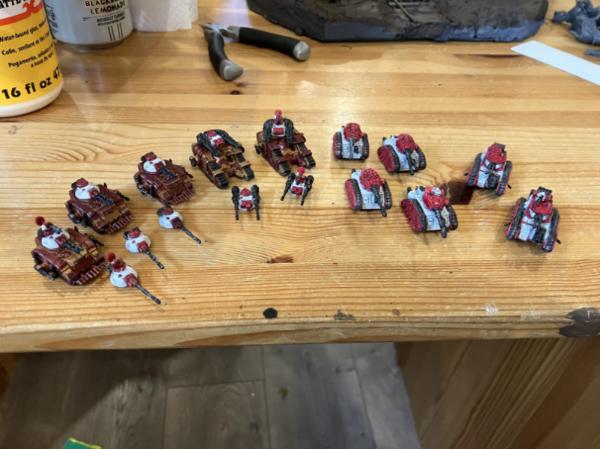
The final tank group shot.
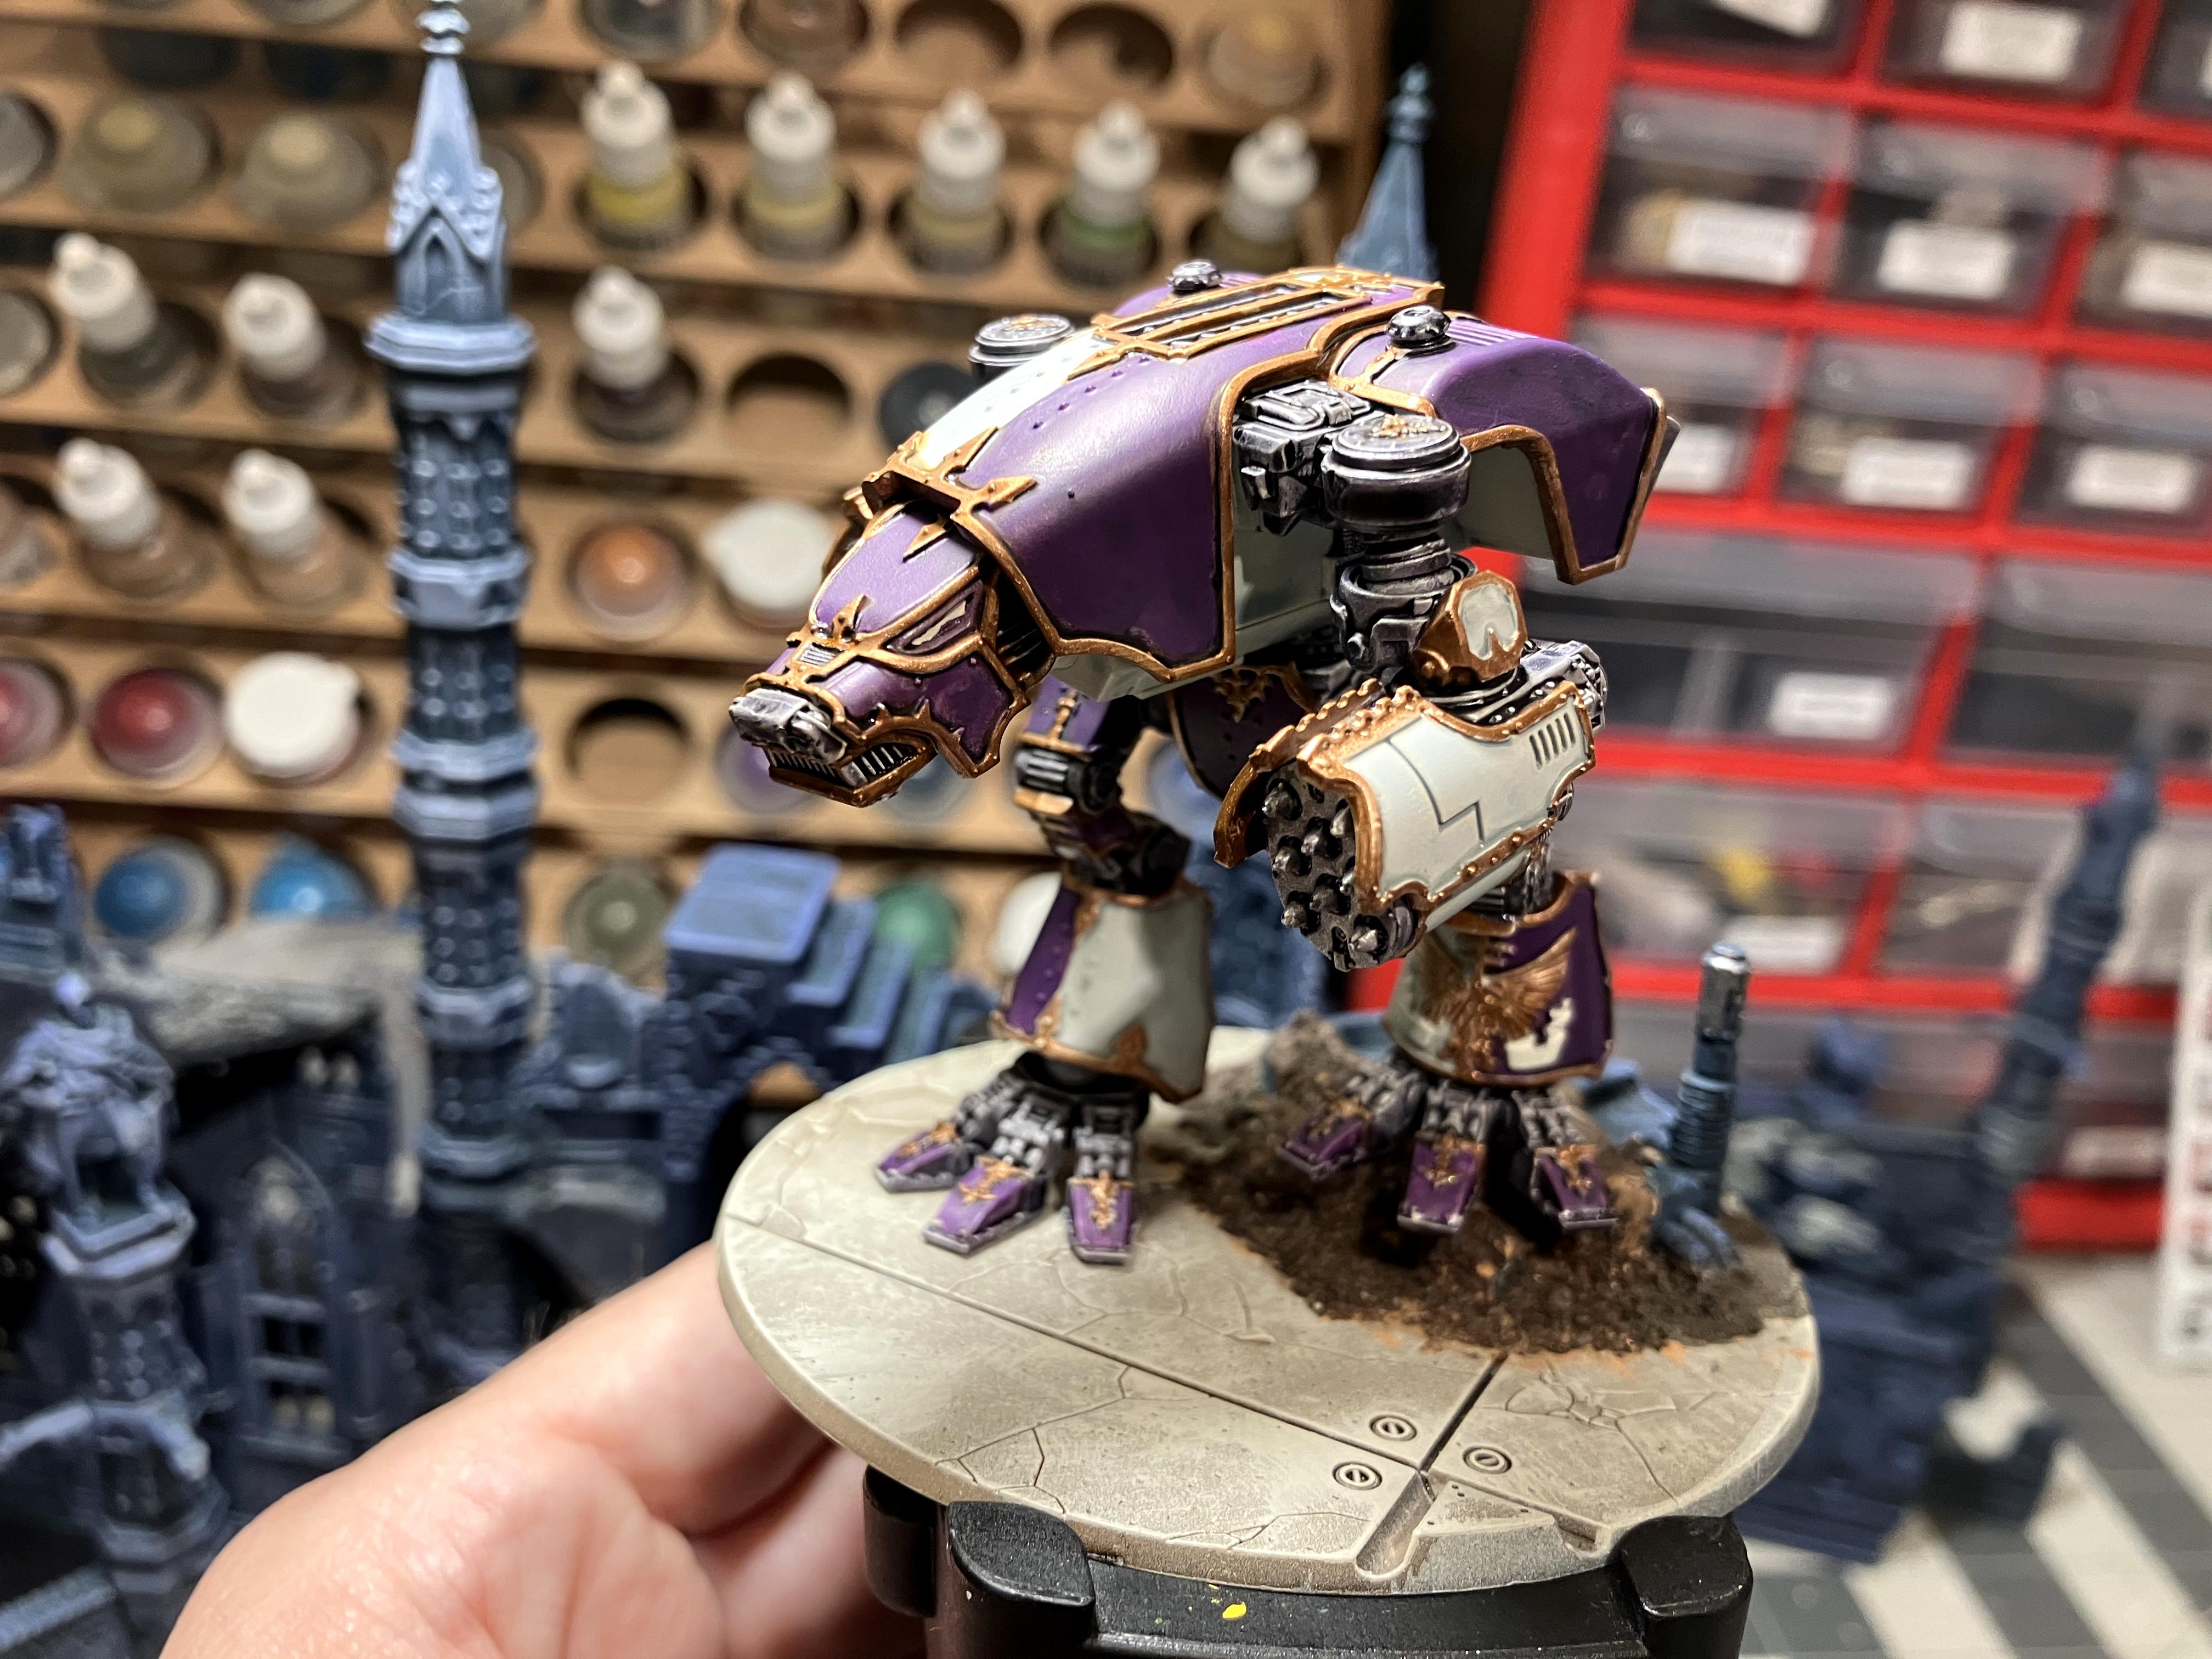
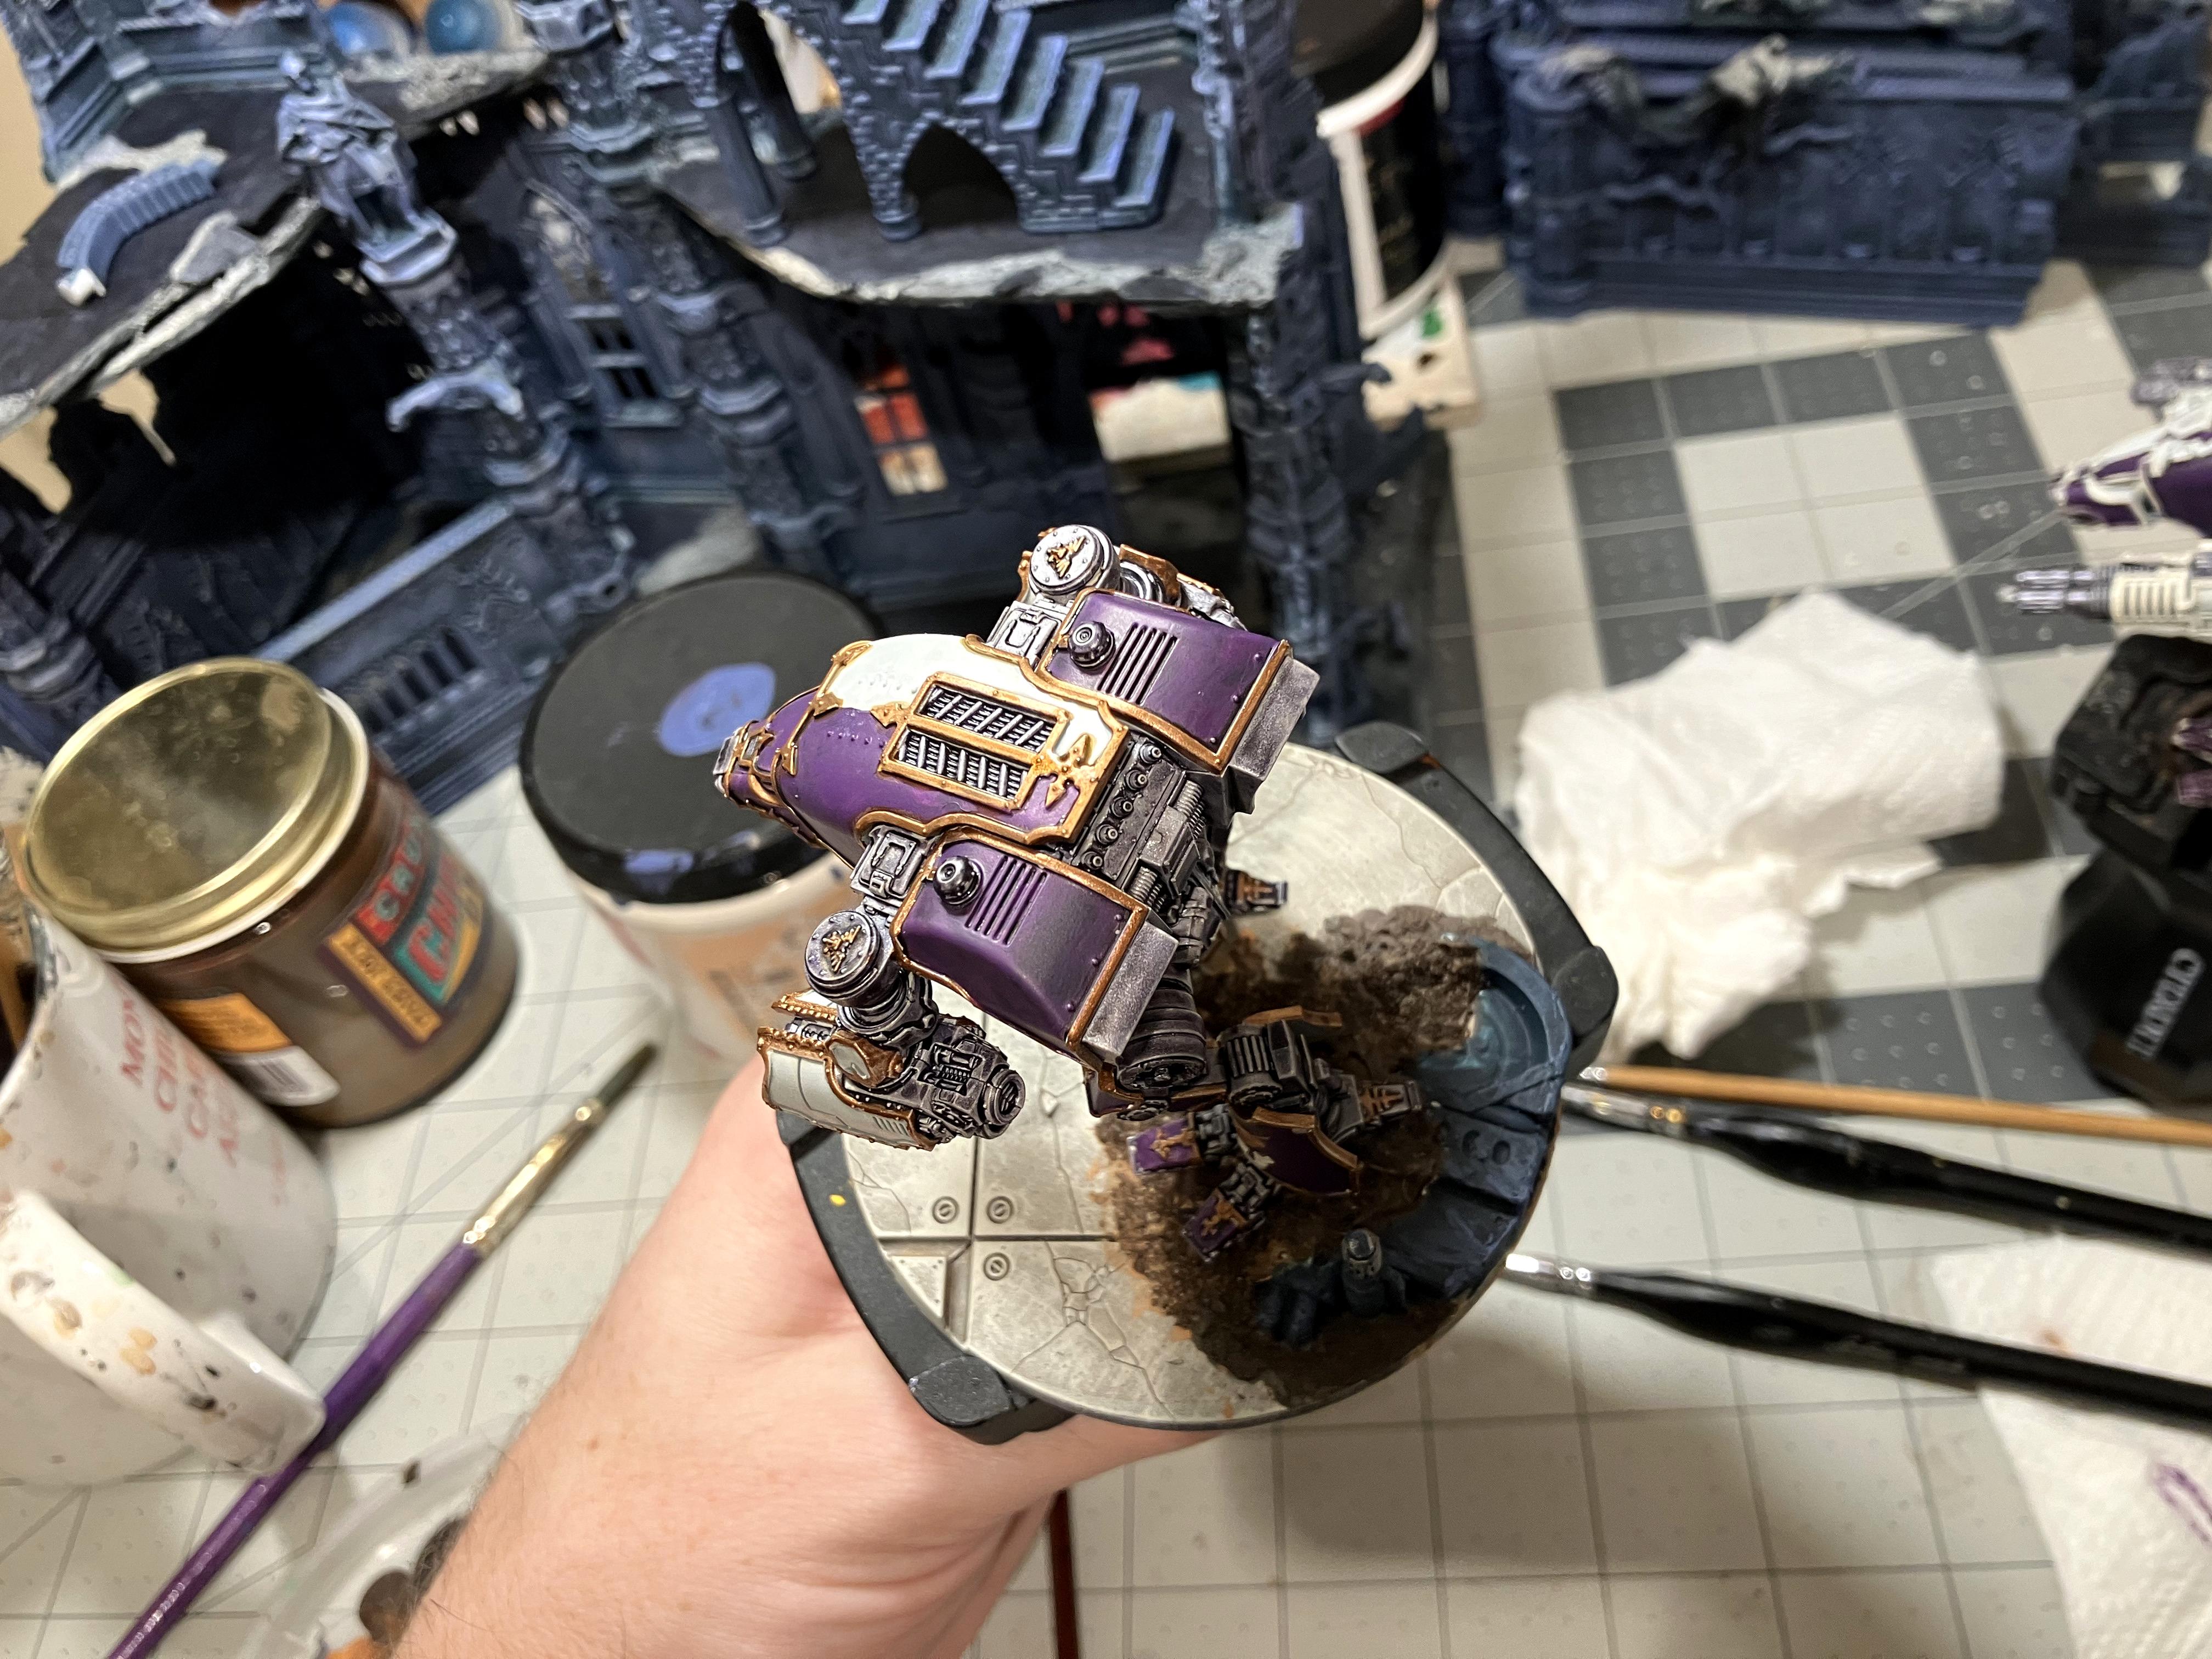
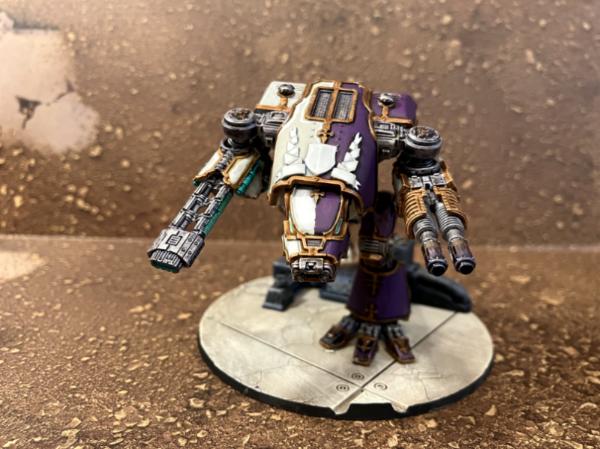
Next up are the Thousand Sons - A bit darker than I wanted them to be, but unless I really want to drybrush them more brightly, I'm pretty happy with the end result. From WIP to completion.
Undercoating done. Sort of very Iron-Man esque.
I was testing out some drybrush vs washes here - not pleased with just a drybrush.
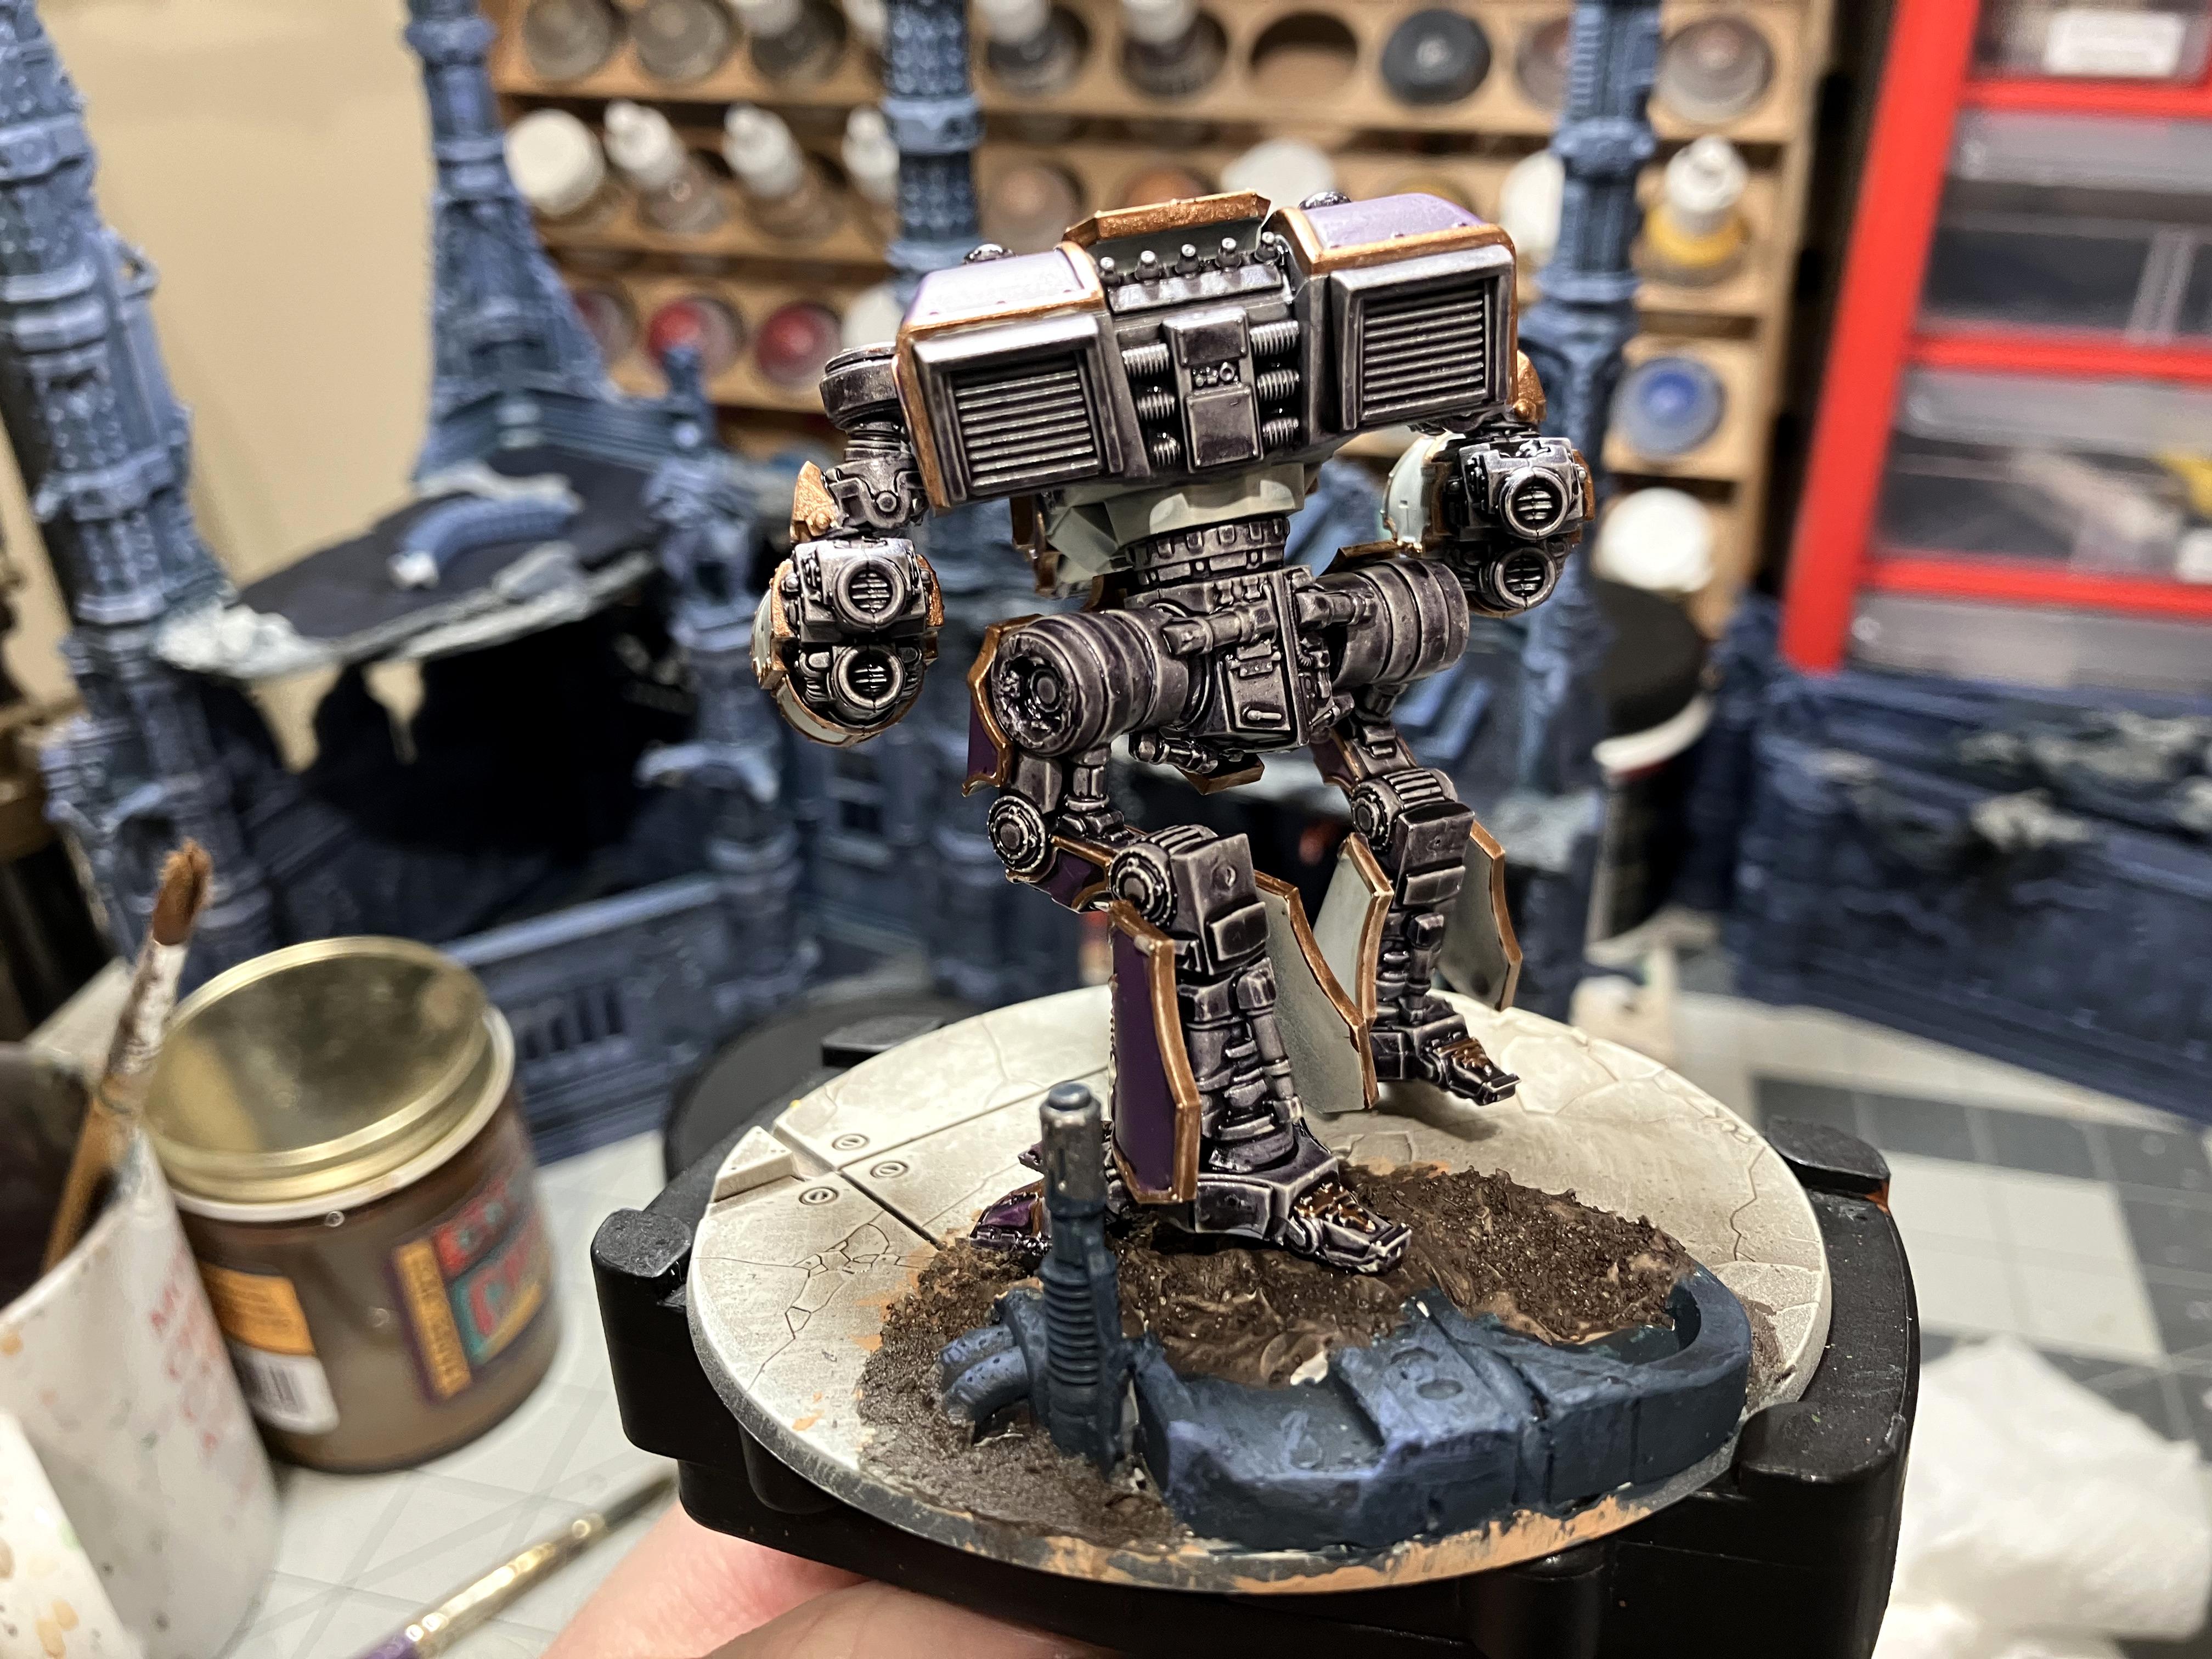
A **Teeny Tiny** update to my LI progress - Finally finished up the Contemptor dreds. Been stalled on these because, well, you guessed it, more jungle terrain! These are (Replace with WERE) the last two pieces of this commission until the client wanted some more ruins to add flexibility to his set. So those are in progress as well. Spoiler - only one of these terrain pieces is fully done as I'm waiting on some 3-D printed jungle trees to add additional details and some different looks - jungle trees should not all look alike!
First off - Tiny Dreds!
Now onto terrain. As usual, built from a core of pink foam and aluminum foil covered tubes for trees, wrapped in paper packing tape. This piece has additional detail in the form of some plaster of paris ruin pieces (coated in mod podge several times before being applied to this to add in some strength).
Here's where I made a classic terrain builder mistake. I thought I had enough clay. I did not. Cue a quick trip to Michaels (post holiday is a depressing time to visit). You can also see the size of the terrain!
Some of the white clay started to crack - wasn't too happy with that as it didn't happen as much with the terracotta one. I have resolved to change back to the terracotta one next time. Fortunately I could fill in the gaps and use flock and similar to help camouflage and fill the holes.
Adding more details now. I start with the largest pieces and work my way down to flocking and other bases as it helps hide the hot glue connection points and blends the whole project together.
Probably the best shot of the details. I need to work on my phone camera work evidently.
Anywho - more photos and work incoming as I finish this commission. Then onto my own things!
More scenery for you this go around - client requested some additional overgrown ruins to add to the vibe of the board. One of their armies is knights, which is why the terrain is so large. The concept for this piece is a single large 11 x 18 foamcore base, cut into three sections - two "L" shaped ruins with the remaining piece in between. Together they are either one extra large overgrown ruin, or two large ruins and one barricade style piece.
Working on the tree in the ruins part...
First layers of paint going on - Black Mod Podge base, a turquoise blue base coat with two layers of drybrush over it, a fourth whiter drybrush over the design accents, while more grey drybrushing over the concrete floor pieces. All textured with a handy rocky and aluminum foil.
Washing it...
You can see here how the pieces all fit together. It's actually super cool how it works - it took some delicate finagling to ensure the foamcore pieces were sturdy enough to hold up to this (I added a layer of chipboard underneath the foam after I first cut it out.
Another angle (not the best!)
Adding flock, moss, and leaf litter. I purposefully didn't put too many extra plants into these two pieces as I wanted them to be most accessible to minis (and people's hands will be moving in and out, so I wanted the least amount of things to knock over/damage.
My friend was awesome enough to resin print me some jungle plants I purchased on Mini Factory, so I'll be adding those to the barricade piece!
Just finished up the remainder of this Jungle commission, and my first time messing around with resin prints for some jungle elements that would be too hard to craft from other materials. Would love to know your thoughts!
This was the initial design. The trees are actually one tree where I think I was missing a piece (the main top trunk part that all the branches were supposed to connect to). So I improvised and made a bunch of smaller trees.
Painting it up and adding more flower details.
Done!
Now for the piece that has bedeviled me the entire commission. At first it was too square, then too blocky. With a lot of finagaling I'm... happy...ish. Too late now, and adding the resin details made me feel better about it. It had to walk a narrow line between being LOS blocking, rocky and junglish, plus keep the train track and... it's fine!
Whelp! Another commission done and on the way! More terrain coming your way soon enough!
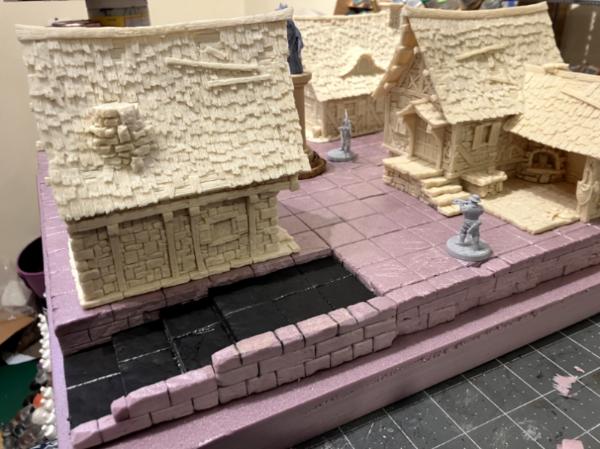
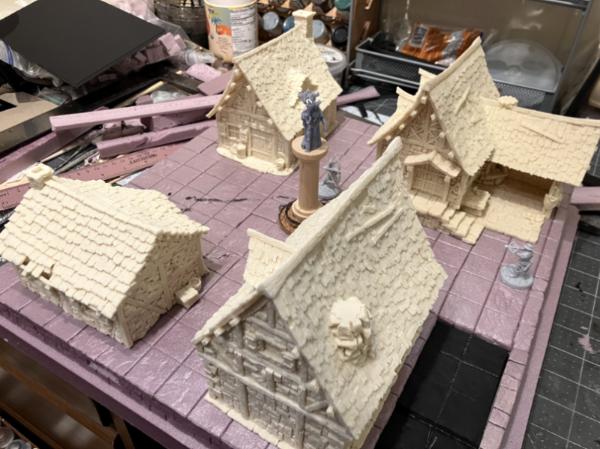
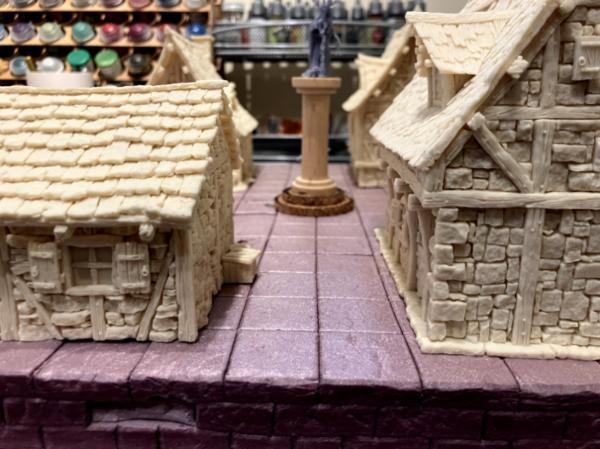
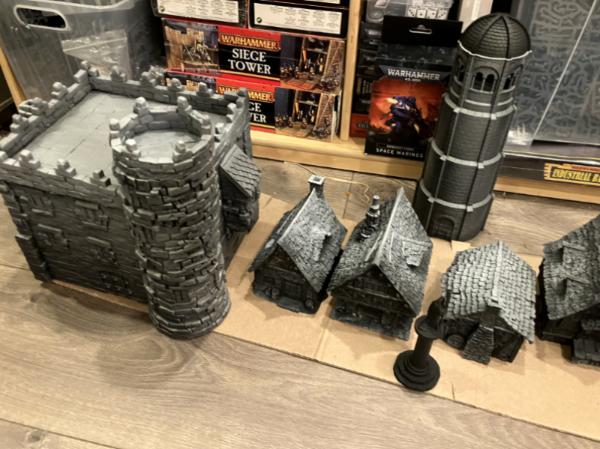
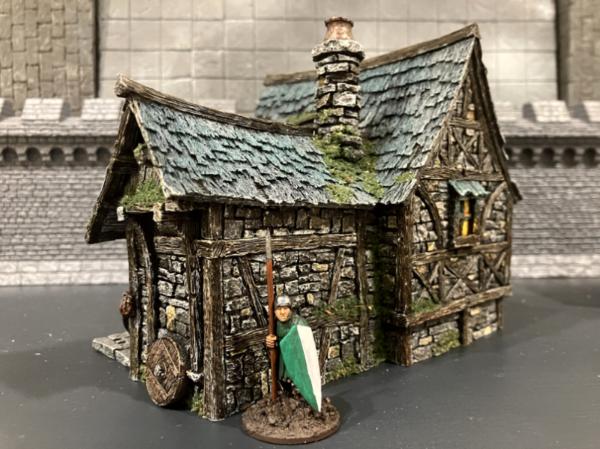
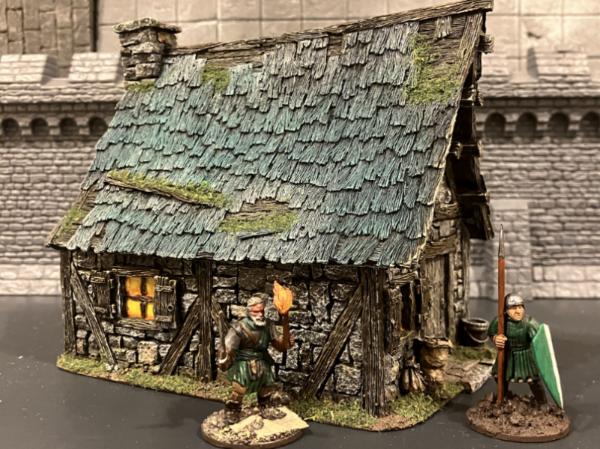
As I'm between projects at this point right now, I get to work on my own projects, woo hoo. I've always wanted to build a fantasy-style village with both scratchmade terrain and some things from Tabletop World. I was lucky enough to get the blacksmith building from them this last holiday, so I'll be painting that up and building a few more houses and the like to expand. The eventual goal is to build a small fortified town with a nearby keep. I have an old Warhammer Fantasy Castle that I'll be modifiying and building up to compliment the town.
So here's the goal then:
5-8 hovels/houses (including 2 or so fancier ones)
Blacksmith
Inn & Stables (I have the Inn built, but the attached stable component is not built)
Guardhouse/barracks
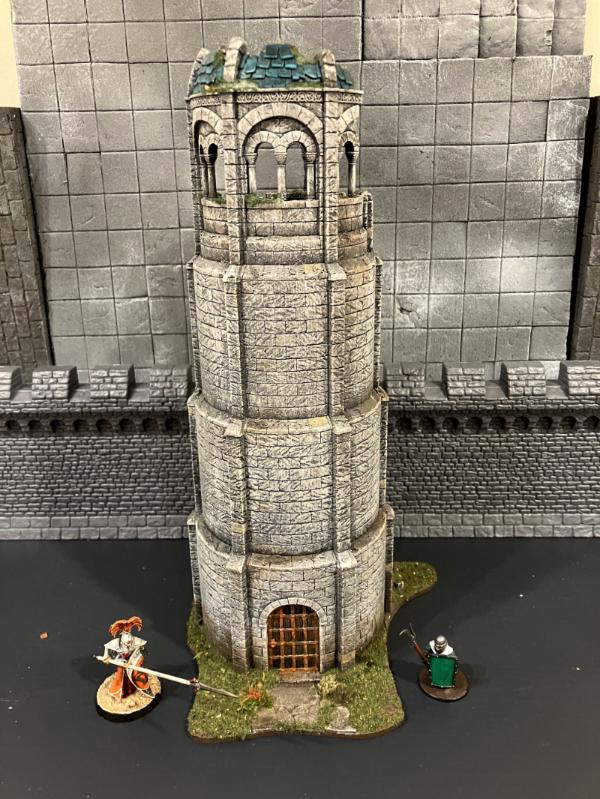
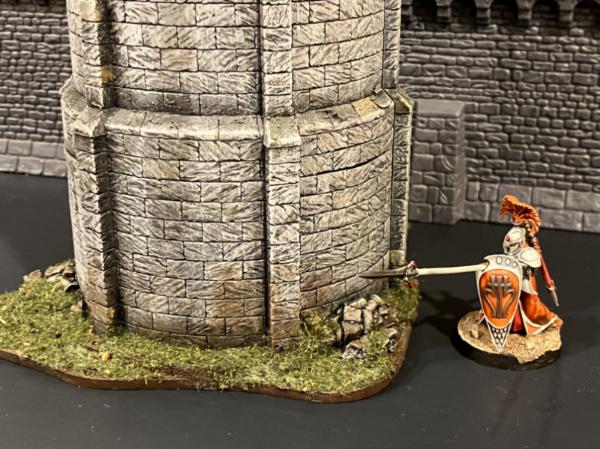
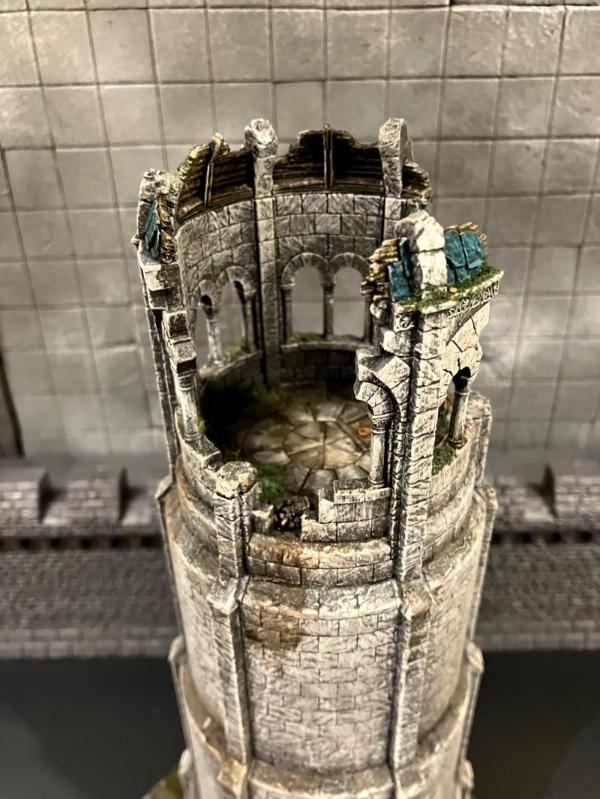
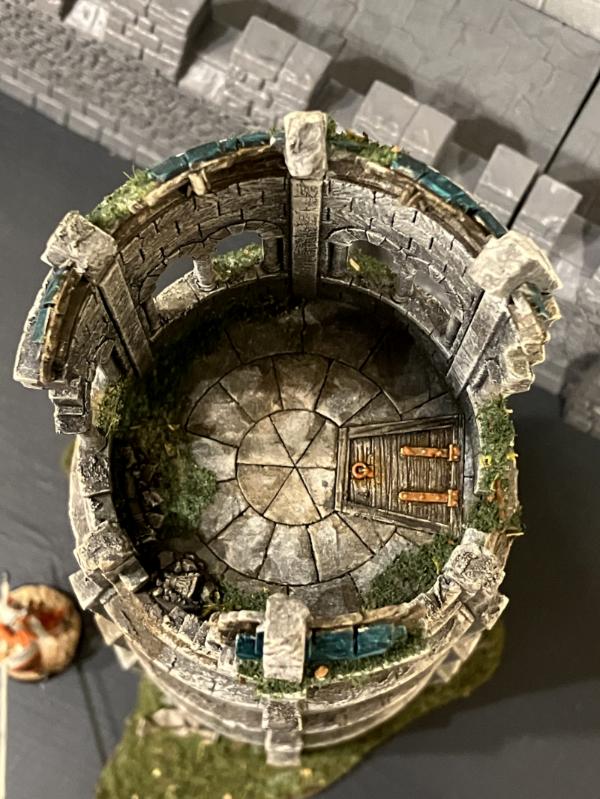
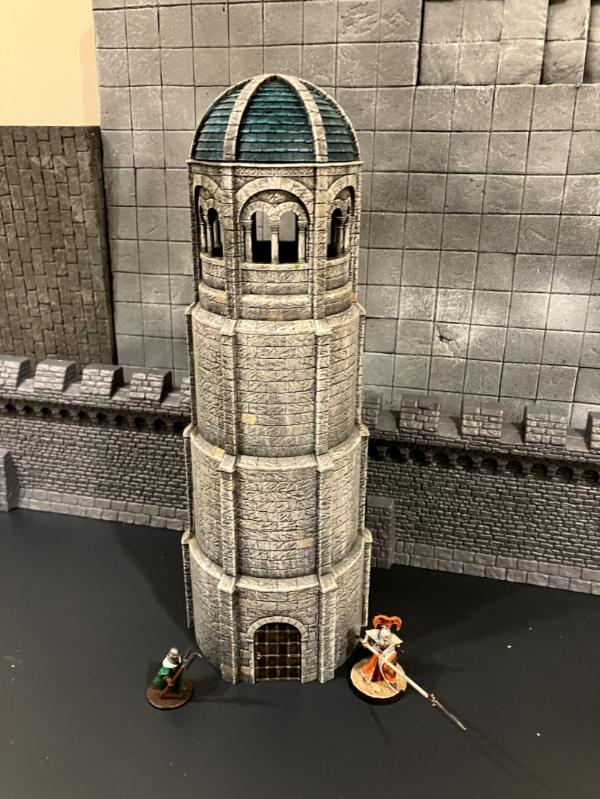
Ruined Tower *using the MESBG terrain from GW Tower
Plus lots of various little gribbles and the like.
Here's the (basic, but happy!) start.
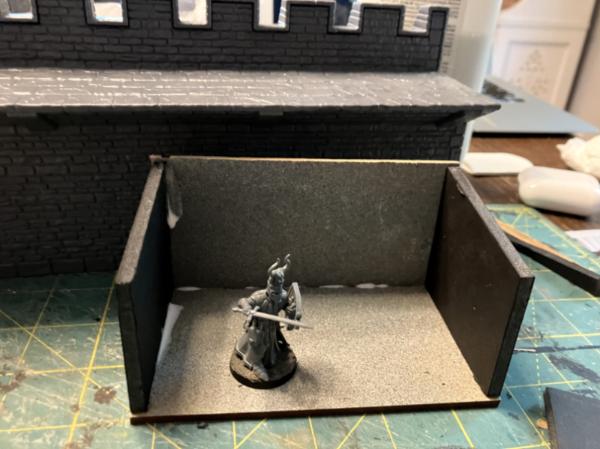
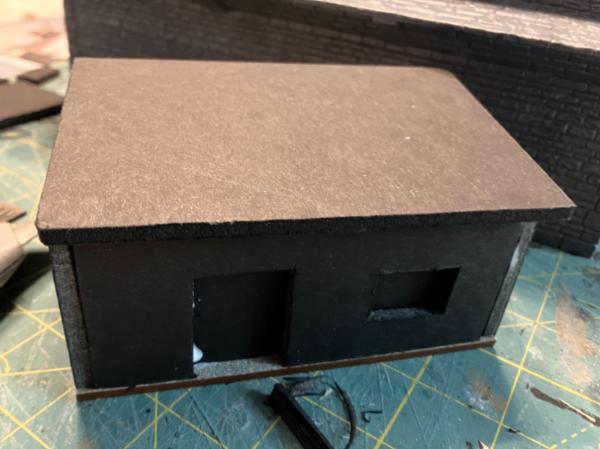
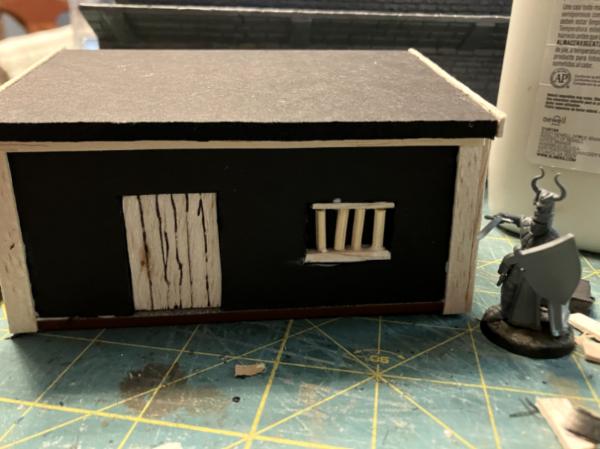
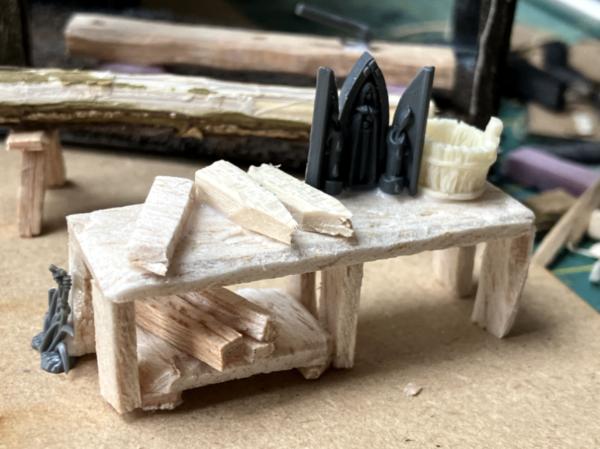
This is the house of a local forager and farmer. Built on a base of scrap pink foam from a core of Warbases.co.uk small mdf building, then using some gifted tiles for the roof, balsa wood for the beams, and bits of granny grating backed by some plastic sheet for the windows. I used some Spackle to make the wattle/daub composition on the building.
My favorite little parts are the shield above the door (plus that framing, which was a happy accident) and the small wood pile and chopping log. This is as far as I'll paint until I build up some more buildings so they all look consistent (learned that lesson on several projects)
Gwyn chan 'r Gwyll wrote: The wood pile and axe are what make the building into almost a whole scene. It makes it look entirely lived-in.
I saw a video on youtube somewhere that basically mentioned that every one of your 'lived in' fantasy building needed either a coal cellar or a source of wood nearby. Wood piles / stores also make great scatter terrain. Thanks for the kind words!
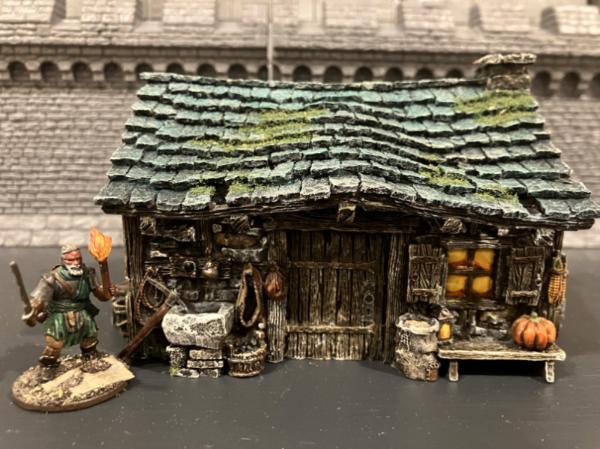
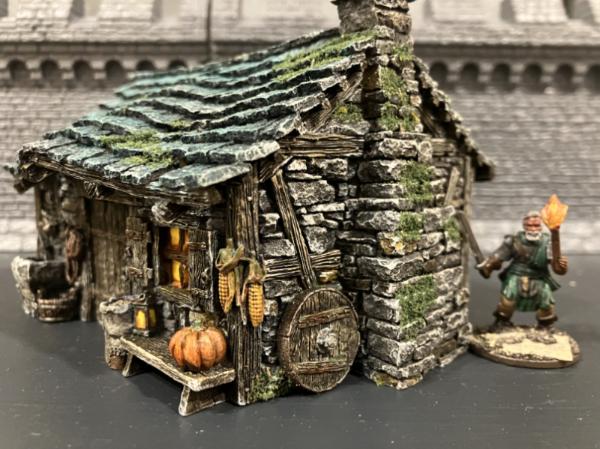
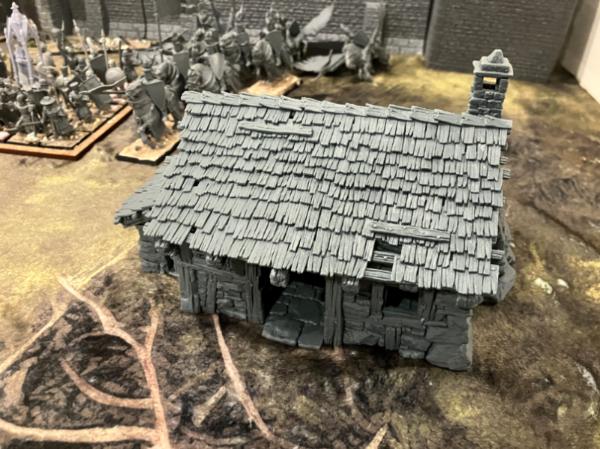
The town of Border (A homemade town in my Dungeons and Dragons campaigns) is now expanding with some new buildings! First up is the granary/chicken coop. Taking inspiration from some depictions of some medieval and ancient style granaries, I put this small Warbases Dark Age Building (a timber barn, I believe) onto stilts and turn it into a chicken coop of some type. I realized that these buildings are basic, but with some adjustment they can turn into some awesome scenes.
But what would a good border town be without a watchtower. Unfortunately, this is the old watchtower - struck by a lightning bolt, this unlucky watchtower no longer serves it's purpose in town, and a new, more fortified version has been built slightly north of it. Nowadays its used mostly for storage of local farmer's militia gear.
With that, I wanted to show you a new set of arrivals - some more tabletop terrain buildings join the growing town!
Can't wait to paint all these up!
Finished up work on the granary and some fun little statutes for my D&D world.
Finally - added in a new construction - a small livestock paddock. Once this is complete I think I'll start work on a larger structure to compliment the village.
Another spring day, another set of progress on the fantasy village. This time, it's a sturdy keep as the town's central bastion. Home to a small garrison of loyal retainers to the lord, it will watch over the walled hamlet.
But first! Some small walls for the livestock of the village.
Now onto castle building. Foamcore for the main walls to speed up the process, white styrofoam for the bulk of the inside, pink insulation foam bricks for the cladding on the tower. (Tower obviously provided by fake pringles). Wood from coffee stirrers. Metal windows and hatch piece provided from a kickstarter I backed a long time ago, but finally used in a project! I made some more from white foamcore, then I graduated to using chipboard instead.
This last bit is my personal favorite - I wanted the keep to have the ability to concievably be lived in for real, and what better than a poop shoot?
Roofing matches another building in town to tie them together.
Meer_Cat wrote:What a terrific build! Simple materials, a lot of attention to detail and a ton of imagination- really nicely done!
Love the addition of the garderobe.
muette wrote:Looking good! Love the stone arrangement on the tower.
Thanks for the love! I absolutely wanted to include the gardenrobe on this build. Next part will be adding a chimney on the other side and finishing the defensive windows. The amount of time I spent looking at Keep images on Pintrest and the internet only to go "Those are too big, let me go smaller" made me laugh. I will be building / assembling a larger base with a ramp so that way there is at least some additional opportunity for height and defensiveness, but separate so that way I can use it for the homes as well. New update will come tomorrow likely.
Blockade: I'll post tomorrow.
Narrator: Sadly, his optimism was ill founded. It was more than a week before he posted again.
But wait, there's an update! A GOOD update! (More photos yay)
The castle is assembled! (Although I still may add some small buttresses on the wall that has nothing on the first floor, but I'm not 100% on that yet. Thoughts and comments accepted!)
I wasn't 100% happy with the window details and thus trimmed the stonework down to better match the rest of the stonework on the other windows.
The finished Gardenrobe and wall supports on the right side of the building.
Back Wall - I'd put the supports here as they'd fill some empty space, but I'm also not against empty space.
The chimney - I went with one larger piece of foam rather than a bunch of small ones, then cut out some pieces and put in some individual foam pieces to give it some more texture. Painting should help this. The bottom part looks more uniform than the top part.
The tower parapet is slightly lower in height than the wall parapet, so I added a flatter piece to provide about 2.5 bricks worth of cover, rather than the 3 full bricks the wall gets. Hard to tell the difference from far away, but it does let the archers reach over the wall more easily to shoot directly down.
Here you can see more details on the wall top. Nothing much else has changed.
Next step is to build the large platforms for homes and keep and then on to the warhammer walls!
The dreaded "Let's organize this room" bug has struck. But not before I made some progress on other things!
I built a base for both the castle and the village - it can hold part of the village or the castle. I'm going to build another two of varying heights, and add some mobile ramps to connect to them.
You can see a little bit of the detail on the edge better here. It's just an inch thick foam, which is what I have available locally.
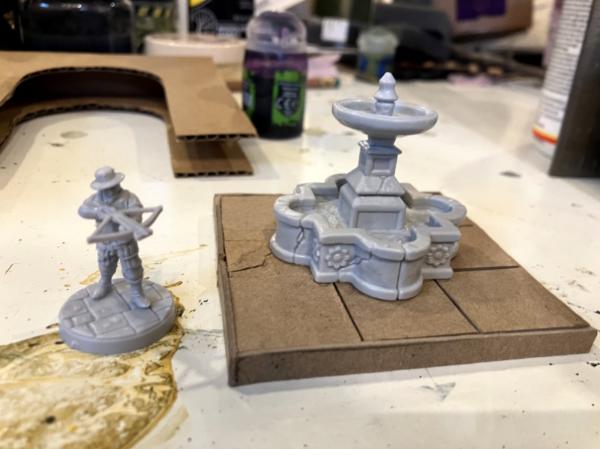
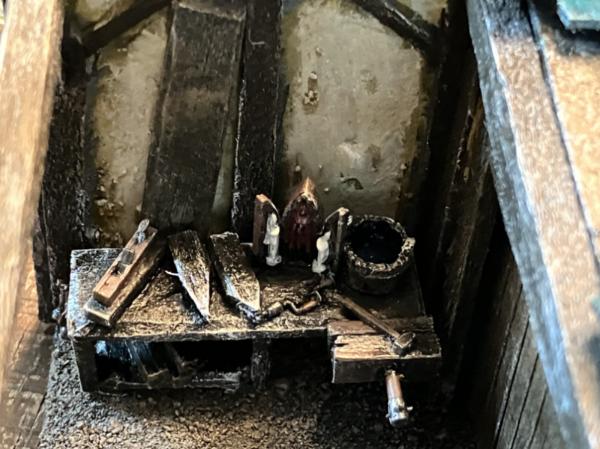
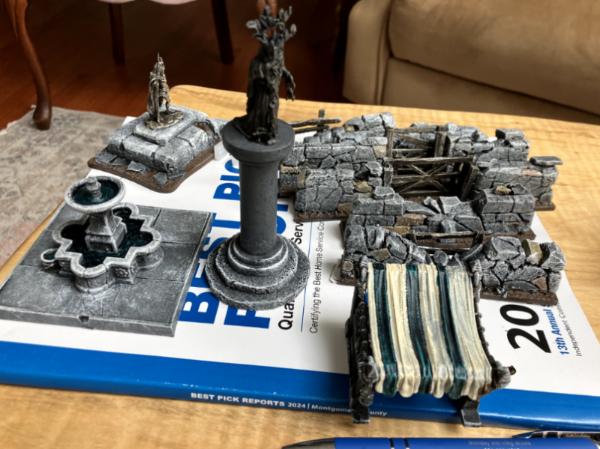
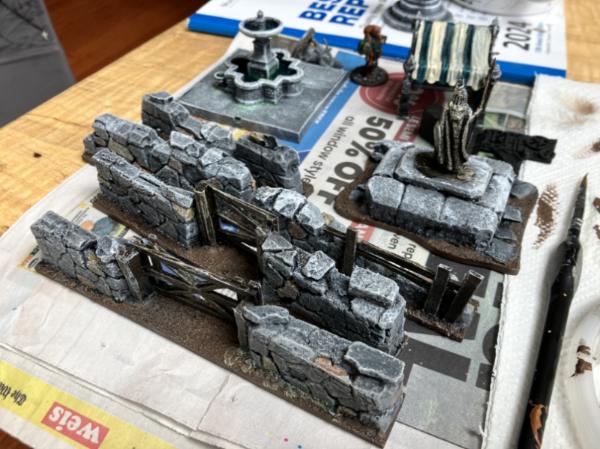
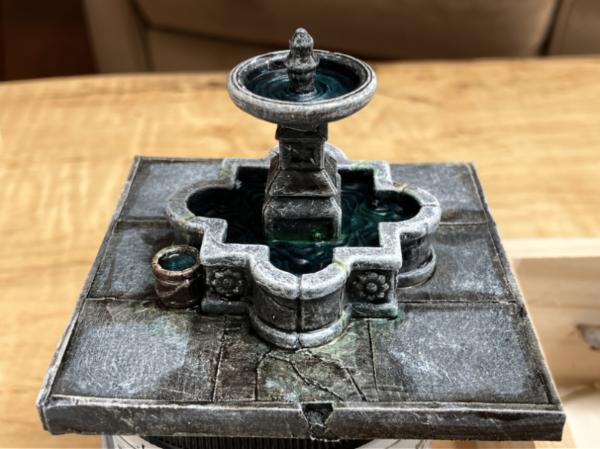
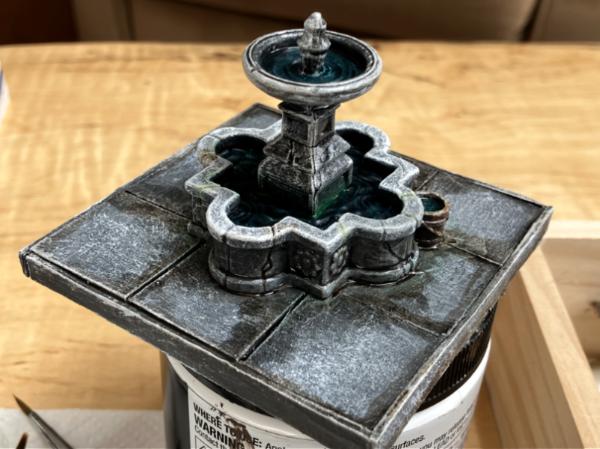
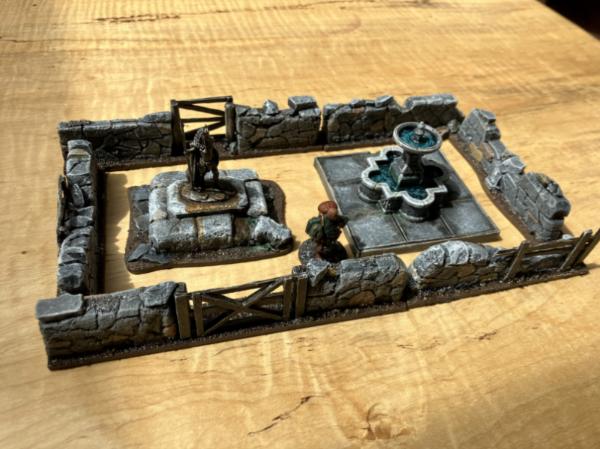
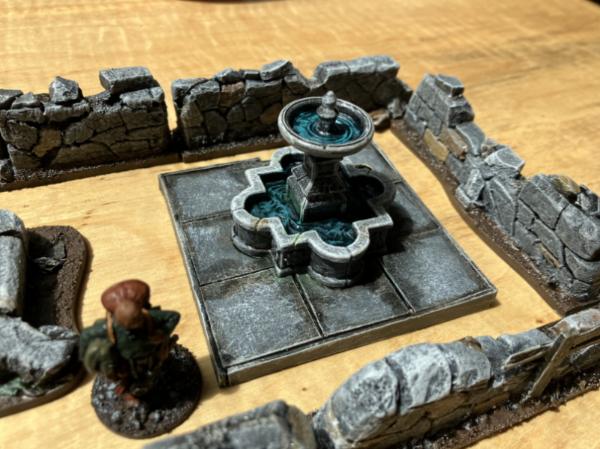
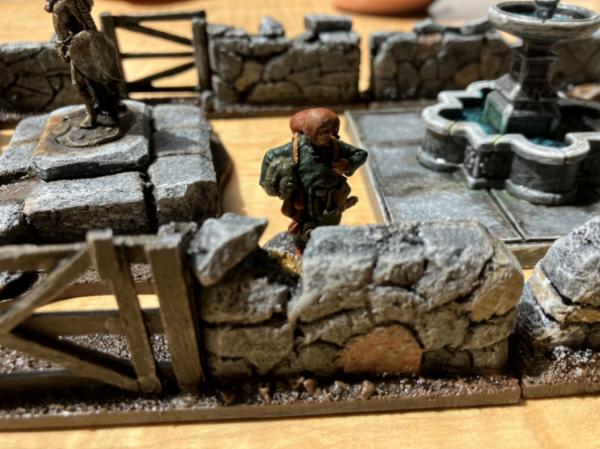
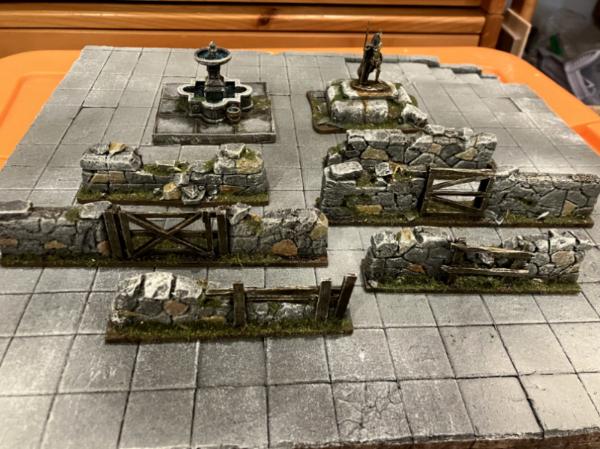
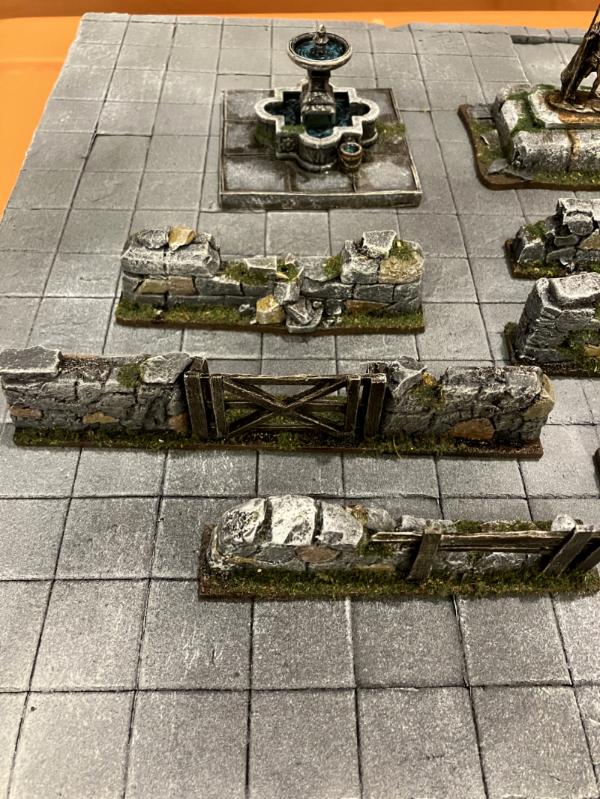
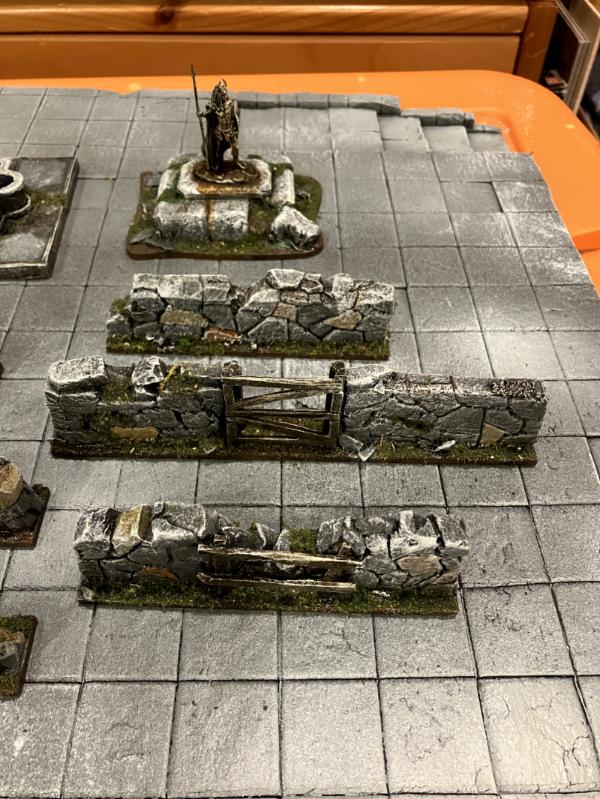
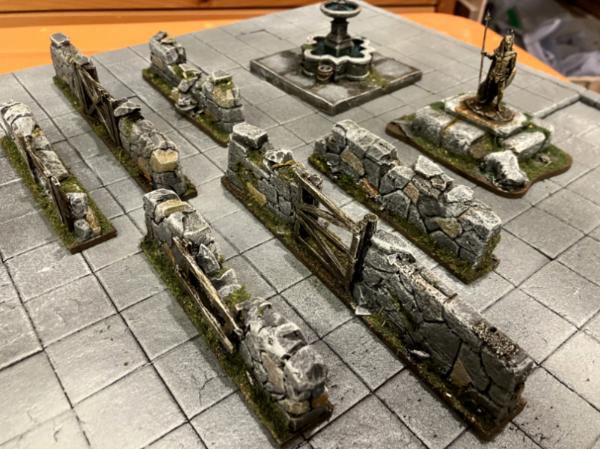
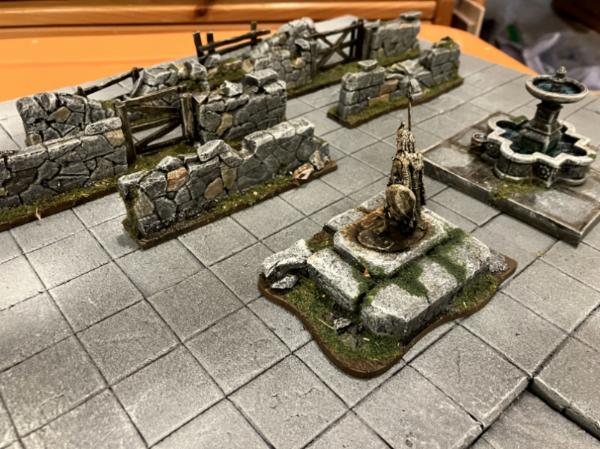
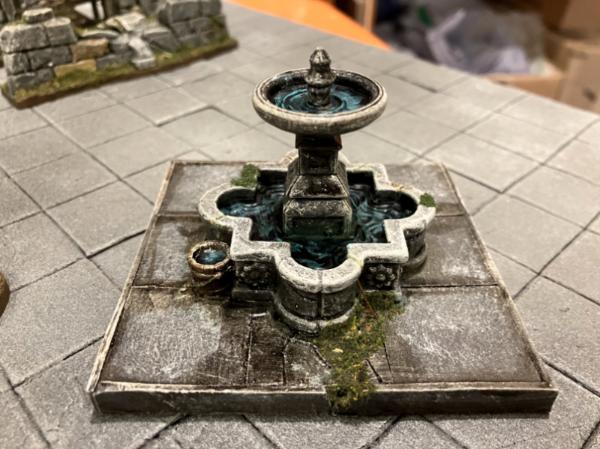
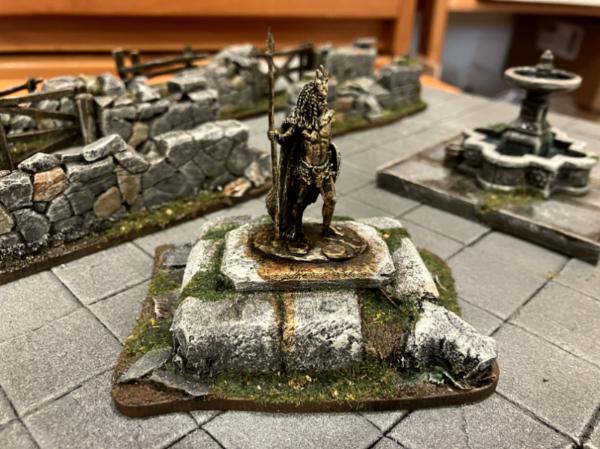
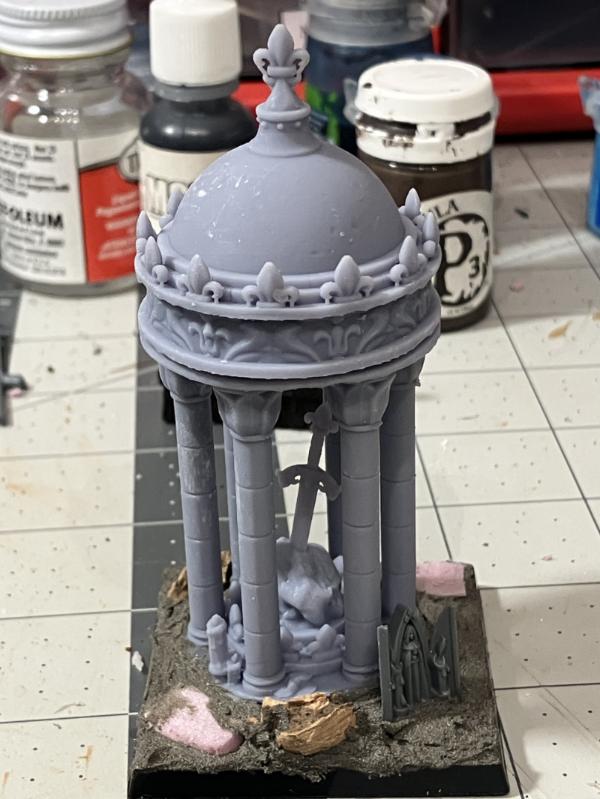
A small fountain for the village.
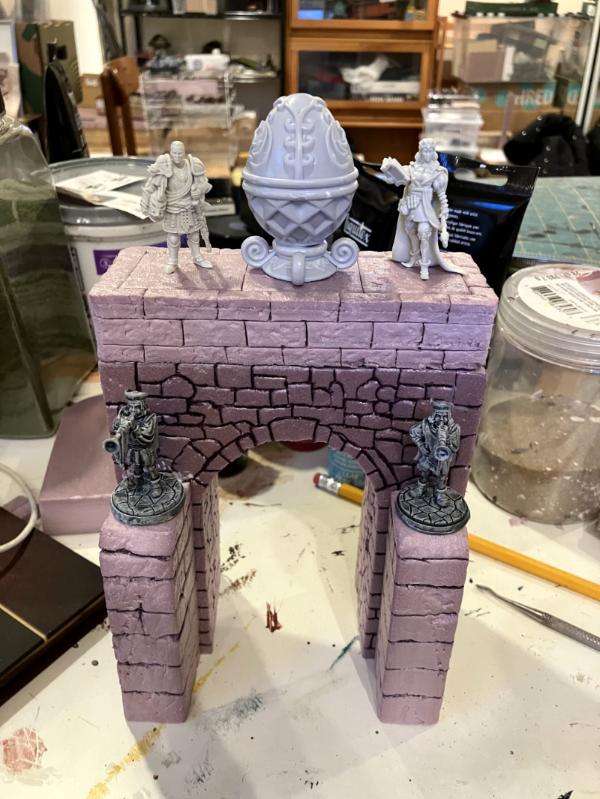
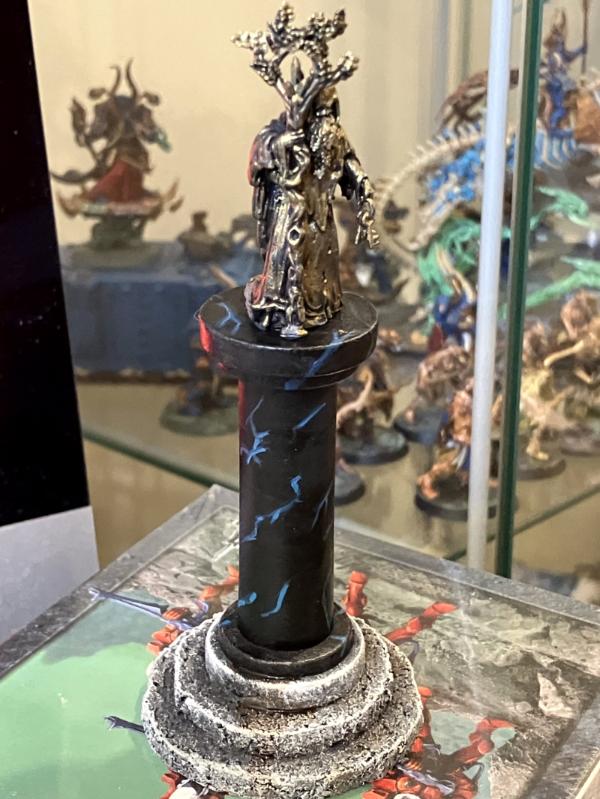
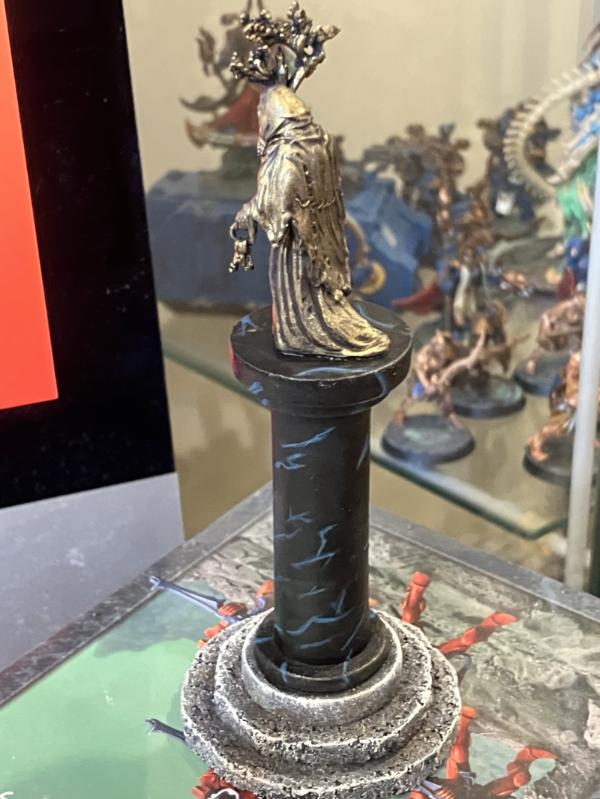
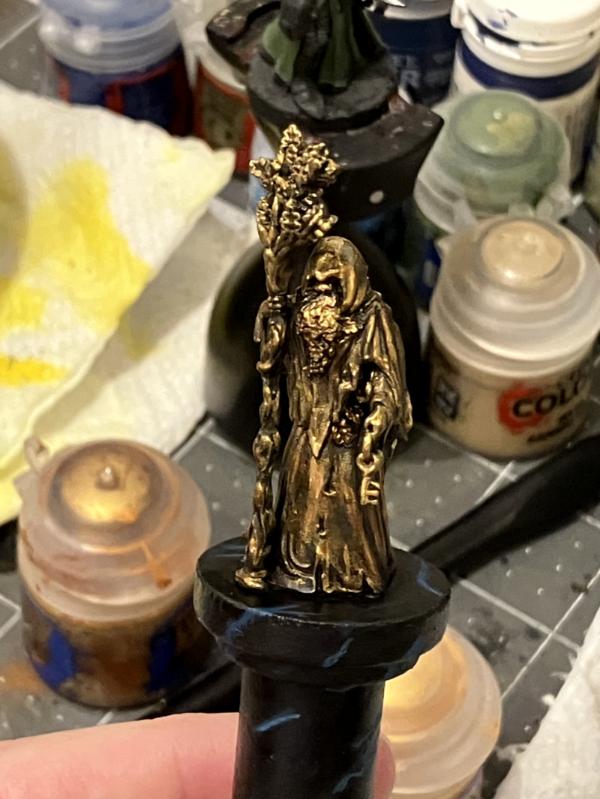
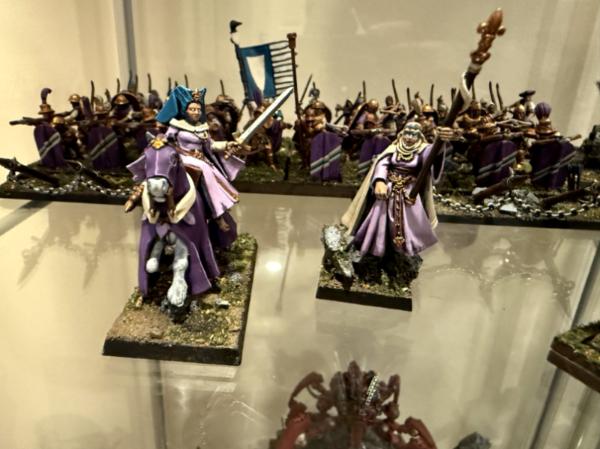
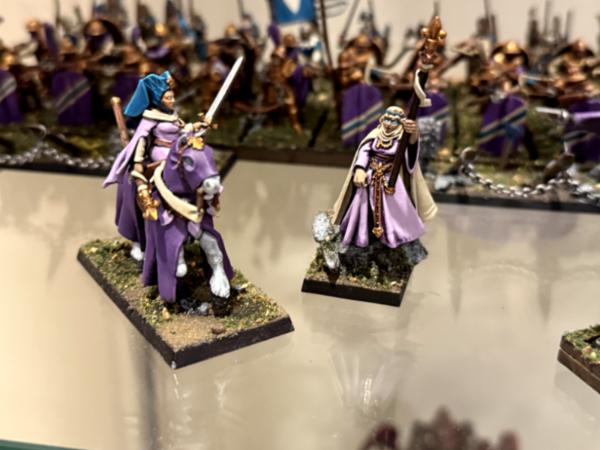
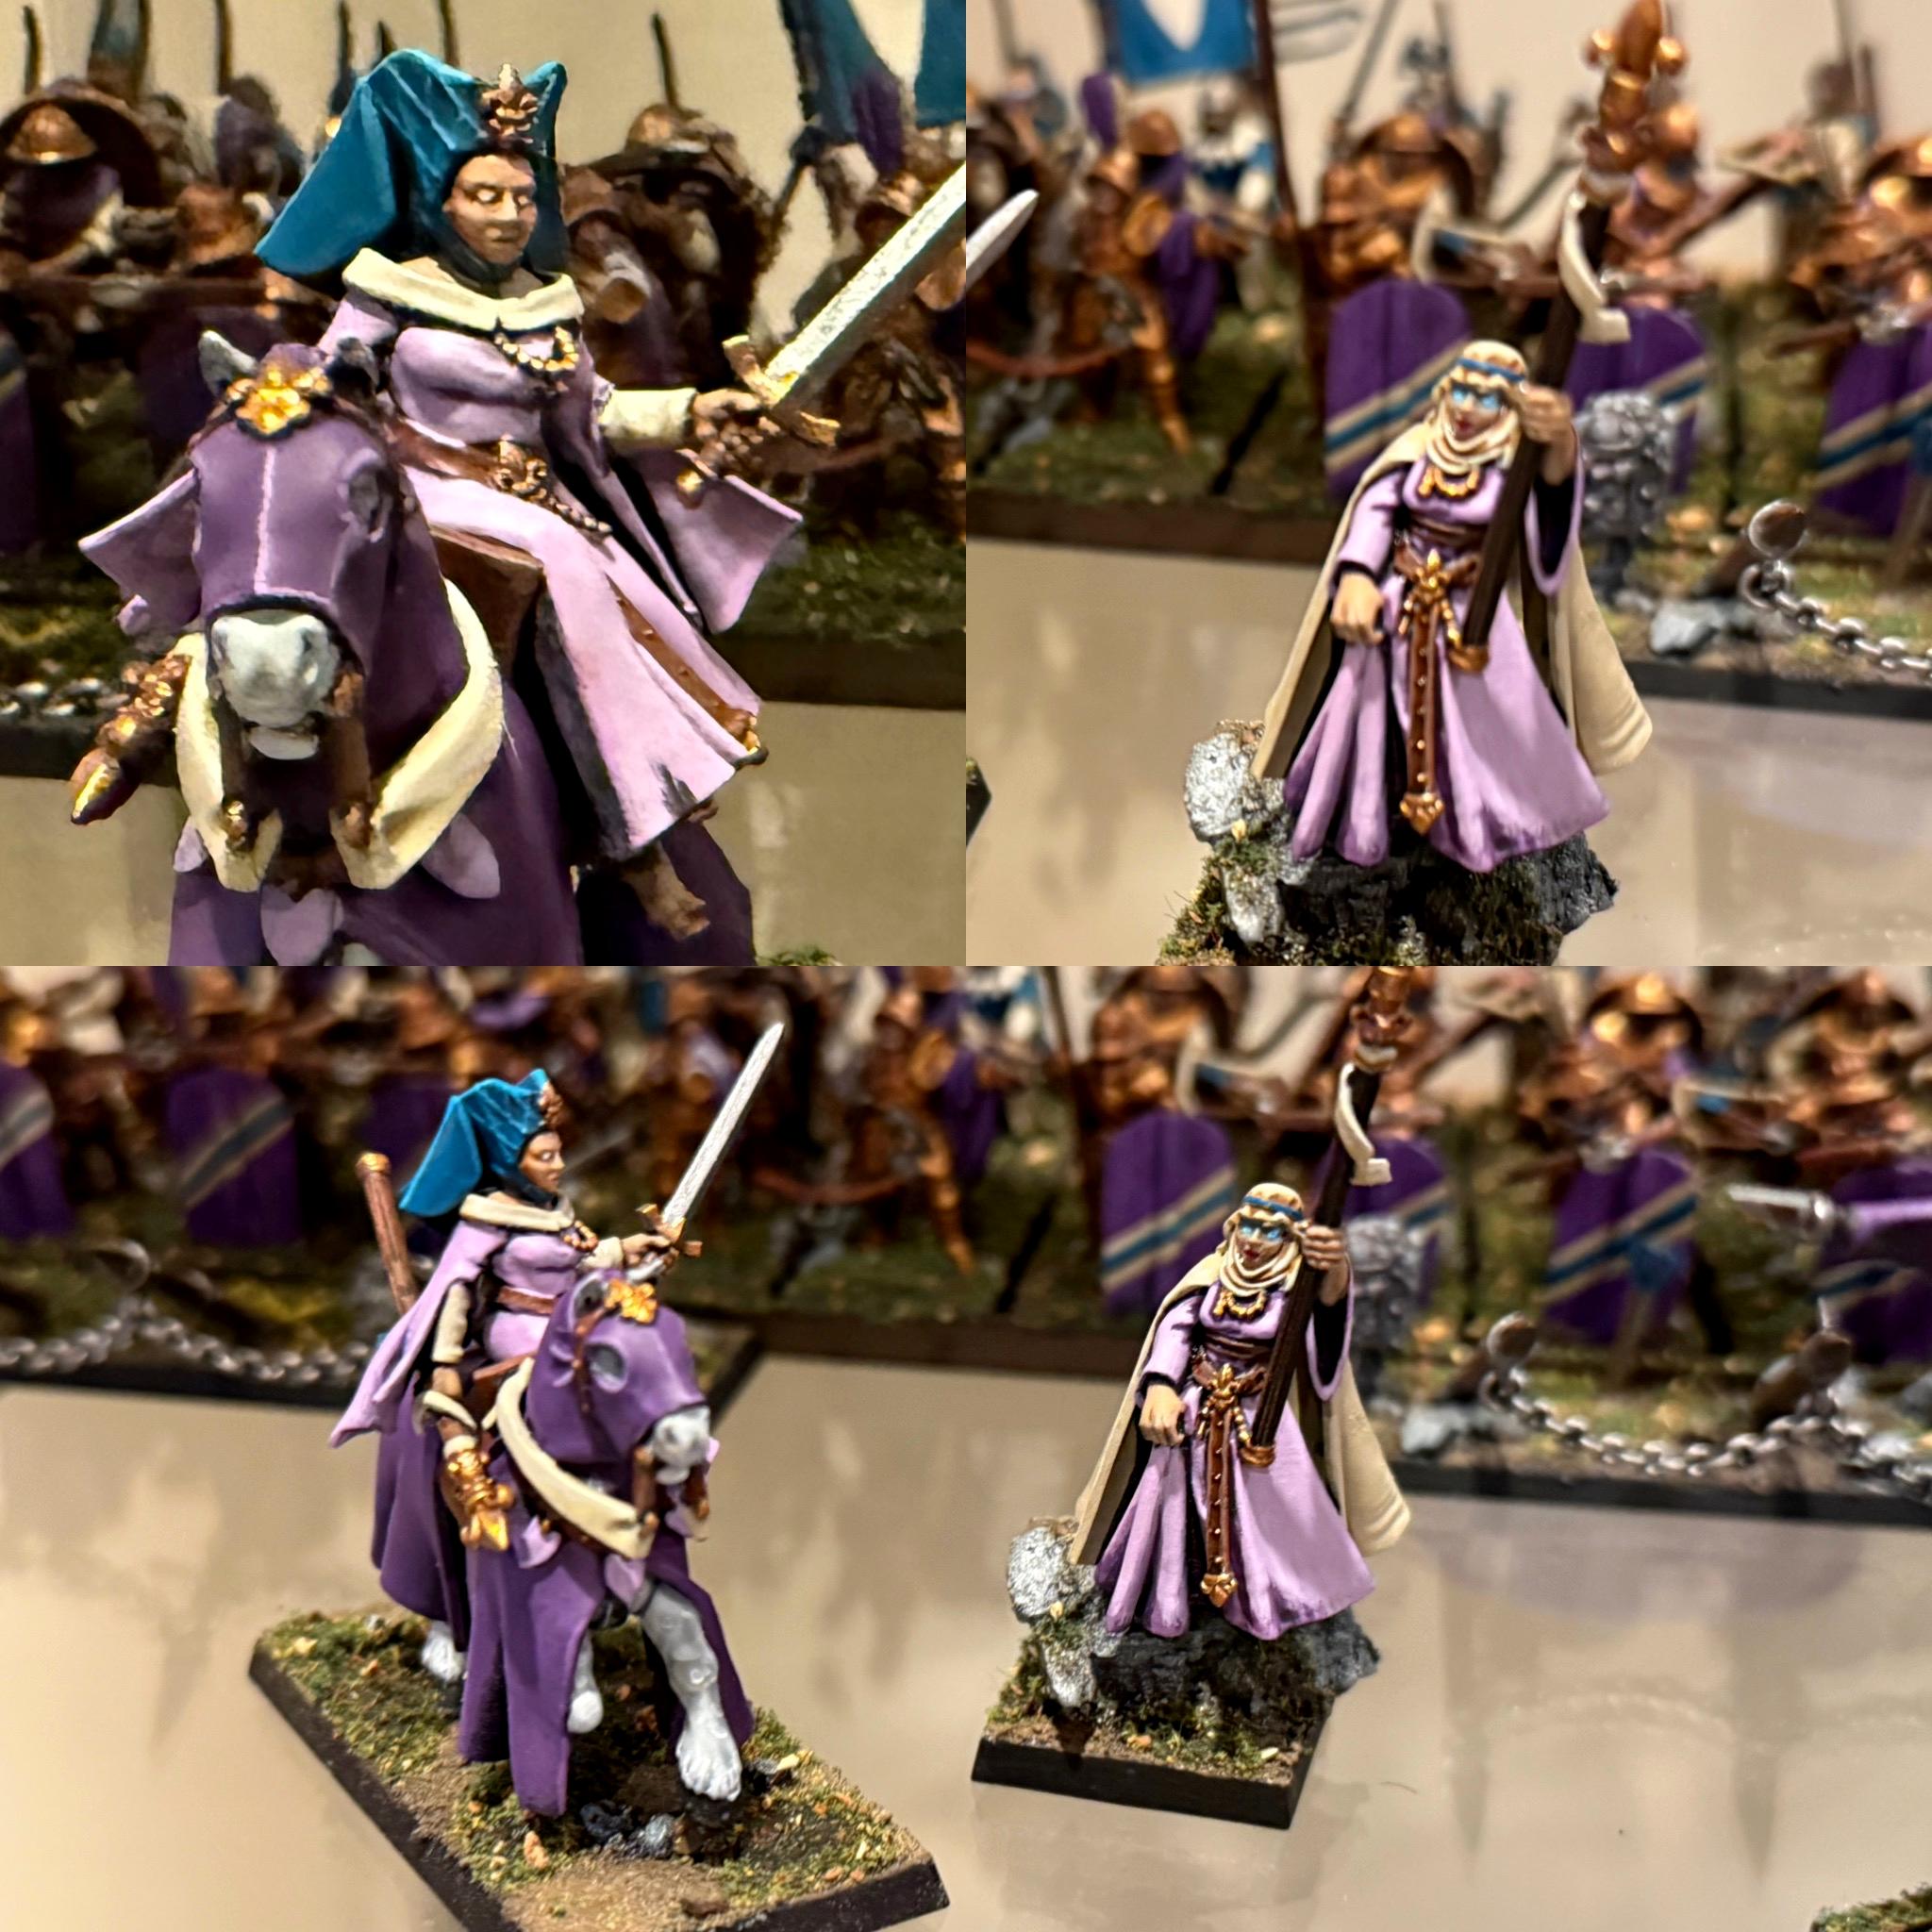
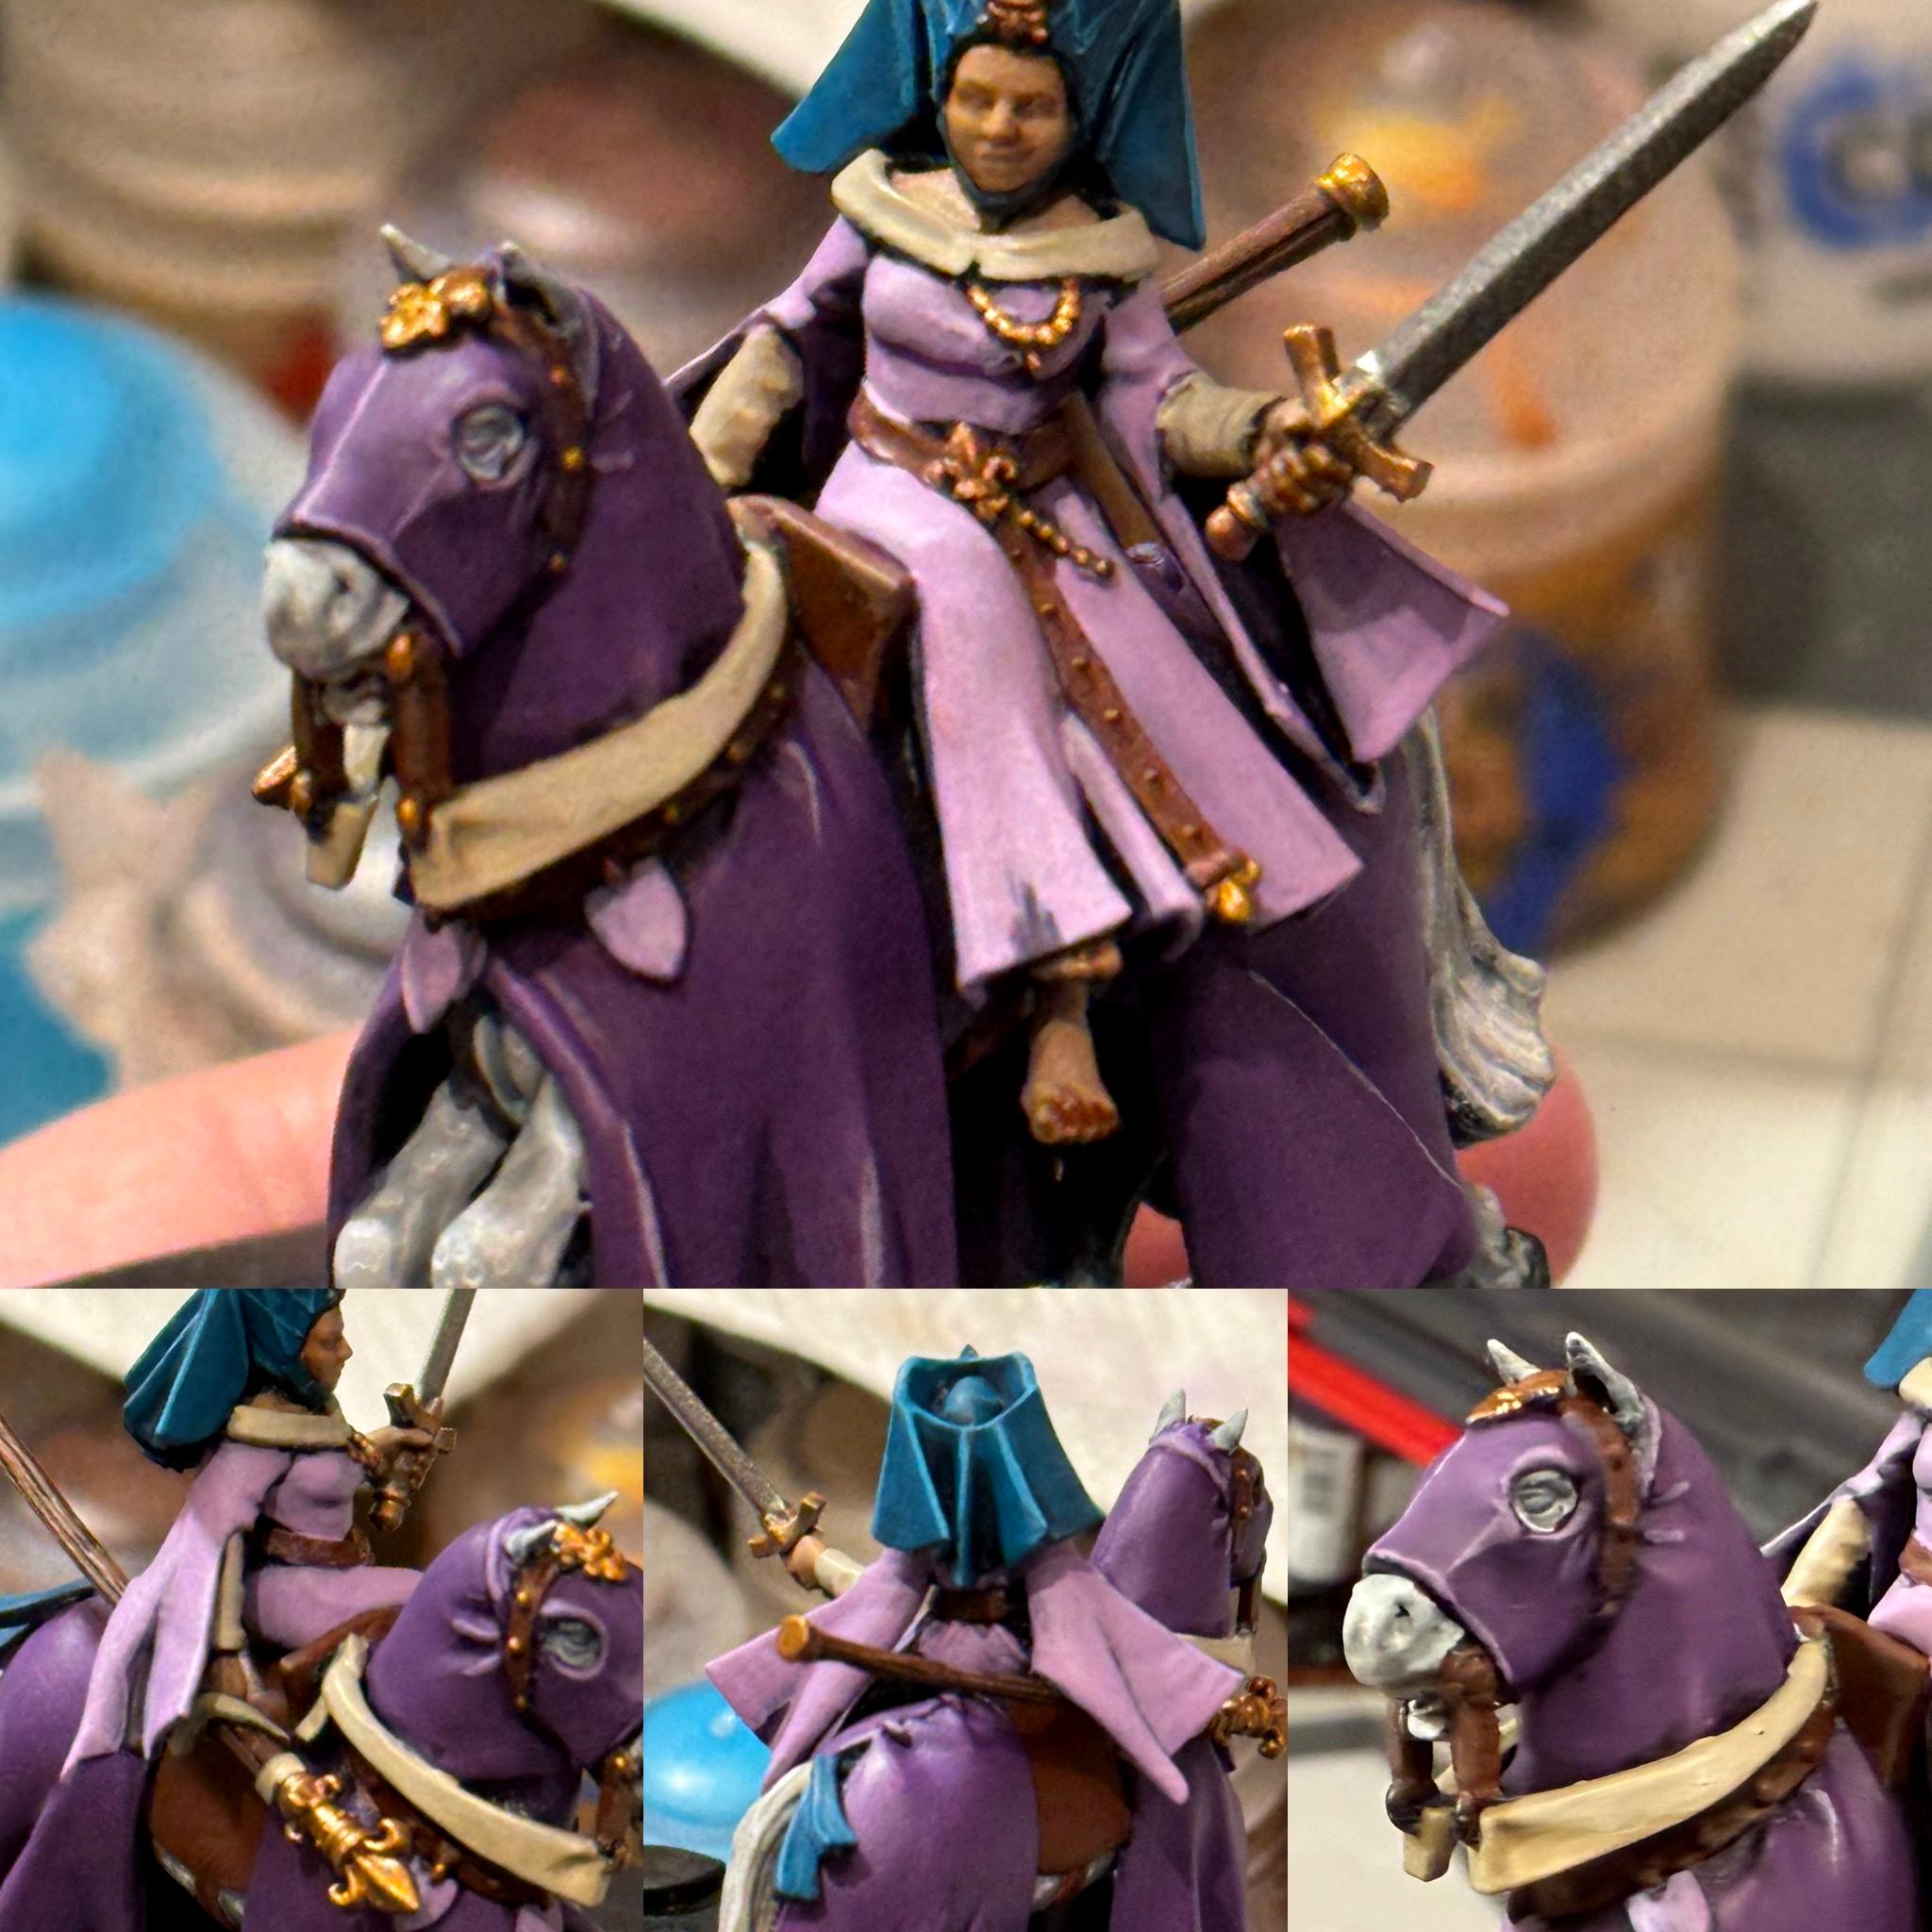
Naturally, the local lord insisted that a commemorative arch be built to celebrate his victory in the most recent war. That would be him and his wife, a renowned sorcereress, atop the victory arch.
It wasn't all building though! Undercoating was in full swing too! (I also figured I'd save everyone the 'joy' of looking at black undercoated models for everything I've already posted.
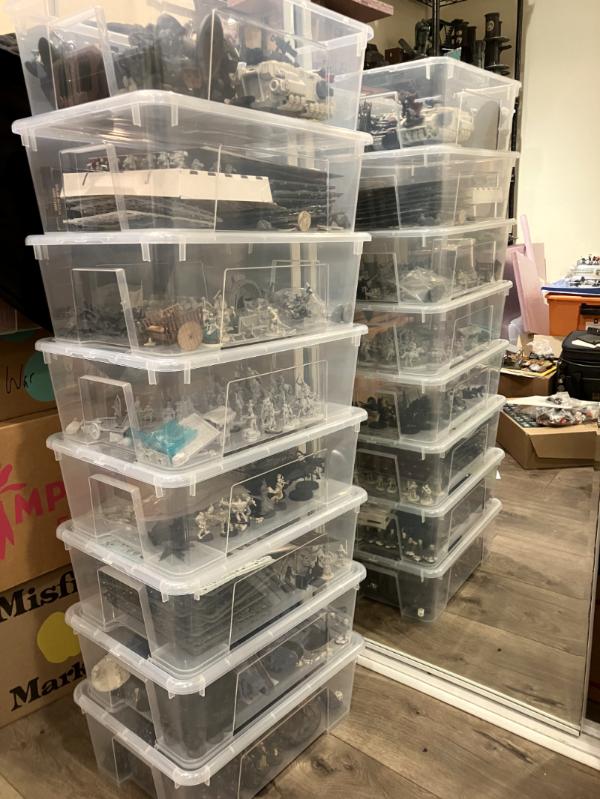
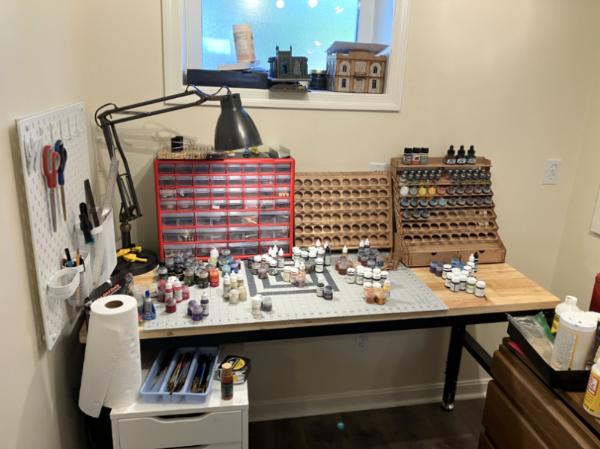
Then, naturally, the dreaded "I need to clean this place" bug struck, and so in an effort to reset the mechanism (to borrow a phrase from the Independent Characters), I set out to finally organize and clean up the hobby room and make it function. It hasn't really been super clean and organized since I moved, so there's tons of little surprises cropping up everywhere. A while ago I bought some Samla (Smala? Sanla?) boxes at Ikea, dirt cheap. I originally intended them to store terrain but I've since decided they're actually a TON better as project boxes to contain unfinished miniatures. I can see what is in each box, they click close, they stack, what's not to like?
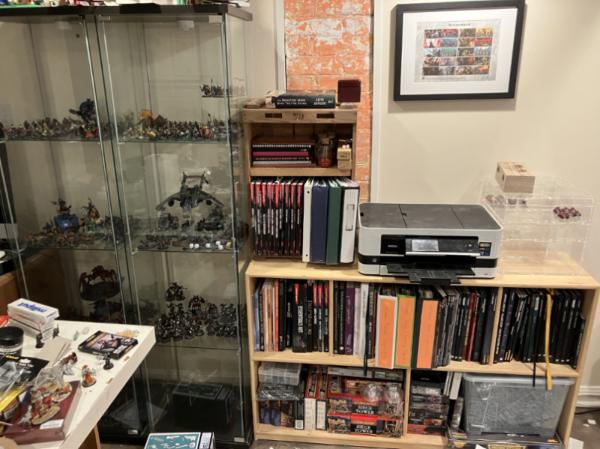
The picture is deceiving - there's a mirror in the background!
From top to bottom project wise
1. The mostly armor part of my Black Templar army (A Kratos that I don't think I can legally use, a Gladiator, one of the larger dreads, and a repaint of an older land raider crusader)
2. Legions Imperalis (All the non-vehicles essentially)
3. D&D Minis that are both relevant to the campaigns I'm a part of, and ones I want to paint - mostly metal and resin.
4. Assembled Miniatures from the Dungeons and Lasers Kickstarter (#3? #2? I don't even know) Very low priority. There's a whole nother of the large boxes full of minis on sprue I think I'll never touch.
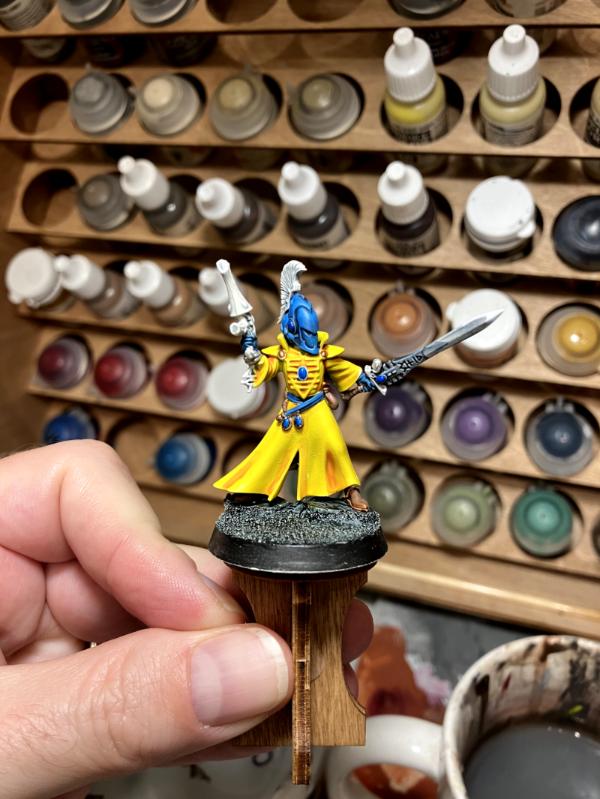
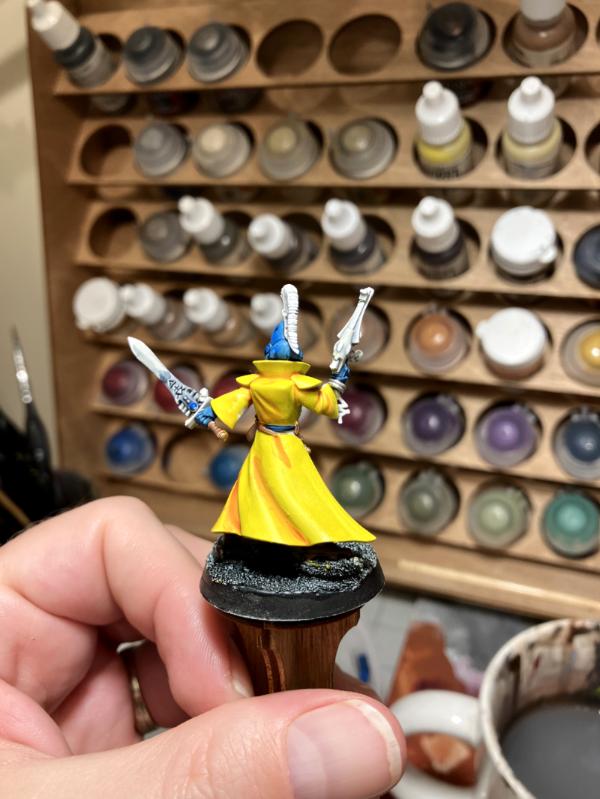
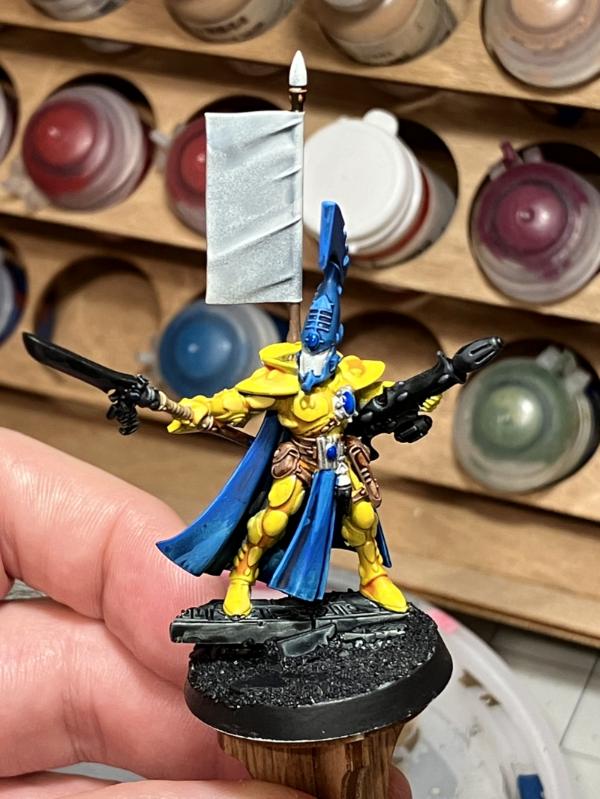
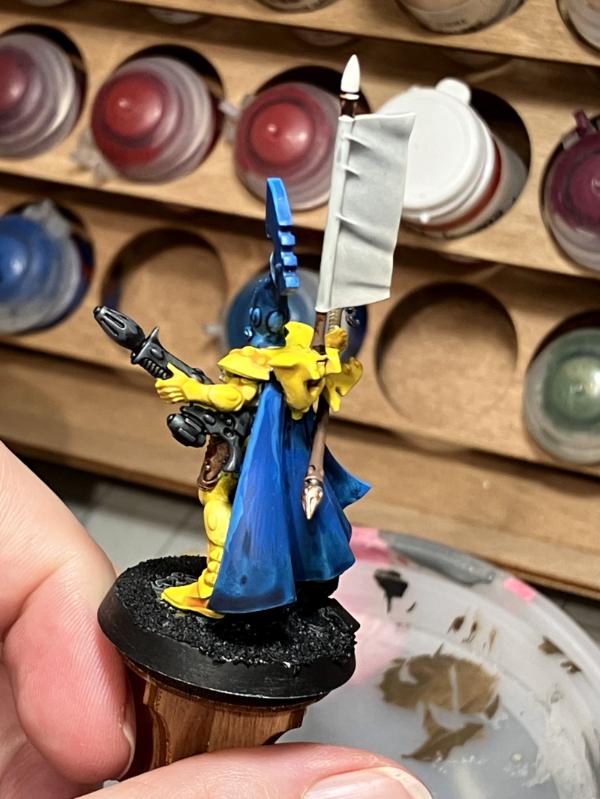
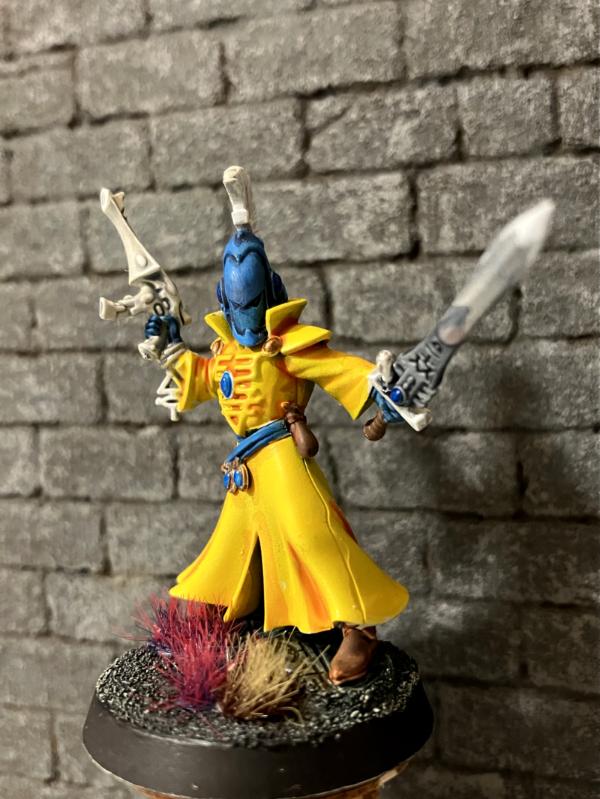
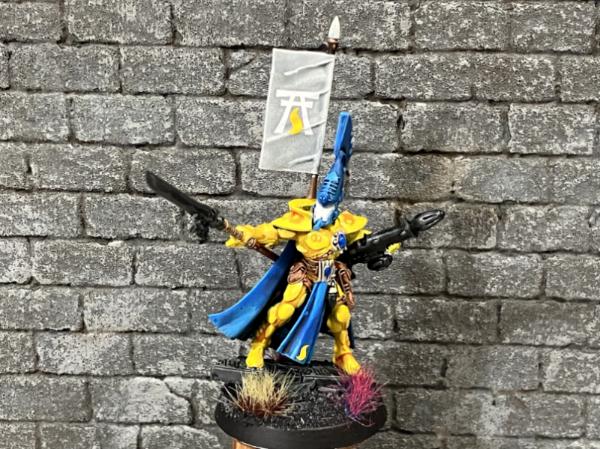
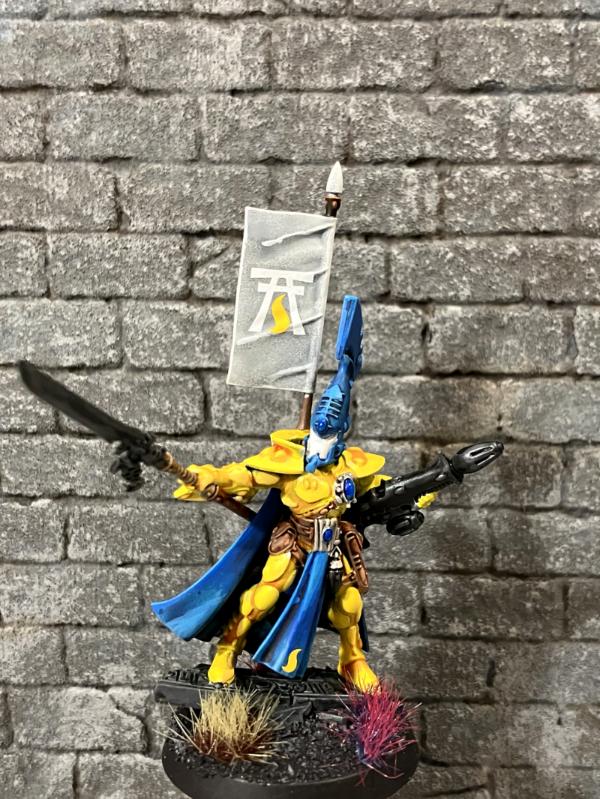
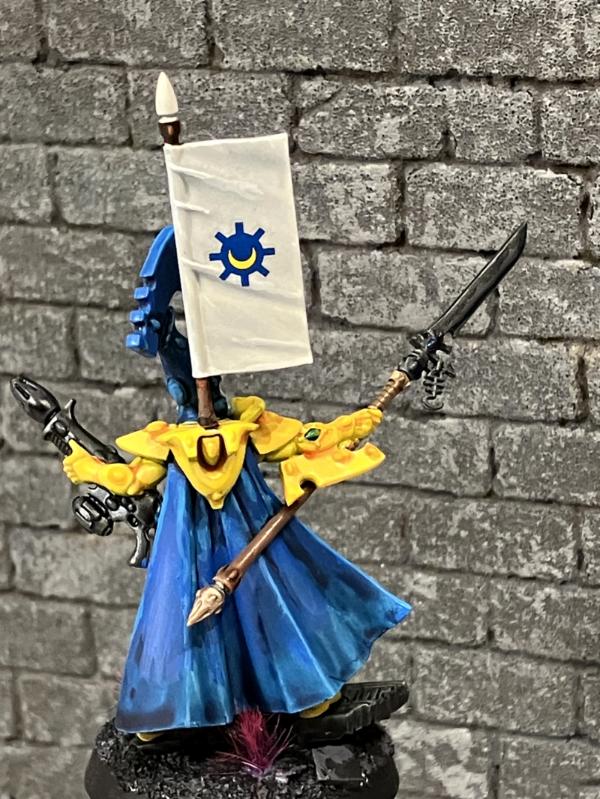
5. The last parts of my Iyanden Army - Few things in here are a priority, as most are ancient metal, but I've got some jetbikes and a set of corsairs to finish, plus a few characters including the autarch.
6. Age of Sigmar - Mostly Cities of Sigmar, might put the few Lumineth minis I haven't finished in here as well to avoid buying another box!
7. Guard - A newer Leman Russ, plus a Rogal Dorn, and about 30 converted vostroyans and real vostroyans plus artillery. This would be my...well... third guard army, if you count....
8. My Renegades and Heretics army - This box is actually nearly done - I took them out after this photo and returned them to the display shelf. But I did leave the about dozen or so minis that still need gap filling and painting in there.
Not pictured - the roman empire minis, dark age romans, Oathmark Orks, Halflings and variety of frostgrave humans that ended up in a pile that I'll have to figure out what to do with. So many choices on what to work on!
What's this? Another double post? Gees blockade...
First up, hobby room clean up progress.
Then, naturally, I got distracted...
Spoiler:
Spoiler:
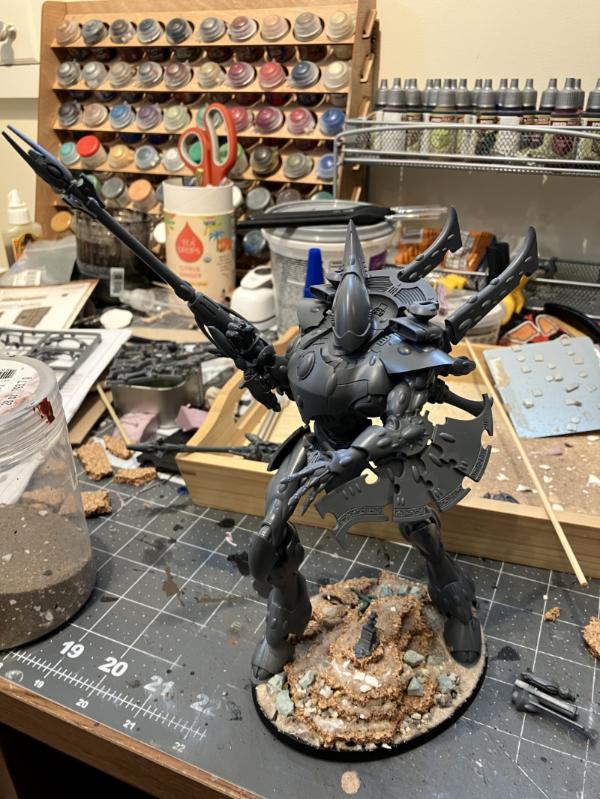
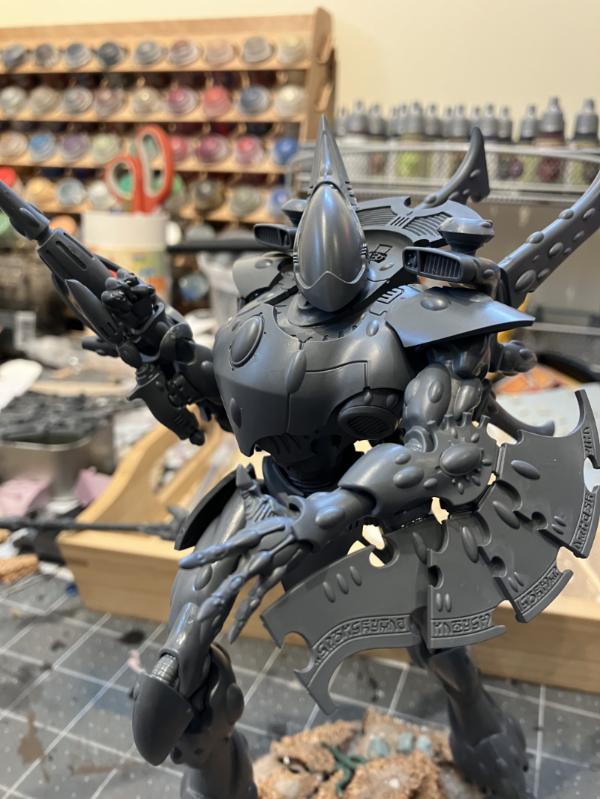
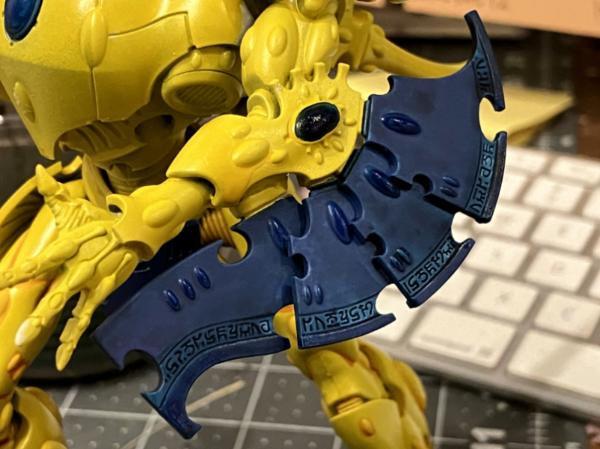
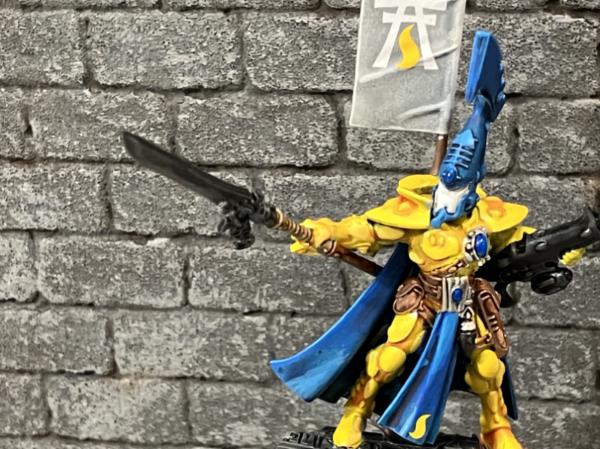
The gun arm here is magnetized, so I can swap it for a wraithcannon so some random neckbeard won't yell at me about 'it doesn't show your actual weapon'
Spoiler:
Super in love with the pose honestly. Debating whether to magnetize the head as well, but realistically it shouldn't matter.
Primed this lovely lady today, will maybe have some painting progress in the future, but I really should be working more on finishing the cleaning up this room!
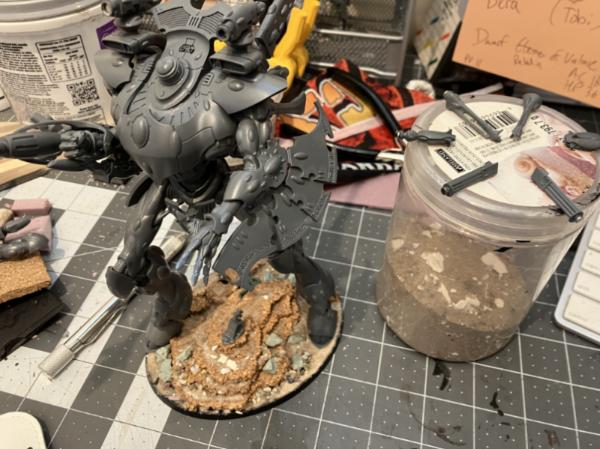
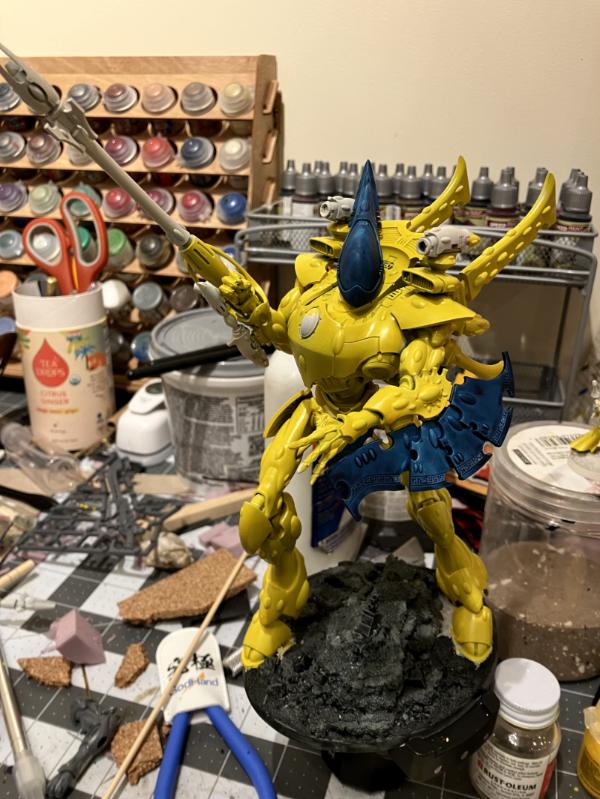
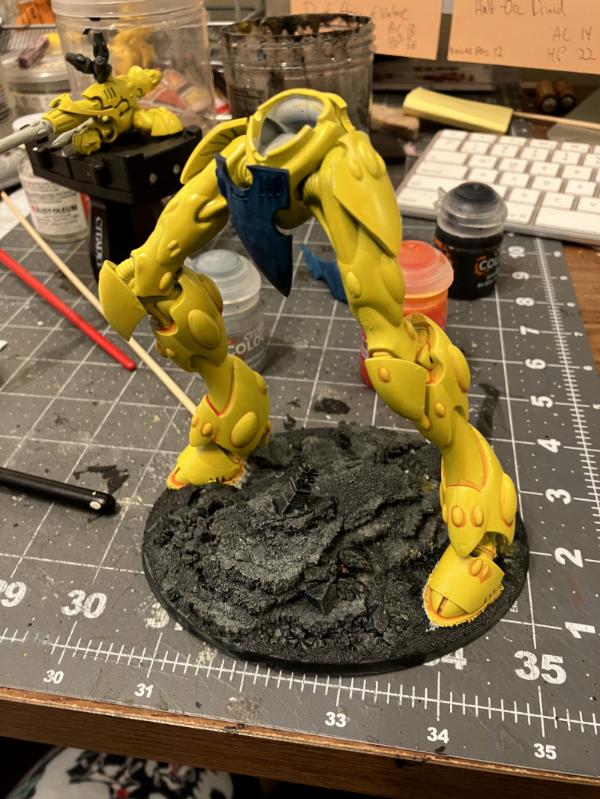
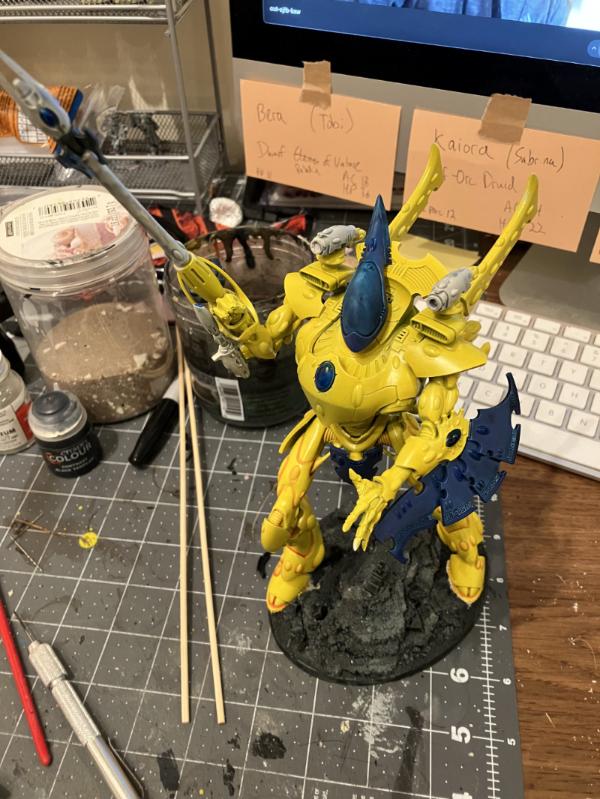
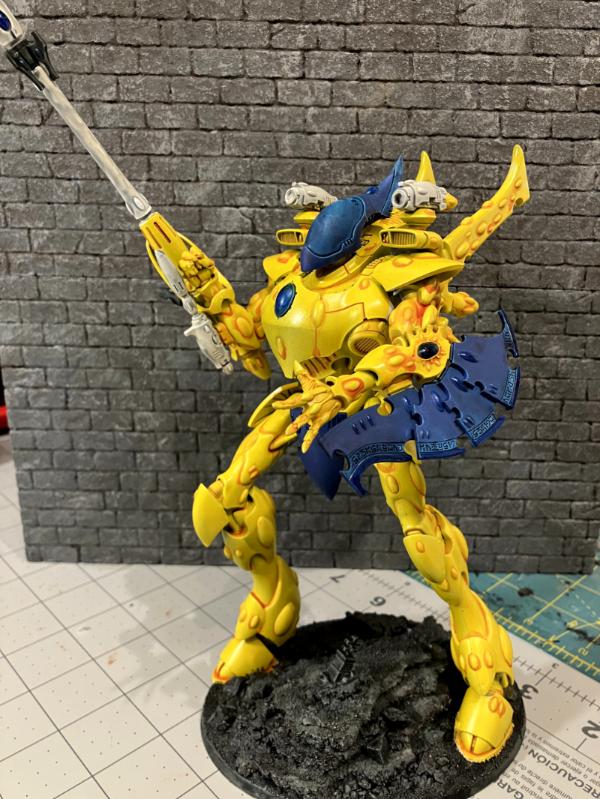
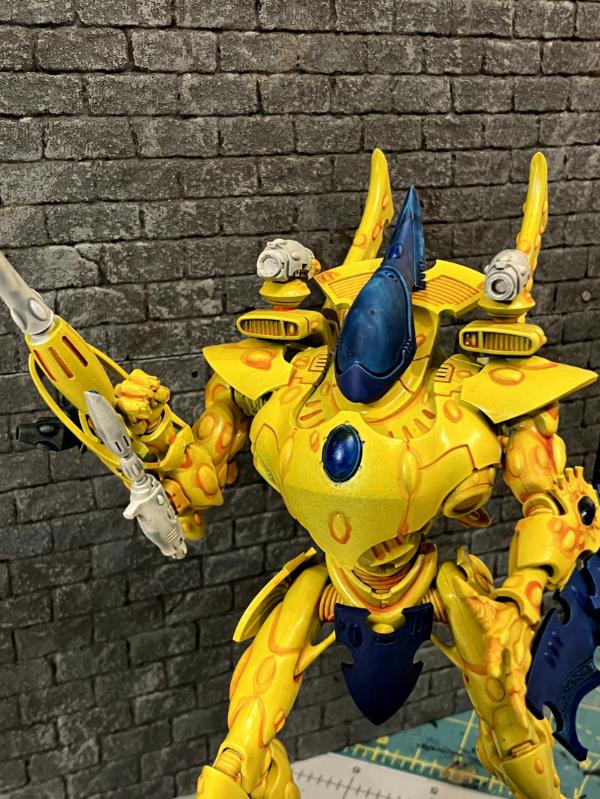
Got some base layers of paint on the Wraithknight.
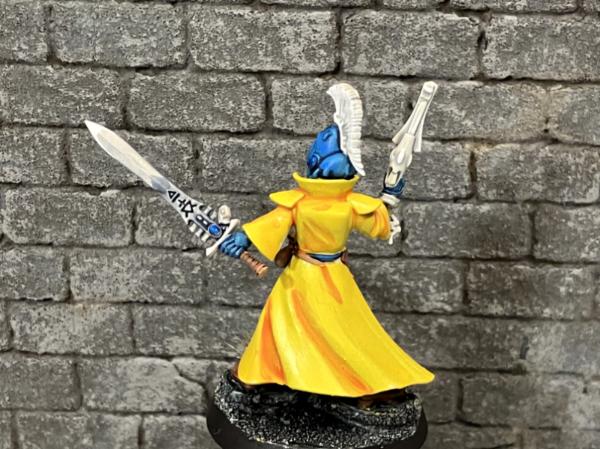
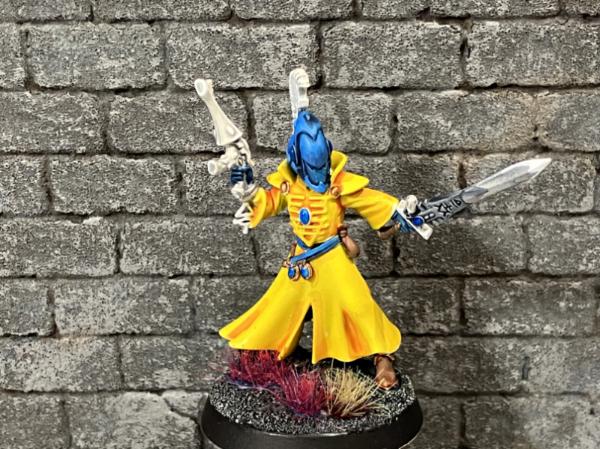
I'm not the fanciest painter, but I like the recipe that I've worked on for my Iyanden - Bad Moon Yellow with a Cassandora yellow wash around the gems and recesses. I use Storm-something blue for the heads/shield and then overcoat with ultramarine blue (I think, away from desk right now). Because it is the centerpiece model, I'll likely be edge highlighting even more, especially on the gems. I use astrogranite white for the weapons and black templar for the bases.
As far as progress goes on the remaining units in the Eldar Project Box.
As per last post, the goal was to finish painting the Wraithknight and finish up some warlocks.
So, naturally, I did NOT finish either of those.
But I did unlock a different hobby progress - family reinforcements in the form of our first offspring! Here's to building the hobby for the next generation!
My friends insisted on getting me things, so naturally my focus shifted from 'what can I sit and spend hours doing" to 'what can I do in a chunk of time where I have to be able to put down everything at a moment's notice.'
First up, blurry photo of the first 5 / 10 dire avengers gifted to me - I was hoping to modify them a bit using the new guardian sprues, but I find myslef without time to do that! (or the patience, for that matter).
Then because I don't paint my own terrain evidently, I naturally added to my to paint pile. I've always wanted the lovely Gondor mansion kit, and I found a relatively good deal online and pulled the trigger.
Things I love about the kit: details details details! Things go together smoothly, love the options, arches and floor pieces.
Cons: You really need two or three mansions to make anything other than the tiniest of buildings. I had to do some converting / minor hacking to get away with this small building. Also there are a few pieces that MUST go together to make some things work, so keep an eye out for when you want to transition between walls and arches, and the stairwell connection pieces.
The second floor layout. First floor is a 2x2 walls square with just a door and arrow slit pieces primarily. This would be the 'armory section."
Within the walled village stand many important buildings. Vital to the defense of town is the town garrison commandant's office & armory. Featuring a strongly secured and always guarded armory below, and an airy, glass windowed office above, this building is a cornerstone of the day-to-day operations of the town's defenses, especially when the lord is away.
The above layout.
Now the finished building (except the painting)
Last photo shows the close up of the covered entryway. This is the most 'converted' part - as I realized that I wanted one more wall piece here, but I was out of both arches and walls (eek). With a bit of trimming, the balustrade piece works fine and I think looks better than putting another window piece or archway (to nowhere?) here.
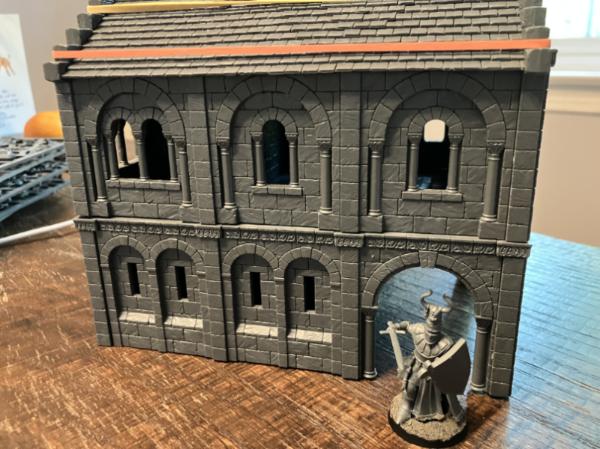
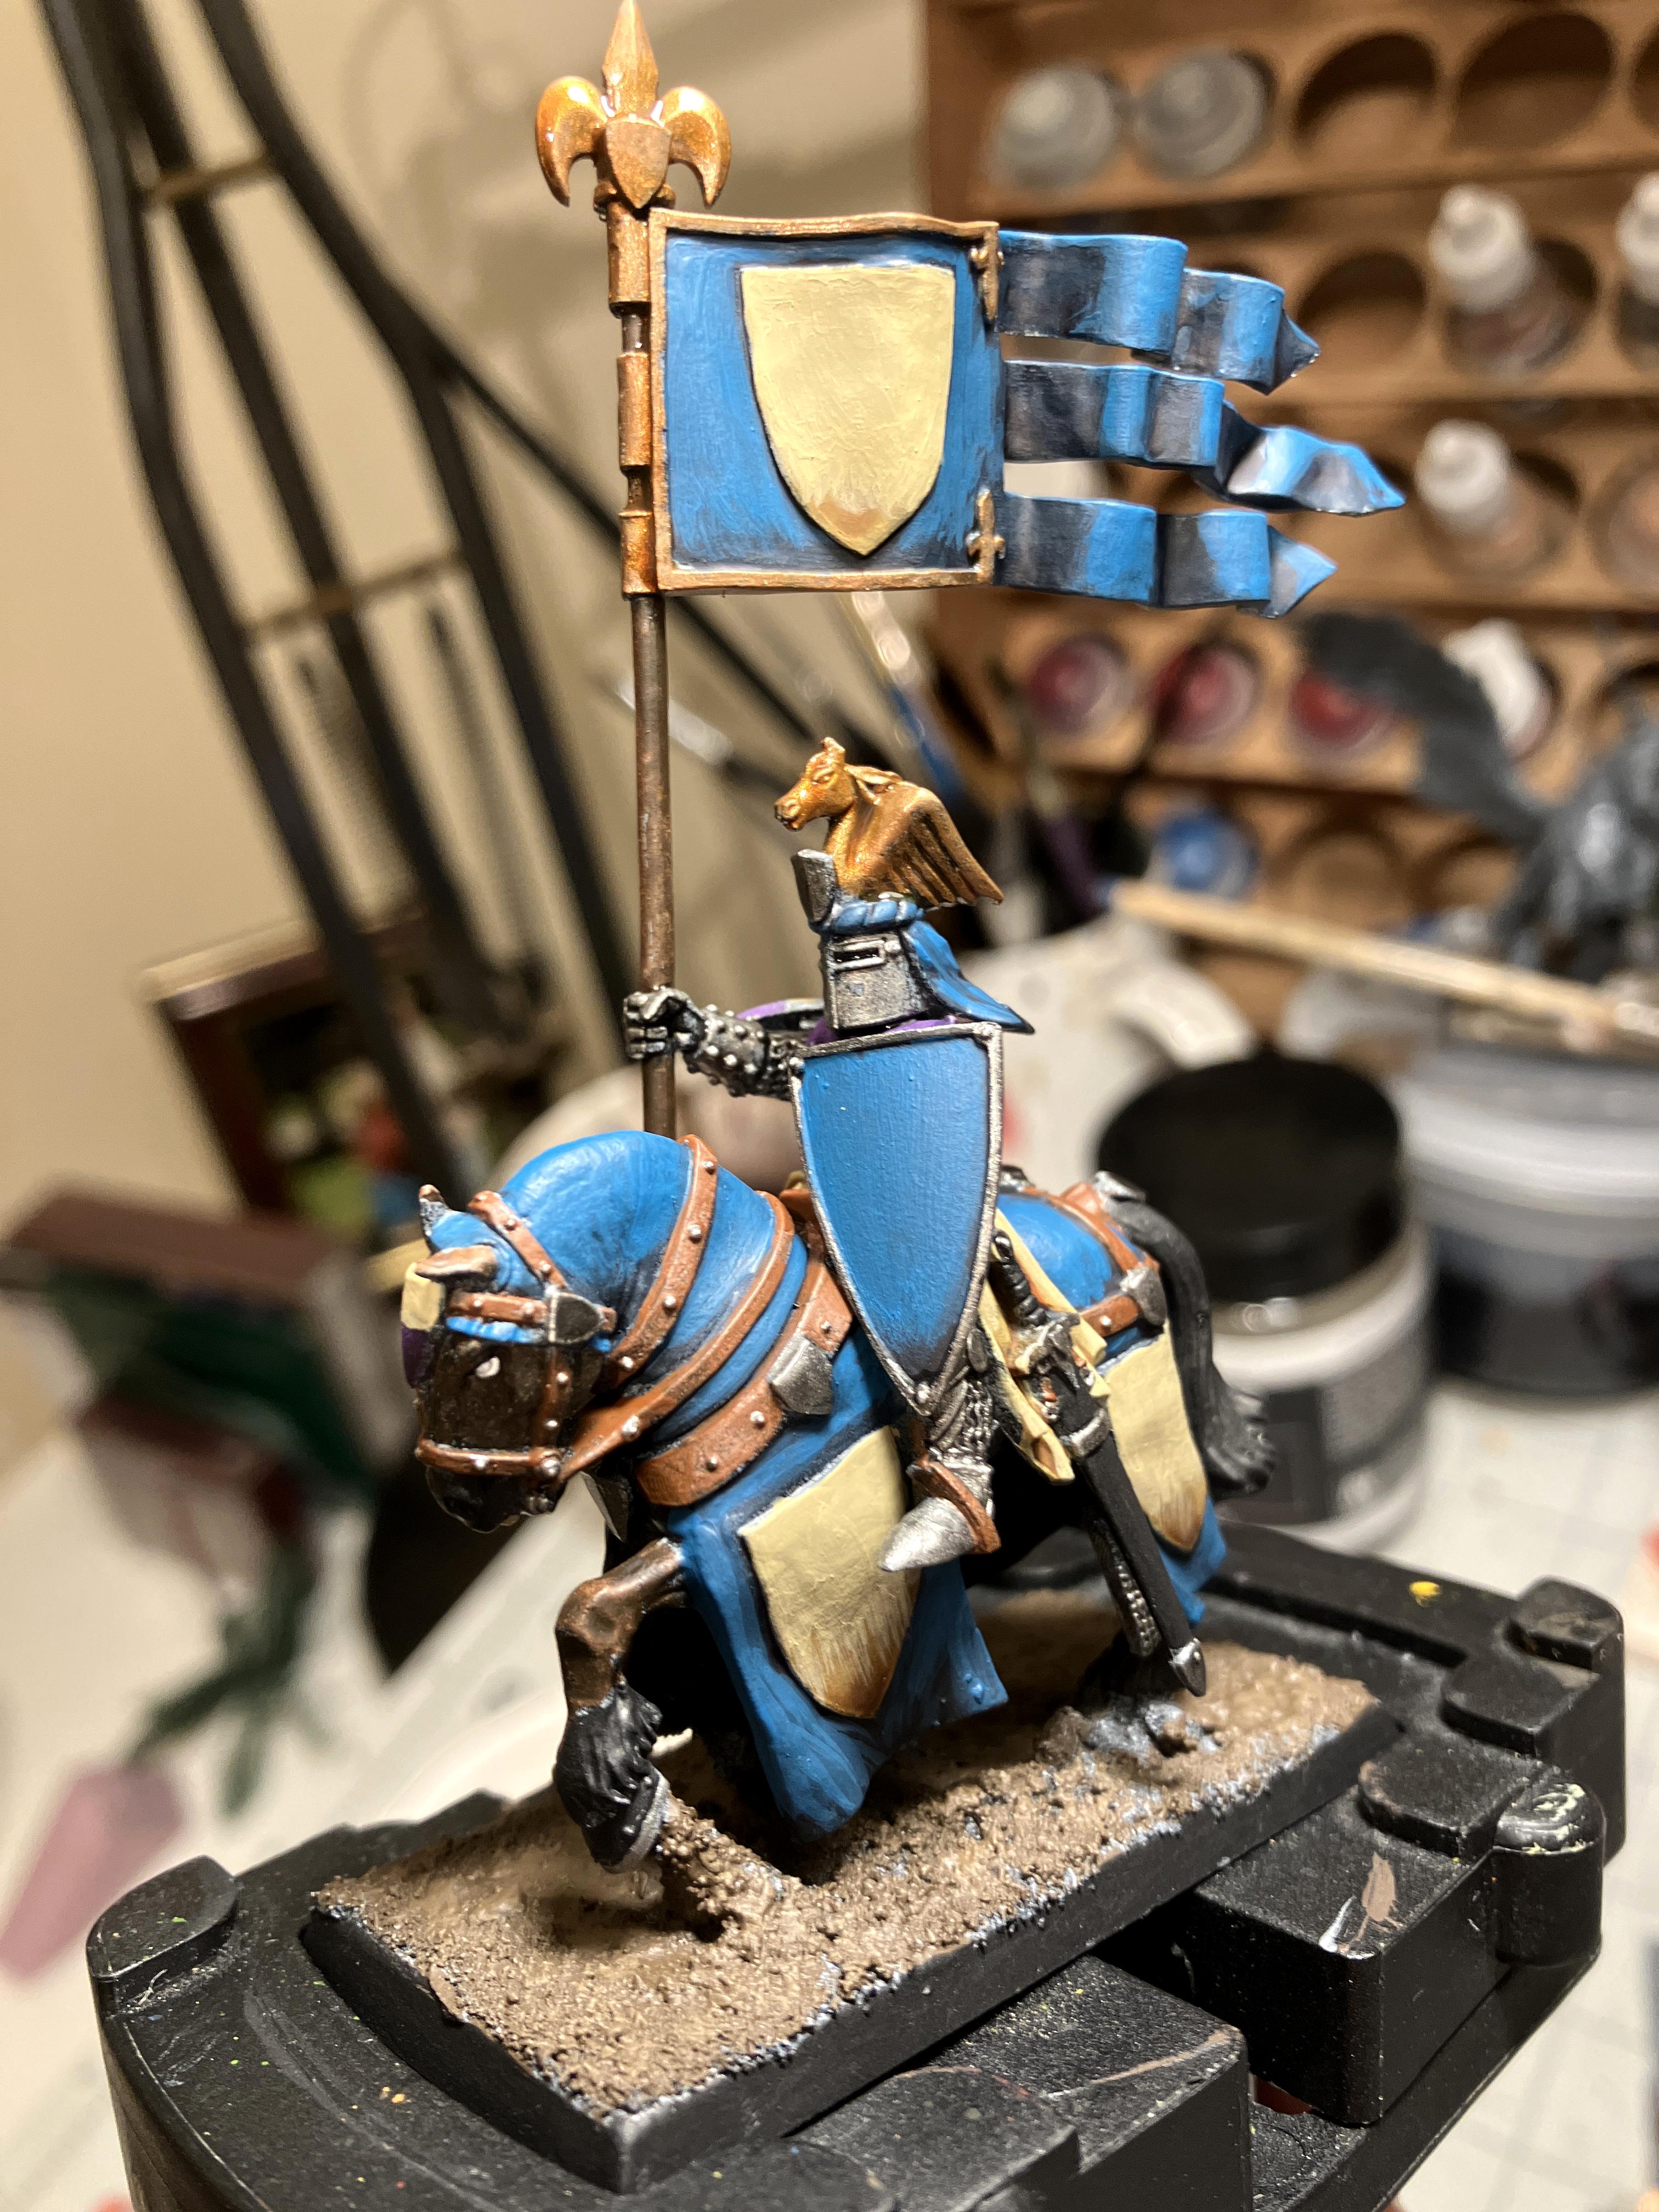
The knight is Sir Miltonred, the first of the Brettonian Foot Knights I have been building up for use in D&D. I have no plans to play TOW, but I can't help but get such beautiful looking minis. I also have circle to square base conversion trays that will let me use them that way should I ever care enough to build up an army that way. Sir Miltonred will be modeling an awful lot here (you can see how he is slightly bigger than the MESBG scaled building.
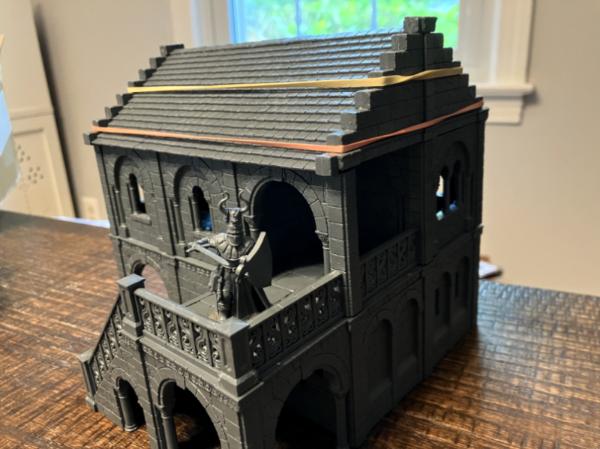
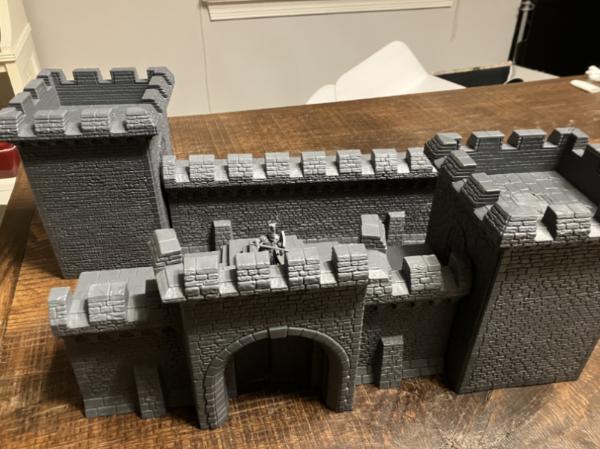
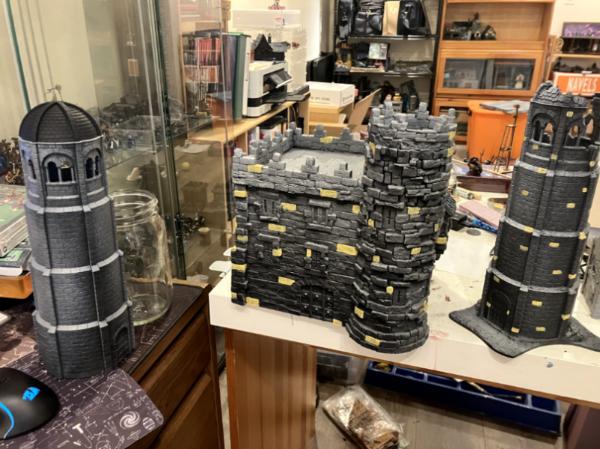
Today I finally got started on putting together the Warhammer Fortress! I'm super excited to see this painted up.
First impressions...Man - they really didn't build a lot of interior supports for the towers. But also... this is very straightfoward!
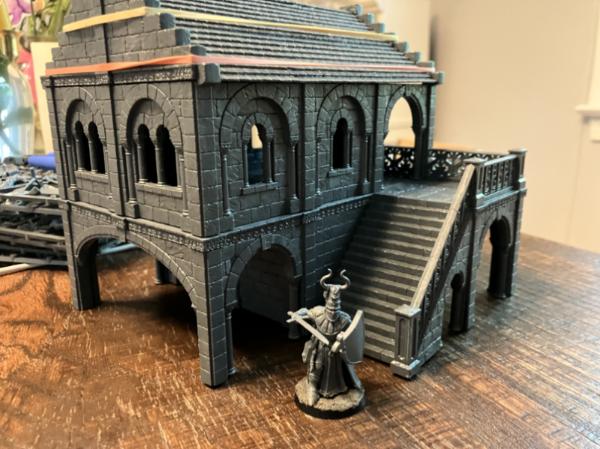
Sir Miltonred exploring the fortifications.
I finished half the walls and towers. I have plans to build four additional pieces to the fortress. Two wall pieces with stairs and buildings attached. One of these will have a platform for a trebuchet, similar to the ones you might see in Minas Tirith (but no where near the same style of stonework.)
Then two ruined wall segments (with a gap between them to allow for free placement), and a ruined tower as well.
But what about the village? Basecoating progress has been made!
Here you can see the ruined watchtower and new, complete watchtower. Next to that is the armory. Behind them are the buildings (three houses and a blacksmith) that will make up most of phase one of the town.
Next goal: Finish building the warhammer fortress, but then what? Paint what I have first? or keep building and then paint in one large group? Thoughts?
So I threw caution to the wind and decided to throw together the first prototype building for the within the wall community. This is going to be the carpenter's residence. In my limited research, a Castle could have up to 50 people living their permanently! Obviously, this fortress is nowhere near big enough to have that work, even including the towers as potential housing locations. Plans for the fortress include...
1. The carpenter's house (the house and the materials that make it look like a carpenter's place will be separate, but will be the same height. So if I want them to function on their own in a town-like setting, I'll just put them back to back and it will look like a single larger building!
2. The barracks/stables - This is the big one, the one that will be likely three floors high and match the keep in height. This is the one that I'll build a specific wall section for and thus be able to build more structure into the wall rather than be limited by the slanted gangway portion of the GW walls.
3. The Armory (already built and described elsewhere - a freestanding building using the Gondor Mansion kit. Also home to the garrison commander and steward (see what I did there?)
4. Kitchen - another small sized building, with some food storage inside/outside plus a larger oven for baking bread and such.
5. Shrine - a small shrine building (deliberately religious agnostic to match any setting)
Seems like a lot, but with two already built, and the barracks/stable being WAY backburner, it's only a few more things to work on.
Without further ado, project time!
Built the base using some leftover mdf from a long ago kickstarter that had 'teeth' and made connecting at a right angle a breeze. It had been spray painted grey at some point.
Foamcore bits formed the side walls, front, door and window backing and roof.
The window isn't what I would normally do, but after reading Paul Davies' book Battlefields in Miniature (pretty good basic primer, has lots of tricks and other things in it, I used it to help design the carpenter's home in the first place), he recommended doing windows with the wooden bar like structure. Now that it is in, I love it! I'll just have to paint it to not look like a prison.
Added more crossbeams and supporting pillars.
Roof was made with chipboard strips, cut into regular-ish sizes. Biggest annoyance is that with the top layer it doesn't QUITE fit under the wall perfectly. I'll solve that by hiding it with neighboring pieces but still. Grr.
Final building detail is the doorknob. I'll add the daub / plaster look tomorrow before I paint it up! thoughts on what the side yard of the carpenter's home should include (Besides planed wood). I do have a 3-d print of a broken/unassembled Trebuchet, so that is a definite contender for positioning next door.
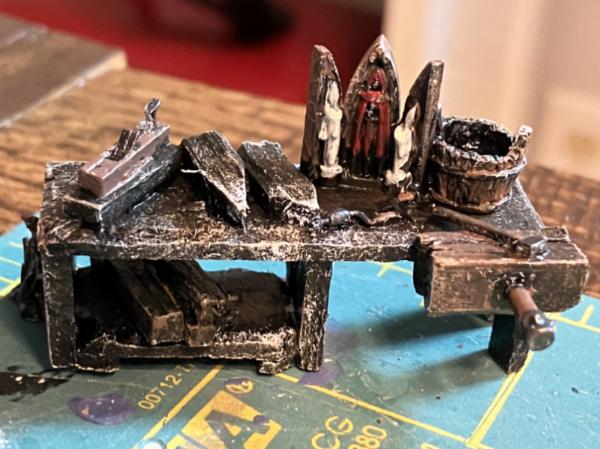
Thanks for the kind words! Got a chunk of progress done yesterday. Was able to finish the last pre-painting steps on the Carpenter's house, and decided to start building his workshop since I already had all the construction materials out.
To begin with, any inhabited medieval building needed a source of heat! Thus, I built a little chimney for my woodworker to stay warm.
Obviously just a bunch of pink insulation foam scrap, but it took a while to put together. I had to ensure it fit onto an unoccupied wall space while also not interrupting the ability of the building to squeeze under the wall, and also to not mess up a set of wall access stairs that I had built. There was only one available option, so I called in the mason, Elmer Glue.
Next came the last furnishing steps - a door ring and a coating of plaster (drywall spackle that isn't exactly in the best condition, but it does what I need it to do for now.)
I ended up doing twoish thin layers of it to build up the effect and fill in any small gaps by the top wooden supports. Here you can see the puzzle-piecing between this building and the wall stairs. The stairs are actually three pieces, the first two with the stairs themselves are glued together on a thin base, while the back piece that is only visible from the side is there to ensure that it sits mostly flush against the wall while also keeping it more stable.
Okay, on to more construction. Not going to narrate step by step here, but in essence I created a piece that fits side by side and back to back. The rooflines are the same, the construction style is similar. The biggest difference is this will look much more lived in, including wood piles, a tool area, and some workbenches w/ WIPs I think. Any other ideas of what to add?
I think you can see where this is going! The longer piece is the exposed workshop area, while the enclosed space will store tools and be the 'business' side of the construction. Thoughts? C&C? All Appreciated!
Made good progress considering the craziness this week has been. I was able to finish the structure and roof of the carpenter's shop. I'm excited to share the progress with you.
You can see the shop window as well with loops for a rope to hold the shop window open.
Naturally, my camera's focus was elsewhere, but you can see the doorway in the background as well.
Here's my favorite part (or my insanity showing, you be the judge) - Can you tell me where the rooftop split is?
Spoiler:
As you can see, that took, well, forever. Will I do it again? Nope. But it's fun for this one. It would reveal more details under the carpenter's shop and allow miniatures to be placed within the building on that side. Speaking of more details...
Yes, it's insane to add details under it, but it also helps hold the roof in a specific place.
Now the collection of final shots and options for placement. First we have the inside fortress 'hug the wall' option.
Other option is the fully independent and isolated shop in town, showing off the side window and roofline!
C&C appreciated, I also realized I missed adding one more support near the shop window so I'll have to add that. After this, adding the spackle, then basecoating and painting!
Roof tiles are made from chipboard. I got mine from amazon, but they're relatively commonly available around. I like the 8.5 x 11 size as you can double them up and use them for terrain bases as well. https://amzn.to/3KcTeU6
But you don't need to buy them - The thinner ones (the lighter grey) is actually from when I bought specialty stamps and its the anti-fold cardboard in the back of the stamp purchase thing. But cardboard from drink boxes (like for a 12 pack of soda) or a cereal box does just as well, I prefer the shiny side up for that as the cardboard side takes glue a bit better.
If you peek through the gallery I've even made large buildings from it. (spoilered for interest)
Roof of an Inn
Spoiler:
Bunker (I always use double layers for building walls especially to fight against warping, then smoosh between a heavy book or two with regular PVA glue)
Spoiler:
Spoiler:
Apartment buildings (my most ambitious project to date with chipboard). Would not recommend for something this size in the future as the amount of cutting ended up hurting my arm. Foamcore is used for things like this for a reason! But the detail you can get with chipboard is superior and it works much better with glue and will bond stronger with regular PVA.
Skinflint Games wrote: I'm a sucker for a good terrain blog, and this is AWESOME - subbed!
Thanks for the awesome words! It means a lot. As a reward, here's some ACTUAL PAINTING (I know, right). I managed to finish(ish) four buildings yay!
First the WIP shots - just three here.
Paint process - After a basecoat of matte black primer, I zenithal highlight with a dark grey, then a smaller, just from above, light grey. (I had to manually replicate this with acrylic paint for the farmhouse and coop as they both had foam and I didn't want to risk it so just did black mod podge covering for them).
I painted the plaster parts first - A basecoat of a dark yellow, then a lighter yellow, then an off white with successively lighter focused layers. I left the darker paint parts in the corners suggesting both weathering and aging (or a lack of care in wanting to paint there as a pretend miniature inhabitant.
I then painted the wood with a dark umber brown. I drybrushed with tanned skin shadow from privateer press (maybe?). I'd use whatever tan I have for this and this is what I found first.
Then I did the stone with a dark grey. I used the browns and darkest yellows from the other parts to paint a few stones here and there to add some differences into it. I then drybrushed all the stone a mid grey and then the entire structure with a titanium white overbrush (not rooftops).
Then I washed the wood to tone down the piece - I used a mixture of Agrax Earthshade and Garaghak's Sewer Contrast paint to paint different parts (Agrax for the more exposed places, Garaghak's Sewer for the more protected places.
Then I used Telladon Turquoise Contrast Paint straight onto the roof tiles (over the zenithal). I then mixed together a mix of a similar turquoise paint and a bit of white to drybrush the roof tiles.
Ta Da, here's what you get.
Farmhouse & Chicken Coop (or granary, your choice)
You can see the paint effect on the stones - it's really subtle but it looks better in person (and in better light).
Now for the Carpenter's House & Workshop
Shop & House together
Beam Detail on the Shop
Roof Detail on the shop
A better shot of the whole shop
I still have to deal with the occasional metal pieces, and the farmhouse and coop need painting and base work (and a little bit on the roofs to show age and mildew, etc). Also the leaded windows need some love, along with the workshop contents - I'm thinking just some stored boards, and a log in the midst of being chopped up (plus a healthy share of wood shavings and pieces from the work on the buildings to set the scene better.)
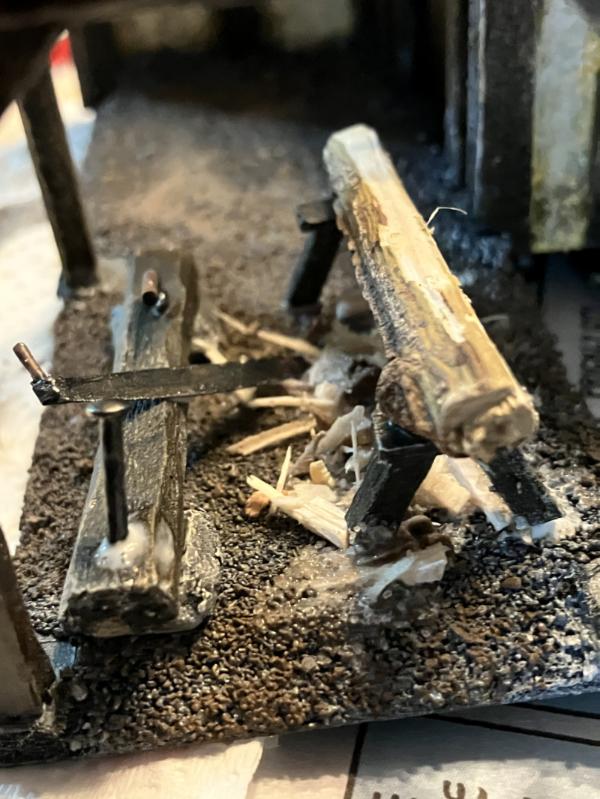
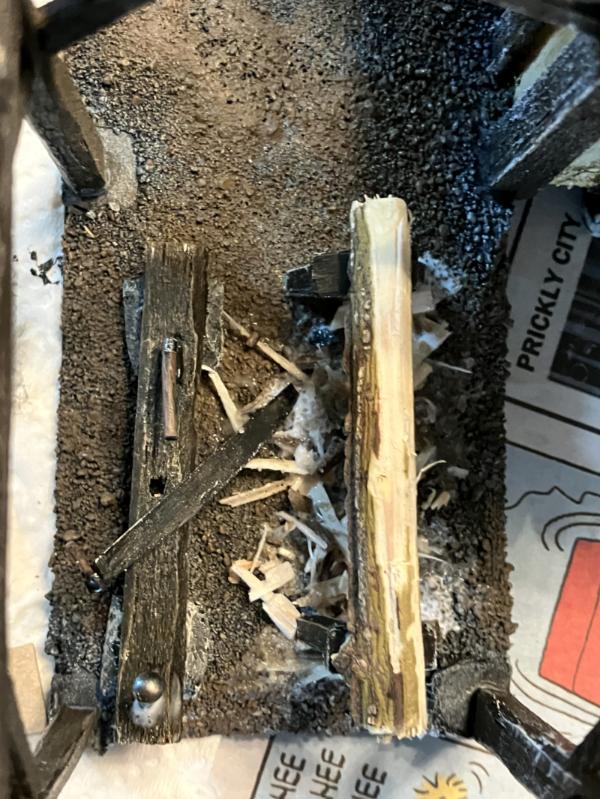
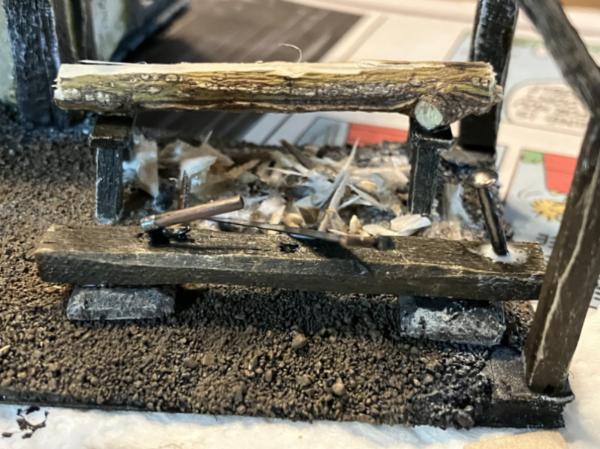
Made some good painting progress on the workshop's decorations/work areas. This piece is coming across more as a mini diorama, and I'm okay with that. First the in progress shots.
Chop Chop!
Workbench area!
Positioning workbench and loose materials.
General alignment of items.
Now onto painting. I replicated the painting on the beams of the structure on most of the interior, to represent wood that has been weathered and dried over time, yet I didn't do that on the log that is currently being worked on to show that the wood looks more 'live' normally and dries / is stained to a different color.
The Sawpit in it's mostly final form.
I dropped money on a 1:35 scale construction kit to get some scale appropriate saws and hammers. This is one of them.
*Glue is still drying, sorry!*
Workbench with tools and a clamp!
Workbench in it's final location with extra board. I also have an extra encased bow and arrows that I'll be hanging up somewhere in the workshop.
I did do research into the tools and materials available, so much of it is, well, reasonable for a fantasy carpenter shop. I'm definitely going a bit over the top here but that's okay. To do is finish the candle, the plant, and glue things in, then apply some textured mud to hide some of the gaps between things. Otherwise, it's good enough for me!
I've been working on some smaller scatter terrain pieces for the village, as I wanted to clear them out before starting more bigger pieces of the project.
First up, the field boundaries and some market pieces.
I focused on finishing up the walls and stone pieces as those are the fastest to do.
Shot of all the complete things so far (Except flock and such)
You can see the water a bit better here.
Details on the wall. Same formula as the other walls so I won't go over it again.
Now the nature god - Kalanos - statue. Right now it's mostly a weathered type stone, but I'm not certain the next step. Do I try to make it more metalic, leave it as is? Cover it in moss and such (that's the current plan) and then I want to add some candles and the like.
C&C always appreciated. The market stalls and market statute are the next thing to focus on, just taking me a bit longer.
I finished some scatter terrain today, which is awesome in that it cleared a bunch of small things off my to do list and now lets me get set up to work on the castle and towers.
First up, the statue of my merchant (and death) god in my D&D Campaign - Decesul. All transactions done under his gaze are seen as both holy and 'under the keys', signifying the merchant's good faith and the purchaser's good intentions as well. People who violate this is towns with many followers are likely to be barred from working within the marketplace confines, or worse...
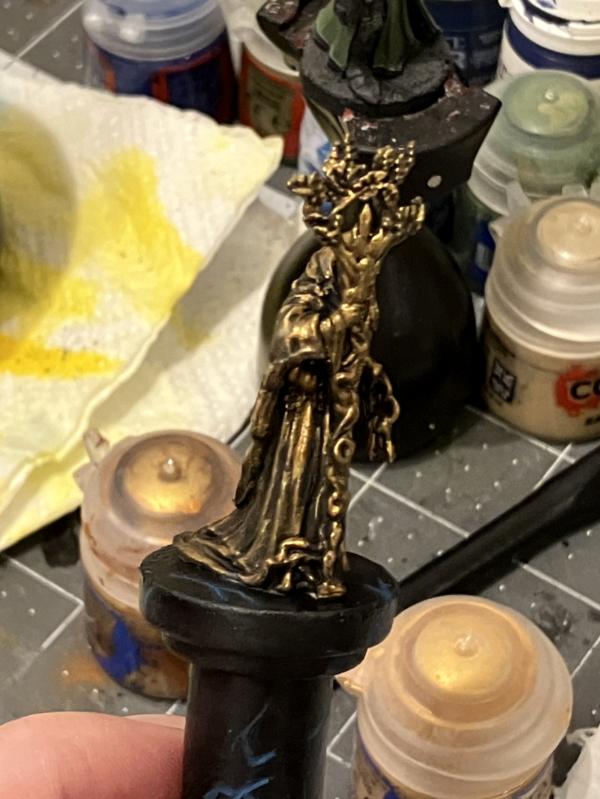
First steps at the statue and black marble.
With advice from friends, I upped the color quotient and did not use niholous oxide paint to weather the statue.
You can see his branching Staff of Commerce and his key ring. It's a 3-D Print (not my own) as it took forever to find a miniature with a set of keys who wasn't either some inappropriate model with overly exaggerated keys or a cartoon jailer.
Onto the walls (and as a bonus, you can see the finished stone platform that I'll be using for some things as well.
I took a bit more care on the fountain and statue to use the moss flock proper rather than just the (thoroughly random) mix that I have now.
I've been looking at videos of how to make candles and such as offerings for the statue, so hopefully I'll get to play with oven bake clay!
Not much of an update here, but I wanted to post it so that I maintain my personal goal of at least one post a week here. Finished the Statue of my Merchant God - went full gold / gold plated (it's a merchant god, after all).
Bronze Acrylic Base -> Seraphim Sepia Wash -> Highlight of Balthasar Gold -> Ghenna Gold > Auric Gold (only on head and most exposed pieces)
Not my best photos, sorry!
Now onto progress on the stone work for the Castle Keep and the two Towers
Got through yellow on two of the three buildings. My goal for the week is to finish all three using the same strategy I have before. Mostly stone buildings are the easiest to do as there's limited 'non stone' paints to use.
I got some great progress to share today! Between attending a few Zoom Webinars I was able to get a chunk of terrain painting done on the intact Watchtower, the ruined watchtower, and the castle keep.
A slightly earlier photo (before the detail work on all the wooden pieces)
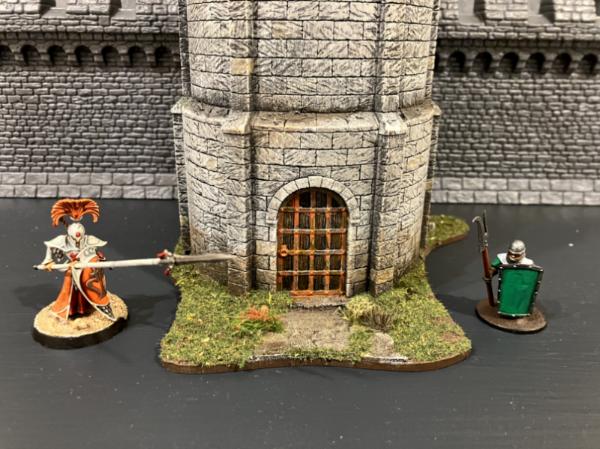
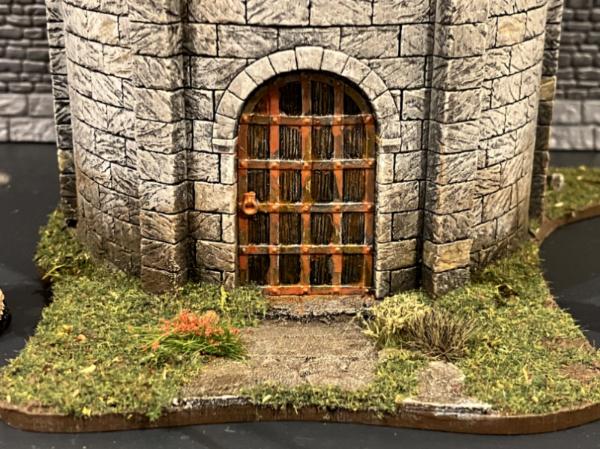
First up - the Intact Watchtower. This is the town's current watchtower, and thus maintained well. Built without a base to allow it to go anywhere on the board, all that is left to do is some work on the door and perhaps a small amount of additional weathering.
Second - the Ruined Watchtower - This building was damaged in some previous event. I plan on weathering the wooden details to show more wear and tear, and adding a lot more foliage to this building. It also has a base that needs completion (plus the door). (Also I feel like the stonework colors seem very washed out on some of these photos, sorry!)
Finally - the Castle Keep - this one needs the most work in my opinion, as now only are there two doors that need some more work, but also I need to weather the base of the building a lot more to bring out some more details. The windows also need some more love and attention.
The tile detail on the gardenrobe especially needs me to darken it back down and then I can lightly rehighlight it. Otherwise, next time I'll try and take better photos!
I've barely been able to appreciate the first page, but your work makes me really want to get back into the hobby. It's inspiring stuff (one of the best compliments I can give).
everything looks great, and I could probably give a comment on every photo, I love the cinder bricks by the way!
jabbakahut wrote: I've barely been able to appreciate the first page, but your work makes me really want to get back into the hobby. It's inspiring stuff (one of the best compliments I can give).
everything looks great, and I could probably give a comment on every photo, I love the cinder bricks by the way!
First off, thanks for the kind words! Even I am surprised and how much improvement there is from my earlier works (I've got a project to show involving one that is going to be very interesting.)
I looked through your things - you really should hop back into the hobby - your terrain work looks awesome, and there is so much inspiration to draw from all these forum postings. (edited to say not just mine - I've been pulling a lot from here and from some mordheim boards - be careful there, the pull is deep for a game I don't play!)
Howdy all! I managed to sneak some progress in between rocking a newborn to sleep and thus have this pint-sized update. I did a lot more weathering on the towers, all that's really left is the base drybrushing on the ruined tower and the flocking.
I also highlighted the Tower's Tiles individually (rather than drybrsuhing like I did on the other buildings) due to the circular nature. I really like the results (and through a happy whoospies, one side looks like it was more 'sunny' as I accidentally added more white to my highlight brush.)
Work continues on the door. I will likely test out some rust texture and paints on the ruined door on the left. But they're serviceable.
I also went back to the castle keep and after some more weathering and washes, I decided I really didn't like how the handful of washed out roof tiles look, so I repainted them and then highlighted them in the same method as the tower tiles. Looks so much better in person.
That's it for now. Next update should see me completely done with the tiles and the keep.
Yet I've been thinking - the keep top is very flat. I'll likely make a leaded pitched roof see example https://www.pinterest.com/pin/388294799096483514/ that allows for more imaginary 'living space' below and also provides more places to hide as a D&D players. Making it removable allows for more storage and also makes it just look better.
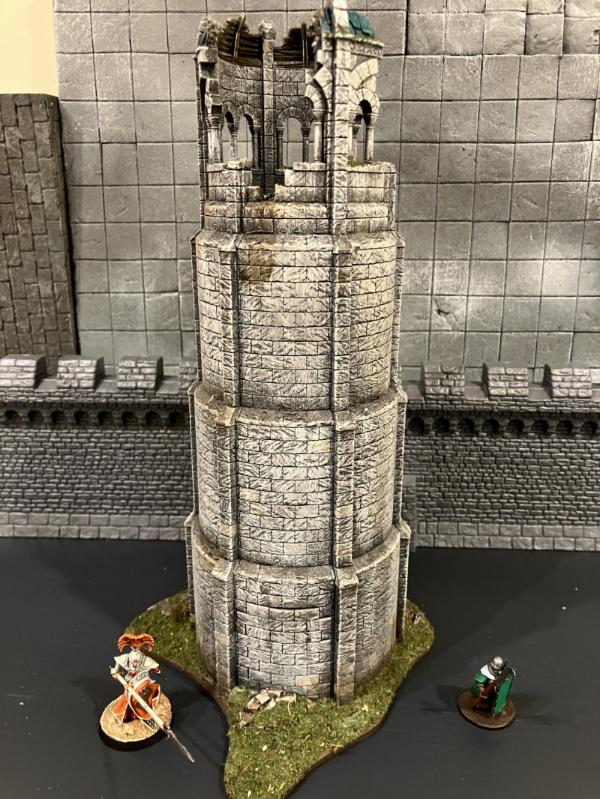
The Ruined Watchtower is finished! I also completed the other pieces, but I'll drag out posting those as I want to do a tweak to the keep. I'll spoiler the multiple shots so you can explore to your hearts content.
First up, the tower in whole
Spoiler:
Spoiler:
Next the gate, rusty and forlorn (plus other base pics)
Spoiler:
Spoiler:
Finally, the ruined cupola. I love the vibrancy that comes from adding just a bit of moss.
Spoiler:
Spoiler:
Pretty proud of the results! I also used some of my floor pieces as a background, and I think I have my go-to backdrop for now.
More terrain goodness! Sadly, the intact tower isn't as 'exciting' to look at!
These were a joy to paint up, went together relatively easily, and are a great addition to the board. I plan on using them in both the town and fortress set up. I have the pictures of the keep, but I want to add a roof so I won't post pics until that's done.
The next question of course is - do I work on the fortress walls and towers next, or do I finish the town's cottages and blacksmith next?
Maréchal des Logis Walter wrote:I vote for the blacksmith's booth
Good thing I started it then!
But because I am a glutton for punishment I figured I'd do all the rest as well. So by the end of this I'll either be crazy or be done with phase one of the village!
Gwyn chan 'r Gwyll wrote:The moss really does add a lot, doesn't it?
Absolutely. I use AK Moss Texture - https://amzn.to/3RVhezB - for moss and then any I don't recover goes into my bin of flock, which is a combination of Model Scenics green flock, scrub brush, small cork pieces, old GW Flock, etc. I use that differently from the moss - moss if for walls and hard to get places generally (with maybe a TINY bit of the Flock combo.) the Flock is for everything else, although I'll add more of the darker green scrub for areas that are more forested/abandoned. I then add the tiny chunks of foliage & bushes. The ruined tower has my first piece with flowers!
I think some in the community tend to underestimate the power of 1.) flock itself and 2.) different types in different places. (goodness knows I did!)
I got all the base layers on the Tabletop World buildings done yesterday. As I didn't do a great job in spotlighting each one, my goal to finish phase 1 of the fantasy village is to complete the following...
[list]
1. Keep (Done)
2. Ruined Watchtower (Done)
3. Watchtower (done)
4. Carpenter's House (done) & Workshop (done)
5. Farmhouse (Done) and Coop (Done) and Farm walls (done)
6. Market place statues (done)
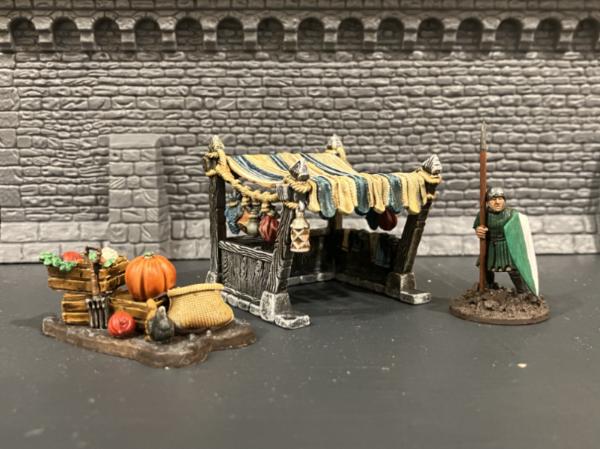
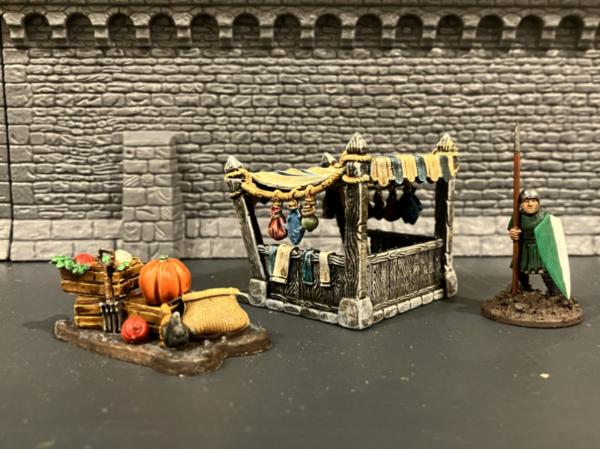
7. 1 Market Stall (In progress) 2 market carts (unprimed)
8. Triumph Arch (Done)
9. Armory (Done)
10. Blacksmith (WIP)
11. Baker's House (WIP) and Bakery Workshop (Not started)
12. Stone Tile Hut (WIP)
13. Mayor's House (WIP)
14. Fisherman's cottage (Done), Small Docks (Done), large stone docks & steps (done)
15. Warhammer Fortress Towers (x4, unprimed) and Walls (x4 Unprimed)
16. Inn / Tavern (Done a long time ago, see page 1-2 for more details!)
So still a chunk to do! But here is good news, I got all the base layers on the remaining town major buildings done.
Blacksmith on the right, Baker's house on the left (based because of the materials in front of the building, not for any other reason)
More blacksmith details.
Definitely still a WIP, but the detail layers here are amazing.
Baker's House
Mayor's house on the left.
This townhouse is slightly fancier than the remaining buildings and has a second story (Implied) inside, so it definitely is nicer than all the other buildings in town other than the inn.
Stone roof hut
I didn't focus too much attention on this. It has the most other little details, so I figure this is just someone who works in town/the area.
Next goal is the overbrushing/drbrushing and then details!
Finished all four of the new village buildings! First up, the building I've affectionately called the Mayor's house.
Next up the Blacksmith. Probably my favorite building to paint. Every time you think you've found all the details, there's more. Biggest 'why not? complaint was that there's no personal chimney for the actual house portion.
There are some more internal details that need to go in here, hence the missing space at the back.
Next is a Farmer's hut. Tons of detail.
I think it is funny how the smallest building has the most details. Spent more time on this building than all the rest.
Now the building I call the baker's house. To go with a bakery that has yet to be built.
Finally a bonus (that is sort of a meh for me, but I tried hard to make the roof look weathered and sun bleached, so I guess I succeeded?)
First market stall building!
Hope you all enjoy! Can't recommend the buildings enough for those with the $ to drop down on Tabletop World. I backed their recent kickstarter so I should be getting some more buildings and walls from them as well, which is a treat to look forward to.
Next I'm likely going to switch gears to something non scenery to clear the mechanism (and it's way too hot to prime so painting something that is already ready is easiest)
Building List for the Village
1. Keep (Done)
2. Ruined Watchtower (Done)
3. Watchtower (done)
4. Carpenter's House (done) & Workshop (done)
5. Farmhouse (Done) and Coop (Done) and Farm walls (done)
6. Market place statues (done)
7. 1 Market Stall (In progress) 2 market carts (unprimed)
8. Triumph Arch (Done)
9. Armory (Done)
10. Blacksmith (Done)
11. Baker's House (Done) and Bakery Workshop (Not started)
12. Stone Tile Hut (Done)
13. Mayor's House (Done)
14. Fisherman's cottage (Done), Small Docks (Done), large stone docks & steps (done)
15. Warhammer Fortress Towers (x4, unprimed) and Walls (x4 Unprimed)
16. Inn / Tavern (Done a long time ago, see page 1-2 for more details!)
Since building up my tiny fantasy village, I needed a palette cleanser.
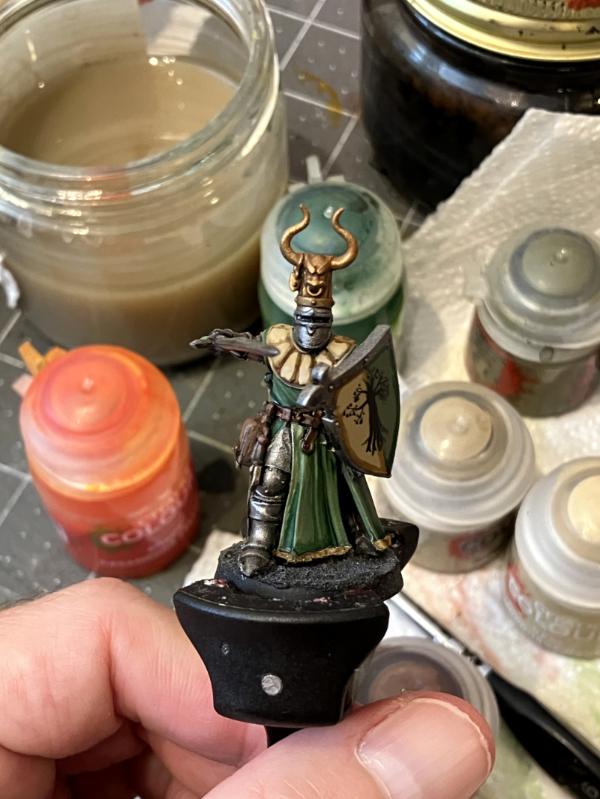
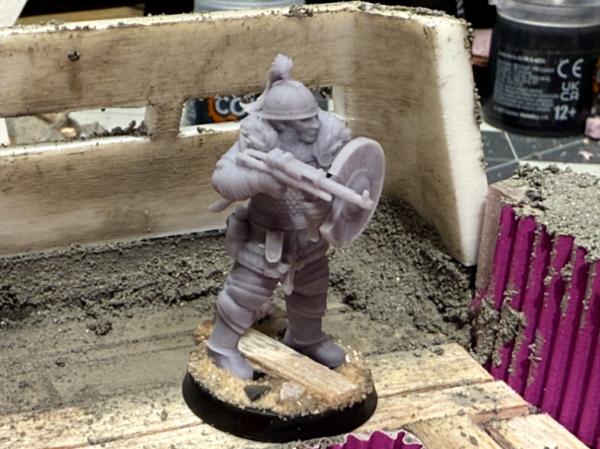
Enter Sir Miltonred,
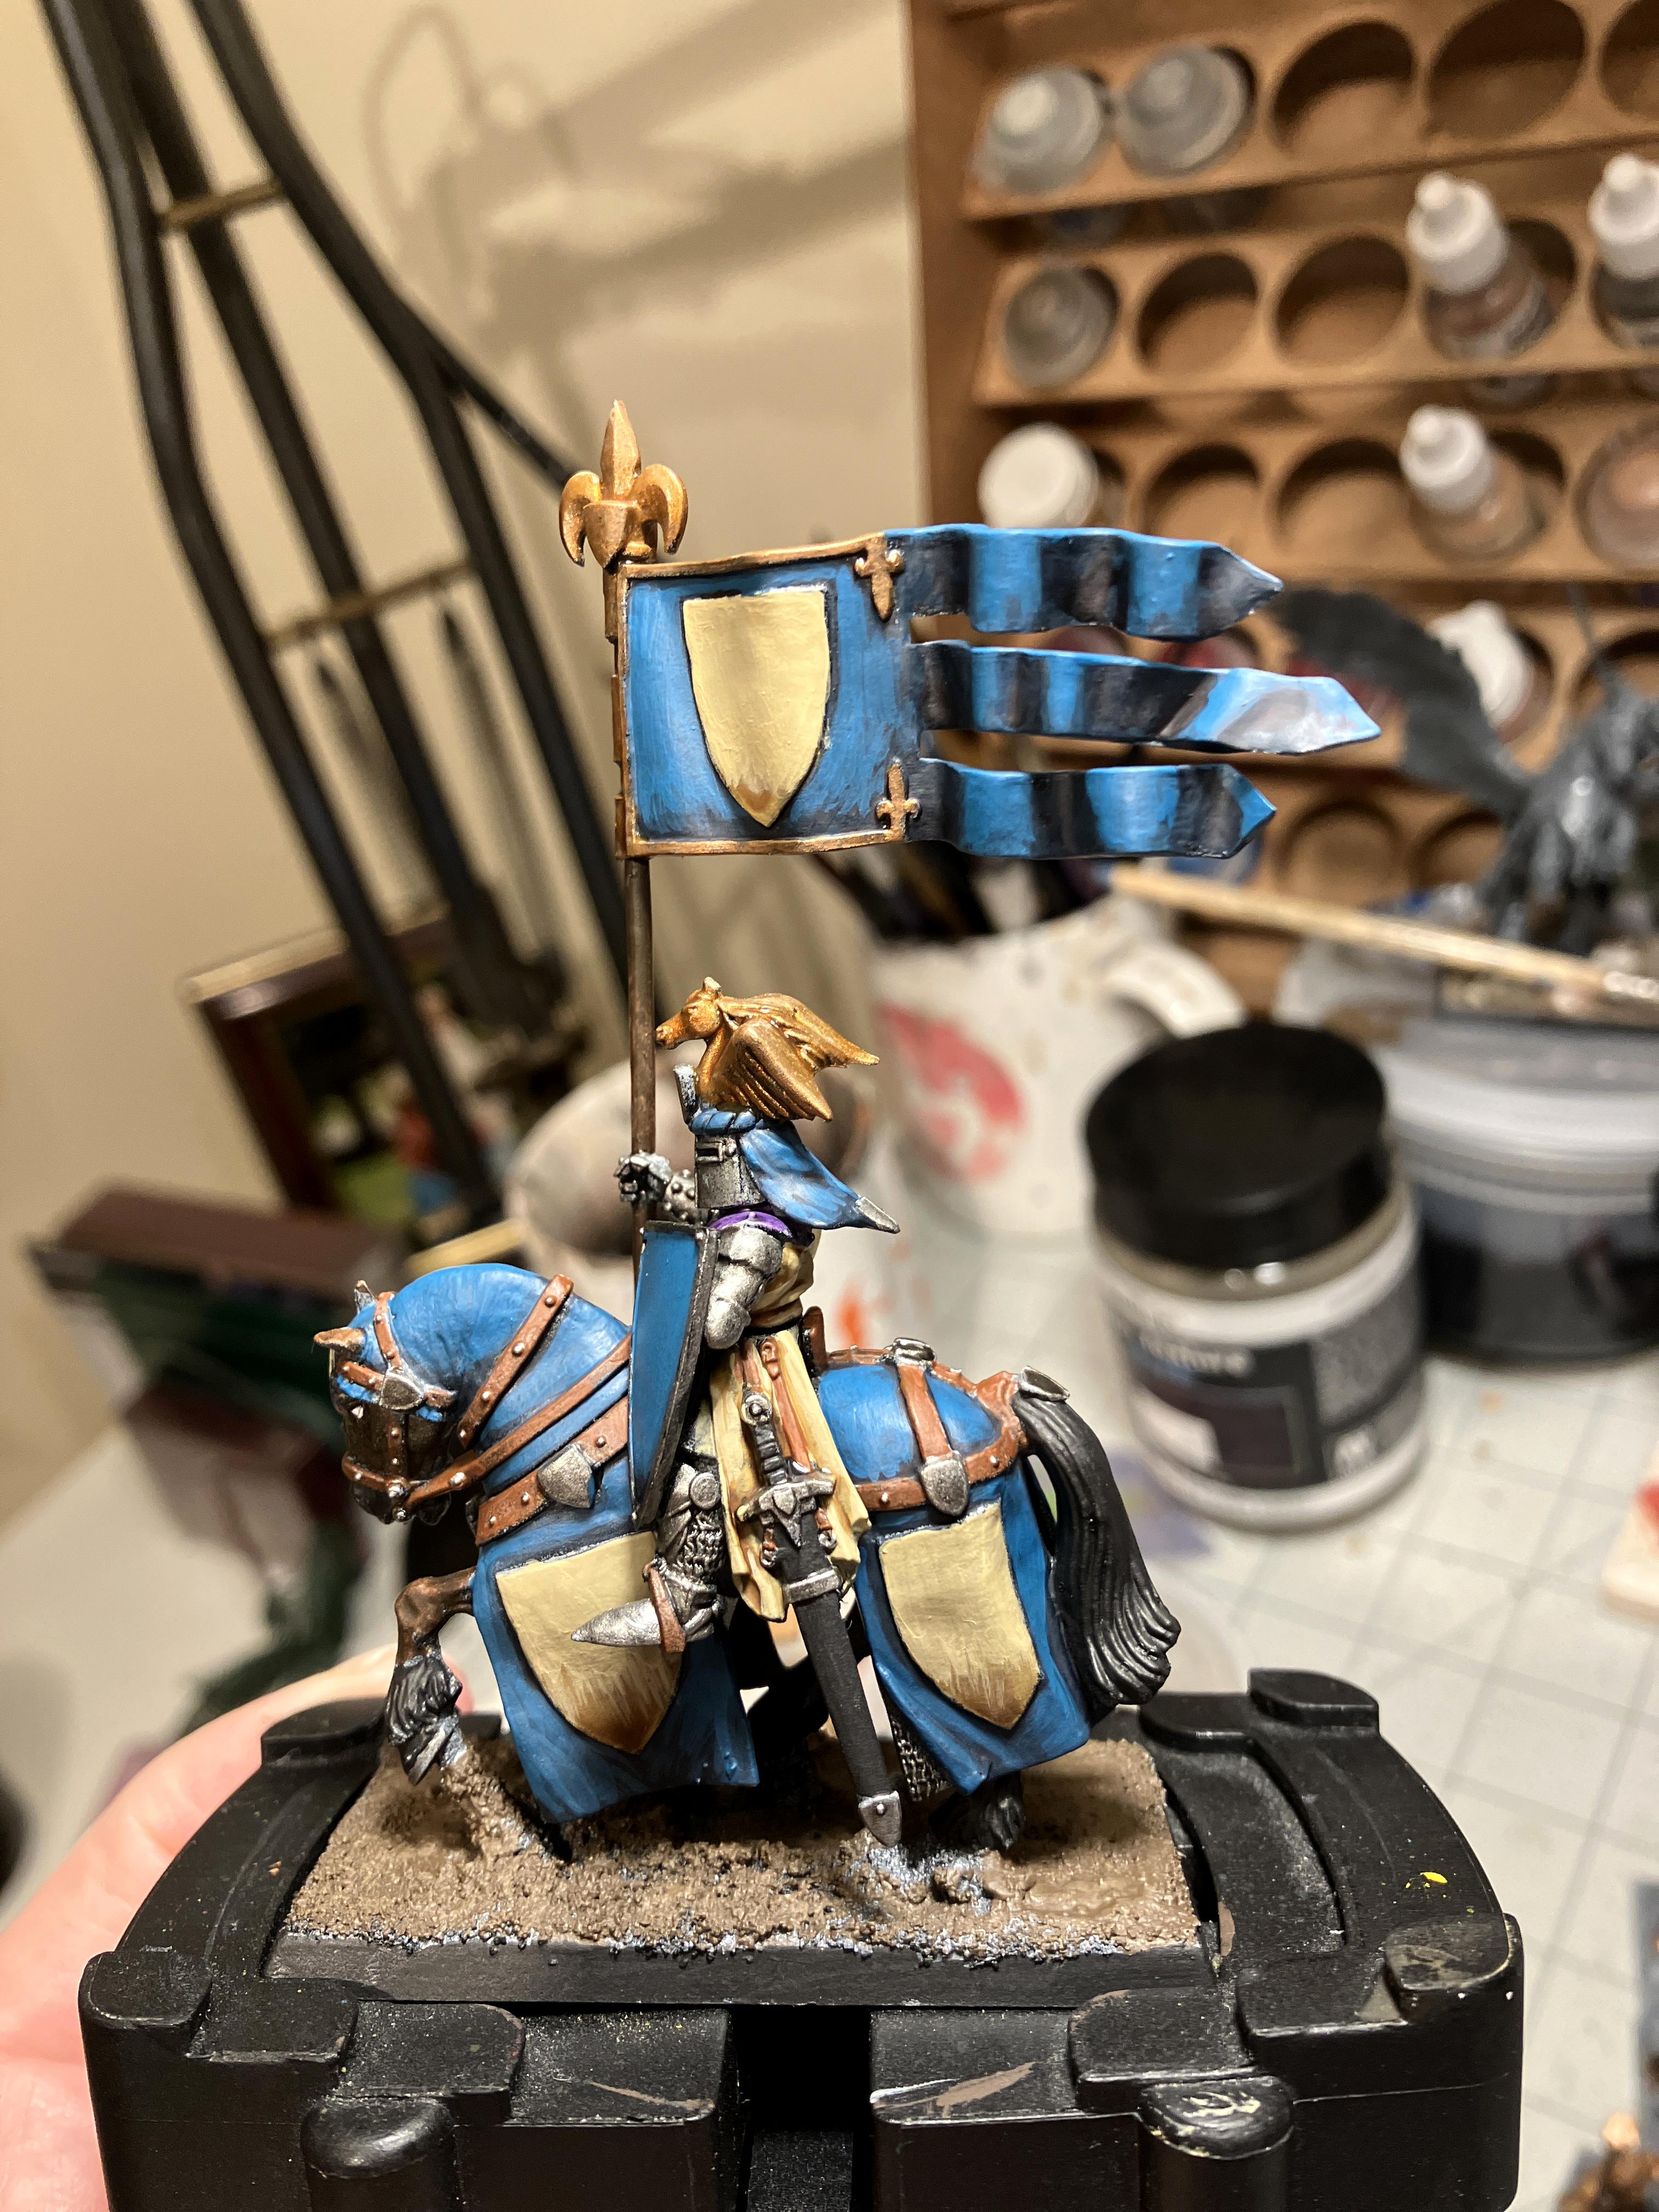
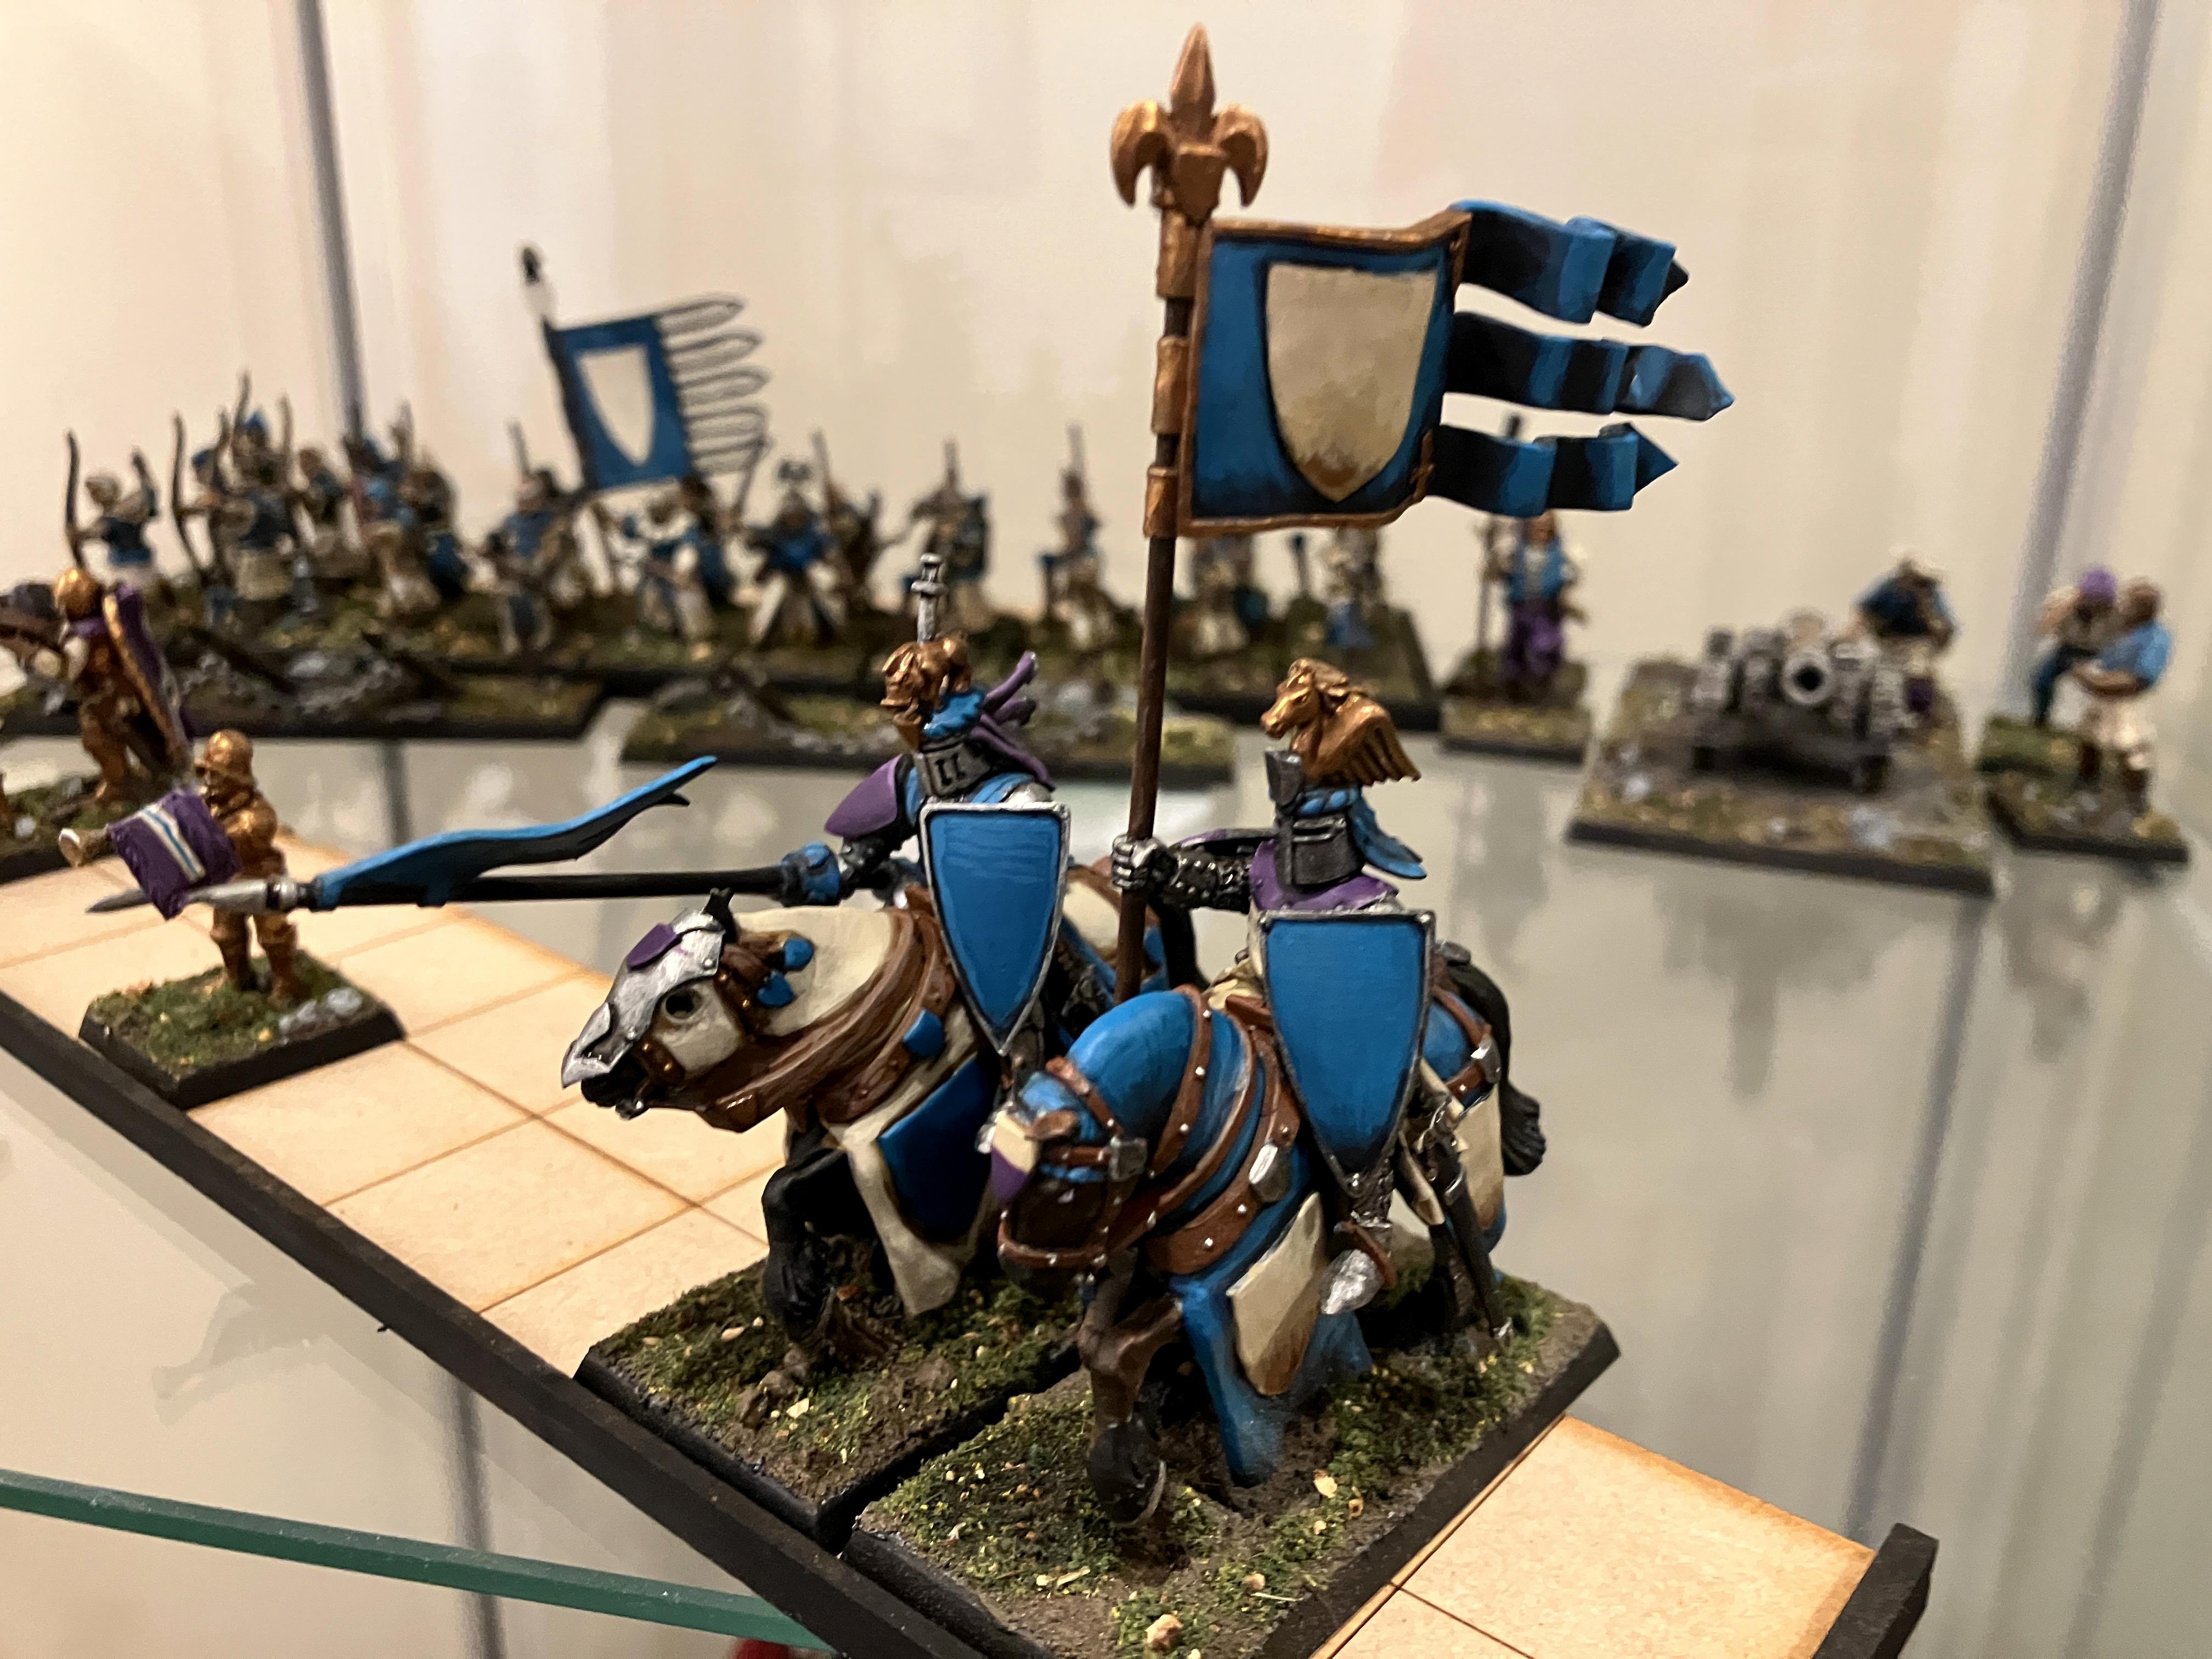
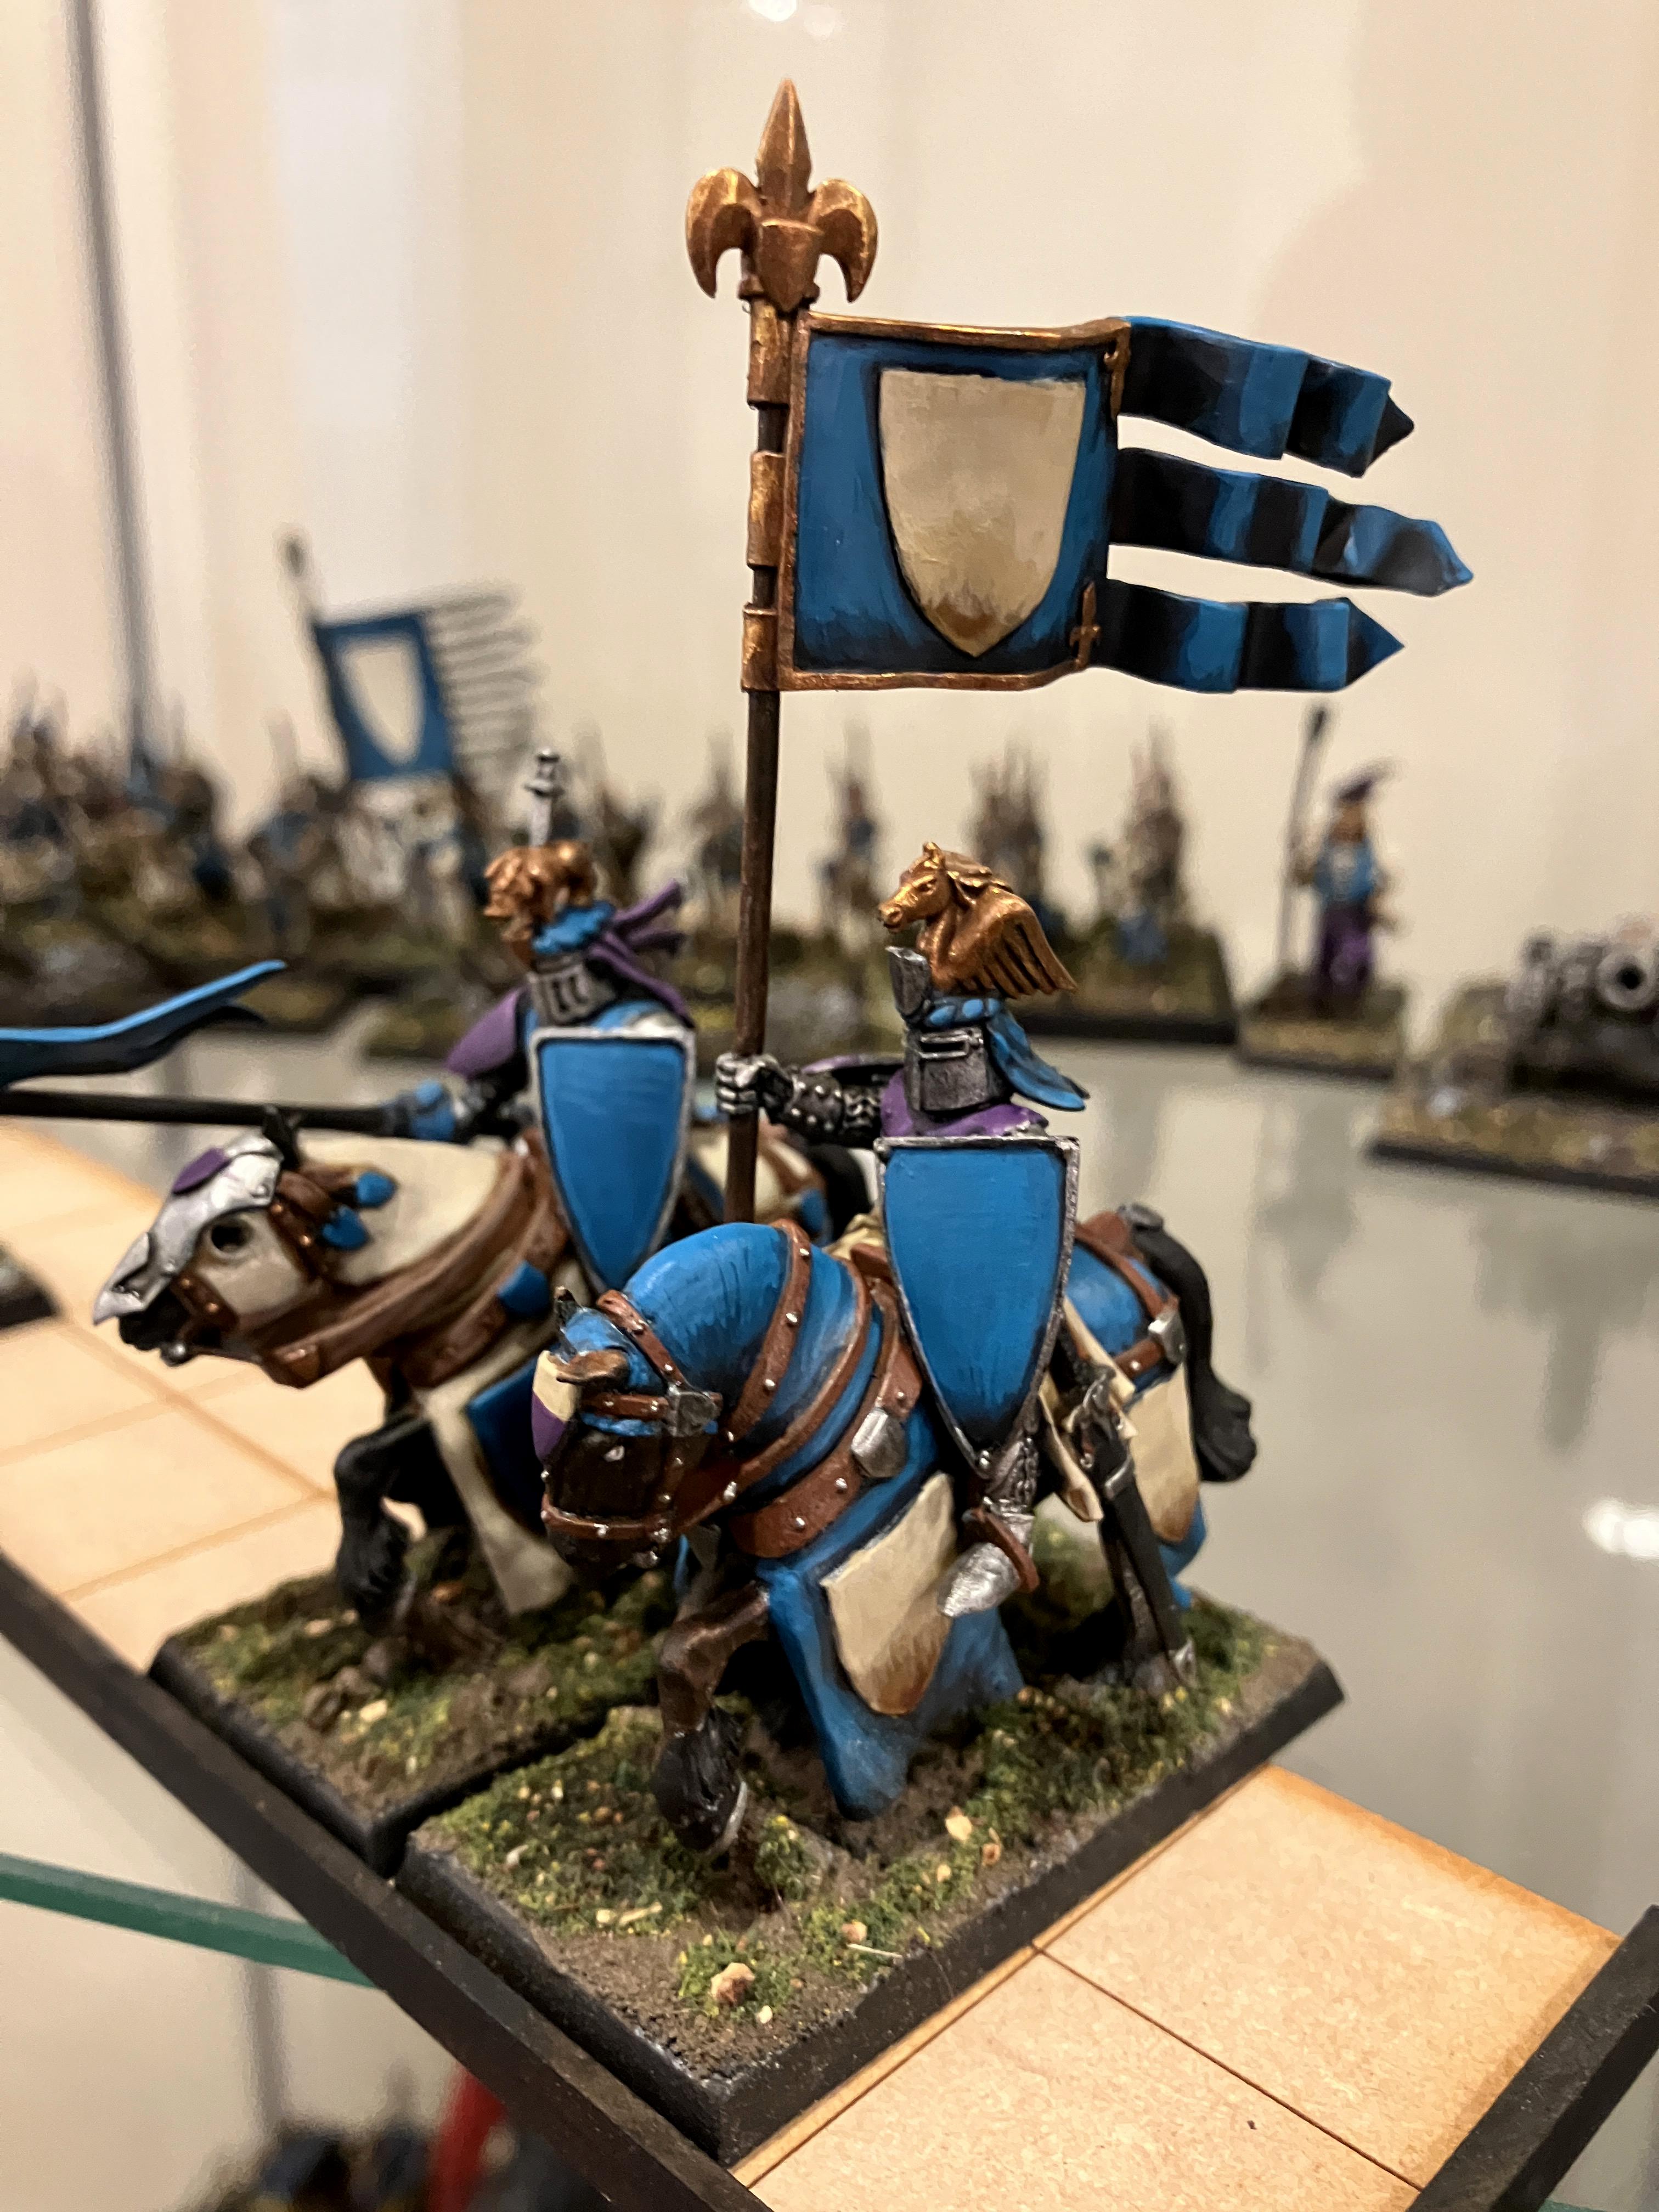
Did freehand on the shield - it is my attempt at an olive tree. While I'm not 110% satisfied, and may go back to narrow the trunk, I'm fairly happy. Fortunately this is a one-off. My bretonnian starter army finally shipped, so I'll have time to decide which paint scheme to go for. Next up - basing him and then finishing the Wraithknight.
While I still work on the Wraithknight (Not showing you a bunch of pictures of me doing target washes and then small gemstone highlights. I can only do that for about 20 minutes before I go a bit stir crazy), I have purchase (those count as progress, right!).
I finally received my Bretonnian Starter Army box. That, plus the mounted standard bearer, trebuchet kit, foot knights (and some unit fillers) should allow me to build out a pretty good army. But wait, there's more!
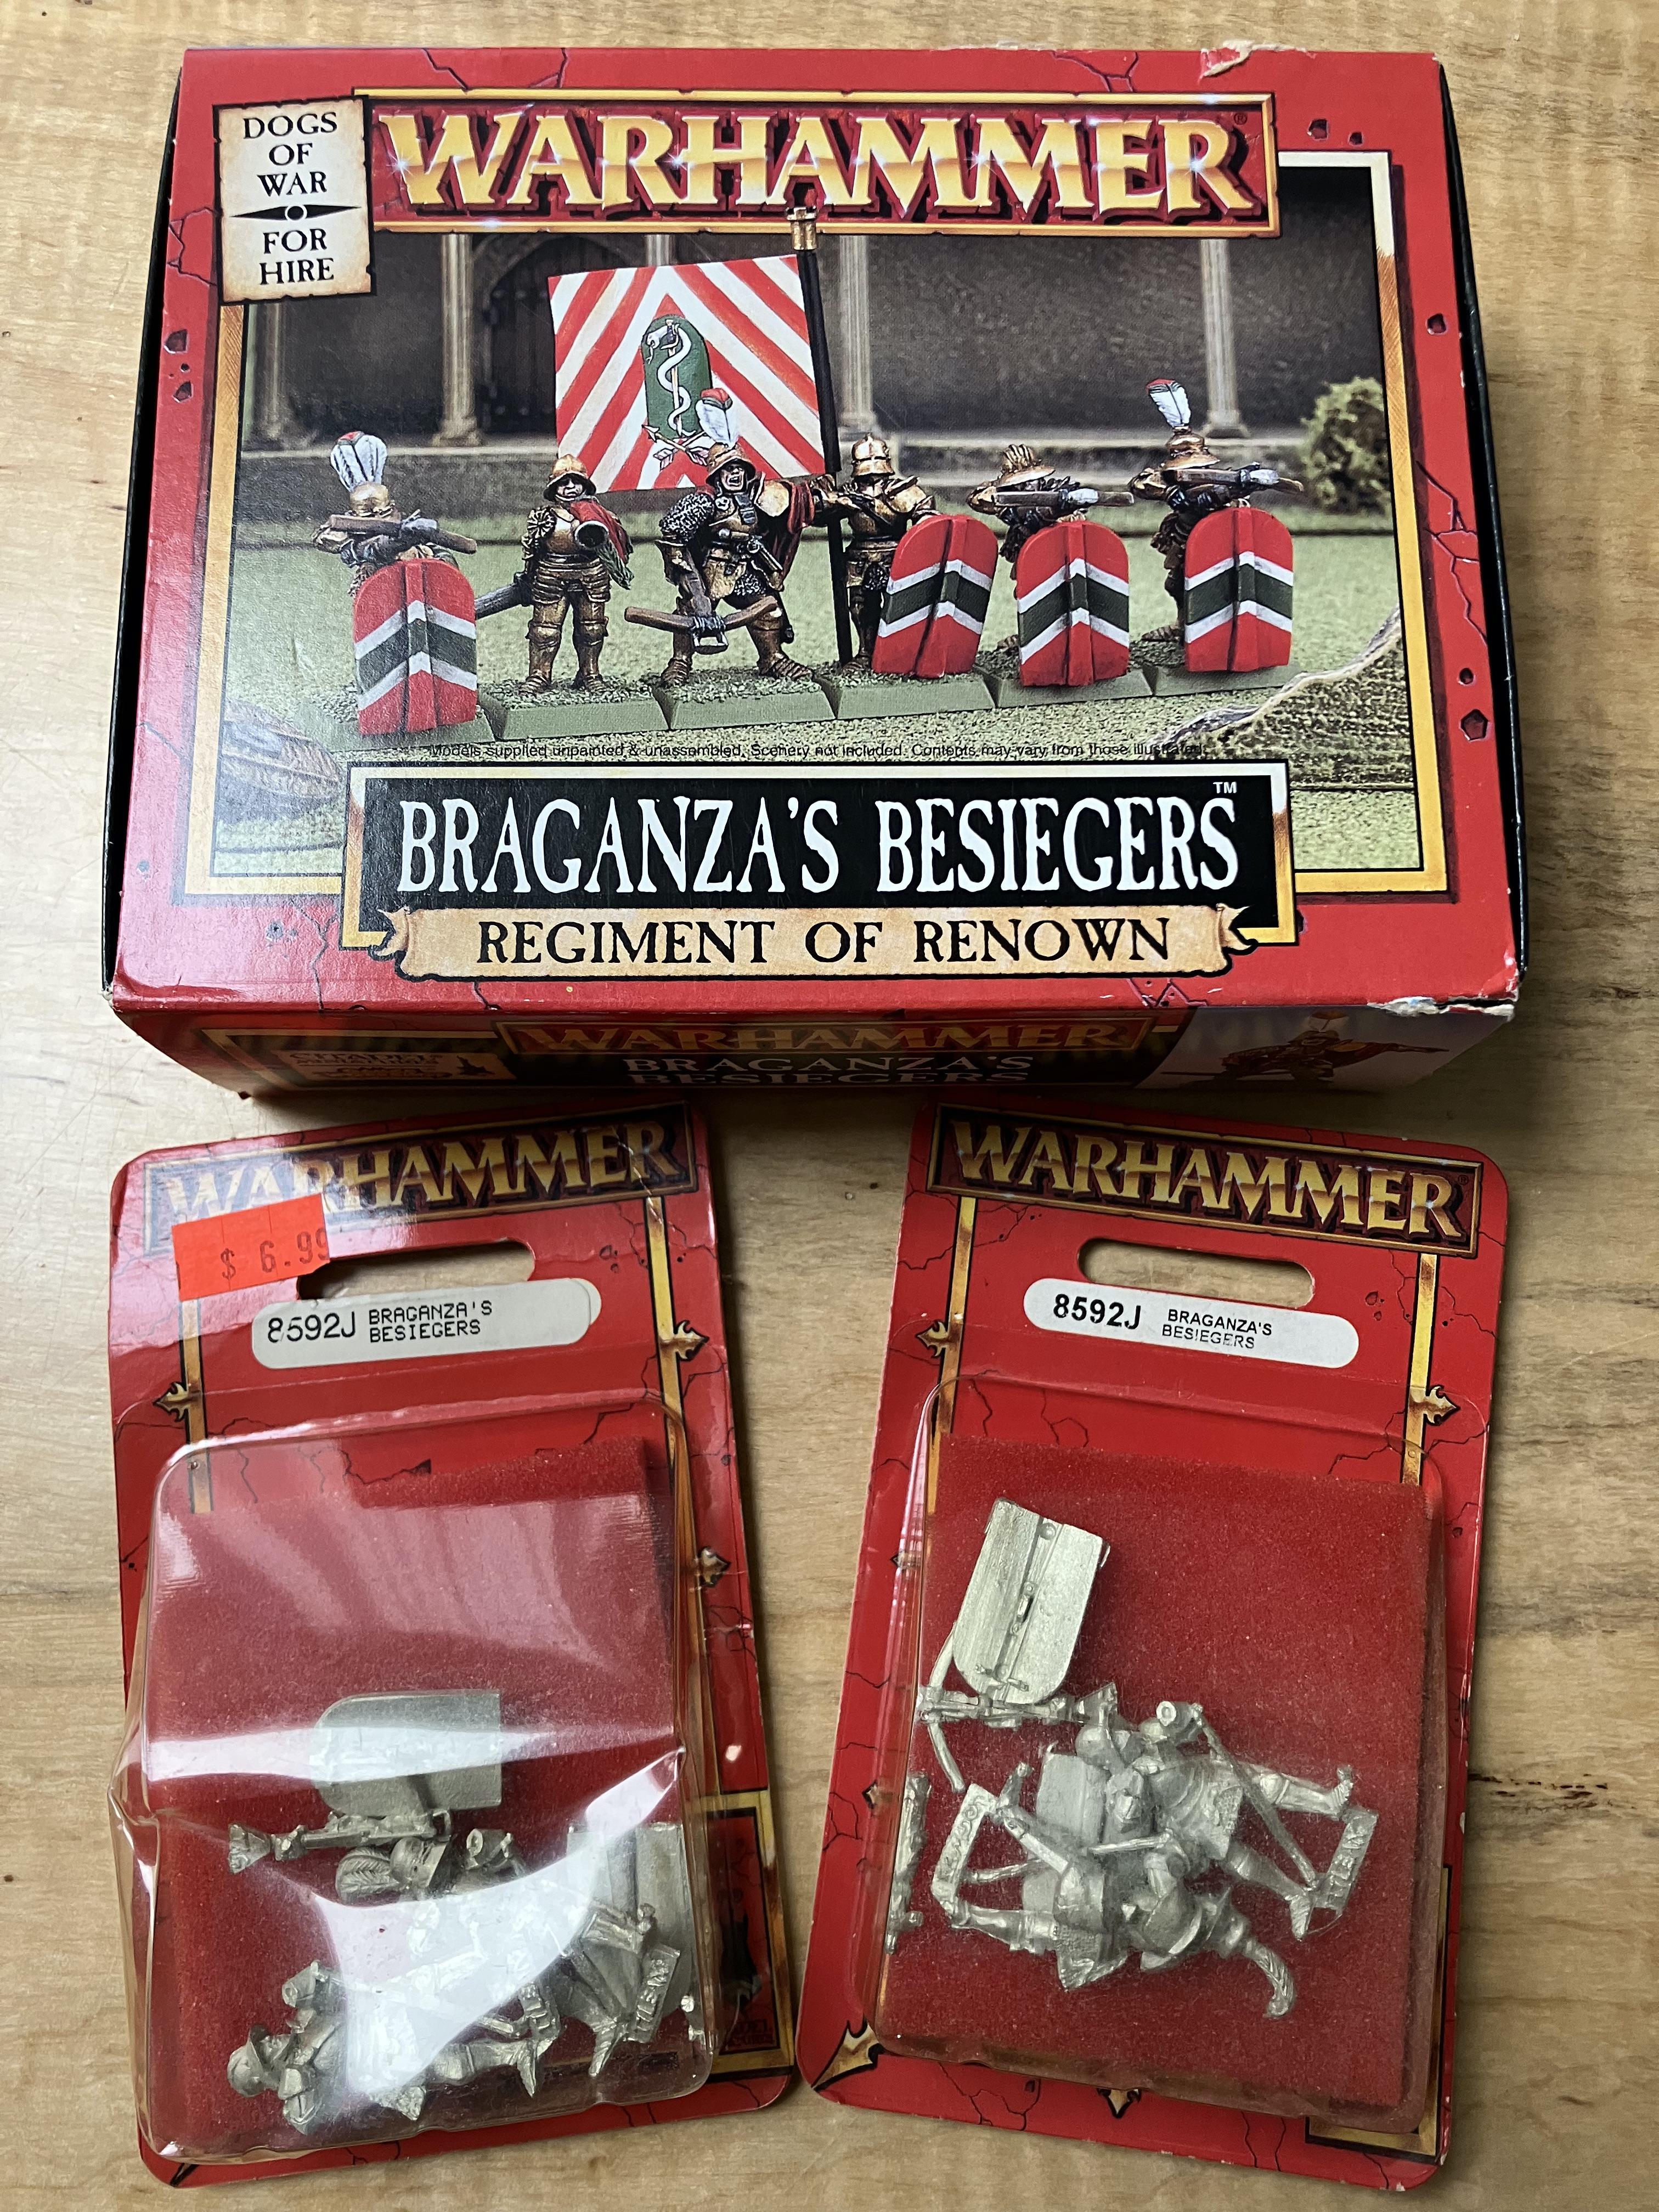
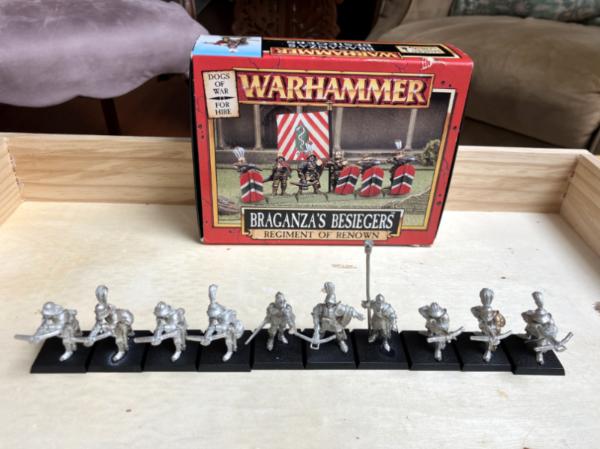
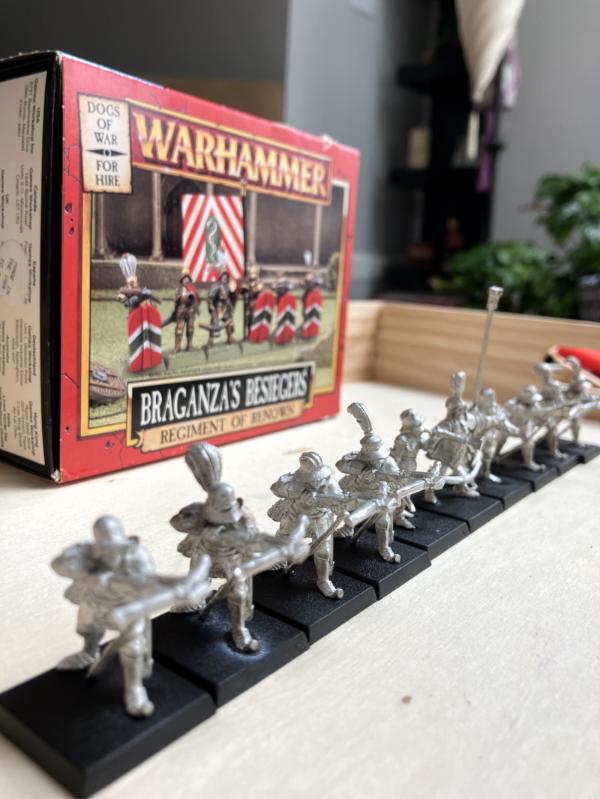
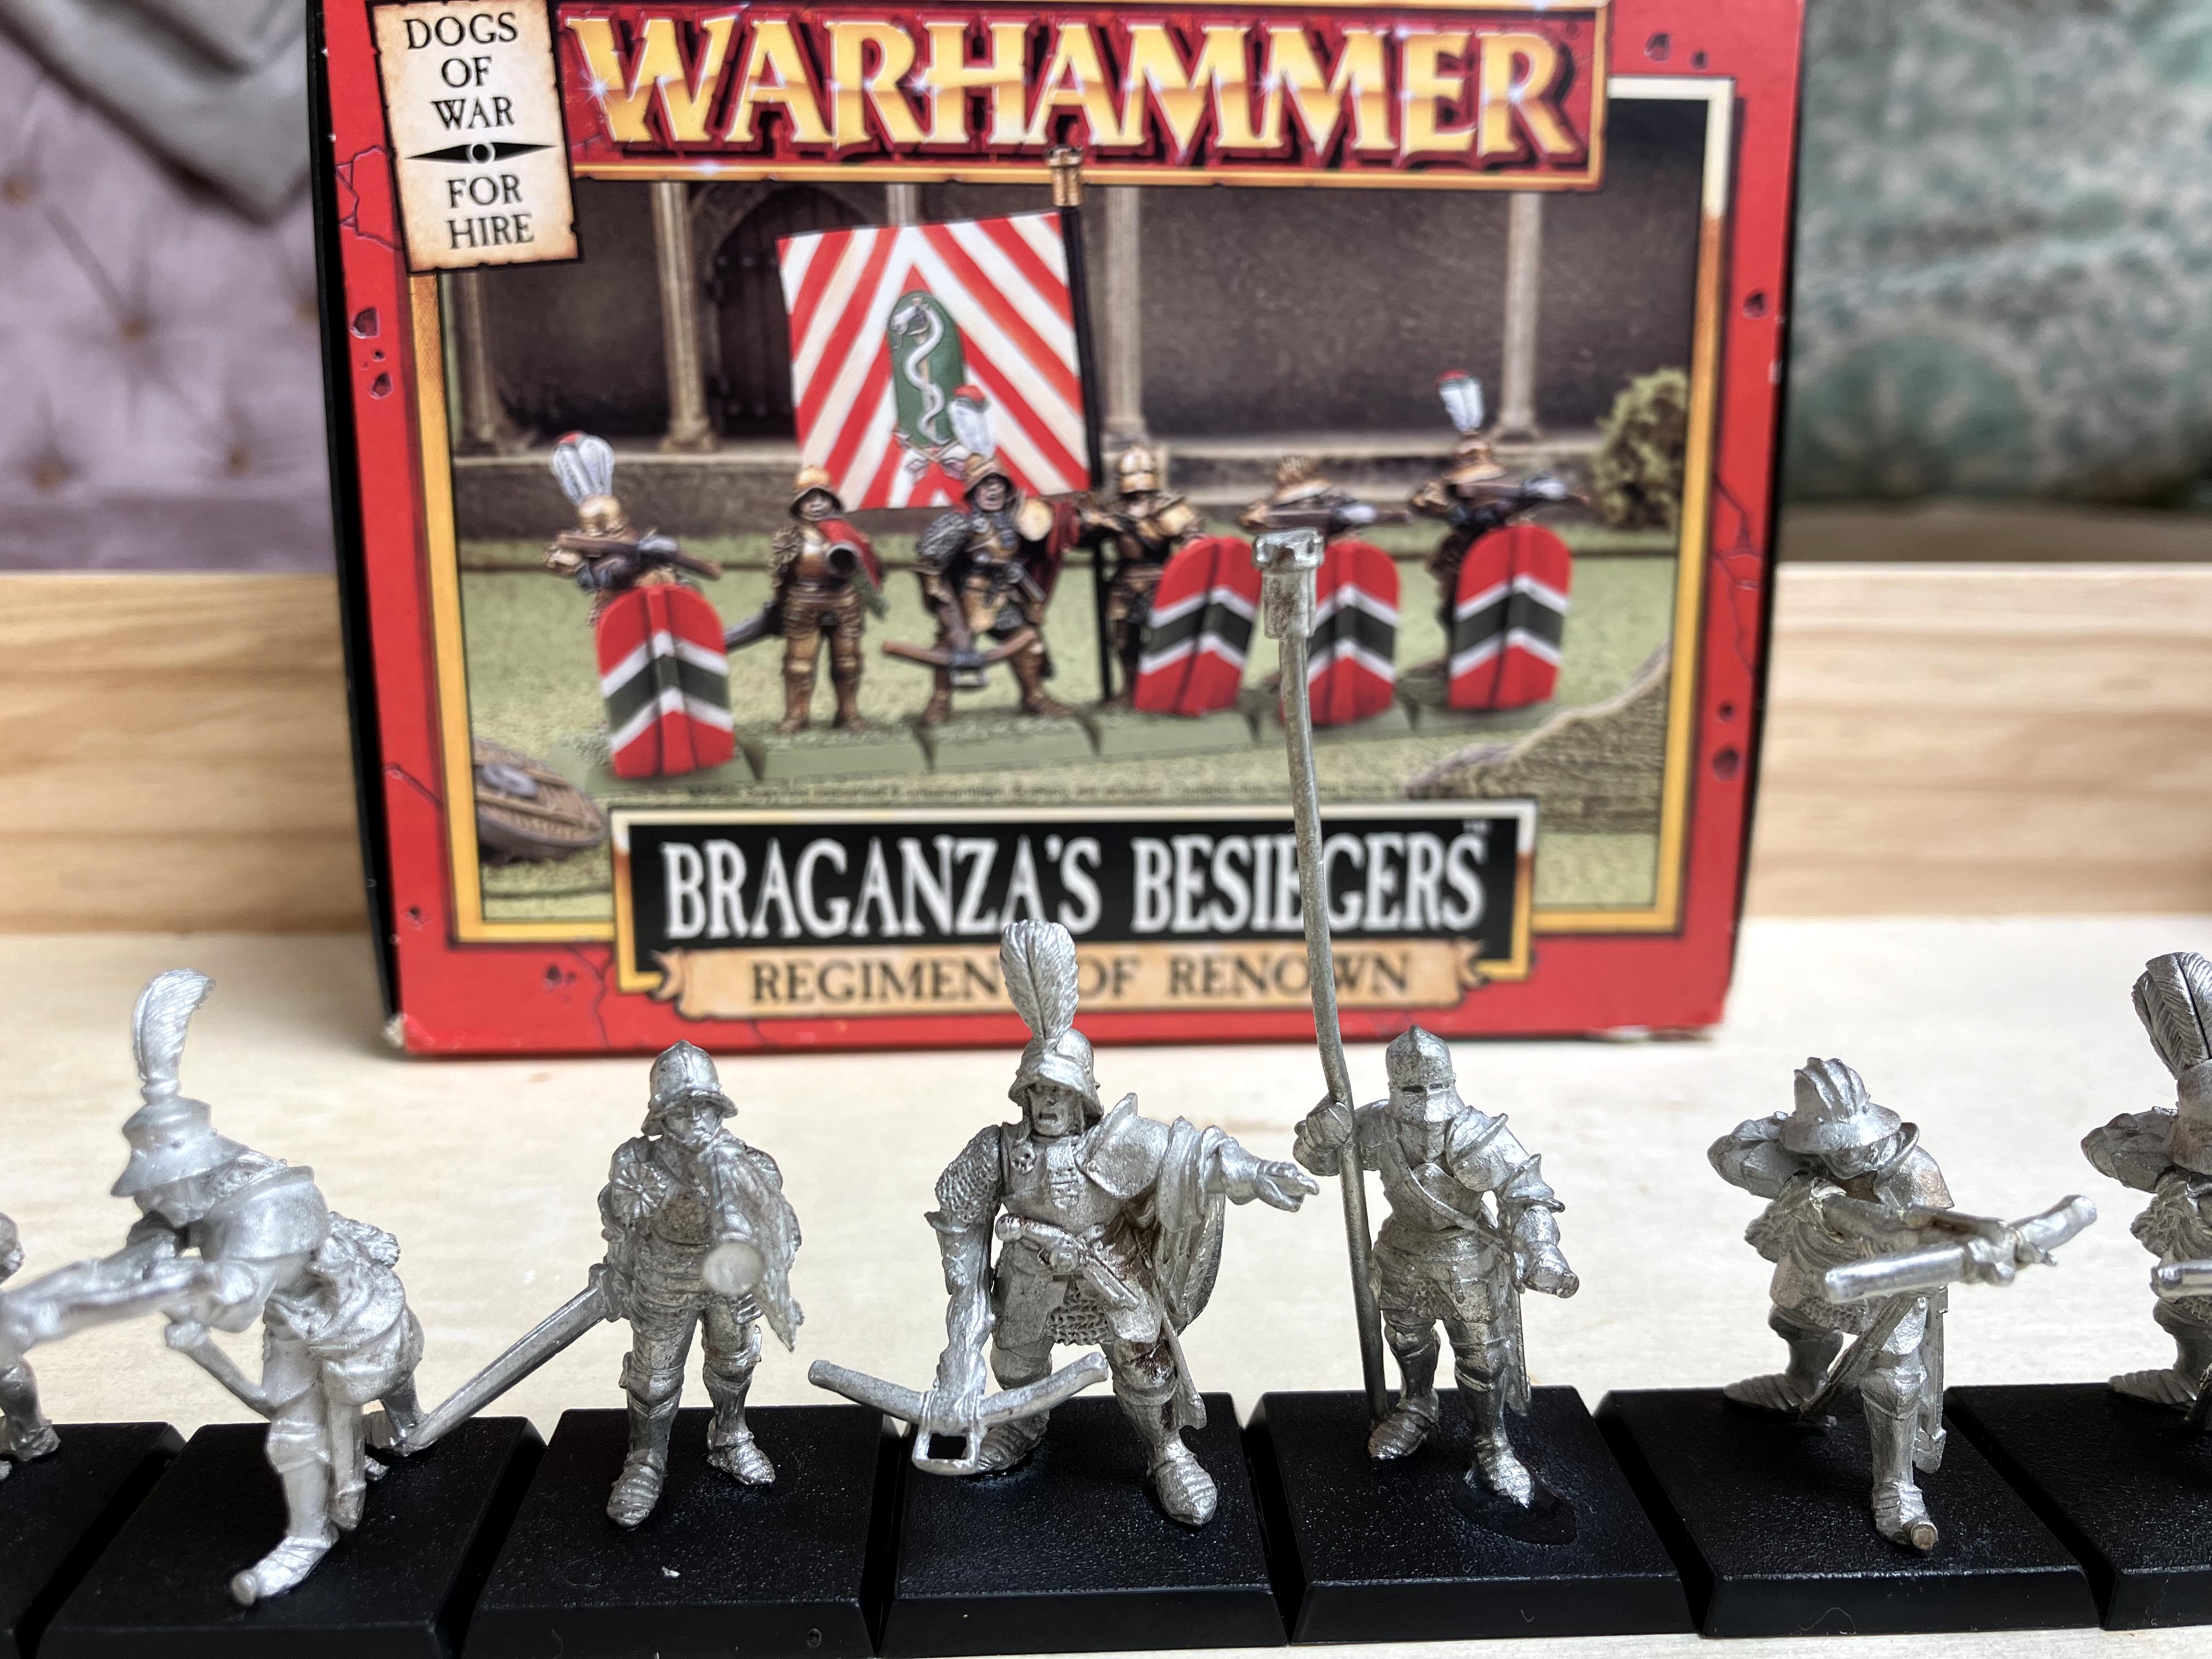
This is my 'expensive and unnecessary purchase of the year' - Found it in an online auction with a bunch of other Dogs of War things, threw bids at different lots, but only won this one (read: I didn't want to drop $200 on 16 Ricco's Republican Guard)
I plan on building a 2000 point Bretonnian Exile's Army (I still need to purchase the armies of fantasy book though). Any idea what I should use the Besiegers as in this army since Dogs of War don't exist?
I really like the bigger bases over the smaller ones. This ten man squad was about as expensive as half the Bretonnian Army box (eek). I'll likely run then as Border Prince Brigands, giving them a special banner or shield perhaps.
tzurk wrote: Man those minis bring back some memories. I reckon the Dogs of War line is one of GW's peak accomplishments.
I feel your pain on pricing of some of these old metal minis too though, but sometimes they just need to be MINE...
How good is an update of the hobby space for sparking some motivation! Can't wait to see what it brings!
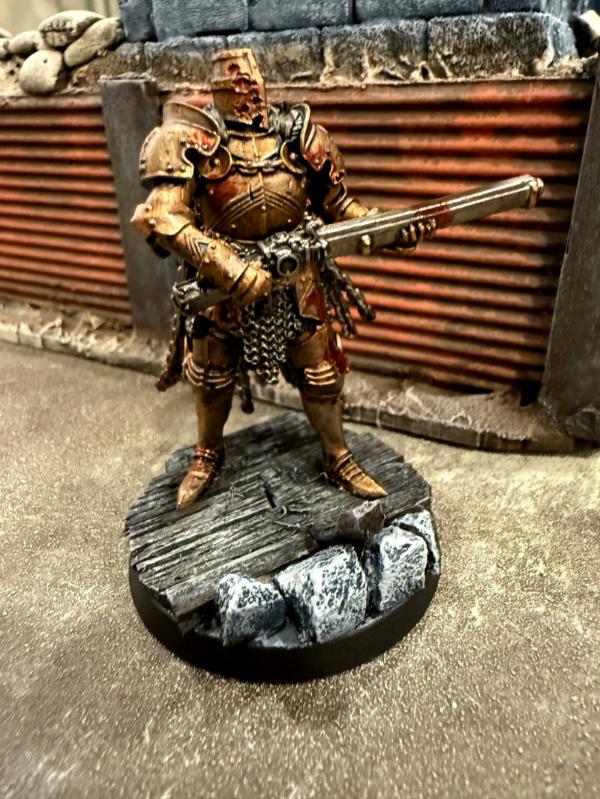
I found an online auction house that was selling a deceased person's warhammer and miniature collections and got really lucky on the purchase of the core set. I really was going for a set of pikemen (one of the three types made for the line), but the price at the end just went a bit insane, especially for metal minis that are, well, old. So I put together this lovely little group! Also, I love the DoW line - I am wondering if they'll be popped into Made to Order at some point.
Here's a project update (from a day or two ago!)
I'm going from two 'regular' desks to a hobby desk and a single desk. So naturally now that I've moved stuff around, I have to take everything out of those desks. the floor is a mess but the room is set up beautifully now! Even the new offspring is enjoying watching me organize.
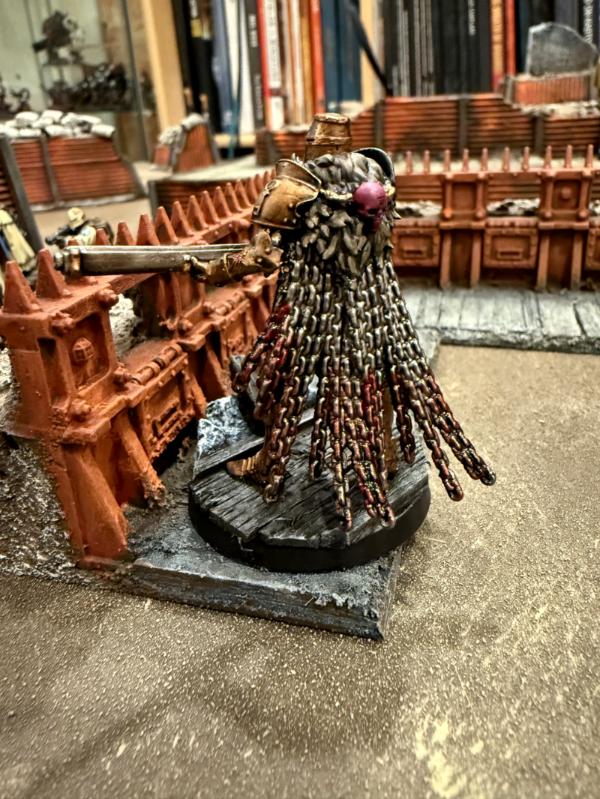
Because I struggle with sticking to just one thing, I've opened the last of my renegades and heretics army components and started putting it together on the new workbench. Originally I wanted to build them as the two large mortar style constructs, but I ended up being unable to do that as I clipped off one of the sprues and I'm unsure where it has gone. So instead, giant laser cannons instead! (My loyalists have the artillery cannons, and I do not do mirror matches).
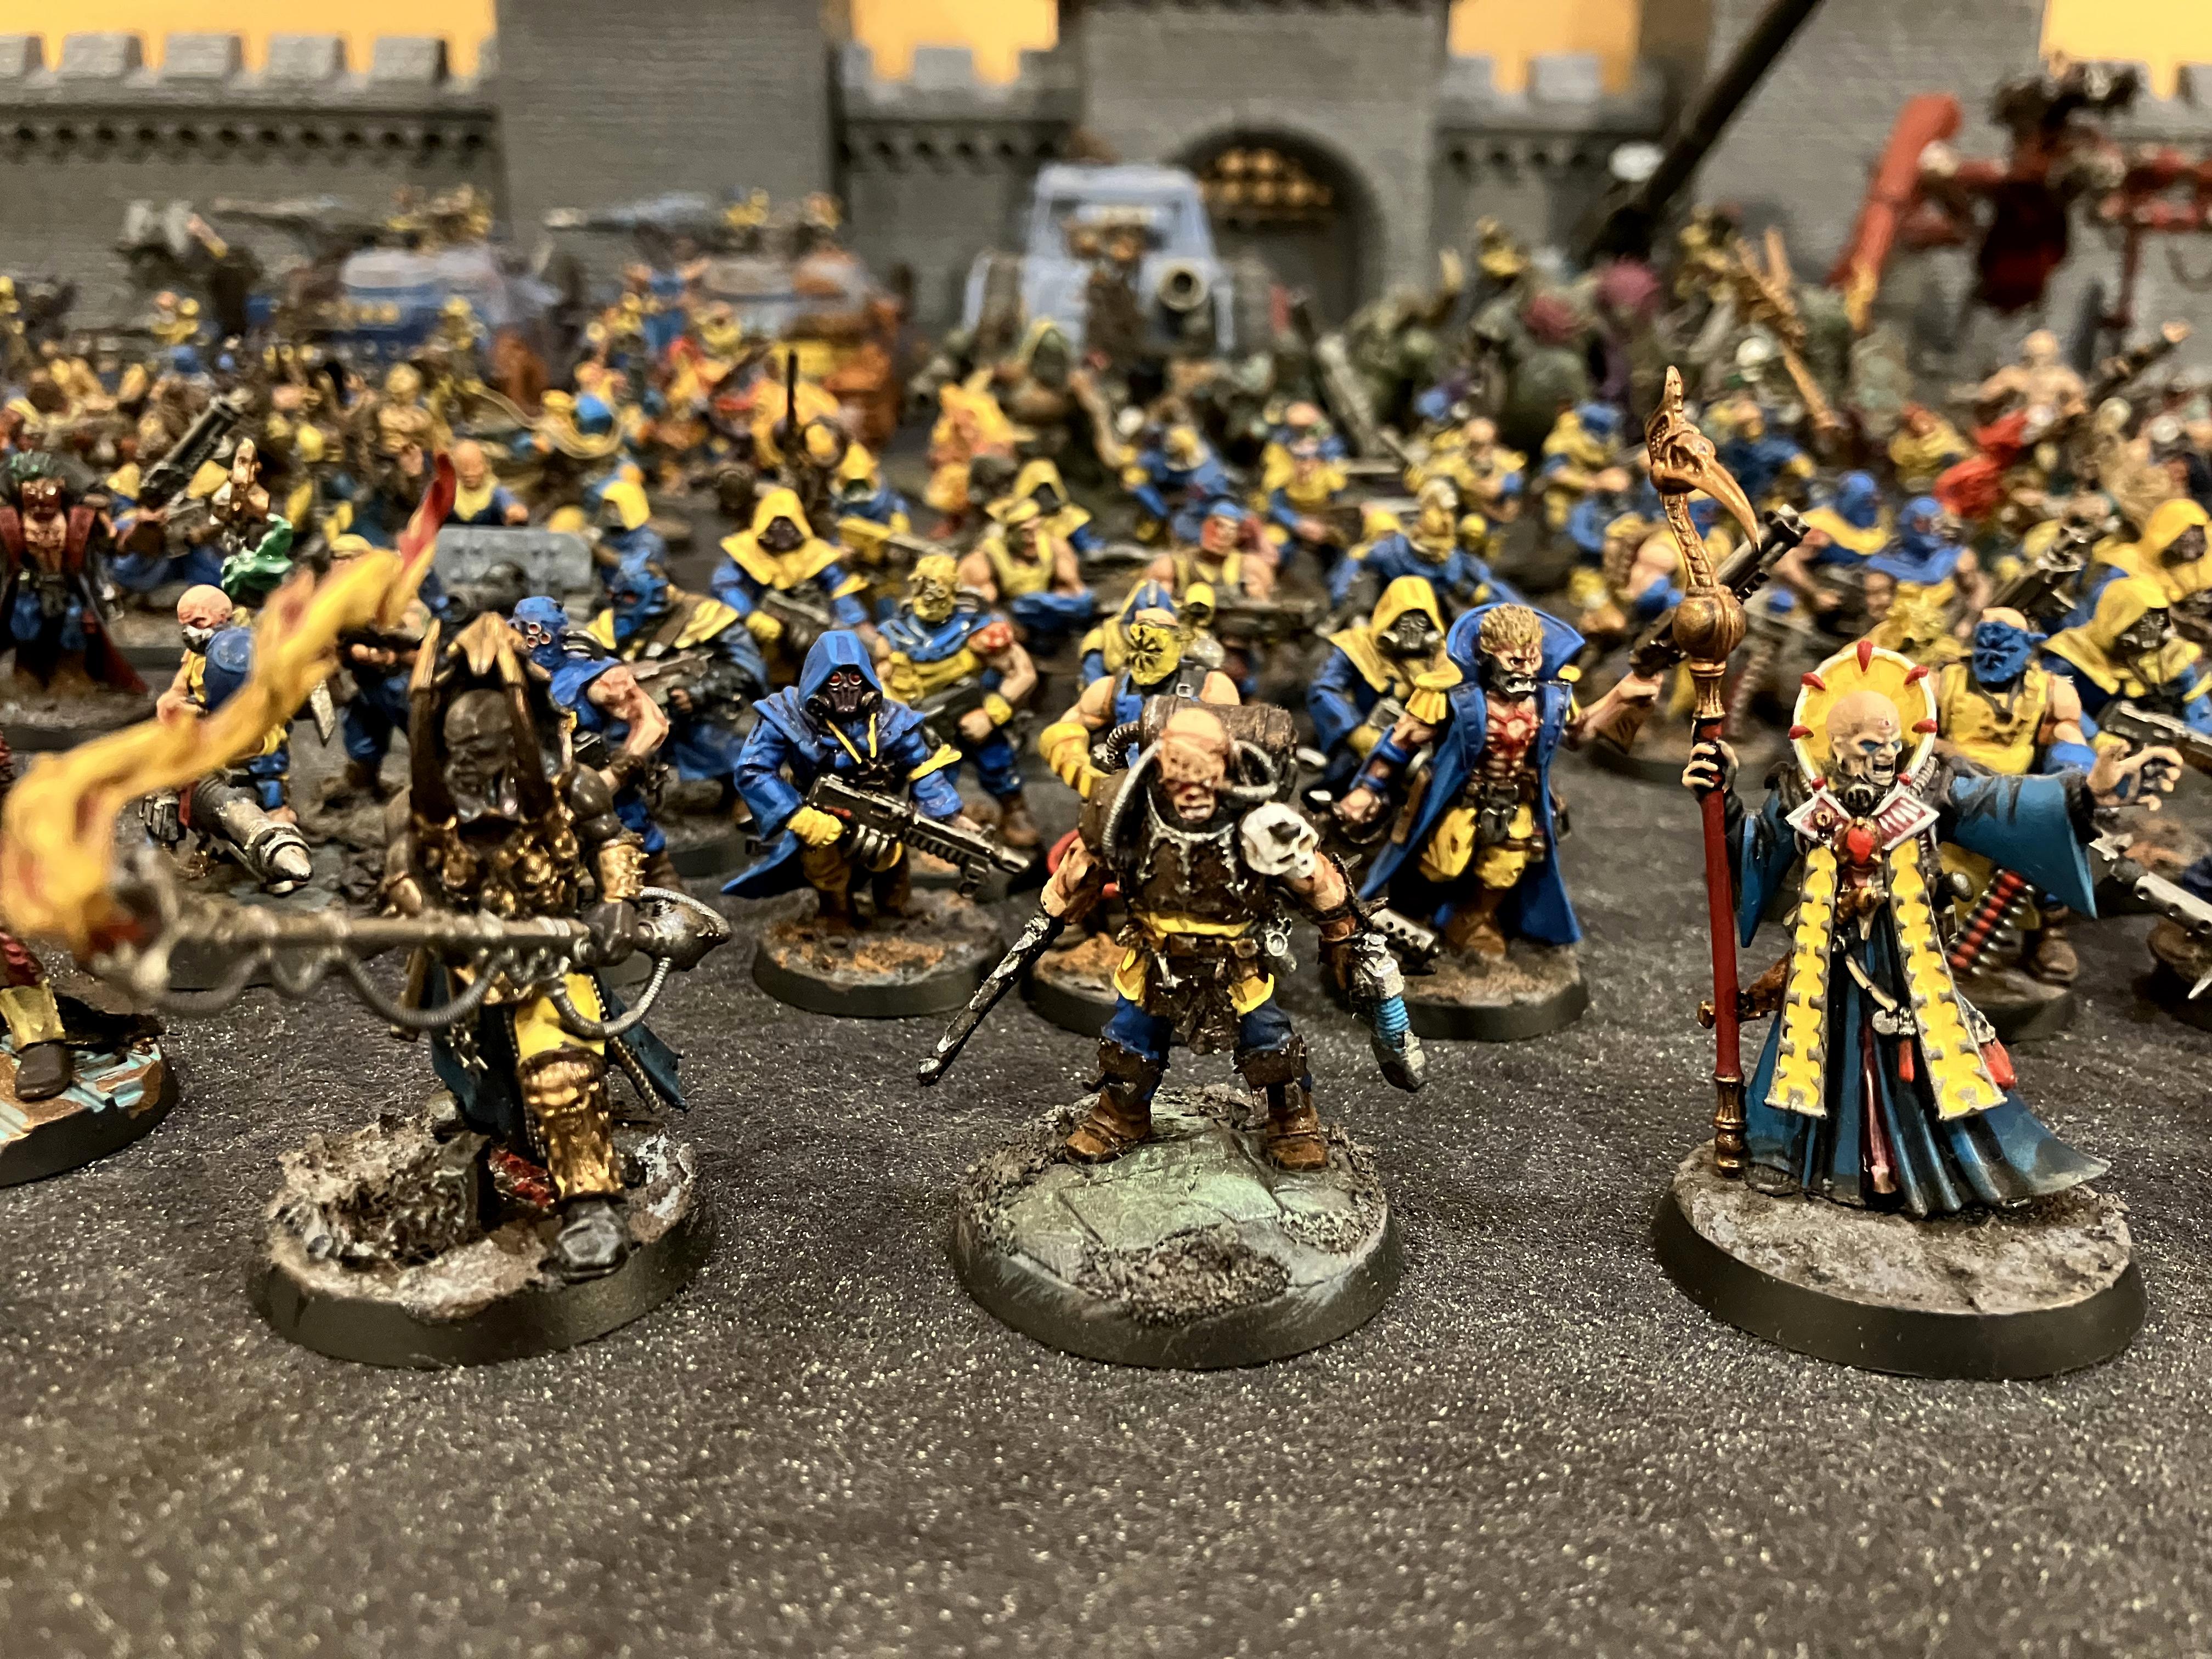
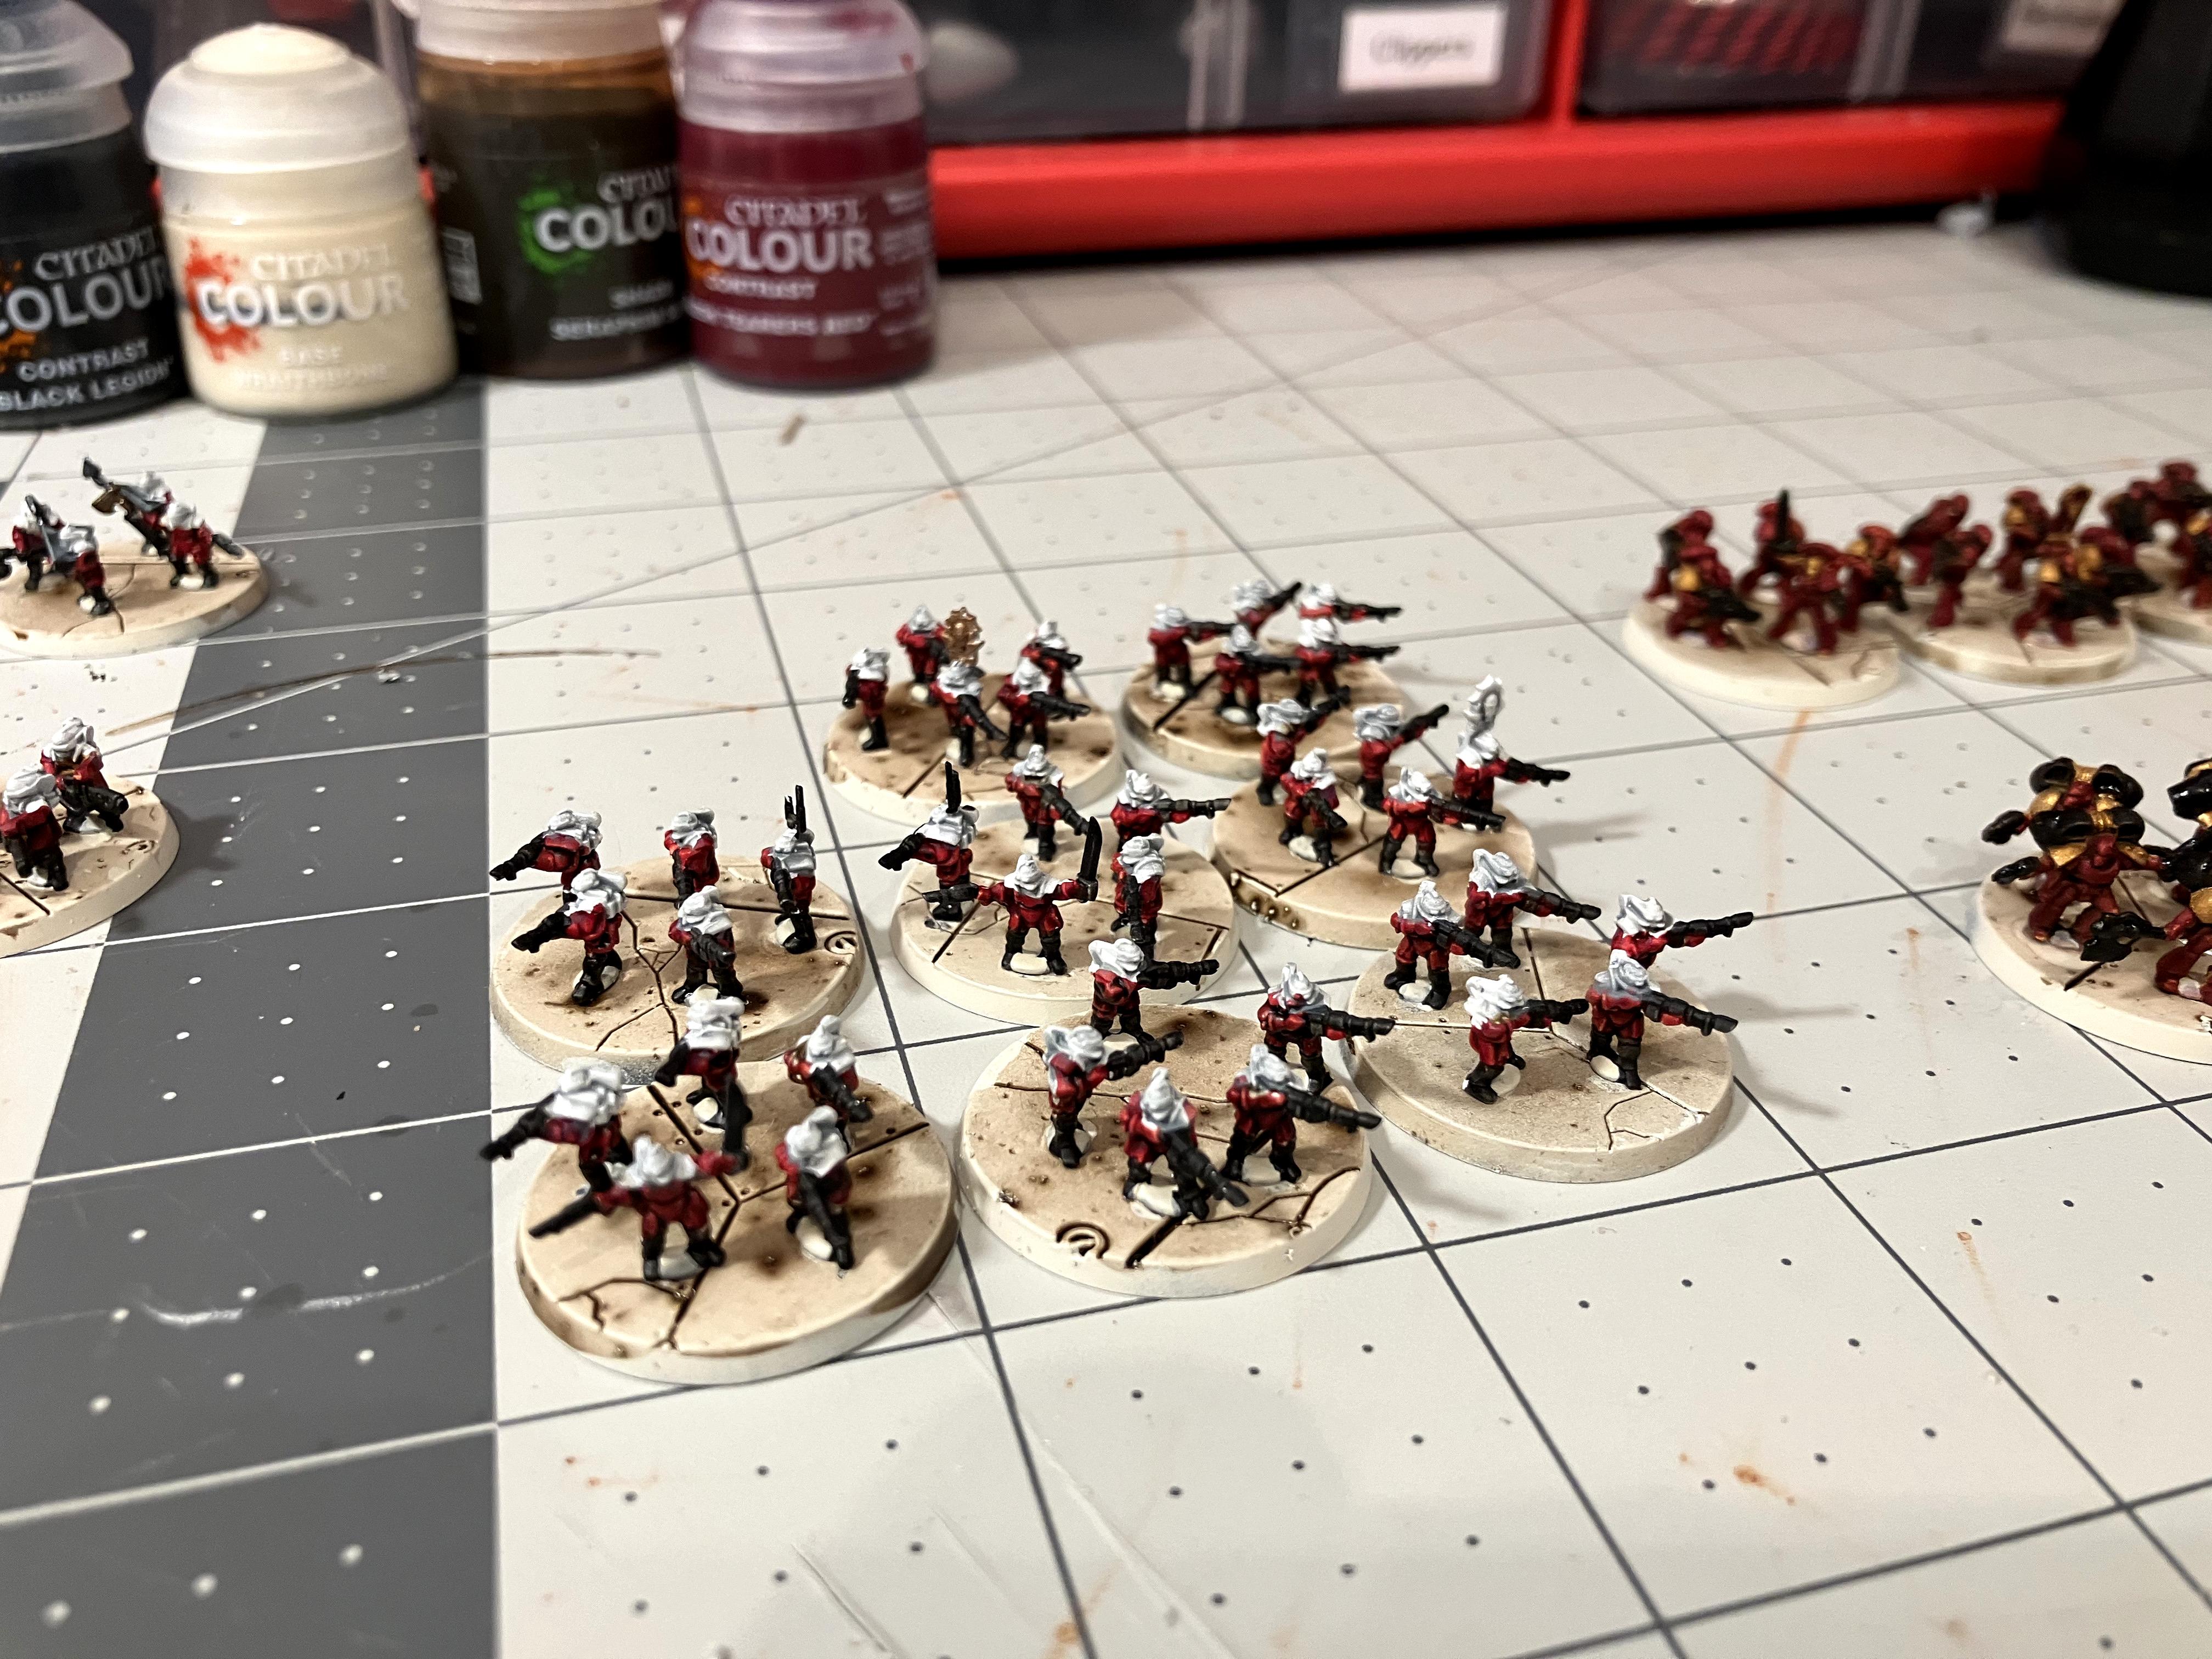
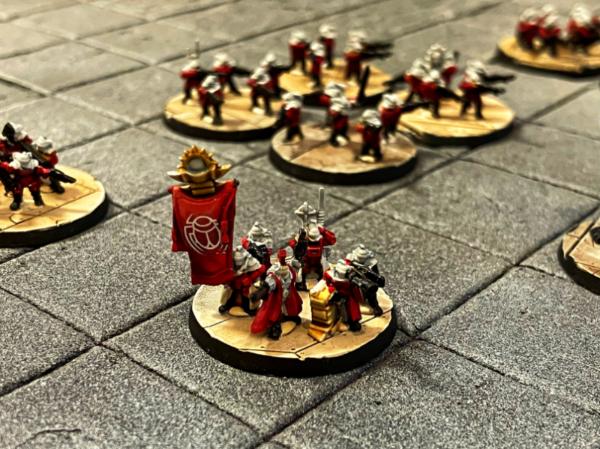
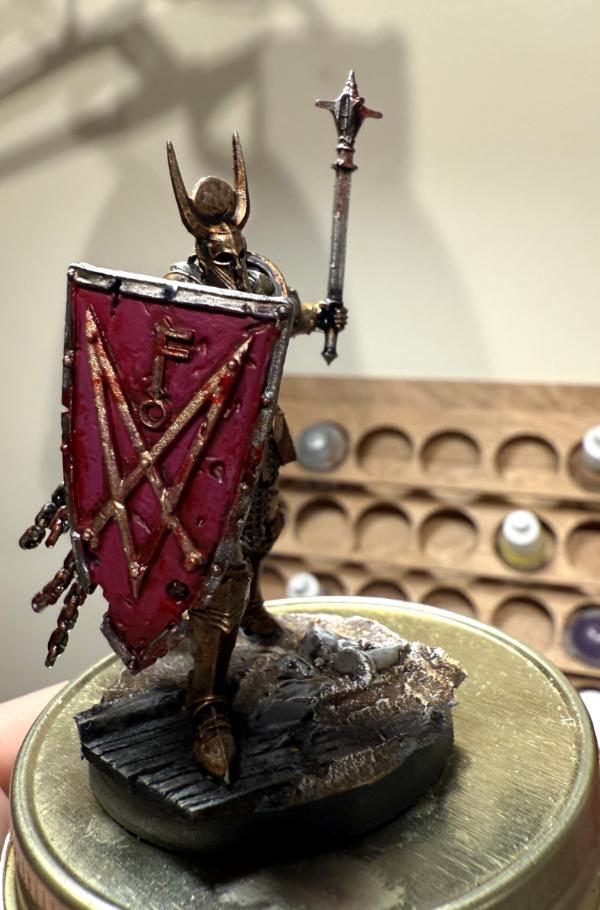
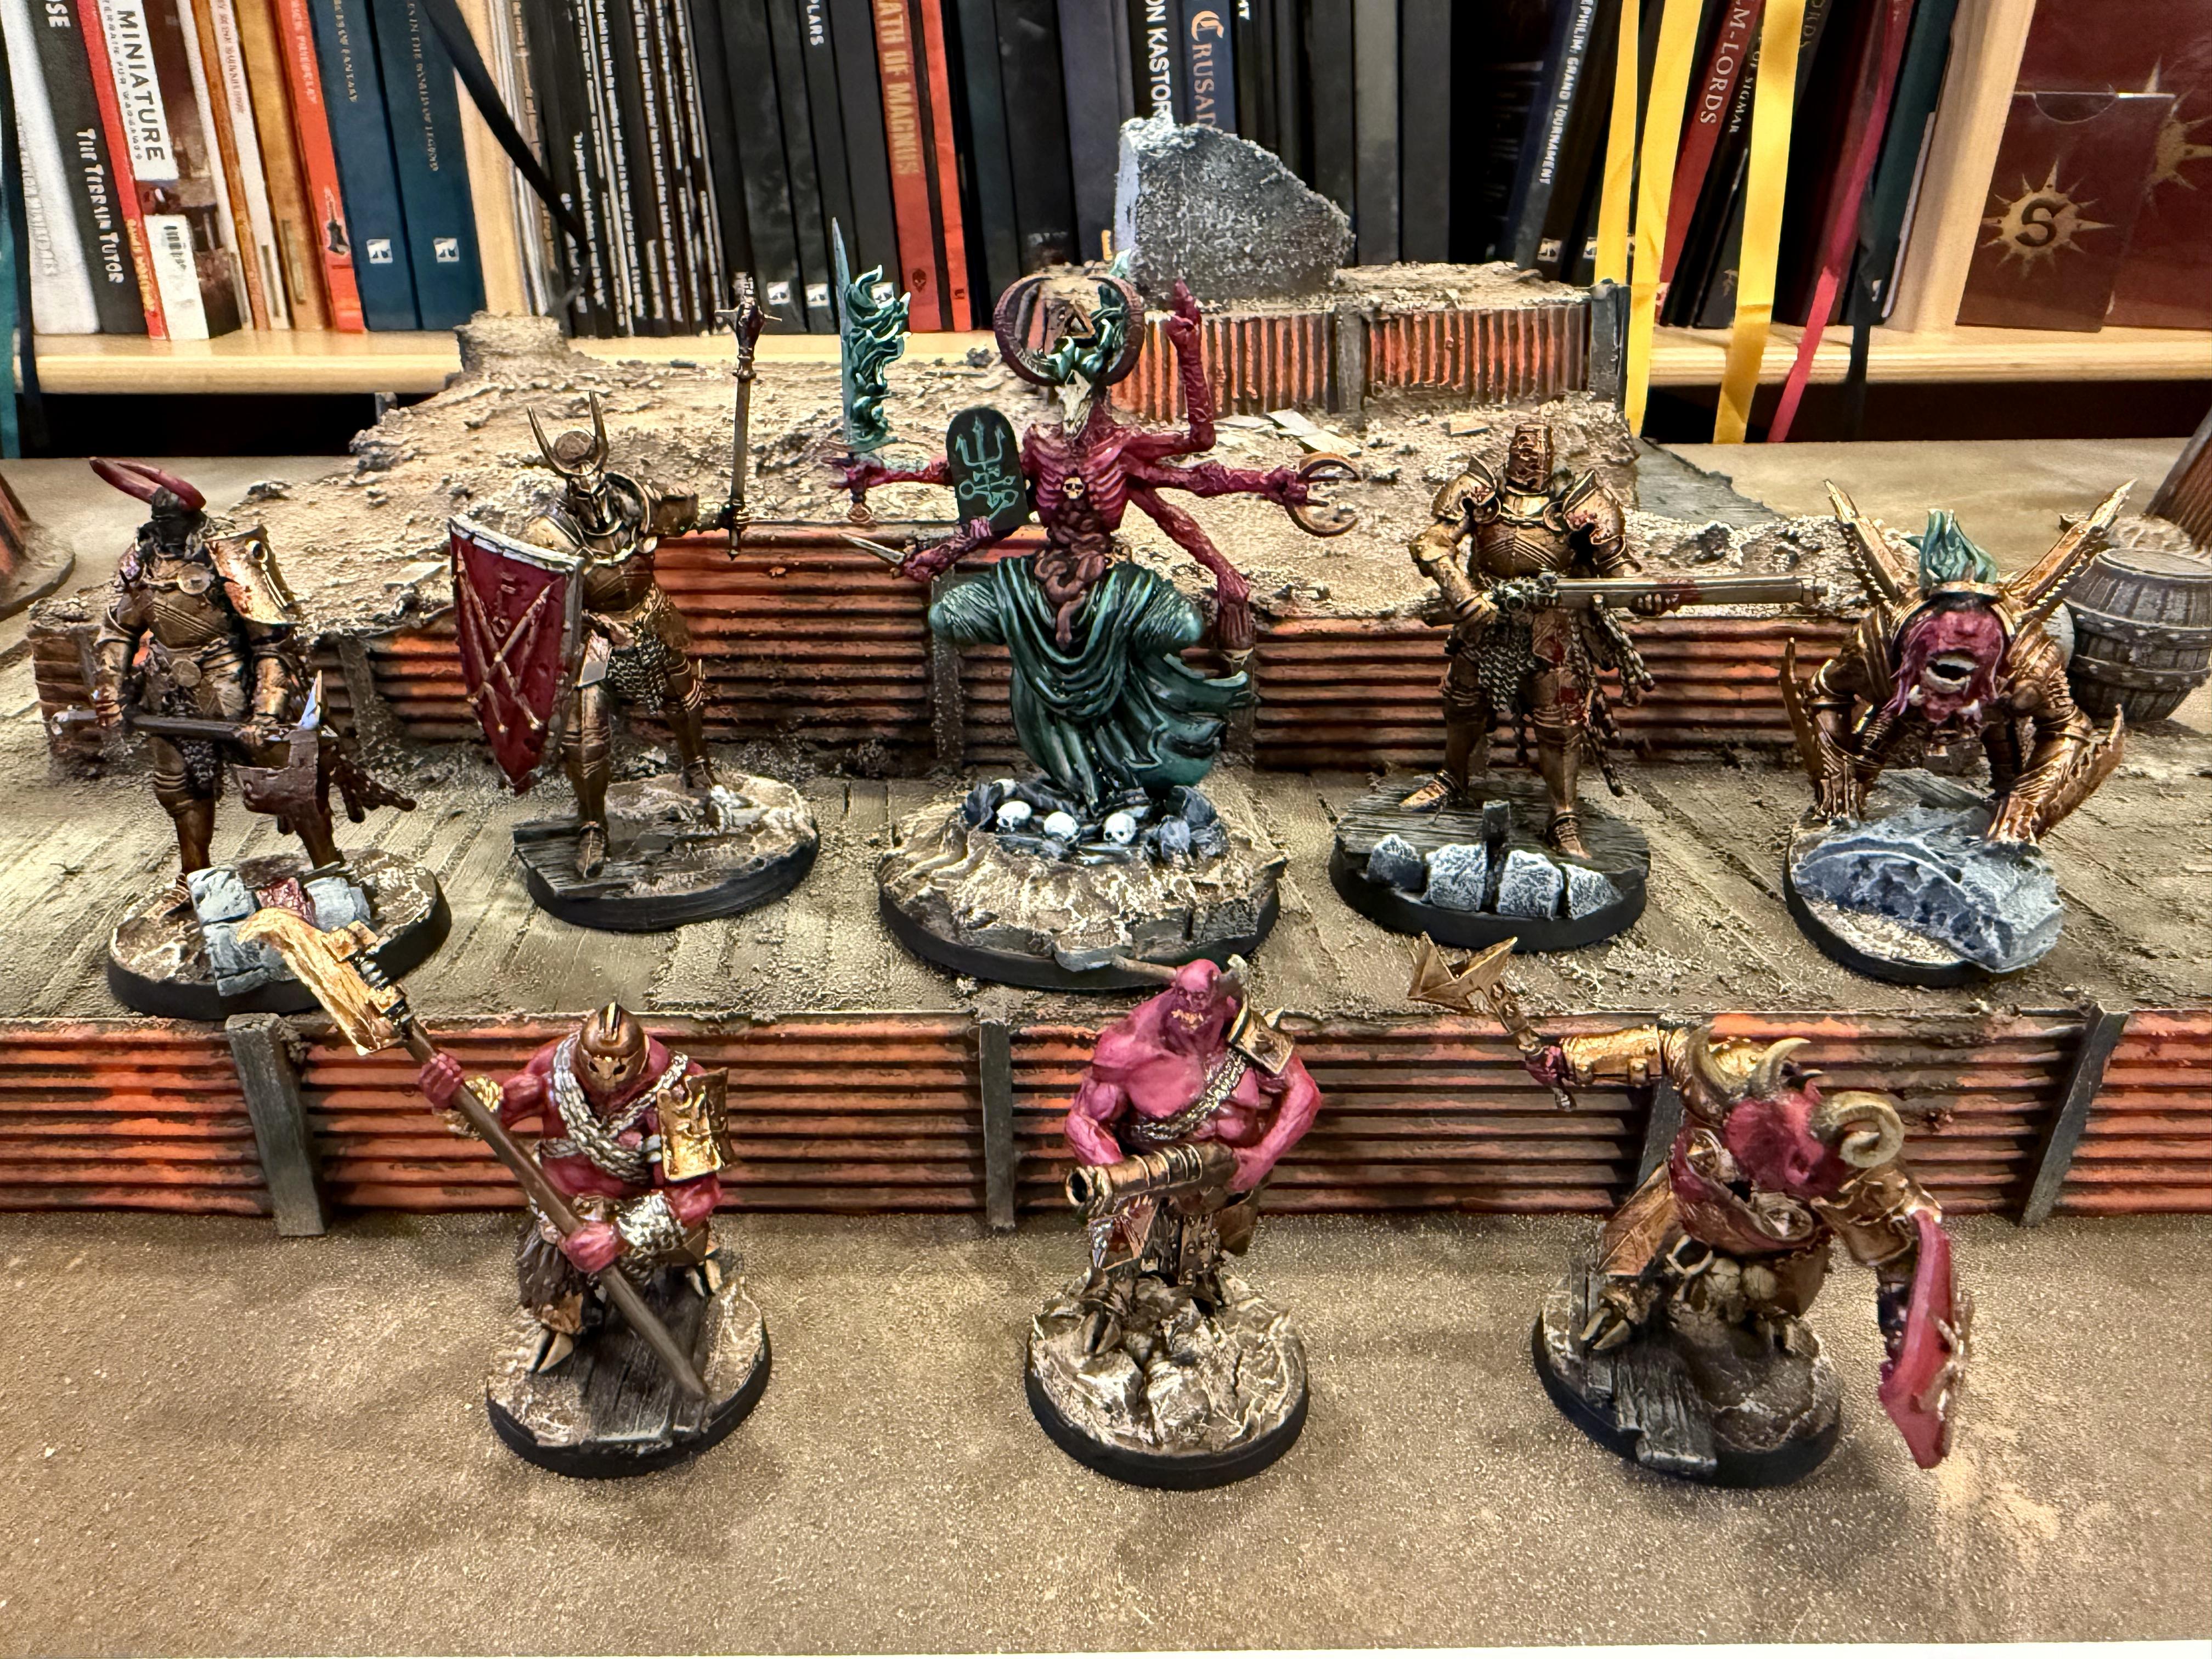
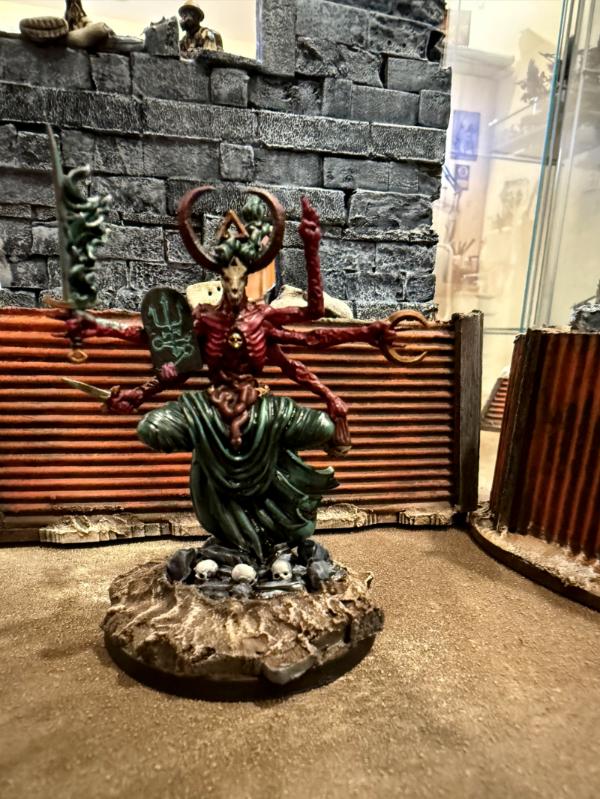
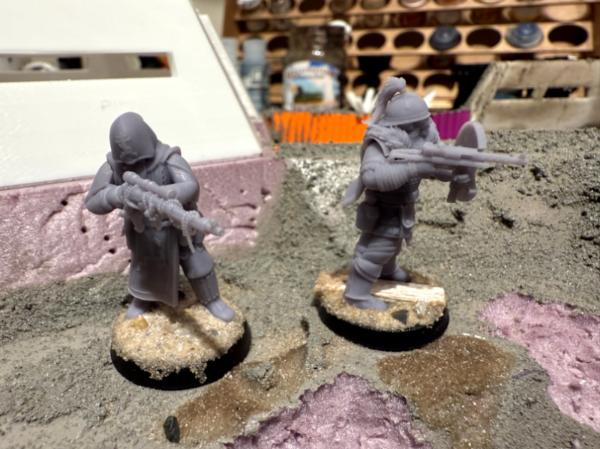
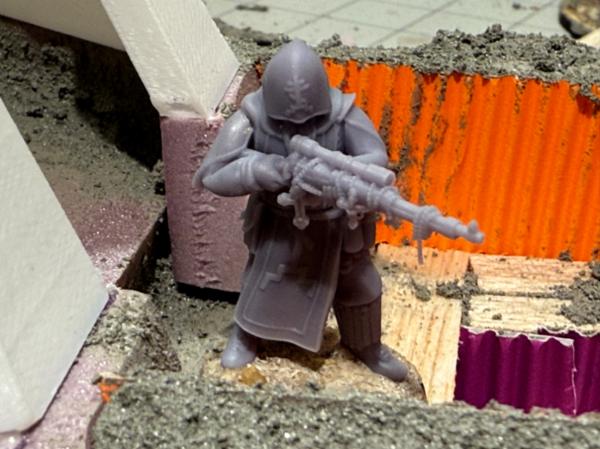
My Renegade and Heretics army is played using the Astra Miliatrum Codex. It's designed to mimic a Blood Pact Company from Gaunt's Ghosts.
You can see some of the detail I tried to carve into the plastic shields. I also purposefully carved off all the Imperial iconography.
Obviously, there's a way to go! But I'm excited for the progress (which is harder to get nowadays with a tiny person needing holding all day long.)
Resin heads are from Anvil Industries, and I plan on bulking out the bases to represent more of a built up defensive position in ruins.
Nice start, those heads are awesome. Looking I over your earlier posts, there’s some awesome terrain you’ve been building. The fantasy buildings are some real classics!
Thanks for the kind comments @Gobert and @Captain Brown
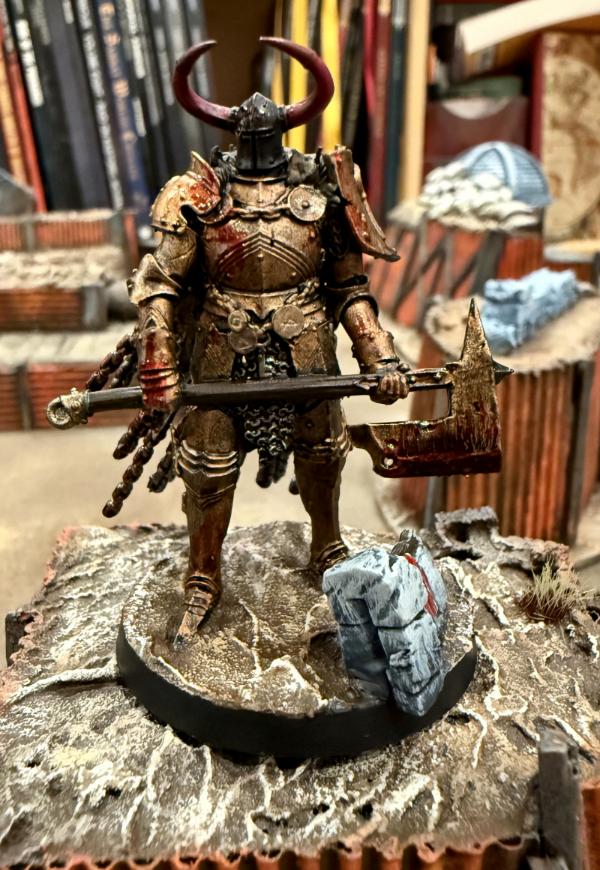
Finally putting all the pieces together for the Blood Pact Command Squad and Artillery. Did some greenstuffing to clean up some key pieces and fill / hide a lot of gaps (as can happen with kitbashing, especially with a kit like the Jackals, which want to go together in a very specific way.
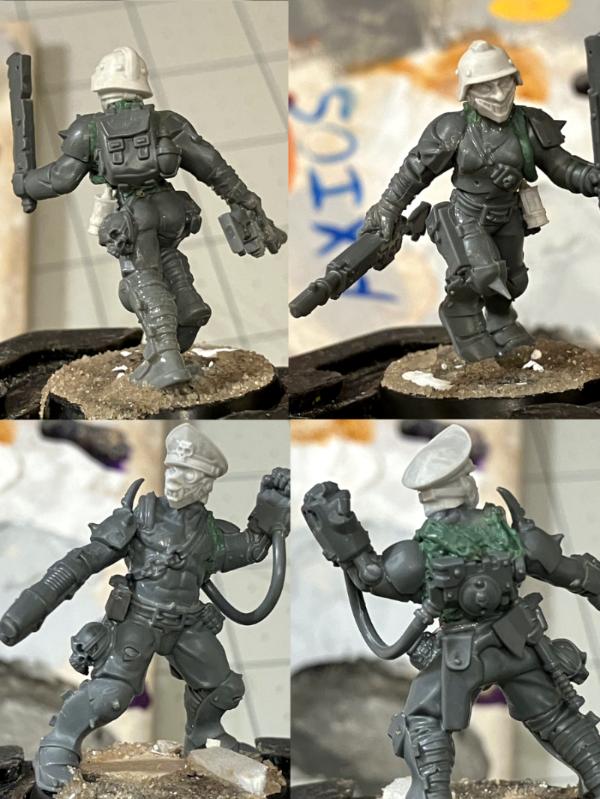
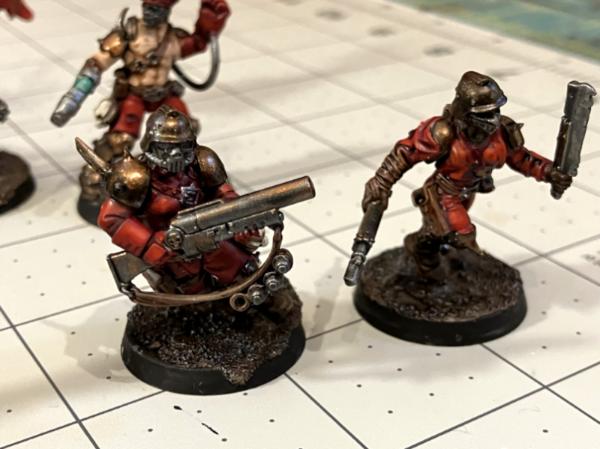
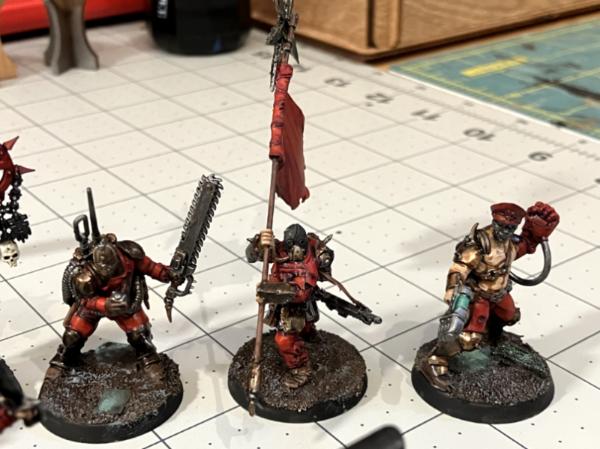
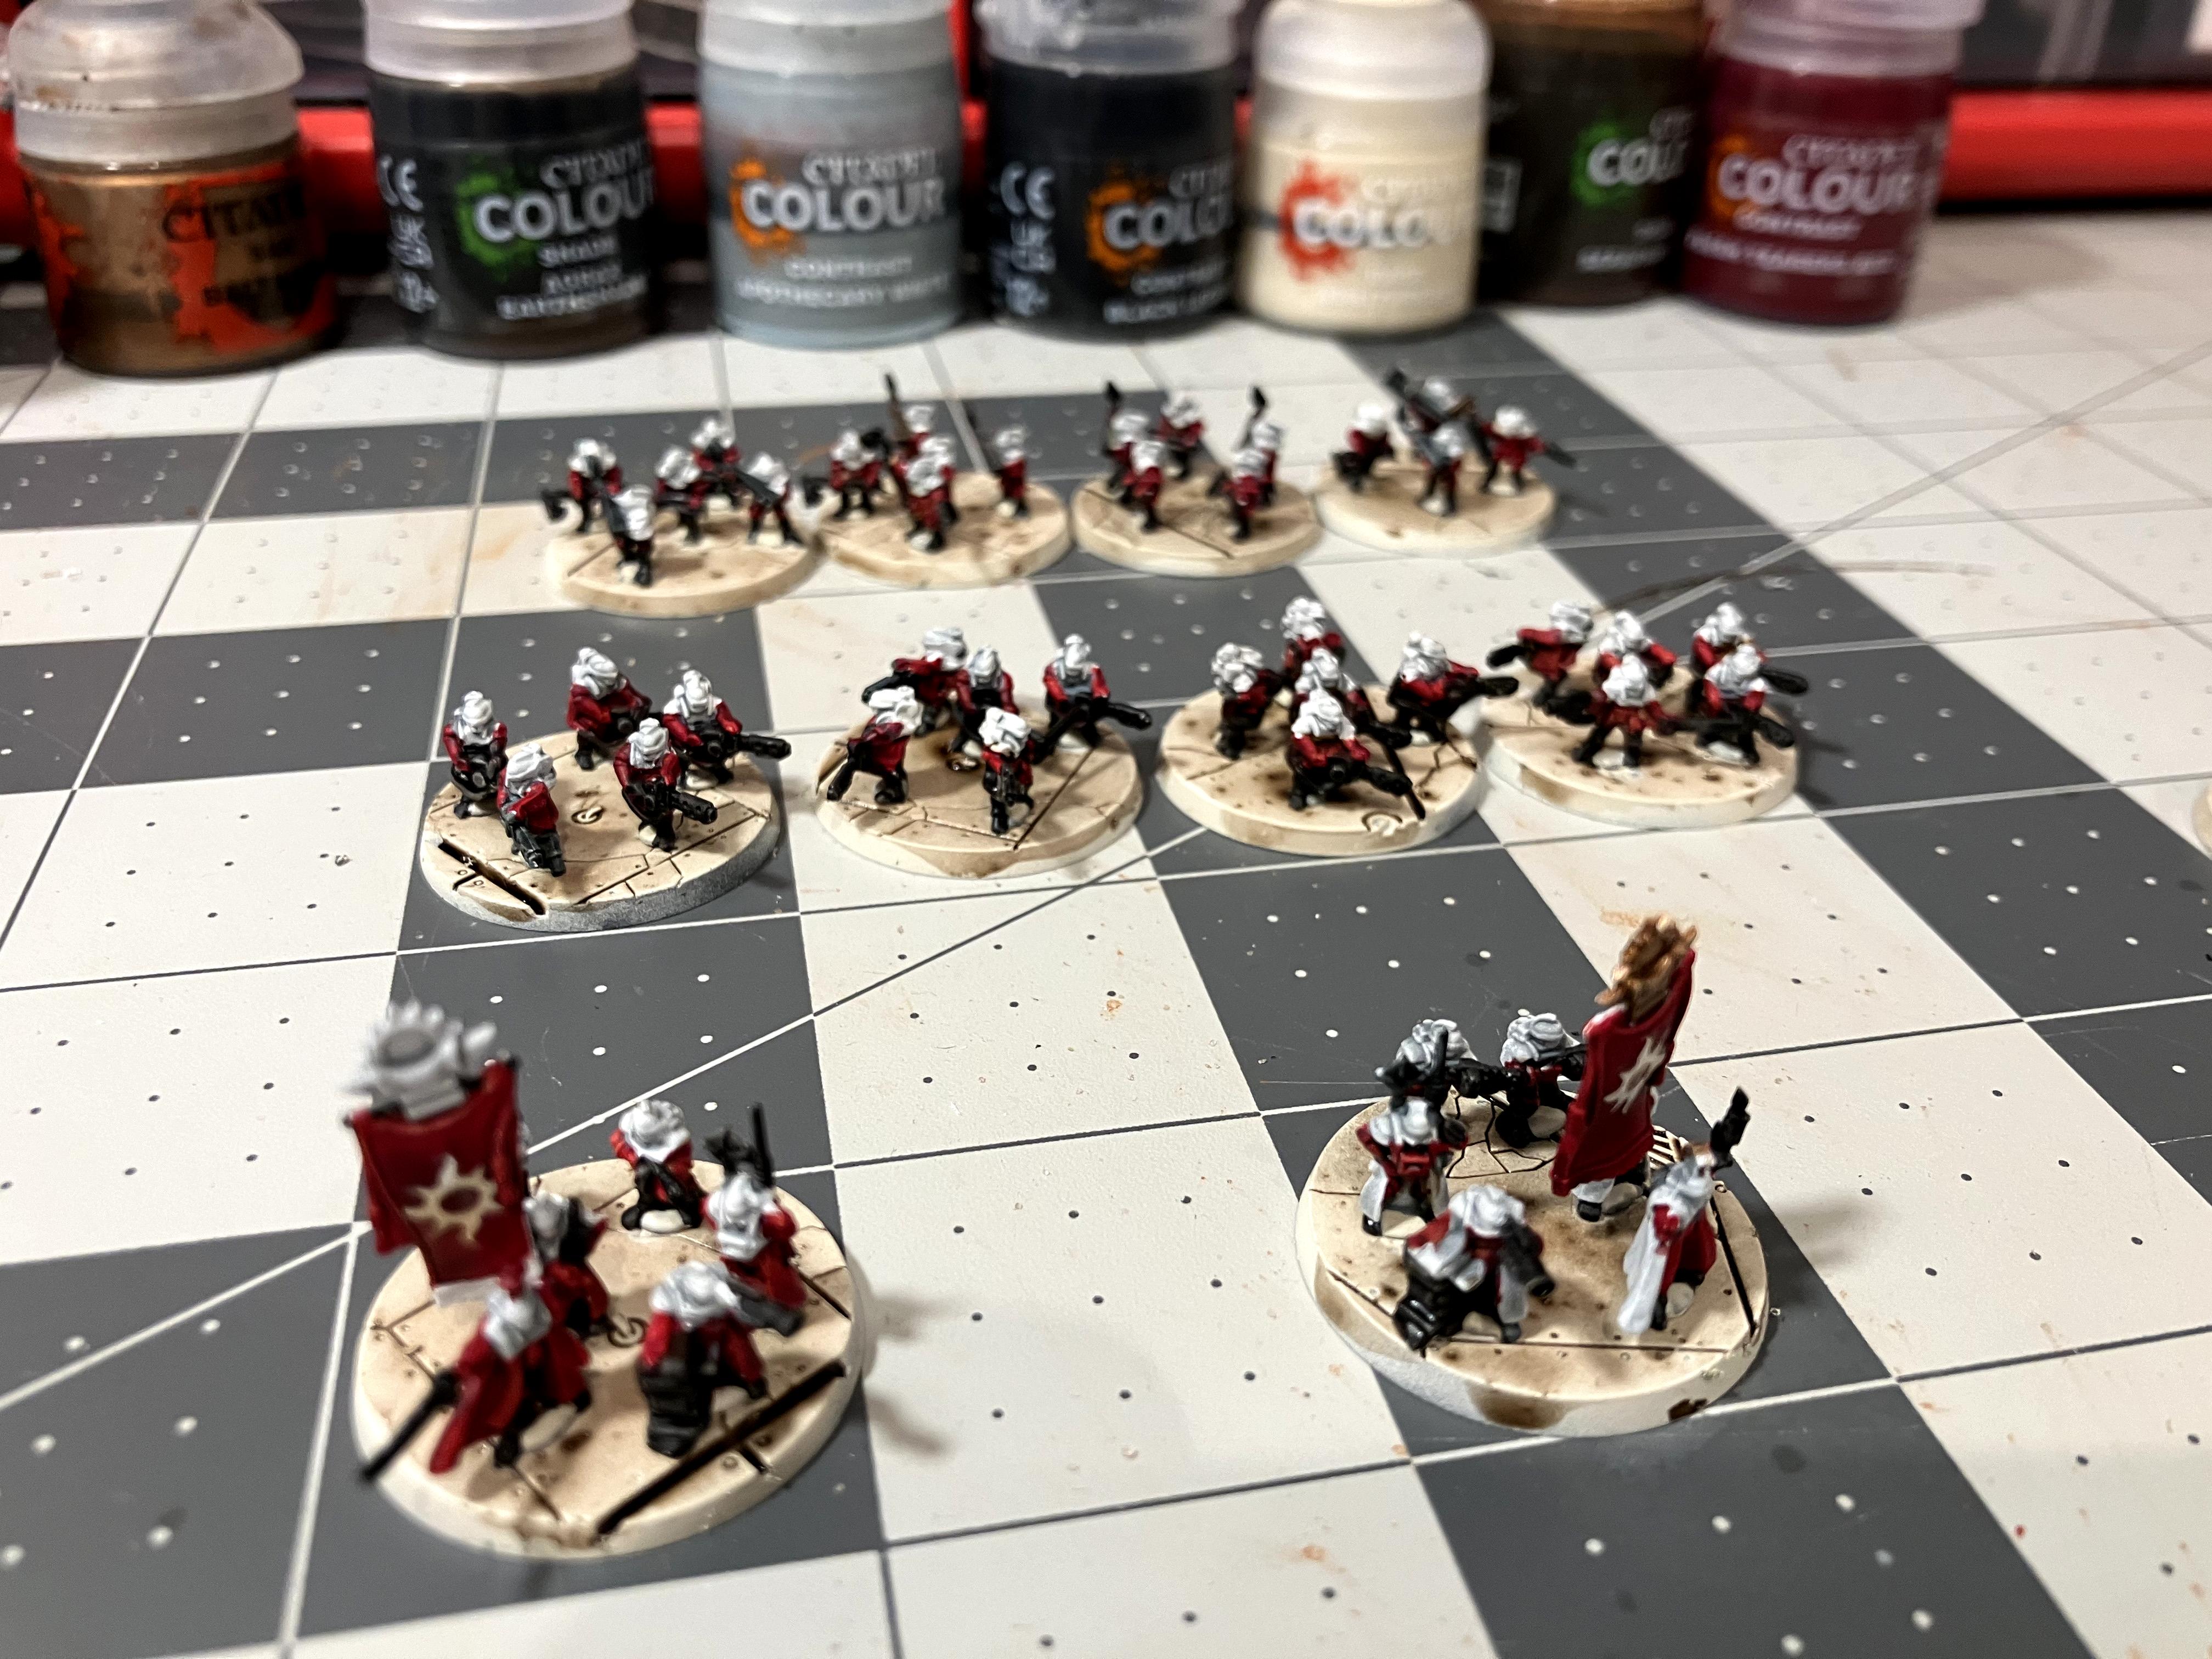
First up, the Renegade Command Squad (Run as a cadian command squad)
Commander and veteran
Another Veteran Blood Pact Member
Vox Operator
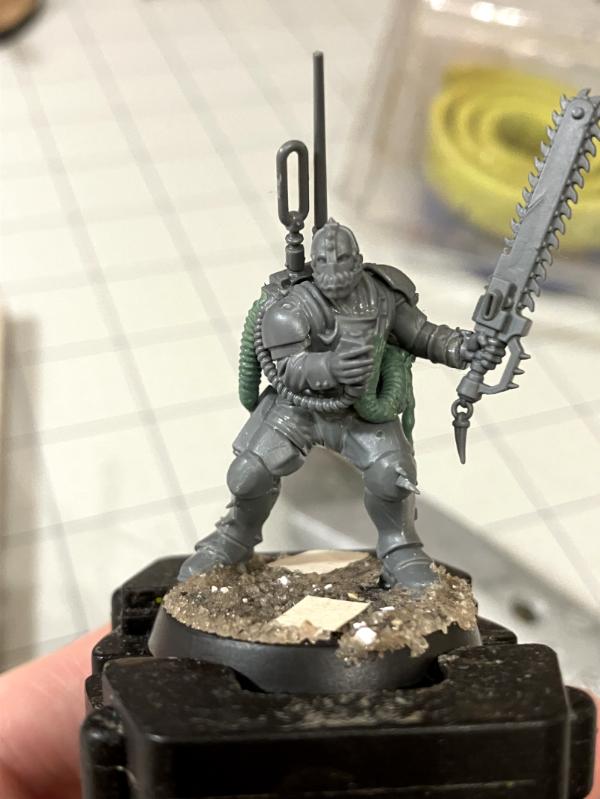
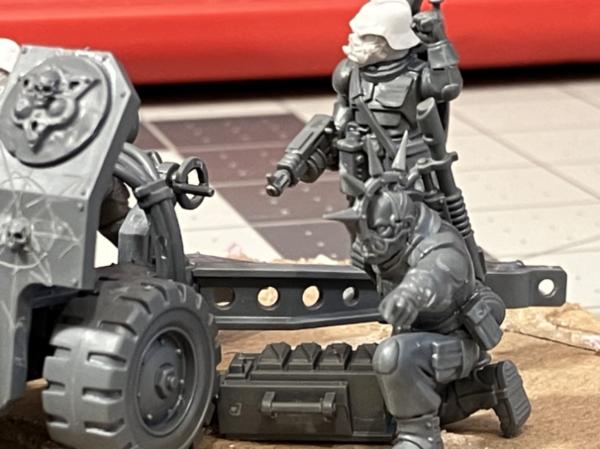
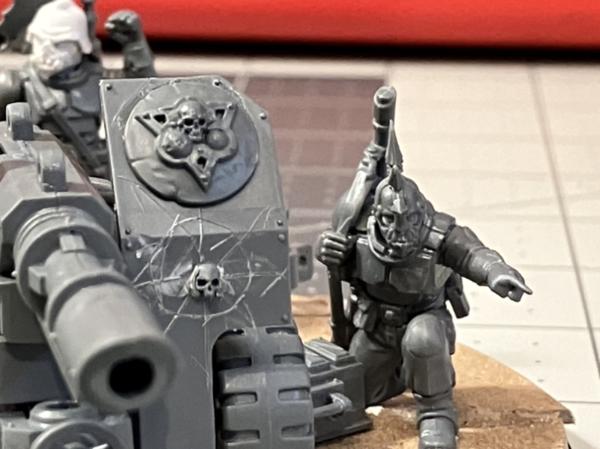
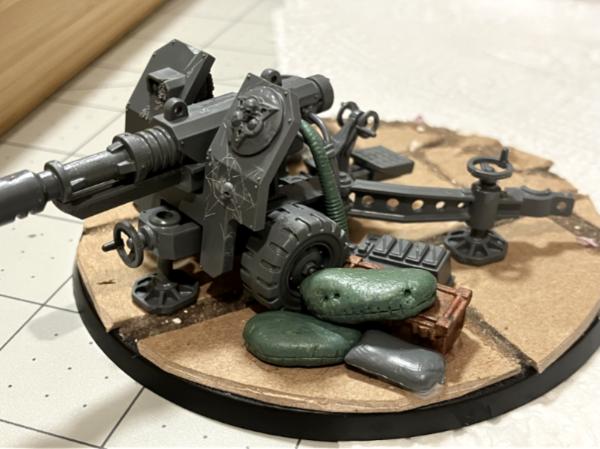
Then had some fun playing around with posing for the artillery.
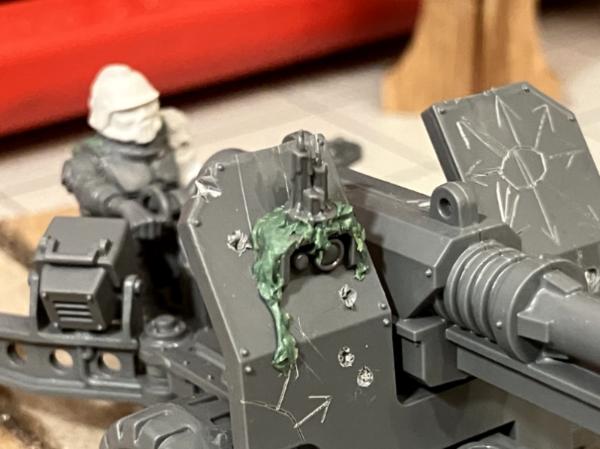
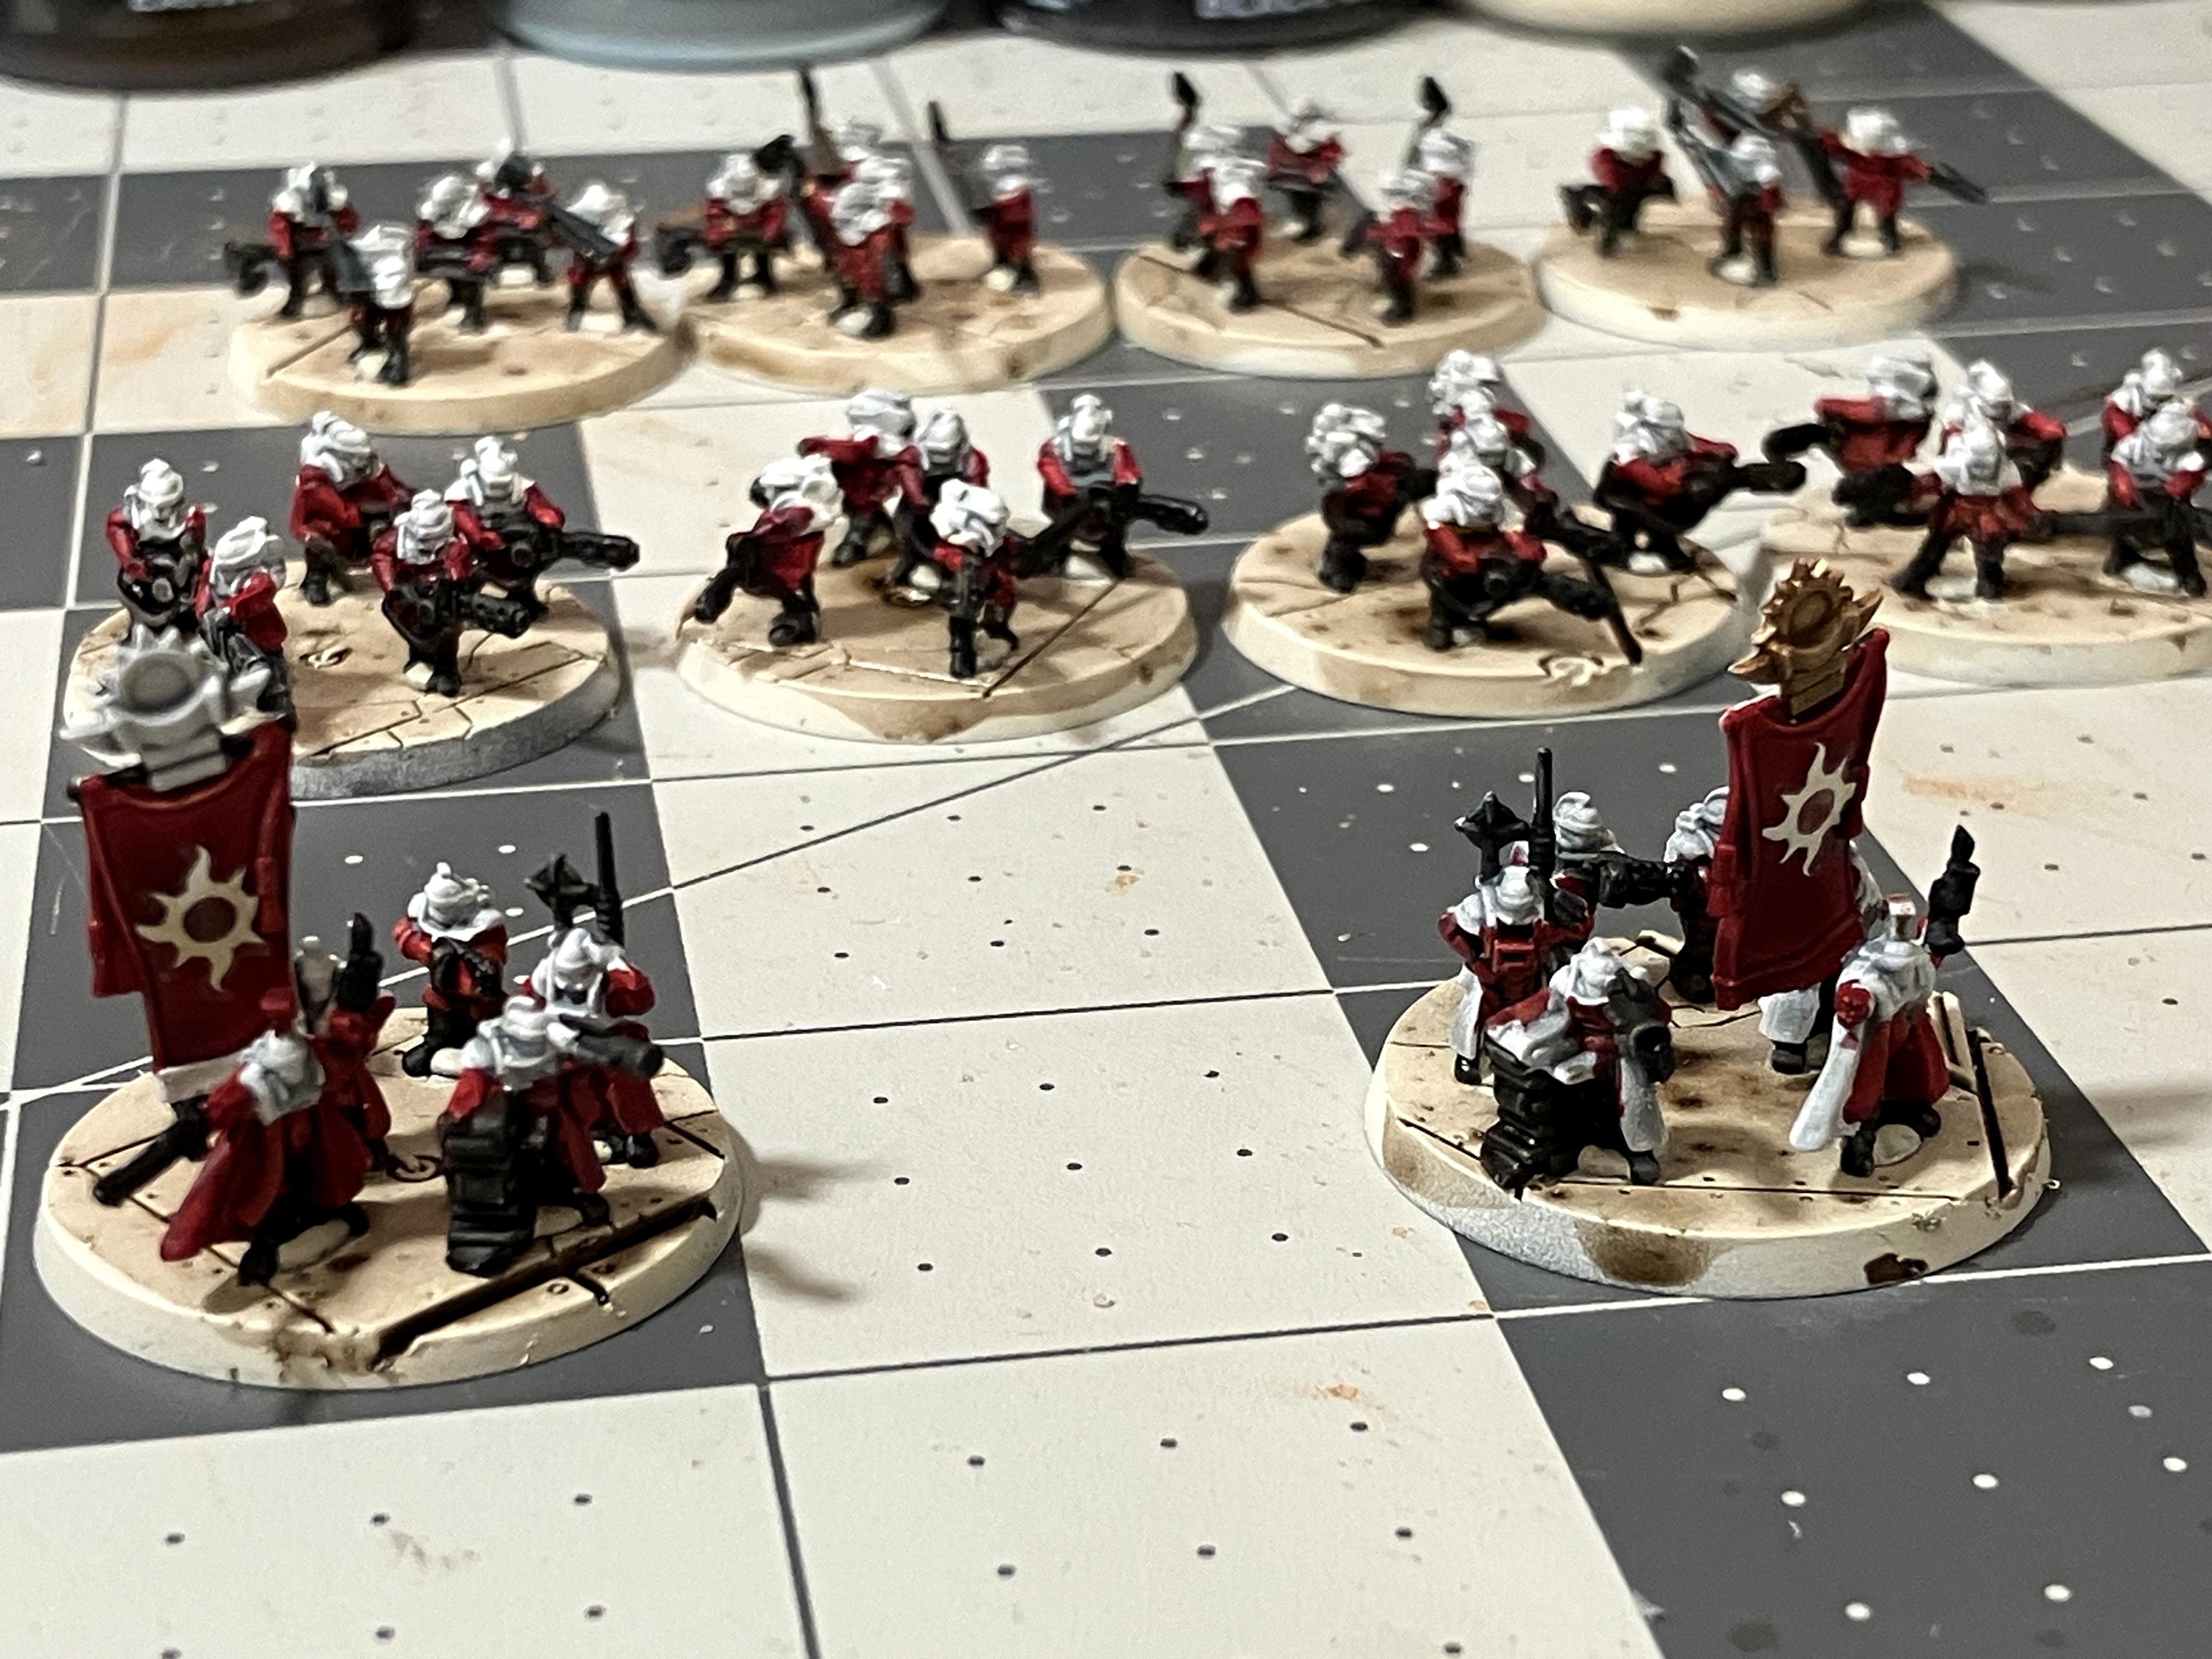
Then got to work and added some more details. I'm not the best at sculpting, but I am trying my best here.
(I have smoothed out the fingerprint marks :-)
Personal favorite detail - candle wax.
I'm pretty happy with this. I might shorten the cape on the running figure and trim it up but we'll see. I'll want to look at it tomorrow after sleeping on it. Otherwise, It looks like were onto priming and painting!
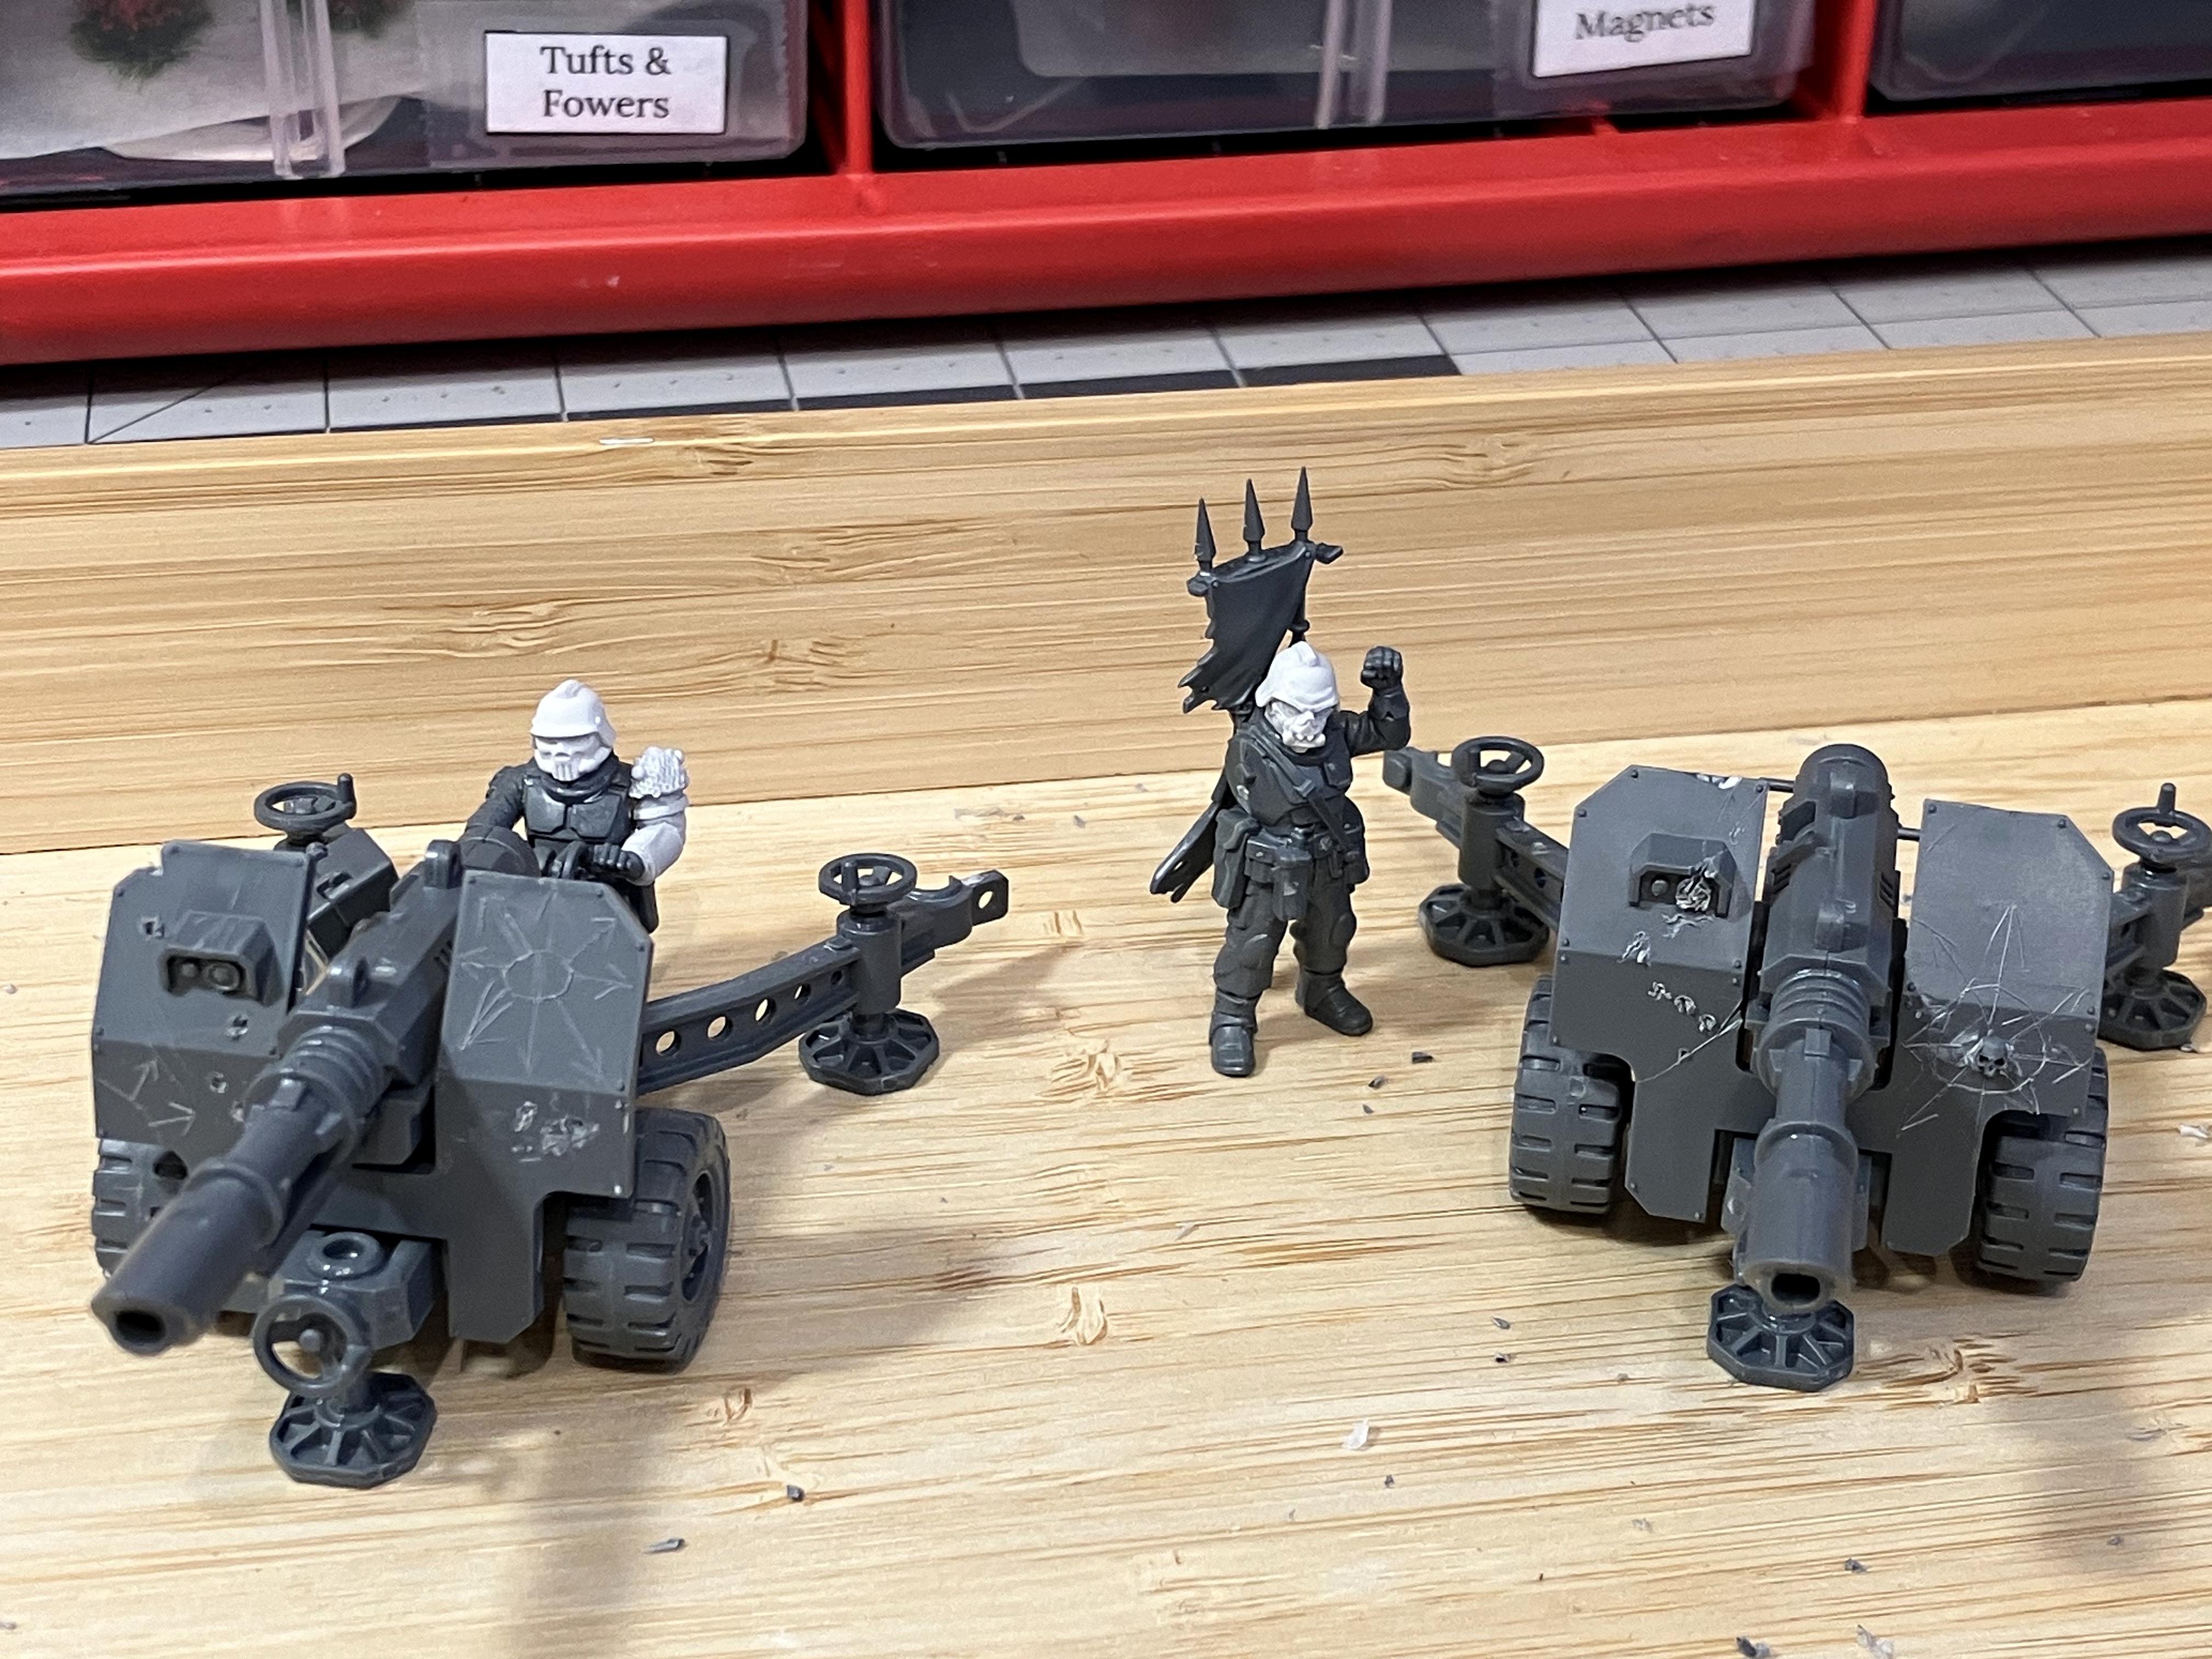
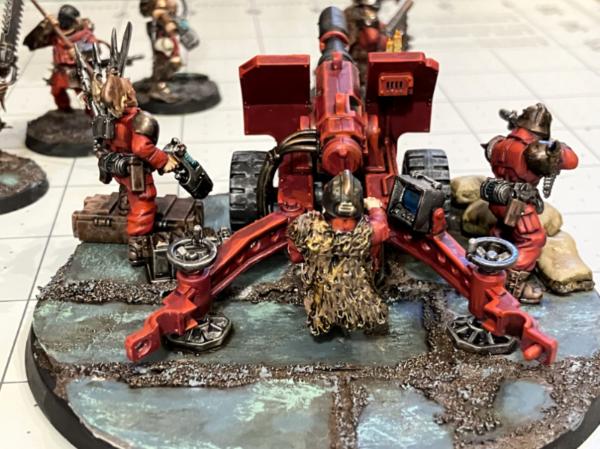
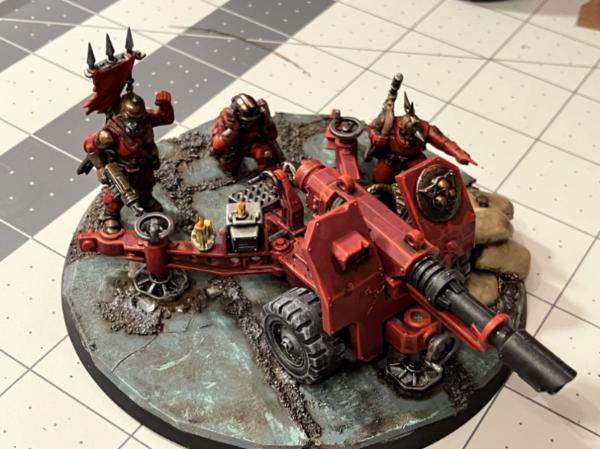
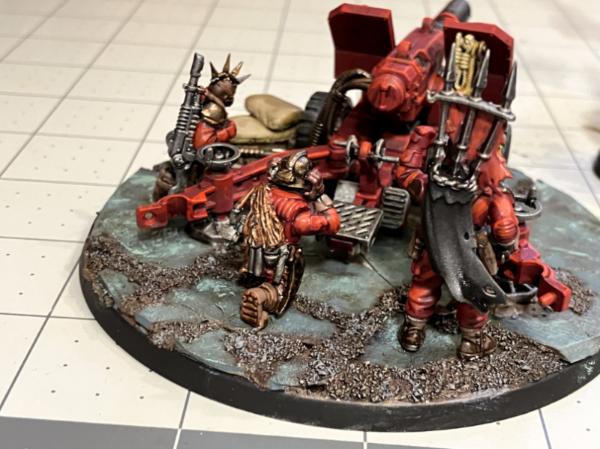
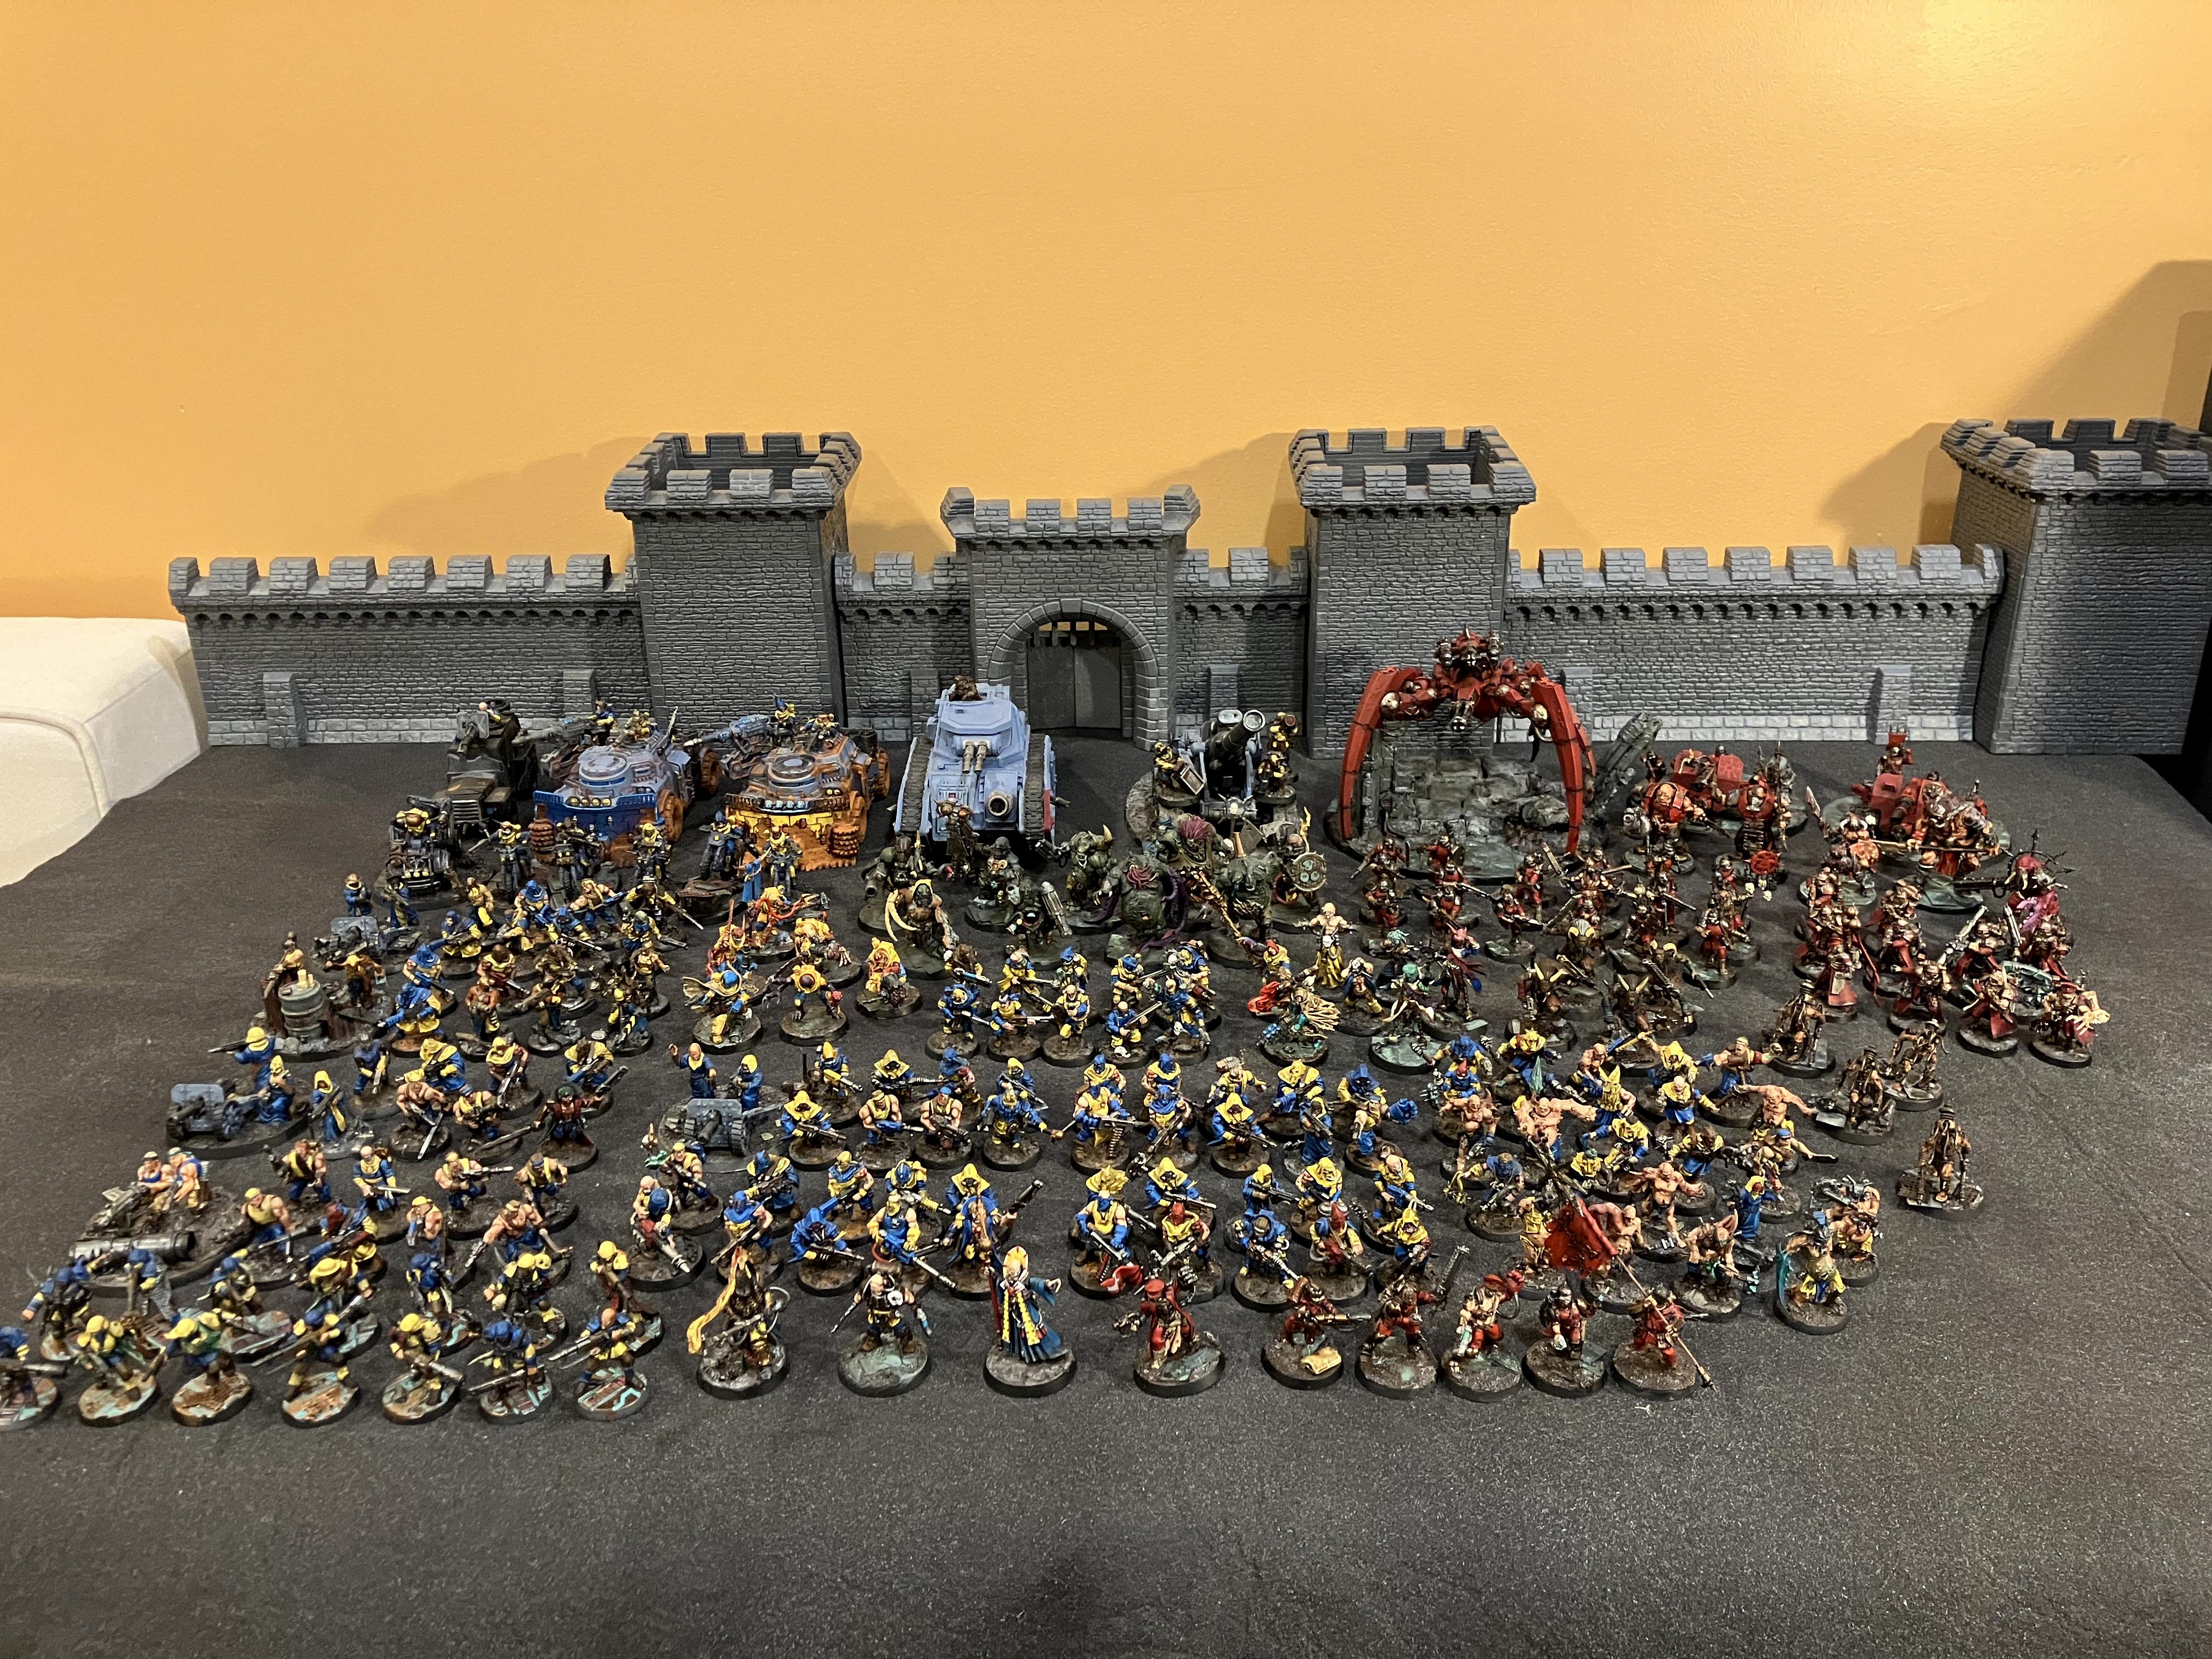
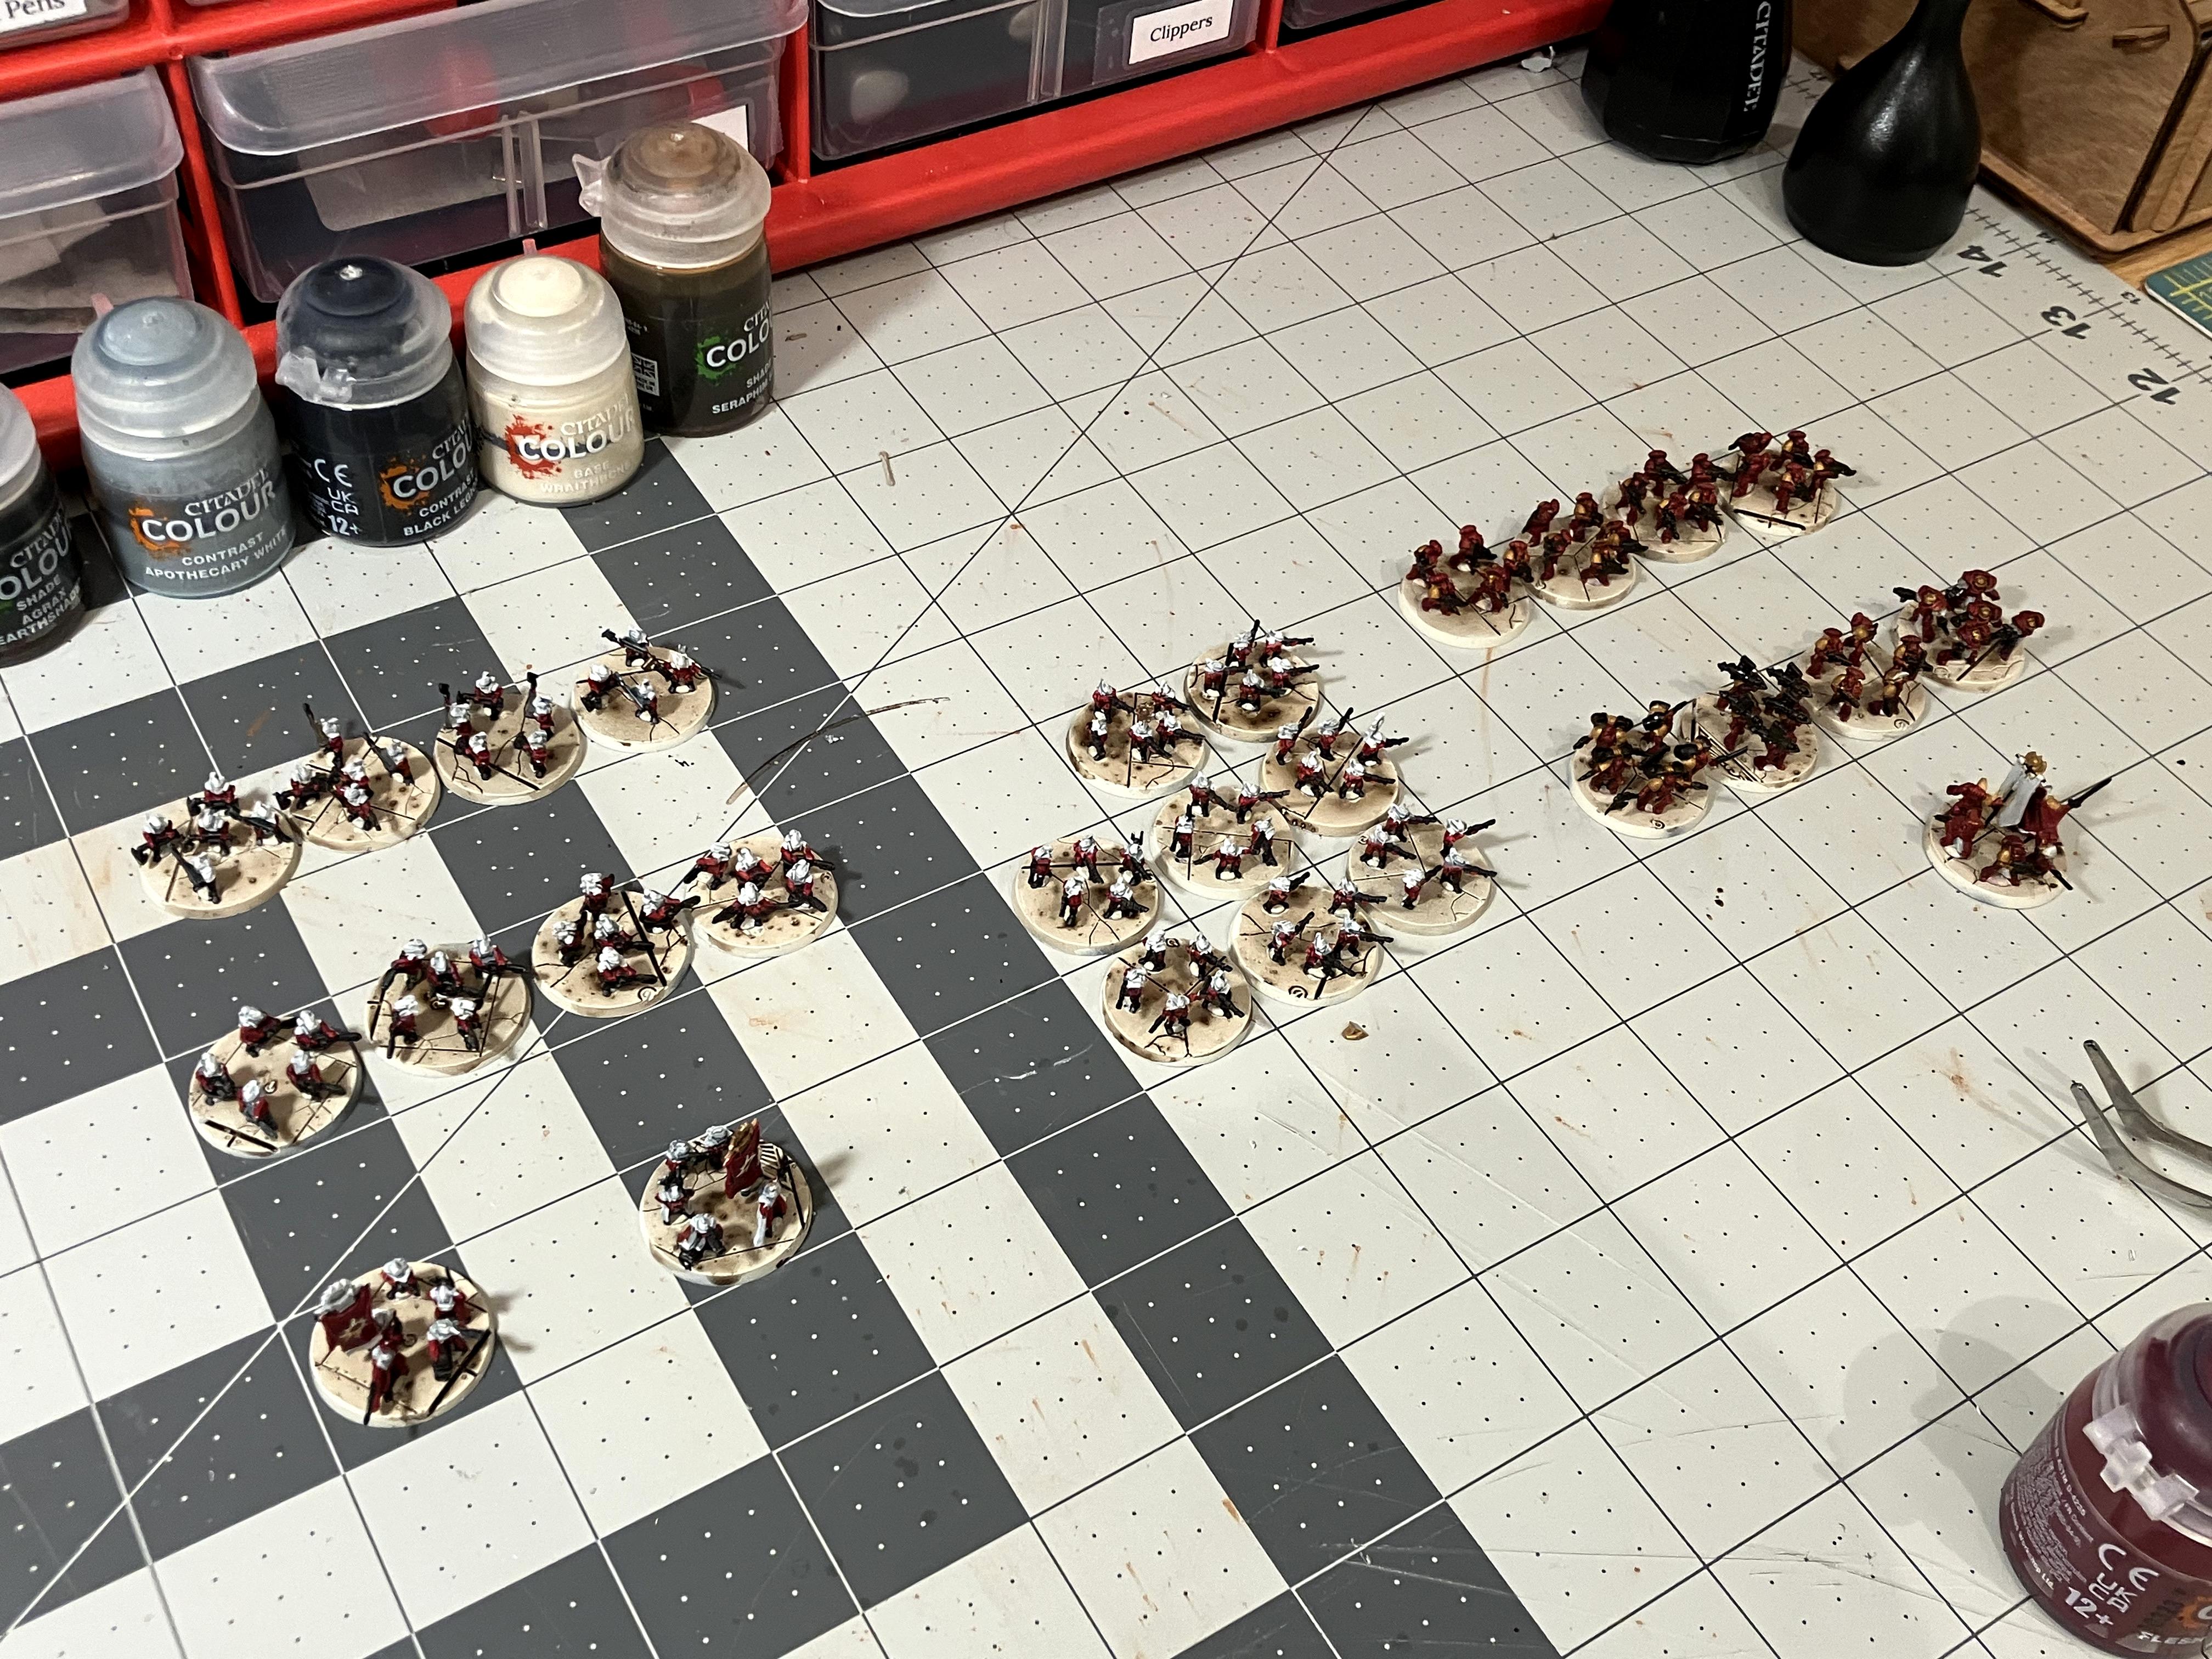
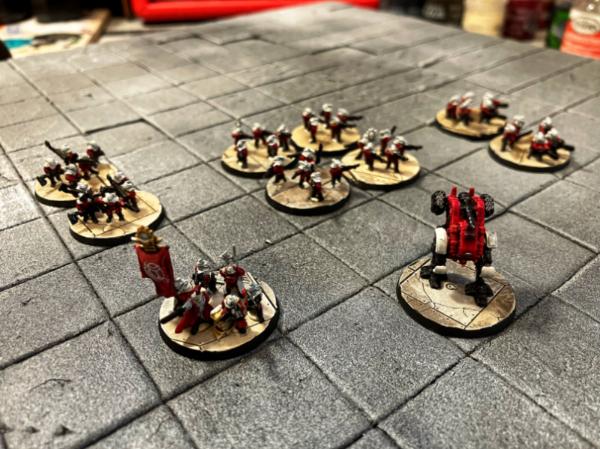
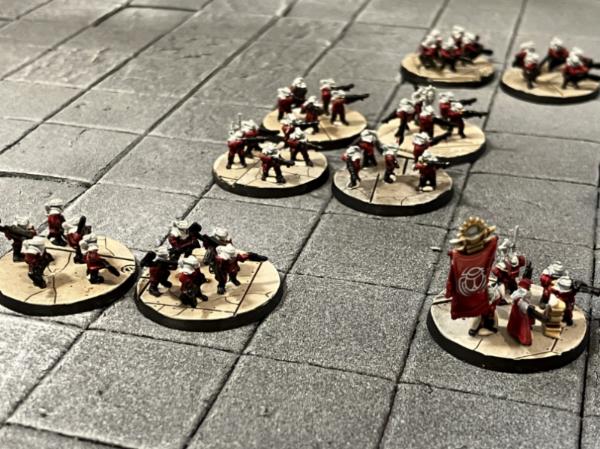
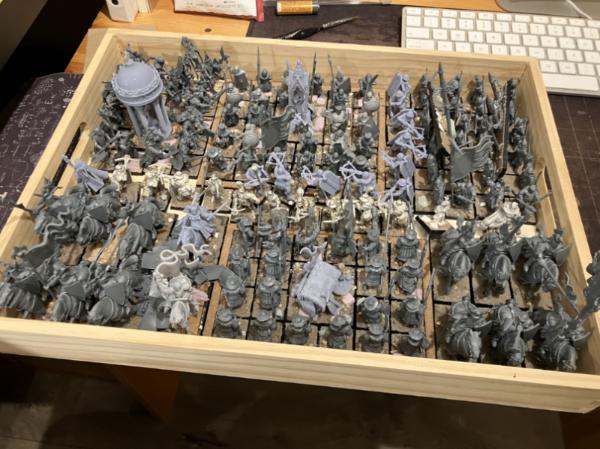
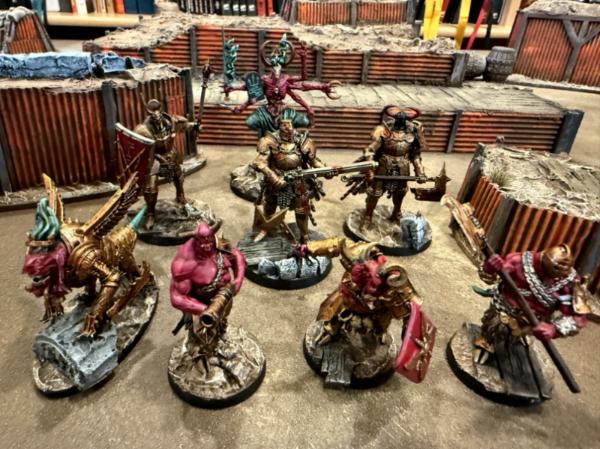
Huzzah! More miniatures have been finished. I've joined the Independent Character's Hobby Progress Challenge in an effort to motivate myself but also keep myself accountable to finishing projects. So I've ranked my projects by size in order to complete some faster and thus feel a sense of accomplishment. First up, the group unassembled pic.
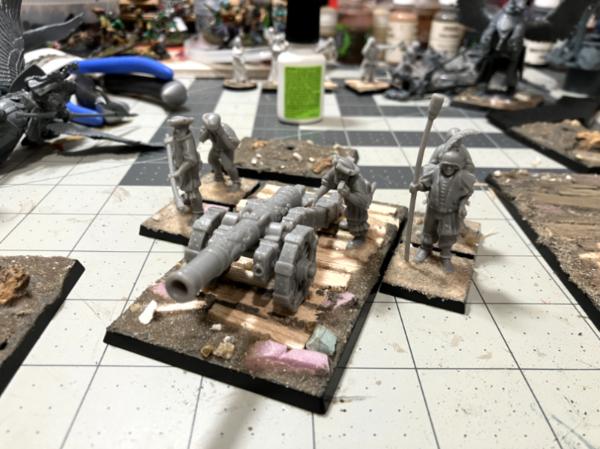
Essentially this is two ordinance pieces with six crew total, then six more Blood Pact infantry reinforcements. Most are for a command squad (officer, bannerman, and master vox.) But I hadn't quite finished the first counts as bannerman before I remembered I had an old FW Heretic flag bearer, so now I have two! Throw in two more basic grunts and I have about three squads worth of Blood Pact to go with my Thousand Sons / Sons of Sek Renegades.
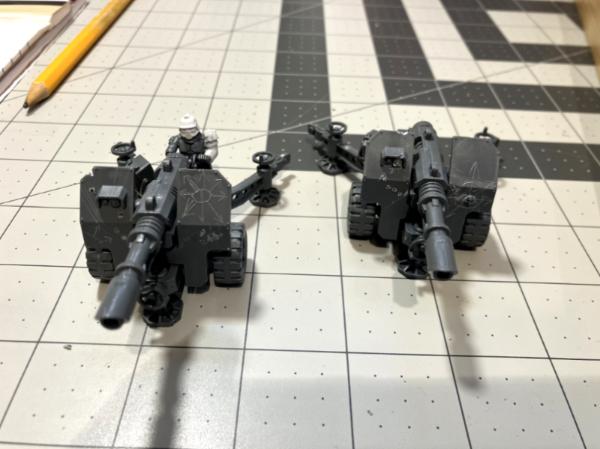
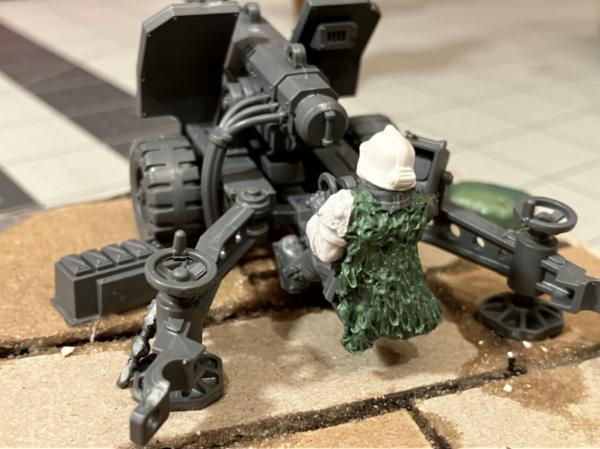
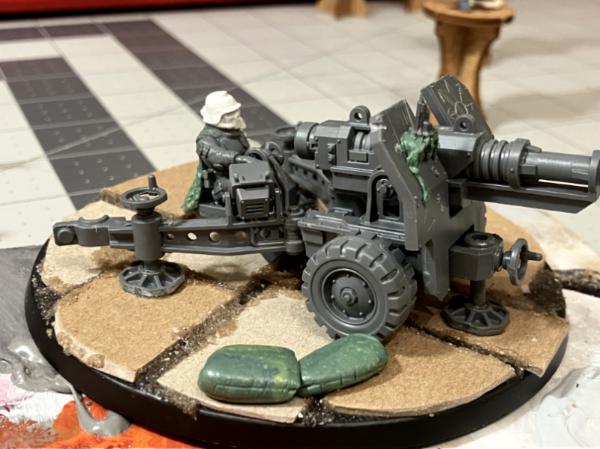
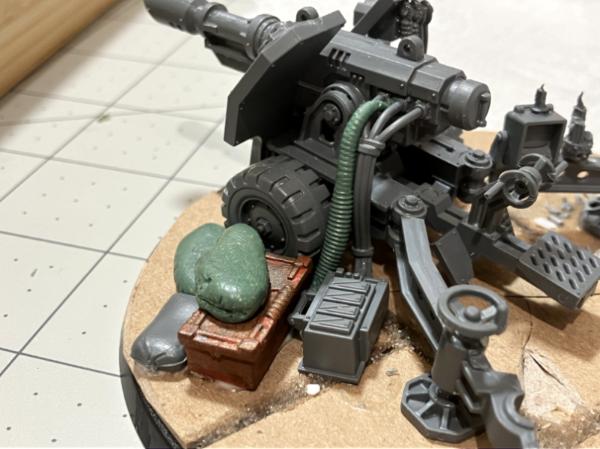
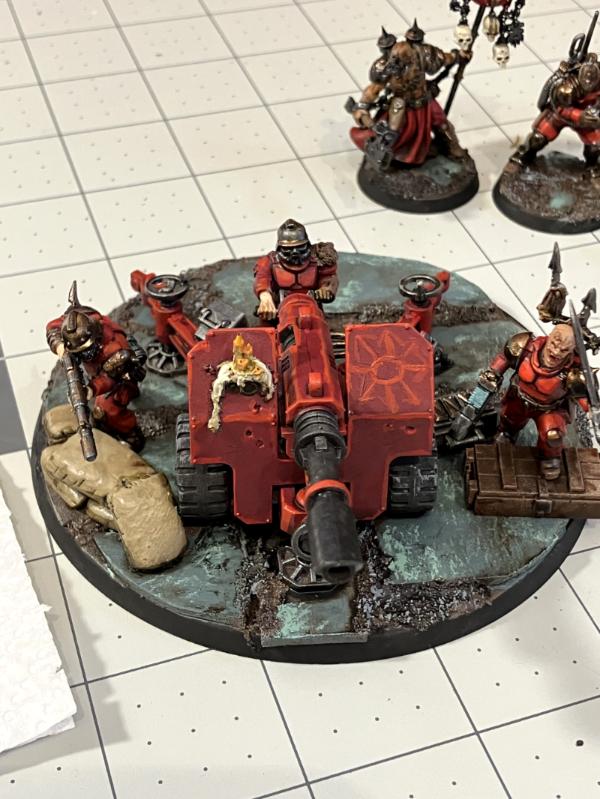
Artillery piece #1
Artillery Piece #2
Running Blood Pact Reinforcements
Command Squad Members (didn't get a close up of the other bannerman but you can see him in the other photos.)
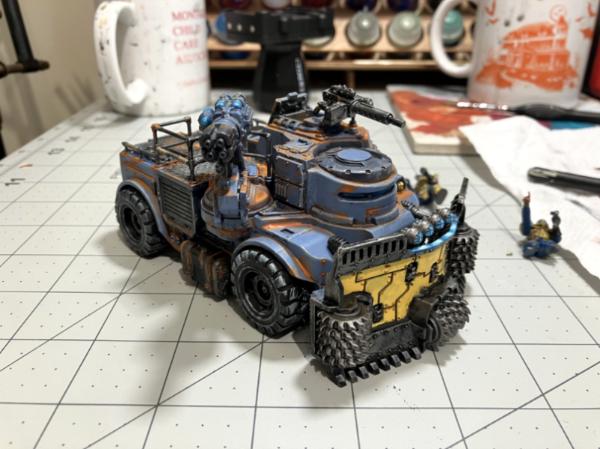
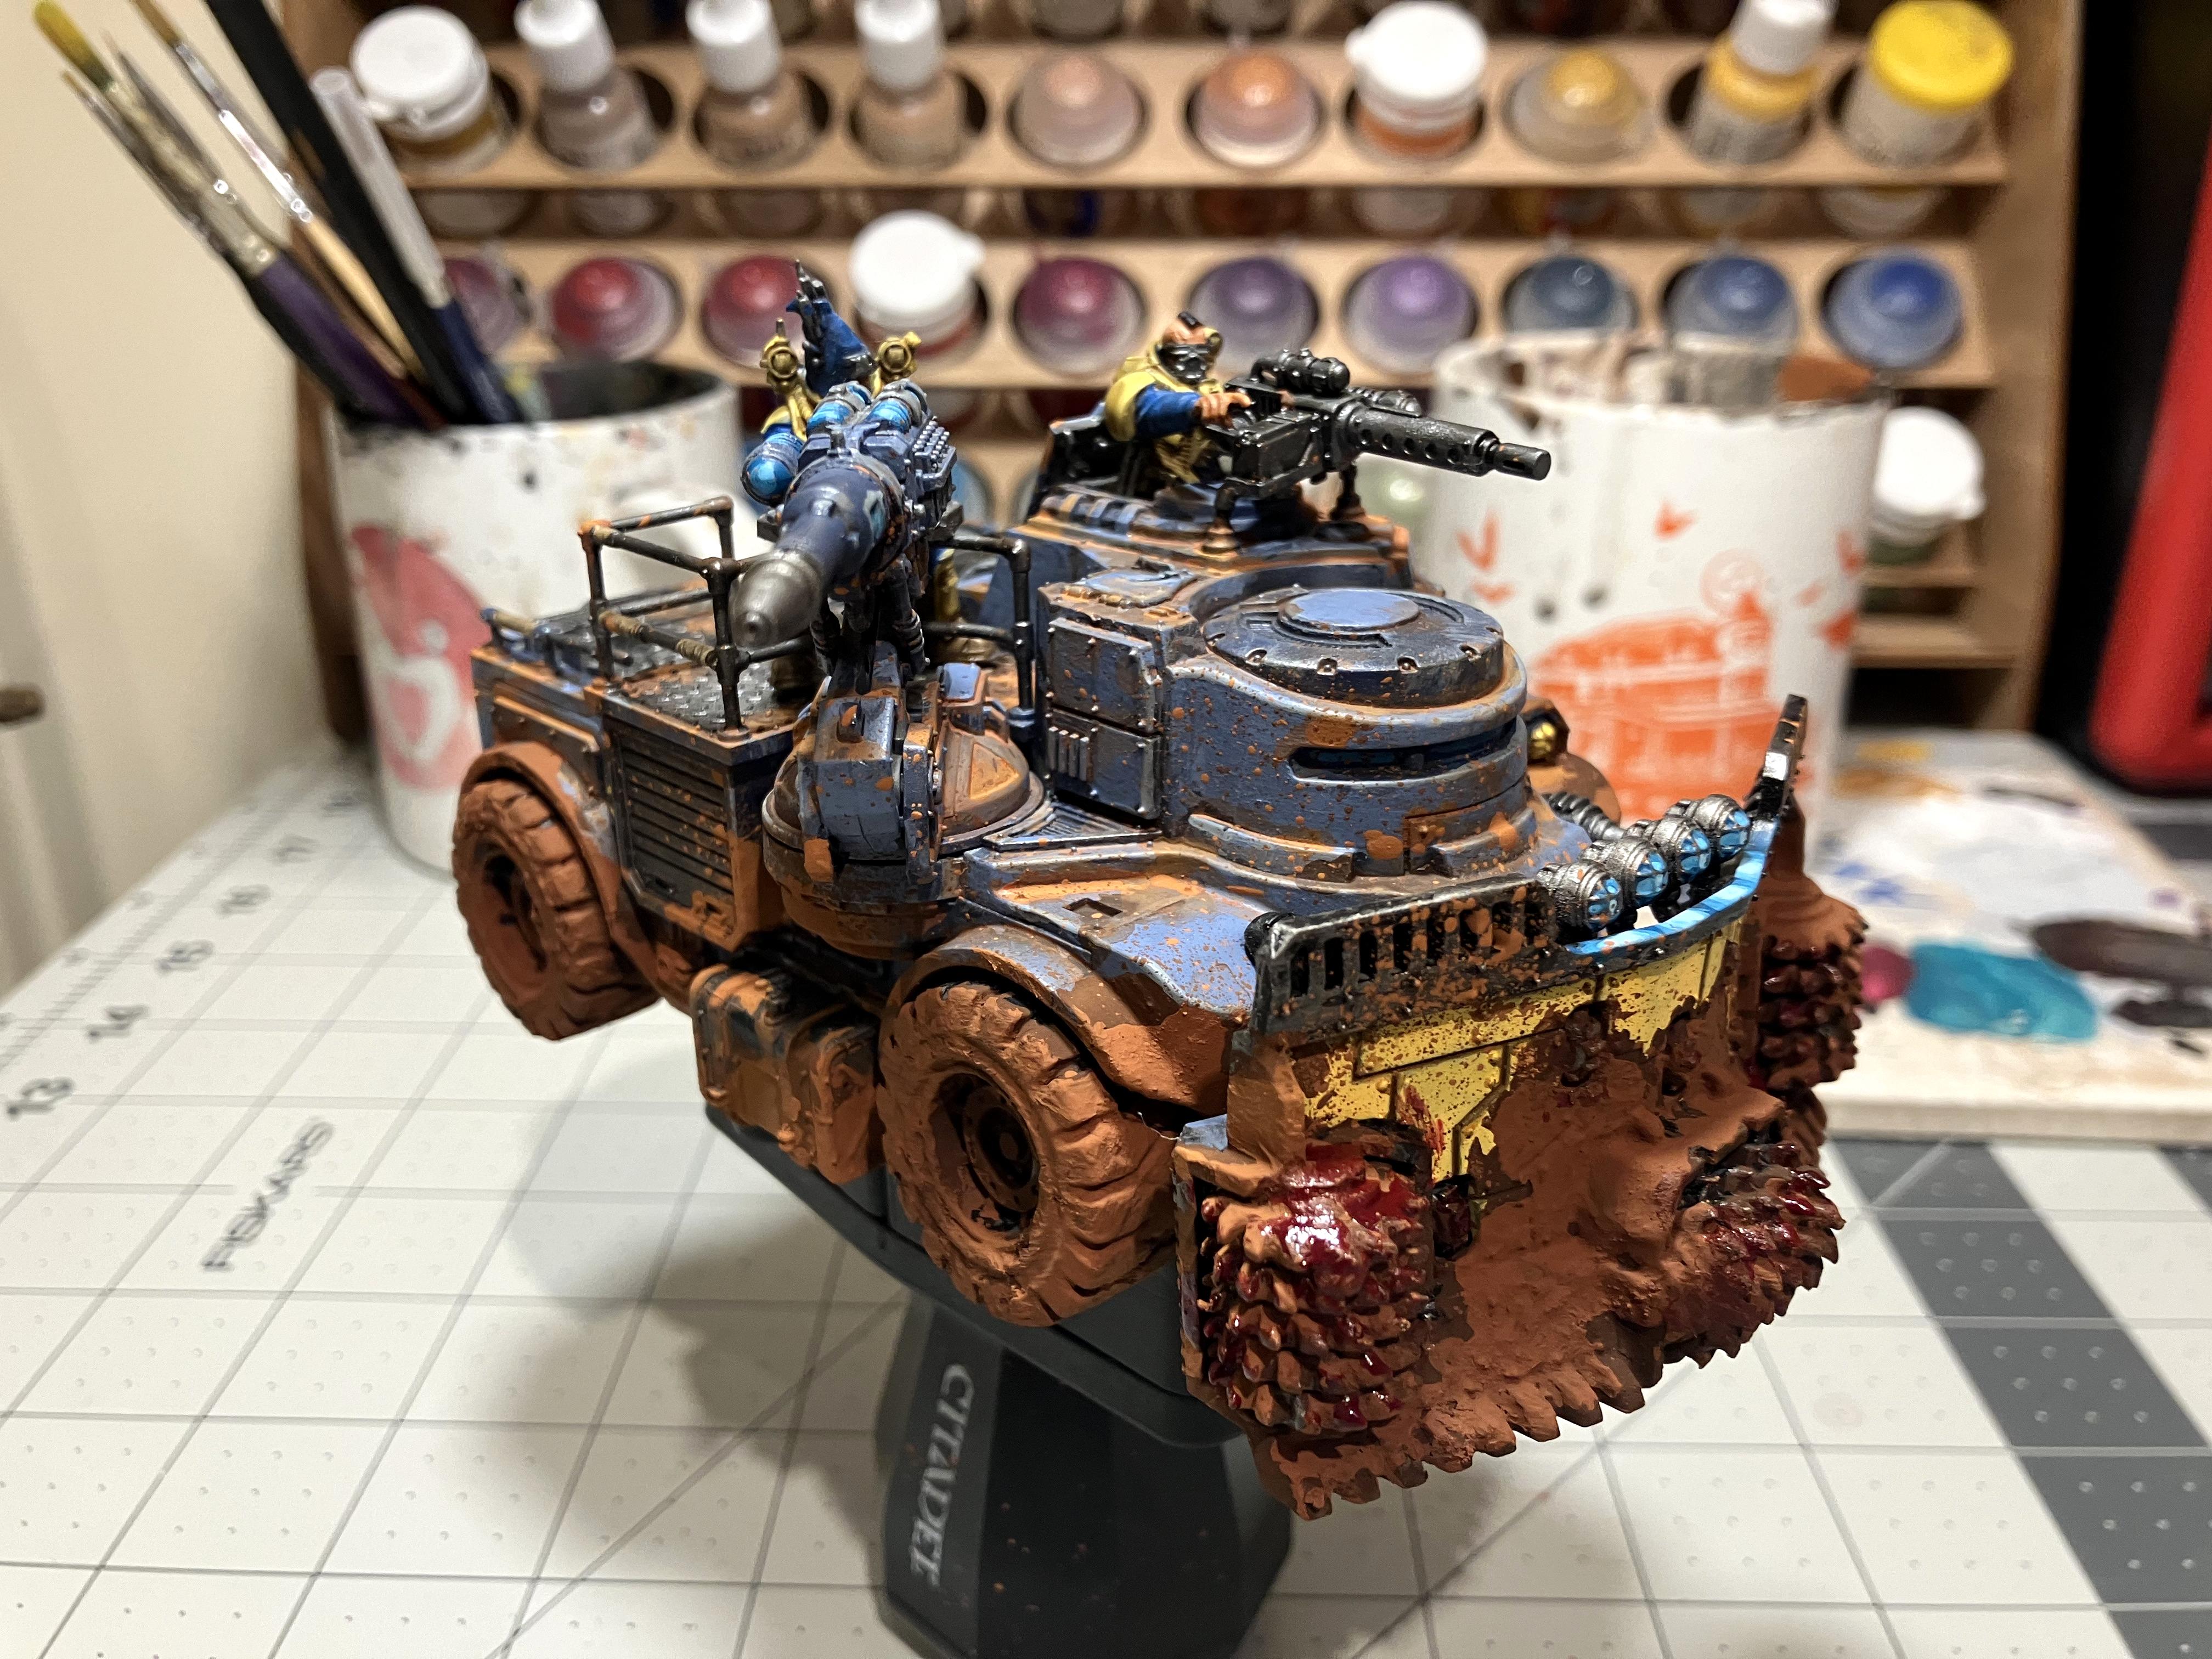
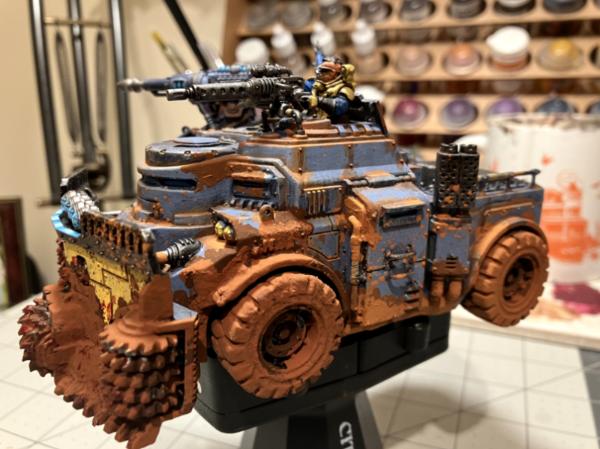
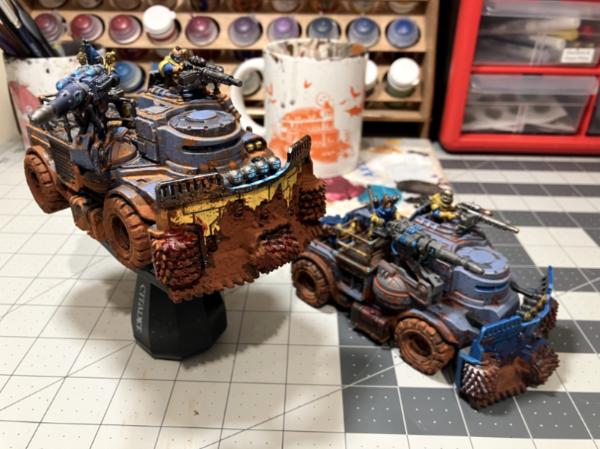
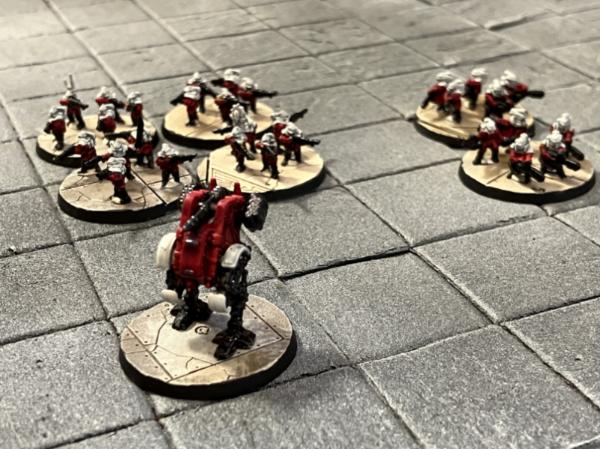
Now I need to finish this Goliath Rockcrusher I'll use as a Chimera or as itself for my Sons of Sek. It is neatly done just needs detail work but then I will officially have finished an army!!!
In my pursuit of clearing the last of my project boxes, I've actually done it. I've had a GSC Rockcrusher (back when I ran my heretics as GSC) sitting in the 'sorta painted' column for years, with me finishing the last of the Blood Pact (although I only have 28 infantry plus a command squad and I'm annoyed about that - that's another story) I wanted to finish the damn thing.
So.... Let's get to work!
Here's (mostly) where it started (subtract the metallics on the front and the rust effects).
Here's where it ended up!
Tons more photos below, spoilered for kindness to your computers (lots more angle shots)
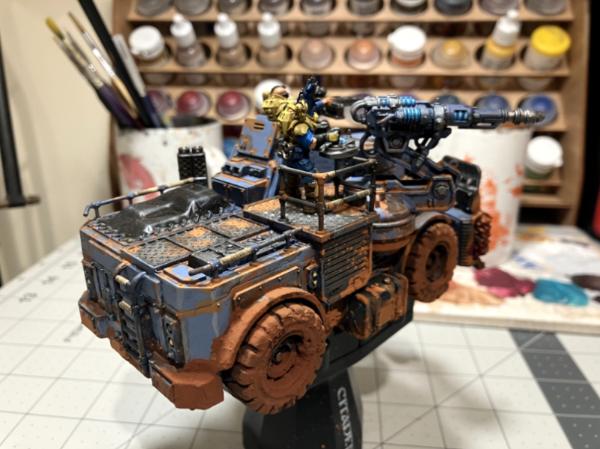
Spoiler:
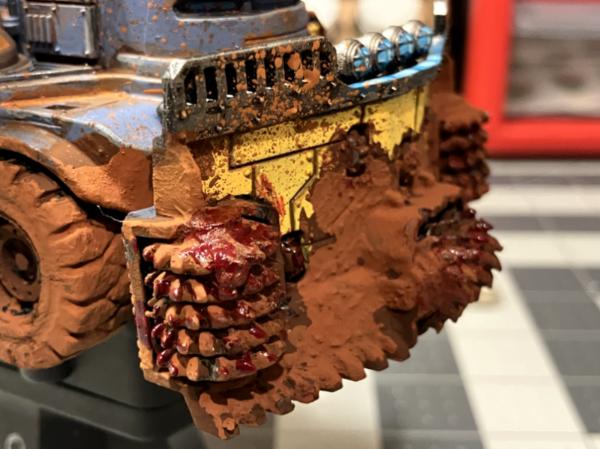
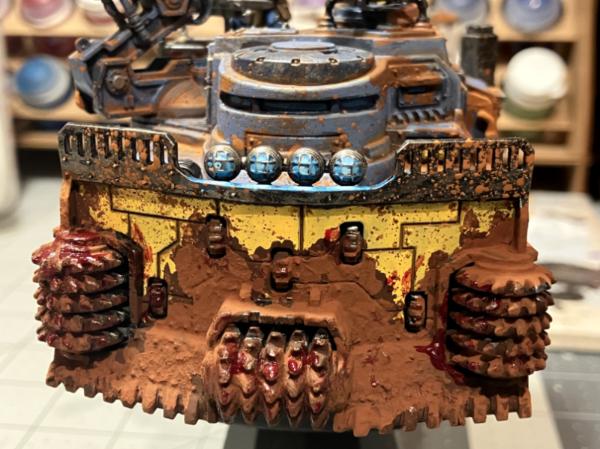
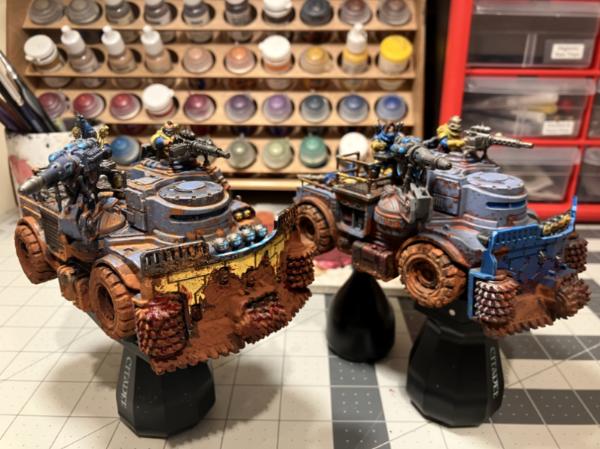
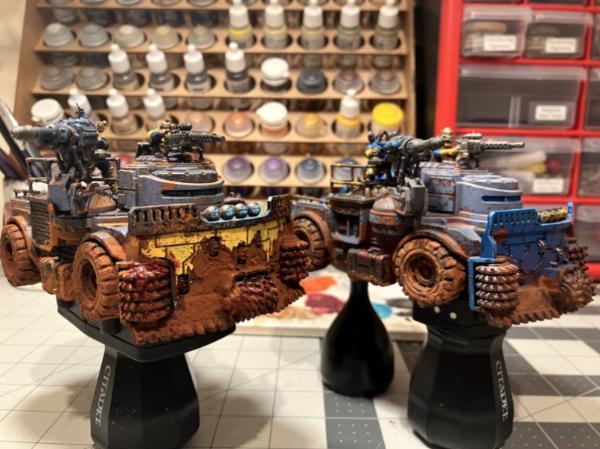
Then some more fun ones with his sibling. These vehicles were painted nearly four? five? years apart (not sure when the first kit came out) so I'm pretty happy with how I did to keep them pretty similar.
More Spoilered
Spoiler:
In more recent times, I'll run these two as Chimeras (Their weapons are also magnetized so I have a multilaser option, a flame thrown option, and a 'sure it's a heavy bolter' option)
Materials Used:
AK Rust Effects Kit (Light Rust and Orange Brown primarily) (Messed up on this, should have started with brown before oranges, but you live and learn).
Secret Weapon Pigments Terracotta and (Something something) Brown
Vallejo Pigment Fixer mixed into the pigments to make a paste
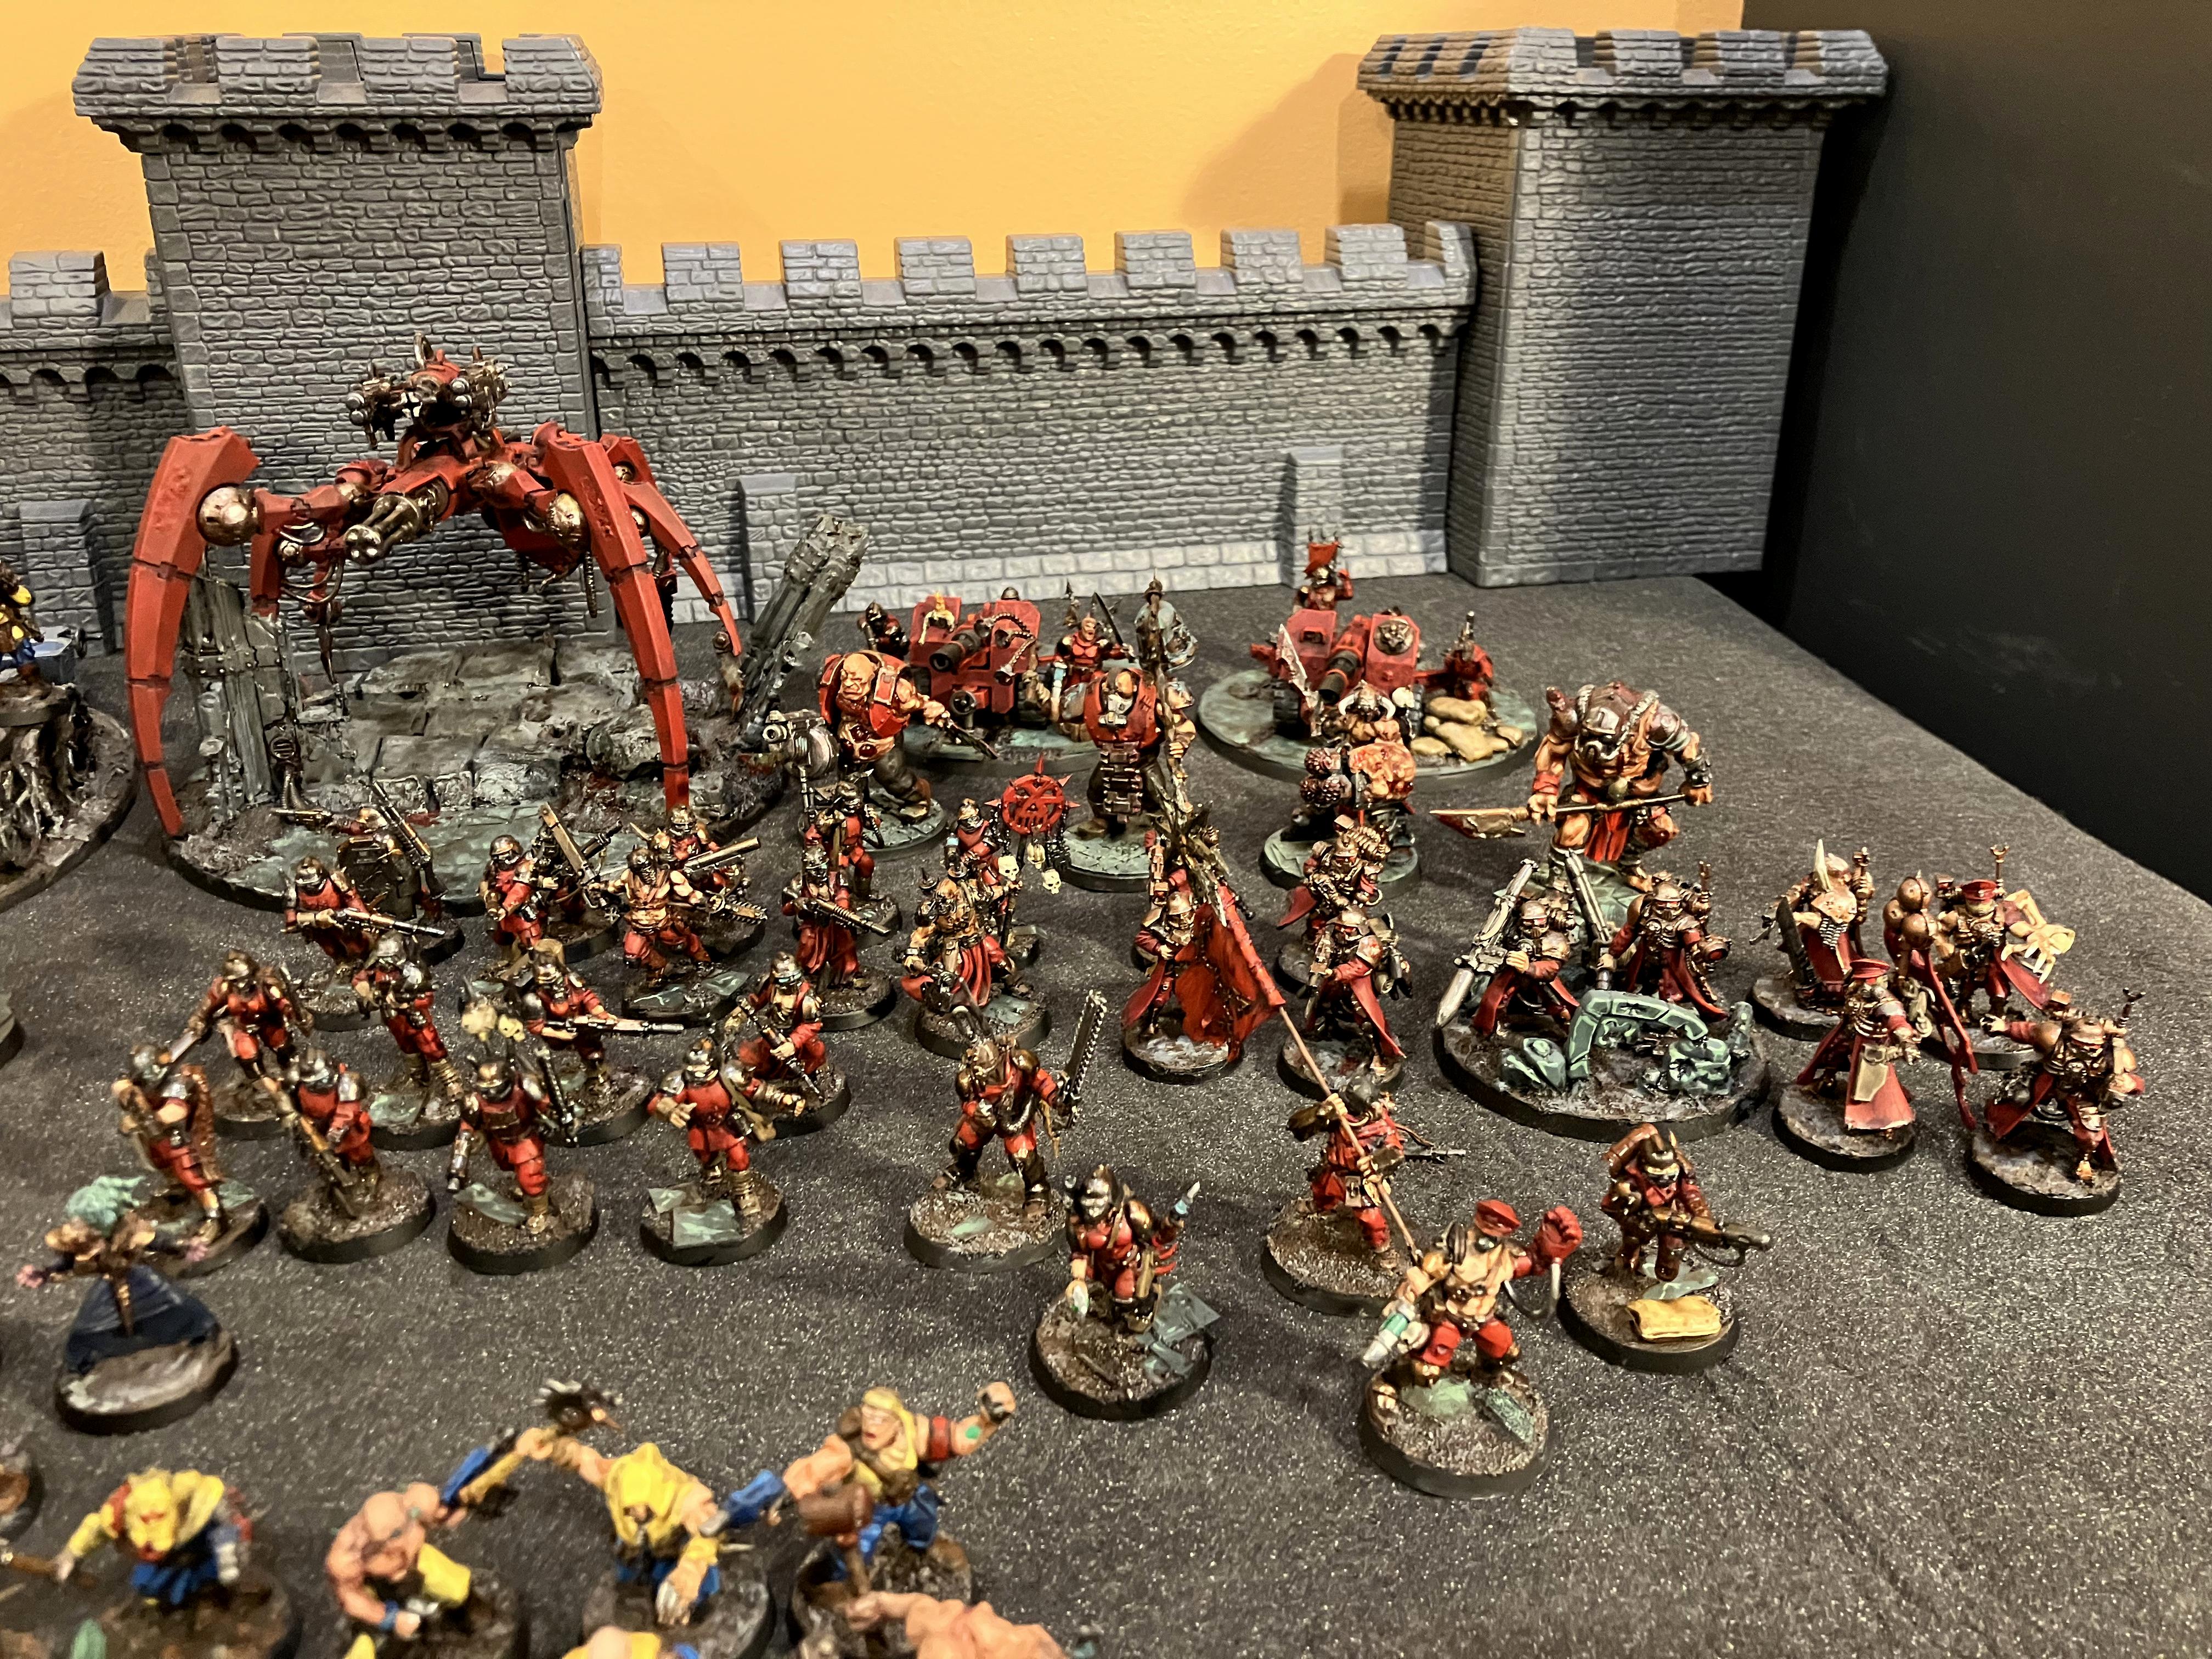
Blood for the Blood God
Smart use of colour to easily differentiate the two for loadouts/transport contents as well.
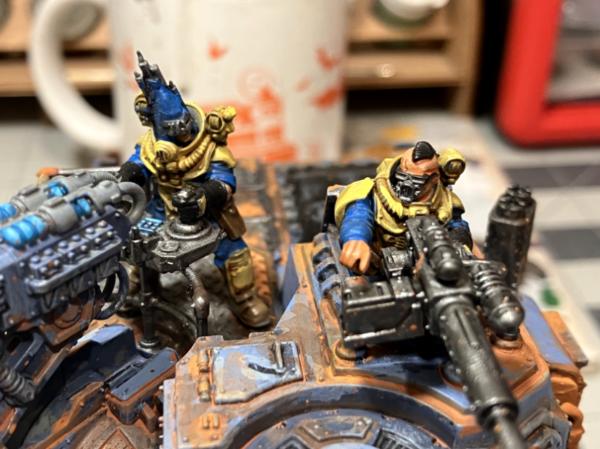
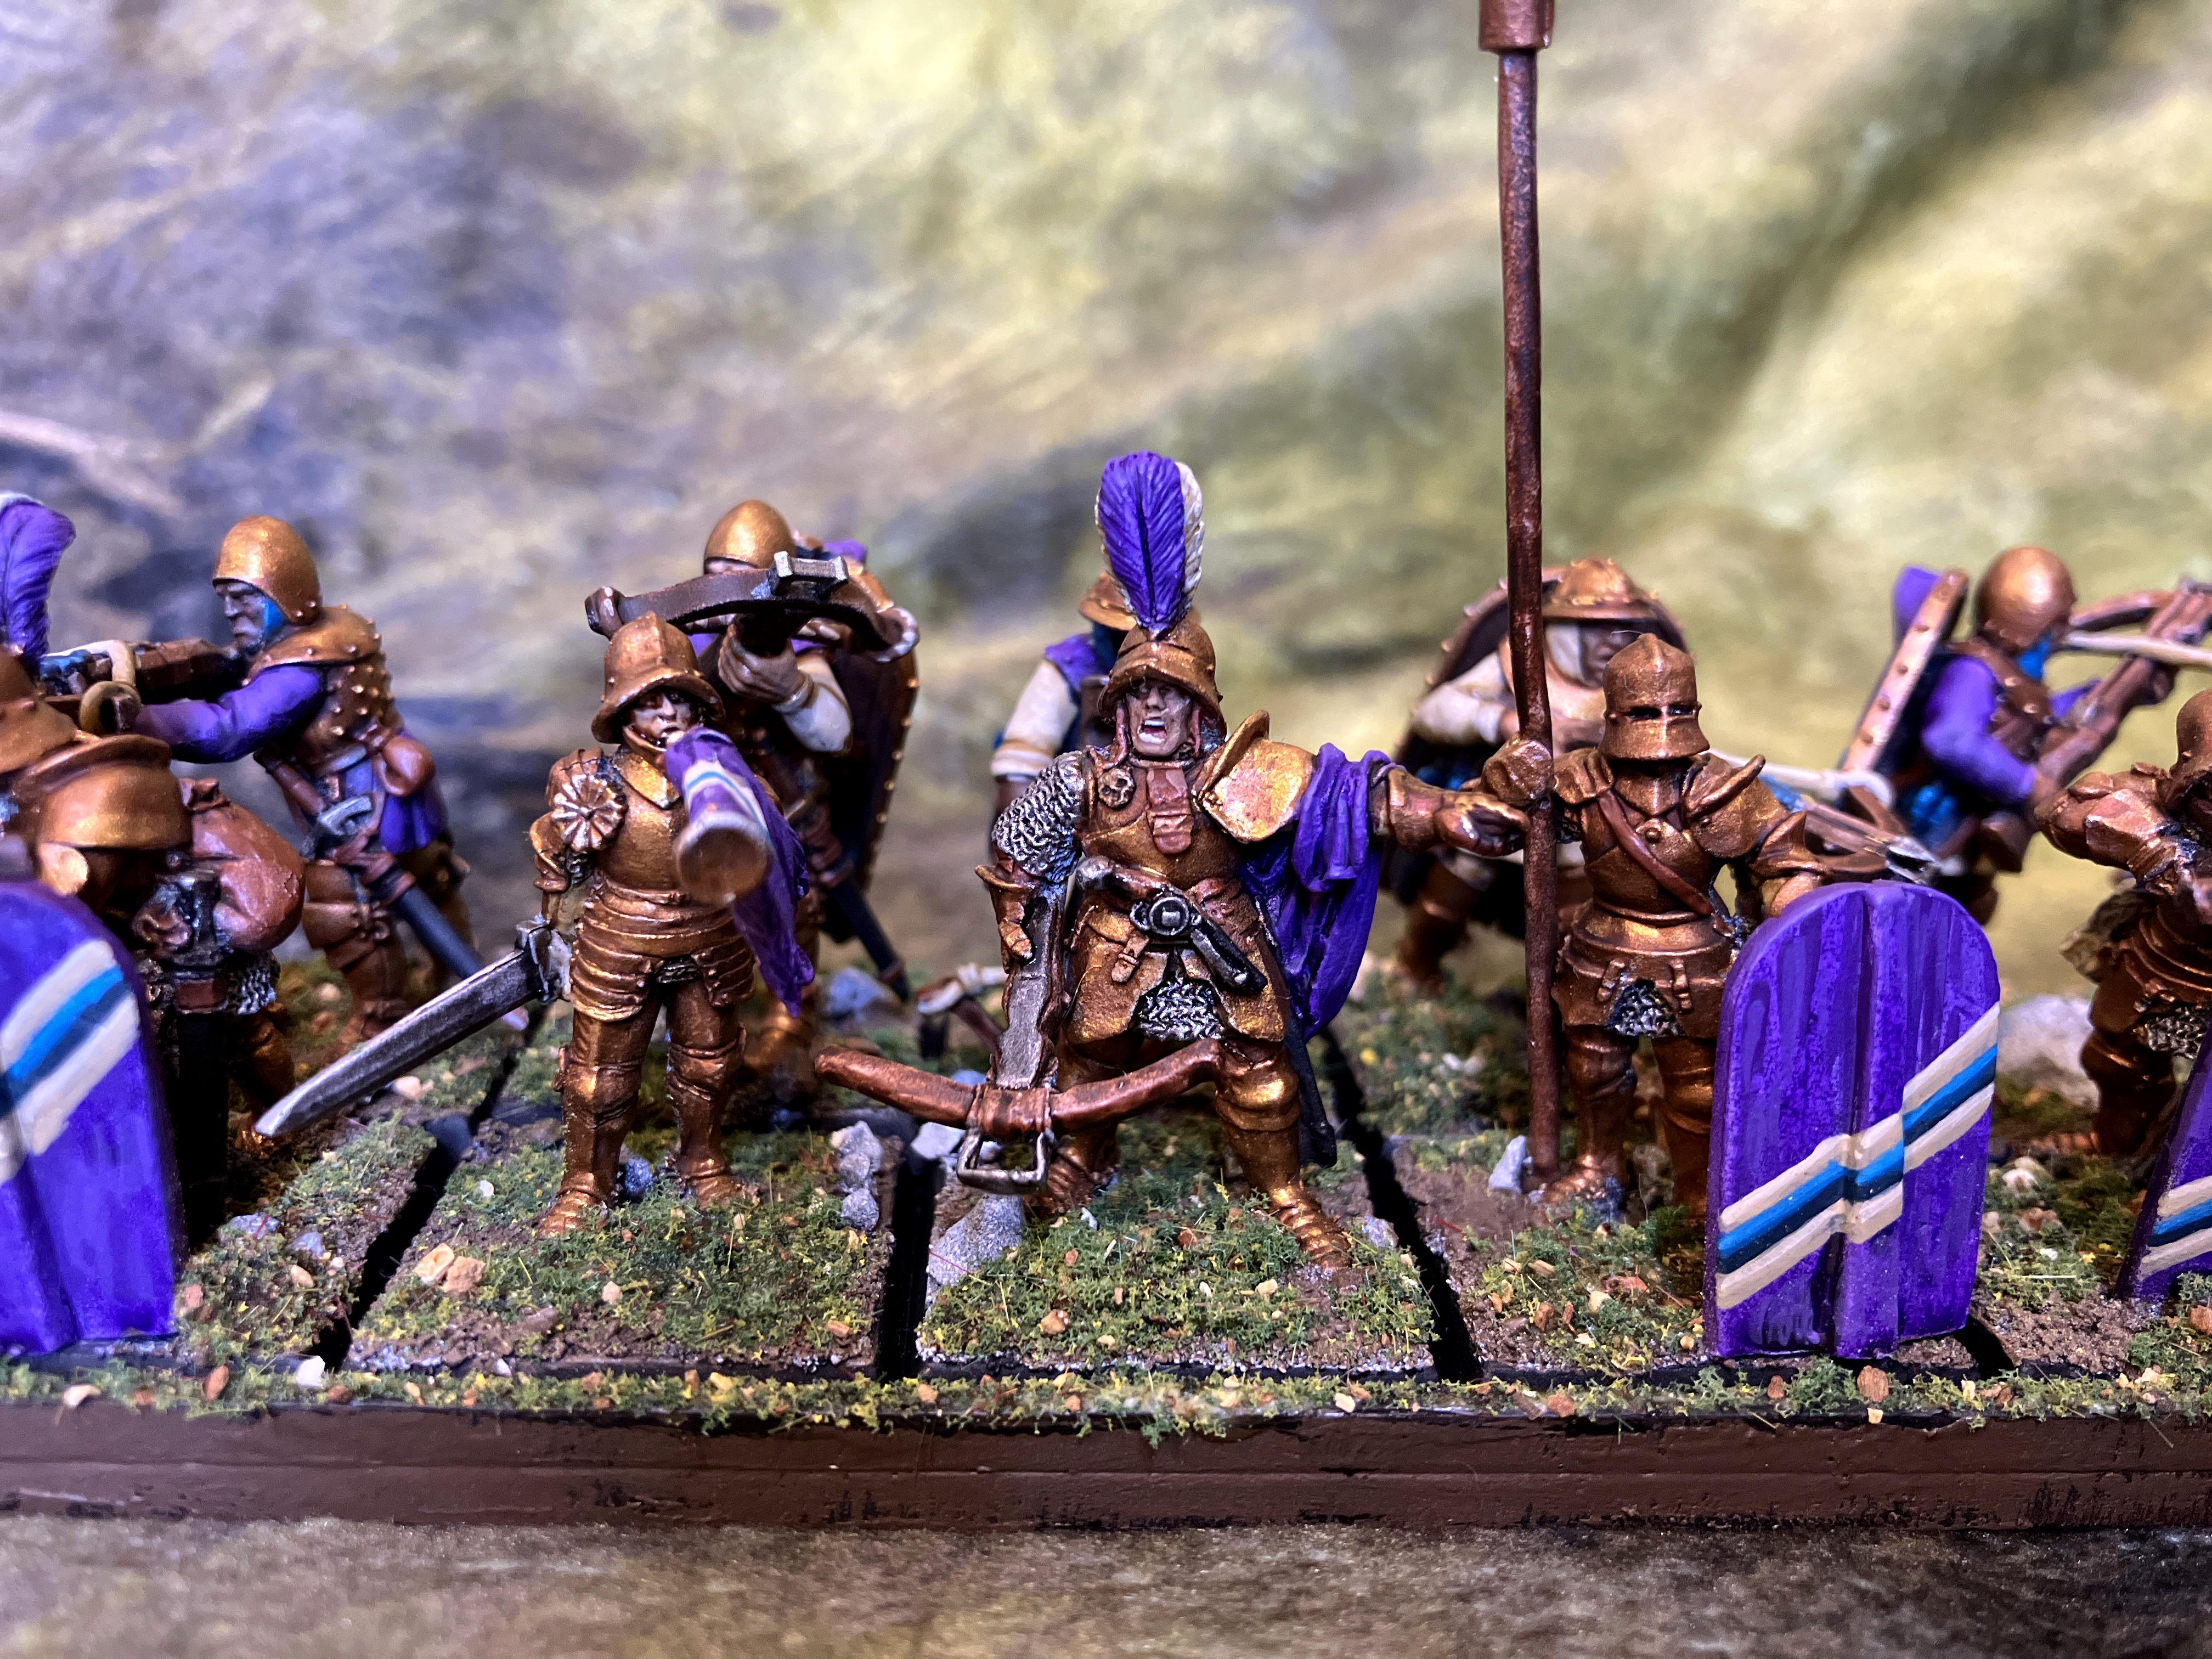
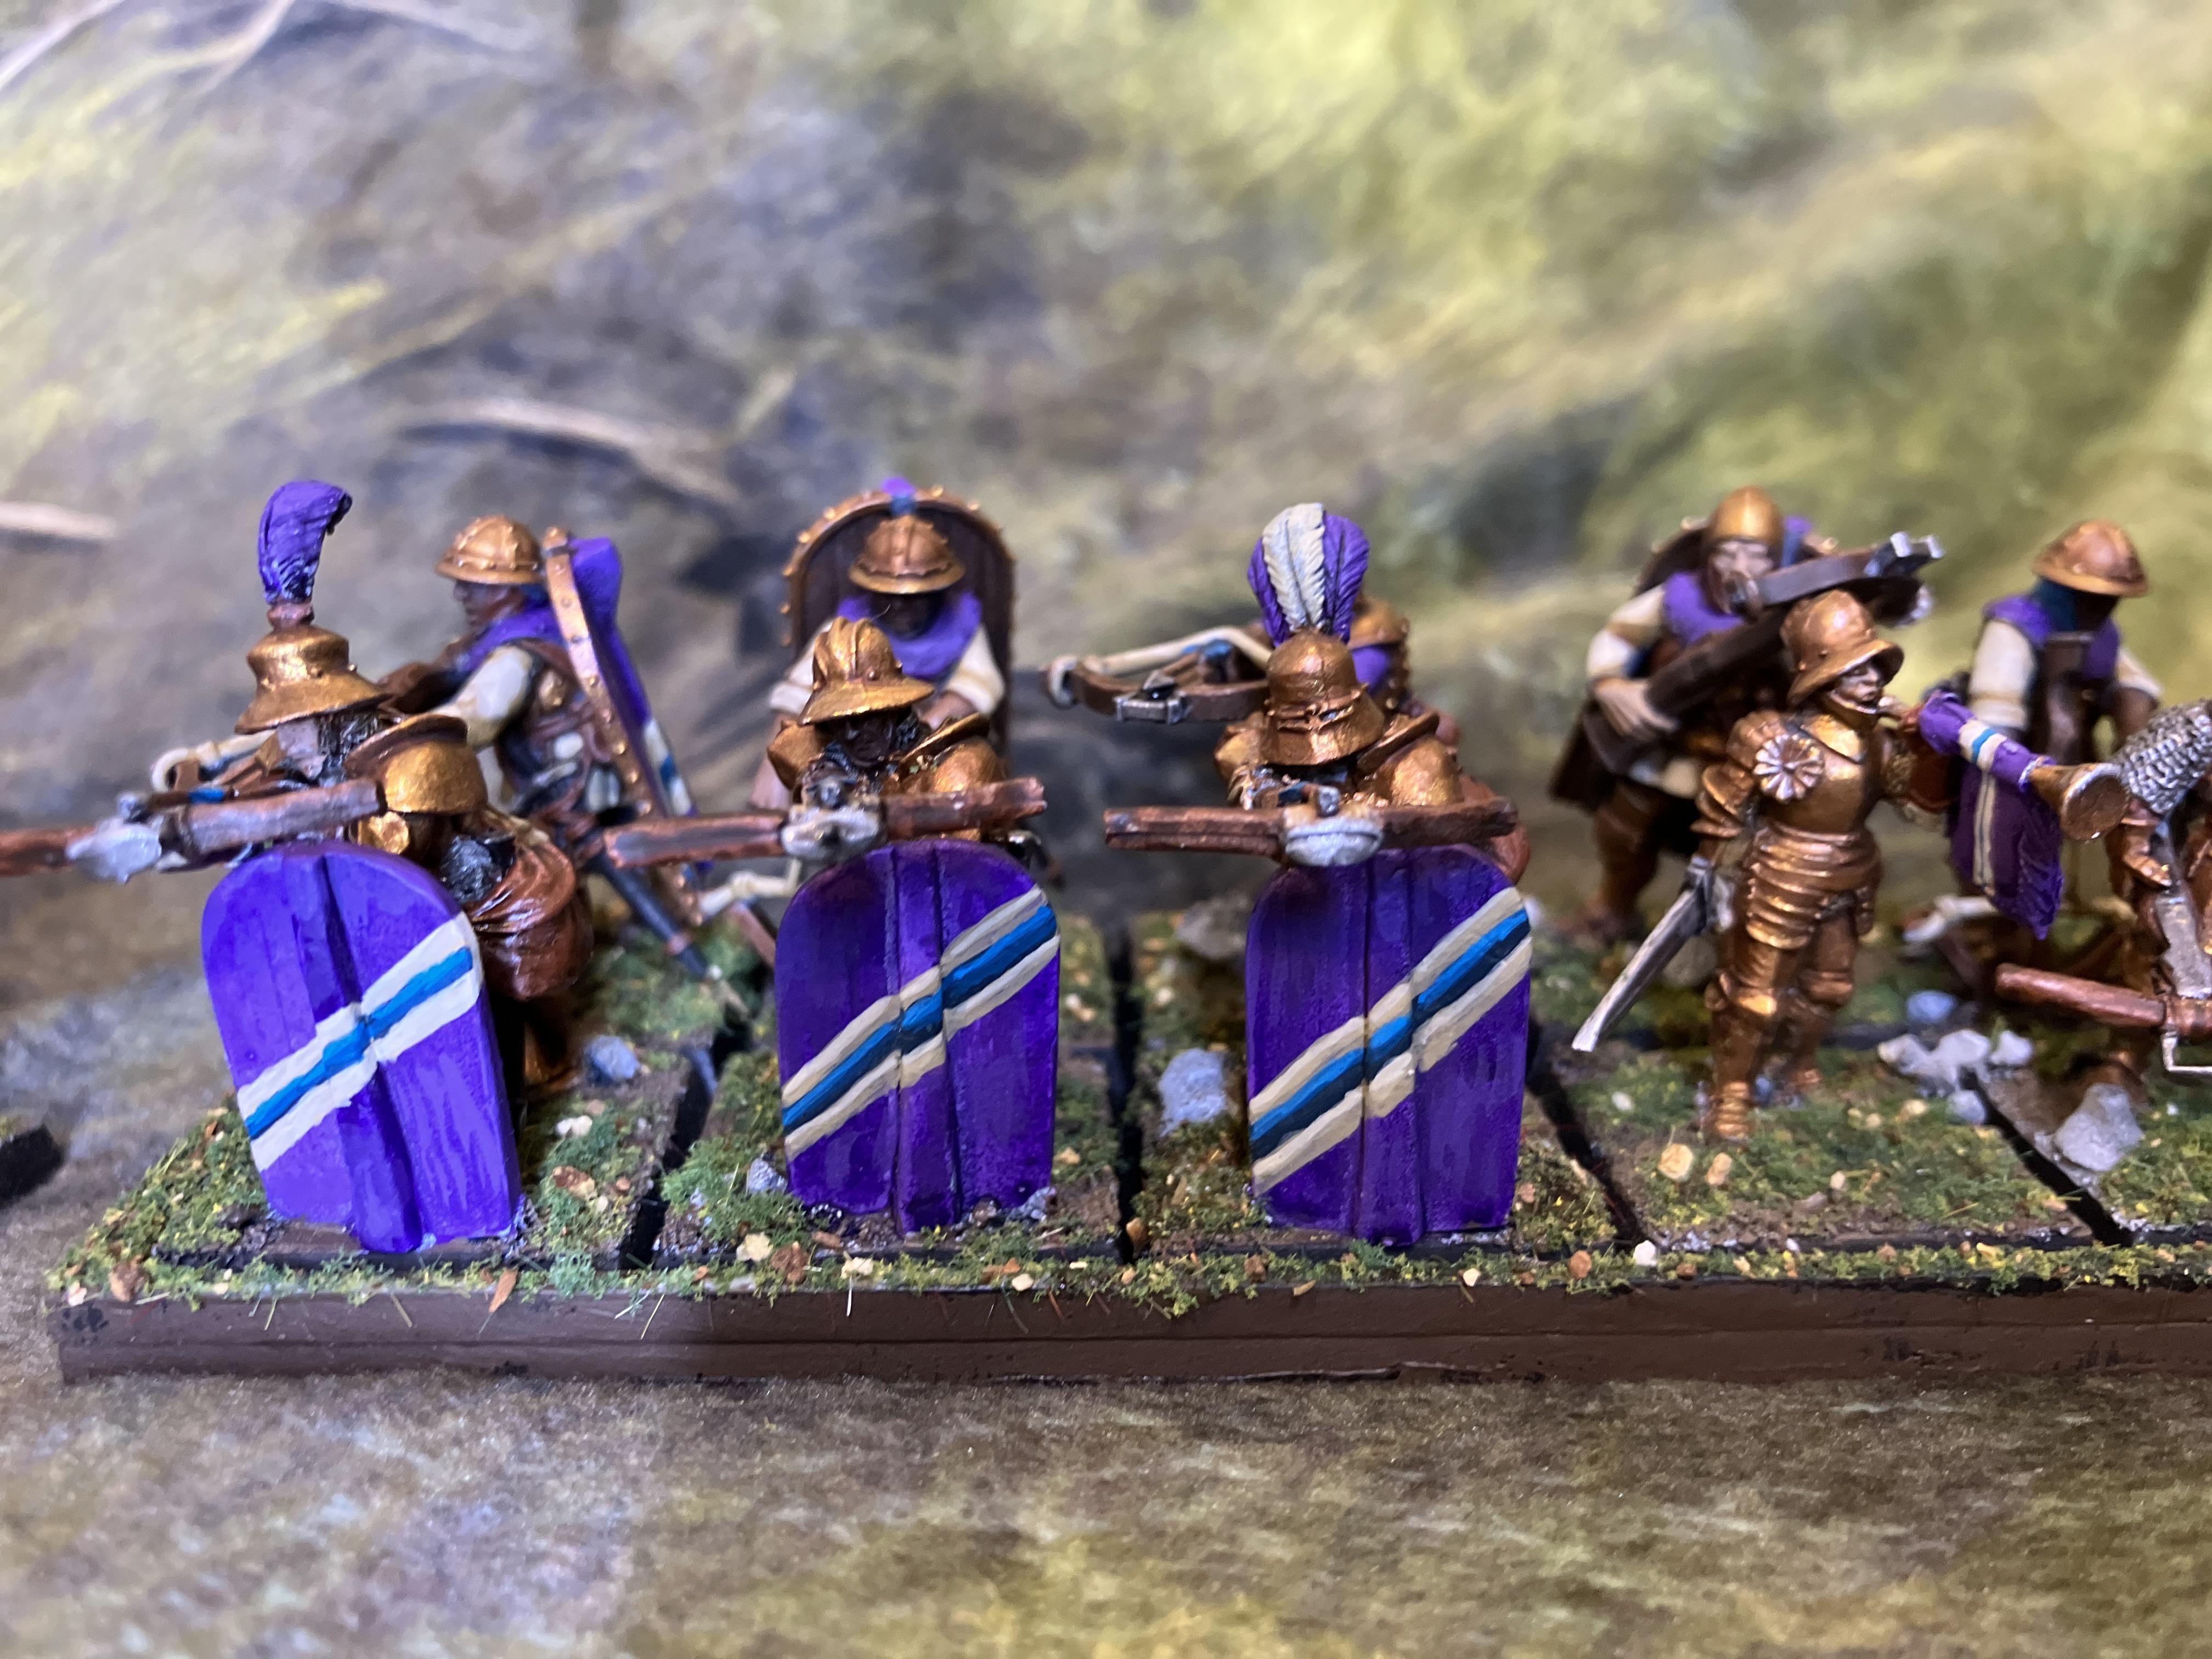
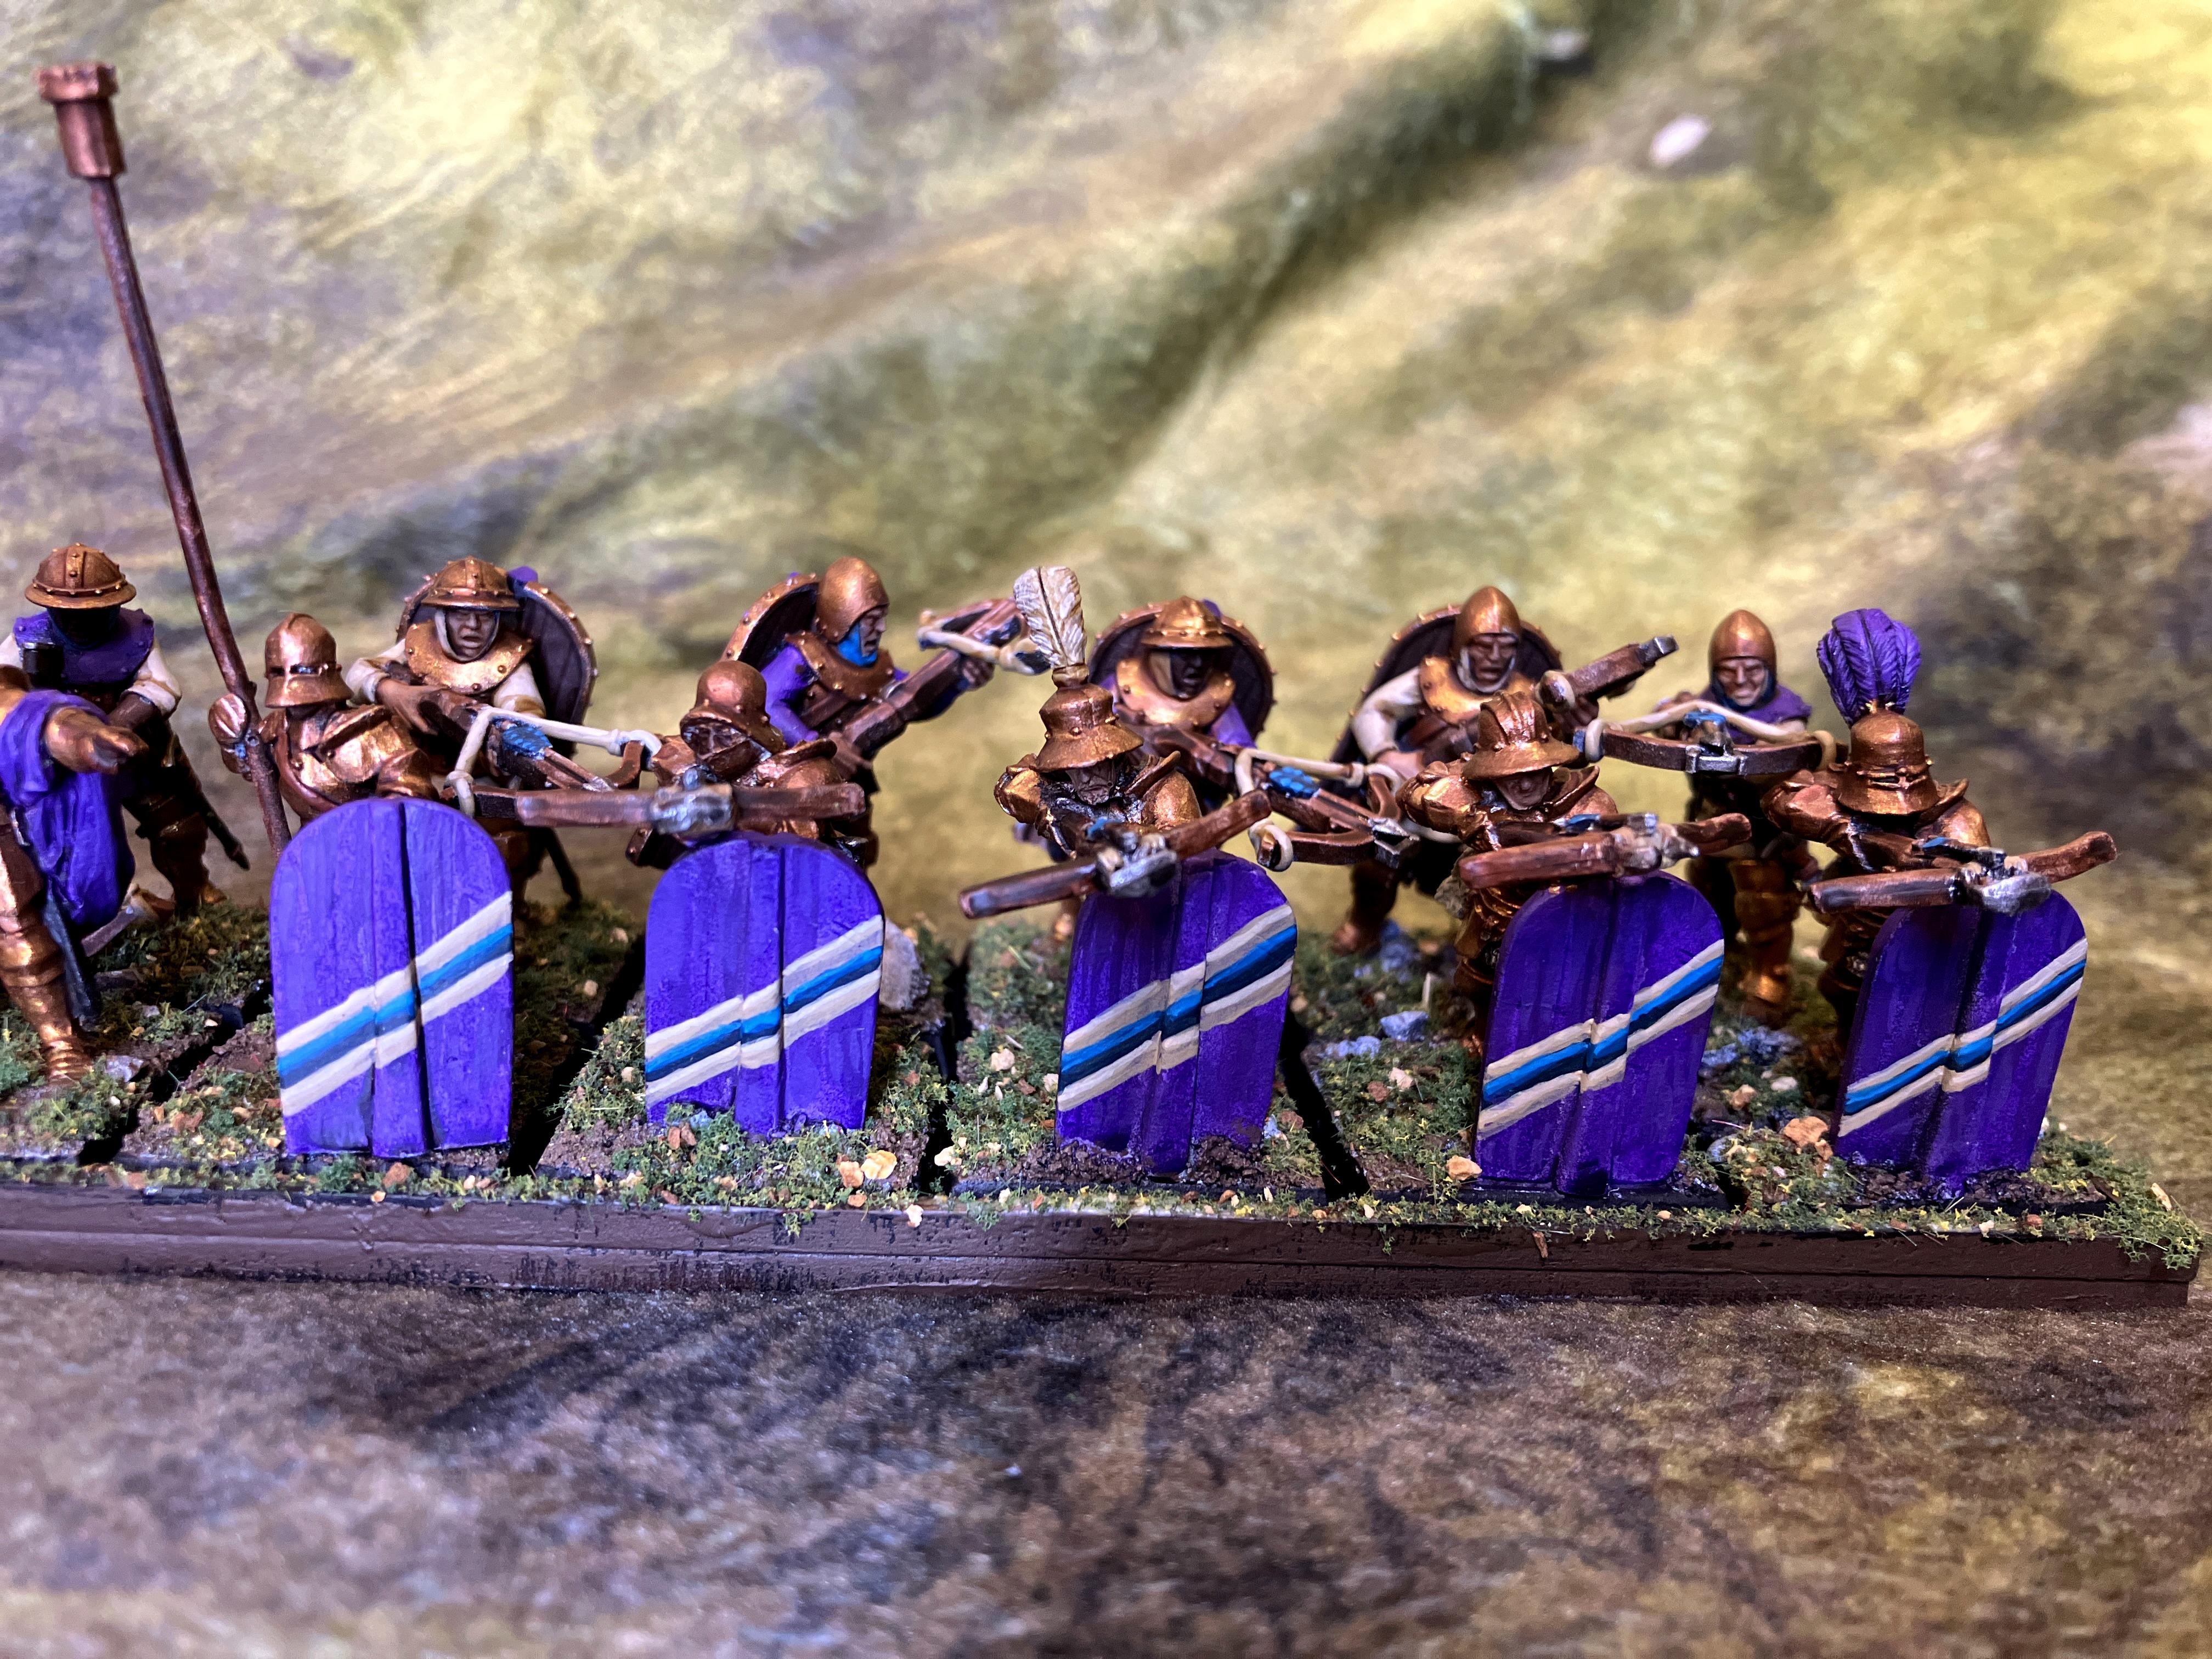
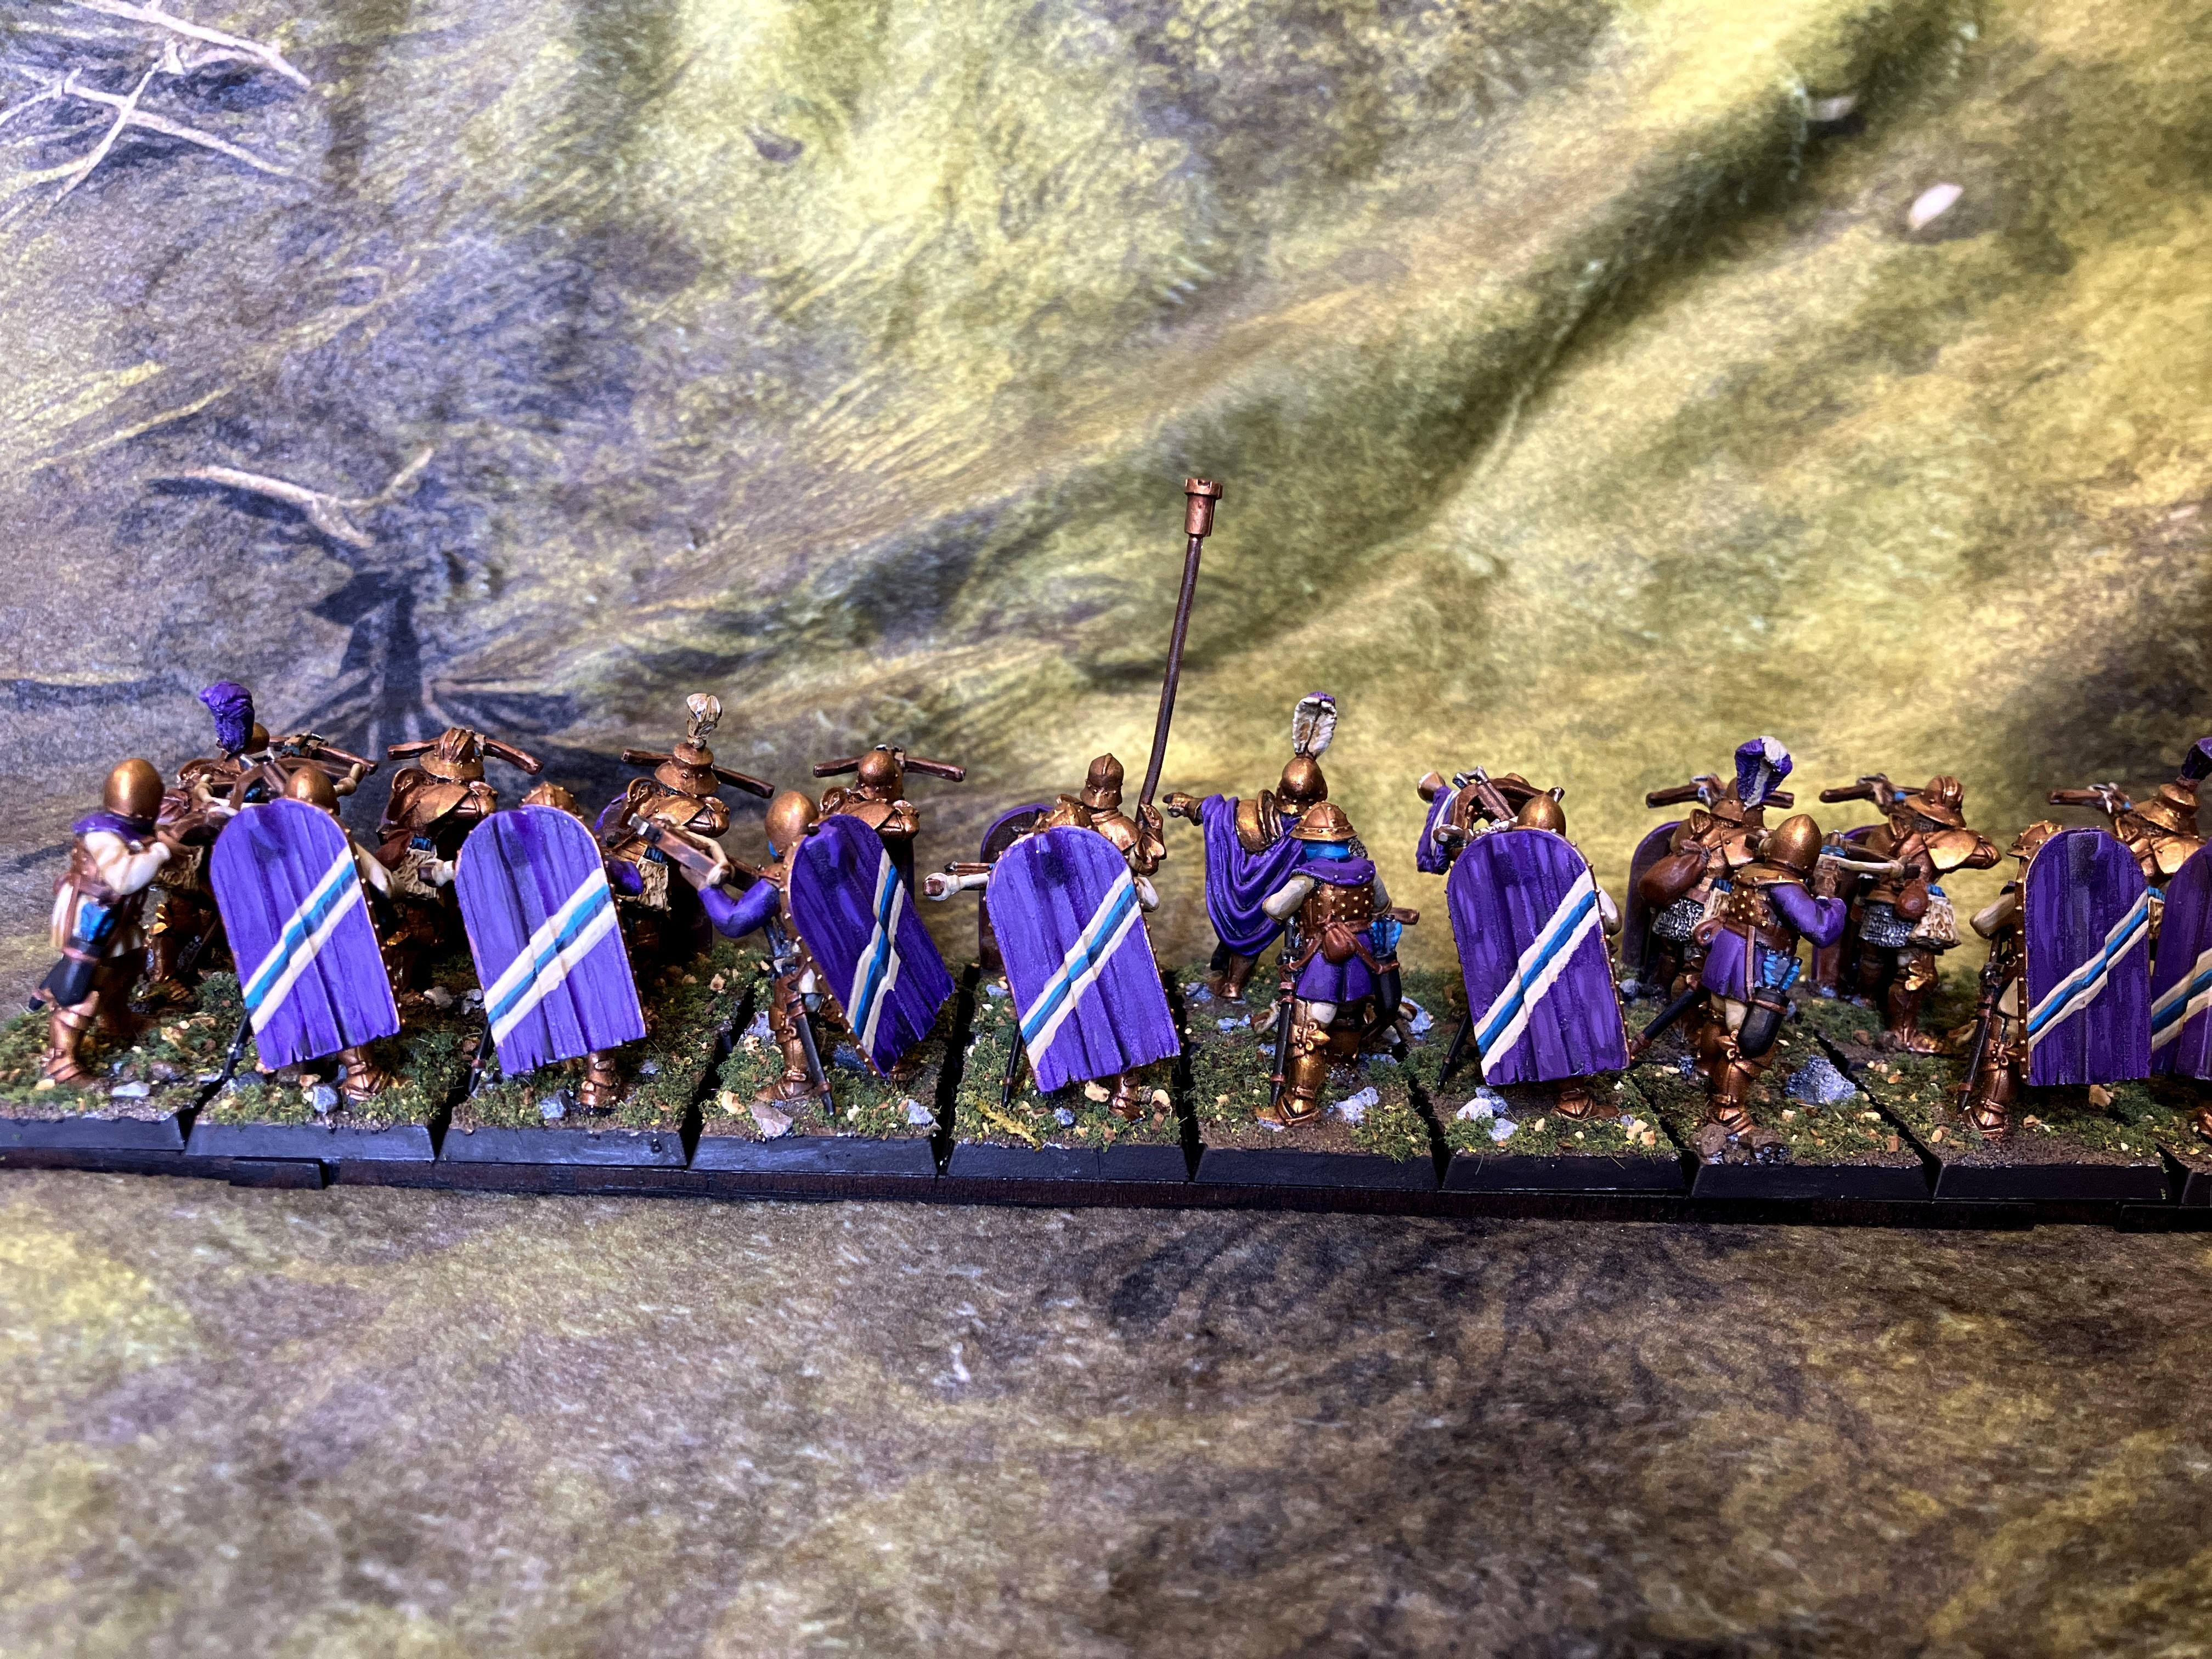
Guardsmen sharpening up nicely to! Red's a pain to highlight but you've done it nicely there, looks especially good on the gun placements IMO. Soooo many edges.
Love the shirtless guy with the powerfist. Full army pics when??
Smart use of colour to easily differentiate the two for loadouts/transport contents as well.
Guardsmen sharpening up nicely to! Red's a pain to highlight but you've done it nicely there, looks especially good on the gun placements IMO. Soooo many edges.
Love the shirtless guy with the powerfist. Full army pics when??
Thanks for the kind comments.
Yellow is a pain in the ass but somehow I've ended up with that as a major color component for not one but two armies (both Iyanden and my Sons of Sek / Thousands Sons Style cultists). I have a lot of experience with Red from both my Black Templars and the 30k Thousand sons (which I'm trying to sell now as I cannot justify that many space marine armies).
Shirtless guy was meant to be a 'could be straken?" style figure originally, but now he's just a corrupted officer.
Full army pic ASAP. Probably later this week. It's a lot of infantry. Hilariously, a full army pic will include some of my standard guard tanks, as I purposesfully designed them to be 'side ambivalent' so I could use them for either renegades or imperium.
Those blood pact look superb. The red on the guns is spot on, can’t wait for the full army pics! The mid and rust effects seem really effective, the paste works particularly well on the front of them!
Blood Pact and Chaos Mutants and Sons of Sek oh my!
Family shot was requested, and secured.
Composed of mostly chaos cultists, blackstone fortress minis, Forgeworld renegades, a lot of catachan hand-me-downs, and a variety of kitbashes with everything from the new Cadian kit to Empire Flagellants, the Frostgrave Cultist Kit and even some P3 minis. Had a blast building the army, and a lot of the cultists play double duty with my (comparatively tiny) Thousand Sons Army (which I suppose I'll post soon cause, well, it's less than 30 models.)
This army is roughly 211 miniatures and four dedicated chaos vehicles (Two Rockcrushers that count as Chimeras, a 'Sentinel' scout car, and my Stalk Tank (Counts as Rogal Dorn).
I posted more pictures over on the finished P&M Showcase thread of mine, but here's a smattering of what the people want.
gobert wrote: Awesome army pics! There’s not much better in this hobby than a well painted army. And you’ve eeked out 3 from 1. Have a couple of exalts!
Also, that castle wall is cool
Gracias!
To be fair, the castle wall is simply unpainted grey plastic from GW - the original Warhammer Fortress from GW (not the resin one from...elsewhere? Mind Blank) It's on my to paint list. Right now I'm working on a handful of Eldar characters and then the Wraithknight and that will clear out my Eldar backlog. Then Legions Imperialis and then maybe some AoS.
Got some work done on some Eldar Characters. Digging through the project boxes revealed a treasure trove of partially done characters. So I figured I'd work on them. These guys are pretty much done. I suppose I'll try to play around with some decals, and they need tufts to match the rest of the army.
Great work on the 1k sons. Awesome use of AoS parts in there, what a creative and cohesive force!
My jaw dropped at the traitor guard force. What a labour of love, must feel great to see them all massed like that! Love the ragtag feel of the individual units and schemes coming together in one army.
Lovely colour work on the Eldar too - though between the other two armies it's no surprise you've mastered yellow and blue!
Thanks for the kind words Tzurk, FeistyRips & MeerCat. I do not consider myself an amazing painter (Above average at best is what I generally aim for) but I'm pretty good at the base three colors I suppose!
Here's a reward for nice things being said. More miniatures (in this case, finished, with decals, and based!) I use just those two types of tufts in the entire army. I love the pink one as it really stands out against the blackened world husk bases I use. I also use the two types to distinguish between my guardian squads so I can tell them apart (one squad has pink tufts, the other brown).
I tried to make sure the decals didn't look out of place, and his staff/spear sort of does look like wood, which was the goal. Really happy with the hair. Spear tip was the best NM "Metal Wraithbone" idea I could come up with as my army doesn't include much in the way of actual metallics.
Warlock #2 - Didn't do any decals on him because I was unsure of some of the meaning of many of them and the Iyaden ones just didn't fit right in any space I liked.
Iyanden Autarch - I used black for his weapon to denote it as something other than a shuriken weapon but also give him another way to stick out.
Finally - spoilered for big pics - I have some wraithknight progress. So much highlighting is driving me crazy, but I finished washing all the yellows (now to highlight the blues and yellows)
Smooth work on the decals and love the different coloured tufts both aesthetically and as a mechanical reminder.
Wraithknight is coming along nicely. Big models terrify me too. I always like feeling like I'm only a few brush strokes away from "close enough is good enough", and that's hard to achieve with monsters like that. Looking good so far, very striking and will make a lovely centerpiece!
Classic colours on the Eldar, a good bunch of characters you’ve knocked out fast. That wraith knight is looking good already, good luck getting through the highlights!
Thanks y'all! With summer ending I've been back to work, plus watching Tiny Blockade afterschool, plus I took a short term commission, so I'll be less spam-y with my posts in the immediate future until we get childcare figured out. But this commission will let me do a review of the rampart modular terrain from Archon Studios. So silver lining?
So I decided that I'm going to continue the master plan of slowly working my way through my project boxes, and as part of The Independent Characters Hobby Progress Challenge, I've decided to work on these little guys, with the IDEA that, hey, I'll be ale to finish them relatively quickly. ***
Current Goal: All the Infantry in the entire army (Whatever was in the starter box, plus one additional box of auxilia support (and I think I bought another box of auxilia infantry, so maybe that too? It's in the photo. Color scheme for the Spireguard is simple.
All contrast paints for the infantry.
Flesh Tearers Red for the Uniforms
Apothecary White for the helms, cloaks, and backpacks.
Black Legion black for the boots and guns.
It matches my vehicles from much earlier this year.
Thousand sons are base coated gold, then with just the Flesh Tearers red (although I may experiment with a translucent red over them as well)
Add in the sentinels and ogryns, and thats everything but the titans complete.
Onward.
***Shh, that wraithknight is completely imaginary!***
Finished this sprue of tiny guys. Only four, five? to go! Contrast paints, then an agrax wash on the red and black to add some depth and find any gaps that I missed. Easy, if sort of mind numbing, to do.
Then onto a commission update that I needed to do.
Using the Rampart Eternal Cathedral Kit.
Client wanted these to be able to represent barricades for GW terrain set up rules, so that's what they will be! The only building is, in my typical fashion, two buildings with a triangular base that will fit together. Which is nice as it's the only based option. Everything else will still connect together (and be jungle-ified)
Finally, another huzzah update.
The LAST (I SWEAR) Purchase for the medieval village! I cannot wait to crack this baby open and actually use it (after I'm done with LI and the commission, of course).
Main pan is actually to build two more wall segments for the castle and then either incorporate the manor into the wall OR build a clone of it into the wall and then have this wherever I want it. Eek! As usual, my eyes are bigger than my hobby time.
Those little guys sure paint up quick! How are you finding the cathedral? It looks a gorgeous kit and the jungle theme sounds super cool. I’m also well jealous on the empire terrain, sadly my empire stuff is a long way down my paint list
I'm made progress on the super tiny guys! Work time is precious and not often available, but I've managed to finish the first sprue of the Thousand Sons Cohort
Progress so far:
Painted:
1 x Solar Auxilia
1 x Thousand Sons
Remaining
3 x Solar Auxilia
1 x Thousand Sons
Unbuilt
1 Whole Box of Solar Auxilia Support
Here's a close up on some details
Sorry for the weird background, it's really hard to photograph these guys on the sprue.
Tsons colors - GW Gold Primer Spray Paint, Flesh Tearer's Red, Black Legion Black for Weapons, then Ulthan Grey and then Apothecary White for the whites, then a wash of Seraphim Sepia over all non white parts, Nuln Oil Gloss over the black weapons.
Question: Should I base what I have now (bases are already painted) to feel more accomplished? Or simply plow through the rest of the on sprue guys?
gobert wrote: Those little guys sure paint up quick! How are you finding the cathedral? It looks a gorgeous kit and the jungle theme sounds super cool. I’m also well jealous on the empire terrain, sadly my empire stuff is a long way down my paint list
Here's the progress! Finished construction, got a base on it, and detailed the base. My goal is to spray paint and prime today or tomorrow given that weather later this week is predicted to be not the best.
Realizing I need to fill all those interior holes. That's a to-do item for today then (should be easy, just put in the bits that allow the pieces to connect to each other)
One of my personal goals for this commission was to make ruin piles look slightly more convincing and 'realistic', hence the piles of debris.
Regardless of beliefs on debris, this is gameplay terrain and thus all the upper story edges are playable with limited debris fields because I want you to be able to put bigger bases up there.
Pretty happy with them so far, with the exception that I wish there were more of the little gargoyle exterior heads. I'll run up a full review when I'm finished.
Keep building! Got a LOT of work to finish by the end of September eek.
I really like the Rampart terrain designs, I also added floors to my buildings.
That triangle set up is quite useful to add a bit of modularity to terrain pieces.
The cathedral is an amazing kit and building up nicely.
For my two cents, base the figures as you finish a few, not just for the sense of accomplishment/completion, but also for a change of pace, to keep the interest levels up.
gobert wrote: The little mini guys are looking cool. So much detail in such tiny figures! Those completion endorphins are always good, so I say base them up.
The Cathedral is developing nicely. I’d say you have a good mix between realism and playability right now with the rubble
Thanks! I was able to prime what I've got the other day, so I should get a few coats of paint on it by the weekend.
@Meercat - I've cleared another sprue of the Auxilia, and I think I will base them. I'm halfway done with them now and honestly could use a slight break from painting the same 4 colors.
@Cap'n Brown - Wish I had seen this like two weeks ago! But now I know for the future - I had to clip the pieces that clip the walls together in half to cover all the gaps in the interior walls.
@Tommygun - I've actually decided it's my new favorite way to build ruins. As one whole piece then cut into two. I did one a ways back that was three pieces, but was 11x14 inches so it works that way. This is roughly 6x6 inches total.
So going on people's advice to base what I had, I'm SO glad I did.
Full sizing the photos, not because I'm an amazing photographer, but because they're so damn tiny that it makes sense. Spoiler in effect.
First up, the whole detachment - it's half of the marines you get in the starter box I believe. So I have another version of this halfway painted (mostly the red).
Spoiler:
I used the smallest decals from the 30k HH Burning of Prospero 28 mm sized kit for the banner. It looks like there is somethign wrong with the banner, but its just a tiny sliver of plastic sprue debris. I blew it off right after this.
Spoiler:
These were the first ones I built up. I'm a bit annoyed at the fact that you end up with four different extra minis for the sprue - one terminator, one assault marine, and two regular marines. So between two sprues I'll have about 8 extra minis. So naturally, I'll be stretching the terminator pieces to make two more bases rather than just the one you get, as well as two more assault marine bases and one more basic marine base. maybe with some blood splatter to show dead marines (plus bits from the tank sprue that have marine torsos.
Spoiler:
Now the Prospero Spireguard - I have two more sprues, this is the entire group from the starter set, but I purchased an extra box set of the Auxilia. So this times two.
First up, just the troops.
Spoiler:
The whole platoon.
Spoiler:
The Commanders - same decal usage of the HH 28mm Tsons options.
Spoiler:
Finally here's the entire group. Not spoilered.
Thoughts on the bases? I am going back and forth from blacking the edges to leaving them sort of marbled and natural.
Also if you looked closely enough you could see I've primed and zenithaled the terrain!
More photos soon, but I finished all the Thousand Sons Legions Imperialis Marines Huzzah!
Also made the decisions to black rim all the bases. Finished the Tsons, now onto the last of the Auxilia. I will post photos when I finish painting and assembling them and the Tsons again, but wanted to show that there was progress! I'll need to prime more bases sadly, which with the current flood like weather conditions is not happening for a bit, so I'll do what I can. Also made good progress converting a few bases to have fewer guys but also dead guys to ensure no leftover epic marines.
Any time you can complete a kit and have no leftover parts is an obsessive-compulsive victory- rock on!
The ensemble looks great and having so many, painted to such a good standard, gives them a perfection en masse that even stands of four or five can't compete.
I love whatever GW is calling Epic these days. And I really like how each of your units really stands out. They are unique and they still look like they are all a part of the same force. Really well done!
Nice to see scratch-built terrain of such quality; the big manor house and the 'reclaimed by nature' terrain are my favourites. I like your colourful chaos army as well.
Thanks for the kind words all - I do love building my terrain. I likely will need to build some things to go with all these Legions Imperialis. But for now, the biggest little things I have!
Two Warhound Titans (small scale!)
I'll be honest - I royally screwed up the legs on one. Legs facing one direction, feet another. Didn't catch it until the armor stage and was absolutely annoyed. Ended up cutting at the joints because I use plastic glue and then repositioning. So instead of two standing one I have one standing one and one that is, well, running forward. I'm going to use some plaster hirst arts molds pieces to give these bases more life and eliminate some of the flatness that seems boring.
Leg progress and set up.
Up close and personal!
Went double missle launchers as I can say he's anti-infantry or anti-building/vehicle.
The second one is still in progress, but will likely be volkite and melta. But I will appreciate C&C about what to build the second one as. I honestly don't care enough to magnetize, and i'm not going to spend more money on this game by buying FW weapon packs for the warhound unless I know I play it a lot.
Cool mini titans . Having recently read betrayer, I vote Ursus claw, but I’m not sure that’s a standard loaf out. If it’s not, then mega bolters are the coolest
In searching for an appropriate paint scheme to match my Thousand Sons, I stumbled across the Legio Xestobiax - their purple, white and gold color scheme matches perfectly with the colors of both the Spireguard and the Thousand Sons themselves. Coolest thing about the fluff on these guys is that the forge world - Zhao-Akhad - literally figured out how to create ghosts from former crew and pilots and haunt their own titans (something something short story somewhere).
Sigh, it's like they wish they were Iyanden or something.
Also, do I have a problem with ghosty bois and or haunted giant battlesuits?
Anywho - still haven't named Warhound #1 here, taking (moderately serious) community suggestions.
Super happy with the scheme so far. I will likely edge highlight the white panels and further highlight the gold with ghenna gold. I may drybrush the steel as well, but in the color panels the silver/industrial metals are more muted. I love the purpleish tone to this Army Painter Broadsword Silver which I used as the base, then hit with Nuln Oil.
I'll do green on the weapon tips/glow effects and the eyes.
Warhound #2 is in progress too, but I found that I had more willingness to complete one over trying to pace and do both.
gobert wrote: Beautiful pair of white and purple titans. Such a cool scheme. I love the white stone you’ve gone for with their bases. It works well for them
Thanks guys. It's Wraithbone spray, an agrax earthsade wash, and then a drybrush of khaki stone I believe? something to that effect.
@Gobert - Yea, I like the missile pods for him. I can always use the anti infantry or anti building ones, and since I have a reaver that I'm going to be much more 'anti other titan' build, I think he'll do a good job really being annoying (I hope!)
In the best update possible, I did rally yesterday. Of course, I then crashed last night, but we finished a task!
I've found its challenging to leave the modular nature of these walls functional and yet truly weather and flock them. It results in large areas having ot be left uncovered in order to allow for the placement of your hands to smoosh the pieces together to form solid walls. I also did way less plant and flock coverage on all the pieces than I maybe would have liked too to match the other commission pieces a few pages back (the ones with the trees and the like growing up through the buildings and railways.
All in all, I enjoyed this piece. Life just got in the way far too much to finish it in a timely manner (oops!)
Now to finish that one little sprue of auxilia, right?
Yes, I did indeed start a useless side quest, but quickly returned to my true goal finishing all the infantry*
*with the exception of the handful of infantry that are also in the sprue for the support weapons. But that is another problem. For December Blockade.
So now for yet more tiny auxilia pictures. much the same except the lovely little standard.
Yes and I also finished ONE more walker. I'm honestly dreading those things now, but the remaining walkers and the ogryn, plus the support weapons. That will be the entire army except for the Reaver Titan. so I'm pretty close to having a second army finished!
In other super exciting news, I spent a chunk of time painting the rims of the LI and my aeldari army black. Talk about a mind numbing task!
I also purchased the previously unreleased Bretonnian Lord using the 'we missed you' voucher. Felt like buying one of the old blister packs (In retrospect, I miss them).
Honestly it's been a busy month as I'm certain many people would agree. These little support weapons and their sentinel walker and Ogryn friends are just .... draining some soul out of me in painting.
Here's some progress. I have nearly finished all the missile launchers. then I do one walker, four ogryns, and then repeat with another set of the support units. I'm also doing a cheeky 'cheat' with the cyclops bomb vehicles as they are basically one color, one wash, and one delicate line of black for tracks.
Then, of course, I need to work on the Reaver titan to round out the army.
I've also been debating my immediate next project. Truly feeling the Bretonnians army as it hasn't been built or assembled. I could also do my minimal Cities of Sigmar list which is just the start set essentially. Then I've got guard, leftover Black Templars, a whole variety of things in the wings. Thoughts?
Suck when a project starts draining the motivation. Despite that they’re looking good, and the rest of the gang in the previous post looks awesome too.
Hilarious, I of course decided to work on the little Necromunda citizen in the background as a pallet cleanser. Which also led to me working on a Lumineth ballista that I had sitting around... so I'm definitely making progress. I actually have the remaining sentinels mostly finished as well, along with all the little white minis on the paint handles. Then just that large block of remaining bullgryn. But it is progress!
Maybe tiny tanks. But I have MORE than enough tiny people.
Finished all of them. I'll do the one missing Cyclops later as it is truly missing (likely in the trash thanks to a whoospie by me and the cleaners) So I'll just have to make an 'exploded' version.)
Here's a sneak peak at the actual last part of the project - a Reaver Titan (LI Scale, naturally) for the Legio Xestobiax.
Obviously, just a concept, but is it too wicked witch of the west?
In other news, I painted things NOT 6mm tall.
In process of preparing to paint up my first bretonnia unit (the archers likely, as they are the quickest to assemble in my book), I painted up some test peasants.
Ignoring Yellow Peasant, which blue do you like better (Man or woman), and which tan do you like better (man or woman).
I'm leaning towards the man's tan and the woman's blue (which is more teal, and thus not the same blue as everyone else's blue bretonnian army). But I'd love your thoughts!
Happy New Year Hobbying. Hobby year in review coming soon.
First view through your work and truly impressive. Loving the purple and white paint schemes on those war hounds and the finish on those walls is top shelf.
Alaricuk wrote:First view through your work and truly impressive. Loving the purple and white paint schemes on those war hounds and the finish on those walls is top shelf.
Thanks! It's a mix of different flocks and the dried contents of some old tea bags (and mulled wine seasonings). Make sure to seal it afterwords and let it dry thoroughly.
youwashock wrote:Nice work powering through the LI guys. Can't have been easy.
In retrospect, what I should have done is broken it up by chunk - so six support bases, then a cohort of infantry, then some space marines, then tanks, then wash and repeat. Annoying, but that is what it is now. And they're done! Except the Reaver, which is already in progress.
My only real Warhammer Holiday gift was a forest and field battle mat from, well, Battlemats. Here's a look at how it looks under some minis and terrain.
I'll do a full review later, but I have already tested dice rolling on it, and it works, Sticking a book under it to create hills does work (many layers of books are better than just one) but I honestly will probably treat it like most of the neoprene battle mats, I just am glad this should work over my wooden display city boards so I don't need yet more boards to put under this!
So Far in 2024...
I finished an entire Legions Imperialis Thousand Sons & Prospero Spireguard army (4 Auxilia Cohorts, 1 Support Cohort, 6 Auxilia Tanks, 8 Auxilia Sentinels, 4 Dreds, 8 Tsons Tanks, Two Tsons Cohorts, Two Warhounds (and a Reaver un-der-con-struct-ionnnnnnn)
But Wait....
I also finished by Blood Pact Army (counts as IG)
A Blood Pact Command Squad w/ two Banner Bearers
Finished a Chimera Counts as Goliath Rockcrusher w/ weathering
Ordnance Battery x 2
I also completed a chunk of my Iyanden Leadership
A Farseer, 2 Warlocks and a Autarch
So in general, not a ton of minis that are not LI, but I figured I helped make a real life human miniature and they're a bit time consuming!
Good work finishing the LI stuff, looks quite tricky to do. Love the Dread under the Reavers foot, I wonder if cutting a little recess as though the concrete has been pushed down might sell the scene a little more? Also make sure it has red feet (maybe different coloured legs, red and white stripes perhaps )
Impressive haul for the year, particularly when a newborn is involved! All the best for 2025!
gobert wrote: Good work finishing the LI stuff, looks quite tricky to do. Love the Dread under the Reavers foot, I wonder if cutting a little recess as though the concrete has been pushed down might sell the scene a little more? Also make sure it has red feet (maybe different coloured legs, red and white stripes perhaps )
I'll definitely work on cutting into the base. Or using green stuff to build it up slightly and then smoosh it down. Love the idea.
Doubled posted this into here and the Pile of Shame / Daily Hobby paint discussion board, but I wanted it here for posterity too.
Finished the following this year.
Legions Imperalis (Prospero Defense Force Completed!)
2 Warhound Titans (Just missing the one Reaver under construction)
1 Cohort (61 bases) Space Marines Thousand Sons including 2 Sicarans and 4 Predators
4 Cohorts Auxilia (58 bases) including 4 Leman Russes and 2 Malcadors
3 Random Medieval Peasants and 1 Knight
Blood Pact Army (Complete)
6 Person Command Squad w/ two different standard bearers
3 additional Blood Pact Squad members
Blood Pact Tank Commander
Two Ordinance Artillery Pieces
Iyanden Characters
Two new Warlocks
One Farseer
One Autarch
So many tiny minis!
Terrain
3 Commissions (Large sets)
Medieval Town & Keep
Goals for 2025
Build and finish...
LI Reaver Titan (January, this is for you!)
Warhammer the Old World Bretonnian Army
Starter Box Contents
Lord on Pegasus
3 Pegasus Knights
12 Knights
24 Peasant Bowmen
36 Men at Arms
Additional Army Components Bretonnian Lord on Foot (The Old New Unreleased Mini)
Trebuchet (3D printed)
16 Foot Knights
2 Damsels (One on foot, on riding)
1 Army Standard Bearer (on horse)
6 Mounted Yeomen Conversions (may need to rebase them)
20 Braganza's Besiegers (Crossbowmen, can use in an Exile Army or if they ever bring back Dogs of War)
Quite a list of finished minis! The Blood Pact & LI stuff were definitely the highlights that I saw. The Warhammer Keep sounds awesome, can’t wait to see it
So living here in the Mid-Atlantic means that its a frigid "SNOW IS COMING PANIC" day. Since I did my shopping yesterday, and there's not chance of priming, I could either magnetize the arms on the reaver or build Bretonnians. I get very flustered with magnetization so naturally I built and based 60 miniatures instead.
This is the start of my Bretonnian Exiles list. It will have some minor conversion work, but I'm focused primarily on just getting it built up and onto the battlefield.
Introducing Sciaparto's Long Feather Bowmen. Behind them are the by now familiar Borganzino's Ballistas (Since Braganza's Besiegers don't exist in this timeline yet). Off to the side you may see Lord Palisch, a gentleman of reknowned hairstyling with an unfortunate knack for talking his way into the servant's quarters (which is what got him exiled in the first place).
Head swap using a Cities of Sigmar head.
Used the triptarch from the Cities of Sigmar guys as well, added a bird from a Lumineth kit.
Nothing different, just a drum that did NOT want to fit together no matter what.
Purposefully picked the banner top that looked like a bird too.
The goal today and tomorrow will be to build up the spearmen or the knights perhaps.
Wow,you really don't like magnetizing Which is good for us. Bretonians are looking good. And I agree with Tommygun, seeing this makes me want to start an Old World Army, but I already have too many games to try to play and not enough time or people to play with.
Tommygun1918 wrote:When I see stuff like this, I'm so tempted to start an Old Hammer or Sigmar army, but I have too many or things to do.
Keep your paints warm.
Yea, I gave in last year, but fortunately can claim that I don't need to buy any more minis for the army because I literally have 2k points worth of guys! (Probably more)
Syro_ wrote:Wow,you really don't like magnetizing Which is good for us. Bretonians are looking good. And I agree with Tommygun, seeing this makes me want to start an Old World Army, but I already have too many games to try to play and not enough time or people to play with.
I'm fortunate that my gaming group has people who play 40k, AoS and The Old World (along with other things) but I'm honestly going to be happy if I build them and paint them and they look 'right' to my eyeballs.
SDKFZ wrote:That looks awesome ! Been far to long since ive seen a Bretonian Army in the making....
I haven't seen many on here in a while, but youtube was full of them last year when the Old World came back. I'm just half a year behind!
Now to reward you all with pictures :-) I have finished, by my count, 100 Bretonnian infantry in the last week. Thanks Snow Days!
That would be 24 Bowmen + 20 Crossbowmen + 24 Yeoman Guard + 30 Men At Arms + Bretonnian Lord on Foot & Squire = 100! (all based too!)
I already posted the bowmen earlier so men at arms it is. Bowmen command is my Frugal Monthly Dakka Challenge.
Yeoman Guard & Men at Arms (or Men at Arms unit #1 - smaller one is on the left))
Command Group (Prior to basing) of the Yeoman Guard
They definitely look a bit weird without shields but hard won experience has taught me you must paint them separately. Also got lucky in that I found a unit mover that fits them perfectly! 20 Infantry + a 2x2 unit Filler = 24 Yeomen.
Now my more grab bag Men at arms.
So the box set in the Starter Army kit gives you 36 Men at Arms. If you're counting, I'd used 20 already since I included a 2x2 unit filler in the Yeoman Guard unit. So I had 16 left but I really wanted a 24 man unit to at least balance the Yeomen Guard. With a filler that still left me at 20, so into the closet of potential we went. My bits box for fantasy is pretty limited since I haven't done many full time armies for it, and many of my on-sprue kits are for Frostgrave sized minis, where there is a slight size change (although I did use some Fireforge heads on the archers, but still). Digging in the closet resulted in finding ten additional Empire Spearmen or halberdiers. Given the rag tag nature of Men-At-Arms in the first place, then add in the Exile list I plan to run, I thought "Why wouldn't this army have some empire deserters?"
Honestly I love them. The unit looks much more rag tag but also has more poses which makes me happy. It also let me stretch my unit size and scratch that conversion itch. As another benefit it clears out some of the absolutely ancient box of oldddd warhammer minis.
Check out some of these conversions. You can also see my unit fillers here. They are made by Highland Miniatures as part of their Gallia line of Not-Bretonnians. I backed their 3D print Frontiers thing on MyMiniFactory. I'm happy with the sculpts, but was NOT pleased with the prints from the person I got them from off Etsy. Lots of breakage and the bases are not flat for these small terrain pieces. I also got a Trebuchet and a Banner Bearer on horseback, plus two damsels and the ten crossbowmen from them. Fairly certain I am missing shields from them, one of the damsel's feet was definitely broken off a rock. Anyways, complaining aside, those issues are not Highland's fault.
Anywho, don't let anyone tell you that you can't get work done in the winter! I got plenty one, just not what I was 'supposed' to be working on. And with these temperatures I doubt I'll be priming anytime soon.
Bretonnian Army To Do
Build
12 Knights of the Realm
16 Foot Knights
3 Pegasus Knights
1 Lord on Pegasus
2 Damsels
1 Banner Bearer
1 Trebuchet
1 Bombard (to be!)
10 Gun Armed Border Prince Brigands (Yes, I may have found them in ye olde warhammer box) Will have to make a Command Group for them.
Still super cold here, so it's been a building marathon, followed by a basing marathon (Because I'm a build and base then prime person).
But first - a tentative list I am building to. With this being a full army project, I've pretty much bought to what I want, although those new wizards tempt me. So here's the list (2k)
Baron on Royal Pegasus
Damsel Lvl 2 (On Horse)
Paladin (Bannerwoman on Horse)
Paladin (On Foot)
6 Knights of the Realm
6 Knights of the Realm
12 Bowmen
24 Yeomen Guard
16 Knights of the Realm on Foot
3 Pegasus Knights
20 Border Prince Brigands (Crossbows, shields, close order to represent the besiegers)
1 Trebuchet
1 Bombard
Anyways, onto pictures!
Characters
Two damsels, another extra potential wizard, trebuchet crew too (I have to put the 3d print of the trebuchet itself in a warm water bath because it has warped somehow in storage)
You can see the basing theme I have for the artillery - I'll put some balsawood boards down to represent them trying to level the ground - some former empire engineer is telling them things.
Foot knights now
I'm trying to stretch this unit a bit larger than it is - I have 16 guys to play with but would love to sneak it up to 24 somehow. I'll have to play with my bits box a lot. Might use a 3D print or two to stretch the minis.
Finally a family shot.
Spoiler:
Current progress minus characters. The Pegasus knights are built but they're nothing different than usual so they aren't included here. Should get my bombard today in the main plus another knight or two. Would love thoughts on the list and building!
I was hoping to nab the new Bret Character today, even if just to add him to the footknights and get an additional footknight model out of him, but as per usual, he was scooped up super fast. Annoying!
The goal today is to finish the footknights, then maybe start on the Duke himself. Plus I've got that reaver that needs magnetizing in the wings...
Good progress with the army building, coming together very nicely. Cool additions with unit fillers they all add a good bit of flavour to the units. Fingers crossed that you get some better weather to get them primed .
Alright - I'm definitely close to being able to prime this week (Huzzah) but in the meantime, I have actually been...well... building.
First up, reinforcements for the Exile army.
Pre Basing
Post Basing
Up close of the Unit Filler
So I turned a unit of 16 back into a unit of 20. Cool beans. But wait I turned out some other cool goodies. The bois need a place to hang out.
So it is a bit small but I'm sure it is fine. There are bunk beds, right?
Plus, we needed the big gun since the trebuchet is out of commission. The Baron hires only the best (and only) available bombard.
It's a bit on the wimpy side, but I actually like it more that way. Not cartoonishly huge. You can actually see the basing for the pegasus knights in the background as well.
In preparation for priming, I tried to gather all the army together.
I think I'll need a bigger board! Keep on building!
gobert wrote:Great progress with the build blockade. Is it odd that the unit fillers kinda make me want to start an old world army!?
Yea, that may have helped me pull the trigger to build my 'kid Blockade wanted this' army.
Captain Brown wrote:Interesting idea to expand your units with some square terrain blockade23. - CB
Thanks CB. Honestly, the Unit fillers are a super unique style thing for the Old World versus all other GW lines. No little token-y thing from the Eldar line, but this lets you really build in a scenic 'base' that isn't a base that has purpose and includes elements from the army. I won't lie, I definitely got more unit fillers than necessary but hey they're always 'scatter terrain' in a pinch.
Got everything but the Baron primed yesterday, so now starting to work on the Dakka painting goal of the month (Ho boy, a lot of archers to paint!
I finished a dakka painting challenge (a cheap unit) and also made progress on my first unit for my Bretonnian army.
Pre-basing
After basing and remembering that I had one more test model to add to the group.
I'll write up a little blurb on the bois when I finish the whole unit. Lots of layering on these guys which I could probably reduce but I really enjoy the process and I think they're better than a lot of my other recent things.
i wonder if anyone should be concerned that a) theres a blind folded archer and b) hes pointing right at the back of the drummers head? these are great... i love the mustache on the banner barer... lol
Well, it's the first week of February, and I've slogged through the remainder of the Peasant bowmen.
Allow me to introduce Verluckan Scioparto's Long Feather Bowmen in all their 'glory'.
Scioparto's Long Feather Bowmen are the first reserves to be activated and marshalled into Lord Leinad's Army. While the knights enjoy the last few comforts of home, these moderately capable bowmen, armed with the best bows their grandfathers could buy, have assembled under the aged, lucky symbol of the Grey Crane. Scioparto himself, once a moderately capable yeomen, was given the honor of turning the rag tag group of farmers into flak, and he knows it. Suitably armored not for the enemy, but for the not insignificant chance of getting shot by his own men, he spends most of battle exhorting his men to shoot 'arrz' faster. Accompanied by his mustachioed banner bearer, Lorence, and the balding, but not bad, drummer Melox, Scioparto's goal is simply to make it home to his six children and second wife alive.
Remaining photos spoilered for space
Spoiler:
Command Group
If you've already been over to the Dakka Painting challenge, you'll see that this month I'm working on a sneaky bombard for the Brets.
Unfortunately after building I noticed that the crew are just a little tall. So half giants crew the cannon, so what? It's already a mercenary piece!
I do need ideas on a third splash color for the mercenaries like the bombard crew and the crossbowmen. I'm already going traditional-ish gold armor for Borganzinos' Besiegers, but that wouldn't look good on cloth when another color is already cream. Unless people thinkg yellow + cream + teal blue works? Thoughts?
@Usern - Yea I tried to paint some eye sockets on the bandaged nose man but they looked a little wonky. Settled for really being targeted (hah) with washes.
@Gobert - thanks! It's (hilariously) a mix of flock, and mulling wine spice plus chai tea.
@Tommy - thanks! I struggle in this 'what scheme to paint them' as I already have a Blue & gold thousand sons army, grey blue Guard, Purple guard, black and white space marines, red chaos guard, blue and yellow Genestealer Cult, Blue and yellow Eldar.... And Green is evidently a no no for Brets, so I was like ugh... Running out of color options and I did not want an orange army. This was one of the more 'not what I have but also not painting tons of white' schemes.
Built up and painted the Bombard! Huzzah! I really worked harder at layering my paints this go around as I wanted to take advantage of some slightly bigger models to just practice wet blending using my new wet palette. Did I do better? I think so. C&C always welcome of course, but my style (according to other people, I just try to layer paint) is the cell shaded look. (Shrug). I purposefully added purple in here to distinguish the more mercenary components of the army from the standard guys. However I really like the look and am going to use it as a splash color and part of the knight heraldry in some way. I think the cooler blue and purple tones work with the warmer / yellowish cream colors.
Anywho, here is Clipen's Culvern Crew.
Hired by Lord Leinad when his trebuchet crew used unseasoned wood to construct their siege equipment, "Captain" Clipen's crew are all hand picked men (and one woman) of a certain stature. Only selecting persons over six feet tall ensures that the culvern can be moved around even without draft horses in a pinch. Clipen himself studied at the academy in Nuln before a disagreement over the proper length of a cannon led to his departure. Now making his living in the Border Princes, Calvert Clipen looks to make a name for himself and his newer, lighter, 'quick bombard.'
A full size one of the crew.
Hope you enjoy them! I'll have to post them in the painting challenge thread as well.
Also, because I'm pushing myself here, here's the rest of February and March's goal. 20 Crossbowmen and 6 Knights (You know, the point of a Bretonnian Army)
While I have some updates on the crossbowmen (and it isn't very superb to look at) I think my test knight of the realm is looking pretty good so far. Figuring out which layers to do first is truly the challenging part.
Obviously need some more layers to smooth out the brush strokes, but so far so good. Considering I want to finish painting his squad by the end of the month I have some time, but I'm doing okay on it overall.
Thanks guys! Work life seems to have coalesced recently and absolutely smacked me upside the head. I'll have more painting soon but I have to clear some of these backlog work and class things!
Another speedy update. I snuck in some hobby time today and finished one knight. So huzzah! Proof of concept and all that.
Forgive the dust, it's just flock I forgot to blow off.
I really like this scheme. I tried to ensure that the top surfaces were brighter and benefited from that zenethial highlight. I haven't done transfers (and likely won't until the end) as I'm not sure whether I want to use GWs or a 3rd party.
Now only 5 knights and 20 crossbowmen to go by the end of March.
Been a busy week, but I've managed to complete the Knights of the Realm Bannerman. That being said, I also now feel confident batch painting the remainder of the squad. So good progress has been made!
Once again, I'm not doing decals until the very end because I haven't decided on them yet. This bad boy was flocked as well, but the best lit glamor shots were done before that stage.
I used some of Duncan' Rhodes painting ideas here, but I really was trying to keep the darker areas 'in shadow' especially with the banner. I'm pretty pleased with how it came out. The heraldry shield areas look either great or janky to me, which happens when I don't put down five hundred layers of different paints on them. These had five and I still feel like they don't look amazing in some cases.
Here the two finished knights are as they ride together into my display cabinet. I really am enjoying the purple as a splash color. The lead Knight will have more purple than everyone else to show he's in charge.
Now enjoy a moderately acceptable photo of the other four in progress.
The one with the antlers is my leader, and I realized I used gold for all their helmet toppers except for the musician (the one with the falcon who has a sneaky horn hidden under his arm) so I'll have to make his helmet gold as well to make it match. The other squad will also use purple but have silver toppers to better connect as well since I'm not going to add yet another splash color. You can see the variation of the heraldic fields here on their horse's coverings (Insert proper name here). No two knights are alike, but the color scheme ties them together. They also all have blue shields in this case. So the other squad will likely do purple shields but silver helmet toppers. They'll also have their tiny little shields with blue instead of purple like these guys do. I should be able to finish these all by the end of the week, then work on the crossbowmen.
Well, well, well, look what Blockade finally finished.
One full units of Knights of the Realm. I even had time to paint up their movement tray and base it as well.
Introducing Ser Alejan's Lances
Ser Alejan's Lances are some of Lord Leinad's most loyal followers, having traced their roots to the core group of men who followed him to the Border Princes. Surprisingly, Ser Alejan's men are all actually knights, having been knighted by the Baron or another local lord. Ser Alejan wears more purple than his men to indicate his high standing with the lord. Know for his rash charges in his youth, Ser Alejan has listened to the baron of late and been careful to shepherd the men under his command, saving their blood curdling charge for the most worthy of opponents.
The rest are spoilered for your benefit.
Spoiler:
Ser Alejan himself.
The rest of his command - the Knight with the Hunting Falcon has a horn hidden on the bird side - totally a musician. He is also the most junior member of the unit, hence why his helm is entirely silver and not the gold of his peers.
The remaining three knights.
So for those of you keeping track, here's the unit count so far.
Finished Ser Alejan's Knights of the Realm
Captain Clipen's Bombard
Scioparto's Longfeather Bowmen
In Progress Braganzino's Ballistas - Status - roughly 40% done (still on base layers, but must be done by end of March)
Not Started The Duke/Baron on Royal Pegasus
3 Pegasus Knights
Knights of the Realm Unit #2
Foot Knights
Men at Arms Unit #1
Men at Arms #2 / Yeomen Guard
Two Prophetesses
Trebuchet
10 Mounted Squires
Keep on building! I'll get a new family shot once I finish the crossbowmen/ballistas.
April's goal: Castle Walls, Yeomen and a Prophetess
Ser Alejan's Knights of the Realm
Captain Clipen's Bombard
Scioparto's Longfeather Bowmen
Borganzino's Ballistas
All done! - 56 models (including the cannon itself)
Still a lot to go
The Duke/Baron on Royal Pegasus
3 Pegasus Knights
Knights of the Realm Unit #2
Foot Knights
Men at Arms Unit #1
Men at Arms #2 / Yeomen Guard
Two Prophetesses
Trebuchet
10 Mounted Squires
But anyways, photos!
A mixture of the old Dogs of War Braganza's Besiegers combined with some 3D printed Bretonnian Crossbowmen from Highland Minis. Love the combination, definitely looks like they put their more heavily armored boys in the front row and their reloaders/weaker reserves in the back.
But wait, a story!
Borganzino's Ballistas - founded and led by the enigmatic Bartholomew Borganzino, the Ballistas are a rarity in the border princes - heavily armored crossbow infantry. Specializing in siege warfare, his men are not just crossbowmen, but siege engineers. Equally adept at digging trenches as they are at assembling mantlets, Borganzino invests in his men and their equipment. Dead men pull no paychecks, and he charges a premium for his mens' unique skillset.
Rest of the Mercenary photos spoilered for your benefit.
Spoiler:
More Knight photos since that's the second unit completed this month.
Some more army shots so far. Slightly different but spoilered since they all look similar.
Spoiler:
Next up is probably something to cleanse the palette a bit. Honestly might jump to a Black Templar vehicle or something else. Still need to work on the Brets and finish them up! Can't do another giant block of infantry for a bit, and I've got two blocks of Bret Men At arms staring at me from the shelf.
Great work and a terrific army shot! The mantlets with the sigil striping on them was a great unifying touch. The color scheme rocks, individually (you've painted them up well) and especially en masse. Rock on!
@meercat - thanks! The stripes were all freehand, and it's about the most freehand I do. but after a few practice ones, I definitely think it went better. The way I'm using paint colors is that the more purple a unit has, it's either more mercenary or the person is more powerful. So the units like the bowmen that are blue and cream are, well, poor and definitely NOT powerful. But there's tiny amounts of purple in accent colors everywhere.
On to today's question - What do Black Templars and Bretonnians have in common? Well.. in this case... they're my monthly goals!
Character Goals (I feel like there's a joke in there somewhere)
Goal Keeping (with the Dakka Painter League abandoned project of the month + large project IC's Podcast goal)
This repulsor & dred have been sitting in the Black Templar project box for at least six months, likely longer, and it would be nice to clear them out. I've found that the basecoat does a lot of heavy lifting with my style of painting BTs. The tedious part is the highlighting. Tons and tons of edge highlight. With the dred I really want to do a bit more weathering using powders and some silver painting for scratches.
Here's the progress so far! Black all has a highlight layer, I'll mix some more of the incubi darkness with some brighter blue and do tighter highlighting on the extreme raised surfaces.
April is my absolutely busy month, so if I can get to the bretonnian characters, cool. If not I won't sweat it. Between school, work, graduate program things plus family obligations and I've got a perfect storm for something not getting done. if it's not perfect I won't be sweating it. Anything to clear the mountain of plastic waiting on the shelves of potential.
Zambro wrote: Your Bret army pictures are coming along so nicely. They look amazing on the table.
I really enjoyed the little bit of backstory for the Borganzino's Ballistas.
Thanks! I'm really enjoying coming up with a backstory for each unit. I think when I finish the army I'll print up a little army roster w/ backstory for each one and make a tiny book.
Making good progress so far on the April goal. Should be able to finish the Dred by the end of the weekend.
Man, it really is nice to paint NOT a ton of infantry.
Redemptor dred finished. Or at least tabletop ready. I'll want to weather him up a bit after this but I'm happy so far. He meshes well with the rest of the army. But that was not the fully April goal. I wanted to clear out the Gladiator Valiant too.
Started with the black turret as I already had the colors out. Made some good progress on it and I'm calling it acceptably done. Will probably add a decal or two.
Turret on the hull. I REALLY don't want to highlight everything white, so I'm debating how much 'red' to make it. Should it be white primary, then red secondary, or the other way around?
Hopefully the tank will go fast (Way more metallic painted pieces than the dred, I started that but it's a lot of finicky work around the levitation pieces).
Task complete for the April Dakka Painting Challenge (and ICs challenge, for that matter, I'm double dipping). Lots of photos today, so prepare to SCROLL.
First up, the Redemptor Dreadnaught. Now with Decals and Tufts!
Second, the as yet not seen in progress Gladiator Valiant. I really like this vehicle. After painting this and a Repulsor, I much prefer this kit. I also think (maybe?) the developers/mini designers learned their lesson. Less weapons is more. This vehicle has just 4 weapons including a turret multimelta. I do not need a whole data sheet for weapons, just TWO different profiles to memorize. Much more reasonable.
Okay, now there are some cute little partner shots here that I will spoiler.
Spoiler:
But wait, there's more! I ALSO painted up this little Hasslefree female warrior. Why? I had her out, wanted to not paint just black, red, and white for a while and painted her up. A free extra painted mini for the year!
So, since I count tanks as 'ten minis' and dreds as '5 minis' that's 16 more minis in the completed pile for the year.
So here's the scorecard for ALL minis.
Painted this year: 72 mini 'points' (1 tank, 1 dred, 57 infantry/artillery)
Purchased: 19 minis so far (mostly IG sized)
Keep on painting! For the remainder of the month I'll be picking away at some Bretonnian characters who aren't officially part of a challenge but would also just CLEAR things out. I've got a lot of schoolwork and the like building up so that will likely impact me finishing anything else major.
I really like your use and implementation of the Black Templars colour scheme. It can be quite easy to get sucked into making everything black. You've done a good job of making both minis look interesting but still clearly what they are supposed to be.
Love the white and red Valiant, gives a great balance to all the black in the army. What’s your white recipe btw?
Thanks Gobert! It's actually a color scheme I've wanted to do for a while. I went lazy on this.
Wraithbone primer from the rattlecan, seraphin sepia in the recesses and on the bolts. Then edge highlight everything with corax white then white scar. I tried to keep the white scar on the more upraised surfaces.
Hilarious, this is not what I do on my regular BTs, as I cannot get wraithbone spray on them because I'm not really a sub assemblies painter. So I start with black, then I use Coat De Arms old school paint to work from black to dark grey, lighter grey, then sepia in the recesses, then about two more layers of grey to white. I actually need to finish my last group of Primaris crusaders so I'll show how they look next time I have something else to post. Been an insane week to get any other painting done.
Thanks, it’s a cool scheme, I’ll file that way for future use! Have you tried masking the rest of the mini off to let you spray wraithbone on the shoulder pads? I’ve had good success with my Void Panthers doing that. I’ve even used it to spray their bolters.
gobert wrote: Thanks, it’s a cool scheme, I’ll file that way for future use! Have you tried masking the rest of the mini off to let you spray wraithbone on the shoulder pads? I’ve had good success with my Void Panthers doing that. I’ve even used it to spray their bolters.
Honestly I need to try. A bigger chunk of problem for the crusaders isn't the shoulder pads, but the tabards and the like. I guess putty would work, but I don't know how to use my airbrush (It's a nice one, just never had a place to vent it.) so another thing I should work on. I'll have to try it with one of the handful of infantry models I have left.
I prefer masking tape as it’s hard to get the putty (I use blue tac) thin enough to get to things like the backs of tabards. When I first got an airbrush I used it outside to good effect.
Painted up this Damsel for my Bretonnians. I sort of used her as a test case for the damsel on horseback.
Debating if I should add a line of blue or something along the hem of her coat. But otherwise I'm pretty happy with her! (I've since added flock and gave her some glowy eyes.
So its been a SLOG of a month here and only just managed to clear some painting. Between school and work and family responsibilities.... there's never enough time.
But here are the pair of damsels.
I did not go glowy eyes for the Damsel on horseback as I figure she's more focused on riding, not casting, at this second. Whites of her eyes are the best I can do.
Spoilered Montage / Close Ups
Spoiler:
With this done, I've also finished up the little Bretonnian Lord on foot's helper (thats a mouthful) and I will be finishing up the Lord as well in the next few days. Then its onto either some Imperial Guard for a break or a BIG chunk of the men on foot to clear out a full unit. Trying to finish this whole army this year, but with summer coming up I should have much more time to paint (very excited for this).
More Progress, although not the amount I hoped for, but progress is progress!
First up, the little Lordly Helper for my Bretonnian Lord on Foot.
Face detail is iffy, which is about the best I could do. Not the best on skin tones at this smaller level (or any level, for that matter!)
But also, because I needed a 'Hobby Progress Challenge' Mini and didn't have anything just primed I could drop for the Independent Characters, I cracked into the Age of Sigmar Cities of Sigmar box and finished up this Alchemist dude.
I hope the sigils come across as 'glowing' There's also a hair / wisp of something in the pot that has now been removed. Mostly contrast paints, but I finished this guy up in about two hours. Pretty happy with him.
Now I've been building my Krieg Siege Engineers and TEmpestus Aquilons. Not because I want to paint them but because it's a nice break between painting loads of bretonnians. However, my goal this month is to clear one of the large groups of men-at-arms. Yippie.
@Gobert - Thanks! Yea, you don't see many at all, so I figured I'd paint him up. The lord is still a WIP.
This month's painting challenge and hobby goal is to finish these boys.
Annoyingly, my only photo is evidently the one without the guy with the tritarch, but whatever, it's fine. It's been a long month with limited time to paint, so I picked a bigger unit since my next week is free! Also picked up some new paints and 3 more pegasus knights this week because evidently that's the meta but also now I can do some conversion
Lord Leinad's Exile Army
Ser Alejan's Knights of the Realm
Captain Clipen's Bombard
Scioparto's Longfeather Bowmen
Borganzino's Ballistas
2 Prophetesses
Lord's Helper
All done! - 59 models (including the cannon itself)
In Progress
Lord on Foot
Men at Arms Unit #1
Still a lot to go
The Duke/Baron on Royal Pegasus
3 Pegasus Knights (Unit 1)
3 Pegasus Knights (Unit 2) - A NEW PURCHASE
Knights of the Realm Unit #2
Foot Knights
Men at Arms #2 / Yeomen Guard
Trebuchet
10 Mounted Squires
Progress! I've only got 6 days left, and it's strangely super busy in the summer months here (OMG heat wave, but doing more things than I would expect outside).
Also, this is NOT men at arms #1 - I realized that on my Kanban Board - this is my Yeomen unit (hence why they all look more uniform & will have more purple than the other unit. So I'll have to switch around the units on the to do slash in progress list.
Anyways, got every base layer on but skin tones.
Close up on the unit filler.
Now more action shots of all the units from all the sides. Spoilered for those that care.
Spoiler:
Anywho, finishing this unit will push me over the halfway miniature goalpost, (not unit, but still!). Then I'll likely work on the Battle Standard Bearer and the Pegasus Knights / Regular Knights.
Sweet looking unit, and great unit filler idea! I've always enjoyed seeing the creativity of some people in putting together unit fillers.
Are you up to date on TOW's new FAQ/Errata? I've seen some discussion around it - what are your thoughts? I don't know the game, but I get the feeling there are some big (divisive) changes.
It's a meaty post today, so I hope you brought your BBQ dipping sauce.
Zambro wrote: Sweet looking unit, and great unit filler idea! I've always enjoyed seeing the creativity of some people in putting together unit fillers.
Are you up to date on TOW's new FAQ/Errata? I've seen some discussion around it - what are your thoughts? I don't know the game, but I get the feeling there are some big (divisive) changes.
I wish I was - Honestly I'm building this army for me, then I'll figure out what's going on rule wise as soon as I finish. By my count, I have roughly 1000 points painted up and ready to go. First up, enjoy some 'not best effort photographs taken by a very tired Blockade last night' from Lord Leinad's latest unit.
Russellito's Half-Halberds are some of Lord Leinad's oldest retainers and followers. Man of common ancestry who have fought by his side for years. They have earned the right to paint their shields in the full blue of his coat of arms, and those who have demonstrated exceptional bravery have been well-rewarded with armor and paint of the rarest pigment. Along with some cold silver torn from the pockets of their enemies. The Half-Halberds form the core of Lord Leinad's battleline and often form the rearguard, protecting the bombards and Scioparto's Longfeathers alike.
Spoilered cause they're very similar.
Spoiler:
The Command Group was my Dakka Painting Challenge focus, and I'm pretty pleased with them and the conversion work.
Spoilered alternate angles
Spoiler:
Now some left and right flank lookie-loos. Some brief background. Everyone in the first two rows has either a more action pose set up or has purple on them to signify a bit more wealth among the yeomen. It also helps me figure out where models go. The two men with flag hats are the rear flank corners, also helping keep track of who goes where.
Unit Filler & Back Row gets a bit of love too.
Now the current army group shot!
Lord Leinad's Exile Army
Ser Alejan's Knights of the Realm
Captain Clipen's Bombard
Scioparto's Longfeather Bowmen
Borganzino's Ballistas
2 Prophetesses
Lord's Helper
Yeoman Unit - Russelliti's Half-Halberds
All done! - 78 models (including the cannon itself)
In Progress
Lord on Foot <---- THIS GUY NEEDS TO BE DONE URGH
Still a lot to go
The Duke/Baron on Royal Pegasus
3 Pegasus Knights (Unit 1)
3 Pegasus Knights (Unit 2) - A NEW PURCHASE
Knights of the Realm Unit #2
Foot Knights
Men at Arms #2 / Yeomen Guard
Trebuchet
10 Mounted Squires
I've got a lot of respect for that! It's the way it should be.
What do you think you'll look at next? I'd love to see a peg unit...
Hilariously that's actually whats up next. As you saw on the list I've got a mix of big and small units remaining. I finished the Bretonnian Lord on Foot (I'll wait to post pics of him until I finish another thing or two).
Working on Lady Olive, Knight and Battle Standard Bearer of Lord Leinad's Army currently. I also have my Pegasus Unit that I'll start working on shortly. Had some out-of-the-ordinary muscle/tendon arm issues recently which make it hard to paint (and type) so I'm taking a short break from that. But I'm beginning to feel better so hopefully I can be back on the bandwagon soon enough.
After that, it should be August, where I have a lot of open time (maybe) prior to the next school year starting. I'll likely hit the next big Yeomen Unit then and finish building the Baron/Duke on Griffon or Whatnot.
Well it's been pretty quiet here this month although I've been working 3 jobs so painting time is short and hard to capture. I've been focused on my Battle Standard Bearer this month, and pretty happy with the progress so far. I went for simple and well done over more flashy color choices I think. Feedback is always appreciated - In this particular case do I need to highlight the horse?
( EDITED as I put in doubles of the same photo. Oops.
It's a black horse with white hair and white (ish) hooves - I still need to do a light sepia wash on the hooves to brown them up a bit, but I think the horse is nearly done. Next focus is the skin and hair of the rider - She looks very joan of arc (which was likely the point) But I like the idea of a Bretonnian Exile list being more open to female knights & also not having as fancy a banner as the mainline Bretonnian ducal armies would. Once I decide on a transfer to put on all of them it would be added in.
If I ever drop money on the real BSB minis, I'll slot her into one of the knight groups as a Paladin.
thoughts? Feedback? Once she's done, I'll be starting on the Pegasus Knights. I probably should have been painting them up at the same time but honestly my brainspace is so limited right now I figured focus on getting one thing done over poorly attempting 4 minis.
Nice work on the BSB, she looks a bit Brienne of Tarth to me, which would suit an Exile list pretty well I reckon. Keeping the banners simple would also work for the exiles too. Makes sense that they would be stripped of their heraldry, or maybe have a basic version instead?
Nice work on the BSB, she looks a bit Brienne of Tarth to me, which would suit an Exile list pretty well I reckon. Keeping the banners simple would also work for the exiles too. Makes sense that they would be stripped of their heraldry, or maybe have a basic version instead?
Thanks Gobert - or I'm just too lazy to figure out heraldry right now and will be doing that at the very end.
Amazing work all over bretonnians. This reminds me times when I'm a kid.wanna see your pegasus knights.
Thanks Kabbakaba - You're in luck then! Because I FINALLY finished them.
Introducing Ser Watte's Sky Coursers
Ser Watte was once one of the most feared Monster Hunters in Brionne, but when called to the cliffs of Massif Orcal to combat the growing orkish menace, he came face to face with several Pegasi captured by the hulking orkish brutes. In freeing them, the pegasus "Mitanni' carried him far away from his allies. His original companions called him a coward when, upon the eve of battle, Ser Watte was nowhere to be found. But Ser Watte was isolated, high atop a mountain top deep in the Fangs, praying to the Lady to help him save the life of not one, but three pegasi. The lady granted him his wish, but that wish created a self-imposed exile as his former Baron declared him a traitor for cowardice before the enemy. Thus Ser Watte traveled east, eventually ending up in the territories controlled by Lord Leinad. Thus, an agreement was struck to develop a safe harbor for those brave souls willing to ride the Pegasi of the Fang Mountains.
Ser Watte himself.
Ser Stepano
Ser MaPont
More Photos Spoilered for Honesty Sake
Spoiler:
Heraldry from the side!
Also, a BONUS for you
I haven't really shared about my Lumineth Army because, well, lets face it It's not very important when you're here for Bretonnian Delight. Maybe later.
But Bretonnian Progress Awaits!
Lord Leinad's Exile Army
Ser Alejan's Knights of the Realm
Captain Clipen's Bombard
Scioparto's Longfeather Bowmen
Borganzino's Ballistas
2 Prophetesses
Lord's Helper & Lord on Foot
Yeoman Unit - Russelliti's Half-Halberds
Ser Watte's Sky Courser - Pegasus Knights
All done! - 82 models (including the cannon itself)
In Progress
None
Still a lot to go
The Duke/Baron on Royal Pegasus (Still needs to be finished)
3 Pegasus Knights (Unit 2) - A NEW PURCHASE
Knights of the Realm Unit #2
Foot Knights (24)
Men at Arms #2 / Yeomen Guard (32)
Bonus Prophetess
Trebuchet & Crew
10 Mounted Squires
Planned Purchase
Cathay Cannon (For Bombard #2)
Next up will likely be the Yeomen Guard as that's the biggest piece of the pie and will be a good change of pace from what I've done in the last month. At the rate I'm going, the rest of the year will look roughly like this.
August - Yeomen & Prophetess
September: Knights of the Realm & Trebuchet & Crew
October: Foot Knights
November: Pegasus Knights & Maybe Mounted Squires
December - Baron
First up... I did get started on my painting goals!
As per usual, moderately potato shots. My overhead lightbulbs have also failed so lighting is worse now, replacements on the way though.
Also - seeing the new made to order Brets and I'm like "I don't need them, but if I get them I could field an even bigger group! So naturally, I'll plop down some money for both the archers and spearmen.
THEN... The NEW hotness. Trench Crusade. It's been a while since I did terrain, and I miss it. Here's the only photo I managed to take. It's covered in goop and primed now along with the rest of the Court and New Antioch Minis. I'm thinking of going for a North African Vibe here instead of the usual fields of Europe vibe.
Normally I'd be like "Let's make a full sized 3-D board. But I really like the modularity of using scratch built pieces and just moving them around a flat board to create depth. It also will be easier to store. We'll see what I end up doing. Gotta finish some of these Brets first I suppose.
This is my test piece for my modular trench crusade board / warhammer trenches. I am not really planning on building the base part of the table for quite some time / at all but these pieces help reset the hobby boredom counter and clear the mechanism. I've done most of the building for now, so enjoy the following building/assembling/ sculpting montage.
Then shortly it's back to work for me so likely the pacing of updates will shrink for a bit sadly. Still have the goal to finish the Brets though!
First up - the ruined building trench outpost. I'm going for a more desert ish theme for my Trench Crusade buildings and minis as I'm intrigued by the Nile front rather than the usual European front idea.
Spoilered for easiness.
Spoiler:
The beginning.
Adding Sandbags EVERYWHERE
Rear positions need sandbags too!
Inside of the rear positions.
Above view with removable second floor. I went for a more square building to match Ethiopian / Abyssinian stylings.
Second grouping now - The smaller modular pieces - a trench shrine (With space for replaceable slot for whichever sides little shrine goes in there (not made yet) or a 40k shrine!)
Now some more pieces - a larger angled trench wall section that is damage, a blood fountain, and a small supply depot.
Finally* - This is a big post, sorry! - I have the other larger piece - a trench step up fighting position and a trench temple. Ideally this will have some religious iconography inside. I made the small little railing thing in front removable and the room is removable too - I've added sandbags to make it more 'we have to protect stone piece somehow.'
Initial Layout.
Detailings and scale.
You can see I've tested this piece several times on the not yet dry vallejo battlefield texture on top of the trench, but it's fine, w/e.
Yes well... It has been a month, and with school starting, it's definitely been short on time. But in good news I think I'm on my second to last piece in this set for now.
Built up this three tier trench piece. I designed it as a 'both sides have been building trenches towards each other and thus each side created a 'island' of trench works around a small old ruin. It is roughly 18 inches by 18 inches or so (at least I think).
A zoom in on some details. A friend gave me some random 3D terrain pieces that they bought during COVID for their kid and they never used them. So their random curiosity is my gain, as I used some of the little barrels and boxes. There are some wall pieces and such that I'd love to work in but it didn't really match this set of terrain. Maybe later!
Detail on the high point. Perfect for a sniper in Trench crusade, only the toughest of stone structures remain exposed on the firing line. You can see more random detailing here. I scooped up a lot of random leftover bits and rocks and sand and dropped it into areas I figured where random bits would eventually sink or fall to.
You can see the detailing on the foam here. I basically tried to carve wooden detail into the foam for the plans for the trenches on one side. I'm pretty pleased with the result so far, but we'll see how it holds up to painting, especially since I likely will need to cover it in mod podge to protect it.
So that pieces is ready for painting (now that it has it's pre-mixed grout surface treatment), I got started on my last piece of this set - a bunker strong point.
You can see the bones of it - a trench line in the middle, raised firing step on three sides, plus I'll likely put 'barbed wire' on the hill to add a new feature and some explosive shell markers somewhere. With the bunker piece being 3D printed, it's hard to carve into somewhat, plus its also thin. I may consider putting paste atop it to give it a poured concrete look, then drilling holes in the thing maybe?
Anyways, keep on building (and painting). I'll hopefully spray paint this week!
That's 11 pieces of trench crusade terrain completed! Is it enough for a 3x3 board? Uh... Sure? I literally haven't even checked, but the big hill is roughly 15x15 inches so.... yes?
Painting Strategy (for everyone's sake) - Dark brown basecoat, lighter brown drybrush (all over), Red>dark Orange>mid Orange> light orange drybrush of metals,
mid, mid-light, light brown to parchments of drybrushing for ground, burnt umber wash for everything at this point EXCEPT THE SANDBAGS - this makes them stand out from everything else and keeps their matching look.
I then drybrush various dark to light greys for wood pieces (after bringing them back to 'wood' level with wood grain paint).
Blue barrels are two different GW blues (a mid tone that is sort of matte and I'm forgetting it, maybe Altiaoc blue?) and then Teclis blue for the highlights. Stone was light blue with a drakenhoff nightshade wash (yes, expensivish on all the stone) then a drybrush of the same blue-grey, then a lighter blue, then white mixed with that lighter blue, then white)
Close ups on different pieces of my Abyssinian Front Terrain.
Trench Temple
Awkward photo #2 because I wanted to show you the detail inside. I purposefully made it system & side agnostic, but the front little piece is removable so you can put any shrine in there you want. I wanted it to look like sorta plastered / stuccoed walls and some older ruined stone pieces.
Trench Outpost / Lookout
The top floor is removable to place more guys inside. There are details inside, but very hard to paint (I always forget this lesson).
Some scatter terrain pieces. I like this one the most as it includes a dead tree that has literally been in my house for years.
Water barrels
Finally - the first of the Fronteris Converted Trench Pieces. I really like these pieces as they look so much better than just random metal walls everywhere.
Last but not least, the big boy. Trench Hill. Standing nearly three inches tall at it's height, it's roughly 15x15inches. Maybe a bit more.
I tried two different methods of trench boarding here - one with foam and one with actual pieces. I think the foam pieces carved to look like wood look nice, but the other side is more integrated (and likely harder wearing). We'll have to see what happens with actual gameplay!)
EDIT - Added this photo as I realized you can't actually see the other 'type' of duckboard.
Let me know what you think? One was drybrushed with my usual gray strategy, the other was drybrushed with the same colors as the ground, just with less pressure and build up to show more 'mid walkway definition' (Made that up).
Anywho, enjoy and keep painting!
Goal next month / this month is finish brets and get some New Antioch boys on the table.
SarpedonofSotha wrote:Way to go ! That looks absolutely amazing! Keep up the great work !
Thanks! I know watching terrain being painted can be sort of a slog at times so it's good to hear C&C on the end parts!
muette wrote:Awesome terrain pieces! Gaming there has to be fun.
Sadly due to the presence of a tiny fingered goblin and the need to have eyes on them at all times, gaming here is rare, but is still doable! Can't wait to host this as it's much smaller board than the Warhammer boards so this should actually be playable upstairs, which is nice.
Kid_Kyoto wrote:Amazing terrain, love the mix of bits and the feel of despair around them.
I finally got some actual trench crusade bits so now I can start working in little shrines and things of that nature to make objectives and more scatter terrain.
But I have a treat for you! NOT more terrain!
The first member of my New Antioch Abyssinnian Expeditionary Force / Nile Front Warband. Super excited for this, as the scheme came together from start to finish in just under two hours. The paint has finally gone much more matte than some of these pictures (not sure if it was the layering or just some excess water).
Beauty shots for the sides and rear spoilered.
Spoiler:
The badge is a differently version of New Antioch symbol - white for purity of their cause, blue border for the waters of the Nile, blue spear tip for their division symbol, and green field for the hills of Abyssinia.
Now, some action shots!
Now that I see the vision combined, the scheme has really clicked for me. Time to make some progress on clearing this backlog! Keep painting (and get back in the trenches!)
All 8 of them here. Four Yeomen, a sniper priest, an engineer and a heavy mechanized infantry member. Of all of them, I think the engineer was trickiest to do. Not sure how I feel about all his armor still.
You can see I've tried to add some various scrapes and dents to the big guy here. I don't particularly want to go heavy duty sponge weathering on him as it is a desertish front and rust operates differently in dry climes.
Now a comparison shot with other painted minis of mine (for scale of course).
With them done, I'm still motivated to finish yet more warbands. So I'll be finishing my court of the Seven Headed Serpent warband. This way I have two demo groups to use with my friends. I am actually expecting part of a Byzantine Remnants warband as well, so we'll see how they slot into the members I already have.
But now, another sneak peak!
Going for bright skin, dark armor. Will likely work the metal armor up to sycorax bronze, then agrax and nuln oil it right back down.
Happy painting!
Made some good progress on the Seven Headed Serpent Court Warband. The warband is 8 minis, and now I've completed fully half - the test model for the Yoke Fiends & now the three Hell Knights!
But first, what does the Trench Board look like now?
I still want to finish three more pieces. The remainder of the GW fronteris trench lines with a concrete hard point (2 pieces) and a full bodied bunker piece. That should fill the board up nicely and give some more terrain options.
Now the Hell Knights. I wanted something that would both stand out yet match the board. Gold works for the desert color scheme. Could have done silver, but it didn't really look good with the bases.
First up is the Hell Knight w/ Orphium Rifle (Spelling? IDK)
Spoiler:
While I love the look of a knight with a rifle, I really like this Axe-man more. The amount of blood on him is very suitable (although nothing like putting more gore on him.)
Spoiler:
Finally, the Sword & Mace combo
Spoiler:
So I have the Sorcerer, two yoke fiends, and a pit locust to finish. All are about 60% done. I may order a praetor, but I'm really trying to clear things so that I don't purchase more minis than I paint. Otherwise, with these guys done, I'll finish those three terrain pieces, then likely clear some Bretonnian backlog. That will set me up nicely for the lean months of November & December.
That trench board looks fantastic! The latest minis are also looking really nice, this is some solid work. I like the weathering on that armoured Big Guy earlier. Loving the Hell Knights too, mate, great stuff.
That trench board looks fantastic! The latest minis are also looking really nice, this is some solid work. I like the weathering on that armoured Big Guy earlier. Loving the Hell Knights too, mate, great stuff.
Thanks Ragsta. I need to be more brave about doing that with my minis. It was fun, and I think the next step (once I'm done with all of the minis for Trench Crusade) is to use the weathering powders that have, literally, been gathering dust, and give their bases all a nice dusting of desert powder. Appreciate the kind words!
Good news - I completed the Court of the Seven Headed Serpent Warband. Introducing the Bloody Nile Warband (Name is still WIP)...
First up, the entire warband.
For some reason the pit Locust's 'face' details is always weirdly blurry. Not sure if that's the demon host within it or just that it isn't the sharpest detailed piece.
Now the big boy - the Court Sorcerer - Onnomez the Two Tongued.
I'll be posting all the photos in my 'completed' section of the Finished Models thread (yay, something else done!)
Thanks for all the kind words muette, Usernames, and Kid_Kyoto. It does make a difference, especially on the slog that is finishing this one terrain piece.
But bunkers wait for no war, so let's keep on with that progress update.
First up, just some basic tank traps (now muddied up, of course) but yet another good scatter terrain piece - and very versatile!
When last we left off, the bunker looked something like this...
and now it looks more like this!
But wait, who is that in the ruins? It's warband number three for Trench Crusade, my Byzantine Remnants (I'm a sucker for them, I know.) So that makes three warbands (although since both these guys and the regular Abyssinian Expeditionary Force are both New Antioch, I could combo them and just use one of their sets of rules).
Dumb move moment. When I ordered them off etsy (because I don't own a 3-D printer, shocking I tell you. But I know how much trouble I'd get myself into with one), I said 'oh look the Lieutenants have all the pieces and look of the regular guys, I don't need to order them too. Naturally, I was wrong, and now I'm stuck making fancy guys into regular yeomen instead of having a ton of Lts. Oh well. I think they look good, and I'm trying to change them up so they look a bit unique, which the capes help with.
Man, you’ve been busy blockade! Fantastic work on the trench board, speedy production to a good standard the trench crusade troops are coming along nicely now as well
Meer_Cat wrote:
Loving the bunker build- really nice work. I'm a big fan of pink insulating foam board, myself. Very versatile, and easy to work with. Rock on!
gobert wrote:Man, you’ve been busy blockade! Fantastic work on the trench board, speedy production to a good standard the trench crusade troops are coming along nicely now as well
Thanks team! I have good news. More progress. First obligatory "More unprimed minis (although they are all now primed yay!)
Now onto the final terrain pieces! First up, the boring things.
Tank Traps
Fronteris Terrain as Trenches
Combined with the other two now I have three pieces!
Bunker Complex
Trench /Bunker Entrance
Sniper Nest / Opposite the Bunker
GRIMDARK
The 3D printed / Resin printed skeleton bits are a bit flexible, but I'm still betting they'll be the first to go.
Some other bits and bobs that haven't showed up yet. Made this piece a while ago to add a bit of 'nature' to the board. I still need to go back and put tufts everywhere too.
Here's the overall board layout (modular, but I like this one as it is tall pieces on either side and smaller pieces as no man's land in the middle).
Terrain List
Left Side- Central Bunker, Water Storage, Damaged Trenchpiece, Miracle Fountain. Central (top to bottom) - Trench Hill, Two trench pieces, Trench shrine, Tank Traps. Right Side (Top to bottom) - Trench Graves, Modular Trench Pieces, Trench Temple, Ruined Building Outpost
Total is 15 pieces of terrain for this game I've played once! I have one more piece that isn't even fully built (and might never be but that's okay) and is the last bit of the fronteris wall that I want to include, and / or a crater with a damaged vehicle. I think the board is sufficiently dense right now.
Thoughts? comments? Things you see are missing? Keep painting and building!
Tommygun1918 wrote: That's a great looking board. I'm very tempted by Trench Crusade, but I don't need more armies to paint.
Thanks Tommy, but I'd not be a great trench angel if I didn't point out that an 'army' is less than ten models in most cases. Just a taste, am I right?
Anywho, was planning to focus on the Brets, but since I'm attending Shorehammer this year, the needs of an army list have dictated what I'll be doing.
Sword Brethren & Scouts, plus an Execrator. So naturally I had to make them. Sigh, I always do this to myself.
At the startish. You can see the work on the big block of Brets in the back. There's still this month's challenge for December actually, since I've already cleared November's goal for the Independent Character's HPC. But let's focus on these guys first.
"Hey, you need some scouts too btw. They're really good compliment to a list that is basically 'hey, deal with a land raider and a repulsor and two large blocks of smack you in the head boys.'
Sigh. Fine.
Anywho... progress was made.
I have until the first weekend of december. Wish me luck!
PaddyMick wrote: I was wonering what to do for trench crusae terrain, and you've given me a lot of ideas and inspiration, thanks. Your stuff looks great!
If I had a single 'redo' I think I'd have split the hill piece into two pieces - made it so that the small hill can fit perfectly atop the big one and be removable using a magnet or four to hold it in place perhaps. That way it could be it's own thing elsewhere. The challenge with 'actual damaged terrain' is that there isn't enough flat space to mix them effectively without it looking weird.
I have the day before Thanksgiving (here in the states) off of work, but tiny human daycare is open so today is a great day to get some work done! Here's the current status of the Black Templar Sword Brethren.
80% done I'd say. If I was really smashed for time, I'd finish their bases and call it a day. But I have the time, so I'll be adding another layer of grey-white, then red highlights, then the black highlights with incubi darkness. I've brought two minis up to white scar white level of shoulder pads, and honestly, it looks super chalky and I'm not very happy with it. So instead I'll probably stay with the Corax white level (which is the next step to do).
Cloaks! Not my method as I found it online (thanks youtube shorts). Method is straightforward and suprisingly easy to do (and shorter to do than layering up tons of layers with a brush like I normally do).
Sponge Method - Spray paint black, all over paint khorne red, carronburg crimson wash, sponge khorne red back up, then 50:50 mix Khorne red & Mephiston red, then just mephiston, then wazdakka red for final highlight. All using a sponge and going lighter each time. Use a fine tipped brush to get the smallest areas hidden by the backpack. To also be transparent, in the video they didn't even bother with the first two steps, starting from a dark red sponged on immediately after undercoating. Just make sure you're being a bit light with the sponge to avoid the bumps of too much paint, but I a loving the texture.
Now to focus on the Combi Weapon Lieutenant (who nearly made the Shorehammer list, but I decided to switch him to an Execrator at the last minute. I'm beating myself up over this a bit as I have four characters but only 'space' in my two big attack blobs for three of them, so likely the Emperor's Champion is going to be left out of a blob and just...hang out nearby).
No Cloak cause he's sneaky, and two close combat weapons because that's what the model comes with. Kitbashed from a Sword Brethren (which is an amazing kit for bits & character making if you're even moderately a kitbasher). Really particularly proud of the leather work on this guy as well. Still trying to figure out how to do the tabards differently than my normal style, so I figured the crosshatched would look okay. Not sure if I'll keep it or just paint over that.
Great work on the Bretonnians and the terrain. Good luck finishing that force for Shorehammer.
Cheers,
CB
Thanks! Making some progress as you'll see - I even managed to get primer on the scouts so all the painted minis should be my own.
SarpedonofSotha wrote:Amazing work ! Truly inspiring keep it up !
Thanks! Here's some more mini pics as a thank you!
It's the yearly 'it is Thanksgiving in the USA and I'm not cooking anything so instead I'll post."
Pictures probably look a little bit repetitive, but other than basing and black highlights and maybe some metal work (the least of my concerns right now) I'm nearly done!
The whole crew. (7 Sword Brethren & 2 Characters)
Icon Bearer for the Sword Brethren - not that they have special rules, but this guy could always represent another character if needed and I love the banner/religous icon.
More Combi Weapon LT work in progress - He'll be my Castellan for my Shorehammer List
Finally Execrator progress - he's the closest to being done (and now has painted skin too even though it isn't in these pictures.)
That's it for today's progress & likely tomorrows as well. Next post will be the finished group shot and probably the whole army shot prior to shorehammer!
Happy Turkey Day for those of you celebrating, and if not, happy Thursday :-)
Trench crusade board looks amazing! With 10 minis and I’m assuming a small sized board it would probably double up as a kill team board too.
Great work smashing out the Templars. I too love a bit of sponging, gives a lovely texture and more consistent than stippling can be
So I promised some photos, and here I am to deliver! It's been a busy two weeks, but I managed to take some photos. Shorehammer is a Highlander Style Tournament, so only one of anything/everything! 1250 points.
My list...
Helbrect
Castellan
Execrator with Enhancement (the fights first one)
Emperor's Champion
5 Sword Brethren
5 Space Marine Scouts (Sniper & Missile Launcher)
5 Intercessors
10 Assault Intercessors
Land Raider Redeemer (w/ Multi Melta)
Repulsor (Just a regular one)
The usual suspects of photos.
Scout uniform close up (cause I'm pretty happy that I did it so well)
Land Raider
Okay so rough overview - Played Tau, Dark Eldar & Orks.
First game, hung tight with a Mont'ka (the all units get assault heavy weapons things) for about 3 turns. I've not played Tau in... two years maybe? It was close but my opponent definitely had more tools to deal with things than I had. I was not as aggressive off the bat as I should have been, so I lost one of my two tanks in my own backfield even though I had first turn. Ended up in a 88-43 defeat. Only photo is from turn 1 where I still had an army.
Game two - Dark Eldar. Didn't take tons of great photos here, but played a good friend from my own club! T12 is hard for the DE to take down, and both tanks survived on 1 HP way late into the game. 60-31 victory for the BTs.
Game Three - Orks! Another army I rarely play other than my friend's orks every shorehammer. Almost entirely close combat.
Here you see Helbrect getting ready to wipe out a big squad. Game swung back and forth over several turns, ending with just Snikrot and 8 gretch alive, plus (as usual for the stars of the entire tournament) the regular intercessors and the landraider. The raider took zero wounds all game, but my intercessors were down to just two models and the last ones left to hold down any objectives. A tight game, but a loss at 73-68.
So 1-2 for the tournament. I wish I had been able to pull out that last game, but as usual I met my goal of one win, had a blast, and even talked about running a trench crusade tournament next shorehammer perhaps. We'll have to see!
Also, here's a new photo - clearing out older minis that need to make the upgrade to Black Templars.