Forum adverts like this one are shown to any user who is not logged in. Join us by filling out a tiny 3 field form and you will get your own, free, dakka user account which gives a good range of benefits to you:
No adverts like this in the forums anymore.
Times and dates in your local timezone.
Full tracking of what you have read so you can skip to your first unread post, easily see what has changed since you last logged in, and easily see what is new at a glance.
Email notifications for threads you want to watch closely.
Being a part of the oldest wargaming community on the net.
If you are already a member then feel free to login now.
A while back I put together Big Mek Booma, the grand architect of the warmachines in my Waaagh!
When I did, I gave him a Kustom Force Field generator-type backpack in the expectation that I'd be using him for that more than anything else. However, times have changed, and I have come to see the error of my ways. You see, I tend to run big squads of Lootas. Lootas have an absolutely terrific range and high strength, but have a bit of a shoddy leadership, and if they take a couple casualties they have a tendency to up and run. Since they're pretty costly in terms of points, I've been experimenting recently with sticking a Big Mek with a bosspole in with them to try and prevent any early retreats.
From what I have been able to figure, giving that Big Mek a Shokk Attack Gun makes a ton of sense. The random 2d6 for strength averages around S7, which happens to be the same as the lootas, so it makes sense to turn the SAG on whatever the lootas are firing as well. Additionally, both the SAG and the deffguns share the same range, meaning it makes sense to keep them in a squad together. It's a beautiful squad for taking down those high-save units like Terminators, because the SAG will simply penetrate the armor if it hits, while the deffguns will just force piles and piles of saves.
The problem, then, is figuring out how to get Booma a Shokk Attack Gun. After a bit of head-scratching, I had what I thought was a rather clever idea: Make it the orky equivalent of the thunderfire cannon.
The way I figured it, if I'm going to be making a separate Shokk Attack Gun model, I may as well make it huge so that I can run it as the Shokk Attack Battery formation in Apocalypse. The idea's pretty simple: In regular games, I park the Shokk Attack Gun somewhere near Booma on the board to display what armament he actually has (which, of course, would be a SAG). In apocalypse games, I'd make a larger base (Maybe 3.5-4" diameter) that I could magnetize both my Big Mek and the gun to, which would have the same profile as 3 Big Meks (meaning, 6 wounds) and 'count as' the entire Shokk Attack Gun battery, by itself.
So, with the concept firmly in mind, my first problem was collecting the parts I'd need. I've been stewing this whole concept over for the past six months or so, and I think it was a foregone conclusion from the start that I would have to motorize the thing. The problem therein was motorizing it at an appropriate speed.
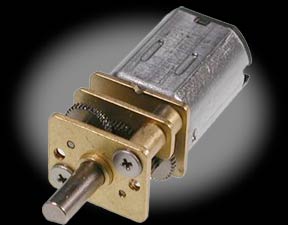
First, I started looking for motors small enough to fit in what I wanted.
The video above shows a stock SAG bit stuck to the front of a small helicopter motor. Now, this motor had two particular complications. First, it spun incredibly fast once it got going, which is impractical from a hobby standpoint because I don't need my models trying to get airborne from the table. Second, it didn't really have the torque to start spinning without help, even when voltage was applied; you had to give it a bit of assistance by spinning the bit first with your finger. I could have tried higher voltages, but the motor wasn't really rated for it, and would have burned out in a hurry.
The second motor I tried was from a lego kit. It was substantially slower, and a hell of a lot noisier, but due to it's 'lego' casing, it was a bit too large to be practical.
It was actually a bit slower than I wanted - I was aiming for a 'sweet spot' of sorts of about one to two revolutions per second.
I tried a whole host of other motors...
But I wasn't particularly happy with any of them. It seemed that with the low-voltage DC motors, your choices were either a small motor that spun at 30,000 RPM and didn't have enough torque to really get the SAG bit spinning, or larger, chunkier motors that had the torque but needed a hefty amount of voltage and space. I had been looking for a long time for a decent gear-motor mechanism that would take one of the speedy little motors and step it down enough to approximate 120 rpm or so, but the problem there was that most gearing mechanisms that could do that take up a relatively large amount of space. While I'm making a big SAG, I didn't want it to be too big as to not fit on a Thunderfire chassis!
This little bugger had the ideal RPM for my project, ran on anywhere between 3 and 6 volts, had a hefty amount of torque, and a very small size (only 33.1mm long to the tip of the shaft!). The only downside to the motor was the price, but consider this: By making this Mega-SAG, I'm basically obviating the need to buy 2-3 more SAG Mek models, which more than recoups the cost.
I also decided pretty early on that I was not going to be using the actual body of the Thunderfire cannon, due mostly to how incredibly bad GW's casts are and how much repairing the body of the gun would have required. Instead, I'm only going to use the tread sections and the crosspiece that serves as the base of the gun.
So, what would serve as the body of the gun, then? I could scratchbuild something, and I figured I'd have to, but then the answer arrived all on its own: The Shadowsword Cannon. Specifically, the base of its gigantic barrel!
Once assembled, the base of the shadowsword cannon serves as a giant frame for the SAG to build upon, and it fills the space left vacant on the treads by the Thunderfire Cannon perfectly.
With these parts all in hand, I've set about building.
Automatically Appended Next Post: So the Shadowsword cannon base fit together with minimal headache, and I started on the front end of the gun. Using another Shadowsword cannon part for the front end, I managed to snugly fit the motor inside and glue it in so it was centered.
Now, some of you may wonder why there's a turbine on the front - after all, the videos above pretty much demonstrate that I have a SAG spinny front bit.
However, after a bit of eyeballing, I've come to the conclusion that the SAG spinny front bit has three problems that prohibit me from using it on this project. First off, it's too small. Since I'm making a very large Shokk Attack Gun, it seems only proper that the front spinny gubbin be much larger than the standard bit.
The second problem with the bit was that it was (surprisingly enough! ) never designed to actually spin, meaning that it spins horribly off-balance due to the 'prongs' not being angled out equally.
The third, and last problem with the bit was that it was heavy. While the Thunderfire Cannon chassis is more than weighty enough to hold the gun down and in place, the weight puts more of a strain on the motor, and I need the motor to survive a good, long time.
Thus, I started on what you see above by making the 'axis' for the new SAG spinny bit. The turbine on the front is one of the bits from the underside of a beakie drop pod, with styrene tubing behind it to help bulk it out a bit. There's a smaller styrene tube in the middle of the turbine that goes back through the front of the gun casing to the motor, which spins the part wonderfully. All assembled, we have the following:
You can see the stock SAG bit for scale here.
So, if I'm making my ownSAG bit, how would I possibly make one that spins better than the existing Mega-SAG? Surely anything I make would inherently be offbalanced, due to it's hand-crafted natureWhat's worse, it could be fragile in the long run - how well does Superglue hold up to repeatedly being spun over and over and over again? I could picture one of the arms of the gun just falling off after a few years! Well, this is where the magic of casting comes in.
Here's the general idea: Make one prong out of styrene. Cast the prong three times. The resulting prongs will be extremely lightweight due to the fact that they're made out of resin, which means there's a lot less strain on the motor. They're also going to be all one solid piece, meaning that there's much less chance of any parts like rivets going flying off after years of use. Lastly, they're all exactly identical, which means that they are all the same weight, and will balance the front SAG bit perfectly as they spin!
With this in mind, I set about making the 'prong' for the SAG and came up with the following:
You may wonder what the heck's going on at the right side of the prong - it looks like two cylinders are just pointing out to nowhere. The answer to that is actually quite simple - there's going to be ribbed cabling between the two, from the base of the bit up to the spherical 'head', between the ends of the two cylinders. However, ribbed cable texture is a pain in the ass to cast, and is prone to defects that can be monstrously annoying to clean up. What I'm going to do instead is basically cast the bit as it is, and then get some very short, evenly-measured lengths of guitar wire to put in each end of the cylinders between the head and base of the prong.
So now, we cast the prong three times over!
Automatically Appended Next Post: And with a wave of my hat, some magic words ("Krump! Stomp! Smash 'em! Waaaagh!"), and my pressure pot, presto!
(I should probably mention that we are 'up to speed' now; the previous posts were me finally getting around to putting stuff up online from yesterday and the day before.)
The original prong won't be used, so I cast myself three nice, fresh copies and cleaned them up a bit. For those of you who might be curious, this is what the mold looked like:
I got these out with surprisingly few mold lines to clean up, which makes me pretty happy. What's more, I managed to cast the areas where the cabling is going as hollow, so I can just wiggle some wire in there and be done with it, rather than trying to drill them out properly.
And lastly, here's a neat little comparison:
Leftmost is obviously my Mega-SAG bit. In the middle is a SAG bit from 2nd edition, which as you may be able to tell from the pictures is even more lopsided than the one on the far right, our current edition SAG bit. I tried designing mine closer to the current edition one, since it'd be easier for most players to recognize... though truth be told, how many three-pronged, spinning ork guns are there?
Now for the harrowing task of trying to attach them to the main turbine exactly 120 degrees apart!
This message was edited 4 times. Last update was at 2009/08/21 18:18:02
Thats freaking awesome. I've always loved the SAG Mek, and I remember seeing Booma on the boards before as well. Defiantly subbed, I know this is getting a little ahead of you, are you going to model grots for the thing to fire?
Breaker wrote:Thats freaking awesome. I've always loved the SAG Mek, and I remember seeing Booma on the boards before as well. Defiantly subbed, I know this is getting a little ahead of you, are you going to model grots for the thing to fire?
I have a secret weapon for this particular aspect of the model. I'm not revealing it just yet, though - you're going to have to wait!
I added a bit of ribbed cabling between the sections of the prongs, then went ahead and attached them to the turbine. I think the results are quite nice.
Of course, it's not nearly as impressive if it's not moving, so let's remedy that with a video!
Edit: I don't know how to embed this at the right aspect ratio, so you may be better off clicking through to youtube itself and viewing it there.
My next goal is to figure out how I'm going to attach the Shadowsword cannon gun housing to the treads, so that I can figure out where to work in a 6v power source and switch.
After that comes the ammo feed... but that part's a secret. I have a great idea coming up for that one.
This message was edited 1 time. Last update was at 2009/08/21 23:27:12
Epic. I don't care a whole lot for the SAG model to begin with, and I had thought of mounting it on an armored chassis of some sort, but this completely trumps anything I could have thought of. I have no doubt you'll keep us up to speed on this project.
Edit: And we have achieved double postage! Always wondered how people did that.....
Anyways, to elaborate further; if I had the time and space to meddle with things like this, I´d love to. Sadly I have a little of the first and none of the latter, so I´ll do my small scale stuff and clap my hands when others do it as well as you do.
Ahh, if only I had access to something that could help me with space/time.....
This message was edited 1 time. Last update was at 2009/08/22 00:03:53
Nice work mate!
For your battery problem, have you considered a LiPo battery? - there would have been one in the helicopter that you got the tiny motor from...
All the tactics in the world can't save you from to hit to wound to save
for leadership
Could always do the good old fashion saturday morning cartoon villain lever and stuff the Battery on a grot (maybe the ammo runts model or something similar) and disguise the battery pack as a... well a spare battery pack. Granted, I'm always for punting grots... and thats why I fully support this conversion!
Breaker wrote:Could always do the good old fashion saturday morning cartoon villain lever and stuff the Battery on a grot (maybe the ammo runts model or something similar) and disguise the battery pack as a... well a spare battery pack. Granted, I'm always for punting grots... and thats why I fully support this conversion!
I rather like this idea! Shouldn't be too hard to make a battery tube just big enough to fit a real battery inside, with some sort of simple twist thingy on the end for when the battery needs to be replaced.
Oh dear god...that's what a Shokk Attack Gun is supposed to be! Amazing stuff, needs some more orky glyphs and a bunch of unlucky grots ready to get sucked into the vortex. I'd disguise the battery pack as an ammo crate...not very original, but it'd get the job done. Nice job!
The battery pack's likely going to be fitted to the underside of the Thunderfire Cannon chassis. I have a feeling I can dremel out the extra space inside the Shadowsword cannon bit, and extend a column downward where I can fit the battery in.
The switch being a literal pull lever on the model may come about, though.
As I mentioned, I have what I think is a brilliant idea for the ammunition feed, but you're all going to have to wait and see. I'll say this much: It's not going to be your standard 'grot in a vacuum' setup.
Personally, i have never much approved of ork modelers because they most often just buy some IG armor, glue it together backwards, paint it black, put some rivets on it and call it a conversion.
BUT HOLY S**T! You really went balls to the wall with this job! The closest thing i've ever seen to applications of simple machinery to GW models was the working lever on the basilisk, and you've gone and upped the ante tenfold!
You deserve some sort of medal for this. Seriously.
Automatically Appended Next Post: And i can't wait to see what you've schemed up for the ammo feed system!
This message was edited 1 time. Last update was at 2009/08/22 09:43:08


 ) never designed to actually spin, meaning that it spins horribly off-balance due to the 'prongs' not being angled out equally.


 Back on the path of the Imperial Citizen
 Krieg: More wins than Losses.
 : Catachans
 : Chaos Space Marines


 bleeeeh 2/0/2 but what fun they are when they win


 251 point Khador Army
 245 points Ret Army


