| Author |
Message |
 |
|
|
|
|
Advert
|
Forum adverts like this one are shown to any user who is not logged in. Join us by filling out a tiny 3 field form and you will get your own, free, dakka user account which gives a good range of benefits to you:
- No adverts like this in the forums anymore.
- Times and dates in your local timezone.
- Full tracking of what you have read so you can skip to your first unread post, easily see what has changed since you last logged in, and easily see what is new at a glance.
- Email notifications for threads you want to watch closely.
- Being a part of the oldest wargaming community on the net.
If you are already a member then feel free to login now. |
|
 |
2012/06/12 09:57:14
Subject: Ogre Kingdoms Display Board Project by 3T-Studios - Completed!
|
|

Regular Dakkanaut
|
Hello Dakka-dwellers, I'd like to introduce a new project log from our studio, this one was by my head designer and resident diva, Mismuse. I am posting this blog on her behalf. So without further ado, here she is:
3T-studios has a lot of potential projects and commission requests come our way. Although I am the main designer and planner of most of these projects it is still only a handful that I take on personally as my own. I tend to gravitate towards projects that require tedious preparations and intricate builds. I like the gathering of supplies, organizing my materials, putting together the design and plans in my head before executing it on paper and most of all I like research. I often browse the net or consult my collection of books, grabbing my rebel and going around and snapping pictures of shapes, colors and texture but it is going into the “Zone” is what I look forward the most. The Zone is achieved only during a certain phase and construction part of a project that involves what seem like an endless repetitious tasks and steps. This long and drawn out ritual is what have made me notorious for not having WIP updates and pictures available to my clients specially in the early phase of my projects. This is one of the reason why patience is one of the required things we ask of our potential clients even before they contact us.
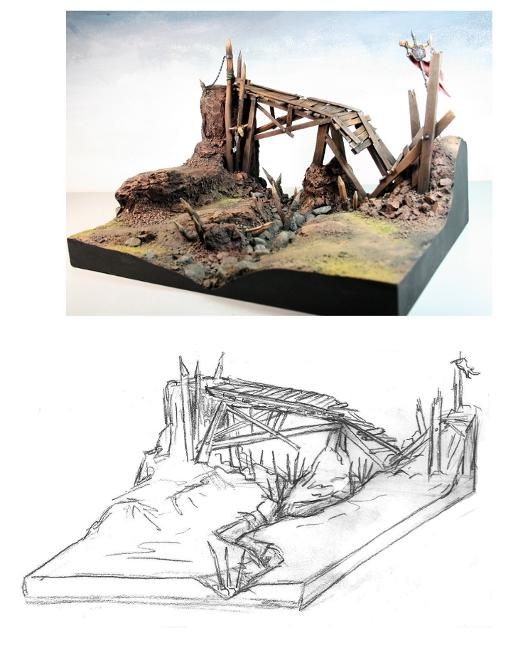
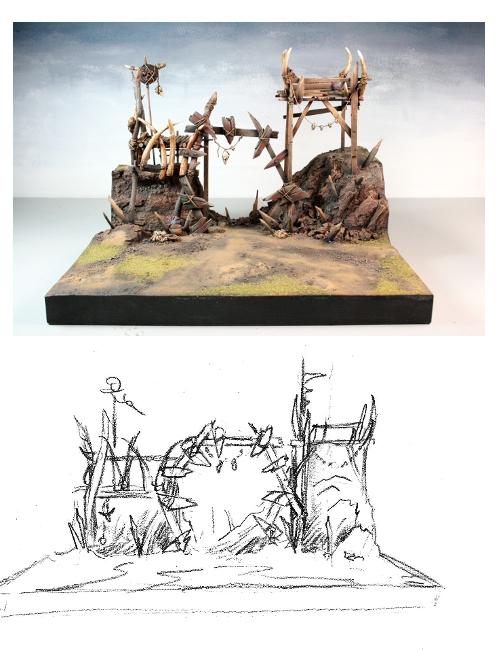
This project started in a similar fashion as any project I have done before. Sketches.

RuntHerder (Terraformer) is about the only artist I trust to make a visual representation of my plans. His speed and uncanny ability to interpret my vision flawlessly is why when I am short in time, I ask for his help. Sometimes I wonder if he has access to my head. I only have to describe how I see something, give him the details of perimeters and dimension and Boom I have it in hand soon after.
This have made it easier for me during construction as I would have a guide to follow and go back for reference and it has also helped for my client to visualize a concept and plan I have of his projects. My client wanted three display boards for his Ogre army. He had a specific dimension in mind because these boards are to be displayed on a glass display case he had and so it was very important to get the dimensions right. After a few back and forth of him measuring the space he has we finally got it right.
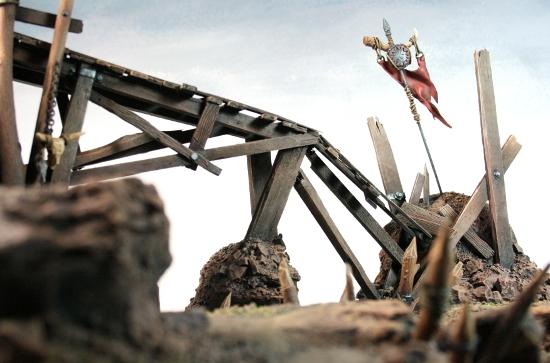
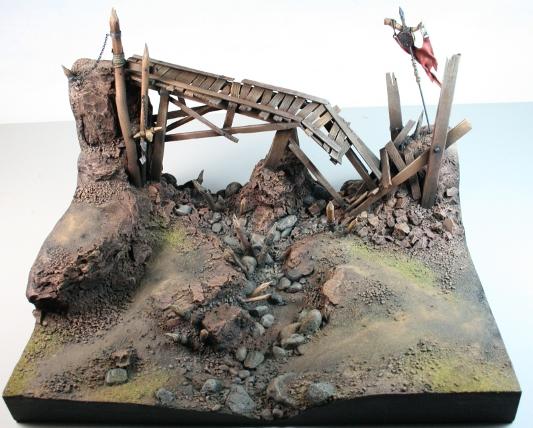
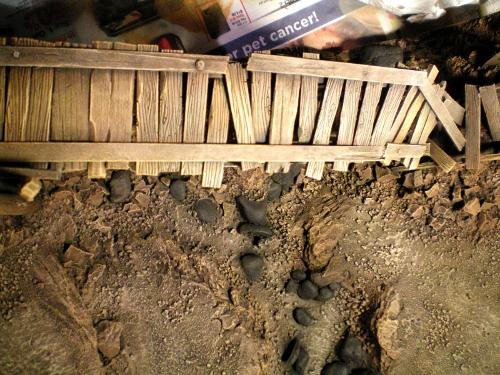
Here is a close up of the bridge that would be the center prominent structure of the first board.

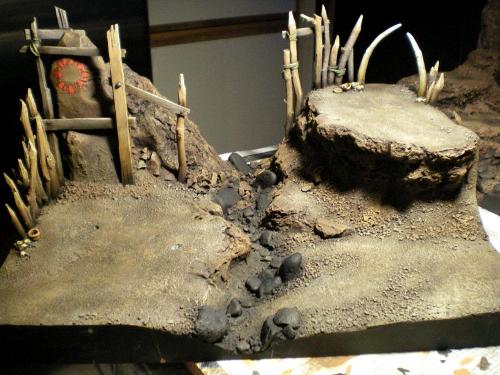
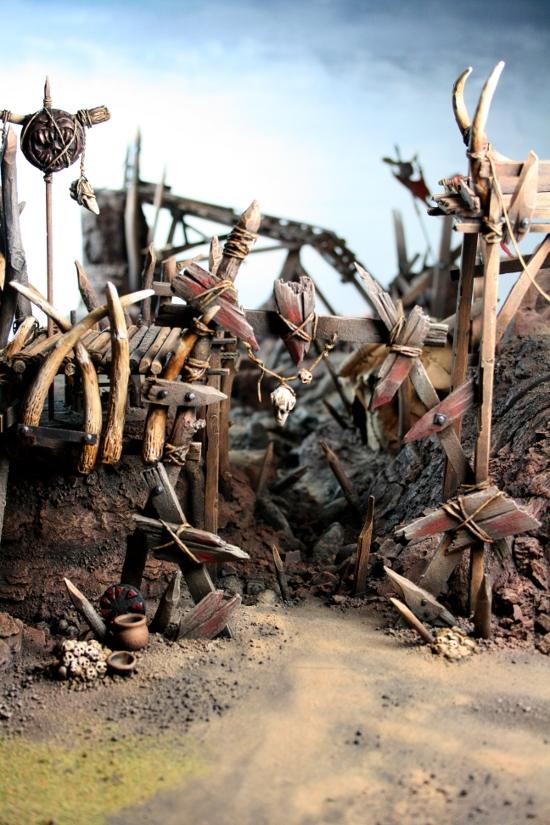
The second board is the main encampment. Log walls, hut and banners are only some of the details that will go into into this.

Some more sketches made a long the way.

and finally the final board which the client wasn’t able to see until later on due to some changes he requested before the design phase was finished.

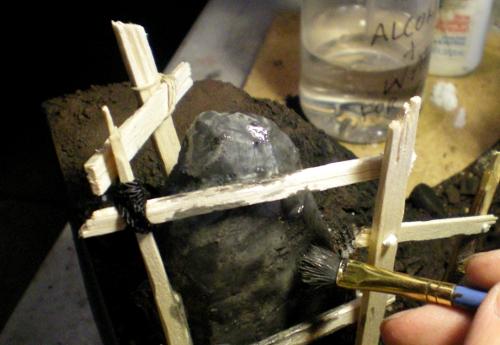
having finished the design phase and approval of my client we proceeded to cut the bases and I went ahead and put together the materials needed to start this project.
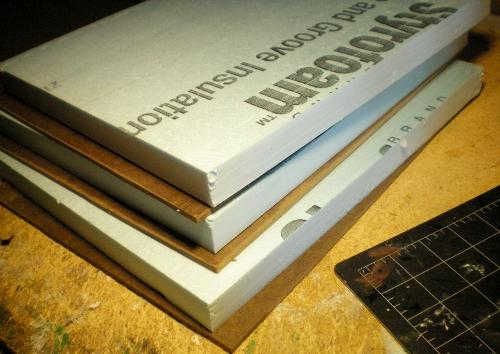
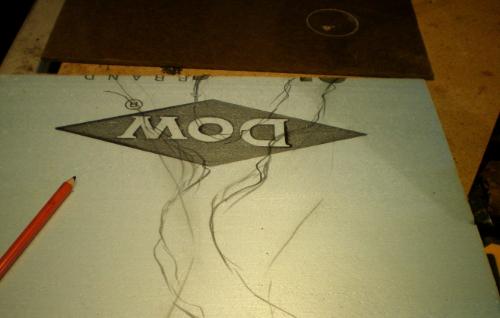
3/8 ” MDF is what we use for our base. This material doesn’t usually have problems with warping compared to other particle boards or plywood. I also realized that it isn’t always available in other countries as I’ve had many inquiries where one should get this. Same goes for blue high density foam. These things are used for insulation and also comes in pink depending where you are from.
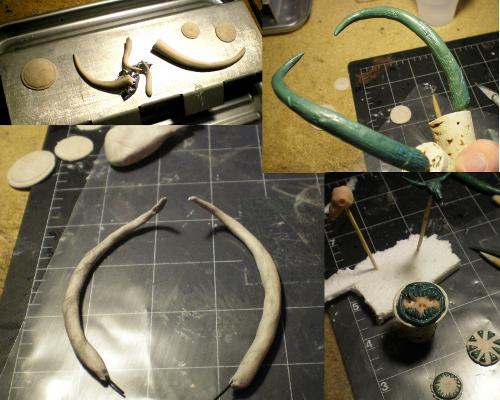
We start sculpting pieces during this time as well. We first use super sculpey to achieve the shape. We bake and let cool and followed by greenstuff for finer details. It takes about four days from sculpting to making casted pieces.
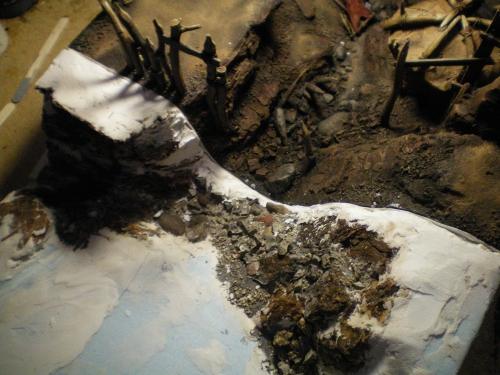
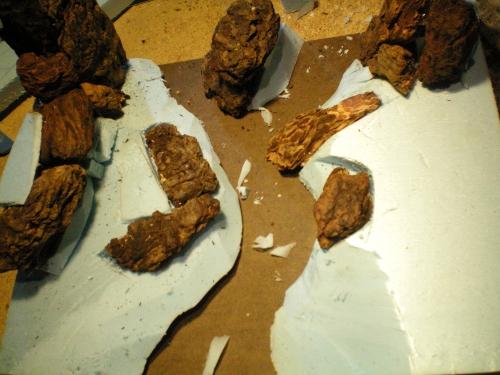
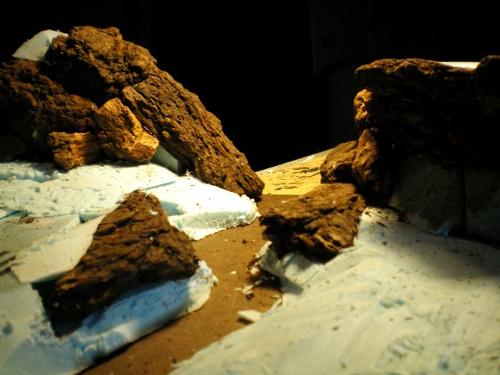
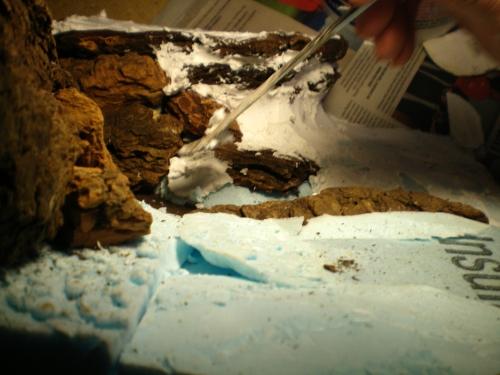
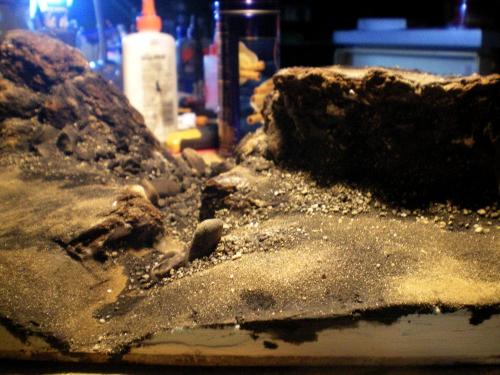
Blue foam carved and big bark chunks placed using a glue gun. The bark has excellent texture for cliff faces.
Filling in the gaps and spaces using light spackle. Not overly careful as it will be buffed and smoothed out once dry.

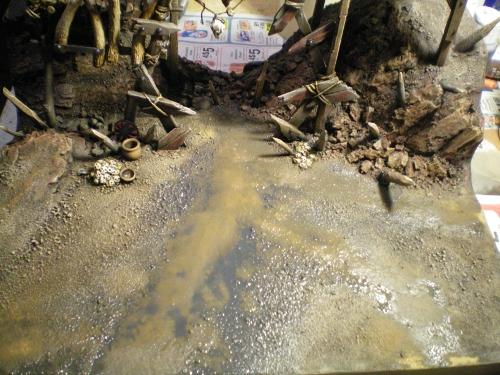
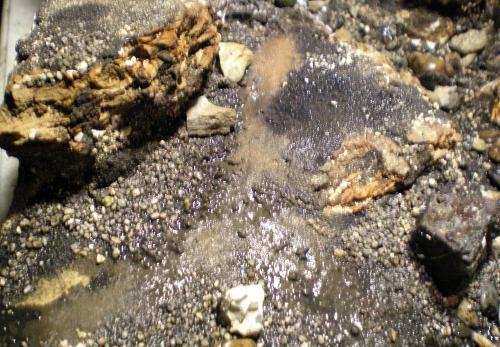
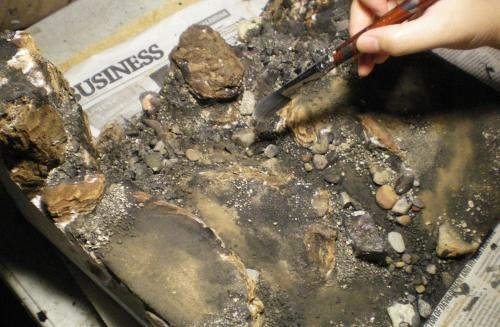
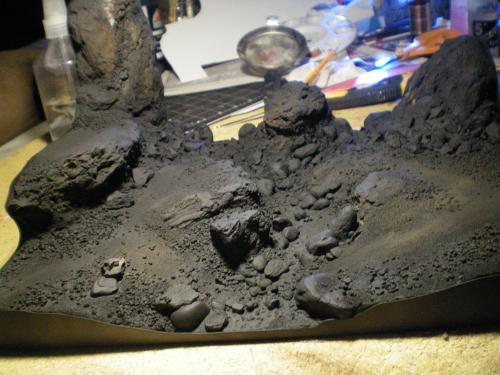
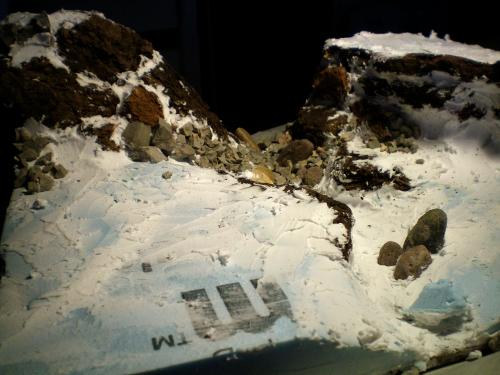
Perfect time to add rocks while waiting for the spackle to dry. I chose a texture of rocks with sharp edges near the foot of the ruined bridge.
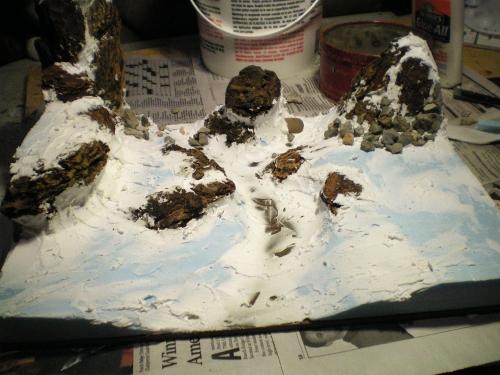
Here is the closeup of the rocks. These are actually broken pieces of quickcrete. I also added some round rocks to depict boulders.

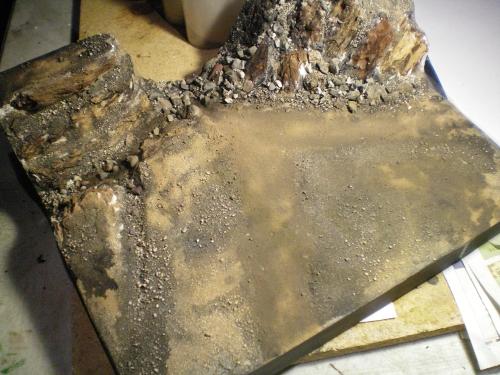
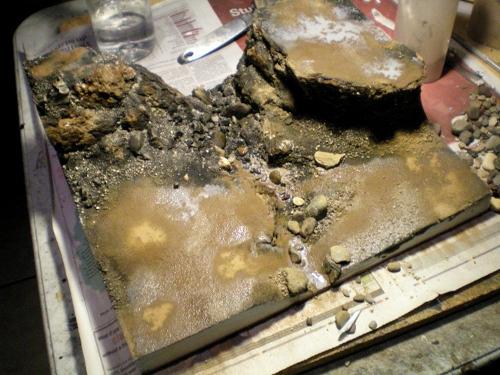
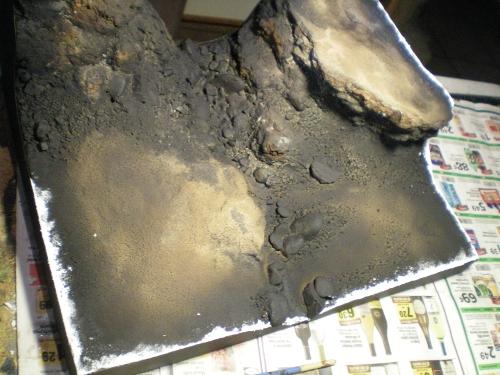
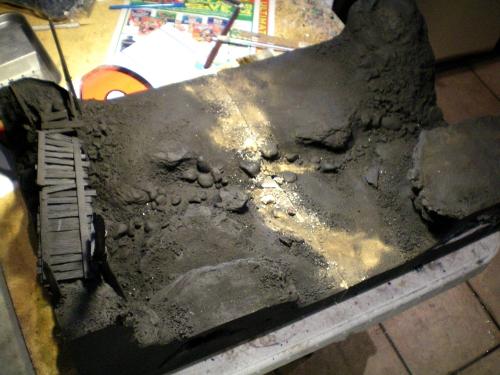
After the spackle dries it was time to smooth and buff using a fine sand paper to prepare it for graveling. We add black paint to the watered down PVA glue so for maximum coverage when it is time to prime it black. As usual we use three grades of sand from medium, covering all the flat areas. Pile the rough grade along the edges and rocks. We then use the watered down PVA and soak it down preceded and followed by a light misting from a spray bottle to ensure that everything is wet so the glue flows through everything easier.
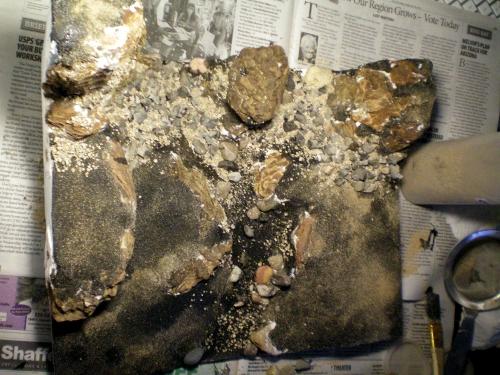
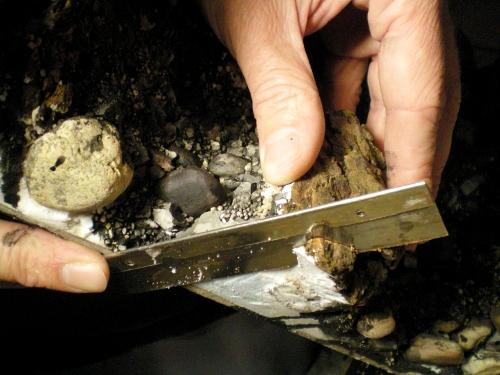
It takes a day or a few hours in front of a fan to make sure that it dries completely. As soon as it dries a quick brushing was in order to shake off loose sand/gravel. The next part takes a little bit of care for placement of the round stones. I use smooth tumbled river rocks, tiny, small and medium grade that I gathered specifically for the dried river look. One must take care on how to place every piece or it might look off. A few dabs of PVA glue under each rock placed, and time to let dry, which takes a few hours. Then back to blending using medium and rough grade sand.
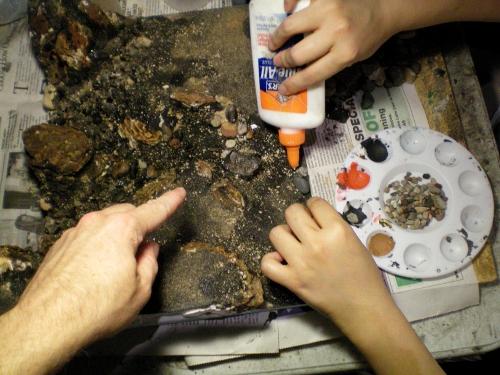
Before the trip in front of the fan, I laid out the fine sand for the paths I pre-marked earlier on. I soakied the area with watered down PVA. Sand and sprayed lightly with water.
A quick run with a brush or toothbrush to make sure nothing is loose. A quick tap to the underside while shaking it upside down also works.
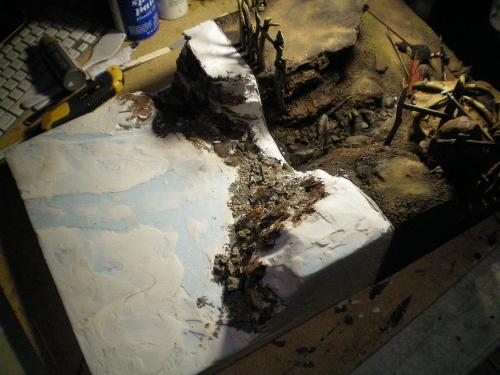
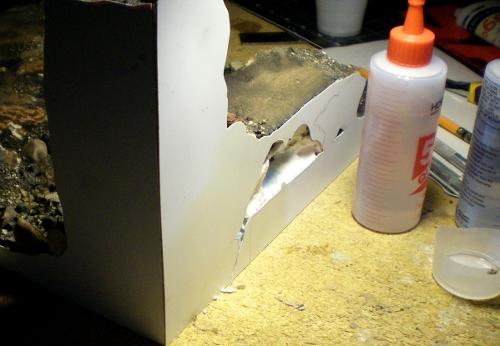
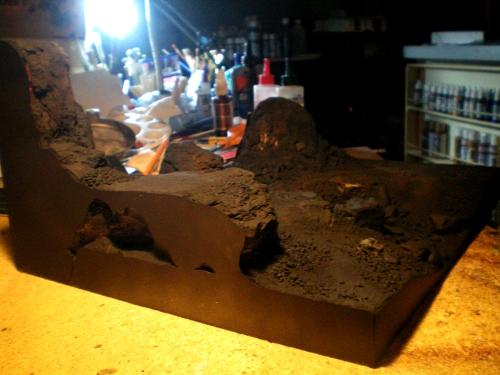
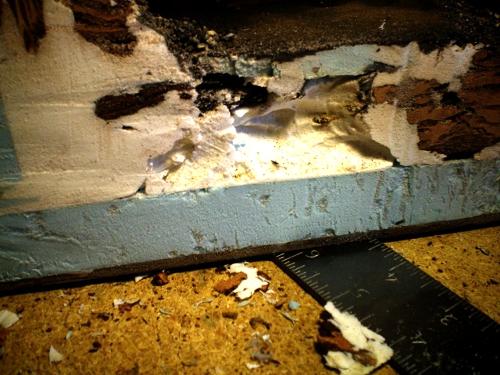
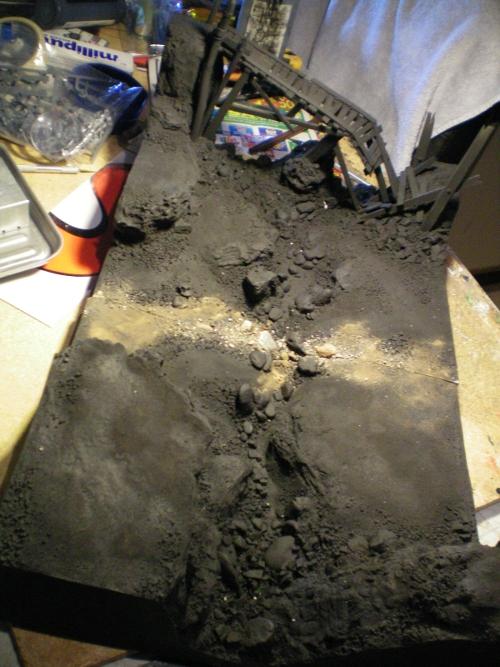
Here I’ve asked Terraformer to help with the framing. Making sure to shave the sides square before cladding.
Cladding goes on smoothly, using two part epoxy to secure carefully trimmed pieces of plasticard. Later on all outside edge gaps and seams will be treated with squadron putty before the final priming.
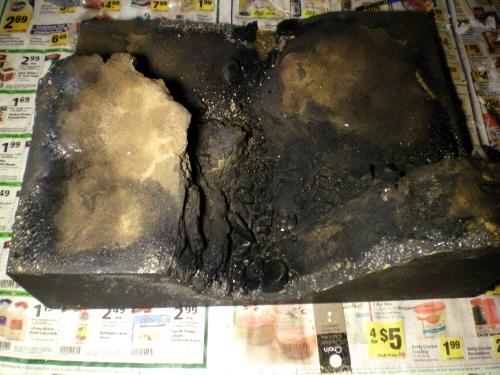
Here the gaps between the plasticard and ground were filled with light spackle. We let it dry before smoothing it out, followed by blending using medium grade sand or depending what type of ground texture it needs. A final brushing for loose stuff and finally we spray primer.
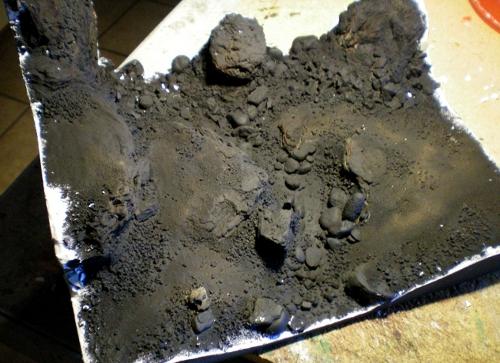
This actually is not the final time that we will spray prime this base. That is why you see areas that are still exposed. I usually do construction of the structures and finish it before the final primer coverage.
The primed base from another angle. It is now ready for structures.
To be continued...
|
|
This message was edited 7 times. Last update was at 2012/06/19 13:36:26
|
|
|
 |
|
2012/06/12 10:14:36
Subject: Ogre Kingdoms Display Board Project by 3T-Studios
|
|

Dakka Veteran
|
MOAR !
Subscribed. This is one area of the hobby I have no experience in and I look with awe on others work.
Looking fantastic !
|
 -STOLEN ! -STOLEN !  - Astral Claws - Astral Claws  - Custodes - Custodes  - Revenant Shroud - Revenant Shroud
DR:70-S+++G++M(GD)B++I++Pw40k82/fD++A++/areWD004R+++T(S)DM+
|
|
|
|
|
2012/06/12 10:17:19
Subject: Ogre Kingdoms Display Board Project by 3T-Studios
|
|

Esteemed Veteran Space Marine
|
looking good! you got me interested! subscribed!
|
|
|
|
|
|
2012/06/12 15:45:11
Subject: Re:Ogre Kingdoms Display Board Project by 3T-Studios
|
|

Pyromaniac Hellhound Pilot
|
Always a treat to see your work 
Looking forward to more updates!
Cheers,
Rawson
|
 The 104th Vostroyan Mechanized The 104th Vostroyan Mechanized
 Rawson's Reboot Rawson's Reboot

Viktor von Domm: nope... can´t do that for the sake of all lving creatures that dwell on earth....
dsteingass: That's like saying "I forgot to tell you who your real father is"
nerdfest09: Rawson speaks the truth! |
|
|
|
|
2012/06/12 19:07:54
Subject: Ogre Kingdoms Display Board Project by 3T-Studios
|
|
Unhealthy Competition With Other Legions
|
Looking good, checked your blog out and there is some awesome terrain on there 
|
|
|
|
|
|
2012/06/12 21:45:57
Subject: Ogre Kingdoms Display Board Project by 3T-Studios
|
|
Nurgle Predator Driver with an Infestation
|
I always love watching your updates. Such beautiful work all the time.
|
|
|
|
|
2012/06/14 08:40:31
Subject: Re:Ogre Kingdoms Display Board Project by 3T-Studios
|
|
Regular Dakkanaut
|
Mismuse:
In between the drying times of Base number one I started carving away the blue foam for base two. More large bark chunks were also picked and adhered to their proper spots.
Same steps as base one, I fill all gaps with light spackle. By the time I’m done Base One was ready to gravel as this one goes outside to dry. Depending on the time of day, I decide what should go in front of a fan to dry, or what gets treated to AZ sun. Either way works well, especially during summer.
Rough and large round-ish pebbles are imbedded to the still-soft spackle before the final sanding and prep for the graveling.
Medium grade sand was sifted on all surfaces, followed by rough grade around the boulders and debris zones. All treated to watered down PVA glue. Drying time, brushing for loose gravel. Rinse and repeat.
It is very important to mention that you have to-pre plan the areas for pathways and places with high traffic, to keep rougher sand coverage off the paths, which would be a pain to try to smooth out later. The fine grade sand goes on last for effective blending.
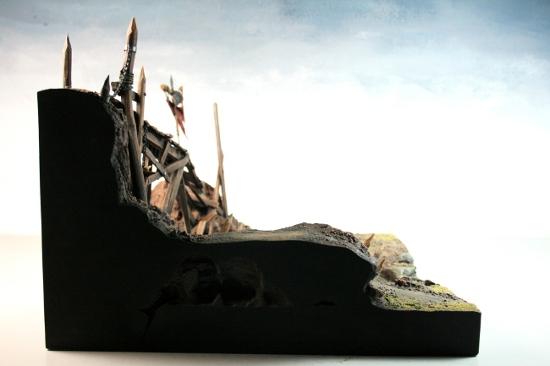
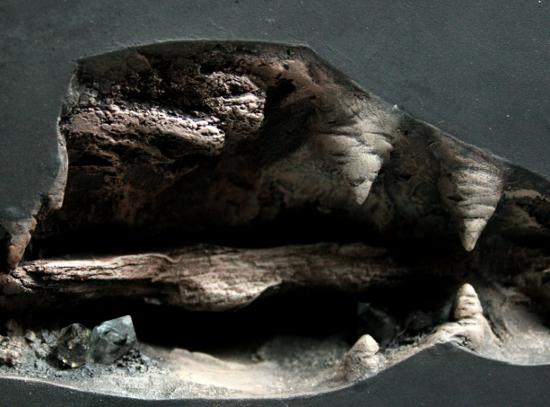
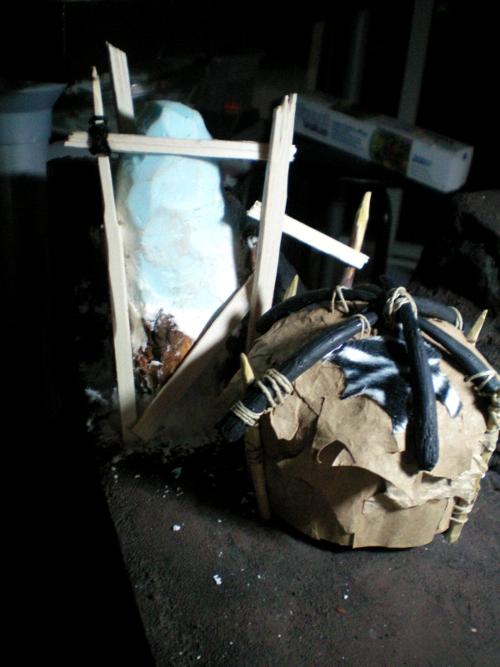
with both the boards graveled, dried and ready for cladding I passed them both for Runt to work on, and while he was cutting the sides square I noticed something curious; The interior spaces between the spackle, bark chunks and blue foam created a cave like gap. Unexpected things like this often spark some great ideas. Although it wasn’t part of a plan I went ahead and designed a cutaway into a cave that would add an interesting visual element to an other wise featureless, black wall.
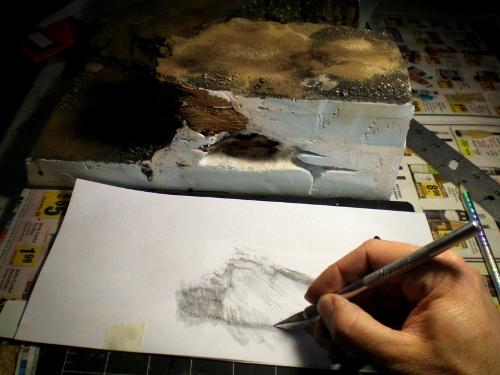
I opted for board two to have the same feature. Here is Terraformer carving out the second cave on Base Two.
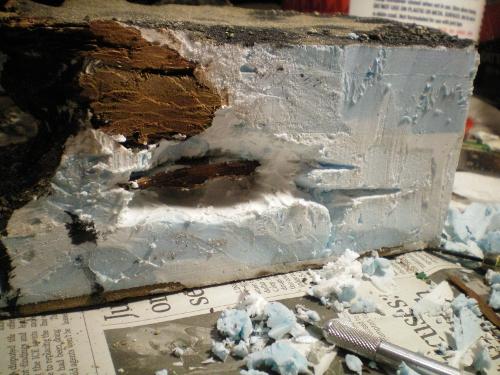
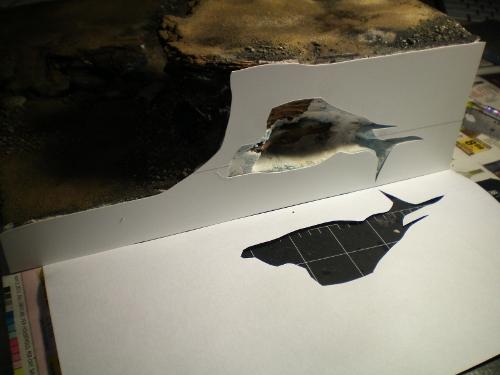
He cut out a stencil of a charcoal impression of the cave outline, which he used use as a guide to cut the plasticard that we will use to clad the sides.
Cut, clad and secured using two part epoxy.
Milliput was used to create the stalagmites and the stalactites and other flowstone cave details. Milliput can be smoothed out using water but still retains a stone-like grain when it dries. It also takes well to carving without crumbling.
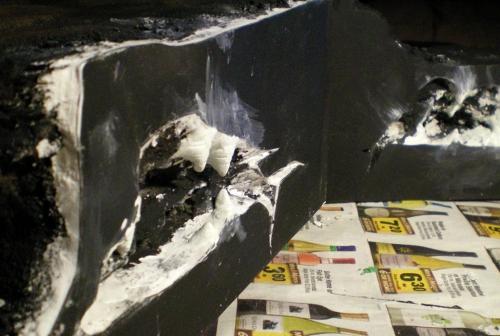
Light spackle in gaps. Dry time was quick because it was a small amount.
Blending in the appropriate grade of sand. Dry time and final brushing and it is ready for structures.
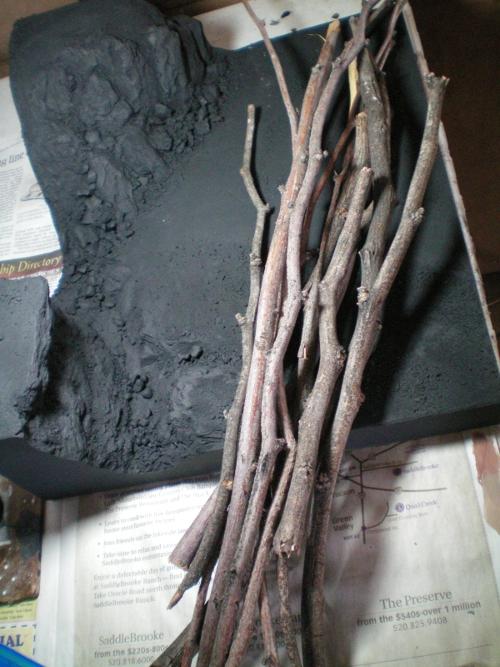
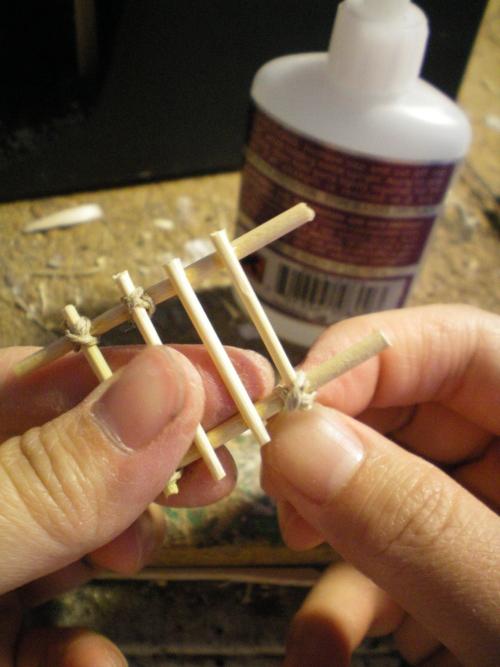
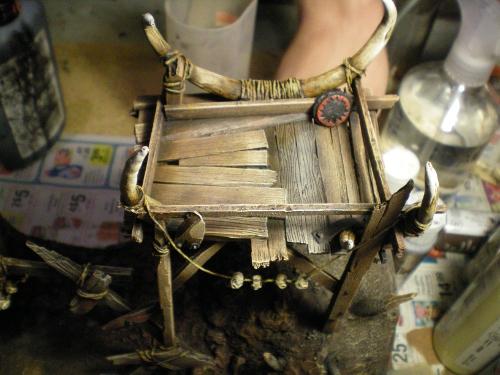
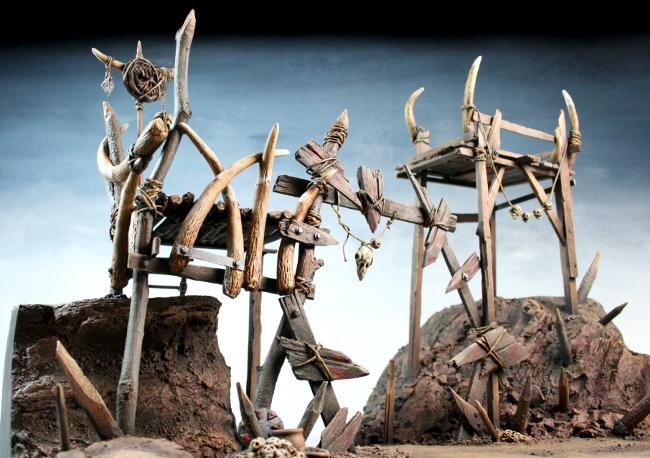
Meanwhile, more components were needed. It just happens that we’ve been making a lot of structures that needed wood such as scaffolding, shacks and bridges. I wanted to create a variety of textures. Although working with balsa and basswood is great, I like to mix it up with our very one sculpted wood planks, rich in knots and wood grain to imply a ramshackle look.
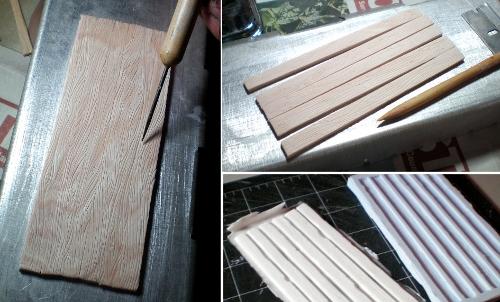
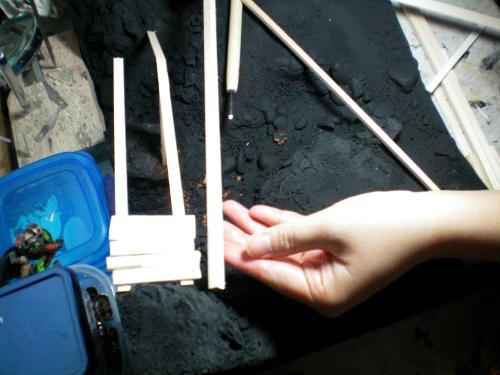
The saying, “You have to break a few eggs to make an omelet” seems appropriate to what I was about to do next. Most people cringe to see this process; that after all the careful work of finishing a base it would only be hacked, spliced and torn to ugliness before it becomes pretty again. Here is the mid-support of the bridge, placed at an angle. I used two 1/8 thick basswood strips, although it comes in 1/4″ thickness I slapped two 1/16 together for strength. Basswood is a harder wood compared to balsa, but all wood grains create weak points, especially in thin pieces of wood. To eliminate this problem I glue the pieces with opposite grain angles to each other to strengthen it.
The top part of the bridge. Planks are alternated carved basswood and resin cast wood planks. I made sure that it’ll support a 30 mm base.
Here I am with my demolition tool. A wood chisel and a rubber mallet.
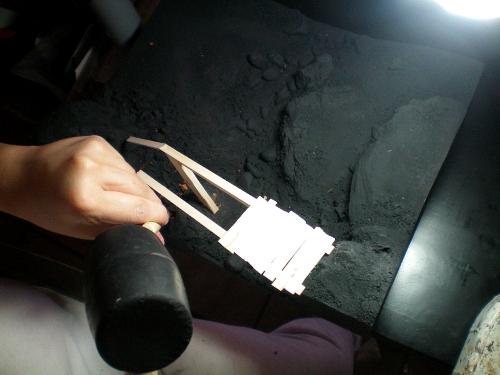
Bridge is taking shape. I texture the basswood pieces individually using my exacto knife. Adding grooves and notches to make the wood have a worn and old look to it.
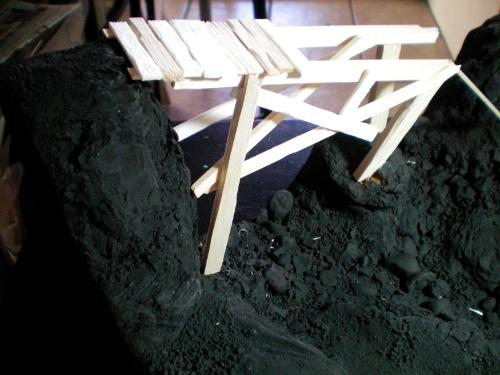
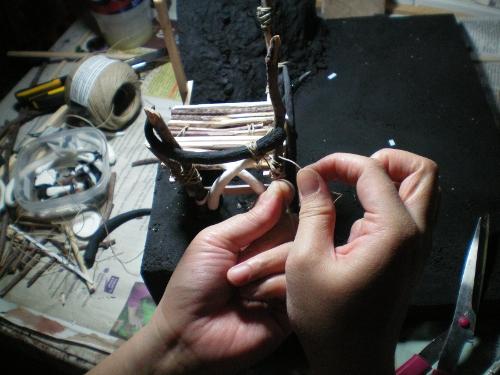
I add different types of supports, from natural wooden bark to carved dowels. Here I am using super glue to secure a nylon string that simulates rope.
Finishing up the ruined part of the bridge. Adding rivets and metal bands.
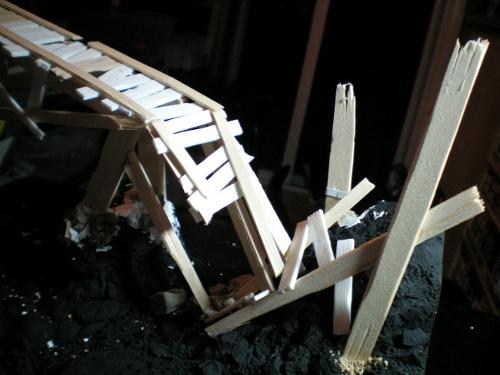
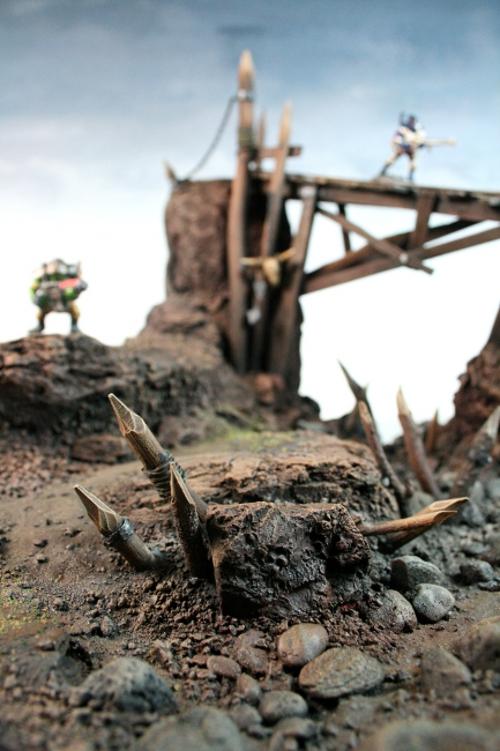
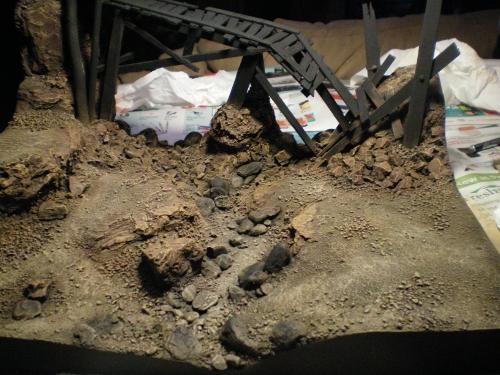
Bird’s eye view of the bridge. You can see the mixed planks I used, assembling them in a haphazard way leading up to the ruined part.
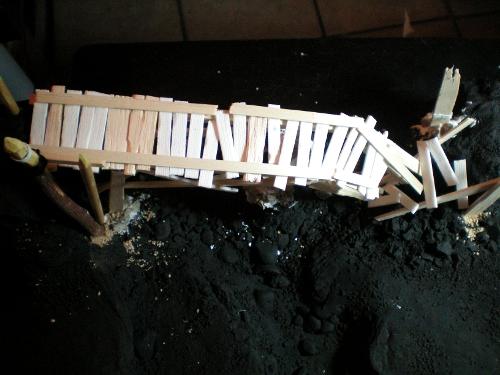
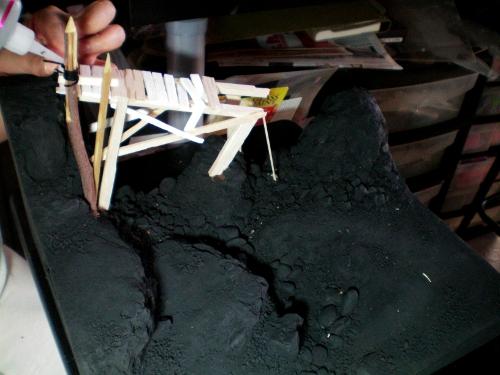
after assembling the bridge it is time to blend in the support beams using the appropriate grade of sand. Letting it dry before spraying prime. If I use pure wood on a structure I sometimes hand paint or use an airbrush but since I used resin for this particular structure I used a spray can primer.
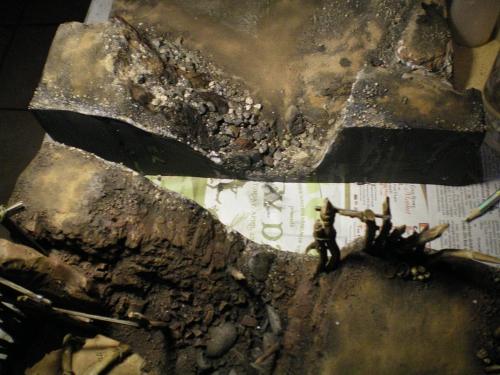
Although individually these boards will occupy their own display shelf I promised the client that we will make the boards continuous and so he can have an option to display them all while connected to each other if he wishes. Here you can see the final adjustments of light spackle to make sure that the boards are the same level. If you see a bit of a gap it is because one of the board wasn’t framed yet. The frame will be the exact shape as the front of the other board. Carved away excess material and added rocks while the spackle is soft.
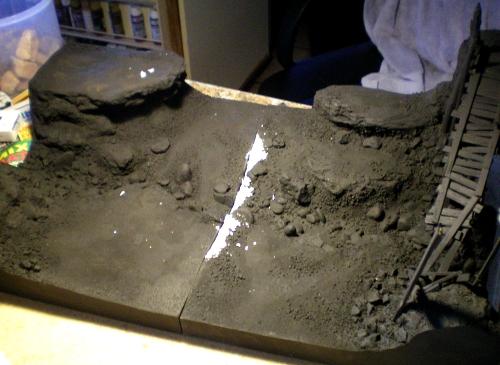
The front frame was now secured using two part epoxy. Placing the two boards together as we blended the appropriate grade of sand. A bit of brushing after it dries to prep it for priming.
To be continued...
|
|
This message was edited 3 times. Last update was at 2012/06/14 08:48:52
|
|
|
|
|
2012/06/16 10:29:44
Subject: Ogre Kingdoms Display Board Project by 3T-Studios - Updated 6/14/12
|
|
Veteran Wolf Guard Squad Leader
|
Really impressive. I love your stuff, looking forward to seeing it finsihed
Young Logan
|
30K Blog: hobbyfromtheaett.blogspot.com
 Bran Redmaws Great Company - 5500pts Bran Redmaws Great Company - 5500pts
30K Space Wolves - 1500pts
  Deathguard -2300 pts Deathguard -2300 pts  |
|
|
|
|
2012/06/16 10:35:48
Subject: Re:Ogre Kingdoms Display Board Project by 3T-Studios - Updated 6/14/12
|
|
Mechanized Halqa
|
Really good work, cant wait to see it finnished
|
GENERATION 10: The first time you see this, copy and paste it into your sig and add 1 to the number after generation. Consider it a social experiment.
|
|
|
|
|
2012/06/17 05:45:44
Subject: Re:Ogre Kingdoms Display Board Project by 3T-Studios - Updated 6/14/12
|
|
Regular Dakkanaut
|
We left off after blending the sand on both Board One and Board Two. Here is another shot from a different angle.
I began to paint the ground. I always go for muddy earth tones with richer warmer tone on rocks for contrast. After finishing the highlights I re-blacken the bridge and the river rocks.
I started the base color of the bridge.
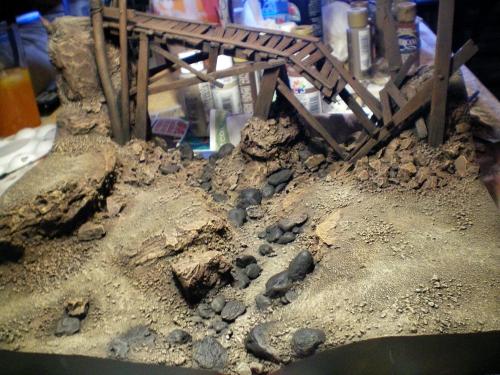
The texture of the planks comes out after the final highlights.
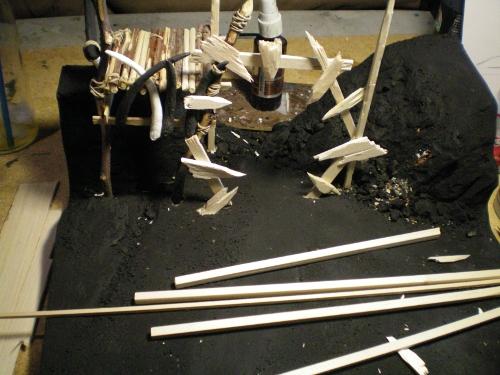
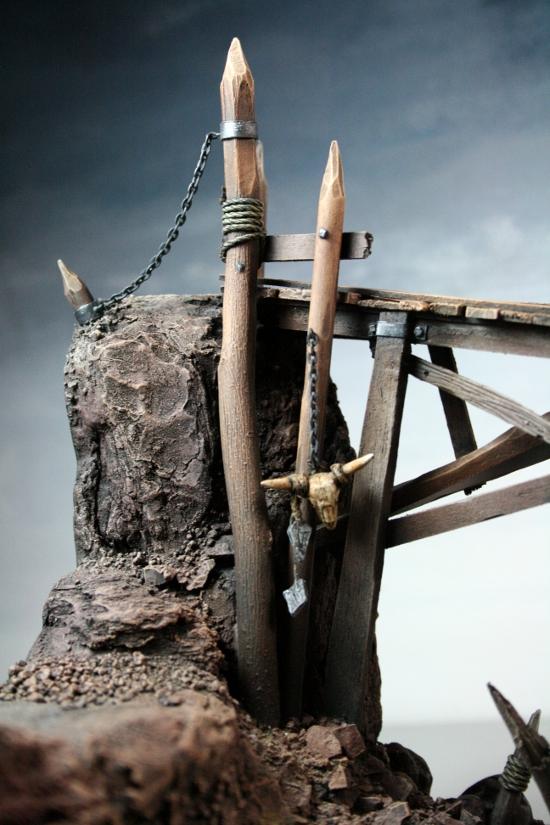
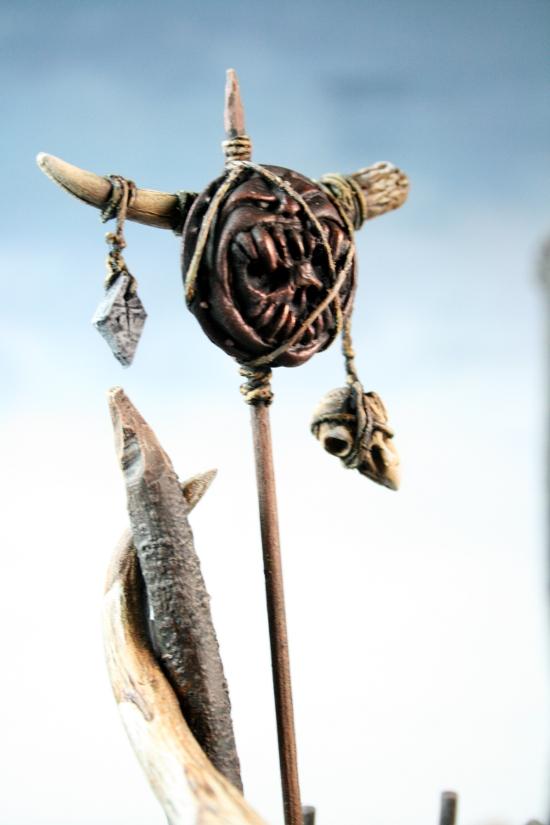
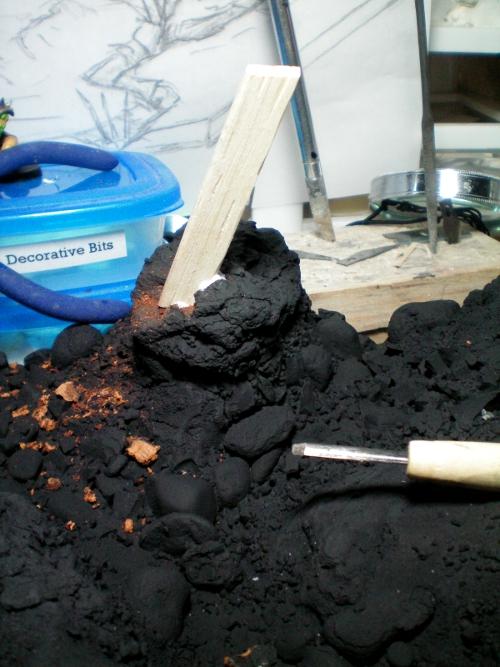
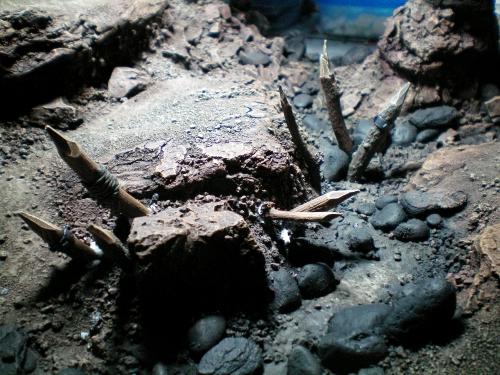
Sometimes when I work on something for so long I stop seeing the colors and shapes of everything and this is when I know I need to change gears and work on something else for awhile. I started working on whittling the dozens of spikes I’m going to need for the three boards. My absolute favorite type of wood is something that grows abundantly here in Arizona. Mesquite has a knobby and very fine textured bark that makes for dynamic logs and trees that maintain a good sense of scale. The wood is easy enough to carve into even if it is dry.
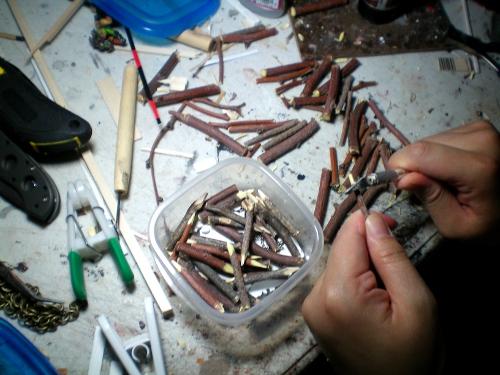
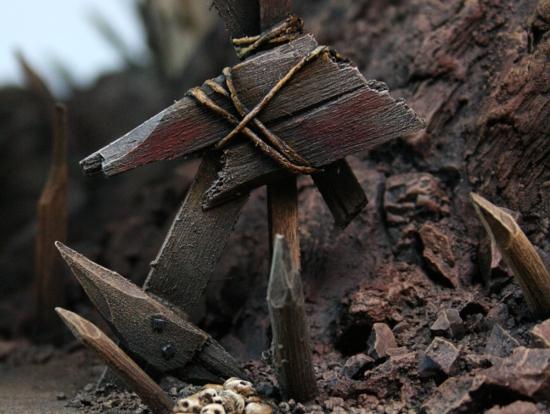
I leave some of the spikes bare but I also do a variety of things such as gluing a band of plasticard strip and then riveting it to make it look like a metal band. I also wrapped couple with nylon twine for a look of rope.
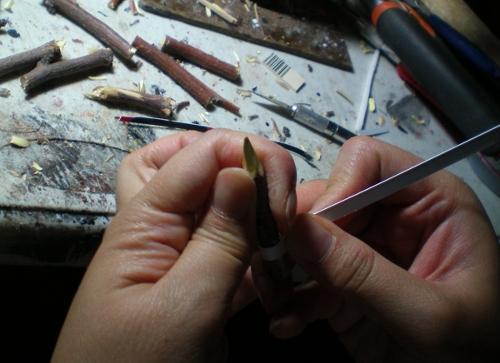
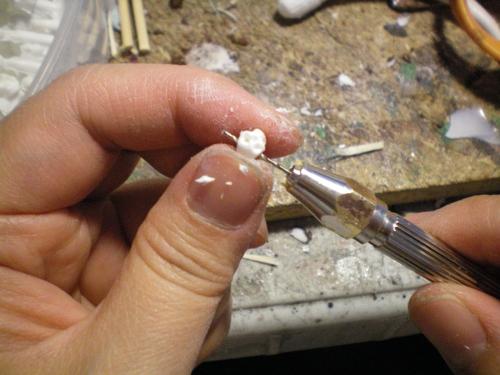
After carving a few dozen or so it was time to prime and then paint. I then use my wood carving chisel with the round blade and choose the spot I wanted my spikes in and secure each one with PVA glue.
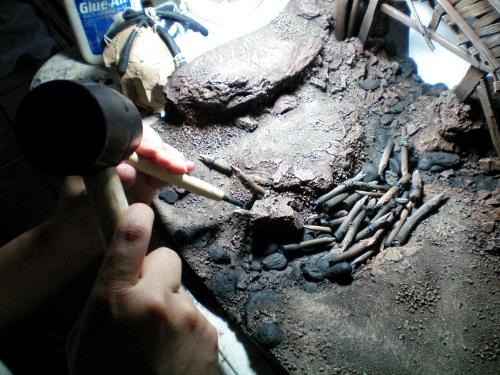
The picture seen here has a hint of PVA which I wasn’t too concerned about. These spikes will be blended in by using the appropriate grade of sand.
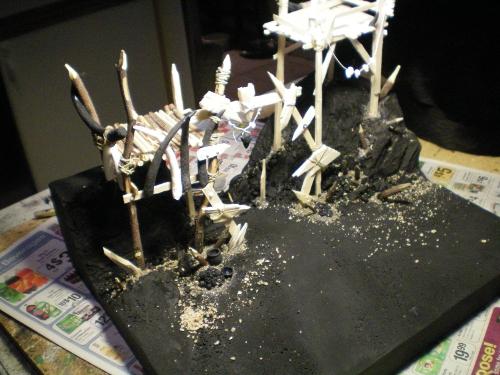
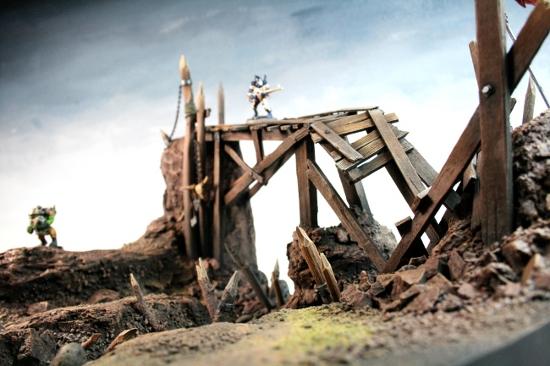
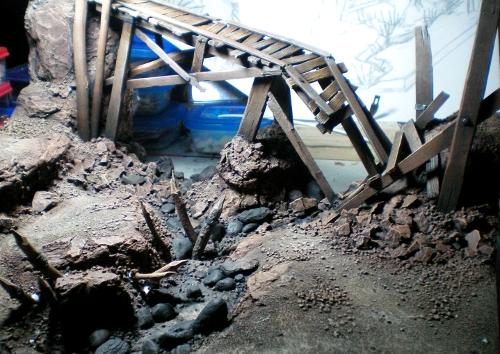
Here is another angle showing the finished bridge. The river rocks will be painted last and all the other accessories will be added later.
The hundredth time this piece has been brushed. Not really, but every board will go through plenty of brushing to ensure that nothing is loose and any debris is off of it.

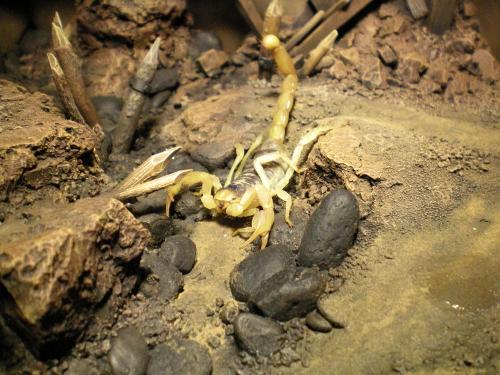
I don’t even know how to explain this one but it is real and it did happen. Scorpions are the bane of my existence. Ever since I moved here from CA I have been stung about a dozen times. I kid you not. These things seek me out. I don’t even bat an eye anymore when I see these things. Welcome to the Southwest the home of the nastiest critters. (No scorpions were harmed during this project. This lil fellow was captured by Terraformer and freed back to the desert.)
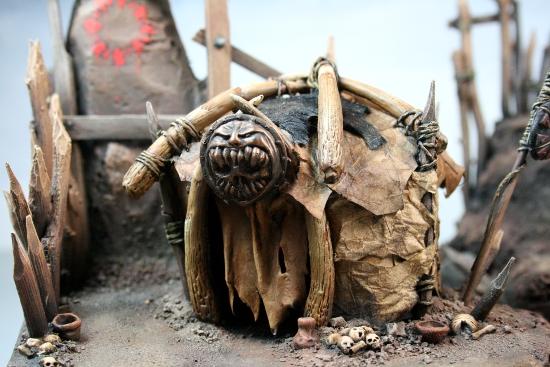
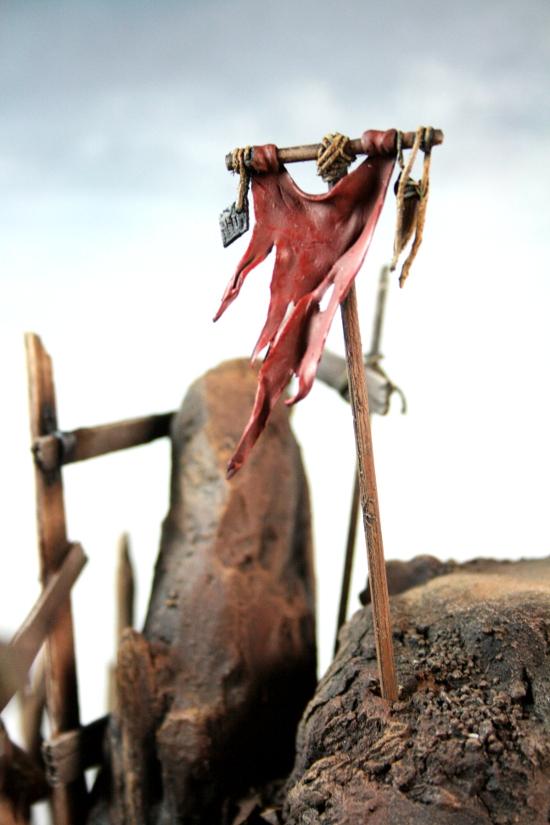
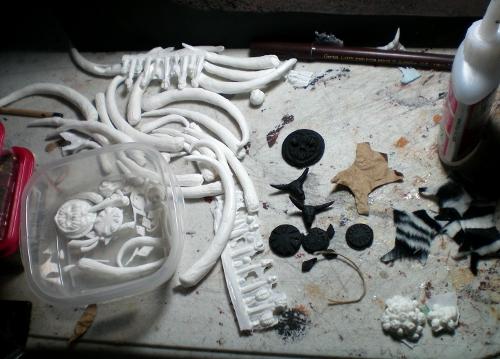
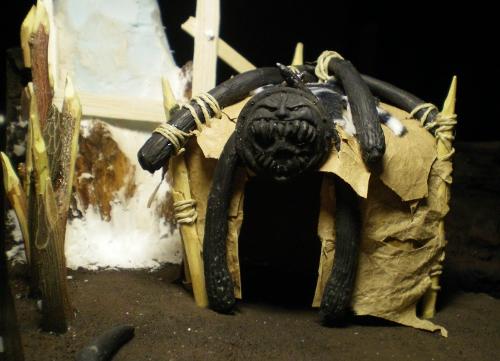
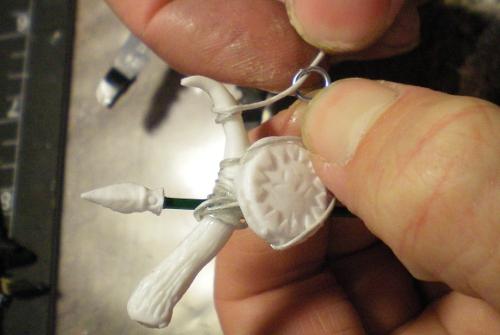
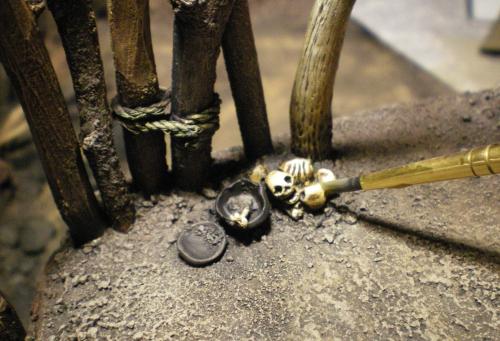
With most of the work done on the first board I now begin casting the pieces I will need for the second board. Here you can see the various sizes of tusks, ogre shields, some runes and different human and animal skulls. I also started cutting out shapes that look like animal pelts. All the resin parts will be scrubbed and cleaned before priming.
The main feature that will go on the second board is the hut. I’ve decided to carve the form out of florist ball foam. These things are great for making a form, they collapse with a little bit of pressure applied to it and it will retain the shape. I constructed the frame of the tent using the ridges from the concave shapes I carved and pressed into the foam. The concave shape will make it so that when I drape the wet paper onto the form it will mimic the effects of gravity. (Full step-by-step DIY on this in the future.)

After draping the last of the pieces it’s time to dry. PVA takes a bit of a long time to dry. A stint in front of the fan helps but it’s best to do something else while it’s drying.
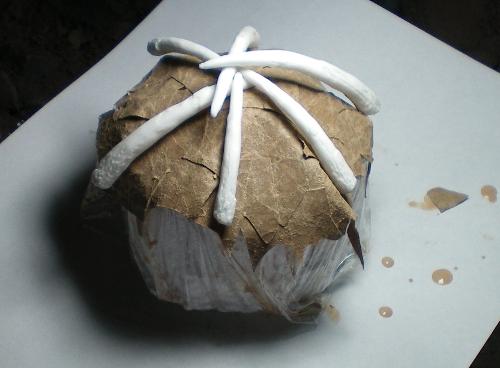
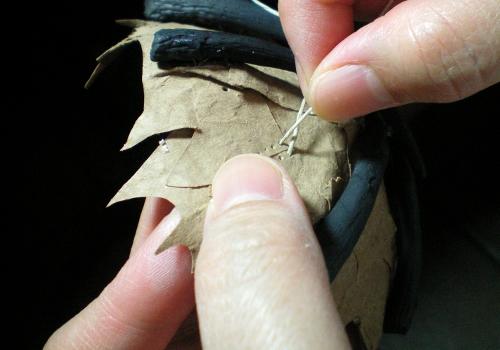
Here I am doing some stitching. Terraformer at this point starts to hover behind me making tsk tsk sounds. He thought I was kidding when I said I would be doing some real stitching. I am using hemp twine available for purchase at any crafting stores. If you noticed I also primed the resin tusks since I am not painting the roof it is best to prime the resin separately.
Little touches such as the animal pelt on top adds to the realism.

More stitches.

To be continued...
|
|
|
|
|
|
2012/06/17 12:17:19
Subject: Ogre Kingdoms Display Board Project by 3T-Studios - Updated 6/16/12 (Now with 100% More Scorpion!)
|
|

Dipping With Wood Stain
|
Wow thanks for uploading this in such detail, really interesting to see =)
Also props on the ultra-realistic scorpion 
|
|
|
|
|
|
2012/06/17 13:27:02
Subject: Ogre Kingdoms Display Board Project by 3T-Studios - Updated 6/16/12 (Now with 100% More Scorpion!)
|
|
Renegade Inquisitor de Marche
|
This is awesome
|
Dakka Bingo! By Ouze
"You are the best at flying things"-Kanluwen
"Further proof that Purple is a fething brilliant super villain  " -KingCracker " -KingCracker
"Purp.. Im pretty sure I have a gun than can reach you...."-Nicorex
"That's not really an apocalypse. That's just Europe."-Grakmar
"almost as good as winning free cake at the tea drinking contest for an Englishman." -Reds8n
Seal up your lips and give no words but mum.
Equip, Reload. Do violence.
Watch for Gerry. |
|
|
|
|
2012/06/17 14:05:32
Subject: Ogre Kingdoms Display Board Project by 3T-Studios - Updated 6/16/12 (Now with 100% More Scorpion!)
|
|
Rampaging Reaver Titan Princeps
|
Amazing, anything 3T is beautifully astounding.
|
|
|
|
|
2012/06/17 19:01:18
Subject: Ogre Kingdoms Display Board Project by 3T-Studios - Updated 6/16/12 (Now with 100% More Scorpion!)
|
|
Avatar of the Bloody-Handed God
Inside your mind, corrupting the pathways
|
Every project you guys do makes me want to cry at how awesome your stuff is
|
|
|
|
|
|
2012/06/18 06:56:48
Subject: Ogre Kingdoms Display Board Project by 3T-Studios - Updated 6/16/12 (Now with 100% More Scorpion!)
|
|
Dakka Veteran
|
Fantastic - Thank you for such detail and WIP photos
Every post enhances the hobby for everybody !
I Love the huts !
|
-STOLEN ! - Astral Claws - Custodes - Revenant Shroud
DR:70-S+++G++M(GD)B++I++Pw40k82/fD++A++/areWD004R+++T(S)DM+
|
|
|
|
|
2012/06/18 08:44:07
Subject: Ogre Kingdoms Display Board Project by 3T-Studios - Updated 6/16/12 (Now with 100% More Scorpion!)
|
|
Esteemed Veteran Space Marine
|
those ogre huts are really amazing!!! as is everything els!
|
|
|
|
|
|
2012/06/19 04:04:17
Subject: Ogre Kingdoms Display Board Project by 3T-Studios - Updated 6/16/12 (Now with 100% More Scorpion!)
|
|
Lord Commander in a Plush Chair
California + Philidelphia
|
very nice detailing here!
|
 [ [
"Don't worry, Vik! You have all of your internet friends to keep you company! And, as everyone knows, internet friends are at least one step above imaginary friends "-Rawson
"Does an Ork shiiiit green?" "...Rogue! -you rock!" "Damn you too Rogue!""[TTFN]... That means tittyfething right?""Yep, that's me, a two-dollar whore"-Dsteingass
"... but if we all fail together we can make it look like we´ve won actually.." "...to all killers out there...: my face will hit your fist so hard it´s gonna bleed...your fist that is...""lol....OMG... you are a serial""he knows no pain...nor fear^^ he is a riveteer""yep... some of the dakka chaps here sure made the joints of my jaw quite loose...""er... emailsex... now that at least sounds like the perfect safer sex... but i like mine a bit more...wet""do you know what they call a quarter pounder of a buckte full of rivets in france?" "No...what?" "Rivitz royal"-Viktor von Domm
" I expected to hear gak like that from RW, not you Vik... for shame Sir, for shame"-AnUnearthlyChilde
"We are Vik's private collection of muses for the monkey on his back.....""you, guys are worse than my children......"-mxwllmdr
"Singling one out as odd in a =][_= thread is like going into an asylum, pointing at someone at random and saying "that person's insane""-Shrike |
|
|
|
|
2012/06/19 07:27:48
Subject: Ogre Kingdoms Display Board Project by 3T-Studios - Updated 6/16/12 (Now with 100% More Scorpion!)
|
|
Fresh-Faced New User
Pittsburgh, PA
|
Wow! Subbed. Are you by chance located in Los Angeles? Just moved here a few months ago, and I don't have any modelling buddies haha.
|
|
|
|
|
2012/06/19 07:34:40
Subject: Ogre Kingdoms Display Board Project by 3T-Studios - Updated 6/16/12 (Now with 100% More Scorpion!)
|
|
Fully-charged Electropriest
|
Oh wow, fantastic project you have here!
|
|
|
|
|
2012/06/19 08:50:11
Subject: Ogre Kingdoms Display Board Project by 3T-Studios - Updated 6/16/12 (Now with 100% More Scorpion!)
|
|
Fresh-Faced New User
|
beware... wrote:Wow! Subbed. Are you by chance located in Los Angeles? Just moved here a few months ago, and I don't have any modelling buddies haha.
Sorry, We're not from CA.
|
|
|
|
|
|
2012/06/19 13:01:39
Subject: Re:Ogre Kingdoms Display Board Project by 3T-Studios - Updated 6/16/12 (Now with 100% More Scorpion!)
|
|
Regular Dakkanaut
|
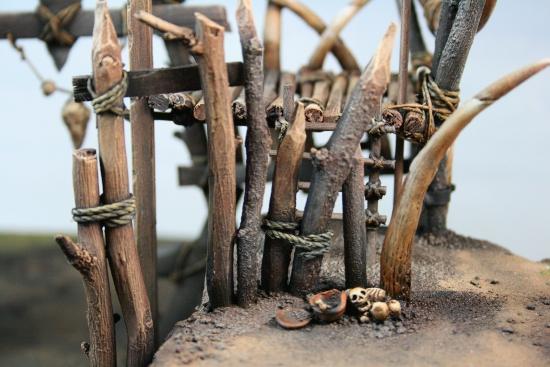
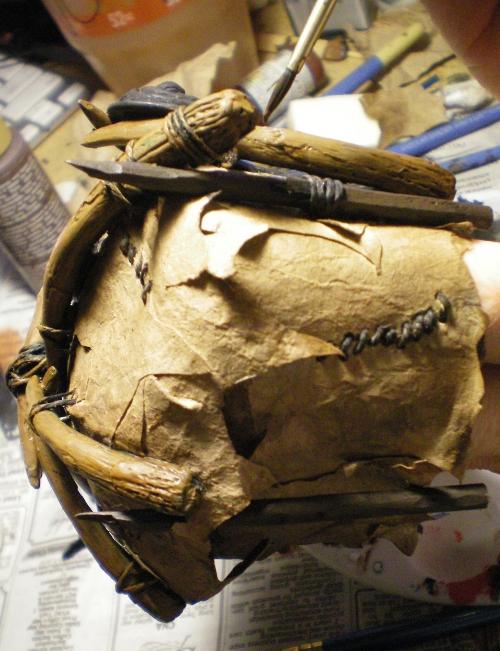
The wall frames I used are dowels that I distressed and whittled the ends to points. Bindings are done with hemp twine. I usually pre-prime components before construction but since it’s wood I have the option to just hand paint it black after assembly.
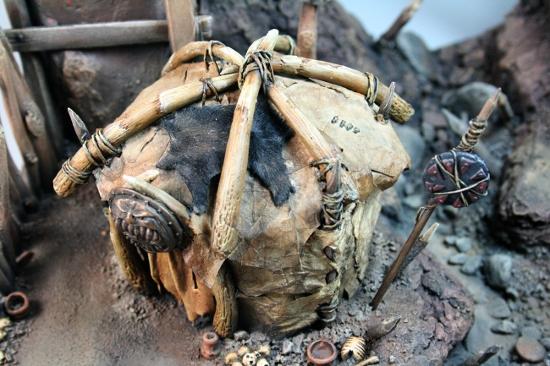
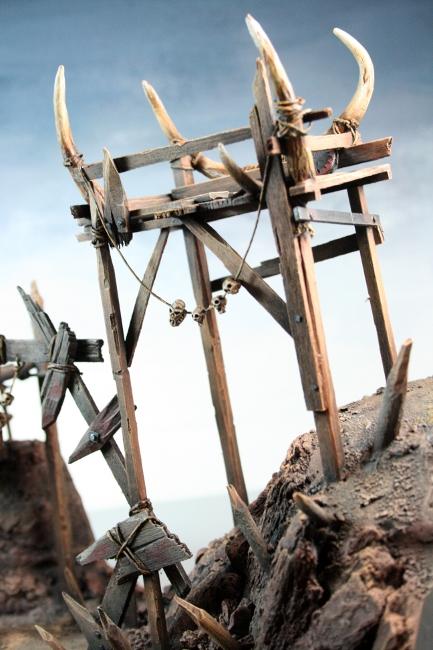
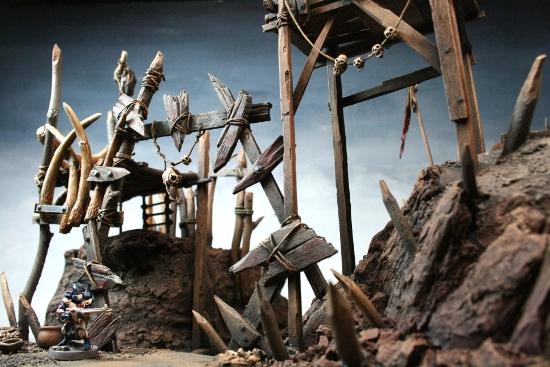
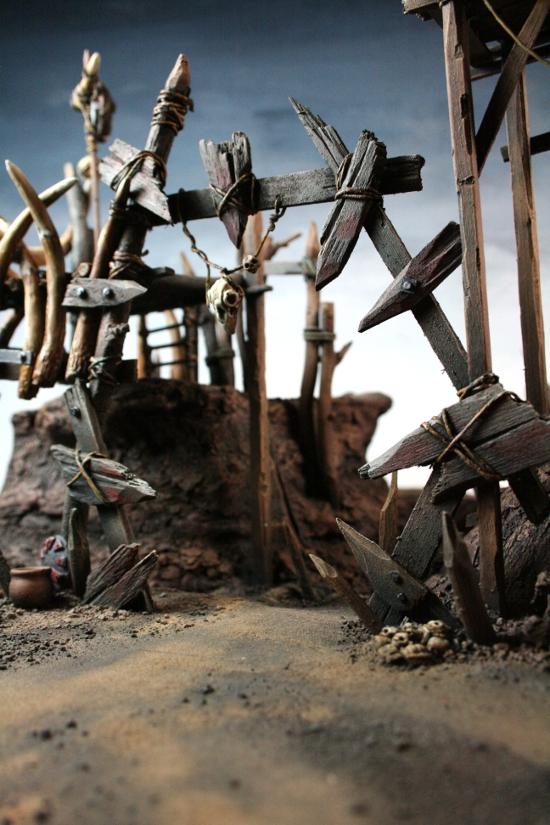
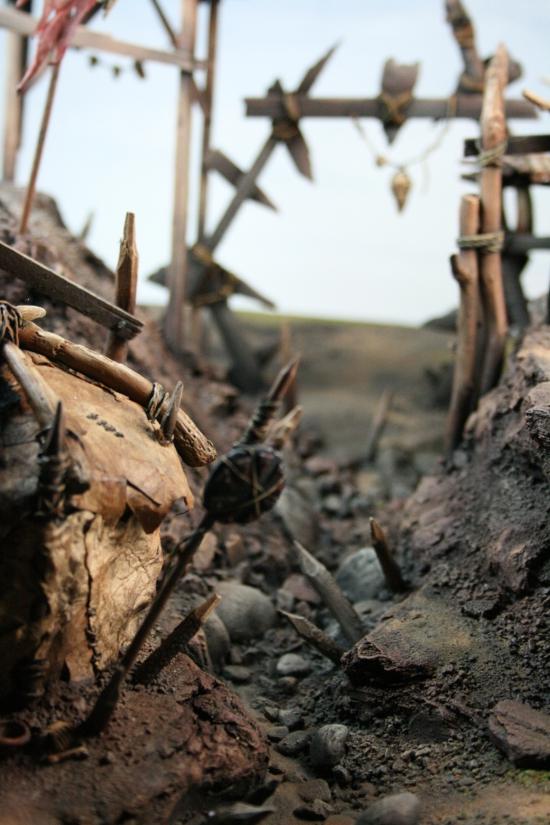
With most of the construction and work on the hut done I focus my attention to the other structures that are going to the second board. Here is my carved runic monument that will be framed by rough lumber.
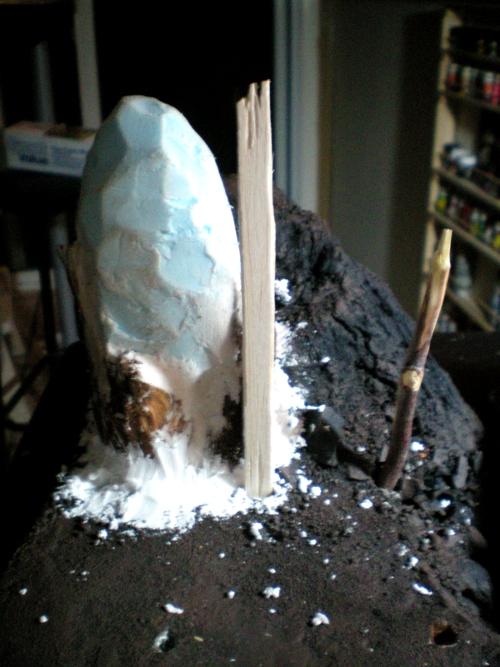
Framing completed. Some riveting and it’s ready for black paint. I also marked the spot where the hut will go.
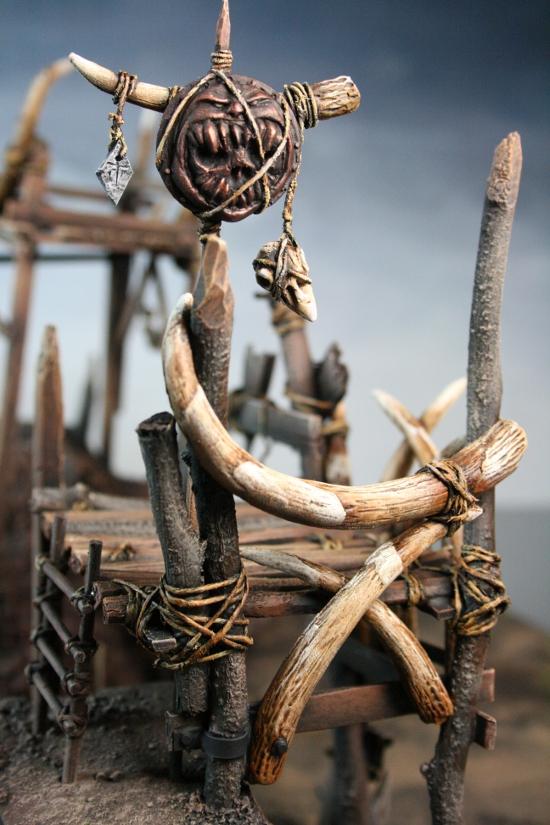
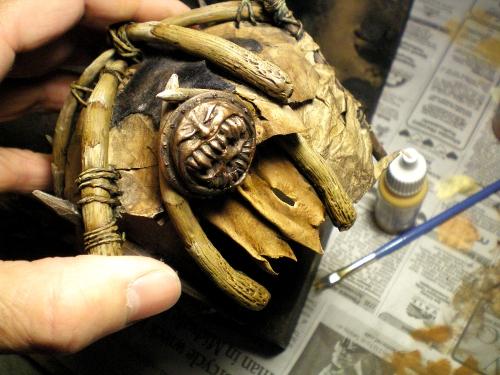
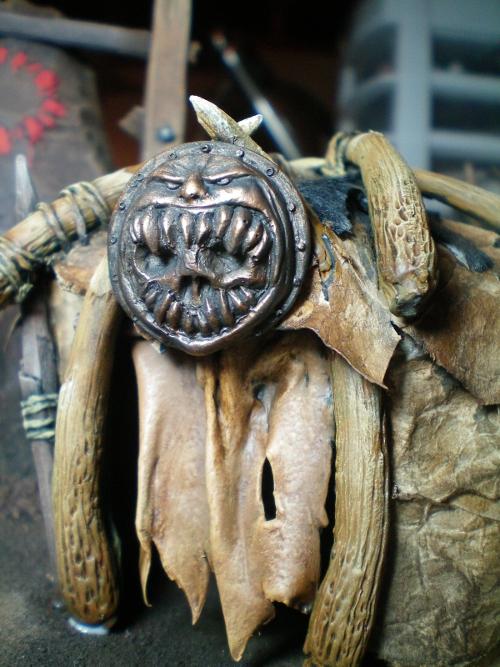
I cut out the entrance for the hut and glued the frame using the cast tusks. I also glued the pre-primed ogre emblem over the door.
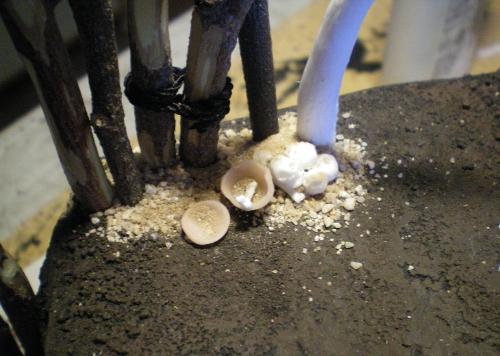
A quick sculpting job using super sculpey. These pieces of earthenware will be placed around the encampment.
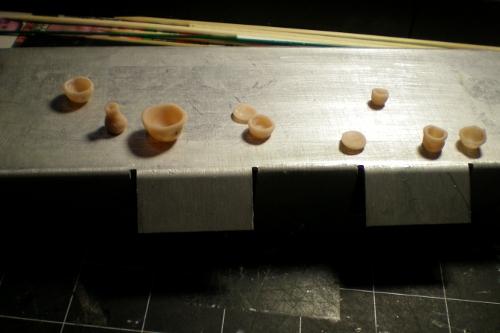
Here are some placed and blended in using rough sand.
Time to paint the runic rock.
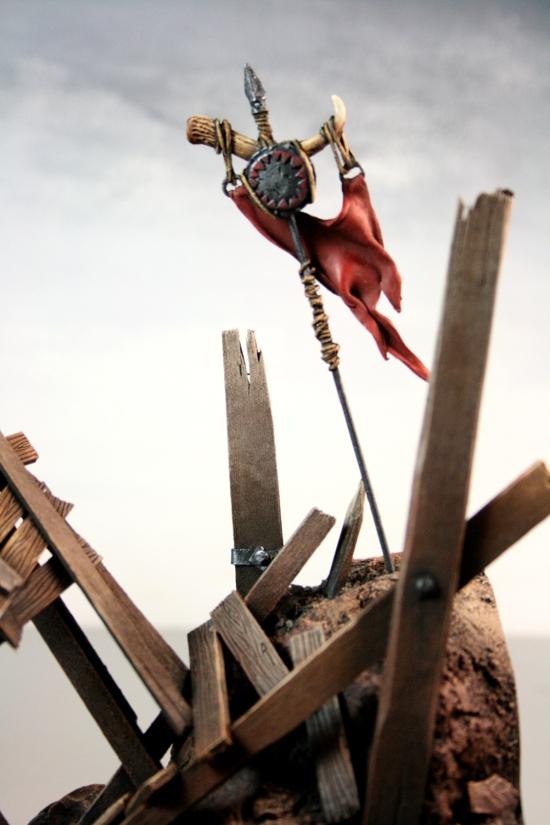
Assembling the standards. Letting Terraformer have all the fun. He’s really great assembling these things on the fly. That guy is a genius!
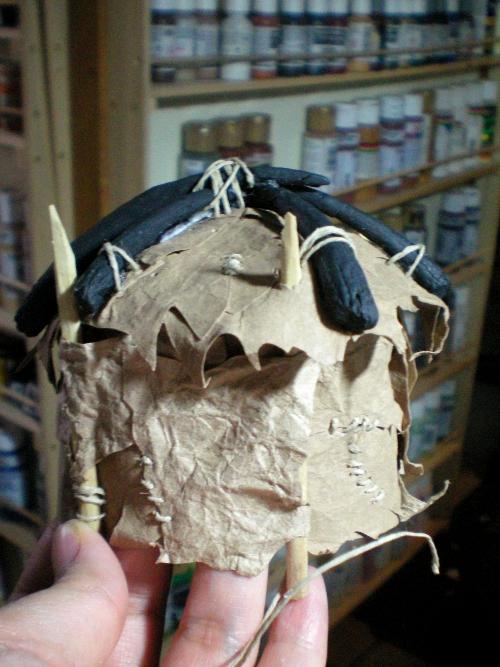
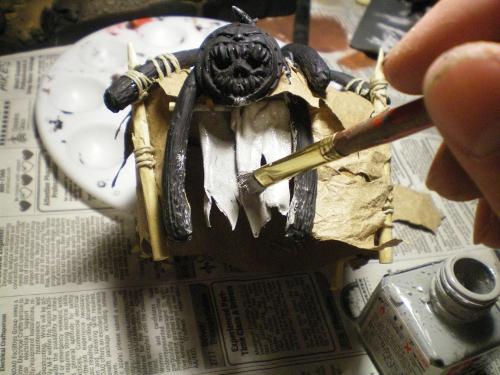
Meanwhile, the remaining paper was trimmed and secured by glue. I made a leather flap over the doorway made out of Greenstuff.
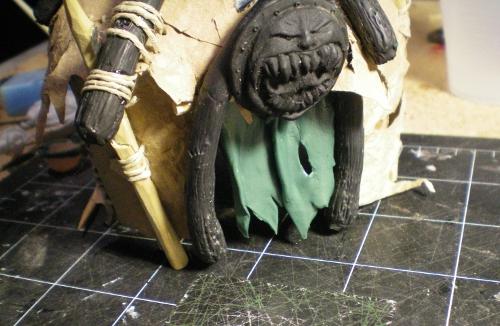
After the greenstuff cured, it was time to hand-paint the primer. While the enamel primer was setting and getting sticky, I stippled it with a stiff brush to give it a bumpy, skin-like texture.
Base color of snakebite leather for the tusks goes in as well as dark brown on the dowels. Black goes on the flap.
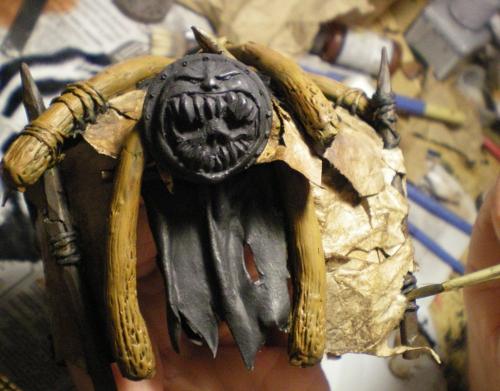
Carefully picking out the stitches as well. I mentioned that the hut itself wont be painted but it will be stained to make it look dirty.
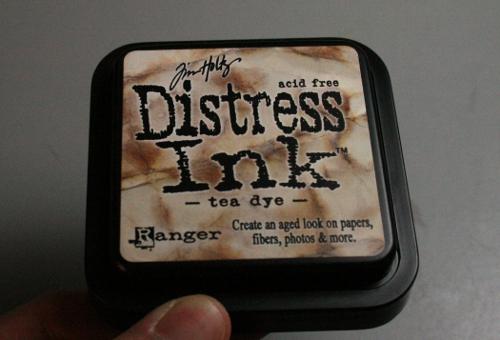
There are many ways to stain paper to make it look old or dirty but for the lazy this product is the way to go. It goes on a little reddish until it’s dried but with combination with dabbing dark brown ink and this you will achieve the look of grime and dirt.
The ropes, tusks and emblem are all finished. Doing the final highlights on the leather flap.
Time to pick out the small items on this board and finish all the painting.
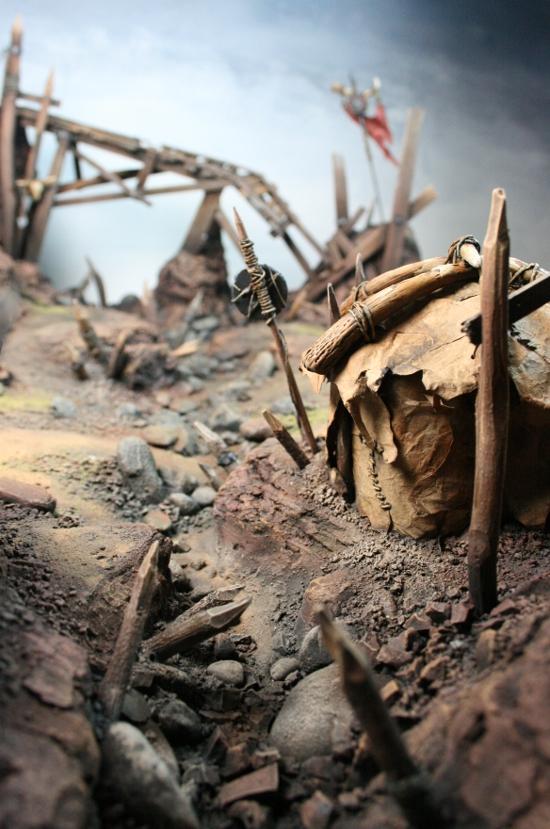
Here is the second board before the hut goes in. Everything is painted except for the river rocks.
The hut is now glued onto the board. The final blending in using dirt and sand will follow.
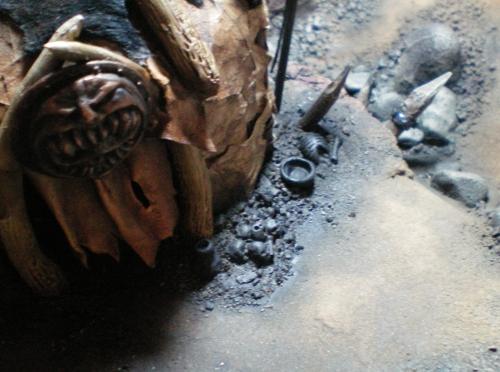
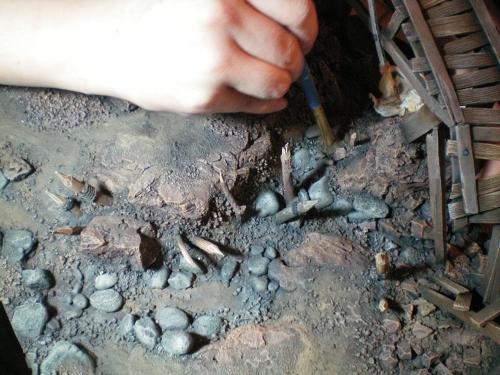
The hut is now blended in with dirt and gravel piled on the walls. The pikes are also placed on the spot I picked. The resin, scupley and plastic parts have been primed and will be painted soon as well.
The last painting to be done was the river rocks, which I did starting with board one.
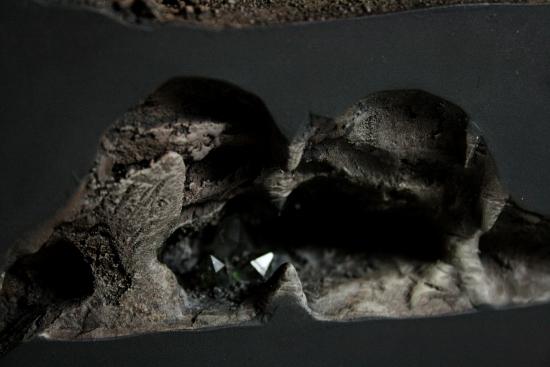
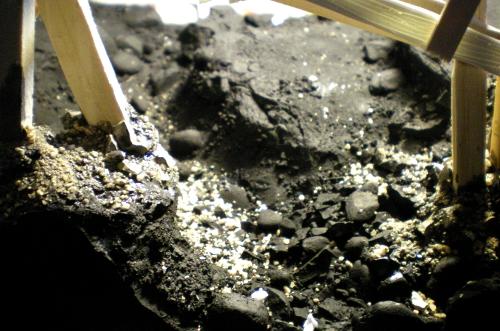
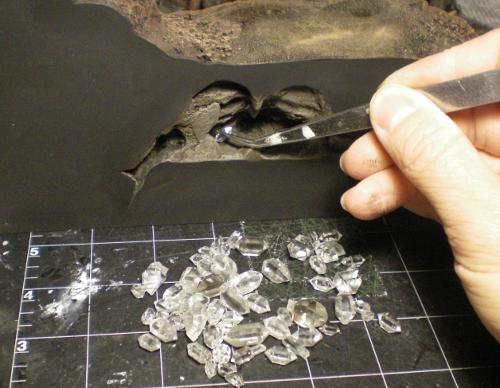
Here was a nice extra detail Terraformer had decided to put in. Crystals in the tiny caves. These are left over Herkimer Diamonds I had when I did jewelry making some time ago.
|
|
|
|
|
|
2012/06/19 13:07:26
Subject: Ogre Kingdoms Display Board Project by 3T-Studios - Updated 6/16/12 (Now with 100% More Scorpion!)
|
|
Esteemed Veteran Space Marine
|
cant wait for your new update!!
|
|
|
|
|
|
2012/06/19 13:07:53
Subject: Re:Ogre Kingdoms Display Board Project by 3T-Studios - Updated 6/16/12 (Now with 100% More Scorpion!)
|
|
Regular Dakkanaut
|
|
|
This message was edited 2 times. Last update was at 2012/06/19 13:22:39
|
|
|
|
|
2012/06/19 13:27:13
Subject: Ogre Kingdoms Display Board Project by 3T-Studios - Updated 6/16/12 (Now with 100% More Scorpion!)
|
|
Avatar of the Bloody-Handed God
Inside your mind, corrupting the pathways
|
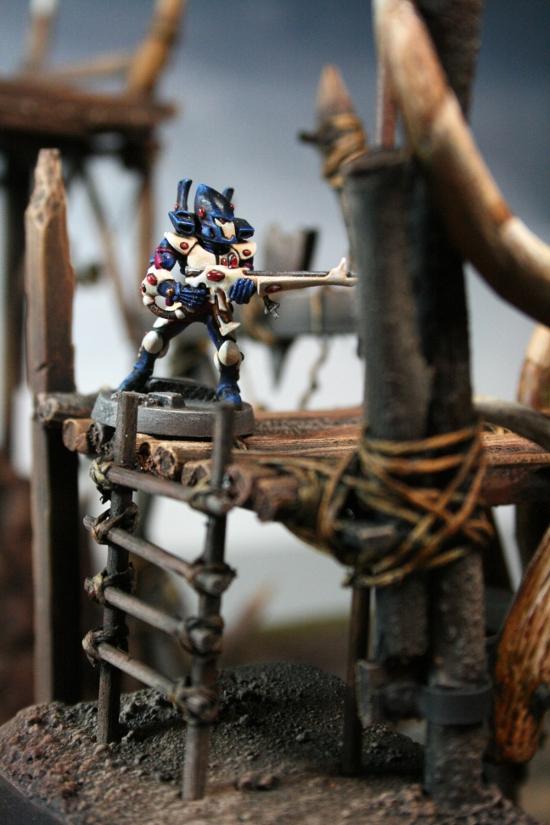
Damn awesome, made even more so by Steve the Eldar
|
|
|
|
|
|
2012/06/19 13:28:15
Subject: Re:Ogre Kingdoms Display Board Project by 3T-Studios - Updated 6/16/12 (Now with 100% More Scorpion!)
|
|
Regular Dakkanaut
|
|
|
|
|
|
|
2012/06/19 13:59:31
Subject: Ogre Kingdoms Display Board Project by 3T-Studios - Completed!
|
|
Avatar of the Bloody-Handed God
Inside your mind, corrupting the pathways
|
Very nice
Do you have a picture of the sections together?
|
|
|
|
|
|
2012/06/19 17:47:35
Subject: Ogre Kingdoms Display Board Project by 3T-Studios - Completed!
|
|
Fresh-Faced New User
|
SilverMK2 wrote:Very nice
Do you have a picture of the sections together?
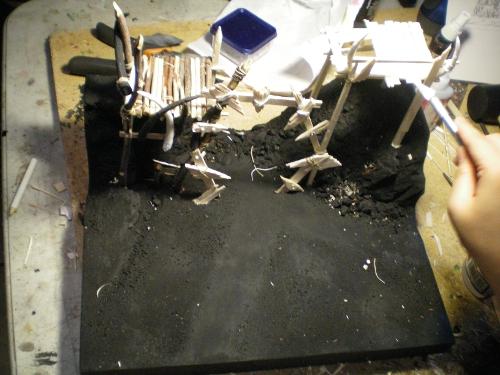
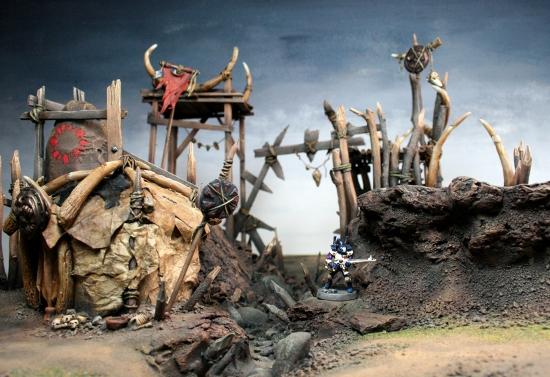
I have this test shot I took but it made me realize that my photo studio table is too small. Usually when this happens I would take the shoot outside but I finished this project a little too late in the evening, I think I was a bit burnt out anyway (I couldn't see what I'm working on anymore) and having to take the pics, resizing and then writing the logs basically everything else that I have to on my to do list, my thoughts were, "fudge it, there would be other projects"
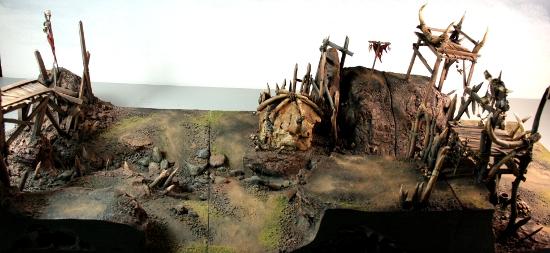
Here's another futile attempt
Terraformer you owe me a bigger photo studio. Get on it.
|
|
This message was edited 1 time. Last update was at 2012/06/19 17:48:33
|
|
|
|
|
2012/06/19 17:50:40
Subject: Ogre Kingdoms Display Board Project by 3T-Studios - Completed!
|
|
Avatar of the Bloody-Handed God
Inside your mind, corrupting the pathways
|
Haha, fair enough
Looks good - I was just having a hard time seeing how it all connected together in the detail shots.
|
|
|
|
|
|
2012/06/19 17:59:54
Subject: Re:Ogre Kingdoms Display Board Project by 3T-Studios - Completed!
|
|
Mauleed
The Netherlands
|
Wow  This is dropdead beautiful. I am always looking at your site for inspiration and everything you people at 3T make is fantastic.
I'll never get to the same level...but that's ok. Keep up the brilliant work
|
|
This message was edited 1 time. Last update was at 2012/06/19 18:00:25
" It's a cookbook ". |
|
|
|
|
2012/06/19 20:22:28
Subject: Ogre Kingdoms Display Board Project by 3T-Studios - Completed!
|
|
Fixture of Dakka
|
Fantastic Mismuse everything looks so real, I love everything you guys do its very inspiring stuff.
Nice to see Steve make an appearance as well, I think he's your star model.
|
|
|
|
|
|
|
|