| Author |
Message |
 |
|
|
|
|
Advert
|
Forum adverts like this one are shown to any user who is not logged in. Join us by filling out a tiny 3 field form and you will get your own, free, dakka user account which gives a good range of benefits to you:
- No adverts like this in the forums anymore.
- Times and dates in your local timezone.
- Full tracking of what you have read so you can skip to your first unread post, easily see what has changed since you last logged in, and easily see what is new at a glance.
- Email notifications for threads you want to watch closely.
- Being a part of the oldest wargaming community on the net.
If you are already a member then feel free to login now. |
|
 |
2012/10/05 20:57:47
Subject: Re: Terrain Project- Building a Better Battlefield
|
|

Longtime Dakkanaut
|
@ monkeytroll- I'm glad the glimpses into my particular brand of modeling madness are interesting. I get what you are saying, I really enjoy seeing the process as much as (if not more than sometimes) then end result. Ash1 is a great example of amazing 'end result' (I love his work) but no real WIP information.
@ Vik- That's exactly what I'm going to do. Bits of the treadplae jutting out of a crater mound, rocks / etc spread out randomly over the treadplate that survived, etc. I'll be pretty awesome when it is done. Promise.  And as for multiple craters....
@ Dave- Oh man you know it. The reason I still have that sheet is for YEARS (like since ... 1996?) I've been meaning to mold the entire sheet. And that exactly what I'm going to do. I have no idea how to use / make a press mold, but I do know how to use that 'brush on' stuff. I'm finally motivated enough to do it, and the work I put into it will be paid back over and over again instead of making individual craters every time. Gaaahh. That just gave me a headache just thinking about.
Not likely that I'll have another update before Monday / Tuesday. I'm going to be flat out this weekend doing pre-winter stuff. Early to bed tonight because I have some friends helping me w/ firewood tomorrow, starting @ 7am and working until we get tired, drunk, or it's dark outside. I'm guessing 'dark outside' because no one is going to be the first person to say "I'm done" and 3 of the 4 people working are prior military. Ha. By the end of the day I hope to have at least 2 full seasons in the back yard, if not 3. A lot of work in one day, but much like making a mold for the craters, it's an effort that I'll be able to enjoy for a long time to come. However, that means tomorrow night I'll be going to bed around... oh, maybe 7? Sunday I'm heading to my FLGS and picking up the new Chaos Codex!!!!! I won't be home for many hrs after that though because it's a 'responsible adult' day out (groceries, etc) and I'll likely still be beat from Saturday.
Thanks for the views / comments. Always appreciate feedback. More coming, you can bet on that. 
|
|
|
|
2012/10/09 05:34:02
Subject: Re: Terrain Project- Building a Better Battlefield
|
|
Longtime Dakkanaut
|
@ Vik- Yes sir. Fingers are surprisingly important in this hobby.
@ GiraffeX- Thank you, I'm really digging this project and I'm always happy to know that I'm spreading the inspiration. A few of these ideas are organically my own, but most I've gleaned from others. Sooner or later I'm going to amass another list of those who have inspired me and who's work I genuinely respect and appreciate. Most of the credit for my terrain goes to them. I'm just the guy w/ the paintbrush and hobby knife. They were the inspiration that made it happen. And as for the plastic crater sheet... I prefer to call it 'experienced'.
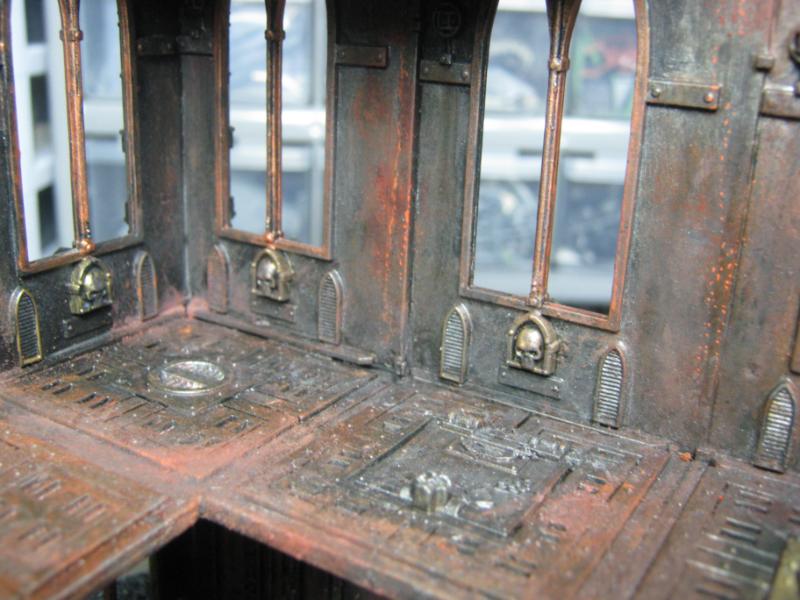
@ mekbadzappa- Hey, thanks for the compliments. My goal is to make the entire table look exactly like that- abused, abandoned, and completely miserable. The 'fluffy' idea behind it has really started to come together. I'm envisioning a PDF outpost on an Imperial planet well within the safe confines of Segmentum Pacificus. Planetary law mandates that all citizens must serve in the Imperial Guard, but it does not mandate that all Guardsmen be deployed. This particular outpost was designed for the sons and daughters of the the Elite Class to fulfill their Imperial commitment without the unnecessary exposure to hostile engagement. All was well until the Night of a Thousand Rebellions. Now the outpost is in ruins and only the scattered rubble stands as a monument to those who died here. It's former glory is still visible in some places, but in most it is a mere echo lost in time and space.
@ inmygravenimage- The floors are actually to resolve a ruling issue we've had here before. With no base there was an occasional discussion on how we determined what was 'ruins' and what wasn't, and TLOS came into that as well. Now there won't be any question at all of what is what. But yes, I could have gone the lame way and just slapped it directly to the hardboard and called it good enough. I'm really glad I decided to put some effort into it. I really feel that this is some of the best stuff I've done. Now all I have to do it maintain or exceed this level. Yeah. No problem. 
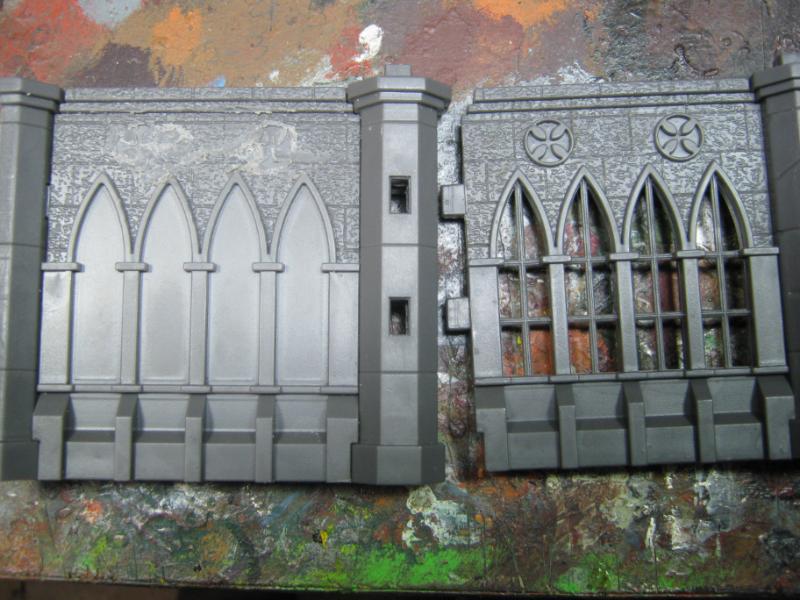
@ marty- Glad to see you back around. Hope you saw the influence you've had on some of these pieces. Your work w/ Pegasus Gothic and Imperial Cities of Death has always fascinated me, and now I'm finally giving it a try. With any luck I'll be the lucky owner of a brand new Imperial Sector box set soon. In fact I need to call GW tomorrow and find out what is going on. I'm supposed to have a $60 credit for stuff my aunt sent back to them after she bought Orks for my b-day. Ha. At least she tried, which is more than I can say for anyone else in my family. Anyway, yeah, i have that going on and I'm pretty psyched. I'm also really looking forward to pulling out my Gothic plates and seeing how I want them to go. I've considered making one massive piece but I know it wouldn't get a lot of table time so I'm likely going to go with smaller base footprints and multiple stories. I could make quite a few of those, and I think they match up w/ the GW IS pretty well. We'll see in the coming months. The craters will have to be more mud / mud puddle than pooled icky slime because I want it to be just a regular plain 'ol bombed out building. Difficult Terrain, 4+ Cover Save, that's it. I specifically don't want it turning into 'mystery terrain'. I'll make it as old and mucky as possible.
 
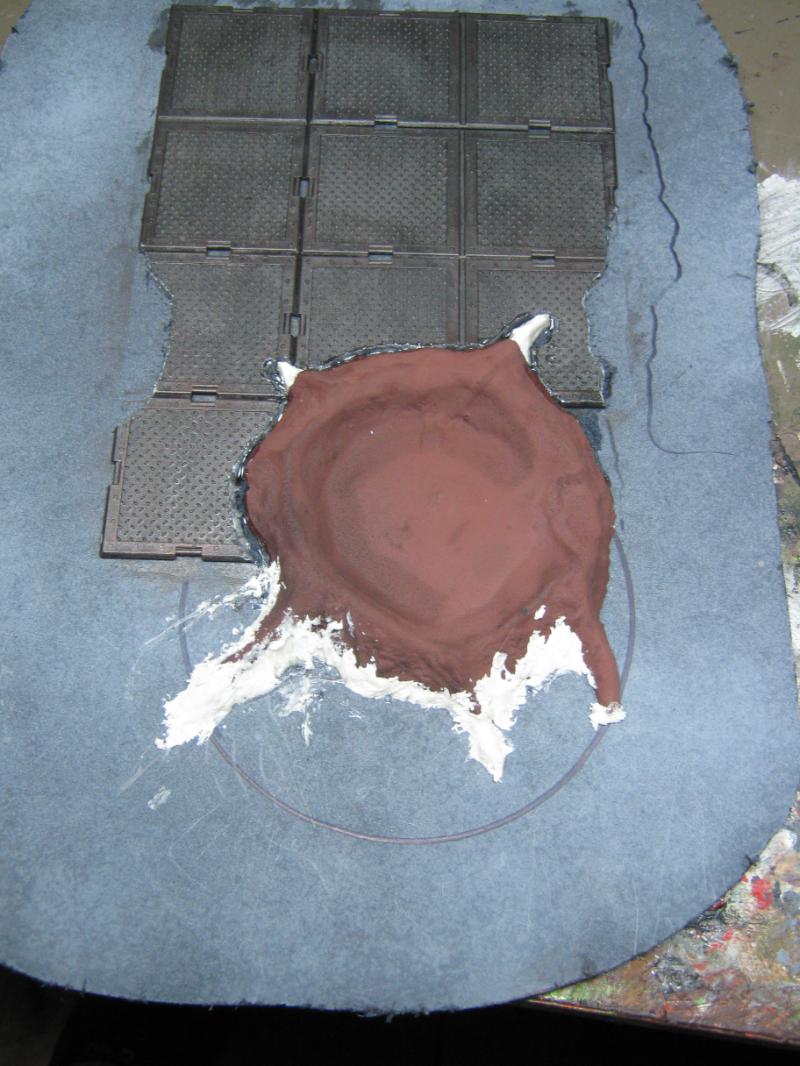
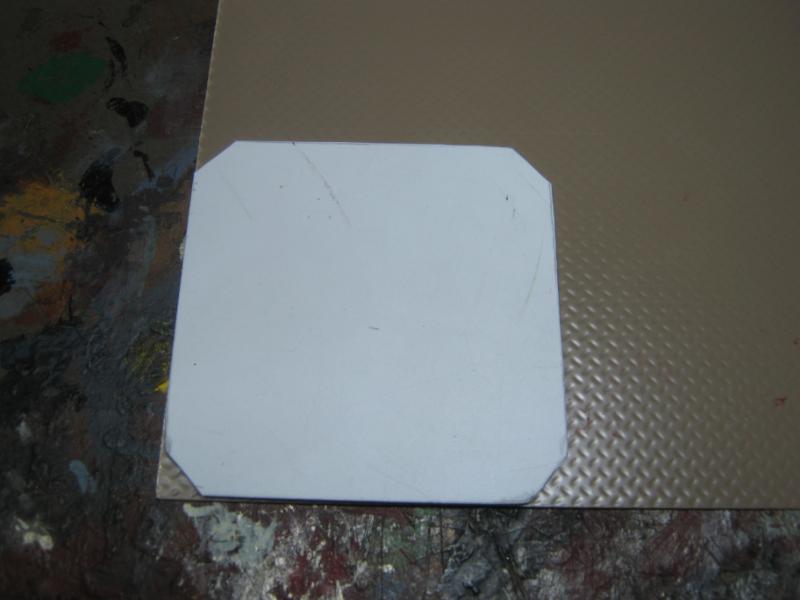
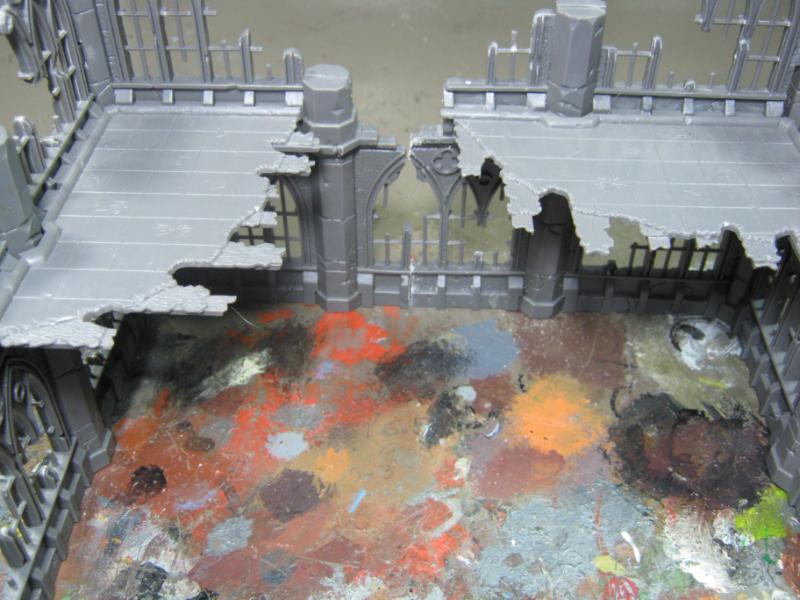
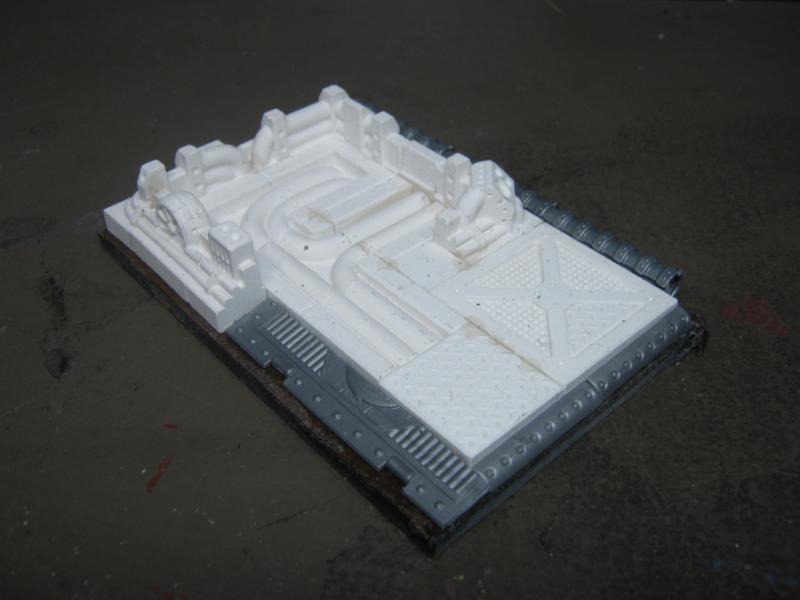
Ok, short update again tonight, but a pretty cool one. This is going to apply to many future projects as well as the one I have in mind currently. Tonight I finally cut a crater out of my last sheet.
I cut this part out with a very dull hobby knife. Why... WHY do I wait months of use to change blades? Far and beyond dull, I usually only change them after thay have broken off in the chuck. I have at least 5 or 6 packs of xacto blades that I haven't even opened yet, some of them from years ago. How many times have I posted "duh, cut myself again"?
...
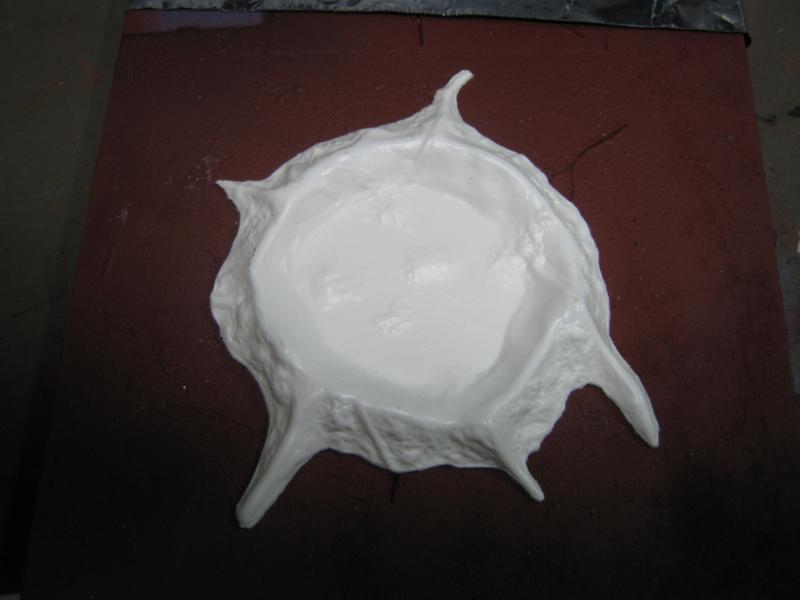
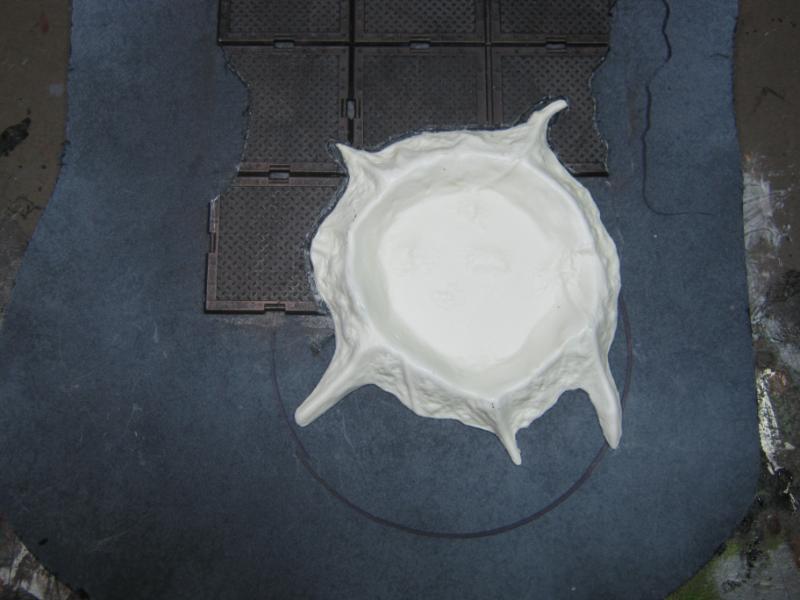
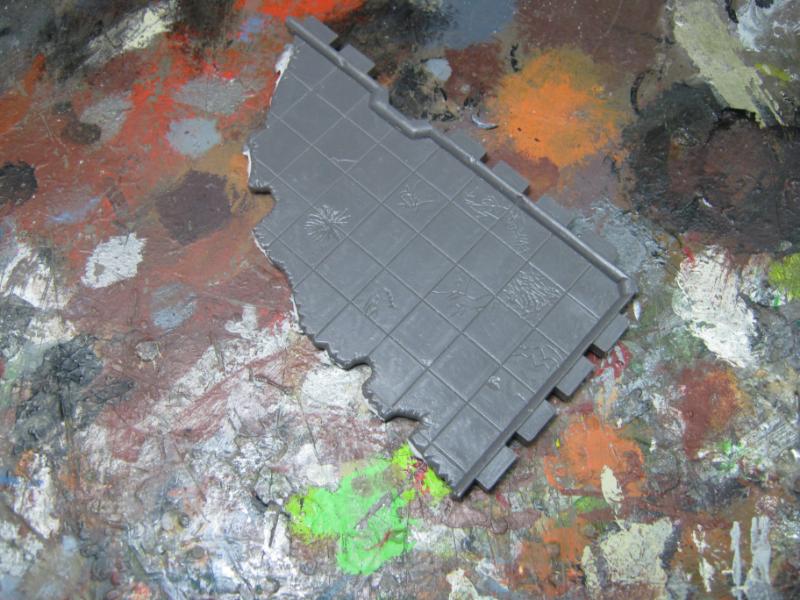
So yeah, here's the end result of the hobby knife cutout:
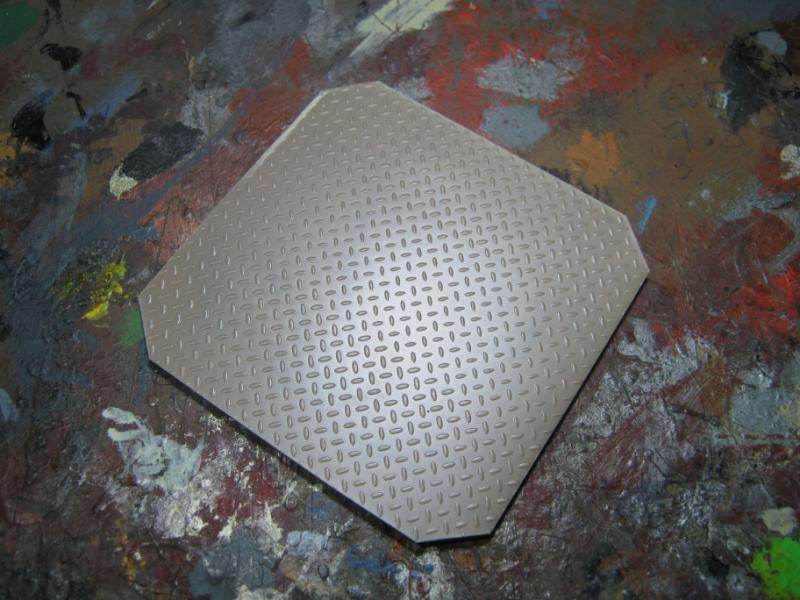
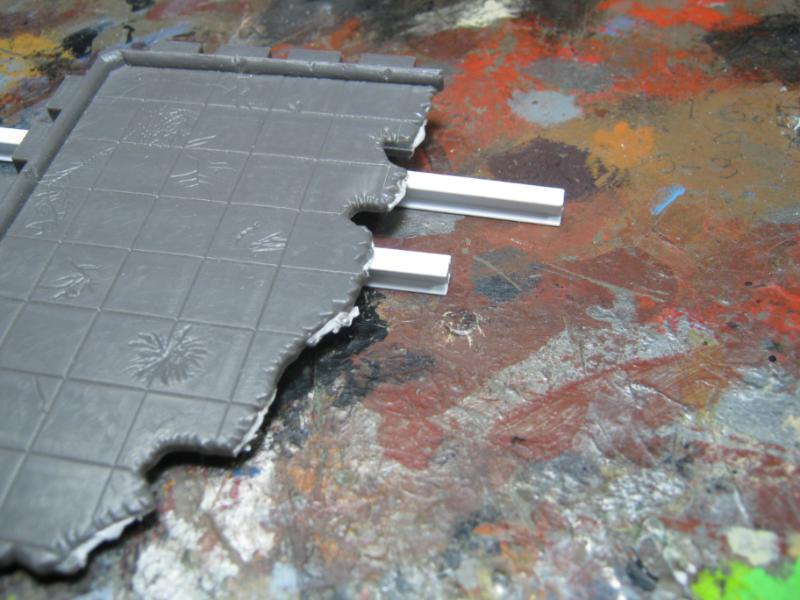
I was so dreading the next part- trimming the excess plastic away from the detail of the crater. I knew it was going to be an annoying process that would take forever and yield substandard results. Just as I was resigning myself to wallowing in Wargame Modeling despair I had an absolute flash of brilliance!!! I decided to use my Wonder Cutter that I usually use on pinkboard insulation. It worked amazingly well and took about 3 minutes. I took a file around the edges to smooth it out more, but I am *really* happy how this came out. Horray for technology!!!
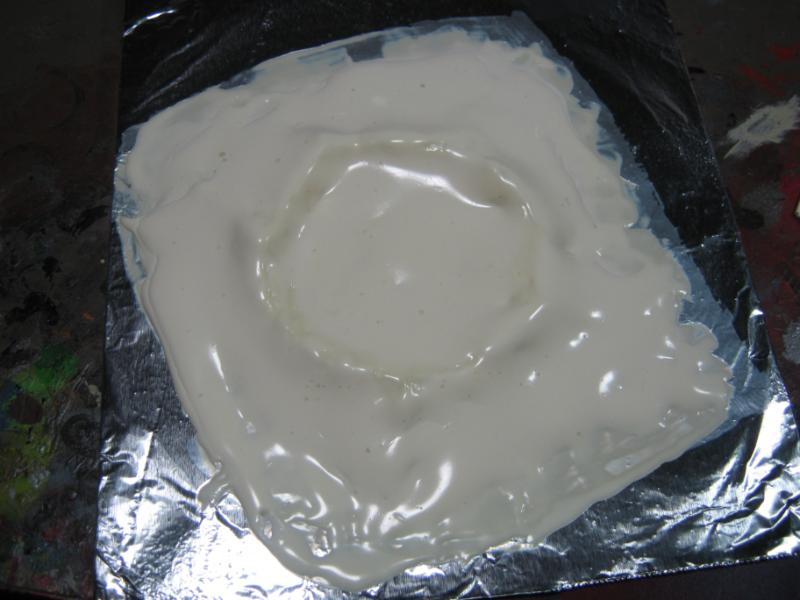
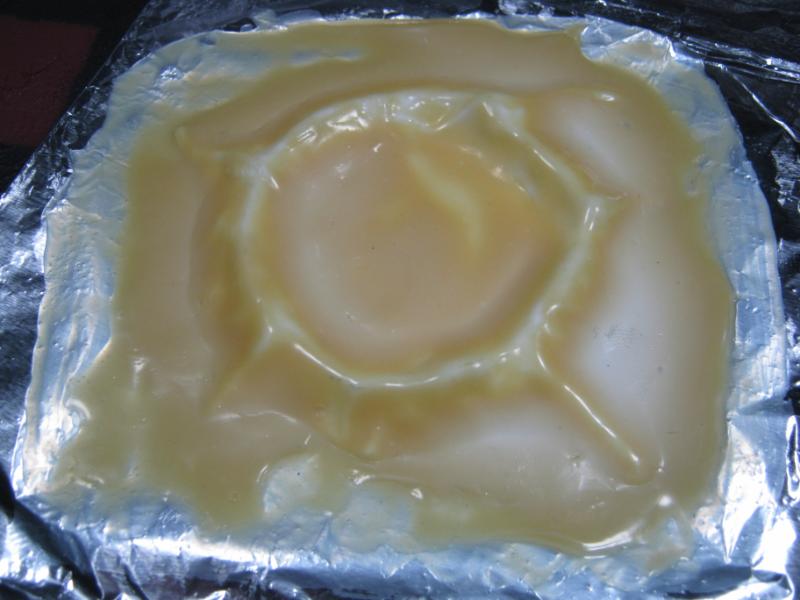
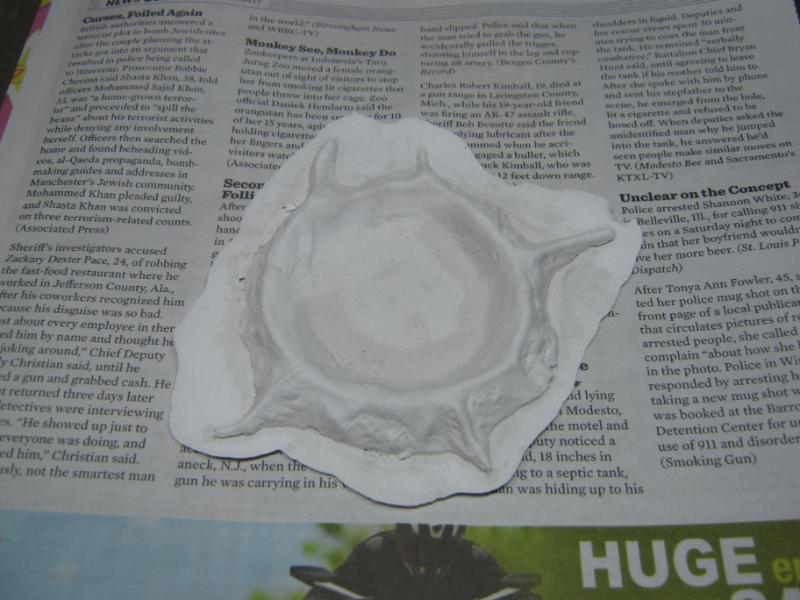
Next pic is of the last time I'll ever use a brush-on mold maker. It's not terrible, but I know there are better ways of doing this and I've gained enough experience with things to know I could do casting with a bit of practice. My next mold will be one of those cool ones with Lego blocks and everything. But for now here's crater mold #1 after a few coats. I used tinfoil only because I was out of wax paper and I'm getting mighty impatient these days and I figured the worst that could happen is I'd have a bad mold. On that note, the mold might look too thick but I was drying it w/ a hair dryer between coats. I figure I'll have the mold done in a few days. I'll pour plaster first, but my goal is to cast these in resin for durability over the years.
And that's it for this one. I'll be updating it when I can. As always, thanks for the views and for the C&C. I'll have more to share as soon as I have something done.
|
|
|
|
2012/10/09 20:00:37
Subject: Re: Terrain Project- Building a Better Battlefield
|
|
Longtime Dakkanaut
|
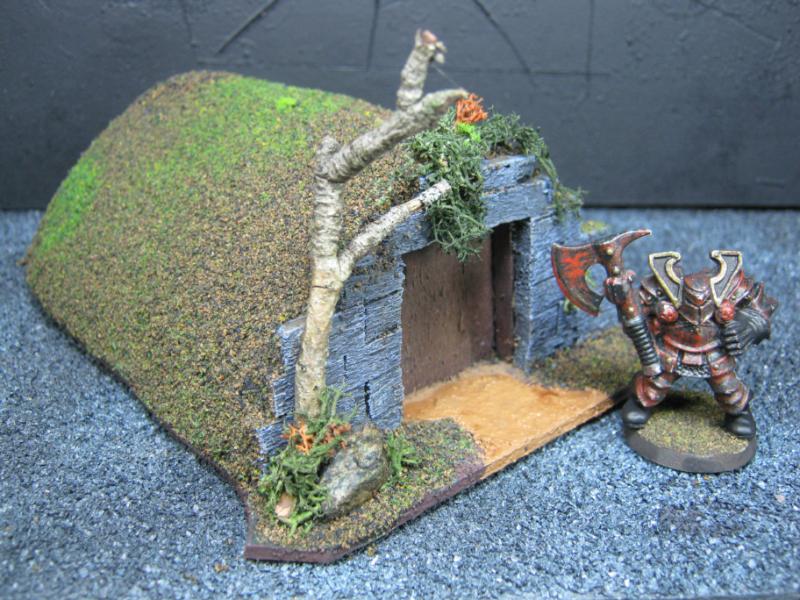
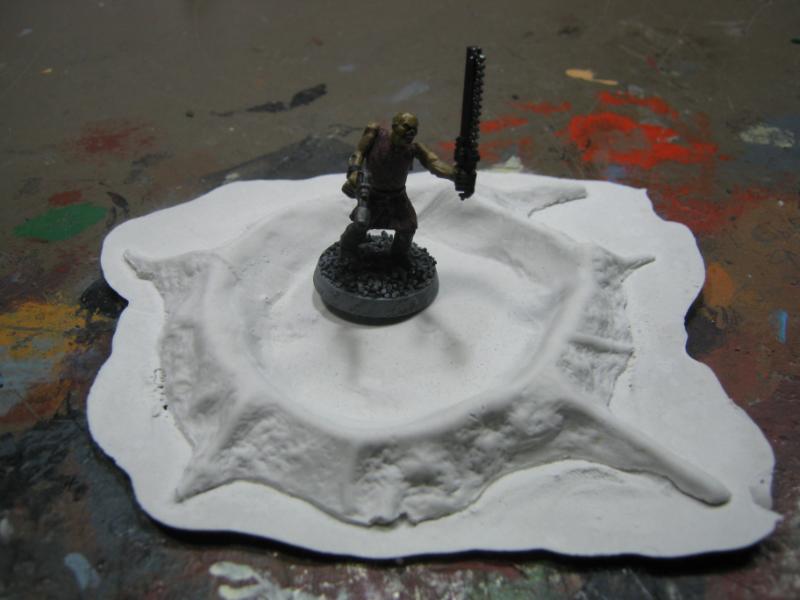
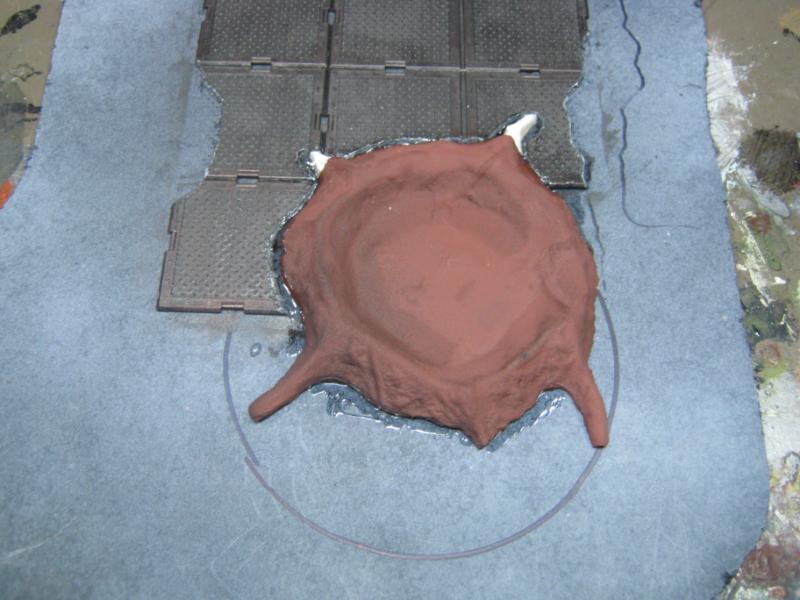
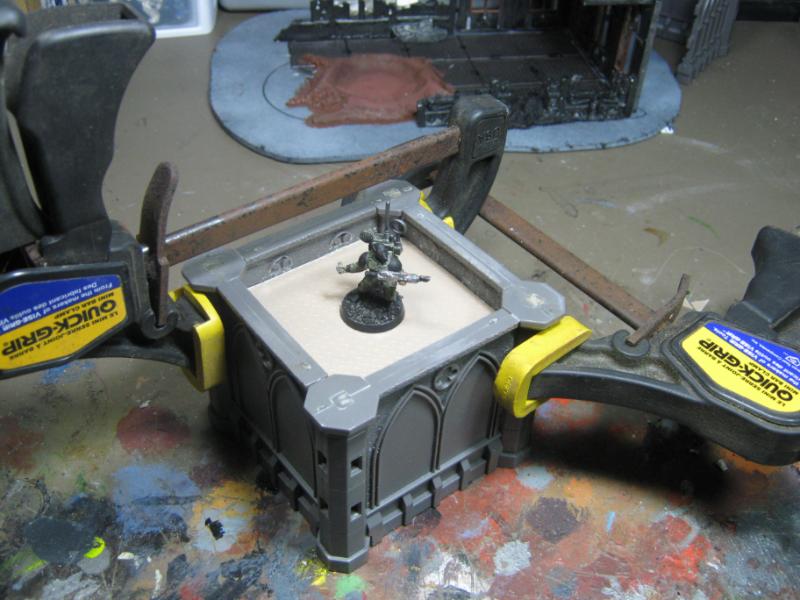
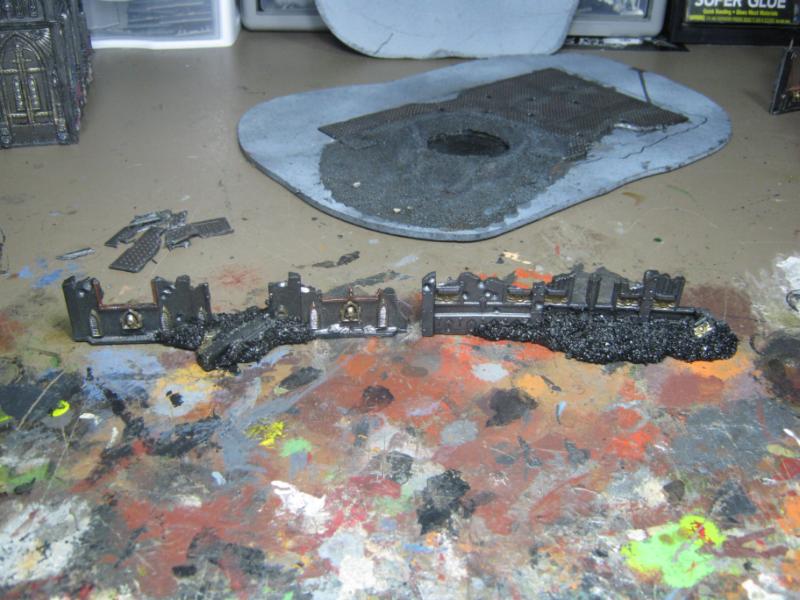
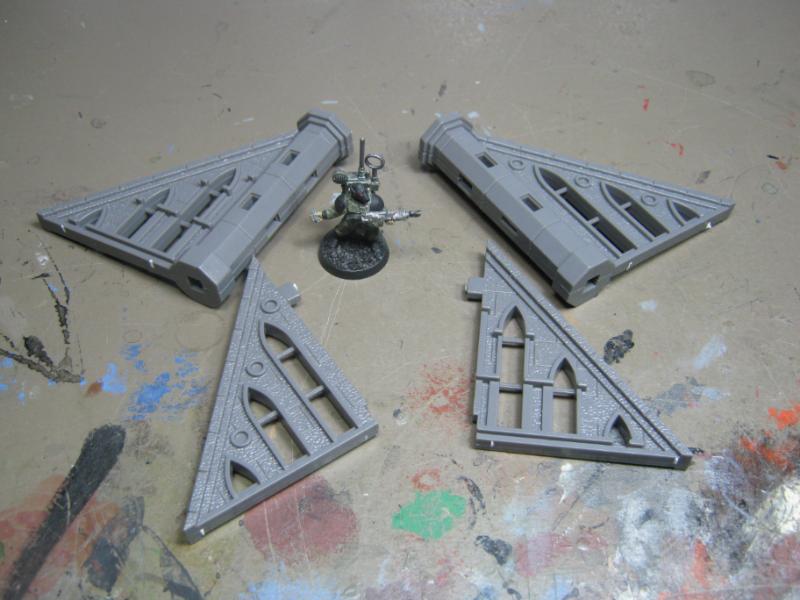
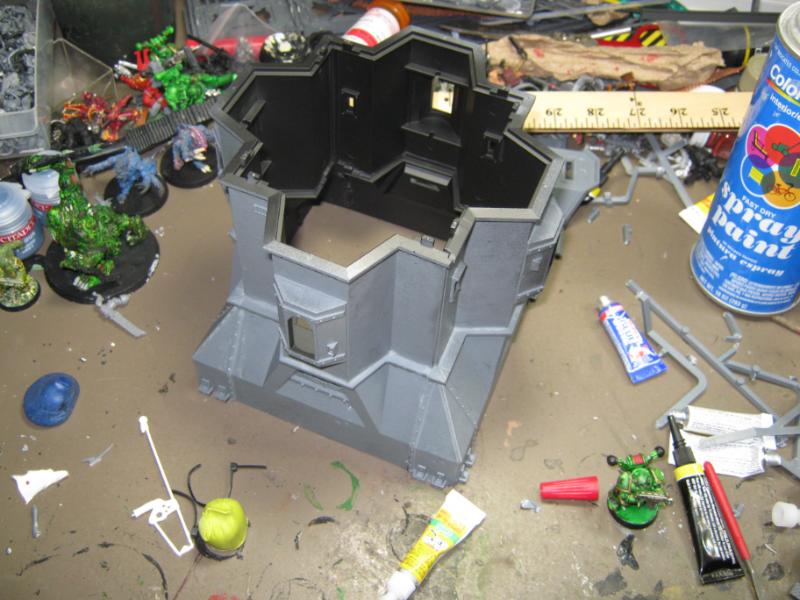
@ Vik- that ugly mess is the start of my new crater mold. It'll be done in a few days once it has a few more coats and has completely cured. It's a bit of a process but the end result will be worth it. The Wonder Cutter is this:
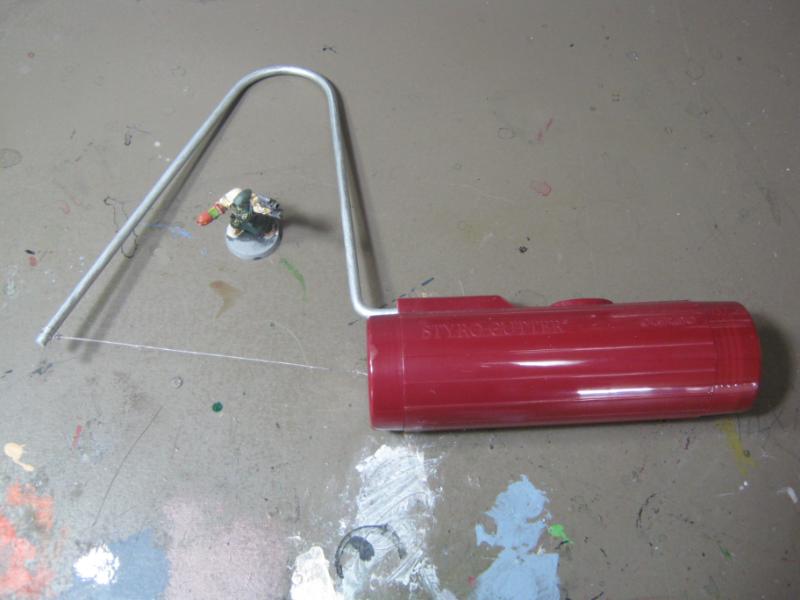
Miniature provided to show scale.
@ Dave- I don't know either. It's not like I don't know better, or I don't have replacement blades. It's a mystery.
@ Monkeytroll- See? I'm not the only one. I'd offer that I'm in the majority. But so are stupid people. Hmm. I think I need to make a point of changing my blades more often.
@ Moltar- Welcome back! I was worried you'd be abducted and sold into the slave trade to make iPhones and whatnot. That's really cool to hear about the game shop there. You almost have to wonder how a GW product would sell there (maybe Tau? Ha!). Looking forward to you getting settled in and sharing your new work.
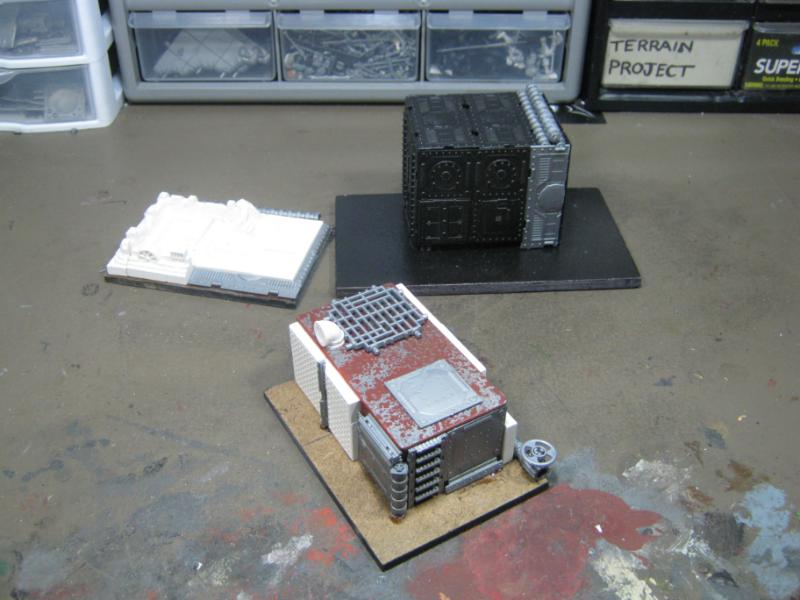
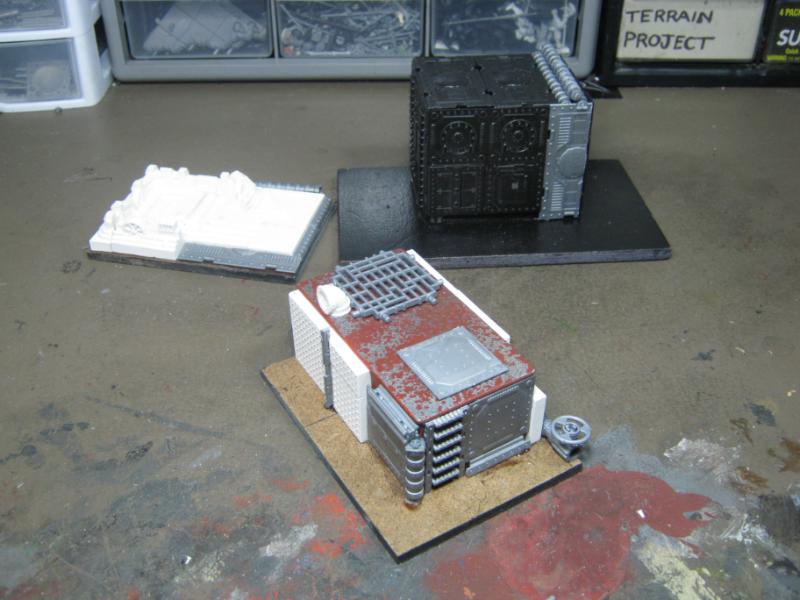
Another short update, but a decent one. Progress is skipping right along on the 'crater building'. Depending on how this one comes out I may make another, but no more than 2, I don't want to ruin the uniqueness of each individual piece.
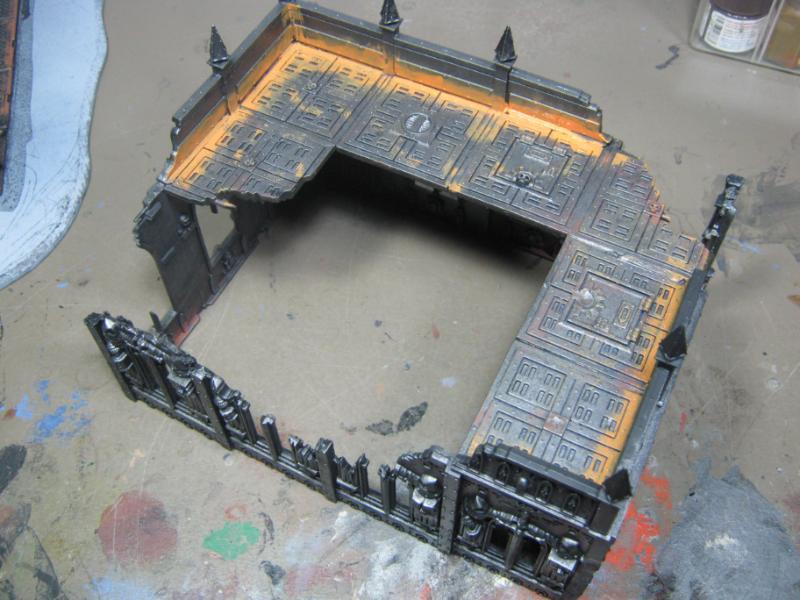
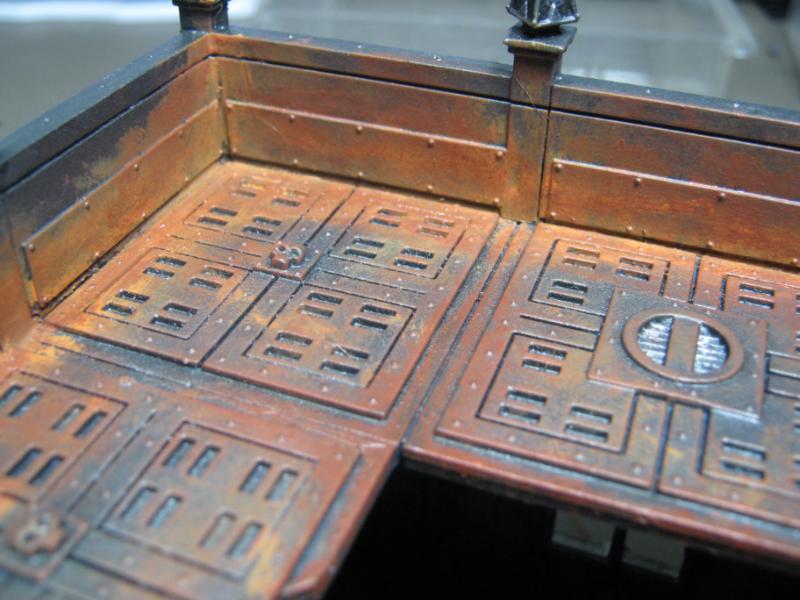
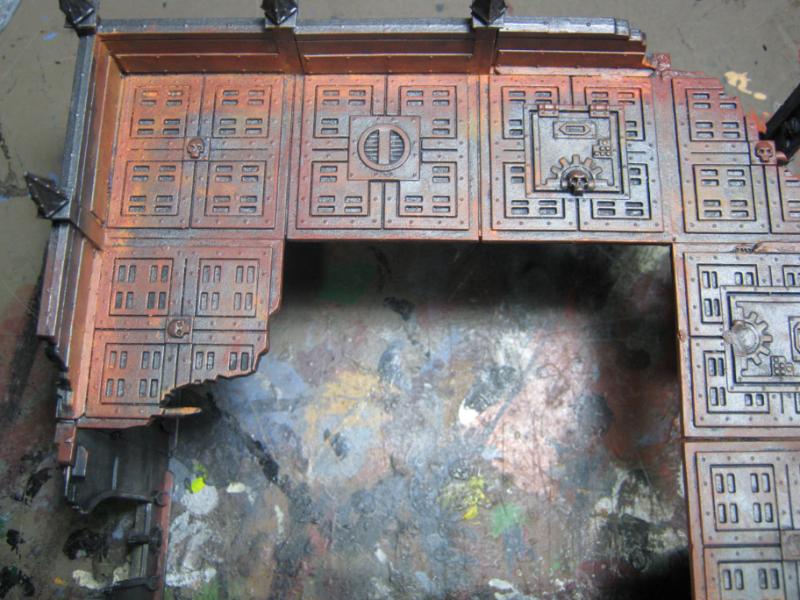
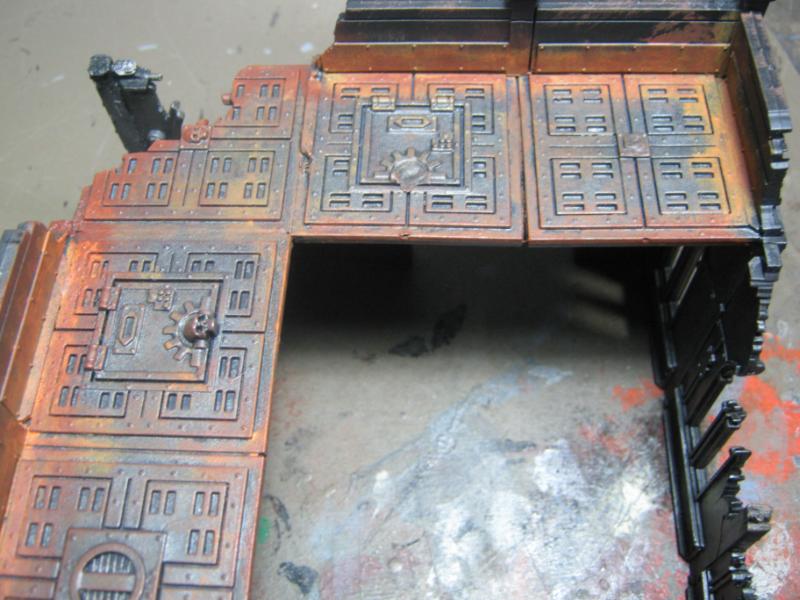
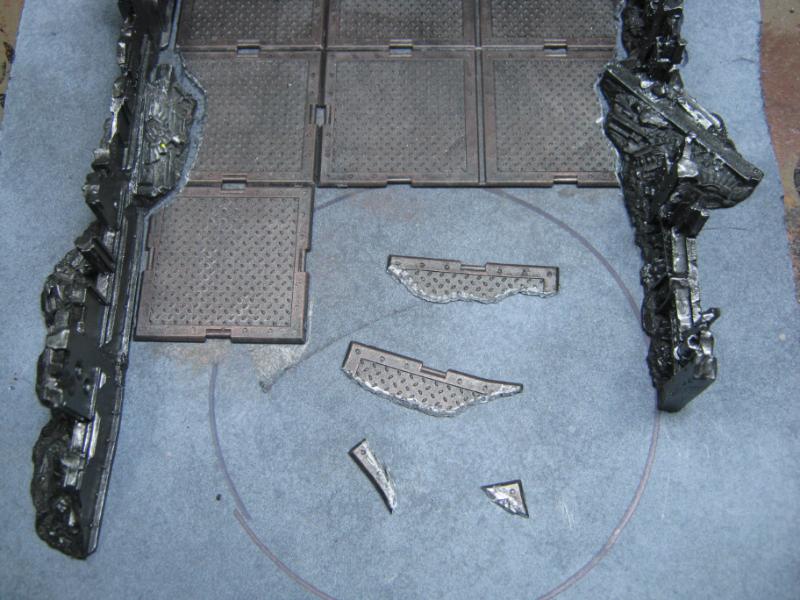
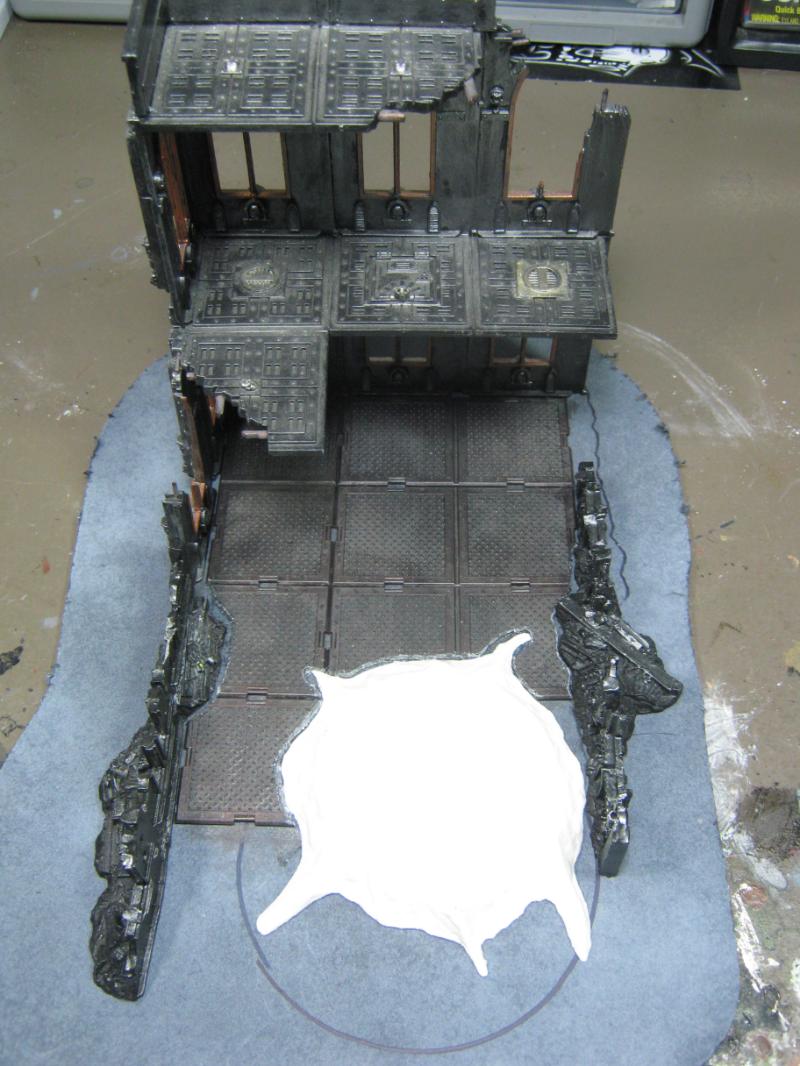
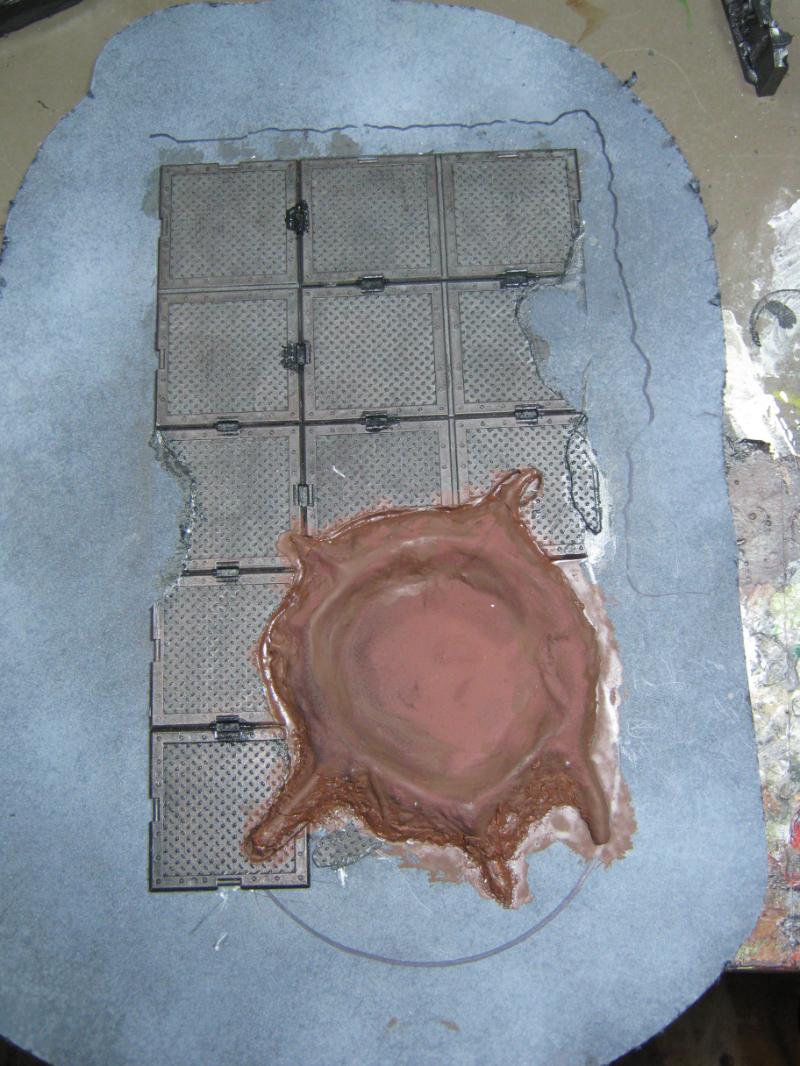
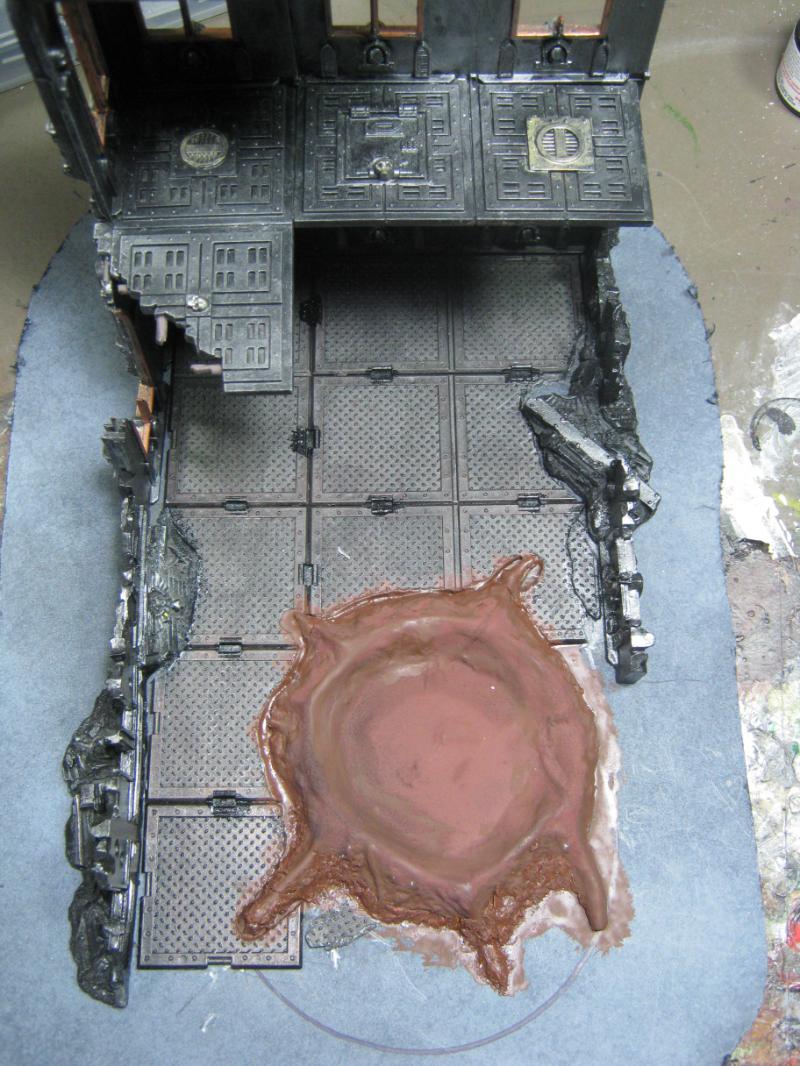
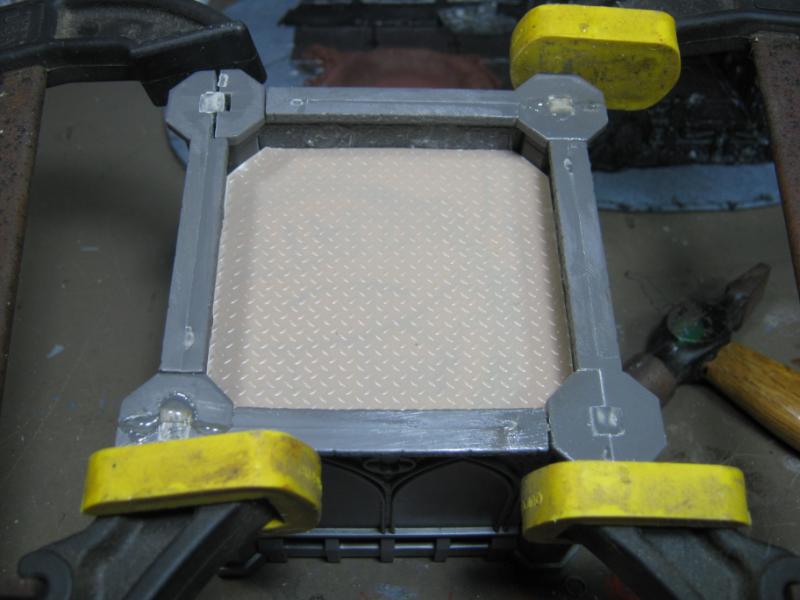
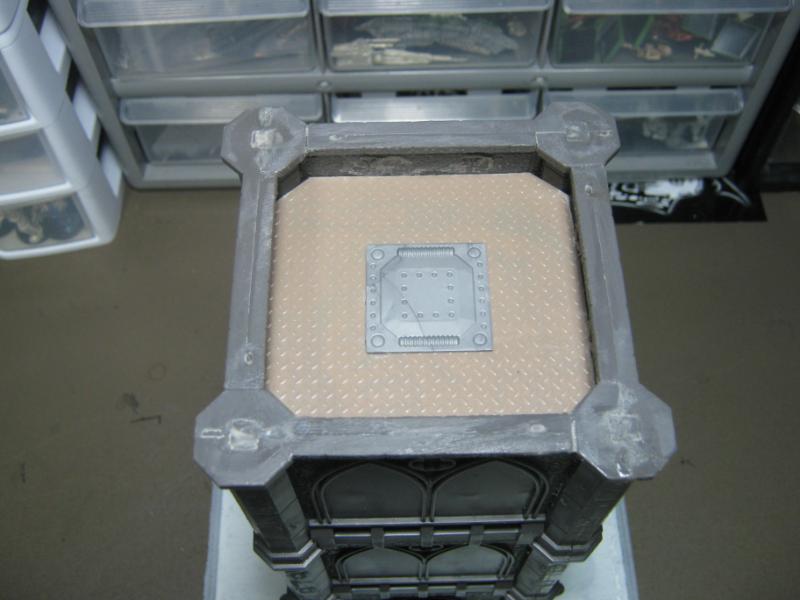
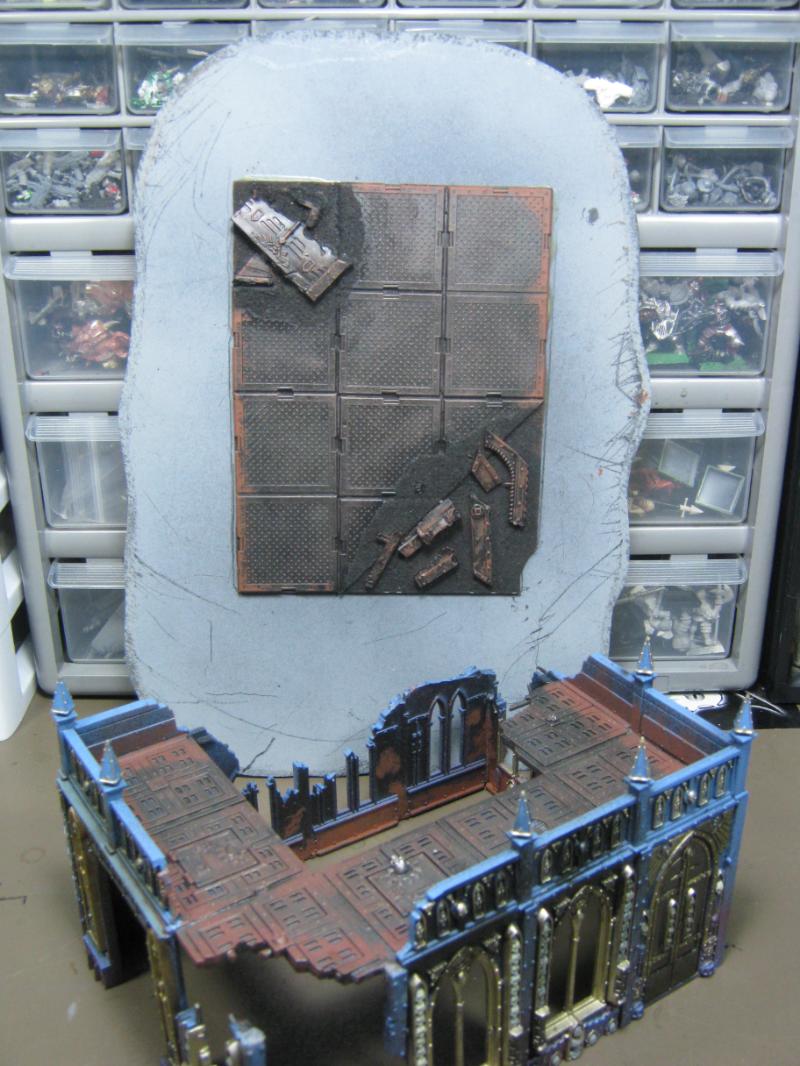
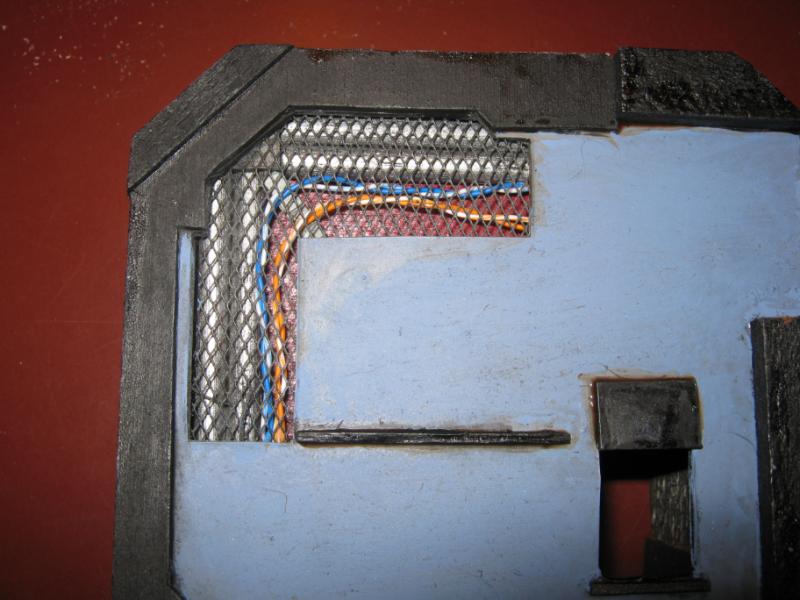
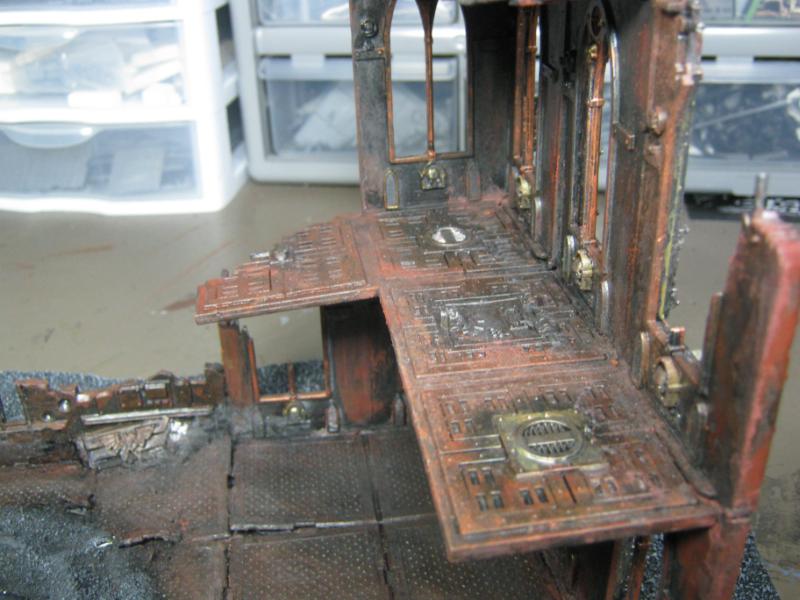
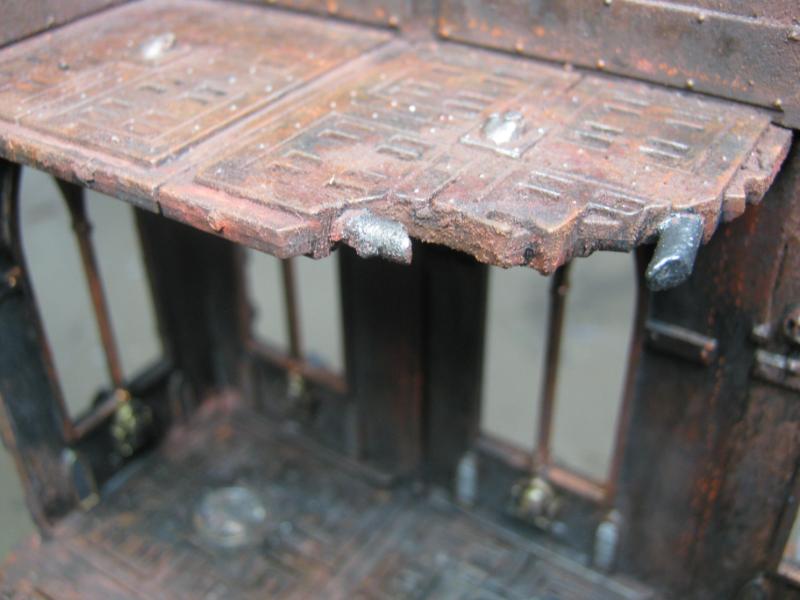
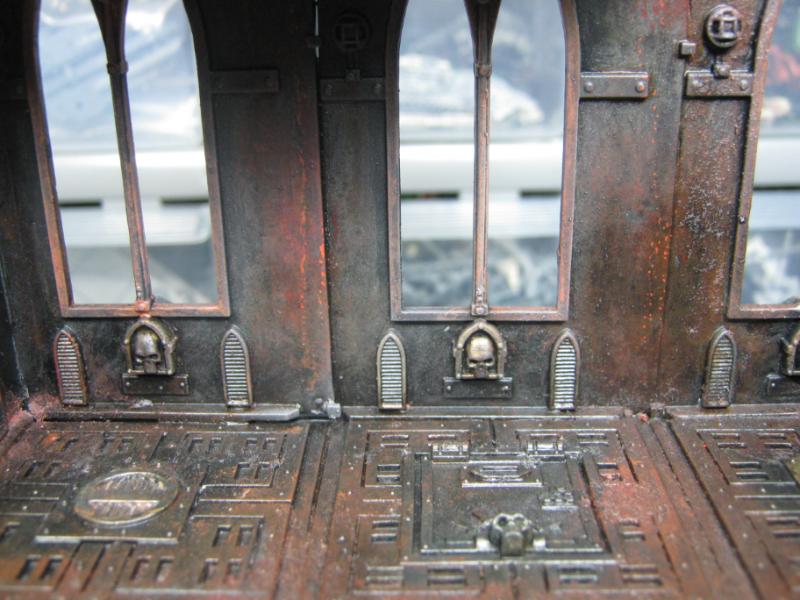
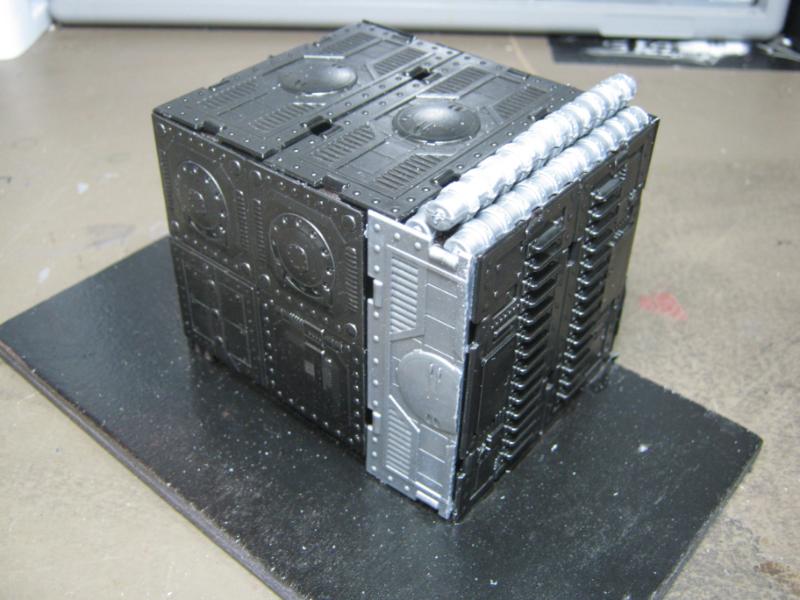
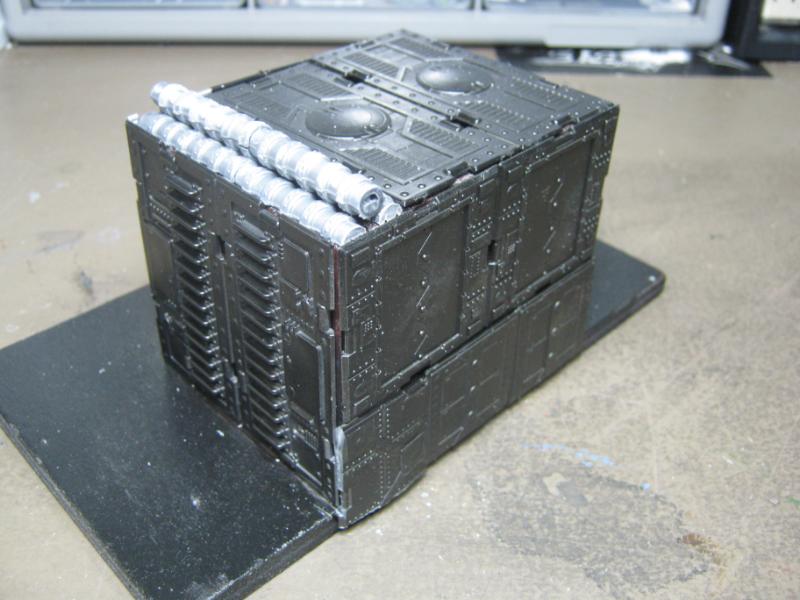
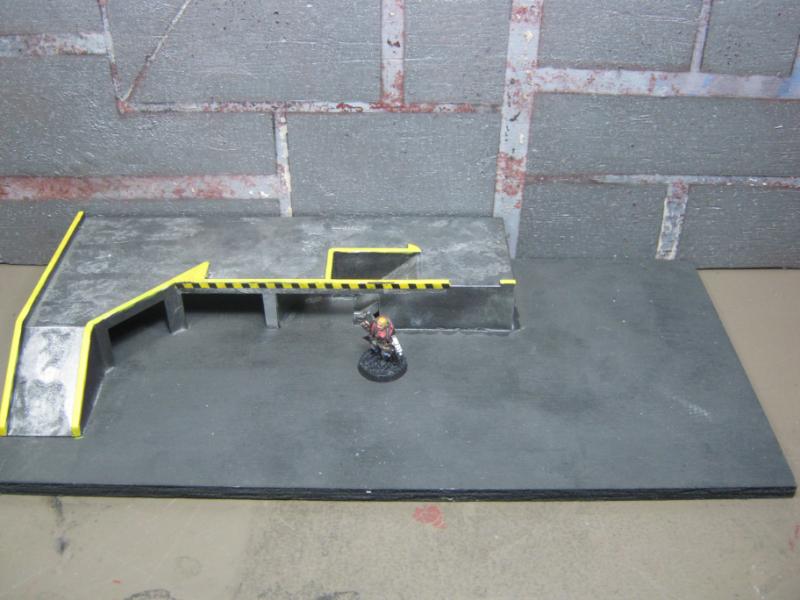
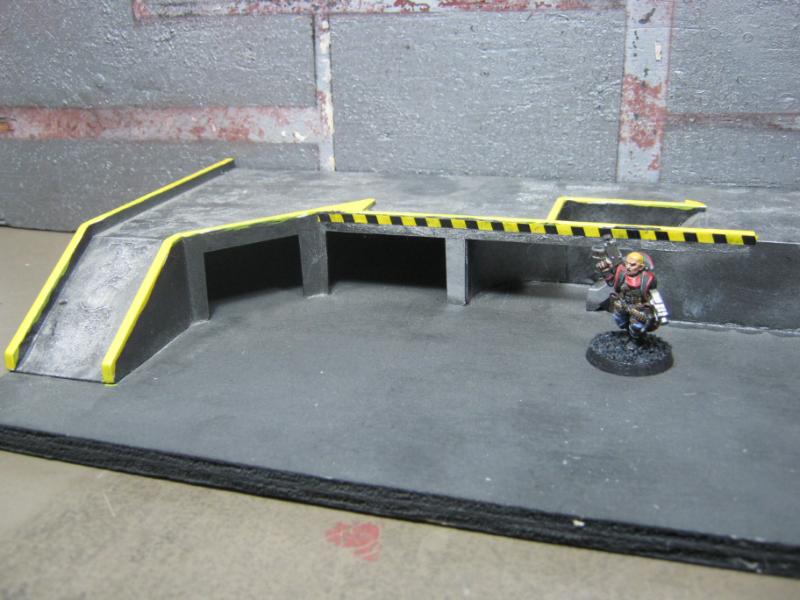
I haven't had the chance to sit down and get the detail work done on the first building I started so I've been hammering away at the 'bulk work' on the 2nd building. This morning I sprayed the base, sprayed the tread plate floor, glued to the base, painted Tamiya Gun Metal, and light drybrush w/ a mix of Gunmetal and Flat Brown:

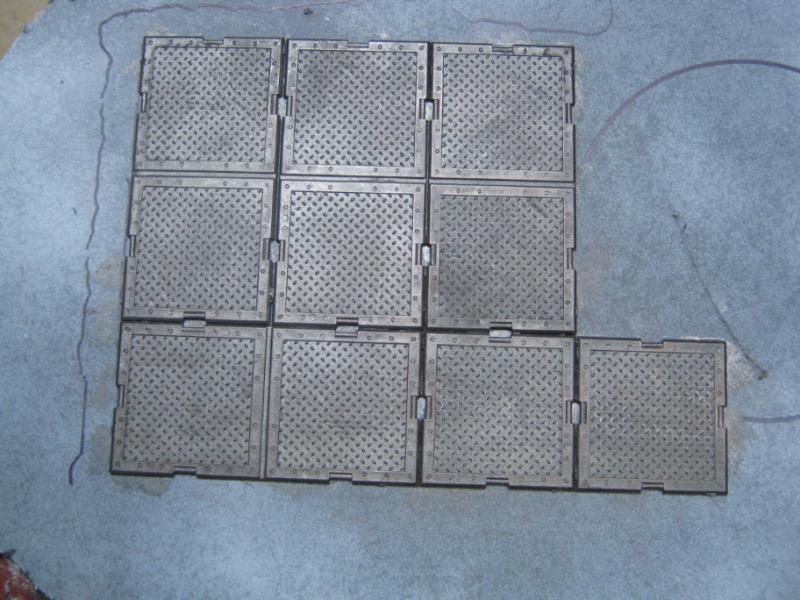
I glued the tread plates directly to the board on this one instead of on a sheet becasue there's already so much going on w/ overlap that this will be a lot easier and look better when it is done. You'll notice the circle that some of the plates overlap. This is where the crater will be, and I'm going to cut out the bits of tread plate where the crater will go w/ a Dremel tool and use the leftover bitz of tread plate as rubble around the crater. There will also be bitz that come off for the rubble overhang from the resin pieces I'm using for damaged walls. I may have to pick up another set of those actually. They make pretty handy fillers for my lack of actual wall pieces.
I think that's it but I'm at work and my mind is scattered, it's taken me hours to get this much typed out. Questions / comments welcomed.
|
|
|
|
2012/10/09 20:29:58
Subject: Re: Terrain Project- Building a Better Battlefield
|
|
Longtime Dakkanaut
|
@ Vik- This is the exact one I have- http://www.benfranklin.com/item.php?id=MP-FA601/4/3&c=a&s1=Graphics+And+Cutting&s2=Miscellaneous+Cutters&s3=Styro+Cutter&gclid=CLD726nh9LICFQZnOgode1MAJA
There's others that are higher quality for sure, but I've had this one for 3 years now and no issues other than you absolutely *must* remove the batteries because the 'off' switch doesn't work.
As for the bits... yes.
Skalk Bloodaxe wrote:You'll notice the circle that some of the plates overlap. This is where the crater will be, and I'm going to cut out the bits of tread plate where the crater will go w/ a Dremel tool and use the leftover bitz of tread plate as rubble around the crater. There will also be bitz that come off for the rubble overhang from the resin pieces I'm using for damaged walls.
.
I'm on it, trust me. Entire idea here is to make this look better.
|
|
This message was edited 1 time. Last update was at 2012/10/09 20:30:59
|
|
|
|
2012/10/09 21:49:08
Subject: Re: Terrain Project- Building a Better Battlefield
|
|
Longtime Dakkanaut
|
@ Vik- Nope. Asking never hurts.
@ Galorn- Oh man that would be awesome! I'll swap you some stuff if you show me how you make those awesome molds. The technique I'm using right now is functional but it takes forever and is not what I would prefer.
Update on pending supply drop- I have an Imperial Sector box set enroute as of 4pm today. I am so psyched I can't hardly explain it. This will be my first ever opportunity to build my own stuff w/ my own vision instead of fixing the mess of someone else. eBay is awesome, but this is a treat indeed. Really looking forward to this.
A LOT!!!
|
|
This message was edited 1 time. Last update was at 2012/10/09 21:51:18
|
|
|
|
2012/10/12 17:13:33
Subject: Re: Terrain Project- Building a Better Battlefield
|
|
Longtime Dakkanaut
|
@ Moltar- Welcome home.
@ Vik- Thanks, and see below.
@ monkeytroll- More incredible awesomeness coming soon!
Text update. Nothing new going on, have been slammed at work and at home. Hope to change that soon. Getting a game in this weekend, will take pics.
And oh yeah... my Imperial Sector box arrived today.
*head asplode*
|
|
|
|
2012/10/14 01:52:03
Subject: Re: Terrain Project- Building a Better Battlefield
|
|
Longtime Dakkanaut
|
@ Dave- I agree, it's a pretty awesome set. I'm not sure I'd pay $120 for it, but the $62 it cost me was pretty fair.
@ Vik- Hi. 
@ Galorn- I am going to get some for sure.
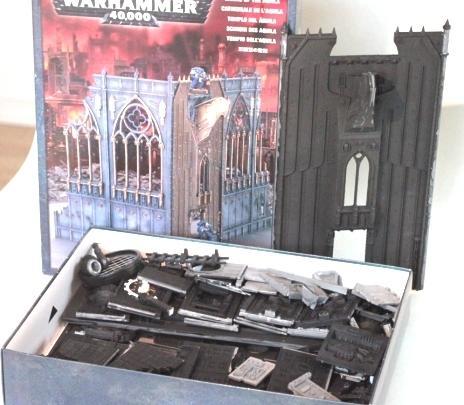
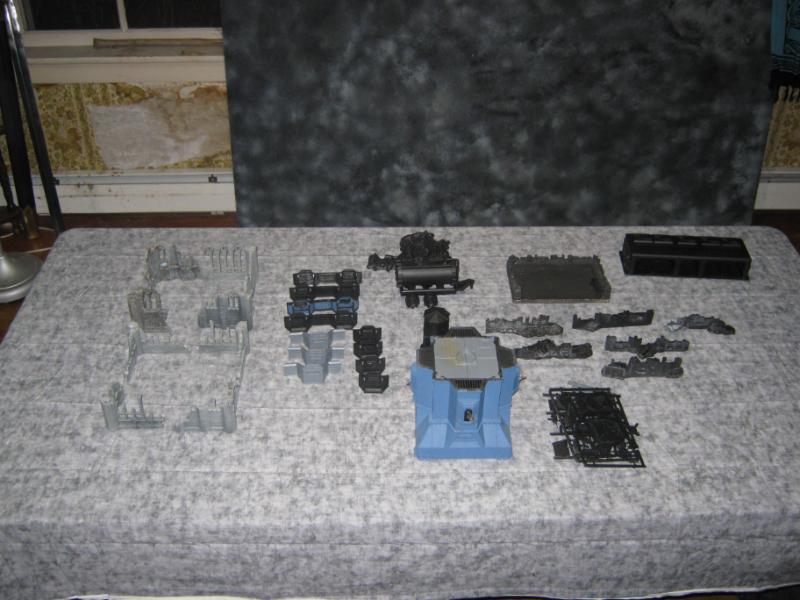
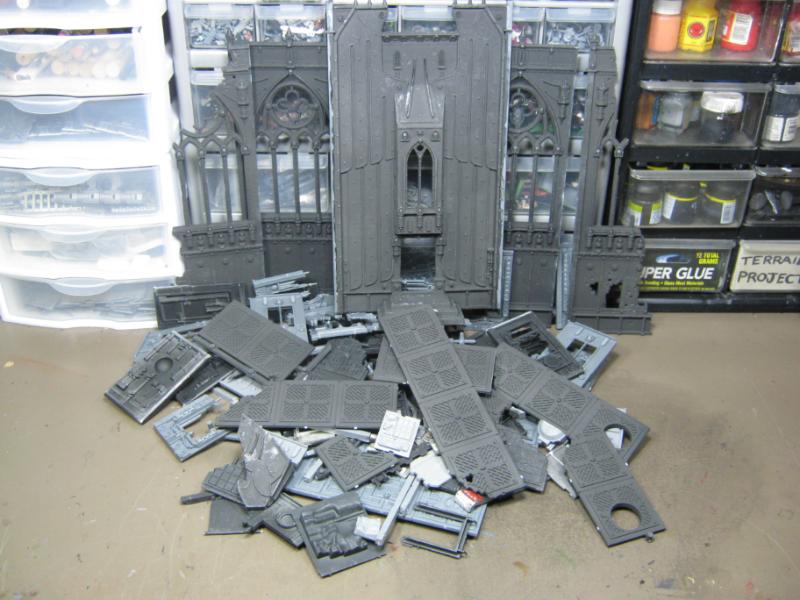
Biggest update in a while, and another example of hobby ADD. First up is my Imperial Sector. It's a massive haul and I'm really excited about it.
Look at the size of that box!
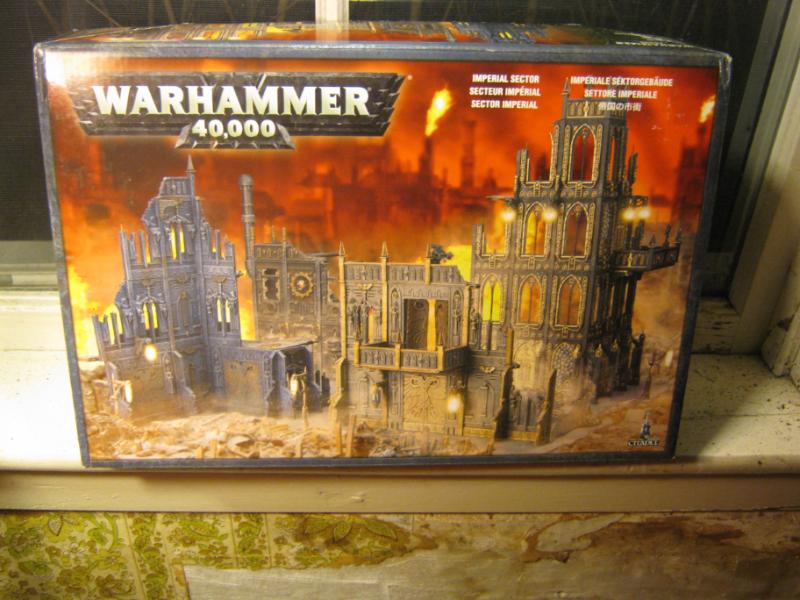
Look at how much sprue comes in it!
Look at the incredible detail!
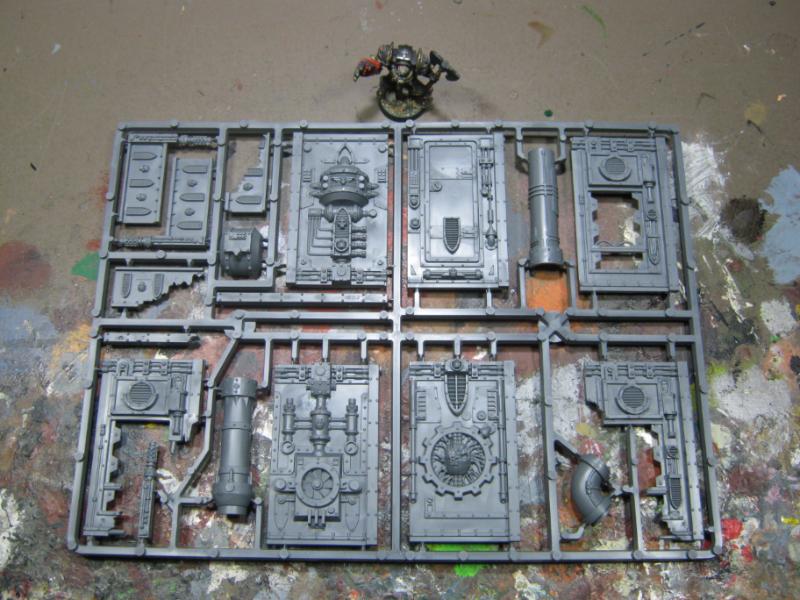
There's some amazing things coming w/ that set. Will take me a LONG time to do this so be patient, it's not going to happen overnight. But it will happen.
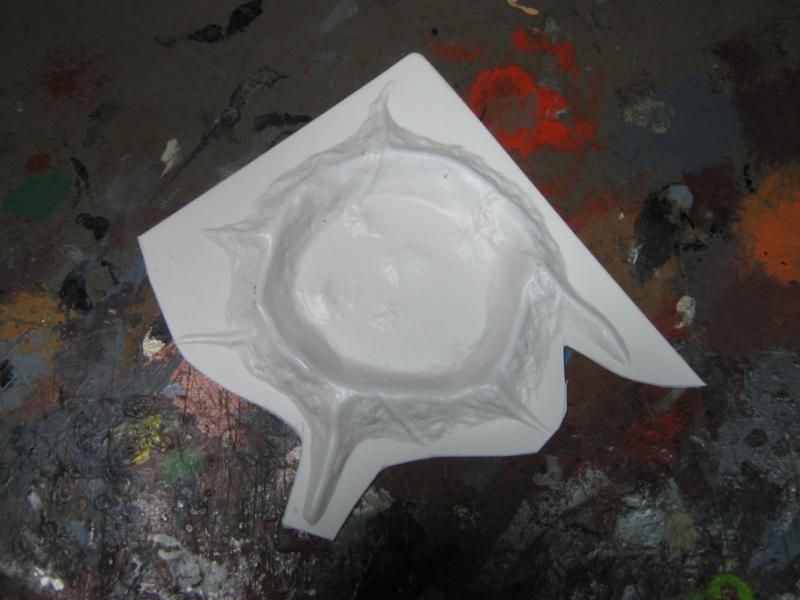
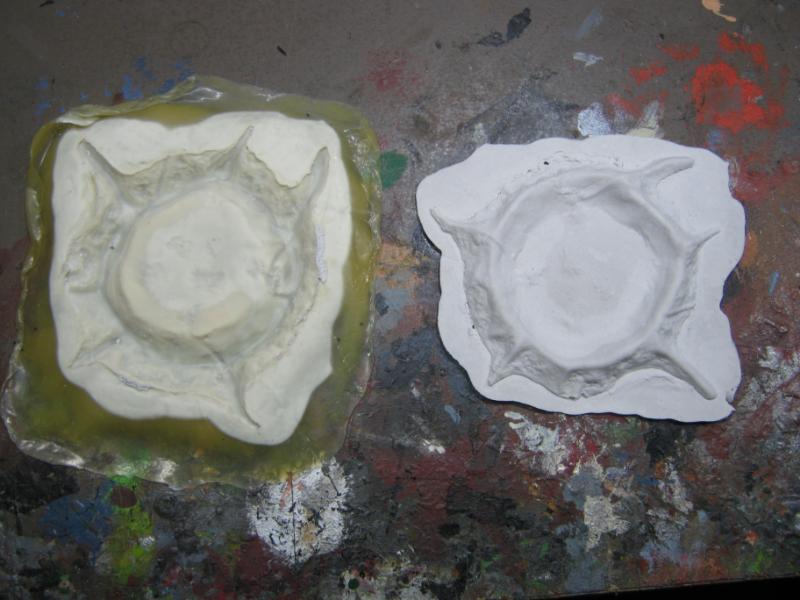
Next up is a series of my crater mold process. I think it came out really well overall.
Ready to peel off the master:
Mold and master. Came apart really easy, no problems at all.
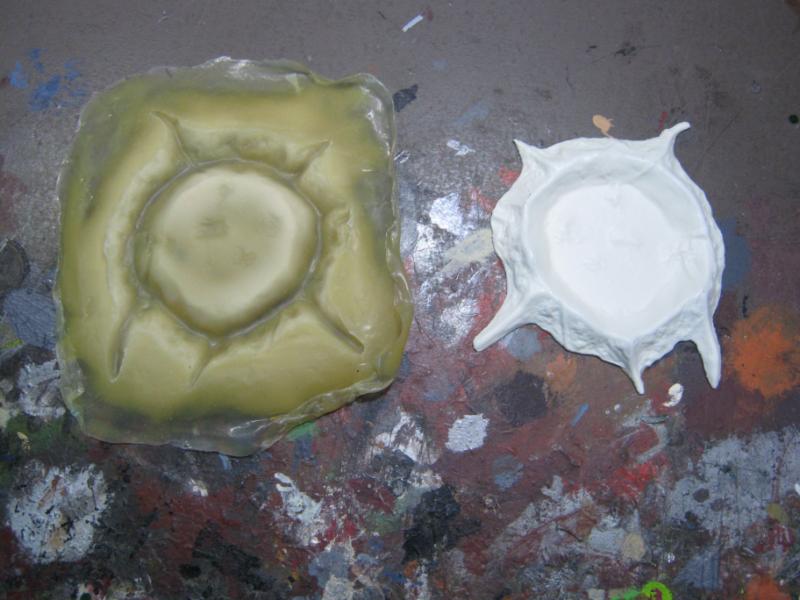
Poured and drying. I used plaster for the first test. I learned today that resin is expensive.

First cast is done!

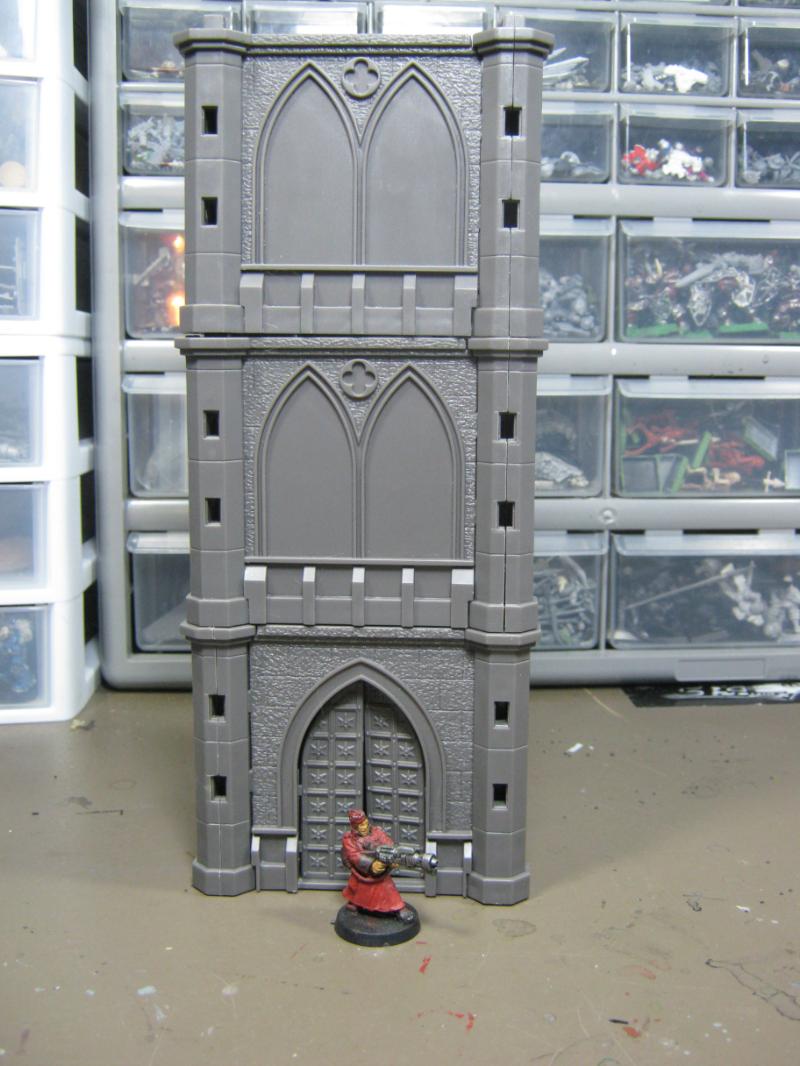
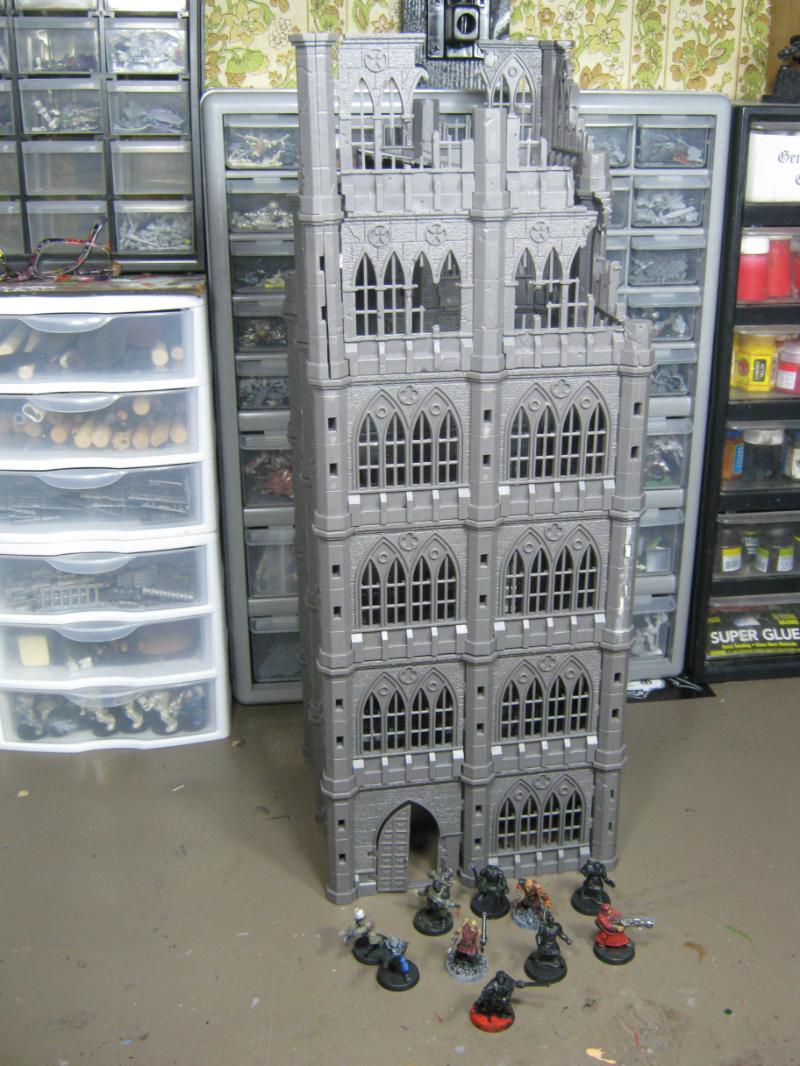
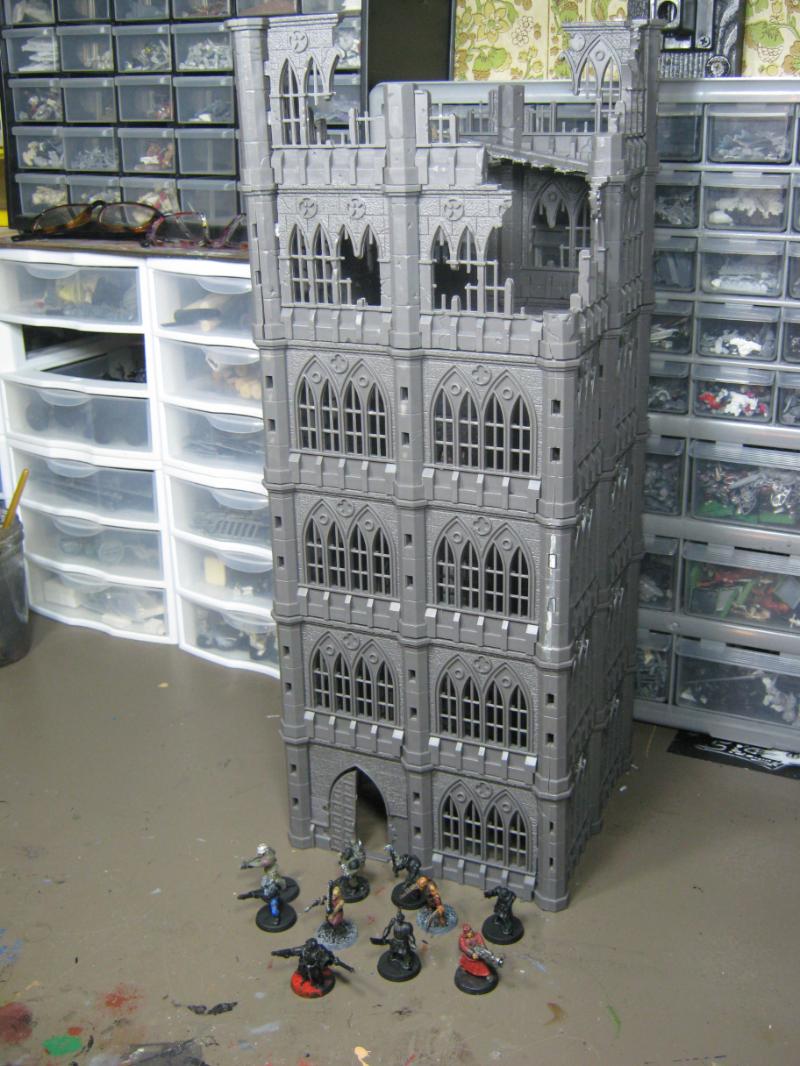
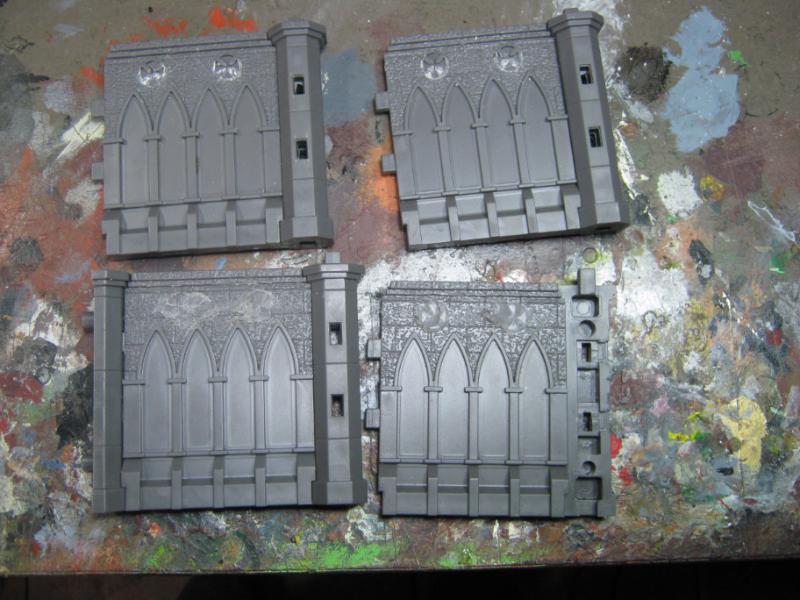
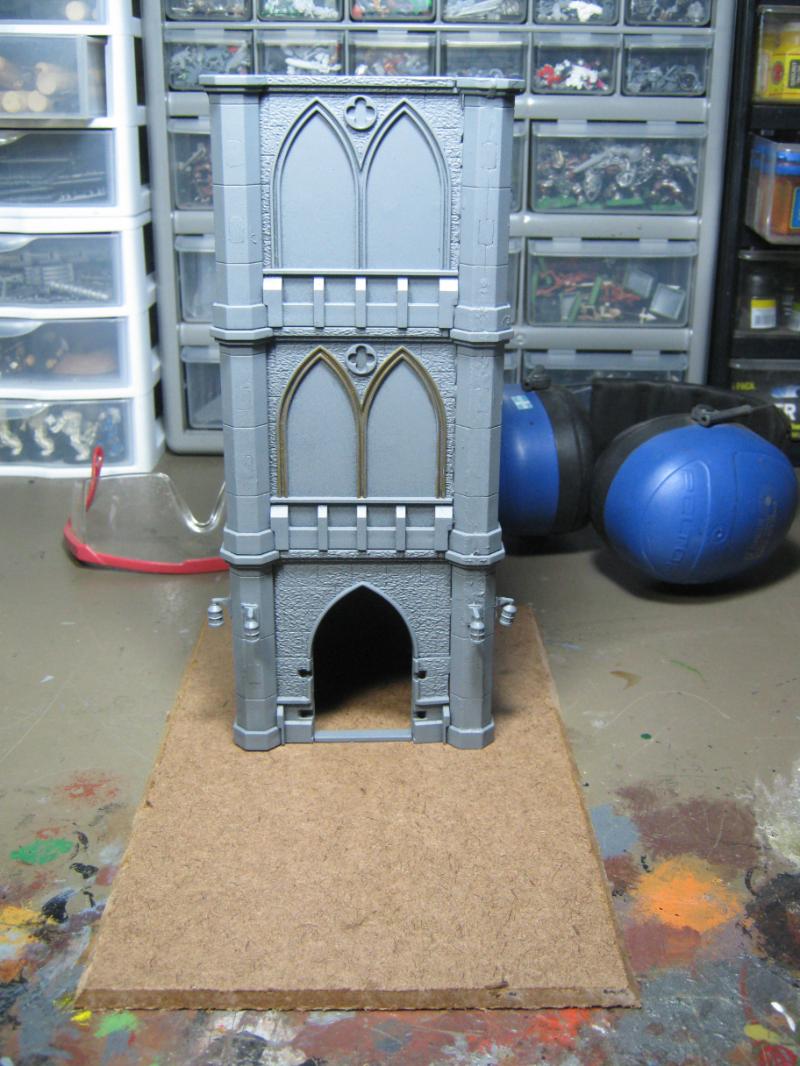
Last up is me messing around w/ my Pegasus Hobbies Gothic buildings. Building in first pic I'm going to keep and turn it into a watch tower or somethings.
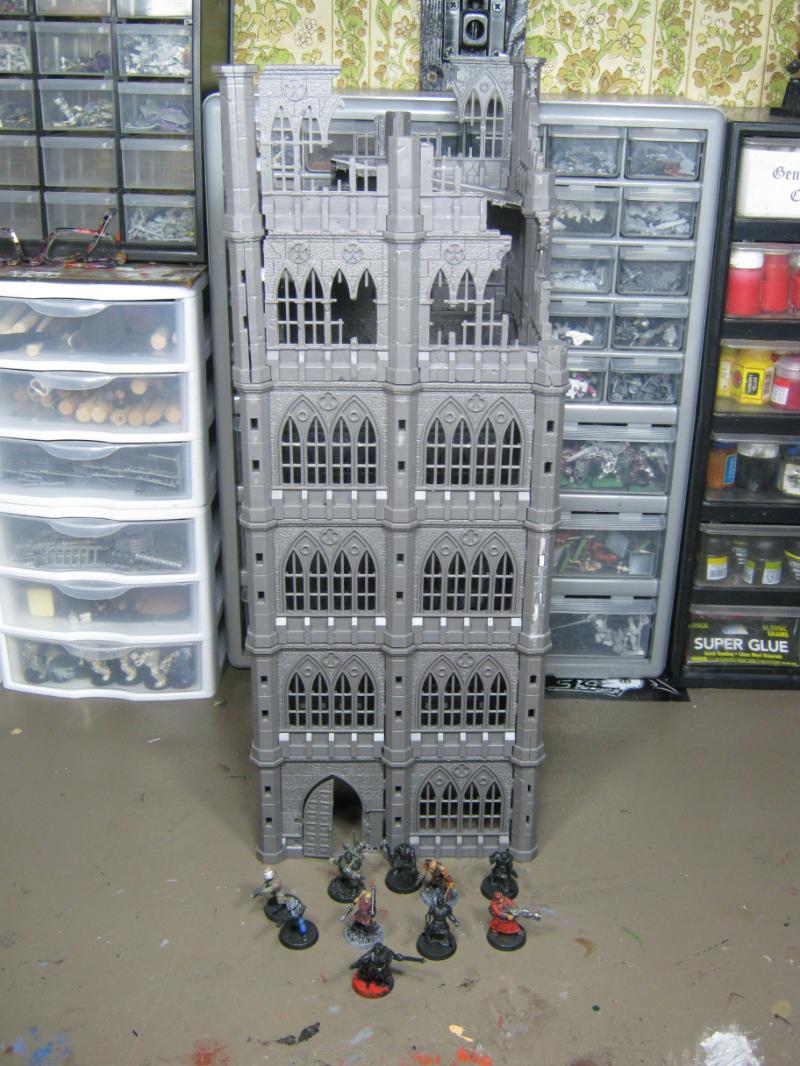
Next pics I was just goofing off but I think it looks really cool. Not going to keep it like this but man I really did think about it.
That's it for now. More later when I have something to share.
|
|
|
|
2012/10/16 00:46:40
Subject: Re: Terrain Project- Building a Better Battlefield
|
|
Longtime Dakkanaut
|
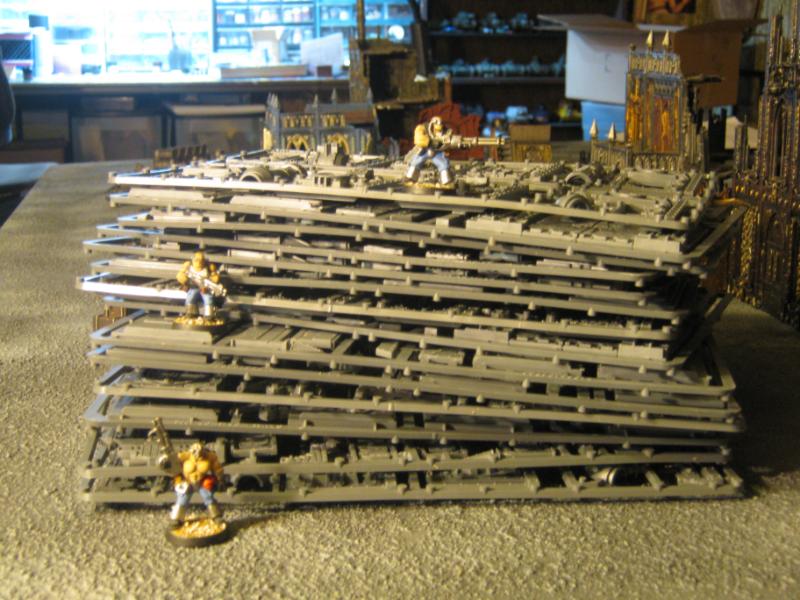
@ Everyone that posted- I AM NOT BUILDING A 6 STORY RUIN. It was a goof-off thing I did while waiting for glue to set on a different model.
Today the Terrain Project thread is a year and day old. I was going to put together a 'trip down memory lane' selection of my favorite projects and show how my skill has progressed in the last year, but I decided to get some real work done instead.
First up, a few links to some really cool stuff I found on eBay. If you're working on bringing up the standard of your table, this stuff looks like it could be great. if I hadn't scored so hardcore recently I'd be diving into this stuff.
Cool Chaos-looking ruins:
http://www.ebay.com/itm/Ruins-of-Baletemple-gothic-plastic-terrain-for-fantasy-gaming-/251160294764?pt=Games_US&hash=item3a7a51f56c
Decent ruined cuty wall sections:
http://www.ebay.com/itm/Scorched-city-28mm-modular-wargaming-terrain-set-Sci-fi-Historical-1-48-1-56-/251160294768?pt=Games_US&hash=item3a7a51f570
And the monster hookup pack- 60 city wall sections!
http://www.ebay.com/itm/Scorched-city-FAT-PACK-28mm-modular-wargaming-terrain-SciFi-Historical-1-48-1-56-/251162126607?pt=Games_US&hash=item3a7a6de90f
So anyway, here's what I've been up to.
Prepping the floor for cutting:

Floor cut, kept the scraps for later:
Traced out the base of the crater and cut again:
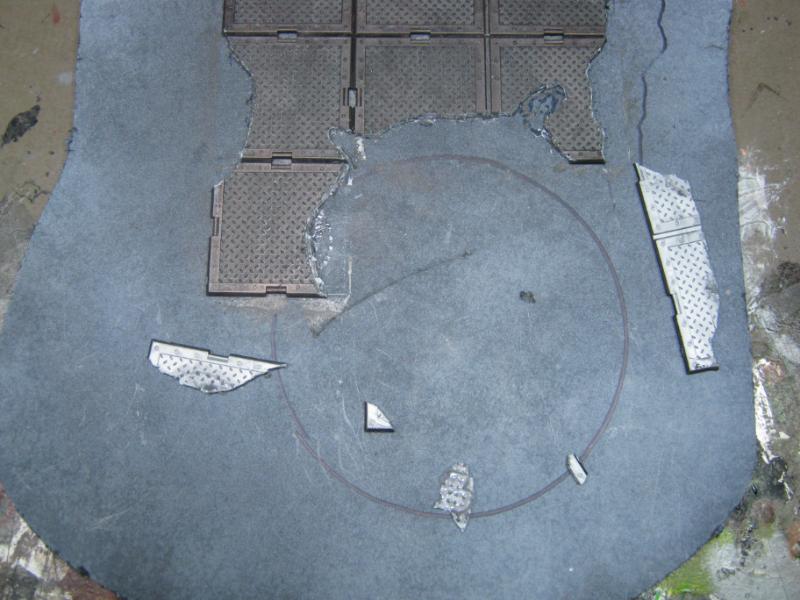
Fits perfectly. This is the master crater, the cast is coming in a minute.
Another mockup to make sure I'm still on track. As you'll see later, I wasn't.
Trimming the excess off the cast crater:
Cast crater sealed w/ 3 coats of primer (for better durability) and glued the base:
Air-dry putty to fill in some gaps. It was also here that I realized I made a couple mistakes.
Putty dried and another layer of paint for durability. Mistakes I fixed were adding a missing treadplate (lower left) and moving the ruined wall (upper right) to the correct position (only a cutout in this pic)
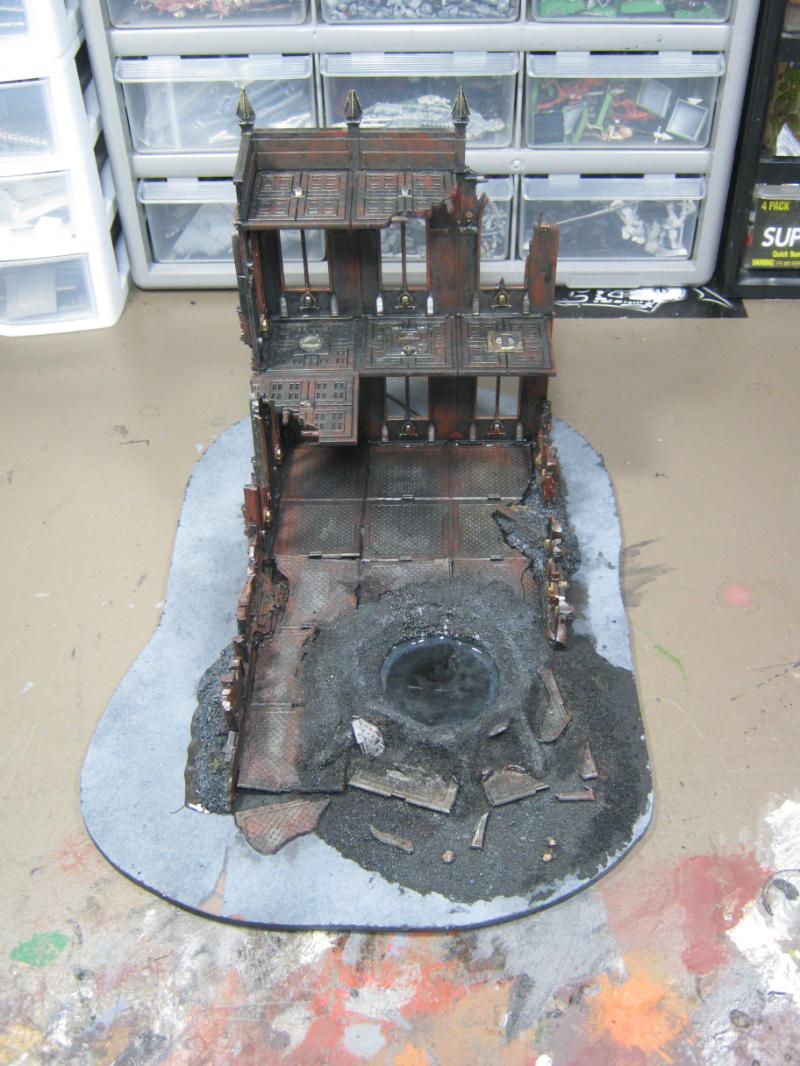
And a final look at the corrected mockup. A lot more work is needed here but it's coming along and I'm really liking it a lot.
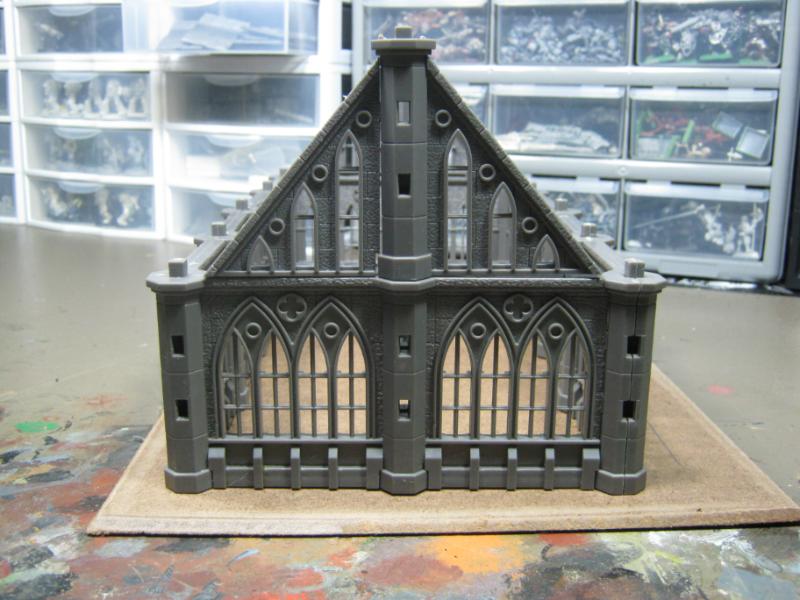
I got bored working on the Imperial Sector building so I started working on the Pegasus Hobbies tower. Not going to complain a lot here, but let me tell you this was a LOT harder than it looks and it took a lot more time that I could possibly have expected. Really tested my modeling skills.
These walls will be the interior top of the tower. I'm cutting out where the rooftop will sit.
Shot of after and before. I know, it's backwards.
Checking things out to make sure they fit properly. These Gothic plates are really cool but they don't match up all that well w/o cutting and filing.
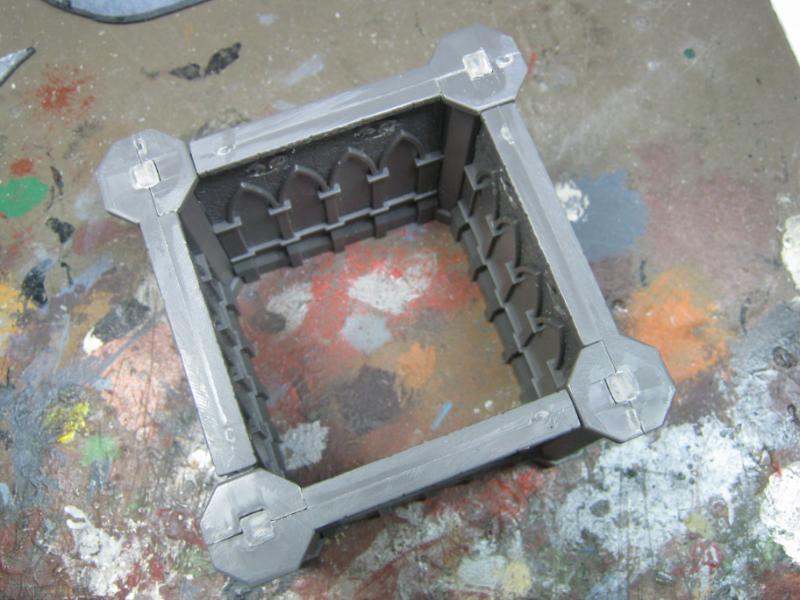
Gluing first sections. Did another one just like it to make overall gluing easier once I got the rooftop done.
Rooftop. This was not easy to figure out as the inside is larger than the outside and it took a long time to get right. But I did and here it is.
Putting something awesome to good use. Thanks again, Dave. This stuff is excellent. Gluing tread plate to the rooftop piece.
Ta-da! Instant rooftop.
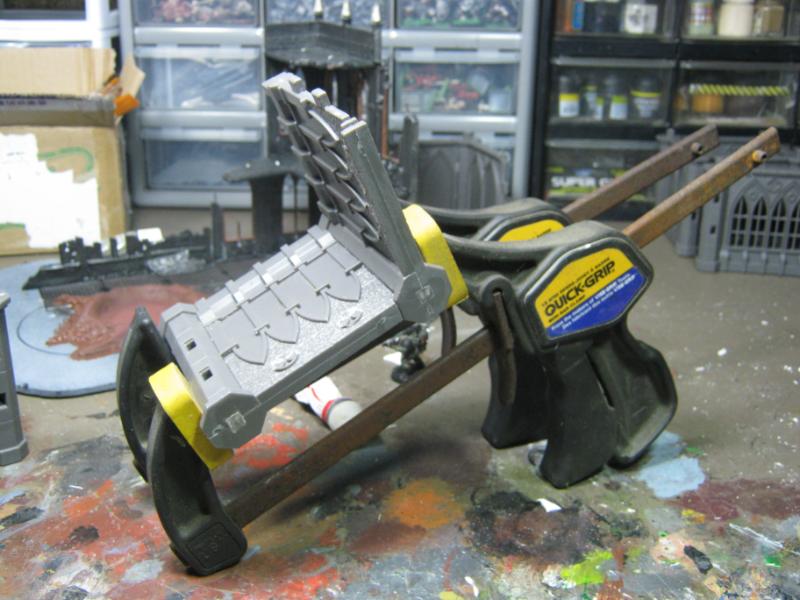
Gluing the walls and rooftop together.
More gluing and clamping. I wish I had 4 clamps. These pieces do not like staying together and need to be crushed into submission w/ a healthy amount of polystyrene glue.
Added a hatch to the rooftop because eventually someone (hi Daichallar ) would ask how the models get to the rooftop.
Primed. I see a couple joints that didn't fit right. I'll be filling them later.
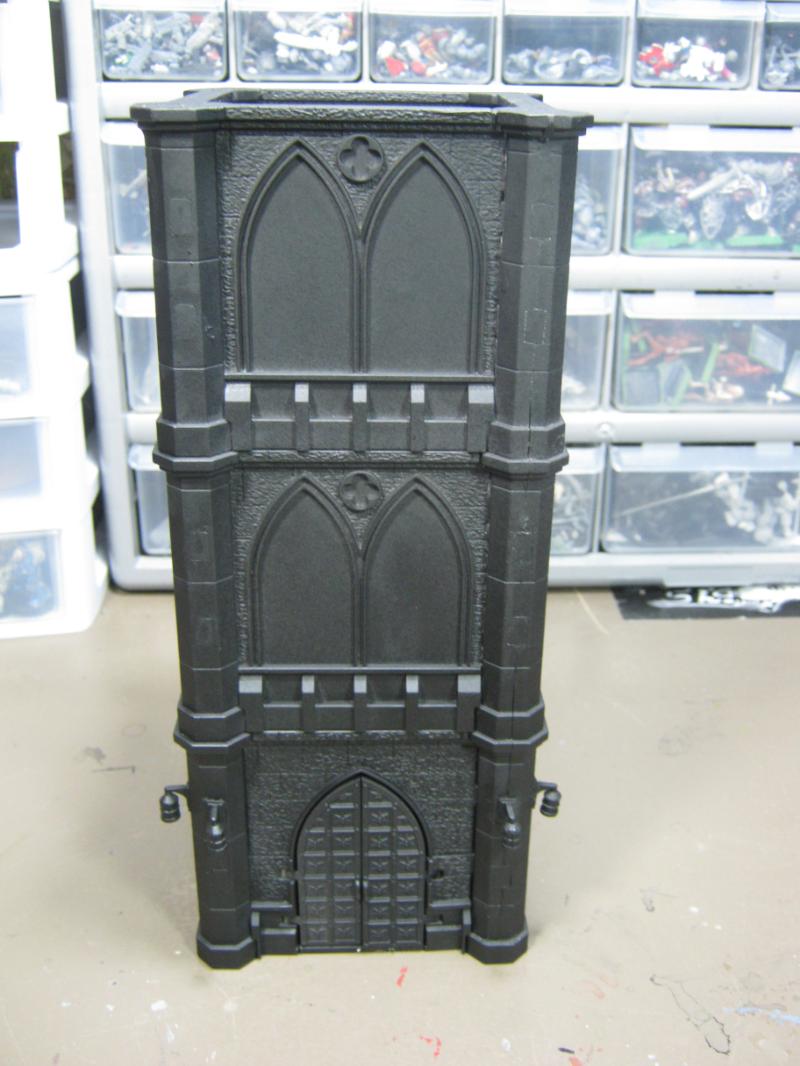
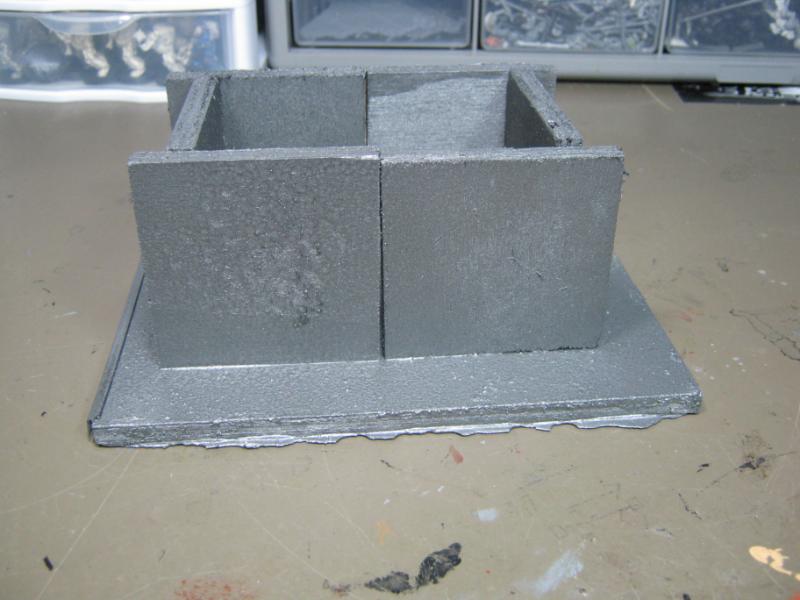
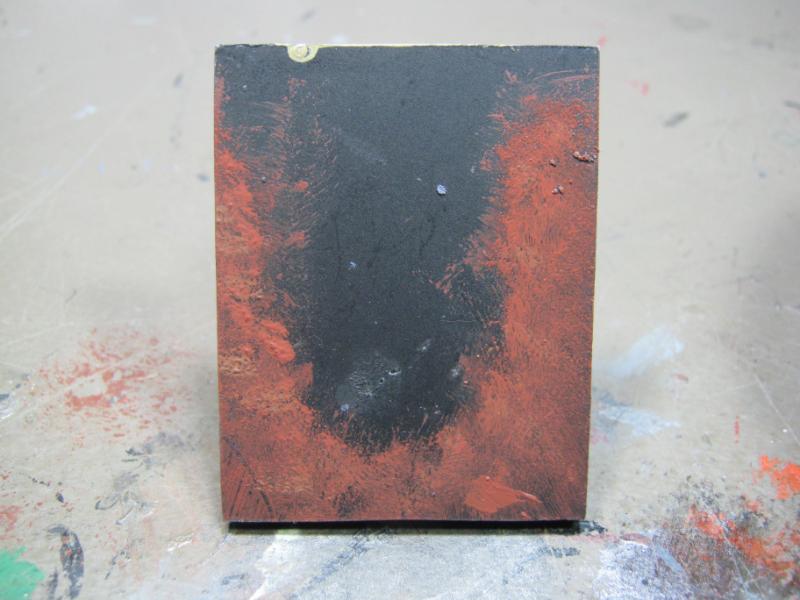
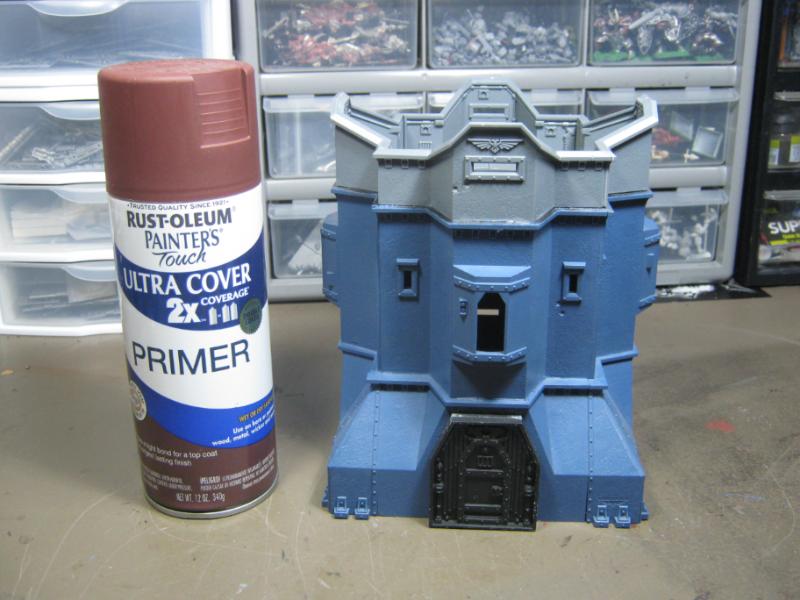
This building will not be a 'ruin'. It's simply abandoned and lacks aesthetic maintenance, but still fully functional tower. My wife bought this spray paint the other day for a crafty project she is doing, and I tried it on my regular 'spray test' piece.
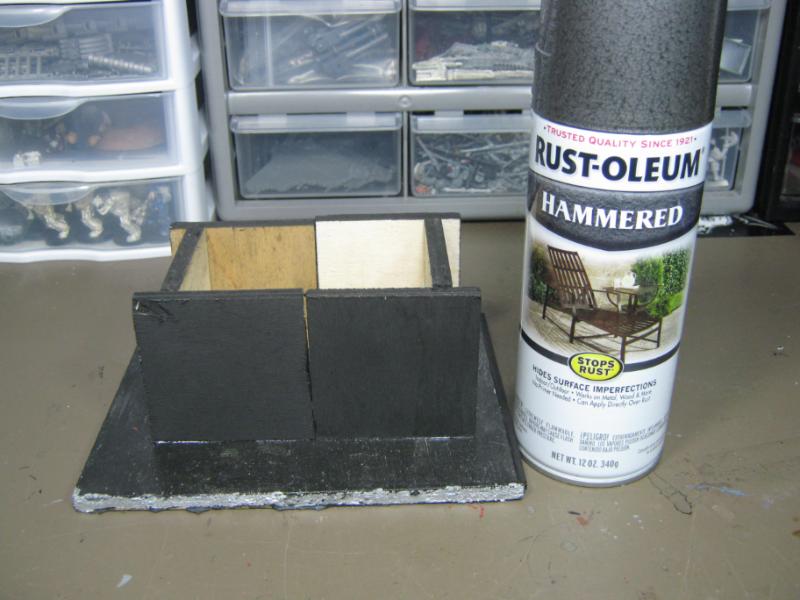
Hrrm. Not sure I like it. What do you guys think?
And just for some fun.
Decided to see if I could get a squad of Havocs on the rooftop. No problem at all.
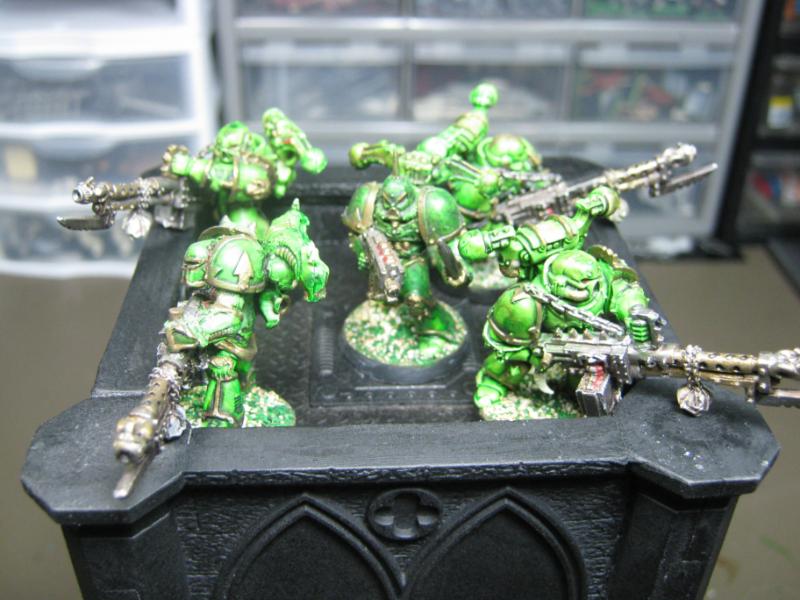
In fact, I can 9 20mm bases up top. If this tower ever winds up in my deployment zone I am so doing this.
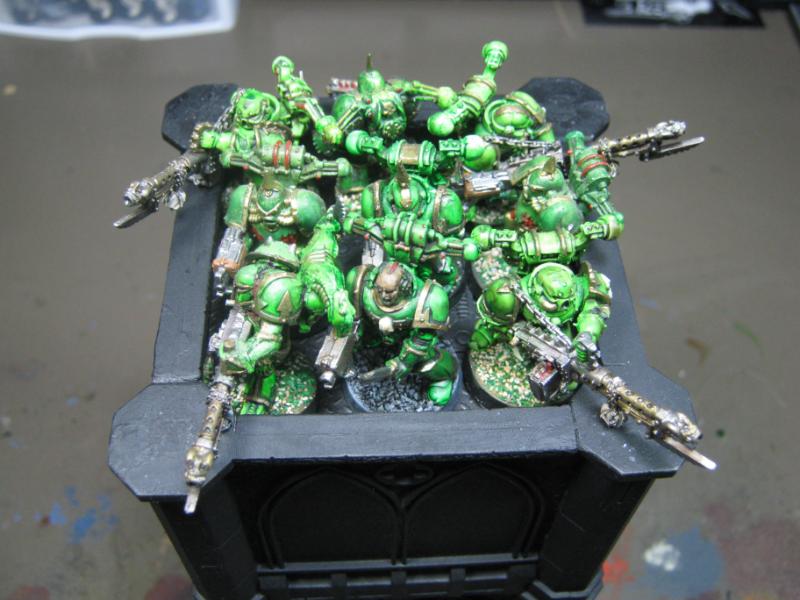
... or, maybe not.
That's it for this one. Thanks for checking it out. C&C welcomed. I'll be back when I have more to share.
|
|
|
|
2012/10/17 02:02:06
Subject: Re: Terrain Project- Building a Better Battlefield
|
|
Longtime Dakkanaut
|
@ Bruticus- I'll try a few different things w/ it to see how it works out for me. Your 'endorsement' carries some weight, I'll have a decent go at it.
@ ENOZONE- Hey, thanks for checking this out. Lots more coming. I'll be doing this for the next few years at this rate.
@ UMGuy- Wow, thank you for the high compliments! There's a lot of really great Terrain blogs on Dakka, and a lot of the authors post here. I've taken a lot of ideas from them, and I hope I've offered some inspiration in return. Keep checking back, there's more and more and more coming.
@ graven- Thanks as always. And be assure that the crater and surrounding building will look appropriately blown up.
@ Dave- Yup. Been doing some research to that end. See below.
@ Vik- The hatch is from a haul I picked up from Horde O Bitz, it's made by Pegasus Hobbies.
@ Everyone- check this link out!!! I found it while doing online research for 'bomb crater'. The entire site is amazing and I want to spend my next 4 paychecks there.
http://www.hobbylinc.com/htm/pls/pls91695.htm
Just a text update tonight. Been doing research for bomb craters and have an idea of what I want to do. As I was doing research on 'real world' examples so I can make 'realistic' model buildings for my toy soldiers to fight pretend battles on, the pictures became more than inspiration for wargame terrain. These are pictures of real craters made by real explosives and real people died. Maybe it's where my head is at these days, but that really hit me. For all the various excuses and justification, man's inhumanity toward man will be our ultimate legacy, but no one will be left to engrave our pathetic epitaph.
Anyway, here's what I found as examples:


I have a much better idea how to create directional scree, how to incorporate the chopped bitz I kept from the floor plates into the debris, and how to blend the crater in with a convincing effect.
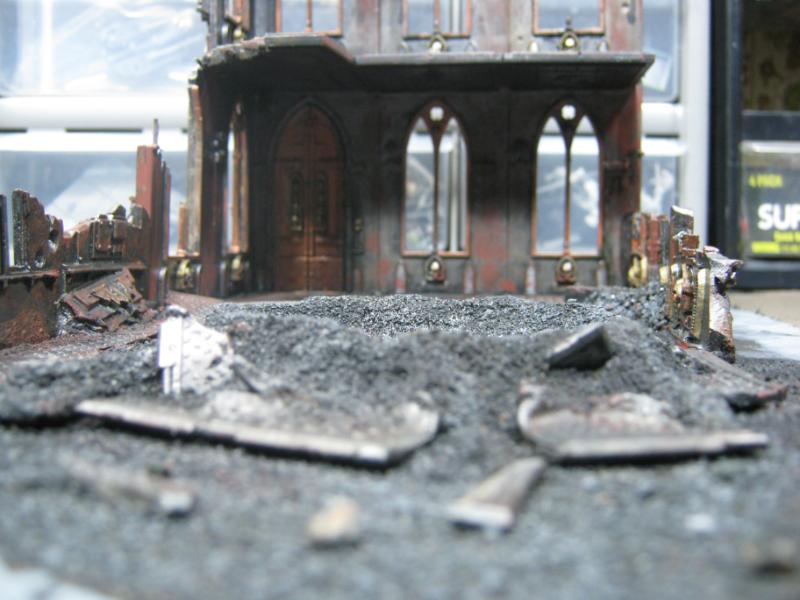
One of the challenges (and the reason why I cut the crater into the floor) is because the crater is higher than the level of the surrounding building. I do not have the ability to go 'deeper' so I'm going to have to work with the lack of depth to create the 'huge gaping hole in the ground' look I'm going for. I'm thinking about a water effect, but even then it's going to be noticeably higher than the floor around it. Still thinking about that one, but I'll find a manageable way to do it.
The crater (and surrounding blown up stuff) is going to be textured with a fine gritty sand that will simulate the look of dirt scattered from the impact and explosion. The floor will be strewn with debris, and it's likely I'll melt and peel back some of the plates to simulate the concussive shock the building received when the shell hit it. I'll probably leave some Imperial equipment around as well, like broken ammo boxes, abandoned weapons, etc.
I'm trying to decide still if the table will be a ruined and long abandoned Imperial outpost, ruined and recently abandoned Imperial outpost, or if it will be an entrenched battlefield still held by whatever force is currently occupying it, enduring the ravages of constant war.
That's it for tonight. Thanks for checking this out, thanks for posting, C&C welcomed, and I'll be back as soon as I have something to share.
*edited because I keep screwing up the hyperlinks*
|
|
This message was edited 2 times. Last update was at 2012/10/17 11:39:32
|
|
|
|
2012/10/23 22:39:06
Subject: Re: Terrain Project- Building a Better Battlefield
|
|
Longtime Dakkanaut
|
@ Dave- Yes, it is.
@ monkeytroll- Point taken and applied. See below.
@ Vik- HOB has been my #1 resource for bitz. It's rare that I cannot find what I am looking for there, even when I wasn't aware of exactly what it was I needed. Regarding the broken pavement etc, it hasn't happened yet but is on the list of things to be done before I sign off on this one as 'finished'.
Small update today. I've been doing some work on the 2nd piece I started (no idea where the motivation for #1 has gone) and on the Pegasus Hobbies tower.
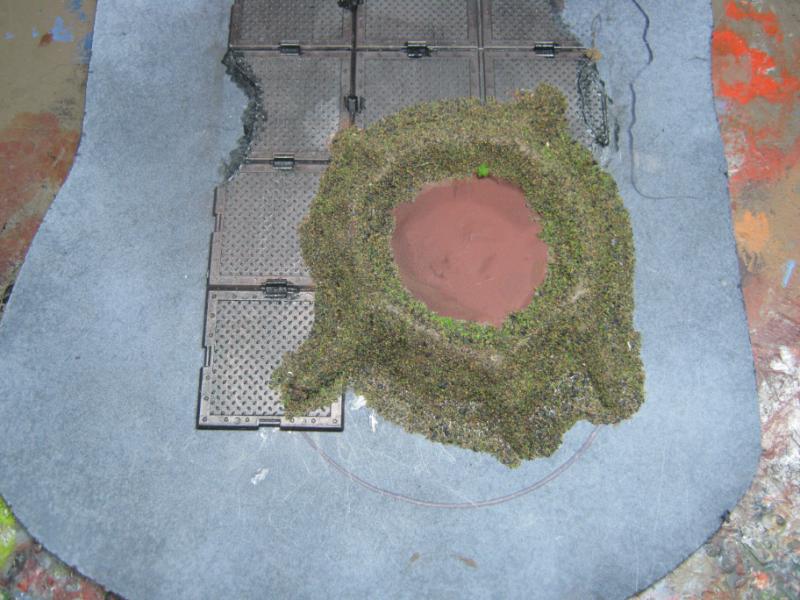
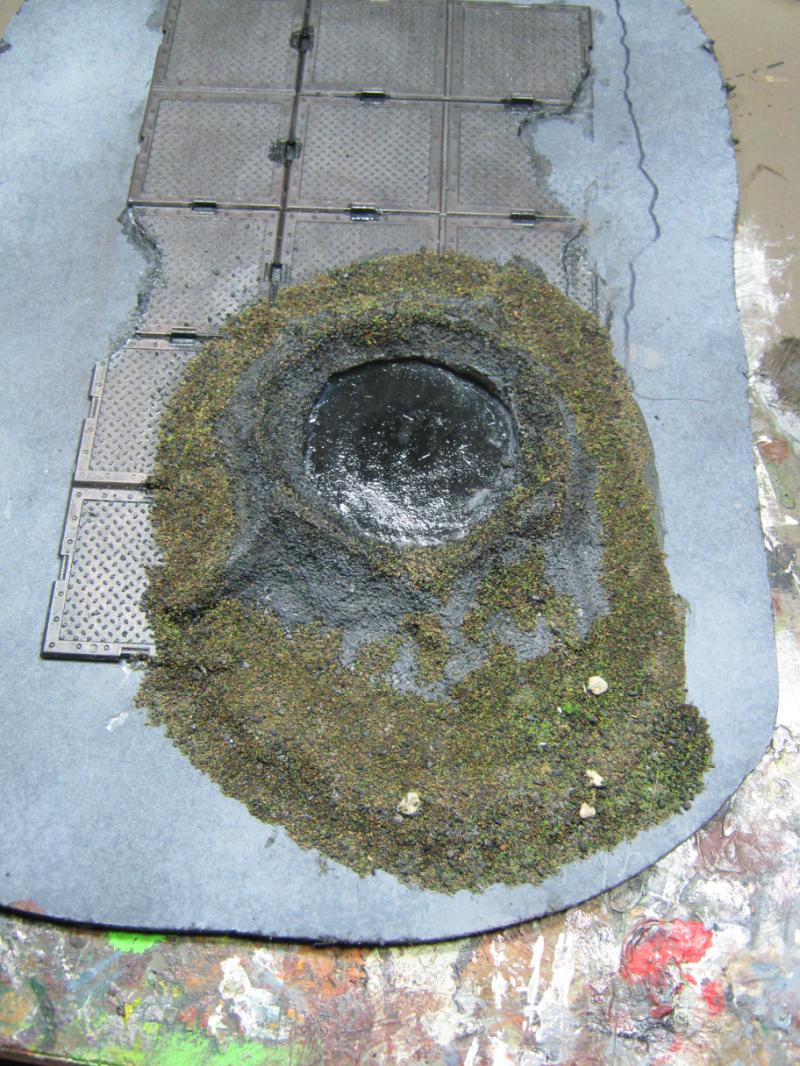
I didn't take a pic of the first stage (repainting the crater) but here's the next step- flocking:
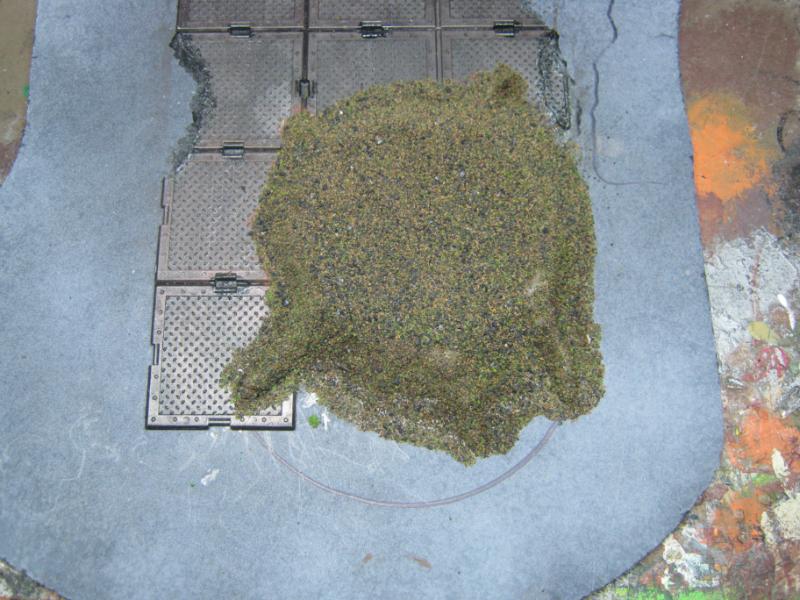
Don't worry, it's for texture, not color. All of this is stuff I swept off the table after a different project. Remember this?
That's where it came from. I'm not wasting anything on this project.
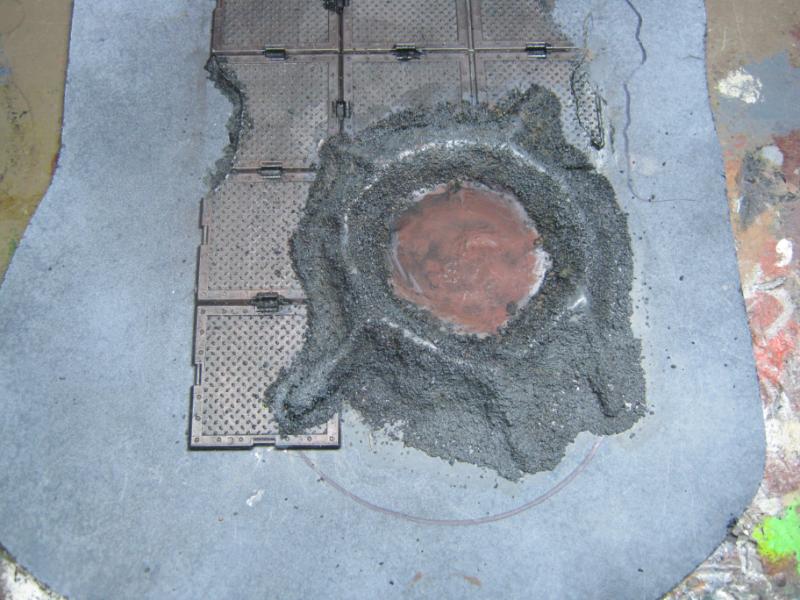
Anyway, here's what it looked like once the flock had dried:
I added another layer of paint to give it the right color and make it more durable:
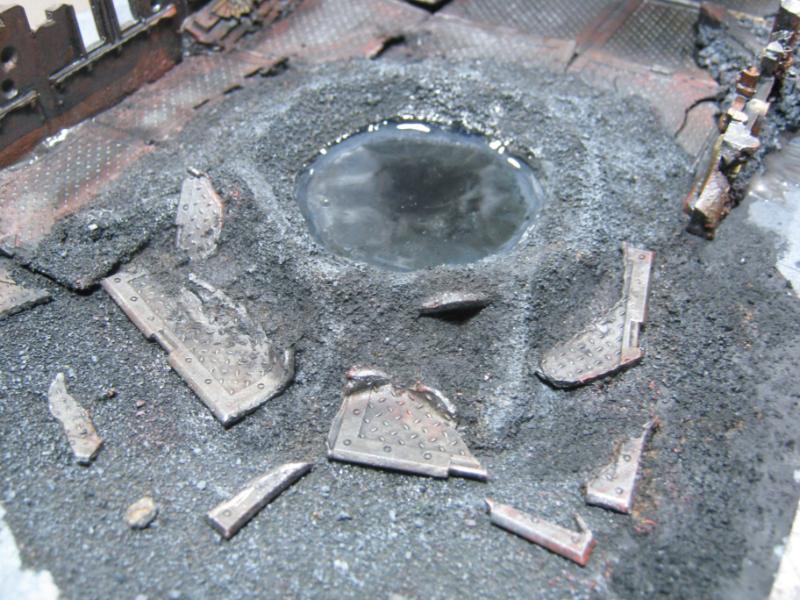
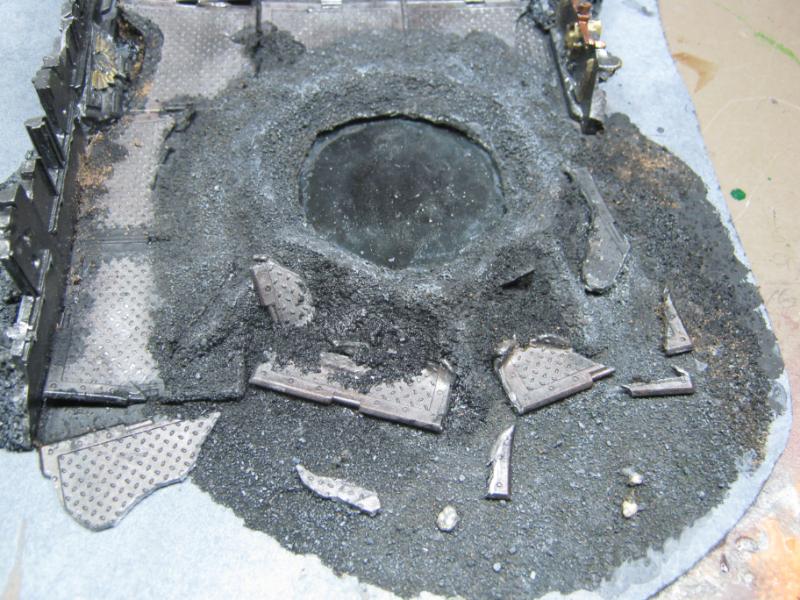
I couldn't get past the fact that the middle of the crater was noticeably higher than the surrounding 'flat' areas. I thought about it a lot, like fill w/ water effect, ramp up the rim of the crater more to minimize the height issue, etc. Then inspiration hit me. Wasn't sure I had the skill or the stones to do it, but it occurred to me that if I hollowed out the center of the crater it would be lower than the surrounding 'flat' areas, even if only by 1/16th of an inch. I figured if I really messed up I'd find a way to fix it, and if it came out the way I wanted it would be awesome. I grabbed a small chisel and chipped out the bottom of the crater. Here's the result:
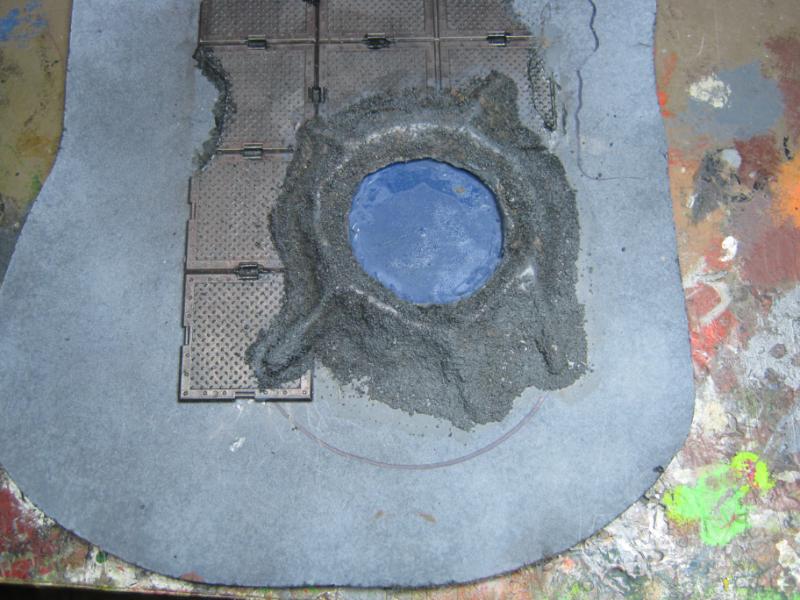
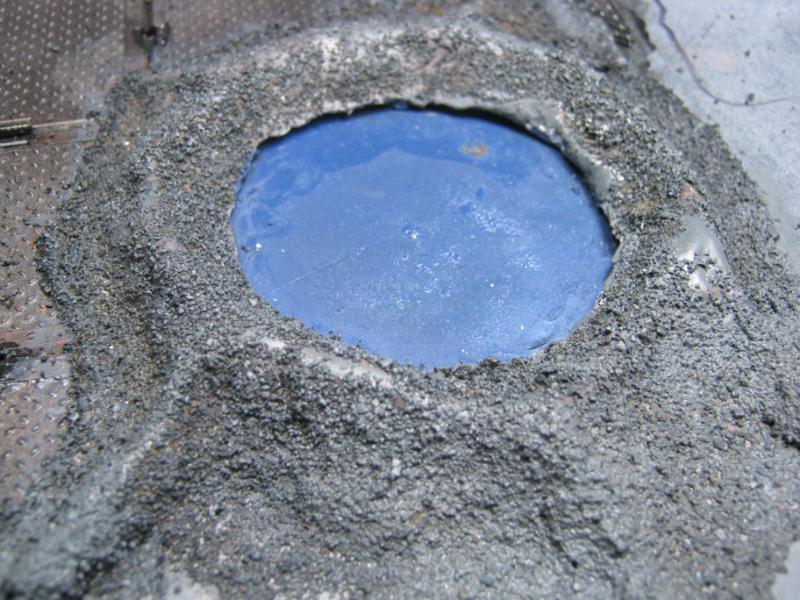
Base painted blue in these pics because the contrast was really low and I wanted you guys to be able to see what I did.
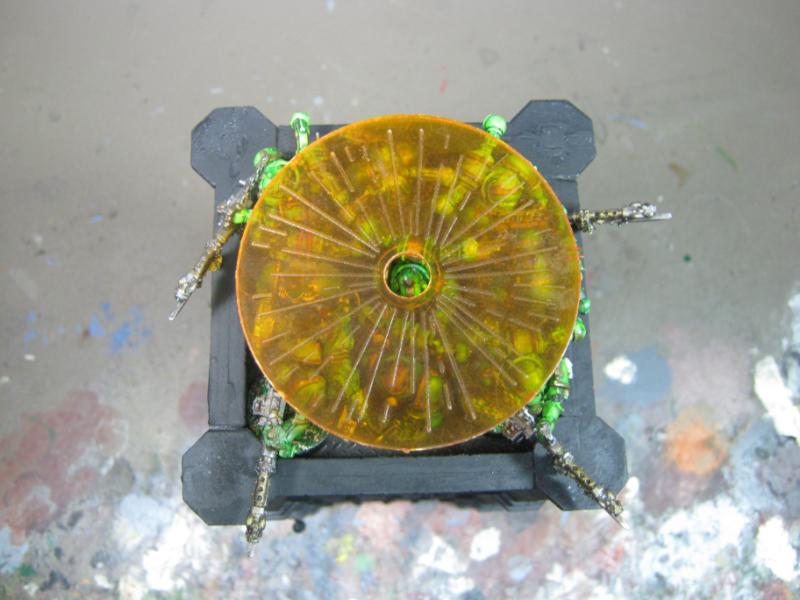
I used a few different things here until I found what I was looking for w/ a 'depth' effect. Tamiya Smoke. I like this stuff.
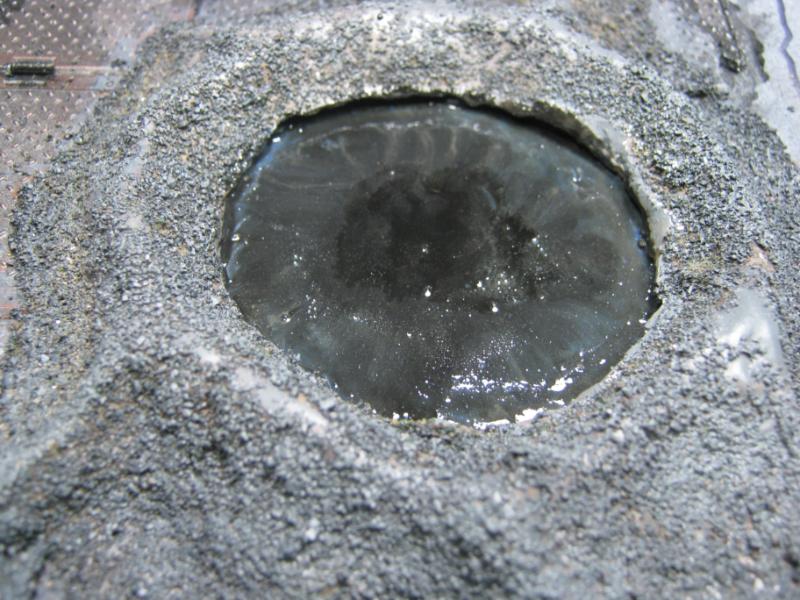
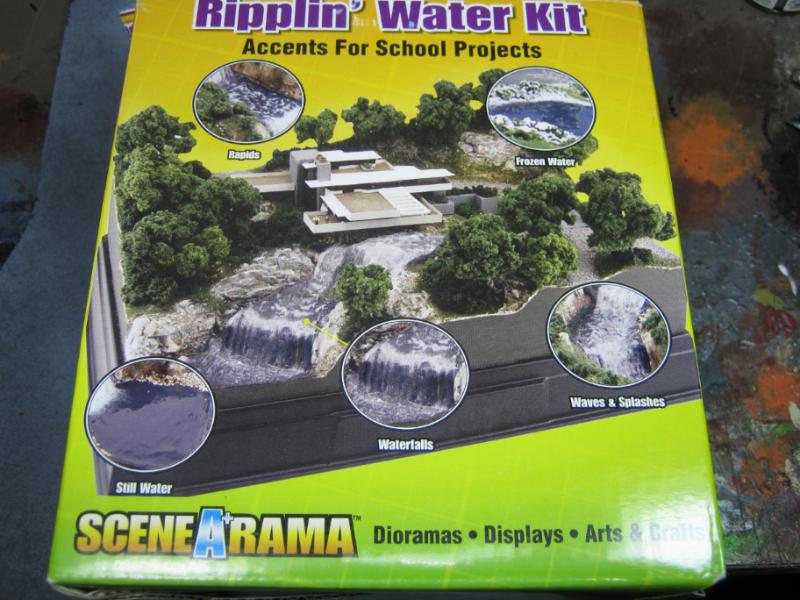
I'll be using this stuff for the water effect. I got it for free so if I screw this up I'll only be out the time it took me to get this far, and to fix it.
Annnnnndddd... slam on the brakes for this piece, nothing else has been done. Looking forward to having the time to work on it more.
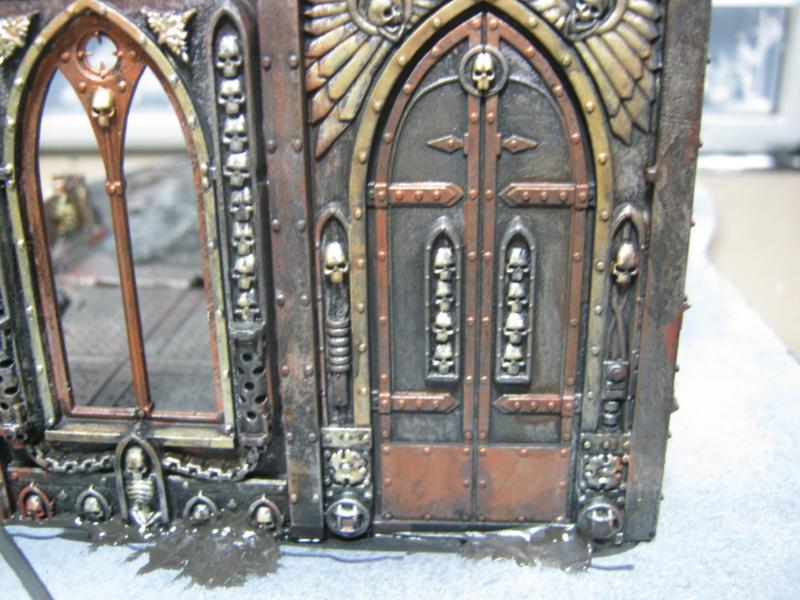
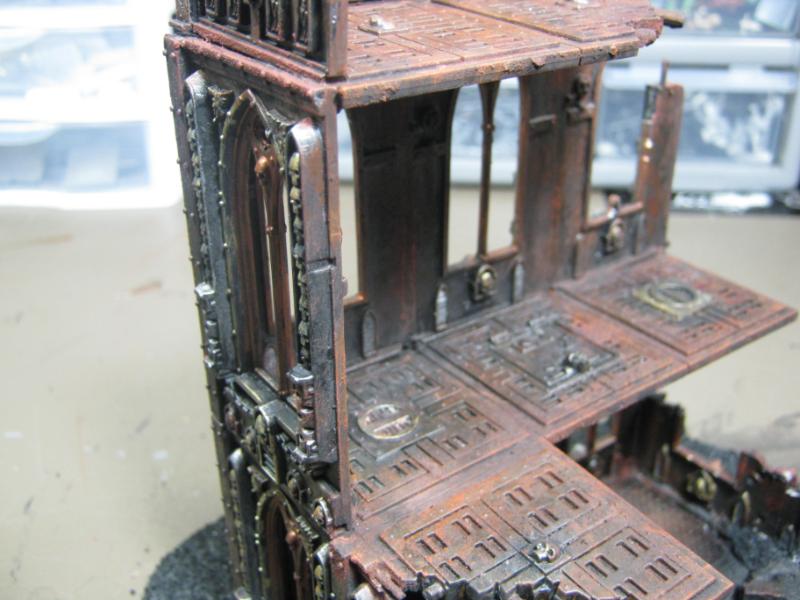
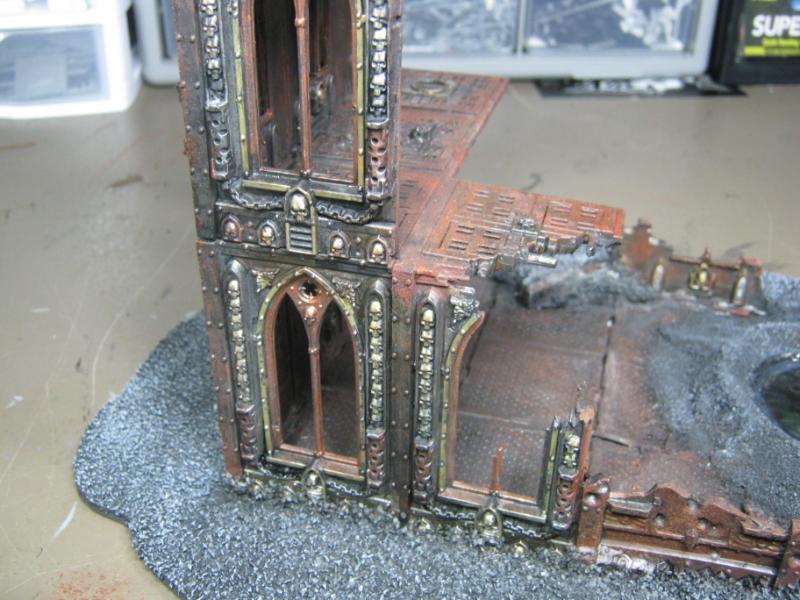
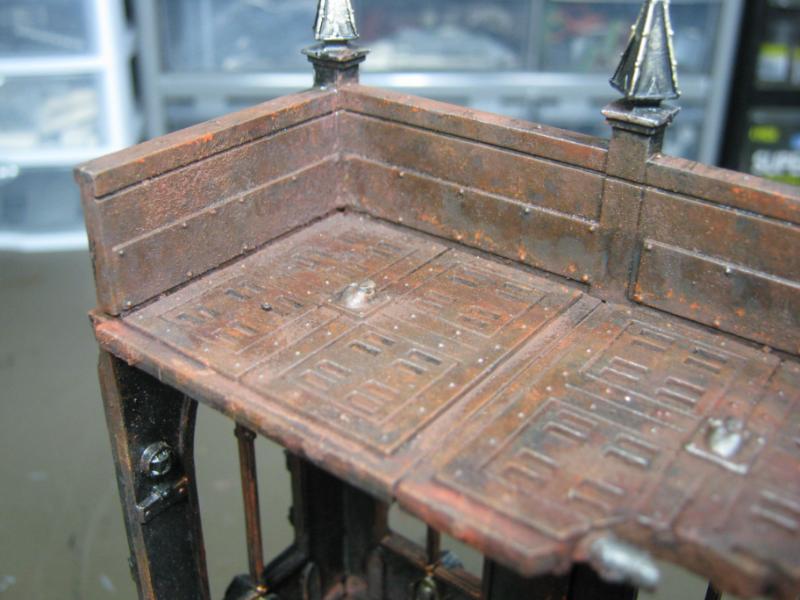
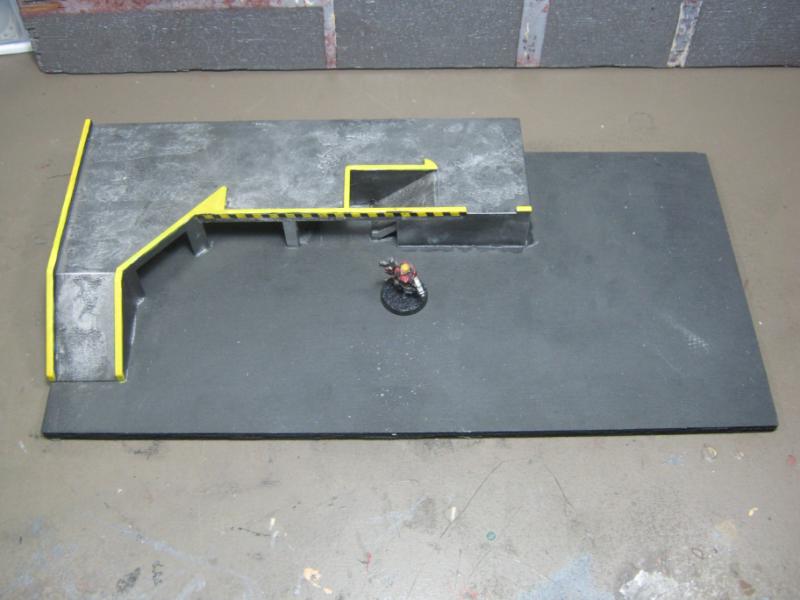
I've got more work done on the Gothic tower. Note that it is stone grey. That happened on purpose and it will not be receiving the 'rustification' effect as a result becasue ... well, it's stone. HOWEVER, that does not mean that it will remain unblemished by the ravages of alien weather and passage of time. I'm going to be trying a new weathering effect for stone. It will look cool, I promise. And not all of it will be stone. I'm going to have gilded arches, iron hinges / door stuff, etc. I'm not taking the easy way out just becasue it's a stone building.
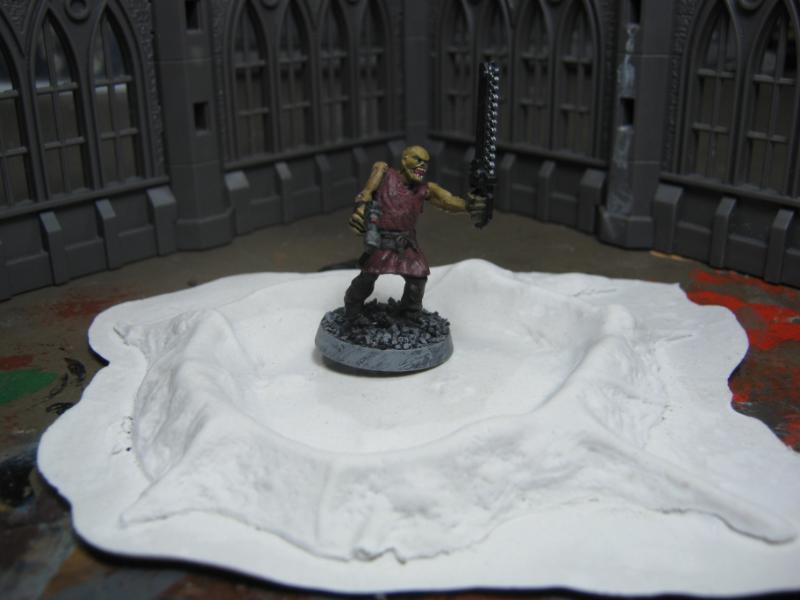
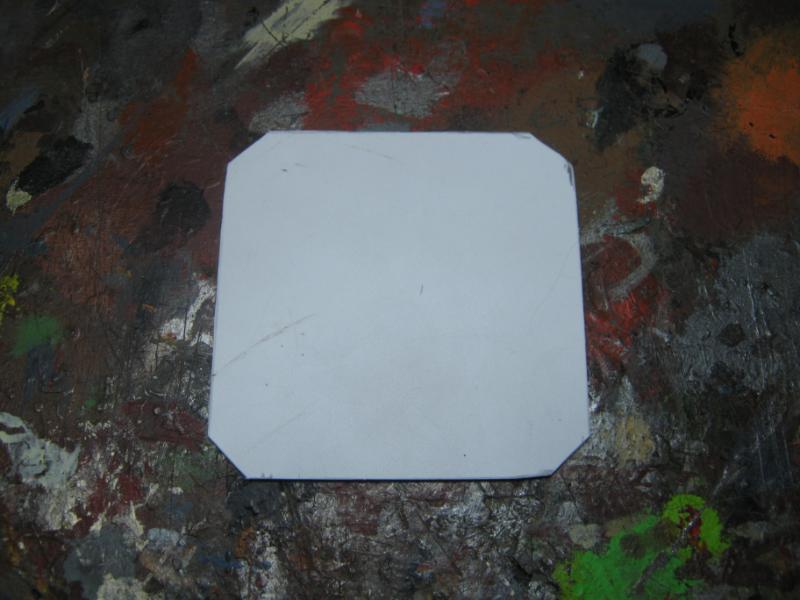
Also note the base. It's been a new issue on the table recently- what is 'difficult terrain', and what is not? I base everything the same way for aesthetic effect. While it makes for a better-looking table, it does create some confusion. Solution? Shape of the base. If it is symmetrical with a building on it (square, rectangle, round) it's normal terrain. If it is asymmetrical base with a building on it it is considered Difficult Terrain from the edge of the base inward. Small bases like this:
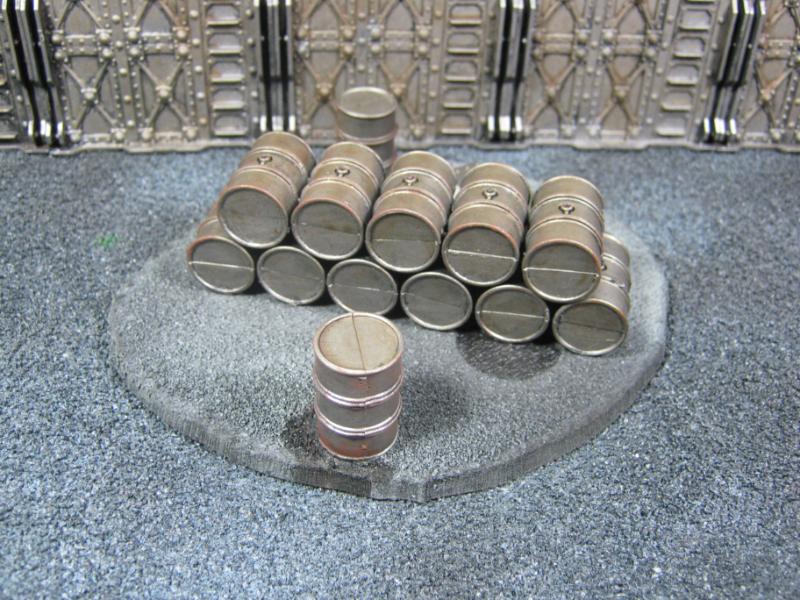
...are just terrain.
So another issue solved. Give me another 30 years of this and I'll have it just about right.
That's it for this one. I'll leave you with a glimpse into the far future, and I'll be back when I can. Don't expect much coming from me for the next couple weeks, tomorrow is 'cut day' for the conversion at work. I'll be pulling 12-14 hr days minimum and might be working the next couple weekends. Depends how it goes. Bottom line is my life is chaos and I'm trying to duck and cover as best I can.
Enjoy.
|
|
|
|
2012/10/25 17:01:38
Subject: Re: Terrain Project- Building a Better Battlefield
|
|
Longtime Dakkanaut
|
@ Moltar- Water effect will likely be the last thing I do on this before gluing the building to the base, so it'll be a while. I'm hoping it turns out well because I really want to do more of this (water / slime / sludge effect).
@ Dave- True, but I'm HPP instead of salary, so I'm making $$$bank$$$ right now. 6 hrs OT yesterday, 2 on Tuesday, 1 on Monday. Probably 3 today, 3-5 tomorrow, and possibly working this weekend depending on how tomorrow goes. I'm going to pay off a bunch of stuff that been riding me for a while. Nothing like a clean slate.
@ Vik- Thank you! More greatness coming. Trying to figure out the 'destroyed / disturbed floor tile' look. It's not asphalt or concrete, it's metal, so I'm still trying to figure how to make it look realistic. Thinking about peeling it back and rolling the edges over, and then having the bits that were blown off or buried in the crater sticking up in other places.
@ Galorn- Hmm. I have a sand pit up behind the house. I'll check that out. Free is my favorite price.
Nothing new to report. All work and no play makes Skalk a dull boy

This weekend is looking rainy but warm. If the weather isn't too bad I'm going to saddle up and take the 48 out for a putt. If it's all hurricaney like they are shock and aweing about I'll stay home and do some modeling. If I'm not working.
Gah. I need a break and I need some genuine modeling time. So many achievable goals, so much raw material to work with, no time to do anything w/ them.
'Excusez-moi, garçon. Could I please have some cheese and crackers with my whine? '
Ha.
I'll be back with something soon. I'm highly motivated, incredibly well stocked, and have some great ideas. All I need is time.
Thanks for looking (at nothing this time). I'll be back.
|
|
|
|
2012/10/30 04:07:58
Subject: Re: Terrain Project- Building a Better Battlefield
|
|
Longtime Dakkanaut
|
@ ENOZONE- Me too! Stick around, a lot more is coming and if you're the kind of person that learns from other people's mistakes you have a wealth of information here.
@ Dave- The only thing I have going for me right now is OT. I'm not liking work at all right now. Everyone is stressed, management is riding people because they are getting ridden by other people, customers are freaking out... the bonus at the end of this will be sweet but the 'right now' it seems not worth it.
This is a HUGE update. Even if you're just looking at pictures, you'll be busy. I'm sharing 40 of them in this update.
First up is me bragging and showing off my passion. I just got new pipes, high flow air breather, and a chip upgrade.
http://www.withstrengthweburn.com/terrain/48_01.jpg
http://www.withstrengthweburn.com/terrain/48_02.jpg
*pics are links instead of displayed here because they are HUGE*
I didn't wind up working Saturday so I went riding during the late afternoon. The only reason I turned around and came home is because I have my kids. Someday I'm going to saddle up and leave. I'll warn you guys before I go.
Anyway, on to the modeling!
I got to take a massive chunk of time over the last couple of days and got some genuine work done. I'm really happy with the stuff I was able to do and I'm that much closer to having an absolutely awesome table. There are limitations I'm working within (skill, storage, general functionality of a game table) but overall I'm really pleased with the progress I'm making and I truly feel I'm a better modeler than I was when all of this started.
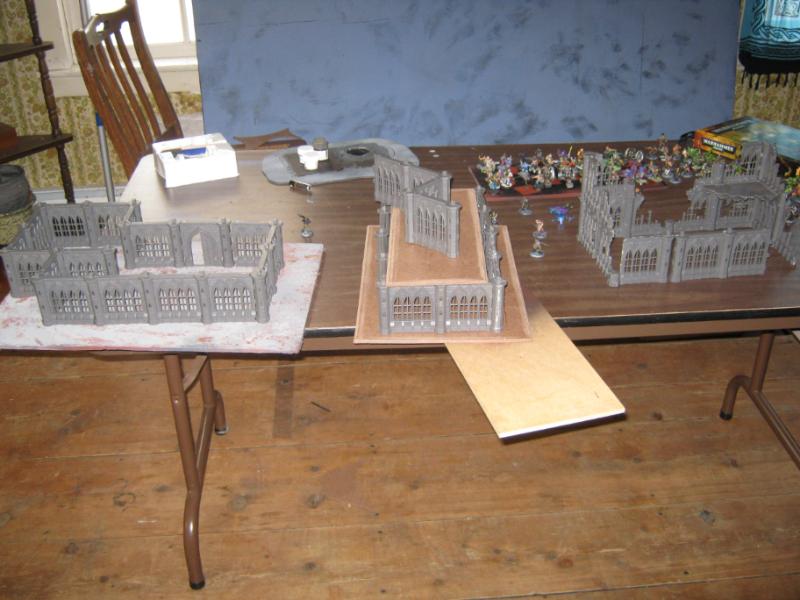
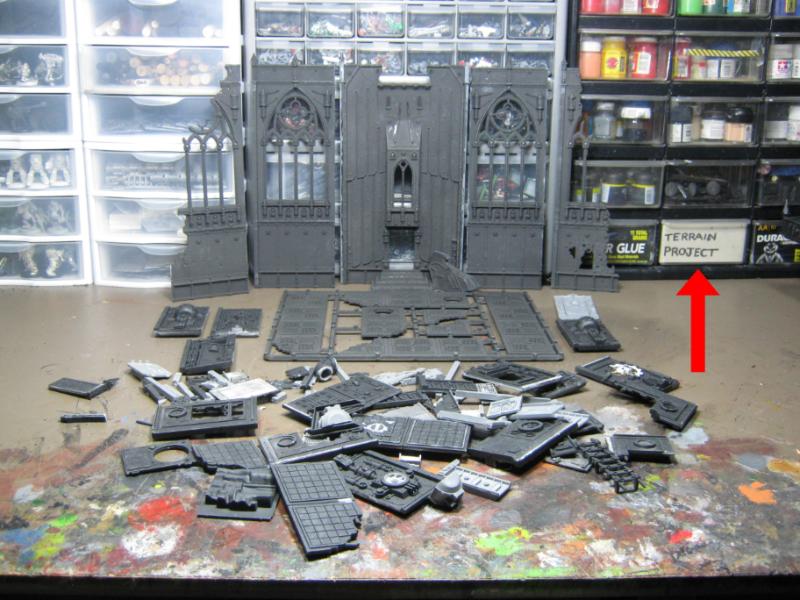
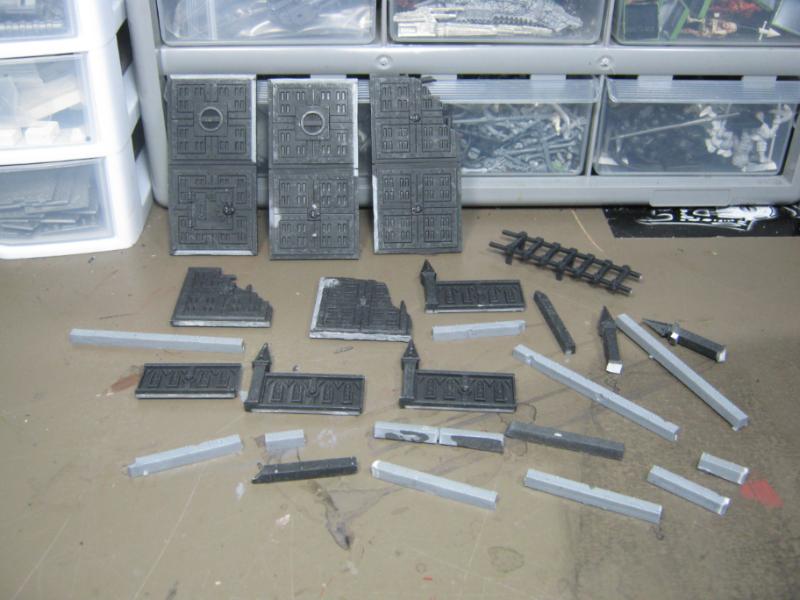
The first thing I did was sort out the madness. Nothing junks up my table (and surrounding area) like a terrain project in full swing. While I was cleaning things up I decided that it is a bit early for the Pegasus Gothic buildings to be out on the 'on deck' shelf so I disassembled them all. But before I tore them apart and put them away I decided to take pictures of them because it took a lot of thinking to figure this much out. You'll see these again someday.
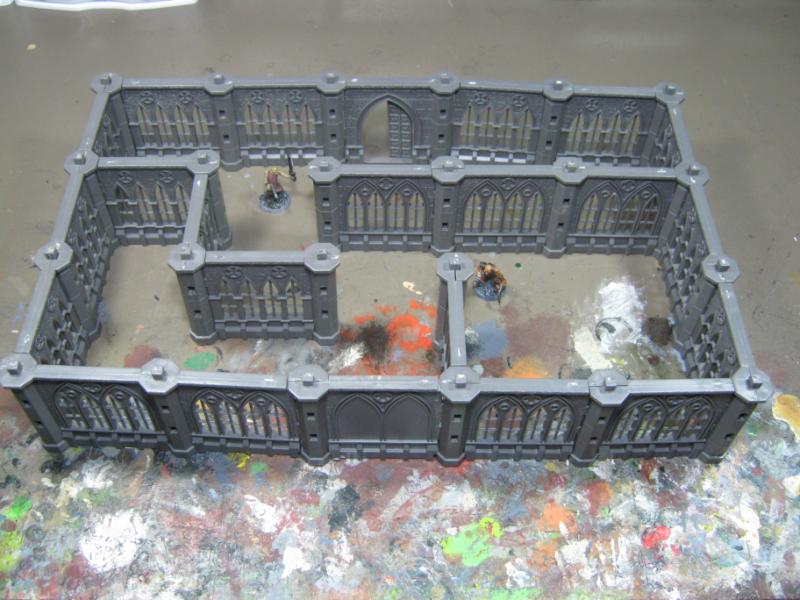
Large building:
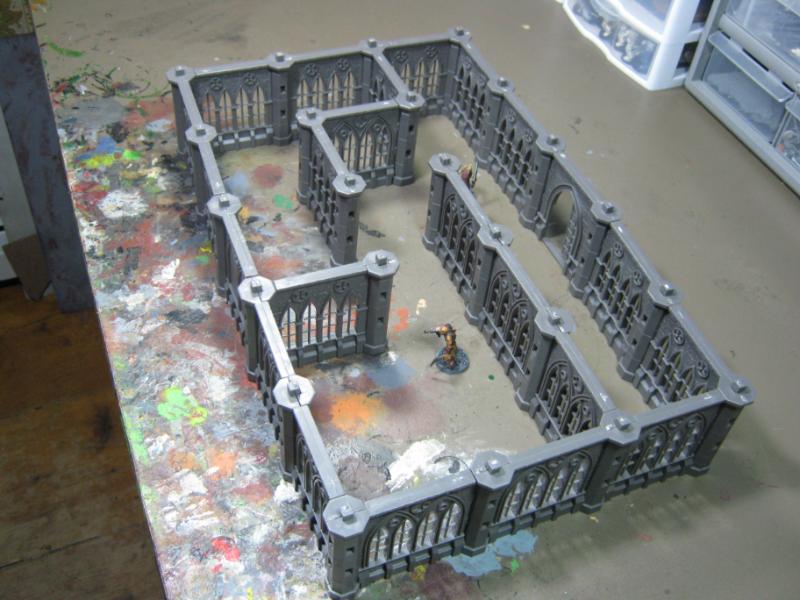
Small building:
Both will have more doors and will have roofs. More on that later.
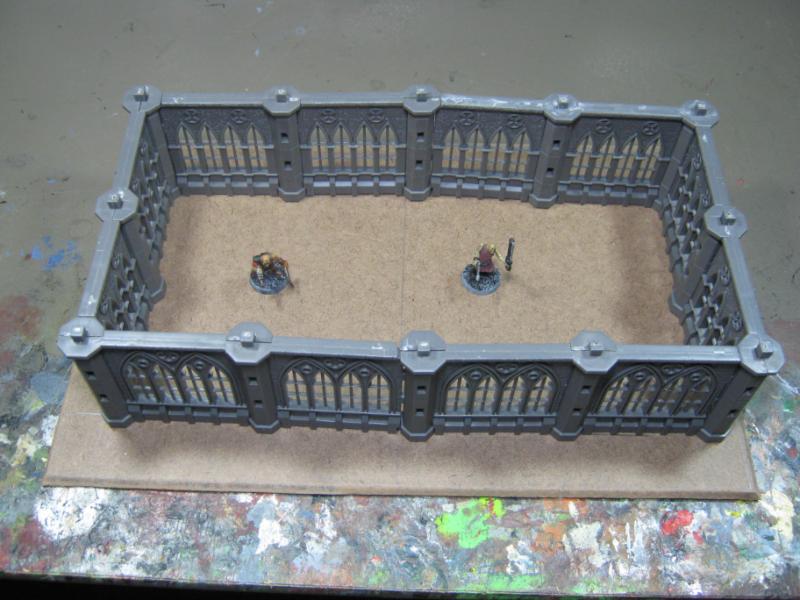
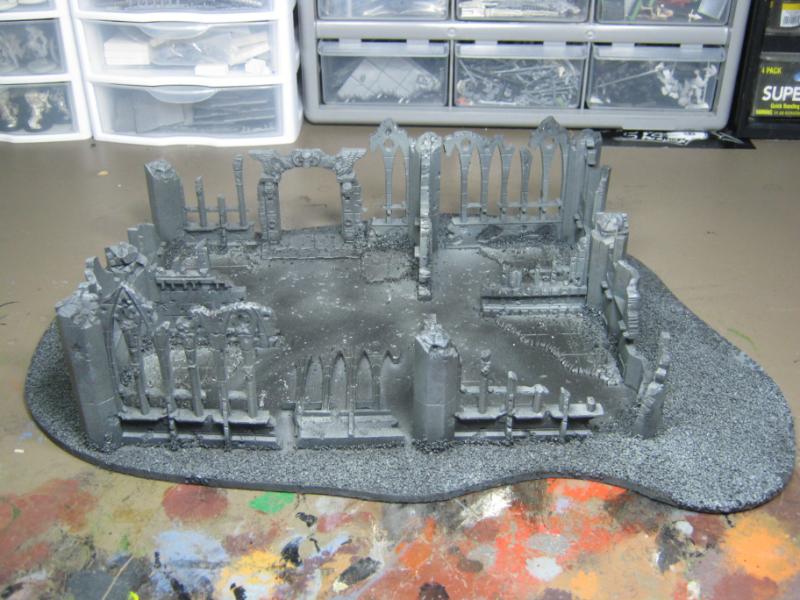
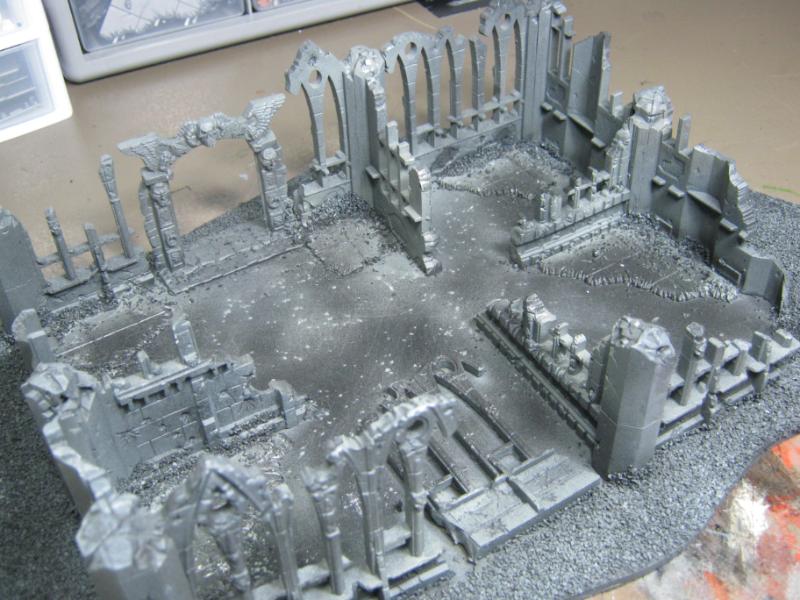
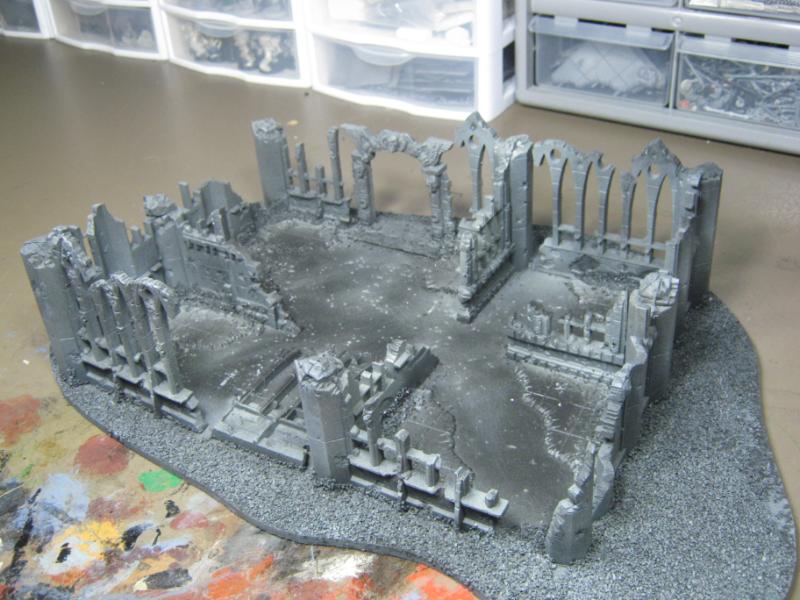
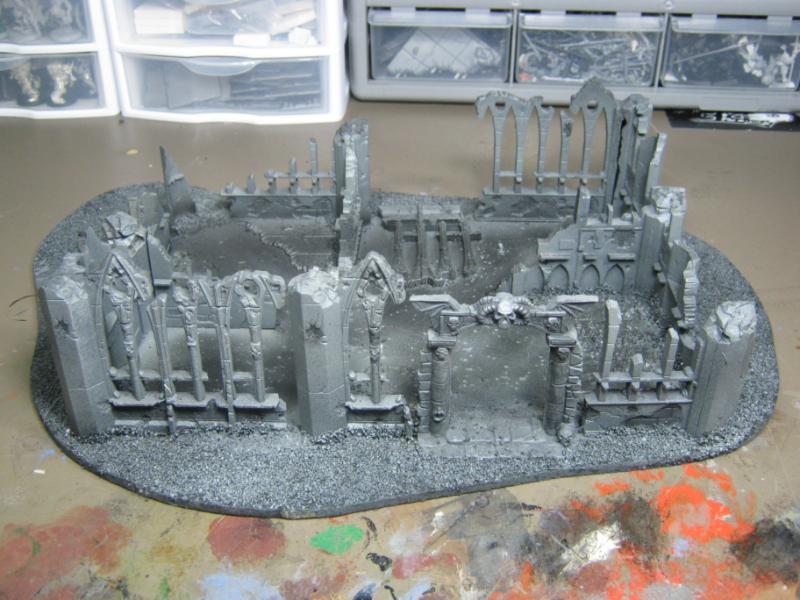
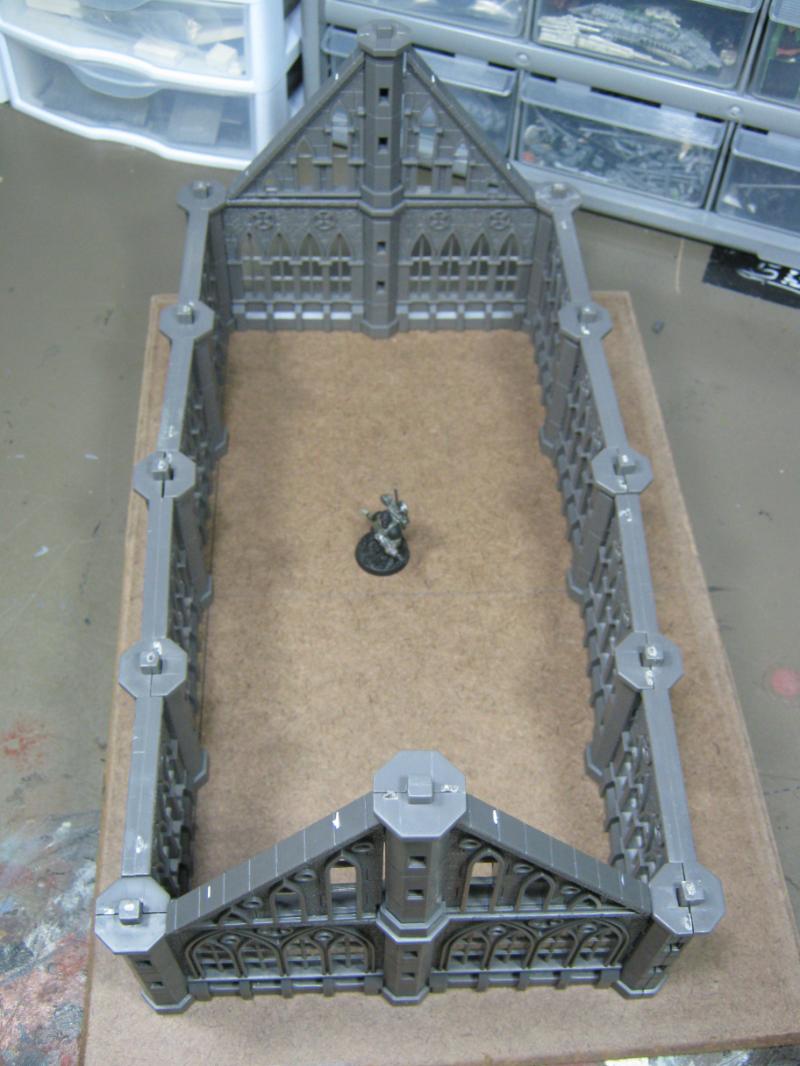
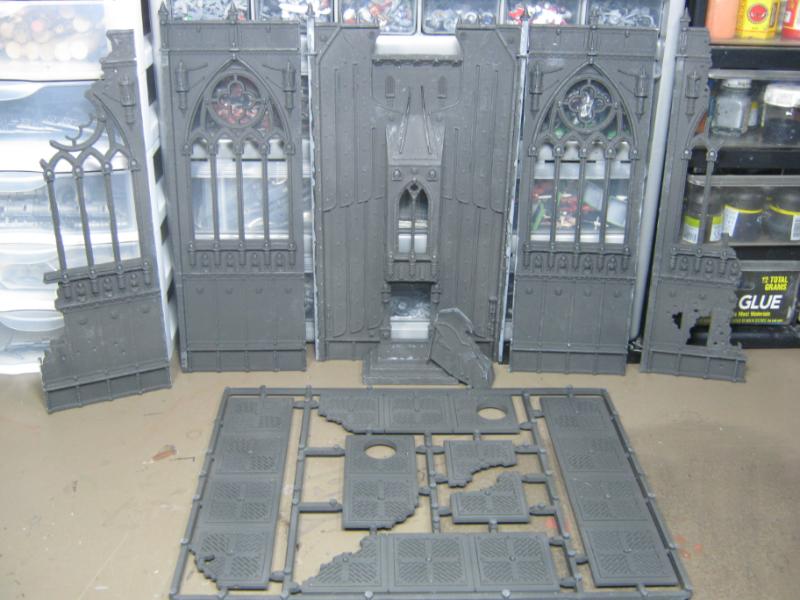
While I was packing up the Pegasus stuff I stopped and took a hard look at my Gothic Ruins and an idea struck me. If I put them together as they are made I have a small box with a weird gap of ruin in between.
I had an idea and got to work; Basically all i did was take out a clamp and my saw:

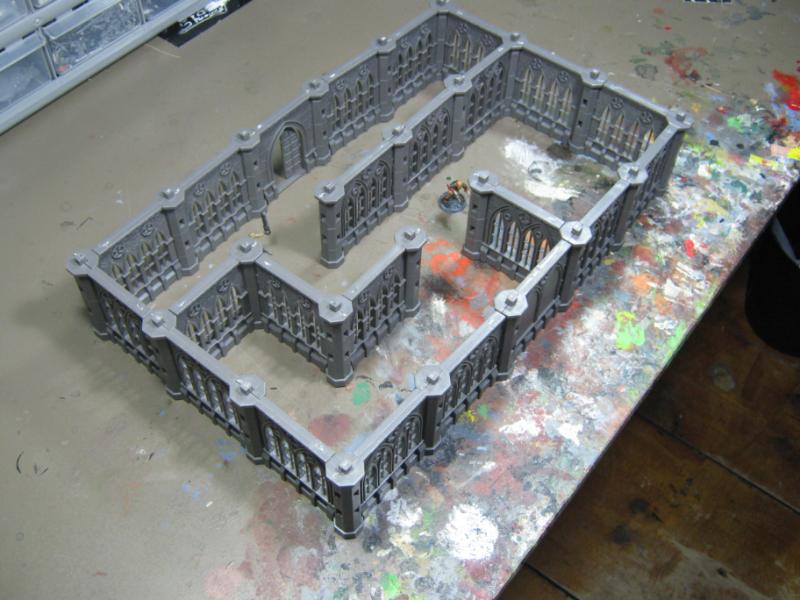
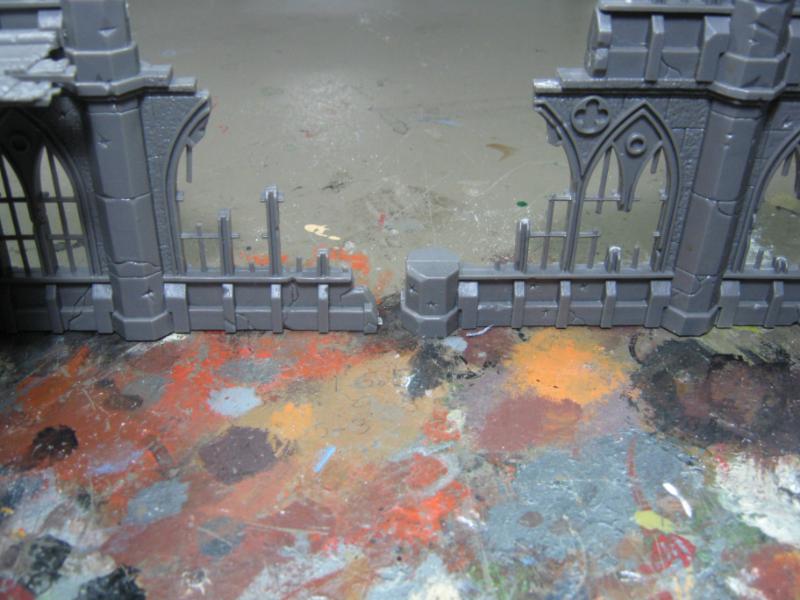
A bit of fiddly stuff later and I had this:
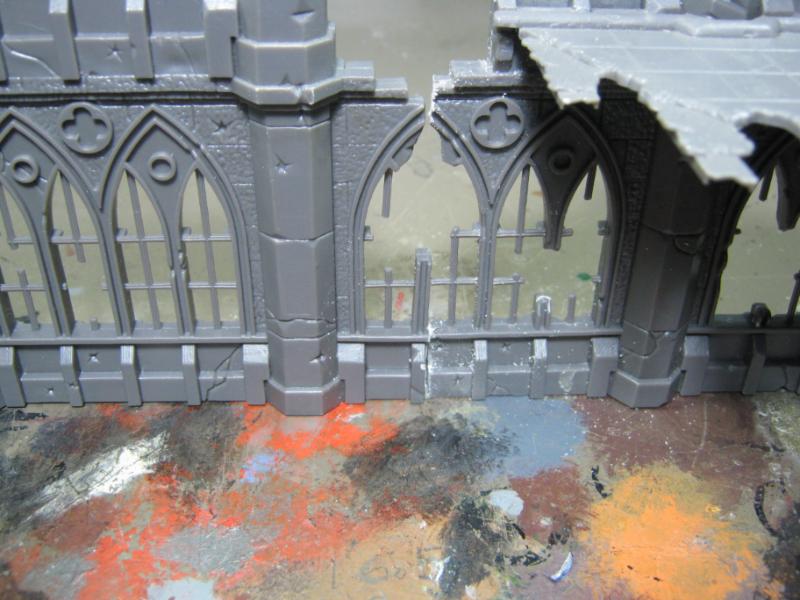
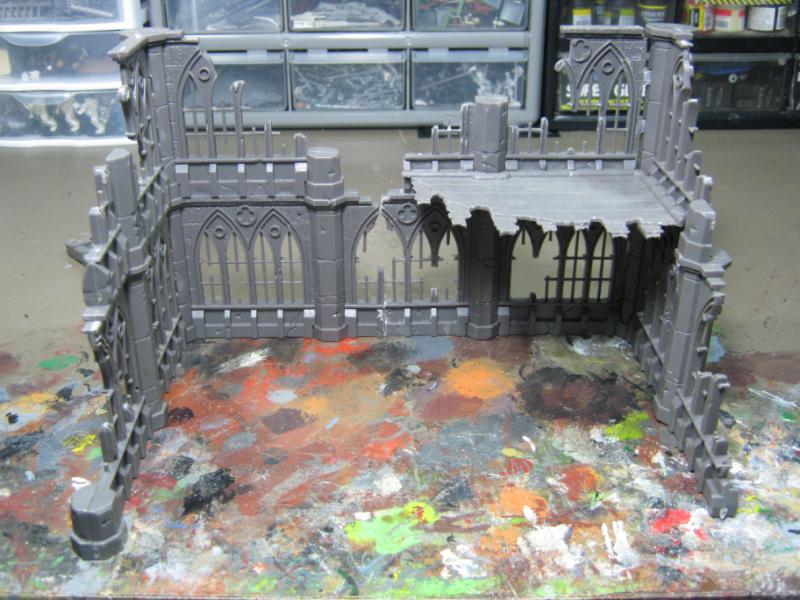
I was really impressed with myself until I noticed this:
Oops. But no worries, I figured it out.
...and for that awesome 'ruined blown up building' look, I'll be doing this when I'm ready to get to work on this piece:
Moving on to other things, I got a bit more work done on Imperial Sector building #1 again. Glued the floor to the base:
I started looking at this piece and wondered why I wasn't working on it anymore, it was going along great and then stopped dead. usually when something like that happens there's a reason above and beyond IRL. So I put some thought into it and realized that I completely hated the piece and wanted to throw it against the wall to make it go away.
Since that wasn't an option, I tried to figure out what would make me happy w/ the piece and realized it wasn't the piece I hated, it was the color. It had to go. So I did this:
and here's how it came out:
And with a bit of metallic paint:
For those that are disappointed that I painted it blah and generic, consider this- rather a piece that fits my table than a piece that eventually finds itself on the Shelf of Shame. And I'll get some cool detail on it later. For now I am liking it WAY better and this project will be finished in the next few weeks.
Speaking of SoS, here's a project that has been on my 'on deck' shelf for MONTHS, and I know I made this over a year ago, just never finished it. Now that I have the Pegasus Gothic buildings / ruins on deck, this now has a place on the table and with a little more work will look right at home on my table:
Everything is from the old GW ruins set, long time ago, can't remember when it came out, and the door arch is from the old Warhammer Quest set. I did a lot of hacking and cutting to make this, and you'll see this done over the next couple months.
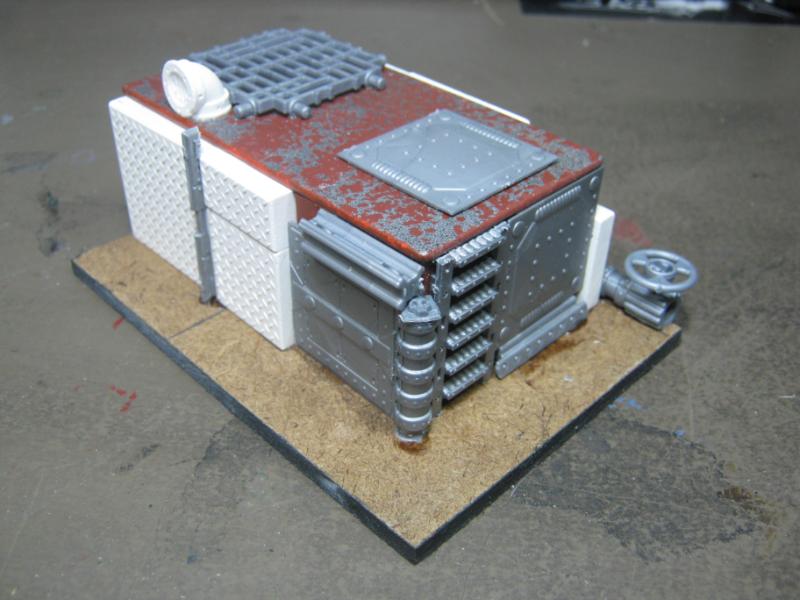
More hobby ADD! I got to work on Imperial Sector building #2 again, and was really in the mood to get some work done on it. First thing I did was draw out the 'blast' area bit more.
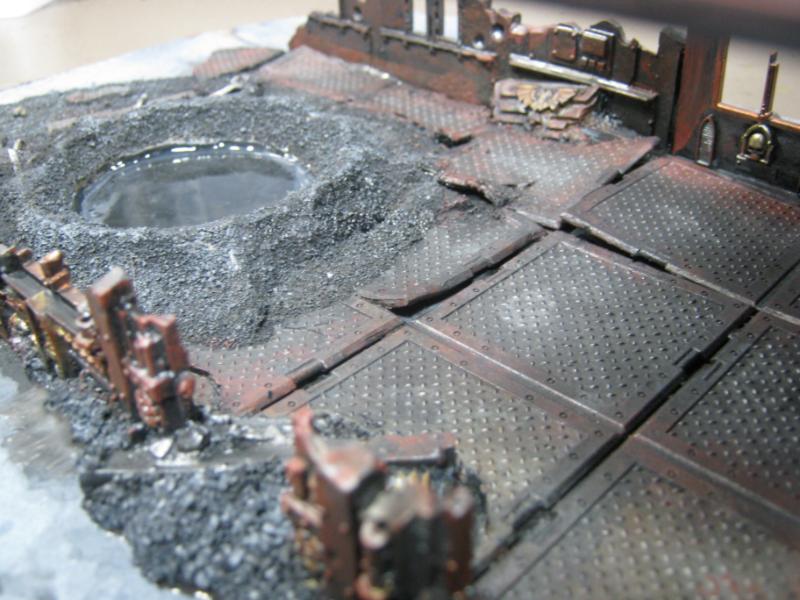
Here it is a bit more bulked up and soaked w/ a 50/50 black paint / water mix:
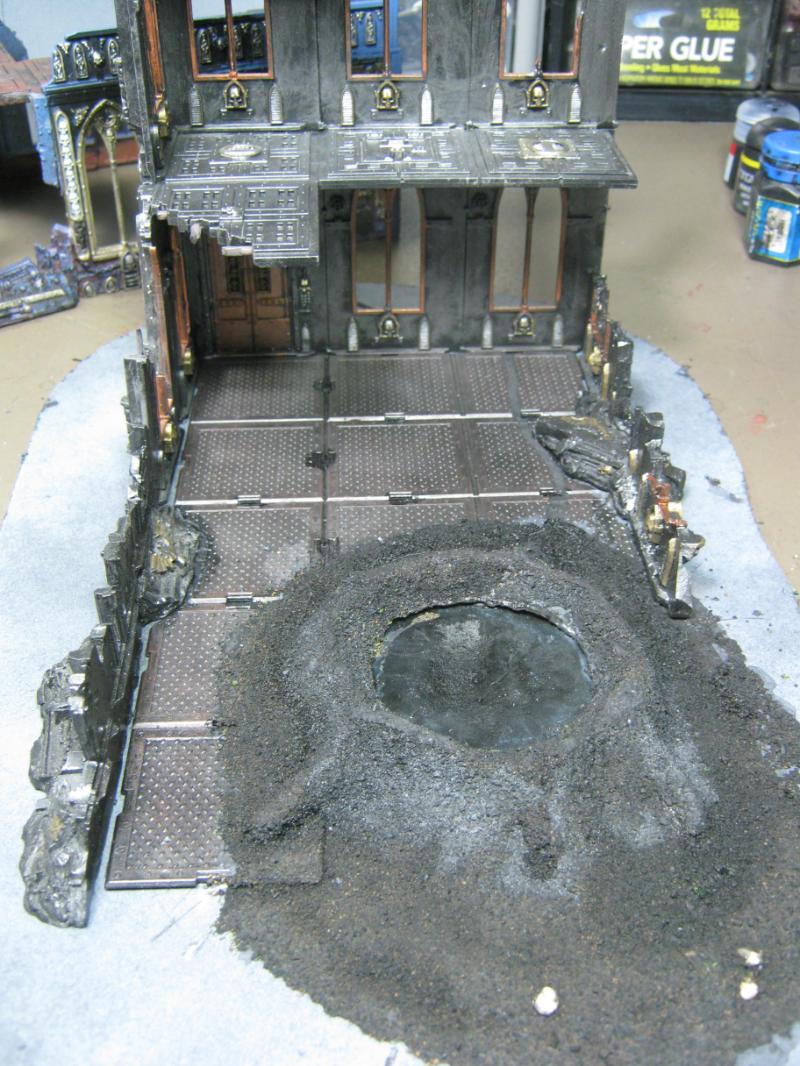
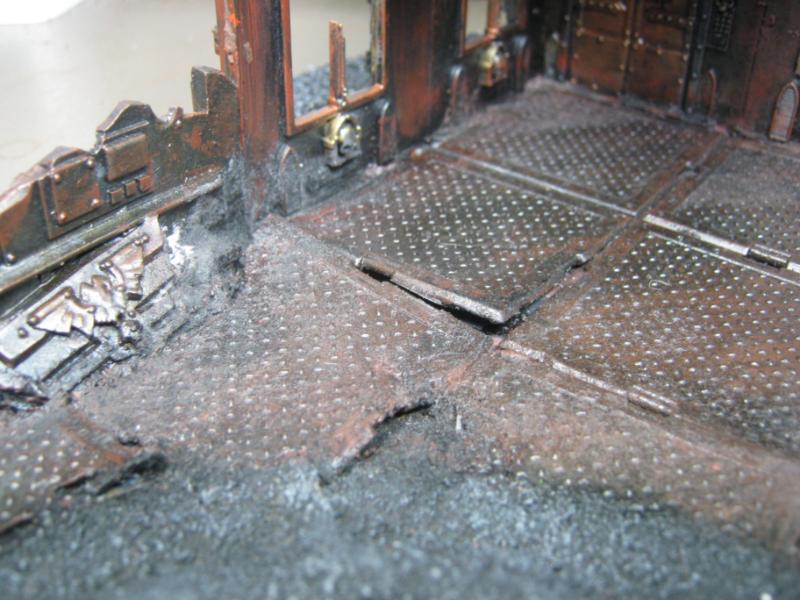
Also got working on the lower walls. notice how I bulked them up w/ the crushed stone stuff I use. Hides imperfections and looks great. Used Elmer's wood glue and that was it. Should have taken 2 pics for details, but this is what i have to share:
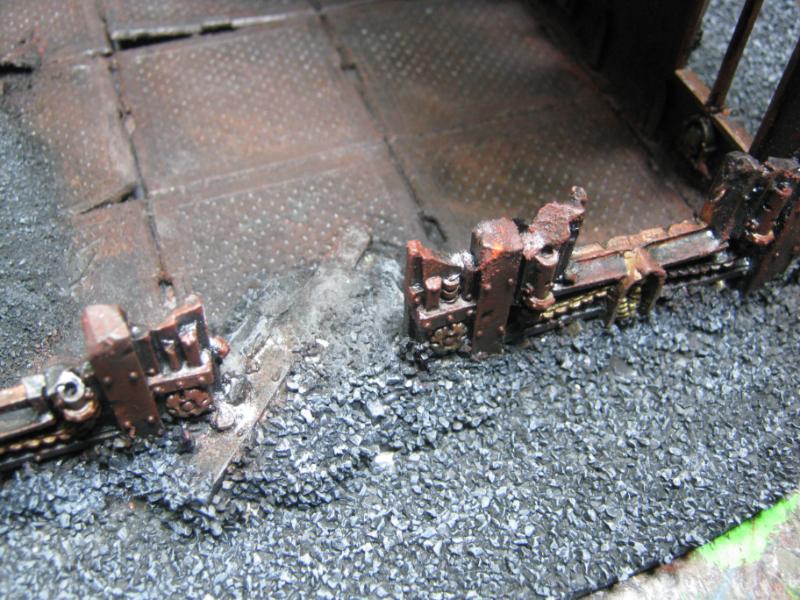
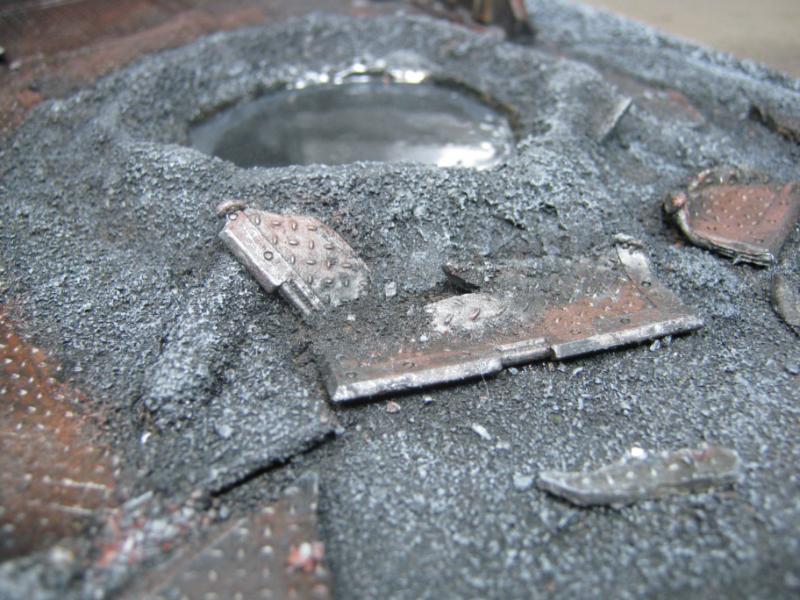
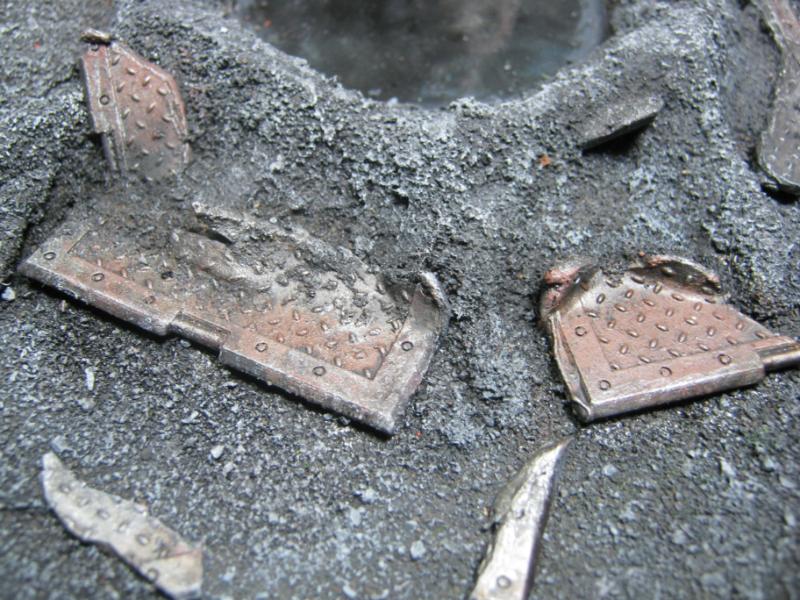
Also got to work on the debris for the crater. Notice the curled edges and bits sticking out from the crater:
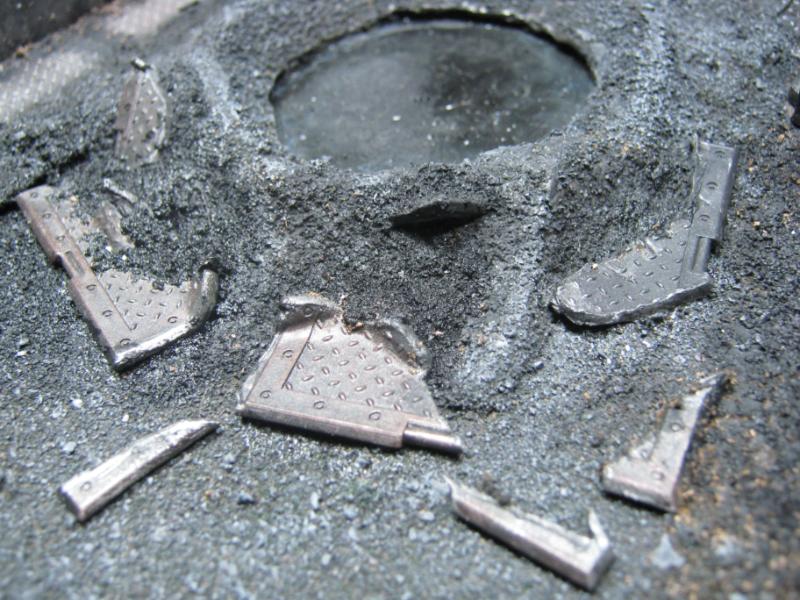
I decided that I had enough work done that I could glue the building to the base. From experience I know that it'll be grabbed from the top many times and it's quite heavy. Perfect recipe for broken terrain and hurt feelings. To avoid unnecessary tragedy I used a 2-part epoxy for the building and walls. It came out really well (look at right side of model in next pic, you can see some of it). After I had it bonded to the base for all of eternity I decided it was time to try my water effect stuff.
...
I tried to open the jar w/ my hands. Fail. Tried a piece of rubber that I use to open really difficult jars. Fail. Tried almost everything else I could think of. Fail. Finally invoking the names of Odin, Thor, and Magni I grabbed my favorite pliers and CRANKED on that lid. It's stripped and ground down but it finally came off. The entire time I was worried it was going to shatter in my hands and it would be another ER trip to ruin my day of modeling. My efforts were worth it.
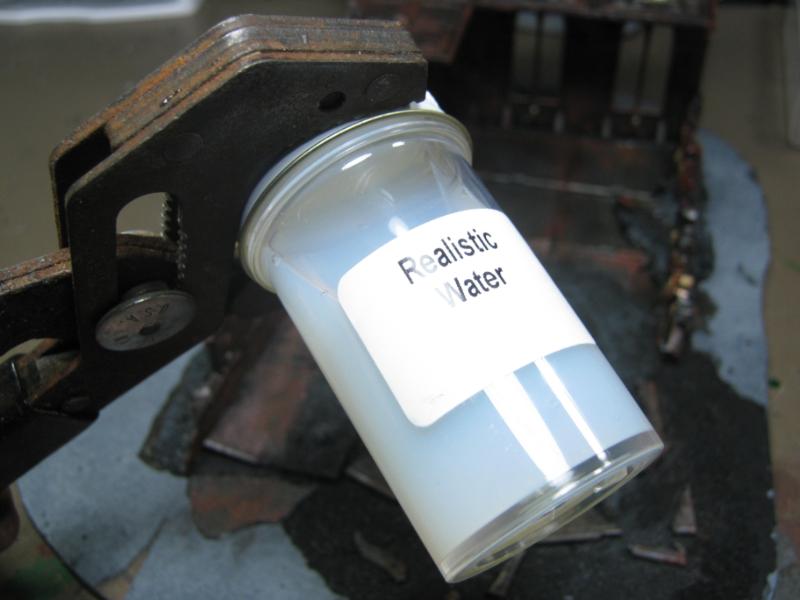
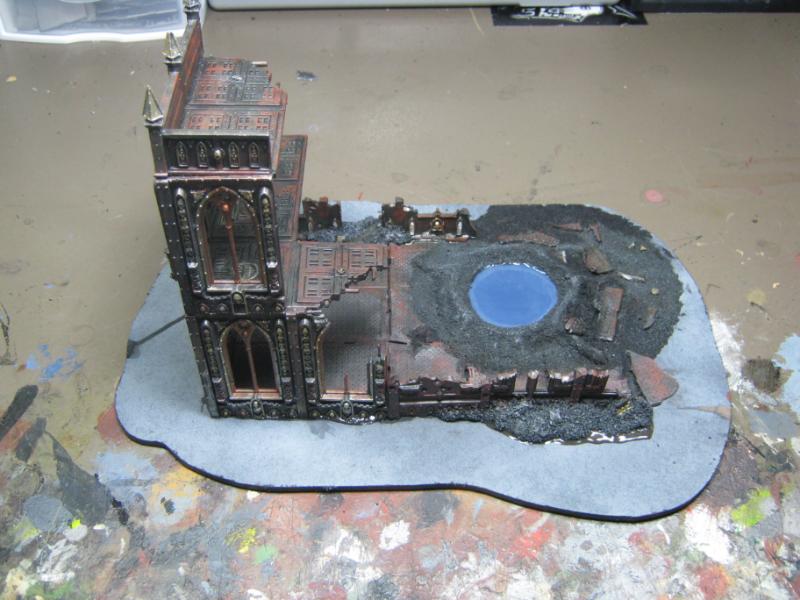
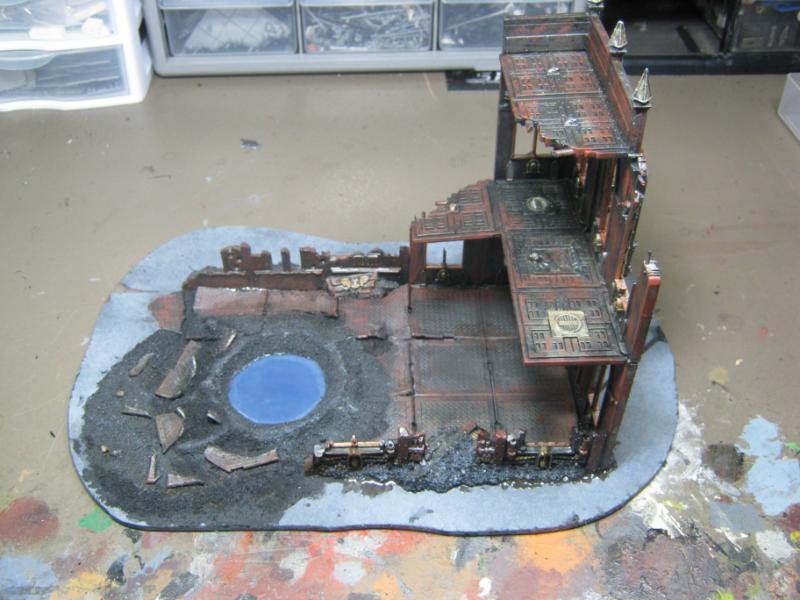
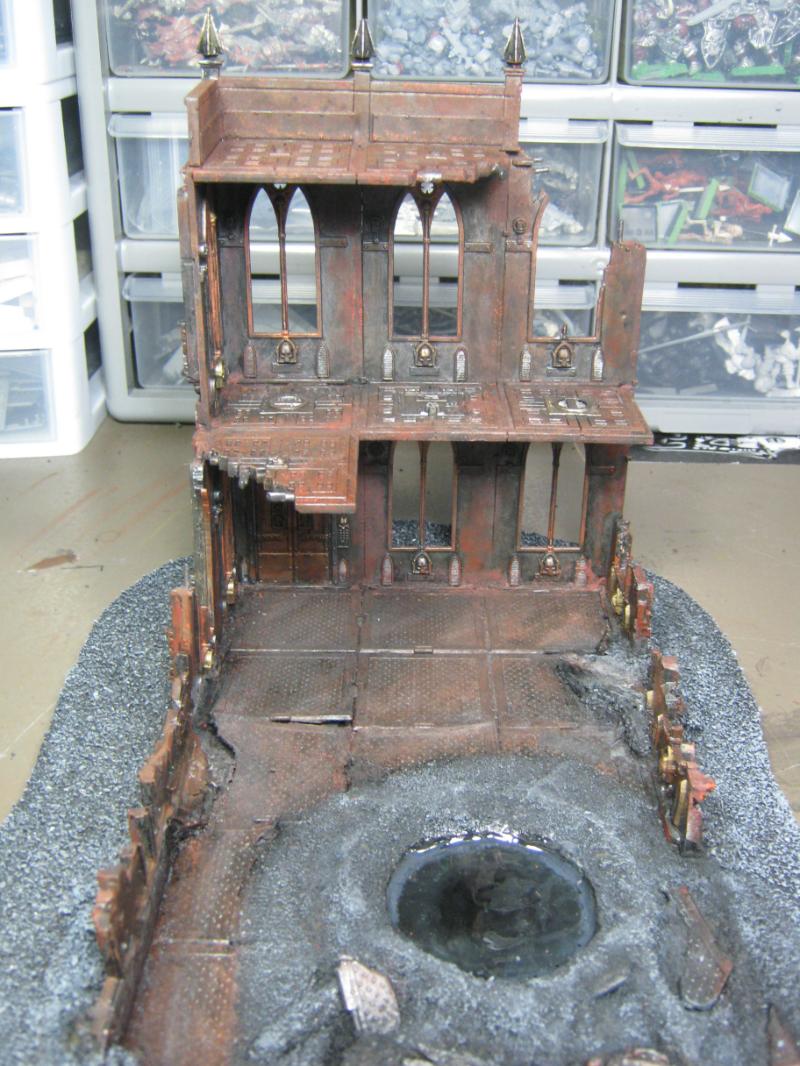
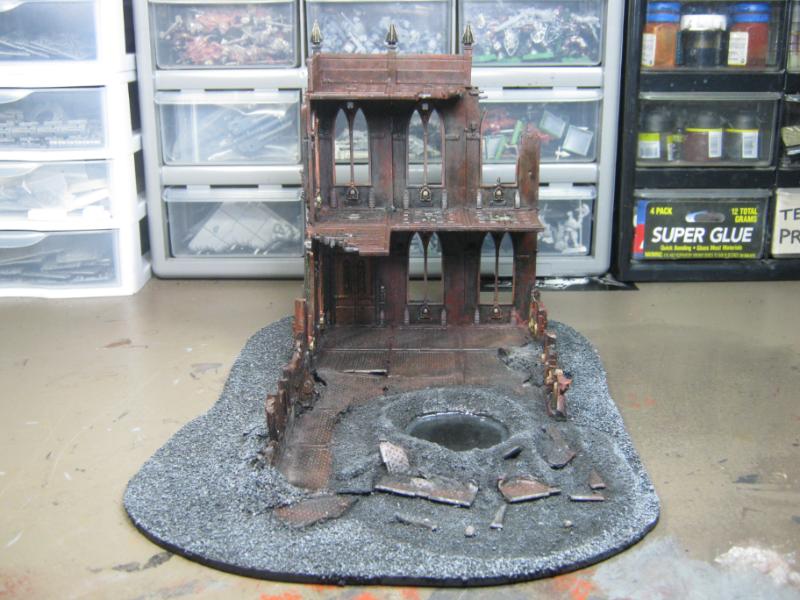
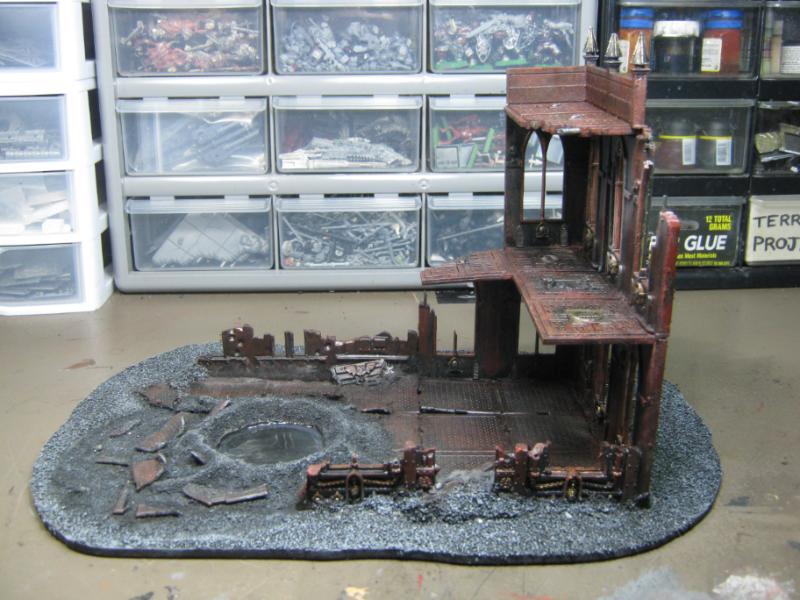
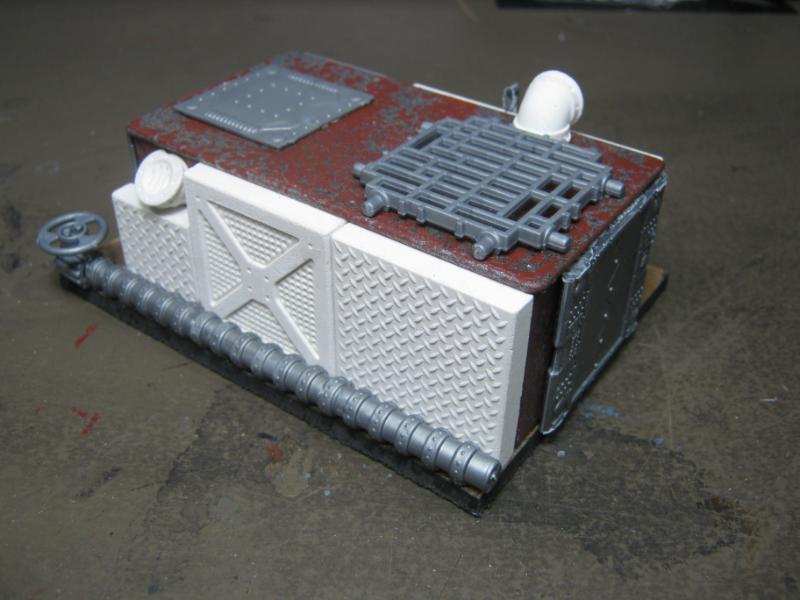
Take a look at the entire piece, not just the water effect stuff. it's not that blue, it's just how it looks when it is still wet. Check the start of my rust effects, the torn up floor, the tight fit for the lower walls, etc. I've put a lot of work into this.
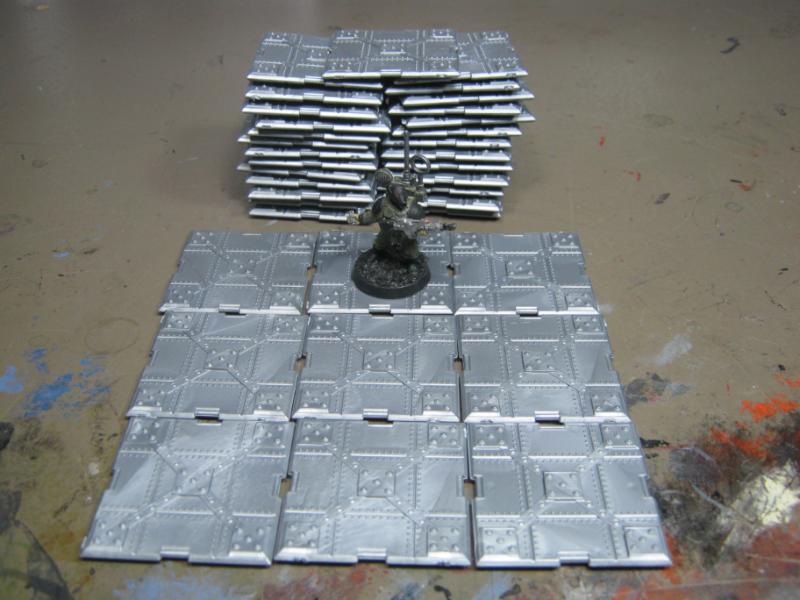
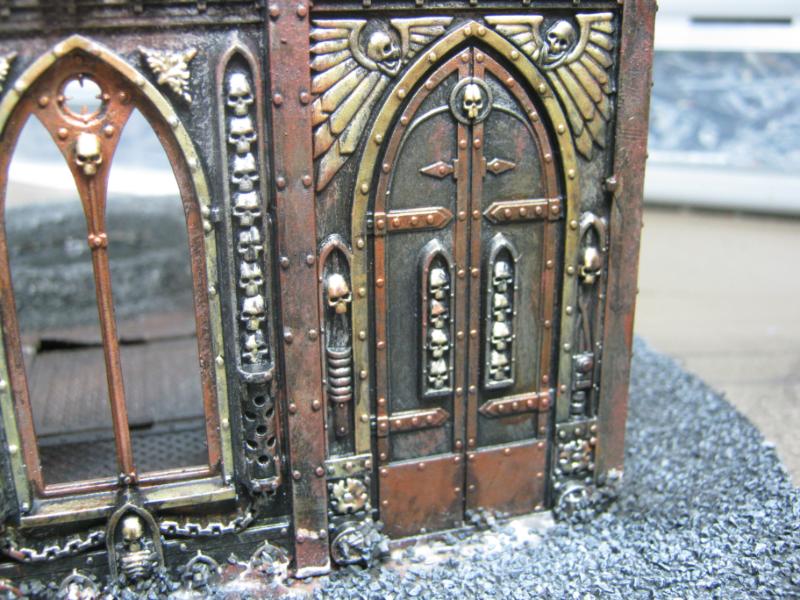
And.... SUPPLY DROP! BAM!
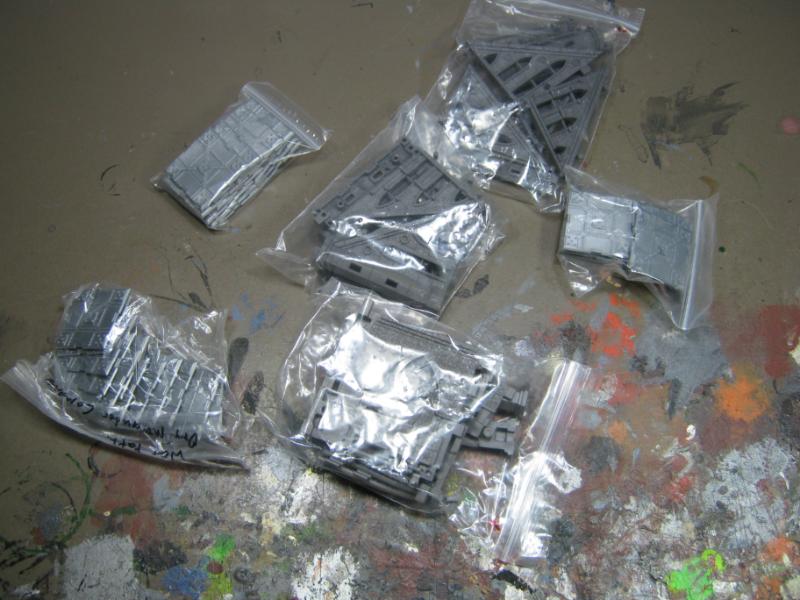
I picked up a LOT of these. They were on sale and I decided to give them a try. I'm sure I'll find something awesome to do w/ them. Look at all the rivets!
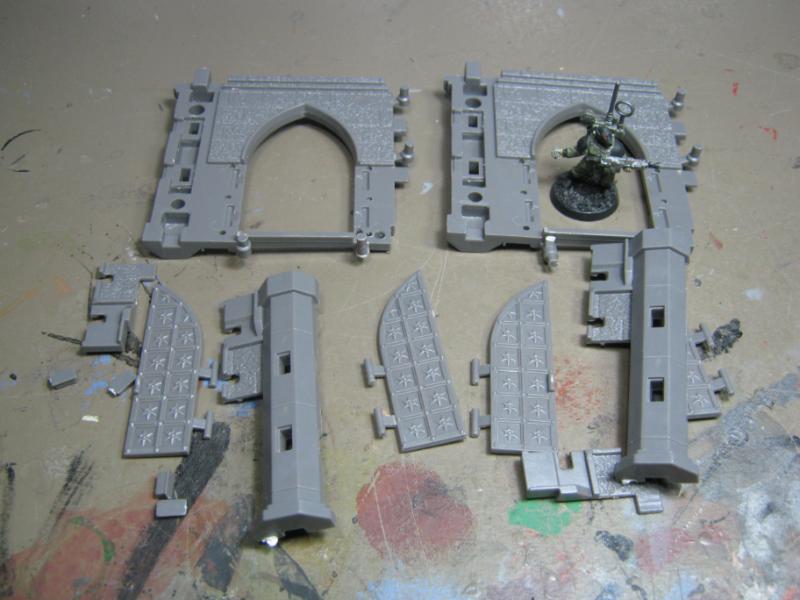
I also picked up two doors. I'll be needing 2 more of them, but that will be later as I get closer to doing the Pegasus part of this project:
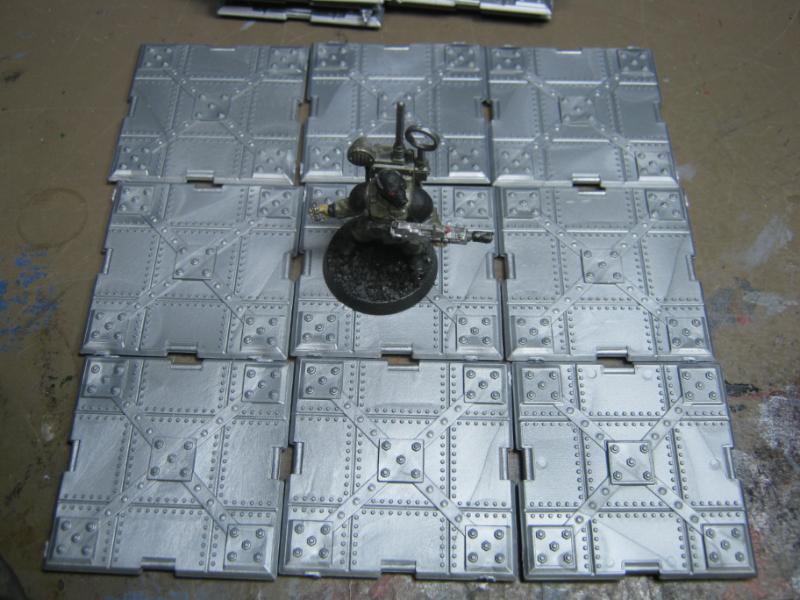
Of all the cool stuff that came in, here's the biggest score of all:
... because I can do this with them:
Hmm. There's a wicked storm heading this way, so with any luck I'll get a call that work is closed tomorrow. A full day of glorious modeling!
Great stuff will be coming soon. I can't remember the last time I was so motivated on a project. I know I'm just taking a lot of pre-fab stuff and putting it together, but I'm putting it together with an overall vision and I'm not just throwing random projects onto the table.
Thanks for looking. I really appreciate the feedback you folks leave because I'm always looking to improve so your C&C is welcomed and considered.
I'll be back when I have something to share.
|
|
|
|
2012/10/30 22:00:26
Subject: Re: Terrain Project- Building a Better Battlefield
|
|
Longtime Dakkanaut
|
@ Dave / Brian / Moltar- Thank you for the compliments. Text is a poor form of communication, and I assure you I'm not beating myself up for what I'm using or what I'm doing w/ it. madmarty is a great example of of taking pre-fab and making into something totally unique and completely amazing. And you (Dave) are working on stuff now that I can only hope to achieve. Bruticus is another great example as well, and he's a huge inspiration for me.
I mentioned pre-fab because I've seen two other threads where people have given the OP some flak for using all pre-fab (mostly money spent and how 'anyone. I was merely acknowledging that yes it's pre-fab but it's not at all 'stock' and I'm doing some unique things with it that is not something you'd get straight out of the box. I am very happy w/ how my skills have improved, my vision has narrowed to focus on a specific theme, and I'm making use of long-forgotten bitz and pieces that could have been done a long time ago but through the intervention of fate I've come to them when my skills are rising. I'm going to put some great stuff on my table and I will be the envy of my local gaming group (all 3 of them).
@ madmarty- Thanks! You probably already know that you are my #1 inspiration w/ the Pegasus Gothic buildings. You make them look like aerial photographs of WWII. You are the standard I'm hoping to reach (or at least come very close w/ 'best effort')
@ eldartau1987- Thanks for checking this out, and welcome to the club! There will be a lot more coming as time allows.
@ Element206- Thank you for the in-depth post, it's obvious you spent some time going through my past work and that's really appreciated. I dig through this blog every now and then to re-discover old ideas that never got used and lost in the mad rush. There's some bits I did that I really do not like anymore (like this):
But even in 'failed' projects there is always something worth keeping and expanding on, like this:
Idea came from dsteingass and my attempt at replicating what he did was a good effort but was limited to my skill at the time. I am absolutely certain that if I tried this again it would look a lot better. I may have to test that theory. . Again, I appreciate the compliments and the time you took to catch up on this blog. A lot more great stuff is on the way. Once I finish the things I'm posting now I have 3 other pre-built eBay rescues that need to based and brought up to the standard of the rest of my work, and then I have a NIB Imperial Sector to play with. And if that isn't enough, I have enough Necromunda bulkheads to choke a 4x4 table. There are many great things coming, I just need the time to do it.
|
|
|
|
2012/10/31 03:13:43
Subject: Terrain Project- Building a Better Battlefield
|
|
Longtime Dakkanaut
|
|
|
|
|
2012/11/01 23:31:24
Subject: Re: Terrain Project- Building a Better Battlefield
|
|
Longtime Dakkanaut
|
@ GD1- Thanks man! I really wish I would just bite the $$$ bullet and get an airbrush. You and Dave make it look like the best thing to happen in the modeling world since Super Glue (I don't know which came first, I'm just using that for comparative purposes)
@ Galorn- It needs to be tones down a bit, yes. I'll be putting my 3/1 black wash mix on it, it's what I have all over Imperial Sector #2 and it looks pretty decent.
@ Dave- Ok. I'll do it. There's no point in having them if I'm not using them. I need to watch some tuts online first, I have no idea how to do this.
@ Graven- I really like that you noticed (and mentioned) the one flat wall. It just gave up, fell inward, and there it is. I thought about chopping it up a bit to give it that 'landed flat and then shattered' look, but I went for the more subtle approach of 'just fell over'. The interior of that building needs a lot of rubble, but not so much that it turns it into a diaorama instead of a functional game piece.
@ Moltar- I'm going to. Also, have been thinking about this lately- your first post (that I saw) on dakka was that NDD (Not Damage Damage) you did on that Space Marine Scout. I'm wondering if that would work for larger terrain pieces?
Bad news- I'm on day ... I forget... of 14 hr days (that's 14 straight, no lunch, just two 10 min breaks). Add my 1/2 hrs to get up / ready, 45 min commute commute each way, obligatory 'chill' period when I get home... we're up to 16 hrs. Wind up w/ eat somehting, chill out, shower, get ready for tomorrow, etc... 5-6 hrs sleep if I am lucky. I'm starting to feel a bit disconnected and a little woozy.
Good news- Got to leave early for Halloween w/ my kids last night. We all dress up and go Trick and Treating. It's Trick 'and' Treating becasue we trick them every time. I'm 45 years old and still filling my candy bag. Muauhhahaaha!!!
SUCK news / AWESOME news- I'm on call this weekend and will likely be doing a straight shift from home via VPN. That's the suck. The awesome is I'll be getting paid so much I should be embarrassed, and I get to model ALL WEEKEND!
I am so beat tired. ANd I'm bummed wicked bad becasue I sooooooooooooo want to be working on my projects that are >...< this close to being done, but just SIT THERE waiting for my return.
Gah.
So anyway, no update at all, just rambling a bit before I get back to work.
Thanks to everyone that posted. I will be back on Dakka soon and I'll catch up with all your threads. I know good working is going on right now, and I don't like missing out on it.
I will be back.
|
|
|
|
2012/11/02 11:34:31
Subject: Re: Terrain Project- Building a Better Battlefield
|
|
Longtime Dakkanaut
|
@ both- you guys rock. Thank you. I'll still try a tut vid, but at least I have an idea now.
|
|
|
|
2012/11/02 22:31:02
Subject: Re: Terrain Project- Building a Better Battlefield
|
|
Longtime Dakkanaut
|
@ Moltar- Hey, I remember that base! I have some hobby sponges, maybe I need to pick up some regular ones? I'm open to suggestions.
@ deffskulla- Man, talk about timing. We're doing a platform conversion at work and it has failed miserably. See below.

So... yeah. That whole 'stay home and model all weekend' thing I was mentioning a while ago? That status has been changed to 'working all weekend at work at my desk doing the same job I've been doing all week' to be closely followed up with 'another full week of 12-14 hr days M-F' and possibly 'work again all weekend'.
I refrain for even alluding to profanity on Dakka because it is (for myself) bad form, but man... I gotta tell you this is about as tempted as I've ever been. Upside is the pay. Downside is my family has put out 'MISSING" posters all over town.
I need a break.
Thanks for sticking w/ this. I'll be back.
|
|
|
|
2012/11/08 20:10:39
Subject: Re: Terrain Project- Building a Better Battlefield
|
|
Longtime Dakkanaut
|
@ Moltar- Stole one from the kitchen. Results pending.
@ Galorn & Rogue- Thank you. See below.
@ Dave- Oh yeah buddy. See below the first below.
@ Shaz- Thank you, and yes they do!
Rather than complain about recent events, I'll employ a meme:

Don't expect anything from me for the next few weeks unless I snap and have to take some administrative leave.
HOWEVER, not all is bad new. I scored this on eBay today:
$36!!! I'm really happy for this. Even more awesome stuff I have no time for. I will be going flat out at least until the end of December. I'll work as I can, but it's 20 minutes here, 40 minutes there.
Thanks for sticking with me during the flat moments. It'll be worth it once I get cranked back up. I'm going to choke my table with some much Grimdark awesomeness that I'll rip open the fabric of reality that separates us from the Warp and create a new Eye of Terror.
|
|
|
|
2012/11/08 23:41:33
Subject: Re: Terrain Project- Building a Better Battlefield
|
|
Longtime Dakkanaut
|
@ Dave- now it is on my desk as well.
@ Joe- 1) thank you very much. Maybe my son will finish it someday.  2) Je ne peux pas parler français et aurait besoin d'embaucher un traducteur 3) Rumor is we're all getting comp days once this is done. Free time off (meaning not spending vacation time) and getting paid for it! Whoo!
@ Vik- I may be a wage whore, but I'm a wage whore with a LOT of toys.
@ monkeytroll- Thanks man. Looking forward to getting back on track. I expect things to calm down in a month or so.
Ok, that's it for now, won't be stopping by Dakka for a while. If anyone wants to contact me directly just to say 'hi', email me. skalkbloodaxe@gmail.com
|
|
|
|
2012/11/22 23:34:05
Subject: Re: Terrain Project- Building a Better Battlefield
|
|
Longtime Dakkanaut
|
@ Dave- no problem, I saved it.
@ Vik- The last few week$ have $ucked. $o little Dakka or modeling time and a huge amount of $tre$$. However, it ha$ been manageable, i$ almo$t over, and I have been properly compen$ated for it.
Ok. Hi. Said I'd be back, and I am. Will admit to having had a few moments where I could have been on Dakka, but I think you'll appreciate my decision to model instead. I'll catch up w/ everyone in a few weeks or so once I can start slacking off at work and surf Dakka again.
I've been stealing time here and there as I could, and the result is a have a LOT of work done and have a HUGE update to share. I'm going to start with the project I was working on when I left and move forward from there, but I'll be submitting my work in category format instead of serial because it was hard to keep track of even as I took notes (yes, I took notes as I was doing the projects). Also, I'll be splitting this into at least 3 posts because there's simply too much to look at and I don't want to overwhelm people w/ 100+ photos in a single post.
First up in an idea I had when Dave was advising me to try the weathering powders. I wanted to practice with something before wasting my powders, and all I could come up with that I already had at the house was baking soda:
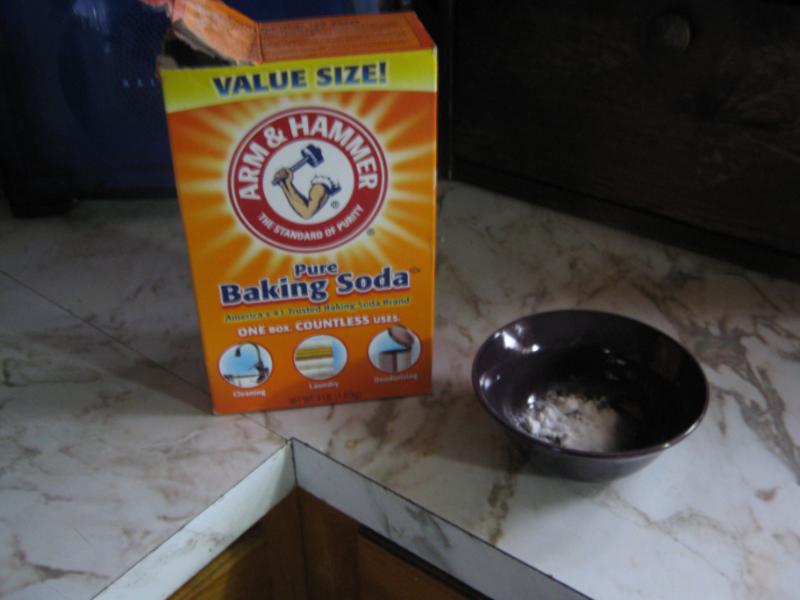
The idea was to brush the baking soda on whatever I was going to work with and then color it with a wash. Results were not so good. Didn't even bother with a picture. My next idea was to mix baking soda into rust paint and apply that w/ a small brush to at least create texture. Again, not wanting to waste my 'good' supplies on a test, I decided to make my own rust paint.
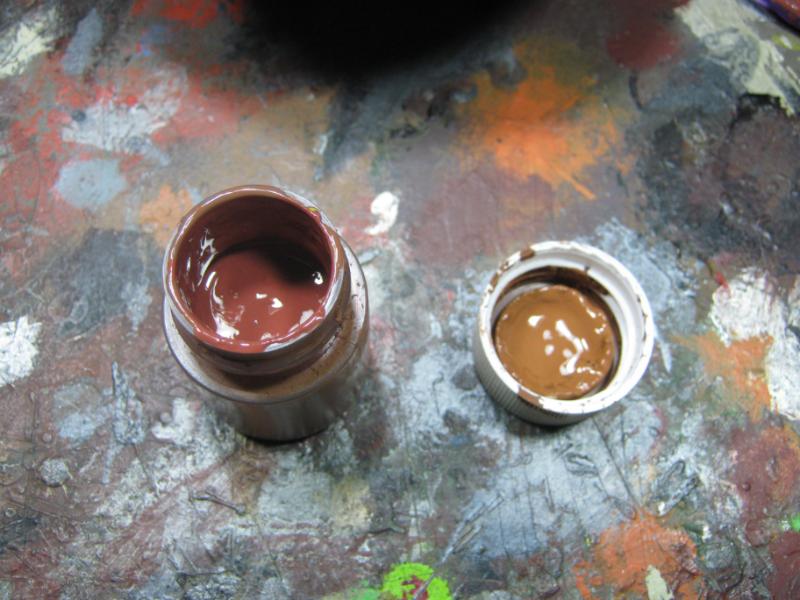
Paint on left is end result. Paint on right is what it looked like when I first started mixing. Yes, I know it's backwards, but didn't realize it until after I took the pic. Anyway, I used a lot of different colors to mix this, and I really like it. It's a 'mid-range' rust tone, between the bright oranges and the deep reds.
Mixed some paint into a spare pot w/ some baking soda, mashed it all up, and did a color / texture test. Here is my first run:
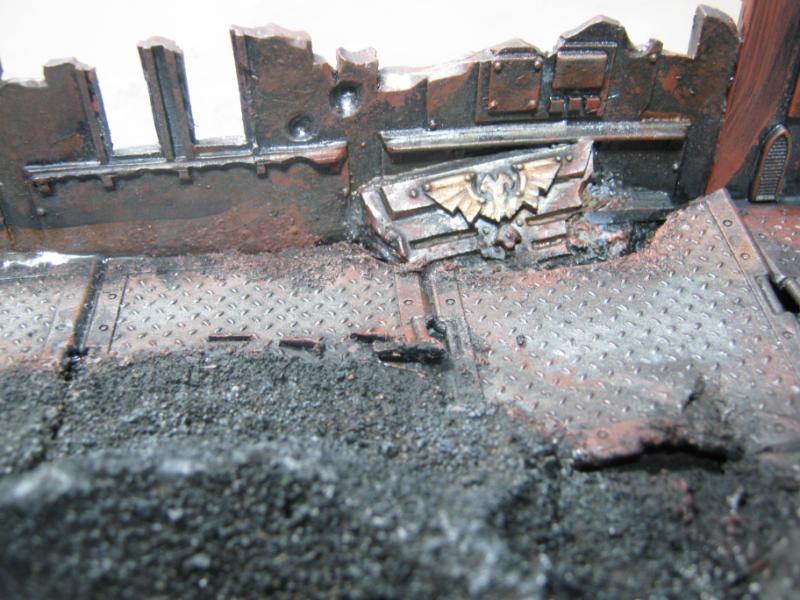
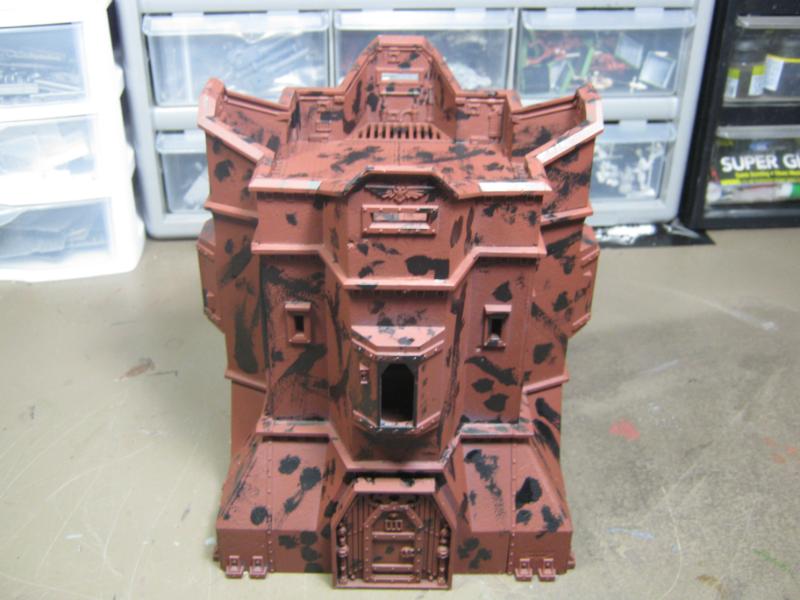
I liked the results enough to keep going with it and started to apply it to Imperial Sector building #2 which was almost finished, just needed that extra effort to make a really good model instead of simply a good one. Here's how it came out:
I really like how that came out. A lot. I'll be revisitng that idea as a base and will highlight over it.
Once I finished a few more bitz here and there I officially delared this piece DONE. Here are the final shots:
Apparently I didn't take any of the other sides. It is a small matter, I'm sure you'll see this again in the future.
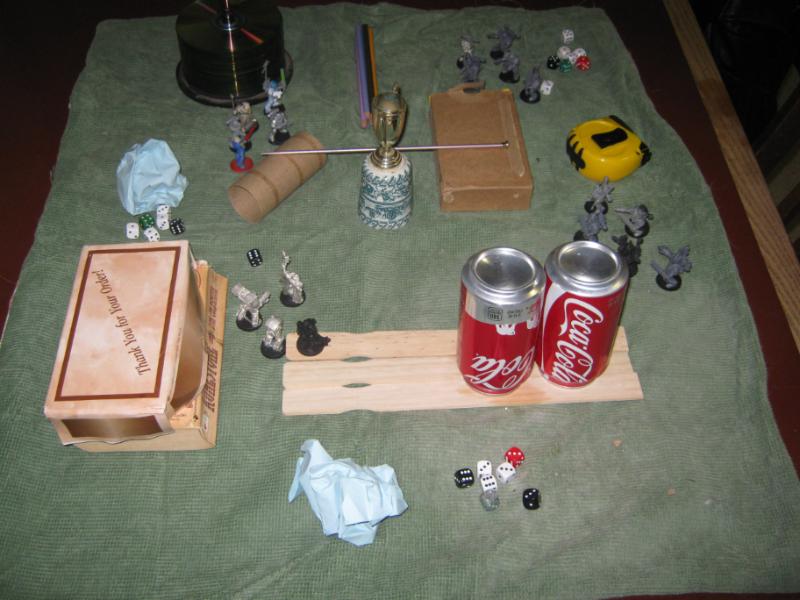
Next project I'll share is a bit off the current track but was fun and functional nontheless. I looked up the maximum number of Objective Markers that could come out in a 6th Ed game and found 9 (and if that is wrong please correct me). I did not have any 'real' objective markers, we'd just use random bitz from my Necromunda terrain, and a few times we lost track of what was what. So I decided to slap together a quick project in between prokjects I was waiting for to have glue dry, paint dry, etc. My friend Kaitlyn was hangout out w/ me at the time and wanted to help, so we figured out how to make it happen and then got to work.
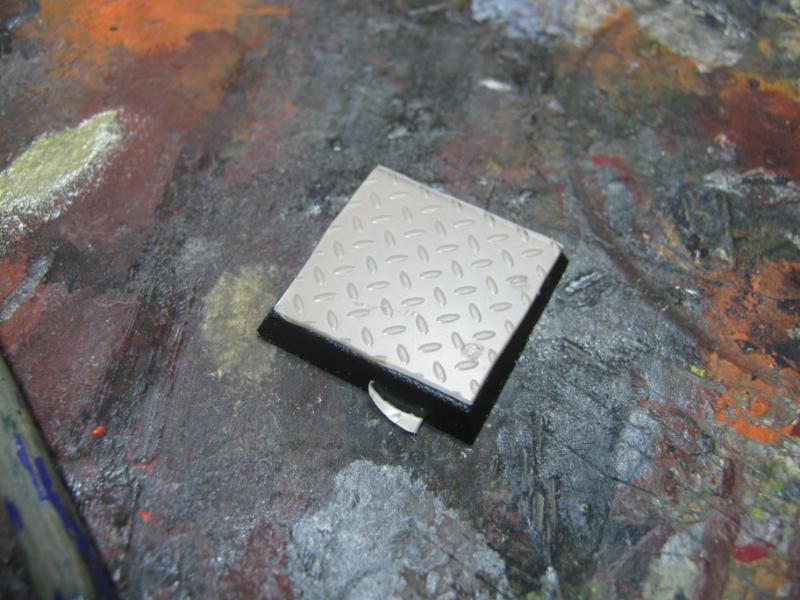
Materials were all stuff I already had, and I would likely never have used the 25mm square bases or the WFB Zombie grave stones. This was a win all the way around.
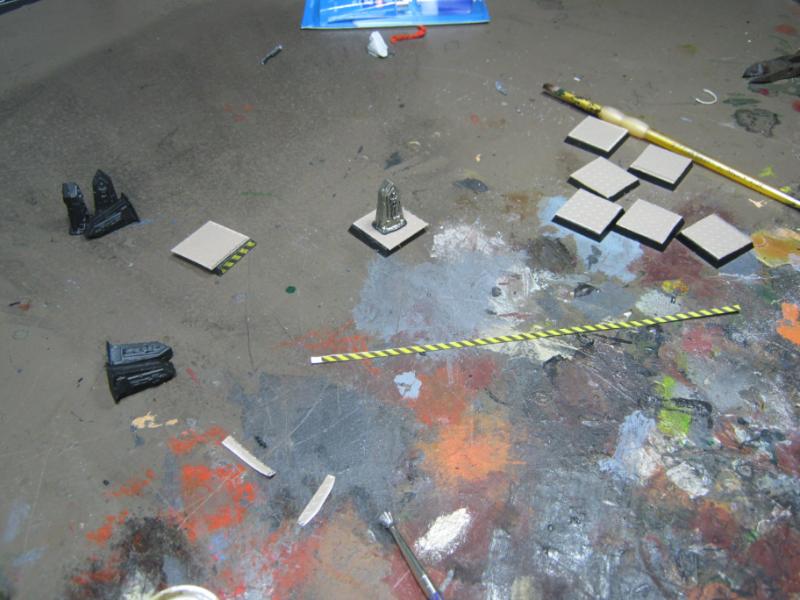
Once again, the treadplate from Dave is being used for something functional on my game table:
Quick mockup of what the end-result idea was:

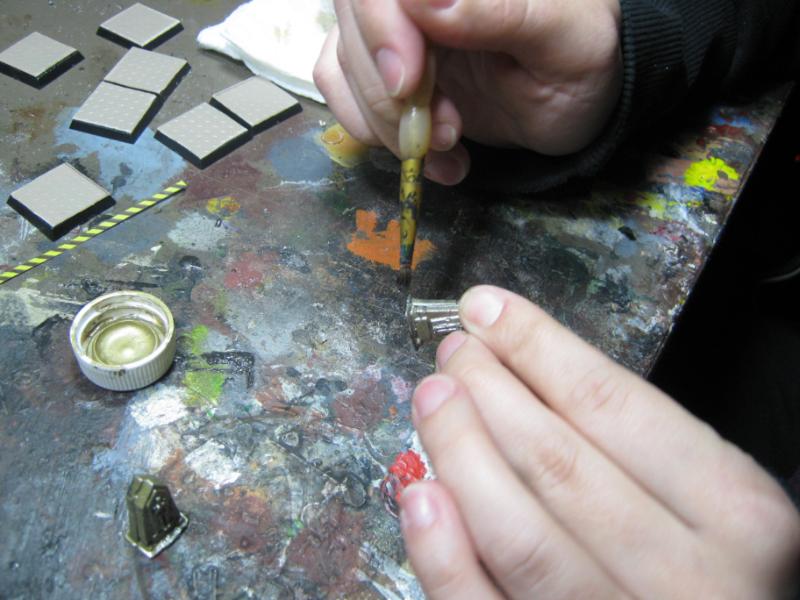
Kaitlyn being indoctrinated into the creatively bizarre world of Wargame Modeling:
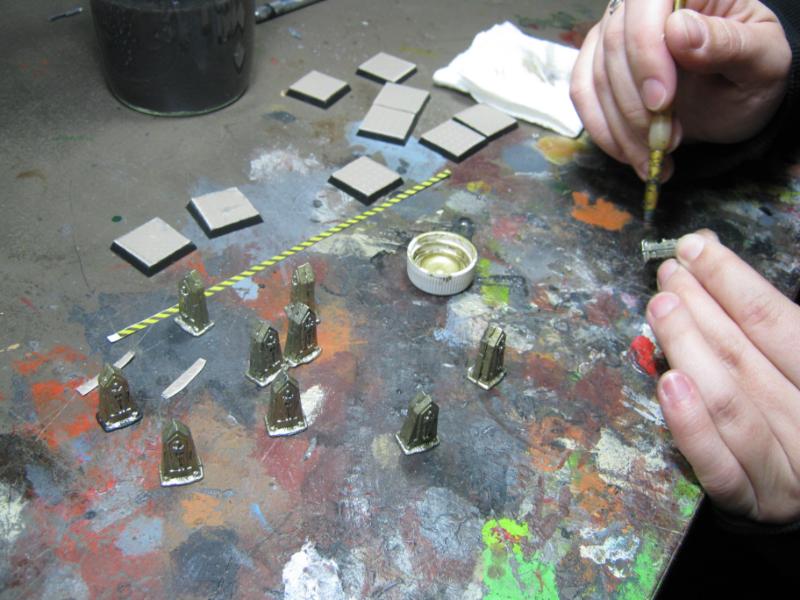
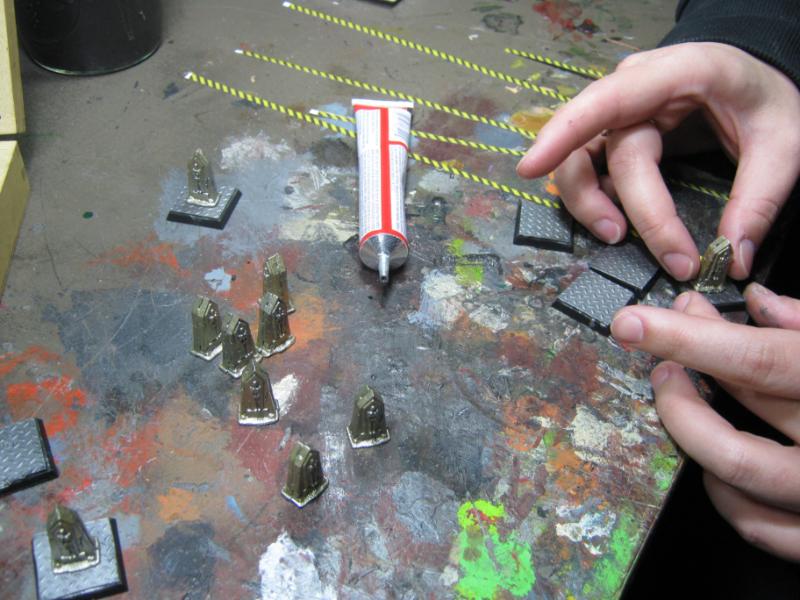
annnnndd.... DONE!
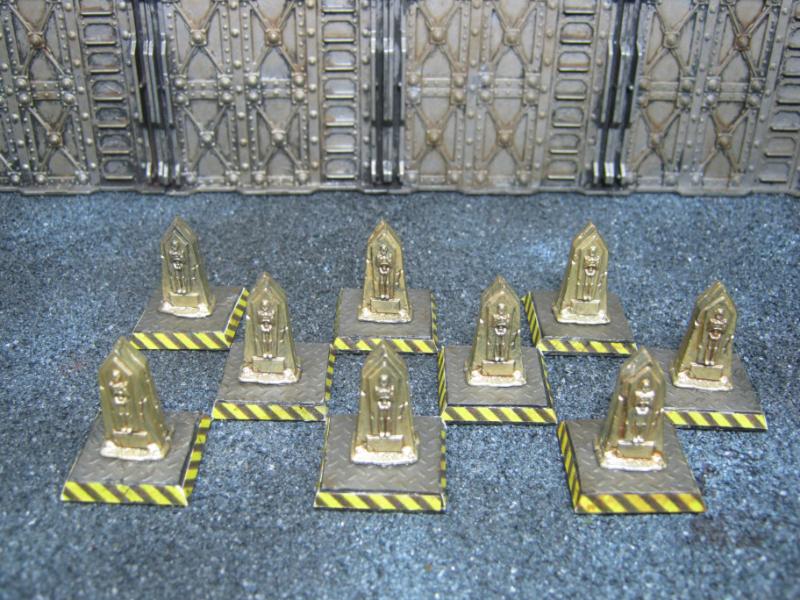
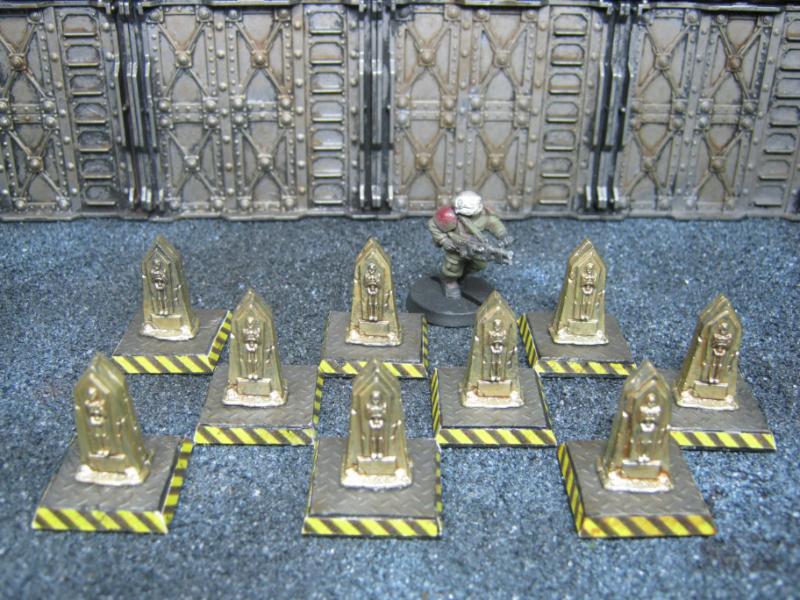
Model for scale comparison:
Entire project took about an hours. They are not perfect, nothing I'd ever enter into a contest, but they look good on the table and are functionally efficient for my future games.
That's it for this one, but I'll be back very soon. I have a LOT of stuff to share. And before I go, here's a teaser for the next update:
Thanks for looking, C&C welcome, and I'll be back!
|
|
This message was edited 1 time. Last update was at 2012/11/22 23:35:56
|
|
|
|
2012/11/23 23:50:21
Subject: Re: Terrain Project- Building a Better Battlefield
|
|
Longtime Dakkanaut
|
@ tinfoil- Thank you. It's what I am going for, and have found a technique to create more texture w/o it looking 'added on'. Will show some examples later.
@ Moltar- Thanks, I genuinely appreciate your compliments. The rust is still a learning process, but I know I'm getting better. The objective markers were fun to make and didn't take up much time (the best part of it was I used things I 'had no use for'). I feels good to completely finish up a project and move on to the next. I enjoy that feeling of accomplishment, and it helps clean up my desk at the same time.
@ Anung Un Rama- Briancj is right, and there is the additional consideration of my space available to store them. At most I'll go 3 levels. They have a huge footprint and my shelves are only w 12" x h 12"-16". If I had the space I might go higher, but as it is I'm going to go longer / wider.
@ Briancj- Yup.
I haven't done anything since 9am except model. I had today off (company holiday) and spent it doing what I wanted to do. Wicked updates coming.
|
|
|
|
2012/11/24 23:38:25
Subject: Re: Terrain Project- Building a Better Battlefield
|
|
Longtime Dakkanaut
|
@ Galorn- Yes we do, and I have no idea what 'local harbor freight tools' are. 
The next installment was complete just a couple hrs ago, wanted to finish it up so I could show the whole story from start to finish.
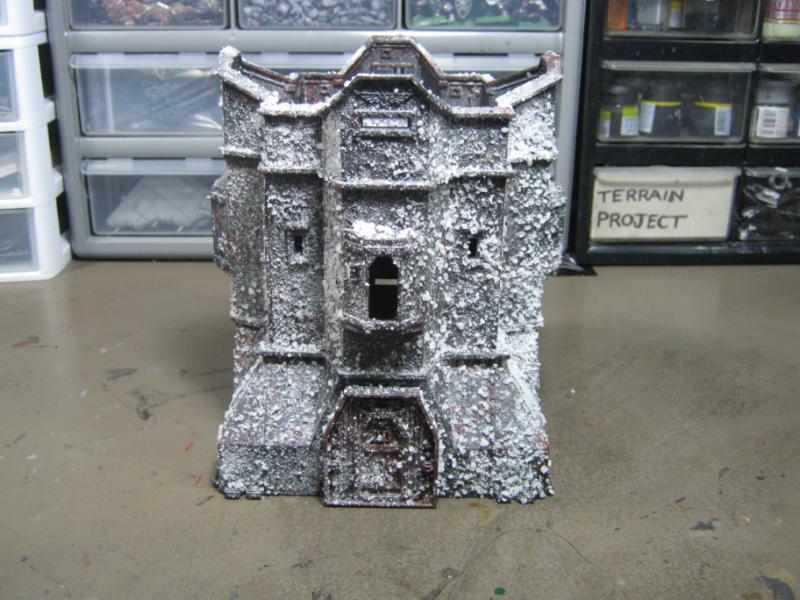
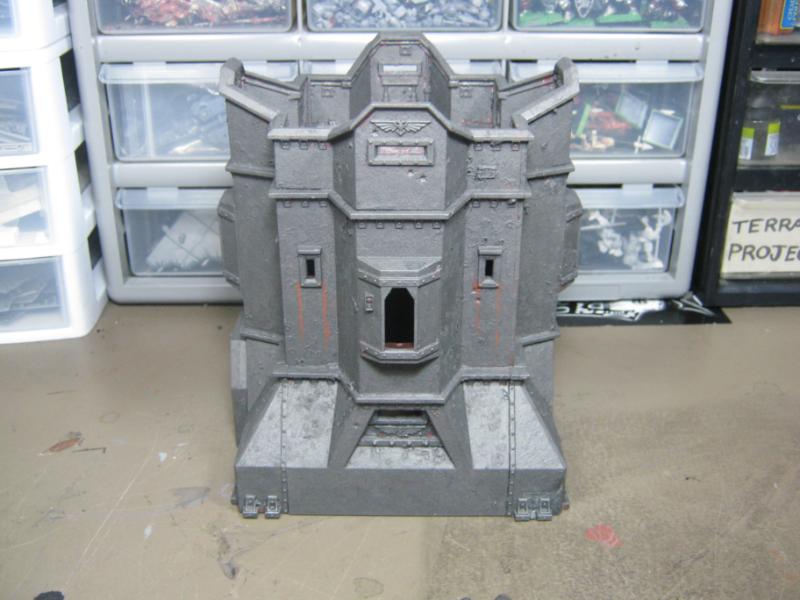
You may remember this picture if you have been around for a while. I took it on January 11 2012:
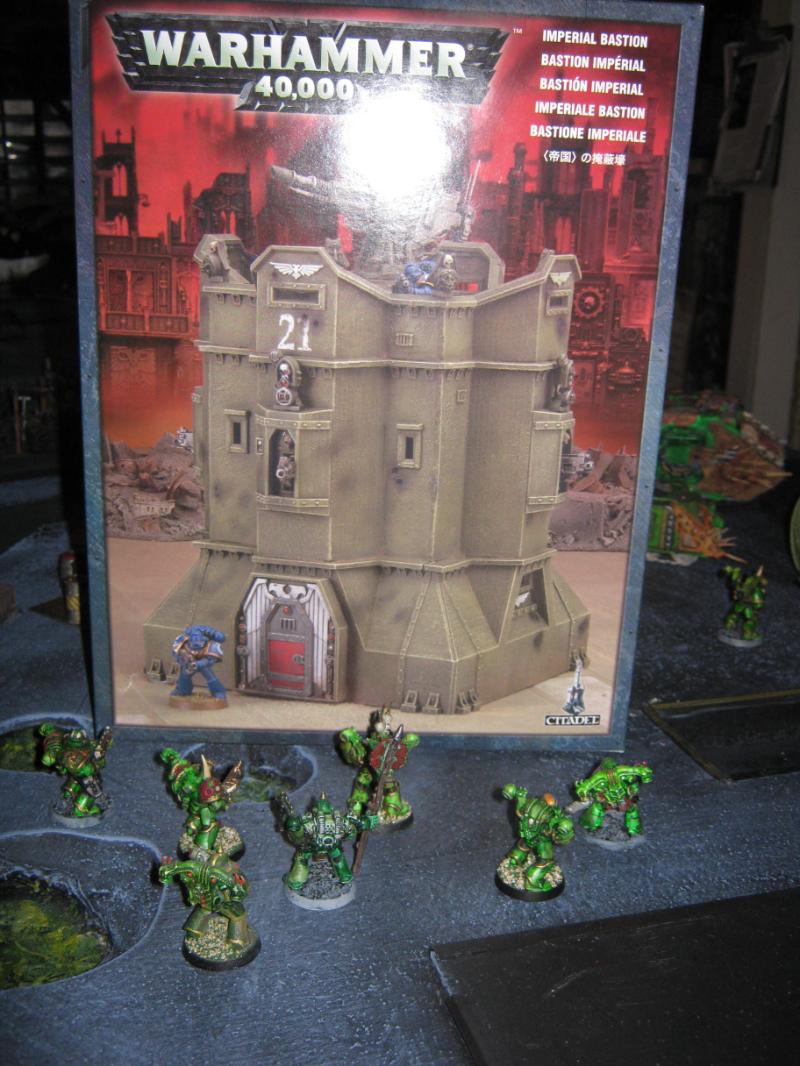
I promptly got to work on it that same day:
... and here it is again 6 months later in a group photo of unfinished terrain projects taken June 13. Really moving along!
Doesn't show up again until November 22:

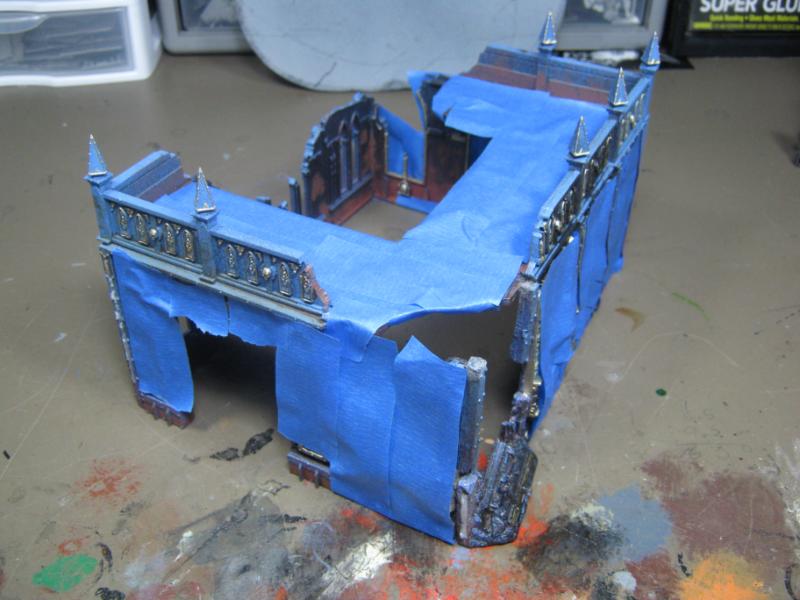
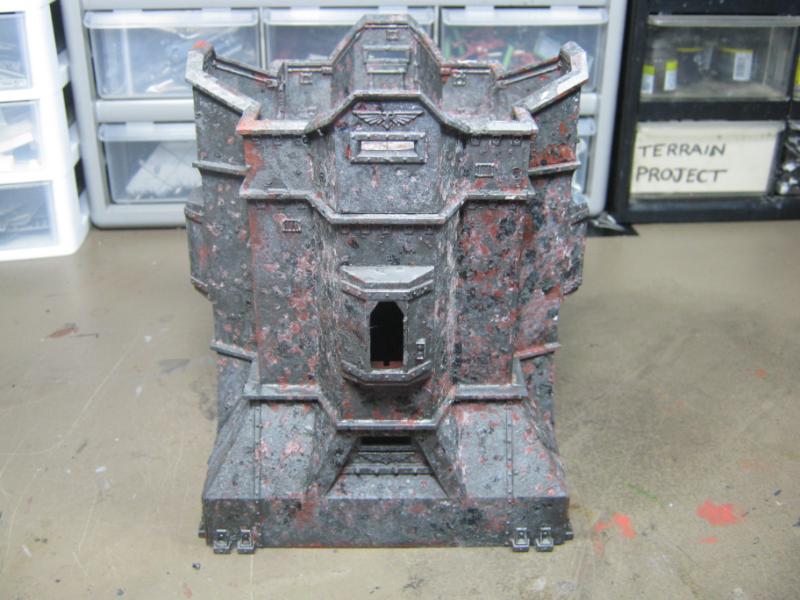
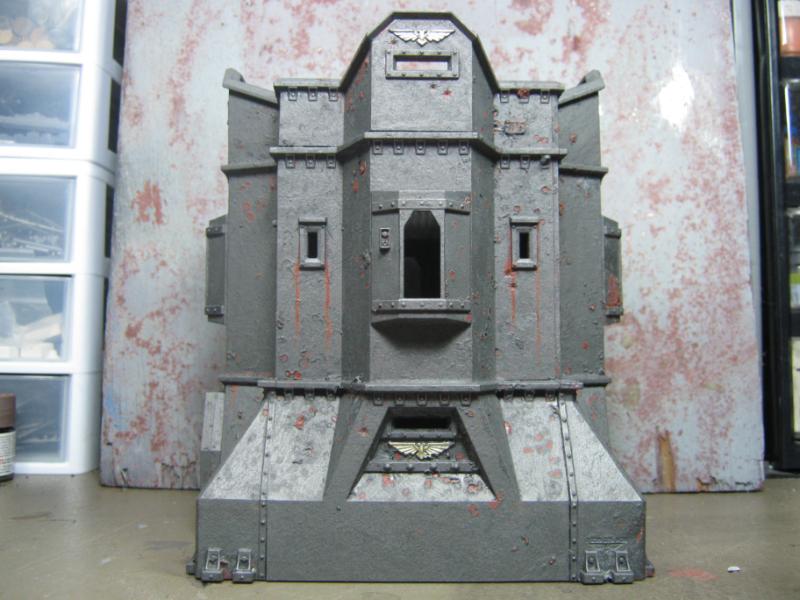
Here's how this happened- I was working on another project, and I had to move this to get at something I wanted. I put this on my desk instead of back on the shelf. The piece I was working on needed to dry, and I was looking at the Bastion thinking what a horrible job I did building it, and since I had a moment I could at least seal up the gaps.
Then I decided to glue the ramparts on, just because they were there. This brings me to a short rant about GW models if you care to read it:
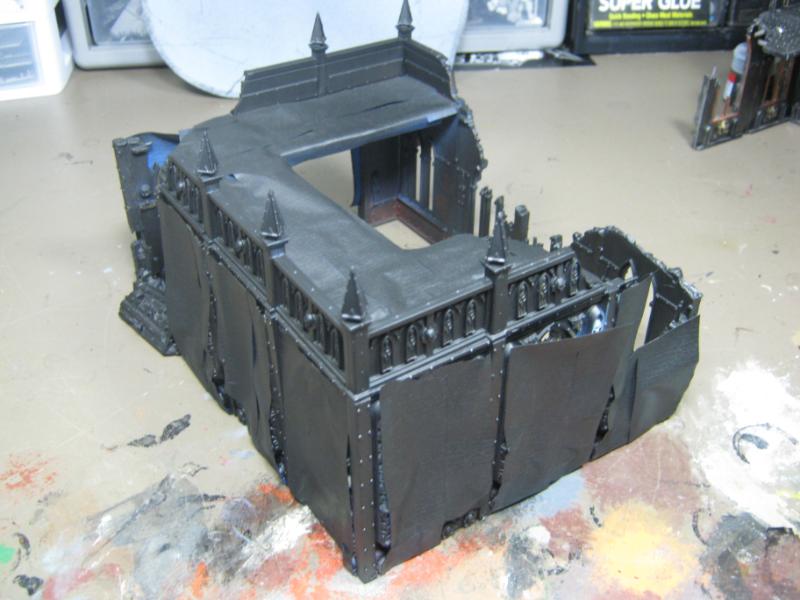
I glued on the bunker door and suddenly this became an active project even though I really didn't have any specific interest or need for this piece at the moment. The blue absolutely had to go, and I wanted to try salting this for a different rust effect. I gave it a nice clean undercoat, and officially ended the color blue on my tabletop. Sorry Dave, but it had to go.
Next I added some black streaks to break up the rusty spots. Had I thought of it I would have used streaks of different colors of rust as well, or painted in sections (orange top, light red middle, deep red bottom) but of course that only occurred to me much later:
Now it was ready for a soaking in hairspray and sprinkle of salt. I had read online about trying Margarita salt but I couldn't find any, so I tried coarse sea salt. The results were disappointing to say the least:
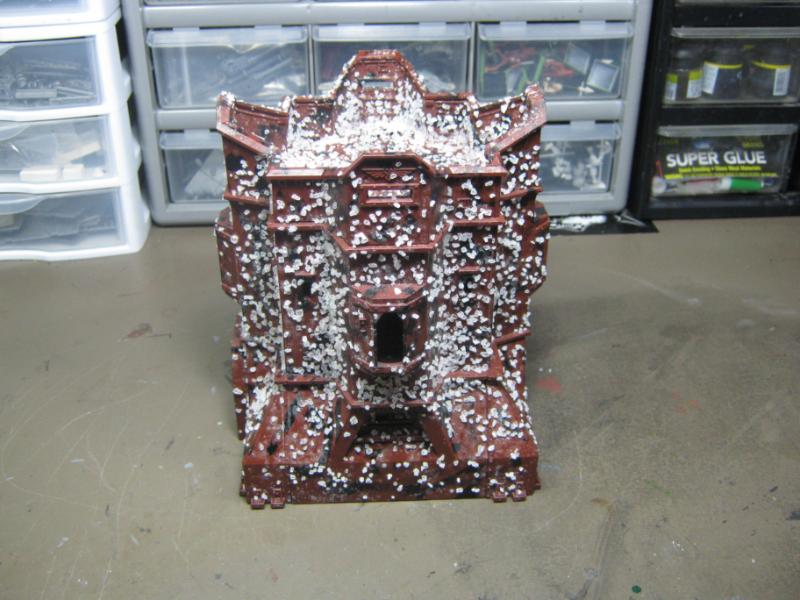
Problem #1 above all else was the salt simply would not stay adhered to the Bastion. Problem #2 was there was way too much of it. I did my best to solve the problem by re-soaking it with matte sealer.
Word of advice for anyone that models- never never EVER use matte sealer when you are working on a slat effect. While it did solve one problem (salt not sticking) it created an entirely new one. The overcoat of paint and the salt underneath were nearly impossible to brush off and ultimately I had to put the model in the shower and use the hand-held shower head w/ hot water and a stiff brush to finally rub off or melt the salt. Unfortunately it also took off most of the overcoat as well. Tally so far- Bastion 2, Skalk 0. (by the way, this is the 'good' side. The other sides look much worse)
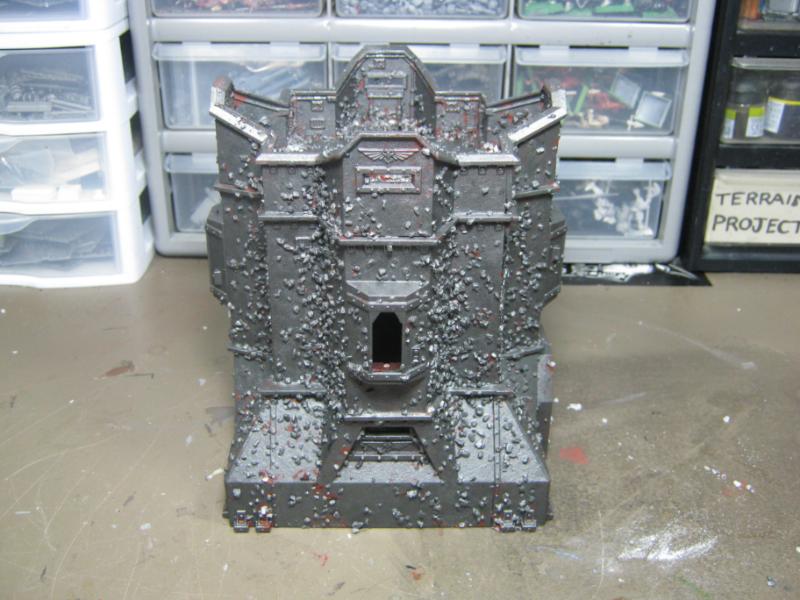
By now I was rather annoyed. At least a couple hours had gone into this already (though I was working on other projects when I was waiting for things to dry etc) and so far complete fail. My next idea was to re-salt it (this time without matte sealer) and see what happened.
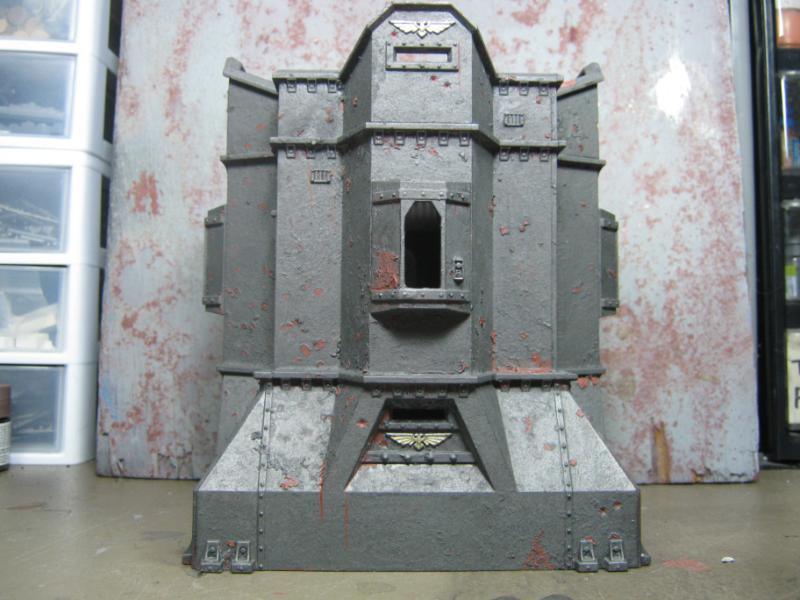
I repainted the overcoat but didn't take a pic for some reason. Anyway, this is after I brushed the 2nd coat of salt off:
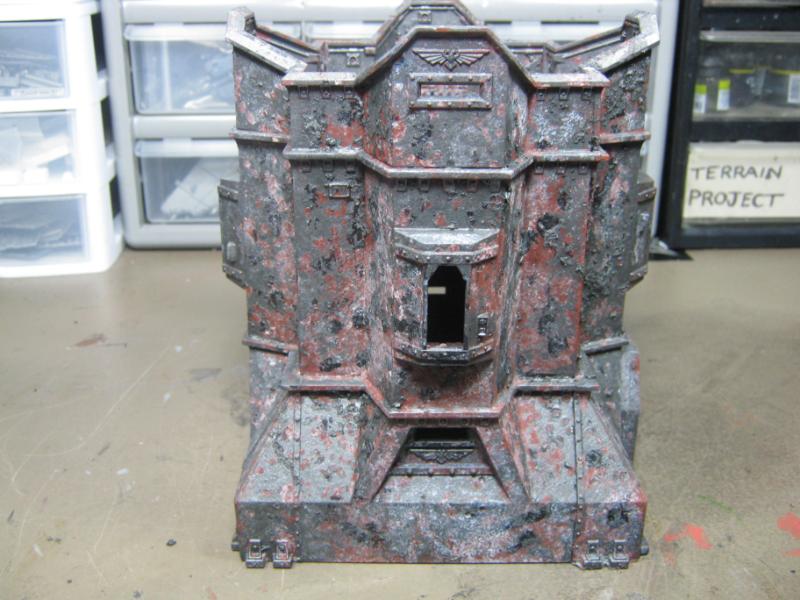
Total disaster, and I was mad. All that time wasted, and probably ruined a good model. At that point I didn't care what it wound up looking like, I just painted it the overcoat and was going to sponge rust all over and call it done and not ever show it on Dakka. The idea to paint the model again is what saved this project. I started to really look at it, and decided it was salvageable.
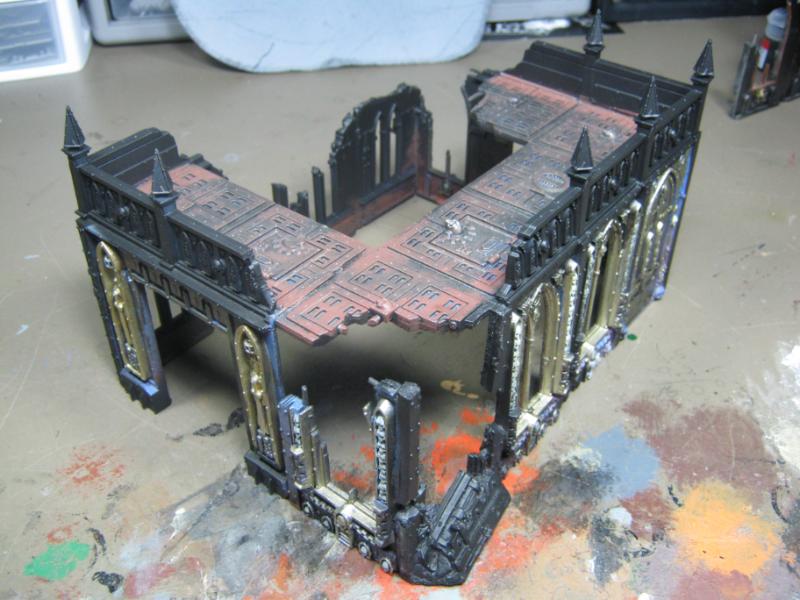
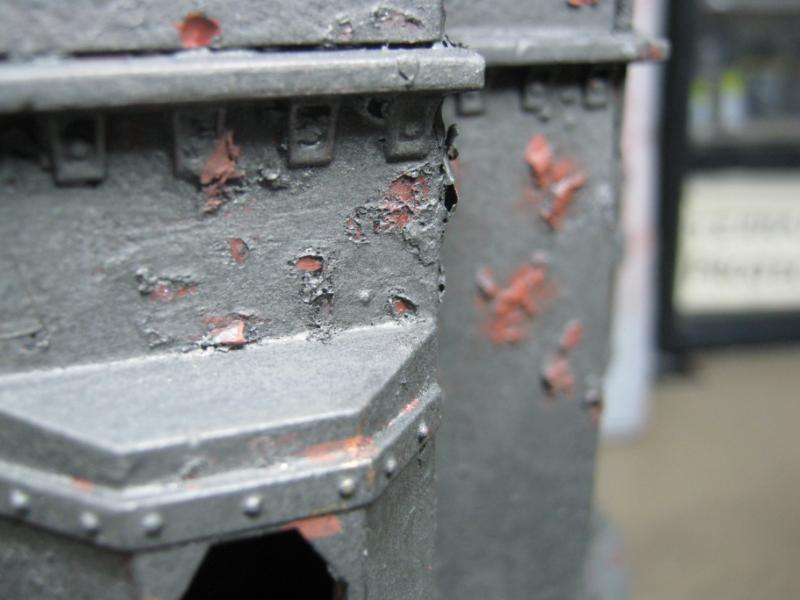
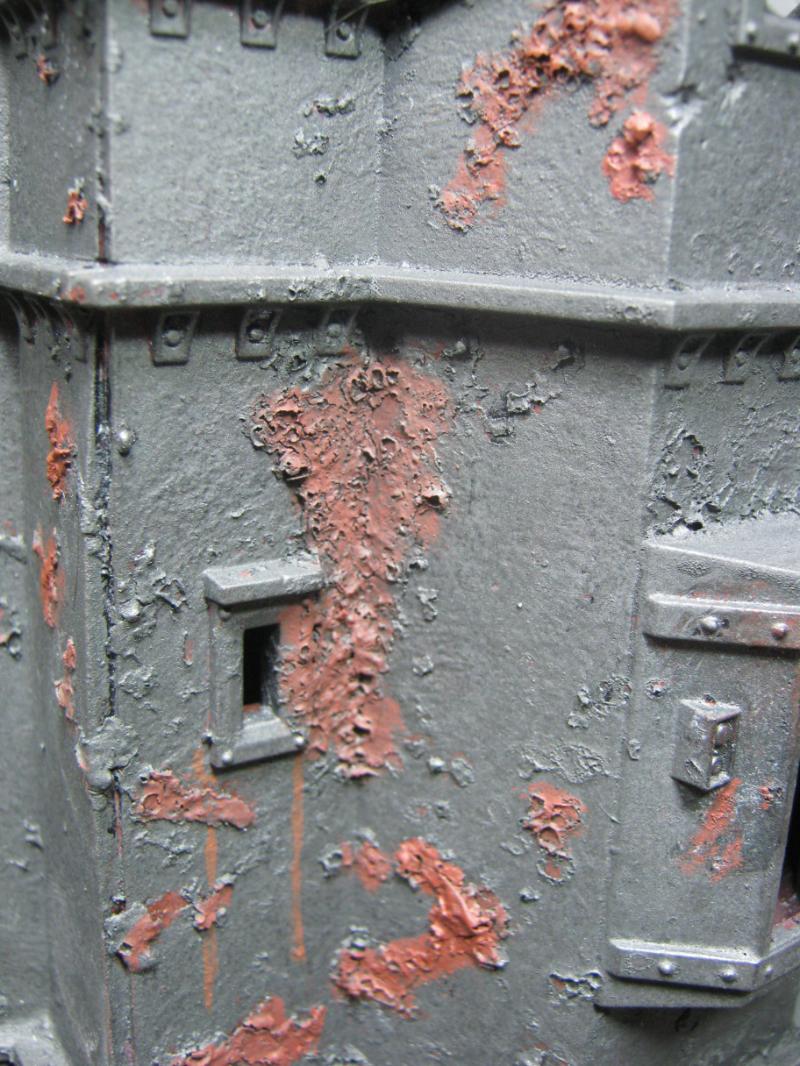
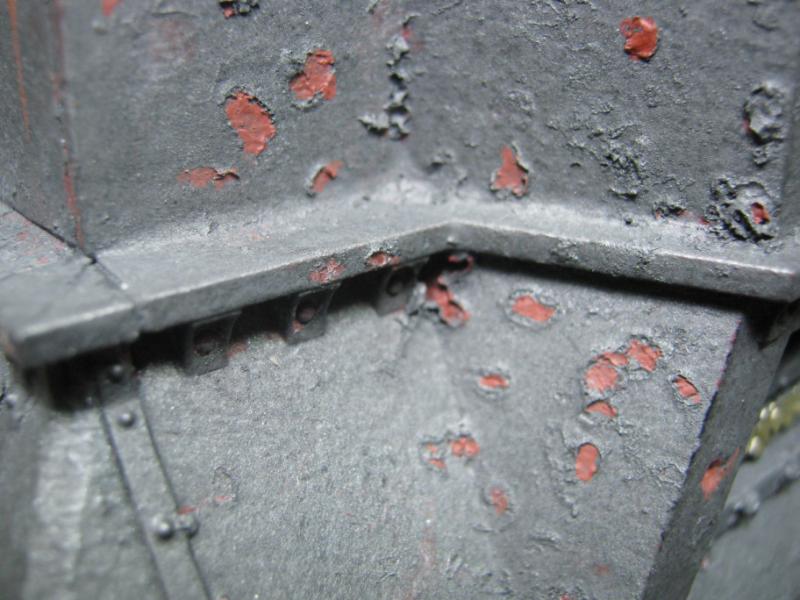
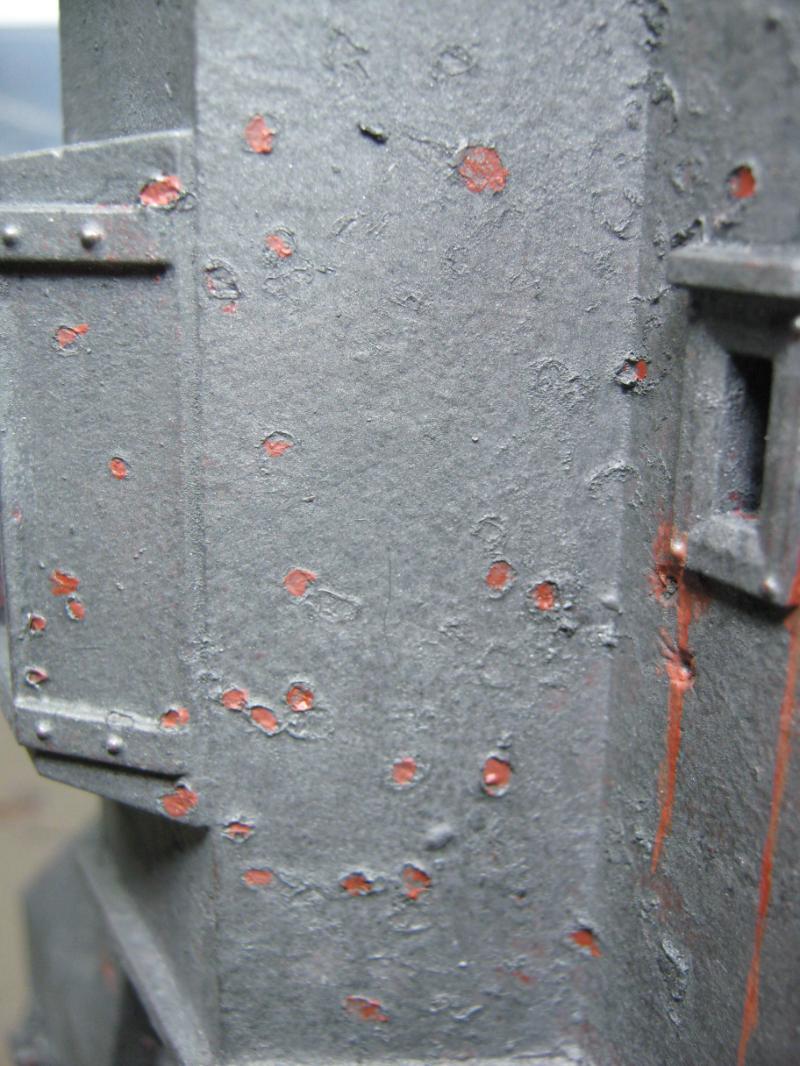
The rust streaks were only the beginning. As I looked at the model more and more I realized I had done something incredible w/o having any idea that I was doing it. The rust was there staring back at me, it just needed to be painted to bring it out. I had inadvertently taken a serious step forward in my modeling evolution:
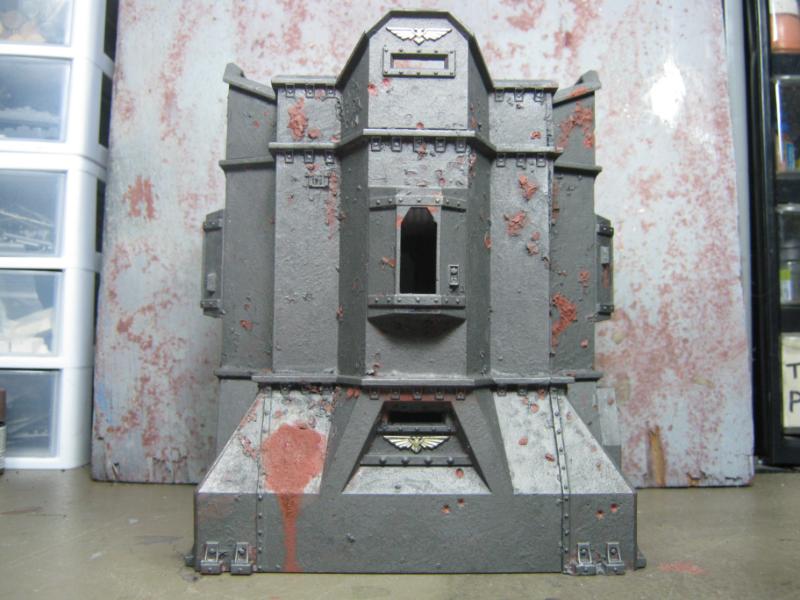
Closeups of the detail:

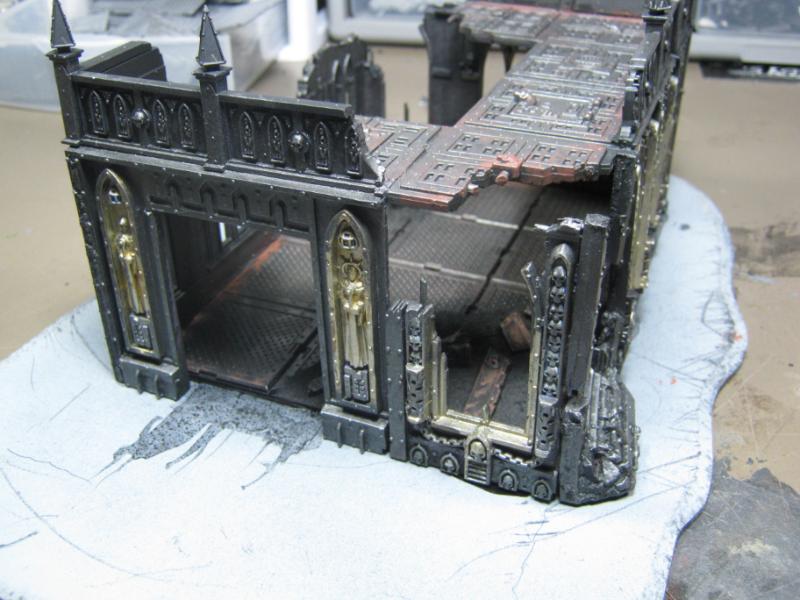
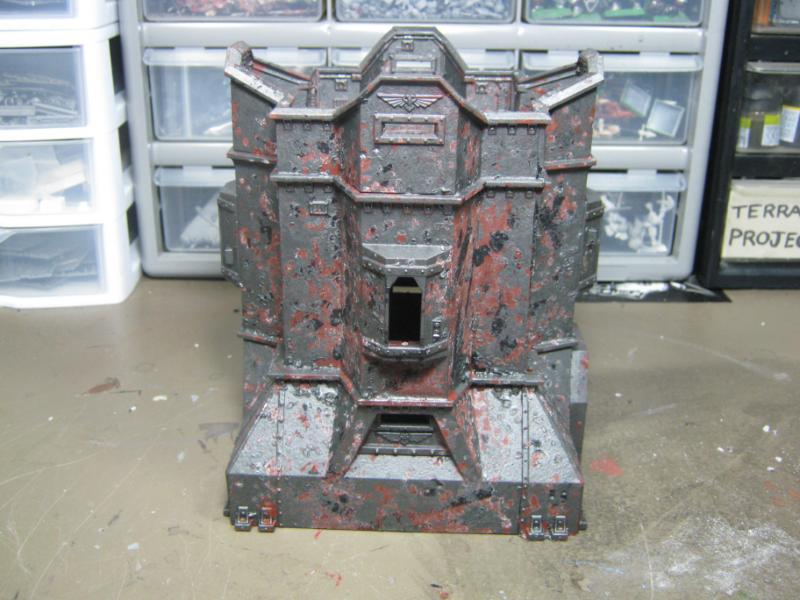
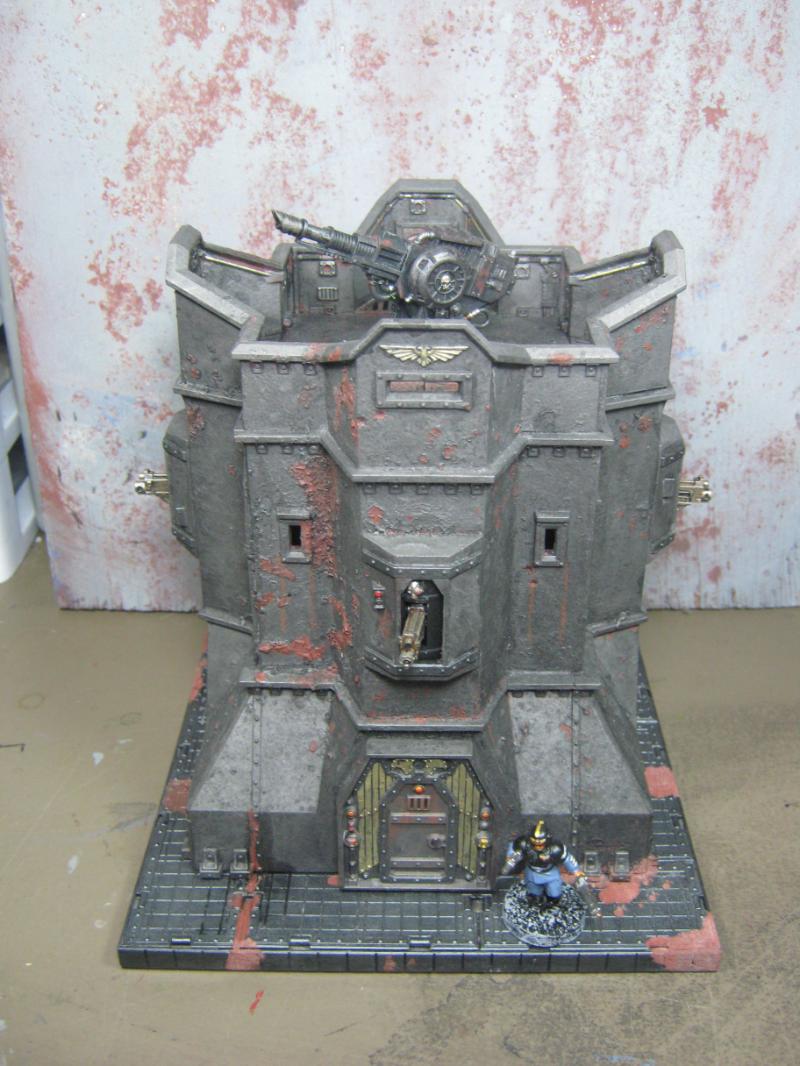
Before getting to the next bit- I forgot to take a pic but I applied the 'finishing touch' for the building by applying a very light black wash to bring out the grit and take away the last vestiges of 'clean'. I really like how it came out. Then I got to work on the base. I did consider skipping that part but a few months ago a wise hobbyist said that all completed models have a base. Plus it also helped me to reinforce the new standard on the table for buildings and bases- geometric shape = functional building, asymmetrical shapes = ruins. I used some more Platformer bitz for the floor. I can't emphasize how handy these things are to have around! They will be part of every project I do from here on out. I applied some 'baking soda' rust to the base as well and then glued the bastion to the base. I used regular modeling glue as both base and building are made from the same stuff.
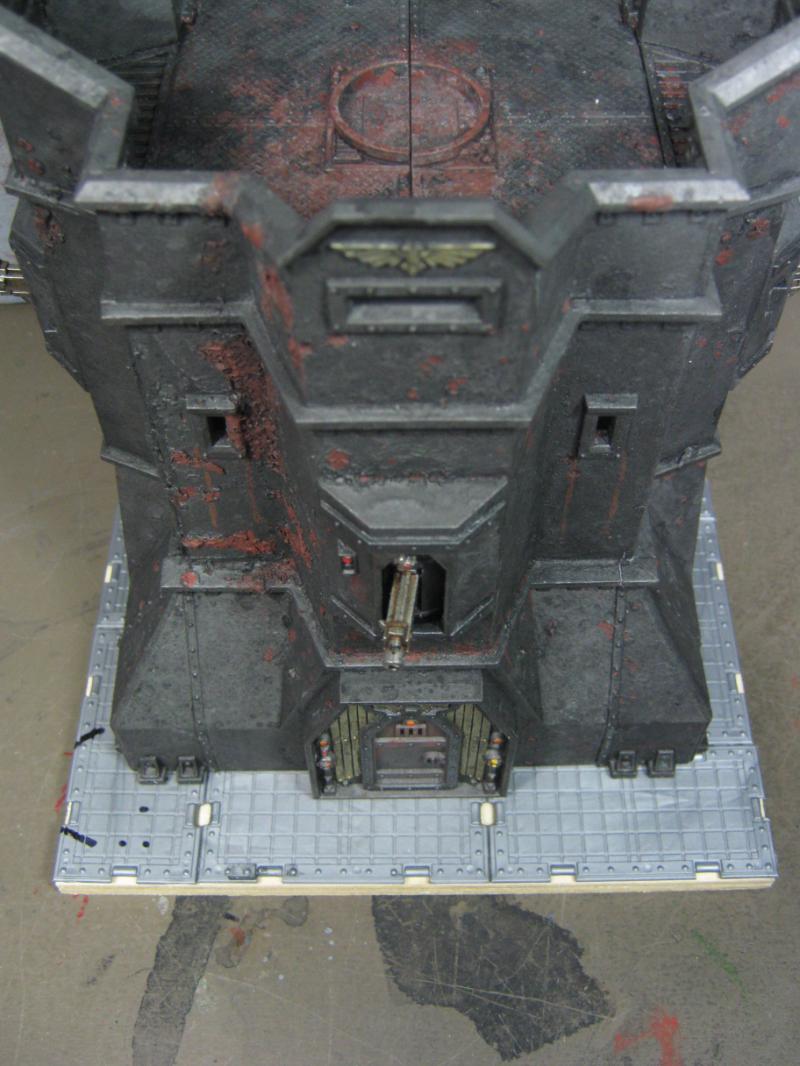
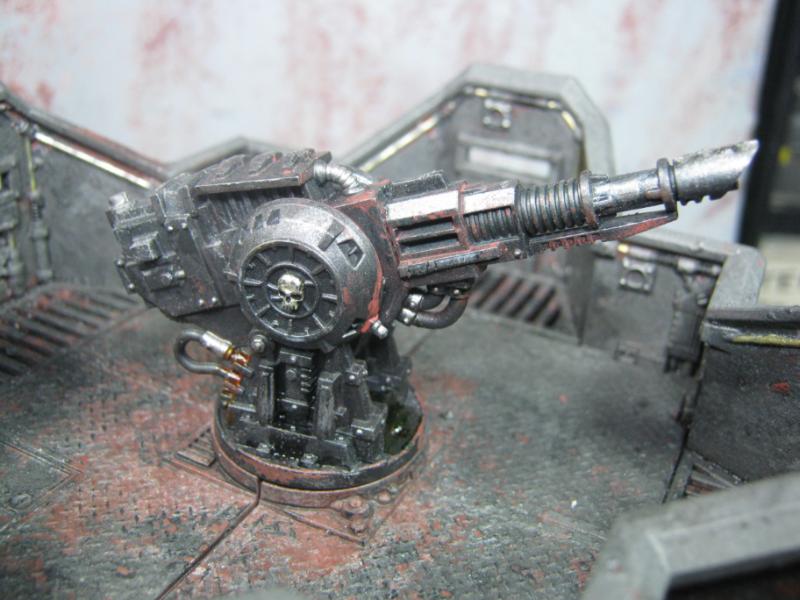
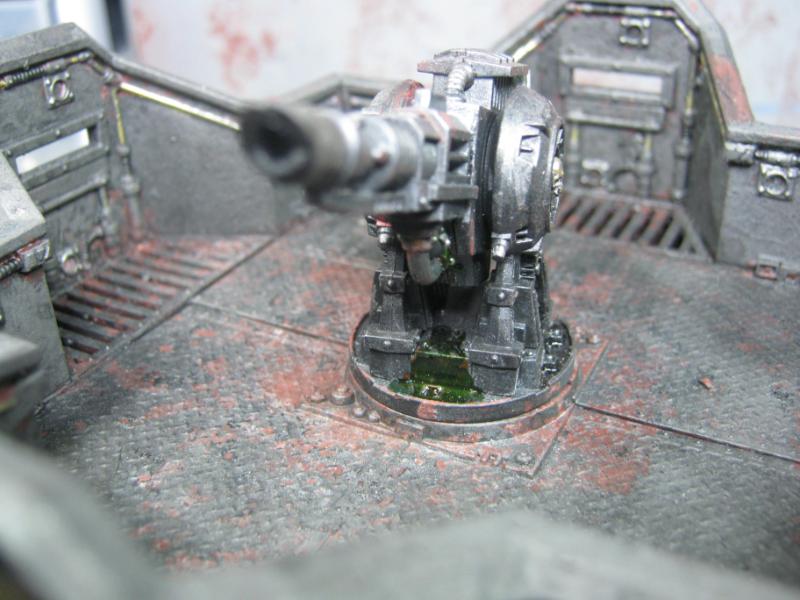
While waiting for the glue to dry I decided to get started on the Icarus Lascannon:

Once the glue had dried I 'tied in' the rust from the platform to the building and from the building to the platform.

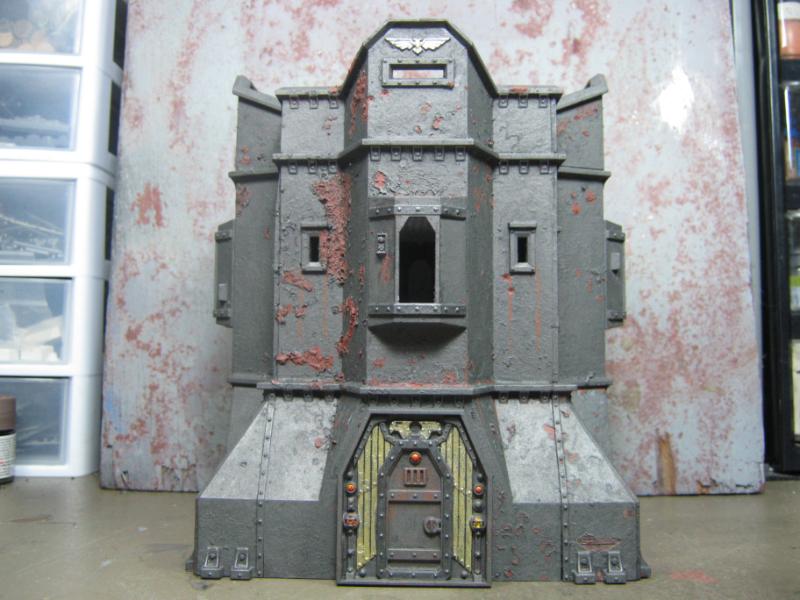
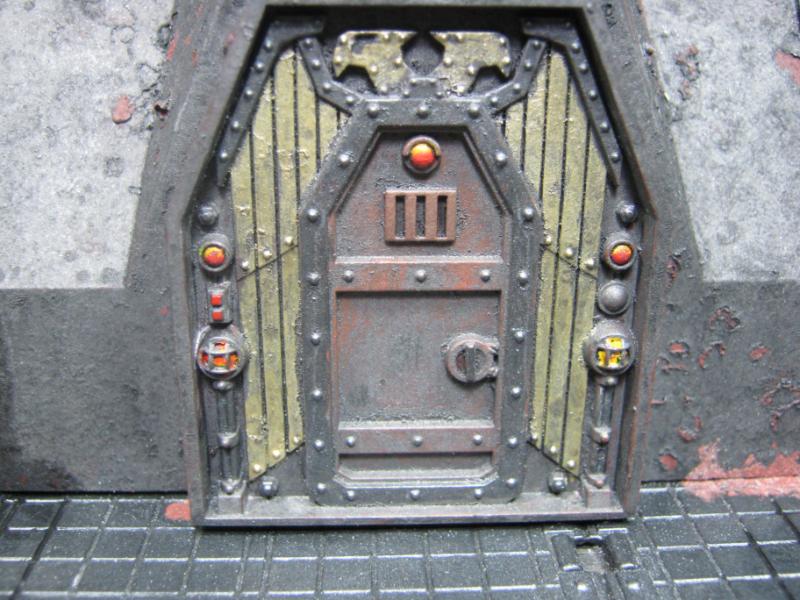
Check the detail on the lights (front door). Another first for me.
Skipped the painting process on the Icarus gun since it is so small compared to everything else I have been working on. Here are the end results. Note the leaking oil (black, sides), hydraulic fluid (red, right rear), coolant leakage (green, front bottom). Also notice how I was subtle w/ the rust so it would tie in w/ the rooftop regardless of direction the gun is turned:

...and the entire thing, one last shot. I am officially declaring this model FINISHED!
I know I made a lot of mistakes on this, but the important part is that I see them and know how to avoid (or use them more effectively) next time. I'm leaving it 'as is' so I can use it as a measurement of my progress, because there was a time not so long ago where I thought these were good pieces of terrain:

Thanks for looking. More coming soon.
|
|
|
|
2012/11/30 20:22:06
Subject: Re: Terrain Project- Building a Better Battlefield
|
|
Longtime Dakkanaut
|
@ Moltar- If I were going to pitch it I'd likely never have shown it on Dakka (since all my other recent work has been above my normal average). I have a few failures that you've never seen, and won't unless you drive to VT. They are in the closet with the rest of the skeletons. I really like how this came out, and it's highly likely I'll pick up another one . So much that I may buy another one and use the same effect on purpose this time.
@ Vik- I enjoy the WIP so the Vet's can see the struggles and offer advice, and so the young bloods can see my mistakes and hopefully avoid them as they come up through the ranks. The Guardsman head is from the basic kit, nothing special.
@ Brian- Well, I'll agree to the extent that if I had not made those pieces, I would not be maing the ones I am not. I haven't given up on scratch build, I'm just immersed in pre0fab right now and I'm really liking the results. And what I am learing now will be alloied to my next scratch build. I'll win a LoER contest yet.
@ Galorn- same as I said to Brian, and dude I looked up HFT... I could spend a full paycheck there and still leave a lot of things I wanted behind. Wow. That place looks awesome.
@ GiraffeX- Thanks, I really appreciate the compliment. Having those problems make me a better modeler, so long as I actually learn something from it. And trust me, I really did this time.
@ Dave- I have tried the weathering powders but haven't shared those attempts because so far my only results have been to make a muddy mess of things. I've been looking at videos online and I'll have another go at it soon, I just haven't figured them out yet. And I've learned my lesson regarding matte coats. It's for one thing and one thing only. I won't make that mistake again, it was a horrible times trying to fix it.
@ Lordjig6- thanks for commenting! I'm thinking you are no less surprised than I was. I thought this one was marked for the Shelf of Shame. I'm really happy w/ this project and am looking forward to using these techniques on other projects I have coming up.
@ graven- I've been working on a couple other build projects concurrent with the Bastion and my opinion is unchanged, even with brand new straight out of the box pieces. It's annoying, but a bit of work and perseverance has (so far) yielded worthwhile results. My table is looking progressively better with the completion of each new piece, and the shared similarities on each building (color scheme and detail) has really tied everything together. I've alluded to the 'fluff' behind the overall theme before, it might be time to write something up that gives a distinct definition to what I'm doing, and why. As for your phone crashing... not sure on that one. Perhaps a data transmission intercept by the Inquisition?
@ eldartau1987- Wow. 200 Bastions? I can completely understand why you hate them. I can't even imagine that. Congratulations on maintaining you sanity (be that as it may ) and interest in the hobby. Your story is a great example of why I would never consider doing this for a living, even if it was only supplemental. I'd go mad and wind up hating one of my true joys in life.
@ Styrofoam04- You've seen my other projects so you already know the majority of my 'successes' are due to dumb luck and fortunate happenstance. Someday I hope to produce INTENTIONAL results, but until then I'll be satisfied with the gifts bestowed upon me by the Dark Gods of Modeling.
Not an update (yet... one is coming this weekend though), this is a 'thank you'. You all keep me going. I'd be do this anyway, I don't need to be on Dakka, but it's nice to receive the compliments and attention from fellow gamers and modelers, most of whom I feel are far more accomplished than I am. That's not false humility, it is a genuine compliment to you all and great appreciation for your suggestions, points, and continued interest in my project.
I have 5 other projects in the background that I'll be sharing more of over the next couple weeks. Dakka time has been gutted again by work, but modeling time at home has increased enough to where I feel I'm moving ahead instead of stagnating. I'm really looking forward to sharing my latest efforts.
I'll be back w/ a LOT more to share. I'm dedicated to this project and I have nothing else on my radar except choking my table with so much awesomeness that there will hardly be room left for the armies.
|
|
|
|
2012/12/04 18:34:56
Subject: Re: Terrain Project- Building a Better Battlefield
|
|
Longtime Dakkanaut
|
@ Dave- I appreciate the thumbs up, I'm really putting some effort into bringing up the quality of my terrain and I know I'm on the right track.
@ monkeytroll- I'm really happy I was able to save it. If nothing else I could have Nurgled it up, but to date I have no interest in buying fortifications, I'd sooner choke the board w/ infantry and support. As far as the scratch build, see below.
@ Feldenglas- it looks better in person. We'll have to get a game on soon.
Small update today only becasue I'm burning time during lunch (I got to TAKE lunch, so that's a step in the right direction).
To everyone that likes my scrathbuilds, check these out. They are mostly made from bitz that I would not have used, and they are slotted for practice pieces for my wife and ktbb22. They couldn't beat me, so apparently they are going to join me.
Lots of Hurst and Pegasus on those, so technically it's not scratch, but it is an artistic application. It also reminds me of the stuff that Bruticus builds, and that's a good thing. I don't expect to see these on the 40K table but they would be perfect for Necromunda (which I'm going to start steering people towards. I'm sick of not playing it).
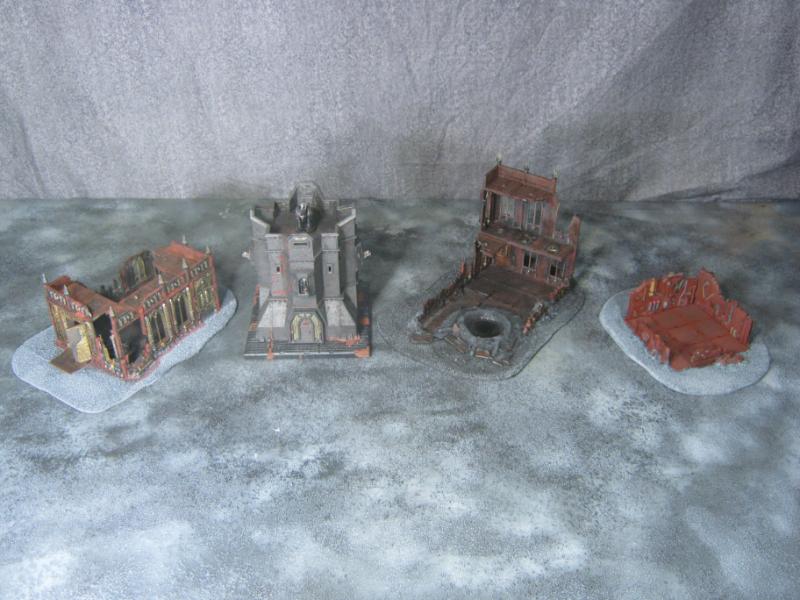
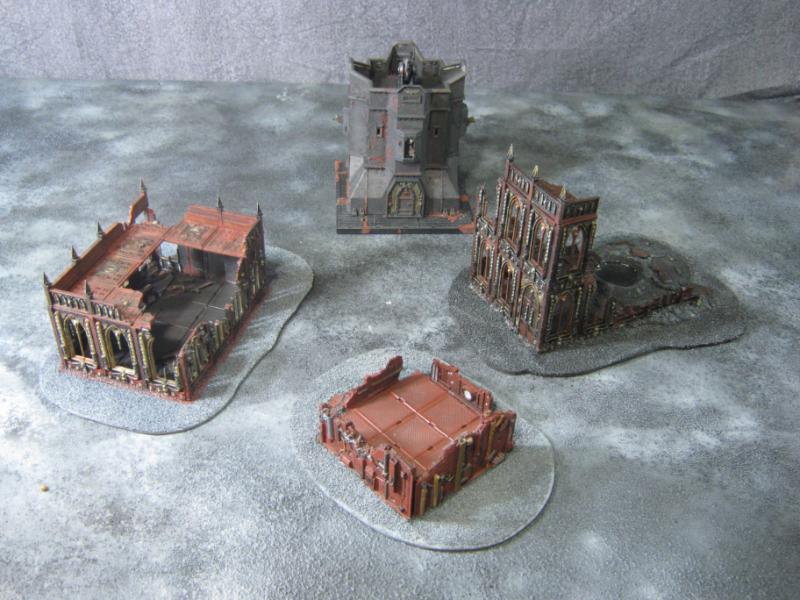
Last but not least, here's a shot of my best work to date. Note that my LoER piece is missing from these photos. Had to change the base to meet new base regs for the 40K table, it will be back before too long.

Thanks for looking, and I'll be back soon (I hope).
|
|
|
|
2012/12/04 22:04:19
Subject: Re: Terrain Project- Building a Better Battlefield
|
|
Longtime Dakkanaut
|
@ Gits- Thanks! Appreciate you stopping by. I'm really trying to step up to the next level. I'm getting closer w/ every piece I do, but I still haven't broken the barrier. Too many of my successes have been due to fortunate happenstance. Even with what I've learned so far I still find myself tripping over the same old mistakes. I can't tell you how many times I've built something, gotten to the primary color base, and then tore it apart because I realized I'd made a n00b mistake. 
@ monkeytroll & Dave- I'm kaing the board match with a specific and deliberate purpose. I'm not opposed to throwing out more random pieces for a game, but I'm really trying... ahem... "forge a narrative" with my primary terrain. I'll work on the fluff and it will make a lot more sense. However, in a Necromunda game I'd be a lot more eclectic and that would match the spirit of the game 100%.
if you need truly varied terrain from me, I re-submit this:
Muuahhaha
|
|
|
|
2012/12/07 20:40:07
Subject: Re: Terrain Project- Building a Better Battlefield
|
|
Longtime Dakkanaut
|
@ Gits- I have no idea. Really.
@ graven- Thanks, I really enjoyed setting that up. Only 'problem' now is what to do about the rest of the table. Look at all that open space! I guess I'll have to do more modeling.
@ Vik- I have no idea what will become of those, all i did was build them. The artistic expression that will be visited upon them will not be from my hands. As far as the fluff goes, I agree that not everything has to match, and in the 'real world' it normally doesn't, but on this project I'm drawing from my military experience where (at least from installation to installation) everything looks like it was stamped from the same cookie cutter ( STC anyone?) and that is the idea here. There will of course be the variances in each design, and 'important' buildings will at times be significantly different in design, there's always a distinct and unquestionable cohesion that ties it all together with .
Not an 'update', just a 'catch up'. I'm so far behind in posting here. I have nothing new to offer but I have some things from a couple weeks back I wanted to share.
SUPPLY DROP!!!
I posted a while back I had won this. I really scored on this auction. Check this out (also note the newly designated paint pot tray )
Shrine, and I think all the pieces are there? Not sure. It's wicked cool for what it is though. And there's more!
Manufactorum bitz:

rooftop / walkway bitz:
Random vehicle bitz:
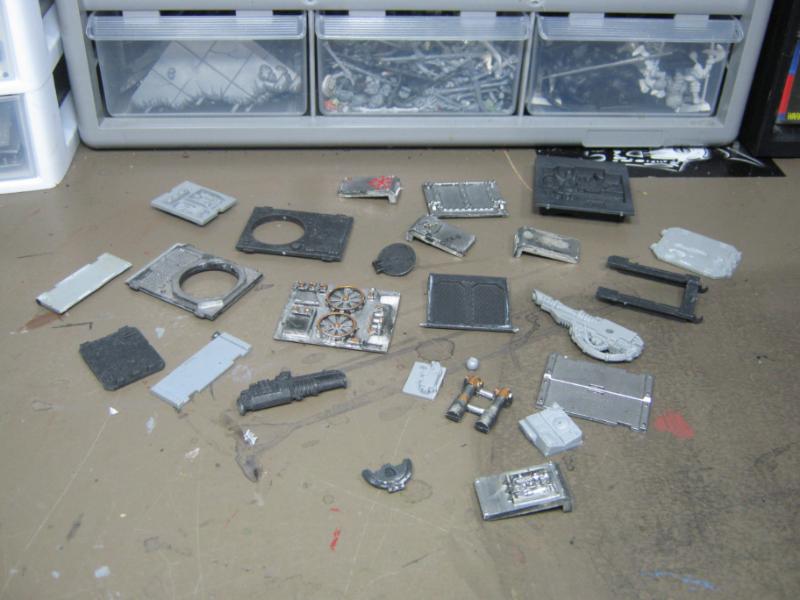
That was all in the same box. Plus on the same day this showed up:

All together, this is what I picked up:
I thought about just gluing it all together and calling it done, but I decided to do something a bit more creative with it.
I've got some more work done but need a full day to sort through pics and upload a post that makes a bit of sense. I'm buried in pictures and notes to sort out.
Last night I could have modeled but did a desk reorg instead. I went through old paint pots, brushes, glue tubes, blades, etc. I threw out a lot of stuff and created a decent amount of space... FOR NEW STUFF! Naw, just kidding. Ok, sort of not. I found a Bastion at my FLGS for $30 instead of the $40+ it's selling for nowadays, so I bought it. Not going to be opened up soon, but I will get to it and will be happy for the $$$ I saved when I do.
I have 1/2 day off on Monday. I was at a 'use it or lose it' w/ my time off so I'm burning up 6.5 hrs and will hopefully get some modeling done.
Thanks for looking, I'll be back!
|
|
|
|
2012/12/12 03:22:56
Subject: Re: Terrain Project- Building a Better Battlefield
|
|
Longtime Dakkanaut
|
@ Vik- sometimes I feel like that's what I'm doing anyway.
@ Dave- Everythng I have is marked for a project. I have no idea what that project is or when I'll get to it, but it's all going to be used for... uhm... something. Eventually. Probably. And no, my new toy has not arrived yet. Here's the latest update:
Date Time Location Status
December 7, 2012 18:16:00 CHICAGO, IL 60647 DISPATCHED TO SORT FACILITY
*twitch* 
I had 1/2 a day off yesterday and decided to take a break from the Imperial Sector stuff I've been working with, have hit a bit of a snag w/ staying focused so I worked on an old piece I've had for a few years.
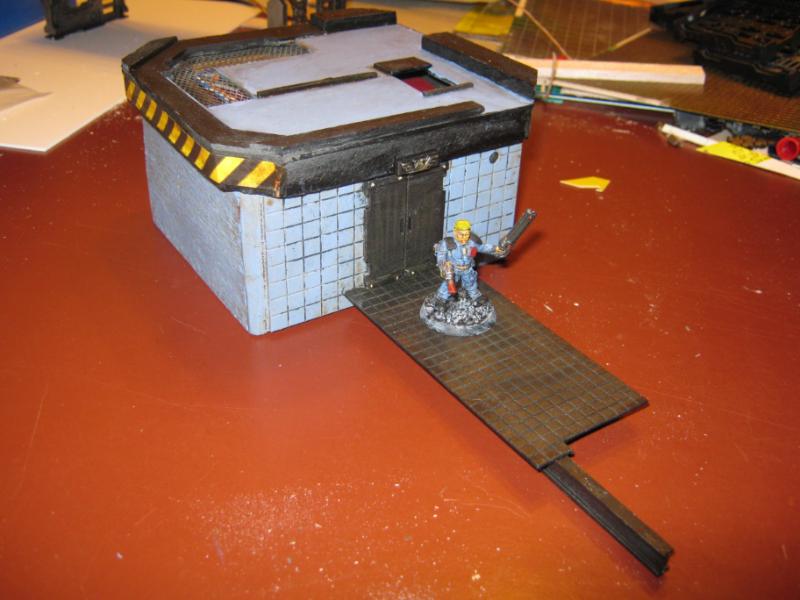
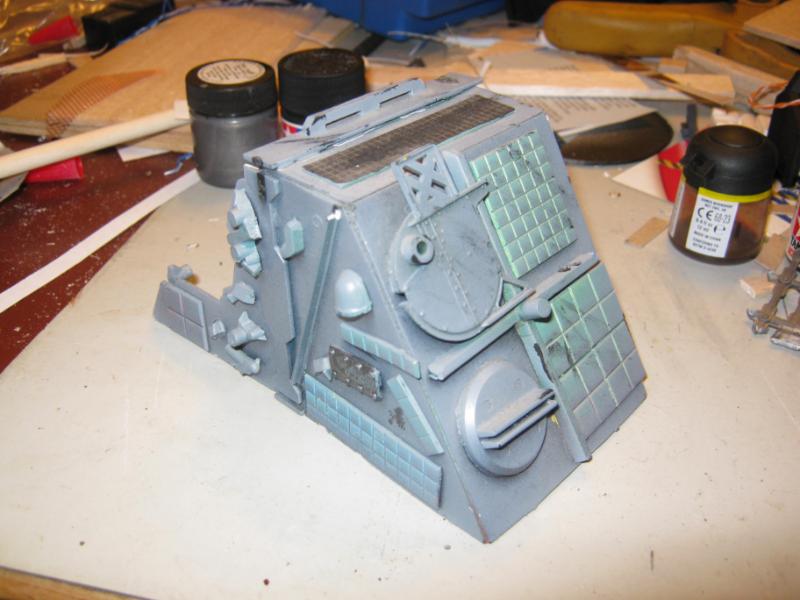
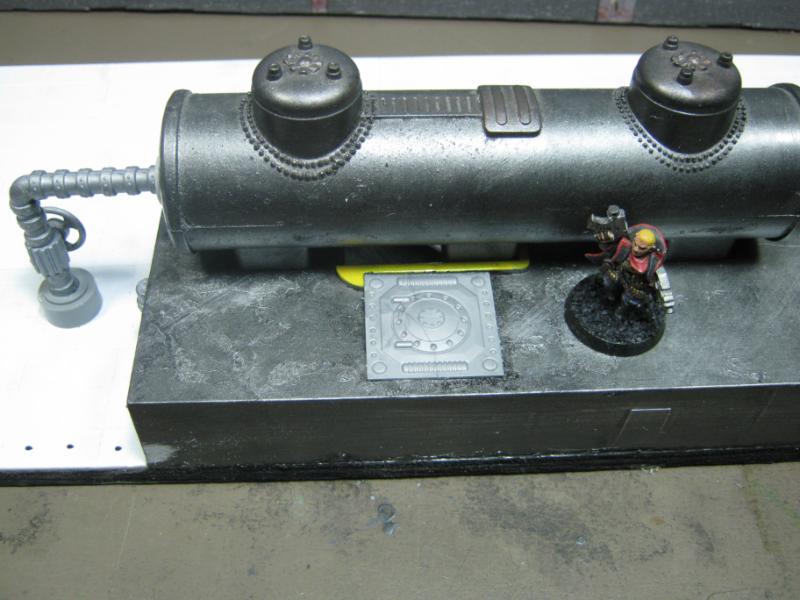
This is what was showing up on my table. The platform is from a MircoMachines set I picked up in the 'free' pile at a yard sale. The base is a small piece of plywood.
Functional and sort of cool, but bland. I would put a few things on it like crates or barrels to liven it up a bit, but overall it was still pretty basic. Time for a renovation. First step was to cover the plywood. I used this style of plasticard because it was the only stuff I had enough to cover the entire base.

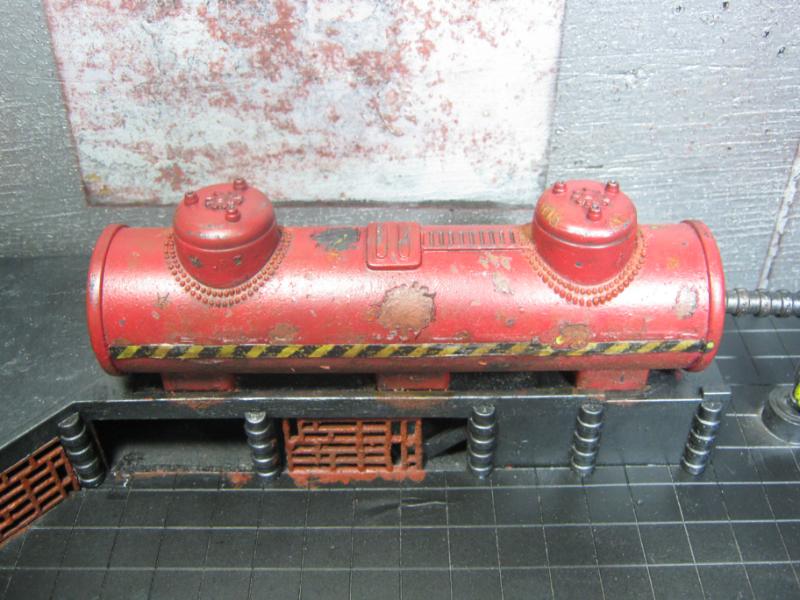
Fast forward a bit, didn't want to bore people to death with the minutia of adding little bits here and there. Here's the final build completed. The tank is from an HO scale train (and was frequently used on this piece so it was a slam dunk to make it permanent), the other bits are random Pegasus Hobbies sets. There's also a WFB shield and a Leman Russ track roller in there.
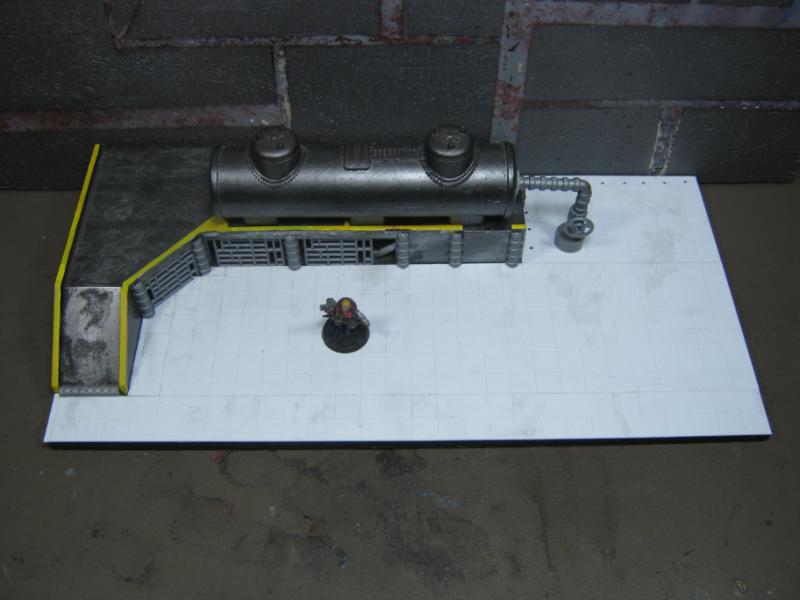
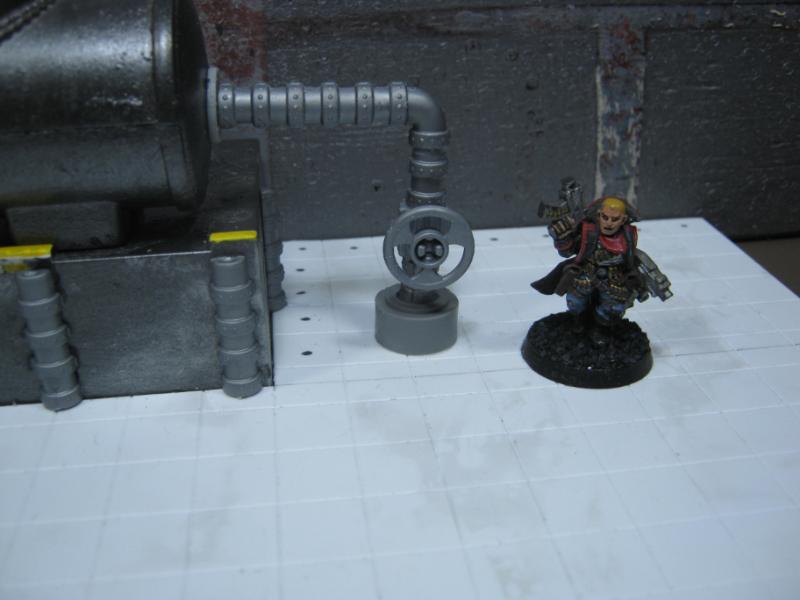
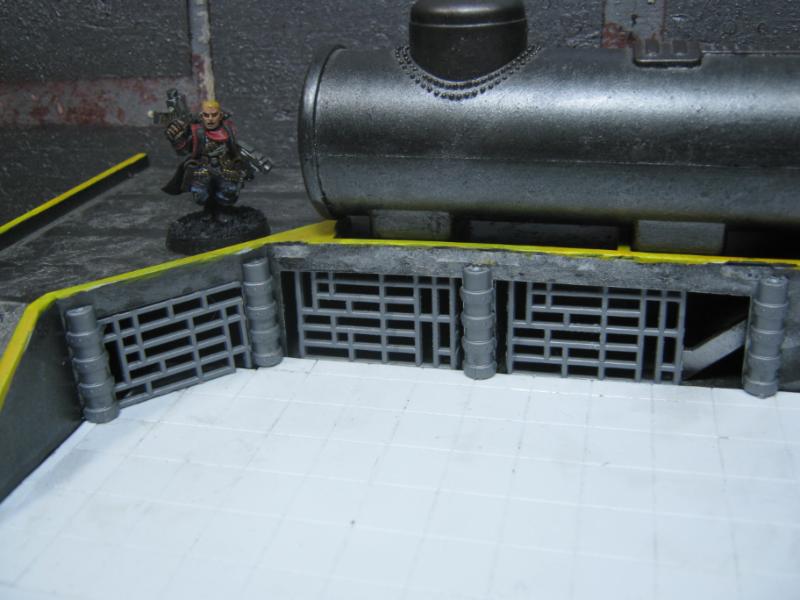
Fast forward again. This is where the project is at, I took these pics about 20 min ago. Please understand that the glare from my lamps is making this REALLY shiny, IRL it looks much better. Not sure how to dim the glare. Any suggestions?
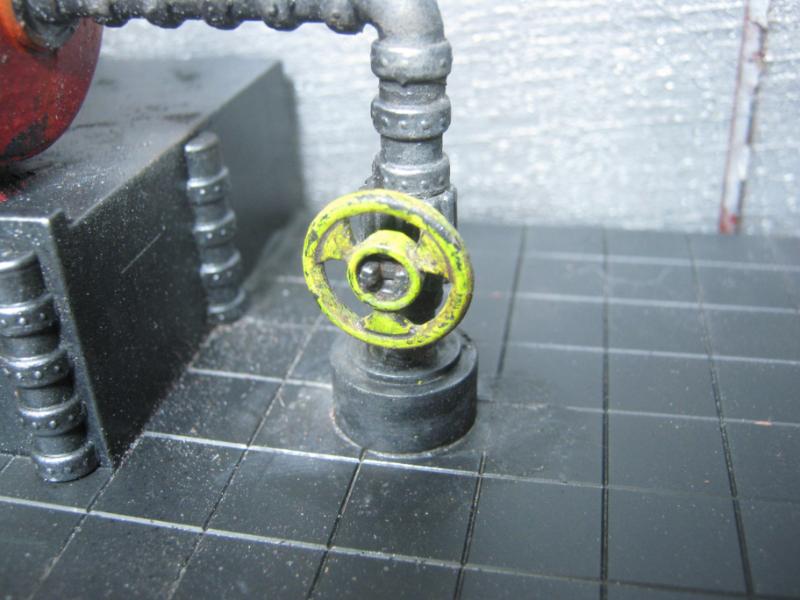
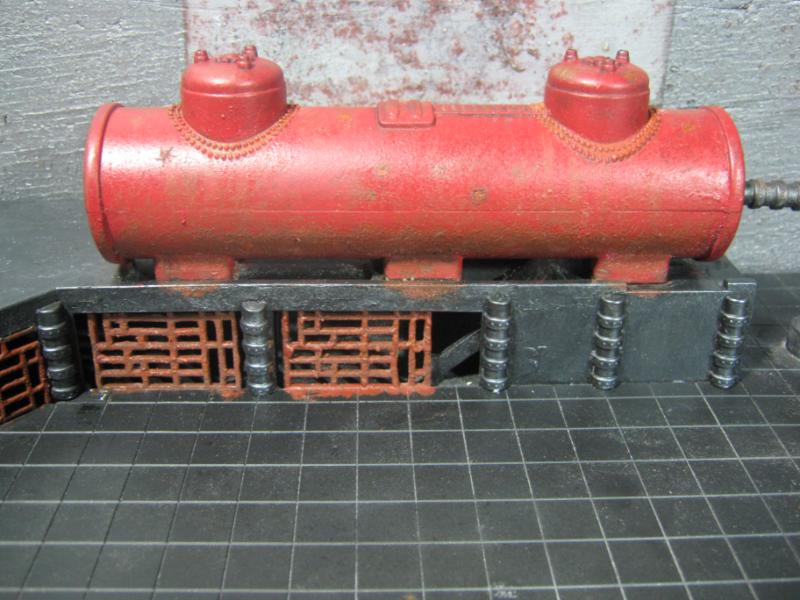

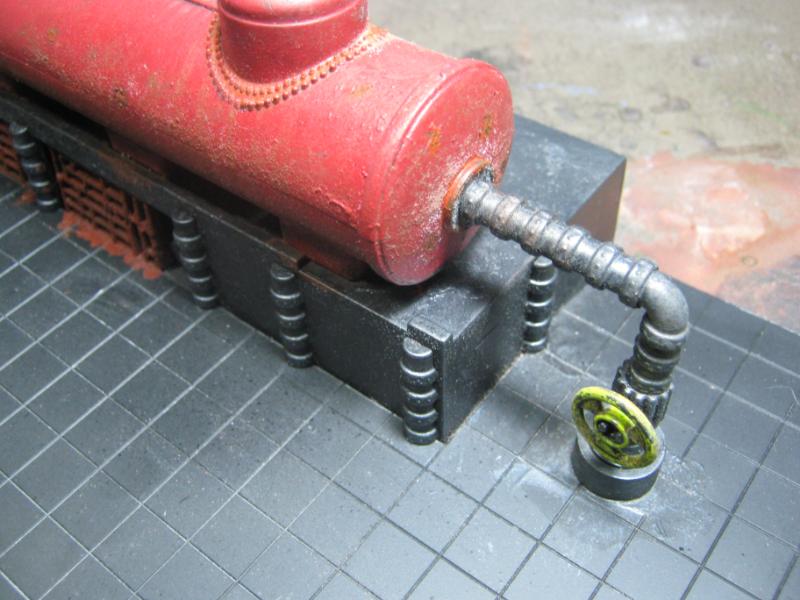
I really like how the valve wheel came out, and the rust on the grates is decent. The small pitted rust spots on the tank are coming along as well. I have NO idea what to do w/ the base or the platform. I don't want to slobber rust all over it, but I don't want it looking too clean either. Suggestions?
Work and home are still beating me down. I'm not on Dakka anywhere near what I would like to be. A lot of you have great projects that I'm totally missing out on, and when I do have some unexpected free time I'm modeling instead of posting. I will catch up as soon as I can. Until then, know that I'm thinking of you guys and I miss being part of the fun. Really looking forward to getting back here and catching up.
Thanks for looking, C&C directly requested as I'm running low on ideas on what to do w/ the platform and the base. I'll check out comments at work during break and I'll be back as soon as I can.
|
|
|
|
2012/12/12 14:17:47
Subject: Re: Terrain Project- Building a Better Battlefield
|
|
Longtime Dakkanaut
|
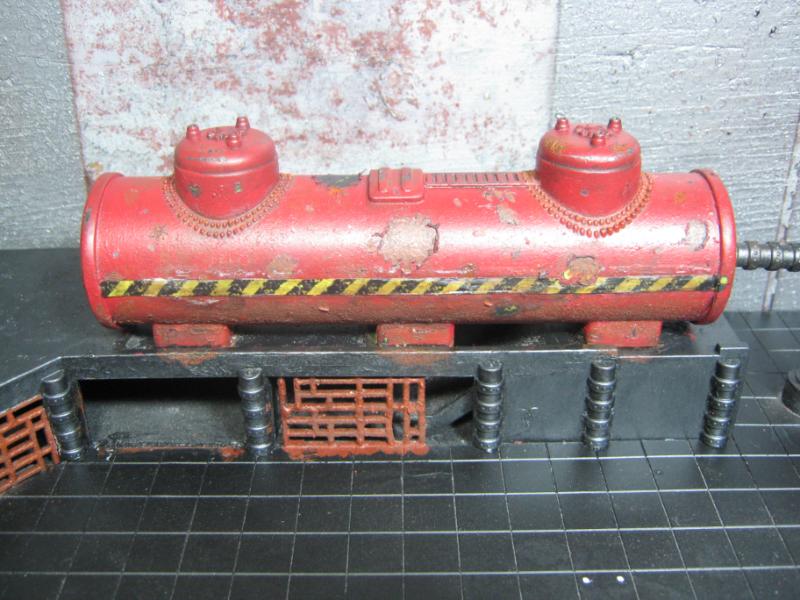
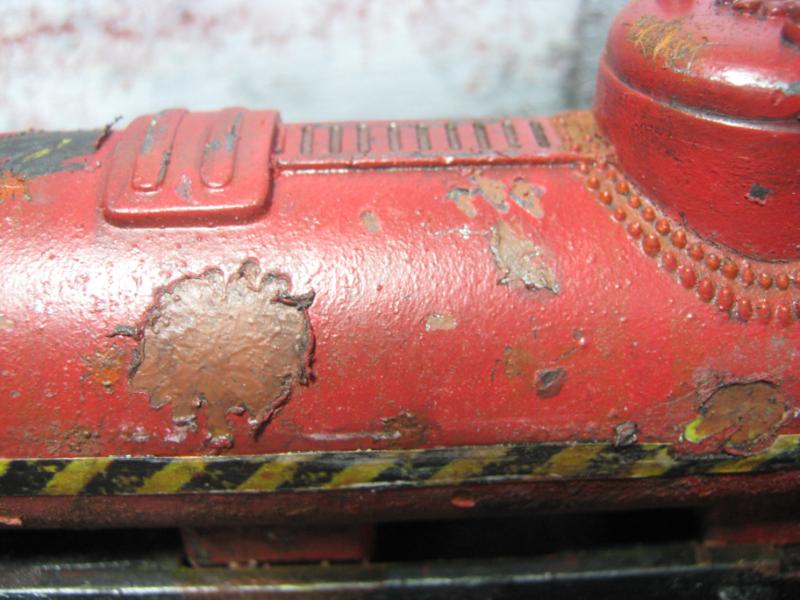
@ Marty- Thanks for the compliment! I'm really trying to step up, and I'm glad it is starting to show. As for the tank, I agree that overall it needs a bit more obvious corrosion, and I'm going to do hazard stripes that cover the seams of the tank, like this:

@ Dave- I really try to avoid things that ruin scale perspective. The floor might have to come up in the areas where vehicles pulled in for refuel and I'll rout is out just slightly and use a hair dryer to mold the plastic into the ruts. I would really have preferred asphalt, and of course now that I am thinking about it if I had used a single sheet of blank plasticard I could have replicated that surface, with the obvious repave and fill-ins. It also just occurred to me that I need to have caps for the underground tanks, each a different color, discoloring on the pavement to show fuel spills, maybe traffic markings to show where to pull up, where to not drive, etc. Hmm. (thinking about how to make that happen... looks like I'll be tearing up some stuff)
@ MauS- I'll leave the garbage, mattresses, and sofas to this guy. But you have given me an idea. Debris like crumpled papers, etc in the edges of the platform... a Nuka Cola machine for refreshment while the vehicle crews are taking 5 during the refuel, the bottles RSJake gave me... that would really bring the detail and scale to life. Thanks for the idea! Now I have to go buy a Nuka Cola machine.
Thanks guys, really appreciate the feedback! It's given me some genuine inspiration.
|
|
|
|
2012/12/14 20:18:10
Subject: Re: Terrain Project- Building a Better Battlefield
|
|
Longtime Dakkanaut
|
@ monkeytroll- It's getting better. Work has been downgraded from "overwhelming" to "barely manageable". Looking forward to "almost normal" but at least I'm getting back to posting on other threads again. As for critique, this thrad will still be here once you're in a better state of mind to be operating your laptop
@ graven- I checked out your Sanctum Sororitas and my only critique is there wasn't a dead Space Nun. Other than that it's absolutely brilliant and if you'd be awesome enough to share your color technique I'm going replicate is once I start working on my Pegasus Gothic buildings.
@ Galorn- That would be very cool of you, thank you. As it is I have to stick w/ the tiles as I cannot remove them w/o destroying the entire sheet, apparently I glued it quite well.
@ Llamahead- Thanks for stopping by! It's always good to see you on Dakka. When I saw the loading dock in that free pile I instantly knew what I wanted to do with it, an unusual experience for sure. Usually I see something, say "wow, that could be something cool" and then it sits in my bin for 3 years.
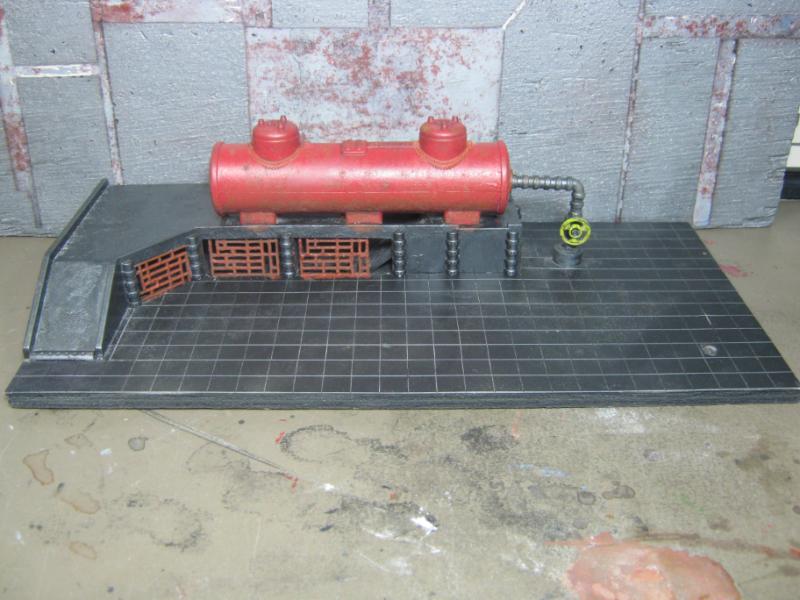
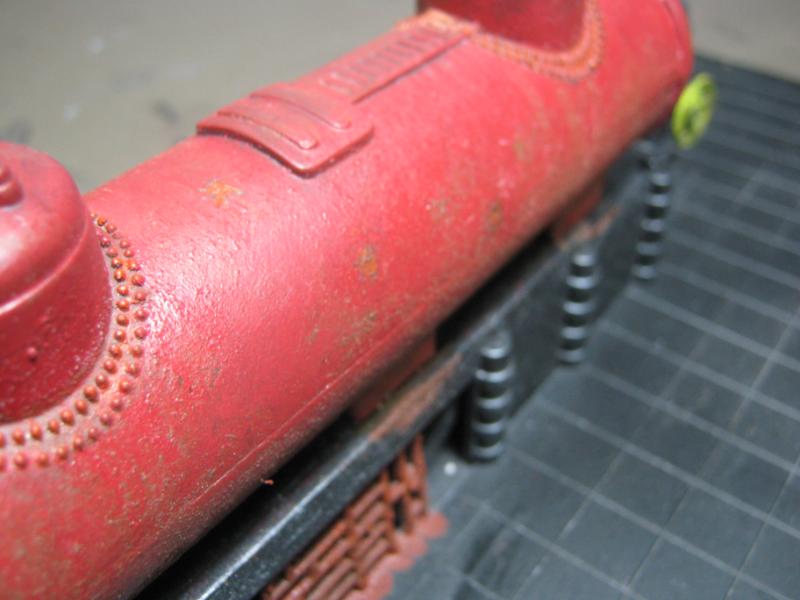
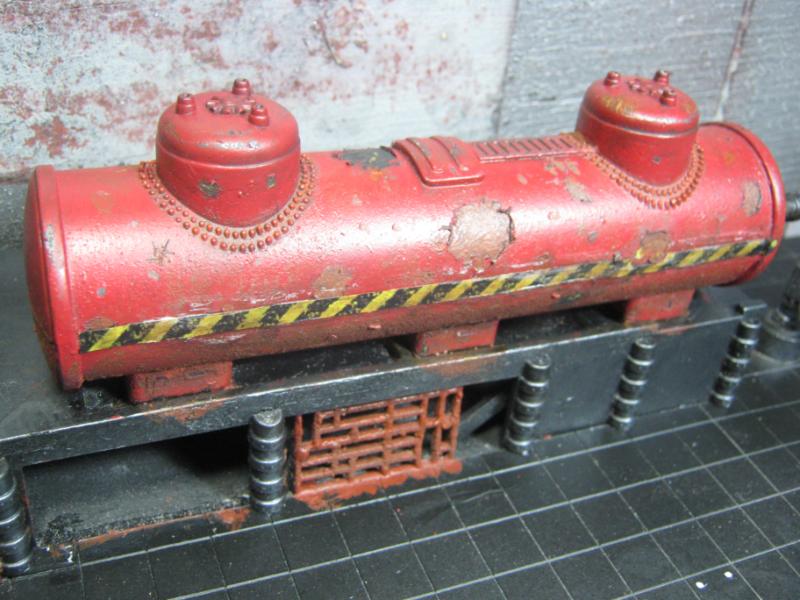
The crown jewel of this post is likely going to overwhelm anything else I share, so it's coming last. I'll share the models first so you at least get to see them. Ha. I worked a bit on the Refuel Depot (that's what I've decided it is) and specifically put some wear on the tank. Remeber it's still a WIP and I know the hazard strip is too wide and messed up in a 'poor application' sort of way. It will be relaced. The underlying rust is going to be highlighted with a more orange around the edges and will also have some subtle colors (darker / lighter) in the larger patches. C&C welcome as always. Open to better ideas than what I'm doing at the moment.
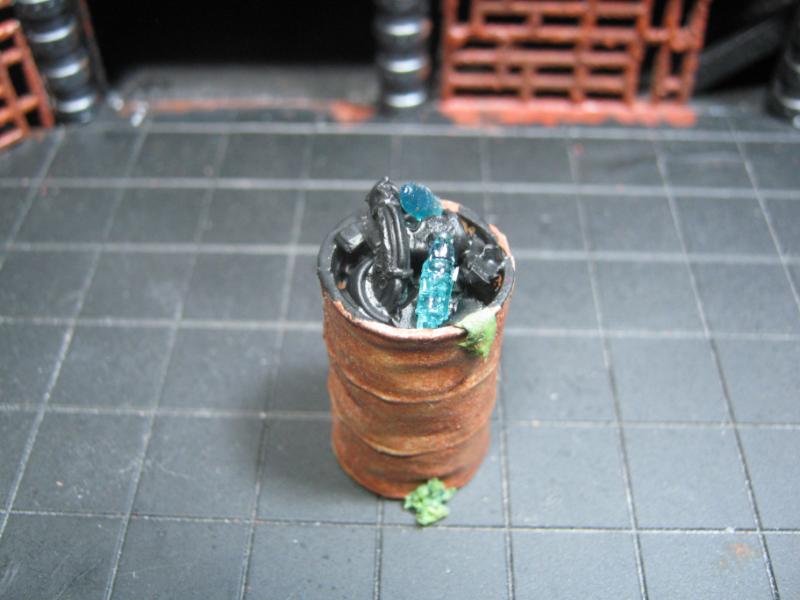
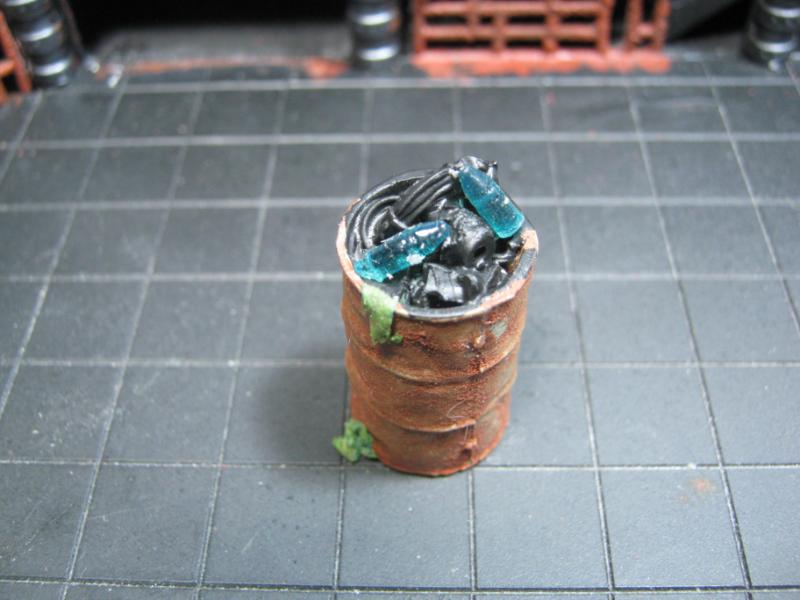
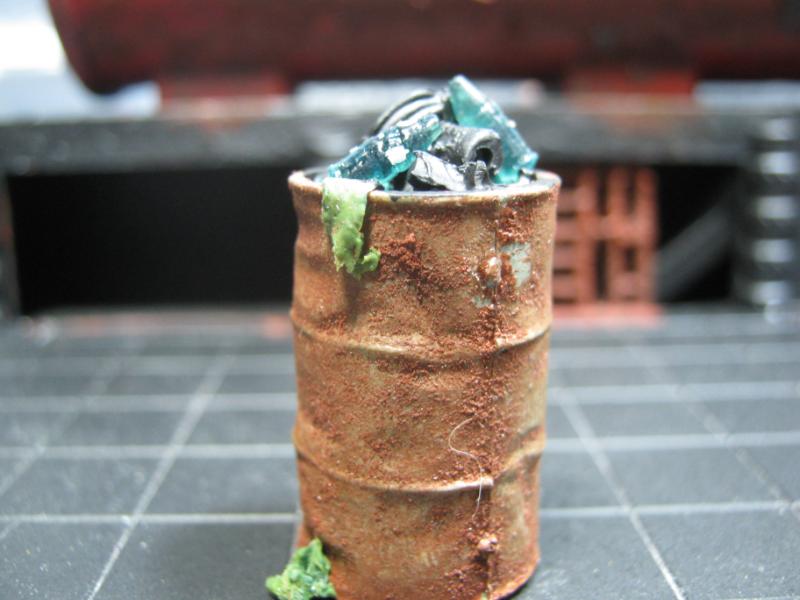
I also made a trash can out of a fuel barrel. The bottles are from RSJake and are not glued in yet, they are just representational of what the final product will be. The inside debris will be painted. The can is going to get another 'once over' w/ coloring, will likely paint it yellow or a different shade of red. I really like the rust effect, it was actually a tester for the rust I was dabbing on the fuel tank. I added a tiny bit of GS to make an oily rag and there may be more GS on the bottom to show stuff that fell out. I may also cut a gap in the bottom w/ a Dremel tool (from the inside) to make the can look like it is rotting out. The cat hair was contributed by my cat Daemon (yes, that really is his name).
So that's the modeling part. The next is me finally able to share a 'secret' that only Dave knew about. I bought it based on his recommendation, and I am very much looking forward to learning how to use this. I have been working a ridiculous amount of OT at my job so I don't feel even one tiny little bit guilty about the expense. I have finally done somehting I've been talking about for over 2 years. I consider it a present from myself to myself because I am just that awesome.
Gentlemen, I proudly present the tool that will catapult me to the next level of modeling:
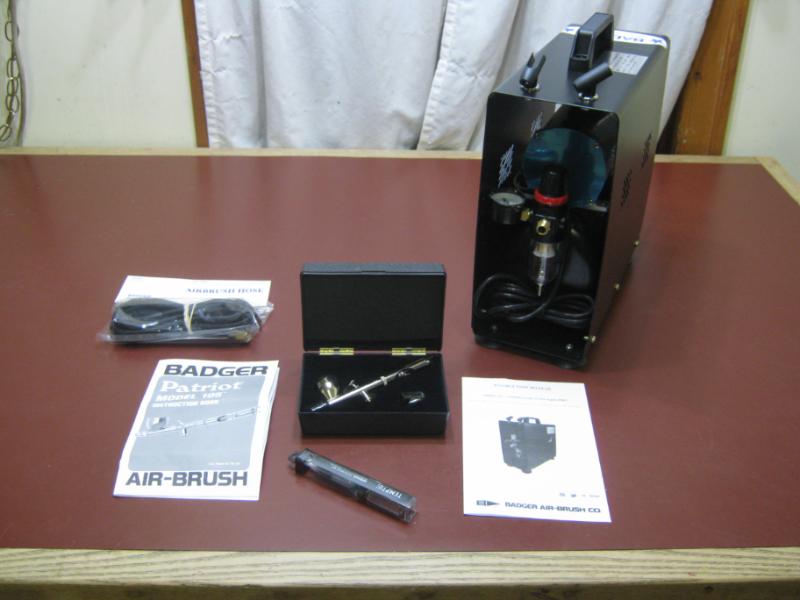
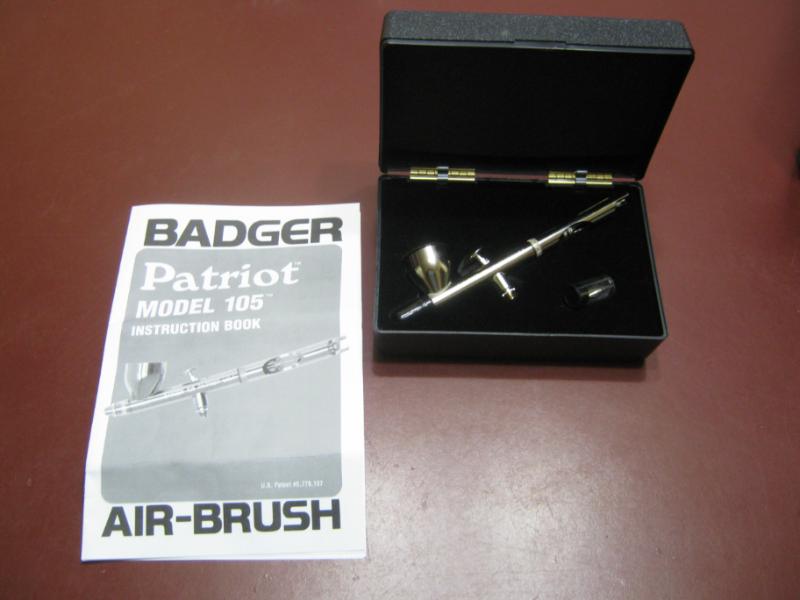
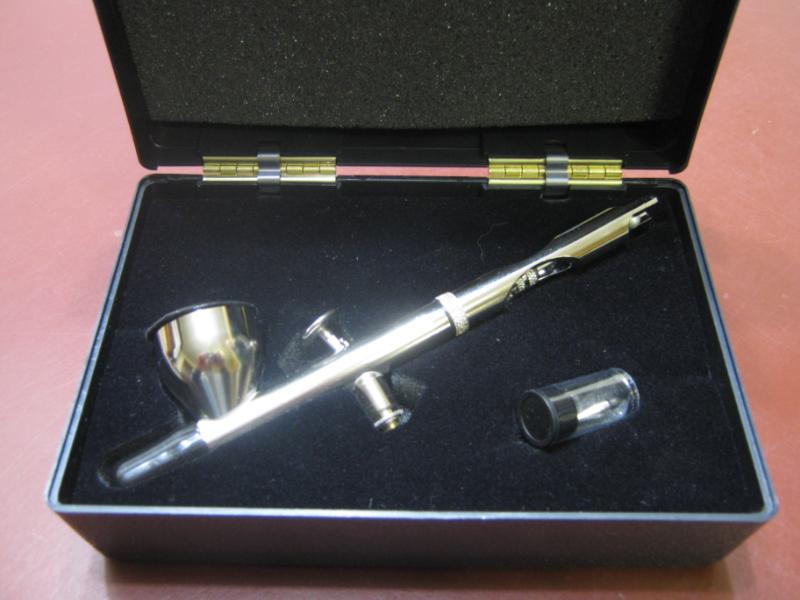

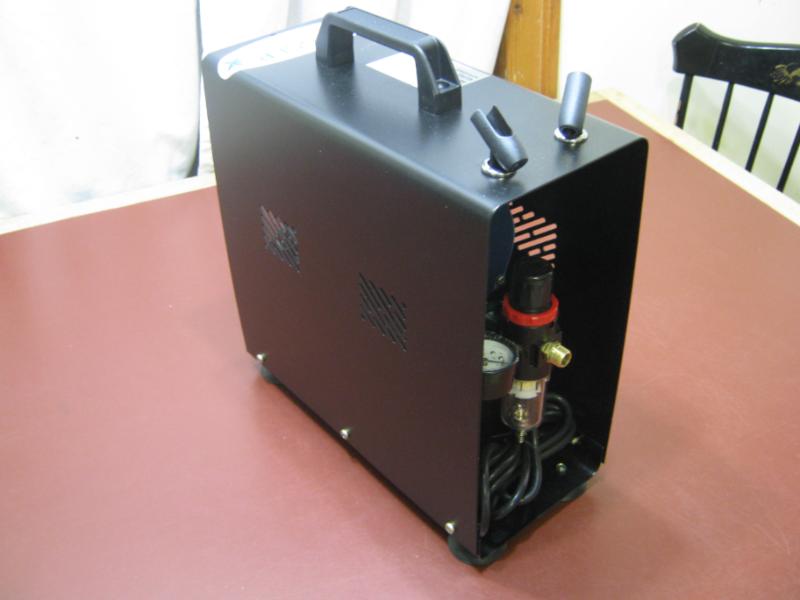
The compressor is a Badger TC910 ASPIRE PRO, the airbrush is a Badger PATRIOT 105 (in case you didn't see the name on the manual, ha), the hose is Badger 10' Heavy-Duty Braided Air Hose, and the cleaning kit is from Temptu.
Hopefully I'll avoid some of the airbrush n00b frustrations because I invested into a high-end product. All I need now is time to practice practice practice. I'll share my failures along the way so there's a history of my improvement as I become more familiar and skilled.
HUGE thanks to Dave for his recommendation, advice, and support. He truly exemplifies the spirit of community I enjoy on Dakka. LoER forever!
As always, thanks for taking the time to check this out and I appreciate the interest. C&C always welcomed. The experience you share helps me (and anyone that reads this blog) become a better modeler.
Today is a good day.
|
|
|
|
2012/12/18 05:19:43
Subject: Re: Terrain Project- Building a Better Battlefield
|
|
Longtime Dakkanaut
|
@ Gits- I really like the case / carrier as well, because it is heavy. Gave me a surprise when I picked the box up at the PO.
@ Dave- I'll let you know how it sounds as soon as I set it up. Yes, I know... but read on, you'll see why not.
@ monkeytroll- Thanks for the compliments on the tank. I hope you like the finished product. The trash can didn't get the 'rotted out bottom' effect since I couldn't get the stuffing I out into it earlier. Kind of an 'after the fact' idea that I'll try on something else soon, Very soon. And I'm really looking to practicing w/ the airbrush.
@ Moltar- The trashwork on the fuel tank is a culmination of everything I've learned to date. See below for more awesomeness. And yes, the airbrush is going to change everything. Next level, here I come!
@ bama- Thanks for the compliments! As for the cat hair, no need to shave. He spontaneously donates every time he comes to visit me. So thoughtful. If you go through any of my threads you'll see plenty examples of this.
@ bigfish- The peeling paint was a different technique for me and it worked quite well, I'll be doing it more as new projects come to the fore.
@ Galorn- Whenever you guys can come up. It'll be a long winter and I'm not going anywhere.
@ Styrofoam- Thanks for the compliment! I'm really excited about the Badger and I'm looking forward to finally getting it going!
Ok, so in case you hadn't figured it out yet, I did NOT fire up the airbrush rig this weekend, but for good reason as you'll see below. I really wanted to finish my Fuel Depot piece and knew I wouldn't if I started in on the airbrush, so I left it alone and instead spent my modeling time finish up what I feel is my best piece to date.
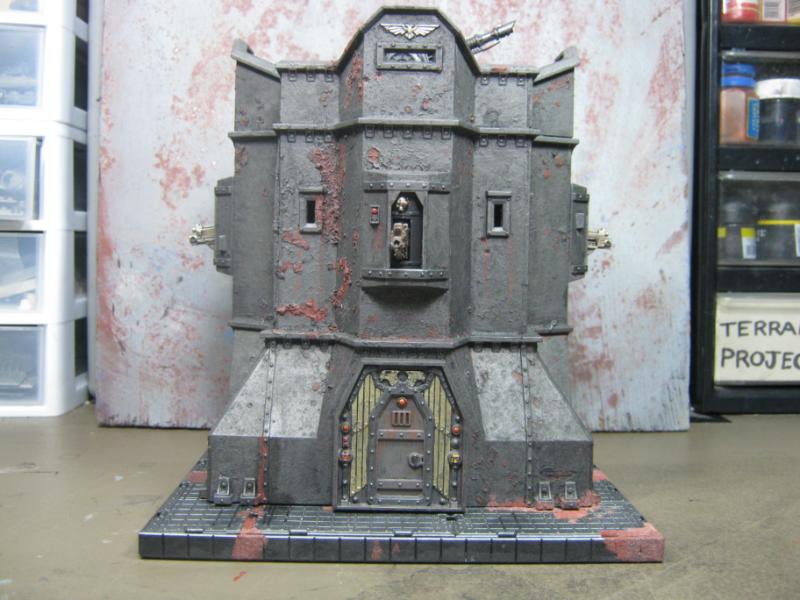
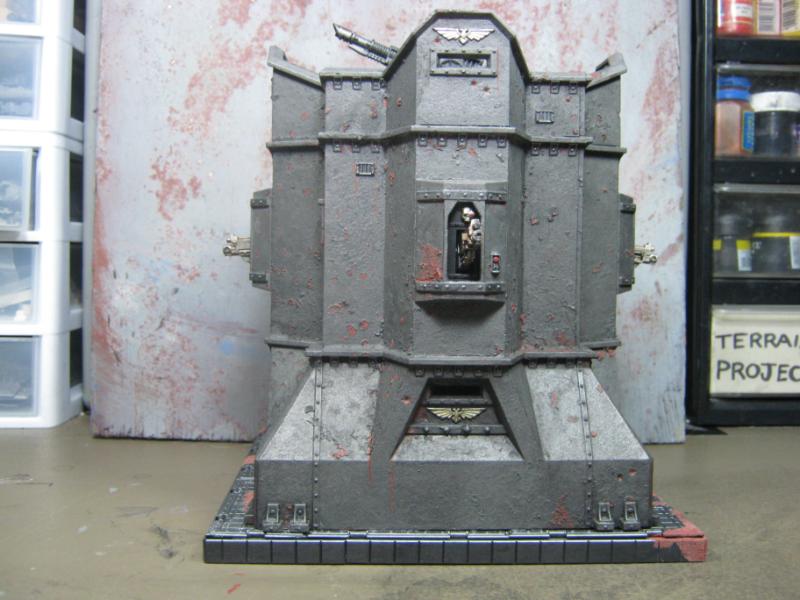
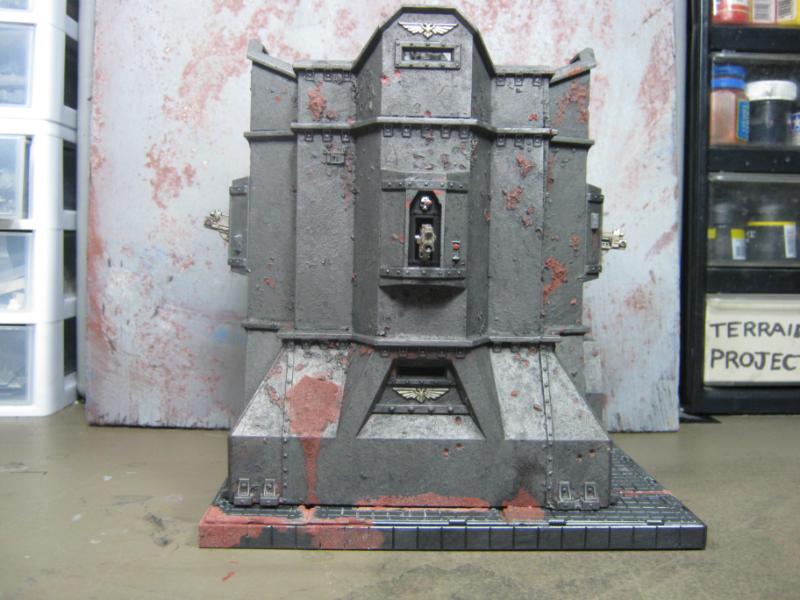
Before I get started, PLEASE understand that it is NO WAY near as shiny IRL as it is in these pics. Very soon I am going to build a light box so I have more control over my pictures. I'll still use my 'dynamic background' setup for small pieces and miniatures, but the larger stuff I'm making / taking pics of deserve better exposure to show the true work and detail I've put into them.
That said, here's my finished piece. Yes, i know the base could have taken more detail and the platform is a bit bland. I think it's ok and it'll work overall. The base is a nice open space for other things to go on (barrels, crates, etc) and the fuel tank would overwhelm the minor detail I'd have put on the platform. My opinions. I am still open to discussion / recommendations. All I have to do is add stuff, I don't have to undo anything.
First pic is of a brilliant idea I had for something completely different. I had been thinking about rivets again on another piece I want to get started somewhere in Jan / Feb that is HEAVILY inspired by inmygravenimage's Sanctum Sororitas but again I found myself not looking forward to it because my rivets still seem a bit wonky so I found an AWESOME substitute in the form of Beading Closures from my FLCS (Friendly Local Craft Store). Rather clever of me I thought at the time, but I had no idea just how clever it would turn out to be..
As I was working on the final touches of the Fuel Depot I realized I needed something on the back of the platform, it was just too underwhelming. I was putting a lot of responsibility on the tank to be the focus point and knew someone would call me on it so I started to reach for my Pegasus Hobbies bitz tray (my recent 'go to' for all things filler and detail) and while I was reaching saw the remaining piece of chain I used on my LoER contest piece hanging from my lamp. It didn't take long to figure out what to do next.
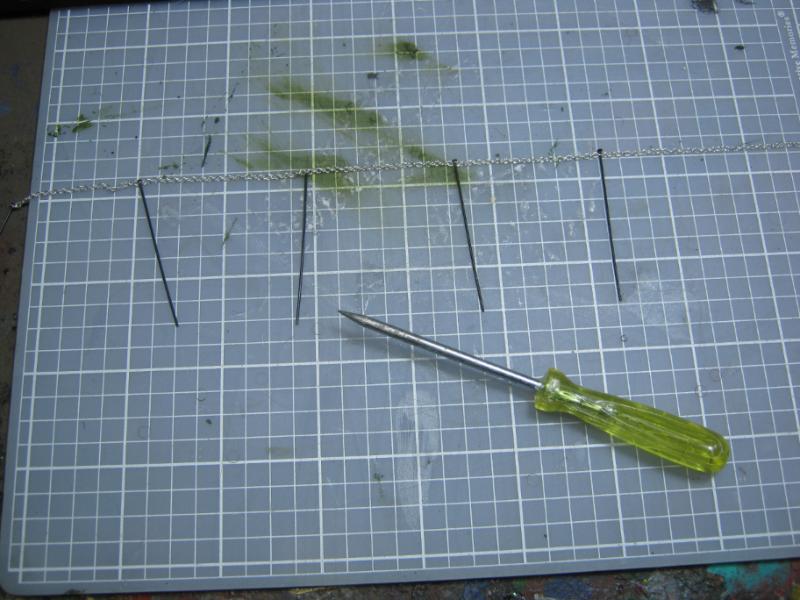
I had to work the openings on each link where I was going to use a Bead Closure. Other than that it was a quick and easy process. Expect to see this again.
Ok, blah blah blah etc... on to the pics!

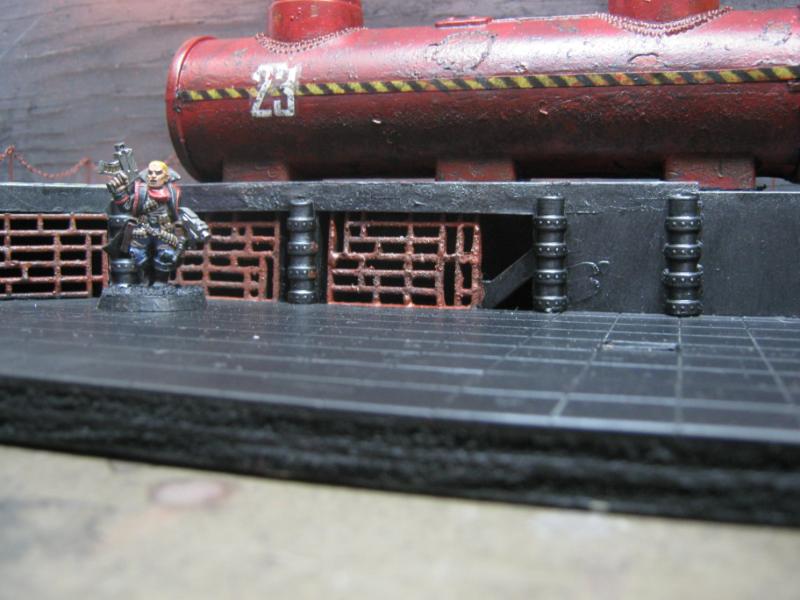
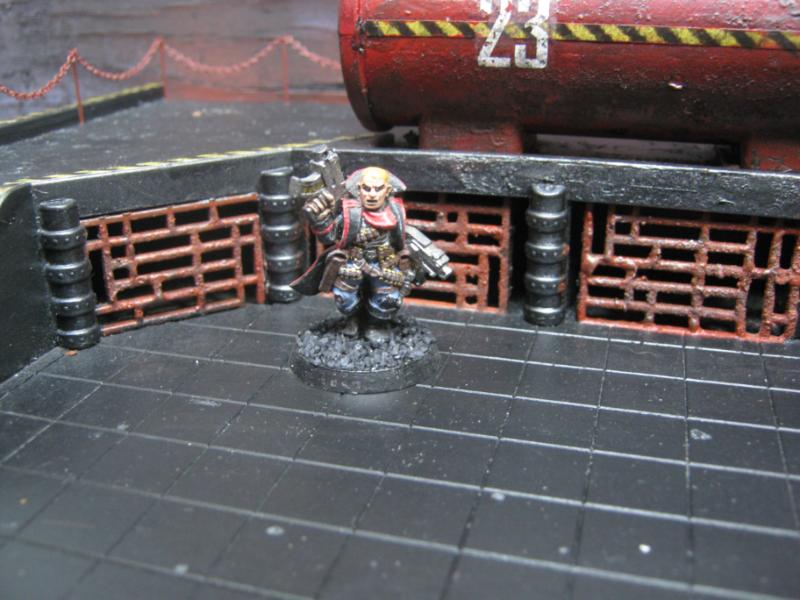
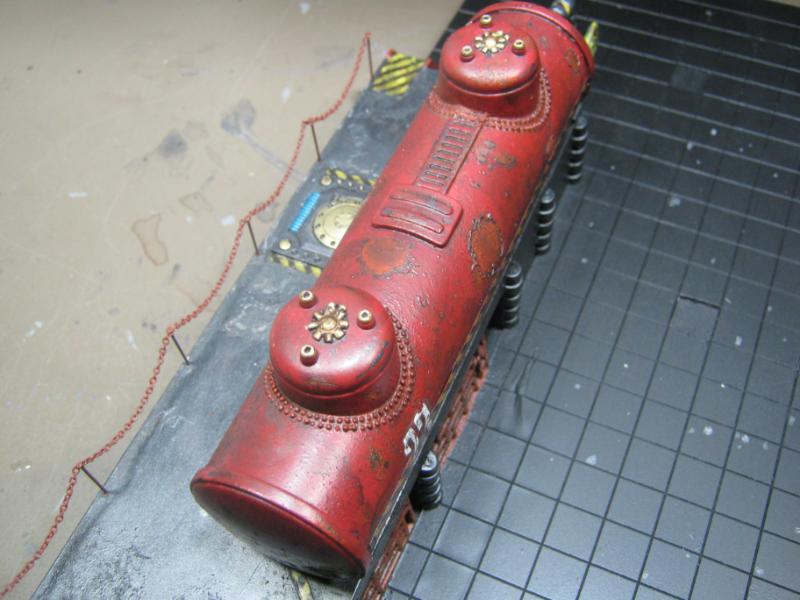
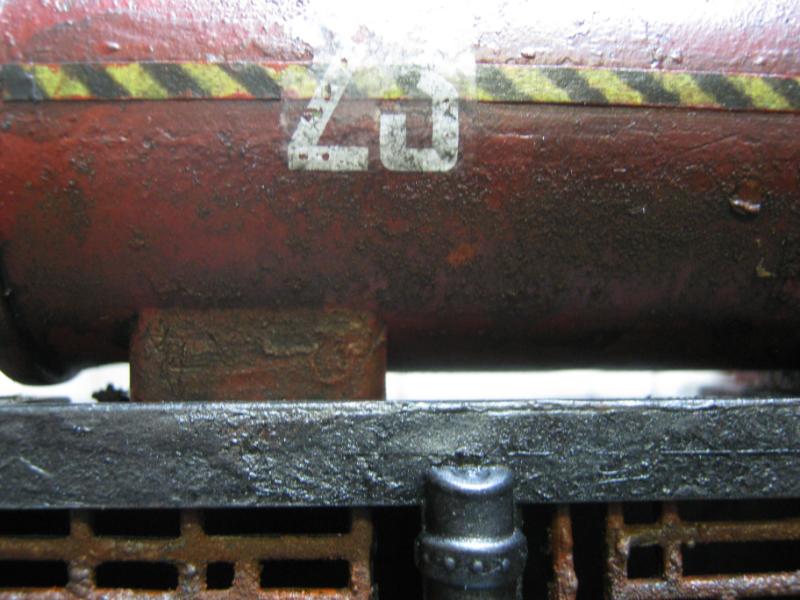
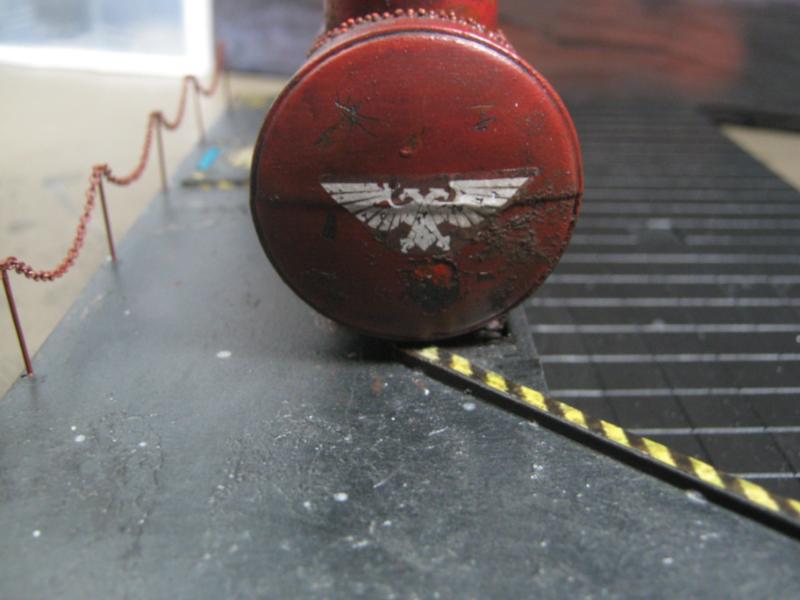

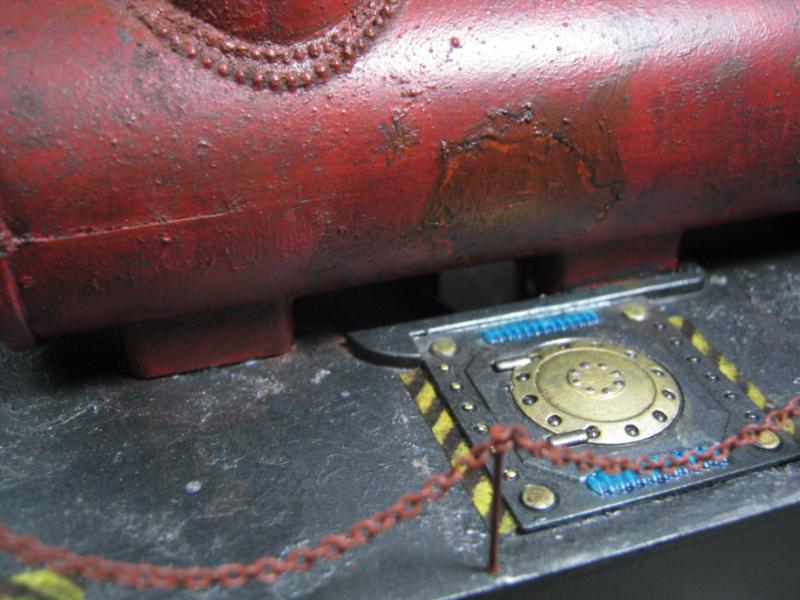
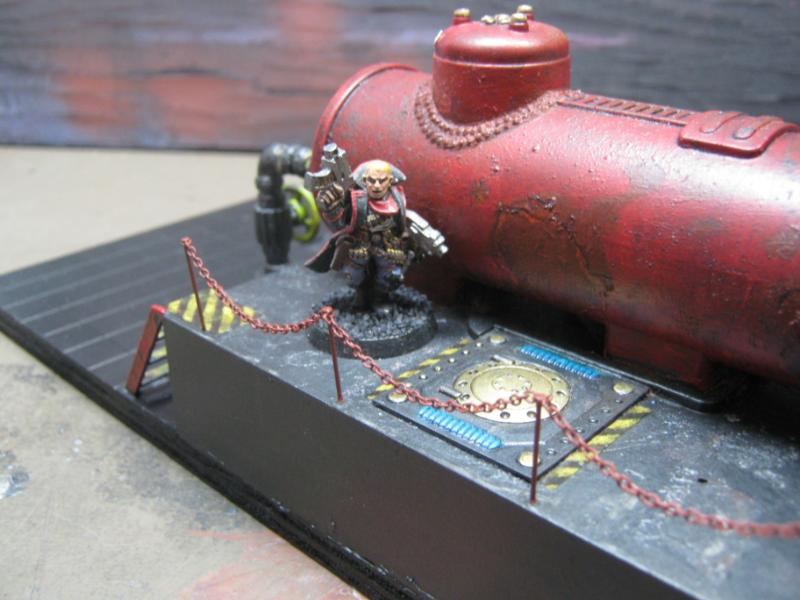
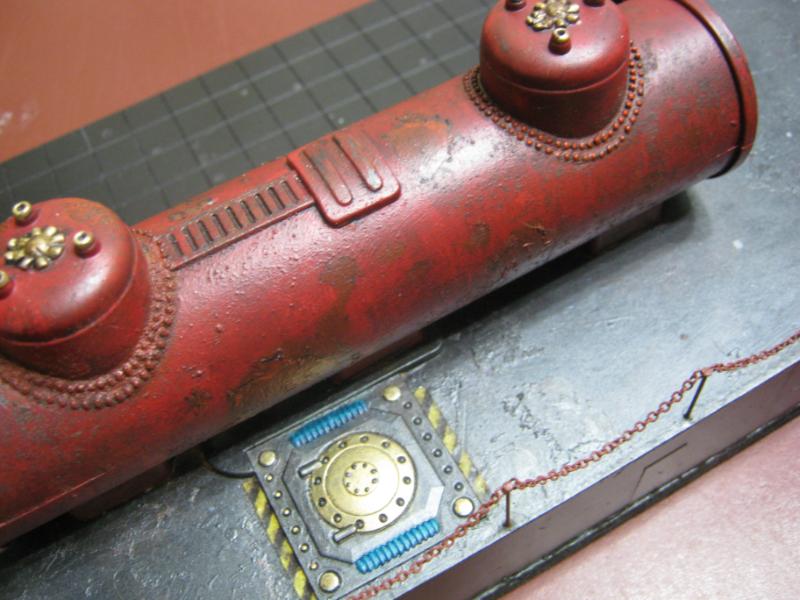
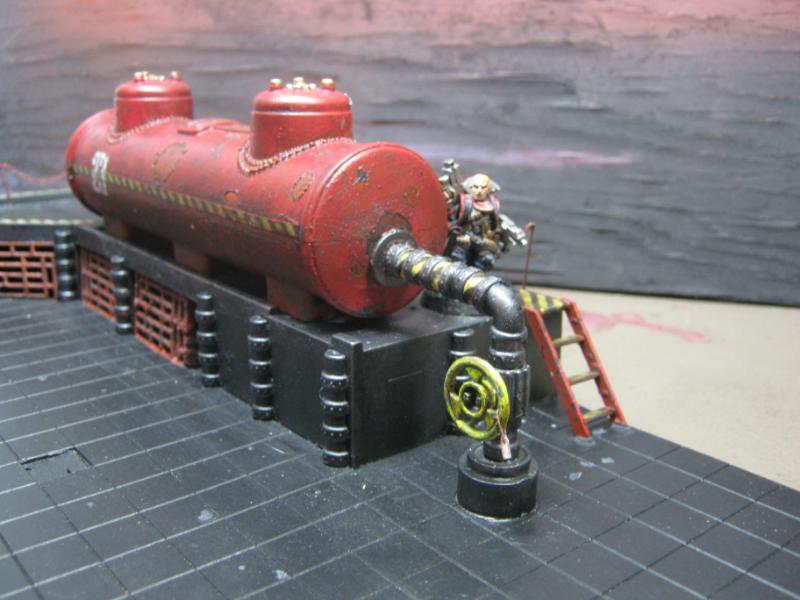
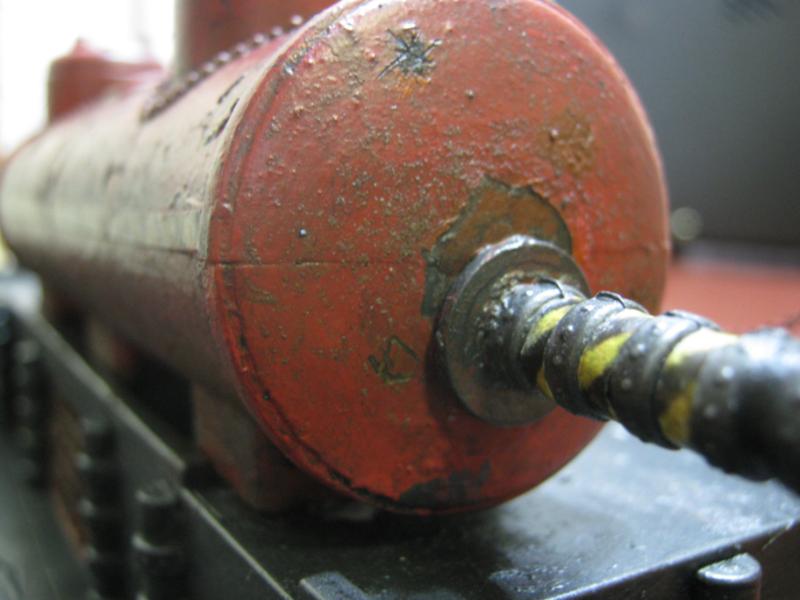
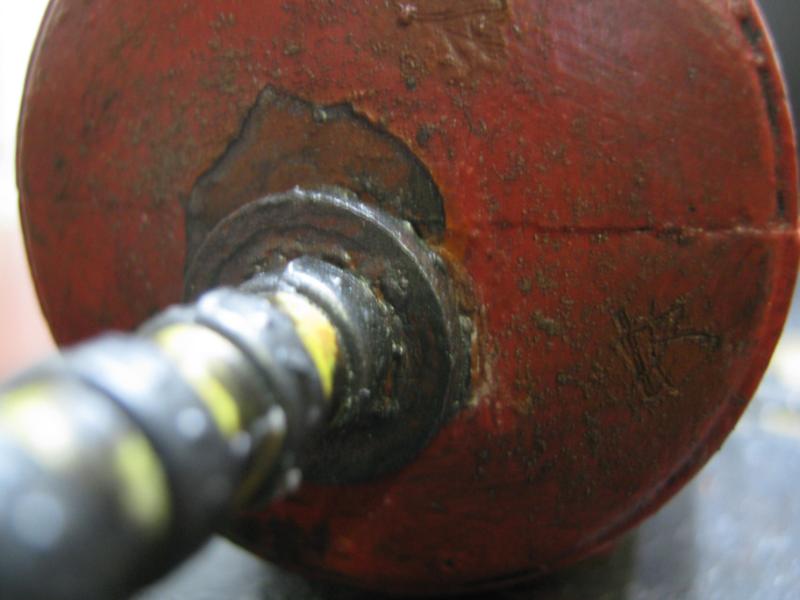
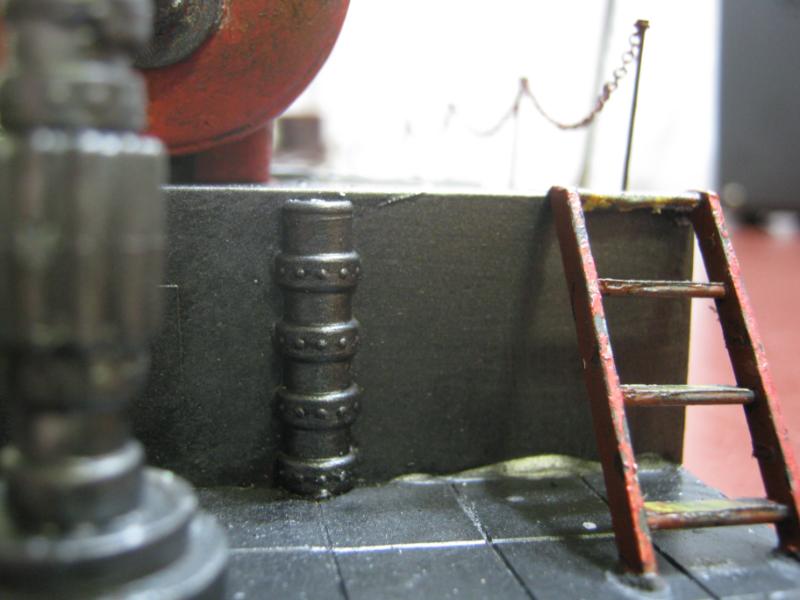
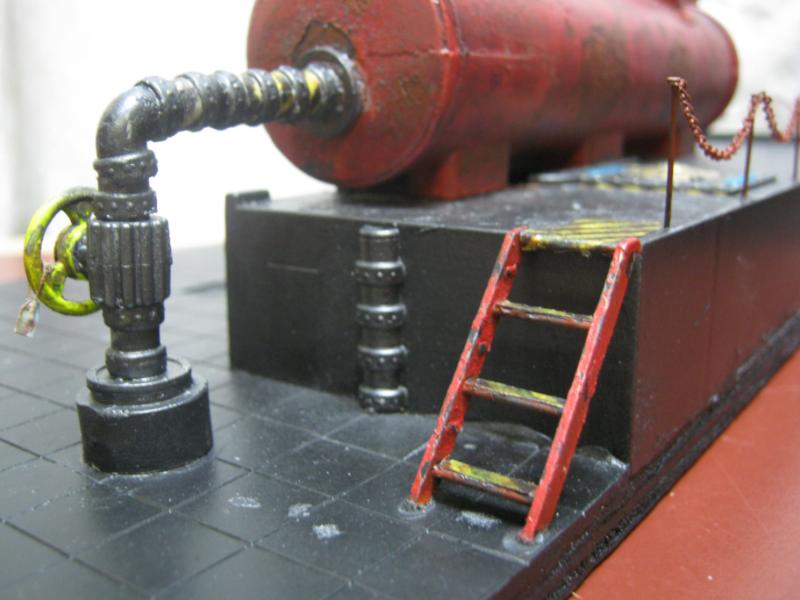
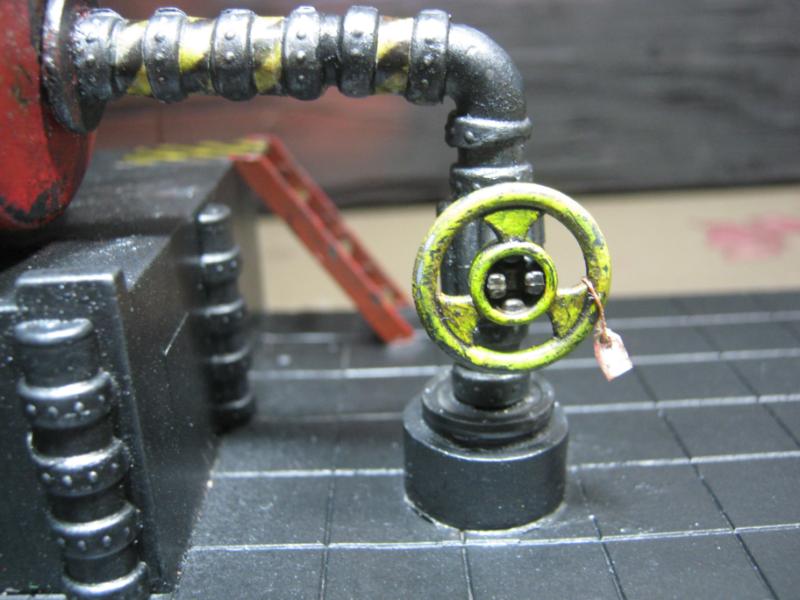
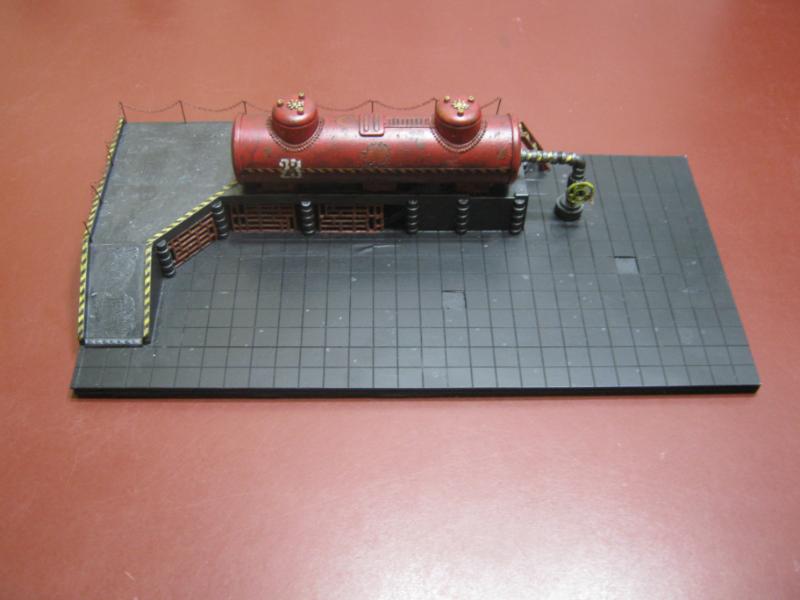
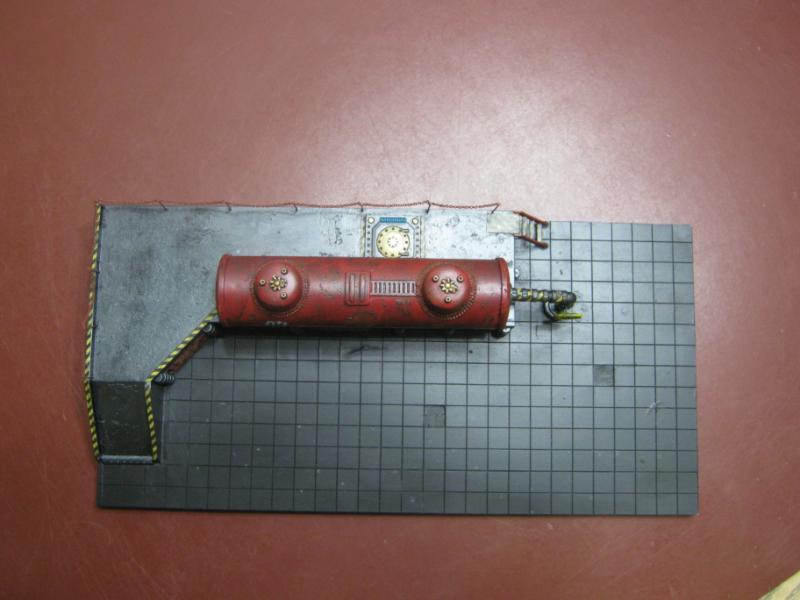
... and saved the best for last. I'm getting better.
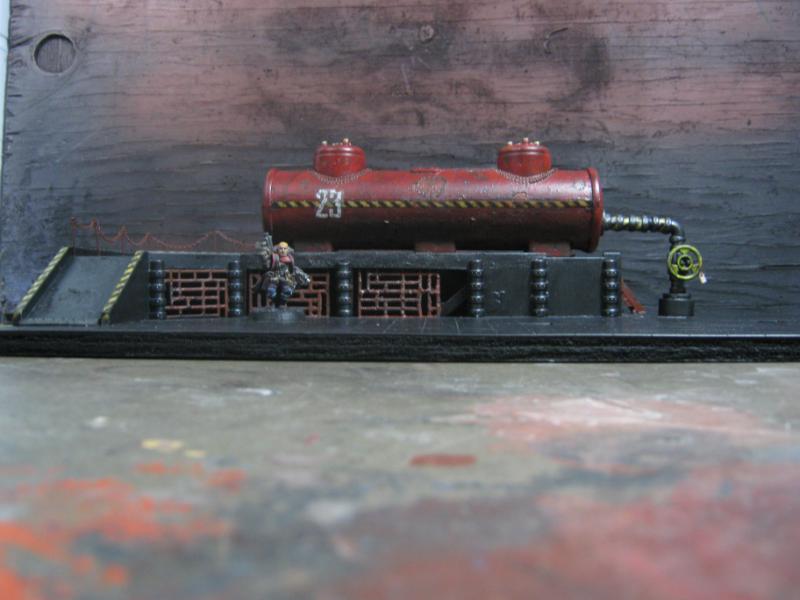
Now of course as I was posting this I saw GLARING oversights and avoidable mistakes. Aquila on end of tank is just slightly askew. I could have blended the edges of the decals better. I should have made little rusty drips / runs from my chain railing. I didn't use any of Dave's weathering powders on anything. Again. I really should have done / do something more w/ the base. I completely over-rusted the grates. I should have pushed myself for even a bit of OSL on the hatch lights. So many things I did wrong or could have done better. For all my advancement and learned skill, I'm still making mistakes and slacking off toward the end of every project.
BUT... all that said, I'm very happy with this piece and it finally has a place on my table as part of the story instead of just being a thing that breaks LOS. I put a lot of work into that piece and I'm as proud of the accomplishment as anything else I've done. I really like the tag on the valve wheel, I think it adds a lot (and for some reason seems really funny to me). I like the chain railing a lot, the wear on the decals is excellent, the hazard stripes are straight and add to the scale perspective instead of draw away from it, the stairs are decent, the rust on the tank is some of the best I have done... so yeah, I'm not running myself down at all. I see mistakes, but I also see success.
I'm still learning and I'm still working hard toward a goal. I know I'm not making diorama-quality terrain and I'm ok with that. My requirements are that anything I build has to be playable, durable, and look as good as I am capable of producing. Every new piece is another opportunity to apply known skills and to expand my 'comfort zone' each time I model. My 'comfort zone' is about to be shattered by that airbrush. Ha.
I don't know what my next project will be. I'm slowing down on the Imperial Sector stuff right now as I'm waiting for a couple things to happen before I dive into more work on them (specifically I need more 'themed rubble' and I need more hardboard for the bases). I'm starting to dig back through my old terrain so maybe I'll drag another piece of it out for an overhaul. Hard telling right now. All I know for sure is whatever I do next I'll put in a solid 90% effort on it.
That's it for this one. As always, thanks for looking, and C&C is openly welcomed.
|
|
|
|
|
|
|