| Author |
Message |
 |
|
|
|
|
Advert
|
Forum adverts like this one are shown to any user who is not logged in. Join us by filling out a tiny 3 field form and you will get your own, free, dakka user account which gives a good range of benefits to you:
- No adverts like this in the forums anymore.
- Times and dates in your local timezone.
- Full tracking of what you have read so you can skip to your first unread post, easily see what has changed since you last logged in, and easily see what is new at a glance.
- Email notifications for threads you want to watch closely.
- Being a part of the oldest wargaming community on the net.
If you are already a member then feel free to login now. |
|
 |
2012/07/06 22:37:01
Subject: Re:Cadian 11th Assault, Revamping my CCS, Now for Bodyguards (AKA Hooray for cool useless models!)
|
|

Posts with Authority
Boston-area [Watertown] Massachusetts
|
Bodyguards are now AMAZINGLY USEFUL, and I suspect any command squad will take them as a required set of figures.
Sorry. 
|
Falling down is the same as being hit by a planet — "I paint to the 20 foot rule, it saves a lot of time." -- Me
ddogwood wrote:People who feel the need to cheat at Warhammer deserve pity, not anger. I mean, how pathetic does your life have to be to make you feel like you need to cheat at your toy army soldiers game?
 |
|
|
 |
|
2012/07/07 06:44:16
Subject: Cadian 11th Assault, Revamping my CCS, Now for Bodyguards (AKA Hooray for cool useless models!)
|
|

Fixture of Dakka
|
I love those new single sprue plastic kits for WHFB. I wish they would do a few for 40K. That Primaris looks wicked! Don't tempt me into another project for a figure that's not in my army list...yet.
Briancj wrote:Bodyguards are now AMAZINGLY USEFUL, and I suspect any command squad will take them as a required set of figures.
Sorry.
SSSHHHHHH!!!!! You are giving away State secrets! The Departmento Munitorium will be most displeased. 

|
The secret to painting a really big army is to keep at it. You can't reach your destination if you never take any steps.
I build IG...lots and lots of IG. |
|
|
|
|
2012/07/07 07:16:14
Subject: Re:Cadian 11th Assault, Revamping my CCS, Now for Bodyguards (AKA Hooray for cool useless models!)
|
|
Posts with Authority
Boston-area [Watertown] Massachusetts
|
The Inquisition! (Let's begin!) The Inquisiiiiiiition! (Look out sin!)
|
Falling down is the same as being hit by a planet — "I paint to the 20 foot rule, it saves a lot of time." -- Me
ddogwood wrote:People who feel the need to cheat at Warhammer deserve pity, not anger. I mean, how pathetic does your life have to be to make you feel like you need to cheat at your toy army soldiers game?
|
|
|
|
|
2012/07/07 12:32:50
Subject: Re:Cadian 11th Assault, Revamping my CCS, Now for Bodyguards (AKA Hooray for cool useless models!)
|
|
Fleshound of Khorne
OC, California
|
JB wrote:"BOSS, DA PLANE, DA PLANE!".
He might be a little tall to yell that. Awesome work by the way, this thread is definitely subscribed.
|
|
|
|
|
2012/07/07 17:17:57
Subject: Re:Cadian 11th Assault, Revamping my CCS, Now for Bodyguards (AKA Hooray for cool useless models!)
|
|
Fixture of Dakka
|
Thejokerguy wrote:JB wrote:"BOSS, DA PLANE, DA PLANE!".
He might be a little tall to yell that. Awesome work by the way, this thread is definitely subscribed.
He's got a bionic arm with a nasty sword so he can yell whatever he wants...when the commissar isn't around.
Thanks for looking and I hope you enjoy the revamp of my Cadian army.

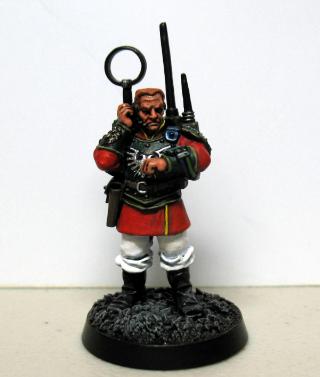
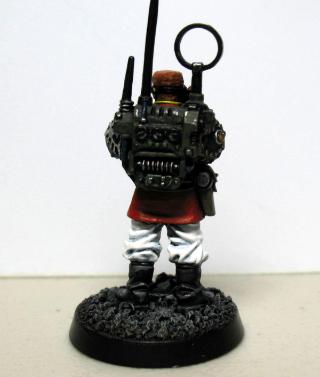
I finished my second bodyguard. Shots below. Click to see them larger in my Dakka Work in Progress Gallery.
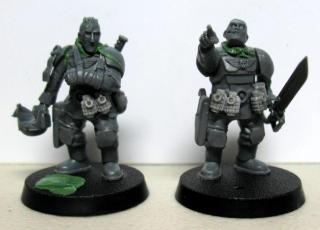
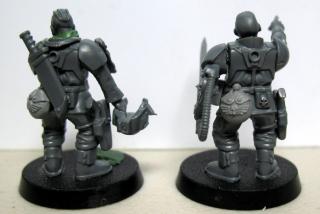
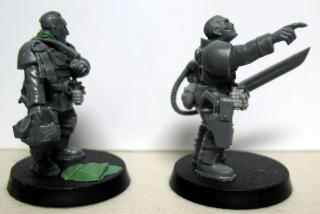
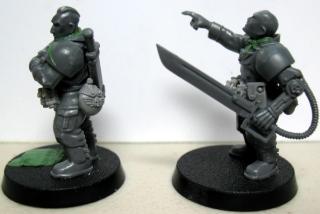
These figures were fun to work on. I'm glad there are only two of them though because that Valkyrie door gunner pose would not work for a third guy. The two of them look dissimilar enough to fool most casual viewers and that is good enough for me.
Other than the door gunner body, the bits are all from the Cadian sets: Command Squad and Infantry Squad. There is one bit from the Space Marine Commander set. See if you can find it.
I did a bit of greenstuff work on them but nothing complicated. Both of their heads needed a GS collar because their heads are not designed for those bodies. I also wanted to keep the right arm of the wounded guy a bit further from his body so I pinned the arm where I wanted and filled in the gap with green stuff. The heads are pinned on to make sure they stay put in the desired positions.
Now they need to dry and I will hopefully get to prime them tonight so that I can paint them tomorrow! 
EDIT: Priming complete...in spite of me forgetting to wash the plastic with a bit of dishsoap to get the mold release off. My first coat of primer didn't completely coat. The paint keep "moving off" of parts of the models. The second coat worked and the "job is a good one" now.
|
|
This message was edited 3 times. Last update was at 2013/04/07 10:13:43
The secret to painting a really big army is to keep at it. You can't reach your destination if you never take any steps.
I build IG...lots and lots of IG. |
|
|
|
|
2012/07/08 19:40:51
Subject: Re:Cadian 11th Assault, Revamping my CCS, Now for Bodyguards (AKA Hooray for cool useless models!)
|
|
Fixture of Dakka
|
|
|
This message was edited 1 time. Last update was at 2012/07/08 19:42:33
The secret to painting a really big army is to keep at it. You can't reach your destination if you never take any steps.
I build IG...lots and lots of IG. |
|
|
|
|
2012/07/09 19:39:20
Subject: Re:Cadian 11th Assault, Revamping my CCS; The new bodyguards get some paint!
|
|
Nigel Stillman
|
Love the look of the bodyguards and they're painted really well too! Though they look like they have taken way too many Look Out Sir hits for their own good!
|
|
|
|
|
2012/07/09 22:03:21
Subject: Re:Cadian 11th Assault, Revamping my CCS; The new bodyguards get some paint!
|
|
Fixture of Dakka
|
Vladsimpaler wrote:Love the look of the bodyguards and they're painted really well too! Though they look like they have taken way too many Look Out Sir hits for their own good!
Thanks! I almost finished them tonight but will need a few more hours for the last washes and basing work. I had a blast working on them. The Cadian Command Squad set isn't cheap but it has a lot of characterful bits that are a "must have" for any fan of the current Cadian plastics.
I'll post the pics of the finished models tomorrow.
Then I'll have to decide whether to work on my command Chimera or a medic or a regimental standard bearer. 
|
The secret to painting a really big army is to keep at it. You can't reach your destination if you never take any steps.
I build IG...lots and lots of IG. |
|
|
|
|
2012/07/10 04:22:06
Subject: Re:Cadian 11th Assault, Revamping my CCS; The new bodyguards get some paint!
|
|
Nigel Stillman
|
JB wrote:Vladsimpaler wrote:Love the look of the bodyguards and they're painted really well too! Though they look like they have taken way too many Look Out Sir hits for their own good!
Thanks! I almost finished them tonight but will need a few more hours for the last washes and basing work. I had a blast working on them. The Cadian Command Squad set isn't cheap but it has a lot of characterful bits that are a "must have" for any fan of the current Cadian plastics.
I'll post the pics of the finished models tomorrow.
Then I'll have to decide whether to work on my command Chimera or a medic or a regimental standard bearer.
That's good to hear! I am debating getting one of the Cadian Command Squads after you recommended the bionic arm with the power sword from it. It does have lots of cool bits, I especially love the swagger stick that the Officer can hold. I'm not a huge fan of the new Cadians, but the command box set is almost too cool to pass up. Of course, it comes down to buying it or saving up for a Valkyrie! 
Looking forward to the finished models, and I say that you should do the standard bearer. : )
|
|
|
|
|
2012/07/11 19:39:51
Subject: Re:Cadian 11th Assault, Revamping my CCS; The new bodyguards get some paint!
|
|
Fixture of Dakka
|
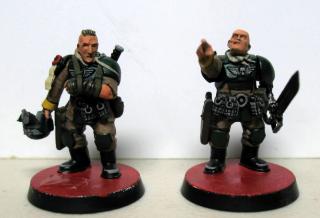
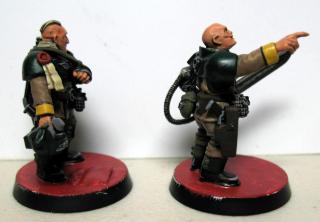
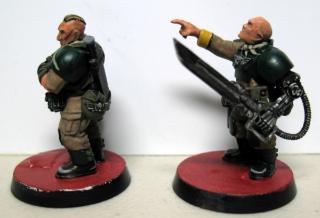
Well, I am a day late but here are the finished bodyguards. I didn't have much time yesterday for painting so I was only able to get washes and ink on them before leaving them to dry. This evening I had enough time to complete the paint work.
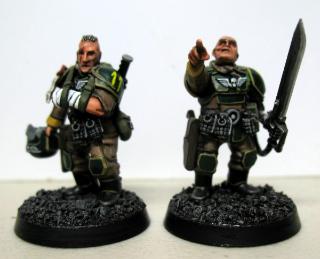 
As noted earlier, I built these guys using the Valkyrie door gunner body as the primary component. The heads, arms, and most of the kit comes from the Cadian Command Squad set. The purity seal is from the Space Marine Commander set. There was minor green stuff work to fit the heads to the torsos. I made "drive-on rag" neckerchiefs. The right arm of the wounded man was pinned and puttied to hang just a bit further from the body for a more appealing pose. The pants pockets on the right sides of both figures was clipped in order to allow the pistol holsters to hang low like modern combat holsters. Heads and most of the arms were pinned. All paints used were GW's previous range of paints though Flesh Wash was even older and the primer was Vallejo Game Color White Primer.
I'm going to have a tough time with the rest of my Cadian army revamp because I feel compelled to make each individual mini more gritty and realisitic. That's a bad idea when you have roughly 100 infantry models.
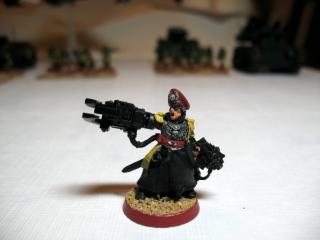
I never did post the finished pics of my Master of Ordnance. Here they are; unfortunately a bit darker looking than they should be. The stark light contrasts in the photo rob him of most of his nice color variation. Ah well...
I was thinking about building and painting a regimental standard next. I may do that or finish my One Hour Yarrick mini. The Hero of Armageddon probably deserves the honor, don't you think?
This is what he looks like right now:
I rush painted him in an hour for a game with some friends of AgeofEgos. It gave him some color but now makes for a horrible base to work with. I really want to finish the job right but I don't feel like stripping him first. We'll see if I can make him presentable.
Cheers to all!! May your paint brush tips never split and your dice roll well (except when you play against me).
|
|
This message was edited 1 time. Last update was at 2012/07/11 19:42:42
The secret to painting a really big army is to keep at it. You can't reach your destination if you never take any steps.
I build IG...lots and lots of IG. |
|
|
|
|
2012/07/16 18:55:57
Subject: Re:Cadian 11th Assault, Revamping my CCS; The bodyguards are finished!
|
|
Fixture of Dakka
|
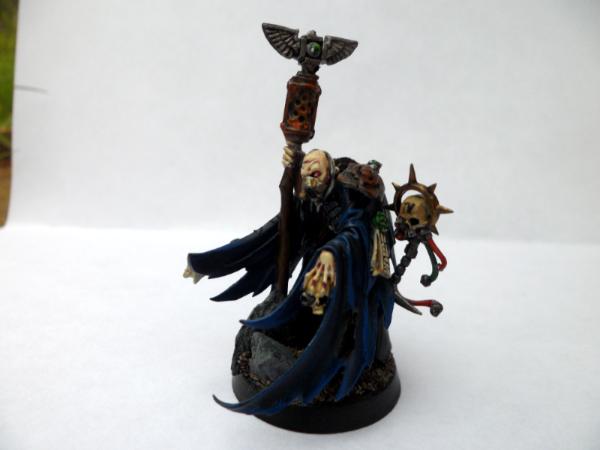
Well, my final decision was to work on Commissar Yarrick. He's still a work in progress but he needs to dry overnight before I can do the rest of his washes, inks, and highlights. I may also do some chipping on his Power Klaw but I'm guessing he has people to keep his gear in tip top shape.
The first picture is what he looked like when I started. The rest of the pictures are the current work in progress shots.
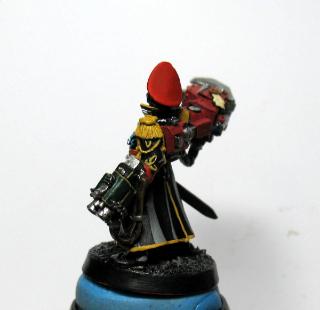 
He is another one of the IG metal minis that I really enjoyed painting. He has a lot of little details that I did not notice until I was painting him...and repainting...and repainting...and damn, another detail that I overlooked...and repainting.
The paints are all GW's discontinued paint line except for Vallejo Game Color White Primer and Scorpion Green.
The reds are primarily Mechrite Red and Blood Red. The gold trim is either Iyanden Darksun or Desert Yellow. That grey on his coat is Codex Grey and is positioned as a highlight. Once I wash it a few times it darkens a lot but still looks lighter than the Chaos Black.
Hopefully, I'll finish him tomorrow.
|
The secret to painting a really big army is to keep at it. You can't reach your destination if you never take any steps.
I build IG...lots and lots of IG. |
|
|
|
|
2012/07/18 21:06:09
Subject: Re:Cadian 11th Assault, Commissar Yarrick is complete! Hooray!
|
|
Fixture of Dakka
|
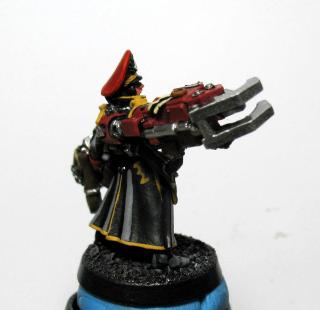
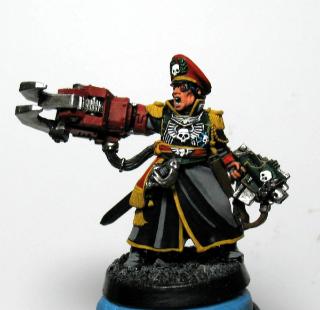
Quick update to say that Commissar Yarrick is done. All of the washes, inks, and highlights went off without a hitch.
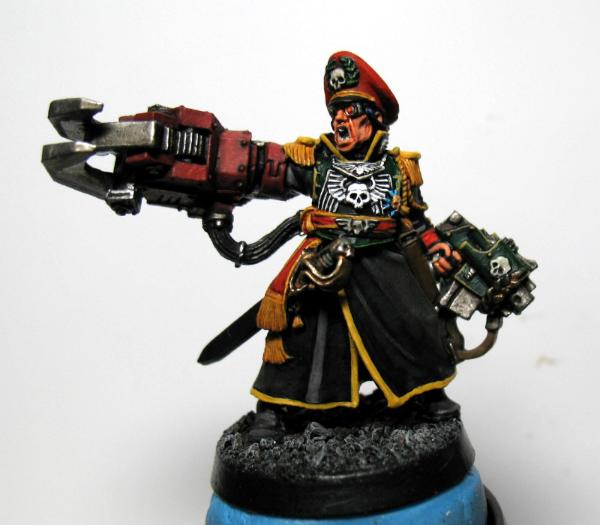
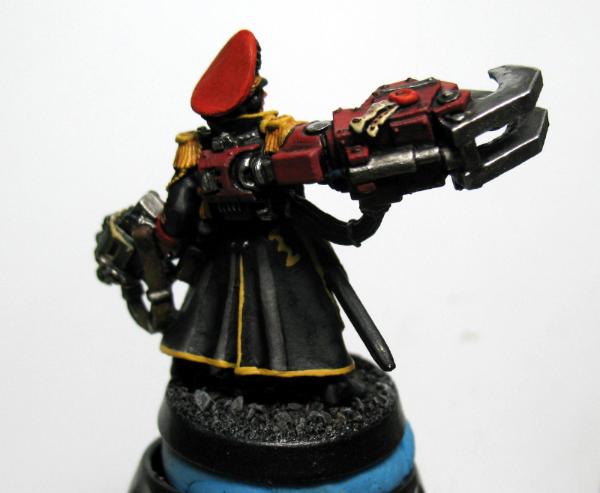
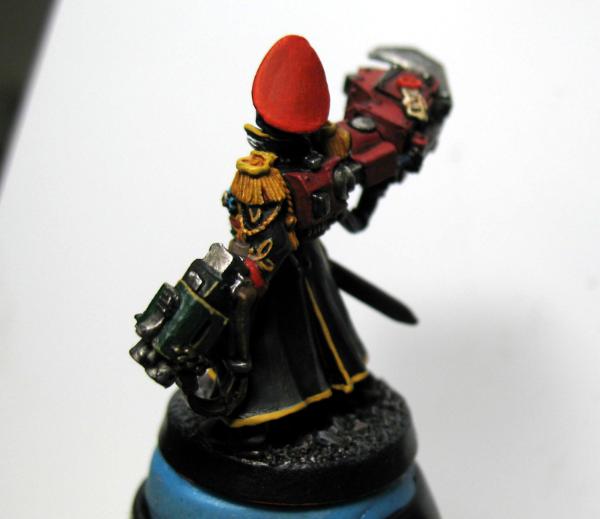
This was a fun model. The changes since the last update were the old GW Flesh Wash over his skin then neatened back up with Dwarf Flesh. I used Ogryn Flesh wash over the hat braid, parts of the epaulettes, and the sash. Badab Black wash over the power klaw, skull pin on his sash, over most of his boots and coat to tone down the Codex Grey highlights, and over the metallic portions of the storm bolter,
He also got a Fiery Orange dot on his laser eye and Gryphonne Sepia wash over his sword hilt, the skull on his blue max medal, and the wreath on his storm bolter.
He looks a little darker and grittier than the GW Heavy Metal version but my version fits in better with my Cadians. After all of the red on him, I just couldn't do a red storm bolter too and I wanted his armor to be Dark Angels Green like my Cadian force. ...and the dream became real.
Hooray! ...of course, now I am looking at these photos and thinking about doing a bit more painting...hmmm..... 
|
The secret to painting a really big army is to keep at it. You can't reach your destination if you never take any steps.
I build IG...lots and lots of IG. |
|
|
|
|
2012/07/19 02:44:10
Subject: Re:Cadian 11th Assault, Commissar Yarrick is complete! Hooray!
|
|
Posts with Authority
Boston-area [Watertown] Massachusetts
|
GOOD Yarrick.
|
Falling down is the same as being hit by a planet — "I paint to the 20 foot rule, it saves a lot of time." -- Me
ddogwood wrote:People who feel the need to cheat at Warhammer deserve pity, not anger. I mean, how pathetic does your life have to be to make you feel like you need to cheat at your toy army soldiers game?
|
|
|
|
|
2012/07/22 21:29:53
Subject: Re:Cadian 11th Assault, Commissar Yarrick is complete! Hooray!
|
|
Fixture of Dakka
|
Briancj wrote:GOOD Yarrick.
Thanks, but now that he is done, I am wondering what to work on next. I'm working full time, taking two online classes, and fitting in plenty of summertime fun so I need a simple project. Maybe I'll work on some terrain for a while?
|
The secret to painting a really big army is to keep at it. You can't reach your destination if you never take any steps.
I build IG...lots and lots of IG. |
|
|
|
|
2013/04/05 17:37:58
Subject: Re:Cadian 11th Assault, Working to finish my three Vendettas. So close...
|
|
Fixture of Dakka
|
Feth! It's been nearly a year since I've added anything new. Work combined with online college courses has been kicking my hindquarters!
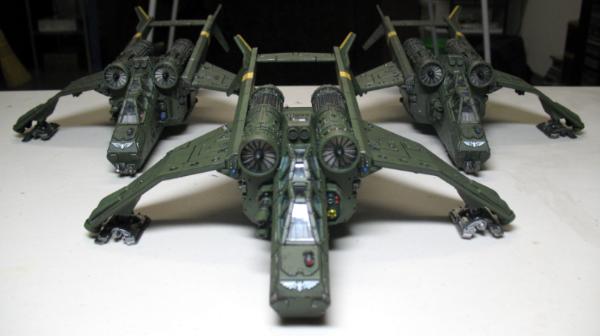
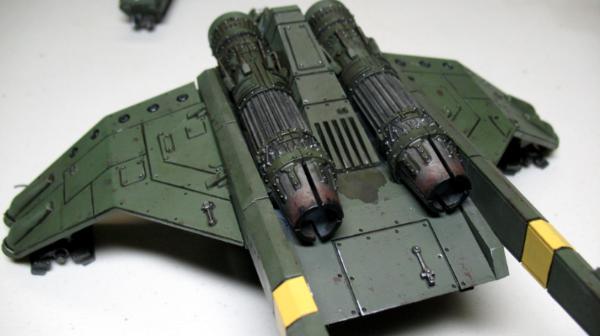
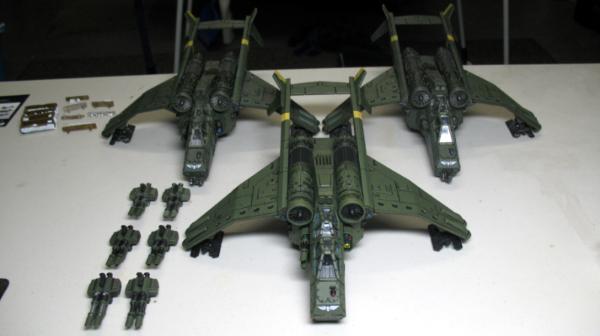
Those who have seen my army before know that I built the model in the foreground. I purchased the other two from Lycaeus Wrex along with a platoon of Cadian IG and a Manticore (so now I have two!). You can never have enough Imperial Guard.
The steps to success:
1. Finish converting the lascannons: One of his models lacked three lascannons. My model's lascannons were converted differently than his so I felt obligated to make mine match. Lots of small magnets are required which are a pain in the ass. This step is almost complete. I just need to reattach one weapon mount to my Vendetta because I glued it on incorrectly the first time.
2. Repaint my model: It is painted differently and needs a repaint. This step also includes painting all of the added lascannons for all three models.
3. Paint details including squadron markings on all models.
4. Add decals, which also involves some gloss coating.
5. Weather all three models.
6. Decorate the bases for all three models in an urban rubble theme.
7. Dullcoat all three models (while remembering to protect the clear plastic canopies)
I still have a long way to go on them.
|
The secret to painting a really big army is to keep at it. You can't reach your destination if you never take any steps.
I build IG...lots and lots of IG. |
|
|
|
|
2013/04/05 21:14:41
Subject: Cadian 11th Assault, Working to finish my three Vendettas. So close...
|
|
Shroomin Brain Boy
|
You can never have enough Imperial Guard.
this!... 
and remeber 8.
have fun painting up these cool models!!! i sure know i would!
one of these days i need to concentrate to make a flyer from scratch...
|
|
|
|
|
|
2013/04/06 10:02:53
Subject: Cadian 11th Assault, Working to finish my three Vendettas. So close...
|
|
Fixture of Dakka
|
Thanks Vik! Fun is the most important thing!
I finished Step 1 last night and started painting all of the lascannons.
Today, I hope to finish them and begin detailing the three Vendettas.
I also need to place an order with Mad Robot Miniatures. He makes wonderful heads that I can use for my IG veterans.

|
|
This message was edited 3 times. Last update was at 2013/04/06 12:34:05
The secret to painting a really big army is to keep at it. You can't reach your destination if you never take any steps.
I build IG...lots and lots of IG. |
|
|
|
|
2013/04/06 20:45:24
Subject: Cadian 11th Assault, Working to finish my three Vendettas. So close...
|
|
Shroomin Brain Boy
|
i am secretly getting very addicted to heads...
just today i got a mega steal of bitz from an ebay auktion i bought... had plenty of elven heads, choas and even flagelants inside...
and vic minatures also is highly recoendable for such uses
the lists of cool looking heads for the battle hardened vet are almost endless!
|
|
|
|
|
|
2013/04/06 22:30:03
Subject: Re:Cadian 11th Assault, Working to finish my three Vendettas. So close...
|
|
Fixture of Dakka
|
That sounds like a nice set of bits to win, Vik! The flagellant bits sound especially enticing.
I agree that Victoria's stuff is amazing. Steve at Mad Robot Miniatures is also a great sculptor though not as prolific. Most important for me is that Steve's stuff fits the style of my Cadian army better than Victoria's work. If I was doing Praetorians, Tanith, Mordians, Salvar Chem Dogs, Chaos Renegades, Scots, or some other scruffy PDF or IG, I would use a lot of her bits.
I made a lot of progress on my Vendettas today. All of the final fiddly bits are attached and most of the lascannons and my Vendetta are painted to match the other two. So I have pretty much completed my steps 1 and 2. Tomorrow I can get further into detailing the three Vendettas while also finishing the basic paint on the lascannons.
To recap the steps to success:
1. [Complete] Finish converting the lascannons: One of his models lacked three lascannons. My model's lascannons were converted differently than his so I felt obligated to make mine match. Lots of small magnets are required which are a pain in the ass. This step is almost complete. I just need to reattach one weapon mount to my Vendetta because I glued it on incorrectly the first time.
2. [Almost Complete] Repaint my model: It is painted differently and needs a repaint. This step also includes painting all of the added lascannons for all three models.
3. Paint details including squadron markings on all models.
4. Add decals, which also involves some gloss coating.
5. Weather all three models.
6. Decorate the bases for all three models in an urban rubble theme.
7. Dullcoat all three models (while remembering to protect the clear plastic canopies)
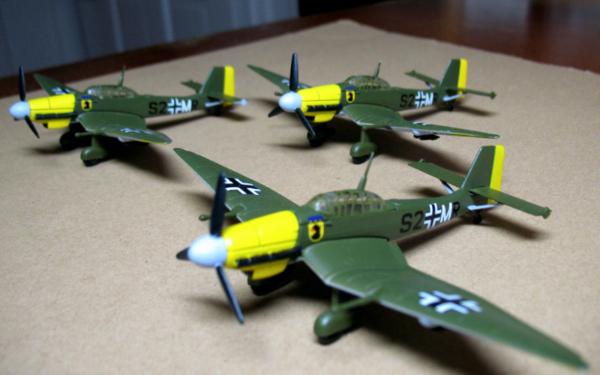
The squadron markings will need to include some Cadian iconography, my trademark yellow color, and something to symbolize assault since my regiment is an assault regiment. I may go with a clenched fist since it is easy to find GW symbols for that. For the yellow color, I may copy my WWII Stuka dive bomber markings in some fashion. The yellow I use for my Cadians is not quite so bright and I will use less of it than you see covering the Stukas.
|
The secret to painting a really big army is to keep at it. You can't reach your destination if you never take any steps.
I build IG...lots and lots of IG. |
|
|
|
|
2013/04/06 22:51:41
Subject: Cadian 11th Assault, Working to finish my three Vendettas. So close...
|
|
Shroomin Brain Boy
|
well... that amount of yellow indeed stings a bit so tuning it down a bit is a good decision^^
of course... as your army is way more modern than mine... mad robots stuff is more fitting... do you have your eyes on their new torsos too? i bet you could do some squads with them and it would look quite cool... maybe mix in the anvil ind. guns...those i really like too!
|
|
|
|
|
|
2013/04/07 14:58:28
Subject: Re:Cadian 11th Assault, Working to finish my three Vendettas. So close...
|
|
Fixture of Dakka
|
Vik,
I will keep the yellow color toned down so that it does not blind you.
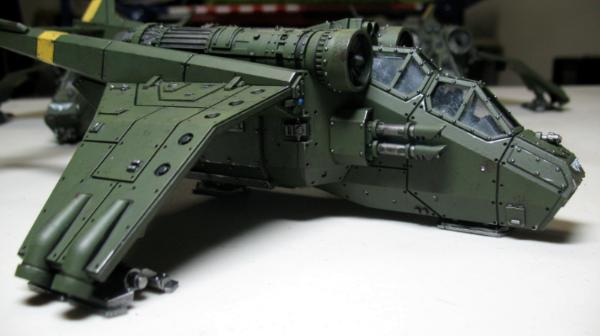
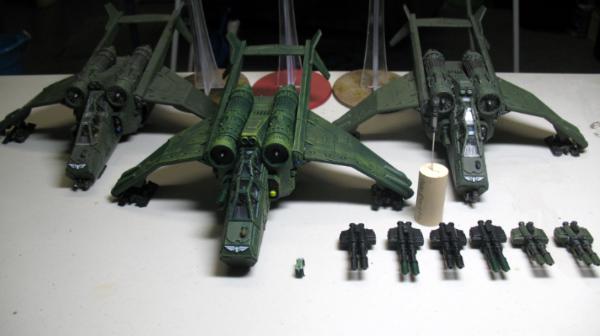
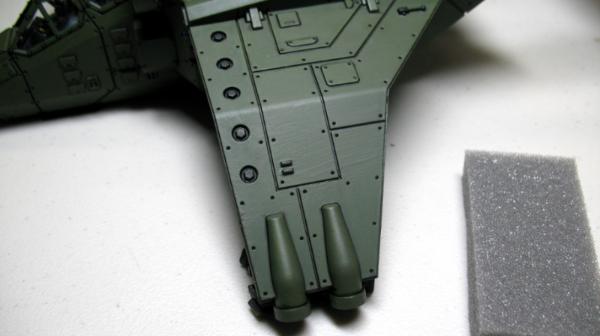
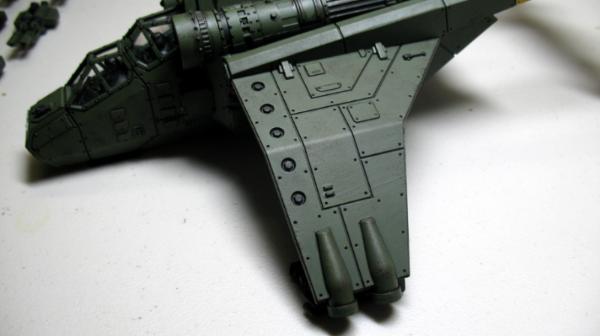
Progress is ongoing but slow. I am posting this update to keep myself motivated and so that I can remember these changes later.
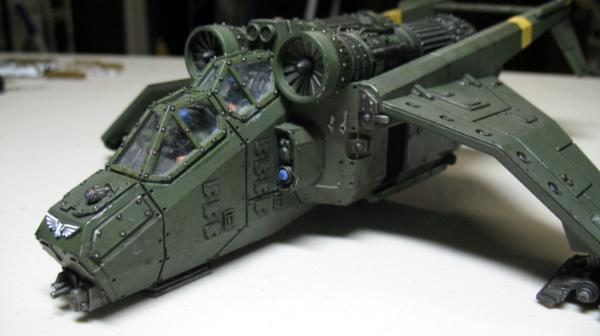
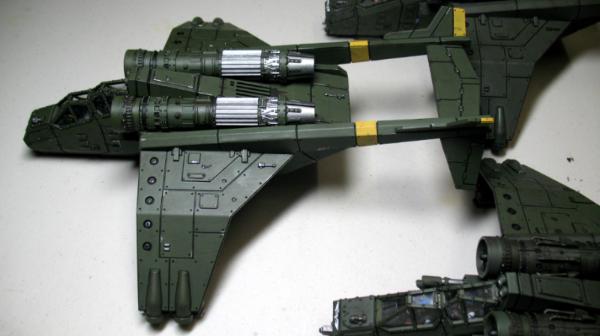
The original photo is shown first followed by an updated photo:
I had to use the new GW color Castellan Green instead of Catachan Green but they match very well. Good job, Games Workshop for not screwing that up.
I am black lining my Vendetta now and will move to the others in turn. I am using a mix of Badab Black, Brown Ink, Vallejo Glaze medium, and just a little bit of Vallejo Game Color Black (051). This is a slow process but necessary before I move on to the other details and weathering.
As usual, click on the photos to zoom in (in the Dakka Gallery). My camera takes pretty good shots. Any problems are usually due to my hands and my Ott Lite.
|
The secret to painting a really big army is to keep at it. You can't reach your destination if you never take any steps.
I build IG...lots and lots of IG. |
|
|
|
|
2013/04/07 16:51:02
Subject: Cadian 11th Assault, Working to finish my three Vendettas. So close...
|
|

Rough Rider with Boomstick
|
Here, I throw some motivation at you - make use of it!
|
Run a whole lot of wfrp and other rpg's, play The Woods and Kill Team, gather and look mournfully at imperial guard knowing I'll never finish enough to use them on the tabletop  |
|
|
|
|
2013/04/07 23:01:50
Subject: Cadian 11th Assault, Working to finish my three Vendettas. So close...
|
|
Fixture of Dakka
|
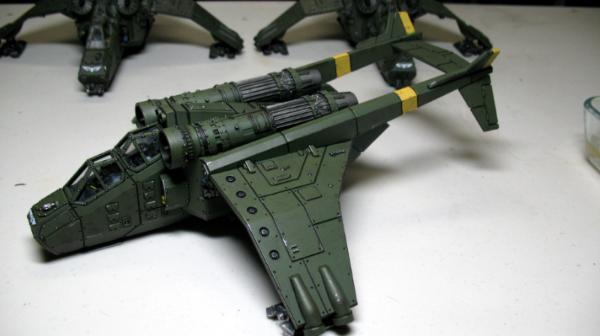
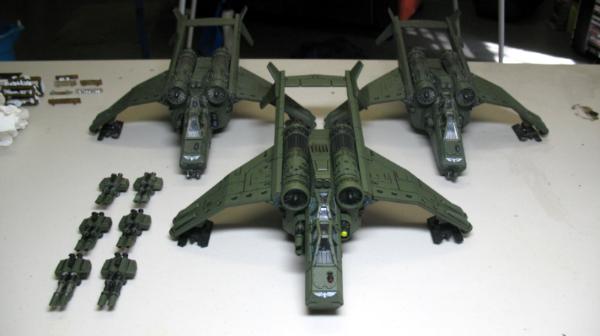
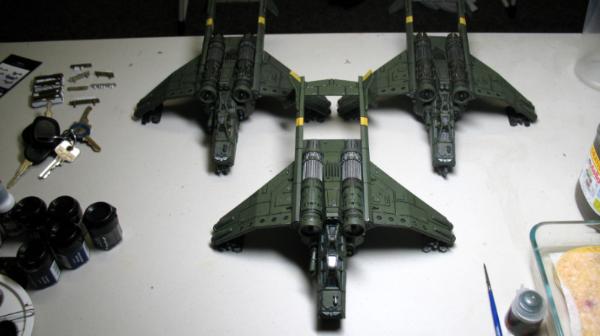
Hah! Thanks, I think. I bulled through all day to finish the black lining on all three Vendettas and even managed to get the first coat of Iyanden Darksun on. Now I can move on to the detailing and weathering. I also need to finish the lascannons but I'll do those along the way.
The pics don't look too much different between WIP 1 (top) and WIP 3 (bottom) but believe me when I say that a lot of hours of work went in between. My hand is cramped now.
The yellow is simple enough that it shouldn't burn VIk's eyes.
|
The secret to painting a really big army is to keep at it. You can't reach your destination if you never take any steps.
I build IG...lots and lots of IG. |
|
|
|
|
2013/04/07 23:37:07
Subject: Cadian 11th Assault, Working to finish my three Vendettas. So close...
|
|
Rough Rider with Boomstick
|
Yeah that yellow's appropriate with the other colours in the scheme, nicely done. Huzzah!
|
Run a whole lot of wfrp and other rpg's, play The Woods and Kill Team, gather and look mournfully at imperial guard knowing I'll never finish enough to use them on the tabletop |
|
|
|
|
2013/04/08 12:38:47
Subject: Re:Cadian 11th Assault, Working to finish my three Vendettas. So close...
|
|
Fixture of Dakka
|
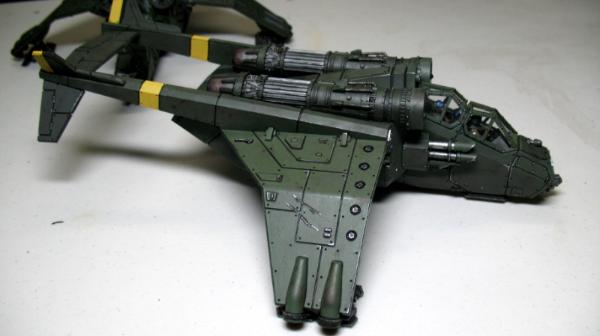
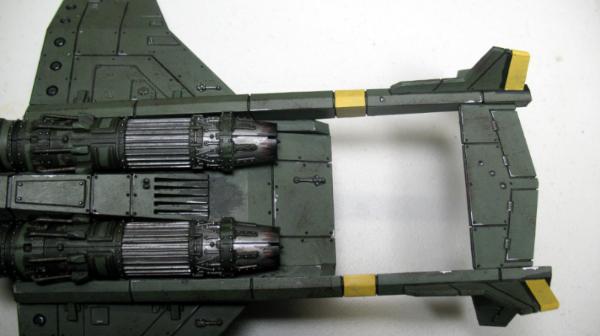
Continuing my theme of spending hours, painting the Vendettas, that do not provide dramatically visible results, I added a second coat of yellow to them and sponged them.
I decided to go with a 1: 2 mix of Chaos Black and Dark Flesh.
Unfortunately, you can't even tell they were sponged unless you zoom in (click on the photos). The effect is much more visible to me since I can see the whole aircraft looking rather beat up.
Pre-Sponge
Oh well, I am moving on to painting on worn paint and metal. Perhaps that will show up better.
Automatically Appended Next Post:
After sponging on the mix of Chaos Black and Dark Flesh, I decided to also sponge on a bit of GW Charadon Granite. Then I finished up the yellow identification bands and painted the missing Boltgun Metal parts on my original Vendetta so that it would better match the two I obtained from Lycaeus Wrex. Now it looks shiny new compared to the other Vendettas. Ugh!
As usual, click to zoom in on any photo in my Dakka gallery.
Now I am well into tidying up with Chaos Black, Castellan Green, and Boltgun Metal. There are lots of little areas to clean up. Then I will weather a few areas with a brush where I was unable to reach with the sponges. That should allow me to begin the prep work for the decals, which will be a mix of Forge World, Cadian, Bretonnian, and old Imperial vehicle transfers.
I'm starting to see the light at the end of the tunnel but it will probably take me several more days to get through all of it and begin the washes. I'm thinking that I will use several washes of Badab Black over the bare Gunmetal before using a Sepia wash over most of the model areas as a filter. Then I will just have a few touchups to bring out anything that was too muted by the washes.
I just have to keep plugging away to get this done.
|
|
This message was edited 1 time. Last update was at 2013/04/08 20:19:15
The secret to painting a really big army is to keep at it. You can't reach your destination if you never take any steps.
I build IG...lots and lots of IG. |
|
|
|
|
2013/04/08 20:55:18
Subject: Cadian 11th Assault, Working to finish my three Vendettas. So close...
|
|
Shroomin Brain Boy
|
my eyes....my eyes.....
are totally healthy
zoomed in on those pics as ordered.... you aimed for a more subtle and still usable weathering... i think that is one of the more difficult types of weathering...and i like what i see....!
yellow markings look very good... how many coats of yellow do we see here?
|
|
|
|
|
|
2013/04/09 04:18:42
Subject: Cadian 11th Assault, Working to finish my three Vendettas. So close...
|
|
Fixture of Dakka
|
Thanks Vik.
It is three coats of Iyanden Darksun, which surprised me because it is a foundation colour and I expected it to cover better. In retrospect, I should have used a yellowy brown underneath it instead of painting the yellow straight on over the Catellan (Catachan) green.
I also managed to add some battle damage to the Vendettas that should show up in later pics.
Something is messing with my photo quality. I'm not sure if the problem is the bright coloured table or the fluorescent light directly overhead (above my Ott Lite).
Given that the fluoescent has not been a factor in earlier photos, I suspect the bright table is the primary problem.
|
|
This message was edited 2 times. Last update was at 2013/04/09 04:26:29
The secret to painting a really big army is to keep at it. You can't reach your destination if you never take any steps.
I build IG...lots and lots of IG. |
|
|
|
|
2013/04/09 20:51:41
Subject: Re:Cadian 11th Assault, Working to finish my three Vendettas. So close...
|
|
Fixture of Dakka
|
|
The secret to painting a really big army is to keep at it. You can't reach your destination if you never take any steps.
I build IG...lots and lots of IG. |
|
|
|
|
2013/04/09 21:02:05
Subject: Cadian 11th Assault, Working to finish my three Vendettas. So close...
|
|
Shroomin Brain Boy
|
i made some nice pics some weeks ago on a blue blanket... sometimes i even use an orange blanket as a backdrop...
often it is the daylight that produces thed best light...
it is way too often a hit and miss...
they all say for yellow start with brown... well... if i want a sharp yellow i start with white...sadly for the most recent yellow stuff of mine i started on black... i must be hating myself^^
|
|
|
|
|
|
2013/04/09 21:08:39
Subject: Cadian 11th Assault, Working to finish my three Vendettas. So close...
|
|
Fixture of Dakka
|
I may have to try a blanket. Down in the Man Cave, I don't get enough sunlight though I have two very nice windows.
I usually use Snakebite Leather as a layer underneath my yellows but I forgot this time. Castellan Green is a bad color to paint yellow over.
Your yellow Rhino is so bright that the Sun is jealous. Did you start that one with a white undercoat?
|
The secret to painting a really big army is to keep at it. You can't reach your destination if you never take any steps.
I build IG...lots and lots of IG. |
|
|
|
|
|
|